

Page 1

Favorit 99000
User manual Dishwasher
Page 2
Contents
2
Thank you for choosing one of our high-quality products.
To ensure optimal and regular performance of your appliance please read this
instruction manual carefully. It will enable you to navigate all processes perfectly
and most efficiently. To refer to this manual any time you need to, we recommend
you to keep it in a safe plac e. An d p le as e pass it to any future owner of the appliance.
We wish you much joy with your new appliance.
Contents
Operating instructions 3
Safety information 3
Children and vulnerable persons safety
General safety 3
Use 3
Care and cleaning 4
Installation 4
Frost precautions 4
Water connection 4
Electrical connection 5
Internal light 5
Service centre 5
Disposal of the appliance 6
Product description 6
Control panel 7
Scroll buttons 7
Option button 7
Cancel button 8
OK/Start button 8
Option menu 8
Display 9
Use of the appliance 9
Switch on for the first time - set the display
language 9
Setting the water softener 10
Manual adjustment 10
Electronic adjustment 10
Use of dishwasher salt 11
Use of detergent and rinse aid 12
Use of detergent 12
Use of rinse aid 12
Adjust the rinse aid dosage 12
Multitab function 13
Loading cutlery and dishes 13
Hints and tips 13
Washing programmes 14
3
Select and start a washing programme 15
Select and start a washing programme
Interruption of a washing programme
How to cancel a washing programme or a
delay start 16
At the end of the washing programme
Auto Off 17
Remove the load 17
Care and cleaning 17
To remove and clean the filters 17
To clean the spray arms 18
To clean the external surfaces 18
What to do if… 18
The washing results and drying results are
not satisfactory 20
How to activate the rinse aid dispenser
Technical data 21
Environment concerns 21
Installation instructions 21
Installation 21
Installation under a counter 21
How to remove the appliance worktop
To adjust the level of the appliance 22
Water drain connection 22
Subject to change without notice
15
16
16
20
22
Page 3

Safety information
Operating instructions
Safety information
Before the installation and use, read this manual carefully:
• For your personal safety and the safety of your property.
• For the respect of the environment,
• For the correct operation of the appliance.
Always keep these instructions with the appliance also if you move or sell it.
The manufacturer is not responsible if an incorrect installation and use causes damage.
Children and vulnerable persons safety
• Do not let persons, children included, with reduced physical sensory, reduced mental
functions or lack of experience and knowledge to use the appliance. They must have
supervision or instruction for the operation of the appliance by a person who is responsible for their safety.
• Keep all packaging away from children. There is the risk of suffocation or physical injury.
• Keep all detergents in a safe area. Do not let the children touch the detergents.
• Keep children and small animals away from the appliance when the door is open.
General safety
• Do not change the specifications of this appliance. There is the risk of injury and damage
to the appliance.
• Obey the safety instructions from the manufacturer of the dishwasher detergent to
prevent burns to eyes, mouth and throat.
• Do not drink the water from the appliance. Detergent residue can stay in your appliance.
• Always close the door after you load or unload the appliance to prevent injury and to
prevent someone falling on an open door.
• Do not sit or stand on the open door.
3
Use
• The appliance is only for domestic use. Do not use the appliance for commercial and
industrial use or for other uses.
• Do not use the appliance for uses than that for which it made. You will prevent physical
injury to persons or prevent damage to property.
• Only use the appliance to clean household utensils that are applicable for dishwashers.
• Do not put flammable products or items that are wet with flammable products in, near
or on the appliance. Risk of explosion or fire.
• Put the knives and all items with sharp points in the cutlery basket with their points
down. If not, put in a horizontal position in the upper basket or in the knife basket. (Not
all models have the knife basket).
• Use only specified products for dishwashers (detergent, salt, rinse aid).
• Types of salt that are not specified for dishwashers can cause damage to the water
softener.
• Fill the appliance with salt before you start a washing programme. The grains of salt and
salty water can cause corrosion or make a hole in the bottom of the appliance.
Page 4

Safety information
4
• Do not fill the rinse aid dispenser with other products than rinse aid, (e.g. dishwasher
cleaning agent, liquid detergent). This can cause damage to the appliance.
• Make sure that the spray arms can move freely before you start a washing programme.
• If you open the door while the appliance is in operation, hot steam can escape. There is
a risk of skin burns.
• Do not remove the dishes from the appliance before the end of the washing programme.
Care and cleaning
• Before maintenance, switch off the appliance and disconnect the mains plug from the
mains socket.
• Do not use flammable products or products that can cause corrosion.
• Do not use the appliance without the filters. Make sure that the installation of the filters
is correct. An incorrect installation causes unsatisfactory washing results and damage
to the appliance.
• Do not use spray water or steam to clean the appliance. Risk of electrocution and damage
to the appliance.
Installation
• Make sure that the appliance has not suffered any damage while in transport. Do not
connect a damaged appliance. If necessary, contact the supplier.
• Remove all packaging before first use.
• Only a qualified person must do the electrical and the plumbing installation, the set up
and the maintenance of the appliance. This to prevent the risks of structural damage or
physical injury.
• Make sure that the mains plug is disconnected from the mains socket during installation.
• Do not drill into the sides of the appliance to prevent damage to hydraulic components
and electrical components.
Frost precautions
• Do not install the appliance where the temperature is below 0°C.
• The manufacturer is not responsible for frost damage.
Water connection
• Use new hoses to connect the appliance to the water supply. Do not use used hoses.
• Do not connect the appliance to new pipes or pipes not used for a long time. Let the
water flow for some minutes, then connect the inlet hose.
• Make sure not to squash or cause damage to the water hoses when you install the
appliance.
• Make sure that the water couplings are tight to prevent a water leakage.
• The first time you use the appliance, make sure that the hoses do not have water leaks.
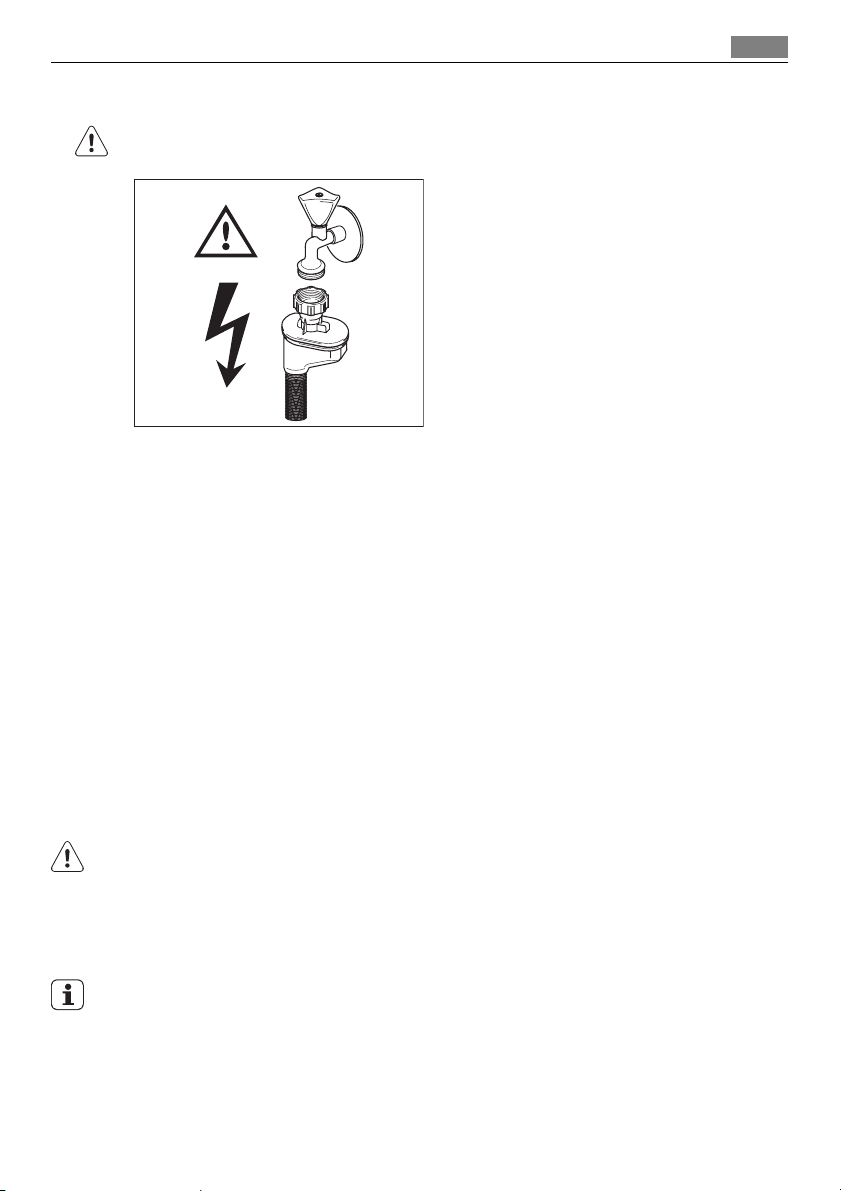
• The water inlet hose is double-walled and has an inner mains cable and a safety valve.
The water inlet hose is under pressure only when the water flows. If there is a leak in the
water inlet hose, the safety valve interrupts the running water.
– Be careful when you connect the water inlet hose:
– Do not put the water inlet hose or the safety valve in water.
– If the water inlet hose or the safety valve are damaged, immediately disconnect
the mains plug from the mains socket.
Page 5
Safety information
– Contact the service centre to replace the water inlet hose with safety valve.
WARNING!
Dangerous voltage.
Electrical connection
• The appliance must be earthed.
• Make sure that the electrical data on the rating plate agree with your domestic power
supply.
• Always use a correctly installed shockproof socket.
• Do not use multi-way plugs, connectors and extension cables. There is a risk of fire.
• Do not replace or change the mains cable. Contact the service centre.
• Make sure not to squash or cause damage to the mains plug and cable behind the
appliance.
• Make sure that the mains plug is accessible after the installation.
• Do not pull the mains cable to disconnect the appliance. Always pull the mains plug.
• The appliance is supplied with a 13 amp mains plug attached. If it is necessary to change
the fuse in the mains plug, use a 13 amp ASTA approved (BS 1362) fuse.
5
Internal light
This appliance has an internal light that comes on when you open the door and goes off
when the door is closed.
WARNING!
Visible led radiation, do not look directly into the beam.
The LED lamp is CLASS 2 in accordance with IEC 60825-1: 1993 + A1:1997 + A2:2001.
Emission wave length: 450 nm
Maximum emitted power: 548 μW
To replace the internal light, contact the service centre.
Disconnect the mains plug from the mains socket before the replacement of the internal
light.
Service centre
• Only an approved engineer can repair or work on the appliance. Contact the service
centre.
Page 6

Product description
6
• Use only original spare parts.
Disposal of the appliance
• To prevent the risk of physical injury or damage:
– Disconnect the mains plug from the mains socket.
– Cut off the mains cable and discard it.
– Discard the door catch. This prevents children or small animals from being closed
inside of the appliance. There is a risk of suffocation.
WARNING!
The dishwasher detergents are dangerous and can cause corrosion !
• If an accident occurs with these detergents, contact immediately your regional poisons
centre and a doctor.
• If the detergent gets into the mouth, contact immediately your regional poisons centre
and a doctor.
• If the detergent gets into the eyes, contact immediately a doctor and wet the eyes with
water.
• Keep dishwasher detergents in a safe area and out of children touch.
• Do not keep the appliance door open when there is detergent in the detergent dispenser.
• Fill the detergent dispenser only before you start a washing programme.
Product description
11
10
1
2
3
4
5
1 Upper basket
2 Water hardness dial
3 Salt container
4 Detergent dispenser
5 Rinse aid dispenser
9
8
7
6
Page 7

6 Rating plate
7 Filters
8 Lower spray arm
9 Upper spray arm
10 Top spray arm
11 Worktop
Control panel
Control panel
6
7
1
3
2
4
1 On/off button
2 Scroll buttons
3 Option button
4 Cancel button
5 OK/Start button
6 Display
The messages in the display and the audible signals help you to operate with the appliance.
Scroll buttons
With these buttons you can:
• select a washing programme in the washing programme menu,
• select options in the option menu.
Option button
Use this button to select options.
To select an option:
1. Switch on the appliance.
2. Press the option button: the display shows the menu of available options.
3. Press one of the scroll buttons to go through the menu and select the necessary option.
4. Press the OK/Start button to confirm or to go into the submenu.
5. Press one of the scroll buttons to select the adjustment in the submenu.
6. Press the OK/Start button to confirm.
7. Press the cancel button to exit from the menu.
5
Page 8

Control panel
8
Cancel button
Use this button to:
• Cancel a washing programme or a delay start. Refer to 'Select and start a washing programme'.
• To exit from the option menu.
OK/Start button
With this button you can:
• confirm or memorise an option,
• start a washing programme.
Option menu
Menu Submenu Description of the option
DELAY START With this function you can delay the start of the
EXTRA HYGIENE ON
OFF
MULTITAB ON
OFF
SETTINGS LANGUAGE ENGLISH You can set the language of the messages in the dis-
WATER HARDNESS You can adjust the level of the water softener. Refer
RINSE AID You can activate/deactivate the rinse aid dispenser.
SOUND VOLUME You can adjust the volume of all the audible signals.
BRIGHTNESS You can incr ease or decrease the intensity of the light
CONTRAST You can increase or decrease the contrast of the dis-
washing programme with an interval between 1 and
24 hours.
The countdown of the delay start is with steps of 1
hour (24h, 23h, 22h, etc.).
This function gives more hygiene to dishes and
glasses. During the last rinse, the temperature increases to 68°C and stays above 65°C minimum for
10 to 14 minutes.
This function is available with all washing programmes but does not have an effect on some programmes. Refer to 'Washing programmes'
The multitab function is for combi detergent tablets.
Refer to 'Multitab function'.
play.
Different languages are available.
to 'Setting the water softener'.
10 levels are available.
Factory set: off.
5 levels are available.
Level 0 = volume off.
of the display.
10 levels are available.
Factory set: level 10.
play.
10 levels are available.
Factory set: level 6.
Page 9

Display
Use of the appliance
1 The small bars show the progress of the washing programme.
2 Messages: washing programmes, optional functions and related programme phases
show in this part of the display.
3 Symbols
Symbols
DELAY START - comes on when the delay start is set and while the countdown operates.
EXTRA HYGIENE - comes on when the related function and/or the INTENSIV PRO washing
programme are set.
MULTITAB - comes on when the function is set.
SOUND VOLUME - comes on when the audible signals are off (level 0).
9
Use of the appliance
Switch on for the first time - set the display language
1. Switch on the appliance.
2. When the display shows LANGUAGE ENGLISH and the word ENGLISH flashes, you can
confirm or change the language.
– Press the OK/Start button to confirm.
– Press one of the scroll buttons to select a different language and press the OK/Start
button to confirm.
3. Press the cancel button to exit from the menu.
Refer to the instructions for each step of procedure:
1. Make a check if the adjustment of the water softener agrees with the water hardness
in your area. If necessary, adjust the water softener.
2. Fill the salt container with dishwasher salt.
3. Fill the rinse aid dispenser with rinse aid.
4. Load cutlery and dishes into the appliance.
5. Set the correct washing programme for the type of load and soil.
6. Fill the detergent dispenser with the correct quantity of detergent.
7. Start the washing programme.
If you use the combi detergent tablets ('3 in 1', '4 in 1', '5 in 1'), refer to 'Multitab function'.
Page 10

Setting the water softener
10
Setting the water softener
The water softener removes minerals and salts from the water supply. Minerals and salts
can have a bad effect on the operation of the appliance.
Equivalent scales measure the water hardness:
• German degrees (dH°).
• French degrees (°TH).
• mmol/l (millimol for each litre - international unit for the hardness of water).
• Clarke degrees.
Adjust the water softener to the water hardness in your area. If necessary, contact your
local water authority.
Water hardness Water hardness adjustment
°dH °TH mmol/l Clarke manually electronically
51 - 70 91 - 125 9,1 - 12,5 64 - 88
43 - 50 76 - 90 7,6 - 9,0 53 - 63
37 - 42 65 - 75 6,5 - 7,5 46 - 52
29 - 36 51 - 64 5,1 - 6,4 36 - 45
23 - 28 40 - 50 4,0 - 5,0 28 - 35
19 - 22 33 - 39 3,3 - 3,9 23 - 27
15 - 18 26 - 32 2,6 - 3,2 18 - 22 1 4
11 - 14 19 - 25 1,9 - 2,5 13 - 17 1 3
4 - 10 7 - 18 0,7 - 1,8 5 - 12 1 2
< 4 < 7 < 0,7 < 5
1) Factory position.
2) No use of salt is necessary.
You must adjust the water softener manually and electronically.
1)
2
1)
2
1)
2
1)
2
1)
2
1)
2
2)
1
10
5
1
9
8
7
6
1)
2)
Manual adjustment
Turn the water hardness dial to the position 1 or 2
(refer to the chart).
Electronic adjustment
1. Go into the option menu.
2. Go to SETTINGS .
Page 11

Use of dishwasher salt
3. Press the OK/Start button to confirm.
4. Go to WATER HARDNESS .
5. Press the OK/Start button to confirm.
6. Use the scroll buttons to set the level of the water softener. Refer to the chart for the
right level to set.
7. Press the OK/Start button to confirm.
If the water softener is set electronically to the level 1, the salt indicator message stays off.
Use of dishwasher salt
Do these steps to fill the salt container:
1. Turn the cap counterclockwise to open
the salt container.
2. Fill the salt container with 1 litre of water
(only with the first operation).
3. Use the funnel to fill the salt container
with salt.
4. Remove the salt around the opening of
the salt container.
5. Turn the cap clockwise to close the salt
container.
It is correct that water comes out from the salt
container when you fill it with salt.
11
When the salt container is empty, the display shows a message: REFILL SALT .
The message does not show while a washing programme operates.
After you fill the salt container, the message can continue to stay on for some hours. This
does not have an unwanted effect on the operation of the appliance.
Page 12

20
30
M
A
X
1
2
3
4
+
-
Use of detergent and rinse aid
12
Use of detergent and rinse aid
1
2
7
3
4
6
5
Use of detergent
To help the environment, do not use more than the correct quantity of detergent.
Follow the detergent manufacturer recommendations on the detergent packaging.
Do these steps to fill the detergent dispenser:
1.
Press the release button
2.
Put the detergent in the dispenser
3. If the washing programme has a prewash phase, put a small quantity of detergent on
the inner part of the appliance door.
4.
If you use the detergent tablets, put the tablet in the detergent dispenser
5. Close the detergent dispenser. Press the lid until it locks into position.
Different brands of detergent dissolve in different times. Some detergent tablets do not
have the best cleaning results during short washing programmes. Use long washing programmes when you use the detergent tablets to fully remove the detergent.
2
to open the lid 7 of the detergent dispenser.
1
.
1
.
Use of rinse aid
Rinse aid makes it possible to dry the dishes without streaks and stains.
The rinse aid dispenser automatically adds rinse aid during the last rinsing phase.
Do these steps to fill the rinse aid dispenser:
1.
Press the release button
2.
Fill the rinse aid dispenser
3. Remove the spilled rinse aid with an absorbent cloth to prevent too much foam during
6
to open the lid 5 of the rinse aid dispenser.
3
with rinse aid. The mark 'max' shows the maximum level.
the washing programme.
4. Close the rinse aid dispenser. Press the lid until it locks into position.
Adjust the rinse aid dosage
Factory set: position 3.
Page 13

Multitab function
You can set the rinse aid dosage between position 1 (lowest dosage) and position 4 (highest
dosage).
Turn the rinse aid selector
When the rinse aid dispenser is empty, the display shows a message: REFILL RINSE AID .
The message does not show while a washing programme operates.
4
to increase or decrease the dosage.
Multitab function
The multitab function is for combi detergent tablets.
These tablets contain agents as detergent, rinse aid and dishwasher salt. Some types of
tablets can contain other agents.
Do a check if these tablets are applicable for the local water hardness. Refer to the instructions from the manufacturer.
When you set the multitab function, it stays on until you deactivate it.
The multitab function deactivates the flow of rinse aid and salt.
The multitab function deactivates the salt and the rinse aid messages.
The programme duration can increase if you use the multitab function.
Activate the multitab function before the start of a washing programme.
You cannot activate the multitab function when the programme operates.
To activate the multitab function
• Go to the option menu and activate the multitab function. Refer to 'Control panel'.
To deactivate the multitab function and use separately detergent, salt and rinse aid:
1. Go to the option menu and deactivate the multitab function. Refer to 'Control panel'.
2. Fill the salt container and rinse aid dispenser.
3. Adjust the water hardness setting to the highest level.
4. Do a washing programme without dishes.
5. Adjust the water softener to the water hardness in your area.
6. Adjust the rinse aid dosage.
13
Loading cutlery and dishes
Refer to the leaflet 'Examples of ProClean loads'.
Hints and tips
Do not use the appliance to clean objects that can absorb water (e.g. sponges, household
cloths).
• Before you load cutlery and dishes, follow these steps:
– Remove remaining food.
– Make remaining burnt food in the pans soft.
• While you load cutlery and dishes, follow these steps:
– Load hollow items (e.g. cups, glasses and pans) with the opening down.
– Make sure that water does not collect in the container or in a deep base.
Page 14

Washing programmes
14
– Make sure that cutlery and dishes do not bond together.
– Make sure that the glasses do not touch other glasses.
– Put small objects in the cutlery basket.
– Mix the spoons with other cutlery to prevent them from bonding together.
– Arrange the items to let water touch all surfaces.
• Plastic items and pans with non-stick coatings can retain the water droplets.
• Put light items in the upper basket. Make sure that the items do not move.
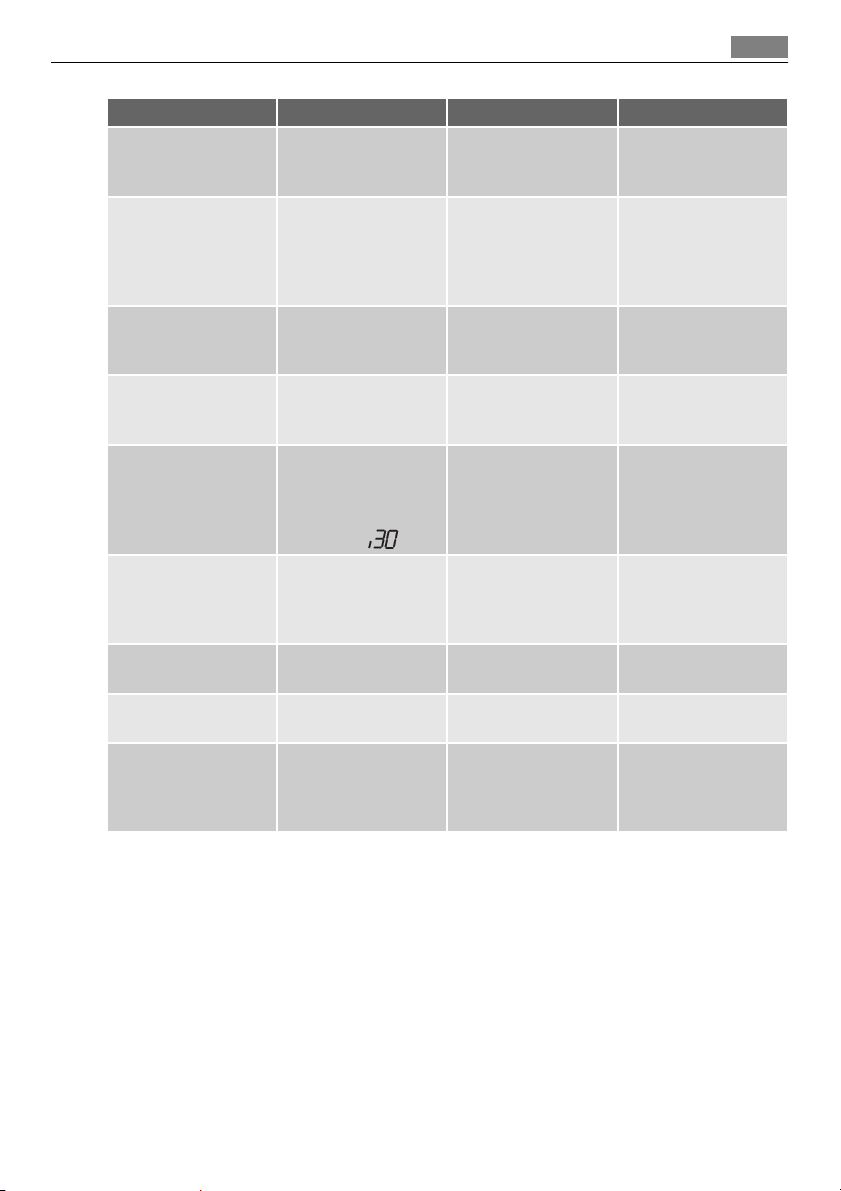
Washing programmes
Programme Degree of soil Type of load Programme descrip-
1)
AUTOMATIC
30 MINUTES
INTENSIV PRO Heavy soil Crockery, cut-
3)
ENERGY
50 MINUTES Light soil Crockery and
45° GLASS Normal or
PLATE WARM-ERThis programme makes the dishes
Any Crockery, cut-
2)
Normal or
light soil
Normal soil Crockery and
light soil
warm before use or removes the
dust from dishes not used for a
long time.
lery, pots and
pans
Crockery and
cutlery
lery, pots and
pans
cutlery
cutlery
Delicate crockery and glassware
Prewash
Main wash 45 °C or 70
°C
1 or 2 middle rinses
Last rinse
Dry
Main wash 60 °C
Rinse
Prewash
Main wash 70 °C
1 middle rinse
Last rinse
Dry
Prewash
Main wash 50 °C
1 middle rinse
Last rinse
Dry
Main wash 55 °C
1 middle rinse
Last rinse
Main wash 45 °C
1 middle rinse
Last rinse
Dry
1 hot rinse Yes, without ef-
tion
EXTRA HYGIENE
function
Yes, with effect.
Yes, with effect.
This washing programme includes
the EXTRA HYGIENE function. It
is not necessary to
set the function.
Yes, with effect.
Yes, with effect.
Yes, without effect.
fect.
Page 15

Select and start a washing programme
15
Programme Degree of soil Type of load Programme descrip-
PREWASH This programme gives dishes a
EXTRA SILENT
1) The appliance adjusts automatically the temperature and the quantity of the water. This depends if the appliance
has a full load or not and on the degree of soil. The programme duration and the programme consumptions
can change.
2) When you have a light load, this programme gives a timesaving solution with perfect washing results.
3) Test programme for test institutes. Refer to supplied leaflet for test data.
4) This washing programme operates with a low level of noise. The pump works at a very low speed to decrease
the level of noise of 25% compared to the declaration programme. Because of the low level of noise the
programme has a very long time duration. Set this washing programme in times when the power rate is more
economical.
quick rinse to prevent the remaining food to bond on the dishes and
bad odours to come out from the
appliance.
Do not use detergent with this
programme.
4)
Normal soil Crockery and
cutlery
1 cold rinse Yes, without ef-
Prewash
Main wash 50 °C
1 middle rinse
Last rinse
Dry
tion
EXTRA HYGIENE
function
fect.
Yes, without effect.
Consumption values
Programme
AUTOMATIC 0,9 - 1,7 8 - 15
30 MINUTES 0,8 9
INTENSIV PRO 1,5 - 1,7 13 - 15
ENERGY 0,9 - 1,0 9 - 11
50 MINUTES 1,0 - 1,1 10 - 11
45° GLASS 0,8 - 0,9 11 - 12
PLATE WARMER 0,8 4
PREWASH 0,1 4
EXTRA SILENT 1,1 - 1,2 9 - 11
1) The display shows the programme duration.
1)
Energy (kWh) Water (litre)
The pressure and temperature of the water, the variations of power supply and the quantity
of dishes can change these values.
Select and start a washing programme
Select and start a washing programme
1. Close the door of the appliance.
2. Switch on the appliance.
Page 16

Select and start a washing programme
16
3. Select, if necessary, options. Refer to 'Control panel'.
4. Select a washing programme. Refer to 'Washing programmes'.
5. Press the OK/Start button. The washing programme starts automatically.
– If the delay start is set, the countdown starts automatically. When the countdown
is completed, the washing programme starts automatically.
– If the salt container and /or the rinse aid dispenser are empty, the related messages
show in the display and the appliance will not start. Press the OK/Start button again
to start the washing programme.
Fill the salt container and/or the rinse aid dispenser when the appliance is empty and before
you start a washing programme.
If the delay start is set, the opening of the appliance door interrupts the countdown. When
you close the door, the countdown continues from the point of interruption.
Interruption of a washing programme
• Open the appliance door.
– The washing programme stops.
• Close the appliance door.
– The washing programme continues from the point of interruption.
How to cancel a washing programme or a delay start
If a washing programme or a delay start has not started, you can change the selection.
When a washing programme or a delay start operate, it is not possible to change the
selection. It is necessary to cancel the washing programme or the delay start.
When you cancel the delay start, this automatically cancels the selected washing programme. You have to select the washing programme again.
1. Press the cancel button.
2. The display shows the message CONFIRM CANCEL ? .
3. Press the OK/Start button to confirm.
Make sure that there is detergent in the detergent dispenser before you start a new washing
programme.
At the end of the washing programme
• The appliance stops automatically.
• The audible signals operate.
1. The display shows the messages PROGRAMME END and PLEASE SWITCH OFF .
If the salt container and /or the rinse aid dispenser are empty, the related messages show
in the display.
2. Open the appliance door.
3. Switch off the appliance.
4. For better drying results, keep the door ajar for some minutes.
Page 17

Care and cleaning
Auto Off
The Auto Off function automatically switches off the appliance 10 minutes after the end
of the washing programme.
This helps to decrease energy consumption.
Remove the load
• Let the dishes become cold before you remove them from the appliance. Hot dishes are
easily damaged.
• First remove the items from the lower basket, then from the upper basket.
• There can be water on the sides and door of the appliance. Stainless steel becomes cool
more quickly than the dishes.
Care and cleaning
To remove and clean the filters
Dirty filters decrease the washing results. Although the maintenance is very low with these
filters, we recommend that you make a check at intervals and if necessary, clean them.
1. To remove filter (A), turn it counterclock-
wise and remove it out from filter (B).
17
2. Filter (A) has 2 parts. To disassemble the
filter, pull them apart.
3. Fully clean the parts under running water.
4. Put the 2 parts of the filter (A) together
and push. Make sure that they assemble
correctly in each other.
5. Remove the filter (B).
6. Fully clean the filter (B) under running wa-
ter.
B
A
Page 18

What to do if…
18
7. Put the filter (B) to its initial position. Make
sure that it assembles correctly under the
two guides (C).
8. Put the filter (A) into position in filter (B)
and turn it clockwise until it locks.
To clean the spray arms
Do not remove the spray arms.
If the holes in the spray arms become clogged, remove remaining parts of soil with a cocktail
stick.
To clean the external surfaces
Clean the external surfaces of the appliance and control panel with a damp soft cloth. Only
use neutral detergents. Do not use abrasive products, scouring pads or solvents (e.g. acetone).
What to do if…
C
The appliance does not start or stops during operation.
First try to find a solution to the problem (refer to the chart). If not, contact the service
centre.
Malfunction Fault code Possible cause Possible solution
The appliance does not
fill with water.
The water pressure is
The water tap is
The filter in the water
The connection of the
• An audible signal
operates.
• The display shows
the message OPEN
THE TAP .
The water tap is closed. Open the water tap.
too low.
blocked or is furred
with limescale.
inlet hose is blocked.
water inlet hose is not
correct.
Contact your local water authority.
Clean the water tap.
Clean the filter.
Make sure that the
connection is correct.
Page 19
What to do if…
Malfunction Fault code Possible cause Possible solution
The water inlet hose is
The appliance does not
drain the water.
The connection of the
The water drain hose is
The anti-flood device
operates.
The programme does
not start.
The mains plug is not
Blow out fuse in the
The delay start is set. If you want to cancel
• An audible signal
operates.
• The display shows
the message DRAIN
BLOCKED .
• An audible signal
operates.
• The display shows
the message SERVICE CODE
The appliance door is
damaged.
There is a blockage in
the sink spigot.
water drain hose is not
correct.
damaged.
Close the water tap
.
open. The display
shows the message
PLEASE CLOSE DOOR .
connected in.
household fuse box.
Make sure that the water inlet hose has no
damages.
Clean the sink spigot.
Make sure that the
connection is correct.
Make sure that the water drain hose has no
damages.
and contact the service centre.
Close the door correctly.
Put in the mains plug.
Replace the fuse.
the delay start, refer to
'Select and start a
washing programme'.
After the check, switch on the appliance. The programme continues from the point of
interruption.
If the malfunction shows again, contact the service centre.
If the display shows other fault codes, contact the service centre.
The necessary data for the service centre is on the rating plate.
We recommend that you write the data here:
Model (MOD.) ....................
Product number (PNC) ....................
Serial number (S.N.) ....................
19
Page 20

What to do if…
20
The washing results and drying results are not satisfactory
Problem Possible cause Possible solution
The dishes are not clean. The selected washing pro-
The baskets were not loaded
The spray arms could not turn
The filters are dirty or not as-
The quantity of detergent was
Limescale particles on the
dishes.
Incorrect water softener ad-
The salt container cap is not
There are streaks, milky stains,
or a bluish layer on glasses and
dishes.
Dry water drop stains on
glasses and dishes.
The detergent can be the cause. Use a different brand of deter-
The dishes are wet. You have set a washing pro-
The dishes are wet and dull. The rinse aid dispenser is emp-
The multitab function is on.
gramme was not applicable for
the type of load and soil.
correctly, water did not touch
all surfaces.
freely because of incorrect arrangement of the load.
sembled and installed correctly.
not sufficient or missing.
The salt container is empty. Fill the salt container with dish-
justment
closed correctly.
Rinse aid dosage is too high. Decrease the rinse aid dosage.
Rinse aid dosage is too low. Increase the rinse aid dosage.
gramme without drying phase
or with a decreased drying
phase.
ty.
(The rinse aid dispenser is automatically off).
Make sure that the washing
programme is applicable for the
type of load and soil.
Load the baskets correctly.
Make sure that an incorrect arrangement of the load does not
cause a blockage of the spray
arms.
Make sure that the filters are
clean and correctly assembled
and installed.
Make sure that the quantity of
detergent is sufficient.
washer salt.
Adjust the water softener.
Make sure that the salt container cap is closed correctly.
gent.
Let the door stay ajar for some
minutes before you remove the
dishes.
Fill the rinse aid dispenser with
rinse aid.
Activate the rinse aid dispenser.
Refer to 'How to activate the
rinse aid dispenser'.
How to activate the rinse aid dispenser
• Go to the option menu and activate the rinse aid dispenser. Refer to 'Control panel'.
Page 21

Technical data
Technical data
Dimensions Width 596 mm
Height 850 mm
Depth 625 mm
Water supply pressure Minimum 0,5 bar (0,05 MPa)
Maximum 8 bar (0,8 MPa)
Water supply
Capacity Place settings 12
1) Connect the water inlet hose to a water tap with a 3/4'' thread.
The rating plate on the inner edge of the appliance door shows the electrical connection
data.
If the hot water comes from alternative sources of energy, (e.g. solar panels, photovoltaic
panels and aeolian), use a hot water supply to decrease energy consumption.
1)
Cold water or hot water maximum 60 °C
Environment concerns
The symbol on the product or on its packaging indicates that this product may not be
treated as household waste. Instead it should be taken to the appropriate collection point
for the recycling of electrical and electronic equipment. By ensuring this product is disposed
of correctly, you will help prevent potential negative consequences for the environment
and human health, which could otherwise be caused by inappropriate waste handling of
this product. For more detailed information about recycling of this product, please contact
your local council, your household waste disposal service or the shop where you purchased
the product.
Recycle the materials with the symbol
recycle it.
. Put the packaging in applicable containers to
21
Installation instructions
Installation
Installation under a counter
Put the appliance adjacent to a water tap and a water drain.
Remove the appliance worktop to install it under a sink unit or a kitchen worktop.
Page 22

Installation
22
Make sure that the dimensions of the recess
agree with the dimensions in the picture.
How to remove the appliance worktop
1. Remove the rear screws (1).
2. Pull the worktop from the behind of the
appliance (2).
3. Lift the worktop and move it from the
front slots (3).
4. Use the adjustable feet to adjust the level
of the appliance.
5. Install the appliance under the kitchen
worktop. Do not squash or bend the water
hoses during the installation.
To adjust the level of the appliance
A correct level of the appliance lets the door to close and seal correctly.
With an incorrect appliance level, the door does catches on the sides of the cabinet.
Loosen or tighten the adjustable feet to make the appliance level.
Water drain connection
Connect the water drain hose to:
• The sink spigot and attach it under the work surface. This prevents that the waste water
from the sink goes back into the appliance.
Page 23

23
• A stand pipe with vent-hole. The internal di-
ameter must be minimum 4 cm.
Remove the sink plug when the appliance
drains the water to prevent that the water goes
back into the appliance.
The drain hose extension must not be longer
than 2 m. The internal diameter must not be
smaller than the diameter of the hose.
If you connect the water drain hose to a trap spigot under the sink, remove the plastic membrane
(A). If you do not remove the membrane, remaining food can cause a blockage in the drain hose
spigot
A safety device impedes the dirty water to go back
into the appliance. If, the spigot of the sink has a
'non-return valve', this can cause the appliance to
drain incorrectly. Remove the non-return valve.
max 85 cm
min 40 cm
max 400 cm
Page 24

www.electrolux.com
To buy accessories, consumables and spare parts at our online shop please visit: www.aegelectrolux.co.uk
117946640-B-072010
 Loading...