

Page 1

FAVORIT 89020 VIL
User manual Dishwasher
Notice d'utilisation Lave-vaisselle
Manual de instrucciones Lavavajillas
Page 2
Contents
2
Thank you for choosing one of our high-quality products.
To ensure optimal and regular performance of your appliance please read this
instruction manual carefully. It will enable you to navigate all processes perfectly
and most efficiently. To refer to this manual any time you need to, we recommend
you to keep it in a safe plac e. An d p le as e pass it to any future owner of the appliance.
We wish you much joy with your new appliance.
Contents
Operating instructions 3
Safety information 3
Correct use 3
General safety 3
Child safety 3
Installation 4
Product description 4
Control panel 5
Up and down scrolling buttons (+ -) 5
Display 6
OPTION button 6
OK / START button 7
Switching on for the first time - setting the
language 7
First use 8
Setting the water softener 8
Setting manually 9
Setting electronically 9
Use of dishwasher salt 9
Use of rinse aid 10
Adjusting the dosage of rinse aid 11
Daily use 11
Loading cutlery and dishes 12
The lower basket 13
The cutlery basket 13
Beer glasses 15
The upper basket 16
Adjusting the height of the upper basket
Use of detergent 18
Fill with detergent 18
Multitab function 19
Washing programmes 20
Select and start a washing programme 22
Cancel a delay start or a washing programme
in progress 22
Interrupt a washing programme in progress
End of the washing programme 22
Unloading the dishwasher 23
Care and cleaning 23
Cleaning the filters 23
Cleaning the spray arms 24
External cleaning 25
Internal cleaning 25
Prolonged periods of non-operation 25
Frost precautions 25
Moving the machine 25
What to do if… 25
Technical data 27
Installation instructions 27
Installation 27
Fixing to the adjacent units 28
Levelling 28
Water connection 28
Water supply connections 28
Water inlet hose with safety valve 29
Water outlet hose connection 29
Electrical connection 30
17
Environment concerns 31
Packaging material 31
Subject to change without notice
22
Page 3

Safety information
Operating instructions
Safety information
In the interest of your safety and to ensure the correct use, before installing and first using
the appliance, read this user manual carefully, including its hints and warnings. To avoid
unnecessary mistakes and accidents, it is important to ensure that all people using the
appliance are thoroughly familiar with its operation and safety features. Save these instructions and make sure that they remain with the appliance if it is moved or sold, so that
everyone using it through its life will be properly informed on appliance use and safety.
Correct use
• This dishwasher is only intended for washing household utensils suitable for machine
washing.
• Do not put any solvents in the dishwasher. This could cause an explosion.
• Knives and other items with sharp points must be loaded in the cutlery basket with their
points down or placed in a horizontal position in the upper basket.
• Only use products (detergent, salt and rinse aid) suitable for dishwashers.
• Avoid opening the door whilst the appliance is in operation, hot steam may escape.
• Do not take any dishes out of the dishwasher before the end of the dishwashing cycle.
• After use, isolate the appliance from the power supply and turn off the water supply.
• This product should be serviced only by an authorised service engineer, and only genuine
spare parts should be used.
• Under no circumstances should you attempt to repair the machine yourself. Repairs
carried out by inexperienced persons will cause injury or serious malfunctioning. Contact
your local Service Force Centre. Always insist on genuine spare parts.
3
General safety
• Persons (including children) with reduced physical sensory, mental capabilities or lack
of experience and knowledge must not use the appliance. They must have supervision
or instruction for the operation of the appliance by a person responsible for their safety.
• Dishwasher detergents can cause chemical burns to eyes, mouth and throat. Could endanger life! Comply with the safety instructions of the dishwasher detergent manufacturer.
• Water in the dishwasher is not for drinking purposes. Detergent residue may still be
present in your machine.
• Ensure that the door of the dishwasher is always closed when it is not being loaded or
unloaded. In this way you will avoid anybody tripping over the open door and hurting
themselves.
• Do not sit or stand on the open door.
Child safety
• This appliance is designed to be operated by adults. Don’t allow children to use the
dishwasher unsupervised.
• Keep all packaging well away from children. There is risk of suffocation.
• Keep all detergents in a safe place out of children’s reach.
Page 4
Product description
4
• Keep children well away from the dishwasher when the door is open.
Installation
• Check your dishwasher for any transport damage. Never connect a damaged machine.
If your dishwasher is damaged contact your supplier.
• All packaging must be removed before use.
• Any electrical and plumbing work required to install this appliance must be carried out
by a qualified and competent person.
• For safety reasons it is dangerous to alter the specifications or attempt to modify this
product in any way.
• Never use the dishwasher if the electrical supply cable and water hoses are damaged; or
if the control panel, work top or plinth area are damaged such that the inside of the
appliance is freely accessible. Contact your local Service Force centre, in order to avoid
hazard.
• All sides of the dishwasher must never be drilled to prevent damage to hydraulic and
electric components.
WARNING!
For electrical and water connection carefully follow the instructions given in specific paragraphs.
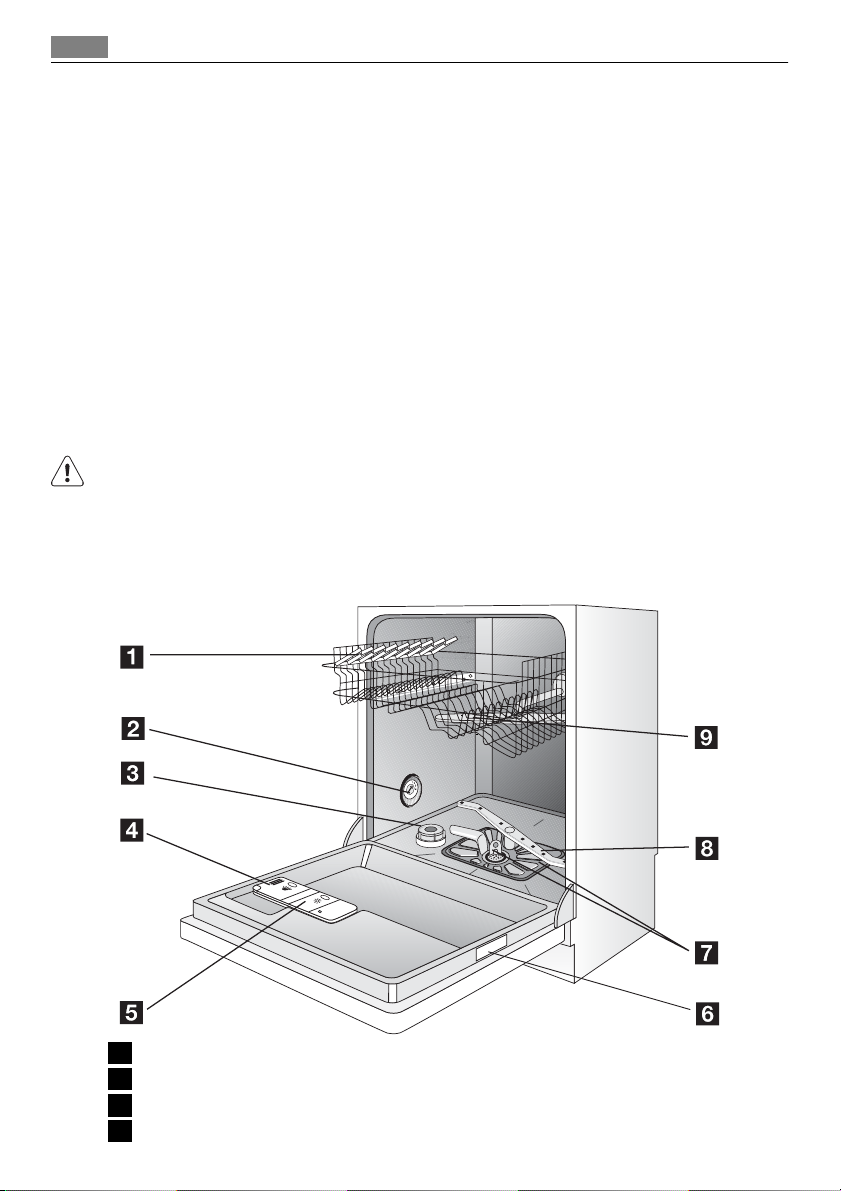
Product description
1 Upper basket
2 Water hardness dial
3 Salt container
4 Detergent dispenser
Page 5
Control panel
5 Rinse aid dispenser
6 Rating plate
7 Filters
8 Lower spray arm
9 Upper spray arm
Optical signal
Once the washing programme has started , a point-shaped optical signal shows on the
floor beneath the appliance door.
If the appliance has been installed higher up with a furniture door mounted flush, the
optical signal will be no longer visible.
Optical signal
Red light fixed Indicates the start of a washing programme and remains on for all the
duration
Red light flashes Indicates a malfunction of the appliance
Green light fixed Indicates the end of the washing programme
This dishwasher has an internal light that turns on and off when the opening and closing
of the dishwasher's door occurs.
Internal light is equipped with led lamp CLASS 1 in accordance with EN 60825-1: 1994 +
A1: 2002 + A2: 2001.
In case that this light has to be replaced, please, contact your local Service Force Centre.
5
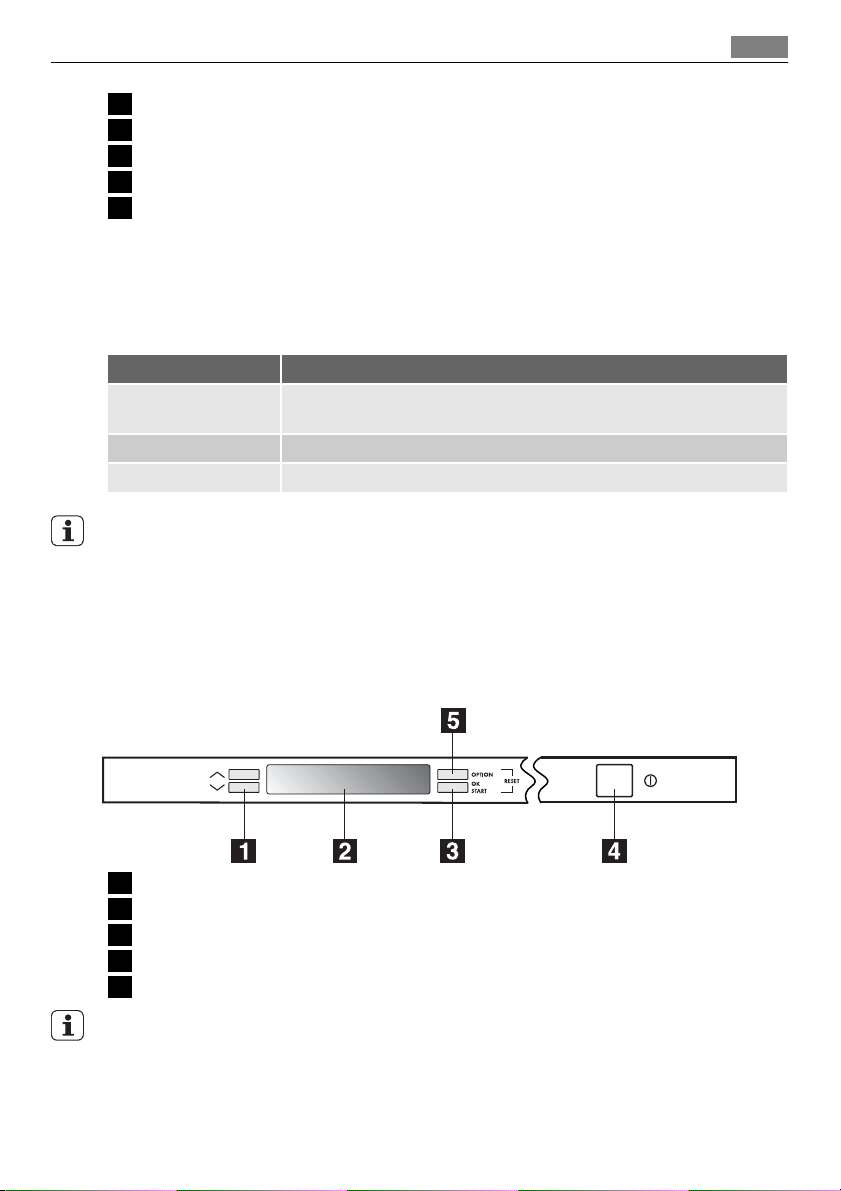
Control panel
1 Up and down scrolling buttons
2 Display
3 OK / START button
4 ON/OFF button
5 OPTION button
A sequence of displayed messages and audible signals will guide you in the setting of the
appliance and the selection of a washing programme and options.
Up and down scrolling buttons (+ -)
These two buttons have a double function:
• selecting within programme menu,
Page 6
Control panel
6
• selecting within option menu and submenu.
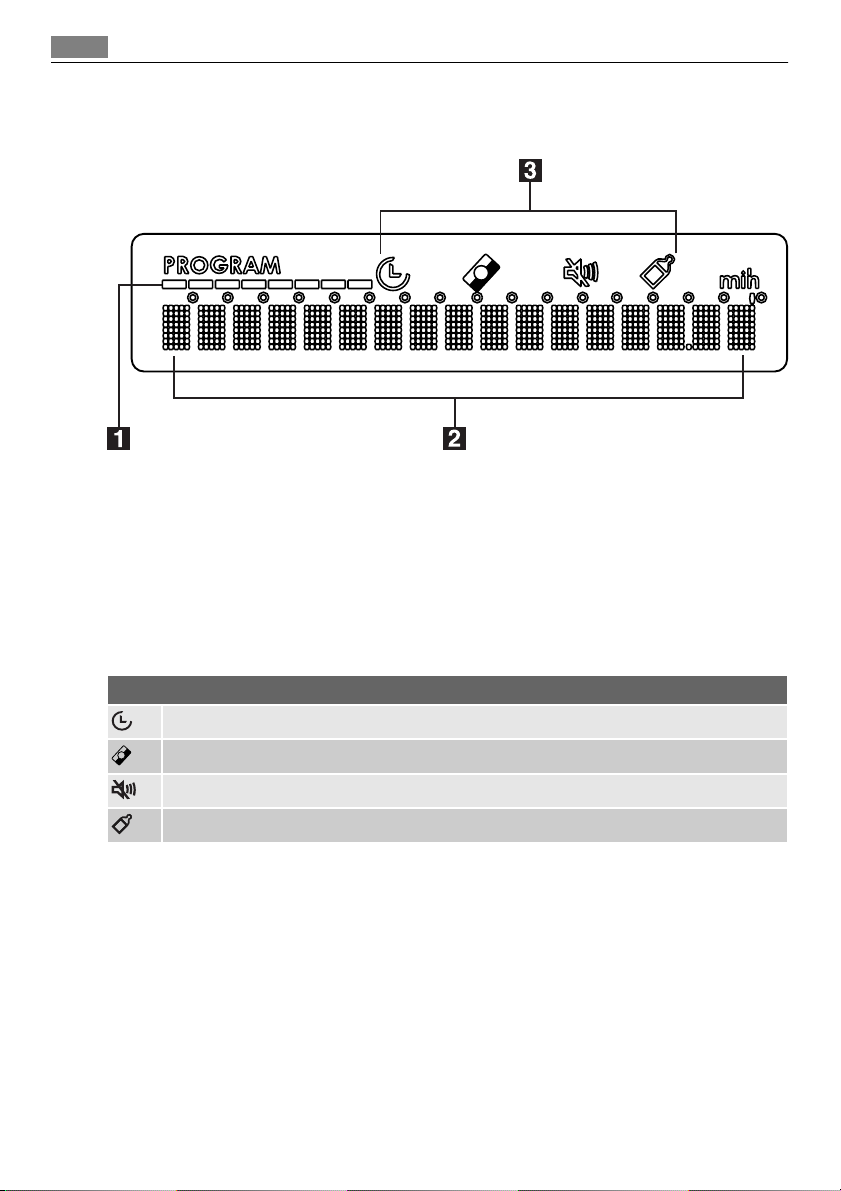
Display
1.
Washing programmes: during the progress of the programme these little bars indicate
the phase of the washing programme: prewash - main wash - rinses - drying.
2. In this row several details are displayed:
–
Setting mode guide to the selection of the washing programme - duration time of
the programme, options (when together with the washing programme one or more
options are set, the update of the programme duration will occur automatically).
–
Once the programme has started indicates the sequence of the running phase
and the running time of the programme in progress.
3.
Symbols: indicate the options (see chart).
The symbols have the following meaning:
DELAY START : fixed in setting mode; flashing when countdown in progress
MULTITAB : illuminated when the MULTITAB function is active.
SOUND VOLUME : exclusion of the volume for vocal messages. (Except for alarm signals)
CARE PLUS : illuminated when 70° INTENSIVE programme is set
OPTION button
Press this button to enter a menu of options; press again to exit from the menu.
How to set the options
1.
Press OPTION button.
2.
Press one of the up and down scrolling buttons until desired option is displayed:
DELAY START
MULTITAB
SETTINGS
3.
Press OK / START to confirm and enter submenu.
4.
Press up and down scrolling buttons until required submenu is displayed.
5.
Press OK / START to confirm.
Page 7

6.
To exit from the menu press OPTION button.
Option menu Option submenu
DELAY START
MULTITAB
SETTINGS LANGUAGE
Allows the start of the selected washing programme to be delayed for
between 1 and 19 hours. The countdown will decrease with steps of
1 hour. Only in the last hour the decrease is in minutes. Once the
countdown has elapsed the washing programme will start automatically.
Sets the dishwasher for the use of conventional detergents or combi
detergent tablets (3 in 1 - 4 in 1 - 5 in 1 etc...). See MULTITAB function.
–
ON: function activated. Use combi detergent tablets. The symbol
appears in the display.
–
OFF: function deactivated. Use conventional detergents.
Allows you to view messages in the required language.
WATER HARDNESS
Allows you to set electronically the water softener.
RINSE AID
Allows you to activate or deactivate the rinse aid dispenser.
–
ON: activated
–
OFF: deactivated
BRIGHTNESS
Allows you to increase or decrease the brightness of the background
of the display, 10 different levels can be selected.
Factory setting: level 10.
SOUND VOLUME
Allows you to adjust the volume of the acoustic signals (from 0 to 5).
Level 0 means the deactivation of the acoustic signals and the corresponding symbol
appears in the display.
Control panel
7
OK / START button
Press it to:
• confirm / memorize any option,
• start a washing programme.
The OK / START and OPTION buttons if pressed simultaneously can:
• cancel a washing programme in progress,
• cancel the setting of an option.
It is also possible to return to the factory setting for the following options:
LANGUAGE
BRIGHTNESS
In setting mode press for about 6 seconds these 2 buttons simultaneously; the default
language message will appear in the display.
Switching on for the first time - setting the language
1.
Press the ON/OFF button.
Page 8
First use
8
2. In the display appears the default language message. If you want to confirm the default
language press OK / START .
3.
If you want to set a different language use the up and down scrolling buttons until
the required language appears in the display. Press OK / START to confirm.
First use
Before using your dishwasher for the first time:
• Ensure that the electrical and water connections comply with the installation instruc-
tions
• Remove all packaging from inside the appliance
• Set the water softener
• Pour 1 litre of water inside the salt container and then fill with dishwasher salt
• Fill the rinse aid dispenser
If you want to use combi detergent tablets such as: "3 in 1", "4 in 1", "5 in 1" etc... set the
Multitab function (see "Multitab function").
Setting the water softener
The dishwasher is equipped with a water softener designed to remove minerals and salts
from the water supply, which would have a detrimental or adverse effect on the operation
of the appliance.
The higher the content of these minerals and salts, the harder your water is. Water hardness
is measured in equivalent scales, German degrees (°dH), French degrees (°TH) and mmol/l
(millimol per litre - international unit for the hardness of water).
The softener should be adjusted according to the hardness of the water in your area. Your
local Water Authority can advise you on the hardness of the water in your area.
The water softener must be set in both ways: manually, using the water hardness dial and
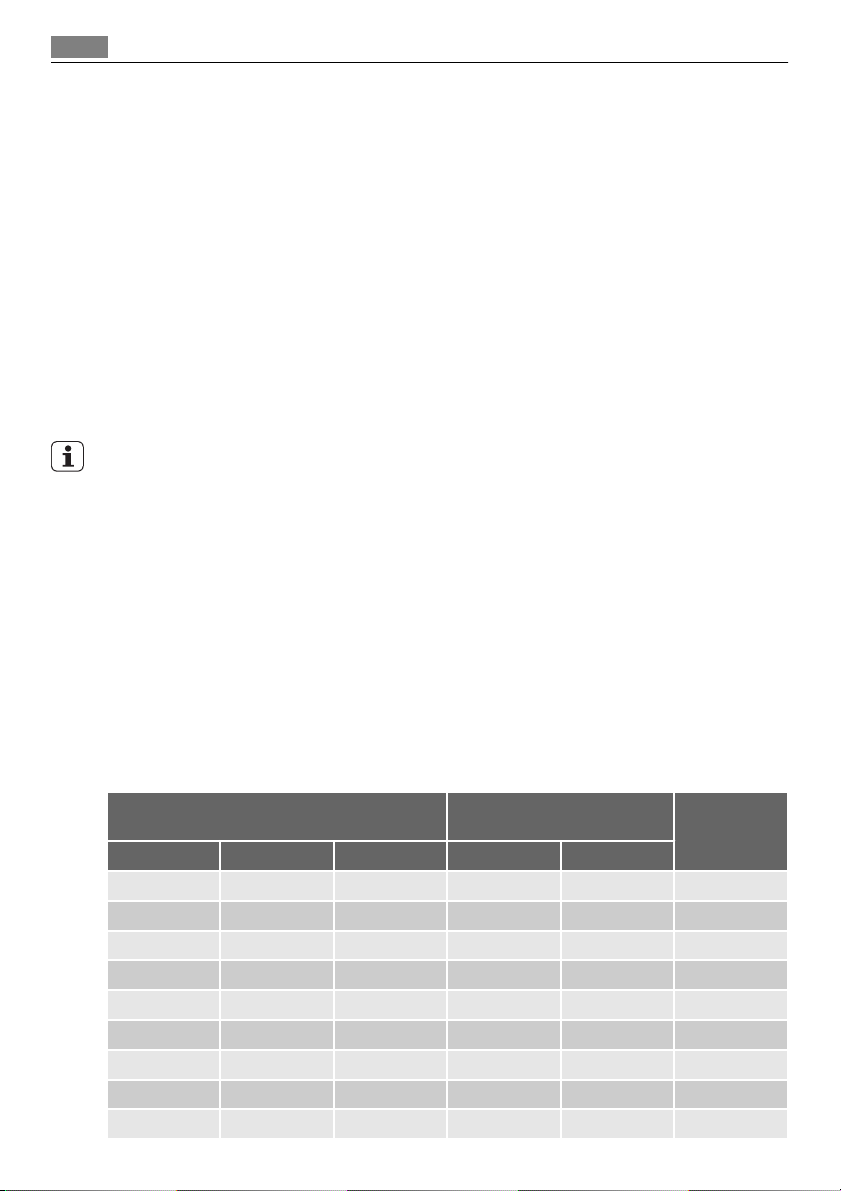
electronically.
Water hardness Adjusting the water hardness
°dH °TH mmol/l manually electronically
51 - 70 91 - 125 9,1 - 12,5 2 level 10 yes
43 - 50 76 - 90 7,6 - 8,9 2 level 9 yes
37 - 42 65 - 75 6,5 - 7,5 2 level 8 yes
29 - 36 51 - 64 5,1 - 6,4 2 level 7 yes
23 - 28 40 - 50 4,0 - 5,0 2 level 6 yes
19 - 22 33 - 39 3,3 - 3,9 2 level 5 yes
15 - 18 26 - 32 2,6 - 3,2 1 level 4 yes
11 - 14 19 - 25 1,9 - 2,5 1 level 3 yes
4 - 10 7 - 18 0,7 - 1,8 1 level 2 yes
setting
Use of salt
Page 9

Use of dishwasher salt
9
Water hardness Adjusting the water hardness
setting
°dH °TH mmol/l manually electronically
< 4 < 7 < 0,7 1 level 1 no
Setting manually
The dishwasher is factory set at position 2.
1. Open the dishwasher door.
2. Remove the lower basket from the dishwasher.
3. Turn the water hardness dial to position 1
or 2 (see table).
4. Replace the lower basket.
Setting electronically
The dishwasher is factory set at level 5.
Enter Option menu - SETTINGS - WATER HARDNESS .
Using the up and down scrolling buttons set the level of the water softener according to
the hardness of the water in your area (see chart).
Use of dishwasher salt
Use of salt
WARNING!
Only use salt specifically designed for use in dishwashers. All other types of salt not specifically designed for use in a dishwasher, especially table salt, will damage the water softener. Only fill with salt just before starting one of the complete washing programmes. This
will prevent any grains of salt or salty water, which may have been spilt, remaining on the
bottom of the machine for any period of time, which may cause corrosion.
To fill:
1. Open the door, remove the lower basket and unscrew the cap of the salt container by
turning it anticlockwise.
2.
Pour 1 litre of water inside the container (this is necessary only before filling with
salt for the first time) .
Page 10

Use of rinse aid
10
3. Using the funnel provided, pour in the salt
until the container is full.
4. Replace the cap making sure that there is
no trace of salt on the screw thread or on
the gasket.
5. Replace the cap tightly turning it clockwise until it stops with a click.
Do not worry if water overflows from the unit
when filling with salt, this is quite normal.
The salt container will require topping up periodically.
You are reminded of this by a displayed message REFILL SALT .
This occurs only at the start and at the end of the washing programme; during the running
of the programme the indication for salt refilling is not active.
The refilling salt message can remain visible for 2-6 hours after the salt has been replenished,
assuming the dishwasher remains switched on. If you are using salts that take longer to
dissolve then this can take longer. The function of the machine is not affected.
Use of rinse aid
WARNING!
Only use branded rinse aid for dishwashers.
Never fill the rinse aid dispenser with any other substances (e.g. dishwasher cleaning agent,
liquid detergent). This would damage the appliance.
Rinse aid ensures thorough rinsing, and spot and streak free drying.
Rinse aid is automatically added during the last rinse.
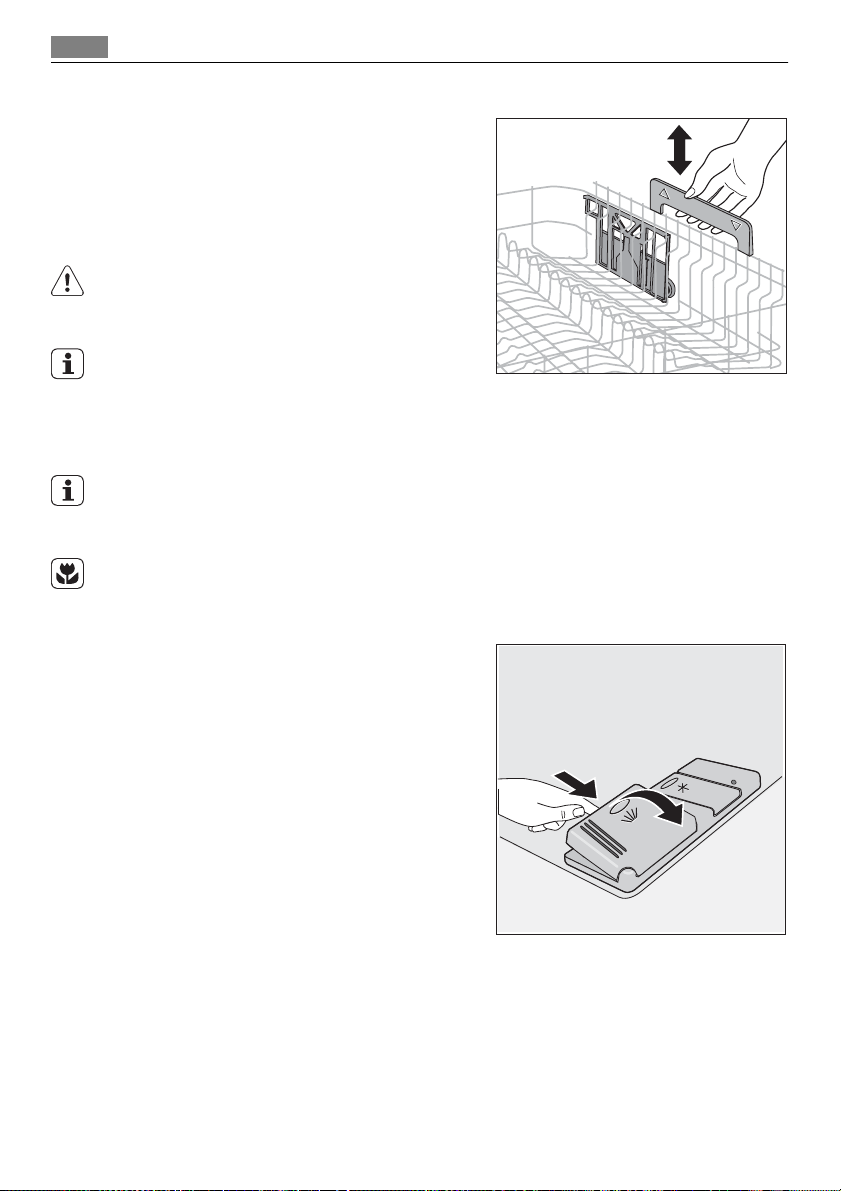
1. Open the container by pressing the release
button (A).
Page 11

Daily use
2. Add the rinse aid in the container. The
maximum level for filling is indicated by
"max".
The dispenser holds about 110 ml of rinse
aid, which is sufficient for between 16 and
40 dishwashing cycles, depending upon
the dosage setting.
3. Ensure that the lid is closed after every refill.
Clean up any rinse aid spilt during filling with
an absorbent cloth to avoid excess foaming
during the next wash.
The rinse aid container will require topping up periodically.
You are reminded of this by a displayed message REFILL RINSE AID .
This occurs only at the start and at the end of the washing programme; during the running
of the programme the indication for rinse aid refilling is not active.
Adjusting the dosage of rinse aid
According to the finish and drying results obtained, adjust the dose of rinse aid by means
of the 6 position selector (position 1= minimum dosage, position 6= maximum dosage).
The dose is factory set in position 4.
11
Increase the dose if there are drops of water or lime
spots on the dishes after washing.
Reduce it if there are sticky whitish streaks on the
dishes or a bluish film on glassware or knife blades.
Daily use
• Check if it's necessary to refill with dishwasher salt or rinse aid.
• Load cutlery and dishes into the dishwasher.
• Fill with dishwasher detergent.
• Select a wash programme suitable for the cutlery and dishes.
• Start the wash programme.
Page 12

Loading cutlery and dishes
12
Loading cutlery and dishes
Sponges, household cloths and any object that can absorb water may not be washed in the
dishwasher.
• Before loading the dishes, you should:
– Remove all left over food and debris.
– Soften remnants of burnt food in pans
• When loading the dishes and cutlery, please note:
– Dishes and cutlery must not impede the rotation of the spray arms.
– Load hollow items such as cups, glasses, pans, etc. with the opening downwards so
that water cannot collect in the container or a deep base.
– Dishes and items of cutlery must not lie inside one another, or cover each other.
– To avoid damage to glasses, they must not touch.
– Lay small objects in the cutlery basket.
• Plastic items and pans with non stick coatings have a tendency to retain water drops;
these items will not dry as well as porcelain and steel items.
• Light items (plastic bowls etc.) must be loaded in the upper basket and arranged so they
do not move.
For washing in the dishwasher the following cutlery and dishes
are not suitable: are of limited suitability:
• Cutlery with wooden, horn, china or motherof-pearls handles.
• Plastic items that are not heat resistant.
• Older cutlery with glued parts that are not
temperature resistant.
• Bonded cutlery items or dishes.
• Pewter or copper items.
• Lead crystal glass.
• Steel items prone to rusting.
• Wooden platters.
• Items made from synthetics fibres.
Open the door and slide out the baskets to load the dishes.
• Only wash stoneware in the dishwasher if it
is specially marked as being dishwasher-safe
by the manufacturer.
• Glazed patterns may fade if machine washed
frequently.
• Silver and aluminium parts have a tendency
to discolour during washing: Residues, e.g.
egg white, egg yolk and mustard often cause
discolouring and staining on silver. Therefore
always clean left-overs from silver immediately, if it is not to be washed straight after
use.
Page 13

The lower basket
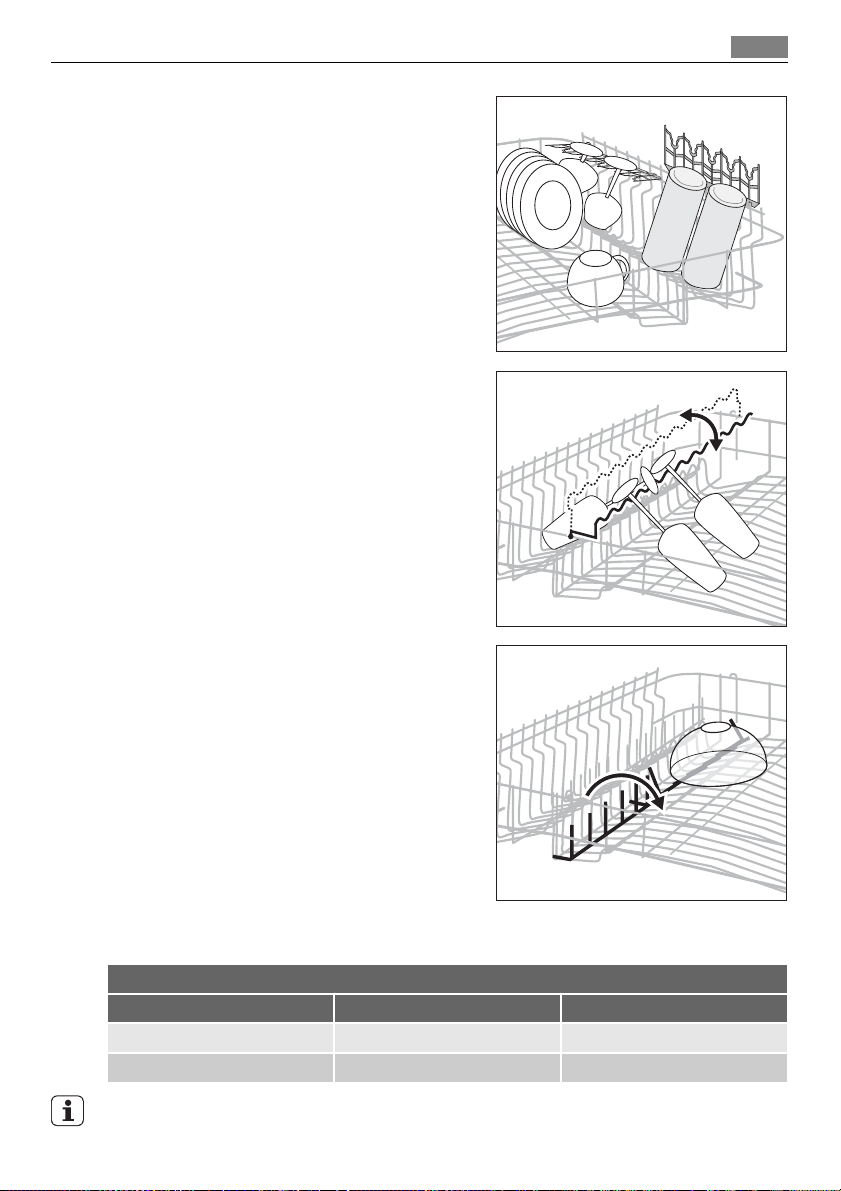
Load larger and heavily soiled dishes and pans in
the lower basket.
To make it easie r to lo ad larger dishes, all rear plate
racks in the lower basket can be folded down.
Loading cutlery and dishes
13
The cutlery basket
WARNING!
Sharp knives and other items of cutlery with sharp edges must be laid in the cutlery tray
or in the upper basket because of the risk of injury.
Place knives, small spoons and small forks in the
cutlery tray which is in the upper basket. Place
forks and spoons that do not fit in the cutlery tray
in the cutlery basket.
To ensure that all items of cutlery in the cutlery
basket can be reached by the water, you should:
Page 14

Loading cutlery and dishes
14
1. Place the grid insert on the cutlery basket.
2. Place forks and spoon in the cutlery basket
with their handles pointing downwards.
For larger utensils, such as whisks, leave off
one half of the cutlery grid.
The cutlery basket can be opened out.
Always make sure that you put your hand around
both parts of the two-part handle when removing
it from the dishwasher.
1. Place the cutlery basket on a table or work
surface.
2. Open out the two-part handle.
3. Remove cutlery.
Page 15

Beer glasses
There are the glass holders on the left hand side in
the lower basket.
You can arrange there up to 4 beer glasses.
You can fold up the beer glass holders if necessary.
You can replace the beer glass holders with 2 supplied cup racks. You can use them as:
• cup shelves
• champagne glass holders.
Loading cutlery and dishes
15
Do these steps to remove beer glass holders
1. Pull upwards and push lightly on the hooks
from below.
2. Use the hooks to attach cup racks onto the
horizontal bar.
Page 16

Loading cutlery and dishes
16
You can remove the support that fix the beer glass
holders or cup racks if necessary.
1. Use the thumbs to push the support back.
2. Push them forwards to fix the support
again.
WARNING!
Do not hold the support with the hand. This
can cause injury. Place the hand under the
support on the lower basket.
The upper basket
Load smaller, fragile crockery and long, sharp cutlery in the upper basket.
• Arrange items of crockery on and under the
folding cup racks so that they are offset from
each other and water can reach all items.
Page 17
• The cup racks can be folded up out of the way
for tall crockery items.
• Lay or hang wine and brandy glasses in the
slots in the cup racks.
• For glasses with long stems, fold the glass
rack to the right, otherwise fold it away to
the left.
Loading cutlery and dishes
17
• The row of spikes on the left of the upper
basket is also in two parts and can be folded
away.
Spikes not folded away: place glasses, mugs
etc. in the upper basket.
Spikes folded away: more room for serving
dishes.
Adjusting the height of the upper basket
Maximum height of the dishes in:
the upper basket the lower basket
With upper basket raised 23 cm 34 cm
With upper basket lowered 25 cm 32 cm
The height of the upper basket can also be adjusted when it is loaded.
Page 18
Use of detergent
18
Raising / lowering the upper basket:
1. Pull out the upper basket completely.
2. Holding the upper basket by the handle,
raise it as far as it will go and then lower
it vertically.
The upper basket will latch into the lower
or the upper position.
WARNING!
After loading your machine always close the
door, as an open door can be a hazard.
Before closing the door, ensure that the spray
arms can rotate freely.
Use of detergent
Only use detergents specifically designed for use in dishwashers.
Please observe the manufacturer's dosing and storage recommendations as stated on the
detergent packaging.
Using no more than the correct amount of detergent contributes to reducing pollution.
Fill with detergent
1. Open the lid.
Page 19

2. Fill the detergent dispenser (1) with detergent. The marking indicates the dosing
levels:
20 = approximately 20 g of detergent
30 = approximately 30 g of detergent.
3. All programmes with prewash need an additional detergent dose (5/10 g) that must
be placed in the prewash detergent chamber (2).
This detergent will take effect during the
prewash phase.
4. When using detergent tablets, place the
tablet in compartment (1)
5. Close the lid and press until it locks in
place.
Detergent tablets
Detergent tablets from different manufactures dissolve at different rates. For this reason,
some detergent tablets do not attain their full
cleaning power during short washing programmes. Therefore, please use long washing
programmes when using detergent tablets, to
ensure the complete removal of detergent residuals.
Multitab function
19
Multitab function
This appliance is equipped with the "Multitab function", that allows the use of the "Multitab
" combi detergent tablets.
These products are detergents with a combined cleaning, rinsing and salt functions. They
can also contain other different agents depending on which kind of tablets you choose ("3
in 1", "4 in 1", "5 in 1" etc...).
Check whether these detergents are suitable for your water hardness. See the manufacturers instructions.
Select the "Multitab function " before the start of a washing programme.
Once this function is selected it will remain active also for the following washing programmes.
With the selection of this function the inflow of rinse aid and salt from each respective
supply container is automatically deactivated and also the displayed messages for salt and
rinse aid are deactivated.
With the use of the "Multitab function", the cycle durations may change. In this case, in
the display, the indication of the running time of the programme is automatically updated.
Page 20

Washing programmes
20
Once the programme is running, the "Multitab function " can NO longer be changed. If you
want to exclude the "Multitab function " you have to cancel the programme setting and
then deactivate the "Multitab function ".
In this case you have to set a washing programme (and desired options) again.
If the drying results are not satisfactory we recommend that you:
1. Fill up the rinse aid dispenser with rinse aid.
2. Activate the rinse aid dispenser.
3. Set the rinse aid dosage to position 2.
The activation/deactivation of the rinse aid can only be possible with the MULTITAB function
active.
If you decide to turn back to the use of the standard detergent system we advise
that you:
1. Deactivate the MULTITAB function
2. Fill up the dispensers for salt and rinse aid again.
3. Adjust the water hardness setting to the highest setting and perform 1 normal washing
programme without loading any dishes.
4. Adjust the water hardness setting according to the hardness of the water in your area.
5. Adjust the rinse aid dosage.
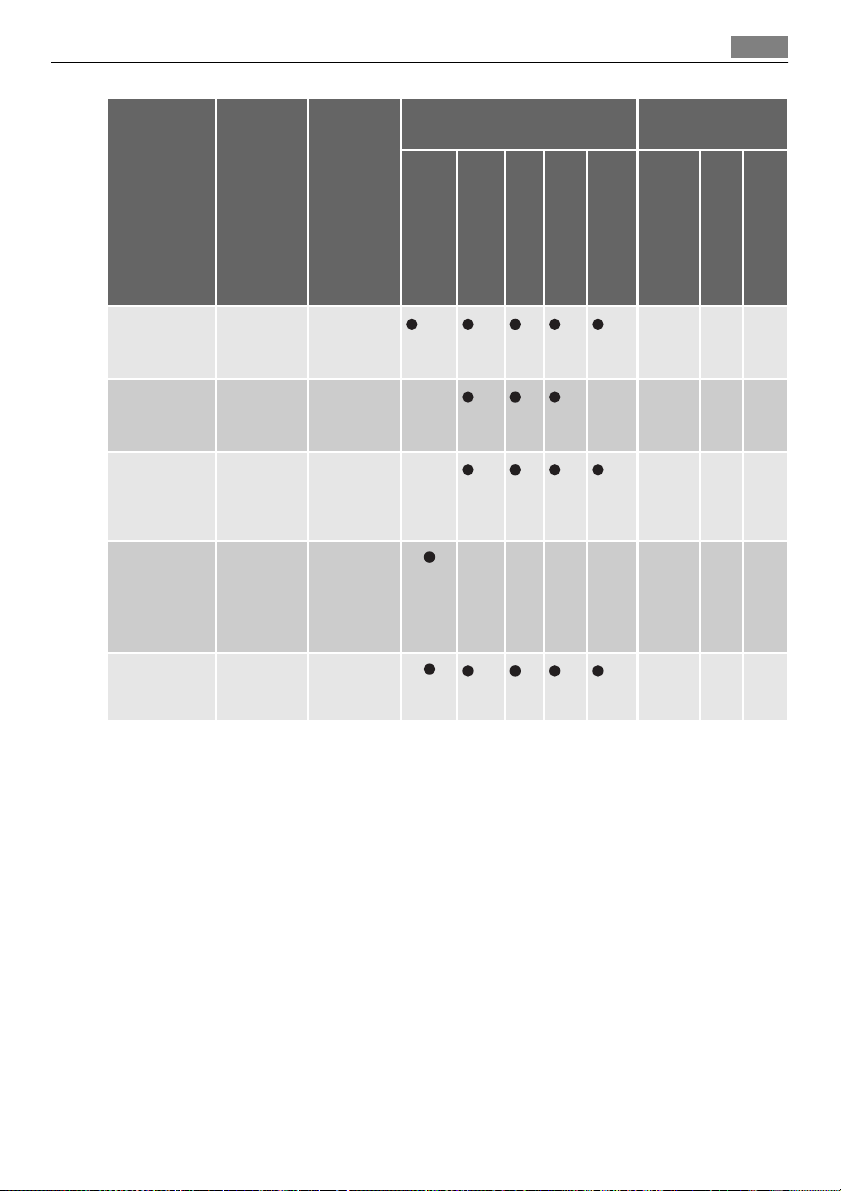
Washing programmes
Programme Degree of
AUTOMATIC3)Mixed nor-
30 MINUTES4)Light soil Crockery
70° INTEN-
5)
SIVE
65° NORMAL Normal
soil
mal and
heavy soil
Heavy soil Crockery,
soil
Type of
load
Crockery,
cutlery,
pots and
pans
and cutlery
cutlery,
pots and
pans
Crockery
and cutlery
Programme description Consumption val-
ues
2)
Main wash
Prewash
Intermediate rinse
1/2x
Final rinse
Drying
Duration (minutes)
-
-
-
-
1)
Energy (kWh)
Water (litres)
12 - 23
1,1 - 1,7
9
0,9
16 - 18
1,5 -1,7
18 - 20
1,4 - 1,6
Page 21
Washing programmes
21
Programme Degree of
soil
6)
ENERGY
Normal
soil
55° 1 HOUR Normal
soil
45° GLASS Normal
soil
Type of
load
Crockery
and cutlery
Crockery
and cutlery
Delicate
crockery
and glass-
Programme description Consumption val-
ues
2)
Prewash
Main wash
Intermediate rinse
Drying
Final rinse
Duration (minutes)
-
-
-
1)
Energy (kWh)
1,0 - 1,1
1,0 - 1,2
0,8 -0,9
Water (litres)
12 - 13
11 - 12
14 - 15
ware
PREWASH Any Partial load
(to be com-
-
4
0,1
pleted later
in the
7)
day)
NIGHT CYCLE Normal
soil
1) The consumption values are intended as a guide and depends on the pressure and the temperature of the water
and also by the variations of the power supply and the amount of dishes.
2) The digital display shows the programme duration.
3) During the Auto washing programme the amount of soil on the dishes is determined by how cloudy the water
is. The programme duration, water and energy consumption levels can vary; this depends upon if the appliance
is fully or partially loaded and if the dishes are lightly or heavily soiled. The temperature of the water is
automatically adjusted between 45° C and 70° C.
4) Ideal for washing a partially loaded dishwasher. This is the perfect daily programme, made to meet the needs
of a family of 4 persons who only wish to load breakfast and dinner crockery and cutlery.
5) This programme is foreseen with Care Plus function, which gives a greater degree of hygiene to dishes and
glasses. In the last rinse phase the temperature will be held at over 65°C for at least 10 minutes.
6) Test programme for test institutes.
7) This programme does not require the use of detergent
Crockery
and cutlery
-
13 - 14
1,2- 1,3
NIGHT CYCLE programme
Night Cycle is a silent washing programme that will not disturb you, even when you sleep.
It can be set at night or in times with a more economical power rate.
During the Night Cycle the pump runs at a very low speed to reach a noise level reduction
of 25% compared to the declaration programme. As a consequence, it has a very long
running time.
Page 22

Select and start a washing programme
22
Select and start a washing programme
1. Check that the baskets have been loaded correctly and that the spray arms are free to
rotate.
2. Check that the water tap is opened.
3.
Press the ON/OFF button.
4. Select the washing programme. ( See "Washing programmes chart" ).
5. If required, postpone the start time of the washing programme.
6. Set, if required, the options.
7.
Press the OK / START button and close the door, the washing programme will start
automatically.
If the delay start has been set, the countdown will start automatically. Once the delay
start has elapsed the programme will start automatically.
The opening of the door will interrupt the countdown. Close the door; the countdown
will continue from the point at which it was interrupted.
WARNING!
Interrupt or cancel a washing programme in progress ONLY if it's absolutely necessary.
Attention! Hot steam may escape when the door is opened. Open the door carefully.
Cancel a delay start or a washing programme in progress
1. Open the dishwasher door.
2.
Press simultaneously both OPTION and OK / START buttons.
3.
The message CONFIRM CANCEL ? is displayed.
4.
Press OK / START button to confirm.
5.
The appliance returns to setting mode and the message CHOOSE PROGRAMME is
displayed.
• If a delay start is cancelled, also set the washing programme has been cancelled.
• If a new washing programme is set, check that there is detergent in the detergent dis-
penser.
Interrupt a washing programme in progress
•
Open the dishwasher door; the programme will stop. The message PLEASE CLOSE
DOOR is displayed.
• Close the dishwasher door; the programme will continue from the point at which it was
interrupted.
End of the washing programme
• The dishwasher will automatically stop and an acoustic signal informs you of the end of
the washing programme.
Page 23

Unloading the dishwasher
The dishwasher's drying system is provided with a device that allows air to circulate inside
the dishwasher to prevent residual steam recondensing on the dishes as water droplets.
Once the washing programme has ended this device operates intermittently for other
20 minutes, as long as the dishwasher is switched on.
If the On/Off button is pressed or the door is opened during these 20 minutes, the device
will be automatically cancelled.
1. Open the dishwasher door.
–
The messages PROGRAMME END alternated with PLEASE SWITCH OFF are displayed.
2. Press the On/Off button.
– Leave the door ajar and wait a few minutes before removing the dishes; in this way
they will be cooler and the drying will be improved
Unloading the dishwasher
• Hot dishes are sensitive to knocks.
The dishes should therefore be allowed to cool down before removing from the appliance.
• Empty the lower basket first and then the upper one; this will avoid water dripping from
the upper basket onto the dishes in the lower one.
• Water may appear on the sides and the door of the dishwasher as the stainless steel will
eventually become cooler than the dishes.
CAUTION!
When the washing programme has finished, it is recommended that the dishwasher is
unplugged and the water tap turned off.
23
Care and cleaning
Cleaning the filters
The filters must be checked and cleaned from time to time. Dirty filters will degrade the
washing result.
A displayed message will periodically appear to remind you to check and if necessary clean
the filters.
WARNING!
Before cleaning the filters ensure that the machine is switched off.
1. Open the door, remove the lower basket.
Page 24

Care and cleaning
24
2. The dishwasher filter system comprises a
coarse filter ( A ), a microfilter ( B ) and a
flat filter. Unlock the filter system using
the handle on the microfilter, and remove
the filter system.
3. Turn the handle about 1/4 a turn anticlockwise and remove the filter system.
4.
Take hold of the coarse filter ( A ) by the
handle with the hole and remove from the
microfilter ( B ).
5. Clean all filters thoroughly under running
water.
6. Remove the flat filter from the base of the
washing compartment and clean both
faces thoroughly.
7. Put the flat filter back in the base of the
washing compartment and ensure that it
fits perfectly.
8.
Place the coarse filter ( A ) in the microfilter ( B ) and press together.
9. Put the filter combination in place and
lock by turning the handle clockwise to the
stop. During this process ensure that the
flat filter does not protrude above the base
of the washing compartment.
WARNING!
NEVER use the dishwasher without filters. Incorrect repositioning and fitting of the filters
will produce poor washing results and may result in damage to the appliance.
Cleaning the spray arms
NEVER try to remove the spray arms.
Page 25

What to do if…
If residues of soil have clogged the holes in the spray arms, remove them with a cocktail
stick.
External cleaning
Clean the external surfaces of the machine and control panel with a damp soft cloth. If
necessary use only neutral detergents. Never use abrasive products, scouring pads or solvent
(acetone, trichloroethylene etc....).
Internal cleaning
Ensure that the seals around the door, the detergent and rinse aid dispensers are cleaned
regularly with a damp cloth.
We recommend every 3 months to run the wash programme for heavy soiled dishes using
detergent but without dishes.
Prolonged periods of non-operation
If you are not using the machine for any prolonged period of time you are advised to:
1. Unplug the appliance and then turn off the water.
2. Leave the door ajar to prevent the formation of any unpleasant smells.
3. Leave the inside of the machine clean.
Frost precautions
Avoid placing the machine in a location where the temperature is below 0°C. If this is
unavoidable, empty the machine, close the appliance door, disconnect the water inlet pipe
and empty it.
25
Moving the machine
If you have to move the machine (moving house etc....):
1. Unplug it.
2. Turn the water tap off.
3. Remove the water inlet and discharge hoses.
4. Pull the machine out together with the hoses.
Avoid over tilting the machine during transportation.
What to do if…
The dishwasher will not start or stops during operation.
Certain problems are due to the lack of simple maintenance or oversights, which can be
solved with the help of the indications described in the chart, without calling out an engineer.
Switch off the dishwasher and carry out the following suggested corrective actions.
Page 26

What to do if…
26
Display message and malfunction Possible cause and solution
• intermitted audible signal
•
message OPEN THE TAP in the display
The dishwasher does not fill with water
• intermitted audible signal
•
DRAIN BLOCKED message in the display
The dishwasher will not drain
• intermitted audible signal
•
appears in the display
Anti-flood device is activated
The programme does not start. • The dishwasher’s door has not been properly
• The water tap is blocked or furred with limescale.
Clean the water tap.
• The water tap is turned off.
Turn the water tap on.
• The filter (where present) in the threaded hose
fitting at the water inlet valve is blocked.
Clean the filter in the threaded hose.
• The water inlet hose has not been correctly
laid or it is bent or squashed.
Check the water inlet hose connection.
• The sink spigot is blocked.
Clean out the sink spigot.
• The water drain hose has not been correctly
laid or it is bent or squashed.
Check the water drain hose connection.
• Close the water tap and contact your local
Service Force Centre.
closed. Close the door.
• The main plug is not plugged in. Insert the
main plug.
• The fuse has blown out in the household fuse
box.
Replace the fuse.
• Delay start has been set.
If dishes are to be washed immediately, cancel
the delay start.
Once these checks have been carried out, switch on the appliance: the programme will
continue from the point at which it was interrupted.
If the malfunction or fault code reappears contact the Service Force Centre.
For other fault codes not described in the above chart, please contact your local Service
Force Centre, quoting the model (Mod.), product number (PNC) and serial number (S.N.).
This information can be found on the rating plate located on the side of the dishwasher
door.
So that you always have these numbers at hand, we recommend you to make a note of
them here:
Mod. : . . . . . . . . . . . . . . . . . . . . . . .
PNC :. . . . . . . . . . . . . . . . . . . . . . . .
S.N. : . . . . . . . . . . . . . . . . . . . . . . . .
Page 27

Technical data
The wash results are not satisfactory
The dishes are not clean • The wrong washing programme has been se-
The dishes are wet and dull • Rinse aid was not used.
There are streaks, milky spots or a bluish coating
on glasses and dishes
Water drops have dried onto glasses and dishes • Increase rinse aid dosing.
lected.
• The dishes are arranged in such a way as to
stop water reaching all parts of the surface.
The baskets must not be overloaded.
• The spray arms do not rotate freely due to
incorrect arrangement of the load.
• The filters in the base of the washing compartment are dirty or incorrectly positioned.
• Too little or no detergent has been used.
• Where there are limescales deposits on the
dishes; the salt container is empty or the incorrect level of the water softener has been
set.
• The drain hose connection is not correct.
• The salt container cap is not properly closed.
• The rinse aid dispenser is empty.
• Decrease rinse aid dosing.
• The detergent may be the cause. Contact the
detergent manufacturer’s consumer care line.
27
If after all these checks, the problem persists, contact your local Service Force Centre.
Technical data
Dimension Width - height - depth (cm) 59,6 x 85,8-93,8 x 55
Electrical connection - Voltage
- Overall power - Fuse
Water supply pressure Minimum - Maximum (MPa) 0,05 - 0,8
Capacity Place settings 12
Information on the electrical connection is given on the rating
plate on the inner edge of the dishwasher's door
Installation instructions
Installation
WARNING!
Any electrical and/or plumbing work required to install this appliance should be carried out
by a qualified electrician and/or plumber or competent person.
Page 28

Water connection
28
Remove all packaging before positioning the machine.
If possible, position the machine next to a water tap and a drain.
This dishwasher is designed to be fitted under a kitchen counter or work surface.
Attention! Carefully follow the instructions on the enclosed template for building in the
dishwasher and fitting the furniture panel.
No further openings for the venting of the dishwasher are required, but only to let the
water fill and drain hose and power supply cable pass through.
The dishwasher incorporates adjustable feet to allow the adjustment of the height.
During all operations that involve accessibility to internal components the dishwasher has
to be unplugged.
When inserting the machine, ensure that the water inlet hose, the drain hose and the supply
cable are not kinked or squashed.
Fixing to the adjacent units
The dishwasher must be secured against tilting.
Therefore make sure that the counter it is fixed under, is suitably secured to a fixed structure
(adjacent kitchen unites, cabinets, wall).
Levelling
Good levelling is essential for correct closure and sealing of the door. When the appliance
is correctly levelled, the door will not catch on either side of the cabinet. If the door does
not close correctly, loosen or tighten the adjustable feet until the machine is perfectly level.
Water connection
Water supply connections
This appliance can be connected to either a hot (max. 60°) or cold water supply.
With a hot water supply you can have a significant reduction of energy consumption. This
however, depends on how the hot water is produced. (We suggest alternative sources of
energy that are more environmentally friendly as e.g. solar or photovoltaic panels and
aeolian).
For making the connection itself, the coupling nut fitted to the machine's supply hose is
designed to screw onto a 3/4" thread spout or to a purpose made quick-coupling tap such
as the Press-block.
The water pressure must be within the limits given in the "Technical specifications". Your
local Water Authority will advise you on the average mains pressure in your area.
The water inlet hose must not be kinked, crushed, or entangled when it is being connected.
The dishwasher features fill and drain hoses which can be turned either to the left or the
right to suit the installation by means of the locknut.
The locknut must be correctly fitted to avoid water leaks.
(Attention! NOT all models of dishwashers have fill and drain hoses provided with locknut.
In this case, this kind of facility is not possible). If the machine is connected to new pipes
or pipes which have not been used for a long time, you should run the water for a few
minutes before connecting the inlet hose.
DO NOT use connection hoses which have previously been used for an old appliance.
Page 29

Water connection
This appliance has been fitted with safety features which will prevent the water used in
the appliance from returning back into the drinking water system. This appliance complies
with the applicable plumbing regulations.
Water inlet hose with safety valve
After connecting the double-walled water inlet hose, the safety valve is next to the tap.
Therefore the water inlet hose is only under pressure while the water is running. If the
water inlet hose starts to leak during this operation, the safety valve cuts off the running
water.
Please take care when installing the water inlet hose:
• The electrical cable for the safety valve is in the double-walled water inlet hose. Do not
immerse the water inlet hose or the safety valve in water.
• If water inlet hose or the safety valve is damaged, remove the mains plug immediately.
• A water inlet hose with safety valve must only be replaced by a specialist or by the Service
Force Centre.
WARNING!
Warning! Dangerous voltage.
29
Water outlet hose connection
The end of the drain hose can be connected in the following ways:
1. To the sink outlet spigot, securing it to the underside of the work surface. This will
prevent waste water from the sink running into the machine.
2. To a stand pipe provided with vent-hole, minimum internal diameter 4 cm.
Page 30

Electrical connection
30
The waste connection must be at a maximum
height of 60 cm from the bottom of the dishwasher.
The drain hose can face either to the right or left
of the dishwasher.
Ensure the hose is not bent or squashed as this
could prevent or slow down the discharge of water.
The sink plug must not be in place when the machine is draining as this could cause the water to
syphon back into the machine.
The total length of the drain hose, including any
extension you might add, must be no longer than
4 metres. The internal diameter of the extension
hose must be no smaller than the diameter of the
hose provided.
Likewise the internal diameter of the couplings used for connections to the waste outlet
must be no smaller than the diameter of the hose provided.
When connecting the drain hose to an under sink trap spigot, the entire plastic mem-
brane (A) must be removed . Failure to remove all the membrane will result in food
particles building up over time eventually blocking the dishwasher drain hose spigot.
Our appliances are supplied with a security device to protect
against the return of dirty water back into the machine. If the
spigot of your sink has a "no return valve" incorporated this
can prevent the correct draining of your dishwasher. We
therefore advise you to remove it.
To avoid water leakage after installation make sure that the
water couplings are tight.
Electrical connection
WARNING!
Safety standards require the appliance to be earthed.
Prior to using the appliance for the first time, ensure that the rated voltage and type of
supply on the rating plate match that of the supply where the appliance is to be installed.
The fuse rating is also to be found on the rating plate.
Always plug the mains plug into a correctly installed shockproof socket. Multi-way plugs,
connectors and extension cables must not be used.
This could constitute a fire hazard through overheating.
If necessary, have the domestic wiring system socket replaced. In case that the electrical
cable has to be replaced, contact your local Service Force centre.
The plug must be accessible after the appliance has been installed.
Never unplug the appliance by pulling on the cable. Always pull the plug.
The manufacturer accepts no liability for failure to observe the above safety precautions.
Page 31

Environment concerns
Environment concerns
The symbol on the product or on its packaging indicates that this product may not be
treated as household waste. Instead it should be taken to the appropriate collection point
for the recycling of electrical and electronic equipment. By ensuring this product is disposed
of correctly, you will help prevent potential negative consequences for the environment
and human health, which could otherwise be caused by inappropriate waste handling of
this product. For more detailed information about recycling of this product, please contact
your local council, your household waste disposal service or the shop where you purchased
the product.
Packaging material
The packaging materials are environmentally friendly and can be recycled. The plastic components are identified by markings, e.g. >PE<, >PS<, etc. Please dispose of the packaging
materials in the appropriate container at the community waste disposal facilities.
WARNING!
When a unit is no longer being used:
• Pull the plug out of the socket.
• Cut off the cable and plug and dispose of them.
• Dispose of the door catch. This prevents children from trapping themselves inside and
endangering their lives.
31
Page 32

Sommaire
32
Nous vous remercions d’avoir choisi l’un de nos produits de qualité.
Afin de garantir une performance optimale et constante de votre appareil, veuillez
lire attentivement cette notice d'utilisation. Il vous permettra d’utiliser
correctement et efficacement toutes les fonctions de l’appareil. Nous vous
recommandons de conserver cette notice à proximité pour une utilisation rapide et
optimale. Si l'appareil devez être vendu ou cédé à une autre personne, assurez-vous
que la notice d'utilisation l'accompagne.
Nous vous souhaitons beaucoup de plaisir avec votre nouvel appareil.
Sommaire
Notice d'utilisation 33
Consignes de sécurité 33
Utilisation correcte 33
Consignes de sécurité 33
Sécurité enfants 34
Installation 34
Description de l'appareil 35
Bandeau de commande 36
Touches de déroulement "+ et -" 36
Affichage 36
Touche OPTION 37
OK / START touche 38
Première mise en service - réglage de la
langue 38
Première utilisation 39
Réglage de l'adoucisseur d'eau 39
Réglage manuel 39
Réglage électronique 40
Utilisation du sel régénérant 40
Utilisation du liquide de rinçage 41
Réglage de la dose de liquide de rinçage
42
Utilisation quotidienne 42
Rangement des couverts et de la vaisselle
42
Panier inférieur 43
Panier à couverts 44
Verres à bière 45
Panier supérieur 47
Réglage de la hauteur du panier supérieur
48
Utilisation du produit de lavage 49
Versez le produit de lavage dans le
compartiment correspondant 49
Fonction "Tout en 1" 50
Programmes de lavage 51
Sélection et départ d'un programme de lavage
53
Annulation d'un départ différé ou d'un
programme en cours 53
Interruption d'un programme en cours
53
Fin du programme de lavage 53
Déchargement du lave-vaisselle 54
Entretien et nettoyage 54
Nettoyage des filtres 54
Nettoyage des bras d'aspersion 55
Nettoyage de la carrosserie 56
Nettoyage interne 56
En cas d'absence prolongée 56
Précautions contre le gel 56
Transport de l'appareil 56
Que faire si… 56
Caractéristiques techniques 58
Instructions d'installation 59
Installation 59
Fixation 59
Mise à niveau 59
Raccordement à l'arrivée d'eau 59
Raccordements à l'arrivée d'eau 59
Tuyau d'arrivée d'eau avec soupape de
sécurité 60
Raccordement du tuyau de vidange 61
Branchement électrique 62
Page 33

Consignes de sécurité
33
En matière de protection de l'environnement
62
Matériaux d'emballage 62
Sous réserve de modifications
Notice d'utilisation
Consignes de sécurité
Pour votre sécurité et pour garantir une utilisation correcte de l'appareil, lisez attentivement
cette notice d'utilisation, ainsi que ses conseils et avertissements, avant d'installer et d'utiliser l'appareil pour la première fois. Pour éviter toute erreur ou accident, veillez à ce que
toute personne qui utilise l'appareil connaisse bien son fonctionnement et ses options de
sécurité. Conservez cette notice avec l'appareil. Si l'appareil devait être vendu ou cédé à
une autre personne, assurez-vous que la notice d'utilisation l'accompagne, afin que le
nouvel utilisateur soit correctement informé du fonctionnement de celui-ci et des avertissements s'y rapportant.
Utilisation correcte
• Votre appareil est destiné à un usage domestique normal. Ce lave-vaisselle est conçu
pour laver la vaisselle et les ustensiles de cuisine pouvant être lavés en machine.
• N'utilisez pas de solvants dans votre lave vaisselle. Ceux-ci pourraient provoquer une
explosion.
• Les couteaux et autres ustensiles pointus ou tranchants doivent être placés dans le panier
à couverts avec la pointe vers le bas, ou placez-les en position horizontale dans le panier
supérieur.
• N'utilisez que des produits (détergent, sel, produit de rinçage) spécifiques pour lavevaisselle.
• Évitez d'ouvrir la porte tandis que l'appareil fonctionne : une vapeur brûlante peut s'en
échapper.
• Ne sortez pas la vaisselle du lave-vaisselle avant la fin du cycle de lavage.
• Lorsque le programme est terminé, débranchez l'appareil et fermez le robinet d'arrivée
d'eau.
• Cet appareil ne peut être entretenu et réparé que par un technicien autorisé, exclusivement avec des pièces d'origine.
• N'essayez en aucun cas de réparer le lave-vaisselle vous-même. Les réparations effectuées par du personnel non qualifié peuvent provoquer des blessures ou le mauvais
fonctionnement du lave-vaisselle. Contactez le Service Après-vente. Exigez des pièces
d'origine.
Consignes de sécurité
• Les personnes (y compris les enfants) souffrant de capacités physiques, sensorielles ou
mentales réduites ou qui ne connaissent pas la machine, ne doivent pas utiliser l'appareil.
Elles doivent être supervisées ou guidées par la personne responsable de leur sécurité.
117963160-00-122008
Page 34

Consignes de sécurité
34
• Les détergents pour lave-vaisselle peuvent occasionner des brûlures chimiques au niveau
des yeux, de la bouche et de la gorge. Potentiellement dangereux ! Respectez les instructions de sécurité du fabricant de détergent pour lave-vaisselle.
• L'eau de votre le lave-vaisselle n'est pas potable. Des résidus de détergent peuvent subsister dans votre lave-vaisselle.
• Assurez-vous que la porte du lave-vaisselle est toujours correctement fermée lorsque
vous n'êtes pas occupé à le remplir ou le vider. Vous éviterez ainsi que quelqu'un ne
trébuche sur la porte ouverte et ne se blesse.
• Ne montez pas et ne vous asseyez pas sur la porte ouverte de votre appareil.
Sécurité enfants
• Cet appareil est conçu pour être utilisé par des adultes. Ne laissez pas des enfants utiliser
le lave-vaisselle sans contrôle.
• Ne laissez pas les emballages à portée des enfants. Ils pourraient s'asphyxier.
• Conservez tous les détergents dans un endroit sûr, hors de portée des enfants.
• Éloignez les enfants à bonne distance de l'appareil lorsque la porte est ouverte.
Installation
• Vérifiez que le lave-vaisselle n'a subi aucun dommage au cours du transport. Ne branchez
jamais un appareil endommagé. Si votre lave-vaisselle est endommagé, adressez-vous à
votre revendeur.
• Retirez tous les emballages avant utilisation.
• Les branchements électriques et hydrauliques nécessaires à l'installation de l'appareil ne
doivent être effectués que par un électricien et/ou un plombier qualifié.
• Pour des raisons de sécurité, il est interdit de modifier les spécifications ou de tenter de
modifier l'appareil de quelque façon que ce soit.
• N'utilisez jamais le lave vaisselle si le câble électrique ou les tuyaux d'eau sont endommagés ; ou si le bandeau de commande, le plan de travail de l'appareil ou la plinthe sont
endommagés au point que l'intérieur de l'appareil en est accessible. Contactez votre
Service Après-vente pour éviter tout danger.
• Les parois du lave vaisselle ne doivent jamais être percées, pour éviter d'endommager les
composants hydrauliques et électriques.
AVERTISSEMENT
Avant de procéder aux branchements électriques et hydrauliques, respectez scrupuleusement les instructions fournies dans les paragraphes spécifiques de cette notice.
Page 35

Description de l'appareil
1 Panier supérieur
2 Sélecteur de dureté de l'eau
3 Réservoir de sel
4 Distributeur de produit de lavage
5 Distributeur de liquide de rinçage
6 Plaque signalétique
7 Filtres
8 Bras d'aspersion inférieur
9 Bras d'aspersion supérieur
Description de l'appareil
35
Signal optique
Dès que le programme de lavage démarre, un signal optique en forme de point apparaît
sur le sol au-dessous de la porte de l'appareil.
Si le lave-vaisselle est installé en hauteur avec une sortie d'évacuation montée dans la porte
d'un meuble, ce signal optique ne sera plus visible.
Signal optique
Voyant rouge fixe Indique le départ d'un programme de lavage, et reste allumé pendant
Voyant rouge clignotant
Voyant vert fixe Indique la fin du programme de lavage
toute la durée du programme
Indique une anomalie de fonctionnement de l'appareil
Page 36

Bandeau de commande
36
Ce lave-vaisselle est doté d'un éclairage intérieur qui s'allume lors de l'ouverture de la porte
et s'éteint lors de la fermeture de celle-ci.
Pour l'éclairage interne, l'appareil est équipé d'un voyant DEL de CLASSE 1 conformément
à la norme EN 60825-1: 1994 + A1: 2002 + A2: 2001.
Si l'ampoule est défectueuse, faites-la remplacer par le Service après-vente.
Bandeau de commande
1 Touches de déroulement "+ et -"
2 Affichage
3 OK / START Touche
4 Touche Marche/Arrêt
5 OPTION Touche
Une série de messages visuels et de signaux sonores vous guideront lors du réglage de
l'appareil et de la sélection d'un programme de lavage et des options.
Touches de déroulement "+ et -"
Ces deux touches ont une double fonction :
• sélection dans le menu des programmes,
• sélection dans le menu des options et le sous-menu.
Affichage
Page 37

Bandeau de commande
1.
Programmes de lavage : pendant le déroulement du programme, ces petites barres
indiquent la phase du programme de lavage : prélavage - lavage - rinçages - séchage.
2. Sur cette ligne, plusieurs informations sont affichées :
–
Mode programmation , permet la sélection du programme de lavage - durée du
programme, options (lorsqu'une ou plusieurs options sont réglées avec le programme
de lavage, la durée du programme est mise à jour automatiquement).
–
Dès que le programme a démarré , indique la séquence de la phase en cours et la
durée du programme en cours.
3.
Symboles : indique les options (voir le tableau).
Les symboles ont la signification suivante :
DEPART DIFFERE : réglé dans le mode programmation ; clignote pendant le décompte
MULTITAB : s'allume lorsque la fonction "Tout en 1" est active.
VOLUME SONORE : désactivation des messages vocaux. (à l'exception des signaux d'alar-
me)
CARE PLUS : s'allume lorsque le programme 70° INTENSIF est sélectionné
Touche OPTION
Appuyez sur cette touche pour accéder au menu d'options ; appuyez de nouveau pour sortir
du menu.
Réglage des options
1.
Appuyez sur la touche OPTION .
2.
Appuyez sur l'une des touches de déroulement + et - jusqu'à ce que l'option souhaitée
s'affiche :
DEPART DIFFERE
MULTITAB
REGLAGES
3.
Appuyez sur OK / START pour confirmer et accéder au sous-menu.
4.
Appuyez sur les touches + et - jusqu'à ce que le sous-menu voulu s'affiche.
5.
Appuyez sur OK / START pour confirmer.
6.
Pour sortir du menu, appuyez sur la touche OPTION .
37
Menu Options Sous-menu des options
DEPART DIFFERE
MULTITAB
Vous permet de différer de 1 heure à 19 heures le départ du programme de lavage sélectionné. Le décompte s'effectue d'heure en
heure. Il n'est affiché en minutes que pendant la dernière heure. Dès
que le décompte est terminé, le programme de lavage démarre automatiquement.
Vous permet de régler le lave-vaisselle pour pouvoir utiliser des produits de lavage classiques ou des pastilles de détergent multifonctions
(3 en 1 - 4 en 1 - 5 en 1 etc.). Voir fonction MULTITAB.
–
ON: fonction activée. Utilisez des tablettes de lavage. Le symbole
s'affiche.
–
OFF: fonction désactivée. Utilisez des produits de lavage classiques.
Page 38

Bandeau de commande
38
Menu Options Sous-menu des options
REGLAGES LANGUE
Vous permet de visualiser les messages dans la langue de votre choix.
DURETE EAU
Vous permet de régler électroniquement l'adoucisseur d'eau.
PROD. RINCAGE
Vous permet d'activer ou de désactiver le distributeur de liquide de
rinçage.
–
ON: activé
–
OFF: désactivé
LUMINOSITE
Vous permet d'augmenter ou de diminuer la luminosité de l'arrièreplan de l'affichage (10 niveaux disponibles).
Réglage d'usine : niveau 10.
VOLUME SONORE
Vous permet de régler le VOLUME SONORE des signaux sonores (de 0
à 5).
Le niveau 0 correspond à la désactivation du VOLUME SONORE et le
symbole correspondant
s'affiche.
OK / START touche
Appuyez dessus pour :
• confirmer / mémoriser une option quelconque,
• démarrer un programme de lavage.
Les touches OK / START et OPTION si elles sont appuyées simultanément, permettent ce
qui suit :
• annuler un programme en cours,
• annuler le réglage d'une option.
Il est également possible de restaurer le réglage usine des options suivantes :
LANGUE
LUMINOSITE
Dans le mode programmation, appuyez simultanément pendant environ 6 secondes sur ces
2 touches ; le message concernant la langue par défaut s'affiche.
Première mise en service - réglage de la langue
1.
Appuyez sur la touche ON/OFF .
2. Le message concernant la langue par défaut s'affiche. Si vous souhaitez confirmer la
langue par défaut, appuyez sur OK / START .
3. Si vous souhaitez sélectionner une langue différente, utilisez les touches de déroule-
ment + et - jusqu'à ce que la langue de votre choix apparaisse à l'écran. Appuyez sur
OK / START pour confirmer.
Page 39

Première utilisation
Première utilisation
Avant d'utiliser votre lave-vaisselle pour la première fois :
• Assurez-vous que les raccordements électriques et hydrauliques sont conformes aux
instructions d'installation
• Retirez tous les emballages présents à l'intérieur de l'appareil
• Réglez l'adoucisseur d'eau
• Versez 1 l d'eau dans le réservoir à sel, puis approvisionnez en sel
• Remplissez le distributeur de liquide de rinçage
Si vous souhaitez utiliser des pastilles de détergent multifonctions telles que : "3 en 1", "4
en 1", "5 en 1" etc., programmez la fonction Multitab (voir "Fonction Multitab").
Réglage de l'adoucisseur d'eau
Le lave-vaisselle est équipé d'un adoucisseur d'eau conçu pour éliminer les minéraux et les
sels de l'eau d'alimentation susceptibles de nuire au bon fonctionnement de l'appareil.
Plus la teneur en minéraux et en sels est élevée, plus l'eau est dure. La dureté de l'eau est
calculée en échelles équivalentes, degrés allemands (°dH), degrés français (°TH) et mmol/l
(millimol par litre - unité internationale de dureté de l'eau).
L'adoucisseur doit être réglé en fonction du degré de dureté de l'eau de votre région. Renseignez-vous auprès de la Compagnie locale de distribution des eaux pour connaître le
degré de dureté de l'eau de votre zone d'habitation.
L'adoucisseur d'eau doit être réglé des deux façons suivantes : manuellement, à l'aide du
sélecteur de dureté de l'eau, et électroniquement.
Dureté de l'eau Réglage de la dureté de l'eau Utilisation du
°dH °TH mmol/l manuel électronique
51 - 70 91 - 125 9,1 - 12,5 2 niveau 10 oui
43 - 50 76 - 90 7,6 - 8,9 2 niveau 9 oui
37 - 42 65 - 75 6,5 - 7,5 2 niveau 8 oui
29 - 36 51 - 64 5,1 - 6,4 2 niveau 7 oui
23 - 28 40 - 50 4,0 - 5,0 2 niveau 6 oui
19 - 22 33 - 39 3,3 - 3,9 2 niveau 5 oui
15 - 18 26 - 32 2,6 - 3,2 1 niveau 4 oui
11 - 14 19 - 25 1,9 - 2,5 1 niveau 3 oui
4 - 10 7 - 18 0,7 - 1,8 1 niveau 2 oui
< 4 < 7 < 0,7 1 niveau 1 non
39
sel régénérant
Réglage manuel
Le lave-vaisselle est réglé d'usine sur la position 2.
Page 40

Utilisation du sel régénérant
40
1. Ouvrez la porte du lave-vaisselle.
2. Sortez le panier inférieur du lave-vaisselle.
3. Tournez le sélecteur de dureté de l'eau sur
la position 1 ou 2 (voir tableau).
4. Replacez le panier inférieur.
Réglage électronique
Le lave-vaisselle est réglé d'usine sur la position 5.
Entrez menu Options - REGLAGES - DURETE EAU .
En utilisant les touches de déroulement + et - , réglez le niveau de l'adoucisseur d'eau en
fonction du degré de dureté de l'eau de votre région (voir le tableau).
Utilisation du sel régénérant
AVERTISSEMENT
Utilisez uniquement du sel spécial pour lave-vaisselle. Tout autre type de sel non spécialement étudié pour être utilisé dans un lave-vaisselle, en particulier le sel de cuisine, peut
endommager l'adoucisseur d'eau. Approvisionnez en sel avant de démarrer un programme
de lavage complet. Vous éviterez ainsi que des grains de sel ou de l'eau salée qui a débordé
n'entre en contact avec le fond de la cuve pendant un laps de temps prolongé, engendrant
de la corrosion.
Pour réapprovisionner :
1. Ouvrez la porte, retirez le panier inférieur et dévissez le bouchon du réservoir de sel en
le tournant dans le sens inverse des aiguilles d'une montre.
2.
Versez 1 l d'eau à l'intérieur du réservoir (cette opération est nécessaire uniquement
lorsque vous remplissez le réservoir pour la première fois) .
3. Versez le sel à l'aide de l'entonnoir, jusqu'à
ce que le réservoir soit rempli.
4. Remettez le bouchon en place en veillant
à ce que le filetage et le joint ne présentent aucune trace de sel.
5. Serrez le bouchon en le tournant dans le
sens des aiguilles d'une montre, jusqu'à ce
que vous entendiez un clic.
Ne vous préoccupez pas si de l'eau déborde du
réservoir lorsque vous le remplissez. Cela est
parfaitement normal.
Le réservoir à sel doit être réapprovisionné régulièrement.
Le message AJOUTER LE SEL s'affiche à l'écran pour vous le rappeler.
Ce n'est le cas qu'au démarrage et à la fin du programme de lavage. L'indication de réapprovisionnement en sel est désactivée en cours de lavage.
Page 41

Utilisation du liquide de rinçage
Le message de réapprovisionnement en sel peut rester affiché de 2 à 6 heures après avoir
effectué le remplissage, à condition que le lave-vaisselle reste sous tension. Si vous utilisez
un sel peu soluble, il se peut que cette opération prenne davantage de temps. Le fonctionnement de l'appareil n'en sera pas pour autant entravé.
Utilisation du liquide de rinçage
AVERTISSEMENT
Utilisez exclusivement des liquides de rinçage de marque, spéciaux pour lave-vaisselle.
Ne remplissez jamais le distributeur de liquide de rinçage avec d'autres produits (par ex. un
agent de nettoyage pour lave-vaisselle, un produit de lavage liquide). Cela aurait pour effet
d'endommager la machine.
Le liquide de rinçage assure un rinçage optimal et un séchage sans taches ni striures.
Le liquide de rinçage est automatiquement ajouté au cours du dernier rinçage.
1. Ouvrez le distributeur en appuyant sur le
levier de fermeture (A).
41
2. Versez le liquide de rinçage dans la goulotte de remplissage. Le niveau maximum
de remplissage est signalé par "max".
Le distributeur contient environ 110 ml de
liquide de rinçage, quantité suffisante
pour 16 à 40 cycles de lavage, en fonction
du réglage de la dose programmée.
3. Vérifiez que le couvercle est fermé après
chaque remplissage.
Essuyez tout débordement de liquide de rinçage à l'aide de papier absorbant, afin d'éviter
une formation excessive de mousse lors du lavage suivant.
Le distributeur de liquide de rinçage doit être réapprovisionné régulièrement.
Le message PROD. RINCAGE s'affiche à l'écran pour vous le rappeler.
Page 42

Utilisation quotidienne
42
Ce n'est le cas qu'au démarrage et à la fin du programme de lavage. L'indication de réapprovisionnement en liquide de rinçage est désactivée en cours de lavage.
Réglage de la dose de liquide de rinçage
En fonction des résultats de brillance et de séchage obtenus, adaptez le dosage du liquide
de rinçage à l'aide du sélecteur à 6 positions (position 1 = dosage minimum, position 6 =
dosage maximum).
La dose est réglée d'usine sur la position 4.
Augmentez le dosage si vous constatez la présence
de gouttes d'eau ou de taches de calcaire sur la
vaisselle au terme du lavage.
En revanche, si des rayures blanches sont présentes
sur la vaisselle, ou si les verres et les lames de couteaux sont recouverts d'un film bleuâtre, il convient de réduire le dosage.
Utilisation quotidienne
• Contrôlez le niveau du réservoir de sel et du distributeur de liquide de rinçage.
• Rangez les couverts et la vaisselle dans le lave-vaisselle.
• Versez le produit de lavage dans le compartiment correspondant.
• Sélectionnez un programme adapté au lavage des couverts et de la vaisselle.
• Démarrez le programme.
Rangement des couverts et de la vaisselle
Les éponges, les chiffons de nettoyage et tout autre objet absorbant l'eau ne doivent pas
être lavés au lave-vaisselle.
• Avant de charger la vaisselle, veillez à :
– enlever tous les restes d' aliments.
– Laissez tremper les casseroles au fond desquelles adhèrent des restes d'aliments brûlés
ou attachés
Page 43

Rangement des couverts et de la vaisselle
43
• Lorsque vous chargez la vaisselle et les couverts, veillez à prendre les précautions sui-
vantes :
– La vaisselle et les couverts ne doivent pas entraver la rotation des bras d'aspersion.
– Chargez les articles creux, tels que tasses, verres, casseroles, etc. en les retournant, de
manière à ce que l'eau ne s'accumule pas dans le creux ou dans un fond bombé.
– La vaisselle et les couverts ne doivent pas être insérés les uns dans les autres, ou se
chevaucher.
– Pour éviter que les verres ne se brisent, évitez qu'ils ne se touchent.
– Déposez les petits objets dans le panier à couverts.
• La vaisselle en plastique et les poêles en matériau antiadhésif tendent à retenir les gouttes
d'eau ; ces articles ne seront pas séchés aussi bien que les articles en porcelaine et en
acier.
• Les articles légers (bols en plastique, etc.) doivent être rangés dans le panier supérieur et
disposés de façon à ce qu'ils ne puissent se retourner.
Pour le lavage au lave-vaisselle, les couverts et plats suivants
ne sont pas adaptés : peuvent convenir dans une mesure limitée :
• Couverts à manche en bois, en corne, en porcelaine ou en nacre.
• Articles en plastique non résistant à la chaleur.
• Couverts anciens dont certains éléments sont
collés et ne résistent pas à la température.
• Couverts ou vaisselle présentant des soudures.
• Articles en étain ou en cuivre.
• Verres en cristal au plomb.
• Articles en acier sujets à la rouille.
• Plateaux en bois.
• Articles en fibres synthétiques.
• Lavez au lave-vaisselle uniquement de la vaisselle en faïence garantie lavable en machine
par le fabricant.
• Les décors vernis peuvent se ternir au fil des
lavages.
• Les pièces en argent et en aluminium ont tendance à se décolorer au cours du lavage : les
résidus de blanc d'œuf, de jaune d'œuf et de
moutarde provoquent souvent une décoloration et la formation de taches sur l'argent. Par
conséquent, veillez à toujours éliminer les restes d'aliments de la vaisselle en argent si vous
ne la lavez pas immédiatement après utilisation.
Ouvrez la porte et tirez les paniers vers vous pour y charger la vaisselle.
Panier inférieur
Rangez les casseroles et les grands plats très sales
dans le panier inférieur.
Page 44

Rangement des couverts et de la vaisselle
44
Pour faciliter le rangement des grands plats, vous
pouvez rabattre vers le bas tous les supports d'assiettes arrière du panier inférieur.
Panier à couverts
AVERTISSEMENT
Les couteaux et autres ustensiles pointus ou tranchants doivent être placés dans le range
couverts ou dans le panier supérieur pour éviter tout risque de blessure.
Placez les couteaux, les petites cuillères et les petites fourchettes dans le range couverts qui se
trouve dans le panier supérieur. Placez dans le range couverts les fourchettes et les cuillères qui ne
peuvent pas être rangées dans le panier à couverts.
Pour que l'eau puisse atteindre tous les ustensiles
qui se trouvent dans le panier à couverts, nous vous conseillons ce qui suit :
1. Placez le séparateur à couverts sur le panier à couverts.
Page 45

Rangement des couverts et de la vaisselle
2. Disposez les fourchettes et les cuillères
dans le panier à couverts, le manche tourné vers le bas.
Pour les gros ustensiles, comme les fouets,
laissez libre la moitié du séparateur à couverts.
Le panier à couverts est rabattable.
Lorsque vous le sortez, saisissez l'intégralité de la
double poignée avec votre main.
1. Placez le panier à couverts sur une table ou sur
le plan de travail.
2. Ouvrez les deux parties de la poignée.
3. Retirez les couverts.
45
Verres à bière
Les supports pour verres sont sur le côté gauche
du panier inférieur.
Vous pouvez y disposer jusque 4 verres à bière.
Vous pouvez rabattre le support pour verres à bière
vers le haut, si nécessaire.
Page 46

Rangement des couverts et de la vaisselle
46
Vous pouvez remplacer le support pour verres à
bière par deux supports pour tasses livrés en option. Vous pouvez les utiliser comme :
• porte-tasses
• supports pour flûtes à champagne.
Procédez comme suit pour ôter le support pour
verres à bière
1. Soulevez et poussez légèrement sous les crochets d'attache.
2. À l'aide des crochets d'attache, insérez les supports pour tasses sur l'entretoise transversale.
Vous pouvez enlever les supports pour tasses ou
verres à bière, si nécessaire.
1. Poussez le support avec les pouces vers l'arrière.
Page 47

2. Poussez-le de nouveau en avant pour le
fixer.
AVERTISSEMENT
Ne saisissez pas le support avec les mains. Vous
risquez de vous blesser. Mettez une main sous
le support du panier inférieur.
Panier supérieur
Rangez la petite vaisselle fragile et les couverts
pointus ou coupants dans le panier supérieur.
• Disposez les articles en quinconce au-dessus et
au-dessous des supports pour tasses, de façon
à ce que l'eau puisse atteindre toute la vaisselle.
Rangement des couverts et de la vaisselle
47
• Pour la vaisselle de grande dimension, vous
pouvez rabattre les supports pour tasses vers
le haut.
• Couchez ou suspendez les verres à pied en
insérant leur pied dans les fentes des supports pour tasses.
Page 48

Rangement des couverts et de la vaisselle
48
• Pour les verres à long pied, rabattez-le sup-
port pour verres vers la droite ou vers la gauche.
• La rangée d'ergots à gauche du panier supé-
rieur peut également être rabattue en deux
parties.
Rangée d'ergots non rabattue : disposez les
verres, tasses, etc. dans le panier supérieur.
Rangée d'ergots rabattue : plus de place pour
les plats.
Réglage de la hauteur du panier supérieur
Hauteur maximale de la vaisselle dans :
Panier supérieur Panier inférieur
Avec le panier supérieur relevé 23 cm 34 cm
Avec le panier supérieur abaissé 25 cm 32 cm
Vous pouvez aussi régler la hauteur du panier supérieur lorsque le panier est plein.
Pour relever / abaisser le panier supérieur :
Page 49

Utilisation du produit de lavage
1. Tirez complètement le panier supérieur
pour le faire sortir.
2. Tout en le maintenant par la poignée, relevez le panier supérieur le plus possible
puis abaissez-le verticalement.
Le panier supérieur se verrouille dans sa
position la plus haute ou la plus basse.
AVERTISSEMENT
Après avoir chargé l'appareil, veillez à toujours
refermer la porte, car une porte ouverte est
source de danger.
Avant de refermer la porte, assurez-vous que les bras d'aspersion tournent librement.
Utilisation du produit de lavage
Utilisez exclusivement des produits de lavage spécialement conçus pour une utilisation au
lave-vaisselle.
Veuillez respecter le dosage et les consignes de stockage du fabricant figurant sur l'emballage.
En utilisant la quantité de produit de lavage strictement nécessaire, vous contribuerez à la
protection de l'environnement.
49
Versez le produit de lavage dans le compartiment correspondant
1. Ouvrez le couvercle.
Page 50

Fonction "Tout en 1"
50
2. Versez le produit de lavage dans le distributeur (1). Le repère indique le niveau de
dosage :
20 = environ 20 g de produit de lavage
30 = environ 30 g de produit de lavage.
3. Tous les programmes avec prélavage nécessitent une dose supplémentaire de produit de lavage (5 à 10 g) à placer dans le
compartiment de prélavage (2).
Ce produit de lavage agira au cours de la
phase de prélavage.
4. Si vous utilisez du produit de lavage en
pastilles, placez la pastille dans le compartiment (1)
5. Fermez le couvercle et appuyez jusqu'à ce
qu'il soit verrouillé.
Produit de lavage en pastilles
Les produits de lavage en pastilles de différents
fabricants présentent un taux de dissolution
variable. C'est pourquoi certains produits de
lavage en pastilles n'atteignent pas leur pouvoir de nettoyage optimal au cours des programmes courts. Par conséquent, veuillez sélectionner un programme de lavage long si
vous utilisez des produits de lavage en pastilles, afin d'éliminer complètement les résidus de lessive.
Fonction "Tout en 1"
Cet appareil est doté de la fonction " Multitab ", ce qui vous permet d'utiliser les pastilles
de détergent multifonctions " Multitab ".
Ces produits combinent les fonctions de produit de lavage, de liquide de rinçage et de sel
régénérant. Ils peuvent également contenir d'autres substances selon le type de pastille
utilisé ("3 en 1", "4 en 1", "5 en 1", etc.).
Vérifiez que ces produits de lavage sont appropriés au degré de dureté de l'eau d'alimentation. Consultez à cet effet les instructions du fabricant.
Sélectionnez la "fonction Multitab " avant de lancer un programme de lavage.
Dès que cette fonction est sélectionnée, elle restera également activée pour les programmes
de lavage suivants.
Lorsque cette fonction est sélectionnée, l'alimentation en liquide de rinçage et en sel à
partir des bacs respectifs est automatiquement désactivée, de même que les messages
concernant le sel et le liquide de rinçage.
Page 51

Programmes de lavage
51
L'utilisation de la fonction " Multitab ", peut entraîner une modification de la durée du
cycle. Dans ce cas, la durée du programme est automatiquement mise à jour sur l'affichage.
Une fois que le programme a démarré, la fonction " Multitab " NE peut PLUS être modifiée.
Si vous souhaitez annuler la fonction " Multitab" il vous faudra d'abord annuler la sélection
du programme de lavage, puis désactiver la fonction " Multitab ".
Dans ce cas, vous devrez régler à nouveau le programme de lavage (et les options souhaitées).
Si le séchage n'est pas satisfaisant, nous vous conseillons de :
1. Remplir le distributeur de liquide de rinçage.
2. Activer le distributeur de liquide de rinçage.
3. Régler le dosage du liquide de rinçage sur la position 2.
L'activation/la désactivation du distributeur de liquide de rinçage est possible uniquement
si la fonction MULTITAB est activée.
Si vous souhaitez réutiliser des produits de lavage traditionnels, nous vous conseillons de :
1. Désactiver la fonction MULTITAB"
2. Remplir les distributeurs de sel régénérant et de liquide de rinçage.
3. Régler la position maximale du degré de dureté de l'eau et d'effectuer 1 programme
normal sans charger l'appareil.
4. Régler ensuite le degré de dureté de l'eau en fonction de la dureté de l'eau de votre
région.
5. Régler la dose de liquide de rinçage.
Programmes de lavage
Programme Degré de
AUTOMATI-
3)
QUE
30 MINUTES4)Légère-
70° INTENSIF5)Très sale Vaisselle,
salissure
Normale et
très sale
ment sale
Type de
vaisselle
Vaisselle,
couverts,
plats et
casseroles
Vaisselle et
couverts
couverts,
plats et
casseroles
Description du programme Valeurs de consom-
mation
2)
Prélavage
Lavage
Rinçage intermédiaire
1/2x
Séchage
Rinçage final
Durée (minutes)
Énergie (kWh)
-
1,1 - 1,7
0,9
-
1,5 -1,7
1)
Eau (litres)
12 - 23
9
16 - 18
Page 52

Programmes de lavage
52
Programme Degré de
salissure
65° NORMAL Moyenne-
ment sale
ECONOMI-
6)
QUE
Moyennement sale
55 ° 1 HEURE Moyenne-
ment sale
45° VERRE Moyenne-
ment sale
PRELAVAGE Tous Charge
Type de
vaisselle
Vaisselle et
couverts
Vaisselle et
couverts
Vaisselle et
couverts
Vaisselle
délicate et
verres
partielle (à
Description du programme Valeurs de consom-
mation
2)
Prélavage
Lavage
Rinçage intermédiaire
Séchage
Rinçage final
Durée (minutes)
Énergie (kWh)
-
1,4 - 1,6
-
1,0 - 1,1
-
1,0 - 1,2
-
0,8 -0,9
0,1
1)
Eau (litres)
18 - 20
12 - 13
11 - 12
14 - 15
4
compléter
dans la
journée)
NIGHT CYCLE Moyenne-
ment sale
1) Les valeurs de consommation sont fournies à titre indicatif et varient en fonction de la pression et de la
température de l'eau, des variations dans l'alimentation électrique et de la quantité de vaisselle.
2) La durée du programme de lavage apparaît sur l'affichage numérique.
3) Au cours du programme "Auto", le degré de salissure de la vaisselle est déterminé par le degré de turbidité de
l'eau. La durée du programme, les niveaux de consommation d'eau et d'énergie peuvent varier ; tout dépend
de la charge du lave-vaisselle (pleine ou demi-charge) et du degré de salissure de la vaisselle. La température
de l'eau est automatiquement ajustée entre 45 °C et 70 °C.
4) Idéal pour le lavage d'un lave-vaisselle partiellement chargé. Programme de lavage journalier parfait, adapté
aux besoins d'une famille de 4 personnes qui souhaitent seulement laver la vaisselle et les couverts du dîner et
du petit déjeuner.
5) Ce programme est prévu avec la fonction Care Plus, qui assure une plus grande hygiène de la vaisselle et des
verres. Au cours du dernier rinçage, cette option permet de maintenir la température à plus de 65 °C pendant
au moins 10 minutes.
6) Programme de test des organismes de contrôle.
7) Ce programme n'utilise pas de produit de lavage
Vaisselle et
couverts
7)
-
13 - 14
1,2- 1,3
Programme NIGHT CYCLE
Night Cycle est un programme très peu bruyant. Il peut être sélectionné la nuit ou aux
heures creuses pour profiter d'un tarif avantageux.
Page 53

Sélection et départ d'un programme de lavage
Pendant le Night Cycle, la pompe fonctionne à très faible vitesse pour atteindre une réduction du niveau sonore de 25 % par rapport au programme déclaré. Le programme
économique dure donc plus longtemps.
Sélection et départ d'un programme de lavage
1. Vérifiez que les paniers ont été chargés correctement et que les bras d'aspersion tour-
nent librement.
2. Assurez-vous que le robinet d'eau est ouvert.
3.
Appuyez sur la touche Marche/Arrêt .
4. Sélectionnez le programme de lavage. ( Voir le tableau des "Programmes de lavage" ).
5. Si besoin est, différez l'heure de départ du programme.
6. Le cas échéant, réglez les options.
7.
Appuyez sur la touche OK / START et fermez la porte ; le programme démarre automatiquement.
Si le départ différé est réglé, le décompte commence automatiquement. Dès que la
durée du départ différé est écoulée, le programme démarre automatiquement.
L'ouverture de la porte interrompt le décompte. Fermez la porte ; le décompte reprend
là où il a été interrompu.
AVERTISSEMENT
Interrompez ou annulez un programme en cours UNIQUEMENT si cela s'avère strictement nécessaire.
Attention ! Un nuage de vapeur peut s'échapper par la porte du lave-vaisselle lorsque vous l'ouvrez. Soyez prudent en effectuant cette opération.
53
Annulation d'un départ différé ou d'un programme en cours
1. Ouvrez la porte du lave-vaisselle.
2.
Appuyez simultanément sur les deux touches OPTION et OK / START .
3.
Le message INTERROMPRE ? s'affiche.
4.
Appuyez sur la touche OK / START pour confirmer.
5.
L'appareil revient au mode de programmation et le message CHOISIR PROGRAMME
s'affiche.
• Si le départ différé est annulé, le programme de lavage le sera également.
• Si vous voulez sélectionner un nouveau programme, vérifiez qu'il y a du produit de lavage
dans le distributeur correspondant.
Interruption d'un programme en cours
•
Ouvrez la porte du lave-vaisselle ; le programme s'arrête. Le message FERMER LA PORTE s'affiche.
• Fermez la porte du lave-vaisselle ; Le programme reprendra là où il a été interrompu.
Fin du programme de lavage
• Le lave-vaisselle s'arrête automatiquement et un signal sonore vous informe de la fin du
programme.
Page 54

Déchargement du lave-vaisselle
54
Pour prévenir la recondensation de la vapeur résiduelle sur la vaisselle sous forme de gouttes
d'eau, le système de séchage du lave-vaisselle est doté d'un dispositif qui fait circuler l'air
à l'intérieur du lave-vaisselle.
Lorsque le programme de lavage est terminé ce dispositif fonctionne par intermittence
pendant encore 20 minutes, tant que le lave-vaisselle est allumé.
Si pendant ces 20 minutes, la porte est ouverte ou la touche Marche/Arrêt activée, ce
dispositif est automatiquement annulé.
1. Ouvrez la porte du lave-vaisselle.
–
Les messages alternés FIN DE PROGRAMME et ETEINDRE SVP s'affichent.
2. Appuyez sur la touche Marche/Arrêt.
– Ouvrez la porte du lave-vaisselle, laissez-la entrouverte et attendez quelques minutes
avant de décharger la vaisselle ; cela permet de la laisser refroidir et améliore le
processus de séchage
Déchargement du lave-vaisselle
• Les plats encore chauds sont sensibles aux chocs.
C'est pourquoi il est préférable de laisser refroidir la vaisselle avant de la décharger de
la machine.
• Videz en premier lieu le panier inférieur, puis le panier supérieur ; ceci permettra d'éviter
que de l'eau ne s'égoutte du panier supérieur sur la vaisselle du panier inférieur.
• Il se peut que de l'eau soit présente sur les parois externes et sur la porte du lave-vaisselle,
car l'acier inoxydable est en définitive plus froid que les plats.
ATTENTION
Dès que le programme est terminé, débranchez le lave-vaisselle et fermez le robinet d'arrivée
d'eau.
Entretien et nettoyage
Nettoyage des filtres
Contrôlez et nettoyez les filtres très régulièrement. Des filtres non nettoyés réduisent les
performances de lavage.
Un message s'affichera régulièrement pour vous rappeler de nettoyer les filtres.
AVERTISSEMENT
Avant de nettoyez les filtres, assurez-vous que l'appareil est mis à l'arrêt.
1. Ouvrez la porte, sortez le panier inférieur.
Page 55

2. Le système de filtrage du lave-vaisselle
comporte un filtre grossier ( A ), un microfiltre ( B ) et un filtre plat. Desserrez le
système de filtrage à l'aide de la poignée
du microfiltre et sortez-le.
3. Tournez la poignée dans le sens contraire
des aiguilles d'une montre et effectuez 1/4
de tour pour enlever le système de filtrage.
4.
Saisissez le filtre grossier ( A ) par la poignée annulaire et retirez-le du microfiltre
( B ).
5. Nettoyez minutieusement tous les filtres à
l'eau courante.
Entretien et nettoyage
55
6. Retirez le filtre plat du fond de la cuve et
nettoyez minutieusement les deux faces.
7. Réinstallez le filtre plat dans le fond du
compartiment de lavage en veillant à ce
qu'il soit bien installé.
8.
Introduisez le filtre grossier ( A ) dans le
microfiltre ( B ) et appuyez sur les deux
filtres à la fois.
9. Mettez l'ensemble de ces filtres en place
et bloquez-les en tournant la poignée
dans le sens des aiguilles d'une montre
jusqu'à la butée. Au cours de cette opération, contrôlez que le filtre plat ne dépasse
pas du fond de la cuve.
AVERTISSEMENT
N'utilisez jamais le lave-vaisselle sans les filtres. Si les filtres n'ont pas été correctement
réinstallés, les performances de lavage pourront être compromises et l'appareil pourrait
être endommagé.
Nettoyage des bras d'aspersion
Ne retirez JAMAIS les bras d'aspersion.
Page 56

Que faire si…
56
Si des résidus de salissures ont bouché les orifices des bras d'aspersion, éliminez ceux-ci à
l'aide d'un cure-dent.
Nettoyage de la carrosserie
Nettoyez les surfaces externes de l'appareil, de même que le bandeau de commande, à l'aide
d'un chiffon doux humide. Le cas échéant, utilisez uniquement des produits nettoyants
neutres. N'utilisez en aucun cas de substances abrasives, de tampons métalliques ou de
solvants (acétone, trichloréthylène, etc.).
Nettoyage interne
Essuyez régulièrement les joints situés autour de la porte et des distributeurs de produit de
lavage et de liquide de rinçage à l'aide d'un chiffon humide.
Nous vous conseillons d'effectuer tous les 3 mois un lavage pour vaisselle très sale mais
sans vaisselle et avec produit de lavage.
En cas d'absence prolongée
Si vous n'utilisez pas l'appareil pendant un certain temps, veillez à :
1. Débrancher l'appareil et à fermer le robinet d'arrivée d'eau.
2. Laisser la porte entrouverte pour prévenir la formation d'odeurs désagréables.
3. Nettoyer soigneusement l'intérieur de l'appareil.
Précautions contre le gel
Évitez d'installer l'appareil dans un endroit où la température ambiante est inférieure à 0°C.
Si cela n'est pas possible, videz l'appareil, fermez la porte, débranchez le tuyau d'arrivée
d'eau et vidangez.
Transport de l'appareil
Si vous devez transporter l'appareil (en cas de déménagement, etc.) :
1. Retirez la fiche de la prise secteur.
2. Fermez le robinet d'arrivée d'eau.
3. Retirez les tuyaux d'arrivée d'eau et de vidange.
4. Tirez l'appareil hors de sa niche ainsi que les tuyaux.
Évitez d'incliner l'appareil au cours du transport.
Que faire si…
Le lave-vaisselle ne démarre pas ou s'arrête en cours de programme.
Certaines anomalies de fonctionnement peuvent dépendre d'opérations d'entretien non
correctes ou d'oubli et peuvent être résolues à l'aide des indications fournies dans le tableau,
sans faire appel à un technicien.
Mettez le lave-vaisselle à l'arrêt et effectuez les contrôles que nous vous suggérons ci-après.
Page 57

Que faire si…
Message affiché et Anomalie de fonctionnement Cause possible et solution
• répétition du signal sonore
•
le message OUVRIR ROBINET est affiché
Le lave-vaisselle n'est pas approvisionné en
eau
• répétition du signal sonore
•
le message POMPE BLOQUEE est affiché
Le lave-vaisselle ne vidange pas
• répétition du signal sonore
•
apparaît sur l'affichage
Le système de sécurité anti-débordement
s'est déclenché
Le programme ne démarre pas. • La porte du lave-vaisselle n'a pas été fermée
• Le robinet d'arrivée d'eau est obstrué ou incrusté de tartre.
Nettoyez le robinet d'arrivée d'eau.
• Le robinet d'arrivée d'eau est fermé.
Ouvrez le robinet d'arrivée d'eau.
• Le filtre (s'il est présent) situé dans l'embout
à vis du tuyau au niveau de la soupape d'admission est bouché.
Nettoyez le filtre situé dans l'embout à vis du
tuyau.
• Le tuyau d'arrivée d'eau n'a pas été installé
correctement, est plié ou écrasé.
Vérifiez le raccordement du tuyau d'arrivée
d'eau.
• Le robinet de l'évier est bouché.
Nettoyez à fond le robinet de l'évier.
• Le tuyau de vidange n'a pas été installé correctement, est plié ou écrasé.
Vérifiez le raccordement du tuyau de vidange.
• Fermez le robinet d'arrivée d'eau et contactez
le Service Après-vente.
correctement. Fermez la porte.
• La fiche n'est pas branchée. Insérez la fiche
dans la prise secteur.
• Le fusible a grillé dans la boîte à fusibles.
Remplacez le fusible.
• Le départ différé a été réglé.
Si la vaisselle doit être lavée immédiatement,
annulez le départ différé.
57
Après avoir effectué ces contrôles, mettez l'appareil en marche : Le programme reprendra
là où il a été interrompu.
Si l'anomalie persiste ou que le code d'erreur s'affiche à nouveau, contactez le Service Aprèsvente.
Si des codes d'erreurs non décrits dans le tableau ci-dessus s'affichent, contactez le Service
Après-vente, communiquez le modèle, le numéro de code produit et le numéro de série.
Vous trouverez ces informations sur la plaque signalétique située sur le côté du lave-vaisselle.
Afin de pouvoir disposer à tout moment de ces numéros, nous vous recommandons de les
inscrire ici :
Modèle : . . . . . . . . . . . . . . . . . . . . . . .
N° code produit : . . . . . . . . . . . . . . . . . . . . . . .
N° de série : . . . . . . . . . . . . . . . . . . . . . . . .
Page 58

Caractéristiques techniques
58
Les résultats de lavage sont insatisfaisants
La vaisselle n'est pas propre • Vous n'avez pas sélectionné le programme
La vaisselle est mouillée et terne • Vous n'avez pas utilisé de liquide de rinçage.
Les verres et la vaisselle présentent des rayures,
des taches blanches ou un film bleuâtre
Des gouttes d'eau ont séché sur les verres et la
vaisselle
approprié.
• La vaisselle est disposée de manière telle à
empêcher l'eau d'atteindre toutes les surfaces. Ne surchargez pas les paniers.
• La rotation des bras d'aspersion est entravée
par de la vaisselle mal rangée.
• Les filtres situés dans le fond de la cuve sont
encrassés ou mal installés.
• Vous avez utilisé trop peu de produit de lavage
ou avez oublié d'approvisionner le distributeur de produit de lavage.
• Si des dépôts de tartre sont présents sur la
vaisselle ; cela signifie que le réservoir de sel
est vide ou que vous n'avez pas réglé correctement le niveau de l'adoucisseur d'eau.
• Le raccordement du tuyau de vidange n'a pas
été réalisé correctement.
• Le bouchon du réservoir à sel n'a pas été vissé
correctement.
• Le distributeur de liquide de rinçage est vide.
• Réduisez le dosage du liquide de rinçage.
• Augmentez le dosage du liquide de rinçage.
• Il se peut que le produit de lavage soit en
cause. Contactez le service clientèle du fabricant du produit de lavage.
Si, après avoir effectué tous ces contrôles, le problème persiste, contactez le Service Aprèsvente.
Caractéristiques techniques
Dimensions Largeur x Hauteur x Profondeur
Branchement électrique - Tension - Puissance totale - Fusible
Pression de l'eau d'alimentation
Capacité Couverts 12
(cm)
Les informations concernant le branchement électrique figurent
sur la plaque signalétique apposée sur le bord intérieur de la porte
du lave-vaisselle
Minimum - Maximum (MPa) 0,05 - 0,8
59,6 x 85,8-93,8 x 55
Page 59

Installation
Instructions d'installation
Installation
AVERTISSEMENT
Les branchements électriques et les raccordements hydrauliques nécessaires à l'installation
de l'appareil doivent être réalisés par un électricien qualifié et/ou un plombier ou autre
personne compétente.
Retirez tous les emballages avant d'installer la machine.
Dans la mesure du possible, placez-la à proximité d'un robinet d'arrivée d'eau et d'un dispositif d'évacuation.
Ce lave-vaisselle a été conçu pour être encastré sous un évier ou un plan de travail.
Important ! Pour appliquer le panneau sur la porte et pour encastrer le lave-vaisselle, suivez
attentivement les instructions reportées sur le gabarit fourni avec le matériel.
Il est nécessaire de prévoir un espace pour le passage du câble d'alimentation et des tuyaux
d'alimentation et d'évacuation d'eau, afin qu'ils ne soient pas pliés.
La hauteur du lave-vaisselle peut varier et être ajustée grâce aux pieds réglables.
Avant toute intervention sur le lave-vaisselle, il est nécessaire de débrancher l'appareil.
Lors de l'encastrement de l'appareil, veillez à ce que les tuyaux d'arrivée d'eau, de vidange
et le câble d'alimentation ne soient pas pliés ou écrasés.
Fixation
Le lave-vaisselle doit être assuré contre le renversement.
Veillez donc à ce que les éléments auxquels il est fixé soient bien ancrés à une structure
fixe (mur, meubles adjacents,...).
59
Mise à niveau
Une bonne mise à niveau est indispensable pour une parfaite fermeture et étanchéité de
la porte. Assurez-vous que la porte du lave-vaisselle se ferme correctement sansfrottement
latéraux. Si la porte ne ferme pas correctement, dévissez ou vissez les pieds jusqu'à ce que
l'appareil soit parfaitement de niveau et d'aplomb.
Raccordement à l'arrivée d'eau
Raccordements à l'arrivée d'eau
Cet appareil peut être alimenté en eau chaude (max. 60°) ou en eau froide.
Avec une alimentation en eau chaude, vous pouvez réduire votre consommation d'énergie
électrique de manière spectaculaire. Cela dépend, toutefois, de la manière dont l'eau chaude
est produite. (Nous suggérons d'autres sources d'énergie plus écologiques telles que, par
ex., les panneaux solaires ou panneaux photovoltaïques, et les éoliennes).
Pour réaliser le raccordement proprement dit, l'écrou-raccord installé dans le tuyau d'alimentation de l'appareil doit être vissé sur une goulotte avec filetage "Witworth" pour tuyau
3/4" ou à un robinet à raccord rapide spécialement conçu à cet effet de type "Press-block".
Page 60

Raccordement à l'arrivée d'eau
60
La pression de l'eau doit se situer dans les limites indiquées dans les "Caractéristiques techniques". Pour connaître la pression d'alimentation moyenne de votre région, adressez-vous
à votre Compagnie locale de distribution des eaux.
Veillez à ce que le tuyau d'arrivée d'eau ne soit pas enroulé, écrasé ou enchevêtré lorsque
vous effectuez le raccordement.
Le lave-vaisselle est doté de tuyaux d'alimentation et de vidange pouvant être orientés à
gauche ou à droite selon les besoins de l'installation, à l'aide du contre-écrou.
Il est nécessaire que le contre-écrou soit installé correctement pour éviter toute
fuite d'eau.
(Attention ! Les lave-vaisselle ne sont PAS tous dotés de tuyaux d'alimentation et de vidange
avec contre-écrou. Dans ce cas-ci, cette option n'est pas disponible). Si l'appareil est raccordé au moyen de tuyaux neufs ou de tuyaux ayant peu servi, faites s'écouler l'eau pendant
quelques minutes avant de brancher le tuyau d'arrivée d'eau.
N'utilisez PAS des tuyaux provenant d'un ancien appareil.
Cet appareil est doté de fonctions de sécurité destinées à empêcher que l'eau utilisée dans
l'appareil ne soit réintroduite dans le système d'eau potable. Cet appareil est conforme aux
règlements applicables en matière de tuyauterie.
Tuyau d'arrivée d'eau avec soupape de sécurité
Après avoir raccordé le tuyau d'arrivée d'eau à double paroi, la soupape de sécurité se situe
à proximité du robinet. Par conséquent, le tuyau d'arrivée d'eau est sous pression uniquement lorsque l'eau s'écoule. Si le tuyau d'arrivée d'eau fuit au cours de cette opération, la
soupape de sécurité interrompt l'écoulement de l'eau.
Faites attention au moment d'installer le tuyau d'arrivée d'eau :
• Le fil électrique de la soupape de sécurité est situé à l'intérieur du tuyau d'arrivée d'eau
à double paroi. N'immergez pas le tuyau d'arrivée d'eau ou la soupape de sécurité dans
l'eau.
• Si le tuyau d'arrivée d'eau ou la soupape de sécurité est endommagé, remplacez immédiatement la prise secteur.
• Le remplacement du tuyau d'arrivée d'eau avec soupape de sécurité relève de la compétence exclusive d'un professionnel ou du Service Après-vente.
AVERTISSEMENT
Attention ! Tension dangereuse.
Page 61

Raccordement à l'arrivée d'eau
Raccordement du tuyau de vidange
L'extrémité du tuyau de vidange peut être raccordée de deux façons :
1. Au robinet de sortie de l'évier, en la fixant à la partie inférieure de la surface de travail.
Cela empêchera que les eaux usées de l'évier ne pénètrent dans l'appareil.
2. À une conduite fixe dotée d'une évacuation murale dotée d'une ventilation spéciale,
diamètre intérieur de 4 cm minimum.
Le raccordement de vidange doit être situé à une
hauteur maximale de 60 cm par rapport à la base
du lave-vaisselle.
Le tuyau de vidange peut être orienté à droite ou
à gauche du lave-vaisselle.
Assurez-vous que le tuyau n'est pas courbé ou
écrasé, sous peine d'empêcher ou de ralentir l'évacuation de l'eau.
Le bouchon d'évier ne doit pas être mis en place
lorsque l'appareil évacue l'eau, sous peine de provoquer un effet de siphon et un reflux de l'eau vers
l'appareil.
La longueur totale du tuyau de vidange, y compris
celle de la rallonge (si vous en utilisez une), ne doit
pas dépasser 4 mètres. Le diamètre intérieur de la
rallonge ne doit pas être inférieur au diamètre du tuyau de vidange fourni.
De même que le diamètre intérieur des raccords utilisés pour les branchements ne doit pas
être inférieur au diamètre du tuyau d'évacuation fourni.
Lorsque vous raccordez le tuyau de vidange à un embout du siphon sous l'évier, n'oubliez
pas d'enlever toute la membrane de plastique (A) . Si vous oubliez d'enlever toute la
membrane, des particules d'aliments risquent de s'accumuler avec le temps et de boucher
l'embout du tuyau de vidange du lave-vaisselle.
Nos appareils sont équipés d'un dispositif de sécurité empêchant le reflux des eaux usées vers l'appareil. Si le robinet de
votre évier est doté d'un clapet de retenue incorporé, cela
pourrait entraver la vidange correcte de votre lave-vaisselle.
C'est pourquoi nous vous recommandons de le retirer.
61
Pour éviter toute fuite d'eau après l'installation, assurez-vous
que les raccords des tuyauteries d'eau sont bien serrés.
Page 62

Branchement électrique
62
Branchement électrique
AVERTISSEMENT
L'appareil doit être relié à la terre conformément aux normes en vigueur.
Avant d'utiliser l'appareil pour la première fois, vérifiez que la tension nominale et le type
d'alimentation figurant sur la plaque signalétique correspondent aux valeurs d'alimentation
de la pièce où l'appareil doit être installé.
La puissance nominale du fusible figure également sur la plaque signalétique.
Branchez toujours la fiche principale dans une prise correctement installée, protégée contre
les chocs et comportant une borne de mise à la terre. L'appareil ne doit pas être raccordé
à l'aide d'un prolongateur, d'une prise multiple ou d'un raccordement multiple.
Risque d'incendie.
Si nécessaire, remplacez la prise femelle de l'installation électrique de votre habitation. Si
le câble électrique doit être remplacé, contactez le Service Après-vente.
La prise doit rester accessible une fois que l'appareil est installé.
Pour débrancher l'appareil, ne tirez jamais sur le cordon mais tirez toujours la prise.
Le fabricant décline toute responsabilité en cas de non-respect des précautions de sécurité
mentionnées dans ce chapitre.
En matière de protection de l'environnement
Le symbole sur le produit ou son emballage indique que ce produit ne peut être traité
comme déchet ménager. Il doit être remis au point de collecte dédié à cet effet (collecte et
recyclage du matériel électrique et électronique).
En procédant à la mise au rebut de l'appareil dans les règles de l’art, nous préservons
l'environnement et notre sécurité, s’assurant ainsi que les déchets seront traités dans des
conditions optimum.
Pour obtenir plus de détails sur le recyclage de ce produit, veuillez prendre contact avec les
services de votre commune ou le magasin où vous avez effectué l'achat.
Matériaux d'emballage
Les matériaux d'emballage sont conçus dans le respect de l'environnement et sont recyclables. Les composants en plastique sont identifiables grâce aux sigles >PE <, >PS <, etc.
Veuillez jeter les matériaux d'emballage dans le conteneur approprié du centre de collecte
des déchets de votre commune.
AVERTISSEMENT
Si vous n'utilisez plus votre appareil :
• Retirez la fiche de la prise secteur.
• Coupez le câble et la fiche et jetez-les.
• Éliminez le loquet de la porte, cela évitera aux enfants de s'enfermer dans l'appareil et
de mettre ainsi leur vie en danger.
Page 63

Índice de materias
Gracias por elegir uno de nuestros productos de alta calidad.
Si quiere asegurarse de que el electrodoméstico funcione de forma óptima y
continua, lea el manual de instrucciones atentamente. Las instrucciones que
contiene le permitirán realizar todos los procesos con la máxima perfección y
eficacia. Es aconsejable que guarde este manual en un lugar seguro para que pueda
consultarlo siempre que lo necesite. Y no olvide entregárselo al futuro propietario
del electrodoméstico.
Esperamos que disfrute de su nuevo electrodoméstico.
Índice de materias
63
Instrucciones de uso 64
Información sobre seguridad 64
Uso correcto 64
Instrucciones generales de seguridad 64
Seguridad de los niños 65
Instalación 65
Descripción del producto 66
Panel de mandos 67
Teclas de desplazamiento arriba y abajo (+
-) 67
Visor digital 67
OPTION Tecla 68
OK / START tecla 69
Primera puesta en marcha: selección de
idioma 69
Primer uso 69
Ajuste del descalcificador de agua 70
Ajuste manual 70
Ajuste electrónico 71
Uso de sal para lavavajillas 71
Uso de abrillantador 72
Ajuste de la cantidad de abrillantador 73
Uso diario 73
Carga de cubiertos y vajilla 73
El cesto inferior 74
Cesto para cubiertos 75
Copas de cerveza y de cava 76
Cesto superior 78
Ajuste de la altura del cesto superior 79
Uso de detergente 79
Carga de detergente 80
Función Multitab 81
117963160-00-122008
Programas de lavado 81
Selección e inicio del programa de lavado
83
Cancelación de un programa de lavado o de
un inicio diferido en marcha 83
Interrupción de un programa de lavado en
marcha 84
Finalización del programa de lavado 84
Descarga del lavavajillas 84
Mantenimiento y limpieza 84
Limpieza de los filtros 84
Limpieza de los brazos aspersores 86
Limpieza externa 86
Limpieza interna 86
Periodos prolongados sin funcionamiento
86
Precauciones en caso de congelamiento
86
Desplazamiento de la máquina 86
Qué hacer si… 86
Datos técnicos 88
Instrucciones de instalación 89
Instalación 89
Fijación a las unidades adyacentes 89
Nivelación 89
Conexión de agua 89
Conexiones del suministro de agua 89
Tubo de carga de agua con válvula de
seguridad 90
Conexión del tubo de entrada de agua
90
Conexión eléctrica 92
Aspectos medioambientales 92
Page 64

Información sobre seguridad
64
Materiales de embalaje 92
Salvo modificaciones
Instrucciones de uso
Información sobre seguridad
Por su seguridad y para garantizar el funcionamiento correcto del lavavajillas, antes de
instalarlo y utilizarlo por primera vez lea atentamente este manual del usuario, incluidos
los consejos y advertencias. Para evitar errores y accidentes, es importante que todas las
personas que utilicen el aparato estén perfectamente al tanto de su funcionamiento y de
las características de seguridad. Conserve estas instrucciones y no olvide mantenerlas junto
al aparato en caso de su desplazamiento o venta para que quienes lo utilicen a lo largo de
su vida útil dispongan siempre de la información adecuada sobre el uso y la seguridad.
Uso correcto
• Este lavavajillas está destinado exclusivamente al lavado de utensilios del hogar aptos
para el lavado a máquina.
• No introduzca disolventes en el lavavajillas. Existe riesgo de explosión.
• Los cuchillos y otros objetos con puntas afiladas deben colocarse en el cesto para cu-
biertos con la punta hacia abajo, o en posición horizontal en el cesto superior.
• Utilice exclusivamente productos (detergente, sal y abrillantador) adecuados para lava-
vajillas.
• No abra la puerta con el aparato en funcionamiento, ya que puede producirse la salida
de vapor caliente.
• No retire platos del lavavajillas antes de que finalice el ciclo de lavado.
• Después del usar el aparato, desconecte la alimentación eléctrica y cierre el suministro
de agua.
• Este producto debe ser reparado por un técnico de servicio autorizado, y sólo se deben
utilizar piezas de recambio originales.
• Nunca intente reparar la máquina personalmente. Las reparaciones realizadas por per-
sonal sin experiencia pueden provocar lesiones personales o desperfectos graves. Póngase en contacto con el Centro de servicio técnico. Solicite siempre piezas de recambio
originales.
Instrucciones generales de seguridad
• Las personas (incluidos niños) con discapacidad física, sensorial o mental, o con expe-
riencia y conocimiento insuficientes, no deben utilizar el electrodoméstico. Sólo podrán
utilizarlo bajo la supervisión o instrucción de la persona responsable de su seguridad.
• Los detergentes del lavavajillas pueden provocar quemaduras de origen químico en ojos,
boca y garganta. ¡Pueden representar un riesgo para la vida! Cumpla las instrucciones
de seguridad respecto al detergente para lavavajillas suministradas por el fabricante.
• El agua del lavavajillas no es apta para el consumo humano. Podría haber restos de
detergente en la máquina.
Page 65

Información sobre seguridad
• Cerciórese de que la puerta del lavavajillas esté siempre cerrada cuando no se realicen
operaciones de carga o descarga. De ese modo evitará que alguien tropiece con la puerta
abierta y se haga daño.
• No se siente ni se ponga de pie sobre la puerta abierta.
Seguridad de los niños
• Este aparato está diseñado para ser utilizado por adultos. No permita que los niños
utilicen el lavavajillas sin supervisión.
• Mantenga los materiales de embalaje alejados de los niños. Existe riesgo de asfixia.
• Mantenga los detergentes en un lugar seguro y fuera del alcance de los niños.
• Mantenga a los niños alejados del lavavajillas cuando la puerta se encuentre abierta.
Instalación
• Compruebe si el lavavajillas ha sufrido daños durante el transporte. Nunca se debe co-
nectar una máquina dañada. Si el lavavajillas está dañado, comuníquelo al distribuidor.
• Es necesario retirar todo el material de embalaje antes del uso.
• Cualquier tarea eléctrica o de fontanería que requiera la instalación de este aparato debe
estar a cargo de un profesional cualificado.
• Por razones de seguridad, es peligroso alterar las especificaciones o intentar modificar
este producto en modo alguno.
• En ningún caso debe utilizar el lavavajillas si observa deterioro en el cable de alimentación
eléctrica o los tubos de agua; o si el panel de mandos, la superficie superior o la zona de
peana presentan daños, de modo que pudiera accederse fácilmente al interior del aparato. Para evitar riesgos, póngase en contacto con el Centro de servicio técnico.
• Nunca debe perforar los laterales del lavavajillas, pues podrían producirse daños en los
componentes hidráulicos y eléctricos.
ADVERTENCIA
Al realizar las conexiones eléctricas y de agua, siga atentamente las instrucciones suministradas en los párrafos específicos.
65
Page 66

Descripción del producto
66
Descripción del producto
1 Cesto superior
2 Selección del ajuste de dureza del agua
3 Recipiente de sal
4 Distribuidor de detergente
5 Distribuidor de abrillantador
6 Placa de datos técnicos
7 Filtros
8 Brazo aspersor inferior
9 Brazo aspersor superior
Señal óptica
Una vez iniciado el programa de lavado, aparece una señal óptica con forma de flecha en
la base, debajo de la puerta del lavavajillas.
Si el aparato se ha instalado elevado o empotrado en un mueble que cubre hasta el nivel
de la puerta, la señal óptica no será visible.
Señal óptica
Luz roja fija Indica el inicio de un programa de lavado y permanece encendida mien-
Luz roja parpadeante Indica un fallo de funcionamiento del aparato
Luz verde fija Indica el fin del programa de lavado
tras dura el mismo
Page 67

Panel de mandos
Este lavavajillas cuenta con una luz interna que se enciende y apaga al abrir y cerrar la
puerta.
La luz interior tiene una lámpara LED CLASE 1 conforme con la normativa EN 60825-1:
1994 + A1: 2002 + A2: 2001.
Si fuera necesario sustituir la bombilla, póngase en contacto con el Centro de servicio
técnico local.
Panel de mandos
1 Teclas de desplazamiento arriba y abajo
2 Visor digital
3 OK / START Tecla
4 Tecla de encendido/apagado
5 OPTION Tecla
Una secuencia de mensajes en el visor digital y una serie de señales acústicas le guiarán en
el ajuste del aparato y en la selección del programa y de las opciones de lavado.
67
Teclas de desplazamiento arriba y abajo (+ -)
Estas dos teclas poseen una doble función:
• la selección dentro de un menú de programa,
• la selección dentro del menú y el submenú de opciones.
Visor digital
Page 68

Panel de mandos
68
1.
Programas de lavado: durante el proceso del programa, estas pequeñas barras indican
la fase del programa de lavado: prelavado - lavado principal - aclarados - secado.
2. En esta fila se muestran varios detalles:
–
Modo de ajuste: guía para la selección del programa de lavado - duración del
programa, opciones (cuando se selecciona una o más opciones con el programa de
lavado, la actualización de la duración del programa se produce automáticamente).
–
Una vez que el programa de lavado está en marcha indica la secuencia de la fase
actual y el tiempo de duración del programa.
3.
Símbolos: indica las opciones (consulte la tabla).
Los símbolos significan lo siguiente:
INICIO DIFER. : fijo en el modo de ajuste; parpadeante durante la cuenta atrás
MULTITAB : encendido cuando la función Pastilla múltiple está activa.
VOLUMEN : cancelación del volumen de los mensajes de voz. (excepto para las señales de
alarma)
CARE PLUS : se enciende cuando se selecciona el programa 70° INTENSIVO
OPTION Tecla
Pulse esta tecla para acceder a un menú de opciones; vuelva a pulsarla cuando desee salir
del menú.
Cómo ajustar las opciones
1.
Pulse la tecla OPTION .
2.
Pulse una de las teclas de desplazamiento arriba y abajo hasta que aparezca la opción
que desea:
INICIO DIFER.
MULTITAB
AJUSTES
3.
Pulse OK / START para confirmar y acceder al submenú.
4.
Pulse las teclas de desplazamiento arriba y abajo hasta que aparezca el submenú
necesario.
5.
Pulse OK / START para confirmar.
6.
Para salir del menú, pulse la tecla OPTION .
Menú de opciones Submenú de opciones
INICIO DIFER.
MULTITAB
Permite diferir el inicio del programa de lavado entre 1 y 19 horas. La
cuenta atrás disminuye en intervalos de 1 hora. Sólo en la última hora
los intervalos son de minutos. El programa de lavado se pone en marcha de forma automática cuando termina la cuenta atrás.
Permite ajustar el lavavajillas para el uso de detergentes convencionales o pastillas de detergente combinadas ("3 en 1" – "4 en 1" – "5
en 1", etc.). Consulte la función MULTITAB.
–
ON: función activada. Utilice pastillas de detergente combinadas.
En el visor digital aparece el símbolo
–
OFF: función desactivada. Utilice detergente convencional.
.
Page 69

Menú de opciones Submenú de opciones
AJUSTES IDIOMA
Permite elegir el idioma de los mensajes.
DUREZA AGUA
Permite el ajuste electrónico del descalcificador.
ABRILLANTADOR
Permite activar o desactivar el distribuidor de abrillantador.
–
ON: activado
–
OFF: desactivado
BRILLO
Permite aumentar o reducir el brillo del fondo del visor digital, mediante la selección entre 10 intensidades de brillo.
Ajuste de fábrica: nivel 10.
VOLUMEN
Permite ajustar el volumen de las señales acústicas (de 0 a 5).
El nivel 0 significa la desactivación de las señales sonoras y aparece
en el visor digital el símbolo
OK / START tecla
Púlsela para:
• confirmar/memorizar cualquier opción,
• iniciar el programa de lavado.
Si las teclas OK / START y OPTION se pulsan a la vez, se puede:
• cancelar un programa de lavado en marcha,
• cancelar el ajuste de una opción.
correspondiente.
Primer uso
69
También es posible recuperar los ajustes de fábrica de las siguientes opciones:
IDIOMA
BRILLO
En modo de ajuste, pulse durante unos 6 segundos estas 2 teclas a la vez; en el indicador
aparece el mensaje en el idioma por defecto.
Primera puesta en marcha: selección de idioma
1.
Pulse la tecla ON/OFF .
2. En el indicador aparece el mensaje en el idioma por defecto. Si desea confirmar el idioma
por defecto, pulse OK / START .
3.
Si desea seleccionar otro idioma, utilice las teclas de desplazamiento arriba y abajo
hasta que aparezca en el indicador el idioma que prefiera. Pulse OK / START para
confirmar.
Primer uso
Antes de utilizar el lavavajillas por primera vez:
• Compruebe que las conexiones eléctricas y de agua son conformes con las instrucciones
de instalación
Page 70

Ajuste del descalcificador de agua
70
• Retire todo el material de embalaje del interior del aparato
• Ajuste el descalcificador de agua
• Vierta 1 litro de agua en el recipiente de sal y a continuación llénelo con sal para lava-
vajillas
• Llene el distribuidor de abrillantador
Si desea utilizar pastillas combinadas con detergente, como: "3 en 1", "4 en 1", "5 en 1" etc...
ajuste la función Multitab (consulte "Función Multitab").
Ajuste del descalcificador de agua
El lavavajillas cuenta con un descalcificador de agua que elimina sales y minerales del
suministro de agua, ya que podrían afectar o deteriorar el funcionamiento de la máquina.
Cuanto mayor es el contenido de dichos minerales y sales, más dura será el agua. La dureza
del agua se mide con escalas equivalentes, en grados alemanes (°dH), grados franceses (°TH)
y mmol/l (milimol por litro, unidad internacional de la dureza del agua).
El descalcificador debe ajustarse en función de la dureza que presente el agua de su zona.
La empresa local de suministro de agua puede indicarle el grado de dureza de la misma.
El descalcificador de agua se debe ajustar de dos maneras: manualmente, utilizando el
selector de dureza del agua, y electrónicamente.
Dureza del agua Selección del ajuste de dureza
°dH °TH mmol/l manualmente electrónica-
51 - 70 91 - 125 9,1 - 12,5 2 nivel 10 sí
43 - 50 76 - 90 7,6 - 8,9 2 nivel 9 sí
37 - 42 65 - 75 6,5 - 7,5 2 nivel 8 sí
29 - 36 51 - 64 5,1 - 6,4 2 nivel 7 sí
23 - 28 40 - 50 4,0 - 5,0 2 nivel 6 sí
19 - 22 33 - 39 3,3 - 3,9 2 nivel 5 sí
15 - 18 26 - 32 2,6 - 3,2 1 nivel 4 sí
11 - 14 19 - 25 1,9 - 2,5 1 nivel 3 sí
4 - 10 7 - 18 0,7 - 1,8 1 nivel 2 sí
< 4 < 7 < 0,7 1 nivel 1 no
del agua
mente
Uso de sal
Ajuste manual
El lavavajillas se ajusta en fábrica en la posición 2.
Page 71

Uso de sal para lavavajillas
1. Abra la puerta del lavavajillas.
2. Extraiga el cesto inferior del lavavajillas.
3. Coloque el selector de dureza del agua en
la posición 1 ó 2 (consulte la tabla).
4. Vuelva a colocar el cesto inferior.
Ajuste electrónico
El lavavajillas se ajusta en fábrica en el nivel 5.
Acceda al menú Opciones - AJUSTES - DUREZA AGUA .
Con las teclas de desplazamiento arriba y abajo se ajusta el nivel de descalcificador de
agua en función de la dureza del agua de su zona (consulte la tabla).
Uso de sal para lavavajillas
ADVERTENCIA
Utilice exclusivamente sal específica para lavavajillas. Los otros tipos de sal no específicos
para lavavajillas, en especial la sal de mesa, dañarán el descalcificador de agua. Cargue la
sal sólo antes de iniciar uno de los programas de lavado completos. Así evitará que los
granos de sal o el agua salada que pueda haber salpicado permanezcan en el fondo de la
máquina, lo que puede provocar corrosión.
71
Para cargar:
1. Abra la puerta, extraiga el cesto inferior y desenrosque la tapa del recipiente de sal
girándola de derecha a izquierda.
2.
Vierta 1 litro de agua en el recipiente (esto es necesario sólo antes de cargar sal
por primera vez) .
3. Utilice el embudo suministrado para ver-
ter sal hasta llenar el recipiente.
4. Vuelva a colocar la tapa, tras comprobar
que no hay restos de sal en la rosca ni en
la junta.
5. Vuelva a colocar la tapa y ajústela girán-
dola a derecha hasta alcanzar el tope con
un chasquido.
No se preocupe si el agua desborda la unidad
al cargar sal, ya que es algo normal.
El recipiente de sal debe llenarse periódicamente.
Un mensaje en el visor digital se lo recordará RELLENAR SAL .
Esto sucede sólo al inicio y al final del programa de lavado; durante la ejecución del programa no está activa la indicación de recarga de abrillantador.
Page 72

Uso de abrillantador
72
El mensaje de recarga de sal puede permanecer visible de 2 a 6 horas después de rellenar
el recipiente, siempre que el lavavajillas permanezca conectado. Si utiliza sal que tarde más
en disolverse, este tiempo puede ser mayor. El funcionamiento de la máquina no se ve
afectado.
Uso de abrillantador
ADVERTENCIA
Utilice exclusivamente abrillantador de marca para lavavajillas.
No llene el distribuidor de abrillantador con otra sustancia (por ej., agente limpiador de
lavavajillas o detergente líquido). Podría dañar el aparato.
El abrillantador garantiza un aclarado perfecto y un secado sin puntos y franjas.
El abrillantador se añade automáticamente durante el último aclarado.
1. Para abrir el recipiente pulse el botón de
apertura (A).
2. Añada abrillantador en el recipiente. El ni-
vel de llenado máximo se indica mediante
el texto "max".
El distribuidor tiene una capacidad de unos
110 ml de abrillantador, suficiente para 16
a 40 ciclos de lavado, dependiendo del
ajuste de dosis.
3. Cerciórese de cerrar la tapa después de ca-
da recarga.
Limpie con un paño absorbente las salpicadu-
ras de abrillantador producidas durante la recarga para evitar la formación excesiva de espuma en el siguiente lavado.
El recipiente de abrillantador debe llenarse periódicamente.
Un mensaje en el visor digital se lo recordará RELLENAR ABRILL. .
Esto sucede sólo al inicio y al final del programa de lavado; durante la ejecución del programa no está activa la indicación de recarga de abrillantador.
Page 73

Uso diario
Ajuste de la cantidad de abrillantador
Dependiendo de los resultados de acabado y secado obtenidos, ajuste la dosis de abrillantador con el selector de 6 posiciones (la posición 1 es dosis mínima, la posición 6 es máxima).
La dosis se ajusta en fábrica en la posición 4.
Aumente la dosis si observa gotas de agua o motas
de cal en la vajilla tras el lavado.
Redúzcala si observa marcas blanquecinas en la
vajilla o una película azulada en las copas o la hoja
de los cuchillos.
Uso diario
• Compruebe si es necesario añadir sal de lavavajillas o abrillantador.
• Cargue los cubiertos y la vajilla en el lavavajillas.
• Añada detergente para lavavajillas.
• Seleccione un programa de lavado adecuado para los cubiertos y la vajilla.
• Inicie el programa de lavado.
73
Carga de cubiertos y vajilla
En el lavavajillas no se deben lavar esponjas, paños de cocina ni ningún objeto que absorba
agua.
• Antes de cargar la vajilla:
– Elimine todos los restos de comida y desechos.
– Ablande los restos de comida pegada de las cazuelas
• Al cargar la vajilla y los cubiertos, tenga en cuenta lo siguiente:
– La vajilla y los cubiertos no deben obstaculizar la rotación de los brazos aspersores.
– Coloque los objetos huecos, como tazas, copas, cazuelas, etc. con la abertura hacia
abajo, para que el agua no pueda acumularse en el recipiente ni en los fondos.
– Los platos y cubiertos no deben colocarse unos dentro de otros ni cubrirse entre sí.
– Para evitar que las copas se dañen, no deben tocarse entre sí.
– Coloque los objetos pequeños en el cesto de los cubiertos.
• Los objetos de plástico y las sartenes con revestimiento antiadherente tienden a retener
gotas de agua; no se secan tan bien como los objetos de porcelana y de acero.
Page 74

Carga de cubiertos y vajilla
74
• Los objetos ligeros (cuencos de plástico, etc.) deben colocarse en el cesto superior y
ordenarse de modo que no se muevan.
Para el lavado de cubiertos y vajilla en el lavavajillas
no son adecuados: son relativamente adecuados:
• Cubiertos con asa de madera, cuerno, cerámica o madreperla.
• Ele mento s de p lá sti co que no re sista n el c alor .
• Cubiertos antiguos con piezas pegadas que no
resistan altas temperaturas.
• Elementos de cubertería o vajilla pegados.
• Objetos de peltre o cobre.
• Copas de cristal de plomo.
• Objetos de acero que puedan oxidarse.
• Bandejas de madera.
• Objetos de fibra sintética.
• Lave los recipientes de barro cocido en el lavavajillas sólo si tienen una marca especial o
una indicación del fabricante.
• Los dibujos de barniz pueden desaparecer si
se lavan a máquina con frecuencia.
• Las piezas de plata y aluminio tienden a perder
color con el lavado: Los restos, como la clara
o la yema de huevo o la mostaza, pueden decolorar o manchar la plata. Por lo tanto, elimine siempre y de inmediato los restos adheridos a la plata si no la va a lavar acto seguido.
Abra la puerta y deslice hacia fuera los cestos para cargar la vajilla.
El cesto inferior
Coloque la vajilla grande y muy sucia y las cazuelas
en el cesto inferior.
Para facilitar la colocación de la vajilla grande, se
pueden abatir todos los soportes de platos posteriores en el cesto inferior.
Page 75

Carga de cubiertos y vajilla
Cesto para cubiertos
ADVERTENCIA
Los cuchillos y otros objetos con bordes afilados deben colocarse en la bandeja para cubiertos o en el cesto superior debido al riesgo de sufrir heridas.
Coloque cuchillos, cucharillas y tenedores pequeños en la bandeja para cubiertos del cesto superior.
Los tenedores y cucharas se deben colocar en la
bandeja para cubiertos del cesto de cubertería.
Para que el agua pueda circular alrededor de todos
los cubiertos en el cesto, debería realizar los siguientes pasos:
1. Coloque la rejilla en el cesto de cubiertos.
75
2. Introduzca los tenedores y las cucharas
con el mango hacia abajo en el cesto de
cubiertos.
Para utensilios más grandes como, por
ejemplo, batidoras de mano, deje libre la
mitad de la rejilla de cubiertos.
Page 76

Carga de cubiertos y vajilla
76
Es posible abrir el cesto de cubertería.
Cerciórese siempre de colocar la mano en torno a
las dos partes del asa de dos piezas cuando lo extraiga del lavavajillas.
1. Coloque el cesto de cubertería sobre una mesa
o encimera.
2. Abra el asa de dos piezas.
3. Extraiga los cubiertos.
Copas de cerveza y de cava
En los soportes para copas de cerveza, a la izquierda del cesto inferior, se pueden colgar hasta 4 copas.
Si es necesario, los soportes para copas de cerveza
se pueden abatan hacia arriba.
Los soportes para copas de cerveza se pueden sustituir por 2 estantes para tazas suministrados de
manera opcional, que también sirven para colocar
copas de cava.
Si es necesario, es posible retirar las barras que fijan
los soportes para copas de cerveza o para tazas.
• estantes para tazas
• soportes para copas de champán.
Page 77

Para retirar los soportes para vasos altos, siga los
pasos que se indican a continuación
1. Tire de ellos hacia arriba y presione ligeramente en los ganchos desde abajo.
2. Utilice los ganchos para fijar los estantes para
tazas en la barra horizontal.
Si fuera necesario, puede retirar las bases que fijan
los soportes para vasos altos o los estantes para
tazas.
1. Empuje el soporte hacia atrás con los pulgares.
Carga de cubiertos y vajilla
77
2. Empuje el soporte hacia adelante para fijarlo de nuevo en su lugar.
ADVERTENCIA
Importante: Existe riesgo de sufrir heridas: no
tome las barras con la mano; como apoyo, coloque la mano debajo de las barras en el cesto
inferior.
Page 78

Carga de cubiertos y vajilla
78
Cesto superior
Acomode la vajilla pequeña y frágil y los cubiertos
largos y afilados en el cesto superior.
• Disponga las piezas de vajilla por encima y por
debajo del soporte de tazas abatible para que
estén compensadas entre sí y el agua de lavado
alcance todos los elementos.
• Para los objetos más altos, es posible plegar
los estantes para tazas.
• Apoye o cuelgue las copas de vino o de coñac
en los enganches de los soportes de tazas.
• Para las copas de tallo alto, abata el soporte
de vasos a la derecha o a la izquierda.
Page 79

• La fila de púas situada a la izquierda del cesto
superior también se divide en dos partes y se
puede abatir.
Púas no abatidas: coloque vasos, tazas, etc.
en el cesto superior.
Púas abatidas: más espacio para platos.
Ajuste de la altura del cesto superior
Altura máxima de platos en:
el cesto superior el cesto inferior
Con el cesto superior elevado 23 cm 34 cm
Con el cesto superior bajado 25 cm 32 cm
La altura del cesto superior también se puede ajustar estando cargado.
Para subir o bajar el cesto superior:
1. Retire el cesto superior por completo.
2. Levante el cesto superior por el asa hasta
el tope y bájelo verticalmente.
El cesto superior encaja en la posición inferior o superior.
ADVERTENCIA
Después de cargar la máquina cierre siempre
la puerta; una puerta abierta representa riesgos.
Uso de detergente
79
Antes de cerrar la puerta, compruebe que los
brazos aspersores giran sin obstáculos.
Uso de detergente
Utilice exclusivamente detergente específico para lavavajillas.
Tenga en cuenta las recomendaciones del fabricante sobre dosis y almacenamiento que se
indican en el envase del detergente.
Atenerse al uso de la cantidad exacta de detergente contribuye a reducir la contaminación.
Page 80

Uso de detergente
80
Carga de detergente
1. Abra la tapa.
2. Llene el distribuidor de detergente (1). La
marca indica el nivel de dosificación:
20 = unos 20 g de detergente
30 = unos 30 g de detergente.
3. Todos los programas con prelavado necesitan una dosis adicional de detergente
(5/10 g), que debe colocarse en el compartimiento de detergente para prelavado
(2).
Ese detergente actúa en la fase de prelavado.
4. Si utiliza pastillas de detergente, coloque
la pastilla en el compartimiento (1)
5. Cierre la tapa y presione hasta que encaje.
Pastillas de detergente
Las pastillas de fabricantes diferentes se disuelven a distinta velocidad. Por ello, algunas
pastillas de detergente no alcanzan la capacidad de limpieza total en los programas de lavado breves. Por lo tanto, si utiliza pastillas de
detergente, emplee programas de lavado prolongados para garantizar la eliminación de los
residuos de detergente.
Page 81

Función Multitab
Función Multitab
Este aparato cuenta con la "función Multitab ", que permite el uso de pastillas de detergente
combinadas " Multitab ".
Son productos detergentes que combinan las funciones de limpieza, abrillantado y sal.
También pueden contener otros agentes, dependiendo de su tipo ("3 en 1", "4 en 1", "5 en
1" etc.).
Compruebe si dichos detergentes son adecuados para la dureza del agua que utiliza. Consulte las instrucciones del fabricante.
Seleccione la "función Multitab" antes de que se inicie un programa de lavado.
Una vez seleccionada dicha función, seguirá activa también para los demás programas de
lavado.
Con la selección de esta función, la entrada de abrillantador y sal procedentes de los recipientes correspondientes se desactiva automáticamente, al igual que los mensajes en el
visor digital respecto a la sal y el abrillantador.
La duración del ciclo puede cambiar cuando se utiliza la "función Multitab". En tal caso, la
indicación del tiempo que dura el programa se actualiza automáticamente en el visor digital.
Una vez que el programa está en marcha, la función " Multitab " queda bloqueada y NO
puede cambiarse. Si desea excluir la "función Multitab" deberá cancelar el ajuste de programa y desactivar la ''función Multitab ''.
En tal caso deberá seleccionar nuevamente un programa de lavado (y las opciones que
desee).
Si el resultado del secado no es satisfactorio, se recomienda lo siguiente:
1. Cargue el distribuidor de líquido abrillantador.
2. Active el distribuidor de abrillantador.
3. Ajuste la cantidad de abrillantador en la posición 2.
La activación/desactivación del distribuidor de abrillantador sólo es posible con la función
MULTITAB activa.
81
Si decide volver a utilizar el sistema de detergente normal, es conveniente que:
1. Desactive la "función MULTITAB"
2. Llene otra vez los distribuidores de sal y de abrillantador.
3. Ajuste el valor de dureza del agua al máximo y ejecute un programa de lavado normal
sin cargar vajilla.
4. Ajuste la dureza de agua de acuerdo con la que exista en su zona.
5. Ajuste la cantidad de abrillantador.
Programas de lavado
Page 82

Programas de lavado
82
Programa Grado de
suciedad
AUTOMÁTICO3)Suciedad
normal y
suciedad
extrema
Tipo de
carga
Vajilla, cubertería,
ollas y sartenes
Descripción del programa Valores de consumo
1)
2)
Prelavado
Lavado principal
Aclarado intermedio
Aclarado final
Secado
Duración (minutos)
Energía (kWh)
-
1/2x
1,1 - 1,7
Agua (litros)
12 - 23
combinadas
30 MINUTOS4)Suciedad
ligera
70° INTENSI-
5)
VO
Gran suciedad
Vajilla y cubertería
Vajilla, cubertería,
ollas y sar-
-
-
0,9
1,5 -1,7
9
16 - 18
tenes
65° NORMAL Suciedad
normal
AHORRO
ENERG.
Suciedad
6)
normal
55° 1 HORA Suciedad
normal
45° CRISTAL Suciedad
normal
Vajilla y cubertería
Vajilla y cubertería
Vajilla y cubertería
Vajilla y
cristalería
fina
PRELAVADO Cualquiera Carga par-
cial (se
-
18 - 20
1,4 - 1,6
-
12 - 13
1,0 - 1,1
-
11 - 12
1,0 - 1,2
-
14 - 15
0,8 -0,9
0,1
4
completará
a lo largo
7)
del día)
NIGHT CYCLE Suciedad
normal
1) Los valores de consumo se ofrecen como guía y dependen de la presión y temperatura del agua, así como de
las variaciones del suministro de energía y la cantidad de platos.
2) El visor digital muestra la duración del programa.
3) Durante el programa de lavado automático, el grado de suciedad de la vajilla se puede determinar observando
la turbiedad del agua. La duración del programa y los niveles de consumo de agua y energía pueden variar
Vajilla y cubertería
-
13 - 14
1,2- 1,3
Page 83

Selección e inicio del programa de lavado
dependiendo de si el lavavajillas está total o parcialmente lleno y de si la vajilla está ligeramente sucia o muy
sucia. La temperatura del agua se regula automáticamente entre 45 °C y 70 °C.
4) Es ideal cuando el lavavajillas está parcialmente lleno. Se trata del programa diario perfecto para las necesidades
de una familia de 4 personas que sólo necesita cargar la vajilla y cubertería del desayuno y la comida.
5) Este programa debe utilizarse con la función Care Plus, que proporciona un lavado intenso de la vajilla y la
cristalería con un nivel de higiene más alto. En la fase del último aclarado, la temperatura se mantendrá a por
encima de 65 °C durante 10 minutos como mínimo.
6) Programa de prueba para organismos de control.
7) Este programa no requiere el uso de detergente.
NIGHT CYCLE deseado
Night Cycle es un programa de lavado silencioso que no le molestará ni siquiera cuando
esté durmiendo. Se puede seleccionar por la noche o en horas del día con un precio energético más económico.
Durante el Night Cycle, la bomba funciona a una velocidad muy baja para lograr una reducción del nivel acústico del 25% respecto al programa determinado. Por tanto, el tiempo
de duración del programa es muy largo.
Selección e inicio del programa de lavado
1. Compruebe que los cestos están cargados correctamente y que los brazos aspersores
giran sin obstrucción.
2. Compruebe que el grifo está abierto.
3.
Pulse la tecla ON/OFF .
4. Seleccione el programa de lavado. (Consulte la tabla "Programas de lavado").
5. Si es necesario, retrase la hora de inicio del programa de lavado.
6. Si es necesario, ajuste las opciones.
7.
Pulse la tecla OK / START y cierre la puerta; el programa de lavado se iniciará automáticamente.
Si se ha ajustado el inicio diferido, la cuenta atrás empieza de manera automática.
Transcurrido el intervalo de inicio diferido, el programa se pone en marcha automáticamente.
Si se abre la puerta, la cuenta atrás se interrumpe de inmediato. Cierre la puerta; la
cuenta atrás continúa desde el punto en que se interrumpió.
ADVERTENCIA
Interrumpa o cancele un programa de lavado en marcha SÓLO si es absolutamente
necesario.
¡Atención! Al abrir la puerta puede salir vapor caliente. Abra la puerta con cuidado.
83
Cancelación de un programa de lavado o de un inicio diferido en marcha
1. Abra la puerta del lavavajillas.
2.
Pulse a la vez las teclas OPTION y OK / START .
3.
Aparece el mensaje ¿ CANCELAR ? .
4.
Pulse la tecla OK / START para confirmar.
5.
El aparato vuelve al modo de ajuste y aparece el mensaje ELEGIR PROGRAMA .
• Si se cancela el inicio diferido, también se cancela el programa de lavado.
Page 84

Descarga del lavavajillas
84
• Si selecciona un nuevo programa de lavado, compruebe que hay suficiente detergente
en el distribuidor.
Interrupción de un programa de lavado en marcha
•
Abra la puerta del lavavajillas; el programa se detiene. Aparece el mensaje CERRAR
PUERTA .
• Cierre la puerta del lavavajillas; el programa continuará a partir del punto en que se
interrumpió.
Finalización del programa de lavado
• El lavavajillas se detiene automáticamente y una señal sonora le informa del final del
programa de lavado.
El sistema de secado del lavavajillas se suministra con un dispositivo que permite la circulación de aire en el interior del aparato para evitar que el vapor residual se vuelva a condensar en la vajilla en forma de gotas de agua.
Una vez finalizado el programa de lavado, dicho dispositivo funciona de forma inter-
mitente durante 20 minutos más, mientras el lavavajillas se encuentre conectado.
Si se pulsa la tecla On/Off o se abre la puerta en el transcurso de los 20 minutos, el dispositivo
se cancela automáticamente.
1. Abra la puerta del lavavajillas.
–
Aparece el mensaje PROGR. TERMINADO que se alterna con DESCONECTAR .
2. Pulse la tecla de encendido/apagado.
– Deje la puerta entreabierta y espere unos minutos antes de extraer la vajilla; de ese
modo se enfriará y mejorará el secado
Descarga del lavavajillas
• Los platos calientes son sensibles a los golpes.
Por lo tanto, es necesario esperar a que la vajilla se enfríe antes de retirarla del lavavajillas.
• Vacíe primero el cesto inferior y a continuación el superior; de ese modo evitará el goteo
desde el cesto superior sobre la vajilla situada en el inferior.
• Es posible la presencia de agua en los costados y la puerta del lavavajillas, ya que el acero
inoxidable se enfría antes que la vajilla.
PRECAUCIÓN
Cuando el programa de lavado haya concluido, es conveniente desenchufar el lavavajillas
y cerrar el grifo.
Mantenimiento y limpieza
Limpieza de los filtros
Los filtros deben comprobarse y limpiarse periódicamente. Los filtros sucios degradan el
resultado del lavado.
Page 85

Mantenimiento y limpieza
Aparece un mensaje periódicamente para recordarle que limpie los filtros.
ADVERTENCIA
Antes de limpiar los filtros asegúrese de que la máquina está apagada.
1. Abra la puerta y extraiga el cesto inferior.
2. El sistema de filtrado del lavavajillas está
formado por un filtro grueso ( A ), un microfiltro ( B ) y un filtro plano. Utilice el asa
del microfiltro para desbloquear el sistema
de filtrado y extráigalo.
3. Gire el asa aproximadamente 1/4 de dere-
cha a izquierda y extraiga el sistema de
filtrado.
4.
Tome el filtro grueso ( A ) por el asa con
orificio y extráigalo del microfiltro ( B ).
5. Limpie todos los filtros a fondo con agua
corriente.
85
6. Extraiga el filtro plano de la base del com-
partimiento de lavado y limpie las dos caras a conciencia.
7. Vuelva a colocar el filtro plano en la base
del compartimiento de lavado y compruebe que encaja perfectamente.
8.
Coloque el filtro grueso ( A ) en el microfiltro ( B ) y presiónelos entre sí.
9. Coloque la combinación de filtros en su
posición y bloquee girando el asa a la derecha hasta el tope. Durante este proceso
cerciórese de que el filtro plano no sobresalga de la base del compartimiento de lavado.
Page 86

Qué hacer si…
86
ADVERTENCIA
El lavavajillas NUNCA se debe utilizar sin filtros. La reinstalación incorrecta de los filtros
reducirá la calidad del lavado y puede provocar daños en el aparato.
Limpieza de los brazos aspersores
NO intente extraer los brazos aspersores.
Si observa que los residuos de alimentos han taponado los orificios de los brazos aspersores,
elimínelos con un palillo.
Limpieza externa
Limpie las superficies externas de la máquina y del panel de mandos con un paño suave y
húmedo. Si es necesario, utilice sólo detergentes neutros. No utilice productos abrasivos,
estropajos ni disolventes (acetona, tricloroetileno, etc.).
Limpieza interna
No olvide limpiar periódicamente las juntas de la puerta y los distribuidores de detergente
y abrillantador con un paño húmedo.
Se recomienda que cada 3 meses ejecute un programa de lavado para vajilla muy sucia,
utilizando detergente pero con el lavavajillas vacío.
Periodos prolongados sin funcionamiento
Si no utiliza la máquina durante un tiempo prolongado, es conveniente:
1. Desenchufar la máquina y cerrar el conducto de agua.
2. Dejar la puerta entreabierta para evitar la aparición de olores desagradables.
3. Dejar el interior de la máquina limpio.
Precauciones en caso de congelamiento
No sitúe la máquina en lugares con temperaturas por debajo de 0 °C. Si tal cosa es inevitable,
vacíe la máquina, cierre la puerta, desconecte el tubo de entrada de agua y vacíelo.
Desplazamiento de la máquina
Si debe desplazar la máquina (por mudanza, etc.):
1. Desenchúfela.
2. Cierre el grifo.
3. Extraiga los tubos de entrada de agua y de desagüe.
4. Retire la máquina junto con los tubos.
No incline la máquina durante su transporte.
Qué hacer si…
El lavavajillas no se pone en marcha o se detiene durante el funcionamiento.
Algunos problemas, que pueden deberse sencillamente a falta de mantenimiento o a descuidos, pueden resolverse con la ayuda de las indicaciones de la tabla y sin necesidad de
llamar al servicio técnico.
Apague el lavavajillas y lleve a cabo las acciones de corrección recomendadas.
Page 87

Qué hacer si…
87
Mensaje en el visor digital y fallo de funciona-
• señal acústica intermitente
•
mensaje ABRIR GRIFO en el visor digital
El lavavajillas no carga agua
• señal acústica intermitente
•
BOMBA BLOQUEADA mensaje en el visor digital
El lavavajillas no desagua
• señal acústica intermitente
•
aparece en el visor digital
El dispositivo antiinundación está activado
El programa no se inicia. • La puerta del lavavajillas no se ha cerrado co-
miento
• El grifo está bloqueado o tiene incrustaciones
• El grifo está cerrado.
• El filtro (si está presente) de la conexión de
• El tubo de entrada de agua no está bien ins-
• El desagüe está obstruido.
• El tubo de desagüe no está bien instalado, está
• Cierre el grifo y póngase en contacto con el
• El enchufe principal no está conectado a la
• Se ha quemado el fusible de la caja de fusibles
• Se ha seleccionado el inicio diferido.
Causa y soluciones posibles
calcáreas.
Limpie el grifo.
Abra el grifo.
tubo roscado de la válvula de entrada de agua
está obstruido.
Limpie el filtro del tubo roscado.
talado, está doblado u obstruido.
Compruebe la conexión de la toma de entra-
da.
Limpie el desagüe.
doblado u obstruido.
Compruebe la conexión del tubo de desagüe.
Centro de servicio técnico.
rrectamente. Cierre la puerta.
toma. Conecte el enchufe principal.
de la vivienda.
Cambie el fusible.
Si decide lavar la vajilla de inmediato, cancele
el inicio diferido.
Una vez realizadas las comprobaciones, encienda el aparato: el programa continuará a partir
del punto en que se interrumpió.
Si el código de error o fallo de funcionamiento se repite, llame al Centro de servicio técnico.
En caso de producirse otros códigos de fallo no descritos en la tabla anterior, consulte al
Centro de servicio técnico local, indicando el modelo (Mod.), el número de producto (PNC)
y el número de serie (S.N.).
Esa información se puede encontrar en la placa de datos técnicos situada en el costado de
la puerta del lavavajillas.
Para que siempre tenga los datos a mano, es conveniente que los anote aquí:
Mod. (Modelo). : . . . . . . . . . . . . . . . . . . . . . . .
PNC (Número de producto) :. . . . . . . . . . . . . . . . . . . . . . . .
S.N.(Número de serie). : . . . . . . . . . . . . . . . . . . . . . . . .
Page 88

Datos técnicos
88
Los resultados del lavado no son satisfactorios
La vajilla no está limpia • Se ha seleccionado el programa de lavado
La vajilla aparece mojada y deslucida • No se utilizó abrillantador.
Se ven rayas, puntos blancos o una película azulada en copas y platos
Se han secado gotas de agua en copas y platos • Aumente la dosificación de abrillantador.
equivocado.
• La vajilla se ha dispuesto de tal modo que el
agua no llega a todas las partes de la superficie. No se deben sobrecargar los cestos.
• Los brazos aspersores no giran libremente por
la disposición incorrecta de la carga.
• Los filtros de la base del compartimiento de
lavado están sucios o colocados de forma incorrecta.
• Se ha utilizado poco o ningún detergente.
• Si se observan depósitos de cal en la vajilla; el
recipiente de sal está vacío o se ha ajustado
un nivel de descalcificador incorrecto.
• La conexión del tubo de desagüe es incorrecta.
• La tapa del recipiente de sal no está debidamente cerrada.
• El distribuidor de abrillantador está vacío.
• Reduzca la dosificación de abrillantador.
• La causa podría ser el detergente. Llame al teléfono de atención al cliente del fabricante del
detergente.
Si después de las comprobaciones anteriores se repite el problema, póngase en contacto
con el Centro de servicio técnico.
Datos técnicos
Medidas Ancho x Alto x Fondo (cm) 59,6 x 85,8-93,8 x 55
Conexión eléctrica - Voltaje -
Potencia total - Fusible
Presión del suministro de agua Mínima - Máxima (MPa) 0,05 - 0,8
Capacidad Cubiertos 12
Los datos de la conexión eléctrica se indican en la placa de datos
técnicos, situada en el borde interno de la puerta del lavavajillas
Page 89

Instalación
Instrucciones de instalación
Instalación
ADVERTENCIA
Cualquier trabajo eléctrico o de fontanería que requiera la instalación de este aparato debe
estar a cargo de un electricista homologado o fontanero profesional.
Retire todo el material de embalaje antes de situar el aparato.
Si es posible, coloque el aparato junto a un grifo y un desagüe.
Este lavavajillas está diseñado para instalarse debajo de una encimera o superficie de trabajo
de cocina.
¡Atención! Siga atentamente las instrucciones de la plantilla adjunta para empotrar el lavavajillas e instalar el panel del mueble.
No es necesario añadir aberturas de ventilación al lavavajillas, sólo son necesarias las que
permiten el paso de los tubos de entrada de agua y de desagüe y del cable de alimentación.
El lavavajillas cuenta con patas ajustables para regular la altura.
Para cualquier operación que requiera el acceso a los componentes internos del lavavajillas,
es necesario desenchufarlo.
Al empotrar la máquina, compruebe que el tubo de entrada de agua, el tubo de desagüe y
el cable de alimentación no quedan doblados o presionados.
Fijación a las unidades adyacentes
El lavavajillas debe asegurarse para evitar que se incline.
Por lo tanto, cerciórese de que la encimera bajo la que se encuentra está correctamente
unida a una estructura fija (unidades de cocina adyacentes, pared).
89
Nivelación
La nivelación correcta es esencial para el cierre y sellado adecuados de la puerta. Si el aparato
está bien nivelado, la puerta no se apoyará en ninguno de los lados del aparato. Si la puerta
no cierra correctamente, afloje o apriete las patas ajustables hasta obtener la nivelación
correcta.
Conexión de agua
Conexiones del suministro de agua
Este aparato se puede conectar a una toma de agua caliente (máx. 60 °C) o fría.
La conexión con el suministro de agua caliente permite reducir de forma importante el
consumo de energía. No obstante, el consumo depende de la fuente de energía utilizada
para calentar el agua. (Se aconseja utilizar fuentes de energía alternativas que sean menos
agresivas con el medio ambiente, como paneles solares o fotovoltáicos y energía eólica).
Para realizar la conexión, la tuerca de acoplamiento instalada en el tubo de suministro de
la máquina está diseñada para enroscarse en un conducto con rosca para gas de 3/4 pulgadas o en un acoplamiento específico como una espiga de conexión rápida.
Page 90

Conexión de agua
90
La presión del agua debe situarse en los límites indicados en las "Especificaciones técnicas".
La empresa de suministro de agua de su zona puede informarle de la presión media de la
red.
Al conectar el tubo de entrada de agua, éste no debe estar doblado, aplastado ni enredado.
El lavavajillas cuenta con tubos de entrada y desagüe que se pueden situar a derecha o
izquierda, en función de la instalación, mediante la contratuerca.
La contratuerca debe estar correctamente instalada para evitar fugas de agua.
(¡Atención! NO todos los modelos de lavavajillas cuentan con tubos de entrada de agua y
de desagüe con contratuerca. En tal caso, esta opción no estará disponible). Si la máquina
se conecta a tubos nuevos o tubos que no se han utilizado durante mucho tiempo, es
necesario dejar correr el agua durante unos minutos antes de conectar el tubo de carga.
NO utilice tubos de conexión procedentes de un aparato antiguo.
Este aparato cuenta con funciones de seguridad que impiden que el agua utilizada regrese
al sistema de agua potable. Este aparato cumple las normas hidráulicas vigentes.
Tubo de carga de agua con válvula de seguridad
Después de conectar el tubo de entrada de agua con doble pared, la válvula de seguridad
queda situada junto al grifo. Por lo tanto, el tubo de entrada de agua sólo está bajo presión
cuando corre el agua. Si el tubo de entrada de agua presenta una fuga durante esta operación, la válvula de seguridad interrumpe el paso del agua.
Tenga cuidado al instalar el tubo de entrada de agua:
• El cable eléctrico de la válvula de seguridad se encuentra en el tubo de entrada de agua
de doble pared. No sumerja el tubo de entrada de agua ni la válvula de seguridad.
• Si el tubo de entrada de agua o la válvula de seguridad sufre daños, desconecte el enchufe
principal de inmediato.
• El tubo de entrada de agua con válvula de seguridad sólo debe ser sustituido por un
especialista o por el Centro de servicio técnico.
ADVERTENCIA
¡Advertencia! Voltaje peligroso.
Conexión del tubo de entrada de agua
El extremo del tubo de desagüe se puede conectar de la siguiente forma:
1. Al sumidero, fijándolo debajo de la encimera. Así se evitará que el agua de desecho pase
del fregadero a la máquina.
Page 91

Conexión de agua
91
2. A un tubo vertical suministrado, con orificio de ventilación y un diámetro interno de
al menos 4 cm.
La conexión para desagüe debe estar a una altura
máxima de 60 cm desde la base del lavavajillas.
El tubo de desagüe puede quedar orientado a la
derecha o a la izquierda del lavavajillas.
Cerciórese de que el tubo no queda doblado ni
aplastado, ya que eso podría impedir o dificultar la
descarga de agua.
El tapón del fregadero no debe estar colocado
cuando la máquina desagua, ya que el agua podría
ser reabsorbida al interior de la máquina.
La longitud total del tubo de desagüe, incluida
cualquier prolongación que le añada, no debe superar los 4 metros. El diámetro interno del tubo de
prolongación no debe ser inferior al del tubo suministrado.
De igual modo, el diámetro interno de los acoplamientos utilizados para las conexiones con
el tubo de desagüe no debe ser inferior al diámetro del tubo suministrado.
Al conectar el tubo de descarga al desagüe, bajo el fregadero, es necesario retirar toda la
membrana de plástico (A) . Si la membrana no se retira por completo, se acumularán
residuos de alimentos que al cabo del tiempo podrían obstruir la salida del tubo de desagüe
del lavavajillas.
Nuestros aparatos se suministran con un dispositivo de seguridad que los protege del retorno de agua sucia al interior
de la máquin a. S i el sum ider o ti ene una "válv ula ant irr etor no"
incorporada, podría impedir el desagüe correcto del lavavajillas. Por lo tanto, se recomienda retirarla.
Para evitar fugas de agua tras la instalación, cerciórese de que
las conexiones de agua están bien ajustadas.
Page 92

Conexión eléctrica
92
Conexión eléctrica
ADVERTENCIA
Las normas de seguridad exigen que el aparato disponga de conexión a tierra.
Antes de usar el aparato por primera vez, compruebe que el voltaje nominal y el tipo de
suministro que indica la placa de datos técnicos coinciden con los del lugar donde se instalará.
La capacidad del fusible también figura en la placa de datos técnicos.
Conecte siempre el enchufe principal a una toma con aislamiento de conexión a tierra. No
se deben utilizar enchufes o conectores múltiples ni cables prolongadores.
Podrían provocar riesgos de incendio en caso de sobrecalentamiento.
Si es necesario, sustituya la toma de la instalación eléctrica de la vivienda. Si fuera necesario
sustituir el cable eléctrico, póngase en contacto con el Centro de servicio técnico.
Debe ser posible acceder al enchufe una vez instalado el aparato.
No tire del cable para desenchufar el aparato. Tire siempre del enchufe.
El fabricante no acepta responsabilidades por fallos debidos al incumplimiento de las normas de seguridad indicadas.
Aspectos medioambientales
El símbolo que aparece en el aparato o en su embalaje, indica que este producto no se
puede tratar como un residuo normal del hogar. Se deberá entregar, sin coste para el
poseedor, bien al distribuidor, en el acto de la compra de un nuevo producto similar al que
se deshecha, bien a un punto municipal de recolección selectiva de equipos eléctricos y
electrónicos para su reciclaje. Al asegurarse de que este producto se desecha correctamente,
usted ayudará a evitar posibles consecuencias negativas para el medio ambiente y la salud
pública, lo cual podría ocurrir si este producto no se gestionara de forma adecuada. Para
obtener información más detallada sobre el reciclaje de este producto, póngase en contacto
con el Ayuntamiento de su Municipio, ó con la tienda donde lo compró.
Materiales de embalaje
Los materiales de embalaje son ecológicos y se pueden reciclar. Los componentes plásticos
se identifican con marcas, por ej. >PE <, >PS <, etc. Deseche los materiales de embalaje en
los contenedores de uso público destinados a tal efecto.
ADVERTENCIA
Si se va a desechar la unidad:
• Extraiga el enchufe de la toma.
• Corte el cable y el enchufe y deséchelos.
• Elimine el cierre de la puerta. Esto evitará que los niños al jugar queden atrapados dentro
y pongan en riesgo su vida.
Page 93

939495
Page 94

Page 95

Page 96

www.electrolux.com
Vous pouvez commander des accessoires, consommables et pièces détachées via notre magasin
online sur: www.aeg-electrolux.be
Para comprar accesorios, consumibles y recambios en nuestra tienda online, por favor visite
nuestro site: www.aeg.com.es
117963160-00-122008
 Loading...