

Page 1

WASHING MACHINE
INSTRUCTIONS MANUAL
EWT 1058
GB
Page 2

2
Page 3

For the user
Warnings
Keep this instruction book with the appliance. If the appliance is sold or transferred to another owner, ensure
that the book is supplied with the appliance. The new user can then find out about the operation of the
appliance and the relevant warnings.
These warnings have been provided in the interest of safety.
Please read these notes carefully before installing and using your appliance. Thank you for your attention.
Use
• Upon delivery of the appliance, remove the packaging
immediately. Check its general appearance.
Note any comments in writing on the delivery note of
which you keep one copy.
• This appliance is designed to be used by adults.
Ensure children do not touch it and use it as a toy.
• It is dangerous to alter or try to alter the specifications
of this appliance.
• Your appliance is designed for normal domestic usage.
Do not use it for commercial or industrial purposes or
for other uses than the one for which it was designed.
• Always unplug the appliance and turn off the water
after use.
• Only wash items which are designed to be machine
washed. Follow the instructions on the care label in
each garment.
• Do not wash garments containing wire and frayed or
torn articles.
• Any objects such as coins, safety pins, nails, screws,
etc. should be removed before washing.
They can cause extensive damage if they are left in
the clothing.
• Garments on which stain removers containing petrol,
alcohol, trichloroethylene, etc have been used should
not be machine washed. If such stain removers are
used, allow the product to evaporate before placing the
garments in the drum.
• Wash small items such as socks, laces, etc, in a small
washing bag or pillow. This prevents these items
sliding between the drum and the tub.
• Only use the quantities of fabric softener recommended
by the manufacturer. Indelible marks on the fabric may
result if you overfill with softener.
• Always unplug the appliance before cleaning and repairing it.
Safeties
• Lid: your appliance is fitted with a safety device
preventing the lid from being closed when the drum
doors are open. It is then impossible to start.
An electronic safety device prevents the lid from being
opened during the operating cycle. At the end of the
cycle, the lid can be opened immediately: the immediate
opening “Door” light is thus extinguished. When the
lid is locked and released, an audible “click/clack”
alarm is sounded to warn you of the start or end of the
cycle.
Note: In the event of a power failure, the lid can only
be opened after 2 minutes.
• Washing motor:
motor against the risk of mechanical overload, excess
voltage or low voltage.
• Heating:
is filled with the amount of water required for washing.
This safety device works essentially when the water is
cut off or if the water inlet tap is closed.
• Anti-foam system
intermediate spin after the main wash and the three
rinsing cycles for the whites and coloureds programmes ensures very low water consumption. After the
wash cycle, the spin cycle remains controlled by the
foam detection system. If necessary, the spin cycle is
interrupted until the foam is evacuated.
• Balance control system:
the appliance remains stable during intermediate or
final spins and detects if the load is unevenly distributed
in the drum (small load or tangled washing) which the
balance control system then remedies.
the heating system can only operate if the tub
a thermal safety device protects the
: The electronic spin cycle with
This safety device ensures
3
Page 4

Disposal
Packaging
• All materials marked with the symbol are recyclable. Dispose of them in a tip designed for this purpose
(contact your local waste disposal office) so that they
can be recovered and recycled.
> PE <= polyethylene
> PS <= polystyrol
> PP <= polypropylene
Environment protection
To save water and energy and therefore to help to protect
the environment, we recommend that you follow these
instructions:
• If possible, load the appliance to full capacity rather
than with partial loads (ensuring that the drum is not
overloaded).
Appliance
When disposing of your old appliance, make it unusable
as it may represent a danger: cut the electric cable and
make the door catch unusable.
• Use the prewash function only for very dirty laundry.
• Adjust the amount of detergent to the hardness of the
water as well as to the load and soiling of the laundry.
4
Page 5

Contents
For the user
Warnings 3
Description of the appliance 6
Control panel 7
Description of controls 7-10
Using the machine 11-12
Loading the laundry 11
Measuring the detergent 11
Additives 11
Selecting the desired programme 11
Selecting the spin speed or the "no spin"
option 11
Selecting the desired option 12
Selecting the delay start 12
Starting the programme 12
Modifying the programme in progress 12
Interruption a programme in progress 12
Opening the lid 12
Cancelling a programme 12
End of programme 12
Washing guide 13
Sorting the laundry into categories 13
Temperatures 13
Removing stains 13
Check the laundry 13
Maximum laundry loads depending on
fabric type 14
Detergents 14
International wash care symbols 15
Programme chart 16-17
Maintenance and cleaning 18
Descaling the appliance 18
After each wash cycle 18
External cleaning 18
Detergent dispenser 18
Drain filter 18
Troubleshooting 19
After-Sales Service 21
For the installation engineer
Warnings 22
Installation 22
Technical specifications 22
Installation 23
Removing the transit bolts 23
Location 23
Levelling 24
Moving the appliance 24
Water inlet 24
Draining 24
Electrical connection 25
How to read the instructions manual ?
The following symbols will assist you whilst reading this manual:
Safety instructions
Advice and recommendations
Information linked to the protection of the environment
5
Page 6

Description of the appliance
Display window
Programme progress
Start / Pause button
Programme
selector
Options
Lid
Lid handle
Detergent dispenser
Symbols
1 - prewash (
2 - wash (
3 - softener (
4 - softener overflow
)
) (powder or liquid detergent)
)
Filter access flap
1
3
2
4
Lever for placing
appliance on rollers
6
Page 7
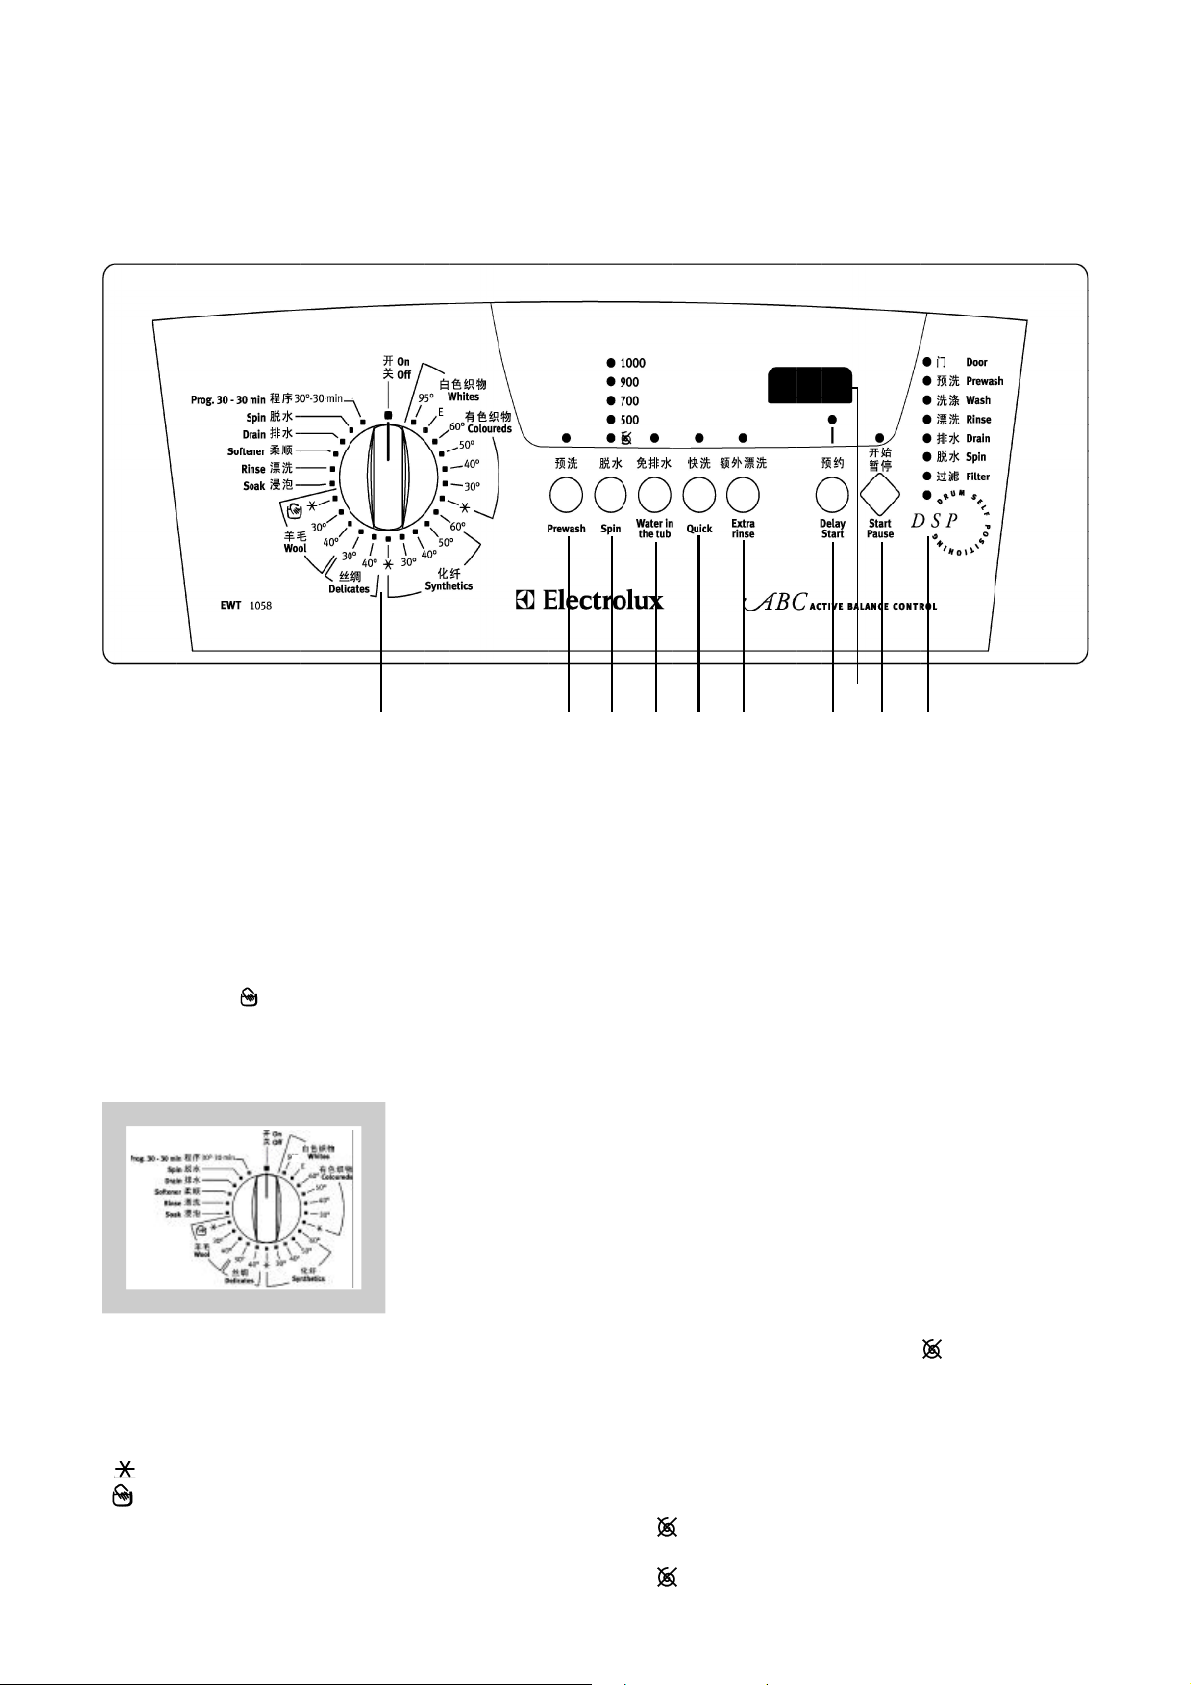
Control panel
8
4321
6
5
7
10
9
1. Programme selector
It is used to select the most suitable programme to the
type and soiling of your laundry as well as the temperature of the washing.
This dial is divided into two sectors:
- wash programmes:
whites, coloureds, synthetics, delicates, wool and
handwash (
- additional programmes and stop function.
This programme selector can be turned to the left or to
the right.
At the end of the programme, the selector should be
on the stop position "On/Off".
Symbols on the programme selector:
- E = energy saving programme,
= cold,
= handwash programme.
-
),
5°
Options buttons
The various options should be chosen after the
programme has been displayed and before pressing
the Start/Pause button.
The corresponding lights illuminate when these buttons
are pressed. When pressed again, the lights extinguish.
They flash for approximately 3 seconds and the word
"Err" appears on the display window to warn of a selec-
tion error.
2. Prewash button
The appliance performs a prewash at 30°C max.
The prewash ends with a short spin for the whites,
coloureds and synthetics programmes and drains the
water for delicates. It is not possible to select the
prewash option for the wool and handwash programmes.
This option is recommended for heavily soiled laundry.
3. Spin button
When selecting the programme, a maximum speed
(corresponding to the type of laundry) is displayed.
However, by pressing the Spin button, this speed can be
reduced or the "no spin" option "
selected depending on your drying options.
Spinning speeds depend on the type of laundry. The
following speeds can be selected:
• Whites / Coloureds:
500/700/900 and 1000 rpm.
• Synthetics / Wool / Handwash:
/500/700 and 900 rpm.
• Delicates:
/500 and 700 rpm.
7
" (drain) can be
Page 8

No spin
If you select the " " position, the appliance drains the
water only. This function cannot be selected with the
Whites and Coloureds programmes. This function is
very useful for very delicate laundry.
4. Water in the tub button
This button can be used with all wash and rinse programmes. The water from the final rinse is not drained
at the end of the selected programme to prevent creasing the laundry if it is not removed immediately from the
drum. You can select this option at any point up to the
rinse cycles by selecting the Start/Pause button beforehand. The Start/Pause light flashes and the remaining
time display window shows “
There are three different ways of draining the water:
• Select the Drain programme
The appliance drains the water without spinning. Before
selecting the Drain programme
lector must be in the stop position "On/Off".
• Press the Start/Pause button
The appliance drains the water and spins the washing
depending on the type of laundry at maximum speed.
• Select the spin speed
Select the desired spin speed by pressing the Spin
button and then press the Start/Pause button.
Warning: if the water is not drained within 18 hours, the
water is automatically drained.
0”.
, the programme se-
5. Quick button
By pressing this button, the washing time is reduced as
follows:
- 49 minutes for the 90°C whites programmes,
- 62 minutes for the 60°C coloureds programmes,
- 28 minutes for synthetics,
- 8 minutes for delicates.
This function cannot be used on the wool, handwash
programmes and is recommended for lightly soiled
clothes.
6. Extra rinse button
This button can be selected with all programmes except
with wool and handwash "
The appliance performs 4 rinses instead of 3.
" programmes.
7. Delay start button
This button is used to delay the start of a programme
from 1 to 24 hours.
Using delay start
• Select the programme.
• Select the required time for the delay start.
• Press the Start/Pause button.
The timer is displayed in hours.
The lid can be opened to load the washing during the
delay start period by pressing the Start/Pause button.
The programme starts when the time has elapsed.
Modifying the delay start
• Press the Start/Pause button.
• Press the Delay start button until the new number of
hours at the end of which you want the programme to
start appears in the display window; if you want to
cancel delay start, move the programme selector to
the stop position "On/Off".
• Press the Start/Pause button again so as to
activate the new delay start selection or to start
the programme (if the delay start has been
cancelled).
Be careful : if you use liquid detergent for a washing
cycle with a delay start, use a ball to put directly in the
drum and choose a programme without prewash.
If you want to realize a prewash with a delay start in the
same time, please use powder detergent.
8. Display window
This display window is used to view the following
information:
Programme cancellation - programme duration - delay start - incorrect selection - error codes.
Programme cancellation
If you want to cancel a programme, turn the programme
selector dial to the stop position "On/Off". A new
programme can then be selected after cancelling the
previous one.
Programme duration
This is calculated as a function of the maximum load
specified for each textile
2.052.05
The programme duration can vary depending on the
temperature and the water inlet pressure as well as the
mains voltage of your appliance or else if foam during
rinses or imbalances during spinning are detected.
When the programme has finished, “
display window.
You can activate the delay start using the Delay start
button (24 hours maximum). The number of hours at the
end of which you want the programme to start decreases hour by hour.
8
type. The readout of the
washing time appears in
hours and minutes in the
display window and reduces
minute by minute.
0” flashes in the
Delay start
Page 9

1515
Err
44
Incorrect selection
If you select a function which
is not compatible with the
chosen wash programme,
the time remaining window
displays “Err”.
Error codes
Pause
The programme in progress is interrupted when this
button is pressed. It continues when this button is
pressed again. During the pause, the light of the Start/
Pause button flashes.
Drain
By pressing the Start/Pause button:
• The water from the soak programme is drained.
• The water from programmes with rinse hold is drained
(button selected) and the washing is spun.
10. Programmes procedure
Any operating faults are
shown by an error code on
the display. The error code
E40E40
provides assistance for users and for the After-Sales
Department (see pages 19
and 20).
9. Start/Pause button
This button has three
functions:
Start - Pause - Continuation
of the cycle after stopping
with the tub full or after
soaking.
Start
When you select a programme, the lights corresponding
to the various phases within the programme illuminate.
When the programme starts, only the immediate opening
light "Door" and the phase in progress light remains
illuminated.
If one of the lights as follow and the "DSP" light flash at
the same time than an error code on the display window,
the following faults may have occurred:
• E10 + "Rinse" light:
==> the appliance is not filling.
• E20 + "Wash" light:
==> the appliance is not draining.
• E40 + "Prewash" light:
==> the lid is not closed properly.
See the “Troubleshooting” section on page 19 to remedy
the fault.
After having selected the wash programme, press this
button to start the appliance; the corresponding light
stops flashing.
If you have selected a delay start, the timer starts.
The time remaining window displays the duration of the
programme or the delay start time.
9
Page 10

Information about the programme
Wool
With this programme, woollen garments which contain
the words “pure new wool, machine washable, does not
shrink” on the care label can be washed but also woollen garments which normally have to be handwashed
and all other garments which contain the “hand wash-
able” symbol on the care label.
Soak
The soak programme is a separate programme which
operates with the Start/Pause button after having selected it.
It is recommended for washing heavily soiled laundry.
Pour the powder into the prewash compartment
The washing temperature is 30°C and the programme
ends with the tub full.
The water can be drained in two ways:
• Draining only
Press the Start/Pause button. The water is drained.
• Drain and spin
Turn the programme selector dial to the stop position "On/Off", select the Spin programme (and the
spin speed if necessary) and press the Start/Pause
button.
.
Spin
This programme spins the washing at maximum speed.
A different spin speed can be selected depending on
the nature of the washing using the Spin button.
Prog. 30 - 30 min
A complete programme which can be combined with the
following functions:
Spin, no spin (drain), water in the tub and delay start.
This programme can be used for lightly soiled clothing or
to freshen it up.
Maximum load: 2,5 kg
Washing temperature: 30°C
Programme duration: 30 minutes
Spin speed: 700 rpm
On/Off
If you want to cancel a programme which has already
been selected, turn the programme selector dial to the
stop position "On/Off". Another programme can then be
selected.
Warning
• If the water is not drained within 18 hours, the
appliance is drained automatically.
• After draining, a wash programme can be selected.
Turn the programme selector dial to the stop posi-
tion "On/Off", select the programme and press the
Start/Pause button.
Rinse - Softener
This is a separate programme which is used to rinse
and spin handwashed garments.
Drain
The separate drain programme can be used for programmes which end with the tub full to drain the water
before the final rinse.
First, turn the programme selector dial to the stop
position "On/Off" then select the Drain programme.
Press the Start/Pause button.
THE DRUM SELF POSITIONING SYSTEM
This electronic system ensures the doors are in the
upper position when the wash programme finishes thus
aiding removal and loading of the washing. If the washing
remains unevenly distributed meaning that the drum is
not in the correct position, turn the drum the hand until
the doors are in the high position.
10
Page 11

Using the machine
Before using your appliance for the first time, we
recommend you to perform a preliminary wash, without
laundry, to clean the drum and tub if necessary:
- Pour an amount of detergent into the “wash” compart-
ment.
- Select a 95°C cotton programme.
- Press the Start/Pause button : the wash cycle starts.
1. Loading the laundry
A
lift the lid of the machine,
open the drum by pressing on button A : the two flaps
are opened automatically,
load the laundry, close the drum and the lid of the
appliance.
Warning: before closing the lid of your appliance,
ensure that the drum door is properly closed:
the two flaps are locked,
the locking button A is out.
An electronic system allows the drum to be in the high
position when the cycle is finished. This system allows
for easier loading and unloading of the laundry. If an
unbalanced weight alters the functionning, turn the drum
by hand.
4. Selecting the desired programme
Turn the programme selector to the chosen programme.
The lights corresponding to the phases included in the
programme illuminate.
If the programme selector is turned when the appliance
is performing a wash cycle, the code “Err” appears in the
display window and flashes for 4 seconds. The programme will be carried out and will ignore the new
position of the selector. The timer for the current cycle
reappears in the display window.
The stop position "On/Off" of the programme selector is
used to cancel the programme and to restart the appliance in the event of an error.
6. Selecting the spin speed or the
no spin option "
"
2. Measuring the detergent
Pour the amount of powdered detergent into the dispens-
( ) and ( ) or a scale-remover into the dispenser
ers
( ) if applicable.
If you are using a liquid detergent, refer to the “Choosing
a detergent” section in the washing guide.
3. Additives
If required, pour fabric softener into the softener dispenser
( ) without exceeding the maximum level.
When selecting the programme, or in pause mode, the
light corresponding to the maximum spin speed
illuminates. You can adjust the spin speed which corresponds to the type of laundry and the degree of dampness
required at the end of the wash depending on your drying
possibilities. You can also choose the no spin position
" immediately after the final rinse.
"
7. Selecting the desired option
Press the desired button or buttons; the corresponding
lights illuminate. When one of these options is not
compatible with the selected programme, the corresponding light flashes for 4 seconds and the word “Err”
appears in the display window.
11
Page 12

8. Selecting delay start
Before starting the programme, if you want to delay it,
press this button until the desired delay start is displayed; this appears in the display window (24 hours
maximum).
9. Starting the programme
- Opening the lid at the end of the cycle:
The immediate opening of the lid is signalled by a double
“click” of the locking device. The immediate opening
light "Door" is extinguished and only the drum in upper
position light "DSP" remains illuminated.
13. Cancelling a programme
Turn the programme selector dial to the stop position
"On/Off".
14. End of programme
The appliance stops automatically.
If the "Water in the tub" option has been selected, the
light of the Start/Pause button flashes indicating that the
water must be drained before opening the lid (see page
8: "Water in the tub" button).
Turn the programme selector dial to the stop position
"On/Off".
Remove the laundry.
Unplug the appliance and switch off the water inlet tap.
Check that the drum is empty: any garments left in the
machine may be damaged during the next wash (shrink-
age) or their colour may run onto other garments.
Press the Start/Pause button: the corresponding light
stops flashing and only the lights of the phase currently
being performed and the light of the Start/Pause button
remain illuminated.
If a delay start has been selected, the appliance starts
the timer.
The time remaining window displays the duration of the
programme or the delay start.
10. Modifying the programme in
progress
Before any modifications, the appliance must be switched
to PAUSE by pressing the Start/Pause button. If you
want to change the programme, the current one must be
cancelled first by turning the programme selector to the
stop position "On/Off". Then select the new programme
and press the Start/Pause button again.
11. Interrupting a programme in
progress
Press the Start/Pause button: the corresponding light
flashes during the pause period. Press this same button
again to continue the programme.
Note:
We recommend that the lid and drum are left open after
use to air the tub.
12. Opening the lid
- Opening the lid during the cycle:
The lid can be opened (after pressing the start/pause
button) throughout all wash phases when the temperature of the washing water is below 40°C; the immediate
opening light "Door" is then illuminated.
12
Page 13

Washing guide
Sorting the laundry into categories:
Removing stains
Remove certain stains which may not come out, especially if they are old, by working from the outside of the
stain towards the inside to avoid making rings.
To obtain the best washing results, we recommend that
you sort your laundry into categories:
- on the one hand, resistant laundry which can withstand
powerful washing and spinning;
- on the other hand, delicate laundry which should be
washed with care.
For mixed loads or loads consisting of garments made
from fibres of different types, select a programme and
temperature suited to the most delicate fibre.
Temperatures
High temperature : 90°C
Ideal for cotton, linen and hemp garments such as tea
towels, towels, sheets, pillow cases, etc. The generally
white fibres may be heavily soiled.
Average temperature : 60°C
Recommended for whites which are not heavily soiled
and for fast coloureds, for synthetics and mixed cotton.
All these garments contain a care label stating that they
can be washed at a maximum temperature of 60°C.
Low temperature : 30-40°C
Ideal for delicate synthetics, silk, acrylic and woollen
garments containing the care label “pure new wool - does
not shrink - (
general be dry cleaned or handwashed.
Washing coloureds
When washed for the first time, coloureds may loose
their colour which may run onto other garments.
To ensure that the colour does not run, we recommend
that you perform the following simple test:
)". All other woollen garments must in
Grass. Wash carefully, treat with diluted bleach. For
woollen garments, methylated spirits may achieve good
results.
Felt tip pen. Dab with a clean cloth soaked in methylated spirits. Take care not to spread the stain.
Rust. Use an anti-rust product, following the manufacturer’s recommendations carefully.
Scorch marks. If the fabric is only slightly scorched and
provided that the colours are fast, soak in water with a
little bleach, otherwise soak the fabric in a solution of 10
parts water to 1 part hydrogen peroxide and leave for 10
- 15 minutes.
Chewing gum. Dilute it with nail varnish remover then
remove it with a clean cloth. Ensure that the fabric can
withstand the nail varnish remover.
Tar. Spread a bit of butter onto the stain, leave then
sponge off with turps.
Lip stick. Place the stained side of the fabric on kitchen
paper then dampen the reverse of the fabric with nail
varnish remover taking care to change the paper underneath the stain frequently. Ensure that the fabric can
withstand the nail varnish remover.
Paint. Do not allow paint marks to dry. Treat immediately with the solvent specified on the paint tin (water,
turps, white spirit). Wash then rinse.
Wax. Scratch off the wax with a blunt blade to remove
as much as possible, then iron it placing a sheet of silk
paper between the iron and the stained fabric.
Select a non visible
part of the garment
Dampen with
warm water
Then press it between a
white piece of cotton
If the colour runs
handwash the
garment
If the colour does not
run, you can machine
wash it
Check the laundry
Empty all pockets.
Close zips and poppers.
Remove curtain hooks or place the curtains in a laundry
bag.
Remove loose buttons, pins and clips.
To protect them, place curtains in a pillow case for
example.
Fasten or remove loose buttons.
13
Page 14

Maximum laundry loads depending on fabric type
The amount of laundry placed in the drum must not
exceed the maximum capacity of the appliance. This
capacity varies depending on the nature of the fabrics.
Reduce the quantity for heavily soiled laundry or for
sponge type fabrics.
Maximum load
Not all textiles have the same volume and the same
water retention ability.
This is why, the drum should in general be filled:
- fully but without excessive pressure for cotton, linen
and mixed fabrics,
- half full for treated cottons and synthetic fabrics,
- approximately a third full for very delicate garments
such as net curtains and woollen items.
For a mixed laundry load, fill the drum depending on the
nature of the most delicate fabrics.
The average weights of the most common items are
listed below as a guide:
Note : Only use low foaming detergents, specially
designed for use in wahing machines. Use neutral
products for washing wool.
If you use liquid detergents, place the dosing ball
directly into the drum. If the laundry is then to be dried
in a tumble dryer, remember to remove the dosing ball.
Liquid detergent can also be poured directly into the
dispensing drawer (
switched on immediately.
Liquid detergents are designed for lower temperatures,
being 30°C and 40°C, whilst a powder detergent should
be used for higher temperatures from 60°C to 90°C.
), provided that the appliance is
bath robe .......................................................... 1200 g
hand towel ......................................................... 180 g
large towel ........................................................1300 g
single sheet ........................................................ 800 g
pillow case ..........................................................200 g
night shirt ............................................................ 180 g
man's pyjamas.................................................... 500 g
child's pyjamas ................................................... 200 g
man's shirt .......................................................... 250 g
blouse ................................................................. 150 g
tea towel ............................................................. 100 g
overalls ..................................................... 300 à 600 g
Detergent
Choosing the detergent
Detergent manufacturers state on the label the maximum amount of detergent to be used depending on the
laundry load.
Amount :
The amount of detergent to use depends on the amount
of laundry to be washed, water hardness and the degree
of soiling of the laundry.
Use slightly less detergent in soft water areas. For hard
water areas or heavily soiled or stained laundry, use
lightly more detergent.
You can find out about how hard the water is in your area
by contacting your local water board or other professional department.
14
Page 15

International wash care symbols
NORMAL
WASH
DELICATE
WASH
BLEACHING
Washing
at
95°C
Washing
at
60°C
Washing
40°C
Chlorine bleach may be used
(cold wash only and with a diluted
solution.)
at
Washing
at
30°C
Delicat
hand
washing
Do not use chorine black
Do not
wash
IRONING
DRY
CLEANING
DRYING
High temperature
max2000.
Dry cleaning
(all normal
solvents)
Dry garment
flat
Medium temperature
max. 150°C
Dry cleaning (all
solvents except
trichloroethylene)
Dry garmen
hanging
Low temperature
(petroleum and R113
solvents only)
Dry on clothes
hanger
max 110°C
Dry cleaning
High heat
setting
Low heat
setting
May be tumble
dried
Do not iron
Do not
dry clean
Do not tumble
dry
15
Page 16

"handwash" symbol
Programme chart
SEE THE DISPLAY WINDOW
WASH PROGRAMMES
Position of
programme
selector
Whites
95
Whites
60 E
Coloureds ( )
60
50
40
30
Synthetics
60
50
40
30
Wash programme Possible
options
Whites, e.g. normally
soiled work clothes,
bed linen, table linen,
clothes, towels
Energy saving
programme for
whites
ECO white, e.g.
lightly soiled sheets,
lightly soiled table
linen, etc. Cotton or
linen colours clothes,
sponge fabric
Synthetics, clothes,
coloureds, non-iron
shirts, blouses
Prewash
Quick
Water in the tub
Extra rinse
Prewash
Water in the tub
Extra rinse
Prewash
Short
Water in the tub
Extra rinse
Prewash
Short
Water in the tub
Extra rinse
Max.
load
5,0 kg 64 2,00
5,0 kg 64 1,50
5,0 kg 49 0,95
2,5 kg 57 0,90
Indicative consumptions (*)
Water
liters
Power
kWh
Time
min.
Delicates
40
30
Wool
40
30
Handwash
( ) Programme recommended for comparisons based on CEI standard 456: 60°C cotton programme.
* The data is given purely as an indication: the consumption values may vary in relation to the quantity
and the type of laundry, the temperature of the water supply and the ambient temperature. The data
refers to the highest temperature provided for each programme.
For delicate fabrics
e.g. curtains
Machine washable
wool
Very delicate laundry
bearing the
Prewash
Short
Water in the tub
Water in the tub 1,0 kg 50 0,40
Water in the tub 1,0 kg 50 0,30
2,5 kg 53 0,50
16
Page 17

Programmes chart
SEE THE DISPLAY WINDOW
SPECIAL PROGRAMMES
Position of the
programme
selector
Soak
Rinse
**
Softener
Drain
Programme
description
For very dirty
laundry except
wool
Handwashed
laundry can be
rinsed with this
programme
Handwashed
laundry can be
rinsed with this
programme
Water from final
rinse drained for
wash
programmes
which stop with
rinse hold
Wash programme Possible
options
Presoak at 30°C.
Rinse hold.
To drain, press
Start/pause button.
After 18 hours, the
machine drains
automatically.
3 rinses with liquid
softener.
Spin.
1 rinse with liquid
softener.
Spin.
Water drained
(see page 8)
Water in the tub 5,0 kg
Water in the tub 5,0 kg
Max.
load
5,0 kg 24 0,30
2,5 kg
2,5 kg
5,0 kg
2,5 kg
Indicative consumptions (*)
Water
liters
40 0,15
20 0,05
- 0,01
Power
kWh
Time
min.
Spin
Prog. 30 - 30 min
On/Off
Separate spin
for all garments
For lightly soiled
garments,
except wool
Stop, cancel Current programme
Spin 5,0 kg
2,5 kg
Washing at 30°C
2 rinses
Short spin at 700 rpm
cancelled
Water in the tub 2,5 kg 47 0,20
- - -
- 0,03
* The data is given purely as an indication: the consumption values may vary in relation to the quantity
and the type of laundry, the temperature of the water supply and the ambient temperature. The data
refers to the highest temperature provided for each programme.
** "Water in the tub" button not selected: rinsing for cotton programmes, bleaching possible.
"Water in the tub" button selected: rinsing for synthetics and delicates programmes.
17
Page 18

Maintenance and cleaning
Disconnect the appliance before cleaning.
Descaling the appliance
It is not generally necessary to descale the appliance if
the correct amount of detergent is used.
However, if scale builds up, use a specific non corrosive
product specially designed for washing machines available in the shops.
Use the correct amount of descaler and the correct
descaling frequency specified on the packaging.
After each wash cycle
We recommend that the lid and drum are left open after
use to air the drum and prevent mould and stagnant
smells forming.
External cleaning
Clean the exterior cabinet of the appliance with warm
water and mild detergent. Rinse and dry thoroughly.
Important: never use alcohol, solvents or similar products.
Detergent dispenser
Removal :
Press the clips located on either side of the dispensing
drawer and pull it upwards.
Refitting :
Reposition the detergent dispenser in the slots until it is
clipped in.
Drain filter
Regularly clean the filter located at the bottom of the
appliance ("Filter" light illuminates when this filter is
blocked). If you frequently wash laundry which sheds
fluff, clean the filter after each wash. Lower the drain
hose over a large bowl placed on the floor to drain any
water remaining in the machine then:
to drain the residual water:
a. Open the flap
You can then clean it with running water and a brush or
cloth.
Check that the siphons located at the rear of the
dispensing drawer are not blocked.
b. Place a shallow straight edged bowl underneath.
To finish draining, turn the drain filter plug so that it is
vertical and can release the residual water.
to clean the filter:
a. Turn the filter in an anti-clockwise direction and
remove.
b. Clean it thoroughly under running water.
c. Replace the filter and screw it in a clockwise
direction.
d. Close the flap.
18
Page 19

Troubleshooting
The manufacturing process of your appliance has been subject to many checks. However, if you notice an operating
fault, refer to the table below before calling the after-sales service. Whilst the appliance is operating, the following error
codes may appear in the display window (and the cycle progress lights may flash, see page 12).
E10 + "Rinse" and "DSP" lights: filling problem.
E20 + "Wash" and "DSP" lights
E40 + "Prewash" and "DSP" lights: lid open.
Err : Incorrect selection.
After having removed the possible causes of the fault, press the Start/Pause button to restart the interrupted cycle.
If the error code reappears or if the fault has not disappeared, contact the after-sales service of your retail outlet.
: draining problem.
Symptoms
The machine does not start.
The machine does not fill.
The machine empties as it fills.
The machine does not spin and/
or does not drain.
Solutions
Check that:
- the fuses are in good condition,
- the appliance is correctly connected,
- the lid of the appliance and the drum flaps are
correctly closed (error code E40),
- the “Start/Pause” button has been pressed,
- there is not a power failure,
- the water tap is fully open,
- the water inlet filter is not blocked.
Check that:
- the water inlet tap is open and that there is sufficient
pressure,
- there is not a water cut.
Check that:
- the end of the drain hose is not too low.
Check that:
- the drain hose is not blocked or kinked (error code
E20),
- the drain pump filter is not blocked ("Filter" light
illuminated),
- the laundry load is correctly balanced in the drum,
- the Drain programme or the "Water in the tub" option
have not been selected.
The machine leaks or overflows.
The washing results are not
satisfactory.
Check that:
- there is not too much detergent,
- the detergent is suitable for machine washing
(formation of excess foam),
- the end of the drain hose is correctly secured,
- the drain filter is correctly replaced after cleaning,
- the water inlet hose is not leaking.
Check that:
- the detergent is suitable for machine washing,
- the machine is not overloaded,
- the wash programme is suitable.
19
Page 20

Symptoms
Solutions
The machine vibrates or is very
noisy.
The lid does not open.
The wash cycle is much too long.
The machine stops during a wash
cycle.
Check that:
- the transit bolts have been removed (see "removing
transit bolts" section),
- the appliance is level and installed correctly,
- the appliance is not too close to a wall or other
furniture,
- the laundry is correctly distributed in the drum,
- the appliance is not overloaded.
- the appliance is in the heating phase,
- the lid is still locked.
Check that:
- the water pressure is sufficient,
- the water inlet filter is not blocked,
- there is not a water cut
Check that:
- the water pressure is sufficient,
- the water inlet filter is not blocked,
- the fuses are in good condition and have not blown,
- the appliance is not finishing its wash programme
by a rinse hold.
The laundry is not spun
sufficiently or water remains in
the drum (error code E20).
Softener flows out of the overflow
hole.
Check that:
- the drain hose is not kinked,
- the height of the end of the drain hose is not higher
than on metre,
- the drain pump filter is not blocked ("Filter" light
illuminated),
Check that:
- you have used the correct amount,
- the siphons on the rear of the detergent dispenser
are not blocked.
20
Page 21

After-Sales Service
If an operating fault occurs, refer to the “TROUBLESHOOTING” section. If, despite all the checks,
a repair is deemed necessary, contact the retailer
of your appliance in the first instance. Failing this
(if you have moved house, if the shop where you
bought the appliance has closed, etc), please
contact the Consumer Technical Assistance which
will then inform you of the address of an AfterSales Service.
If your appliance is repaired, ask the After-Sales
Service to use Manufacturer certified Replacement Parts.
Rating plate
When calling an After-Sales Service, specify the
model, product number and serial number of the
appliance. This information is shown on the inside
of the filter access flap and on the rating plate
mounted on the rear of the appliance.
21
Page 22

For the installation
engineer
Warnings
Installation
• This appliance is heavy. Take care when moving it.
• The transit bolts must be removed before use. Failure
to remove the protection devices for transport may
damage the appliance or neighbouring furniture. The
appliance must be unplugged when removing the transit bolts.
• Ensure a qualified plumber carries out the necessary
plumbing work to install the appliance.
• If the electricity supply to your home requires modifying
in order to connect your appliance, contact a qualified
electrician.
• Before connecting your appliance, carefully read the
instructions given in the "Electrical connection" sec
tion.
• After having installed the appliance, ensure that it is
not resting on the power lead.
• When the machine is installed on carpeted floor, ensure
that the carpet does not obstruct the ventilation
openings located on the underside of the appliance.
• The power lead must only be replaced by the After-
Sales Service.
Technical specifications
DIMENSIONS Height 850 mm
Width 397 mm
Depth 600 mm
VOLTAGE / FREQUENCY 230 V / 50 Hz
TOTAL POWER 2300 W
FUSE RATING 10 A
WATER PRESSURE minimum 0,05 MPa (0,5 bar)
maximum 0,8 MPa (8 bar)
SPIN SPEED cotton / mixed cotton 500 / 700 / 900 / 1000 rpm
synthetics / wool
delicates
Power consumption (coloureds 60°C wash) 0,95 kWh
for an uniform load of 5,0 kg of mixed cotton
This appliance complies with EEC directive 89-336 relating to electromagnetic compatibility and to directive
EEC 73-23 relating to electrical safety.
/ 500 / 700 / 900 rpm
/ 500 / 700 rpm
22
Page 23

Installation
Removing the transit bolts
Parts used to protect the internal components of
the appliance during transport must be removed
before the appliance is used for the first time.
These parts and their mountings must be kept for
future transport.
1. Remove the packaging from the appliance. Tilt the
appliance towards the rear, rotate it through a quarter
of a turn on one of the rear corners to remove the
transport pallet.
This comes away naturally from the appliance.
2. Open the lid of the appliance and remove the wedge
which is blocking the drum and the red plastic
spacer. Close the lid.
B
5. Ensure that you have removed all these parts from
the appliance and keep them for future transportation
(e.g. when moving house).
6. If you want to align your appliance with neighbouring
furniture, you can cut the pipe bracket located on the
rear of the appliance. This will gain an extra 2 - 3 cm
in depth. Leave the two side blanks in place.
3. On the rear part and using a 10 mm spanner, unscrew
and remove the red spacers (A).
A
4. The holes which are now visible should be blanked
with the plugs (B) which are located in the bag
attached to the appliance, remembering to insert the
central capsule.
Location
Place the appliance on a flat and solid floor.
Ensure that the appliance is not touching the wall or other
cabinets in the kitchen.
The tap, the drain pipe and the power socket must be
located near to the machine’s pipes and the power lead.
To install your appliance, you need:
a power supply (see electrical connection),
a water inlet with a 20 x 27 mm connection,
a drain with a minimum height of 70 cm,
a ventilated room.
23
Page 24

Levelling
Level the appliance by raising or lowering the feet.
Precise levelling prevents vibrations, noise and the
machine moving whilst operating. After levelling, lock
the feet by tightening the rings by hand or with a
screwdriver.
Moving the appliance
Draining
The end of the drain hose can be placed in two different
ways:
In a drain pipe (or branch of the sink drain pipe),
of which the distance from the floor must be between
70 and 100 cm.
It is essential to have an air gap at the end of the drain
hose to prevent any siphoning.
In addition, the drain hose should not be bent. It
should be placed on floor level with the end being
located at the height specified above.
Over the edge of a sink using the plastic section
supplied with the appliance :
To move the appliance, simply place it on its rollers by
pulling the lever located at the bottom of the appliance
from right to left. Once the machine is in the desired
position, return the lever to its initial position.
Water inlet
A
Screw the supply hose connector onto the threaded end
of the water inlet tap (20x27 mm), taking care to correctly
position the seal A, located in the bag supplied with the
appliance.
The water inlet pipe must not be extended. If the pipe is
too short, purchase a longer high pressure hose.
To other end of the water inlet hose, on the appliance
side, can be orientated in any direction. Undo the
tightening ring slightly, rotate the end of the pipe and then
do up the ring securely.
In this case, ensure that the end cannot fall out onto
the floor when the machine is draining. For example,
you can secure it with a piece of string to the tap or
secure it to the wall.
Important:
Under no circumstances must the drain hose be
extended.
Failure to comply with these rules may lead to your
appliance not functioning correctly.
24
Page 25

Electrical connection
This appliance can only be connected to 230 V single
phase.
Ensure that the household meter and fuses can withstand the current absorbed by the appliance, taking into
account the other electrical appliances connected.
Rating of the line fuses (one per phase):
10 A for 230 V.
Important
The appliance must be installed correctly in accord-
ance with the provisions of standards.
Use an electrical socket which is earthed and which
must be easily accessible and connected in accordance with standards.
The appliance must not be connected using an extension lead or multi-way socket.
Ensure that the earth plug complies with current regulations.
We decline any liability for accidents or faults caused
by the failure to earth or incorrect earthing of the
appliance.
25
Page 26

02/02
 Loading...