

Page 1

EUT1100AOW
.................................................. ...............................................
EN FREEZER USER MANUAL 2
FI PAKASTIN KÄYTTÖOHJE 21
SV FRYSSKÅP BRUKSANVISNING 40
Page 2
www.electrolux.com
2
CONTENTS
SAFETY INFORMATION . . . . . . . . . . . . . . . . . . . . . . . . . . . . . . . . . . . . . . . . . . . . . . . . . . . . . . . . . 3
PRODUCT DESCRIPTION . . . . . . . . . . . . . . . . . . . . . . . . . . . . . . . . . . . . . . . . . . . . . . . . . . . . . . . 6
CONTROL PANEL . . . . . . . . . . . . . . . . . . . . . . . . . . . . . . . . . . . . . . . . . . . . . . . . . . . . . . . . . . . . . 7
DAILY USE . . . . . . . . . . . . . . . . . . . . . . . . . . . . . . . . . . . . . . . . . . . . . . . . . . . . . . . . . . . . . . . . . . . 9
HELPFUL HINTS AND TIPS . . . . . . . . . . . . . . . . . . . . . . . . . . . . . . . . . . . . . . . . . . . . . . . . . . . . . 10
CARE AND CLEANING . . . . . . . . . . . . . . . . . . . . . . . . . . . . . . . . . . . . . . . . . . . . . . . . . . . . . . . . 11
WHAT TO DO IF… . . . . . . . . . . . . . . . . . . . . . . . . . . . . . . . . . . . . . . . . . . . . . . . . . . . . . . . . . . . . 13
INSTALLATION . . . . . . . . . . . . . . . . . . . . . . . . . . . . . . . . . . . . . . . . . . . . . . . . . . . . . . . . . . . . . . 15
NOISES . . . . . . . . . . . . . . . . . . . . . . . . . . . . . . . . . . . . . . . . . . . . . . . . . . . . . . . . . . . . . . . . . . . . 18
TECHNICAL DATA . . . . . . . . . . . . . . . . . . . . . . . . . . . . . . . . . . . . . . . . . . . . . . . . . . . . . . . . . . . . 19
ENVIRONMENT CONCERNS . . . . . . . . . . . . . . . . . . . . . . . . . . . . . . . . . . . . . . . . . . . . . . . . . . . . 20
WE’RE THINKING OF YOU
Thank you for purchasing an Electrolux appliance. You’ve chosen a product that brings with it
decades of professional experience and innovation. Ingenious and stylish, it has been designed with
you in mind. So whenever you use it, you can be safe in the knowledge that you’ll get great results
every time.
Welcome to Electrolux.
Visit our website for:
Get usage advice, brochures, trouble shooter, service information:
www.electrolux.com
Register your product for better service:
www.electrolux.com/productregistration
Buy Accessories, Consumables and Original spare parts for your appliance:
www.electrolux.com/shop
CUSTOMER CARE AND SERVICE
We recommend the use of original spare parts.
When contacting Service, ensure that you have the following data available.
The information can be found on the rating plate. Model, PNC, Serial Number.
Warning / Caution-Safety information
General information and tips
Environmental information
Subject to change without notice.
Page 3
SAFETY INFORMATION
ENGLISH 3
In the interest of your safety and to ensure
the correct use, before installing and first
using the appliance, read this user manual
carefully, including its hints and warnings.
To avoid unnecessary mistakes and accidents, it is important to ensure that all people using the appliance are thoroughly familiar with its operation and safety features.
Save these instructions and make sure that
they remain with the appliance if it is moved
or sold, so that everyone using it through
its life will be properly informed on appliance use and safety.
For the safety of life and property keep the
precautions of these user's instructions as
the manufacturer is not responsible for
damages caused by omission.
CHILDREN AND VULNERABLE
PEOPLE SAFETY
• This appliance is not intended for use by
persons (including children) with reduced
physical, sensory or mental capabilities,
or lack of experience and knowledge,
unless they have been given supervision
or instruction concerning use of the appliance by a person responsible for their
safety.
Children should be supervised to ensure
that they do not play with the appliance.
• Keep all packaging well away from children. There is risk of suffocation.
• If you are discarding the appliance pull
the plug out of the socket, cut the connection cable (as close to the appliance
as you can) and remove the door to prevent playing children to suffer electric
shock or to close themselves into it.
• If this appliance featuring magnetic door
seals is to replace an older appliance
having a spring lock (latch) on the door
or lid, be sure to make that spring lock
unusable before you discard the old appliance. This will prevent it from becoming a death trap for a child.
GENERAL SAFETY
WARNING!
Keep ventilation openings, in the appliance
enclosure or in the built-in structure, clear
of obstruction.
• The appliance is intended for keeping
foodstuff and/or beverages in a normal
household as explained in this instruction
booklet.
• Do not use a mechanical device or any
artificial means to speed up the thawing
process.
• Do not use other electrical appliances
(such as ice cream makers) inside of refrigerating appliances, unless they are
approved for this purpose by the manufacturer.
• Do not damage the refrigerant circuit.
• The refrigerant isobutane (R600a) is contained within the refrigerant circuit of the
appliance, a natural gas with a high level
of environmental compatibility, which is
nevertheless flammable.
During transportation and installation of
the appliance, be certain that none of the
components of the refrigerant circuit become damaged.
If the refrigerant circuit should become
damaged:
– avoid open flames and sources of igni-
tion
– thoroughly ventilate the room in which
the appliance is situated
• It is dangerous to alter the specifications
or modify this product in any way. Any
damage to the cord may cause a shortcircuit, fire and/or electric shock.
WARNING!
Any electrical component (power
cord, plug, compressor) must be
replaced by a certified service
agent or qualified service personnel
to avoid hazard.
1.
Power cord must not be lengthened.
2.
Make sure that the power plug is not
squashed or damaged by the back
of the appliance. A squashed or
damaged power plug may overheat
and cause a fire.
3.
Make sure that you can come to the
mains plug of the appliance.
4.
Do not pull the mains cable.
Page 4
www.electrolux.com
4
• This appliance is heavy. Care should be
• Do not remove nor touch items from the
• Avoid prolonged exposure of the appli-
• Bulb lamps (if foreseen) used in this ap-
DAILY USE
• Do not put hot pot on the plastic parts in
• Do not store flammable gas and liquid in
• Do not place food products directly
• Frozen food must not be re-frozen once
• Store pre-packed frozen food in accord-
• Appliance's manufacturers storage rec-
• Do not place carbonated or fizzy drinks
• Ice lollies can cause frost burns if con-
5.
If the power plug socket is loose, do
not insert the power plug. There is a
risk of electric shock or fire.
6.
You must not operate the appliance
without the lamp cover (if foreseen)
of interior lighting.
taken when moving it.
freezer compartment if your hands are
damp/wet, as this could cause skin
abrasions or frost/freezer burns.
ance to direct sunlight.
pliance are special purpose lamps selected for household appliances use only.
They are not suitable for household room
illumination.
WARNING!
Do not place frozen food on the
worktop since cold and vapour
may produce water condensate
within its inner side. The resulting
drip liquid may cause malfunctions.
Therefore, do not place nor leave
frozen items of any kind on the
worktop.
the appliance.
the appliance, because they may explode.
against the air outlet on the rear wall. (If
the appliance is Frost Free)
it has been thawed out.
ance with the frozen food manufacturer's
instructions.
ommendations should be strictly adhered to. Refer to relevant instructions.
in the freezer compartment as it creates
pressure on the container, which may
cause it to explode, resulting in damage
to the appliance.
sumed straight from the appliance.
CARE AND CLEANING
• Before maintenance, switch off the appliance and disconnect the mains plug
from the mains socket.
• Do not clean the appliance with metal
objects.
• Do not use sharp objects to remove frost
from the appliance. Use a plastic scraper.
• Never use a hair drier or other heating
appliances to speed up defrosting. Excessive heat may damage the plastic interior, and humidity could enter the electric system making it live.
INSTALLATION
For electrical connection carefully
follow the instructions given in specific paragraphs.
• Unpack the appliance and check if there
are damages on it. Do not connect the
appliance if it is damaged. Report possible damages immediately to the place
you bought it. In that case retain packing.
• It is advisable to wait at least four hours
before connecting the appliance to allow
the oil to flow back in the compressor.
• Adequate air circulation should be
around the appliance, lacking this leads
to overheating. To achieve sufficient ventilation follow the instructions relevant to
installation.
• Wherever possible the back of the product should be against a wall to avoid
touching or catching warm parts (compressor, condenser) to prevent possible
burn.
• The appliance must not be located close
to radiators or cookers.
• Make sure that the mains plug is accessible after the installation of the appliance.
• Connect to potable water supply only (If
a water connection is foreseen).
SERVICE
• Any electrical work required to do the
servicing of the appliance should be carried out by a qualified electrician or competent person.
Page 5
• This product must be serviced by an authorized Service Centre, and only genuine spare parts must be used.
ENVIRONMENT PROTECTION
This appliance does not contain
gasses which could damage the
ozone layer, in either its refrigerant
circuit or insulation materials. The
appliance shall not be discarded
together with the urban refuse and
rubbish. The insulation foam contains flammable gases: the appliance shall be disposed according
to the applicable regulations to obtain from your local authorities.
Avoid damaging the cooling unit,
especially at the rear near the heat
exchanger. The materials used on
this appliance marked by the sym-
are recyclable.
bol
ENGLISH 5
Page 6
www.electrolux.com
6
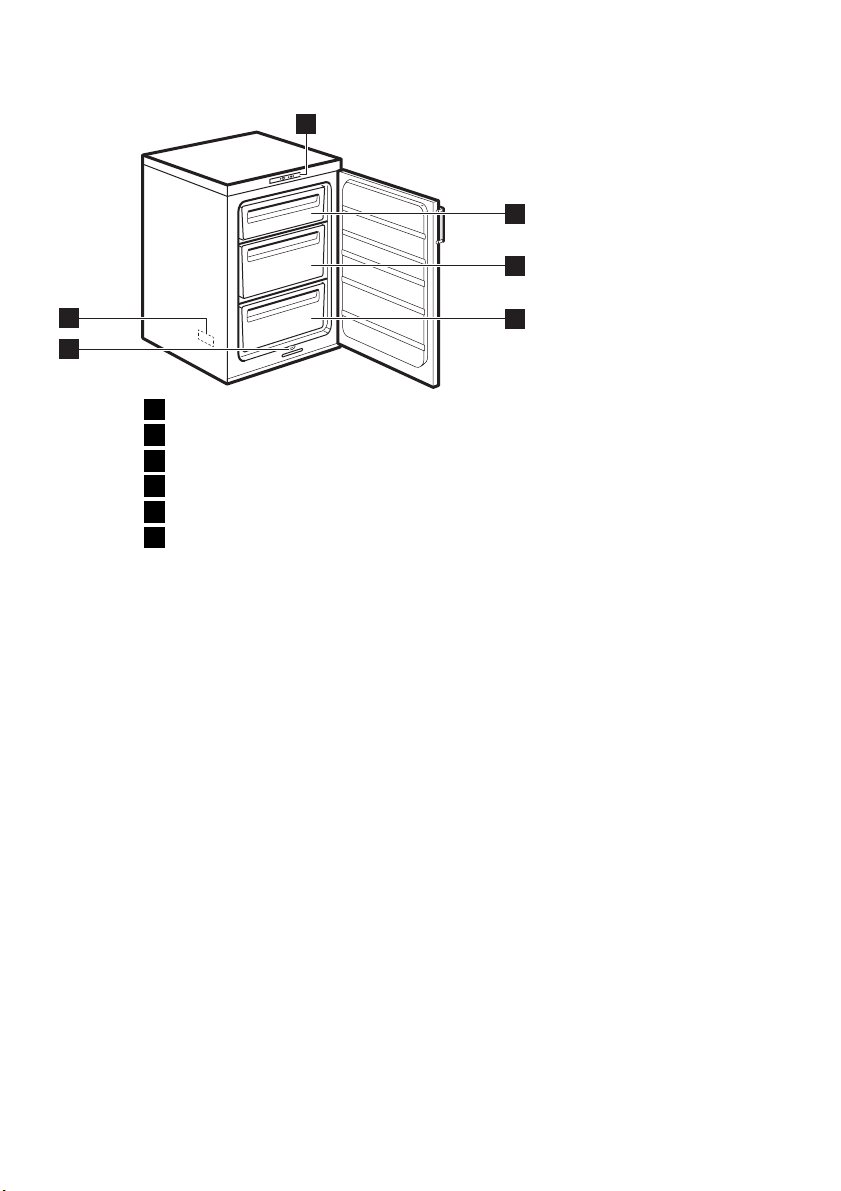
PRODUCT DESCRIPTION
1
2
3
6
5
Control panel
1
Freezer drawer
2
Storage drawer
3
Storage drawer
4
Defrost water drain
5
Rating plate (inside)
6
4
Page 7
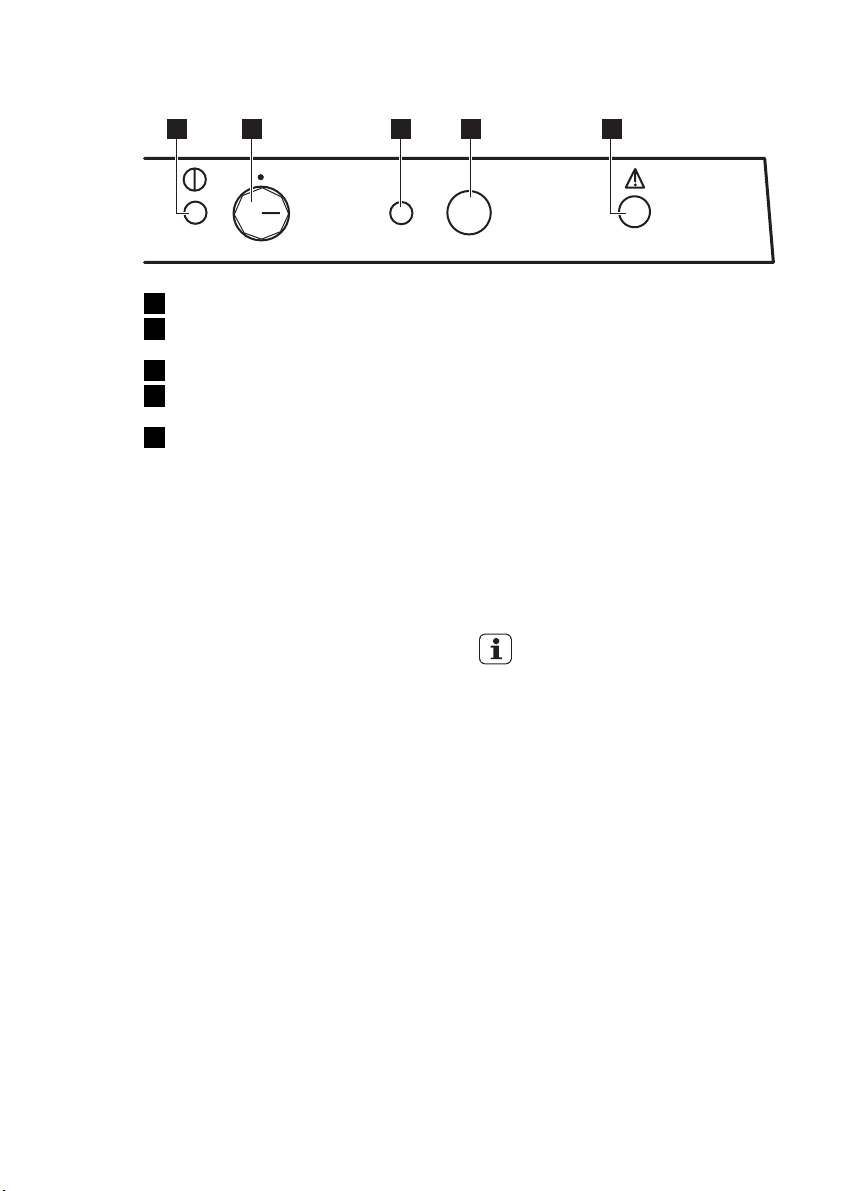
CONTROL PANEL
1 2 3 4 5
ENGLISH 7
Green On/Off Indicator Light
1
Temperature Regulator and On/Off
2
Switch
Yellow Fast Freeze Indicator Light
3
Acoustic Signal Stop and Fast Freeze
4
Switch
Red Alarm Indicator Light
5
SWITCHING ON
1.
Allow the appliance to stand for 4 hrs
after installation.
2.
Insert the plug into the wall socket.
3.
Turn the Temperature Regulator clockwise to a temperature lower than << 16 °C >> position.
4.
The Green On/Off Indicator Light will
light up and Red Alarm Indicator Light
will blink.
5.
The lighting up of the Green On/Off Indicator Light means that the appliance
is switched on.
6.
The blinking of the Red Alarm Indicator
Light means an improper temperature
in the freezing compartment. In addition, an intermittent sound can be
heard, which can be stopped by
pressing the Acoustic Signal Stop and
Fast Freeze Switch once.
7.
When switching on the freezer for the
first time, the Red Alarm Indicator Light
will blink until the internal temperature
has reached a level required for the
safe conservation of frozen food.
SWITCHING OFF
1.
To turn off the appliance, turn the
Temperature Regulator to the "O" position.
2.
To disconnect the appliance from the
power disconnect the mains plug from
the wall socket.
TEMPERATURE REGULATION
The temperature within the appliance is
controlled by the Temperature Regulator
situated on the control panel.
To operate the appliance, proceed as follows:
• turn the Temperature Regulator toward
lower settings to obtain the minimum
coldness.
• turn the Temperature Regulator toward
higher settings to obtain the maximum
coldness.
A medium setting is generally the
most suitable.
However, the exact setting should be
chosen keeping in mind that the temperature inside the appliance depends on:
• room temperature
• how often the door is opened
• the quantity of food stored
• the location of the appliance.
RED ALARM INDICATOR LIGHT
Under normal operating conditions, the internal temperature of the freezer will ensure
the long-term conservation of the stored
food.
When such temperature rises above a certain level (-12 °C), the appliance will trigger
an acoustic and light alarm. The light alarm
is a blink red light (Red Alarm Indicator
Light), while the acoustic alarm is an intermittent sound.
You can stop the acoustic alarm by pressing the Acoustic Signal Stop Switch once.
Page 8
www.electrolux.com
8
FAST FREEZE FUNCTION
If more than 3-4 kg of food is to be frozen:
1.
2.
3.
4.
5.
When switching on the freezer for
the first time, the Red Alarm Indicator Light will blink until the internal
temperature has reached a level required for the safe conservation of
frozen food.
Press the Fast Freeze Switch for 2-3
seconds to activate the fast-freeze
function 6-24 hours before placing the
fresh food in the freezer, the Yellow
Fast Freeze Indicator Light will illuminate. The compressor will now run
continuously, to ensure that the fresh
food is frozen as quickly as possible.
It is possible to deactivate the function
at any time by pressing the Fast Freeze
Switch for 2-3 seconds.
Place the foods in the freezing compartment (the top box), for maximum
freezing performance remove the
drawer (if the drawer is foreseen) and
then place the foods to be frozen directly on the evaporator. In case of
freezing smaller food volumes do not
need to remove the drawer.
Once the food is completely frozen (it
may take up to 24 hours) you can
manually switch off the fast-freeze
function by pressing the Fast Freeze
Switch for 2- 3 seconds and the Yellow Fast Freeze Indicator light will also
go out.
Move frozen food from the freezing
compartment into the other two compartments (storing compartments) to
make room for another freezing.
If the Fast Freeze Switch is accidentally left on, the fast-freeze
function will be automatically
switched off 48 hours later. The
Yellow Fast Freeze Indicator light
will also go out.
Do not use detergents or abrasive
powders, as these will damage the
finish.
BEFORE FIRST USE
Before using the appliance for the first time,
wash the interior and all internal accessories with lukewarm water and some neutral
soap so as to remove the typical smell of a
brand-new product, then dry thoroughly.
Page 9
DAILY USE
FREEZING FRESH FOOD
The freezer compartment (the top box) is
suitable for freezing fresh food and storing
frozen and deep-frozen food for a long
time.
To freeze fresh food activate the fast freeze
function.
The maximum amount of food that can be
frozen in 24 hours is specified on the rat-
ing plate, a label located on the inside of
the appliance.
The freezing process lasts 24 hours: during
this period do not add other food to be frozen.
STORAGE OF FROZEN FOOD
When first starting-up or after a period out
of use, before putting the products in the
compartment let the appliance run at least
2 hours on the higher settings.
ENGLISH 9
In the event of accidental defrosting, for example due to a power
failure, if the power has been off for
longer than the value shown in the
technical characteristics chart under "rising time", the defrosted food
must be consumed quickly or
cooked immediately and then refrozen (after cooling).
THAWING
Deep-frozen or frozen food, prior to being
used, can be thawed at room temperature.
Small pieces may even be cooked still frozen, directly from the freezer: in this case,
cooking will take longer.
Page 10

www.electrolux.com
10
HELPFUL HINTS AND TIPS
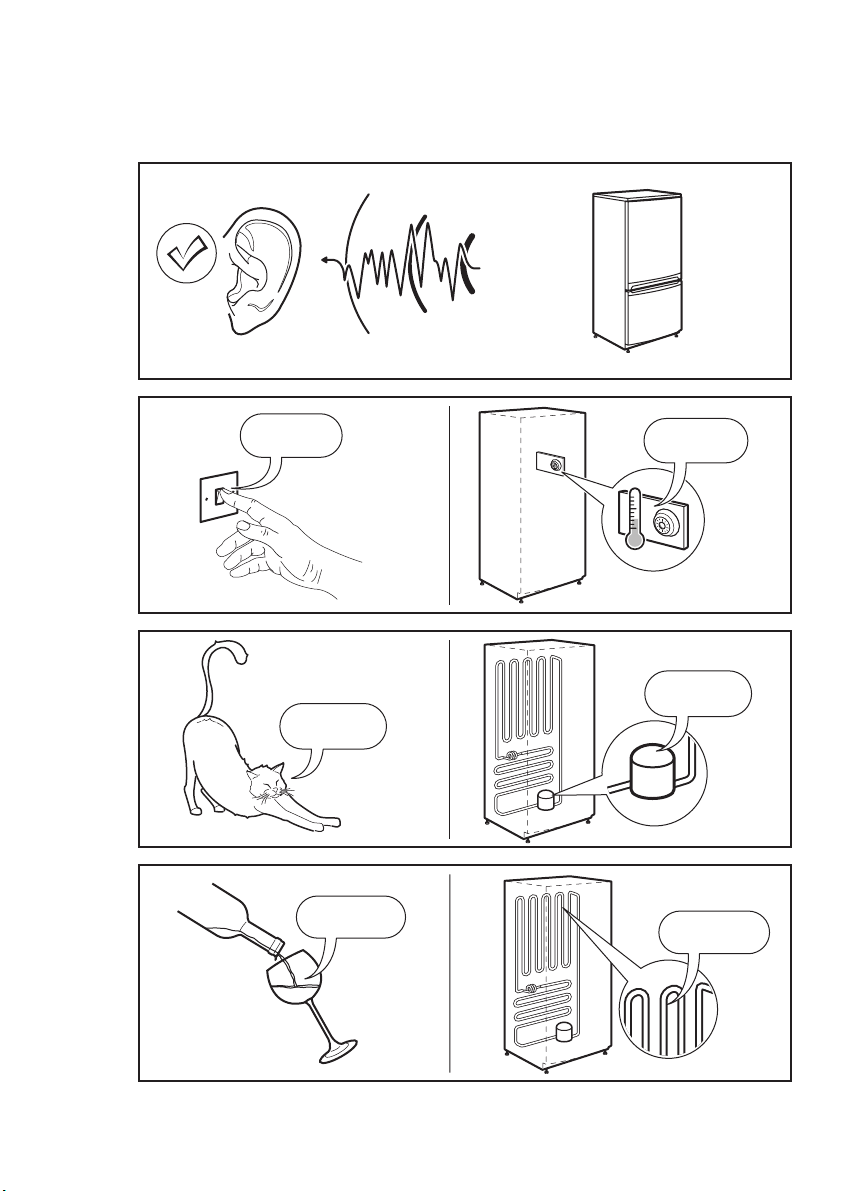
NORMAL OPERATING SOUNDS
• You may hear a faint gurgling and a bubbling sound when the refrigerant is pumped through the coils or tubing. This is
correct.
• When the compressor is on, the refrigerant is being pumped around and you will
hear a whirring sound and a pulsating
noise from the compressor. This is correct.
• The thermic dilatation might cause a
sudden cracking noise. It is natural, not
dangerous physical phenomenon. This is
correct.
• When the compressor switches on or
switches off, you will hear a faint "click"
of the temperature regulator. This is correct.
HINTS FOR FREEZING
To help you make the most of the freezing
process, here are some important hints:
• the maximum quantity of food which can
be frozen in 24 hrs. is shown on the rating plate;
• the freezing process takes 24 hours. No
further food to be frozen should be added during this period;
• only freeze top quality, fresh and thoroughly cleaned, foodstuffs;
• prepare food in small portions to enable
it to be rapidly and completely frozen
and to make it possible subsequently to
thaw only the quantity required;
• wrap up the food in aluminium foil or polythene and make sure that the packages
are airtight;
• do not allow fresh, unfrozen food to
touch food which is already frozen, thus
avoiding a rise in temperature of the latter;
• lean foods store better and longer than
fatty ones; salt reduces the storage life of
food;
• water ices, if consumed immediately after removal from the freezer compartment, can possibly cause the skin to be
freeze burnt;
• it is advisable to show the freezing in
date on each individual pack to enable
you to keep tab of the storage time.
HINTS FOR STORAGE OF
FROZEN FOOD
To obtain the best performance from this
appliance, you should:
• make sure that the commercially frozen
foodstuffs were adequately stored by the
retailer;
• be sure that frozen foodstuffs are transferred from the foodstore to the freezer
in the shortest possible time;
• not open the door frequently or leave it
open longer than absolutely necessary;
• once defrosted, food deteriorates rapidly
and cannot be refrozen;
• do not exceed the storage period indicated by the food manufacturer.
Page 11
CARE AND CLEANING
ENGLISH 11
CAUTION!
Unplug the appliance before carrying out any maintenance operation.
This appliance contains hydrocarbons in its cooling unit; maintenance and recharging must therefore only be carried out by authorized technicians.
PERIODIC CLEANING
The equipment has to be cleaned regularly:
• clean the inside and accessories with
lukewarm water and some neutral soap.
• regularly check the door seals and wipe
clean to ensure they are clean and free
from debris.
• rinse and dry thoroughly.
Do not pull, move or damage any
pipes and/or cables inside the cabinet.
Never use detergents, abrasive
powders, highly perfumed cleaning
products or wax polishes to clean
the interior as this will damage the
surface and leave a strong odour.
Clean the condenser (black grill) and the
compressor at the back of the appliance
with a brush. This operation will improve
the performance of the appliance and save
electricity consumption.
Take care of not to damage the
cooling system.
Many proprietary kitchen surface cleaners
contain chemicals that can attack/damage
the plastics used in this appliance. For this
reason it is recommended that the outer
casing of this appliance is only cleaned with
warm water with a little washing-up liquid
added.
After cleaning, reconnect the equipment to
the mains supply.
DEFROSTING THE FREEZER
A certain amount of frost will always form
on the freezer shelves and around the top
compartment.
Defrost the freezer when the frost layer reaches a thickness of about 3-5 mm.
About 12 hours prior to defrosting,
set the Temperature Regulator toward higher settings , in order to
build up sufficient chill reserve for
the interruption in operation.
To remove the frost, follow the instructions
below:
1.
Switch off the appliance and disconnect the mains plug from the mains
socket.
2.
Remove any stored food, wrap it in
several layers of newspaper and put it
in a cool place.
CAUTION!
Do not touch frozen goods with
wet hands. Hands can freeze to
the goods.
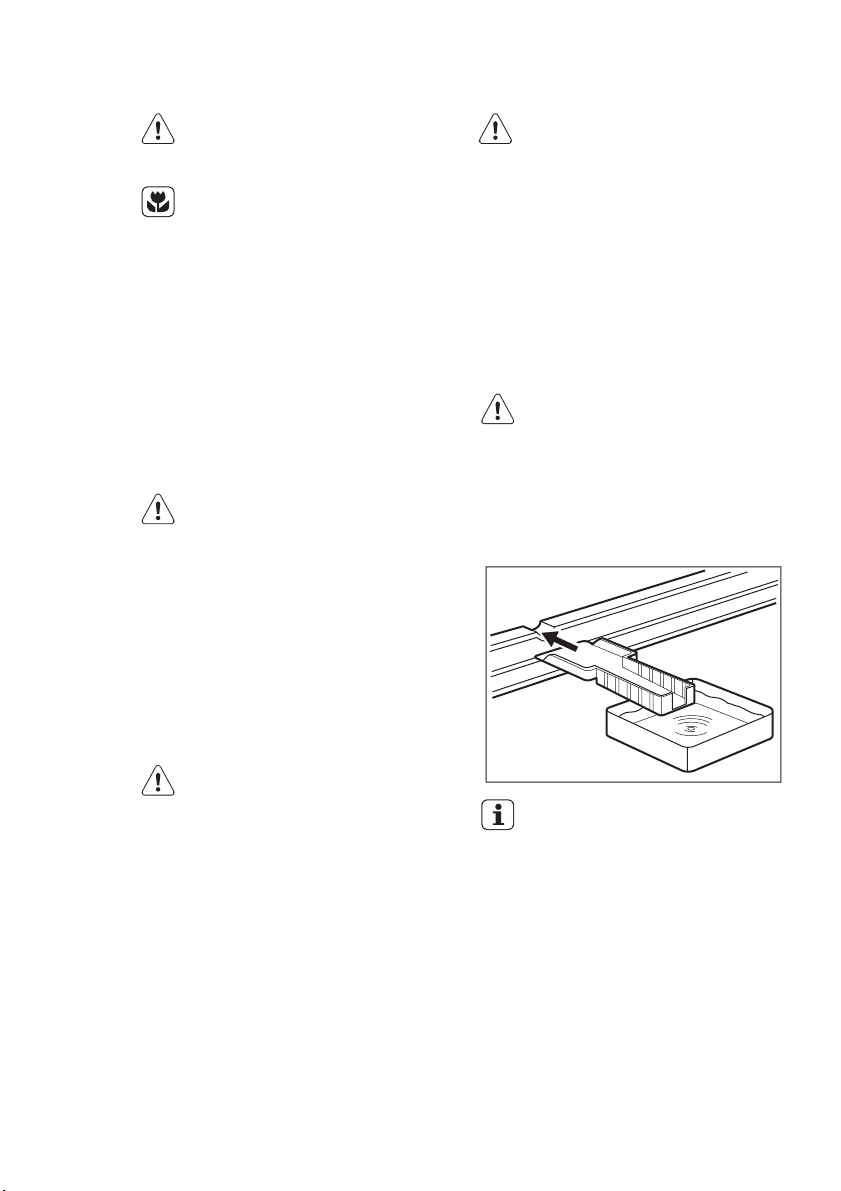
3.
Leave the door open and insert the
plastic scraper in the appropriate seating at the bottom centre, placing a basin underneath to collect the defrost
water.
In order to speed up the defrosting
process, place a pot of warm water
in the freezer compartment. In addition, remove pieces of ice that
break away before defrosting is
complete.
4.
When defrosting is completed, dry the
interior thoroughly and keep the scraper for future use.
5.
Switch on the appliance.
6.
Turn the Temperature Regulator to the
<< -18 °C >> position and leave to run
for at least 4 hours in quick freeze
mode.
7.
After 4 hours reload the previously removed food into the compartments.
Page 12
www.electrolux.com
12
PERIODS OF NON-OPERATION
When the appliance is not in use for long
periods, take the following precautions:
1.
2.
3.
4.
WARNING!
Never use sharp metal tools to
scrape off frost from the evaporator
as you could damage it.
Do not use a mechanical device or
any artificial means to speed up the
thawing process other than those
recommended by the manufacturer.
A temperature rise of the frozen
food packs, during defrosting, may
shorten their safe storage life.
disconnect the appliance from electricity supply
remove all food
defrost and clean the appliance and all
accessories
leave the door/doors open to prevent
unpleasant smells.
If the cabinet will be kept on, ask
somebody to check it once in a
while to prevent the food inside
from spoiling in case of a power
failure.
Page 13
WHAT TO DO IF…
ENGLISH 13
WARNING!
Before troubleshooting, disconnect
the mains plug from the mains
socket.
Only a qualified electrician or competent person must do the troubleshooting that is not in this manual.
There are some sounds during normal use (compressor, refrigerant
circulation).
The appliance operates discontinuously, so the stopping of compressor does not mean being no current. That is why you must not
touch the electrical parts of the appliance before breaking the circuit.
Problem Possible cause Solution
The appliance is
noisy
The appliance is not supported properly
Check if the appliance
stands stable (all the four
feet should be on the floor)
The compressor operates continually
Doors are not shut properly
The thermostatic control is
set incorrectly
or do not close tightly
Set a warmer temperature
Check if the doors close well
and the gaskets are undamaged and clean
The door has been opened
too frequently
Large quantities of food to
be frozen were put in at the
Do not leave the door open
longer than necessary
Wait some hours and then
check the temperature again
same time
Food placed in the appli-
ance was too warm
The room temperature is
too high.
There is too much
frost and ice
Products are not wrapped
properly
Doors are not shut properly
or do not close tightly
Allow food to cool to room
temperature before storing
Decrease the room temperature
Wrap the products better
Check if the doors close well
and the gaskets are undamaged and clean
The Temperature regulator
Set a warmer temperature
may be set incorrectly
It is too warm in the
freezer
The door does not close
Large quantities of food to
Temperature regulator may
be set incorrectly
tightly or it is not shut properly
be frozen were put in at the
same time
Set a lower temperature
Check if the door closes well
and the gasket is undamaged and clean
Insert smaller quantities of
food to be frozen at any one
time.
Page 14
www.electrolux.com
14
Problem Possible cause Solution
Food placed in the appli-
Products to be frozen are
It is too cold inside
the freezer
The appliance does
not work at all. Neither cooling nor
lighting works
Power does not reach the
The appliance is not
There is no voltage in the
The appliance does
not cool at all
There is no voltage in the
The appliance is not
Temperature Regulator is
Green indicator
flashing
CLOSING THE DOOR
1.
2.
3.
ance was too warm
placed too closely to each
other
Temperature regulator may
be set incorrectly
Plug is not connected to
the mains socket properly
appliance
switched on
mains socket (try to connect another appliance into
it)
Plug is not connected to
the mains socket properly
mains socket (try to connect another appliance into
it)
switched on
not on
Temperature sensor prob-
lem
Clean the door gaskets.
If necessary, adjust the door. Refer to
"Installation".
If necessary, replace the defective door
gaskets. Contact the Service Center.
Allow food to cool to room
temperature before storing.
Place the products in a way
so that cold air could circulate among them
Set a warmer temperature
Connect the mains plug
properly
Try connecting another electrical device to the power
outlet
Switch on the appliance
Call an electrician
Connect the mains plug
properly
Call an electrician
Switch on the appliance
Check the Temperature
Regulator
Call the service personnel
Page 15
INSTALLATION
ENGLISH 15
WARNING!
Read the "Safety Information" carefully for your safety and correct operation of the appliance before installing the appliance.
POSITIONING
This appliance can be installed in a dry,
well ventilated indoor (garage or cellar) also,
but for optimum performance install this
appliance at a location where the ambient
temperature corresponds to the climate
LEVELLING
LOCATION
class indicated on the rating plate of the
appliance:
Cli-
Ambient temperature
mate
class
SN +10°C to + 32°C
N +16°C to + 32°C
ST +16°C to + 38°C
T +16°C to + 43°C
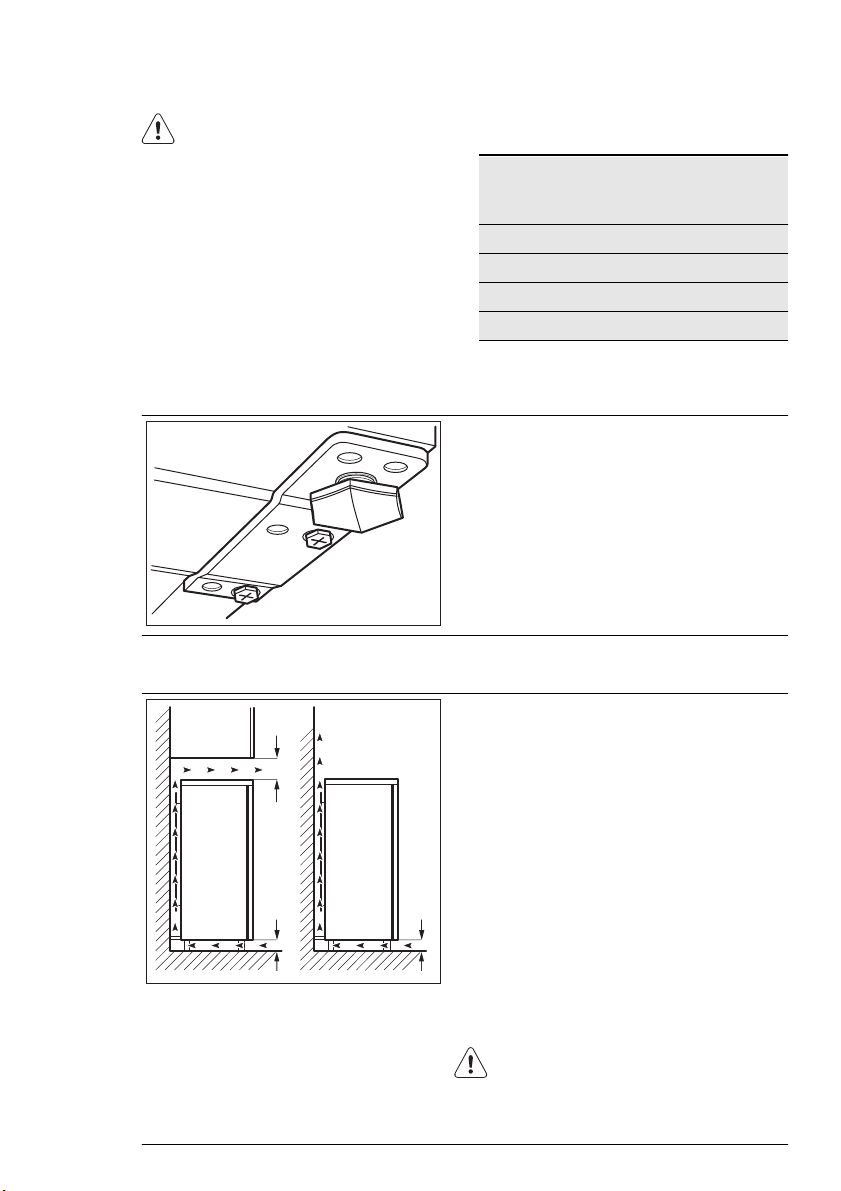
When placing the appliance ensure that it
stands level. This can be achieved by two
adjustable feet at the bottom in front.
100 mm
15 mm 15 mm
The appliance should be installed well away
from sources of heat such as radiators, boilers, direct sunlight etc. Ensure that air can
circulate freely around the back of the cabinet.To ensure best performance, if the appliance is positioned below an overhanging wall
unit, the minimum distance between the top
of the cabinet and the wall unit must be at
least 100 mm . Ideally, however, the appliance should not be positioned below overhanging wall units. Accurate levelling is ensured by one or more adjustable feet at the
base of the cabinet. If the cabinet is placed in
a corner and the side with the hinges facing
the wall, the distance between the wall and
the cabinet must be at least 10 mm to allow
the door to open enough so that the shelves
can be removed.
WARNING!
It must be possible to disconnect the
appliance from the mains power supply; the plug must therefore be easily
accessible after installation.
Page 16
www.electrolux.com
16
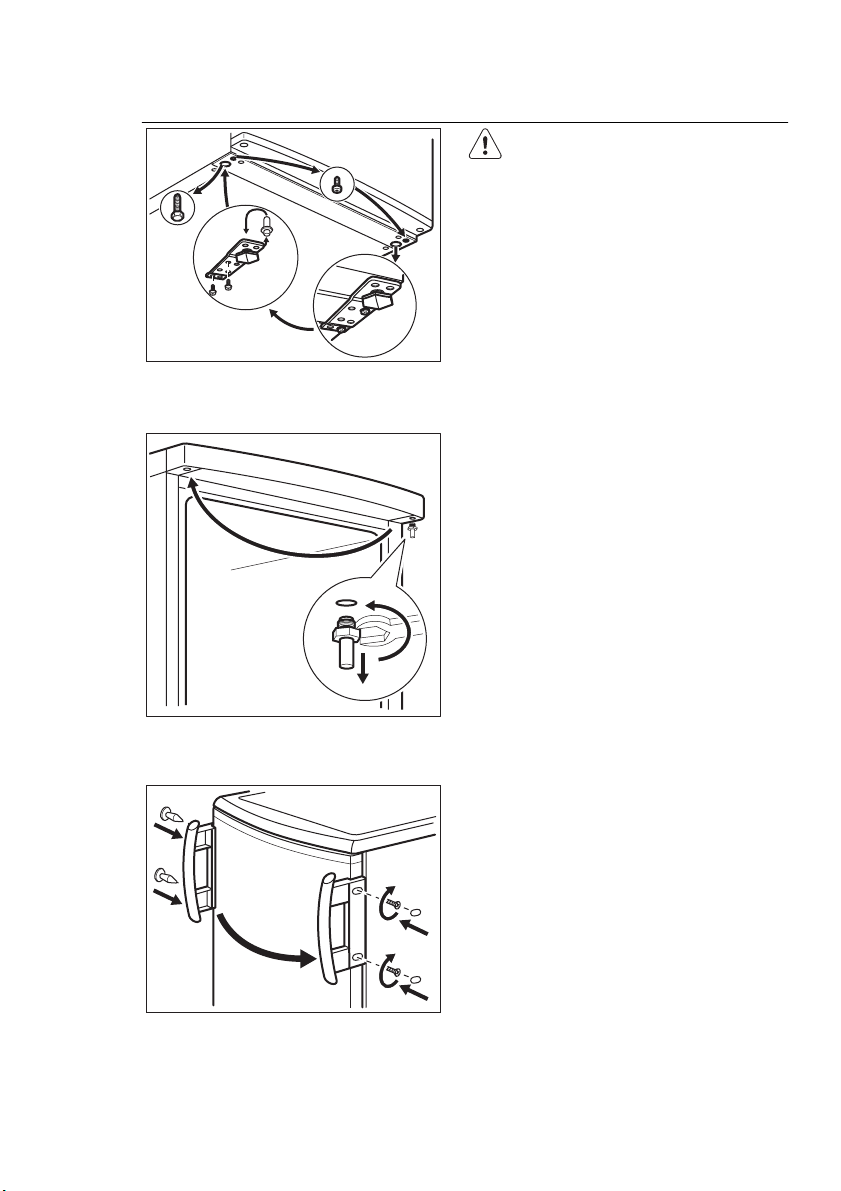
DOOR REVERSIBILITY
To carry out the following operations, we suggest that this be
made with another person that will
keep a firm hold on the doors of
the appliance during the operations.
To change the opening direction of the
door, do these steps:
• Remove the plug from the power socket.
• Tilt back the appliance carefully so that
the compressor cannot touch the floor.
• Unscrew the left foot.
• Unscrew the screws of the door bottom
hinge.
• Take off the appliance door by pulling it
slightly downwards.
• Unscrew the top door hinge pin of the
appliance then screw it back on the other side.
• Fit the appliance door on the upper door
2
1
4
1
2
hinge pin.
• Remove the lower hinge. Put over the
pin in the direction of the arrow.
• Unscrew and install the screw on the opposite side.
• Install the lower hinge on the opposite
side leaving the position of the door unchanged.
• Screw in the one screw in the place set
free on the other side as well as the right
adjustable foot .
• Remove and install the handle (if foreseen) on the opposite side.
• Reposition, level the appliance, wait for
at least four hours and then connect it to
the power socket.
Do a final check to make sure that:
• All screws are tightened.
• The door opens and closes correctly.
3
Page 17

ENGLISH 17
If the ambient temperature is cold (i.e. in
Winter), the gasket may not fit perfectly to
the cabinet. In that case, wait for the natural fitting of the gasket.
In case you do not want to carry out the
above mentioned operations, contact the
nearest After Sales Service Force. The After
Sales Service specialist will carry out the reversibility of the doors at your cost.
ELECTRICAL CONNECTION
Before plugging in, ensure that the voltage
and frequency shown on the rating plate
correspond to your domestic power supply.
The appliance must be earthed. The power
supply cable plug is provided with a contact for this purpose. If the domestic power
supply socket is not earthed, connect the
appliance to a separate earth in compliance with current regulations, consulting a
qualified electrician.
The manufacturer declines all responsibility
if the above safety precautions are not observed.
This appliance complies with the E.E.C. Directives.
Page 18
www.electrolux.com
18
NOISES
There are some sounds during normal running (compressor, refrigerant circulation).
SSSRRR!
HISSS!
CLICK!
BRRR!
OK
CLICK!
BRRR!
CRACK!
BLUBB!
CLICK!
BRRR!
BLUBB!
BLUBB!
Page 19

HISSS!
ENGLISH 19
HISSS!
TECHNICAL DATA
Dimension
Height 850 mm
Width 595 mm
Depth 635 mm
Rising Time 24 h
Voltage 230-240 V
Frequency 50 Hz
The technical information are situated in the
rating plate on the internal left side of the
appliance and in the energy label.
SSSRRR!
CRACK!
SSSRRR!
CRACK!
Page 20

www.electrolux.com
20
ENVIRONMENT CONCERNS
Recycle the materials with the symbol
Put the packaging in applicable containers
to recycle it.
Help protect the environment and human
health and to recycle waste of electrical
and electronic appliances. Do not dispose
.
appliances marked with the symbol
the household waste. Return the product
to your local recycling facility or contact
your municipal office.
with
Page 21

SUOMI 21
SISÄLLYS
TURVALLISUUSOHJEET . . . . . . . . . . . . . . . . . . . . . . . . . . . . . . . . . . . . . . . . . . . . . . . . . . . . . . . 22
LAITTEEN KUVAUS . . . . . . . . . . . . . . . . . . . . . . . . . . . . . . . . . . . . . . . . . . . . . . . . . . . . . . . . . . . 25
KÄYTTÖPANEELI . . . . . . . . . . . . . . . . . . . . . . . . . . . . . . . . . . . . . . . . . . . . . . . . . . . . . . . . . . . . . 26
PÄIVITTÄINEN KÄYTTÖ . . . . . . . . . . . . . . . . . . . . . . . . . . . . . . . . . . . . . . . . . . . . . . . . . . . . . . . . 28
HYÖDYLLISIÄ NEUVOJA JA VINKKEJÄ . . . . . . . . . . . . . . . . . . . . . . . . . . . . . . . . . . . . . . . . . . . . 29
HOITO JA PUHDISTUS . . . . . . . . . . . . . . . . . . . . . . . . . . . . . . . . . . . . . . . . . . . . . . . . . . . . . . . . 30
KÄYTTÖHÄIRIÖT . . . . . . . . . . . . . . . . . . . . . . . . . . . . . . . . . . . . . . . . . . . . . . . . . . . . . . . . . . . . . 32
ASENNUS . . . . . . . . . . . . . . . . . . . . . . . . . . . . . . . . . . . . . . . . . . . . . . . . . . . . . . . . . . . . . . . . . . 34
ÄÄNET . . . . . . . . . . . . . . . . . . . . . . . . . . . . . . . . . . . . . . . . . . . . . . . . . . . . . . . . . . . . . . . . . . . . . 37
TEKNISET TIEDOT . . . . . . . . . . . . . . . . . . . . . . . . . . . . . . . . . . . . . . . . . . . . . . . . . . . . . . . . . . . . 38
YMPÄRISTÖNSUOJELU . . . . . . . . . . . . . . . . . . . . . . . . . . . . . . . . . . . . . . . . . . . . . . . . . . . . . . . 39
WE’RE THINKING OF YOU
Kiitämme teitä Electrolux-laitteen hankinnasta. Olette valinneet tuotteen, joka perustuu
vuosikymmenien aikana saatuun kokemukseen ja innovaatioon. Kekseliäs ja tyylikäs laite, joka on
suunniteltu teitä ajatellen. Laitetta käyttäessänne voitte olla aina varma erinomaisista tuloksista.
Tervetuloa Electroluxin maailmaan.
Vieraile verkkosivullamme:
Saadaksesi käyttöön liittyviä neuvoja, esitteitä, vianmääritysohjeita ja huolto-ohjeita:
www.electrolux.com
Tuotteen rekisteröimiseksi parempaa huoltoa varten:
www.electrolux.com/productregistration
Ostaaksesi laitteesi lisävarusteita, kulutusosia ja alkuperäisiä varaosia:
www.electrolux.com/shop
KULUTTAJANEUVONTA JA HUOLTO
Suosittelemme alkuperäisten varaosien käyttöä.
Pidä seuraavat tiedot saatavilla ottaessasi yhteyttä valtuutettuun huoltoliikkeeseen.
Kyseiset tiedot löytyvät laitteen arvokilvestä. Malli, tuotenumero, sarjanumero.
Varoitukset/huomautukset ja turvallisuusohjeet.
Yleistietoja ja vinkkejä
Ympäristönsuojeluohjeita
Oikeus muutoksiin pidätetään.
Page 22

www.electrolux.com
22
TURVALLISUUSOHJEET
Lue tämä käyttöohje ja sen sisältämät neuvot sekä varoitukset huolellisesti ennen laitteen asentamista ja ensimmäistä käyttöä,
jotta osaisit käyttää laitetta turvallisesti ja oikealla tavalla. Turhien virheiden ja onnettomuuksien välttämiseksi on tärkeää, että
kaikki laitteen käyttäjät perehtyvät huolellisesti sen toimintaan ja turvallisuusominaisuuksiin. Pidä tämä ohje tallessa ja varmista, että se kulkee aina laitteen mukana esimerkiksi asunnon vaihdon yhteydessä tai
luovutetaan mahdolliselle uudelle omistajalle. Näin kaikilla laitteen käyttäjillä on asianmukaiset ohjeet turvallista käyttöä varten.
Huomioi tarkasti käyttöohjeen sisältämät
varoitukset käyttäjien turvallisuuden varmistamiseksi ja omaisuusvahinkojen välttämiseksi. Valmistaja ei vastaa vahingoista, jotka ovat aiheutuneet varoitusten ja turvallisuusohjeiden vastaisesta toiminnasta.
LASTEN JA TAITAMATTOMIEN
HENKILÖIDEN TURVALLISUUS
• Tämä laite ei ole tarkoitettu fyysisesti,
motorisesti tai henkisesti rajoitteisten tai
kokemattomien tai taitamattomien henkilöiden (eikä lasten) käyttöön, ellei heidän
turvallisuudestaan vastuussa oleva henkilö valvo ja opasta heitä laitteen käytössä.
Pikkulapsia on valvottava eikä heidän pidä antaa leikkiä laitteella.
• Pidä kaikki pakkausmateriaalit poissa
lasten ulottuvilta. Ne voisivat aiheuttaa
tukehtumisvaaran.
• Kun poistat laitteen käytöstä lopullisesti,
irrota pistoke pistorasiasta, leikkaa virtajohto irti (mahdollisimman läheltä laitteen
liitäntäkohtaa) ja irrota laitteen ovi. Tällä
tavoin voidaan välttää leikkiville lapsille aiheutuva sähköiskun tai loukkuunjäämisen vaara.
• Tässä laitteessa on magneettiset oven tiivisteet. Jos entisen laitteesi ovessa on
jousilukitus (salpa), riko jousilukitus, ennen kuin poistat vanhan laitteen käytöstä
estääksesi lasten loukkuunjäämisen vaaran.
YLEISET
TURVALLISUUSOHJEET
VAROITUS!
Pidä kalusteen sisään asennetun laitteen
syvennyksen tai kalustekaapin ilmanvaihtoaukot vapaina.
• Laite on tarkoitettu elintarvikkeiden ja/tai
juomien säilyttämiseen kotitalouskäytössä tämän käyttöohjeen kuvauksen mukaisesti.
• Älä yritä nopeuttaa sulatusta mekaanisten laitteiden tai muun keinotekoisen sulatusvälineen avulla.
• Älä käytä muita sähkölaitteita (esim. jäätelökonetta) jäähdytyslaitteiden sisällä, ellei valmistaja ole hyväksynyt niitä kyseiseen käyttötarkoitukseen.
• Varo vahingoittamasta jäähdytysputkistoa.
• Laitteen jäähdytysputkisto sisältää isobutaania (R600a), joka on hyvin ympäristöystävällinen maakaasu, mutta kuitenkin
tulenarka.
Varmista, etteivät jäähdytysputkiston
komponentit pääse vaurioitumaan laitteen kuljetuksen ja asennuksen aikana.
Jos jäähdytysputkisto vaurioituu:
– Vältä avotulta ja muita syttymislähteitä.
– Tuuleta huolellisesti huone, johon laite
on sijoitettu.
• Laitteen teknisten ominaisuuksien muuttaminen tai muiden muutosten tekeminen laitteeseen on vaarallista. Vahingoittunut virtajohto voi aiheuttaa oikosulun,
tulipalon ja/tai sähköiskun.
VAROITUS!
Sähköosien (virtajohto, pistoke,
kompressori) vaihdon saa suorittaa
vain valtuutettu huoltoliike vaaratilanteiden välttämiseksi.
1.
Virtajohtoa ei saa jatkaa.
2.
Varmista, että virtajohto ei joudu puristuksiin tai pääse vahingoittumaan
laitteen takana. Litistynyt tai vahingoittunut virtajohto voi ylikuumentua
ja aiheuttaa tulipalon.
Page 23

3.
Laitteen verkkovirtakytkennän on oltava hyvin ulottuvilla siten, että pistoke on helppo irrottaa pistorasiasta.
4.
Älä vedä virtajohdosta pistoketta irrottaessasi.
5.
Jos pistoke on löysästi kiinni virtajohdossa, älä kiinnitä sitä pistorasiaan. Tämä aiheuttaa sähköiskun tai
tulipalon vaaran.
6.
Laitetta ei saa käyttää, jos sisävalon
lampun suojus (jos varusteena) puuttuu.
• Laite on painava. Sen siirtämisessä on
noudatettava varovaisuutta.
• Älä koske pakastimessa oleviin tuotteisiin
kostein tai märin käsin. Koskettaminen
voi aiheuttaa ihon hankautumista tai kylmävammoja.
• Laite ei saa olla pitkään suorassa auringonvalossa.
• Tässä laitteessa olevat polttimot (jos varusteena) ovat erityisesti kodinkoneita
varten suunniteltuja erikoispolttimoita. Ne
eivät sovi huoneiden valaistukseen.
VAROITUS!
Älä aseta pakasteita työtasolle, sillä
kylmyys ja huuru saattavat aiheuttaa kosteuden tiivistymistä tason sisäpinnalle. Tippuva neste saattaa
aiheuttaa toimintahäiriöitä. Älä siis
jätä tai aseta mitään pakastettuja
tuotteita työtasolle.
PÄIVITTÄINEN KÄYTTÖ
• Älä laita kuumia kattiloita laitteen muoviosien päälle.
• Älä säilytä tulenarkoja kaasuja tai nesteitä
jääkaapissa, sillä ne voivat räjähtää.
• Älä laita elintarvikkeita suoraan takaseinän ilmanvaihtoaukkoa vasten. (Mikäli
kyseessä on huurtumaton Frost Free malli)
• Pakasteita ei saa pakastaa uudelleen sen
jälkeen, kun ne on kerran sulatettu.
• Säilytä valmispakasteet pakkauksen ohjeita noudattaen.
• Noudata tarkasti laitteen valmistajan säilytysohjeita. Lue ohjeet.
• Älä laita pakastimeen hiilihappopitoisia tai
poreilevia juomia, sillä jäätyessä pakkaukseen muodostuu painetta, jolloin se
voi räjähtää ja vahingoittaa laitetta.
SUOMI 23
• Mehujäät voivat aiheuttaa kylmävammoja, jos ne nautitaan suoraan pakastimesta otettuina.
HUOLTO JA PUHDISTUS
• Ennen kuin aloitat huoltoa tai puhdistusta, kytke laite pois toiminnasta ja irrota
pistoke pistorasiasta.
• Älä käytä laitteen puhdistuksessa metalliesineitä.
• Älä käytä huurteen poistamisessa teräviä
esineitä. Käytä muovista kaavinta.
• Älä koskaan käytä hiustenkuivaajaa tai
muuta lämmityslaitetta sulatuksen nopeuttamiseen. Liiallinen kuumuus voi vahingoittaa muovisia sisäpintoja ja kosteutta voi päästä sähköjärjestelmään.
ASENNUS
Noudata tarkasti sähköliitäntää käsittelevissä kappaleissa annettuja
ohjeita.
• Pura laite pakkauksestaan ja tarkista
mahdolliset kuljetusvauriot. Vaurioitunutta laitetta ei saa kytkeä verkkovirtaan. Ilmoita mahdollisista vahingoista välittömästi jälleenmyyjälle. Säilytä tässä tapauksessa pakkausmateriaalit.
• Odota vähintään kaksi tuntia, ennen kuin
kytket laitteen verkkovirtaan, jotta öljy ehtii virrata kompressoriin.
• Laitteen ympärillä on oltava hyvä ilmankierto, jotta ylikuumenemisen vaaraa ei
ole. Noudata asennusohjeissa esitettyjä
ilmanvaihtomääräyksiä.
• Laite on mahdollisuuksien mukaan sijoitettava selkä seinää vasten, jotta palovammoja aiheuttaviin kuumiin osiin (kompressori, lauhdutin) ei voida koskea.
• Laitetta ei saa sijoittaa lämpöpatterin tai
lieden viereen.
• Varmista, että laitteen verkkovirtakytkentä on hyvin ulottuvilla laitteen asennuksen
jälkeen.
• Liitä ainoastaan juomavesiverkostoon
(jos laitteessa on vesiliitäntä).
HUOLTOPALVELU
• Kaikki laitteen asennukseen liittyvät sähkötyöt on annettava ammattitaitoisen
sähköasentajan tehtäväksi.
Page 24

www.electrolux.com
24
• Laitteen huoltotyöt saa suorittaa vain val-
YMPÄRISTÖNSUOJELU
tuutettu huoltoliike, ja ainoastaan alkuperäisten varaosien käyttäminen on sallittua.
Tämä laite ei sisällä otsonikerrosta
tuhoavia kaasuja jäähdytyspiirissä
eikä eristemateriaaleissa. Käytöstäpoistettua laitetta ei saa toimittaa
tavallisen yhdyskuntajätteen keräykseen. Eristevaahto sisältää tulenarkoja kaasuja: laitteen käytöstäpoistossa ja hävittämisessä tulee
noudattaa paikallisia jätehuoltomääräyksiä. Vältä vahingoittamasta
jäähdytysyksikköä, erityisesti lämmönvaihtimen läheltä. Tässä lait-
teessa käytetyt, symbolilla
mer-
kityt materiaalit ovat kierrätettäviä.
Page 25

LAITTEEN KUVAUS
SUOMI 25
1
2
3
6
5
Käyttöpaneeli
1
Pakastinosasto
2
Säilytysosasto
3
Säilytysosasto
4
Sulatusveden tyhjennys
5
Tyyppikilpi (sisällä)
6
4
Page 26

www.electrolux.com
26
KÄYTTÖPANEELI
1 2 3 4 5
Vihreä virran merkkivalo
1
Lämpötilan säädin ja virtakytkin
2
Pikapakastuksen keltainen merkkivalo
3
Merkkiäänen vaimennin ja pikapakas-
4
tustoiminnon kytkin
Punainen hälytysmerkkivalo
5
LAITTEEN KÄYNNISTÄMINEN
1.
Anna laitteen asettua noin neljä tuntia
asennuksen jälkeen.
2.
Kiinnitä pistoke pistorasiaan.
3.
Käännä lämpötilan säädintä myötäpäivään alle << - 16 °C >>:n lämpötilaan.
4.
Vihreä virran merkkivalo syttyy, ja punainen hälytysmerkkivalo vilkkuu.
5.
Vihreän virran merkkivalon syttyminen
merkitsee, että laite on kytketty päälle.
6.
Vilkkuva punainen hälytysmerkkivalo
merkitsee, että pakastinosaston lämpötila on virheellinen. Laitteesta kuuluu
myös ajoittainen merkkiääni, joka voidaan vaimentaa painamalla kerran
merkkiäänen vaimenninta ja pikapakastustoiminnon kytkintä.
7.
Kun pakastin kytketään päälle ensimmäistä kertaa, punainen hälytysmerkkivalo vilkkuu, kunnes sisälämpötila on
saavuttanut vaaditun lämpötilatason
elintarvikkeiden turvallista pakastusta
varten.
LAITTEEN KYTKEMINEN POIS
PÄÄLTÄ
1.
Laite kytketään pois toiminnasta kääntämällä lämpötilan säädin asentoon O.
2.
Irrota laite verkkovirrasta vetämällä pistoke irti pistorasiasta.
LÄMPÖTILAN SÄÄTÄMINEN
Laitteen lämpötilaa säädetään käyttöpaneelissa sijaitsevan lämpötilan säätimen
avulla.
Laitetta käytetään seuraavasti:
• Lämpötila säädetään lämpimämmäksi
kääntämällä lämpötilan säädintä pienempiä asetusarvoja kohti.
• Lämpötila säädetään kylmemmäksi
kääntämällä lämpötilan säädintä suurempia asetusarvoja kohti.
Keskiasento on yleensä sopivin
asetus.
Huomioi lämpötilan säätämisessä seuraavat siihen vaikuttavat asiat:
• huoneen lämpötila
• oven avaamistiheys
• säilytettävien elintarvikkeiden määrä
• laitteen sijaintipaikka.
PUNAINEN
HÄLYTYSMERKKIVALO
Normaaleissa käyttöolosuhteissa pakastimen sisälämpötila varmistaa pakastettujen
elintarvikkeiden pitkäaikaisen säilymisen.
Kun sisälämpötila nousee tietyn tason (-12
°C) yläpuolelle, laite aktivoi merkkiäänen, ja
hälytysmerkkivalo syttyy. Hälytysmerkkivalossa vilkkuu punainen valo (punainen hälytysmerkkivalo), ja äänimerkki kuuluu ajoittain.
Merkkiääni voidaan vaimentaa painamalla
kerran merkkiäänen vaimenninta.
Kun pakastin kytketään päälle ensimmäistä kertaa, punainen hälytysmerkkivalo vilkkuu, kunnes sisälämpötila on saavuttanut vaaditun lämpötilatason elintarvikkeiden
turvallista pakastusta varten.
Page 27

PIKAPAKASTUSTOIMINTO
Jos aiot pakastaa yli 3–4 kg elintarvikkeita:
1.
Paina pikapakastustoiminnon painiketta 2–3 sekunnin ajan ja käynnistä pikapakastustoiminto 6–24 tuntia ennen
tuoreiden elintarvikkeiden asettamista
pakastimeen. Keltainen pikapakastuksen merkkivalo syttyy. Kompressori on
nyt yhtäjaksoisesti käynnissä, jotta tuoreiden elintarvikkeiden pakastus olisi
mahdollisimman nopeaa.
2.
Voit poistaa toiminnon käytöstä milloin
tahansa painamalla pikapakastustoiminnon painiketta 2–3 sekunnin ajan.
3.
Aseta elintarvikkeet pakastinosastoon
(ylin lokero), pakastusteho voidaan
maksimoida poistamalla laatikko (jos
olemassa) ja asettamalla pakastettavat
elintarvikkeet suoraan höyrystimen
päälle. Jos pakastat pieniä elintarvikemääriä, vetolaatikkoa ei tarvitse poistaa.
4.
Kun elintarvikkeet ovat pakastuneet
kokonaan (voi viedä jopa 24 tuntia), pikapakastustoiminto voidaan kytkeä
manuaalisesti pois päältä painamalla
pikapakastustoiminnon painiketta 2–3
sekunnin ajan. Tämän jälkeen keltainen
pikapakastuksen merkkivalo sammuu.
5.
Siirrä pakastetut elintarvikkeet pakastinosastosta kahteen muuhun osastoon
(säilytysosastot), jotta pakastimessa
olisi tilaa muita pakastuskertoja varten.
Jos pikapakastustoiminnon painike
jätetään vahingossa päälle, pikapakastustoiminto kytkeytyy automaattisesti pois päältä 48 tunnin päästä.
Tällöin keltainen pikapakastuksen
merkkivalo sammuu.
SUOMI 27
KÄYTTÖÖNOTTO
Ennen kuin otat laitteen käyttöön, pese sisäosat ja kaikki kaapin sisälle sijoitettavat
varusteet haalealla vedellä ja käsitiskiaineella poistaaksesi uudelle laitteelle tyypillisen
hajun. Kuivaa pinnat ja varusteet lopuksi
huolellisesti.
Älä käytä puhdistusaineita tai hankaavia jauheita, sillä ne vahingoittavat pintoja.
Page 28

www.electrolux.com
28
PÄIVITTÄINEN KÄYTTÖ
TUOREIDEN
ELINTARVIKKEIDEN
PAKASTAMINEN
Pakastinosasto (ylin lokero) soveltuu tuoreiden elintarvikkeiden pakastamiseen sekä
valmispakasteiden pitkäaikaiseen säilyttämiseen.
Käynnistä pikapakastustoiminto, kun pakastat tuoreita elintarvikkeita.
24 tunnin aikana pakastettavien elintarvikkeiden enimmäismäärä on merkitty arvo-
kilpeen, joka sijaitsee laitteen sisäpuolella.
Pakastusprosessi kestää 24 tuntia: tänä aikana pakastimeen ei saa lisätä uusia pakastettavia ruokia.
PAKASTEIDEN SÄILYTTÄMINEN
Kun käytät pakastinta ensimmäistä kertaa
tai pitkän käyttämättömän jakson jälkeen,
anna laitteen toimia vähintään kahden tunnin ajan suuremmilla asetusarvoilla.
Jos pakastin sulaa vahingossa esimerkiksi sähkökatkon vuoksi, kun
sähkö on ollut poikki pitempään
kuin teknisissä ominaisuuksissa
(kohdassa Käyttöönottoaika) mainitun ajan, sulaneet elintarvikkeet on
käytettävä nopeasti tai valmistettava ruoaksi, jonka jälkeen ne voidaan pakastaa uudelleen (kun ne
ovat jäähtyneet).
SULATUS
Pakasteet voidaan sulattaa ennen käyttöä
huoneen lämpötilassa.
Pienempiä paloja voidaan kypsentää myös
jäisinä suoraan pakastimesta otettuna.
Kypsennys kestää tässä tapauksessa pitempään.
Page 29

HYÖDYLLISIÄ NEUVOJA JA VINKKEJÄ
SUOMI 29
NORMAALIN TOIMINNAN
ÄÄNET
• Laitteesta voi kuulua lorisevaa tai pulputtavaa ääntä jäähdytysaineen pumppautuessa kierukoiden tai putkien läpi. Tämä
on normaalia.
• Kun kompressori on käynnissä, jäähdytysaine virtaa kaikkialla putkistossa, jolloin kompressorista kuuluu hurinaa tai
sykkivää ääntä. Tämä on normaalia.
• Lämpölaajeneminen voi aiheuttaa äkillistä
ritisevää ääntä. Lämpölaajeneminen on
luonnollinen fysikaalinen ilmiö. Tämä on
normaalia.
• Kompressorin käynnistyessä tai pysähtyessä lämpötilan säätimestä kuuluu vaimea naksahdus. Tämä on normaalia.
PAKASTUSOHJEITA
Seuraavassa on muutamia tärkeitä ohjeita
tehokkaan pakastamisen varmistamiseksi:
• 24 tunnin aikana pakastettavien elintarvikkeiden maksimimäärä on mainittu laitteen arvokilvessä.
• Ruokien pakastuminen kestää 24 tuntia.
Tänä aikana pakastimeen ei saa lisätä
uusia pakastettavia ruokia.
• Pakasta vain korkealaatuisia, tuoreita ja
puhdistettuja elintarvikkeita.
• Jaa ruoka pieniin annoksiin, jotta se pakastuu nopeasti ja täydellisesti. Tällöin
voit myöhemmin sulattaa vain tarvitsemasi määrän.
• Kääri elintarvikkeet alumiinifolioon tai
pakkaa muovipusseihin mahdollisimman
ilmatiiviisti.
• Älä anna tuoreiden pakastamattomien
ruokien koskea jo pakastuneita tuotteita,
jotta niiden lämpötila ei nouse.
• Vähärasvaiset ruoat säilyvät paremmin
kuin rasvaiset. Suola lyhentää elintarvikkeiden säilytysaikaa.
• Jos jääpaloja nautitaan suoraan pakastimesta otettuina, ne voivat aiheuttaa kylmävammoja.
• Merkitse pakastuspäivämäärä kaikkiin
pakkauksiin, jotta voit helposti seurata
säilytysaikoja.
PAKASTEIDEN
SÄILYTYSOHJEITA
Noudata seuraavia ohjeita varmistaaksesi
laitteen parhaan suorituskyvyn:
• Tarkista, että kaupasta ostamasi pakasteet on säilytetty oikein.
• Laita pakasteet pakastelokeroon mahdollisimman nopeasti ostoksilla käynnin
jälkeen.
• Älä avaa ovea usein, älä myöskään pidä
ovea auki pitempään kuin on tarpeen.
• Sulatettu pakaste pilaantuu nopeasti eikä
sitä saa pakastaa uudelleen.
• Älä käytä tuotetta pakkaukseen merkityn
viimeisen käyttöpäivän jälkeen.
Page 30

www.electrolux.com
30
HOITO JA PUHDISTUS
HUOMIO
Kytke laite irti verkkovirrasta ennen
puhdistus- ja huoltotöiden aloittamista.
Laitteen jäähdytysyksikkö sisältää
hiilivetyä; Jäähdytysyksikön huollon
ja täytön saa suorittaa ainoastaan
valtuutettu huoltoliike.
SÄÄNNÖLLINEN PUHDISTUS
Laite on puhdistettava säännöllisesti:
• Puhdista sisäosa ja varusteet lämpimällä
vedellä ja käsitiskiaineella.
• Tarkista oven tiivisteet säännöllisesti ja
pyyhi puhtaaksi.
• Huuhtele ja kuivaa huolellisesti.
Älä vedä, siirrä tai vahingoita kaapin
sisällä olevia putkia ja/tai kaapeleita.
Älä käytä puhdistusaineita, hankausjauhetta, voimakastuoksuisia
puhdistustuotteita tai kiillotusvahaa
sisätilojen puhdistamisessa, sillä
tällaiset tuotteet vahingoittavat pintoja ja jättävät voimakkaan tuoksun.
Puhdista laitteen takapuolella sijaitsevat
lauhdutin (musta ritilä) ja kompressori harjalla. Tämä toimenpide parantaa laitteen
suorituskykyä ja säästää energiaa.
Varo vahingoittamasta jäähdytysjärjestelmää.
Monet keittiön pintojen puhdistusaineet sisältävät kemikaaleja, jotka voivat vahingoittaa laitteen muoviosia. Tästä syystä laitteen
ulkopintojen puhdistuksessa on suositeltavaa käyttää vain lämmintä vettä ja käsitiskiainetta.
Kun laite on puhdistettu, kytke se takaisin
verkkovirtaan.
PAKASTIMEN SULATTAMINEN
Pakastimen hyllyihin ja yläosastoon muodostuu aina jonkin verran huurretta.
Sulata pakastin, kun huurrekerroksen paksuus on noin 3-5 mm.
Aseta lämpötilan säädin korkeampaan asetukseen noin 12 tuntia ennen sulatuksen aloittamista, jotta
pakasteet jäätyvät mahdollisimman
kylmiksi ja varaavat näin itseensä
kylmää sulatustoimenpiteen ajaksi.
Huurteen poistaminen:
1.
Kytke laite pois päältä ja irrota pistoke
pistorasiasta.
2.
Poista pakastimesta kaikki elintarvikkeet, kääri ne paksulti sanomalehteen
ja laita viileään paikkaan.
HUOMIO
Älä koske pakasteisiin märin käsin.
Kädet voivat jäätyä kiinni ruokaan.
3.
Jätä ovi auki ja aseta muovikaavin laitteen alaosassa keskellä olevaan, sille
tarkoitettuun paikkaan. Aseta kaapimen varren alapuolelle astia, joka kerää
sulatusveden.
Voit nopeuttaa sulatusta laittamalla
lämmintä vettä sisältävän astian pakastimen sisään. Poista myös sulatuksen aikana irtoilevat jääpalat pakastimen sisältä.
4.
Kun pakastin on sulatettu, kuivaa sisäpinnat hyvin ja laita kaavin talteen.
5.
Kytke laitteeseen virta.
6.
Käännä lämpötilan säädin asentoon <<
-18 °C >> ja jätä pakastin käymään vähintään 4 tunnin ajaksi pikapakastustilassa.
7.
Aseta pakasteet takaisin osastoihin 4
tunnin kuluttua.
Page 31

VAROITUS!
Älä koskaan käytä teräviä metalliesineitä huurteen poistamisessa
höyrystimestä, sillä se voi vahingoittua.
Älä yritä nopeuttaa sulatusta mekaanisilla tai muilla välineillä, joita
valmistaja ei ole neuvonut käyttämään.
Pakasteiden lämpötilan nouseminen sulatuksen aikana voi lyhentää
niiden turvallista säilytysaikaa.
JOS LAITETTA EI KÄYTETÄ
PITKÄÄN AIKAAN
Jos laitetta ei ole tarkoitus käyttää pitkään
aikaan, suorita seuraavat toimenpiteet:
1.
Kytke laite irti verkkovirrasta.
2.
Ota kaikki ruoat pois.
3.
Sulata ja puhdista laite sekä kaikki sen
varusteet.
4.
Jätä ovi/ovet raolleen, jotta laitteen sisälle ei muodostu epämiellyttävää hajua.
Jos jätät laitteen toimintaan, pyydä
jotakin henkilöä tarkistamaan kaappiin jätetyt elintarvikkeet aika ajoin,
jotta ne eivät pilaannu esimerkiksi
sähkökatkon sattuessa.
SUOMI 31
Page 32

www.electrolux.com
32
KÄYTTÖHÄIRIÖT
VAROITUS!
Irrota pistoke pistorasiasta, ennen
kuin aloitat vianmäärityksen.
Vianmääritystoimenpiteet, joita ei
ole mainittu tässä käyttöohjeessa,
on annettava ammattitaitoisen sähköasentajan suoritettaviksi.
Tietynlaiset äänet kuuluvat laitteen
normaaliin toimintaan (kompressori,
jäähdytysaineen kierto).
Laite toimii jaksoittain, joten kompressorin pysähtyminen ei tarkoita
virran katkeamista. Sen vuoksi laitteen sähköosiin ei saa koskea ennen virran katkaisemista.
Ongelma Mahdollinen syy Korjaustoimenpide
Laitteen käyntiääni
on kova.
Laitetta ei ole tuettu kunnolla paikalleen.
Tarkista, että laite on tukevasti paikallaan (kaikki neljä
jalkaa koskevat lattiaan).
Kompressori käy jatkuvasti.
Ovet eivät sulkeudu tiiviisti,
Termostaatti on säädetty
virheellisesti.
tai niitä ei ole suljettu kunnolla.
Säädä lämpötila korkeammaksi.
Tarkista, että ovet sulkeutuvat tiiviisti ja että tiivisteet
ovat ehjät ja puhtaat.
Ovea on avattu liian usein. Älä pidä ovea auki pitem-
pään kuin on tarpeen.
Pakastimeen on asetettu
suuria määriä elintarvikkeita
Odota muutama tunti ja tarkista lämpötila uudelleen.
samanaikaisesti.
Ruoka on asetettu pakasti-
meen liian lämpimänä.
Anna ruokien jäähtyä huoneen lämpötilaan ennen pakastamista.
Huoneen lämpötila on liian
Alenna huoneen lämpötilaa.
korkea.
Laitteessa on liikaa
huurretta ja jäätä.
Ovet eivät sulkeudu tiiviisti,
Lämpötilan säädin ei ehkä
Pakastimen sisällä
on liian lämmintä.
Ovi ei sulkeudu tiiviisti, tai
Elintarvikkeita ei ole pakattu
kunnolla.
tai niitä ei ole suljettu kunnolla.
ole oikeassa asennossa.
Lämpötilan säädin ei ehkä
ole oikeassa asennossa.
sitä ei ole suljettu kunnolla.
Pakkaa tuotteet paremmin.
Tarkista, että ovet sulkeutuvat tiiviisti ja että tiivisteet
ovat ehjät ja puhtaat.
Säädä lämpötila korkeammaksi.
Säädä lämpötila alhaisemmaksi.
Tarkista, että ovi sulkeutuu
tiiviisti ja että tiiviste on ehjä
ja puhdas.
Pakastimeen on asetettu
suuria määriä elintarvikkeita
samanaikaisesti.
Aseta pakastimeen pienempiä ruokamääriä yhdellä kertaa.
Page 33

SUOMI 33
Ongelma Mahdollinen syy Korjaustoimenpide
Ruoka on asetettu pakasti-
meen liian lämpimänä.
Anna ruoan jäähtyä huoneen
lämpötilaan ennen pakastamista.
Pakastettavat elintarvikkeet
ovat liian lähellä toisiaan.
Sijoittele tuotteet siten, että
kylmä ilma pääsee kiertämään niiden ympärillä.
Pakastimen sisällä
on liian kylmä.
Laite ei toimi lainkaan. Sekä jäähdytys
Lämpötilan säädin ei ehkä
ole oikeassa asennossa.
Pistoke ei ole kunnolla kiinni
pistorasiassa.
Säädä lämpötila korkeammaksi.
Kytke pistoke kunnolla pistorasiaan.
että valot ovat poissa
toiminnasta.
Laite ei saa virtaa. Testaa virtalähde kytkemällä
siihen toinen sähkölaite.
Pakastinta ei ole kytketty
Kytke virta laitteeseen.
päälle.
Pistorasiassa ei ole jännitet-
Ota yhteys sähköasentajaan.
tä. (Testaa pistorasia kytkemällä siihen jokin toinen
sähkölaite.)
Laite ei kylmennä
lainkaan.
Pistorasiassa ei ole jännitet-
Pistoke ei ole kunnolla kiinni
pistorasiassa.
Kytke pistoke kunnolla pisto-
rasiaan.
Ota yhteys sähköasentajaan.
tä. (Testaa pistorasia kytkemällä siihen jokin toinen
sähkölaite.)
Pakastinta ei ole kytketty
Kytke virta laitteeseen.
päälle.
Lämpötilan säädintä ei ole
Tarkista lämpötilan säädin.
kytketty päälle.
Vihreä merkkivalo
vilkkuu.
Lämpötila-anturin häiriö. Ota yhteys valtuutettuun
huoltopalveluun.
OVEN SULKEMINEN
1.
Puhdista oven tiivisteet.
2.
Säädä ovea tarvittaessa. Lue ohjeet
kohdasta "Asennus".
3.
Vaihda tarvittaessa vaurioituneet oven
tiivisteet. Ota yhteys valtuutettuun huoltoliikkeeseen.
Page 34

www.electrolux.com
34
ASENNUS
VAROITUS!
Lue huolellisesti turvallisuusohjeet
oman turvallisuutesi ja laitteen
asianmukaisen toiminnan varmistamiseksi, ennen kuin aloitat laitteen
asennuksen.
SIJOITTAMINEN
Laitteen voi asentaa kuivaan, hyvin tuuletettuun sisätilaan (autotalliin tai kellariin), mutta
parhaiten se toimii paikassa, jossa ympäristön lämpötila vastaa laitteen arvokilvessä
määritettyä ilmastoa koskevaa luokitusta:
TASAPAINOTTAMINEN
SIJOITUSPAIKKA
Ilmas-
Ympäristön lämpötila
toluokka
SN +10 °C – 32 °C
N +16 °C – 32 °C
ST +16 °C – 38°C
T +16 °C – 43 °C
Kun sijoitat laitteen paikalleen, tarkista, että
se on vaakatasossa. Voit säätää laitteen
vaakatasoon laitteen pohjassa etupuolella
olevilla säätöjaloilla.
100 mm
15 mm 15 mm
Laite tulee sijoittaa kauas lämpölähteistä, kuten lämpöpattereista, boilereista, suorasta
auringonvalosta, jne. Varmista, että ilma voi
kiertää vapaasti laitteen takana. Jos laite
asennetaan kalustekaapin alapuolelle, varmista laitteen paras suorituskyky tarkistamalla,
että kalusteen yläosan ja laitteen välissä on
vähintään 100 mm tilaa. Mahdollisuuksien
mukaan tulee kuitenkin välttää sijoittamasta
laitetta kalustekaapin alapuolelle. Laite voidaan säätää tarkasti vaakatasoon sen pohjassa olevan yhden tai useamman säätöjalan
avulla. Jos laite sijoitetaan huoneen nurkkaan
siten, että saranat ovat seinän puolella, seinän ja laitteen välillä tulee olla vähintään 10
mm, jotta ovi pääsee aukeamaan riittävästi
hyllyjen poistamista varten.
VAROITUS!
Käyttäjän on pystyttävä irrottamaan
laite sähköverkosta. Asennuksen jälkeen pistokkeen on oltava helposti
käyttäjän ulottuvilla.
Page 35

OVEN KÄTISYYDEN VAIHTAMINEN
2
1
4
1
2
3
SUOMI 35
Avautumissuunnan vaihdossa tarvitaan toinen henkilö, joka pitelee laitteen ovia tukevasti toimenpiteiden
aikana.
Oven avautumissuunta vaihdetaan seuraavalla tavalla:
• Irrota pistoke pistorasiasta.
• Kallista laite varovasti takaosan varaan
siten, ettei kompressori koske lattiaan.
• Ruuvaa vasen jalka auki.
• Ruuvaa auki oven alasaranan ruuvit.
• Ota ovi pois paikaltaan vetämällä sitä kevyesti alaspäin.
• Irrota yläsaranan tappi ja ruuvaa se sen
jälkeen toiselle puolelle.
• Sovita ovi yläsaranan tappiin.
• Irrota alasarana. Käännä tappi ympäri
nuolen suuntaisesti.
• Kierrä ruuvi irti ja kiinnitä se vastakkaiselle
puolelle.
• Asenna alasarana vastakkaiselle puolelle
muuttamatta oven asentoa.
• Ruuvaa ruuvi toiselle puolelle vapautuneeseen tilaan ja kiinnitä oikea säädettävä jalka.
• Poista kahva (jos olemassa) ja kiinnitä se
vastakkaiselle puolelle.
• Sijoita laite paikalleen ja tasapainota se.
Odota vähintään neljä tuntia ennen kuin
kytket virtajohdon pistorasiaan.
Tarkista lopuksi seuraavat seikat:
• Kaikki ruuvit on kiristetty.
• Ovi avautuu ja sulkeutuu kunnolla.
Jos sijoituspaikan lämpötila on alhainen
(esim. talvella), tiiviste ei mahdollisesti tartu
hyvin. Odota tässä tapauksessa, että tiiviste kiinnittyy itsestään.
Jos et halua suorittaa edellä kuvattuja toimenpiteitä itse, voit ottaa yhteyttä valtuutettuun huoltoliikkeeseen. Huoltoliikkeen ammattitaitoinen asentaja vaihtaa oven kätisyyden korvausta vastaan.
Page 36

www.electrolux.com
36
SÄHKÖLIITÄNTÄ
Ennen kuin kytket laitteen verkkovirtaan,
tarkista, että arvokilvessä mainittu jännite ja
taajuus vastaavat verkkovirran arvoja.
Laite on kytkettävä maadoitettuun pistorasiaan. Virtajohdon pistoke on varustettu
maadoituskoskettimella. Jos pistorasia, johon laite kytketään, ei ole maadoitettu, ota
yhteys sähköasentajaan ja pyydä asentajaa
kytkemään laite erilliseen maadoitusliittimeen voimassa olevien määräysten mukaisesti.
Valmistaja ei vastaa millään tavalla vahingoista, mikäli edellä olevia turvallisuusohjeita ei ole noudatettu.
Tämä laite vastaa Euroopan yhteisön. direktiivejä.
Page 37

ÄÄNET
Tietynlaiset äänet kuuluvat laitteen normaaliin toimintaan (kompressori, jäähdytysaineen kierto).
SSSRRR!
HISSS!
SUOMI 37
CLICK!
BRRR!
OK
CLICK!
BRRR!
CRACK!
BLUBB!
CLICK!
BRRR!
BLUBB!
BLUBB!
Page 38

www.electrolux.com
38
HISSS!
HISSS!
TEKNISET TIEDOT
Mitat
Korkeus 850 mm
Leveys 595 mm
Syvyys 635 mm
Käyttöönottoaika 24 tuntia
Jännite 230-240 V
Taajuus 50 Hz
Tekniset tiedot on merkitty laitteen sisälle,
vasemmalle puolelle kiinnitettyyn arvokilpeen ja energiatarraan.
SSSRRR!
CRACK!
SSSRRR!
CRACK!
Page 39

YMPÄRISTÖNSUOJELU
SUOMI 39
Kierrätä materiaalit, jotka on merkitty
merkillä
asianmukaiseen kierrätysastiaan.
Suojele ympäristöä ja ihmisten terveyttä
kierrättämällä sähkö- ja elektroniikkaromut.
. Kierrätä pakkaus laittamalla se
Älä hävitä merkillä
kodinkoneita kotitalousjätteen mukana.
Palauta tuote paikalliseen
kierrätyskeskukseen tai ota yhteyttä
paikalliseen viranomaiseen.
merkittyjä
Page 40

www.electrolux.com
40
INNEHÅLL
SÄKERHETSINFORMATION . . . . . . . . . . . . . . . . . . . . . . . . . . . . . . . . . . . . . . . . . . . . . . . . . . . . 41
PRODUKTBESKRIVNING . . . . . . . . . . . . . . . . . . . . . . . . . . . . . . . . . . . . . . . . . . . . . . . . . . . . . . . 44
KONTROLLPANEL . . . . . . . . . . . . . . . . . . . . . . . . . . . . . . . . . . . . . . . . . . . . . . . . . . . . . . . . . . . . 45
DAGLIG ANVÄNDNING . . . . . . . . . . . . . . . . . . . . . . . . . . . . . . . . . . . . . . . . . . . . . . . . . . . . . . . . 47
RÅD OCH TIPS . . . . . . . . . . . . . . . . . . . . . . . . . . . . . . . . . . . . . . . . . . . . . . . . . . . . . . . . . . . . . . 48
UNDERHÅLL OCH RENGÖRING . . . . . . . . . . . . . . . . . . . . . . . . . . . . . . . . . . . . . . . . . . . . . . . . . 49
OM MASKINEN INTE FUNGERAR . . . . . . . . . . . . . . . . . . . . . . . . . . . . . . . . . . . . . . . . . . . . . . . . 51
INSTALLATION . . . . . . . . . . . . . . . . . . . . . . . . . . . . . . . . . . . . . . . . . . . . . . . . . . . . . . . . . . . . . . 53
BULLER . . . . . . . . . . . . . . . . . . . . . . . . . . . . . . . . . . . . . . . . . . . . . . . . . . . . . . . . . . . . . . . . . . . . 56
TEKNISKA DATA . . . . . . . . . . . . . . . . . . . . . . . . . . . . . . . . . . . . . . . . . . . . . . . . . . . . . . . . . . . . . 57
MILJÖSKYDD . . . . . . . . . . . . . . . . . . . . . . . . . . . . . . . . . . . . . . . . . . . . . . . . . . . . . . . . . . . . . . . 58
WE’RE THINKING OF YOU
Tack för att du köpt en Electrolux-produkt. Du har valt en produkt som för med sig årtionden av
yrkeserfarenhet och innovation. Genial och snygg har den utformats med dig i åtanke. Så när du än
använder den kan du känna dig trygg med att veta att du får fantastiska resultat varje gång.
Välkommen till Electrolux.
Besök vår webbplats för att:
Få tips om användning, broschyrer, felsökare, serviceinformation:
www.electrolux.com
Registrera din produkt för bättre service:
www.electrolux.com/productregistration
Köp tillbehör, förbrukningsvaror och originalreservdelar till din produkt:
www.electrolux.com/shop
KUNDTJÄNST OCH SERVICE
Vi rekommenderar att originalreservdelar används.
Ha följande uppgifter till hands när du kontaktar serviceavdelningen.
Informationen finns på typskylten. Modell, PNC, serienummer.
Varnings-/viktig säkerhetsinformation.
Allmän information och tips
Miljöinformation
Med reservation för ändringar.
Page 41

SÄKERHETSINFORMATION
SVENSKA 41
För din egen säkerhet och för att du skall
kunna använda produkten på korrekt sätt
är det viktigt att du noggrant läser igenom
denna bruksanvisning, inklusive tips och
varningar, innan du installerar och använder
produkten första gången. För att undvika
onödiga misstag och olyckor är det viktigt
att alla som använder produkten har god
kännedom om dess skötsel och skyddsanordningar. Spara denna bruksanvisning
och se till att den följer med produkten om
den flyttas eller säljs, så att alla som använder produkten får korrekt säkerhetsinformation och information om hur den skall
skötas.
För att minimera risken för skador på person och egendom är det viktigt att du läser
och följer säkerhetsföreskrifterna i denna
bruksanvisning. Tillverkaren ansvarar inte
för skador orsakade av att föreskrifterna
inte har följts.
SÄKERHET FÖR BARN OCH
HANDIKAPPADE
• Denna produkt är inte avsedd att användas av personer (även barn) med nedsatt
fysisk eller sensorisk förmåga, eller om
de har bristande erfarenhet och kunskap, om de inte instrueras och övervakas av en person som ansvarar för deras
säkerhet.
Barn bör alltid övervakas när de använder produkten för att säkerställa att de
inte leker med den.
• Håll allt förpackningsmaterial utom räckhåll för barn. Risk för kvävning kan föreligga.
• När du skall kassera produkten: koppla
loss den från eluttaget och klipp av nätkabeln (så nära produkten som möjligt)
och demontera dörrarna så att lekande
barn inte utsätts för elektriska stötar eller
löper risk att bli innestängda.
• Om denna produkt, som har magnetiska
dörrtätningar, skall ersätta en äldre produkt som har en fjäderbelastad spärr i
dörrarna, var noga med att göra fjäderspärren obrukbar innan du kasserar den
gamla produkten. Då finns det ingen risk
att produkten blir en dödsfälla för barn.
ALLMÄN SÄKERHET
VARNING
Se till att ventilationsöppningarna inte
blockeras i produktens hölje eller i inbyggnadsutrymmet.
• Produkten är avsedd för förvaring av
matvaror och/eller drycker i ett normalt
hushåll enligt beskrivning i denna bruksanvisning.
• Använd inga mekaniska eller artificiella
metoder för att påskynda upptiningsprocessen.
• Använd inga andra elektriska apparater
inne i produkten, (t.ex. en glassmaskin),
såvida de inte har godkänts för detta ändamål av tillverkaren.
• Var noga med att inte skada kylkretsen.
• I kylkretsen används isobutan (R600a)
som köldmedel. Det är en miljövänlig naturgas, men den är dock brandfarlig.
Se till att inga komponenter i kylkretsen
skadas under transport och installation
av produkten.
Om kylkretsen skadas:
– undvik att komma nära öppen eld och
antändande källor
– ventilera noga rummet där produkten
står
• Det är farligt att ändra specifikationerna
eller att försöka modifiera denna produkt
på något sätt. En skadad nätkabel kan
orsaka kortslutning, brand och/eller
elektriska stötar.
VARNING
Elektriska delar (t.ex. nätkabel,
stickkontakt, kompressor) får endast bytas ut av en certifierad serviceagent eller annan kvalificerad
servicepersonal för att undvika fara.
1.
Nätkabeln får inte förlängas.
2.
Se till att stickkontakten inte kläms
eller skadas av produktens baksida.
En skadad stickkontakt kan överhettas och orsaka brand.
3.
Se till att stickkontakten är åtkomlig
när produkten har installerats.
4.
Dra inte i nätkabeln.
Page 42

www.electrolux.com
42
• Denna produkt är tung. Var försiktig när
• Plocka inte ut matvaror från frysfacket
• Se till att produkten inte exponeras för
• Lamporna (i förekommande fall) som an-
DAGLIG ANVÄNDNING
• Ställ inte heta kärl på plastdelarna i pro-
• Förvara inte brandfarliga gaser eller väts-
• Placera inte matvaror direkt mot luftut-
• Fryst mat får inte frysas om när den har
• Förvara färdig fryst mat enligt tillverka-
• Följ noga rekommendationerna om för-
• Placera inte kolsyrade eller mousserande
• Isglassar kan orsaka frostskador om de
5.
Sätt inte i stickkontakten om eluttaget sitter löst. Risk för elektriska stötar eller brand föreligger.
6.
Produkten får inte användas utan att
innerbelysningens lampglas (i förekommande fall) sitter på plats.
du flyttar den.
och ta inte i dem med våta eller fuktiga
händer eftersom detta kan leda till skador på huden eller frost-/frysskador.
direkt solsken under långa perioder.
vänds i den här produkten är speciallampor som endast är avsedda för användning i produkter som denna. De lämpar
sig inte som rumsbelysning.
VARNING
Placera inte frysta livsmedel på arbetsytan, eftersom kylan och ångan kan orsaka kondens på insidan.
Då kan vätskan som droppar ner
orsaka felfunktioner. Därför är det
viktigt att inte lämna någon form av
frysta produkter på arbetsytan.
dukten.
kor i produkten eftersom de kan explodera.
loppet på den bakre väggen. (Om produkten är frostfri)
tinats.
rens anvisningar.
varing från produktens tillverkare. Se relevant avsnitt i bruksanvisningen.
drycker i frysen eftersom detta skapar ett
tryck i behållaren som då kan explodera
och skada frysen.
konsumeras direkt från frysen.
SKÖTSEL OCH RENGÖRING
• Stäng av produkten och koppla loss den
från eluttaget före underhåll.
• Rengör inte produkten med metallföremål.
• Använd inga vassa föremål för att avlägsna frost från produkten. Använd i
stället en plastskrapa.
• Använd aldrig en hårtork eller andra
elektriska produkter för att påskynda avfrostningen. För hög värme kan skada
plastdelarna inne i produkten, fukt kan
tränga in i det elektriska systemet och
göra det strömförande.
INSTALLATION
För den elektriska anslutningen, följ
noga anvisningarna i respektive avsnitt.
• Packa upp produkten och kontrollera att
den inte har några utvändiga skador. Anslut inte produkten om den är skadad på
något sätt. Rapportera omedelbart eventuella skador till din återförsäljare, och
spara i så fall förpackningsmaterialet.
• Vi rekommenderar att du väntar minst
fyra timmar innan du nätansluter produkten så att oljan kan rinna tillbaka i kompressorn.
• Tillräcklig luftcirkulation måste säkerställas runt produkten, annars överhettas
den. För att erhålla tillräcklig ventilation,
följ instruktionerna som är relevanta för
installationen.
• När så är möjligt bör produktens baksida
vara vänd mot en vägg för att undvika
risken för brännskador genom kontakt
med produktens varma delar (kompressor, kondensor).
• Produkten får inte placeras nära värmeelement eller spisar.
• Säkerställ att elkontakten är åtkomlig efter installation av produkten.
• Anslut endast till dricksvattenledning (om
det finns en vattenanslutning).
SERVICE
• Allt arbete avseende elektricitet som
krävs för att utföra service på produkten
skall utföras av en behörig elektriker eller
annan kompetent person.
Page 43

• Service på denna produkt får endast utföras av en auktoriserad serviceverkstad.
Endast originaldelar får användas.
MILJÖSKYDD
Denna produkt innehåller inte, varken i kylkretsen eller i isolationsmaterialen, någon gas som kan skada
ozonlagret. Produkten får inte kasseras tillsammans med det vanliga
hushållsavfallet. Isolationsmaterialet
innehåller brandfarliga gaser: Produkten skall därför kasseras enligt
tillämpliga bestämmelser som kan
erhållas från de lokala myndigheterna. Undvik att skada kylenheten,
särskilt på baksidan nära kondensorn. Material i denna produkt som
är märkta med symbolen
återvinnas.
kan
SVENSKA 43
Page 44

www.electrolux.com
44
PRODUKTBESKRIVNING
1
2
3
6
5
Kontrollpanelen
1
Infrysningslåda
2
Förvaringslåda
3
Förvaringslåda
4
Avfrostningsränna
5
Typskylt (på insidan)
6
4
Page 45

KONTROLLPANEL
1 2 3 4 5
Grön kontrollampa för På/Av
1
Temperaturreglage och På/Av-knapp
2
Gul kontrollampa för snabbinfrysning
3
Knapp för snabbinfrysning och stopp
4
av ljudsignal
Röd larmindikator
5
SLÅ PÅ
1.
Låt produkten stå upprätt i 4 timmar
efter installationen.
2.
Sätt i stickkontakten i eluttaget.
3.
Vrid temperaturreglaget medurs till en
temperatur under läget << - 16 °C >>.
4.
Den gröna kontrollampan för På/Av
tänds och den röda larmindikatorn
blinkar.
5.
När den gröna kontrollampan för På/Av
tänds betyder det att produkten är
påslagen.
6.
När den röda larmindikatorn blinkar betyder det att frysdelen har fel temperatur. Dessutom hörs en periodisk ljudsignal, som kan stoppas genom att
trycka på knappen för snabbinfrysning
och stopp av ljudsignal en gång.
7.
När frysen slås på för första gången
blinkar den röda larmindikatorn tills den
inre temperaturen har nått den nivå
som krävs för säker förvaring av frysta
matvaror.
STÄNGA AV
1.
För att stänga av produkten vrider du
temperaturreglaget till läget "O".
2.
För att koppla bort produkten från
strömkällan: Dra ut stickkontakten ur
eluttaget.
SVENSKA 45
TEMPERATURREGLERING
Temperaturen inuti produkten kontrolleras
av temperaturreglaget som sitter på kontrollpanelen.
Gör på följande sätt för att reglera produkten:
• Vrid temperaturreglaget mot de låga inställningarna för att få låga frysnivåer.
• Vrid temperaturreglaget mot de höga inställningarna för att få höga frysnivåer.
En medelhög inställning är i regel
bäst.
Den exakta inställningen bör dock väljas
med hänsyn till att temperaturen inne i produkten beror på:
• rumstemperaturen
• hur ofta dörren öppnas
• mängden matvaror som förvaras
• produktens placering.
RÖD LARMINDIKATOR
Under normala driftsförhållanden garanterar
frysens interna temperatur att den förvarade maten håller sig länge.
När temperaturen stiger ovanför en viss
nivå (-12 °C) utlöser produkten ett ljud- och
ljuslarm. Ljuslarmet är en blinkande röd
lampa (röd larmindikator), och ljudlarmet är
ett periodiskt ljud.
Du kan stoppa det akustiska larmet genom
att trycka på knappen för stopp av ljudlarm
en gång.
När frysen slås på för första gången blinkar den röda larmindikatorn
tills den inre temperaturen har nått
den nivå som krävs för säker förvaring av frysta matvaror.
Page 46

www.electrolux.com
46
FUNKTIONEN FÖR
SNABBINFRYSNING
Om mer än 3–4 kg matvaror ska frysas in:
1.
2.
3.
4.
5.
Tryck på knappen för snabbinfrysning i
2–3 sekunder för att aktivera funktionen för snabbinfrysning 6–24 timmar
innan de färska matvarorna placeras i
frysen. Den gula kontrollampan tänds.
Kompressorn körs nu kontinuerligt för
att säkerställa att de färska matvarorna
fryses ner så snabbt som möjligt.
Du kan när som helst stänga av funktionen genom att trycka på knappen
för snabbinfrysning i 2–3 sekunder.
Placera matvarorna i infrysningslådan
(översta lådan). För bästa frysresultat,
avlägsna lådan (om sådan finns) och
placera sedan de matvaror som ska
frysas in direkt på evaporatorn. Om
mindre mängder mat ska frysas är det
inte nödvändigt att ta ut lådan.
När maten är helt nedfryst (det kan ta
upp till 24 timmar) kan du manuellt slå
av funktionen för snabbinfrysning genom att trycka in knappen för snabbinfrysning i 2–3 sekunder. Den gula kontrollampan för snabbinfrysning släcks.
Flytta de frysta matvarorna från infrysningslådan till de andra två lådorna
(förvaringslådorna) för att lämna utrymme till ny infrysning.
Om knappen för snabbinfrysning av
misstag lämnas på stängs snabbinfrysningsfunktionen av automatiskt
48 timmar senare. Den gula kontrollampan för snabbinfrysning
släcks också.
INNAN MASKINEN ANVÄNDS
FÖRSTA GÅNGEN
Innan du använder produkten första gången, rengör dess insida och alla invändiga
tillbehör med ljummet vatten och en liten
mängd neutral såpa för att ta bort den typiska lukten hos nya produkter. Eftertorka
sedan noga.
Använd inga starka rengöringsmedel eller skurpulver eftersom sådana produkter skadar ytfinishen.
Page 47

DAGLIG ANVÄNDNING
INFRYSNING AV FÄRSKA
LIVSMEDEL
Infrysningslådan är lämpligt för infrysning av
färska livsmedel och långvarig förvaring av
frysta och djupfrysta matvaror
Vid infrysning av färska matvaror aktiverar
du funktionen för snabbinfrysning.
Maximal mängd livsmedel som kan frysas
inom 24 timmar anges på typskylten som
sitter på produktens insida.
Infrysningen tar 24 timmar: lägg inte in andra livsmedel som ska frysas under denna
period.
FÖRVARING AV FRYST MAT
Vid första uppstart eller efter ett uppehåll i
avstängt läge, låt produkten stå på i minst
två timmar innan du lägger in några matvaror.
I händelse av en oavsiktlig avfrostning, t.ex. vid ett strömavbrott och
avbrottet varar längre än den tid
som anges i den tekniska informationen under Temperaturökningstid, måste den tinade maten konsumeras snabbt eller omedelbart
tillagas och sedan frysas in på nytt
(när maten har kallnat).
SVENSKA 47
UPPTINING
Djupfryst och fryst mat kan tinas vid rumstemperatur innan den används.
Småbitar kan till och med tillagas direkt från
frysen medan de fortfarande är frysta. Tillagningen tar i detta fall dock lite längre tid.
Page 48

www.electrolux.com
48
RÅD OCH TIPS
NORMALA LJUD UNDER DRIFT
• Det kan höras ett svagt porlande och ett
bubblande ljud när köldmedlet pumpas
genom spiralrören och rörledningarna.
Detta är normalt.
• När kompressorn är i drift pumpas köldmedlet runt och det hörs ett surrande
och ett pulserande ljud från kompressorn. Detta är normalt.
• Den termiska utvidgningen kan orsaka
ett plötsligt knäppande ljud. Detta är ett
naturligt och ofarligt fysikaliskt fenomen.
Detta är normalt.
• När kompressorn slås på och av kan ett
svagt "klick" höras från temperaturtermostaten. Detta är normalt.
TIPS OM INFRYSNING
Här följer några värdefulla tips som hjälper
dig att använda infrysningsfunktionen på
bästa sätt:
• Den maximala mängd mat som kan frysas in på 24 timmar anges på typskylten.
• Infrysningsprocessen tar 24 timmar. Ytterligare mat som skall frysas in bör inte
läggas in under denna period.
• Frys endast in färska och rengjorda matvaror av hög kvalitet.
• Dela upp maten i små portioner för en
snabbare och fullständig infrysning. Sedan kan du dessutom plocka ut och tina
endast den mängd du behöver.
• Slå in maten i aluminiumfolie, eller lägg
den i plastpåsar, och se till att förpackningarna är lufttäta.
• Låt inte färsk, ej infryst mat komma i
kontakt med redan infryst mat, detta för
att temperaturen inte skall öka i den infrysta maten.
• Magra matvaror håller bättre och längre
än feta. Salt förkortar matens lagringstid.
• Isglass kan, om den konsumeras direkt
från frysfacket, orsaka frysskador på huden.
• Det är lämpligt att anteckna datumet för
infrysning på varje separat förpackning
så att du kan hålla reda på förvaringstiderna.
TIPS OM FÖRVARING AV FRYST
MAT
Observera följande för att utnyttja produktens prestanda på bästa sätt:
• Kontrollera att kommersiellt infrysta matvaror har förvarats på rätt sätt av återförsäljaren.
• Transportera frysta matvaror från affären
till frysen så snabbt som möjligt.
• Öppna inte dörren för ofta och låt den
inte stå öppen längre tid än absolut nödvändigt.
• När fryst mat tinas upp försämras den
snabbt och får inte frysas in på nytt.
• Överskrid inte den förvaringsperiod som
anges av matvarans tillverkare.
Page 49

UNDERHÅLL OCH RENGÖRING
SVENSKA 49
FÖRSIKTIGHET
Koppla loss produkten från eluttaget innan du utför någon form av
underhåll.
Kylenheten i denna produkt innehåller kolväten: underhåll och påfyllning får därför endast utföras av
en auktoriserad servicetekniker.
REGELBUNDEN RENGÖRING
Utrustningen måste rengöras med jämna
mellanrum:
• rengör produkten insida och alla tillbehör
med ljummet vatten och en liten mängd
neutral såpa.
• inspektera regelbundet dörrtätningarna
och torka dem rena från eventuell smuts.
• skölj och torka noga.
Dra inte i, flytta inte och undvik att
skada rörledningarna och kablarna
inne i produkten.
Använd aldrig skarpa rengöringsmedel, skurpulver, parfymerade
rengöringsprodukter eller vaxpolermedel för att rengöra produkten invändigt eftersom sådana produkter
skadar ytfinishen och efterlämnar
en stark lukt.
Frosta av frysen när frostlagret har en tjocklek på cirka 3–5 mm.
Cirka 12 timmar före avfrostningen
ställer du in temperaturreglaget på
en hög inställning för att bygga upp
en tillräcklig kylreserv för driftavbrottet.
Gör enligt följande för att avlägsna frosten:
1.
Stäng av produkten och koppla bort
den från eluttaget.
2.
Plocka ut matvarorna, slå in dem i flera
lager med tidningspapper och lägg
dem på en sval plats.
FÖRSIKTIGHET
Ta inte i fryst mat med våta händer.
Dina händer kan frysa fast vid matvarorna.
3.
Låt dörren stå öppen och sätt fast
plastskrapan längst ned i mitten och
placera en behållare undertill för att
samla upp avfrostningsvattnet.
Rengör kondensorn (svart galler) och kompressorn på produktens baksida med en
borste. Detta förbättrar produktens prestanda och bidrar till en lägre energiförbrukning.
Var försiktig så att du inte skadar
kylsystemet.
Många produkter för rengöring av köksytor
innehåller kemikalier som kan skada plastkomponenterna i produkten. Vi rekommenderar därför att produktens ytterhölje endast rengörs med varmt vatten och ett milt
diskmedel.
Anslut produkten till eluttaget igen efter
rengöringen.
AVFROSTNING AV FRYSEN
En viss mängd frost bildas alltid på fryshyllorna och runt det övre facket.
För att påskynda avfrostningsprocessen kan du placera en skål med
varmt vatten i frysfacket. Du kan
också ta bort isbitar som lossnar
innan avfrostningen är klar.
4.
När avfrostningen är klar torkar du
noga av produktens insida. Spara
skrapan för framtida bruk.
5.
Sätt på produkten.
6.
Vrid temperaturreglaget till läget << 18 °C >> och låt produkten arbeta i
minst 4 timmar i snabbinfrysningsläget.
7.
Efter 4 timmar, lägg tillbaka matvarorna
som du tidigare plockade ut.
Page 50

www.electrolux.com
50
LÅNGA UPPEHÅLL
Följ nedanstående anvisningar om produkten inte skall användas under en längre tidsperiod:
1.
2.
3.
4.
VARNING
Använd aldrig vassa metallverktyg
för att skrapa av frost från evaporatorn, eftersom den kan skadas.
Använd inga mekaniska verktyg eller andra medel för att påskynda
avfrostningsprocessen utöver de
som rekommenderas av tillverkaren.
En temperaturökning hos frysta
matförpackningar kan förkorta tiden som de kan förvaras utan säkerhetsrisk.
Koppla loss produkten från eluttaget.
Plocka ur alla matvaror.
Avfrosta och rengör produkten och alla
tillbehör.
Låt dörren/dörrarna stå på glänt så att
inte dålig lukt bildas.
Om produkten lämnas påslagen,
be någon titta till den då och då så
att inte matvarorna i den förstörs i
händelse av strömavbrott.
Page 51

OM MASKINEN INTE FUNGERAR
SVENSKA 51
VARNING
Ta ur stickkontakten från eluttaget
innan felsökning påbörjas.
Endast en behörig elektriker eller
annan kompetent person får utföra
felsökning som inte beskrivs i denna bruksanvisning.
Vissa ljud hörs under normal användning (kompressor, cirkulation
av köldmedel).
Produkten arbetar hela tiden, så
när kompressorn stannar innebär
inte detta att produkten är utan
ström. Det är därför du inte får ta i
de elektriska delarna utan att först
koppla bort produkten från eluttaget.
Problem Möjlig orsak Åtgärd
Produkten bullrar.
Produkten står ostadigt. Kontrollera att produkten
står stadigt (alla fyra fötterna
ska ha kontakt med golvet).
Kompressorn arbetar
Termostaten är felinställd Ställ in en högre temperatur
hela tiden.
Dörrarna sluter inte tätt eller
stängs inte ordentligt
Kontrollera att dörrarna
stängs ordentligt och att tätningarna är oskadda och
rena
Dörren har öppnats för ofta Låt inte dörren stå öppen
längre än nödvändigt
Stora mängder mat har
lagts in samtidigt för infrysning.
Alltför varm mat har lagts in
i produkten.
Rumstemperaturen är för
Vänta några timmar och
kontrollera sedan temperaturen igen
Låt maten svalna till rumstemperatur före infrysning.
Sänk rumstemperaturen.
hög.
Det har bildats för
mycket frost och is.
Dörrarna sluter inte tätt eller
Matvarorna är inte korrekt
inpackade.
stängs inte ordentligt
Packa in matvarorna ordentligt.
Kontrollera att dörrarna
stängs ordentligt och att tätningarna är oskadda och
rena
Temperaturreglaget kan
Ställ in en högre temperatur
vara felaktigt inställt
Det är för varmt inuti
frysen
Dörren sluter inte tätt eller
Temperaturreglaget kan
vara felaktigt inställt
stängs inte ordentligt
Ställ in en lägre temperatur
Kontrollera att dörren stängs
ordentligt och att tätningen
är oskadad och ren
Stora mängder mat har
lagts in samtidigt för infrys-
Lägg in mindre mängder
mat för infrysning samtidigt.
ning.
Page 52

www.electrolux.com
52
Problem Möjlig orsak Åtgärd
Alltför varm mat har lagts in
Produkter som ska frysas
Det är för kallt inuti
frysen.
Produkten fungerar
inte alls. Varken kylning eller belysning
fungerar.
Produkten får ingen ström. Prova med att ansluta en
Produkten är inte påslagen Slå på produkten
Eluttaget är strömlöst (pro-
Produkten kyler inte
alls
Eluttaget är strömlöst (pro-
Produkten är inte påslagen Slå på produkten
Temperaturreglaget är intepåKontrollera temperaturregla-
Grön kontrollampa
blinkar
STÄNGNING AV DÖRREN
1.
2.
3.
i produkten.
in har placerats för nära
varandra.
Temperaturreglaget kan
vara felaktigt inställt
Stickkontakten sitter inte
ordentligt i eluttaget
va med att ansluta en annan apparat till eluttaget).
Stickkontakten sitter inte
ordentligt i eluttaget
va med att ansluta en annan apparat till eluttaget).
Problem med temperatursensor
Rengör dörrtätningarna.
Justera dörren vid behov. Se avsnitt
"Installation".
Byt vid behov ut defekta dörrtätningar.
Kontakta serviceavdelningen.
Låt mat svalna till rumstemperatur före infrysning.
Placera produkterna så att
kalluft kan cirkulera mellan
dem
Ställ in en högre temperatur
Sätt i stickkontakten ordentligt i eluttaget
annan elektrisk apparat till
eluttaget.
Tillkalla en behörig elektriker.
Sätt i stickkontakten ordentligt i eluttaget
Tillkalla en behörig elektriker.
get
Kontakta servicepersonalen
Page 53

INSTALLATION
SVENSKA 53
VARNING
För din egen säkerhet och för att
du skall kunna använda produkten
på korrekt sätt, läs noga igenom
avsnittet "Säkerhetsinformation" innan du installerar produkten.
PLACERING
Produkten kan installeras på en torr, välventilerad plats inomhus (garage eller källare), men för bästa funktion bör den installeras i ett utrymme som har samma omgiv-
JUSTERING AV HÖJD OCH DJUP
PLATS
ningstemperatur som överensstämmer
med klimatklassen som är angiven på typskylten:
Klimat-
Omgivningstemperatur
klass
SN +10°C till + 32°C
N +16 °C till + 32°C
ST +16 °C till + 38 °C
T +16 °C till + 43°C
Se till att produkten står i våg där den installeras. Detta görs med de två justerbara
fötterna på bottens framsida.
100 mm
15 mm 15 mm
Produkten bör installeras på behörigt avstånd
från värmekällor såsom värmeelement, värmepannor, direkt solljus, etc. Se till att luft
kan cirkulera fritt runt produktens baksida.
För att säkerställa bästa prestanda, om produkten är placerad under en överhängande
väggenhet, måste det minsta avståndet mellan produktens överdel och väggenheten
vara minst 100 mm. Produkten bör dock inte
placeras under överhängande väggenheter.
Produkten ställs in vågrätt med en eller flera
justerbara fötter i botten. Om produkten placeras i ett hörn och gångjärnssidan står mot
en vägg, ska avståndet mellan väggen och
produkten vara minst 10 mm för att dörren
ska kunna öppnas tillräckligt för att kunna ta
ut hyllorna.
VARNING
Det måste gå att koppla loss produkten från elnätet. Kontakten måste
därför vara lättåtkomlig efter installationen.
Page 54

www.electrolux.com
54
OMHÄNGNING AV DÖRRAR
Vi rekommenderar att du ber någon om hjälp med att hålla ett fast
grepp om dörren under arbetets
gång.
Gör på följande sätt för att ändra dörrens
öppningsriktning:
• Koppla bort produkten från eluttaget.
• Luta produkten försiktigt bakåt så att
kompressorn inte kommer i kontakt med
golvet.
• Skruva loss den vänstra foten.
• Skruva loss skruvarna till dörrens nedre
gångjärn.
• Ta bort produktens dörr genom att dra
den lite nedåt.
• Skruva loss produktens övre gångjärnssprint, och skruva sedan tillbaka den på
den andra sidan.
• Sätt dörren på den övre gångjärnssprin-
2
1
4
1
2
3
ten.
• Avlägsna det nedre gångjärnet. Flytta
över sprinten i pilens riktning.
• Skruva loss skruven och skruva fast den
på motsatta sidan.
• Installera det nedre gångjärnet på den
andra sidan utan att ändra dörrens position.
• Skruva i den ena skruven på den plats
som blivit ledig på den andra sidan, och
på den högra justerbara foten.
• Ta bort och sätt tillbaka handtaget (i förekommande fall) på den motsatta sidan.
• Ställ tillbaka produkten på plats, justera
in den i våg och vänta sedan minst fyra
timmar innan du ansluter den till eluttaget.
Kontrollera slutligen följande:
• Alla skruvar är åtdragna.
• Dörren öppnas och stängs ordentligt.
Page 55

SVENSKA 55
Om rumstemperaturen är låg (t.ex. på vintern) kanske tätningen inte fäster ordentligt.
Vänta i så fall tills tätningen har anpassat
sig på naturlig väg.
Om du inte vill hänga om dörren själv kan
du kontakta den lokala servicegivaren. En
servicetekniker hänger om den mot en avgift.
ELEKTRISK ANSLUTNING
Kontrollera före anslutning till ett eluttag att
nätspänningen och nätfrekvensen överensstämmer med de värden som anges på
typskylten.
Produkten måste jordas. Nätkabelns stickkontakt är försedd med en kontakt för detta ändamål. Om nätspänningsmatningen
inte är jordad, kontakta en kvalificerad
elektriker för att ansluta produkten till en
separat jord enligt gällande bestämmelser.
Tillverkaren ansvarar inte för skador orsakade av att ovanstående säkerhetsåtgärder
inte har följts.
Denna produkt uppfyller kraven enligt EGdirektiven för CE-märkning.
Page 56

www.electrolux.com
56
BULLER
Vissa ljud hörs under normal användning
(kompressor, cirkulation av köldmedel).
SSSRRR!
HISSS!
CLICK!
BRRR!
OK
CLICK!
BRRR!
CRACK!
BLUBB!
CLICK!
BRRR!
BLUBB!
BLUBB!
Page 57

HISSS!
SVENSKA 57
HISSS!
TEKNISKA DATA
Mått
Höjd 850 mm
Bredd 595 mm
Djup 635 mm
Temperaturökningstid 24 tim.
Nätspänning 230-240 V
Frekvens 50 Hz
Den tekniska informationen anges på typskylten som sitter till vänster inne i produkten samt på energietiketten.
SSSRRR!
CRACK!
SSSRRR!
CRACK!
Page 58

www.electrolux.com
58
MILJÖSKYDD
Återvinn material med symbolen
Återvinn förpackningen genom att placera
den i lämpligt kärl.
Bidra till att skydda vår miljö och vår hälsa
genom att återvinna avfall från elektriska
.
och elektroniska produkter. Släng inte
produkter märkta med symbolen
hushållsavfallet. Lämna in produkten på
närmaste återvinningsstation eller kontakta
kommunkontoret.
med
Page 59

SVENSKA 59
Page 60

www.electrolux.com/shop 200384057-A-472011
 Loading...