

Page 1
Kühl - Gefrierschrank /
dubbelsdeurs- koelkast / refrigerateur -
congelateur / fridge - freezer
GEBRAUCHSANWEISUNGEN
GEBRUIKSAANWIJZING
NSTRUCTION BOOKLET
MODE D’EMPLOI
2223 335-61
ERN 29850
NL
D
F
UK
Page 2

39
WARNINGS
It is most important that this instruction book should be retained with the appliance for future
reference. Should the appliance be sold or transferred to another owner, or should you move house
and leave the appliance, always ensure that the book is supplied with the appliance in order that the
new owner can be acquainted with the functioning of the appliance and the relevant warnings.
If this appliance featuring magnetic door seals is to replace an older appliance having a spring lock
(latch) on the door or lid, be sure to make that spring lock unusable before you discard the old
appliance. This will prevent it from becoming a death-trap for a child.
This must be done before the appliance is built intoThese warnings are provided in the interest of
safety.You must read them carefully before installing or using the appliance.
General Safety
• This appliance is designed to be operated by
adults. Children should not be allowed to tamper
with the controls or play with the product.
• It is dangerous to alter the specifications or
modify this product in any way.
• Care must be taken to ensure that the appliance
does not stand on the electrical supply cable.
Important: if the supply cord is damaged, it must
be replaced by the manufacturer, its service agent
or similarly qualified person in order to avoid a
hazard.
• Before any cleaning or maintenance work is carried
out, be sure to switch off and unplug the appliance.
• This appliance is heavy. Care should be taken
when moving it
• Ice lollies can cause frost burns if consumed
straight from the appliance.
• Take utmost care when handling your
appliance so as not to cause any damages to
the cooling unit with consequent possible
fluid leakages.
• The appliance must not be located close to
radiators or gas cookers.
• Avoid prolonged exposure of the appliance to
direct sunlight.
• There must be adequate ventilation round the
back of the appliance and any damage to the
refrigerant circuit must be avoided.
• For freezers only (except built-in models): an
ideal location is the cellar or basement.
• Do not use other electrical appliances (such
as ice cream makers) inside of refrigerating
appliances, unless they are approved for this
purpose by the manufacturer.
Service/Repair
• Any electrical work required to install this
appliance should be carried out by a qualified
electrician or competent person
• This product should be serviced by an authorized
Service Centre, and only genuine spare parts
should be used.
• Under no circumstances should you attempt to
repair the appliance yourself. Repairs carried out
by inexperienced persons may cause injury or
more serious malfunctioning. Refer to your local
Service Centre, and always
• This appliance contains hydrocarbons in its
cooling unit; maintenance and recharging must
therefore only be carried out by authorized
technicians.
Use
• The domestic refrigerators and freezers are
designed to be used specifically for the storage
of edible foodstuffs only.
• Best performance is obtained with ambient
temperature between +18°C and +43°C (class T);
+18°C and +38°C (class ST); +16°C and +32°C
(class N); +10°C and +32°C (class SN).The
class of your appliance is shown on its rating
plate.
Warning: when the ambient temperature is not
included within the range indicated for the class
of this appliance, the following instructions must
be observed: when the ambient temperature
drops below the minimum level, the storage
temperature in the freezer compartment cannot
be guaranteed; therefore it is advisable to use the
food stored as soon as possible.
• Frozen food must not be re-frozen once it has
been thawed out.
• Manufacturers’ storage recommendations should
be strictly adhered to. Refer to relevant
instructions.
• The inner lining of the appliance consists of
channels through which the refrigerant passes. If
these should be punctured this would damage the
appliance beyond repair and cause food loss. DO
NOT USE SHARP INSTRUMENTS to scrape off
frost or ice. Frost may be removed by using the
scraper provided. Under no circumstances should
solid ice be forced off the liner. Solid ice should be
allowed to thaw when defrosting the appliance.
Page 3
40
Cleaning the interior
Before using the appliance for the first time, wash
the interior and all internal accessories with lukewarm water and some neutral soap so as to remove
the typical smell of a brand-new product, then dry
thoroughly.
Do not use detergents or abrasive
powders, as these will damage the finish.
USE
CONTENTS
Warnings . . . . . . . . . . . . . . . . . . . . . . . . . . . . . . . . . . . . . . . . . . . . . . . . . . . . . . . . . . . . . . . . . . . . . . . . . . .39
Use - Cleaning the interior . . . . . . . . . . . . . . . . . . . . . . . . . . . . . . . . . . . . . . . . . . . . . . . . . . . . . . . . . . . . . . . . .40
Use - Control panel - Display - Operation - Temperature indication . . . . . . . . . . . . . . . . . . . . . . . . . . . . . . . . . .41
Activation of funztions - Switching Off - Use of the fridge compartment - Temperature regulation - Fresh food
refrigeration - Shopping Function . . . . . . . . . . . . . . . . . . . . . . . . . . . . . . . . . . . . . . . . . . . . . . . . . . . . . . . . . . . . . .42
Use of the freezer compartment - Temperature regulation - Freezing fresh food - Storage of frozen food . . . . .43
Excessive temperature alarm - Thawing - Ice-cube production . . . . . . . . . . . . . . . . . . . . . . . . . . . . . . . . . . . . . .44
Use -Shelf holders - Movable shelves - Positioning the door shelves - Air circulation . . . . . . . . . . . . . . . . . . . . .45
Hints - Hints for refrigeration - Hints for freezing - Hints for storage of frozen food . . . . . . . . . . . . . . . . . . . . .46
Maintenance - Periods of no operation - Periodic cleaning Interior light - Defrosting . . . . . . . . . . . . . . . . . .47
Customer service and spare parts - Installation - Location - Electrical connection . . . . . . . . . . . . . . . . .48
Installation - Door reversibility - Building-in instructions . . . . . . . . . . . . . . . . . . . . . . . . . . . . . . . . . . . . . . . .49
• Do not place carbonated or fizzy drinks in the
freezer as it creates pressure on the container,
which may cause it to explode, resulting in
damage to the appliance.
Installation
• During normal operation, the condenser and
compressor at the back of the appliance heat up
considerably. For safety reasons, minimum
ventilation must be as shown in the relevant
Figure.
Attention: keep ventilation openings clear of
obstruction.
• If the appliance is transported horizontally, it is
possible that the oil contained in the compressor
flows in the refrigerant circuit. It is advisable to
wait at least two hours before connecting the
appliance to allow the oil to flow back in the
compressor.
• There are working parts in this product which
heat up. Always ensure that there is adequate
ventilation as a failure to do this will result in
component failure and possible food loss. See
installation instructions.
• Parts which heat up should not be exposed.
Wherever possible the back of the product should
be against a wall.
• If the appliance has been transported
horizontally, it is possible that the oil contained in
the compressor ílows in the refrigerant circuit. It
is advisable to wait at least two hours before
connecting the appliance to allow tl¦e oil to flow
back in the compressor.
Environment Protection
This appliance does not contain gasses which
could damage the ozone layer, in either its
refrigerant circuit or insulation materials.The
appliance shall not be discarded together with
the urban refuse and rubbish. Avoid damaging
the cooling unit, especially at the rear near the
heat exchanger. Information on your local
disposal sites may be obtained from municipal
authorities.The materials used on this appliance
marked by the symbol are recyclable.
Disposal of old Appliances
The symbol on the product or on its packaging
indicates that this product may not be treated as
household waste. Instead it shall be handed over to
the applicable collection point for the recycling of
electrical and electronic equipment. By ensuring this
product is disposed of correctly, you will help prevent
potential negative consequences for the
environment and human health, which could
otherwise be caused by inappropriate waste
handling of this product. For more detailed
information about recycling of this product, please
contact your local city office, your household waste
disposal service or the shop where you purchased
the product.
Page 4
41
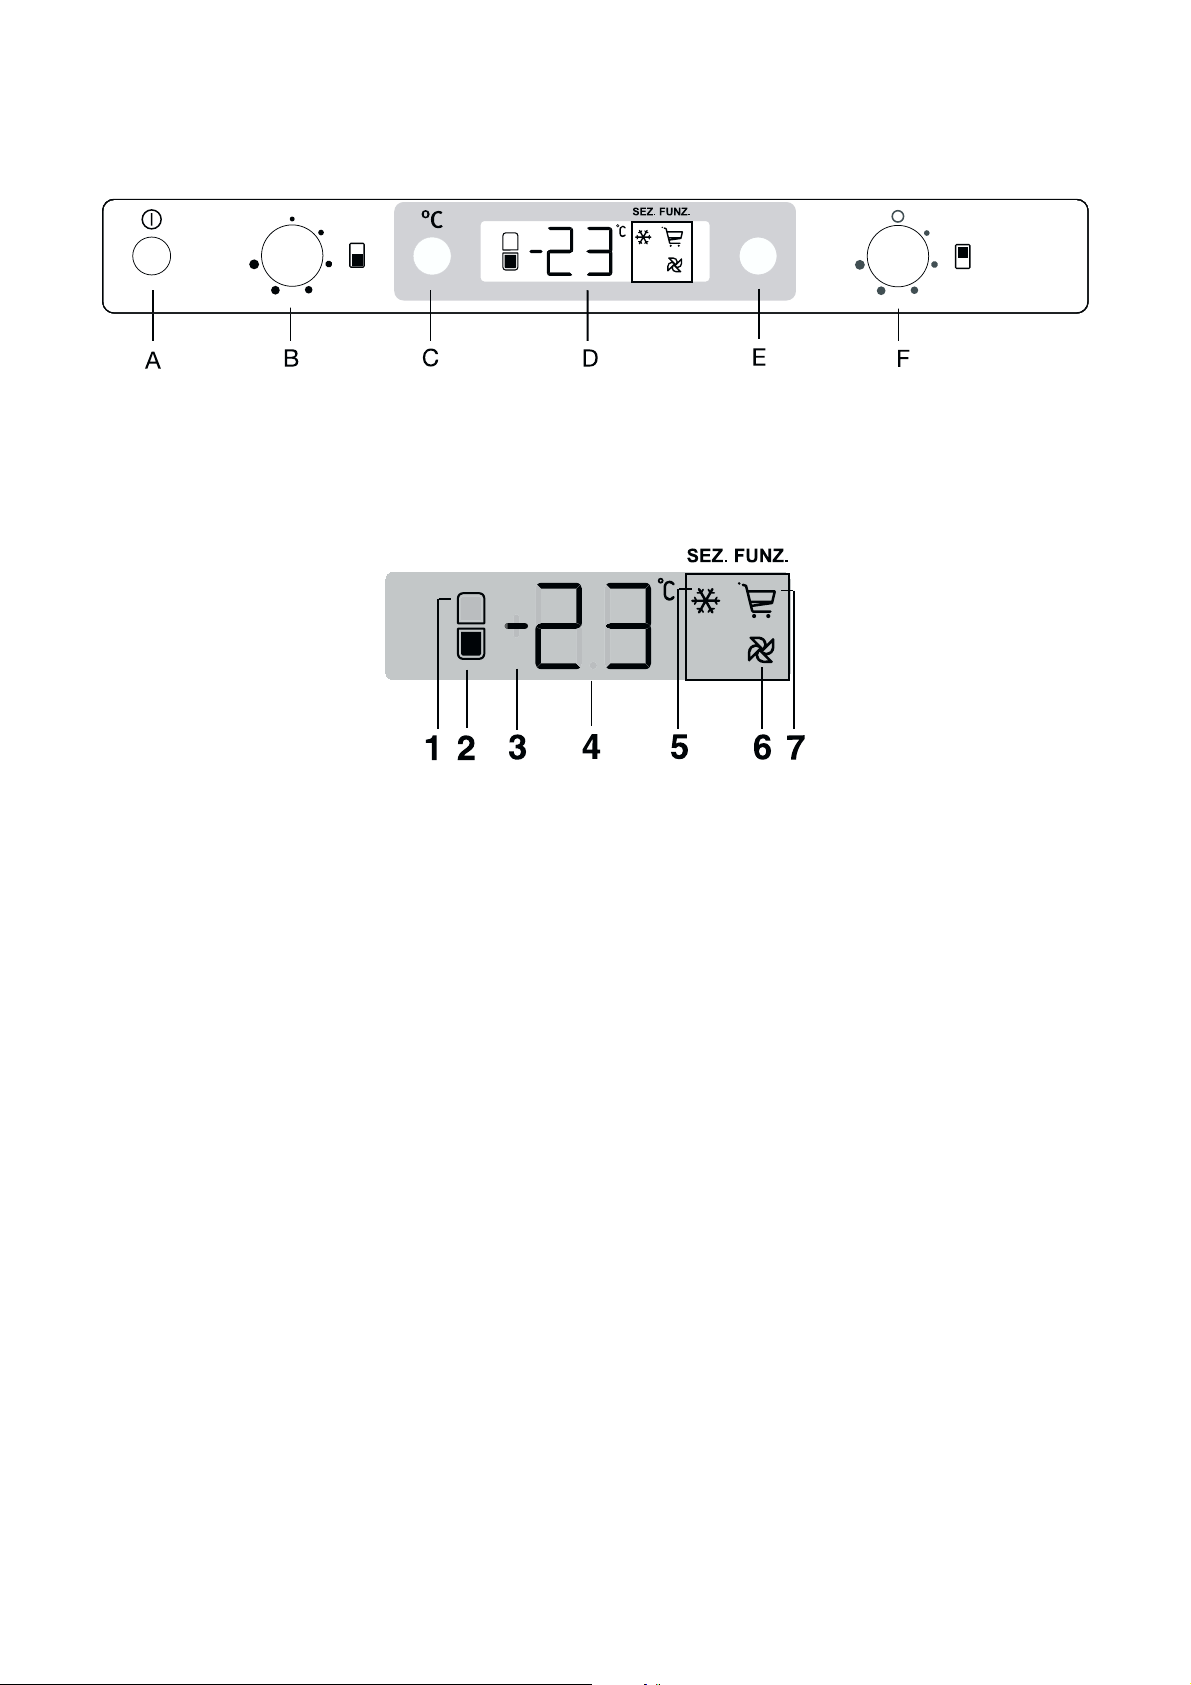
Control panel
DISPLAY
A - Applinace button ON/OFF
B - Freezer Thermostat control knob
C - Temperature indication button
Operation
After plugging the plug into the power outlet, if the
display is not illuminated, press key (A), appliance on.
As soon as the appliance is turned on, the following
signals will appear on the control panel:
• symbol (3) will be positive, indicating that the
temperature is positive.
• the temperature flashes, the background of the
display is red and you will hear a buzzer. Press key
(E) and the buzzer will go off (also see the section
on "excessive temperature alarm").
By turning the knob the display flashes and shows
the desired temperature. For a correct storage of
the food the following temperatures should be set:
+5°C in the fridge
-18°C in the freezer
Important
If the door remains ajar for more than 7 minutes, the
internal lighting will turn off electronically; after this, the
lighting function will be reset by opening and closing
the door itself.
Temperature indication
In normal conditions, the display indicates the freezer
temperature (symbol 2).
Each time key C is pressed, the display indicates in
sequence:
1. symbol 1 turns on and indicator 4 shows the
temperature of the fridge compartment;
2.symbol 2 turns on and indicator 4 shows the
temperature of the freezer compartment.
In any case, after 10 seconds normal display
conditions are restored.
D - Temperature and function indicator
E - Function button/ reset alarm
F - Fridge Thermostat knob
3. positive and negative Temperture indicator
4. Temperature indicator
5. If on the fast freeze funcion is on
6. If on the minidac is on
7 If on the shopping function is on
1. If on, the indicated temperature is that of the
fridge compartment;
if it flashes, the alarm corresponds to the
relative compartment.
2. If on, the indicated temperature is that of the
freezer compartment;
if it flashes, the alarm corresponds to the
relative compartment.
MODE
Page 5
42
Use of the fridge compartment
Temperature regulation
The temperature of this compartment may be
regulated by rotating the knob (F), and may vary
between more or less +2°C and +8°C.
When the knob is rotated, the display flashes and
indicates the set temperature. After having set the
desired temperature, if the knob is not rotated within
5 seconds, the temperature of the freezer
compartment will be indicated.
The temperature is automatically regulated and can
be increased to achieve a higher temperature
(warmer) by rotating the thermostat knob toward
●
settings or reduced (colder) rotating the knob
towards ● settings.
However, the exact setting should be chosen
keeping in mind that the temperature inside the
refrigerator depends on:
• room temperature;
• how often the door is opened;
• the quantity of food stored;
• location of appliance.
To shut off the refrigerator compartment, rotate the
knob (F) anticlockwise till position "O". In this
position the word "OF" is indicated for 5 seconds.
The freezer compartment will keep on working.
We suggest placing the knob in the middle position to
obtain an internal temperature of approximately +5° C.
Once the refrigerator compartment is shut off, the
only temperature which is indicated is that of the
freezer compartment. In this condition, the functions
minidac and shopping cannot be activated, and the
lighting in the refrigerator compartment will be
switched off.
Shopping Function
If you need to insert a large amount of warm food, for
example after doing the grocery shopping, we suggest
activating the Shopping function to chill the products
more rapidly and to avoid warming the other food
which is already in the refrigerator.
The shopping function is activated by pressing key E
(several times if necessary) until the corresponding
icon appears
The shopping function shuts off automatically after
approximately 6 hours.
During the shopping function also the fan inside the
refrigerator compartment is automatically activated.
Note: the fan inside the refrigerator compartment is
automatically activated also when the room
temperature is high (over 38°C), even though the
shopping function is not activated.
It is possible to de-activate the function at any time by
pressing key E (see paragraph "Function Activation").
Fresh food refrigeration
To obtain the best performance:
• do not store warm food or evaporating liquids in
the refrigerator;
• cover or wrap the food, particularly if it has a
strong flavour.
• Position food so that air can circulate freely
around it.
Switching off
The appliance is shut off by pressing key (A) for more
than 1 second. After this, a countdown of the
temperature from -3 -2 -1 will be shown.
When the appliance is shut off, display (D) also goes
off.
Activation of functions
Each time key E is pressed, the following functions are
activated in a clockwise direction:
Symbol 5 : fast freeze function
Symbol 6 : minidac function
Symbol 7 : shopping function
No Symbol: Normal operation
Not more than one function can be activated at a time;
to de-activate the functions, press the key several
times until no icon appears
Important
If the ambient temperature is high or the
appliance is fully loaded, and the appliance is
set to the lowest temperatures, it may run
continuously causing frost to form on the rear
wall. In this case the dial must be set to a higher
temperature to allow automatic defrosting and
therefore reduced energy consumption.
Page 6
43
Use of the freezer compartment
Temperature regulation
The temperature of this compartment may be
regulated by rotating the knob (B), and may vary
between more or less -15°C and -24°C.
When the knob is rotated, the display flashes and
indicates the set temperature. After having set the
desired temperature, if the knob is not rotated within
5 seconds, the temperature of the freezer
compartment will be indicated.
The temperature is automatically regulated and can
be increased to achieve a higher temperature
(warmer) by rotating the thermostat knob toward
●
settings or reduced (colder) rotating the knob
towards ● settings.
However, the exact setting should be chosen
keeping in mind that the temperature inside the
freezer depends on:
• room temperature;
• how often the door is opened;
• the quantity of food stored;
• location of appliance.
We suggest setting the knob to the middle position
to obtain an internal temperature of approximately
-18°C, which guarantees proper freezing and
conservation of the frozen foods.
Freezing fresh food
The freezer compartment is suitable for long term
storage of commercially frozen and deep-frezen
food, and for freezing fresh food.
The maximum quantity of foods to freeze in 24 hours
is shown on the serial number plate.
To freeze the amount of food indicated on the serial
number plate, place the food directly in touch with the
cooling surface (remove the drawer or basket).
In case the food is frozen inside the drawers or
baskets, the maximum quantity is slightly reduced.
Place the food to be frozen in the upper part of the
freezer, as this is the coldest point.
To freeze fresh foods, you will need to activate the
rapid freezing function. Press key E (several times if
necessary) until the corresponding icon appears
After a pre-cooling period of 24 hours, place the foods
in the freezer.
The freezing process takes 24 hours. During this
period do not put other foods in the freezer.
This function stops automatically after 54 hours.
The function can be de-activated at any time by
pressing key E (see paragraph "Activation of
Functions").
Storage of frozen food
When first starting-up or after a period out of use,
before putting the products in the compartment let
the appliance run at least 12 hours on the fast freeze
setting. To obtain the best performance from this
appliance, you should:
if large quantities of food are to be stored, remove all
drawers and baskets from appliance and place food
on cooling shelves.
Pay careful attention not to exceed load limit stated
on the side of the upper section (where applicable).
Important
In the event of accidental defrosting, for example
due to a power failure, if the power has been off
for longer that the value shown in the technical
characteristics chart under “rising time”, the
defrosted food must be consumed quickly or
cooked immediately and then refrozen (after
cooling).
The freezer is provided with the symbol
which means that it is suitable for freezing fresh food
and for long term storage of frozen and deep-frozen
food.
Ice packs
There are two ice packs in one drawer of the freezer.
In the event of a power failure or malfunction, the ice
pack will lengthen the amount of time it takes for the
frozen food to become too warm by several hours. The
ice pack can only fulfil this task optimally if it is placed in
the uppermost drawer, at the front, above the frozen
food.You can use the ice pack for cooling cold bags.
Page 7

44
Thawing
Deep-frozen or frozen food, prior to being used, can
be thawed in the refrigerator compartment or at
room temperature, depending on the time available
for this operation.
Small pieces may even be cooked still frozen, directly
from the freezer: in this case, cooking will take longer.
Ice-cube production
This appliance is equipped with one or more trays
for the production of ice-cubes. Fill these trays with
water, then put them in the freezer compartment.
Do not use metallic instruments to remove the
trays from the freezer.
Excessive temperature alarm
An increase in the temperature in the freezer
compartment (for example due to an power failure)
is indicated by:
- flashing temperature;
- freezer compartment flashing (symbol 2);
- red illumination of display;
- sounding of buzzer.
When normal conditions are restored:
- the acoustic signal shuts off;
- the temperature value continues to flash;
- the display illumination remains red.
When you press key "E" to de-activate the alarm, the
highest temperature reached in the compartment
appears on indicator 4 for approximately 5 seconds.
At this point the flashing stops and the display
illumination changes over from red to white.
During the alarm phase, the buzzer can be switched
off by pressing key E; the illumination of the display
remains red until normal storage conditions are
restored.
Page 8

45
Shelf holders
Yourappliance is equipped with shelf retainers that
make it possible to secure the shelves during
transportation.
To remove them proceed as follows:
Raise the shelf from the back, push it in the direction
of the arrow until it is freed and remove the retainers.
Movable shelves
The walls of the refrigerator are equipped with a
series of runners so that the shelves can be
positioned as desired.
Positioning the door shelves
To permit storage of food packages of various sizes,
the door shelves can be placed at different heights.
To make these adjustments proceed as follows:
Gradually pull the shelf in the direction of the arrows
until it comes free, then reposition as required.
Air circulation
The refrigerator compartment is provided with a
special fan D.A.C. (Dynamic Air Cooling) which is
activated by pressing key E (several times if
necessary) until the corresponding icon appears ;
if the green warning light is on (fig.1), this means
that the fan is working.
We suggest using the fan (D.A.C.) when the room
temperature is higher than 28°C.
This device enables the food to cool quickly and
helps to keep a regular temperature inside the
refrigerator compartment.
The special fan D.A.C. (Dynamic Air Cooling) is
automatically activated when the room temperature
is higher than 38°C or when the Shopping function is
activated.
It is possible to de-activate the function at any time
by pressing key E (see paragraph "Function
Activation").
Fig. 1
A
B
D338
PRXXX
SWITCH
Page 9

46
Hints for storage of frozen food
To obtain the best performance from this appliance,
you should:
• make sure that the commercially frozen
foodstuffs were adequately stored by the retailer;
• be sure that frozen foodstuffs are transferred
from the foodstore to the freezer in the shortest
possible time;
• not open the door frequently or leave it open
longer than absolutely necessary.
• Once defrosted, food deteriorates rapidly and
cannot be refrozen.
• Do not exceed the storage period indicated by
the food manufacturer.
will find sketches of various animals and food
types together with the recommended storage
time (in months) from the time of freezing;
• do not put carbonated liquids (fizzy drinks,
etc.) in the freezer compartment as they may
burst.
Hints for freezing
To help you make the most of the freezing process,
here are some important hints:
• the maximum quantity of food which can be
frozen in 24 hrs. is shown on the rating plate;
• the freezing process takes 24 hours. No further
food to be frozen should be added during this
period;
• only freeze top quality, fresh and thoroughly
cleaned, foodstuffs;
• prepare food in small portions to enable it to be
rapidly and completely frozen and to make it
possible subsequently to thaw only the quantity
required;
• wrap up the food in aluminium foil or polythene
and make sure that the packages are airtight;
• do not allow fresh, unfrozen food to touch food
which is already frozen, thus avoiding a rise in
temperature of the latter;
• lean foods store better and longer than fatty
ones; salt reduces the storage life of food;
• water ices, if consumed immediately after
removal from the freezer compartment, can
possibly cause the skin to be freeze burnt;
• it is advisable to show the freezing-in date on
each individual pack to enable you to keep tab of
the storage time;
• on the inner door or special card (if supplied) you
HINTS
Hints for refrigeration
Useful hints:
Meat (all types): wrap in polythene bags and place
on the glass shelf above the vegetable drawer.
For safety, store in this way only one or two days
at the most.
Cooked foods, cold dishes, etc..: these should be
covered and may be placed on any shelf.
Fruit and vegetables: these should be thoroughly
cleaned and placed in the special drawer(s)
provided.
Butter and cheese: these should be placed in
special airtight containers or wrapped in aluminium
foil or polythene bags to exclude as much air as
possible.
Milk bottles: these should have a cap and should
be stored in the bottle rack on the door.
Bananas, potatoes, onions and garlic, if not
packed, must not be kept in the refrigerator.
Page 10

47
MAINTENANCE
Unplug the appliance before carrying out
any maintenance operation.
Warning
This appliance contains hydrocarbons in its cooling
unit; maintenance and recharging must therefore
only be carried out by authorized technicians.
Periodic cleaning
Clean the inside with warm water and bicarbonate of
soda. Rinse and dry thoroughly.
Clean the condenser (black grill) and the
compressor at the back of the appliance with a
brush or a vacuum cleaner.This operstion will
improve the performance of the appliance and save
electricity consumption.
Periods of non-operation
When the appliance is not in use for long periods,
take the following precautions:
remove the plug from the wall socket;
remove all food;
defrost and clean the interior and all accessories;
leave the door ajar to allow air to circulate to prevent
unpleasant smells.
Defrosting
Frost is automatically eliminated from the evaporator
of the refrigerator compartment every time the motor
compressor stops, during normal use. The defrost
water drains out through a trough into a special
container at the back of the appliance, over the
motor compressor, where it evaporates.
It is important to periodically clean the defrost
water drain hole in the middle of the refrigerator
compartment channel to prevent the water
overflowing and dripping onto the food inside.
Use the special cleaner provided, which you will
find already inserted into the drain hole.
Interior light
If it becomes necessary to replace the lamp, press
on the rear hook and at the same time slide the
cover in the direction indicated by the arrow.
Replace the lamp with one of the same
power (the maximum power is shown on the
light diffuser).
D037
Page 11

48
can vary by ±6% of the rated voltage.
For operation with different voltages, a suitably sized
auto-transformer must be used.
The appliance must be earthed.
The power supply cable plug is provided with a
contact for this purpose.
If the domestic power supply socket is not earthed,
connect the appliance to a separate earth in
compliance with current regulations, consulting a
specialist technician.
The freezer compartment, however, will become
progressively covered with frost. This should be
removed with the special plastic scraper provided,
whenever the thickness of the frost exceeds 4 mm.
During this operation it is not necessary to switch off
the power supply or to remove the foodstuffs.
However, when the ice becomes very thick on the
inner liner, complete defrosting should be carried out
and it is advisable to carry out this operation when
the appliance is empty.
To carry out complete defrosting of the freezer
compartment proceed as follows:
1. pull out the plug from the wall socket or turn the
thermostat knob to the «O» setting;
2. remove any stored food, wrap it in several layers
of newspaper and put it in a cool place;
3. leave the door open, insert the plastic scraper in
the appropriate seating at the bottom centre,
placing a basin underneath to collect the defrost
water;
4. when defrosting is completed, dry the interior
thoroughly and refit the plug; keep the scraper for
future use;
5. turn the thermostat knob back to the required
setting or replace the plug in the power socket.
After letting the appliance run for at least half an
hour, replace the previously removed food into
the compartment.
CUSTOMER SERVICE AND SPARE PARTS
If the appliance is not functioning properly, check
that:
• the plug is firmly in the wall socket and the mains
power switch is on;
• there is an electricity supply (find out by plugging
in another appliance);
• the thermostat knob is in the correct position.
• If there are water drops on the bottom of the
cabinet, check that the defrost water drain
opening is not obstructed (see “Defrosting”
section).
• If your appliance is still not working properly after
making the above checks, contact the nearest
service centre.
To obtain fast service, it is essential that when you
apply for it you specify the model and serial number
of your appliance which can be found on the
guarantee certificate or on the rating plate located
inside the appliance, on the bottom left-hand side.
INSTALLATION
Location
The appliance should be installed well away from
sources of heat such as radiators, boilers, direct
sunlight etc.
Electrical connection
Before plugging in, ensure that the voltage and
frequency shown on the serial number plate
correspond to your domestic power supply. Voltage
Important:
Never use sharp metal tools to scrape off frost
from the evaporator as you could damage it.
Do not use a maechanical device or any artificial
means to speed up the thawing process other
than those recommended by the manufacturer.
A temperature rise of the frozen food packs,
during defrosting, may shorten their safe storage
life.
D068
Page 12

49
ATTENTION!
It must be possible to disconnect the appliance from
the mains power supply; the plug must therefore be
easily accessible after installation.
Door reversibility
The appliance is supplied with the right
door opening.To change the opening
direction of the door proceed as in the
following instructions before installing it.
1. Unscrew the upper pin and remove the spacer
2. Remove the upper door
3. Remove the hinge cover (A).
Unscrew the pins (B) and the spacers (C) and refit
them on the middle hinge of the opposite side. Snap
the hinge cover (A).
4. Refit the upper door, the upper pin and the
spacer on the opposite side
5. Unscrew the lower pin and remove the spacer
and refit them on the opposite side
The Manufacturer declines all responsibility if
the above safety precautions are not observed.
This appliance complies with the following
E.E.C. Directives:
- 87/308 EEC of 2/6/87 relative to radio interference
suppression.
- 73/23 EEC of 19.2.73 (Low Voltage Directive) and
subsequent modifications;
- 89/336 EEC of 3.5.89 (Electromagnetic
Compatibility Directive) and subsequent
modifications.
Instructions for totally built-in appliances
Building-in instructions
Dimensions of housing
Height 1780 mm
Depth 550 mm
Width 560 mm
For safety reasons, minimum ventilation must be as
shown in Fig.
Attention: keep ventilation openings clear of
obstruction.
B
C
A
50 mm
min.
200 cm
2
D567
min.
200 cm
2
Page 13

50
Apply the sealing strip pushing it between the
refrigerator and the adjacent cabinet.
Apply covers (C-D) on joint cover lugs and into hinge
holes.
Snap vent grille (B) and hinge cover (E) into
position.
It is necessary that the niche is provided with a
conduct of ventilation having the following
dimensions:
Depth 50 mm
Width 540 mm
Fit the appliance in the niche by making sure that it
stands against the interior surface of the unit on the
side where the door hinges of the appliances are
fitted. Insert the appliance until the upper strip butts
up against the unit (1) and make sure that the lower
hinge is in line with the surface of the unit (2).
Fasten the appliance with 4 screws provided in the
kit included with the appliance. (I = short) (P = long)
540
50
B
T
H
PR01
1
2
D023
I
P
D724
C
D
E
B
Page 14

51
Separate parts Ha, Hb, Hc, Hd as shown in the
figure.
Place guide (Ha) on the inside part of the furniture
door, up and down as shown in the figure and mark
the position of external holes. After having drilled
holes, fix the guide with the screws supplied.
Fix cover (Hc) on guide (Ha) until it clips into place.
Open the appliance door and the furniture door at
90°. Insert the small square (Hb) into guide (Ha).
Put together the appliance door and the furniture
door and mark the holes as indicated in the figure.
Remove the brackets and mark a distance of 8 mm
from the outer edge of the door where the nail must
be fitted (K).
PR266
Ha
Hc
ca. 50 mm
90°
90°
Hd
Hb
2
1
m
m
PR33
ca. 50 mm
Hc
Ha
8mm
2
1
m
m
Ha
PR167
Hb
8mm
K
Ha
Page 15

52
Place the small square on the guide again and fix it
with the screws supplied.
Should the lining up of the furniture door be
necessary, use the clearance of slots.
At the end of operations, it is necessary to check if
the door of the furniture closes properly.
Fix cover (Hd) on guide (Hb) until it clips into place.
If the appliance is fixed to the side of the kitchen unit,
simply slacken the screws in the fixing brackets (E), move
the brackets as shown in the figure and re-tighten the
screws.
PR168
Hb
Hb
Hd
PR167/1
D735
E
E
Page 16

66
DÉCLARATION DE CONDITIONS DE GARANTIE
Nos appareils sont produits avec le plus grand soin. Malgré cela, un défaut peut toujours se présenter. Notre
service clientèle se chargera de réparer ceci sur demande, pendant ou après la période de garantie. La durée
de vie de l’appareil n’en sera pas pour autant amputée.
La présente déclaration de conditions de garantie est basée sur la Directive de l’Union Européenne 99/44/CE
et les dispositions du Code Civil. Les droits légaux dont le consommateur dispose au titre de cette législation
ne peuvent être altérés par la présente déclaration de conditions de garantie.
Cette déclaration ne porte pas atteinte aux obligations de garantie du vendeur envers l’utilisateur final.
L’appareil est garanti dans le cadre et dans le respect des conditions suivantes :
1. Compte tenu des dispositions stipulées aux paragraphes 2 à 15, nous remédierons sans frais à toute
défectuosité qui se manifeste au cours de la période de 24 mois à compter de la date de livraison de
l’appareil au premier consommateur final.
Ces conditions de garantie ne sont pas d’application en cas d’utilisation à des fins professionnelles ou de
façon équivalente.
2. La prestation sous garantie implique que l’appareil est remis dans l’état qu’il avait avant que la défectuosité
ne survienne. Les composants défectueux sont remplacés ou réparés. Les composants remplacés sans
frais deviennent notre propriété.
3. Afin d’éviter des dommages plus sévères, la défectuosité doit immédiatement être portée à notre
connaissance.
4. L’application de la garantie est soumise à la production par le consommateur des preuves d’achat avec la
date d’achat et/ou la date de livraison.
5. La garantie n’interviendra pas si des dommages causés à des pièces délicates, telles que le verre
(vitrocéramique), les matières synthétiques et le caoutchouc, résultent d’une mauvaise utilisation.
6. Il ne peut pas être fait appel à la garantie pour des anomalies bénignes qui n’affectent pas la valeur et la
solidité générales de l’appareil.
7. L’obligation de garantie perd ses effets lorsque les défectuosités sont causées par :
• une réaction chimique ou électrochimique provoquée par l’eau,
• des conditions environnementales anormales en général,
• des conditions de fonctionnement inadaptées,
• un contact avec des produits agressifs.
8. La garantie ne s’applique pas pour les défectuosités, sont dues au transport, survenues en dehors de notre
responsabilité. Celles causées par une installation ou un montage inadéquat, par un manque d’entretien, ou
par le non-respect des indications de montage et d’utilisation, ne seront pas davantage couvertes par la
garantie.
9. Ne sont pas couvertes par la garantie, les défectuosités qui proviennent de réparations ou d’ interventions
pratiquées par des personnes non qualifiées ou incompétentes, ou qui ont pour cause l’adjonction
d’accessoires ou de pièces de rechange non d’origine.
10.Les appareils aisément transportables doivent être délivrés ou envoyés au service clientèle. Les
interventions à domicile ne peuvent s’entrevoir que pour des appareils volumineux ou pour des appareils
encastrables.
11.Si des appareils sont encastrés, sous-encastrés, fixés ou suspendus de telle sorte que le retrait et la remise
en place de ceux-ci dans leur niche d’encastrement prennent plus d’une demi-heure, les frais de prestation
qui en découlent seront portés en compte. Les dommages connexes causés par ces opérations de retrait
et de remise en place sont à charge de l’utilisateur.
12.Si au cours de la période de garantie, la réparation répétée d’une même défectuosité n’est pas concluante,
ou si les frais de réparations sont jugés disproportionnés, le remplacement de l’appareil défectueux par un
autre de même valeur peut être accompli en concertation avec le consommateur.
Dans ce cas nous nous réservons le droit de réclamer une participation financière calculée au prorata de la
période d’utilisation écoulée.
13.La réparation sous garantie n’entraîne pas de prolongation de la période normale de garantie, ni le départ
d’un nouveau cycle de garantie.
(B)
Page 17

67
14.Nous octroyons une garantie de douze mois sur les réparations, limitée à la même défectuosité.
15.Hormis les cas où une responsabilité est imposée légalement, cette déclaration de conditions de garantie
exclut toute indemnisation de dommages extérieurs à l’appareil dont le consommateur voudrait faire
prévaloir les droits. Dans le cas d’une responsabilité reconnue légalement, la compensation n’excèdera pas
la valeur d’achat de l’appareil.
Ces conditions de garantie sont valables uniquement pour des appareils achetés et utilisés en Belgique. Pour
les appareils exportés, l’utilisateur doit d’abord s’assurer qu’ils satisfont aux conditions techniques (p. ex. : la
tension, la fréquence, les prescriptions d’installation, le type de gaz, etc.) pour le pays concernérespectif, et
qu’ils supportent les conditions climatiques et environnementales locales. Pour les appareils achetés à
l’étranger, l’utilisateur doit d’abord s’assurer qu ‘ils répondent bien aux qualifications requises en Belgique. Des
adaptations indispensables ou souhaitée ne sont pas couvertes par la garantie et ne sont pas possibles dans
tous les cas.
Le service clientèle se tient à votre disposition, également après expiration de la période de garantie.
Adresse de notre service clientèle :
ELECTROLUX HOME PRODUCTS BELGIUM
Bergensesteenweg, 719 – 1502 LEMBEEK
Tél. 02.3630444
Page 18

www.electrolux.com
www.electrolux.be
www.electrolux.pl
www.electrolux.hr
www.electrolux.cz
www.electrolux.hu
www.electrolux.ro
www.electrolux.sk
www.electrolux.si
 Loading...