

Page 1
Built-under Oven
Instruction and Installation Manual
319 4394-00
K/PM--D 99.05.01
EON 946
GB
Page 2

Dear Customer !
Carefully please read these instructions for use. First of
all pay special attention to the chapter “Hints on safety”.
Keep these instructions for use for later on consultation
and hand them over to a possible follow--up owner of
the appliance.
By means of this warning triangle and/or by the
signal words “precaution” and “attention!” hints
are stressed which are of importance for your
safety or for the functionability of the appliance.
Please do absolutely adhere to.
After this sign you will get further information on
attendance and practical application of the
appliance.
By means of this sign we have marked tips and
hints for the economical and environment--protecting use of the appliance.
For possibly occurring trouble these instructions do
contain hints for self--acting remedy, see chapter“What
to do, if ...”
Should these hints not be sufficient there are at any
time two places to call at for helping you on: (After-sales--service or Hotline).
Here you will get an answer to any question in relation
with the equipment and application of your appliance.
We are, of course, ready to accept wishes, suggestions
and critics. We are aimed at permanently improving our
products and services for the benefit of our customers.
Our after-sales-service will be at your disposal at any
time with regard to technical problems (addresses and
phone numbers are given in chapter “after-sales-service agencies”).
2
Page 3

3
Contents
Instructions for the user
Hints on safety 44
Disposal 45
Description of the appliance 46
Total view 46
Control panel 46
Safety equipment 47
Prior to first use 48
Daytime setting 48
First cleaning 48
First warming up 49
Hotplate switches 50
The electronic oven control 51
General information 51
Switch-on and switch-off 52
Oven functions 52
Oven temperature 53
Children safety device 54
Short term alarm 55
Automatic program - cooking time 56
Automatic program - switch-off time 57
Switch-on and switch-off automatic 58
Meat probe 59
Instructions for the installer
Installation instructions 73
Hints on safety 73
Built-in in kitchen furniture 73
Built-in dimensions 73
Mains connection 74
Hob connection 75
Technical data, typeplate 76
The oven cavity 61
Oven accessories 61
Grease filter 61
Oven runners 61
Application of the oven functions 62
Top and bottom heat 62
Hot-air 62
Pizza function 63
Infrared grill 63
Large surface grill 63
Turbo grill 64
Oven illumination 64
Hints, tips and charts 65
Roasting 66
Baking 67
Pizza function 68
Grilling 69
What to do in case of.. 70
Cleaning and care 71
Oven and accessories, door and panel 71
Oven runners 72
Fold down top heat elements 72
Oven with stainless steel fascia 72
Page 4

4
Hints on safety
The safety of this appliance corresponds to the
acknowledged rules of technique and to the law on
appliance safety. The safety measures existing as a
matter of self-understandingwould, however, not cover
all of possible risks of accidents.
Moreover, we feel compelled as the manufacturer to
make you familiar with the following hints on safety.
Electrical safety
Mounting and connection of the new appliance must
exclusively be carried out by an approved electric fitter.
Please observe this hint, as otherwise the claim under
guarantee will be ruled out with occurring damages.
Built--in appliances must be installed in built--in
cupboards. The cupboards have to be located
and fastened in a way that they are stable.
Damagedappliances must not be used. Fuselage
to be cut off or unscrewed in case of trouble or failure.
Repair work at the appliance must exclusively be
carried out by expert technicians. Improper repair
work may lead to considerable danger. In need of
repair please contact our after--sales--service or
your expert dealer.
Besides the accessories supplied with the unit do
exclusively make use of suitable and temperature--resistant baking tins androasting dishes. Do
please follow the manufacturers’ instructions.
Safety at cleaning
No heating element must be switched on during
the cleaning procedure. Make sure that the oven
has cooled down in a way that one may get in
touch with interior parts without any danger.
Always keep the oven clean. When heating up fat
splashes and spots will cause inconvenient
odours.
The oven door must firmly close. Ensure clean
sealing surfaces at door and door frame.
The cleaning of the appliance with a steam jet or
high--pressure cleaner is not allowed because of
the requirements of electrical safety.
Safety for children
When roasting, baking or grilling the oven gets
hot. On principle, keep away small children, therefore.
Make use of the door-lock. In this case small children cannot open the oven door.
Make use of the children safety deviceof theelectronic oven control.
Safety during use
This appliance must exclusively be used for the
boiling and frying of food as usual in household
applications.
Precaution with the connection of electric
appliances to sockets in the vicinity of the
appliance. Connection leads must not get in touch
with the hot oven door or cavity frame.
In case of careless handling there is danger of
burning oneself at the heating elements in the
oven.
How to avoid damages on the appliance
Do not use the oven for the purpose of space
heating.
The oven bottom must not be covered with alufoil. Pots, pans and vessels must not be placedon
the oven bottom. The heat will accumulate and
may cause damage to the material.
Make sure that no acetic liquids, such as vinegar,
lemon or deliming means get access to the
enamelled cavity, as this would result in mat
spots. Use the deep enamelled universal pan for
preparations like fruit cake etc.
Do’nt keep bread or damp food in the oven cavity.
The opened oven door must not be burdened too
heavily, do not sit or step on it.
When taking out thehot itemsdo absolutelymake
use of pot or thermo-gloves.
After use make sure that the appliance is
switched off.
Page 5
5
Disposal
Disposal of packing material
All parts of the packing are re--usable, foils and
hard foam correspondingly marked.
PE = Polyethylen (cover, bags of accessories)
PS = Polystrol (cushion)
Packing material and possibly old appliances
are to be disposed off orderly.
Please do observe the national and regional
regulations on appliances and packing material
as wellas the materialmarking (materialseparation, waste collection, depots for valuable substances).
Hints on disposal
The appliance must not be disposed of with the
rubbish.
Information on collection dates and places are
available from the local towns cleaning dept. or
from the municipal administration. This symbol
refers to tips and hints on the economic and
environment protecting use of the appliance.
Warning! Past use old appliances do please render unserviceable prior to disposal. Cut off the
mains.
Page 6
6
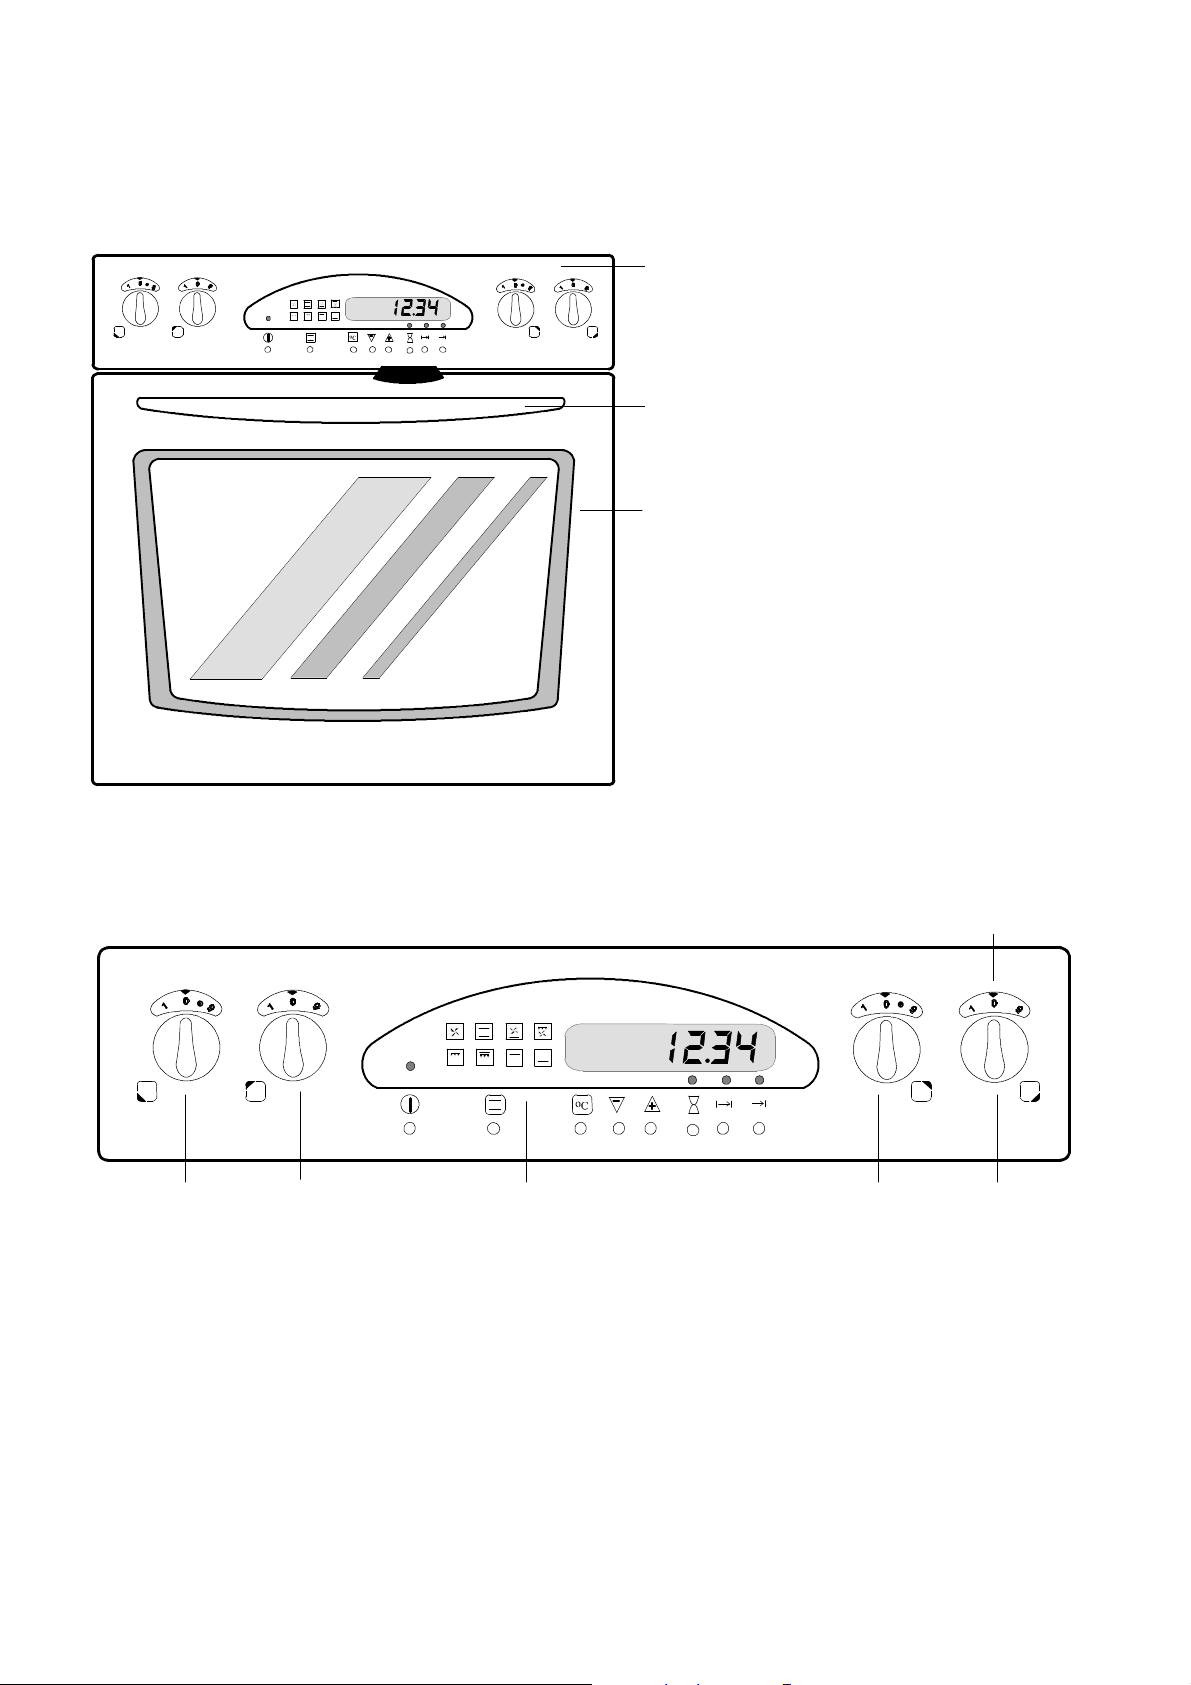
Description of the appliance
Total view
Panel with switches and
electronic oven control
oven door handle
oven door
with glass fascia and oven view
Panel
À
Hotplate switch, front left
À
Hotplate switch, rear left
Á
Electronic oven control
Â
Hotplate switch, rear right
Ã
Hotplate switch, front right
Ä
Å
Scale illumination
Á ÄÂ Ã
Å
a b c d e f
a Push button ON/OFF
b Push button oven functions
c Push button oven temperature
d Push buttons temperature and time
+ = forward / -- = backward
e Push button short--term alarm
f Push buttons automatic programs
Page 7
7
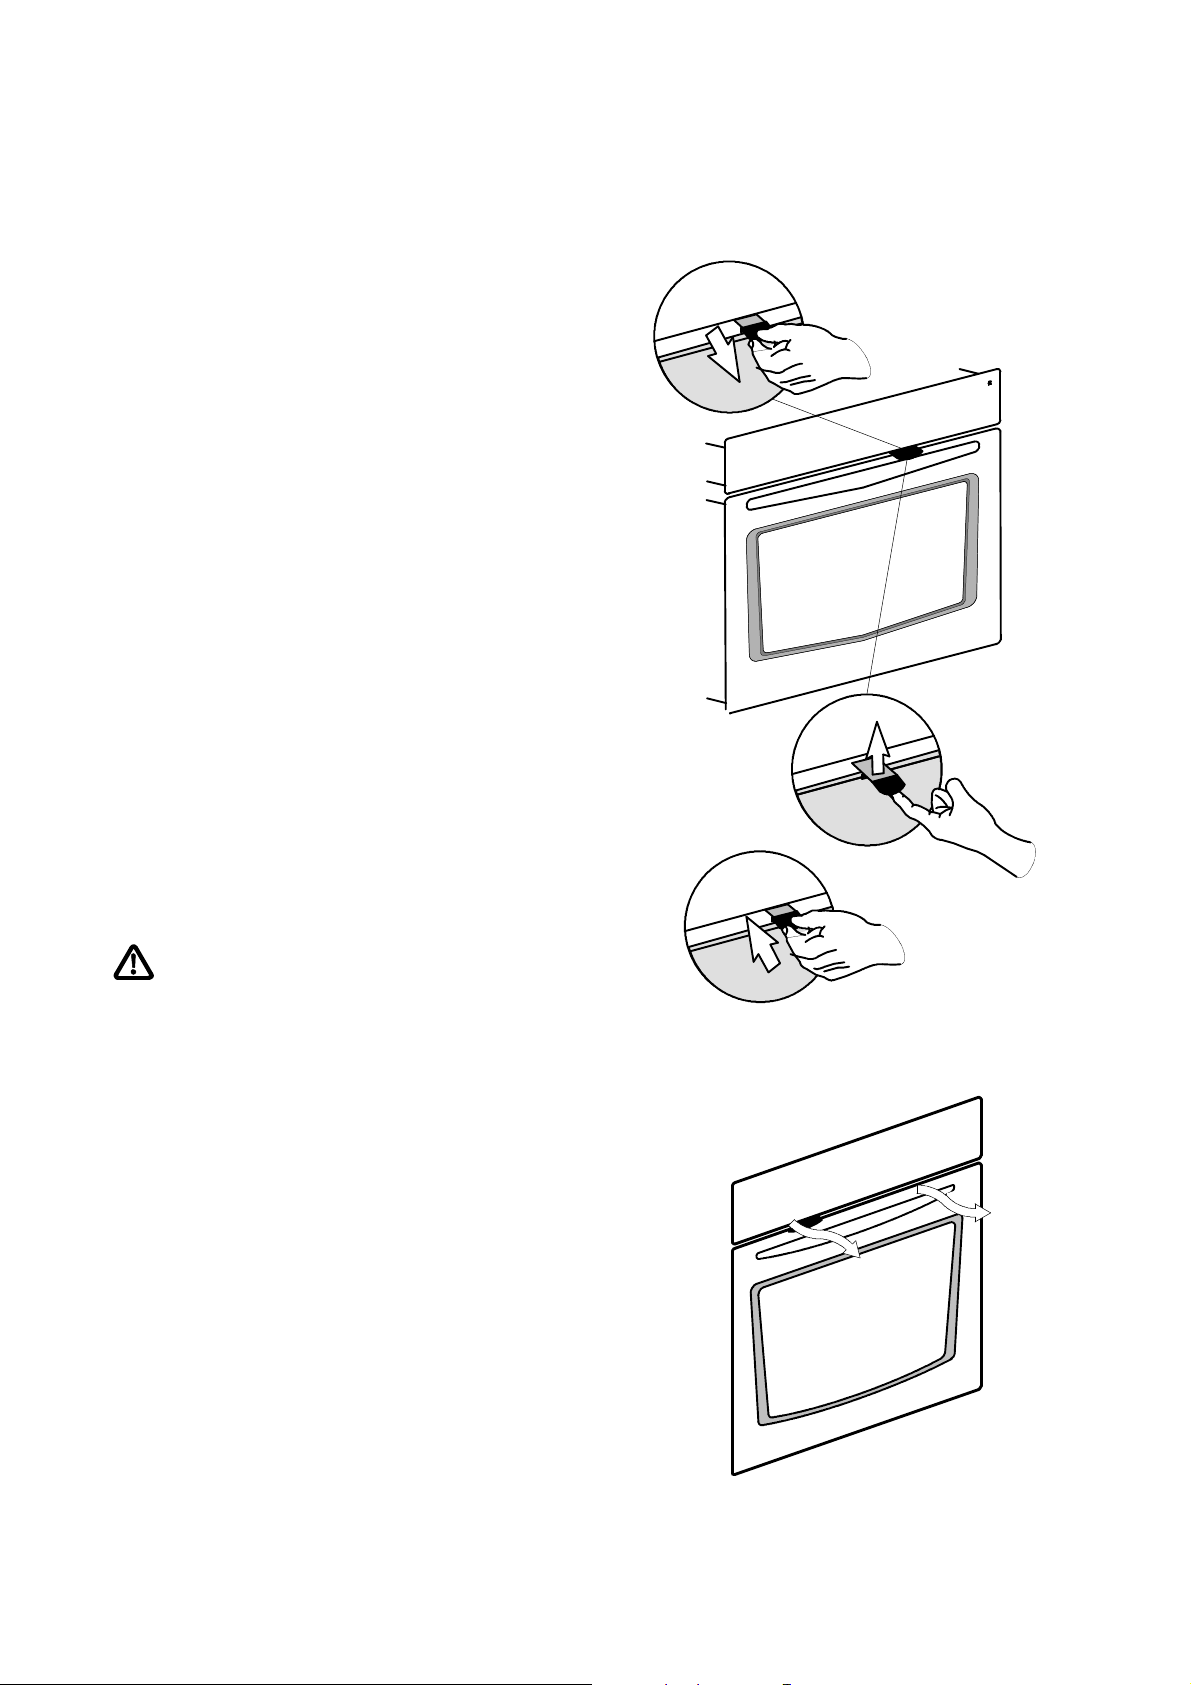
Safety equipment
Oven door locking /
Children safety mechanism
By means of an interlocking mechanism for the oven
you can prevent playing children from getting access
to it.
Activating of door lock
For interlocking of the oven door pull the interlocking
tongue out.
Opening and closing of the oven door with activated interlocking mechanism.
To open the door push the tongue upwards, the door
can easily be opened. Make use of thermo-gloves or of
a pot cloth in case the appliance will be hot.
When closing thedoor the interlocking tonguewill automatically catch in.
Deactivating of door lock
Push the tongue in. Now the oven may always be opened.
Activation (pull out) or deactivation (push in) of the
interlocking mechanism are always to be realized with
the door open.
In order to avoid any burns do only activate or
deactivate the oven door interlocking mechanism with the appliance in cold state.
Oven cooling fan
The appliance is fitted with a cooling fan that will automatically switch on in case of heat beeing developed
and, if need be, continue to run after switch-off of the
appliance.
Page 8
8
Prior to first use
In the chapters ”Daytime setting” and ”First heating -- up” the
manipulation steps for the electronic oven control are just
briefly described with hints on buttons and symbols: Relevant
explanatory information you will find in the following chapter
”The electronic oven control”:
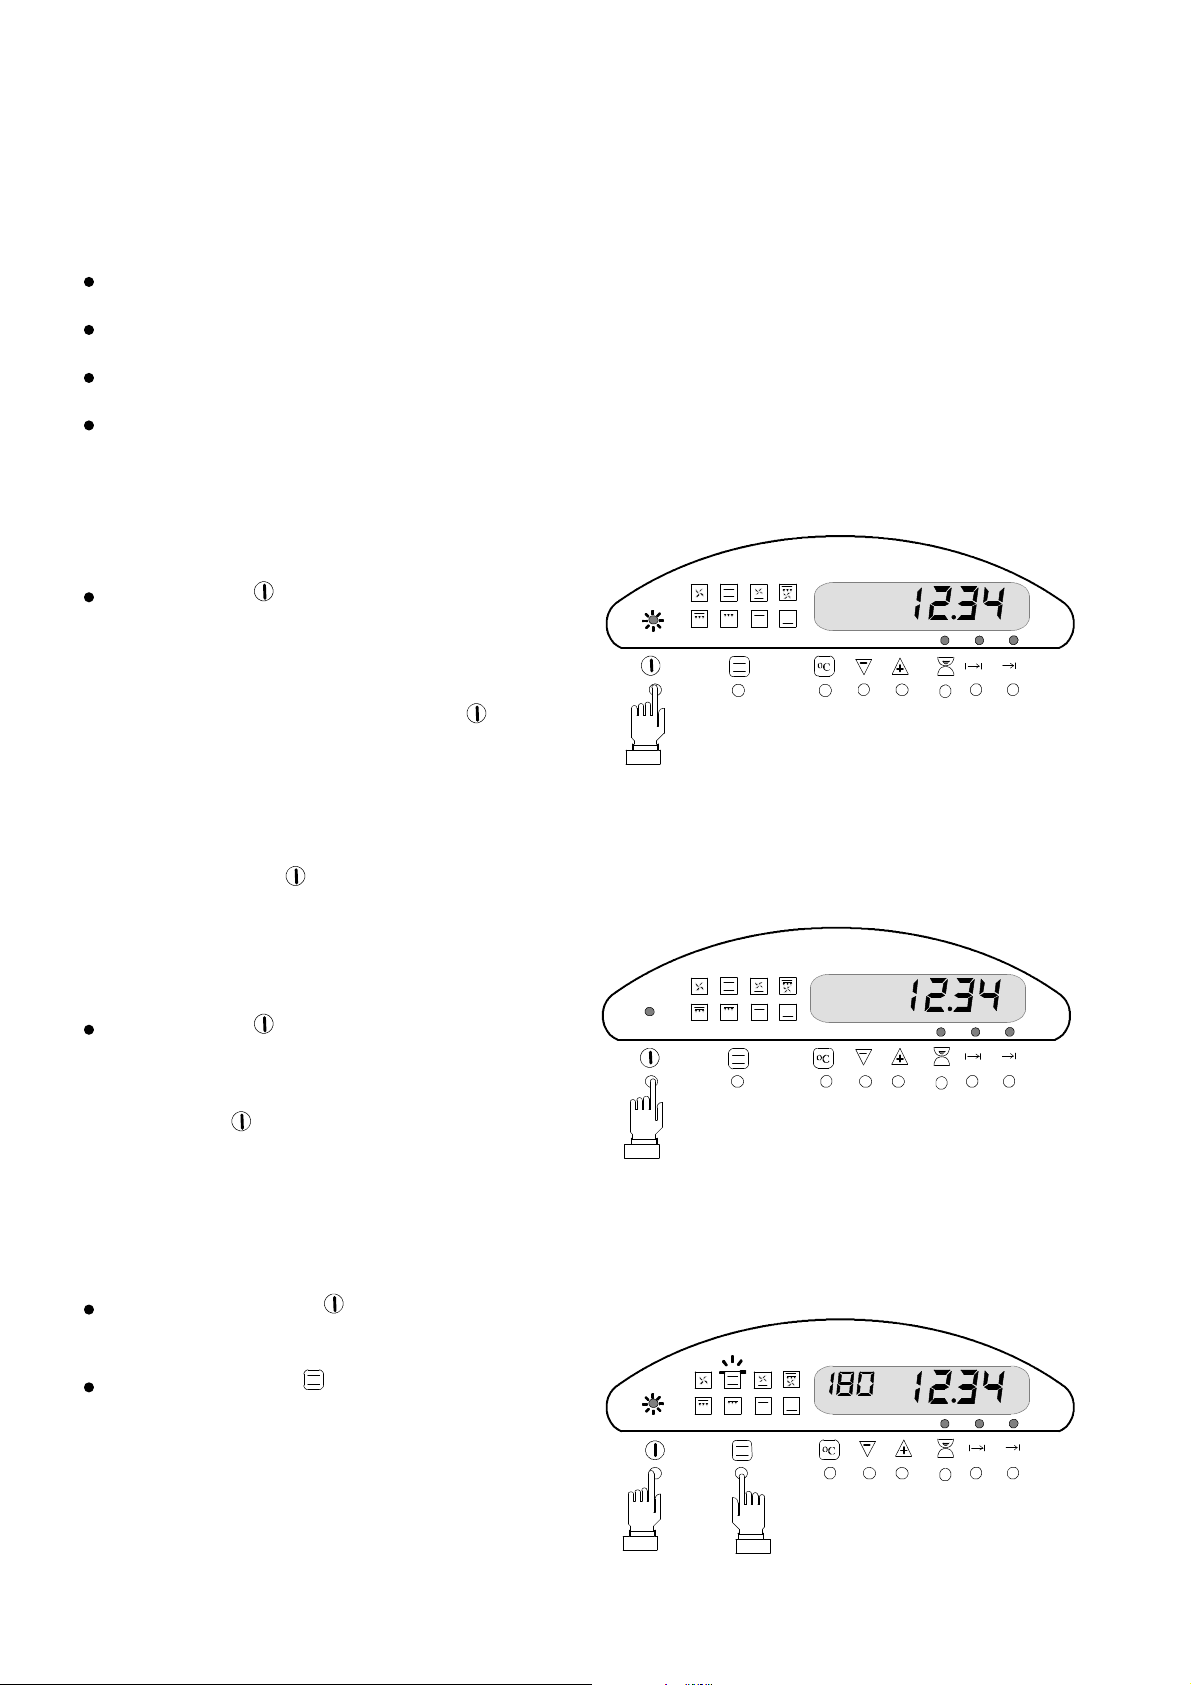
Daytime setting
The appliance must be switched off when setting or
resetting the daytime. After connection to the power
supply or after a power failure 12 00 will flash for about
5 seconds in the display. Afterwards 12 00 will remain
on and between the indicator for hours and minutes
will flash. The actual daytime between 0.00 - 23.59
hours has to be set.
As long as 12 00 is flashing:
by means of pushing the buttons and
set the daytime.
With 12.00 already remainingon in the display and with
flashing:
At first do simultaneously push the buttons
(cooking duration) and (switch--off
time) for about 5 seconds since 12 00 flashes,
then by means of buttons and then set
the daytime.
After 5 seconds the time will remain in the display and
is flashing between the indication of hours and minu-
tes. The setting procedure is completed.
In case of corrections of time (Summer/Winter time,
power failure, etc.) proceed in same manner.
First cleaning
To remove any possible production remnants, the appliance should be cleaned before use.
Remove any possibly existing labels and protective foils from control panel and oven door.
Clean control panel and oven door with warm water
and a cleanser and dry afterwards.
Removethe accessories from the oven and rinsethem.
Clean the oven and the door with warm water and a
cleanser and dry afterwards.
With that the oven light may be switched on:
Push button (on/off) for switching on
the oven light and for switching off.
Page 9
9
First warming up
The oven must once be heated up prior to first use.
When first heating up take care for a sufficient
space ventilation.
Push button (on/off).
The switch--on control and the oven indicator
lamp will come on.
Then push the button (oven function) for
several times, and set position (Top/bottom
heat),
the function symbol lights up in the display and
the temperatur indicator shows 200 as pre--set
temperature.
Push the temperature button and
by means of button set the oven
temperature to 250oC.
After about 5 seconds the oven function will switch on.
In this setting operate the empty and closed oven for
about 60 minutes.
Switch--off: push button (on/off).
The control and oven indicator lamp will go out.
The cooling fan continues to run until the oven is
considerably cooled down.
Page 10
1
0
Hotplate switches
Switch--on and switch--off
Cooking zones or hotplates of built--in hobs are switched and regulated by means of four switches at the
right on the control panel. With switched on cooking
zones the scale section above the switches is lighted
up andat the same time serving as a signallamp. Switches for normal cooking zones or hotplates
Switches for normal cooking zones or hotplates
For switching--on turn the selector knob on the panel to the right or to the left to the desired output
to the positions 1 -- 9. Position9 ist the highest and
position 1 the lowest output.
For switching--off turn the selector knob to the
OFF--position.
Switches for dual--circuit zones
With the dual--circuit zone and the griddle zone the
greater heating elements can, depending on pots or
pans size be added to the smaller heating elements.
Setting of the small cooking zone
Turn the switch knob to the right to the the setting
desired between 1 and 9.
Adding dual--circuit of cooking or griddle zone
Turn the switch knob to the right. Continueturning
beyond position 9 to symbol to a clearly noticeable stop (Attention! Do not exceed when turning).
Afterwards turn the setting knob back to the setting desired. Danach die gewünschte Garstufe
einstellen.
For termination of the cooking procedure switch
back to the OFF--position.
When switching on again the cooking zone and
griddle zone the greater heating element has to
be added again.
Check after use whether the appliance is switched off. All switches to be in the OFF--positon.
Hints for using the cooking zones pls. find in teh separate instruction manual of your hob.
Page 11
1
1
The electronic oven control
Temperatureindicator
Oven functions
Symbols
and
Push buttons
Switch--on
/--off control
General information
Functions
Daytime
The setting is described in chapter
”Prior to first use”.
Oven function selection
Oven temperature selection
Short-term alarm
Automatic program Cooking duration
Automatic program Switch-off time
Temperature automatism with the meat probe
Children safety device
Setting duration 5 seconds
Any setting performed will within 5 seconds be taken
over by the electronic control and possibly started.
With initial settings it may happen that, within this short
period of time, you will not have completed yet the
setting step next to follow. By repeated pushing of the
corresponding button you may reactivate the desired
setting procedure and continue.
Oven cooling fan
After switch--off the appliance will continue to run until
the oven temperature has dropped below about 160
o
C.
Indication of daytime and time
settings
Controllamps for time setting
Push buttons
Pushing the button switches the
oven on or off. The switch--on control
lamp and the oven light come on.
With the function setting knob the
desired oven function has to be set:
pushing the button several times
since the symbol of the desired
function lights up.
After actuation of the button the oven
temperature desired may be set with
the buttons -- or +.
Push buttons for all settings
Button -- = backward
Button * = forward.
Timer/Short--term alarm -- Setting of
sequences of time without any
switching on/off effect.
Time settings:
Setting of the duration of cooking
time. The function starts at once and
is automatically switched off after
lapse of the time set.
Setting of the switch--off time. The
oven is switched off at the time set.
An automatic switching on and off at
pre--set times is possible by combination
of programs cooking time and switch--off
time. .
time and
temperature
Page 12
1
2
Safety switch--off device
The electronic oven control is provided with a safety
switch-off device for the case where function and
temperature are set without any limitation of time
(cooking time, switch-off time). Depending on the
intensity of the temperature set the oven will be
switched off automatically.
with temperature setting up to 115oC
after 12 hours 30 minutes
with temperature setting from 115 up to 195oC
after 8 hours 30 minutes
with temperature setting from 195 up to 245oC
after 5 hours 30 minutes
with temperature setting from 245 up to 270oC
after 1 hour 30 minutes.
Switch--on
Push button (On/Off) the switch--on control lamp and the oven
illumination come on.
Prior to the setting of functions and temperatures the
appliance must be switched on with button .
Within 5 seconds then proceed with the desired setting
(function, temperature, time).
You can operate the oven without any setting of time,
with function and temperature setting only. In such a
case the appliance will have to be switched off
manually with button at the end of the cooking
procedure.
Switch--off and correction
Push button (On/Off)
the switch--on control lamp and the oven
illumination go out.
Push the button in order to switch off all functions
and time settings, this also refers the correction of
wrongsettings. Afterwards newsettings can at oncebe
made.
switch--on
switch--off
Oven functions
By means of button (on/off)
switch on the oven.
then push button (oven function) for
several times until the symbol of the desired
function lights up in the display.
The oven functions, their order and distinctive features
are represented and described on the page next to
follow.
Duringthe cookingprocedure youmay also switchover
to another oven function.
1
switch--on
2
push and set the
oven function
Page 13

1
3
Oven functions
Oven lighting
Push button . The oven lamp always comes on with the oven
switched on. The switch-on control lamp lights up.
Function
symbols
preset
temperature
Hotair (rear-element, fan)
Variable between 30 and 270oC, for baking and roasting on up
to 3 shelf levels at a time.
Top--/bottom heat
Variable between 30 and 270oC, for baking and roasting on one
shelf level.
Pizza setting (rear-element, fan, bottom heat element)
Variable between 30 and 270oC, for pizza, fruit cake on the tin,
quiches.
Turbogrill (infra-red grill and fan)
Variablebetween 30 and270oC, for highitems tobe grilled, rolled
meat, poultry.
Infra-red grill
Variable between 30 and 270oC, for radiation grilling of flat items
to be grilled.
Large surface grill (infra-red grill and top heat element)
Variable between 30 and 270oC, for radiation grilling of flat items
to be grilled.
Top heat
For re-baking and gratinating on one shelf level, variable from 30
to approximately 180oC.
Bottom heat
For re-baking on one shelf level, variable from 30 to
approximately 180oC.
180oC
200oC
200oC
180oC
250oC
250oC
120oC
120oC
Oven temperature
Switch on the oven and set the desired
oven function by pushing button .
Together with the oven function a preset temperature
shows up on the display, which is corresponding to the
practice of many preparations. Without setting any
different temperature the function will be switched on
at the given temperature after 5 seconds.
Other temperature settings are possible between 30
and 270oC in steps of 5 degrees, also for the purpose
of correction.
Push the temperature button and by
means of buttons and set the desired
oven temperature.
The actual oven temperature will be displayed upon
actuation of the temperature button . After 5
seconds the display will jump back to the set
temperature.
Upon reaching the set temperature in the oven, a
sound signal will resound. The temperature in the oven
will now remain constant any time, as the heating
elements are switched on when falling below or
switched off when exceeding this temperature.
switch-on
setting of the oven
function
Push
temperature button
select temperature
Page 14

1
4
Children safety device
With the children safety device activated there cannot
be any unintended settings of the electronic control
system (e.g. by playing children). Make use of this
device also in case of long--termed absence.
The childrensafety device willonly be effective withthe
appliance in switched off condition, in order to prevent
children from switching on the oven.
Switch- on of the children safety device:
At the same time keep the buttons
(temperature) and pushed for at least 5
seconds. A short sound signal will resound
and a point will appear in the display beneath
the minute figures.
Switch--on, setting of a baking function or
tem--perature will not be possible from this time on.
Settings of time are possible, will however not result in
automatic switch--on of the oven.
Exception: Short--term alarm, can be used as usual.
Switch- off of the children safety device:
At the same time push the buttons of
(temperature) and for at least 5 seconds
until the sound signal will resound and a
point disappears in the display beneath
the minute figures.
Now the oven is ready again for usual operation.
Page 15

1
5
Short term-alarm
With the short--term alarm there is no switching
function for the appliance. It may beused for observing
and controlling of cooking times and sequences in the
kitchen, also independent of the oven or in parallel with
automatic settings.
Push button (short-term alarm).
The display shows000 and thecontrol lamp above
the button flashes.
then push buttons and and set the
desired time.
(between 1 minute and 19 hours 59 minutes).
5 seconds after setting the daytime shows up in the
display again, the control lamp for the short-term alarm
is shining.
During the sequence of time the remaining time can be
checked by pushing the short-term alarm button.
The dual double tone resounds after expiration.
This signal can at once be switched off by
pushing the short-term alarm button .
As long as the signal resounds, the control lamp for the
short-term alarm is on.
The soundsignal willautomatically stopafter 3minutes
and the control lamp goes out.
If you want to cancel or correct a time setting before
end of sequence, push the short-term alarm button
and by means of button set back to 0 correct by
means of buttons or .
Page 16

1
6
Automatic programs
Prior to the setting of automatic programs the
appliance must be switched on (button ) as well
as oven function and temperature has to be set.
Without these settings any programming will not
have an effect on the oven.
Cooking duration
- Setting of the time of cooking -
The roasting, baking or grilling time for dishes
according to recipes, charts or own selection is set by
the program cooking time. The duration of cooking
starts at once, the oven function remains switched on
until automatic switch-off.
Switch--on ,
function and temperature to be set.
Push button (cooking duration).
The display shows 000 and the control lamp
above the button flashes.
By means of pushing the buttons or
set the desired duration of cooking
(between 1 minute and 9 hours 59 minutes),
example: 3 hours 20 minutes.
The display shows the daytime again, the control lamp
for program cooking duration is shining.
The running off duration of cooking may be displayed
by pushing button . The switch--off time may be
checked by button .
Corrections of the duration of cooking are possible
after repeated pushing of button and pushing
buttons or to set the desired time.
By means of button you may switch off the
appliance at once, the automatic program setting
is cancelled at the same time.
A soundsignal resounds after expiration of the duration
of cooking. The oven is automatically switched off and
the oven light goes out. The display now shows the
daytime and the control lamp of is flashing.
The sound signal can be cancelled by pushing any
button, all light indicators will at once go out - or
after about 3 minutes the sound signal, the control
lamps and the function symbol will automatically go
out. The display shows the actual daytime.
Page 17

1
7
Switch-off time
- Setting of the end of cooking time -
By program switch-off time you set the time end
for cooking procedures. The duration of cooking
startsat once, the oven function remains on for the
time set until automatic switch-off.
Switch--on ,
function and temperature to be set.
Push button (switch--off time)
and with the buttons or select the desired
end of cooking time.
Example: 10.00.
(= the time at which the meal should be ready).
The end of duration of cooking must be within the 24
hours next to follow.
The control lamp for flashes. After 5 seconds the
oven function is switched on.
The daytime shows up in the display and the control
lamps for program duration and end of program are
shining.
The runningoff duration of cooking can be displayedby
pushing button and the switch-off time by pushing
button .
Corrections of the switch-off time are possible after
repeated pushing of button and with button or
pushing.
You can at once switch off the appliance with
button , the automatic program setting is
cancelled at a time.
A triple sound signal indicates the end of cooking time,
the ovenis automaticallyswitched off and the ovenlight
goes out.
The display now shows up the daytime. The oven
function symbol as well as the switch-on control lamp
the control lamp for (switch--off time) is flashing.
The sound signal can be cancelled by pushing any
button, all light indicators will at a time go out - or the
sound signal, the control lamps and the function
symbol will automatically be switched off after about 3
minutes. The display shows the actual daytime.
Page 18

1
8
Combination of programs
cooking duration and switch-off time
Setting of duration of cooking and switch-off time
By the combination of programs cooking time and switch-off
time the oven can automatically be switched on at a later time
and beswitched off after the cooking procedure at a timefixed
before. The description is based on the following example:
Setting of automatic functions: 8.00 o’clock. The meal should
be ready at 12.30 h, a duration of cooking of 1 hour 20 minutes
is needed for the preparation.
Switch-on ,
set function and selectthe temperature .
Push button (cooking duration)
The control lamp above the button flashes.
Then by means of pushing the buttons or
set the desired duration of cooking.
(between 1 minute and 9 hours 59 minutes)
example: 1 hour 20 minutes.
Push button (switch--off time
and with the buttons or set the desired
switch-off time -- example: 12.00.
The end of the duration of cooking must be within the
24 hours next to follow.
The oven function and light are switched off after the
setting procedure. The display shows the daytime and
the control lamps above buttons and shining.
The start of the duration of cooking is calculated from
switch-off time minus duration of cooking (example:
10.40 hours). At this time the desired function will be
switched on.
During the duration of cooking the control lamp for
program is shining.
Time settings can be checked by pushing the buttons
and .
For correction of the duration of cooking or switch-off
time push the corresponding button and change the
time settings by pushing the buttons or .
By means of button you can at once switch off
the appliance, the automatic program setting is
cancelled at the same time.
A triple sound signal indicates the end of cooking time,
the oven function and oven light are automatically
switched off. The display now shows the daytime, the
oven function symbol and the switch--on control lamp
is shining, the control lamp of flashes.
The sound signal can be cancelled by pushing any
button, all light indicators will at a time go out - or the
sound signal, the control lamps and the function
symbol will automatically be switched off after about 3
minutes. The display shows the actual daytime.
Page 19

1
9
Meat probe
Exclusively make use of original parts supplied or
after complaints original spareparts.
When cookingthe temperature in the center of the food
(= core temperature) is measured by means of the
meat probe and the duration of cooking will
automatically be ended upon reachingthe temperature
set.
The meat probe can be used with the functions top and
bottom heat, hot-air, pizza setting, turbo-grill, separate
bottom heat and separate top heat.
The functions infrared grill and large-surface grill
remain switched off with plugged in meat probeand will
be jumped over in the operating sequence of oven
functions.
With plugged in meat probe time-controlled automatic
programs can in fact be set, thefunction, however, will,
independent of the time setting, be switched off upon
reaching the core temperature in the food.
The plug-in socket for the meat probe is located in the
right-hand oven side wall.
Completely insert the meat probe up to the handle into
the center of the food, into the pectoral muscle with
poultry. The tip of the meat probe must not touch any
bone, fat will alsomisrepresent the temperature shown
in the display.
Two temperatures have to be paid attention to:
the oven temperature: is to be set as indicated in the
charts for baking and roasting and according to the
items to be cooked.
the core temperature: is to be set according to the
chart on core temperature
Core temperatures
of different sorts of meat
Sort of meat Core temperatureoC
Roastbeef
Fielt of beef
Roast beef 75--80 fully cooked
Roast porc, lean
Roast porc, narbled
Filet of porc
Meat loaf 80-90 fully cooked
Cured sparerib, porc 70-75 fully cooked
Roast veal 75-80 fully cooked
Roast lamb 70-85 fully cooked
Poultry
turkey
chicken, duck
goose
Game 80--85 fully cooked
Fish 70 fully cooked
45-55 english
55-65 medium
65-75 well done
70--75 fully cooked
75--80 fully cooked
65--70 core rose-coloured
85-90 fully cooked
85-90 fully cooked
90--95 fully cooked
Backofentemperatur
Kerntemperatur
Page 20

2
0
The meat probe has to be inserted in the food,
then put the food to be cooked into the oven.
Switch on the oven , set the oven function
and the oven temperature .
Up to the handle insert the plug of the meat
probe into the socket in the oven side wall.
A short signal resounds and instead of the oven
temperature 60c will appear in the display as default
core temperature.
According to your preparation you may vary this
temperature value in steps of 5 degrees between 30oC
and 95oC.
By means of the buutons or and in
line with your preparation set the core
temperature.
The display shows the switch-on control lamp, the
symbol of the oven function selected, the control lamp
for program duration, the core temperature set,
and the daytime.
By actuation of button temperature the different
temperature settings and the temperature values
reached can be checked:
1 x actuation: core temperature reached (example 65)
2 x actuation: oven temperature set (185)
3 x actuation: oven temperature reached (155).
The oven function is automatically switched
off when reaching the set core temperature
within the item to be cooked.
The triple sound signal refers you to the end of the
duration of cooking. The display flashes the control
lamp above the button of cooking time.
The soundsignal can at once be cancelled by actuation
of any button. It ends after 3 minutes and all indicators
go out.
Thus, you remove the item cooked from the oven:
At first withdraw the plug of the meat probe from the
socket in the oven side wall (HOT: use pot cloth or
thermo-gloves), afterwards remove the item cooked
from the oven
1 time 3 times2 times
Push button for completely switching--off.
The meat probe not in use must not be kept inside the
oven.
Page 21

2
1
The oven cavity
oven runners, removable
A
separation panel , rear
B
element and fan behind
infrared-grill
C
top heat element
D
large-surface grill
C+D
oven illumination
E
type plate
F
grease filter
G
plug-in socket for meat
H
probe
runner level
54321
D
C
E
A
F
E
5
G
H
B
A
4
3
2
1
Oven accessories
Besides the accessories supplied with the unit
do exclusively make use of suitable and temperature--resistant baking tins and roasting dishes.
Do please follow the manufacturers’ instructions.
The oven has the following accessories:
1 drip pan
2 baking sheets
1 wire shelve
1 grease filter for rear element
Further baking sheets and wire shelves can beordered
with our Central Spareparts Service.
Grease filter
A fine-meshed inox grid in front of the ovenfan protects
the rear wall element against splashes of fat and prevents from molestation by odours.
Grease filter to be hooked in with all roasting procedures with hot-air andwhen turbogrilling; filter to be removed when baking as the baking time would otherwise
be extended.
Oven runners
The oven is fitted with 4 runners. In the charts and illustrations of these instructions they are numbered from
1=bottom to 4= top.
Special formed mouldings on each side of pan, baking
sheet or wire shelf have to be inserted into the stoppositions of the oven runners. Please insert baking
sheets, wire shelf or pan between the double bars:
this will hold them in a secure position when inserting
them and taking them out.
5
4
3
2
1
stop position
runner level
Page 22

2
2
Application of the oven functions
Top- and bottom heat
Heating elements installed under the oven bottom and
at the oven ceiling respectiveley give off radiant heat to
the food. Any temperature between 50 and 270oC can
be set.
Baking and roasting using top and bottom heat is only
possible at one level.
l flat cakes and biscuits on the baking sheet
- in runner 1, 2 or 3
l high cakes, ring or square moulds
- wire shelve in runner1, 2 or 3.
Top heat
The radiant heat from the element at the oven ceiling
is used for follow-up baking, overbaking and gratinating. 180oC can be reached at maximum.
Bottom heat
The heating element under the oven bottom gives off
radiantheat to the items to becooked. The function can
be set for follow-up baking and incrustation on the
sheet. 180oC can be reached at maximum.
Hot-air
The oven is heatedby circulating hot-air. The fan at the
oven back-wall intensively moves the hot-air in the
oven and thus ensures even cooking. Any temperature
between 50 and 270oC can be selected.
Depending on the food you can use up to 3 runner levels. We recommend:
l 1 baking sheet: runner 2 or 3
l 2 baking sheets: runners 1+3 or 2+4
l 3 baking sheets: runners 1, 3 and 5
l 1-2 high moulds side by side:
wire shelve in runner 1
l flat mould: baking sheet in runner 2 or 3
l 2 flat moulds: wire shelve and/or baking
sheets in runners 1 and 3 respectively.
Page 23

2
3
Pizza setting
The application of the pizza setting functionis advantageous when baking pizzas, fruit or curd pies on the
sheet or quiches, etc. This setting combines hot-air
function and bottom heat element.
In runner level 1 radiant heat results in strong crust formation and avoids a thorought wetting of the dough.
Roasting or baking at equal temperature may take
place in two upper runner levels, however, without the
effect of radiant heat.
Grilling
During grill operation the oven always has to be
closed. When grilling, do not leave the appliance
unsupervised.
Set the function switch to the selected grilling function.
Which grilling function is to select depends on the
amount and the height of the grill food.
The temperature can be adapted to the particular food,
as the oven thermostat holds the temperature within
the set range also during grill operations.
For special advices of function selection, temperature
setting and runner level please see the grilling charts.
Infrared-grill
The infra-red grill guarantees successful results for
small amounts of flat meat als well as for chicken halves, placed in the middle part of the wire shelf. Temperature from 210 to 270oC.
Large-surface grill
For flat items to begrilled, halfchickens, etc. on the fully
charged wire shelf. This function combines the infrared
grill with top heat element.
Temperature from 210 to 270oC.
Both surface--grill functions are suitable for flat meat,
such as steaks, chops, sausages, fish, etc.
As the radiation heat can brown only the surface of the
grill food, same has to be turned over after some time.
Do notinsert flat grillfood too closebeneath the heating
element. Drip pan has to be inserted in runner level 1
or 2.
The large surface grill functions can, moreover be
used:
H for the overbaking of toast
Hfor the overflaming of marzipane or icecream
Hfor the crustation of soufflées.
The grill food has to be inserted on the wire sehelf, depebnding on height, into runner 4 or 5. The distance toward the grill heating element can be varied by inserting the wire shelf with its convexity either turned
upward or downward.
Page 24

2
4
Turbo-grill
For highroasts such as pork loin, legor poultryit is advisable to select the function turbo-grill with temperature
settings of about 150 to 190oC.
The infra-red grill operates along with the fan. In this
way, notonly the surfaceof thegrill foodis brownedand
grilled, but the grill heat is led intensively to all sides of
the grill food.
Insert the drip pan into runner level 1 or 2 and the wire
shelf with the grilling food into the runner above.
Oven lighting -- bulb exchange
Before opening the oven lamp fuselage has to
be cut off or unscrewed.
You may replace defect light bulbs yourself.
For the replacement you need bulbs that are heat--resistant up to 300oC, 25 watt / 220-230 V -- E 14.
You can buy these bulbs in electronic specialist shops
or at the spare parts service.
Round oven lamp on the oven rear:
Unscrew the round protective cover glass, replace the
oven lamp and rescrew the protective cover glass.
Rectangular oven lamp in the left oven wall:
Remove the left oven runner. With a wide screw driver
or a suitable knife unclip the protective glass carefully
from the support, replace the bulb and relocate the protective glass into its holder.
Page 25

2
5
Hints, tips and charts
Roasting with
hot-air and top-/bottom heat
The length of roasting time depends on the kind of
meat,weightand height of theroast. Basicallyyourekkon per cm height of meat:
l beef, game 14 - 17 minutes
l pork, veal 14 - 17 minutes
l fillet, roastbeef 10 - 12 minutes.
The higher the roast is, the lower the temperature
needs to be.
The doneness can be checked by pressing the meat
down with a spoon. If the roast does not give way, it is
done.
After switch--off leave the roast for another 10 minutes
in theoven so that nojuice willbe running out, when you
cut the roast.
Roasting on the wire shelf
Place roast on wireshelf with its servingside turned upward. Insert universal drip pan in runner 1 or 2 and the
wire shelf in the runner above it.
Temperature selection
The hot air function is faster than ordinary functions in
supplying the food with heat. Therefore, set the temperature by about 25oC lower than recommended in recipes for top and bottom heat.
Hint: The household appliance dealer is offeringbaking
/ roasting thermometers for the indication of the state
of cooking.
Grease filter
Grease filter to be hooked in with all roasting procedures with hotair and when turbogrilling; filter to be removed when baking as the baking time would otherwise
be extended.
Preheating
As the set temperature is reached within a very short
time, preheating of the oven before inserting the food
is not necessary for most of the baking and roasting
operations.
We recommend preheating with:
Roasting in the drip pan vessels
Put lean meat, game or meat loaf directly into the drip
pan or in a vessel onto the wire shelf. Put short--roasts
on a sheet into the oven.
In case there is need for a roasting time of more than
an hour, put the ingredients for the gravy into the pan
only half an hour before the end of cooking time, have
them browned and fill in a little hot water.
Bake- and roastware
Use only the accessories supplied with the unit or dark
enamelled baking moulds. Do exclusively make use of
suitable and temperature--resistant baking tins and
roasting dishes.
At baking or roasting with hot-air or pizza function you
can use dark and bright bakingmoulds, baking pottery,
heat--resistant moulds and pots. Do exclusively make
use of suitable and temperature--resistant baking tins
and roasting dishes. Bright sheets and molds do, however, extend the baking and roasting times. Please observe manufacturer‘s instructions.
At function top-/bottom heat do not usebright and gleaming sheets or moulds.
In the according runner level baking moulds and roasting dishes are put onto the wire shelf. Special hints
are given in the baking an roasting charts.
l meat dishes and short--roasts, such as fillet,
roastbeef, schnitzel or cutlet. The meat pores
are quicker closed and the item to be roasted
remains juicy.
l fancy biscuits that tend to spread easily,
l rolls, quiches, Swiss rolls.
For this purpose and before insertion of the items the
oven is heated up until the temperature signal lamp
goes out.
Baking with
hot-air and top-/ bottom heat
Introduction for using the baking chart
The chart on baking operations contains in most cases
temperature ranges, e.g. 160-175oC. Select the lower
temperaturefor themoment. In case of too high temperatures a cake overcrusts too fast, it will collapse or will
not rise properly, because only an insufficient amount
of water is extracted.
If the bakingoperationtakes too longor if the cake does
not brown enough as expected, you may select a higher setting.
The even browning of the cake can be improved by reducing the baking temperature (by about 10oC). Then
prolonging of the baking time is necessary.
You might also have to change the baking time even if
you exactly followed the instructions given in the recipe, as the size of eggs, the binding quality of the flour
and the material of which the mould is made can vary.
Page 26

2
6
Roastin
g
Kind of roast
Roasts
Function:
Hot--air
Temperature
°C
For all kind of roasts we recommend using the hot--air
function. If you like roasting with top/bottom heat, please
set temperature 20--25oC higher.
when using at a time
1 level 2 levels
wire shelf in level
drip pan
in level
rosting time in
minutes
1 kg pork,
per cm of height, well done
smoked pork loin,
per cm of height, well done
Mince meat 160-170 2 -- 1 60-70
Beaf,
per cm of height, well done
Sirloin,
per cm of height
Roastbeef,
per cm of height
Roast veal,
per cm of height, well done
Roast lamb (ca. 1,8 kg) 170-180 2 -- 1 90
150-160 2 -- 1 14-20
150-160 2 -- 1 10-15
150-160 2 -- 1 18-20
T190-200 2 -- 1 6-8 rare
8-10 medium
T190-200 2 -- 1 8-10 rare
10-12 medium
170-180 2 -- 1 14-17
Short roasts on baking sheet or drip pan in 1 resp. 2 levels
Sausages “cordon bleu” T220-230 3 4 + 1
Sausages T220-230 3 4 + 1
Schnitzel/chops, coated T240-250 3 4 + 1
Meat balls T210-220 3 4 + 1
------
------
------
------
5-8
12-15
13-15
15-20
Liver T240-250 3 4 + 1
------
6-7
Fish on baking sheet or drip pan in level 1
Trouts (à 200 -- 250 g) 190-200 3
4 Trout fillets (à 200 g) 170-180 3
Fish fillets, coated (ca. 1 kg) 190-200 3
------
------
------
20-25
20-25
25-30
Poultry
1 kg turkey roll,
per cm of height
Chicken 150-160 2 -- 1 55-60
Duck (2 -- 2,5 kg) 150-160 2 -- 1 90-120
Goose (ca. 4,5 kg) 150-160 2 -- 1 150-180
Roasting times are approximated times. T = Preheating since the temperature indicator lamp goes out.
150-160 2 -- 1 11-15
Drying up
Function:
Hot--air
Temperature
°C
level from bottom / sheets
1 level 2 levels 3 levels
approximated
time / = hours
Apples, 75 3 3, 1 5. 3. 1 ca. 6
Mushrooms 50 3 3, 1 5. 3. 1 6-8
Page 27

2
7
Baking
Top--
/
Hot--air
bottom heat
Kind of pastry Tempera-
ture °C
Batter in tins or on the sheet
High ring cake
Frankfurt ring, meddle high
Plain cake, loaf tin
Apple cak, round tin
Flat cake
160-170
150-160
160-170
160-170
160-170
Short pastry in tins or on the sheet
Tart with curd (750 g Quark)
tin 26cm
Tart with fruit
Cake with curd, on sheet
-- -- --
150-160
-- -- --
Puff pastry
French apple cake
T160-170
Sponge mixture
Spong cake, (DIN)
Fruit flan
Swiss roll
T150-160
T150-160
T180-190
Yeast pastry
High ring cake
Medium high ring cake
150-160
160-170
Yeast pastry :
with butter/sugar coating,
with almonds
with crumble topping
with apple/crumble topping (DIN)
with curd
Fruit loaf (500 g flour)
170-180
170-180
T170-190
150-160
T150-160
T220-230
Pizza
oven levels
when using at a time
1 level 2 levels 3 levels
1
3
3
2
3
-- -- --
2
-- -- --
-- -- --
-- -- --
-- -- --
-- -- --
-- -- --
-- -- --
-- -- --
-- -- --
-- -- --
-- -- --
-- -- --
-- -- --
-- -- --
-- -- --
-- -- --
-- -- --
3 ---- -- ------
3
3
3
2
2
-- -- --
4+1
-- -- --
-- -- --
-- -- --
-- -- --
-- -- --
-- -- --
-- -- --
-- -- --
-- -- --
3
3
3
3
2
1
-- -- --
4+1
-- -- --
-- -- --
-- -- --
-- -- --
-- -- --
-- -- --
-- -- --
-- -- --
-- -- --
-- -- --
Baking time
minutes Tempera-
ture °C
70-75
70-80
15-25
40-50
20-30
60-90 +10 Min.
after switch-- off
45-60
45-55
40-50
35-45
25-30
10-15
45-60
30-35
25-30
25-35
40-50
45-50
65-70
10-20
170-180
160-170
T180-190
T170-180
180-190
160-170
180-190
170-180
T190-200 2
T170-180
T170-180
T190-200
160-170
170-180
T190-200
180-190
180-200
170-180
T170-180
T250-260
oven level
2
3
3
2
3
1
1
2
2
3
2
1
2
3
3
3
3
2
1
Small pastries
Meringues
Macroons
Butter dough (DIN)
Puff pastries
Small brioches on sheet
Choux pastry
Cream puff
Strudel an quiches
Apfelstrudel
Swiss apple quiche
Cheese and onion tart
Tart with vegetables
Quiche Lorraine
Bread an rolls
Breakfast rolls
Wholemeal bread
White loaf in tin
Flat loaf, Pitta
Approximated times may be changed.
Recommended functions and temperatures are bold typed.
T = Preheating of oven since temperature control lamp goes out.
T80-90
130-140
140-160
T170-180
T170-180
180-190
150-160
-- -- --
-- -- --
-- -- --
T220-230
T190-200
T170-180
-- -- --
3
3
3
3
3
3
2
-- -- --
-- -- --
-- -- --
3
3
2
-- -- --
4+1
4+1
4+1
4+1
4+2
-- -- --
-- -- --
-- -- --
-- -- --
4 + 2
-- -- --
-- -- --
-- -- --
-- -- --
-- -- --
5,3,1
-- -- --
-- -- --
-- -- --
-- -- --
-- -- --
-- -- --
-- -- --
-- -- --
-- -- --
-- -- --
150-180
20-30
15-45
15-20
15-20
35-40
55
30-40
30-40
30-40
15-20
45-60
40-50
15-25
80-90
T160-170
160-170
T180-190
T180-190
T200-210
T220-230
T220-230
T220-230
T240-250
T210-220
T180-200
T230-250
3
3
3
3
3
3
2
1
1
3
3
1
2
Page 28

2
8
Pizza stage
Kind of cakes and pastriestry
Temperature °C Baking time in min oven level
from bottom
Short pastry
Tart with curd
(750 g curd, round tin 26 cm)
Tart with fruit 170-180 40-45 2
Tart with curd on the baking sheet 150-160 45-55 2
150-160 60-90
+ 10 min after switch-- off
Puff pas
French apple tart T170 40-45 2
Yeast pastry
Cake with curd on the sheet 150-160 35-45 2
Pizza (on the sheet) T220-230 10-20 1
Pizza (in tins) T220-230 5-10 1
Small pastry
Nut cookies 160-170 20-25 1
Strudel and Quiches
Quiche with vegetables 190-200 30-35 2
Bread
Fladenbrot T210-230 15-25 2
2
Gratins
Vegetables au gratin 160-170 25-35 1
Gratin with pasta and vegetables 160-170 30-40 1
Approximated times may be changed. T = Preheating of oven since temperature control lamp goes out.
Page 29

2
9
Infra--red and
5
5
4
4
5
large surface grilling
Function
Tempera-
tureoC
Kind of grilling food -- for all dishes the oven has to be preheated for 3 minutes.
Drip pan in
oven level
Wire
shelf
Minutes
side 1 side 2
4 -- 8 pork chops 250 1
2 -- 4 pork chops 250 1
pork medaillons 250 1
4 fillet steaks 250 1
2 half chickens 250 1
5
5
15 10
12 12
5 4
6 5
15-20 15-20
4 half chickens 250 1 4 15-20 15-20
1 -- 4 chicken tights 250 1
4 -- 6 chicken tights 250 1
Grill sausages, up to 6 Stück 250 1
Grill sausages, up to 12 Stück 250 1
Fish 250 1
4
5
5
20 10
20 15
5-10 5
5-10 5
10
Toast without topping 250 1 5 1-2 1-2
Turbo grilling
Tempera-
ture °C
Pork rolled meat (2 kg) 160-180 2 1 115-125 60
Smoked pork loin (1 kg) 190-200 2 1 45-60 25-30
Chicken (900 -- 1000 g) 190-200 2 1 55-65 25--30
Wire shelve
Drip pan in
oven level
Grill time --
minutes
turn over after
..... minutes
Pasta au gratin 180 2 1 20-30
Potatoes au gratin 200 3 1 20-30
Gnocchi au gratin 180 3 1 20-23
Cauliflower with sauce Hollandaise 200 3 1 15
Gratins, toast
Kind of food Tempera-
ture °C
Pasta au gratin
Potatoes au gratin
190-200
190-200
Hot--air
oven level Time
minutes
2
2
30-40
50-65
Top--/bottom heat
Tempera-
ture °C
-- -- --
200
oven level
-- -- -2
Toast ”Hawaii” 250 3
14-16
-- -- -- -- -- --
Page 30

What to do in case of ....
Repair work at the appliance must exclusively be carried out byexpert technicians. Improper repair work
may lead to considerable danger. In need of repair please contact our after--sales--service or your expert
dealer.
... practical problems
practical problem possible cause remedy
Items to be baked or roasted would
not really rise
Items to be baked or roasted would
not become brown
Wrong temperature setting Check the temperature set with the
indications of the chart
Too low a temperature
Increase the temperature setting,
look into the state of cooking, possibly shorten the time
Items to be baked or roasted would
not regularly brown
Items to be baked or roasted
become too dark
Items to be baked or roasted
become too dry
Wrong material of tins/moulds
Irregular height Reduce the temperature setting,
Too high a temperature Check the temperature set with the
Duration of baking too long
because of too low a temperature
With top and bottom heat make
use of dark oven tins only.
possibly extend the time
indications of the chart, reduce the
temperature setting, possibly
extend the time
Check the temperature set with the
indications of the chart, possibly
increase the temperature setting
and shorten the time
... technical problems
technical problem possible cause remedy
The built-under oven would not
function.
Oven lighting would not come on. The bulb is defective Replace the bulb - see page 66
Running noises and air flow at the
oven door after switching off all
functions.
Trouble with the power supply Check the fuselage
That’s no trouble, just the cooking
fan continues to run until the oven
is fairly cooled down.
Damaged appliances must not be used. In case of trouble or failure do please cut
off or unscrew the fuselage.
Do not do anything with the oven. Inappropriate work may lead to damages with persons and material.
Not being in a position to cure a trouble or failure with the help of the hints do please contact your
after-sales-service or your fitter.
30
Page 31

3
1
Cleaning and care
No heating element must be switched on during
the cleaning procedure. Make sure that the oven
has cooled down in a way that one may get in
touch with interior parts without any danger. Only
the function switch may be switched on for oven
lighting.
Steam and high--pressure cleaning units are not
suitable for cleaning because of the requirements of electrical safety.
Clean enamelled cavity
Carefully and regularly clean the appliance in lukewarm or cold state. Avoid repeated burning-on of soiling.
The oven inside is washed with a warm washing--up
liquid and a sponge or cloth. Afterwards wipe out with
clear water and dry.
Never use caustic, scouring and scratching cleaners,
oven sprays, steel-wool. Same will destroy the catalytic
cleaning aid resp. the clean enamelled bottom.
Wire shelf and grill pan, baking sheets and
cake moulds
Oven accessories and shelving parts to be cleaned
with a warm washing-up liquid. These items are not suitable for cleaning in a dishwasher.
Grease filter
Wash the stainless steel grease filter after every use
with a soft brush in a hot washing-up liquid or quite simply in a dishwasher. Have tenacious soiling soak and
react, for instance, in a hot scouring agent solution.
D
Control panel and oven door
Do please pay attention to clean sealing surfaces at the door and in the door frame.
The control panel and the oven door have to be cleaned
with warm washing-up liquid or glass cleansing agent
and to be wiped dry. For cleaning the inside of the oven
door use only washing-up water.
Page 32

3
2
Removal and installation of the runners
For easier cleaning you may remove the entire shelving
parts from the oven inside.
Remove: first press the vertical grid element (1) backwards and draw off towards the center of the cavity and
remove (2) from the oven, lift slightly, if need be.
Hang in again: Insert first the rear clevis hook (3), then
the clevis hook in front of the cavity and (4) firmly press
down.
Important: make sure that the grid runners are in the
right position. Grid runners stop positions must be in
front of the cavity and show down to the bottom.
Fold down top-heat element
For easier cleaning the heating elements under the
oven ceiling can be folded down at a slant.
Lay both your thumbs to the left and right on the outside
oven frame, then grip with your fingers in the front
bends of the heating elements and draw them off their
fixture to the front. The heating elements can now be
lowered at a slant and you can clean the oven ceiling.
After cleaning move the elements up again, draw in
again with fingers and thumbs and catch into the fixture.
remove
1
hang in
2
stop position
clevis hook
4
3
Appliances with stainless steel surface
During the cleaning procedure make sure that
the stainless steel surface finish (the fine horizontal lines) will not be processed against the
structure.
For the stainless steel front side we recommend
throughout and regular cleaning and care with
suitable stainless steel cleaners and preservative agents.
Please observe manufacturer‘s instructions.
Scratching and scouring agents are not suitable.
Before wiping put the cleaner on a wet cloth and
afterwards wash off with water and dry with a
clean cloth.
Page 33

3
3
Installation instructions
The appliance must exclusively be connected to the mains by an expert electrician.
With the installation and in case of a service failure the appliance has to be isolated from the
mains. Fuselage to be switched-off or removed.
The general rules for the operation of electric
appliances, the provisions by the competent
electricity supply board and the specifications of
these instructions for installation have to be
strictly adhered to.
Prior to first use remove any possibly existing
labels and protective foils from the front of the
appliance.
Built--in cupbo-
Installation in kitchen furniture
Electrical safety is to be ensured by professional
installation.
ard for built--
under ovens
600 mm
Protection against accidental contact according
to the regulations set by VDE or other local
authorities must be ensured by correct installation of the appliances.
The same refers to the back of the appliance
which, even in case of built--in solutions away
from the wall, must not be freely accessible.
Built--in cupboards have to be located and fastened in a way that they are stable.
With built--in furniture the plastic coating or the veneer
respectively and the glue used must be temperature-resistant up to 95°C.
Unsuitable plastic coating and non--heat--resistant
glues are the reason for possible deformation and loosening of the coating. When in doubt check with the
manufacturer of the built--in furniture.
With regard to the protection against overheating of
surrounding furniture surfaces this appliance corresponds to type Y. This appliance or the built--in cupboard
for the appliance respectively may be located with the
rear wall and one side wall to whatever high walls or furniture respectively and with the other side to another
appliance or furniture of the same height as this
appliance.
567
560--568
522 / 540
547
560-600
579
20
594
592
Built--in dimensions
The opening in the cupboard must correspond to commercial dimensions. The hints required are given in the
following dimension sketch.
Page 34

3
4
Mains connection
The mains connection must be carried out by an expert
electrician. The VDE-regulations and the valid prescriptions by the local power supply boards have to be
complied with.
According to existing mains voltage the appliances are
to be connected in correspondence with the following
diagram of connections.
Prior to connection it should be checked whether the
voltage stated on the type plate - i.e. the nominal voltage of the appliance - is identical with the prevailing
mains voltage. The type plate ist located on the lower
oven frame at the left side and is visible after opening
of the oven door.
The heating element voltage amounts to 230 V ~. The
appliance will also perfectly perform with the former
mains voltage of 220 V ~.
The mains connection must be carried out in a way that
an all--pole isolating device is existing with a contact
opening of at least 3 mm, e.g. LS-automatism, earth-leakage circuit--breaker or fuse.
Connecting possibilities
1
1 2 3 4 5
L1 L2 L3 N PE
400 V 3N~
2
3
DK må ikke bruges i
1
L1 N (L2) PE
2
230 V~ (
gœldende installationsforeskrifter
DK
skal overholdes
3 4 5
GB
240 V~)
1 2 3 4 5
L1 L2 N PE
400 V 2N~
4
1
2
3 4 5
A wire of type H05VV-F or of higher rating is to be used
as supply cable.
The mains terminal is located at the back of the
appliance behind a covering slide.
The protective conductor is to be connected to terminal
. The bridges of the terminal board are to be chan-
ged accordingly, if need be.
The cable connections have to be established as
prescribed and the terminal screws be firmly tightened. Afterwards the supply cable has to be secured
by strain relief device.
After connection to the power supply all heating
elements are to be switched on shortly at maximum setting one after another, in order to check
the operability.
Fixing in kitchen furniture
L1 L2 L3 PE
230 V 3~
After completion of the mains connection the built-in or
-under oven is located in the cupboard and aligned.
Remove the rubber plug from the plastic sleeves in the
oven frame and with the screws supplied in a bag the
appliance is to be screwed down in the cupboard. Finally put the rubber plugs back into the plastic sleeves.
D
1. remove rubber plugs
2. inscrew the oven
3. put back rubber plugs
Page 35

3
5
Connection of the hob
Please check the appliance for possibly occured
transport damages. Only build in elements which are
free of defects.
When locating built--in cooking areas and hobs the
front cross arm of the built--in cupboard must be removed in order to ensure unimpeded escape of theradiant
heat.
The cut--out dimensionsfor the worktop opening and
the dimensions and hints for the mounting of the
clamps please take from the installation instructions of
hob or cooking area.
Mainly built--in cooking areas and hobs are located
above a built--under oven or control box. An intermediate bottom is required in case of a combination with
a control box. This will ensure protection against accidental contact according to VDE-- or other local regulations.
The following must be observed, if the hob will be
installed in a different manner, i.e. without the builtunder oven or control box immediately underneath:
The distance from the hob to the furniture part must
at least amount to 130 mm.If needed, please fix an
insulation. Drawers must not be located under a
hotplate.
Built-under ovens and built-in combination
hobs are provided with special plug-in
systems. A label on the oven and on the hob
will give you advice with regard to admissible combinations.
Please check:
Field A --- Equipment with (R) or without
(NR) residual heat indicator
Field B --- Nominal voltage of the hob unit
Field C --- Cooking zone or hotplates:
The equipment reference on the hob label
must be in conformity with one of the following diagrams.
ATTENTION!
To ensure safety and trouble-free functioning, do
connect only those hotplates/cooking zones, that are
in conformity with the indications in fields A, B and C.
The space under the hob must be closed to all sides
in order to ensure the non--accessibility of the lower
side.
When installing hobs with design criteria different
from the above, theinstallating instructions of this particular hob will have to be adhered to.
Two 14-pole socket-contacts for the cooking
zones /hotplates are located on the oven jacket.
Please make sure that according to reference figures 1 - 2 - 3 - 4 the matching plugs of the hob are
vertically plugged in from the top and will firmly
snap into place. Position the connection cables at
the side on the oven ceiling.
Prior to first use remove any possibly existing
labels and protective foils from the front of the
appliance.
After connection to the power supply all heating
elements are to be switched on shortly at maximum setting one after another, in order to check
the operability.
The reference figures
1 - 2 - 3 - 4 are impressed
on the plugs and on the bottom
beneath the socket-contacts.
Page 36

3
6
Technical data
EON 946
Outer dimensions
Width 592/540 mm. . . . . . . . . . . . . . . . . . . . . .
Height 594/579 mm. . . . . . . . . . . . . . . . . . . . .
Depth 547/567 mm. . . . . . . . . . . . . . . . . . . . . .
Depth with open door 1010 mm. . . . . . . .
Oven cavity dimensions
Breite 408 mm. . . . . . . . . . . . . . . . . . . . . .
Höhe 310 mm. . . . . . . . . . . . . . . . . . . . . .
Tiefe 407 mm. . . . . . . . . . . . . . . . . . . . . . .
Volumen 51.4 l. . . . . . . . . . . . . . . . . . .
Total weight net 32,5 kg. . . . . . . . . . . .
Connected load:
Top heat 1000 W. . . . . . . . . . . . . . . . . . .
Bottom heat 1000 W. . . . . . . . . . . . . . . .
Rear element 2400 W. . . . . . . . . . . . . . .
Infra--red grill 1900 W. . . . . . . . . . . . . . . .
Large surface grill 2900 W. . . . . . . . . . .
Turbo grill 1900 W. . . . . . . . . . . . . . . . . .
Pizza function 3400 W. . . . . . . . . . . . . . .
Cooling fan 30 W. . . . . . . . . . . . . . . . .
Hot--air fan 30 W. . . . . . . . . . . . . . . . .
Oven illumination 2x 25 W. . . . . . . . .
Voltage 230 V ~. . . . . . . . . . . . . . . . . .
Total connected load max 11.100 W. . .
incl. hotplates
Type plate
Note down here the data from the type plate of your appliance. Same is to be seen after opening the oven
door an the oven frame in the bottom at the left side.
Make always reference to this info:
-- when filing a service call
-- when ordering spare parts or accessories
-- with technical queries.
TYP
HEE1 008
D 35745 Herborn
Made in Germany
TYP
HEE1 008
D 35745 Herborn
Made in Germany
MODELL Prod.-Nr.
EON 946 948 901 600
Total max. 11.1 kW - 3N AC 400V, 50 Hz
230 Volt ~
MODELL Prod.-Nr.
EON 946 K 948 901 601
Total max. 11.1 kW - 3N AC 400V, 50 Hz
230 Volt ~
Serien-Nr
Serien-Nr
TYP
HEE1 008
D 35745 Herborn
Made in Germany
MODELL Prod.-Nr
EON 946 X 948 901 602
Total max. 11.1 kW - 3N AC 400V, 50 Hz
230 Volt ~
Serien-Nr.
Page 37

3
7
Page 38

38
 Loading...