

Page 1

Operating instructions
Руководство по эксплуатации
EOG 1733
Page 2

2
Page 3

Dear Customer,
Congratulations on having chosen one of our appliances, which we are sure you will
appreciate for its performance, quality and reliability and that will make your
everyday life more comfortable, safer and easier.
We have always been committed to manufacturing, using cutting-edge technology,
in respect for the environment, and in full compliance with and even anticipating the
relevant regulations.
Over 90% of our electrical appliances are class A, A+, A++ ecological products,
and are recommended by the WWF.
Make sure to carefully read the instructions in this handbook as they provide
important information on correct and safe use and maintenance of the appliance.
3
Page 4
For the user
Instruction guide
Instruction guide 4
For your safety 5
Description of oven 8
Description of controls 9
Control panel 9
Electronic programmer 11
Using the oven for the first time 17
Cooking 18
Cooking with the rotisserie 20
Cooking tables 21
Cleaning and maintenance 23
What to do if something
does not work 25
For the installer
Replacing the oven lamp 26
Technical specifications 27
Installation 28
These symbols will help you quickly
find the main
information.
Information on safety
Step by step instructions
)
Useful advice and suggestions
Information on protecting
the environment
Gas supply 31
Conversion to other types of gas 33
Technical assistance and spare
parts 34
European warranty 35
This appliance complies with the following EEC Directives:
- 73/23 and 90/683 (Low Voltage);
- 89/336 (Electromagnetic Compatibility);
- 93/68 (General Standards)
and subsequent amendments.
- 90/396 (Gas Appliances)
4
Page 5

For your safety
This new appliance is easy to use.
However, make sure to read this handbook before installing and using it for the first
time. In this way you can obtain best performance, avoid incorrect operations, use
the appliance in complete safety and respect the environment.
Installation
• Modifying or attempting to change
the characteristics of this product is
hazardous.
• Appliance installation and connection
to the power supply must only be
carried out by QUALIFIED
PERSONNEL. Before carrying out
any operation, make sure the
appliance is disconnected from the
power supply.
• After unpacking the appliance, make
sure it is not damaged and that the
power cable is in perfect condition.
Otherwise, contact the dealer before
using the appliance.
• The manufacturer declines any
liability if the accident-prevention
regulations are not respected.
Children’s safety
• This appliance must only be used
by adults. Make sure children do
not touch the controls or play
with the equipment.
• The exposed parts of this appliance
become hot during cooking and
remain so for some time even after
the appliance is turned off. Keep
children away until it has
cooled.
During use
• This product is designed for nonprofessional home use, for cooking
food. Do not use it for any other
purpose.
• When using a power socket near this
appliance, make sure the cords of
any electrical appliances being used
do not touch it and are far enough
away from its hot parts.
• The parts of this appliance become
hot during cooking and stay so for
some time even after it is switched
off. Do not touch the heating
elements inside the oven.
• Beware of the hot air coming
from the oven when opening
the door during or at the end of
cooking.
• After using the appliance, make
sure all the controls are in the
“CLOSED” or “OFF” position.
• DO NOT use the switched off oven
as a space for placing food or
containers; damage or accidents
could occur if it is unintentionally
switched on.
5
Page 6

Cleaning and maintenance
• Before carrying out any
maintenance or cleaning operation,
make sure the appliance is
disconnected from the power
supply.
• Always keep the appliance
clean. Food residuals can create
the risk of fire.
• Do not use steam or steam
appliances to clean the oven.
• In case of faults, never try to
repair the appliance on your
own. Repairs carried out by
unqualified persons can cause
damage and accidents. Consult
this handbook. If you do not find the
necessary information, contact the
nearest Assistance Centre.
Assistance for this appliance must
be carried out by an authorised
Technical Assistance Centre.
Always demand the use of original
spare parts.
Advice for safeguarding the
environment
Packing
• All the materials used are
environmentally friendly and
recyclable. Please make your
contribution to safeguarding the
environment by using the special
differentiated waste collection
channels.
Appliances in disuse
• Appliances that are no longer used
or unusable are not worthless waste.
Through ecological disposal, various
materials used in manufacturing your
appliance can be recovered.
• Find out about the possibilities of
disposal from your specialised dealer
or local Council.
• When disposing of the appliance,
make it unusable by cutting off
the power cable.
6
Page 7

• The symbol on the product or
on the packing indicates that it should
not be treated as normal household
waste but must be taken to an
appropriate collection point for the
recycling of electrical and electronic
equipment. Correct disposal of this
appliance will help prevent possible
negative consequences for the
environment and the health of persons.
For more detailed information about
the recycling of this product, contact
your local council office or waste
disposal service, or the shop where
you purchased the product.
This instruction handbook must
be kept with the appliance for any
future consultation. If the
appliance is sold or given to
another person, make sure the
handbook goes with it, so that the
new user can know how to use the
appliance with the relative
instructions.
MANUFACTURER:
ELECTROLUX HOME PRODUCTS ITALY S.p.A.
Viale Bologna 298
47100 FORLI’ (Italy)
7
Page 8
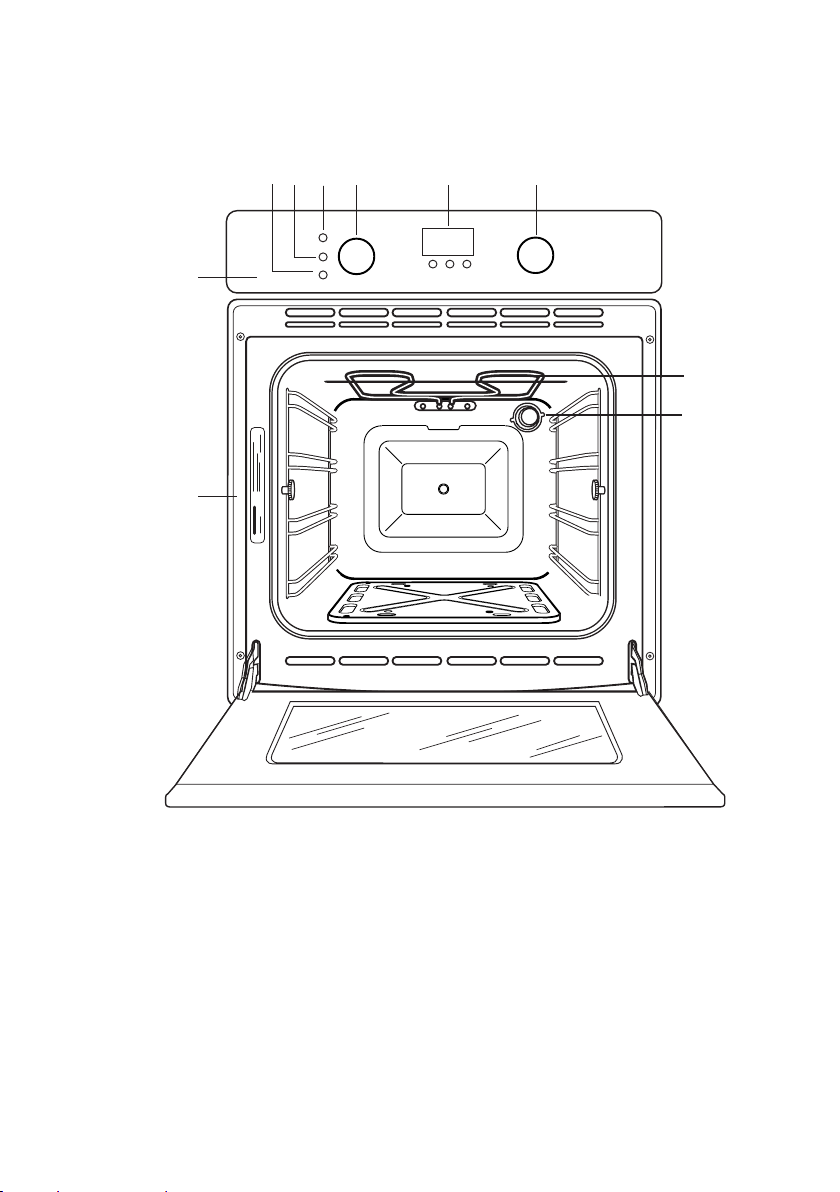
Description of oven
10
5
7
4
36
2
1
8
9
1. Control panel
2. Selector knob
3. Electronic programmer
4. Thermostat knob
5. Operating control light
6. Thermostat light
7. Block warning light
8. Grill
8
9. Oven light
10. Oven dataplate
Page 9
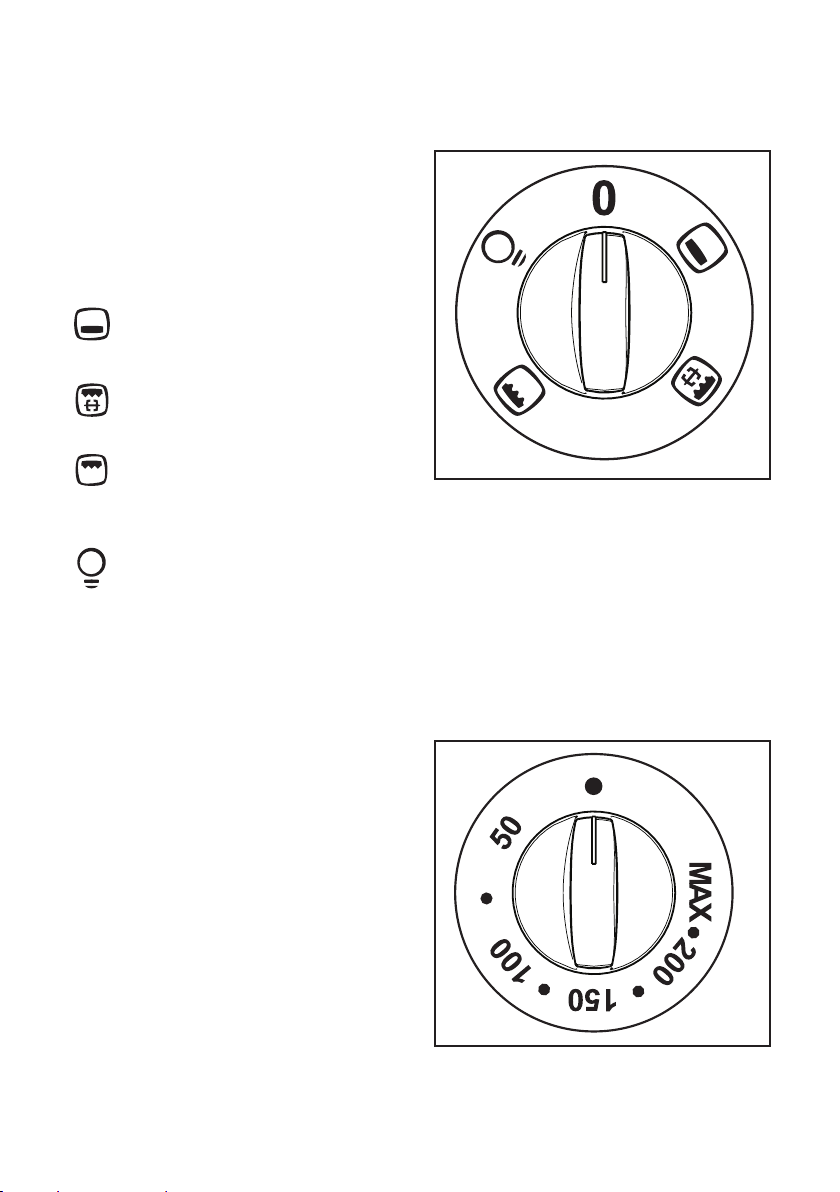
Description of controls
Selector
This control is used for selecting the type
of cooking. The symbols on the selector
knob have the following meanings:
0 oven off;
the oven emits heat from bottom;
electric grill and rotisserie
operation;
the grill is switched on: the oven
emits heat only from top (for
browning food);
the oven light is switched on but
the oven does not heat;
Turn the knob to these symbols to obtain
the required function. At the same time,
the oven light is switched on.
Operating control light
The operating control light comes on
when the selector knob is turned to a
function.
Thermostat
The cooking temperature can be set
between 50°C and MAX (240°C), turning
the thermostat knob clockwise.
9
Page 10
Gas oven operation
The oven cannot be lit with a
naked flame
To light the oven:
)
1. turn the selector knob to the symbol
(the oven light and operating
control light come on);
2. turn the thermostat knob to the
required temperature (the thermostat
light comes on);
3. the oven is lit after about 5 seconds.
The “block” light comes on if the oven
fails to light. To try lighting again, turn
the selector knob to “0” and the
thermostat knob to z (off), wait one
minute then repeat the operations
described above.
When used for the first time,
several lighting attempts are
normally required due to the
presence of air in the gas pipe.
4. The thermostat light goes off when
the oven temperature reaches the
level set with the thermostat. The
light may come on several times
during cooking, to keep the temperature constant.
In case of a power failure during
gas oven operation, the oven
switches off and the gas flow is
stopped. The appliance switches
on again automatically as soon
as the power is restored.
Electric grill
z To switch on the electric grill, turn the
selector knob to the symbol and
the thermostat knob to “max”.
z To switch on the electric grill and the
rotisserie, turn the selector knob to
the symbol and the thermostat
knob to 200 ° C.
Thermostat light
This light on the control panel comes on
when the oven is heating. The light goes
off when the oven temperature reaches
the level selected with the thermostat.
The light may come on several times
during cooking, to keep the temperature
constant.
“Block” warning light
This light comes on to indicate gas
“block” and therefore burner shutdown.
To eliminate the block, turn the selector
knob to “0” and the thermostat knob to z
(off), wait a few seconds then repeat the
lighting operation.
Safety thermostat
To prevent overheating, the oven has a
safety thermostat which intervenes in the
event of failure of the main thermostat.
In which case, the electrical power is
disconnected. Do not try to repair the
appliance on your own; contact the
nearest Assistance Centre.
10
Page 11
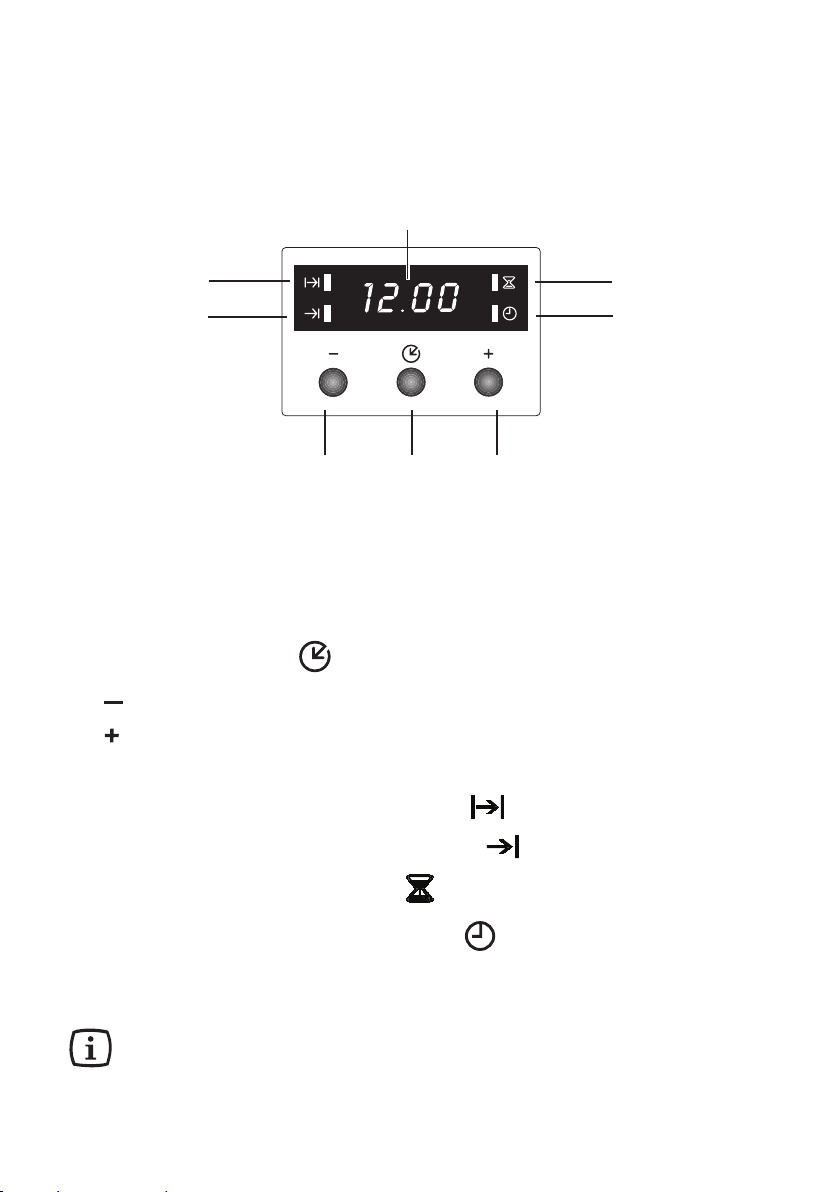
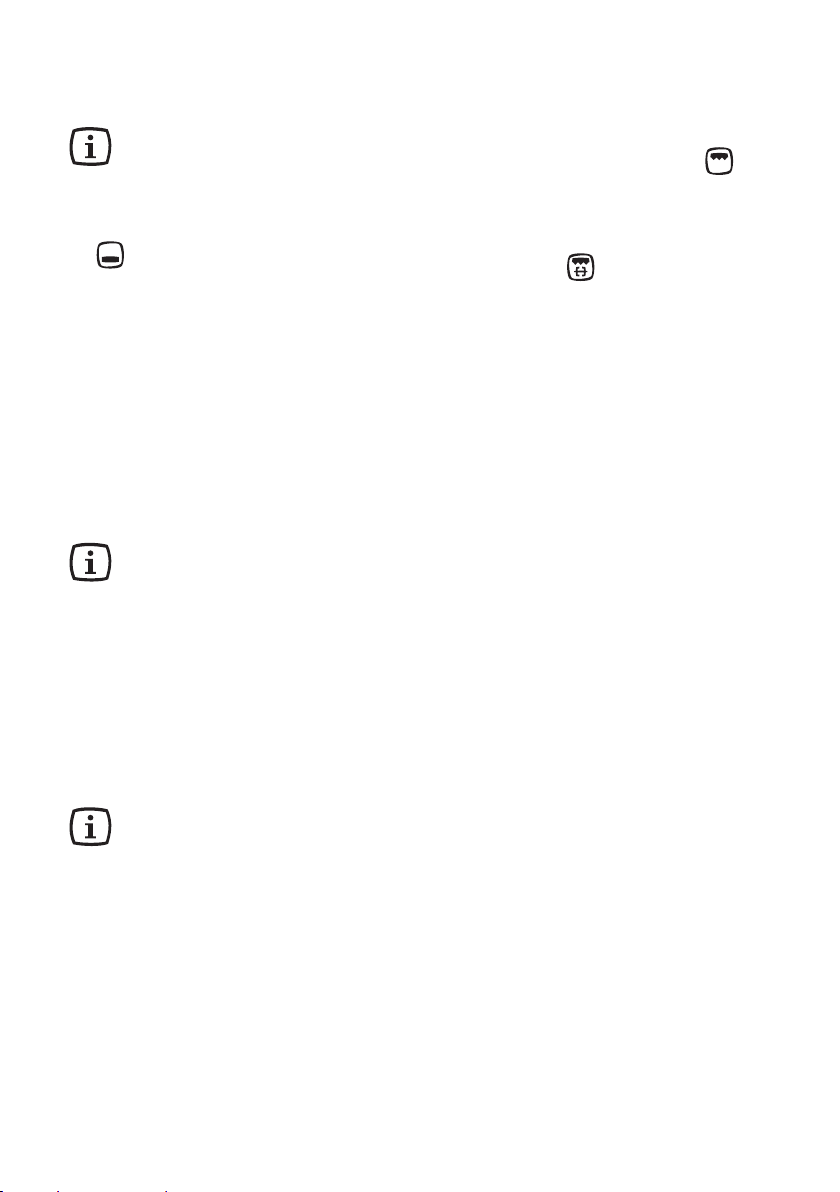
Electronic programmer
4
5
6
123
1. Function selection key
2. “ ” key
3. “ ” key
4. Display
5. Light indicating the “Cooking time” function
6. Light indicating the “End of cooking” function
7
8
7. Light indicating the “Timer” function
8. Light indicating the “Current time” function
The oven only works if the time has been set.
The oven can also be used manually, i.e. without any programming.
11
Page 12

Setting the current time
As soon as the appliance is electrically
connected, or after a power failure, the
“Current time” indicator flashes.
Setting the time:
1. press the keys “ ” or “ ”.
2. When the correct setting appears,
wait 5 seconds: the “Current time”
light goes off and the set time
appears on the display.
To change the time:
1. press the key repeatedly to select
the “Current time” function”. The
corresponding light starts flashing.
Proceed as described above.
The time can only be changed if
automatic functions have not been set
(“Cooking time” or “End of
cooking” ).
“Cooking time” function
It is possible to start cooking immediately
and automatically set the time. After
arranging the food to be cooked, press
the key repeatedly to select the
“Cooking time” function. The
corresponding light starts flashing.
Proceed as follows:
To set the cooking time:
1. press the keys “ ” or “ ”.
2. When the required cooking time
appears, wait 5 seconds: the
“Cooking time” light stays on and
the current time is displayed.
12
Page 13

3. At the end of the set time, the light
starts flashing, the oven switches off
automatically and an acoustic signal
is activated. Turn the oven knob and
thermostat knob to 0.
Press any key to switch off the
acoustic signal. Important! With this
operation, oven operation is
automatically restored; therefore, at
the end of cooking remember to turn
the oven knob and thermostat knob
to 0.
To cancel the cooking time:
1. press the key repeatedly to select
the “Cooking time” function. The
corresponding light flashes and
the remaining cooking time is
displayed.
2. Press the key “ ” until the digits
“0:00” appear on the display. The light
goes off after 5 seconds and the
current time is displayed.
13
Page 14

“End of cooking” function”
It is possible to start cooking immediately
and automatically set the end of cooking
time. After arranging the food to be cooked,
press the key repeatedly to select the
“End of cooking” function. The
corresponding light starts flashing.
Proceed as follows:
To set the end of cooking time:
1. press the keys “ ” or “ ”.
2. When the required end of cooking
time appears, wait 5 seconds: the
“End of cooking” light stays on and
the current time is displayed.
3. At the end of the set time, the light
starts flashing, the oven switches off
automatically and an acoustic signal
is activated. Turn the oven knob and
thermostat knob to 0.
Press any key to switch off the
acoustic signal. Important! With
this operation, oven operation is
automatically restored; therefore, at
the end of cooking, remember to turn
the oven knob and thermostat knob
to 0.
To cancel the end of cooking time:
1. press the key repeatedly to select
the “End of cooking” function. The
corresponding light flashes and the
end of cooking time is displayed.
2. Press the key “ ” until the current
time is displayed. The programmer
emits a beep and the light goes off.
14
Page 15

Combined “Cooking time” and
“End of cooking” function
The “Cooking time” and “End” functions
can be used together to automatically
switch the oven on and off at a later stage.
1. Set the cooking time with the
“Cooking time” function (proceed
as described in the section “Cooking
time function”). Then press the key
: the time just set will be displayed.
2. Set the required end of cooking time
with the “End of cooking” function
(proceed as described in the section
“End of cooking function”).
The corresponding lights stay on and
the current time is displayed. T h e
oven will switch on and off
automatically according to the set
times.
“TIMER” function
The timer emits an acoustic signal at the
end of the set time, but does not inter-
rupt cooking.
To set the timer:
1. press the key repeatedly to select
the “Timer” function”. The
corresponding light starts flashing.
2. Then, press the keys “ ” or “ ”
(max. time: 2 hours and 30 minutes).
3. When the correct setting appears,
wait 5 seconds: the “Timer” light
stays on and the current time is
displayed.
4. At the end of the set time, the light
starts flashing and an acoustic signal
is activated. Press any key to switch
off the acoustic signal
15
Page 16

To cancel the timer setting:
1. press the key repeatedly to select
the “Timer” function”. The
corresponding light flashes and the
remaining time is displayed.
2. Press the key “ ” until the digits
“0:00” appear on the display. After 5
seconds the light goes off and the
current time is displayed.
Switching off the display
1. Press two or three keys (depending
on the model) at the same time for
about 5 seconds. The display
switches off.
2. Press any key to switch the display
on again.
The display can only be switched
off if other functions are not set.
16
Page 17

Using the oven the first time
The oven works only if the time
has been set.
When using the oven for the first
time, set the current time with the
programmer (refer to the
instructions in the section
“Electronic programmer”)
When used for the first time, it is advisable to heat the oven empty in order to
eliminate any unpleasant odours caused
by the insulation and manufacturing residues.
When switching the oven on for the first
time:
a) set the thermostat to MAX;
b) heat the oven EMPTY for about 45
minutes;
c) switch the grill on for 5-10 minutes
d) air the room during the entire
operation.
Before cooking for the first time,
carefully wash the GRILL and
DRIP-TRAY (i.e. the enamelled
metal tray with raised edges
located inside the oven).
During the first minutes of operation, IT
IS ABSOLUTELY NORMAL if the oven
produces unpleasant odours and fumes.
This is due to heating of the insulation
and manufacturing residues.
After 45 minutes, allow the oven to cool,
then clean the inside with hot water and
a mild detergent.
To open the oven door,
always grip the handle in the
middle (Fig. 5).
17
Page 18

Cooking
Oven guides
The side walls of the oven have GUIDES
for adjusting the grill height.
4
3
2
1
Take care not to damage the
enamelled parts of the oven when
inserting and removing the driptray and grill.
Always cook with the oven
door closed.
• Always use oven gloves to re-
move food from the oven.
• The oven cooks at temperatures of
50° to 240°C. Therefore, use recipi-
ents able to withstand such temperatures (e.g. metal pans, heat-
resistant dishes, ovenware).
• This oven is equipped with an
exclusive cooking system that
generates natural air circulation and
continuous recovery of cooking
steam.
This allows cooking in a constantly
humid environment, keeping food
soft on the inside and crisp on the
outside. Moreover, the cooking time
and energy consumption are reduced
to a minimum.
18
During cooking, steam may be
produced which comes out on opening
the oven door. This is absolutely
normal.
Beware of the hot air coming
from the oven when opening
the door during or at the end of
cooking.
When the steam deposits on
the oven door it becomes condensate. To reduce the
formation of condensate, heat
the oven for about 10 minutes
before cooking. It is advisable
to dry the condensate at the
end of cooking
• Never place objects on the bot-
tom of the oven or cover it with
aluminium foil while cooking,
because you could damage the
enamel and spoil the food being
cooked. Always place recipients,
ovenware and aluminium foil on the
grill specially inserted on the oven
guides.
• When cooking with fats or oils (e.g.
fried foods), make sure the sauces
do not overheat; in fact, these substances can catch fire if brought to
high temperatures.
Therefore, when introducing or removing food from the oven, make sure
the sauces (oil, juices, melted fats)
do not spill in considerable quantities on the bottom. In which case,
carefully clean the bottom of the oven
before starting other cooking. This will
also avoid the creation of unpleasant
fumes and odours.
Page 19

Cooling fan
The oven is equipped with a fan for
cooling the control panel, knobs and the
oven door grip. To prevent dangerous
overheating, this fan continues to work
EVEN AFTER THE OVEN IS SWITCHED
OFF, until the temperature falls to
normal levels.
Advice for cooking meat and
fish
Meat can be arranged in recipients
suitable for cooking in the oven, or directly
on the grill.
In the latter case, ALWAYS pour a
little water in the drip-tray and insert
it on the guides under the grill.
The drip-tray will collect the fats melted
during cooking, and the water prevents
the fats from burning and producing
unpleasant odours or smoke.
White meats, poultry and fish usually
require cooking at medium temperature
(between 150° and 175°C), whereas
cooking red meats “rare” requires
temperatures between 200 and 240° C
for short times.
Advice for baking cakes
Cakes require a moderate temperature,
between 150° and 200° C.
Before baking a cake, it is advisable to
heat the oven for about 10 minutes, and
avoid opening the oven door during
baking.
Advice for grilling
To grill meat or fish, baste it with a little
oil and place on the grill.
When grilling, the heat only comes from
above, therefore the grill must be inserted
on the upper or lower guides depending
on the thickness of the meat or fish. In
which case, ALWAYS make sure to
insert the drip-tray on the lowest
guides, but not on the bottom of the
oven, after pouring about two cups
of water in it.
When cooking with the ventilated
grill, select a temperature not higher
than 200°C.
The possible formation of condensate on the oven door glass,
walls and bottom does not affect oven operation. It is advisable to dry the condensate at
the end of cooking.
19
Page 20

Cooking with the rotisserie
To use the rotisserie, proceed as
follows:
1. Insert the spit frame on the
)
second guide from the
bottom, as shown in the figure.
2. Insert the first fork in the spit,
skewer the food to be cooked
and secure it by inserting the
second fork; fix the two forks
by tightening the special
screws.
3. Insert the tip of the spit in the
hole of the rotisserie motor,
clearly visible in the middle of
the rear wall of the oven.
4. Place the front part of the spit
on the spit frame.
5. Unscrew the grip.
6. Turn the selector knob to the
symbol and the
thermostat knob to “200”
20
It is advisable to insert the driptray on the first guide from the
bottom, after pouring about two
cups of water in it.
Page 21

Cooking tables
Gas oven
Level
WEIGHT
IN
FOOD TYPE
G
CAKES AND PASTRIES
With whisked mixture
With leavened mixture
Short pastry, mould bottom
Cheese-cake 2 150 60 ~ 80
Apple pie 2 175 40 ~ 60
Strudel 2 150 60 ~ 80
Tarts 2 175 45 ~ 60
Small cakes and pastries
Biscuits 3 160 10 ~ 20
Meringues 3 100 90 ~ 120
1000 White bread 1 175 45 ~ 60 1 long loaf
500 Rye-bread 2 150 30 ~ 45 sandwich loaf
500 Bread rolls 3 175 20 ~ 35 8 bread rolls
250 Pizza 2 190 20 ~ 35 on drip-tray
1000 Roast beef 2 175 50 ~ 70 Cooked on grill
1200 Roast pork 2 175 100 ~ 130 Cooked on grill
1000 Roast veal 2 175 90 ~ 120 Cooked on grill
1500
1200 Lamb 2 175 110 ~ 130 Leg
1000 Chicken 2 175 60 ~ 80 Whole
4000 Turkey 2 175 210 ~ 240 Whole
1500 Duck 2 160 120 ~ 150 Whole
3000 Goose 2 160 150 ~ 200 Whole
1200 Rabbit 2 175 60 ~ 80 In pieces
1000 Whole 2 175 40 ~ 60 2 fish
800 Fillets 2 175 30 ~ 40 4 fillets
BREAD and PIZZA
TIMBALES, PIES
AND PUDDINGS
With macaroni 2 175 40 ~ 50
With vegetables 2 175 45 ~ 60
Quiches 2 175 35 ~ 45
Lasagne 2 175 45 ~ 60
MEAT
Roast beef
(English style)
FISH
2 175 45 ~ 60
3 175 20 ~ 35
2 175 20 ~ 30
2 190 15 ~ 25
2 200 50 ~ 70 Cooked on grill
Temperature
4
3
°C
2
1
Cooking
time
minutes
NOTES
NOTES:
Cooking times do not include pre-heating time.
It is advisable to heat the oven for about 10 minutes before cooking, in particular for
cakes and pastries, pizza and bread.
21
Page 22

Grilling
Quantity
FOOD TYPES
Number
Pieces
Steak
Chops
Sausages 8 500 4 max 10 6
Chicken in pieces 6 800 3 max 30 20
Kebabs 4 700 4 max 12 10
Chicken breast 4 400 4 max 13 10
Halved tomatoes 8 500 4 max 12 —
Fish, fillets 4 400 4 max 8 6
Scallops 6 — 4 max 12 —
Toasted sandwiches 4 — 4 max 8 —
Sliced bread 4 — 4 max 2~3 1
Grams
4 800 4 max 10 8
4 600 4 max 12 8
Level
Grilling
temperature
4
3
2
1
°C
Cooking
time minutes
part
Lower
part
Upper
Cooking with the rotisserie
FOOD TYPE Quantity Level Temp. °C Cooking time (min.)
Poultry 1000 2 200 50/60
Roasts 800 2 200 50/60
22
Page 23

Cleaning and maintenance
General cleaning
Before carrying out any
maintenance or cleaning
operation, make sure the
appliance is cold and
disconnected from the power
supply.
• If using spray products never di-
rect the spray on the electric
heating coils (clearly visible in
the top part of the oven) or the
thermostat bulb located at the
top back.
Cleaning the inside of the oven
Clean the enamelled parts with
lukewarm water, detergent and a soft
sponge. DO NOT use scouring pads,
steel wool or acids (e.g. descaling
products), as they could damage the
enamel.
After cleaning, rinse thoroughly and dry
with a soft cloth or shammy leather.
Fruit contains acids which,
becoming hot during cooking, can
form stains that are very hard to
clean. This can make the enamel
duller, but does not affect oven
operation. To prevent these
stains, always clean the oven
after cooking fruit. This will avoid
the possibility of any cooking
residuals burning during
subsequent cooking.
In case of stubborn stains, do not use
abrasive detergents (e.g. powders). Use
normal detergents or a cloth moistened
with hot vinegar, leaving it on the stain
for a while.
23
Page 24

Oven door
Important - Remove the oven door
before cleaning it.
To do so, proceed as follows:
)
1) open the door fully;
2) locate the two door hinges;
3) lift and turn the levers on the two
hinges;
4) hold the door by the side edges
and close it slowly but not COMPLETELY;
5) pull the door forward, removing it
from its seat;
6) place the door on a stable surface.
Do not clean the oven door
when it is still hot, as the glass
could shatter. If scratches or
deep cracks are noted on the
surface of the glass, contact the
authorised Assistance Centre
for replacing the glass.
24
Models in stainless steel or
aluminium: It is advisable to
clean the oven door and control
panel in stainless steel or
aluminium only with a moist
sponge, carefully drying with a
soft cloth after cleaning. Never
use steel wool, acids or abrasive
products as they can damage the
surface.
Page 25

What to do if something does not work
Some operating problems may depend on simple maintenance operations
or oversights, and can be easily solved without the intervention of Technical
Assistance.
PROBLEM
THE OVEN DOES NOT WORK
THE THERMOSTAT LIGHT DOES NOT
COME ON
CURE
Make sure the control knobs are
correctly set for cooking and repeat the
operations given in the handbook.
or
Make sure the programmer is correctly
set for cooking and repeat the operations
given in the handbook.
or
Check the electrical system safety
switches (“protection switch”). If the fault
concerns the system, contact an
electrician.
Turn the thermostat to a temperature.
or
Turn the selector to a function.
THE OVEN LIGHT DOES NOT SWITCH
ON
THE OVEN TAKES TOO LONG TO
COOK OR COOKS TOO FAST
MOISTURE FORMS ON THE FOOD
AND INSIDE THE OVEN
Turn the selector to a function.
or
Purchase a lamp for high
temperatures from an Assistance Centre
and fit it following the instructions given
in the relevant section.
Consult this handbook (the section
“Advice on
oven use”).
Do not leave food in the oven for more
than 15-20 minutes after cooking.
25
Page 26

Replacing the oven lamp
Make sure the appliance is
disconnected from the power
supply.
The oven lamp must have specific
characteristics:
a) structure suitable for high
temperatures (up to 300 de-
grees);
b) power supply 230 V (50 Hz);
c) power 15/25 W;
d) connection type E 14.
To replace the lamp, proceed as follows:
a) unscrew the glass lamp cover;
b) unscrew the old lamp;
c) fit the new lamp;
d) refit the glass cover;
e) switch the power on.
26
Page 27

Technical specifications
Gas oven burner power
Natural gas 2.7 kW
LPG 2.5 kW
Electric power
Heating element Grill 1650 W
Oven light 25 W
Cooling fan 25 W
Rotisserie motor 4 W
Total electric power 1704 W
Power supply (50Hz) 230 V
Gas category II2H3+
Appliance arranged for: Natural gas G20 / 20 mbar
Min. dimensions of installation compartment
Undercounter
Width 56.0-57.0 cm
Depth min. 55.0 cm
Useful dimensions of oven recess
height 33.5 cm
width 40.5 cm
depth 41.0 cm
useful volume 56 l
height:
in column: 58.0 cm
59.3
cm
27
Page 28

Installation
Fitting in modular cabinets
For correct operation of the appliance if
inserted in a modular cabinet, the cabinet
must have suitable characteristics.
In compliance with the safety regulations,
protection against possible contact with
electrical parts and parts only protected
with functional insulation must be
guaranteed by correct fitting of the
equipment. All the parts ensuring
protection, and also a possible covering
panel (e.g. if the appliance is placed at
the end or beginning of modular units),
must be fixed so that they cannot be
removed without using a tool.
It is advisable to install the appliance at
a certain distance from refrigerators and
freezers, because the heat given off
could affect their operation.
FO 0290
FITTING IN COLUMN
28
OVEN OVERALL DIMENSIONS
593
FO 2662
UNDERCOUNTER INSTALLATION
Page 29

Fixing to the cabinet
• Insert the appliance in the
compartment.
• Open the oven door and fix the
oven body to the cabinet with four
wood screws suitable for the holes
specially provided in the external
trim.
When also inserting a cooktop with electric hot-plates, the electrical connection
of the top and the oven must be carried
out separately, for electrical reasons and
to facilitate possible removal of the oven
from the cabinet.
Any extensions must be made with
cables suitable for the required power.
Electrical connection
Before carrying out the connection, make
sure:
1) the limiter valve and the electrical
system can take the appliance load
(refer to the dataplate);
2) the supply system is equipped with
an efficient earth connection in compliance with the current standards
and regulations;
3) the socket or omnipolar switch used
are easily accessible with the appliance installed.
The appliance is supplied with a power
cable. The cable must be equipped with
a standard plug suitable for the load
indicated on the dataplate. The plug
must be inserted in a suitable power
socket.
593
29
Page 30

To connect directly to the mains, a
suitable omnipolar switch with contact
gap of at least 3 mm complying with
current standards must be installed
between the appliance and the network.
The yellow/green earth wire must not be
interrupted by the switch and must be
2-3 cm longer than the other wires.
In any case the power cable must be
positioned in such a way that no part of
it reaches a temperature of 50°C higher
than the ambient temperature.
After connection, test the heating
elements by operating them for about 3
minutes.
Replacing the power cable
In case of replacement, only use cables
of type H07 RN-F, H05 RN-F, H05 RRF, H05 VV-F, H05 V2V2-F (T90), H05
BB-F (section 3 x 1.5 mm2), suitable for
the load and the working temperature.
Also, the yellow/green earth wire must
be approx. 2 cm longer than the phase
and neutral wires.
Terminal block
The oven is equipped with an easily
accessed special terminal block,
arranged for operation with a 230 V
single-phase power supply.
The Manufacturer declines any
liability if the accident-prevention
regulations are not respected.
30
Page 31

Gas supply
The gas connection must be
carried out in compliance with
the current regulations.
The appliances leave the factory, tested
and adjusted for the type of gas specified
on the plate located in the bottom
protection, near the gas connection pipe.
Make sure the type of gas used is the
same as that specified on the plate.
Otherwise, proceed according to the
instructions given in the section
“Converting to different types of gas”.
To ensure maximum efficiency and lower
consumption, make sure the gas supply
pressure respects the values given in the
“Oven burner specifications” table.
If the pressure of the gas used is different
(or variable) from that provided for, a
suitable pressure regulator for the gas
(NOT LPG), complying with current
standards, must be installed on the inlet
pipe. The use of pressure regulators for
liquified gases (LPG) is allowed provided
they comply with current standards.
The use of a gas cooking
appliance produces heat and
humidity in the room where it
is installed. Ensure good
ventilation in the room by
keeping air inlets open and
efficient, or install an extractor
hood with exhaust flue.
Intensive and prolonged use of
the appliance may require extra ventilation, e.g. by opening
a window or by increasing the
power of the extractor, if
present.
Connection
The oven feed gas train is located at the
front, behind the control panel.
Connection:
31
Page 32

1. Partially insert the oven in the
)
cabinet (approx. 30 cm) and
access the gas train from above.
Make the gas connection,
choosing from one of the two
systems:
a) flexible metal tube (Fig 22),
limited to those not longer than 2
m: screw the union onto the 1/2
gas train, inserting the gasket,
which is included in the bag of
accessories.
b) rigid metal pipe (Fig. 23)
(annealed copper Ø 8mm): insert
the copper pipe in the gas train
union after positioning the nut and
double cone, which are included
in the bag of accessories.
2. To complete the connection, tighten
the nuts with a 24 mm wrench,
taking care not to mechanically
stress the gas circuit (Fig. 24);
3. Insert the oven in the cabinet and
fix it as indicated in the section
“Fixing to the cabinet”, making
sure the gas supply connection
pipe is not crushed.
FLEXIBLE
tube
Gasket
II
Fig. 22
RIGID pipe
Nut
Double cone
Fig. 23
32
IMPORTANT:
After installation, always check
the perfect seal of all unions using
a soapy solution. Never carry out
this check with a flame.
Fig. 24
Page 33

Conversion to other types of gas
To convert the appliance to a different
type of gas from that for which it is
arranged, the nozzle must be replaced
with one suitable for the new type of gas.
The oven burner does not
require primary air adjustment.
Replacing the oven burner nozzle
1. Remove the bottom of the oven
(“A”);
2. undo the two screws (“C”) fixing
the burner;
3. slowly remove the burner from
the nozzle holder, making sure
the burner bush remains in the
correct position inside the
burner; carefully move the burner
to the left, avoiding any kind of
strain on the igniter plug
connection cable (“E”);
4. undo the nozzle (“D”) with the
special 7 mm wrench and
replace it with one suitable for the
new type of gas (refer to the table
“Oven burner specifications” at
the bottom of the page).
5. then refit everything, repeating
the operations in reverse order.
6. replace the rating plate (located
near the gas connection) with
that corresponding to the new
type of gas, included in the bag
of injectors supplied.
33
Page 34

Oven burner specifications
GAS INJECTOR NOMINAL NOMINAL GAS
TYPE MARK GAS FLOW IN
1/100 mm POWER
(kW) m3/h g/h
Natural Gas
114 2.7 0.257 1.0 52 20
(G20)
LPG
(G30/G31)
0.78 2.5 - 182 1.0 52 28-30 / 37
Natural Gas
(G20)
124 2.5 0.238 - 1.0 52. 13
Technical assistance and spare parts
If the checks suggested in the previous
section are not useful for solving the
problem, contact the nearest authorised
Technical Assistance Centre,
specifying the type of fault, appliance
model (Mod.), product
number (Prod. no.)
and serial number
(Ser. No.) given on
the oven dataplate.
The dataplate is located on the outside
of the oven and is visible, opening the
door, in the place shown in the Figure.
Original spare parts, certified by the
product manufacturer, and identified by
this mark, are only available at our
Technical Assistance Centres and
Authorised Spare Parts Shops.
REDUCED
GAS
POWER
(kW)
BY-PASS
NEEDLE
(1/100 mm)
NOMINAL
GAS
PRESSURE
(mbar)
34
Page 35

EUROPEAN GUARANTEE
This appliance is guaranteed by Electrolux in each of the countries listed below for the period specified
in the appliance guarantee or otherwise by law. If you move from one of these countries to another of
the countries listed below the appliance guarantee will move with you subject to the following
qualifications:-
••
• The appliance guarantee starts from the date you first purchased the appliance which will be
••
evidenced by production of a valid purchase document issued by the seller of the appliance.
••
• The appliance guarantee is for the same period and to the same extent for labour and parts as
••
exists in your new country of residence for this particular model or range of appliances.
••
• The appliance guarantee is personal to the original purchaser of the appliance and cannot be
••
transferred to another user.
••
• The appliance is installed and used in accordance with instructions issued by Electrolux and is
••
only used within the home, i.e. is not used for commercial purposes.
••
• The appliance is installed in accordance with all relevant regulations in force within your new
••
country of residence.
The provisions of this European Guarantee do not affect any of the rights granted to you by law.
35
Page 36

36
 Loading...