

Page 1

EEB4233
EOB3430
................................................ .............................................
SQ FURRË UDHËZIMET PËR
PËRDORIM
EN OVEN USER MANUAL 26
2
Page 2
www.electrolux.com
2
PËRMBAJTJA
1. TË DHËNA PËR SIGURINË . . . . . . . . . . . . . . . . . . . . . . . . . . . . . . . . . . . . . . . . . . . . . . . . . 3
2. UDHËZIME PËR SIGURINË . . . . . . . . . . . . . . . . . . . . . . . . . . . . . . . . . . . . . . . . . . . . . . . . . 4
3. PËRSHKRIM I PRODUKTIT . . . . . . . . . . . . . . . . . . . . . . . . . . . . . . . . . . . . . . . . . . . . . . . . . 6
4. PËRPARA PËRDORIMIT TË PARË . . . . . . . . . . . . . . . . . . . . . . . . . . . . . . . . . . . . . . . . . . . 6
5. PËRDORIMI I PËRDITSHËM . . . . . . . . . . . . . . . . . . . . . . . . . . . . . . . . . . . . . . . . . . . . . . . . 7
6. FUNKSIONET E ORËS . . . . . . . . . . . . . . . . . . . . . . . . . . . . . . . . . . . . . . . . . . . . . . . . . . . . 8
7. PËRDORIMI I AKSESORËVE . . . . . . . . . . . . . . . . . . . . . . . . . . . . . . . . . . . . . . . . . . . . . . . . 9
8.
FUNKSIONET SHTESË . . . . . . . . . . . . . . . . . . . . . . . . . . . . . . . . . . . . . . . . . . . . . . . . . . . 10
9. UDHËZIME DHE KËSHILLA TË NEVOJSHME . . . . . . . . . . . . . . . . . . . . . . . . . . . . . . . . . . 11
10.
KUJDESI DHE PASTRIMI . . . . . . . . . . . . . . . . . . . . . . . . . . . . . . . . . . . . . . . . . . . . . . . . . 18
11. SI TË VEPROJMË NËSE… . . . . . . . . . . . . . . . . . . . . . . . . . . . . . . . . . . . . . . . . . . . . . . . . 23
12.
INSTALIMI . . . . . . . . . . . . . . . . . . . . . . . . . . . . . . . . . . . . . . . . . . . . . . . . . . . . . . . . . . . . . 24
ME JU NË MENDJE
Faleminderit që bletë një produkt Electrolux. Ju keni zgjedhur një produkt i cili sjell me vete
dekada të tëra me përvojë dhe risi nga profesionistë. Gjenial dhe elegant, ky produkt është
projektuar duke ju pasur ju në mendje. Pra, sa herë që ta përdorni mund të ndjeheni të sigurt se
çdo herë do të merrni prej tij rezultate të shkëlqyera.
Mirë se vini në Electrolux.
Vizitoni faqen tonë të internetit në adresën:
Merrni këshilla përdorimi, broshura, informacion për ndreqjen e problemeve si dhe për
shërbimin:
www.electrolux.com
Regjistroni produktin tuaj për shërbim më të mirë:
www.electrolux.com/productregistration
Blini aksesorë, pjesë konsumi, pjesë këmbimi origjinale për pajisjen tuaj:
www.electrolux.com/shop
KUJDESI DHE SHËRBIMI PËR KLIENTËT
Rekomandojmë përdorimin e pjesëve origjinale të këmbimit.
Kur kontaktoni me Shërbimin, sigurohuni që të dispononi të dhënat e mëposhtme.
Informacioni mund të gjendet në pllakën e specifikimeve. Modeli, PNC, Numri i serisë.
Paralajmërim / Të dhëna për sigurinë dhe kujdesin.
Të dhëna të përgjithshme dhe këshilla
Të dhëna për ambientin
Rezervohet mundësia e ndryshimeve.
Page 3

1. TË DHËNA PËR SIGURINË
Përpara instalimit dhe përdorimit të pajisjes, lexoni me
kujdes udhëzimet e ofruara. Prodhuesi nuk është
përgjegjës nëse shkaktohen lëndime dhe dëme nga
instalimi dhe përdorimi i pasaktë. Gjithmonë mbajini
udhëzimet bashkë me pajisjen, për t'iu referuar në të
ardhmen.
1.1 Siguria e fëmijëve dhe personave me probleme
PARALAJMËRIM
Rrezik mbytjeje, lëndimi ose gjymtimi të përhershëm.
• Kjo pajisje mund të përdoret nga fëmijë të moshës 8
vjeç e sipër dhe persona me aftësi të kufizuara fizike,
ndjesore ose mendore ose që nuk kanë eksperiencë
dhe njohuri, nëse ata mbikëqyren nga një i rritur ose
nga një person që është përgjegjës për sigurinë e tyre.
• Mos lejoni fëmijët të luajnë me pajisjen.
• Mbajini të gjitha materialet e ambalazhimit larg fëmijëve.
• Mbajini fëmijët dhe kafshët shtëpiake larg pajisjes, gjatë
kohës që ajo punon ose kur ftohet. Pjesët e prekshme
janë të nxehta.
• Nëse pajisja ka një mekanizëm për sigurinë e fëmijëve,
ju rekomandojmë që ta aktivizoni.
• Pastrimi dhe mirëmbajtja nuk duhet të kryhet nga
fëmijët pa mbikëqyrje.
SHQIP 3
1.2 Siguria e përgjithshme
• Kur përdoret, pajisja nxehet nga brenda. Mos i prekni
elementet e nxehjes që gjenden në pajisje. Përdorni
gjithmonë doreza furre për të hequr ose për të futur
aksesorët ose enët në furrë.
• Mos përdorni pastrues me avull për të pastruar
pajisjen.
• Përpara punimeve të mirëmbajtjes, shkëputni furnizimin
me rrymë elektrike.
Page 4

www.electrolux.com
4
• Mos përdorni pastrues gërryes të fortë ose kruajtëse të
• Për të hequr mbështetëset e rafteve, nxirrni fillimisht
mprehta metalike për të pastruar xhamin e derës,
sepse këto mund të gërvishtin sipërfaqen, gjë e cila
mund të rezultojë në krisjen e xhamit.
jashtë pjesën e përparme të mbështetëses së raftit dhe
pastaj pjesën e pasme nga paretet anësore. Montojini
mbështetëset e rafteve në rendin e kundërt.
2.
UDHËZIME PËR SIGURINË
2.1 Instalimi
PARALAJMËRIM
Vetëm një person i kualifikuar
duhet ta instalojë këtë pajisje.
• Hiqni të gjithë paketimin.
• Mos instaloni ose mos përdorni një
pajisjen të dëmtuar.
• Zbatoni udhëzimet e instalimit të dhëna
me pajisjen.
• Gjithmonë bëni kujdes kur e lëvizni
pajisjen sepse është e rëndë. Përdorni
gjithnjë doreza sigurie.
• Mos e tërhiqni pajisjen nga doreza.
• Ruani largësitë minimale nga pajisjet
dhe njësitë e tjera.
• Sigurohuni që pajisja të jetë e instaluar
nën dhe pranë strukturave të sigurta.
• Anët e pajisjes duhet të jenë pranë
pajisjeve ose njësive me të njëjtën
lartësi.
Lidhja elektrike
PARALAJMËRIM
Rrezik zjarri dhe goditjeje elektrike.
• Të gjitha lidhjet elektrike duhen kryer
nga një elektricist i kualifikuar.
• Pajisja duhet tokëzuar.
• Sigurohuni që të dhënat elektrike në
pllakën e specifikimeve të përkojnë me
karakteristikat e rrjetit elektrik. Nëse nuk
përkojnë, kontaktoni me një elektricist.
• Përdorni gjithmonë një prizë të tokëzuar
të instaluar si duhet.
• Mos përdorni përshtatës me shumë
spina dhe kabllo zgjatuese.
• Sigurohuni që të mos dëmtoni prizën
dhe kabllon elektrike. Kontaktoni me
qendrën e shërbimit ose një elektricist
për ndërrimin e kabllos elektrike të
dëmtuar.
• Mos i lini kabllot që të prekin derën e
pajisjes, veçanërisht kur dera është e
nxehtë.
• Mbrojtja nga goditja e pjesëve me
korrent dhe të izoluara duhet të
shtrëngohet në mënyrë të tillë që të
mos hiqet pa vegla.
• Pajisjen futeni në prizë vetëm në fund të
instalimit. Sigurohuni që spina të jetë e
arritshme pas montimit të pajisjes.
• Nëse priza është e lirë, mos e futni
spinën.
• Mos e shkëputni pajisjen nga rrjeti duke
e tërhequr nga kablloja elektrike.
Gjithmonë tërhiqeni kabllon duke e
kapur nga spina.
• Përdorni mjetet e duhura izoluese:
çelësa mbrojtës të linjës, siguresa
(siguresa tip vidë të hequra nga
mbajtësja), çelësa të humbjeve në
tokëzim dhe kontaktorë.
• Instalimi elektrik duhet të ketë një pajisje
instaluese e cila ju lejon të shkëpusni
pajisjen nga rryma elektrike në të gjitha
polet. Pajisja instaluese duhet të ketë
një hapje kontakti me gjerësi minimale 3
mm.
Page 5
2.2 Përdorimi
PARALAJMËRIM
Rrezik lëndimi, djegiesh ose
goditjeje elektrike ose shpërthimi.
• Përdoreni pajisjen në mjedis shtëpiak.
• Mos i ndryshoni specifikimet e kësaj
pajisjeje.
• Sigurohuni që vrimat e ajrimit nuk janë
të bllokuara.
• Mos e lini pajisjen të pambikëqyrur gjatë
punës.
• Çaktivizojeni pajisjen pas çdo përdorimi.
• Kur përdoret, pajisja nxehet nga
brenda. Mos i prekni elementet e
nxehjes që gjenden në pajisje. Përdorni
gjithmonë doreza furre për të hequr ose
për të futur aksesor ose enë për furrë.
• Bëni kujdes kur hapni derën e pajisjes
ndërkohë që pajisja është në punë.
Mund të dal ajër i nxehtë.
• Mos e përdorni pajisjen me duar të
lagura ose kur ajo ka kontakt me ujin.
• Mos ushtroni presion mbi derën e
hapur.
• Mos e përdorni pajisjen si sipërfaqe
pune ose për të ruajtur sende.
• Mbajeni gjithmonë të mbyllur derën e
pajisjes kur pajisja është në punë.
• Hapeni me kujdes derën e pajisjes.
Përdorimi i përbërësve me alkool mund
të krijoj një përzierje alkooli dhe ajri.
• Mos lejoni që pajisja të bjer në kontakt
me shkëndija apo flakë të hapura kur
hapni derën.
• Mos vendosni produkte të ndezshme
ose sende të lagura me produkte të
ndezshme brenda, pranë ose mbi
pajisje.
PARALAJMËRIM
Rrezik dëmtimi i pajisjes.
•Për të parandaluar dëmtime ose
çngjyrime të smaltit:
– Mos vendosni enë furre ose objekte
të tjera drejtpërdrejt në fund të pajisjes.
– Mos fusni letër alumini direkt në
pjesën e poshtme të pajisjes.
– mos hidhni ujë drejtpërdrejt në
pajisjen e nxehtë.
– mos lini enë të lagura dhe ushqim në
pajisje pasi të keni mbaruar gatimin.
SHQIP 5
– bëni kujdes kur hiqni ose vendosni
aksesorët.
• Çngjyrimi i smaltit nuk ndikon në
funksionimin e pajisjes. Ai nuk
konsiderohet defekt në kuptimin e ligjit
për garancinë.
• Përdorni një tigan të thellë për kek të
njomë. Lëngjet e frutave shkaktojnë
njolla që mund të jenë të përhershme.
2.3 Kujdesi dhe pastrimi
PARALAJMËRIM
Rrezik lëndimi, zjarri ose dëmtimi
të pajisjes.
• Përpara se të kryeni mirëmbajtjen e
pajisjes, çaktivizojeni atë dhe hiqeni nga
priza.
• Sigurohuni që pajisja të jetë e ftohtë. Ka
rrezik që panelet e xhamit të thyhen.
• Ndërrojini menjëherë panelet prej xhami
të derës kur janë të dëmtuara. Lidhuni
me Servisin.
• Tregoni kujdes kur ta hiqni derën nga
pajisja. Dera është e rëndë!
• Pastrojeni pajisjen rregullisht për të
parandaluar dëmtimin e materialit të
sipërfaqes.
• Yndyra ose ushqimi i mbetur brenda
pajisjes mund të shkaktojë zjarr.
• Pastrojeni pajisjen me një leckë të butë
të lagësht. Përdorni vetëm detergjente
neutrale. Mos përdorni produkte
gërryese, materiale pastruese të
ashpra, tretës ose objekte metalike.
• Nëse përdorni spërkatës për furrën,
ndiqni udhëzimet e sigurisë në paketim.
• Mos e pastroni smaltin katalitik (nëse
ka) me asnjë lloj detergjenti.
2.4 Drita e brendshme
• Lloji i llambës ose llambës halogjene të
përdorur për këtë pajisje, është vetëm
për pajisje elektroshtëpiake. Mos e
përdorni atë për ndriçim banese.
PARALAJMËRIM
Rrezik nga goditja elektrike.
• Përpara ndërrimit të llambës,
shkëputeni pajisjen nga korrenti.
• Përdorni vetëm llamba me të njëjtat
specifikime.
Page 6
www.electrolux.com
6
2.5 Eliminimi i pajisjes
PARALAJMËRIM
Rrezik lëndimi ose mbytjeje.
• Shkëputeni pajisjen nga rrjeti i furnizimit
elektrik.
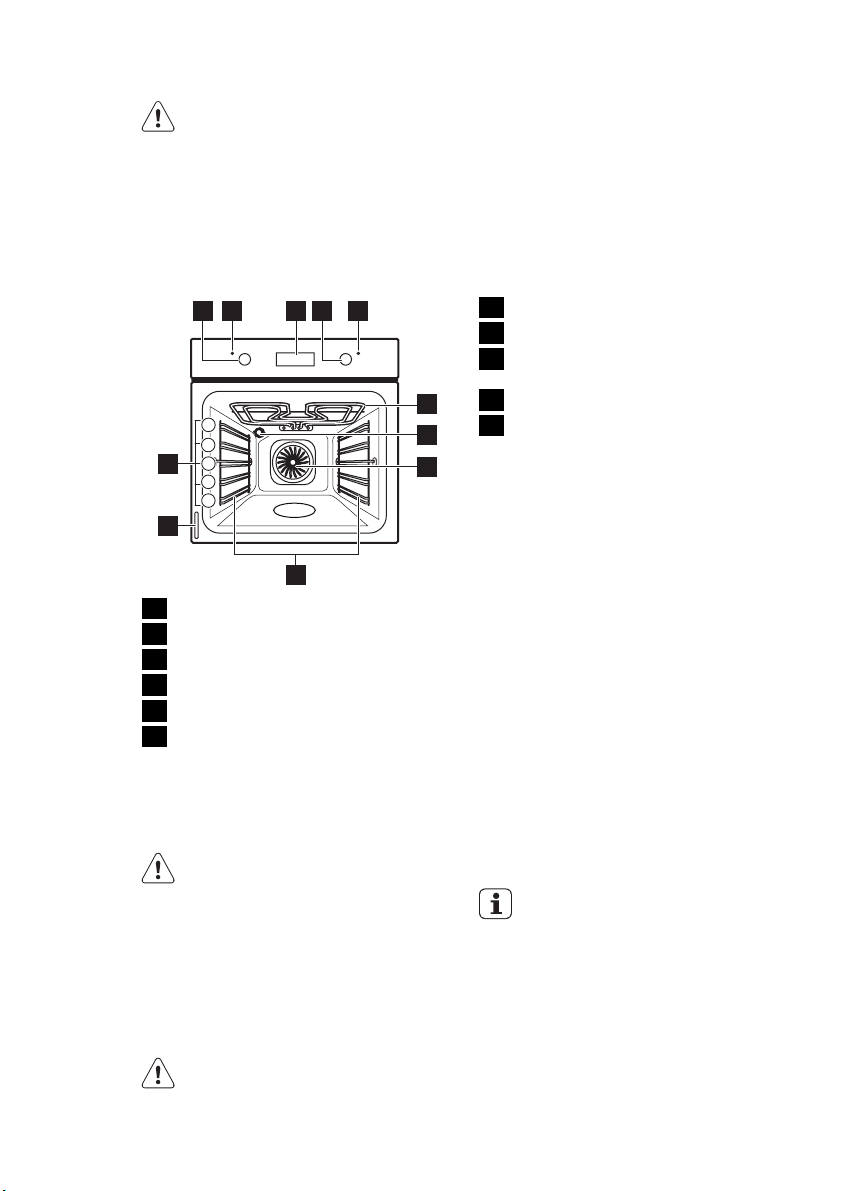
3. PËRSHKRIM I PRODUKTIT
3 52 41
5
4
3
11
2
1
10
9
Çelësi i funksioneve të furrës
1
Treguesi i energjisë
2
Programuesi elektronik
3
Çelësi i temperaturës
4
Treguesi i temperaturës
5
Skarë
6
• Prisni kabllon e lidhjes me rrjetin dhe
hidheni.
• Hiqni kapësen e derës për të
parandaluar bllokimin brenda pajisjes të
fëmijëve dhe të kafshëve shtëpiake.
Llamba e furrës
7
Ventilatori
8
Mbështetëset e rafteve, të
9
çmontueshme
Pllaketa regjistruese
6
7
8
10
Pozicionet e raftit
11
3.1 Aksesorët e furrës
Rafti me rrjetë
•
Për enët e gatimit, tavat e kekëve dhe
të pjekjes.
Tavë për pjekje
•
Për ëmbëlsira dhe biskota.
Tava e skarës/pjekjes
•
Për të pjekur ose si tavë për të
mbledhur yndyrën.
Shinat teleskopike
•
Për rafte dhe tava.
4. PËRPARA PËRDORIMIT TË PARË
PARALAJMËRIM
Referojuni kapitujve të sigurisë.
4.1 Pastrimi paraprak
• Hiqni të gjithë aksesorët dhe
mbështetëset e rafteve që mund të
hiqen (nëse ka).
• Pastroni pajisjen përpara përdorimit të
parë.
Referojuni kapitullit "Kujdesi dhe
pastrimi".
4.2 Vendosja e orës
Kur e lidhni pajisjen me rrjetin elektrik ose
pas një ndërprerjeje të rrymës, treguesi i
funksionit të orës ditore pulson.
Shtypni butonin + ose - për të vendosur
orën e saktë.
Përpara se të përdorni furrën,
duhet që të caktoni orën.
Page 7
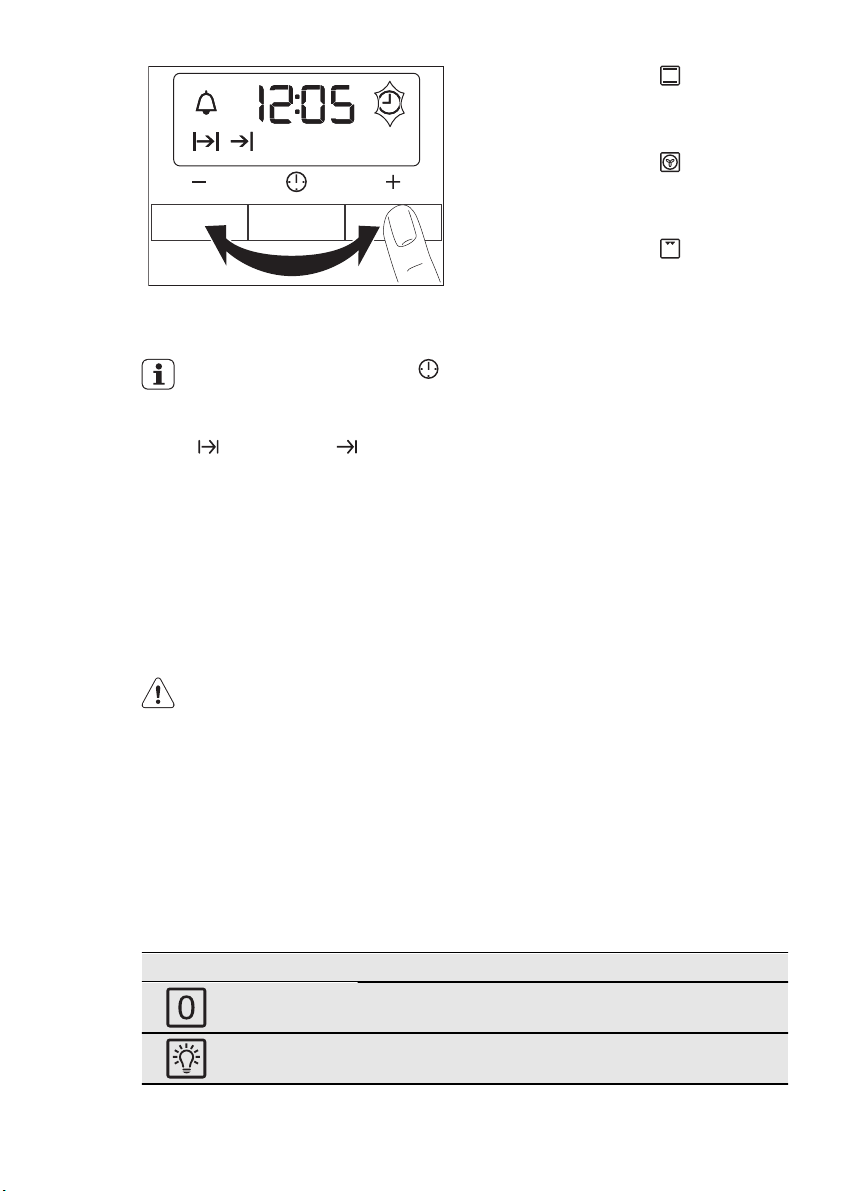
Pas rreth pesë sekondash, pulsimi do të
ndalet dhe në ekran do të afishohet ora
që keni regjistruar.
Për të ndryshuar orën shtypni
vazhdimisht derisa të pulsojë
treguesi i orës ditore. Nuk duhet
të vendosni funksionin Kohëzgjatja
ose Përfundimi
njëkohësisht.
4.3 Parangrohja
Ngrohni paraprakisht pajisjen bosh për të
djegur yndyrën e mbetur.
SHQIP 7
1.
Vendosni funksionin dhe
temperaturën maksimale.
2.
Lëreni pajisjen të punojë për rreth një
orë.
3.
Vendosni funksionin dhe
temperaturën maksimale.
4.
Lëreni pajisjen të punojë për rreth
dhjetë minuta.
5.
Vendosni funksionin dhe
temperaturën maksimale.
6.
Lëreni pajisjen të punojë për rreth
dhjetë minuta.
Aksesorët mund të nxehen më shumë
sesa zakonisht. Pajisja mund të nxjerrë
erë të keqe dhe tym. Kjo është normale.
Sigurohuni që të ketë ajrosje të
mjaftueshme.
5. PËRDORIMI I PËRDITSHËM
PARALAJMËRIM
Referojuni kapitujve të sigurisë.
Për të përdorur pajisjen, shtypni çelësin.
Çelësi del jashtë.
5.1 Aktivizimi dhe çaktivizimi i
pajisjes
1.
Çojeni çelësin e funksioneve të furrës
te funksioni i dëshiruar.
5.2 Funksionet e furrës
Funksioni i furrës Përdorimi
Pozicioni fikur Pajisja është e fikur.
Të lehta
Për të aktivizuar llambën e furrës pa një funksion
Kur pajisja është në funksionim,
treguesi i fuqisë qëndron i ndezur.
2.
Rrotullojeni çelësin e temperaturës te
temperatura e përzgjedhur.
Treguesi i temperaturës ndizet kur
temperatura e pajisjes rritet.
3.
Për ta çaktivizuar pajisjen, rrotullojeni
çelësin e kontrollit të funksioneve të
furrës dhe çelësin e temperaturës në
pozicionin e fikjes.
gatimi.
Page 8
www.electrolux.com
8
Funksioni i furrës Përdorimi
Gatim
tradicional
Nxehja nga
sipër
Nxehtësia e
poshtme
Pjekja në
skarë
Skarë e
shpejtë
Për të pjekur dhe skuqur në një nivel të furrës.
Elementët e nxehjes poshtë dhe lart vihen në punë
njëkohësisht.
Për të përfunduar ushqimet e gatuara. Funksionon
vetëm elementi i sipërm i ngrohjes.
Për pjekjen e kekëve me bazë krokante ose të thekur.
Funksionon vetëm elementi i poshtëm i ngrohjes.
Për të pjekur në skarë ushqime të sheshta në sasi të
vogla në qendër të raftit. Për të thekur.
Për të pjekur në skarë ushqime të sheshta në sasi të
mëdha. Për të thekur. Funksionon elementi i plotë i
skarës.
Për gatimin e copave të mëdha të mishit. Elementi i
Skarë turbo
skarës dhe ventilatori i furrës punojnë njëri pas tjetrit,
duke qarkulluar ajër të nxehtë rreth e qark ushqimit.
Për pjekjen dhe gatimin e ushqimeve me të njëjtën
Ventilator i
plotë /
Shkrirje
temperaturë gatimi, duke përdorur më shumë se një
nivel të furrës, pa përzierjen e erërave. / Për të shkrirë
ushqimet e ngrira. Çelësi i temperaturës duhet të jetë
në pozicionin fikur
Për të bërë pica, quiche ose kek. Skara dhe elementi
Cilësimi për
pica
i poshtëm japin nxehtësi të drejtpërdrejtë dhe
ventilatori qarkullon ajër të nxehtë për të gatuar
shtresat e picave ose mbushjet e kekëve.
6. FUNKSIONET E ORËS
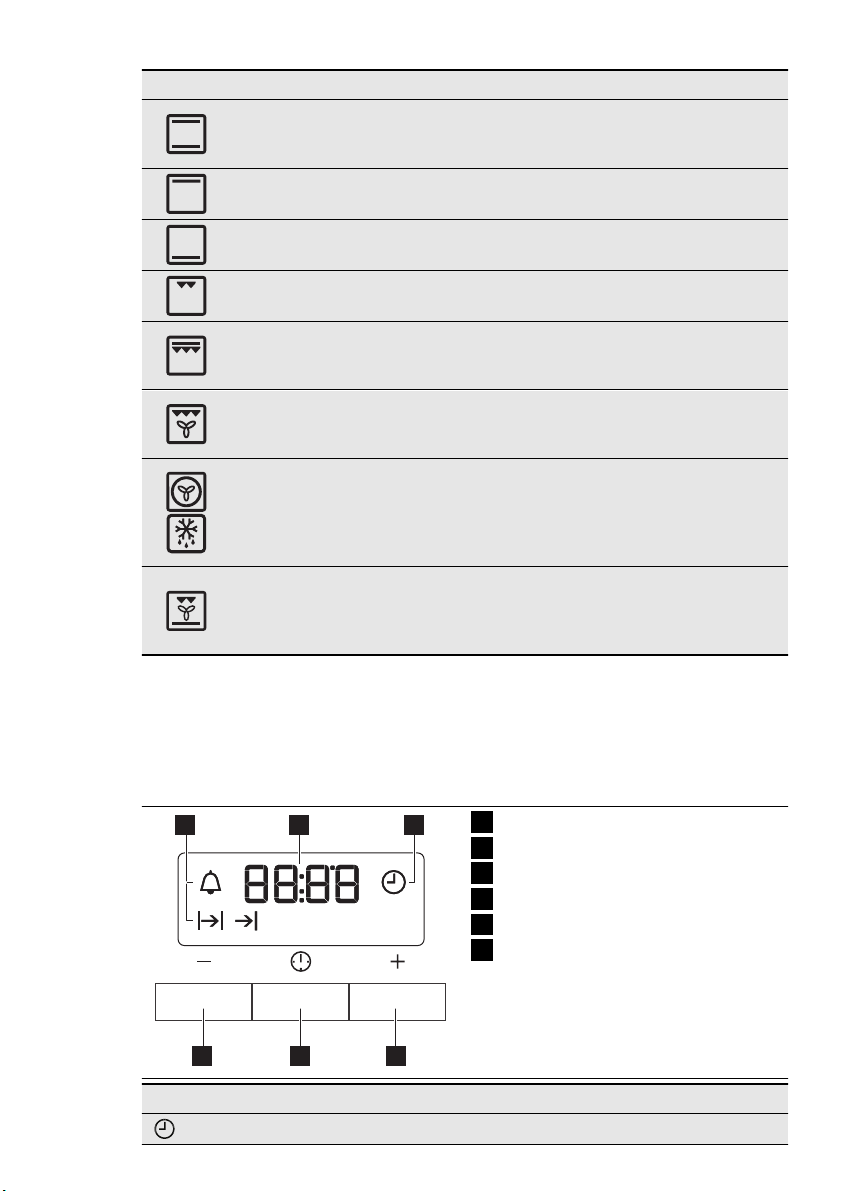
6.1 Programuesi elektronik
1 2 3
hr min
Funksioni i orës Përdorimi
Ora e ditës Për të vendosur, ndryshuar ose kontrolluar orën ditore.
Treguesit e funksioneve
1
Afishimi i kohës
2
Treguesi i funksionit
3
Butoni +
4
Butoni i përzgjedhjes
5
Butoni -
6
456
Page 9
Funksioni i orës Përdorimi
Kujtuesi i
minutave
Për të vendosur një numërim mbrapsht. Ky funksion nuk
ndikon në funksionimin e furrës.
Kohëzgjatja Për të vendosur sa kohë duhet të jetë në punë pajisja.
Përfundimi Për të vendosur kohën kur duhet të çaktivizohet pajisja.
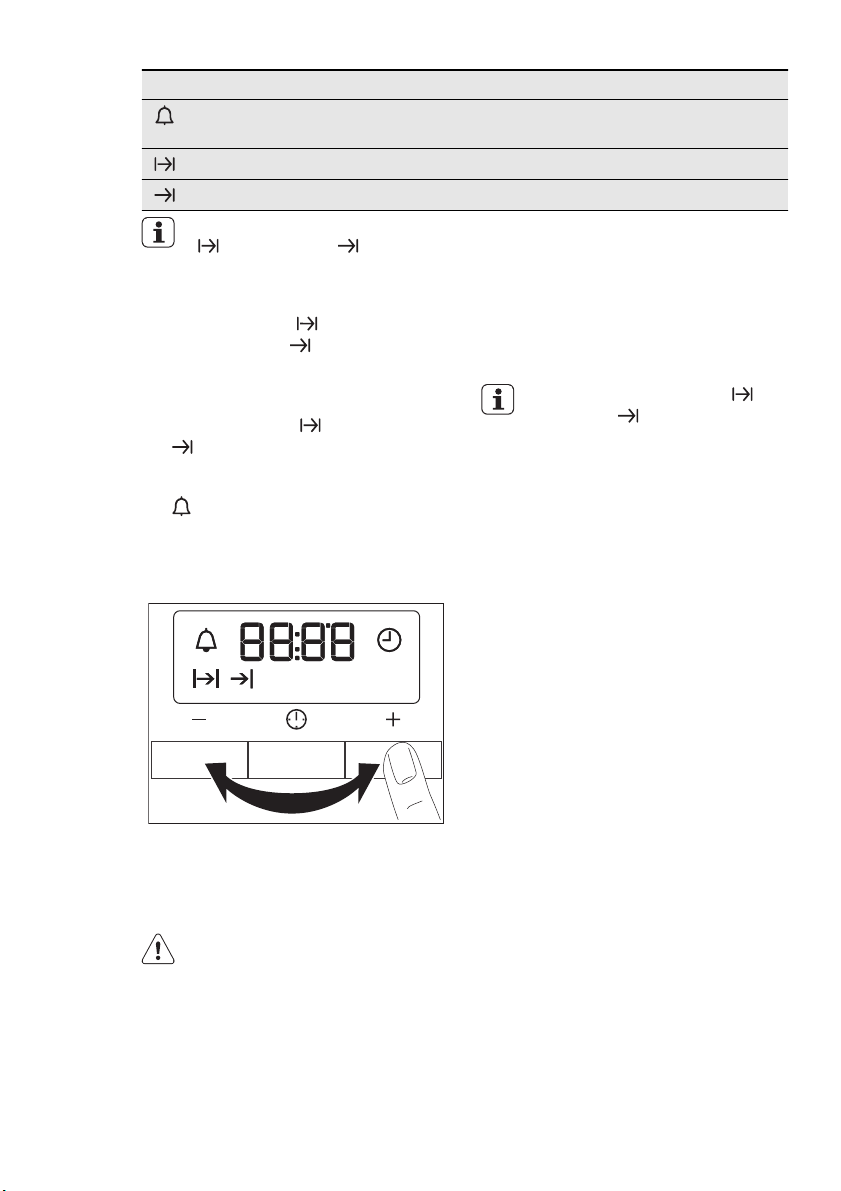
Ju mund të përdorni Kohëzgjatja
dhe Përfundimi në të
njëjtën kohë, kur pajisja duhet të
aktivizohet dhe më pas të
çaktivizohet. Vendosni në fillim
Kohëzgjatjen
Përfundimin
, dhe pastaj
.
3.
Shtypni + ose - për të vendosur
kohën për funksionin e nevojshëm të
orës.
Ekrani shfaq treguesin për funksionin
e orës që vendosët. Kur përfundon
koha e vendosur, treguesi pulson dhe
tingëllon një sinjal akustik për dy
minuta.
6.2 Cilësimi i funksioneve të orës
1.
Për Kohëzgjatjen dhe Përfundimin
, vendosni një funksion të furrës
dhe temperaturën. Kjo nuk është e
nevojshme për Kujtuesin e minutave
.
2.
Shtypni butonin e përzgjedhjes
vazhdimisht, derisa treguesi i
funksionit të dëshiruar të orës të fillojë
pulsimin.
hr minhr min
4.
Shtypni një buton për të ndërprerë
sinjalin.
5.
Rrotullojeni çelësin e kontrollit të
funksioneve të furrës dhe çelësin e
temperaturës në pozicionin e fikjes.
6.3 Anulimi i funksioneve të orës
1.
Shtypni butonin e përzgjedhjes
vazhdimisht, derisa treguesi i
funksionit të dëshiruar të fillojë
pulsimin.
2.
Shtypni dhe mbani shtypur butonin -.
Pas pak sekondash funksioni i orës
fiket.
SHQIP 9
Me funksionet Kohëzgjatja dhe
Përfundimi
automatikisht.
pajisja çaktivizohet
7. PËRDORIMI I AKSESORËVE
PARALAJMËRIM
Referojuni kapitujve të sigurisë.
Page 10

www.electrolux.com
10
7.1 Shinat teleskopike
°C
°C
1.
Tërhiqni jashtë shinat teleskopike të
krahut të djathtë dhe të majtë.
2.
Vendoseni raftin me rrjetë mbi shinat
teleskopike e më pas shtyjini ato me
kujdes brenda pajisjes.
Sigurohuni që shinat teleskopike t'i
fusni brenda plotësisht në pajisje
përpara se të mbyllni derën e furrës.
Ruajini udhëzimet për shinat
teleskopike për përdorim në të
ardhmen.
Me shinat teleskopike mund t'i fusni e
nxirrni raftet më lehtë.
8. FUNKSIONET SHTESË
8.1 Ventilatori ftohës
Kur pajisja është në punë, ventilatori
ftohës aktivizohet automatikisht për t’i
mbajtur sipërfaqet e pajisjes të ftohta.
Nëse çaktivizoni pajisjen, ventilatori i
ftohjes mund të vazhdojë të punojë derisa
të ftohet temperatura në pajisje.
KUJDES
Mos i pastroni shinat teleskopike
në enëlarëse. Mos i lubrifikoni
shinat teleskopike.
8.2 Termostati i sigurisë
Përdorimi i pasaktë i pajisjes ose pjesët
me defekt mund të shkaktojnë mbinxehje
të rrezikshme. Për ta parandaluar këtë,
furra ka një termostat sigurie që ndërpret
furnizimin me energji. Furra ndizet
aktivizohet përsëri automatikisht kur bie
temperatura.
Page 11

9. UDHËZIME DHE KËSHILLA TË NEVOJSHME
SHQIP 11
• Pajisja ka pesë nivele raftesh.
Numërojini nivelet e pajisjes duke filluar
nga poshtë.
• Pajisja ka një sistem të veçantë që
qarkullon ajrin dhe riciklon vazhdimisht
avullin. Me këtë sistem bëhet i mundur
gatimi në një ambient me avull dhe i
mban gatesat të buta brenda dhe të
pjekura mirë nga jashtë. Ai ul kohën e
gatimit dhe konsumin e energjisë në
minimum.
• Në pajisje ose në panelet e dyerve prej
xhami mund të kondensohet lagështi.
Kjo është normale. Qëndroni gjithmonë
pak larg pajisjes kur hapni derën e
pajisjes ndërsa është në punë. Për të
ulur kondensimin, përdoreni pajisjen
bosh për 10 minuta para gatimit.
• Fshini lagështinë e formuar pas çdo
përdorimi të pajisjes.
• Mos vendosni objekte drejtpërdrejt mbi
bazën e pajisjes dhe mos i mbuloni
pjesët e pajisjes me letër alumini gjatë
gatimit. Kjo mund të ndryshojë
rezultatet e pjekjes dhe mund të
shkaktojë dëmtimin e smaltit të furrës.
9.1 Pjekja e kekëve
• Mos e hapni derën e furrës para se të
ketë kaluar 3/4 e kohës së pjekjes.
• Nëse përdorni dy tava pjekjeje
njëkohësisht, mbajeni një nivel bosh
mes tyre.
9.2 Gatimi i mishit dhe peshkut
• Përdorni një tavë të thellë për ushqimet
me shumë yndyrë, për të ruajtur furrën
nga njollat që mund të mos ikin më.
• Lëreni mishin afro 15 minuta përpara se
ta shponi, në mënyrë që lëngu të mos
derdhet jashtë.
• Për të parandaluar tymin e tepërt në
furrë gjatë pjekjes, hidhni pak ujë në
tavën e thellë. Për të parandaluar
kondensimin e tymit, shtoni ujë sa herë
që të thahet.
9.3 Kohët e gatimit
Kohët e gatimit varen nga lloji,
shpeshtësia dhe vëllimi i ushqimit.
Fillimisht, kontrolloni funksionimin e
pajisjes kur gatuani. Gjeni përzgjedhjet më
të mira (përzgjedhjet e nxehtësisë, kohët e
gatimit, etj.) për gatesat tuaja, recetat dhe
sasitë përkatëse kur përdorni pajisjen.
9.4 Tabela e pjekjes dhe e skuqjes
KEKË
LLOJI I
GATIMIT
Recetat me
qull të rrahur
Brumë i
shkrifët për
ëmbëlsirë
Kek me
gjalpë
qumështi e
krem bulmeti
Gatim
tradicional
Pozicion
i i raftit
Temp
[°C]
2 170 3 (2 dhe 4) 160 45 - 60 Në një formë
2 170 3 (2 dhe 4) 160 20 - 30 Në një formë
1 170 2 165 60 - 80 Në një formë
Ventilator i plotë
Pozicioni
i raftit
Temp
[°C]
Koha e
gatimit
[në
minuta]
Shënime
keku
keku
keku 26 cm
Page 12

www.electrolux.com
12
LLOJI I
GATIMIT
Kek me
mollë
(Ëmbëlsirë
me mollë)
Gatim
tradicional
Pozicion
i i raftit
Temp
[°C]
2 170 2 (majtas
Ventilator i plotë
Pozicioni
i raftit
Temp
[°C]
160 80 - 100 Në dy forma
dhe
djathtas)
Koha e
gatimit
[në
minuta]
Shënime
keku prej 20
cm në një raft
me rrjetë
1)
Strudel 3 175 2 150 60 - 80 Në një tavë
pjekjeje
Ëmbëlsirë
me reçel
2 170 2 (majtas
dhe
165 30 - 40 Në një formë
keku 26 cm
djathtas)
Pandispanjë 2 170 2 160 50 - 60 Në një formë
keku 26 cm
Kek
krishtlindjesh
/Kek i pasur
2 160 2 150 90 - 120 Në një formë
keku 20 cm
me fruta
Kek me
kumbulla
Kekë të
vegjël - në
1 175 2 160 50 - 60 Në një tavë
1)
buke
3 170 3 140 -
150
20 - 30 Në një tavë
pjekjeje
një nivel
Kekë të
vegjël - në
- - 2 dhe 4 140 150
25 - 35 Në një tavë
pjekjeje
dy nivele
Kekë të
vegjël - në
- - 1, 3 dhe 5 140 150
30 - 45 Në një tavë
pjekjeje
tre nivele
Biskota /
rripa brumi
3 140 3 140 -
150
30 - 35 Në një tavë
pjekjeje
të shkrifët në një nivel
Biskota /
rripa brumi
- - 2 dhe 4 140 150
35 - 40 Në një tavë
pjekjeje
të shkrifët në dy nivele
Biskota /
rripa brumi
- - 1, 3 dhe 5 140 150
35 - 45 Në një tavë
pjekjeje
të shkrifët në tre nivele
Mafishe - në
një nivel
Mafishe - në
dy nivele
3 120 3 120 80 - 100 Në një tavë
pjekjeje
- - 2 dhe 4 120 80 - 100 Në një tavë
1)
pjekjeje
1)
Page 13
SHQIP 13
LLOJI I
GATIMIT
Gatim
tradicional
Pozicion
i i raftit
Temp
[°C]
Ventilator i plotë
Pozicioni
i raftit
Temp
[°C]
Koha e
gatimit
[në
minuta]
Shënime
Simite 3 190 3 190 12 - 20 Në një tavë
1)
pjekjeje
Ekler - në
një nivel
Ekler - në dy
nivele
Torta të
sheshta
Kek i pasur
me fruta
Kek
"Viktoria"
3 190 3 170 25 - 35 Në një tavë
pjekjeje
- - 2 dhe 4 170 35 - 45 Në një tavë
pjekjeje
2 180 2 170 45 - 70 Në një formë
keku 20 cm
1 160 2 150 110 -
120
1 170 2 (majtas
160 50 - 60 Në një formë
dhe
Në një formë
keku 24 cm
keku 20 cm
djathtas)
1)
Ngroheni paraprakisht për 10 minuta.
BUKË DHE PICA
LLOJI I
GATIMIT
Bukë e
bardhë
Gatim
tradicional
Pozicion
i i raftit
Temp
[°C]
Ventilator i plotë
Pozicioni
i raftit
Temp
[°C]
1 190 1 190 60 - 70 1 - 2 copë,
Koha e
gatimit
[në
minuta]
Shënime
500 g për
1)
copë
Bukë thekre 1 190 1 180 30 - 45 Në një tavë
buke
Simite 2 190 2 (2 dhe 4) 180 25 - 40 6 - 8 simite në
një tavë
1)
pjekjeje
Pica 1 230 -
250
1 230 -
250
10 - 20 Në një tavë
pjekjeje ose
tavë të thellë
Gurabije 3 200 3 190 10 - 20 Në një tavë
1)
pjekjeje
1)
Ngroheni paraprakisht për 10 minuta.
1)
Page 14
www.electrolux.com
14
KREM I PJEKUR
Bazë brumi 2 200 2 180 40 - 50 Në një formë
Pite me
perime
Quiche 1 180 1 180 50 - 60 Në një
Lazanja 2 180 -
Kaneloni 2 180 -
1)
MISH
Mish lope 2 200 2 190 50 - 70 Në një raft me
Mish derri 2 180 2 180 90 - 120 Në një raft me
Viç 2 190 2 175 90 - 120 Në një raft me
Rosto viçi
angleze, e
pjekur pak
Rosto viçi
angleze, e
pjekur
mesatarisht
Rosto viçi
angleze, e
pjekur mirë
Shpatull
derri
Kërci derri 2 180 2 160 100 -
Mish qengji 2 190 2 175 110 -
Gatim
LLOJI I
GATIMIT
tradicional
Pozicion
i i raftit
Temp
[°C]
2 200 2 175 45 - 60 Në një formë
190
190
Ngroheni paraprakisht për 10 minuta.
Gatim
LLOJI I
GATIMIT
tradicional
Pozicion
i i raftit
Temp
[°C]
2 210 2 200 50 - 60 Në një raft me
2 210 2 200 60 - 70 Në një raft me
2 210 2 200 70 - 75 Në një raft me
2 180 2 170 120 -
Ventilator i plotë
Pozicioni
i raftit
Temp
[°C]
2 180 -
190
2 180 -
190
Ventilator i plotë
Pozicioni
i raftit
Temp
[°C]
Koha e
gatimit
[në
Shënime
minuta]
formë
25 - 40 Në një
formë
25 - 40 Në një
formë
Koha e
gatimit
[në
Shënime
minuta]
rrjetë
rrjetë
rrjetë
rrjetë
rrjetë
rrjetë
Me lëkurë
150
2 copë
120
Kofshë
130
1)
1)
1)
Page 15
SHQIP 15
LLOJI I
GATIMIT
Gatim
tradicional
Pozicion
i i raftit
Temp
[°C]
Ventilator i plotë
Pozicioni
i raftit
Temp
[°C]
Koha e
gatimit
[në
minuta]
Shënime
Pulë 2 220 2 200 70 - 85 I paprerë
Gjel deti 2 180 2 160 210 -
I paprerë
240
Rosë 2 175 2 220 120 -
I paprerë
150
Patë 2 175 1 160 150 -
I paprerë
200
Lepur 2 190 2 175 60 - 80 I prerë në
copa
Lepur i egër 2 190 2 175 150 -
200
I prerë në
copa
Fazan 2 190 2 175 90 - 120 I paprerë
PESHK
LLOJI I
GATIMIT
Troftë / Krap
Gatim
tradicional
Pozicion
i i raftit
Temp
[°C]
Ventilator i plotë
Pozicioni
i raftit
Temp
[°C]
2 190 2 175 40 - 55 3 - 4 peshq
Koha e
gatimit
[në
minuta]
Shënime
deti
Peshk ton/
2 190 2 175 35 - 60 4 - 6 fileto
Salmon
9.5 Pjekja në skarë
Nxehni paraprakisht furrën bosh
për 10 minuta, para gatimit.
Sasia Pjekja në skarë Koha e gatimit [në
LLOJI I
GATIMIT
Copë [g] Pozicioni
i raftit
Temp
[°C]
Biftek fileto 4 800 4 maks. 12-15 12-14
Biftek 4 600 4 maks. 10-12 6-8
Salsiçe 8 - 4 maks. 12-15 10-12
Kotëleta derri 4 600 4 maks. 12-16 12-14
Pulë (e ndarë në
2 1000 4 maks. 30-35 25-30
2 pjesë)
Qebapë 4 - 4 maks. 10-15 10-12
Gjoks pule 4 400 4 maks. 12-15 12-14
Hamburger 6 600 4 maks. 20-30 -
Njëra
anë
minuta]
Ana
tjetër
Page 16
www.electrolux.com
16
Sasia Pjekja në skarë Koha e gatimit [në
minuta]
LLOJI I
GATIMIT
Copë [g] Pozicioni
i raftit
Temp
[°C]
Njëra
anë
Ana
tjetër
Filetë peshku 4 400 4 maks. 12-14 10-12
Sanduiçë të
4-6 - 4 maks. 5-7 -
thekur
Bukë e thekur 4-6 - 4 maks. 2-4 2-3
9.6 Skarë turbo
Mish lope
LLOJI I
GATIMIT
Bërxolla gjedhi
ose fileto, e
gatuar pak
Bërxollë gjedhi
ose fileto, e
gatuar
mesatarisht
Bërxollë gjedhi
ose fileto, e
gatuar mirë
1)
Nxehni furrën paraprakisht.
Sasia
për cm
trashësi
për cm
trashësi
për cm
trashësi
Pozicioni i
raftit
1
1
1
Temperatur
a [°C]
190 - 200
180 - 190
170 - 180
1)
1)
1)
Koha
[minuta]
5 - 6
6 - 8
8 - 10
Mish derri
LLOJI I
GATIMIT
Shpatull, qafë,
kofshë
Sasia
1 - 1,5 kg 1 160 - 180 90 - 120
Pozicioni i
raftit
Temperatur
a [°C]
Koha
[minuta]
Bërxolla, brinjë 1 - 1,5 kg 1 170 - 180 60 - 90
Qofte 750 g - 1 kg 1 160 - 170 50 - 60
Nyje derri
(gjysmë e gatuar)
750 g - 1 kg 1 150 - 170 90 - 120
Viç
LLOJI I
GATIMIT
Mish viçi i
Sasia Pozicioni i
raftit
Temperatura
[°C]
Koha
[minuta]
1 kg 1 160 - 180 90 - 120
pjekur
Nyjë viçi 1,5 - 2 kg 1 160 - 180 120 - 150
Page 17

SHQIP 17
Mish qengji
LLOJI I
GATIMIT
Kofshë qengji,
Sasia Pozicioni i
raftit
Temperatura
[°C]
Koha
[minuta]
1 - 1,5 kg 1 150 - 170 100 - 120
rosto qengji
Shpinë qengji 1 - 1,5 kg 1 160 - 180 40 - 60
Shpezë
LLOJI I
GATIMIT
Porcione
shpezësh
Gjysma pule 400 - 500 g
Sasia Pozicioni i
raftit
200 - 250 g
secila
Temperatura
[°C]
Koha
[minuta]
1 200 - 220 30 - 50
1 190 - 210 35 - 50
secila
Pulë, pulastren 1 - 1,5 kg 1 190 - 210 50 - 70
Rosë 1,5 - 2 kg 1 180 - 200 80 - 100
Patë 3,5 - 5 kg 1 160 - 180 120 - 180
Gjel deti 2,5 - 3,5 kg 1 160 - 180 120 - 150
Gjel deti 4 - 6 kg 1 140 - 160 150 - 240
Peshk (i gatuar me avull)
LLOJI I
GATIMIT
Sasia Pozicioni i
raftit
Temperatura
[°C]
Koha
[minuta]
Peshk i plotë 1 - 1,5 kg 1 210 - 220 40 - 60
9.7 Shkrirja
LLOJI I
GATIMIT
[g]
shkrirjes
[në
minuta]
Pulë 1000 100 - 140 20 - 30
Mish 1000 100 - 140 20 - 30
Mish 500 90 - 120 20 - 30
Troftë 150 25 - 35 10 - 15 Luleshtrydhe 300 30 - 40 10 - 20 -
Koha e
Koha e
shkrirjes së
mëtejshme
[në minuta]
Shënime
Vendoseni pulën mbi
një pjatë të sheshtë të
kthyer në një pjatancë
të madhe. Kthejeni
pasi të ketë kaluar
gjysma e kohës.
Kthejeni pasi të ketë
kaluar gjysma e kohës.
Kthejeni pasi të ketë
kaluar gjysma e kohës.
Page 18

www.electrolux.com
18
LLOJI I
GATIMIT
[g]
Koha e
shkrirjes
[në
minuta]
Koha e
shkrirjes së
mëtejshme
[në minuta]
Shënime
Gjalpë 250 30 - 40 10 - 15 -
Kajmaku mund të
Ajkë 2 x 200 80 - 100 10 - 15
rrihet edhe kur në disa
vende është ende pak
i ngrirë.
Tortë 1400 60 60 -
9.8 Tharja - Ventilator i plotë
Mbulojini raftet e furrës me letër gatimi.
PERIME
LLOJI I
GATIMIT
Fasule 3 1/4 60 - 70 6 - 8
Speca 3 1/4 60 - 70 5 - 6
Perime për
supë
Kërpudha 3 1/4 50 - 60 6 - 8
Barishte
erëzash
Pozicioni i raftit
1 nivel 2 nivele
Temperatura
[°C]
Koha [orë]
3 1/4 60 - 70 5 - 6
3 1/4 40 - 50 2 - 3
FRUTA
LLOJI I
GATIMIT
Pozicioni i raftit
1 nivel 2 nivele
Kumbulla 3 1/4 60 - 70 8 - 10
Kajsi 3 1/4 60 - 70 8 - 10
Feta molle 3 1/4 60 - 70 6 - 8
Dardhë 3 1/4 60 - 70 6 - 9
Informacion mbi akrilamidet
E rëndësishme Sipas zbulimeve të fundit
shkencore, nëse e thekni ushqimin
(veçanërisht ato me përmbajtje
10. KUJDESI DHE PASTRIMI
PARALAJMËRIM
Referojuni kapitujve të sigurisë.
Temperatura
[°C]
niseshteje), akrilamidet mund të përbëjnë
një rrezik për shëndetin.Për këtë arsye, ju
këshillojmë të gatuani në temperaturat më
të ulëta dhe të mos e thekni shumë
ushqimin.
• Pastroni pjesën e përparme të pajisjes
me një copë të butë me ujë të ngrohtë
dhe një agjent pastrues.
Koha [orë]
Page 19

• Për të pastruar sipërfaqet metalike
përdorni agjent të zakonshëm pastrimi.
• Pastrojeni furrën nga brenda pas çdo
përdorimi. Më pas mund të pastroni
ndotjet më lehtë e të mos i lejoni të
digjen.
• Ndotjet e forta pastrojini me një
pastrues të posaçëm për furrat.
• Pastrojini të gjithë aksesorët e furrës
pas çdo përdorimi dhe lërini të thahen.
Përdorni një leckë të butë me ujë të
ngrohtë dhe agjent pastrues.
• Nëse keni aksesorë që nuk ngjisin, mos
i pastroni duke përdorur lëndë agresive,
sende me cepa të mprehta ose në
enëlarëse. Mund të dëmtohet shtresa
që nuk ngjit.
Pajisjet prej inoksi ose alumini:
Pastrojeni derën e furrës vetëm
me sfungjer të lagur. Thajeni me
leckë të butë.
Mos përdorni tel krues, acide ose
materiale gërryese, pasi ato mund
të dëmtojnë sipërfaqen e furrës.
Pastroni panelin e kontrollit të
furrës duke marrë të njëjtat masa
paraprake.
SHQIP 19
10.1 Pastrimi i guarnicionit të
derës
• Guarnicionin e derës kontrollojeni
rregullisht. Guarnicioni i derës ndodhet
rreth kornizën së hapësirës së furrës.
Mos e përdorni pajisjen nëse
guarnicioni i derës është i dëmtuar.
Lidhuni me Qendrën e Shërbimit.
• Për të pastruar guarnicionin e derës
shikoni informacionin e përgjithshëm
mbi pastrimin.
10.2 Mbështetëset e rafteve
Ju mund t'i hiqni mbështetëset e rafteve
për të pastruar muret anësore.
Heqja e mbështetëseve të rafteve
1
2
1.
Tërhiqni pjesën ballore të
mbështetëses nga muri anësor.
2.
Tërhiqni pjesën e pasme të
mbështetëses së rafteve jashtë murit
anësor dhe hiqeni.
Page 20

www.electrolux.com
20
Montimi i mbështetëseve të
rafteve
Montoni mbështetëset e rafteve në rendin
e kundërt.
Skajet e rrumbullakuara të
mbështetëseve të rafteve duhen
vendosur nga përpara.
10.3 Tavani i furrës
Ju mund ta hiqni skarën për të pastruar
më lehtë tavanin e furrës.
PARALAJMËRIM
Çaktivizojeni pajisjen para se të
hiqni skarën. Sigurohuni që pajisja
të jetë e ftohtë. Ka rrezik djegieje.
1.
Hiqni vidën që mban skarën. Herën e
parë, përdorni një kaçavidë.
10.4 Llamba e furrës
PARALAJMËRIM
Bëni kujdes kur ndërroni llambën
e furrës. Ka rrezik goditjeje
elektrike.
Përpara se të zëvendësoni llambën e
furrës:
• Çaktivizoni furrën.
• Hiqni siguresat në kutinë e siguresave
ose çaktivizoni çelësin stakues.
Për të mos lejuar dëmtimin e
llambës së furrës dhe kapakut prej
xhami, vendosni një leckë në fund
të furrës.
Llambën halogjene kapeni
gjithmonë me një pecetë për të
evituar djegien e mbetjeve të
yndyrshme mbi llambë.
1.
Rrotullojeni kapakun prej xhami në
drejtim të kundërt të akrepave të orës
për ta çmontuar.
2.
Pastroni mbulesën prej xhami.
3.
Zëvendësojeni llambën e furrës me
një llambë furre që i reziston
temperaturës 300°C.
Përdorni të njëjtin lloj llambe furre.
4.
Montoni mbulesën prej xhami.
2.
Me kujdes tërhiqeni poshtë skarën.
3.
Pastrojeni tavanin e furrës me një
copë të butë e me ujë e pastrues dhe
lëreni të thahet.
4.
Montoni skarën sipas rendit të
kundërt.
PARALAJMËRIM
Sigurohuni që skara të jetë
montuar saktë dhe që nuk bie
poshtë.
10.5 Pastrimi i derës së furrës
Dera e furrës është e përbërë nga dy
panele xhami. Mund të hiqni derën e
furrës dhe panelin e brendshëm prej
xhami për ta pastruar.
Dera e furrës mund të mbyllet
nëse përpiqeni të hiqni panelet e
brendshme prej xhami, përpara se
të hiqni derën e furrës.
Page 21

Çmontimi i derës së furrës dhe panelit prej xhami
1.
Hapeni derën plotësisht dhe mbani dy
menteshat e derës.
2.
Ngrini dhe rrotulloni levat mbi dy
menteshat.
SHQIP 21
3.
Mbyllni derën e furrës në pozicionin e
parë të hapjes (përgjysmë). Pastaj
tërhiqeni atë përpara dhe hiqeni
derën nga foleja.
Page 22

www.electrolux.com
22
4.
Vendoseni derën mbi një cohë të
butë në një sipërfaqe të
qëndrueshme.
5.
Lironi sistemin bllokues për të hequr
panelet e brendshme prej xhami.
6.
Rrotullojini dy mbërthyeset 90° dhe
nxirrini ato nga foletë e tyre.
90°
7.
Ngrini me kujdes (hapi 1) dhe hiqni
(hapi 2) panelin prej xhami.
8.
Pastroni panelin e xhamit me ujë dhe
sapun. Fshijini panelin prej xhami me
kujdes.
2
1
Page 23

Montimi i derës dhe panelit të xhamit
11. SI TË VEPROJMË NËSE…
PARALAJMËRIM
Referojuni kapitujve të sigurisë.
Problemi Shkaku i mundshëm Zgjidhja
Furra nuk nxehet. Pajisja është çaktivizuar. Aktivizoni pajisjen.
Furra nuk nxehet. Nuk është vendosur ora. Vendosni orën.
Furra nuk nxehet. Nuk janë bërë cilësimet e
Furra nuk nxehet. Ka rënë siguresa në
Llamba e furrës nuk
funksionon.
Në ekran shfaqet 12.00. Ka pasur ndërprerje të
Mbi ushqim dhe brenda
furrës grumbullohet avull
dhe bulëza të
kondensuara.
Nëse nuk e gjeni dot vetë një zgjidhje,
lidhuni me shitësin tuaj ose qendrën e
shërbimit.
Të dhënat e nevojshme për qendrën e
shërbimit ndodhen në etiketën e
Rekomandojmë që ju t'i shkruani të dhënat këtu:
Modeli (MOD.) .........................................
Numri i produktit (PNC) .........................................
nevojshme.
kutinë e siguresave.
Llamba e furrës është me
defekt.
energjisë.
I keni lënë ushqimet në
furrë për shumë kohë.
SHQIP 23
Kur të ketë përfunduar procedura e
pastrimit, montoni panelin prej xhami dhe
derën e furrës. Kryejini hapat e mësipërm
sipas rendit të kundërt.
Zona e afishimit duhet të vendoset
përballë pjesës së brendshme të derës.
Sigurohuni që pas instalimit sipërfaqja e
kornizës së panelit prej xhami në ana e
printuar të mos jetë e ashpër kur e prekni.
Sigurohuni që të instaloni saktë në
mbajtëse panelin e brendshëm prej
xhami. Referojuni figurës.
Sigurohuni që të gjitha
cilësimet të jenë të sakta.
Kontrolloni siguresën.
Nëse siguresa bie më
shumë se një herë,
kontaktoni një elektricist
të kualifikuar.
Zëvendësoni llambën e
furrës.
Vendosni orën.
Mos i mbani gatimet në
furrë për më shumë se
15-20 minuta pas
përfundimit të gatimit.
specifikimeve. Pllaka e specifikimeve
gjendet në kornizën ballore të hapësirës
së pajisjes.
Page 24

www.electrolux.com
24
Numri serial (S.N.) .........................................
12. INSTALIMI
PARALAJMËRIM
Referojuni kapitujve të sigurisë.
12.1 Montimi
558
548
A
B
20
573
590
600
min. 550
20
min. 560
min. 550
20
min. 560
12.2 Instalimi elektrik
589
594
5
PARALAJMËRIM
Instalimin elektrik duhet ta kryejë
vetëm një person i kualifikuar.
Prodhuesi nuk mban përgjegjësi
nëse nuk i ndiqni masat e sigurisë
të përshkruara në kapitullin "Të
dhëna për sigurinë".
Kjo pajisje ofrohet me spinë dhe kabllo
elektrike.
12.3 Kablloja
Llojet e kabllove të përshtatshme për
instalim ose zëvendësim: H07 RN-F, H05
RN-F, H05 RRF, H05 VV-F, H05 V2V2-F
(T90), H05 BB-F.
Për pjesën e kabllon shikoni fuqinë totale
(te etiketa e specifikimeve) dhe te tabela:
Fuqia totale
maksimumi
1380 W
maksimumi
2300 W
maksimumi
3680 W
Teli i vatrës (jeshil/të verdhë) duhet të jetë
2 cm më i gjatë se telat e fazës dhe të
nulit (blu dhe kafe).
Prerje e tërthortë
e kabllos
3 x 0,75 mm²
3 x 1 mm²
3 x 1,5 mm²
Page 25

13. PROBLEME QË LIDHEN ME MJEDISIN
SHQIP 25
Ricikloni materialet me simbolin
Vendoseni ambalazhin te kontenierët e
riciklimit nëse ka.
Ndihmoni në mbrojtjen e mjedisit dhe
shëndetit të njerëzve dhe në riciklimin e
mbetjeve të pajisjeve elektrike dhe
.
elektronike. Mos hidhni pajisjet e shënuara
me simbolin
Ktheni produktin në pikën lokale të
riciklimit ose kontaktoni me zyrën
komunale.
e mbeturinës shtëpiake.
Page 26

www.electrolux.com
26
CONTENTS
1. SAFETY INFORMATION . . . . . . . . . . . . . . . . . . . . . . . . . . . . . . . . . . . . . . . . . . . . . . . . . . 27
2. SAFETY INSTRUCTIONS . . . . . . . . . . . . . . . . . . . . . . . . . . . . . . . . . . . . . . . . . . . . . . . . . 28
3. PRODUCT DESCRIPTION . . . . . . . . . . . . . . . . . . . . . . . . . . . . . . . . . . . . . . . . . . . . . . . . 30
4. BEFORE FIRST USE . . . . . . . . . . . . . . . . . . . . . . . . . . . . . . . . . . . . . . . . . . . . . . . . . . . . . 30
5. DAILY USE . . . . . . . . . . . . . . . . . . . . . . . . . . . . . . . . . . . . . . . . . . . . . . . . . . . . . . . . . . . . 31
6. CLOCK FUNCTIONS . . . . . . . . . . . . . . . . . . . . . . . . . . . . . . . . . . . . . . . . . . . . . . . . . . . . 32
7. USING THE ACCESSORIES . . . . . . . . . . . . . . . . . . . . . . . . . . . . . . . . . . . . . . . . . . . . . . . 33
8.
ADDITIONAL FUNCTIONS . . . . . . . . . . . . . . . . . . . . . . . . . . . . . . . . . . . . . . . . . . . . . . . . 34
9. HELPFUL HINTS AND TIPS . . . . . . . . . . . . . . . . . . . . . . . . . . . . . . . . . . . . . . . . . . . . . . . 35
10.
CARE AND CLEANING . . . . . . . . . . . . . . . . . . . . . . . . . . . . . . . . . . . . . . . . . . . . . . . . . . . 43
11. WHAT TO DO IF… . . . . . . . . . . . . . . . . . . . . . . . . . . . . . . . . . . . . . . . . . . . . . . . . . . . . . . 47
12.
INSTALLATION . . . . . . . . . . . . . . . . . . . . . . . . . . . . . . . . . . . . . . . . . . . . . . . . . . . . . . . . . 48
WE’RE THINKING OF YOU
Thank you for purchasing an Electrolux appliance. You’ve chosen a product that brings with it
decades of professional experience and innovation. Ingenious and stylish, it has been designed
with you in mind. So whenever you use it, you can be safe in the knowledge that you’ll get great
results every time.
Welcome to Electrolux.
Visit our website for:
Get usage advice, brochures, trouble shooter, service information:
www.electrolux.com
Register your product for better service:
www.electrolux.com/productregistration
Buy Accessories, Consumables and Original spare parts for your appliance:
www.electrolux.com/shop
CUSTOMER CARE AND SERVICE
We recommend the use of original spare parts.
When contacting Service, ensure that you have the following data available.
The information can be found on the rating plate. Model, PNC, Serial Number.
Warning / Caution-Safety information
General information and tips
Environmental information
Subject to change without notice.
Page 27

1. SAFETY INFORMATION
Before the installation and use of the appliance, carefully
read the supplied instructions. The manufacturer is not
responsible if an incorrect installation and use causes injuries and damages. Always keep the instructions with
the appliance for future reference.
1.1 Children and vulnerable people safety
WARNING!
Risk of suffocation, injury or permanent disability.
• This appliance can be used by children aged from 8
years and above and persons with reduced physical,
sensory or mental capabilities or lack of experience and
knowledge if they are supervised by an adult or a person who is responsible for their safety.
• Do not let children play with the appliance.
• Keep all packaging away from children.
• Keep children and pets away from the appliance when
it operates or when it cools down. Accessible parts are
hot.
• If the appliance has a child safety device, we recommend that you activate it.
• Cleaning and user maintenance shall not be made by
children without supervision.
ENGLISH 27
1.2 General Safety
• Internally the appliance becomes hot when in operation. Do not touch the heating elements that are in the
appliance. Always use oven gloves to remove or put in
accessories or ovenware.
• Do not use a steam cleaner to clean the appliance.
• Before maintenance cut the power supply.
Page 28

www.electrolux.com
28
• Do not use harsh abrasive cleaners or sharp metal
• To remove the shelf supports first pull the front of the
scrapers to clean the glass door since they can scratch
the surface, which may result in shattering of the glass.
shelf support and then the rear end away from the side
walls. Install the shelf supports in the opposite sequence.
2.
SAFETY INSTRUCTIONS
2.1 Installation
WARNING!
Only a qualified person must install this appliance.
• Remove all the packaging.
• Do not install or use a damaged appli-
ance.
• Obey the installation instruction sup-
plied with the appliance.
• Always be careful when you move the
appliance because it is heavy. Always
wear safety gloves.
• Do not pull the appliance by the handle.
• Keep the minimum distance from the
other appliances and units.
• Make sure that the appliance is installed
below and adjacent safe structures.
• The sides of the appliance must stay
adjacent to appliances or to units with
the same height.
Electrical connection
WARNING!
Risk of fire and electrical shock.
• All electrical connections should be
made by a qualified electrician.
• The appliance must be earthed.
• Make sure that the electrical information
on the rating plate agrees with the power supply. If not, contact an electrician.
• Always use a correctly installed shock-
proof socket.
• Do not use multi-plug adapters and extension cables.
• Make sure not to cause damage to the
mains plug and to the mains cable.
Contact the Service or an electrician to
change a damaged mains cable.
• Do not let mains cables to come in
touch with the appliance door, specially
when the door is hot.
• The shock protection of live and insulated parts must be fastened in such a
way that it cannot be removed without
tools.
• Connect the mains plug to the mains
socket only at the end of the installation. Make sure that there is access to
the mains plug after the installation.
• If the mains socket is loose, do not
connect the mains plug.
• Do not pull the mains cable to disconnect the appliance. Always pull the
mains plug.
• Use only correct isolation devices: line
protecting cut-outs, fuses (screw type
fuses removed from the holder), earth
leakage trips and contactors.
• The electrical installation must have an
isolation device which lets you disconnect the appliance from the mains at all
poles. The isolation device must have a
contact opening width of minimum 3
mm.
2.2 Use
WARNING!
Risk of injury, burns or electric
shock or explosion.
Page 29

• Use this appliance in a household environment.
• Do not change the specification of this
appliance.
• Make sure that the ventilation openings
are not blocked.
• Do not let the appliance stay unattended during operation.
• Deactivate the appliance after each
use.
• Internally the appliance becomes hot
when in operation. Do not touch the
heating elements that are in the appliance. Always use oven gloves to remove or put in accessories or ovenware.
• Be careful, when you open the appliance door while the appliance is in operation. Hot air can release.
• Do not operate the appliance with wet
hands or when it has contact with water.
• Do not apply pressure on the open
door.
• Do not use the appliance as a work
surface or as a storage surface.
• Always keep the appliance door closed
when the appliance is in operation.
• Open the appliance door carefully. The
use of ingredients with alcohol can
cause a mixture of alcohol and air.
• Do not let sparks or open flames to
come in contact with the appliance
when you open the door.
• Do not put flammable products or items
that are wet with flammable products
in, near or on the appliance.
WARNING!
Risk of damage to the appliance.
ENGLISH 29
– be careful when you remove or install
the accessories.
• Discoloration of the enamel has no effect on the performance of the appliance. It is not a defect in the sense of
the warranty law.
• Use a deep pan for moist cakes. Fruit
juices cause stains that can be permanent.
2.3 Care and Cleaning
WARNING!
Risk of injury, fire or damage to
the appliance.
• Before maintenance, deactivate the appliance and disconnect the mains plug
from the mains socket.
• Make sure the appliance is cold. There
is the risk that the glass panels can
break.
• Replace immediately the door glass
panels when they are damaged. Contact the Service.
• Be careful when you remove the door
from the appliance. The door is heavy!
• Clean regularly the appliance to prevent
the deterioration of the surface material.
• Remaining fat or food in the appliance
can cause fire.
• Clean the appliance with a moist soft
cloth. Only use neutral detergents. Do
not use abrasive products, abrasive
cleaning pads, solvents or metal objects.
• If you use an oven spray, obey the safety instructions on the packaging.
• Do not clean the catalytic enamel (if applicable) with any kind of detergent.
• To prevent damage or discoloration to
the enamel:
– Do not put ovenware or other objects
in the appliance directly on the bottom.
– Do not put aluminium foil directly on
the bottom of the appliance.
– do not put water directly into the hot
appliance.
– do not keep moist dishes and food in
the appliance after you finish the cooking.
2.4 Internal light
• The type of light bulb or halogen lamp
used for this appliance, is only for
household appliances. Do not use it for
house lighting.
WARNING!
Risk of electrical shock.
• Before replacing the lamp, disconnect
the appliance from the power supply.
• Only use lamps with the same specifications.
Page 30

www.electrolux.com
30
2.5 Disposal
WARNING!
Risk of injury or suffocation.
• Disconnect the appliance from the
mains supply.
3. PRODUCT DESCRIPTION
3 52 41
5
4
3
11
2
1
10
9
Knob for the oven functions
1
Power indicator
2
Electronic programmer
3
Knob for the temperature
4
Temperature indicator
5
• Cut off the mains cable and discard it.
• Remove the door catch to prevent children and pets to get closed in the appliance.
Grill
6
Oven lamp
7
Fan
8
Shelf support, removable
6
7
8
9
Rating plate
10
Shelf positions
11
3.1 Oven accessories
• Wire shelf
For cookware, cake tins, roasts.
Baking tray
•
For cakes and biscuits.
Grill- / Roasting pan
•
To bake and roast or as pan to collect
fat.
Telescopic runners
•
For shelves and trays.
4. BEFORE FIRST USE
WARNING!
Refer to the Safety chapters.
4.1 Initial cleaning
• Remove all accessories and removable
shelf supports (if applicable).
• Clean the appliance before first use.
Refer to the chapter "Care and
cleaning".
4.2 Setting the time
You must set the time before you
operate the oven.
When you connect the appliance to the
electrical supply or after a power cut, the
indicator for the Time of Day function
flashes.
Press the + or - button to set the correct
time.
Page 31

After approximately five seconds, the
flashing stops and the display shows the
time of day you set.
To change the time, press
again and again until the indicator
for the Time of Day function flashes. You must not set the Duration
or End function at the same
time.
4.3 Preheating
Preheat the empty appliance to burn off
the remaining grease.
ENGLISH 31
1.
Set the function and the maximum
temperature.
2.
Let the appliance operate for one
hour.
3.
Set the function and the maximum
temperature.
4.
Let the appliance operate for ten minutes.
5.
Set the function and the maximum
temperature.
6.
Let the appliance operate for ten mi-
nutes.
Accessories can become hotter than usually. The appliance can emit an odour and
smoke. This is normal. Make sure that the
airflow is sufficient.
5. DAILY USE
WARNING!
Refer to the Safety chapters.
To use the appliance, push the knob. The
knob comes out.
5.1 Activating and deactivating
the appliance
1.
Turn the knob for the oven functions
to an oven function.
The power indicator comes on while
the appliance operates.
5.2 Oven functions
Oven function Application
2.
Turn the knob for the temperature to
a temperature.
The temperature indicator comes on
while the temperature in the appliance
increases.
3.
To deactivate the appliance, turn the
knob for the oven functions and the
knob for the temperature to the Off
position.
Off position The appliance is off.
Light To activate the oven lamp without a cooking function.
Page 32

www.electrolux.com
32
Oven function Application
Conventional
Cooking
Top Heat
Bottom Heat
Grilling
Fast Grilling
To bake and roast on one oven level. The top and
bottom heating elements operate at the same time.
To finish cooked dishes. Only the top heating element
operates.
To bake cakes with crispy or crusty bottom. Only the
bottom heating element operates.
To grill flat food items in small quantities in the middle
of the shelf. To make toast.
To grill flat food items in large quantities. To make
toast. The full grill element operates.
To cook large pieces of meat. The grill element and
Turbo Grilling
the oven fan operate one after the other and circulate
hot air around the food.
True Fan
Cooking /
Defrosting
To roast or roast and bake food with the same cook-
ing temperature on more than one oven level without
flavour transference. / To thaw frozen food. The knob
for the temperature must be in the off position
To make pizza, quiche or pie. The grill and bottom el-
Pizza Setting
ement provide direct heat and the fan circulates the
hot air to cook the pizza toppings or pie filling.
6. CLOCK FUNCTIONS
6.1 Electronic programmer
1 2 3
hr min
Clock function Application
Time of day To set, change or check the time of day.
Minute Minder To set a countdown time. This function has no effect on
Function indicators
1
Time display
2
Function indicator
3
Button +
4
Selection button
5
Button -
6
456
the operation of the oven.
Page 33

Clock function Application
Duration To set how long the appliance must operate.
End To set when the appliance must be deactivated.
3.
You can use Duration and End
at the same time to set the
time when the appliance must be
activated and then deactivated.
First set Duration
.
, then End
Press + or - to set the time for the
necessary clock function.
The display shows the indicator for
the clock function you set. When the
set time ends, the indicator flashes
and an acoustic signal sounds for two
minutes.
6.2 Setting the clock functions
1.
For Duration and End , set an
oven function and temperature. This
is not necessary for the Minute Mind-
.
er
2.
Press the Selection button again and
again until the indicator for the necessary clock function flashes.
4.
Press a button to stop the signal.
5.
Turn the knob for the oven functions
and the knob for the temperature to
the off position.
6.3 Cancelling the clock
functions
1.
Press the Selection button again and
hr minhr min
again until the necessary function indicator flashes.
2.
Press and hold the button -.
The clock function goes out after
some seconds.
ENGLISH 33
With the Duration and End
functions, the appliance deactivates automatically.
7. USING THE ACCESSORIES
WARNING!
Refer to the Safety chapters.
Page 34

www.electrolux.com
34
7.1 Telescopic runners
°C
°C
1.
Pull out the right and left hand telescopic runners.
2.
Put the wire shelf on the telescopic
runners and carefully push them into
the appliance.
Make sure you push back the telescopic runners fully in the appliance
before you close the oven door.
Keep the installation instructions
for the telescopic runners for future use.
With telescopic runners you can put in
and remove the shelves more easily.
8. ADDITIONAL FUNCTIONS
8.1 Cooling fan
When the appliance operates, the cooling
fan activates automatically to keep the
surfaces of the appliance cool. If you deactivate the appliance, the cooling fan
continues to operate until the temperature
in the appliance cools down.
CAUTION!
Do not clean the telescopic runners in the dishwasher. Do not lubricate the telescopic runners.
8.2 Safety thermostat
Incorrect operation of the appliance or defective components can cause dangerous
overheating. To prevent this, the oven has
a safety thermostat which interrupts the
power supply. The oven activates again
automatically when the temperature
drops.
Page 35

9. HELPFUL HINTS AND TIPS
ENGLISH 35
• The appliance has five shelf levels.
Count the shelf levels from the bottom
of the appliance floor.
• The appliance has a special system
which circulates the air and constantly
recycles the steam. With this system
you can cook in a steamy environment
and keep the food soft inside and crusty outside. It decreases the cooking
time and energy consumption to a minimum.
• Moisture can condense in the appliance
or on the door glass panels. This is normal. Always stand back from the appliance when you open the appliance
door while cooking. To decrease the
condensation, operate the appliance for
10 minutes before cooking.
• Clean the moisture after each use of
the appliance.
• Do not put the objects directly on the
appliance floor and do not put aluminium foil on the components when you
cook. This can change the baking results and cause damage to the enamel.
9.1 Baking cakes
• Do not open the oven door before 3/4
of the set cooking time is up.
• If you use two baking trays at the same
time, keep one empty level between
them.
9.2 Cooking meat and fish
• Use a deep pan for very fatty food to
prevent the oven from stains that can
be permanent.
• Leave the meat for approximately 15
minutes before carving so that the juice
does not seep out.
• To prevent too much smoke in the oven
during roasting, add some water into
the deep pan. To prevent the smoke
condensation, add water each time after it dries up.
9.3 Cooking times
Cooking times depend on the type of
food, its consistency, and volume.
Initially, monitor the performance when
you cook. Find the best settings (heat setting, cooking time, etc.) for your cookware, recipes and quantities when you
use this appliance.
9.4 Baking and roasting table
CAKES
Conventional
TYPE OF
DISH
Whisked
recipes
Shortbread
dough
Buttermilk
cheesecake
Apple cake
(Apple pie)
Cooking
Shelf
position
Temp
[°C]
2 170 3 (2 and 4) 160 45 - 60 In a cake
2 170 3 (2 and 4) 160 20 - 30 In a cake
1 170 2 165 60 - 80 In a 26 cm
2 170 2 (left and
True Fan Cook-
ing
Shelf po-
sition
Temp
[°C]
160 80 - 100 In two 20 cm
right)
Cooking
time
[min]
Notes
mould
mould
cake mould
cake moulds
on a wire
1)
shelf
Page 36

www.electrolux.com
36
TYPE OF
DISH
Conventional
Cooking
Shelf
position
Temp
[°C]
True Fan Cook-
ing
Shelf po-
sition
Temp
[°C]
Cooking
time
[min]
Notes
Strudel 3 175 2 150 60 - 80 In a baking
tray
Jam-tart 2 170 2 (left and
right)
Sponge
2 170 2 160 50 - 60 In a 26 cm
cake
Christmas
2 160 2 150 90 - 120 In a 20 cm
cake / Rich
fruit cake
165 30 - 40 In a 26 cm
cake mould
cake mould
cake mould
Plum cake 1 175 2 160 50 - 60 In a bread
1)
tin
Small cakes
- one level
Small cakes
- two levels
Small cakes
- three levels
Biscuits /
pastry
3 170 3 140 -
150
- - 2 and 4 140 150
- - 1, 3 and 5 140 150
3 140 3 140 -
150
20 - 30 In a baking
tray
25 - 35 In a baking
tray
30 - 45 In a baking
tray
30 - 35 In a baking
tray
stripes - one
level
Biscuits /
pastry
- - 2 and 4 140 150
35 - 40 In a baking
tray
stripes - two
levels
Biscuits /
pastry
- - 1, 3 and 5 140 150
35 - 45 In a baking
tray
stripes three levels
Meringues one level
Meringuestwo levels
3 120 3 120 80 - 100 In a baking
tray
- - 2 and 4 120 80 - 100 In a baking
1)
tray
Buns 3 190 3 190 12 - 20 In a baking
1)
tray
Eclairs - one
level
Eclairs - two
levels
3 190 3 170 25 - 35 In a baking
tray
- - 2 and 4 170 35 - 45 In a baking
tray
1)
Page 37

ENGLISH 37
TYPE OF
DISH
Conventional
Cooking
Shelf
position
Temp
[°C]
True Fan Cook-
ing
Shelf po-
sition
Temp
[°C]
Cooking
time
[min]
Notes
Plate tarts 2 180 2 170 45 - 70 In a 20 cm
cake mould
Rich fruit
cake
Victoria
sandwich
1)
Preheat for 10 minutes.
1 160 2 150 110 -
120
In a 24 cm
cake mould
1 170 2 160 50 - 60 In a 20 cm
cake mould
BREAD AND PIZZA
TYPE OF
DISH
Conventional
Cooking
Shelf
position
Temp
[°C]
True Fan Cook-
ing
Shelf po-
sition
Temp
[°C]
Cooking
time
[min]
Notes
White bread 1 190 1 190 60 - 70 1 - 2 pieces,
500 gr per
1)
piece
Rye bread 1 190 1 180 30 - 45 In a bread tin
Bread rolls 2 190 2 (2 and 4) 180 25 - 40 6 - 8 rolls in a
baking tray
Pizza 1 230 -
250
1 230 -
250
10 - 20 In a baking
tray or a deep
1)
pan
Scones 3 200 3 190 10 - 20 In a baking
1)
tray
1)
Preheat for 10 minutes.
1)
FLANS
TYPE OF
DISH
Conventional
Cooking
Shelf
position
Temp
[°C]
True Fan Cook-
ing
Shelf po-
sition
Temp
[°C]
Cooking
time
[min]
Notes
Pasta flan 2 200 2 180 40 - 50 In a mould
Vegetable
2 200 2 175 45 - 60 In a mould
flan
Quiches 1 180 1 180 50 - 60
Lasagne 2 180 -
190
Cannelloni 2 180 -
190
2 180 -
190
2 180 -
190
25 - 40
25 - 40
In a mould
In a mould
In a mould
1)
1)
1)
Page 38

www.electrolux.com
38
1)
MEAT
Beef 2 200 2 190 50 - 70 On a wire
Pork 2 180 2 180 90 - 120 On a wire
Veal 2 190 2 175 90 - 120 On a wire
English roast
beef, rare
English roast
beef, medium
English roast
beef, well
done
Shoulder of
pork
Shin of pork 2 180 2 160 100 -
Lamb 2 190 2 175 110 -
Chicken 2 220 2 200 70 - 85 Whole
Turkey 2 180 2 160 210 -
Duck 2 175 2 220 120 -
Goose 2 175 1 160 150 -
Rabbit 2 190 2 175 60 - 80 Cut in pieces
Hare 2 190 2 175 150 -
Pheasant 2 190 2 175 90 - 120 Whole
Preheat for 10 minutes.
Conventional
TYPE OF
DISH
Cooking
Shelf
position
2 210 2 200 50 - 60 On a wire
2 210 2 200 60 - 70 On a wire
2 210 2 200 70 - 75 On a wire
2 180 2 170 120 -
Temp
[°C]
True Fan Cook-
ing
Shelf po-
sition
Temp
[°C]
Cooking
time
[min]
150
120
130
240
150
200
200
Notes
shelf
shelf
shelf
shelf
shelf
shelf
With rind
2 pieces
Leg
Whole
Whole
Whole
Cut in pieces
Page 39

ENGLISH 39
FISH
TYPE OF
DISH
Trout / Sea
Conventional
Cooking
Shelf
position
Temp
[°C]
2 190 2 175 40 - 55 3 - 4 fish
True Fan Cook-
ing
Shelf po-
sition
Temp
[°C]
Cooking
time
[min]
Notes
bream
Tuna fish /
2 190 2 175 35 - 60 4 - 6 fillets
Salmon
9.5 Grilling
Preheat the empty oven for 10 minutes, before cooking.
Quantity Grilling Cooking time [min]
TYPE OF DISH Pieces [g] Shelf po-
sition
Fillet steaks 4 800 4 max. 12 - 15 12 - 14
Beef steaks 4 600 4 max. 10 - 12 6 - 8
Sausages 8 - 4 max. 12 - 15 10 - 12
Pork chops 4 600 4 max. 12 - 16 12 - 14
Chicken (cut in
2 1000 4 max. 30 - 35 25 - 30
2)
Kebabs 4 - 4 max. 10 - 15 10 - 12
Breast of chick-
4 400 4 max. 12 - 15 12 - 14
en
Hamburger 6 600 4 max. 20 - 30 Fish fillet 4 400 4 max. 12 - 14 10 - 12
Toasted sand-
4 - 6 - 4 max. 5 - 7 -
wiches
Toast 4 - 6 - 4 max. 2 - 4 2 - 3
Temp
[°C]
1st side 2nd side
9.6 Turbo Grilling
Beef
TYPE OF DISH Quantity
Roast beef or fillet, rare
Roast beef or fillet, medium
Roast beef or fillet, well done
per cm of
thickness
per cm of
thickness
per cm of
thickness
Shelf posi-
tion
1
1
1
Tempera-
ture [°C]
190 - 200
180 - 190
170 - 180
1)
1)
1)
Time [min]
5 - 6
6 - 8
8 - 10
Page 40

www.electrolux.com
40
1)
Pork
Shoulder, neck,
ham joint
Chop, spare rib 1 - 1.5 kg 1 170 - 180 60 - 90
Meat loaf 750 g - 1 kg 1 160 - 170 50 - 60
Pork knuckle
(precooked)
Veal
Roast veal 1 kg 1 160 - 180 90 - 120
Knuckle of
veal
Lamb
Leg of lamb,
roast lamb
Saddle of
lamb
Preheat the oven.
TYPE OF DISH Quantity
1 - 1.5 kg 1 160 - 180 90 - 120
750 g - 1 kg 1 150 - 170 90 - 120
TYPE OF
Quantity Shelf posi-
DISH
1.5 - 2 kg 1 160 - 180 120 - 150
TYPE OF
Quantity Shelf posi-
DISH
1 - 1.5 kg 1 150 - 170 100 - 120
1 - 1.5 kg 1 160 - 180 40 - 60
Shelf posi-
tion
tion
tion
Tempera-
ture [°C]
Temperature
[°C]
Temperature
[°C]
Time [min]
Time [min]
Time [min]
Poultry
TYPE OF
DISH
Poultry portions
Chicken , half 400 - 500 g
Quantity Shelf posi-
tion
200 - 250 g
1 200 - 220 30 - 50
each
1 190 - 210 35 - 50
Temperature
[°C]
Time [min]
each
Chicken, pou-
1 - 1.5 kg 1 190 - 210 50 - 70
lard
Duck 1.5 - 2 kg 1 180 - 200 80 - 100
Goose 3.5 - 5 kg 1 160 - 180 120 - 180
Turkey 2.5 - 3.5 kg 1 160 - 180 120 - 150
Turkey 4 - 6 kg 1 140 - 160 150 - 240
Page 41

ENGLISH 41
Fish (steamed)
TYPE OF
DISH
Whole fish 1 - 1.5 kg 1 210 - 220 40 - 60
Quantity Shelf posi-
tion
Temperature
[°C]
Time [min]
9.7 Defrosting
TYPE OF
DISH
Chicken 1000 100 - 140 20 - 30
Meat 1000 100 - 140 20 - 30 Turn halfway through.
Meat 500 90 - 120 20 - 30 Turn halfway through.
Trout 150 25 - 35 10 - 15 Strawberries 300 30 - 40 10 - 20 Butter 250 30 - 40 10 - 15 -
Cream 2 x 200 80 - 100 10 - 15
Gateau 1400 60 60 -
[g]
Defrosting
time [min]
Further de-
frosting time
[min]
Notes
Place the chicken on
an upturned saucer
placed on a large
plate. Turn halfway
through.
Cream can also be
whipped when still
slightly frozen in pla-
ces.
9.8 Drying - True Fan Cooking
Cover the oven shelves with baking
parchment.
VEGETABLES
TYPE OF
DISH
Beans 3 1/4 60 - 70 6 - 8
Peppers 3 1/4 60 - 70 5 - 6
Vegetables for
soup
Mushrooms 3 1/4 50 - 60 6 - 8
Herbs 3 1/4 40 - 50 2 - 3
Shelf position
1 level 2 levels
3 1/4 60 - 70 5 - 6
Temperature
[°C]
Time [hr]
Page 42

www.electrolux.com
42
FRUIT
Plums 3 1/4 60 - 70 8 - 10
Apricots 3 1/4 60 - 70 8 - 10
Apple slices 3 1/4 60 - 70 6 - 8
Pears 3 1/4 60 - 70 6 - 9
Information on acrylamides
Important! According to the newest
scientific knowledge, if you brown food
(specially the one which contains starch),
TYPE OF
DISH
Shelf position
1 level 2 levels
Temperature
[°C]
acrylamides can pose a health risk. Thus,
we recommend that you cook at the
lowest temperatures and do not brown
food too much.
Time [hr]
Page 43

10. CARE AND CLEANING
ENGLISH 43
WARNING!
Refer to the Safety chapters.
• Clean the front of the appliance with a
soft cloth with warm water and a cleaning agent.
• To clean metal surfaces use a usual
cleaning agent.
• Clean the oven interior after each use.
Then you can remove dirt more easily
and it does not burn on.
• Clean stubborn dirt with a special oven
cleaner.
• Clean all oven accessories after each
use and let them dry. Use a soft cloth
with warm water and a cleaning agent.
• If you have nonstick accessories, do
not clean them using aggressive
agents, sharp-edged objects or a dishwasher. It can destroy nonstick coating.
Stainless steel or aluminium
appliances:
Clean the oven door with a wet
sponge only. Dry it with a soft
cloth.
Do not use steel wool, acids or
abrasive materials, as they can
cause damage to the oven surface. Clean the oven control panel
with the same precautions.
10.1 Cleaning the door gasket
• Regularly do a check of the door gasket. The door gasket is around the
frame of the oven cavity. Do not use the
appliance if the door gasket is damaged. Contact the Service Centre.
• To clean the door gasket, refer to the
general information about cleaning.
10.2 Shelf supports
You can remove the shelf supports to
clean the side walls.
Removing the shelf supports
1.
Pull the front of the shelf support away
from the side wall.
Page 44

www.electrolux.com
44
2.
Pull the rear end of the shelf support
away from the side wall and remove
it.
1
2
Installing the shelf supports
Install the shelf supports in the opposite
sequence.
The rounded ends of the shelf
supports must point to the front.
10.3 Oven ceiling
You can remove the grill to clean the oven
ceiling more easily.
WARNING!
Deactivate the appliance before
you remove the grill. Make sure
that the appliance is cold. There is
a risk of burns.
1.
Remove the screw which holds the
grill. For the first time, use a screwdriver.
10.4 Oven lamp
WARNING!
Be careful when you change the
oven lamp. There is a risk of electrical shock.
Before you change the oven lamp:
• Deactivate the oven.
• Remove the fuses in the fuse box or
deactivate the circuit breaker.
Put a cloth on the bottom of the
oven to prevent damage to the
oven light and glass cover.
Always hold the halogen lamp
with a cloth to prevent grease residue from burning on the lamp.
1.
Turn the glass cover counterclockwise to remove it.
2.
Clean the glass cover.
3.
Replace the oven light bulb with an
applicable 300 °C heat-resistant oven
light bulb.
Use the same oven lamp type.
4.
Install the glass cover.
2.
Carefully pull the grill down.
3.
Clean the oven ceiling with a soft
cloth with warm water and a cleaning
agent, and let it dry.
4.
Install the grill in the opposite sequence.
WARNING!
Make sure that the grill is correctly
installed and that it does not fall
down.
10.5 Cleaning the oven door
The oven door has two glass panels. You
can remove the oven door and the internal glass panel to clean it.
The oven door can close if you try
to remove the internal glass panel
before you remove the oven door.
Page 45

Removing the oven door and the glass panel
1.
Open the door fully and hold the two
door hinges.
2.
Lift and turn the levers on the two
hinges.
ENGLISH 45
3.
Close the oven door to the first opening position (halfway). Then pull forward and remove the door from its
seat.
Page 46

www.electrolux.com
46
4.
Put the door on a soft cloth on a stable surface.
5.
Release the locking system to remove the internal glass panel.
6.
Turn the two fasteners by 90° and remove them from their seats.
90°
7.
Carefully lift (step 1) and remove (step
2) the glass panel.
8.
Clean the glass panel with water and
soap. Dry the glass panel carefully.
2
1
Page 47

Installing the door and the glass panel
11. WHAT TO DO IF…
WARNING!
Refer to the Safety chapters.
Problem Possible cause Remedy
The oven does not heat
up.
The oven does not heat
up.
The oven does not heat
up.
The oven does not heat
up.
The oven lamp does not
operate.
The display shows 12.00. There was a power cut. Set the clock.
Steam and condensation
settle on the food and in
the oven.
If you cannot find a solution to the problem yourself, contact your dealer or the
service centre.
We recommend that you write the data here:
Model (MOD.) .........................................
Product number (PNC) .........................................
Serial number (S.N.) .........................................
When the cleaning is completed, install
the glass panel and the oven door. Do the
above steps in the opposite sequence.
The screen-printing zone must face the
inner side of the door. Make sure that after the installation the surface of the glass
panel frame on the screen-printing zones
is not rough when you touch it.
Make sure that you install the internal
glass panel in the seats correctly. Refer to
the illustration.
The appliance is deacti-
Activate the appliance.
vated.
The clock is not set. Set the clock.
The necessary settings
are not set.
The fuse in the fuse box
is released.
Make sure that the settings are correct.
Do a check of the fuse. If
the fuse is released more
than one time, contact a
qualified electrician.
The oven lamp is defec-
Replace the oven lamp.
tive.
You left the dish in the
oven for too long.
Do not keep the dishes in
the oven for longer than
15 - 20 minutes after the
cooking ends.
The necessary data for the service centre
is on the rating plate. The rating plate is
on the front frame of the appliance cavity.
ENGLISH 47
Page 48

www.electrolux.com
48
12. INSTALLATION
WARNING!
Refer to the Safety chapters.
12.1 Building In
558
548
A
B
20
573
590
600
min. 550
20
min. 560
min. 550
20
min. 560
12.2 Electrical installation
589
594
5
WARNING!
Only a qualified person must do
the electrical installation.
The manufacturer is not responsible if you do not follow the safety
precautions from the chapter
"Safety Information".
This appliance is supplied with a main
plug and a main cable.
12.3 Cable
Cable types applicable for installation or
replacement: H07 RN-F, H05 RN-F, H05
RRF, H05 VV-F, H05 V2V2-F (T90), H05
BB-F.
For the section of the cable refer to the
total power (on the rating plate) and to the
table:
Total power
maximum 1380W3 x 0.75 mm²
maximum 2300W3 x 1 mm²
maximum 3680W3 x 1.5 mm²
The hearth cord (green / yellow cable)
must be 2 cm longer than phase and neutral cables (blue and brown cables).
Section of the ca-
ble
Page 49

13. ENVIRONMENT CONCERNS
ENGLISH 49
Recycle the materials with the symbol
. Put the packaging in applicable
containers to recycle it.
Help protect the environment and human
health and to recycle waste of electrical
and electronic appliances. Do not dispose
appliances marked with the symbol
with the household waste. Return the
product to your local recycling facility or
contact your municipal office.
Page 50

www.electrolux.com
50
Page 51

ENGLISH 51
Page 52

www.electrolux.com/shop
397296601-B-312012
 Loading...