

Page 1

Gebrauchsanleitung
User manual
Einbau-Backofen
Built-in oven
EOB 31002
Page 2

2 electrolux
Page 3

Willkommen bei Electrolux!
Wir möchten uns bedanken, dass Sie sich für ein erstklassiges Produkt von Electrolux
entschieden haben, welches Ihnen sicherlich viel Freude bereiten wird.
Es ist unser Bestreben, eine breite Vielfalt von Qualitätsprodukten anzubieten, die
helfen, Ihr Leben etwas komfortabler zu machen. Sie finden einige Beispiele auf der
vorletzten Seite in diesem Heft.
Bitte nehmen Sie sich einige Minuten, diese Benutzerinformation zu lesen, um voll von
den Vorteilen Ihres neuen Gerätes profitieren zu können. Wir sind sicher, dass wird Ihr
Leben zukünftig etwas leichter machen.
Wir wünschen eine gute Zeit.
electrolux 3
Page 4
Inhaltsverzeichnis
Warnungen und wichtige Hinweise 5
Erst-Installation 7
Gerätebeschreibung 8
Elektro-Backofen 9
Praktische Tipps 12
Back- und Brattabelle 14
Pflege und Wartung 16
Wass etwas falsch läuft 20
Technische Daten 21
Anweisungen für den Installateur 22
Einbau-Anweisungen 24
Kundendienst 25
Europäische Garantie 26
Anleitung zur
Gebrauchsanweisung
Sicherheitsanweisung
Schritt-für-Schritt-Anweisung
)
Ratschläge
Umweltinformationen
Dieses Gerät entspricht den folgenden EWG-Richtlinien:
- 2006/95 (Niederspannungsrichtlinie);
- 89/336 (EMC Richtlinie);
- 93/68 (algemeine Richtlinie);
und weitere Änderungen.
4 electrolux
Page 5

Deutsch
Warnungen und wichtige Hinweise
Heben Sie auf jeden Fall die mit diesem Gerät gelieferte Gebrauchsanweisung auf. Sollte
nämlich das Gerät an Dritte abgegeben oder verkauft werden, oder falls Sie das Gerät bei
einem Umzug in der alten Wohung lassen sollten, ist es von größter Wichtigkeit, daß der/die
neue Nutzer(in) über diese Gebrauchsanweisung und die Hinweise verfügen kann.
Diese Hinweise dienen der Sicherheit des Nutzers und seiner Mitbewohner. Lesen Sie sie
also aufmerksam, bevor Sie das Gerät anschließen und/oder in Gebrauch nehmen.
Installation
z Die Installation muss von fachkundigem
Personal vorgenommen werden, unter
Beachtung der bestehenden Vorschriften.
Die einzelnen Installationsarbeiten sind
unter den Hinweisen für den Installateur
beschrieben.
z Lassen Sie die Installation und den
Anschluß von einem Fachmann, gemäß
den ihm dank seiner Fachkenntnis
bekannten Richtlinien ausführen.
z Auch gegebenenfalls auf Grund der
Installation erforderliche Modifikationen an
der Stromversorgung haben durch einen
Fachmann zu erfolgen.
Betrieb
z Dieser Backofen ist zur Zubereitung von
Speisen gedacht; gebrauchen Sie ihn
niemals zu Anderem.
• Beim Öffnen der Ofentür, während oder
am Ende des Garens auf den Heißluftstrom achten, der aus dem Ofen austritt.
• Beim Herdbetrieb mit erhöhter Vorsicht
vorgehen. Durch die starke Hitze der
Heizkörper sind Rost und sonstige Teile sehr
heiß.
z Falls Sie - aus welchen Gründen auch
immer - Alu-Folie zur Zubereitung von
Speisen im Backofen verwenden sollten,
lassen Sie diese nie in direkten Kontakt
mit dem Boden des Ofens kommen.
z Gehen Sie bei der Reinigung des Ofens
vorsichtig vor: sprühen Sie nie auf den
Fettfilter (falls vorhanden), die Heizstäbe
und den Thermostatfühler.
z Es ist gefährlich Veränderungen jeglicher
Art an diesem Gerät oder an seinen
Eigenschaften vorzunehmen.
z Um Beschädigungen an der
Spezialbeschichtung der Scheiben zu
vermeiden was zum Zerplatzen der
Scheiben führen kann, keinesfalls
scheuernde Reinigungsmittel, spitze
Gegenstände oder kratzende Topfreiniger
verwenden!
z Während des Back-, Brat- und Grillvor-
gangs werden das Backofenfenster und
die übrigen Geräteteile heiss, deshalb
sollten Kinder vom Gerät ferngehalten
werden. Bei Anschluss von Elektrogeräten
an Steckdosen in Backofennähe, ist darauf
zu achten, dass Anschlussleitungen nicht
mit heissen Kochstellen in Berührung
kommen oder in der heissen Backofentür
eingeklemmt werden.
z Verwenden Sie immer Topfhandschuhe
um feuerfeste, heiße Schüsseln oder Töpfe
aus dem Backofen zu nehmen.
z Eine regelmäßige Reinigung verhindert die
Verschlechterung des
Oberflächenmaterials.
z Schalten Sie vor der Reinigung des
Backofens entweder den Strom ab oder
ziehen Sie den Netzstecker.
• Das Gerät nicht mit einem Dampfstrahloder Hochdruckreiniger reinigen.
z Benutzen Sie keine Scheuermittel oder
scharfe Metallschaber. Sie können die
Türscheiben verkratzen und dadurch zum
Zerspringen der Scheiben führen.
z Stellen Sie sicher, daß die Schaltknöpfe
sich in der «0» Stellung befinden wenn der
Backofen nicht mehr benutzt wird.
electrolux 5
Page 6

z Dieser Backofen wurde je nach Ausführung
als Einzelgerät oder als
Kombinationsgerät mit Elektroplatte für den
Anschluß an Ein-Phase an 230 V
hergestellt.
Personensicherheit
z Dieses Gerät ist für den Gebrauch seitens
Erwachsenen bestimmt. Es ist gefährlich,
wenn Sie es Kindern zum Gebrauch oder
Spiel überlassen.
z Kinder und Personen, die aufgrund ihrer
physischen, sensorischen oder geistigen
Fähigkeiten oder ihrer Unerfahrenheit oder
Unkenntnis nicht in der Lage sind, das
Gerät sicher zu benutzen, sollten dieses
Gerät nicht ohne Aufsicht oder Anweisung
durch eine verantwortliche Person
benutzen.
z Halten Sie Kinder fern, solange der Ofen
in Betrieb ist. Auch nachdem Sie den
Backofen ausgeschaltet haben, bleibt die
Türe noch lange heiß.
Umweltinformationen
z Ein Gerät, das nicht funktioniert, muß vom
Stromnetz getrennt werden, damit es nicht
versehentlich benützt wird.
z Ziehen Sie bei ausgedienten Geräten den
Netzstecker aus der Steckdose und
machen Sie Netzschlußleitung sowie
Stecker unbrauchbar. Sie verhindern damit,
daß ein Mißbrauch mit den Geräten
getrieben wird.
Das Symbol
auf dem Produkt oder seiner
Verpackung weist darauf hin, dass dieses
Produkt nicht als normaler Haushaltsabfall zu
behandeln ist, sondern an einem
Sammelpunkt für das Recycling von
elektrischen und elektronischen Geräten
abgegeben werden muss. Durch Ihren Beitrag
zum korrekten Entsorgen dieses Produkts
schützen Sie die Umwelt und die Gesundheit
Ihrer Mitmenschen. Umwelt und Gesundheit
werden durch falsches Entsorgen gefährdet.
Weitere Informationen über das Recycling
dieses Produkts erhalten Sie von Ihrem
Rathaus, Ihrer Müllabfuhr oder dem Geschäft,
in dem Sie das Produkt gekauft haben.
Kundendienst
z Lassen Sie Überprüfungsarbeiten und/
oder Reparaturen vom Kundendienst des
Herstellers oder von einem vom Hersteller
autorisierten Kundendienst ausführen und
verwenden Sie nur Original-Ersatzteile.
z Versuchen Sie nicht, das Gerät bei
Funktionsstörungen oder Schäden selbst
zu reparieren. Durch Reparaturen seitens
ungeschulter Personen können Schäden
oder Verletzungen hervorgerufen werden.
6 electrolux
Page 7
Erst-Installation
Vor der Inbetriebnahme des
Gerätes das Verpackungsmaterial
sowohl im Herd als auch außen,
einschließlich aller
Werbeaufkleber und Schutzfolien,
vollständig entfernen.
Das Backofen-Zubehör vor dem ersten
Garvorgang sorgfältig abwaschen.
Nach der Installation des Backofens:
)
1. den Temperaturregler-Knopf auf 250;
2. den Backofen-Funktionswähler auf die
Funktion ‘Heissluft‘ stellen ;
3. den leeren Backofen einschalten für etwa
45 Minuten;
4. dem Raum Frischluft zuführen (z.B. durch
das Öffnen eines Fensters).
Während dieser Zeit kann ein unangenehmer
Geruch auftreten. Dieser wird verursacht
durch Rückstände von der Herstellung und
ist absolut normal. Wenn diese Aktion
durchgeführt ist, den Backofen abkühlen
lassen, dann denselben mit einem weichen
Tuch, eingeweicht in einer Spülmittellauge,
innen reinigen.
Es wird empfohlen, das oben beschriebenen
Verfahren durch Auswählen der Garfunktion
‘Grill’ etwa 5-10 Minuten lang zu
wiederholen.
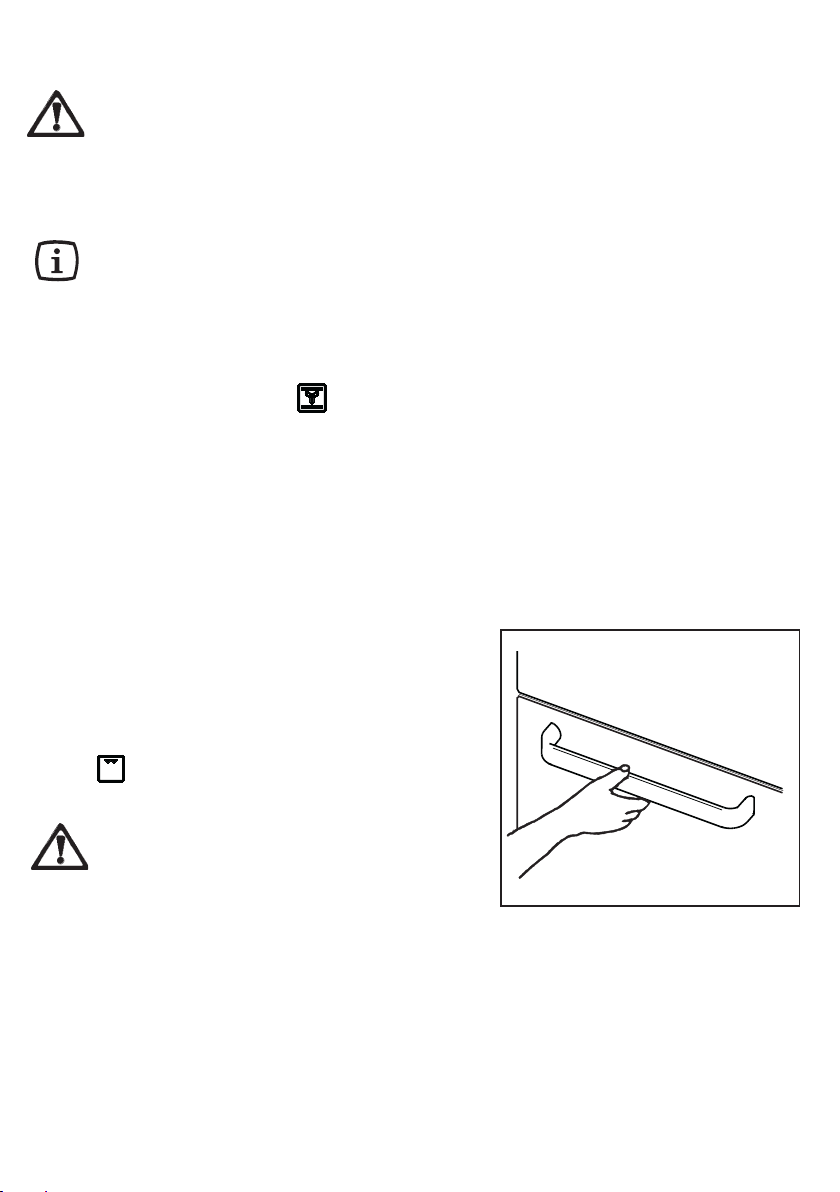
Um die Backofentür zu öffnen,
immer den Griff in der Mitte
anpacken (Abb. 1).
Abb. 1
electrolux 7
Page 8
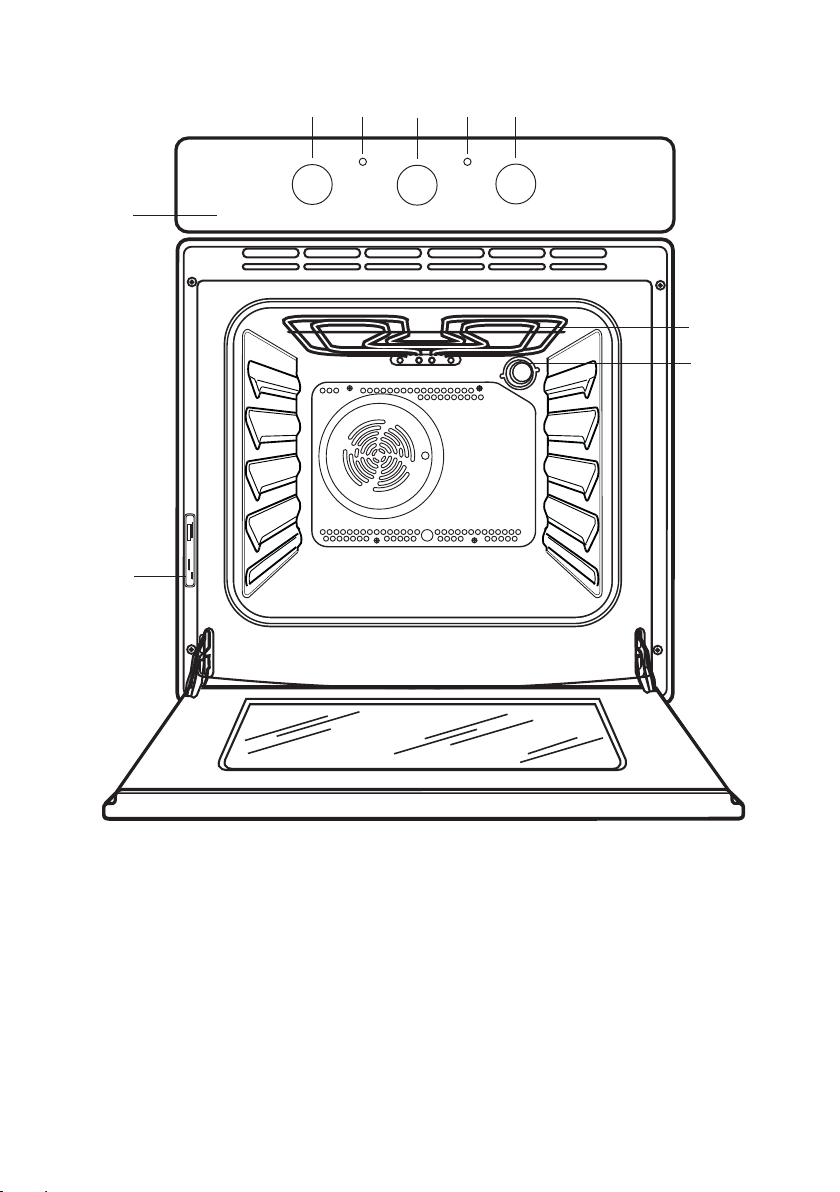
Gerätebeschreibung
1
9
362
4 5
7
8
1. Bedienungsblende
2. Knebel für Backofen-Temperaturregler
3. Thermostat-Kontrollampe
4. Schaltuhr
5. Betriebskontrollampe
6. Knebel für Backofen-Funktionswähler
7. Grill
8. Backofen-Lampe
9. Typenschild
8 electrolux
Page 9
Elektro-Backofen
0
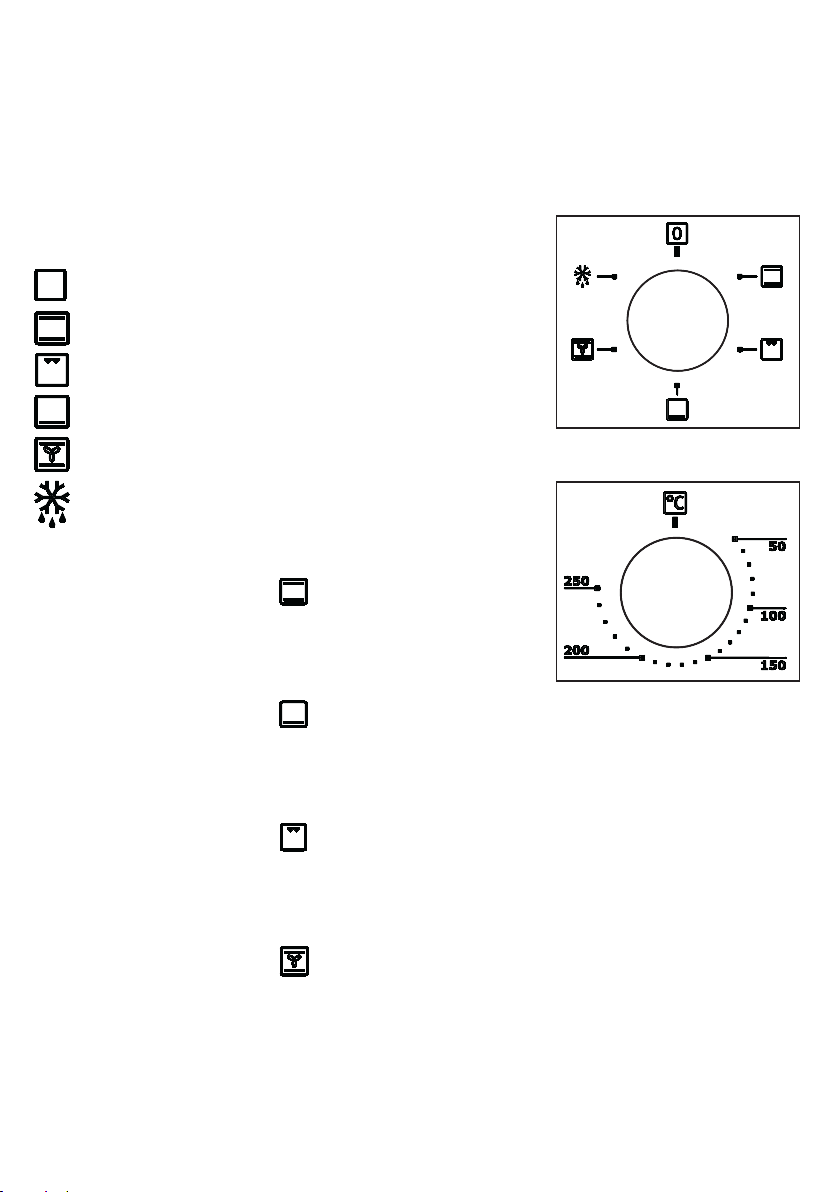
Bedienungsknebel
Durch Drehen des Thermostat-Knebels
(Abb. 3) kann die geei-gnetste Temperatur
gewählt werden und durch Drehen des
Wahlschalter-Knebels (Abb. 2) kann das
geeignetste Heizsystem gewählt werden:
Backofen ausgeschalten
0
Ober- und Unterhitze
Grill
Unterhitze
Heissluft
Auftauen
Ober-und Unterhitze
— Wahlschalter-Knebel auf drehen,
— dann Thermostat-Knebel auf die
geeignete Temperatur einstellen.
Unterhitze
— Wahlschalter-Knebel auf drehen,
— dann Thermostat-Knebel auf die
geeignete Temperatur einstellen.
Grill
— Wahlschalter-Knebel auf drehen,
— dann Thermostat-Knebel auf die
geeignete Temperatur einstellen.
Heissluft
— Wahlschalter-Knebel auf drehen,
— dann Thermostat-Knebel auf die
geeignete Temperatur einstellen.
Abb. 2
Abb. 3
electrolux 9
Page 10
Auftauen
- Wahlschalter-Knebel auf drehen. In
dieser Schalterstellung lässt sich
Tiefgefrorenes im kalten Luftstrom in
kurzer Zeit schonend auftauen.
Bemerkung: Wenn sich der Wahlschalter-
Knebel auf Stellung befindet, soll der
Thermostat-Knebel auf « » gedreht werden.
Thermostat-Kontrollampe
Sie erlischt, wenn die eingestellte
Temperatur im Backofen erreicht ist, und
leuchtet jeweils beim Aufheizen wieder auf.
Betriebskontrollampe
Sie zeigt an, daß ein oder mehrere
Heizkörper des Backofens eingeschaltet
sind.
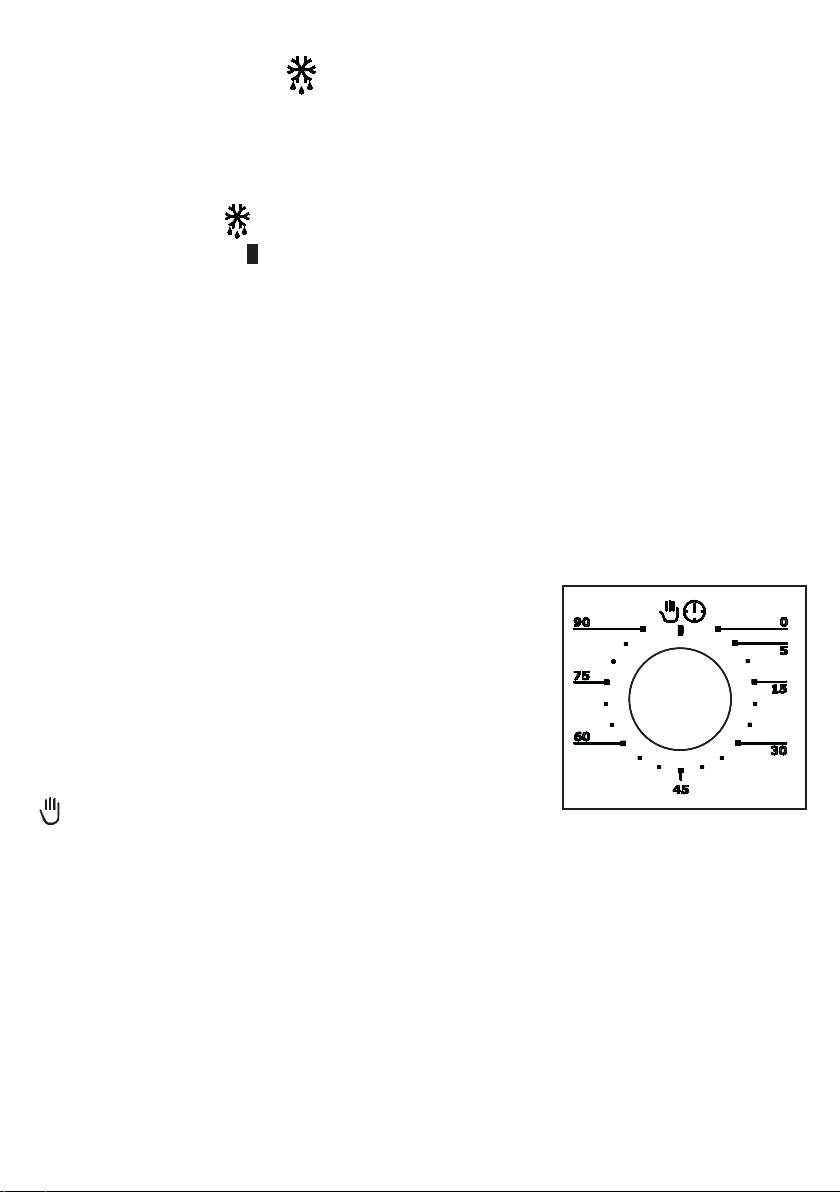
Schaltuhr
Den Drehschalter (Abb. 4) bis zur Stellung
“90 Minuten” drehen. Anschließend
denselben zurück drehen und auf die
entsprechende Kochzeit schalten. Nach
Ablauf der vorgewählten Zeit schaltet die Programmiereinheit den Ofen ab. Zugleich ertönt
ein Signal, das dann automatisch aufhort.
Für den manuellen Betrieb den Drehschalter
nach links drehen, bis das “Hand”-Symbol
mit dem Zeichen zusammenfallt.
Sicherheits-Thermostat
Um gefährliche Überhitzung zu vermeiden
(durch unsachgemässen Gebrauch des
Gerätes oder defekte Bestandteile), ist der
Backofen mit einem SicherheitsThermostat ausgestattet, welcher die
Stromversorgung unterbricht. Die
Wiederinschaltung erfolgt automatisch bei
Temperaturabfall.
Sollte der Sicherheits-Thermostat aufgrund
unsachgemässen Gebrauchs des Gerätes
Abb. 4
10 electrolux
Page 11

ansprechen, genügt es, nach der Abkühlung
des Ofens, die Fehlerursache zu beseitigen;
spricht dagegen der Thermostat wegen
eines defekte Bauteiles an, so wenden Sie
sich bitte an den Kundendienst.
Kühlungsventilator
Die eingebaute Gehäusekühlung sorgt für
niedrige Temperaturen an Bedienungsblende, Schalterknebel und Backofen-Türgriff bei
aufgeheiztem Backofen.
Außerdem wird durch den Luftstrom, der
zwischen Tür und Bedienungsblende
entweicht, der Wrasenaustritt aus dem
Backofen erleichtert.
Die Gehäusekühlung schaltet sich automatisch am anfang des Garvorganges ein.
Das ausschalten der Gehäusekühlung erfolgt
dagegen beim abschalten des Backofens.
Zum raschen Auskühlen kann die Backofentür etwas geöffnet werden (Raststelle),
wodurch sich die Abkühlzeit verkürzt.
Dieser Ofen ist mit einem Garsystem ausgestattet, das einen natürlichen Luftstrom
erzeugt und die Kochdämpfe kontinuierlich
im Umlauf hält.
Während des Garens wird Dampf erzeugt, der
beim Öffnen der Tür austreten kann. Das ist
normal.
Achtung: Beim Öffnen der Backofentür,
während oder am Ende des Garvorganges
auf einen möglichen Dampfaustritt achten!
electrolux 11
Page 12
Praktische Tipps
Beim Garen die Backofentür
immer geschlossen halten.
Dieser Backofen ist mit einem exklusiven
Garsystem ausgestattet, das einen natürlichen Luftstrom erzeugt und die Kochdämpfe
kontinuierlich in Umlauf bringt. Das Garen
der Speisen erfolgt somit in einer ständig
feuchten Umgebung, welche die Speisen
innen zart und außen knusprig gart. Die
Garzeiten und der Energieverbrauch werden
auf ein Mindestmaß verringert. Während des
Garens wird Dampf erzeugt, der beim Öffnen
der Tür austreten kann.
Das ist normal.
Beim Öffnen der Backofentür, während oder am Ende des Garens auf
den Heißluftstrom achten, der aus
dem Backofen austritt.
Wenn Speisen erhitzt werden, wird
Dampf erzeugt wie das in einem Kochkessel geschieht. Wenn der Dampf
mit dem Backofen-Türglas in Berührung kommt, kondensiert er und es
entstehen Wasser-Tröpfchen.
Um Kondensation zu verringern, den
leeren Backofen immer 10 Minuten
vorheizen!
Wir empfehlen Ihnen, die Wassertropfen nach jedem Garvorgang wegzuwischen.
Ober- und Unterhitze
Hitze von oben und von unten. Es wird
empfohlen die mittlere Einschiebeleiste zu
benutzen. Sollte das Gericht mehr Wärme
von oben oder von unten benötigen,
sobenutzen Sie die oberen oder die unteren
Einschiebeleisten.
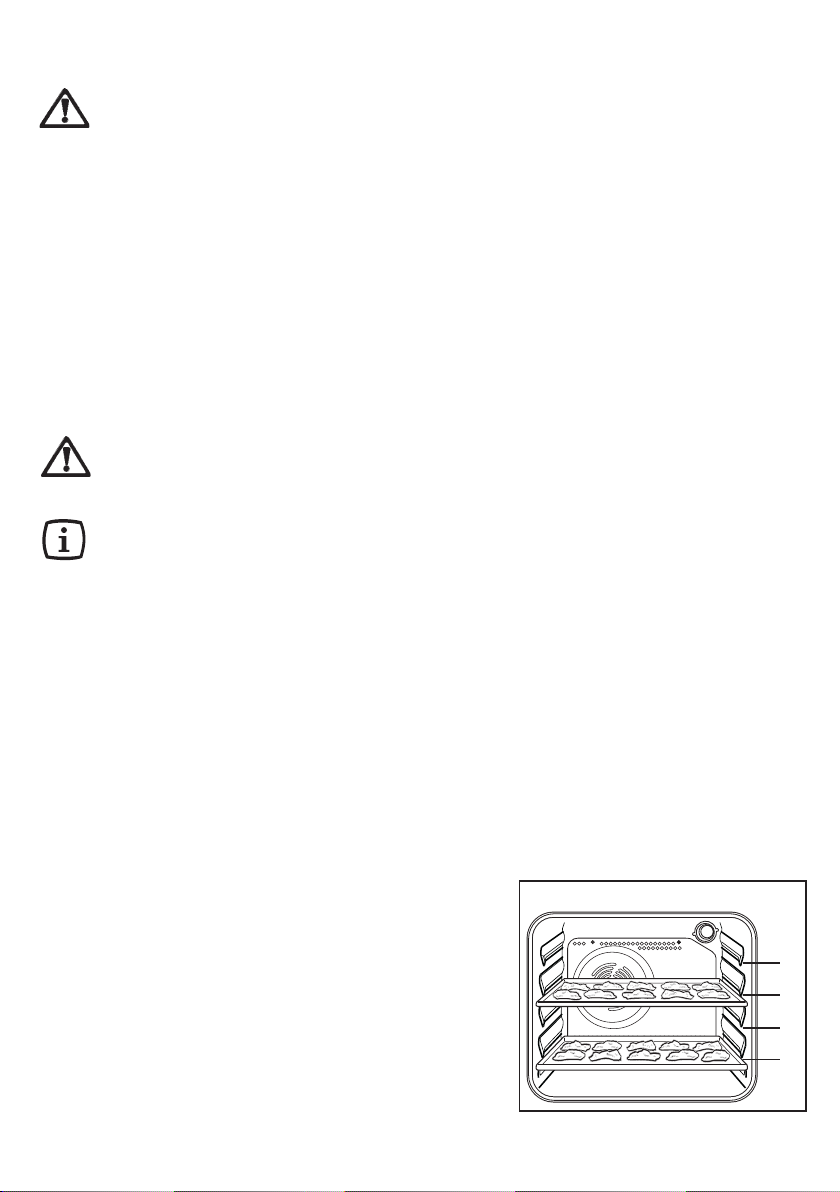
Heißluft- und Gebäckbetrieb
Das Gebläse an der Backofen-rückwand
verteilt erhitzte Luft in einemständigen
Kreislauf direkt auf das Brat-/ Backgut.
Diese Funktion gibt Ihnen die Möglichkeit
12 electrolux
zum Braten oder Braten und Backen
gleichzeitig auf mehreren Ebenen ohne
Geschmacksänderung (Abb. 5).
Gebäckbetrieb eignet sich um Kuchen,
Kleingebäck und Brötchen zu backen.
Beim Backen oder Garen in nur einer Etage
wird empfohlen, zur besseren Beobachtung,
die unteren Einschiebeleisten zu benützen.
Heisslufbetrieb eignet sich auch besonders
gut zum Sterilisieren und zum Dörren von
Pilzen oder Obst.
Grillen
Alle Fleischarten eignen sich zum Grillen,
Ausnahme machen lediglich Wildfleisch und
Hackbraten.
Fleisch und Fisch werden vor dem Grillen
mit Öl bestrichen.
Je flacher das Grillgut ist, um so näher am
Grillstab grillen und umgekehrt. Der Rost
kann mit Wölbung nach oben oder nach
unten eingeschoben werden. Um eine gute
Bräunung zu erzielen, wird der Rost in die
4. Einschiebeleiste, also dicht unter den
Grill geschoben.
Mit etwas Wasser in der Fettpfanne wird die
Reinigung erleichtert. Fettpfanne in die erste
Einschiebeleiste von unten einschieben.
Bei jedem Back-, Brat- oder Grillvorgang
muss die Backofentür geschlossen bleiben.
Während des Backofenbetriebs bleibt die
Backofenlampe eingeschaltet.
Heißluftbetrieb
4
3
2
1
Abb. 5
Page 13
Ratschläge
Zum Backen:
Backgut erfordert gewöhnlich eine mässige
Temperatur (150°C-200°C) und daher ist ein
Vorheizen des Backofens von ca. 10 Minuten
notwendig.
Die Backofentür nicht öffnen, bevor 3/4 der
Backzeit abgelaufen ist.
Mürbeteig wird in der Springform oder auf
dem Blech bis zu 2/3 der Backzeit gebacken
und danach garniert, bevor er fertiggebakken
wird. Diese weitere Backzeit ist abhängig
von der Art und Menge der Garnitur. Rührteige
müssen schwer vom Löffel reissen. Die
Backzeit würde durch zuviel Flüssigkeit
unnötig verlängert werden.
Werden zwei Backbleche mit Gebäck
gleichzeitig in den Ofen eingeschoben, muss
zwischen den Blechen eine Einschiebeleiste
freigelassen werden (Abb. 5).
Werden zwei Backbleche mit Gebäck
gleichzeitig in den Ofen eingeschoben,
müssen die Bleche nach etwa 2/3 der
Backzeit von oben nach unten getauscht und
gedreht werden.
Zum Braten:
Nicht weniger als 1 Kg Braten nehmen, kleinere Stücke könnten beim Braten
austrokknen. Dunkles Fleisch, das aussen
gut gegart, jedoch innen noch rosa bis rot
bleiben soll, muss bei höherer Temperatur
(200 °C-250°C) gebraten werden.
Helles Fleisch, Geflügel, und Fisch erfordern
dagegen eine niedrigere Temperatur (150°C175°C). Die Sossenzutaten werden nur bei
kurzer Garzeit gleich zu Beginn in die
Bratenpfanne gegeben, andernfalls werden
sie in der letzten halben Stunde zugegeben.
Ob das Fleisch gar ist, können Sie mit einem
Löffel prüfen: lässt es sich nicht eindrücken,
so ist es durchgebraten. Roastbeef und Filet,
die innen rosa bleiben sollen, müssen bei
höherer Temperatur in kürzerer Zeit gebraten
werden.
Beim Garen von Fleischgerichten direkt auf
dem Rost zum Auffangen des Saftes
Fettpfanne in die Leiste unten einschieben.
Den Braten vor dem Anschneiden
mindestens 15 Minuten stehen lassen,
damit der Fleischsaft nicht ausfliessen kann.
Um die Rauchbildung im Backofen zu vermindern, empfiehlt es sich, ein wenig
Wasser in die Fettpfanne zu giessen. Um
Kon-densbildung zu vermeiden, mehrmals
Wasser zugeben. Die Teller können bis zum
Servieren im Backofen bei
Mindesttemperatur warmgehalten werden.
Vorsicht!
Den Backofen nicht mit Alufolie
auslegen und kein Kochgeschirr,
keine Fettpfanne oder Backblech auf
den Boden stellen, da sonst das
Backofenemail durch den
entstehenden Hitzestau beschädigt
wird.
Vorsicht!
Beim Einschieben und Herausziehen
des Zubehör (Rostes und der
Fettpfanne usw.) in den Backofen
könnte die Backofenemaille
beschädigt werden.
Garzeiten
Die Garzeiten können unterschiedlich sein,
aufgrund der verschiedenen Zusammensetzung, Zutaten-und Flüssigkeitsmenge der
einzelnen Speisen.
Merken Sie sich die Einstelldaten der ersten
Koch-bzw. Bratvorgänge, um Erfahrung zu
sammeln für die spätere Zubereitung gleicher
Gerichte.
Aufgrund Ihrer eigenen Erfahrungen können
Sie die angegebenen Werte individuell
verändern.
electrolux 13
Page 14
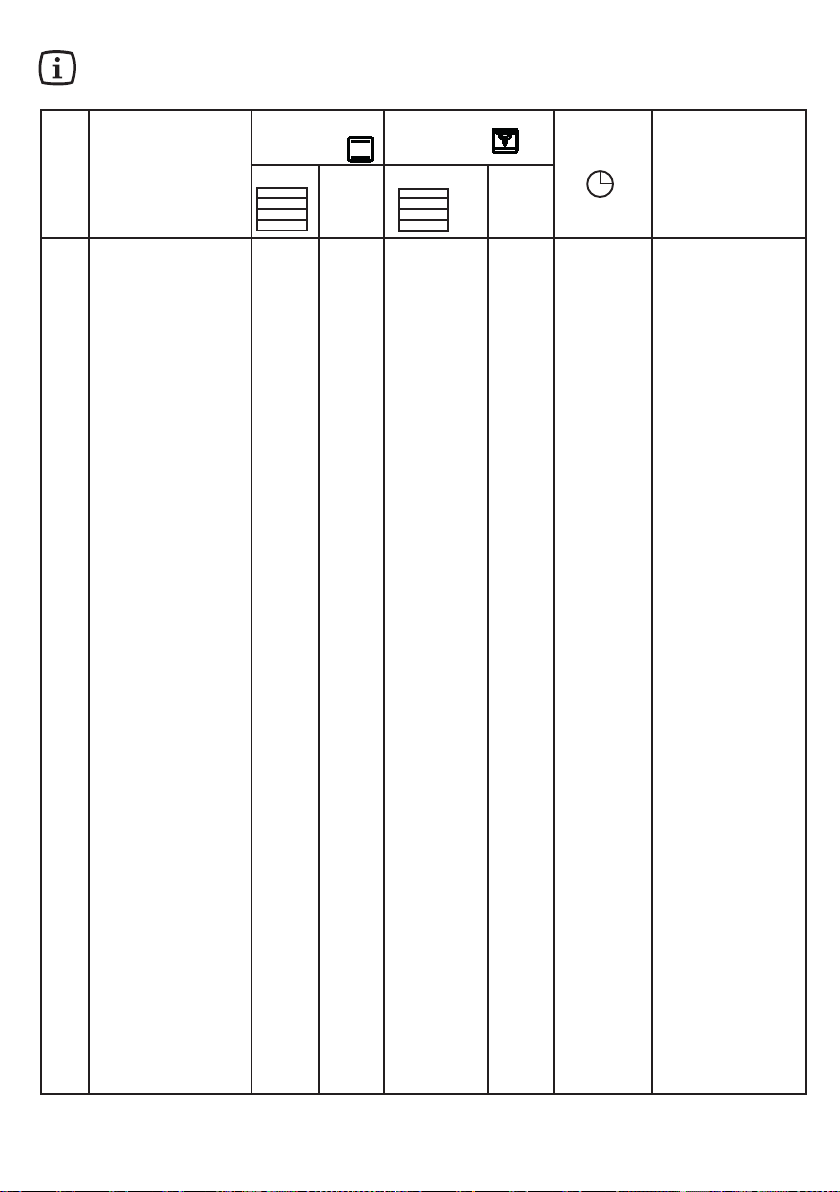
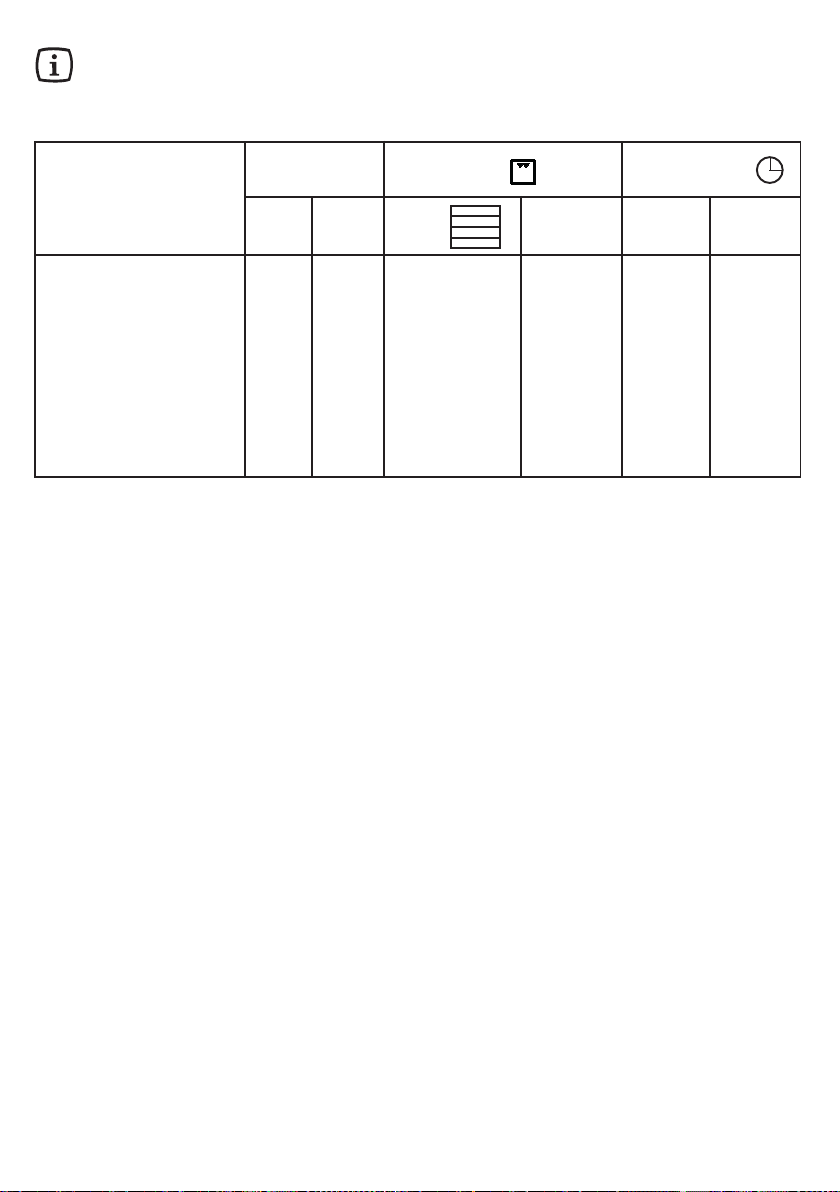
Back- und Brattabelle
Zeitangaben beinhalten kein Vorheizen.
Den leeren Backofen immer 10 Minuten vorheizen!
Ober- und Unterhitze sowie Heißluft
Ober- und
Unterhitze
ART DER
SPEISE
Gewicht (gr.)
KUCHEN
Rührteig 1 170 2 (1u3)* 160 45-60 Kuchenform
Mürbeteig 2 170 2 (1u3)* 160 20-30 Kuchenform
Buttermilch-
Käsekuchen 1 160 2 150 60-80
Apfelkuchen 1 180 2(1u3)* 170 40-60 Kuchenform
Strudel 2 175 2 150 60-80 Kuchenform
Marmeladentorte 2 175 2(1u3)* 160 30-40 Kuchenform
Rührkuchen 175 2 160 45-60 Kuchenform
Biskuitkuchen 1 175 2 (1u3)* 160 30-40 Kuchenform
Stollen 1 170 1 160 40-60 Kuchenform
Kastenkuchen 1 170 2 160 50-60 Kuchenform
Kleine Kuchen 2 175 2 (1u3)* 160 25-35 in Backblech
Biskuits 3 160 2 (1u3)* 150 20-30 in Backblech
Baiser 2 100 2 (1u3)* 100 90-120 in Backblech
Hefekleingebäck 2 190 2 (1u3)* 180 12-20 in Backblech
Windbeutel/Eclairs 2 200 2 (1u3)* 190 15-25 in Backblech
BROT UND PIZZA
1000 Weißbrot 1 190 2 180 40-60 1-2 Stück
500 Roggenbrot 2 190 2 180 30-45 in Brotpfanne
500 Brötchen 2 200 2 (1u3)* 175 20-35 6-8Brötchen
250 Pizza 1 210 2 (1u3)* 190 15-30
FLANS
Pasta-Flan- 2 200 2(1u3)* 175 40-50 Kuchenform
Gemüse-Flan 2 200 2(1u3)* 175 45-60 Kuchenform
Quiches 2 200 2(1u3)* 180 35-45 Kuchenform
Lasagne 2 180 2 160 45-60 Kuchenform
Cannelloni 2 200 2 175 40-55 Kuchenform
FLEISCH
1000 Rind 2 190 2 175 50-70 auf dem Rost
1200 Schwein 2 180 2 175 100-130 auf dem Rost
1000 Kalb 2 190 2 175 90-120 auf dem Rost
1500 Roastbeef, rot 2 210 2 200 50-60 auf dem Rost
1500 Roastbeef, rosa 2 210 2 200 60-70 auf dem Rost
1500 Roastbeef, durch 2 210 2 200 70-80 auf dem Rost
2000 Schweineschulter 2 180 2 175 120-150 mit Schwarte
1200 Lamm 2 1 90 2 1 75 110-130 Bein
1000 Hähnchen 2 190 2 175 60-80 komplett
5000 Truthahn 2 180 2 160 210-240 komplett
1500 Ente 2 175 2 160 120-150
3000 Gans 2 175 2 160 150-200 komplett
1200 Hase 2 190 2 175 60-80 A-Stücke
1200 Schweinshaxen 2 180 2 160 100-120 2 Stücke
Hackbraten 2 180 2 160 40-60 in Brotpfanne
WILD
1500 Hasenrücken 2 190 2 175 150-200 A-Stücke
800 Fasan 2 190 2 175 90-120 komplett
FISCH
1200 Bachforelle/Zahnbrassen 2 1 90 2(1u3)* 175 30-40 3-4 Fische
1500 Thunfisch/Lachs 2 190 2(1u3)* 175 25-535 4-6 Stücke
(*)
Falls Sie gleichzeitig mehr als ein Gericht garen, empfehlen wir diese, auf den in Klammern angegebenen
Ebenen abzustellen.
Ebene
4
3
2
1
temp.
°C
Heißluft
Ebene
4
temp.
3
°C
2
1
14 electrolux
Garzeit
in
NOTIZEN
minuten
Kuchenform
komplett
Page 15
Zeitangaben beinhalten kein Vorheizen.
Den leeren Backofen immer 10 Minuten vorheizen!
Herkömmliches Grillen
°C
Kochzeit in
Minuten
1 Seite
2 Seite
Menge
ART DER SPEISE
Stücke
Rinderfiletsteaks 4 800 3 250 12-15 12-14
Rinderfilet 4 600 3 250 10-12 6-8
Grilwürste 8
Schweinenacksteaks 4 600 3 250 12-16 12-14
Hamburger 6 600 3 250 10-15 8-10
ähnchenbrürste 4 400 3
H
H
ähnchen, (in 2 Hälften) 2 1000 3
Spieße 4
Fischfilet (Seezunge) 4 400 3 250 12-14 10-12
Belegte Toastbrote 4-6
Wei
ßbrotscheiben
Die angegebenen Temperaturen sind Richtwerte. Vielleicht müssen die Temperaturen persönlichen
Ansprüchen angepaßt werden.
4-6
Gr.
—
—
—
—
Ebene
Grill
4
3
temp.
2
1
3 250 8-10 4-6
250 12-15 12-14
3 250 10-15 10-12
3 250 5-7
3 250 2-4 2-3
250 30-35 25-30
electrolux 15
Page 16
Pflege und Wartung
Vor dem Reinigen den Backofen
ausschalten und abkühlen lassen.
Das Gerät darf nicht mit einem
Heißdampf- oder Dampfstrahlreiniger gereinigt werden.
Wichtig: Vor jeder Reinigungsarbeit das
Gerät unbe-dingt spannungslos machen.
Für eine lange Lebensdauer des Gerätes ist
es nötig, regelmässig folgende Reinigungsarbeiten vorzunehmen:
- Durchführung nur bei abgekühltem
Backofen.
- Die emaillierten Teile mit Seifenlauge
reinigen.
- Keine Scheuermittel verwenden.
- Edelstahlteile und Glasscheiben mit
einem weichen Tuch trockenreiben.
- Bei hartnäckigen Flecken handelsübliche
Reinigungsmittel für Edelstahl oder
warmen Essig benutzen.
Die Emaillierung des Backofens ist äusserst
haltbar und weitgehenst unempfindlich. Die
Einwirkung von heissen Fruchtsäuren
(Zitronen, Pflaumen oder ähnliches) können
jedoch auf der Emailoberfläche belibende,
matte und rauhe Flecken hinterlassen.
Solche Flecken in der Hochglanzoberfläche
der Emaille beeinträchtigen die Funktion des
Backofens jedoch nicht. Reinigen Sie den
Backofen grundsätzlich nach jedem
Gebrauch. Verschmutzungen lassen sich so
am leichtesten entfernen. Ein weiteres
Einbrennen wird damit vermieden.
Geräte in Edelstahl oder Aluminium
Wir empfehlen, die Backofentür nur mit
einem nassen Schwamm zu reinigen und
hinterher mit einem weichen Tuch zu
trocknen. Verwenden Sie keine scheuernde
Gegenstände, Säure oder Scheuermittel, da
diese die Oberfläche schädigen können.
Reinigen Sie die Blende mit der gleichen
Sorgfalt.
16 electrolux
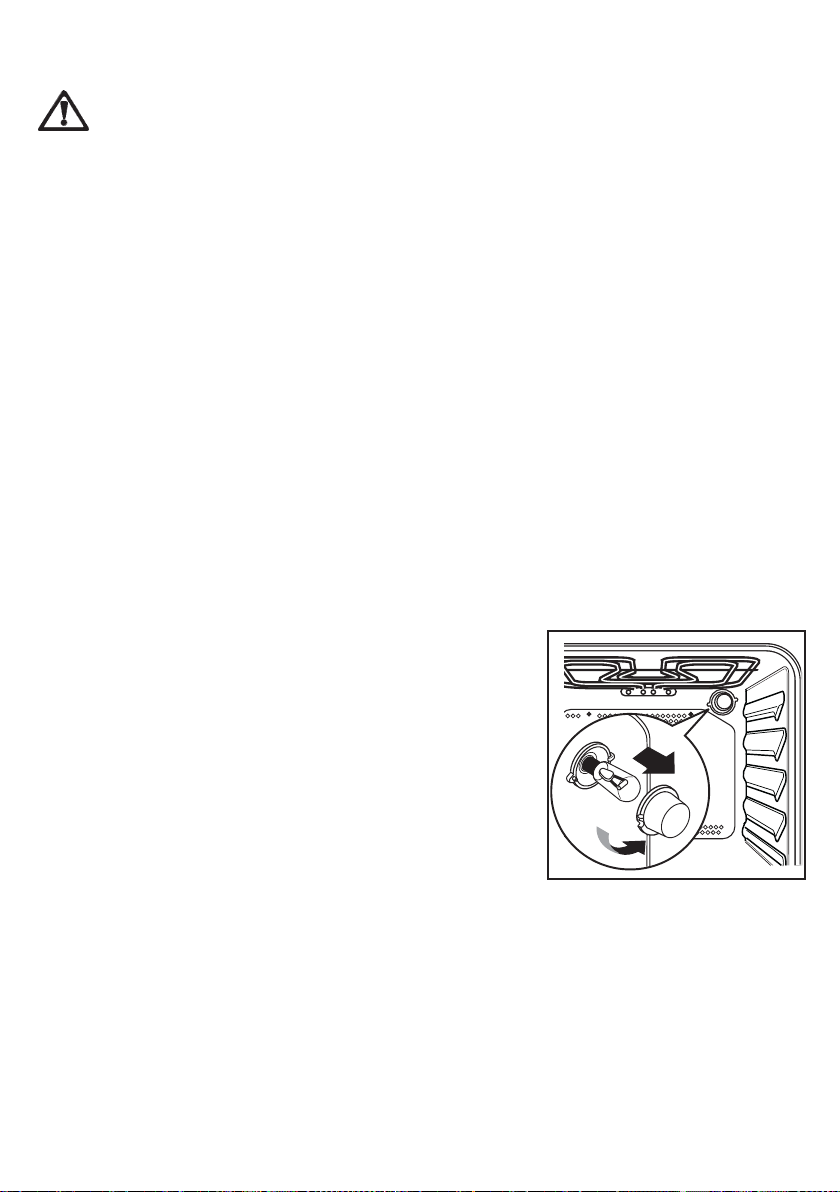
Austausch der Backofenlampe
Bei einem Ersatz der Backofenlampe muss
die neue Lampe folgende Merkmale
aufweisen:
- Elektrische Leistung: 15 W/ 25 W;
- Elektrische Spannung: 230 V (50 Hz);
- Hitzebeständigkeit von 300°C;
- Lampenfassung: E14.
Sie können Ersatzlampen bei Ihrem
Fachhändler beziehen.
Auswechseln der Backofenlampe
(Abb. 6):
)
1. Vergewissern Sie sich, dass die
Stromversorgung des Ofens
unterbrochen ist.
2. Drehen Sie Glasabdeckung nach links.
3. Entfernen Sie die durchgebrannte Lampe
und setzen Sie eine neue ein.
4. Bringen Sie die Glasabdeckung wieder
an.
5. Schalten Sie den Strom wieder ein.
Abb. 6
Page 17

Backofentür
Die Backofentür besteht aus zwei Glasscheiben. Zum bequemen Reinigen lässt
sich die Backofentür aushängen und können die internen Scheiben herausgezogen
werden.
Achtung - Die Backofentür muss
vor dem Reinigen ausgebaut
werden. Die Backofentür könnte
plötzlich zuschlagen, wenn Sie
versuchen, die Innenscheiben
aus der eingehängten Ofentür zu
ziehen.
Gehen Sie beim Ausbau wie folgt vor.
)
1. Die Tür ganz öffnen;
2. gehen Sie zu den beiden Türscharnieren
(Abb. 7);
3. heben Sie die Hebel auf den Scharnieren
an und klappen Sie diese (Abb. 8) nach
vorne;
4. fassen Sie die Tür an den beiden Außenkanten und schließen Sie die Tür nur
ca.45° (Abb. 9);
5. ziehen Sie die Tür nach vorne aus ihrem
Sitz (Abb. 9);
6. legen Sie die Tür auf festem Boden ab
(Abb. 10) und schützen Sie die Oberfläche des Griffs mit einem weichen Tuch;
Abb. 7
Abb. 8
Abb. 9
Abb. 10
electrolux 17
Page 18

7. betätigen Sie zum Entfernen der
Innenscheiben das Verriegelungsystem
(Abb. 11);
8. drehen Sie die beiden Feststeller um 90°
und ziehen Sie diese aus ihrem Sitz
(Abb. 12);
9. heben Sie die obere Scheibe vorsichtig
etwas an und ziehen Sie die Scheibe
heraus, die an dem Zierrahmen auf allen
vier Seiten erkennbar ist (Abb. 13).
Reinigen Sie die Backofentür mit lauwarmem
Wasser und einem weichen Tuch.
Verwenden Sie zum Reinigen keine
Metallschwämmchen, Metallwolle,
scheuernde Schwämme oder Säuren, die
die wärmereflektierende Spezialoberfläche
der Innenscheiben beschädigen können.
Nach der Reinigung die Innenscheiben wieder
in die Tür einsetzen. Die Tür in den Ofen
einbauen; gehen Sie dabei in der zum Ausbau
umgekehrten Reihenfolge vor. Achten Sie
auf die richtige Ausrichtung der Scheiben.
Abb. 11
90°
18 electrolux
Abb. 12
2
1
Abb. 13
Page 19

Gehen Sie wie folgt vor:
)
a) Die Innenscheibe mit dem Zierrahmen
auf den 4 Seiten muss so eingebaut
werden, dass der Siebdruck nach der
Außenseite des Ofens weist. Die
Scheibe ist richtig eingesetzt, wenn bei
Berührung der sichtbaren Oberfläche
mit den Fingern keine Rauheit auf Höhe
des Siebdrucks zu fühlen ist.
Die Innenscheibe muss in ihren Sitz gemäß
Abb. 14 eingesetzt werden. Nach dem
Einsetzen der Scheiben in die Backofentür
die Scheiben in umgekehrter Reihenfolge
zur Vorgehensweise des Punktes 8. sichern.
Nie die warme Backofentür
reinigen, da die Scheiben
zerspringen können. Wenn Sie
Kratzer oder Risse auf der
Glasscheibe feststellen, rufen Sie
sofort den Kundendienst und
lassen Sie die Scheiben
auswechseln.
Edelstahl- oder Aluminiummodelle:
Reinigen Sie die Backofentür und die
Bedienblende aus Edelstahl oder Aluminium
mit einem feuchten Schwamm und trocken
Sie anschließend mit einem weichen Tuch
sorgfältig ab. Verwenden Sie zum Reinigen
keine Metallschwämmchen, Metallwolle,
Säuren oder Scheuermittel, die die
Oberflächen verkratzen können.
Abb. 14
Reinigen der
Backofentürdichtung
Um die Öffnung des Backofens ist eine
Dichtung angebracht.
Kontrollieren Sie regelmäßig den
Zustand der Dichtung. Die Dichtung
bei Bedarf reinigen, ohne dazu
Gegenstände oder Scheuermittel zu
verwenden. Wenn Sie
Beschädigungen der Dichtung
feststellen, rufen Sie sofort den
nächsten Kundendienst an. Benutzen
Sie den Ofen nicht, solange die
Dichtung nicht ersetzt worden ist.
electrolux 19
Page 20

Wenn etwas falsch läuft
Wenn das Gerät nicht richtig arbeitet, bitte vor Anforderung des Electrolux Service-Centers
folgendes überprüfen:
PROBLEM
Der Backofen schaltet nicht ein.
Die Backofen-Temperaturlampe
brennt nicht.
Die Backofen-Glühlampe brennt
nicht.
Die Zubereitung der Gerichte dauert
zu lange oder sie garen zu schnell.
LÖSUNG
Prüfen, ob der Backofen auf manueller Betrieb
steht und die Schalterknebel auf einer
Funktion und einer Temperatur stehen.
oder
Prüfen, ob das Gerät ordentlich
angeschlossen ist und der SteckdosenSchalter oder die Netzstrom-zufuhr zum
Backofen auf EIN stehen.
Den Temperaturwähler auf eine Temperatur
stellen.
oder
Den Backofen-Funktionsschalter auf eine
Funktion stellen.
Den Backofen-Funktionsschalter auf eine
Funktion stellen.
oder
Eine neue Backofen-Glühbirne kaufen, ggf.
beim Electrolux Service-Center anfordern und
gemäß der Anweisung auf dieser
Gebrauchsanweisung, montieren.
Ziehen Sie den Inhalt dieser Anweisung zu
Rate, besonders das Kapitel „Ratschläge zum
Backofen-Gebrauch“.
Dampf und Kondenswasser setzen
sich auf den Speisen und in der
Backofenmuffel ab.
20 electrolux
Wenn der Garvorgang beendet ist, die
Gerichte nicht länger als 15-20 Minuten im
Backofen stehenlassen.
Page 21

Technische Daten
Einbaunische
Höhe in Schrank: mm 580
unterbau: mm 593
Breite mm 560
Tiefe mm 550
Backofen
Höhe mm 335
Breite mm 405
Tiefe mm 400
Nutzinhalt l 56
Heizleistung (W)
Unterhitze 1000 W
Oberhitze 800 W
Ober- und Unterhitze 1800 W
Grill 1650 W
Backofen-Lampe 25 W
Motor des Heißluftgebläses 25 W
Motor der Kühlungsbelüftung 25 W
Gesamtanschlusswert 1875 W
Backofen-Thermostat 50 °C - 250 °C
Betriebsspannung (50 Hz) 230 V
electrolux 21
Page 22

Anweisungen für den Installateur
Einbau und Installation sind streng
unter Beachtung der bestehenden
Vorschriften durchzuführen.
Jegliche Eingriffe müssen bei
ausgeschaltetem Gerät
vorgenommen werden. Eingriff
dürfen nur von anerkannten
Fachleuten durchgeführt werden.
Elektroanschluss
Vor dem Anschluss bitte folgendes beachten:
- Die Sicherung und die Hausinstallation
müssen auf die max. Belastung des
Gerätes ausgelegt sein (siehe
Typenschild).
- Die Hausinstallation muss mit einem vorschriftsmässigen und den geltenden Vorschriften entsprechenden Erdanschluss
ausgestattet sein.
- Die Steckdose oder der mehrpolige Ausschalter müssen auch nach erfolgter
Installation des Gerätes einfach zu
erreichen sein.
Das Gerät wird mit einem Anschlußkabel
geliefert. Dieses muß mit einem
ordnungsgemäßen Stecker versehen
werden, welcher der Belastung gemäß
Typenschild entspricht. Der Stecker muß in
eine ordnungsgemäße Steckdose passen.
Als Anschlußleitungen sind, unter
Berücksichtigung des jeweils erforderlichen
Nennquerschnittes, folgende Typen geeignet:
H07 RN-F, H05 RN-F, H05 RR-F, H05 VV-F,
H05 V2V2-F (T90), H05 BB-F.
Wird der Anschluss ohne Stecker
vorgenommen, oder ist dieser nicht
zugänglich muss zwischen Gerät und
Netzleitung ein mehrpoliger Ausschalter
(z.B. Sicherungen, LS-Schalter) mit
Mindestabstand zwischen den Kontakten
von 3 mm angebracht werden. Der Schalter
darf den Schutzleiter an keinem Punkt
22 electrolux
Page 23

unterbrechen. Der Gelb-grüne Schutzleiter
sollte 2-3 cm länger als alle anderen Kabel
sein.
Das Anschlusskabel muss jedenfalls so ausgelegt sein, dass es an keiner Stelle 50 °C
(über der Raumtemperatur) erreicht.
Nach erfolgtem Anschluss müssen die
Heizelemente geprüft werden, indem sie ca.
3 Minuten lang in Betrieb gesetzt werden.
Klemmenblock
Der Backofen ist mit einem leicht
zugängigen Klemmenblock ausgerüstet,
der ausgelegt ist für den Betrieb an einer
Einphasen-Stromversorgung von 230 V
(Abb. 15).
Der Hersteller lehnt jegliche
Verantwortung ab für den Fall, daß den
Sicherheits-Maßnahmen nicht
entsprochen wurde.
Abb. 15
electrolux 23
Page 24

Einbau-Anweisungen
Zur einwandfreien Funktion des eingebauten
Gerätes muss das Einbaumöbel bzw. die
Einbaunische passende Abmessungen
haben.
Gemäss den bestehenden Vorschriften
müssen alle Teile, die den Berührungsschutz
spannungsführender und betriebsisolierter
Teile gewährleisten, so befestigt sein, dass
sie nicht ohne Werkzeug abgenommen
werden können.
Hierzu gehört auch die Befestigung
eventueller Abschluss-Seiten am Anfang oder
Ende einer Anbaulinie.
Der Berührungsschutz muss auf jeden Fall
durch den Einbau sichergestellt sein.
Das Gerät mit seiner Rückseite bzw, mit
einer Seitenwand an höhere Küchenmöbel,
Geräte bzw. Wände angestellt werden kann.
An die andere Seitenwand dürfen jedoch nur
andere Geräte oder Möbel mit gleicher Höhe
wie das Gerät angestellt werden.
Abb. 16
Abb. 17
Backofenmasse (Abb. 16)
Einbau-Anweisungen
Zur einwandfreien Funktion des eingebauten
Gerätes muss das Einbaumöbel bzw. die
Einbaunische passende Abmessungen
haben (Abb. 17-18).
24 electrolux
550 M
5
6
0
- 5
IN
3
9
5
7
0
0
0
1
÷
0
8
Abb. 18
Page 25

Befestigung im Möbel
1. Die Backofentür öffnen.
2. Das Gerät jeweils links und rechts mit
den mit gelieferten Führungshülsen (A)
und Schrauben (B) am Einbauschrank
befestigen (siehe Abb. 19).
Abb. 19
Kundendienst
Wenn nach den beschriebenen Kontrollen
das Problem im Kapitel "Wenn etwas
falsch läuft" nicht gelöst werden kann, rufen
Sie den nächsten Kundendienst des
Herstellers und geben Sie die Art des
Defektes, das Gerätemodell (Mod.), die
Produktionsnummer (Prod. Nr.) sowie die
Fabrikations-nummer (Ser. Nr.) an,
welche Sie auf dem Typenschild des Ofens
finden.
Die Original-Ersatzteile des Herstellers,
welche mit dem folgenden Markenzeichen
gekennzeichnet sind, finden Sie
ausschließlich in den Zentralen unseres
Kundendienstes sowie
in autorisierten
Ersatzteil-Geschäften.
electrolux 25
Page 26

Europäische Garantie
Für dieses Gerät besteht in den am Ende dieser Benutzerinformation aufgeführten Ländern eine Garantie von Electrolux für den Zeitraum, der in der Gerätegarantie oder andernfalls gesetzlich festgelegt ist. Wenn Sie aus einem dieser Länder in ein anderes der aufgeführten Länder ziehen, wird die Gerätegarantie unter folgenden Voraussetzungen mit
übertragen:
• Die Gerätegarantie beginnt an dem Datum, an dem Sie das Gerät gekauft haben. Dies
wird durch ein gültiges Kaufdokument bescheinigt, das von dem Verkäufer des Gerätes ausgestellt wurde.
• Die Gerätegarantie gilt für denselben Zeitraum und in demselben Ausmaß für Arbeitszeit und Teile, wie sie für dieses spezielle Modell oder diese spezielle Gerätereihe in
Ihrem neuen Aufenthaltsland gelten.
• Die Gerätegarantie ist personengebunden, d. h. sie gilt für den Erstkäufer des Geräts
und kann nicht auf einen anderen Benutzer übertragen werden.
• Das Gerät wird in Übereinstimmung mit der von Electrolux herausgegebenen Anleitung
installiert und verwendet und wird nur im Privathaushalt eingesetzt, d. h. nicht für gewerbliche Zwecke genutzt.
• Das Gerät wird in Übereinstimmung mit allen relevanten Bestimmungen installiert, die
in Ihrem neuen Aufenthaltsland gelten.
Die Bestimmungen dieser europäischen Garantie haben keinerlei Auswirkungen auf die
Rechte, die Ihnen gesetzlich zustehen.
26 electrolux
Page 27

electrolux 27
Page 28

Welcome to the world of Electrolux
Thank you for choosing a first class product from Electrolux, which hopefully
will provide you with lots of pleasure in the future. The Electrolux ambition is to offer
a wide variety of quality products that make your life more comfortable. You find
some examples on the cover in this manual. Please take a few minutes to study
this manual so that you can take advantage of the benefits of your new machine.
We promise that it will provide a superior User Experience delivering Ease-of-Mind.
Good luck!
28 electrolux
Page 29

English
For your safety
It is most important that the instruction book should be retained with the appliance for future
reference. Should the appliance be sold or transferred to another owner, or should you move
house and leave the appliance, always ensure that the book is supplied with the appliance in
order that the new owner can be acquainted with the functioning of the appliance and the
relevant warnings. These warnings are provided in the interest of safety. You must read
them carefully before installing or using the appliance.
Installation
z Any installation work must be undertaken
by a qualified electrician or competent
person.
z Installation and initial adjustment of your
oven MUST be carried out by qualified
personnel in compliance with current
regulations. Specific installation
instructions for the installer are given in this
booklet.
During use
z This appliance has been designed for
cooking edible foodstuffs only, and must
not be used for any other purposes.
z Always stand back from the oven when
opening the oven door during cooking or
at the end of it to allow any build up of
steam or heat to release.
z It is dangerous to alter the specifications
or modify the product in any way.
z Appliances become very hot with use, and
retain their heat for a long period after use.
Care should be taken to avoid touching
heating elements inside the oven.
z Always ensure that the control knobs are
in the “off” position when not in use.
z For hygiene and safety reasons, this
appliance should be kept clean at all times.
A build-up of fats or foodstuffs could result
in a fire.
z Never line any part of the oven with
aluminium foil.
z Easy clean-liners (if provided) should never
be cleaned with any other than soapy water.
z Never use steam or steam machines to
clean the appliance.
z Do not use harsh abrasive cleaners or
sharp metal scraper to clean the oven door
glass since they can scratch the surface,
which may result in shattering of the glass.
z Before any maintenance or cleaning work
is carried out on the appliance, always turn
off the isolator switch at the cooker point,
and allow to cool.
z Ensure that the shelves are put in place in
the correct way.
z This oven (even if it is linked to an electrical
cooking table) is made to function at 230 V
monophase with neutral.
People safety
z This appliance is not intended for use by
children or other persons whose physical,
sensory or mental capabilities or lack of
experience and knowledge prevents them
from using the appliance safely without
supervision or instruction by a responsible
person to ensure that they can use the
appliance safely.
z This appliance is designed to be operated
by adults. Children should not be allowed
to tamper with the controls or play with the
product.
z Children should be supervised at all times
and should not be allowed to touch the hot
surfaces or be in the vicinity when in use or
until the appliance has cooled after use.
z During oven cooking and grilling, the
appliance door and the surrounding parts
are warmed up to a very high temperature.
Be careful and keep children away from
the appliance while you are using it. When
you connect other appliances to a plug near
electrolux 29
Page 30

the oven, check carefully that the wire does
not touch warm parts of the oven and does
not get taken in the oven door.
Environmental information
· After installation, please dispose of the
packaging with due regard to safety and
the environment.
· When disposing of an old appliance, make
it unusable, by cutting off the cable. Remove
any door catches, to prevent small children
being trapped inside.
Technical assistance
z This appliance should be serviced by an
authorized Network Service Centre, and
only genuine spare parts should be used.
z Under no circumstances should you
attempt to repair the appliance yourself.
Repairs carried out by inexperienced
persons may cause injury or serious
malfunctioning. Refer to your local Service
Centre. Always insist on genuine spare
parts.
Guide to use the instructions
The symbol on the product or on its
packaging indicates that this product may not
be treated as household waste. Instead it shall
be handed over to the applicable collection
point for the recycling of electrical and electronic
equipment. By ensuring this product is disposed
of correctly, you will help prevent potential negative consequences for the environment and
human health, which could otherwise be caused
by inappropriate waste handling of this product.
For more detailed information about recycling
of this product, please contact your local city
office, your household waste disposal service
or the shop where you purchased the product.
Safety Instructions
Step by step instructions for an
)
operation
Hints and Tips
Environmental information
This appliance complies with the
following E.E.C. Directives:
- 2006/95 (Low Voltage Directive);
- 89/336 (Electromagnetical Compatibility
Directive);
- 93/68 (General Directives)
and subsequent modifications.
30 electrolux
Page 31

Contents
For your safety 29
When the oven is first installed 31
Description of the appliance 32
Electric oven 33
Hints and tips for using the oven 35
Cooking tables 37
Cleaning and maintenance 39
What happens if something goes wrong 44
Technical data 45
Instructions for the Installer 46
Building-in 47
Service and spare parts 48
European guarantee 48
When the oven is first installed
Before using the appliance,
remove all packaging, both inside
and outside the appliance,
including the advertising labels
and any protective film.
Before cooking for the first time,
carefully wash the oven accessories.
Once the oven has been installed:
)
1. set the thermostat knob to 250;
2. switch the oven function control knob to
fan cooking function ;
3. allow the oven to run empty for
approximately 45 minutes;
4. open a window for ventilation.
During this time, an unpleasant odour may
be emitted. This is absolutely normal, and
is caused by residues of manufacturing.
Repeat this operation for the grill cooking
function for approximately 5-10 minutes.
Once this operation is carried out, let the
oven cool down, then clean the oven cavity
with a soft cloth soaked in warm soapy
water.
Fig. 1
To open the oven door, always
catch the handle in its central
part (Fig. 1).
electrolux 31
Page 32

Description of the appliance
362
4 5
1
9
7
8
1. Control panel
2. Oven thermostat control knob
3. Oven thermostat control light
4. End of cooking programmer
5. Operating control light
6. Oven function control knob
7. Grill
8. Oven lamp
9. Rating plate
32 electrolux
Page 33

Electric oven
0
Oven Function (Fig. 2) and
Thermostat (Fig. 3) control knobs
They enable to select the most appropriate
type of heating for the different cooking
requirements by appropriately connecting
the heating elements and adjusting
temperature to the required level.
OFF position
0
Conventional cooking - The heat
comes from both the top and bottom
element, ensuring even heating
inside the oven.
Grill - The grill element will be on.
Bottom heating element - The heat
comes from the bottom of the oven
only.
Fan cooking - This allows you to roast
or roast and bake simoultaneously
using any shelf, without flavour
transference.
Defrost setting - This setting is
intended to assist in thawing of frozen
food.
End of cooking programmer
This device (Fig. 4) allows you to make the
oven switch off automatically once the preset
time is over. An acousitic signal will be heard
when the cooking is completed.The cooking
duration can be set up to 90 minutes
maximum.
Place food in the oven and turn the oven
function control knob and the thermostat
control knob on the required settings. Turn
the timer knob to maximum time position
("90"), then turn it back to set the required
cooking time. When the cooking time is over,
Fig. 2
Fig. 3
Fig. 4
electrolux 33
Page 34

0
an acoustic alarm will sound and the oven
will switch off automatically.
Turn the timer knob on to set the oven on
manual operation.
Operating control light
It indicates that one or more of the heating
elements are turned on.
Oven thermostat control light
This light goes off when the oven heats up
to the temperature set and comes on again
every time the thermostat cuts in to stabilize
temperature.
Safety thermostat
In order to avoid excessive overheating due
to incorrect use of the appliance or else to a
faulty component, the oven is equipped with
a safety thermostat which cuts off the power
supply if necessary. Operation is restored
automatically when the oven temperature
decreases to normal values. Therefore, if the
thermostat cuts in because you have not
been using the appliance correctly, the oven
can be used again simply by waiting for the
appliance to cool down. If, instead, the
thermostat cuts in because of a faulty
component, you should call the Service
Department.
The cooling fan
The oven is provided with a cooling fan,
meant to keep the front panel, the knobs
and the oven door handle cool.
The fan switches on automatically when the
oven is activated. Warm air is blown out
through the aperture near the oven door
handle. The fan switches off when, after
cooking, the oven function control knob is
set to OFF position
34 electrolux
.
0
Page 35

Hints and tips for using the oven
Always cook with the oven door
closed.
The oven is supplied with an exclusive system
which produces a natural circulation of air
and the constant recycling of steam.
This system makes it possible to cook in a
steamy environment and keep the dishes soft
inside and crusty outside. Moreover, the
cooking time and energy consumption are
reduced to a minimum. During cooking steam
may be produced which can be released when
opening the oven door. This is absolutely
normal.
However, always stand back from the
oven when opening the oven door during
cooking or at the end of it to allow any
build up of steam or heat to release.
Conventional cooking
Heat comes from the top and from the
bottom, therefore it is preferable to use the
central runners.
If cooking requires more heat from the top
or from the bottom use the top or the bottom
runners.
heights means that you can cook several
different dishes at the same time and up to
three tins of biscuits and mini pizzas to be
eaten immediately or subsequently deep
frozen.
Naturally the oven can also be used for
cooking on just one shelf. In this case you
should use the lowest set of runners so that
you can keep an eye on progress more
easily.
In addition, the oven is particularly
recommended for sterilizing preserves,
cooking home-made fruit in syrup, and for
drying mushrooms or fruit.
Grilling
When grilling meat or fish, spread a little oil
on them and always place them on the oven
grid. The shelf level depends on the
thinckness of the food.
Always place the dripping pan at the lowest
level, with some water in it, to avoid smoke
and unpleasant smells.
Some hints
Fan cooking
The food is cooked by means of preheated
air force blown evenly round the inside of
the oven by a fan set on the rear wall of the
oven itself.
Heat thus reaches all parts of the oven evenly
and fast and this means that you can
simultaneously cook different types of foods
positioned on the various oven shelves (Fig.
5). Fan cooking ensures rapid elimination
of moisture and the dryer oven environment
stops the different aromas and flavours from
being transmitted from one food to another.
The possibility of cooking on several shelf
For baking cakes
Cakes require a moderate temperature
(normally between 150 °C and 200 °C). In
addition, the oven must be heated up
beforehand - for about 10 minutes.
Fan cooking
4
3
2
1
Fig. 5
electrolux 35
Page 36

The oven door should not be opened before
at least 3/4 of the set cooking time is up.
Normal short pastry dough should be
cooked in a mould or tin for 2/3 of total
cooking time required and then garnished
as desired before being cooked completely.
Clearly, the remaining cooking time depends
on the type of garnish used (jam, fruit, etc.).
Care should be taken to ensure that any
dough and cake mixes are of the right
consistency since an unduly moist mix
lengthens cooking time unnecessarily. The
raw dough or mix should therefore be fairly
difficult to detach from the spoon or beater.
If three shelves are filled with cakes and tarts
simultaneously, it is advisable to slot in an
extra shelf between the two lower shelves
(Fig. 5).
For cooking meat and fish
Meat cooked in the oven should weigh at
least 1 kg to prevent it from becoming too
dry during cooking. Very tender red meat to
be cooked rare, i.e. well cooked on the
outside but extremely juicy inside, requires
high-temperature cooking (200 °C-250 °C).
White meat, poultry and fish instead require
low-temperature cooking (150 °C-175 °C).
The ingredients for the accompanying sauce
or gravy should be put in the baking pan at
the very beginning only when cooking times
are short.
Otherwise they should be added during the
last half hour. A simple way of checking
whether meat is done or not is to press it
with a spoon; if the meat does not yield under
this pressure it means that it is done to a
turn. In the case of roast beef and fillet
steaks, the inside of which should remain
fairly pink in color, cooking times must be
short.
The meat can be cooked in a baking pan or
else directly on the shelf - in this case a
dripping pan must obviously be placed
underneath the shelf to collect the juice.
Should you cook very fat food, place the
meat directly on the grill and the grill over
the dripping pan in order not to dirty the oven.
Once the meat is cooked, it is advisable to
let it rest for at least 15 minutes before
carving so that the juice does not seep out.
To prevent the formation of too much smoke
in the oven during roasting, it is a good idea
to pour a little water into the dripping pan
and—to prevent steam—to add a little bit
more during cooking if the original amount
dries up too much.
Before serving, the various courses can be
kept hot in the oven which should be turned
down to the minimum temperature.
Warning! - Do not attempt to place
objects on the bottom of the oven and
do not cover it with aluminium foil
while cooking, as you can damage
the enamelled surfaces and the food
you are cooking.
Always place pans, heat-resisting
pans and aluminium foils on the oven
shelves.
Warning! - Be careful when you insert
and extract the oven accessories (e.g.
dripping pan, grid etc...) from the oven
in order not to damage the enamelled
surfaces of the oven cavity.
Cooking times
Cooking times vary according to the type of
food to be cooked, its consistency, and
volume.We suggest that you take particular
note of your first cooking experiments with
the oven, since operating in the same
conditions for the same dishes you will of
course obtain similar results.
Only experience will enable you to make
the appropriate changes to values given on
charts.
36 electrolux
Page 37

Cooking tables
Cooking times do not include pre-heating time. A short oven pre-heating (about 10 minutes) is necessary before any cooking.
Traditional cooking and fan cooking
Traditional
Fan cooking
Level
4
3
2
1
temp.
TYPE OF DISH
Weight (gr.)
cooking
Level
4
3
2
1
temp.
°C
CAKES
Whipped up kneading
Shortbread dough
Butter-milk cheese cake
2 170 2 (1 and 3)* 160 45 ~ 60 In cake mould
2 170 2 (1 and 3)* 160 20 ~ 30 In cake mould
1 160 2 150 60 ~ 80 In cake mould
Apple cake 1 180 2 (1 and 3)* 170 40 ~ 60 In cake mould
Strudel 2 175 2 150 60 ~ 80
Jam-tart 2 175 2 (1 and 3)* 160 30 ~ 40
Fruit cake 1 175 1 160 45 ~ 60 In bread pan
Sponge cake 1 175 2 (1 and 3)* 160 30 ~ 40 In cake mould
Christmas cake 1 170 1 160 40 ~ 60 In cake mould
Plum cake 1 170 1 160 50 ~ 60 In bread pan
Small cakes 2 175 2 (1 and 3)* 160 25 ~ 35 In baking tray
Biscuits 2 160 2 (1 and 3)* 150 20 ~ 30 In baking tray
Meringues 2 100 2 (1 and 3)* 100 90 ~ 120 In baking tray
Buns 2 190 2 (1 and 3)* 180 12 ~ 20 In baking tray
Pastry: Choux 2 200 2 (1 and 3)* 190 15 ~ 25 In baking tray
BREAD AND PIZZA
1000 White bread 1 190 2 180 40 ~ 60 1-2 pieces
500 Rye bread 1 190 1 180 30 ~ 45 In bread pan
500 Bread rolls 2 200 2 (1 and 3)* 175 20 ~ 35 6-8 rolls
250 Pizza 1 210 2 (1 and 3)* 190 15 ~ 30 in baking pan
FLANS
Pasta flan 2 200 2 (1 and 3)* 175 40 ~ 50 in mould
Vegetable flan 2 200 2 (1 and 3)* 175 45 ~ 60 in mould
Quiches 1 200 2 (1 and 3)* 180 35 ~ 45 in mould
Lasagne 2 180 2 160 45 ~ 60 in mould
Cannelloni 2 200 2 175 40 ~ 55 in mould
MEAT
1000 Beef 2 190 2 175 50 ~ 70 On grid
1200 Pork 2 180 2 175 100 ~ 130 On grid
1000 Veal 2 190 2 175 90 ~ 120 On grid
English roast beef
1500
1500 underdone 2 210 2 200 50 ~ 60 On grid
1500 done 2 210 2 200 60 ~ 70 On grid
1500 well done 2 210 2 200 70 ~ 80 On grid
2000 Shoulder of pork 2 180 2 170 120 ~ 150 With rind
1200 Shin of pork 2 180 2 160 100 ~ 120 2 pieces
1200 Lamb 2 190 2 175 110 ~ 130 Leg
1000 Chicken 2 190 2 175 60 ~ 80 Whole
4000 Turkey 2 180 2 160 210 ~ 240 Whole
1500 Duck 2 175 2 160 120 ~ 150 Whole
3000 Goose 2 175 2 160 150 ~ 200 Whole
1200 Rabbit 2 190 2 175 60 ~ 80 Cut in pieces
1500 Hare 2 190 2 175 150 ~ 200 Cut in pieces
800 Pheasant 2 190 2 175 90 ~ 120 Whole
Meat loaf 2 180 2 160 40 ~ 60 in bread pan
FISH
1200 Trout/Sea bream 2 190 2 (1 and 3)* 175 30 ~ 40 3-4 fishes
1500 Tuna fish/Salmon 2 190 2 (1 and 3)* 175 25 ~ 35 4-6 fillets
(*) If you need to cook more than one dish at the same time, we recommend you to place them on the levels
quoted between brackets.
°C
Cooking
time
NOTES
minutes
electrolux 37
Page 38

Cooking times do not include pre-heating time. A short oven pre-heating (about 10 minutes) is necessary before any cooking.
Grilling
°C
Cooking time
(minutes)
Upper
side
Lower
side
Quantity
TYPE OF DISH
Pieces Weight
Fillet steaks
Beef-steaks 4 600 3 250 10 ~ 12 6 ~ 8
Sausages 8 — 3 250 12 ~ 15 10 ~ 12
Pork chops 4 600 3 250 12 ~ 16 12 ~ 14
Chicken (cut in two) 2 1000 3 250 30 ~ 35 25 ~ 30
Kebabs 4 — 3 250 10 ~ 15 10 ~ 12
Chicken (breast) 4 400 3 250 12 ~ 15 12 ~ 14
Hamburger 6 600 3 250 10 ~ 15 8 ~ 10
Fish (fillets) 4 400 3 250 12 ~ 14 10 ~ 12
Sandwiches 4-6 — 3 250 5 ~ 7 —
Toast 4-6 — 3 250 2~4 2 ~ 3
4 800 3 250 12 ~ 15 12 ~ 14
Level
Grilling
4
3
2
1
temp.
The oven temperatures are intended as a guide only. It may be necessary to increase or
decrease the temperatures to suit individual preferences and requirements.
38 electrolux
Page 39

Cleaning and maintenance
Before any cleaning switch the
oven off and let it cool down.
Never use steam or steam
machines to clean the appliance.
Important! Before carrying out
maintenance and cleaning
operations, make sure that your
oven is disconnected from the
mains power supply.
Cleaning must be carried out after the oven
has cooled down. Wash the enamelled parts
with lukewarm water and detergent. Do not
use abrasive products, such as steel wool
pads, acids etc. since these could damage
the various surfaces. Rinse stainless steel
parts with water after use, and dry them with
a soft cloth or chamois leather.
In the case of persistent stains, you can
use normal non-abrasive detergents or
products specific for stainless steel readily
available on the market. Another alternative
is a drop of hot vinegar. When cleaning the
oven door with the glass top cover use just
hot water, taking care to avoid using coarse
cloths or abrasive products.
The hot acids of fruit (e.g. Iemons, stewed
prunes, etc.) leave difficult-to-remove stains
on the enamelled surfaces; this inconvenient
may remove enamel gloss, but, it does not
impair oven operation.
Clean the oven thoroughly after use; in this
way it will be possible to remove cooking
residuals more easily, thus avoiding these
from burning the next time the oven is used.
electrolux 39
Page 40

The oven door
The oven door consists of two panes of
glass. The oven door can be disassembled
and the internal panes can be removed to
make cleaning easier.
Important - Remove the oven door
before cleaning it. The oven door
could abruptly close if you try to
remove the internal panes of glass
when the door is still assembled.
To do so, proceed as follows.
)
1. open the door fully;
2. locate the two door hinges (Fig. 6);
3. lift and turn the levers on the two hinges
(Fig. 7);
4. hold the door by the side edges and
close it slowly but not COMPLETELY
(Fig. 8);
5. pull the door forward, removing it from its
seat (Fig. 8);
6. place the door on a stable surface
protected by a soft cloth to prevent the
handle surface from being damaged (Fig.
9);
Fig. 6
Fig. 7
40 electrolux
Fig. 8
Fig. 9
Page 41

7. release the locking system to remove the
internal panes of glass (Fig. 10);
8. turn the 2 fasteners 90° and extract them
from their seats (Fig. 11);
9. gently lift and carefully take off the
uppermost pane marked by a decorative
frame on 4 sides (Fig. 12).
Clean the oven door with lukewarm water and
a soft cloth. Do not use products such as
scouring pads, steel wool, abrasive sponges
or acids because they could damage the
special heat-reflecting surface of the internal
panes of glass.
After cleaning, reassemble the panes in the
door and then the oven door, following the
procedure described above in reverse. Make
sure you reposition the panes correctly.
Fig. 10
90°
Fig. 11
2
1
Fig. 12
electrolux 41
Page 42

To perform this operation correctly,
proceed as follows:
)
a) the decorated internal pane with a frame
on the 4 sides must be reassembled so
that the screen-printing is facing outwards.
The side of the pane of glass is correct if
you do not feel any roughness near the
screen printing when you pass your fingers
over the surface.
The internal pane of glass must be put back
into the right seats as shown in Fig. 13.
After the panes of glass have been
reassembled in the oven door, perform the
procedure described in point 8. in reverse to
ensure they are locked.
Do not clean the oven door when it
is still hot, as the glass could shatter.
If scratches or deep cracks are
noted on the surface of the glass,
contact the authorised Assistance
Centre for replacing the glass.
Models in stainless steel or
aluminium: It is advisable to clean
the oven door and control panel in
stainless steel or aluminium only with
a moist sponge, carefully drying with a
soft cloth after cleaning. Never use
steel wool, acids or abrasive products
as they can damage the surface.
Fig. 13
How to clean the oven door seal
A rubber seal around the oven opening
guarantees correct operation.
Check the condition of this seal
periodically. If it has to be cleaned,
do not use abrasive objects or
substances. If you notice that the
seal is damaged, contact your local
service centre and do not use the
oven until it has been repaired.
42 electrolux
Page 43

Replacing the oven light
Disconnect the appliance from the
electricity supply.
If the oven bulb needs replacing, it must
comply with the following specifications:
electric power, 15 W/25 W; electric rate, 230
V (50 Hz); resistant to temperatures of 300°C;
connection type: E14. These bulbs are
available from your local Service Force Centre.
To replace the faulty bulb:
)
1. Ensure the oven is disconnected from the
electrical supply.
2. Turn the glass cover anticlockwise (Fig.
14).
3. Remove the faulty bulb and replace it with
the new one.
4. Refit the glass cover.
5. Reconnect to the electrical supply.
Fig. 14
electrolux 43
Page 44

What happens if something goes wrong
If the appliance is not working correctly, please carry out the following checks, before
contacting your local Service Centre.
SYMPTOM
The oven does not come on.
The oven temperature light does
not come on.
The oven light does not come on.
It takes too much time to finish the
dishes, or they are cooked too fast.
SOLUTION
Check the oven is in manual operation and
that both a cooking function and a temperature have been selected
Check the appliance is wired in properly, and
the socket switch or the switch from the
mains supply to the oven are ON.
Turn the thermostat knob on a temperature
or
Turn the oven function control knob on a
function.
Turn the oven function control knob on a
function
or
Buy a new oven light bulb, asking for it to your
local Service Centre and replace it by following
the instruction provided in this booklet.
Refer to the contents of this booklet,
especially to the chapter "Hints and tips for
using the oven".
Steam and condensation settle on
the food and the oven cavity.
44 electrolux
Leave dishes inside the oven no longer than
15-20 minutes after the cooking is completed.
Page 45

Technical data
Dimension of the oven recess
Height in-column 580 mm
undertop 593 mm
Width 560 mm
Depth 550 mm
Dimensions of the oven cavity
Height 335 mm
Width 405 mm
Depth 400 mm
Capacity 56 l
Heating elements ratings
Bottom heating element 1000 W
Top heating element 800 W
Full Oven (Top+Bottom) 1800 W
Grill heating element 1650 W
Oven lamp 25 W
Convection fan 25 W
Cooling fan 25 W
Maximum power rating 1875 W
Oven thermostat regulation: from 50°C up
to 250°C
Voltage tension (50 Hz) 230 V
electrolux 45
Page 46

Instructions for the Installer
The instructions given below are
designed specifically for a
qualified installer and should aid
him or her to perform all
installation, adjustment, and
maintenance operations with
absolute precision and in
compliance with all current
legislation and regulations. We
strongly recommend that all
operations for the installation of
your appliance be carried out by
Qualified Personnel in
accordance with existing rules
and regulations.
Electrical connection
Prior to making the electrical connection,
make sure that:
— the protection fuse and the domestic
wiring system are suitable to carry the
total electric load of the oven (see rating
plate);
— your domestic wiring system has an
efficient earth connection in compliance
with rules and laws in force;
— the wall socket or the omnipole switch
used for the electrical connection can
easily be reached after the oven is built
in.
yellow ground wire must not be interrupted
by the switch and it should be 2-3 cm. longer
than the other cables. The supply cable must
in all cases be laid out in such a way as to
ensure that it does not reach at any given
point a temperature 50°C higher than the
ambient temperature.
Suitable power supply cables are the
following types, considering the respective
necessary section of cable: H07 RN-F, H05
RN-F, H05 RR-F, H05 VV-F, H05 V2V2-F
(T90), H05 BB-F.
Terminal block
The oven has an easily accessible terminal
block, which is meant to work with an
electric single-phase rate of 230 V (Fig. 15).
The Manufacturer disclaims any liability
in case these accident-preventing rules
are not observed.
This appliance is delivered with an electric
supply cable.
A proper plug, according to the electric load
specified on the rating plate, must be fitted
to the cable. The plug is to be inserted into
a suitable wall socket. If you require a direct
connection to the electric network (mains),
it will be necessary to fit between the
appliance and the mains an omnipole switch,
with a minimum gap between contacts of 3
mm, suitable for the required load and in
compliance with rules in force. The green &
46 electrolux
Fig. 15
Page 47

Building-in
To ensure correct operation of the built-in
assembly, the kitchen cabinet and the
recess for the built-in appliance must have
suitable dimensions.
When the appliance is fitted-in, there must
be no open spaces left and it must be
closed on all sides by the kitchen furniture
to prevent the possibility of inadvertently
touching “live” (current carrying) parts of the
oven. All parts ensuring such a protection,
including any covering panel (for instance,
if the appliance is installed at the end or at
the beginning of a kitchen counter) must be
fastened in such a way as to prevent removal
of the same without the aid of some tool.
This appliance can be placed with its back
and with one side close to appliances or
walls of higher height. The other side,
instead, must be placed close to furniture
or appliances, having the same height.
Fig. 16
Fig. 17
Overall oven dimensions (Fig. 16)
In-Column recess dimensions
The recess must have the dimensions
shown in Fig. 17.
Undertop recess dimensions
The recess must have the dimensions shown
in Fig. 18.
Securing the oven to the cabinet
1. Fit the appliance into the cabinet recess.
2. Open the oven door and secure the oven
to the kitchen cabinet by placing the four
distance holders (A) in the holes provided
in the oven frame and then inserting the
four wood screws (B) (Fig. 19).
IN
M
0
5
5
560 - 570
electrolux 47
3
9
5
80÷100
Fig. 18
Fig. 19
Page 48

Service and spare parts
If after the checks listed in the chapter
"What happens if something goes wrong",
the appliance still does not work correctly,
contact your local Service Centre,
specifying the type of malfunctioning, the
appliance model (Mod.), the product
number (Prod. No.) and the serial number
(Ser. No.) marked on the identification
plate. This plate is placed on the front
external edge of the oven cavity.
Original spare parts, certified by the product
manufacturer and carrying this symbol, are
only available at our
Service Centre and
authorized spare parts
shops.
European guarantee
This appliance is guaranteed by Electrolux in each of the countries listed at the back of
this user manual, for the period specified in the appliance guarantee or otherwise by law.
If you move from one of these countries to another of the countries listed below the
appliance guarantee will move with you subject to the following qualifications:
• The appliance guarantee starts from the date you first purchased the appliance which
will be evidenced by production of a valid purchase document issued by the seller of
the appliance.
• The appliance guarantee is for the same period and to the same extent for labour and
parts as exists in your new country of residence for this particular model or range of
appliances.
• The appliance guarantee is personal to the original purchaser of the appliance and
cannot be transferred to another user.
• The appliance is installed and used in accordance with instructions issued by Electrolux
and is only used within the home, i.e. is not used for commercial purposes.
• The appliance is installed in accordance with all relevant regulations in force within your
new country of residence.
The provisions of this European Guarantee do not affect any of the rights granted to you by
law.
48 electrolux
Page 49

electrolux 49
Page 50

EOB 31002
0,79 kWh
0,78 kWh
56,0
43 min.
41 min.
1130 cm
²
50 electrolux
Page 51

electrolux 51
Page 52

www.electrolux.cz
www.electrolux.hr
www.electrolux.hu
www.electrolux.it
www.electrolux.pl
www.electrolux.ro
www.electrolux.ru
www.electrolux.si
35694-2602 04/08 R.A
 Loading...