

Page 1
ENN2903COW
................................................ .............................................
EN FRIDGE FREEZER USER MANUAL 2
FR RÉFRIGÉRATEUR/
CONGÉLATEUR
DE KÜHL - GEFRIERSCHRANK BENUTZERINFORMATION 49
KK ТОҢАЗЫТҚЫШ-
МҰЗДАТҚЫШ
ES FRIGORÍFICO-
CONGELADOR
NOTICE D'UTILISATION 25
ҚОЛДАНУ ТУРАЛЫ
НҰСҚАУЛАРЫ
MANUAL DE
73
95
INSTRUCCIONES
Page 2
www.electrolux.com
2
CONTENTS
1. SAFETY INFORMATION . . . . . . . . . . . . . . . . . . . . . . . . . . . . . . . . . . . . . . . . . . . . . . . . . . . 3
2. CONTROL PANEL . . . . . . . . . . . . . . . . . . . . . . . . . . . . . . . . . . . . . . . . . . . . . . . . . . . . . . . 5
3. DAILY USE . . . . . . . . . . . . . . . . . . . . . . . . . . . . . . . . . . . . . . . . . . . . . . . . . . . . . . . . . . . . . 7
4. HELPFUL HINTS AND TIPS . . . . . . . . . . . . . . . . . . . . . . . . . . . . . . . . . . . . . . . . . . . . . . . . 9
5. CARE AND CLEANING . . . . . . . . . . . . . . . . . . . . . . . . . . . . . . . . . . . . . . . . . . . . . . . . . . . 10
6. WHAT TO DO IF… . . . . . . . . . . . . . . . . . . . . . . . . . . . . . . . . . . . . . . . . . . . . . . . . . . . . . . 13
7. INSTALLATION . . . . . . . . . . . . . . . . . . . . . . . . . . . . . . . . . . . . . . . . . . . . . . . . . . . . . . . . . 14
8.
NOISES . . . . . . . . . . . . . . . . . . . . . . . . . . . . . . . . . . . . . . . . . . . . . . . . . . . . . . . . . . . . . . 21
9. TECHNICAL DATA . . . . . . . . . . . . . . . . . . . . . . . . . . . . . . . . . . . . . . . . . . . . . . . . . . . . . . 23
10.
ENVIRONMENT CONCERNS . . . . . . . . . . . . . . . . . . . . . . . . . . . . . . . . . . . . . . . . . . . . . . 23
WE’RE THINKING OF YOU
Thank you for purchasing an Electrolux appliance. You’ve chosen a product that brings with it
decades of professional experience and innovation. Ingenious and stylish, it has been designed
with you in mind. So whenever you use it, you can be safe in the knowledge that you’ll get great
results every time.
Welcome to Electrolux.
Visit our website for:
Get usage advice, brochures, trouble shooter, service information:
www.electrolux.com
Register your product for better service:
www.electrolux.com/productregistration
Buy Accessories, Consumables and Original spare parts for your appliance:
www.electrolux.com/shop
CUSTOMER CARE AND SERVICE
We recommend the use of original spare parts.
When contacting Service, ensure that you have the following data available.
The information can be found on the rating plate. Model, PNC, Serial Number.
Warning / Caution-Safety information
General information and tips
Environmental information
Subject to change without notice.
Page 3
ENGLISH 3
1.
SAFETY INFORMATION
In the interest of your safety and to ensure
the correct use, before installing and first
using the appliance, read this user manual
carefully, including its hints and warnings.
To avoid unnecessary mistakes and accidents, it is important to ensure that all
people using the appliance are thoroughly
familiar with its operation and safety features. Save these instructions and make
sure that they remain with the appliance if
it is moved or sold, so that everyone using
it through its life will be properly informed
on appliance use and safety.
For the safety of life and property keep
the precautions of these user's instructions as the manufacturer is not responsible for damages caused by omission.
1.1 Children and vulnerable
people safety
• This appliance is not intended for use
by persons (including children) with reduced physical, sensory or mental capabilities, or lack of experience and
knowledge, unless they have been given supervision or instruction concerning
use of the appliance by a person responsible for their safety.
Children should be supervised to ensure that they do not play with the appliance.
• Keep all packaging well away from children. There is risk of suffocation.
• If you are discarding the appliance pull
the plug out of the socket, cut the connection cable (as close to the appliance
as you can) and remove the door to
prevent playing children to suffer electric shock or to close themselves into it.
• If this appliance featuring magnetic
door seals is to replace an older appliance having a spring lock (latch) on the
door or lid, be sure to make that spring
lock unusable before you discard the
old appliance. This will prevent it from
becoming a death trap for a child.
1.2 General safety
WARNING!
Keep ventilation openings, in the appliance enclosure or in the built-in structure,
clear of obstruction.
• The appliance is intended for keeping
foodstuff and/or beverages in a normal
household as explained in this instruction booklet.
• Do not use a mechanical device or any
artificial means to speed up the thawing
process.
• Do not use other electrical appliances
(such as ice cream makers) inside of refrigerating appliances, unless they are
approved for this purpose by the manufacturer.
• Do not damage the refrigerant circuit.
• The refrigerant isobutane (R600a) is
contained within the refrigerant circuit of
the appliance, a natural gas with a high
level of environmental compatibility,
which is nevertheless flammable.
During transportation and installation of
the appliance, be certain that none of
the components of the refrigerant circuit become damaged.
If the refrigerant circuit should become
damaged:
– avoid open flames and sources of ig-
nition
– thoroughly ventilate the room in
which the appliance is situated
• It is dangerous to alter the specifications or modify this product in any way.
Any damage to the cord may cause a
short-circuit, fire and/or electric shock.
WARNING!
Any electrical component (power
cord, plug, compressor) must be
replaced by a certified service
agent or qualified service personnel to avoid hazard.
1.
Power cord must not be lengthened.
2.
Make sure that the power plug is
not squashed or damaged by the
back of the appliance. A squashed
or damaged power plug may overheat and cause a fire.
3.
Make sure that you can come to
the mains plug of the appliance.
Page 4

www.electrolux.com
4
• This appliance is heavy. Care should be
• Do not remove nor touch items from
• Avoid prolonged exposure of the appli-
• Bulb lamps (if foreseen) used in this ap-
1.3 Daily Use
• Do not put hot pot on the plastic parts
• Do not store flammable gas and liquid
• Do not place food products directly
• Frozen food must not be re-frozen once
• Store pre-packed frozen food in ac-
• Appliance's manufacturers storage rec-
• Do not place carbonated or fizzy drinks
• Ice lollies can cause frost burns if con-
1.4 Care and cleaning
• Before maintenance, switch off the ap-
• Do not clean the appliance with metal
4.
Do not pull the mains cable.
5.
If the power plug socket is loose,
do not insert the power plug. There
is a risk of electric shock or fire.
6.
You must not operate the appliance without the lamp cover (if
foreseen) of interior lighting.
taken when moving it.
the freezer compartment if your hands
are damp/wet, as this could cause skin
abrasions or frost/freezer burns.
ance to direct sunlight.
pliance are special purpose lamps selected for household appliances use
only. They are not suitable for household room illumination.
in the appliance.
in the appliance, because they may explode.
against the air outlet on the rear wall. (If
the appliance is Frost Free)
it has been thawed out.
cordance with the frozen food manufacturer's instructions.
ommendations should be strictly adhered to. Refer to relevant instructions.
in the freezer compartment as it creates
pressure on the container, which may
cause it to explode, resulting in damage
to the appliance.
sumed straight from the appliance.
pliance and disconnect the mains plug
from the mains socket.
objects.
• Do not use sharp objects to remove
frost from the appliance. Use a plastic
scraper.
• Regularly examine the drain in the refrigerator for defrosted water. If necessary, clean the drain. If the drain is
blocked, water will collect in the bottom
of the appliance.
1.5 Installation
For electrical connection carefully
follow the instructions given in
specific paragraphs.
• Unpack the appliance and check if
there are damages on it. Do not connect the appliance if it is damaged. Report possible damages immediately to
the place you bought it. In that case retain packing.
• It is advisable to wait at least four hours
before connecting the appliance to allow the oil to flow back in the compressor.
• Adequate air circulation should be
around the appliance, lacking this leads
to overheating. To achieve sufficient
ventilation follow the instructions relevant to installation.
• Wherever possible the back of the
product should be against a wall to
avoid touching or catching warm parts
(compressor, condenser) to prevent
possible burn.
• The appliance must not be located
close to radiators or cookers.
• Make sure that the mains plug is accessible after the installation of the appliance.
• Connect to potable water supply only (If
a water connection is foreseen).
1.6 Service
• Any electrical work required to do the
servicing of the appliance should be
carried out by a qualified electrician or
competent person.
• This product must be serviced by an
authorized Service Centre, and only
genuine spare parts must be used.
Page 5
1.7 Environment Protection
This appliance does not contain
gasses which could damage the
ozone layer, in either its refrigerant
circuit or insulation materials. The
appliance shall not be discarded
together with the urban refuse and
rubbish. The insulation foam con-
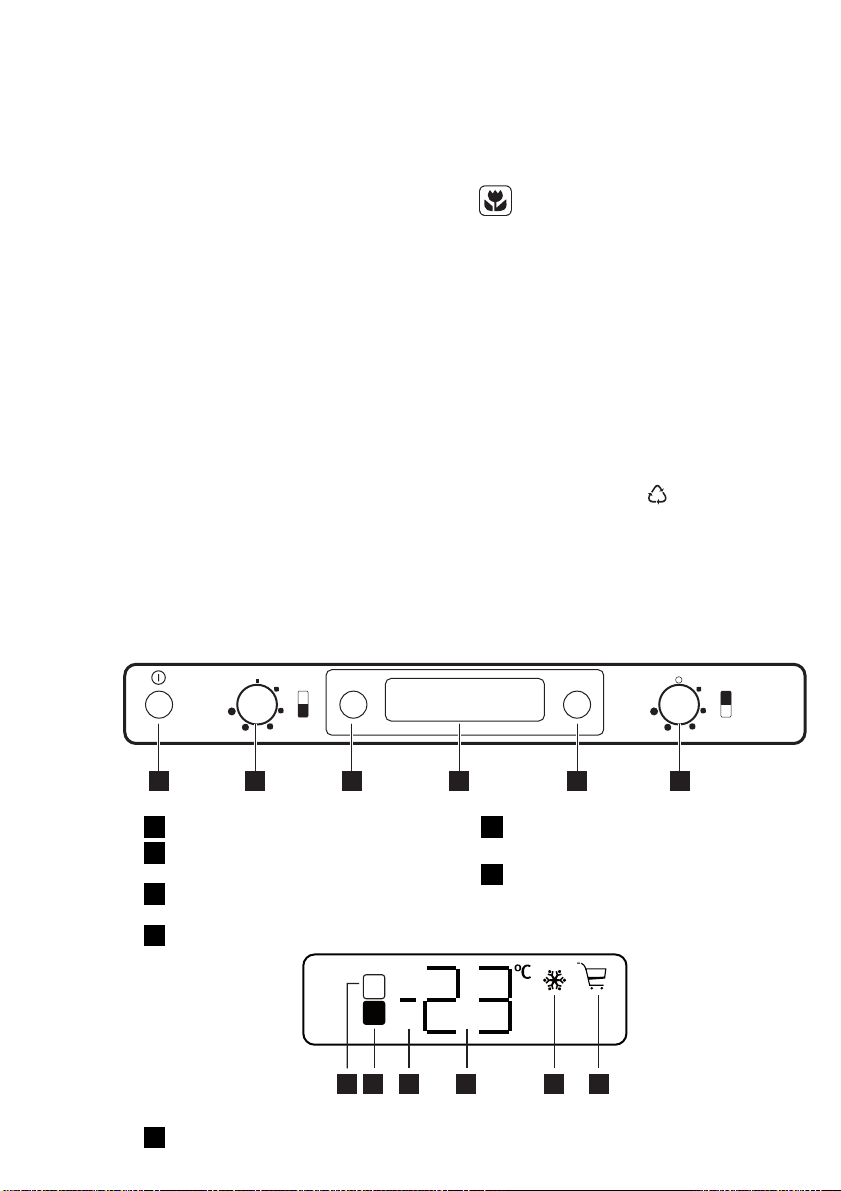
2. CONTROL PANEL
123 4 5 6
ENGLISH 5
tains flammable gases: the appliance shall be disposed according
to the applicable regulations to
obtain from your local authorities.
Avoid damaging the cooling unit,
especially at the rear near the heat
exchanger. The materials used on
this appliance marked by the sym-
are recyclable.
bol
MODE˚C
ON/OFF switch
1
Freezer temperature regulator
2
Fridge-Freezer temperature indication
3
button
Display
4
1 2 3 4 5 6
Fridge compartment indicator
1
Freezer compartment indicator
2
Positive or negative temperature indi-
3
cator
Temperature indicator
4
Action Freeze function
5
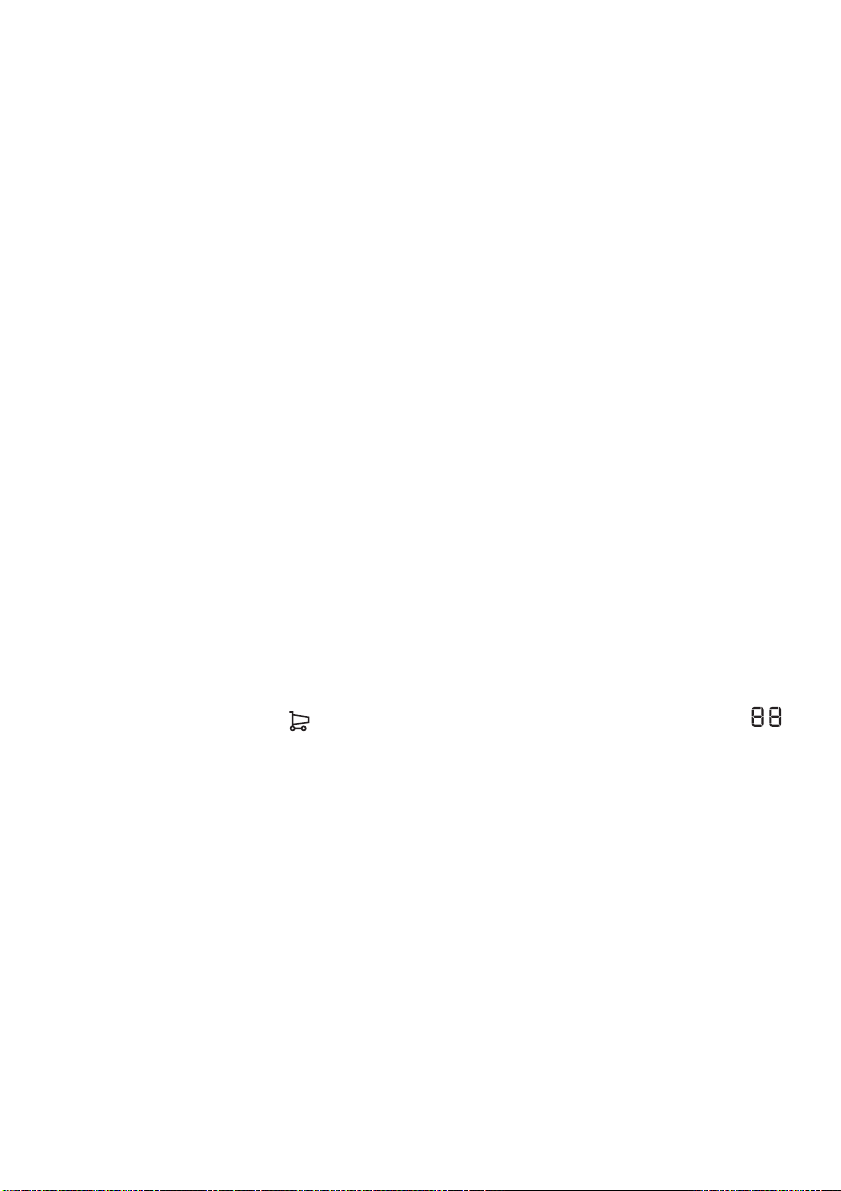
Shopping function
6
2.2 Switching on
After plugging the plug into the power
outlet, if the display is not illuminated,
press ON/OFF switch.
As soon as the appliance is turned on, the
following signals will appear on the control
panel:
Function button
5
Alarm reset switch
Fridge temperature regulator
6
2.1 Display
• Positive or negative temperature indicator will be positive, indicating that the
temperature is positive
• the temperature flashes, the background of the display is red and you will
hear a buzzer.
Press Function button and the buzzer will
go off (also refer to "Excessive temperature alarm" ).
Set the desired temperature (refer to
"Temperature regulation").
2.3 Switching off
The appliance is shut off by pressing ON/
OFF switch for more than 1 second.
After this, a countdown of the temperature from -3 -2 -1 will be shown.
Page 6

www.electrolux.com
6
When the appliance is switched off, Display also goes off.
2.4 Switching off the fridge
compartment
To switch off the refrigerator compartment, rotate the Fridge temperature setting regulator counter- clockwise till position "O".
The freezer compartment will keep on
working.
Once the refrigerator compartment is shut
off, the only temperature which is indicated is the one of the freezer compartment.
In this condition, the lighting in the refrigerator compartment will be switched off.
2.5 Temperature Indication
Each time the Fridge-Freezer temperature
indication button is pressed, the display
indicates in sequence:
1.
2.
In any case, after 10 seconds normal display conditions are restored.
– The Fridge compartment indicator
is on.
– The display indicates the fridge
temperature.
– The Freezer compartment indicator
1)
is on.
– The display indicates the freezer
temperature.
The temperature of the fridge compartment may be regulated by rotating the
Fridge temperature regulator, and may
vary between more or less +2°C and
+8°C.
The temperature of the freezer compartment may be regulated by rotating the
Freezer temperature regulator, and may
vary between more or less -15°C and
-24°C.
For a correct storage of the food the following temperatures should be set:
+5°C in the fridge
-18°C in the freezer.
During normal functioning the Temperature indicator shows the temperature currently set.
To operate the appliance, proceed as follows:
• turn the Temperature regulator clockwise to obtain the maximum coldness
• turn the Temperature regulator counterclockwise to obtain the minimum coldness.
The intermediate position is usually the
most suitable.
However, the exact setting should be
chosen keeping in mind that the temperature inside the appliance depends on:
• room temperature
• how often the door is opened
• the quantity of food stored
• the location of the appliance.
2.6 Functions menu
Each time Function button is pressed, the
following functions are activated in a
clockwise direction:
• Action Freeze function
• Shopping function
• no symbol: normal operation.
You can set one function ON at a
time.
To set the functions OFF, press the Function button several times until no icon appears.
2.7 Temperature regulation
The temperature within the appliance is
controlled by the Temperature regulator.
1)
In normal conditions.
2.8 Shopping Function
If you need to insert a large amount of
warm food, for example after doing the
grocery shopping, we suggest to activate
the Shopping function to chill the products more rapidly and to avoid warming
the other food which is already in the refrigerator.
The Shopping function is activated by
pressing Function button (several times if
necessary) until the corresponding icon
appears
The Shopping function shuts off automatically after approximately 6 hours.
It is possible to deactivate the function at
any time by pressing Function button (see
"Activation of functions" ) .
.
Page 7
2.9 Action Freeze Function
To freeze fresh foods, you will need to activate the Action Freeze function. Press
Function button (several times if necessary) until the corresponding icon appears.
This function stops automatically after 52
hours.
It is possible to deactivate the function at
any time by pressing Function button (refer to "Functions Menu").
2.10 Excessive temperature
alarm
An increase in the temperature in the
freezer compartment (for example due to
a power failure) is indicated by:
• flashing temperature
• freezer compartment flashing (Freezer
compartment indicator )
• red illumination of display
3. DAILY USE
ENGLISH 7
• sounding of buzzer
•alarm symbol.
When normal conditions are restored:
• the acoustic signal shuts off
• the temperature value continues to
flash
• the display illumination remains red.
When you press Function button / Alarm
reset switch to deactivate the alarm, the
highest temperature reached in the com-
partment appears on indicator
some seconds.
At this point the flashing stops and the
display illumination changes over from red
to white.
During the alarm phase, the buzzer can
be switched off by pressing Function button / Alarm reset switch.
The illumination of the display remains red
until normal storage conditions are restored.
for
3.1 Cleaning the interior
Before using the appliance for the first
time, wash the interior and all internal accessories with lukewarm water and some
neutral soap so as to remove the typical
smell of a brand-new product, then dry
thoroughly.
Do not use detergents or abrasive
powders, as these will damage
the finish.
3.2 Freezing fresh food
The freezer compartment is suitable for
freezing fresh food and storing frozen and
deep-frozen food for a long time.
To freeze fresh food activate the Fast
Freeze function at least 24 hours before
placing the food to be frozen in the freezer
compartment.
Place the fresh food to be frozen in the
Fast Freeze compartment, as this is the
coldest point.
The maximum amount of food that can be
frozen in 24 hours is specified on the rat-
ing plate, a label located on the inside of
the appliance.
The freezing process lasts 24 hours: during this period do not add other food to
be frozen.
When use the Fast Freeze function:
about
6
hours
Introducing small
quantities of fresh
food (about 5 kg)
before
about
24
hours
Introducing the maximum quantity of food
(see rating plate)
before
not
nee-
Introducing frozen
food
ded
not
needed
Introducing small
quantities of fresh
food daily 2 kg maximum
3.3 Storage of frozen food
When first starting-up or after a period out
of use, before putting the products in the
Page 8
www.electrolux.com
8
compartment let the appliance run at least
2 hours on the higher settings.
3.4 Ice-cube production
This appliance is equipped with one or
more trays for the production of icecubes. Fill these trays with water, then put
them in the freezer compartment.
3.7 Movable shelves
In the event of accidental defrosting, for example due to a power
failure, if the power has been off
for longer than the value shown in
the technical characteristics chart
under "rising time", the defrosted
food must be consumed quickly
or cooked immediately and then
re-frozen (after cooling).
Do not use metallic instruments to
remove the trays from the freezer.
3.5 Cold accumulators
The freezer contains at least one cold accumulator which increases storage time in
the event of a power cut or breakdown.
3.6 Thawing
Deep-frozen or frozen food, prior to being
used, can be thawed in the refrigerator
compartment or at room temperature, depending on the time available for this operation.
Small pieces may even be cooked still frozen, directly from the freezer: in this case,
cooking will take longer.
The walls of the refrigerator are equipped
with a series of runners so that the
shelves can be positioned as desired.
For better use of space, the front halfshelves can lie over the rear ones.
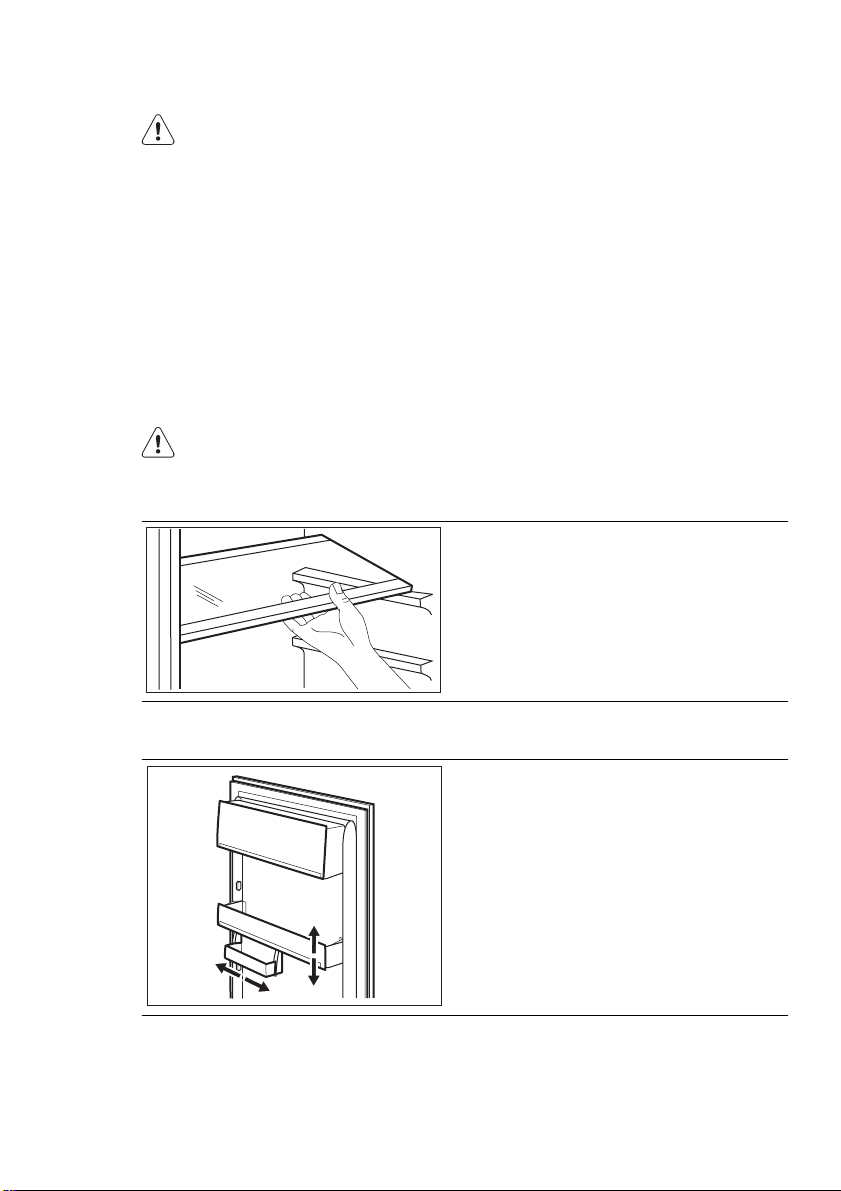
3.8 Positioning the door shelves
To permit storage of food packages of
various sizes, the door shelves can be
placed at different heights.
To make these adjustments proceed as
follow: gradually pull the shelf in the direction of the arrows until it comes free, then
reposition as required.
Page 9

3.9 Humidity control
4. HELPFUL HINTS AND TIPS
ENGLISH 9
The glass shelf incorporates a device with
slits (adjustable by means of a sliding lever), which makes it possible to regulate
the temperature in the vegetable drawer(s).
When the ventilation slots are closed:
the natural moisture content of the food in
the fruit and vegetable compartments is
preserved for longer.
When the ventilation slots are opened:
more air circulation results in a lower air
moisture content in the fruit and vegetable
compartments.
4.1 Hints for energy saving
• Do not open the door frequently or
leave it open longer than absolutely
necessary.
• If the ambient temperature is high and
the Temperature Regulator is set to low
temperature and the appliance is fully
loaded, the compressor may run continuously, causing frost or ice on the
evaporator. If this happens, set the
Temperature Regulator toward warmer
settings to allow automatic defrosting
and so a saving in electricity consumption.
4.2 Hints for fresh food
refrigeration
To obtain the best performance:
• do not store warm food or evaporating
liquids in the refrigerator
• do cover or wrap the food, particularly if
it has a strong flavour
• position food so that air can circulate
freely around it
4.3 Hints for refrigeration
Useful hints:
Meat (all types) : wrap in polythene bags
and place on the glass shelf above the
vegetable drawer.
For safety, store in this way only one or
two days at the most.
Cooked foods, cold dishes, etc..: these
should be covered and may be placed on
any shelf.
Fruit and vegetables: these should be
thoroughly cleaned and placed in the special drawer(s) provided.
Butter and cheese: these should be
placed in special airtight containers or
wrapped in aluminium foil or polythene
bags to exclude as much air as possible.
Milk bottles: these should have a cap and
should be stored in the bottle rack on the
door.
Bananas, potatoes, onions and garlic, if
not packed, must not be kept in the refrigerator.
4.4 Hints for freezing
To help you make the most of the freezing
process, here are some important hints:
• the maximum quantity of food which
can be frozen in 24 hrs. is shown on
the rating plate;
• the freezing process takes 24 hours.
No further food to be frozen should be
added during this period;
• only freeze top quality, fresh and thoroughly cleaned, foodstuffs;
• prepare food in small portions to enable
it to be rapidly and completely frozen
Page 10
www.electrolux.com
10
and to make it possible subsequently to
thaw only the quantity required;
• wrap up the food in aluminium foil or
polythene and make sure that the
packages are airtight;
• do not allow fresh, unfrozen food to
touch food which is already frozen, thus
avoiding a rise in temperature of the latter;
• lean foods store better and longer than
fatty ones; salt reduces the storage life
of food;
• water ices, if consumed immediately after removal from the freezer compartment, can possibly cause the skin to be
freeze burnt;
• it is advisable to show the freezing in
date on each individual pack to enable
you to keep tab of the storage time.
5. CARE AND CLEANING
4.5 Hints for storage of frozen
food
To obtain the best performance from this
appliance, you should:
• make sure that the commercially frozen
foodstuffs were adequately stored by
the retailer;
• be sure that frozen foodstuffs are transferred from the foodstore to the freezer
in the shortest possible time;
• not open the door frequently or leave it
open longer than absolutely necessary;
• once defrosted, food deteriorates rapidly and cannot be refrozen;
• do not exceed the storage period indicated by the food manufacturer.
CAUTION!
Unplug the appliance before carrying out any maintenance operation.
This appliance contains hydrocarbons in its cooling unit; maintenance and recharging must therefore only be carried out by authorized technicians.
5.1 Periodic cleaning
The equipment has to be cleaned regularly:
• clean the inside and accessories with
lukewarm water and some neutral
soap.
• regularly check the door seals and wipe
clean to ensure they are clean and free
from debris.
• rinse and dry thoroughly.
Do not pull, move or damage any
pipes and/or cables inside the
cabinet.
Never use detergents, abrasive
powders, highly perfumed cleaning products or wax polishes to
clean the interior as this will damage the surface and leave a
strong odour.
Clean the condenser (black grill) and the
compressor at the back of the appliance
with a brush. This operation will improve
the performance of the appliance and
save electricity consumption.
Take care of not to damage the
cooling system.
Many proprietary kitchen surface cleaners
contain chemicals that can attack/damage the plastics used in this appliance.
For this reason it is recommended that
the outer casing of this appliance is only
cleaned with warm water with a little
washing-up liquid added.
After cleaning, reconnect the equipment
to the mains supply.
Page 11
5.2 Defrosting of the refrigerator
5.3 Defrosting the freezer
A certain amount of frost will always form
on the freezer shelves and around the top
compartment.
Defrost the freezer when the frost layer
reaches a thickness of about 3-5 mm.
ENGLISH 11
Frost is automatically eliminated from the
evaporator of the refrigerator compartment every time the motor compressor
stops, during normal use. The defrost water drains out through a trough into a special container at the back of the appliance, over the motor compressor, where
it evaporates.
Periodically clean the defrost water drain
hole in the middle of the refrigerator compartment channel to prevent the water
overflowing and dripping onto the food inside. Use the special cleaner provided,
which you will find already inserted into
the drain hole.
About 12 hours prior to defrosting, set the Temperature regulator
toward higher settings, in order to
build up sufficient chill reserve for
the interruption in operation.
Page 12
www.electrolux.com
12
To remove the frost, follow the instructions below:
1.
Switch off the appliance.
2.
Remove any stored food, wrap it in
several layers of newspaper and put it
in a cool place.
CAUTION!
Do not touch frozen goods with
wet hands. Hands can freeze to
the goods.
3.
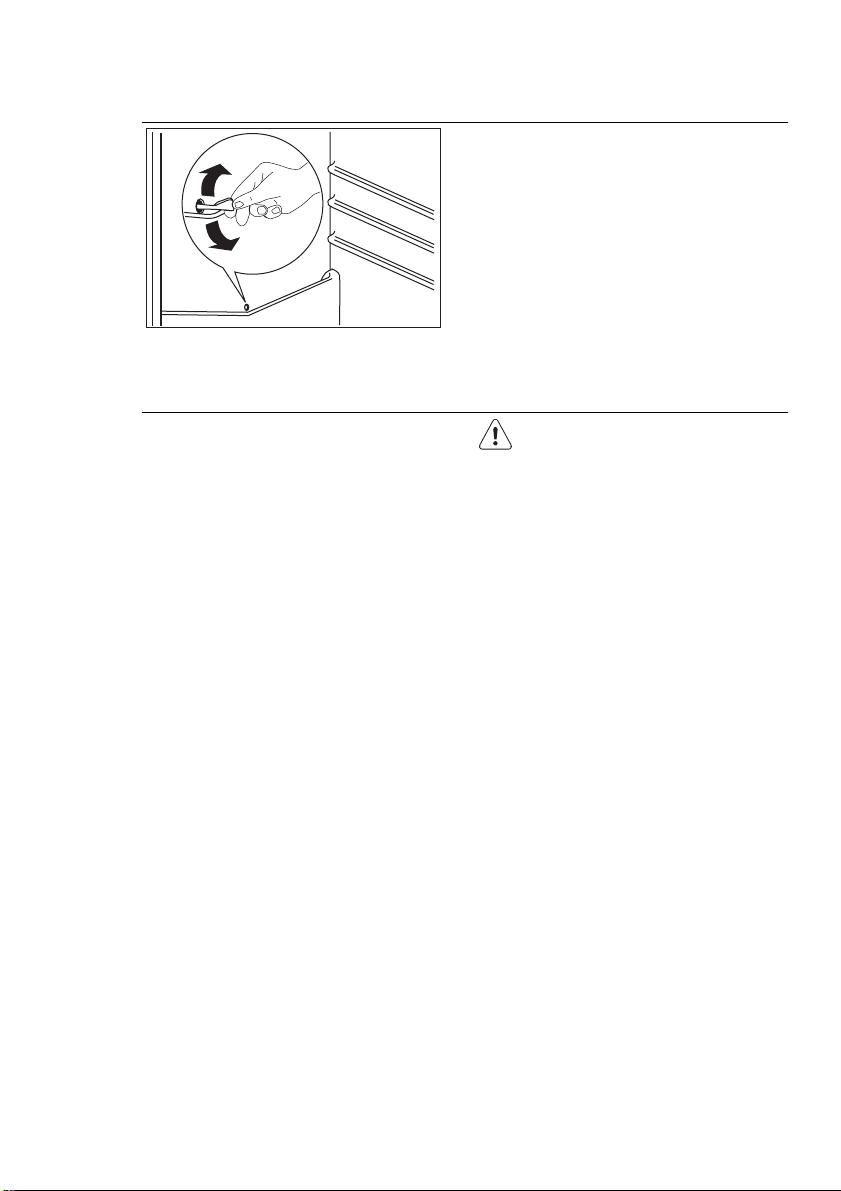
Leave the door open and insert the
plastic scraper in the appropriate
seating at the bottom centre, placing
a basin underneath to collect the defrost water.
In order to speed up the defrosting process, place a pot of warm
water in the freezer compartment.
In addition, remove pieces of ice
that break away before defrosting
is complete.
4.
When defrosting is completed, dry
the interior thoroughly and keep the
scraper for future use.
5.
Switch on the appliance.
6.
After two or three hours, reload the
previously removed food into the
compartment.
5.4 Periods of non-operation
When the appliance is not in use for long
periods, take the following precautions:
disconnect the appliance from elec-
•
tricity supply
• remove all food
• defrost (if foreseen) and clean the appliance and all accessories
Never use sharp metal tools to scrape off
frost from the evaporator as you could
damage it.
Do not use a mechanical device or any artificial means to speed up the thawing
process other than those recommended
by the manufacturer.
A temperature rise of the frozen food
packs, during defrosting, may shorten
their safe storage life.
• leave the door/doors ajar to prevent unpleasant smells.
If the cabinet will be kept on, ask somebody to check it once in a while to prevent the food inside from spoiling in case
of a power failure.
Page 13
6. WHAT TO DO IF…
ENGLISH 13
WARNING!
Before troubleshooting, disconnect the mains plug from the
mains socket.
Only a qualified electrician or competent person must do the troubleshooting that is not in this manual.
There are some sounds during
normal use (compressor, refrigerant circulation).
Problem Possible cause Solution
The appliance does
not operate. The
The appliance is switched
off.
Switch on the appliance.
lamp does not operate.
The mains plug is not con-
nected to the mains sock-
Connect the mains plug to
the mains socket correctly.
et correctly.
The appliance has no
power. There is no voltage
in the mains socket.
Connect a different electrical appliance to the mains
socket.
Contact a qualified electrician.
The buzzer sounds. The temperature in the
freezer is too high.
The lamp does not
The lamp is in stand-by. Close and open the door.
Refer to "Excessive Temperature Alarm"
work.
The lamp is defective. Refer to "Replacing the
lamp".
The compressor operates continually.
The door is not closed
The temperature is not set
correctly.
Set a higher temperature.
Refer to "Closing the door".
correctly.
The door has been
opened too frequently.
The product temperature
is too high.
Do not keep the door open
longer than necessary.
Let the product temperature decrease to room temperature before storage.
The room temperature is
too high.
Water flows on the
rear plate of the refrigerator.
Water flows into the
refrigerator.
During the automatic defrosting process, frost defrosts on the rear plate.
The water outlet is clogged.
Decrease the room temperature.
This is correct.
Clean the water outlet.
Page 14
www.electrolux.com
14
Problem Possible cause Solution
Products prevent that wa-
Water flows on the
ground.
The temperature in
the appliance is too
low.
The temperature in
the appliance is too
high.
Many products are stored
The temperature in
the refrigerator is
too high.
The temperature in
the freezer is too
high.
There is too much
frost.
The door is not closed
6.1 Replacing the lamp
The appliance is equipped with a longlife
LED interior light.
Only service is allowed to replace the
lighting device. Contact your Service Center .
ter flows into the water
collector.
The melting water outlet
does not flow in the evaporative tray above the
compressor.
The temperature regulator
is not set correctly.
The temperature regulator
is not set correctly.
at the same time.
There is no cold air circu-
lation in the appliance.
Products are too near to
each other.
Food is not wrapped correctly.
correctly.
2.
If necessary, adjust the door. Refer to
"Installation".
3.
If necessary, replace the defective
door gaskets. Contact the Service
Center.
Make sure that products do
not touch the rear plate.
Attach the melting water
outlet to the evaporative
tray.
Set a higher temperature.
Set a lower temperature.
Store less products at the
same time.
Make sure that there is cold
air circulation in the appliance.
Store products so that
there is cold air circulation.
Wrap the food correctly.
Refer to "Closing the door".
6.2 Closing the door
1.
Clean the door gaskets.
7. INSTALLATION
WARNING!
Read the "Safety Information"
carefully for your safety and correct operation of the appliance
before installing the appliance.
7.1 Positioning
Install this appliance at a location where
the ambient temperature corresponds to
the climate class indicated on the rating
plate of the appliance:
Page 15
Cli-
Ambient temperature
mate
class
SN +10°C to + 32°C
N +16°C to + 32°C
ST +16°C to + 38°C
T +16°C to + 43°C
7.2 Electrical connection
Before plugging in, ensure that the voltage and frequency shown on the rating
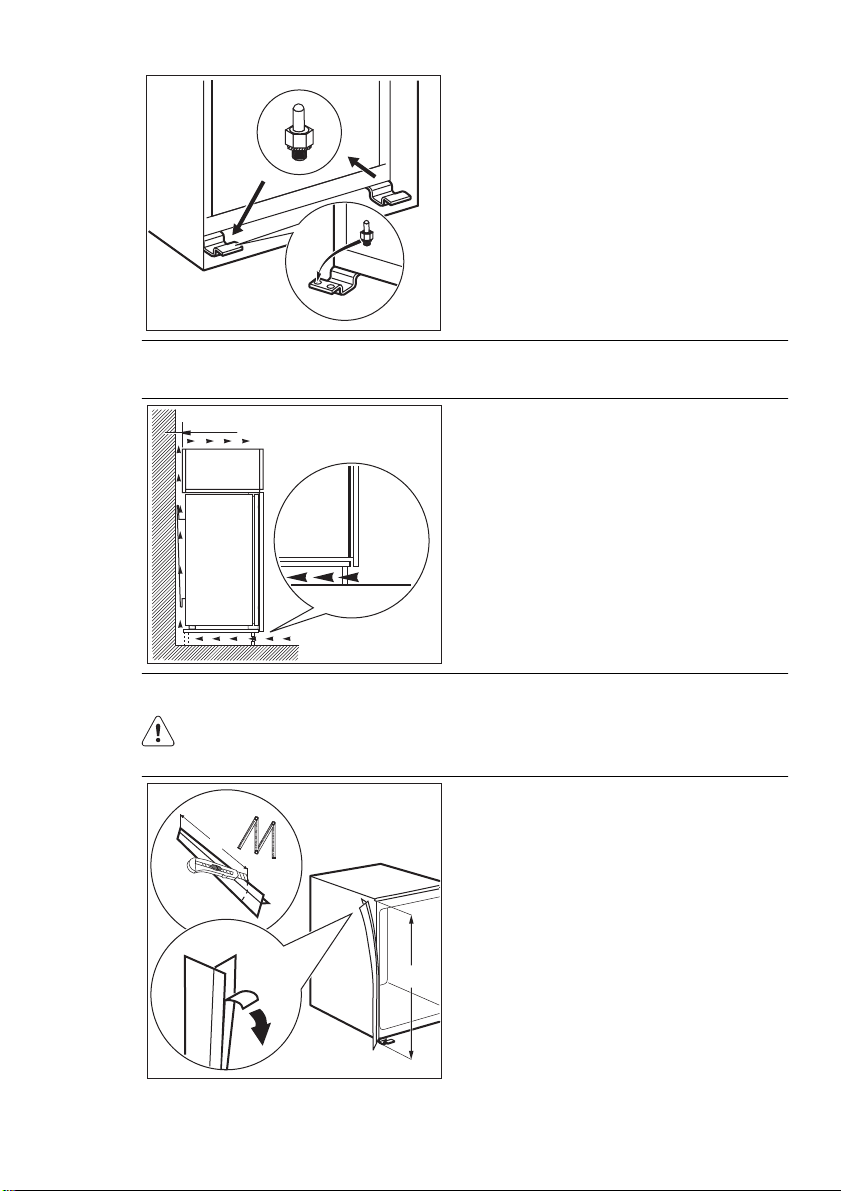
7.3 Door reversibility
ENGLISH 15
plate correspond to your domestic power
supply.
The appliance must be earthed. The power supply cable plug is provided with a
contact for this purpose. If the domestic
power supply socket is not earthed, connect the appliance to a separate earth in
compliance with current regulations, consulting a qualified electrician.
The manufacturer declines all responsibility if the above safety precautions are not
observed.
This appliance complies with the E.E.C.
Directives.
The door of the appliance opens to the
right. If you want to open the door to the
left, do these steps before you install the
appliance:
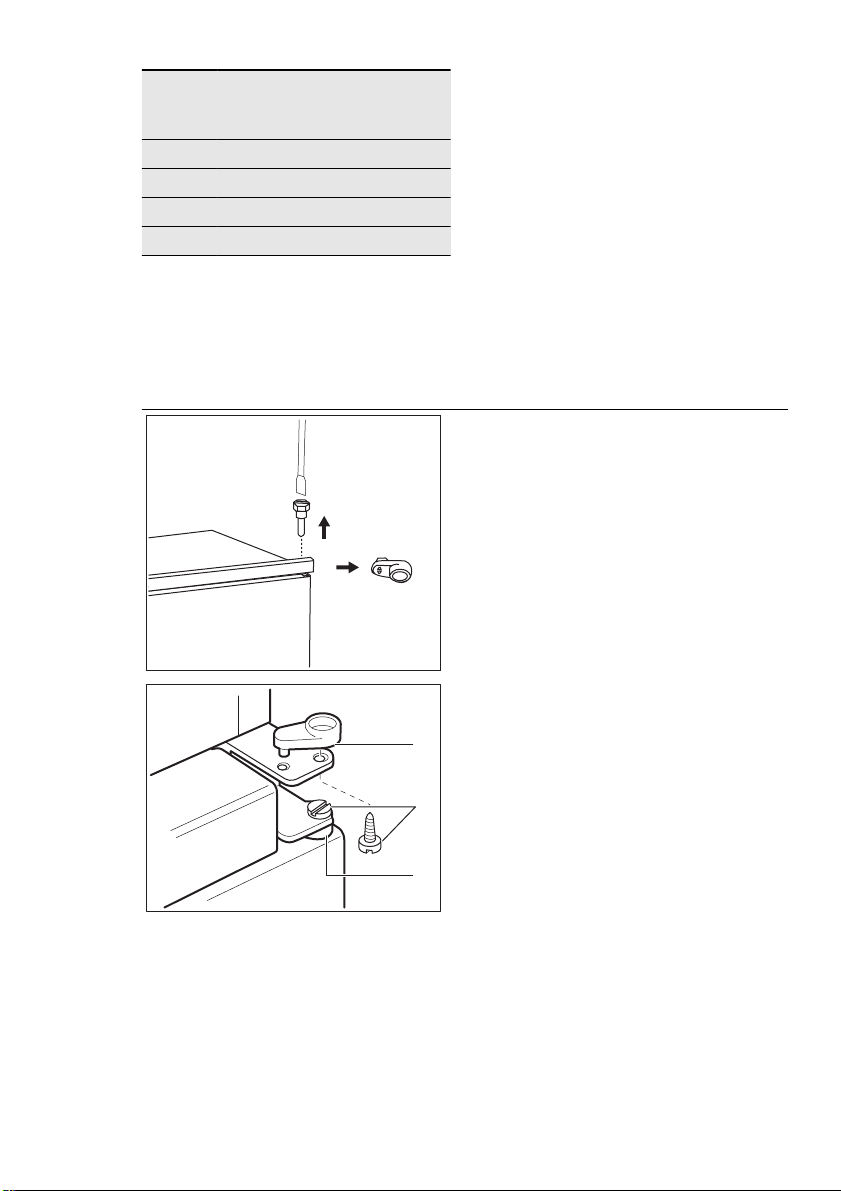
• Loosen the upper pin and remove the
spacer.
• Remove the upper pin and the upper
door.
• Unscrew the pins (B) and spacers (C).
C
B
C
Page 16
www.electrolux.com
16
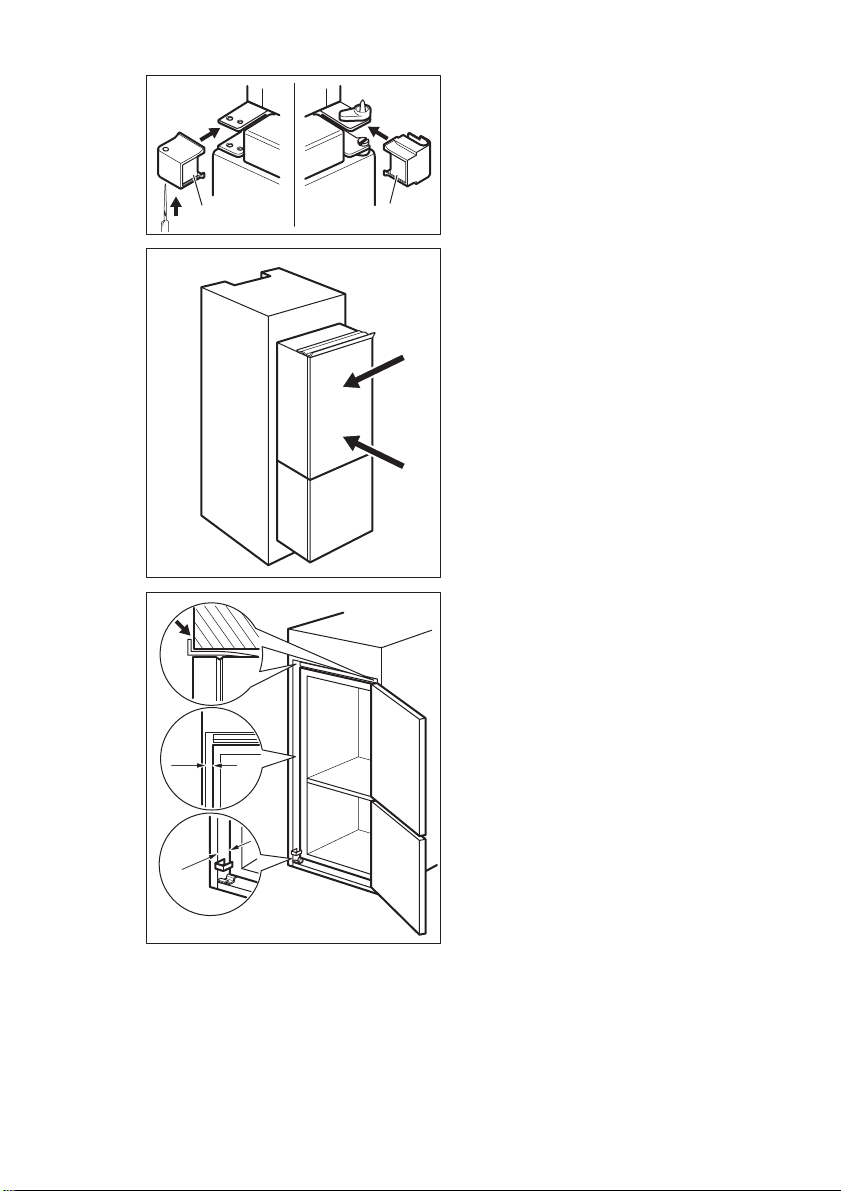
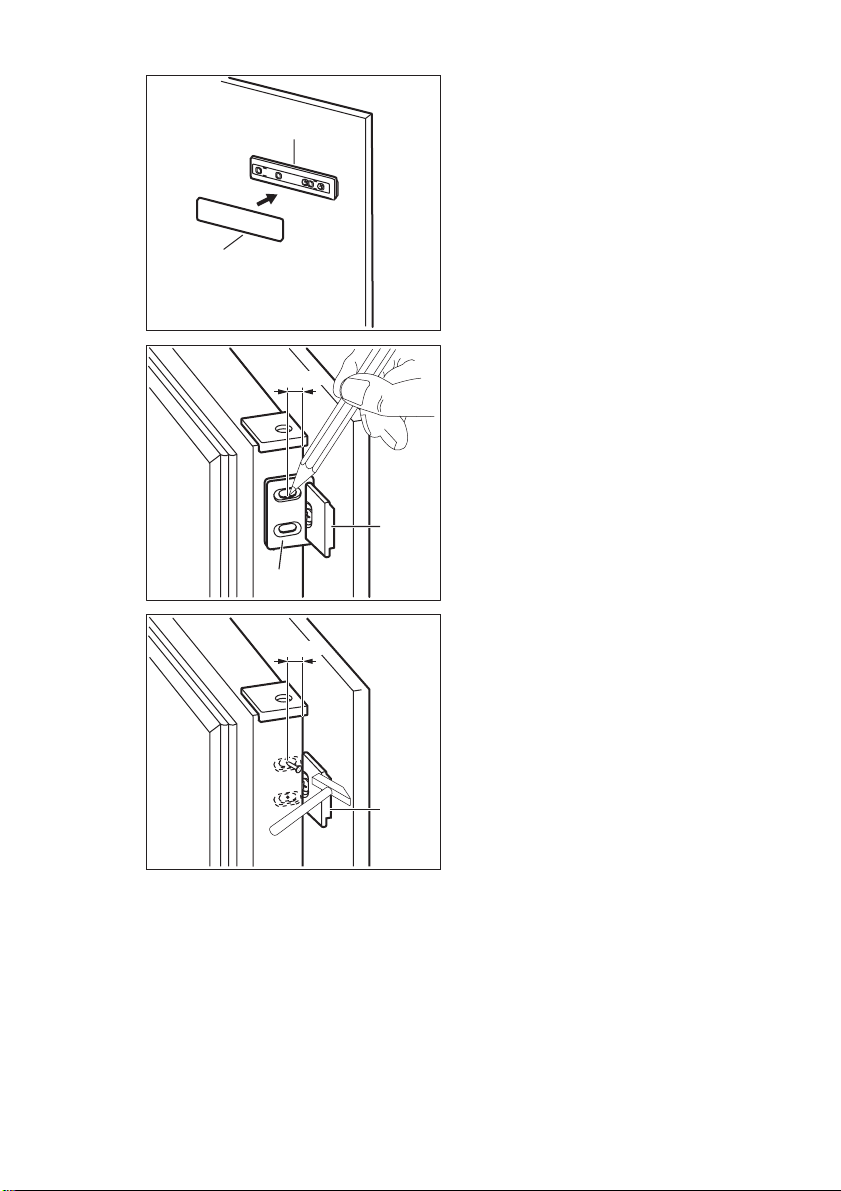
7.4 Ventilation requirements
• Remove the lower door.
• Loosen the lower pin.
On the opposite side:
• Install the lower pin.
• Install the lower door.
• Refit the pins (B) and the spacers (C) on
the middle hinge on the opposite side.
• Install the upper door.
• Tighten the spacer and the upper pin.
5 cm
min.
200 cm
2
min.
200 cm
7.5 Installing the appliance
CAUTION!
Make sure that the mains cable
can move freely.
x
The airflow behind the appliance must be
sufficient.
2
Do these steps.
If necessary cut the adhesive sealing strip
and then apply it to the appliance as shown
in figure.
x
Page 17
4 mm
ENGLISH 17
Drill the hinge cover A, as shown in figure.
Apply the covers A and A1 (in the accessories bag) in to the middle hinge.
A1A
Install the appliance in the niche.
Push the appliance in the direction of the
arrow (1) until the upper gap cover stops
against the kitchen furniture.
2
Push the appliance in the direction of the
arrow (2) against the cupboard on the opposite side of the hinge.
1
Adjust the appliance in the niche.
Make sure that the distance between the
appliance and the cupboard front-edge is
44 mm.
The lower hinge cover (in the accessories
bag) makes sure that the distance between
the appliance and the kitchen furniture is
correct.
Make sure that the clearance between the
appliance and the cupboard is 4 mm.
Open the door. Put the lower hinge cover
in position.
44 mm
Page 18
www.electrolux.com
18
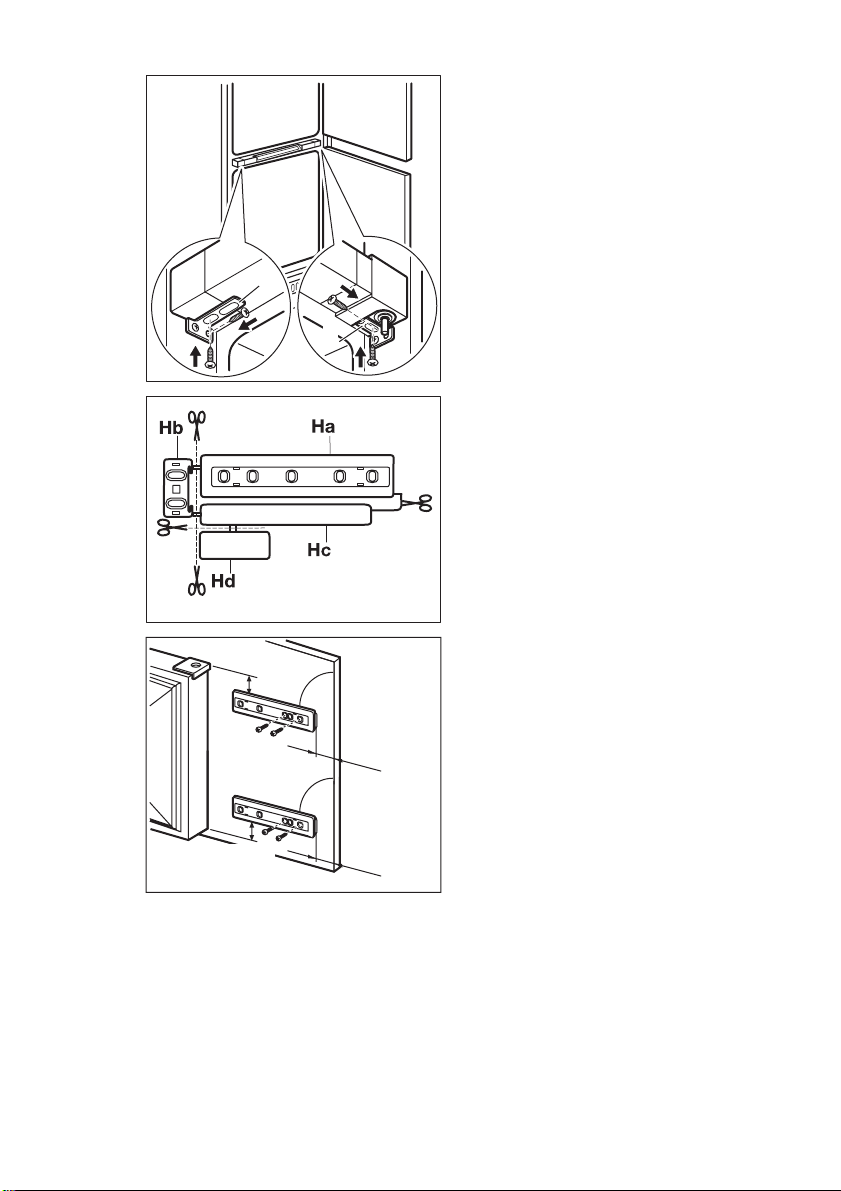
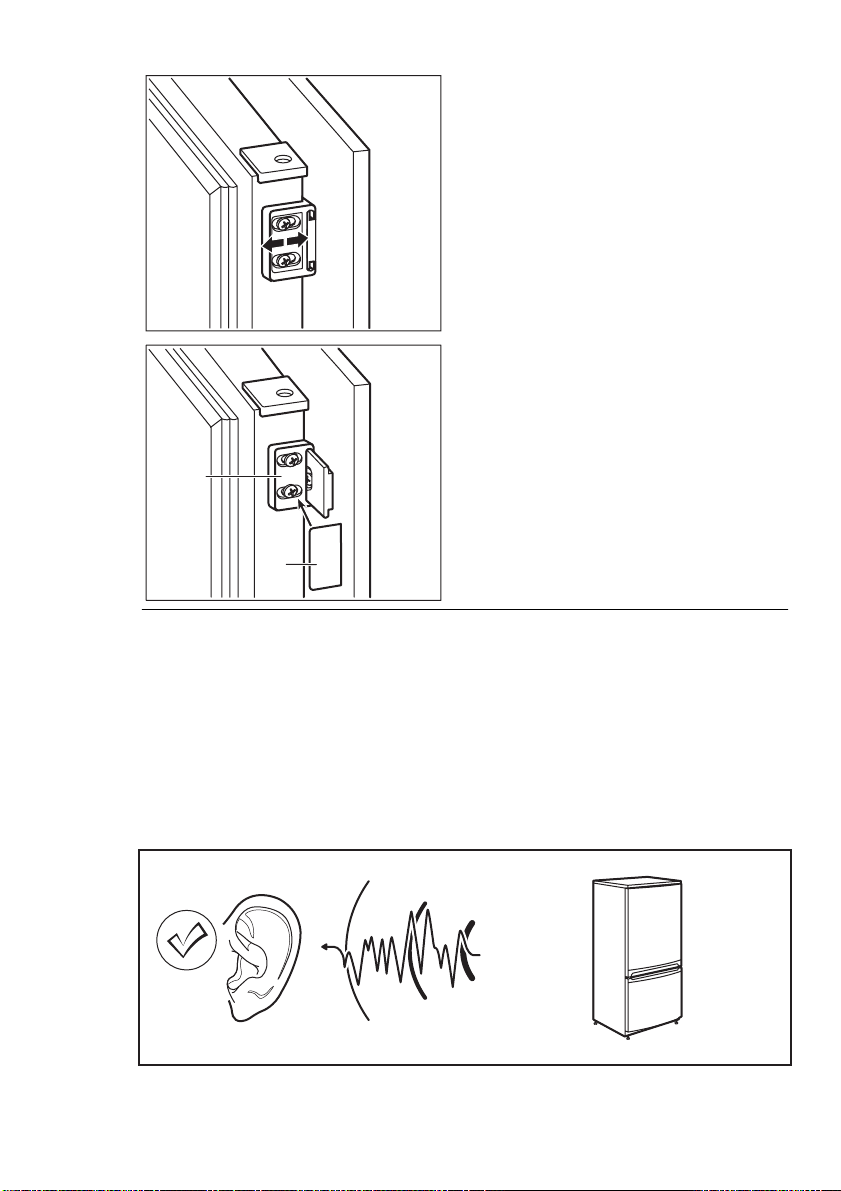
Attach the appliance to the niche with 4
screws.
I
I
Remove the correct part from the hinge
cover (E). Make sure to remove the part
DX, in the case of right hinge, SX in opposite case.
Attach the covers (C, D) to the lugs and the
hinge holes.
Install the vent grille (B).
C
Attach the hinge covers (E) to the hinge.
D
E
E
B
Page 19
ENGLISH 19
If the appliance must connect laterally to
the kitchen furniture door:
1.
Slacken the screws in fixing brackets
(H).
2.
Move the brackets (H).
3.
Retighten the screws.
H
H
Disconnect the parts (Ha), (Hb), (Hc) and
(Hd).
ca. 50 mm
ca. 50 mm
Install the part (Ha) on the inner side of the
kitchen furniture.
90°
21 mm
90°
21 mm
Page 20
www.electrolux.com
20
Hc
Ha
8 mm
Hb
Push the part (Hc) on the part (Ha).
Open the appliance door and the kitchen
furniture door at an angle of 90°.
Insert the small square (Hb) into guide (Ha).
Put together the appliance door and the
furniture door and mark the holes.
Ha
8 mm
K
Remove the brackets and mark a distance
of 8 mm from the outer edge of the door
where the nail must be fitted (K).
Ha
Page 21
Hb
ENGLISH 21
Place the small square on the guide again
and fix it with the screws supplied.
Align the kitchen furniture door and the appliance door by adjusting the part (Hb).
Hb
Press the part (Hd) on the part (Hb).
Hd
Do a final check to make sure that:
• All screws are tightened.
8. NOISES
There are some sounds during normal
running (compressor, refrigerant circulation).
OK
• The sealing strip is attached tightly to
the cabinet.
• The door opens and closes correctly.
SSSRRR!
CLICK!
HISSS!
BRRR!
CRACK!
BLUBB!
Page 22
www.electrolux.com
22
CLICK!
BRRR!
BLUBB!
CLICK!
BRRR!
BLUBB!
HISSS!
HISSS!
Page 23
ENGLISH 23
SSSRRR!
9. TECHNICAL DATA
Dimension of the recess
Height 1780 mm
Width 560 mm
Depth 550 mm
Rising Time 24 h
Voltage 230-240 V
Frequency 50 Hz
The technical information are situated in
the rating plate on the internal left side of
the appliance and in the energy label.
SSSRRR!
CRACK!
CRACK!
10. ENVIRONMENT CONCERNS
Recycle the materials with the symbol
. Put the packaging in applicable
containers to recycle it.
Help protect the environment and human
health and to recycle waste of electrical
and electronic appliances. Do not dispose
appliances marked with the symbol
Page 24

www.electrolux.com
24
with the household waste. Return the
product to your local recycling facility or
contact your municipal office.
Page 25
FRANÇAIS 25
SOMMAIRE
1. CONSIGNES DE SÉCURITÉ . . . . . . . . . . . . . . . . . . . . . . . . . . . . . . . . . . . . . . . . . . . . . . . 26
2. BANDEAU DE COMMANDE . . . . . . . . . . . . . . . . . . . . . . . . . . . . . . . . . . . . . . . . . . . . . . . 28
3. UTILISATION QUOTIDIENNE . . . . . . . . . . . . . . . . . . . . . . . . . . . . . . . . . . . . . . . . . . . . . . 30
4. CONSEILS UTILES . . . . . . . . . . . . . . . . . . . . . . . . . . . . . . . . . . . . . . . . . . . . . . . . . . . . . . 33
5. ENTRETIEN ET NETTOYAGE . . . . . . . . . . . . . . . . . . . . . . . . . . . . . . . . . . . . . . . . . . . . . . 34
6. EN CAS D'ANOMALIE DE FONCTIONNEMENT . . . . . . . . . . . . . . . . . . . . . . . . . . . . . . . . 37
7. INSTALLATION . . . . . . . . . . . . . . . . . . . . . . . . . . . . . . . . . . . . . . . . . . . . . . . . . . . . . . . . . 39
8.
BRUITS . . . . . . . . . . . . . . . . . . . . . . . . . . . . . . . . . . . . . . . . . . . . . . . . . . . . . . . . . . . . . . . 45
9. CARACTÉRISTIQUES TECHNIQUES . . . . . . . . . . . . . . . . . . . . . . . . . . . . . . . . . . . . . . . . 48
10.
EN MATIÈRE DE PROTECTION DE L'ENVIRONNEMENT . . . . . . . . . . . . . . . . . . . . . . . . . 48
NOUS PENSONS À VOUS
Merci d'avoir choisi ce produit Electrolux. Avec ce produit, vous bénéficiez de dizaines d'années
d'expérience professionnelle et d'innovation. Ingénieux et élégant, il a été conçu sur mesure pour
vous. Grâce à cet appareil, vous savez que chaque utilisation vous apportera satisfaction.
Bienvenue chez Electrolux.
Visitez notre site Internet pour :
Obtenir des conseils d'utilisation, des brochures, de l'aide, des informations :
www.electrolux.com
Enregistrer votre produit pour obtenir un meilleur service :
www.electrolux.com/productregistration
Acheter des accessoires, consommables et pièces de rechange d'origine pour votre
appareil :
www.electrolux.com/shop
SERVICE APRÈS-VENTE
N'utilisez que des pièces de rechange d'origine.
Avant de contacter le service, assurez-vous de disposer des informations suivantes :
Vous trouverez ces informations sur la plaque signalétique. Modèle, PNC, numéro de série.
Avertissement/Attention : consignes de sécurité.
Informations générales et conseils
Informations écologiques
Sous réserve de modifications.
Page 26

www.electrolux.com
26
1.
CONSIGNES DE SÉCURITÉ
Pour votre sécurité et garantir une utilisation correcte de l'appareil, lisez attentivement cette notice, y compris les conseils
et avertissements, avant d'installer et
d'utiliser l'appareil pour la première fois.
Pour éviter toute erreur ou accident, veillez à ce que toute personne qui utilise
l'appareil connaisse bien son fonctionnement et ses fonctions de sécurité. Conservez cette notice avec l'appareil. Si l'appareil doit être vendu ou cédé à une autre
personne, veillez à remettre cette notice
au nouveau propriétaire, afin qu'il puisse
se familiariser avec son fonctionnement et
sa sécurité.
Pour la sécurité des personnes et des
biens, conservez et respectez les consignes de sécurité figurant dans cette notice. Le fabricant décline toute responsabilité en cas de dommages dus au non-respect de ces instructions.
1.1 Sécurité des enfants et des
personnes vulnérables
• Cet appareil n'est pas destiné à être
utilisé par des enfants ou des personnes dont les capacités physiques, sensorielles ou mentales, ou le manque
d'expérience et de connaissance les
empêchent d'utiliser l'appareil sans risque lorsqu'ils sont sans surveillance ou
en l'absence d'instruction d'une personne responsable qui puisse leur assurer une utilisation de l'appareil sans
danger.
Empêchez les enfants de jouer avec
l'appareil.
• Ne laissez pas les différents emballages
à portée des enfants. Ils pourraient
s'asphyxier.
• Si l'appareil doit être mis au rebut, veillez à couper le câble d'alimentation
électrique au ras de l'appareil pour éviter les risques d'électrocution. Démontez la porte pour éviter que des enfants
ne restent enfermés à l'intérieur.
• Cet appareil est muni de fermetures
magnétiques. S'il remplace un appareil
équipé d'une fermeture à ressort, nous
vous conseillons de rendre celle-ci inutilisable avant de vous en débarrasser.
Ceci afin d'éviter aux enfants de s'en-
fermer dans l'appareil et de mettre ainsi
leur vie en danger.
1.2 Consignes générales de
sécurité
AVERTISSEMENT
Veillez à ce que les orifices de ventilation,
situés dans l'enceinte de l'appareil ou la
structure intégrée, ne soient pas obstrués.
• Les appareils sont destinés uniquement
à la conservation des aliments et/ou
des boissons dans le cadre d’un usage
domestique normal, tel que celui décrit
dans la présente notice.
• N'utilisez pas d'appareils électriques,
d'agents chimiques ou tout autre système artificiel pour accélérer le processus
de dégivrage.
• Ne faites pas fonctionner d'appareils
électriques (comme des sorbetières
électriques, ...) à l'intérieur des appareils de réfrigération à moins que cette
utilisation n'ait reçu l'agrément du fabricant.
• N'endommagez pas le circuit frigorifique.
• Le circuit frigorifique de l’appareil contient de l’isobutane (R600a), un gaz naturel offrant un haut niveau de compatibilité avec l’environnement mais qui est
néanmoins inflammable.
Pendant le transport et l'installation de
votre appareil, assurez-vous qu'aucune
partie du circuit frigorifique n'est endommagée.
Si le circuit frigorifique est endommagé :
– évitez les flammes vives et toute au-
tre source d'allumage
– aérez soigneusement la pièce où se
trouve l'appareil
• Ne modifiez pas les spécifications de
l'appareil. Si le câble d'alimentation est
endommagé, il peut causer un court
circuit, un incendie et/ou une électrocution.
Page 27
AVERTISSEMENT
Les éventuelles réparations ou interventions sur votre appareil, ainsi que le remplacement du câble
d'alimentation, ne doivent être effectuées que par un professionnel
qualifié.
1.
Ne branchez pas le cordon d'alimentation à une rallonge.
2.
Assurez-vous que la prise n'est pas
écrasée ou endommagée par l'arrière de l'appareil. Une prise de
courant écrasée ou endommagée
peut s'échauffer et causer un incendie.
3.
Vérifiez que la prise murale de l'appareil est accessible.
4.
Ne débranchez pas l'appareil en tirant sur le câble.
5.
Si la prise murale n'est pas bien fixée, n'introduisez pas de prise dedans. Risque d'électrocution ou
d'incendie.
6.
N'utilisez pas l'appareil sans le diffuseur de l'ampoule (si présent) de
l'éclairage intérieur.
• Cet appareil est lourd. Faite attention
lors de son déplacement.
• Ne touchez pas avec les mains humides les surfaces givrées et les produits
congelés (risque de brûlure et d'arrachement de la peau).
• Évitez une exposition prolongée de
l'appareil aux rayons solaires.
• Les ampoules (si présentes) utilisées
dans cet appareil sont des ampoules
spécifiques uniquement destinées à
être utilisées sur des appareils ménagers. Elles ne sont pas du tout adaptées à un éclairage quelconque d'une
habitation.
1.3 Utilisation quotidienne
• Ne posez pas d'éléments chauds sur
les parties en plastique de l'appareil.
• Ne stockez pas de gaz ou de liquides
inflammables dans l'appareil (risque
d'explosion).
• Ne placez pas d'aliments directement
contre la sortie d'air sur la paroi arrière
de l'appareil. (Si l'appareil est sans givre.)
FRANÇAIS 27
• Un produit décongelé ne doit jamais
être recongelé.
• Conservez les aliments emballés conformément aux instructions de leur fabricant.
• Respectez scrupuleusement les conseils de conservation donnés par le fabricant de l'appareil. Consultez les instructions respectives.
• Ne mettez pas de bouteilles ni de boîtes de boissons gazeuses dans le compartiment congélateur, car la pression
se formant à l'intérieur du contenant
pourrait le faire éclater et endommager
ainsi l'appareil.
• Ne consommez pas certains produits
tels que les bâtonnets glacés dès leur
sortie de l'appareil, car ils peuvent provoquer des brûlures.
1.4 Entretien et nettoyage
• Avant toute opération d'entretien, mettez l'appareil hors tension et débranchez-le de la prise de courant.
• N'utilisez pas d'objets métalliques pour
nettoyer l'appareil.
• N'utilisez pas d'objet tranchant pour
gratter la couche de givre. Utilisez une
spatule en plastique.
• Contrôlez régulièrement l'orifice d'évacuation de l'eau de dégivrage dans le
compartiment réfrigérateur. Nettoyez-le,
si besoin. Si l'orifice est bouché, l'eau
s'écoulera en bas de l'appareil.
1.5 Installation
Avant de procéder au branchement électrique, respectez scrupuleusement les instructions fournies dans cette notice.
• Déballez l'appareil et vérifiez qu'il n'est
pas endommagé. Ne branchez pas
l'appareil s'il est endommagé. Signalez
immédiatement au revendeur de l'appareil les dommages constatés. Dans
ce cas, gardez l'emballage.
• Il est conseillé d'attendre au moins quatre heures avant de brancher l'appareil
pour que le circuit frigorifique soit stabilisé.
• Veillez à ce que l'air circule librement
autour de l'appareil pour éviter qu'il ne
Page 28
www.electrolux.com
28
• Placez l'appareil dos au mur pour éviter
• Placez de préférence votre appareil loin
• Assurez-vous que la prise murale reste
• Branchez à l'alimentation en eau pota-
1.6 Maintenance
• Les branchements électriques néces-
• Cet appareil ne doit être entretenu et
surchauffe. Pour assurer une ventilation
suffisante, respectez les instructions de
la notice (chapitre Installation).
tout contact avec le compresseur et le
condenseur (risque de brûlure).
d'une source de chaleur (chauffage,
cuisson ou rayons solaires trop intenses).
accessible après l'installation de l'appareil.
ble uniquement. (Si un branchement
sur le réseau d'eau est prévu.)
saires à l'entretien de l'appareil doivent
être réalisés par un électricien qualifié
ou une personne compétente.
réparé que par un Service après-vente
autorisé, exclusivement avec des pièces d'origine.
1.7 Protection de
l'environnement
Le système frigorifique et l'isolation de votre appareil ne contiennent pas de C.F.C. contribuant
ainsi à préserver l'environnement.
L'appareil ne doit pas être mis au
rebut avec les ordures ménagères
et les déchets urbains. La mousse
d'isolation contient des gaz inflammables : l'appareil sera mis au
rebut conformément aux règlements applicables disponibles auprès des autorités locales. Veillez
à ne pas détériorer les circuits frigorifiques, notamment au niveau
du condenseur. Les matériaux utilisés dans cet appareil identifiés
par le symbole
bles.
sont recycla-
2. BANDEAU DE COMMANDE
123 4 5 6
Touche Marche/Arrêt
1
Thermostat du compartiment congé-
2
lateur
Touche d'affichage de la température
3
du réfrigérateur/congélateur
Affichage
4
1 2 3 4 5 6
Voyant du compartiment réfrigérateur
1
MODE˚C
Touche de fonctions
5
Touche de réinitialisation d'alarme
Thermostat du compartiment réfrigé-
6
rateur
2.1 Afficheur
Page 29
Voyant du compartiment congélateur
2
Indicateur de température positif ou
3
négatif
Indicateur de température (sur le ban-
4
deau de commandes)
Fonction Action Freeze
5
Fonction Shopping
6
2.2 Mise en marche
Branchez l'appareil. Si l'afficheur ne s'allume pas, appuyez sur la touche Marche/
Arrêt.
Dès que l'appareil est mis en fonctionnement, les signaux suivants apparaissent
sur le bandeau de commande :
• L'indicateur de température est positif,
indiquant que la température est positive
• La température clignote, le fond
d'écran est éclairé en rouge et l'alarme
sonore retentit
Pour désactiver l'alarme, appuyez sur la
touche Fonctions (consultez aussi le paragraphe « Alarme de température excessive »).
Pour sélectionner une température différente, reportez-vous au paragraphe « Réglage de la température ».
2.3 Mise à l'arrêt
En appuyant sur la touche Marche / Arrêt
pendant plus de 1 seconde, l'appareil est
mis à l'arrêt.
L'afficheur effectue ensuite un décompte :
-3 -2 -1.
Lorsque l'appareil est mis à l'arrêt, l'afficheur s'éteint également.
2.4 Mise à l'arrêt du
compartiment réfrigérateur
Pour arrêter le compartiment réfrigérateur,
tournez le thermostat du réfrigérateur vers
la gauche jusqu'à la position « O ».
Le compartiment congélateur continue de
fonctionner.
Une fois le compartiment réfrigérateur à
l'arrêt, la seule température indiquée est
celle du compartiment congélateur.
Dans ce cas, l'éclairage du compartiment
réfrigérateur s'éteint.
2)
En conditions normales.
FRANÇAIS 29
2.5 Affichage de la température
À chaque fois que vous appuyez sur la
touche d'affichage de la température du
réfrigérateur/congélateur, l'écran affiche
de façon séquentielle :
1.
– Le voyant du compartiment réfrigé-
rateur s'allume.
– L'affichage indique la température
du réfrigérateur.
2.
– Le voyant du compartiment congé-
lateur s'allume.
– L'affichage indique la température
du congélateur.
Dans tous les cas, au bout de 10 secondes, l'affichage revient à la normale.
2)
2.6 Menu Fonctions
Chaque fois que vous appuyez sur la touche Fonctions, les fonctions suivantes
sont activées, dans le sens des aiguilles
d'une montre :
• Fonction Action Freeze
• Fonction Shopping
• aucun symbole : fonctionnement nor-
mal.
Vous ne pouvez activer qu'une
fonction à la fois.
Pour désactiver les fonctions, appuyez
sur la touche Fonction à plusieurs reprises
jusqu'à ce qu'aucun symbole ne soit affiché.
2.7 Réglage de la température
La température à l'intérieur de l'appareil
est contrôlée par le thermostat.
Vous pouvez réguler la température du
compartiment réfrigérateur en tournant le
thermostat du réfrigérateur ; la température peut varier plus ou moins entre +2 °C
et +8 °C.
Vous pouvez réguler la température du
compartiment congélateur en tournant le
thermostat du congélateur ; la température peut varier plus ou moins entre -15 °C
et -24 °C.
Pour une conservation correcte des aliments, sélectionnez les températures suivantes :
+5 °C dans le réfrigérateur
-18 °C dans le congélateur.
Page 30
www.electrolux.com
30
En fonctionnement normal, l'indicateur de
température affiche la température actuellement définie.
Pour utiliser l'appareil, procédez comme
suit :
• tournez le thermostat vers la droite pour
• tournez le thermostat vers la gauche
Une position intermédiaire est généralement la plus indiquée.
Toutefois, on obtiendra le réglage exact
en tenant compte du fait que la température à l'intérieur de l'appareil dépend de
plusieurs facteurs :
• la température ambiante
• la fréquence d'ouverture de la porte
• la quantité d'aliments stockés
• l'emplacement de l'appareil.
2.8 Shopping Fonction
Si vous devez ranger une grande quantité
d'aliments dans votre réfrigérateur, par
exemple après avoir fait vos courses,
nous vous suggérons d'activer la fonction
Shopping : elle permet de refroidir rapidement les aliments tout en évitant le réchauffement des denrées déjà stockées
dans le réfrigérateur.
Pour activer la fonction Shopping , appuyez sur la touche Fonctions (plusieurs
fois, si nécessaire), jusqu'à ce que le sym-
bole correspondant
La fonction Shopping se désactive automatiquement au bout de 6 heures environ.
Vous pouvez à tout moment désactiver
cette fonction en appuyant sur la touche
Fonction (reportez-vous au paragraphe
« Activation des fonctions »).
2.9 Action Freeze Fonction
Pour congeler des aliments frais, vous devez activer la fonction Action Freeze. Ap-
obtenir le niveau de froid maximal
pour obtenir le niveau de froid minimal.
apparaisse.
puyez sur la touche Fonctions (plusieurs
fois, si nécessaire) jusqu'à ce que le symbole correspondant apparaisse.
Cette fonction s'arrête automatiquement
au bout de 52 heures.
Il est possible de désactiver la fonction à
n'importe quel moment en appuyant sur
la touche Fonctions (reportez-vous au
chapitre "Menu Fonctions").
2.10 Alarme de température
excessive
Une augmentation de la température dans
le compartiment congélateur (par exemple
à cause d'une coupure de courant) est indiquée par les symptômes suivants :
• la température clignote
• le voyant du compartiment congélateur
clignote
• l'éclairage de l'écran est rouge
• l'alarme sonore se fait entendre
• un symbole d'alarme s'affiche.
Au rétablissement des conditions normales :
• les signaux sonores sont désactivés
• la valeur de température continue de
clignoter
• l'éclairage de l'écran reste rouge.
Lorsque vous appuyez sur la touche
Fonction / Réinitialisation d'alarme, la
température maximale atteinte dans le
compartiment apparaît sur l'afficheur
pendant quelques secondes.
À ce stade, l'affichage cesse de clignoter
et change de couleur : il devient blanc.
Pendant la phase d'alarme, l'alarme sonore peut être désactivée en appuyant sur
la touche Fonctions / Réinitialisation
d'alarme.
L'éclairage de l'écran demeure rouge jusqu'à ce que les conditions de stockage
normales soient rétablies.
3. UTILISATION QUOTIDIENNE
3.1 Nettoyage intérieur
Avant d'utiliser l'appareil pour la première
fois, nettoyez l'intérieur et tous les acces-
soires internes avec de l'eau tiède savonneuse pour supprimer l'odeur caractéristique du "neuf" puis séchez soigneusement.
Page 31

N'utilisez pas de produits abrasifs,
poudre à récurer, éponge métallique pour ne pas abîmer la finition.
3.2 Congeler les aliments frais
Le compartiment congélateur est idéal
pour congeler des aliments frais et conserver à long terme des aliments surgelés
ou congelés.
Activez la fonction Fast Freeze 24 heures
au moins avant d'introduire les aliments
frais à congeler dans le compartiment
congélateur.
Placez les aliments frais à congeler dans
le compartiment Fast Freeze, car il s'agit
du point le plus froid.
La quantité maximale d'aliments frais que
vous pouvez congeler par tranche de 24
heures est indiquée sur la plaque signa-
létique (située à l'intérieur de l'appareil).
Le processus de congélation dure 24
heures : vous ne devez ajouter aucun autre aliment à congeler pendant cette période.
Lors de l’utilisation de la fonction
Fast Freeze :
environ
6 heures auparavant
environ
24
heures
auparavant
pas
nécessaire
pas
nécessaire
Introduisez de petites
quantités d’aliments
frais (5 kg environ)
Introduisez les denrées fraîches en utilisant la capacité
maximale de congélation (voir la plaque
signalétique)
Introduction d’aliments frais
Introduisez de petites
quantités d’aliments
frais 2 kg maximum
FRANÇAIS 31
tion Max pendant 2 heures environ, avant
d'introduire les produits dans le compartiment.
En cas de dégivrage accidentel,
dû par exemple à une panne de
courant, si la panne doit se prolonger plus longtemps qu'il n'est
indiqué à la rubrique "temps
d'augmentation" dans la section
Caractéristiques techniques, consommez les aliments décongelés
le plus rapidement possible ou recongelez-les après les avoir cuits
(une fois refroidis).
3.4 Fabrication de glaçons
Cet appareil est équipé d'un ou de plusieurs bacs à glaçons. Remplissez d'eau
ces bacs et mettez-les dans le compartiment congélateur.
N'utilisez pas d'instruments métalliques pour décoller les bacs du
congélateur.
3.5 Accumulateurs de froid
Le congélateur est équipé d'au moins un
accumulateur de froid qui permet d'augmenter l'autonomie de votre appareil en
cas de coupure de courant.
3.6 Décongélation
Avant utilisation, les aliments surgelés ou
congelés peuvent être décongelés dans le
compartiment du réfrigérateur ou à température ambiante en fonction du temps
disponible pour cette opération.
Les petites portions peuvent même être
cuites sans décongélation préalable (la
cuisson sera cependant un peu plus longue).
3.3 Conservation des aliments
congelés
À la mise en service ou après un arrêt
prolongé, placez le thermostat sur la posi-
Page 32

www.electrolux.com
32
3.7 Clayettes amovibles
3.8 Mettez en place les balconnets de la porte.
Plusieurs glissières ont été installées sur
les parois du réfrigérateur pour vous permettre de placer les clayettes comme
vous le souhaitez.
Pour exploiter au mieux l'espace, vous
pouvez placer les demi-clayettes avant
au-dessus des clayettes arrière.
Selon la taille des emballages des aliments conservés, les balconnets de la
porte peuvent être positionnés à différentes hauteurs.
Pour les ajuster, procédez comme suit :
tirez progressivement sur le balconnet
dans le sens des flèches pour le dégager,
puis repositionnez-le selon vos besoins.
3.9 Contrôle de l'humidité
La clayette inférieure en verre est équipée
d'un dispositif muni de fentes dont les ouvertures sont réglables à l'aide d'un levier
coulissant, afin de réguler la température
du bac à légumes.
Lorsque les fentes de ventilation sont fermées :
le taux d'humidité naturel des aliments
conservés dans le bac à fruits et légumes
est préservé plus longtemps.
Lorsque les fentes de ventilation sont ouvertes :
le taux d'humidité est plus bas, car la circulation d'air est plus importante.
Page 33

4. CONSEILS UTILES
FRANÇAIS 33
4.1 Conseils pour l'économie
d'énergie
• N'ouvrez pas la porte trop souvent ou
plus longtemps que nécessaire.
• Si la température ambiante est élevée,
le dispositif de réglage de température
est sur la position de froid maximum et
l'appareil est plein : il est possible que
le compresseur fonctionne en régime
continu, d'où un risque de formation
excessive de givre sur l'évaporateur.
Pour éviter ceci, modifiez la position du
dispositif de réglage de température de
façon à obtenir des périodes d'arrêt du
compresseur et ainsi permettre un dégivrage automatique, d'où des économies d'énergie.
4.2 Conseils pour la réfrigération
de denrées fraîches
Pour obtenir les meilleures performances
possibles :
• N'introduisez pas d'aliments encore
chauds ou de liquides en évaporation
dans le réfrigérateur.
• Couvrez ou enveloppez soigneusement
les aliments, surtout s'ils sont aromatiques.
• Placez les aliments pour que l'air puisse
circuler librement autour.
4.3 Conseils pour la réfrigération
Conseils utiles :
Viande (tous les types) : enveloppez-la
dans des sachets en plastique et placezla sur la tablette en verre au-dessus du
bac à légumes.
La période de conservation est de 1 à 2
jours au maximum.
Aliments cuits, plats froids, etc. : placezles bien couverts sur une clayette.
Fruits et légumes : placez-les une fois nettoyés dans le(s) bac(s) à légumes fourni(s).
Beurre et fromage : placez-les dans des
récipients étanches spéciaux ou enveloppez-les soigneusement dans des feuilles
d'aluminium ou de polyéthylène, pour emmagasiner le moins d'air possible.
Lait en bouteille : bouchez-le et placez-le
dans le balconnet de la contreporte réservé aux bouteilles.
Bananes, pommes de terre, oignons et ail
ne se conservent pas au réfrigérateur, s'ils
ne sont pas correctement emballés.
4.4 Conseils pour la congélation
Pour obtenir les meilleurs résultats, voici
quelques conseils importants :
• la quantité maximale de denrées que
vous pouvez congeler par 24 heures
est indiquée sur la plaque signalétique.
• le temps de congélation est de 24 heures. Aucune autre denrée à congeler ne
doit être ajoutée pendant cette période.
• congelez seulement les denrées alimentaires fraîches, de qualité supérieure (une fois nettoyées).
• préparez la nourriture en petits paquets
pour une congélation rapide et uniforme, adaptés à l'importance de la consommation.
• enveloppez les aliments dans des feuilles d'aluminium ou de polyéthylène et
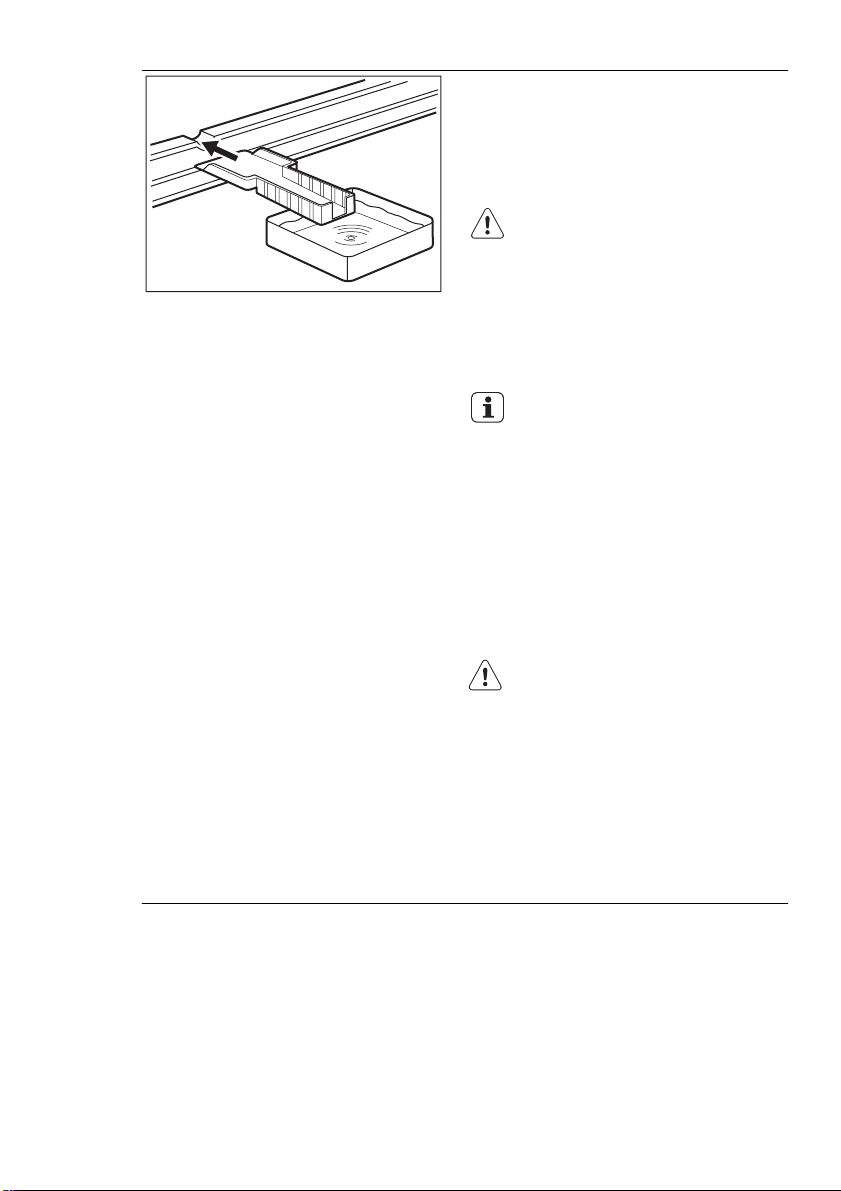
assurez-vous que les emballages sont
étanches ;
• ne laissez pas des aliments frais, non
congelés, toucher des aliments déjà
congelés pour éviter une remontée en
température de ces derniers.
• les aliments maigres se conservent
mieux et plus longtemps que les aliments gras ; le sel réduit la durée de
conservation des aliments
• la température très basse à laquelle se
trouvent les bâtonnets glacés, s'ils sont
consommés dès leur sortie du compartiment congélateur, peut provoquer des
brûlures.
• L'identification des emballages est importante : indiquez la date de congélation du produit, et respectez la durée
de conservation indiquée par le fabricant.
Page 34

www.electrolux.com
34
4.5 Conseils pour la
conservation des produits
surgelés et congelés du
commerce
Pour obtenir les meilleures performances
possibles :
• assurez-vous que les denrées surgelées achetées dans le commerce ont
été correctement entreposées par le revendeur ;
5. ENTRETIEN ET NETTOYAGE
• prévoyez un temps réduit au minimum
pour le transport des denrées du magasin d'alimentation à votre domicile ;
• évitez d'ouvrir trop souvent la porte du
congélateur et ne la laissez ouverte que
le temps nécessaire ;
• une fois décongelés, les aliments se
détériorent rapidement et ne peuvent
pas être recongelés ;
• ne dépassez pas la durée de conservation indiquée par le fabricant.
ATTENTION
débrancher l'appareil avant toute
opération d'entretien.
Cet appareil contient des hydrocarbures dans son circuit réfrigérant : l'entretien et la recharge ne
doivent donc être effectués que
par du personnel autorisé.
5.1 Nettoyage périodique
Cet appareil doit être nettoyé régulièrement :
• Nettoyez l'intérieur et tous les accessoires avec de l'eau tiède savonneuse.
• Vérifiez régulièrement les joints de porte
et nettoyez-les en les essuyant pour
éviter toute accumulation de déchets.
• Rincez et séchez soigneusement.
Ne pas tirer, déplacer ou endommager les tuyaux et/ou câbles qui
se trouvent à l'intérieur de l'appareil.
Ne JAMAIS utiliser de produits
abrasifs ou caustiques ni d'éponges avec grattoir pour nettoyer
l'intérieur de façon à ne pas l'abîmer et laisser de fortes odeurs.
Nettoyer le condenseur (grille noire) et le
compresseur situés à l'arrière de l'appareil
avec une brosse ou un aspirateur. Cette
opération améliore les performances de
l'appareil et permet des économies
d'énergie.
Attention à ne pas endommager
le système de réfrigération.
De nombreux détergents pour la cuisine
recommandés par les fabricants contiennent des produits chimiques qui peuvent
attaquer/endommager les pièces en plastique utilisées dans cet appareil. Il est par
conséquent recommandé d'utiliser seulement de l'eau chaude additionnée d'un
peu de savon liquide pour nettoyer la carrosserie de l'appareil.
Après le nettoyage, rebranchez l'appareil.
Page 35

5.2 Dégivrage du réfrigérateur
5.3 Dégivrage du congélateur
Une certaine quantité de givre se forme
toujours sur les clayettes du congélateur
et autour du compartiment supérieur.
Dégivrez le congélateur lorsque l'épaisseur de la couche de givre est d'environ
3-5 mm.
FRANÇAIS 35
En fonctionnement normal, le givre est automatiquement éliminé de l'évaporateur
du compartiment réfrigérateur à chaque
fois que le compresseur s'arrête. L'eau de
dégivrage est collectée dans un récipient
spécial situé à l'arrière de l'appareil, audessus du compresseur, d'où elle s'évapore.
Nettoyez régulièrement l'orifice d'écoulement de la goulotte d'évacuation de l'eau
de dégivrage située au milieu du compartiment réfrigérateur pour empêcher l'eau
de déborder et de couler à l'intérieur de
l'appareil. Nettoyez l'orifice d'écoulement
de l'eau de dégivrage avec le bâtonnet
spécial se trouvant déjà dans l'orifice.
Environ 12 heures avant d'effectuer le dégivrage, réglez le bouton
du thermostat vers le haut, de
manière à assurer une réserve de
froid pendant l'interruption du
fonctionnement.
Page 36

www.electrolux.com
36
Pour enlever le givre, suivez les instructions ci-dessous :
1.
Éteignez l'appareil.
2.
Sortez les denrées congelées, enveloppez-les dans plusieurs feuilles de
papier journal et conservez-les dans
un endroit frais.
ATTENTION
Ne touchez pas les produits congelés et les surfaces givrées avec
les mains humides. Risque de
brûlures ou d'arrachement de la
peau.
3.
Laissez la porte ouverte et utilisez la
spatule en plastique comme gouttière
en l'insérant dans l'emplacement prévu à cet effet. Placez au-dessous un
récipient dans lequel s'écoulera l'eau
de dégivrage
Le dégivrage peut être accéléré
en plaçant un récipient d'eau
chaude dans le compartiment
congélateur. Retirez également les
morceaux de glace au fur et à mesure qu'ils se détachent, avant
que le processus de dégivrage ne
soit terminé.
4.
Une fois le dégivrage terminé, séchez
soigneusement l'intérieur et conservez la spatule pour une utilisation ultérieure.
5.
Mettez l'appareil en marche.
6.
Attendez deux à trois heures avant de
replacer les denrées surgelées ou
congelées dans le compartiment.
N'utilisez en aucun cas d'objets métalliques ou tranchants pour gratter la couche
de givre sur l'évaporateur, car vous risqueriez de le détériorer.
N'utilisez aucun dispositif mécanique ou
autre moyen artificiel pour accélérer le
processus de dégivrage hormis ceux recommandés dans cette notice d'utilisation.
Une élévation de la température des denrées congelées, pendant le dégivrage,
peut réduire leur durée de conservation.
Page 37

5.4 En cas d'absence prolongée
ou de non-utilisation
Prenez les précautions suivantes :
• débranchez l'appareil
• retirez tous les aliments
• dégivrez si nécessaire et nettoyez l'appareil ainsi que tous les accessoires
• laissez la porte/les portes entrouverte(s)
pour prévenir la formation d'odeurs
désagréables.
Si, toutefois, vous n'avez pas la possibilité
de débrancher et vider l'appareiI, faites
vérifier régulièrement son bon fonctionnement pour éviter la détérioration des aliments en cas de panne de courant.
6. EN CAS D'ANOMALIE DE FONCTIONNEMENT
FRANÇAIS 37
AVERTISSEMENT
Avant d'intervenir sur l'appareil,
débranchez-le.
La résolution des problèmes, non
mentionnés dans la présente notice, doit être exclusivement confiée à un électricien qualifié ou à
une personne compétente.
Certains bruits pendant le fonctionnement (compresseur, circuit
de réfrigérant) sont normaux.
Anomalie Cause possible Solution
L'appareil ne fonc-
tionne pas. L'am-
L'appareil est à l'arrêt. Mettez l'appareil sous ten-
sion.
poule ne fonctionne
pas.
La fiche n'est pas correc-
tement branchée dans la
prise de courant.
Le courant n'arrive pas à
l'appareil. La prise de courant n'est pas alimentée.
Branchez correctement la
fiche dans la prise de courant.
Branchez un autre appareil
électrique dans la prise de
courant.
Faites appel à un électricien
qualifié.
Le signal sonore se
déclenche.
La température du congélateur est trop élevée.
Consultez le paragraphe
« Alarme température excessive ».
L'ampoule ne fonctionne pas.
L'ampoule est défectueu-
L'ampoule est en mode
veille.
se.
Fermez puis ouvrez la porte.
Consultez le paragraphe
« Remplacement de l'ampoule ».
Le compresseur
fonctionne en permanence.
La porte n'est pas correc-
Le dispositif de réglage de
température n'est pas correctement réglé.
tement fermée.
Sélectionnez une température plus élevée.
Reportez-vous au paragraphe « Fermeture de la porte ».
Page 38

www.electrolux.com
38
Anomalie Cause possible Solution
La porte a été ouverte trop
La température du produit
La température ambiante
De l'eau s'écoule
sur la plaque arrière
du réfrigérateur.
De l'eau s'écoule
dans le réfrigérateur.
Des produits empêchent
De l'eau coule sur le
sol.
La température à
l'intérieur de l'appareil est trop basse.
La température à
l'intérieur de l'appareil est trop élevée.
Trop de produits ont été
La température du
réfrigérateur est
trop élevée.
La température du
congélateur est trop
élevée.
Il y a trop de givre. Les aliments ne sont pas
La porte n'est pas fermée
6.1 Remplacement de l'ampoule
L'appareil est équipé d'un éclairage à diode DEL longue durée.
souvent.
est trop élevée.
est trop élevée.
Pendant le dégivrage au-
tomatique, le givre fond
sur l'évaporateur.
L'orifice d'évacuation de
l'eau de dégivrage est
obstrué.
l'eau de s'écouler dans le
réservoir d'eau.
L'eau de dégivrage ne
s'écoule pas dans le plateau d'évaporation situé
au-dessus du compresseur.
Le dispositif de réglage de
température n'est pas correctement réglé.
Le dispositif de réglage de
température n'est pas correctement réglé.
introduits simultanément.
L'air froid ne circule pas
dans l'appareil.
Les produits sont trop
près les uns des autres.
correctement emballés.
correctement.
Le remplacement du dispositif d'éclairage
doit uniquement être effectué par un technicien du service après-vente. Contactez
votre service après-vente.
Ne laissez pas la porte ouverte plus longtemps que
nécessaire.
Laissez le produit revenir à
température ambiante
avant de le placer dans
l'appareil.
Réduisez la température
ambiante.
Ce phénomène est normal.
Nettoyez l'orifice.
Assurez-vous que les produits ne touchent pas l'évaporateur.
Fixez le tuyau de sortie de
l'eau au plateau d'évaporation.
Sélectionnez une température plus élevée.
Sélectionnez une température plus basse.
Introduisez moins de produits en même temps.
Assurez-vous que de l'air
froid circule dans l'appareil.
Stockez les produits de façon à permettre la circulation de l'air froid.
Emballez les aliments correctement.
Reportez-vous au chapitre
« Fermeture de la porte ».
Page 39

6.2 Fermeture de la porte
1.
Nettoyez les joints de la porte.
2.
Si nécessaire, ajustez la porte. Reportez-vous au chapitre « Installation ».
7. INSTALLATION
FRANÇAIS 39
3.
Si nécessaire, remplacez les joints de
porte défectueux. Contactez votre
service après-vente.
AVERTISSEMENT
Pour votre sécurité et le bon fonctionnement de l'appareil, veuillez
lire attentivement les "Consignes
de sécurité" avant d'installer l'appareil.
7.1 Emplacement
Installez cet appareil à un endroit où la
température ambiante correspond à la
classe climatique indiquée sur la plaque
signalétique de l'appareil :
Classe
Température ambiante
climatique
SN +10 à + 32 °C
N +16 à + 32 °C
ST +16 à + 38 °C
T +16 à + 43 °C
7.3 Réversibilité de la porte
7.2 Branchement électrique
Contrôlez, avant de brancher l'appareil, si
la tension et la fréquence indiquées sur la
plaque signalétique correspondent à celles de votre réseau.
L'appareil doit être relié à la terre. La fiche
du câble d'alimentation comporte un logement pour mise à la terre. Si la prise de
courant murale n'est pas mise à la terre,
branchez l'appareil sur une prise de terre
conformément aux normes en vigueur, en
demandant conseil à un électricien qualifié.
Le fabricant décline toute responsabilité
en cas d'incident suite au non-respect
des consignes de sécurité sus-mentionnées.
Cet appareil est conforme aux directives
communautaires.
La porte de l'appareil s'ouvre vers la droite. Si vous souhaitez modifier le sens
d'ouverture de la porte (vers la gauche),
effectuez les opérations suivantes avant
d'installer définitivement l'appareil :
• Dévissez le pivot supérieur et retirez
l'entretoise.
• Retirez le pivot supérieur et la porte supérieure.
Page 40

www.electrolux.com
40
7.4 Ventilation
• Dévissez les pivots (B) et les entretoises
(C).
C
B
C
• Retirez la porte inférieure.
• Desserrez le pivot inférieur.
Du côté opposé :
• Mettez en place le pivot inférieur.
• Mettez en place la porte inférieure.
• Remettez les pivots (B) et les entretoises (C) sur la charnière intermédiaire du
côté opposé.
• Mettez en place la porte supérieure.
• Serrez l'entretoise et le pivot supérieur.
5 cm
min.
200 cm
2
min.
200 cm
7.5 Installation de l'appareil
ATTENTION
Assurez-vous que le câble n'est
pas coincé.
Veillez à garantir une circulation d'air suffisante à l'arrière de l'appareil.
2
Suivez les étapes ci-dessous.
Page 41

FRANÇAIS 41
Si nécessaire, coupez la bande d'étanchéité adhésive et appliquez-la sur l'appareil,
x
comme indiqué sur la figure.
x
Percez le cache-charnière A, comme indiqué dans la figure.
Appliquez les caches A et A1 (disponibles
dans le sachet des accessoires) dans la
charnière intermédiaire.
A1A
Insérez l'appareil dans le meuble d'encastrement.
Poussez l'appareil dans la direction indiquée par la flèche (1) jusqu'à ce que la par-
2
tie couvrant l'interstice en haut de l'appareil
butte contre le meuble de cuisine.
Poussez l'appareil dans la direction indiquée par la flèche (2) contre le meuble, du
côté opposé à la charnière.
1
Page 42

www.electrolux.com
42
4 mm
44 mm
Ajustez la position de l'appareil dans le
meuble d'encastrement.
Assurez-vous que la distance entre l'appareil et le bord avant du meuble est de
44 mm.
Le cache de la charnière inférieure (dans le
sachet d'accessoires) vous permet de vérifier que la distance entre l'appareil et le
meuble de cuisine est correcte.
Assurez-vous que l'écart entre l'appareil et
le meuble est de 4 mm.
Ouvrez la porte. Mettez en place le cache
de la charnière inférieure.
Fixez l'appareil au meuble d'encastrement
à l'aide de 4 vis.
I
I
Retirez la pièce correcte du cache-charnière (E). Assurez-vous que vous retirez bien
la pièce DX s'il s'agit de la charnière droite,
SX s'il s'agit de l'autre charnière.
Page 43

FRANÇAIS 43
Fixez les protections (C, D) sur les ergots et
dans les trous des charnières.
Mettez en place la grille d'aération (B).
C
D
Fixez les cache-charnières (E) sur la charnière.
E
E
B
Si l'appareil doit être fixé latéralement à la
porte du meuble de cuisine :
1.
Desserrez les vis dans les pattes de fixation (H).
2.
Réglez les pattes de fixation (H).
3.
Resserrez les vis.
H
H
Détachez les pièces (Ha), (Hb), (Hc) et (Hd).
Page 44

www.electrolux.com
44
ca. 50 mm
ca. 50 mm
Hc
Ha
8 mm
Installez la pièce (Ha) sur la face intérieure
du meuble de cuisine.
90°
21 mm
90°
21 mm
Poussez la pièce (Hc) sur la pièce (Ha).
Ouvrez la porte de l'appareil et la porte du
meuble de cuisine à un angle de 90°.
Insérez le petit carré (Hb) dans le guide
(Ha).
Joignez la porte de l'appareil et la porte du
meuble et repérez les trous.
Hb
Ha
Page 45

8 mm
K
Hb
FRANÇAIS 45
Retirez les supports et repérez une distance de 8 mm à partir de l'arête extérieure de
la porte où le clou doit être posé (K).
Ha
Placez de nouveau le petit carré sur le guide et fixez-le à l'aide des vis fournies.
Alignez la porte du meuble de cuisine et
celle de l'appareil en réglant la pièce (Hb).
Appuyez la pièce (Hd) sur la pièce (Hb).
Faites une dernière vérification pour vous
assurer que :
• Toutes les vis sont bien serrées.
• Le joint d'étanchéité est solidement fixé
au meuble.
8. BRUITS
L'appareil émet certains bruits pendant
son fonctionnement (compresseur, circuit
frigorifique).
Hb
Hd
• La porte s'ouvre et se ferme correctement.
Page 46

www.electrolux.com
46
SSSRRR!
HISSS!
CLICK!
BRRR!
OK
CLICK!
BRRR!
CRACK!
BLUBB!
CLICK!
BRRR!
BLUBB!
BLUBB!
Page 47

HISSS!
FRANÇAIS 47
HISSS!
SSSRRR!
CRACK!
SSSRRR!
CRACK!
Page 48

www.electrolux.com
48
9. CARACTÉRISTIQUES TECHNIQUES
Dimensions de la niche
d'encastrement
Hauteur 1780 mm
Largeur 560 mm
Profondeur 550 mm
Temps de levée 24 h
Tension 230-240 V
Fréquence 50 Hz
Les caractéristiques techniques figurent
sur la plaque signalétique située sur le cô-
té gauche à l'intérieur de l'appareil et sur
l'étiquette énergétique.
10. EN MATIÈRE DE PROTECTION DE
L'ENVIRONNEMENT
Recyclez les matériaux portant le symbole
. Déposez les emballages dans les
conteneurs prévus à cet effet.
Contribuez à la protection de
l'environnement et à votre sécurité,
recyclez vos produits électriques et
électroniques. Ne jetez pas les appareils
portant le symbole
ménagères. Emmenez un tel produit dans
votre centre local de recyclage ou
contactez vos services municipaux.
avec les ordures
Page 49

DEUTSCH 49
INHALT
1. SICHERHEITSHINWEISE . . . . . . . . . . . . . . . . . . . . . . . . . . . . . . . . . . . . . . . . . . . . . . . . . 50
2. BEDIENFELD . . . . . . . . . . . . . . . . . . . . . . . . . . . . . . . . . . . . . . . . . . . . . . . . . . . . . . . . . . 52
3. TÄGLICHER GEBRAUCH . . . . . . . . . . . . . . . . . . . . . . . . . . . . . . . . . . . . . . . . . . . . . . . . . 54
4. PRAKTISCHE TIPPS UND HINWEISE . . . . . . . . . . . . . . . . . . . . . . . . . . . . . . . . . . . . . . . . 56
5. REINIGUNG UND PFLEGE . . . . . . . . . . . . . . . . . . . . . . . . . . . . . . . . . . . . . . . . . . . . . . . . 58
6. WAS TUN, WENN … . . . . . . . . . . . . . . . . . . . . . . . . . . . . . . . . . . . . . . . . . . . . . . . . . . . . 61
7. MONTAGE . . . . . . . . . . . . . . . . . . . . . . . . . . . . . . . . . . . . . . . . . . . . . . . . . . . . . . . . . . . . 63
8.
GERÄUSCHE . . . . . . . . . . . . . . . . . . . . . . . . . . . . . . . . . . . . . . . . . . . . . . . . . . . . . . . . . . 69
9. TECHNISCHE DATEN . . . . . . . . . . . . . . . . . . . . . . . . . . . . . . . . . . . . . . . . . . . . . . . . . . . . 71
10.
UMWELTTIPPS . . . . . . . . . . . . . . . . . . . . . . . . . . . . . . . . . . . . . . . . . . . . . . . . . . . . . . . . . 72
WIR DENKEN AN SIE
Vielen Dank, dass Sie sich für ein Electrolux Gerät entschieden haben. Sie haben ein Produkt
gewählt, hinter dem eine jahrzehntelange professionelle Erfahrung und Innovation steht. Bei der
Entwicklung dieses großartigen und eleganten Geräts haben wir an Sie gedacht. So haben Sie
bei jedem Gebrauch die Gewissheit, dass Sie stets großartige Ergebnisse erzielen werden.
Willkommen bei Electrolux.
Besuchen Sie uns auf unserer Website, um:
Anwendungshinweise, Prospekte, Fehlerbehebungs- und Service-Informationen zu
erhalten:
www.electrolux.com
Ihr erworbenes Produkt zu registrieren, um den besten Service dafür zu gewährleisten:
www.electrolux.com/productregistration
Zubehör, Verbrauchsmaterial und Original-Ersatzteile für Ihr Gerät zu erwerben:
www.electrolux.com/shop
KUNDENDIENST UND -BETREUUNG
Bitte verwenden Sie ausschließlich Original-Ersatzteile für Ihre Produkte.
Halten Sie folgende Angaben bereit, wenn Sie sich an den Kundendienst wenden
(diese Informationen finden Sie auf dem Typenschild): Modell, Produktnummer (PNC),
Seriennummer.
Warnungs-/ Sicherheitshinweise.
Allgemeine Hinweise und Ratschläge
Hinweise zum Umweltschutz
Änderungen vorbehalten.
Page 50

www.electrolux.com
50
1.
SICHERHEITSHINWEISE
Lesen Sie zu Ihrer Sicherheit und für die
optimale Geräteanwendung vor der Installation und dem Gebrauch des Gerätes die
vorliegende Benutzerinformation aufmerksam durch, einschließlich der Ratschläge
und Warnungen. Es ist wichtig, dass zur
Vermeidung von Fehlern und Unfällen alle
Personen, die das Gerät benutzen, mit
der Bedienung und den Sicherheitsvorschriften vertraut sind. Heben Sie die Benutzerinformation gut auf und übergeben
Sie sie bei einem Weiterverkauf des Gerätes dem neuen Besitzer, so dass jeder
während der gesamten Lebensdauer des
Gerätes über Gebrauch und Sicherheit informiert ist.
Halten Sie sich zu Ihrer Sicherheit und
zum Schutz Ihres Eigentums strikt an die
Vorsichtsmaßnahmen der vorliegenden
Benutzerinformation, da der Hersteller bei
Missachtung derselben von jeder Haftung
freigestellt ist.
1.1 Sicherheit von Kindern und
hilfsbedürftigen Personen
• Das Gerät darf von Personen (einschließlich Kindern), deren physische,
sensorische Fähigkeiten und deren
Mangel an Erfahrung und Kenntnissen
einen sicheren Gebrauch des Gerätes
ausschließen nur unter Aufsicht oder
nach ausreichender Einweisung durch
eine verantwortungsbewusste Person
benutzt werden, die sicherstellt, dass
sie sich der Gefahren des Gebrauchs
bewusst sind.
Kinder müssen beaufsichtigt werden,
damit sie nicht am Gerät herumspielen
können.
• Halten Sie das Verpackungsmaterial
unbedingt von Kindern fern. Erstickungsgefahr!
• Ziehen Sie vor der Entsorgung des Gerätes den Netzstecker, schneiden Sie
das Netzkabel (so nah wie möglich am
Gerät) ab und entfernen Sie die Tür, so
dass spielende Kinder vor elektrischem
Schlag geschützt sind und sich nicht in
dem Gerät einschließen können.
• Wenn dieses Gerät mit magnetischer
Türdichtung ein älteres Modell mit
Schnappverschluss (Türlasche) an der
Tür oder auf dem Deckel ersetzt, machen Sie den Schnappverschluss vor
dem Entsorgen des Altgerätes unbrauchbar. So verhindern Sie, dass das
Gerät nicht zu einer Todesfalle für Kinder wird.
1.2 Allgemeine
Sicherheitshinweise
WARNUNG!
Achten Sie darauf, dass die Belüftungsöffnungen im Gehäuse oder in der Einbaunische nicht blockiert sind.
• Das Gerät ist für die Aufbewahrung von
Lebensmitteln und/oder Getränken in
einem normalen Haushalt bestimmt,
wie in der vorliegenden Gebrauchsanweisung beschrieben wird.
• Benutzen Sie keine mechanischen oder
sonstigen Hilfsmittel, um den Abtauprozess zu beschleunigen.
• Verwenden Sie keine anderen Elektrogeräte (wie Speiseeisbereiter) in Kühlgeräten, wenn solche Geräte nicht ausdrücklich vom Hersteller für diesen
Zweck zugelassen sind.
• Beschädigen Sie nicht den Kältekreislauf.
• Das Kältemittel Isobutan (R600a) im
Kältekreislauf des Gerätes ist ein natürliches und sehr umweltfreundliches Gas,
das jedoch leicht entflammbar ist.
Achten Sie beim Transport und bei der
Aufstellung des Gerätes darauf, nicht
die Komponenten des Kältekreislaufs
zu beschädigen.
Bei einer eventuellen Beschädigung des
Kältekreislaufs:
– Offene Flammen und Zündfunken
vermeiden
– Den Raum, in dem das Gerät instal-
liert ist, gut lüften
• Technische und anderweitige Änderungen am Gerät sind gefährlich. Ein defektes Netzkabel kann Kurzschlüsse
und einen Brand verursachen und/oder
zu Stromschlägen führen.
Page 51

WARNUNG!
Elektrische Bauteile (Netzkabel,
Stecker, Kompressor) dürfen zur
Vermeidung von Gefahren nur
vom Kundendienst oder einer
Fachkraft ausgewechselt werden.
1.
Das Netzkabel darf nicht verlängert
werden.
2.
Vergewissern Sie sich, dass der
Netzstecker nicht von der Geräterückseite geklemmt oder beschädigt wird. Ein geklemmter oder beschädigter Netzstecker überhitzt
und kann einen Brand verursachen.
3.
Vergewissern Sie sich, dass der
Netzstecker des Geräts frei zugänglich ist.
4.
Ziehen Sie nicht am Netzkabel.
5.
Stecken Sie den Netzstecker nie in
eine lockere Steckdose. Es besteht
Brand- und Stromschlaggefahr.
6.
Betreiben Sie das Gerät nicht ohne
Lampenabdeckung (wenn vorgesehen) der internen Beleuchtung.
• Dieses Gerät ist schwer. Vorsicht beim
Transport.
• Entnehmen oder berühren Sie nie mit
nassen/feuchten Händen Tiefkühlgut,
da dies zu Hautverletzungen oder Kälteverbrennungen führen kann.
• Das Gerät nicht direkter Sonneneinstrahlung aussetzen.
• Die Leuchtmittel (wenn vorgesehen) in
diesem Gerät sind Speziallampen, die
nur für Haushaltsgeräte geeignet sind.
Sie eignen sich nicht zur Raumbeleuchtung.
1.3 Täglicher Gebrauch
• Stellen Sie keine heißen Töpfe auf die
Kunststoffteile des Gerätes.
• Lagern Sie keine feuergefährlichen Gase oder Flüssigkeiten in dem Gerät. Explosionsgefahr.
• Legen Sie Lebensmittel nicht direkt vor
den Luftauslass in der Rückwand.
(Wenn es ein No-Frost-Gerät ist)
• Ein aufgetautes Produkt darf nicht wieder eingefroren werden.
• Abgepackte Tiefkühlkost immer entsprechend den Herstellerangaben aufbewahren.
DEUTSCH 51
• Die Lagerempfehlungen des Geräteherstellers sollten strikt eingehalten werden. Halten Sie sich an die betreffenden
Anweisungen.
• Keine kohlensäurehaltigen Getränke
oder Sprudel in den Tiefkühlschrank
stellen, da der Druckanstieg in den Behältern zur Explosion führen und das
Gerät beschädigen kann.
• Eis am Stiel kann Kälteverbrennungen
verursachen, wenn es direkt nach der
Entnahme aus dem Gefrierschrank gegessen wird.
1.4 Reinigung und Pflege
• Schalten Sie vor Wartungsarbeiten immer das Gerät ab und ziehen Sie den
Netzstecker aus der Steckdose.
• Reinigen Sie das Gerät nicht mit Metallgegenständen.
• Keine scharfen Gegenstände zum Entfernen von Reif und Eis im Gerät verwenden. Verwenden Sie einen Kunststoffschaber.
• Kontrollieren Sie den Tauwasserabfluss
im Kühlraum in regelmäßigen Abständen. Reinigen Sie den Ablauf, falls nötig. Bei verstopftem Wasserabfluss
sammelt sich das Wasser auf dem Boden des Geräts an.
1.5 Montage
Halten Sie sich für den elektrischen Anschluss strikt an die Anweisungen der betreffenden Abschnitte.
• Kontrollieren Sie nach dem Auspacken
das Gerät auf eventuelle Beschädigungen. Nehmen Sie das Gerät nicht in Betrieb, wenn es beschädigt ist. Melden
Sie die Schäden umgehend dem Händler, bei dem Sie es erworben haben.
Bewahren Sie in diesem Fall die Verpackung auf.
• Lassen Sie das Gerät mindestens vier
Stunden stehen, bevor Sie es elektrisch
anschließen, damit das Öl in den Kompressor zurückfließen kann.
• Ausreichenden Freiraum zur Luftzirkulation um das Gerät lassen; anderenfalls
besteht Überhitzungsgefahr. Halten Sie
sich für die Belüftung an die Installationsanweisungen.
Page 52

www.electrolux.com
52
• Das Gerät sollte zur Vermeidung von
Verbrennungen durch Berührung von
heißen Bauteilen (Kompressor, Kondensator) möglichst mit der Rückseite gegen eine Wand aufgestellt werden.
• Das Gerät darf nicht in der Nähe von
Heizkörpern oder Kochern installiert
werden.
• Vergewissern Sie sich, dass der Netzstecker des Gerätes nach der Installation frei zugänglich ist.
• Wenn ein Wasseranschluss vorgesehen
ist, verbinden Sie das Gerät nur mit
dem Trinkwasseranschluss.
1.6 Kundendienst
• Sollte die Wartung des Gerätes elektrische Arbeiten verlangen, so dürfen diese nur von einem qualifizierten Elektriker
oder einem Elektro-Fachmann durchgeführt werden.
• Wenden Sie sich für Reparaturen und
Wartung nur an Fachkräfte der autori-
2. BEDIENFELD
sierten Kundendienststellen und verlangen Sie stets Original-Ersatzteile.
1.7 Umweltschutz
Das Gerät enthält im Kältekreis
oder in dem Isoliermaterial keine
ozonschädigenden Gase. Das
Gerät darf nicht wie normaler
Hausmüll entsorgt werden. Die
Isolierung enthält entzündliche
Gase: das Gerät muss gemäß den
geltenden Vorschriften entsorgt
werden; sie erhalten diese bei Ihrer Gemeindeverwaltung. Nicht
das Kälteaggregat beschädigen,
insbesondere nicht in der Nähe
des Wärmetauschers. Die Materialien, die bei der Herstellung dieses Geräts verwendet wurden und
mit dem Symbol
können recycelt werden.
markiert sind,
MODE˚C
123 4 5 6
EIN/AUS-Taste
1
Temperaturregler Gefriergerät
2
Kühl-/Gefrierschrank-Taste für Tem-
3
peraturanzeige
Display
4
Funktionstaste
5
Lösch-Schalter für den Alarmton
Temperaturregler Kühlgerät
6
2.1 Display
1 2 3 4 5 6
Anzeige Kühlraum
1
Anzeige Gefrierraum
2
Page 53

Temperaturvorzeichen
3
Temperaturanzeige
4
Action Freeze-Funktion
5
Shopping-Funktion
6
2.2 Einschalten des Geräts
Stecken Sie den Netzstecker in die Netzsteckdose. Sollte das Display nicht aufleuchten, drücken Sie die EIN/AUS-Taste.
Nach dem Einschalten des Geräts wird
auf dem Bedienfeld Folgendes angezeigt:
• Die Temperaturvorzeichenanzeige zeigt
ein Pluszeichen an
• Die Temperaturanzeige blinkt, der Hintergrund des Displays leuchtet rot und
es ertönt ein Signalton.
Drücken Sie die Funktionstaste, um den
Summton abzuschalten (siehe auch
„Temperaturwarnung”).
Stellen Sie die gewünschte Temperatur
ein (siehe "Temperaturregulierung").
DEUTSCH 53
1.
– Die Anzeige des Kühlschranks
leuchtet.
– Das Display zeigt die Kühlschrank-
temperatur an.
2.
– Die Anzeige des Gefrierschranks
leuchtet.
– Das Display zeigt die Temperatur
im Gefrierschrank an.
Nach 10 Sekunden werden stets die normalen Anzeigebedingungen wiederhergestellt.
3)
2.6 Funktionsmenü
Bei jedem Betätigen der Funktionstaste
werden abwechselnd die folgenden Funktionen aktiviert:
• Action Freeze-Funktion
• Shopping-Funktion
• Kein Symbol: Normalbetrieb.
Sie können jeweils eine Funktion
einschalten.
2.3 Ausschalten
Das Gerät wird ausgeschaltet, wenn Sie
die EIN/AUS-Taste länger als 1 Sekunde
lang betätigen.
Danach wird ein Temperatur-Countdown
(-3 -2 -1) angezeigt.
Nach dem Abschalten des Gerätes erlischt auch das Display.
2.4 Ausschalten des Kühlraums
Um den Kühlraum auszuschalten, drehen
Sie den Temperaturregler für den Kühlraum entgegen dem Uhrzeigersinn in die
Position „O“.
Der Gefrierraum bleibt dabei weiterhin eingeschaltet.
Nach dem Ausschalten des Kühlraums
wird nur die Temperatur des Gefrierraums
weiterhin angezeigt.
Die Kühlraumbeleuchtung wird bei ausgeschaltetem Kühlraum ebenfalls ausgeschaltet.
2.5 Temperaturanzeige
Wenn die Taste für die Temperaturanzeige des Kühl-/Gefrierschranks gedrückt
wird, zeigt das Display nacheinander Folgendes an:
3)
Unter normalen Bedingungen.
Drücken Sie zum Ausschalten der Funktionen mehrmals die Funktionstaste, bis
kein Symbol mehr angezeigt wird.
2.7 Temperaturregelung
Die Temperatur im Gerät wird vom Temperaturregler geregelt.
Die Temperatur im Kühlraum kann durch
Drehen des Temperaturreglers für den
Kühlraum eingestellt werden. Der Einstellbereich liegt zwischen ca. +2 °C und +8
°C.
Die Temperatur im Gefrierraum kann
durch Drehen des Temperaturreglers für
den Gefrierraum eingestellt werden. Der
Einstellbereich liegt zwischen ca. -15 °C
und -24 °C.
Für eine ordnungsgemäße Lagerung von
Lebensmitteln sollten Sie folgende Temperaturen einstellen:
+5 °C im Kühlraum
-18 °C im Gefrierraum.
Im Normalbetrieb zeigt die Temperaturanzeige die aktuell eingestellte Temperatur
an.
Bedienen Sie das Gerät wie folgt:
• Drehen Sie den Temperaturregler im
Uhrzeigersinn, um die maximal mögliche Kühlung einzustellen.
Page 54

www.electrolux.com
54
• Drehen Sie den Temperaturregler ent-
Eine mittlere Stellung ist im Allgemeinen
am besten geeignet.
Allerdings muss für eine exakte Einstellung berücksichtigt werden, dass die
Temperatur im Inneren des Geräts von
verschiedenen Faktoren abhängt:
•Raumtemperatur
• Häufigkeit des Öffnens der Tür
• Menge der eingelagerten Lebensmittel
• Standort des Geräts.
2.8 Shopping-Funktion
Wenn Sie eine größere Menge noch nicht
gekühlter Lebensmittel lagern möchten,
zum Beispiel nach einem Einkauf, empfehlen wir das Einschalten der Funktion
Shopping, um einerseits ein schnelleres
Abkühlen der Produkte zu gewährleisten
und andererseits zu vermeiden, dass sich
die Wärme auf die bereits im Kühlschrank
befindlichen Lebensmittel überträgt.
Die Funktion Shopping wird aktiviert, indem Sie die Funktionstaste gegebenenfalls mehrmals drücken, bis das ge-
wünschte Symbol
Die Funktion Shopping wird nach 6 Stunden automatisch abgeschaltet.
Sie kann jederzeit durch Drücken der
Funktionstaste (siehe „Funktionsmenü”)
ausgeschaltet werden.
2.9 Action Freeze Funktion
Zum Einfrieren frischer Lebensmittel müssen Sie die Funktion Action Freeze einschalten. Drücken Sie die Funktionstaste
gegen dem Uhrzeigersinn, um die geringste Kühlung einzustellen.
erscheint.
gegebenenfalls mehrmals, bis das gewünschte Symbol erscheint.
Diese Funktion endet automatisch nach
52 Stunden.
Sie kann jederzeit durch Drücken der
Funktionstaste (siehe "Funktionsmenü")
ausgeschaltet werden.
2.10 Temperaturwarnung
(Temperatur zu hoch)
Ein Anstieg der Temperatur im Gefrierfach
(zum Beispiel aufgrund eines Stromausfalls) wird wie folgt angezeigt:
• blinkende Temperaturanzeige
• blinkende Anzeige (Gefrierfach-Anzeige)
• Display leuchtet rot
• durch das Ertönen eines Summers
•Alarmsymbol.
Sobald die normalen Bedingungen wieder
hergestellt sind:
• wird das akustische Signal ausgeschal-
tet
• blinkt der Temperaturwert weiterhin
• das Display leuchtet weiter rot.
Wenn Sie die Funktionstaste/den AlarmRückstellschalter zum Ausschalten des
Alarms betätigen, wird in der Anzeige
einige Sekunden lang die wärmste Temperatur im Fach angezeigt.
Die Temperaturanzeige hört zu diesem
Zeitpunkt auf zu blinken, und das Display
leuchtet nicht mehr rot, sondern weiß.
In der Alarmphase kann das Signal durch
Drücken der Funktionstaste/des AlarmRückstellschalters ausgeschaltet werden.
Das Display leuchtet weiterhin rot, bis die
normalen Lagerbedingungen wiederhergestellt sind.
3. TÄGLICHER GEBRAUCH
3.1 Reinigung des Innenraums
Bevor Sie das Gerät in Betrieb nehmen,
beseitigen Sie den typischen „Neugeruch“
am besten durch Reinigen der Innenteile
mit lauwarmem Wasser und einer neutralen Seife. Sorgfältig nachtrocknen.
Verwenden Sie keine aggressiven
Reinigungsmittel oder Scheuerpulver, die die Oberfläche beschädigen.
3.2 Einfrieren frischer
Lebensmittel
Der Gefrierraum eignet sich zum Einfrieren
von frischen Lebensmitteln und zum La-
Page 55

gern von gefrorenen und tiefgefrorenen
Lebensmitteln über einen längeren Zeitraum.
Um frische Lebensmittel einzufrieren,
schalten Sie bitte die Fast Freeze-Funktion mindestens 24 Stunden, bevor Sie die
einzufrierenden Lebensmittel in das Gefrierfach legen, ein.
Legen Sie die einzufrierenden Lebensmittel in das Fach Fast Freeze, da dies der
kälteste Bereich ist.
Die maximale Menge an Lebensmitteln,
die in 24 Stunden eingefroren werden
kann, ist auf dem Typenschild angegeben, das sich im Innern des Geräts befindet.
Der Gefriervorgang dauert 24 Stunden:
Legen Sie während dieses Zeitraums keine weiteren einzufrierenden Lebensmittel
in das Gerät.
Wann müssen Sie die Fast Freeze
Funktion aktivieren:
Etwa 6
Stunden
Einlegen kleiner Mengen frischer Lebensmittel (ca. 5 kg)
vorher
Etwa
24
Stunden
Einlegen der maximalen Menge an Lebensmitteln (siehe
Typenschild)
vorher
Nicht
erfor-
Einlegen gefrorener
Lebensmittel
derlich
Nicht
erforderlich
Einlegen kleiner Mengen frischer Lebensmittel, ca. 2 kg täglich maximal
3.3 Lagerung gefrorener
Produkte
Lassen Sie das Gerät vor der ersten Inbetriebnahme oder nach einer Zeit, in der
das Gerät nicht benutzt wurde, mindestens zwei Stunden lang auf den höheren
DEUTSCH 55
Einstellungen laufen, bevor Sie Lebensmittel in das Gefrierfach hinein legen.
Kam es zum Beispiel durch einen
Stromausfall, der länger dauerte
als der in der Tabelle mit den
technischen Daten angegebene
Wert (siehe "Ausfalldauer") zu einem ungewollten Abtauen, dann
müssen die aufgetauten Lebensmittel sehr rasch verbraucht oder
sofort gekocht und (nach dem Abkühlen) erneut eingefroren werden.
3.4 Eiswürfelbereitung
Dieses Gerät ist mit einer oder mehreren
Schalen für die Herstellung von Eiswürfeln
ausgestattet. Füllen Sie die Schalen mit
Wasser und stellen Sie diese in das Gefrierfach.
Bitte verwenden Sie zum Herausholen der Schalen aus dem Gefrierschrank keine Utensilien aus
Metall.
3.5 Kälteakkumulatoren
Der Gefrierschrank wird mit einem oder
mehreren Gefrierakkumulatoren geliefert.
Diese verlängern die Zeitdauer, in der die
Lebensmittel bei einem Stromausfall oder
einem Ausfall des Gerätes gekühlt werden.
3.6 Auftauen
Tiefgefrorene oder gefrorene Lebensmittel
können vor der Verwendung je nach der
zur Verfügung stehenden Zeit im Kühlschrank oder bei Raumtemperatur aufgetaut werden.
Kleinere Teile können sogar direkt aus
dem Gefrierraum entnommen und anschließend sofort gekocht werden. In diesem Fall dauert der Garvorgang etwas
länger.
Page 56

www.electrolux.com
56
3.7 Verstellbare Ablagen
3.8 Positionieren der Türablagen
Die Wände des Kühlschranks sind mit einer Reihe von Führungsschienen ausgestattet, die verschiedene Möglichkeiten für
das Einsetzen der Ablagen bieten.
Zur besseren Raumnutzung können die
vorderen Hälften der Ablagen auf die hinteren Hälften gelegt werden.
Die Türablagen können in unterschiedlicher Höhe positioniert werden, womit das
Lagern verschieden großer Lebensmittelpackungen ermöglicht wird.
Nehmen Sie die Einstellungen wie folgt
vor: Ziehen Sie den Einsatz langsam in
Pfeilrichtung, bis er sich herausheben
lässt, und setzen Sie ihn dann an der gewünschten Position wieder ein.
3.9 Feuchtigkeitsregulierung
In die Glasablage ist eine Vorrichtung mit
(über einen Schieber verstellbaren) Schlitzen integriert, die die Temperaturregelung
in den Gemüsefächern ermöglicht.
Bei geschlossenen Lüftungsschlitzen:
bleibt der natürliche Feuchtegehalt der
Lebensmittel in den Obst- und Gemüsefächern für längere Zeit erhalten.
Bei geöffneten Lüftungsschlitzen:
führt die höhere Luftzirkulation zu einem
niedrigeren Feuchtegehalt der Luft in den
Obst- und Gemüsefächer.
4. PRAKTISCHE TIPPS UND HINWEISE
4.1 Energiespartipps
• Öffnen Sie die Tür nicht zu häufig, und
lassen Sie diese nicht länger offen als
unbedingt notwendig.
• Wenn die Umgebungstemperatur hoch
ist und der Temperaturregler auf eine
niedrige Temperatur eingestellt und das
Gerät voll beladen ist, kann es zu andauerndem Betrieb des Kompressors
und damit zu Reif- oder Eisbildung am
Page 57

Verdampfer kommen. Stellen Sie in diesem Fall den Temperaturregler auf eine
höhere Einstellung ein, die ein automatisches Abtauen und damit auch einen
niedrigeren Energieverbrauch ermöglicht.
4.2 Hinweise für die Kühlung
frischer Lebensmittel
So erzielen Sie die besten Ergebnisse:
• Legen Sie bitte keine warmen Lebensmittel oder dampfenden Flüssigkeiten in
den Kühlschrank.
• Decken Sie die Lebensmittel ab oder
verpacken Sie diese entsprechend, besonders wenn sie stark riechen.
• Legen Sie die Lebensmittel so hinein,
dass um sie Luft frei zirkulieren kann.
4.3 Hinweise für die Kühlung
Tipps:
Fleisch (alle Sorten): wickeln Sie Fleisch in
lebensmittelechte Tüten und legen Sie
diese auf die Glasablage über der Gemüseschublade.
Bitte lagern Sie Fleisch aus Sicherheitsgründen nur einen oder maximal zwei Tage auf diese Weise.
Gekochte Lebensmittel, kalte Gerichte
usw.: diese können abgedeckt auf eine
Ablage gelegt werden.
Obst und Gemüse: bitte waschen Sie
Obst und Gemüse gründlich und legen
Sie es in die speziell dafür vorgesehene(n)
Schublade(n).
Butter und Käse: diese sollten stets in
speziellen luftdichten Behältern verpackt
sein oder in Aluminiumfolie bzw. in lebensmittelechte Tüten eingepackt werden, um so wenig Luft wie möglich in der
Verpackung zu haben.
Milchflaschen: bitte bewahren Sie Milchflaschen stets mit Deckel im Flaschenregal in der Tür auf.
Bananen, Kartoffeln, Zwiebeln und Knoblauch sollten nicht im Kühlschrank aufbewahrt werden, außer diese sind dafür
speziell verpackt.
4.4 Hinweise zum Einfrieren
Im Folgenden finden Sie einige wertvolle
Tipps für einen optimalen Gefriervorgang:
DEUTSCH 57
• die maximale Menge an Lebensmitteln,
die innerhalb von 24 Stunden eingefroren werden kann. ist auf dem Typschild
angegeben;
• der Gefriervorgang dauert 24 Stunden.
Legen Sie während dieses Zeitraums
keine weiteren einzufrierenden Lebensmittel in das Gefrierfach;
• frieren Sie ausschließlich frische und
gründlich gewaschene Lebensmittel
von sehr guter Qualität ein;
• teilen Sie die Lebensmittel in kleinere
Portionen ein, damit diese schnell und
vollständig gefrieren und Sie später nur
die Menge auftauen müssen, die Sie
gerade benötigen;
• die einzufrierenden Lebensmittelportionen sollten stets luftdicht in Aluminiumfolie oder in lebensmittelechte Gefrierbeutel verpackt werden, um so wenig
Luft wie möglich in der Verpackung zu
haben;
• achten Sie beim Hineinlegen von frischen, noch ungefrorenen Lebensmitteln darauf, dass diese keinen Kontakt
mit Gefriergut bekommen, da dieses
sonst antauen kann;
• weniger fetthaltige Lebensmittel lassen
sich besser lagern als fetthaltigere; Salz
verkürzt die Lagerzeit von Lebensmitteln im Gefrierfach;
• werden Gefrierwürfel direkt nach der
Entnahme aus dem Gefrierfach verwendet, können Sie zu Frostbrand auf der
Haut führen;
• es empfiehlt sich, das Einfrierdatum auf
jeder einzelnen Packung zu notieren,
um einen genauen Überblick über die
Lagerzeit zu haben.
4.5 Hinweise zur Lagerung
gefrorener Produkte
So erzielen Sie die besten Ergebnisse mit
Ihrem Gerät:
• Vergewissern Sie sich, dass die gefrorenen Lebensmittel vom Händler angemessen gelagert wurden.
• Achten Sie unbedingt darauf, die eingekauften gefrorenen Lebensmittel in der
kürzest möglichen Zeit in das Gefriergerät zu bringen.
• Öffnen Sie die Tür nicht zu häufig, und
lassen Sie die Tür nicht länger offen als
notwendig.
Page 58

www.electrolux.com
58
• Aufgetaute Lebensmittel verderben sehr
schnell und eignen sich nicht für ein erneutes Einfrieren.
5. REINIGUNG UND PFLEGE
• Das Haltbarkeitsdatum auf der Tiefkühlkostverpackung darf nicht überschritten
werden.
VORSICHT!
Ziehen Sie bitte vor jeder Reinigungsarbeit immer den Netzstecker aus der Steckdose.
Der Kältekreis des Gerätes enthält
Kohlenwasserstoffe; Wartungsarbeiten und Nachfüllen von Kältemittel dürfen daher nur durch vom
Hersteller autorisiertes Fachpersonal ausgeführt werden.
5.1 Regelmäßige Reinigung
Der gesamte Kühlschrank muss regelmäßig gereinigt werden:
• Reinigen Sie die Innenseiten und die
Zubehörteile mit lauwarmem Wasser
und etwas Neutralseife.
• Prüfen und säubern Sie die Türdichtungen in regelmäßigen Abständen und
kontrollieren Sie, dass diese sauber und
frei von Verunreinigungen sind.
• Spülen und trocknen Sie diese sorgfältig ab.
Ziehen Sie nicht an Leitungen
und/oder Kabeln im Innern des
Kühlschranks und achten Sie darauf, diese nicht zu verschieben
oder zu beschädigen.
Benutzen Sie zur Reinigung des
Innenraums keinesfalls Putzmittel,
Scheuerpulver, stark parfümierte
Reinigungsmittel oder Wachspolituren, da diese die Oberfläche des
Innenraums beschädigen und einen starken Eigengeruch hinterlassen können.
Reinigen Sie den Kondensator (schwarzes
Gitter) und den Kompressor auf der Geräterückseite mit einer Bürste. Dadurch verbessert sich die Leistung des Geräts und
es verbraucht weniger Strom.
Bitte achten Sie darauf, das Kühlsystem nicht zu beschädigen.
Viele Haushaltsreiniger für Küchen enthalten Chemikalien, die den im Gerät verwendeten Kunststoff angreifen können.
Aus diesem Grund ist es empfehlenswert,
das Gerät außen nur mit warmem Wasser
und etwas flüssigem Tellerspülmittel zu
reinigen.
Schließen Sie das Gerät nach der Reinigung wieder an die Netzversorgung an.
Page 59

5.2 Abtauen des Kühlschranks
5.3 Abtauen des
Gefrierschranks
Auf den Ablagen des Gefrierschranks und
im Innern des oberen Fachs wird sich
stets etwas Reif bilden.
Tauen Sie den Gefrierschrank ab, wenn
die Reifschicht eine Stärke von etwa 3 bis
5 mm erreicht hat.
DEUTSCH 59
Bei normalem Betrieb wird Reif bei jedem
Anhalten des Kompressors automatisch
aus dem Verdampfer des Kühlschranks
entfernt. Das Tauwasser läuft durch eine
Rinne in einen speziellen Behälter an der
Rückseite des Geräts über dem Motorkompressor, wo es verdampft.
Reinigen Sie deshalb regelmäßig die Abflussöffnung des Tauwassers in der Mitte
des Kühlschrankkanals, damit das Wasser nicht überfließt und auf die gelagerten
Lebensmittel tropft. Benutzen Sie dazu
bitte das mitgelieferte Reinigungswerkzeug, das sich bereits in der Ablauföffnung befindet.
Stellen Sie den Temperaturregler
bitte 12 Stunden vor dem Abtauen auf eine kühlere Einstellung,
damit eine ausreichende Kälte als
Reserve für die Unterbrechung im
Betrieb entstehen kann.
Page 60

www.electrolux.com
60
Entfernen Sie den Reif wie nachstehend
erläutert:
1.
Schalten Sie das Gerät aus.
2.
Nehmen Sie das gesamte Gefriergut
heraus, verpacken Sie es in mehrere
Schichten Zeitungspapier und lagern
Sie es an einem kühlen Ort.
VORSICHT!
Fassen Sie gefrorene Lebensmittel
nicht mit nassen Händen an. Ihre
Hände könnten an den Lebensmitteln festfrieren.
3.
Lassen Sie die Tür des Geräts offen
stehen und setzen Sie den Kunststoffschaber in die entsprechende
Aufnahme unten in der Mitte; stellen
Sie eine Schale zum Auffangen des
Tauwassers darunter.
Stellen Sie eine Schale mit warmem Wasser in das Gefrierfach,
um den Abtauprozess zu beschleunigen. Entfernen Sie bereits
während des Abtauprozesses vorsichtig Eisstücke, die sich lösen
lassen.
4.
Ist das Geräteinnere vollständig abgetaut, trocken Sie die nassen Oberflächen gründlich ab und bewahren Sie
den Kunststoffschaber für eine spätere Verwendung auf.
5.
Schalten Sie das Gerät ein.
6.
Nachdem das Gerät zwei bis drei
Stunden in Betrieb ist, können Sie die
ausgelagerten Lebensmittel wieder in
den Gefrierraum hineinlegen.
5.4 Stillstandzeiten
Bei längerem Stillstand des Gerätes müssen Sie folgendermaßen vorgehen:
Entfernen Sie Reif und Eis vom Verdampfer bitte niemals mit scharfen metallischen
Gegenständen, da dieser dadurch beschädigt werden könnte.
Versuchen Sie nicht, den Abtauvorgang
durch andere als vom Hersteller empfohlene mechanische oder sonstige Hilfsmittel zu beschleunigen.
Ein Temperaturanstieg des Gefrierguts
während des Abtauens des Geräts kann
die Lagerzeit dieser Lebensmittel verkürzen.
trennen Sie das Gerät von der Netz-
•
versorgung
• entnehmen Sie alle Lebensmittel
Page 61

• Tauen Sie das Gerät ab (sofern vorgesehen). Reinigen Sie den Innenraum
und das gesamte Zubehör.
• lassen Sie die Türen offen/angelehnt,
um das Entstehen unangenehmer Gerüche zu vermeiden.
6. WAS TUN, WENN …
DEUTSCH 61
Möchten Sie bei einer längeren Abwesenheit den Gefrierschrank weiter laufen lassen, bitten Sie jemanden, gelegentlich die
Temperatur zu prüfen, damit das Gefriergut bei einem möglichen Stromausfall
nicht im Innern des Gerätes verdirbt.
WARNUNG!
Ziehen Sie vor der Fehlersuche
immer den Netzstecker aus der
Steckdose.
Maßnahmen zur Störungsbehebung, die in der vorliegenden Gebrauchsanweisung nicht beschrieben sind, dürfen nur von einem
qualifizierten Elektriker oder einer
kompetenten Person durchgeführt
werden.
Während das Gerät in Betrieb ist,
entstehen bestimmte Geräusche
(Kompressor und Kühlkreislauf).
Störung Mögliche Ursache Abhilfe
Das Gerät funktio-
niert nicht. Die Lam-
Das Gerät ist abgeschaltet.
Schalten Sie das Gerät ein.
pe funktioniert nicht.
Der Netzstecker steckt
nicht richtig in der Steckdose.
Das Gerät bekommt kei-
nen Strom. Es liegt keine
Spannung an der Netzsteckdose an.
Stecken Sie den Netzstecker richtig in die Steckdose.
Testen Sie bitte, ob ein anderes Gerät an dieser
Steckdose funktioniert.
Kontaktieren Sie gegebenenfalls einen qualifizierten
Elektriker.
Es wird ein Warnton
ausgegeben.
Die Temperatur im Gefrierraum ist zu hoch.
Siehe hierzu den Abschnitt
"Temperaturwarnung (Temperatur zu hoch)".
Die Lampe funktioniert nicht.
Die Lampe ist im StandbyModus.
Schließen und öffnen und
Sie die Tür.
Die Lampe ist defekt. Siehe hierzu "Austauschen
der Lampe".
Der Kompressor arbeitet ständig.
Die Tür ist nicht richtig ge-
Die Tür wurde zu häufig
Die Temperatur ist nicht
richtig eingestellt.
schlossen.
geöffnet.
Stellen Sie eine höhere
Temperatur ein.
Siehe hierzu "Schließen der
Tür".
Lassen Sie die Tür nicht
länger als unbedingt erforderlich offen.
Page 62

www.electrolux.com
62
Störung Mögliche Ursache Abhilfe
Die Temperatur der zu
Die Raumtemperatur ist zu
Wasser fließt an der
Rückwand des Kühlschranks hinunter.
Wasser fließt in den
Kühlschrank.
Die eingelagerten Lebens-
Wasser fließt auf
den Boden.
Die Temperatur im
Gerät ist zu niedrig.
Die Temperatur im
Gerät ist zu hoch.
Es wurden zu viele Pro-
Die Temperatur im
Kühlschrank ist zu
hoch.
Die Temperatur im
Gefrierraum ist zu
hoch.
Es bildet sich zu viel
Eis.
Die Tür wurde nicht richtig
6.1 Austauschen der Lampe
Das Gerät ist mit einer langlebigen LEDInnenbeleuchtung ausgestattet.
Die Beleuchtung darf nur von einem Fachmann ausgetauscht werden. Wenden Sie
sich hierzu an den Kundendienst.
kühlenden Lebensmittel ist
zu hoch.
hoch.
Beim automatischen Ab-
tauen fließt das abgetaute
Wasser an der Rückwand
des Kühlschranks hinunter.
Der Wasserabflusskanal ist
verstopft.
mittel verhindern, dass das
Wasser zum Kollektor
fließt.
Der Tauwasserablauf läuft
nicht in die Verdampferschale über dem Kompressor.
Die Temperatur ist nicht
richtig eingestellt.
Die Temperatur ist nicht
richtig eingestellt.
dukte auf einmal eingelegt.
Die Kaltluft kann im Gerät
nicht zirkulieren.
Die Lebensmittel liegen zu
dicht aneinander.
Die Lebensmittel sind nicht
richtig verpackt.
geschlossen.
6.2 Schließen der Tür
1.
Reinigen Sie die Türdichtungen.
2.
Stellen Sie die Tür nach Bedarf ein.
Siehe hierzu „Montage“.
3.
Ersetzen Sie die defekten Türdichtungen, falls erforderlich. Wenden Sie
sich hierzu an den Kundendienst.
Lassen Sie Lebensmittel auf
Raumtemperatur abkühlen,
bevor Sie sie ins Gerät legen.
Senken Sie die Raumtemperatur.
Das ist normal.
Reinigen Sie den Ablauf.
Stellen Sie sicher, dass die
Lebensmittel nicht die
Rückwand berühren.
Befestigen Sie den Tauwasserablauf an der Verdampferschale.
Stellen Sie eine höhere
Temperatur ein.
Stellen Sie eine niedrigere
Temperatur ein.
Legen Sie weniger Produkte auf einmal ein.
Stellen Sie sicher, dass die
Kaltluft im Gerät zirkulieren
kann.
Lagern Sie die Lebensmittel
so, dass die Kaltluft im Gerät zirkulieren kann.
Verpacken Sie die Lebensmittel richtig.
Siehe hierzu „Schließen der
Tür“.
Page 63

7. MONTAGE
DEUTSCH 63
WARNUNG!
Lesen Sie bitte die "Sicherheitshinweise" sorgfältig vor der Aufstellung des Geräts durch, um
Gefahren für Sie selbst zu vermeiden und einen korrekten Betrieb
des Geräts zu gewährleisten.
7.1 Aufstellung
Installieren Sie dieses Gerät an einem Ort,
an dem die Umgebungstemperatur mit
der Klimaklasse übereinstimmt, die auf
dem Typschild des Geräts angegeben ist:
Klima-
Umgebungstemperatur
klasse
SN +10°C bis + 32°C
N +16°C bis + 32°C
ST +16°C bis + 38°C
T +16°C bis + 43°C
7.3 Wechsel des Türanschlags
7.2 Elektrischer Anschluss
Kontrollieren Sie vor der ersten Benutzung
des Gerätes, ob die Netzspannung und frequenz Ihres Hausanschlusses mit den
auf dem Typenschild angegebenen Anschlusswerten übereinstimmen.
Das Gerät muss geerdet sein. Zu diesem
Zweck ist die Netzkabelsteckdose mit einem Schutzkontakt ausgestattet. Falls die
Steckdose Ihres Hausanschlusses nicht
geerdet sein sollte, lassen Sie das Gerät
bitte gemäß den geltenden Vorschriften
erden und fragen Sie dafür einen qualifizierten Elektriker.
Der Hersteller übernimmt keinerlei Haftung
für Schäden oder Verletzungen, die durch
Missachtung der oben genannten Sicherheitshinweise entstehen.
Das Gerät entspricht den EU- Richtlinien.
Die Tür des Geräts öffnet sich nach
rechts. Wenn Sie möchten, dass sich die
Tür nach links öffnet, gehen Sie vor dem
Einbau des Geräts bitte nach den folgenden Anweisungen vor:
• Lockern Sie den oberen Stift und entfernen Sie das Distanzstück.
• Entfernen Sie den oberen Stift und die
obere Tür.
• Lösen Sie die Stifte (B) und die Distanzstücke (C).
C
B
C
Page 64

www.electrolux.com
64
7.4 Anforderungen an die Belüftung
• Entfernen Sie die untere Tür.
• Lösen Sie den unteren Stift.
Auf der gegenüberliegenden Seite:
• Bringen Sie den unteren Stift an.
• Bringen Sie die untere Tür an.
• Bringen Sie die Stifte (B) und die Distanzstücke (C) am mittleren Scharnier
auf der gegenüberliegenden Seite an.
• Bringen Sie die obere Tür an.
• Legen Sie das Distanzstück ein und ziehen Sie den oberen Stift fest.
5 cm
min.
200 cm
2
7.5 Montage des Geräts
VORSICHT!
Achten Sie darauf, dass sich das
Netzkabel des Geräts frei bewegen lässt.
x
min.
200 cm
Hinter dem Gerät muss genug Platz für eine ausreichende Luftzirkulation sein.
2
Führen Sie die folgenden Schritte aus:
Schneiden Sie bei Bedarf den Dichtungsstreifen zu und bringen Sie ihn am Gerät
an, wie in der Abbildung dargestellt.
x
Page 65

4 mm
44 mm
DEUTSCH 65
Bohren Sie, wie in der Abbildung gezeigt,
die Scharnierabdeckung A auf.
Bringen Sie die Abdeckungen A und A1 (im
Beipack) am mittleren Scharnier an.
A1A
Setzen Sie das Gerät in die Einbaunische.
Schieben Sie das Gerät in Pfeilrichtung (1),
bis die obere Spaltabdeckung am Küchenmöbel anliegt.
2
Schieben Sie das Gerät auf der den Scharnieren gegenüberliegenden Seite in Pfeilrichtung (2) soweit wie möglich gegen die
Seitenwand des Küchenmöbels.
1
Richten Sie das Gerät in der Einbaunische
aus.
Vergewissern Sie sich, dass der Abstand
zwischen dem Gerät und der Schrankvorderkante 44 mm beträgt.
Mit der unteren Scharnierabdeckung (im
Beipack) können Sie sicherstellen, dass der
Abstand zwischen dem Gerät und dem Küchenmöbel richtig ist.
Achten Sie darauf, dass der Abstand zwischen dem Gerät und dem Schrank 4 mm
beträgt.
Öffnen Sie die Tür. Stecken Sie die untere
Scharnierabdeckung auf.
Page 66

www.electrolux.com
66
Befestigen Sie das Gerät mit 4 Schrauben
in der Einbaunische.
I
I
Entfernen Sie das entsprechende Teil aus
der Scharnierabdeckung (E). Achten Sie
darauf, im Falle eines rechten Scharniers
Teil DX bzw. bei einem gegenüberliegenden Scharnier Teil SX zu entfernen.
Setzen Sie die beiliegenden Abdeckkappen
(C, D) in die Befestigungs- und Scharnierlöcher ein.
C
D
E
E
Bauen Sie das Belüftungsgitter (B) ein.
Stecken Sie die Scharnierabdeckungen (E)
auf das Scharnier auf.
B
Page 67

DEUTSCH 67
Wenn das Gerät seitlich an die Küchenmöbeltür angeschlossen werden muss:
1.
Lockern Sie die Schrauben in den Haltewinkeln (H).
2.
Verschieben Sie die Haltewinkel (H).
3.
Ziehen Sie die Schrauben wieder an.
H
H
Trennen Sie die Teile (Ha), (Hb), (Hc) und
(Hd) ab.
ca. 50 mm
ca. 50 mm
Montieren Sie das Teil (Ha) an der Innenseite der Tür des Küchenmöbels.
90°
21 mm
90°
21 mm
Page 68

www.electrolux.com
68
Hc
Ha
8 mm
Hb
Drücken Sie das Teil (Hc) auf das Teil (Ha).
Öffnen Sie die Gerätetür und die Möbeltüre
in einem Winkel von 90°.
Setzen Sie das Führungsstück (Hb) in die
Führungsschiene (Ha) ein.
Halten Sie die Gerätetür an die Tür des Küchenmöbels, und markieren Sie die Bohrungen.
Ha
8 mm
K
Nehmen Sie die Halterungen wieder ab.
Markieren Sie 8 mm ab der Türaußenkante
die Stelle, an der der Nagel (K) eingesetzt
werden muss.
Ha
Page 69

Hb
DEUTSCH 69
Setzen Sie das Führungsstück erneut auf
die Führungsschiene und schrauben Sie es
mit den mitgelieferten Schrauben fest.
Richten Sie die Tür des Einbaumöbels und
die Gerätetür mit dem Führungsstück (Hb)
aus.
Hb
Drücken Sie Abdeckung (Hd) auf das Führungsstück (Hb).
Hd
Führen Sie eine Endkontrolle durch, um
sicherzustellen, dass:
• alle Schrauben fest angezogen sind.
8. GERÄUSCHE
Während das Gerät in Betrieb ist, entstehen bestimmte Geräusche (Kompressor
und Kühlkreislauf).
OK
• der Dichtungsstreifen sicher am Gerät
befestigt ist.
• die Tür korrekt öffnet und schließt.
SSSRRR!
CLICK!
HISSS!
BRRR!
CRACK!
BLUBB!
Page 70

www.electrolux.com
70
CLICK!
BRRR!
BLUBB!
CLICK!
BRRR!
BLUBB!
HISSS!
HISSS!
Page 71

DEUTSCH 71
SSSRRR!
CRACK!
9. TECHNISCHE DATEN
Abmessung der Aussparung
Höhe 1780 mm
Breite 560 mm
Tiefe 550 mm
Ausfalldauer 24 h
Spannung 230-240 V
Frequenz 50 Hz
Die technischen Informationen befinden
sich auf dem Typenschild innen links im
Gerät sowie auf der Energieplakette.
SSSRRR!
CRACK!
Page 72

www.electrolux.com
72
10. UMWELTTIPPS
Recyceln Sie Materialien mit dem Symbol
. Entsorgen Sie die Verpackung in den
entsprechenden Recyclingbehältern.
Recyceln Sie zum Umwelt- und
Gesundheitsschutz elektrische und
elektronische Geräte. Entsorgen Sie
Geräte mit diesem Symbol
dem Hausmüll. Bringen Sie das Gerät zu
Ihrer örtlichen Sammelstelle oder wenden
Sie sich an Ihr Gemeindeamt.
nicht mit
Page 73

ҚАЗАҚ 73
МАЗМҰНЫ
1. ҚАУІПСІЗДІК ТУРАЛЫ МАҒЛҰМАТТАР . . . . . . . . . . . . . . . . . . . . . . . . . . . . . . . . . . . . . . . . . . . . . . . . . . 74
2. БАСҚАРУ ПАНЕЛІ . . . . . . . . . . . . . . . . . . . . . . . . . . . . . . . . . . . . . . . . . . . . . . . . . . . . . . . . . . . . . . . . . . . . 76
3. КҮНДЕЛІКТІ ПАЙДАЛАНУ . . . . . . . . . . . . . . . . . . . . . . . . . . . . . . . . . . . . . . . . . . . . . . . . . . . . . . . . . . . . . 78
4. ПАЙДАЛЫ НҰСҚАУЛАР МЕНЕН КЕҢЕСТЕР . . . . . . . . . . . . . . . . . . . . . . . . . . . . . . . . . . . . . . . . . . . . . . 80
5. КҮТУ МЕНЕН ТАЗАЛАУ . . . . . . . . . . . . . . . . . . . . . . . . . . . . . . . . . . . . . . . . . . . . . . . . . . . . . . . . . . . . . . . 81
6. НЕ ІСТЕРСІҢІЗ, ЕГЕР... . . . . . . . . . . . . . . . . . . . . . . . . . . . . . . . . . . . . . . . . . . . . . . . . . . . . . . . . . . . . . . . 84
7. ОРНАТУ . . . . . . . . . . . . . . . . . . . . . . . . . . . . . . . . . . . . . . . . . . . . . . . . . . . . . . . . . . . . . . . . . . . . . . . . . . . . 85
8. ШУЫЛ ТҮРЛЕРІ . . . . . . . . . . . . . . . . . . . . . . . . . . . . . . . . . . . . . . . . . . . . . . . . . . . . . . . . . . . . . . . . . . . . . 91
9. ТЕХНИКАЛЫҚ СИППАТАМА . . . . . . . . . . . . . . . . . . . . . . . . . . . . . . . . . . . . . . . . . . . . . . . . . . . . . . . . . . . 93
10. ҚОРШАҒАН ОРТАҒА ЗИЯН КЕЛДІРМЕУ ТУРАЛЫ МАҒЛҰМАТТАР . . . . . . . . . . . . . . . . . . . . . . . . . . . 94
СІЗ ОЙЫМЫЗДА БОЛДЫҢЫЗ
Electrolux құрылғысын сатып алғаныңызға рахмет. Сіз ондаған жылдар бойғы кәсіби тәжірибе мен
инновацияға сүйеніп жасалған құрылғыны таңдадыңыз. Тапқырлықтың туындысы болған, көз тартарлық
бұл құрылғыны жасау барысында сіз ойымызда болдыңыз. Сондықтан, қолданған сайын тамаша нәтижеге
қол жеткізе алатыныңызға сенімді болыңыз.
Electrolux әлеміне қош келдіңіз.
Біздің веб-сайтқа барып келесіні қараңыз:
Қолдануға қатысты кеңестер, кітапшалар, ақаулықты түзету, қызмет көрсету туралы ақпарат:
www.electrolux.com
Сізге барынша жақсы қызмет көрсету үшін өніміңізді мына жерге тіркеңіз:
www.electrolux.com/productregistration
Құрылғыңызға қажетті керек-жарақтарды, шығынды материалдарды және фирмалық қосалқы
бөлшектерді сатып алу үшін:
www.electrolux.com/shop
ТҰТЫНУШЫҒА КӨМЕК, ҚЫЗМЕТ КӨРСЕТУ
Фирмалық заттарды қолдануды ұсынамыз.
Қызмет көрсету орталығына хабарласқанда келесі деректердің дайын болуын қамтамасыз етіңіз.
Деректерді техникалық ақпарат тақтайшасынан табуға болады. Үлгісі, Өнім нөмірі, Сериялық нөмірі
Ескерту / Абайлаңыз - Қауіпсіздік туралы маңызды мағлұмат.
Жалпы мағлұматтар менен кеңестер
Қорғаған ортаға зиян келдірмей пайдалану туралы нұсқаулар
Өндіруші ескертусіз өзгеріс енгізу құқығына ие.
Page 74

www.electrolux.com
74
1.
ҚАУІПСІЗДІК ТУРАЛЫ МАҒЛҰМАТТАР
Құрылғыны орнатып, ең алғаш пайдаланбас
бұрын, өз қауіпсіздігіңіз бен құрылғыны дұрыс
қолдану мақсатында, пайдаланушыға
арналған бұл нұсқаулықты, оның ішінде
кеңестері мен ескертулеріне назар салып
оқып шығыңыз. Осы құрылғыны
пайдаланатын адамдардың барлығы, қажетсіз
ақаулықтар мен тұрмыстық апаттардың алдын
алу үшін,оны пайдалану тәсілдерімен және
қауіпсіздікті қамтамасыз ететін
функцияларымен жете таныс болуы керек.
Осы қолдану туралы нұсқаулықты сақтап
қойыңыз және тоңазытқышты басқа
адамдарға бергеніңізде немесе
сатқаныңызда, оны пайдаланатын әрбір
адамның бұйымның қолданыс мерзімі
аяқталғанға дейін оған қатысты пайдалану
және қауіпсіздік шараларынан хабардар
болуы үшін нұсқаулықты да қоса беруді
ұмытпаңыз.
Адам өмірі мен құрылғының қауіпсіздігін
қамтамасыз ету үшін осы пайдаланушы
нұсқаулығындағы ескертулерді орындаңыз,
себебі қадағалаудың жеткіліксіздігінен туған
ақаулық үшін өндіруші жауапкершілік
көтермейді.
1.1 Балалар мен әлсіз адамдардың
қауіпсіздігі
• Бұл құрылғыны физиологиялық, сезімдік не
болмаса ақыл-ой деңгейіне байланысты не
пеш жұмысына қатысты тәжрибиесі мен
білімінің аздығына байланысты пайдалана
алмайтын адамдар (балаларды қоса
алғанда), пешті пайдалану туралы ерекше
нұсқауларды алмайынша не олардың
қауіпсіздігіне ие адамның қадағалауынсыз
пайдаланбауға тиіс.
Балалар құрылғымен ойнамас үшін оларды
қадағалап отыру қажет.
• Машинаның орауыштары мен қорабын
балалардың қолы жетпейтін жерде
сақтаңыз. Тұншығып кету қаупі бар.
• Егер құрылғыны тастасаңыз, оның ашасын
розеткадан суырыңыз да, қорек сымын
қиып(құрылғыға барынша тақата)балалар
ішіне кіріп қамалып не электр тогының
қатерлі әсеріне ұшырамас үшін есігін
ағытып алып тастаңыз.
• Егер есігі магнитті тығыздағышпен
жабдықталған бұл құрылғыны, есігінде не
қақпағында серіппелі құлыбы бар ескі
құрылғының орнына қоймақ болсаңыз, ескі
құрылғыны ең алдымен оның серіппелі
құлыбын жарамсыз етіп барып тастаңыз.
Бұл құрылғыны бала ішіне қамалып
қалатын қауіп көзіне айналудан сақтайды.
1.2 Жалпы қауіпсіздік туралы
мағлұматтар
Құрылғының корпусындағы немесе
кіріктірілген элементіндегі желдеткіш
саңылауларды бітемей, ашық ұстаңыз.
• Осы нұсқаулықта айтылғандай, бұл
құрылғы әдеттегі үй жағдайларында
тамақты және/немесе сусындарды сақтау
үшін арналған.
• Жібіту үдерісін жылдамдату мақсатында
ешқандай механикалық немесе кез келген
басқа жасанды құралды пайдаланушы
болмаңыз.
• Өндіруші рұқсат бермеген болса,
тоңазытқыш құрылғылардың ішіне басқа
электр құрылғыларды (балмұздақ жасайтын
құрылғы сияқты) салып қолданушы
болмаңыз.
• Салқындатқыш зат ағатын жүйеге зақым
келтірмеңіз.
• Құрылғының салқындатқыш зат ағатын
жүйесінде изобутан (R600a) және қоршаған
ортамен сыйысымдылығы жоғары, бірақ
сонда да жанғыш зат болып табылатын,
табиғи газ болады.
Құрылғының тасымалдау және орнату
кезінде салқындатқыш зат жүйесіне зақым
келтірілмейтініне көз жеткізіңіз.
Салқындатқыш зат жүйесі зақымдалса:
– жалын от пен тұтату көздері болмауы
тиіс
– құрылғы орналасқан бөлмені жақсылап
желдетіңіз
• Осы өнімді немесе оның сипаттарын
өзгерту қауіпті. Кабельге зақым келсе қысқа
тұйықталу, өрт шығу және/немесе тоқ соғу
қаупі төнеді.
Назарыңызда болсын!
Page 75

Назарыңызда болсын!
Кез келген электрлік бөлшектерін
(қуат сымы, аша, компрессор),
қатерлі жағдай орын алмас үшін,
куәлігі бар қызмет көрсетуші маманы
немесе білікті техник маман
ауыстыруға тиіс.
1.
Қуат кабелін ұзартуға болмайды.
2.
Қуат кабелі құрылғының артқы
жағында мыжылып немесе
зақымдалып қалмағанына көз
жеткізіңіз. Мыжылған немесе
зақымдалған қуат кабелі тым қызып
кетіп, өрт шығуына әкелуі мүмкін.
3.
Құрылғының айыры қол жетерлік
жерде орналасқанына көз жеткізіңіз.
4.
Айырды қуат кабелін ұстап тартпаңыз.
5.
Розетка босап кеткен болса, айырды
оған қоспаңыз. Тоқ соғу немесе өрт
шығу қаупі бар.
6.
Құрылғыны ішкі жарықтама шамының
қақпағы (егер бар болса) жабылмаса
іске қосуға болмайды.
• Бұл құрылғы ауыр. Оны жылжытқан кезде
абай болу керек.
• Қолыңыз сулы болса, мұздатқыш бөліктен
заттарды алмаңыз және оларға тимеңіз,
себебі қолыңыздың терісі сыдырылып кетуі
немесе қарылып қалуы мүмкін.
• Құрылғыны ұзақ уақытқа тікелей күн
сәулелерінің астына қоймаңыз.
• Осы құрылғыда тек тұрмыстық
құрылғыларда пайдалануға арналған
арнайы шамдар (егер бар болса) ғана
қолданылған. Олар үйді жарықтандыру
үшін қолдануға жарамайды.
1.3 Күнделікті пайдалану
• Ыстық ыдысты құрылғы ішіндегі пластик
жерлерге қоймаңыз.
• Құрылғы ішіне тұтанғыш газ бен сұйықты
қоймаңыз, себебі олар жарылып кетуі
мүмкін.
• Тағамдарды артқы қабырғадағы ауа
шығатын саңылауға қарама-қарсы қоюға
болмайды. (Егер құрылғыға мұз қатпайтын
болса)
• Мұздатылған тағамды жібітіп алған соң оны
қайта мұздатуға болмайды.
• Алдын ала оралған тағамды мұздатылған
тағам өндірушінің нұқсауларына сай
сақтаңыз.
ҚАЗАҚ 75
• Құрылғы өндірушінің тағам сақтауға
қатысты ұсыныстарын қатаң орындау
керек. Тиісті нұсқауларға қараңыз.
• Көмірқышқылдандырылған не көпіршитін
сусындарды тоңазытқыш камераға
қоймаңыз, себебі ыдысқа түскен қысым
оның жарып, нәтижесінде құрылғыға нұқсан
келуі мүмкін.
• Мұздақтарды тоңазытқыштан алған бетте
пайдаланғанда аяз қарып жіберуі мүмкін.
1.4 Күтім және тазалау
• Құрылғыға қызмет көрсетуді бастамас
бұрын құрылғыны өшіріп, ашаны электр
желісіндегі розеткадан суырып алыңыз.
• Құрылғыны металл заттармен
тазаламаңыз.
• Құрылғы қырауын тазалау үшін өткір
заттарды пайдаланбаңыз. Пластик
қырғышты пайдаланыңыз.
• Еріген суды жинайтын табақшаны мезгілмезгіл тексеріп отырыңыз. Қажет болса,
табақшаны тазалап отырыңыз. Табақша
толып қалған жағдайда су құрылғының
астыңғы жағына жиналады.
1.5 Орнату
Электр желісіне қосарда, арнайы
бөлімдерде берілген нұсқауларды
мұқият орындаңыз.
• Құрылғы орамын ашып, оның еш жерінің
бүлінбегенін тексеріп алыңыз. Құрылғының
бір жері бүлініп қалса қоспаңыз. Қандай да
бір бүлінушілік орын алғанда, құрылғыны
сатып алған жерге дереу хабарлаңыз.
Бұндай жағдайда қорабын сақтап қойыңыз.
• Құрылғыны қоспас бұрын оның майы
компрессорға ағып құйылу үшін кем
дегенде екі сағат күтіңіз.
• Құрылғы айналасында ауа жеткілікті түрде
айналуға тиіс, ауа айналымы жеткіліксіз
болса құрылғы қызып кетеді. Желдету
жеткілікті болу үшін орнатуға қатысты
нұсқауларды орындаңыз.
• Мүмкін болса, құрылғының жылы тұратын
бөлшектерін (компрессор, конденсатор)
ұстап қалып не оларға қол тигізіп алып
күйіп қалмас үшін тоңазытқыштың арт
жағын әрқашан қабырғаға қаратып
қойыңыз.
• Құрылғыны радиатор не пештердің қасына
жақын орналастыруға болмайды.
Page 76

www.electrolux.com
76
• Құрылғыны орнатқан соң оның ашасының
қол оңай жететін жерде болуын
қамтамасыз етіңіз.
• Тек ауыз суы жүйесіне ғана қосыңыз (егер
суға қосу қажет болса).
1.6 Қызмет
• Құрылғыны жөндеу үшін қажет электр
жұмыстарын электр маманы не білікті адам
жүзеге асыруға тиіс.
• Бұл өнімге қызмет көрсетуді тек уәкілетті
қызмет көрсету орындары жүзеге асыру
керек және құрылғының нағыз өз
бөлшектері ғана пайдаланылуға тиіс.
1.7 Қоршаған ортаны қорғау
Бұл құрылғының салқындатқыш
сұйығының құрамында да, изоляция
2. БАСҚАРУ ПАНЕЛІ
материалдарында да озон қабатына
зиян келтіретін газдар жоқ. Бұл
құрылғыны тұрмыстық қалдық пен
қоқыстар тасталатын жерге тастауға
болмайды. Оның изоляция
қабаттамасында тұтанғыш газдар
бар: құрылғыны жергілікті құзырлы
мекемелерден алынатын жарамды
ережелерге сай тастау қажет.
Салқындатқыш құралға, әсіресе оның
қызу алмастырғышқа жақын артқы
бөлігіне зиян келтірмеңіз. Құрылғыда
пайдаланылған
белгіленген материалдар қайта
өңдеуден өткізуге жарайды.
MODE˚C
белгішесімен
123 4 5 6
ON/OFF түймешігі
1
Мұздатқыш температурасын реттеу тетігі
2
Тоңазытқыш-мұздатқыштың
3
температурасын көрсететін түймешік
Бейнебет
4
Функция түймешігі
5
Сигналды қайтару тетігі
Тоңазытқыш температурасын реттеу
6
тетігі
2.1 Бейнебет
1 2 3 4 5 6
Тоңазытқыш бөліктің индикаторы
1
Мұздатқыш бөліктің индикаторы
2
Оң немесе теріс температура
3
индикаторы
Температура индикаторы
4
Action Freeze функциясы
5
Shopping функциясы
6
Page 77

2.2 Қосу
Құрылғы ашасын розеткаға қосқан соң
бейнебет жанбаса, ON/OFF түймешігін
басыңыз.
Құрылғы іске қосыла салысымен басқару
панелінде келесі шамдар пайда болады:
• Нөлден жоғары не төмен температураны
көрсеткіш, температураның нөлден жоғары
екендігін көрсетіп тұрады
• температура жыпылықтап, бейнебет фоны
қызыл түске енеді де, сигнал естіледі.
Функция түймешігін басыңыз, сонда сигнал
өшеді (сонымен қатар, "Артық температураны
ескерту сигналы" тарауын қараңыз).
Қажетті температураны
орнатыңыз("Температураны реттеу" тарауын
қараңыз).
ҚАЗАҚ 77
Дегенмен, 10 секундтан соң бейнебет
қалыпты жағдайға көшеді.
2.6 Функциялар мәзірі
Функция түймешігін әр басқан сайын,
төмендегі функциялар сағат бағыты бойынша
қосылады:
• Action Freeze функциясы
• Shopping функциясы
• еш символ жоқ: қалыпты жағдай.
Бір сәтте тек бір ғана функцияны
ҚОСУҒА(ON)болады.
Функцияларды OFF (сөндірулі) қалпына қою
үшін Function (функция) түймешігін ешқандай
белгіше болмағанша бірнеше рет басыңыз.
2.3 Өшіру
Құрылғы Қосу/Өшіру түймешігін 1 секундтан
артық басып тұрғанда өшеді.
Осыдан кейін, -3 -2 -1 реті бойынша
басталатын температураның кері санағы
орын алады.
Құрылғыны өшірген кезде, бейнебет те өшеді.
2.4 Тоңазытқыш бөлікті сөндіру
Тоңазытқыш бөлікті сөндіру үшін Тоңазытқыш
температурасының тетігін сағат тілінің
бағытына қарсы "O" қалпына дейін бұраңыз.
Тоңазытқыш бөлік жұмыс істей береді.
Тоңазытқыш бөлік жабылғаннан кейін
мұздатқыштың температурасы ғана
көрсетіледі.
Бұндай жағдайда мұздатқыш бөліктің ішіндегі
шам сөніп тұрады.
2.5 Температура көрсету
Тоңазытқыш-мұздатқыш температурасын
көрсететін түймешікті әр басқан сайын
бейнебетте төмендегілер бірінен соң бірі
көрсетіледі:
1.
– Тоңазытқыш камерасының шамы
жанады.
– Бейнебетте тоңазытқыш
температурасы пайда болады.
2.
– Мұздатқыш камерасының шамы
– Бейнебетте мұздатқыш температурасы
4)
Қалыпты жағдайда.
4)
жанады.
пайда болады.
2.7 Температураны реттеу
Құрылғының ішіндегі температура
Температура тетігінің көмегімен
басқарылады.
Тоңазытқыш бөліктің температурасын
Тоңазытқыш температурасының тетігімен
реттеуге болады және ол +2°C және +8°C
градус аралығы шамасында болады.
Мұздатқыш бөліктің температурасын
Мұздатқыш температурасының тетігімен
реттеуге болады және ол -15°C және -24°C
градус аралығы шамасында болады.
Тағамды дұрыс сақтау үшін келесі
температураларды орнату керек:
тоңазытқышта +5°C
мұздатқышта -18°C.
Қалыпты жұмыс жасап тұрған кезде,
Температура индикаторы ағымдық
температураны көрсетеді.
Құрылғыны іске қосу үшін төмендегі
әрекеттерді орындаңыз:
• суықтықты ең жоғары мәнге қою үшін
Температура тетігін сағат тілінің бағытымен
бұраңыз
• ең аз суықтық мәніне қою үшін
Температура тетігін сағат тілінің бағытына
қарсы бұраңыз.
Осы екеуінің аралығы әдетте неғұрлым
оңтайлы температура деп саналады.
Дегенмен, дәл мәнді құрылғының ішіндегі
температураның төмендегі жағдайларға
тәуелді болатынын ескеріп таңдау керек:
• бөлме температурасы
• есіктің қаншалықты жиі ашылатыны
• сақталатын тағамның мөлшері
Page 78

www.electrolux.com
78
• құрылғы орналасқан жер.
2.8 Shopping функциясы
Жылы тағамды көп мөлшерде, мысалы, азықтүлік дүкенінен келген бетте салғыңыз келсе,
тағамдарды неғұрлым тез тоңазыту үшін және
тоңазытқыштағы басқа тағамдар жібіп кетпес
үшін Shopping функциясын іске қосуды
ұсынамыз.
Shopping функциясы, функция
түймешігін(қажет болса бірнеше рет)тиісті
белгіше
қосылады.
Shopping функциясы шамамен 6 сағат уақыт
өткен соң автоматты түрде өшеді.
Функцияны кез келген уақытта Функция
түймешігін басып ("Функцияларды іске қосу"
тарауын қараңыз) ажыратуға болады.
2.9 Action Freeze функциясы
Жаңа әкелген тағамдарды мұздату үшін
Action Freeze функциясын қосуыңыз қажет.
Функция түймешігін(қажет болса бірнеше
рет)тиісті белгіше пайда болғанша басыңыз.
Бұл функция 52 сағаттан соң автоматты түрде
тоқтайды.
Функцияны кез келген уақытта функция
түймешігін басып("Функциялар мәзірі"
тарауын қараңыз)ажыратып қоюға болады.
пайда болғанша басқан кезде
• температура мәні жыпылықтайды
• тоңазытқыш камерасының көрсеткіші
жыпылықтайды (Тоңазытқыш камерасының
көрсеткіші)
• бейнебет фоны қызыл түске енеді
• дыбысты сигнал естіледі
• ескерту белгішесі көрінеді.
Қалыпты жұмыс режимі орнағанда:
• дыбысты сигнал өшеді
• температура мәні жыпылықтауын
жалғастырады
• бейнебет фоны қызыл қалпы қалады.
Дыбысты сигналды өшіру үшін функция
түймешігін/ескерту сигналын бастапқы
қалыпқа көшіру түймешігін басқан кезде,
камера ішінде орын алған ең жоғарғы
температура
секунд көрсетіліп тұрады.
Осы кезде жыпылықтау тоқтайды да,
бейнебет түсі қызыл түстен ақ түске ауысады.
Ескерту циклі орын алып тұрған кезде
функция түймешігі/ескерту сигналын қайтару
түймешігі арқылы дыбысты сигналды өшіріп
қоюға болады.
Тағамды сақтауға болатын қалыпты жағдай
орын алғанша бейнебет фоны қызыл болып
жанып тұрады.
көрсеткішінде бірнеше
2.10 Артық температураны ескерту
сигналы
Мұздатқыш камераның ішіндегі
температураның көбейгенін(мысалы, электр
қуаты өшкен кезде)төмендегідей көрінеді:
3. КҮНДЕЛІКТІ ПАЙДАЛАНУ
3.1 Ішін тазалау
Құрылғыны ең алғаш пайдаланбас бұрын,
жаңа бұйымға тән иісті арылту үшін оның іші
мен ішкі керек-жарақтарын сәл нейтрал сабын
салынған жылы сумен жуып, содан соң мұқият
құрғатыңыз.
Жуғыш зат не жеміргіш ұнтақтарды
пайдаланбаңыз, бұл құрылғының
сыртқы қабатына зиян келтіреді.
3.2 Жаңа тағамды мұздату
Мұздатқыш камера жаңа тағамды мұздату
мен тоңазыған және мұздатылған тағамдарды
ұзақ уақыт сақтауға жарайды.
Жаңа тағамды мұздату үшін Fast Freeze
функциясын, мұздатылатын тағамды
мұздатыш камераға қоярдың алдында, кем
дегенде 24 сағат бұрын қосыңыз.
Мұздатылатын тағамды Fast Freeze бөлігіне
қойыңыз, себебі бұл ең суық жер.
24 сағат ішінде мұздатуға болатын тағамның
ең көп мөлшері құрылғының ішіндегі
Page 79

техникалық ақпарат тақтайшасында
көрсетілген.
Мұздату үрдісі 24 сағатқа созылады: осы
уақыт аралығында тоңазытқыңыз келген
басқа тағамды қосып салмаңыз.
Fast Freeze функциясын қолдану
уақыты:
шамаме
н 6
сағат
Жаңа тағамды азаздан салу (шамамен 5
кг)
бұрын
шамаме
н 24
сағат
бұрын
қажет
емес
қажет
емес
Тағамды ең көп
мөлшерде салу
(техникалық ақпарат
тақтайшасын қараңыз)
Мұздатылған тағамды
салу
Жаңа тағамды күніне
ең көбі 2 кг-нан салу
3.3 Мұздатылған тағамды
сақтайтын камера
Құрылғыны ең алғаш қолданғанда не ұзақ
уақыт пайдаланбағаннан кейін қосқан кезде,
камераға тамақ салмас бұрын құрылғыны ең
кем дегенде 2 сағат ең жоғарғы
параметрлерге қойып жұмыс істетіп алыңыз.
Кездейсоқ еріп кету, мысалы электр
қуаты өшіп, ток техникалық
сипаттамалар кестесіндедегі "көтеру
уақыты" бөлімінде берілген
мәндерден де ұзақ уақыт бойы
қосылмай тұрса, еріп кеткен тағамды
жылдам пайдаланып не дереу пісіріп
алып барып қайта тоңазыту
(салқындатқан соң) қажет.
ҚАЗАҚ 79
3.4 Мұз текшелерін жасау
Бұл құрылғыда мүз текшелерін жасауға
арналған бір не одан да көп науалар бар. Осы
науаларға су толтырыңыз да, содан соң
оларды мұздатқыш камераға салыңыз.
Науаларды камерадан алу үшін
металл аспаптарды пайдаланбаңыз.
3.5 Суық аккумуляторы
Мұздатқыштың электр қуаты өшіп не қандай
да бір оқыс жағдай орын алғанда тағамды
ұзағырақ сақтай тұруға көмектесетін кем
дегенде бір суық аккумуляторы бар.
3.6 Жібіту
Мұздатылған не тоңазытылған тағамды
қажетке жаратпас бұрын, осы жұмысқа
арналған уақыттың шамасына қарай отырып,
оны тоңазытқыш ішінде не бөлме
температурасында жылытуға болады.
Тағамның кіші кесектерін тоңазытқыштан
алған бетте мұздаған қалпы пісіре беруге
болады. бұндай жағдайда пісіру уақыты
ұзағырақ болады.
3.7 Жылжымалы сөрелер
Тоңазытқыштың қабырғасында сөрелерді
қалауыңызша орналастыруға арналған
бірнеше бағыттауыш бар.
Орынды тиімді пайдалану үшін алдыңғы
жарты сөрелерді артқы сөрелерге жатқызып
жинауға болады.
Page 80

www.electrolux.com
80
3.8 Есіктің сөрелерін орналастыру
3.9 Ылғалдылықты бақылау
Әр түрлі мөлшерде оралған тағамдарды
орналастыру үшін есіктегі сөрелерді түрлі
биіктікке қоюға болады.
Бұл үшін төмендегі әрекеттерді орындаңыз:
сөрелерді көрсеткі бағыты бойынша еппен
тартып шығарыңыз да, қажетті орынға
қойыңыз.
Шыны сөре көкөніс салынатын сөре(лер)дің
температурасын реттеуге мүмкіндік беретін
саңылаулары (сырғыма тетіктің көмегімен
реттелетін) бар құралмен жабдықталған.
Желдету саңылаулары жабық тұрған кезде:
жеміс пен көкөніс тартпасына салынған
тағамның құрамындағы табиғи ылғалдылық
ұзағырақ сақталады.
Желдету саңылаулары ашық тұрған кезде:
ауа көбірек айналып тұрса, жеміс пен көкөніс
салынатын бөліктердегі ауаның ылғалдылығы
төменірек болады.
4. ПАЙДАЛЫ НҰСҚАУЛАР МЕНЕН КЕҢЕСТЕР
4.1 Қуатты үнемдеуге қатысты
ақыл-кеңес
• Есікті жиі-жиі ашпаңыз не қажетті уақыттан
артық уақыт ашып тұрмаңыз.
• Орта температурасы жоғары болса,
температура регуляторы ең жоғарғы
параметрге қойылса және тоңазытқыш
ішіне тамақ толтырылса салынса,
компрессор буландырғыш құралдың үстіне
мұз қатырып, үздіксіз жұмыс жасауы мүмкін.
Бұндай жағдай орын алса, температура
регуляторын құрылғы электр қуатын
үнемдей отырып өздігінен жібу үшін төменгі
көрсеткішке қойыңыз.
4.2 Жаңа тағамды тоңазытуға
қатысты ақыл-кеңес
Ең жақсы нәтижеге жету үшін:
• жылы не буы бұрқырап тұрған сұйық
заттарды тоңазытқышқа қоймаңыз
• тағамның бетін жабыңыз не оны орап
салыңыз, әсіресе ол өткір иісті болса
• тағамды ауа оның айналасында еркін
айнала алатындай етіп орналастырыңыз
4.3 Тоңазытуға қатысты ақыл-кеңес
Пайдалы кеңестер:
Ет (барлық түрлері) : полиэтилен қалтаға орап
көкөніс суырмасының үстіңгі жағындағы шыны
сөреге қойыңыз.
Page 81

Сақтық мақсатында тағамды осылайша тек
бір, көп дегенде екі күн ғана сақтау керек.
Пісірілген тағамдар, суық тағамдар т.б.:
бұлардың бетін жауып кез келген сөреге
қоюға болады.
Жемістер мен көкөністер: бұларды мұқият
тазалап арнайы сөреге (лер) салу қажет.
Сарымай мен ірімшік: бұларды арнайы ауа
өткізбейтін сауыттарға салып не алюминий
қағазға не полиэтилен қалтаға орап,
мүмкіндігінше ауа өткізбеуге тырысу қажет.
Сүт бөтелкелері: бұлардың тығындарын
жауып, есіктегі бөтелке қойылатын қатарға
қою қажет.
Оралмаған банан, картоп, пияз бен
сарымсақты тоңазытқышта ұстауға болмайды.
4.4 Тоңазыту туралы кеңес
Төменде тоңазыту үрдісін барынша тиімді
жүзеге асыру үшін бірнеше маңызды кеңестер
берілген:
• 24 сағат ішінде тоңазытуға болатын ең көп
тағам мөлшері техникалық ақпарат
тақтайшасында берілген;
• мұздату үрдісі 24 сағатқа созылады. Осы
уақыт аралығында тоңазытылуға тиіс ешбір
қосымша тағамды қосып салуға болмайды;
• тек аса жоғары сапалы, жаңа және мұқият
тазаланған тағамдарды ғана тоңазытыңыз;
• тағамды жылдам әрі толықтай мұздатып,
қажетті кезде оның тек қажетті мөлшерін
ғана жібіту үшін кішкене бөлшектерге бөліп
дайындаңыз;
• тағамды алюминий қағазға не полиэтилен
қалтаға орап, орамының ауа
өткізбейтіндігіне көз жеткізіп алыңыз;
ҚАЗАҚ 81
• жаңа, мұздамаған тағамды әлдеқашан
мұздаған тағамға, оның температурасы
көтеріле бастамас үшін тигізбеңіз;
• майы аз тағамдар майлы тағамдарға
қарағанда жақсы әрі ұзақ сақталады; тұз
тағамның сақталу уақытын азайтады;
• мұз текшелерін мұздатқыш камерадан
алған бетте тура пайдаланса, аяз теріні
қарып кетуі мүмкін;
• Тағамдарды сақтау уақытының кестесін
жасау үшін, тағамның әрбір жеке
орамасына оның тоңазытылған ай-күнін
жазып қою ұсынылады;
4.5 Тоңазытылған тағамдарды
сақтауға қатысты ақыл-кеңес
Құрылғының барынша жақсы жұмыс істеуін
қамтамасыз ету үшін мына әрекеттерді
орындау керек:
• сатушының мұздаған қалпы сатылатын
тағамдарды тиісті түрде мұздатқанына көз
жеткізіңіз;
• мұздатылған тағамдарды дүкеннен
мұздатқышқа барынша аз уақыт ішінде
жеткізіңіз;
• егер аса қажет болмаса есігін жиі ашпаңыз
немесе ұзақ уақыт ашып қалдырмаңыз;
• мұздап тұрған тағамды жібіткеннен кейін
сапасы дереу түсе бастайды және оны
қайта мұздатуға болмайды;
• тағамды өндіруші көрсеткен жарамдылық
мерзімінен артық уақыт сақтамаңыз.
5. КҮТУ МЕНЕН ТАЗАЛАУ
Сақтандыру туралы ескерту!
Жөндеу жұмысын жүргізбес бұрын
құрылғыны электр желісінен
ағытыңыз.
Бұл құрылғының салқындатқыш
құралында сутегілі көміртек бар;
сондықтан да, жөндеу жұмыстары
мен оны қайта толтыруды тек
уәкілетті маман ғана жүзеге асыруға
тиіс.
5.1 Мезгілімен тазалап отыру
Құрылғыны мезгіл-мезгіл тазалап отыру
қажет:
• іші мен керек-жарақтарын аздап нейтрал
сабын салынған жылы сумен тазалаңыз.
• есік тығыздағышын мезгіл-мезгіл тазалап,
кір тұрып қалмас үшін сүртіп алып
отырыңыз.
• шайып мұқият құрғатыңыз.
Page 82

www.electrolux.com
82
Құрылғының артындағы конденсатор (қара
гриль) мен компрессорды шөтке не
шаңсорғышпен тазалаңыз. Бұлай істеу
5.2 Тоңазытқыш мұзын-қырауын еріту
5.3 Мұздатқыштың мұзын еріту
Мұздатқыш сөрелер мен үстіңгі камераның
айналасына белгілі бір мөлшерде ылғи қырау
жиналып тұрады.
Қырау қабатының қалыңдығы шамамен 3-5
мм жеткен кезде мұздатқышты жібітіңіз.
Құрылғы ішіндегі түтікшелер және/не
сымдардың ешқайсысын тартпаңыз,
жылжытып не бүлдірмеңіз.
Құрылғының ішін тазалау үшін жуғыш
заттарды, жеміргіш ұнтақтар мен аса
хош иістендірілген тазалағыш
заттарды не балауыз
жылтыратқыштарды пайдаланбаңыз,
себебі бұндай заттар құрылғының
беткі қабатын бүлдіріп, онда ерекше
иіс қалдырады.
құрылғы жұмысын жақсартып, электр
шығынын азайтады.
Салқындатқыш жүйеге еш нұқсан
келтірмеуге тырысыңыз.
Ас үй құрылғыларының бетін тазалауға
арналған көпшілік заттардың құрамында осы
құрылғы үшін пайдаланылған пластиктерге
зиянды әсер ететін химикаттар бар.
Сондықтан да осы құрылғы корпусының
сыртын, тек аздаған жуғыш зат салынған
жылы сумен тазалау ұсынылады.
Тазалап болған соң құрылғыны электр
желісіне қайта қосыңыз.
Құрылғы қалыпты жұмыс істеп тұрса, қырау
тоңазытқыш камерадағы буландырғыштан,
мотор компрессоры тоқтаған сайын
автоматты түрде шығарылады. Еріген су науа
арқылы құрылғының артқы жағында, мотор
компрессорының үстінде орналасқан арнайы
сауытқа жиналады да, сол жерде буға
айналады.
Жиналған су ағып, тоңазытқыштағы тағамға
тамшыламас үшін тоңазытқыш бөліктегі
науаның ортасындағы еріген су ағатын
саңылауды мезгіл-мезгіл тазалаңыз.
Құрылғымен бірге жеткізілетін арнайы
тазалағыш құралды пайдаланыңыз, оны су
ағатын тесіктен аласыз.
Жібітуге 12 сағат қалғанда, құрылғы
жұмысын тоқтатуға жеткілікті суық
қорын қалыптастыру үшін
температура түймешесін ең жоғарғы
параметрге қойыңыз.
Page 83

ҚАЗАҚ 83
Қырауды кетіру үшін төмендегі нұсқауларды
орындаңыз:
1.
Құрылғыны сөндіріңіз.
2.
Ішінде тағам тұрса, оны алып, бірнеше
қабат газетке ораңыз да, салқын жерге
қойыңыз.
Сақтандыру туралы ескерту!
Мұздатылған заттарды дымқыл
қолмен ұстамаңыз. Қолдарыңыз
мұздатылған заттарға жабысып
қалуы мүмкін.
3.
Есікті ашық қалдырыңыз да, астына
еріген су жиналатын тегеш қойып,
пластик қырғышты түбінің ортаңғы
тұсындағы тиісті ойыққа сұғыңыз.
Жібіту үрдісін жылдамдату үшін
мұздатқыш бөліктің ортасына жылы
су құйылған стакан қойыңыз.
Сонымен қатар сындыруға болатын
мұзды ерімей тұрып алыңыз.
4.
Мұзы еріп болғаннан кейін құрылғының
ішін жақсылап құрғатыңыз да, қырғышты
кейін қолдану үшін сақтап қойыңыз.
5.
Құрылғыны қосыңыз.
6.
Екі немесе үш сағаттан кейін алып қойған
тағамдарды қайта тоңазытқышқа
салыңыз.
5.4 Ұзақ уақыт бойы пайдаланбау
Құрылғы ұзақ уақыт бойы пайдаланылмайтын
жағдайда мына сақтық шараларын
орындаңыз:
• құрылғыны электр желісінен ажыратыңыз
• барлық тағамдарды шығарыңыз
• мұзын ерітіп (егер бар болса), құрылғыны
және барлық керек-жарақтарын тазалаңыз
Буландырғыштағы қырауды ешқашан өткір
металл қырғышпен қырмаңыз, оны бүлдіріп
алуыңыз мүмкін.
Мұзды жылдам еріту үшін өндіруші ұсынған
құралдардан өзге механикалық немесе басқа
жасанды заттарды ешқашан қолданбаңыз.
Құрылғының мұзын еріту кезінде, оралып
мұздатылған тағамдардың температурасының
жоғарылауы олардың қауіпсіз сақталу
мерзімін қысқартуы мүмкін.
• жағымсыз иіс пайда болмас үшін есік/
есіктерді ашық қалдырыңыз.
Егер құрылғы пайдаланылып тұратын болса,
электр қуаты өшіп қалған жағдайда ішіндегі
тағам бұзылып кетпес үшін басқа бір адамның
арасында бір рет бақылап қойып отыруын
сұраңыз.
Page 84

www.electrolux.com
84
6. НЕ ІСТЕРСІҢІЗ, ЕГЕР...
Назарыңызда болсын!
Ақаулық себебін іздестірмес бұрын
ашаны розеткадан суырып алыңыз.
Осы нұсқаулықта көрсетілмеген
ақаулық түрін тек білікті маман не
білікті адам ғана іздестіруге тиіс.
Қалыпты жұмыс кезінде біраз шуыл
(компрессор, салқындатқыш
сұйықтың айналуы) естіліп тұрады.
Ақаулық Ықтимал себебі Шешімі
Құрылғы жұмыс істемей
Құрылғы сөндірулі. Құрылғыны іске қосыңыз.
тұр. Шам жанбай тұр.
Қуат ашасы розеткаға дұрыс
сұғылмаған.
Құрылғыға электр қуаты
келмей тұр. Розеткада ток
жоқ.
Ашаны розеткаға дұрыстап
сұғыңыз.
Розеткаға басқа электр
құрылғысын қосып көріңіз.
Электрші маманға
хабарласыңыз.
Дыбыстық сигнал
естіледі.
Мұздатқыштың ішіндегі
температура тым жоғары.
"Жоғары температураны
ескерту сигналы" тарауын
қараңыз.
Шам жанбайды. Шам күту режимінде тұр. Есікті жауып, қайта ашыңыз.
Шамның ақауы бар. "Шамды ауыстыру" тарауын
қараңыз.
Компрессор үздіксіз
жұмыс істейді.
Температура дұрыс
орнатылмаған.
Жоғарырақ температураға
қойыңыз.
Есік дұрыс жабылмаған. "Есікті жабу" тарауын қараңыз.
Есік тым жиі ашылған. Есікті қажет кезде ғана
ашыңыз, ұзақ ашып қоймаңыз.
Тағамның температурасы
тым жоғары.
Тағамды сақтардың алдында
температурасын бөлме
температурасына дейін
азайтыңыз.
Бөлме температурасы тым
жоғары.
Тоңазытқыштың артқы
тақтасына су ағады.
Мұзды автоматты түрде еріту
барысында еріген су артқы
Бөлменің температурасын
азайтыңыз.
Бұл дұрыс.
тақтаға ағады.
Су тоңазытқыштың ішіне
ағады.
Тағамдар судың су жинағыш
Су ағатын түтікше бітеліп
қалған.
науаға құйылуына кедергі
Су ағатын түтікшені
тазалаңыз.
Тағамдарды артқы тақтаға
тигізбей орналастырыңыз.
жасайды.
Page 85

ҚАЗАҚ 85
Ақаулық Ықтимал себебі Шешімі
Су жерге ағады. Еріген су ағатын түтікше
арқылы аққан су
компрессордың үстіндегі
Еріген су ағатын түтікшені
буландырғыш науаға
жалғаңыз.
буландырғыш науаға
ақпайды.
Құрылғының ішіндегі
температура тым төмен.
Құрылғының ішіндегі
температура тым
Температураны реттеу тетігі
дұрыс мәнге қойылмаған.
Температураны реттеу тетігі
дұрыс мәнге қойылмаған.
Жоғарырақ температураға
қойыңыз.
Төменірек температураға
қойыңыз.
жоғары.
Бір мезгілде тым көп тағам
сақтауға қойылған.
Тоңазытқыштың ішіндегі
температура тым
Құрылғының ішінде суық ауа
айналымы жоқ.
Бір мезгілде сақталатын тағам
мөлшерін азайтыңыз.
Құрылғы ішінде суық ауаның
айналуын қамтамасыз етіңіз.
жоғары.
Мұздатқыштың ішіндегі
температура тым
Тағамдар бір-біріне өте
жақын қойылған.
Тағамдарды суық ауа айнала
алатындай етіп сақтаңыз.
жоғары.
Қырау тым көп қатқан. Тағам дұрыс оралмаған. Тағамды дұрыстап ораңыз.
Есік дұрыс жабылмаған. "Есікті жабу" тарауын қараңз.
2.
6.1 Шамды ауыстыру
Құрылғы қолданыс мерзімі ұзақ LED ішкі
жарықтама шамымен жабдықталған.
Жарықтандыру құралын сервис қызметкері
ауыстыру керек. Қызмет көрсету орталығына
хабарласыңыз.
Қажет болса, есікті реттеңіз. "Орнату"
тарауын қараңыз.
3.
Қажет болса, зақым келген
тығыздағыштарды өзгертіңіз. Қызмет
көрсету орталығына хабарласыңыз.
6.2 Есікті жабыңыз
1.
Есік тығыздағыштарын тазалаңыз.
7. ОРНАТУ
7.1 Орналастыру
Бұл құрылғыны температурасы құрылғының
техникалық ақпараттар тақтайшасында
Назарыңызда болсын!
Құрылғыны орнатпай тұрып
"Қауіпсіздік туралы ақпаратты" жеке
басыңыздың қауіпсіздігін қамтамасыз
ету үшін және құрылғыны дұрыс
пайдалану үшін мұқият оқып
шығыңыз.
көрсетілген климат санатына сай келетін
жерге орналастыру қажет:
Климат
Қоршаған орта температурасы
санаты
SN +10°C бастап + 32°C дейін
N +16°C бастап + 32°C дейін
ST +16°C бастап + 38°C дейін
T +16°C бастап + 43°C дейін
Page 86

www.electrolux.com
86
7.2 Электр желісіне жалғау
Электр желісіне қоспас бұрын техникалық
ақпарат тақтайшасында көрсетілген кернеу
мен жиіліктің үйдегі электр желісінің қуатына
сай келетіндігін тексеріп алыңыз.
Құрылғы жерге қосылуға тиіс. Осы мақсатта
қорек сымы контактпен қатар жеткізілген. Егер
үйдегі розетка жерге қосылмаған болса, білікті
7.3 Есіктің ашылатын жағын өзгерту
электр маманынан ақыл-кеңес ала отырып,
құрылғыны қолданыстағы ережелерге сай
жерге жекелей қосыңыз.
Жоғарыда айтылып өткен ережелер
сақталмаса, өндіруші қандай да бір
жауапкершілікті өз мойнына алудан бас
тартады.
Бұл құрылғы E.E.C. ережелеріне сай келеді.
Құрылғының есігі оң жаққа қарай ашылады.
Есікті сол жаққа қарай ашылатын етіп
өзгерткіңіз келсе, құрылғыны орнатпай тұрып
төмендегі әрекеттерді жүзеге асырыңыз:
• Үстіңгі шеге босатыңыз да, нығыздағышты
алыңыз.
• Үстіңгі шеге мен үстіңгі есікті алыңыз.
• Шегелер (B) мен нығыздағыштарды (C)
ағытыңыз.
C
B
C
• Астыңғы есікті алыңыз.
• Астыңғы шегені босатыңыз.
Қарама-қарсы жақта:
• Астыңғы шегені салыңыз.
• Астыңғы есікті орнатыңыз.
• Шегелер (B) мен нығыздағыштарды (C)
қарама-қарсы жақтағы ортаңғы топсаға
салыңыз.
• Үстіңгі есікті орнатыңыз.
• Тығыздағыш пен үстіңгі шегені қатайтыңыз.
Page 87

7.4 Желдетуге қойылатын талаптар
ҚАЗАҚ 87
5 cm
min.
200 cm
2
7.5 Құрылғыны орнату
Сақтандыру туралы ескерту!
Қорек сымын еркін жылжытуға
болатынына көз жеткізіңіз.
x
min.
200 cm
Құрылғының арт жағында ауа жақсы айналып
тұруға тиіс.
2
Мына қадамдарды орындаңыз.
Қажет болса, жабысқақ тұмшалағыш таспаны
кесіп алып, суретте көрсетілгендей құрылғыға
жапсырыңыз.
x
Топсаның қақпағын A суретте көрсетілгендей
бұрғылаңыз.
A және A1 (керек-жарақтар салынған қалтада)
қақпақтарын топсаның ортасына салыңыз.
A1A
Page 88

www.electrolux.com
88
4 mm
Құрылғыны жиһаз ойығына орнатыңыз.
Құрылғыны көрсеткі (1) бағытымен үстіңгі
саңылаудың қақпағы ас үй қаптамасына
тірелгенше итеріңіз.
2
Құрылғыны көрсеткінің (2) бағытымен, ас үй
қаптамасының, топсаның қарсы жағында
орналасқан жағына қарай итеріңіз.
1
Құрылғыны ұяға келтіріп орналастырыңыз.
Құрылғы мен ас үй қаптамасынң алдыңғы
жиегінің арасында 44 мм орын қалуын
қамтамасыз етіңіз.
Астыңғы топсаның қақпағы (керек-жарақтар
қалтасында) құрылғы мен ас үй қаптамасының
арасындағы қашықтықтың дұрыс сақталуын
қамтамасыз етеді.
Құрылғы мен ас үй қаптамасының аралығында
4 мм орын қалуын қамтамасыз етіңіз.
Есікті ашыңыз. Астыңғы топсаның қақпағын
орнына қойыңыз.
44 mm
Құрылғыны жиһаз ойығына 4 бұрандамен
бекітіңіз.
I
I
Page 89

ҚАЗАҚ 89
Топса қақпағының (E) алынуға тиіс бөлшегін
дұрыс тауып алып қойыңыз. Оң жақ топсадан
DX бөлшегін, егер сол жақ топса болса SX
бөлшегін алуды ұмытпаңыз.
Тесіктер мен топса саңылауларын
қақпақтармен (C, D) бітеңіз.
Желдеткіш саңылаудың торкөзін (B)
C
D
орнатыңыз.
Топса қақпақтарын (E) топсаға орнатыңыз.
E
E
B
егер құрылғыны ас үй қаптамасының есігіне
жалғастырып қою қажет болса:
1.
Қапсырмалардың (H) бұрандаларын
босатыңыз.
2.
Қапсырмаларды (H) жылжытыңыз.
3.
Бұрандаларды қайта қатайтыңыз.
H
H
Page 90

www.electrolux.com
90
(Ha), (Hb), (Hc) және (Hd) бөлшектерін
ағытыңыз.
ca. 50 mm
ca. 50 mm
Hc
Ha
8 mm
(Ha) бөлшегін ас үй қаптамасының ішкі жағына
орнатыңыз.
90°
21 mm
90°
21 mm
(Hc) бөлшегін (Ha) бөлшегінің үстіне қойып
итеріңіз.
Құрылғының есігі мен ас үй қаптамасының
есігін 90° градус бұрыш жасай отырып ашыңыз.
Кішкене текшені (Hb) бағыттағышқа (Ha)
салыңыз.
Құрылғы мен ас үй қаптамасының есіктерін
бірге ұстап тұрып, тесіктерін белгілеңіз.
Hb
Ha
Page 91

8 mm
K
Hb
ҚАЗАҚ 91
Қапсырмаларды алыңыз да, есіктің сыртқы
қырынан шеге қадалатын жерге (K) дейін 8 мм
қалдырыңыз да, белгілеңіз.
Ha
Кішкене текшені бағыттағышқа қайта
орналастырыңыз да, оларды берілген
бұрандамен бекітіңіз.
Ас үй қаптамасының есігі мен құрылғының
есігін, (Hb) бөлшегін реттеу арқылы дұрыс
қалыпқа келтіріңіз.
(Hd) бөлшегін (Hb) бөлшегіне кіріктіре басыңыз.
Hb
Төмендегілерді тексеріңіз:
• Барлық бұрандалардың қатайтып
бұралғанын.
8. ШУЫЛ ТҮРЛЕРІ
Құрылғы қалыпты жұмыс істеп тұрған кезде
түрлі шуыл естіледі (компрессор,
салқындатқыш сұйықтықтың айналуы).
Hd
• Тығыздағыш таспаның қаптамаға мықтап
бекігенін.
• Есіктің дұрыс ашылып-жабылатынын.
Page 92

www.electrolux.com
92
SSSRRR!
HISSS!
CLICK!
BRRR!
OK
CLICK!
BRRR!
CRACK!
BLUBB!
CLICK!
BRRR!
BLUBB!
BLUBB!
Page 93

HISSS!
ҚАЗАҚ 93
HISSS!
SSSRRR!
CRACK!
9. ТЕХНИКАЛЫҚ СИППАТАМА
Ұяның өлшемдері
Биіктігі 1780 мм
Ені 560 мм
Тереңдігі 550 мм
Көтерілу уақыты 24 сағ.
Кернеу 230-240 В
Жиілік 50 Гц
SSSRRR!
CRACK!
Page 94

www.electrolux.com
94
Техникалық ақпарат құрылғының сол жақ ішкі
қабырғасындағы техникалық ақпарат
тақтайшасында және электр қуатының
жапсырмасында көрсетілген.
10. ҚОРШАҒАН ОРТАҒА ЗИЯН КЕЛДІРМЕУ ТУРАЛЫ
МАҒЛҰМАТТАР
Белгі
өңдеуден өткізуге тапсырыңыз. Орам
материалдарын қайта өңдеуден өткізу үшін
тиісті контейнерлерге салыңыз.
Электрлік және электроникалық
құрылғылардың қалдығын қайта өңдеуден
өткізу арқылы, қоршаған ортаға және
салынған материалдарды қайта
адамның денсаулығына зиын келтіретін
жағдайларға жол бермеуге өз үлесіңізді
қосыңыз. Белгі
тұрмыстық қалдықтармен бірге тастамаңыз.
Өнімді жергілікті қайта өңдеу орталығына
өткізіңіз немесе жергілікті мекемеге
хабарласыңыз.
салынған құрылғыларды
Page 95

ESPAÑOL 95
ÍNDICE DE MATERIAS
1. INFORMACIÓN SOBRE SEGURIDAD . . . . . . . . . . . . . . . . . . . . . . . . . . . . . . . . . . . . . . . . 96
2. PANEL DE MANDOS . . . . . . . . . . . . . . . . . . . . . . . . . . . . . . . . . . . . . . . . . . . . . . . . . . . . 98
3. USO DIARIO . . . . . . . . . . . . . . . . . . . . . . . . . . . . . . . . . . . . . . . . . . . . . . . . . . . . . . . . . . 100
4. QUÉ HACER SI… . . . . . . . . . . . . . . . . . . . . . . . . . . . . . . . . . . . . . . . . . . . . . . . . . . . . . . 103
5. MANTENIMIENTO Y LIMPIEZA . . . . . . . . . . . . . . . . . . . . . . . . . . . . . . . . . . . . . . . . . . . . 104
6. QUÉ HACER SI… . . . . . . . . . . . . . . . . . . . . . . . . . . . . . . . . . . . . . . . . . . . . . . . . . . . . . . 107
7. INSTALACIÓN . . . . . . . . . . . . . . . . . . . . . . . . . . . . . . . . . . . . . . . . . . . . . . . . . . . . . . . . 109
8.
RUIDOS . . . . . . . . . . . . . . . . . . . . . . . . . . . . . . . . . . . . . . . . . . . . . . . . . . . . . . . . . . . . . 115
9. USO DIARIO . . . . . . . . . . . . . . . . . . . . . . . . . . . . . . . . . . . . . . . . . . . . . . . . . . . . . . . . . . 117
10.
ASPECTOS MEDIOAMBIENTALES . . . . . . . . . . . . . . . . . . . . . . . . . . . . . . . . . . . . . . . . . 117
PENSAMOS EN USTED
Gracias por adquirir un producto Electrolux. Ha escogido un producto que contiene décadas de
experiencia e innovación profesionales. Ingenioso y elegante, se ha diseñado pensando en usted.
Así que, siempre que lo utilice puede tener la seguridad de que conseguirá excelentes resultados.
Bienvenido a Electrolux.
Visite nuestro sitio web para:
Obtener consejos, folletos, soluciones a problemas e información de servicio:
www.electrolux.com
Registrar su producto para recibir un mejor servicio:
www.electrolux.com/productregistration
Adquirir accesorios, artículos de consumo y recambios originales para su aparato:
www.electrolux.com/shop
ATENCIÓN Y SERVICIO AL CLIENTE
Le recomendamos que utilice recambios originales.
Al contactar con el Servicio, cerciórese de tener la siguiente información a mano.
La información se puede encontrar en la placa de características. Modelo, PNC, Número de
serie.
Advertencia - Precaución-Información sobre seguridad.
Datos y recomendaciones generales
Información medioambiental
Salvo modificaciones.
Page 96

www.electrolux.com
96
1.
INFORMACIÓN SOBRE SEGURIDAD
Por su seguridad y para garantizar el funcionamiento correcto del aparato, antes
de instalarlo y utilizarlo por primera vez lea
atentamente este manual del usuario, incluidos los consejos y advertencias. Para
evitar errores y accidentes, es importante
que todas las personas que utilicen el
aparato estén perfectamente al tanto de
su funcionamiento y de las características
de seguridad. Conserve estas instrucciones y no olvide mantenerlas junto al aparato en caso de su desplazamiento o venta para que quienes lo utilicen a lo largo
de su vida útil dispongan siempre de la información adecuada sobre el uso y la seguridad.
Por la seguridad de personas y bienes, siga las normas de seguridad indicadas en
estas instrucciones, ya que el fabricante
no se hace responsable de daños provocados por omisiones.
1.1 Seguridad de niños y
personas vulnerables
• Este electrodoméstico no está diseñado para que lo usen personas (incluidos
niños) con discapacidad física, sensorial o mental, o con experiencia y conocimiento insuficientes, a menos que
una persona responsable de su seguridad les supervise o instruya en el uso
del electrodoméstico.
No permita que los niños jueguen con
el electrodoméstico.
• Mantenga los materiales de embalaje
alejados de los niños. Existe riesgo de
asfixia.
• Si va a desechar el aparato, extraiga el
enchufe de la toma, corte el cable de
conexión (tan cerca del aparato como
pueda) y retire la puerta para impedir
que los niños al jugar puedan sufrir
descargas eléctricas o quedar atrapados en su interior.
• Si este aparato, que cuenta con juntas
de puerta magnéticas, sustituirá a un
aparato más antiguo con cierre de
muelle (pestillo) en la puerta, cerciórese
de inutilizar el cierre de muelle antes de
desechar el aparato antiguo. Evitará así
que se convierta en una trampa mortal
para niños.
1.2 Instrucciones generales de
seguridad
Mantenga libres de obstrucciones las
aberturas de ventilación del alojamiento
del aparato o de la estructura empotrada
• El aparato está diseñado para conservar los alimentos y bebidas de una vivienda normal, como se explica en este
folleto de instrucciones.
• No utilice dispositivos mecánicos ni
medios artificiales para acelerar el proceso de descongelación.
• No utilice otros aparatos eléctricos (como máquinas para hacer helados) dentro de los aparatos de refrigeración, a
menos que el fabricante haya autorizado su utilización para estos fines.
• No dañe el circuito del refrigerante.
• El circuito del refrigerante del aparato
contiene isobutano (R600a). Se trata de
un gas natural con un alto nivel de
compatibilidad medioambiental, aunque
es inflamable.
Durante el transporte y la instalación del
aparato, cerciórese de no provocar daños en el circuito de refrigeración.
Si el circuito de refrigeración se daña:
– mantenga el aparato alejado de las
llamas y de cualquier fuente de encendido
– ventile bien la habitación en la que se
encuentra el aparato
• Es peligroso alterar las especificaciones
o modificar este producto en modo alguno. Cualquier daño en el cable de alimentación puede provocar un cortocircuito, un incendio o una descarga eléctrica.
ADVERTENCIA
ADVERTENCIA
Los componentes eléctricos (cable de alimentación, enchufe,
compresor) debe sustituirlos un
técnico autorizado o personal de
reparaciones profesional a fin de
evitar riesgos.
Page 97

1.
El cable de alimentación no se debe prolongar.
2.
Compruebe que la parte posterior
del aparato no aplaste ni dañe el
enchufe. Un enchufe aplastado o
dañado puede recalentarse y provocar un incendio.
3.
Cerciórese de que tiene acceso al
enchufe del aparato.
4.
No tire del cable de alimentación.
5.
Si la toma de red está floja, no introduzca el enchufe. Existe riesgo
de descarga eléctrica o incendio.
6.
No utilice el aparato sin la tapa de
la bombilla (si está provisto de ella)
de iluminación interior.
• Este aparato es pesado. Debe tener
precauciones durante su desplazamiento.
• No retire ni toque elementos del compartimento congelador con las manos
húmedas o mojadas, ya que podría sufrir abrasión de la piel o quemaduras
por congelación.
• Evite la exposición prolongada del aparato a la luz solar directa.
• Las bombillas que se utilizan en este
aparato (si está provisto de ellas) son
especiales, y se han seleccionado exclusivamente para uso en aparatos domésticos. No pueden utilizarse para la
iluminación de la vivienda.
1.3 Uso diario
• No coloque recipientes calientes sobre
las piezas plásticas del aparato.
• No almacene gas ni líquido inflamable
en el aparato, ya que podrían estallar.
• No coloque alimentos directamente
contra la salida de aire de la pared posterior. (Si el aparato es No Frost, es decir, no acumula escarcha.)
• Los alimentos que se descongelen no
deben volver a congelarse.
• Guarde los alimentos congelados, que
se adquieren ya envasados, siguiendo
las instrucciones del fabricante.
• Se deben seguir estrictamente las recomendaciones del fabricante del aparato
sobre el almacenamiento. Consulte las
instrucciones correspondientes.
• No coloque bebidas carbonatadas o
con gas en el congelador, ya que se
ESPAÑOL 97
genera presión en el recipiente, que podría estallar y dañar el aparato.
• Si se consumen polos helados retirados directamente del aparato, se pueden sufrir quemaduras causadas por el
hielo.
1.4 Cuidado y limpieza
• Antes de realizar tareas de mantenimiento, apague el aparato y desconecte el enchufe de la toma de red.
• No limpie el aparato con objetos metálicos.
• No utilice objetos afilados para eliminar
el hielo del aparato. Utilice un raspador
plástico.
• Inspeccione habitualmente el desagüe
del agua descongelada del frigorífico. Si
es necesario, limpie el desagüe. Si el
desagüe se bloquea, el agua se acumulará en la base del aparato.
1.5 Instalación
Para realizar la conexión eléctrica,
siga atentamente las instrucciones
de los párrafos correspondientes.
• Desembale el aparato y compruebe
que no tiene daños. No conecte el aparato si está dañado. Informe de los posibles daños de inmediato a la tienda
donde lo adquirió. En ese caso, conserve el material de embalaje.
• Es recomendable esperar al menos dos
horas antes de conectar el aparato, para permitir que el aceite regrese al compresor.
• El aparato debe contar con circulación
de aire adecuada alrededor, ya que de
lo contrario se produce recalentamiento. Para conseguir una ventilación suficiente, siga las instrucciones correspondientes a la instalación.
• Siempre que sea posible, la parte posterior del producto debe estar contra
una pared, para evitar que se toquen
las partes calientes (compresor, condensador) y se produzcan quemaduras.
• El aparato no debe colocarse cerca de
radiadores ni de hornillas de cocina.
• Asegúrese de que es posible acceder
al enchufe después de instalar el electrodoméstico.
Page 98

www.electrolux.com
98
• Realice la conexión sólo a un suministro
de agua potable (si está prevista una
conexión de agua).
1.6 Servicio técnico
• Un electricista homologado deberá realizar las tareas que se requieran para
ejecutar el servicio o mantenimiento de
este electrodoméstico.
• Las reparaciones de este aparato debe
realizarlas un centro de servicio técnico
autorizado y sólo se deben utilizar recambios originales.
1.7 Protección del medio
ambiente
Este aparato no contiene gases
perjudiciales para la capa de ozo-
2. PANEL DE MANDOS
no, ni en el circuito de refrigerante
ni en los materiales aislantes. El
aparato no se debe desechar junto con los residuos urbanos. La
espuma aislante contiene gases
inflamables: el aparato se debe
desechar de acuerdo con la normativa vigente, que puede solicitar a las autoridades locales. No
dañe la unidad de refrigeración,
en especial la parte trasera, cerca
del intercambiador de calor. Los
materiales de este aparato marca-
dos con el símbolo
clables.
MODE˚C
son reci-
123 4 5 6
Interruptor de encendido/apagado
1
Regulador de temperatura del conge-
2
lador
Botón de indicador de temperatura
3
del frigorífico-congelador
Visor digital
4
Tecla de función
5
Interruptor de restablecimiento de la
alarma
Regulador de temperatura del frigorífi-
6
co
2.1 Pantalla
1 2 3 4 5 6
Indicador del compartimento frigorífi-
1
co
Indicador del compartimento conge-
2
lador
Page 99

Indicador de temperatura positiva o
3
negativa
Indicador de temperatura
4
Función Action Freeze
5
Función Shopping
6
2.2 Encendido
Si la pantalla no se enciende una vez enchufado el aparato, pulse la tecla de encendido/apagado.
Una vez encendido el aparato, aparecerá
la siguiente señal en el panel de control:
• El indicador de temperatura positiva o
negativa será positivo, para indicar que
la temperatura es positiva
• parpadea la temperatura, el fondo de la
pantalla es rojo y se oirá una señal
acústica.
Pulse la tecla Función y se apagará al señal acústica (consulte también "Alarma
por exceso de temperatura").
Seleccione la temperatura deseada (consulte "Regulación de temperatura").
2.3 Apagado
Para apagar el aparato, pulse el interruptor de encendido/apagado durante más
de un segundo.
A continuación, se muestra el contador
de cuenta atrás, -3 -2 -1, de la temperatura.
Cuando se apaga el aparato, también lo
hace la pantalla.
2.4 Apagado del compartimento
frigorífico
Para apagar el compartimento frigorífico,
gire el regulador de ajuste de temperatura
del frigorífico hacia la izquierda hasta la
posición "O".
El compartimento congelador sigue funcionando.
Una vez ha apagado el compartimento frigorífico, sólo se muestra la temperatura
del compartimento congelador.
En este estado, la iluminación del compartimento frigorífico se apaga.
ESPAÑOL 99
2.5 Indicador de temperatura
Cada vez que se pulsa el indicador de
temperatura del frigorífico-congelador, la
pantalla muestra por orden:
1.
– Se enciende el piloto del comparti-
mento frigorífico.
– La pantalla indica la temperatura
del frigorífico.
2.
– Se enciende el piloto del comparti-
mento congelador.
– La pantalla indica la temperatura
del congelador.
En cualquier caso, se recuperan las condiciones normales de la pantalla tras 10
segundos.
5)
2.6 Menú de funciones
Cada vez que se pulsa la tecla de funciones, se activan las funciones siguientes
de izquierda a derecha:
• Función Action Freeze
• Función Shopping
• sin símbolo: funcionamiento normal.
Puede activar las funciones de
una en una.
Para desactivar las funciones, pulse la
tecla de función varias veces hasta que
no aparezca ningún icono.
2.7 Regulación de la
temperatura
La temperatura en el aparato se controla
a través del regulador.
Es posible regular la temperatura del
compartimento frigorífico girando el regulador de temperatura, y puede variar entre
aproximadamente +2°C y +8°C.
Es posible regular la temperatura del
compartimento congelador girando el regulador de temperatura, y puede variar
entre aproximadamente -15°C y -24°C.
La temperatura adecuada para la correcta
conservación de los alimentos debe ser:
+5 °C en el frigorífico
-18°C en el congelador
Durante el funcionamiento normal la temperatura programada aparece en el indicador de temperatura.
5)
En condiciones normales.
Page 100

www.electrolux.com
100
Para utilizar el aparato, proceda como se
indica:
• gire el regulador de temperatura hacia
• gire el regulador de temperatura hacia
La posición intermedia suele ser la más
adecuada.
Sin embargo, el ajuste exacto debe elegirse teniendo en cuenta que la temperatura
interior del aparato depende de:
• temperatura ambiente
• la frecuencia con que se abre la puerta
• la cantidad de alimentos guardados
• ubicación del aparato.
2.8 Función Shopping
Si necesita introducir una gran cantidad
de alimentos calientes, por ejemplo, después de haber hecho la compra, se aconseja activar la funciónShopping para enfriarlos más rápidamente y evitar que suba la temperatura de los que ya se guardan en el frigorífico.
La función Shopping se activa pulsando la
tecla de funciones (varias veces, si es necesario) hasta que aparezca el icono co-
rrespondiente
La función Shopping se desactiva automáticamente después de unas 6 horas.
Se puede desactivar esta función en cualquier momento pulsando la tecla de función (consulte "Activación de funciones").
2.9 Action Freeze Función
Para congelar alimentos frescos, es necesario activar la función Action Freeze. Pulse la tecla de funciones (varias veces, si
es necesario) hasta que aparezca el icono
correspondiente.
la derecha para obtener el frío máximo
la izquierda para obtener el frío mínimo.
.
La función se para automáticamente después de 52 horas.
La función se puede desactivar en cualquier momento pulsando la tecla de funciones (consulte "Menú de funciones").
2.10 Alarma por exceso de
temperatura
Un aumento de la temperatura del compartimento congelador (por ejemplo, por
un corte de energía eléctrica) se indica
mediante:
• parpadeo de la cifra de la temperatura
• parpadeo del compartimento congela-
dor (indicador del compartimento congelador)
• iluminación del indicador en color rojo
• señal acústica
• símbolo de alarma.
Cuando se restablecen las condiciones
normales:
• se desactiva la señal acústica
• la cifra de la temperatura continúa par-
padeando
• el indicador sigue iluminado en rojo.
Cuando se pulsa la tecla de función para
desactivar la alarma / interruptor de restablecimiento de la alarma, la temperatura
más elevada alcanzada en el comparti-
mento aparece en el indicador
rante algunos segundos.
En ese momento, se detiene el parpadeo
y la iluminación del indicador cambia de
rojo a blanco.
Para apagar la señal acústica durante la
fase de alarma, pulse el interruptor de
restablecimiento de la función / alarma.
La iluminación de la pantalla permanece
en rojo hasta que se restablecen las condiciones normales de almacenamiento.
du-
3. USO DIARIO
3.1 Limpieza de las partes
internas
Antes del empleo limpiar todas las partes
internas con agua tibia y jabón neutro, a
fin de eliminar el característico olor de
nuevo y secarlas luego cuidadosamente.
No utilice detergentes ni polvos
abrasivos, ya que podrían dañar el
acabado
 Loading...