


user manual kasutusjuhend informaţii pentru utilizator návod na používanie
Oven
Ahi
Cuptor
Rúra
EOB53202

2 electrolux
Electrolux. Thinking of you.
Share more of our thinking at www.electrolux.com
CONTENTS
Safety information |
2 |
Helpful hints and tips |
9 |
Product description |
5 |
Care and cleaning |
13 |
Before first use |
5 |
What to do if… |
17 |
Daily use |
6 |
Technical data |
17 |
Clock functions |
7 |
Installation |
17 |
Using the accessories |
8 |
Environment concerns |
19 |
Additional functions |
8 |
|
|
Subject to change without notice
SAFETY INFORMATION
Before the installation and use, read this manual carefully:
•For your personal safety and the safety of your property
•For the respect of the environment
•For the correct operation of the appliance.
Always keep these instructions with the appliance also if you move or sell it.
The manufacturer is not responsible if incorrect installation or use results in damage.
Children and vulnerable people safety
•This appliance can be used by children aged from 8 years and above and persons with reduced physical, sensory or mental capabilities or lack of experience and knowledge if they have been given supervision or instruction concerning use of the appliance in safe way and understand the hazards involved. Children shall not play with the appliance.
•Keep all packaging away from children. There is the risk of suffocation or physical injury.
•Keep children and animals away from the appliance when the door is open or the appliance is in the operation, because it becomes hot. There is the risk of injury or other permanent disability.
•If the appliance has Child Lock or Key Lock (Control Lock) function, use it. It prevents children and animals from accidental operation of the appliance.
General safety
•Do not change the specifications of this appliance. There is the risk of injury and damage to the appliance.
•Do not let the appliance stay unattended during operation.
•Switch off the appliance after each use.
Installation
•Only an approved electrician can install and connect the appliance. Contact an approved service centre. This is to prevent the risks of structural damage or physical injury.
•Make sure that the appliance is not damaged because of transport. Do not connect a damaged appliance. If necessary, contact the supplier.
•Remove all packaging, stickers and layers from the appliance before first use. Do not remove the rating plate. It can invalidate the guarantee.
•Fully obey the laws, ordinances, directives and standards in force in the country where you use the appliance (safety regulations, recycling regulations, electrical or gas safety rules etc.).
•Make sure that the appliance is disconnected from the power supply during the installation.
•Be careful when you move the appliance. The appliance is heavy. Always use safety gloves. Do not pull the appliance by the handle.
•The electrical installation must have an isolation device which lets you disconnect the appliance from the mains at all
poles. The isolation device must have a contact opening width of minimum 3 mm.
•You must have correct isolation devices: line protecting cut-outs, fuses (screw type fuses removed from the holder), earth leakage trips and contactors.
•The shock protection parts must be fixed in such a way that they cannot be undone without tools.
•Before the installation, make sure that the kitchen cabinet has the recess dimensions applicable.
•Make sure that the appliance is installed below and adjacent safe structures.
•Keep the minimum distances to the other appliances and units.
•Install the appliance with its back and one side close to the higher appliance. The other side must be close to appliance with the same height.
•The appliance cannot be positioned on a base.
•Built in ovens and built in cooking surfaces are attached with special connection system. To prevent damage to the appliance, only use an appliance with the appliances from the same manufacturer.
Electrical connection
•The appliance must be earthed.
•Make sure that the electrical data on the rating plate agree with your domestic power supply.
•Information on the voltage is on the rating plate.
•Always use a correctly installed shockproof socket.
•When you connect electrical appliances to mains sockets, do not let cables touch or come near the hot appliance door.
•Do not use multi-way plugs, connectors and extension cables. There is the risk of fire.
•Do not replace or change the mains cable. Contact the service centre.
•Make sure not to squash or cause damage to the mains plug (if applicable) and cable behind the appliance.
•Make sure that the mains connection is accessible after the installation.
electrolux 3
•Do not pull the mains cable to disconnect the appliance. Always pull the mains plug
– if applicable.
Use
•The appliance is only for domestic use. Do not use the appliance for commercial and industrial use.
•Only use the appliance for domestic cooking tasks. This is to prevent physical injury to persons or prevent damage to property.
•Do not use the appliance as a work surface or storage surface.
•Do not put flammable products or items that are wet with flammable products, and/or fusible objects (made of plastic or aluminium) in, near or on the appliance. There is the risk of explosion or fire.
•The interior of the appliance becomes hot during use. There is the risk of burns. Do not touch the heating elements in the appliance. Use gloves when you insert or remove the accessories or pots.
•Be careful when you remove or install the accessories to prevent damage to the oven enamel.
•Always stay away from the appliance when you open the door while the appliance is in operation. Hot steam can release. There is the risk of skin burns.
•Discoloration of the enamel has no effect on the performance of the appliance so it is not a defect in the sense of the warranty law.
•To prevent damage or discoloration to the enamel:
–do not put any objects directly on the appliance floor and do not cover it with aluminium foil;
–do not put hot water directly into the appliance;
–do not keep moist dishes and food in the appliance after you finish the cooking.
•Do not use this appliance if it is in contact with water. Do not operate the appliance with wet hands.
•Do not apply pressure on the open door.
•Always close the appliance door when you cook, even while grilling.
4 electrolux
Care and cleaning
•Before maintenance, switch off the appliance and disconnect the appliance from the power supply.
•Before maintenance, make sure that the appliance is cold. There is the risk of burns. There is the risk that the glass panels can break.
•Keep the appliance clean at all times. A build-up of fats or other foodstuff can result in a fire.
•Regular cleaning prevents the surface material from deteriorating
•Use a deep baking tray for very moist cakes to prevent that fruit juices cause stains that can be permanent.
•For your personal safety and the safety of your property, only clean the appliance with water and a soap. Do not use flammable products or products that can cause corrosion.
•Do not clean the appliance with steam cleaners, high-pressure cleaners, sharp objects, abrasive cleaning agents, abrasive sponges and stain removers
•If you use an oven spray, follow the instructions from the manufacturer.
•Do not clean the glass door with abrasive cleaning agents or metal scraper. Heat resistant surface of the inner glass can break and shatter.
•When the door glass panels are damaged they become weak and can break. You must replace them. Contact the service centre.
•Be careful when you remove the door from the appliance. The door is heavy!
•Do not clean catalytic enamel (if applicable).
Risk of fire
•Open the door carefully. The use of ingredients with alcohol can cause a mixture of alcohol and air. There is the risk of fire.
•Do not let sparks or open flames come near the appliance when you open the door.
•Do not put flammable products or items that are wet with flammable products, and/or fusible objects (made of plastic or aluminium) in, near or on the appliance.
Oven lamp
•Bulb lamps used in this appliance are special lamps selected for household appliances use only. They cannot be used for the full or partial illumination of a household room.
•If it becomes necessary to replace the lamp use one of the same power and specifically designed for household appliances only.
•Disconnect the appliance from the power supply before the replacement of the oven lamp. There is the risk of electrical shock.
Service centre
•Only an approved engineer can repair or work on the appliance. Contact an approved service centre.
•Use only original spare parts.
Disposal of the appliance
•To prevent the risk of physical injury or damage
–Disconnect the appliance from the power supply.
–Cut off the mains cable and discard it.
–Discard the door catch. This prevents children or small animals from being closed inside of the appliance. There is the risk of suffocation.
electrolux 5
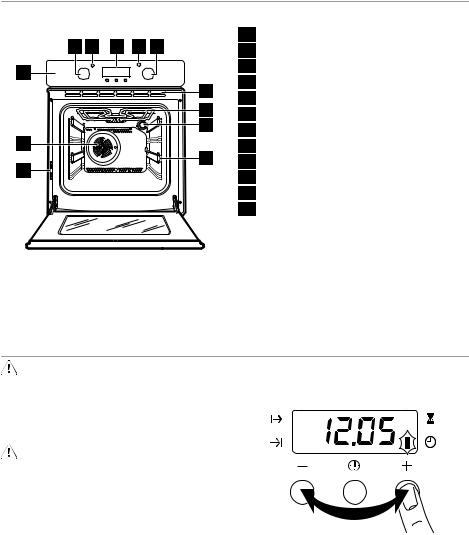
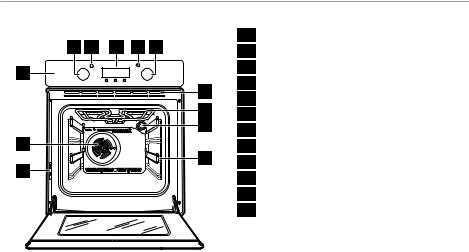
PRODUCT DESCRIPTION
General overview |
|
|
|
2 3 4 5 6 |
1 |
Control panel |
|
2 |
Temperature control knob |
||
1 |
3 |
Temperature indicator |
|
4 |
Display |
||
7 |
|||
5 |
Power indicator |
||
8 |
|||
6 |
Oven function control knob |
||
9 |
7 |
Air vents for the cooling fan |
|
|
|||
10 |
8 |
Grill |
|
11 |
9 |
Oven lamp |
|
12 |
10 |
Fan |
|
|
|||
|
11 |
Telescopic shelf runner |
|
|
12 |
Rating plate |
Oven accessories |
For cakes and biscuits. |
• Oven shelf |
• Deep roasting pan |
For cookware, cake tins, roasts. |
To bake and roast or as pan to collect |
• Flat baking tray |
fat. |
BEFORE FIRST USE
Warning! Refer to "Safety information" chapter.
Initial Cleaning
• Remove all parts from the appliance.
• Clean the appliance before first use.
Caution! Do not use abrasive cleaning agents! This can damage the surface. Refer to chapter "Care and Cleaning".
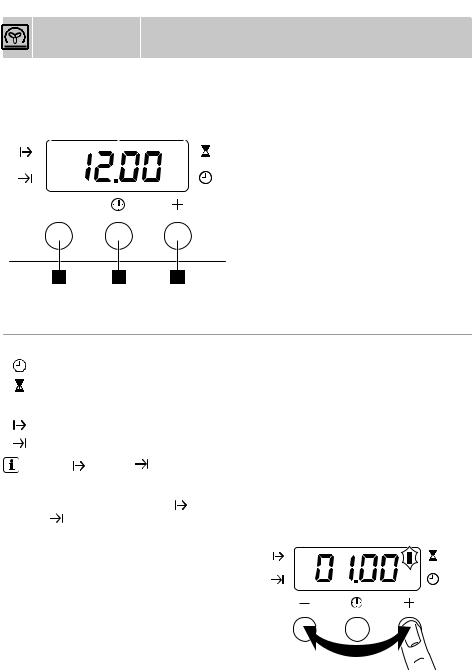
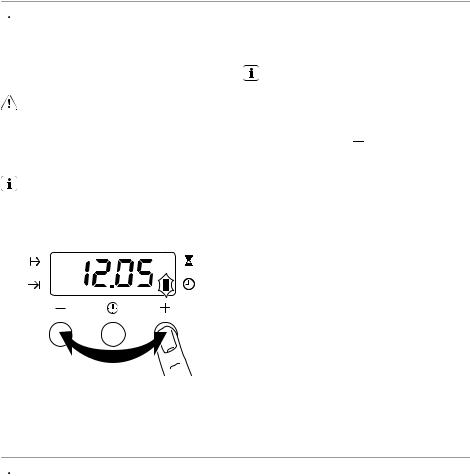
Setting the time
 The oven only operates after time set.
When you connect the appliance to the electrical supply or in case of a power cut, the Time function indicator flashes automatically.
To set the current time use " + " or " - " button.
After approximately 5 seconds, the flashing stops and the display shows the time of day set.
6 electrolux |
|
|
|
|
|
|
For time change you must not set an |
5. Set function |
and maximum tempera- |
||
|
automatic function (Duration or End |
ture. |
|
||
|
) at the same time. |
6. Let the appliance operate without the |
|||
Pre-heating |
|
|
food for approximately 10 minutes. |
||
|
|
This is to burn off the residue in the appli- |
|||
1. |
Set function |
|
and maximum tempera- |
||
|
ance. The accessories can become more |
||||
|
ture. |
|
|
hot than usually. When you pre-heat the |
|
2. |
Let the appliance operate without the |
appliance for the first time, the appliance |
|||
3. |
food for approximately 1 hour. |
can make an odour and smoke. This is the |
|||
Set function |
|
and maximum tempera- |
usual effect. Make sure the airflow is suffi- |
||
|
ture. |
|
|
cient. |
|
4.Let the appliance operate without the food for approximately 10 minutes.
DAILY USE
Warning! Refer to "Safety information" chapter.
To use the appliance, push the control knob. The control knob comes out.
Activating and deactivating the appliance
1.Turn the knob for the oven functions to an oven function.
Oven functions
2.Turn the knob for the temperature to a temperature.
The power indicator comes on while the appliance operates.
The temperature indicator comes on while the temperature in the appliance increases.
3.To deactivate the appliance, turn the knob for the oven functions and the knob for the temperature to the Off position.
Oven function
OFF position
Oven lamp
Conventional cooking
Fan forced cooking
Bottom heating element
Inner grill
Full grill
Thermal grilling
Fan cooking
Application
The appliance is OFF.
Lights up without any cooking function.
Heats both from the top and bottom element. To bake and roast on one oven level.
To cook several different dishes at the same time. To cook homemade fruit in syrup, and to dry mushrooms or fruit.
Heats only from the bottom of the oven. To bake cakes with crispy or crusty bases.
To grill flat food items in small quantities in the middle of the shelf. To make toasts.
The full grill element is on. To grill flat food items in large quantities. To make toasts.
The grill element and the oven fan operate alternately and circulate hot air around the food. To cook large pieces of meat. Maximum temperature for this function is 200 °C.
To roast or roast and bake the food that requires the same cooking temperature, using more than one shelf, without flavour transference.
electrolux 7
Oven function |
|
Application |
|
|
|
The bottom element provides direct heat to the base of pizzas, quichPizza es or pies, while the fan ensures air is circulated to cook the pizza
toppings or pie fillings.
Display
|
|
|
|
|
|
|
|
|
|
|
|
|
|
1 |
Function Indicators |
|
1 |
|
|
2 |
|
|
3 |
|
|
2 |
Time display |
||||
|
|
|
|
|
|
|
|
|
|
|
|
|
|
||
|
|
|
|
|
|
|
|
|
|
|
|
|
|
|
Function Indicators |
|
|
|
|
|
|
|
|
|
|
|
|
|
3 |
||
|
|
|
|
|
|
|
|
|
|
|
|
|
|
|
Button "+" |
|
|
|
|
|
|
|
|
|
|
|
|
|
4 |
||
|
|
|
|
|
|
|
|
|
|
|
|
|
|
|
Selector Button |
|
|
|
|
|
|
|
|
|
|
|
|
|
5 |
||
|
|
|
|
|
|
|
|
|
|
|
|
|
|||
|
|
|
|
|
|
|
|
|
|
|
|
|
|
|
Button "-" |
|
|
|
|
|
|
|
|
|
|
|
|
|
6 |
||
|
|
|
|
|
|
|
|
|
|
|
|
|
|
|
|
|
|
|
|
|
|
|
|
|
|
|
|
|
|
|
|
6 5 4
CLOCK FUNCTIONS
Clock function |
|
|
Application |
||||
|
|
|
Time of day |
Shows the time. To set, change or check the time. |
|||
|
|
|
|
|
|||
|
|
|
Minute minder |
To set a countdown time. |
|||
|
|
|
|
|
A signal sounds, after the time period is completed. |
||
|
|
|
|
|
This function has no effect on the operation of the oven. |
||
|
|
|
|
Duration |
To set how long the oven has to be in operation. |
||
|
|
|
|
End |
To set the switch-off time for an oven function. |
||
|
|
|
|
|
|
||
Duration |
and End |
can be used at |
2. Push the Selection button again and |
||||
the same time, if the oven is to be |
again until the indicator for necessary |
||||||
switched on and off automatically later. |
clock function flashes. |
||||||
In this case first set Duration |
, then |
|
|||||
End |
. |
|
|
|
|
||
Setting the clock functions
1. Set an oven function and temperature (not necessary for Minute Minder).
8 electrolux
3.To set the time for Minute minder  , Duration
 or End
  , push "+" or "-" button.
The indicator for related clock function comes on.
When the time period ends, the indicator for the clock function flashes and an acoustic signal sounds for 2 minutes.
With the functions Duration 
 and End
  the appliance deactivates automatically.
4.Push any button to stop the signal.
5.Turn the knob for the oven function and the knob for the temperature to the Off position.
Cancelling the clock functions
1.Press the Selection button again and again until necessary function indicator flashes.
2.Press and hold button "- ".
The clock function goes out in some seconds.
USING THE ACCESSORIES
Warning! Refer to "Safety information" chapter.
Telescopic shelf supports
On 2 and 4 shelf levels there are telescopic shelf supports installed. With telescopic shelf supports you can insert and remove the shelves more easily.
1.Pull out the right and left hand telescopic shelf supports.
 °C
°C
2.Put the shelf on the telescopic shelf supports and carefully push them inside the oven.
 °C
°C
Warning! Do not close the oven door if the telescopic shelf supports are not completely inside the oven. This can damage the door enamel and glass.
Warning! Telescopic shelf supports and other accessories become very hot when you use the appliance. Wear oven gloves or equivalent.
ADDITIONAL FUNCTIONS
Cooling fan
When the appliance operates, the cooling fan switches on automatically to keep the surfaces of the appliance cool. If you switch off the appliance, the cooling fan continues to operate until the appliance cools down.
Safety thermostat
To prevent dangerous overheating (due to incorrect use of the appliance or defective components), the oven has a safety thermostat, which interrupts the power supply. The oven switches back on again automatically, when the temperature drops.

electrolux 9
HELPFUL HINTS AND TIPS
•The appliance has four shelf levels. Count the shelf levels from the bottom of the appliance floor.
•The appliance has a special system which circulates the air and constantly recycles the steam. With this system you can to cook in a steamy environment and keep the food soft inside and crusty outside. It decreases the cooking time and energy consumption to a minimum.
•Moisture can condense in the appliance or on the glass doors. This is normal. Always stand back form the appliance when you open the appliance door while cooking. To decrease the condensation, run the appliance for 10 minutes before cooking.
•Wipe away moisture after every use of the appliance.
•Do not put the objects directly on the appliance floor and do not cover the components with aluminium foil when you cook. This can change the baking results and damage the enamel coating.
Baking cakes
•The best temperature for baking cakes is between 150°C and 200°C.
•Preheat the oven for approximately 10 minutes before baking.
•Do not open the oven door before 3/4 of the set cooking time is up.
•If you use two baking trays at the same time, keep one level empty between them.
Baking and roasting table
CAKES
Cooking meat and fish
•Do not cook meat with weight below 1 kg. Cooking too small quantities makes the meat too dry.
•To keep the red meat well cooked outside and juicy inside set the temperature between 200°C-250°C.
•For white meat, poultry and fish set the temperature between 150°C-175°C.
•Use a dripping pan for very fatty food to prevent the oven from stains that can be permanent.
•Leave the meat for approximately 15 minutes before carving so that the juice does not seep out.
•To prevent too much smoke in the oven during roasting, add some water into the dripping pan. To prevent the smoke condensation, add water each time after it dries up.
Cooking times
Cooking times depend on the type of food, its consistency, and volume.
Initially, monitor the performance when you cook. Find the best settings (heat setting, cooking time, etc.) for your cookware, recipes and quantities when you use this appliance.
|
|
Convention- |
Fan cooking |
|
Fan forced |
|
|
|
||||||
|
|
al cooking |
|
cooking |
|
Cook- |
|
|||||||
TYPE OF |
|
|
|
|
|
|
|
|||||||
|
|
Tem |
|
|
|
|
|
|
|
Tem |
|
ing time |
Notes |
|
DISH |
|
Level |
|
Level |
|
Tem |
|
Level |
|
|
||||
|
p |
|
|
|
|
p |
|
[min] |
|
|||||
|
|
|
|
|
|
p [°C] |
|
|
|
|
|
|||
|
|
|
[°C] |
|
|
|
|
|
|
[°C] |
|
|
|
|
|
|
|
|
|
|
|
|
|
|
|
|
|
||
Whisked re- |
|
2 |
170 |
|
2 (1 |
|
160 |
|
2 (1 |
|
165 |
|
45-60 |
In cake mould |
cipies |
|
|
|
|
and |
|
|
|
and |
|
|
|
|
|
|
|
|
|
|
3) |
|
|
|
3) |
|
|
|
|
|
Shortbread |
2 |
170 |
|
2 (1 |
160 |
2 (1 |
160 |
24-34 |
In cake mould |
|||||
dough |
|
|
|
|
and |
|
|
|
and |
|
|
|
|
|
3)3)

10 electrolux |
|
|
|
|
|
|
Convention- |
||
|
|
|||
TYPE OF |
|
al cooking |
||
|
|
|
|
|
|
|
|
Tem |
|
DISH |
|
Level |
|
|
|
|
p |
||
|
|
|
|
|
|
|
|
|
[°C] |
Butter-milk |
|
1 |
|
170 |
cheese cake |
|
|
|
|
Apple cake |
|
1 |
|
170 |
(Apple pie) |
|
|
|
|
|
|
|
|
|
Strudel |
|
2 |
|
175 |
Jamtart |
|
2 |
|
170 |
|
|
|
|
|
Fruit cake |
|
2 |
|
170 |
Sponge |
|
2 |
|
170 |
cake (Fatless |
|
|
|
|
sponge |
|
|
|
|
cake) |
|
|
|
|
Christmas |
|
2 |
|
170 |
cake/Rich |
|
|
|
|
fruit cake |
|
|
|
|
Plum cake |
|
2 |
|
170 |
|
|
|
|
|
Small cakes |
|
3 |
|
170 |
|
|
|
|
|
Biscuits |
|
3 |
|
150 |
|
|
|
|
|
Meringues |
|
3 |
|
100 |
Buns |
|
3 |
|
190 |
|
|
|
|
|
Choux |
|
3 |
|
190 |
|
|
|
|
|
Plate tarts |
|
3 |
|
180 |
Victoria |
|
1 or 2 |
|
180 |
sandwich |
|
|
|
|
1) Preheat for 10 minutes. |
|
|||
BREAD AND PIZZA |
|
|||
|
|
Convention- |
||
|
|
|||
TYPE OF |
|
al cooking |
||
|
|
|
|
|
|
|
|
Tem |
|
DISH |
|
Level |
|
|
|
|
p |
||
|
|
|
|
|
|
|
|
|
[°C] |
White bread |
|
1 |
|
190 |
|
|
|
|
|
Rye bread |
|
1 |
|
190 |
|
|
|
|
|
Fan cooking |
|
Fan forced |
|
|
|
||||
|
cooking |
|
Cook- |
|
|||||
|
|
|
|
|
Notes |
||||
Level |
|
Tem |
|
Level |
|
Tem |
|
ing time |
|
|
|
|
p |
|
[min] |
|
|||
|
|
p [°C] |
|
|
|
|
|
||
|
|
|
|
|
[°C] |
|
|
|
|
|
|
|
|
|
|
|
|
|
|
2 |
|
160 |
|
2 |
|
165 |
|
60-80 |
In cake mould 26 cm |
|
|
|
|
|
|
|
|
|
|
2 (1 |
160 |
2 (1 |
160 |
|
100-120 2 cake moulds of 20 |
||||
and |
|
|
|
and |
|
|
|
|
cm on the oven shelf |
3)3)
2 |
|
150 |
|
2 |
|
150 |
|
60-80 |
On baking tray |
2 |
|
160 |
|
2 (1 |
|
160 |
|
30-40 |
In cake mould 26 cm |
|
|
|
|
and |
|
|
|
|
|
|
|
|
|
3) |
|
|
|
|
|
2 |
|
155 |
|
2 |
|
155 |
|
60-70 |
In cake mould 26 cm |
2 |
|
160 |
|
2 |
|
160 |
|
35-45 |
In cake mould 26 cm |
|
|
|
|
|
|
|
|
|
|
2 |
|
160 |
|
2 |
|
160 |
|
50-60 |
In cake mould 20 cm |
|
|
|
|
|
|
|
|
|
|
2 |
|
160 |
|
2 |
|
165 |
|
50-60 |
In bread tin 1) |
3 (1 |
160 |
3 (1 |
165 |
20-30 |
On flat baking tray |
||||
and |
|
|
|
and |
|
|
|
|
|
3)3)
3 |
|
150 |
|
3 (1 |
|
140 |
|
20-30 |
On flat baking tray1) |
|
|
|
|
and |
|
|
|
|
|
|
|
|
|
3) |
|
|
|
|
|
3 |
|
100 |
|
3 |
|
115 |
|
90-120 |
On flat baking tray |
3 |
|
180 |
|
3 |
|
180 |
|
15-20 |
On flat baking tray1) |
3 |
|
180 |
|
3 (1 |
|
180 |
|
25-35 |
On flat baking tray1) |
|
|
|
|
and |
|
|
|
|
|
|
|
|
|
3) |
|
|
|
|
|
2 |
|
170 |
|
2 |
|
170 |
|
45-70 |
In cake mould 20 cm |
2 |
|
170 |
|
2 |
|
170 |
|
40-55 |
Left + right in cake |
|
|
|
|
|
|
|
|
|
mould 20 cm |
|
|
|
|
|
|
|
|
||
Fan cooking |
|
Fan forced |
|
|
|
||||
|
cooking |
|
Cook- |
|
|||||
|
|
|
|
|
Notes |
||||
Level |
|
Tem |
|
Level |
|
Tem |
|
ing time |
|
|
|
|
p |
|
[min] |
|
|||
|
|
p [°C] |
|
|
|
|
|
||
|
|
|
|
|
[°C] |
|
|
|
|
|
|
|
|
|
|
|
|
|
|
1 |
|
190 |
|
1 |
|
195 |
|
60-70 |
1-2 pieces, 500 gr |
|
|
|
|
|
|
|
|
|
one piece1) |
1 |
|
180 |
|
1 |
|
190 |
|
30-45 |
In bread tin |
|
|
|
|
|
|
|
|
|
|
|
|
Convention- |
|
TYPE OF |
|
al cooking |
|
|
|
|
|
|
|
Tem |
|
DISH |
|
Level |
|
|
p |
||
|
|
|
|
|
|
|
[°C] |
Bread rolls |
|
2 |
190 |
|
|
|
|
Pizza |
|
1 |
190 |
|
|
|
|
Scones |
|
3 |
200 |
|
|
|
|
1) Preheat for 10 minutes.
Fan cooking |
|
Fan forced |
|
|
||||
|
cooking |
|
Cook- |
|||||
|
|
|
|
|
||||
Level |
|
Tem |
|
Level |
|
Tem |
|
ing time |
|
|
|
p |
|
[min] |
|||
|
|
p [°C] |
|
|
|
|
||
|
|
|
|
|
[°C] |
|
|
|
|
|
|
|
|
|
|
|
|
2 (1 |
|
180 |
|
2 (1 |
|
180 |
|
25-40 |
and |
|
|
|
and |
|
|
|
|
3) |
|
|
|
3) |
|
|
|
|
1 |
|
190 |
|
1 |
|
190 |
|
20-30 |
|
|
|
|
|
|
|
|
|
2 |
|
190 |
|
2 |
|
190 |
|
10~20 |
|
|
|
|
|
|
|
|
|
electrolux 11
Notes
6-8 rolls on flat baking tray 1)
On deep roasting pan1)
On flat baking tray1)
FLANS
|
Convention- |
|
Fan cooking |
|
fan forced |
|
|
|
|
|
||||||
|
al cooking |
|
|
cooking |
|
|
Cook- |
|
|
|||||||
TYPE OF |
|
|
|
|
|
|
|
|
Notes |
|||||||
|
|
Tem |
|
|
|
Tem |
|
|
|
Tem |
|
|
ing time |
|
||
DISH |
Level |
|
|
Level |
|
|
Level |
|
|
|
|
|||||
|
p |
|
|
p |
|
|
p |
|
|
[min] |
|
|
||||
|
|
|
|
|
|
|
|
|
|
|
|
|
||||
|
|
|
[°C] |
|
|
|
[°C] |
|
|
|
[°C] |
|
|
|
|
|
Pasta flan |
2 |
|
180 |
|
2 |
|
180 |
|
2 |
|
180 |
|
40-50 |
|
|
|
Vegetable |
2 |
|
200 |
|
2 |
|
175 |
|
2 |
|
200 |
|
45-60 |
|
In mould |
|
flan |
|
|
|
|
|
|
|
|
|
|
|
|
|
|
|
|
Quiches |
1 |
|
190 |
|
1 |
|
190 |
|
1 |
|
190 |
|
40-50 |
|
In mould |
|
Lasagne |
2 |
|
200 |
|
2 |
|
200 |
|
2 |
|
200 |
|
25-40 |
|
In mould |
|
Cannelloni |
2 |
|
200 |
|
2 |
|
190 |
|
2 |
|
200 |
|
25-40 |
|
In mould |
|
Yorkshire |
2 |
|
220 |
|
2 |
|
210 |
|
2 |
|
210 |
|
20-30 |
|
6 pudding mould 1) |
|
pudding |
|
|
|
|
|
|
|
|
|
|
|
|
|
|
|
|
1) Preheat for 10 minutes. |
|
|
|
|
|
|
|
|
|
|
|
|
|
|
|
|
MEAT |
|
|
|
|
|
|
|
|
|
|
|
|
|
|
|
|
|
|
|
|
|
|
|
|
|
|
|
|
|
|
|
||
|
Conventional |
|
Fan cooking |
|
Fan forced |
|
|
|
|
|
||||||
|
cooking |
|
|
cooking |
|
|
Cook- |
|
|
|||||||
TYPE OF |
|
|
|
|
|
|
|
|
Notes |
|||||||
|
|
Tem |
|
|
|
Tem |
|
|
|
Tem |
|
|
ing time |
|
||
DISH |
Level |
|
|
Level |
|
|
Level |
|
|
|
|
|||||
|
p |
|
|
p |
|
|
p |
|
|
[min] |
|
|
||||
|
|
|
|
|
|
|
|
|
|
|
|
|
||||
|
|
|
[°C] |
|
|
|
[°C] |
|
|
|
[°C] |
|
|
|
|
|
Beef |
2 |
|
200 |
|
2 |
|
190 |
|
2 |
|
190 |
|
50-70 |
|
On oven shelf and |
|
|
|
|
|
|
|
|
|
|
|
|
|
|
|
|
|
deep roasting pan |
Pork |
2 |
|
180 |
|
2 |
|
180 |
|
2 |
|
180 |
|
90-120 |
|
On oven shelf and |
|
|
|
|
|
|
|
|
|
|
|
|
|
|
|
|
|
deep roasting pan |
Veal |
2 |
|
190 |
|
2 |
|
175 |
|
2 |
|
175 |
|
90-120 |
|
On oven shelf and |
|
|
|
|
|
|
|
|
|
|
|
|
|
|
|
|
|
deep roasting pan |
English roast |
2 |
|
210 |
|
2 |
|
200 |
|
2 |
|
200 |
|
44-50 |
|
On oven shelf and |
|
beef rare |
|
|
|
|
|
|
|
|
|
|
|
|
|
|
|
deep roasting pan |
English roast |
2 |
|
210 |
|
2 |
|
200 |
|
2 |
|
200 |
|
51-55 |
|
On oven shelf and |
|
beef medium |
|
|
|
|
|
|
|
|
|
|
|
|
|
|
|
deep roasting pan |
English roast |
2 |
|
210 |
|
2 |
|
200 |
|
2 |
|
200 |
|
55-60 |
|
On oven shelf and |
|
beef well |
|
|
|
|
|
|
|
|
|
|
|
|
|
|
|
deep roasting pan |
done |
|
|
|
|
|
|
|
|
|
|
|
|
|
|
|
|
|
|
|
|
|
|
|
|
|
|
|
|
|
|
|
|
|

12 electrolux |
|
|
|
|
|
|
|
|
|
|
|
|
|
|
|
|
|
|
|
|
|
|
|
|
|
|
|
|
|
|
|
|
|
Conventional |
Fan cooking |
|
Fan forced |
|
|
|
|
||||||
|
|
cooking |
|
cooking |
|
Cook- |
|
|
|||||||
TYPE OF |
|
|
|
|
|
|
|
Notes |
|||||||
|
|
|
Tem |
|
|
Tem |
|
|
Tem |
|
ing time |
|
|||
DISH |
|
Level |
Level |
|
Level |
|
|
||||||||
|
p |
p |
|
p |
|
[min] |
|
|
|||||||
|
|
|
|
|
|
|
|
|
|
|
|||||
|
|
|
|
[°C] |
|
|
[°C] |
|
|
[°C] |
|
|
|
|
|
Shoulder of |
2 |
|
180 |
|
2 |
|
170 |
|
2 |
170 |
|
120-150 |
|
On deep roasting pan |
|
pork |
|
|
|
|
|
|
|
|
|
|
|
|
|
|
|
Shin of pork |
2 |
|
180 |
|
2 |
|
160 |
|
2 |
160 |
|
100-120 |
|
2 pieces on deep |
|
|
|
|
|
|
|
|
|
|
|
|
|
|
|
|
roasting pan |
Lamb |
2 |
|
190 |
|
2 |
|
190 |
|
2 |
190 |
|
110-130 |
|
Leg |
|
Chicken |
2 |
|
200 |
|
2 |
|
200 |
|
2 |
200 |
|
70-85 |
|
Whole on deep roast- |
|
|
|
|
|
|
|
|
|
|
|
|
|
|
|
|
ing pan |
Turkey |
1 |
|
180 |
|
1 |
|
160 |
|
1 |
160 |
|
210-240 |
|
Whole on deep roast- |
|
|
|
|
|
|
|
|
|
|
|
|
|
|
|
|
ing pan |
Duck |
2 |
|
175 |
|
2 |
|
160 |
|
2 |
160 |
|
120-150 |
|
Whole on deep roast- |
|
|
|
|
|
|
|
|
|
|
|
|
|
|
|
|
ing pan |
Goose |
1 |
|
175 |
|
1 |
|
160 |
|
1 |
160 |
|
150-200 |
|
Whole on deep roast- |
|
|
|
|
|
|
|
|
|
|
|
|
|
|
|
|
ing pan |
Rabbit |
2 |
|
190 |
|
2 |
|
175 |
|
2 |
175 |
|
60-80 |
|
Cut in pieces |
|
Hare |
2 |
|
190 |
|
2 |
|
175 |
|
2 |
175 |
|
150-200 |
|
Cut in pieces |
|
Pheasant |
2 |
|
190 |
|
2 |
|
175 |
|
2 |
175 |
|
90-120 |
|
Whole on deep roast- |
|
|
|
|
|
|
|
|
|
|
|
|
|
|
|
|
ing pan |
FISH |
|
|
|
|
|
|
|
|
|
|
|
|
|
|
|
|
|
|
|
|
|
|
|
|
|
|
|
|
|
|
|
|
|
Convention- |
Fan cooking |
|
Fan forced |
|
|
|
|
||||||
|
|
al cooking |
|
cooking |
|
Cook- |
|
|
|||||||
TYPE OF |
|
|
|
|
|
|
|
Notes |
|||||||
|
|
|
Tem |
|
|
|
|
|
|
Tem |
|
ing time |
|
||
DISH |
|
Level |
|
|
Level |
|
Tem |
|
Level |
|
|
||||
|
|
p |
|
|
|
p |
|
[min] |
|
|
|||||
|
|
|
|
|
|
|
p [°C] |
|
|
|
|
|
|||
|
|
|
|
[°C] |
|
|
|
|
|
[°C] |
|
|
|
|
|
|
|
|
|
|
|
|
|
|
|
|
|
|
|
||
Trout/Sea |
|
2 |
|
190 |
|
2 (1 |
|
175 |
|
2 (1 |
175 |
|
40-55 |
|
3-4 fishes |
bream |
|
|
|
|
|
and |
|
|
|
and |
|
|
|
|
|
|
|
|
|
|
|
3) |
|
|
|
3) |
|
|
|
|
|
Tuna fish/ |
2 |
|
190 |
|
2 (1 |
|
175 |
2 (1 |
175 |
35-60 |
|
4-6 fillets |
|||
Salmon |
|
|
|
|
|
and |
|
|
and |
|
|
|
|
|
|
3)3)
Grilling
Preheat the empty oven for 10 minutes, before cooking.
|
|
Quantity |
Grilling |
|
|
Cooking time in mi- |
||||||
|
|
|
|
|
|
|
|
|
nutes |
|
||
TYPE OF DISH |
|
Pieces |
|
g |
level |
|
Temp. |
|
1st side |
|
|
2nd side |
|
|
|
|
|
|
|
(°C) |
|
|
|
|
|
Fillet steaks |
|
4 |
|
800 |
3 |
|
250 |
|
12-15 |
|
|
12-14 |
Beef steaks |
|
4 |
|
600 |
3 |
|
250 |
|
10-12 |
|
|
6-8 |
Sausages |
|
8 |
|
/ |
3 |
|
250 |
|
12-15 |
|
|
10-12 |
Pork chops |
|
4 |
|
600 |
3 |
|
250 |
|
12-16 |
|
|
12-14 |
Chicken (cut in 2) |
|
2 |
|
1000 |
3 |
|
250 |
|
30-35 |
|
|
25-30 |
Kebabs |
|
4 |
|
/ |
3 |
|
250 |
|
10-15 |
|
|
10-12 |
|
|
|
|
|
|
|
|
|
|
|
|
|
|
|
|
|
|
|
|
|
|
|
|
|
|
|
electrolux 13 |
|
|
|
|
|
|
|
|
|
|
|
|
|
||
|
|
Quantity |
|
|
Grilling |
|
Cooking time in mi- |
|||||||
|
|
|
|
|
|
|
|
|
|
|
nutes |
|
||
TYPE OF DISH |
|
Pieces |
|
g |
|
level |
|
|
Temp. |
|
1st side |
|
|
2nd side |
|
|
|
|
|
|
|
|
|
(°C) |
|
|
|
|
|
Breast of chicken |
|
4 |
|
400 |
3 |
|
250 |
|
12-15 |
|
|
12-14 |
||
Hamburger |
|
6 |
|
600 |
3 |
|
250 |
|
20-30 |
|
|
|
||
Fish Fillet |
|
4 |
|
400 |
3 |
|
250 |
|
12-14 |
|
|
10-12 |
||
Toasted sandwich- |
|
4-6 |
|
/ |
3 |
|
250 |
|
5-7 |
|
|
/ |
||
es |
|
|
|
|
|
|
|
|
|
|
|
|
|
|
Toast |
|
4-6 |
|
/ |
3 |
|
250 |
|
2-4 |
|
|
2-3 |
||
Thermal grilling |
|
|
|
|
|
|
|
|
|
|
|
|
|
|
Warning! Use this function with a |
|
|
|
|
|
|
|
|
|
|
||||
maximum temperature of 200°C. |
|
|
|
|
|
|
|
|
|
|
||||
|
|
|
|
|
|
|
|
|
|
|
|
|
||
|
|
Quantity |
|
|
Grilling |
|
Cooking time in mi- |
|||||||
|
|
|
|
|
|
|
|
|
|
|
nutes |
|
||
TYPE OF DISH |
Pieces |
|
g |
|
level |
|
|
Temp. |
|
1st side |
|
|
2nd side |
|
|
|
|
|
|
|
|
|
|
(°C) |
|
|
|
|
|
Rolled joints (turkey) |
1 |
|
1000 |
|
3 |
|
|
200 |
30-40 |
|
|
20-30 |
||
Chicken (cut in two) |
2 |
|
1000 |
|
3 |
|
|
200 |
25-30 |
|
|
20-30 |
||
Chicken drumsticks |
6 |
|
- |
|
3 |
|
|
200 |
15-20 |
|
|
15-18 |
||
Quail |
4 |
|
500 |
|
3 |
|
|
200 |
25-30 |
|
|
20-25 |
||
Vegetable gratin |
- |
|
- |
|
3 |
|
|
200 |
20-25 |
|
|
- |
||
pieces. Scallops |
- |
|
- |
|
3 |
|
|
200 |
15-20 |
|
|
- |
||
Mackerel |
2-4 |
|
- |
|
3 |
|
|
200 |
15-20 |
|
|
10-15 |
||
Fish slices |
4-6 |
|
800 |
|
3 |
|
|
200 |
12-15 |
|
|
8-10 |
||
|
|
|
|
|
|
|
|
|
|
|
|
|
|
|
Pizza
Preheat the empty oven for 10 minutes, before cooking.
TYPE OF DISH |
|
Pizza Function |
|
|
Level |
temp.°C |
|
|
|||
|
|
||
Pizza , large |
|
1 |
200 |
Pizza , small |
|
1 |
200 |
|
|
|
|
Bread rolls |
|
1 |
200 |
|
|
|
|
Cooking time in |
|
NOTES |
minutes |
|
|
|
|
|
|
|
|
15~25 |
|
on flat baking tray |
10~20 |
|
on flat baking tray or |
|
on oven shelf |
|
|
|
|
15~25 |
|
on flat baking tray |
|
|
|
Information on acrylamides
Important! According to the newest scientific knowledge, if you brown food (specially the one which contains starch),
acrylamides can pose a health risk. Thus, we recommend that you cook at the lowest temperatures and do not brown food too much.
CARE AND CLEANING
Warning! Refer to "Safety information" chapter.
•Clean the front of the appliance with a soft cloth with warm water and cleaning agent.
14 electrolux
•To clean metal surfaces use a usual cleaning agent
•Clean the oven interior after each use. Thus you can remove dirt more easily and it does not burn on.
•Clean stubborn dirt with a special oven cleaner.
•Clean all oven accessories (with a soft cloth with warm water and cleaning agent) after each use and let them dry.
•If you have nonstick accessories, do not clean them using an aggressive agents, sharp edged objects or dishwasher. It can destroy nonstick coating!
Cleaning the door gasket
•Regularly do a check of the door gasket. The door gasket is around the frame of the oven cavity. Do not use the appliance if the door gasket is damaged. Contact the Service Centre.
•To clean the door gasket refer to the general information about the cleaning.
Oven lamp
Warning! Be careful! There is the risk of electrical shock!
Before you change the oven lamp:
•Switch off the oven.
•Remove the fuses in the fuse box or switch off the circuit breaker.
Put a cloth on the bottom of the oven for protection of the oven light and glass cover.
1.Turn the glass cover anti-clockwise to remove it.
2.Clean the glass cover.
3.Replace the oven light bulb with applicable 300°C heat-resistant oven light bulb.
Use the same oven lamp type.
4.Install the glass cover.
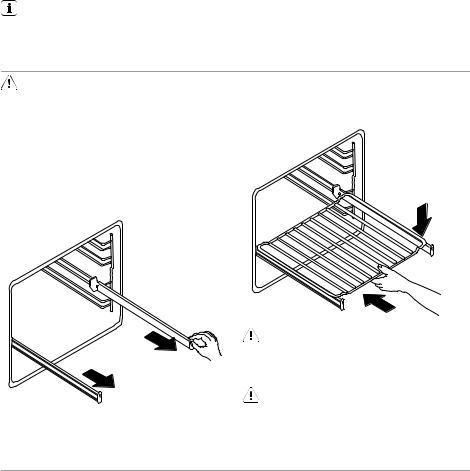
Shelf support rails
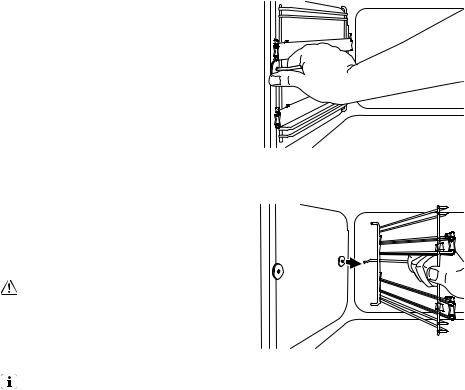
You can remove the shelf support rails to clean the side walls.
Removing the shelf support rails
1.Pull the front of the shelf runners away from the side wall.
2.Pull the shelf runners from the back of the side wall to remove the shelf support rails.
2 


 1
1

Installing the shelf support rails
Install the shelf support rails in opposite sequence.
Important! Make sure that the retaining pins on the telescopic shelf runners point to the front.
Cleaning the oven door
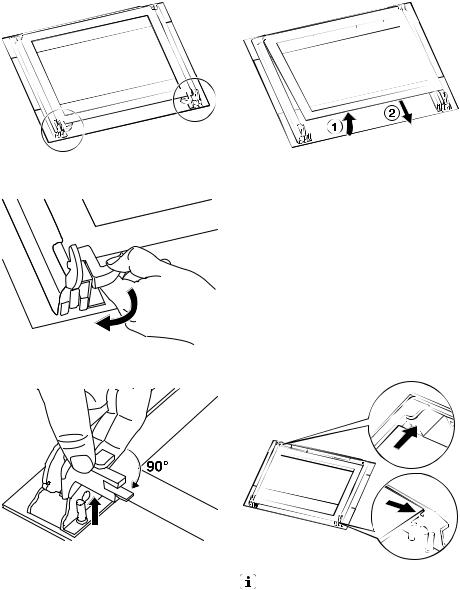
The oven door has two panels of glass. You can remove the oven door and the internal panel of glass to clean it.
Removing the oven door and the glass panel
1.Fully open the door and identify the hinge to the left side of the door.

2.Push lightly the tightening component until it pulls back.
3.Hold the pushed component with one hand and use a screwdriver with the other hand to remove the left side of the door from its seat.
electrolux 15
4.Identify the hinge to the right side of the door.
5. Lift and turn the lever on the hinge.
6.Close the oven door to the first opening position (halfway). Then pull forward and remove the door from its seat.
16 electrolux
7.Put the door on a soft cloth on a stable surface.
8.Release the locking system to remove the internal panel of glass.
9.Turn the two fasteners by 90° and remove them from their seats.
10.Carefully lift (step 1) and remove (step 2) the panel of glass.
Clean the glass panel with water and soap. Dry the glass panel carefully.
Installing the door and the glass panel
When the cleaning is completed, install the glass panels and the oven door. Do the above steps in the opposite sequence. When you install the panel with a decorative frame, make sure that the screen-printing zone looks to the inner side of the door. Make sure that after the installation the surface of the glass panel frame on the screen-printing zones is not rough when you touch it.
Make sure that you install the internal panel of glass in the seats correctly (refer to the illustration).
Stainless steel or aluminium appliances:
Clean the oven door with a wet sponge only. Dry it with a soft cloth.
Do not use steel wool, acids or abrasive materials as they can damage the oven surface. Clean the oven control panel with the same precautions

electrolux 17
WHAT TO DO IF…
Warning! Refer to "Safety information" chapter.
Problem |
|
Possible cause |
|
Remedy |
The oven does not heat up |
|
The oven is not switched on |
|
Switch on the oven |
The oven does not heat up |
|
The clock is not set |
|
Set the clock |
The oven does not heat up |
|
The necessary settings are not |
|
Control the settings |
|
|
set |
|
|
The oven does not heat up |
|
The fuse in the fuse box is re- |
|
Control the fuse. If the fuse is |
|
|
leased |
|
released more than one time, |
|
|
|
|
refer to a qualified electrician. |
The oven lamp does not oper- |
|
The oven lamp is defective |
|
Replace the oven lamp |
ate |
|
|
|
|
Steam and condensation settle |
|
You left the dish in the oven for |
|
Do not leave the dishes in the |
on the food and in the oven |
|
too long |
|
oven for longer than 15-20 mi- |
cavity |
|
|
|
nutes after the cooking process |
|
|
|
|
ends |
The display shows “12.00” |
|
A power cut |
|
Reset the clock |
|
|
|
|
|
If you cannot find a solution to the problem yourself, contact your dealer or the service centre.
We recommend that you write the data here:
Model (MOD.)
Product number (PNC)
Serial number (S.N.)
The necessary data for the service centre is on the rating plate. The rating plate is on the front frame of the oven cavity.
.........................................
.........................................
.........................................
TECHNICAL DATA
Voltage |
|
230 V |
Frequency |
|
50 Hz |
|
|
|
INSTALLATION
Warning! Refer to "Safety information" chapter.
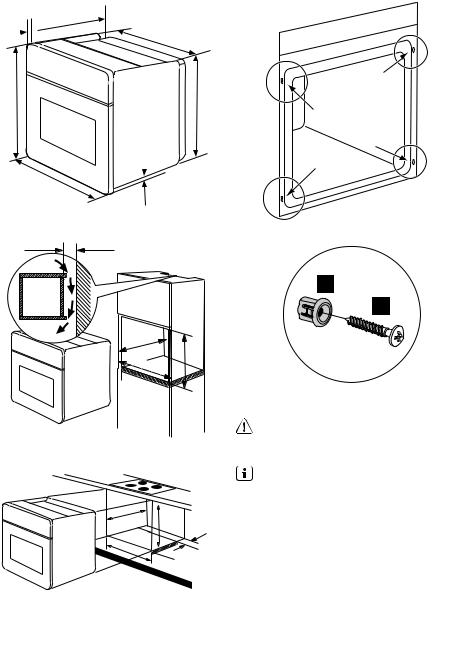
18 electrolux
540 20 
590
594
560
570
2
50
550 |
min |
|
|
|
580 |
||
560÷570 |
|||
|
|||
550 |
min |
593 |
|
|
|
||
|
|
80÷100 |
|
560- |
|
||
|
|
||
|
570 |
|
|
A
B
Electrical installation
Warning! Only a qualified and competent person must do the electrical installation.
The manufacturer is not responsible if you do not follow safety precautions from chapter "Safety Information".
This appliance is only supplied with a main cable.
The cable
Cable types applicable for installation or replacement: H07 RN-F, H05 RN-F, H05 RRF, H05 VV-F, H05 V2V2-F (T90), H05 BB-F.
For the section of the cable refer to the total power (on the rating plate) and to the table:
Total power |
|
Section of the cable |
maximum 1380 W |
|
3 x 0,75 mm² |
maximum 2300 W |
|
3 x 1 mm² |
|
|
|

Total power |
|
Section of the cable |
maximum 3680 W |
|
3 x 1,5 mm² |
|
|
|
electrolux 19
The hearth cord (green/yellow cable) must be 2 cm longer than phase and neutral cables (blue and brown cables).
ENVIRONMENT CONCERNS
The symbol  on the product or on its packaging indicates that this product may not be treated as household waste. Instead it should be taken to the appropriate collection point for the recycling of electrical and electronic equipment. By ensuring this product is disposed of correctly, you will help prevent potential negative consequences for the environment and human health, which could otherwise be caused by inappropriate waste handling of this product. For more detailed information
about recycling of this product, please contact your local council, your household waste disposal service or the shop where you purchased the product.
Packaging material
The packaging material is environmen- tally-friendly and recyclable. Plastic parts are marked with international abbreviations such as PE, PS, etc. Dispose of the packaging material in the containers provided for this purpose at your local waste management facility.
20 electrolux
Electrolux. Thinking of you.
Tulge jagama meie mõtteid aadressil www.electrolux.com
SISUKORD
Ohutusinfo |
20 |
Seadme kirjeldus |
22 |
Enne esimest kasutamist |
23 |
Igapäevane kasutamine |
23 |
Kella funktsioonid |
24 |
Tarvikute kasutamine |
25 |
Lisafunktsioonid |
26 |
Vihjeid ja näpunäiteid |
26 |
Puhastus ja hooldus |
31 |
Mida teha, kui... |
34 |
Tehnilised andmed |
35 |
Paigaldamine |
35 |
Jäätmekäitlus |
36 |
Jäetakse õigus teha muutusi
OHUTUSINFO
Enne paigaldamist ja kasutamist lugege kasutusjuhend hoolega läbi.
•Enda ja oma vara ohutuse tagamiseks
•Looduse säästmiseks
•Seadme asjakohaseks kasutamiseks. Hoidke juhend alles, et see oleks käepärast ka siis, kui seadme teise kohta viite või edasi müüte.
Tootja ei vastuta vale paigaldamise või ebaõige kasutuse tõttu tekkinud kahjude eest.
Laste ja ohustatud isikute turvalisus
•Seda seadet võivad kasutada vähemalt 8-aastased lapsed ning füüsilise, sensoorse või vaimupuudega inimesed või kogemuste ja teadmisteta isikud, kui nende üle on järelvalve ja neid juhendatakse seadme turvalise kasutamise osas ning nad mõistavad seadme kasutamisega kaasnevaid ohte. Lapsed ei tohi seadmega mängida.
•Hoidke pakkematerjalid lastele kättesaamatus kohas. Lämbumisvõi vigastusoht!
•Hoidke lapsed ja koduloomad seadmest eemal, kui selle uks on lahti või seade töötab, sest see läheb kuumaks. Kehavigastuse või muu püsiva kahjustuse oht!
•Kui seadmel on lapselukk või lukufunktsioon (nuppude lukustus), kasutage seda. See hoiab ära võimaluse, et lapsed ja loomad seadme juhuslikult sisse lülitavad.
Üldised ohutusjuhised
•Ärge muutke seadme tehnilisi omadusi. Sellega kaasneb seadme vigastamise ja kahjustamise oht.
•Ärge jätke seadet järelevalveta, kui see töötab.
•Lülitage seade välja pärast iga kasutuskorda.
Paigaldamine
•Seadme paigaldamise ja ühendamise võib teostada ainult väljaõppinud elektrik. Pöörduge volitatud teeninduskeskusse. Nii hoiate ära seadme kahjustusi ja võimalikke kehavigastusi.
•Veenduge, et seade ei ole transportimisel viga saanud. Vigastatud seadet ei tohi vooluvõrku ühendada. Vajaduse korral võtke ühendust tarnijaga.
•Enne esmakordset kasutamist eemaldage seadmelt pakend, kleebised ja kattekihid. Ärge eemaldage andmesilti. Vastasel juhul võib garantii kehtetuks muutuda.
•Järgige seadme kasutuskoha riigis kehtivaid seadusi, määrusi, direktiive ja standardeid (ohutuseeskirju, jäätmekäitluseeskirju, elektrija/või gaasiohutuse eeskirju jne).
•Veenduge, et seade oleks paigaldamise ajal vooluvõrgust väljas.
•Olge seadme liigutamisel ettevaatlik. See seade on raske. Kasutage alati kaitsekindaid. Ärge kunagi tõmmake seadet käepidemest.
•Seadme ühendus vooluvõrguga tuleb varustada mitmepooluselise lahklülitiga. Lahklüliti lahutatud kontaktide vahemik peab olema vähemalt 3 mm.
•Kasutada tuleb nõuetekohaseid isolatsiooniseadiseid: kaitselüliteid, kaitsmeid (keermega kaitsmed tuleb pesast eemaldada), maalekkevoolu kaitsmeid ja kontraktoreid.
•Põrutuskaitsedetailid tuleb paigaldada nii, et neid ilma tööriistade abita eemaldada ei saaks.
•Enne paigaldamist veenduge, et köögikapi mõõdud, kuhu soovite seadme paigaldada, oleksid sobivad.
•Veenduge, et seade on paigaldatud kindlate konstruktsioonide alla ja kõrvale.
•Tagage minimaalne kaugus muudest seadmetest ja mööbliesemetest.
•Paigaldage seade nii, et selle üks külg ja tagaosa oleks vastu kõrgemat mööblieset. Teine külg tuleb paigutada sama kõrgusega mööbliesemesse.
•Seadet ei tohi paigutada põhja peale.
•Integreeritud ahjud ja pliidid on varustatud spetsiaalse ühendussüsteemiga. Vältimaks seadme kahjustamist, kasutage ainult sama tootja valmistatud seadmeid.
Elektriühendus
•Seade peab olema maandatud.
•Kontrollige, kas andmeplaadil toodud elektriandmed vastavad teie kohalikule vooluvõrgule.
•Teave pinge kohta on toodud andmesildil.
•Kasutage alati nõuetekohaselt paigaldatud maandatud pistikupesa.
•Kui ühendate elektriseadmed vooluvõrku, siis veenduge, et toitekaabel ei satu kokkupuutesse seadme kuuma uksega ega jää selle lähedusse.
•Ärge kasutage mitmik-pistikuid, vaheühendusi ega pikenduskaableid. Tuleoht.
•Ärge asendage toitekaablit ega muutke seda. Pöörduge teeninduskeskuse poole.
•Jälgige, et seadme taga olevat toitepistikut (kui kohaldatav) ega juhet ei muljutaks ega vigastataks.
•Veenduge, et pärast paigaldamist on tagatud juurdepääs toitepistikule.
•Seadet vooluvõrgust eemaldades ärge tõmmake toitekaablist. Tõmmake alati toitepistikust – kui kohaldatav.
Kasutamine
•See seade on ette nähtud ainult koduseks kasutamiseks. Ärge kasutage seda ärivõi tööstuslikul eesmärgil.
•Kasutage seadet ainult koduseks toiduvalmistamiseks. See hoiab ära võimalikud kehalised vigastused või varakahjud.
electrolux 21
•Ärge kasutage seadet tööpinna ega hoiukohana.
•Ärge pange süttivaid või süttiva ainega määrdunud esemeid ja/või sulavaid esemeid (plastist või alumiiniumist) seadmesse, selle lähedusse või peale. Plahvatusvõi tulekahjuoht!
•Kasutamise käigus läheb seadme sisemus kuumaks. Põletusoht! Ärge puudutage kütteelemente seadmes. Tarvikuid või potte ahju pannes või ahjust välja võttes kasutage kindaid.
•Olge ahjutarvikute eemaldamisel ja paigaldamisel ettevaatlik, et mitte emaili kahjustada.
•Kui avate ahju ust ajal, mil ahi töötab, tuleb alati seista uksest eemal. Välja võib paiskuda tulist auru. Nahapõletuse oht!
•Emaili värvi muutus ei mõjuta seadme tööd ning kuna tegemist pole defektiga, ei kuulu see garantii alla.
•Et hoida ära emaili kahjustumine või värvi muutumine:
–ärge asetage esemeid vahetult seadme põhjale ning ärge katke seda fooliumiga kinni;
–ärge pange tulist vett vahetult seadmesse;
–ärge hoidke niiskeid nõusid ja toitu ahjus pärast toiduvalmistamise lõppu.
•Ärge kasutage seadet, kui see on kokkupuutes veega. Ärge käsitsege seadet märgade kätega.
•Äge suruge avatud uksele.
•Toiduvalmistamisel pange ahju uks alati kinni, ka grillides.
Puhastamine ja hooldus
•Enne hooldust lülitage seade välja ja eemaldage see vooluvõrgust.
•Enne hooldust veenduge, et seade on maha jahtunud. Põletusoht! Klaaspaneelid võivad puruneda.
•Hoidke seade alati puhtana. Rasva või toidujääkide kogunemine võib põhjustada tulekahju.
•Regulaarne puhastamine hoiab ära pinnakattematerjali kahjustumise.
•Eriti mahlaste kookide puhul kasutage sügavat küpsetusplaati, et väljavalguv mahl ei tekitaks püsivaid plekke.
•Isikliku ohutuse ja oma vara säästmise huvides puhastage seadet ainult vee ja
22 electrolux
seebiga. Ärge kasutage kergsüttivaid tooteid või tooteid, mis võivad põhjustada korrosiooni.
•Ärge puhastage seadet aurupuhastite, kõrgsurvepuhastite, teravate esemete, abrasiivsete puhastusvahendite, abrasiivsete švammide ega plekieemaldajatega
•Kui kasutate ahjupihusteid, järgige tootja juhiseid. Ärge kütteelementide ja termostaadi anduri peale midagi pihustage.
•Ärge puhastage klaasust abrasiivsete puhastusvahendite ega metallkaabitsaga. Siseklaasi kuumuskindel pind võib mõraneda ja puruneda.
•Ukse klaaspaneelid muutuvad kahjustumisel hapraks ja võivad puruneda. Need tuleb asendada. Pöörduge teeninduskeskusse.
•Olge ukse eemaldamisel ettevaatlik. Uks on raske!
•Ärge puhastage katalüütilist emaili (kui see on olemas).
Tuleoht
•Avage uks ettevaatlikult. Alkoholi sisaldavate komponentide kasutamise tagajärjel võib alkohol õhuga seguneda. Tuleoht!
•Kui avate ukse, vältige ahju läheduses sädemeid või lahtist leeki.
•Ärge pange süttivaid või süttiva ainega määrdunud esemeid ja/või sulavaid ese-
meid (plastist või alumiiniumist) seadmesse, selle lähedusse või peale.
Ahjuvalgusti
•Selles seadmes kasutatavad lambid on mõeldud kasutamiseks üksnes kodumasinates. Neid ei saa kasutada ruumide täielikuks või osaliseks valgustamiseks.
•Kui tekib vajadus lamp välja vahetada, tuleb kasutada sama võimsusega ja spetsiaalselt kodumasinate jaoks mõeldud lampi.
•Enne ahjuvalgusti vahetamist ühendage seade vooluvõrgust lahti. Elektrilöögioht!
Teeninduskeskus
•Masinat tohib remontida või hooldada ainult volitatud tehnik. Pöörduge volitatud teeninduskeskusse.
•Kasutage ainult originaalvaruosi.
Seadme kõrvaldamine
•Kehaliste vigastuste vältimiseks
–Lahutage seade vooluvõrgust.
–Lõigake toitekaabel seadme küljest lahti ja visake ära.
–Kõrvaldage ukse fiksaator. See takistab laste ja väikeloomade seadmesse kinnijäämist. Lämbumisoht.
SEADME KIRJELDUS
Üldine ülevaade |
|
|
|
2 3 4 5 6 |
1 |
Juhtpaneel |
|
2 |
Temperatuuri reguleerimise nupp |
||
1 |
3 |
Temperatuuri näidik |
|
4 |
Ekraan |
||
7 |
|||
5 |
Toiteindikaator |
||
8 |
|||
6 |
Ahju funktsioonide nupp |
||
9 |
7 |
Jahutusventilaatori õhuavad |
|
|
|||
10 |
8 |
Grill |
|
11 |
9 |
Ahju lamp |
|
12 |
10 |
Ventilaator |
|
|
|||
|
11 |
Ahju teleskoopjuhikud |
|
|
12 |
Andmeplaat |
Ahju tarvikud
•Ahjurest
Nõude, koogivormide ja grilltükkide jaoks
•Madal küpsetusplaat
electrolux 23
Kookide ja küpsiste jaoks.
•Sügav röstimispann
Küpsetamiseks ja praadimiseks või rasvapannina.
ENNE ESIMEST KASUTAMIST
 Hoiatus Vt jaotist "Ohutusinfo".
Esimene puhastamine
•Eemaldage seadmelt kõik osad.
•Puhastage seadet enne esmakordset kasutamist.
Ettevaatust Ärge kasutage abrasiivseid puhastusaineid! See võib pinda rikkuda. Vt ptk "Puhastus ja hooldus".
Kellaaja õigeks panemine
Ahi hakkab tööle alles siis, kui aeg on õigeks pandud.
Seadme ühendamisel elektrivõrku või voolukatkestuse ajal hakkab ajafunktsiooni indikaator automaatselt vilkuma
Kellaaja määramiseks vajutage nuppe " +" või " -".
Umbes 5 sekundi pärast vilkumine lõppeb ja kell hakkab näitama õiget aega.
Aja muutmisel ei tohi samaaegselt määrata automaatset funktsiooni (Kestus  või Lõpp
  ).
).
Eelkuumutus
1.Valige funktsioon  ja maksimaalne temperatuur.
2.Laske ahjul umbes tund aega tühjalt (ilma toiduta) töötada.
3.Valige funktsioon  ja maksimaalne temperatuur.
4.Laske ahjul umbes 10 minutit tühjalt (ilma toiduta) töötada.
5.Valige funktsioon  ja maksimaalne temperatuur.
6.Laske ahjul umbes 10 minutit tühjalt (ilma toiduta) töötada.
See on vajalik ahjus olevate jääkide ärapõlemiseks. Tarvikud võivad minna tavalisest tulisemaks. Ahju esmakordselt eelsoojendades võib eralduda ebameeldivat lõhna ja suitsu. See on normaalne. Veenduge, et õhk saaks piisavalt liikuda.
IGAPÄEVANE KASUTAMINE
 Hoiatus Vt jaotist "Ohutusinfo".
Seadme kasutamiseks vajutage juhtnuppu. Juhtnupp liigub esile.
Seadme sisseja väljalülitamine
1.Ahju funktsiooni valimiseks keerake ahjufunktsioonide nuppu.
2.Temperatuuri valimiseks keerake temperatuuri nuppu.
Seadme töötamise ajal toiteindikaator põleb.
Temperatuuri indikaator süttib, kui temperatuur seadmes tõuseb.
3.Seadme väljalülitamiseks keerake ahjufunktsioonide nupp ja temperatuuri nupp Väljas-asendisse.
 Loading...