

Page 1

ENN2814COW
................................................ .............................................
EN FRIDGE FREEZER USER MANUAL 2
IT FRIGO-CONGELATORE ISTRUZIONI PER L’USO 25
ES FRIGORÍFICO-
CONGELADOR
MANUAL DE
INSTRUCCIONES
50
Page 2

www.electrolux.com
2
CONTENTS
1. SAFETY INSTRUCTIONS . . . . . . . . . . . . . . . . . . . . . . . . . . . . . . . . . . . . . . . . . . . . . . . . . . 3
2. CONTROL PANEL . . . . . . . . . . . . . . . . . . . . . . . . . . . . . . . . . . . . . . . . . . . . . . . . . . . . . . . 5
3. DAILY USE . . . . . . . . . . . . . . . . . . . . . . . . . . . . . . . . . . . . . . . . . . . . . . . . . . . . . . . . . . . . . 8
4. HELPFUL HINTS AND TIPS . . . . . . . . . . . . . . . . . . . . . . . . . . . . . . . . . . . . . . . . . . . . . . . 11
5. CARE AND CLEANING . . . . . . . . . . . . . . . . . . . . . . . . . . . . . . . . . . . . . . . . . . . . . . . . . . . 12
6. WHAT TO DO IF… . . . . . . . . . . . . . . . . . . . . . . . . . . . . . . . . . . . . . . . . . . . . . . . . . . . . . . 14
7. INSTALLATION . . . . . . . . . . . . . . . . . . . . . . . . . . . . . . . . . . . . . . . . . . . . . . . . . . . . . . . . . 16
8.
NOISES . . . . . . . . . . . . . . . . . . . . . . . . . . . . . . . . . . . . . . . . . . . . . . . . . . . . . . . . . . . . . . 22
9. TECHNICAL DATA . . . . . . . . . . . . . . . . . . . . . . . . . . . . . . . . . . . . . . . . . . . . . . . . . . . . . . 24
WE’RE THINKING OF YOU
Thank you for purchasing an Electrolux appliance. You’ve chosen a product that brings with it
decades of professional experience and innovation. Ingenious and stylish, it has been designed
with you in mind. So whenever you use it, you can be safe in the knowledge that you’ll get great
results every time.
Welcome to Electrolux.
Visit our website for:
Get usage advice, brochures, trouble shooter, service information:
www.electrolux.com
Register your product for better service:
www.electrolux.com/productregistration
Buy Accessories, Consumables and Original spare parts for your appliance:
www.electrolux.com/shop
CUSTOMER CARE AND SERVICE
We recommend the use of original spare parts.
When contacting Service, ensure that you have the following data available.
The information can be found on the rating plate. Model, PNC, Serial Number.
Warning / Caution-Safety information
General information and tips
Environmental information
Subject to change without notice.
Page 3

ENGLISH 3
1.
SAFETY INSTRUCTIONS
In the interest of your safety and to ensure
the correct use, before installing and first
using the appliance, read this user manual
carefully, including its hints and warnings.
To avoid unnecessary mistakes and accidents, it is important to ensure that all
people using the appliance are thoroughly
familiar with its operation and safety features. Save these instructions and make
sure that they remain with the appliance if
it is moved or sold, so that everyone using
it through its life will be properly informed
on appliance use and safety.
For the safety of life and property keep
the precautions of these user's instructions as the manufacturer is not responsible for damages caused by omission.
1.1 Children and vulnerable
people safety
• This appliance is not intended for use
by persons (including children) with reduced physical, sensory or mental capabilities, or lack of experience and
knowledge, unless they have been given supervision or instruction concerning
use of the appliance by a person responsible for their safety.
Children should be supervised to ensure that they do not play with the appliance.
• Keep all packaging well away from children. There is risk of suffocation.
• If you are discarding the appliance pull
the plug out of the socket, cut the connection cable (as close to the appliance
as you can) and remove the door to
prevent playing children to suffer electric shock or to close themselves into it.
• If this appliance featuring magnetic
door seals is to replace an older appliance having a spring lock (latch) on the
door or lid, be sure to make that spring
lock unusable before you discard the
old appliance. This will prevent it from
becoming a death trap for a child.
1.2 General safety
WARNING!
Keep ventilation openings, in the appliance enclosure or in the built-in structure,
clear of obstruction.
• The appliance is intended for keeping
foodstuff and/or beverages in a normal
household and similar applications such
as:
– staff kitchen areas in shops, offices
and other working environments;
– farm houses and by clients in hotels,
motels and other residential type environments;
– bed and breakfast type environ-
ments;
– catering and similar non-retail appli-
cations.
• Do not use a mechanical device or any
artificial means to speed up the thawing
process.
• Do not use other electrical appliances
(such as ice cream makers) inside of refrigerating appliances, unless they are
approved for this purpose by the manufacturer.
• Do not damage the refrigerant circuit.
• The refrigerant isobutane (R600a) is
contained within the refrigerant circuit of
the appliance, a natural gas with a high
level of environmental compatibility,
which is nevertheless flammable.
During transportation and installation of
the appliance, be certain that none of
the components of the refrigerant circuit become damaged.
If the refrigerant circuit should become
damaged:
– avoid open flames and sources of ig-
nition
– thoroughly ventilate the room in
which the appliance is situated
• It is dangerous to alter the specifications or modify this product in any way.
Any damage to the cord may cause a
short-circuit, fire and/or electric shock.
WARNING!
Any electrical component (power
cord, plug, compressor) must be
replaced by a certified service
agent or qualified service personnel to avoid hazard.
Page 4

www.electrolux.com
4
• This appliance is heavy. Care should be
• Do not remove nor touch items from
• Avoid prolonged exposure of the appli-
• Bulb lamps (if foreseen) used in this ap-
1.3 Daily Use
• Do not put hot pot on the plastic parts
• Do not store flammable gas and liquid
• Do not place food products directly
• Frozen food must not be re-frozen once
• Store pre-packed frozen food in ac-
• Appliance's manufacturers storage rec-
• Do not place carbonated or fizzy drinks
1.
Power cord must not be lengthened.
2.
Make sure that the power plug is
not squashed or damaged by the
back of the appliance. A squashed
or damaged power plug may overheat and cause a fire.
3.
Make sure that you can come to
the mains plug of the appliance.
4.
Do not pull the mains cable.
5.
If the power plug socket is loose,
do not insert the power plug. There
is a risk of electric shock or fire.
6.
You must not operate the appliance without the lamp cover (if
foreseen) of interior lighting.
taken when moving it.
the freezer compartment if your hands
are damp/wet, as this could cause skin
abrasions or frost/freezer burns.
ance to direct sunlight.
pliance are special purpose lamps selected for household appliances use
only. They are not suitable for household room illumination.
in the appliance.
in the appliance, because they may explode.
against the air outlet on the rear wall. (If
the appliance is Frost Free)
it has been thawed out.
cordance with the frozen food manufacturer's instructions.
ommendations should be strictly adhered to. Refer to relevant instructions.
in the freezer compartment as it creates
pressure on the container, which may
cause it to explode, resulting in damage
to the appliance.
• Ice lollies can cause frost burns if consumed straight from the appliance.
1.4 Care and cleaning
• Before maintenance, switch off the appliance and disconnect the mains plug
from the mains socket.
• Do not clean the appliance with metal
objects.
• Do not use sharp objects to remove
frost from the appliance. Use a plastic
scraper.
• Regularly examine the drain in the refrigerator for defrosted water. If necessary, clean the drain. If the drain is
blocked, water will collect in the bottom
of the appliance.
1.5 Installation
For electrical connection carefully
follow the instructions given in
specific paragraphs.
• Unpack the appliance and check if
there are damages on it. Do not connect the appliance if it is damaged. Report possible damages immediately to
the place you bought it. In that case retain packing.
• It is advisable to wait at least four hours
before connecting the appliance to allow the oil to flow back in the compressor.
• Adequate air circulation should be
around the appliance, lacking this leads
to overheating. To achieve sufficient
ventilation follow the instructions relevant to installation.
• Wherever possible the back of the
product should be against a wall to
avoid touching or catching warm parts
(compressor, condenser) to prevent
possible burn.
• The appliance must not be located
close to radiators or cookers.
• Make sure that the mains plug is accessible after the installation of the appliance.
• Connect to potable water supply only (If
a water connection is foreseen).
Page 5
1.6 Service
• Any electrical work required to do the
servicing of the appliance should be
carried out by a qualified electrician or
competent person.
• This product must be serviced by an
authorized Service Centre, and only
genuine spare parts must be used.
1.7 Environment Protection
This appliance does not contain
gasses which could damage the
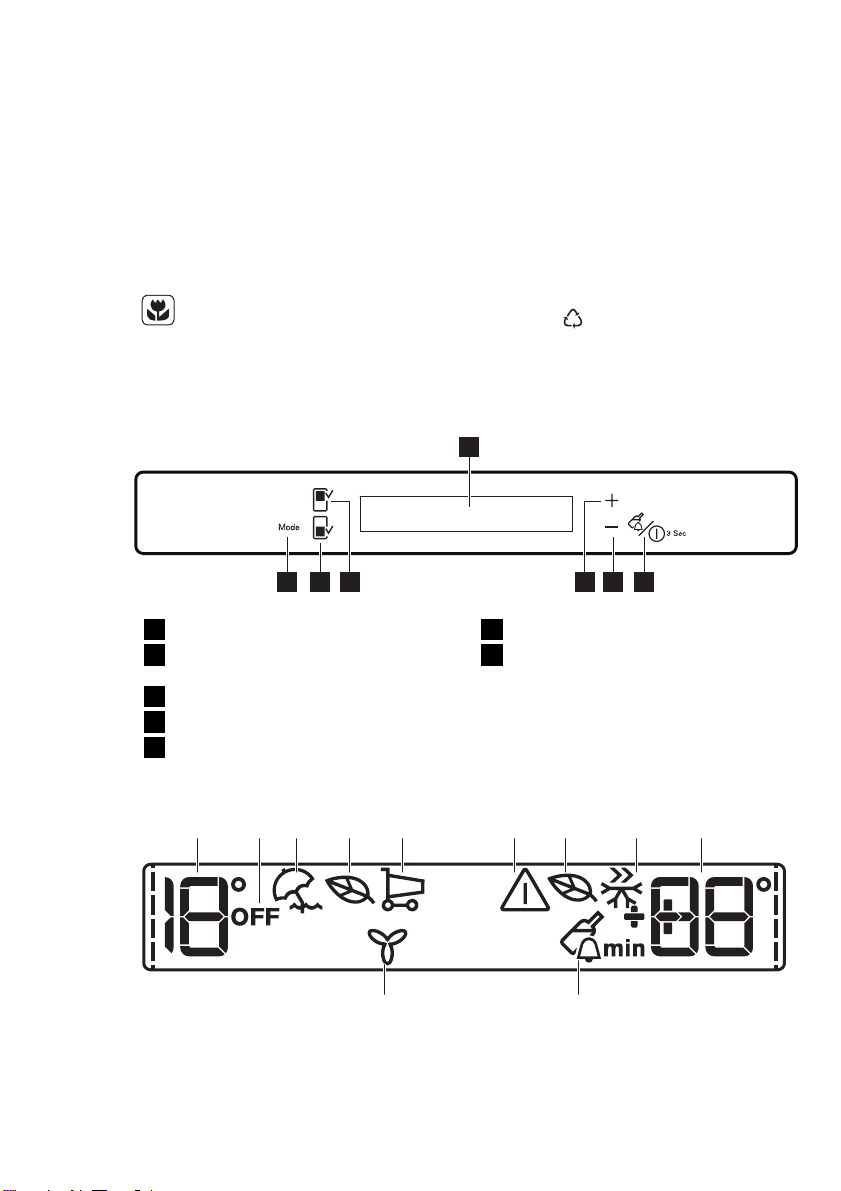
2. CONTROL PANEL
ENGLISH 5
ozone layer, in either its refrigerant
circuit or insulation materials. The
appliance shall not be discarded
together with the urban refuse and
rubbish. The insulation foam contains flammable gases: the appliance shall be disposed according
to the applicable regulations to
obtain from your local authorities.
Avoid damaging the cooling unit,
especially at the rear near the heat
exchanger. The materials used on
this appliance marked by the sym-
are recyclable.
bol
1
234567
Display
1
Drink Chill button and Appliance ON/
2
OFF button
Temperature colder button
3
Temperature warmer button
4
Fridge Compartment button
5
Freezer Compartment button
6
Mode button
7
It is possible to change predefined sound
of buttons to a loudly one by pressing together Mode button and Temperature
colder button for some seconds. Change
is reversible.
2.1 Display
A DCB E F G H I
K J
A)
Fridge temperature indicator
B)
Fridge OFF indicator
C)
HolidayMode
D)
Fridge EcoMode
E)
ShoppingMode
F)
Alarm indicator
G)
Freezer EcoMode
H)
FastFreeze mode
Page 6
www.electrolux.com
6
I)
J)
K)
2.2 Switching on the appliance
To switch on the appliance do these
steps:
1.
2.
If DEMO appears on the Display, the appliance is in demonstration mode: refer to
“WHAT TO DO IF....” paragraph.
To select a different set temperature refer
to "Temperature regulation".
2.3 Switching off the fridge
To switch off the fridge:
1.
2.
2.4 Switching on the fridge
To switch on the fridge:
1.
To select a different set temperature refer
to "Temperature regulation".
2.5 Switching off
To switch off the appliance do these
steps:
1.
2.
3.
2.6 Temperature regulation
Select the fridge or freezer compartment.
Freezer temperature indicator
DrinksChill mode
FreeStore mode
After selection of the fridge or
freezer compartment the anima-
tion
After selection of the temperature
the animation flashes for a few minutes.
Connect the mains plug to the power
socket.
The temperature indicators show the
set default temperature.
Press the Fridge Compartment button
for few seconds.
The fridge OFF indicator is shown.
Press the Fridge Compartment button.
The fridge OFF indicator goes off.
Press the Appliance ON/OFF button
for 3 seconds.
The display switches off.
To disconnect the appliance from the
power disconnect the mains plug
from the power socket.
starts.
Press the temperature button to set the
temperature.
Set default temperature:
• +4°C for the fridge
• -18°C for the freezer
The temperature indicators show the set
temperature.
The set temperature will be reached within 24 hours.
After a power failure the set temperature remains stored.
2.7 HolidayMode
This function allows you to keep the refrigerator closed and empty during a long
holiday period without the formation of a
bad smell.
The fridge compartment must be
empty with holiday function on.
To switch on the function:
1.
Press the Mode button until the corresponding icon appears.
The Holiday indicator flashes for few
seconds.
The fridge temperature indicator
shows the set temperature.
To switch off the function:
1.
Press the Mode button until the Holiday indicator flashes.
2.
The Holiday indicator goes off.
The function switches off by selecting a different fridge set temperature.
2.8 EcoMode for Fridge and
Freezer Compartment
For optimal food storage select the EcoMode .
To switch on the function:
1.
Select the fridge/freezer compartment.
2.
Press the Mode button until the corresponding icon appears.
The EcoMode indicator flashes for
few seconds.
The temperature indicator shows the
set temperature:
– for the fridge: +4°C
– for the freezer: -18°C
Page 7
3.
The EcoMode indicator is shown.
To switch off the function:
1.
Select the fridge/freezer compartment.
2.
Press the Mode button until the EcoMode indicator flashes.
3.
The EcoMode indicator goes off.
The function switches off by selecting a different set temperature.
2.9 ShoppingMode
If you need to insert a large amount of
warm food, for example after doing the
grocery shopping, we suggest activating
the ShoppingMode to chill the products
more rapidly and to avoid warming the
other food which is already in the refrigerator.
To switch on the function:
1.
Press the Mode button until the corresponding icon appears.
The ShoppingMode indicator flashes
for few seconds.
The ShoppingMode shuts off automatically after approximately 6 hours.
To switch off the function before its automatic end:
1.
Press the Mode button until the
ShoppingMode indicator flashes.
2.
The ShoppingMode indicator goes
off.
The function switches off by selecting a different fridge set temperature.
2.10 FastFreeze mode
To switch on the function:
1.
Select the freezer compartment.
2.
Press the Mode button until the cor-
responding icon appears.
The FastFreeze indicator flashes for
few seconds.
This function stops automatically after 52
hours.
To switch off the function before its automatic end:
1.
Select the freezer compartment.
2.
Press the Mode button until the Fast-
Freeze indicator flashes.
3.
The FastFreeze indicator goes off.
ENGLISH 7
The function switches off by selecting a different freezer set temperature.
2.11 DrinksChill mode
The DrinksChill mode is to be used to set
an acoustic alarm at the preferred time,
useful for example when a recipe requires
to cool down a mixture for a certain period of time, or when a reminder is needed
in order not to forget the bottles placed in
the freezer for fast cooling.
To switch on the function:
1.
Press the DrinkChill button.
The DrinksChill indicator appears.
The Timer shows the set value (30 mi-
nutes).
2.
Press the Temperature colder button
and Temperature warmer button to
change the Timer set value from 1 to
90 minutes.
3.
The Timer start to flash (min).
At the end of the countdown the DrinksChill indicator flashes and an audible
alarm sounds:
1.
Remove any drinks contained in the
freezer compartment.
2.
Press the DrinkChill button to switch
off the sound and terminate the func-
tion.
It is possible to deactivate the function at
any time during the countdown:
1.
Press the DrinkChill button.
2.
The DrinksChill indicator goes off.
It is possible to change the time during
the countdown and at the end by pressing the Temperature colder button and
the Temperature warmer button.
2.12 High temperature alarm
An increase in the temperature in the
freezer compartment (for example due to
an earlier power failure) is indicated by:
• flashing the alarm and freezer tempera-
ture indicators
• sounding of buzzer.
To reset the alarm:
1.
Press any button.
2.
The buzzer switches off.
3.
The freezer temperature indicator
shows the highest temperature
Page 8

www.electrolux.com
8
reached for a few seconds. Then
show again the set temperature.
4.
The alarm indicator continue to flash
until the normal conditions are re-
stored.
When the alarm has returned the alarm indicator goes off.
2.13 Door open alarm
An acoustic alarm will sound if the door is
left open for a few minutes. The door
open alarm conditions are indicated by:
• flashing Alarm indicator
• acoustic buzzer
When normal conditions are restored
(door closed), the alarm will stop.
During the alarm, the buzzer can be
switched off by pressing any button.
2.14 FreeStore mode
To switch on the function:
3. DAILY USE
1.
Press the Mode button until the corresponding icon appears.
The FreeStore indicator flashes for
few seconds.
2.
The FreeStore indicator is shown.
To switch off the function:
1.
Press the Mode button until the FreeStore indicator flashes.
2.
The FreeStore indicator goes off.
If the function is activated automatically the FreeStore indicator is
not shown (refer to "Daily use").
The activation of the FreeStore
mode increases the energy consumption.
3.1 Cleaning the interior
Before using the appliance for the first
time, wash the interior and all internal accessories with lukewarm water and some
neutral soap so as to remove the typical
smell of a brand-new product, then dry
thoroughly.
Do not use detergents or abrasive
powders, as these will damage
the finish.
If DEMO appears on the Display, the appliance is in demonstration mode: refer to
“WHAT TO DO IF...” paragraph.
3.2 Freezing fresh food
The freezer compartment is suitable for
freezing fresh food and storing frozen and
deep-frozen food for a long time.
To freeze fresh food activate the Fast
Freeze function at least 24 hours before
placing the food to be frozen in the freezer
compartment.
Place the fresh food to be frozen on the
shelves in contact with side walls that are
cold.
All the compartments are suitable for
freezing fresh food.
The maximum amount of food that can be
frozen in 24 hours is specified on the rat-
ing plate, a label located on the inside of
the appliance.
The freezing process lasts 24 hours: during this period do not add other food to
be frozen.
3.3 Storage of frozen food
When first starting-up or after a period out
of use, before putting the products in the
compartment let the appliance run at least
2 hours on the higher settings.
If large quantities of food are to be stored,
remove all drawers and shelves from appliance.
Page 9
In the event of accidental defrosting, for example due to a power
failure, if the power has been off
for longer that the value shown in
the technical characteristics chart
under "rising time", the defrosted
food must be consumed quickly
or cooked immediately and then
re-frozen (after cooling).
3.4 Thawing
Deep-frozen or frozen food, prior to being
used, can be thawed in the refrigerator
compartment or at room temperature, de-
3.6 Temperature Indicator
3.7 Movable shelves
A
ENGLISH 9
pending on the time available for this operation.
Small pieces may even be cooked still frozen, directly from the freezer: in this case,
cooking will take longer.
3.5 Ice-cube production
This appliance is equipped with one or
more trays for the production of icecubes. Fill these trays with water, then put
them in the freezer compartment.
Do not use metallic instruments to
remove the trays from the freezer.
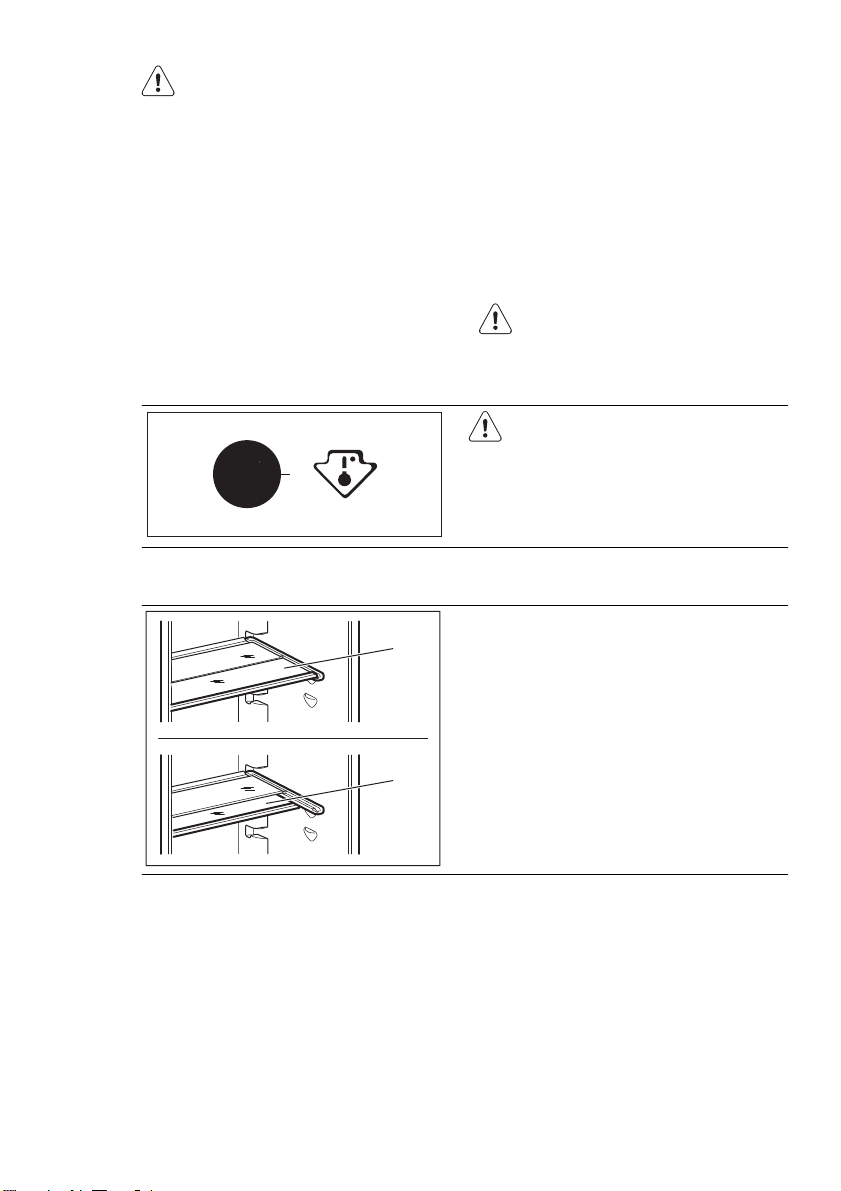
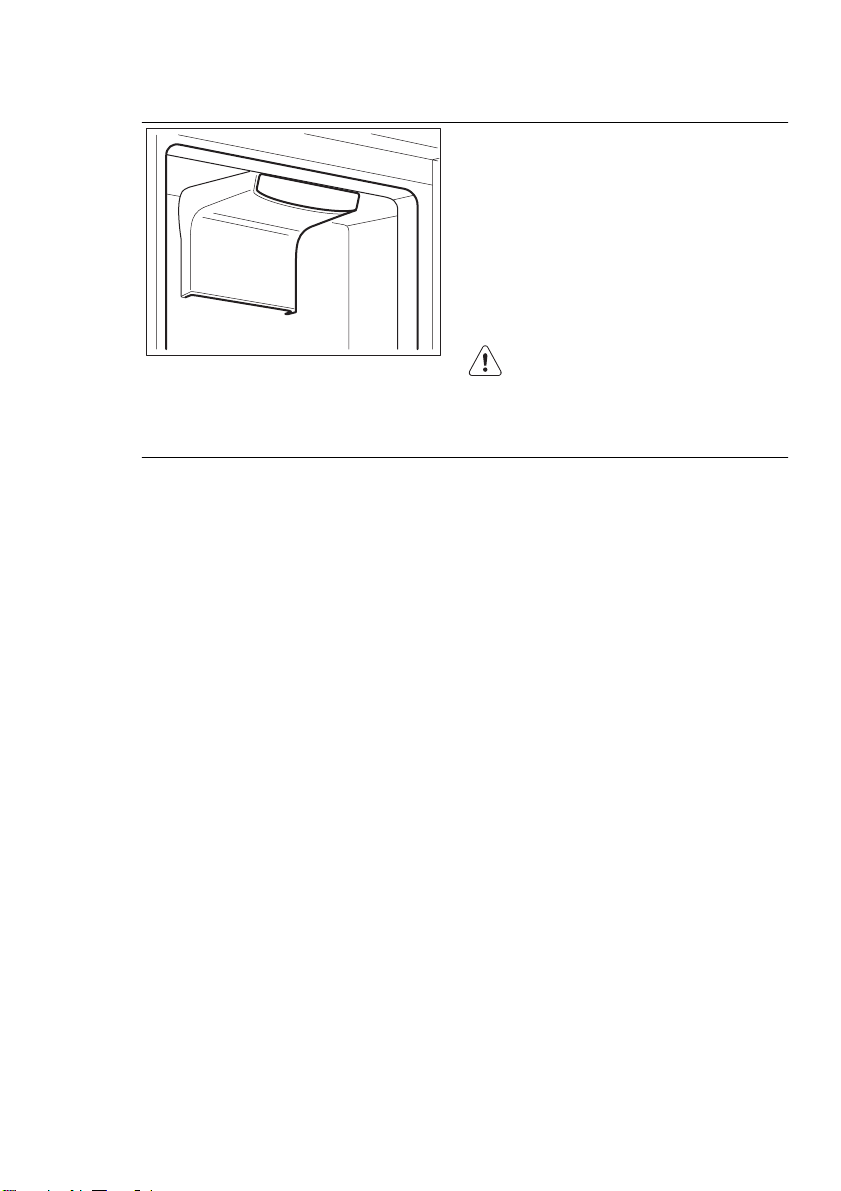
This appliance is sold in France.
In accordance with regulations
valid in this country it must be
provided with a special device
(see figure) placed in the lower
compartment of the fridge to indicate the coldest zone of it.
The walls of the refrigerator are equipped
with a series of supports so that the
shelves can be positioned as desired.
For better use of space, the front halfshelves can be placed under the rear
ones.
B
Page 10

www.electrolux.com
10
3.8 Positioning the door shelves
3.9 Humidity control
3.10 Low Temperature
compartment
The models equipped with this feature in
the fridge part, it is indicated for a best
To permit storage of food packages of
various sizes, the door shelves can be
placed at different heights.
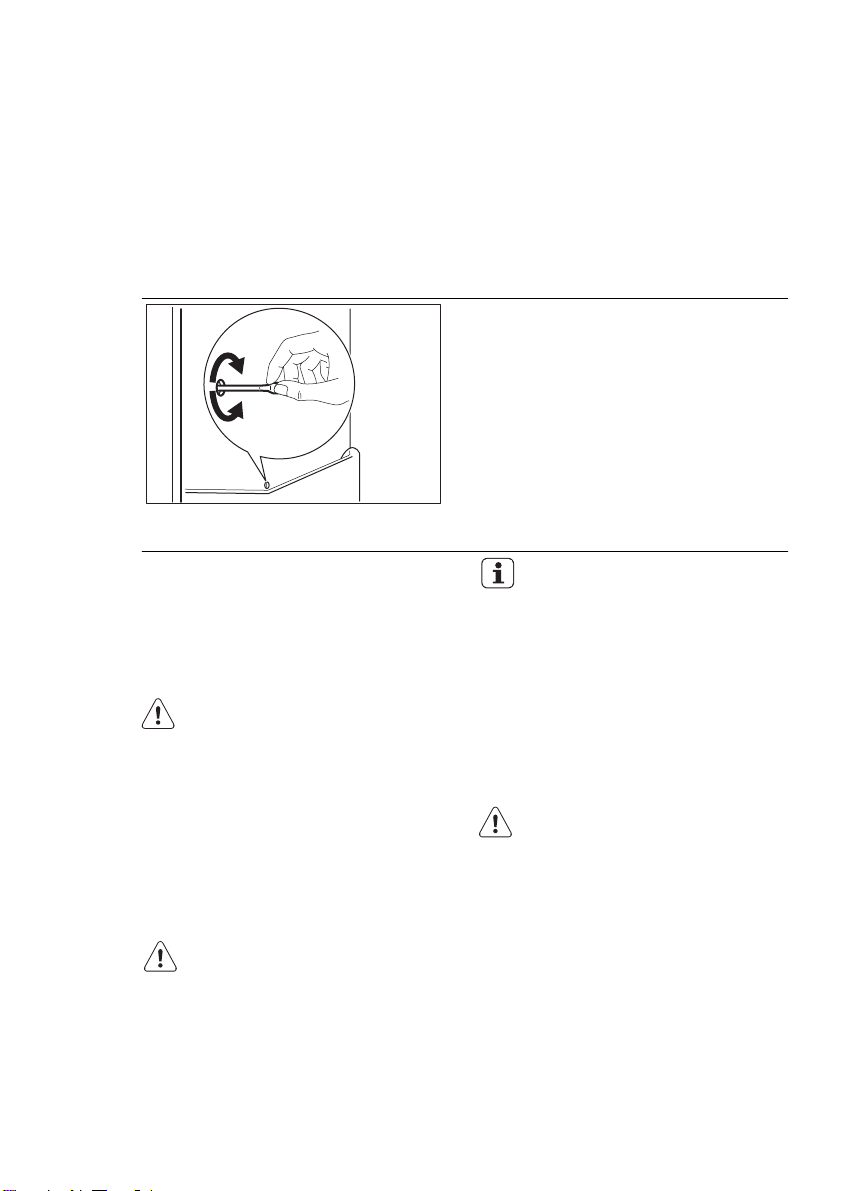
To make these adjustments proceed as
follow: gradually pull the shelf in the direction of the arrows until it comes free, then
reposition as required.
The glass shelf incorporates a device with
slits (adjustable by means of a sliding lever), which makes it possible to regulate
the temperature in the vegetable drawer(s).
When the ventilation slots are closed:
the natural moisture content of the food in
the fruit and vegetable compartments is
preserved for longer.
When the ventilation slots are opened:
more air circulation results in a lower air
moisture content in the fruit and vegetable
compartments.
conservation of fresh foods as fish, meat,
seafood, etc.
It is placed in the lower part, directly
above of the vegetable conservation
drawer.
3.11 Carbon Air Filter
Your appliance is equipped with a carbon
filter TASTEGUARD in a drawer in the rear
wall of the fridge compartment.
The filter purifies the air from unwanted
odors in the fridge compartment meaning
that the storage quality will be further improved.
During the operation, always keep the air
ventilation drawer closed.
Page 11
3.12 FreeStore
4. HELPFUL HINTS AND TIPS
ENGLISH 11
The refrigerator compartment is equipped
with a device that allows for rapid cooling
of foods and more uniform temperature in
the compartment.
This device activates by itself when needed, for example for a quick temperature
recovering after door opening or when the
ambient temperature is high.
Allows you to switch on the device manually when needed (refer to FreeStore
mode).
The FreeStore device stops when the
door is open and restarts immediately after the door closing.
4.1 Hints for energy saving
• Do not open the door frequently or
leave it open longer than absolutely
necessary.
• If the ambient temperature is high and
the Temperature Regulator is set to low
temperature and the appliance is fully
loaded, the compressor may run continuously, causing frost or ice on the
evaporator. If this happens, set the
Temperature Regulator toward warmer
settings to allow automatic defrosting
and so a saving in electricity consumption.
4.2 Hints for fresh food
refrigeration
To obtain the best performance:
• do not store warm food or evaporating
liquids in the refrigerator
• do cover or wrap the food, particularly if
it has a strong flavour
• position food so that air can circulate
freely around it
4.3 Hints for refrigeration
Useful hints:
Meat (all types) : wrap in polythene bags
and place on the glass shelf above the
vegetable drawer.
For safety, store in this way only one or
two days at the most.
Cooked foods, cold dishes, etc..: these
should be covered and may be placed on
any shelf.
Fruit and vegetables: these should be
thoroughly cleaned and placed in the special drawer(s) provided.
Butter and cheese: these should be
placed in special airtight containers or
wrapped in aluminium foil or polythene
bags to exclude as much air as possible.
Milk bottles: these should have a cap and
should be stored in the bottle rack on the
door.
Bananas, potatoes, onions and garlic, if
not packed, must not be kept in the refrigerator.
4.4 Hints for freezing
To help you make the most of the freezing
process, here are some important hints:
Page 12
www.electrolux.com
12
• the maximum quantity of food which
can be frozen in 24 hrs. is shown on
the rating plate;
• the freezing process takes 24 hours.
No further food to be frozen should be
added during this period;
• only freeze top quality, fresh and thor-
oughly cleaned, foodstuffs;
• prepare food in small portions to enable
it to be rapidly and completely frozen
and to make it possible subsequently to
thaw only the quantity required;
• wrap up the food in aluminium foil or
polythene and make sure that the
packages are airtight;
• do not allow fresh, unfrozen food to
touch food which is already frozen, thus
avoiding a rise in temperature of the latter;
• lean foods store better and longer than
fatty ones; salt reduces the storage life
of food;
• water ices, if consumed immediately af-
ter removal from the freezer compart-
5. CARE AND CLEANING
ment, can possibly cause the skin to be
freeze burnt;
• it is advisable to show the freezing in
date on each individual pack to enable
you to keep tab of the storage time.
4.5 Hints for storage of frozen
food
To obtain the best performance from this
appliance, you should:
• make sure that the commercially frozen
foodstuffs were adequately stored by
the retailer;
• be sure that frozen foodstuffs are transferred from the foodstore to the freezer
in the shortest possible time;
• not open the door frequently or leave it
open longer than absolutely necessary;
• once defrosted, food deteriorates rapidly and cannot be refrozen;
• do not exceed the storage period indicated by the food manufacturer.
CAUTION!
Unplug the appliance before carrying out any maintenance operation.
This appliance contains hydrocarbons in its cooling unit; maintenance and recharging must therefore only be carried out by authorized technicians.
5.1 Periodic cleaning
The equipment has to be cleaned regularly:
• clean the inside and accessories with
lukewarm water and some neutral
soap.
• regularly check the door seals and wipe
clean to ensure they are clean and free
from debris.
• rinse and dry thoroughly.
Do not pull, move or damage any
pipes and/or cables inside the
cabinet.
Never use detergents, abrasive
powders, highly perfumed cleaning products or wax polishes to
clean the interior as this will damage the surface and leave a
strong odour.
Clean the condenser (black grill) and the
compressor at the back of the appliance
with a brush. This operation will improve
the performance of the appliance and
save electricity consumption.
Take care of not to damage the
cooling system.
Many proprietary kitchen surface cleaners
contain chemicals that can attack/damage the plastics used in this appliance.
For this reason it is recommended that
the outer casing of this appliance is only
cleaned with warm water with a little
washing-up liquid added.
Page 13
After cleaning, reconnect the equipment
to the mains supply.
5.2 Replacing the carbon air
filter
To get the best performance the carbon
air filter should be changed once every
year.
5.3 Defrosting the refrigerator
5.4 Defrosting the freezer
A certain amount of frost will always form
on the freezer shelves and around the top
compartment.
Defrost the freezer when the frost layer
reaches a thickness of about 3-5 mm.
About 12 hours prior to defrosting, set the Temperature regulator
toward higher settings , in order to
build up sufficient chill reserve for
the interruption in operation.
To remove the frost, follow the instructions below:
1.
Switch off the appliance.
2.
Remove any stored food, wrap it in
several layers of newspaper and put it
in a cool place.
CAUTION!
Do not touch frozen goods with
wet hands. Hands can freeze to
the goods.
3.
Leave the door open.
ENGLISH 13
New active air filters can be purchased
from your local dealer.
Refer to "Installation of the carbon air filter" for the instructions.
The air filter is a consumable accessory
and as such is not covered by the guarantee.
Frost is automatically eliminated from the
evaporator of the refrigerator compartment every time the motor compressor
stops, during normal use. The defrost water drains out through a drain hole into a
special container at the back of the appliance, over the motor compressor, where
it evaporates.
It is important to periodically clean the defrost water drain hole in the middle of the
refrigerator compartment channel to prevent the water overflowing and dripping
onto the food inside.
In order to speed up the defrosting process, place a pot of warm
water in the freezer compartment.
In addition, remove pieces of ice
that break away before defrosting
is complete.
4.
When defrosting is completed, dry
the interior thoroughly.
5.
Switch on the appliance.
6.
After two or three hours, reload the
previously removed food into the
compartment.
Never use sharp metal tools to
scrape off frost from the innerliner
as you could damage it.
Do not use a mechanical device
or any artificial means to speed up
the thawing process other than
those recommended by the manufacturer.
A temperature rise of the frozen
food packs, during defrosting,
may shorten their safe storage life.
5.5 Periods of non-operation
When the appliance is not in use for long
periods, take the following precautions:
disconnect the appliance from elec-
•
tricity supply
Page 14
www.electrolux.com
14
• remove all food
• defrost (if foreseen) and clean the appliance and all accessories
• leave the door/doors ajar to prevent unpleasant smells.
6. WHAT TO DO IF…
If the cabinet will be kept on, ask somebody to check it once in a while to prevent the food inside from spoiling in case
of a power failure.
WARNING!
Before troubleshooting, disconnect the mains plug from the
mains socket.
Only a qualified electrician or competent person must do the troubleshooting that is not in this manual.
There are some sounds during
normal use (compressor, refrigerant circulation).
Problem Possible cause Solution
The appliance does
not operate. The
The appliance is switched
off.
Switch on the appliance.
lamp does not operate.
The mains plug is not con-
nected to the mains sock-
Connect the mains plug to
the mains socket correctly.
et correctly.
The appliance has no
power. There is no voltage
in the mains socket.
Connect a different electrical appliance to the mains
socket.
Contact a qualified electrician.
The lamp does not
The lamp is in stand-by. Close and open the door.
work.
The lamp is defective. Refer to "Replacing the
lamp".
The compressor operates continually.
The door is not closed
The temperature is not set
correctly.
Set a higher temperature.
Refer to "Closing the door".
correctly.
The door has been
opened too frequently.
The product temperature
is too high.
Do not keep the door open
longer than necessary.
Let the product temperature decrease to room temperature before storage.
The room temperature is
too high.
Decrease the room temperature.
Page 15
Problem Possible cause Solution
Water flows on the
rear plate of the refrigerator.
Water flows into the
refrigerator.
Products prevent that wa-
During the automatic defrosting process, frost defrosts on the rear plate.
The water outlet is clogged.
ter flows into the water
This is correct.
Clean the water outlet.
Make sure that products do
not touch the rear plate.
collector.
Water flows on the
ground.
The melting water outlet
does not flow in the evaporative tray above the
Attach the melting water
outlet to the evaporative
tray.
compressor.
The temperature in
the appliance is too
The temperature regulator
is not set correctly.
Set a higher temperature.
low.
The temperature in
the appliance is too
The temperature regulator
is not set correctly.
Set a lower temperature.
high.
Many products are stored
at the same time.
The temperature in
the refrigerator is
There is no cold air circulation in the appliance.
too high.
The temperature in
the freezer is too
Products are too near to
each other.
Store less products at the
same time.
Make sure that there is cold
air circulation in the appliance.
Store products so that
there is cold air circulation.
high.
Upper or lower
square is shown in
the temperature display.
An error has occurred in
measuring the temperature.
Call your service representative (the cooling system
will continue to keep food
products cold, but temperature adjustment will not be
possible).
DEMO appears on
the Display.
The appliance is in demonstration mode (DEMO).
Keep pressed approximately 10 sec. the Light button
since a long sound of buzzer is heard and the Display
shut off for a short while:
appliance start works regularly.
6.1 Replacing the lamp
The appliance is equipped with a longlife
LED light.
Only service is allowed to replace the
lighting device. Contact your Service Center.
6.2 Closing the door
1.
Clean the door gaskets.
2.
If necessary, adjust the door. Refer to
"Installation".
3.
If necessary, replace the defective
door gaskets. Contact the Service
Center.
ENGLISH 15
Page 16
www.electrolux.com
16
7. INSTALLATION
WARNING!
Read the "Safety Information"
carefully for your safety and correct operation of the appliance
before installing the appliance.
7.1 Positioning
Install this appliance at a location where
the ambient temperature corresponds to
the climate class indicated on the rating
plate of the appliance:
Climate
class
SN +10°C to + 32°C
Ambient temperature
7.2 Electrical connection
Before plugging in, ensure that the voltage and frequency shown on the rating
plate correspond to your domestic power
supply.
The appliance must be earthed. The power supply cable plug is provided with a
contact for this purpose. If the domestic
power supply socket is not earthed, connect the appliance to a separate earth in
compliance with current regulations, consulting a qualified electrician.
The manufacturer declines all responsibility if the above safety precautions are not
observed.
This appliance complies with the E.E.C.
Directives.
N +16°C to + 32°C
ST +16°C to + 38°C
T +16°C to + 43°C
7.3 Installation of the CLEANAIR CONTROL Filter
TheCLEANAIR CONTROL Filter is an active carbon filter which absorbs bad odors
maintain the best flavour and aroma for all
foodstuffs without risk of odor cross contamination.
On delivery the carbon filter is in a plastic
bag to preserve performance.
The filter should be placed in the drawer
before the appliance is turned on.
• Open the drawer.
• Take the filter out of the plastic bag.
• Insert the filter in the drawer.
• Close the drawer.
The filter should be handled care-
fully so fragments do not loosen
from the surface.
Make sure that the air lever drawer is closed to obtain proper function.
7.4 Door reversibility
Page 17
ENGLISH 17
The door of the appliance opens to the
right. To open the door to the left, do
these steps before you install the appliance.
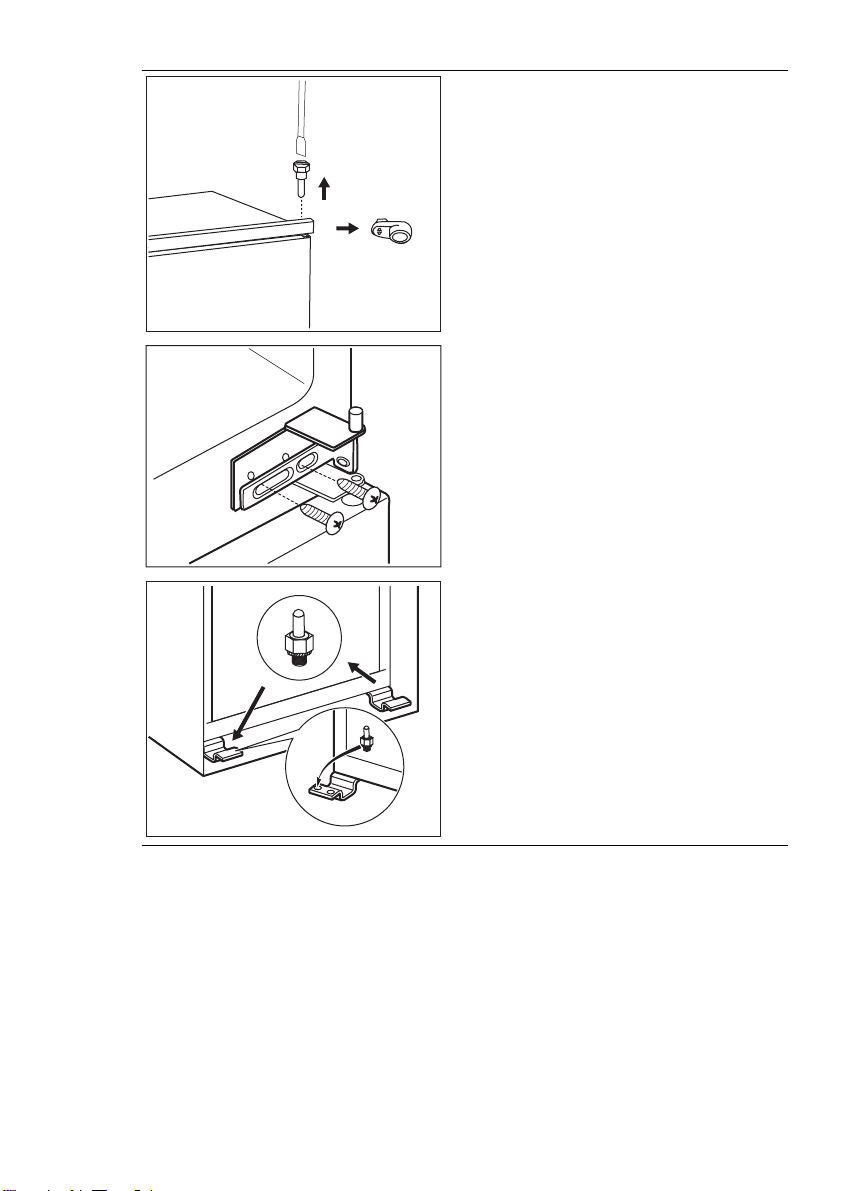
• Loosen and remove the upper pin.
• Remove the upper door.
• Remove the spacer.
• Loosen the middle hinge.
• Remove the lower door.
• Loosen and remove the lower pin.
On the opposite side:
• Tighten the lower pin.
• Install the lower door.
• Tighten the middle hinge.
• Install the spacer.
• Install the upper door.
• Tighten the upper pin.
Page 18
www.electrolux.com
18
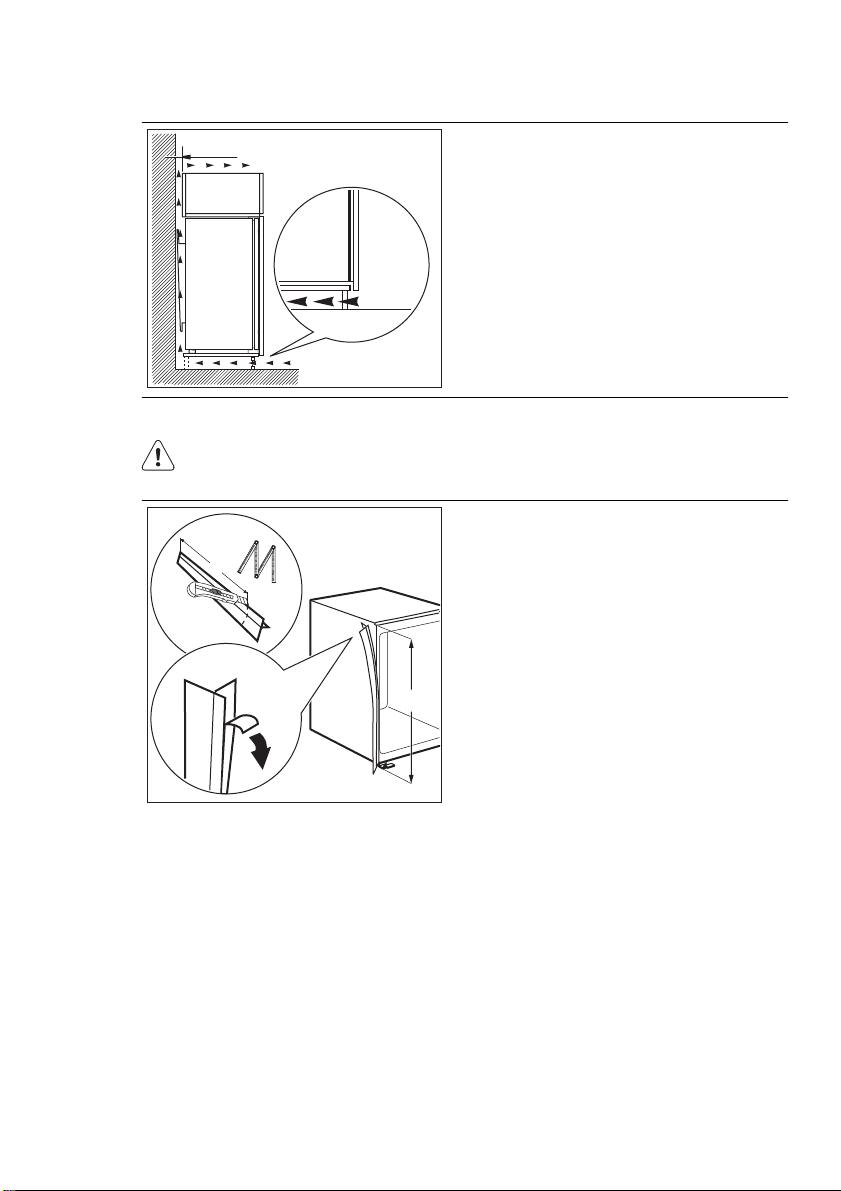
7.5 Ventilation requirements
5 cm
min.
200 cm
2
min.
200 cm
7.6 Installing the appliance
CAUTION!
Make sure that the mains cable
can move freely.
x
The airflow behind the appliance must be
sufficient.
2
Do the following steps:
If necessary cut the adhesive sealing
strip and apply it to the appliance as
shown in figure.
x
Page 19

4 mm
44 mm
ENGLISH 19
Install the appliance in the niche.
Push the appliance in the direction of
the arrow (1) until the upper gap cover
stops against the kitchen furniture.
2
Push the appliance in the direction of
the arrow (2) against the cupboard on
the opposite side of the hinge.
1
Adjust the appliance in the niche.
Make sure that the distance between
the appliance and the cupboard frontedge is 44 mm.
The lower hinge cover (in the accessories bag) makes sure that the distance
between the appliance and the kitchen
furniture is correct.
Make sure that the clearance between
the appliance and the cupboard is 4
mm.
Open the door. Put the lower hinge cover in position.
Attach the appliance to the niche with 4
screws.
I
I
Page 20

www.electrolux.com
20
Remove the correct part from the hinge
cover (E). Make sure to remove the part
DX, in the case of right hinge, SX in opposite case.
Attach the covers (C, D) to the lugs and
the hinge holes.
Install the vent grille (B).
C
Attach the hinge covers (E) to the hinge.
D
E
E
B
Connect the appliance laterally to the
kitchen furniture sidewall:
1.
Loosen the screws of the part (G)
and move the part (G) till the furni-
G
H
ture sidewall.
2.
Tighten the screws of the part (G)
again.
3.
Attach the part (H) to the part (G).
Page 21
ENGLISH 21
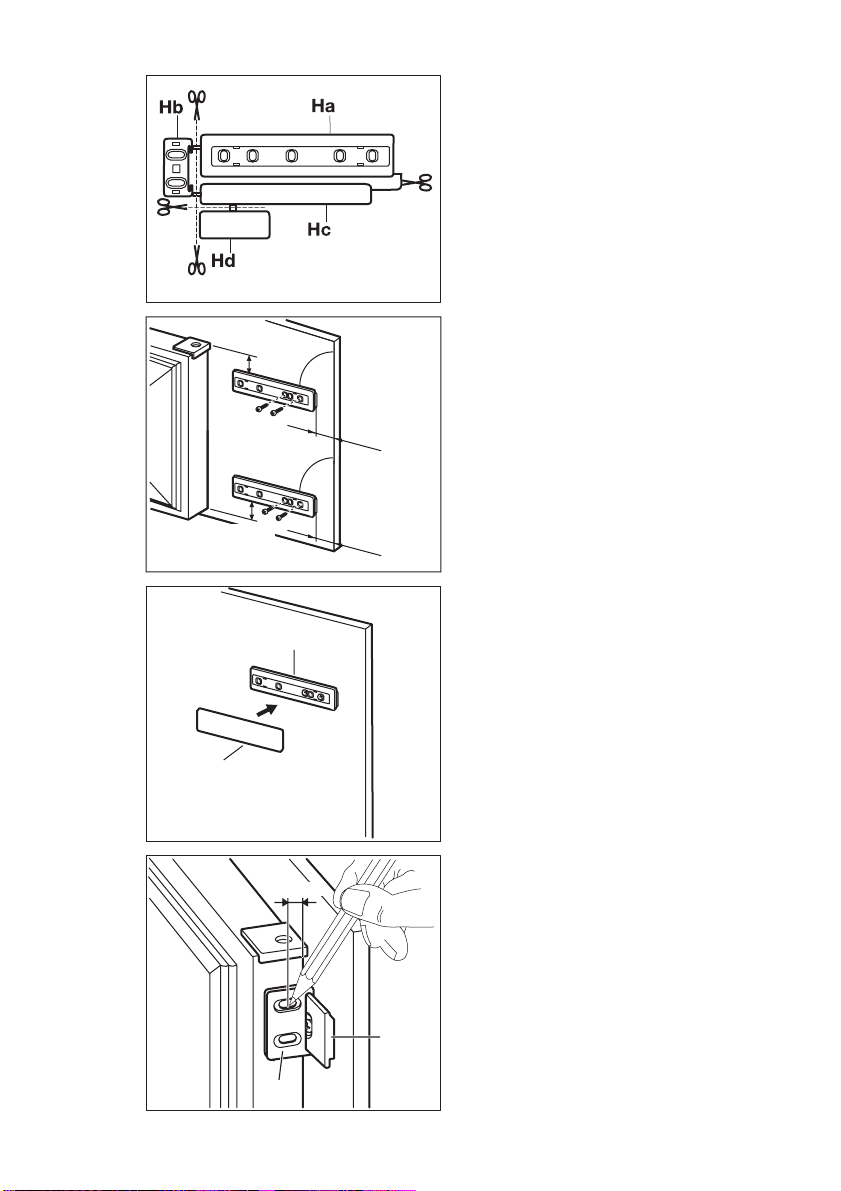
Disconnect the parts (Ha), (Hb), (Hc) and
(Hd).
ca. 50 mm
ca. 50 mm
Hc
Ha
8 mm
Install the part (Ha) on the inner side of
the kitchen furniture door.
90°
21 mm
90°
21 mm
Push the part (Hc) on the part (Ha).
Open the appliance door and the kitchen furniture door at an angle of 90°.
Insert the small square (Hb) into guide
(Ha).
Put together the appliance door and the
furniture door and mark the holes.
Hb
Ha
Page 22

www.electrolux.com
22
8 mm
K
Hb
Remove the brackets and mark a distance of 8 mm from the outer edge of
the door where the nail must be fitted
(K).
Ha
Place the small square on the guide
again and fix it with the screws supplied.
Align the kitchen furniture door and the
appliance door by adjusting the part
(Hb).
8. NOISES
There are some sounds during normal
running (compressor, refrigerant circulation).
Press the part (Hd) on the part (Hb).
Do a final check to make sure that:
• All screws are tightened.
• The sealing strip is attached tightly to
the cabinet.
• The door opens and closes correctly.
Hb
Hd
Page 23
SSSRR
HISSS!
R!
ENGLISH 23
CLICK!
BRRR!
OK
SSSRRR!
HISSS!
SSSRRR!
HISSS!
BLUBB!
CLICK!
BRRR!
CRACK!
CLICK!
BRRR!
BLUBB!
BLUBB!
CRACK!CRACK!
Page 24

www.electrolux.com
24
9. TECHNICAL DATA
Dimension of the recess
Height 1780 mm
Width 560 mm
Depth 550 mm
Rising Time 22 h
Voltage 230-240 V
Frequency 50 Hz
The technical information are situated in
the rating plate on the internal left side of
the appliance and in the energy label.
10. ENVIRONMENT CONCERNS
Recycle the materials with the symbol
. Put the packaging in applicable
containers to recycle it.
Help protect the environment and human
health and to recycle waste of electrical
and electronic appliances. Do not dispose
appliances marked with the symbol
with the household waste. Return the
product to your local recycling facility or
contact your municipal office.
Page 25

ITALIANO 25
INDICE
1. ISTRUZIONI DI SICUREZZA . . . . . . . . . . . . . . . . . . . . . . . . . . . . . . . . . . . . . . . . . . . . . . . 26
2. PANNELLO DEI COMANDI . . . . . . . . . . . . . . . . . . . . . . . . . . . . . . . . . . . . . . . . . . . . . . . . 28
3. UTILIZZO QUOTIDIANO . . . . . . . . . . . . . . . . . . . . . . . . . . . . . . . . . . . . . . . . . . . . . . . . . . 32
4. CONSIGLI E SUGGERIMENTI UTILI . . . . . . . . . . . . . . . . . . . . . . . . . . . . . . . . . . . . . . . . . 35
5. PULIZIA E CURA . . . . . . . . . . . . . . . . . . . . . . . . . . . . . . . . . . . . . . . . . . . . . . . . . . . . . . . . 36
6. COSA FARE SE… . . . . . . . . . . . . . . . . . . . . . . . . . . . . . . . . . . . . . . . . . . . . . . . . . . . . . . . 38
7. INSTALLAZIONE . . . . . . . . . . . . . . . . . . . . . . . . . . . . . . . . . . . . . . . . . . . . . . . . . . . . . . . . 40
8.
RUMORI . . . . . . . . . . . . . . . . . . . . . . . . . . . . . . . . . . . . . . . . . . . . . . . . . . . . . . . . . . . . . . 47
9. DATI TECNICI . . . . . . . . . . . . . . . . . . . . . . . . . . . . . . . . . . . . . . . . . . . . . . . . . . . . . . . . . . 49
PENSATI PER VOI
Grazie per aver acquistato un'apparecchiatura Electrolux. Avete scelto un prodotto che ha alle
spalle decenni di esperienza professionale e innovazione. Ingegnoso ed elegante, è stato
progettato pensando a voi. Quindi, in qualsiasi momento desiderate utilizzarlo, potete esser certi
di ottenere sempre i migliori risultati.
Benvenuti in Electrolux.
Visitate il nostro sito web per:
ricevere consigli, scaricare i nostri opuscoli, eliminare eventuali anomalie, ottenere
informazioni sull'assistenza.
www.electrolux.com
registrare il vostro prodotto e ricevere un servizio migliore:
www.electrolux.com/productregistration
acquistare accessori, materiali di consumo e ricambi originali per la vostra
apparecchiatura:
www.electrolux.com/shop
SERVIZIO CLIENTI E MANUTENZIONE
Consigliamo sempre l’impiego di ricambi originali.
Quando si contatta l'Assistenza, accertarsi di disporre dei seguenti dati.
Le informazioni si trovano sulla targhetta di identificazione. Modello, numero dell'apparecchio
(PNC), numero di serie.
Avvertenza / Attenzione - Importanti Informazioni di Sicurezza
Informazioni e consigli generali
Informazioni in materia di sicurezza ambientale
Con riserva di modifiche.
Page 26

www.electrolux.com
26
1.
ISTRUZIONI DI SICUREZZA
Per garantire un impiego corretto e sicuro
dell'apparecchio, prima dell'installazione e
del primo utilizzo leggere con attenzione il
libretto istruzioni, inclusi i suggerimenti e le
avvertenze. Per evitare errori e incidenti, è
importante garantire che tutte le persone
che utilizzano l'apparecchio ne conoscano il funzionamento e le caratteristiche di
sicurezza. Conservare queste istruzioni e
accertarsi che rimangano unite all'apparecchio in caso di vendita o trasloco, in
modo che chiunque lo utilizzi sia correttamente informato sull'uso e sulle norme di
sicurezza.
Per la sicurezza delle persone e delle cose
osservare le precauzioni indicate nelle
presenti istruzioni per l'utente, il produttore non è responsabile dei danni provocati
da eventuali omissioni.
1.1 Sicurezza dei bambini e
delle persone fragili
• Questo apparecchio non deve essere
usato da persone, bambini inclusi, con
ridotte capacità fisiche, sensoriali o psichiche, oppure prive di conoscenza e
esperienza, a meno che non siano state
istruite all'uso dell'apparecchio da parte
dei responsabili della loro sicurezza, oppure sotto vigilanza di questi.
I bambini devono essere sorvegliati per
assicurarsi che non giochino con l'apparecchio.
• Tenere i materiali di imballaggio al di
fuori della portata dei bambini. Alcuni
materiali possono creare rischi di soffocamento.
• Qualora l'apparecchio venga demolito,
estrarre la spina dalla presa, tagliare il
cavo di collegamento (il più vicino possibile all'apparecchio) e smontare lo
sportello per evitare che i bambini giocando possano subire scosse elettriche
o chiudersi dentro l'apparecchio.
• Se questo nuovo apparecchio, che è
dotato di guarnizioni magnetiche nello
sportello, va a sostituirne uno più vecchio avente sportello o coperchio con
chiusure a molla, si deve rendere inutilizzabili tali chiusure prima di eliminare
l'apparecchio sostituito, per evitare che
diventi una trappola mortale per i bambini.
1.2 Norme di sicurezza generali
AVVERTENZA!
Verificare che le aperture di ventilazione,
sia sull'apparecchiatura che nella struttura
da incasso, siano libere da ostruzioni.
• L'apparecchiatura è progettata per la
conservazione domestica di alimenti e/
o bevande e usi affini:
– cucine di negozi, uffici e altri ambienti
di lavoro;
– fattorie e clienti di hotel, motel e altri
ambienti residenziali;
– bed and breakfast;
– catering e usi simili non di vendita.
• Non utilizzare dispositivi meccanici o altri mezzi artificiali per accelerare lo sbrinamento.
• Non utilizzare altre apparecchiature
elettriche (per esempio gelatiere) all'interno del frigorifero, salvo quelle approvate per tale scopo dal produttore.
• Non danneggiare il circuito refrigerante.
• Il circuito refrigerante dell'apparecchiatura contiene isobutano (R600a), un
gas naturale con un elevato livello di
compatibilità ambientale che, tuttavia, è
infiammabile.
Durante il trasporto e l'installazione dell'apparecchiatura, assicurarsi che nessuno dei componenti del circuito refrigerante venga danneggiato.
In caso di danneggiamento del circuito
refrigerante:
– evitare fiamme libere e scintille
– aerare bene il locale in cui si trova
l'apparecchiatura
• È pericoloso cambiare le specifiche o
modificare il prodotto in qualunque modo. Un danneggiamento del cavo potrebbe provocare cortocircuiti, incendi
e/o scosse elettriche.
Page 27

AVVERTENZA!
Tutti i componenti elettrici (cavo di
alimentazione, spina, compressore) devono essere sostituiti da un
tecnico certificato o da personale
d'assistenza qualificato al fine di
evitare di correre rischi.
1.
Non collegare prolunghe al cavo di
alimentazione.
2.
Evitare che il lato posteriore dell'apparecchiatura possa schiacciare o
danneggiare la spina, causandone
il surriscaldamento con un conseguente rischio di incendio.
3.
La spina dell'apparecchiatura deve
trovarsi in una posizione accessibile.
4.
Evitare di tirare il cavo di alimentazione.
5.
Se la presa elettrica non è perfettamente stabile, non inserire la spina.
Il collegamento potrebbe provocare
scosse elettriche o creare un rischio di incendio.
6.
L'apparecchiatura non deve essere
messa in funzione senza il coprilampada interno (se previsto).
• Questa apparecchiatura è pesante.
Procedere con cautela durante gli spostamenti.
• Evitare di estrarre o di toccare gli alimenti riposti nel vano congelatore con
le mani bagnate o umide; il contatto potrebbe provocare abrasioni o ustioni da
freddo.
• Evitare un'esposizione prolungata dell'apparecchiatura alla luce solare diretta.
• Le lampadine utilizzate in questa apparecchiatura (se previste) sono lampadine speciali selezionate esclusivamente
per elettrodomestici. Non sono adatte
per l'illuminazione degli ambienti.
1.3 Uso quotidiano
• Non collocare pentole calde sulle parti
in plastica dell'apparecchio.
• Non collocare gas e liquidi infiammabili
nell'apparecchio, perché potrebbero
esplodere.
• Evitare di appoggiare gli alimenti contro
la presa d'aria situata nella parete po-
ITALIANO 27
steriore (per le apparecchiature di tipo
no-frost)
• Gli alimenti congelati non devono essere ricongelati una volta scongelati.
• Riporre gli alimenti surgelati preconfezionati secondo le istruzioni del produttore dell'alimento surgelato.
• Osservare rigorosamente i consigli per
la conservazione degli alimenti del produttore dell'apparecchio. Vedere le relative istruzioni.
• Non collocare bevande gassate o frizzanti nello scomparto congelatore perché creano pressione sul recipiente che
può esplodere danneggiando l'apparecchio.
• I ghiaccioli possono provocare bruciature da gelo se consumati immediatamente dopo averli tolti dall'apparecchio.
1.4 Pulizia e cura
• Prima della manutenzione, spegnere
l'apparecchio e staccare la spina dalla
presa.
• Non pulire l'apparecchio con oggetti
metallici.
• Non usare oggetti appuntiti per rimuovere la brina dall'apparecchio. Usare un
raschietto di plastica.
• Esaminare regolarmente il foro di scarico dell'acqua di sbrinamento nel frigorifero. Se necessario, pulirlo. Se il foro è
otturato, l'acqua si raccoglie sul fondo
dell'apparecchio.
1.5 Installazione
Per il collegamento elettrico, seguire attentamente le istruzioni dei
paragrafi corrispondenti.
• Disimballare l'apparecchio e assicurarsi
che non presenti danni. Non collegare
l'apparecchio se è danneggiato. Segnalare immediatamente gli eventuali
danni al negozio in cui è stato acquistato. In questo caso conservare l'imballaggio.
• Si consiglia di attendere almeno due
ore prima di collegare l'apparecchio per
consentire all'olio di arrivare nel compressore.
• Attorno all'apparecchio vi deve essere
un'adeguata circolazione dell'aria, altri-
Page 28

www.electrolux.com
28
• Se possibile il retro dell'apparecchio
• L'apparecchio non deve essere posto
• Installare l'apparecchio in modo che la
• Collegare solo a sorgenti d'acqua pota-
1.6 Assistenza tecnica
• Gli interventi elettrici sull'apparecchiatu-
• Gli interventi di assistenza devono esse-
menti si può surriscaldare. Per ottenere
una ventilazione sufficiente seguire le
istruzioni di installazione.
dovrebbe essere posizionato contro
una parete per evitare di toccare le parti
calde o di rimanervi impigliati (compressore, condensatore), evitando così possibili scottature.
vicino a radiatori o piani di cottura a
gas.
presa rimanga accessibile.
bile (se è previsto un collegamento alla
rete idrica).
ra devono essere eseguiti esclusivamente da elettricisti qualificati o da personale competente.
re eseguiti esclusivamente da tecnici
autorizzati e utilizzando solo ricambi originali.
1.7 Tutela ambientale
Questo apparecchio non contiene
gas che potrebbero danneggiare
lo strato di ozono nel circuito refrigerante o nei materiali isolanti.
L'apparecchio non deve essere
smaltito assieme ai rifiuti urbani e
alla spazzatura. La schiuma dell'isolamento contiene gas infiammabili: lo smaltimento dell'apparecchio va eseguito secondo le prescrizioni vigenti da richiedere alle
autorità locali. Evitare di danneggiare il gruppo refrigerante, specialmente nella parte posteriore vicino allo scambiatore di calore. I
materiali usati su questo apparecchio contrassegnati dal simbolo
sono riciclabili.
2. PANNELLO DEI COMANDI
Display
1
TastoDrink Chill e tasto ON/OFF ap-
2
parecchiatura
Tasto Temperatura più fresca
3
Tasto Temperatura più calda
4
Tasto vano frigorifero
5
Tasto vano congelatore
6
1
234567
TastoMode
7
È possibile modificare le impostazioni audio predefinite dei tasti e impostarle con
un volume più alto, premendo contemporaneamente il tasto Mode e il tasto temperatura più fresca per alcuni secondi. La
modifica è reversibile.
Page 29

2.1 Display
A DCB E F G H I
K J
A)
Indicatore della temperatura del frigorifero
B)
Spia OFF del frigorifero
C)
Funzione HolidayMode
D)
Modalità Eco frigorifero
E)
ShoppingMode
F)
Spia allarme
G)
Modalità Eco congelatore
H)
Modalità FastFreeze
I)
Indicatore della temperatura del congelatore
J)
Modalità DrinksChill
K)
Modalità FreeStore
Dopo aver selezionato il vano frigorifero o congelatore si avvia l'a-
nimazione
Dopo aver selezionato la temperatura, l'animazione lampeggia per
alcuni minuti.
.
2.2 Accensione
dell'apparecchiatura
Per accendere l'apparecchiatura procedere come segue:
1.
Inserire la spina nella presa di alimentazione.
2.
Gli indicatori di temperatura visualizzano la temperatura impostata prede-
finita.
Se DEMO appare sul display, l'apparecchiatura si trova in modalità dimostrazione: fare riferimento al paragrafo “COSA
FARE SE...”.
Per selezionare una temperatura diversa,
consultare la sezione "Regolazione della
temperatura".
2.3 Spegnimento del frigorifero
Per spegnere il frigorifero:
1.
Premere il tasto Fridge Compartment
per alcuni secondi.
2.
La spia OFF del frigorifero viene visualizzata.
2.4 Accensione del frigorifero
Per accendere il frigorifero:
1.
Premere il tasto Fridge Compartment .
La spia OFF del frigorifero si spegne.
Per selezionare una temperatura diversa,
consultare la sezione "Regolazione della
temperatura".
2.5 Spegnimento
Per spegnere l'apparecchiatura, procedere come segue:
1.
Premere il tasto ON/OFF dell'appa-
recchiatura per 3 secondi.
2.
Il display si spegne.
3.
Per scollegare l’apparecchiatura dalla
corrente elettrica, staccare la spina
dalla presa di alimentazione.
2.6 Regolazione della
temperatura
Selezionare il vano frigorifero o congelatore.
Premere il tasto Temperatura per impostarla.
Impostare la temperatura predefinita:
• +4°C per il frigorifero
• -18°C per il congelatore
ITALIANO 29
Page 30

www.electrolux.com
30
Gli indicatori della temperatura visualizzano la temperatura impostata.
La temperatura impostata verrà raggiunta
entro 24 ore.
2.7 Funzione HolidayMode
Questa funzione consente di mantenere il
frigorifero chiuso e vuoto durante un lungo
periodo di vacanza senza che si formino
odori sgradevoli.
Per attivare la funzione:
1.
Per disattivare la funzione:
1.
2.
Dopo un'interruzione di corrente la
temperatura impostata rimane in
memoria.
Quando si attiva la funzione Holiday, il vano frigorifero deve essere
vuoto.
Premere il tasto Mode finché non appare l'icona corrispondente.
L'indicatore Holiday lampeggia per alcuni secondi.
L'indicatore della temperatura del frigorifero visualizza la temperatura impostata.
Premere il tasto Mode fino a quando
la spia Holiday lampeggia.
L'indicatore Holiday si spegne.
La funzione si disattiva selezionando un'impostazione di temperatura per il frigorifero diversa.
1.
Selezionare il vano frigorifero o con-
gelatore.
2.
Premere il tasto Mode fino a quando
la spia EcoMode lampeggia.
3.
L'indicatore EcoMode si spegne.
La funzione si disattiva selezionando una temperatura impostata diversa.
2.9 ShoppingMode
Se occorre inserire una grande quantità di
alimenti nel frigorifero, per esempio al ritorno dalla spesa, è consigliabile attivare
la funzione ShoppingMode per raffreddare
più rapidamente gli alimenti introdotti nel
frigorifero e non far intiepidire i cibi già
presenti al suo interno.
Per attivare la funzione:
1.
Premere il tasto Mode finché non ap-
pare l'icona corrispondente.
La spia ShoppingMode lampeggia
per alcuni secondi.
La funzione ShoppingMode si disattiva
automaticamente dopo circa 6 ore.
Per disattivare la funzione prima dello spegnimento automatico:
1.
Premere il tasto Mode fino a quando
la spia ShoppingMode lampeggia.
2.
La spia ShoppingMode si spegne.
La funzione si disattiva selezionando un'impostazione di temperatura per il frigorifero diversa.
2.8 EcoMode per il vano
frigorifero e congelatore
Per una conservazione ottimale del cibo,
selezionare EcoMode .
Per attivare la funzione:
1.
Selezionare il vano frigorifero o congelatore.
2.
Premere il tasto Mode finché non appare l'icona corrispondente.
La spia EcoMode lampeggia per alcuni secondi.
La spia della temperatura visualizza la
temperatura impostata:
– per il frigorifero: +4°C
– per il congelatore: -18°C
3.
La spia EcoMode viene visualizzata.
Per disattivare la funzione:
2.10 ModalitàFastFreeze
Per attivare la funzione:
1.
Selezionare il vano congelatore.
2.
Premere il tasto Mode finché non ap-
pare l'icona corrispondente.
La spia FastFreeze lampeggia per al-
cuni secondi.
Questa funzione si interrompe in modo
automatico dopo 52 ore.
Per disattivare la funzione prima dello spegnimento automatico:
1.
Selezionare il vano congelatore.
2.
Premere il tasto Mode fino a quando
la spia FastFreeze lampeggia.
3.
L'indicatore FastFreeze si spegne.
La funzione si disattiva selezionando un'impostazione di temperatura per il congelatore diversa.
Page 31

2.11 Modalità DrinksChill
La modalità DrinksChill deve essere usata
per impostare un segnale acustico in un
preciso momento, utile per esempio
quando una ricetta richiede il raffreddamento di alimenti misti per un certo periodo di tempo o quando è necessario un
promemoria per non dimenticare le bottiglie messe in frigorifero per un raffreddamento rapido.
Per attivare la funzione:
1.
Premere il tasto DrinkChill .
Appare la spia DrinksChill .
Il timer visualizza il valore impostato
(30 minuti).
2.
Premere il tasto Temperatura più
fredda o Temperatura più calda per
modificare il valore preimpostato del
timer da 1 a 90 minuti.
3.
Il Timer inizia a lampeggiare (min).
Al termine del conto alla rovescia la spia
DrinksChill lampeggia e viene emesso un
segnale acustico:
1.
Estrarre le eventuali bevande dal vano
congelatore.
2.
Premere il tasto DrinkChill per spe-
gnere il segnale acustico e porre fine
alla funzione.
È possibile disattivare la funzione in qualsiasi momento durante il conto alla rovescia:
1.
Premere il tasto DrinkChill .
2.
La spia DrinksChill si spegne.
È possibile modificare l'ora in qualsiasi
momento e prima della fine premendo il
tasto Temperatura più fredda ed il tasto
Temperatura più calda.
2.12 Allarme di alta temperatura
Un aumento di temperatura nel vano congelatore (per esempio a causa di una precedente interruzione dell'alimentazione
elettrica) è indicato da:
• lampeggiamento degli indicatori di allar-
me e della temperatura del congelatore
• emissione di un segnale acustico.
ITALIANO 31
Per resettare l'allarme:
1.
Premere un tasto qualsiasi.
2.
Il segnale acustico si spegne.
3.
L'indicatore della temperatura del
congelatore visualizza per alcuni secondi la temperatura più alta raggiunta, quindi viene nuovamente visualizzata la temperatura impostata.
4.
L'indicatore di allarme continua a lampeggiare fino al ripristino delle condi-
zioni normali.
Quando l'allarme si interrompe, l'indicatore di allarme si spegne.
2.13 Allarme porta aperta
Se la porta è lasciata aperta per alcuni minuti, viene emesso un segnale acustico.
Le condizioni di allarme della porta aperta
sono indicate da:
• indicatore allarme lampeggiante
• segnale acustico
Al ripristino delle condizioni normali (porta
chiusa), l'allarme si interrompe.
Durante l'allarme, il segnale acustico può
essere disattivato premendo qualsiasi tasto.
2.14 ModalitàFreeStore
Per attivare la funzione:
1.
Premere il tasto Mode finché non ap-
pare l'icona corrispondente.
La spia FreeStore lampeggia per al-
cuni secondi.
2.
La spia FreeStore viene visualizzata.
Per disattivare la funzione:
1.
Premere il tasto Mode fino a quando
la spia FreeStore lampeggia.
2.
La spia FreeStore si spegne.
Se la funzione è attivata automaticamente, la spia FreeStore viene
visualizzata (fare riferimento a "Utilizzo quotidiano").
L'attivazione della modalità FreeStore aumenta il consumo di
energia.
Page 32

www.electrolux.com
32
3. UTILIZZO QUOTIDIANO
3.1 Pulizia dell'interno
Prima di utilizzare l'apparecchiatura per la
prima volta, lavare l'interno e gli accessori
con acqua tiepida e sapone neutro per
eliminare il tipico odore dei prodotti nuovi,
quindi asciugare accuratamente.
Non usare detergenti corrosivi o
polveri abrasive che possano danneggiare la finitura.
Se DEMO appare sul display, l'apparecchiatura si trova in modalità dimostrazione: fare riferimento al paragrafo “COSA
FARE SE…”.
3.2 Congelamento di alimenti
freschi
Il vano congelatore è adatto al congelamento di cibi freschi e alla conservazione
a lungo termine di alimenti congelati e surgelati.
Per congelare cibo fresco, attivare la funzione Fast Freeze almeno 24 ore prima di
inserire gli alimenti da congelare nel vano
congelatore.
Sistemare gli alimenti freschi da congelare
sui ripiani a contatto con le pareti laterali
fredde.
Tutti i comparti sono adatti a congelare
alimenti freschi.
La quantità massima di alimenti congelabili in 24 ore è riportata sulla targhetta
dei dati, un'etichetta presente sulle pareti
interne dell'apparecchiatura.
Il processo di congelamento dura 24 ore:
non aggiungere altri alimenti da congelare
per tutta la durata del processo.
tura per almeno 2 ore con una regolazione alta prima di introdurre gli alimenti.
Per conservare grandi quantità di cibo, rimuovere tutti i cassetti e i ripiani dall'apparecchiatura.
In caso di sbrinamento accidentale, per esempio a causa di un'interruzione dell'alimentazione elettrica, se l'alimentazione manca
per un periodo superiore al valore
indicato nella tabella dei dati tecnici sotto "Tempo di risalita", il cibo
scongelato deve essere consumato rapidamente o cucinato immediatamente e quindi ricongelato
(dopo il raffreddamento).
3.4 Scongelamento
Prima dell'utilizzo, i cibi surgelati o congelati possono essere scongelati nel vano
frigorifero o a temperatura ambiente, in
funzione del tempo disponibile per questa
operazione.
I pezzi piccoli possono addirittura essere
cucinati ancora congelati, direttamente
dal congelatore: in questo caso la cottura
durerà più a lungo.
3.5 Produzione di cubetti di
ghiaccio
Questo apparecchio è equipaggiato con
una o più vaschette per la produzione di
cubetti di ghiaccio. Riempire d'acqua le
vaschette quindi inserirle nel vano congelatore.
Non usare strumenti metallici per
rimuovere le vaschette dal congelatore.
3.3 Conservazione dei surgelati
Al primo avvio o dopo un periodo di non
utilizzo, lasciare in funzione l'apparecchia-
Page 33

3.6 Spia della temperatura
3.7 Ripiani rimovibili
ITALIANO 33
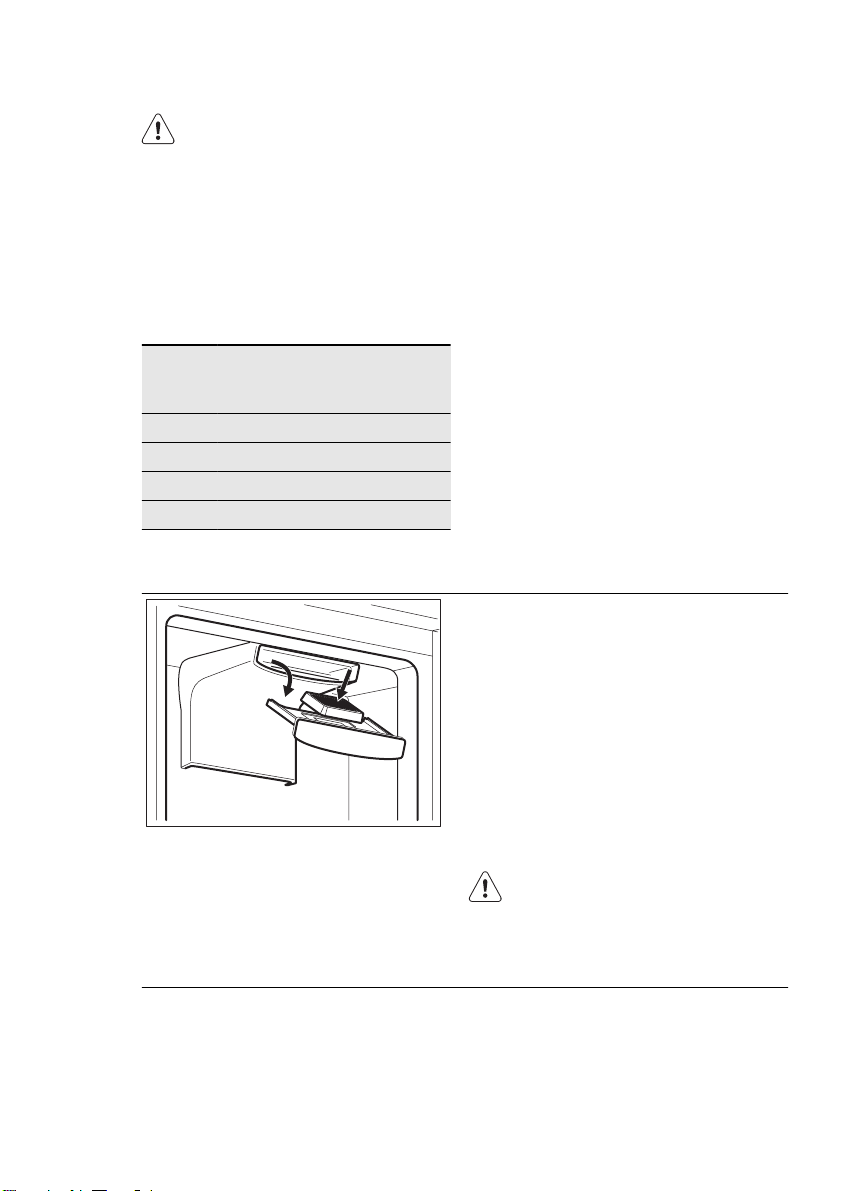
Questa apparecchiatura viene
venduta anche in Francia.
Per rispettare la normativa vigente
in questo paese, essa deve essere dotata di un particolare dispositivo, posto nella parte bassa della
cella frigorifero (vedi figura) per segnalare la zona più fredda del vano.
Le guide presenti sulle pareti del frigorifero
A
permettono di posizionare i ripiani a diverse altezze.
Per un migliore sfruttamento dello spazio,
i semiripiani anteriori possono essere collocati sotto a quelli posteriori.
B
3.8 Posizionamento dei ripiani della porta
Per facilitare l'introduzione di alimenti di
diverse dimensioni, i ripiani della porta
possono essere posizionati ad altezze differenti.
Per regolare l'altezza, procedere come
segue: tirare delicatamente il ripiano nella
direzione indicata dalle frecce fino a sganciarlo, quindi riposizionarlo dove necessario.
Page 34

www.electrolux.com
34
3.9 Controllo dell'umidità
3.10 Vano a bassa temperatura
I modelli dotati di questa caratteristica
al'interno del vano frigorifero, sono ideali
per una migliore conservazione di alimenti
3.11 Filtro dell'aria al carbone
Il ripiano di vetro incorpora un dispositivo
a fessure, regolabili per mezzo di una leva
scorrevole, che consente di regolare la
temperatura del cassetto o dei cassetti
delle verdure.
Quando le fessure di ventilazione sono
chiuse:
l'umidità naturale del cibo conservato negli scomparti della frutta e della verdura
viene preservata più a lungo.
Quando le fessure di ventilazione sono
aperte:
la maggiore circolazione di aria riduce l'umidità presente negli scomparti della frutta e della verdura.
freschi quali pesce, carne, frutti di mare,
ecc.
Si trova nella parte inferiore, immediatamente sopra il cassetto per le verdure.
L'apparecchiatura è dotata di un filtro al
carbone TASTEGUARD all'interno di un
cassetto sulla parete posteriore del vano
frigorifero.
Il filtro purifica l'aria eliminando gli odori
sgradevoli nel vano frigorifero, migliorando
ulteriormente la qualità di conservazione.
Durante il funzionamento, tenere sempre
chiuso il cassetto di ventilazione aria.
Page 35

3.12 FreeStore
Il vano frigorifero è dotato di un dispositivo
che consente un rapido raffreddamento
degli alimenti e una temperatura più uniforme nello scomparto.
Il suddetto si avvia automaticamente
quando necessario, ad esempio per un
rapido recupero della temperatura dopo
l'apertura della porta o quando la temperatura ambiente è elevata.
Consente di accendere manualmente il dispositivo quando necessario (fare riferimento alla modalità FreeStore ).
Il dispositivo FreeStore si interrompe
quando si apre la porta e si riavvia immediatamente dopo la chiusura della suddetta.
4. CONSIGLI E SUGGERIMENTI UTILI
ITALIANO 35
4.1 Consigli per il risparmio
energetico
• Non aprire frequentemente la porta e
non lasciarla aperta più di quanto assolutamente necessario.
• Se la temperatura ambiente è elevata, il
termostato è impostato su una regolazione alta e l'apparecchio è a pieno carico, il compressore può funzionare in
continuo causando la formazione di brina o ghiaccio sull'evaporatore. In questo caso, ruotare il termostato su una
regolazione più bassa per consentire lo
scongelamento automatico risparmiando così energia.
4.2 Consigli per la refrigerazione
di cibi freschi
Per ottenere i migliori risultati:
• non riporre nel frigorifero cibi caldi o liquidi in fase di evaporazione
• coprire o avvolgere il cibo, in particolare
se emana un odore forte
• posizionare il cibo in modo che l'aria
possa circolare liberamente attorno ad
esso
4.3 Consigli per la refrigerazione
Consigli utili:
Carne (tutti i tipi): avvolgerla in sacchetti di
politene e collocarla sul ripiano di vetro
sopra il cassetto delle verdure.
Per motivi di sicurezza, conservarla in
queste condizioni solo per uno o due giorni al massimo.
Cibi cucinati, piatti freddi ecc..: dovrebbero essere coperti e possono essere collocati su qualsiasi ripiano.
Frutta e verdura: dovrebbero essere pulite
accuratamente e collocate nell'apposito/i
cassetto/i speciale/i.
Burro e formaggio: dovrebbero essere
posti in contenitori ermetici speciali o avvolti in pellicole di alluminio o sacchetti di
politene per escludere per quanto possibile l'aria.
Bottiglie di latte: dovrebbero essere tappate e conservate nell'apposito ripiano
sulla porta.
Page 36

www.electrolux.com
36
Non conservare nel frigorifero banane, patate, cipolle o aglio se non sono confezionati.
4.4 Consigli per il congelamento
Per un processo di congelamento ottimale, ecco alcuni consigli importanti:
• la quantità massima di cibo che può es-
• il processo di congelamento dura 24
• congelare solo alimenti freschi, di otti-
• preparare il cibo in piccole porzioni per
• avvolgere il cibo in pellicole di alluminio
• non lasciare che cibo fresco non con-
• i cibi magri si conservano meglio e più a
sere congelata in 24 h è riportata sulla
targhetta;
ore. In questo periodo non aggiungere
altro cibo da congelare;
ma qualità e accuratamente puliti;
consentire un congelamento rapido e
completo e per scongelare in seguito
solo la quantità necessaria;
o in politene e verificare che i pacchetti
siano ermetici;
gelato entri in contatto con quello già
congelato, per evitare un aumento della
temperatura in quest'ultimo;
lungo di quelli grassi; il sale riduce il periodo di conservazione del cibo;
• i ghiaccioli, se consumati immediatamente dopo la rimozione dal vano congelatore, possono causare ustioni da
congelamento della pelle;
• si consiglia di riportare la data di congelamento su ogni singolo pacchetto per
riuscire a tenere traccia del tempo di
conservazione;
4.5 Consigli per la
conservazione dei surgelati
Per ottenere risultati ottimali
• Controllare che i surgelati esposti nei
punti vendita non presentino segni di interruzione della catena del freddo
• Il tempo di trasferimento dei surgelati
dal punto vendita al congelatore domestico deve essere il più breve possibile;
• Non aprire frequentemente la porta e limitare il più possibile i tempi di apertura;
• Una volta scongelati, gli alimenti si deteriorano rapidamente e non possono
essere ricongelati;
• Non superare la durata di conservazione indicata sulla confezione.
5. PULIZIA E CURA
ATTENZIONE
Staccare la spina dell'apparecchio
prima di eseguire lavori di manutenzione.
Questo apparecchio contiene
idrocarburi nell'unità di raffreddamento; la manutenzione e la ricarica devono pertanto essere effettuate esclusivamente da tecnici
autorizzati.
5.1 Pulizia periodica
L'apparecchio deve essere pulito regolarmente:
• Pulire l'interno e gli accessori con acqua tiepida e un po' di sapone neutro.
• Controllare regolarmente le guarnizioni
della porta e verificare che siano pulite e
prive di residui.
• Risciacquare e asciugare accuratamente.
Non tirare, spostare o danneggiare tubi e/o cavi all'interno dell'apparecchio.
Non usare mai detergenti, polveri
abrasive, prodotti per la pulizia
con una forte profumazione o cere
lucidanti per pulire l'interno, in
quanto danneggiano la superficie
e lasciano un odore forte.
Pulire il condensatore (griglia nera) e il
compressore sul retro dell'apparecchio
con una spazzola. Questa operazione mi-
Page 37

gliorerà le prestazioni dell'apparecchiatura
riducendone i consumi di energia.
Non danneggiare il sistema di raffreddamento.
Molti detergenti per cucine di marca contengono sostanze chimiche in grado di attaccare/danneggiare la plastica impiegata
in questo apparecchio. Per questo motivo
si raccomanda di pulire l'involucro esterno
dell'apparecchio solo con acqua calda
con un po' di liquido detergente.
Dopo la pulizia, ricollegare l'apparecchio
alla rete di alimentazione.
5.3 Sbrinamento del vano frigorifero
5.4 Sbrinamento del
congelatore
È normale che sui ripiani del congelatore e
intorno allo scomparto superiore si formi,
col tempo, uno strato di brina.
Quando tale strato raggiunge uno spessore di circa 3 - 5 mm, è necessario procedere allo sbrinamento del vano congelatore.
Circa 12 ore prima dello sbrinamento, impostare il termostato su
una regolazione più alta per accumulare una riserva di freddo sufficiente per l'interruzione del funzionamento
Per rimuovere la brina, procedere come
segue:
1.
Spegnere l'apparecchiatura.
2.
Rimuovere i surgelati, avvolgerli in alcuni strati di carta di giornale e riporli
in un luogo fresco.
ITALIANO 37
5.2 Sostituzione del filtro
dell'aria al carbone
Per garantire il massimo rendimento, sostituire il filtro dell'aria al carbone una volta
all'anno.
I filtri di ricambio possono essere acquistati presso il distributore di zona.
Per le istruzioni, consultare la sezione "Installazione del filtro dell'aria al carbone".
Il filtro dell'aria è un materiale di consumo
e come tale non è coperto da garanzia.
Durante l'uso normale, la brina viene eliminata automaticamente dall'evaporatore
del vano frigorifero ogni volta che il motocompressore si arresta. L'acqua di sbrinamento giunge attraverso un foro di scarico in un apposito recipiente posto sul retro dell'apparecchiatura, sopra il motocompressore, dove evapora
È importante pulire periodicamente il foro
di scarico dell'acqua di sbrinamento, situato al centro del canale sulla parete posteriore, per evitare che l'acqua fuoriesca
sugli alimenti.
ATTENZIONE
Non toccare il cibo congelato con
le mani bagnate. Le mani potrebbero aderire all'alimento congelato.
3.
Lasciare la porta aperta.
Per accelerare il processo di sbrinamento, collocare un recipiente
di acqua calda nel vano congelatore. Rimuovere inoltre i pezzi di
ghiaccio che si staccano prima
che lo sbrinamento sia completo.
4.
Una volta completato lo sbrinamento,
asciugare accuratamente l'interno.
5.
Accendere l’apparecchiatura.
6.
Dopo due o tre ore, reintrodurre nel
vano il cibo precedentemente rimosso
Page 38

www.electrolux.com
38
Per rimuovere la brina dal rivestimento interno, non usare utensili
metallici appuntiti che possano
danneggiarlo.
Non usare dispositivi meccanici o
altri mezzi artificiali non raccomandati dal produttore allo scopo di
accelerare il processo di sbrinamento.
Un aumento della temperatura dei
surgelati durante lo sbrinamento
può ridurre la loro durata di conservazione.
5.5 Periodi di inutilizzo
Quando l'apparecchio non è utilizzato per
lunghi periodi, adottare le seguenti precauzioni:
6. COSA FARE SE…
• scollegare l'apparecchio dalla rete
elettrica
• rimuovere tutto il cibo
• sbrinare (se necessario) e pulire l'apparecchiatura e tutti gli accessori
• lasciare la/e porta/e socchiusa/e per
evitare odori sgradevoli.
Se l'apparecchio rimane acceso, chiedere
a qualcuno di controllare ogni tanto per
evitare che il cibo contenuto marcisca in
caso di interruzione dell'alimentazione
elettrica.
AVVERTENZA!
Prima di eseguire la ricerca guasti,
estrarre la spina dalla presa di alimentazione.
Le operazioni di ricerca guasti,
non descritte nel presente manuale, devono essere eseguite esclusivamente da elettricisti qualificati
o da personale competente.
Durante l'uso alcuni rumori di funzionamento (come quelli del compressore o del circuito refrigerante) sono da considerarsi normali.
Problema Causa possibile Soluzione
L'apparecchiatura
non funziona. La
L'apparecchiatura è spenta.
Accendere l’apparecchiatura.
lampadina non si
accende.
La spina non è inserita
correttamente nella presa
di alimentazione.
L'apparecchiatura non ri-
ceve corrente. Assenza di
tensione nella presa di alimentazione.
Inserire correttamente la
spina nella presa di alimentazione.
Collegare alla presa di alimentazione un'altra apparecchiatura elettrica.
Rivolgersi ad un elettricista
qualificato.
La lampadina non si
accende.
La lampadina è in modalità
stand-by.
Chiudere e riaprire la porta.
La lampadina è difettosa. Fare riferimento alla sezione
"Sostituzione della lampadina".
Page 39

Problema Causa possibile Soluzione
Il compressore ri-
mane sempre in fun-
La temperatura non è impostata correttamente.
Impostare una temperatura
superiore.
zione.
La porta non è chiusa cor-
rettamente.
La porta viene aperta trop-
po frequentemente.
Consultare la sezione
"Chiusura della porta".
Limitare il più possibile il
tempo di apertura della porta.
La temperatura degli ali-
menti è troppo alta.
Prima di mettere a conservare gli alimenti, lasciarli raffreddare a temperatura ambiente.
La temperatura ambiente
è troppo alta.
Sul pannello posteriore del frigorifero
scorre acqua.
Durante lo sbrinamento
automatico, la brina che si
forma sul pannello poste-
Abbassare la temperatura
ambiente.
Non si tratta di un'anomalia.
riore si scioglie.
All'interno del frigorifero scorre acqua.
Gli alimenti impediscono
Scorre acqua sul
pavimento.
Lo scarico dell'acqua è
ostruito.
all'acqua di fluire nell'apposito collettore.
L'acqua di sbrinamento
non viene scaricata nella
bacinella di evaporazione
Pulire lo scarico dell'acqua.
Evitare di disporre gli alimenti a diretto contatto con
il pannello posteriore.
Collegare lo scarico dell'acqua di sbrinamento alla ba-
cinella di evaporazione.
posta sopra il compressore.
La temperatura all'interno dell'apparecchiatura è troppo
Il regolatore della temperatura non è impostato correttamente.
Impostare una temperatura
superiore.
bassa.
La temperatura al-
l'interno dell'apparecchiatura è troppo
Il regolatore della temperatura non è impostato correttamente.
Impostare una temperatura
inferiore.
alta.
Sono stati introdotti molti
alimenti contemporanea-
Introdurre gli alimenti un po-
co alla volta.
mente.
La temperatura nel
frigorifero è troppo
alta.
L'aria fredda non circola
correttamente all'interno
dell'apparecchiatura.
Adottare le misure necessa-
rie per garantire una corret-
ta circolazione dell'aria fred-
da.
La temperatura nel
vano congelatore è
troppo alta.
I prodotti sono troppo vicini tra loro.
Disporre i prodotti in modo
da consentire una corretta
circolazione dell'aria fredda.
ITALIANO 39
Page 40

www.electrolux.com
40
Problema Causa possibile Soluzione
Sul display della
temperatura è visualizzato un quadrato
superiore o inferiore.
DEMO appare sul display.
6.1 Sostituzione della lampadina
L'apparecchiatura è dotata di una lampadina a LED a lunga durata.
Solo al servizio assistenza è permesso sostituire l'impianto d'illuminazione. Contattare il Centro di Assistenza locale.
6.2 Chiusura della porta
1.
Si è verificato un errore
durante la misurazione
della temperatura.
L'apparecchiatura è in
modalità dimostrazione
(DEMO).
Pulire le guarnizioni della porta.
Contattare il Centro di Assi-
stenza (il sistema refrigeran-
te continuerà a tenere gli
alimenti freddi, ma non sarà
possibile regolare la tempe-
ratura).
Tenere il tasto Luce premu-
to per circa 10 sec., finché
non si sente un suono pro-
lungato provenire dal cicali-
no e il display si spegne per
un tempo brevissimo: l'ap-
parecchiatura inizia a fun-
zionare regolarmente.
2.
Se necessario, regolare la porta. Vedere "Installazione".
3.
Se necessario, sostituire le guarnizioni
della porta difettose. Contattare il
Centro di assistenza locale.
7. INSTALLAZIONE
AVVERTENZA!
Leggere con attenzione le "Informazioni per la sicurezza" per la
vostra sicurezza e per il corretto
funzionamento dell'apparecchio
prima di procedere all'installazione.
7.1 Posizionamento
Installare questo apparecchio in un punto
in cui la temperatura ambiente corrisponda alla classe climatica indicata sulla sua
targhetta:
Classe
Temperatura ambiente
climatica
SN da + 10°C a + 32°C
N da + 16°C a + 32°C
ST da + 16°C a + 38°C
T da + 16°C a + 43°C
7.2 Collegamento elettrico
Prima di inserire la spina, verificare che la
tensione e la frequenza riportate sulla targhetta corrispondano ai valori della rete
elettrica domestica.
L'apparecchio deve essere collegato a
massa. La spina del cavo di alimentazione
è dotata di un contatto a tale scopo. Se la
presa della rete elettrica domestica non è
collegata a massa, collegare l'apparecchio ad una massa separata in conformità
Page 41

alle norme relative alla corrente, consultando un elettricista qualificato.
Il fabbricante declina qualsiasi responsabilità se le precauzioni suddette non sono rispettate.
Il presente apparecchio è conforme alle
direttive CEE.
7.3 Installazione del filtro CLEANAIR CONTROL
Il filtroCLEANAIR CONTROL è un filtro al
carbone attivo che assorbe i cattivi odori e
permette a tutti gli alimenti conservati di
mantenere le proprie proprietà organolettiche senza il rischio di contaminazione di
odori.
Alla consegna, il filtro è contenuto in una
confezione di plastica, al fine di preservarne le prestazioni.
Il filtro deve essere posizionato all'interno
del cassetto prima dell'accensione dell'apparecchiatura.
• Aprire il cassetto.
• Togliere il filtro dalla confezione di plastica.
• Inserire il filtro nel cassetto.
• Chiudere il cassetto.
Maneggiare il filtro con attenzione
per evitare che eventuali frammenti si stacchino dalla superficie.
Accertarsi che il cassetto della leva dell'aria sia chiuso per assicurare il corretto funzionamento.
7.4 Possibilità di invertire la
porta
la porta dell'apparecchiatura si apre verso
destra. Per aprire la porta verso sinistra,
prima di installare l'apparecchiatura eseguire queste operazioni:
• Allentare e rimuovere il perno superiore.
• Rimuovere la porta superiore.
• Rimuovere il distanziale.
ITALIANO 41
Page 42

www.electrolux.com
42
7.5 Requisiti di ventilazione
• Allentare la cerniera centrale.
• Rimuovere la porta inferiore.
• Allentare e rimuovere il perno inferiore.
Sul lato opposto:
• Serrare il perno inferiore.
• Installare la porta inferiore.
• Serrare la cerniera centrale.
• Installare il distanziatore.
• Installare la porta superiore.
• Serrare il perno superiore.
5 cm
min.
200 cm
2
7.6 Installazione
dell’apparecchiatura
ATTENZIONE
Accertarsi che il cavo di rete sia libero da ostacoli.
min.
200 cm
Il flusso d'aria dietro l'apparecchiatura deve essere sufficiente.
2
Seguire i seguenti passaggi:
Page 43

ITALIANO 43
Se necessario, tagliare la striscia sigillante adesiva e applicarla come illustrato
x
in figura.
x
Installare l'apparecchiatura nella nicchia.
Spingere l'apparecchiatura in direzione
della freccia (1) finché la mascherina superiore si arresta contro il mobile da cu-
2
cina.
Spingere l'apparecchiatura in direzione
della freccia (2) contro il mobile sul lato
opposto rispetto alla cerniera.
1
4 mm
44 mm
Posizionare correttamente l'apparecchiatura nella nicchia.
Assicurarsi che la distanza tra l'apparecchiatura ed il bordo anteriore dell'armadio sia di 44 mm.
Il copricerniera inferiore (incluso nel sacchetto degli accessori) permette di controllare che la distanza fra l'apparecchiatura ed il mobile della cucina sia corretta.
Accertarsi che lo spazio fra l'apparecchiatura e il mobile sia di 4 mm.
Aprire la porta. Applicare il copricerniera
inferiore.
Page 44

www.electrolux.com
44
Fissare l'apparecchiatura nella nicchia
con 4 viti.
I
I
Rimuovere la parte appropriata del copricerniera (E). Accertarsi di rimuovere la
parte DESTRA per la cerniera di destra,
o la parte SINISTRA per quella di sinistra.
Applicare i cappucci (C, D) a coprigiunti
e fori delle cerniere.
Installare la griglia di sfiato (B).
C
Applicare i copricerniera (E).
D
E
E
B
Page 45

ITALIANO 45
Collegare l'apparecchiatura lateralmente
alla parete laterale del mobile da cucina:
1.
Allentare le viti della parte (G) e spostare la parte (G) sino alla parete la-
G
H
terale del mobile.
2.
Serrare nuovamente le viti della parte (G).
3.
Fissare la parte (H) alla parte (G).
Staccare le parti (Ha), (Hb), (Hc) e (Hd).
ca. 50 mm
ca. 50 mm
Installare la parte (Ha) sul lato interno
della porta del mobile.
90°
21 mm
90°
21 mm
Page 46

www.electrolux.com
46
Hc
Ha
8 mm
Hb
Spingere la parte (Hc) sulla parte (Ha).
Aprire la porta dell'apparecchiatura e
l'anta del mobile da cucina con un'angolazione di 90°.
Inserire il quadratino (Hb) nella guida
(Ha).
Unire la porta dell'apparecchiatura alla
porta del mobile e marcare i fori.
Ha
8 mm
K
Togliere le staffe e segnare la posizione
in cui deve essere inserito il chiodo (K)
ad una distanza di 8 mm dal bordo
esterno della porta.
Ha
Page 47

Hb
ITALIANO 47
Riapplicare il quadratino sulla guida e
fissarlo con le viti in dotazione.
Allineare lo sportello del mobile da cucina con quello dell'apparecchiatura regolando la parte (Hb).
Hb
Premere la parte (Hd) sulla parte (Hb).
Eseguire un controllo finale per accertarsi che:
• tutte le viti siano serrate.
• la striscia sigillante sia fissata saldamente all'unità;
• la porta si apra e si chiuda correttamente.
Hd
8. RUMORI
Durante l'uso, alcuni rumori di funzionamento (come quelli del compressore o del
circuito refrigerante) sono da considerarsi
normali.
OK
SSSRR
HISSS!
BLUBB!
R!
CLICK!
BRRR!
CRACK!
Page 48

www.electrolux.com
48
SSSRRR!
HISSS!
BLUBB!
SSSRRR!
HISSS!
BLUBB!
CLICK!
BRRR!
CLICK!
BRRR!
CRACK!CRACK!
Page 49

9. DATI TECNICI
Nicchia di incasso
Altezza 1780 mm
Larghezza 560 mm
Profondità 550 mm
Tempo di salita 22 h
Tensione 230-240 V
Frequenza 50 Hz
I dati tecnici sono riportati sulla targhetta
del modello, applicata sul lato sinistro in-
10. CONSIDERAZIONI AMBIENTALI
ITALIANO 49
terno dell'apparecchiatura, e sull'etichetta
dei valori energetici.
Riciclare i materiali con il simbolo
Buttare l'imballaggio negli appositi
contenitori per il riciclaggio.
Aiutare a proteggere l’ambiente e la salute
umana e a riciclare rifiuti derivanti da
apparecchiature elettriche ed elettroniche.
.
Non smaltire le apparecchiature che
riportano il simbolo
rifiuti domestici. Portare il prodotto al
punto di riciclaggio più vicino o contattare
il comune di residenza.
insieme ai normali
Page 50

www.electrolux.com
50
ÍNDICE DE MATERIAS
1. INSTRUCCIONES DE SEGURIDAD . . . . . . . . . . . . . . . . . . . . . . . . . . . . . . . . . . . . . . . . . . 51
2. PANEL DE MANDOS . . . . . . . . . . . . . . . . . . . . . . . . . . . . . . . . . . . . . . . . . . . . . . . . . . . . 53
3. USO DIARIO . . . . . . . . . . . . . . . . . . . . . . . . . . . . . . . . . . . . . . . . . . . . . . . . . . . . . . . . . . . 57
4. CONSEJOS ÚTILES . . . . . . . . . . . . . . . . . . . . . . . . . . . . . . . . . . . . . . . . . . . . . . . . . . . . . 60
5. MANTENIMIENTO Y LIMPIEZA . . . . . . . . . . . . . . . . . . . . . . . . . . . . . . . . . . . . . . . . . . . . . 61
6. QUÉ HACER SI… . . . . . . . . . . . . . . . . . . . . . . . . . . . . . . . . . . . . . . . . . . . . . . . . . . . . . . . 63
7. INSTALACIÓN . . . . . . . . . . . . . . . . . . . . . . . . . . . . . . . . . . . . . . . . . . . . . . . . . . . . . . . . . 65
8.
RUIDOS . . . . . . . . . . . . . . . . . . . . . . . . . . . . . . . . . . . . . . . . . . . . . . . . . . . . . . . . . . . . . . 72
9. DATOS TÉCNICOS . . . . . . . . . . . . . . . . . . . . . . . . . . . . . . . . . . . . . . . . . . . . . . . . . . . . . . 74
PENSAMOS EN USTED
Gracias por adquirir un producto Electrolux. Ha escogido un producto que contiene décadas de
experiencia e innovación profesionales. Ingenioso y elegante, se ha diseñado pensando en usted.
Así que, siempre que lo utilice puede tener la seguridad de que conseguirá excelentes resultados.
Bienvenido a Electrolux.
Visite nuestro sitio web para:
Obtener consejos, folletos, soluciones a problemas e información de servicio:
www.electrolux.com
Registrar su producto para recibir un mejor servicio:
www.electrolux.com/productregistration
Adquirir accesorios, artículos de consumo y recambios originales para su aparato:
www.electrolux.com/shop
ATENCIÓN Y SERVICIO AL CLIENTE
Le recomendamos que utilice recambios originales.
Al contactar con el Servicio, cerciórese de tener la siguiente información a mano.
La información se puede encontrar en la placa de características. Modelo, PNC, Número de
serie.
Advertencia - Precaución-Información sobre seguridad.
Datos y recomendaciones generales
Información medioambiental
Salvo modificaciones.
Page 51

ESPAÑOL 51
1.
INSTRUCCIONES DE SEGURIDAD
Por su seguridad y para garantizar el funcionamiento correcto del aparato, antes
de instalarlo y utilizarlo por primera vez lea
atentamente este manual del usuario, incluidos los consejos y advertencias. Para
evitar errores y accidentes, es importante
que todas las personas que utilicen el
aparato estén perfectamente al tanto de
su funcionamiento y de las características
de seguridad. Conserve estas instrucciones y no olvide mantenerlas junto al aparato en caso de su desplazamiento o venta para que quienes lo utilicen a lo largo
de su vida útil dispongan siempre de la información adecuada sobre el uso y la seguridad.
Por la seguridad de personas y bienes, siga las normas de seguridad indicadas en
estas instrucciones, ya que el fabricante
no se hace responsable de daños provocados por omisiones.
1.1 Seguridad de niños y
personas vulnerables
• Este electrodoméstico no está diseñado para que lo usen personas (incluidos
niños) con discapacidad física, sensorial o mental, o con experiencia y conocimiento insuficientes, a menos que
una persona responsable de su seguridad les supervise o instruya en el uso
del electrodoméstico.
No permita que los niños jueguen con
el electrodoméstico.
• Mantenga los materiales de embalaje
alejados de los niños. Existe riesgo de
asfixia.
• Si va a desechar el aparato, extraiga el
enchufe de la toma, corte el cable de
conexión (tan cerca del aparato como
pueda) y retire la puerta para impedir
que los niños al jugar puedan sufrir
descargas eléctricas o quedar atrapados en su interior.
• Si este aparato, que cuenta con juntas
de puerta magnéticas, sustituirá a un
aparato más antiguo con cierre de
muelle (pestillo) en la puerta, cerciórese
de inutilizar el cierre de muelle antes de
desechar el aparato antiguo. Evitará así
que se convierta en una trampa mortal
para niños.
1.2 Instrucciones generales de
seguridad
Mantenga libres de obstrucciones las
aberturas de ventilación del alojamiento
del aparato o de la estructura empotrada
• El aparato está diseñado para conservar los alimentos y bebidas de una vivienda normal, como se explica en este
folleto de instrucciones.
– áreas de cocina para el personal en
– granjas y por clientes en hoteles, mo-
– entornos de tipo hostales o pensio-
– servicios de catering y actividades si-
• No utilice dispositivos mecánicos ni
medios artificiales para acelerar el proceso de descongelación.
• No utilice otros aparatos eléctricos (como máquinas para hacer helados) dentro de los aparatos de refrigeración, a
menos que el fabricante haya autorizado su utilización para estos fines.
• No dañe el circuito del refrigerante.
• El circuito del refrigerante del aparato
contiene isobutano (R600a). Se trata de
un gas natural con un alto nivel de
compatibilidad medioambiental, aunque
es inflamable.
Durante el transporte y la instalación del
aparato, cerciórese de no provocar daños en el circuito de refrigeración.
Si el circuito de refrigeración se daña:
– mantenga el aparato alejado de las
– ventile bien la habitación en la que se
• Es peligroso alterar las especificaciones
o modificar este producto en modo alguno. Cualquier daño en el cable de alimentación puede provocar un cortocir-
ADVERTENCIA
tiendas, oficinas y otros entornos de
trabajo;
teles y otros entornos de tipo residencial;
nes;
milares al por mayor.
llamas y de cualquier fuente de encendido
encuentra el aparato
Page 52

www.electrolux.com
52
• Este aparato es pesado. Debe tener
• No retire ni toque elementos del com-
• Evite la exposición prolongada del apa-
• Las bombillas que se utilizan en este
1.3 Uso diario
• No coloque recipientes calientes sobre
• No almacene gas ni líquido inflamable
• No coloque alimentos directamente
cuito, un incendio o una descarga eléctrica.
ADVERTENCIA
Los componentes eléctricos (cable de alimentación, enchufe,
compresor) debe sustituirlos un
técnico autorizado o personal de
reparaciones profesional a fin de
evitar riesgos.
1.
El cable de alimentación no se debe prolongar.
2.
Compruebe que la parte posterior
del aparato no aplaste ni dañe el
enchufe. Un enchufe aplastado o
dañado puede recalentarse y provocar un incendio.
3.
Cerciórese de que tiene acceso al
enchufe del aparato.
4.
No tire del cable de alimentación.
5.
Si la toma de red está floja, no introduzca el enchufe. Existe riesgo
de descarga eléctrica o incendio.
6.
No utilice el aparato sin la tapa de
la bombilla (si está provisto de ella)
de iluminación interior.
precauciones durante su desplazamiento.
partimento congelador con las manos
húmedas o mojadas, ya que podría sufrir abrasión de la piel o quemaduras
por congelación.
rato a la luz solar directa.
aparato (si está provisto de ellas) son
especiales, y se han seleccionado exclusivamente para uso en aparatos domésticos. No pueden utilizarse para la
iluminación de la vivienda.
las piezas plásticas del aparato.
en el aparato, ya que podrían estallar.
contra la salida de aire de la pared posterior. (Si el aparato es No Frost, es decir, no acumula escarcha.)
• Los alimentos que se descongelen no
deben volver a congelarse.
• Guarde los alimentos congelados, que
se adquieren ya envasados, siguiendo
las instrucciones del fabricante.
• Se deben seguir estrictamente las recomendaciones del fabricante del aparato
sobre el almacenamiento. Consulte las
instrucciones correspondientes.
• No coloque bebidas carbonatadas o
con gas en el congelador, ya que se
genera presión en el recipiente, que podría estallar y dañar el aparato.
• Si se consumen polos helados retirados directamente del aparato, se pueden sufrir quemaduras causadas por el
hielo.
1.4 Cuidado y limpieza
• Antes de realizar tareas de mantenimiento, apague el aparato y desconecte el enchufe de la toma de red.
• No limpie el aparato con objetos metálicos.
• No utilice objetos afilados para eliminar
el hielo del aparato. Utilice un raspador
plástico.
• Inspeccione habitualmente el desagüe
del agua descongelada del frigorífico. Si
es necesario, limpie el desagüe. Si el
desagüe se bloquea, el agua se acumulará en la base del aparato.
1.5 Instalación
Para realizar la conexión eléctrica,
siga atentamente las instrucciones
de los párrafos correspondientes.
• Desembale el aparato y compruebe
que no tiene daños. No conecte el aparato si está dañado. Informe de los posibles daños de inmediato a la tienda
donde lo adquirió. En ese caso, conserve el material de embalaje.
• Es recomendable esperar al menos dos
horas antes de conectar el aparato, para permitir que el aceite regrese al compresor.
• El aparato debe contar con circulación
de aire adecuada alrededor, ya que de
lo contrario se produce recalentamiento. Para conseguir una ventilación sufi-
Page 53

ciente, siga las instrucciones correspondientes a la instalación.
• Siempre que sea posible, la parte posterior del producto debe estar contra
una pared, para evitar que se toquen
las partes calientes (compresor, condensador) y se produzcan quemaduras.
• El aparato no debe colocarse cerca de
radiadores ni de hornillas de cocina.
• Asegúrese de que es posible acceder
al enchufe después de instalar el electrodoméstico.
• Realice la conexión sólo a un suministro
de agua potable (si está prevista una
conexión de agua).
1.6 Servicio técnico
• Un electricista homologado deberá realizar las tareas que se requieran para
ejecutar el servicio o mantenimiento de
este electrodoméstico.
• Las reparaciones de este aparato debe
realizarlas un centro de servicio técnico
2. PANEL DE MANDOS
ESPAÑOL 53
autorizado y sólo se deben utilizar recambios originales.
1.7 Protección del medio
ambiente
Este aparato no contiene gases
perjudiciales para la capa de ozono, ni en el circuito de refrigerante
ni en los materiales aislantes. El
aparato no se debe desechar junto con los residuos urbanos. La
espuma aislante contiene gases
inflamables: el aparato se debe
desechar de acuerdo con la normativa vigente, que puede solicitar a las autoridades locales. No
dañe la unidad de refrigeración,
en especial la parte trasera, cerca
del intercambiador de calor. Los
materiales de este aparato marca-
dos con el símbolo
clables.
son reci-
Pantalla
1
Tecla Drink Chill y tecla ON/OFF del
2
aparato
Tecla de enfriamiento de temperatura
3
Tecla de calentamiento de tempera-
4
tura
Tecla del compartimento frigorífico
5
1
234567
Tecla del compartimento congelador
6
Tecla Mode
7
Se puede cambiar el sonido predefinido
de las teclas a otro más alto manteniendo
pulsadas al mismo tiempo la tecla Mode y
la de enfriamiento de temperatura durante
unos segundos. El cambio es reversible.
Page 54

www.electrolux.com
54
2.1 Pantalla
A)
B)
C)
D)
E)
F)
G)
H)
I)
J)
K)
2.2 Encendido del aparato
Para encender el aparato realice los siguientes pasos:
1.
2.
Si DEMO aparece en la pantalla, el aparato está en el modo de demostración: consulte el apartado “QUÉ HACER SI….”.
Para programar otra temperatura, consulte la sección "Regulación de la temperatura".
A DCB E F G H I
K J
Indicador de temperatura del frigorífico
Indicador de apagado del frigorífico
Modo Vacaciones
EcoMode frigorífico
ShoppingMode
Indicador de alarma
EcoMode congelador
Modo FastFreeze
Indicador de temperatura del conge-
lador
Modo DrinksChill
Modo FreeStore
Tras seleccionar el compartimento
frigorífico o congelador, empieza
la animación
Tras seleccionar la temperatura, la
animación parpadea durante unos
minutos.
Conecte el enchufe a la toma de corriente.
Los indicadores de temperatura
muestran la temperatura predeterminada programada.
.
2.3 Apagado del frigorífico
Para apagar el frigorífico:
1.
Pulse la tecla Fridge Compartment
durante unos segundos.
2.
Aparece el indicador de frigorífico
OFF.
2.4 Encendido del frigorífico
Para encender el frigorífico:
1.
Pulse la tecla Fridge Compartment.
El indicador de frigorífico OFF se apa-
ga.
Para programar otra temperatura, consulte la sección "Regulación de la temperatura".
2.5 Apagado
Para apagar el aparato:
1.
Pulse la tecla ON/OFF del aparato
durante 3 segundos.
2.
La pantalla se apaga.
3.
Para desconectar el aparato de la co-
rriente, desconecte el enchufe de la
toma de corriente.
2.6 Regulación de la
temperatura
Seleccione el compartimento frigorífico o
congelador.
Pulse la tecla de temperatura para ajustar
la temperatura.
Ajuste la temperatura predeterminada:
• +4°C para el frigorífico
• -18°C para el congelador
Page 55

Los indicadores de temperatura muestran
la temperatura programada.
La temperatura programada se alcanza
en un plazo de 24 horas.
Después de un corte del suministro eléctrico, la temperatura ajustada se guarda.
2.7 Modo Vacaciones
Esta función permite mantener el frigorífico vacío y cerrado durante periodos largos de tiempo sin que se formen malos
olores.
El compartimento del frigorífico
debe estar vacío mientras la función esté activada.
Para activar la función:
1.
Pulse la tecla Mode hasta que aparezca el icono correspondiente.
El indicador Vacaciones parpadea
unos segundos.
El indicador de temperatura del frigorífico muestra la temperatura programada.
Para desactivar la función:
1.
Pulse la tecla Mode hasta que parpadee el indicador Vacaciones.
2.
El indicador Vacaciones se apaga.
La función se apaga seleccionando una temperatura programada
diferente.
2.8 EcoMode para el frigorífico y
el compartimento congelador
Para un almacenamiento óptimo de los
alimentos, seleccione EcoMode.
Para activar la función:
1.
Seleccione el compartimento frigorífico/congelador.
2.
Pulse la tecla Mode hasta que aparezca el icono correspondiente.
El indicador EcoMode parpadea unos
segundos.
El indicador de temperatura muestra
la temperatura programada:
– para el frigorífico: +4°C
– para el congelador: -18°C
3.
Aparece el indicador EcoMode.
Para desactivar la función:
ESPAÑOL 55
1.
Seleccione el compartimento frigorífi-
co/congelador.
2.
Pulse la tecla Mode hasta que parpa-
dee el indicador EcoMode.
3.
El indicador EcoMode se apaga.
La función se apaga seleccionando una temperatura programada
diferente.
2.9 ShoppingMode
Si necesita introducir una gran cantidad
de alimentos calientes, por ejemplo, después de haber hecho la compra, se aconseja activar la función ShoppingMode para enfriarlos más rápidamente y evitar que
suba la temperatura de los que ya se
guardan en el frigorífico.
Para activar la función:
1.
Pulse la tecla Mode hasta que apa-
rezca el icono correspondiente.
El indicador ShoppingMode parpadea
unos segundos.
ShoppingMode se desactiva automáticamente después de unas 6 horas.
Para apagar la función antes de que termine automáticamente:
1.
Pulse la tecla Mode hasta que parpa-
dee el indicador ShoppingMode.
2.
El indicador ShoppingMode se apa-
ga.
La función se apaga seleccionando una temperatura programada
diferente.
2.10 Modo FastFreeze
Para activar la función:
1.
Seleccione el compartimento conge-
lador.
2.
Pulse la tecla Mode hasta que apa-
rezca el icono correspondiente.
El indicador FastFreeze parpadea
unos segundos.
La función se detiene automáticamente
después de 52 horas.
Para apagar la función antes de que termine automáticamente:
1.
Seleccione el compartimento conge-
lador.
2.
Pulse la tecla Mode hasta que parpa-
dee el indicador FastFreeze.
3.
El indicador FastFreeze se apaga.
Page 56

www.electrolux.com
56
2.11 Modo DrinksChill
El modo DrinksChill se utiliza para ajustar
una alarma acústica a la hora deseada y
es útil, por ejemplo, para recetas que precisan el enfriamiento de una mezcla durante un tiempo determinado, o cuando
se necesita un recordatorio para no olvidar que se han colocado botellas en el
congelador para que se enfríen rápidamente.
Para activar la función:
1.
2.
3.
Al terminar la cuenta atrás, el indicador
DrinksChill parpadea y suena la alarma:
1.
2.
La función se puede desactivar en cualquier momento durante la cuenta atrás:
1.
2.
El tiempo puede modificarse durante la
cuenta atrás y al finalizar, pulsando las
teclas de enfriamiento o calentamiento de
temperatura.
2.12 Alarma de temperatura alta
Un aumento de la temperatura del compartimento congelador (por ejemplo, por
falta de energía eléctrica) se indicará mediante:
• indicadores de temperatura del conge-
• emisión de una señal acústica.
La función se apaga seleccionando una temperatura programada
diferente para el congelador.
Pulse la tecla DrinkChill .
Aparece el indicador DrinksChill.
El temporizador muestra el valor ajus-
tado (30 minutos).
Pulse la tecla de enfriamiento o calen-
tamiento de temperatura para cambiar el valor del temporizador entre 1
y 90 minutos.
El Temporizador empieza a parpadear (min).
Saque todas las bebidas del compartimento congelador.
Pulse la tecla DrinkChill para apagar
el sonido y desactivar la función.
Pulse la tecla DrinkChill.
El indicador DrinksChill se apaga.
lador y alarma intermitentes
Para reiniciar la alarma:
1.
Pulse cualquier tecla.
2.
El avisador acústico se apaga.
3.
El indicador de temperatura del con-
gelador muestra la temperatura más
alta alcanzada durante unos segun-
dos. A continuación vuelve a mostrar
la temperatura programada.
4.
El indicador de alarma sigue parpa-
deando hasta que se restablecen las
condiciones normales.
Cuando la alarma vuelve, el indicador se
apaga.
2.13 Alarma de puerta abierta
Si la puerta se queda abierta durante
unos minutos, sonará una señal acústica.
Los indicadores de puerta abierta son los
siguientes:
• indicador de alarma intermitente
• señal acústica
Una vez restablecidas las condiciones
normales (puerta cerrada), la alarma acústica se detendrá.
La señal acústica se puede desactivar durante la fase de alarma pulsando para ello
cualquier tecla.
2.14 Modo FreeStore
Para activar la función:
1.
Pulse la tecla Mode hasta que apa-
rezca el icono correspondiente.
El indicador FreeStore parpadea unos
segundos.
2.
Aparece el indicador FreeStore.
Para desactivar la función:
1.
Pulse la tecla Mode hasta que parpa-
dee el indicador FreeStore.
2.
El indicador FreeStore se apaga.
Si la función se activa automáticamente, el indicador FreeStore no
se muestra (consulte la sección
"Uso diario").
La activación del modo FreeStore
incrementa el consumo de energía.
Page 57

3. USO DIARIO
ESPAÑOL 57
3.1 Limpieza del interior
Antes de utilizar el aparato por primera
vez, lave el interior y los accesorios internos con agua templada y un jabón neutro
para eliminar el típico olor de los productos nuevos. A continuación seque bien.
No utilice detergentes ni polvos
abrasivos, ya que podrían dañar el
acabado.
Si DEMO aparece en la pantalla, el aparato está en el modo de demostración: consulte el apartado “Qué hacer si….”.
3.2 Congelación de alimentos
frescos
El compartimento del congelador es adecuado para congelar alimentos frescos y
conservar a largo plazo los alimentos congelados y ultracongelados.
Para congelar alimentos frescos, active la
función Fast Freeze al menos 24 horas
antes de introducir los alimentos en el
compartimento congelador.
Coloque los alimentos frescos que va a
congelar en los estantes situados en contacto con las paredes laterales que están
frías.
Todos los compartimentos son adecuados para congelar alimentos frescos.
La cantidad máxima de alimentos que
puede congelarse en 24 horas se indica
en la placa de características, una etiqueta situada en el interior del aparato.
El proceso de congelación dura 24 horas:
durante ese tiempo no deben añadirse
otros alimentos para congelar.
3.3 Conservación de alimentos
congelados
Al poner en marcha el aparato por primera vez o después de un periodo sin uso,
déjelo en marcha al menos durante 2 horas con un ajuste alto antes de colocar los
productos en el compartimento.
Si se van a guardar cantidades grandes
de alimentos, retire todos los cajones y
estantes del aparato.
En caso de producirse una descongelación accidental, por ejemplo, por un corte del suministro
eléctrico, si la interrupción ha durado más que el valor indicado en
la tabla de características técnicas
bajo la especificación "periodo de
tiempo en descongelación", los
alimentos descongelados deberán
consumirse cuanto antes o cocinarse de inmediato, y luego volverse a congelar (después de que
se hayan enfriado).
3.4 Descongelación
Los alimentos ultracongelados o congelados, antes de utilizarlos, se pueden descongelar en el compartimento frigorífico o
a temperatura ambiente, dependiendo del
tiempo de que se disponga.
Es posible incluso cocinar piezas pequeñas congeladas, tomadas directamente
del congelador; en tal caso, el tiempo de
cocción será más prolongado.
3.5 Producción de cubitos de
hielo
Este aparato cuenta con una o varias
bandejas para la producción de cubitos
de hielo. Llene las bandejas con agua y
colóquelas en el compartimento congelador.
No utilice instrumentos metálicos
para retirar las bandejas del congelador.
Page 58

www.electrolux.com
58
3.6 Indicador de temperatura
3.7 Estantes móviles
Este aparato está autorizado para
su venta en Francia.
En conformidad con la normativa
válida en dicho país, deberá ir
provisto de un dispositivo especial
(consulte la figura) situado en el
compartimiento inferior del frigorífico para indicar la zona más fría
del mismo.
Las paredes del frigorífico cuentan con
A
soportes para colocar los estantes del
modo que se prefiera.
Para aprovechar mejor el espacio, los estantes frontales más pequeños pueden
colocarse bajo los traseros.
B
3.8 Colocación de los estantes de la puerta
Para poder guardar alimentos de distintos
tamaños, los estantes de la puerta se
pueden colocar a diferentes alturas.
Para realizar esos ajustes proceda como
se indica a continuación: mueva paulatinamente el estante en la dirección de las
flechas hasta retirarlo del soporte y colóquelo en la posición que desee.
Page 59

3.9 Control de humedad
3.10 Compartimento de baja
temperatura
Los modelos equipados con esta función
en la zona de frigorífico, están indicados
para una mejor conservación de alimen-
3.11 Filtro de carbón
ESPAÑOL 59
El estante de cristal incorpora un dispositivo con ranuras (ajustables mediante un
palanca deslizante), que permite regular la
temperatura de los cajones para verduras
Cuando las ranuras de ventilación están
cerradas:
la humedad natural de los alimentos guardados en los compartimentos para frutas
y verduras se mantiene durante más tiempo.
Cuando las ranuras de ventilación están
abiertas:
el aumento del aire circulante reduce el
contenido de humedad de los alimentos.
tos frescos como pescado, carne, marisco, etc.
Se encuentra en la parte inferior, justo por
encima del cajón de conservación de verduras.
Su aparato está equipado con un filtro de
carbón activado TASTEGUARD, situado
en un cajón de la pared posterior del
compartimento frigorífico.
El filtro purifica el aire, elimina los malos
olores del compartimento frigorífico y mejora la calidad de conservación de los alimentos.
Durante el funcionamiento, mantenga
siempre cerrado el cajón de ventilación
del aire.
Page 60

www.electrolux.com
60
3.12 FreeStore
4. CONSEJOS ÚTILES
El compartimento frigorífico cuenta con
un dispositivo que permite enfriar los alimentos con más rapidez y mantener una
temperatura más uniforme dentro del
compartimento.
El dispositivo se activa por sí solo cuando
es necesario, por ejemplo, para recuperar
rápidamente la temperatura después de
abrir la puerta o cuando la temperatura
ambiente sea elevada.
Permite encender el dispositivo manualmente cuando sea necesario (consulte el
modo FreeStore).
El dispositivo FreeStore se detiene cuando la puerta está abierta y se reinicia inmediatamente después de cerrar la puerta.
4.1 Consejos para ahorrar
energía
• No abra la puerta con frecuencia ni la
deje abierta más tiempo del estrictamente necesario.
• Si la temperatura ambiente es elevada,
la temperatura del aparato se ha ajustado en los valores más altos y está totalmente lleno, el compresor podría funcionar de manera continua, provocando la formación de escarcha o hielo en
el evaporador. Si esto sucede, gire el
regulador de temperatura a valores inferiores para permitir la descongelación
automática y ahorrar en el consumo
eléctrico.
4.2 Consejos para la
refrigeración de alimentos
frescos
Para obtener los mejores resultados:
• no guarde en el frigorífico alimentos calientes ni líquidos en evaporación;
• cubra o envuelva los alimentos, en especial si tienen sabores fuertes;
• coloque los alimentos de modo que el
aire pueda circular libremente entre
ellos.
4.3 Consejos para la
refrigeración
Consejos útiles:
Carne (de todo tipo): guárdela en bolsas
de plástico y colóquela en el estante de
vidrio, sobre el cajón de las verduras.
Por razones de seguridad, guárdela de
ese modo durante uno o dos días, como
máximo.
Alimentos cocinados, platos fríos, etc..:
los debe cubrir y puede colocarlos en
cualquiera de los estantes.
Frutas y verduras: se deben limpiar a conciencia y colocar en los cajones especiales suministrados a tal efecto.
Mantequilla y queso: colóquelos en recipientes herméticos especiales o envueltos
en papel de aluminio o en bolsas de plástico, para excluir tanto aire como sea posible.
Page 61

Botellas de leche: deben tener tapa y se
colocarán en el estante para botellas de la
puerta.
Los plátanos, las patatas, las cebollas y
los ajos, si no están empaquetados, no
deben guardarse en el frigorífico.
4.4 Consejos sobre la
congelación
Estos consejos son importantes para poder aprovechar al máximo el proceso de
congelación:
• la cantidad máxima de alimentos que
puede congelarse en 24 horas se
muestra en la placa de datos técnicos;
• el proceso de congelación requiere 24
horas. Durante ese periodo no deben
añadirse otros alimentos para congelación;
• congele sólo productos alimenticios de
máxima calidad, frescos y perfectamente limpios;
• prepare los alimentos en porciones pequeñas para que se congelen de manera rápida y total, así como para poder descongelar posteriormente sólo
las cantidades necesarias;
• envuelva los alimentos en papel de aluminio o polietileno y compruebe que los
envoltorios quedan herméticamente cerrados;
• no permita que alimentos frescos y sin
congelar entren en contacto con alimentos ya congelados, para evitar el
aumento de temperatura de los segundos;
ESPAÑOL 61
• los alimentos magros se congelan mejor que los grasos; la sal reduce el tiempo de almacenamiento de los alimentos;
• el hielo, si se consume inmediatamente
después de retirarlo del compartimento
congelador, puede provocar quemaduras por congelación en la piel;
• es recomendable etiquetar cada paquete con la fecha de congelación para
controlar el tiempo que permanecen almacenados.
4.5 Consejos para el
almacenamiento de alimentos
congelados
Para obtener el máximo rendimiento de
este aparato, deberá:
• comprobar que el comerciante ha mantenido los productos congelados correctamente almacenados;
• procurar que los alimentos congelados
pasen de la tienda al congelador en el
menor tiempo posible;
• evitar la apertura frecuente de la puerta
o dejarla abierta más del tiempo estrictamente necesario;
• los alimentos descongelados se deterioran con rapidez y no pueden congelarse de nuevo;
• no supere el tiempo de almacenamiento indicado por el fabricante de los alimentos.
5. MANTENIMIENTO Y LIMPIEZA
PRECAUCIÓN
Antes de realizar tareas de mantenimiento, desenchufe el aparato.
Este equipo contiene hidrocarburos en la unidad de refrigeración;
por tanto, el mantenimiento y la
recarga deben estar a cargo exclusivamente de técnicos autorizados.
5.1 Limpieza periódica
El equipo debe limpiarse de manera habitual:
• Limpie el interior y los accesorios con
agua templada y un jabón neutro.
• Revise y limpie periódicamente las juntas de la puerta para mantenerlas limpias y sin restos.
• Aclare y seque a fondo.
Page 62

www.electrolux.com
62
Limpie el condensador (rejilla negra) y el
compresor de la parte posterior del aparato con un cepillo. Esa operación mejorará el rendimiento del aparato y reducirá
el consumo eléctrico.
No mueva, dañe ni tire de los conductos o cables del interior del armario.
No utilice detergentes, polvos
abrasivos, productos de limpieza
perfumados ni cera para limpiar el
interior, ya que dañarán la superficie y dejarán un fuerte olor.
Tenga cuidado para no dañar el
sistema de refrigeración.
el exterior del aparato se limpie sólo con
agua templada a la que se añadirá un poco de líquido lavavajillas.
Después de la limpieza, vuelva a conectar
el aparato a la toma de red.
5.2 Sustitución del filtro de
carbón
Para garantizar un rendimiento óptimo se
recomienda cambiar el filtro de carbón
una vez al año.
En la red de distribuidores autorizados
puede adquirir filtros de carbón nuevos.
Consulte las instrucciones del apartado
“Instalación del filtro de carbón”.
Muchas marcas de limpiadores de superficies de cocina contienen químicos que
pueden atacar o dañar los plásticos del
aparato. Por tal razón, se recomienda que
5.3 Descongelación del frigorífico
5.4 Descongelación del
congelador
Siempre se forma un poco de escarcha
en los estantes del congelador y en torno
al compartimento superior.
Descongele el congelador sólo cuando la
capa de escarcha alcance un grosor de
unos 3 a 5 mm.
Unas 12 horas antes de realizar la
descongelación, coloque el regulador de temperatura en los niveles más elevados, con el fin de
acumular frío suficiente para la interrupción del funcionamiento.
El filtro de aire es un accesorio consumible y, como tal, no está cubierto por la
garantía.
La escarcha se elimina automáticamente
del evaporador del frigorífico cada vez
que se detiene el compresor, durante el
funcionamiento normal. El agua de la descongelación se descarga a través de un
orificio hacia un recipiente especial situado en la parte posterior del aparato, sobre
el motor compresor, donde se evapora.
Es importante limpiar periódicamente el
orificio de salida del agua de descongelación situado en la mitad del canal del
compartimento frigorífico para evitar que
el agua se desborde y caiga sobre los alimentos del interior.
1.
Apague el aparato.
2.
Retire los alimentos congelados, envuélvalos en varias hojas de papel de
periódico y colóquelos en un sitio
fresco.
PRECAUCIÓN
No toque los alimentos congelados con las manos mojadas. Podrían congelarse al contacto con
los alimentos.
3.
Deje la puerta abierta.
Para eliminar la escarcha, siga estos pasos:
Page 63

Para acelerar el proceso de descongelación, coloque un recipiente con agua tibia en el compartimento congelador. Además, retire
los trozos de hielo que se desprendan antes de que finalice la
descongelación.
4.
Cuando la descongelación haya terminado, seque a fondo el interior del
aparato.
5.
Encienda el aparato.
6.
Al cabo de dos o tres horas, vuelva a
introducir los alimentos que retiró previamente.
No utilice herramientas metálicas
afiladas para raspar la escarcha
del revestimiento interior, ya que
podría dañarlo.
No utilice dispositivos mecánicos
ni medios artificiales para acelerar
el proceso de descongelación, excepto los recomendados por el
fabricante.
El aumento de la temperatura de
los paquetes de alimentos congelados durante la descongelación
puede acortar su tiempo de almacenamiento.
ESPAÑOL 63
5.5 Periodos sin funcionamiento
Si el aparato no se utiliza durante un tiempo prolongado, tome las siguientes precauciones:
• desconecte el aparato de la red
eléctrica;
• extraiga todos los alimentos;
• descongele (si así está previsto) y limpie
el aparato y todos sus accesorios.
• deje la puerta(s) entreabierta para prevenir olores desagradables.
Si va a mantener el armario en marcha,
solicite a alguien que lo inspeccione de
vez en cuando para evitar que los alimentos se echen a perder en caso de un corte de energía.
6. QUÉ HACER SI…
ADVERTENCIA
Desenchufe el aparato antes de
realizar cualquier reparación.
Las reparaciones que no figuran
en este manual deben dejarse en
manos de un electricista o profesional cualificado y competente.
Problema Posible causa Solución
El aparato no fun-
ciona. La bombilla
no funciona.
El aparato no está correc-
El aparato no recibe sumi-
Durante el funcionamiento normal
del aparato suelen producirse
ciertos ruidos (compresor, circulación del refrigerante).
El aparato se apaga. Encienda el aparato.
Enchufe el aparato correctamente enchufado a la
toma de corriente.
tamente a la toma de co-
rriente.
Enchufe un aparato eléctrinistro eléctrico. No hay
tensión en la toma de corriente.
co diferente a la toma de
corriente.
Llame a un electricista cua-
lificado.
Page 64

www.electrolux.com
64
Problema Posible causa Solución
La bombilla no fun-
ciona.
La bombilla es defectuosa. Consulte "Cambio de la
El compresor funciona continuamente.
La puerta no está bien ce-
La puerta se ha abierto
La temperatura del pro-
La temperatura ambiente
El agua fluye por la
placa posterior del
frigorífico.
El agua fluye al interior del frigorífico.
Los productos impiden
El agua fluye hacia
el suelo.
La temperatura del
aparato es demasiado baja.
La temperatura del
aparato es demasiado alta.
Se han almacenado mu-
La temperatura del
frigorífico es demasiado alta.
La temperatura del
congelador es demasiado alta.
La bombilla está en espera.
La temperatura no se ha
ajustado correctamente.
rrada.
con excesiva frecuencia.
ducto es demasiado alta.
es demasiado alta.
Durante el proceso de
descongelación automática, la escarcha se derrite
en la placa posterior.
La salida de agua está
obstruida.
que el agua fluya al colector de agua.
El agua de la descongelación no fluye hacia la bandeja de evaporación situada sobre el compresor.
El ajuste de temperatura
no es correcto.
El ajuste de temperatura
no es correcto.
chos productos a la vez.
No hay circulación de aire
frío en el aparato.
Los productos están demasiado próximos entre
sí.
Cierre y abra la puerta.
bombilla".
Seleccione una temperatu-
ra más alta.
Consulte "Cierre de la puer-
ta".
No mantenga abierta la
puerta más tiempo del ne-
cesario.
Deje que la temperatura del
producto descienda a la
temperatura ambiente an-
tes de guardarlo.
Reduzca la temperatura
ambiente.
Esto es correcto.
Limpie la salida de agua.
Compruebe que los pro-
ductos no tocan la placa
posterior.
Fije la salida de agua de
descongelación a la bande-
ja de evaporación.
Seleccione una temperatu-
ra más alta.
Seleccione una temperatu-
ra más baja.
Guarde menos productos
al mismo tiempo.
Compruebe que el aire frío
circula libremente en el
aparato.
Guarde los productos de
modo que haya circulación
de aire frío entre ellos.
Page 65

Problema Posible causa Solución
En la pantalla de
temperatura aparece un cuadrado superior o inferior.
Se ha producido un error
en la medición de la temperatura.
Póngase en contacto con
su servicio técnico (el siste-
ma de refrigeración seguirá
manteniendo fríos los ali-
mentos, pero no podrá
ajustar la temperatura).
DEMO aparece en la
pantalla.
El aparato está en modo
de demostración (DEMO).
Mantenga pulsada aproxi-
madamente 10 s la tecla de
la luz; se escucha un largo
sonido de la señal acústica
y la pantalla se apaga bre-
vemente: el aparato empie-
za a funcionar con normali-
dad.
2.
6.1 Cambio de la bombilla
El aparato está equipado con una luz LED
de larga duración.
El dispositivo de iluminación sólo debe ser
sustituido por el servicio técnico. Póngase
en contacto con el servicio técnico.
Si es necesario, ajuste la puerta. Consulte "Instalación".
3.
Si es necesario, cambie las juntas defectuosas. Póngase en contacto con
el servicio técnico.
6.2 Cierre de la puerta
1.
Limpie las juntas de la puerta.
ESPAÑOL 65
7. INSTALACIÓN
ADVERTENCIA
Lea atentamente la "Información
sobre seguridad" para garantizar
su propia seguridad y el correcto
funcionamiento del electrodoméstico antes de instalar el electrodoméstico.
7.1 Colocación
Instale el aparato en un punto en el que la
temperatura ambiente se corresponda
con la clase climática indicada en la placa
de datos técnicos del aparato:
Clase
Temperatura ambiente
climática
SN +10°C a + 32°C
N +16°C a + 32°C
ST +16°C a + 38°C
T +16°C a + 43°C
7.2 Conexión eléctrica
Antes de conectar el aparato, compruebe
que el voltaje y la frecuencia que aparecen en la placa de datos técnicos se corresponden con el suministro de la vivienda.
El aparato debe tener conexión a tierra. El
enchufe del cable de alimentación se suministra con un contacto para tal fin. Si la
toma de red de la vivienda carece de conexión a tierra, conecte el aparato a una
Page 66

www.electrolux.com
66
toma de tierra conforme con la normativa,
después de consultar a un electricista
profesional.
El fabricante rechaza toda responsabilidad si no se toman las precauciones antes indicadas.
7.3 Instalación del filtro CLEANAIR CONTROL
7.4 Cambio del sentido de
apertura de la puerta
Este aparato es conforme con las directivas de la CEE.
El filtro CLEANAIR CONTROL es un filtro
de carbón activado que absorbe los malos olores, conserva el sabor y el aroma
de los alimentos en condiciones óptimas
y evita la contaminación cruzada de olores.
El filtro de carbón activado se suministra
en una bolsa de plástico que garantiza su
duración e integridad.
El filtro se debe colocar en el cajón antes
de poner en marcha el aparato.
• Abra el cajón.
• Extraiga el filtro de la bolsa de plástico.
• Inserte el filtro en el cajón.
• Cierre el cajón.
Manipule el filtro con cuidado para
que no se desprendan fragmentos de su superficie.
Asegúrese de que el cajón de la
llave de aire esté cerrado para
que funcione correctamente.
La puerta del aparato se abre hacia la derecha. Si desea abrir la puerta hacia la izquierda, siga estas instrucciones antes de
instalar el aparato.
• Afloje y retire el perno superior.
• Retire la puerta superior.
• Retire el separador.
Page 67

7.5 Requisitos de ventilación
ESPAÑOL 67
• Desatornille la bisagra central.
• Retire la puerta inferior.
• Afloje y retire el perno inferior.
En el lado opuesto:
• Apriete el perno inferior.
• Vuelva a colocar la puerta inferior.
• Apriete la bisagra central.
• Coloque el separador.
• Coloque la puerta superior.
• Apriete el perno superior.
5 cm
min.
200 cm
2
min.
200 cm
7.6 Instalación del aparato
PRECAUCIÓN
Compruebe que el cable de alimentación de red pueda moverse
con facilidad.
El aire debe poder circular libremente por
la parte posterior del aparato.
2
Ejecute los pasos siguientes:
Page 68

www.electrolux.com
68
Si es necesario, corte la cinta selladora
adhesiva y péguela al aparato como se
x
muestra en la figura.
x
Instale el aparato en el hueco.
Empuje el aparato en el sentido de la
flecha (1) hasta que la cubierta de la separación superior haga tope contra el
2
mueble de cocina.
Empuje el aparato en el sentido de la
flecha (2) contra el mueble en el lado
opuesto de la bisagra.
1
4 mm
44 mm
Ajuste el aparato en el hueco.
Asegúrese de que haya una distancia
de 44 mm entre el aparato y el borde
delantero del mueble.
La tapa de la bisagra inferior (incluida en
la bolsa de accesorios) garantiza que la
separación entre el aparato y el mueble
de cocina sea la adecuada.
Asegúrese de que quede un espacio de
4 mm entre el aparato y el mueble.
Abra la puerta. Coloque la tapa de la bisagra inferior en su lugar.
Page 69

ESPAÑOL 69
Fije el aparato al hueco con cuatro tornillos.
I
I
Retire la parte correcta de la tapa de la
bisagra (E). No olvide extraer la pieza
DX, en el caso de la bisagra derecha, y
la pieza SX en el caso contrario.
Fije las tapas (C, D) a las lengüetas y a
los orificios de la bisagra.
Instale la rejilla de ventilación (B).
C
Fije las tapas (E) a la bisagra.
D
E
E
B
Page 70

www.electrolux.com
70
Conecte el aparato lateralmente con la
puerta del mueble de cocina:
1.
Afloje los tornillos de la pieza (G) y
desplace la pieza (G) hasta la puerta
G
H
del mueble.
2.
Vuelva a apretar los tornillos de la
pieza (G).
3.
Fije la pieza (H) a la pieza (G).
Desconecte las piezas (Ha), (Hb), (Hc) y
(Hd).
ca. 50 mm
ca. 50 mm
Instale la pieza (Ha) en el lado interno
del mueble de cocina.
90°
21 mm
90°
21 mm
Page 71

Hc
Ha
8 mm
Hb
8 mm
ESPAÑOL 71
Empuje la pieza (Hc) contra la pieza
(Ha).
Abra la puerta del aparato y la puerta
del mueble de cocina en un ángulo de
90°.
Introduzca el cuadrado pequeño (Hb) en
la guía (Ha).
Coloque juntas la puerta del aparato y la
puerta del mueble de cocina y marque
los orificios.
Ha
Quite los soportes y ponga una marca a
una distancia de 8 mm desde el borde
exterior de la puerta en la que se debe
colocar el clavo (K).
K
Ha
Page 72

www.electrolux.com
72
Hb
Vuelva a colocar el cuadrado pequeño
en la guía y fíjelo con los tornillos suministrados.
Alinee las puertas del mueble de cocina
y del aparato mediante el ajuste de la
pieza (Hb).
Hb
Presione la pieza (Hd) contra la pieza
(Hb).
Finalmente, compruebe que:
• Todos los tornillos están apretados.
• La cinta selladora se ha fijado con firmeza al armario.
• La puerta abre y cierra correctamente.
Hd
8. RUIDOS
Durante el funcionamiento normal del
aparato suelen producirse ciertos ruidos
(compresor, circulación del refrigerante).
OK
SSSRR
HISSS!
BLUBB!
R!
CLICK!
BRRR!
CRACK!
Page 73

ESPAÑOL 73
SSSRRR!
HISSS!
BLUBB!
SSSRRR!
HISSS!
BLUBB!
CLICK!
BRRR!
CLICK!
BRRR!
CRACK!CRACK!
Page 74

www.electrolux.com
74
9. DATOS TÉCNICOS
Medidas de la cavidad
Altura 1780 mm
Anchura 560 mm
Profundidad 550 mm
Tiempo de estabilización 22 h
Voltaje 230-240 V
Frecuencia 50 Hz
La información técnica se encuentra en la
placa de características, situada en el la-
do interior izquierdo del aparato, y en la
etiqueta de consumo energético.
10. ASPECTOS MEDIOAMBIENTALES
residuos de aparatos eléctricos y
Recicle los materiales con el símbolo
Coloque el material de embalaje en los
contenedores adecuados para su
reciclaje.
Ayude a proteger el medio ambiente y la
salud pública, así como a reciclar
.
electrónicos. No deseche los aparatos
marcados con el símbolo
residuos domésticos. Lleve el producto a
su centro de reciclaje local o póngase en
contacto con su oficina municipal.
junto con los
Page 75

ESPAÑOL 75
Page 76

www.electrolux.com/shop
222363182-A-112013
 Loading...