

Page 1
user manual
istruzioni per l’uso
bruksanvisning
Fridge Freezer
Frigo-Congelatore
Kyl-frys
ENA34733X
ENA38733X
ENA38733W
Page 2
2 electrolux
This Quick user manual contains all the basic facts of your new product and is easy to use. Electrolux
wants to lower our paper consumption related to user manuals by some 30%, which will help spare
12,000 trees every year. The Quick user manual is one of many steps taken by Electrolux for the
environment. It may be a small step, but just by doing a little you do a lot.
A complete user manual can be found at www.electrolux.com
SAFETY INFORMATION
In the interest of your safety and to ensure the correct use, before installing and first using the appliance, read this user manual carefully, including
its hints and warnings. To avoid unnecessary mistakes and accidents, it is important to ensure
that all people using the appliance are thoroughly
familiar with its operation and safety features.
Save these instructions and make sure that they
remain with the appliance if it is moved or sold,
so that everyone using it through its life will be
properly informed on appliance use and safety.
For the safety of life and property keep the precautions of these user's instructions as the manufacturer is not responsible for damages caused
by omission.
Children and vulnerable people safety
• This appliance is not intended for use by persons (including children) with reduced physical,
sensory or mental capabilities, or lack of experience and knowledge, unless they have been
given supervision or instruction concerning use
of the appliance by a person responsible for
their safety.
Children should be supervised to ensure that
they do not play with the appliance.
• Keep all packaging well away from children.
There is risk of suffocation.
• If you are discarding the appliance pull the plug
out of the socket, cut the connection cable (as
close to the appliance as you can) and remove
the door to prevent playing children to suffer
electric shock or to close themselves into it.
• If this appliance featuring magnetic door seals
is to replace an older appliance having a spring
lock (latch) on the door or lid, be sure to make
that spring lock unusable before you discard
the old appliance. This will prevent it from becoming a death trap for a child.
General safety
Caution! Keep ventilation openings clear
of obstruction.
• The appliance is designed exclusively for domestic use.
• The appliance is intended for keeping foodstuff
and/or beverages in a normal household as explained in this instruction booklet.
• Do not use a mechanical device or any artificial
means to speed up the thawing process.
1) If the lamp cover is foreseen
• Do not use other electrical appliances (such as
ice cream makers) inside of refrigerating appliances, unless they are approved for this purpose by the manufacturer.
• Do not damage the refrigerant circuit.
• The refrigerant isobutane (R600a) is contained
within the refrigerant circuit of the appliance, a
natural gas with a high level of environmental
compatibility, which is nevertheless flammable.
During transportation and installation of the appliance, be certain that none of the components of the refrigerant circuit become damaged.
If the refrigerant circuit should become damaged:
– avoid open flames and sources of ignition
– thoroughly ventilate the room in which the ap-
pliance is situated
• It is dangerous to alter the specifications or modify this product in any way. Any damage to the
cord may cause a short-circuit, fire and/or electric shock.
Warning! Any electrical component (power
cord, plug, compressor) must be replaced
by a certified service agent or qualified service personnel.
1. Power cord must not be lengthened.
2. Make sure that the power plug is not squashed or damaged by the back of the appliance. A squashed or damaged power plug
may overheat and cause a fire.
3. Make sure that you can come to the mains
plug of the appliance.
4. Do not pull the mains cable.
5. If the power plug socket is loose, do not insert the power plug. There is a risk of electric shock or fire.
6. You must not operate the appliance without the lamp cover
1)
of interior lighting.
• This appliance is heavy. Care should be taken
when moving it.
• Do not remove nor touch items from the freezer compartment if your hands are damp/wet,
as this could cause skin abrasions or frost/freezer burns.
• Avoid prolonged exposure of the appliance to
direct sunlight.
•
Bulb lamps
2)
used in this appliance are special
purpose lamps selected for household applian-
Page 3

electrolux 3
ces use only. They are not suitable for household room illumination.
Daily Use
• Do not put hot pot on the plastic parts in the
appliance.
• Do not store flammable gas and liquid in the appliance, because they may explode.
• Do not place food products directly against the
air outlet on the rear wall.
3)
• Frozen food must not be re-frozen once it has
been thawed out.
• Store pre-packed frozen food in accordance
with the frozen food manufacturer's instructions.
• Appliance's manufacturers storage recommendations should be strictly adhered to.
• Do not place carbonated or fizzy drinks in the
freezer compartment as it creates pressure on
the container, which may cause it to explode,
resulting in damage to the appliance.
• Ice lollies can cause frost burns if consumed
straight from the appliance.
Care and cleaning
• Before maintenance, switch off the appliance
and disconnect the mains plug from the mains
socket.
• Before using the appliance for the first time,
wash the interior and all internal accessories
with lukewarm water and some neutral soap
so as to remove the typical smell of a brandnew product, then dry thoroughly.
• Do not clean the appliance with metal objects.
• Do not use sharp objects to remove frost from
the appliance. Use a plastic scraper.
• Never use a hair drier or other heating appliances to speed up defrosting. Excessive heat
may damage the plastic interior, and humidity
could enter the electric system making it live.
• Regularly examine the drain in the refrigerator
for defrosted water. If necessary, clean the
drain. If the drain is blocked, water will collect
in the bottom of the appliance.
Installation
Important! For electrical connection carefully
follow the instructions given in specific
paragraphs.
• Unpack the appliance and check if there are
damages on it. Do not connect the appliance if
it is damaged. Report possible damages immediately to the place you bought it. In that case
retain packing.
• It is advisable to wait at least four hours before
connecting the appliance to allow the oil to
flow back in the compressor.
• Adequate air circulation should be around the
appliance, lacking this leads to overheating. To
achieve sufficient ventilation follow the instructions relevant to installation.
• Wherever possible the back of the product
should be against a wall to avoid touching or
catching warm parts (compressor, condenser)
to prevent possible burn.
• The appliance must not be located close to radiators or cookers.
• Make sure that the mains plug is accessible after the installation of the appliance.
•
Connect to potable water supply only.
4)
Service
• Any electrical work required to do the servicing
of the appliance should be carried out by a qualified electrician or competent person.
• This product must be serviced by an authorized Service Centre, and only genuine spare
parts must be used.
Environment Protection
This appliance does not contain gasses
which could damage the ozone layer, in either its refrigerant circuit or insulation materials.
The appliance shall not be discarded together
with the urban refuse and rubbish. The insulation
foam contains flammable gases: the appliance
shall be disposed according to the applicable regulations to obtain from your local authorities.
Avoid damaging the cooling unit, especially at the
rear near the heat exchanger. The materials used
on this appliance marked by the symbol
are
recyclable.
2) If the lamp is foreseen
3) If the appliance is Frost Free
4) If a water connection is foreseen
Page 4
4 electrolux
CONTROL PANEL
B
A - Appliance button ON/OFF D - Function button
B - Temperature regulation button E - Confirmation button
C - Temperature and function indicator
Display
10 1 2 3 4
56789
Temperature indicator.
1
Excessive temperature alarm.
2
FreeStore funcion indicator.
3
Shopping function indicator.
4
Child Lock function indicator.
5
First switch on
After plugging the plug into the power outlet, if
the display is not illuminated, press key (A), appliance on.
As soon as the appliance is turned on, it is in
alarm condition, the temperature flashes and you
will hear a buzzer.
Press key (E) and the buzzer will go off (also see
the section on "excessive temperature alarm" )
the icon
will appear the warmest temperature reached.
For a correct storage of the food select the Eco
mode function that guarantee the following temperatures are set:
+5°C in the fridge
-18°C in the freezer
• Wait until the inside compartment temperature
reach -18°C, before introducing the goods in
the freezer compartment.
• To select a different temperature see "Temperature regulation".
still flashes and on the indicator
DEAC
Timer function indicator.
6
Positive or negative temperature indicator.
7
Action Freeze function indicator.
8
Compartment indicator.
9
Eco Mode function indicator.
10
Switching off
The appliance is shut off by pressing key (A) for
more than 1 second.
During this, a countdown of the temperature
from -3 -2 -1 will be shown.
Switch off the fridge compartment
To switch off the fridge compartment press the
button (D) until this compartment is selected and
then press the button (A), until a countdown from
-3 -2 -1 is completed.
Important! It is not possible to run only the fridge.
If the freezer is turned off, the fridge will also turn
off.
Functions Menu
By activating the key (D) the functions menu is operating. Each function could be confirmed by
pressing button (E). If there is no confirmation after some seconds the display will go out from the
menu and return in normal condition.
The following functions are indicated:
Select the fridge compartment
Page 5
electrolux 5
Select the freezer compartment
Eco Mode function
FreeStore function
Shopping function
Child Lock function
Drinks Chill function
Action Freeze function
Temperature regulation
Press the key (D) to select the compartment and
than the key (B) to set the necessary temperature.
Press the key (E) to confirm the selection.
The temperature indicator shows the set temperature. The set temperature will be reached within
24 hours.
Fluctuations of some degrees around set temperature are normal and does not mean any fault in
the appliance.
Holiday Function "H"
The holiday function sets the temperature at +
15°C.
This function allows you to keep the refrigerator
shut and empty during a long holiday period ( e.
g. the summer holidays) without the formation of
a bad smell.
To turn on the holiday function operate as per
modift the selected temperature. The temperature indicator can modify the displayed temperature up to + 8 °C, 1 °at a tim. + 2 °C will be followed by the letter "H ". Press key E to confirm.
Now the refrigerator is in the "holiday "function in
the energy- saving mode.
Important! The fridge compartment must be
empty with holiday function on.
Child Lock Function
The Child Lock function is activated by pressing
key (D) (several times if necessary) until the corre-
sponding icon appears
.
You must confirm the choice by pressing key (E)
within few seconds. You will hear the buzzer and
the icon remains lighted. In this condition any possible operation through the keys does not cause
any change as long as this function is activated.
It is possible to de-activate the function at any
time by pressing key (D) until the corresponding
icon will flash and then key (E).
Shopping Function
If you need to insert a large amount of warm
food, for example after doing the grocery shopping, we suggest activating the Shopping function to chill the products more rapidly and to
avoid warming the other food which is already in
the refrigerator.
The Shopping function is activated by pressing
key (D) (several times if necessary) until the corre-
sponding icon appears
. You must confirm
the choise by pressing key (E) within few seconds. You will hear the buzzer and the icon remains lighted.
The Shopping function shuts off automatically after approximately 6 hours. It is possible to de-activate the function at any time by pressing key (D)
until the corresponding icon will flash and then
key (E).
Eco Mode Function
Press the key (D) (several times if necessary) until
the corresponding icon appears
.
Press the key (E) to confirm the selection. You
will hear the buzzer and the icon remains lighted.
In this condition the temperatures are automatically set (+ 5°C and - 18°C), in the best conditions for storing food.
Set a different temperature in one of the compartment to switch off the function.
FreeStore Function
Press the key (D) (several times if necessary) until
the corresponding icon appears
Press the key (E) to confirm the selection. You
will hear the buzzer and the icon remains lighted.
Important! If the function is activated
automatically the FreeStore icon is not shown
(refer to "Daily use").
The activation of the FreeStore function increase
the energy consumption.
Action Freeze Function
The freezer compartment is suitable for long term
storage of commercially frozen and deep-frozen
food, and for freezing fresh food.
The maximum quantity of foods to freeze in 24
hours is shown on the rating plate.
To freeze the amount of food indicated on the rating plate, place the food directly in touch with the
cooling surface (remove the drawer or basket). In
case the food is frozen inside the drawers or baskets, the maximum quantity is slightly reduced.
To freeze fresh foods, you will need to activate
the Action Freeze function. Press key (D) (several
times if necessary) until
indicator appears.
You must confirm the choice by pressing key (E)
within few seconds. You will hear the buzzer and
on the display will appear some animation with
lines.
After a pre-cooling period of 24 hours, place the
foods in the freezer.
Place the food to be frozen in the
compartment, as this is the coldest point.
The freezing process takes 24 hours. During this
period do not put other foods in the freezer.
This function stops automatically after 52 hours.
Page 6
6 electrolux
It is possible to deactivate the function at any
time by pressing key (D) until
flash and then press key (E).
Drinks Chill Function
The Drinks Chill function is to be used as a safety
warning when placing bottles in the freezer compartment. It is activated by pressing key (D) (several times if necessary) until the corresponding
icon appears
You must confirm the choice by pressing key (E)
within few seconds. You will hear the buzzer and
the icon remains lighted.
In this condition it operates a timer with a default
value of 30 min. and it could change from 1 to 90
min., by pressing key (B) you select the minutes
needed.
At the end of the selected time there are the following indications:
•
on the indicator
•
the icon flashing
•
the icon
• sounding of an acoustic alarm until key (E) is
pressed
.
the symbol flashing
flashing
indicator will
FIRST USE
Cleaning the interior
Before using the appliance for the first time, wash
the interior and all internal accessories with lukewarm water and some neutral soap so as to remove the typical smell of a brand-new product,
then dry thoroughly.
At this point bear in mind to remove the drinks
contained in the freezer compartment.
It is possible to deactivate the function at any
time by pressing key (D) until the corresponding
icon will flash and then key (E).
Excessive temperature alarm
An increase in the temperature in a compartment
(for example due to an power failure) is indicated
by:
• flashing temperature
•
freezer compartment
•
flashing of the icon
• sounding of buzzer
When normal conditions are restored:
• the acoustic signal shuts off
• the temperature value continues to flash
When you press key (E) to de-activate the alarm,
the highest temperature reached in the compart-
ment appears on indicator
Then it returns on the normal operation showing
the temperature of the selected compartment.
During the alarm phase, the buzzer can be switched off by pressing key (E).
Important! Do not use detergents or abrasive
powders, as these will damage the finish.
flashing
for some seconds.
DAILY USE
Storage of frozen food
When first starting-up or after a period out of use,
before putting the products in the compartment
let the appliance run at least 2 hours on the higher settings.
Important! In the event of accidental defrosting,
for example due to a power failure, if the power
has been off for longer than the value shown in
the technical characteristics chart under "rising
time", the defrosted food must be consumed
quickly or cooked immediately and then re-frozen
(after cooling).
Thawing
Deep-frozen or frozen food, prior to being used,
can be thawed in the refrigerator compartment or
at room temperature, depending on the time available for this operation.
Small pieces may even be cooked still frozen, directly from the freezer: in this case, cooking will
take longer.
FreeStore
The refrigerator compartment is equipped with a
device that allows for rapid cooling of foods and
more uniform temperature in the compartment.
This device activates by itself when needed, for
example for a quick temperature recovering after
door opening or when the ambient temperature
is high.
Allows you to switch on the device manually
when needed (refer to "FreeStore Function").
Page 7
electrolux 7
Important! The FreeStore device stops when
the door is open and restarts immediately after
the door closing.
Vegetable drawer with humidity control
The drawer is suitable for storing fruit and vegetables.
There is a grille (if foreseen) on the bottom of the
drawer to separate the fruit and vegetables from
any humidity that may form on the bottom surface.
All parts inside the drawer can be removed for
cleaning purposes
To regulate the humidity in the vegetable drawer
there is a device with slits (adjustable by means
of a sliding lever).
When the ventilation slots are closed:
the natural moisture content of the food in the
fruit and vegetable compartments is preserved
for longer.
When the ventilation slots are opened:
more air circulation results in a lower air moisture
content in the fruit and vegetable compartments.
FreshZone drawer
TheFreshZonedrawer is suitable for storing fresh
food like fish, meat, seafood, because the temperature is lower here than in the rest of the fridge.
HELPFUL HINTS AND TIPS
Normal Operating Sounds
• You may hear a faint gurgling and a bubbling
sound when the refrigerant is pumped through
the coils or tubing. This is correct.
• When the compressor is on, the refrigerant is
being pumped around and you will hear a whir-
ring sound and a pulsating noise from the compressor. This is correct.
• The thermic dilatation might cause a sudden
cracking noise. It is natural, not dangerous physical phenomenon. This is correct.
Page 8
8 electrolux
CARE AND CLEANING
Caution! Unplug the appliance before
carrying out any maintenance operation.
This appliance contains hydrocarbons in its
cooling unit; maintenance and recharging
must therefore only be carried out by authorized
technicians.
Defrosting of the refrigerator
Frost is automatically eliminated from the evaporator of the refrigerator compartment every time
the motor compressor stops, during normal use.
The defrost water drains out through a trough into a special container at the back of the appliance, over the motor compressor, where it evaporates.
It is important to periodically clean the defrost water drain hole in the middle of the refrigerator compartment channel to prevent the water overflowing and dripping onto the food inside. Use the special cleaner provided, which you will find already
inserted into the drain hole.
Defrosting of the freezer
The freezer compartment of this model, on the
other hand, is a "no frost" type. This means that
there is no buildup of frost when it is in operation,
neither on the internal walls nor on the foods.
The absence of frost is due to the continuous circulation of cold air inside the compartment, driven by an automatically controlled fan.
TECHNICAL DATA
ENA34733X
ENA34733W
Dimension
Height 1850 mm 2010 mm
Width 595 mm 595 mm
Depth 648 mm 648 mm
Rising Time 18 h 18 h
The technical information are situated in the rating plate on the internal left side of the appliance
and in the energy label.
ENA38733W
ENA38733X
INSTALLATION
Caution! Read the "Safety Information"
carefully for your safety and correct
operation of the appliance before installing the
appliance.
Positioning
Install this appliance at a location where the ambient temperature corresponds to the climate class
indicated on the rating plate of the appliance:
Climate
class
SN +10°C to + 32°C
N +16°C to + 32°C
ST +16°C to + 38°C
T +16°C to + 43°C
Ambient temperature
Page 9
Location
The appliance should be installed well away from
sources of heat such as radiators, boilers, direct
sunlight etc. Ensure that air can circulate freely
around the back of the cabinet. To ensure best
performance, if the appliance is positioned below
an overhanging wall unit, the minimum distance
between the top of the cabinet and the wall unit
must be at least 100 mm . Ideally, however, the
appliance should not be positioned below overhanging wall units. Accurate levelling is ensured
by one or more adjustable feet at the base of the
cabinet.
Warning! It must be possible to
disconnect the appliance from the mains
power supply; the plug must therefore be easily
accessible after installation.
mm
min
100
electrolux 9
2
1
3
Levelling
When placing the appliance ensure that it stands
level. This can be achieved by two adjustable feet
at the bottom in front.
A
mm
20
Electrical connection
Before plugging in, ensure that the voltage and
frequency shown on the rating plate correspond
to your domestic power supply.
The appliance must be earthed. The power supply cable plug is provided with a contact for this
purpose. If the domestic power supply socket is
not earthed, connect the appliance to a separate
earth in compliance with current regulations, consulting a qualified electrician.
The manufacturer declines all responsibility if the
above safety precautions are not observed.
This appliance complies with the E.E.C. Directives.
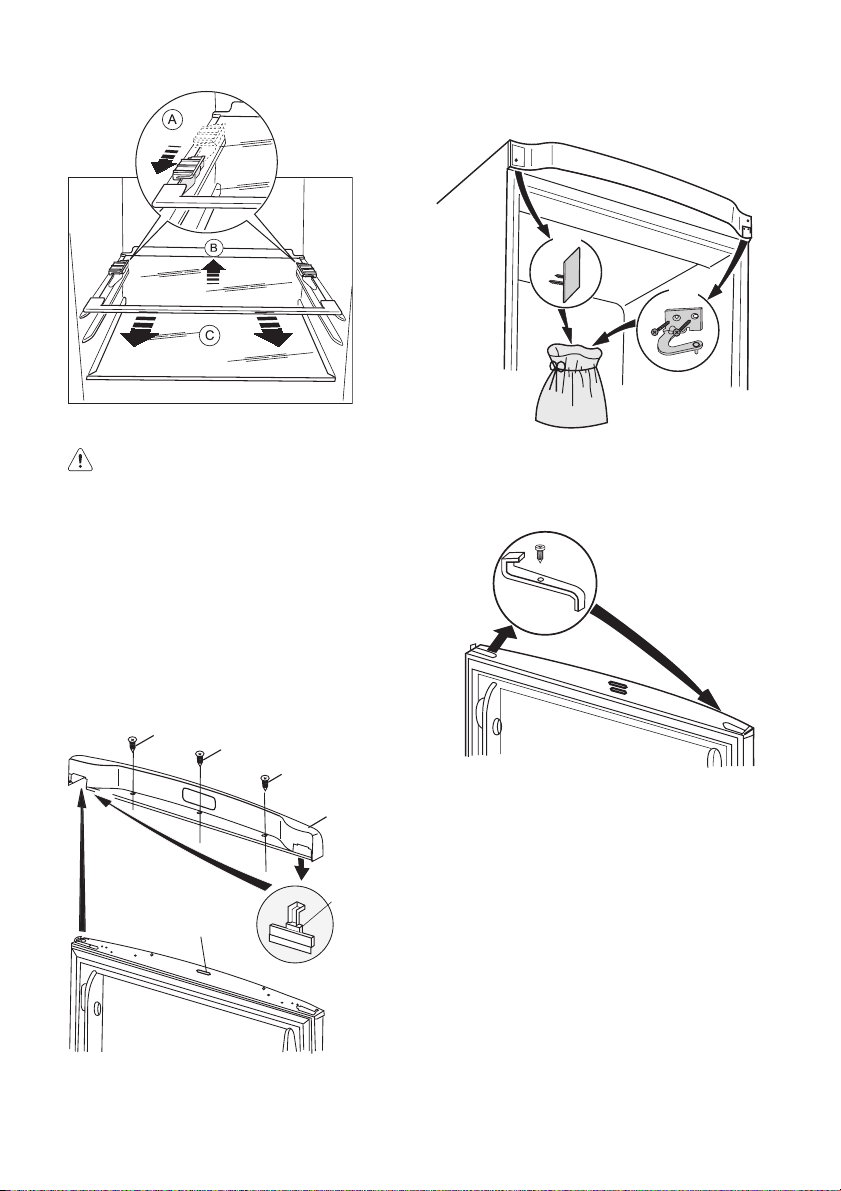
Rear spacers
In the bag with the documentation, there are
two spacers which must be fitted as shown
in the figure.
Slacken the screws and insert the spacer under
the screw head, then tighten again the screws.
B
Removing the shelf holders
Your appliance is equipped with shelf retainers
that make it possible to secure the shelves during transportation.
To remove them proceed as follows:
1. Move the shelf holders in the direction of the
arrow (A).
2. Raise the shelf from the rear and push it forward until it is freed (B).
3. Remove the retainers (C).
Page 10
10 electrolux
Door reversibility
Warning! Before carrying out any
operations, remove the plug from the power
socket.
Important! To carry out the following
operations, we suggest that this be made with
another person that will keep a firm hold on the
doors of the appliance during the operations.
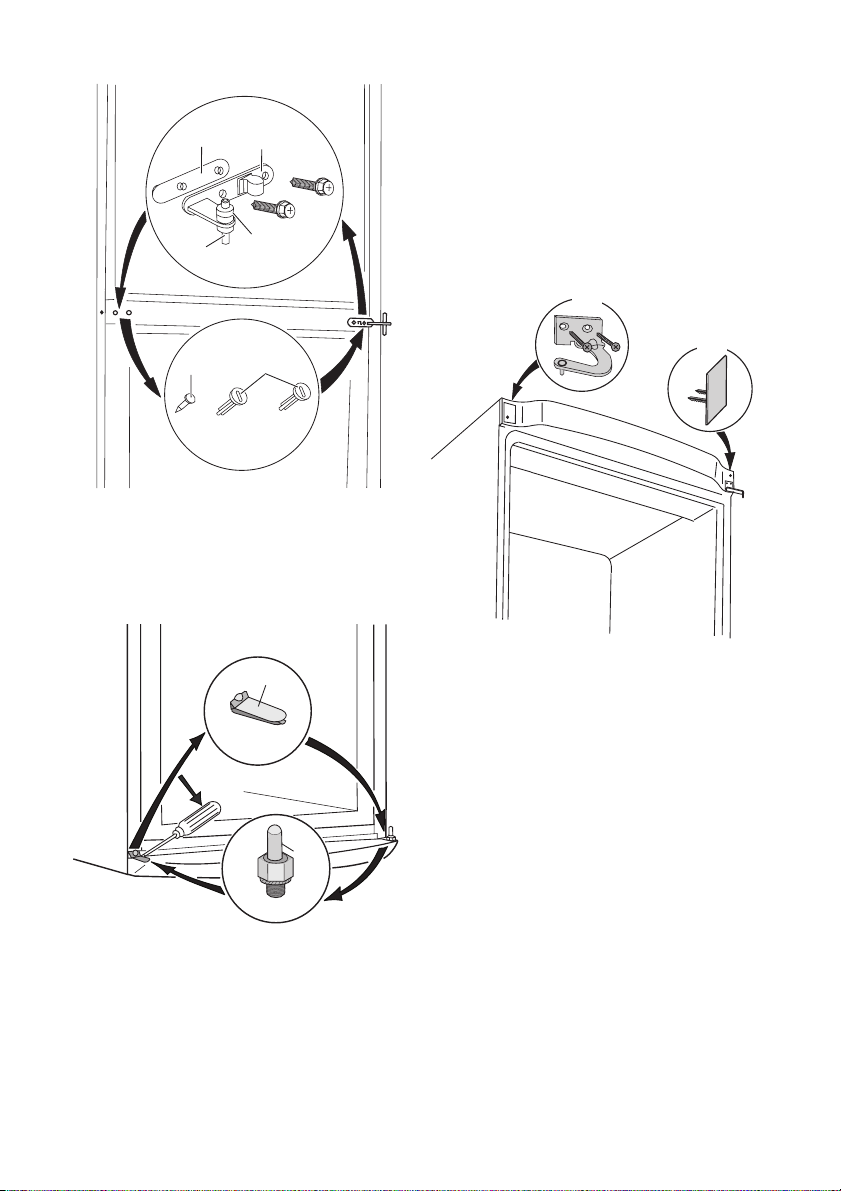
To change the opening direction of the door, do
these steps:
1. Open the door with the appliance in the upright position. Unscrew the screws (t1) and remove the upper door plastic trim (t2). Close
the door.
t1
t1
t1
t2
door mount (t5). Place them in an empty plastic bag.
t4
t5
4. Remove the upper door.
5. Unscrew the screw and remove the door stopper (d1). Attach it reversed on the other side.
d1
6. Unscrew the middle hinge (m2). Remove the
plastic spacer (m1).
7. Remove the lower door.
t3
d7
2. Remove the little plastic cover from the door
plastic trim and refit on the opposite side (t3).
3. Remove the panel (t4). If it is necessary use a
screwdriver very carefully. Unscrew the
screw on the other side. Remove the upper
Page 11
m1
m5
m6
m2
electrolux 11
14. Re-insert the lower door on the pivot pin (b2).
15. Re-screw the middle hinge (m1) on the opposite side . Do not forget the plastic spacer
(m2) inserted under the middle hinge.
16. Re-insert the upper door on the middle hinge
(m5).
Make sure that the edges of the doors run
parallel to the side edge of the appliance.
17. Position and fix the upper hinge (you can find
them in the instruction for use bag) on the opposite side (t6).
t6
m3
8. Remove the spacer (m6) and move to the other side of the hinge pivot (m5).
9. Remove using a tool the cover (b1). Unscrew
the lower hinge pivot (b2) and the spacer (b3)
and place them on the opposite side.
10. Re-insert the cover (b1) on the opposite side.
m4
b1
b2
b3
11. Remove the stoppers (d1) and move to the
other side of the doors.
12. Remove the left-hand cover pin of the middle
hinge (m3,m4) and move to the other side.
13. Fit the pin of the middle hinge (m5) into the lefthand hole of the lower door.
t7
18. Insert the panel (t7) (that can be found in the
instruction for use bag).
19. Open the upper door, attach the top cover
(t2) using screws (t1). Insert the magnet (d7).
Close the door.
20. Reposition, level the appliance, wait for at
least four hours and then connect it to the
power socket.
Do a final check to make sure that:
• All screws are tightened.
• The magnetic seal adheres to the cabinet.
• The door opens and closes correctly.
If the ambient temperature is cold (i.e. in Winter),
the gasket may not fit perfectly to the cabinet. In
that case, wait for the natural fitting of the gasket.
In case you do not want to carry out the above
mentioned operations, contact the nearest After
Sales Service Force. The After Sales Service specialist will carry out the reversibility of the doors at
your cost.
Page 12

12 electrolux
ENVIRONMENTAL CONCERNS
The symbol on the product or on its
packaging indicates that this product may not be
treated as household waste. Instead it should be
taken to the appropriate collection point for the
recycling of electrical and electronic equipment.
By ensuring this product is disposed of correctly,
you will help prevent potential negative
consequences for the environment and human
health, which could otherwise be caused by
inappropriate waste handling of this product. For
more detailed information about recycling of this
product, please contact your local council, your
household waste disposal service or the shop
where you purchased the product.
Page 13

electrolux 13
Questa Guida rapida, di facile consultazione, contiene tutte le informazioni principali sul vostro nuovo
prodotto. Electrolux intende ridurre del 30% il consumo di carta legato alla stampa dei libretti di
istruzioni, una riduzione che permetterà di salvare 12.000 alberi ogni anno. La Guida rapida è una
delle molte iniziative che Electrolux ha intrapreso a favore dell’ambiente. Si tratta di un piccolo passo,
Il libretto di istruzioni completo è disponibile all’indirizzo www.electrolux.com
ma con i piccoli passi si può arrivare lontano.
INFORMAZIONI PER LA SICUREZZA
Per garantire un impiego corretto e sicuro dell'apparecchio, prima dell'installazione e del primo utilizzo leggere con attenzione il libretto istruzioni, inclusi i suggerimenti e le avvertenze. Per evitare errori e incidenti, è importante garantire che tutte le
persone che utilizzano l'apparecchio ne conoscano il funzionamento e le caratteristiche di sicurezza. Conservare queste istruzioni e accertarsi che
rimangano unite all'apparecchio in caso di vendita o trasloco, in modo che chiunque lo utilizzi sia
correttamente informato sull'uso e sulle norme di
sicurezza.
Per la sicurezza delle persone e delle cose osservare le precauzioni indicate nelle presenti istruzioni per l'utente, il produttore non è responsabile
dei danni provocati da eventuali omissioni.
Sicurezza dei bambini e delle persone fragili
• Questo apparecchio non deve essere usato da
persone, bambini inclusi, con ridotte capacità fisiche, sensoriali o psichiche, oppure prive di conoscenza e esperienza, a meno che non siano
state istruite all'uso dell'apparecchio da parte
dei responsabili della loro sicurezza, oppure sotto vigilanza di questi.
I bambini devono essere sorvegliati per assicurarsi che non giochino con l'apparecchio.
• Tenere i materiali di imballaggio al di fuori della
portata dei bambini. Alcuni materiali possono
creare rischi di soffocamento.
• Qualora l'apparecchio venga demolito, estrarre
la spina dalla presa, tagliare il cavo di collegamento (il più vicino possibile all'apparecchio) e
smontare lo sportello per evitare che i bambini
giocando possano subire scosse elettriche o
chiudersi dentro l'apparecchio.
• Se questo nuovo apparecchio, che è dotato di
guarnizioni magnetiche nello sportello, va a sostituirne uno più vecchio avente sportello o coperchio con chiusure a molla, si deve rendere
inutilizzabili tali chiusure prima di eliminare l'apparecchio sostituito, per evitare che diventi una
trappola mortale per i bambini.
Avvertenze di sicurezza generali
Attenzione Assicurarsi che le aperture di
ventilazione non siano otturate.
• Questa apparecchiatura è destinata esclusivamente all'uso domestico.
• L'apparecchiatura è progettata per la conservazione domestica di alimenti e/o bevande nelle
modalità descritte nelle presenti istruzioni.
• Non utilizzare dispositivi meccanici o altri mezzi
artificiali per accelerare lo sbrinamento.
• Non utilizzare altre apparecchiature elettriche
(per esempio gelatiere) all'interno del frigorifero,
salvo quelli approvati per tale scopo dal produttore.
• Non danneggiare il circuito refrigerante.
• Il circuito refrigerante dell'apparecchiatura contiene isobutano (R600a), un gas naturale con
un elevato livello di compatibilità ambientale
che, tuttavia, è infiammabile.
Durante il trasporto e l'installazione dell'apparecchiatura, assicurarsi che nessuno dei componenti del circuito refrigerante venga danneggiato.
In caso di danneggiamento del circuito refrigerante:
– evitare fiamme libere e scintille
– aerare bene il locale in cui si trova l'apparec-
chiatura
• È pericoloso cambiare le specifiche o modificare il prodotto in qualunque modo. Un danneggiamento del cavo potrebbe provocare cortocircuiti, incendi e/o scosse elettriche.
Avvertenza Tutti i componenti elettrici (ca-
vo di alimentazione, spina, compressore) devono essere sostituiti da un tecnico certificato o
da personale d'assistenza qualificato.
1. Non collegare prolunghe al cavo di alimentazione.
2. Evitare che il lato posteriore dell'apparecchiatura possa schiacciare o danneggiare
la spina causandone il surriscaldamento
con un conseguente rischio di incendio.
3. La spina dell'apparecchiatura deve trovarsi
in una posizione accessibile.
4. Evitare di tirare il cavo di alimentazione.
5. Se la presa elettrica non è perfettamente stabile, non inserire la spina. Il collegamento
potrebbe provocare scosse elettriche o
creare un rischio di incendio.
Page 14

14 electrolux
6. L'apparecchio non deve essere messo in
funzione senza il coprilampada interno
5)
la luce interna.
• Questa apparecchiatura è pesante. Prestare attenzione quando occorre spostarla.
• Evitare di estrarre o di toccare gli alimenti riposti nel vano congelatore con le mani bagnate o
umide; il contatto potrebbe provocare ustioni
da freddo.
• Evitare un'esposizione prolungata dell'apparecchiatura alla luce solare diretta.
•
Lampadine
6)
utilizzate in questo apparecchio
sono lampadine speciali, selezionate per essere usate unicamente negli elettrodomestici.
Non sono adatte per l'illuminazione degli ambienti.
Uso quotidiano
• Non appoggiare pentole calde sulle parti in plastica dell'apparecchiatura.
• Non riporre gas o liquidi infiammabili nell'apparecchiatura: i contenitori potrebbero esplodere.
• Evitare di appoggiare gli alimenti contro la presa d'aria situata nella parete posteriore.
7)
• Gli alimenti scongelati non devono essere ricongelati.
• Conservare i surgelati seguendo le indicazioni
riportate sulle confezioni.
• Osservare rigorosamente le raccomandazioni
del produttore riguardo alla conservazione degli alimenti.
• Non introdurre bevande gassate o frizzanti nel
vano congelatore; la pressione del recipiente
potrebbe causarne l'esplosione con il rischio di
danneggiamento dell'apparecchiatura.
• I ghiaccioli, se consumati appena estratti dall'apparecchiatura, possono provocare ustioni
da freddo.
Pulizia e cura
• Prima di eseguire qualunque intervento di manutenzione, spegnere l'apparecchiatura ed
estrarre la spina dalla presa.
• Ispezionare regolarmente lo scarico dell'acqua
del-
di sbrinamento. Lo scarico deve essere sempre perfettamente libero. L'ostruzione dello scarico può causare un deposito di acqua sul fondo dell'apparecchiatura.
Installazione
Importante Per il collegamento elettrico,
seguire attentamente le istruzioni dei paragrafi
corrispondenti.
• Disimballare l'apparecchio e assicurarsi che
non presenti danni. Non collegare l'apparecchio se è danneggiato. Segnalare immediatamente gli eventuali danni al negozio in cui è stato acquistato. In questo caso conservare l'imballaggio.
• Si consiglia di attendere almeno due ore prima
di collegare l'apparecchio per consentire all'olio di arrivare nel compressore.
• Attorno all'apparecchio vi deve essere un'adeguata circolazione dell'aria, altrimenti si può surriscaldare. Per ottenere una ventilazione sufficiente seguire le istruzioni di installazione.
• Se possibile il retro dell'apparecchio dovrebbe
essere posizionato contro una parete per evitare di toccare le parti calde o di rimanervi impigliati (compressore, condensatore), evitando
così possibili scottature.
• L'apparecchio non deve essere posto vicino a
radiatori o piani di cottura a gas.
• Installare l'apparecchio in modo che la presa rimanga accessibile.
• Per il collegamento idrico, usare solo sorgenti
d'acqua potabile.
Assistenza tecnica
• Gli interventi elettrici sull'apparecchiatura devono essere eseguiti esclusivamente da elettricisti qualificati o da personale competente.
• Gli interventi di assistenza devono essere eseguiti esclusivamente da tecnici autorizzati e utilizzando solo ricambi originali.
• Prima di utilizzare l'apparecchiatura per la prima volta, lavare l'interno e gli accessori con acqua tiepida e sapone neutro per eliminare il tipico odore dei prodotti nuovi, quindi asciugare
accuratamente.
• Non pulire l'apparecchiatura con oggetti metallici.
• Non usare oggetti appuntiti per sbrinare l'apparecchiatura. Usare un raschietto di plastica.
• Non utilizzare mai asciugacapelli o altri apparecchi riscaldanti per accelerare lo sbrinamento.
Un calore eccessivo può danneggiare le parti
in plastica interne e l'umidità può penetrare nel
sistema elettrico rendendolo sotto tensione.
5) Per le apparecchiature che prevedono il coprilampada
6) Nel caso in cui la lampadina sia prevista
7) Per le apparecchiature di tipo no-frost
8) Per gli apparecchi che prevedono un collegamento alla rete idrica
8)
Page 15
electrolux 15
Tutela ambientale
Questo apparecchio non contiene gas che
potrebbero danneggiare lo strato di ozono
nel circuito refrigerante o nei materiali isolanti.
L'apparecchio non deve essere smaltito assieme
ai rifiuti urbani e alla spazzatura. La schiuma dell'i-
solamento contiene gas infiammabili: lo smaltimento dell'apparecchio va eseguito secondo le
prescrizioni vigenti da richiedere alle autorità locali. Evitare di danneggiare il gruppo refrigerante,
specialmente nella parte posteriore vicino allo
scambiatore di calore. I materiali usati su questo
apparecchio contrassegnati dal simbolo
riciclabili.
PANNELLO DEI COMANDI
AC
BDE
A - Tasto ON/OFF D - Tasto Funzioni
B - Tasto di regolazione della temperatura E - Tasto di conferma
C - Indicatore di temperatura e funzioni
Display
10 1 2 3 4
sono
56789
Indicatore della temperatura.
1
Allarme temperatura eccessiva.
2
Indicatore di funzione FreeStore.
3
Indicatore della funzione Shopping.
4
Indicatore della funzione Sicurezza bambini.
5
Prima accensione
Dopo aver inserito la spina nella presa, se il display non si illumina premere il tasto (A) per accendere l'apparecchio.
All'accensione dell'apparecchio si attiva la modalità di allarme, la temperatura lampeggia ed è
emesso un segnale acustico.
Premendo il tasto (E) si disattiva il segnale acustico (vedere anche la sezione "Allarme di tempera-
tura eccessiva" ), il simbolo
peggiare e l'indicatore
ra massima raggiunta.
continua a lam-
mostra la temperatu-
Indicatore della funzione Timer.
6
Indicatore di temperatura positiva o negati-
7
va.
Indicatore della funzione Action Freeze.
8
Indicatore scomparto.
9
Indicatore della funzione modalità Eco.
10
Per una corretta conservazione degli alimenti, selezionare la funzione modalità Eco per impostare
le temperature seguenti:
+5 °C nel frigorifero
-18 °C nel congelatore
• Attendere che il vano congelatore abbia raggiunto la temperatura di -18 °C prima di introdurvi alimenti congelati.
• Per selezionare una diversa temperatura, vedere "Regolazione della temperatura".
Page 16

16 electrolux
Spegnimento
L'apparecchio si spegne premendo il tasto (A)
per più di 1 secondo.
Contemporaneamente appare un conto alla rovescia (3 -2 -1) della temperatura.
Spegnimento del comparto frigorifero
Per spegnere il comparto frigorifero premere il tasto (D) fino a che non viene selezionato il comparto, quindi premere il tasto (A) fino che non viene
completato il conto alla rovescia -3 -2 -1.
Importante Non è possibile far funzionare
solamente il frigorifero.
Nel caso in cui il congelatore venga spento, anche il frigorifero si spegnerà.
Menu Funzioni
Premendo il tasto (D) si attiva il menu Funzioni.
Per confermare la funzione desiderata, premere il
tasto (E). Se non si conferma una funzione entro
alcuni secondi, il display esce dal menu e ritorna
alla condizione iniziale.
Sono indicate le seguenti funzioni:
Selezionare lo scomparto frigorifero
Selezionare lo scomparto congelatore
Funzione modalità Eco
Funzione FreeStore
Funzione Shopping
Funzione Sicurezza Bambini
Funzione Raffreddamento bevande
Funzione Action Freeze
Regolazione della temperatura
Premere il tasto (D) per selezionare lo scomparto,
quindi il tasto (B) per impostare la temperatura necessaria.
Premere il tasto (E) per confermare la selezione.
Gli indicatori della temperatura visualizzano la temperatura impostata. La temperatura impostata verrà raggiunta entro 24 ore.
Le fluttuazioni di alcuni gradi in più o in meno rispetto alla temperatura impostata sono normali e
non indicano un'anomalia di funzionamento del dispositivo.
Funzione Holiday "H"
La funzione Holiday imposta la temperatura a
+15 °C.
Questa funzione consente di mantenere il frigorifero chiuso e vuoto durante un periodo di vacanza (per es. durante le vacanze estive) senza che
si formino odori sgradevoli.
Per attivare la funzione Holiday, procedere come
per modificare la temperatura selezionata. L'indicatore di temperatura può modificare la temperatura visualizzata di 1 ° per volta fino a + 8 °C. Dopo + 2 °C appare la lettera "H ". Premere il tasto
E per confermare.
Il frigorifero funziona ora in modalità di risparmio
per le vacanze.
Importante Il vano frigorifero deve essere vuoto
quando si attiva la funzione Holiday.
Funzione Sicurezza bambini
La funzione Sicurezza bambini si attiva premendo
il tasto (D) (se necessario più volte) finché appare
il simbolo
.
Confermare la selezione premendo entro alcuni
secondi il tasto (E). Si avverte un segnale acustico e il simbolo rimane acceso. Con questa funzione attiva, l'azionamento di qualunque tasto non
produce alcun effetto.
È possibile disattivare la funzione in qualsiasi momento premendo il tasto (D) finché lampeggia il
simbolo corrispondente e quindi premendo il tasto (E).
Funzione Shopping
Se occorre inserire una grande quantità di alimenti nel frigorifero, per esempio al ritorno dalla spesa, è consigliabile attivare la funzione Shopping
per raffreddare più rapidamente gli alimenti introdotti nel frigorifero e non intiepidire i cibi già presenti al suo interno.
La funzione Shopping si attiva premendo il tasto
(D) (se necessario più volte) finché appare il sim-
. Confermare la selezione premendo en-
bolo
tro alcuni secondi il tasto (E). Si avverte un segnale acustico e il simbolo rimane acceso.
La funzione Shopping si spegne automaticamente dopo circa 6 ore. È possibile disattivare la funzione in qualsiasi momento premendo il tasto (D)
finché lampeggia il simbolo corrispondente e quindi premendo il tasto (E).
Funzione modalità Eco
Premere il tasto (D) (se necessario più volte) finché appare il simbolo corrispondente.
.
Premere il tasto (E) per confermare la selezione.
Si avverte un segnale acustico e il simbolo rimane acceso.
Con questa funzione attiva, sono automaticamente impostate le temperature (+ 5°C e - 18°C), ottimali per la conservazione degli alimenti.
Impostare una temperatura diversa in uno degli
scomparti per disattivare la funzione.
Funzione FreeStore
Premere il tasto (D) (se necessario più volte) finché appare il simbolo corrispondente.
Premere il tasto (E) per confermare la selezione.
Si avverte un segnale acustico e il simbolo rimane acceso.
Page 17

electrolux 17
Importante Nel caso in cui la funzione venga
attivata automaticamente, l'icon FreeStore non
viene visualizzata (consultare la sezione "Utilizzo
quotidiano").
L'attivazione della funzione FreeStore aumenta il
consumo energetico.
Funzione Action Freeze
Il vano congelatore è adatto al congelamento di
cibi freschi e alla conservazione a lungo termine
di alimenti congelati e surgelati.
La quantità massima di alimenti congelabile in 24
ore è riportata sulla targhetta di identificazione.
Per congelare la quantità di alimenti indicata sulla
targhetta di identificazione, porre gli alimenti direttamente a contatto con la superficie di raffreddamento (rimuovendo il cassetto o il cestello). Se gli
alimenti sono congelati all'interno del cassetto o
del cestello, la quantità massima è leggermente ridotta.
Per il congelamento di alimenti freschi, è necessario attivare la funzione Action Freeze. Premere il
tasto (D) (se necessario più volte) finché appare
l'indicatore
Confermare la selezione premendo entro alcuni
secondi il tasto (E). Si avverte un segnale acustico e sul display appare un'animazione con linee.
Dopo un periodo di pre-raffreddamento di 24
ore, introdurre gli alimenti nel congelatore.
Riporre gli alimenti da congelare nel vano
rappresenta il punto più freddo.
Il processo di congelamento dura 24 ore: finché
non è concluso, non aggiungere altro cibo nel congelatore.
Questa funzione si arresta automaticamente dopo 52 ore.
È possibile disattivare la funzione in qualsiasi momento premendo il tasto (D) finché lampeggia l'in-
dicatore
Funzione Raffreddamento bevande
La funzione Raffreddamento bevande è utile quando si introducono bottiglie nel vano congelatore
per raffreddarle rapidamente. La funzione si attiva
.
che
e quindi premendo il tasto (E).
premendo il tasto (D) (se necessario più volte) finchè appare il simbolo
Confermare la selezione premendo entro alcuni
secondi il tasto (E). Si avverte un segnale acustico e il simbolo rimane acceso.
Con questa funzione si attiva un timer preimpostato a 30 minuti che può essere regolato tra 1 e
90 minuti premendo il tasto (B) per selezionare i
minuti desiderati.
Al termine del tempo selezionato appaiono le indicazioni seguenti:
•
sull'indicatore
•
il simbolo
•
il simbolo
• si attiva un allarme acustico finché si mantiene
premuto il tasto (E)
A questo punto occorre rimuovere le bottiglie contenute nel vano congelatore.
È possibile disattivare la funzione in qualsiasi momento premendo il tasto (D) finché lampeggia il
simbolo corrispondente e quindi premendo il tasto (E).
Allarme di temperatura eccessiva
L'eventuale aumento di temperatura in un vano
(per esempio a causa di un'interruzione della corrente elettrica) è segnalato come segue:
• temperatura lampeggiante
•
indicatore del vano congelatore
te
•
simbolo
• emissione di un segnale acustico
Al ripristino delle condizioni normali:
• l'allarme acustico si interrompe
• il valore della temperatura continua a lampeg-
giare
Quando si preme il tasto (E) per disattivare l'allar-
me, l'indicatore
temperatura massima raggiunta nel vano,
quindi ritorna al normale funzionamento mostrando la temperatura del vano selezionato.
Durante la fase di allarme, il segnale acustico può
essere disattivato premendo il tasto (E).
lampeggia
lampeggiante
.
lampeggia il simbolo
lampeggia
lampeggian-
mostra per alcuni secondi la
PRIMO UTILIZZO
Pulizia dell'interno
Prima di utilizzare l'apparecchio per la prima volta, lavare l'interno e gli accessori interni con acqua tiepida e un po' di sapone neutro in modo a
togliere il tipico odore dei prodotti nuovi, quindi
asciugare accuratamente.
UTILIZZO QUOTIDIANO
Conservazione dei surgelati
Al primo avvio o dopo un periodo di non utilizzo,
lasciare in funzione l'apparecchiatura per almeno
Importante Non usare detergenti corrosivi o polveri abrasive che danneggiano le finiture.
2 ore con una regolazione alta prima di introdurre
gli alimenti.
Page 18

18 electrolux
Importante Se si verifica un'interruzione della
corrente elettrica di durata superiore al "tempo di
salita" indicato nella tabella dei dati tecnici, il cibo
scongelato deve essere consumato rapidamente
o cucinato immediatamente e quindi ricongelato
(dopo il raffreddamento).
Scongelamento
Prima dell'utilizzo, i cibi surgelati o congelati possono essere scongelati nel vano frigorifero o a temperatura ambiente, in funzione del tempo disponibile per questa operazione.
I pezzi piccoli possono addirittura essere cucinati
ancora congelati, direttamente dal congelatore:
in questo caso la cottura durerà più a lungo.
FreeStore
Il vano frigo è dotato di un dispositivo che consente un rapido raffreddamento degli alimenti e una
temperatura più uniforme nello scomparto.
La griglia posta sul fondo del cassetto (se presente) separa la frutta e la verdura dagli eventuali depositi di umidità che si potrebbero formare nella
parte inferiore dell'apparecchio.
Tutti i componenti interni del cassetto possono essere rimossi per facilitare la pulizia
Per regolare l'umidità nel cassetto delle verdure
c'è un dispositivo a fessure (con regolazione tramite leva scorrevole).
Il suddetto si avvia automaticamente quando necessario, ad esempio per un rapido recupero della temperatura dopo l'apertura dello sportello, o
quando la temperatura ambiente è elevata.
Consente di accendere manualmente il dispositivo quando necessario (fare riferimento a "Funzione FreeStore").
Importante Il dispositivo FreeStore si
interrompe quando si apre lo sportello e riavvia
immediatamente dopo la chiusura del suddetto.
Cassetto verdura con controllo dell'umidità
Questo cassetto è particolarmente adatto per la
conservazione di frutta e verdura.
Quando le fessure di ventilazione sono chiuse:
l'umidità naturale del cibo conservato negli scomparti della frutta e della verdura viene preservata
più a lungo.
Quando le fessure di ventilazione sono aperte:
la maggiore circolazione di aria riduce l'umidità
presente negli scomparti della frutta e della verdura.
Scomparto FreshZone
Lo scomparto FreshZone è ideale per la conservazione di alimenti freschi quali pesce, carne e frutti di mare poiché la temperatura è inferiore rispetto al resto del frigorifero.
Page 19

CONSIGLI E SUGGERIMENTI UTILI
Rumori normali durante il funzionamento
• Quando il refrigerante viene pompato attraverso le bobine o le tubazioni si può sentire un fievole gorgoglio e un borbottio. Non si tratta di
un'anomalia.
• Quando il compressore è in funzione, viene
pompato il refrigerante e si può sentire un ron-
PULIZIA E CURA
Attenzione Staccare la spina
dell'apparecchio prima di eseguire lavori di
manutenzione.
Questo apparecchio contiene idrocarburi
nell'unità di raffreddamento; la manutenzione e la ricarica devono pertanto essere effettuate
esclusivamente da tecnici autorizzati.
Sbrinamento del frigorifero
Durante l'uso normale la brina è eliminata automaticamente dall'evaporatore del vano frigorifero
ogni volta che il motocompressore si arresta. L'acqua di sbrinamento è scaricata attraverso un condotto in un contenitore speciale sul retro dell'apparecchio, sopra il motocompressore, dove evapora.
È importante pulire periodicamente il foro di scarico dell'acqua di sbrinamento al centro del canale
nel vano frigorifero per evitare che l'acqua fuoriesca gocciolando sul cibo all'interno. Usare lo speciale detergente in dotazione, già inserito nel foro
di scarico.
electrolux 19
zio e un rumore pulsante dal compressore.
Non si tratta di un'anomalia.
• La dilatazione termica potrebbe provocare uno
schiocco improvviso. È un fenomeno naturale,
non pericoloso. Non si tratta di un'anomalia.
Sbrinamento del vano congelatore
Il vano congelatore in questo modello è di tipo
"no frost", cioè non forma ghiaccio sulle pareti interne e sugli alimenti durante il funzionamento.
L'assenza di ghiaccio è dovuta alla circolazione
continua di aria fredda prodotta all'interno del vano da una ventola azionata automaticamente.
Page 20

20 electrolux
DATI TECNICI
ENA34733X
ENA34733W
Dimensioni
Altezza 1850 mm 2010 mm
Larghezza 595 mm 595 mm
Profondità 648 mm 648 mm
Tempo di salita 18 h 18 h
I dati tecnici sono riportati sulla targhetta del modello applicata sul lato sinistro interno dell'apparecchiatura e sull'etichetta dei valori energetici.
ENA38733W
ENA38733X
INSTALLAZIONE
Attenzione Leggere con attenzione le
"Informazioni per la sicurezza" per la vostra
sicurezza e per il corretto funzionamento
dell'apparecchio prima di procedere
all'installazione.
Posizionamento
Installare questo apparecchio in un punto in cui
la temperatura ambiente corrisponda alla classe
climatica indicata sulla sua targhetta:
Classe
climati-
ca
SN da + 10°C a + 32°C
N da + 16°C a + 32°C
ST da + 16°C a + 38°C
T da + 16°C a + 43°C
Posizione
L'apparecchio deve essere installato lontano da
fonti di calore (termosifoni, boiler, luce solare diretta, ecc.). Verificare che sul lato posteriore sia
garantita un'adeguata circolazione dell'aria. Per
ottenere prestazioni ottimali, se l'apparecchio è installato al di sotto di un pensile si raccomanda di
mantenere una distanza minima tra quest'ultimo
e lo spigolo superiore dell'apparecchio di almeno
100 mm. Se possibile, tuttavia, evitare di installare l'apparecchio sotto un pensile. Per consentire
un perfetto livellamento dell'apparecchio sono
provvisti uno o più piedini regolabili.
Avvertenza Deve essere possibile
scollegare l'apparecchio dalla rete elettrica;
eseguire perciò l'installazione facendo sì che la
spina rimanga facilmente accessibile.
Temperatura ambiente
mm
min
100
A
mm
20
Collegamento elettrico
Prima di inserire la spina, verificare che la tensione e la frequenza riportate sulla targhetta corrispondano ai valori della rete elettrica domestica.
L'apparecchio deve essere collegato a massa.
La spina del cavo di alimentazione è dotata di un
contatto a tale scopo. Se la presa della rete elettrica domestica non è collegata a massa, collegare l'apparecchio ad una massa separata in conformità alle norme relative alla corrente, consultando un elettricista qualificato.
Il fabbricante declina qualsiasi responsabilità se le
precauzioni suddette non sono rispettate.
Il presente apparecchio è conforme alle direttive
CEE.
Distanziatori posteriori
Nella custodia della documentazione sono in-
clusi due distanziatori, da installare come
mostrato nella figura.
Allentare le viti, inserire il distanziatore sotto la testa delle viti e stringerle nuovamente.
B
Page 21

2
1
3
Livellamento
L'apparecchio deve trovarsi perfettamente in piano. Per correggere gli eventuali dislivelli è possibile regolare in altezza i due piedini anteriori.
Rimozione dei fermi dei ripiani
L'apparecchio è equipaggiato con fermi dei ripiani che permettono di assicurarli durante il trasporto.
Per rimuoverli, procedere come segue:
1. Spostare i fermi dei ripiani in direzione della
freccia (A).
2. Sollevare il ripiano dalla parte posteriore e spin-
gerlo in avanti fino a liberarlo (B).
3. Rimuovere i fermi (C).
electrolux 21
Reversibilità della porta
Avvertenza Prima di eseguire le operazioni
descritte, estrarre la spina dalla presa.
Importante Per eseguire le seguenti operazioni,
si raccomanda di farsi aiutare da un'altra persona
che tenga ben ferme le porte
dell'apparecchiatura.
Per cambiare la direzione di apertura della porta,
procedere come segue:
1. Aprire la porta con l'apparecchiatura in posizione verticale. Estrarre le viti (t1) e rimuovere
il frontalino di plastica superiore (t2). Chiudere la porta.
t1
t1
t1
t2
t3
d7
2. Rimuovere la piccola copertura in plastica dal
frontalino della porta e applicarla sul lato opposto (t3).
3. Rimuovere il pannello (t4). Se è necessario,
utilizzare un cacciavite facendo molta atten-
Page 22

22 electrolux
zione. Rimuovere la vite sull'altro lato. Rimuovere il sostegno superiore della porta (t5). Riporre tutti i componenti in un sacchetto di plastica.
t4
t5
m3
m1
m5
m2
m6
m4
4. Rimuovere la porta superiore.
5. Estrarre la vite e rimuovere il fermaporta (d1).
Applicarlo sull'altro lato in senso opposto.
d1
6. Svitare la cerniera centrale (m2). Rimuovere il
distanziatore in plastica (m1).
7. Rimuovere la porta inferiore.
8. Rimuovere il distanziatore (m6) e trasferirlo sull'altro lato del perno della cerniera (m5).
9. Rimuovere la copertura (b1) usando un utensile adatto. Svitare il perno della cerniera inferiore (b2) e il distanziatore (b3) e applicarli sul
lato opposto.
10. Reinserire la copertura (b1) sul lato opposto.
b1
b2
b3
11. Rimuovere i fermi (d1) e applicarli sul lato opposto delle porte.
12. Rimuovere il perno di sinistra della copertura
della cerniera centrale (m3, m4) e trasferirlo
sull'altro lato.
13. Inserire il perno della cerniera centrale (m5)
nel foro di sinistra della porta inferiore.
14. Reinserire la porta inferiore sul perno (b2).
15. Riavvitare la cerniera centrale (m1) sul lato opposto . Non dimenticare di inserire il distan-
Page 23

electrolux 23
ziatore in plastica (m2) sotto la cerniera centrale.
16. Riagganciare la porta superiore alla cerniera
centrale (m5).
Verificare che i bordi delle porte siano paralleli al fianco dell'apparecchiatura.
17. Posizionare e fissare la cerniera superiore (inclusa nel sacchetto delle istruzioni per l'uso)
sul lato opposto (t6).
t6
t7
CONSIDERAZIONI AMBIENTALI
Il simbolo sul prodotto o sulla confezione
indica che il prodotto non deve essere
considerato come un normale rifiuto domestico,
ma deve essere portato nel punto di raccolta
appropriato per il riciclaggio di apparecchiature
elettriche ed elettroniche. Provvedendo a smaltire
questo prodotto in modo appropriato, si
contribuisce a evitare potenziali conseguenze
18. Inserire il pannello (t7) (nel sacchetto delle
istruzioni per l'uso).
19. Aprire la porta superiore e fissare la copertura superiore (t2) con le viti (t1). Inserire il magnete (d7). Chiudere la porta.
20. Riposizionare l'apparecchiatura, livellarla, attendere almeno quattro ore e inserire la spina
nella presa.
Effettuare un controllo finale per verificare che:
• Tutte le viti siano serrate.
• La guarnizione magnetica aderisca all'apparec-
chiatura.
• La porta si apra e si chiuda correttamente.
Se la temperatura ambiente è bassa (ad esempio
in inverno), è possibile che la guarnizione non aderisca perfettamente. In tal caso, attendere che
aderisca naturalmente.
Per chi preferisca non eseguire direttamente le
operazioni sopra descritte, rivolgersi al servizio
post-vendita più vicino. L'intervento di inversione
delle porte eseguito dai tecnici del servizio postvendita sarà a carico dell'utente.
negative per l’ambiente e per la salute, che
potrebbero derivare da uno smaltimento
inadeguato del prodotto. Per informazioni più
dettagliate sul riciclaggio di questo prodotto,
contattare l’ufficio comunale, il servizio locale di
smaltimento rifiuti o il negozio in cui è stato
acquistato il prodotto.
Page 24

24 electrolux
Denna snabbguide innehåller alla basfakta om din nya produkt och är enkel att använda. Electrolux
har som målsättning att minska företagets förbrukning av papper till bruksanvisningar med cirka 30 %,
vilket kommer att rädda 12.000 träd varje år. Snabbguiden är en av många åtgärder som Electrolux
vidtar för att värna om miljön. Det må vara ett litet steg, men genom att bidra med lite åstadkommer vi
En komplett bruksanvisning är tillgänglig på www.electrolux.com
mycket.
SÄKERHETSINFORMATION
För din egen säkerhet och för att du skall kunna
använda produkten på korrekt sätt är det viktigt
att du noggrant läser igenom denna bruksanvisning, inklusive tips och varningar, innan du installerar och använder produkten första gången. För
att undvika onödiga misstag och olyckor är det
viktigt att alla som använder produkten har god
kännedom om dess skötsel och skyddsanordningar. Spara denna bruksanvisning och se till att
den följer med produkten om den flyttas eller
säljs, så att alla som använder produkten får korrekt säkerhetsinformation och information om hur
den skall skötas.
För att minimera risken för skador på person och
egendom är det viktigt att du läser och följer säkerhetsföreskrifterna i denna bruksanvisning. Tillverkaren ansvarar inte för skador orsakade av att
föreskrifterna inte har följts.
Säkerhet för barn och handikappade
• Denna produkt är inte avsedd att användas av
personer (även barn) med nedsatt fysisk eller
sensorisk förmåga, eller om de har bristande erfarenhet och kunskap, om de inte instrueras
och övervakas av en person som ansvarar för
deras säkerhet.
Barn bör alltid övervakas när de använder produkten för att säkerställa att de inte leker med
den.
• Håll allt förpackningsmaterial utom räckhåll för
barn. Risk för kvävning kan föreligga.
• När du skall kassera produkten: koppla loss
den från eluttaget och klipp av nätkabeln (så
nära produkten som möjligt) och demontera
dörrarna så att lekande barn inte utsätts för
elektriska stötar eller löper risk att bli innestängda.
• Om denna produkt, som har magnetiska dörrtätningar, skall ersätta en äldre produkt som
har en fjäderbelastad spärr i dörrarna, var noga
med att göra fjäderspärren obrukbar innan du
kasserar den gamla produkten. Då finns det ingen risk att produkten blir en dödsfälla för barn.
Allmän säkerhet
Försiktighet Se till att
ventilationsöppningarna inte blockeras eller
täpps igen.
• Denna produkt är endast avsedd för användning i hemmet.
• Produkten är avsedd för förvaring av matvaror
och drycker i ett normalt hushåll enligt beskrivning i denna bruksanvisning.
• Använd inga mekaniska eller artificiella metoder
för att påskynda upptiningsprocessen.
• Använd inga andra elektriska apparater inne i
produkten, t.ex. en glassmaskin, såvida de inte
har godkänts för detta ändamål av tillverkaren.
• Var noga med att inte skada kylkretsen.
• I kylkretsen används isobutan (R600a) som köldmedel. Det är en miljövänlig naturgas, men
den är dock brandfarlig.
Se noga till att inga komponenter i kylkretsen
skadas under transport och installation av produkten.
Om kylkretsen skadas:
– undvik att komma nära öppen eld och antän-
dande källor
– ventilera noga rummet där produkten står
• Det är farligt att ändra specifikationerna eller att
försöka modifiera denna produkt på något
sätt. En skadad nätkabel kan orsaka kortslutning, brand och/eller elektriska stötar.
Varning Elektriska delar (t.ex. nätkabel,
stickkontakt, kompressor) får endast bytas
ut av en certifierad serviceagent eller annan kvalificerad servicepersonal.
1. Nätkabeln får inte förlängas.
2. Se till att stickkontakten inte kläms eller skadas av produktens baksida. En skadad
stickkontakt kan överhettas och orsaka
brand.
3. Se till att stickkontakten är åtkomlig när produkten har installerats.
4. Dra inte i nätkabeln.
5. Sätt inte i stickkontakten om eluttaget sitter
löst. Risk för elektriska stötar eller brand föreligger.
6. Produkten får inte användas utan att lampg-
• Denna produkt är tung. Var försiktig när du flyttar den.
• Plocka inte ut matvaror från frysfacket, och ta
inte i dem, med våta eller fuktiga händer efter-
9)
sitter på plats över den inre belys-
laset
ningen.
9) I förekommande fall.
Page 25

electrolux 25
som detta kan leda till hudsår eller frost/frysskador.
• Se till att produkten inte exponeras för direkt
solsken under långa perioder.
•
Lamporna
10)
som används i den här hushållsapparaten är speciallampor som endast är avsedda för användning i hushållsapparater som
denna! De lämpar sig inte som rumsbelysning.
Daglig användning
• Ställ inte heta kärl på plastdelarna i produkten.
• Förvara inte brandfarliga gaser eller vätskor i
produkten eftersom de kan explodera.
• Placera inte matvaror direkt mot luftutloppet på
den bakre väggen.
11)
• Fryst mat får inte frysas om när den har tinats.
• Förvara färdig fryst mat enligt tillverkarens anvisningar.
• Följ noga rekommendationerna om förvaring
från produktens tillverkare.
• Placera inte kolsyrade eller mousserande drycker i produkten eftersom detta skapar ett tryck i
behållaren som då kan explodera och skada
produkten.
• Isglassar kan orsaka frostskador om de konsumeras direkt från produkten.
Skötsel och rengöring
• Stäng av produkten och koppla loss den från
eluttaget före underhåll.
• Innan du använder produkten första gången,
rengör insidan och alla invändiga tillbehör med
ljummet vatten och lite neutral såpa för att ta
bort den typiska lukten hos nya produkter. Eftertorka sedan noga.
• Rengör inte produkten med metallföremål.
• Använd inga vassa föremål för att avlägsna
frost från produkten. Använd en plastskrapa.
• Använd aldrig en hårtork eller andra värmegenererande apparater för att påskynda avfrostningen. Hög värme kan skada plastdelarna
inne i produkten, och fukt kan tränga in i det
elektriska systemet och göra det strömförande.
• Kontrollera regelbundet kylens tömning av avfrostat vatten. Rengör vid behov tömningskanalen. Om tömningskanalen täpps igen kommer
vatten att samlas på produktens botten.
Installation
Viktigt För den elektriska anslutningen, följ noga
anvisningarna i respektive avsnitt.
• Packa upp produkten och kontrollera att den
inte har några utvändiga skador. Anslut inte produkten om den är skadad på något sätt. Rapportera omedelbart eventuella skador till din
återförsäljare, och spara i så fall förpackningsmaterialet.
• Vi rekommenderar att du väntar minst fyra timmar innan du nätansluter produkten så att oljan kan rinna tillbaka i kompressorn.
• Tillräcklig luftcirkulation måste säkerställas runt
produkten, annars överhettas den. För att erhålla tillräcklig ventilation, följ instruktionerna
som är relevanta för installationen.
• När så är möjligt bör produktens baksida vara
vänd mot en vägg för att undvika risken för
brännskador genom kontakt med produktens
varma delar (kompressor, kondensor).
• Produkten får inte placeras nära värmeelement
eller spisar.
• Säkerställ att elkontakten är åtkomlig efter installation av produkten.
• Produkten får endast anslutas till ett dricksvattenssystem.
12)
Service
• Allt arbete avseende elektricitet som krävs för
att utföra service på produkten skall utföras av
en behörig elektriker eller annan kompetent person.
• Service på denna produkt får endast utföras av
en auktoriserad serviceverkstad. Endast originaldelar får användas.
Miljöskydd
Denna produkt innehåller inte, varken i kylk-
retsen eller i isolationsmaterialen, någon gas
som kan skada ozonlagret. Produkten får inte kasseras tillsammans med det vanliga hushållsavfallet. Isolationsmaterialet innehåller brandfarliga gaser: Produkten skall därför kasseras enligt tillämpliga bestämmelser som kan erhållas från de lokala myndigheterna. Undvik att skada kylenheten,
särskilt på baksidan nära kondensorn. Material i
denna produkt som är märkta med symbolen
kan återvinnas.
10) Om hushållsapparaten har en lampa
11) Om produkten är frostfri
12) Om produkten har en vattenanslutning
Page 26

26 electrolux
KONTROLLPANEL
B
A - Strömbrytare På/Av D - Funktionsknapp
B - Temperaturknapp E - OK-knapp
C - Temperatur- och funktionsdisplay
Display
10 1 2 3 4
56789
Temperaturindikator
1
Larm vid för hög temperatur.
2
Indikator för funktionen FreeStore
3
Symbol för funktionen Shopping
4
Symbol för barnlås
5
När du sätter på produkten första gången
Om displayen inte tänds när du ansluter produkten till eluttaget, tryck på knapp (A) för att sätta
på produkten.
När produkten sätts på är den i larmläge: temperaturen blinkar på displayen och du hör en ljudsignal.
Tryck på knapp (E) för att stänga av ljudsignalen
(se även avsnittet "Larm om övertemperatur" ).
Symbolen
turdisplayen
peraturen.
För korrekt förvaring av dina matvaror, välj Ekofunktionen som garanterar att följande temperaturer ställs in:
+5 °C i kylskåpet,
-18 °C i frysen.
• Vänta tills temperaturen når -18 °C i frysen innan du lägger in matvaror.
• Se avsnittet "Temperaturreglering" om du vill
välja en annan temperatur.
blinkar fortfarande och på tempera-
visas den högsta uppnådda tem-
DEAC
Symbol för timerfunktion.
6
Positiv eller negativ temperaturindikator.
7
Symbol för funktionen Action Freeze
8
Symbol för fack.
9
Symbol för Eko-funktionen
10
Stänga av produkten
Håll strömbrytaren (A) intryckt i mer än en sekund
för att stänga av produkten.
Samtidigt visas en nedräkning av temperaturen
från -3 -2 -1.
Stänga av kylen
För att stänga av kylen, tryck på knapp D tills denna enhet är vald och håll sedan knapp A intryckt
tills en nedräkning från -3 -2 -1 är klar.
Viktigt Det går inte att ha endast kylen påslagen.
Om du stänger av frysen så stängs även kylen av.
Funktionsmeny
Tryck på knapp (D) för att öppna funktionsmenyn. Varje funktion bekräftas genom att man trycker på knapp (E). Om ingen bekräftelse sker inom
några sekunder lämnas menyn och displayen återgår till normalläget.
Följande funktioner visas:
Välj kylfacket.
Välj frysfacket.
Eko-funktionen
Page 27

electrolux 27
FreeStore-funktionen
Shoppingfunktionen
Barnlåsfunktionen
Funktionen för dryckkylning
Funktionen Action Freeze
Temperaturreglering
Tryck på knappen (D) för att välja enhet och sedan knappen (B) för att välja nödvändig temperatur.
Tryck på knappen (E) för att bekräfta valet.
Temperaturdisplayen visar den inställda temperaturen. Den inställda temperaturen uppnås inom
24 timmar.
Några graders variation kring den inställda temperaturen är normalt och innebär inte att det är fel
på produkten.
Semesterfunktionen "H"
Semesterfunktionen ställer in temperaturen på
+15 °C.
Med denna funktion kan du ha kylskåpet avstängt och tomt under exempelvis en semester
utan att dåliga lukter bildas.
För att aktivera semesterfunktionen, utför stegen
för att ändra den inställda temperaturen. Temperaturdisplayen kan ändra den visade temperaturen upp till +8 °C med 1 °C åt gången. +2 °C
följs av bokstaven "H". Tryck på knapp (E) för att
bekräfta.
Kylskåpet är nu inställt på semesterfunktionen i
energisparläge.
Viktigt Kylskåpet måste vara tomt när
funktionen aktiveras.
Barnlås
Barnlåset aktiveras genom att trycka på knapp D
tills motsvarande symbol
visas på displayen.
Du måste bekräfta valet genom att trycka på
knapp E inom några sekunder. Du hör en ljudsignal och symbolen förblir tänd. Så länge funktionen är aktiverad ändras inga inställningar om någon trycker på knapparna.
Du kan när som helst stänga av funktionen genom att trycka på knapp D tills motsvarande symbol börjar att blinka och sedan trycka på knapp E.
Shopping-funktionen
Om du behöver lägga in en större mängd varma
matvaror när du har handlat rekommenderar vi
att du aktiverar Shopping-funktionen för att kyla
matvarorna snabbare och för att inte värma upp
andra matvaror i produkten.
Shopping-funktionen aktiveras genom att trycka
på knapp D tills motsvarande symbol
visas på
displayen. Du måste bekräfta valet genom att
trycka på knapp E inom några sekunder. Du hör
en ljudsignal och symbolen förblir tänd.
Shopping-funktionen stängs av automatiskt efter
cirka 6 timmar. Du kan när som helst stänga av
funktionen genom att trycka på knapp D tills motsvarande symbol börjar att blinka och sedan
trycka på knapp E.
Eko-funktionen
Tryck på knapp (D) (flera gånger vid behov) tills
motsvarande symbol visas på displayen.
.
Tryck på knappen (E) för att bekräfta valet. Du
hör en ljudsignal och symbolen förblir tänd.
I detta läge ställs temperaturerna in automatiskt
(+5 °C resp. –18 °C) till de bästa förhållandena
för förvaring av matvaror.
Ställ in en annan temperatur i ett av facken för att
stänga av funktionen.
FreeStore-funktionen
Tryck på knapp (D) (flera gånger vid behov) tills
motsvarande symbol visas på displayen.
Tryck på knappen (E) för att bekräfta valet. Du
hör en ljudsignal och symbolen förblir tänd.
Viktigt Om funktionen aktiveras automatiskt
visas ikonen FreeStore inte. (Se "Daglig
användning").
Aktivering av funktionen FreeStore leder till ökad
energiförbrukning.
Funktionen Infrysning
Frysen är lämplig för infrysning av färska matvaror
och långvarig förvaring av frysta och djupfrysta
matvaror.
Den största mängden mat som kan frysas in på
24 timmar anges på typskylten.
För att frysa in den mängd som anges på typskylten, placera matvarorna i direkt kontakt med kylytan (avlägsna lådan eller korgen). Om matvarorna
fryses in i lådorna eller korgarna reduceras den
maximala kapaciteten något.
För att frysa in färska matvaror behöver du aktivera funktionen Infrysning. Tryck på knapp (D) tills
symbolen
visas på displayen.
Du måste bekräfta valet genom att trycka på
knapp (E) inom några sekunder. En ljudsignal avges och displayen visar en animering med linjer.
Efter en förkylningsperiod på 24 timmar kan du
lägga in matvarorna i frysen.
Lägg matvarorna i facket
eftersom detta är
den kallaste platsen.
Infrysningsprocessen tar 24 timmar. Lägg inte in
andra matvaror för frysning under denna period.
Denna funktion stängs av automatiskt efter 52 timmar.
Du kan när som helst stänga av funktionen ge-
nom att trycka på knapp (D) tills symbolen
bör-
jar att blinka och sedan trycka på knapp (E).
Page 28

28 electrolux
Funktionen Dryckkylning
Funktionen Dryckkylning är avsedd att användas
som en säkerhetsvarning när flaskor läggs in i frysen för kylning. Funktionen aktiveras genom att
trycka på knapp (D) tills symbolen
playen.
Du måste bekräfta valet genom att trycka på
knapp (E) inom några sekunder. Du hör en ljudsignal och symbolen förblir tänd.
Härmed aktiveras en timer med en förinställd tid
på 30 minuter som kan justeras från 1 till 90 minuter. Tryck på knapp (B) för att ställa in önskad
tid.
När den inställda tiden löper ut visas följande indikeringar:
•
på displayen
•
symbolen
•
symbolen
• en ljudsignal avges tills knapp (E) trycks in
Var noga med att då plocka ut flaskorna ur frysen.
Du kan när som helst stänga av funktionen genom att trycka på knapp (D) tills motsvarande symbol börjar att blinka och sedan trycka på knapp (E).
blinkar symbolen
blinkar
blinkar
visas på dis-
Larm för övertemperatur
En temperaturökning i ett fack (t.ex. på grund av
ett strömavbrott) indikeras genom att:
•temperaturen blinkar
•
symbolen för frysen
•
symbolen
• en ljudsignal avges
När normala förhållanden har återställts:
• ljudsignalen stängs av
• temperaturvärdet fortsätter att blinka
När du trycker på knapp (E) för att stänga av larmet visas den högsta uppnådda temperaturen i
enheten på displayen
Displayen återgår sedan till normalläge och visar
temperaturen i den valda enheten.
Medan larmet pågår kan ljudsignalen stängas av
genom att trycka på knapp (E).
blinkar
NÄR MASKINEN ANVÄNDS FÖRSTA GÅNGEN
Invändig rengöring
Innan du använder produkten första gången, rengör dess insida och alla invändiga tillbehör med
ljummet vatten och en liten mängd neutral såpa
för att ta bort den typiska lukten hos nya produkter. Eftertorka sedan noga.
Viktigt Använd inga starka rengöringsmedel eller skurpulver eftersom sådana produkter skadar
ytfinishen.
blinkar
under några sekunder.
DAGLIG ANVÄNDNING
Förvaring av fryst mat
Vid första uppstart eller efter ett uppehåll i avstängt läge, låt produkten stå på i minst två timmar innan du lägger in några matvaror.
Viktigt I händelse av en oavsiktlig avfrostning,
t.ex. vid ett strömavbrott och avbrottet varar
längre än den tid som anges i den tekniska
informationen under Temperaturökningstid,
måste den tinade maten konsumeras snabbt
eller omedelbart tillagas och sedan frysas in på
nytt (när maten har kallnat).
Upptining
Djupfryst och fryst mat kan, innan den används,
tinas i kylen eller vid rumstemperatur beroende
på den tid som står till förfogande för upptiningen.
Småbitar kan till och med tillagas direkt från frysen medan de fortfarande är frysta. Tillagningen
tar i detta fall dock lite längre tid.
FreeStore
Kylfacket är utrustat med en funktion som möjliggör snabb nedkylning av matvaror och en jämnare temperatur i kylfacket.
Denna funktion aktiveras automatiskt vid behov
och ger till exempel en snabb temperaturåterställning när dörren har stått öppen eller när omgivningstemperaturen är hög.
Du kan aktivera funktionen manuellt vid behov.
(Se " FreeStore-funktionen".)
Viktigt Funktionen FreeStore avaktiveras när
dörren öppnas och startar direkt igen när dörren
har stängts.
Page 29

electrolux 29
Grönsakslåda med fuktkontroll
Den här lådan är lämplig för förvaring av frukt och
grönsaker.
Det finns ett galler (på vissa modeller) i lådans botten för att separera frukterna och grönsakerna
från eventuell fukt som kan bildas på botten.
Alla delar i lådan kan tas bort för rengöring.
För att reglera fuktigheten i grönsakslådan finns
det ventilationsöppningar (som du kan ställa in
med en spak).
När ventilationsöppningarna är stängda:
det naturliga fuktinnehållet hos matvarorna i fruktoch grönsakslådan bevaras längre.
När ventilationsöppningarna är öppna:
högre luftcirkulation resulterar i en lägre fuktnivå i
frukt- och grönsakslådan.
FreshZone-låda
Lådan FreshZone är lämplig för förvaring av färska livsmedel som fisk, kött, skaldjur, eftersom temperaturen här är lägre än övriga delen av kylen.
RÅD OCH TIPS
Normala ljud under drift
• Det kan höras ett svagt porlande och ett bubblande ljud när köldmedlet pumpas genom spiralrören och rörledningarna. Detta är normalt.
• När kompressorn är i drift pumpas köldmedlet
runt och det hörs ett surrande och ett pulserande ljud från kompressorn. Detta är normalt.
• Den termiska utvidgningen kan orsaka ett plötsligt knäppande ljud. Detta är ett naturligt och
ofarligt fysikaliskt fenomen. Detta är normalt.
Page 30

30 electrolux
UNDERHÅLL OCH RENGÖRING
Försiktighet Koppla loss produkten från
eluttaget innan du utför någon form av
underhåll.
Kylenheten i denna produkt innehåller kolväten: underhåll och påfyllning får därför en-
dast utföras av en auktoriserad servicetekniker.
Avfrostning av kylskåpet
Frost avlägsnas automatiskt från evaporatorn i kylutrymmet varje gång kompressorn stannar under
normal användning. Det avfrostade vattnet töms
ut via en ränna i en särskild behållare som sitter
ovanför kompressorn på kylskåpets baksida, där
vattnet avdunstar.
Det är viktigt att regelbundet rengöra avfrostningsvattnets tömningshål i mitten av kylskåpsutrymmet för att undvika att vattnet rinner över och droppar ned på matvarorna. Använd medföljande specialverktyg som redan sitter i tömningshålet.
Avfrostning av frysen
Frysavdelningen på denna modell är emellertid av
"frostfri" typ. Detta innebär att det inte bildas någon frost under drift, varken på innerväggarna eller matvarorna.
Att frost inte bildas beror på en kontinuerlig cirkulation av kalluft, som genereras av en automatiskt
kontrollerad fläkt, inne i frysavdelningen.
TEKNISKA DATA
ENA34733X
ENA34733W
Mått
Höjd 1850 mm 2010 mm
Bredd 595 mm 595 mm
Djup 648 mm 648 mm
Temperaturökningstid 18 timmar 18 timmar
Den tekniska informationen anges på typskylten
som sitter till vänster inne i produkten samt på
energietiketten.
ENA38733W
ENA38733X
Page 31

INSTALLATION
Försiktighet För din egen säkerhet och för
att du skall kunna använda produkten på
korrekt sätt, läs noga igenom avsnittet
"Säkerhetsinformation" innan du installerar
produkten.
Placering
Installera produkten på en plats där omgivningstemperaturen motsvarar den klimatklass som anges på typskylten:
Klimat-
klass
SN +10 till +32 °C
N +16 till +32 °C
ST +16 till +38 °C
T +16 till +43 °C
Placering
Produkten bör placeras på säkert avstånd från
värmekällor såsom element, varmvattensberedare, direkt solsken, etc. Se till att luften kan cirkulera fritt runt produktens baksida. För att säkerställa bästa prestanda om produkten placeras under
en överhängande väggenhet måste det vara
minst 100 mm avstånd mellan produktens ovansida och väggenheten. Produkten bör dock helst
inte placeras under överhängande väggenheter.
Produkten kan justeras in i våg med en eller flera
justerbara fötter.
Varning Det måste gå att koppla bort
produkten från elnätet. Stickkontakten
måste därför vara lätt att komma åt när
produkten har installerats.
mm
min
100
Omgivningstemperatur
electrolux 31
Elektrisk anslutning
Kontrollera före anslutning till ett eluttag att nätspänningen och nätfrekvensen överensstämmer
med de värden som anges på typskylten.
Produkten måste jordas. Nätkabelns stickkontakt
är försedd med en kontakt för detta ändamål.
Om nätspänningsmatningen inte är jordad, kontakta en kvalificerad elektriker för att ansluta produkten till en separat jord enligt gällande bestämmelser.
Tillverkaren ansvarar inte för skador orsakade av
att ovanstående säkerhetsåtgärder inte har följts.
Denna produkt uppfyller kraven enligt EG-direktiven för CE-märkning.
Bakre distanshållare
I påsen med bruksanvisningen finns två di-
stanshållare som skall monteras såsom figuren visar.
Lossa skruvarna, för in distanshållarna under skruvarnas huvuden och dra åt skruvarna.
2
1
3
Avvägning
Se till att produkten står i våg där den installeras.
Justera vid behov produkten med hjälp av de två
främre, justerbara fötterna.
A
mm
20
B
Page 32

32 electrolux
Borttagning av hyllspärrarna
Din produkt är utrustad med hyllspärrar för att
låsa hyllorna under transport.
För att ta bort hyllspärrarna:
1. Flytta hyllspärrarna i pilens riktning (A).
2. Lyft hyllan bakifrån och tryck den framåt tills
den kommer fri (B).
3. Ta bort spärrarna (C).
Omhängning av dörrar
Varning Koppla loss produkten från
eluttaget innan du påbörjar arbetet.
Viktigt Vi rekommenderar att du ber någon om
hjälp med att hålla ett fast grepp om dörrarna
under arbetets gång.
Gör på följande sätt för att ändra dörrarnas öppningsriktning:
1. Öppna dörrarna med produkten i upprätt po-
sition. Lossa skruvarna (t1) och avlägsna den
övre dörrens plastlist (t2). Stäng dörren.
t1
t1
t1
t2
2. Lossa den lilla plastkåpan från plastlisten och
sätt fast kåpan på motsatta sidan (t3).
3. Avlägsna panelen (t4). Använd vid behov en
skruvmejsel försiktigt. Skruva loss skruven på
andra sidan. Avlägsna det övre dörrfästet
(t5). Lägg delarna i en tom plastpåse.
t4
t5
4. Avlägsna den övre dörren.
5. Skruva loss skruven och avlägsna dörrstoppet (d1). Montera det omvänt på andra sidan.
d1
6. Skruva loss det mellersta gångjärnet (m2). Avlägsna distanshållaren av plast (m1).
7. Avlägsna den nedre dörren.
d7
t3
Page 33

m1
m5
m3
8. Avlägsna distanshållaren (m6) och flytta den
till andra sidan av gångjärnsupphängningen
(m5).
9. Avlägsna kåpan (b1) med ett verktyg. Skruva
loss den nedre gångjärnsupphängningen (b2)
och distanshållaren (b3) och placera dem på
motsatta sidan.
10. Sätt fast kåpan (b1) på motsatta sidan.
m2
m6
m4
electrolux 33
13. Sätt det mellersta gångjärnets (m5) sprint i
det vänstra hålet på den nedre dörren.
14. Haka fast den nedre dörren på gångjärnsupphängningen (b2).
15. Skruva fast det mellersta gångjärnet (m1) på
motsatta sidan. Glöm inte plastdistansen
(m2) som skall sitta under det mellersta gångjärnet.
16. Haka fast den övre dörren på det mellersta
gångjärnet (m5).
Kontrollera att dörrkanterna löper parallellt
med produktens kanter.
17. Positionera och fäst det övre gångjärnet
(finns i påsen med bruksanvisningen) på motsatta sidan (t6).
t6
t7
b1
b2
b3
11. Avlägsna stoppen (d1) och flytta dem till dörrarnas andra sida.
12. Avlägsna den vänstra kåpsprinten från det
mellersta gångjärnet (m3, m4) och flytta den
till andra sidan.
18. Sätt fast panelen (t7) (finns i påsen med bruksanvisningen).
19. Öppna den övre dörren och montera den
övre panelen (t2) med skruvar (t1). Sätt i magneten (d7). Stäng dörren.
20. Ställ tillbaka produkten på plats, justera in
den i våg och vänta sedan minst fyra timmar
innan du ansluter den till eluttaget.
Kontrollera slutligen att:
• Alla skruvar är åtdragna.
• Magnettätningen fäster ordentligt mot produk-
ten.
• Dörrarna öppnar och stänger ordentligt.
Om rumstemperaturen är låg (t.ex. på vintern) kanske tätningen inte fäster ordentligt. Vänta i så fall
tills tätningen har anpassat sig på naturlig väg.
Om du inte vill hänga om dörrarna själv kan du
kontakta Electrolux Service. En servicetekniker
hänger om dem mot en avgift.
Page 34

34 electrolux
MILJÖSKYDD
Symbolen på produkten eller emballaget
anger att produkten inte får hanteras som
hushållsavfall. Den skall i stället lämnas in på
uppsamlingsplats för återvinning av el- och
elektronikkomponenter. Genom att säkerställa att
produkten hanteras på rätt sätt bidrar du till att
förebygga eventuellt negativa miljö- och
hälsoeffekter som kan uppstå om produkten
kasseras som vanligt avfall. För ytterligare
upplysningar om återvinning bör du kontakta
lokala myndigheter eller sophämtningstjänst eller
affären där du köpte varan.
Page 35

electrolux 35
Page 36

www.electrolux.com/shop
210621399-A-262010
 Loading...