

Page 1

EME31151
................................................ .............................................
EN MICROWAVE OVEN USER MANUAL
Page 2

www.electrolux.com
2
CONTENTS
1. SAFETY INFORMATION . . . . . . . . . . . . . . . . . . . . . . . . . . . . . . . . . . . . . . . . . . . . . . . . . . . 3
2. SAFETY INSTRUCTIONS . . . . . . . . . . . . . . . . . . . . . . . . . . . . . . . . . . . . . . . . . . . . . . . . . . 5
3. PRODUCT DESCRIPTION . . . . . . . . . . . . . . . . . . . . . . . . . . . . . . . . . . . . . . . . . . . . . . . . . 6
4. BEFORE FIRST USE . . . . . . . . . . . . . . . . . . . . . . . . . . . . . . . . . . . . . . . . . . . . . . . . . . . . . . 6
5. CONTROL PANEL . . . . . . . . . . . . . . . . . . . . . . . . . . . . . . . . . . . . . . . . . . . . . . . . . . . . . . . 7
6. DAILY USE . . . . . . . . . . . . . . . . . . . . . . . . . . . . . . . . . . . . . . . . . . . . . . . . . . . . . . . . . . . . . 8
7. AUTOMATIC PROGRAMMES . . . . . . . . . . . . . . . . . . . . . . . . . . . . . . . . . . . . . . . . . . . . . . 11
8.
USING THE ACCESSORIES . . . . . . . . . . . . . . . . . . . . . . . . . . . . . . . . . . . . . . . . . . . . . . . 12
9. ADDITIONAL FUNCTIONS . . . . . . . . . . . . . . . . . . . . . . . . . . . . . . . . . . . . . . . . . . . . . . . . 12
10.
HELPFUL HINTS AND TIPS . . . . . . . . . . . . . . . . . . . . . . . . . . . . . . . . . . . . . . . . . . . . . . . 13
11. RECIPES . . . . . . . . . . . . . . . . . . . . . . . . . . . . . . . . . . . . . . . . . . . . . . . . . . . . . . . . . . . . . . 21
12.
CARE AND CLEANING . . . . . . . . . . . . . . . . . . . . . . . . . . . . . . . . . . . . . . . . . . . . . . . . . . . 23
13. TROUBLESHOOTING . . . . . . . . . . . . . . . . . . . . . . . . . . . . . . . . . . . . . . . . . . . . . . . . . . . . 23
14.
INSTALLATION . . . . . . . . . . . . . . . . . . . . . . . . . . . . . . . . . . . . . . . . . . . . . . . . . . . . . . . . . 24
WE’RE THINKING OF YOU
Thank you for purchasing an Electrolux appliance. You’ve chosen a product that brings with it
decades of professional experience and innovation. Ingenious and stylish, it has been designed
with you in mind. So whenever you use it, you can be safe in the knowledge that you’ll get great
results every time.
Welcome to Electrolux.
Visit our website for:
Get usage advice, brochures, trouble shooter, service information:
www.electrolux.com
Register your product for better service:
www.electrolux.com/productregistration
Buy Accessories, Consumables and Original spare parts for your appliance:
www.electrolux.com/shop
CUSTOMER CARE AND SERVICE
We recommend the use of original spare parts.
When contacting Service, ensure that you have the following data available.
The information can be found on the rating plate. Model, PNC, Serial Number.
Warning / Caution-Safety information
General information and tips
Environmental information
Subject to change without notice.
Page 3

1. SAFETY INFORMATION
Before the installation and use of the appliance, carefully
read the supplied instructions. The manufacturer is not
responsible if an incorrect installation and use causes injuries and damages. Always keep the instructions with
the appliance for future reference.
1.1 Children and vulnerable people safety
WARNING!
Risk of suffocation, injury or permanent disability.
• This appliance can be used by children aged from 8
years and above and persons with reduced physical,
sensory or mental capabilities or lack of experience and
knowledge if they have been given supervision or instruction concerning use of the appliance in a safe way
and understand the hazards involved.
• Do not let children play with the appliance.
• Keep all packaging away from children.
• Keep all detergents away from children.
• Keep children and pets away from the appliance door
when it is open.
• If the appliance has a child safety device, we recommend you activate it.
• Cleaning and user maintenance shall not be made by
children without supervision.
ENGLISH 3
1.2 General Safety
• This appliance is intended to be used in household and
similar applications such as:
– staff kitchen areas in shops, offices and other work-
ing environments;
– farm houses;
– by clients in hotels, motels and other residential envi-
ronments;
Page 4

www.electrolux.com
4
• Internally the appliance becomes hot when in opera-
• Do not use a steam cleaner to clean the appliance.
• Before maintenance cut the power supply.
• If the door or door seals are damaged, the appliance
• Only a competent person can carry out any service or
• Do not heat liquids and other foods in sealed contain-
• Only use utensils that are suitable for use in microwave
• When heating food in plastic or paper containers, keep
• The appliance is intended for heating food and bever-
• If smoke is observed, switch off or unplug the appli-
• Microwave heating of beverages can result in delayed
• The contents of feeding bottles and baby food jars shall
– bed and breakfast type environments.
tion. Do not touch the heating elements that are in the
appliance. Always use oven gloves to remove or put in
accessories or ovenware.
must not be operated until it has been repaired by a
competent person.
repair operation that involves the removal of a cover
which gives protection against exposure to microwave
energy.
ers. They are liable to explode.
ovens.
an eye on the appliance due to the possibility of ignition.
ages. Drying of food or clothing and heating of warming pads, slippers, sponges, damp cloth and similar
may lead to risk of injury, ignition or fire.
ance and keep the door closed in order to stifle any
flames.
eruptive boiling. Care must be taken when handling the
container.
be stirred or shaken and the temperature checked before consumption, in order to avoid burns.
Page 5

ENGLISH 5
• Eggs in their shell and whole hard-boiled eggs should
not be heated in the appliance since they may explode,
even after microwave heating has ended.
• The appliance should be cleaned regularly and any
food deposits removed.
• Failure to maintain the appliance in a clean condition
could lead to deterioration of the surface that could adversely affect the life of the appliance and possibly result in a hazardous situation.
2.
SAFETY INSTRUCTIONS
2.1 Installation
WARNING!
Only a qualified person must install this appliance.
• Remove all the packaging.
• Do not install or use a damaged appli-
ance.
• Obey the installation instruction sup-
plied with the appliance.
• The appliance can be placed almost
anywhere in the kitchen. Make sure the
oven is placed on a flat, level surface
and that vents as well as the surface
underneath the appliance are not
blocked (for sufficient ventilation).
Electrical connection
WARNING!
Risk of fire and electrical shock.
• All electrical connections should be
made by a qualified electrician.
• The appliance must be earthed.
• Make sure that the electrical information
on the rating plate agrees with the power supply. If not, contact an electrician.
• If the appliance is connected to the
socket via an extension cord, make
sure the cord is earthed.
• Make sure not to cause damage to the
mains plug and to the mains cable.
Contact the Service or an electrician to
change a damaged mains cable.
• Do not pull the mains cable to disconnect the appliance. Always pull the
mains plug.
2.2 Use
WARNING!
Risk of injury, burns or electric
shock or explosion.
• Use this appliance in a household environment.
• Do not change the specification of this
appliance.
• Make sure that the ventilation openings
are not blocked.
• Do not let the appliance stay unattended during operation.
• Do not apply pressure on the open
door.
• Do not use the appliance as a work
surface and do not use the cavity for
storage purposes.
2.3 Care and Cleaning
WARNING!
Risk of injury, fire or damage to
the appliance.
• Before maintenance, deactivate the appliance and disconnect the mains plug
from the mains socket.
Page 6
www.electrolux.com
6
• Clean regularly the appliance to prevent
the deterioration of the surface material.
• Do not allow food spills or cleaner residue to accumulate on door sealing surfaces.
• Remaining fat or food in the appliance
can cause fire.
• Clean the appliance with a moist soft
cloth. Only use neutral detergents. Do
not use abrasive products, abrasive
cleaning pads, solvents or metal objects.
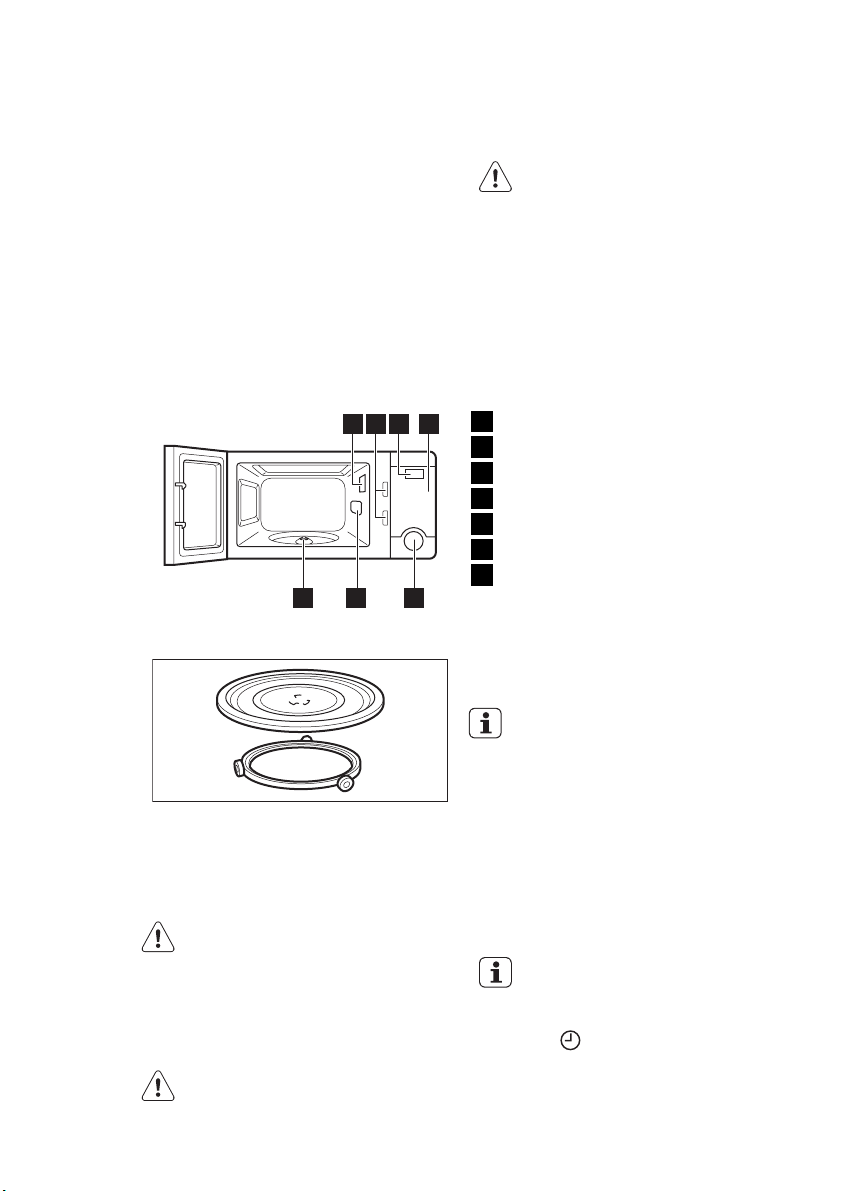
3. PRODUCT DESCRIPTION
1 2 43
7
6 5
• If you use an oven spray, obey the safety instructions on the packaging.
2.4 Disposal
WARNING!
Risk of injury or suffocation.
• Disconnect the appliance from the
mains supply.
• Cut off the mains cable and discard it.
Lamp
1
Safety interlock system
2
Display
3
Control panel
4
Door opener
5
Waveguide cover
6
Turntable shaft
7
3.1 Accessories
4. BEFORE FIRST USE
WARNING!
Refer to the Safety chapters.
4.1 Initial Cleaning
• Remove all parts from the appliance.
• Clean the appliance before first use.
Refer to chapter "Care and Cleaning".
Turntable set
Glass cooking tray and roller guide.
Always use the turntable set to
prepare food in the appliance.
4.2 Setting the time
When you connect the appliance
to the electrical supply or after a
power cut, display shows : 0.
1.
Touch once for a 12 hour clock
system or twice for a 24 hour clock
system.
2.
Touch the Time Set pads to enter the
correct time.
Page 7

3.
Touch to confirm.
If you enter an incorrect time the error signal sounds. Touch
time.
5. CONTROL PANEL
ENGLISH 7
If the time is not set, display shows : 0
when the appliance is not in use.
and re-enter the
1
2
3
4
5
6
7
8
9
Symbol Function Description
— Display Shows the settings and current time.
1
2
One Touch pads
3
Auto Cook To cook or reheat favorite foods.
Frozen Pizza
Beverage
Dinner Plate
To cook or reheat specific quantities of food.
Pasta
4
Clock To set the clock.
Page 8

www.electrolux.com
8
Symbol Function Description
5
Power To set a power level.
6
Time Set pads
7
+10 min
+1 min
+10 sec
8
9
6. DAILY USE
WARNING!
Refer to the Safety chapters.
6.1 Activating and deactivating
the appliance
1.
Touch the pad with the function you
want to activate.
2.
To set the time touch the Time Set
pads.
3.
Touch to activate the appliance.
4.
To deactivate the appliance you can:
– wait until the appliance deactivates
automatically when the time comes
to an end.
– push the door opener. The appli-
ance stops automatically. Close the
door to continue cooking. Use this
option to inspect the food.
–
touch
To erase all the settings, touch
one more time.
When the appliance deactivates automatically 3 beeps sound.
CAUTION!
Do not let the appliance operate
when there is no food in it.
Defrost To defrost food by weight or time.
To set the current time and cooking time (maximum 59 min 90
sec).
Start / +30 sec To start the oven or increase the cooking time for
30 seconds at full power.
The cooking time increases with each additional
touch of the pad.
Stop / Clear To deactivate the appliance or delete the cooking
settings.
Each time a pad is touched, you
hear a beep sound.
The appliance is set to cook on
full power unless you set a lower
power level.
The display shows the present
time when the cooking time ends.
6.2 General information about
using the appliance
General:
• After you deactivate the appliance, let
the food stand for some minutes.
• Remove the aluminium foil packaging,
metal containers, etc. before you prepare the food.
Cooking:
• If possible, cook food covered with ma-
.
terial suitable for use in the microwave.
Only cook food without a cover if you
want to keep it crusty
• Do not overcook the dishes by setting
the power and time too high. The food
can dry out, burn or catch fire in some
places.
• Do not use the appliance to cook eggs
or snails in their shells, because they
Page 9

can explode. With fried eggs, pierce the
yolks first.
• Prick food with "skin" or "peel", such as
potatoes, tomatoes, sausages, with a
fork several times before cooking so
that the food does not explode.
• For chilled or frozen food, set a longer
cooking time.
• Dishes which contain sauce must be
stirred from time to time.
• Vegetables that have a firm structure,
such as carrots, peas or cauliflower,
must be cooked in water.
• Turn larger pieces after half of the cooking time.
• If possible, cut vegetables into similarsized pieces.
• Use flat, wide dishes.
• Do not use cookware made of porcelain, ceramic or earthenware with small
holes, e. g. on handles or unglazed bottoms. Moisture going into the holes can
cause the cookware to crack when it is
heated.
• The glass cooking tray is a work space
for heating food or liquids. It is necessary for the operation of the microwave.
Defrosting meat, poultry, fish:
• Put the frozen, unwrapped food on a
small upturned plate with a container
ENGLISH 9
below it so that the defrosting liquid
collects in the container.
• Turn the food after half of the defrosting
time. If possible, divide and then remove the pieces that started to defrost.
Defrosting butter, portions of gateau,
quark:
• Do not fully defrost the food in the appliance, but let it defrost at room temperature. This gives a more even result.
Fully remove all metal or aluminium
packaging before defrosting.
Defrosting fruit, vegetables:
• Do not fully defrost fruit and vegetables,
which are to be further prepared while
raw, in the appliance. Let them defrost
at room temperature.
• You can use a higher microwave power
to cook fruit and vegetables without defrosting them first.
Ready meals:
• You can prepare ready meals in the appliance only if their packaging is suitable
for microwave use.
• You must follow the manufacturer's instructions printed on the packaging
(e.g. remove the metal cover and pierce
the plastic film).
Suitable cookware and materials
Cookware / Material Microwave
Defrosting Heating Cooking
Ovenproof glass and porcelain (with no
metal components, e.g. Pyrex, heat-proof
glass)
Non-ovenproof glass and porcelain
1)
Glass and glass ceramic made of ovenproof / frost-proof material (e.g. Arcoflam),
grill shelf
Ceramic 2), earthenware
Heat-resistant plastic up to 200 °C
2)
3)
Cardboard, paper X -- --
Clingfilm X -- --
Roasting film with microwave safe closure
3)
X X X
X -- --
X X X
X X X
X X X
X X X
Page 10

www.electrolux.com
10
Cookware / Material Microwave
Roasting dishes made of metal, e.g. enamel, cast iron
Baking tins, black lacquer or silicon-coated
Baking tray -- -- --
Browning cookware, e.g. Crisp pan or
Crunch plate
Ready meals in packaging
1)
2)
3)
X suitable
-- not suitable
6.4 Defrosting
You can choose between 2 defrosting
modes:
•Weight defrosting
•Time defrosting
Weight and time defrosting
1.
2.
Defrosting Heating Cooking
-- -- --
-- -- --
3)
-- X X
3)
With no silver, gold, platinum or metal plating / decorations
Without quartz or metal components, or glazes which contain metals
You must follow the manufacturer’s instructions about the maximum temperatures.
X X X
6.3 Power setting table
The maximum power output is 1000 W.
The table shows the approximate percentage of power for each function.
Touch the
Power pad
1 time P-HI 100 %
2 times P-90 90 %
3 times P-80 80 %
4 times P-70 70 %
5 times P-60 60 %
6 times P-50 50 %
7 times P-40 40 %
8 times P-30 30 %
9 times P-20 20 %
10 times P-10 10 %
11 times P-00 0 %
Touch once to set the weight defrosting or twice for time defrosting.
Touch the Time Set pads to input the
desired weight or time.
Power setting Approximate Percentage of Power
3.
Touch to confirm and start the
appliance.
For weight defrosting the time is
set automatically. Weight defrosting should not be used on food
that is left out of the freezer for
more then 20 min, or for frozen
ready-made food.
The display counts down the time. When
you hear an acoustic signal during defrosting, turn over or rearrange the food.
Page 11

6.5 Cooking
You can cook food in one or two stages.
Cooking in two stages includes defrosting.
Cook all frozen foods in two
stages.
Cooking in two stages:
1.
Touch
mode.
2.
Touch the Time Set pads to set defrosting time or food weights.
and set the defrosting
7. AUTOMATIC PROGRAMMES
ENGLISH 11
3.
Touch
power level.
4. Touch the Time Set pads to input the
time.
5.
Touch
pliance.
When you hear an acoustic signal during
defrosting, turn over or reposition the
food.
To cook in one stage skip step 1 and 2.
and select the desired
to confirm and start the ap-
WARNING!
Refer to the Safety chapters.
Repeatedly touch
gory. Then touch
the appliance.
to select food cate-
to confirm and start
7.1 Auto Cooking
You can easily cook or reheat favorite
food using Auto Cooking function.
Display Food category Amount
AC-1 Bread 4 pieces
AC-2 Soup 350 g
AC-3 Potato 3 medium sized
AC-4 Fresh vegetable 200 g
AC-5 Frozen vegetable 200 g
7.2 One Touch Cooking
You can cook or reheat foods by the
touch of just one pad.
Repeatedly touch the desired pad to increase the amount of food. The display
shows the selected amount. After 1.5
seconds the appliance starts cooking.
Symbol Amount of food
Beverage 1 – 3 cups
Frozen
Pizza
200 g / 400 g
1)
Symbol Amount of food
Dinner
Plate
2)
Pasta
1)
Use only frozen pizza made for microwave
ovens. Use only one frozen pizza at a
time.
2)
Place pasta into a double amount of
water. Cover with lid or plastic wrap. Stir
after cooking. Let the food stand 3 to 5
minutes.
350 g / 450 g
1 – 2 serving
Page 12

www.electrolux.com
12
8. USING THE ACCESSORIES
WARNING!
Refer to the Safety chapters.
8.1 Inserting the turntable set
1.
Place the roller guide around the turntable shaft.
2.
Place the glass cooking tray on the
roller guide
CAUTION!
Do not cook food without the
turntable set. Use only the turntable set provided with the appliance.
9. ADDITIONAL FUNCTIONS
9.1 Child Safety Lock
The Child Safety Lock prevents an accidental operation of the appliance.
To activate or deactivate the Child Safety
Lock touch and hold
until you hear a beep sound.
When the Child Safety Lock is on, display
shows the current time. If you touch any
key, display shows Loc.
9.2 Power Save Mode
The appliance contains features
which help you save energy during everyday cooking.
for 3 seconds,
Never cook food directly on the
glass cooking tray.
To activate or deactivate Power Save
Mode:
1.
Touch .
2.
Touch and then hold for 3 seconds. The beep sounds and the dis-
play turns off.
Touch any pad to operate the oven in
Power Save Mode. The display turns on.
If there is no operation within 10 seconds,
the display turns off.
Page 13

10. HELPFUL HINTS AND TIPS
10.1 Tips for the microwave
Problem Remedy
You cannot find details for the
amount of food prepared.
The food got too dry. Set shorter cooking time or select lower mi-
The food is not defrosted, hot or
cooked after the time came to an
end.
After the cooking time comes to
an end, the food is overheated at
the edge but is still not ready in the
middle.
To get better results for rice use a flat,
wide dish.
The power setting and time in the
cooking tables are guidelines only.
They depend on the recipe, quality, quantity and temperature of
the used ingredients.
10.2 Defrosting
Always defrost roast with the fat side
down.
ENGLISH 13
Look for a similar food. Increase or shorten
the length of the cooking times according to
the following rule: Double the amount = al-
most double the time, Half the amount =
half the time
crowave power.
Set longer cooking time or set higher power.
Note that large dishes need longer time.
Next time set a lower power and a longer
time. Stir liquids halfway through, e.g. soup.
Do not defrost covered meat because this
may cause cooking instead of defrosting.
Always defrost whole poultry breast side
down.
When you hear an acoustic signal, turn
over or rearrange the food.
If there are any icy areas after defrosting,
allow the food to stand for 5 – 60 minutes.
Beef
Food Weight
(g)
Power Setting
Time
(min)
Minced beef 450 Defrost 7 – 9
Stewing meat 675 Defrost 12 – 14
Patties
450 (110
g each)
Defrost 5 – 7
Steak 200 Defrost 2 – 4
Comments
Break apart and re-
move defrosted
pieces.
Divide and change
position of the food
pieces.
Turn over after half
of the time.
Break apart and re-
move defrosted
pieces. Turn over
after half of the
time.
Page 14

www.electrolux.com
14
Food Weight
(g)
Power Setting
Time
(min)
Goulash 500 Defrost 6 – 8
Sliced sausage 100 Defrost 2 – 3
Pork
Food Weight
(g)
Power Setting
Time
(min)
Spareribs 450 Defrost 7 – 9
Chops
500 (125
g each)
Defrost 7 – 9
Minced pork 450 Defrost 5 – 7
Goulash 500 Defrost 6 – 8
Poultry
Food Weight
(g)
Power Set-
ting
Time
(min)
Whole chicken 1125 Defrost 20 – 23
Chicken breasts 450 Defrost 6 – 8
Diced chicken 900 Defrost 16 – 18
Chicken thighs 675 Defrost 13 – 15
Comments
Divide and change
position of the
meat. Remove de-
frosted pieces
Turn over after half
of the time.
Comments
Divide and change
position of the food
pieces.
Divide and turn over
the food pieces
Break apart and re-
move defrosted
pieces.
Divide and change
position of the
meat. Remove de-
frosted pieces
Comments
Turn over after half
of the time. Cover
with aluminium foil if
needed.
Divide and change
position of the food
pieces.
Divide and change
position of the food
pieces.
Divide and change
position of the food
pieces.
Page 15

Fish and seafood
Food Weight
(g)
Power Setting
Time
(min)
Whole fish 450 Defrost 6 – 8
Fish fillets 675 Defrost 11 – 13
Shrimps 225 Defrost 3 – 5
Dairy products
Food Weight
(g)
Power Setting
Time
(min)
Quark 250 Defrost 1 – 2
Butter 250 Defrost 1 – 2
Cheese 250 Defrost 1 – 2
Cream 200 Defrost 1 – 2
ENGLISH 15
Comments
Turn over after half
of the time. Cover
with aluminium foil if
needed.
Divide and turn over
the food pieces.
Divide and change
position of the food.
Comments
Remove aluminium
parts, turn halfway
through
Remove aluminium
parts, turn halfway
through
Remove aluminium
parts, turn halfway
through
Remove aluminium
parts, turn halfway
through
Cakes / pastries
Food Weight
(g)
Power Setting
Time
(min)
Cheesecake 1 piece Defrost 1
Cake (gateau) 1 piece Defrost 1
Dry cake (e.g.
Pound cake)
1 piece Defrost 0:50 – 1
Fruit cake 1 piece Defrost 0:50 – 1
Sliced bread 300 Defrost 1:30 – 2
Bread rolls 4 rolls Defrost 1 – 2
Comments
Turn around after
half of the time.
Turn around after
half of the time.
Turn around after
half of the time.
Turn over after half
of the time.
Turn over after half
of the time.
Turn over after half
of the time.
Page 16

www.electrolux.com
16
Fruits
Food Weight
Strawberries 300 Defrost 3 – 4
Plums, cherries,
raspberries,
black- currants,
apricots
10.3 Cooking
Always remove chilled meat and poultry
from the refrigerator at least 30 minutes
before cooking.
Let the meat, poultry, fish and vegetables
stay covered after cooking.
Brush a little oil or melted butter over the
fish.
Meat
Food Weight
Beef joint:
- Rare
- Medium
- Well done
Pork joint 450 P-HI 10 – 13
Bacon joint 450 P-HI 8 – 10
(g)
Power Setting
250 Defrost 2 – 3
Add 30 – 45 ml of cold water for every
250 g of vegetables unless the table
states differently. Cut the fresh vegetables
into even size pieces before cooking.
Cook all vegetables with a cover on the
container. Allow vegetables to stay covered for 3 minutes.
(g)
Power Setting Time (min) Comments
6 – 8
450 P-80
7 – 9
9 – 11
Time
(min)
Comments
Stir halfway
through
Stir halfway
through
Cook covered. Turn
the food over sever-
al times during
cooking.
Cook covered. Turn
the food over sever-
al times during
cooking.
Cook covered. Turn
the food over sever-
al times during
cooking.
Poultry
Food Weight
(g)
Power Setting Time (min) Comments
Whole chicken 900 P-HI 4 – 9
Diced chicken 450 P-80 5 – 7
Cook covered. Turn
the food over sever-
al times during
cooking.
Cook covered. Turn
the food over sever-
al times during
cooking.
Page 17

ENGLISH 17
Food Weight
(g)
Chicken breast
(boned)
450 P-80 6 – 8
Power Setting Time (min) Comments
Fish
Food Weight
(g)
Power Setting Time (min) Comments
Fish fillets 450 P-HI 3 – 5
Whole mackerel (cleaned and
450 P-HI 3 – 5
prepared)
Whole Trout
(cleaned and
450 P-HI 4 – 6
prepared)
Salmon stakes 450 P-HI 4 – 6
Cook covered. Turn
the food over sever-
al times during
cooking.
Cook covered. Turn
the food over sever-
al times during
cooking.
Cook covered. Turn
the food over sever-
al times during
cooking.
Cook covered. Turn
the food over sever-
al times during
cooking.
Cook covered. Turn
the food over sever-
al times during
cooking.
Fresh Vegetable
Food Weight
(g)
Broccoli
Brussels
sprouts
250
500
250 P-HI 3 – 4
Power Setting Time (min) Comments
P-HI
2 – 3
4 – 6
Carrots 250 P-HI 2 – 3
Cauliflower
250
500
P-HI
2 – 3
4 – 6
Cook covered. Stir
once during cooking
and once after
cooking.
Add 60 – 75 ml of
water. Cook cov-
ered. Stir once dur-
ing cooking and
once after cooking.
Cook covered. Stir
once during cooking
and once after
cooking.
Cook covered. Stir
once during cooking
and once after
cooking.
Page 18

www.electrolux.com
18
Food Weight
(g)
Power Setting Time (min) Comments
Courgette 250 P-HI 2 – 3
Egg plant 250 P-HI 2 – 3
Leeks 250 P-HI 2 – 3
Mushrooms
125
250
P-HI
1 – 2
2 – 4
Onions 250 P-HI 2 – 3
Pepper 250 P-HI 2 – 4
Peeled potatoes
Potatoes in
their jackets
250
500
P-HI
4 – 6
7 – 9
800 P-HI 7 – 9
Cabbage 250 P-HI 4 – 6
Add 30 ml of water
or 2 tablespoons of
butter. Cook cov-
ered. Stir once dur-
ing cooking and
once after cooking.
Cook covered. Stir
once during cooking
and once after
cooking.
Cut into thick slices.
Cook covered. Stir
once during cooking
and once after
cooking.
Do not add any wa-
ter. Cook covered.
Stir once during
cooking and once
after cooking. Drain
before serving.
Add 15 ml of water.
Cook covered. Stir
once during cooking
and once after
cooking.
Cook covered. Stir
once during cooking
and once after
cooking
Cook covered. Stir
once during cooking
and once after
cooking
Cook covered, stir
halfway through.
Cook covered. Stir
once during cooking
and once after
cooking.
Page 19

Frozen Vegetables
Food Weight
(g)
Power Setting Time (min) Comments
Spinach 125 P-HI 1 – 2
Broccoli 250 P-HI 2:30 – 4
Peas 250 P-HI 2:30 – 4
Green beans 250 P-HI 3 – 5
Mixed vegetables (carrots /
250 P-HI 2:30 – 4
peas / corn)
Mixed vegetables (Chinese
250 P-HI 3 – 5
style)
ENGLISH 19
Add 15 ml of water.
Cook covered. Stir
once during cooking
and once after
cooking
Add 30 ml of water.
Cook covered. Stir
once during cooking
and once after
cooking
Add 15 ml of water.
Cook covered. Stir
once during cooking
and once after
cooking
Add 30 ml of water.
Cook covered. Stir
once during cooking
and once after
cooking
Add 15 ml of water.
Cook covered. Stir
once during cooking
and once after
cooking
Add 15 ml of water.
Cook covered. Stir
once during cooking
and once after
cooking
Melting
Food Weight
(g)
Power Setting Time (min) Comments
Chocolate /
Chocolate
150 P-70 1:30 – 2 Stir halfway through.
coating
Butter 100 P-70 0:50 – 1 Stir halfway through.
10.4 Reheating
When you reheat packed ready meals always follow the instruction written on the
packaging.
Page 20

www.electrolux.com
20
Food
Weight (g)
Power
Setting
Time (min) Comments
Stir halfway
Baby food 128 P-HI 0:20
through. Check
temperature!
Baby milk
100 ml
225 ml
P-HI
0:20 – 0:30
0:40 – 0:50
Put spoon into the
bottle, stir and
check temperature!
Wrap in a paper
Sandwich roll or
bun
1 roll P-HI 0:20 – 0:30
towel and place the
glass cooking tray.
Do not use recycled
paper towels.
Convenience
food
Frozen ready
meals
400 - 500 P-70 5 – 7
400 - 500 P-70 6 – 8
Lasagna 300 P-HI 4 – 6
Casserole
Mashed potatoes
1 cup
4 cups
1 cup
4 cups
P-HI
P-HI
1:30 – 3
5 – 7
2 – 3
6 – 8
Remove any aluminium lids. Turn half-
way through
Remove any aluminium lids. Turn half-
way through
Cover the food
while cooking.
Cover the food
while cooking. Stir
halfway through.
Cover the food
while cooking. Stir
halfway through.
Cover the food
Baked beans 1 cup P-HI 2 – 3
while cooking. Stir
halfway through.
Ravioli or pasta
in sauce
1 cup
4 cups
P-HI
2 – 3
6 – 9
Milk 200 ml P-HI 1:10
Water 200 ml P-HI 1:30
Cover the food
while cooking. Stir
halfway through.
Put spoon in the
container.
Put spoon in the
container.
Sauce 200 ml P-HI 1:30 – 1:50 Stir halfway through
Soup 300 ml P-HI 2 – 2:30 Stir halfway through
Page 21

11. RECIPES
ENGLISH 21
The temperature and baking times
in the tables are guidelines only.
They depend on the recipes, quality and quantity of the ingredients
used.
11.1 Breakfast
Omelettes
Ingredients:
• 15 g melted butter
• 4 eggs
• 6 tablespoon milk
• salt and pepper
Method:
Whisk together eggs, milk and season
with salt and pepper. Coat the dish with
the melted butter. Pour the omelette mixture into a flan dish. Cook on P-HI for 2
minutes, turn over the omelette and cook
on P-HI for another 1 minute.
– Time in the appliance: 3 minutes in total
Scrambled eggs
Ingredients:
• 15 g melted butter
• 2 eggs
• 2 tablespoon milk
• salt and pepper
Method:
Mix together eggs, milk and melted butter
and season them with salt and pepper.
Cook on P-HI for 3 minutes stirring every
30 sec.
– Time in the appliance: 3 minutes in total
11.2 Dinner
Tomato soup with orange
Ingredients:
• 25 g melted butter
• 1 medium onion, chopped
• 1 large carrot
• 1 large potato, chopped
• 800 g canned tomatoes, chopped
• Juice and grated zest of 1 medium orange
• 900 ml of hot vegetable broth
• salt and pepper
Method:
Mix onion, carrot, potato and the melted
butter and cook them on P-HI for 4 minutes. Stir after half of the time. Then add
tomatoes, orange juice, orange zest and
broth. Mix all together and season with
salt and pepper. Cover the bowl and cook
on P-HI for 15 minutes until vegetables
are tender. Stir 2 – 3 times during cooking. Blend the soup and serve.
– Time in the appliance: 19 minutes in to-
tal
French onion soup
Ingredients:
• 1 large onion, sliced
• 1 tablespoon corn oil
• 50 g flour
• 1.2 l meat or vegetable broth
• 2 tablespoons parsley, chopped
• 4 thick slices of French bread
• 50 g cheese, grated
Method:
Mix together onion and corn oil in a bowl.
Cook them on P-HI for 1 minute. Mix in
flour and add broth gradually. Season
with salt and pepper and add parsley.
Cover the bowl and cook on P-70 for 16
minutes. Pour the soup into serving
bowls, place the bread on top of them
soup in each bowl and sprinkle it generously with cheese. Cook on P-70 for 2 minutes until the cheese melts.
– Time in the appliance: 19 minutes in to-
tal
Stir fried vegetables
Ingredients:
• 1 tablespoon sunflower oil
• 2 tablespoons soya sauce
• 1 tablespoon sherry
• 2.5 cm ginger root, peeled and grated
• 2 medium carrots, cut in small strips
• 100 g button mushrooms, chopped
• 50 g bean sprouts
• 100 g mangetout
• 1 red pepper, seeded and thinly sliced
• 4 spring onions, chopped
• 100 g canned water chestnuts, sliced
Page 22

www.electrolux.com
22
• 1 / 4 head of Chinese cabbage, thinly
Method:
Mix together sunflower oil, soya sauce,
sherry, ginger and carrots in a bowl. Cover it and cook on P-HI for 3 – 5 minutes.
Stir once. Then add button mushrooms,
bean sprouts, mangetout, red pepper,
spring onions, water chestnuts and Chinese cabbage. Mix all together. Cook on
P-HI for 5 – 6 minutes, until the vegetables are tender. Stir 2 – 3 times during
cooking.
– Time in the appliance: 8 – 11 minutes in
Honeyed chicken
Ingredients:
• 4 boneless chicken breasts
• 2 tablespoons honey
• 1 tablespoon whole grain mustard
• 1 / 2 tablespoon dried tarragon
• 1 tablespoon tomato puree
• 150 ml chicken broth
• salt and pepper
Method:
Place the chicken breasts in a casserole
dish. Mix together all remaining ingredients. Pour them over the chicken. Season
with salt and pepper. Cook on P-HI for 13
– 14 minutes. Change position of the
chicken breasts and pour it with the
sauce twice during cooking.
– Time in the appliance: 13 – 14 minutes
Jacket potatoes with blue cheese
and chive
Ingredients:
• 2 potatoes, baked (250 g each)
• 50 g butter
• 100 g blues cheese, chopped
• 1 tablespoon fresh chives, chopped
• 50 g mushroom, sliced
• salt and pepper
Method:
Prick each potato. Cook on P-HI for 7 – 9
minutes. Halve and hollow the potatoes.
Put the potato pulp, butter, cheese,
chives, mushrooms into a bowl and mix it
together. Season with salt and pepper.
Put the mixture into the potato skins and
place them in a flan dish. Cook on P-50
for 10 minutes.
sliced
total
in total
– Time in the appliance: 17 – 19 minutes
in total
White sauce
Ingredients:
• 25 g melted butter
• 25 g flour
• 300 ml milk
• salt and pepper
Method:
Mix together butter, flour and milk. Cook
on P-HI for 3 – 4 minutes. Stir every 2 minutes until the sauce gets thick and
smooth. Season with salt and pepper.
– Time in the appliance: 3 – 4 minutes in
total
Savory mince
Ingredients:
• 1 small onion, chopped
• 1 garlic clove, crushed
• 1 teaspoon oil
• 200 g canned tomatoes, chopped
• 1 tablespoon tomato puree
• 1 teaspoon herb mix
• 225 g minced beef
• salt and pepper
Method:
Mix onion, garlic and oil in a caserolle
dish. Cook on P-HI for 2 minutes or until it
gets soft Then mix in all the other ingredients. Cover the caserolle dish and cook
on P-HI for 5 minutes and then change to
P-50 and cook for 8 – 13 minutes or until
the meat is ready.
– Time in the appliance: 15 – 20 minutes
in total
11.3 Desserts
Strawberry jam
Ingredients:
• 675 g strawberries, hulled
• 3 tablespoons lemon juice
• 675 g caster sugar
Method:
Put the strawberries and lemon juice into
a large bowl. Heat them on P-HI for 4 minutes, or until the fruits are soft. Add the
sugar and mix well. Cook on P-70 for 20
– 25 minutes until setting point is reached.
Page 23

Stir every 4 – 5 minutes. Pour the jam into
clean jars. Cover, seal and label.
To find the setting point place 1 teaspoon
of jam into a chilled saucer. Allow it to
stand for 1 minute. Then move the jam
surface gently with your finger. If the surface of the jam wrinkles, you reached the
setting point.
– Time in the appliance: 24 – 29 minutes
in total
Plain microwave cake
Ingredients:
• 100 g margarine
• 100 g sugar
•1 egg
12. CARE AND CLEANING
ENGLISH 23
• 100 g self raising flour, sifted
• 2 – 3 tablespoons milk
Method:
Cover the bottom of a cake dish with
greaseproof paper. Whip the margarine
with sugar until light and fluffy. Beat in the
egg and gradually add the flour and milk
alternately. Pour the dough into the prepared cake dish. Cook on P-HI for 4 – 5
minutes. Then prick the cake with a toothpick. If the toothpick is not clear, the cake
is not ready yet. Let the cake stand in the
appliance after cooking for additional 5
minutes.
– Time in the appliance: 9 – 10 minutes in
total
WARNING!
Refer to the Safety chapters.
Notes on cleaning:
• Clean the front of the appliance with a
soft cloth with warm water and a cleaning agent.
• To clean metal surfaces, use a usual
cleaning agent.
13. TROUBLESHOOTING
WARNING!
Refer to the Safety chapters.
Problem Possible cause Remedy
The appliance does
not operate.
The appliance does
not operate.
The appliance does
not operate.
The appliance does
not operate.
The lamp does not
operate.
The appliance is deactivated.
The appliance is not plugged in.
The fuse in the fuse box is
blown.
The door is not closed properly.
The lamp is defective. The lamp has to be replace.
• Clean the appliance interior after each
use. Then you can remove dirt more
easily and it does not burn on.
• Clean stubborn dirt with a special
cleaner.
• Clean all accessories regularly and let
them dry. Use a soft cloth with warm
water and a cleaning agent.
Activate the appliance.
Plug in the appliance.
Check the fuse. If the fuse
blows more than one time,
contact a qualified electrician.
Make sure that nothing
blocks the door.
Page 24

www.electrolux.com
24
Problem Possible cause Remedy
There is sparking in
the cavity.
There is sparking in
the cavity.
The turntable set
makes scratching or
grinding noise.
The appliance stop
to operate without a
clear reason.
If you cannot find a solution to the problem yourself, contact your dealer or the
customer service centre.
We recommend that you write the data here:
Model (MOD.) .........................................
Product number (PNC) .........................................
Serial number (S.N.) .........................................
14. INSTALLATION
There are metal dishes or
dishes with metal trim.
There are metal skewers or
aluminium foil that touches
the interior walls.
There is an object or dirt below the glass cooking tray.
Remove the dish from the
appliance.
Make sure that the skewers
and foil does not touch the
interior walls.
Clean the area below the
glass cooking tray.
There is a malfunction. If this situation repeats call
the customer service center.
The necessary data for the customer
service center is on the rating plate on the
appliance.
CAUTION!
Do not block the air vents. If you
do that, the appliance can overheat.
CAUTION!
Do not connect the appliance to
adapters or extension leads. This
can cause overloading and risk of
fire.
• The appliance is for a kitchen counter
top use only. It must be placed on a
stable and flat surface.
• Put the appliance far away from steam,
hot air and water splashes.
• If you transport the appliance in cold
weather, do not activate it immediately
after the installation. Let is stand in the
room temperature and absorb the heat.
14.1 Electrical installation
WARNING!
Only a qualified person must do
the electrical installation.
The manufacturer is not responsible if you do not follow the safety
precautions from the chapter
"Safety Information".
This appliance is supplied with a main cable and main plug.
A
B
C
Minimal distances
Dimension mm
A 170
B 25
C 25
Page 25

15. ENVIRONMENT CONCERNS
ENGLISH 25
Recycle the materials with the symbol
. Put the packaging in applicable
containers to recycle it.
Help protect the environment and human
health and to recycle waste of electrical
and electronic appliances. Do not dispose
appliances marked with the symbol
with the household waste. Return the
product to your local recycling facility or
contact your municipal office.
Page 26

www.electrolux.com
26
Page 27

ENGLISH 27
Page 28

www.electrolux.com/shop
892961007-A-512012
 Loading...