

Page 1
user manual
notice d'utilisation
Gas hob
Table de cuisson gaz
FR
EHT70830X
Page 2

2 electrolux
Electrolux. Thinking of you.
Share more of our thinking at www.electrolux.com
CONTENTS
Safety information 2
Installation 4
Product description 7
Operation 7
Helpful hints and tips 8
SAFETY INFORMATION
Warning! These instructions are only
valid in the countries whose symbols
appear on this booklet's cover.
For your safety and correct operation
of the appliance, read this manual
carefully before installation and use. Always keep these instructions with the
appliance even if you move or sell it.
Users must fully know the operation
and safety features of the appliance.
General safety
Warning! Persons (including children)
with reduced physical sensory, mental
capabilities or lack of experience and
knowledge must not use the appliance.
They must have supervision or
instruction for the operation of the
appliance by a person responsible for
their safety.
Child safety
• Only adults can use this appliance. Children must get supervision to make sure
that they do not play with the appliance.
• Keep all packaging away from children.
There is a risk of suffocation and physical
injury.
• Keep children away from the appliance
during and after the operation, until the
appliance is cold.
Use
• Remove all packaging, stickers and the
protective layer of the stainless steel hob
panel (if present) from the appliance before first use. Do not remove the rating
plate. It can invalidate the guarantee.
Care and cleaning 9
What to do if… 10
Technical data 11
Environment concerns 11
Subject to change without notice
• Set the cooking zones to the "off" position after each use.
• Burners and accessible part become hot
during and after use. Do not put cutlery
or saucepan lids on the cooking surface.
Cookware and its contents can tip over.
There is the risk of burns.
• Too hot fats and oils can ignite very
quickly. There is the risk of fire.
• Do not leave the appliance unattended
during operation.
• Always monitor the appliance during operation.
• Do not let the liquids overflow into the
holes of the top of the hob
• Do not use the hob without cookware.
• The appliance is only for domestic use.
Do not use the appliance for commercial
and industrial use.
• Only use the appliance for domestic
cooking tasks. This is to prevent physical
injury to persons or prevent damage to
property.
• Use only cookware with diameter applicable to the dimensions of burners. There
is a risk of overheating and rupture of the
glass plate (if applicable).
• Do not use a pan with diameter smaller
than burner dimension - flames will heat
up the pan handle.
• Pots must not enter the control zone.
• Do not use not stable cookware to prevent from tilt and accident.
• Do not put flammable products or items
that are wet with flammable products,
and/or fusible objects (made of plastic or
aluminium) and/or fabrics in, near or on
the appliance. There is the risk of explosion or fire.
Page 3

electrolux 3
• Use only the accessories supplied with
appliance.
• Be careful when you connect the appliance to the near sockets. Do not let electricity bonds touch the appliance or hot
cookware. Do not let electricity bonds
tangle.
• If there is a crack on the surface, disconnect power supply to prevent the electric
shock.
Installation
You must read these instructions.
•
The manufacturer is not responsible
for any injury to persons and pets or
damage to property caused by failure
to obey these requirements.
• To prevent the risks of structural
damage or physical injury, installation, connection of the appliance to
the power supply and gas system,
setting up and maintenance must only be done by qualified personnel in
compliance with standards and local
regulation force.
• Make sure that the appliance is not damaged because of transport. Do not connect a damaged appliance. If it is necessary, speak to the supplier.
• Only use built-in appliances after you assemble the appliance into correct built-in
units and work surfaces that obey the
standards.
• Do not install the hob over a domestic
appliances if the installation instructions
do not allow it.
• Install the appliance only on a worktop
with flat surface.
• Do not change the specifications or modify this product. There is the risk of injury
and damage to the appliance.
• Fully obey the laws, ordinances, directives and standards in force in the country where you use the appliance (safety
regulations, recycling regulations, electrical safety rules etc.)
• Keep the minimum distances to other appliances and units.
• Install anti-shock protection, for example
install the drawers only with a protective
panel directly below the appliance.
• Prevent damage of the cut surfaces of
the worktop against moisture with a correct sealant.
• Seal the appliance to the worktop with no
space left with a correct sealant.
• Prevent damage to the bottom of the appliance from steam and moisture, e.g.
from a dishwasher or oven.
• Do not install the appliance adjacent to
doors and below windows. Hot cookware can be hit off the hob when you
open the doors or windows.
• Before installation, make sure that the local supply conditions (gas type and pressure) agree with the adjustment of appliance. The adjustment conditions for the
appliance are on the rating plate, which
you can find near the gas supply pipe.
• This appliance is not connected to a
combustion products evacuation device.
It must be installed and connected in accordance with current installation regulations. Particular attention must be given
to the relevant requirements regarding
ventilation.
• The use of a gas cooking appliance
cause heat and moisture in the room
in which it is installed. Make sure
that the ventilation in the kitchen is
good: keep natural ventilation holes
open or install a mechanical ventilation device (mechanical extractor
hood).
• More ventilation (for example opening of a window or increasing the level of mechanical ventilation where
present) is necessary when you operate the appliance with intensity for a
long time.
• Carefully obey the instructions for electrical connections. There is the risk of injury
from electrical current.
• Disconnect the appliance from the
electrical supply, before you do the
maintenance work or you clean it.
• The electrical mains terminal is live.
• Make electrical mains terminal free of
voltage.
• Install correctly to give anti-shock protection.
• A loose and incorrect mains plug and
socket connections can make the terminal become too hot.
Page 4
4 electrolux
• A qualified electrician must install the
clamping connections correctly.
• Use a strain relief clamp on cable.
• Use the correct mains connection cable
and replace the damaged mains cable
with applicable cable. Speak to your local
Service Force Centre.
• The appliance must have the electrical installation which lets you disconnect the
appliance from the mains at all poles with
a contact opening width of minimum 3
mm.
• If the fixing bracket is near to the terminal
block, always make sure the connection
cable does not come in contact with the
edge of the bracket.
INSTALLATION
Warning! The following instructions
about installation, connection and
maintenance must be carried out by
qualified personnel in compliance with
standards and local regulations in
force.
Gas Connection
Choose fixed connections or use a flexible
pipe in stainless steel in compliance with
the regulation in force. If you use flexible
metallic pipes, be careful they do not come
in touch with mobile parts or they are not
squeezed. Also be careful when the hob is
put together with an oven.
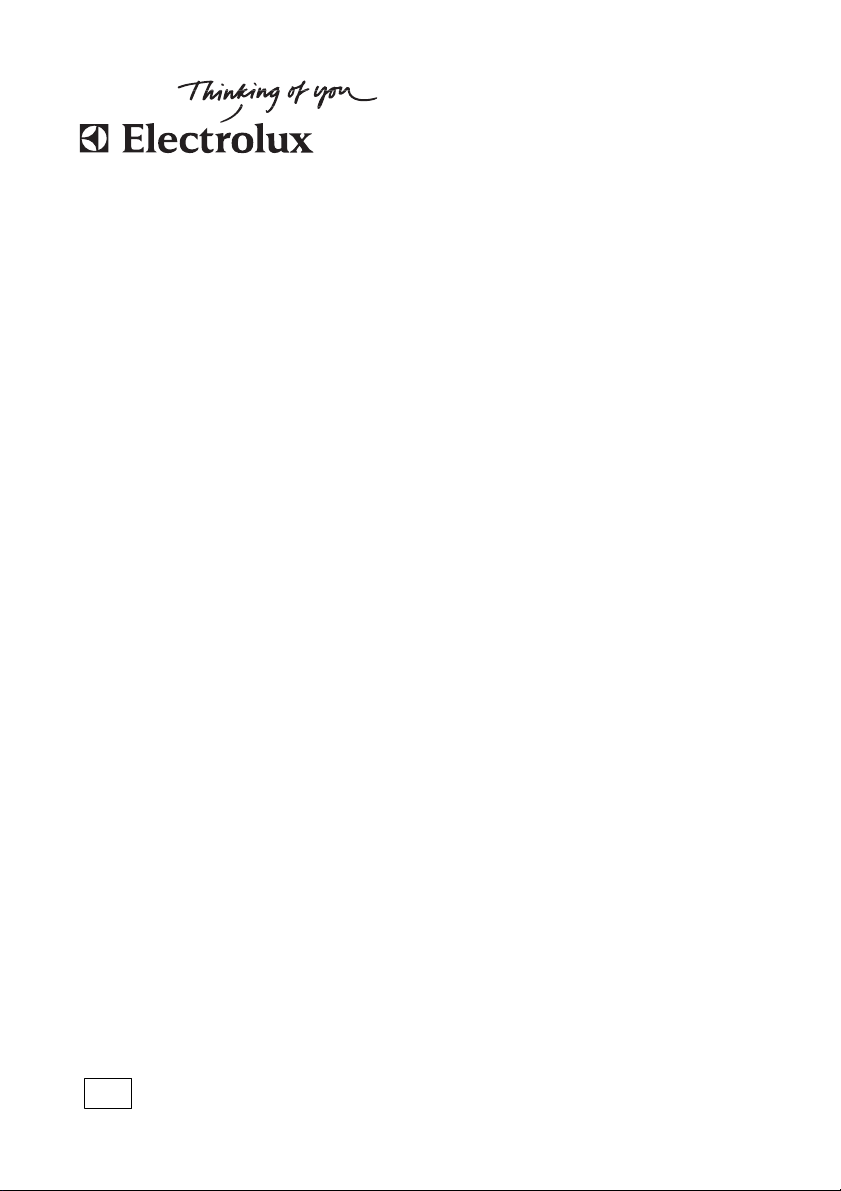
Important! Make sure that the gas supply
pressure of the appliance obeys the
recommended values. The adjustable
connection is fixed to the comprehensive
ramp by means of a threaded nut G 1/2".
Screw the parts without force, adjust the
connection in the necessary direction and
tighten everything.
• You must have correct isolation devices:
line protecting cut-outs, fuses (screw
type fuses removed from the holder),
ground leakage trips and contactors.
Disposal of the appliance
• To prevent the risk of physical injury or
damage
– Disconnect the appliance from the
power supply.
– Cut off the mains cable where it con-
nects with the appliance and discard it.
– Flat the external gas pipes if there are
fitted.
– Speak to your local authorised facilities
for disposal of your appliance.
1
2
3
2
4
1 End of shaft with nut
2 Washer (additional washer is only for
Slovenia and Turkey)
3 Elbow
4 Rubber pipe holder for liquid gas (only
for Slovenia and Turkey)
Rigid connection:
Carry out connection by using metal rigid
pipes (copper with mechanical end).
"Flexible" connection with mechanical
end:
– Natural gas: connection carry out with a
flexible pipe with mechanical end which is
screwed directly on the elbow finishing
the slope of the appliance.
Page 5

electrolux 5
– Butane / Propane: use a flexible tube,
equipped with it's collars if it is worth visiting over all it's length and if the appliance runs only on butane. If the appliance runs on Propane, use a flexible pipe
with suitable metal end.
Flexible nonmetal pipes connection:
If it is possible to easily control the connection in its full area, you can use a flexible
pipe. Tightly attach the flexible pipe by
clamps.
Liquid gas: use the rubber pipe holder. Always engage the gasket. Then continue
with the gas connection. The flexible pipe is
prepared for apply when:
– it can not get hot more than room tem-
perature, higher than 30°C;
– it is no longer than 1500 mm;
– it shows no throttles;
– it is not subject to traction or torsion;
– it does not get in touch with cutting
edges or corners;
– it can be easily examined in order to
check its condition.
The control of preservation of the flexible
pipe consists in checking that:
– it does not show cracks, cuts, marks of
burnings on the two ends and on its full
length;
– the material is not hardened, but shows
its correct elasticity;
– the fastening clamps are not rusted;
– expired term is not due.
If one or more defects are visible, do not repair the pipe, but replace it.
Important! When installation is complete,
make sure that the seal of each pipe fitting
is correct. Use a soapy solution, not a
flame!
Injectors replacement
1. Remove the pan supports.
2. Remove the caps and crowns of the
burner.
3. With a socket spanner 7 remove the in-
jectors and replace them with the ones
which are necessary for the type of gas
you use (see table in Technical Data
section).
4. Assemble the parts, follow the same
procedure backwards.
5. Replace the rating plate (it is near the
gas supply pipe) with the one for the
new type of gas supply. You can find
this plate in the package supplied with
the appliance.
If the supply gas pressure is changeable or
different from the necessary pressure, you
must fit an applicable pressure adjuster on
the gas supply pipe.
Adjustment of minimum level
To adjust the minimum level of the burners:
1. Light the burner.
2. Turn the knob on the minimum position.
3. Remove the knob.
4. With a thin screwdriver, adjust the bypass screw position.
1
1 The by-pass screw
– If you change from natural gas to liq-
uid gas, fully tighten the by-pass
screw in.
– If you change from liquid gas to natu-
ral gas, undo the by-pass screw approximately 1/4 of a turn (1/2 of a
turn for Triple Crown burner).
Warning! Make sure the flame does
not go out when you quickly turn the
knob from the maximum position to the
minimum position.
Electrical connection
• Ground the appliance according to safety
precautions.
• Make sure that the rated voltage and
type of power on the rating plate agree
with the voltage and the power of the local power supply.
Page 6
6 electrolux
• This appliance is supplied with a mains
cable. It has to be supplied with a correct
plug, able to support the load marked on
the rating plate. The plug has to be fitted
in a correct socket.
• Any electrical component must be installed or replaced by the Service Force
Centre technician or qualified service personnel.
• Always use a correctly installed shockproof socket.
• Make sure that there is an access to the
mains plug after installation.
• Do not pull the mains cable to disconnect
the appliance. Always pull the mains
plug.
• The appliance must not be connected
with an extension cable, an adapter or a
multiple connection (risk of fire). Check
that the ground connection is in conformity with the standard and regulations
force.
• The power cable must be placed in such
a way that it does not touch any hot part.
• Connect the appliance to the mains with
a device that lets to disconnect the appliance from the mains at all poles with a
contact opening width of minimum 3
mm, eg. automatic line protecting cutout, earth leakage trips or fuse.
• None of a parts of the connection cable
can not get a temperature 90 °C. The
blue neutral cable must be connected to
the terminal block label with "N". The
brown (or black) phase cable (fitted in the
terminal block contact marked with "L")
must always be connected to the live
phase.
Replacement of the connection cable
To replace the connection cable use only
H05V2V2-F T90 or equivalent type. Make
sure that the cable section is applicable to
the voltage and the working temperature.
The yellow/green earth wire must be approximately 2 cm longer than the brown (or
black) phase wire.
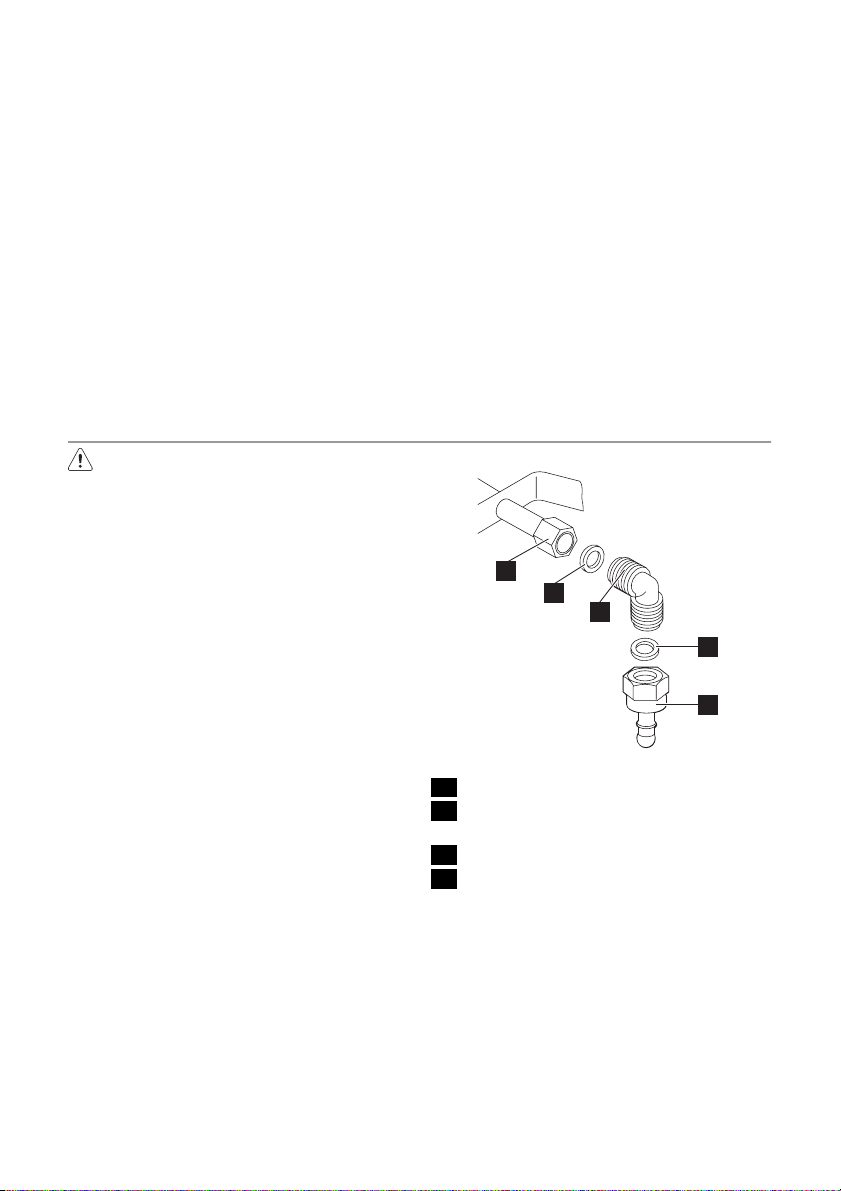
Building In
min. 600 mm
min. 450 mm
min. 55 mm
30 mm
480 mm
min. 650 mm
560 mm
A
A
B
A) supplied seal
B) supplied brackets
Possibilities for insertion
Kitchen unit with door
The panel installed below the hob must be
easy to remove and let an easy access in
case a technical assistance intervention is
necessary.
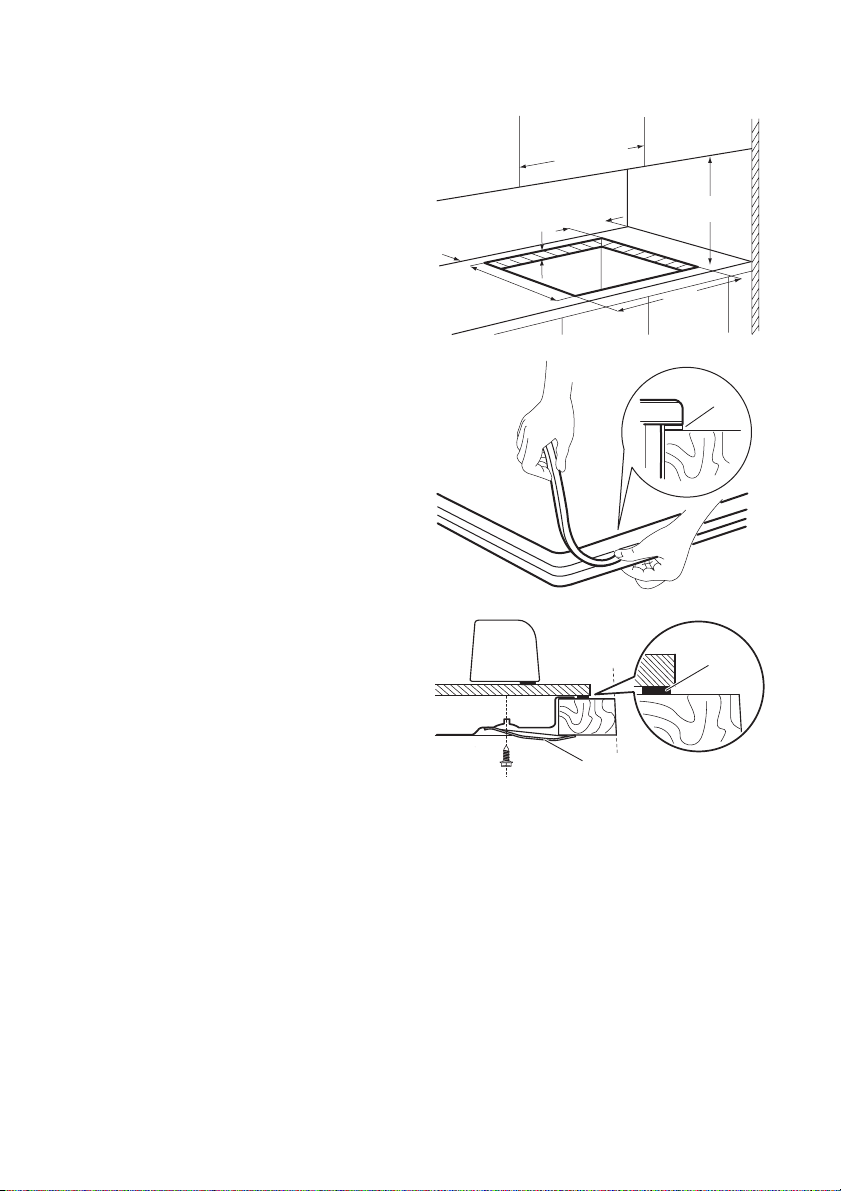
Page 7
60 mm
b
electrolux 7
supply of air. The electrical connection of
30 mm
the hob and the oven must be installed
separately for safety reasons and to let easy
remove oven from the unit.
a
min 20 mm
(max 150 mm)
50 cm
2
120 cm
2
a) Removable panel
b) Space for connections
Kitchen unit with oven
The hob recess dimensions must obey the
indication and the kitchen unit must be
equipped with vents to let a continuous
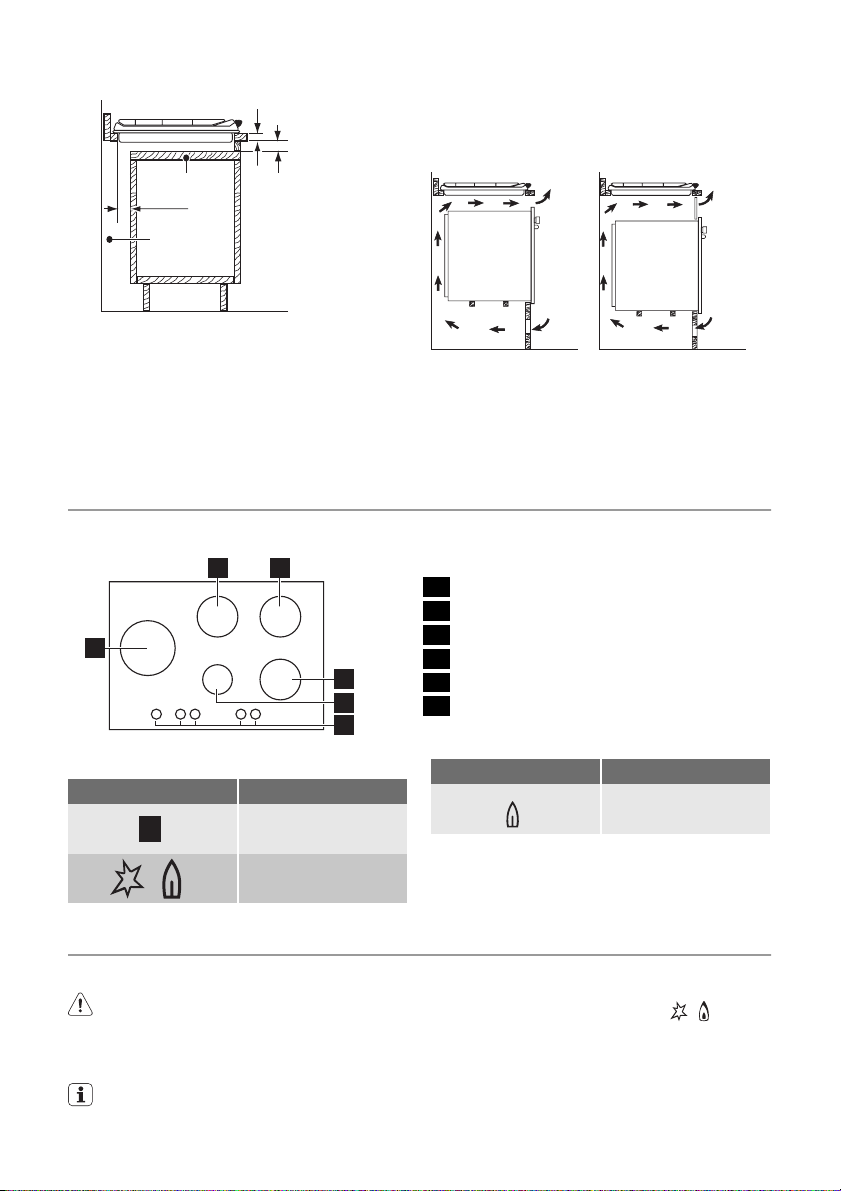
PRODUCT DESCRIPTION
Cooking surface layout
2 3
1
4
5
6
Control knobs
Symbol Description
no gas supply / off
position
ignition position /
maximum gas supply
2
360 cm
MANUFACTURER:
ELECTROLUX ITALIA S.p.A.
C.so Lino Zanussi, 30
33080 PORCIA (PN) - ITALIA
1 Triple Crown burner
2 Semi-rapid burner
3 Semi-rapid burner
4 Semi-rapid burner
5 Auxiliary burner
6 Control knobs
Symbol Description
minimum gas supply
180 cm
2
OPERATION
Ignition of the burner
Warning! Be very careful when you
use open fire in kitchen environment.
Manufacturer decline any responsibility
in case misuse of the flame
Always light the burner before you put
cookware.
To light the burner:
1. Turn the control knob counterclockwise
to the maximum position (
) and
push it down.
2. Keep the control knob pushed for approximately 5 seconds; this will let thermocouple to warm up. If not, the gas
supply will be interrupted.
Page 8

8 electrolux
3. Adjust the flame after it is regular.
If after some tries the burner does not
light, check if the crown and its cap are
in correct positions.
1 Burner cap and crown
2 Thermocouple
3 Ignition candle
2 Burner crown
3 Ignition candle
4 Thermocouple
Warning! Do not keep the control
knob pushed for more than 15
seconds.
1
If the burner does not light after 15
seconds, release the control knob, turn
it into off position and try to light the
burner again after minimum 1 minute.
Important! In the absence of electricity you
can ignite the burner without electrical
2
device; in this case approach the burner
with a flame, push the relevant knob down
and turn it counter-clockwise to maximum
3
gas release position.
If the burner accidentally goes out, turn
the control knob to the off position and
try to light the burner again after minimum 1 minute.
The spark generator can start automatically when you switch on the mains,
after installation or a power cut. It is
1
normal.
Turning the burner off
To put the flame out, turn the knob to the
2
symbol
.
Warning! Always turn the flame down
or switch it off before you remove the
3
pans of the burner.
4
1 Burner cap
HELPFUL HINTS AND TIPS
Energy savings
• If possible, always put the lids on the
pans.
• When the liquid starts to boil, turn down
the flame to barely simmer the liquid.
Warning! Use pots and pans with
diameter applicable to the dimension of
burner.
Do not use cooking vessels on the hotplate that overlap its edges.
Burner Diameters of cookware
Triple Crown 180 - 280 mm
Semi-rapid
(rear left)
Semi-rapid
(rear right)
120 - 240 mm
120 - 240 mm
Page 9
electrolux 9
Burner Diameters of cookware
Semi-rapid
(front right)
Auxiliary 80 - 180 mm
120 - 220 mm
Warning! Pots must not enter the
control zone.
Warning! Make sure pot handles do
not protrude over the front edge of the
cooktop and that pots are centrally
positioned on the rings in order to
achieve maximum stability and to
obtain lower gas consumption.
Do not place unstable or deformed pots on
the rings to prevent from spill and injury.
CARE AND CLEANING
Warning! Switch the appliance off and
let it cool down before you clean it.
Disconnect the appliance from the
electrical supply, before carrying out
any cleaning or maintenance work.
Warning! For safety reasons, do not
clean the appliance with steam
cleaners or high-pressure cleaners.
Warning! Do not use abrasive
cleaners, steel wool pads or acids, they
can cause damage to the appliance.
Scratches or dark stains on the glass
have no effect on how the appliance
operates.
• You can remove the pan supports to
easily clean the hob.
• To clean the enamelled parts, cap and
crown, wash it with warm soapy water
and dry it carefully before you put them
back.
• Stainless steel parts wash with water,
and then dry with a soft cloth.
• The pan supports are not dishwasher
proof; they must be washed by hand.
• When you wash the pan supports by
hand, take care when you dry them as
the enamelling process occasionally
leaves rough edges. If necessary, remove
stubborn stains using a paste cleaner.
• Make sure you position the pan supports
correctly after cleaning.
Warning! Flame diffuser are not
recommended.
Do not simmer for a long time with cast
iron pans and potstones.
Warning! Do not put the aluminium foil
on the hob top to keep the surface
clean during the cooking
Warning! Use cast iron pots and pans
only on the Triple Crown and rear
burners.
• To make burners work correctly, make
sure that the arms of the pan supports
are in the centre of the burner.
Be very careful when you replace the
•
pan supports to prevent the hob top
from damage.
After cleaning, dry the appliance with a soft
cloth.
Removing the dirt:
1. – Remove immediately: melting plas-
tic, plastic foil, and food containing
sugar.
– Stop the appliance and let it cool
down before you clean: limescale
rings, water rings, fat stains, shiny
metallic discolorations. Use a special
cleaner applicable for surface of hob.
2. Clean the appliance with a damp cloth
and some detergent.
3. At the end rub the appliance dry
with a clean cloth.
Cleaning of the spark plug
This feature is obtained through a ceramic
ignition candle with a metal electrode. Keep
these components well clean to prevent difficult lighting and check that the burner
crown holes are not obstructed.
Periodic maintenance
Periodically speak your local Service Force
Centre to check the conditions of the gas
supply pipe and the pressure adjuster, if fitted.
Page 10

10 electrolux
WHAT TO DO IF…
Problem Possible cause Remedy
There is no spark when lighting
the gas
• Burner cap and crown are
The flame is blow out immediately after ignition
The gas ring burns unevenly • Burner crown is blocked with
If there is a fault, first try to find a solution to
the problem yourself. If you cannot find a
solution to the problem yourself, speak your
dealer or the local Service Force Centre.
If you operated the appliance incorrectly, or the installation was not carried
out by a registered engineer, the visit
from the customer service technician or
• There is no electrical supply • Make sure that the unit is
placed uneven
• Thermocouple is not heated
sufficient
food residues
dealer may not take place free of
charge, even during the warranty period.
Labels supplied with the accessories
bag
Stick the adhesive labels as indicated below:
connected and the electrical
supply is switched on.
• Control the fuse. If the fuse is
released more than one time,
refer to a qualified electrician.
• Make sure that the burner
cap and crown are in correct
positions.
• After lightning the flame,
keep the knob pushed for
approximately 5 seconds.
• Make sure that the injector is
not blocked and the burner
crown is clear of food particles.
1 2 3
MOD.
PROD.NO.
SER.NO
DATA
MOD.
PROD.NO.
SER.NO
DATA
MODELMODEL
1 Stick it on Guarantee Card and send
this part
2 Stick it on Guarantee Card and keep
this part
3 Stick it on instruction booklet
0049
03 IT
MADE IN ITALY
MOD.
PROD.NO.
SER.NO.
TYPE
230V-50Hz
IP20
These data are necessary to help you
quickly and correctly. These data are
available on the supplied rating plate.
• Model description .................
• Product number (PNC) .................
• Serial Number (S.N.) .................
Page 11

Use the original spare parts only. They are
available at Service Force Centre and approved spare parts shops.
TECHNICAL DATA
electrolux 11
Hob dimensions
Width: 740 mm
Length: 510 mm
Hob recess dimensions
Width: 560 mm
Length: 480 mm
Heat input
Triple Crown burner: 3.8 kW
Semi-rapid burner: 1.9 kW
Auxiliary burner: 1.0 kW
TOTAL POWER: G20/G25 (2E+) 20/25
mbar = 10.5 kW
G30 (3+) 28-30 mbar
= 763 g/h
G31 (3+) 37 mbar =
750 g/h
G130 (1c) 8 mbar =
10.4 kW
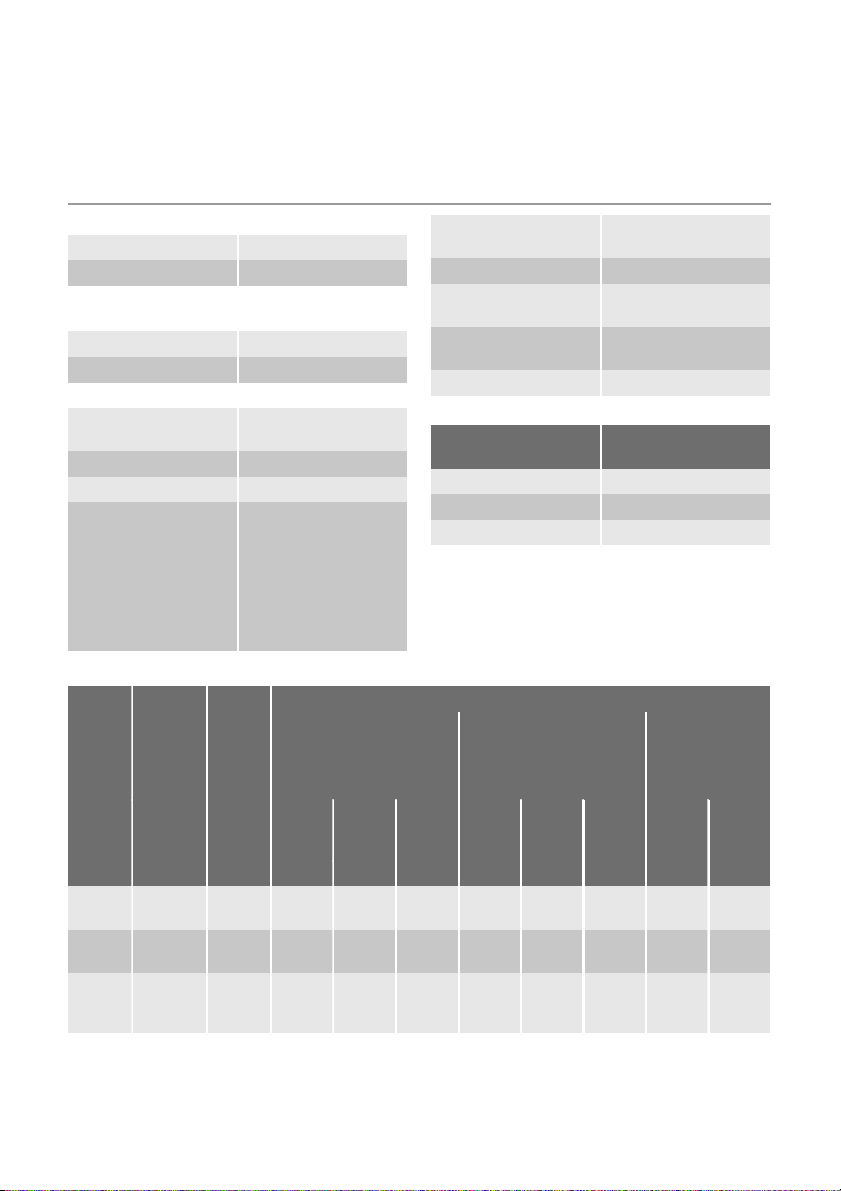
Gas burners
RE-
DUC-
ED
POW-
ER
NATURAL GAS
G20/G25 (2E+) 20/25
mbar
G20
inj.
1/100
mm
20
mbar
m³/h m³/h g/h g/h
BURN
ER
Auxiliary
Semirapid
Triple
Crown
NOR-
MAL
POW-
ER
kW kW
1.0 0.33 70 0.095 0.111 50 73 71 127 0.140
1.9 0.45 96 0.181 0.210 71 138 136 195 0.266
3.8 1.4 146 0.362 0.421 98 276 271 348 0.517
Electric supply: 230 V ~ 50 Hz
Category: III1c2E+3+
Gas connection: G 1/2"
Gas supply: G20/G25 (2E+) 20/25
Appliance class: 3
mbar
By-pass diameters
Burner Ø By-pass in 1/100
Auxiliary 28
Semi-rapid 32
Triple Crown 56
NORMAL POWER
LPG (Butane/Propane)
(3+) 28-30/37 mbar
G25
mbar
25
inj.
1/100
mm
G30
28-30
mbar
G31
37
mbar
mm.
TOWN GAS
G130 (1c) 8
inj.
1/100
mm
mbar
m³/h
ENVIRONMENT CONCERNS
The symbol on the product or on its
packaging indicates that this product may
not be treated as household waste. Instead
it should be taken to the appropriate
collection point for the recycling of electrical
and electronic equipment. By ensuring this
product is disposed of correctly, you will
help prevent potential negative
consequences for the environment and
human health, which could otherwise be
caused by inappropriate waste handling of
this product. For more detailed information
Page 12

12 electrolux
about recycling of this product, please
contact your local council, your household
waste disposal service or the shop where
you purchased the product.
Packaging material
The packaging materials are friendly to
the environment and can be recycled.
The plastic components are identified
by marking: >PE<,>PS<, etc. Discard
the packaging materials as household
waste at the waste disposal facilities in
your municipality.
Page 13

Electrolux. Thinking of you.
Partagez notre imagination sur www.electrolux.com
SOMMAIRE
Consignes de sécurité 13
Installation 15
Description de l'appareil 19
Fonctionnement 19
Conseils utiles 20
CONSIGNES DE SÉCURITÉ
Avertissement Ces instructions
s'appliquent uniquement aux pays dont
les symboles figurent sur la couverture
de cette notice d'utilisation.
Pour votre sécurité et le bon fonctionnement de l'appareil, lisez attentivement ce manuel avant l'installation et
l'utilisation. Conservez ces instructions
à proximité de l'appareil. Les utilisateurs doivent connaître parfaitement le
fonctionnement et les fonctions de sécurité de l'appareil.
Avertissements importants
Avertissement Cet appareil n'est pas
conçu pour être utilisé par des
personnes (y compris des enfants) dont
les facultés physiques, sensorielles ou
mentales sont réduites, ou qui
manquent d'expérience et de
connaissances, à moins qu'une
personne responsable de leur sécurité
ne les supervise ou leur donne des
instructions sur la manière de l'utiliser.
Sécurité enfants
• Cet appareil ne doit être utilisé que par
des adultes Surveillez les enfants, pour
vous assurer qu'ils ne jouent pas avec
cet appareil.
• Ne laissez aucun emballage à la portée
des enfants. Ils risquent en effet de
s'étouffer ou de se blesser.
• Ne laissez pas les enfants s'approcher
de l'appareil pendant ou après son utilisation, et cela jusqu'à ce qu'il soit froid.
electrolux 13
Entretien et nettoyage 21
En cas d'anomalie de fonctionnement 22
Caractéristiques techniques 23
En matière de protection de
l'environnement 24
Sous réserve de modifications
Application
• Retirez tous les emballages, les étiquettes et le film protecteur du panneau de la
table de cuisson en acier inoxydable (le
cas échéant) avant de l’utiliser pour la
première fois. Ne retirez pas la plaque signalétique Cela peut annuler la garantie.
• Mettez à l'arrêt les zones de cuisson
après chaque utilisation.
• Les brûleurs et les parties accessibles
sont chauds pendant et après la cuisson.
Ne posez pas de couverts ou de couvercles sur le plan de cuisson. Les récipients
et leur contenu peuvent basculer. Risque
de brûlure.
• Surveillez attentivement la cuisson lors de
friture dans l'huile ou la graisse : les
graisses surchauffées s'enflamment facilement. Risque d'incendie !
• Ne laissez pas l'appareil sans surveillance
en cours de fonctionnement.
• Surveillez toujours l'appareil pendant son
fonctionnement.
• Evitez tout écoulement dans les orifices
de la table de cuisson.
• N'utilisez jamais l'appareil sans récipients
de cuisson dessus.
• Cet appareil est destiné à un usage domestique normal. N'utilisez jamais l'appareil à des fins commerciales ou industrielles.
• Votre appareil est destiné à la cuisson
des aliments. Vous éviterez ainsi des risques matériels et corporels.
• Utilisez uniquement des récipients dont le
diamètre correspond aux diamètres indiqués pour chaque zone de cuisson. Risque de surchauffe et de rupture de la ta-
Page 14

14 electrolux
ble en verre (si votre appareil en est équipé) !
• N'utilisez pas un récipient dont le diamètre est plus petit que celui de la zone de
cuisson - la flamme va s'étendre et surchauffer la poignée du récipient.
• Les récipients ne doivent pas entrer en
contact avec les commandes.
• N'utilisez pas de récipients de cuisson
instables : ils peuvent se renverser et
provoquer un accident.
• Ne conservez pas ou ne placez pas de
produits inflammables (ou d'éléments imbibés de produits inflammables, et/ou
des produits susceptibles de fondre
(plastique, aluminium,...) ou du matériel
(torchon,...) sur ou à proximité de l'appareil. Risque d'explosion ou d'incendie !
• N'utilisez que les accessoires fournis
avec l'appareil.
• Faites attention si vous branchez d'autres
appareils électriques à des prises situées
à proximité de la table de cuisson. Contrôlez que les câbles d'alimentation n'entrent pas en contact avec les surfaces
brûlantes de l'appareil ou les récipients
brûlants. Contrôlez que les câbles ne
soient pas enchevêtrés.
• Si votre table de cuisson est endommagée (éclat, fêlure,...), débranchez-la de la
prise électrique pour éviter tout risque
d'électrocution.
Installation
• Veuillez lire attentivement cette notice d'utilisation. Le fabricant ne pourra être tenu pour responsable en cas
de dommages corporels ou matériels
résultant du non-respect des prescriptions suivantes.
Pour éviter tout risque (mobilier, im-
•
mobilier, corporel,...), l'installation,
les raccordements (gaz, électricité,...), la mise en service et la maintenance de votre appareil doivent être
effectués uniquement par un professionnel qualifié, selon les normes et
règlements en vigueur.
• Vérifiez que l'appareil n'a pas été endommagé pendant le transport. Ne branchez
jamais un appareil endommagé. Si nécessaire, contactez le magasin vendeur.
• N'utilisez les appareils encastrables
qu'après les avoir installés dans des
meubles d'encastrement appropriés et
qui répondent aux normes en vigueur.
• N'installez pas la table de cuisson audessus d'un appareil électroménager si
celui-ci ne l'a pas formellement prévu.
• Installez l'appareil uniquement sur un
plan de travail dont la surface est plane.
• Ne modifiez pas ou n'essayez pas de
modifier les caractéristiques de cet appareil. Vous risqueriez de vous blesser et
d'endommager l'appareil.
• Respectez la législation, la réglementation, les directives et les normes en vigueur dans le pays où est installé l'appareil (réglementations de sécurité sur le recyclage, consignes de sécurité électrique
et/ou gaz).
• Respectez l'espacement minimal requis
par rapport aux autres appareils.
• La protection contre les contacts accidentels doit être assurée par le montage,
par exemple les tiroirs doivent être installés uniquement avec un panneau de protection directement sous l'appareil.
• Pour protéger l'appareil de l'humidité,
mettez du mastic (joint) adapté sur les
surfaces de découpe du plan de travail.
• Le joint comble les fentes entre le plan de
travail et l'appareil.
• Protégez la partie inférieure de l'appareil
de la vapeur et de l'humidité émanant,
par exemple, d’un lave-vaisselle ou d'un
four.
• N'installez pas l'appareil à proximité
d'une porte ou sous une fenêtre. Les récipients chauds sur la table de cuisson
pourraient se renverser à l'ouverture de
celles-ci.
• Avant d'installer et d'utiliser l'appareil, assurez-vous que les réglages de l'appareil
soient compatibles avec les conditions
d'installation du local (type de gaz, pression du gaz,...). Les paramètres de réglage de l'appareil figurent sur la plaquette
située à proximité du tuyau d'arrivée du
gaz.
• Cet appareil n’est pas raccordé à un dispositif d’évacuation des produits de combustion. Il doit être installé et raccordé
conformément aux règles d’installation en
vigueur. Une attention particulière sera
accordée aux dispositions applicables en
matière de ventilation.
Page 15

electrolux 15
• L'utilisation d'un appareil de cuisson
au gaz conduit à la production de
chaleur et d'humidité dans la pièce
où il est installé. Veillez à assurer une
bonne aération de la cuisine : maintenez ouverts les orifices d'aération
naturelle ou installez un dispositif
d'aération mécanique (hotte à extraction mécanique).
• Une utilisation intensive et prolongée
de l'appareil peut nécessiter une aération supplémentaire en ouvrant la
fenêtre, ou une aération plus efficace, par exemple en augmentant la
puissance de la ventilation mécanique (si elle existe).
• Les opérations d'installation et de branchement doivent être réalisées par un
technicien qualifié. Risque de blessure
due à un choc électrique !
• Débranchez l'appareil du réseau
électrique avant toute opération de
nettoyage ou d'entretien.
• La borne d'alimentation est sous tension.
• Mettez la borne d'alimentation hors tension.
• Assurez-vous que l'appareil est correctement installé de manière à éviter tout
contact.
• Si les prises males et femelles sont mal
serrées ou mal installées, la borne peut
surchauffer.
• Le raccordement électrique ne doit être
effectué que par un électricien qualifié.
• Le câble ne doit pas être tendu.
• Utilisez le câble d'alimentation approprié
et remplacez-le par un câble spécialement adapté s'il est endommagé. Adressez-vous à votre service après vente
pour le remplacement du câble d'alimentation.
• Dans le cas d'une installation fixe, le raccordement au réseau doit être effectué
par l'intermédiaire d'un interrupteur à
coupure omnipolaire, ayant une distance
d'ouverture des contacts d'au moins 3
mm.
• Si la patte de scellement se trouve à
proximité du répartiteur, vérifiez toujours
que le câble d'alimentation n'entre pas
en contact avec le bord de la patte.
• Les dispositifs d'isolement comprennent :
des disjoncteurs, des fusibles (les fusibles
à visser doivent être retirés du support),
des disjoncteurs différentiels et des contacteurs.
Mise au rebut de l'appareil
• Pour éviter tout dommage corporel ou
matériel.
– Débranchez l'appareil électriquement.
– Coupez le câble d'alimentation au ras
de l'appareil et mettez-le au rebut.
– Ecrasez les tuyaux de gaz extérieures,
s'ils existent.
– Informez-vous auprès des services de
votre commune des endroits autorisés
pour la mise au rebut de l'appareil.
INSTALLATION
Avertissement Les instructions
suivantes concernant l’installation, le
raccordement et la maintenance de
l'appareil doivent être effectuées par un
professionnel qualifié selon les normes
et règlements en vigueur.
Raccordement au gaz
Choisissez un raccordement fixe ou utilisez
un tuyau flexible en acier inoxydable conforme à la réglementation en vigueur. Si vous
utilisez des tuyaux métalliques flexibles, assurez-vous qu'ils n'entrent pas en contact
avec les parties mobiles et qu'ils ne sont
pas tordus. Faites également attention lorsque la table de cuisson est reliée à un four.
Important Assurez-vous que la pression
d’alimentation de l'appareil répond aux
valeurs recommandées. Le raccordement
réglable est relié à la rampe complète par
un écrou fileté G 1/2". Vissez les pièces
sans forcer, réglez le raccordement dans le
sens nécessaire et serrez le tout.
Page 16

16 electrolux
1
2
3
2
4
1 Extrémité de l'arbre avec écrou
2 Rondelle (la rondelle supplémentaire ne
concerne que la Slovénie et la Turquie)
3 Coude
4 Porte-tuyau en caoutchouc pour gaz li-
quide (uniquement pour la Slovénie et
la Turquie)
Raccordement rigide :
Effectuez le raccordement en utilisant des
tuyaux métalliques rigides (en cuivre avec
embout mécanique).
Raccordement « flexible » avec embout
mécanique :
– Gaz naturel : le raccordement s'effectue
avec un tuyau flexible à embout mécanique qui se visse directement sur le coude
terminant la rampe de l'appareil.
– Butane / Propane : Un tube souple,
équipé de ses colliers, peut être utilisé s'il
est visitable sur toute sa longueur et si
l'appareil ne fonctionne qu'au butane. Si
l'appareil fonctionne au propane, il faut
utiliser un tuyau flexible à embout métallique approprié.
Raccordement de tuyaux flexibles non
métalliques :
S'il est visitable sur toute sa longueur, vous
pouvez utiliser un tuyau flexible. Fixez fermement le tuyau flexible à l'aide de colliers.
Gaz liquide : utilisez le détendeur en
caoutchouc. Intercalez toujours le joint.
Continuez alors le raccordement au gaz. Le
tuyau flexible s'applique lorsque :
– il ne doit pas devenir plus chaud que la
température ambiante, à savoir plus de
30 °C ;
– il n'est pas plus long que 1,50 m ;
– il ne montre aucun étranglement ;
– il n'est soumis à aucune traction et aucu-
ne torsion ;
– il n'entre pas en contact avec la découpe
ou les coins tranchants ;
– il est visitable sur toute sa longueur afin
de vérifier son état.
Vérifiez les points suivants pour contrôler le
bon état du tuyau flexible :
– il ne présente aucune fente, coupure,
marque de brûlure sur les deux extrémi-
tés et sur toute sa longueur ;
– le matériau n'est pas durci, mais présen-
te une élasticité correcte ;
– les colliers de serrage ne sont pas rouil-
lés ;
– la date d'expiration n'est pas passée.
Si vous constatez au moins un de ces défauts, ne réparez pas le tuyau, mais remplacez-le.
Important Quand l'installation est
terminée, assurez-vous que chaque
raccord est étanche en utilisant une
solution savonneuse, et non une flamme !
Remplacement des injecteurs
1. Enlevez les supports de casseroles.
2. Retirez le chapeau et la couronne du
brûleur.
3. À l'aide d'une clé 7, retirez les injec-
teurs et remplacez-les par ceux requis
pour le type de gaz utilisé (reportezvous au tableau de la section Caractéristiques techniques).
4. Assemblez les pièces, en suivant la
même procédure dans l'ordre inverse.
5. Remplacez l'étiquette (qui se trouve
près du tuyau d'arrivée du gaz) par
celle qui est prévue pour le nouveau type d'alimentation au gaz. Vous trouverez cette étiquette dans le sachet fourni
avec l'appareil.
Si la pression du gaz d'alimentation est variable ou diffère de la pression nécessaire,
vous devez installer un régulateur de pression approprié sur le tuyau d'arrivée de gaz.
Page 17

electrolux 17
Réglage du niveau minimal
Pour régler le niveau de cuisson minimum
de la table de cuisson :
1. Mettez en fonctionnement la table de
cuisson.
2. Tournez la manette jusqu'à la position
minimum.
3. Enlevez la manette de commande.
4. À l'aide d'un tournevis fin, réglez la position de la vis de dérivation.
1
1 La vis de dérivation
– Si vous passez du gaz naturel à du
gaz liquide, serrez entièrement la vis
de dérivation.
– Si vous passez du gaz liquide au gaz
naturel, dévissez la vis de dérivation
d'environ 1/4 de tour (1/2 tour pour
un brûleur à triple couronne).
Avertissement Assurez-vous que la
flamme ne s'éteint pas lorsque vous
tournez rapidement la manette de la
position maximum à la position
minimum.
Branchement électrique
• L'appareil doit être relié à la terre en res-
pectant bien les précautions de sécurité.
• Vérifiez que la tension nominale et le type
d'alimentation figurant sur la plaque signalétique correspondent aux valeurs
d'alimentation locales.
• Cet appareil est alimenté à l'aide d'un câ-
ble principal. Une fiche appropriée doit
être adaptée au cordon d'alimentation
(reportez-vous à la charge électrique spécifiée sur la plaque signalétique). La fiche
doit être insérée dans une prise murale
appropriée.
• Pour toute intervention sur votre appareil,
faites appel au service après-vente de
votre magasin vendeur.
• Utilisez toujours une prise antichoc correctement installée.
• Assurez-vous que la prise principale est
accessible après installation.
• Ne tirez jamais sur le câble d'alimentation
électrique pour débrancher l'appareil. Tirez toujours sur la prise de courant.
• L'appareil ne doit pas être raccordé à
l'aide d'un prolongateur, d'un raccordement multiple ou d'une prise multiple (risque d'incendie). Vérifiez que la prise de
terre est conforme aux règlements en vigueur.
• Le câble d'alimentation doit être placé de
manière à ce qu'il n'entre pas en contact
avec une surface chaude.
• Raccordez l'appareil au secteur à l'aide
d'un système permettant le débranchement de l'appareil à tous les pôles, avec
une largeur d'ouverture de contact d'au
moins 3 mm., par exemple, un disjoncteur automatique de protection, des déclencheurs de perte à la terre ou un fusible.
• Aucune partie du cordon d'alimentation
ne doit afficher une température supérieure à 90 °C. Le câble neutre bleu doit
être raccordé à la borne « N » de la plaque à bornes. Le câble de phase marron
(ou noir) (partant de la borne « L » de la
plaque à bornes doit toujours être relié à
la phase sous tension.
Remplacement du câble d'alimentation
Ne remplacez le câble de raccordement
qu'avec un câble de type H05V2V2-F T90.
Assurez-vous que la section du câble convient à la tension et à la température de
fonctionnement. Le câble de terre jaune/
vert doit être plus long d'environ 2 cm que
le câble de phase marron (ou noir).
Page 18

18 electrolux
Encastrement
min. 450 mm
min. 55 mm
480 mm
min. 600 mm
30 mm
min. 650 mm
560 mm
A
A
cès au cas où une intervention technique
serait nécessaire.
30 mm
a
60 mm
b
min 20 mm
(max 150 mm)
a) Panneau amovible
b) Espace pour les branchements
Au-dessus d'un four
Les dimensions de la niche d'encastrement
doivent être conformes aux indications et
l'élément de cuisine doit être équipé d'aérations pour assurer un apport d'air continu.
Les raccordements électriques de la table
de cuisson et du four doivent être installés
séparément pour des raisons de sécurité et
pour permettre un retrait facile du four de
l'ensemble.
2
50 cm
120 cm
2
B
A) joint fourni
B) équerres fournies
Possibilités d'insertion
Élément de cuisine avec porte
Le panneau installé sous la table de cuisson
doit être facilement amovible et facile d'ac-
2
360 cm
FABRICANT :
ELECTROLUX ITALIA S.p.A.
C.so Lino Zanussi, 30
33080 PORCIA (PN) - ITALIE
180 cm
2
Page 19

DESCRIPTION DE L'APPAREIL
Description de la table de cuisson
electrolux 19
2 3
1
4
5
6
Manettes de commande
Symbole Description
pas d'alimentation en
gaz / position arrêt
position d'allumage /
alimentation en gaz
maximum
FONCTIONNEMENT
Allumage du brûleur
Avertissement Faites très attention
lorsque vous utilisez une flamme nue
dans une cuisine. Le fabricant décline
toute responsabilité en cas de mauvais
usage de la flamme
Allumez toujours le brûleur avant de
poser les plats.
Pour allumer le brûleur :
1. Tournez le sélecteur dans le sens inverse des aiguilles d'une montre jusqu'à
sa position maximale (
puyer dessus pour l'enfoncer.
2. Maintenez la commande appuyée pendant environ 5 secondes, cela permet
au thermocouple de se réchauffer. Sinon, l'alimentation en gaz sera interrompue.
3. Une fois que la flamme brûle régulièrement, réglez son débit.
Si, après plusieurs tentatives, le brûleur
ne s'allume pas, vérifiez que la couronne et son chapeau sont correctement
placés.
), puis ap-
1 Brûleur à triple couronne
2 Brûleur semi-rapide
3 Brûleur semi-rapide
4 Brûleur semi-rapide
5 Brûleur auxiliaire
6 Manettes de commande
Symbole Description
alimentation en gaz
minimum
1
2
3
1 Chapeau et couronne du brûleur
2 Thermocouple
3 Bougie d'allumage
Page 20

20 electrolux
1 Chapeau du brûleur
2 Couronne du brûleur
3 Bougie d'allumage
4 Thermocouple
Avertissement Ne maintenez pas la
manette de commande appuyée plus
de 15 secondes.
Si le brûleur ne s'allume pas au bout de
15 secondes, relâchez la manette et
positionnez-la sur Arrêt. Attendez au
moins 1 minute avant d'essayer une
nouvelle fois d'allumer le brûleur.
1
Important En cas de coupure d'électricité,
vous pouvez utiliser votre table de cuisson
sans avoir recours au système
2
automatique. Dans ce cas, approchez une
flamme du brûleur, enfoncez la manette
correspondante et tournez-la dans le sens
inverse des aiguilles d'une montre jusqu'à
3
la position de libération maximum du gaz.
Si le brûleur s'éteint accidentellement,
tournez la manette de commande sur
4
la position Arrêt et attendez au moins 1
minute avant d'essayer une nouvelle
fois d'allumer le brûleur.
Le générateur d'étincelles se déclenche automatiquement à la mise sous
tension de l'appareil, après l'installation
ou une coupure d'électricité. Ce phénomène est normal.
Pour éteindre les brûleurs
Tournez la manette jusqu'au symbole
.
Avertissement Baissez ou éteignez
toujours la flamme d'un brûleur avant
de retirer un récipient.
CONSEILS UTILES
Économies d'énergie
• Si possible, couvrez les casseroles.
• Lorsque le liquide commence à bouillir,
baissez le feu pour laisser légèrement frémir le liquide.
Avertissement Utilisez des casseroles
et poêles dont le fond correspond à la
dimension du brûleur.
N'utilisez pas de plats de cuisson qui
dépassent la surface de cuisson.
Brûleur Diamètres des cassero-
Triple cou-
ronne
Semi-rapide
(arrière gau-
che)
Semi-rapide
(arrière droit)
Semi-rapide
(avant droit)
les
180 - 280 mm
120 - 240 mm
120 - 240 mm
120 - 220 mm
Brûleur Diamètres des cassero-
les
Auxiliaire 80 - 180 mm
Avertissement Les récipients ne
doivent pas entrer en contact avec les
commandes.
Avertissement Assurez-vous que les
queues des récipients ne dépassent
pas du rebord avant de la table de
cuisson et que les récipients sont
placés au centre des brûleurs pour une
stabilité maximale et pour consommer
moins de gaz.
Ne placez pas de casseroles instables ou
déformées sur les brûleurs pour éviter des
renversements et des blessures.
Avertissement Il n'est pas conseillé
d'utiliser un diffuseur de flamme.
Page 21

electrolux 21
Ne pas mijoter trop longtemps dans les
casseroles en fonte et les plats en
stéatite.
Avertissement Ne pas mettre la feuille
aluminium sur la partie supérieure de
l'appareil de cuisson, pour que la
ENTRETIEN ET NETTOYAGE
Avertissement Avant de procéder au
nettoyage, assurez-vous que toutes les
manettes se trouvent sur la position
« arrêt », que l'appareil est débranché
et complètement refroidi. Débranchez
l'appareil électriquement avant toute
opération de nettoyage ou d'entretien.
Avertissement Pour des raisons de
sécurité, n'utilisez jamais d'appareil à
vapeur ou à haute pression pour
nettoyer la table de cuisson.
Avertissement N'utilisez pas de
produits nettoyants abrasifs, de
tampons à récurer ou de substances
acides, sous peine d'endommager
l'appareil.
Les égratignures ou les taches sombres sur la table n'ont aucune influence
sur le fonctionnement de l'appareil.
• Vous pouvez retirer les supports de cas-
seroles pour nettoyer la table de cuisson.
• Pour nettoyer les parties émaillées, le
chapeau et la couronne, lavez-les à l'eau
chaude savonneuse puis séchez-les soigneusement avant de les remettre en
place.
• Lavez les éléments en acier inoxydable à
l'eau, puis séchez-les à l'aide d'un chiffon doux.
• Les supports de casseroles ne peuvent
pas être lavés au lave-vaisselle, mais doivent être lavés à la main.
• Lorsque vous lavez les supports de cas-
seroles à la main, faites attention au moment de les sécher car l'émaillage produit
parfois des aspérités sur les bords. Si nécessaire, enlevez les taches rebelles à
l'aide d'une crème détergente.
• Après avoir lavé les supports de cassero-
les, veillez à les remettre en place correctement.
surface reste propre pendant la
cuisson.
Avertissement Les batteries de
cuisine en fonte ne doivent être
utilisées que sur la triple couronne et
les bruleurs arrière.
• Pour que les brûleurs fonctionnent correctement, assurez-vous que les bras
des supports de casseroles sont au milieu du brûleur.
Replacez les supports de casserole
•
avec soin afin de ne pas endommager le dessus de la table de cuisson.
Après nettoyage, séchez l'appareil à l'aide
d'un chiffon doux.
Enlevez les salissures :
1. – Enlevez immédiatement : plasti-
que fondu, feuilles plastique et les aliments contenant du sucre.
Mettez l'appareil à l'arrêt et lais-
–
sez le refroidir avant de procéder
au nettoyage : des cernes de calcaire, traces d'eau, projections de
graisse, décolorations métalliques luisantes. Utiliser un nettoyant spécial
pour la surface de la table de cuisson.
2. Nettoyez l'appareil à l'aide d'un chiffon
humide et un peu de détergent.
3. Pour finir essuyez l'appareil à l'aide
d'un chiffon propre.
Nettoyage du générateur d'étincelles
Cette fonction emploie une bougie d'allumage en céramique et d'une électrode métallique. Maintenez ces éléments propres
pour prévenir un allumage difficile et vérifier
que les trous de la couronne du brûleur ne
sont pas obstrués.
Entretien périodique
Demandez régulièrement à votre service
après-vente local de vérifier l'état du tuyau
d'arrivée de gaz et du régulateur de pression, si l'appareil en est équipé.
Page 22

22 electrolux
EN CAS D'ANOMALIE DE FONCTIONNEMENT
Anomalie Cause possible Solution
Aucune étincelle ne se produit
à l'allumage.
• Le couvercle et la couronne
La flamme s'éteint immédiatement après l'allumage.
Les flammes sont irrégulières. • La couronne du brûleur doit
Certaines anomalies de fonctionnement
peuvent dépendre d'opérations d'entretien
non correctes ou d'oubli et peuvent être résolues à l'aide des indications fournies dans
le tableau, sans faire appel à un service
après-vente. Si l'anomalie persiste, contactez votre magasin vendeur ou votre service
après-vente.
Si un problème résulte d'une mauvaise
utilisation ou si l'installation de l'appareil
• Il n'y a pas d'alimentation
électrique.
du brûleur sont mal positionnés.
• Le thermocouple n'est pas
suffisamment chauffé.
être encrassés avec des restes d'aliments.
n'a pas été réalisée par un professionnel qualifié, le déplacement du technicien du service après vente ou du revendeur peut être facturé même en
cours de garantie.
Étiquettes fournies avec le sac
d'accessoires
Collez les étiquettes adhésives comme indiqué ci-dessous :
• Vérifiez si l'appareil est bien
• Contrôlez le fusible. Si le fu-
• Assurez-vous que le couver-
• Après avoir allumé la flamme,
• vérifiez si l'injecteur n'est pas
branché et allumé;
sible est dégagé plusieurs
fois, contactez un électricien
qualifié.
cle et la couronne du brûleur
sont bien positionnés.
continuez à appuyez sur le
bouton pendant environ 5
secondes.
bouché et s'il n'y pas de particules alimentaires dans la
couronne.
1 2 3
MOD.
PROD.NO.
SER.NO
DATA
MOD.
PROD.NO.
SER.NO
DATA
MODELMODEL
03 IT
MADE IN ITALY
1 Collez-la sur la carte de garantie et en-
voyez cette partie
2 Collez-la sur la carte de garantie et
conservez cette partie
0049
MOD.
PROD.NO.
SER.NO.
TYPE
230V-50Hz
IP20
3 Collez-la sur la notice d'utilisation
Les informations suivantes sont nécessaires pour pouvoir vous offrir une aide
Page 23
electrolux 23
rapide et adaptée. Ces données figurent sur la plaque signalétique.
• Description du modèle ............
• Référence produit (PNC) ............
• Numéro de série (S.N.) ............
Utilisez exclusivement des pièces d'origine
certifiées constructeur. Elles sont disponibles auprès de votre service après-vente.
CARACTÉRISTIQUES TECHNIQUES
Dimensions de la table de cuisson
Largeur : 740 mm
Longueur : 510 mm
Dimensions de la niche d'encastrement
de la table de cuisson
Largeur : 560 mm
Longueur : 480 mm
Puissance
Brûleur à triple couronne :
Brûleur semi-rapide : 1,9 KW
Brûleur auxiliaire : 1,0 KW
PUISSANCE TOTA-
LE :
3,8 KW
G20/G25 (2E+) 20/25
mbar = 10,5 kW
G30 (3+) 28-30 mbar
= 763 g/h
G31 (3+) 37 mbar =
750 g/h
G130 (1c) 8 mbar =
10,4 kW
Diamètres de by-pass
Alimentation électrique :
Catégorie : III1c2E+3+
Raccordement au
gaz :
Alimentation en gaz : G20/G25 (2E+) 20/25
Classe de l'appareil : 3
Brûleur Ø by-pass en
Auxiliaire 28
Semi-rapide 32
Triple couronne 56
230 V ~ 50 Hz
G 1/2 "
mbar
1/100 mm
Brûleurs à gaz
PUIS-
SANCE
NOR-
BRÛLEUR
Auxiliaire
Semirapide
Triple
couronne
MALE
kW kW
1.0 0.33 70 0.095 0.111 50 73 71 127 0.140
1.9 0.45 96 0.181 0.210 71 138 136 195 0.266
3.8 1.4 146 0.362 0.421 98 276 271 348 0.517
PUIS-
SAN-
CE
RÉ-
DUI-
TE
GAZ NATUREL
G20/G25 (2E+) 20/25
mbar
inj.
1/100
mm
G20
mbar
m³/h m³/h g/h g/h
G25
20
mbar
PUISSANCE NORMALE
LPG (butane/propane)
(3+) 28-30/37 mbar
G30
inj.
25
1/100
mm
28-30
mbar
G31
37
mbar
GAZ DE VILLE
G130 (1c) 8
mbar
inj.
1/100
m³/h
mm
Page 24

24 electrolux
EN MATIÈRE DE PROTECTION DE L'ENVIRONNEMENT
Le symbole sur le produit ou son
emballage indique que ce produit ne peut
être traité comme déchet ménager. Il doit
être remis au point de collecte dédié à cet
effet (collecte et recyclage du matériel
électrique et électronique).
En procédant à la mise au rebut de
l'appareil dans les règles de l’art, nous
préservons l'environnement et notre
sécurité, s’assurant ainsi que les déchets
seront traités dans des conditions
optimum.
Pour obtenir plus de détails sur le recyclage
de ce produit, veuillez prendre contact avec
les services de votre commune ou le
magasin où vous avez effectué l'achat.
Emballage
Tous les matériaux d'emballage sont
écologiques et recyclables. Les composants en plastique sont identifiables
grâce aux sigles : >PE<,>PS<, etc.
Veuillez jeter les matériaux d'emballage
dans le conteneur approprié du centre
de collecte des déchets de votre commune.
Page 25

electrolux 25
Page 26

26 electrolux
Page 27

electrolux 27
Page 28

www.electrolux.com/shop
397201301-B-082011
 Loading...