

Bruksanvisning torkskåp
Bruksanvisning tørkeskap
Brugsanvisning tørreskab
Kuivauskaapin käyttöohje
Owners manual drying cabinet
Gebrauchsanleitung Trockenschrank
INNEHÅLL:
• Säkerhetsinformation
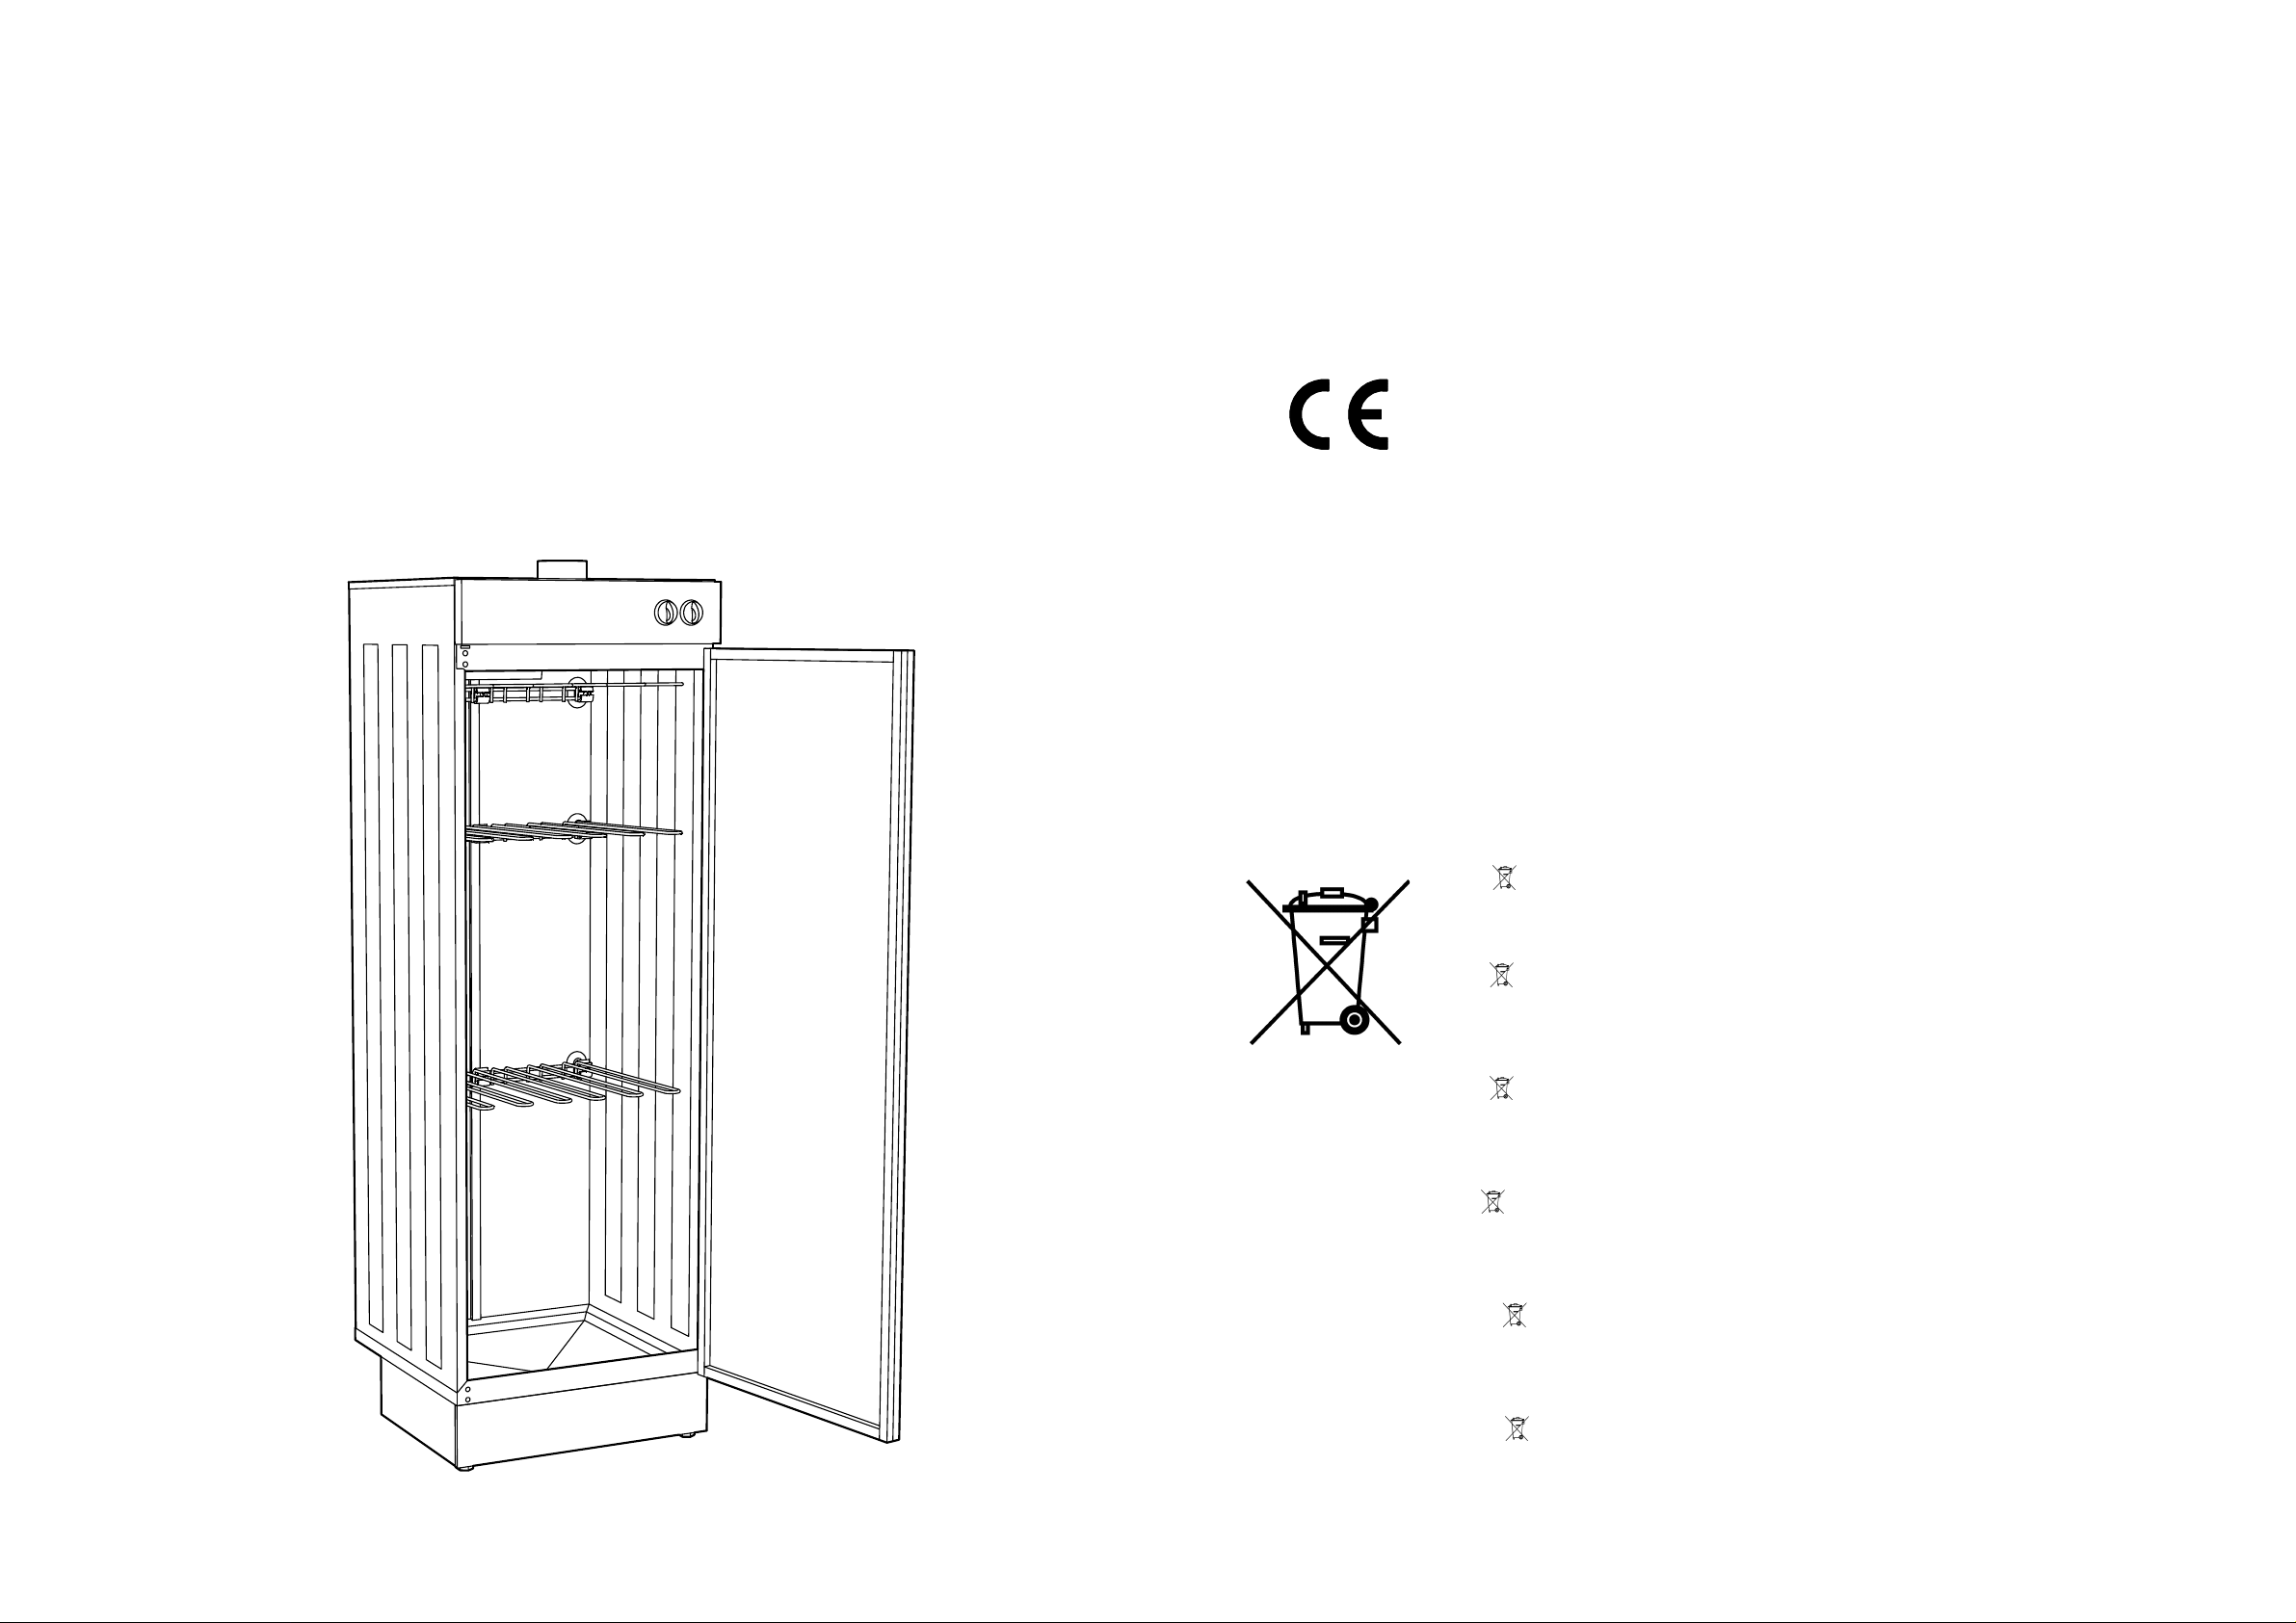
• Vad är vad?
• Tekniska data
• Installation
• Torkråd
• Skötsel
• Felsökning
• Service
INNHOLD:
• Sikkerhetsdata
• Hva er hva?
• Tekniske data
• Installasjon
• Tørkeråd
• Vedlikehold
• Feilsøking
• Service
Denna produkt uppfyller kraven i följande direktiv:
Direktiv om elektromagnetisk kompatibilitet 89 / 336 / EEC.
Lågspänningsdirektivet 73 / 23 / EEC och ändring av detta direktiv, 90 / 683 / EEC
Dette produkt oppfyller kravene gitt ved følgende direktiver:
Direktiv om elektromagnetisk kompatibilitet 89 / 336 / EØF (EMC-direktivet).
Lavspenningsdirektivet 73 / 23 / EØS (LVD-direktivet) og endring til LVD-direktivet 90 / 683 / EØF.
Dette produkt opfylder kravene i følgende direktiver:
Rådets Direktiv om Elektromagnetisk Kompatibilitet 89 / 336 / EØF.
Rådets Direktiv om elektriske materialer bestemt til anvendelse inden for visse spændingsområder 73 / 23 / EØF
og ændringer til dette direktiv 90 / 683 / EØF.
Tämä tuote täyttää seuraavien direktiivien vaatimukset: Sähkömagneettista yhteensopivuutta koskeva
EMC-direktiivi 89 / 336 / EEC.
Pienjännitedirektiivi 73 / 23 / EEC ja pienjännitedirektiivin muutos 90 / 683 / EEC.
This product is manufactured in conformity with the requirements of the following European Union directives:
– 89 / 336 / EEC (a directive relating to electromagnetic compatibility).
– 73 / 23 / EEC (a directive relating to electrical equipment designed for use within certain voltage limits).
– 90 / 683 / EEC (an amendment to directive 73 / 23 / EEC).
Dieses Produkt erfüllt die folgenden Anforderungen und Normen:
EMC (Electromagnetic Compability) Direktive 89 / 336 / EEC;
Low Voltage Directive 73 / 23 / EEC und die Ergänzung zur LVD (Low Voltage Directive) 90 / 683 / EEC.
INDHOLD:
• Sikkerhed
• Hvad er hvad?
• Tekniske data
• Installation
• Gode råd om tørring
• Vedligeholdelse
• Fejl
• Service
SISÄLLYS:
• Turvaohje
• Osaluettelo
• Tekniset tiedot
• Asennus
• Kuivausneuvoja
• Hoito
• Vianetsintä
• Huolto
CONTENTS:
• Safety information
• Identification of
parts
• Technical data
• Installation
• Advice on using
the dryer
• Care
• Fault-tracing
• Service
INHAL T:
• Sicherheitshinweise
• Was ist was?
• Technische Daten
• Installation
• Trockenempfehlungen
• Pflege
• Fehlersuche
• Service
Symbolen på produkten eller emballaget anger att produkten inte får hanteras som hushållsavfall. Den skall i stället
lämnas in på uppsamlingsplats för återvinning av el- och elektronikkomponenter. Genom att säkerställa att produkten hanteras på rätt sätt bidrar du till att förebygga eventuellt negativa miljö- och hälsoeffekter som kan uppstå om produkten kasseras som vanligt avfall. För ytterligare upplysningar om återvinning bör du kontakta lokala myndigheter eller sophämtningstjänst eller affären där du köpte varan.
Symbolet på produktet eller på emballasjen viser at dette produktet ikke må behandles som husholdningsavfall. Det
skal derimot bringes til et mottak for resirkulering av elektrisk og elektronisk utstyr.
Ved å sørge for korrekt avhending av apparatet, vil du bidra til å forebygge de negative konsekvenser for miljø og helse som
gal håndtering kan medføre.
For nærmere informasjon om resirkulering av dette produktet, vennligst kontakt kommunen, renovasjonsselskapet eller forretningen der du anskaffet det.
Symbolet på produktet eller på pakken angiver, at dette produkt ikke må behandles som husholdningsaffald. Det skal i
stedet overgives til en affaldsstation for behandling af elektrisk og elektronisk udstyr.
Ved at sørge for at dette produkt bliver bortskaffet på den rette måde, hjælper du med til at forebygge eventuelle negative
påvirkninger af miljøet og af personers helbred, der ellers kunne forårsages af forkert bortskaffelse af dette produkt.
Kontakt det lokale kommunekontor, affaldsselskab eller den forretning, hvor produktet er købt, for yderligere oplysninger
om genanvendelse af dette produkt.
Symboli , joka on merkitty tuotteeseen tai sen pakkaukseen, osoittaa, että tätä tuotetta ei saa käsitellä t alousjätteenä.
Tuote on sen sijaan luovutettava sopivaan sähkö- ja elektroniikkalaitteiden kierrätyksestä huolehtivaan keräyspisteeseen.
Tämän tuotteen asianmukaisen hävittämisen varmistamisella autetaan estämään sen mahdolliset ympäristöön ja terveyteen
kohdistuvat haittavaikutukset, joita voi aiheutua muussa tapauksessa tämän tuotteen epäasianmukaisest a jätekäsittelystä.
Tarkempia tietoja tämän tuotteen kierrättämisestä saat kuntasi jäteasioit a hoit avalt a viranomaiselta t ai liikkeestä, jost a tuote
on ostettu.
The symbol on the product or on its packaging indicates that this product may not be treated as household waste. Instead it shall be handed over to the applicable collection point for the recycling of electrical and electronic equipment. By ensuring this product is disposed of correctly, you will help prevent potential negative consequences for the environment and
human health, which could otherwise be caused by inappropriate waste handling of this product. For more detailed information about recycling of this product, please contact your local city office, your household waste disposal service or the shop
where you purchased the product.
Das Symbol auf dem Produkt oder seiner Verpackung weist darauf hin, dass dieses Produkt nicht als normaler Haushaltsabfall zu behandeln ist, sondern an einem Sammelpunkt für das Recycling von elektrischen und elektronischen Geräten
abgegeben werden muss. Durch Ihren Beitrag zum korrekten Entsorgen dieses Produkts schützen Sie die Umwelt und die
Gesundheit Ihrer Mitmenschen. Umwelt und Gesundheit werden durch falsches Entsorgen gefährdet. Weitere Informationen
über das Recycling dieses Produkts erhalten Sie von Ihrem Rathaus, Ihrer Müllabfuhr oder dem Geschäft, in dem Sie das
Produkt gekauft haben.
13
14
4141161543
10
14
13
Fig. / Kuva / Abb. 1
12114
5678912
3
10
Fig. / Kuva / Abb. 7
45 m3/h
Fig. / Kuva / Abb. 2 Fig. / Kuva / Abb. 3
Fig. / Kuva / Abb. 4
Fig. / Kuva / Abb. 5
SE
SÄKERHETSINFORMA TION
Hela denna anvisning skall läsas igenom innan torkskåpet tas i
bruk. Torkskåpets användning bör begränsas till personer som läst
och förstått och som kommer att följa alla anvisningar och
varningar.
• Torkskåpet måste anslutas till skyddsjordat uttag. Fast el.anslutning måste utföras av fackman.
• Torkskåpet måste fästas i bakomvarande vägg på grund av tipprisken. Detta är också en förutsättning för att garantin skall gälla.
• Torkskåpet skall alltid installeras i utrymme med säkerställd
ventilation.
• Torkskåpet är endast avsett för avfuktning av vatten.
• Tvätt eller annan utrustning som varit i kontakt med flyktiga kemikalier (bensin, fläckborttagningsmedel eller dylikt) får ej, på grund
av brandrisk, torkas i skåpet.
• Under torkning blir sidoväggarna varma. Små barn bör därför inte
vistas i närheten av torkskåpet under gång.
• Stickproppen skall alltid dras ur vid ingrepp och service av skåpet.
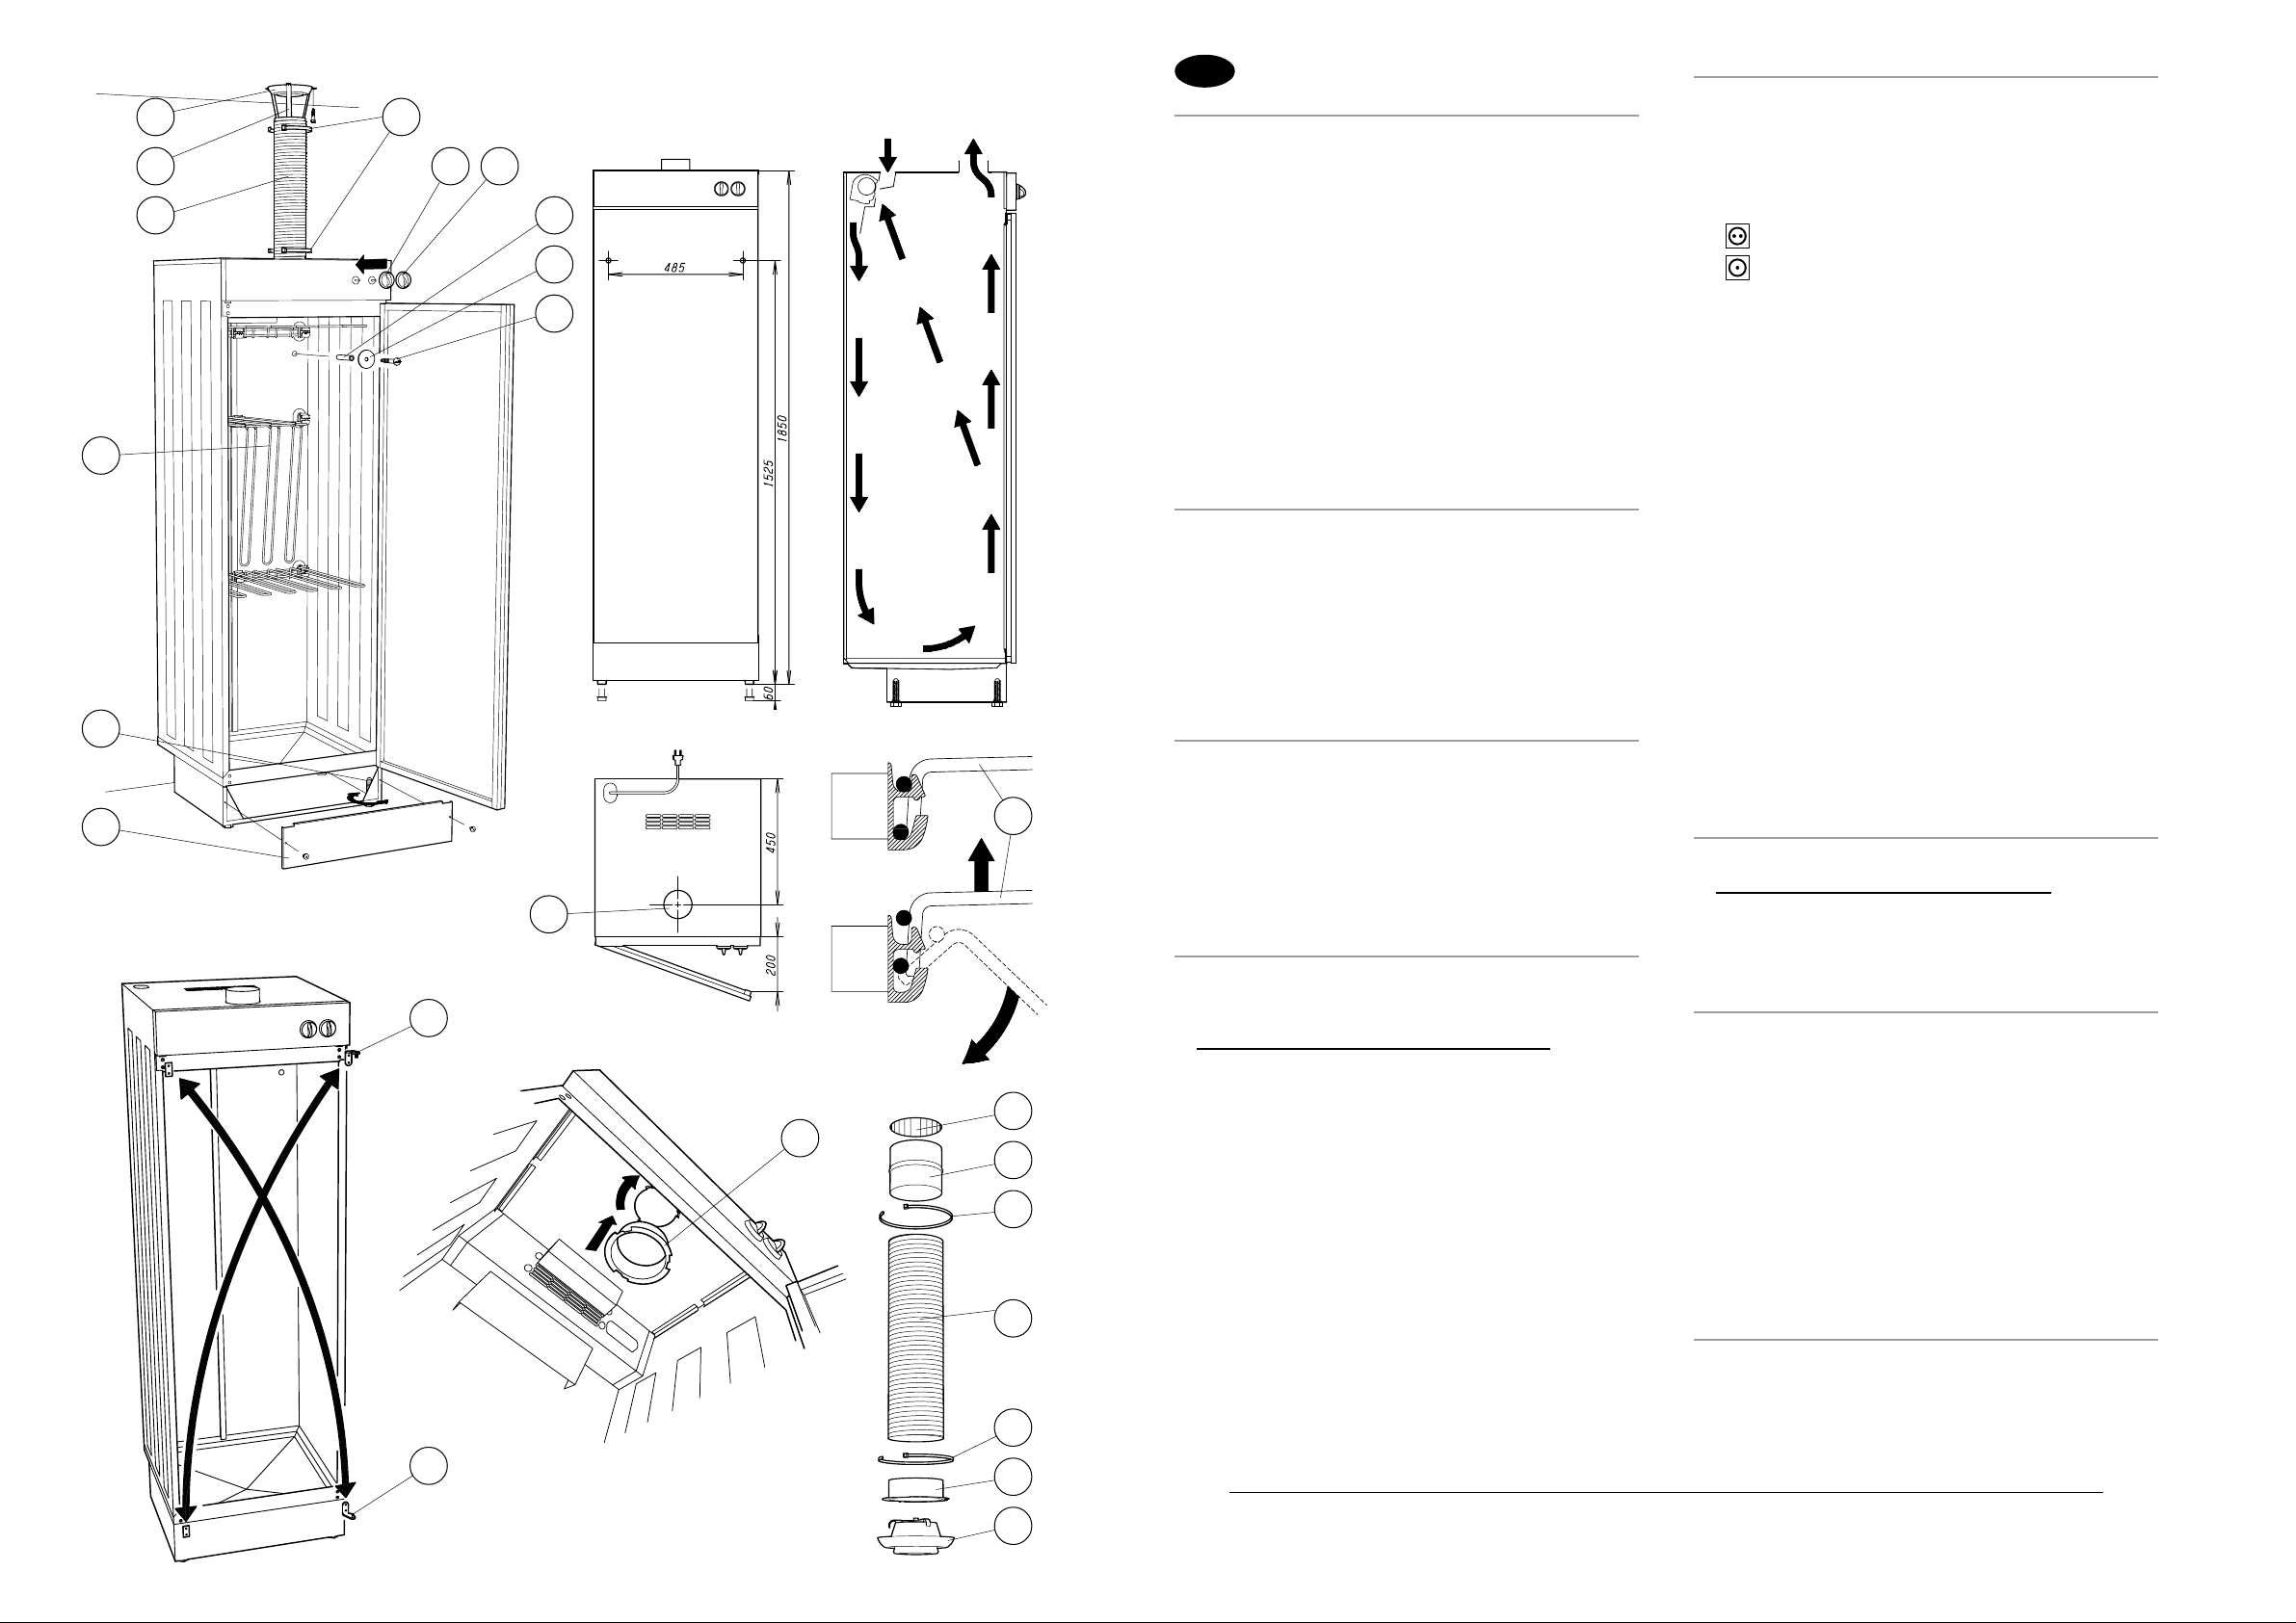
V AD ÄR VAD?
1. Frånluftsventil
2. Dragavbrott
3. Evakueringsslang
4. Buntband
5. Vred för inställning av
temperatur
6. Vred för inställning av tid
7. Plastplugg
8. Bricka
TEKNISKA DATA
Höjd: ........................ 1 850 mm
Bredd: ......................... 600 mm
Djup: ........................... 600 mm
Vikt:.................................. 55 kg
El.anslutning: .................. 230 V
Säkring: ............................ 10 A
Skyddsklass: ................... IP 24
Temperaturväljare: . 30 – 70 ºC
INST ALLATION
• Torkskåpet placeras på avsedd plats. Fötterna justeras så att
skåpet står plant och i lod. Kontrollera med vattenpass i framkant. Se fig. 1.
OBS! Viktigt för att dörren skall täta mot skåpet.
• Skåpet fästes i väggen med bipackad plugg, bricka och skruv.
Borra och förankra med skåpet kvar på plats. Se fig. 1 och 2.
• Anslutning och evakueringsslang monteras enl. fig. 1 och 7.
I vissa fall kan det vara svårt att evakuera den fuktiga luften, på
grund av små utrymmen, dålig grundventilation o.s.v. I sådana
fall ansluts torkskåpet lämpligen utan dragavbrott. Enl. fig. 8,
flyttas ventilen från rummets ventilationskanal in i skåpet och
evakueringsslangen ansluts direkt med en nippel i ventilationskanalen. Nippeln bipackas ej på grund av varierande anslutningsdimensioner. Luftintaget på torkskåpets tak får i sådana
installationer under inga förhållanden övertäckas. Vid fast
evakueringsanslutning sker ventilationen av hela utrymmet genom torkskåpet.
• Vreden monteras på axlarna som finns på fronten. Se fig. 1.
• Hängarna monteras enl. fig. 5 och trycks ordentligt ned i fästena.
Hängarna kan fällas vid behov genom att lyftas rakt upp ur fästet
och fällas nedåt. Se fig. 5.
• Skåpet ansluts till skyddsjordat uttag.
• Dörrupphängningen kan ändras om gångjärnen skiftas diagonalt.
Se fig. 6
9. Skruv
10.Hängställ
11. Justerbar fot
12. Löstagbar sockelfront
13.Gångjärn
14. Anslutning för evakueringsslang
15.Nippel
16.Frånluftskanal
Tidstyrning: ................ 4 timmar
Värmeeffekt: ............... 2 000 W
Motoreffekt:......................35 W
Tot. anslutningseffekt: 2 035 W
Evak. luftmängd: ...... ~ 45 m
Hänglängd: ...................... 18 m
Kapacitet:............ 5 kg torr tvätt
3
/h
TORKRÅD
• All typ av tvätt, våta kläder, skor och utrustning kan torkas skonsamt i ett torkskåp.
• Tvätten hängs så att luften kan cirkulera. Plaggen skall fördelas
jämnt i skåpet. Se fig. 3.
• Överbelasta inte hängarna. Nyttja flera hängare för tunga plagg.
• Tvätten får inte torkas i för hög temperatur. I vissa fall kan märkningen i plaggen vara till hjälp.
Torkas i normal temperatur 70 ºC.
Torkas i låg temperatur max. 50 ºC.
För övrigt gäller:
Bomull och linne 70 ºC
Syntet, ylle, siden 30 – 50 ºC
• Vid torkning av skor och stövlar kan botten skyddas med en
dagstidning eller dylikt, som sedan tas bort.
Torkningen kan styras när det gäller temperatur, tid och energiförbrukning. Torkskåpet är försett med termostat och tidur. Termostatratten är graderad från 0 – 70 ºC och tiduret upp till max. 4 timmar.
Torkskåpet startar och stannar vid in- och urkoppling av tidur. Se
fig. 1.
Ur energisynpunkt är långa torktider att föredra.
Det mest energisnåla torkningsförfarandet är att hänga in tvätten
och ställa dörren i vädringsläge utan ha vare sig fläkt eller värme
igång.
Ett annat alternativ är att ställa termostaten på 0, ha dörren i
vädringsläge och köra enbart fläkt.
Beträffande vädringsläge, se fig. 4.
Riktvärden på torktider och energiförbrukning framgår av nedanstående tabell.
Värdena gäller 3 kg torr tvätt av bomull som är centrifugerad vid
900 varv/minut (restfukt 70 %). Tvätt som har centrifugerats med
högre varvtal och som har mindre restfukt ger kortare torktider och
lägre energiförbrukning.
I villor med mekanisk ventilation föreligger ofta möjligheten att
forcera det totala frånluftsflödet i huset. Skulle luftfuktigheten i
samband med torkning bli för hög reduceras fuktigheten betydligt
om denna forcering utnyttjas i början av torkningsperioden.
SKÖTSEL
Vid rengöring får endast vatten och tvållösning användas.
Viktigt: Använd aldrig flyktiga lösningsmedel.
Eventuellt vatten som samlats i den fördjupade botten bör torkas
upp med en svamp eller dylikt. Försök överhuvudtaget hålla botten
så ren som möjligt. Botten är oftast torr och kan rengöras med
dammsugaren.
FELSÖKNING
Fläktmotor går ej, kontrollera att
— tiduret är tillslaget.
— kontakten är ansluten i vägguttaget.
— säkringen är hel.
— överhettningsskyddet ej är utlöst (se punkten överhett-
ningsskydd).
Ingen värme, kontrollera att
— termostaten är ställd på rätt temperatur.
Överhettningsskydd. Utlöser detta, bryts strömmen till såväl
fläktmotor som värmeelement.
Torkskåpet kan återstartas genom att tiduret vrids till 0–läge och
efter ca 5 minuter återigen vrids till önskad tid.
Kontrollera och åtgärda alltid orsaken till varför överhettningsskyddet utlöst. Orsaken kan vara att luftintaget på taket blockerats
eller att tvätten hänger så tätt att luftcirkulationen hindras.
SERVICE
Om felorsak inte kan finnas eller avhjälpas, kontaktas av leverantören auktoriserat serviceföretag.
Använd endast originalreservdelar.
Ha alltid modellbeteckning, produktnummer och tillverkningsnummer till hands vid kontakt med serviceföretag. Uppgifterna finns på
dataskylten inuti skåpet.
Fig. / Kuva / Abb. 6 Fig. / Kuva / Abb. 8
Temperaturinställning, (°C) Effekt, (Watt) Torktid, (timmar) Energiåtgång, (kWh)
0 0 (dörr i vädringsläge) 10 0
0 35 W (dörr i vädringsläge) 8 0,16 (fläkt 4 timmar)
50° 2 035 W 1,6 2,8
70° 2 035 W 1,4 2,8

GB
SAFETY INFORMA TION
You should read all of these instructions before starting to use the dryer.
The dryer should only be used by persons who have read and understood
the contents of this publication, and who can be expected to comply with the
instructions, including the safety information.
• The appliance must be connected to an electrical supply which is earthed.
If the appliance is to have fixed wiring to the electrical supply, this work
may only be carried out by a qualified electrician.
• The appliance must be secured to the wall behind it, to prevent it from tipping forward. Failure to secure it in this way will invalidate the guarantee.
• The room or area in which the appliance is installed must be suitably ventilated.
• The appliance is designed from the evaporation of water only.
• Laundry and other items which have been in contact with volatile solvents
(dry-cleaning fluid, stain-removing solvents etc.) must not be dried in this
appliance, on account of the risk of fire.
• Before any servicing or other work is undertaken on the appliance it must
first be fully isolated from the electrical supply, either by removing the
electrical plug from the socket, or taking the appropriate action if it has
fixed wiring.
IDENTIFICA TION OF PARTS
1. Exhaust air valve
2. Air terminal fitting (for ventilating
room)
3. Exhaust vent hose
4. Cable straps
5. Control for setting temperature
6. Control for setting time
7. Plastic wall-plug
8. Washer
TECHNICAL DA TA
Height: ............................. 1 850 mm
Width: ................................. 600 mm
Depth: ................................. 600 mm
Weight: .................................... 55 kg
Supply voltage: ...................... 230 V
Fuse: ........................................ 10 A
IP classification: ..................... IP 24
INST ALLATION
• Position the dryer in the place where it is to be installed. Adjust the feet to
ensure the dryer is level (horizontally and vertically). Check the level
using a spirit level. See Fig. 1.
N.B. Important so that the door will tighten against the cupboard.
• Use the wall-plugs, washers and screws supplied to secure the dryer to the
wall. The dryer needs to be in its permanent installation site when you are
drilling and securing it to the wall. See Figs. 1 and 2.
• The vent hose connector and exhaust vent hose should connected to an
existing ventilation system as shown in Figs. 1 and 7. In some cases it
may be difficult to ensure an adequate exhaust air flow to remove moisture as required, in account of restricted space, poor existing ventilation and
so on. In these cases the dryer should be connected to the ventilation
system without using the special air terminal fitting (designed to ensure a
flow of air from the room, independent of the dryer) shown at No. 2 in Fig
1. For this alternative, follow Fig. 8: move the valve from the room ventilation system to inside the top of the dryer and connect the exhaust vent
hose directly to the ventilation duct using a spigot connection sleeve. A
spigot connection sleeve is not supplied with the appliance on account of
variation in the required dimensions. In installations of this type the air intake on the top of the dryer must not under any circumstances be covered, because the ventilation of the room will now be provided via the dryer.
• Install the relevant control knobs on their rods on the front of the dryer.
See Fig. 1.
• Install the dryer racks as shown in Fig. 5, and press them firmly home in
their holders. The racks can be lowered when required, by lifting them
straight up out of their holders and folding them down against the back
wall. See Fig. 5.
• Connect the dryer to an earthed electrical socket.
• To change the side from which the door opens you have to change over
the door hinges and fittings diagonally. See Fig. 6.
9. Screw
10.Dryer rack
11. Adjustable foot
12. Removable plinth panel
13. Hinge
14. Vent hose connector
15. Spigot connection sleeve
16. Ventilation duct
Temp. selector:............... 30 – 70 ºC
Timer control: ...................... 4 hours
Power consumpt., heat: ..... 2 000 W
Power consumpt., motor: ........ 35 W
Total power consumpt.: ...... 2 035 W
Tot. length of drying space: .... 18 m
Load capacity: ..... 5 kg (dry weight)
ADVICE ON USING THE DRYER
• All types of washing, wet clothes, shoes and equipment can be dried just
as gently as required in a cabinet dryer.
• The load should be hung up to dry in a way which allows air to circulate efficiently. Items should be distributed evenly throughout the dryer. See Fig.
3.
• Do not overload the dryer racks. Use more than one arm on the racks to
support heavy items.
• The temperature used must not be too high for the specific load. Garment
care labels may provide useful information on suitable temperatures.
To be dried at ”normal” temperature 70°C
To be dried at ”low” temperature no more than 50°C
Guidelines in the absence of labelling:
• When drying shoes or boots, the base of the dryer can be protected with
newspaper or equivalent, which can be discarded later.
Using a cabinet dryer allows you to control not only the drying time and
temperature, but also the level of energy consumption. The dryer has a
built-in thermostat and timer. The temperature control knob has a range of
0 – 70°C, and the timer can be set for up to 4 hours. The dryer is started
and stopped by means of the timer control. See Fig. 1.
From the point of view of energy conservation, longer drying times (at lower
temperatures) are preferable.
The most economical option for drying is to hang the load inside the dryer
and leave the door in its airing position, without either the fan or the heating
switched on.
Another economy option is to set the temperature control at 0°C, put the
door in airing position, and operate the fan only.
Cotton and linen 70°C
Synthetics, wool, silk 30 – 50°C
For the door airing position, see Fig. 4.
Guideline drying times and energy consumption figures are shown in the table below.
The figures quoted are for a 3 kilogram load (weight when dry) which has
been spun at 900 rpm (70% of moisture remaining). Wash loads which have
been spun at speeds higher than this and with less moisture remaining require less drying time and less energy to dry.
In houses with mechanical ventilation systems there is frequently the option
of accelerating the total exhaust air flow from the dwelling. If experience
shows that the air humidity is frequently too high when the dryer is in use,
this humidity can be reduced significantly if the air flow is accelerated at the
start of the drying time.
CARE
Use only water and a soap solution for cleaning the dryer.
Important: Never use volatile solvents.
If water accumulates inside the base of the dryer it should be removed with
a sponge or cloth. The base of the dryer should be kept as clean as possible
at all times. It will generally be dry, in which case it can be cleaned with a
vacuum cleaner.
FAULT-TRACING
If the fan fails to operate, check:
— that the timer is on
— that the electrical plug is in the socket and switched on
— that no fuses have blown
— that the thermal cutout has not tripped (see the section the
thermal cutout).
If the dryer is not heating, check:
— that the temperature control is set at the required temperature
Thermal cutout. If this is tripped, both the fan motor and the heating elements will cut out.
To restart the dryer, turn the timer control to ”0”, then after about five minutes turn it to the required drying time.
Always investigate why the thermal cutout has tripped, and rectify the problem if you can. Two possible causes are that the air intake on the top of
the dryer has become blocked or covered, or that the dryer load has been
hung up in a way which prevents adequate circulation of air.
SERVICE
If you cannot identify the cause of or rectify a malfunction, contact
the service company authorised by the machine’s supplier.
Use only genuine spare parts.
Before contacting the service company, make a note of the machine model, product number and serial number. This information can
be found on the data plate inside the dryer.
Temperature set, (°C) Power consumption, (Watt) Drying time, (hours) Energy consumption, (kWh)
0 0 (door in airing position) 10 0
0 35 W (door in airing position) 8 0,16 (fan 4 hours)
50° 2 035 W 1,6 2,8
70° 2 035 W 1,4 2,8

DE
SICHERHEITSHINWEISE
Vor der Inbetriebnahme des Trockenschranks bitte diese Anleitung sorgfältig
durchlesen. Es dürfen nur Personen den Trockenschrank bedienen, die diese
Anleitung gelesen und verstanden haben und die Hinweise und Warnungen
beachten.
• Der Trockenschrank muß an eine geerdete Schutzkontaktsteckdose angeschlossen werden. Ein fester Elektroanschluß darf nur von einem Elektroinstallateur ausgeführt werden.
• Der Trockenschrank muß an der rückseitigen Wand fixiert werden, damit er
nicht kippen kann. Dies ist auch eine Voraussetzung für die Gültigkeit der
Garantie.
• Der Trockenschrank darf nur in Räumen mit ausreichender Lüftung aufgestellt werden.
• Der Trockenschrank darf nur zum Trocknen von wassergetränkten Gegenständen verwendet werden.
• Wäsche oder andere Gegenstände, die in Kontakt mit flüchtigen Chemikalien (Benzin, Fleckenentferner oder ähnliche Stoffe) gekommen sind, dürfen wegen des Brandrisikos nicht im Trockenschrank getrocknet werden.
• Vor Eingriffen oder Servicearbeiten ist der Netzstecker aus der Steckdose
zu ziehen.
WAS IST WAS?
1. Abluftventil
2. Entlüftungsspalt
3. Abluftschlauch
4. Kabelbinder
5. Temperatur-Einstellrad
6. Zeit- Einstellrad
7. Kunststoffdübel
8. Scheibe
TECHNISCHE DATEN
Höhe: ............................... 1 850 mm
Breite: ................................. 600 mm
Tiefe: .................................. 600 mm
Gewicht: ...................................55 kg
Elektroanschluß: .................... 230 V
Sicherung:................................. 10 A
Schutzklasse: .......................... IP 24
Temperaturwähler: .......... 30 – 70 ºC
INST ALLATION
• Den Trockenschrank auf den vorgesehenen Platz stellen. Den Schrank mit
den verstellbaren Füße in allen Richtungen waagerecht ausrichten. Mit der
Wasserwaage an der Vorderseite kontrollieren. Siehe Abb. 1.
Achtung! Wichtig für die Dichtung der Tür gegen den Schrank.
• Den Schrank an der rückseitigen Wand mit den mitgelieferten Teilen (Dübel, Scheibe und Schraube) befestigen. Beim Bohren des Loches und beim
Verankern steht der Trockenschrank an seinem Platz. Siehe Abb. 1 und 2.
• Anschluß und Montage des Abluftschlauchs gemäß Abbildung 1 und 7
vornehmen. In einigen Fällen kann es schwierig sein, die feuchte Luft abzuführen, zum Beispiel in kleinen Räumen, bei grundsätzlich schlechter
Lüftung usw. In diesen Fällen sollte der Trockenschrank ohne Entlüftungspalt installiert werden. Gemäß Abb. 8 wird das Ventil vom Ventilationskanal des Raumes in den Schrank verlegt und der Abluftschlauch wird mit
einem Anschlußnippel direkt an den Ventilationskanal angeschlossen. Der
Anschlußnippel liegt nicht bei, da es verschiedene Anschlußgrößen gibt.
Der Lufteinlaß an der Oberseite des Schranks darf bei dieser Installationsart auf keinen Fall abgedeckt werden. Bei einem festen Abluftanschluß erfolgt die Ventilation des gesamten Raums durch den Trockenschrank.
• Die Einstellräder werden auf den Achsen an der Vorderseite montiert. Siehe
Abb. 1.
• Die Hängevorrichtungen werden gemäß Abb. 5 montiert und fest in die Halterungen gedrückt. Die Hängevorrichtungen können bei Bedarf heruntergeklappt werden. Hierzu die Hängevorrichtung gerade nach oben aus der Halterung heben und nach unten klappen. Siehe Abb. 5.
• Den Schrank an eine geerdete Schutzkontaktsteckdose anschließen.
• Die Türaufhängung kann durch diagonales Austauschen der Scharnierstifte
verändert werden. Siehe Abb. 6.
9. Schraube
10. Hängevorrichtung
11. Höhenverstellbare Füße
12. Abnehmbare Sockelfront
13. Scharnier
14. Anschluß für Abluftschlauch
15. Nippel
16. Abluftkanal
Zeitsteuerung: ................. 4 Stunden
Heizleistung: ....................... 2 000 W
Motorleistung: .......................... 35 W
Gesamtanschlußwert: ........ 2 035 W
Gesamtlänge der Hänge-
vorrichtung: ............................. 18 m
Kapazität: ........ 5 kg Trockengewicht
TROCKENEMPFEHLUNGEN
• Jegliche Wäsche, nasse Kleidungsstücke und Gegenstände können im
Trockenschrank schonend getrocknet werden.
• Die Wäsche so aufhängen, daß die Luft zirkulieren kann. Die Kleidungsstücke möglichst gleichmäßig im Schrank verteilen. Siehe Abb. 3.
• Die Hängevorrichtungen nicht überbelasten. Für schwere Wäschestücke
mehrere Aufhänger benutzen.
• Die Wäsche darf nicht bei zu hoher Temperatur getrocknet werden. In einigen Fällen können die Pflegeetiketten in den Kleidungsstücken weiterhelfen:
Wird bei Normaltemperatur getrocknet 70 °C
Wird bei niedriger Temperatur getrocknet max. 50 °C
Grundsätzlich gilt:
• Zum Trocknen von Schuhen und Stiefeln sollte man eine alte Zeitung auf
den Boden legen und danach entfernen.
Temperatur, Zeitdauer und Energieverbrauch des Trockenvorgangs können
gesteuert werden. Der Trockenschrank ist mit einem Thermostaten und einer
Zeitschaltuhr ausgestattet. Das Temperatur-Einstellrad hat eine Skala von
0 – 70 °C und die Zeitschaltuhr von bis zu 4 Stunden. Ein- und Ausschalten
des Trockenschranks werden über die Zeitschaltuhr gesteuert. Siehe Abb. 1.
Wenn man Energie sparen möchte, sind längere Trockenzeiten vorzuziehen.
Am wenigsten Energie wird verbraucht, wenn die Wäsche in den Schrank ge-
hängt und die Tür in Lüftungsstellung gestellt wird, ohne Gebläse oder Heizung einzuschalten. Es ist auch möglich, den Thermostat auf 0 °C zu stellen,
die Tür in Lüftungsposition zu bringen und nur das Gebläse einzuschalten.
Die Lüftungsstellung der Tür wird in Abb. 4 erläutert.
Die folgende Tabelle zeigt Richtwerte für Trockenzeiten und Energieverbrauch.
Die Werte gelten für Baumwollwäsche mit 3 kg Trockengewicht, die bei 9.00
Umdrehungen/Minute geschleudert wurde (Restfeuchtigkeit 70 %). Wäsche,
die mit höheren Drehzahlen geschleudert wurde und deren Restfeuchtigkeit
geringer ist, erfordert kürzere Trockenzeiten und verbraucht weniger Energie.
In Einfamilienhäusern mit mechanischer Entlüftung besteht oft die Möglichkeit, die Gesamtentlüftung des Hauses zu erhöhen. Wenn die Luftfeuchtigkeit im Zusammenhang mit dem Trocknen zu hoch wird, kann die Feuchtigkeit
durch Erhöhen der Abluftmenge des Hauses zu Beginn des Trockenvorgangs
deutlich gesenkt werden.
Baumwolle und Leinen 70 °C
Synthetik, Wolle, Seide 30 – 50 °C
PFLEGE
Zur Reinigung des Trockenschranks ausschließlich Wasser und Seifenlauge
verwenden.
Wichtig: Niemals flüchtige Lösungsmittel verwenden!
Wasser, das sich in der Bodenvertiefung gesammelt hat, mit einem
Schwamm oder ähnlichem entfernen. Den Schrankboden so sauber wie möglich halten. Wenn der Boden trocken ist, kann er auch mit dem Staubsauger
gereinigt werden.
FEHLERSUCHE
Der Gebläsemotor läuft nicht. Kontrollieren, daß
— die Zeitschaltuhr eingeschaltet ist;
— der Stecker in der Steckdose ist;
— die Sicherung einwandfrei ist;
— der Überhitzungsschutz nicht ausgelöst hat (siehe unter
Überhitzungsschutz).
Die Heizung funktioniert nicht. Kontrollieren, daß
— der Thermostat auf die richtige Temperatur eingestellt ist.
Überhitzungsschutz. Wenn der Überhitzungsschutz auslöst, wird die Stromzufuhr zum Gebläsemotor und zur Heizung unterbrochen.
Der Trockenschrank kann in diesem Fall erneut gestartet werden. Hierzu die
Zeitschaltuhr auf Null stellen und nach etwa 5 Minuten wieder auf die
gewünschte Temperatur.
Immer kontrollieren, warum der Überhitzungsschutz ausgelöst hat und
die Ursache beseitigen. Mögliche Ursachen sind ein blockierter Lufteinlaß an
der Schrankoberseite oder eine eingeschränkte Luftzirkulation durch ungünstige Verteilung der Wäsche.
SERVICE
Wenn die Fehlerursache nicht gefunden oder nicht beseitigt werden kann,
Kontakt mit einem autorisierten Serviceunternehmen aufnehmen.
Nur Original-Ersatzteile verwenden.
Beim Kontakt mit dem Serviceunternehmen immer Modellbezeichnung, Pro-
duktnummer und Herstellungsnummer zur Hand haben. Die Angaben finden
Sie auf dem Datenschild im Schrank.
Temperatureinstellung, (°C) Leistung, (Watt) Trockenzeit, (Stunden) Energiverbrauch, (kWh)
0 0 (Tür in Lüftungsstellung) 10 0
0 35 W (Tür in Lüftungsstellung) 8 0,16 (Gebläse 4 Stunden)
50° 2 035 W 1,6 2,8
70° 2 035 W 1,4 2,8

2956359-01 / C
 Loading...