

COMPETENCE E9971-4
Built-In Electric Oven
Operating Instructions

Dear Customer,
Please read these user instructions carefully and keep them to refer to
later.
Please pass the user instructions on to any future owner of the appliance.
The following symbols are used in the text:
1 Safety instructions
Warning! Information that affects your personal safety.
Important! Information that prevents damage to the appliance.
3 Useful tips and hints
2 Environmental information
2

Contents
Operating Instructions. . . . . . . . . . . . . . . . . . . . . . . . . . . . . . . . . . . . . 5
Safety instructions. . . . . . . . . . . . . . . . . . . . . . . . . . . . . . . . . . . . . . . . . . . . . . 5
Disposal . . . . . . . . . . . . . . . . . . . . . . . . . . . . . . . . . . . . . . . . . . . . . . . . . . . . . . . 7
Description of the Appliance. . . . . . . . . . . . . . . . . . . . . . . . . . . . . . . . . . . . . 8
General Overview. . . . . . . . . . . . . . . . . . . . . . . . . . . . . . . . . . . . . . . . . . . . . . . . 8
The electronic oven controls. . . . . . . . . . . . . . . . . . . . . . . . . . . . . . . . . . . . . . . 9
Indicators . . . . . . . . . . . . . . . . . . . . . . . . . . . . . . . . . . . . . . . . . . . . . . . . . . . 9
Buttons . . . . . . . . . . . . . . . . . . . . . . . . . . . . . . . . . . . . . . . . . . . . . . . . . . . . . 10
Oven Features. . . . . . . . . . . . . . . . . . . . . . . . . . . . . . . . . . . . . . . . . . . . . . . . . . . 11
Oven accessories . . . . . . . . . . . . . . . . . . . . . . . . . . . . . . . . . . . . . . . . . . . . . . . . 12
Before Using for the first time . . . . . . . . . . . . . . . . . . . . . . . . . . . . . . . . . . . 13
Setting the language. . . . . . . . . . . . . . . . . . . . . . . . . . . . . . . . . . . . . . . . . . . . . 13
Setting the clock . . . . . . . . . . . . . . . . . . . . . . . . . . . . . . . . . . . . . . . . . . . . . . . . 14
Initial cleaning . . . . . . . . . . . . . . . . . . . . . . . . . . . . . . . . . . . . . . . . . . . . . . . . . . 14
Using the Rings. . . . . . . . . . . . . . . . . . . . . . . . . . . . . . . . . . . . . . . . . . . . . . . . . 15
Setting the heat setting . . . . . . . . . . . . . . . . . . . . . . . . . . . . . . . . . . . . . . . . . . 16
Cooking with the automatic warm up function. . . . . . . . . . . . . . . . . . . . . . . 16
Safety cut-out function for the rings . . . . . . . . . . . . . . . . . . . . . . . . . . . . . . . 17
Using the Oven . . . . . . . . . . . . . . . . . . . . . . . . . . . . . . . . . . . . . . . . . . . . . . . . . 18
Menu operation in overview. . . . . . . . . . . . . . . . . . . . . . . . . . . . . . . . . . . . . . . 18
The Oven Functions menu. . . . . . . . . . . . . . . . . . . . . . . . . . . . . . . . . . . . . . 18
The Options menu . . . . . . . . . . . . . . . . . . . . . . . . . . . . . . . . . . . . . . . . . . . . 19
Use of the oven functions. . . . . . . . . . . . . . . . . . . . . . . . . . . . . . . . . . . . . . . . . 20
Switching the Oven On and Off. . . . . . . . . . . . . . . . . . . . . . . . . . . . . . . . . . . . 22
Inserting the Combination Shelf, Baking Tray and Roasting Pan . . . . . . . . . 25
Inserting/Removing the Grease Filter . . . . . . . . . . . . . . . . . . . . . . . . . . . . . . . 26
Non-stick accessories . . . . . . . . . . . . . . . . . . . . . . . . . . . . . . . . . . . . . . . . . . . . 26
Meat Probe . . . . . . . . . . . . . . . . . . . . . . . . . . . . . . . . . . . . . . . . . . . . . . . . . . . . . 27
Setting meat probe core temperature . . . . . . . . . . . . . . . . . . . . . . . . . . . . 28
Automatic programmes. . . . . . . . . . . . . . . . . . . . . . . . . . . . . . . . . . . . . . . . . . . 30
Meat programmes with weight input . . . . . . . . . . . . . . . . . . . . . . . . . . . . 30
Meat programmes with meat probe. . . . . . . . . . . . . . . . . . . . . . . . . . . . . . 31
Options . . . . . . . . . . . . . . . . . . . . . . . . . . . . . . . . . . . . . . . . . . . . . . . . . . . . . . . . 32
RECIPE MENU in overview. . . . . . . . . . . . . . . . . . . . . . . . . . . . . . . . . . . . . . 32
MEMORY MENU . . . . . . . . . . . . . . . . . . . . . . . . . . . . . . . . . . . . . . . . . . . . . . 35
SETTINGS MENU . . . . . . . . . . . . . . . . . . . . . . . . . . . . . . . . . . . . . . . . . . . . . . 38
3

Clock Functions . . . . . . . . . . . . . . . . . . . . . . . . . . . . . . . . . . . . . . . . . . . . . . . . . 39
Additional functions . . . . . . . . . . . . . . . . . . . . . . . . . . . . . . . . . . . . . . . . . . . . . 44
CHILD LOCK for the oven . . . . . . . . . . . . . . . . . . . . . . . . . . . . . . . . . . . . . . 44
BUTTON LOCK . . . . . . . . . . . . . . . . . . . . . . . . . . . . . . . . . . . . . . . . . . . . . . . . 45
Oven safety cut-out. . . . . . . . . . . . . . . . . . . . . . . . . . . . . . . . . . . . . . . . . . . 45
Mechanical Door Lock. . . . . . . . . . . . . . . . . . . . . . . . . . . . . . . . . . . . . . . . . . . . 46
Cleaning and Care . . . . . . . . . . . . . . . . . . . . . . . . . . . . . . . . . . . . . . . . . . . . . . 47
Outside of the appliance. . . . . . . . . . . . . . . . . . . . . . . . . . . . . . . . . . . . . . . . . . 47
Oven interior . . . . . . . . . . . . . . . . . . . . . . . . . . . . . . . . . . . . . . . . . . . . . . . . . . . 47
Accessories . . . . . . . . . . . . . . . . . . . . . . . . . . . . . . . . . . . . . . . . . . . . . . . . . . . . . 47
Fat Filter . . . . . . . . . . . . . . . . . . . . . . . . . . . . . . . . . . . . . . . . . . . . . . . . . . . . . . . 48
Non-stick accessories . . . . . . . . . . . . . . . . . . . . . . . . . . . . . . . . . . . . . . . . . . . . 48
Cleaning function for oven cleaner spray. . . . . . . . . . . . . . . . . . . . . . . . . . . . 49
Performing Pyroluxe cleaning . . . . . . . . . . . . . . . . . . . . . . . . . . . . . . . . . . . . . 50
Oven Shelf Runner. . . . . . . . . . . . . . . . . . . . . . . . . . . . . . . . . . . . . . . . . . . . . . . 52
Cleaning the Oven Shelf Runner . . . . . . . . . . . . . . . . . . . . . . . . . . . . . . . . . . . 53
Oven Lighting. . . . . . . . . . . . . . . . . . . . . . . . . . . . . . . . . . . . . . . . . . . . . . . . . . . 53
Oven door . . . . . . . . . . . . . . . . . . . . . . . . . . . . . . . . . . . . . . . . . . . . . . . . . . . . . . 55
Oven door glass . . . . . . . . . . . . . . . . . . . . . . . . . . . . . . . . . . . . . . . . . . . . . . . . . 57
What to do if … . . . . . . . . . . . . . . . . . . . . . . . . . . . . . . . . . . . . . . . . . . . . . . . . 60
Index . . . . . . . . . . . . . . . . . . . . . . . . . . . . . . . . . . . . . . . . . . . . . . . . . . . . . . . . 62
Service . . . . . . . . . . . . . . . . . . . . . . . . . . . . . . . . . . . . . . . . . . . . . . . . . . . . . . 63
4

Operating Instructions
1 Safety instructions
This appliance conforms with the following EU Directives:
5
– 73/23/EEC dated 19.02.1973 Low Voltage Directive
– 89/336/EEC dated 03.05.1989 EMC Directive inclusive of Amending
Directive 92/31/EEC
– 93/68/EEC dated 22.07.1993 CE Marking Directive
Electrical safety
• This appliance must be only connected by a registered electrician.
• In the event of a fault or damage to the appliance: Take the fuses out
or switch off.
• Repairs to the appliance must only be carried out by qualified serv-
ice engineers. Considerable danger may result from improper repairs.
If repairs become necessary, please contact our Customer Services or
your dealer.
Child Safety
• Never leave children unsupervised when the appliance is in use.
• The appliance is fitted with a child safety device.
Safety whilst Using
• This appliance is intended to be used for cooking, roasting and baking
food in the home.
• Take care when connecting electric appliances to sockets nearby. Do
not allow connecting leads to come into contact with or to catch beneath the hot oven door.
• Warning: Risk of burns! The interior of the oven becomes hot dur-
ing use.
• Using ingredients containing alcohol in the oven may create an alcohol-air mixture that is easily ignited. In this case, open the door carefully. Do not have embers, sparks or naked flames in the vicinity when
opening the door.
5

3 Information on acrylamides
According to the latest scientific knowledge, intensive browning of
food, especially in products containing starch, can constitute a health
risk due to acrylamides. Therefore we recommend cooking at the lowest
possible temperatures and not browning foods too much.
How to avoid damage to the appliance
• Do not line the oven with aluminium foil and do not place baking
trays, pots, etc. on the oven floor, as the heat that builds up will damage the oven enamel.
• Fruit juices dripping from the baking tray will leave stains, which you
will not be able to remove. For very moist cakes, use a deep tray.
• Do not put any strain on the oven door when open.
• Never pour water directly into the oven when it is hot. This could
cause damage to or discoloration of the enamel.
• Rough handling, especially around the edges of the front panel, can
cause the glass to break.
• Do not store any flammable materials inside the oven. These could ignite when the oven is switched on.
• Do not store any moist foods inside the oven. This could damage the
oven enamel.
3 Note on enamel coating
Changes in the colour of the oven’s enamel coating as a result of use do
not affect the appliance’s suitability for normal and correct use. They
therefore do not constitute a defect in the sense of the warranty law.
6

Disposal
Packaging material
2
The packaging materials are environmentally friendly and can be recycled. The plastic components are identified by markings, e.g. >PE<,
>PS<, etc. Please dispose of the packaging materials in the appropriate
container at the community waste disposal facilities.
2 Old appliance
The symbol
product may not be treated as household waste. Instead it shall be
handed over to the applicable collection point for the recycling of electrical and electronic equipment. By ensuring this product is disposed of
correctly, you will help prevent potential negative consequences for the
environment and human health, which could otherwise be caused by
inappropriate waste handling of this product. For more detailed information about recycling of this product, please contact your local city
office, your household waste disposal service or the shop where you
purchased the product.
W on the product or on its packaging indicates that this
1 Warning: So that the old appliance can no longer cause any danger,
make it unusable before disposing of it.
To do this, disconnect the appliance from the mains supply and remove the mains cable from the appliance.
7
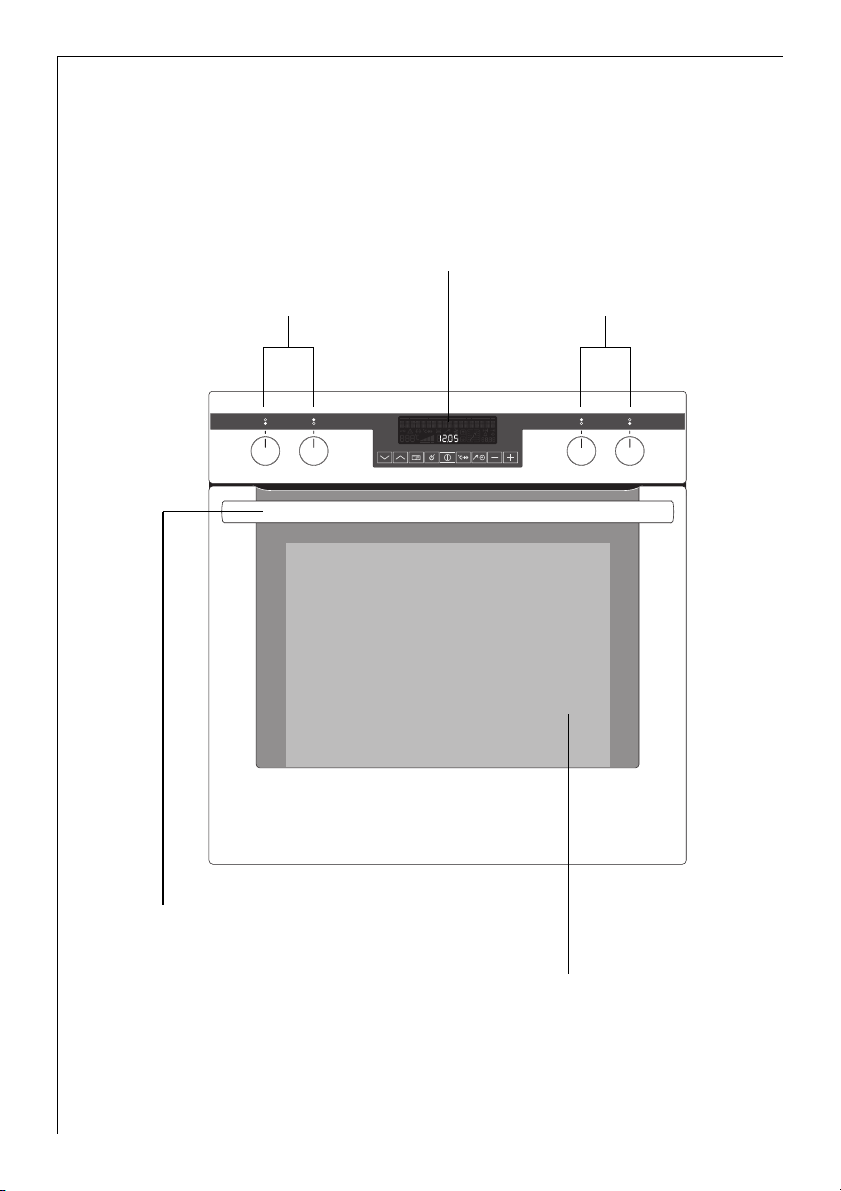
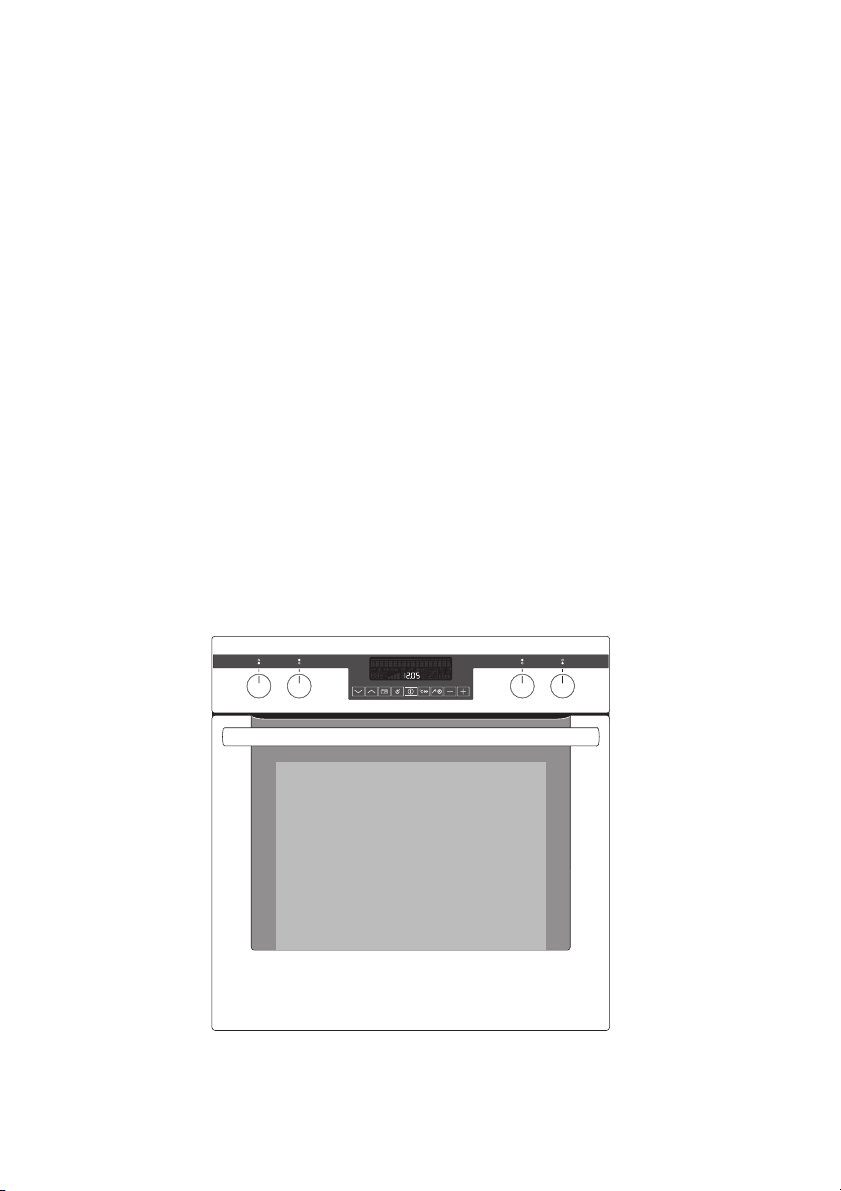
Description of the Appliance
General Overview
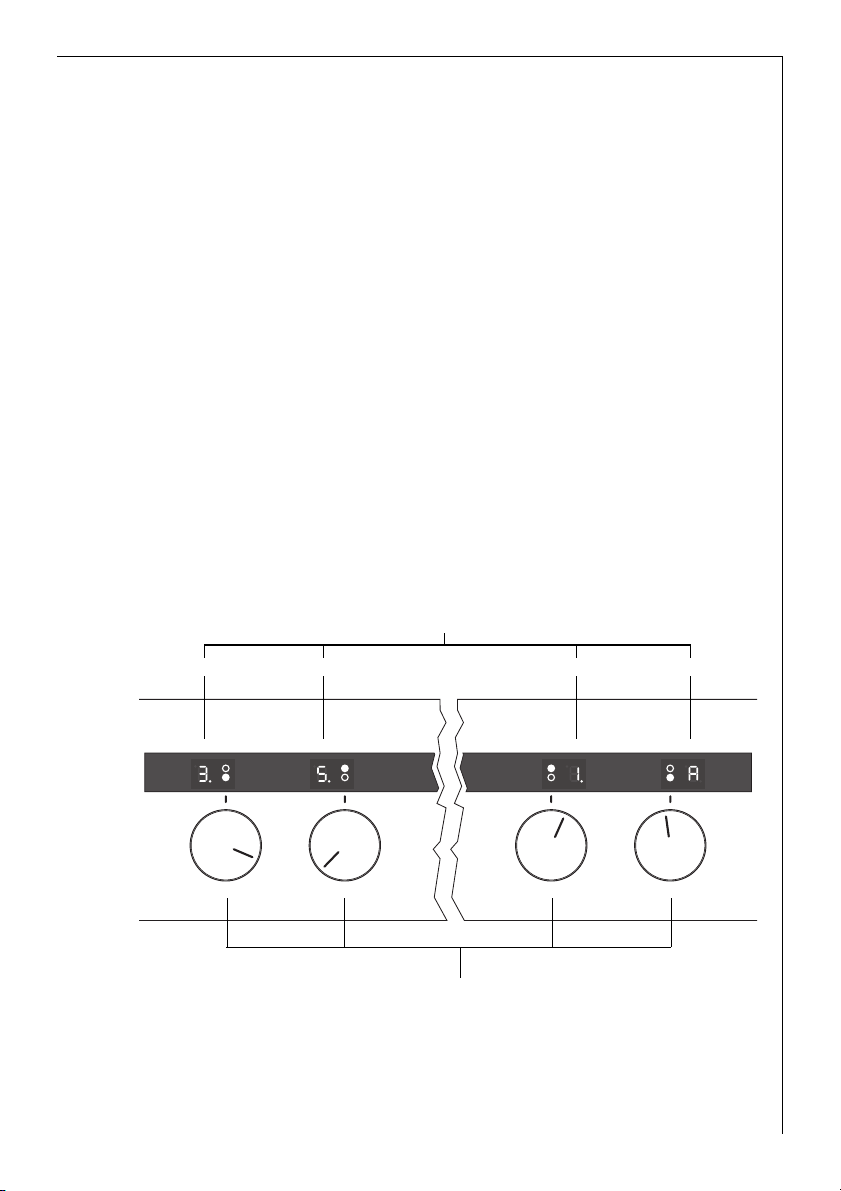
Oven displays
and buttons
Hob Cooking Zone Control Knobs Hob Cooking Zone Control Knobs
Door
handle
Full glass door
8

The electronic oven controls
Indicators
Symbol status bar Menu status bar Text line
___________________
PROFI HOT AIR
150ûc 12.05
Heat indicator Shelf positions
Temperature Time
Meat core temperature
Menu status bar
In the menu status bar the current position within a menu is shown by
a flashing bar.
When the menu status bar can no longer be seen in the display, the
oven begins to heat or the time set begins to count down.
Symbol status bar
Symbol Function
Door lock Door is locked, PYROLUXE in operation.
RAPID HEAT UP RAPID HEAT UP is in operation.
MEATPROBE MEATPROBE is plugged in.
00.06
Clock functions
Period of operation
9

Buttons
wm¸¹º»¼-+
Button Function
w
To select oven functions.
To move down and up in the menu.
m
¸
¹
º
»
¼
-
+
To open the Options menu.
To close the Options menu (press and hold button).
Confirm, change to the sub-menu.
To switch appliance on or off.
Switch RAPID HEAT UP on or off.
Select between clock functions and MEATPROBE.
To set temperature, time, weight or degree of cooking.
10
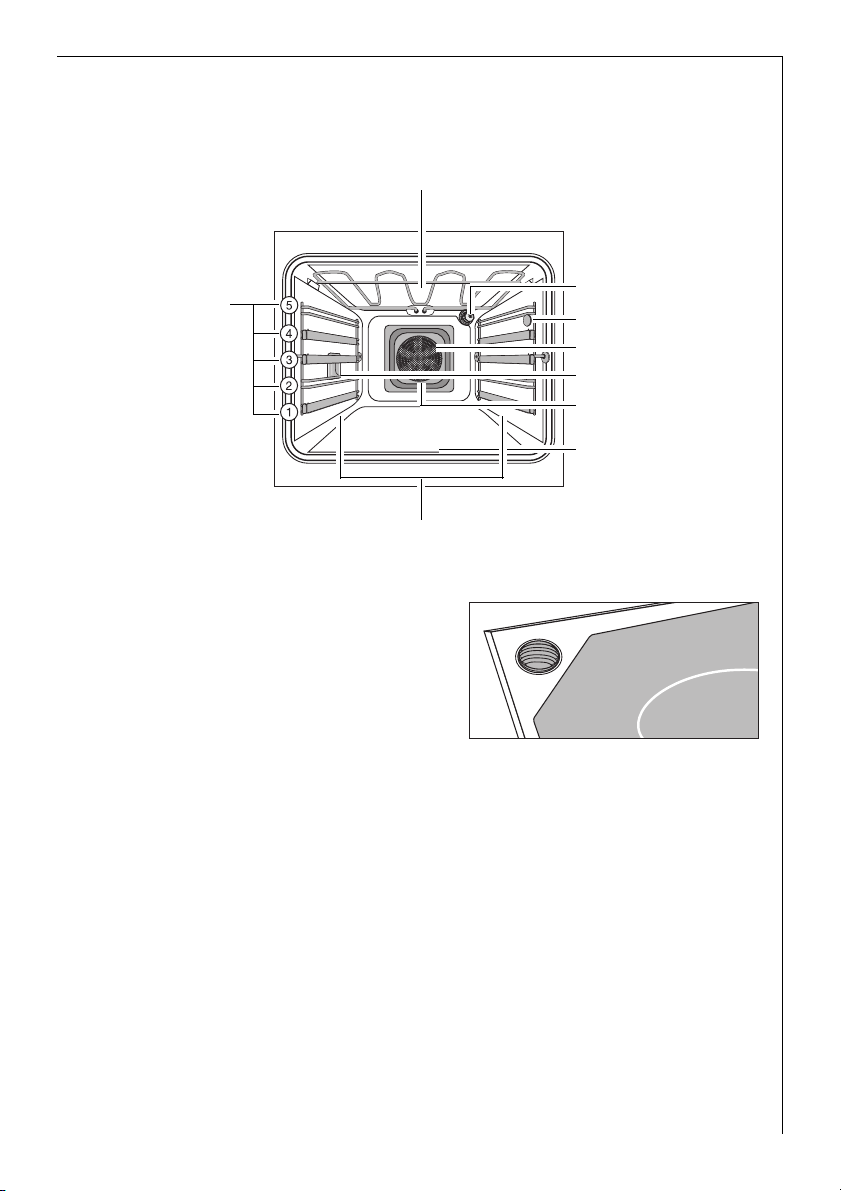
Oven Features
Top heat and heating elements
Shelf positions
Oven shelf runners,
removable
Oven steam vent
The steam from the oven is fed directly upwards via the duct in the
rear of the cooking surface.
Oven lighting
Meat probe socket
Fat Filter
Oven lighting
Fan heating element
Fan
Bottom Heat
11
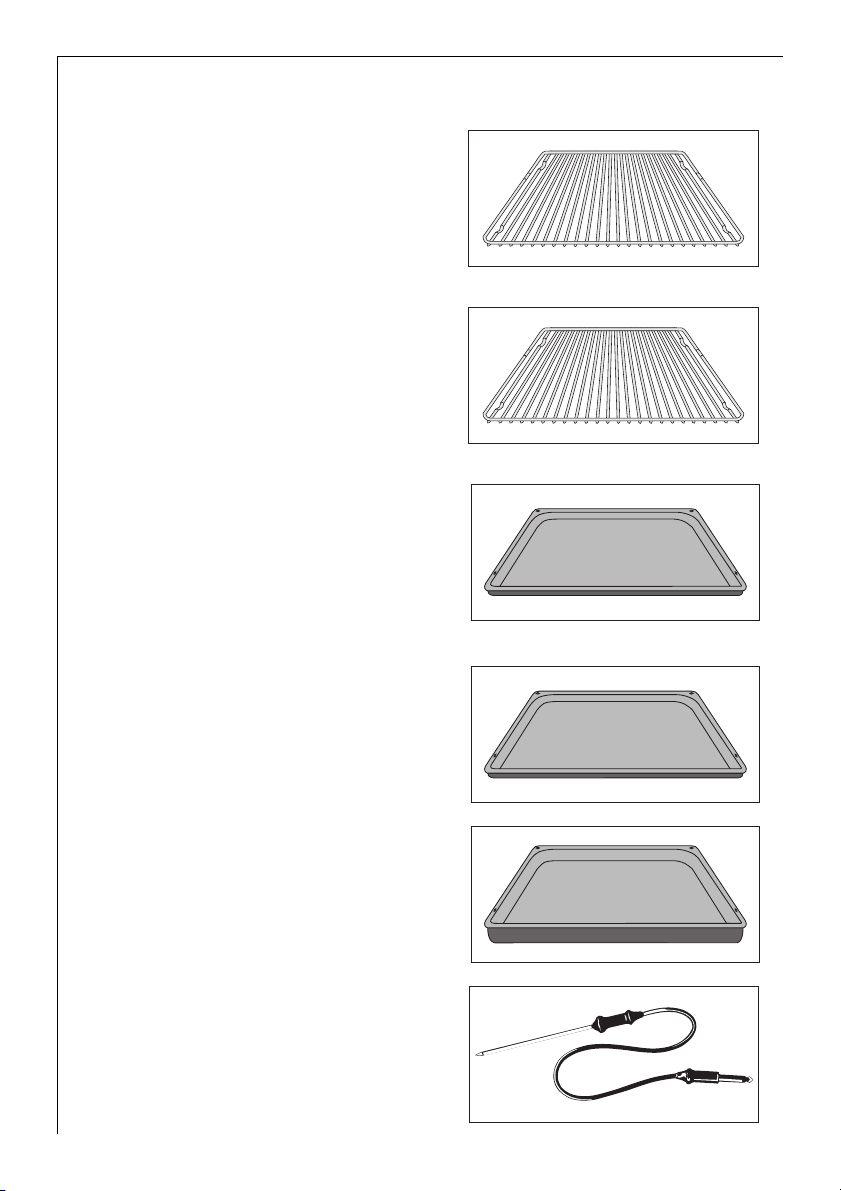
Oven accessories
Combination shelf for telescopic
runners
For cookware, cake tins, roasts and
grilled food.
Oven shelf for non-stick
For cookware, cake tins, roasts and
grilled foods.
Baking tray
For cakes and biscuits.
Non-stick baking tray
For cakes and biscuits.
12
Non-stick roasting tray
For baking and roasting or as a tray
for collecting fat.
Meat probe
For determining exactly how far
joints of meat are cooked.

Before Using for the first time
Setting the language
1. When the appliance has
been connected to the electrical supply, SPRACHE EINSTELLEN - LANGUAGE MENU
is shown in the display.
2. Using the arrow buttons
or select the desired language.
LANGUAGE MENU
ý ý ý ýþ ýþ ý
888ûcþ þüþ1ü2.0ü0
wm¸¹º»¼-+
ENGLISH
ý ý ý ýþ ýþ ý
888ûcþ þüþ1ü2.0ü0
wPmP¸¹º»¼-+
3. Confirm selected language
with the OK button.
From now on the texts in the
display appear in the language set.
ý ý ý ýþ ýþ ý
888ûcþ þüþ1ü2.0ü0
wm¸¹Pº»¼-+
ý
ý
ý ý
ý ý
88.8ú8
ý ý
ý ý
88.8ú8
ý
ý
ý
ý
TIME OF DAY
ý
ý ý
ý ò
88.8ú8
ý
ý
13

Setting the clock
1. TIME OF DAY lights up.
In the clock display you see 12.00.
2. Using the or button,
set the current time.
ý ý ý ýþ ýþ ý
888ûcþ þüþ1ü2.2ü5
TIME OF DAY
ý
ý ý
ý ò
88.8ú8
ý
ý
wm¸¹º»¼-P+P
3. Confirm using the SELECTION button.
The appliance switches itself
off and is now ready for use.
ý ý ý ýþ ýþ ý
888ûcþ þüþ1ü2.2ü5
ý
ý
ý
ý ý
ý ý
88.8ú8
wm¸¹º»¼P-+
3 If you would like to change one of these base settings at a later date,
please refer to the chapter SETTINGS MENU.
Initial cleaning
Clean the oven before using it for the first time.
1 Important: Do not use caustic or abrasive cleaning agents! These can
damage the oven surfaces.
3 For the metal surfaces, use commercially available cleaning agents.
1. Open the oven door.
The oven light is lit.
2. Remove all oven accessories, and clean them with warm water and a
scouring agent.
3. Wash the oven in the same way, and wipe dry.
4. Wipe the front of the appliance with a damp cloth.
14
Using the Rings
Also refer to the operating instructions for your built-in hob. It con-
3
tains important information on ovenware, operation, cleaning and care.
The following description does not apply to induction cooking zones.
Heat settings
• You can set the heat settings from 1 -9.
• You can set intermediate settings between 2 and 7.
• In addition each of the ring switches is fitted with an automatic
warm up function.
u =Keep warm setting
1 = lowest power
9 = highest power
A = Automatic warm up function
2 Switch the cooking zone off approx. 5-10 minutes before cooking is
finished to make use of the residual heat. This saves electricity.
3 The cooker has pop-up ring switches.
Press the ring switch to use it. The switch will then pop up.
Ring displays
front left rear left rear right front right
Hob Cooking Zone Control
15
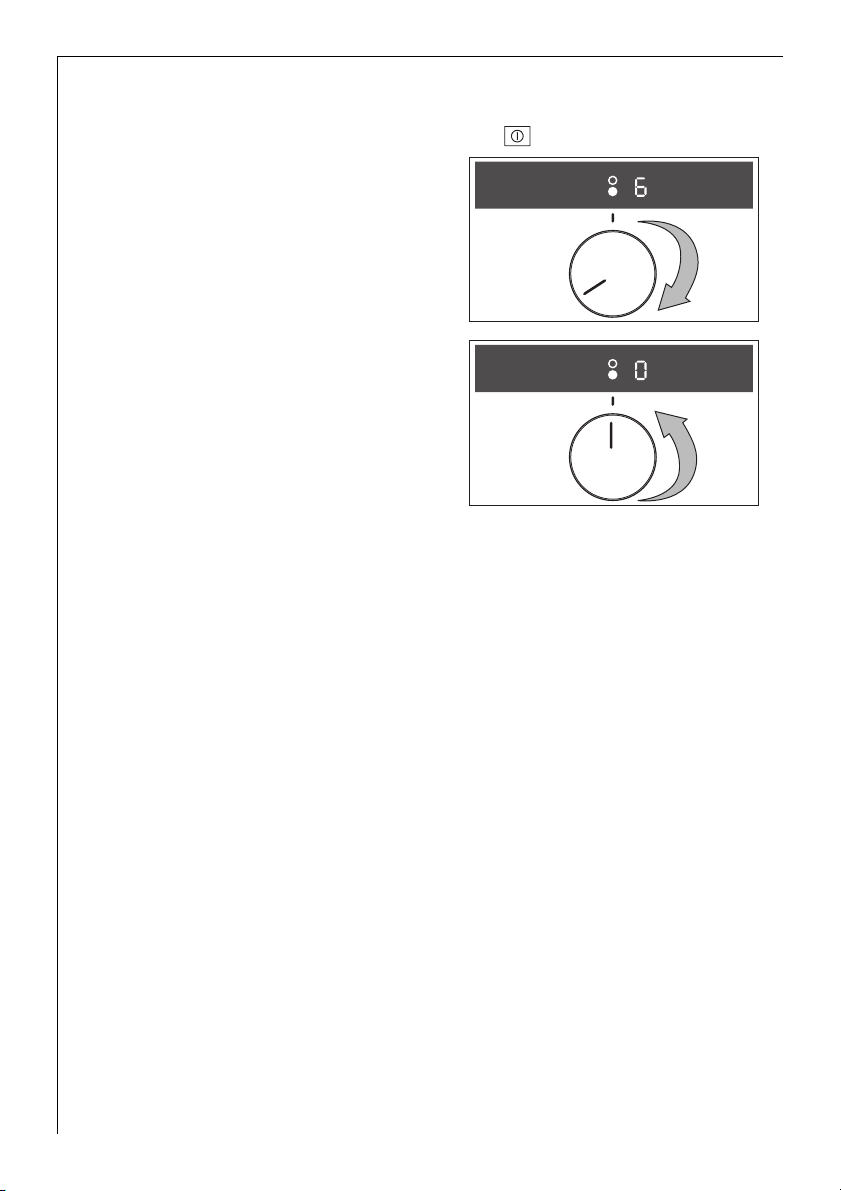
Setting the heat setting
1. Switch on the appliance with the On/Off button.
2. When getting up to heat/searing
food, select a high heat setting.
3. To end the cooking process, turn
back to the Off position.
Cooking with the automatic warm up function
When cooking with the automatic warm up function, the cooking zone
works with full power for a certain amount of time and then switches
back to the heat setting set to continue cooking.
1. To switch on the automatic warm up period, turn the ring switch clockwise as far as it will go.
2. Then turn the ring switch back to the desired heat setting for the continuing cooking period.
3. To end the cooking process, turn back to the “O” position.
3 If you select a higher heat setting during the warming up time, e. g.
turning from “3” up to “6”, the time that has already elapsed for the
warming up period is taken into consideration. If you select a lower
heat setting, the warm up period will end immediately.
3 You can end the automatic warm up function early by turning the ring
switch back to the Off position and then setting the required heat setting for the continuing cooking period again.
16

Warming up times when cooking with the automatic
warm up function
Switch setting: Warming up time with the automatic
warm up function
A and 9 no automatic warm up function
A and8 4.5minutes
A and7 3.5minutes
A and 6
A and6 2minutes
A and 5
A and 5 10 minutes
A and 4
A and4 6.5minutes
A and 3
A and3 5minutes
A and 2
A and2 2minutes
A and1 1minutes
A andu 0.5minutes
.
.
.
.
.
3minutes
12.5 minutes
8minutes
5.5 minutes
3minutes
3 When cooking with the appliance for the first few times, take careful
note of how it performs. This will help you decide which heat settings
are best for “your cookware” and “your recipes and quantities”.
Safety cut-out function for the rings
If one of the rings is not switched off after a certain period of time or
the cooking setting is not altered, the ring will automatically switch itself off.
The ring switch light is switched off.
The rings switch themselves off for:
.
• Heat settings
• Heat settings
• Heat settings
• Heat settings
1 - .2 after 6 hours
.
3 - .4 after 5 hours
.
4 - .5 after 4 hours
.
6 - .9 after 1.5 hours
Starting up after a safety cut-out
To start up again after a safety cut-out, turn the ring switch that is
turned on to the Off position.
After that the ring is ready to use again.
17
Using the Oven
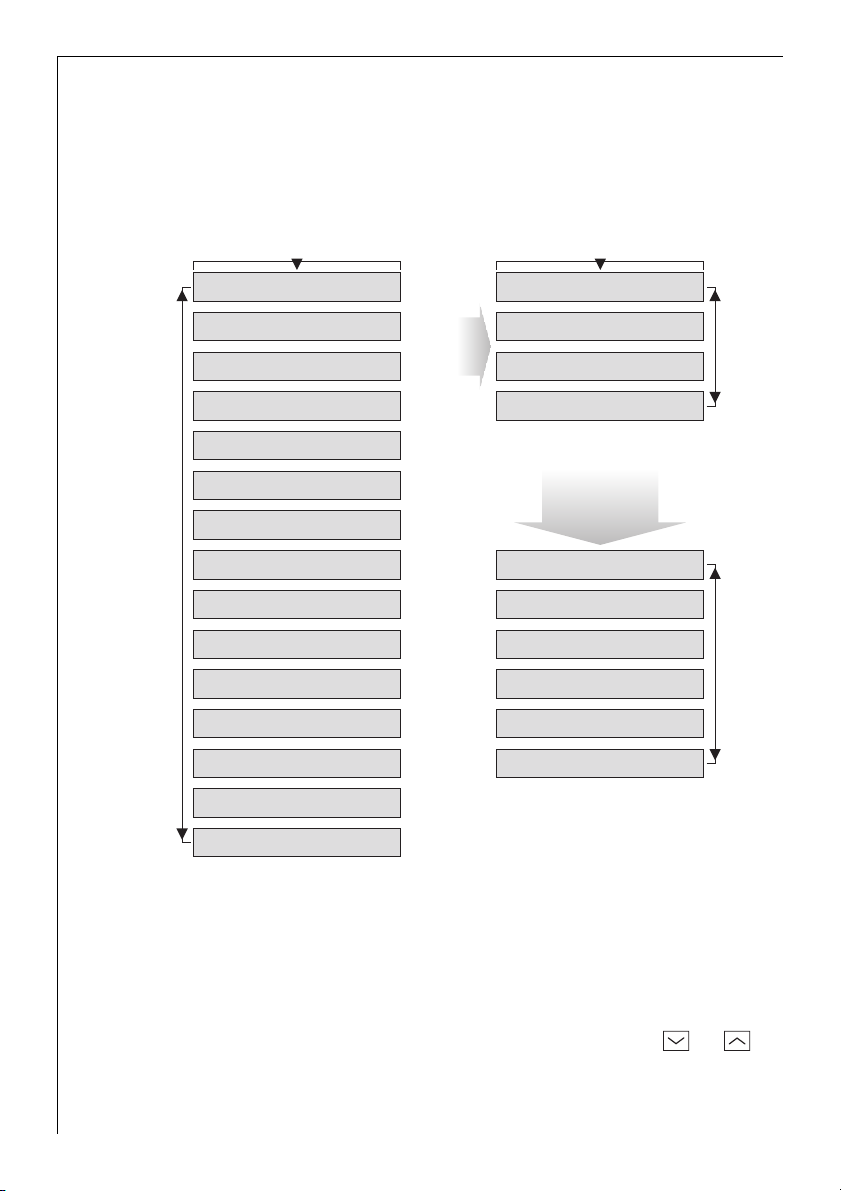
Menu operation in overview
Oven
Functions Menu
Menu
Options
PROFI HOT AIR
AL GUSTO HOT AIR
CONVENTIONAL
ROTITHERM
DUAL GRILL
SINGLE GRILL
KEEP WARM
w
DEFROST
m
BOTTOM HEAT
SLOW COOK ONE
POULTRY
PORK
BEEF
VEAL
GAME
¸
RECIPE MENU
MEMORY MENU
CLEANING MENU
SETTINGS MENU
¹
RAPID HEAT UP MENU
RESIDUAL HEAT MENU
DISPLAY MENU
SOUND MENU
LANGUAGE MENU
FACTORY SETTINGS
w
m
w
m
3 The display only offers setting options that are possible with the cur-
rent function after each operational step.
The Oven Functions menu
• When you switch the appliance on, you find yourself in the Oven
Functions menu.
• Select the desired oven function using the arrow buttons or .
In the menu status bar, the currrent position within the menu is
shown.
18

Setting an example oven function
1. Switch on the appliance us-
ing the ON/OFF button.
2. Using the arrow buttons
or select the oven function.
A suggested temperature appears in the temperature display.
The oven starts to heat up.
3. With the or button,
the temperature can be
raised or lowered.
3 When the temperature set is
reached, an audible signal
sounds.
The Options menu
–—OVEN FUNCTIONS
ý
ý ý
ý ý
88.8ú9
ý ý ý ýþ ýþ ý
280ûcþ þüþ1ü2.2ü5
ý
ý
wm¸¹ºP»¼-+
____________________
CONVENTIONAL
ý
ý ý
ý ý
00.0ü1
ý ý ý ýþ ýþ ý
200ыcюЭЬЬЬю1ь2.2ь5
ý
ý
wPm¸¹º»¼-+
CONVENTIONAL
ý ý ý ýþ ýþ ý
180ыcюЭЬЬЬю1ь2.2ь5
ý
ý
ý
ý ý
ý ý
00.0ü1
wm¸¹º»¼-P+P
• Using the OPTION button, open the Options menu.
• Select the desired option using the arrow buttons or . In the
menu status bar, the current position within the menu is shown.
• Use the OK button to change to the menu of the selected option.
The sub-menus
• Select the desired setting using the arrow buttons or or
change to other sub-menus using the OK button.
3 At the end of every menu there is the menu option BACK.
You use this to go back to the higher menu.
You can cancel a setting procedure by pressing and holding down the
OPTION button.
You will then find yourself back in the Oven functions menu.
19

Use of the oven functions
The oven has the following functions:
Oven function Application
PROFI HOT AIR For baking on up to three oven
levels at the same time.
Set the oven temperatures
20-40 °C lower than when using
Conventional.
AL GUSTO
HOT AIR
CONVENTIONAL For baking and roasting on one
ROTITHERM For roasting larger joints of meat
DUAL GRILL For grilling flat foodstuffs in
SINGLE GRILL For grilling flat foodstuffs placed
KEEP WARM To keep dishes warm. Top heat, bottom
DEFROST For defrosting e. g. flans and ga-
BOTTOM HEAT For baking cakes with crispy or
SLOW COOK For preparing especially tender,
For baking on one oven level dishes that require more intensive
browning and a crispy base.
Set the oven temperatures 20-40
°C lower than when using Conventional.
oven level.
or poultry on one level.
The function is also suitable for
gratinating and browning.
large quantities and for toasting.
in the middle of the grill and for
toasting.
teaux, butter, bread, fruit or other
frozen foods.
crusty bases.
succulent roasts.
Heating
element/fan
Top heat, bottom
heat, rear wall
heating element,
fan
Bottom heat, rear
wall heating element, fan
Top heat,
bottomheat
Grill, top heat, fan
Grill, top heat
Grill
heat
Fan
Bottom heat
Top heat, bottom
heat, rear wall
heating element,
fan
20

Meat programmes
Meat programmes
with weight input
POULTRY Chicken, duck, goose 0.9 to 4.7 kg
PORK Roast pork, shoulder of pork 1.0 to 3.0 kg
BEEF Roast beef, pot roast 1.0 to 3.0 kg
VEAL Roast veal 1.0 to 3.0 kg
GAME Vension, rabbit 1.0 to 3.0 kg
Application Weight range
or
Meat programmes with
meat probe plugged in
TOP SIDE BEEF TOP SIDE BEEF RARE
BEEF SCAN BEEF SCAN RARE Roast beef Scandi-
PORK JOINT - -
VEAL - -
LAMB JOINT - -
GAME - -
BONED POULTRY - -
Degree of cooking Notes
TOP SIDE BEEF WELL
BEEF SCAN MED.
BEEF SCAN WELL
-TOP SIDE BEEF MED.
navian style (no
browning)
Usage, Tables, Tips and Recipes
You will find practical information on the various oven functions, programmes and automatic recipes in the accompanying booklet.
21

Switching the Oven On and Off
Selecting an oven function
1. Switch appliance on using the ON/OFF button.
2. Using the arrow buttons
or select the desired
oven function.
A suggested temperature appears in the temperature display.
The oven starts to heat up.
____________________
CONVENTIONAL
ý ý ý ýþ ýþ ý
200ыcюЭЬЬЬю1ь2.2ь5
wPm¸¹º»¼-+
Changing the oven temperature
With the or button
the temperature can be
raised or lowered.
3 When the temperature set is
reached, an audible signal
sounds.
CONVENTIONAL
ý ý ý ýþ ýþ ý
180ыcюЭЬЬЬю1ь2.2ь5
wm¸¹º»¼-P+P
Switching off an oven function
Press the arrow buttons
or until OVEN FUNCTIONS is in the display again.
–—OVEN FUNCTIONS
ý ý ý ýþ ýþ ý
280ûcþ þüþ1ü2.2ü5
ý
ý
ý
ý
ý
ý
ý
ý
ý
ý ý
ý ý
00.0ü1
ý ý
ý ý
00.0ü1
ý ý
ý ý
88.8ú9
22
Turning appliance off completely
Switch appliance off using
the ON/OFF button.
wPmP¸¹º»¼-+
ý
ý ý
ý ý
88.8ú9
ý ý ý ýþ ýþ ý
280ûcþ þüþ1ü2.2ü5
ý
ý
wm¸¹ºP»¼-+

3 Cooling fan
The fan switches on automatically in order to keep the appliance’s surfaces cool. When the oven is switched off, the fan continues to run to
cool the appliance down, then switches itself off automatically.
Pre-heating with the RAPID HEAT UP function
After an oven function has been selected, with the additional function
RAPID HEAT UP the pre-heating time can be shortened.
Pre-heating the empty oven is unnecesssary for most baking and roasting sessions, because the temperature set is generally reached in a short
time (see Tables and Tips).
We recommend pre-heating the empty oven using the RAPID HEAT UP
function for biscuits that quickly spread into one another, bread rolls
and Swiss rolls.
1 Important: Do not put the food to be cooked into the oven, until RAP-
ID HEAT UP is completed and the oven is operating using the desired
function.
1. Set the oven function (e.g. CONVENTIONAL). Change the suggested
temperature, if necessary.
2. Press the RAPID HEAT UP button. The symbol
When the bars flash one after another it shows that RAPID HEAT UP is
operating.
When the temperature set is reached, the bars of the heat indicator are
lit. An audible signal sounds. The symbol goes out.
The oven now continues heating according to the pre-set oven function and temperature. You can now place the food in the oven.
lights up:
3 If you generally prefer to put food into a pre-heated oven, you can
switch on the RAPID HEAT UP function permanently (see SETTINGS
MENU).
The RAPID HEAT UP function is then switched off with the RAPID HEAT
UP button.
3 The RAPID HEAT UP function can be switched on with the oven func-
tions PROFI HOT AIR, AL GUSTO HOT AIR, CONVENTIONAL and
ROTITHERM.
23

Heat indicator
Heating up indicator
When the oven function has
been switched on the four
bars that slowly light up one
after the other indicate how
far the oven has heated up.
Rapid heat up indicator
When the RAPID HEAT UP
function has been switched
on, the bars that flash one
after the other indicate that
RAPID HEAT UP is operating.
Residual heat indicator
When the oven has been
switched off, the bars that
are still lit indicate the remaining residual heat in the
oven.
CONVENTIONAL
ý
ý ý
ý ý
00.ü07
ý ý ý ýþ ýþ ý
180ыcююЭЮЬЬю1ь2.12
ý
ý
wm¸¹º»¼-+
CONVENTIONAL
ý ý ý é ýþ ýþ ý
180ыcюЭЮЯЬю1ь2.1ь0
ý
ý
ý
ý ý
ý ý
00.0ü5
wm¸¹º»P¼-+
–—OVEN FUNCTIONS
ý ý ý ýþ ýþ ý
280ûcюЭЮЯЬю1ь3.2ь5
ý
ý
ý
ý ý
ý ý
88.8ú9
wm¸¹º»¼-+
24

Inserting the Combination Shelf, Baking Tray and Roasting Pan
Inserting the baking tray or
roasting pan
Insert baking tray or or roasting pan
on the telescopic runners of the selected oven level so that the two
holes engage on the front retaining
pins on the telescopic runners.
Inserting the oven shelf:
Insert the oven shelf so that the
feet point downwards.
Insert the oven shelf on the tele-
scopic runners of the selected oven
level.
3 The high rim around the oven shelf
is an additional device to prevent
cookware from slipping.
Inserting the oven shelf and
roasting pan together:
Lay the oven shelf on the roasting
pan.
Insert the oven shelf and the roasting pan on the telescopic runners of
the selected oven level so that the
two holes of the roasting pan engage on the front retaining pins on
the telescopic runners.
3 To make it easier to insert the insertable component when runners are
extended to different extents, lay the insertable component onto the
runners at the back, push it in as far as the stop and then lower it onto
the retaining pins at the front.
25
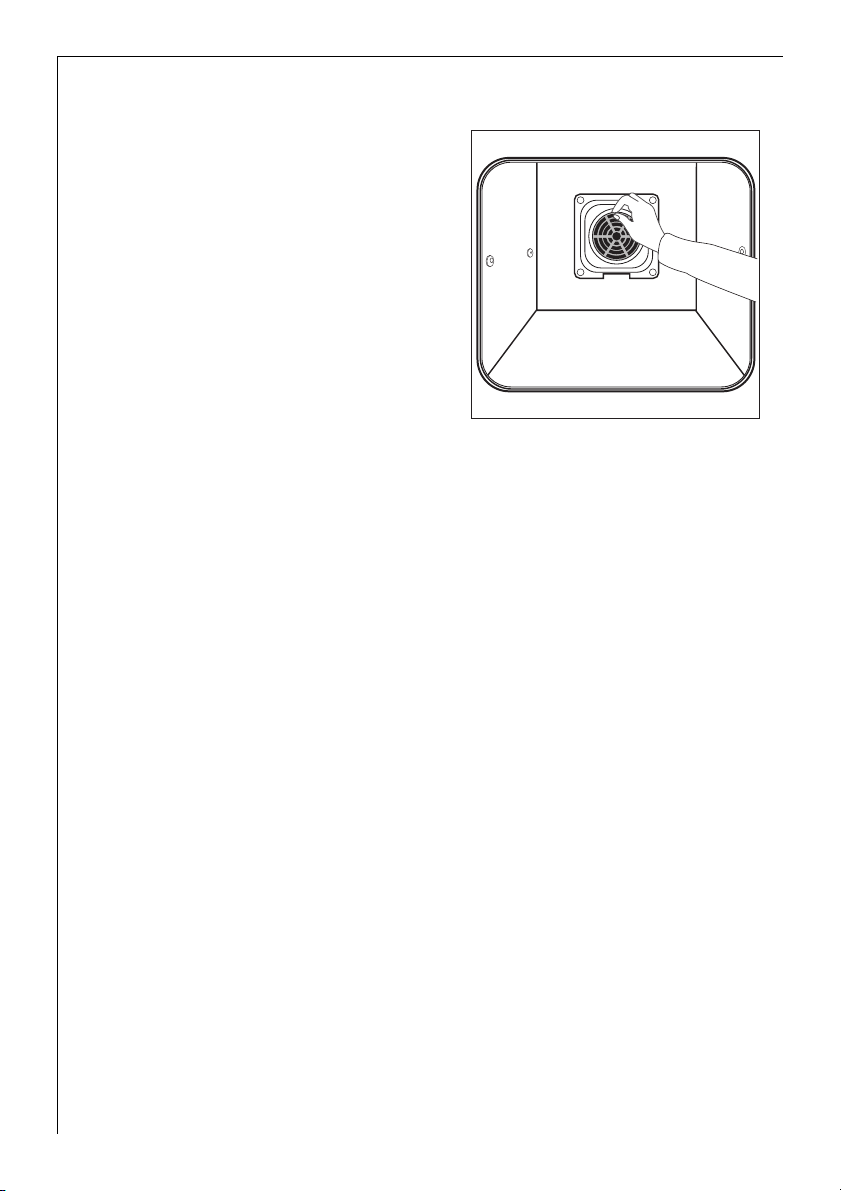
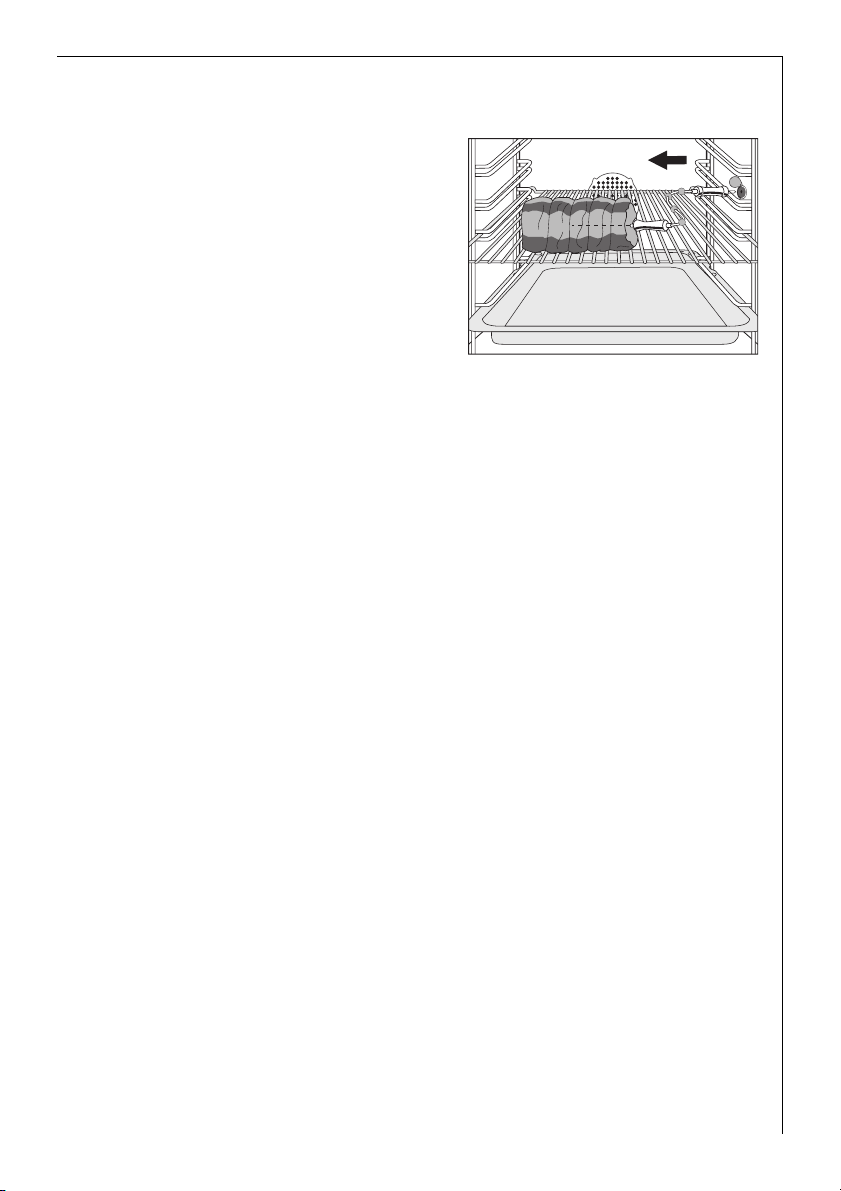
Inserting/Removing the Grease Filter
Only use the grease filter when
roasting to protect the rear heating
elements from fat splashes.
Inserting the grease filter
Hold the grease filter by the
grip and insert the two mounts
downwards into the opening on
the rear wall of theoven (fan
opening).
Taking out the grease filter
Hold the grease filter by the
grip and unhook it.
Non-stick accessories
To ensure that this accessory remains stable and permanently easy to
clean, you should follow these instructions:
• Do not put accessories into the oven without any food.
• Do not place accessories on hot cooking surfaces, as the non-stick
properties can be damaged by overheating.
26

Meat Probe
3 When the meat probe is plugged in, the OVEN FUNCTIONS menu offers
a choice of suitable oven functions and additional programmes for the
meat probe.
1 Important: Only the meat probe supplied may be used. If replacing,
please use only original replacement parts.
Inserting the meat probe
1. Switch on the appliance using the ON/OFF button.
2. Push the tip of the meat probe into
the meat as fully as possible, so that
the tip is in the centre of the meat.
3. Insert the meat probe plug into the
socket on the side wall of the oven
as far as it will go.
27

Setting meat probe core temperature
To switch the oven off when the temperature at the centre of a roast
reaches a core temperature set by you.
There are two temperatures to consider:
– The oven temperature: See Roasting Table
– The core temperature: See MEATPROBE Table
1. Insert meat probe as described before.
In the text line MEATPROBE
and the symbol
played.
are dis-
ý ý ý ýþ ë ý
888ûcþ þüþ8ü6ü0û8
MEATPROBE
ý
ý
ý
ý ý
ý ý
88.8ú8
2. Set the desired core temperature within 5 seconds, using
the or buttons.
wm¸¹º»¼-+
MEATPROBE
ý ý ý ýþ ë ý
280ûcþ þüþ1ü6ü5û1
ý
ý
wm¸¹º»¼-P+P
The display changes to the
current core temperature.
3 If OVEN FUNCTIONS should
already be displayed in the
text line, before the desired
core temperature has been
set, then press the SELECTION button, until the symbol flashes
and then perform the setting.
–—OVEN FUNCTIONS
ý ý ý ýþ ë ý
888ûcþ þüþ8ü3ü0û8
ý
ý
wm¸¹º»¼-+
3 The core temperature is displayed from 30°C.
3. Set oven function and, if necessary, oven temperature.
As soon as the pre-set core temperature is reached, a signal sounds.
4. To switch off the signal, press any button.
ý
ý
ý ý
ý ý
00.5ü5
ý ý
ý ý
88.8ú8
28
Removing the meat probe
1 Warning: The meat probe is very
hot. There is a risk of being burned
when removing the plug and the tip
of the meat probe.
1. Remove the meat probe’s plug from
the socket and take the meat out of
the oven.
2. Switch off the appliance.
3 You will find instructions on the
meat programmes with meat
probe in the chapter “Automatic programmes”.
29

Automatic programmes
In addition to the oven functions for individually setting baking and
roasting, you have the option of working with various automatic programmes:
1. Meat programmes with weight input (OVEN FUNCTIONS menu)
2. Meat programmes with meat probe (OVEN FUNCTIONS menu)
3. Automatic recipes (Options menu)
Meat programmes with weight input
The meat programmes offer optimum settings for each type of meat.
The roasting time is automatically determined by inputting the weight
of the meat.
1. Using the arrow buttons
or select the desired
meat programme.
In the text line the weight
flashes.
____________________
POULTRY 2,5 KG
ý ý ý ýþ ýþ ý
280ûcюЭЬЬЬю1ь2.2ь5
ý
ý
wmP¸¹º»¼-+
2. As long as the weight is
flashing, use the or
button to set the weight of
the food.
The setting changes in 0.1kg
steps (with POULTRY in 0.2kg
steps).
The meat programme is started.
In the clock functions display the length of the programme is displayed.
The time counts down. This means while the programme is running the
actual time remaining is displayed.
--POULTRY 2,5 KG
ý ý ý ýþ ýþ ý
280ûcюЭЬЬЬю1ь2.2ь5
ý
ý
wm¸¹º»¼-P+P
ÒÓ
ÒÓ
í ý
ý ý
01.4ü0
í ý
ý ý
01.0ü5
3 If the suggested weight is not changed within approx. 5 seconds, the
meat programme starts automatically.
Within the first two minutes the weight can still be altered. To do this
press the SELECTION button.
The weight flashes and can be altered.
30

3. With the POULTRY meat programme, please turn the
food if an acoustic signal
sounds and the instruction
TURN-OVER MEAT is in the
text line.
When all meat programmes
are completed, an audible signal sounds.
TURN-OVER MEAT
ÒÕ
í ý
ý ý
00.2ü5
ý ý ý ýþ ýþ ý
280ûcюЭЮЯаю1ь2.55
ý
ý
wm¸¹º»¼-+
Meat programmes with meat probe
3 When the meat probe is plugged in, the OVEN FUNCTIONS menu offers
additional meat programmes with meat probe.
These programmes offer optimum settings for each type of meat.
1 Important: Only the meat probe supplied may be used. If replacing,
please use only original replacement parts.
1. Switch on the appliance using the ON/OFF button.
2. Insert meat probe
In the text line MEATPROBE
is displayed and the symbol flashes.
ý ý ý ýþ ë ý
888ûcþ þüþ8ü6ü0û8
MEATPROBE
ý
ý ý
ý ý
88.8ú8
ý
ý
1. Using the arrow buttons
or select the desired
MEATPROBE programme.
wm¸¹º»¼-+
VEAL
ý ý ý ýþ ë ý
280ûcюЭЬЬЬю1ü30û1
ý
ý
ÒÓ
ý ý
ý ý
00.0ü0
wmP¸¹º»¼-+
As soon as the pre-set core
temperature is reached, a
signal sounds and the temperature reached flashes.
2. To switch off the signal,
press any button.
3. Remove meat probe.
VEAL
ÒÓ
ý ý
ý ý
00ü0ü0
ý ý ý ýþ ë ý
888ûcюЭЮЯЬю8ü6ü0û8
ý
ý
wm¸¹º»¼-+
1 Warning: The meat probe is very hot. There is a risk of being burned
when removing the plug and the tip of the meat probe.
31

Options
RECIPE MENU in overview
¸
RECIPE MENU
¹
w
m
BAKING RECIPES
¹
w
m
ROASTING RECIPES
¹
w
m
OTHER RECIPES
¹
w
m
BACK
LEMON SPONGE CAKE
SWEDISH CAKE
SPONGE CAKE
CHEESE CAKE
FRUIT CAKE
STREUSEL PLAIT
YEAST PLAIT
WHITE BREAD
BACK
PIZZA
POTATO GRATIN
ONION TARTE
QUICHE LORRAINE
LASAGNE
CANNELLONI
MEAT CASSEROLE
FISH STEAKS
BACK
POWDER CAKE
FROZEN PIZZA
DRYING HERBS
PRESERVING
BACK
¹
¹
¹
¹
32

BAKING RECIPES and ROASTING RECIPES
3 For this function, use the recipes supplied in the booklet “Tables, Tips
and Recipes”. This function offers optimum settings for each recipe.
Selecting a recipe.
1. Use the OPTION button
to change to the Options
menu.
_____
RECIPE MENU
ý ý ý ýþ ýþ ý
280ûcþ þüþ1ü2.2ü8
ý
ý
ý
ý ý
ý ý
01.5ü5
wm¸P¹º»¼-+
2. Use the OK button to
change to the RECIPE MENU
menu.
____
BAKING RECIPES
ý ý ý ýþ ýþ ý
280ûcþ þüþ1ü2.2ü8
ý
ý
ý
ý ý
ý ý
01.5ü5
wm¸¹Pº»¼-+
3. Use the arrow buttons or
to select the desired reci-
pe category.
__ __
ROASTING RECIPES
ý ý ý ýþ ýþ ý
280ûcþ þüþ1ü2.2ü8
ý
ý
ý
ý ý
ý ý
01.5ü5
wPm¸¹º»¼-+
4. Use the OK button to
change to e.g. the ROASTING
RECIPES menu.
__ _____
ROASTING RECIPES
ý ý ý ýþ ýþ ý
280ûcþ þüþ1ü2.2ü0
ý
ý
ý
ý ý
ý ý
00.5ü4
5. Use the arrow buttons or
to select the desired reci-
pe.
If the selection is not altered
for a few seconds, the oven
takes this setting and begins
to heat up.
wm¸¹Pº»¼-+
_______
ONION TARTE
ÒÓ
í ý
ý ý
00.5ü5
ý ý ý ýþ ýþ ý
280ûcþ þüþ1ü2.2ü0
ý
ý
wPm¸¹º»¼-+
33

6. An acoustic signal will sound
when the cooking time has
finished.
– “00:00:” flashes in the
clock display and the
symbol flashes.
– The oven heating switch-
es itself off.
7. The audible signal can be stopped by pressing any button.
Delaying the start time
Running the programme can also be automatically started at a later
time (see Clock Functions END ).
_______
ONION TARTE
ÒÓ
í ý
ý ý
00.0ü0
ý ý ý ýþ ýþ ý
280ûcþ þüþ1ü3.1ü5
ý
ý
wm¸¹º»¼-+
3 The clock function END can be set, if the programme has been run-
ning for less than two minutes.
Ending the cooking time early
Press and hold the OPTION button or using the arrow buttons
or select the menu option BACK.
OTHER RECIPES
1. Use the OPTION button to change to the Options menu.
2. Use the OK button to change to the RECIPE MENU menu.
3. Using the arrow buttons or select the recipe category OTHER
RECIPES.
4. Use the OK button to
change to the OTHER RECIPES menu.
_____
OTHER RECIPES
ý ý ý ýþ ýþ ý
280ûcþ þüþ1ü2.2ü0
ý
ý
ý
ý ý
ý ý
00.5ü4
5. Using the arrow buttons
or select the desired
menu option.
A suggested temperature appears in the display.
If the selection is not altered
for a few second, the oven
takes this setting and begins to heat up.
34
wm¸¹Pº»¼-+
_______
POWDER CAKE
ÒÕ
ý ý
ý ý
00.0ü0
ý ý ý ýþ ýþ ý
160ûcþ þüþ1ü3.0ü5
ý
ý
wPmP¸¹º»¼-+

3 With the recipes POWDER CAKE and FROZEN PIZZA using the or
buttons, the suggested temperture can be increased or decreased
by 10°C.
In the category OTHER RECIPES you will find the following menu
options:
POWDER CAKE For baking ready-made cakes and cake mixes.
FROZEN PIZZA For baking ready-made meals such as pizza, la-
sagne, gratins and chips from the deep freeze.
DRYING HERBS For drying fruit, herbs and mushrooms.
PRESERVING For preserving fruit and vegetables.
You will find further instructions on these functions in the booklet
“Tables, Tips and Recipes”.
MEMORY MENU
With this function you can save the optimum settings for your own
recipes.
The first three “Personal recipes” can be called up again directly in the
Oven Functions menu.
There are 10 memory positions available for recipes with pre-set cooking times and 10 for recipes with pre-set meat probe core temperatures.
Saving settings for “Personal Recipes”
To save settings for a known recipe
1. Select oven function and temperature.
2. If necessary, use the SELECTION button to change to the clock func-
tion DURATION
tions” section).
or
3. Use the SELECTION button to change to the MEATPROBE function
and input desired core temperature (see MEATPROBE section).
4. Using the OPTION button, change to the Options menu.
and input desired cooking time (see “Clock Func-
35

5. Using the OK button, se-
lect the suggested menu option STORE MEMORY.
The next free memory position is displayed.
6. Select using the OK but-
ton, e.g. MEMORY 1.
The first letter in the text
line flashes.
7. Using the arrow buttons
or select the desired letter from the alphabet.
8. Use the or button to
move the dash to the right
or the left.
The next letter flashes and
can be changed and so on.
In this way you can write the
name of your own “Personal
Recipe”.
__
STORE MEMORY
ý
ý ý
ý ý
88.8ú9
ý ý ý ýþ ýþ ý
280ûcþ þüþ1ü2.2ü8
ý
ý
wm¸¹Pº»¼-+
__
MEMORY 1
ý
ý ý
ý ý
88.8ú9
ý ý ý ýþ ýþ ý
280ûcþ þüþ1ü2.2ü8
ý
ý
wm¸¹Pº»¼-+
__
MEMORY 1
ý
ý ý
ý ý
88.8ú9
ý ý ý ýþ ýþ ý
280ûcþ þüþ1ü2.2ü8
ý
ý
wPmP¸¹º»¼-+
DAD’S PIZZA _
ý ý ý ýþ ýþ ý
280ûcþ þüþ1ü2.2ü8
ý
ý
ý
ý ý
ý ý
88.8ú9
wm¸¹º»¼-+P
3 There are 18 input fields available.
When you have finished
writing the name, press and
hold the OK button.
SAVED is displayed.
36
SAVED
ý
ý ý
ý ý
88.8ú9
ý ý ý ýþ ýþ ý
280ûcþ þüþ1ü2.2ü8
ý
ý
wm¸¹Pº»¼-+

Calling up settings for “Personal Recipes”
1. Switch on the appliance with the ON/OFF button.
2. Using the arrow button
select saved recipe.
_________________ ___
DAD’S PIZZA
ý
ý ý
ý ý
88.8ú9
ý ý ý ýþ ýþ ý
280ыcюЭЬЬЬю1ь2.2ь9
ý
ý
wmP¸¹º»¼-+
3 You can call up the first three saved “Personal Recipes” directly in the
Oven Functions menu.
Other “Personal Recipes” can be called up in the MEMORY MENU under
the menu option START MEMORY.
Overwriting a memory position
Memory positions that are already filled can be overwritten at any
time.
To do this, proceed as explained in the “Saving settings for your own
recipes”.
However at point 5, instead of the suggested free memory position, use
the button to select the recipe that you want to overwrite.
37

SETTINGS MENU
3 Independent of the current use of the oven, you can change various
base settings. These remain permanently set, until they are changed
again.
RAPID HEAT UP MENU
The function RAPID HEAT UP MENU is automatically
switched on with suitable oven functions.
– RAPID HEAT UP ON
– RAPID HEAT UP OFF
RESIDUAL HEAT MENU
– INDICATOR ON
– INDICATOR OFF
DISPLAY MENU
– DISPLAY ON After the appliance is switched off, the time is displayed.
– DISPLAY OFF
SOUND MENU
– BUTTON TONE MENU
– TONE ON
– TONE OFF
– ERROR TONE MENU
– TONE ON
– TONE OFF
LANGUAGE MENU
– ENGLISH
– ...
FACTORY SETTINGS
– RESTORE SETTINGS
Using the RAPID HEAT UP
ID HEAT UP MENU can be manually switched off for individual baking or roasting sessions.
The function RAPID HEAT UP MENU is not automatically
switched on with suitable oven functions.
Using the RAPID HEAT UP
ID HEAT UP MENU can be manually switched on for individual baking or roasting sessions.
After the appliance is switched off, the residual heat is
indicated.
After the appliance is switched off, the residual heat is
not indicated.
After the appliance is switched off, the clock display also
goes out. As soon as the appliance is switched on, the
display automatically switches itself on.
The DISPLAY OFF setting saves energy.
For setting if each press of a button is confirmed with a
tone.
For setting if audible signals for operational steps that
cannot be carried out are to be acknowledged with a
tone.
For setting the language in the display.
For restoring all settings to the status as at the time of
delivery.
button, the function RAP-
button, the function RAP-
38

Adjusting SETTINGS MENU
1. Using the OPTION button, open the Options menu.
2. Using the arrow buttons or select the menu option SETTINGS
MENU.
3. Using the OK button, change to the SETTINGS MENU menu.
4. Using the arrow buttons or go to the setting that you want to
adjust.
5. Press the OK button.
The value currently set appears in the display.
6. Using the arrow buttons or select the desired value.
7. Press the OK button.
In the display SAVED appears for a few seconds.
Afterwards, you will find yourself back in the Oven Functions menu.
Clock Functions
MINUTE MINDER
To set a countdown. A signal sounds after the time has elapsed.
This function does not affect the functioning of the oven.
DURATION
To set how long the oven is to be in use.
END
To set when the oven is to switch off again.
TIME OF DAY
To set, change or check the time
(See also section “Before Using for the First Time”).
Information about the clock functions
• After a clock function has been selected, the corresponding symbol
flashes for about 5 seconds. During this time, the desired times can
be set or modified using the or button.
• When the desired time has been set, the corresponding symbol con-
tinues to flash for approx. 5 seconds. After this the symbol lights up.
The set time begins to run.
2 Using residual heat with the DURATION and END clock
functions
When the DURATION and END clock functions are used, the
oven switches the heating elements off, when 90% of the time set or
calculated has elapsed. The residual heat present is used to continue
the cooking process until the time set has elapsed (3 to 20 mins.).
39

3 The clock functions display shows the period of operation for the se-
lected oven function, if none of the clock functions MINUTE
MINDER , DURATION or END is set.
MINUTE MINDER
1. Press the SELECTION but-
ton repeatedly, until MINUTE
MINDER
is displayed.
and the symbol
MINUTE MINDER
ý ý ý ýþ ýþ ý
888ûcþ þüþ1ü4.3ü5
ý
ý
ý
__
ý ý
ñ ý
00.0ü0
wm¸¹º»¼P-+
2. Using the or button,
set the desired Countdown
time (max. 99 minutes).
MINUTE MINDER
ý ý ý ýþ ýþ ý
888ûcþ þüþ1ü4.3ü5
ý
ý
ý
__
ý ý
ñ ý
03.5ü0
wm¸¹º»¼-P+P
After about 5 seconds the
display shows the time remaining.
OVEN FUNCTIONS and the
symbol are shown in the
display.
When the time has elapsed,
an audible signal sounds for
2minutes.
“00.00” and the symbol
flash.
–—OVEN FUNCTIONS
ý
ý ý
ñ ý
03.4ü9
ý ý ý ýþ ýþ ý
888ûcþ þüþ1ü4.3ü5
ý
ý
wm¸¹º»¼-+
MINUTE MINDER
ý ý ý ýþ ýþ ý
888ûcþ þüþ1ü4.3ü8
ý
ý
ý
ý ý
ñ ý
00.0ü0
wm¸¹º»¼-+
To turn off the audible signal:
Press any button.
40

DURATION
1. Select oven function and temperature.
2. Press the SELECTION but-
ton repeatedly until DURATION and the symbol is
displayed.
3. Using the or button,
set the desired cooking time.
After about 5 seconds the
remaining cooking time is
displayed.
The symbol lights up:
When the time has elapsed,
an audible signal sounds for
2 minutes. The oven switches
itself off.
___
DURATION
ý
í ý
ý ý
00.0ü0
ý ý ý ýþ ýþ ý
200ûcþ þüþ1ü4.3ü5
ý
ý
wm¸¹º»¼P-+
___
DURATION
ý
í ý
ý ý
00.3ü0
ý ý ý ýþ ýþ ý
200ûcþ þüþ1ü4.3ü5
ý
ý
wm¸¹º»¼-P+P
CONVENTIONAL
ý ý ý ýþ ýþ ý
200ыcюЭЬЬЬю1ь4.3ь5
ý
ý
ý
í ý
ý ý
00.2ü9
wm¸¹º»¼-+
CONVENTIONAL
ý ý ý ýþ ýþ ý
200ыcюЭЮЯаю1ь5.0ь5
ý
ý
ý
í ý
ý ý
00.0ü0
“00.00” and the symbol
flash.
To turn off the audible signal:
Press any button.
wm¸¹º»¼-+
41

END
1. Select the oven function and temperature.
2. Press the SELECTION but-
ton repeatedly until END and
the symbol are displayed.
wm¸¹º»¼P-+
3. Using the or button,
set the desired switch-off
time.
wm¸¹º»¼-P+P
After about 5 seconds the
switch-off time is displayed.
The symbol lights up:
wm¸¹º»¼-+
When the time has elapsed,
an audible signal sounds for
2 minutes. The oven switches
itself off.
ý ý ý ýþ ýþ ý
200ûcþ þüþ1ü4.3ü5
ý ý ý ýþ ýþ ý
200ûcþ þüþ1ü4.3ü5
CONVENTIONAL
ý ý ý ýþ ýþ ý
200ыcюЭЬЬЬю1ь4.3ь5
CONVENTIONAL
ý ý ý ýþ ýþ ý
200ыcюЭЮЯаю1ь5.2ь5
ý
ý
ý
ý
ý
ý
ý
ý
ý
ý
ý
ý
__ _
END
ý î
ý ý
14.3ü5
__ _
END
ý î
ý ý
15.2ü5
ý î
ý ý
15.2ü5
ý î
ý ý
00.00ü
42
“00.00” and the symbol
flash.
To turn off the audible signal:
Press any button.
wm¸¹º»¼-+

DURATION and END combined
3 DURATION and END can be used simultaneously, if the oven is
to be switched on and off automatically at a later time.
1. Select the oven function and temperature.
2. Using the DURATION
function, set the time that
the dish needs to cook,
for example: 1 hour.
ý ý ý ýþ ýþ ý
200ûcþ þüþ1ü2.0ü5
DURATION
ý
ý
ý
___
í ý
ý ý
01.0ü0
wm¸¹º»¼-+
3. Using the END function,
set the time at which the
dish should be ready,
for example: at 14:05.
ý ý ý ýþ ýþ ý
200ûcþ þüþ1ü2.0ü5
ý
ý
ý
__ _
END
ý î
ý ý
14.0ü5
wm¸¹º»¼-+
In the text line is shown
PROGRAMMED.
PROGRAMMED
ý ý ý ýþ ýþ ý
200ûcþ þüþ1ü2.0ü5
ý
ý
ý
ý ý
ý ý
14.0ü5
wm¸¹º»¼-+
The oven switches itself on
automatically at the time
calculated,
for example: at 13:05.
When the set cooking time
has elapsed, an audible signal sounds for 2 minutes and
the oven switches itself off,
for example: at 14:05.
CONVENTIONAL
ý
í î
ý ý
01.0ü0
ý ý ý ýþ ýþ ý
200ûcþ þüþ1ü2.0ü5
ý
ý
wm¸¹º»¼-+
43

Additional functions
CHILD LOCK for the oven
As soon as the CHILD LOCK is activated, the appliance cannot be operated.
Switching on the CHILD LOCK
1. If necessary, switch on the appliance using the ON/OFF button.
No oven function must be selected.
2. Touch SELECTION and
buttons simultaneously
until CHILD LOCK appears in
the display.
The CHILD LOCK is now
operating.
Switching off the CHILD
LOCK
• Touch SELECTION and buttons simultaneously until CHILD
LOCK goes out in the display.
The CHILD LOCK is now deactivated and the oven is again ready for use.
CHILD LOCK
ý ý ý ýþ ýþ ý
280ûcþ þüþ1ü2.2ü8
ý
ý
wm¸¹º»¼P-P+
ý
ý ý
ý ý
88.8ú9
44

BUTTON LOCK
To ensure that all oven functions set are not accidentally altered.
Switching on BUTTON LOCK
1. If necessary, switch on the appliance using the ON/OFF button.
2. Select the oven function.
3. Press the SELECTION and
buttons simultaneously
until BUTTON LOCK appears
in the display.
The BUTTON LOCK is now in
operation.
Switching off BUTTON LOCK
• Press SELECTION and buttons simultaneously for approx.
2 seconds.
BUTTON LOCK
ý
ý ý
ý ý
00.0ü5
ý ý ý ýþ ýþ ý
200ыcюЭЬЬЬю1ь2.2ь8
ý
ý
wm¸¹º»¼P-P+
3 The BUTTON LOCK does not protect the appliance from being acciden-
tally switched off.
After the appliance is switched off, the BUTTON LOCK is automatically
cancelled.
Oven safety cut-out
3 If not switched off after a certain time, or if the temperature is not
modified, the oven switches off automatically.
The oven switches itself off when the oven temperature is:
30 - 120°C after 12.5 hours
120 - 200°C after 8.5 hours
200 - 250°C after 5.5 hours
250 – max. °C after 3.0 hours
Using the appliance after a safety cut-out
Press any button.
3 The safety cut-out is cancelled, if the clock function DURATION or
END is set.
45

Mechanical Door Lock
When the appliance is delivered, the door lock is deactivated.
Activate the door lock
Pull the safety catch forwards until
it locks in place.
Open the oven door:
1. Shut the door.
2. Press the safety catch and keep it
depressed.
3. Open the doors.
Close the oven door
Close the door without pressing the safety catch.
Deactivating the door lock
Press the safety catch back into the panel.
3 Switching off the appliance does not cancel the mechanical door lock.
46

Cleaning and Care
Warning: For cleaning, the appliance must be switched off and cooled
1
down.
Warning: For safety reasons, do not clean the appliance with steam jet
or high-pressure cleaning equipment.
Attention: Do not use any scouring agents, sharp cleaning tools or
scourers.
Outside of the appliance
• Wipe the front of the appliance with a soft cloth and warm water
and washing up liquid.
• For metal fronts, use normal commercially available cleaning agents.
Oven interior
1 Warning: For the purpose of cleaning the oven must be switched off
and have cooled down.
3 Clean the appliance after each use. In this way, residue is easier to clean
off and does not have the chance to burn on. Residue that is not removed may cause changes to the surface colour when PYROLUXE is
used.
1. The oven light switches on automatically when the oven door is
opened.
2. After every use, wipe the oven with a solution of washing-up liquid and
allow to dry.
3 In the event of stubborn dirt, clean using PYROLUXE.
1 Important: If you are using an oven spray, be sure to follow the manu-
facturerís instructions.
Accessories
Wash all slide-in units (shelf unit, baking tray, shelf support rails etc.)
after each use and dry well. Soak briefly to make them easier to clean.
47

Fat Filter
1. Clean the fat filter in hot water and washing up liquid or in the dish-
washer.
2. Badly burned on soiling can be removed by boiling the filter in a little
water to which 2-3 tablespoonsful of dishwasher cleaner has been added.
Non-stick accessories
Clean accessories with a soft sponge or cloth in hot water and washing-up liquid.
3 Bright spots in the coating do not mean that the surface is damaged.
1 Important: Do not use any aggressive or scouring cleaning agents,
spray oven cleaners, steel soap pads or hard objects such as knives
or sharp-edged scrapers. These destroy the coating.
1 Important: Do not clean these accessories in the dishwasher. The
non-stick properties would be lost as a result.
48

Cleaning function for oven cleaner spray
With the cleaning function for oven cleaner spray you can pre-heat the
oven to the optimum effective temperature for oven cleaner sprays.
1 Important: Only use oven cleaner sprays that require the oven to be
heated. Follow manufacturer’s instructions.
1. Using the OPTION button, change to the Options menu.
2. Using the arrow buttons
or select the menu option CLEANING MENU
_____
CLEANING MENU
ý ý ý ýþ ýþ ý
888ûcþ þüþ1ü5.0ü5
ý
ý
ý
ý ý
ý ý
88.8ú8
wPmP¸¹º»¼-+
3. Confirm using the OK
button.
___
PYROLUXE MENU
ý ý ý ýþ ýþ ý
888ûcþ þüþ1ü5.0ü5
ý
ý
ý
ý ý
ý ý
88.8ú8
wm¸¹Pº»¼-+
4. Using the arrow buttons
or select the cleaning
function OVEN CLEANER
SPRAY.
__ _
OVEN CLEANER SPRAY
ý ý ý ýþ ýþ ý
888ûcþ þüþ1ü5.0ü5
ý
ý
ý
ý ý
ý ý
88.8ú8
wPmP¸¹º»¼-+
The oven now heats up to
the required temperature.
The duration of the process
(20 mins.) is shown in the
display.
__
OVEN CLEANER SPRAY
ý ý ý ýþ ýþ ý
888ûcюЭЬЬЬю1ь5.0ь5
ý
ý
wm¸¹º»¼-+
After about 15 mins. the first signal sounds.
The optimum working temperature has now been reached.
5. Spray oven cleaner spray inside the oven interior.
After another 5 mins. another signal sounds for 2 minutes. By this time
the spraying should be finished. (After this point the oven would already have cooled down too much).
ý
í ý
ý ý
00.20
49

The time the oven cleaner spray needs to be left to work depends on
the manufacturer’s instructions.
3 The acoustic signal can be deactivated by pressing any button.
6. Wipe out the oven.
Performing Pyroluxe cleaning
1 Warning: The oven gets very hot during this process. Keep small chil-
dren away.
1 Important Before carrying out the pyrolytic cleaning process, all re-
movable parts, including the side rails, must be removed from the oven.
3 If you use the oven shelf runners that are available as special accesso-
ries, these must be removed before pyrolytic cleaning. If the oven
shelf runners are still in position C1-REMOVE RUNNERS appears in the
display. The Pyroluxe process then cannot be started due to a safety
cut-out that protects the oven shelf runners.
Performing Pyroluxe cleaning
1. First remove the worst of the residue manually.
2. Using the OPTION button, change to the Options menu.
3. Using the arrow buttons
or select the menu option CLEANING MENU.
_____
CLEANING MENU
ý ý ý ýþ ýþ ý
888ûcþ þüþ1ü5.0ü5
ý
ý
ý
ý ý
ý ý
88.8ú8
4. Confirm using the OK
button.
5. Confirm suggested cleaning
function PYROLUXE MENU
using the OK button.
50
wPmP¸¹º»¼-+
___
PYROLUXE MENU
ý
ý ý
ý ý
88.8ú8
ý ý ý ýþ ýþ ý
888ûcþ þüþ1ü5.0ü5
ý
ý
wm¸¹Pº»¼-+
____
PYROLUXE LIGHT
ý
í ý
ý ý
02.15
ý ý ý ýþ ýþ ý
888ûcþ þüþ1ü5.0ü5
ý
ý
wm¸¹Pº»¼-+

6. Using the arrow buttons
or select the length of
Pyroluxe.
– PYROLUXE LIGHT for a
light degree of soiling
(2:15),
– PYROLUXE NORMAL for a
normal degree of soiling (2:45),
– PYROLUXE HEAVY for a high degree of soiling (3:15).
The respective DURATION is displayed.
Pyrolytic cleaning then starts.
__ __
PYROLUXE NORMAL
ý ý ý ýþ ýþ ý
888ûcþ þüþ1ü5.0ü5
ý
ý
wPmP¸¹º»¼-+
3 The oven light does not work.
When a pre-set temperature is reached, the door is locked.
The lock symbol is active until the door is unlocked again.
Changing the Pyroluxe switch off time
The Pyroluxe switch-off time can be delayed using the clock function
END .
ý
í ý
ý ý
02.4ü5
51

Oven Shelf Runner
The shelf support rails on the left and right hand sides of the oven can
be removed for cleaning the side walls.
Removing the shelf support rails
First pull the front of the rail away
from the oven wall and then unhitch at the back.
Fitting the shelf support rails
1 When inserting the rails, make sure
that the retaining pins on the telescopic runners are pointing to the
front.
52
To install, first reattach the rails at
the back, then put them into position at the front and press them
into place.

Cleaning the Oven Shelf Runner
Clean oven shelf runners with hot water and washing up liquid.
1 Important: The oven shelf runners cannot be cleaned in the dish-
washer.
1 Important: On no account grease telescopic runners.
1 Information regarding use in pyrolytic appliances:
The oven shelf runners must be removed before pyrolytic cleaning
is carried out.
Oven Lighting
1 Warning: There is a danger of electric shock! Prior to changing the
oven light bulb:
– Switch off the oven!
– Remove the fuses in the fuse box or switch off the circuit breaker.
3 Place a cloth on the oven floor to protect the oven light and glass cov-
er.
Replacing the oven light bulb/
cleaning the glass cover
1. Remove the glass cover by turning
it anti-clockwise and then clean it.
2. If necessary:
Replace bulb with a 40 watt,
230 V, 300 °C heat-resistant
oven light bulb.
3. Refit the glass cover.
53

Changing side oven light/Cleaning glass cover
1. Remove the left shelf support rail.
2. Remove the glass cover with the aid
of a narrow, blunt implement (e. g.,
teaspoon) and clean it.
3. If necessary:
replace halogen bulb with a
20 watt, 12 V, 300 °C heat-resistant halogen oven light bulb.
3 Always use a cloth to take hold of a
hologen light to avoid burning on
fatty deposits.
4. Refit the glass cover.
5. Insert the shelf support rail.
54

Oven door
For easier cleaning of the oven interior the oven door of your appliance
can be taken off its hinges.
Removing the oven door from its hinges
1. Open the oven door as far as it will
go.
2. Undo the clamping levers (A) on
both door hinges fully.
3. Close the oven door as far as the
first position (approx. 45°).
4. Take hold of the oven door with a
hand on each side and pull it away
from the oven at an upwards angle
(Take care: It is heavy).
3 Lay the oven door with the outer
side facing downwards on something soft and level, for example, a
blanket in order to prevent scratches.
55

Hanging the oven door back on its hinges
1. From the handle side take hold of
the oven door with a hand on each
side and hold at an angle of approx.
45°.
Position the recesses on the bottom
of the oven door on the hinges on
the oven.
Let the door slide down as far as it
will go.
2. Open the oven door as far as it will
go.
3. Fold up the clamping levers (A) on
both door hinges back into their
original positions.
4. Close the oven door.
56

Oven door glass
The oven door is fitted with four panels of glass mounted one behind
the other. The inner panels can be removed for cleaning.
1 Important Rough handling, especially around the edges of the front
panel, can cause the glass to break.
Removing door glass panels
1. Open the oven door as far as it will
go.
2. Undo the clamping levers (A) on
both door hinges fully.
3. Close the oven door as far as the
first position (approx. 45°).
4. Take hold of the door trim (B) on
the upper edge of the door at both
sides and press inwards to release
the clip seal. Then remove the door
trim by pulling it upwards.
57
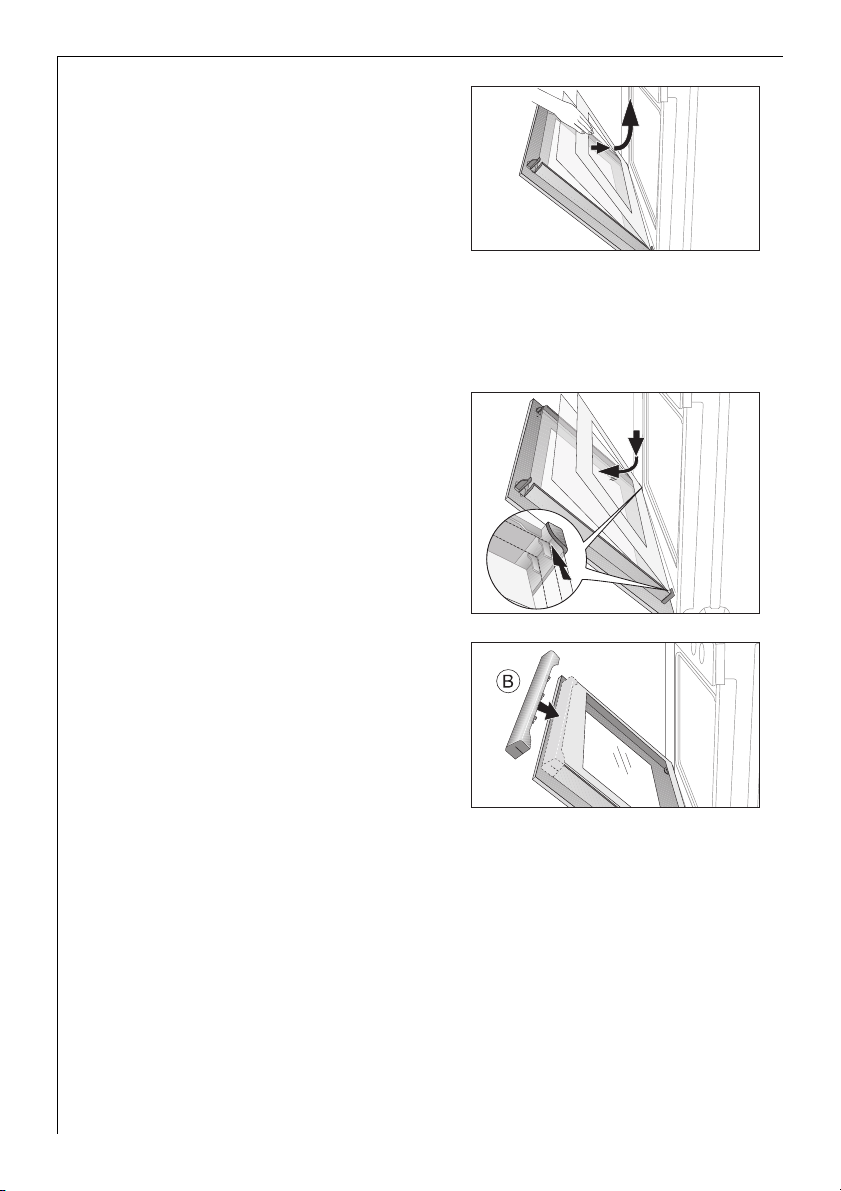
5. Take hold of the door glass panels
on their upper edge one after the
other and take them out of the
guide by pulling them upwards.
Cleaning the door glass panels
Clean the door glass panels thoroughly with a solution of water and
washing up liquid. Then dry them carefully.
Putting the door glass panels back.
1. From above insert the door glass
panels one after the other into the
door profile at the bottom edge of
the door at an angle and lower
them.
3 The two smaller panels first, then
the larger panel.
2. Take hold of the door trim (B) at
each side, position it on the inside
edge of the door and plug the door
trim (B) into the upper edge of the
door.
58

3 On the open side of the door
trim (B) there is a guide bar (C). This
must be pushed between the outer
door panel and the guide corner (D).
The clip seal (E) must be snapped in.
3. Open the oven door as far as it will
go.
4. Fold up the clamping levers (A) on
both door hinges back into their
original positions.
5. Close the oven door.
59

What to do if …
Problem Possible cause Remedy
The cooking zones are
not functioning.
The oven is not heating upThe oven has not been
The oven lighting is not
operating
The pyroluxe is not
working
In the display C1-REMOVE RUNNERS appears
F11 appears in the clock
display
Refer to the operating instructions for the built-in cooking
surface
switched on
The clock has not been set Set the current time on the
The required settings have
not been set
Oven safety cut-out has
been triggered
The house wiring fuse (in the
fuse box) has tripped
The oven light bulb is faulty Replace oven light bulb
Side rails/oven shelf runners
have not been removed
The meat probe has short
circuited or the plug of the
meat probe is not firmly in
position in the socket
Switch oven on
clock
Check the settings
See Oven Safety Cut-out
Check fuse. If the fuses trip
several times, please call a
qualified electrician
Remove side rails/oven shelf
runners
Insert the meat probe plug
into the socket on the oven
side wall as far as it will go.
60
F2 appears in the clock
display
A fault code that is not
listed above appears in
the clock display
Door not closed properly or
door lock faulty
Electronic fault Switch the appliance off and
Close door properly;
Switch the appliance off and
on again via the house fuse
or the safety switch in the
fuse box;
If it is displayed again, please
contact the Customer Care
Department
on again via the house fuse
or the safety switch in the
fuse box.
If it is displayed again, please
contact the Customer Care
Department

If you are unable to remedy the problem by following the above
suggestions, please contact your dealer or the Customer Care Department.
1 Warning! Repairs to the appliance are only to be carried out by quali-
fied service engineers. Considerable danger to the user may result from
improper repairs.
3 If the appliance has been wrongly operated, the visit from the customer
service technician or dealer may not take place free of charge, even
during the warranty period.
3 Advice on cookers with metal fronts:
Because of the cold surface at the front of the cooker, opening the
oven door during (or just after) baking or roasting may cause the glass
to steam up.
61

Index
A
Accessories . . . . . . . . . . . . . . . . . . . . . . . 12, 25
Automatic warm up function . . . . . . . . . . . 16
B
Baking tray . . . . . . . . . . . . . . . . . . . . . . . . . . 12
Button lock . . . . . . . . . . . . . . . . . . . . . . . . . . 45
Buttons . . . . . . . . . . . . . . . . . . . . . . . . . . . . . 10
C
Child lock. . . . . . . . . . . . . . . . . . . . . . . . . . . . 44
Cleaning
accessories. . . . . . . . . . . . . . . . . . . . . . . . . 47
Oven interior. . . . . . . . . . . . . . . . . . . . . . . 47
oven light bulb . . . . . . . . . . . . . . . . . . . . . 53
Oven spray. . . . . . . . . . . . . . . . . . . . . . . . . 49
Pre-cleaning . . . . . . . . . . . . . . . . . . . . . . . 14
Pyroluxe. . . . . . . . . . . . . . . . . . . . . . . . . . . 50
Clock . . . . . . . . . . . . . . . . . . . . . . . . . . . . . . . . 9
Clock Functions . . . . . . . . . . . . . . . . . . . . . . 39
Clock Funktions . . . . . . . . . . . . . . . . . . . . . . 44
Combination shelf . . . . . . . . . . . . . . . . . . . . 12
Cooking . . . . . . . . . . . . . . . . . . . . . . . . . . . . . 15
D
Description of the appliance . . . . . . . . . . . . . 8
Display On/Off . . . . . . . . . . . . . . . . . . . . . . . 38
Door Lock . . . . . . . . . . . . . . . . . . . . . . . . . . . 46
F
Factory settings . . . . . . . . . . . . . . . . . . . . . . 38
Fat Filter . . . . . . . . . . . . . . . . . . . . . . . . . . . . 48
Fault code . . . . . . . . . . . . . . . . . . . . . . . . . . . 60
G
Grease filter. . . . . . . . . . . . . . . . . . . . . . . . . . 26
H
Heat indicator . . . . . . . . . . . . . . . . . . . . . . . . 24
Heating up . . . . . . . . . . . . . . . . . . . . . . . . . . 24
I
Indicators. . . . . . . . . . . . . . . . . . . . . . . . . . . . . 9
L
Language
change . . . . . . . . . . . . . . . . . . . . . . . . . . . . 38
set . . . . . . . . . . . . . . . . . . . . . . . . . . . . . . . 38
setting . . . . . . . . . . . . . . . . . . . . . . . . . . . . 13
62
M
Meat probe. . . . . . . . . . . . . . . . . . . . . . . 27, 31
Core temperature . . . . . . . . . . . . . . . . . . .28
Meat programmes . . . . . . . . . . . . . . . . . . . . .30
Memory menu . . . . . . . . . . . . . . . . . . . . . . . .35
Menu
Options . . . . . . . . . . . . . . . . . . . . . . . . . . . .19
Oven Functions . . . . . . . . . . . . . . . . . . . . .18
overview . . . . . . . . . . . . . . . . . . . . . . . . . . . 18
Menu status bar. . . . . . . . . . . . . . . . . . . . . . . . 9
N
non-stick oven shelf . . . . . . . . . . . . . . . . . . .12
O
Operating period indicator . . . . . . . . . . . . . .40
Oven
accessories . . . . . . . . . . . . . . . . . . . . . . . . .12
light . . . . . . . . . . . . . . . . . . . . . . . . . . . . . .53
steam vent . . . . . . . . . . . . . . . . . . . . . . . . . 11
Oven functions . . . . . . . . . . . . . . . . . . . 20
, 21
P
Pre-heating . . . . . . . . . . . . . . . . . . . . . . . . . .23
R
Rapid heat up. . . . . . . . . . . . . . . . . . 23, 24, 38
Recipes . . . . . . . . . . . . . . . . . . . . . . . . . . 21
Automatic recipes . . . . . . . . . . . . . . . . . . .32
Personal Recipes . . . . . . . . . . . . . . . . . . . . 35
Repairs . . . . . . . . . . . . . . . . . . . . . . . . . . . . . . .5
Residual heat indicator . . . . . . . . . . . . . 24
Ring
use. . . . . . . . . . . . . . . . . . . . . . . . . . . . . . . .15
Roasting tray . . . . . . . . . . . . . . . . . . . . . . . . .25
Roasting tray, non-stick . . . . . . . . . . . . . . . . 12
, 33
, 38
S
Safety . . . . . . . . . . . . . . . . . . . . . . . . . . . . . . . . 5
Safety cut-out . . . . . . . . . . . . . . . . . . . . 17
Setting the clock . . . . . . . . . . . . . . . . . . . . . . 14
Settings. . . . . . . . . . . . . . . . . . . . . . . . . . . . . . 38
shelf . . . . . . . . . . . . . . . . . . . . . . . . . . . . . . . .25
Super Clean baking tray . . . . . . . . . . . . 26
Symbols . . . . . . . . . . . . . . . . . . . . . . . . . . . . . . 9
, 45
, 48
T
Tone settings . . . . . . . . . . . . . . . . . . . . . . . . .38
U
Using the oven. . . . . . . . . . . . . . . . . . . . . . . .18

Service
In the event of technical faults, please first check whether you can
remedy the problem yourself with the help of the operating instructions (section “What to do if…”).
If you were not able to remedy the problem yourself, please contact the
Customer Care Department or one of our service partners.
In order to be able to assist you
quickly, we require the following
information:
– Model description
– Product number (PNC)
– Serial number (S No.)
(for numbers see rating plate)
– Type of fault
– Any error messages displayed by
the appliance
So that you have the necessary reference numbers from your appliance
at hand, we recommend that you write them in here:
Model description: .....................................
PNC: .....................................
S No: .....................................
63

From the Electrolux Group. The world´s No.1 choice.
The Electrolux Group is the world´s largest producer of powered appliances for kitchen, cleaning and outdoor
use. More than 55 million Electrolux Group products (such as refrigerators, cookers, washing machines,
vacuum cleaners, chain saws and lawn mowers) are sold each year to a value of approx. USD 14 billion in more
than 150 countries around the world.
AEG Hausgeräte GmbH
Postfach 1036
D-90327 Nürnberg
http://www.aeg-electrolux.de
© Copyright by AEG
822 927 555-A-110106-01
Subject to change without notice
 Loading...