

Page 1

PERFECT DB 7020 INOX
Dampfbügler
Steam irons
Fer à repasser à vapeur
Stoomstrijkijzer
Ferro da stiro a vapore
Plancha de vapor
Ferro de engomar a vapor
Höyrysilitysraudat
Naparovací žehlicka
Gõzölõs vasaló
УЯдесп бфмпэ
Gebrauchsanweisung
Operating instructions
Mode d’emploi
Gebruiksaanwijzing
Istruzioni per l’uso
Instrucciones para el uso
Instruções de utilização
Käyttöohje
Návod k použití
Használati útmutató
ПдзгЯет чсЮузт
Page 2
1
D
F
E
G H
J
C
K
L
B
M
A
O
N
P
A
C
B
D
2
3
2
Page 3
A
B
C
6/A
4
5
6/B
7
8
3
Page 4

Ironing table - Recommendations for use
g
Fabric
Synthetics
Polyacrilic
Polyamide Enkalon, Grilon, Nylon, Perlon, Rilsan
Polyester
Cellulose
Natural fibres
Silk
Woollens
Temperature
Selector
Steam
Switch
Steam off
“0”
Steam off
“0”
Steam off
“0”
Steam off
“0”
Comments
g
Acrylan, Dralon, Lycra, Orlon, Vonnel
Dacron, Diolen, Kodel, Trevira, Vestan
Cellulose fibres, acetate, cupro,
viscose such as: Cuprama, Colvera,
Phyron, Rayon, Tricell
Silk, wool and synthetic fibres can be
dry-ironed by covering with a damp
cloth and ironing over the cloth
Cotton
Linen
Setting when
not in use
For mixed fibres we recommend ironing at the lower temperature (that of the more sensitive fibre), eg.,
polyester-cotton on polyester position.
Varied ironing speeds and fabric dampness can mean that the optimal setting can differ from that recommended in the table!
= Cold
Steam on
“1”
Steam on
“1”
Steam off
“0”
Constant steam possible from •••
position
Super steam jet from ••• position for
stubborn creases
Remove plug
9
Page 5

g
Dear Customer,
g
Please read these operating instructions carefully. Above all please observe the safety instructions on the
initial pages of these operating instructions! Please keep these operating instructions for future reference. Pass
them on to any subsequent owner of
the appliance.
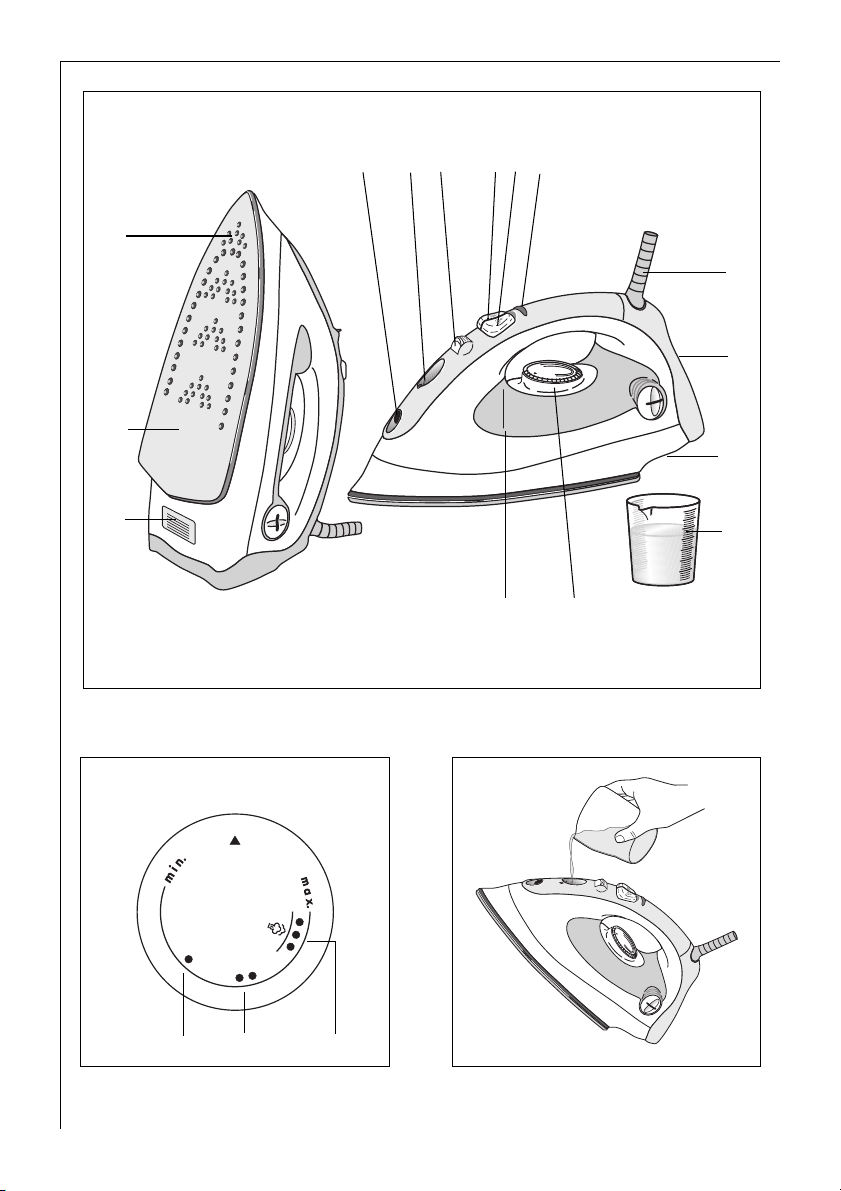
Features (Figure 1)
A Rating plate
B Stainless steel soleplate
C Steam exit holes
D Spray nozzle
E Water filling hole
F Steam “ON/OFF” switch and self-clean-
ing function “Self Clean”
G Spray function button
H Steam jet button
J Power indicator
K Mains cord
L Heel with care information
M Cord storage
M Temperature selector
O Transparent water reservoir
P Measuring beaker
Temperature selector (Figure 2)
A “Cold” setting
B Synthetics
C Silk/wool
D Cotton/linen
1 Safety instructions
• The appliance may only be operated
using the voltage and current rating
indicated on the rating plate
(Figure 1/A).
• The appliance should only be plugged
into a socket installed according to
regulations.
• Caution! During use the soleplate and
cover of the iron reach high operating
temperatures!
• Do not leave the appliance unattended
when switched on.
Even when leaving the room for only a
short period remove the plug. Keep
children away from the appliance.
When steam ironing steam is emitted
1
from the openings in the soleplate –
risk of burns!
• Always remove the mains plug before
cleaning the steam iron, filling with
water or emptying.
• Never immerse the steam iron in water!
• Always place the steam iron in an
upright position on the heel.
• Do not twist or bend the mains cord or
wrap it round the iron while it is still
hot. Only store the appliance once it is
cool and after emptying any remaining
water.
• Please check the mains cord from time
to time for damage! Special tools are
required to repair a damaged mains
cord. To repair this or any other fault
please contact your specialist dealer or
your local customer service centre.
Electrical appliances may only be
repaired by qualified specialists.
Improperly performed repairs may
result in significant risk to the user.
10
Page 6

g
Technical data
Power consumption 2000W
Mains voltage 230 V
This appliance complies with the fol-
;
lowing EC directives:
– 73/23/EWG dated 19.02.1973 “Low
Voltage Directive”, including
Amending Directive 93/68/EWG.
– 89/336/EWG dated 03.05.1989 “EMC
Directive”, including Amending
Directive 92/31/EWG.
Using for the first time
Setting the temperature
(Figure 2)
Please note the internationally applicable care symbols on garment labels.
On good quality garments they indicate the correct ironing temperatures.
The ironing table indicates which temperature is most appropriate for which
type of fabric. We recommend sorting
the washing first. Start with materials
that require low temperature ironing
(eg. PERLON). Follow on by ironing
materials that require progressively
higher temperatures. In this way you
avoid damaging sensitive fabrics by
using too high a temperature. The
power indicator lights up when the
appliance is switched on (Figure 1/J); It
goes off when the set temperature is
reached. However, if the temperature
selector (Figure 1/N) is turned back,
please note that it takes a while for the
soleplate to cool down. Only when the
power indicator light comes on again
the soleplate has reached the cooler
temperature.
Dry ironing
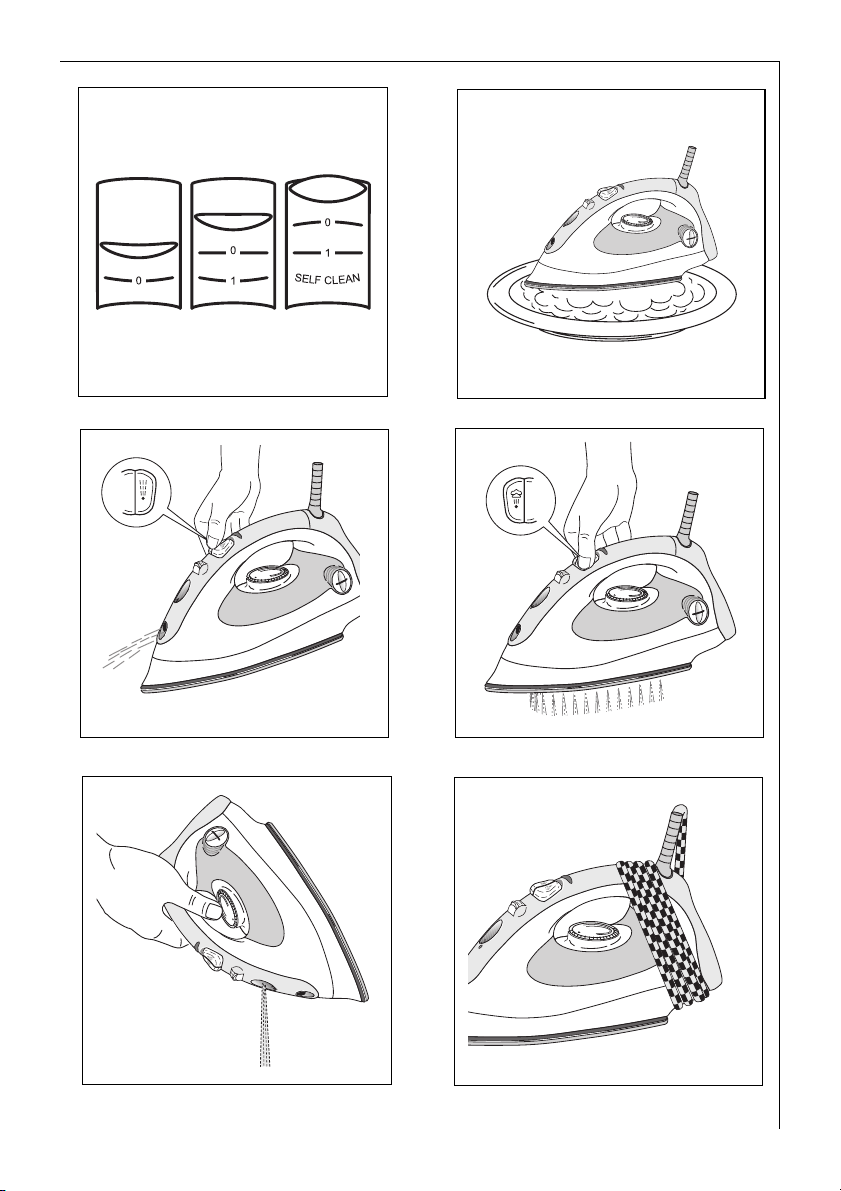
0 Set the steam switch (Figure 1/F) to
position “0” (Figure 4/A).
0 Turn the temperature selector to the
desired temperature.
Steam ironing
Filling the steam iron (Figure 3)
The water reservoir should only be
filled when the plug has been removed
from the socket.
0 Set the steam switch to position “0”
= dry ironing (Figure 4/A) and hold the
appliance upright.
0 Fill the water reservoir at most to the
“MAX” mark. You can use the measuring beaker (Figure 1/P) that comes with
your appliance to do this.
Water quality
You can use tap water up to a water
hardness level of 3 PPM, 17° dH (German degrees of hardness). Your local
Water Authority can advise you on the
hardness of the water in your area. If
the water from your tap is harder than
the above, please use distilled water
available from a chemist or a mixture
of tap water and distilled water. Never
use battery water under any circumstances!
When using for the first time,
please note:
0 Fill the reservoir with water; set the
steam switch (Figure 1/F) to position
“1” (Figure 4/B).
0 Heat the appliance and place it with
the soleplate facing downwards on an
iron rest or plate (Figure 5) to allow the
water to steam through and activate
the steam chamber.
You will obtain optimal steaming
3
results and the noise produced by the
steaming will be steadier after the
water reservoir has been filled and
drained three times.
Ironing with steam
To steam iron, set the temperature
selector (Figure 1/N) to the required
fabric type and wait until the power
indicator (Figure 1/J) goes out – only
then set the steam switch (Figue 1/F)
to position “1” (Figure 4/B). You will
find which temperature setting (fabric
11
Page 7

g
type) matches which steam setting in
the ironing table. As soon as the iron is
held horizontally steam begins to form.
When the iron is set upright again the
steam supply stops automatically.
Spray function (Figure 6/A)
The first time you use the appliance, or
if you have not used it for a long time,
you will need to press the spray button
(Figure 1/G) several times before water
comes out of the spray nozzle
(Figure 1/D). You can also use the
spray function when dry ironing.
Super steam jet function
(Figure 6/B)
The super steam jet is of valuable
assistance when ironing, for example,
creases, embroidery etc. You can trigger the additional steam jet both when
steam ironing and when dry ironing.
0 Set the temperature selector (Figure
1/N) to the “MAX” position and wait
until the correct temperature has been
reached, i.e., until the power indicator
(Figure 1/J) goes out.
0 Raise the steam iron a little away from
the material and press the steam jet
button (Figure 1/H).
Always wait another 5 seconds before
pressing the steam jet button again.
Steaming hanging articles
0 Turn the temperature selector (Figure
1/N) to the “MAX” position and wait
until the power indicator (Figure 1/J)
goes out.
0 Hang the article concerned on a
hanger and hold the steam iron at a
distance of 10 - 20 cm from the material.
0 Now press the steam jet button (Figure
1/H). Wait at least 5 seconds before
pressing the button again.
Important: Do not attempt to freshen
1
up clothing whilst it is still being worn.
Risk of burns!
Storage
Remove the plug from the socket!
Set the temperature selector (Figure
1/N) to the “Cold” position (Figure 2/A)
and the steam switch (Figure 1/F) to
position “0” (Figure 4/A).
Empty out remaining water (Figure 7).
Store the appliance standing upright.
To store properly wrap the mains cord
around the cord storage (Figures 1/K
and 8).
Care and maintenance
Self-cleaning function
We recommend carrying out selfcleaning every two weeks. However,
the period between self-cleaning
should be shorter for harder water
types.
Carry out the self-cleaning function as
follows:
0 Unplug from the mains.
0 Set the steam switch (Figure 1/F) to
position “0” (Figure 4/A).
0 Fill the water reservoir (Figure 1/O) to
the “MAX” mark.
0 Set the temperature selector (Figure
1/N) to “MAX”.
0 Insert the plug into the socket.
0 Wait until the power indicator (Figure
1/J) goes out.
0 Pull out the mains plug.
0 Hold the iron horizontally over a sink.
0 Set the steam switch (Figure 1/F) to the
“Self Clean” position (Figure 4/C) and
hold it firmly in place.
0 Steam and hot water will now run out
of the steam exit holes (Figure 1/C).
Move the iron gently to and fro above
the sink until the water reservoir is
empty.
0 Allow the iron to cool and wipe the
soleplate dry with a soft cloth.
12
Page 8

g
Descaling
When using tap water for steaming,
lime is deposited in the steam chamber; heavy deposits reduce the quantity of steam produced. To descale use
lukewarm water and vinegar essence –
mixing ratio 1:1. Pour the mixture into
the cold appliance, ensuring first that
it is not connected to the mains.
Proprietory brands of descaler are
too aggressive and may not be used!
0 Place the appliance horizontally on an
iron rest or plate (Figure 5). Set the
steam switch (Figure 1/F) to position
“1” (Figure 4/B) and allow all the mixture to flow through.
0 Afterwards repeat the procedure using
clear water and then heat the iron
briefly to allow the steam chambers to
dry. Your steam iron is now ready for
use again.
As a precaution we recommend descaling every three months.
What to do, if ...
• no “Steam” appears when using on a
steam setting?
– In warm, dry air (during the winter)
a smaller jet of steam is normal
because it is taken up by the dry air
before condensing.
– Emptying the filled water reservoir
can wash out fluff. Remove the
mains cord and tip the filled appliance forwards at an angle (Figure 7)
so that the water can run out of the
filling hole.
• drops of water come out of the steam
exit holes?
– Do not set the steam switch to posi-
tion “1” until the temperature for
steam ironing has been reached. If
the temperature has been set too
low for steam ironing increase the
setting.
• stains appear on the washing while
ironing?
– Clean the steam iron. Rub the sole-
plate while still warm with a water
and vinegar mixture or with a nonabrasive cleaning fluid.
– When dry ironing fluff can enter the
steam chambers and carbonize. This
can lead to stains as the water
passes through. Therefore also clean
the inside of the water reservoir. Fill
it with water and gently shake the
steam iron. Then pour the water out.
• the soleplate is rough or furred?
The iron temperature was set too high.
– Select the correct ironing tempera-
ture for the fabric (see ironing
table).
2 Protecting the environment
Do not simply throw packaging material away.
• The cardboard packaging can be recycled in the waste paper collection.
• Deposit the plastic bag made of polyethylene (PE) at a PE collection point
for recycling.
• Padding materials are made of foamed
polystyrene (PS). They are CFC free.
Please inquire with your local authority
about your local recycling centre.
Customer Service
Our products are of the highest quality.
Should you nevertheless have questions concerning the use of this appliance, please write to us. Only with your
support can we be sure to develop
appliances to suit your needs.
13
Page 9

AEG Kundendienst in Europa
Deutschland Europa
Sollte dieses AEG Kleingerät wider Erwarten nicht
funktionieren, senden Sie es bitte an folgende Adresse:
Beginnt die Postleitzahl Ihres Wohnortes
mit 2 - 3 - 4 - 5
AEG Kleingeräte-Zentralwerkstatt
Firma Elektro Stefan Irsen
Sachtlebenstraße 1, 41541 Dormagen
Beginnt die Postleitzahl Ihres Wohnortes
mit 0 - 1 - 6 - 7 - 8 - 9
AEG Kleingeräte-Zentralwerkstatt
Firma Trepesch GmbH
Steinstraße 500, 90419 Nürnberg
In Deutschland stehen wir Ihnen für Fragen, Anregungen
oder bei Problemen rund um unsere Kleingeräte und
Raumpflegegeräte montags bis freitags von 8 bis 18 Uhr
zur Verfügung.
AEG Serviceline unter 01805-30 60 80*
Fax: 0911/ 3 23-49 19 30
E-Mail: service.kleingeraete@aeg-hausgeraete.de
Österreich, 4010 Linz, 0732 / 770101 - 30
Belgique/België, 1502 Lembeek, 02/363.04.44
Danmark, 7000 Fredericia, 70 11 74 00
España, Madrid, 1-885-2700
France, 60307 Senlis, 03-44 62 24 24
Great Britain, Service Force 08705 929 929
Hellas, 18346 MOÓXATO, 01/4822646
Island, Reykjavik (Bræóurnir Ormsson hf), 91-3 88 20
Italia, 20394 Agrate Brianza (Milano), 39 / 68 99-8 39
Luxembourg, 1273 Luxembourg-Hamm, 4 24 31-433
Nederland, 2400 AC Alphen aan den Rijn, 0172-468 300
Norge, 0516 Oslo, 22 72 58 00
Portugal, 2635-445 Rio de Mouro, (01) 926 75 75
Schweiz/Svizzera, 5506 Mägenwil, 0848 848 348
Suomi, Porissa, puh. (02) 622 3300
Sverige, 10545 Stockholm, 08-738 60 00
*(Deutsche Telekom 24 Pf/Min.)
Garantiebedingungen
Für dieses Gerät leisten wir - zusätzlich zu
der gesetzlichen Gewährleistung des
Händlers aus Kaufvertrag - dem Endabneh-
mer gegenüber zu den nachstehenden Bedingungen Garantie:
1. Die Garantiezeit beträgt 12 Monate und
beginnt mit dem Zeitpunkt der Übergabe
des Geräts, der durch Rechnung oder
andere Unterlagen zu belegen ist. Die
Garantiezeit ist auf 6 Monate beschränkt,
wenn das Gerät gewerblich genutzt wird.
2. Die Garantie umfaßt die Behebung aller
innerhalb der Garantiezeit auftretenden
Schäden oder Mängel des Geräts, die
nachweislich auf Material- oder Fertigungsfehlern beruhen. Nicht unter die
Garantie fallen Schäden oder Mängel aus
nicht vorschriftsmäßiger Handhabung
sowie Nichtbeachtung der Gebrauchsanweisungen.
3. Im Garantiefall senden Sie das Gerät an
die für Ihren Wohnort zuständige AEG
Kleingeräte-Zentralwerkstatt oder übergeben es Ihrem Fachhändler.
Bei Einsendung achten Sie bitte auf gute
Verpackung, Ihre vollständige AbsenderAnschrift und eine kurze Fehlerbeschreibung. Fügen Sie zum Nachweis Ihres
Garantieanspruchs den Kaufbeleg bei.
4. Die Garantieleistungen werden ohne jede
Berechnung durchgeführt; sie bewirken
weder eine Verlängerung noch einen
Neubeginn der Garantiezeit. Ausgewechselte Teile gehen in unser Eigentum über.
Guarantee
This appliance is covered by the following
guarantee and is in addition to your statutory and other legal rights. All components
which fail due to defective manufacture will
be repaired or replaced free of charge for a
period of 12 months from the date of
purchase. We will not accept claims if unauthorised modification is made or if nonstandard components are used. The appliance must be used in accordance with the
operating instructions and the guarantee
does not cover any damage caused during
transit or through misuse. In order to establish the date of purchase, advice note or similar document must be produced whenever
the guarantee is claimed.
Garantie
Pour toute mise en œvre de garantie ou de
service après vente, vous devez yous adresser
à votre vendeur.
AEG assure au vendeur le remplacement gratuit des pièces détachées nécessaires à la réparation pendant 1 an, à partir de la date de
votre facture, sauf en cas de non respect des
prescriptions d’utilisation ou lorsqu’une cause étrangère à l’appareil est responsable de la
défaillance.
Les dispositions stipulées ci-dessus ne sont
pas exclusives du bénéfice au profit de
l’acheteur de la garantie légale pour défaut
et vice cachés qui s’applique, en tout état de
cause, dans les conditions des articles 1641 et
suivants, du code civil.
Garantie
AEG Huishoudelijke Apparaten neemt voor
reparaties binnen de garantietermijn - voor
zover de defecten zijn terug te voeren op
materiaal - en/of constructiefouten - de kosten op zich voor materiaal en arbeidsloon.
De garantie bedraagt 12 maanden en gaat in
op de dag van aankoop. Wanneer garantie
wordt verlangd, dient de faktuur can aankoop te worden overlegd. De garantietermijn
wordt door reparaties niet verlengd. Buiten
elke garantieverplichting vallen losse onderdelen van glas en/of kunststof. Alle overige
kosten, zoals voorrijdkosten, kosten van opzending en administratie, zijn voor rekening
van de eigenaar.
Garanzia
Duranti i primi 12 mesi d’esercizio, vengono
fornite gratuitamente dall’AEG le parti di ricam bio r iconosc iute d ifet tose. La ga ranz ia ha
inizio con il giorno dell’acquisto che deve venir comprovato a mezzo della fattura o boletta di consegna. Per il resto valgono le
condizioni generali di fornitura della rispettiva rappresentanza nazionale.
Garantia
Durante los primeros 12 meses, la AEG se
hace cargo de cuantos costes de material y
horas de trabajos invertidas se produzcan en
la subsanación de defectos. La garantia empieza a regir a partir de la fecha de la entrega, la que deberá justificarse mediante
presentación de la factura o de la nota de depacho. Por lo demás serán de aplicación las
condiciones generales de venta se gun rigen
en el respectivo pais de nuestra representación.
Garantie
In Belgien ist nur die durch belge AEG ausgegebene Garantiekarte gültig.
En Belgique, seule la carte de garantie émise
par la belge AEG est valable.
In België is slechts de door de belge AEG uitgegeven waarborgkaart geldig.
AEG Hausgeräte GmbH, Muggenhofer Straße 135, D-90429 Nürnberg 822 949 119 – 0800
 Loading...