

Page 1

User Manual
Istruzioni per l’uso
Freezer
Congelatore
ARCTIS G 91854-4 i
Page 2
2
Dear Customer
Thank you for choosing one of our high-quality products.
With this appliance you will experience the perfect combination of functional desi-
gn and cutting edge technology.
Convince yourself that our appliances are engineered to deliver the best perfor-
mance and control - indeed we are setting the highest standards of excellence.
In addition to this you find environmental and energy saving aspects as an integral
part of our products.
To ensure optimal and regular performance of your appliance please read this
instruction manual carefully. It will enable you to navigate all processes perfectly
and most efficiently.
To refer to this manual any time you need to, we recommend you to keep it in a
safe place. And please pass it to any future owner of the appliance.
We wish you much joy with your new appliance.
The following symbols are used in this manual
Important information concerning your personal safety and information on
how to avoid damaging the appliance
General information and tips
Environmental information
Page 3

3
Contents
Safety . . . . . . . . . . . . . . . . . . . . . . . . . . . . . . . . . . . . . . . . . . . . . . . . . .4
Disposal . . . . . . . . . . . . . . . . . . . . . . . . . . . . . . . . . . . . . . . . . . . . . . . .6
Appliance Packaging Information . . . . . . . . . . . . . . . . . . . . . . . . . . . . . . .6
Disposal of old Appliances . . . . . . . . . . . . . . . . . . . . . . . . . . . . . . . . . . . .6
Remove transport safeguard . . . . . . . . . . . . . . . . . . . . . . . . . . . . . . . .6
Installation . . . . . . . . . . . . . . . . . . . . . . . . . . . . . . . . . . . . . . . . . . . . . .7
Installation Location . . . . . . . . . . . . . . . . . . . . . . . . . . . . . . . . . . . . . . . . . .7
Your refrigerator needs air . . . . . . . . . . . . . . . . . . . . . . . . . . . . . . . . . . . . .8
Housing dimensions . . . . . . . . . . . . . . . . . . . . . . . . . . . . . . . . . . . . . . . . . .8
Rehingeing the door . . . . . . . . . . . . . . . . . . . . . . . . . . . . . . . . . . . . . . . . . .8
Instructions for total built-in . . . . . . . . . . . . . . . . . . . . . . . . . . . . . . . . . .9
Electrical Connection . . . . . . . . . . . . . . . . . . . . . . . . . . . . . . . . . . . . .13
Prior to Initial Start–Up . . . . . . . . . . . . . . . . . . . . . . . . . . . . . . . . . .13
Operating and indicator panel . . . . . . . . . . . . . . . . . . . . . . . . . . . . .14
Starting up -setting the temperature . . . . . . . . . . . . . . . . . . . . . . .15
Freezing and storing frozen food . . . . . . . . . . . . . . . . . . . . . . . . . .16
Preparation of Ice Cubes . . . . . . . . . . . . . . . . . . . . . . . . . . . . . . . . . .17
Storage goods symbols/ Freezing Calendar . . . . . . . . . . . . . . . . . . .18
Defrosting . . . . . . . . . . . . . . . . . . . . . . . . . . . . . . . . . . . . . . . . . . . . .18
Switching off the appliance . . . . . . . . . . . . . . . . . . . . . . . . . . . . . . .18
Cleaning and Care . . . . . . . . . . . . . . . . . . . . . . . . . . . . . . . . . . . . . . .18
Energy Saving Tips . . . . . . . . . . . . . . . . . . . . . . . . . . . . . . . . . . . . . . .19
What to do if . . . . . . . . . . . . . . . . . . . . . . . . . . . . . . . . . . . . . . . . . .20
Correcting Malfunctions . . . . . . . . . . . . . . . . . . . . . . . . . . . . . . . . . . . . . .20
Regulations, Standards, Guidelines . . . . . . . . . . . . . . . . . . . . . . . . .21
Page 4
4
Safety
The safety aspects of our refrigerators/freezers comply with accepted technical standards and the German Appliance Safety Law. Nevertheless, we
consider it our obligation to make you aware of the following safety information:
Intended use
• The refrigerator is intended for use in the home. It is suitable for the cooling, freezing and storing of frozen food, as well as for making ice. If the
appliance is used for purposes other than those intended or used incorrectly, no liability can be accepted by the manufacturer for any damage
that may be caused.
• Alterations or changes to the freezer are not permitted for reasons of
safety.
• If you use the refrigerator in a commercial application or forpurposes
other than the cooling, freezing or frozen storage of foods,please observe all valid legal regulations for your application.
Prior to initial start–up
• Check the refrigerator for transport damage. Under no circumstance
should a damaged appliance be plugged in! In the event of damage, please
contact the vendor.
Refrigerant
The refrigerant isobutane (R600a) is contained within the refrigerant circuit
of the appliance, a natural gas with a high level of environmental compatibility, which is nevertheless flammable.
• During transportation and installation of the appliance, be certain that
none of the components of the refrigerant circuit become damaged.
• If the refrigerant circuit should become damaged:
– avoid open flames and sources of ignition;
– thoroughly ventilate the room in which the appliance is situated.
Safety of children
• Packaging (e.g. wraps, polystyrene) can be dangerous for children. There is
a risk of suffocation! Keep packaging material away from children!
• Please make old appliances unusable prior to disposal. Pull out the mains
plug, cut off the mains cable, break or remove spring or boltcatches, if fitted. By doing this you ensure that children cannot lock themselves in the
Page 5

5
fridge when playing (there is risk of suffocation!)or get themselves into
other dangerous situations.
• This appliance is not intended for use by persons (including children) with
reduced physical, sensory or mental capabilities, or lack of experience and
knowledge, unless they have been given supervision or instruction concerning use of the appliance by a person responsible for their safety. Children should be supervised to ensure that they do not play with the
appliance.!
Daily Operation
• Containers with flammable gases or liquids can leak at low temperatures.
There is a risk of an explosion! Do not store any containers with flammable materials such as, for example, spray cans, fire extinguisher refill cartridges etc in the refrigerator/freezer.
• Bottles and cans must not be placed in the freezer compartment. They can
burst when the contents freeze, high carbonate content drinks can even
explode! Never store lemonade, juices, beer, wine, sparkling wine etc. in
the freezer compartment. Exception: high alcohol content spirits can be
stored in the freezer compartment.
• Do not put ice creams or ice cubes in the mouth immediately after removal from the freezer compartment. Very cold ice can freeze to the lips or
tongue and cause injury.
• Do not touch frozen food with wet hands. Your hands could freeze to the
food.
• Do not operate any electrical appliances in the refrigerator/freezer (e.g.
electric ice cream makers, mixers etc.).
• Before cleaning the appliance, always switch off the appliance and unplug
it, or pull the house fuse or switch off the circuit breaker.
• When unplugging always pull the plug from the mains socket, do not pull
on the cable.
In case of malfunction
• If the a malfunction occurs on the appliance, please look first in the "What
to do if ..." section of these instructions. If the information given there
does not help, please do not perform any further repairs yourself.
• Refrigerators/freezers may only be repaired by qualified service engineers.
Improper repairs can give rise to significant hazards. If your appliance
needs repairing, please contact your specialist dealer or our Customer Service.
Page 6

6
Disposal
Appliance Packaging Information
All materials are environmentally sound! They can be dumped or burned at
an incinerating plant without danger!
About the materials: The plastics can be recycled and are identified as follows:
>PE< for polyethylene, e.g. the outer covering and the bags in the interior.
>PS< for polystyrene foam, e.g. the pads, which are all free of chlorofluo-
rocarbon.
The carton parts are made from recycled paper and should be disposed of
at a waste-paper recycling collection location.
Disposal of old Appliances
For environmental reasons, refrigeration appliances must be disposed of
properly. This applies to your old appliance, and - at the end of its service
life - for your new appliance as well.
Warning! Before disposing of old appliances make them inoperable. Remove plug from mains, sever the power cable, remove or destroy any snap or
latch closures. This eliminates the danger that playing children lock themselves into the appliance (danger of suffocation!) or place themselves into
other life-endangering situations.
Disposal:
• The appliance may not be disposed of with domestic waste or bulky refuse.
• The refrigerant circuit, especially the heat exchanger at the back of the
appliance, may not be damaged.
• The symbol on the product or on its packaging indicates that this
product may not be treated as household waste. Instead it shall be handed over to the applicable collection point for the recycling of electrical
and electronic equipment. By ensuring this product is disposed of correctly, you will help prevent potential negative consequences for the
environment and human health, which could otherwise be caused by
inappropriate waste handling of this product. For more detailed information about recycling of this product, please contact your local city
office, your household waste disposal service or the shop where you purchased the product.
Remove transport safeguard
The appliance and the interior fittings are protected for transport.
• Pull off the adhesive tape on the left and right side of the door.
• Remove all adhesive tape and packing pieces from the interior of the
appliance.
Page 7
7
If installation next to a source of heat is unavoidable, the following minimum clearances must be maintained at the sides of the appliance:
– for electric cookers 3 cm;
– for oil and coal fired ranges 30 cm.
If these clearances cannot be maintained a heat insulating pad is required
between the cooker and the refrigeration appliance.
If the refrigeration appliance is installed next to another refrigerator or free-
zer a clearance of 5 cm at the sides is required, in order to prevent the formation of condensation on the outside of the appliance.
"Installation directly under a hob is not allowed. The temperatures of the
hob, which in part are quite high, may damage the appliance.
If a hob is installed near the appliance, the corresponding installation and
safety instructions must be adhered to. Considering the numerous installation conditions which are possible, there is no way of providing detailed
information here.
It is necessary to avoid overheating of the refrigerator by maintaining adequate distances from heat sources and by the use of a suitable thermal insulation plate. Proper ventilation of the appliance must also be ensured."
Installation
Installation Location
The appliance should be set up in a well ventilated, dry room.
Energy use is affected by the ambient temperature. The appliance should
therefore
– not be exposed to direct sunlight;
– not be installed next to radiators, cookers or other sources of heat;
– only be installed at a location whose ambient temperature corresponds to
the climate classification, for which the appliance is designed.
The climate classification can be found on the serial plate, which is located
at the left on the inside of the appliance.
The following table shows which ambient temperature is correct for each
climate classification: each climate classification:
Climate classification
for an ambient temperature of
SN +10 bis +32 °C
N +16 bis +32 °C
ST +18 bis +38 °C
T +18 bis +43 °C
Page 8

8
Your appliance needs air
For safety reasons, minimum
ventilationmust be as shown Fig.
Attention: keep ventilation openings clear of obstruction;
Housing dimensions
Height 1780 mm
Depth 550 mm
Width 560 mm
Rehingeing the door
The side at which the door opens can
be changed from the right side (factory adjustment) to the left side, if
the installation site requires.
1. Unscrew the upper pin and remove
the spacer
2. Remove the door.
3. Unscrew the lower pin and remove
the spacer and refit them on the
opposite side
4. Refit the door, the upper pin and the
spacer on the opposite side
Warning! When changing the side
at which the door opens, the
appliance may not be connected
to the mains. Remove plug from
the mains beforehand.
D567
50 mm
min.
200 cm
2
min.
2
200 cm
Page 9
9
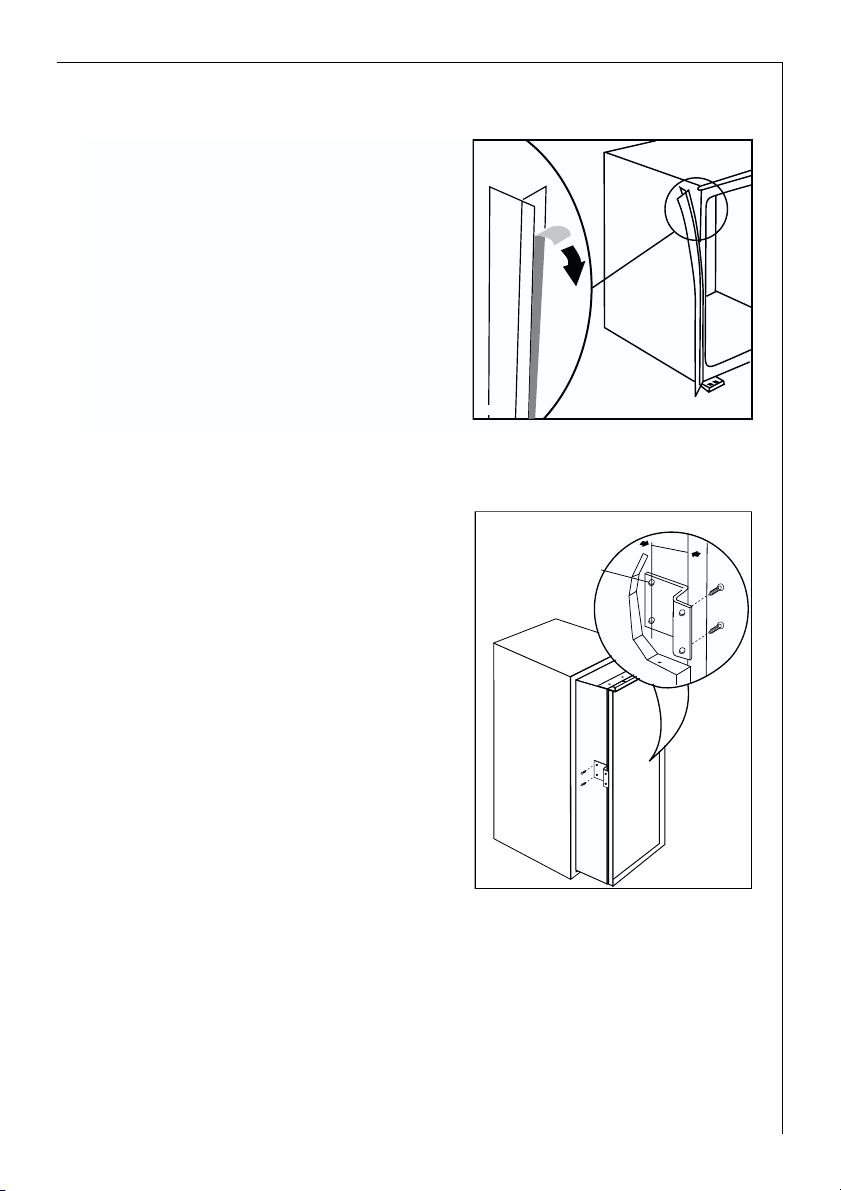
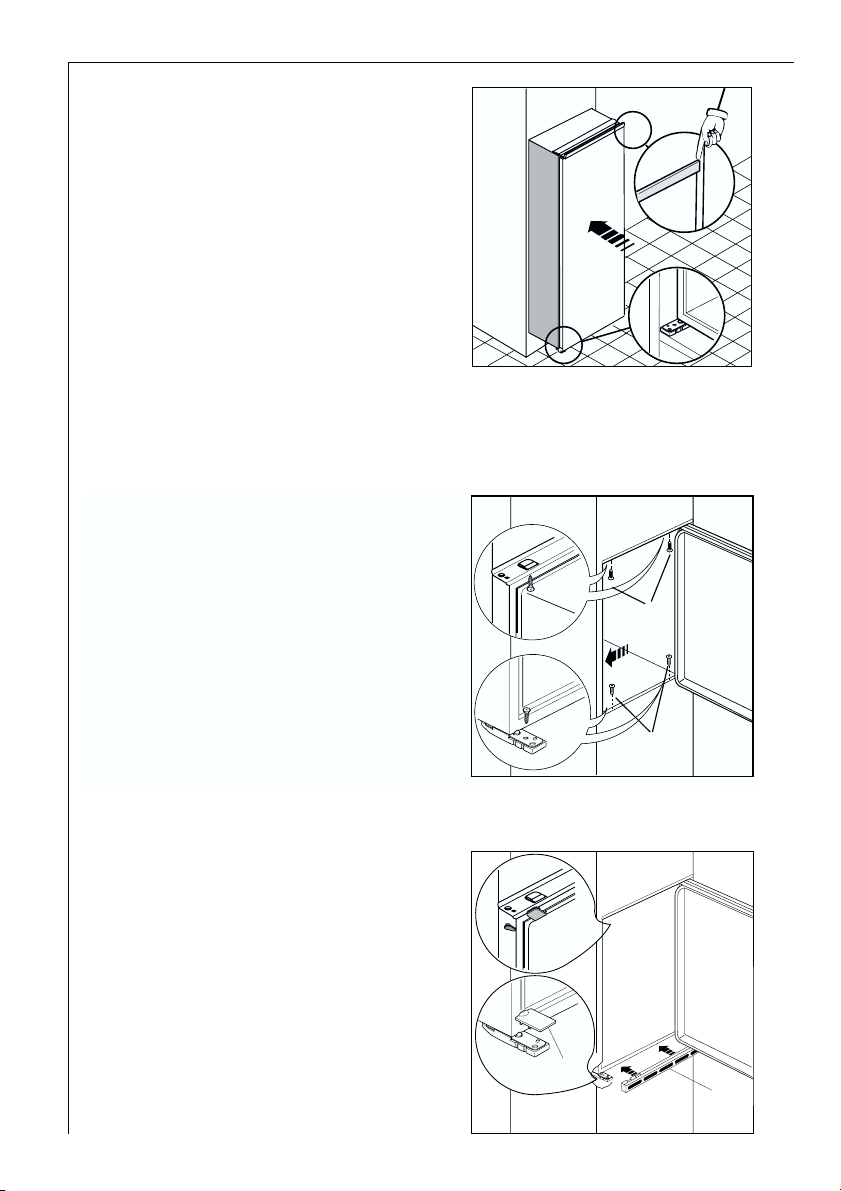
Drill the unit using a Ø 2.5 mm drill
(10 mm max. penetration);
Fix the square fitting to the appliance
Slide the appliance into the recess,
pushing it against the wall on the
handle side.
D740
Ø 2,5
13mm
Apply joint the sealing strip as
shown in figure.
Instructions for total built-in
D765
Page 10
10
Apply covers (C-D) on joint cover
lugs and into hinge holes.
Snap vent grille (B) and hinge cover
(E) into position.
B
E
C
D
Fit the appliance in the niche by
making sure that it stands
against the interior surface of
the unit on the side where the
door hinges of the appliances
are fitted. Insert the appliance
until the upper strip butts up
against the unit (1) and make
sure that the lower hinge is in
line with the surface of the unit
(2).
Fasten the appliance with 4 screws
provided in the kit included with
the appliance.
(I = short) (P = long)
I
P
1
2
D022
Page 11
11
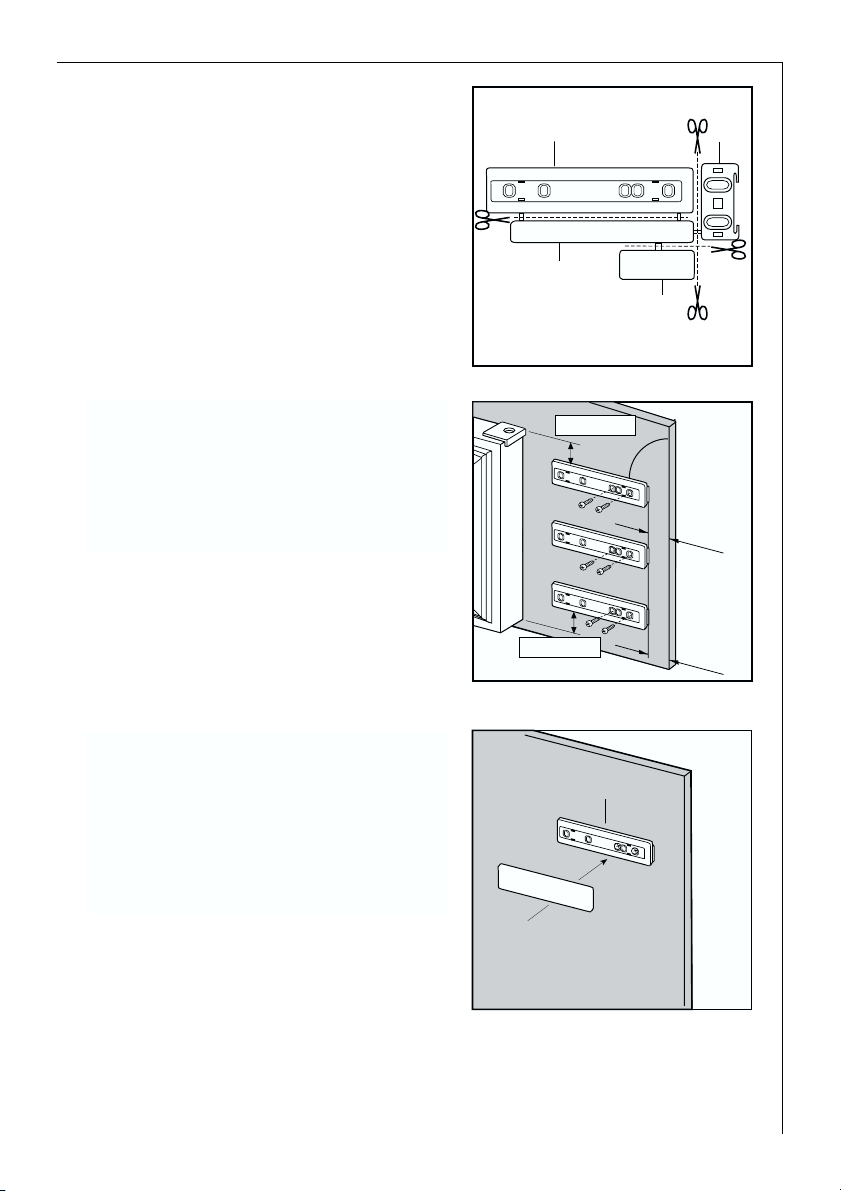
Place guide (Ha) on the inside part of
the furniture door, as shown in the
figure and mark the position of
external holes. After having drilled
holes, fix the guide with the screws
supplied.
Fix cover (Hc) on guide (Ha) until it
clips into place.
Separate parts Ha, Hb, Hc, Hd as
shown in the figure
PR266
Ha
Hc
Hb
Hd
ca. 50 mm
ca. 50 mm
Hc
Ha
90°
2
1
m
m
2
1
m
m
PR33
Page 12
12
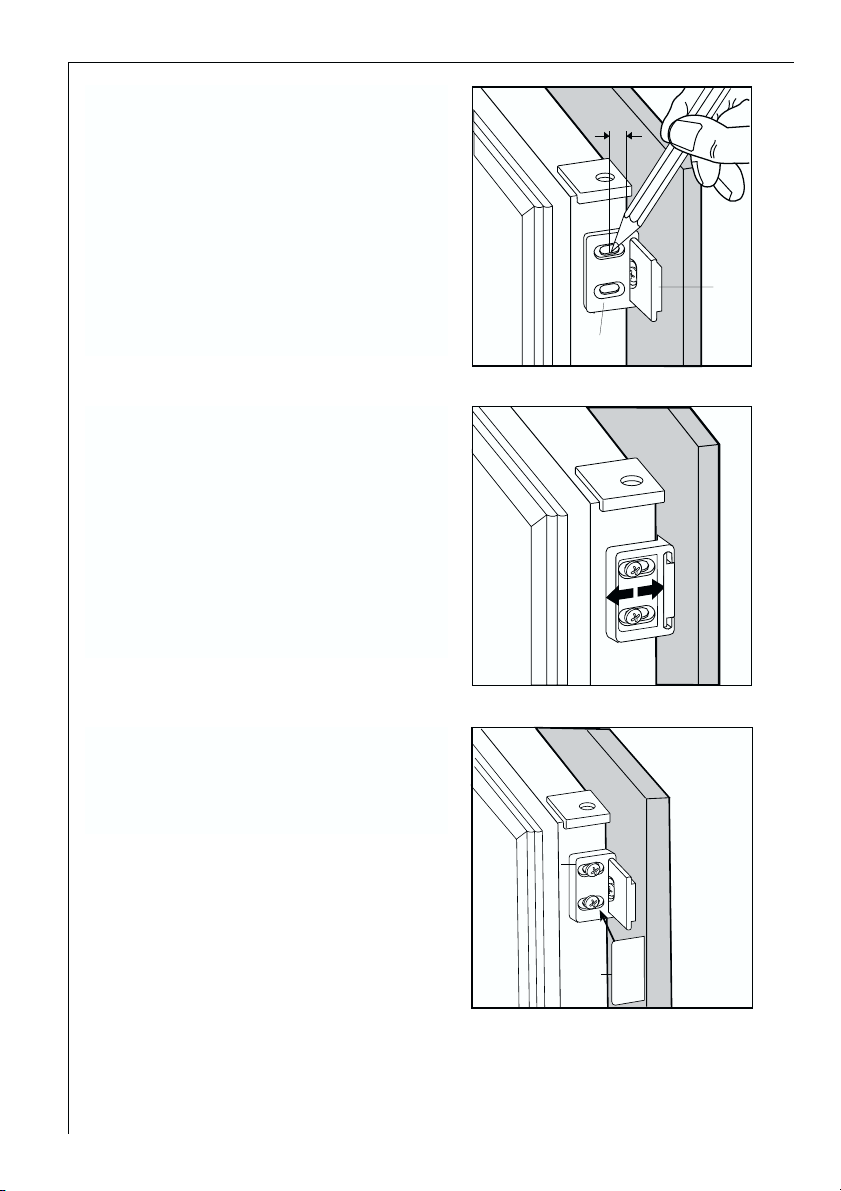
Should the lining up of the furniture
door be necessary, use the clearance
of slots.
At the end of operations, it is necessary to check if the door of the furniture closes properly.
Fix cover (Hd) on guide (Hb) until it
clips into place.
Open the appliance door and the furniture door at 90°. Insert the small
square (Hb) into guide (Ha). Put
together the appliance door and the
furniture door and mark the holes as
indicated in the figure.
Remove the squares and drill holes
with ø 2 mm at 8 mm from the outer
edge of the door. Place the small
square on the guide again and fix it
with the screws supplied.
PR167
8mm
Ha
Hb
PR168
Hb
Hb
Hd
PR167/1
Page 13

13
Electrical connection
Before initial start-up, refer to the appliance rating plate to ascertain if supply voltage and current values correspond with those of the mains at the
installation location.
e.g.: AC 230 ... 240 V 50 Hz or
230 ... 240 V~ 50 Hz
(i.e. 230 to 240 volts alternating current, 50 Hertz)
The rating plate is inside the appliance on the left.
A correctly installed, earthed socket is required for the electrical supply. The
supply must have a fuse rating of at least 10 Amps.
If the socket is not accessible once the appliance is built in, the electrical
installation must include suitable means of isolating the appliance from the
mains (e.g. fuse, cut-out, current trip or similar with a minimum contact
separation of 3 mm).
Attention: The mains connection cable may only be replaced by a skilled
electrician. Please contact your dealer or our customer service department
for repairs.
Prior to Initial Start–Up
• Please clean the appliance interior and all accessories prior to initial start-
up (see section: “Cleaning and Care”).
Page 14

14
Operating and indicator panel
A
B
C
D
E
F
G
H
I
+
°
°C
-
ON/OFF
FROSTMATIC
ALARM OFF
A. Mains pilot indicator (green)
B. Freezer button ON/OFF
C. Temperature setting button (+)
D. Temperature display
E. Temperature setting button (-)
F. FROSTMATIC function "on" indicator (yellow)
G. FROSTMATIC button
H. Alarm reset light
I. Alarm reset button
Temperature setting buttons
The temperature is adjusted using the „C“ and „E“ buttons. These buttons are
connected to the temperature display.
• The temperature display is switched over from the display of the ACTUAL
temperature (Temperature display is illuminated) to the display of the DESIRED temperature (Temperature display flashes) by pressing one of the two
buttons, „C“ or „E“.
• Each time one of the two buttons is pressed again the DESIRED temperature is adjusted by 1 °C. The DESIRED temperature must be reached within 24
hours.
If neither button is pressed, the temperature display automatically switches
back after a short period (approx. 5 sec.) to the display of the ACTUAL temperature.
DESIRED temperature means:
The temperature that has been selected for inside the freezer. The DESIRED
temperature is indicated by flashing numbers.
Page 15

15
ACTUAL temperature means:
The temperature display indicates the current temperature inside the freezer.
The ACTUAL temperature is indicated with illuminated numbers.
Temperature display
The temperature display can indicate several pieces of information.
• During normal operation, the temperature currently present in the freezer
(ACTUAL temperature) is displayed.
• When the temperature is being adjusted a flashing display indicates the
freezer temperature currently set (DESIRED temperature).
Starting Up - Setting the Temperature
1. Plug the mains plug into the mains socket.
2. If the display is OFF, press ON/OFF button. The green mains pilot indicator
illuminates. The alarm light flashes and the buzzer sounds.
3. Press the “I” button to stop the buzzer, the light still flashes since the temperatur is reached.
4. Press either the „C“ or „E“ button. The temperature display switches over and
the DESIRED temperature currently set flashes on the temperature display.
5. Set the required temperature by pressing the „C“ or „E“ buttons (see section
"Temperature setting buttons"). The temperature display will immediately
show the changed setting. Each time the button is pressed the temperature is adjusted by 1 °C.
From a food safety point of view -18 °C should be considered sufficiently
cold for storing food in the freezer.
Ice pack
There are two ice packs in one drawer of the freezer.
In the event of a power failure or malfunction, the ice pack will lengthen
the amount of time it takes for the frozen food to become too warm by
several hours. The ice pack can only fulfil this task optimally if it is placed in
the uppermost drawer, at the front, above the frozen food. You can use the
ice pack for cooling cold bags.
FROSTMATIC
The FROSTMATIC function accelerates the freezing of fresh food and, at the
same time, protects foodstuffs already stored from undesirable warming.
1. The FROSTMATIC function is switched on by pressing the FROSTMATIC button. The yellow light illuminates.
If the FROSTMATIC function is not ended manually, the appliance electro-
Page 16

16
nics switch off the FROSTMATIC function after 52 hours. The yellow light
goes out.
2. The FROSTMATIC function can be ended manually at any time by pressing
the FROSTMATIC button again. The yellow light goes out.
Alarm reset button
In the event of an abnormal temperature rise inside the freezer (e.g. power
cut) warning light (H) will start to flash and a buzzer will sound.
After the temperature has returned to normal, the warning light (H) will
continue to flash, although the buzzer has stopped.
When the alarm button is pressed, the warmest temperature reached in the
compartment flashes on the indicator.(max. 5 seconds).
To stop the buzzer push the button “I”.
Switching the Appliance off
To switch off, hold down the ON/OFF button for approx. 3 seconds. This will
result in a countdown from "3" to "1" taking place in the temperature
display. On reaching "1" the fridge will switch off. The temperature display
will go off.
Note:
The appliance cannot be switched on or off if unplugged, or if there is no
power being supplied to it. Following connection to the mains power supply, the appliance returns to the same operating state as before the interruption of main power.
If the appliance is not going to be used for an extended period:
1. Switch off the appliance, holding down the ON/OFF button until the display
goes off (see above).
2. Remove the mains plug or switch off or turn out the circuit breaker or fuse.
3. Defrost the freezer compartment and clean the appliance thoroughly (see
section: “Cleaning and Maintenance”).
4. Finally, leave the doors open so as to avoid a build up of odours.
Freezing and storing frozen food
You can use your freezer for freezing fresh food yourself.
Important!
• The temperature in the freezer compartment must be –18 °C or colder
before freezing food.
Page 17

17
• Please observe the freezing capacity given on the rating plate. The free-
zing capacity is the maximum quantity of fresh food that can be frozen
within a period of 24 hours. If you wish to freeze food several days in a
row, please observe a maximum capacity of only 2/3 to 3/4 of that on the
rating plate. The quality of the food is best preserved when it is frozen
right through to the core as quickly as possible.
• Allow warm food to cool down before freezing. The warmth will cause
increased ice formation and increase the power consumption.
• Please note the maximum storage times specified by the manufacturer.
• Thawed foods which have not been processed further (cooked into meals)
may not under any circumstances be frozen a second time.
• Containers with flammable gases or liquids can leak at low temperatures.
There is a risk of an explosion! Do not store any containers with flammable materials such as, for example, spray cans, fire extinguisher refill cartridges etc in the refrigerator/freezer.
• Bottles and cans must not be placed in the freezer. They can burst when
the contents freeze, high carbonate content drinks can even explode!
Never store lemonade, juices, beer, wine, sparkling wine etc. in the freezer. Exception: high alcohol content spirits can be stored in the freezer.
• All foods must be packed air tight prior to freezing, so that they do not
dry out or lose their flavour, and so that no flavour contamination of
other frozen goods occurs.
Caution! Do not touch frozen food with wet hands. Your hands could freeze to the food.
1. Place the packed food in the drawers. Place food to be frozen. Unfrozen
food must not touch items already frozen, otherwise the frozen food could
begin to defrost.
2. Press the fast freeze button 24 hours before introducing fresh food for freezing of fresh food. The yellow light comes on.
3. Place frozen foods in the drawers sorted by type, as far as possible.
Preparation of Ice Cubes
1. Fill the ice cube tray 3/4 full with cold water, place it in the freezer compartment and leave to freeze.
2. To loosen the frozen cubes, either bend the ice cube tray or hold it under
running water for a few seconds.
Important! Never try to free an ice tray that is frozen to the freezer compartment using pointed or sharp edged objects. Use the ice scraper supplied.
Page 18

18
Storage Goods Symbols/Freezing Calendar
• The symbols on the drawers show
different types of frozen goods.
• The numbers indicate storage times
in months for the appropriate
types of frozen goods.
Whether the upper or lower value of the indicated storage time is valid
depends on the quality of the foods and pre-treating before freezing. The
lower value applies to foods with high fat content.
Defrosting
Freezer
The inner walls of the freezer are automatically defrosted.
Switching off the appliance
If the appliance is not going to be used for an extended period:
1. Remove all deep-frozen packages as well as ice trays.
2. Switch off the appliance by holding down the ON/OFF button.
3. Remove the mains plug or switch off or turn out the circuit breaker or fuse.
4. Defrost freezer compartment and clean thoroughly (see section: “Cleaning
and Care”).
5. Leave the door open to avoid the build up of odours.
Cleaning and Care
For hygienic reasons the appliance interior, including interior accessories,
should be cleaned regularly.
Warning!
• The appliance may not be connected to the mains during cleaning. Danger
of electrical shock! Before cleaning switch the appliance offand rem ve the
plug from the mains, or switch off or turn out the circuit breaker or fuse.
• Never clean the appliance with a steam cleaner. Moisture could accumu-
late in electrical components, danger of electrical shock! Hot vapours can
Page 19

19
Energy Saving Tips
• Do not install the appliance near cookers, radiators or other sources of
warmth. High ambient temperatures cause longer, more frequent operation of the compressor.
• Ensure sufficient air circulation and exhaust at the appliance base and at
the back wall of the appliance. Never cover air vent openings.
• Do not place warm foods into the appliance. Allow warm foods to cool
first.
• Only leave door open as long as necessary.
• Do not set temperature any colder than necessary.
• Put frozen food in the fridge to defrost. The cold in the frozen food will
then be used to cool the fridge.
• Keep the heat emitting condenser, the metall grille on the rear wall of
your appliance, always clean.
lead to the damage of plastic parts.
• The appliance must be dry before it is placed back into service.
Attention!
• Ethereal oils and organic solvents can attack plastic parts, e.g.
– lemon juice or the juice from orange peals;
– butyric acid;
– cleansers which contain acetic acid.
Do not allow such substances to come into contact with appliance parts.
• Do not use any abrasive cleansers.
1. Remove frozen food and the food from the refrigerator. Wrap frozen food
in several layers of newspaper. Store it in a cool place, well covered.
2.. Switch the appliance off and remove the plug from the mains, or switch off
or turn out the circuit breaker or fuse.
3. Clean the appliance and the interior accessories with a cloth and lukewarm
water. Commercially available dish washing detergents may also be used.
4. After cleaning wipe with fresh water and rub dry.
Accumulation of dust at the condenser increases energy consumption. For
this reason carefully clean the condenser at the back of the appliance once
a year with a soft brush or a vacuum cleaner.
Page 20

20
Malfunction Possible Cause Remedy
Appliance does not work, no
pilot light is illuminated.
Appliance is not switched on Switch on the appliance.
Mains plug is not plugged in
or is loose.
Insert mains plug.
Fuse has blown or is defective.
Check fuse, replace if necessary.
Socket is defective.
Mains malfunctions are to be
corrected by an electrician.
Green light does not light up,
yellow light lights up when
fast freeze fuction is activated, appliance is on.
Green light faulty.
Please inform your customer
service
Yellow light does not light up,
when fast freeze fuction is
activated, appliance is on.
Yellow light faulty.
Please inform your customer
service
The freezer temperature is not
sufficient, red light lights up,
temperature signal sounds
Temperature is not properly
adjusted.
Please look in the "Initial Start
Up" section.
Press the fast freeze switch
Door was open for an extended period.
A large quantity of warm
food was placed in the
appliance within the last 24
hours.
Open the door only as long as
necessary. Press the fast freeze switch
Appliance cools too much. Temperature is set too cold.
Turn the temperature regulator to a warmer setting temporarily.
What to do if ...
Correcting Malfunctions
A malfunction may be caused by only a minor fault that you can rectify
yourself using the following instructions. Do not perform any other work on
the appliance if the following information does not provide assistance in
your specific case.
Warning! Repairs to refrigerators/freezers may only be performed by qualified service engineers. Improper repairs can give rise to significant hazards
for the user. If your appliance needs repairing, please contact your specialist dealer or our Customer Service.
Page 21

21
Heavy build up of frost, possibly also on the door seal.
Door seal is not air tight (possibly after changing over the
hinges).
Carefully warm the leaking
sections of the door seal with
a hair dryer (not hotter than
approx. 50 °C). At the same
time shape the warmed door
seal by hand such that it sits
correctly.
The freezer temperature is not
sufficient, red light lights up,
temperature signal sounds
The appliance is near a heat
source.
Please look in the "Installation
location" section.
Disturbance on the appliance
Switch on the fast freeze
switch, keep the freezer closed, inform your customer
service
Unusual noises.
The appliance is touching the
wall or other objects.
Appliance is not level.
A component, e.g. a pipe, on
the rear of the appliance is
touching another part of the
appliance or the wall.
If necessary, carefully bend
the component out of the
way.
Move the appliance slightly.
Readjust the feet.
The compressor starts after a
period of time.
This is normal, no error has
occurred.
The compressor does not start
immediately after changing
the temperature setting.
Malfunction Possible Cause Remedy
Regulations, Standards, Guidelines
This appliance was designed for household use and was manufactured in
accordance with the appropriate standards. The necessary measures in
accordance with appliance safety legislation regulations (GSG), accident
prevention regulations for refrigeration appliances (VBG 20) and the regulations of the German Society of Electrical Engineers (VDE) were observed in
the manufacture of this appliance.
The refrigerant circuit has been checked for leaks.
This appliance is in accordance with the following EU guidelines:
– 73/23/EWG dated 19 February 1973 - low voltage guidelines.
– 89/336/EWG dated 3 May 1989
(including guideline change notice 92/31/EWG) - EMV guideline
Page 22

22
Gentile Cliente,
Grazie per aver scelto i nostri prodotti di alta qualità.
Con questa apparecchiatura sperimenterete la perfetta combinazione fra il
design funzionale e la tecnologia d'avanguardia.
Le nostre apparecchiature sono state progettate per avere le migliori pre-
stazioni e il massimo controllo raggiungendo i più alti standard di eccellenza.
Inoltre, e' parte integrante dei nostri prodotti l'attenzione per gli aspetti
ambientali e per il risparmio energetico.
Per assicurare prestazioni ottimali e un corretto utilizzo della vostra apparecchiatura, Vi invitiamo a leggere attentamente questo libretto istruzioni.
Vi permetterà di seguire tutte le fasi di utilizzo perfettamente e nel modo
più efficace.
Per consultare questo libretto ogni volta che lo desiderate, Vi consigliamo di
tenerlo in un luogo a portata di mano. Ricordatevi di consegnarlo ad eventuali futuri proprietari dell'apparecchiatura.
I seguenti simboli sono utilizzati nel presente manuale
Informazioni importanti relative alla sicurezza personale e alla prevenzione di
danni e all'apparecchiatura
Informazioni e suggerimenti generali
Informazioni ambientali
Page 23

23
Indice
Sicurezza . . . . . . . . . . . . . . . . . . . . . . . . . . . . . . . . . . . . . . . . . . . . . . .24
Smaltimento . . . . . . . . . . . . . . . . . . . . . . . . . . . . . . . . . . . . . . . . . . . .26
Informazione sull’imballaggio dell’apparecchio . . . . . . . . . . . . . . . . . . .26
Smaltimento di apparecchi vecchi . . . . . . . . . . . . . . . . . . . . . . . . . . . . .26
Rimuovere la sicura del trasporto . . . . . . . . . . . . . . . . . . . . . . . . . . .26
Installazione . . . . . . . . . . . . . . . . . . . . . . . . . . . . . . . . . . . . . . . . . . . .27
Luogo di installazione . . . . . . . . . . . . . . . . . . . . . . . . . . . . . . . . . . . . . . . .27
L’apparecchio necessita d’aria . . . . . . . . . . . . . . . . . . . . . . . . . . . . . . . . .28
Dimensioni della nicchia . . . . . . . . . . . . . . . . . . . . . . . . . . . . . . . . . . . . . .28
Reversibilita’ della porta . . . . . . . . . . . . . . . . . . . . . . . . . . . . . . . . . . . . . .28
Incasso . . . . . . . . . . . . . . . . . . . . . . . . . . . . . . . . . . . . . . . . . . . . . . . . . . . .29
Collegamento elettrico . . . . . . . . . . . . . . . . . . . . . . . . . . . . . . . . . . .33
Prima della messa in servizio . . . . . . . . . . . . . . . . . . . . . . . . . . . . . .33
Pannello di controllo . . . . . . . . . . . . . . . . . . . . . . . . . . . . . . . . . . . . .34
Tasti di regolazione della temperatura . . . . . . . . . . . . . . . . . . . . . . . . . . . . . .34
Display della temperatura . . . . . . . . . . . . . . . . . . . . . . . . . . . . . . . . . . . . . . . . .35
Messa in esercizio - Regolazione della temperatura . . . . . . . . . . . . . . . . . . .35
Massa eutettica . . . . . . . . . . . . . . . . . . . . . . . . . . . . . . . . . . . . . . . . . . . . . . . . . .35
Forstmatic . . . . . . . . . . . . . . . . . . . . . . . . . . . . . . . . . . . . . . . . . . . . . . . . . . . . . . .36
Tasto disattivazione allarme . . . . . . . . . . . . . . . . . . . . . . . . . . . . . . . . . . . . . . .36
Spegnimento dell’apparecchio . . . . . . . . . . . . . . . . . . . . . . . . . . . . . . . . . . . . .36
Congelazione e conservazione . . . . . . . . . . . . . . . . . . . . . . . . . . . . .37
Calendario di congelamento . . . . . . . . . . . . . . . . . . . . . . . . . . . . . . . . . . .38
Cubetti ghiaccio . . . . . . . . . . . . . . . . . . . . . . . . . . . . . . . . . . . . . . . . .38
Sbrinamento . . . . . . . . . . . . . . . . . . . . . . . . . . . . . . . . . . . . . . . . . . . .38
Spegnimento dell’apparecchio . . . . . . . . . . . . . . . . . . . . . . . . . . . . .38
Pulizia e cura . . . . . . . . . . . . . . . . . . . . . . . . . . . . . . . . . . . . . . . . . . .39
Consigli per il risparmio energetico . . . . . . . . . . . . . . . . . . . . . . . . .40
Che cosa fare, se... . . . . . . . . . . . . . . . . . . . . . . . . . . . . . . . . . . . . . . .40
Interventi in caso di anomalie . . . . . . . . . . . . . . . . . . . . . . . . . . . . . . . . .40
Servizio di assistenza . . . . . . . . . . . . . . . . . . . . . . . . . . . . . . . . . . . . .42
Disposizioni, Norme, Direttive . . . . . . . . . . . . . . . . . . . . . . . . . . . . . .42
Page 24

24
Sicurezza
La sicurezza dei nostri apparecchi é conforme ai regolamenti approvati della
tecnica ed alla legge di sicurezza degli apparecchi. Nonostante ciò, riteniamo
di doverVi facilitare la presa di confidenza con le seguenti avvertenze:
Impiego conforme alla scopo previsto
• L’apparecchio refrigerante é stato stabilito per l’uso domestico. È adatto per
raffreddare, congelare e conservare prodotti alimentari surgelati nonché
per la preparazione di gelati.
• Per motivi si sicurezza non é consentito in nessun caso apportare delle
modifiche o trasformazioni.
• Nel caso si voglia impiegare l’apparecchio refrigerante nell’ambito impren-
ditoriale oppure per scopi differenti dal raffreddamento, congelamento di
prodotti alimentari, si prega di osservare le disposizioni de legge vigenti
per il Vostro settore.
Prima della prima messa in servizio
• Verificare l’apparecchio su eventuali danni causati dal trasporto. Non col-
legare in nessun caso un apparecchio danneggiato! In caso di danni rivolgersi al fornitore..
Sostanza refrigerante
L’apparecchio contiene nel circuito refrigerante un gas naturale denominato Isobutano (R600a), avente una elevata tolleranza per l’ambiente, il quale
é tuttavia infiammabile.
• Osservare durante il trasporto e l’installazione dell’apparecchio che non
venga danneggiato alcun elemento delcircuito refrigerante.
• In caso di danneggiamenti al circuito refrigerante:
– evitare assolutamente fiamme libere e fonti incendianti;
– provvedere ad una buona aerazione del locale in cui si trova l’apparecchio.
Sicurezza dei bambini
• I pezzi di imballaggio (p.es. polistirolo) possono essere pericolosi per i bam-
bini. Pericolo di soffocamento! Mantenere il metriale di imballaggio al di
fuori della portata dei bambini!
• Gli apparecchi che non vengono più utilizzati devono essere resi inutiliz-
zabili prima dello smaltimento. Estrarre la spina di rete, spezzare il cavo di
rete, rimuovere oppure distruggere le eventuali chiusure lampo di bloccaggio. Mediante ciò si evita che si possano chiudere dentro dei bambini
Page 25

25
che giocano (pericolo di soffocamento!) oppure che possano trovarsi in
altre situazioni pericolose per la vita.
• Questo apparecchio non deve essere utilizzato da persone (e bambini) con
ridotte capacità fisiche, sensoriali o mentali o prive dell'esperienza e delle
nozioni necessarie, salvo i casi in cui agiscano sotto sorveglianza o siano
stati opportunamente istruiti sull'uso di tale apparecchio da persone
responsabili per la loro sicurezza. Evitare che i bambini utilizzino l'apparecchio in modo improprio. !!
Nel servizio quotidiano
• I contentitori di gas infiammabili oppure liquidi mediante l’effetto del
freddo possono perdere la propria ermeticità. Pericolo di espolsione! Non
immagazzinare mai dei contenitori con sostanze infiammabili, come p.es.
bombole spray, accendini e cartucce di rifornimento, ecc. nell’apparecchio
refrigerante.
• Le bottiglie e le lattine non devono essere collocatenella cella di congelamento. Queste possono scoppiare non appena si congela il contenuto,
mentre i liquidi contenenti anidride carbonica possono addirittura esplodere! Non collocare mai della limonata, succhi, birra,vino, spumante, ecc.
Ad eccezione: I superalcoolici possono essere immagazzinati nella cella di
congelamento.
• Non ingoiare i gelati oppure i cubetti di ghiaccio appena estratti dalla cella di congelamento. Il gelato oppure ghiaccio molto freddo si può incollare alla lingua o alle labbra e causare quindi delle ferite.
• Non toccare i prodotti congelati con le mani bagnate. Le mani si potrebbero congelare sul prodotto.
• Non impiegare mai dei piccoli elettrodomestici (p.es. macchine elettriche
da gelato, mescolatori, ecc.) nell’apparecchio refrigerante.
• Prima di eseguire i lavori di pulizia, é necessario disinserire l’apparecchio,
estrarre la spina oppure disinserire rispett. svitare il fusibile dell’abitazione.
• Estrarre la spina di rete dalla presa tirando sempre dalla parte della spina,
mai dal cavo.
Nel caso di una anomalia
• Se dovessero verificarsi delle anomalie, si prega di leggere in queste istruzioni per l’uso sotto “ Che cosa fare, se...”. Nel caso non siano sufficienti le
avvertenze riportate, si prega di non eseguire ulteriori lavori atunomi di
riparazione
• Gli apparecchi refrigeranti devono essere riparati esclusivamente da persone specializzate. Nel caso della necessità di una riparazione, si prega di
rivolgersi al proprio fornitore oppure presso il nostro servizio di assistenza.
Page 26

26
Smaltimento
Informazione sull’imballaggio dell’apparecchio
Tutti i materiali di produzione impiegati sono tollerabili perl’ambiente! Questi possono essere depositati senza pericoli oppure smaltiti nell’impianto
bruciatore di rifiuti urbani!
Riguardo i materiali di produzione: I materiali sintetici possono essere anche
riciclati e sono contrassegnati nella seguente maniera:
>PE< per politilene, p. es. nell’involucro esterno e nei sacchetti all’interno.
>PS< per polistirolo schiumoso, p.es. nei pezzi di imbottitura, in linea di
massima privi di propellenti.
I pezzi di cartone vengono realizzati con carta riciclata e devono essere
rimessi nella raccolta della carta vecchia.
Smaltimento di apparecchi vecchi
Per motivi ecologici é necessario smaltire conformemente gli apparecchi
vecchi. Ciò vale sia per il Vostro apparecchio finora usato ed anche per il
Vostro apparecchio nuovo.
Attenzione! Gli apparecchi vecchi che non servono più, devono essere resi
inutilizzabili prima dello smaltimento. Estrarre la spina di rete, spezzare il
cavo di rete, rimuovere oppure distruggere le eventuali chiusure lampo di
bloccaggio. Mediante ciò si evita che si possano chiudere dentro dei bambini che giocano (pericolo di soffocamento!) oppure che possano trovarsi in
altre situazioni pericolose per la vita.
Avvertenze sullo smaltimento :
• L’apparecchio non deve essere smaltito insieme ai rifiuti urbani o ingombranti.
• Il circuito refrigerante, in particolare lo scambiatore di calore situato nella parte inferiore dell’apparecchio, non deve essere danneggiato.
• Il simbolo sul prodotto o sulla confezione indica che il prodotto non
deve essere considerato come un normale rifiuto domestico, ma deve
essere portato nel punto di raccolta appropriato per il riciclaggio di apparecchiature elettriche ed elettroniche. Provvedendo a smaltire questo prodotto in modo appropriato, si contribuisce a evitare potenziali conseguenze negative per l'ambiente e per la salute, che potrebbero derivare da
uno smaltimento inadeguato del prodotto. Per informazioni più dettagliate sul riciclaggio di questo prodotto, contattare l'ufficio comunale, il
servizio locale di smaltimento rifiuti o il negozio in cui è stato acquistato
il prodotto.
Rimuovere la sicura del trasporto
L’apparecchio nonché gli accessori interni sono protetti per il traporto
• Rimuovere i nastri adesivi situati ai lati porta
• Rimuovere dall’interno dell’apparecchio tutti i nastri adesivi nonchè i pezzi di imbottitura.
Page 27

27
Nel caso sia inevitabile effettuare l’installazione accanto ad un fonte di calore, é necessario mantenere le seguenti distanze minime:
– dai forni elettrici 3 cm;
– dai forni a nafta e carbone 30 cm.
Nel caso non possano essere mantenute queste distanze, é necessario inserire una piastra di protezione contro il calore tra il forno e l’apparecchio
refrigerante. Se l’apparecchio refrigerante è posto accanto ad un altro apparecchio refrigerante oppure congelante é necessario mantenere una distanza laterale di 5 cm, allo scopo di evitare che si possa formare della condensa sui lati esterni degli apparecchi.
"Il montaggio diretto sotto un piano di cottura non è consentito. Le temperature, in parte elevate, del piano di cottura possono danneggiare l'apparecchio. Se nelle vicinanze dell'apparecchio viene installato un piano di cottura, devono essere rispettate le relative prescrizioni di montaggio e di sicurezza. Data la molteplicità delle possibili condizioni di installazione, è impossibile fornire in questa sede informazioni dettagliate. E' necessario evitare il
riscaldamento del frigorifero mantenendo un'opportuna distanza dalle fonti di calore e mediante l'impiego di un'adeguata piastra di isolamento termico. Deve inoltre essere garantita la corretta ventilazione dell'apparecchio."
Classe climatica per temperature ambientali di
SN +10 fino +32 °C
N +16 fino +32 °C
ST +18 fino +38 °C
T +18 fino +43 °C
Installazione
Luogo d’installazione
L’apparecchio deve essere collocato in un luogo ben aerato ed asciutto.
La temperatura ambientale ha un notevole effetto sul consumo di corrente. Pertano l’apparecchio dovrebbe
– non essere esposto direttamente ai raggi solari;
– non essere messo accanto ad elementi di calore oppure ad un forno o altre
simili fonti di calore;
– essere messo in un luogo la cui temperatura ambientale corrisponda alla
classe climatica per la quale é stato concepito.
La classe climatica é riportata sulla targhetta matricola situata a sinistra nell’interno della cella refrigerante. La seguente tabella mostra quali temperature ambiente sono state assegnate alle classi climatiche:
Page 28

28
L’apparecchio refrigerante necessita di aria
Per motivi di sicurezza la ventilazione deve essere come indicato
in figura.
Attenzione! mantenere le aperture per la ventilazione libere da
ogni ostruzione.
Dimensioni della nicchia
altezza 1780 mm
profondità 550 mm
larghezza 560 mm
Reversibilità della porta
L’apparecchiatura viene fornita con apertura della porta verso
destra.
Per avere l’apertura delle porte nel lato opposto eseguire le
seguenti operazioni prima di effettuare l’installazione
1. Svitare il perno superiore e togliere il
distanziale
2. Togliere la porta.
3. Svitare il perno inferiore e togliere il
distanziale; rimontarli nella parte
opposta.
4. Reinserire la porta e riavvitare il perno superiore e il distanziale nella
parte opposta.
Avvertimento! Durante la reversibilità, l’aparecchio non deve essere collegato alla rete elettrica. Estrarre
innanzitutto la spina dalla rete.
50 mm
D567
min.
200 cm
2
min.
2
200 cm
Page 29

29
Istruzioni per l’incasso
Incollare il coprifuga come indicato in figura.
Forate il mobile con un trapano
con punta Ø 2,5 (penetrazione
massima 10 mm); fissate la squadretta sull’apparecchiatura .
D740
Ø 2,5
13mm
D765
Page 30

30
Applicare i coperchietti (C-D) sulle alette dei coprifuga e nei fori
per le cerniere.
Applicare la griglia di aerazione
(B) e il coperchio copricerniera (E)
inserendoli a scatto.
B
E
C
D
Fissare l’apparecchiatura con le 4
viti in dotazione.
(I = corta) (P = lunga)
I
P
Inserire l’apparecchiatura nel vano
appoggiandola alla parete interna corrispondente al lato di apertura della
porta sino a quando il corpifuga superiore va in battuta (1) e assicurare che
la cerniera inferiore sia in linea con la
parete del mobile (2).
1
2
D022
Page 31

31
Appoggiare la guida (Ha) sulla
parte interna della porta del
mobile come indicato in figura e
segnare la posizione dei fori
esterni. Dopo aver preparato i fori
fissare la guida con le viti in dotazione.
Inserire a scatto il coperchietto
(Hc) sulla guida (Ha)
Separare i pezzi Ha, Hb, Hc, Hd
come da figura
PR266
Ha
Hb
Hc
Hd
ca. 50 mm
ca. 50 mm
Hc
Ha
90°
2
1
m
m
2
1
m
m
PR33
Page 32

32
Per l’eventuale operazione di allineamento della porta del mobile,
utilizzare il gioco dei fori asolati.
Al termine delle operazioni è
necessario controllare l’esatta
chiusura della porta dell’apparecchiatura.
Inserire a scatto il coperchietto
(Hd) sulla guida (Hb).
Aprire la porta dell’apparecchiatura e quella del mobile a 90° ca.
Inserire la squadretta (Hb) nella
guida (Ha). Tenere insieme la
porta dell’apparecchiatura e
quella del mobile e segnare i fori
come indicato in figura.
Togliere le squadrette e fare dei
fori di Ø 2 mm a 8 mm dal bordo esterno della porta. Posizionare nuovamente la squadretta
sopra le guida e fissare con le viti
in dotazione.
PR167
8mm
Ha
Hb
Hb
PR168
Hb
Hd
PR167/1
Page 33

33
Collegamento elettrico
Per effettuare il collegamento eletrrico é necessario impiegare la spina
con contatto di protezionz installata conformemente alle prescrizioni
vigenti. Il fusibile elettrico deve corrispondere ad almeno 10 Ampère. Nel
caso non sia possibile accedere alla presa dopo l’installazione, é necessario prender un idoneo provvedimento per garantire nell’installazione
elettrica la separazione dalla rete dell’apparecchio (p.es. fusibile, interruttore LS, interruttore di protezione contro correnti errate oppure simili con una ampiezza di apertura del contatto di almeno 3mm.
• Prima della messa in servizio, verificare che la tensione di collegamento ed
il tipo di corrente riportati sulla targa matricola corrispondono ai valori
della rete elettrica del luogo di installazione..
p.es..: AC 230 ... 240 V 50 Hz oppure
230 ... 240 V~ 50 Hz
(pertanto da 230 fino 240 Volt corrente alternata, 50 Hertz)
La targa matricola si trova a sinistra nell’interno della cella.
Prima della messa in servizio
• Pulire l’interno dell’apparecchio e tutti gli accessori prima di effettuare
la messa in servizio (vedi capitolo “Pulizia e cura”).
Page 34

34
Pannello di controllo
A
B
C
D
E
F
G
H
I
+
°
°C
-
ON/OFF
FROSTMATIC
ALARM OFF
Tasti di regolazione della temperatura
La regolazione della temperatura avviene tramite i tasti „+“ e „-“.
I tasti sono collegati al display della temperatura.
• Premendo uno dei due tasti „+“ (PIÙ CALDO) oppure „-“ (PIÙ FREDDO), il
display della temperatura si commuta dalla temperatura REALE (Il display
della temperatura è acceso) sulla temperatura NOMINALE (Il display della
temperatura lampeggia).
• Ad ogni ulteriore pressione di uno dei due tasti si aumenta la temperatura
NOMINALE di 1 °C. La temperatura nominale deve essere raggiunta entro le
24 ore.
• Premendo un tasto, il display della temperatura si riporta automaticamente sulla temperatura REALE dopo circa 5 secondi.
Temperatura NOMINALE significa:
la temperatura che dovrebbe essere presente all’interno dello scomparto congelatore. La temperatura NOMINALE viene visualizzata da cifre lampeggianti.
Temperatura REALE significa:
il display della temperatura visualizza la temperatura effettivamente presente in quel momento nello scomparto congelatore. La temperatura REALE viene visualizzata da cifre che restano accese.
A - Lampada spia ACCESO/SPENTO
B - Tasto ACCESO/SPENTO del vano congelatore
C - Tasto per la regolazione della temperatura (più calda)
D - Indicatore della temperatura del congelatore
E - Tasto per la regolazione della temperatura (più fredda)
F - Lampada spia Frostmatic
G - Tasto della funzione Frostmatic
H - Lampada spia d’allarme
I - Tasto disattivazione allarme (Alarm off)
Page 35

35
Display della temperatura
Il display della temperatura può visualizzare diverse informazioni.
• Durante il funzionamento normale viene visualizzata la temperatura attualmente presente nello scomparto congelatore (temperatura EFFETTIVA).
• Durante la regolazione della temperatura, la temperatura impostata in quel
momento nello scomparto congelatore (temperatura NOMINALE) viene
visualizzata sul display con cifre lampeggianti.
Messa in esercizio - Regolazione della temperatura
1. Inserire la spina di rete nella presa.
2. Premete il tasto ON/OFF. Si illumina la spia verde di controllo. La lampada
spia d’alarme (H) continua a lampeggiare, finché la temperatura interna
impostata non viene raggiunta. Si attiva il segnalatore acustico.
3. Premete il tasto „+“ (C) oppure „-“ (E). Il display della temperatura si commuta e visualizza, lampeggiando, la temperatura NOMINALE correntemente impostata.
4. Regolate la temperatura desiderata premendo il tasto „+“ (C) e „-“ (E) (vedi
il paragrafo “Tasti di regolazione della temperatura”). Il display della temperatura visualizza immediatamente la nuova impostazione. Ad ogni pressione dei tasti si aumenta la temperatura di 1 °C.
Secondo la scienza dell'alimentazione, -18°C per lo scomparto congelatore
sono sufficienti come temperatura di conservazione.
5. Il segnalatore acustico si spegne, quando viene raggiunta la temperatura
impostata. Premere il tasto disattivazione allarme per disinserire la lampada
spia d’allarme.
Massa eutettica
L’apparecchio può essere dotata di una o più all’interno una massa eutettiche.
In caso di interruzione della corrente o di mal funzionamento dell’apparecchiatura la massa eutettica aumenterà di qualche ora la conservzione dei
cibi congelati. Per usufruire nel modo migliore la massa eutettica, quest’ultima deve essere posta nel cassetto superiore. La massa euttetica può essere usata anche come elemento raffreddante per la borse termiche.
Page 36

36
FROSTMATIC
La funzione FROSTMATIC accelera la fase di congelamento degli alimenti
freschi proteggendo contemporaneamente le vivande già congelate da un
riscaldamento indesiderato.
1. Premendo il tasto FROSTMATIC si inserisce la cosiddetta funzione FROSTMATIC e si accende la spia gialla.
Se la funzione FROSTMATIC non viene revocata manualmente, i componenti
elettronici dell’apparecchio la disinseriscono dopo 24 ore. La spia gialla si
spegne.
2. Premendo nuovamente il tasto FROSTMATIC è possibile revocare manualmente la funzione FROSTMATIC in qualsiasi momento. La spia gialla si spegne.
Tasto disattivazione allarme
Un aumento anomalo della temperatura del vano congelatore (es. mancanza di energia elettrica) viene indicato dal lampeggio della lampada spia (H)
e da un segnalatore acustico.
Al ripristino delle condizioni normali il segnalatore acustico si spegne mentre continua a lampeggiare la lampada spia d’allarme.
Premendo il tasto d’allarme appare sull’indicatore per alcuni secondi la temperatura più calda raggiunta nel vano.
Spegnimento dell’apparecchio
Per spegnere il frigorifero basta tenere premuto il tasto ON/OFF per ca. 5 secondi. Sul display della temperatura viene visualizzato un cosiddetto „Count down“
(conto alla rovescia) da “3” a “1”. Una volta raggiunta la posizione “1”, lo scomparto congelatore si disinserisce ed il display della temperatura si spegne.
Avvertenza:
Se la spina è staccata oppure manca l’alimentazione di corrente non è possibile modificare le impostazioni dell’apparecchio. Dopo averlo collegato alla
rete, l’apparecchio si riporta nello stato di funzionamento in cui si trovava
prima dell’interruzione di corrente.
Se l’apparecchio resta spento per lunghi periodi di tempo, si dovrà procedere come segue:
1. Spegnete l’apparecchio tenendo premuto il tasto ON/OFF finché non si spegne il display (vedi sopra).
2. Estrarre la spina di rete oppure disinserire rispett. svitare il fusibile.
3. Sbrinate lo scomparto congelatore e pulite accuratamente l’apparecchio
(vedi il paragrafo "Pulizia e manutenzione").
4. Infine, lasciate aperta la porta per evitare che si formino cattivi odori all’interno dell’apparecchio.
Page 37

37
Congelazione e conservazione
Il vostro congelatore é adatto sia per la conservazione dei surgelati che per
la congelazione di cibi freschi.
Attenzione
• La temperatura nello scomparto congelatore dev’essere di -18°C o infe-
riore prima di introdurre i cibi per la congelazione.
• Attenersi per la congelazione ai quantitativi indicati sulla targa matrico-
la.Il quantitativo per la congelazione é la quantità massima di cibi freschi
che possono essere congelati in 24 ore. Volendo effettuare la congelazione di cibi freschi per più giorni consecutivi, ridurre il quantitativo riportato sulla targa a 2/3 o 3/4.
• Lasciare raffreddare eventuali cibi caldi prima di congelarli. Il calore por-
ta a una forte formazione di brina ed un elevato consumo energetico.
• Rispettare le date di scadenza indicato sulle confezioni dal produttore
• I cibi una volta scongelati non possono venir ricongelati previa cottura.
• I contentitori di gas infiammabili oppure liquidi mediante l’effetto del
freddo possono perdere la propria ermeticità. Pericolo di espolsione! Non
immagazzinare mai dei contenitori con sostanze infiammabili, come p.es.
bombole spray, accendini e cartucce di rifornimento, ecc. nell’apparecchio
refrigerante.
• Le bottiglie e le lattine non devono essere collocate nella cella di conge-
lamento. Queste possono scoppiare non appena si congela il contenuto,
mentre i liquidi contenenti anidride carbonica possono addirittura esplodere! Non collocare mai della limonata, succhi, birra,vino, spumante, ecc.
Ad eccezione: I superalcoolici possono essere immagazzinati nella cella di
congelamento.
• Avvolgere ermeticamente gli alimenti prima della congelazione in modo
da evitare che si asciughino, perdano gli aromi o che i sapori si trasmettano agli altri cibi congelati.
Attenzione! Mai toccare i cibi congelati con le mani bagnate. La pelle
potrebbe rimanere attaccata.
1. Porre gli alimenti impacchettati nei cassetti. Porre gli alimenti freschi da
congelare nel cassetto superiore. I cibi freschi non devono venire a contatto con gli alimenti gia’ congelati, per evitare il loro scongelamento.
2. Se si vuole congelare la quantità massima di congelazione si deve attivare
24 ore prima la congelazione rapida . Con quantità inferiori bastano 4-6 ore
prima. La luce spia gialla si accende. Dopo aver raggiunto la temperatura
ottimale spegnere la congelazione rapida. La luce spia gialla si spegne.
3. Collocare i prodotti congelati possibilmente in modo separato nei cassetti.
Page 38

38
Spegnimento dell’apparecchio
Se l’apparecchiatura dovesse essere spenta per un lungo periodo:
1. Svuotare lo scomparto congelante .
2. Spegnere l’apparecchio premendo il tasto B.
3. Togliere la spina dalla presa di corrente oppure disinserire la valvola di sicurezza.
4. Pulire l’apparecchiatura (vedi paragrafo “Pulizia e cura”).
5. Lasciare aperte le porte per evitare la formazione di odori sgradevoli.
Sbrinamento
Lo sbrinamento del congelatore avviene automaticamente.
Calendario di congelamento
• I simboli sui cassetti indicano diversi
tipi di prodotti da congelare.
• Le cifre indicano il periodo di conser-
vazione in mesi per ciascun tipo di
prodotto da congelare.
Il periodo di conservazione dell’alimento congelato varia tra il minimo ed
il massimo indicato (es. 2-6 mesi) ed e’ in funzione del cibo congelato. Per
gli alimenti notevolmente grassi vale sempre la durata inferiore.
Cubetti di ghiaccio
1. Riempire a 3/4 la bacinella ghiaccio con acqua fredda e riporla nel cassetto
congelatore.
2. Per togliere i cubetti pronti é sufficiente torcere la bacinella o metterla brevemente sooto l’acqua corrente.
Attenzione! Si raccomanda di non usare utensili appuntiti o a spigoli per
staccare la bacinella eventualmente rimasta attaccata. Utilizzare la paletta
raschiabrina in dotazione.
Page 39

39
Pulizia e cura
Per motivi d’igiene si dovrebbe.sempre pulire accuratamente e regolarmente l’interno dell’apparecchio, compresi gli accessori.
Avvertimento!
• Durante la pulizia, l’apparecchio non deve essere collegato alla rete elet-
trica. Pericolo di scosse di corrente! Prima di eseguire i lavori di pulizia, é
necessario disinserire l’apparecchio, estrarre la spina oppure disinserire
rispett. svitare il fusibile.
• Non pulire mai l’apparecchio con delle idropulitrici a vapore. L’umidità
potrebbe penetrare negli elementi di costruzione elettrici, pericolo di scosse di corrente! Il vapore bollente può causare dei dannii ai pezzi in materiale sintetico.
• L’apparecchio deve essere asciutto, ancor prima della nuova messa in ser-
vizio.
Attenzione!
• Oli essenziali e sostanze solventi organiche possono intaccare gli elemen-
ti in materiale sintetico, p.es.
– succhi di limone oppure bucce di arancia;
– burro acido;
– sostanze detergenti contenenti acido di aceto.
Evitare il contatto degli elementi dell’apparecchio con simili sostanze.
• Non impiegare mai sostanze detergenti graffianti.
1. Togliere i cibi. Avvolgere con più fogli di giornali i surgelati. Riporre il tutto
in un luogo fresco.
2. Spegnere l’apparecchio ed estrarre la spina oppure disinsrire rispett. svitare
il fusibile.
3. Pulire l’apparecchio e gli accessori interni con un panno morbido imbevuto
di acqua calda. Aggiungere eventualmente del comune detergente per il
lavaggio dei piatti.
4. Risciaquare e asciugare strofinando.
I depositi di polvere sul condensatore situato sul lato posteriore dell’appa-
recchio, riducono notevolmente la potenza di raffreddamento ed aumentano quindi il consumo energetico. Pertanto é necessario pulirlo accuratamente una volta l’anno con una spazzola oppure un aspirapolvere.
5. Una volta che il tutto si é asciugato bene si può rimettere in servizio l’apparecchio.
Page 40

40
Anomalia Possibile causa Intervento
L’apparecchio e le lampade
spie non funzionano
L’apparecchio non é collegato Collegare l’apparecchio
La spina non é inserta o allen-
tata.
Inserie la spina nella presa
L’interruttore generale é disinserito oppure difettoso
Controllare l’interruttore
eventualmente sostituirlo
La presa di corrente é difettosa.
Difetti alla rete elettrica vengono ripristinati dall’ elettricista autorizzato.
Che cosa fare, se ...
Interventi in caso di anomalie
Probabilmente si tratta di un guasto di lieve entità che potrete eliminare da
soli seguendo le seguenti istruzioni. Non effettuare nessun’altra operazione
qualore le informazioni qui riportate non fossero di alcun aiuto per il caso
concreto.
Avvertenza! Le riparazioni del frigorifero devono essere eseguite unicamente da personale specializzato. Riparazioni improprie possono essere fonte di
gravi pericoli per l’utente. Qualora fosse necessaria una riparazione, siete
pregati di rivolgerVi al Vostro rivenditore autorizzato oppure al nostro servizio assistenza clienti
L’apparecchio funziona. Luce
spia verde non si accende
Luce verde difettosa Chiamare l’assistenza tecnica
Consigli per il risparmio energetico
• Non installare l’apparecchio vicino a forni, elementi riscaldanti o altre fon-
ti di calore. Con temperature ambientali elevate il compressore entra in
funzione più spesso e più a lungo.
• Garantire una sufficiente aerazione in entrata e uscita. Non coprire mai le
aperture d’aerazione.
• Non collocare dei cibi caldi nell’apparecchio, lasciarli prima raffreddare.
• Aprire la porta solamente per quanto sia necessario.
• Non regolare una temperatura più fredda di quanto sia necessario..
• Mantenere costantemente pulito il condensatore posto sul lato posterio-
re dell’apparecchiatura.
Page 41

41
Temperatura del congelatore
troppo calda, lampada spia
rossa lampeggiante
L’apparecchio é installato
accanto a una fonte di calore
La temperatura non é correttamente regolata
Vedi paragrafo “Messa in funzione”
Regolare il termostato su una
posizione più fredda accendere funzione Frostmatic
La porta é rimasta aperta a
lungo
Vedi paragrafo “Installazione”
Nell’arco dell 24 ore sono state introdotte grandi quantità
di cibo
Aprire la porta solo per lo
stretto necessario
L’apparecchio fa troppo freddo.
La temperatura é regolata su
un valore troppo freddo
Regolare su temperatura più
calda
Luce spia gialla non si accende con l’accensione della congelazione rapida.
Luce gialla difettosa Chiamare l’assistenza tecnica
Anomalia Possibile causa Intervento
Dopo un certo periodo il
compressore si aziona automaticamente
Ciò é normale, non sussite
alcun distrubo
Dopo aver modificato la regolazione della temperatura il
compressore non interviene
subito
Rumorosità insolita
L’apparecchio é a contatto
con la parete oppure con
altri oggetti
L’apparecchio non é livellato
Un componente installato sul
retro dell’apparecchio p.es. un
tubo, tocca un altro componente oppure la parete
Piegare eventualmente con
cautela
Allontanare leggermente l’apparecchio
Correggere con i piedini regolabili
Forte formazione di brina sulla guarnizione della controporta
La guarnizione della controporta non è più ermetica
(eventualmente dopo aver
effettuato la reversibilità della
porta)
Riscaldare con cautela i punti
non ermetici della guarnizione con un asciugacapelli (non
superare i 50°C) rimettendo in
forma tirando la guarnizione
in modo che poggi perfettamente
Page 42

42
Servizio di assistenza
Rivolgersi al Vostro rivenditore specializzato oppure presso il nostro servizio
di assistenza nel caso gli interventi suggeriti nella precedente tabella non
risolvano il problema. Gli indirizzi e/o numeri telefonici sono riportati nel
libretto “Condizioni di garanzia / indirizzi del centro di assistenza” allegato.
Una preparazione mirata dei pezzi di ricambio può risparmiare costi e tempo. Si prega pertanto di indicare i seguenti dati del Vostro apparecchio:
• Descrizione modello
• Numero di produzione (No.P)
• Numero di ultimazione (No.U)
Queste indicazioni sono riportate sulla targa matricola situata nell’interno
dell’apparecchio. Allo scopo di aver rapidamente a portata di mano tutti i
dati, si consiglia di annotarli qui.
Avvertenza: Una chiamata del servizio di assistenza non giustificata é soggetta all’obbligo di risarcimento delle spese anche durante la garanzia.
Disposizioni, Norme, Direttive.
L’apparecchiatura é stato concepita per l’impiego domestico ed é stata prodotta sotto l’osservanza delle norme vigenti per questi tipi di apparecchiature. Nella produzione sono stati inoltre presi i particolari provvedimenti
necessari in conformità alla legge sulla sicurezza degli apparecchi (GSG), le
prescrizione sulla prevenzione degli infortuni per impiianti refrigeranti (VBG
20) e le disposizioni della cooperativa tedesca elettricisti (VDE).Il circuito
refrigerante é stato verificato sull’ermeticità.
Questo apparecchio è conforme alle seguenti direttive CEE:
– 73/23/CEE del 19.2.1973 - Direttiva sulle basse tensioni
– 89/336/CEE del 3.5.1989
(compresa successive modifiche del 92/31/CEE) - Direttiva EMV
Page 43

Page 44

www.electrolux.com
www.aeg-electrolux.it
2223 419-61-00-22112007 Subject to change without notice
Con riserva di modifiche
 Loading...