

Aeg-electrolux AEG RMS110NG User Manual
PROFESSIONAL 110 Gas
&
Falcon 110 Gas
Users Guide and Installation Instructions
U1 264 01

Australia
2

Contents
Australia
2 Minute Tour Page 4
The hotplate burners Page 8
The griddle Page 8
The Warmer Page 8
The grill Page 8
The ovens Page 9
Oven shelves Page 9
The Handyrack Page 10
Oven cooking guide Page 11
Cooking using the timer Page 12
The clock Page 12
Cleaning your cooker Page 14
Moving your cooker Page 17
Troubleshooting Page 18
General Safety Instructions Page 20
Service and spares Page 22
Installation Page 23
Servicing Notes Page 32
Circuit Diagram Page 37
Technical Data Page 38
3
Australia
2 Minute Tour
Be safe
You need clean fresh air - so does your cooker. Burner flames produce exhaust gases, heat and
moisture. Make sure that the kitchen is well ventilated: keep natural ventilation holes open or install a
powered cooker hood that vents outside. If you have several burners on or use the cooker for a long time,
open a window or turn on an extractor fan. For more detail see the Installation Instructions.
We recommend you read pages 20 & 21 if you have not used a gas cooker before.
We describe some basic guidelines on how to use a gas cooker safely.
Gas and Electricity on
Make sure that the gas supply is turned on and that the cooker is wired in and switched on.
The cooker needs electricity.
Peculiar smells
When you first use your cooker it may give off a slight odour. This should stop after a little use.
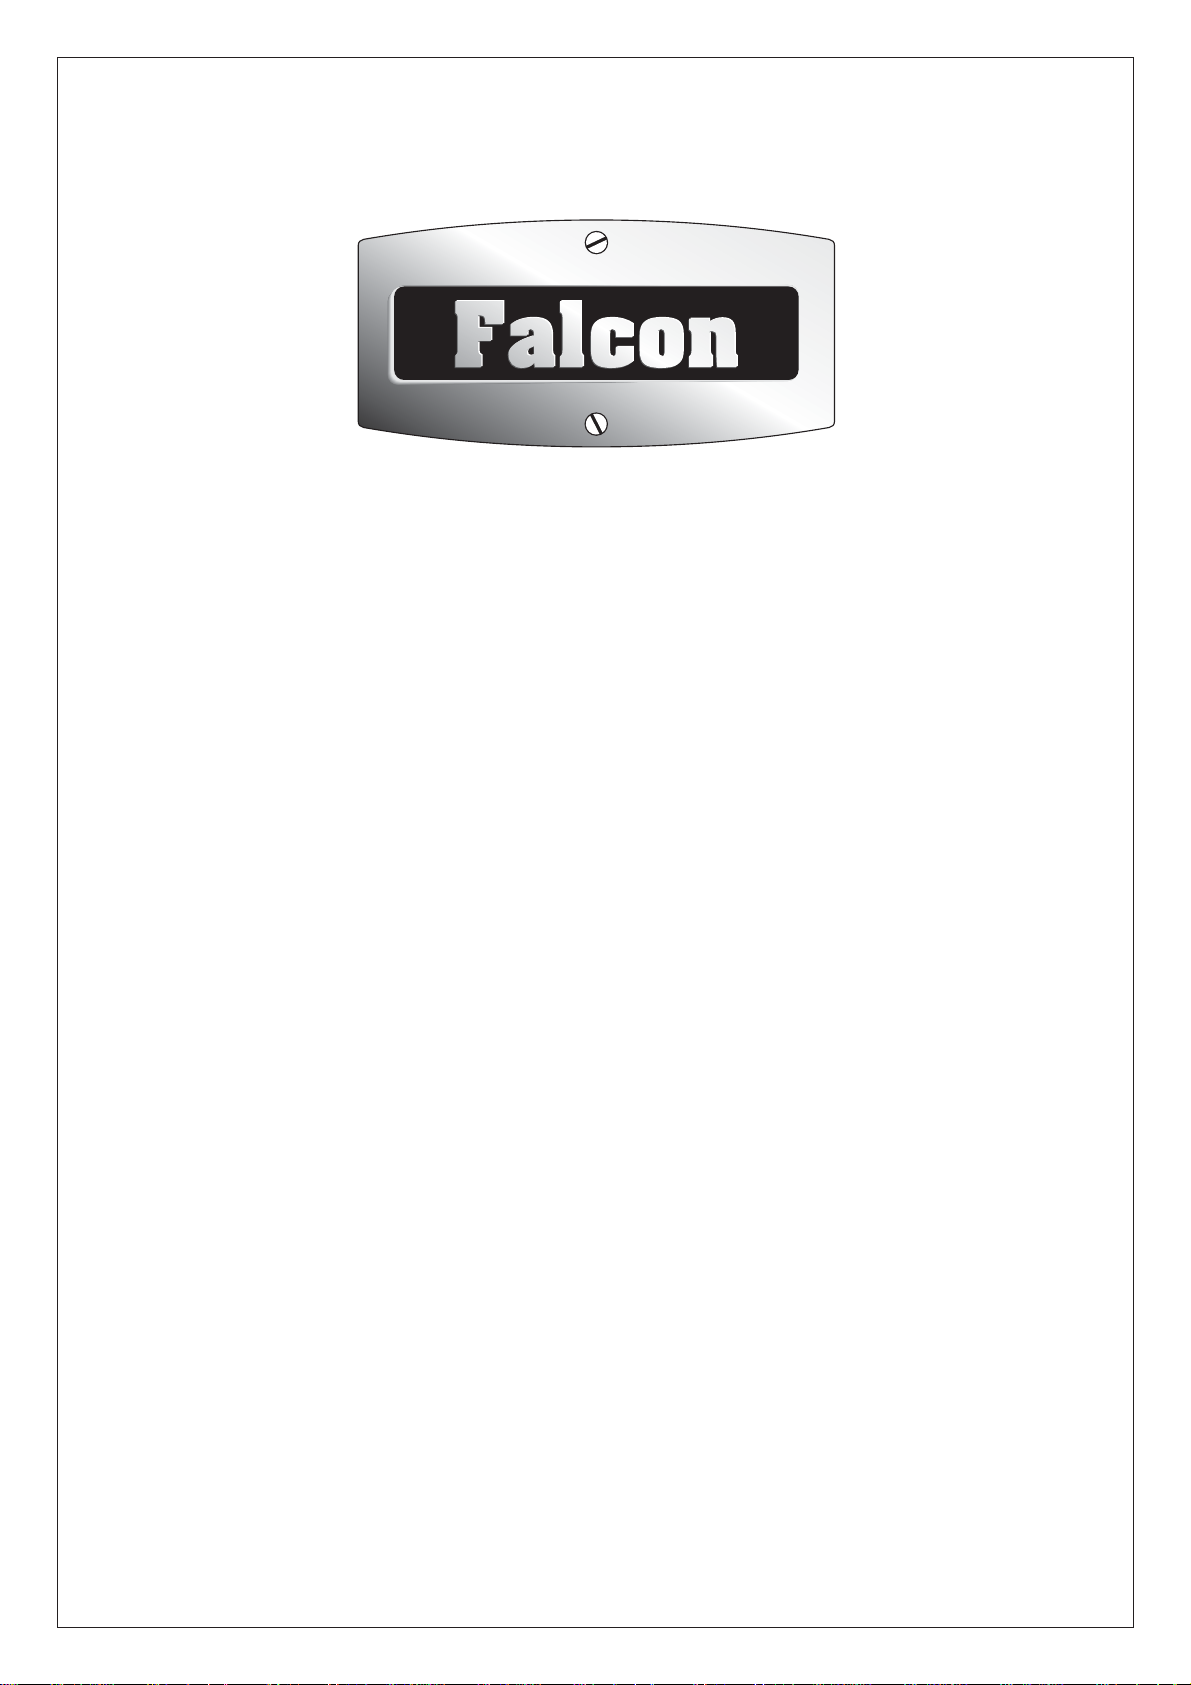
HOTPLATE BURNERS
The drawing by each knob
indicates which burner that knob
1 2
controls. Push in and turn a
knob to the large flame symbol ( )
and press the igniter button or light
with a match.
More about the burners on page 8
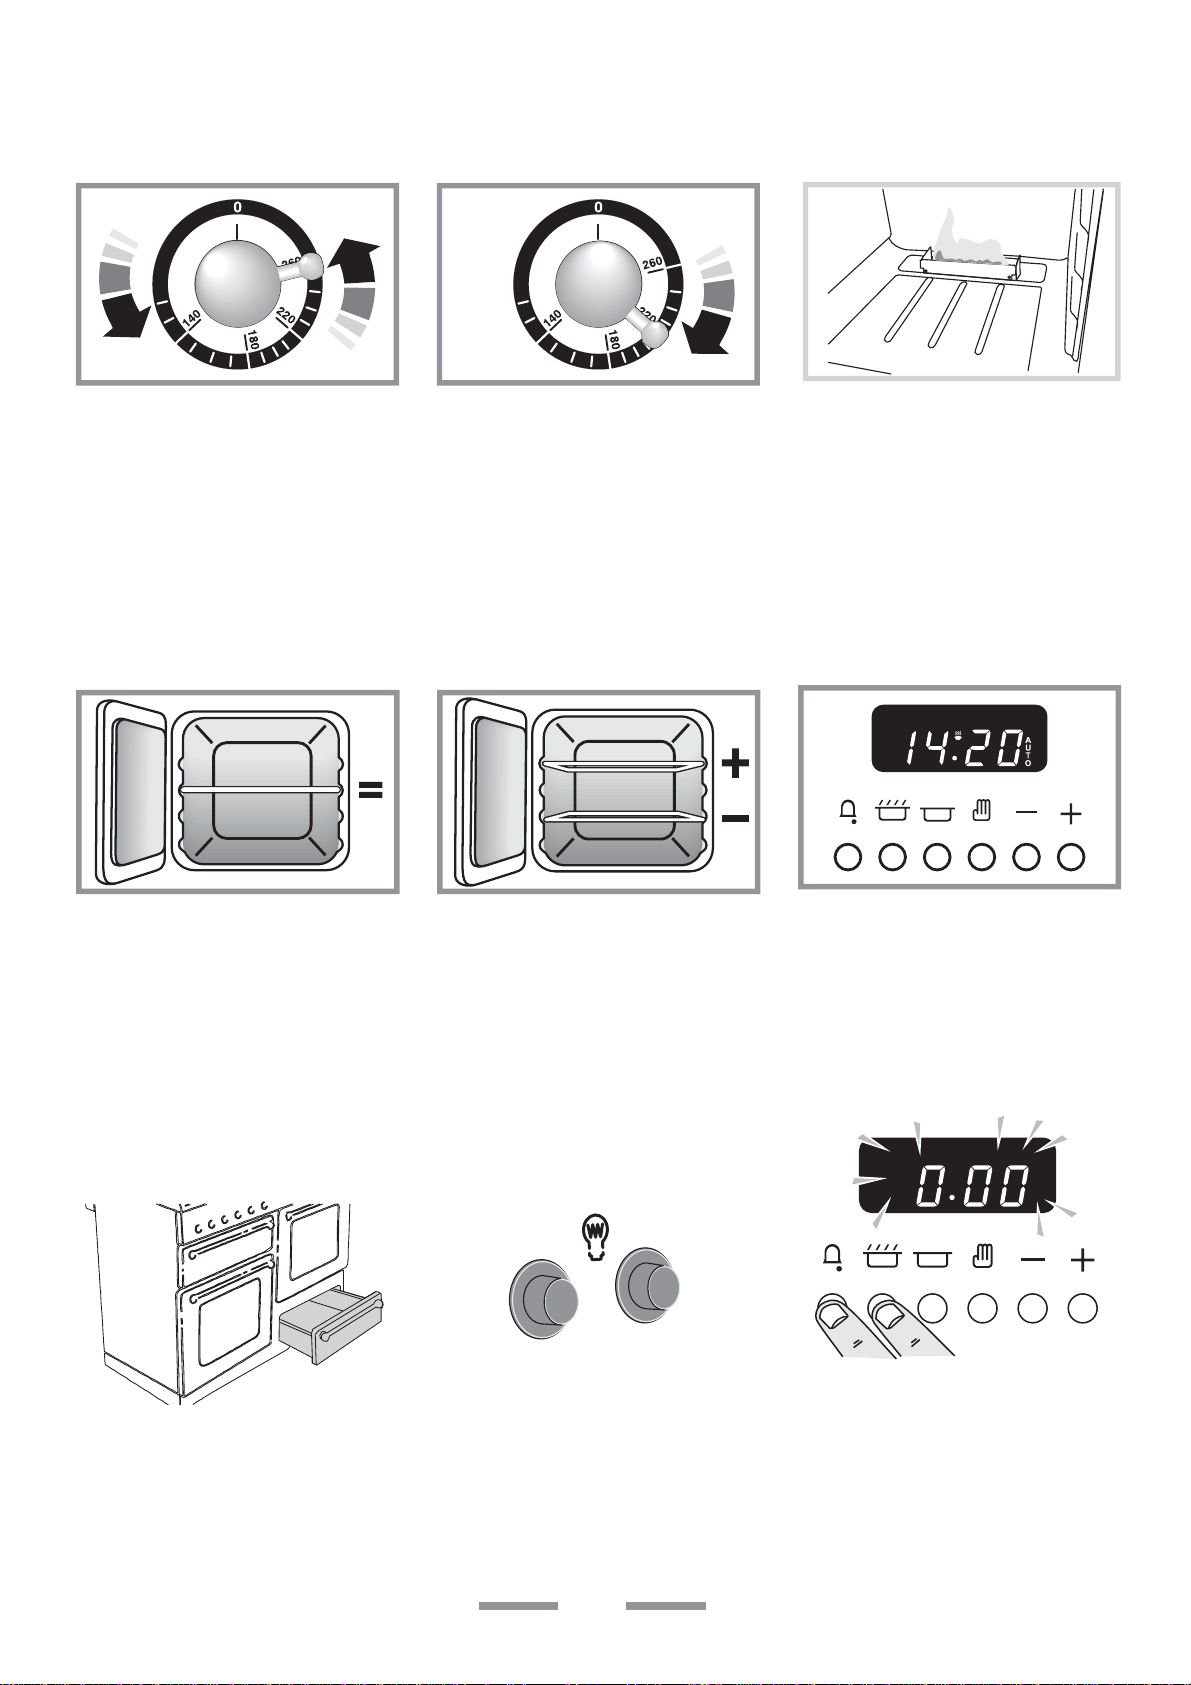
beyond high, not between high and
off. The small flame marks the ‘low
position’. Turn the knob towards it
after the contents of a pan have
boiled.
Adjust the flame height to suit
by turning the knob. On this
cooker the low position is
Make sure flames are under the
pans. Using a lid will help the
3
contents boil more quickly.
Pans and kettles with concave bases
or down turned base rims should not
be used.
Simmering aids, such as
asbestos or mesh mats, are
3
NOT recommended. They will
reduce burner performance and
could damage the pan supports.
Avoid using unstable and
misshapen pans that may tilt
4 5
easily and pans with a very
small base diameter e.g. milk pans,
single egg poachers. The minimum
pan diameter recommended is
120mm.
4
The Wok burner is designed to
provide even heat over a large
area. It is ideal for large pans
and stir frying. For heating smaller
pans the smaller burners may be
more efficient.
Australia
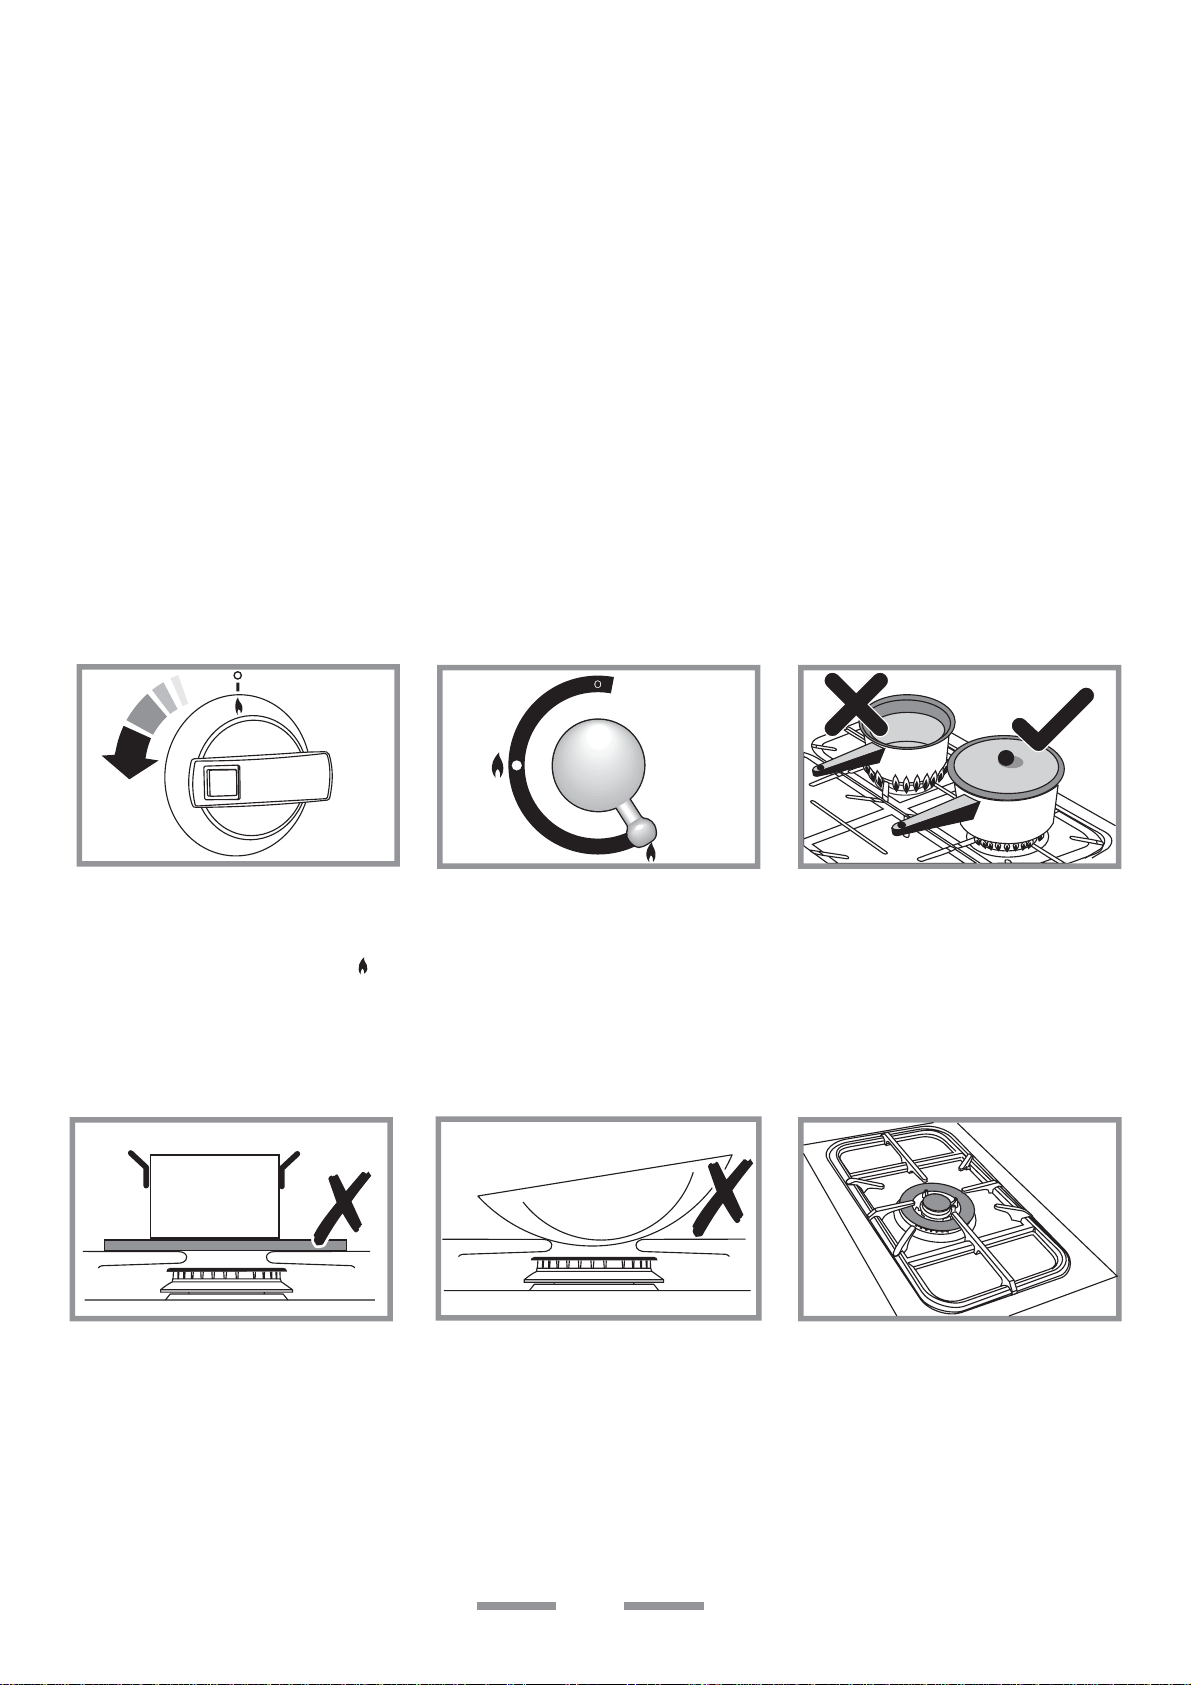
GRIDDLE
The griddle fits a single pan
support, front to back. It is
1
designed for cooking food on
directly. Don’t use pans of any
kind on it. The griddle surface is nonstick and metal cooking utensils (e.g.
spatulas) will damage the surface.
Use heat resistant plastic or wooden
utensils.
More about the griddle on page 8
Don’t put it crossways - it will
not fit properly and will be
2
unstable.
Don’t put it on the Wok burner - it is
not designed to fit the Wok burner
pan support.
Position the griddle over the
hotplate burners resting on the
3
pan support. The griddle can be
lightly brushed with cooking oil
before use. Light the hotplate
burners. Adjust the flame heights to
suit.
Preheat the griddle for a
maximum of 5 minutes before
4
adding food. Leaving it longer
may cause damage. The controls
can be turned to a lower position
simply by turning the control knobs
towards the lower position marked
with the small flame symbol.
Warmer
Use the warmer for keeping food
warm while the final touches are put
to a meal. Turn the control knob anticlockwise to the on position. The
‘HOT’ indicator lights up. For best
results, pre-heat a covered serving
dish for 10 minutes before adding
food to it.
Always leave space around the
griddle for the gases to escape.
5
Never fit two griddles side by
side. Large pans should also be
spaced well apart. The maximum
pan base diameter is 250mm.
2 Minute Tour continues over the page...
5
Australia
2 Minute Tour - continued
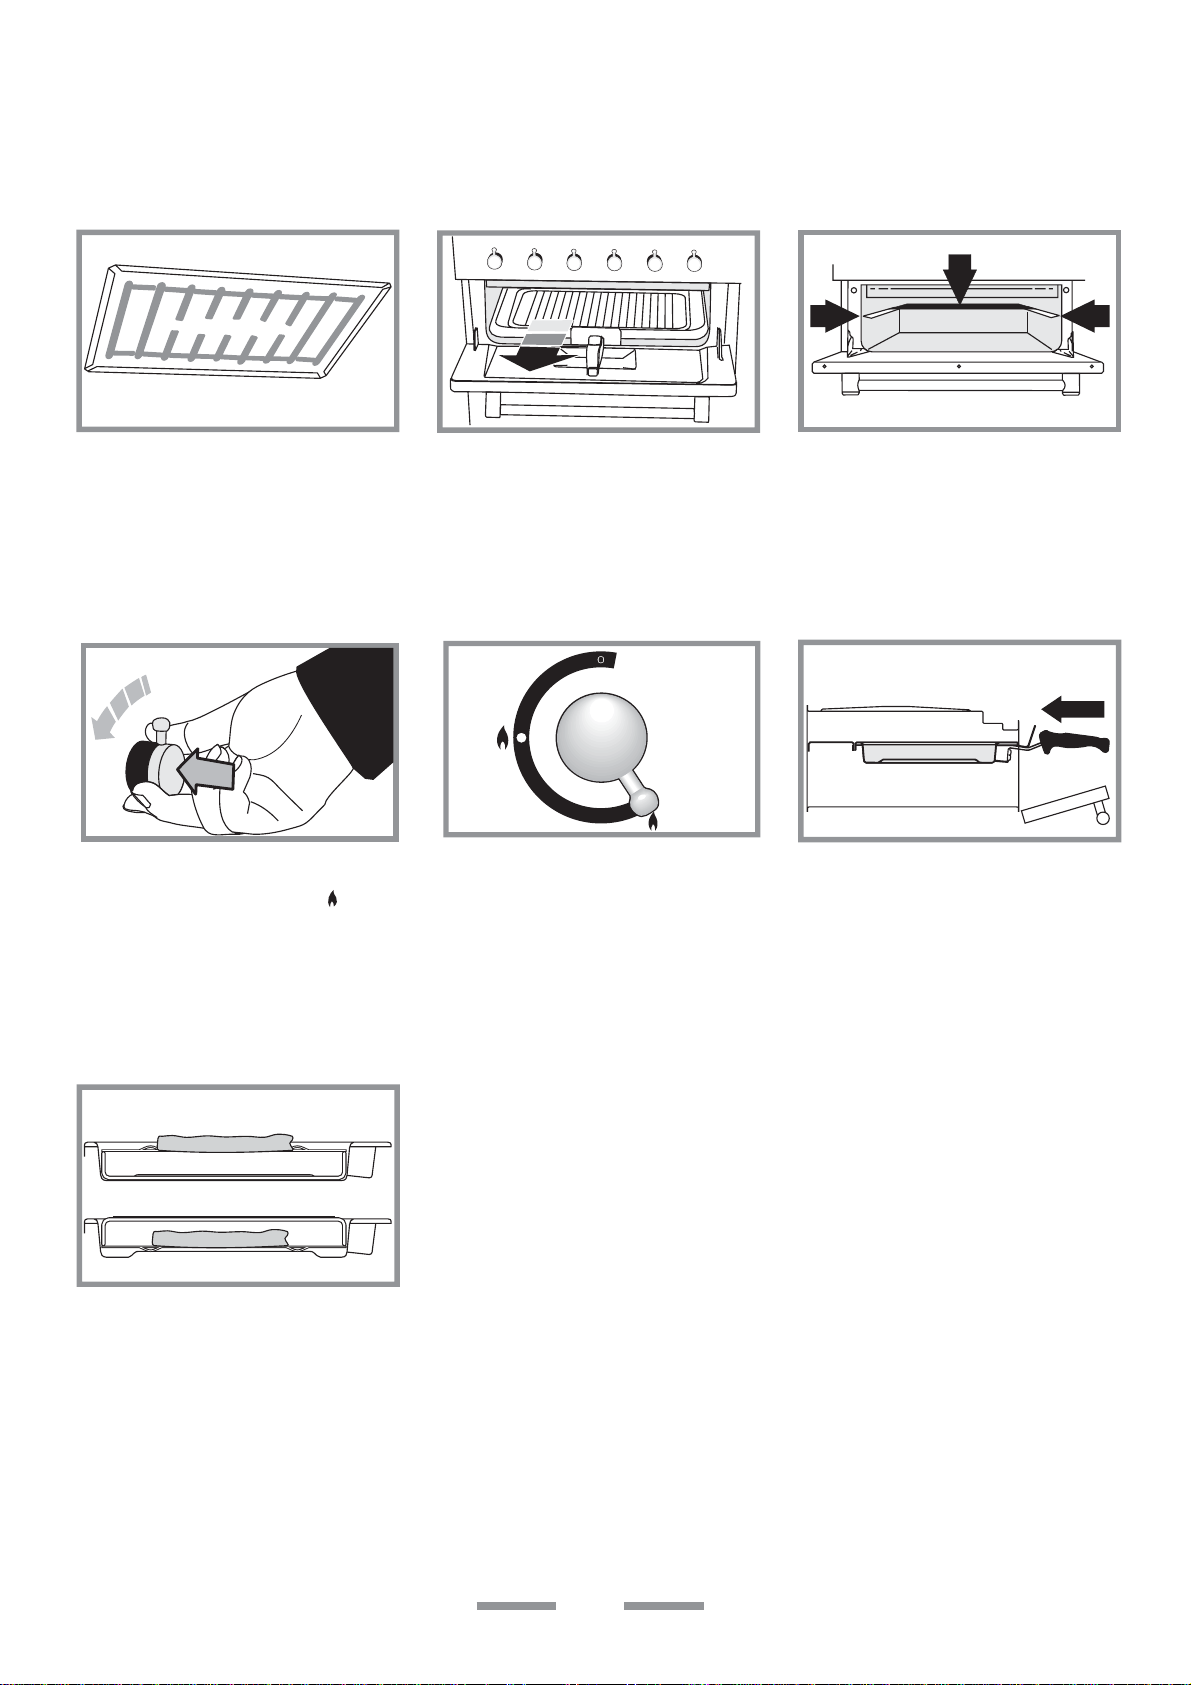
GRILL
CAUTION: Accessible parts may be hot when the grill is in use. Young children should be
kept away.
The burner does not glow red food cooks from the heat of the
1 2
flame. The first time you light
the grill there may be a little smoke
given off - this is perfectly normal.
More about the grill on page 8
Remove the pan from the
bottom of the grill compartment.
After placing your food on the
grill tray pan, slide the grill pan
3
onto the side supports just
below the elements. Make sure it is
pushed right in and touches the
backstop.
Press in the grill knob, turn to
the large flame symbol ( ) and
4
press the igniter button or light
with a match.
The grill pan grid can be turned
over to give two grilling
7
positions.
The low position, marked with
the small flame symbol, is
5
beyond high, not between high
and off.
Never close the grill door when
the grill is on.
For best results preheat for 2
minutes with the grill pan in
6
position. After placing your food
on the grill pan grid, slide the
grill pan onto the side supports.
Adjust the grill heat to suit by turning
the knob.
Make sure it is pushed right in and
touches the back stop.
6
Australia
THE OVENS
Push in and turn the knob
controlling the oven to the full on
1
position. The oven will light
automatically.
More about the oven on page 9
Turn the control knob back to
the temperature you wish to
2
cook on and for best results preheat the oven for 15 minutes before
placing your dishes in it.
The two ovens in your cooker
use the our special ‘Heatflow’
3
system.
Because the oven burner is not
hidden under the oven base you will
see the burner flames at the back of
the oven - this is perfectly normal.
Initially the gas will burn with a small
flame but after approximately one
minute the flame will become larger
indicating that the oven is full on.
Dishes cooking on the central
shelf will cook at the
4
temperature indicated on the
knob.
Storage
The bottom drawer is for storing oven
trays and other cooking utensils. It
can get very warm, don’t store
anything in it which may melt or
catch fire. The drawer can be
removed completely by pulling it right
out and up.
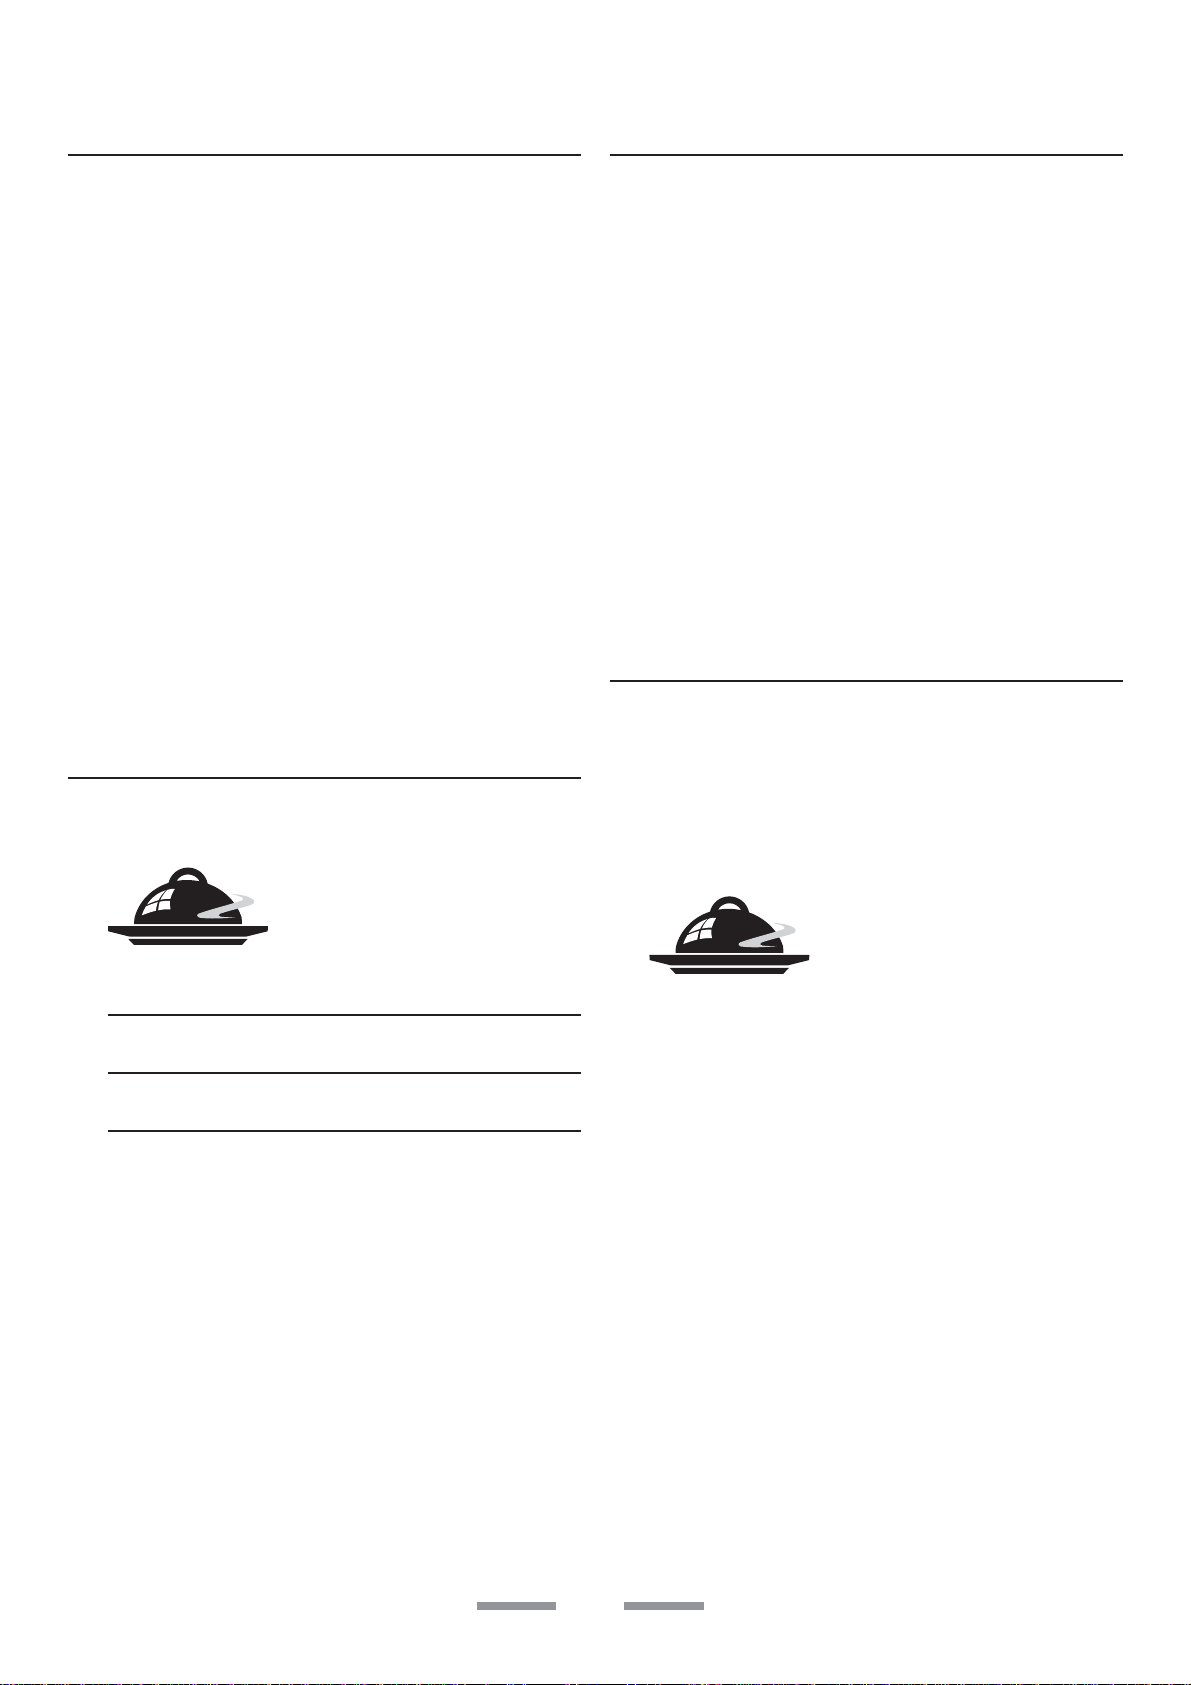
Dishes placed above the central
position will be cooked at
5
approximately 10°C higher,
dishes cooked below approximately
10°C lower. You can therefore cook
dishes requiring different
tempuratures at the same time.
Oven light
Press the appropriate button to turn
on one of the oven lights.
Warning - if one of the oven lights
fail,
turn off the power supply
before you change the bulb to
avoid the possibility of electric
shock. See the ‘Troubleshooting’
section for details on how to
change an oven light bulb.
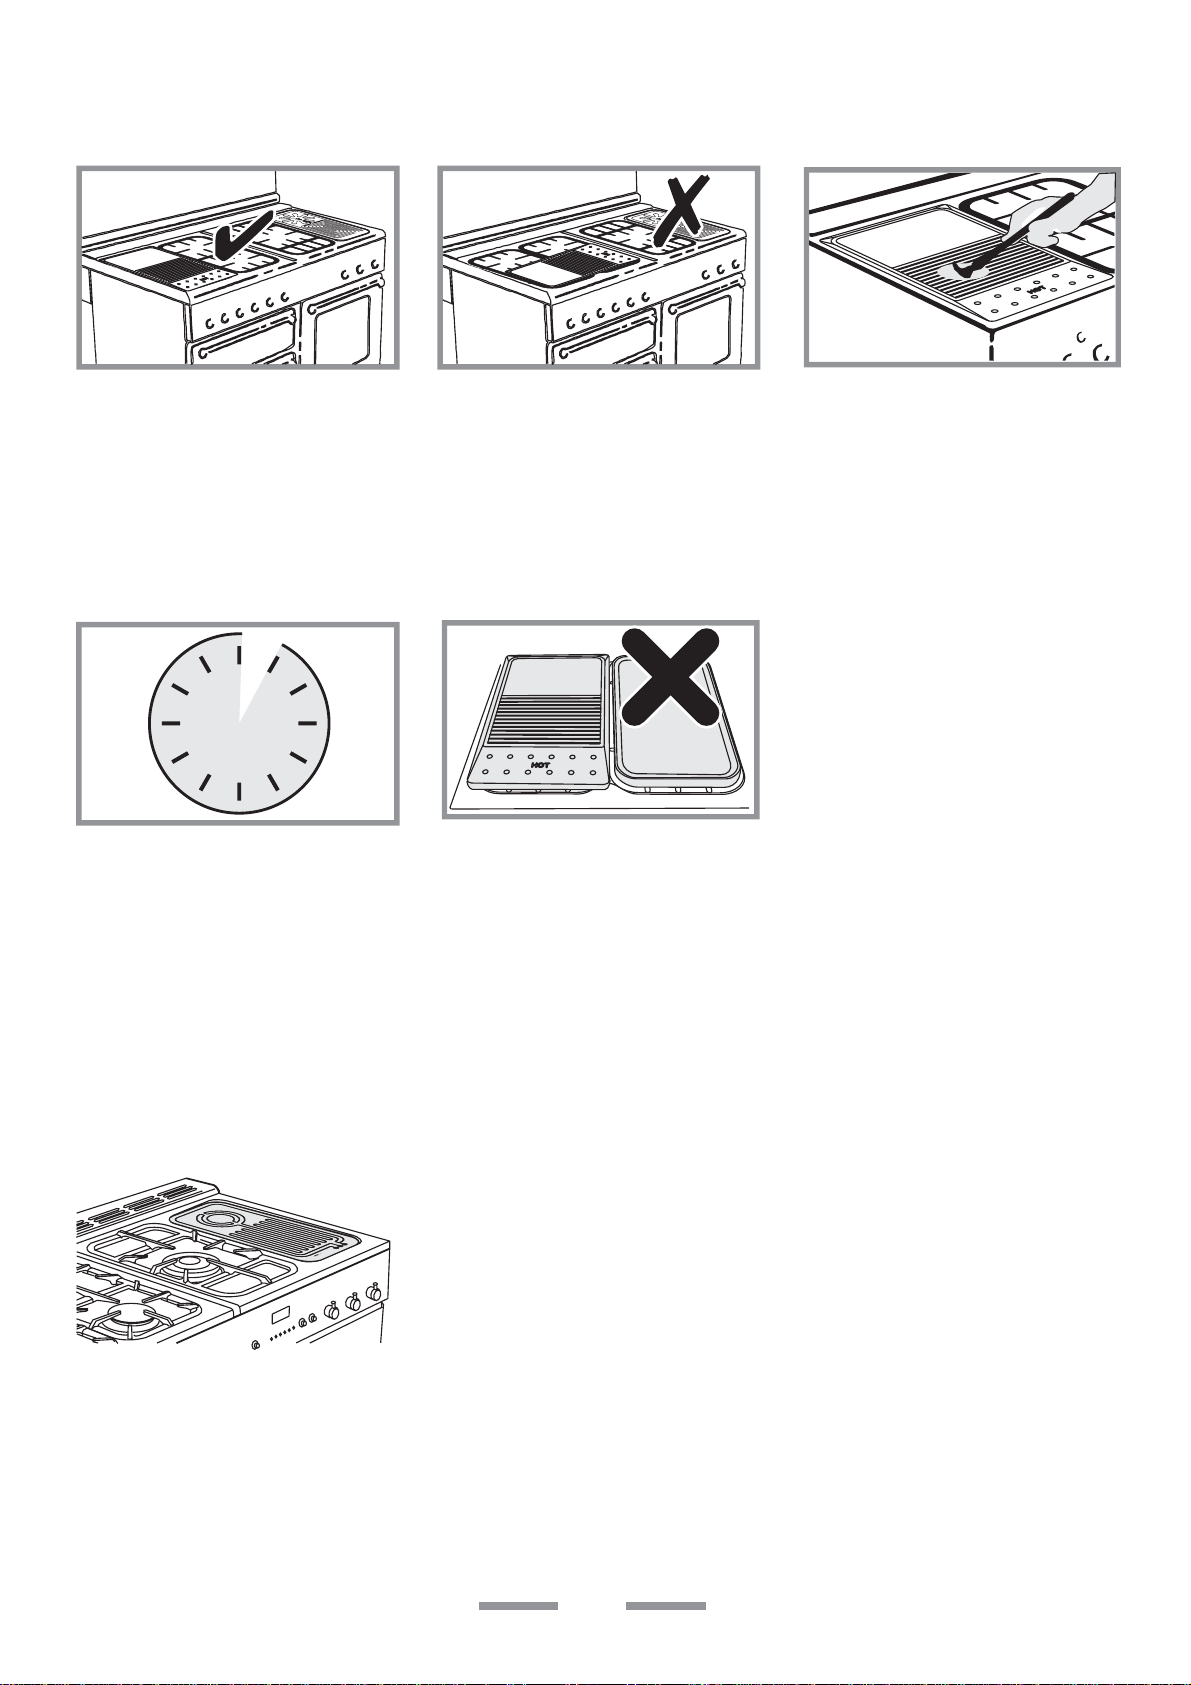
You can use the timer to turn
the oven on and off. Check
6
clock is set to time of day.
To set the time of day
More about the clock on page 13
Press and hold as above. At the
same time, press (-) or (+) until the
correct time shows. Don’t forget it’s a
24 hour clock. If you make a mistake
or press the wrong button, turn off
the power supply for a minute or two
and start again.
7
Australia
The hotplate burners
You should read ‘hotplate burners’ in the ‘2
Minute Tour’ before all the following
information
If a burner flame goes out, turn the control knob
off and leave it for one minute before relighting it.
You can remove the burner parts for
cleaning, see page 14.
You should wipe the enamel top surface of the
cooker around the hotplate burners as soon as
possible after spills occur. Try to wipe them off
while the enamel is still warm.
Avoid using unstable and misshapen pans that
may tilt easily and pans with a very small base
diameter e.g. milk pans, single egg poachers.
The minimum pan diameter recommended is
120mm. Smaller pans will be unstable.
Pans and kettles with down turned base rims
should not be used.
The griddle
You should read ‘griddle’ in the 2 Minute Tour
before all the following information
The Warmer
The Warmer can be used for keeping food warm
while the final touches are put to a meal. For
best results preheat a covered serving dish for
10 minutes on the Warmer before adding the
food.
Turn the control knob clockwise to the 'On'
position. The 'HOT' indication light glows on the
Warmer.
CAUTION:- If a crack in the Warmer surface
becomes visible, due to accidental damage etc.,
isolate the appliance from the electricity supply
immediately by turning it off at the wall and
arrange for its repair.
DO NOT RECONNECT THE COOKER TO THE
ELECTRICITY
SUPPLY UNTIL AFTER REPAIR!
The grill
You should read ‘grill’ in the 2 Minute Tour’
before all the following information
Never close the grill door while the grill is
on.
Don’t leave the grill on for more than a few
moments, without the grill pan underneath it.
Use the following heat settings as a guide for
griddle cooking.
High/medium:
Drop scones, Bacon, Chops, Steak, Burgers.
Medium/low:
Potato cakes, Eggs, Fish cakes.
Experience will soon familiarise you with the
correct setting to use for cooking.
After cooking allow the griddle to cool before
cleaning.
Don’t put it on the Wok burner - it is not designed
to fit the Wok burner pan support.
For best results, especially on toast, preheat the
grill with the grill pan in the cooking position for
two minutes before use.
The grill trivet can be removed and the food
placed on it while you are waiting for the grill
to preheat.
The grill pan grid can be turned over to give two
grilling positions.
8
Australia
The ovens
You should read ‘the oven’ in the
‘2 Minute Tour’ before all the following
information
The wire shelves should always be pushed firmly
to the back of the oven.
Baking trays with food cooking on them should
be placed level with the front edge of the oven’s
wire shelves. Other containers should be placed
centrally. Keep all trays and containers away
from the back of the oven, as overbrowning of
the food may occur.
For even browning, the maximum recommended
size of a baking tray is 320mm (12 l/2") by
305mm (12").
When the oven is on, don’t leave the door open
for longer than necessary, otherwise the knobs
may get very hot.
Both ovens are protected by a safety cut off,
which reduces the supply of gas to the oven if
the flames go out, e.g. an interruption to the
mains supply.
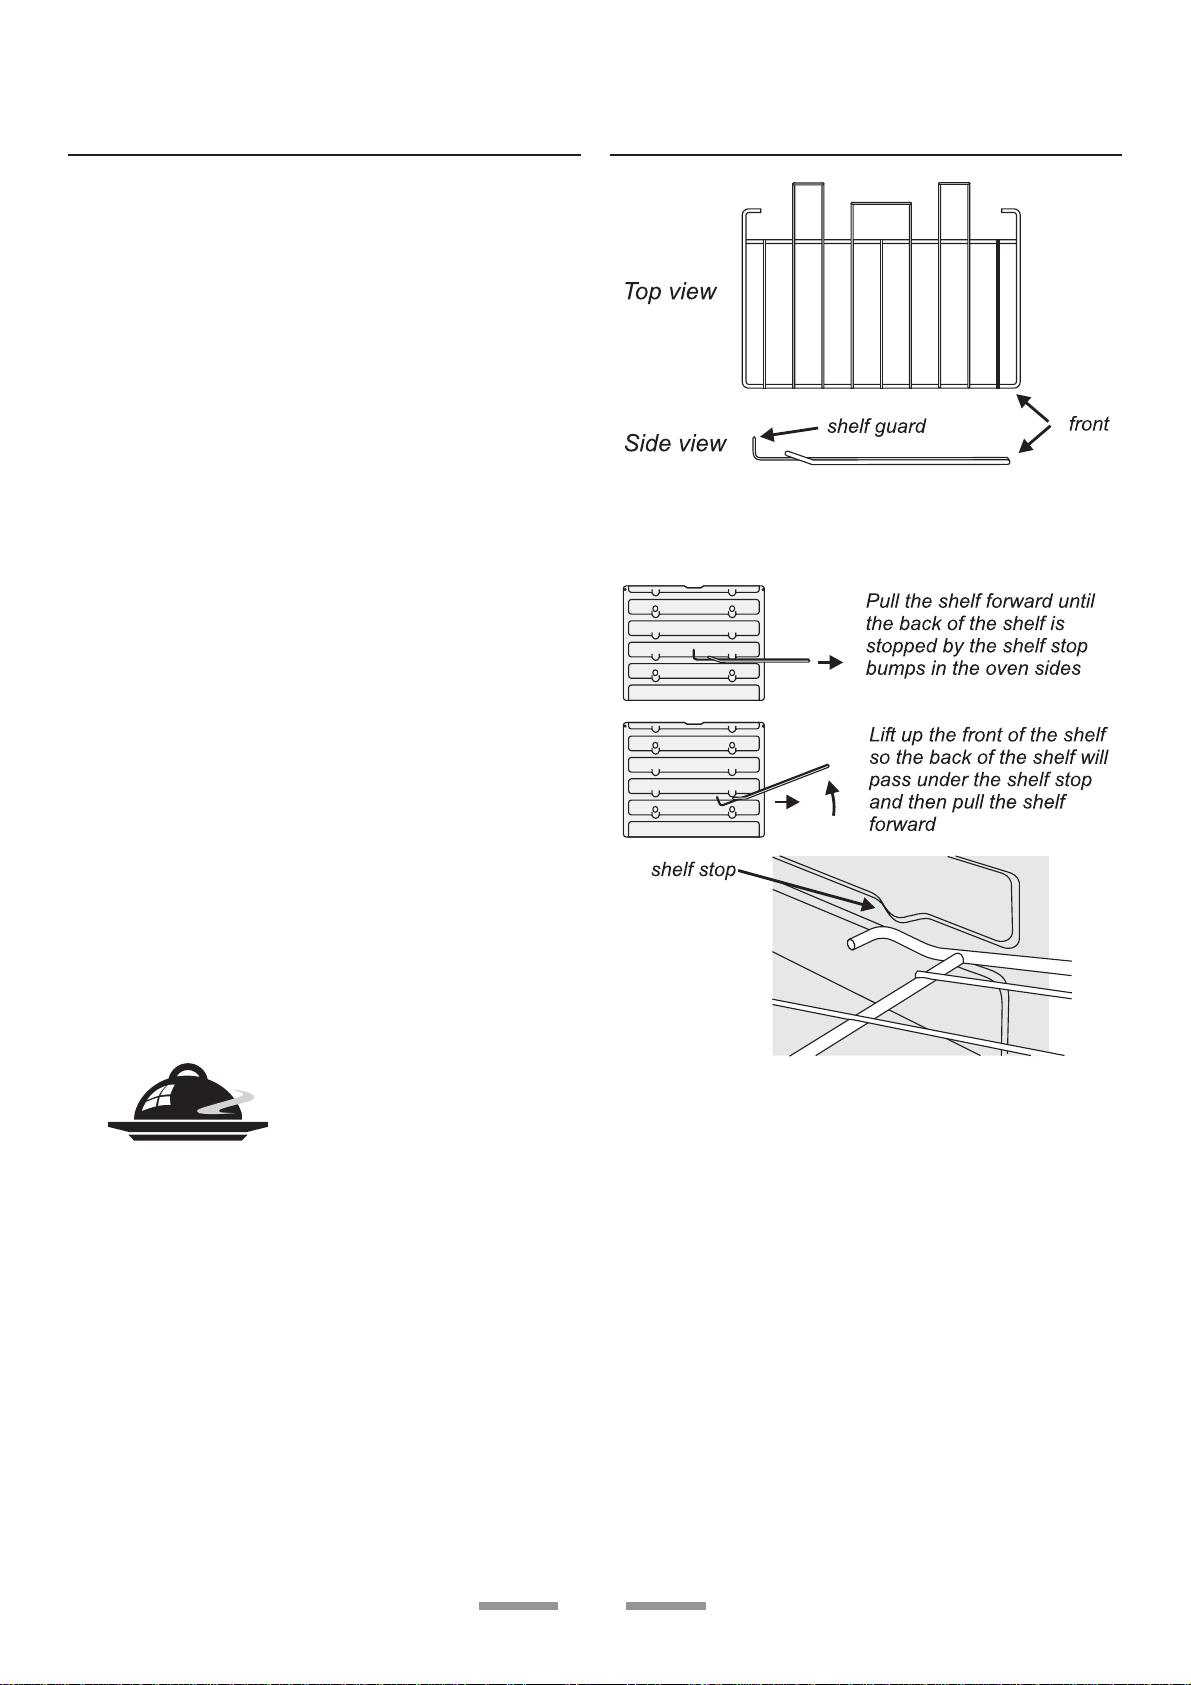
Oven shelves
the shelf guard should be at the back pointing upwards
The oven shelves can be easily removed and
refitted.
• Always leave a ‘fingers width’ between dishes
on the same shelf This allows the heat to
circulate freely around them.
•
Plates can be warmed in the ovens on the ‘S’
setting. The ‘S’ setting can be used to keep
foods hot for 3-4 hours after ‘normal’ cooking,
without drying out or overbrowning.
• The self cleaning oven liners (see Cleaning
your cooker) work better when fat splashes
are avoided. Cover meat when cooking.
•
To reduce fat splashing when you add
vegetables to hot fat around a roast, dry them
thoroughly or brush lightly with cooking oil.
•
Sufficient heat rises out of the oven while
cooking to warm plates in the grill
compartment.
•
If you want to brown the base of a pastry dish,
preheat the baking tray for 15 minutes before
placing the dish in the centre of the tray.
• Where dishes may boil and spill over during
cooking, place them on a baking tray.
To refit the shelf, line up the shelf with a groove
in the oven side and push the shelf back until the
ends hit the shelf stop. Lift up the front so the
shelf ends clear the shelf stops, and then lower
the front so that the shelf is level and push it fully
back.
9
Australia
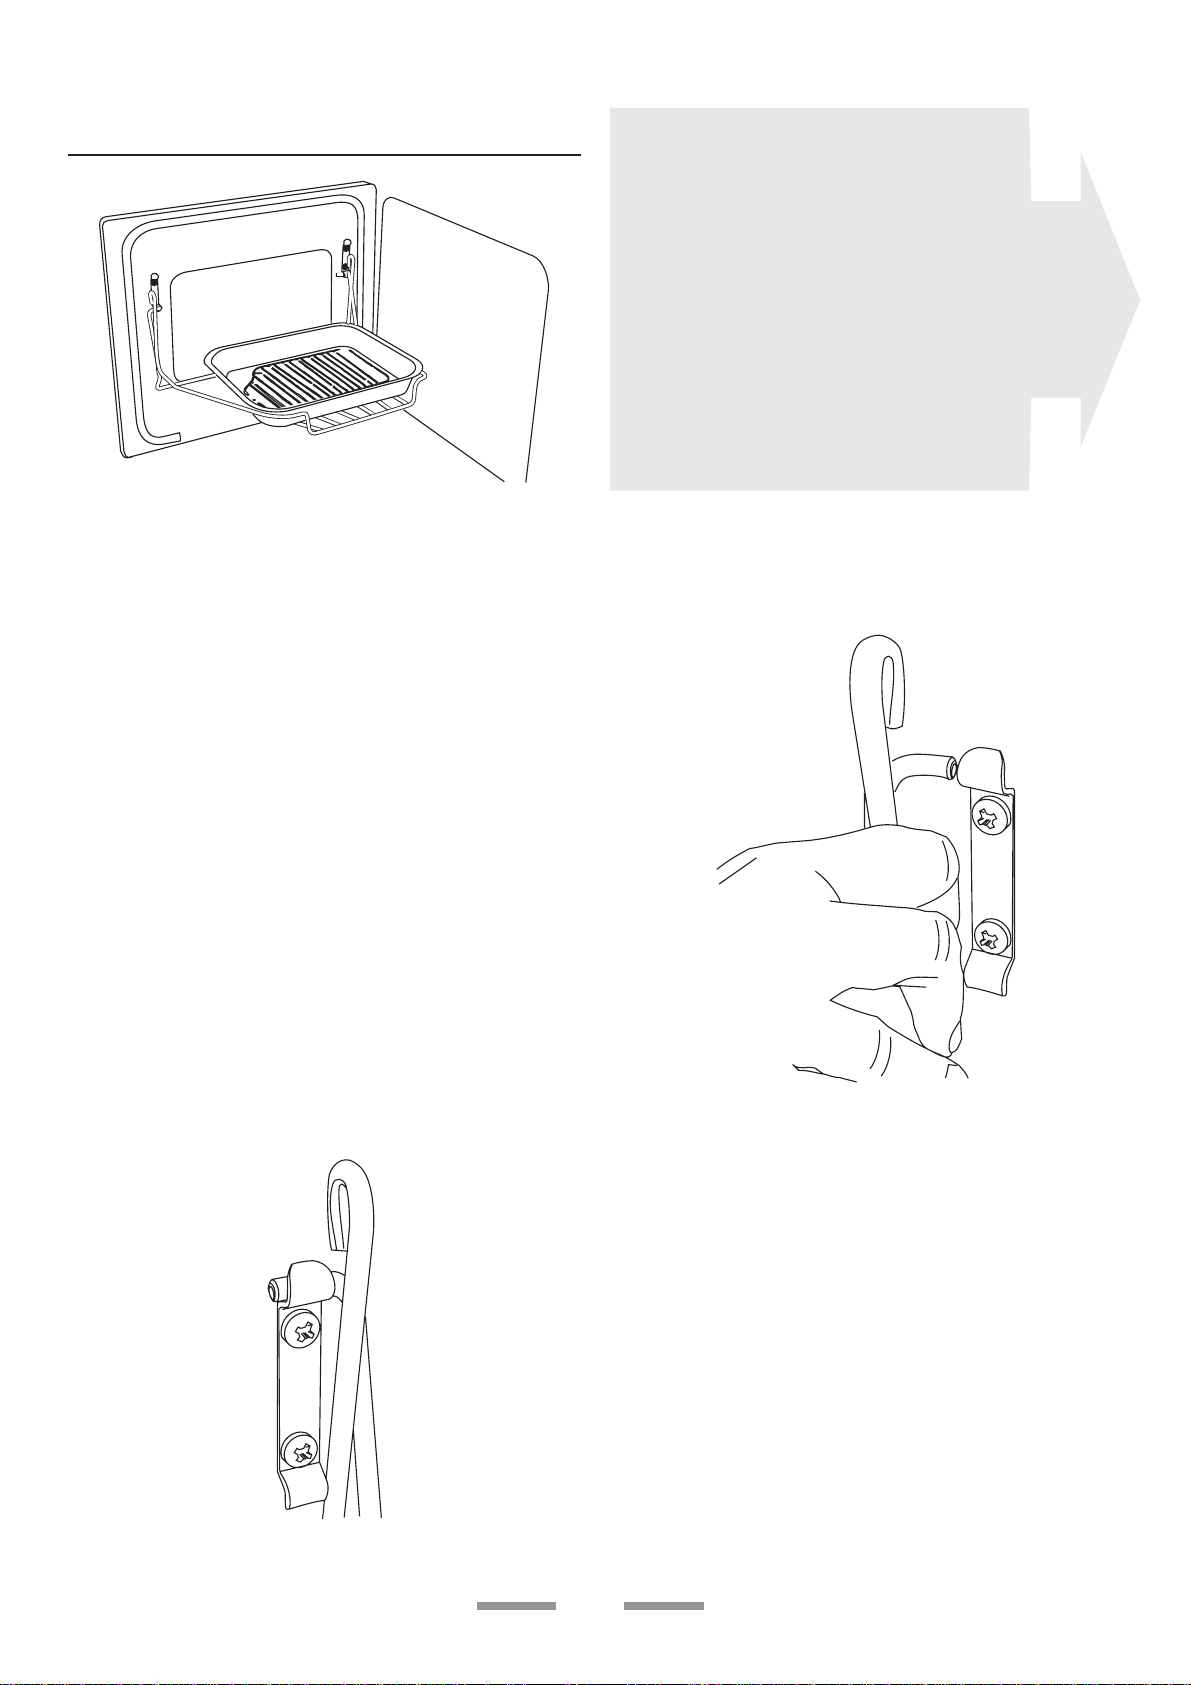
The Handyrack
The Handyrack should only be used with the
supplied meat tin, which is designed to fit the
Handyrack. Any other vessel could be
unstable.
The maximum weight which can be held by the
Handyrack is 5.5kg (12lb).
Food cooking on it is easy to attend to, because
it’s accessible when the door is open. It can be
fitted at two different heights. One of the oven
shelves must be removed and the other
positioned to suit.
The oven control settings and
cooking times given opposite are
intended to be used only as a
guide. Individual tastes may
require the temperature to be
altered to provide a preferred
result.
Always leave at least one runner
space between shelves when 2 tier
cooking. Place baking trays,
individual cake tins or baking
dishes centrally on the oven shelf.
For best results pre-heat the oven
for 15mins.
Then spring the other side out to clip it onto the
other bracket.
When the Handyrack is used in its highest
position, other dishes can be cooked on the
bottom shelf position of the oven.
When the Handyrack is used in its lowest
position, other dishes can be cooked on the
second shelf position of the oven or standing on
the base of the oven.
The Handyrack fits to the left hand oven door
only.
To fit the Handyrack, locate one side of it on the
door bracket.
10
Oven cooking guide
Oven Shelf position
Meat Temp°C from top Approximate cooking time
Beef (no bone) 180 3-4 30-35mins. per 500g.+30-35 mins.
220 3-4 20-25mins. per 500g.+20-25 mins.
Lamb 180 3-4 30-35mins. per 500g.+30-35 mins.
220 3-4 25-30mins. per 500g.+25-30 mins.
Pork and Veal 180 2-3 35-40mins. per 500g.+35-40 mins.
220 3-4 25-30mins. per 500g.+25-30 mins.
Poultry
Chicken (2.3kg) 180 3-4 20-25mins. per 500g.+20-25 mins.
220 3-4 15-20mins. per 500g.+15-20 mins.
Turkey (4.5kg) 180 3-4 25-30mins. per 500g.+25-30 mins.
220 3-4 20mins. per 500g.+20 mins.
(over 4.5kg) 180 4 20mins. per 500g.+20 mins.
220 4 15mins. per 500g.+15 mins.
Duck/ duckling 18 0 4 25-30mins. per 500g.
220 4 20mins. per 500g.
Australia
Thoroughly thaw frozen joints
before cooking. Meat may be
roasted at 235°C and the
cooking time adjusted
accordingly. For stuffed and
rolled meats, add approx. 10
min. per 500g. or cook at 220°C
or 20min, then 180°C for the
remainder.
For stuffed poultry, you could
cook at 220°C for 20mins. and
then 180°C for remainder. Don’t
forget to include the weight of the
stuffing. For fresh or frozen
prepacked poultry, follow
instructions on the pack.
Thoroughly thaw frozen poultry
before cooking.
Casseroles
150-160 3-4 2-4 hours according to recipe.
Yorkshire Pudding
235 2 Large tin 30-35 mins. Individual, 10-20 mins.
Fish
205 2 Fillets 15-20 mins. Whole 15-20mins. per 500g.
205 2 Steaks according to thickness.
Cakes
Very rich fruit 150 4 45-50mins. per 500g. of mixture.
Christmas/ wedding etc.
Fruit 180mm tin 165 4 2 to 21/2 hours.
Fruit 230mm tin 165 4 Up to 31/2 hours.
Madeira 180mm 180 4 80-90 mins.
Queen cakes 205 2 & 4 or 3 15-25 mins.
Scones 235 2 & 4 or 3 10-15 mins.
Victoria sandwich
180mm tin 190 2 & 4 or 3 20-30mins.
230mm tin 190 2 & 4 or 3 30-40 mins.
Desserts
Shortcrust tarts 220 2 & 4 40-60 mins. on pre-heated tray.
Fruit pies 220 2-3 35-45 mins.
Tartlets 220 2-3 10-20 mins. according to size.
Flaky/rough puff 235 2-3-4 20-40 mins. according to size.
Puff pastry 250 2-3-4 20-40 mins. according to size.
Meringues 110 3 11/2 to 2 hrs.
Baked egg custard 180 3 45-60 mins.
Baked sponge
pudding 205 3 40-45 mins.
Milk pudding 150-160 3 2-3 hrs.
When two tier cooking leave at
least one runner space between
shelves. Position the baking tray
with the front edge along the
front of the oven shelf.
Rich fruit cakes made with self-
raising flour should be cooked on
190°C for the first half hour at
least and then finished at the
setting shown.
If cooking more than one tart at
the same time, swap them over
at approx. 25 mins. For even
browning the maximum size of
baking tray recommended is
320mm x 305mm. This ensures
free heat circulation.
If cooking a two tier load, when
the top tray is removed, the tray
in the lower position should be
raised to the higher shelf, or the
trays interchanged, for the
remaining cooking time.
11

Australia
Cooking using the timer
The timer can be used to turn just one oven or
both on and off automatically. The start and stop
time must be the same for both ovens but
different cooking temperatures can be set.
If you want to turn one of the ovens on at
the same time as the timer is set for
automatic cooking, you must wait until the
timer has turned on the oven/ ovens first.
Then you can adjust either of them manually
in the normal way.
You can set the oven to turn on any time over
the following 24 hour period
If you want to cook more than one dish,
choose dishes which require approximately
the same time. However, dishes can be
‘slowed down’ slightly by using small
containers and covering them with
aluminium foil, or ‘speeded up’ slightly by
cooking smaller quantities or placing in
larger containers.
Very perishable foods such as pork or fish
should be avoided if a long delay period is
planned, especially in hot weather.
Don’t place warm food in the oven.
Don’t use an oven already warm.
Don’t use if an adjoining oven is warm.
Avoid using wine or beer if there is a delay
period, as fermentation may take place.
To avoid curdling, cream should be added
to dishes just before serving.
Fresh vegetables which may discolour during a
delay period should be coated in melted fat or
immersed in a water and lemon juice solution.
Many frozen foods are ideal for delayed
cooking and can be placed in the oven while
still frozen.
Fruit pies, custard tarts or similar wet mixtures
on top of uncooked pastry are only satisfactory if
there is a short delay period. Dishes containing
leftover cooked meat or poultry should not be
cooked automatically if there is a delay period.
Whole poultry must be thoroughly defrosted
before placing in the oven.
Check that meat and poultry are fully
cooked before serving.
12
 Loading...