

Page 1
Gefriertruhen
Chest freezers
Congélateurs-horizontaux
Congélatori orizzontali
Diepvrieskisten
Säiliöpakastimet
Gebrauchsanweisung
Operating Instructions
Mode d’emploi
Istruzioni per l’uso
Gebrauiksaanwijzing
Käyttöohje
Page 2

D F
Inhalt Seite
Bildseiten (bitte ausklappen) 4/5
Allgemeine Hinweise 8/9
Gewerbliche Nutzung, Aufstellort, Vor Inbetriebnahme, Anbringen der LagerkorbGriffe
Inbetriebnahme, Temperatur-Regelung, 9/10
Energiesparen bei Halb-oder Teilbeladung
Einfrieren; Tiefkühllagern und Umgang mit
der Kälte
Abtauen und Reinigen, Störungen und 11/12
Kundendienst
Reparaturbedingungen
Abschalten des Gerätes, Tips zur Energie- 13
Einsparung
Wenn Sie einmal umziehen wollen,
Deckel-Schloß
Rolle des Druckausgleichventils
Garantiebedingungen 14
GB
Contents Page
Illustration pages (please unfold) 4/5
General instructions 15
Industrial use, Choice of location, Before
starting up, Fitting of basket handles
Starting up, Temperature regulation 16/17
Energy-saving during half- or part-loading,
Freezing fresh food. The do’s and don’ts 17
of storing frozen fodd
Defrosting and cleaning 18
Faults and sevicing, When not in use, 19
Hints on energy-saving,
Special accessories
The role of the pressure 20
equalisation valve
Contenu Page
Pages avec figures 4/5
Remarques générales 21
Utilisation professionnelle, 21/22
Lieu d’implantation, Avant la mise
en service, Mise en
place des poignées de panier
Mise en service, Régulation de la tempéra- 22
ture, Economie d’énergie avec une
demi-charge ou une charge partielle
Congélatiom, stockage et comportement à 23
l’égard du froid
Dégivrage et nettoxage, Pannes et service 24
après-vente
Arrêt du congélateur, Conseils pour 25
économiser de l’énergie, accessoires
supplémentairs
Le rôle de la soupape 26
compensateur de pression
2
Page 3
2
5
4
Page 4
7 10
5
Page 5

6
Page 6

GB
General instructions
You have just purchased a home freezer which
has been produced according to the standards
applicable to these appliances. During
manufacture, the necessary measures have been
taken as required by the Appliance Safety Act,
the Accident Prevention Regulations for
Refrigerating Installations (VBG 20), and the
Requirements of the Association of German
Electrical Engineers (VDE).
The refrigeration circuit has been checked for
leakage.
This appliance meets the radio interference
suppression requirements of EC Directive
821499 EC and the standards concerning the
effects of electrical appliances on power systems
EN 60 555 Parts 1-3/DIN VDE 0838 Parts 1-3,
June 1987.
Before starting up, we recommend you to read
the following Instructions for Use, since only by
doing so can you benefit from all the advantages
offered by your chest freezer.
These Instructions for Use are intended for
several comparable models with different
equipment. Please note only the instructions
which refer to your chest freezer version.
Industrial use
Should you use your home freezer for industrial
purposes, please note the legal requirements
valid in your area.
Choice of location
If possible, your freezer should be installed in a
dry, well-ventilated room. Please make sure that
your chest freezer or its electrical components are
not exposed to any spraying or splashing water.
The refrigerating unit needs a good supply of air
and proper ventilation in order to function
perfectly. Please make sure that the external
walls of the appliance are not covered over or
blocked.
Ambient temperature has an effect on the power
consumption of the refrigerating system. The
appliance should therefore:
– not stand in the direct sunshine, next to a
radiator, or close to the oven
– stand in a position where the ambient
temperature corresponds with the climate
category for which the appliance was
designed.
You will find data on this on the rating plate, which
is in the interior of the appliance. It will consist of
one of the following:
Climate Ambient temperature
category from ... to
SN + 10 to + 32 °C
N + 16 to + 32 °C
ST + 18 to + 38 °C
T + 18 to + 43 °C
The appliance should be installed horizontally on
a firm surface. Correct any floor irregularities with
suitable packing pieces.
When your chest freezer is in use, you will find
that the outside is warm to touch. This is caused
by the special cooling system, integrated cooling
circuit (shell-and-tube condenser) whose heat
prevents formation of condensation and thereby
rust on the external housing.
Ensure that all surfaces (sides) of your chest
freezer receive sufficient air so that the heat can
be dissipated.
Thermometer
On some models there is a thermometer fitted
into the dividing wall between the large and the
small freezer space.
It shows the temperature of the items at the same
level as the upper filling mark. If your freezer is
not full, please remove the thermometer from its
holder and place it on the frozen food.
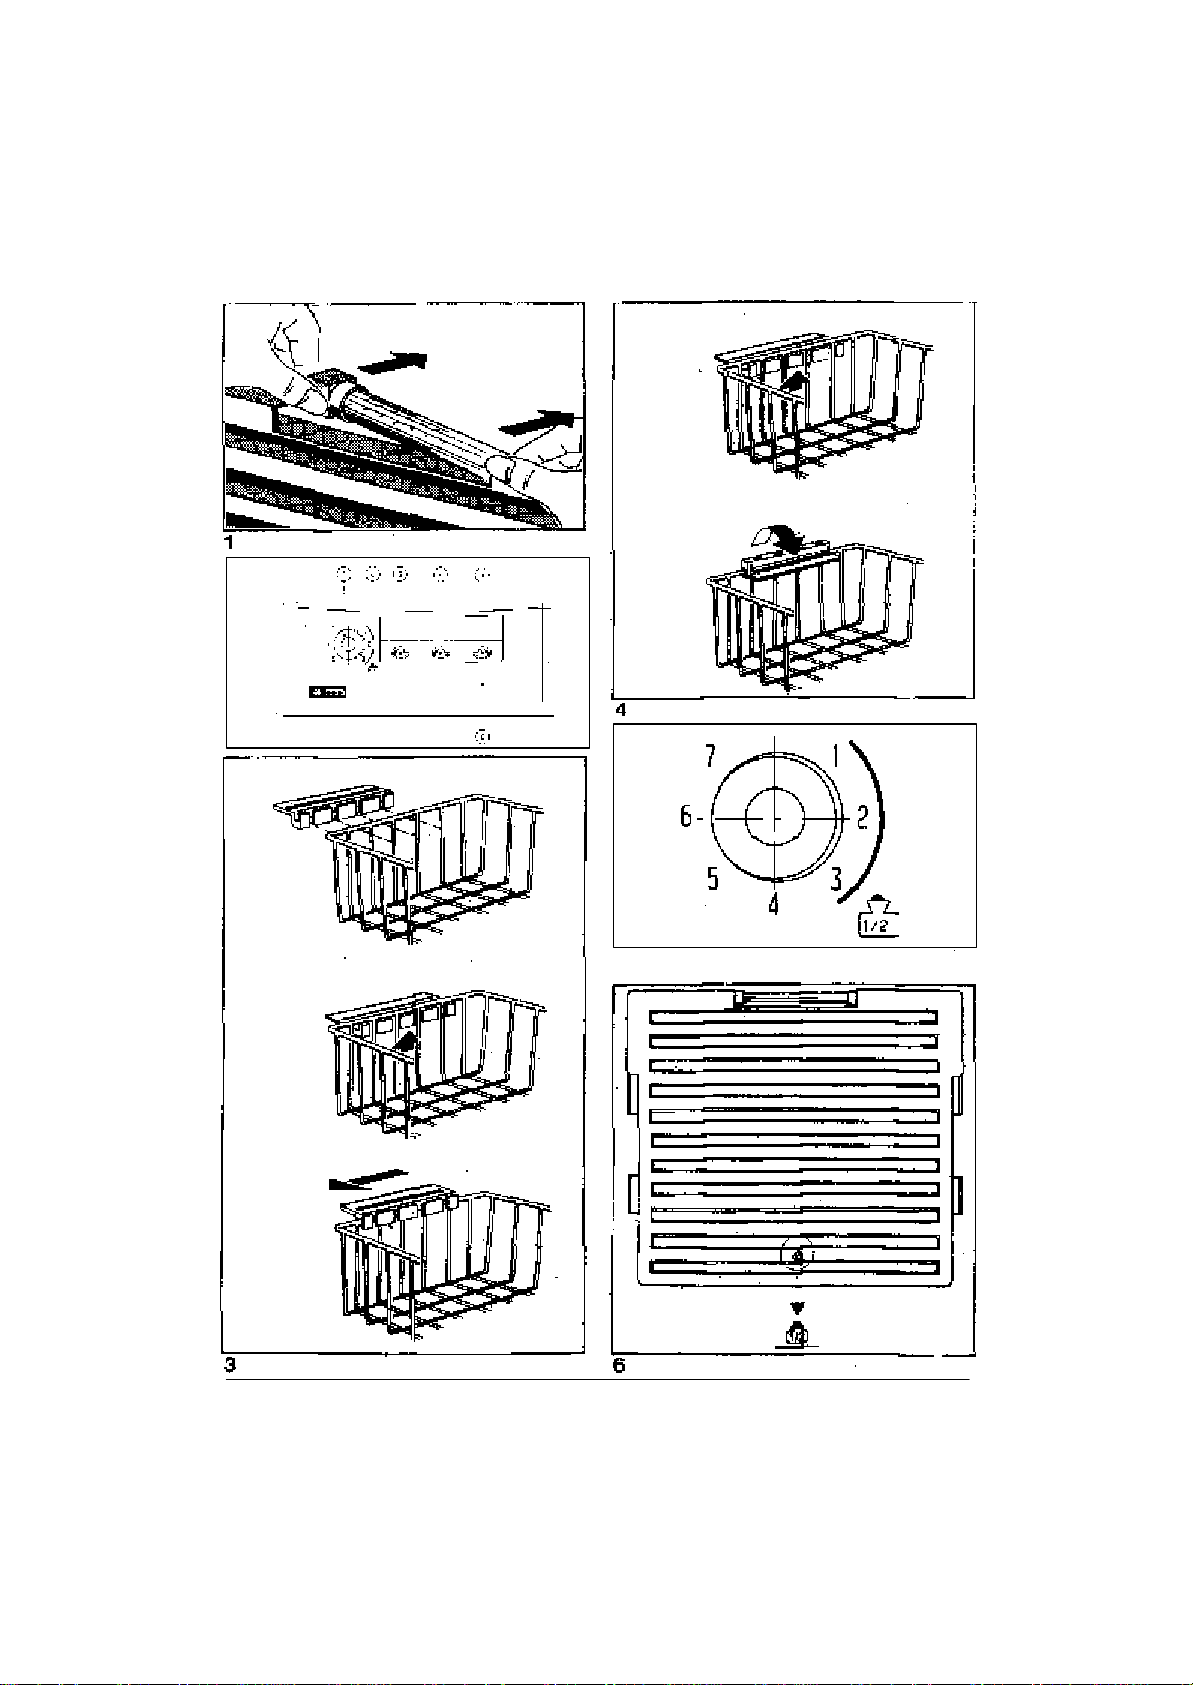
You can remove the thermometer by withdrawing
it laterally from its holder (Fig. 1).
If the lid is open for long periods, the temperature
indication will be affected by room air.
Ensure that the storage temperature is at least
-18 °C.
Before starting up
In common with all new appliances, your chest
freezer will emit a specific odour when new.
!t is advisable to clean the interior of the freezer
and all accessories before use (see also
“Defrosting and cleaning”).
Fitting of basket handles
Insert handles as shown in Fig. 3 if the basket is
to be suspended on the plastic cover frame on
the upper edge of your chest freezer.
If baskets are to be placed in the chest freezer
15
Page 7

GB
and stacked above each other; the handles are
to be folded inwards as shown in Fig. 4.
The handles then serve as a support for the
basket to be placed on top.
Voltage and current
Please ensure that the voltage and current
indicated on the rating plate agrees with. the
voltage of your electricity supply.
220/240 volts ~ (i.e. 220/240 V a. c.).
The rating plate is located on the inside of the
freezer lid.
Electrical connection
WARNING - THIS APPLIANCE MUST BE
EARTHED
If your appliance has been equipped with a mains
lead with a moulded-on type plug; you must
comply with the following regulations: The plug
moulded on to the cord incorporates a fuse. For
replacement, use a 13 amp BS 1362 fuse. Only
ASTA approved or certified fuses should be used.
The fuse cover/carrier must be replaced in the
event of changing the fuse. The plug must not
be used if the fuse cover/carrier is lost. A
replacement cover/carrier must be obtained from
an electrical goods retailer. If the socket outlets
in your home are not suitable for the plug fitted
to the appliance, then the plug must be cut off’
and an appropriate one fitted. When fitting the
plug ‘please note the following points:
lmportant The wires in the mains lead are
coloured in accordance with the following code:
Green and Yellow Earth
Blue Neutral
Brown Live
As the colours of the wires in the mains lead of
this appliance may not correspond with the
coloured markings identifying the terminals in
your plug, proceed as follows:
1. The wire which is coloured green and yellow
must be connected to the earth terminal in
your plug, which is marked with the letter E
or by the earth symbol or coloured green, or
green and yellow.
2. The wire which is coloured brown must be
connected to the live terminal which is
marked with the letter L or coloured red.
3. The wire which is coloured blue must be
connected to the neutral terminal which is
marked with the letter N or coloured black.
When wiring the plug, ensure that all strands of
wire are securely retained in each terminal. De
riot forget to tighten the mains lead clamp on the
plug.
Warning! A cut off plug inserted into a 13 amp
socket is a serious safety (shock) hazard.
Ensure that the cut off plug is disposed of
safely.
Voltage 220/240 V AC
Fuse rating 13 amps
See rating plate for further information.
Earthing contact socket
The earthing contact socket outlet necessary for
connection of the freezer to the electricity supply
should be positioned so that it is possible to pull
out the appliance plug.
Controls and monitoring
devices
Fig. 2
u temperature regulator
v symbols for energy-saving range during half-
or part loading (not on all models)
w green mains operating lamp
x red temperature monitoring lamp (warning)
y yellow lamp
z fast freeze button
Starting up
The green light is illuminated as long as the
freezer is connected.The yellow light is
illuminated when the “Super” button is depressed.
See under “Freezing”.The red warning light is
illuminated when the temperature in the freezer
is higher than the thermostat setting (alarm).
The panel has an acoustic alarm which emits a
“beep” sound when the red warning light comes
on. This sound can be stopped by pressing the
“Super” button (yellow light comes on).The red
warning light remains on as long as the
temperature in the freezer is higher than the
16
Page 8

GB
thermostat setting.Once the freezer has returned
to normal temperature and the red warning light
is off, press the “Super” button again (yellow light
goes off). The alarm can be due to:
• Insertion of a large amount of fresh food. The
alarm will stop after a while.
• Opening the lid too long. The alarm will stop
after a while.
• A defect in the system. See under “If
something does not work”.
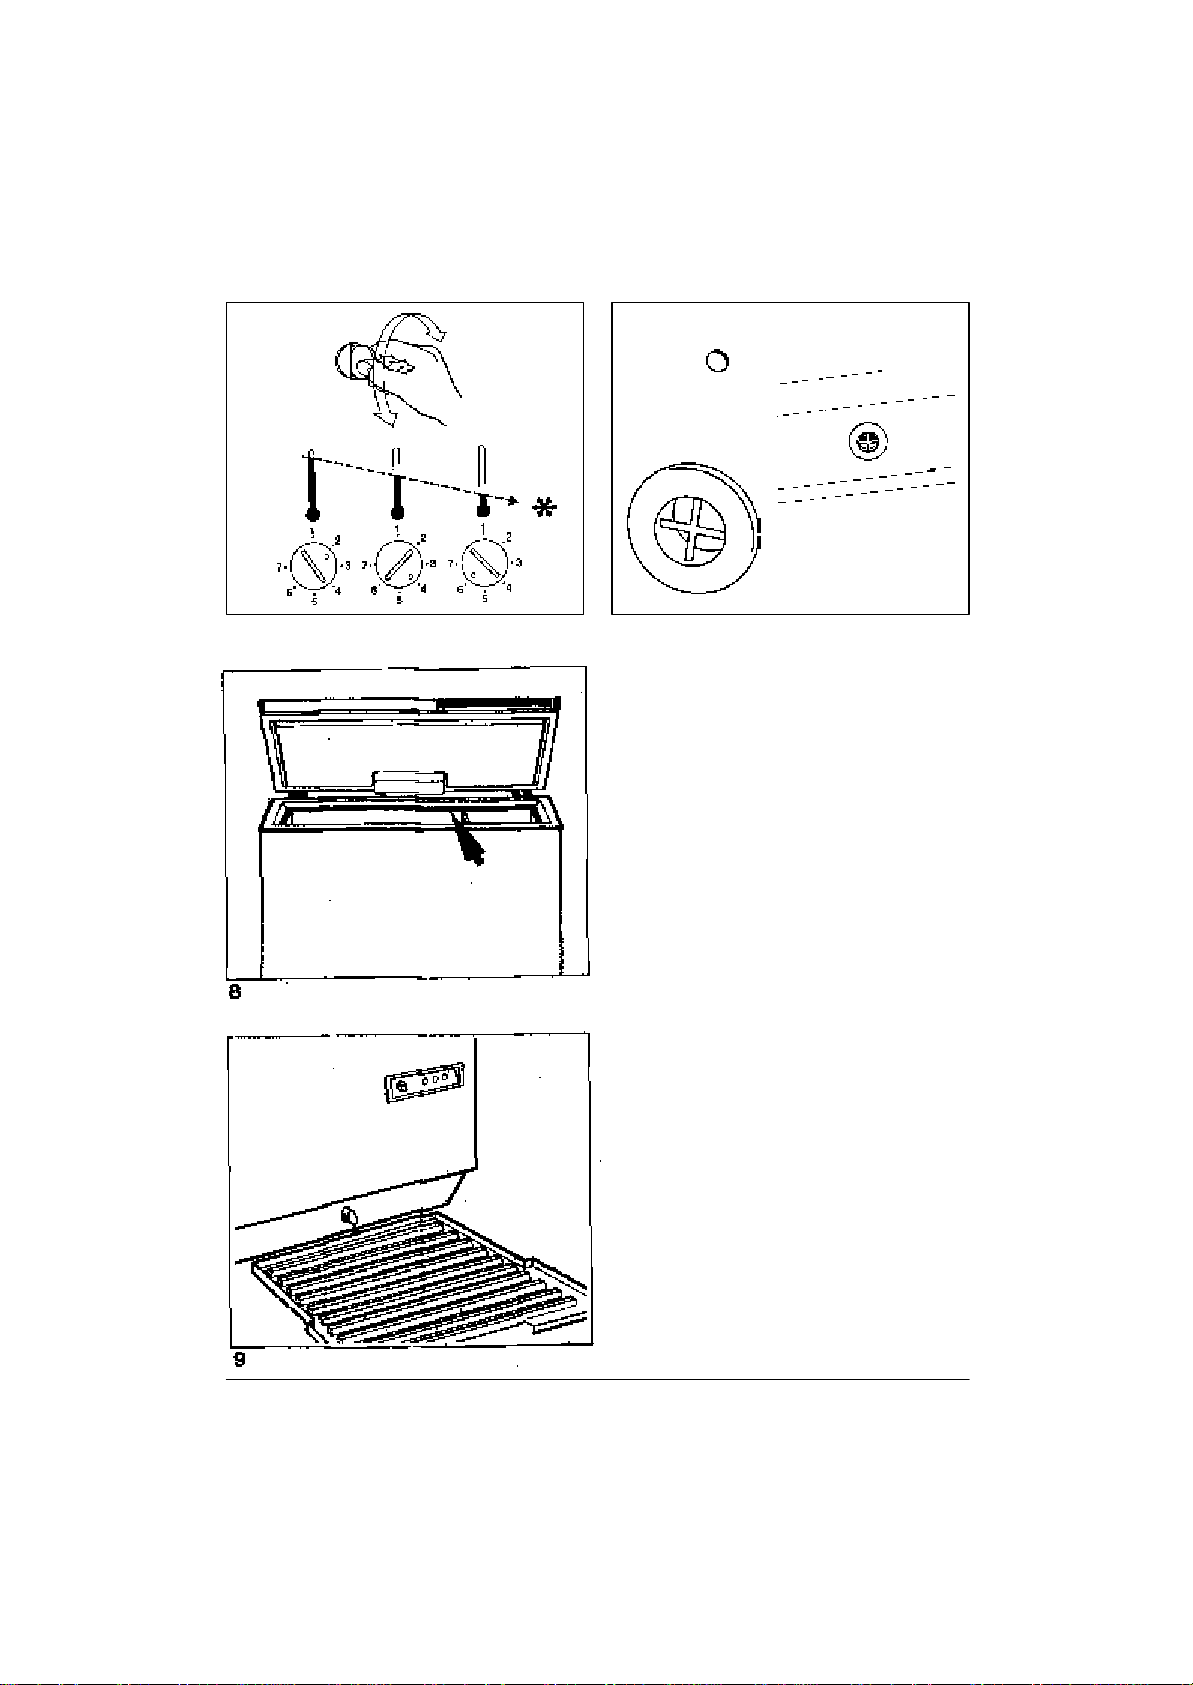
Temperature regulation
(Fig. 7.)
The thermostat ensures that the required
temperature is maintained in the freezer. Adjust
the temperature by turning the button with a coin
that fits the groove. Turning the thermostat
button towards ,,7” makes the temperature in the
freezer colder, and turning the button towards ,,1”
makes the temperature warmer.The correct
setting can be found by measuring the
temperature of the top package in the middle of
the freezer. This should not have a temperature
higher than -18°C.
Energy-saving during
Half-or part-loading
When your chest freezer is half- or even less
loaded, you can save energy if you store your
frozen food in the lower area - not higher than
the green stacking mark on the separating wall
(Fig. 6).
Turn the temperature controller in the green
storage area (Fig. 5) and monitor the storage
temperature with a thermometer placed on the
frozen food. The minimum storage temperature
should be -18 °C. When storing frozen food above
the green stacking mark, please never forget to
reset the temperature controller to a colder
setting; settings 3 to 7.
Freezing fresh food
Your freezer can be used for storage of frozen
food and for freezing of fresh food.
Before filling the freezer for the first time with
frozen food (deep-frozen food); the optimum
storage temperature of -18 °C must have been
attained at the filling mark.
If you intend to freeze food yourself, switch on
the fast freeze button 4 to 24 hours beforehand
(according to quantity).
Freeze only sound fresh food.
Please make sure that as far as possible
airtight packaged food has good contact with
the side refrigerating panels during freezing.
In this manner, the food will freeze right through
more quickly.
After around 24 hours (or less for smaller
quantity), the fast freeze switch can be switched
off.
If you intend. to freeze more food, retain the fast
freeze setting.
Only place the food in the baskets after freezing
is completed!
It is particularly important to keep the freshly
inserted food separate from the already frozen
food.
For this reason, we recommend using the small
freezing compartment on the internal right-hand
side for freezing purposes. Only when freezing
larger quantities (e: g. a quantity corresponding
to the daily freezing capacity) must you freeze
part of the food having proper contact with the
side walls in the large freezing compartment.
The daily freezing capacity of your chest freezer
is shown on the rating plate. This quantity should
not be exceeded. If freezing is carried out every
day, it is advisable to reduce this maximum figure
to obtain improved frozen food quality. That is to
say, if you want to carry out freezing .on several
consecutive days, only utilize 2/3 to 3/4 of the
maximum capacity.
Maximum loading/
filling mark
Please note that you should store frozen food
only as far as the lower edge of the plastic cover
frame (figure 8/arrow).
Hint for test centres
Filling plans for determination of freezing capacity
and warm-up time according to DIN Standard
conditions may be ordered direct from the
manufacturer.
17
Page 9

GB
Storing deep-frozen food and
the do’s and don’ts of storing
frozen food
Once the freezing process is completed,
deepfrozen storage takes place in the
temperature range below -18 °C, the freezer
system being regulated automatically (fast freeze
button switched off). When freezing food
yourself, please note the maximum storage times
and the storage times indicated in the “Freezer
Booklet”.
For storage of already frozen food, it is imperative
to note the storage time specified by the
manufacturer on the packing.
Make sure that only packed food is stored in the
freezer, since unpacked food will soon dry out
when exposed to the extreme cold.
With the exception of spirits and drinks containing
a higher percentage of alcohol, beverages in
glass bottles, particularly soft drinks containing
carbon dioxide, juices, beer, wine, etc. should not:
be stored in the freezer. When the contents,
freeze, the glass bottles will crack or even burst.
Ice-cream and fatty foods should be kept near
the bottom.
Never handle deep-frozen food with wet hands.
Your hands could easily become frozen to the
food.
Never use the freezer as a means of cooling hot
meals, since this causes heavy frost formation
on the evaporators and an increase in electricity
consumption.
If you want to utilize fully the effective capacity of
your appliance and need to store an especially
large quantity of deep-frozen food, you can
remove all storage baskets. Even when food is
loaded in this manner, the functional safety of
your appliance is assured.
Defrosting and cleaning
The moisture in the air entering the freezer when
the lid is opened condenses in the freezer in the
form of frost.
This should be removed from time to time with a
plastic scraper, e.g. pastry scraper (not with a
knife or the like). It is not necessary to switch off
the freezer when doing so. To prevent heavy frost
formation, keep the freezer lid closed as much
as possible. This also saves electricity, since
heavy frost incrustation impairs refrigerating
efficiency.
Your freezer should be defrosted at least once a
year or as soon as a thick layer of frost has
formed. This is best done when your chest freezer
is completely or partly empty.
Any temperature rise in the frozen food will
reduce the time for which it can be kept. Before
defrosting therefore, switch over your freezer to
“Fast Freeze” for around 12 hours to build up
sufficient low temperature reserve.
All food packages remaining in the freezer,
hermetically packed if possible, should then be
wrapped in several layers of newspaper and
stored in a cool place (e.g. refrigerator).
To defrost, the chest freezer is switched off: pull
out mains plug or remove fuse. The green lamp
goes out.
You can accelerate the defrosting process by
placing a bowl of hot water in the freezer and
removing the lumps of ice before they are
completely melted.
Never attempt to accelerate defrosting by means
of electric heating or warming appliances,
candles, or the like.
This may. place you at risk of a serious accident
and may also damage your chest freezer.
Make sure when cleaning your chest freezer that
no liquids penetrate inside the operating and
monitoring devices and inside the electrical
components.
Draining off after defrosting into removable
separating wall (not on all models):
To drain off the water after defrosting, remove
the plug from the defrosting outlet in the floor of
the internal compartment. Before doing so, do
not forget to place the removed separating wall
or a flat dish under the outlet to collect the water
(Fig. 9). When defrosting is completed, refit the
sealing plug.
After defrosting the freezer, wash inside and out
as well as accessories with lukewarm water to
which a mild detergent can be added. Then rinse
with clean water and wipe dry Finally, switch the
freezer back on.
The frozen food can be placed back inside after
around 10 minutes (see also “Starting up”).
18
Page 10

GB
Faults and servicing
In order to ensure absolute safety always have
any necessary repairs, especially repairs to the
electrical parts of the appliance, carried out by a
qualified electrician. In the event of a breakdown,
therefore, you are advised to call either the dealer
from whom you purchased the freezer or our
after-sales service department direct.
Before approaching our after-sales service,
check whether it is not one of the pilot light bulbs
that is defective.
If, for example, the green alight goes out whilst
the freezer is operational, switch over to “Fast
Freeze”.
If the amber light comes on, the green light is
defective.
If the amber light does not come on when set to
“Fast Freeze”, but the refrigerating unit is
operational, this means that the amber light must
be replaced.
If neither of the pilot lights is on, first check that
the power supply has not been cut off (mains
plug, house fuse, overall power failure in the
supply system, etc.). If necessary, contact your
electrician immediately.
If the red light and the temperature audible alarm
come on, or the temperature inside the freezer
has risen sharply without fresh food having been
inserted or the lid having been open for any length
of time, this means that there is a fault.
Switch to “Fast Freeze”, keep your freezer closed,
and notify our after-sales service immediately
(see list of service centres). In this case, do not
carry out any repairs yourself, especially in the
electrical parts of the appliance.
N. B! Unjustified after-.sales. service calls must
be paid for even during the guarantee period.
Important: Check regularly on the red
temperature monitoring lamp and on a
thermometer placed inside whether the storage
temperature is being maintained.
When not in use
If your freezer is to remain unused for any length
of time, it must be disconnected (unplugged) from
the electricity supply. It should then be defrosted,
cleaned thoroughly, and the lid left open to
prevent any odours from forming.
Hints on energy-saving
One or two additional hints on energy-saving are
given below:
– Do not install your freezer next to a radiator
or oven or in direct sunlight.
– Do not place any hot food in the freezer.
– Do not open the lid unnecessarily and close
it again as quickly as possible.
– Check the storage temperature in the freezer
compartment with a thermometer.
– Do not set the storage temperature lower than
-18 °C.
– Ensure good ventilation of all surfaces (sides)
of your chest freezer:
When doing so, please quote
– the, type,
– E-number, and
– F-number of your appliance.
The rating plate bearing this information is located
inside the lid.
Keep the freezer closed and inform our aftersales service whether the refrigeration system is
still operating. If the refrigeration system fails, the
cold retained in frozen food stored in a full freezer
will remain effective for a specific period of time.
This is indicated in the brochure accompanying
the appliance.
If you ever move house
If your freezer is not fully loaded, pack all the
frozen food in concentrated fashion at a few
storage levels.
Switch over to fasts freeze 24 hours before the
removal van leaves to create a low-temperature
reserve in the frozen food.
Secure the chest freezer lid against opening
during transport.
Place the chest freezer on the removal van last
so that you can unload it first and replug it into
the mains supply.
19
Page 11

GB
Cover lock
If your chest freezer is equipped with a Iock, the
key should not be kept within reach of children
or near the appliance so that children cannot lock
themselves inside.
The role of the pressure
equalisation valve
(Fig. 10.)
The pressure equalisation valve installed in your
machine performs automatically the elimination
of the pressure difference which otherwise would
make the opening of the cover difficult or even
impossible.
Its operation may – as the case may be – be
heard due to the air flowing in through the airing
outlet arranged in the rear wall of the deep freezer
box.
For a safe operation, keep the two openings of
the valve free, do not cover them!
LOW FROST SYSTEM
The patented LOW FROST System reduces the
ice-build-up in the chest freezer by up to 80
percent, which results in up to five times longer
periods between the requirement to defrost.
To get the full benefit of the system, please
observe the following points:
The amount of ice-build-up in any freezer is very
much dependent of the moisture of the
surrounding air. The ice will build up quicker in a
humid climate th an in a dry climate. Therefore
you should avoid installing your freezer invery
humid surroundings.
The LOW FROST system minimizes the amount
of ice caused by the natural te mperature cycle
of the freezer. Howeve r, ice-build-up from other
sources is not reduced. The most important other
sources a re poorly wrapped food and warm air
introduced when the lid is opened. Therefore, it
is important to ensure that the lid isn’t opened
unnecessarily, and the lid is not obst ru cted by
packs of food when closed.
If food sta red in the freezer is not wrapped p
roperl y, humidity from the food will settie as ice
on the freezer walls. Food quality will also
deteriorate, so ensure that food put in the freezer
is wrapped weil.
Maintenance and Cleaning
The LOW FROST system does not need any
maintenance or cleaning during normal use. If
needed the pipe can be wiped with a soft cloth.
Do n ot use any sharp or piercing tools, as this
may damage the system.
20
Page 12

820417624
 Loading...