

Page 1

ARCTIS
Tisch-Gefrierschrank electronic
Congélateur armoire table top
électronique
Table Top Electronic Freezer
Gebrauchsanweisung
Mode d’emploi
Operating Instructions
Page 2
45
Dear customer,
Before placing your new refrigerator/freezer into operation please read
these operating instructions carefully. They contain important information for safe use, for installation and for care of the appliance.
Please keep these operating instructions for future reference. Pass
them on to possible new owners of the appliance.
These operating instructions are for use with several technically
comparable models with varying accessories. Please observe the notes
which apply to your model.
Notes which are important for your safety or for the proper functioning of the appliance are stressed with a warning triangle and/ or with
signal words (Warning!, Caution!, Attention!). Please observe the following carefully.
This symbol guides you step by step in the operation of the appliance.
Supplementary information regarding operation and practical applications of the appliance appear after this symbol.
Tips and notes concerning economical and environmentally sound use
of the appliance are marked with the cloverleaf.
The operating instructions contain instructions for the correction of
possible malfunctions by the user in the section "What to do if ...". If
these instructions should not be sufficient, our customer service
department is always available to you.
Printed on paper manufactured with environmentally sound processes.
he who thinks ecologically acts accordingly ...
☞
Page 3

46
Contents
Safety . . . . . . . . . . . . . . . . . . . . . . . . . . . . . . . . . . . . . . . . . . . . . . . . . . . 47
Disposal. . . . . . . . . . . . . . . . . . . . . . . . . . . . . . . . . . . . . . . . . . . . . . . . . . 49
Appliance Packaging Information . . . . . . . . . . . . . . . . . . . . . . . . . . . . . . . . 49
Disposal of old Appliances . . . . . . . . . . . . . . . . . . . . . . . . . . . . . . . . . . . . . . 49
Remove transport safeguard . . . . . . . . . . . . . . . . . . . . . . . . . . . . . . . . . . 49
Installation . . . . . . . . . . . . . . . . . . . . . . . . . . . . . . . . . . . . . . . . . . . . . . . 50
Installation Location. . . . . . . . . . . . . . . . . . . . . . . . . . . . . . . . . . . . . . . . . . . 50
Your freezer needs air . . . . . . . . . . . . . . . . . . . . . . . . . . . . . . . . . . . . . . . . . 50
Electrical Connection . . . . . . . . . . . . . . . . . . . . . . . . . . . . . . . . . . . . . . . . . . 51
Reversing the door . . . . . . . . . . . . . . . . . . . . . . . . . . . . . . . . . . . . . . . . . . . . 51
Prior to Initial Start–Up . . . . . . . . . . . . . . . . . . . . . . . . . . . . . . . . . . . . . 52
Description of the appliance . . . . . . . . . . . . . . . . . . . . . . . . . . . . . . . . . . 53
Operating and indicator panel . . . . . . . . . . . . . . . . . . . . . . . . . . . . . . . . 53
Audible temperature alarm . . . . . . . . . . . . . . . . . . . . . . . . . . . . . . . . . . . . . 54
Starting up and temperature regulation. . . . . . . . . . . . . . . . . . . . . . . . . 55
Ice pack. . . . . . . . . . . . . . . . . . . . . . . . . . . . . . . . . . . . . . . . . . . . . . . . . . . . . 55
Freezing and storing frozen food . . . . . . . . . . . . . . . . . . . . . . . . . . . . . . 56
Storage Goods Symbols/Freezing Calendar . . . . . . . . . . . . . . . . . . . . . . . 57
Preparation of Ice Cubes. . . . . . . . . . . . . . . . . . . . . . . . . . . . . . . . . . . . . 58
Malfunctions. . . . . . . . . . . . . . . . . . . . . . . . . . . . . . . . . . . . . . . . . . . . . . 58
Defrosting and cleaning . . . . . . . . . . . . . . . . . . . . . . . . . . . . . . . . . . . . . 58
Magnetic door seal . . . . . . . . . . . . . . . . . . . . . . . . . . . . . . . . . . . . . . . . . 60
Switching off the appliance . . . . . . . . . . . . . . . . . . . . . . . . . . . . . . . . . . 60
If you should ever move house . . . . . . . . . . . . . . . . . . . . . . . . . . . . . . . . 61
Energy Saving Tips . . . . . . . . . . . . . . . . . . . . . . . . . . . . . . . . . . . . . . . . . 61
What to do if... . . . . . . . . . . . . . . . . . . . . . . . . . . . . . . . . . . . . . . . . . . . . 62
Correcting Malfunctions . . . . . . . . . . . . . . . . . . . . . . . . . . . . . . . . . . . . . . . 62
Customer Service. . . . . . . . . . . . . . . . . . . . . . . . . . . . . . . . . . . . . . . . . . . 64
Noises during Operation . . . . . . . . . . . . . . . . . . . . . . . . . . . . . . . . . . . . . 65
Regulations, Standards, Guidelines . . . . . . . . . . . . . . . . . . . . . . . . . . . . . 65
Technical Terminology . . . . . . . . . . . . . . . . . . . . . . . . . . . . . . . . . . . . . . . 66
Page 4
Important Safety Instructions
These warnings are provided in the interests of your safety. Ensure
you fully understand them before installing or using the appliance.
Your safety is of paramount importance. If you are unsure about the
meaning of these warnings contact the Customer Care Department
for assistance.
Intended use
• The freezer is intended for use in the home. It is suitable for the
freezing and storing frozen food, as well as for making ice. If the
appliance is used for purposes other than those intended or used
incorrectly, no liability can be accepted by the manufacturer for any
damage that may be caused.
• Alterations or changes to the freezer are not permitted for reasons
of safety.
• If you use the freezer in a commercial application or for purposes
other than the freezing or frozen storage of foods, the manufacturer
accepts no liability for any damages which may occur.
Prior to initial start–up
• Ensure that the appliance does not stand on the electrical supply
cable.
Important: if the supply cable is damaged, it must be replaced
by authorised service or qualified personnel using a special cable of
the same type.
• Check the appliance for transport damage. Under no circumstance
should a damaged appliance be plugged in. In the event of damage,
please contact your supplier.
Refrigerant
The refrigerant isobutane (R600a) is contained within the refrigerant
circuit of the appliance, a natural gas with a high level of environmental compatibility, which is nevertheless flammable.
• During transportation and installation of the appliance, be certain
that none of the components of the refrigerant circuit become damaged.
• If the refrigerant circuit should become damaged:
– avoid open flames and sources of ignition;
– thoroughly ventilate the room in which the appliance is situated.
Safety of children
• Packaging (e.g. wraps, polystyrene) can be dangerous for children.
There is a risk of suffocation! Keep packaging material away from
children!
• Please make old appliances unusable prior to disposal. Pull out the
47
Page 5

mains plug, cut off the mains cable, break or remove spring or bolt
catches, if fitted. By doing this you ensure that children cannot lock
themselves in the appliance when playing (there is risk of suffocation!) or get themselves into other dangerous situations.
• Often children cannot recognise the hazards present in household
appliances. It is therefore important that you ensure adequate supervision and never let children play with the appliance!
Daily Operation
• Containers with flammable gases or liquids can leak at low temperatures. There is a risk of an explosion! Do not store any containers
with flammable materials such as spray cans, fire extinguisher refill
cartridges etc in the appliance.
• Bottles and cans must not be placed in the freezer. They can burst
when the contents freeze, high carbonate content drinks can even
explode! Never store lemonade, juices, beer, wine, sparkling wine etc.
in the freezer. Exception: high alcohol content spirits can be stored
in the freezer.
• Do not put ice creams or ice cubes in the mouth immediately after
removal from the freezer. Very cold ice can freeze to the lips or
tongue and cause injury.
• Do not touch frozen food with wet hands. Your hands could freeze
to the food.
• Do not operate any electrical appliances in the freezer (e.g. electric
ice cream makers, mixers etc.).
• Placing frozen goods on the top of the appliance can lead to the
accumulation of condensation in the cavity of the storag etray
through contact with the cold. Electronic components are housed
within this cavity. If condensation should drip onto these components, the appliance could be damaged by a short circuit. For this
reason do not place frozen goods on top of the appliance.
• Before cleaning the appliance, always switch off the appliance and
unplug it, or pull the house fuse or switch off the circuit breaker.
• When unplugging always pull the plug from the mains socket, do not
pull on the cable.
In case of malfunction
• If a malfunction occurs on the appliance, please look first in the
"What to do if ..." section of these instructions. If the information
given there does not help, please do not perform any further repairs
yourself.
• Under no circumstance should you attempt to repair the appliance
yourself. Repairs carried out by inexperienced persons may cause
injury or serious malfunctioning. Contact our Customer Service.
48
Page 6
Disposal
Appliance Packaging Information
All materials are environmentally sound! They can be disposed of or
burned at an incinerating plant without danger.
About the materials: The plastics can be recycled and are identified as
follows:
>PE< for polyethylene, e.g. the outer covering and the bags in the
interior.
>PS< for polystyrene foam, e.g. the pads, which are all free of chlorofluorocarbon.
The carton parts are made from recycled paper and should be disposed
of at a waste-paper recycling collection location.
Disposal of old Appliances
For environmental reasons, refrigeration appliances must be disposed
of properly. This applies to your old appliance, and - at the end of its
service life - for your new appliance as well.
Warning! Before disposing of old appliances make them inoperable.
Remove plug from mains, sever the power cable, remove or destroy
any snap or latch closures. This ensures that playing children do not
lock themselves inside the appliance (danger of suffocation!) or place
themselves into other life-endangering situations.
Disposal:
• The appliance may not be disposed of with domestic waste or bulky
refuse.
• The refrigerant circuit, especially the heat exchanger at the back of
the appliance, must not be damaged.
• Information concerning collection schedules or locations can be
obtained from your local Council or Environmental Health Office.
Remove transport packaging
The appliance and the interior fittings are protected for transport.
Pull off the adhesive tape on the left and right side of the door.
You can remove any remnants of adhesive using white spirit.
Remove all adhesive tape and packing pieces from the interior of the
appliance.
☞
☞
49
Page 7

50
Installation
Installation Location
The appliance should be set up in a well ventilated, dry room.
Energy use and efficient performance of the appliance is affected by
the ambient temperature.
The appliance should therefore
– not be exposed to direct sunlight;
– not be installed next to radiators, cookers or other sources of heat;
– only be installed at a location whose ambient temperature
corresponds to the climate classification, for which the appliance is
designed.
The climate classification can be found on the serial plate, which is
located at the left on the inside of the appliance.
The following table shows which ambient temperature is correct for
each climate classification:
If installation next to a source of heat is unavoidable, the following
minimum clearances must be maintained at the sides of the appliance:
– for electric cookers 3 cm;
– for oil and coal fired ranges 30 cm.
If these clearances cannot be maintained a heat insulating pad is
required between the cooker and the refrigeration appliance.
If the refrigeration appliance is installed next to another refrigerator
or freezer a clearance of 5 cm at the sides is required, in order to prevent the formation of condensation on the outside of the appliance.
Climate classification for an ambient temperature of
SN +10 to +32 °C
N +16 to +32 °C
ST +18 to +38 °C
T +18 to +43 °C
Your appliance needs air
Your freezer is designed for maintenance-free operation. What it
should never lack is good ventilation. Air is supplied under the ventilation slot between the freezer and storage surface. Air is extracted
through the upper ventilation grille. Never obstruct these openings.
Page 8
51
Electrical Connection
The plug socket necessary for connection of your appliance to the
electricity supply should be positioned so that it is possible to pull out
the appliance plug.
A concealed protective contact plug socket requires 10 A/16 A fusing.
If the socket is not accessible, the electrical installation must include
suitable means of isolating the appliance from the mains (e.g. fuse,
cut-out, current trip or similar with a minimum contact separation of
3 mm).
Before initial start-up, refer to the appliance serial plate to ascertain if
supply voltage and current values correspond with those of the mains
at the installation location.
e.g.: AC 220 ... 240 V 50 Hz or
220 ... 240 V ~50 Hz
(i.e. 220 to 240 volts alternating current, 50 Hertz)
The rating plate is inside the appliance on the left.
☞
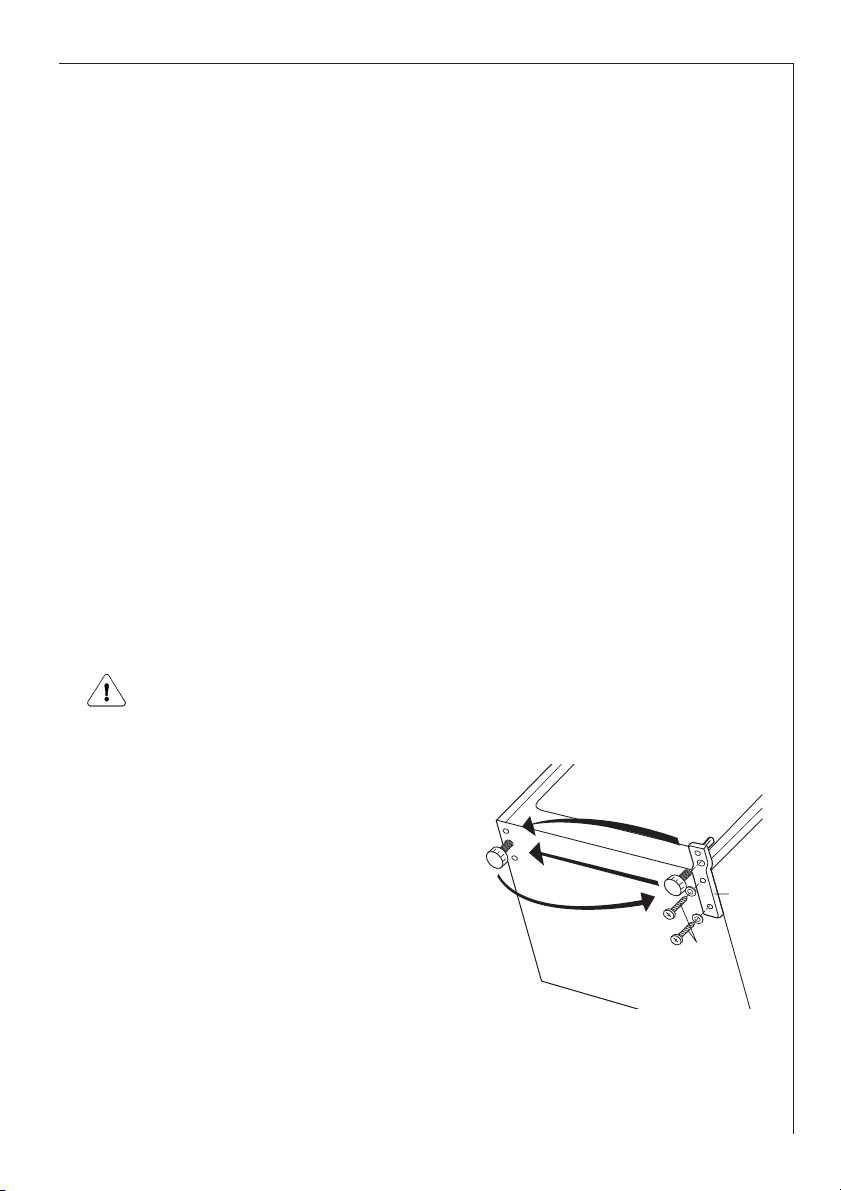
Tilt the appliance slightly towards the
rear and prop it securely.
Unscrew the door hinge screws (K)
and remove the hinge pin bracket (1).
Open the door a little way and take it
out downwards.
☞
☞
☞
Reversing the door
The side at which the door opens can be changed from the right side
(as supplied) to the left side, if the installation site requires.
Warning! When changing the side at which the door opens, the appliance must not be connected to the mains. Remove plug from the
mains beforehand.
EG97
1
K
Page 9

Prior to Initial Start–Up
Please clean the appliance interior and all accessories prior to initial
start-up (see section: “Cleaning and Care”).
Remove the ice pack from the appliance.
Only put the ice pack to freeze in the top drawer after the optimal
storage temperature of –18 °C has been reached.
Re-freeze thawed ice packs in the same way, e. g. after cleaning the
appliance.
☞
☞
☞
☞
52
Unscrew the upper pin (A) and screw
it into place on the opposite side.
Fit the door into the upper pin (A)
and close it.
Screw the hinge pin bracket (1)
securely into place on the opposite
side using the screws (K).
Unscrew the handle. Refit it on the
opposite side after having pushed in
the plugs with a punch. Cover the
holes left open with the plugs contained in the documentation pack.
☞
☞
☞
☞
EG98
12
A
Page 10

➀ ➁ ➂ ➄➃ ➅
FROSTMATIC
1 Pilot light (green)
2 Temperature control knob and ON/OFF switch
3 Fast freeze (FROSTMATIC) light (amber)
4 Fast freeze (FROSTMATIC) button
5 Symbol for temperature warning tone
6 Warning light (red)
The freezer has stops to prevent the drawers from falling out when
fully extended.
To remove the drawers (e.g. for cleaning purposes), pull them out as far
as the stops, lift and extract.
➀ = Drawer for storage and
freezing fresh food
➁ = Drawer for storage
➂ = Drawer for storage
➃ = Drawer for storage
➄ = Control panel
Description of the appliance
53
Operating and indicator panel
-24
-16
°C
-18
-20-22
Page 11

The temperature control knob (2), which incorporates the appliance’s
On-/Off switch.
The
green pilot light (1), which comes on when the appliance is activated by turning the thermostat knob (2) beyond the “-16°C„ position.
In this switch position, the refrigerating unit automatically operates by
system control.
The
temperature regulator (2), which can be used for continuously
variable setting of the most energy saving storage temperature for
your frozen food.
The optimum storage conditons occur at -18°C.
The
FROSTMATIC button (4) with its amber pilot light (3). The amber
pilot light comes on when the switch
(4) has been operated. The
refrigerating unit then operates continuously. If the FROSTMATIC function is not ended manually, the appliance electronics switch off the
FROSTMATIC function after 48 hours. The amber light (3) goes out.
The
red remperature pilot light (6) comes on when:
– the appliance has been started up but the storage temperature has
not yet been attained;
– the minimum storage temperature is no longer being maintained
(fault);
– excessive amounts of fresh food are placed inside; or
– if the appliance door is open for too long.
Important note: if you operate the FROSTMATIC button or adjust the
temperature control knob, your appliance’s refrigeration motor may
not start immediately, but does after some time. This does not mean
that your appliance has a fault.
After adjusting the temperature, leave the appliance to set temperature and allow 24 hours for the temperature to stablise before making
further changes.
54
Audible temperature alarm
If your freezer is equipped with an audible temperature alarm (5), an
acoustic warning sound simultaneously with illumination of the red
temperature pilot lamp (6), alerting you to the fact that the storage
temperature in your freezer is too high or too warm. The audible warning sounds until the red temperature pilot lamp goes out or until the
audible alarm is switched off by operation of the FROSTMATIC button.
The FROSTMATIC button can be switched off when the red lamp has
gone out.
Page 12

Starting up and temperature regulation
The temperature control knob can be used to set the required storage
temperature, -18°C or colder.
Setting „•“ means:
Off.
Setting “-16°C” means:
highest, warmest internal temperature
Setting “-24°C” means:
lowest, coldest internal temperature
Recommended control knob setting:
“-18°C”
.
Turn the temperature regulator (2) in the direction of “-16°C”.
The green light (1) and the red light (6) come on, the audible warning
sounds (if fitted), and the refrigeration motor starts up.
Additionally operate FROSTMATIC by depressing the FROSTMATIC but-
ton (4) for more than one second.
The amber pilot light (3) comes on, the audible warning switches itself
off, and the refrigerator motor runs continuously.
Only when the red light (6) has gone out should you reset the FROST-
MATIC button (4) the amber light (3) goes out and the audible warning
is activated again.
If the FROSTMATIC function is not ended manually, the appliance electronics switch off the FROSTMATIC function after 48 hours. The amber
light (3) goes out.
Important: Regularly check on the red temperature pilot light (6) to
ensure that the required storage temperature is being maintained.
☞
☞
☞
55
Ice pack
There is an ice pack in one drawer of the freezer.
Refer to the section “Prior to Initial Start–Up” concerning freezing of
the ice pack.
In the event of a power failure or malfunction, the ice pack will
lengthen the amount of time it takes for the frozen food to defrost by
several hours.
The ice pack can only fulfil this task optimally if it is placed in the
uppermost drawer, at the front, above the frozen food.
You can use the ice pack for cooling cold bags.
Page 13

56
Freezing and storing frozen food
You can use your freezer for freezing fresh food yourself.
Important!
• The temperature in the freezer compartment must be –18°C or
colder before freezing food.
• Please observe the freezing capacity given on the rating plate. The
freezing capacity is the maximum quantity of fresh food that can be
frozen within a period of 24 hours. If you wish to freeze food several days in a row, please observe a maximum capacity of only 2/3 to
3/4 of that on the rating plate. The quality of the food is best preserved when it is frozen right through to the core as quickly as possible.
• Allow warm food to cool down before freezing. The warmth will
cause increased ice formation and increase the power consumption.
• Please note the maximum storage times specified by the manufac-
turer.
• Thawed foods which have not been processed further (cooked into
meals) may not under any circumstances be frozen a second time.
• Containers with flammable gases or liquids can leak at low temper-
atures. There is a risk of an explosion! Do not store any containers
with flammable materials such as spray cans, fire extinguisher refill
cartridges etc in the freezer.
• Bottles and cans must not be placed in the freezer. They can burst
when the contents freeze, high carbonate content drinks can even
explode! Never store lemonade, juices, beer, wine, sparkling wine
etc. in the freezer.
Press the FROSTMATIC button for freezing of fresh food. The amber
light illuminates.
To utilise the maximum rated freezing capacity, switch on the fast
freeze switch 24 hours before freezing is due to start (the amber light
illuminates). For smaller amounts the fast freeze switch should be
switched on 4 - 6 hours in advance.
The FROSTMATIC button need not be pressed for freezing of small
quantities of up to 3 kg.
All foods must be packed air tight prior to freezing, so that they do
not dry out or lose their flavour, and so that no flavour contamination of other frozen goods occurs.
Caution! Do not touch frozen food with wet hands. Your hands could
stick to the food and cause skin abrasions.
☞
☞
Page 14

Storage Goods Symbols/Freezing Calendar
• The symbols on the drawers show
different types of frozen goods.
• The numbers indicate storage times
in months for the appropriate types
of frozen goods. Whether the upper or lower value of the indicated
storage time is valid depends on the quality of the foods and pretreating before freezing. The lower value applies to foods with high
fat content.
57
Place the packed food in the drawers. Place food to be frozen in the
appliance´s top drawer (1) equipped with its own refrigerating unit.
Unfrozen food must not touch items already frozen, otherwise the
frozen food could begin to defrost. Freezer drawers (2), (3) and (4)
should only be used for storage of frozen food. The lowest drawer has
a solid base and can be used for catching some of the melt-water
when the freezer is being defrosted.
In order to enlarge the appliance´s volume the two central drawers (2)
and (3) can be removed.
Place frozen foods in the drawers sorted by type, as far as possible.
Once the required storage temperate has been reached, press the
FROSTMATIC button again. The yellow light goes out.
Tips:
• The following are suited for the packaging of frozen goods:
– freezer bags and polyethylene wraps;
– special cans for frozen goods;
– extra–thick aluminium foil.
• The following are suitable for sealing bags and wrap: plastic clips,
rubber bands or tape.
• Smooth the air out of the bag before sealing; air makes it easier for
the frozen food to dry out.
• Make flat packages, because these freeze more quickly.
• Do not fill cans for frozen goods to the brim with liquid or
paste–like goods, because liquids expand during freezing.
Note for inspection authorities:
Batch plans for the determination of freezing performance or warmup time can be requested directly from the manufacturer.
☞
☞
☞
Page 15

Defrosting and cleaning
During use and when the door is opened, moisture is deposited as frost
inside the appliance, particularly on the evaporator. This frost must be
removed from time to time using the soft plastic scraper supplied.
Under no circumstances use hard or pointed objects for this purpose.
The freezer should always be defrosted when the layer of frost has
reached a thickness of approx. 4 millimetres. Defrost should be carried
out once a year regardless of the amount of frost that has built up. A
good time for defrosting is when the appliance is empty or contains
only a small amount of food.
Each temperature rise reduces the keeping qualities of your frozen
food. Around 12 hours before defrosting your freezer, switch over to
FROSTMATIC to build up a low temperature reserve in the frozen food.
Warning!
• Do not use electrical heating appliances or any other mechanical or
artificial devices to speed up the defrosting process.
• Do not use defrosting sprays, they can be hazardous to your health
and/or contain substances that damage plastics.
Caution! Do not touch frozen food with wet hands. Your hands could
freeze to the food.
☞
58
Preparation of Ice Cubes
Fill the ice cube tray 3/4 full with cold water, place it in the freezer
compartment and leave to freeze.
To loosen the frozen cubes, either bend the ice cube tray or hold it
under running water for a few seconds.
Important! Never try to free an ice tray that is frozen to the freezer
compartment using pointed or sharp edged objects. Use the ice scraper
supplied.
☞
☞
Malfunctions
If the electronics in the appliance have detected a fault that prevents
the ACTUAL temperature being measured, the warning light in the
temperature display will flash. The appliance will continue to function
using a backup program until your local Service Force engineer has
repaired the appliance.
Page 16

Tip: To speed up the defrosting process,
place a pan with warm water in the appliance and close the door.
Remove pieces of ice that have fallen before they completely defrost.
After defrosting, thoroughly clean the freezer compartment and interior fittings.
Warning!
• The appliance may not be connected to the mains during cleaning.
Danger of electrical shock! Before cleaning switch the appliance off
and remove the plug from the mains, or disconnect from the power
supply.
• Never clean the appliance with a steam cleaner. Moisture could
accumulate in electrical components, danger of electrical shock! Hot
vapours can lead to the damage of plastic parts.
• The appliance must be dry before it is placed back into service.
Important!
• Ethereal oils and organic solvents can attack plastic parts, e.g.
– lemon juice or the juice from orange peel;
– butyric acid;
– cleansers which contain acetic acid.
Do not allow such substances to come into contact with appliance
parts.
• Do not use any abrasive cleansers.
Clean the appliance and the interior accessories with a cloth and
lukewarm water. Commercially available dish washing detergents may
also be used.
After cleaning wipe with fresh water and rub dry.
☞
☞
☞
59
Remove all drawers except the bottom one. The bottom drawer serves
as a practical container to collect the
water from the thawing ice. Pull out
the drawer and insert the plastic
scraper in the special location to act
as an extension channel to collect
the defrost water.
☞
Remove frozen food, wrap it in several layers of newspaper and store
it, covered, in a cool place.
Switch off the appliance and unplug it, or pull the fuse or switch off
the circuit breaker.
☞
☞
Page 17

Accumulation of dust at the condenser increases energy consumption.
For this reason carefully clean the condenser at the back of the
appliance once a year with a soft brush or a vacuum cleaner.
After everything is dry, switch to FROSTMATIC function. After running
the appliance for two or three hours, it is ready again for storing
frozen food. Once the frozen food has been placed in the freezer,
return the FROSTMATIC button to the off position.
☞
60
Magnetic door seal
After opening and closing the door of your freezer whilst it is in operation, you will not immediately be able to open the door again
because a vacuum will have developed inside, keeping the door closed
until the pressures inside and outside the door have equalised. After a
few minutes you can easily reopen the door.
Switching off the appliance
To switch off the appliance, turn the temperature regulator to
position "
•
".
If the appliance is not going to be used for an extended period:
Remove all deep-frozen packages as well as ice-trays.
Switch off the appliance by turning the temperature regulator to
position "
•
".
Remove the mains plug or switch off or disconnect the electricity supply.
Defrost freezer and clean thoroughly (see section: “Defrosting and
Cleaning”).
Leave the door open to avoid the build up of odours.
☞
☞
☞
☞
☞
☞
Page 18

If you should ever move house
If the freezer compartment is not fully loaded, pack the frozen food all
together on as few storage levels as possible: drawer (1).
24 hours before the removal lorry is due to leave switch over to
FROSTMATIC function in order to build up a reserve of coldness in the
frozen items.
Make sure the freezer door cannot come open during transport.
Ensure that the freezer is the last item loaded onto the removal lorry,
so that it is the first to be taken off and can be plugged in again at
once.
☞
☞
☞
61
Energy Saving Tips
• Do not install the appliance near cookers, radiators or other sources
of warmth. High ambient temperatures cause longer, more frequent
operation of the compressor.
• Ensure sufficient air circulation and exhaust at the appliance base
and at the back wall of the appliance. Never cover air vent
openings.
• Do not place warm foods into the appliance. Allow warm foods to
cool first.
• Only leave door open as long as necessary.
• Do not set temperature any colder than necessary.
• Check the storage temperature in the freezer on the thermometer.
• Put frozen food in the fridge to defrost. The cold in the frozen food
will then be used to cool the fridge.
• Always keep the heat emitting condenser, the metal grille on the rear
wall of your appliance clean.
Page 19

62
What to do if ...
Correcting Malfunctions
Spare parts:
The following spare parts can be ordered from your local AEG Service
Force Centre. You can fit these yourself without any special skill or
training, e.g.:
– freezer drawers,
– door handle
A malfunction may be caused by only a minor fault that you can rectify yourself using the following instructions. Do not perform any other
work on the appliance if the following information does not provide
assistance in your specific case.
Please check whether the pilot lights come on, the refrigerating unit
operates, and the internal temperature is being maintained. Do not
perform any other work on the appliance if the following information
does not provide assistance in your specific case.
Warning! Repairs to refrigerators/freezers may only be performed by
competent service engineers. Improper repairs can give rise to significant hazards for the user. If your appliance needs repairing, please
contact your specialist dealer or our Customer Service.
If the freezer system has stopped working and the freezer is full, the
reserve in the cold accumulator and in the deep frozen food itself will
give the food a hold over time of about 25 hours. If the freezer is
without a cold accumulator the hold over time will be reduced to
about 18 hours.
Symptom
Appliance does not work,
no pilot light is illuminated.
Possible Cause
Appliance is not switched
on.
Mains plug is not plugged
in or is loose.
Fuse has blown or is
defective
Socket is defective.
Mains malfunctions are to
be corrected by an electrician.
Remedy
Switch on the appliance.
Insert mains plug.
Check fuse, replace if necessary.
Page 20

63
Appliance cools too much.
Green light does not light
up, yellow light lights up
when the FROSTMATIC
function is activated.
Green light faulty.
Please inform our customer service.
Yellow light does not light
up, when the FROSTMATIC
function is activated,
appliance is on.
Yellow light faulty.
Please inform our customer service.
Temperature is set too
cold.
Turn the temperature regulator to a warmer setting
temporaily.
The freezer temperature is
not sufficient, red light
lights up, temperature
acoustic alarm sounds.
Temperature is not properly adjusted.
A large quantity of warm
food placed in the appliance within the last 24
hours.
Please look in the “Initial
Start Up” section.
Press the FROSTMATIC button.
Open the door only as long
as necessary. Press the
FROSTMATIC button.
Door was open for an
extended period.
The appliance is near a
heat source.
Please look in the
“Installation Location”
section.
Symptom Possible Cause Remedy
Heavy build up of frost,
possibly also on the door
seal.
Door seal is not air tight
(possibly after reversing
the door).
Carefully warm the leaking
sections of the door seal
with a hair dryer (on a
cool setting). At the same
time shape the warmed
door seal by hand such
that it sits correctly.
Unsual noises.
Appliance is not level.
The appliance is touching
the wall or other objects.
A components, e.g. a pipe,
on the rear of the appliance is touching another
part of the appliance or
the wall.
Readjust the feet.
Move the appliance slightly.
If necessary, carefully bend
the component out of the
way.
Page 21

64
Customer Service
If you cannot find the remedy for a malfunction in these operating
instructions, please contact your dealer or our customer service
department. Addresses and telephone numbers are listed in the accompanying booklet "Guarantee Conditions/Customer Service Locations".
Selective ordering of replacement parts can save unnecessary travel
and costs. For this reason always provide the following appliance
information:
• Model Name
• Model Number (PNC)
• Serial Number (S-No.)
This information can be found on the serial plate in the interior at the
left of the appliance. We recommend that you enter this information
here, so that it is handy if needed.
Note: The customer bears the costs of unjustified customer service
calls even during the guarantee period.
The compressor starts after
a period of time.
This is normal, no error has
occurred.
The compressor does not
start immediately after
pressing the FROSTMATIC
button or after changing
the temperature setting.
Symptom Possible Cause Remedy
Important: regularly check on the red temperature pilot light to ensure
that the storage temperature is being maintained.
Page 22

65
Noises during Operation
The following noises are characteristic of refrigeration appliances:
•
Clicks Whenever the compressor switches on or off, a click can
be heard.
•
Humming As soon as the compressor is in operation, you can hear
it humming.
•
Bubbling/ When refrigerant flows into thin tubes, you can hear
Splashing bubbling or splashing noises. Even after the compressor
has been switched off, this noise can be heard for a
short time.
Regulations, Standards, Guidelines
This appliance was designed for household use and was manufactured
in accordance with the appropriate standards. The necessary measures
in accordance with appliance safety legislation regulations (GSG), accident prevention regulations for refrigeration appliances (VBG 20) and
the regulations of the German Society of Electrical Engineers (VDE)
were observed in the manufacture of this appliance.
The refrigerant circuit has been checked for leaks.
This appliance is in accordance with the following EU
guidelines:
– 73/23/EWG dated 19 February 1973 - low voltage guidelines.
– 89/336/EWG dated 3 May 1989
(including guideline change notice 92/31/EWG) - EMV guideline.
Page 23

66
Technical terminology
• Refrigerant
• Refrigerant
Circuit
• Evaporator
• Compressor
• Condenser
Liquids that can be used to a generate a cooling
effect are known as refrigerants. They have a relatively low boiling-point, indeed so low, that the
warmth from the food stored in the fridge or freezer can cause the refrigerant to boil and vaporise.
Closed circulation system that contains the refrigerant. The refrigerant circuit comprises primarily of an
evaporator, a compressor, a condenser and pipe
work.
The refrigerant is evaporated in the evaporator.
Similar to all other liquids, refrigerant requires heat
to evaporate. This heat is removed from the interior
of the appliance, as a result the interior is cooled.
The evaporator is therefore located inside the appliance or placed in foam immediately behind the
inner wall and thus not visible.
The compressor looks like a small drum. It is driven
by a built-in electric motor and is mounted on the
base of the appliance at the rear. The task of the
compressor is to draw in vaporised refrigerant from
the evaporator, to compress it, and to pass it on to
the condenser.
The condenser normally has the form of a grid. The
refrigerant compressed in the compressor is liquefied in the condenser. During this process, heat is
released to the surrounding air at the surface of the
condenser. The condenser is mounted on the base of
the appliance.
Page 24

Page 25

AEG Hausgeräte GmbH
Postfach 1036
D-90327 Nürnberg
http://www.aeg.hausgeraete.de
© Copyright by AEG
01-0401
2222 692-44
 Loading...