

Page 1
66300KF-an
Glaskeramik-Kochfeld
Ceramic glass hob
Table de cuisson vitrocéramique
Montage- und Gebrauchsanweisung
Installation and Operating Instructions
Instructions de montage et mode d’emploi
Page 2

Sehr geehrte Kundin, sehr geehrter Kunde,
lesen Sie bitte diese Gebrauchsanweisung sorgfältig durch.
Beachten Sie vor allem den Abschnitt „Sicherheitshinweise“ auf den
ersten Seiten. Bewahren Sie bitte diese Gebrauchsanweisung zum späteren Nachschlagen auf. Geben Sie sie an eventuelle Nachbesitzer des
Gerätes weiter.
Folgende Symbole werden im Text verwendet:
1 Sicherheitshinweise
Warnung: Hinweise, die Ihrer persönlichen Sicherheit dienen.
Achtung: Hinweise, die zur Vermeidung von Schäden am Gerät dienen.
3 Hinweise und praktische Tipps
2 Umweltinformationen
1. Diese Ziffern leiten Sie Schritt für Schritt beim Bedienen des Gerätes.
2. …
3. …
Für eventuell auftretende Störungen enthält diese Gebrauchsanweisung Hinweise zur selbständigen Behebung, siehe Abschnitt „Was tun,
wenn...“.
Bei technischen Problemen steht Ihnen unser Werkskundendienst in Ihrer Nähe jederzeit zur Verfügung (Adressen und Telefonnummern finden Sie im Verzeichnis „Kundendienststellen“).
Beachten Sie dazu auch den Abschnitt „Service“.
Gedruckt auf umweltschonend hergestelltem Papier.
Wer ökologisch denkt, handelt auch so …
2
Page 3

Inhalt
Gebrauchsanweisung. . . . . . . . . . . . . . . . . . . . . . . . . . . . . . . . . . . . . . . 5
Sicherheit. . . . . . . . . . . . . . . . . . . . . . . . . . . . . . . . . . . . . . . . . . . . . . . . . . . . . . 5
Entsorgung . . . . . . . . . . . . . . . . . . . . . . . . . . . . . . . . . . . . . . . . . . . . . . . . . . . . 7
Gerätebeschreibung. . . . . . . . . . . . . . . . . . . . . . . . . . . . . . . . . . . . . . . . . . . . . 8
Ausstattung Koch- und Bedienfeld . . . . . . . . . . . . . . . . . . . . . . . . . . . . . . . . . 8
Digitale Anzeigen. . . . . . . . . . . . . . . . . . . . . . . . . . . . . . . . . . . . . . . . . . . . . . . . 9
Sicherheitsabschaltung der Kochzonen. . . . . . . . . . . . . . . . . . . . . . . . . . . . . . 9
Vor dem ersten Gebrauch. . . . . . . . . . . . . . . . . . . . . . . . . . . . . . . . . . . . . . . . 10
Erstes Reinigen. . . . . . . . . . . . . . . . . . . . . . . . . . . . . . . . . . . . . . . . . . . . . . . . . . 10
Bedienung des Kochfeldes . . . . . . . . . . . . . . . . . . . . . . . . . . . . . . . . . . . . . . . 10
Touch Control-Sensorfelder . . . . . . . . . . . . . . . . . . . . . . . . . . . . . . . . . . . . . . . 10
Gerät einschalten. . . . . . . . . . . . . . . . . . . . . . . . . . . . . . . . . . . . . . . . . . . . . . . . 10
Gerät ausschalten . . . . . . . . . . . . . . . . . . . . . . . . . . . . . . . . . . . . . . . . . . . . . . . 11
Kochstufenwahl . . . . . . . . . . . . . . . . . . . . . . . . . . . . . . . . . . . . . . . . . . . . . . . . . 11
Warmhaltestufe . . . . . . . . . . . . . . . . . . . . . . . . . . . . . . . . . . . . . . . . . . . . . . . . . 11
Dreikreis-Kochzone ein- und ausschalten. . . . . . . . . . . . . . . . . . . . . . . . . . . . 12
Bräterzone ein- und ausschalten . . . . . . . . . . . . . . . . . . . . . . . . . . . . . . . . . . . 13
Kochzone ausschalten . . . . . . . . . . . . . . . . . . . . . . . . . . . . . . . . . . . . . . . . . . . . 14
Restwärmeanzeige. . . . . . . . . . . . . . . . . . . . . . . . . . . . . . . . . . . . . . . . . . . . . . . 14
Kochen mit der Ankochautomatik . . . . . . . . . . . . . . . . . . . . . . . . . . . . . . . . . . 15
Kochen ohne Ankochautomatik. . . . . . . . . . . . . . . . . . . . . . . . . . . . . . . . . . . . 16
Kindersicherung . . . . . . . . . . . . . . . . . . . . . . . . . . . . . . . . . . . . . . . . . . . . . . . . . 17
Timer . . . . . . . . . . . . . . . . . . . . . . . . . . . . . . . . . . . . . . . . . . . . . . . . . . . . . . . . . . 20
Bedienfeld verriegeln/entriegeln . . . . . . . . . . . . . . . . . . . . . . . . . . . . . . . . . . . 23
Anwendung, Tabellen, Tipps. . . . . . . . . . . . . . . . . . . . . . . . . . . . . . . . . . . . . . 24
Kochgeschirr. . . . . . . . . . . . . . . . . . . . . . . . . . . . . . . . . . . . . . . . . . . . . . . . . . . . 24
Energiesparen. . . . . . . . . . . . . . . . . . . . . . . . . . . . . . . . . . . . . . . . . . . . . . . . . . . 24
Tipps zum Kochen mit und ohne Ankochautomatik . . . . . . . . . . . . . . . . . . . 25
Anhaltswerte zum Kochen . . . . . . . . . . . . . . . . . . . . . . . . . . . . . . . . . . . . . . . . 26
Reinigung und Pflege . . . . . . . . . . . . . . . . . . . . . . . . . . . . . . . . . . . . . . . . . . . 27
Kochfeld . . . . . . . . . . . . . . . . . . . . . . . . . . . . . . . . . . . . . . . . . . . . . . . . . . . . . . . 27
Metall-Dekorstreifen . . . . . . . . . . . . . . . . . . . . . . . . . . . . . . . . . . . . . . . . . . . . . 28
Was tun, wenn … . . . . . . . . . . . . . . . . . . . . . . . . . . . . . . . . . . . . . . . . . . . . . . . 29
Abhilfe bei Störungen . . . . . . . . . . . . . . . . . . . . . . . . . . . . . . . . . . . . . . . . . . . . 29
3
Page 4

Montageanweisung . . . . . . . . . . . . . . . . . . . . . . . . . . . . . . . . . . . . . . . . 31
Bestimmungen, Normen, Richtlinien . . . . . . . . . . . . . . . . . . . . . . . . . . . . . . . . 32
Sicherheitshinweise für den Installateur. . . . . . . . . . . . . . . . . . . . . . . . . . . . . 33
Elektroanschluss. . . . . . . . . . . . . . . . . . . . . . . . . . . . . . . . . . . . . . . . . . . . . . . . . 34
Service . . . . . . . . . . . . . . . . . . . . . . . . . . . . . . . . . . . . . . . . . . . . . . . . . . . . . . 35
Montage . . . . . . . . . . . . . . . . . . . . . . . . . . . . . . . . . . . . . . . . . . . . . . . . . . . . 105
4
Page 5

Gebrauchsanweisung
1 Sicherheit
Die Sicherheit dieses Gerätes entspricht den anerkannten Regeln der
Technik und dem Gerätesicherheitsgesetz. Zusätzlich sehen wir uns jedoch als Hersteller veranlasst, Sie mit den nachfolgenden Sicherheitshinweisen vertraut zu machen.
Elektrische Sicherheit
• Montage und Anschluss des neuen Gerätes dürfen nur durch einen
konzessionierten Fachmann vorgenommen werden.
• Reparaturen am Gerät dürfen nur von Fachkräften durchgeführt werden. Durch unsachgemäße Reparaturen können erhebliche Gefahren
entstehen. Wenden Sie sich im Reparaturfall an unseren Kundendienst oder an Ihren Fachhändler.
3 Beachten Sie bitte diese Hinweise, da sonst bei auftretenden Schäden
der Garantieanspruch entfällt.
• Einbaugeräte dürfen nur nach dem Einbau in normgerechte, passende Einbauschränke und Arbeitsplatten betrieben werden. Damit wird
der vom VDE geforderte Berührungsschutz elektrischer Geräte sichergestellt.
• Wenn Störungen am Gerät, Brüche, Sprünge oder Risse auftreten:
– Schalten Sie alle Kochzonen aus.
– Schalten Sie die Sicherung für das Kochfeld ab bzw. nehmen Sie
diese heraus.
Sicherheit für Kinder
Wenn Sie kochen und braten, werden die Kochzonen heiß. Halten Sie
deshalb Kleinkinder grundsätzlich fern.
5
Page 6

Sicherheit während der Benutzung
• Dieses Gerät darf nur für das haushaltsübliche Kochen und Braten
von Speisen verwendet werden.
• Verwenden Sie das Kochfeld nicht zum Beheizen des Raumes.
• Vorsicht bei Anschluss von Elektrogeräten an Steckdosen in Gerä-
tenähe. Anschlussleitungen dürfen nicht an heiße Kochstellen gelangen.
• Überhitzte Fette und Öle entzünden sich schnell. Wenn sie Speisen in
Fett oder Öl (z.B. Pommes frites) zubereiten, sollten Sie den Kochvorgang beobachten.
• Schalten Sie nach jedem Gebrauch die Kochzonen aus.
Sicherheit beim Reinigen
Zum Reinigen muss das Gerät ausgeschaltet sein. Die Reinigung des Gerätes mit einem Dampfstrahl- oder Hochdruckreiniger ist aus Sicherheitsgründen nicht zugelassen.
So vermeiden Sie Schäden am Gerät
• Verwenden Sie das Kochfeld nicht als Arbeits- oder Abstellfläche.
• Der rahmenlose Rand der Glaskeramikplatte ist stoßgefährdet. Bitte
Vorsicht beim Hantieren mit Töpfen und Pfannen.
• Betreiben Sie die Kochzonen nicht mit leerem oder ohne Kochgeschirr.
• Glaskeramik ist unempfindlich gegen Temperaturschock und sehr widerstandsfähig, jedoch nicht unzerbrechlich. Besonders spitze und
harte Gegenstände, die auf die Kochfläche fallen, können sie beschädigen.
• Benutzen Sie keine Töpfe aus Gusseisen oder mit beschädigten Böden, die rau sind und Grate aufweisen. Beim Verschieben können
Kratzer entstehen.
• Wenn Zucker oder eine Zubereitung mit Zucker auf die heiße Kochzone gelangt und schmilzt, entfernen Sie diese sofort, noch im heißen
Zustand, mit einem Reinigungsschaber. Erkaltet die Masse, kann es
beim Entfernen zu Oberflächenschäden kommen.
• Halten Sie alle Gegenstände und Materialien, die anschmelzen können, von der Glaskeramikfläche fern, z.B. Kunststoffe, Aluminiumfolien oder Herdfolien. Sollte doch etwas auf der Glaskeramikfläche
anschmelzen, muss dieses, ebenfalls sofort, mit dem Reinigungsschaber entfernt werden.
6
Page 7

2 Entsorgung
Verpackungsmaterial entsorgen
Alle verwendeten Materialien können uneingeschränkt wiederverwertet werden.
Die Kunststoffe sind folgendermaßen gekennzeichnet:
• >PE< für Polyethylen, z. B. bei der äußeren Hülle und den Beuteln im
Innern.
• >PS< für geschäumtes Polystyrol, z. B. bei den Polsterteilen, grundsätzlich FCKW-frei.
Altgerät entsorgen
1 Warnung: Damit von dem ausgedienten Gerät keine Gefahr mehr aus-
gehen kann, bitte vor der Entsorgung unbrauchbar machen.
Dazu Gerät von der Netzversorgung trennen und das Netzanschlusskabel vom Gerät entfernen.
Aus Umweltschutzgründen müssen alle ausgedienten Geräte fachgerecht entsorgt werden.
• Das Gerät darf nicht mit dem Hausmüll entsorgt werden.
• Auskunft über Abholtermine oder Sammelplätze erhalten Sie bei der
örtlichen Stadtreinigung oder der Gemeindeverwaltung.
7
Page 8
Gerätebeschreibung
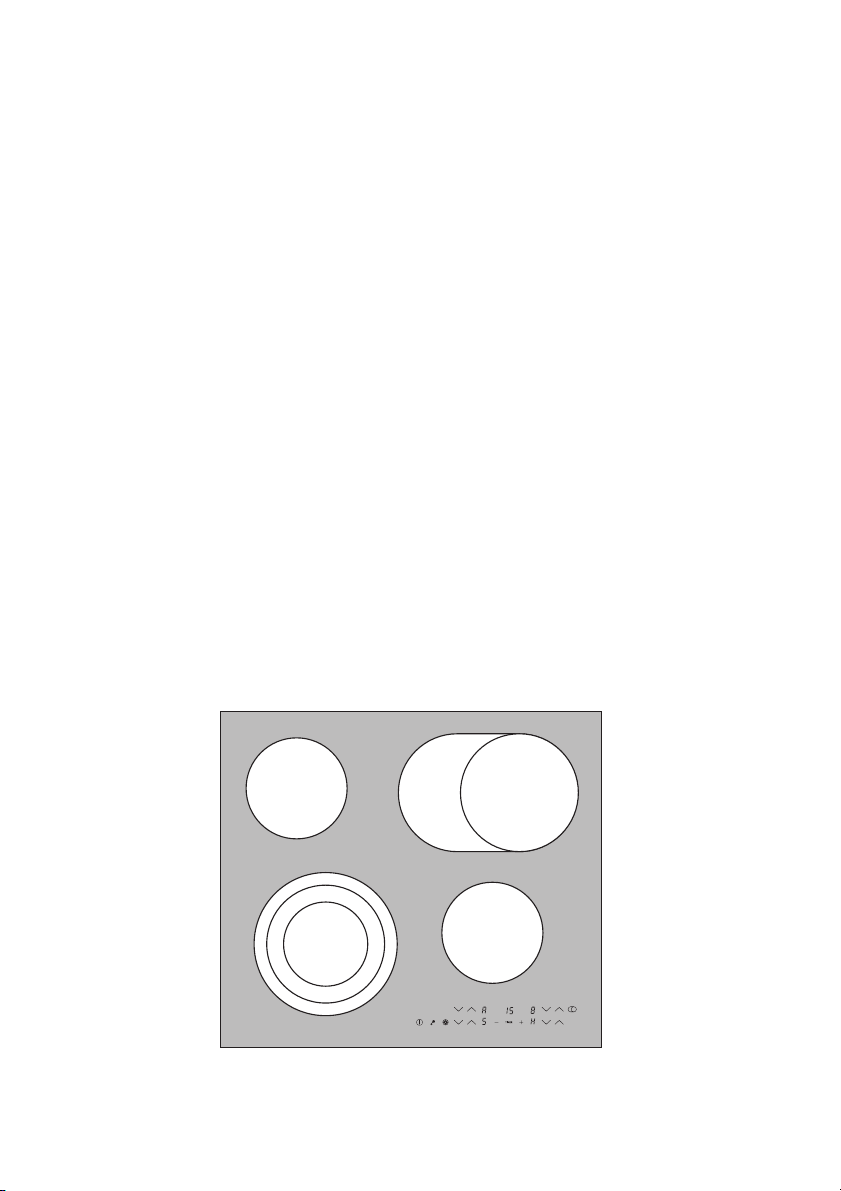
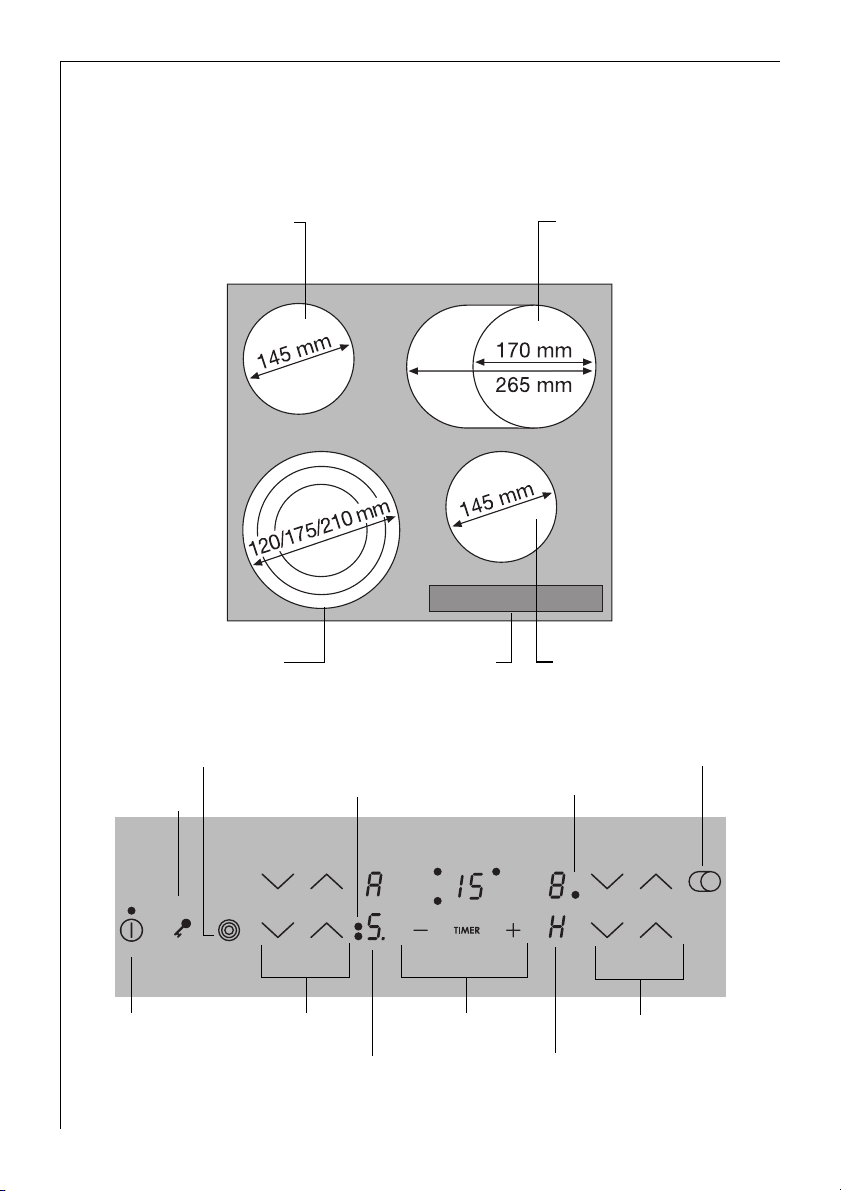
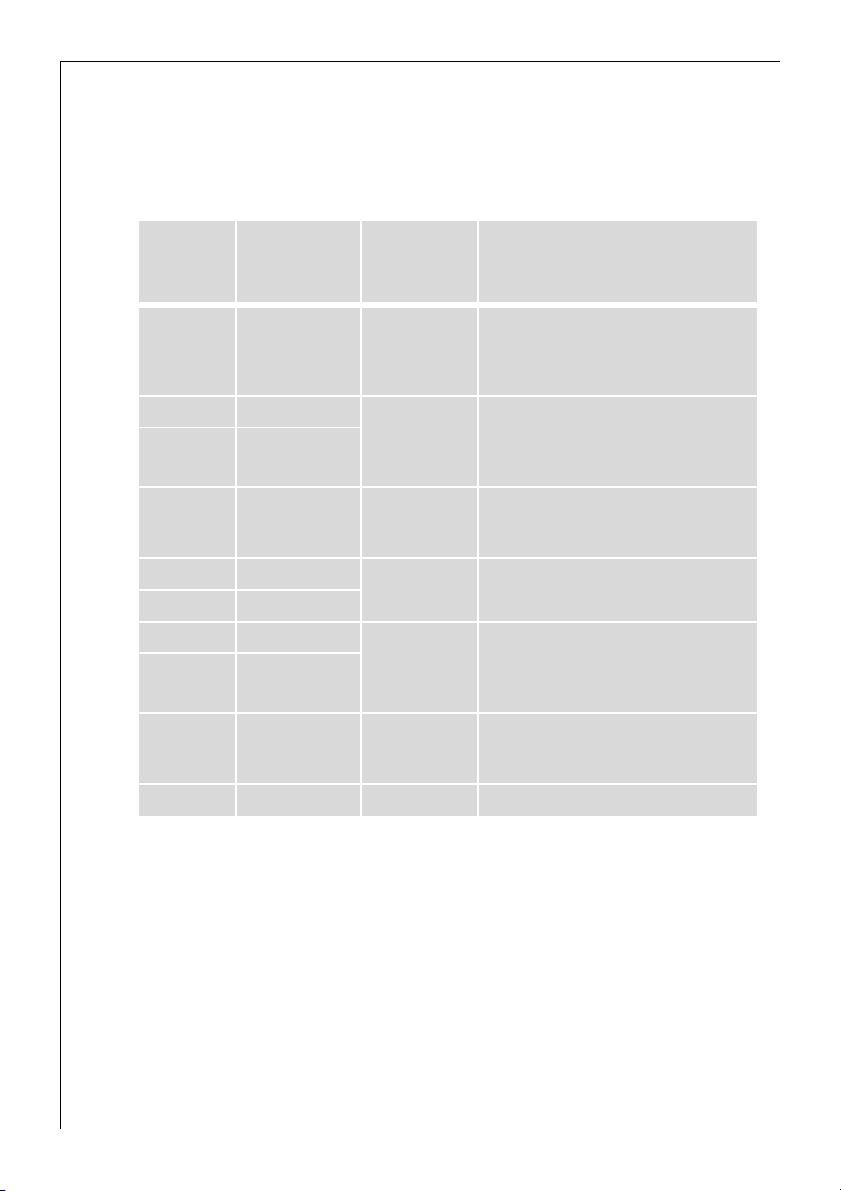
Ausstattung Koch- und Bedienfeld
Einkreis-Kochzone
1200W
Bräterzone
2400W
„Verriegelung“
Sensorfeld
„Ein/Aus“
8
Dreikreis-Kochzone
Sensorfeld Dreikreis
Sensorfeld
2300W
Kontrolllampen Dreikreis
Kochstufenwahl
Anzeige für Kochstufe/Restwärme
Bedienfeld
Kontrolllampe Bräterzone
„Timer“ mit
Kontrollanzeigen
Einkreis-Kochzone
1200W
Sensorfeld Bräterzone
Kochstufenwahl
Page 9

Digitale Anzeigen
Die vier Anzeigefelder, die den vier Kochzonen zugeordnet sind, zeigen:
– ¾ nach dem Einschalten,
– u bei Anwahl der Warmhaltestufe,
– ¿ bis Ç, je nach gewählter Kochstufe,
– 2 bis 6 (mit Dezimalpunkt) für Zwischen-Kochstufen
– a bei Ankochautomatik,
– h bei Restwärme,
– l bei eingeschalteter Kindersicherung
– e bei Fehlfunktion
1 Sicherheitsabschaltung der Kochzonen
Wird eine der Kochzonen nach einer bestimmten Zeit nicht ausgeschaltet oder die Kochstufe nicht verändert, schaltet sich die entsprechende
Kochzone automatisch ab.
Vorhandene Restwärme wird mit h (wie „Heiß“) in den digitalen Anzeigen der entsprechenden Kochzonen angezeigt.
Die Kochzonen schalten sich ab bei:
• Kochstufe u, 1 - 2 nach 6 Stunden
• Kochstufe 3 - 4 nach 5 Stunden
• Kochstufe 5 nach 4 Stunden
• Kochstufe 6 - 9 nach 1,5 Stunden
3 Sollte sich eine oder mehrere Kochzonen vor Ablauf der angegebenen
Zeiten abschalten, siehe Kapitel „Was tun, wenn …“.
Abschaltung durch andere Ursachen
Überkochende Flüssigkeit, die auf das Bedienfeld gelangt, bewirkt das
sofortige Ausschalten aller Kochzonen.
Die gleiche Wirkung tritt ein, wenn Sie ein nasses Tuch auf das Bedienfeld legen. In beiden Fällen muss das Gerät wieder mit dem Hauptschalter I eingeschaltet werden, nachdem die Flüssigkeit oder das Tuch
entfernt wurde.
9
Page 10
Vor dem ersten Gebrauch
Erstes Reinigen
Das Glaskeramik-Kochfeld feucht abwischen.
1 Achtung: Benutzen Sie keine scharfen, scheuernden Reinigungsmittel!
Die Oberfläche könnte beschädigt werden.
Bedienung des Kochfeldes
Touch Control-Sensorfelder
Zur Bedienung der Touch Control-Sensorfelder berühren Sie das gewünschte Feld mit Ihrer Fingerspitze steil von oben, bis entsprechende
Anzeigen aufleuchten oder erlöschen, bzw. die gewünschte Funktion
ausgeführt wird.
3 Vergewissern Sie sich, dass Sie beim Bedienen nur ein Sensorfeld berüh-
ren. Wird der Finger zu flach aufgelegt, wird evtl. das unterhalb liegende Sensorfeld mit angesprochen.
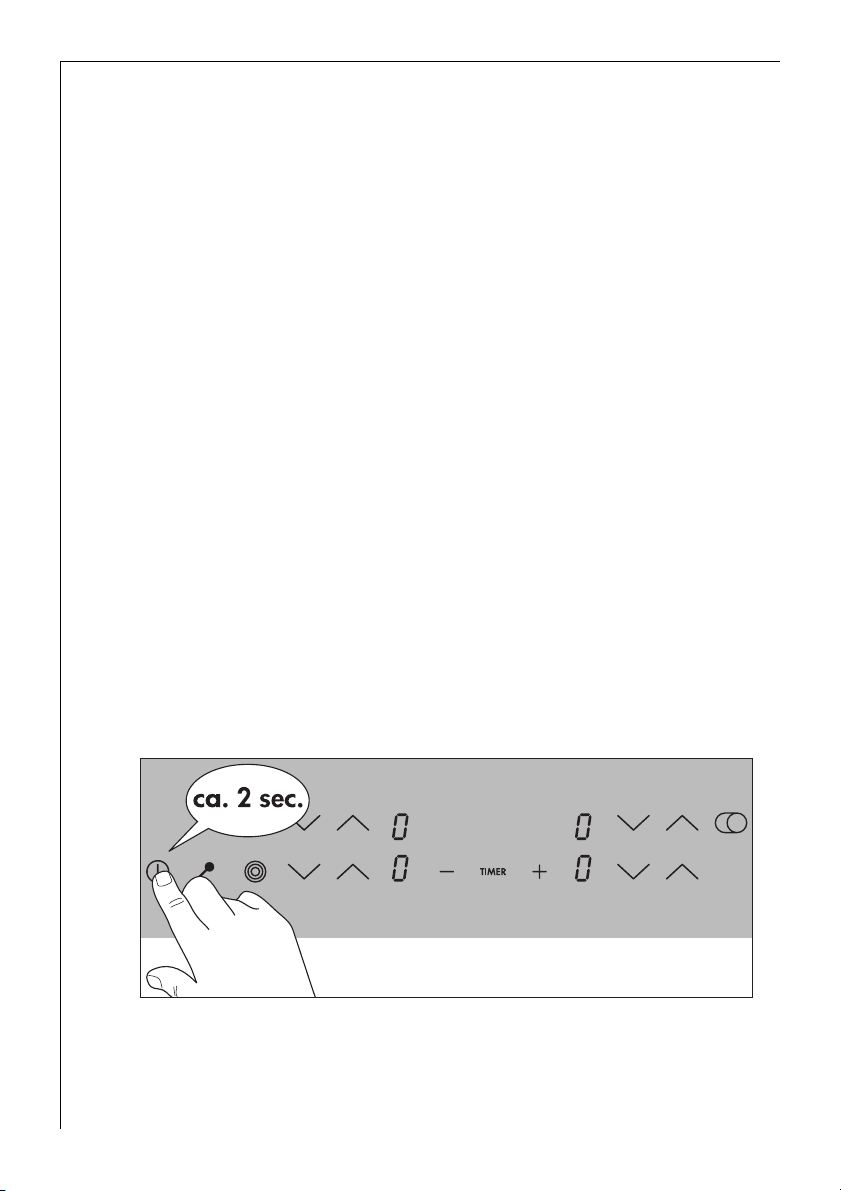
Gerät einschalten
Das komplette Gerät wird mit dem Sensorfeld „Ein/Aus“ I eingeschaltet.
Das Sensorfeld „Ein/Aus“ ca. zwei Sekunden lang berühren.
Die digitalen Anzeigen zeigen ¾ an.
3 Nachdem das Sensorfeld „Ein/Aus“ zum Einschalten Ihres Gerätes betä-
tigt wurde, muss innerhalb von ca. 10 Sekunden bei einer Kochzone
eine Kochstufe eingestellt oder mit dem Timer eine Zeit eingestellt werden (Eieruhr-Funktion). Das Gerät schaltet sich sonst aus Sicherheits-
10
gründen wieder aus.
Page 11
Gerät ausschalten
Zum kompletten Ausschalten des Gerätes Sensorfeld „Ein/Aus“ I betätigen.
Das Sensorfeld „Ein/Aus“ ca. eine Sekunde lang berühren.
3 Nach dem Abschalten einer einzelnen Kochzone oder des gesamten
Kochfeldes wird vorhandene Restwärme mit h (wie „Heiß“) in den digi-
talen Anzeigen der entsprechenden Kochzonen angezeigt.
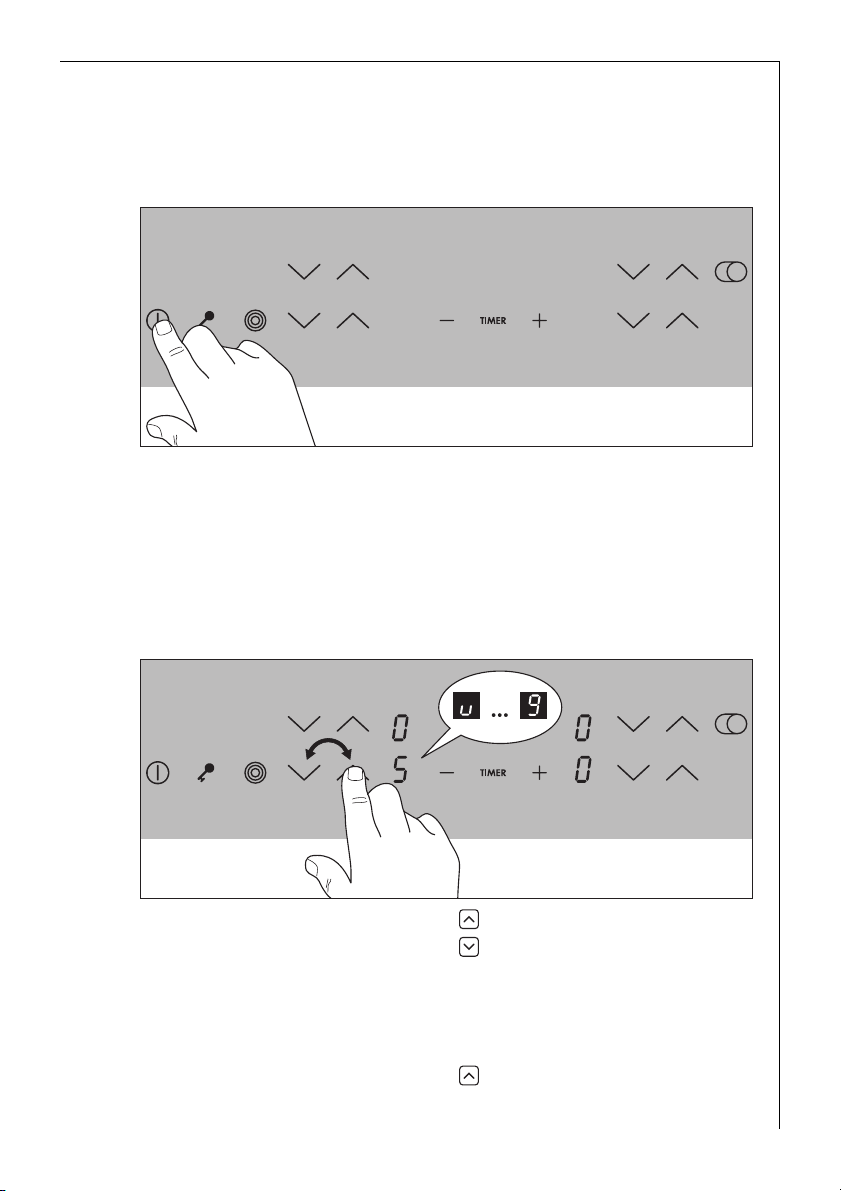
Kochstufenwahl
Zum Einstellen bzw. Verstellen der Kochstufe (u bis Ç) für die gewählte Kochzone.
Mit dem Sensorfeld Kochstufenwahl die Kochstufe erhöhen.
Mit dem Sensorfeld Kochstufenwahl die Kochstufe verringern.
Warmhaltestufe
Alle 4 Kochzonen sind mit einer Warmhaltestufe u ausgestattet.
Mit dem Sensorfeld Kochstufenwahl die Warmhaltestufe u einstel-
len.
11
Page 12
Dreikreis-Kochzone ein- und ausschalten
Je nach Topf- oder Pfannengröße kann bei der Dreikreis-Kochzone mit
dem Sensorfeld „Dreikreiszone“ zu der kleineren Kochzone der jeweils
größere Heizkreis zugeschaltet werden.
3 Diese können nur zugeschaltet werden, wenn für den kleineren Heiz-
kreis schon eine Kochstufe eingestellt ist.
1. Die gewünschte Kochstufe einstellen.
2. Sensorfeld „Dreikreis“ berühren.
12
Der mittlere Heizkreis wird zugeschaltet. Die untere Kontrolllampe
leuchtet.
Page 13
3. Bei erneutem Berühren des Sensorfelds „Dreikreis“ wird der äußere
Heizkreis aktiviert. Die obere Kontrolllampe leuchtet.
4. Zum Ausschalten der äußeren Heizkreise Sensorfeld „Dreikreis“ berühren, der jeweils äußere Heizkreis wird abgeschaltet.
Bräterzone ein- und ausschalten
1. Die gewünschte Kochstufe einstellen.
2. Zum Ein- oder Ausschalten der Bräterzone legen Sie Ihren Finger flach
auf das Sensorfeld „Bräterzone“, bis die Kontrolllampe aufleuchtet oder
erlischt.
13
Page 14
Kochzone ausschalten
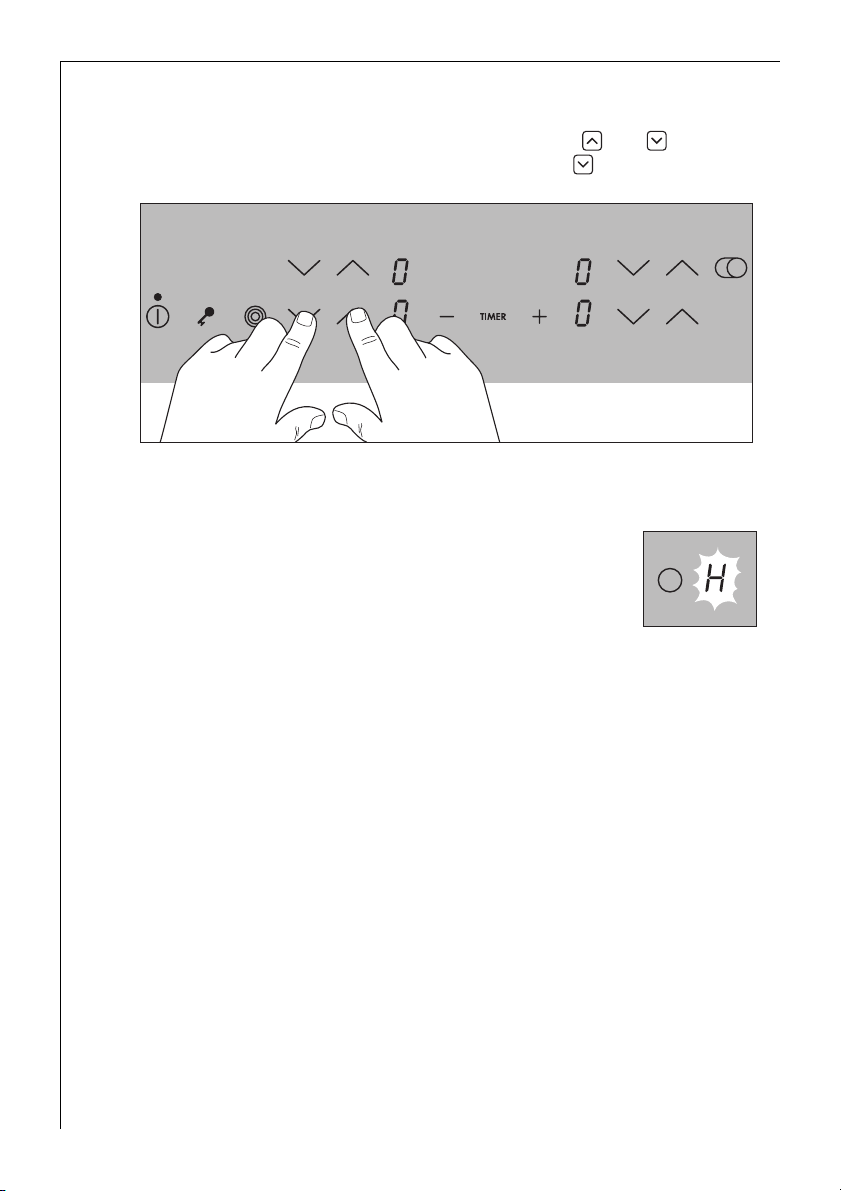
1. Zum Ausschalten die Sensorfelder Kochstufenwahl und gleichzei-
tig berühren oder mit Sensorfeld Kochstufenwahl auf Null zurückstellen.
Restwärmeanzeige
Nach dem Abschalten einer einzelnen Kochzone oder
des gesamten Kochfeldes wird vorhandene Restwärme
mit h (wie „Heiß“) in den digitalen Anzeigen der entsprechenden Kochzonen angezeigt.
Auch nach dem Ausschalten der Kochzone erlischt die
Restwärmeanzeige erst, wenn die Kochzone abgekühlt ist.
2 Sie können die Restwärme zum Schmelzen und Warmhalten von Spei-
sen benutzen.
1 Achtung! Solange die Restwärmeanzeige leuchtet, besteht Verbren-
nungsgefahr.
1 Achtung! Bei einem Stromausfall erlischt auch Symbol h und damit
der Hinweis auf vorhandene Restwärme. Die Möglichkeit sich zu verbrennen besteht jedoch weiter. Dieses können Sie durch aufmerksames
Beobachten vermeiden.
14
Page 15
Kochen mit der Ankochautomatik
Alle vier Kochzonen des Kochfeldes sind in neun Stufen regelbar und
sind mit einer Ankochautomatik ausgestattet:
– ¿, kleinste Kochstufe
– Ç, höchste Kochstufe
– a, Ankochfunktion.
Wenn Sie die von Ihnen gewünschte Kochstufe mit dem Sensorfeld
Kochstufenwahl wählen, arbeitet die Kochzone für eine bestimmte
Zeit mit der vollen Leistung und schaltet automatisch auf die eingestellte Fortkochstufe zurück.
Die Dauer des automatischen Ankochstoßes ist abhängig von der gewählten Fortkochstufe.
1. Sensorfeld Kochstufenwahl berühren, um die gewünschte Kochstufe
¿ bis Æ einzustellen. Die eingestellte Kochstufe wird zunächst angezeigt. Nach 5 Sekunden erscheint anstelle der Kochstufe a (= Ankochautomatik) in der Anzeige. Nach Ablauf der Ankochzeit wird wieder die
Kochstufe angezeigt.
3 Wenn Sie während der Automatik-Funktion eine höhere Stufe wählen,
z.B. von Á nach Ã, wird die Ankochzeit angepasst. Wählen Sie eine
niedrigere Stufe, wird die Ankochzeit sofort beendet.
Kochen mit Ankochautomatik ist nur bei einer kalten oder mässig warmen Kochzone möglich. Ist eine Kochzone beim Einschalten bereits
heiss (Anzeige h), kann nicht mit Ankochautomatik gearbeitet werden.
15
Page 16
Kochen ohne Ankochautomatik
Wenn Sie die Kochzone ohne Ankochautomatik nutzen wollen, dann
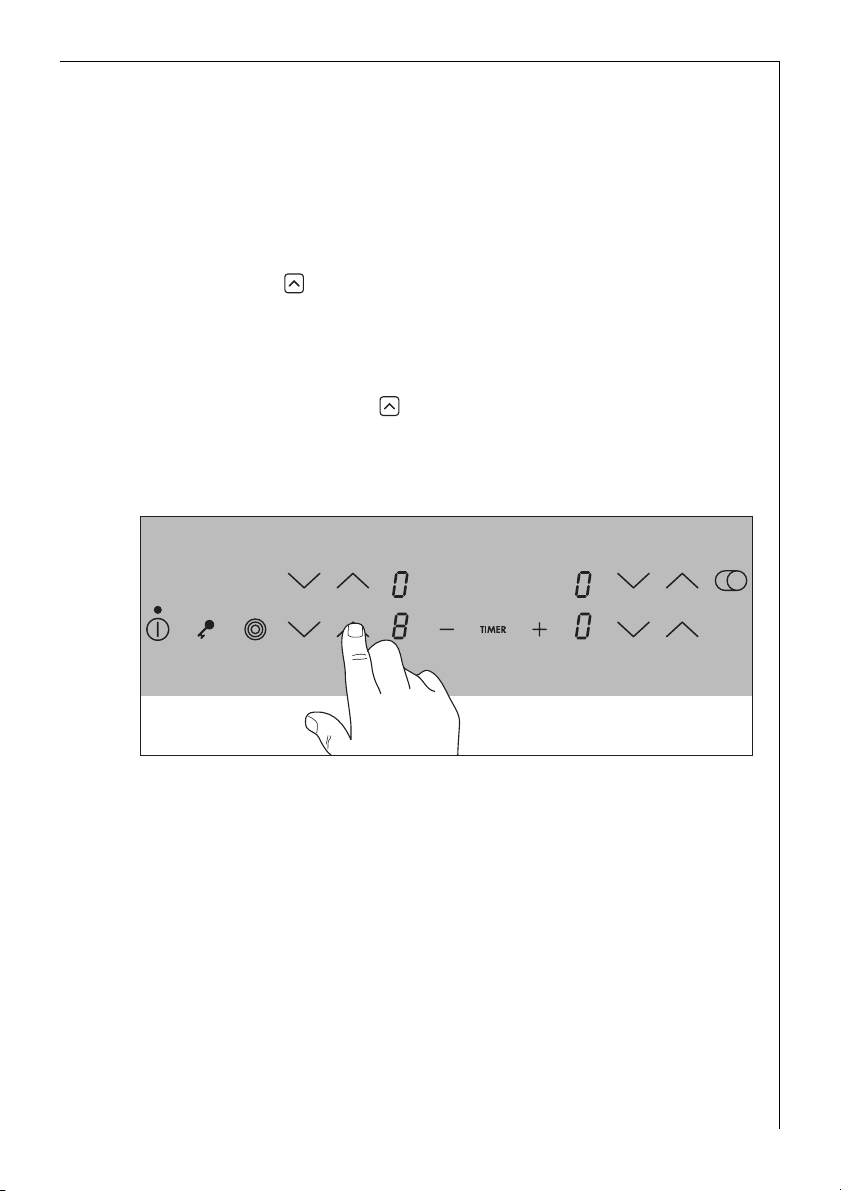
wählen Sie die gewünschte Kochstufe mit dem Sensorfeld Kochstufenwahl .
1. Sensorfeld Kochstufenwahl berühren, um die gewünschte Kochstufe
Ç bis ¿ einzustellen.
3 Mit den Sensorfeldern Kochstufenwahl und können Sie die Stufe
jederzeit verstellen.
16
Page 17
Kindersicherung
Mit der Kindersicherung kann das Kochfeld gegen unerwünschter Benutzung gesichert werden.
Kindersicherung einschalten
Zum Einschalten der Kindersicherung muss das Gerät eingeschaltet
sein, es darf aber keine Kochzone eingeschaltet sein.
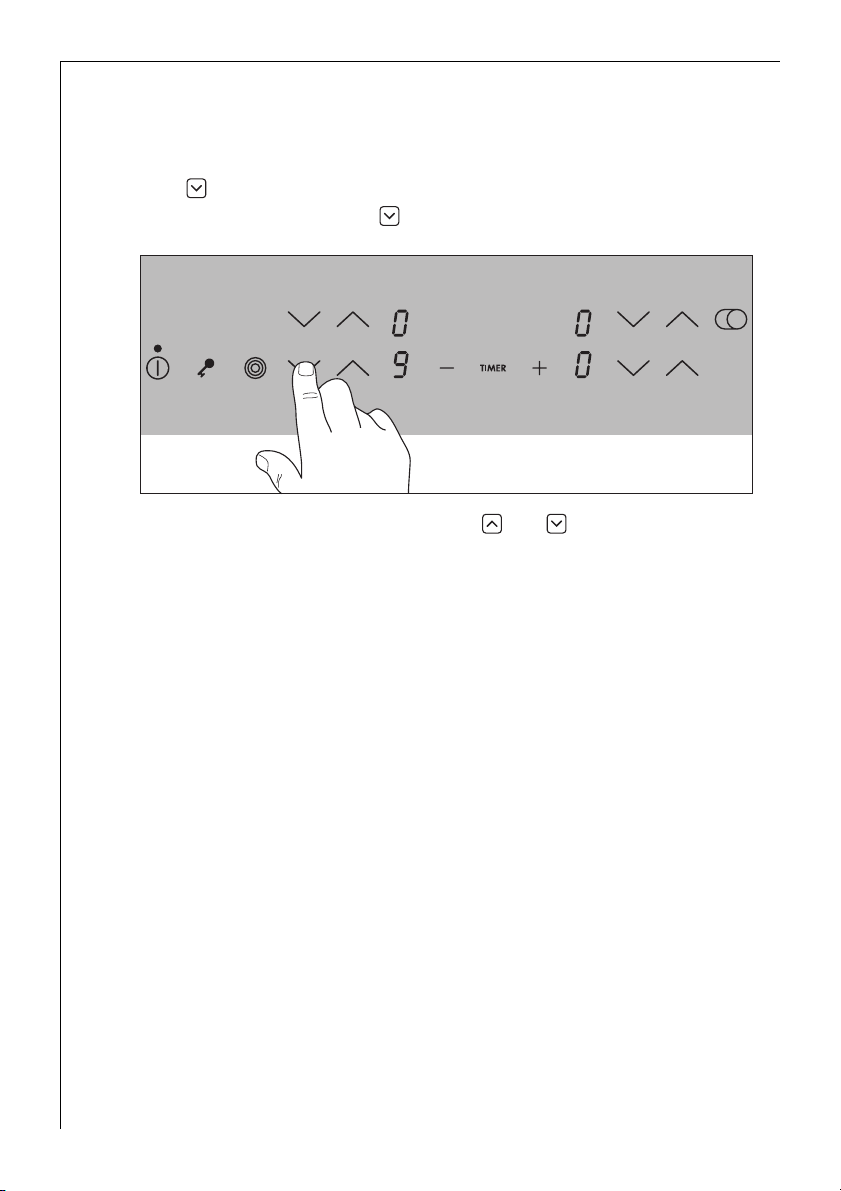
1. Das Sensorfeld ca. drei Sekunden lang berühren..
Zur Bestätigung ertönt ein Signalton.
2. Ein beliebiges Sensorfeld Kochstufenwahl berühren.
In den Anzeigen erscheint l, die Kindersicherung ist aktivert. Das Gerät
schaltet nach einigen Sekunden automatisch ab.
17
Page 18
Kindersicherung überwinden
Die Kindersicherung kann für die einmalige Benutzung des Gerätes (bis
zum nächsten Ausschalten des Gerätes) überwunden werden. Beim
nächsten Einschalten ist die Kindersicherung automatisch wieder aktiv.
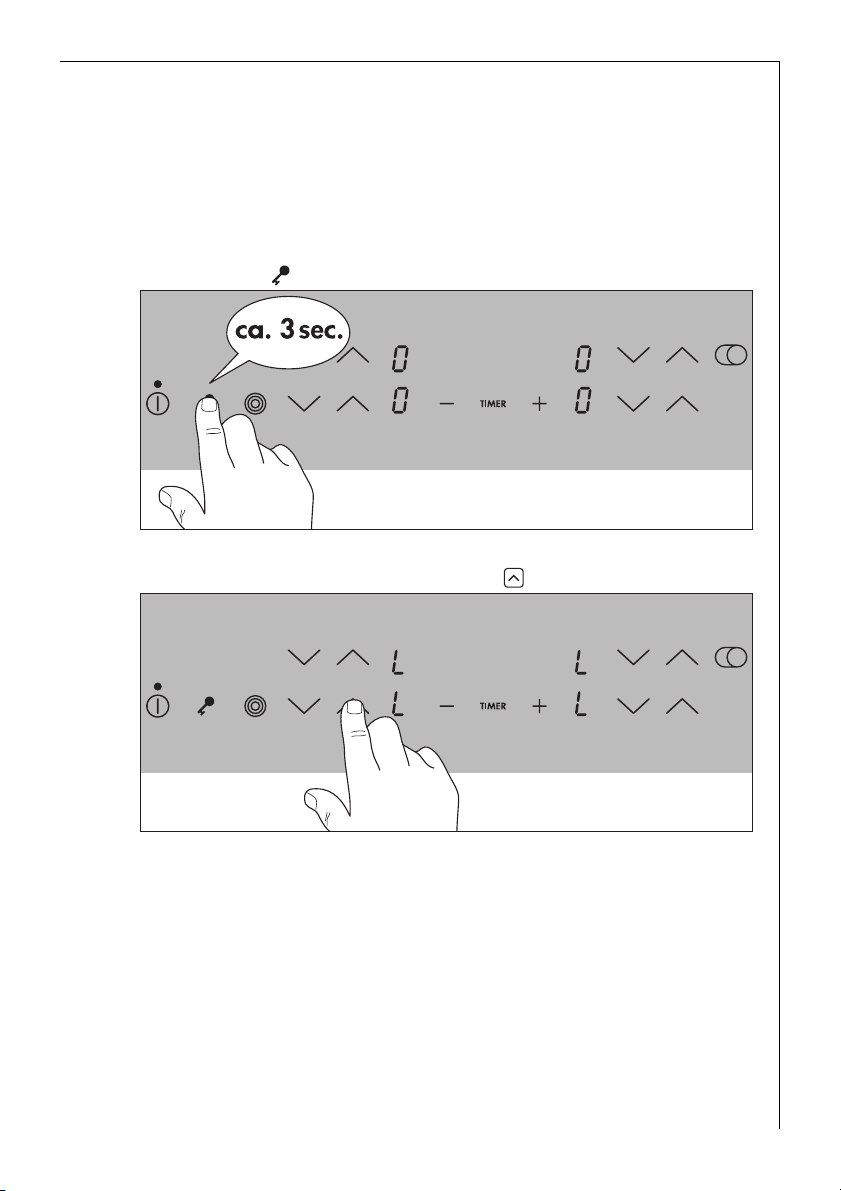
1. Das Gerät einschalten.
Bei aktiver Kindersicherung wird l angezeigt.
2. Gleichzeitig zwei beliebige Sensorfelder Kochstufenwahl und berühren.
18
Zur Bestätigung ertönt ein Signalton. Die Kindersicherung ist bis zum
Ausschalten des Gerätes überwunden, das Kochfeld kann normal benutzt werden.
Page 19
Kindersicherung ausschalten
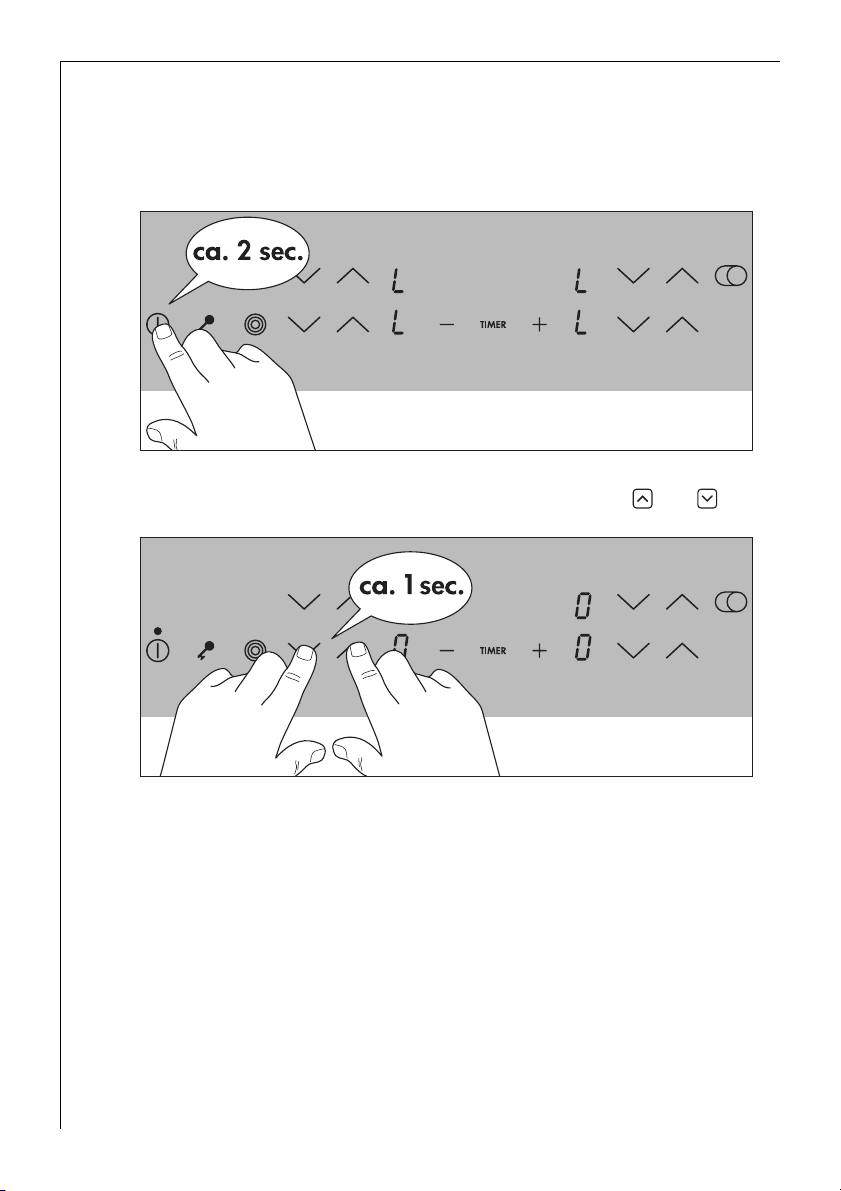
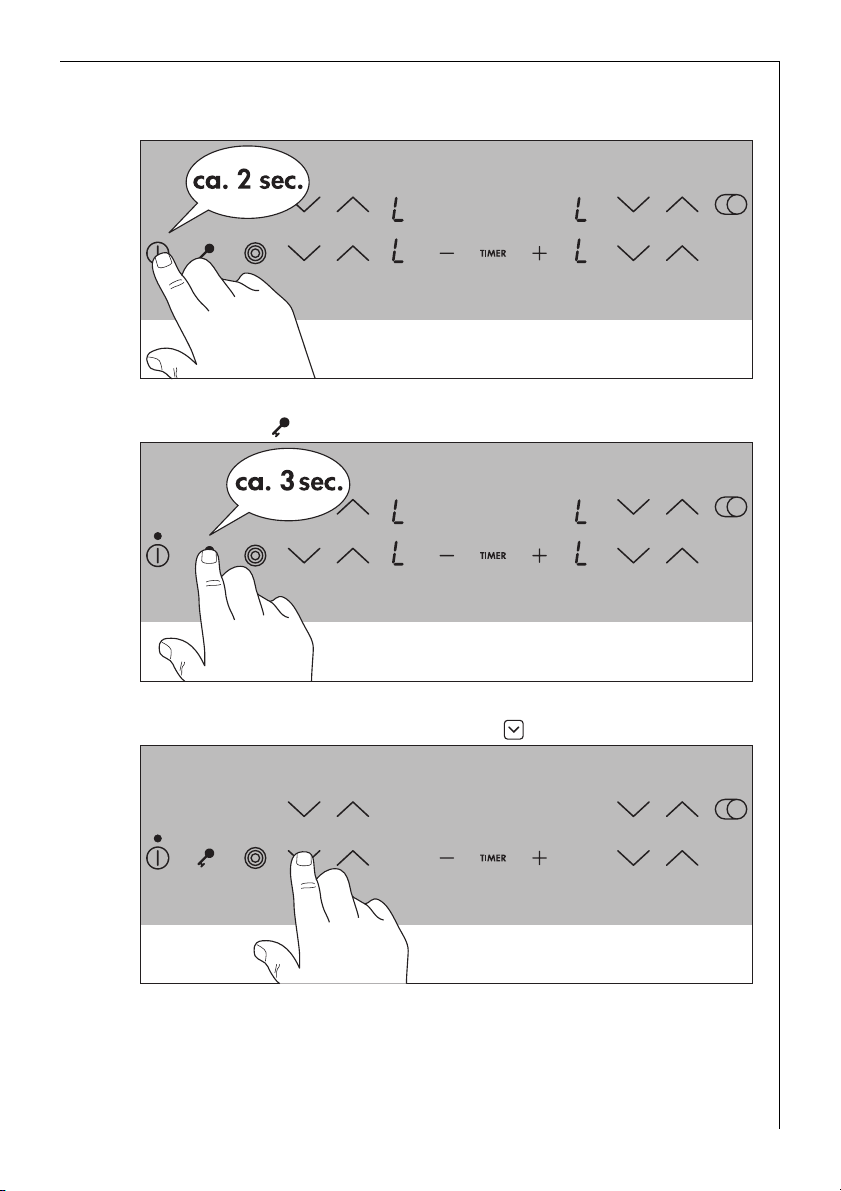
1. Das Gerät einschalten.
Bei aktiver Kindersicherung wird l angezeigt.
2. Das Sensorfeld ca. drei Sekunden lang berühren..
Zur Bestätigung ertönt ein Signalton.
3. Ein beliebiges Sensorfeld Kochstufenwahl berühren.
Die Anzeigen werden dunkel, die Kindersicherung ist ausgeschaltet. Das
Gerät schaltet nach einigen Sekunden automatisch ab.
19
Page 20
Timer
Sie können den Timer auf zwei Arten benutzen:
– als Abschaltautomatik. Sie stellen für eine Kochzone eine Gardauer
ein, nach deren Ablauf schaltet sich die Kochzone automatisch ab.
Diese Funktion kann für mehrere Kochzonen gleichzeitig genutzt
werden.
– als Kurzzeitmesser ohne Schaltfunktion („Eieruhr“), nach Ablauf der
eingestellten Zeitdauer ertönt ein akustisches Signal.
3 Der Kurzzeitmesser kann grundsätzlich nicht genutzt werden, wenn
eine Kochzone eingeschaltet ist.
Abschaltautomatik
Die Kochzone(n), für die Sie die Abschaltautomatik anwenden wollen,
muss (müssen) eingeschaltet sein.
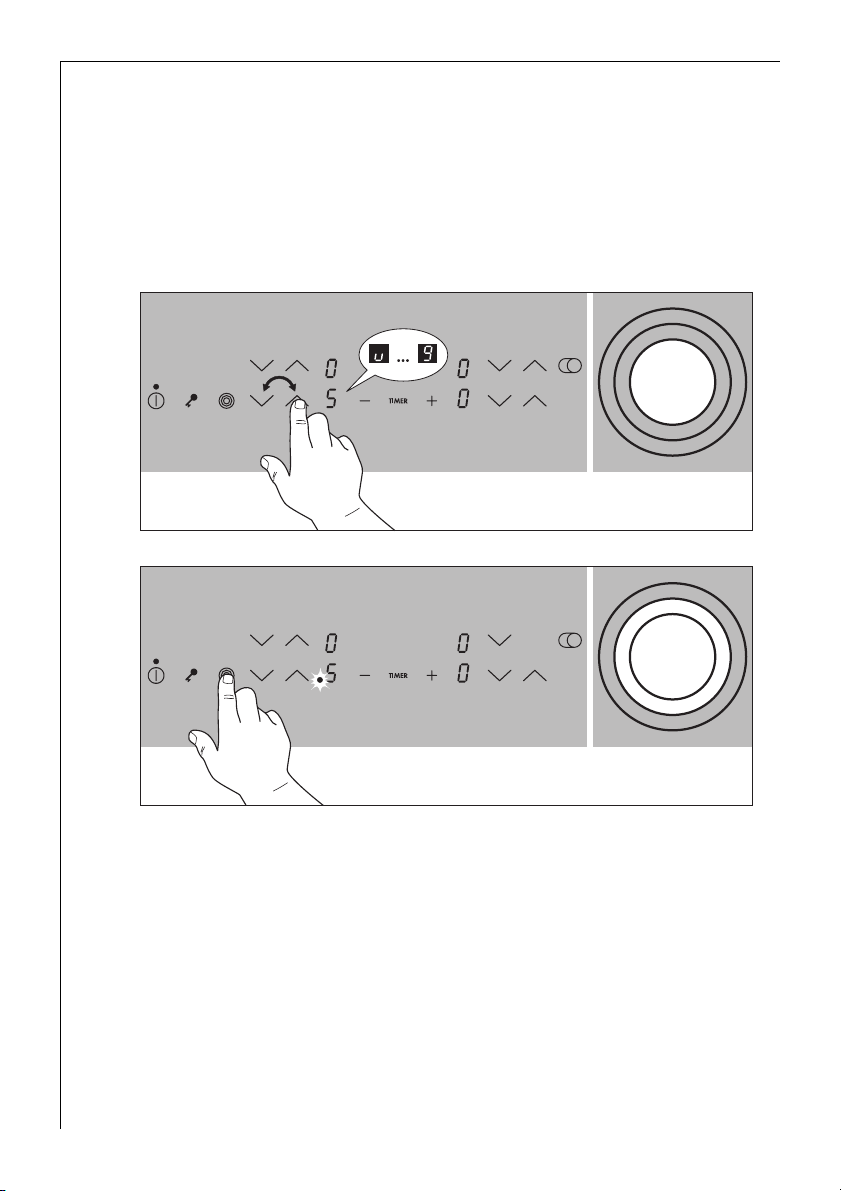
1. Mit dem Sensorfeld Timer auswählen, für welche Kochzone die Abschaltautomatik eingestellt werden soll.
20
Durch einmaliges Berühren des Sensorfeldes Timer wird im Uhrzeigersinn die erste aktive Kochzone ausgewählt, die zugehörige Kontrolllampe blinkt schnell. Dabei entspricht z.B. die linke hintere Kontrolllampe
der linken hinteren Kochzone. In der Timer-Anzeige erscheint 00.
Durch wiederholtes Berühren des Sensorfeldes Timer wird die nächste
aktive Kochzone ausgewählt.
Page 21
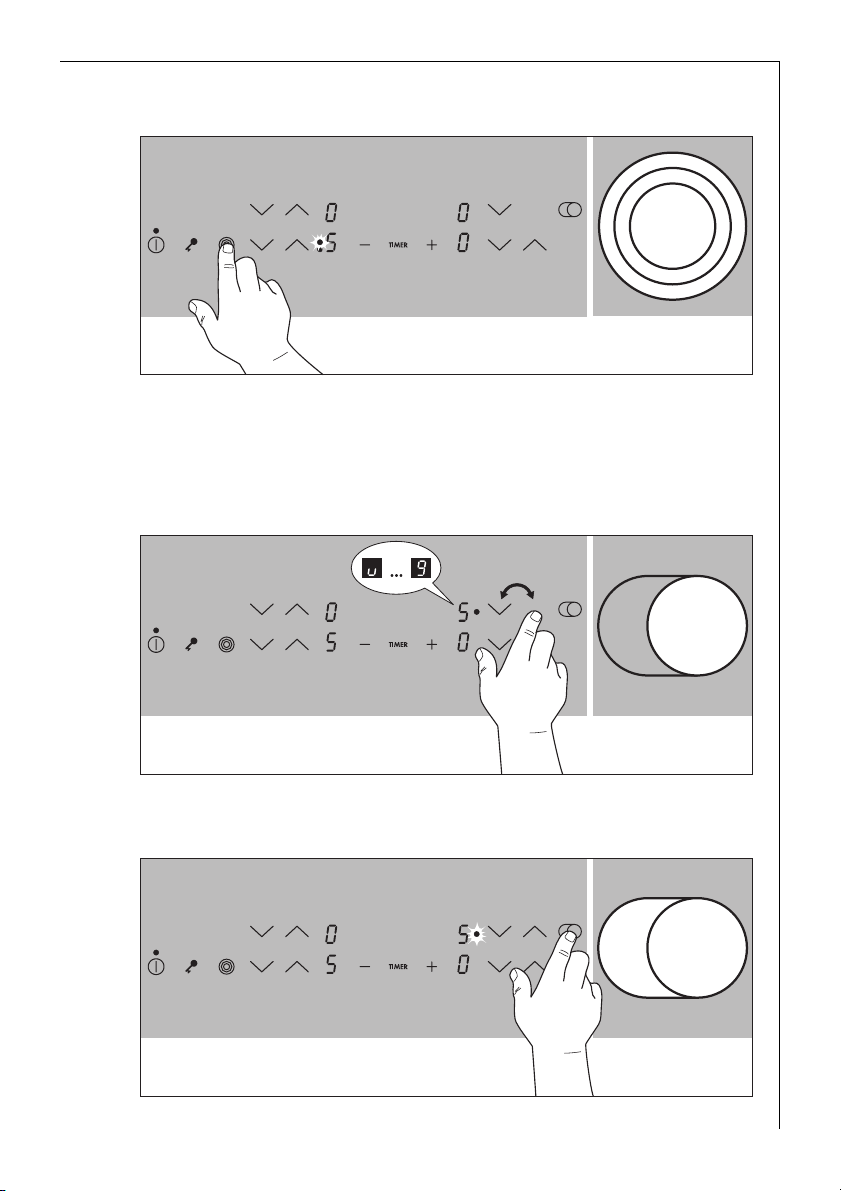
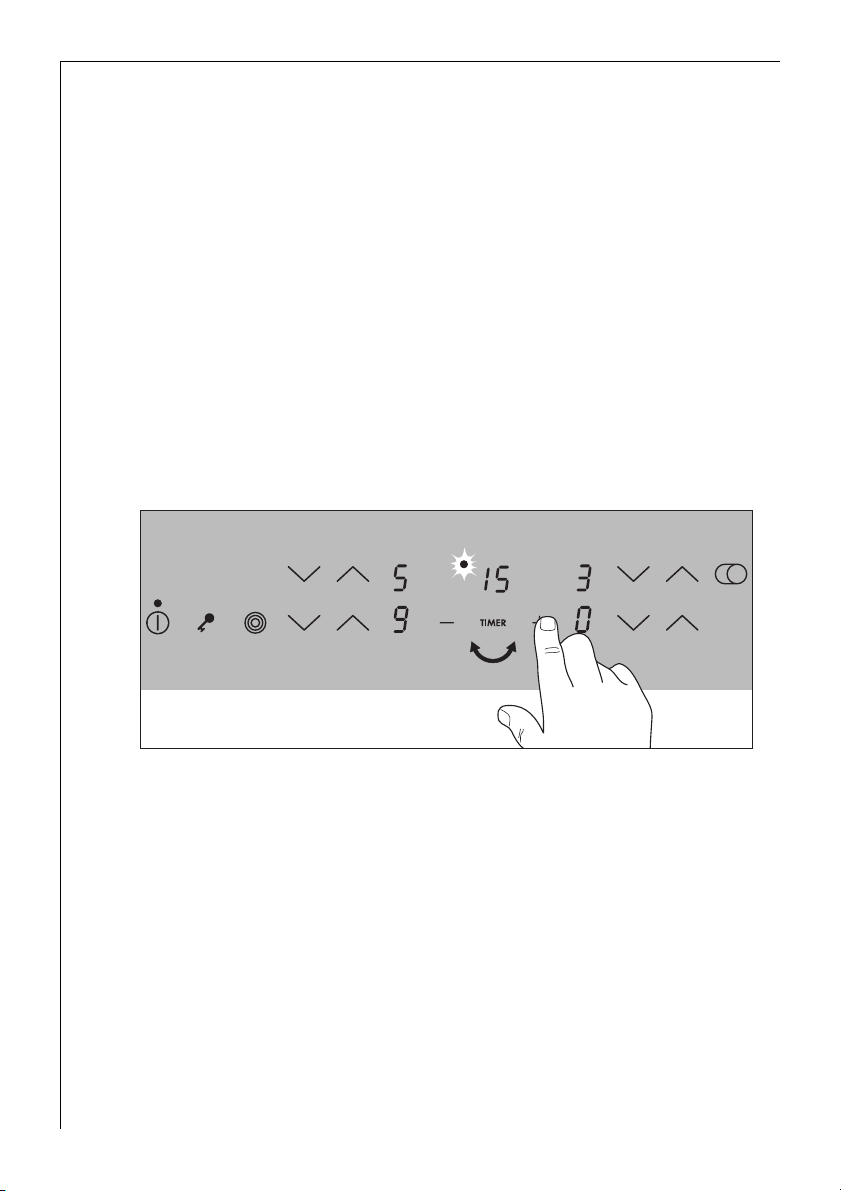
2. Während die Kontrolllampe schnell blinkt, mit den Sensorfeldern Timereinstellung + oder - für diese Kochzone die gewünschte Zeitdauer bis
zum automatischen Abschalten einstellen (z.B. 15 Minuten).
Nach wenigen Sekunden wird die Abschaltautomatik aktiviert
Die Kontrolllampe blinkt jetzt langsamer und die Restgardauer wird
während des Ablaufs im Display angezeigt. Ist die Abschaltautomatik
bei mehreren Kochzonen eingestellt, so gilt dies für die Kochzone mit
der kürzesten Restgardauer. Die Kontrolllampen der übrigen Kochzonen
mit eingestellter Abschaltautomatik leuchten. Zum Anzeigen der Restgardauer einer dieser Kochzonen, muss diese mit dem Sensorfeld Timer
ausgewählt werden, die entsprechende Kontrolllampe blinkt dann
schnell.
Zum Verstellen der Restgardauer muss die gewünschte Kochzone mit
dem Sensorfeld Timer ausgewählt werden. Die dazugehörige Kontrolllampe blinkt dann schneller. Die Verstellung erfolgt mit den Sensorfeldern Timereinstellung + oder -.
Nach Ablauf der eingestellten Gardauer schaltet die Kochzone automatisch ab und es ertönt für zwei Minuten ein akustisches Signal, die
Timeranzeige blinkt 00.
3. Sensorfeld Timer berühren, um das Signal abzustellen.
3 Zur schnelleren Einstellung, berühren Sie eines der Sensorfelder Timer-
einstellung + oder - solange, bis der gewünschte Wert erreicht ist.
Wird zuerst das Sensorfeld Timereinstellung - betätigt, beginnt die
Zeiteinstellung bei 99 Minuten, wird zuerst das Sensorfeld Timereinstellung + betätigt, beginnt die Zeiteinstellung bei 1 Minute.
21
Page 22

Abschaltautomatik vorzeitig beenden
Sie haben zwei Möglichkeiten die Abschaltautomatik vorzeitig abzuschalten:
Kochzone und Timer gleichzeitig abschalten
1. Mit dem Sensorfeld Kochstufenwahl die gewünschte Kochzone auf
Null zurückstellen: Kochzone und Timer schalten ab.
Timer ausschalten - Kochzone bleibt aktiv
1. Mit dem Sensorfeld Timer die gewünschte Kochzone auswählen. Die
entsprechende Kontrolllampe blinkt dann schneller.
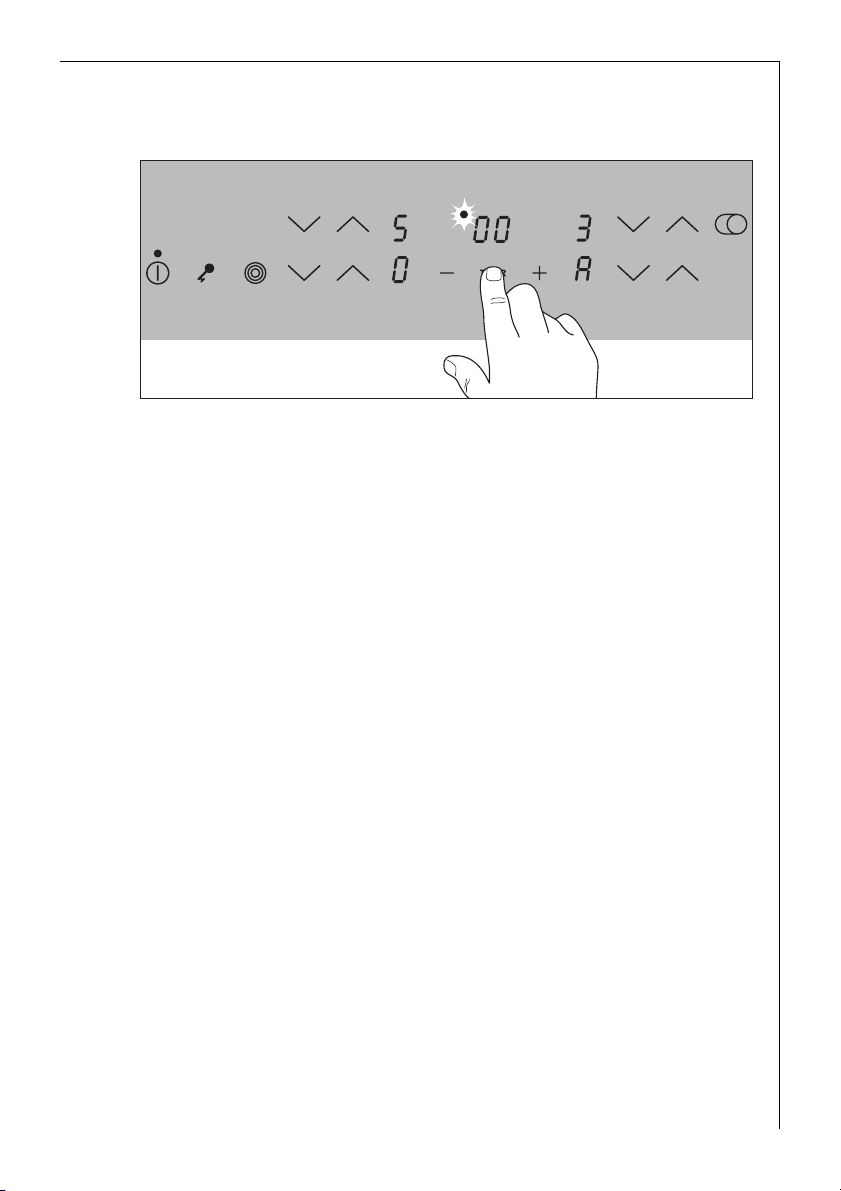
2. Mit dem Sensorfeld Timereinstellung - Timer auf 00 stellen:
– nur Timer schaltet ab.
– Kochzone bleibt in Betrieb.
Kurzzeitmesser
Zur Nutzung des Kurzzeitmessers muss das Gerät eingeschaltet sein, es
darf aber keine Kochzone eingeschaltet sein.
1. Sensorfeld Timer berühren.
In der Timer-Anzeige erscheint 00.
2. Mit den Sensorfeldern Timereinstellung + oder - die gewünschte
Zeitdauer einstellen.
Nach wenigen Sekunden wird der Kurzzeitmesser aktiviert und die
Restzeitdauer wird angezeigt.
Zum Verstellen der Restzeitdauer das Sensorfeld Timer berühren und
mit den Sensorfeldern für die Timereinstellung + oder - die Einstellung ändern.
Nach Ablauf der eingestellten Zeitdauer ertönt ein akustisches Signal
und die Timeranzeige blinkt 00.
3. Sensorfeld Timer berühren, um das Signal abzustellen.
22
Page 23
Bedienfeld verriegeln/entriegeln
Zu jedem beliebigen Zeitpunkt des Kochvorgangs kann das Bedienfeld
mit Ausnahme des Sensorfeldes „Ein/Aus“ verriegelt werden, um ein
Verstellen der Einstellungen, z.B. durch Darüberwischen mit einem Lappen, zu verhindern.
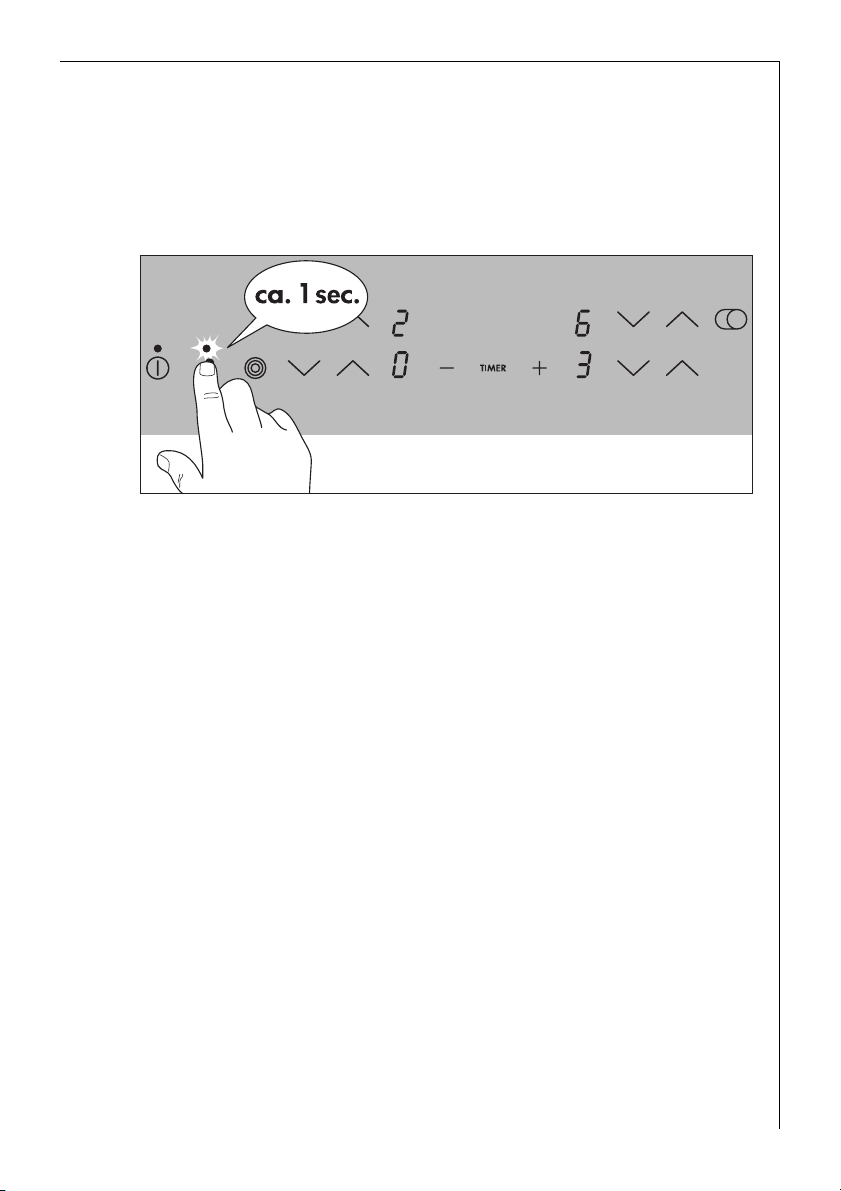
1. Sensorfeld „Verriegelung“ ca. eine Sekunde lang berühren.
Die Kontrolllampe des Sensorfeldes „Verriegelung“ leuchtet. Die Sensorfelder sind verriegelt.
2. Um die Verriegelung wieder aufzuheben, Sensorfeld „Verriegelung“ erneut ca. eine Sekunde lang berühren.
Die Kontrolllampe des Sensorfeldes „Verriegelung“ erlischt.
3 Beim Ausschalten des Geräts wird die Verriegelung automatisch ausge-
schaltet.
23
Page 24
Anwendung, Tabellen, Tipps
Kochgeschirr
• Gutes Kochgeschirr erkennen Sie am Topfboden. Der Boden sollte so
dick und plan wie möglich sein.
• Achten Sie beim Neukauf von Töpfen und Pfannen auf den Boden-
Durchmesser. Hersteller geben oft den oberen Durchmesser des Geschirrrandes an.
• Geschirr mit Aluminium- oder Kupferböden kann metallische Verfär-
bungen auf der Glaskeramikfläche hinterlassen, die nur schwer oder
gar nicht mehr zu entfernen sind.
• Benutzen Sie keine Töpfe aus Gusseisen oder mit beschädigten Bö-
den, die rauh sind oder Grate aufweisen. Beim Verschieben können
bleibende Kratzer entstehen.
• Im kalten Zustand sind die Topf-
böden üblicherweise leicht nach
innen gewölbt (konkav). Sie sollten auf keinen Fall nach außen
gewölbt (konvex) sein.
• Wenn Sie Spezialgeschirr verwen-
den, (z.B. Dampfkochtopf, Simmertopf, WOK usw.), beachten Sie bitte die Herstellerangaben.
Energiesparen
2 Kochgeschirr grundsätzlich vor dem
Einschalten der Kochzone
aufsetzen.
2 Töpfe, wenn möglich, immer mit
dem Deckel verschließen.
2 Kochzonen vor Ende der Garzeit
ausschalten, um die Restwärme zu
nutzen.
2 Topfboden und Kochzone sollten
gleich groß sein.
24
Page 25

Tipps zum Kochen mit und ohne Ankochautomatik
Die automatische Ankochfunktion eignet sich für:
• Gerichte, die kalt aufgesetzt werden, bei hoher Leistung erhitzt wer-
den und auf der Fortgarstufe nicht ständig beobachtet werden müssen,
• Gerichte, die in die heiße Pfanne gegeben werden.
Die automatische Ankochfunktion eignet sich nicht für:
• Gulasch, Rouladen und ähnliche Schmorgerichte, die bis zum Errei-
chen der richtigen Bräunung unter häufigem Wenden angebraten,
aufgegossen und fertiggeschmort werden,
• Klöße, Nudelgerichte mit viel Flüssigkeit,
• das Garen mit Schnellkochtöpfen,
• sehr große Mengen Suppen/Eintöpfe mit mehr als 2 Litern Flüssig-
keit.
Allgemeine Hinweise:
• Beim Kochen ohne Ankochautomatik empfehlen wir zum Ankochen/
Anbraten der Speisen eine hohe Stufe einzustellen (mit der -Taste)
und anschließend auf der entsprechenden Fortgarstufe fertiggaren zu
lassen.
• Beobachten Sie die ersten Kochvorgänge! Dabei können Sie feststel-
len, welche Kochstufe für "Ihre Gerichte" in der von "Ihnen gewöhnlich zubereiteten Menge" mit "Ihrem Kochgeschirr" optimal ist. Sie
wissen dann bald die Vorzüge der Automatik zu schätzen und erhalten ein sicheres Gefühl für Ihr neues Kochfeld.
25
Page 26
Anhaltswerte zum Kochen
Die Angaben in der folgenden Tabelle sind Richtgrößen. Welche Schalterstellung für Kochvorgänge erforderlich ist, hängt von der Qualität
der Töpfe und von der Art und Menge der Lebensmittel ab.
Schalter-
stellung
1) Beim Kochen ohne Automatik kann die Ankochzeit individuell gewählt werden.
3
Ankochzeit der
Automatik
9
8 4,5
7 3,5
6 2,0 Braten
5 10,2
4 6,5
3 4,8
2 1,7
1 1,0 Schmelzen
u 0,5 Warmhalten Speisen warmhalten
(Min.)
1)
Garvorgang Beispiele für die Anwendung
Ankochen
Anbraten
Fritieren
Starkes Braten
Kochen
Dämpfen
Dünsten
Quellen
Ankochen großer Flüssigkeitsmengen,
Spätzle kochen,
Anbraten von Fleisch,
(Gulasch anbraten, Schmorbraten)
Steaks, Lendenstücke,
Kartoffelpuffer,
Bratwürste,
Pfannkuchen/Flädle
Schnitzel/Koteletts,
Leber, Fisch,
Frikadellen, Spiegeleier
Kochen bis 1,5 l Flüssigkeit,
Kartoffeln, Gemüse
Dämpfen und Dünsten von
kleineren Mengen Gemüse,
Quellen von Reis und
Milchgerichten
Butter schmelzen,
Gelatine auflösen,
Schokolade schmelzen
3 Wir empfehlen, beim Ankochen oder Anbraten auf die Ankochstufe „9“
zu stellen und Speisen mit einer längeren Garzeit anschließend auf der
entsprechenden Fortgarstufe fertiggaren zu lassen.
26
Page 27
Reinigung und Pflege
Kochfeld
1 Achtung: Reinigungsmittel dürfen nicht auf die heiße Glaskeramikflä-
che gelangen! Alle Reinigungsmittel müssen nach der Reinigung mit
ausreichend klarem Wasser entfernt werden, da sie beim Wiederaufheizen ätzend wirken können!
Verwenden Sie keine aggressiven Reinigungsmittel, wie z.B. Grill- oder
Backofensprays, grobe Scheuermittel bzw. kratzende Topfreiniger.
3 Reinigen Sie die Glaskeramik-Kochfläche nach jedem Gebrauch, wenn
sie handwarm oder kalt ist. So vermeiden Sie das Festbrennen von Verschmutzungen.
Kalk- und Wasserränder, Fettspritzer und metallisch schimmernde Verfärbungen lassen sich mit einem handelsüblichen Glaskeramik- oder
Edelstahlreiniger entfernen.
Leichte Verschmutzungen
1. Glaskeramikfläche mit einem feuchten Tuch und ein wenig Handspül-
mittel abwischen.
2. Anschließend mit einem sauberen Tuch trockenreiben. Es dürfen keine
Reinigungsmittelrückstände auf der Oberfläche verbleiben.
3. Die gesamte Glaskeramikfläche einmal in der Woche mit einem handelsüblichen Glaskeramik- oder Edelstahlreiniger gründlich reinigen.
4. Danach die Glaskeramikfläche mit ausreichend klarem Wasser abwischen und mit einem sauberen, fusselfreien Tuch trockenreiben.
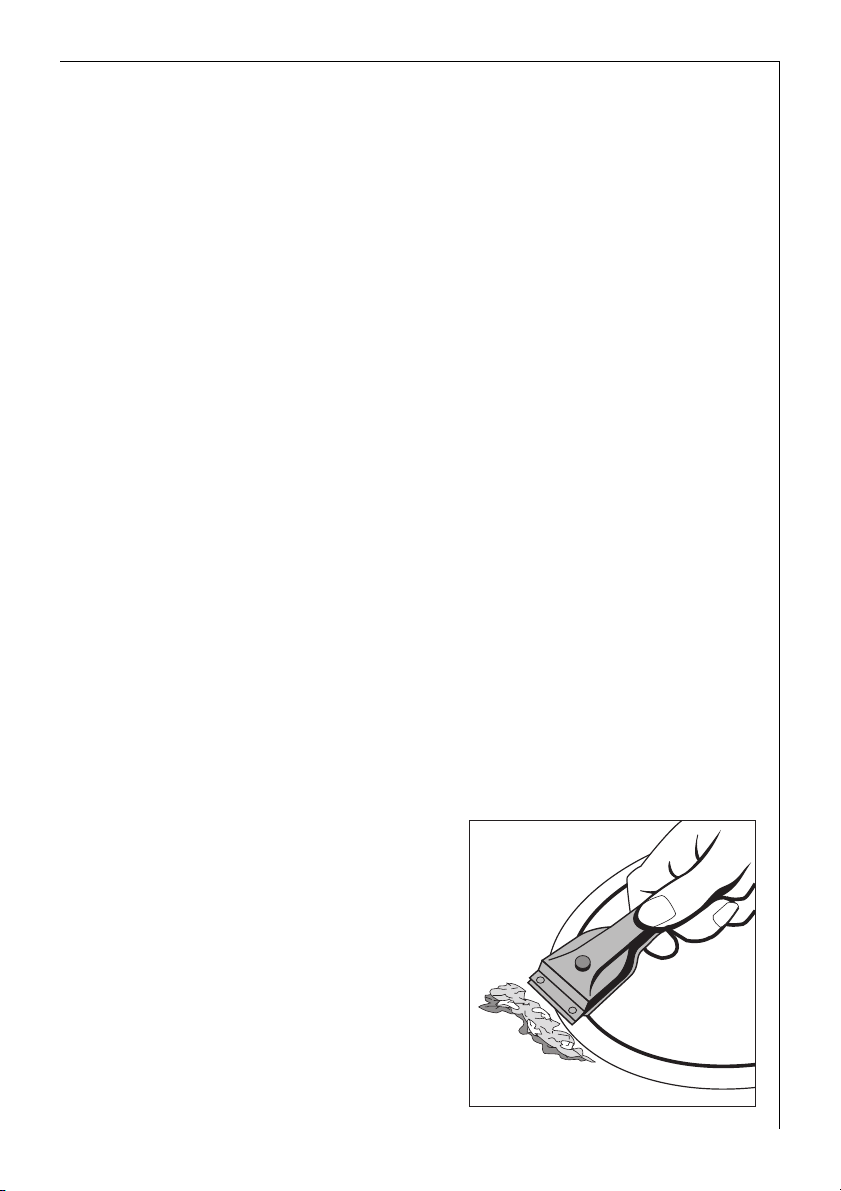
Festklebende Verschmutzungen
1. Zur Entfernung von übergekochten
Speisen oder festgeklebten Spritzern einen Reinigungsschaber
benutzen.
2. Den Reinigungsschaber schräg zur
Glaskeramikfläche ansetzen.
3. Verschmutzungen mit gleitender
Klinge entfernen.
3 Reinigungsschaber und Glaskera-
mikreiniger erhalten Sie im Fachhandel.
27
Page 28
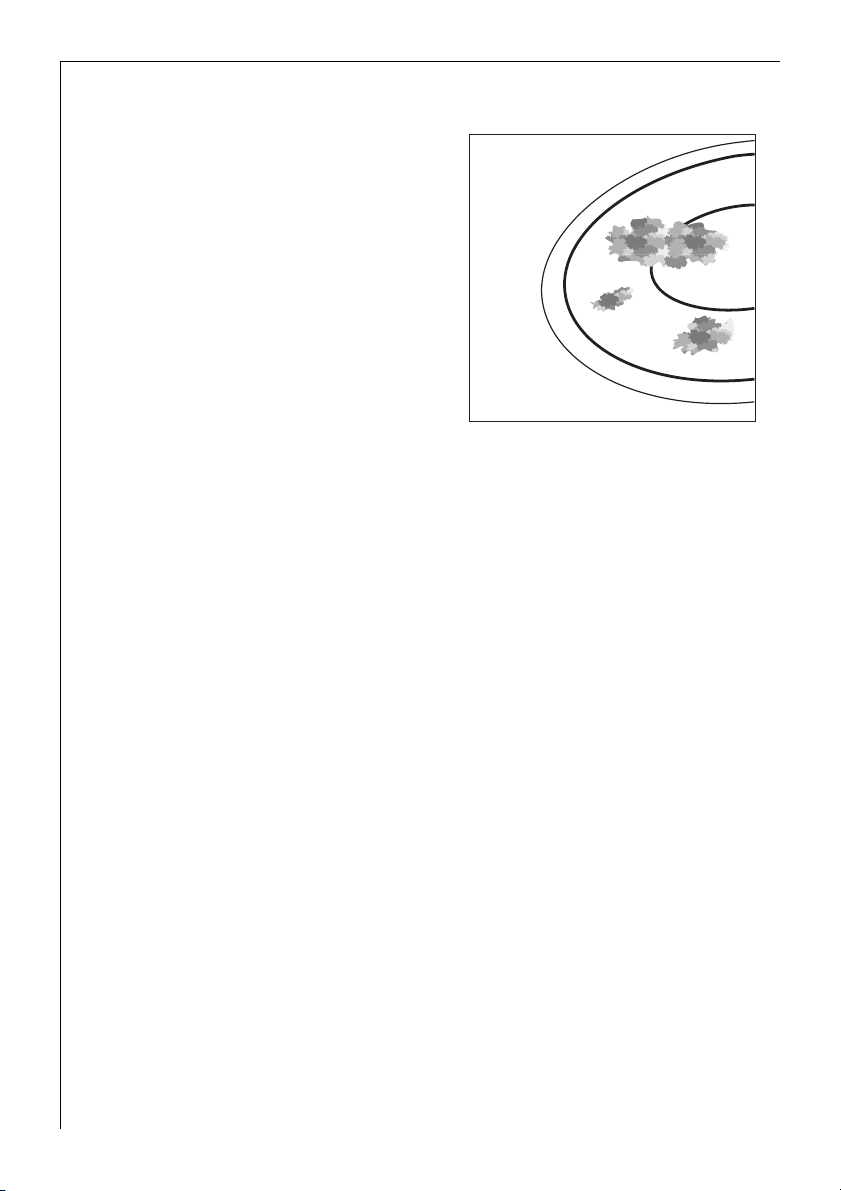
1 Spezielle Verschmutzungen
1. Eingebrannten Zucker, geschmolzenen Kunststoff, Aluminiumfolie oder
andere schmelzbare Materialien so-
fort, noch im heißen Zustand mit
einem Reinigungsschaber entfernen.
1 Achtung: Beim Hantieren mit dem
Reinigungsschaber auf der heißen
Kochzone besteht Verbrennungsgefahr!
2. Anschließend das abgekühlte Kochfeld normal reinigen.
3 Sollte die Kochzone mit darauf ge-
schmolzenen Materialien bereits abgekühlt sein, erwärmen Sie diese
nochmals vor der Reinigung.
Kratzer oder dunkle Flecken in der Glaskeramikfläche, die z.B. durch
scharfkantige Topfböden entstanden sind, lassen sich nicht entfernen.
Sie beeinträchtigen jedoch die Funktionsfähigkeit des Kochfeldes nicht.
Metall-Dekorstreifen
1 Achtung! Keinen Essig, Zitrone oder kalklösende Mittel auf die Metall-
Dekorstreifen des Kochfelds bringen, es entstehen sonst matte Stellen.
Beim Reinigen nicht mit flachen Gegenständen (z.B. Messern) unter die
Dekorstreifen fahren, da sich diese sonst eventuell ablösen können.
1. Metall-Dekorstreifen mit einem feuchten Tuch und ein wenig Handspülmittel abwischen.
2. Eingetrocknete Verschmutzungen mit nassem Tuch einweichen. Anschließend wegwischen und trockenreiben.
28
Page 29

Was tun, wenn …
Abhilfe bei Störungen
Möglicherweise handelt es sich bei einer Störung nur um einen kleinen
Fehler, den Sie anhand nachfolgender Hinweise selbst beheben können.
Führen Sie keine weiteren Arbeiten selbst aus, wenn nachstehende Informationen im konkreten Fall nicht weiterhelfen.
1 Warnung! Reparaturen am Gerät dürfen nur von Fachkräften durchge-
führt werden. Durch unsachgemäße Reparaturen können erhebliche
Gefahren für den Benutzer entstehen. Wenden Sie sich im Reparaturfall
an Ihren Fachhändler oder an den Kundendienst.
Sollte das Glaskeramikkochfeld einen Glasbruch auweisen, so geben Sie
bitte der Kundendienststelle die dreistellige Zahl, welche sich auf der
Glasplatte befindet, an.
Was tun, wenn …
… die Kochzonen nicht funktionieren?
Überprüfen Sie, ob
– die Sicherung in der Hausinstallation (Sicherungskasten) intakt ist.
Sollten die Sicherungen mehrfach auslösen, rufen Sie bitte einen zugelassenen Elektroinstallateur.
– das Gerät richtig eingeschaltet ist,
– Kontrolllampen im Bedienfeld leuchten,
– die entsprechende Kochzone eingeschaltet ist,
– die Kochzonen auf die gewünschte Kochstufe eingestellt sind,
– die Sicherheitsabschaltung der Kochzonen ausgelöst hat (siehe Kapi-
tel „Sicherheit“).
… die Kochzonen sich nicht einschalten lassen?
Überprüfen Sie, ob
– das Bedienfeld verriegelt ist.
– zwischen dem Betätigen der Ein-/Aus-Taste und dem Einschalten der
gewünschten Kochzone eine Zeitspanne von mehr als 10 Sekunden
vergangen ist (siehe Kapitel „Gerät einschalten“).
– die Sensorfelder durch ein feuchtes Tuch oder mit Flüssigkeit teilwei-
se bedeckt sind.
29
Page 30

… die Anzeige bis auf h für Restwärme plötzlich ausfällt?
Überprüfen Sie, ob
– aus Versehen die Ein-/Aus-Taste betätigt wurde.
– die Sensorfelder durch ein feuchtes Tuch, Flüssigkeit oder ähnlichem
teilweise bedeckt sind.
– die Sicherheitsabschaltung aktiviert wurde.
… nach dem Ausschalten der Kochzonen kein h für Restwärme in
der Anzeige erscheint?
Überprüfen Sie, ob
– die Kochzone nur kurz in Betrieb gewesen und daher noch nicht heiß
genug ist.
Sollte die Kochzone heiß sein, rufen Sie bitte den Kundendienst.
… sich eine Kochzone nicht ausschalten lässt?
Überprüfen Sie, ob
– die Berührungsschalter durch ein feuchtes Tuch oder mit Flüssigkeit
teilweise bedeckt sind.
– die Verriegelung eingeschaltet ist.
… sich eine Kochzone nicht einschalten lässt?
Überprüfen Sie, ob
– die Kindersicherung eingeschaltet ist.
– die Verriegelung eingeschaltet ist.
… die Anzeige e leuchtet?
Überprüfen Sie, ob die Kochzone überhitzt wurde.
Diese Anzeige leuchtet bei Überhitzung, Fehlern in der Elektronik oder
aus Sicherheitsgründen.
30
… das Gerät nicht auf die Betätigung eines Sensorfeldes reagiert?
Das Gerät reagiert nicht auf die Betätigung eines Sensorfeldes, wenn
Sie gleichzeitig ein anderes, nicht für eine Kombination vorgesehenes
Sensorfeld berühren.
Wenn Sie aufgrund von Fehlbedienungen den Kundendienst in Anspruch nehmen, kann der Besuch des Kundendienst-Technikers auch
während der Garantiezeit nicht kostenlos erfolgen.
Page 31

Montageanweisung
Achtung! Montage und Anschluss des neuen Gerätes dürfen nur durch
1
einen konzessionierten Fachmann vorgenommen werden.
Beachten Sie bitte diesen Hinweis, da sonst bei auftretenden Schäden
der Garantieanspruch entfällt.
Gerätemaße
Breite 620 mm
Tiefe 520mm
Höhe 47mm
Ausschnittmaße
Breite 560mm
Tiefe 490mm
Eckradius R5
31
Page 32

Bestimmungen, Normen, Richtlinien
Dieses Gerät entspricht folgenden Normen:
• EN 60335-1 und EN 60335-2-6
bezüglich der Sicherheit elektrischer Geräte für den Hausgebrauch
und ähnliche Zwecke und
• EN 60350 bzw. DIN 44546 / 44547 / 44548
bezüglich der Gebrauchseigenschaften von Elektroherden, Kochmulden, Backöfen und Grillgeräten für den Haushalt.
• EN 55014-2 / VDE 0875 Teil 14-2
• EN 55014 / VDE 0875 Teil 14 / 1999-10
• EN 61000-3-2 / VDE 0838 Teil 2
• EN 61000-3-3 / VDE 0838 Teil 3
bezüglich der grundlegenden Schutzanforderungen zur elektro-magnetischen Verträglichkeit (EMV).
5 Dieses Gerät entspricht den folgenden EG-Richtlinien:
• 73/23/EWG vom 19.02.1973 Niederspannungs-Richtlinie
• 89/336/EWG vom 03.05.1989 (EMV-Richtlinie einschließlich Ände-
rungsrichtlinie 92/31/EWG).
32
Page 33

1 Sicherheitshinweise für den Installateur
• In der elektrischen Installation ist eine Einrichtung vorzusehen, die es
ermöglicht, das Gerät mit einer Kontaktöffnungsweite von mind.
3 mm allpolig vom Netz zu trennen.
Als geeignete Trennvorrichtungen gelten z.B. LS-Schalter, Sicherungen (Schraubsicherungen sind aus der Fassung herauszunehmen), FISchalter und Schütze.
• Dieses Gerät entspricht bezüglich des Schutzes gegen Feuergefahr
der EN 60 335-2-6. Geräte dieses Typs dürfen einseitig an nebenstehende Hochschränke oder Wände eingebaut werden.
• Schubladen dürfen nicht unter dem Kochfeld montiert werden.
• Der Berührungsschutz muss durch den Einbau gewährleistet sein.
• Die Standsicherheit des Einbauschrankes muss DIN 68930 genügen.
• Zum Schutz gegen Feuchtigkeit sind alle ausgesägten Schnittflächen
mit geeignetem Dichtungsmaterial zu versiegeln.
• Bei gefliesten Arbeitsflächen müssen die Fugen im Auflagebereich des
Kochteils mit Fugenmaterial voll ausgefüllt sein.
• Bei Natur-, Kunststein- oder Keramikplatten müssen die Schnappfe-
dern mit geeignetem Kunstharz- oder Zweikomponentenkleber eingeklebt werden.
• Dichtung auf einwandfreien Sitz und lückenlose Auflage prüfen. Es
darf keine zusätzliche Silikon-Dichtungsmasse aufgetragen werden,
das erschwert den Ausbau im Servicefall.
• Vermeiden Sie die Montage des Gerätes direkt neben Türen und unter
Fenstern. Aufklappende Türen und aufspringende Fenster können
sonst heißes Kochgeschirr von der Kochstelle reißen.
• Zur Demontage muss die Mulde von unten herausgedrückt werden.
• Die Arbeitsplatte im Ausschnittbereich reinigen.
• Das mitgelieferte, einseitig selbstklebende Dichtungsband umlaufend
auf der Unterseite des Kochfeldes entlang des äußeren Randes der
Glaskeramikscheibe aufkleben. Dabei nicht dehnen. Die Schnittstelle
soll in der Mitte einer Seite liegen. Nach dem Ablängen (einige mm
zugeben) die beiden Enden stumpf gegeneinander drücken.
33
Page 34

Elektroanschluss
Vor dem Anschluss ist zu prüfen, ob die Nennspannung des Gerätes, das
ist die auf dem Typenschild angegebene Spannung, mit der vorhandenen Netzspannung übereinstimmt. Das Typenschild befindet sich auf
der unteren Verkleidung des Kochteils.
Die Heizkörperspannung beträgt AC230V~. Auch bei älteren Netzen
mit AC220V~ arbeitet das Gerät einwandfrei.
Der Netzanschluss des Kochteils ist so auszuführen, dass eine allpolige
Trennmöglichkeit mit einer Kontaktöffnungsweite von mindestens
3mm, z.B. LS-Automat, FI-Schutzschalter oder Sicherung, vorhanden
ist.
Als Netzanschlussleitung muss eine Leitung vom Typ H05VV-F oder höherwertig verwendet werden.
Der Anschluss ist gemäß Schema vorzunehmen. Je nach AnschlussSchema sind die Anschlussbrücken entsprechend einzusetzen. Der
Schutzleiter wird mit Klemme E verbunden. Die Schutzleiterader muss
länger sein als stromführende Adern.
Die Kabelanschlüsse müssen vorschriftsmäßig ausgeführt und die
Klemmschrauben fest angezogen werden.
Abschließend ist die Anschlussleitung mit der Zugentlastungsklemme
zu sichern und die Abdeckung durch festes Andrücken zu schließen
(einrasten).
Vor dem ersten Einschalten müssen evt. vorhandene Schutzfolien oder
Aufkleber von der Glaskeramikfläche oder dem Rahmen entfernt werden.
1 Nach dem Anschließen an die Stromversorgung sind alle Kochzonen zur
Prüfung der Betriebsbereitschaft nacheinander in Maximalstellung kurz
einzuschalten.
34
Page 35

Service
Im Kapitel „Was tun, wenn …“ sind einige Störungen zusammengestellt,
die Sie selbst beheben können. Sehen Sie im Störungsfall zunächst dort
nach.
Handelt es sich um eine technische Störung?
Dann wenden Sie sich bitte an unseren Kundendienst oder einen unserer Service-Partner (Adressen und Telefonnummern finden Sie im Verzeichnis „Kundendienststellen“).
Bereiten Sie das Gespräch in jedem Fall gut vor. Sie erleichtern so die
Diagnose und die Entscheidung, ob ein Kundendienstbesuch nötig ist.
Halten Sie möglichst genau fest:
• Wie äußert sich die Störung?
• Unter welchen Umständen tritt die Störung auf?
Notieren Sie für das Gespräch unbedingt folgende Kennziffern Ihres Gerätes auf dem Typschild:
• Modell-Bezeichnung,
• PNC-Ziffer (9 Ziffern),
• S-No-Ziffer (8 Ziffern).
Wir empfehlen, die Kennziffer hier
einzutragen, damit Sie sie stets zur
Hand haben:
Modell: . . . . . . . . . . .
PNC: . . . . . . . . . . .
S-No: . . . . . . . . . . .
Wann entstehen Ihnen auch während der Garantiezeit Kosten?
• Wenn Sie die Störung mit Hilfe der Störungstabelle (siehe Abschnitt
„Was tun, wenn ...“) selbst hätten beseitigen können,
• wenn mehrere Anfahrten des Kundendienst-Technikers erforderlich
sind, weil er vor seinem Besuch nicht alle wichtigen Informationen
erhalten hat und daher z.B. Ersatzteile holen muss. Diese Mehrfahrten können Sie vermeiden, wenn Sie Ihren Telefonanruf in der oben
beschriebenen Weise gut vorbereiten.
35
Page 36

Dear customer,
Please read these operating instructions carefully.
Pay particular attention to the section “Safety information” on the first
few pages. Please retain these operating instructions for later reference. Pass them on to possible new owners of the appliance.
The following symbols are used in the text:
1 Safety instructions
Warning: Information concerning your personal safety.
Important: Information on how to avoid damaging the appliance.
3 Information and practical tips
2 Environmental information
1. These numbers indicate step by step how to use the appliance.
2. …
3. …
These operating instructions contain information on steps you can take
yourself to rectify a possible malfunction. Refer to the section “What to
do if...”.
In the event of any technical problems please contact your nearest customer service centre at any time. (Addresses and telephone numbers
may be found in the appendix under "Customer Service Centres“).
You should also refer to the section "Service".
36
Printed on recycled paper.
Thinking ecologically means acting ecologically …
Page 37

Contents
Operating Instructions. . . . . . . . . . . . . . . . . . . . . . . . . . . . . . . . . . . . . 39
Safety . . . . . . . . . . . . . . . . . . . . . . . . . . . . . . . . . . . . . . . . . . . . . . . . . . . . . . . . . 39
Disposal . . . . . . . . . . . . . . . . . . . . . . . . . . . . . . . . . . . . . . . . . . . . . . . . . . . . . . . 41
Description of the Appliance. . . . . . . . . . . . . . . . . . . . . . . . . . . . . . . . . . . . . 42
Cooking zones and control panel. . . . . . . . . . . . . . . . . . . . . . . . . . . . . . . . . . . 42
Digital displays . . . . . . . . . . . . . . . . . . . . . . . . . . . . . . . . . . . . . . . . . . . . . . . . . . 43
Safety cut-out function for the cooking zones . . . . . . . . . . . . . . . . . . . . . . . 43
Before Using for the first time . . . . . . . . . . . . . . . . . . . . . . . . . . . . . . . . . . . 44
Initial Cleaning. . . . . . . . . . . . . . . . . . . . . . . . . . . . . . . . . . . . . . . . . . . . . . . . . . 44
Operating the hob . . . . . . . . . . . . . . . . . . . . . . . . . . . . . . . . . . . . . . . . . . . . . . 44
Touch control sensor panels . . . . . . . . . . . . . . . . . . . . . . . . . . . . . . . . . . . . . . . 44
Switching on the appliance . . . . . . . . . . . . . . . . . . . . . . . . . . . . . . . . . . . . . . . 44
Switching off the appliance . . . . . . . . . . . . . . . . . . . . . . . . . . . . . . . . . . . . . . . 45
Heat settings selecting . . . . . . . . . . . . . . . . . . . . . . . . . . . . . . . . . . . . . . . . . . . 45
Keep warm setting. . . . . . . . . . . . . . . . . . . . . . . . . . . . . . . . . . . . . . . . . . . . . . . 46
Switching the triple ring zone on and off . . . . . . . . . . . . . . . . . . . . . . . . . . . 46
Switching the casserole zone on and off . . . . . . . . . . . . . . . . . . . . . . . . . . . . 47
Switching off a cooking zone. . . . . . . . . . . . . . . . . . . . . . . . . . . . . . . . . . . . . . 48
Residual Heat Indicator. . . . . . . . . . . . . . . . . . . . . . . . . . . . . . . . . . . . . . . . . . . 48
Cooking using the automatic warm up function . . . . . . . . . . . . . . . . . . . . . . 49
Cooking without the automatic warm up function. . . . . . . . . . . . . . . . . . . . 50
Child safety lock. . . . . . . . . . . . . . . . . . . . . . . . . . . . . . . . . . . . . . . . . . . . . . . . . 51
Timer . . . . . . . . . . . . . . . . . . . . . . . . . . . . . . . . . . . . . . . . . . . . . . . . . . . . . . . . . . 54
Blocking/unblocking the control panel . . . . . . . . . . . . . . . . . . . . . . . . . . . . . . 57
Uses, Tables and Tips . . . . . . . . . . . . . . . . . . . . . . . . . . . . . . . . . . . . . . . . . . . . 58
Pans. . . . . . . . . . . . . . . . . . . . . . . . . . . . . . . . . . . . . . . . . . . . . . . . . . . . . . . . . . . 58
Advice on Cooking with and without Automatic Warm up . . . . . . . . . . . . . 59
Settings for Cooking on the Zones . . . . . . . . . . . . . . . . . . . . . . . . . . . . . . . . . 60
Cleaning and Care . . . . . . . . . . . . . . . . . . . . . . . . . . . . . . . . . . . . . . . . . . . . . . 61
Hob . . . . . . . . . . . . . . . . . . . . . . . . . . . . . . . . . . . . . . . . . . . . . . . . . . . . . . . . . . . 61
Metal décor strips . . . . . . . . . . . . . . . . . . . . . . . . . . . . . . . . . . . . . . . . . . . . . . . 62
What to do if … . . . . . . . . . . . . . . . . . . . . . . . . . . . . . . . . . . . . . . . . . . . . . . . . 63
Rectifying faults. . . . . . . . . . . . . . . . . . . . . . . . . . . . . . . . . . . . . . . . . . . . . . 63
37
Page 38

Installation Instructions . . . . . . . . . . . . . . . . . . . . . . . . . . . . . . . . . . . 65
Regulations, Standards, Directives. . . . . . . . . . . . . . . . . . . . . . . . . . . . . . . . . . 66
Safety Instructions for the Installer. . . . . . . . . . . . . . . . . . . . . . . . . . . . . . . . . 67
Electrical Connection. . . . . . . . . . . . . . . . . . . . . . . . . . . . . . . . . . . . . . . . . . . . . 68
Service . . . . . . . . . . . . . . . . . . . . . . . . . . . . . . . . . . . . . . . . . . . . . . . . . . . . . . 69
Assembly . . . . . . . . . . . . . . . . . . . . . . . . . . . . . . . . . . . . . . . . . . . . . . . . . . . . 105
38
Page 39

Operating Instructions
1 Safety
The safety aspects of this appliance comply with accepted technical
standards and the German Appliance Safety Law. However, as manufacturers we also believe it is our responsibility to familiarise you with the
following safety instructions.
Electrical Safety
• The installation and connection of the new appliance must only be
carried out by qualified personnel.
• Repairs to the appliance are only to be carried out by approved serv-
ice engineers. Repairs carried out by inexperienced persons may cause
injury or serious malfunctioning. If your appliance needs repairing,
please contact your local customer center or your dealer.
3 Please follow these instructions, otherwise the warranty will not cover
any damage that may occur.
• Flush-mounted appliances may only be operated following installa-
tion in suitable installation cabinets and workplaces which conform
to the relevant standards. This ensures sufficient protection against
contact for electrical units as required by the VDE [Association of
German Electrical Engineers].
• If your appliance malfunctions or if fractures, cracks or splits appear:
– switch off all cooking zones,
– disconnect the hob from the electricity supply.
Child Safety
The cooking zones will become hot when you cook. Therefore, always
keep small children away from the appliance.
39
Page 40

Safety During Use
• This appliance may only be used for normal cooking and frying in the
home. It is not designed for commercial or industrial purposes.
• Do not use the hob to heat the room.
• Take care when plugging electric appliances into mains sockets near
the hob. Connection leads must not come into contact with the hot
surface.
• Overheated fats and oils catch fire quickly. You should supervise
cooking when preparing foods in fat or oil (e.g. chips).
• Switch off the cooking zones after use.
Safety When Cleaning
• For safety reasons do not clean the appliance with a steam jet or high
pressure cleaner.
• Clean the hob in accordance with the maintenance and cleaning in-
structions in this manual.
How to avoid damage to the appliance
• Do not use the cooking area as a worktop or storage space.
• The frameless edge of the glass ceramic surface is susceptible to
knocks. Please be careful when moving pots and pans around.
• Do not have the cook zones on with empty pans, or with no pots or
pans on them.
• Ceramic glass is very tough, and impervious to sharp temperature
changes, but is not unbreakable. It can be damaged if particularly
hard or sharp objects fall on to it.
• Do not use pots made of cast iron, or which have damaged bases with
rough edges or burrs. Moving these around may cause scratches.
• If sugar or a mixture containing sugar falls onto a hot cooking zone
and melts, remove immediately, while still hot, using a kitchen scraper. If left to cool down, it may damage the surface when removed.
• Keep objects or materials liable to melt away from the ceramic glass
surface, for example, artificial materials, aluminium foil, or cooking
wraps. If any other materials or foodstuffs are melting on the ceramic
glass surface, these should also be cleaned away immediately, using a
kitchen scraper.
40
Page 41

2 Disposal
Disposing of the packaging material
All materials used can be fully recycled.
Plastics are marked as follows:
• >PE< for polyethylene, as used for the outer wrapping and the bags
inside.
• >PS< for polystyrene foam, e.g., as used for the padding materials.
They are completely free of CFCs.
Disposal of old appliances
1 Warning: Before disposing of old appliances please make them inoper-
able so that they cannot be the source of danger.
To do this, disconnect the appliance from the mains supply and remove the mains lead.
To protect the environment, it is important that worn out appliances
are disposed of in the correct manner.
• The appliance must not be disposed of with household rubbish.
• You can obtain information about collection dates or public refuse
disposal sites from your local refuse department or council.
41
Page 42

Description of the Appliance
Cooking zones and control panel
Single ring cooking zone
1200W
Casserole zone
2400W
Triple ring cooking zone
„Block“
sensor panel
Sensor panel
”On/Off”
42
2300W
Three-ring sensor panel
Three-ring control lamps
Cooking setting
selector
Indicator for cooking setting/ residual warmth
Control panel
Browning zone control lamp
“Timer” with
control indicators
Single ring cooking zone
1200W
Browning zone sensor panel
Cooking setting
selector
Page 43

Digital displays
The four display panels that belong to the four cooking zones indicate:
– ¾ after having been switched on,
– u when a keep warm setting has been selected,
– ¿ to Ç, depending on the cooking setting selected,
– 2 to 6 (with decimal point) for intermediate cooking settings,
– a when the automatic warm up function is in operation,
– h when there is residual warmth,
– l when the child safety device has been switched on,
– e when there is a malfunction
1 Safety cut-out function for the cooking zones
If one of the cooking zones is not switched off after a certain period of
time or the cooking setting is not altered, that particular cooking zone
will automatically switch itself off.
Any residual warmth will be indicated with h (as for “hot”) in the digital displays corresponding to the particular cooking zones.
The cooking zones switch themselves off when:
• Cooking setting u, 1 - 2 after 6 hours
• Cooking setting 3 - 4 after 5 hours
• Cooking setting 5 after 4 hours
• Cooking setting 6 - 9 after 1.5 hours
3 Should one or more cooking zones switch themselves off before the pe-
riods of time indicated have elapsed, see the chapter “What to do if …”.
Other causes for a cooking zone switching itself off
All cooking zones will immediately switch themselves off if liquid boils
over and lands on the control panel.
The same thing will happen if you place a damp cloth on the control
panel. In both instances, after the liquid or cloth has been removed, the
appliance will need to be switched on again using the main switch I.
43
Page 44

Before Using for the first time
Initial Cleaning
Wipe the ceramic glass surface with a damp cloth.
1 Important: Do not use any caustic, abrasive cleaners! The surface could
be damaged.
Operating the hob
Touch control sensor panels
To operate the touch control sensor panels, touch the desired panel
with the tip of your pointed finger until the relevant displays illuminate
or go out, or until the desired function is carried out.
3 Ensure that you are only touching one sensor panel when operating the
appliance. If you finger is too flat on the panel, the sensor panel below
may be actuated as well.
Switching on the appliance
The entire appliance is switched on using the ”On/Off” sensor panel
I.
Touch the “On/Off” sensor panel for approx. two seconds.
The digital displays will show ¾.
3 After the “On/Off” sensor panel has been actuated to switch on your
appliance, a cooking setting must be selected for a cooking zone within
approx. 10 seconds, or a time must be set using the timer (egg timer
function). If not, the appliance will switch itself off again for reasons
44
related to safety.
Page 45

Switching off the appliance
To completely switch off the appliance, actuate the “On/Off” sensor
panel I.
Touch the “On/Off” sensor panel for approx. one second.
3 After switching off a single cooking zone or the entire cooking surface,
the existing residual warmth will be displayed in the digital displays of
the corresponding cooking zones in the form of h (for “hot”).
Heat settings selecting
For setting and changing the heat setting (u to Ç) for the selected
cooking zone.
Raise the heat setting using the heat setting selector sensor panel .
Lower the heat setting using the heat setting selector sensor panel .
45
Page 46

Keep warm setting
Each of the 4 cooking zones has a keep warm setting u.
Use the heat setting selector sensor panel to set the keep warm set-
ting u.
Switching the triple ring zone on and off
According to the size of the saucepan or frying pan, when using the triple ring cooking zone you can switch from a smaller cooking zone to a
larger cooking zone using the “triple ring zone” sensor panel.
3 You can only switch to the next size if a heat setting has already been
set for the smaller heating ring.
1. Set the desired heat setting.
2. Touch the “triple ring” sensor panel.
This will switch the setting to the centre heating ring. The lower control
lamp will illuminate.
46
Page 47

3. Touch the “triple ring” sensor panel to activate the outer heating ring.
The upper control lamp will illuminate.
4. To switch off the outer heating ring, touch the “triple ring” sensor panel, and the heating ring that is outermost at the time will switch off.
Switching the casserole zone on and off
1. Set the desired heat setting.
2. To switch the casserole zone on or off, place your finger flat on the
“casserole zone” sensor field until the indicator light illuminates or goes
off.
47
Page 48

Switching off a cooking zone
1. To switch off a cooking zone touch the heat setting selector sensor
panel and simultaneously, or return the setting to zero using the
heat setting selector sensor panel .
Residual Heat Indicator
When an individual cooking zone or the entire hob is
switched off, any residual heat is shown with an h (for
“Hot”) in the digital display for the appropriate cooking
zones.
Even after the cooking zone has been switched off, the
residual heat indicator only goes out when the cooking zone is cold.
2 You can use the residual heat for melting and keeping food warm.
1 Important! As long as the residual heat indicator is illuminated, there
is a risk of burns.
1 Important! If the power supply is interrupted the h symbol will also
go out and information about residual heat will no longer be available.
However, it is still possible to burn yourself. This can be avoided by taking care around the hob.
48
Page 49

Cooking using the automatic warm up function
All of the cooking surface’s four cooking zones can be adjusted to any
of nine settings, and are equipped with an automatic warm up function:
– ¿, lowest heat setting
– Ç, highest heat setting
– a, automatic warm up function.
When you select the desired heat setting using the heat setting selector sensor panel, the cooking zone will operate at maximum power
for a certain period of time and will then automatically switch back to
the follow-on heat setting that has been set.
The length of time that the automatic warm up function operates depends on the follow-on heat setting selected.
1. Touch the heat setting selector sensor panel to set the desired heat
setting from ¿ to Æ. The heat setting that has been set will then be
displayed. After a period of 5 seconds, the a (=automatic warm up
function) will appear in the display in place of the heat setting. After
the warm up period has finished, the heat setting will once more be
displayed.
3 If you should choose a higher heat setting while the automatic func-
tion is in operation, e.g. from Á to Ã, the period of time that the warm
up function is in operation will be adjusted accordingly. If you select a
lower setting, the warm up period will end immediately.
You can cook using the automatic warm up function only if the cooking zone is cold or moderately warm. If a cooking zone is already hot
when you switch it on (h indicator), the automatic warm up function
cannot be used.
49
Page 50

Cooking without the automatic warm up function
If you wish to use the cooking zones without the automatic warm up
function, select the desired heat setting using the heat setting selector
sensor panel .
1. Touch the heat setting selector sensor panel in order to set the desired heat setting from Ç to ¿.
3 You can change the setting at any time using the heat setting selector
sensor panels and .
50
Page 51

Child safety lock
You can use the child safety lock to safeguard against unwanted use of
the cooking surface.
Switching on the child safety lock
To be able to switch on the child safety lock the appliance must be
switched on, but all the cooking zones must be switched off.
1. Touch the sensor field for approx. three seconds.
An acoustic signal will sound as confirmation.
2. Touch any heat setting sensor field .
l will appear in the displays, and the child safety lock is activated. The
appliance will switch itself off automatically after a few seconds.
51
Page 52

Overriding the child safety lock
The child safety lock can be overridden in order to use the appliance
(until the appliance is switched off again). When the appliance is
switched on again the child safety device is activated once again.
1. Switch on the appliance.
When the child safety device has been activated, l will be displayed.
2. Touch any two heat setting sensor fields and simultaneously.
52
An acoustic signal will sound as confirmation. The child safety device
has been overridden until the appliance is switched off, and the cooking surface can be used as normal.
Page 53

Switching off the child safety lock
1. Switch on the appliance.
When the child safety device has been activated, l will be displayed.
2. Touch the sensor field for approx. three seconds.
An acoustic signal will sound as confirmation.
3. Touch any heat setting sensor field .
The displays will become dark, and the child safety device is switched
off. The appliance will switch itself off automatically after a few seconds.
53
Page 54

Timer
There are two ways to use the timer:
– as a safety cut-out function. Set a cooking period for a cooking
zone, and after this time has elapsed the cooking zone will automatically switch itself off. This function can be used for more than one
cooking zone simultaneously.
– as a countdown timer without a cut-out function (“egg timer”),
whereby an acoustic signal can be heard after the set period of time
has elapsed.
3 The countdown timer cannot be used if a cooking zone is switched on.
Safety cut-out
The cooking zone(s) for which you want to use the safety cut-out function must be switched on.
1. Using the timer sensor panel, select the cooking zone for which the
safety cut-out is to be set.
54
By touching the timer sensor panel once the first active cooking zone is
selected in a clockwise direction, and the corresponding control lamp
will flash rapidly. Hereby the (e.g.) left rear control lamp corresponds to
the left rear cooking zone. 00 will appear in the timer display.
The next active cooking zone is selected by touching the timer sensor
panel again.
Page 55

2. While the control lamp is flashing rapidly, use the + or - timersetting
sensor panels to set the desired period of time for this cooking zone up
until the point where it automatically switches itself off (e.g.
15 minutes).
The safety cut-out function will be activated after several minutes
The control lamp will now flash more slowly and the remaining cooking
time will be shown in the display as it elapses. If the safety cut-out
function has been set for more than one cooking zone, the time displayed will be that for the cooking zone with the shortest period of
cooking time remaining. The control lamps for the other cooking zones
for which the safety cut-out function has been set will illuminate. To
display the remaining cooking time for any of these cooking zones, it
must be selected using the timer sensor panel, and the corresponding
control lamp will then flash rapidly.
To reset the remaining cooking time the desired cooking zone must be
selected using the timer sensor panel. The corresponding control lamp
will then flash more rapidly. The settings are reset using the + or -
timer setting sensor panels.
After the set period of cooking time has elapsed the cooking zone automatically switches itself off, an acoustic signal sounds for two minutes and the timer display flashes 00.
3. To switch off the signal, touch the timer sensor panel.
3 To make the setting more quickly, touch any of the + or - timer set-
ting sensor panels until the desired value is reached.
If the - timer setting sensor panel is actuated first, the time setting
will begin at 99 minutes, and if the + timer setting sensor panel is actuated first, the time setting will begin at 1 minute.
55
Page 56

Switching off the safety cut-out function before it
has come to an end
There are two ways to switch off the safety cut-out function before it
has come to an end.
Switch off the cooking zone and timer simultaneously
1. Using the heat setting selector sensor panel, reset the desired cook-
ing zone to zero: the cooking zone and timer will switch themselves
off.
Switch off the timer – the cooking zone remains active
1. Select the desired cooking zone using the timer sensor panel. The corre-
sponding control lamp will then flash more rapidly.
2. Using the - timer setting sensor panel, set the timer to 00:
– only the timer will switch itself off.
– the cooking zone will remain in operation.
Countdown timer
To be able to use the countdown timer the appliance must be switched
on, but all the cooking zones must be switched off.
1. Touch the timer sensor panel.
00 will be shown in the timer display.
2. Set the desired period of time using the + or - timer setting sensor
panels.
The countdown timer function will be activated after several minutes
and the remaining time will be displayed.
To reset the remaining time, touch the timer sensor panel and change
the setting using the + or - sensor panels for setting the timer.
After the set period of time has elapsed an acoustic signal sounds and
the timer display flashes 00.
3. To switch off the signal, touch the timer sensor panel.
56
Page 57

Blocking/unblocking the control panel
At any stage of the cooking process the control panel, with the exception of the “On/Off” sensor panel, can be blocked in order to prevent
the settings being changed e.g. by wiping over the panel with a cloth.
1. Touch the “block” sensor panel for approx. one second.
The control light for the “block” sensor panel will illuminate. The sensor
panels are blocked.
2. To unblock the panel, touch the “block” sensor panel again for approx.
one second.
The control light in the “block” sensor panel will go out.
3 When you switch the appliance off the blocking function is automati-
cally switched off.
57
Page 58

Uses, Tables and Tips
Pans
• You can recognise good pans by their bases. The base should be as
thick and flat as possible.
• Pay particular attention when buying new pans to the diameter of
the base. Manufacturers often give only the diameter of the upper
rim.
• Pots with aluminium or copper bases can cause metallic discolouring
on the ceramic glass surface, which is very difficult or impossible to
remove.
• Do not use cast iron pans or pans with a rough, burred or damaged
base. This can produce permanent scratching if the pan is slid across
the surface.
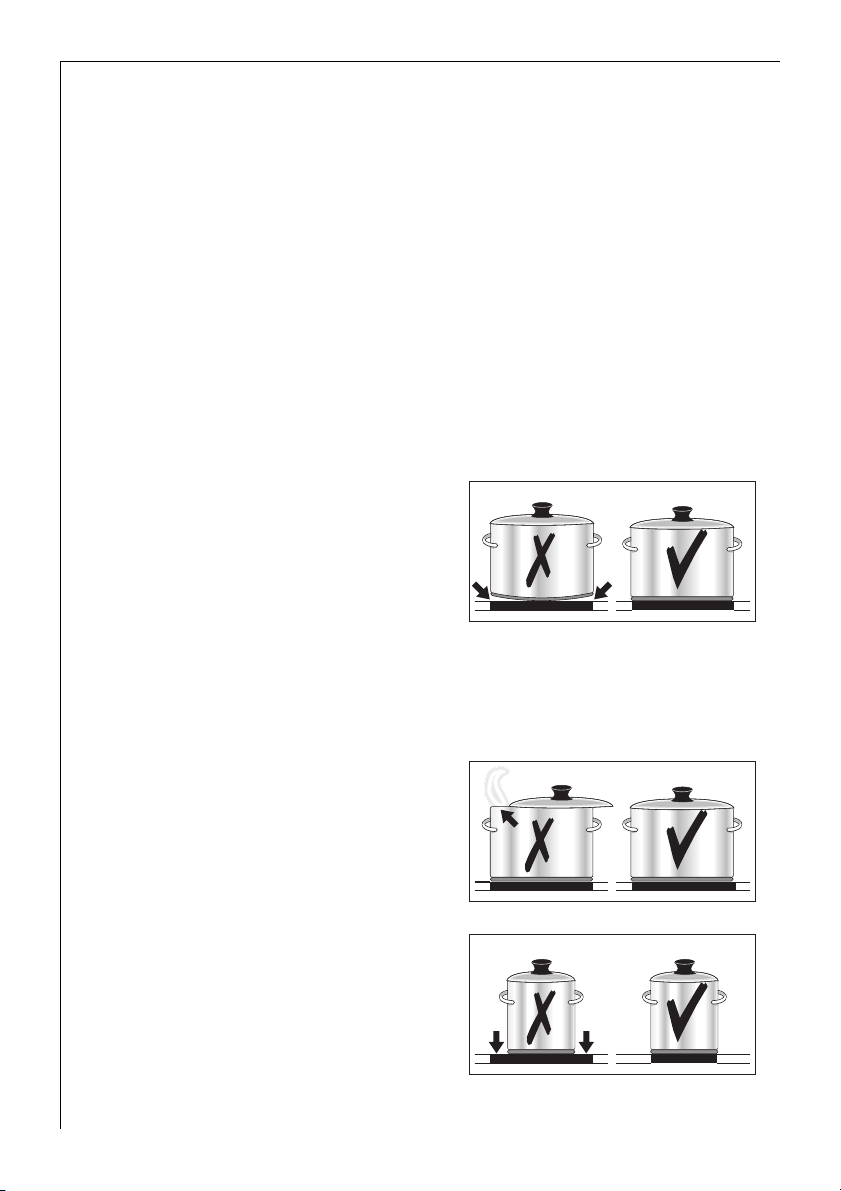
• When cold, pan bases are normal-
ly bowed slightly inwards (concave). They should never be
bowed outwards (convex).
• If you wish to use special types of
pan (e.g. a pressure cooker, simmering pan, wok, etc.), please observe the manufacturer's instructions.
2 Energy saving tips
• Always position pots and pans before switching on the cooking zone.
• Whenever possible always posi-
tion the lids firmly on pots and
pans to cover completely.
• Switch off the cooking zones be-
fore the end of the cooking time
to use the residual heat such as to
keep foods warm or for melting.
• The base of the pan should be the
same size as the cooking zone.
58
Page 59

Advice on Cooking with and without Automatic Warm up
The automatic warm up function is suitable for:
• dishes that start off cold, are heated up at high power and do not
need to be continually watched when cooking on the selected heat
setting,
• dishes that are put in a hot frying pan.
The automatic warm up function is not suitable for:
• goulash, beef olives and similar braised dishes that need continual
turning until browned correctly, have liquid added and are then
braised until cooked,
• dumplings, pasta dishes with large amounts of liquid,
• cooking with pressure cookers,
• very large quantities of soup/ stew with more than 2 litres of liquid.
General notes:
• When cooking without the automatic warm up function, we recom-
mend the use of a high heat setting to warm up the food (using the
button) and then leave the dish to finish cooking at an appropriate
lower heat setting.
• Take special note of the results when you first use the appliance! You
can then decide which heat setting is the best for "your dishes" in the
"quantities you are accustomed to preparing" with "your pans". You
will then quickly appreciate the advantages of the automatic function and will feel relaxed about using your new hob.
59
Page 60

Settings for Cooking on the Zones
The figures in the following table are benchmark figures. The switch
setting required for a certain cooking method depends on the quality
of the pans and the type and amount of food.
Switch
setting
9
8 4,5
7 3,5
6 2,0 Frying
5 10,2
4 6,5
3 4,8
2 1,7
1 1,0 Melting
u 0,5 Keeping warm Keeping meals warm
1) When cooking without the automatic function the warm up period can be individu-
ally selected.
3
Automatic
warm up func-
1)
tion
(min.)
Cooking
method
Warming
Sautéing
Frying
Intensive fry-
ing
Boiling
Steaming
Stewing
Boiling
Examples for use
Warming large amounts of liquid,
boiling noodles,
searing meat,
(browning goulash, braising meat)
Steak, sirloin,
hash browns,
sausages,
pancakes/griddle cakes
Schnitzel/chops,
liver, fish,
rissoles, fried eggs
Cooking up to 1.5 l liquid,
potatoes, vegetables
Steaming and stewing of
small amounts of vegetables,
boiling rice and
milk dishes
Melting butter,
dissolving gelatine,
melting chocolate
3 When warming or sautéing food we recommend that you set the appli-
ance to warm up setting “9” and then, for food which requires a longer
cooking time, switch to the appropriate follow on heat setting to finish
cooking the food.
60
Page 61

Cleaning and Care
Hob
1 Important: Cleaning agents must not come into contact with the hot
ceramic glass surface! All cleaning agents must be removed with plenty
of clean water after cleaning because they can have a caustic effect
when the rings are next heated!
Do not use any aggressive cleaners such as grill or oven sprays, coarse
scourers or abrasive pan cleaners.
3 Clean the ceramic glass surface after each use when it is warm to the
touch or cold. This will avoid spillages becoming burnt on.
Remove scale and water marks, fat spots and discolouration with a metallic shimmer using a commercially available ceramic glass or stainless
steel cleaner.
Light Soiling
1. Wipe the ceramic glass surface with a damp cloth and a little washing
up liquid.
2. Then rub dry with a clean cloth. Remnants of cleaner must not be left
on the surface.
3. Thoroughly clean the entire ceramic glass cooking surface once a week
with a commercially available ceramic glass or stainless steel cleaner.
4. Then wipe the ceramic glass surface using plenty of clean water and
rub dry with a clean fluff-free cloth.
Stubborn Soiling
1. To remove food that has boiled over
or stubborn splashes, use a glass
scraper.
2. Place the glass scraper at an angle
to the ceramic glass surface.
3. Remove soiling by sliding the blade.
3 You can obtain glass scrapers and
ceramic glass cleaners from specialist retailers.
61
Page 62

1 Problem Dirt
1. Remove burnt-on sugar, melted plastic, aluminium foil or other meltable
materials with a glass scraper imme-
diately and while still hot.
1 Important: There is a risk of burning
yourself when the glass scraper is
used on a hot cooking zone!
2. Then clean the hob normally when it
has cooled down.
3 If the cooking zone on which some-
thing has melted has already cooled
down, warm it up again for cleaning.
Scratches or dark marks on the ceramic glass surface, caused for example by a pan base with sharp edges, cannot be removed. However, they
do not impair the function of the hob.
Metal décor strips
1 Warning! Do not use vinegar, lemon juice or lime slaking agents on the
cooking surface's décor strips, otherwise dull spots will result.
When cleaning do not introduce flat objects (e.g. knives) under the décor strips, as otherwise these can possibly become detached.
1. Wipe metal décor strips with a damp cloth and a little washing up liquid.
2. Soak dried on spillages with a wet cloth. Afterwards wipe off and rub
dry.
62
Page 63

What to do if …
Rectifying faults
It is possible that faults have been caused by a minor error, which you
can correct yourself with the help of the following instructions. Do not
attempt any further repairs if the following instructions do not help in
each specific case.
1 Warning! Repairs to the appliance are only to be carried out by ap-
proved service engineers. Improperly effected repairs may result in considerable risk to the user. If your appliance needs repairing, please
contact your specialist dealer or customer service.
If the ceramic glass hob is broken, please quote the 3-digit number on
the glass hob when contacting customer service.
What to do if …
… the cooking zones are not functioning.
Check whether
– the fuse in the house wiring (fuse box) is intact. If the fuses trip a
number of times, please call an authorised electrician.
– the appliance is properly switched on,
– the control lamps in the control panel are illuminated,
– the relevant cooking zone is switched on,
– the cooking zones are set at the desired settings,
– the cooking zones’ safety switchoff function has been activated (see
“Safety” chapter).
… you cannot switch on the cooking zones.
Check whether
– the control panel has been blocked.
– a period of more than 10 seconds has elapsed between when the On/
Off button was actuated and the desired cooking zone switches on
(see chapter “Switching on the appliance”).
– the sensor panels are partially covered by a damp cloth or liquid.
… the display suddenly disappears except for h for residual
warmth.
Check whether
– the On/Off button was accidentally actuated.
– the sensor panels are partially covered by a damp cloth, liquid or sim-
ilar.
– the safety switchoff function has been activated.
63
Page 64

… after having switched off the cooking zones, no h for residual
warmth is indicated in the display.
Check whether
– the cooking zone was only briefly used and therefore did not become
hot enough.
If the cooking zone is hot, please call customer service.
… a cooking zone will not switch off.
Check whether
– the sensor switches are partially covered by a damp cloth or liquid.
– the blocking function is switched on.
…a cooking zone will not switch on.
Check whether
– the child safety device is swiched on.
– the blocking function is switched on.
…the e display is illuminated?
Check whether the cooking zone has been overheated.
This display illuminates in the event of overheating, errors in the electronic equipment or for reasons related to safety.
… the appliance is not responding when a sensor panel is actuated.
The appliance will not respond to a sensor panel being actuated if you
are simultaneously touching another sensor panel that is not part of a
combination.
64
If you request a visit from customer service because of an error made in
operating the appliance, a visit from a customer service engineer may
not be free of charge even during the warranty period.
Page 65

Installation Instructions
Important! The new appliance may only be installed and connected by
1
qualified personnel.
Please observe this instruction, otherwise the warranty will not cover
any damage that may occur.
Appliance dimensions
Width 620 mm
Depth 520mm
Height 47mm
Worktop cut-out dimensions
Width 560mm
Depth 490mm
Corner radius R5
65
Page 66

Regulations, Standards, Directives
This appliance meets the following standards:
• EN 60 335-1 and EN 60 335-2-6
relating to the safety of electrical appliances for household use and
similar purposes and
• EN 60350, or DIN 44546 / 44547 / 44548
relating to the operating features of electric cookers, hobs, ovens,
and grills for household use.
• EN 55014-2
• EN 55014
• EN 61000-3-2
• EN 61000-3-3
• relating to basic requirements for electro-magnetic compatibility
protection (EMC).
5 This appliance complies with the following EU Directives:
• 73/23/EWG dated 19.02.1973 (Low Voltage Directive)
• 89/336/EWG dated 03.05.1989 (EMC Directive including Amending
Directive 92/31/EWG).
66
Page 67

1 Safety Instructions for the Installer
• A device must be provided in the electrical installation which allows
the appliance to be disconnected from the mains at all poles with a
contact opening width of at least 3 mm.
Suitable isolation devices include line protecting cut-outs, fuses
(screw type fuses are to be removed from the holder), earth leakage
trips and contactors.
• In respect of fire protection, this appliance corresponds to
EN 60 335-2-6. This type of appliance may be installed with a high
cupboard or wall on one side.
• Drawers may not be fitted underneath the hob.
• The installation must guarantee shock protection.
• The kitchen unit in which the appliance is fitted must satisfy the sta-
bility requirements of DIN 68930.
• For protection against moisture, all cut surfaces are to be sealed with
a suitable sealant.
• On tiled work surfaces, the joints in the area where the hob sits must
be completely filled with grout.
• On natural, artificial stone, or ceramic tops, the snap action springs
must be bonded in place with a suitable artificial resin or mixed adhesive.
• Ensure that the seal is correctly seated against the work surface with-
out any gaps. Additional silicon sealant must not be applied; this
would make removal more difficult when servicing.
• Avoid installing the appliance next to doors and under windows. Oth-
erwise hot cookware may be knocked off the rings when doors and
windows are opened.
• The hob must be pressed out from below when removed.
• Clean the worktop around the cut-out area.
• Stick the single-sided adhesive sealing tape provided on the under-
side of the hob around the outside edge ensuring that it is not
stretched. The two ends of the tape should join in the middle of one
side. After trimming the tape (allow it to overlap by 2-3 mm), press
the two ends together.
67
Page 68

Electrical Connection
Before connecting, check that the nominal voltage of the appliance,
that is the voltage stated on the rating plate, corresponds to the available supply voltage. The rating plate is located on the lower casing of
the hob.
The heating element voltage is AC230V~. The appliance also works
perfectly on older networks with AC220V~.
The hob is to be connected to the mains using a device that allows the
appliance to be disconnected from the mains at all poles with a contact
opening width of at least 3 mm, eg. automatic line protecting cutout,earth leakage tripsorfuse.
A type H05VV-F cable or one with a higher grade must be used as the
mains connecting cable.
The connection must be carried out as shown in the diagram. The connecting links should be fitted according to the appropriate connection
diagram. The earth lead is connected to terminal E. The earth lead
must be longer than leads carrying electric current.
The cable connections must be made in accordance with regulations and the terminal screws tightened securely.
Finally, the connecting cable is to be secured with the mains cable cleat
and the covering closed by pressing firmly (lock into place).
Before switching on for the first time, any protective foil or stickers
must be removed from the ceramic glass surface.
1 Once connected to the mains supply check that all cooking zones are
ready for use by briefly switching each on in turn at the maximum setting.
68
Page 69

Service
In the “What to do if …” section a number of malfunctions are listed
that you can rectify yourself Look there first if a fault occurs.
Is it a technical fault?
If so, please contact your customer service centre. (You will find addresses and telephone numbers in the section “Customer Service Centres”.)
Always prepare in advance for the discussion. This will make diagnosis
of the problem easier and also make it easier to decide if a customer
service visit is necessary:
Please make a note of the following information as accurately as possible:
• What form does the fault take?
• Under what circumstances does the fault occur?
Prior to the telephone call it is important that you make a note of the
following appliance code numbers
that are given on the rating plate:
• model description,
• PNC code (9 digits),
• S No code (8 digits).
We recommend that you record the
code numbers here so that you always have them to hand:
Model: . . . . . . . . . . .
PNC: . . . . . . . . . . .
S-No: . . . . . . . . . . .
When do you incur costs even during the warranty period?
• if you could have remedied the fault yourself using the fault table
(see section “What to do if …”),
• if the customer service technician has to make several journeys be-
cause he was not provided with all the relevant information before
his visit and therefore, forexample, has to fetch spare parts. These
multiple trips can be avoided if you prepare your phone call as described above.
69
Page 70

Chère cliente, cher client,
veuillez lire attentivement le présent mode d'emploi.
Tenez surtout compte du chapitre «Consignes de sécurité» aux premières pages. Veuillez conserver ce mode d'emploi en vue d'une consultation ultérieure. Transmettez-le à un éventuel nouvel utilisateur de
l’appareil.
Les symboles suivants sont utilisés dans le texte:
1 Consignes de sécurité
Avertissement: Conseils concernant votre propre sécurité.
Attention: Conseils destinés à éviter d'endommager l'appareil.
3 Indications et conseils pratiques
2 Informations concernant l'environnement
1. Ces chiffres vous guident étape par étape pour l'utilisation de l'appareil.
2. …
3. …
Ce mode d’emploi contient des indications pour remédier soi-même à
d’éventuelles défaillances, consulter à cet effet la section
«Que faire si ...».
Notre service après-vente de réparation le plus proche de chez vous se
tient à tout moment à votre disposition en cas de problèmes techniques
(Vous trouverez les adresses et numéros de téléphone dans le répertoire
«Centres de service après-vente».)
Tenez également compte à cet effet de la section «Service».
70
Imprimé sur du papier respectueux de l'environnement.
Penser écologique, c'est bien; agir écologique, c'est mieux!
Page 71

Sommaire
Notice d'utilisation. . . . . . . . . . . . . . . . . . . . . . . . . . . . . . . . . . . . . . . . . 73
Sécurité . . . . . . . . . . . . . . . . . . . . . . . . . . . . . . . . . . . . . . . . . . . . . . . . . . . . . . . 73
Elimination . . . . . . . . . . . . . . . . . . . . . . . . . . . . . . . . . . . . . . . . . . . . . . . . . . . . 75
Description de l'appareil. . . . . . . . . . . . . . . . . . . . . . . . . . . . . . . . . . . . . . . . . 76
Equipement de la table de cuisson et de commande. . . . . . . . . . . . . . . . . . . 76
Affichages numériques . . . . . . . . . . . . . . . . . . . . . . . . . . . . . . . . . . . . . . . . . . . 77
Déconnexion de sécurité des zones de cuisson. . . . . . . . . . . . . . . . . . . . . . . . 77
Avant la première utilisation. . . . . . . . . . . . . . . . . . . . . . . . . . . . . . . . . . . . . 78
Premier nettoyage . . . . . . . . . . . . . . . . . . . . . . . . . . . . . . . . . . . . . . . . . . . . . . . 78
Utilisation de la table de cuisson . . . . . . . . . . . . . . . . . . . . . . . . . . . . . . . . . 78
Touches sensitives . . . . . . . . . . . . . . . . . . . . . . . . . . . . . . . . . . . . . . . . . . . . . . . 78
Mettre l’appareil en fonctionnement . . . . . . . . . . . . . . . . . . . . . . . . . . . . . . . 78
Mettre l'appareil à l'arrêt . . . . . . . . . . . . . . . . . . . . . . . . . . . . . . . . . . . . . . . . . 79
Sélection de la puissance de chauffe. . . . . . . . . . . . . . . . . . . . . . . . . . . . . . . . 79
Position de maintien au chaud. . . . . . . . . . . . . . . . . . . . . . . . . . . . . . . . . . . . . 80
Mettre en fonctionnement et à l'arrêt le foyer à triple zone . . . . . . . . . . . . 80
Mettre en fonctionnement et à l'arrêt la zone de cuisson extensible . . . . . 81
Désactiver les zones de cuisson . . . . . . . . . . . . . . . . . . . . . . . . . . . . . . . . . . . . 82
Indicateur de chaleur restante . . . . . . . . . . . . . . . . . . . . . . . . . . . . . . . . . . . . . 82
Cuisson avec la fonction de saisie automatique. . . . . . . . . . . . . . . . . . . . . . . 83
Cuisson sans la fonction de saisie automatique . . . . . . . . . . . . . . . . . . . . . . . 84
Sécurité enfants. . . . . . . . . . . . . . . . . . . . . . . . . . . . . . . . . . . . . . . . . . . . . . . . . 85
Minuteur. . . . . . . . . . . . . . . . . . . . . . . . . . . . . . . . . . . . . . . . . . . . . . . . . . . . . . . 88
Verrouiller/déverrouiller le bandeau de commande . . . . . . . . . . . . . . . . . . . . 91
Application, tableaux, conseils . . . . . . . . . . . . . . . . . . . . . . . . . . . . . . . . . . . 92
Récipients de cuisson. . . . . . . . . . . . . . . . . . . . . . . . . . . . . . . . . . . . . . . . . . . . . 92
Cuisson pour cuire avec et sans la fonction de saisie automatique. . . . . . . 93
Valeurs indicatives de cuisson . . . . . . . . . . . . . . . . . . . . . . . . . . . . . . . . . . . . . 94
Nettoyage et entretien . . . . . . . . . . . . . . . . . . . . . . . . . . . . . . . . . . . . . . . . . . 95
Table de cuisson . . . . . . . . . . . . . . . . . . . . . . . . . . . . . . . . . . . . . . . . . . . . . . . . . 95
Bandes décoratives en métal . . . . . . . . . . . . . . . . . . . . . . . . . . . . . . . . . . . . . . 97
Que faire si … . . . . . . . . . . . . . . . . . . . . . . . . . . . . . . . . . . . . . . . . . . . . . . . . . . 98
En cas d'anomalie de fonctionnement. . . . . . . . . . . . . . . . . . . . . . . . . . . . 98
71
Page 72

Instructions d'installation . . . . . . . . . . . . . . . . . . . . . . . . . . . . . . . . . 100
Règlements, normes, directives . . . . . . . . . . . . . . . . . . . . . . . . . . . . . . . . . . . . 101
Conseils de sécurité pour l'installateur . . . . . . . . . . . . . . . . . . . . . . . . . . . . . . 102
Raccordement électrique . . . . . . . . . . . . . . . . . . . . . . . . . . . . . . . . . . . . . . . . . 103
Service après-vente . . . . . . . . . . . . . . . . . . . . . . . . . . . . . . . . . . . . . . . . 104
Montage . . . . . . . . . . . . . . . . . . . . . . . . . . . . . . . . . . . . . . . . . . . . . . . . . . . . 105
72
Page 73

Notice d'utilisation
1 Sécurité
La sécurité de cet appareil est conforme aux règles reconnues de la
technique et à la législation portant sur la sécurité des appareils. En
tant que fabricant, nous nous sentons cependant obligés d'attirer votre
attention sur les indications supplémentaires de sécurité suivantes.
Sécurité électrique
• Le montage et le raccordement du nouvel appareil peuvent être ef-
fectués uniquement par un professionnel agréé.
• Les réparations sur l'appareil doivent être effectuées uniquement par
des professionnels. Des réparations mal faites peuvent entraîner de
grands dangers pour l'utilisateur. S'il est nécessaire d'effectuer une
réparation, veuillez vous adresser au service après-vente du magasin
vendeur.
3 Veuillez tenir compte de cette indication sous peine d'annulation de la
garantie en cas de dommages.
• Les appareils encastrables peuvent uniquement être utilisés après
montage dans des armoires encastrées et plans de travail appropriés
conformes aux normes. Ceci garantit la protection contre le contact
des appareils électriques exigée par VDE.
• Si des cassures, fissures ou crevasses apparaissent sur l'appareil:
– mettez tous les foyers hors service,
– débranchez les disjoncteurs ou dévissez les fusibles de la table de
cuisson.
Sécurité pour les enfants
Les foyers sont brûlants pendant le fonctionnement. Par conséquent,
tenez toujours les enfants en bas âge à distance.
73
Page 74

Sécurité pendant l'utilisation
• Cet appareil peut uniquement être utilisé pour la préparation de re-
pas ménagers, donc pour la cuisson et le rôtissage des aliments.
• N'utilisez pas le plan de cuisson pour chauffer la pièce.
• Attention lors du raccordement d'appareils électriques aux prises de
courant situées à proximité de l'appareil. Les câbles de raccordement
ne doivent pas entrer en contact avec des foyers chauds.
• Les huiles et graisses surchauffées s'enflamment facilement. Si vous
préparez des aliments dans la graisse ou l'huile (pommes frites p. ex.),
nous vous recommandons de rester à proximité pour surveiller la
cuisson.
• Mettez les foyers hors service après chaque utilisation.
Sécurité lors du nettoyage
L'appareil doit être hors service pour pouvoir procéder à son nettoyage.
Pour des raisons de sécurité, il est interdit de nettoyer l'appareil avec un
appareil à jet de vapeur ou à haute pression.
Pour éviter d'endommager l'appareil
• N'employez pas la table de cuisson comme plan de travail ou surface
de rangement.
• Le bord sans cadre de la plaque vitrocéramique est sensible aux chocs.
Faites attention lors de la manipulation de casseroles et de poêles.
• N'utilisez pas les zones de cuisson avec des récipients vides ou sans
récipient.
• La vitrocéramique est insensible aux chocs thermiques et très résis-
tante, cependant pas incassable. En particulier, les objets pointus et
durs qui tombent sur le plan de cuisson peuvent l'endommager.
• N'employez pas de casseroles en fonte ou avec un fond endommagé,
qui soient rugueuses et présentent des ébarbures. Des rayures peuvent se produire lors des déplacements.
• Si du sucre ou une préparation au sucre arrive sur le foyer chaud et
fond, enlevez-le immédiatement, tant qu'il est encore encore chaud,
avec un grattoir. Si la masse refroidit, la surface peut être détériorée
lors du nettoyage.
• Tenez tous les objets et matériaux qui peuvent fondre à distance de la
surface vitrocéramique, par exemple, matières plastiques, films d'aluminium ou films pour cuisson au four. Si quelque chose devait cependant fondre sur la surface vitrocéramique, vous devez l'enlever
immédiatement avec le grattoir de nettoyage.
74
Page 75

2 Elimination
Eliminer le matériel d'emballage
Tous les matériaux utilisés peuvent être réutilisés sans limites.
Les matières plastiques sont identifiées de la manière suivante:
• >PE< pour le polyéthylène, par ex. l'enveloppe extérieure et les sa-
chets à l'intérieur.
• >PS< pour la mousse de polystyrène, par ex. les rembourrages, qui
sont toujours exempts de CFC.
Mise au rebut des anciens appareils
1 Avertissement: Afin que l'ancien appareil ne présente aucun danger, il
est indispensable de le rendre inutilisable avant de le mettre au rebut.
A cet effet, débranchez la fiche secteur et sectionnez le câble d'alimentation.
Pour des raisons de protection de l'environnement, tous les appareils
qui ne sont plus utilisés doivent être éliminés dans les règles.
• L'appareil ne doit pas être éliminé avec les ordures ménagères.
• Le service de nettoyage public ou l'administration communale vous
renseignera sur les dates d'enlèvement ou les points de dépôt.
75
Page 76

Description de l'appareil
Equipement de la table de cuisson et de commande
Zone de cuisson
1200W
Zone extensible
2400W
“Verrouillage“
Touche
«Marche/Arrêt»
76
Foyer à triple zone
2300W
Touche triple zone
Touche
Sélection du niveau
de cuisson
Bandeau de commande
Voyants triple zone
« Minuteur » avec
voyants de contrôle
Affichage du niveau de cuisson/chaleur résiduelle
Zone de cuisson
1200W
Touche szone extensible
Voyant zone de cuisson
Sélection du niveau
de cuisson
Page 77

Affichages numériques
Les quatre affichages numériques dont sont pourvus les zones de cuisson indiquent :
– ¾ Après la mise en marche,
– u Lors de la sélection de la fonction de maintien au chaud,
– ¿ à Ç, Selon le niveau de cuisson sélectionné,
– 2 à 6 (avec point décimal) pour les niveaux de cuisson intermédiai-
res
– a Pour la fonction de saisie automatique,
– h Pour indiquer la présence de chaleur résiduelle,
– l Lorsque la sécurité enfants est activée
– e En cas d'anomalie de fonctionnement.
1 Déconnexion de sécurité des zones de cuisson
Si vous oubliez d'éteindre les zones de cuisson, celles-ci se mettront
automatiquement hors service après un certain temps.
Lorsque la coupure de sécurité a été activée apparaît dans l'écran d'affichage correspondant à la zone de cuisson si celle-ci n'est pas assez refroidie.
Les zones de cuisson se déconnectent dans les cas suivants :
• Niveau de cuisson u, 1 - 2 déconnexion au bout de 6 heures
environ
• Niveau de cuisson 3 - 4 déconnexion au bout de 5 heures
environs
• Niveau de cuisson 5 déconnexion au bout de 4 heures
environ
• Niveau de cuisson 6 - 9 déconnexion au bout de 1 heure 30
3 Si une ou plusieurs des zones de cuisson se mettent hors service avant
l'expiration des délais indiqués, voir le chapitre " Que faire si… ".
Déconnexion pour d’autres raisons
Si un débordement se répand sur la table de cuisson ou si un récipient,
un torchon mouillé recouvre le bandeau de commande, le système de
sécurité arrête l'appareil automatiquement.
Il vous suffira donc après avoir nettoyé la table de cuisson ou retiré le
récipient ou le torchon, I d'appuyer sur la touche MARCHE / ARRET
pour réutiliser la table de cuisson.
77
Page 78

Avant la première utilisation
Premier nettoyage
Essuyez le plan de cuisson vitrocéramique humide.
1 Attention: N'utilisez pas d'agents de nettoyage agressifs ou abrasifs !
La surface pourrait être endommagée.
Utilisation de la table de cuisson
Touches sensitives
Pour activer les touches sensitives, appuyez sur la touche désirée jusqu'à ce que l'indicateur correspondant s'allume ou s'éteigne ou que la
fonction désirée soit activée.
3 Assurez-vous lors de cette action que vous ne touchez qu’une seule
touche sensitive. Si vous écrasez trop votre doigt sur la touche, celle-ci
peut éventuellement ne pas réagir.
Mettre l’appareil en fonctionnement
Pour mettre l'ensemble de l'appareil en fonctionnement, appuyez sur la
touche «Marche/Arrêt» I.
Appuyez sur la touche « Marche/Arrêt » pendant environ 2 secondes.
Les écrans d'affichage indiquent le symbole ¾.
3 Après avoir actionné la touche « Marche/Arrêt » pour mettre l'appareil
en fonctionnement, une des zones de cuisson doit être activée dans les
10 secondes à l'aide des touches de sélection des zones de cuisson. Dans
le cas contraire, l'appareil se met hors service automatiquement pour
78
des raisons de sécurité.
Page 79

Mettre l'appareil à l'arrêt
Pour mettre l'ensemble de l'appareil hors service, appuyez sur la
touche « Marche/Arrêt » I.
Appuyez sur la touche « Marche/Arrêt » pendant environ une seconde.
3 Lorsqu'une seule zone ou l'intégralité de la table de cuisson est mis hors
service, la présence de chaleur résiduelle est signalée par l'indicateur h
dans les écrans d'affichage des zones de cuisson correspondantes.
Sélection de la puissance de chauffe
Sélectionnez ou modifiez la puissance de chauffe (u à Ç) de la zone de
cuisson sélectionnée.
Augmentez le niveau de cuisson à l’aide de la touche sensitive de sélection .
Diminuez le niveau de cuisson à l’aide de la touche sensitive de sélection .
79
Page 80

Position de maintien au chaud
La fonction de maintien au chaud u peut être sélectionnée sur les 4
zones de cuisson.
Sélectionnez à l'aide de la touche de sélection la fonction de maintien au chaud u.
Mettre en fonctionnement et à l'arrêt le foyer à triple
zone
Il est possible, selon la taille du récipient, de sélectionner une zone différente sur ce foyer.
3 Les zones intermédiaire et extérieure ne peuvent être activées que si un
niveau de cuisson a préalablement été sélectionné pour la zone intérieure.
1. Sélectionnez le niveau de cuisson souhaité.
2. Appuyez sur la touche « foyer à triple zone ».
La zone intermédiaire s'allume. Le voyant de contrôle inférieur s'allume.
80
Page 81

3. Appuyez de nouveau sur la touche « foyer à triple zone » pour activer la
zone extérieure. Le voyant de contrôle supérieur s'allume.
4. Pour éteindre la zone extérieure, appuyez sur la touche « foyer à triple
zone » " et la zone extérieure correspondante s'éteint.
Mettre en fonctionnement et à l'arrêt la zone de cuisson
extensible
1. Sélectionnez la zone de cuisson souhaitée.
2. Pour mettre en fonctionnement ou à l'arrêt la zone de cuisson extensi-
ble, appuyez sur la touche « fzone extensible » jusqu'à ce que le voyant
de contrôle s'allume ou s'éteigne.
81
Page 82

Désactiver les zones de cuisson
1. Pour désactiver les zones de cuisson, appuyez simultanément sur les
touches de sélection et appuyez sur la touche de sélection
pour atteindre le niveau O.
Indicateur de chaleur restante
Après avoir mis à l'arrêt une zone de cuisson ou l'ensemble de la table de cuisson, la présence de chaleur résiduelle est signalée par un h dans l'écran d'affichage
lorsque la surface de la zone de cuisson respective est
assez chaude pour constituer un danger de brûlure..
L'indicateur s'éteint seulement lorsque ce danger n'existe plus.
Cette indication n'est visible que lorsque la zone de cuisson concernée
est à l'arrêt.
2 Vous pouvez utiliser cette chaleur résiduelle pour faire fondre et main-
tenir au chaud des aliments.
1 Attention! Tant que l'indicateur de chaleur restante est allumé, il y a
danger de brûlure.
1 En cas de coupure de courant, l'indicateur de chaleur résiduelle h
s'éteint. Le risque de brûlure est cependant toujours présent. Vous pouvez l'éviter en surveillant de près votre appareil.
82
Page 83

Cuisson avec la fonction de saisie automatique
Les zones de cuisson de la table sont réglables sur neuf niveaux de cuisson et sont équipées d'une fonction de saisie automatique. :
– ¿, niveau de cuisson minimum
– Ç, niveau de cuisson maximum
– a fonction de saisie automatique
Après avoir sélectionné le niveau de cuisson souhaité à l'aide de la touche , , la zone de cuisson fonctionne pendant un certain temps en
position maximum et revient ensuite au niveau de cuisson sélectionné
pour la suite de la cuisson.
La durée de saisie automatique de la cuisson dépend de la puissance sélectionnée pour la suite de la cuisson.
1. Appuyez sur la touche de la zone de cuisson désirée pour sélectionner un niveau de cuisson entre ¿ et Æ: le niveau de cuisson réglé s'affiche. Après 5 secondes enviro a apparaît dans l'écran d'affichage.
Après expiration de la durée correspondant à la saisie automatique, le
niveau de cuisson s'affiche à nouveau.
3 Si vous sélectionnez une puissance supérieure pendant la fonction
automatique, par ex. si vous passez de Á et Ã, la durée de démarrage
de la cuisson déjà écoulée est prise en compte. Si vous réduisez la puissance, la fonction de saisie automatique est arrêtée immédiatement. Si
une zone de cuisson encore chaude est utilisée pour une nouvelle cuisson, la commande automatique utilise la chaleur résiduelle. Ceci économise du temps et de l'énergie.
83
Page 84

Cuisson sans la fonction de saisie automatique
Pour utiliser une zone de cuisson sans la fonction de saisie automatique, sélectionnez le niveau de cuisson désiré à l'aide de la touche de sélection .
1. Après avoir mis l'appareil en fonctionnement et sélectionné la zone de
cuisson souhaitée avec les touches de sélection des zones de cuisson,
appuyez sur la touche de sélection pour sélectionner un niveau de
cuisson(entre Ç et ¿).
3 Il est possible de modifier à tout moment le niveau de cuisson à l'aide
des touches de sélection et ,tant que la zone de cuisson est sélectionnée.
84
Page 85

Sécurité enfants
La sécurité enfants permet d'éviter l'utilisation non autorisée de la table de cuisson.
Activation de la sécurité enfants
L'activation de la sécurité enfants suppose que l'appareil soit en fonctionnement. En revanche aucune zone de cuisson ne doit fonctionner.
1. Appuyez sur la touche pendant environ trois secondes.
Un signal sonore confirme la manipulation.
2. Appuyez sur la touche d'une zone de cuisson .
Le symbole l s’affiche, la sécurité enfants est activée. L’appareil se déconnecte automatiquement au bout de quelques secondes.
85
Page 86

Brider la sécurité enfants
Pour une unique utilisation de l’appareil (jusqu’à la désactivation), il est
possible de brider la sécurité enfants. Lors de la prochaine mise en marche de l’appareil, la sécurité enfants est de nouveau automatiquement
activée.
1. Mettre l’appareil en marche.
Le symbole l s’affiche si la sécurité enfants est active.
2. Sélectionner au choix deux niveaux de cuisson à l’aide des touches sensitives et .
86
Un signal sonore confirme la manipulation. La sécurité enfants est bridée jusqu’à ce que l’appareil soit désactivé et la plaque de cuisson peut
être utilisée normalement.
Page 87

Désactiver la sécurité enfants
1. Mettez l'appareil en fonctionnement.
Le symbole l s’affiche si la sécurité enfants est active.
2. Appuyez sur la touche pendant environ trois secondes.
Un signal sonore confirme la manipulation.
3. Appuyez sur la touche d'une zone de cuisson..
Les voyants s’éteignent, la sécurité enfants est désactivée. L’appareil se
déconnecte automatiquement au bout de quelques secondes.
87
Page 88

Minuteur
Le minuteur est doté de deux fonctions : :
– une fonction de déconnexion automatique Lorsque la durée de
cuisson sélectionnée pour une zone de cuisson est écoulée, celle-ci
s’éteint automatiquement. Cette fonction peut s’appliquer simultanément à plusieurs zones de cuisson.
– une fonction de minuterie (« sablier ») sans fonction de connexion
après écoulement de la durée sélectionnée, un signal sonore retentit.
3 Le minuteur peut systématiquement être utilisé en même temps qu'une
zone de cuisson.
Déconnexion automatique
La/les zone(s) de cuisson pour lesquelles la déconnexion est prévue
doit(doivent) être activée(s).
1. A l'aide de la touche Minuteur, sélectionnez la zone de cuisson qui doit
être déconnectée automatiquement.
88
En appuyant une fois sur la touche Minuteur on sélectionne une première zone de cuisson et le voyant de contrôle correspondant clignote
rapidement. Par exemple, le voyant de contrôle arrière gauche correspond à la zone de cuisson arrière gauche. L'écran d'affichage du minuteur indique 00
Appuyez une seconde fois sur la touche pour sélectionner la zone de
cuisson suivante.
Page 89

2. Tandis que le voyant de contrôle clignote rapidement, appuyez sur les
touches de réglage Minuteur + et - pour sélectionner la durée après
laquelle cette zone de cuisson se déconnectera automatiquement (par
exemple 15 minutes)..
Au bout de quelques secondes, la déconnexion automatique est activée
Le voyant de contrôle clignote maintenant plus lentement et le temps
de cuisson restant s'affiche sur le bandeau de commande. Si la déconnexion automatique est activée pour plusieurs zones de cuisson, l'affichage correspond au temps de cuisson restant le plus court. Les voyants
de contrôle des autres zones de cuisson dont la déconnexion automatique est activée sont allumés. Pour afficher le temps de cuisson restant
de l'une des zones de cuisson, celle-ci doit être sélectionnée à l'aide de
la touche Minuteur, dans ce cas, le voyant de contrôle correspondant
clignote rapidement.
Pour modifier le temps de cuisson restant pour une zone de cuisson, sélectionnez celle-ci à l'aide de la touche Minuteur. Le voyant de contrôle
correspondant clignote alors plus rapidement. La modification s'effectue à l'aide des touches de réglage Minuteur + et -.
Dès que la durée de la cuisson sélectionnée est écoulée, la zone de cuisson est automatiquement désactivée et un signal sonore retentit pendant deux minutes, l'écran d'affichage du minuteur indique 00.
3. Appuyez sur la touche Minuteur pour désactiver le signal.
3 Pour un réglage plus rapide, appuyez sur l'une des touches Minuteur +
et - jusqu'à ce que la valeur souhaitée soit sélectionnée.
Si la touche de réglage Minuteur - est activée en premier, le décompte commence à 99 minutes, mais si la touche de réglage du Minuteur +
est activée en premier le réglage commence alors à 1 minute.
89
Page 90

Anticiper la désactivation de la déconnexion automatique
Il existe deux manières d’anticiper la déconnexion automatique :
En déconnectant simultanément la zone de cuisson et le minuteur
1. A l'aide des touches de réglage du niveau de cuisson , affichez
0 pour la zone de cuisson souhaitée: la zone de cuisson et le minuteur
se déconnectent.
En mettant à l'arrêt le minuteur sans désactiver la zone de cuisson
1. A l'aide de la touche Minuteur, sélectionnez la zone de cuisson souhai-
tée. Le voyant de contrôle correspondant se met à clignoter plus rapidement.
2. A l'aide de la touche de réglage Minuteur -, positionnez le minuteur
sur 00 :
– seul le Minuteur se déconnecte.
– la zone de cuisson reste activée.
Minuteur (fonction « sablier »)
L'utilisation du minuteur suppose que l'appareil soit en fonctionnement. En revanche, aucune zone de cuisson ne doit être activée.
1. Appuyez sur la touche Minuteur.
L'écran d'affichage du minuteur indique 00.
2. Sélectionnez à l'aide des touches de réglage du minuteur + et - la
durée souhaitée.
Au bout de quelques secondes, le minuteur est activé et le temps restant s’affiche.
Pour modifier le temps restant, appuyez sur la touche Minuteur et sélectionnez une autre durée à l'aide des touches de réglage + et -.
Lorsque la durée sélectionnée est écoulée, un signal sonore retentit et
l'écran d'affichage du minuteur indique 00.
3. Appuyez sur la touche Minuteur pour désactiver le signal.
90
Page 91

Verrouiller/déverrouiller le bandeau de commande
Pour éviter une modification du réglage, on peut, à tout moment au
cours du processus de cuisson, verrouiller le bandeau de commande par
exemple pour le nettoyer avec un chiffon, en ne touchant pas la touche sensitive “Marche/Arrêt”.
1. Effleurer la toucher sensitive “Verrouillage” pendant environ une seconde.
Le voyant de contrôle de la touche sensitive « Verrouillage » s'allume.
Les touches sensitives sont verrouillées.
2. Pour désenclencher le verrouillage, effleurer de nouveau la touche sensitive “verrouillage” pendant environ une seconde.
Le voyant de contrôle de la touche sensitive « Verrouillage » s'éteint.
3 La désactivation de l’appareil désenclenche automatiquement le ver-
rouillage.
91
Page 92

Application, tableaux, conseils
Récipients de cuisson
• Vous reconnaissez les bonnes batteries de cuisine au fond des casse-
roles. Le fond doit être aussi épais et aussi plan que possible.
• Faites attention au diamètre du fond du récipient lors de l'achat de
nouvelles casseroles et poêles. Les fabricants mentionnent souvent le
diamètre du bord du récipient.
• Les récipients à fond en aluminium ou en cuivre peuvent provoquer
des colorations sur la surface vitrocéramique qui ne s'enlèvent que
très difficilement, voire pas du tout.
• N'utilisez pas de casseroles en fonte ou avec un fond endommagé, qui
est rugueux et présente des ébarbures. Cela peut provoquer des rayures lors des déplacements.
• A froid, les fonds de casseroles
sont habituellement légèrement
bombés vers l'intérieur (concaves).
Ils ne peuvent en aucun cas être
bombés vers l'extérieur (convexes).
• Si vous utilisez des récipients de
cuisson spéciaux (p. ex. autocuiseur, casserole avec joint, wok, etc.),
veuillez respecter les indications du fabricant.
2 Conseils pour économiser l'énergie
• Placez toujours les casseroles et poêles sur la zone de cuisson avant
d'enclencher celle-ci.
• Si possible, fermez toujours les
casseroles et poêles avec le
couvercle.
• Coupez les zones de cuisson avant
la fin de la cuisson afin d'utiliser
la chaleur restante, p. ex. pour
maintenir des aliments au chaud
ou pour faire fondre.
• Le diamètre du récipient et de la
zone de cuisson doit être le
même.
92
Page 93

Cuisson pour cuire avec et sans la fonction de saisie
automatique
La fonction de saisie automatique de la cuisson convient pour:
• les aliments froids qui sont chauffés à forte puissance et qui n'ont pas
besoin d'être surveillés pendant qu'ils mijotent,
• les aliments placés dans une poêle chaude.
La fonction de saisie automatique de la cuisson ne convient pas
pour:
• le goulasch, les paupiettes et autres aliments braisés qui doivent être
cuits, arrosés et braisés en les retournant fréquemment pour être bien
dorés,
• les boulettes, les pâtes avec beaucoup de liquide,
• la cuisson avec une cocotte-minute,
• les très grandes quantités de soupe ou de plats uniques avec plus de
2 litres de liquide.
Informations générales:
• ·Pour la cuisson sans la fonction de saisie automatique, nous recom-
mandons d'utiliser, pour lancer la cuisson ou pour saisir une puissance
élevée (avec la touche ) et de terminer la cuisson avec la puissance
de cuisson correspondante.
• Surveillez les premières cuissons! Vous pourrez ainsi déterminer le ni-
veau de cuisson le mieux adapté à "vos plats", dans la "quantité que
vous avez l'habitude de préparer" et avec "vos casseroles". Vous apprendrez alors rapidement à apprécier les avantages de la fonction de
saisie automatique tout en ayant un sentiment de sécurité quant à
votre nouvelle table de cuisson.
93
Page 94

Valeurs indicatives de cuisson
Les valeurs indiquées dans le tableau suivant sont indicatives. Les puissances recommandées dans ce tableau pour la cuisson dépendent de la
nature du récipient et, du type et du volume des aliments à cuire
Durée de
Puissance
cuisson en
automati-
1)
que
(min.)
Type de cuis-
son
Exemples d’utilisation
9 Saisir
8 4,5
7 3,5
6 2,0 Cuisson douce
5 10,2
4 6,5
3 4,8
2 1,7
1 1,0 Faire fondre
u 0,5
1) En cuisson non automatique, la durée peut être sélectionnée séparément.
3
Faire cuire à
feu vif (rous-
sir)
Cuire
Cuissonà la
vapeur
Maintenir au
chaud
Faire bouillir de grandes quantités ,
saisir la viande
Steaks, morceaux de filet,
beignets de pomme de terre
saucisses à griller
crêpes/galettes
Escalopes/côtelettes,
foie, poisson,
boulettes de viande hâchée
(« fricadelles »), œufs au plat
Faire bouillir jusqu’à 1,5 l d’eau
pommes de terre, légumes
Cuisson à la vapeur et à l’étuvée de
petites quantités de légumes,
faire gonfler du riz et
des laitages
Faire fondre du beurre,
de la gélatine,
du chocolat
Maintenir des plats au chaud
3 Nous vous conseillons, pour faire bouillir ou pour saisir des plats, de sé-
lectionner la puissance « 9 » puis de poursuivre la cuisson en choisissant
le niveau de cuisson adéquat.
94
Page 95

Nettoyage et entretien
Table de cuisson
1 Attention: Les produits de nettoyage ne doivent pas entrer en contact
avec la surface vitrocéramique chaude! Tous les produits de nettoyage
doivent être rincés avec suffisamment d'eau claire après le nettoyage,
sinon ils pourraient avoir une action agressive lors du chauffage!
N'employez pas de produits de nettoyage agressifs, tels que p. ex. sprays
pour fours ou grill, agents abrasifs grossiers ou produits de nettoyage
abrasifs pour casseroles.
3 Nettoyez la table de cuisson après chaque utilisation, lorsqu'elle est tiè-
de ou froide. Vous éviterez ainsi que les salissures n'adhèrent.
Enlevez les taches de calcaire et les taches d'eau, les éclaboussures
de graisse et les colorations aux reflets métalliques avec un produit
de nettoyage pour surface vitrocéramique ou pour acier inoxydable du
commerce.
Salissures légères
1. Essuyez la surface vitrocéramique avec un chiffon humide et un peu de
produit de nettoyage.
2. Ensuite, essuyez avec un chiffon propre. Il ne doit pas rester de résidus
de produit de nettoyage sur la surface.
3. Une fois par semaine, nettoyez à fond l'ensemble de la surface vitrocéramique avec un produit de nettoyage du commerce pour surface vitrocéramique ou acier inoxydable.
4. Ensuite, rincez la surface vitrocéramique avec suffisamment d'eau claire et essuyez-la avec un chiffon propre ne peluchant pas.
95
Page 96

Salissures tenaces
1. Pour enlever les aliments ayant dé-
bordé ou les éclaboussures cuites,
utilisez un grattoir à lame de rasoir.
2. Tenez la lame du grattoir en oblique
sur la surface vitrocéramique.
3. Enlevez les salissures en laissant
glisser la lame.
3 Vous pouvez obtenir le grattoir à
lame pour le verre et le produit de
nettoyage pour surface vitrocéramique dans le commerce.
1 Salissures spécifiques
1. Enlevez le sucre caramélisé, les matières plastiques fondues, le film
d'aluminium ou les autres matériaux fusibles immédiatement,
lorsqu'ils sont encore chauds,
avec un grattoir à lame pour le verre.
1 Attention: Danger de brûlure lors
de l'utilisation du grattoir à lame
pour le verre sur le foyer chaud!
2. Ensuite, nettoyez normalement le
foyer refroidi.
3 Si le foyer avec le matériau fondu a déjà refroidi, réchauffez-le avant
de procéder au nettoyage.
Les rayures ou taches sombres sur la surface vitrocéramique, qui ont p.
ex. été provoquées par des fonds de casseroles présentant des arêtes vives, ne peuvent pas être éliminées. Elles ne gênent cependant pas le
fonctionnement du plan de cuisson.
96
Page 97

Bandes décoratives en métal
1 Attention ! Ne pas utiliser du vinaigre, du citron ou de produit antical-
caire sur les bandes décoratives en métal au risque de provoquer des taches mates.
Lors du nettoyage, ne pas utiliser d’objet plat (par exp. des couteaux)
pour passer sous les bandes décoratives en métal au risque de les décoller.
1. Nettoyer les bandes décoratives en métal à l’aide d’un chiffon humide
et un peu de lessive à mains.
2. Imprégner les salissures sèches à l’aide d’un chiffon mouillé. Puis essuyer et sécher.
97
Page 98

Que faire si …
En cas d'anomalie de fonctionnement
En cas de dysfonctionnement, il se peut que l'anomalie constatée ne
soit pas grave et que vous puissiez y remédier vous-même à l'aide des
indications suivantes. N'effectuez aucune intervention si les informations ci-après ne suffisent pas à résoudre vos cas précis.
1 Les réparations sur l'appareil doivent être effectuées uniquement par
des professionnels. Les réparations non effectuées dans les règles peuvent être la source de dangers importants pour l'utilisateur. Pour toute
réparation, adressez-vous au service après vente de votre vendeur.
Si le plan de cuisson en vitrocéramique présente un bris de glace,
veuillez communiquer au service après-vente le numéro à trois chif-
fres qui se trouve sur la plaque de verre.
Que faire si …
... les foyers ne fonctionnent pas ?
Vérifier que
– le fusible de l’installation électrique domestique (disjoncteur) est in-
tact. Si les fusibles sautent plusieurs fois, veuillez contacter un électricien agréé.
– l’appareil est correctement branché,
– les voyants de contrôle sont allumés sur le bandeau de commande,
– la zone de cuisson adéquate est activée,
– les zones de cuisson sont réglées au niveau de cuisson souhaité,
– la déconnexion de sécurité des zones de cuisson est désactivée (voir
chapitre « sécurité »).
98
... est impossible d’activer les foyers ?
Vérifier si
– le bandeau de commande est verrouillé.
– s’il s’est écoulé un laps de temps de plus de 10 secondes entre le mo-
ment où la touche Marche/Arrêt a été actionnée et la mise en marche
de la zone de cuisson requise (voir chapitre « mettre l’appareil en
marche »).
– les zones de commande ne sont pas partiellement recouvertes par un
chiffon humide ou par du liquide.
Page 99

... l’indicateur de chaleur résiduelle retombe soudainement à h
Vérifier si
– la touche Marche/Arrêt n’a pas été actionnée par mégarde.
– les zones de commande ne sont pas partiellement recouvertes par un
chiffon humide, par du liquide ou par autre chose.
– la déconnexion de sécurité n’a pas été activée.
... après avoir désactiver les zones de cuisson, aucun indicateur h
de chaleur résiduelle ne s’affiche ?
Vérifier si
– la zone de cuisson n’a été utilisée que très brièvement et qu’elle n’est
par conséquent pas assez chaude.
Si la zone de cuisson est chaude, contacter le service après-vente.
... il s’avère impossible d’éteindre une zone de cuisson ?
Vérifier si
– les zones de commande ne sont pas partiellement recouvertes par un
chiffon humide ou par du liquide.
– le verrouillage est activé.
... il s’avère impossible d’activer une zone de cuisson ?
Vérifier si
– la sécurité enfants est activée.
– le verrouillage est activé.
... le voyant e s’allume ?
Assurez-vous que la zone de cuisson n’est pas surchauffée.
Ce voyant ne s’allume qu’en cas de surchauffe, d’anomalies du système
électronique ou pour des raisons de sécurité.
... l’appareil ne réagit pas à l’activation d’une zone de commande ?
L’appareil ne réagit pas à l’activation d’une zone de commande si vous
avez simultanément touché une autre zone de commande non prévue
pour une combinaison.
En cas de recours au service après-vente pour des problèmes provoqués
par une erreur de manipulation, la réparation effectuée par le technicien sera facturée, même si l’appareil est encore sous garantie.
99
Page 100

Instructions d'installation
Les opérations d'installation et de branchement de votre appareil doi-
1
vent être effectuées par une personne qualifiée et selon les normes en
vigueur.
Dimensions de l'appareil
Largeur 620 mm
Profondeur 520mm
Hauteur 47mm
Dimensions de la découpe
Largeur 560mm
Profondeur 490mm
Rayon d'arrondi dans les coins R5
100
 Loading...