


WASL3E 200
WASL6E 200
................................................ .............................................
EN WASHING MACHINE USER MANUAL 2
DE WASCHMASCHINE BENUTZERINFORMATION 30

2 electrolux
Electrolux. Thinking of you.
Share more of our thinking at www.electrolux.com
CONTENTS
Safety information 2
Safety instructions 3
Technical information 4
Product description 5
Control panel 6
Programmes 10
Consumption values 13
Before first use 14
Using the appliance 14
Hints and tips 18
Care and cleaning 19
Troubleshooting 22
Installation 24
Environment concerns 28
Subject to change without notice.
SAFETY INFORMATION
Before the installation and use of the appliance, carefully read
the supplied instructions. The manufacturer is not responsible
if an incorrect installation and use causes injuries and damages. Always keep the instructions with the appliance for future reference.
CHILDREN AND VULNERABLE PEOPLE SAFETY
Warning! Risk of suffocation, injury or permanent disability.
• This appliance can be used by children aged from 8 years
and above and persons with reduced physical, sensory or
mental capabilities or lack of experience and knowledge if
they have been given supervision or instruction concerning
use of the appliance in a safe way and understand the hazards involved.
• Do not let children play with the appliance.
• Keep all packaging away from children.
• Keep all detergents away from children.
• Keep children and pets away from the appliance door when
it is open.
• If the appliance has a child safety device, we recommend
you activate it.
• Cleaning and user maintenance shall not be made by children without supervision.
electrolux 3
GENERAL SAFETY
• Before maintenance, deactivate the appliance and disconnect the mains plug from the mains socket.
• Do not change the specification of this appliance.
• Obey the maximum load volume of 9 kg (refer to the “Programme chart” chapter).
• If the supply cord is damaged, it must be replaced by the
manufacturer, its service agent or similarly qualified persons
in order to avoid a hazard.
• The operating water pressure (minimum and maximum)
must be between 0,5 bar (0,05 MPa) and 8 bar (0,8 MPa)
• The ventilation openings in the base (if applicable) must not
be obstructed by a carpet.
• The appliance is to be connected to the water mains using
the new supplied hose-sets. Old hose sets must not be
reused.
SAFETY INSTRUCTIONS
INSTALLATION
• Remove all the packaging and the transit
bolts.
• Keep the transit bolts. When you move
the appliance again you must block the
drum.
• Do not install or use a damaged appli-
ance.
•Do not install or use the appliance where
the temperature is less than 0 °C or
where it is exposed to the weather.
• Obey the installation instruction supplied
with the appliance.
• Make sure that the floor where you install
the appliance is flat, stable, heat resistant
and clean.
• Do not install the appliance where the ap-
pliance door can not be fully opened.
• Always be careful when you move the
appliance because it is heavy. Always
wear safety gloves.
• Make sure that there is air circulation be-
tween the appliance and the floor.
• Adjust the feet to have the necessary
space between the appliance and the
carpet.
Electrical connection
Warning! Risk of fire and electrical
shock.
• The appliance must be earthed.
• Make sure that the electrical information
on the rating plate agrees with the power
supply. If not, contact an electrician.
• Always use a correctly installed shockproof socket.
• Do not use multi-plug adapters and extension cables.
• Make sure not to cause damage to the
mains plug and to the mains cable.
Should the appliance power supply cable
need to be replaced, this must be carried
out by our Service Centre.
• Connect the mains plug to the mains
socket only at the end of the installation.
Make sure that there is access to the
mains plug after the installation.
4 electrolux
• Do not pull the mains cable to disconnect
the appliance. Always pull the mains
plug.
• Do not touch the mains cable or the
mains plug with wet hands.
• This appliance complies with the E.E.C.
Directives.
Water connection
• Make sure not to cause damage to the
water hoses.
• The appliance is to be connected to the
water mains using the new supplied
hose-sets. Old hose sets must not be
reused.
• Before you connect the appliance to new
pipes or pipes not used for a long time,
let the water flow until it is clean.
• The first time you use the appliance,
make sure that there is no leakage.
USE
Warning! Risk of injury, electrical
shock, fire, burns or damage to the
appliance.
• Use this appliance in a household environment.
• Do not change the specification of this
appliance.
• Obey the safety instructions on the detergent packaging.
• Do not put flammable products or items
that are wet with flammable products in,
near or on the appliance.
• Do not touch the glass of the door while
a programme operates. The glass can be
hot.
• Make sure that you remove all metal objects from the laundry.
• Do not put a container to collect possible
water leakage under the appliance. Con-
tact the Service to ensure which accessories can be used.
CARE AND CLEANING
Warning! Risk of injury or damage to
the appliance.
• Before maintenance, deactivate the appliance and disconnect the mains plug
from the mains socket.
• Do not use water spray and steam to
clean the appliance.
• Clean the appliance with a moist soft
cloth. Only use neutral detergents. Do
not use abrasive products, abrasive
cleaning pads, solvents or metal objects.
INTERNAL LIGHT
Warning! Risk of injury.
Visible LED radiation, do not look directly into the beam.
The type of light bulb or halogen lamp
used for this appliance, is only for
household appliances. Do not use it for
house lighting.
To replace the internal light, contact the
Service.
DISPOSAL
Warning! Risk of injury or suffocation.
• Disconnect the appliance from the mains
supply.
• Cut off the mains cable and discard it.
• Remove the door catch to prevent children and pets to get closed in the appliance.
TECHNICAL INFORMATION
Dimensions Width / Height / Depth 600 / 850 / 605 mm
Total depth 640 mm
Electrical connection: Voltage
Overall power
Fuse
Frequency
230 V
2200 W
10 A
50 Hz
electrolux 5
Level of protection against ingress of solid particles and moisture ensured by the protective cover, except where the low voltage equipment has no protection against moisture
Water supply pressure Minimum 0,5 bar (0,05 MPa)
Maximum 8 bar (0,8 MPa)
Water supply
Maximum load Cotton 9 kg
Spin speed Maximum 1400 rpm (WASL3E 200)
1) Connect the water inlet hose to a water tap with a 3/4'' thread.
1)
Cold water
1600 rpm (WASL6E 200)
IPX4
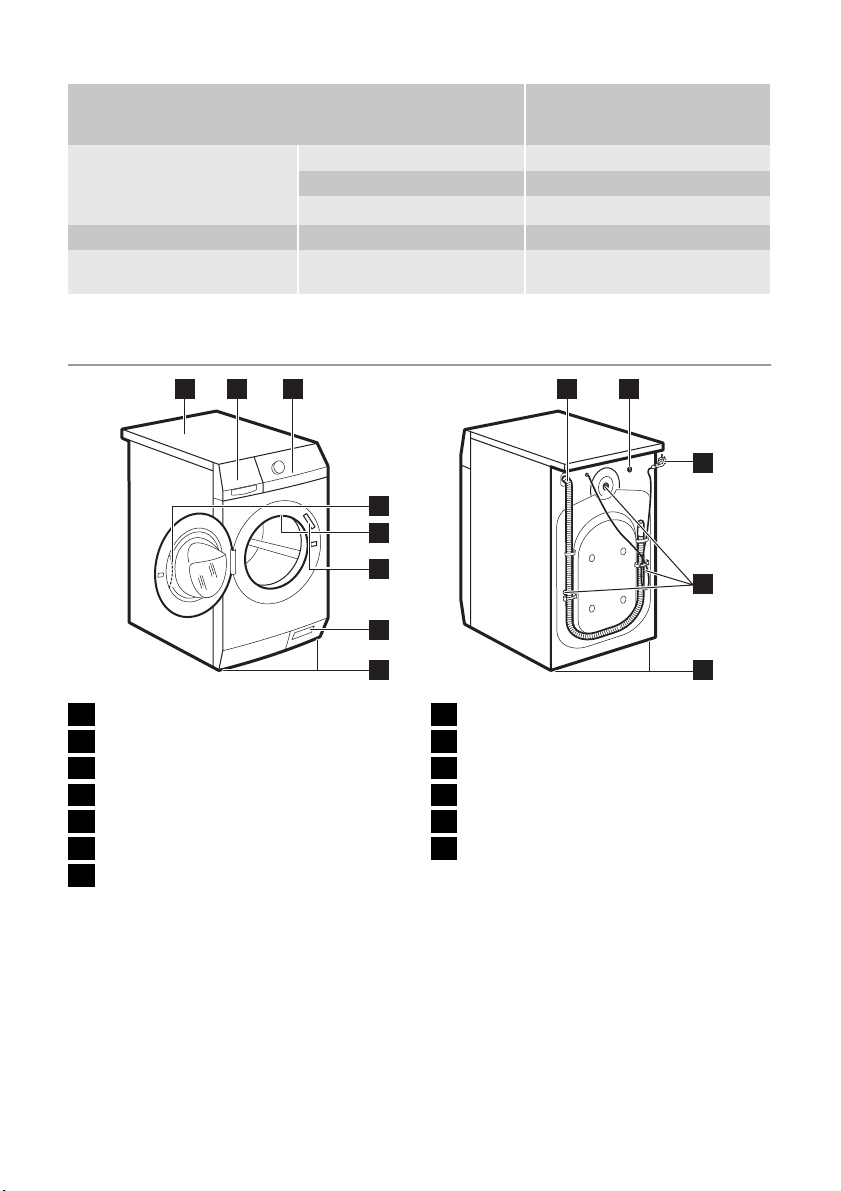
PRODUCT DESCRIPTION
1 2 3
4
5
6
7
8
10
9
11
12
13
Worktop
1
Detergent dispenser
2
Control panel
3
Door handle
4
Internal lamp
5
Rating plate
6
Drain pump
7
Feet for the appliance level
8
Water drain hose
9
Water inlet hose
10
Mains cable
11
Transit bolts
12
Feet for the appliance level
13
6 electrolux
ACCESSORIES
1 2
45 3
Spanner
1
To remove the transit bolts.
Plastic caps
2
To close the holes on the rear side of
the cabinet after the removal of the
transit bolts.
Sound barrier
3
To decrease the noise while the appliance operates.
CONTROL PANEL
1 2 3
Plastic hose guide
4
To connect the drain hose on the edge
of a sink.
Anti-flood inlet hose
5
To prevent possible leakage.
CHILD SAFETY DEVICE
• When you activate this device, you cannot close the door. This prevents children
or pets to be closed in the drum. To activate the device, turn it clockwise, until the
groove is horizontal. To deactivate the
device, turn it counterclockwise, until the
groove is vertical.
Glätten
Défroissage
Auffrischen
Rafraîchir
Baumwolle Eco
Coton Eco
Auto Off button
1
Programme knob
2
Display
3
Steam touch button (Dampf - Vapeur)
4
Memory touch buttons (Memory -
5
Mémoire)
Start/Pause touch button (Start/Pause
6
- Départ/Pause)
Delay start touch button (Zeitvorwahl -
7
Départ Différé)
6789101112
Time save touch button (Zeit Sparen -
8
Court)
Extra rinse touch button (Spülen+ -
9
Rinçage+)
Option touch button (Flecken - Taches)
10
–Stains
– Prewash
–Soak
Spin reduction touch button (Schleu-
11
dern - Essorage)
Temperature touch button (Temp.)
12
4
5
electrolux 7
TOUCH SCREEN
Do not wear gloves when you touch
the buttons.
Make sure the touch screen and buttons are always clean and dry.
AUTO OFF BUTTON
1
Press this button to activate or deactivate
the appliance. A tune sounds when the appliance is activated.
The AUTO OFF function automatically deactivates the appliance to stop the energy
consumption when:
• You do not use the appliance for 5 mi-
6
nutes before you press button
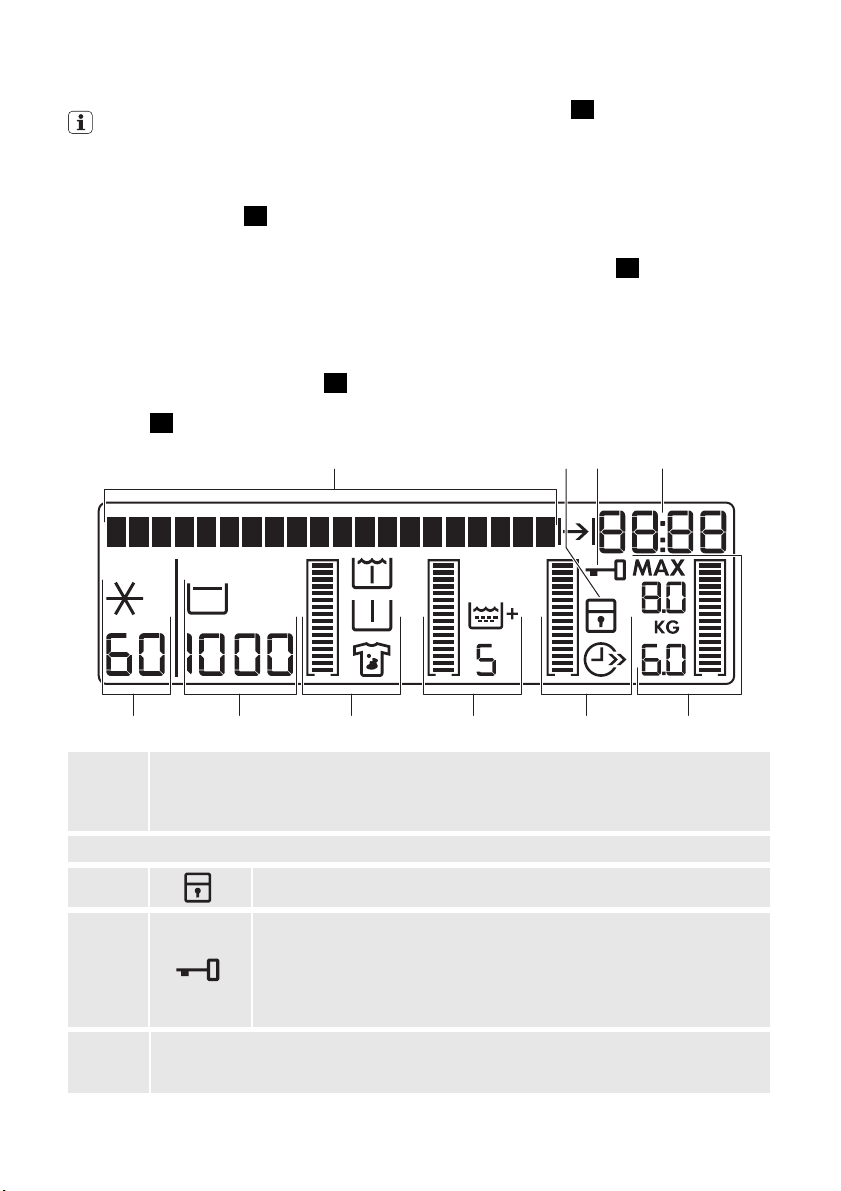
DISPLAY
3
.
ABCD
– All settings are cancelled.
–
Press button
1
to activate the appli-
ance again.
– Set again the washing programme and
all possible options.
• After 5 minutes from the end of the
washing programme. Refer to 'At the end
of programme'.
PROGRAMME KNOB
2
Turn this knob to set a programme. The related programme indicator comes on.
The text bar:
• Guides you in the use of the appliance.
A
• Shows the programme status and phase.
• Shows alarm messages. Refer to 'Troubleshooting' .
The symbols appear on the display when the related phase or function is set.
B
C
• The time of the day
D
When you activate the appliance the display shows the time of the day for some seconds. To adjust the clock, refer to "Clock setting".
Child lock
Door locked
You cannot open the door when the symbol is on.
You can open the door only when the symbol goes off.
If the symbol stays on but the programme is completed:
• There is water in the drum.
• The ' Rinse Hold ' function is on.
EFGHIJ
8 electrolux
• The programme duration
When the washing programme starts, the programme time decreases every minute.
Programme duration symbol
The symbol comes on when the digits shows the programme duration.
• The end time of the washing programme .
Programme end symbol
The symbol comes on when the digits shows the programme end time.
•The time of delay
– When you set the delayed start the time of the programme end increases by steps
of 30 minutes till 10 hours and by steps of one hour till 20 hours.
• The end of the programme
The display shows a zero.
This part comes on only if the door is open - Refer to 'Loading the laundry'.
The programme maximum load
E
The weight of the laundry
The indicator bar fills accordingly to the laundry weight.
The indicator fully fills when you put the maximum load.
If you need to set a function
• An empty indicator bar comes on when the related function is available with the set
programme. If an indicator bar does not come on, it means that it is not available.
• The function symbol comes on when the function is set.
• The indicator bar fills accordingly to the set function.
• If you make an incorrect selection the text bar on the display tells that the selection is not possible.
Time save
The symbol comes on when you set the following functions:
F
Shortened duration
Extra quick
Extra rinsing
G
The indicator bar fills accordingly the numbers of rinses.
Stains
Prewash
H
Soak
The indicator bar fills accordingly to the set functions.
The default spin speed of the programme.
I
_ _ _
No spin
1)
Rinse hold
1) Only available for Spin/Drain programme.
The default temperature of the programme.
J
Cold wash
electrolux 9
STEAM BUTTON
Touch button
4
4
to set the steam level.
This is possible only with programmes
where the steam function is available. The
duration of the steam phase changes accordingly to your selection.
MEMORY BUTTONS
Touch one of the buttons
5
5
to memorise a
programme or to set a memorised programme.
Memorise a programme
1.
Press button
1
to activate the appli-
ance.
2.
Turn the programme knob (
2
) to your
favourite programme.
3. If it is necessary, set one or more func-
tions.
4.
Touch and hold one of the buttons
5
for some seconds. The buzzer sounds
and the display shows that the programme is saved. .
Set a memorised programme
1. Touch the button where you memo-
rised the programme you want to set.
2. The programme indicator comes on
and the display shows all the information.
To cancel a memorised programme
you can only memorise a new programme.
START/PAUSE BUTTON
Touch button
6
to start or interrupt a pro-
6
gramme.
DELAY START BUTTON
Touch button
7
to delay the start of a pro-
7
gramme from 30 minutes to 20 hours.
TIME SAVE BUTTON
Touch button
8
8
to decrease the programme time.
You can select:
SHORTENED DURATION
To wash items with daily soil.
EXTRA QUICK
To wash quickly items with almost no soil.
Some programmes accept only one of
these functions.
EXTRA RINSE BUTTON
Touch button
9
to add rinsing phases to a
9
programme.
Use this function for persons allergic to detergents and in areas where the water is
soft.
STAINS, PREWASH AND SOAK
BUTTON
Touch button
10
10
to set one of the these
functions:
STAINS
Use this function for laundry with hard
stains to remove.
When you set this function, put the stain remover into compartment
.
The programme duration increases.
This function is not available with a
temperature lower than 40° C.
PREWASH
Use this function for heavy soil.
The appliance adds a prewash phase to the
main wash.
The programme duration increases.
SOAK
Use this function for heavy soil.
The appliance soaks the laundry at 30°C for
about half an hour before to wash.
10 electrolux
11
11
to:
SPIN BUTTON
Touch button
• Decrease the maximum speed of the
spin phase of the programme.
The display shows only the spin
speeds available with the set programme.
• Deactivate the spin phase (' No Spin '
function).
• Activate the ' Rinse Hold ' function.
Set this function to prevent fabric creases. The appliance does not drain the
water when the programme is completed.
TEMPERATURE BUTTON
Touch button
12
to change the default
12
temperature.
Symbols - - - and
= cold water
ACOUSTIC SIGNALS FUNCTION
You can hear the acoustic signals when:
• You activate the appliance.
• You deactivate the appliance.
• You touch the buttons.
• The programme is completed.
• The appliance has a malfunction.
To deactivate/activate the acoustic sig-
10
nals, touch button
and button 9 at the
same time for 6 seconds.
If you deactivate the acoustic signals,
they continue operate only when you
touch the buttons and when a malfunction occurs.
CHILD LOCK FUNCTION
This function prevents children to play with
the control panel.
•
To activate the function, touch button
12
and button 11 at the same time until the
display shows the symbol
.
• To deactivate the function, touch button
12
and button 11 at the same time until
the symbol
goes off.
You can activate the function:
•
Before you touch the button
6
: the ap-
pliance cannot start.
•
After you touch the button
6
, all the
buttons and the programme knob are
deactivated.
PERMANENT EXTRA RINSE FUNCTION
With this function you can keep the extra
rinse function permanently on when you set
a new programme.
•
To activate the function touch button
and button 7 at the same time until the
display shows the symbol
.
• To deactivate the function touch button
8
and button 7 at the same time until
the symbol
goes off.
8
PROGRAMMES
Programme
Temperature
Koch/Bunt
Blanc/Couleurs
Cottons
95° - Cold
Extra Leise
Extra Silence
Extra Silent
95° - Cold
Type of load
Weight of load
White and coloured cotton
with heavy level of soil.
Maximum load 9 kg
White and coloured cotton
with normal level of soil.
Maximum load 9 kg
Programme de-
scription
Wash
Rinses
Long spin
Wash
Rinses
Stop with water in
the drum
Functions
SPIN REDUCTION
RINSE HOLD
1)
STAINS
PREWASH
SOAK
EXTRA RINSING
TIME SAVE
RINSE HOLD
STAINS
PREWASH
SOAK
EXTRA RINSING
TIME SAVE
2)
3)
1)
2)
3)

electrolux 11
Programme
Temperature
Pflegeleicht
Synthétiques
Synthetics
60° - Cold
Leichtbügeln
Repassage Facile
Easy Iron
60° - Cold
Feinwäsche
Délicats
Delicates
40° - Cold
Wolle/Seide
Laine/Soie
Wool/Silk
40° - Cold
Daunen
Couette
Duvet
60° - 30°
Anti-Allergie
Anti-Allergies
Anti-Allergy
60°
Schleudern/Pumpen
Essorage/Vi-
5)
dange
Spin/Drain
0°
Spülen
Rinçage
Rinse
0°
Outdoor
Blousons
Outdoor
40° - Cold
Type of load
Weight of load
Synthetic or mixed fabric
items with normal soil.
Maximum load 4 kg
Synthetic fabric items with
normal soil. It prevents the
creases of the laundry.
Maximum load 4 kg
Delicate fabrics as acrylics,
viscose, polyester items
with normal soil.
Maximum load 4 kg
Machine washable wool as
well as for hand washable
woollens and delicate fabrics with «hand washing»
care symbol.
Maximum load 2 kg
Special programme for one
synthetic blanket, duvet,
bedspread and so on.
Maximum load 3 kg
White cotton items4).
Maximum load 9 kg
All fabrics
The maximum load of the
laundry is related to the type
of laundry.
All fabrics
Maximum load 9 kg
Waterproof, sports and outdoor clothing. Do not use
any fabric softener!
Maximum load 2.5 kg
Programme de-
scription
Wash
Rinses
Short spin
Wash
Rinses
Short spin
Wash
Rinses
Short spin
Wash
Rinses
Short spin
Wash
Rinses
Short spin
Wash
Rinses
Short spin
Drainage of the
water
Spin phase at the
maximum speed
Rinse with additives
Spin phase
Wash
Rinses
Short spin
Functions
SPIN REDUCTION
RINSE HOLD
1)
STAINS
PREWASH
2)
SOAK
EXTRA RINSING
TIME SAVE
3)
SPIN REDUCTION
RINSE HOLD
PREWASH
2)
SOAK
EXTRA RINSING
TIME SAVE
3)
SPIN REDUCTION
RINSE HOLD
PREWASH
STAINS
2)
1)
SOAK
EXTRA RINSING
TIME SAVE
3)
SPIN REDUCTION
RINSE HOLD
SPIN REDUCTION
SPIN REDUCTION
RINSE HOLD
STAINS
PREWASH
2)
SOAK
TIME SAVE
SPIN REDUCTION
NO SPIN
6)
SPIN REDUCTION
RINSE HOLD
EXTRA RINSING
SPIN REDUCTION
RINSE HOLD
EXTRA RINSING
7)
12 electrolux
Programme
Temperature
20 min. - 3 kg
40° or 30°
Type of load
Weight of load
Quick wash of sport items
or cotton and synthetic
items, lightly soiled or worn
Programme de-
scription
Wash
Rinses
Short spin
Functions
SPIN REDUCTION
once.
Maximum load 3 kg
Super Eco
0°
Baumwolle
Eco
Coton Eco
9)
Cottons Eco
60° or 40°
1) Not available with temperature lower than 40°C.
2) If you use liquid detergent, set a programme without PREWASH .
3) If you touch the button
the load. It is possible to keep the full load but the washing results are not good.
4) This program removes the micro-organisms thanks to the washing by 60°C and adds on rinse. In this way the
action is more effective. Important! Put into the compartment for stain remover a special additive for
hygiene and select the option STAINS .
5) The default spin speed is for cotton items. Set the spin speed applicable with your laundry.
6) If you select this function the appliance performs only a drain phase.
7) Press button to add rinses. With a low spin speed the appliance performs delicate rinses and a short spin.
8) Use a special detergent for very low temperature.
9) STANDARD PROGRAMMES for the Energy Label consumption values. According to regulation 1061/2010,
these programmes are respectively the «standard 60° C cotton programme» and the «standard 40° C cotton
programme». They are the most efficient programmes in terms of combined energy and water consumption for
washing normally soiled cotton laundry.
Set this programme to have a good washing results and decrease the energy consumption. The time of the
washing programme is extended.
The washing temperature of the washing phase may differ from the temperature declared for the selected programme.
Mixed fabrics (cotton and
synthetic items)
8)
.
Maximum load 3 kg
White and fast coloured cot-
ton with the normal soil.
Maximum load 9 kg
Wash
Rinses
Long spin
Wash
Rinses
Short spin
SPIN REDUCTION
RINSE HOLD
EXTRA RINSING
SPIN REDUCTION
RINSE HOLD
STAINS
PREWASH
2)
SOAK
EXTRA RINSING
TIME SAVE
8
to set the EXTRA QUICK function, we recommend that you decrease the quantity of
3)
STEAM PROGRAMMES
Programme
1)
Steam Auffrischen
Steam Rafraîchir
Steam Refresh
2)
This cycle removes odour from the
laundry.
Steam does not remove animal
odours.
Steam Glätten
Steam Défroissage
Steam Anticrease
2)
This programme helps to dewrinkle
odour from the laundry.
Type of load Load
Cotton and synthetic items.
up to
1.5 Kg
Cotton and synthetic items.
up to
1.5 Kg
electrolux 13
Steam can be used for dried, washed or worn once laundry. These programmes can reduce creases and odours and make your laundry more smooth.
Do not use any detergent. If necessary, remove stains by washing or using localized stain removal.
Steam programmes do not perform any hygienic cycle.
Do not set the Steam programme for this type of clothes:
• Clothes which is not specified on the care label as being suitable for tumble-drying.
• Clothes with inclusion of plastic, metal, wooden parts or alike.
Touch the button 4 to change the duration of steam phase.
1) If you set a Steam programme with dried laundry, at the end of the cycle the laundry feel humid. It is better to
expose clothes to the open air for about 10 minutes to let the humidity go away. Laundry should be removed from
the drum as quick as possible. After a steam cycle, clothes may to be ironed anyway, but with less effort!
2) For the programme time, refer to the display.
CONSUMPTION VALUES
At programme start the display shows the duration programme for the maximum
load capacity.
During the washing phase the programme duration is automatically calculated and
can greatly be reduced if the laundry load is lower than the maximum load capacity
(e.g. Cotton 60°C, maximum load capacity 9 kg, the programme duration exceeds 2
hours; real load 1 kg, the programme duration don’t reach 1 hour).
When the appliance is calculating the real programme duration a dot blinks in the
display.
The data of this table are approximate. Different causes can change the data: the
quantity and type of laundry, the water and ambient temperature.
Programmes Load
(kg)
Cottons 60 °C 9 1.6 69 168 52 43
Cottons 40 °C 9 1.0 69 164 52 43
Synthetics 40 °C 4 0.6 48 105 35 35
Delicates 40 °C 4 0.7 58 86 35 35
Wool/Hand wash
30 °C
Standard cotton programmes
Standard 60 °C
cotton
Standard 60 °C
cotton
Standard 40 °C
cotton
1) At the end of spin phase.
Off Mode (W) Left-On Mode (W)
0.05 0.05
Energy con-
sumption
(kWh)
2 0.35 57 61 30 30
9 0.90 65 233 52 43
4.5 0.58 40 198 52 43
4.5 0.46 40 178 52 43
Water
consump-
tion (litre)
Approxi-
mate pro-
gramme
duration
(minutes)
Remain-
ing moisture (%)
WASL3E
200
1)
Remain-
ing moisture (%)
WASL6E
200
1)
14 electrolux
Off Mode (W) Left-On Mode (W)
The information given in the charts above are in compliance with the EU Commission regulation
1015/2010 implementing directive 2009/125/EC.
BEFORE FIRST USE
1. To activate the drain system, put 2 litre
of water in the main wash compartment
of the detergent dispenser.
2. Put a small quantity of detergent in the
main wash compartment of the detergent dispenser. Set and start a programme for cotton at the highest temperature without laundry. This removes
all possible dirt from the drum and the
tub.
LANGUAGE SETTING
The first time you activate the appliance,
the display shows the default language and
tells you to confirm it or change it:
• Turn the programme knob to set the de-
sired language.
• When the display shows the necessary
6
language, touch button
to confirm the
selection.
Change the language after the first
activation
1.
Touch button
11
and button 10 at the
same time for some seconds.
2. When display shows the language set,
turn the programme knob to set the
new language.
3.
Touch button
6
to confirm the selec-
tion.
CLOCK SETTING
After you set the language, the display tells
to set the clock:
• The hour digits flash.
• Turn the programme knob to change the
hour.
•
Touch button
6
to confirm the selec-
tion.
• The minute digits flash.
• Turn the programme knob to change the
minutes.
•
Touch button
6
to confirm the selec-
tion.
Change the time of the day after the
first activation
1.
Touch button
9
and the button 8 at
the same time for some seconds.
2. The hour digits flash.
3. Turn the programme knob to change
the hour.
4.
Touch button
6
to confirm the selec-
tion.
5. The minute digits flash.
6. Turn the programme knob to change
the minutes.
7.
Touch button
6
to confirm the selec-
tion.
USING THE APPLIANCE
1. Open the water tap.
2. Connect the mains plug to the mains
socket.
For a correct operation of the weight sensor, activate the appliance and set the
programme BEFORE you put the laundry
in the drum.
ACTIVATING THE APPLIANCE AND
SETTING A PROGRAMME
1.
Press button
ance.
1
to activate the appli-
2.
Turn the programme knob (
2
) to the
necessary programme or touch one of
5
the buttons
to set a memorised
programme. The programme indicator
comes on.
3.
The indicator of button
6
flashes with
red colour.
4. The display shows the default temperature and spin. If it is necessary, touch
12
button
and button 11 to change the
water temperature and the spin speed.
electrolux 15
5. If it is necessary, touch the other buttons to add some functions or to set a
delayed start. The display shows the
symbol of the set function and the digit
D
) shows the delayed time.
(
LOADING THE LAUNDRY
1. Open the appliance door.
2. The display (E) shows the maximum
programme load for the programme
(MAX ) and the weight of the laundry
(KG). The text bar on the display tells to
add the laundry.
3. Put the laundry in the drum, one item at
a time. Shake the items before you put
them in the appliance.
4. On the display the weight of the laundry
updates by step of kg 0.5. The weight
is indicative and changes with the type
of the laundry.
If you put more laundry than the maximum load, the display tells that you put
more than the maximum load.
You can wash your laundry but the energy and water consumption increase.
To have the best consumption and
washing performance remove some
items.
The overload indication is available only
for programmes with a maximum load
lower than the appliance maximum
load.
5. Close the door. The text bar on the display tells the percentage of detergent
to use. This data is indicative and refers
to the detergent quantity for a maximum load that the manufacturer recommends.
Caution! Make sure not to have the
laundry out of the drum between the
seal and the door. There is the risk of
water leakage or damage laundry.
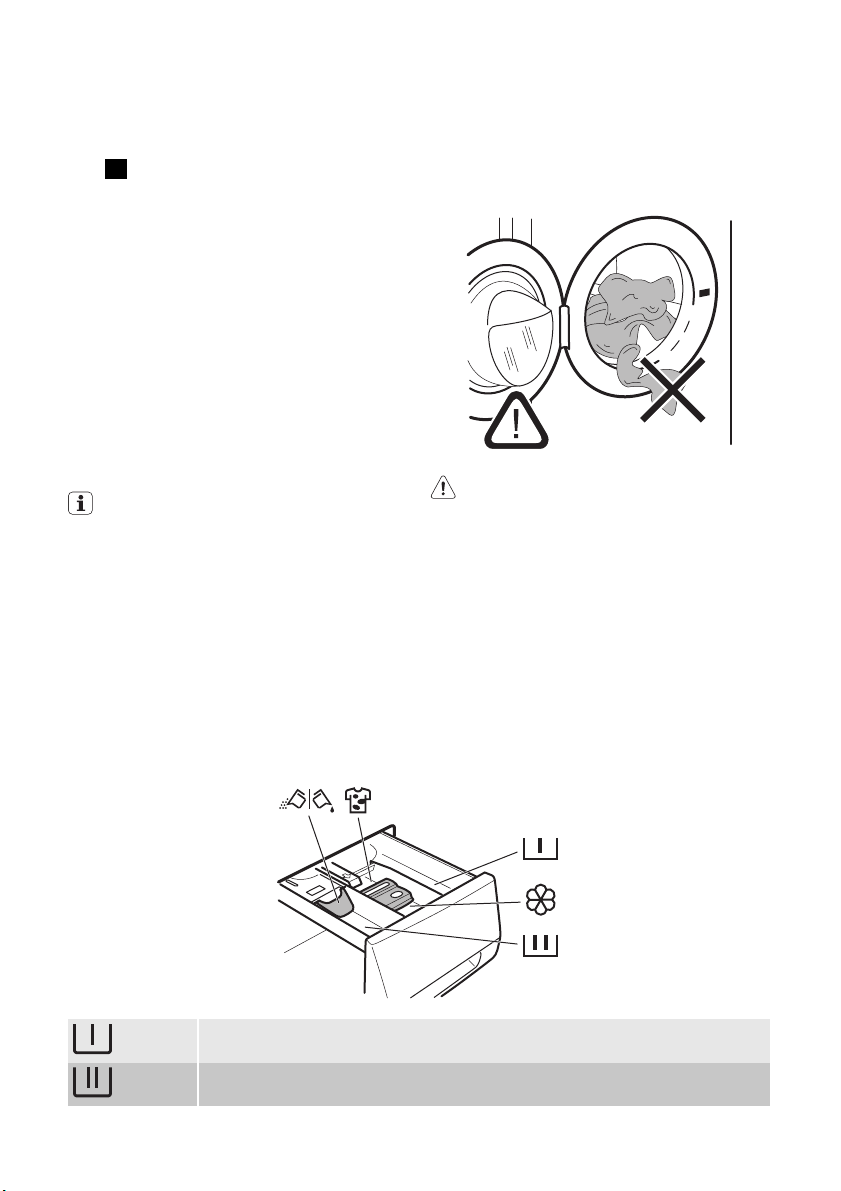
USING THE DETERGENT AND ADDITIVES
The detergent compartment for the prewash phase and the soak programme.
Add the detergent for prewash and soak before the start of the programme.
The detergent compartment for the washing phase.
If you use a liquid detergent, put it immediately before you start the programme.
16 electrolux
Liquid additives compartment (fabric conditioner, starch).
Put the product in the compartment before you start the programme.
This is the maximum level for the quantity of liquid additives.
The compartment for the stain remover.
Put the product in the compartment and set the stain function before you start
the programme.
Flap for powder or liquid detergent
Turn it (up or down) in the correct position to use powder or liquid detergent.
Always obey the instructions that you find on the packaging of the detergent products.
Check the position of the flap
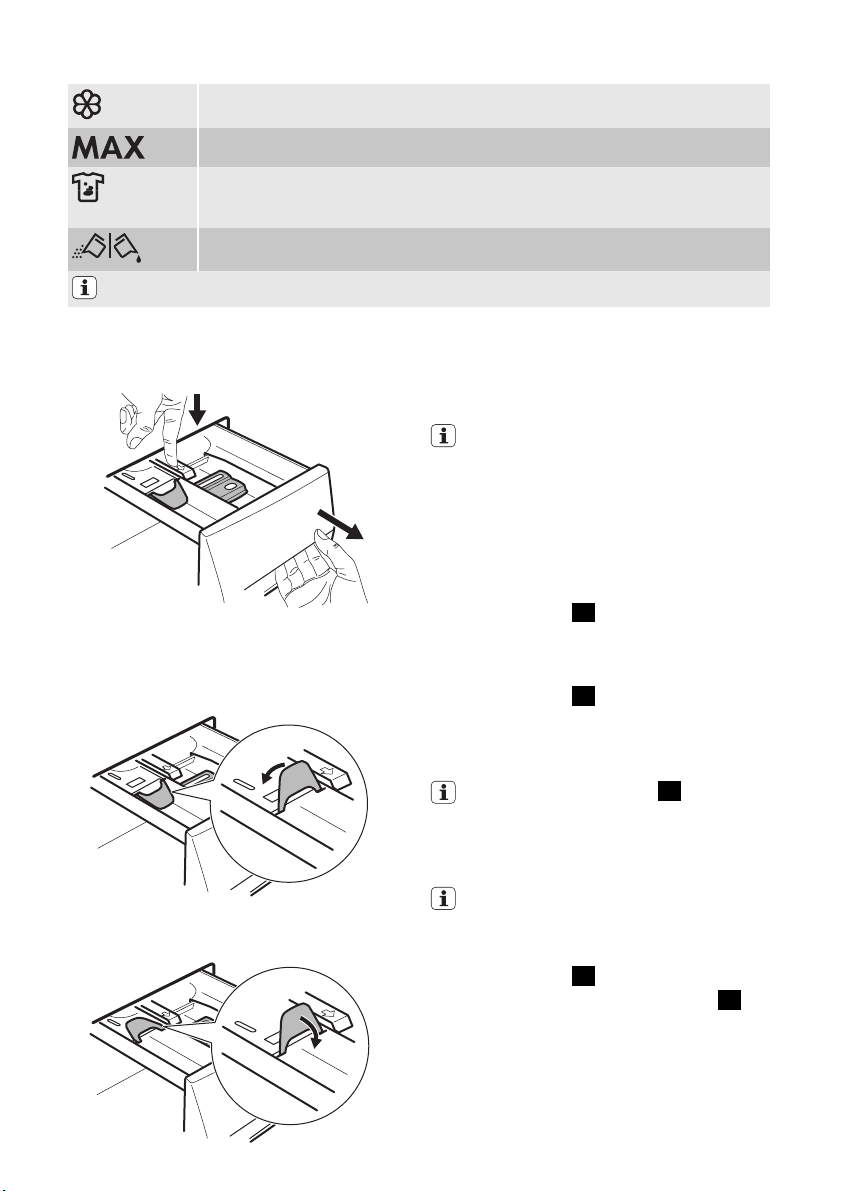
1. Pull out the detergent dispenser until it
stops.
2. Press the lever down to remove the
dispenser.
3. To use powder detergent, turn the flap
up.
4. To use liquid detergent, turn the flap
down.
5. Measure out the detergent and the fabric conditioner.
6. Carefully close the detergent dispenser.
Make sure that the flap does not cause
a blockage when you close the drawer.
With the flap in the position DOWN:
– Do not use gelatinous or thick liquid
detergents.
– Do not put more liquid detergent
than the limit showed in the flap.
– Do not set the prewash phase.
– Do not set the delay start function.
SET THE DELAY START
1.
Touch button
7
again and again to
set the desired delayed start. The display shows the expected end of the
programme
2.
Touch button
6
, the appliance starts
the countdown of the delay start.
When the countdown is completed, the
programme starts automatically.
Before you touch button 6 to start the
appliance, you can cancel or change
the set of the delay start.
You cannot set the delay start with the
Steam programme.
STARTING THE PROGRAMME
1.
Touch button
gramme. The indicator of button
6
to start the pro-
6
stops to flash and is on with red colour.
If a delayed start is set, the appliance starts
the countdown.
electrolux 17
The appliance adjust automatically the cycle time to the laundry you have put in the
drum to have perfect washing results in
the minimum necessary time. After approximately 15 minutes from the start of
the programme, the display shows the
new time value.
INTERRUPT A PROGRAMME
1.
Touch button
6
. The indicator flash-
es.
2.
Touch button
6
again. The washing
programme continues.
CANCEL A PROGRAMME
1.
Press button
1
to cancel the programme and to deactivate the appliance.
2.
Press button
1
again to activate the
appliance. Now, you can set a new
washing programme.
The appliance does not drain the water.
CHANGE A FUNCTION
You can change only some functions before they operate.
1.
Touch button
6
. The indicator flash-
es.
2. Change the function set.
3.
Touch button
6
again. The washing
programme continues.
OPEN THE DOOR
While a programme or the delay start operates, the appliance door is locked.
To open the appliance door:
1.
Touch button
6
. The door lock symbol in the display goes off and a message tells you that the door is unlocked.
2. Open the appliance door.
3. Close the appliance door and touch
6
button
again. The programme or
the delay start continues.
If the temperature and the level of the
water is too high, the door lock symbol
stays on. You cannot open the door. If
necessary, do the following procedure
to open the door:
1. Deactivate the appliance.
2. Wait for some minutes.
3. Make sure that no water is in the
drum.
Important! If you deactivate the appliance,
it is necessary to set the programme again.
AT THE END OF THE PROGRAMME
1. The appliance stops automatically.
2. The acoustic signals operate, if it is active.
3.
In the display
goes on and the message tells you that the programme is
completed.
4.
The indicator of button
6
goes off.
5. The door lock symbol goes off.
6.
Press button
1
to deactivate the appliance. After five minutes from the end
of the programme, the AUTO OFF
function automatically deactivates the
appliance.
When you activate the appliance again,
the display shows the end of the last
set programme. Turn the programme
knob to set a new cycle.
7. Remove the laundry from the appliance. Make sure that the drum is empty.
8. Keep the door ajar, to prevent mildew
and odours.
9. Close the water tap.
The washing programme is completed,
but there is water in the drum:
– The drum turns regularly to prevent the
creases in the laundry.
– The door stays locked.
– You must drain the water to open the
door.
To drain the water:
1. If necessary, decrease the spin speed.
2.
Touch button
6
. The appliance drains
the water and spins.
3. When the programme is completed
and the door lock symbol goes off, you
can open the door
4.
Press button
1
to deactivate the ap-
pliance.
The appliance drain and spin automatically after approximately 18 hours.

18 electrolux
HINTS AND TIPS
THE LAUNDRY LOAD
• Divide the laundry in: white, coloured,
synthetics, delicates and wool.
• Obey the washing instructions that are on
the laundry care labels.
• Do not wash together white and coloured
items.
• Some coloured items can discolour with
the first wash. We recommend that you
wash them separately for the first times.
• Button up pillowcases, close zippers,
hooks and poppers. Tie up belts.
• Empty the pockets and unfold the items.
• Turn inside out multilayered fabrics, wool
and items with painted illustrations.
• Remove hard stains.
• Wash with a special detergent heavy soil
stains.
• Be careful with the curtains. Remove the
hooks or put the curtains in a washing
bag or pillowcase.
•Do not wash in the appliance :
– Laundry without hems or with cuts
– Underwired bras.
– Use a washing bag to wash small
items.
• A very small load can cause balance
problems with the spin phase. If this occurs, adjust manually the items in the tub
and start the spin phase again.
STUBBORN STAINS
For some stains, water and detergent is not
sufficient.
We recommend that you remove these
stains before you put the items in the appliance.
Special stain removers are available. Use
the special stain remover that is applicable
to the type of stain and fabric.
Water hardness table
Level Type
1 soft 0-7 0-15 0-1.5 0-9
2 medium 8-14 16-25 1.6-2.5 10-16
3 hard 15-21 26-37 2.6-3.7 17-25
4 very hard > 21 > 37 >3.7 >25
°dH °T.H. mmol/l Clarke
DETERGENTS AND ADDITIVES
• Only use detergents and additives specially made for washing machines.
• Do not mix different types of detergents.
• To help the environment, do not use
more than the correct quantity of detergent.
• Obey the instructions that you find on the
on packaging of these products.
• Use the correct products for the type and
colour of the fabric, the programme temperature and the level of soil.
• If you use liquid detergents, do not set
the prewash phase.
• If your appliance has not the detergent
dispenser with the flap device, add the
liquid detergents with a dosing ball.
WATER HARDNESS
If the water hardness in your area is high or
moderate, we recommend that you use a
water softener for washing machines. In
areas where the water hardness is soft it is
not necessary to use a water softener.
To know the water hardness in your area,
contact your local water authority.
Obey the instructions that you find on the
packaging of the products.
Equivalent scales measure the water hardness:
• German degrees (°dH).
• French degrees (°TH).
• mmol/l (millimol for each litre - international unit for the hardness of water).
• Clarke degrees.
Water hardness

CARE AND CLEANING
Warning!
Disconnect the appliance from the mains
supply before you clean it.
DESCALING
The water we use contains limescale. If it
becomes necessary, use a water softener
to remove limescales.
Use a special product made for washing
machines. Obey the instructions that you
find on the packaging of the manufacturer.
Do this separately from the laundry wash.
EXTERNAL CLEANING
Clean the appliance only with soap and
warm water. Fully dry all the surfaces.
Caution! Do not use alcohol, solvents
or chemical products.
MAINTENANCE WASH
With the low temperature programmes it is
possible that some detergent stays in the
drum. Make regularly a maintenance wash.
To do this:
• Empty the laundry from the drum.
• Set the hottest cotton wash programme
• Use a correct quantity of powder detergent with biological properties.
After each wash, keep the door open for a
while to prevent mould and to let unpleasant smells go out.
electrolux 19
To do this:
• Clean the drum with special product for
stainless steel.
• Start a short programme for cotton at the
maximum temperature with a small quantity of detergent.
DETERGENT DISPENSER
1. Press the lever.
1
2
2. Pull the dispenser out.
3. Remove the top part of the liquid addi-
tive compartment.
DOOR SEAL
Regularly examine the seal and remove all
objects from the inner part.
DRUM
Regularly examine the drum to prevent
limescale and rust particles.
Only use special products to remove rust
particles from the drum.
4. Clean all the parts with water.
5. Clean the dispenser recess with a
brush.
6. Put back the dispenser in the recess.

20 electrolux
DRAIN PUMP
Regularly examine the drain pump and
make sure that it is clean.
Clean the pump if:
• The appliance does not drain the water.
• The drum cannot turn.
• The appliance makes an unusual noise
because of the blockage of the drain
pump.
• The display shows an alarm code because of the problem with water drain.
Warning!
• Disconnect the mains plug from the
mains socket.
• Do not remove the filter while the appliance operates. Do not clean the
drain pump if the water in the appliance is hot. The water must be cold
before you clean the drain pump.
Cleaning the drain pump:
1. Open the drain pump door.
2. Pull the flap out to remove it.
5. When the container is full of water, put
the drainage duct back again and empty the container. Do steps 4 and 5
again and again until no more water
flows out from the drain pump.
6. Pull back the drainage duct and turn
the filter to remove it.
1
2
7. Remove fluff and objects from the
pump.
8. Make sure that the impeller of the
pump can turn. If this does not occur,
contact the service centre.
3. Put a container below the recess of the
drain pump to collect the water that
flows out.
4. Press the two levers and pull forward
the drainage duct to let the water flow
out.
9. Clean the filter under the water tap and
put it back in the pump into the special
guides.
10. Make sure that you tighten correctly the
filter to prevent leakages.

electrolux 21
11. Put the flap back and close the drain
pump door.
2
1
THE INLET HOSE FILTER AND THE
VALVE FILTER
It could be necessary to clean the filters
when:
• The appliance does not fill with water.
• The appliance fills with the water for a
long time.
•
The indicator of button
6
flashes and
the display shows the related alarm. Refer to 'Troubleshooting'.
Warning! Disconnect the mains plug
from the mains socket.
Cleaning the water inlet filters:
1. Close the water tap.
2. Remove the water inlet hose from the
water tap.
3. Clean the filter in the inlet hose with a
stiff brush.
5. Clean the filter in the valve with a stiff
brush or a towel.
6. Install again the inlet hose. Make sure
that the couplings are tight to prevent
leakages.
45°
20°
7. Open the water tap.
EMERGENCY DRAIN
Because of a malfunction, the appliance
cannot drain the water.
If this occurs, do steps (1) through (6) of 'To
clean the drain pump'.
If necessary, clean the pump.
Put the drainage duct back and close the
drain pump flap.
When you drain the water with the emergency drain procedure, you must activate
again the drain system:
1. Put 2 litres of water in the main wash
compartment of the detergent dispenser.
2. Start the programme to drain the water.
4. Remove the inlet hose behind the appliance.
FROST PRECAUTIONS
If the appliance is installed in an area where
the temperature can be less than 0 °C, remove the remaining water from the inlet
hose and the drain pump.
1. Disconnect the mains plug from the
mains socket.
2. Close the water tap.
3. Remove the water inlet hose

22 electrolux
4. Put the two ends of the inlet hose in a
container and let the water flow out of
the hose.
5. Empty the drain pump. Refer to the
emergency drain procedure
Warning! Make sure that the
temperature is more than 0 °C before
you use the appliance again.
The manufacturer is not responsible for
damages caused by low temperatures.
6. When the drain pump is empty, install
the inlet hose again.
TROUBLESHOOTING
The start of the appliance does not occur or
it stops during operation.
Try to find a solution to the problem before
you contact the service centre (refer to the
table).
Problem Possible cause Possible solution
The display tells to
check the tap: the
appliance does not
fill with water.
The water inlet hose is dam-
The filters in the water inlet
The connection of the water in-
The water pressure is too low. Contact your local water authority.
The water tap is blocked or is
The display tells to
check the drain filter: the appliance
does not drain the
water.
The filter of the drain pump is
The connection of the water
The display tells to
check the door.
The display tells
there is a water
alert.
The water tap is closed. Open the water tap.
aged.
hose is blocked .
let hose is not correct.
furred with limescale.
The water drain hose is dam-
aged.
blocked.
drain hose is not correct.
The appliance door is open or
not closed correctly.
The anti-flood device is activa-
ted.
PROBLEM WITHOUT ALARM MESSAGE
Problem Possible cause Possible solution
The appliance does
not drain the water.
The function Rinse Hold is on. Set the drain programme.
The spin phase does
not operate.
A washing programme without
the drain phase is set.
The spin phase is off. Set the spin programme.
With some problems, the acoustic signals operate and the display shows an
alarm message.
Warning! Deactivate the appliance be-
fore you do the checks.
Make sure that the water inlet hose has
no damages.
Clean the filters. Refer to 'Care and
cleaning'.
Make sure that the connection is correct.
Clean the water tap.
Make sure that the water drain hose has
no damages.
Clean the filter of the drain pump. Refer
to 'Care and cleaning'.
Make sure that the connection is correct.
Close the door correctly.
• Disconnect the appliance.
• Close the water tap.
• Contact the service centre.
Set the drain programme.

electrolux 23
Problem Possible cause Possible solution
The filter of the drain pump is
blocked.
Balance problems with the
laundry load.
The programme
does not start.
The mains plug is not connected in the mains socket.
Blow out fuse in the household
Clean the filter of the drain pump. Refer
to 'Care and cleaning'.
Adjust manually the items in the tub and
start the spin phase again.
Put in the mains plug.
Replace the fuse.
fuse box.
You did not touch button 6 . Touch button 6 .
The delay start is set. If necessary to wash the laundry imme-
diately, cancel the delay start.
The Child Lock function is acti-
Deactivate the Child Lock function.
vated.
There is water on the
floor.
Leakages from the drain
The water drain hose is dam-
You cannot open the
appliance door.
Leakages from the couplings
of the water hoses.
pump.
aged.
The washing programme is in
operation.
Make sure that the couplings are tight.
Make sure that the drain pump filter is
tight.
Make sure that the water inlet hose has
no damages.
Let the washing programme end.
There is water in the drum. Set the drain or the spin programme.
The appliance makes
an unusual noise.
You did not remove the pack-
Incorrect level of the appliance.
aging and/or the transit bolts.
Adjust the level of the appliance. Refer
to 'Installation'.
Remove the packaging and/or the transit bolts. Refer to 'Installation'.
The load is very small. Add more laundry in the drum.
The appliance fills
with water and drain
The end of the drain hose is
too low.
Make sure that the drain hose is in the
correct position.
immediately.
The washing results
are not satisfactory.
You did not remove the stub-
The detergent you used was
not sufficient or correct.
born stains before you wash
Increase the detergent quantity or use a
different one.
Use special products to remove the
stubborn stains.
the laundry.
You set a not correct tempera-
ture.
Make sure that you set the correct temperature.
Too much laundry load. Decrease the laundry load.
The internal lamp is
off.
After a steam programme, garments
The lamp is burned. To replace the lamp, contact the service
centre.
The appliance is not accurately
levelled.
Check the levelling and adjust the appliance by raising or lowering the feet.
are partially wet.
After a steam pro-
gramme, garments
are not sufficiently
A wrong STEAM programme
has been selected (e.g. Synthetic instead of Cotton).
Note the composition of the fabric.
smooth.

24 electrolux
Problem Possible cause Possible solution
Excessive laundry load. Reduce the laundry load
The drum is empty
and the display
shows there is some
weight in .
The drum is full but
the display shows
0.0 kg.
After the check, activate the appliance. The
programme continues from the point of in-
It is necessary to set a tare.
You loaded the laundry before
to activate the appliance.
If the display shows other alarm message,
contact the service centre.
Press button 1 to deactivate the appliance and to activate it again.
Press button 1 to deactivate the appliance . Empty the drum and obey to the
necessary steps. (Refer to 'Loading the
laundy')
terruption.
If the problem occurs again, contact the
service centre.
INSTALLATION
FIXING PLATE KIT (4055171146)
Available from your authorized dealer.
If you install the appliance on a plinth, secure the appliance in the fixing plates.
Follow the instructions supplied with the kit.
UNPACKING
1. Use the gloves. Remove the external
film. If necessary, use a cutter.
4. Remove the internal film.
2. Remove the cardboard top.
3. Remove the polystyrene packaging
materials.
5. Open the door. Remove the polystyrene piece from the door seal and all the
items from the drum.

electrolux 25
6. Put the front piece on the floor behind
the appliance. Carefully put down the
appliance with the rear side on it. Make
sure not to damage the hoses.
7. Remove the polystyrene protection
from the bottom.
1
2
8. Fully clean and dry the bottom of the
appliance. Do not use alcohol, solvents
or chemical products.
9. Make sure to identify the different sizes
and the positions of the sound barriers.
Refer to the illustration:
A (FRONT) = Front of the appliance
B (BACK) = Rear of the appliance
A
B
10. – Remove the adhesive strip from the
silent barriers.
– Attach the four barriers to bottom of
the appliance. Refer to the illustration.
– Make sure that the barriers are se-
curely attached.
x4
A
B
11. Pull up the appliance in vertical position.

26 electrolux
12. Remove the power supply cable and
the drain hose from the hose holders.
13. Remove the three bolts. Use the key
supplied with the appliance.
14. Pull out the plastic spacers.
15. Replace the plastic spacers with the
plastic caps. You can find these caps in
the user manual bag.
We recommend that you keep the
packaging and the transit bolts for
when you move the appliance.
POSITIONING AND LEVELLING
• Install the appliance on a flat hard floor.
• Make sure that carpets do not stop the
air circulation below the appliance.
• Make sure that the appliance does not
touch the wall or other units
• Loosen or tighten the feet to adjust the
level. A correct adjustment of the appliance level prevents the vibration, noise
and the movement of the appliance when
in operation.
x4
• The appliance must be level and stable.
Warning! Remove all the packaging
and the transit bolts before you install
the appliance.
Caution! Do not put cardboard, wood
or equivalent materials below the
appliance feet to adjust the level.
THE INLET HOSE
• Connect the hose to the appliance. Turn
the inlet hose only left or right. Loose the
ring nut to set it in the correct position.

20
O
O
45
O
O
45
20
20
O
O
45
• Connect the water inlet hose to the cold
water tap with 3/4 thread.
electrolux 27
A
WATER DRAINAGE
There are different procedures to connect
the drain hose:
With the plastic hose guide.
• On the edge of a sink.
Caution! Make sure that there are no
leaks from the couplings.
Do not use an extension hose if the inlet hose is too short. Contact the service centre for the replacement of the inlet hose.
Water-stop device
The inlet hose has a water stop device. This
device prevents water leaks in the hose because of its natural ageing. The red sector
in the window «A» shows this fault .
If this occur, close the water tap and contact the service centre to replace the hose.
Make sure that the plastic guide cannot
move when the appliance drains. Attach
the guide to the water tap or the wall.
• To a stand pipe with vent-hole.

28 electrolux
Refer to the illustration. Directly into a
drain pipe at a height of not less than 60
cm and not more than 100 cm. The end
of the drain hose must always be ventilated , i.e. the inner diameter of the drainpipe must be larger than the external diameter of the drain hose.
Without the plastic hose guide.
• To a sink spigot.
clip. Make sure that the drain hose
makes a loop to prevent that remaining
particles go in the appliance from the
sink.
• Directly to a built-in drain pipe in the
room wall and tighten it with a clip.
You can extend the drain hose to maximum 400 cm. Contact the service centre for the other drain hose and the extension.
Refer to the illustration. Put the drain
hose in the spigot and tighten it with a
ENVIRONMENT CONCERNS
The symbol on the product or on its
packaging indicates that this product may
not be treated as household waste. Instead
it should be taken to the appropriate
collection point for the recycling of electrical
and electronic equipment. By ensuring this
product is disposed of correctly, you will
help prevent potential negative
consequences for the environment and
human health, which could otherwise be
caused by inappropriate waste handling of
this product. For more detailed information
about recycling of this product, please
contact your local council, your household
waste disposal service or the shop where
you purchased the product.
PACKAGING MATERIALS
Recycle the materials with the symbol
Put the packaging in applicable containers
to recycle it.
ECOLOGICAL HINTS
To help the environment, use less water
and energy, obey these instructions:
• Set a programme without the prewash
phase to wash laundry with normal soil.
• Always start a washing programme with
the maximum load of laundry.
• If necessary, use a stain remover when
you set a programme with a low temperature.
.

• To use the correct quantity of the detergent, check the water hardness of your
domestic system
electrolux 29

30 electrolux
Electrolux. Thinking of you.
Mehr zu unserem Denken finden Sie unter
www.electrolux.com
INHALT
Sicherheitsinformationen 30
Sicherheitshinweise 31
Technische Daten 33
Gerätebeschreibung 33
Bedienfeld 34
Programme 39
Verbrauchswerte 41
Vor der ersten Inbetriebnahme 42
Gebrauch des Geräts 43
Tipps und Hinweise 47
Reinigung und Pflege 48
Fehlersuche 51
Montage 54
Umwelttipps 59
Änderungen vorbehalten.
SICHERHEITSINFORMATIONEN
Lesen Sie vor der Montage und dem Gebrauch des Geräts zuerst die Gebrauchsanleitung. Der Hersteller übernimmt keine
Verantwortung für Verletzungen und Beschädigungen durch
unsachgemäße Montage. Bewahren Sie die Gebrauchsanleitung griffbereit auf.
SICHERHEIT VON KINDERN UND
SCHUTZBEDÜRFTIGEN PERSONEN
Warnung! Es besteht Erstickungsgefahr, Risiko von
Verletzungen oder permanenten Behinderungen.
• Das Gerät kann von Kindern ab 8 Jahren und Personen mit
eingeschränkten physischen, sensorischen oder geistigen
Fähigkeiten oder mit mangelnder Erfahrung und/oder mangelndem Wissen nur dann verwendet werden, wenn sie
durch eine für ihre Sicherheit zuständige Person beaufsichtigt werden oder in die sichere Verwendung des Geräts eingewiesen wurden und die mit dem Gerät verbundenen Gefahren verstanden haben.
• Kinder dürfen nicht mit dem Gerät spielen.
• Alle Verpackungsmaterialien von Kindern fernhalten.
• Halten Sie alle Reinigungsmittel von Kindern fern.
• Halten Sie Kinder und Haustiere vom geöffneten Gerät fern.
• Falls Ihr Gerät mit einer Kindersicherung ausgestattet ist,
empfehlen wir, diese einzuschalten.

electrolux 31
• Wartung oder Reinigung des Geräts darf nicht von Kindern
ohne Aufsicht erfolgen.
ALLGEMEINE SICHERHEIT
• Schalten Sie vor Reinigungsarbeiten immer das Gerät aus
und ziehen Sie den Netzstecker aus der Steckdose.
• Nehmen Sie keine technischen Änderungen am Gerät vor.
• Beachten Sie die maximale Beladungsmenge von 9 kg (sie-
he Kapitel „Programmtabelle“).
• Wenn das Netzkabel beschädigt ist, muss es vom Herstel-
ler, einem autorisierten Kundendienst oder einer gleichermaßen qualifizierten Person ersetzt werden, um Gefahrenquellen zu vermeiden.
• Der Betriebswasserdruck (Mindest- und Höchstdruck) muss
zwischen 0,5 bar (0,05 MPa) und 8 bar (0,8 MPa) liegen.
• Die Lüftungsöffnungen im Gerätesockel (falls vorhanden)
dürfen nicht von einem Teppichboden blockiert werden.
• Das Gerät muss mit den mitgelieferten neuen Schläuchen
an die Wasserversorgung angeschlossen werden. Alte
Schläuche dürfen nicht wieder verwendet werden.
SICHERHEITSHINWEISE
MONTAGE
• Entfernen Sie die Verpackungsmaterialien
und die Transportschrauben.
• Bewahren Sie die Transportschrauben
auf. Wenn Sie das Gerät umsetzen, müssen Sie die Trommel blockieren.
• Stellen Sie ein beschädigtes Gerät nicht
auf und benutzen Sie es nicht.
• Stellen Sie das Gerät nicht an einem Ort
auf, an dem die Temperatur unter 0 °C
absinken kann, und benutzen Sie das
Gerät nicht, wenn die Temperatur unter 0
°C absinkt.
• Halten Sie sich an die mitgelieferte Montageanleitung.
• Stellen Sie sicher, dass der Boden, auf
dem das Gerät aufgestellt wird, eben, hitzebeständig und sauber ist.
• Stellen Sie das Gerät nicht an einem Ort
auf, an dem die Tür nicht vollständig geöffnet werden kann.
• Seien Sie beim Umsetzen des Geräts
vorsichtig, denn es ist schwer. Tragen Sie
stets Sicherheitshandschuhe.
• Stellen Sie sicher, dass die Luft zwischen
Gerät und Boden zirkulieren kann.
• Stellen Sie die Füße so ein, dass der dazu erforderliche Abstand zwischen Gerät
und Boden vorhanden ist.
Elektrischer Anschluss
Warnung! Brand- und
Stromschlaggefahr.
• Das Gerät muss geerdet sein.
• Stellen Sie sicher, dass die elektrischen
Daten auf dem Typenschild den Daten
Ihrer Stromversorgung entsprechen.

32 electrolux
Wenden Sie sich andernfalls an eine
Elektrofachkraft.
• Das Gerät darf ausschließlich an eine
ordnungsgemäß installierte Schutzkontaktsteckdose angeschlossen werden.
• Verwenden Sie keine Mehrfachsteckdosen oder Verlängerungskabel.
• Achten Sie darauf, Netzstecker und Netzkabel nicht zu beschädigen. Falls das
Netzkabel des Geräts ersetzt werden
muss, lassen Sie dies durch unseren
Kundendienst durchführen.
• Stecken Sie den Netzstecker erst nach
Abschluss der Montage in die Steckdose. Stellen Sie sicher, dass der Netzstecker nach der Montage noch zugänglich
ist.
• Ziehen Sie nicht am Netzkabel, um das
Gerät von der Spannungsversorgung zu
trennen. Ziehen Sie dazu immer direkt
am Netzstecker.
• Fassen Sie das Netzkabel oder den Netzstecker nicht mit nassen Händen an.
• Das Gerät entspricht den EWG-Richtlinien.
Wasseranschluss
• Achten Sie darauf, die Wasserschläuche
nicht zu beschädigen.
• Das Gerät muss mit den mitgelieferten
neuen Schläuchen an den Wasseranschluss angeschlossen werden. Alte
Schläuche dürfen nicht wieder verwendet
werden.
• Bevor Sie neue oder lange Zeit nicht benutzte Schläuche an das Gerät anschließen, lassen Sie Wasser durch die Schläuche fließen, bis es sauber austritt.
• Achten Sie darauf, dass beim ersten Gebrauch des Geräts keine Undichtheiten
vorhanden sind.
GEBRAUCH
Warnung! Verletzungs- Stromschlag-,
Brand-, Verbrennungsgefahr sowie
Risiko von Schäden am Gerät.
• Das Gerät ist für die Verwendung im
Haushalt vorgesehen.
• Nehmen Sie keine technischen Änderungen am Gerät vor.
• Beachten Sie die Sicherheitsanweisungen auf der Waschmittelverpackung.
• Platzieren Sie keine entflammbaren Produkte oder Gegenstände, die mit entflammbaren Produkten benetzt sind, im
Gerät, auf dem Gerät oder in der Nähe
des Geräts.
• Berühren Sie während des Betriebs nicht
das Türglas. Das Glas kann sehr heiß
sein.
• Achten Sie darauf, dass alle Metallobjekte aus der Wäsche entfernt wurden.
• Stellen Sie keinen Behälter zum Auffangen möglicher Wasserlecks unter das
Gerät. Wenden Sie sich an den Kundendienst, wenn Sie Fragen zur Verwendung
möglicher Zubehörteile haben.
REINIGUNG UND PFLEGE
Warnung! Andernfalls besteht
Verletzungsgefahr und das Gerät
könnte beschädigt werden.
• Schalten Sie vor Reinigungsarbeiten immer das Gerät aus und ziehen Sie den
Netzstecker aus der Steckdose.
• Reinigen Sie das Gerät nicht mit einem
Wasser- oder Dampfstrahl.
• Reinigen Sie das Gerät mit einem weichen, feuchten Tuch. Verwenden Sie
ausschließlich Neutralreiniger. Benutzen
Sie keine Scheuermittel, scheuernde Reinigungsschwämmchen, Lösungsmittel
oder Metallgegenstände.
INNENBELEUCHTUNG
Warnung! Verletzungsgefahr.
Sichtbare LED-Abstrahlung; vermeiden
Sie es, direkt in den Lichtstrahl zu blicken.
Die Leuchtmittel in diesem Gerät sind
nur für Haushaltsgeräte geeignet. Benutzen Sie sie nicht für die Raumbeleuchtung.
Für den Austausch der Innenleuchte
wenden Sie sich an den Kundendienst.
ENTSORGUNG
Warnung! Verletzungs- und
Erstickungsgefahr.
• Trennen Sie das Gerät von der Stromversorgung.
• Schneiden Sie das Netzkabel ab und entsorgen Sie es.

electrolux 33
• Entfernen Sie das Türschloss, um zu verhindern, dass sich Kinder oder Haustiere
in dem Gerät einschließen.
TECHNISCHE DATEN
Abmessungen Breite / Höhe / Tiefe 600 / 850 / 605 mm
Gesamttiefe 640 mm
Elektrischer Anschluss: Spannung
Die Schutzverkleidung gewährleistet einen Schutz gegen das
Eindringen von festen Fremdkörpern und Spritzwasser (Feuchtigkeit), außer an den Stellen, an denen das Niederspannungsgerät keinen Schutz gegen Feuchtigkeit besitzt.
Wasserdruck Min. 0,5 bar (0,05 MPa)
Wasserversorgung
Maximale Beladung Baumwolle 9 kg
Schleuderdrehzahl Max. 1400 U/min (WASL3E 200)
1) Schließen Sie den Zulaufschlauch an einen Wasserhahn mit einem 3/4"-Außengewinde an.
1)
Gesamtleistung
Sicherung
Frequenz
Max. 8 bar (0,8 MPa)
Kaltwasser
1600 U/min (WASL6E 200)
230 V
2200 W
10 A
50 Hz
IPX4
GERÄTEBESCHREIBUNG
1 2 3
Arbeitsplatte
1
Waschmittelschublade
2
Bedienfeld
3
Türgriff
4
Innenbeleuchtung
5
Typenschild
6
10
9
11
4
5
6
7
8
Ablaufpumpe
7
Schraubfüße zum Ausrichten des Ge-
8
12
13
räts
Wasserablaufschlauch
9
Wasserzulaufschlauch
10
Netzkabel
11
Transportschrauben
12

34 electrolux
Schraubfüße zum Ausrichten des Ge-
13
räts
ZUBEHÖR
1 2
45 3
Schraubenschlüssel
1
Zum Lösen der Transportschrauben.
Kunststoffkappen
2
Zum Verschließen der Öffnungen auf
der Rückseite des Geräts nach dem
Entfernen der Transportschrauben.
Schallschutz
3
Zur Minderung der Geräuschbelastung
während des Gerätebetriebs.
Kunststoff-Schlauchführung
4
Zum Einhängen des Ablaufschlauchs
an einer Waschbeckenkante.
BEDIENFELD
Aquasafe-Zulaufschlauch
5
Zur Verhinderung von eventuellen Wasserlecks.
EINSTELLEN DER KINDERSICHERUNG
• Bei aktivierter Kindersicherung lässt sich
die Tür nicht schließen, damit Kinder oder
Haustiere nicht in der Trommel eingeschlossen werden können. Zum Aktivieren der Kindersicherung drehen Sie den
Schalter im Uhrzeigersinn, bis die Einkerbung horizontal ist. Zum Deaktivieren der
Kindersicherung drehen Sie den Schalter
gegen den Uhrzeigersinn, bis die Einkerbung vertikal ist.
1 2 3
Glätten
Défroissage
Auffrischen
Rafraîchir
Baumwolle Eco
Coton Eco
Auto Off-Taste
1
Programmwahlschalter
2
Display
3
Dampf-Sensortaste ( Dampf - Vapeur)
4
6789101112
Memory-Sensortasten ( Memory - Mé-
5
moire)
Start/Pause-Sensortaste ( Start/Pause
6
- Départ/Pause)
4
5

electrolux 35
Zeitvorwahl-Sensortaste ( Zeitvorwahl -
7
Départ Différé)
Zeitsparen-Sensortaste ( Zeit Sparen -
8
Court)
Extra Spülen-Sensortaste ( Spülen+ -
9
Rinçage+)
Optionen-Sensortaste ( Flecken - Ta-
10
ches)
– Flecken
– Vorwäsche
– Einweichen
Taste Drehzahlreduzierung (Schleudern
11
- Essorage)
Temperatur-Taste (Temp.)
12
TOUCHSCREEN
Tragen Sie zur Betätigung der Tasten
keine Handschuhe.
Achten Sie darauf, dass Touchscreen
und Tasten stets sauber und trocken
sind.
AUTO OFF-TASTE
1
Drücken Sie diese Taste, um das Gerät einoder auszuschalten. Wird das Gerät eingeschaltet, ist eine Tonfolge zu hören.
DISPLAY
3
ABCD
Die Funktion AUTO OFF schaltet das Gerät
in den folgenden Fällen automatisch aus,
um den Energieverbrauch zu verringern:
• Wenn Sie nicht innerhalb von 5 Minuten
6
die Taste
drücken.
– Alle Einstellungen werden gelöscht.
–
Drücken Sie die Taste
1
, um das
Gerät wieder einzuschalten.
– Stellen Sie das Waschprogramm und
die gewünschten Funktionen erneut
ein.
• 5 Minuten nach dem Ende des Waschprogramms. Siehe „Am Programmende“.
PROGRAMMWAHLSCHALTER
2
Drehen Sie diesen Schalter, um ein Programm einzustellen. Die entsprechende
Programmanzeige leuchtet auf.
EFGHIJ
Die Textzeile:
• Hilft Ihnen bei der Benutzung des Geräts.
A
• Informiert Sie über den Programmstatus und die Programmphase.
• Zeigt Fehlermeldungen an. Siehe hierzu „Fehlersuche“.
Die Symbole erscheinen im Display, wenn die zugehörige Programmphase oder Funktion eingestellt
ist.

36 electrolux
B
Kindersicherung
Tür verriegelt
Sie können die Tür nicht öffnen, solange dieses Symbol erscheint.
C
Sie können die Tür erst öffnen, wenn das Symbol erlischt.
Wenn das Symbol nicht erlischt, obwohl das Programm beendet ist:
• Es befindet sich Wasser in der Trommel.
• Die Spülstopp -Funktion ist eingeschaltet.
•Die Uhrzeit
Wenn Sie das Gerät einschalten, zeigt das Display einige Sekunden lang die Uhrzeit
an. Informationen zur Änderung der Uhrzeit finden Sie unter „Einstellen der Uhrzeit“.
• Die Programmdauer
Wenn das Waschprogramm beginnt, verringert sich die angezeigte Zeit in Minutenschritten.
Programmdauer-Symbol
Das Symbol erscheint, sobald die Ziffern die Programmdauer anzeigen.
• Die Endzeit des Waschprogramms.
D
Programmende-Symbol
Das Symbol erscheint, sobald die Ziffern die Endzeit des Programms anzeigen.
•Die Zeitvorwahl
– Wenn Sie die Zeitvorwahl einstellen, verschiebt sich die Endzeit des Programms in
30-Minuten-Schritten um bis zu 10 Stunden nach hinten, anschließend in Schritten
von 1 Stunde um bis zu 20 Stunden.
• Das Programmende
Das Display zeigt eine Null an.
Dieser Teil ist nur aktiv, wenn die Tür geöffnet ist - Siehe „Einfüllen der Wäsche“.
Die maximale Beladung für das Programm
E
Das Gewicht der Wäsche
Der Anzeigebalken füllt sich entsprechend des Wäschegewichts.
Der Anzeigebalken ist bei Höchstbeladung komplett ausgefüllt.
Wenn Sie eine Funktion einstellen möchten
• Ein leerer Anzeigebalken erscheint nur, wenn die entsprechende Funktion für das
Programm verfügbar ist. Erscheint kein Anzeigebalken, so bedeutet dies, dass die
Funktion nicht zur Verfügung steht.
• Das Symbol der Funktion leuchtet auf, wenn die Funktion eingestellt ist.
• Der Anzeigebalken füllt sich entsprechend der eingestellten Funktion.
• Wenn Sie eine nicht verfügbare Funktion wählen, erkennen Sie an der Textzeile, dass die Auswahl
nicht möglich ist.
Zeit sparen
Das Symbol erscheint, wenn Sie eine der folgenden Funktionen einstellen:
F
Zeitverkürzt
Extra Kurz

Extra Spülen
G
H
Die Standard-Schleuderdrehzahl des Programms.
I
1) Nur verfügbar für das Programm Schleudern/Pumpen .
J
_ _ _
Die Standard-Temperatur des Programms.
Der Anzeigebalken füllt sich entsprechend der Anzahl der Spülgänge.
Flecken
Vorwäsche
Einweichen
Der Anzeigebalken füllt sich entsprechend der eingestellten Funktionen.
Ohne Schleudern
Spülstopp
Kaltwäsche
1)
electrolux 37
DAMPF-TASTE
Berühren Sie
4
4
zur Einstellung der Dampfmenge. Diese Option ist nur bei Programmen mit vorhandener Dampffunktion möglich. Die Dauer der Dampfphase ändert sich
entsprechend Ihrer Einstellung.
MEMORY-TASTEN
Berühren Sie eine der Tasten
5
5
, um ein
Programm zu speichern oder ein gespeichertes Programm auszuwählen.
Programm speichern
1.
Drücken Sie die Taste
1
, um das Ge-
rät einzuschalten.
2. Drehen Sie den Programmwahlschalter
2
auf das bevorzugte Programm.
3. Wählen Sie bei Bedarf eine oder meh-
rere Funktionen aus.
4.
Halten Sie eine der Tasten
5
für einige
Sekunden lang gedrückt. Der Summer
ertönt und das Display zeigt an, dass
das Programm gespeichert wurde. .
Ein gespeichertes Programm
auswählen
1. Berühren Sie die Taste des gespeicherten Programms, das Sie einstellen
möchten.
2. Die Programmkontrolllampe leuchtet
und das Display zeigt alle Informationen.
Speichern Sie einfach ein neues Programm, um ein zuvor gespeichertes zu
löschen.
START/PAUSE-TASTE
Berühren Sie die Taste
6
6
, um ein Pro-
gramm zu starten oder zu unterbrechen.
ZEITVORWAHL-TASTE
Berühren Sie die Taste
7
7
, um den Start
eines Programms um 30 Minuten bis 20
Stunden zu verzögern.
ZEITSPAREN-TASTE
Berühren Sie die Taste
8
8
, um die Programmdauer zu verkürzen.
Sie können wählen zwischen:
ZEITVERKÜRZT
Waschen von gering verschmutzter Wäsche.
EXTRA KURZ
Schnelles Waschen von kaum verschmutzter Wäsche.
Bei einigen Programmen kann jeweils nur
eine dieser Funktionen eingestellt werden.

38 electrolux
EXTRA SPÜLEN-TASTE
Berühren Sie die Taste
9
9
, um einem Programm weitere Spülgänge hinzuzufügen.
Diese Funktion empfiehlt sich in Gebieten
mit weichem Wasser und für Menschen, die
unter Waschmittelallergien leiden.
FLECKEN-, VORWÄSCHE- UND
EINWEICHEN-TASTE
Berühren Sie
10
10
, um eine dieser Funktio-
nen einzustellen:
FLECKEN
Verwenden Sie diese Funktion für Wäsche
mit schwer zu entfernenden Flecken.
Bei Wahl dieser Funktion geben Sie den
Fleckentferner in das Fach
.
Die Programmdauer verlängert sich
entsprechend.
Diese Funktion ist bei Temperaturen
unter 40 °C nicht verfügbar.
VORWÄSCHE
Verwenden Sie diese Funktion bei stark verschmutzter Wäsche.
Das Gerät fügt vor dem Hauptwaschgang
einen Vorwaschgang hinzu.
Die Programmdauer verlängert sich entsprechend.
EINWEICHEN
Verwenden Sie diese Funktion bei stark verschmutzter Wäsche.
Das Gerät weicht die Wäsche bei 30 °C für
ca. 30 Minuten vor dem Waschgang ein.
SCHLEUDERDREHZAHL-TASTE
11
Mit der Taste
können Sie:
11
• Die maximale Schleuderdrehzahl des
Programms verringern.
Das Display zeigt nur die Schleuderdrehzahlen, die mit dem eingestellten
Programm verfügbar sind, an.
• Den Schleudergang ausschalten (Funkti-
on „ Ohne Schleudern “).
• Die „ Spülstopp “ Funktion aktivieren.
Stellen Sie diese Funktion ein, um Knitterfalten zu vermeiden. Das Gerät pumpt
das Wasser am Ende des Programms
nicht ab.
TEMPERATUR-TASTE
Drücken Sie die Taste
12
12
zum Ändern der
Standardtemperatur.
Symbole - - - und
= kaltes Wasser
FUNKTION „AKUSTISCHE SIGNALE“
Sie hören akustische Signale, wenn:
• Sie das Gerät einschalten.
• Sie das Gerät ausschalten.
• Sie die Tasten berühren.
• Das Programm beendet ist.
• Eine Störung des Geräts vorliegt.
Zum Deaktivieren/Aktivieren der akusti-
schen Signale berühren Sie die Tasten
10
und 9 6 Sekunden lang gleichzeitig.
Bei deaktivierten akustischen Signalen
ertönen sie nur noch dann, wenn Sie
eine Taste berühren und wenn eine
Störung vorliegt.
FUNKTION KINDERSICHERUNG
Diese Funktion verhindert, dass Kinder mit
dem Bedienfeld spielen.
• Berühren Sie zum Aktivieren der Funktion
12
die Tasten
ge, bis im Display das Symbol
und 11 gleichzeitig so lan-
er-
scheint.
• Berühren Sie zum Deaktivieren der Funk-
12
tion die Tasten
lange, bis das Symbol
und 11 gleichzeitig so
im Display er-
lischt.
Wenn Sie die Funktion aktivieren:
•
Bevor Sie die Taste
6
berühren: kann
das Gerät nicht starten.
•
Nachdem Sie die Taste
6
berührt haben, sind alle Tasten und der Programmwahlschalter deaktiviert.
FUNKTION „IMMER EXTRA SPÜLEN“
Mit dieser Funktion können Sie die Funktion
„Extra Spülen“ stets beibehalten, auch
wenn Sie ein neues Programm einstellen.
• Berühren Sie zum Aktivieren der Funkti-
8
on die Tasten
lange, bis im Display das Symbol
und 7 gleichzeitig so
er-
scheint.
• Berühren Sie zum Deaktivieren der
8
Funktion die Tasten
tig so lange, bis das Symbol
und 7 gleichzei-
im Dis-
play erlischt.

PROGRAMME
Programm
Temperatur
Koch/Bunt
Blanc/Couleurs
Koch-/Buntwäsche
95 °C - Kalt
Extra Leise
Extra Silence
Extra Leise
95 °C - Kalt
Pflegeleicht
Synthétiques
Pflegeleicht
60 °C - Kalt
Leichtbügeln
Repassage Facile
Leichtbügeln
60 °C - Kalt
Feinwäsche
Délicats
Feinwäsche
40 °C - Kalt
Wolle/Seide
Laine/Soie
Wolle/Seide
40 °C - Kalt
Daunen
Couette
Daunen
60° - 30°
Beladung
Wäschegewicht
Weiße und bunte Kochwäsche, stark verschmutzt.
Max. Beladung 9 kg
Weiße und bunte Baumwolle, normal verschmutzt.
Max. Beladung 9 kg
Synthetik- oder Mischgewebe, normal verschmutzt.
Max. Beladung 4 kg
Synthetikfasern, normal verschmutzt. Verhindert die
Knitterbildung.
Max. Beladung 4 kg
Feinwäsche, z.B. aus Acryl,
Viskose oder Polyester, normal verschmutzt.
Max. Beladung 4 kg
Maschinen- und handwaschbare Wolltextilien und
Feinwäsche mit dem „Handwäsche“-Pflegesymbol.
Max. Beladung 2 kg
Spezialprogramm für eine
Decke, Bettdecke, Tagesdecke usw.
Max. Beladung 3 kg
Programmbe-
schreibung
Hauptwaschgang
Spülgänge
Langer Schleudergang
Hauptwaschgang
Spülgänge
Langer Schleudergang
Stopp mit Wasser
in der Trommel
Hauptwaschgang
Spülgänge
Kurzer Schleudergang
Hauptwaschgang
Spülgänge
Kurzer Schleudergang
Hauptwaschgang
Spülgänge
Kurzer Schleudergang
Hauptwaschgang
Spülgänge
Kurzer Schleudergang
Hauptwaschgang
Spülgänge
Kurzer Schleudergang
electrolux 39
Funktionen
DREHZAHLREDUZIERUNG
SPÜLSTOPP
FLECKEN
VORWÄSCHE
1)
2)
EINWEICHEN
EXTRA SPÜLEN
ZEITSPAREN
SPÜLSTOPP
FLECKEN
VORWÄSCHE
3)
1)
2)
EINWEICHEN
EXTRA SPÜLEN
ZEITSPAREN
3)
DREHZAHLREDUZIERUNG
SPÜLSTOPP
FLECKEN
VORWÄSCHE
1)
2)
EINWEICHEN
EXTRA SPÜLEN
ZEITSPAREN
3)
DREHZAHLREDUZIERUNG
SPÜLSTOPP
VORWÄSCHE
2)
EINWEICHEN
EXTRA SPÜLEN
ZEITSPAREN
3)
DREHZAHLREDUZIERUNG
SPÜLSTOPP
VORWÄSCHE
FLECKEN
2)
1)
EINWEICHEN
EXTRA SPÜLEN
ZEITSPAREN
3)
DREHZAHLREDUZIERUNG
SPÜLSTOPP
DREHZAHLREDUZIERUNG

40 electrolux
Programm
Temperatur
Anti-Allergie
Anti-Allergies
Anti-Allergie
60°
Weiße Baumwolle4).
Max. Beladung 9 kg
Beladung
Wäschegewicht
Programmbe-
schreibung
Hauptwaschgang
Spülgänge
Kurzer Schleudergang
Funktionen
DREHZAHLREDUZIERUNG
SPÜLSTOPP
FLECKEN
VORWÄSCHE
2)
EINWEICHEN
ZEITSPAREN
Schleudern/Pumpen
Essorage/Vidan-
5)
ge
Alle Gewebe
Die maximale Beladung
hängt vom Wäschetyp ab.
Abpumpen des
Wassers
Schleudergang
mit max. Drehzahl
DREHZAHLREDUZIERUNG
OHNE SCHLEUDERN
6)
Schleudern/Pumpen
0°
Spülen
Rinçage
Spülgang
0°
Outdoor
Blousons
Outdoor
40 °C - Kalt
Alle Gewebe
Max. Beladung 9 kg
Imprägnierte Kleidungsstücke, Sport- und OutdoorKleidung. Keinen Weichspüler verwenden!
Mit Zusatzmitteln
spülen
Schleudergang
Hauptwaschgang
Spülgänge
Kurzer Schleudergang
DREHZAHLREDUZIERUNG
SPÜLSTOPP
EXTRA SPÜLEN
7)
DREHZAHLREDUZIERUNG
SPÜLSTOPP
EXTRA SPÜLEN
Max. Beladung 2.5 kg
20 min. - 3 kg
40° oder 30°
Schnellwäsche für Sportsachen oder Baumwoll- und
Synthetikwäsche, die leicht
verschmutzt ist oder einmal
Hauptwaschgang
Spülgänge
Kurzer Schleudergang
DREHZAHLREDUZIERUNG
getragen wurde.
Max. Beladung 3 kg
Super Eco
0°
Baumwolle
Eco
Coton Eco
9)
Koch-/Buntwäsche
Eco
60° oder 40°
1) Bei Temperaturen unter 40 °C nicht verfügbar.
2) Wenn Sie Flüssigwaschmittel benutzen, wählen Sie ein Programm ohne VORWÄSCHE .
3) Wenn Sie die Taste
Wäschemenge zu verringern. Eine volle Beladung ist zwar möglich, aber die Waschergebnisse sind dann nicht
zufriedenstellend.
4) Dieses Programm beseitigt Mikroorganismen durch den Waschgang mit 60 °C und einem zusätzlichen Spülgang.
Auf diese Weise wird die Reinigung effektiver. Achtung!Geben Sie in das Fach Flecken ein spezielles
Hygienemittel und wählen Sie die Option FLECKEN .
5) Die Standard-Schleuderdrehzahl ist die Drehzahl für Koch-/Buntwäsche. Stellen Sie die Schleuderdrehzahl
passend zu Ihrer Wäsche ein.
6) Wenn Sie diese Funktion wählen, führt das Gerät nur eine Abpumpphase durch.
7) Drücken Sie die Taste, um Spülgänge hinzuzufügen. Bei einer niedrigen Schleuderdrehzahl werden
Schonspülgänge und ein kurzer Schleudergang durchgeführt.
8) Verwenden Sie ein spezielles Waschmittel für sehr niedrige Temperaturen.
Mischgewebe (Baumwolle
und Synthetik)
8)
.
Max. Beladung 3 kg
Weiße und farbechte Baumwolle, normal verschmutzt.
Max. Beladung 9 kg
Hauptwaschgang
Spülgänge
Langer Schleudergang
Hauptwaschgang
Spülgänge
Kurzer Schleudergang
DREHZAHLREDUZIERUNG
SPÜLSTOPP
EXTRA SPÜLEN
DREHZAHLREDUZIERUNG
SPÜLSTOPP
FLECKEN
VORWÄSCHE
EINWEICHEN
EXTRA SPÜLEN
ZEITSPAREN
8
berühren, um die Funktion EXTRA KURZ einzustellen, empfehlen wir Ihnen die
2)
3)

electrolux 41
9) STANDARDPROGRAMME für die auf dem Energie-Label angegebenen Verbrauchswerte. Diese
Programme sind gemäß Verordnung 1061/2010 die Standardprogramme „Baumwolle 60 °C“ bzw. „Baumwolle
40 °C“. Hinsichtlich des Energie- und Wasserverbrauchs für das Waschen normal verschmutzter
Baumwollwäsche sind dies die effizientesten Programme.
Stellen Sie dieses Programm ein, wenn Sie gute Waschergebnisse erzielen und den Energieverbrauch senken
möchten. Die Dauer des Waschprogramms wird dadurch verlängert.
Die Wassertemperatur in der Waschphase kann von der für das ausgewählte Programm angegebenen Temperatur abweichen.
DAMPFPROGRAMME
Programm
1)
Dampf Auffrischen
Dampf Rafraîchir
Dampf Auffrischen
2)
Dieses Programm beseitigt Gerüche.
Dampf beseitigt keine Tiergerüche.
Dampf Glätten
Dampf Défroissage
Dampf Glätten
2)
Dieses Programm hilft bei der Beseitigung von Falten in der Wäsche.
Dampf kann für getrocknete, gewaschene oder einmal getragene Wäsche benutzt werden. Diese
Programme können Falten und Gerüche reduzieren und machen Ihre Wäsche glatter.
Verwenden Sie kein Waschmittel. Entfernen Sie Flecken bei Bedarf durch Waschen oder einen an
der entsprechenden Stelle angewandten Fleckentferner.
Dampfprogramme sind keine Hygieneprogramme.
Für folgende Kleidungsstücke dürfen Sie das Dampfprogramm nicht benutzen:
• Wäsche, die laut Kleidungsetikett nicht trocknergeeignet ist
• Wäsche mit Besätzen aus Kunststoff, Metall, Holz o. Ä.
Berühren Sie die Taste 4 , um die Dauer der Dampfphase zu ändern.
1) Wenn Sie mit trockener Wäsche ein Dampfprogramm wählen, wird sich die Wäsche am Ende des Programms
etwas feucht anfühlen. Hängen Sie die Wäsche am besten 10 Minuten an der frischen Luft auf, um die
Feuchtigkeit entweichen zu lassen. Die Wäsche sollte möglichst schnell aus der Trommel entnommen werden.
Nach einem Dampfprogramm lässt sich die Wäsche leichter bügeln!
2) Die Programmdauer entnehmen Sie bitte dem Display.
Beladung Bela-
dung
Baumwolle und Synthetik.
bis zu
1,5 kg
Baumwolle und Synthetik.
bis zu
1.5 kg
VERBRAUCHSWERTE
Am Programmstart zeigt das Display die Programmdauer für die maximale Beladung
an.
Während der Waschphase wird die Programmdauer automatisch berechnet und
verringert sich möglicherweise beträchtlich, wenn die Wäsche weniger wiegt als die
maximal zulässige Beladung. Zum Beispiel beträgt die maximale Beladung bei
Baumwolle 60 °C 9 kg und die Programmdauer überschreitet 2 Stunden. Wiegt die
tatsächliche Beladung 1 kg, verringert sich die Programmdauer auf unter 1 Stunde.
Während das Gerät die tatsächliche Programmdauer berechnet, blinkt ein Punkt im
Display.
Die Werte dieser Tabelle sind Richtwerte. Folgende Faktoren können diese Werte
verändern: Die Wäscheart und -menge, die Wasser- und Raumtemperatur.

42 electrolux
Programme Bela-
dung
(kg)
Koch-/Buntwäsche 60 °C
Koch-/Buntwäsche 40 °C
Pflegeleicht 40 °C 4 0.6 48 105 35 35
Feinwäsche 40
°C
Wolle/Handwä-
sche 30 °C
Standardprogramme Koch-/Buntwäsche
Standardprogramm Koch-/
Buntwäsche 60
°C
Standardprogramm Koch-/
Buntwäsche 60
°C
Standardprogramm Koch-/
Buntwäsche 40
°C
1) Am Ende der Schleuderphase.
Aus-Zustand (W) Ein-Zustand (W)
0.05 0.05
Die in den Tabellen oben enthaltenen Informationen erfüllen die Verordnung (EG) der Kommission
zur 1015/2010 Anwendung der Richtlinie 2009/125/EC.
Energiever-
brauch
(kWh)
9 1.6 69 168 52 43
9 1.0 69 164 52 43
4 0.7 58 86 35 35
2 0.35 57 61 30 30
9 0.90 65 233 52 43
4.5 0.58 40 198 52 43
4.5 0.46 40 178 52 43
Wasser-
verbrauch
(Liter)
Ungefähre
Pro-
grammdauer (in
Minuten)
Rest-
feuchte
1)
(%)
WASL3E
200
Rest-
feuchte
(%)
WASL6E
200
1)
VOR DER ERSTEN INBETRIEBNAHME
1. Zum Aktivieren des Ablaufsystems füllen Sie 2 Liter Wasser in das Hauptfach
der Waschmittelschublade.
2. Geben Sie eine kleine Waschmittelmenge in das Hauptfach der Waschmittelschublade. Stellen Sie ein Koch/Buntwäsche-Programm mit der höchsten
Temperatur ein und starten Sie das
Programm mit leerer Trommel. So werden alle eventuellen Verunreinigungen
aus Trommel und Bottich entfernt.
EINSTELLEN DER SPRACHE
Beim ersten Einschalten des Geräts zeigt
das Gerät die Standardsprache an und fordert Sie auf, diese Sprache zu bestätigen
oder zu ändern.
• Drehen Sie den Programmwahlschalter,
um die gewünschte Sprache einzustellen.
• Sobald das Display die gewünschte
Sprache anzeigt, berühren Sie die Taste
6
Ändern der Sprache nach der ersten
Inbetriebnahme
1.
2. Wenn das Display die eingestellte Spra-
3. Berühren Sie zur Bestätigung die Taste
, um die Auswahl zu bestätigen.
Berühren Sie gleichzeitig die Taste
11
und 10 für einige Sekunden.
che anzeigt, drehen Sie den Programmwahlknopf, um die neue Sprache einzustellen.
6
.

electrolux 43
EINSTELLEN DER UHRZEIT
Nach der Einstellung der Sprache werden
Sie aufgefordert, die Uhrzeit einzustellen.
• Die Stundenziffern blinken.
• Drehen Sie den Programmwahlschalter,
um die Stunden zu ändern.
• Berühren Sie zur Bestätigung die Taste
6
.
• Die Minutenziffern blinken.
• Drehen Sie den Programmwahlschalter,
um die Minuten zu ändern.
• Berühren Sie zur Bestätigung die Taste
6
.
Ändern der Uhrzeit nach der ersten
Inbetriebnahme
1.
Berühren Sie gleichzeitig die Taste
und 8 für einige Sekunden.
GEBRAUCH DES GERÄTS
1. Drehen Sie den Wasserhahn auf.
2. Stecken Sie den Netzstecker in die
Steckdose.
Damit der Gewichtssensor korrekt funktioniert, muss das Gerät eingeschaltet und
ein Programm ausgewählt werden, BEVOR Sie Wäsche in die Trommel füllen.
2. Die Stundenziffern blinken.
3. Drehen Sie den Programmwahlschalter, um die Stunden zu ändern.
4. Berühren Sie zur Bestätigung die Taste
6
.
5. Die Minutenziffern blinken.
6. Drehen Sie den Programmwahlschalter, um die Minuten zu ändern.
7. Berühren Sie zur Bestätigung die Taste
6
.
9
5. Berühren Sie, falls notwendig, weitere
Tasten, um bestimmte Funktionen hinzuzufügen oder die Zeitvorwahl einzustellen. Im Display erscheint das Symbol der eingestellten Funktion und im
D
Bereich (
) die eingestellte Zeitvor-
wahl.
EINSCHALTEN DES GERÄTS UND
EINSTELLEN EINES PROGRAMMS
1.
Drücken Sie die Taste
1
, um das Ge-
rät einzuschalten.
2. Drehen Sie den Programmwahlschalter
2
auf das gewünschte Programm,
oder berühren Sie zum Einstellen eines
gespeicherten Programms eine der
5
Tasten
. Die Programmkontrolllam-
pe leuchtet auf.
3.
Die Kontrolllampe der Taste
6
blinkt
rot.
4. Im Display werden die Standardwerte
für Temperatur und Schleuderdrehzahl
angezeigt. Berühren Sie, falls notwen-
12
dig, die Tasten
und 11 , um die
Wassertemperatur und Schleuderdrehzahl zu ändern.
EINFÜLLEN DER WÄSCHE
1. Öffnen Sie die Gerätetür.
2. Das Display (E) zeigt die maximale Beladung für das Programm (MAX) und
das Gewicht der Wäsche (KG) an. In
der Textzeile des Displays werden Sie
aufgefordert, die Wäsche einzufüllen.
3. Geben Sie jedes Wäschestück einzeln
in die Trommel. Schütteln Sie jedes
Wäschestück leicht aus, bevor Sie es in
das Gerät legen.

44 electrolux
4. Im Display wird das Gewicht in Schritten von 0,5 kg erhöht. Das Gewicht ist
ein Richtwert und abhängig von der Art
der Wäsche.
Wenn das Gewicht der Wäsche die
Höchstbeladung der Trommel über-
5. Schliessen Sie die Tür. In der Textzeile
des Displays wird angezeigt, wie viel
Waschmittel Sie zugeben sollten. Dies
ist ein Richtwert und bezieht sich auf
die Waschmittelmenge für eine vom
Hersteller empfohlene Höchstbeladung.
schreitet, erscheint im Display die Meldung der Überladung.
Sie können die Wäsche waschen, jedoch bei erhöhtem Wasser- und Energieverbrauch.
Für optimale Verbrauchswerte und Waschergebnisse sollten Sie einige Wäschestücke entfernen.
Die Anzeige für Überladung ist nur für
Programme verfügbar, deren erlaubte
Beladung niedriger ist als die Höchstbeladung der Maschine.
Vorsicht! Achten Sie darauf, dass
keine Wäsche aus der Trommel hängt,
die zwischen Dichtung und Tür
eingeklemmt werden könnte. Dies
könnte zu Wasserlecks oder
Beschädigungen der Wäsche führen.
EINFÜLLEN VON WASCH- UND PFLEGEMITTELN
Waschmittelfach für die Vorwaschphase und das Einweichprogramm.
Füllen Sie das Waschmittel für den Vorwaschgang und das Einweichen vor dem
Start des Programms ein.
Waschmittelfach für den Hauptwaschgang.
Wenn Sie Flüssigwaschmittel verwenden, muss dieses direkt vor dem Start des
Programms eingefüllt werden.
Fach für flüssige Pflegemittel (Weichspüler, Stärke).
Füllen Sie das Pflegemittel in das Fach ein, bevor Sie das Programm starten.
Maximale Menge für flüssige Pflegemittel.
Fach für den Fleckenentferner.
Füllen Sie den Fleckenentferner in das Fach ein und stellen Sie die Funktion Flecken ein, bevor Sie das Programm starten.

electrolux 45
Klappe für Waschpulver oder Flüssigwaschmittel
Drehen Sie die Klappe nach oben oder nach unten in die korrekte Position für
Waschpulver oder Flüssigwaschmittel.
Halten Sie sich immer an die Anweisungen auf der Verpackung der Waschmittelprodukte.
Überprüfen Sie die Position der Klappe
1. Ziehen Sie die Waschmittelschublade
bis zum Anschlag heraus.
2. Drücken Sie den Hebel nach unten und
ziehen Sie die Schublade heraus.
3. Drehen Sie die Klappe nach oben,
wenn Sie Waschpulver verwenden.
4. Drehen Sie die Klappe nach unten,
wenn Sie Flüssigwaschmittel verwenden.
6. Schließen Sie die Waschmittelschublade vorsichtig. Achten Sie darauf, dass
die Klappe beim Schließen der Waschmittelschublade nicht blockiert.
Klappe in der unteren Position:
– Verwenden Sie keine Gelwaschmittel
oder Flüssigwaschmittel mit dicker
Konsistenz.
– Füllen Sie nicht mehr Flüssigwasch-
mittel ein als bis zur Markierungslinie
auf der Klappe.
– Stellen Sie nicht den Vorwaschgang
ein.
– Stellen Sie nicht die Zeitvorwahl ein.
EINSTELLEN DER ZEITVORWAHL
1. Berühren Sie zur Einstellung der gewünschten Zeitvorwahl wiederholt die
7
Taste
. Das Display zeigt das vo-
raussichtliche Ende des Programms an.
2.
Nach dem Berühren der Taste
6
beginnt das Gerät die vorgewählte Zeit
herunterzuzählen.
Nach Ablauf der Zeitvorwahl startet das
Programm automatisch.
Sie können die Einstellung der Zeitvorwahl vor dem Einschalten des Geräts
6
mit der Taste
jederzeit abbrechen
oder ändern.
Die Zeitvorwahl kann nicht zusammen
mit dem Programm Dampf eingestellt
werden.
5. Messen Sie Waschmittel und Weichspüler ab.
STARTEN DES PROGRAMMS
1.
Berühren Sie die Taste
6
, um das
Programm zu starten. Die Kontrolllampe der Taste
6
hört auf zu blinken und
leuchtet rot.
Wenn Sie mit der Zeitvorwahl eine Startverzögerung ausgewählt haben, beginnt das
Gerät, die Zeit herunterzuzählen.

46 electrolux
Das Gerät stellt automatisch die Programmdauer für die Menge der eingefüllten Wäsche in der Trommel ein, um perfekte Waschergebnisse in kurzer Zeit zu
erzielen. Etwa 15 Minuten nach dem Start
des Programms erscheint im Display die
neue Zeitangabe.
UNTERBRECHEN EINES PROGRAMMS
1.
Berühren Sie
6
. Die Kontrolllampe
blinkt.
2.
Berühren Sie
6
erneut. Das Wasch-
programm wird fortgesetzt.
ABBRECHEN EINES PROGRAMMS
1.
Drücken Sie die Taste
1
, um das
Programm abzubrechen und das Gerät
auszuschalten.
2.
Drücken Sie die Taste
1
erneut, um
das Gerät einzuschalten. Anschließend
können Sie ein neues Waschprogramm
einstellen.
Das Gerät pumpt das Wasser nicht ab.
ÄNDERN EINER FUNKTION
Einige Funktionen können nur geändert
werden, bevor sie durchgeführt werden.
1.
Berühren Sie
6
. Die Kontrolllampe
blinkt.
2. Ändern Sie die eingestellte Funktion.
3.
Berühren Sie
6
erneut. Das Wasch-
programm wird fortgesetzt.
ÖFFNEN DER TÜR
Während ein Programm oder die Zeitvorwahl aktiv ist, ist die Tür verriegelt.
So öffnen Sie die Gerätetür:
1.
Berühren Sie
6
. Das Türverriegelungssymbol im Display erlischt und es
erscheint eine Meldung, dass die Tür
entriegelt ist.
2. Öffnen Sie die Tür des Geräts.
3. Schließen Sie die Gerätetür und berüh-
6
ren Sie erneut die Taste
. Das Programm bzw. die Zeitvorwahl läuft weiter.
Wenn die Temperatur und der Wasserstand zu hoch sind, leuchtet das Türverriegelungssymbol weiterhin. Die Tür
lässt sich nicht öffnen. Wenn Sie den-
noch die Tür öffnen möchten, gehen
Sie folgendermaßen vor:
1. Schalten Sie das Gerät aus.
2. Warten Sie einige Minuten.
3. Vergewissern Sie sich, dass kein
Wasser in der Trommel steht.
Wichtig! Wenn Sie das Gerät ausschalten,
müssen Sie das Programm anschließend
neu einstellen.
AM PROGRAMMENDE
1. Das Gerät stoppt automatisch.
2. Falls Signaltöne aktiviert sind, ertönt ein
Signalton.
3.
Im Display erscheint
und eine Meldung teilt Ihnen mit, dass das Programm abgeschlossen ist.
4.
Die Kontrolllampe der Taste
6
erlischt.
5. Das Türverriegelungssymbol erlischt.
6.
Drücken Sie die Taste
1
, um das Gerät auszuschalten. Fünf Minuten nach
Ende des Programms schaltet die Abschaltautomatik das Gerät automatisch
aus.
Wenn Sie das Gerät wieder einschalten, zeigt das Display das Ende des zuletzt gewählten Programms an. Drehen
Sie den Programmwahlschalter, um ein
neues Programm einzustellen.
7. Nehmen Sie die Wäsche aus dem Gerät. Vergewissern Sie sich, dass die
Trommel leer ist.
8. Lassen Sie die Tür offen, damit sich
kein Schimmel und keine unangenehmen Gerüche bilden.
9. Schließen Sie den Wasserablasshahn.
Das Waschprogramm ist beendet, aber
es steht Wasser in der Trommel:
– Die Trommel dreht sich regelmäßig, um
Knitterfalten in der Wäsche zu vermeiden.
– Die Tür bleibt verriegelt.
– Sie müssen das Wasser abpumpen, um
die Tür zu öffnen.
Abpumpen des Wassers:
1. Reduzieren Sie, falls erforderlich, die
Schleuderdrehzahl.
2.
Berühren Sie Taste
6
. Das Gerät
pumpt das Wasser ab und schleudert.
3. Wenn das Programm beendet ist und
das Türverriegelungssymbol erlischt,
können Sie die Tür öffnen.

electrolux 47
4.
Drücken Sie die Taste
rät auszuschalten.
1
, um das Ge-
TIPPS UND HINWEISE
BELADUNG
• Teilen Sie die Wäsche auf, in: Kochwäsche, Buntwäsche, Synthetik, Feinwäsche und Wolle.
• Halten Sie sich an die Anweisungen auf
den Kleidungsetiketten.
• Waschen Sie weiße und bunte Wäsche
nicht zusammen.
• Manche farbigen Textilien können beim
ersten Waschen färben. Wir empfehlen,
sie deshalb die ersten Male separat zu
waschen.
• Knöpfen Sie Kopfkissen zu und schließen
Sie Reißverschlüsse, Haken und Druckknöpfe. Schließen Sie Gürtel.
• Leeren Sie die Taschen und falten Sie die
Wäscheteile auseinander.
• Wenden Sie mehrlagige Textilien, Wolle
und bedruckte Wäschestücke vor dem
Waschen.
• Entfernen Sie hartnäckige Flecken.
• Waschen Sie stark verschmutzte Bereiche mit einem speziellen Waschmittel.
• Seien Sie vorsichtig mit Gardinen. Entfernen Sie die Haken, oder stecken Sie die
Gardinen in einen Beutel oder Kopfkissenbezug.
• Nicht im Gerät waschen:
– Ungesäumte Wäschestücke und Wä-
schestücke mit Schnitten im Stoff
–Bügel-BHs
– Verwenden Sie einen Beutel zum Wa-
schen von kleinen Textilien.
• Eine sehr geringe Beladung kann in der
Schleuderphase Probleme verursachen.
Verteilen Sie die Wäschestücke in diesem
Fall mit der Hand neu und starten Sie die
Schleuderphase erneut.
HARTNÄCKIGE FLECKEN
Für manche Flecken sind Wasser und
Waschmittel nicht ausreichend.
Wir empfehlen, diese Flecken zu entfernen,
bevor Sie die entsprechenden Textilien in
das Gerät geben.
Spezial-Fleckentferner sind im Handel erhältlich. Verwenden Sie einen Spezial-
Nach etwa 18 Stunden pumpt das Gerät automatisch das Wasser ab und
schleudert.
Fleckentferner, der für den jeweiligen Fleckentyp und Gewebetyp geeignet ist.
WASCH- UND PFLEGEMITTEL
• Verwenden Sie nur speziell für Waschmaschinen bestimmte Wasch- und Pflegemittel.
• Mischen Sie nicht verschiedene Waschmittel.
• Verwenden Sie der Umwelt zuliebe nicht
mehr als die angegebene Waschmittelmenge.
• Halten Sie sich an die Anweisungen auf
der Verpackung dieser Produkte.
• Verwenden Sie die korrekten Produkte
für Art und Farbe des Gewebes, Programmtemperatur und Verschmutzungsgrad.
• Stellen Sie keine Vorwäsche ein, wenn
Sie Flüssigwaschmittel verwenden.
• Ist Ihr Gerät nicht mit einer Klappe in der
Waschmittelschublade ausgerüstet, geben Sie das Flüssigwaschmittel in eine
Dosierkugel.
WASSERHÄRTE
Wenn die Wasserhärte Ihres Leitungswassers hoch oder mittel ist, empfehlen wir die
Verwendung eines Enthärters für Waschmaschinen. In Gegenden mit weichem
Wasser ist die Zugabe eines Enthärters
nicht erforderlich.
Wenden Sie sich an Ihr örtliches Wasserversorgungsunternehmen, um die Wasserhärte in Ihrem Gebiet zu erfahren.
Halten Sie sich an die Anweisungen auf der
Verpackung der Produkte.
Gleichwertige Maßeinheiten der Wasserhärte:
• Deutsche Wasserhärtegrade (°dH)
• Französische Wasserhärtegrade (°TH).
• mmol/l (Millimol pro Liter - internationale
Einheit für Wasserhärte)
• Clarke-Werte

48 electrolux
Wasserhärtetabelle
Härtegrad Art
1 weich 0-7 0-15 0-1.5 0-9
2 mittel 8-14 16-25 1.6-2.5 10-16
3 hart 15-21 26-37 2.6-3.7 17-25
4 sehr hart > 21 > 37 >3.7 >25
°dH °TH mmol/l Clarke
Wasserhärte
REINIGUNG UND PFLEGE
Warnung!
Trennen Sie das Gerät von der Stromversorgung, bevor Sie es reinigen.
ENTKALKEN
Normales Leitungswasser enthält Kalk. Falls
erforderlich, benutzen Sie einen Enthärter,
um Kalkablagerungen zu entfernen.
Verwenden Sie ein Produkt, das speziell für
Waschmaschinen hergestellt wird. Halten
Sie sich an die Herstelleranweisungen auf
der Verpackung.
Führen Sie die Entkalkung nicht gleichzeitig
mit einer Wäsche durch.
REINIGEN DER AUSSENSEITEN
Reinigen Sie das Gerät nur mit warmem
Wasser und mit etwas Spülmittel. Reiben
Sie alle Oberflächen sorgfältig trocken.
Vorsicht! Verwenden Sie keinen
Alkohol, keine Lösungsmittel und keine
Chemikalien.
WASCHGANG ZUR PFLEGE DER
MASCHINE
Bei Waschprogrammen mit niedrigen Temperaturen kann etwas Waschmittel in der
Trommel zurückbleiben. Führen Sie regelmäßig einen Waschgang zur Pflege der Maschine durch:
• Entnehmen Sie die Wäsche aus der
Trommel.
• Stellen Sie das heißeste Waschprogramm für Koch-/Buntwäsche ein.
• Verwenden Sie die korrekte Menge eines
Waschpulvers mit biologischen Reinigungseigenschaften.
Lassen Sie die Tür nach jedem Waschprogramm einige Zeit offen stehen, um einer
Schimmelbildung vorzubeugen und unangenehme Gerüche entweichen zu lassen.
TÜRDICHTUNG
Überprüfen Sie regelmäßig die Türdichtung
und nehmen Sie alle Gegenstände aus ihr
heraus.
TROMMEL
Überprüfen Sie regelmäßig, dass sich kein
Kalk und keine Rostpartikel in der Trommel
absetzen.
Verwenden Sie zur Entfernung von Rost
aus der Trommel nur Spezialprodukte.
Vorgehensweise:
• Reinigen Sie die Trommel mit einem Spezialreiniger für Edelstahl.
• Starten Sie ein kurzes Programm für
Koch-/Buntwäsche mit der maximalen
Temperatur und einer kleinen Menge
Waschmittel.

electrolux 49
REINIGUNGSMITTELBEHÄLTER
1. Drücken Sie auf den Hebel.
1
2
2. Ziehen Sie die Waschmittelschublade
heraus.
3. Entfernen Sie den oberen Teil des Pflegemittelfachs.
• Das Gerät macht ein ungewöhnliches
Geräusch, weil die Ablaufpumpe blockiert
ist.
• Im Display wird ein Alarmcode angezeigt,
weil es Probleme beim Abpumpen des
Wassers gibt.
Warnung!
• Ziehen Sie den Netzstecker aus der
Netzsteckdose.
• Entfernen Sie den Filter nicht während des laufenden Betriebs. Reinigen Sie die Ablaufpumpe nicht,
wenn das Wasser im Gerät noch
heiß ist. Die Ablaufpumpe darf nur
bei kaltem Wasser gereinigt werden.
Reinigen der Ablaufpumpe:
1. Öffnen Sie die Ablaufpumpenklappe.
2. Ziehen Sie die Klappe zum Entfernen
heraus.
4. Reinigen Sie alle Teile mit Wasser.
5. Reinigen Sie das leere Einschubfach
mit einer Bürste.
6. Schieben Sie die Waschmittelschublade wieder in das Einschubfach ein.
ABLAUFPUMPE
Kontrollieren Sie regelmäßig die Ablaufpumpe und sorgen Sie dafür, dass sie
sauber ist.
Reinigen Sie die Pumpe in folgenden Fällen:
• Das Gerät pumpt das Wasser nicht ab.
• Die Trommel dreht sich nicht.
3. Stellen Sie einen geeigneten Behälter
unter die Öffnung der Ablaufpumpe, um
das Restwasser aufzufangen.
4. Drücken Sie auf die beiden Hebel und
ziehen Sie den Ablaufschlauch nach
vorne, um das Wasser abzulassen.

50 electrolux
5. Wenn der Behälter voll ist, schieben Sie
den Ablaufschlauch wieder zurück und
leeren Sie den Behälter. Wiederholen
Sie die Schritte 4 und 5, bis kein Wasser mehr aus der Ablaufpumpe fließt.
6. Bringen Sie den Ablaufschlauch wieder
in seine ursprüngliche Position und drehen Sie den Filter, um ihn zu entfernen.
1
2
7. Entfernen Sie Flusen und Gegenstände
von der Pumpe.
8. Prüfen Sie, dass sich das Flügelrad der
Pumpe drehen lässt. Ist dies nicht
möglich, wenden Sie sich an den Kundendienst.
11. Bringen Sie die Ablaufpumpenklappe
wieder an und schließen Sie diese.
2
1
ZULAUFSCHLAUCHFILTER UND
VENTILFILTER
Die Filter müssen in folgenden Fällen gereinigt werden:
• Es läuft kein Wasser in das Gerät.
• Das Wasser läuft sehr lange in das Gerät
ein.
•
Die Kontrolllampe der Taste
6
blinkt
und im Display wird der entsprechende
Alarm angezeigt. Siehe hierzu „Fehlersuche“.
Warnung! Ziehen Sie den Netzstecker
aus der Netzsteckdose.
Reinigen der Wasserzulauffilter:
1. Schließen Sie den Wasserhahn.
2. Entfernen Sie den Wasserzulaufschlauch vom Wasserhahn.
3. Reinigen Sie den Filter im Zulaufschlauch mit einer harten Bürste.
9. Reinigen Sie den Filter unter Leitungswasser und setzen Sie ihn wieder in die
dafür vorgesehenen Führungen in der
Pumpe ein.
10. Vergewissern Sie sich, dass der Filter
richtig festgedreht ist, damit kein Wasser austreten kann.
4. Entfernen Sie den Zulaufschlauch von
der Geräterückseite.

electrolux 51
5. Reinigen Sie den Filter im Ventil mit einer harten Bürste oder einem Handtuch.
6. Bringen Sie den Zulaufschlauch wieder
an. Vergewissern Sie sich, dass alle Anschlüsse vollkommen dicht sind, damit
kein Wasser austreten kann.
45°
20°
7. Drehen Sie den Wasserhahn auf.
NOTENTLEERUNG
Das Gerät kann aufgrund einer Funktionsstörung das Wasser nicht abpumpen.
In diesem Fall führen Sie die Schritte (1) bis
(6) unter „So reinigen Sie die Ablaufpumpe“
durch.
Reinigen Sie bei Bedarf die Pumpe.
Bringen Sie den Ablaufkanal wieder in seine
ursprüngliche Position und schließen Sie die
Ablaufpumpenklappe.
Wenn Sie das Wasser über das Notentleerungsverfahren abpumpen, müssen Sie das
Abpumpsystem wieder aktivieren:
1. Füllen Sie 2 Liter Wasser in das Hauptfach der Waschmittelschublade ein.
2. Starten Sie das Programm zum Abpumpen des Wassers.
FROSTSCHUTZMASSNAHMEN
Falls das Gerät in einem Bereich installiert
ist, in dem die Temperatur unter 0 °C sinken kann, entfernen Sie das im Zulaufschlauch und in der Ablaufpumpe verbliebene Wasser.
1. Ziehen Sie den Netzstecker aus der
Netzsteckdose.
2. Schließen Sie den Wasserhahn.
3. Entfernen Sie den Wasserzulaufschlauch.
4. Stecken Sie die beiden Enden des Zulaufschlauchs in einen Behälter und lassen Sie das Wasser aus dem Schlauch
fließen.
5. Leeren Sie die Ablaufpumpe. Siehe Notentleerungsverfahren.
6. Befestigen Sie den Zulaufschlauch wieder, wenn die Ablaufpumpe entleert ist.
Warnung! Vergewissern Sie sich vor
einer erneuten Benutzung des Geräts,
dass die Temperatur mehr als 0 °C
beträgt.
Der Hersteller ist nicht verantwortlich
für Schäden, die durch niedrige Temperaturen entstanden sind.
FEHLERSUCHE
Das Gerät startet nicht oder stoppt während des Betriebs.
Versuchen Sie zunächst eine Lösung für
das Problem zu finden, bevor Sie sich an
den Kundendienst wenden (siehe Tabelle).
Bei einigen Problemen ertönt ein Signalton und das Display zeigt eine Fehlermeldung an.
Warnung! Schalten Sie das Gerät aus,
bevor Sie die Überprüfungen vornehmen.

52 electrolux
Problem Mögliche Ursache Mögliche Abhilfe
Im Display erscheint
die Aufforderung,
den Wasserhahn zu
überprüfen: Das Gerät füllt sich nicht
mit Wasser.
Der Wasserzulaufschlauch ist
Die Filter im Wasserzulauf-
Der Wasserzulaufschlauch ist
Der Wasserdruck ist zu niedrig. Wenden Sie sich an Ihr örtliches Was-
Der Wasserhahn ist blockiert
Im Display erscheint
die Aufforderung,
den Ablauffilter zu
überprüfen: Das Gerät pumpt das Wasser nicht ab.
Der Filter der Ablaufpumpe ist
Der Wasserablaufschlauch ist
Im Display erscheint
die Aufforderung,
die Tür zu überprüfen:
Das Display meldet
einen Wasseralarm.
Der Wasserhahn ist geschlossen.
beschädigt.
schlauch sind zugesetzt.
nicht richtig angeschlossen.
oder durch Kalkablagerungen
verstopft.
Der Wasserablaufschlauch ist
beschädigt.
zugesetzt.
nicht richtig angeschlossen.
Die Gerätetür steht offen oder
ist nicht richtig geschlossen.
Die Aquasafe-Einrichtung wurde ausgelöst.
Drehen Sie den Wasserhahn auf.
Vergewissern Sie sich, dass der Wasserzulaufschlauch nicht beschädigt ist.
Reinigen Sie die Filter. Siehe unter „Reinigung und Pflege“.
Vergewissern Sie sich, dass die
Schlauchverbindung in Ordnung ist.
serversorgungsunternehmen.
Reinigen Sie den Wasserhahn.
Vergewissern Sie sich, dass der Wasserablaufschlauch keine Beschädigungen
aufweist.
Reinigen Sie den Filter der Ablaufpumpe.
Siehe unter „Reinigung und Pflege“.
Vergewissern Sie sich, dass die
Schlauchverbindung in Ordnung ist.
Schließen Sie die Tür richtig.
• Schalten Sie das Gerät aus.
• Schließen Sie den Wasserhahn.
• Wenden Sie sich hierzu an den Kundendienst.
PROBLEME OHNE FEHLERMELDUNGEN
Problem Mögliche Ursache Mögliche Abhilfe
Das Gerät pumpt das
Wasser nicht ab.
Die Funktion Spülstopp ist ak-
Das Gerät schleudert
nicht.
Der Filter der Ablaufpumpe ist
Unwuchtprobleme durch die
Das Programm startet nicht.
Ein Waschprogramm ohne
Abpumpphase ist eingestellt.
tiviert.
Die Schleuderphase ist ausge-
schaltet.
zugesetzt.
Beladung.
Der Netzstecker steckt nicht
richtig in der Steckdose.
Stellen Sie das Abpumpprogramm ein.
Stellen Sie das Abpumpprogramm ein.
Stellen Sie das Schleuderprogramm ein.
Reinigen Sie den Filter der Ablaufpumpe.
Siehe unter „Reinigung und Pflege“.
Verteilen Sie die Wäschestücke mit der
Hand neu und starten Sie die Schleuderphase erneut.
Stecken Sie den Netzstecker in die
Steckdose.

electrolux 53
Problem Mögliche Ursache Mögliche Abhilfe
Die Sicherung im Haussiche-
Setzen Sie eine neue Sicherung ein.
rungskasten ist durchgebrannt.
Sie haben die Taste 6 nicht
Berühren Sie Taste 6 .
berührt.
Die Zeitvorwahl ist eingestellt. Brechen Sie die Zeitvorwahl ab, wenn
die Wäsche sofort gewaschen werden
soll.
Die Funktion Kindersicherung
ist aktiviert.
Es befindet sich
Wasser auf dem Bo-
An den Schlauchanschlüssen
tritt Wasser aus.
den.
An der Ablaufpumpe tritt Was-
ser aus.
Der Wasserablaufschlauch ist
beschädigt.
Die Tür des Geräts
Ein Waschprogramm läuft. Warten Sie das Ende des Waschpro-
lässt sich nicht öff-
Deaktivieren Sie die Funktion Kindersi-
cherung .
Vergewissern Sie sich, dass die
Schlauchanschlüsse fest angeschlossen
sind.
Vergewissern Sie sich, dass die Ablauf-
pumpe fest angeschlossen ist.
Vergewissern Sie sich, dass der Wasser-
zulaufschlauch nicht beschädigt ist.
gramms ab.
nen.
Es befindet sich Wasser in der
Trommel.
Das Gerät verursacht ein ungewöhn-
Das Gerät ist nicht ausgerichtet.
Stellen Sie das Abpump- oder Schleu-
derprogramm ein.
Richten Sie das Gerät waagrecht aus.
Siehe hierzu „Montage“.
liches Geräusch.
Sie haben die Verpackungs-
materialien und/oder die
Transportschrauben nicht ent-
Entfernen Sie die Verpackungsmateriali-
en und/oder die Transportschrauben.
Siehe hierzu „Montage“.
fernt.
Es ist sehr wenig Wäsche in
Füllen Sie mehr Wäsche ein.
der Trommel.
Das Wasser, das in
das Gerät einläuft,
wird sofort abge-
Das Ende des Ablaufschlauchs liegt zu tief.
Vergewissern Sie sich, dass sich der Ab-
laufschlauch in der richtigen Höhe befin-
det.
pumpt.
Die Waschergebnis-
se sind nicht zufriedenstellend.
Sie haben hartnäckige Flecken
Sie haben zu wenig oder ein
falsches Waschmittel verwendet.
nicht vor dem Waschgang ent-
Erhöhen Sie die Waschmittelmenge oder
benutzen Sie ein anderes Waschmittel.
Verwenden Sie zur Entfernung hartnä-
ckiger Flecken Spezialprodukte.
fernt.
Sie haben eine ungeeignete
Temperatur eingestellt.
Es befindet sich zu viel Wä-
Achten Sie darauf, die richtige Tempera-
tur einzustellen.
Verringern Sie die Beladung.
sche in der Trommel.
Die Innenbeleuchtung funktioniert
nicht.
Die Lampe ist defekt. Für den Austausch der Innenbeleuch-
tung wenden Sie sich an den Kunden-
dienst.

54 electrolux
Problem Mögliche Ursache Mögliche Abhilfe
Nach einem Dampfprogramm sind die
Kleidungsstücke teilweise noch feucht.
Nach einem Dampfprogramm sind die
Kleidungsstücke
nicht glatt genug.
Das Gerät ist überladen. Verringern Sie die Wäschemenge.
Die Trommel ist leer
und im Display wird
angezeigt, dass sich
Wäsche darin befindet.
Die Trommel ist voll,
im Display wird jedoch 0,0 kg angezeigt.
Schalten Sie das Gerät nach der Überprüfung wieder ein. Das Programm wird an der
Stelle fortgesetzt, an der es unterbrochen
wurde.
Das Gerät ist nicht waagrecht
ausgerichtet.
Es wurde ein falsches Dampfprogramm gewählt (z. B. Synthetikgewebe anstatt Baumwolle).
Das Leergewicht muss eingestellt werden.
Sie haben die Wäsche eingefüllt, bevor das Gerät eingeschaltet wurde.
Tritt das Problem erneut auf, wenden Sie
sich an den Kundendienst.
Zeigt das Display andere Fehlermeldungen
an, wenden Sie sich an den Kundendienst.
Überprüfen Sie, ob das Gerät waage-
recht steht, und richten Sie es bei Be-
darf mit den verstellbaren Schraubfüßen
waagrecht aus.
Achten Sie auf die Zusammensetzung
des Gewebes.
Drücken Sie die Taste 1 , um das Ge-
rät aus- und wieder einzuschalten.
Drücken Sie die Taste 1 , um das Ge-
rät auszuschalten. Leeren Sie die Trom-
mel und befolgen Sie die notwendigen
Schritte. (Siehe „Einfüllen der Wäsche“)
MONTAGE
SATZ FIXIERPLATTEN (4055171146)
Sie erhalten den Bausatz bei Ihrem Vertragshändler.
Wenn Sie das Gerät auf einem Sockel aufstellen, befestigen Sie es mithilfe der Fixierplatten.
Lesen Sie aufmerksam die dem Bausatz
beiliegende Anleitung.
3. Entfernen Sie die Styropor-Verpackungsteile.
AUSPACKEN
1. Verwenden Sie Handschuhe. Entfernen
Sie die äußere Folie. Benutzen Sie, falls
erforderlich, ein Teppichmesser.
2. Nehmen Sie die Karton-Abdeckung ab.
4. Entfernen Sie die innere Folie.

electrolux 55
5. Öffnen Sie die Tür. Entfernen Sie das
Styroporteil aus der Türdichtung und alle Teile aus der Trommel.
6. Legen Sie das vordere Styroporteil hinter dem Gerät auf den Boden. Legen
Sie das Gerät vorsichtig mit der Rückseite darauf ab. Achten Sie darauf,
nicht die Schläuche zu beschädigen.
8. Reinigen Sie die Unterseite des Geräts
und trocknen Sie sie ab. Verwenden
Sie keinen Alkohol, keine Lösungsmittel
und keine Chemikalien.
9. Sortieren Sie die verschiedenen Teile
des Schallschutzes nach Größe und
Position. Orientieren Sie sich an der
Abbildung.
A (FRONT) = Vorderseite des Geräts
B (BACK) = Rückseite des Geräts
A
7. Entfernen Sie den Styroporschutz von
der Geräteunterseite.
1
2
B

56 electrolux
10. – Entfernen Sie den Klebestreifen von
den Schallschutzteilen.
– Bringen Sie die vier Schallschutzteile
auf der Geräteunterseite an. Orientieren Sie sich an der Abbildung.
– Vergewissern Sie sich, dass die
Schallschutzteile fest angebracht
sind.
x4
A
B
11. Ziehen Sie das Gerät nach oben, sodass es wieder aufrecht steht.
12. Entnehmen Sie das Netzkabel und den
Ablaufschlauch aus den Schlauchhalterungen.
14. Ziehen Sie die Kunststoff-Abstandshalter heraus.
15. Ersetzen Sie die Kunststoff-Abstandshalter durch die Kunststoffkappen. Diese Kappen finden Sie im Beutel mit der
Gebrauchsanleitung.
13. Lösen Sie die drei Schrauben. Verwenden Sie dazu den mitgelieferten
Schraubenschlüssel.
Warnung! Entfernen Sie vor der
Montage des Geräts alle
Verpackungsmaterialien und
Transportschrauben.
Wir empfehlen, Verpackungsmaterial
und Transportschrauben für einen späteren Transport aufzubewahren.
AUFSTELLEN UND AUSRICHTEN
• Stellen Sie das Gerät auf einen ebenen,
festen Boden.
• Stellen Sie sicher, dass die Luftzirkulation
unter dem Gerät nicht durch Teppiche
beeinträchtigt wird.

• Vergewissern Sie sich, dass die Maschi-
20
O
45
O
ne weder die Wand noch andere Geräte
berührt.
• Schrauben Sie die Füße zum Ausrichten
des Geräts weiter heraus oder hinein.
Durch eine korrekte waagrechte Ausrichtung des Geräts werden Vibrationen, Geräusche und ein „Wandern“ des Geräts
während des Betriebs vermieden.
x4
• Das Gerät muss einen waagerechten und
festen Stand haben.
electrolux 57
O
O
45
20
20
O
O
45
• Schließen Sie den Wasserzulaufschlauch
an einen Kaltwasserhahn mit einem 3/4"Außengewinde an.
Vorsicht! Schieben Sie weder Karton
noch Holz oder ähnliche Materialien
unter die Stellfüße, um das Gerät
auszurichten.
WASSERZULAUFSCHLAUCH
• Schließen Sie den Schlauch am Gerät an.
Drehen Sie den Wasserzulaufschlauch
nur nach links oder rechts. Lösen Sie die
Ringmutter, um ihn in die gewünschte
Position zu bewegen.
Vorsicht! Achten Sie darauf, dass die
Anschlüsse dicht sind.
Verwenden Sie keinen Verlängerungsschlauch, falls der Zulaufschlauch zu
kurz ist. Wenden Sie sich an den Kundendienst, um einen anderen Zulaufschlauch zu erhalten.
Aquastopp-Einrichtung
Der Zulaufschlauch verfügt über eine Wasserstopp-Vorrichtung. Diese Vorrichtung
verhindert Wasserlecks am Schlauch, die
durch natürliche Alterung auftreten können.
Der rote Bereich im Fenster „A“ zeigt diesen
Fehler an.
Tritt dieser Fall ein, drehen Sie den Wasserhahn zu und wenden Sie sich an den Kundendienst, um den Schlauch zu erneuern.

58 electrolux
A
WASSERABLAUF
Es gibt mehrere Möglichkeiten, den Ablaufschlauch anzuschließen:
Mit der Kunststoff-Schlauchführung.
• Über eine Waschbeckenkante.
Orientieren Sie sich an der Abbildung. Direkte Einleitung in ein Ablaufrohr auf einer
Höhe nicht unter 60 cm und nicht über
100 cm. Das Ende des Ablaufschlauchs
muss immer belüftet sein, d.h. der Innendurchmesser des Ablaufrohres muss größer sein als der Außendurchmesser des
Ablaufschlauchs.
Ohne Kunststoff-Schlauchführung.
• An einen Siphon.
Stellen Sie sicher, dass die KunststoffFührung beim Abpumpen nicht abrutschen kann. Befestigen Sie deswegen
die Führung am Wasserhahn oder an der
Wand.
• An ein Standrohr mit Entlüftungsöffnung.
Orientieren Sie sich an der Abbildung.
Stecken Sie den Ablaufschlauch in den
Siphon und befestigen Sie ihn mit einer
Schlauchschelle. Stellen Sie sicher, dass
der Schlauch einen Bogen beschreibt,
damit kein Schmutz aus dem Siphon in
das Gerät gelangen kann.
• Direkte Einleitung in ein Abflussrohr in der
Zimmerwand. Mit einer Schlauchschelle
befestigen.

electrolux 59
Sie können den Ablaufschlauch auf
maximal 400 cm verlängern. Fragen
Sie beim Kundendienst nach einem an-
UMWELTTIPPS
Das Symbol auf dem Produkt oder
seiner Verpackung weist darauf hin, dass
dieses Produkt nicht als normaler
Haushaltsabfall zu behandeln ist, sondern
an einem Sammelpunkt für das Recycling
von elektrischen und elektronischen
Geräten abgegeben werden muss. Durch
Ihren Beitrag zum korrekten Entsorgen
dieses Produkts schützen Sie die Umwelt
und die Gesundheit Ihrer Mitmenschen.
Umwelt und Gesundheit werden durch
falsches Entsorgen gefährdet. Weitere
Informationen über das Recycling dieses
Produkts erhalten Sie von Ihrer Gemeinde,
Ihrer Müllabfuhr oder dem Geschäft, in dem
Sie das Produkt gekauft haben.
Wohin mit den Altgeräten?
Überall dort wo neue Geräte verkauft
werden oder Abgabe bei den offiziellen
SENS-Sammelstellen oder offiziellen
SENS-Recyclern.
Die Liste der offiziellen SENSSammelstellen findet sich unter
www.sens.ch.
deren Ablaufschlauch und der
Schlauchverlängerung.
VERPACKUNGSMATERIALIEN
Recyceln Sie Materialien mit dem Symbol
.
Entsorgen Sie die Verpackung in den entsprechenden Recyclingbehältern.
UMWELTTIPPS
Halten Sie sich zum Schutz der Umwelt und
zur Senkung Ihres Wasser- und Stromverbrauchs an diese Anweisungen:
• Stellen Sie zum Waschen normal ver-
schmutzter Wäsche ein Programm ohne
Vorwäsche ein.
• Waschen Sie immer mit der angegebe-
nen maximalen Beladung.
• Benutzen Sie ggf. einen Fleckentferner,
wenn Sie ein Programm mit niedriger
Temperatur auswählen.
• Erkundigen Sie sich nach der Wasserhär-
te Ihres Hausanschlusses, um die richtige
Waschmittelmenge verwenden zu können.

www.electrolux.com/shop 132934821-A-042013
 Loading...