

Page 1

VAMFYR®
825 i, 828i electronic
CARAT
Bodenstaubsauger
Cylinder vacuum cleaner
Aspirapolvere da pavimento
HXeKTpiKii àKoùna
AEG
Gebrauchsanweisung
Operating instructions
Istruzioni per l’uso
OSnyiec;
AUS
ERFAHRUNG
GUT
Page 2

A = Opening button for paper L ■
dustbag compartment M •
B = Button for accessories compartment N =
C = Accessories compartment O =
D = On/Off button P =
E = Micro-filter change indicator Q =
F = Park-System R =
G = Electronic power control S ■
H = Dustbag full indicator T •
I = Foot-operated flex rewind button U ^
J = Micro-filter cassette
K = Micro-filter
16
= Storage rail
= Motor-protection filter
= Paper dustbag
= Floor cleaning head
= Carrying handle
= Button for suction hose removal
= Telescopic tube
= Handle
= Suction hose
= Socket for electric,
power cleaning head
£
C5
Page 3

Contents
Description of appliance
Before using the appliance for the first time
Safety instructions for the user
Assembling the vacuum-cleaner ready for use
Fitting suction hose and tube/s together
Suction tube/Telescopic tube
Connecting suction hose
Mains connection/Flex rewind
Using the floor cleaning head & accessory nozzles
Using the floor cleaning head
Accessory nozzles
Switching on and adjusting
Switching on
Adjusting power
Park-System
Maintenance and cleaning
Changing the paper dustbag
Changing the micro-filter/ultra-micro-filter
Motor protection filter
Transportation and storage
16
18
18/19
20
20
20
21
21
21/22
23
23
23
24
25
25
26
What do I do if...?
Special accessories
For the sake of the environment
AEG Service Centres in Europe
26/27
27/28
29
63
Printed on recycled paper.
AEG - putting words into action.
17
Page 4

Before using the appliance for the first time
Please read all the information contained in this booklet. It gives you important in
structions on safety, use, and maintenance of the appliance. Please keep these
instructions in a safe place and pass them on, if necessary, to the next owner.
Safety instructions for the user
■ This appliance meets the radio interference suppression requirements of EC
Directive 82/499 EC and 87/308 EG, EN 55014/DIN VDE 0875 Part 1, as well as
the standards concerning the reverse effects of electrical appliances on the
power mains EN 60 555 Parts 1-3/DIN VDE 0838 Parts 1-3, of June 1987.
■ This appliance must only be connected to the same mains voltage as shown on
the rating plate.
■ The circuit of the socket used must be protected with a fuse of at least 13 /\.
■ Never use the flex to pull the mains plug out of the plug socket.
■ Do not operate the appliance if:
- the flex is damaged
- the housing shows visible signs of damage.
■ Avoid running over the flex with the appliance, cleaning head or electric power
cleaning head.
■ If no paper dustbag is inserted the cover cannot be closed. Please do not use
force!
■ Make sure a paper dustbag, a MICROFILTER, and a motor protection filter are
always inserted.
■ This vacuum cleaner should only be used for normal dry household dust and dirt.
It must not be used on people or animals.
Keep children away from electrical appliances.
The manufacturer cannot be held responsible for any damage caused by use or
operation of the appliance contrary to these instructions.
■ Allow fitted carjaets that have been shampooed to dry out completely. Never use
your vacuum cleaner to vacuum liquids, otherwise it may be damaged. There is
also a risk of an electric shock.
■ Never use your appliance to vacuum matches, glowing embers, or cigaretteends. Avoid vacuuming hard, pointed objects, since they may damage the appli
ance or paper dustbag.
■ The appliance must be stored in such a way that any weather conditions cannot
affect the appliance. The appliance must not be subjected to humidity or heat
sources.
■ If the flex is defective, the complete flex rewind unit should be replaced by your
AEG Service Centre or an authorised AEG Service Agent.
■ Repairs to electrical appliances should only be carried out by a trained electri
cian. Improper repairs may place the user at serious risk.
■ If your vacuum cleaner has a fault, please contact your electrical retailer or the
AEG Service Centre direct.
■ If the appliance is wrongly operated for a purpose other than that for which it is
intended, no liability can be accepted for any possible damage.
18
Page 5

Important for users in the UK
The wires in the mains lead of this appliance are coloured in accordance with thefol-
lowing code:
BLUE - neutral BROWN - live
As the colours of the wires in the mains lead of this appliance may not correspond
with the coloured markings identifying the terminals in your plug, PROCEED AS
FOLLOWS:
The wire which is coloured BROWN must be connected to the terminal which is
marked L or coloured RED.
The wire which is coloured BLUE must be connected to the terminal which is
marked N or coloured BLACK!
VERY IMPORTANT: Neither wire is to be connected to the earth terminal of a 3 pin
plug.
If a 13 amp plug is fitted, fit a 13 amp BS1362 fuse. If any other type of plug is used,
protect with a 15 amp fuse at the distribution board.
For appliances which come with mains lead and plug moulded on:the plug mould
ed on to the cord incorporates a fuse. For replacement use a 13 amp BS 1362 fuse.
Only ASTA approved or certified fuses should be used. The fuse cover/carrier must
be replaced in the event of changing the fuse. The plug must not be used if the fuse
cover/carrier is lost. A replacement cover/carrier must be obtained from authorised
electrical goods retailers.
WARNING
Should it become necessary to replace the moulded on plug then the defective plug
should be destroyed to avoid any possible shock hazard that could occur should
such a plug be inserted into a 13 amp socket eisewhere in the house.
AEG Service Locations in the United Kingdom
AEG UK Limited Head Office
217 Bath Road
Slough, Berks. SL1 4 AW
Tel.: 0753 872506
Telex: 847541
Telefax: 0753 512271
AEG Scottish Service Centre
Block 11, Unit 1
Dundyvan Industrial Estate
Coatbridge
Lanarkshire ML5 4AQ
Tel.: 0236 440387
Telefax: 0236 440256
0
AEG Northern Service Centre
Unit 20, Haigh Park/Haigh Avenue
Stockport
Gt. Manchester SK41QR
Tel.: 061 4872205
Telefax: 061 474 11 91
Service Appointments
Bristol Tel.: 02 72 252880
(call diverted to Slough)
NorfolkTel.: 0603 765515
(call diverted to Slough)
19
Page 6

Assembling the vacuum-cleaner ready for use
The hose, tubes and accessories can be fitted together by pushing and twisting, and
taken apart by twisting and pulling.
Fitting the suction hose and suction tube together
Push the tube end of the hose firmly into the suction
tube.
Adjusting the teiescopic tube
Slide the button on the tube downwards and set the
tube at the most convenient length for working with.
When the button is released the telescopic tube is
engaged in the position you require.
Connecting the suction hose
20
Insert the hose holder into the suction opening.
When the hose is to be disconnected from the
appliance, press the release button and pull the
hose holder out of the suction opening.
O
Page 7

Mains connection/Rex rewind
The mains cable is located in the cable compart
ment. Press the foot button for the cable, and pull
the cable out. Insert the plug into the socket.
At the end of vacuuming switch off and pull the plug
out of the socket. Press the flex rewind button and
the cable rewinds automatically.
Using the cleaning head and accessory nozzles
The cleaning head and nozzles are attached to the suction tube by pushing and
twisting, and taken apart again by twisting and pulling.
Using the floor cleaning head
For care of carpets and hard floors, the cleaning
head can be adjusted to suit the type of floor with
your foot;
for carpets
Symbol for carpet, brush withdrawn
a
C5
for hard floors
For other optinal extra floor cleaning heads see
Special Accessories.
Accessory Nozzles - Furniture Brush, Crevice and Upholstery Nozzles
The integrated accessories compartment contains
3 nozzles - afurniture brush, a crevice nozzle and a
a
O
upholstery nozzle. Open the compartment by
pressing lightly on the cover as shown in the illus
tration.
Symbol for hard floor, brush extended
21
Page 8

Dusting Brush with swivel joint
For gentle vacuuming of delicate fabrics and
objects, i.e. curtains, furniture, books, pictures etc.
Storage in the tool compartment: only possible in
the normal position (turn dusting brush straight
to the tube).
For vacuuming in those normally inaccessible
places i.e. reaching cobwebs, or down the side of a
sofa!
For vacuuming upholstery, mattresses, etc. The
thread collectors help to pick up the threads and
fluff.
The crevice and upholstery nozzles can be attached to the suctions tubes as well as
the handle of the suctions hose.
22
£
(3
O
Page 9

Switching on and adjusting
Switching on
Press the On/Off-button to switch the vacuum cleaner on or off.
©
Adjusting power - rotating/sliding regulator
The vacuuming power can be adjusted to suit any situation with the electronic power
control.
o
250 W = For delicate fabrics, e.g. net curtains
O
£
C5
0
E2
FFFR
■ I t 11
Park-System
500 W = For upholstery
650 W = Economy setting for light to normally soiled carpets
750 W = For non-fitted carpets (mats and rugs)
max = For hard floors and heavily soiled carpets
For short breaks during vacuuming, use the park
rail to support the suction hose and cleaning head.
o
23
Page 10

Maintenance and cleaning
Before the appliance is cleaned or maintenance in carried and it has to be switched
off and unplugged from the mains supply.
Changing the paper dustbag
Switch off and pull out the mains plug before
changing the dustbag.
Changing the paper dustbag is necessary when
the red dustbag full indicator shows. We recom
mend changing the dustbag even when it does not
appear to be full, this could indicate that there is a
high proportion of very fine dust present.
Open the cover by pressing the button, and lifting it
up until it snaps into place.
Hygienic dustbag change: when you take out the
full dustbag, you automatically cover the opening
by pulling on the closure tag. You may have to over
come a slight resistance as you pull.
Full dustbags can be disposed of with the normal
household rubbish.
Push the new dustbag into the guide rails as far as it will go, only then will the cover
close. If no dustbag is inserted the cover cannot be shut. Please do not use forcel
Paper dustbag sizes
Please use original AEG dustbags. Size 23, or dustbags which carry the AEG Quality
Seal. They are available from electrical retailers under the order-number
E 618 899 683, or from the AEG Service Centre under ET-No. 668 901263. Damage
resulting from the use of any other dustbag is not covered by the Guarantee.
24
Page 11

Changing the nticro-filter/ultra-micro-filter
Switch off and pull out the mains plug before changing the micro-filter.
Changing the micro-filter/ultra-micro-filter is-necessary:
For appliances with no micro-filter indicator - when the dustbag full Indicator
lights up, even when aclean dustbag has been inserted, with the appliance switched
on, hold the head/nozzle upwards or off the floor, ifthe light remains on, thisindicates
the micro-filter should be changed. We recommend changing the micro-filter with
every fifth bag.
For appliances with micro-filter indicator - when this comes on.
The cassette can be opened by pressing the micro
filter button. Take out the cassette in the direction of
the arrow and empty the micro-filter over a dustbin
- this avoids you touching the dirty micro-filter.
Insert the new micro-filter into the cassette as
shown in the illustration, push it back in parallel to
the floor, and snap the cover shut.
Motor protection filter
The motor protection filter is a permanent filter and does not have to be changed
regularly. Exception: if it has been damaged. See ‘What to do if...”.
Cleaning
The cleaner housing and dustbag compartment can be cleaned with a damp cloth
and then wiped dry with a soft cloth. Do not use any abrasives or solvents. The under
0
side of the cleaner head can be cleaned with the crevice nozzle from time to time.
о
25
Page 12
Transportation and storage
For easier storage and for transporting the appli
ance, slide the floor cleaning head or the
ROTOSOFT1000 Turbo-brush into the storage rail.
What to do when.
...the motor protection is activated?
When the paper dustbag is full or blocked or any of the accessories are blocked the
over-heating protection for the motor is activated. Switch off and unplug the vacuum
cleaner and allow the motor to cool down.
Check the paper dustbag and accessories and remove any blockages. The cleaner
can be switched on again after 30 minutes.
... the fuse biows or trips?
If you connect other electrical appliances with a high wattage to the same mains cir
cuit and use them at the same time as the vacuum cleaner, this can trip the fuse.
This can be avoided if you set the electronifi power control to 250 W before you
switch on, and only select a higher output level after switching on.
£
CD
0
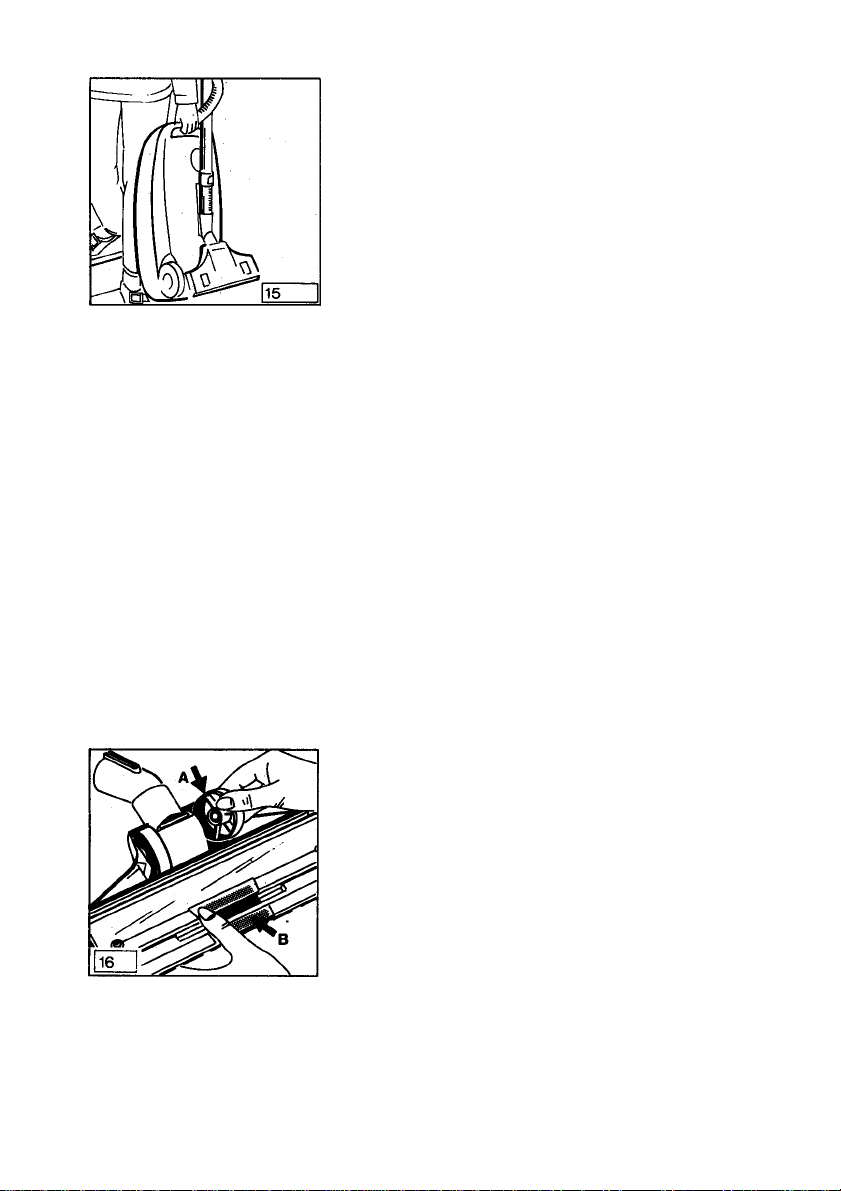
... the thread-coilectors are worn out?
If the thread-collectors (B) at the suction opening
are worn out or stuck together, you can fit ones.
They can be ordered from the AEG Service Centre
under the ET-No. 668 900 560.
...the wheels of the floor cieaning head are hard to move?
Remove any hairs or threads which have become
wrapped round the axle of the roller. The wheels
can be removed for cleaning. Pull roller (A) as illus
trated. Remove hairs and threads. When replacing
it, the semi-circular axle-head must point inwards. If the roller axle is inserted wrong
way round the swivel joint could suffer damage.
26
£
O
Page 13

... the paper dustbag has been damaged and there is dirt in the motor protec
tion filter?
Remove the motor protection filter, clean it (by
shaking the dirt out), and re-insert it.
.the lid comes out of the hinge?
If the lid of the vacuum cleaner has been opened
too far, beyond the stop, and comes out of the
hinge, place it back on the housing and press it
down until it clicks into place.
Special accessories
ROTOSOFT1000 turbo-brush
The ROTOSOFT 1000 makes the care of carpets
and hard floors easier. The rotary motion of its
brush gently loosens shortpile carpets where the
dirt has been trodden in.
27
Page 14

ROTOSOFT electric cleaning head
Special nozzle
For all AEG vacuum-cleaners with socket. For
cleaning difficult carpet conditions.
This cleaning head deals very effectively with diffi
cult carpet conditions. Its rotating brush picks up
trodden-in dirt and straightens the carpet pile.
For use on parquet, tiled and hard floors.
28
R1
Page 15

For the sake of the environment
Please do not simply throwaway the packaging material, or old appliances that have
served their time.
Appliance packaging:
■ The cardboard carton can be sent to the waste-paper collection.
■ The polyethylene plastic bag can go to the plastic collection-point for recycling.
Recyciing the appiiance at the end of its life:
■ Thè plastic parts are identified with numbers so that they can be sent for recycling
when the appliance is taken out of service.
Please ask your municipal authority where the local recycling collection-points are.
29
Page 16

AEG Kundendienst in Europa
52070 Aachen, Grüner Weg 22-24
63741 Aschaffenburg, Dämmer Straße 5
86167 Augsburg-Lechh., RaiffeisenstraBe 13
14199 Berlin, Hohenzollemdamm 150
33609 Bielefeld, Schillerstraße 44
53113 Bonn, Friedrich-Ebert-Allee 26
71034 Bdblingen*Hulb, Dornierstraße 7
38102 Braunschweig, Campestraße 7
28207 Bremen, Hastedter Osterdeich 222
41541 Dormagen-SL Peter, Sachtlebenstraße 1
44139 Dortmund, Rheinlanddamm, AEG Haus
01099 Dresden, Industriegelände, Straße E
Düsseldorf (Kundendienst in 41541 Dormagen)
99096 Erfurt, Amstädter Straße 28
45329 Essen-Aitenessen, Teilungsweg 28
60326 Frankfurt/Main, Mainzer Landstraße 349
79108 Freiburg, Tullastraße 84
36000 Fulda, Michael-Henkel-Straße 4-6
35390 Gießen, Schanzenstraße 1-5
65462 GInsheinvGustavsburg, Darmstädter Landstraße 47
22625 Hamburg-Bahrenfeld, Holstenkamp 40
30179 Hannover, Max-Mülier-Straße 50-56
74072 Heilbronn, Weinsberger Straße 18
95032 Hof, Wunsiedler Straße 56
67655 Kaiserslautern, Jägerstraße 10-12
76185 Karlsruhe, Neureuter Straße 5-7
34123 Kassel-Waldau, Otto-Hahn-Straße 5
87437 Kempten, Brodkorbweg 22
24113 Kiel, Rendsburger Landstraße 206
56068 Koblenz, Rheinstraße 17
Köln (Kundendienst in 41541 Dormagen)
04299 Leipzig, Holzhäuser Straße 120
Mainz-Kosthelm,
(Kundendienst in 65462 Ginsheim-Gustavsburg)
68309 Mannhelm-Käfertal, Heppenheimer Str. 31-33
80634 München-Neuhausen, Arnulfstraße 205
48153 Münster, Friedrich-Ebert-Straße 7
90429 Nürnberg, Muggenhofer Straße 135
77656 Offenburg, Industriestraße 4
49084 Osnabrück, Pferdestraße 23
94032 Passau, Weinholzer Weg 9
88213 Ravensburg, Henri-Dunant-Straße 6
93055 Regensburg, Bukarester Straße 12
83024 Rosenheim, Färberstraße 9
18055 Rostock, Lange Straße 1 a
66121 Saarbrücken-St Johann, Mainzer Straße 176
57072 Siegen, Sandstraße 173
Stuttgart (Kundendienst in 71034 Böblingen)
54292 Ttler, Paulinstraße 152
89073 Ulm, Neue Straße 113-115
97078 Würzburg, Versbacher Straße 22a
Österreich, 1210 Wien, (02 22) 3801-63 33
Belglque/Belgl«, 1800 Vilvoorde, 02/370.08.98
Denmark, 2620 Albertslund, 42-64 85 22
España, Madrid, (91) 675.66.50/54/58/62
France, 92140 Clamart Cedex, 16 (1) 45 3795 50
Great Britein, Slough, 07 53-87 25 06 .
Hellas, Moschaton-Athen, 01/4822 646
Island, Reykiavik (Brasdurnir Ormsson Ltd.) 91-3 8820
Halla, Gusano Mitanino Mi 02/6134760/6197690
Luxembourg, 1246 Luxembourg-Kirchberg, 43 888-4
Nederland, 1066 BP Amsterdam, 020-5105911
Norge, 2000 Uliestrem, 06-810101
Portugal, 1799 Usboa Codex, 891171-897121
Schweiz - Svizzera, 8603 Schwerzenbach 01/9451144
Suomi, 01301 Vantaa 30 (SähköKikkeiden Oy), 90-8381
Sverige, 17141 Solna, 08-290080
Garanttebedingungen
Für dieses Gerät leisten wir-zusätzlichzu
der gesetzlichen Gewährleistung des
Händlers aus Kaufvertrag - dem Endab
nehmer gegenüber zu den nachstehen
den Bedingungen Garantie:
1. DieGarantiezeitbeträgt12Monateund
beginnt mit dem Zeitpunkt der Über
gabe des Geräts, der durch Rechnung
oder andere Unterlagen zu belegen ist.
Die Garantiezeit ist auf 6 Monate
beschränkt, wenn das Gerät gewerb
lich genutzt wird.
2. Die Garantie umfaßt die Behebung aller
Innerhalb der Garantiezeit auftreten
den Schäden oder Mängel des Geräts,
die nachweislich auf Material- oder
Fertigungsfehlern beruhen. Nicht unter
die Garantie feilen Schäden oder Män
gel aus nicht vorschriftsmäßigem An
schluß, unsachgemäßer Handhabung
sowie Nichtbeachtung der Gebrauchs
anweisungen.
3. im Garantiefell kann das Gerät einer
unserer Kundendienst-Stellen oder
dem autorisierten Fachhandel über
geben werden.
Bei Einsendung des Geräts an die für
Sie zuständige Kundendienststeile ist
daraufzu achten, daß das Gerätgut ver
packt, mit vollständigem Absender und
- soweit möglich - mit einer kurzen
Fehlerbeschreibung versehen wird.
4. Die Garantieleistungen werden ohne
jede Berechnung durchgeführt; sie
bewirken weder eine Verlängerung
noch einen Neubeginn der Garantie
zeit. Ausgewechselte Telle gehen in
unser Eigentum über.
Guarantee
This appliance Is covered by the following
guarantee and is in addition to your statu
tory and other legal rights. All components
which fail due to defective manufecture will
be repaired or replaced free of charge fora
period of 12 months from the date of pur
chase. We will not accept claims if unau
thorised modification is made or if non
standard components are used. The
appliance must be used in accordance
with the operating instructions and the
guarantee does not cover any damage
caused during transit or through misuse.
In order to establish the date of purchase,
advice note or similar document must be
produced whenever the guarantee is
claimed.
Garantie
Pour toute mise en œuvre de garantie ou
de service après vente, vous devez vous
adresser à votre vendeur.
AEG assure au vendeur le remplacement
gratuit des pièces détachées nécessaires
à la réparation pendant 1 an, à partir de la
date de votre facture, sauf en cas de non
respect des prescriptions d'utilisation ou
lorsqu'une cause étrangère à l'appareil
est responsable de la défeiilance.
Les dispositions stipulées ci-dessus ne
sont pas exclusives du bénéfice au profit
de l’acheteur de la garantie légale pour
défeut et vice cachés qui s'applique, en
tout état de cause, dans les conditions des
articles 1641 et suivants, du code civil.
Garantie
AEG Nederland N.V.neemtvoorreparaties
blnnen de garantietermljn - voorzoverde
defekten zljn terug te voeren op materiaal en/of konstruktiefouten - de kosten op
zich voor materiaal en arbeitsioon.
AEG Hausgeräte AG, Muggenhofer Straße 135, D-90429 Nürnberg
De garantie bedraagt12 maanden en gaat
in op de dag van aankoop.Wanneer garan
tie wordt verlangd, dient de fektuur van
aankoop te worden overiegd. De garantletermljn wordt door reparatles nlet verlengd. Buiten elke garantieverpflichting
vallen losse onderdelen van glas en/of
kunststof. Aile overige kosten, zoals voorrijdkosten, kosten van opzending en
administratie, zijn voor rekening van de eigenaar.
Garanzia
Duranti i primi 12 mesi d’esercizio, ven
gono fornite gratuitamente dall’AEG le
parti di ricambio riconosciute difettose. La
garanzia ha inizio con il giorno dell'ac
quisto che deve venir comprovato a mezzo
della fattura o boletta di consegna. Per il
resto valgono le condizioni generali di for
nitura della rispettiva rappresentanza
nazionale.
Garantía
Durante los primeros 12 meses, la AEG se
hace cargo de cuantos costes de material
y horas de trabajos invertidas se produz
can en la subsanacíón de defectos. La
garantía empieza a regira partir de la fe^a
de la entrega, la que deberá justificarse
mediante presentación de la fectura o de
la nota de depacho. Por lo demás serán de
aplicación las condiciones generales de
venta según rigen en el respectivo país de
nuestra representación.
Garantie
In Belgien ist nurdiedurchS. A.belge AEG
ausgegebene Garantiekarte gültig.
En Belgique, seule la carte de garantie
émise par la S. A. belge AEG est valable.
In Belgié is slechts de door de S. A. belge
AEG uitgegeven waarborgkaart geldig.
 Loading...