

Page 1
benutzerinformation
notice d'utilisation
istruzioni per l’uso
user manual
Gefriergerät
Congélateur
Congelatore
Freezer
TG09110
Page 2
2 electrolux
Electrolux. Thinking of you.
Mehr zu unserem Denken finden Sie unter
www.electrolux.com
INHALT
Sicherheitshinweise 2
Bedienblende 4
Erste Inbetriebnahme 6
Täglicher Gebrauch 6
Praktische Tipps und Hinweise 6
SICHERHEITSHINWEISE
Lesen Sie zu Ihrer Sicherheit und für die optimale Geräteanwendung vor der Installation
und dem Gebrauch des Gerätes die vorliegende Benutzerinformation aufmerksam
durch, einschließlich der Ratschläge und
Warnungen. Es ist wichtig, dass zur Vermeidung von Fehlern und Unfällen alle Personen, die das Gerät benutzen, mit der Bedienung und den Sicherheitsvorschriften
vertraut sind. Heben Sie die Benutzerinformation gut auf und übergeben Sie sie bei
einem Weiterverkauf des Gerätes dem neuen Besitzer, so dass jeder während der gesamten Lebensdauer des Gerätes über Gebrauch und Sicherheit informiert ist.
Halten Sie sich zu Ihrer Sicherheit und zum
Schutz Ihres Eigentums strikt an die Vorsichtsmaßnahmen der vorliegenden Benutzerinformation, da der Hersteller bei Missachtung derselben von jeder Haftung freigestellt ist.
Sicherheit von Kindern und
hilfsbedürftigen Personen
• Das Gerät darf von Personen (einschließlich Kindern), deren physische, sensorische Fähigkeiten und deren Mangel an
Erfahrung und Kenntnissen einen sicheren Gebrauch des Gerätes ausschließen
nur unter Aufsicht oder nach ausreichender Einweisung durch eine verantwortungsbewusste Person benutzt werden,
die sicherstellt, dass sie sich der Gefahren des Gebrauchs bewusst sind.
Kinder müssen beaufsichtigt werden, damit sie nicht am Gerät herumspielen können.
Reinigung und Pflege 7
Was tun, wenn … 9
Technische Daten 10
Montage 11
Hinweise zum Umweltschutz 13
Änderungen vorbehalten
• Halten Sie das Verpackungsmaterial unbedingt von Kindern fern. Erstickungsgefahr!
• Ziehen Sie vor der Entsorgung des Gerätes den Netzstecker, schneiden Sie das
Netzkabel (so nah wie möglich am Gerät)
ab und entfernen Sie die Tür, so dass
spielende Kinder vor elektrischem Schlag
geschützt sind und sich nicht in dem Gerät einschließen können.
• Wenn dieses Gerät mit magnetischer
Türdichtung ein älteres Modell mit
Schnappverschluss (Türlasche) an der
Tür oder auf dem Deckel ersetzt, machen
Sie den Schnappverschluss vor dem Entsorgen des Altgerätes unbrauchbar. So
verhindern Sie, dass das Gerät nicht zu
einer Todesfalle für Kinder wird.
Allgemeine Sicherheitshinweise
Vorsicht! Die Belüftungsöffnungen
müssen immer frei zugänglich sein.
• Das Gerät ist für die Aufbewahrung von
Lebensmitteln und/oder Getränken in einem normalen Haushalt bestimmt, wie in
der vorliegenden Gebrauchsanweisung
beschrieben wird.
• Benutzen Sie keine mechanischen oder
sonstigen Hilfsmittel, um den Abtauprozess zu beschleunigen.
• Verwenden Sie keine anderen Elektrogeräte (wie Speiseeisbereiter) in Kühlgeräten, wenn solche Geräte nicht ausdrücklich vom Hersteller für diesen Zweck zugelassen sind.
• Achten Sie darauf, den Kältekreislauf
nicht zu beschädigen.
Page 3
electrolux 3
• Das Kältemittel Isobutan (R600a) im Käl-
•
tekreislauf des Gerätes ist ein natürliches
und sehr umweltfreundliches Gas, das jedoch leicht entflammbar ist.
Achten Sie beim Transport und bei der
Aufstellung des Gerätes darauf, nicht die
Komponenten des Kältekreislaufs zu beschädigen.
Bei einer eventuellen Beschädigung des
Kältekreislaufs:
– Offene Flammen und Zündfunken ver-
meiden
– Den Raum, in dem das Gerät installiert
ist, gut lüften
• Änderungen der technischen Eigenschaften oder am Gerät sind gefährlich. Ein
defektes Netzkabel kann Kurzschlüsse
und einen Brand verursachen und/oder
zu Stromschlägen führen.
Täglicher Gebrauch
• Stellen Sie keine heißen Töpfe auf die
• Lagern Sie keine feuergefährlichen Gase
Warnung! Elektrische Bauteile (Netzkabel, Stecker, Kompressor) dürfen nur
• Legen Sie Lebensmittel nicht direkt vor
vom Kundendienst oder einer Fachkraft
ausgewechselt werden.
1. Das Netzkabel darf nicht verlängert
werden.
• Ein aufgetautes Produkt darf nicht wieder
• Abgepackte Tiefkühlkost immer entspre-
2. Vergewissern Sie sich, dass der Netzstecker nicht von der Geräterückseite
gequetscht oder beschädigt wird. Ein
• Die Lagerempfehlungen des Gerätehers-
gequetschter oder beschädigter
Netzstecker überhitzt und kann einen
Brand verursachen.
3. Vergewissern Sie sich, dass der Netz-
• Keine kohlensäurehaltigen Getränke oder
stecker des Gerätes frei zugänglich
ist.
4. Ziehen Sie nicht am Netzkabel.
5. Stecken Sie den Netzstecker nie in eine lockere Steckdose. Es besteht
• Eis am Stiel kann Kälteverbrennungen
Brand- und Stromschlaggefahr.
6. Betreiben Sie das Gerät nicht ohne
1)
Lampenabdeckung
leuchtung.
• Dieses Gerät ist schwer. Vorsicht beim
, der Innenbe-
Reinigung und Pflege
• Schalten Sie vor Wartungsarbeiten immer
Transport.
• Entnehmen oder berühren Sie nie mit
nassen/feuchten Händen Tiefkühlgut, da
• Reinigen Sie das Gerät nicht mit Metalldies zu Hautverletzungen oder Kälteverbrennungen führen kann.
• Verwenden Sie keine scharfen Gegen-
• Das Gerät nicht direkter Sonneneinstrahlung aussetzen.
1) Falls Lampenabdeckung vorhanden.
2) Falls Lampe vorhanden.
3) Wenn das Gerät mit dem Frost-Free-System ausgestattet ist.
2)
Die Leuchtmittel
in diesem Gerät sind
Speziallampen, die nur für Haushaltsgeräte geeignet sind. Sie eignen sich nicht
zur Raumbeleuchtung.
Legen Sie keine tiefgefrorenen
Lebensmittel auf die Arbeitsplatte, da
die Verdunstungskälte zur
Wasserkondensation in ihrem Inneren
führen kann. Die tropfende Flüssigkeit
könnte Störungen verursachen. Stellen
Sie daher keine gefrorenen
Lebensmittel auf die Arbeitsplatte oder
lassen sie darauf liegen.
Kunststoffteile des Gerätes.
oder Flüssigkeiten in dem Gerät. Explosionsgefahr.
den Luftauslass auf der Rückwand.
3)
eingefroren werden.
chend den Herstellerangaben aufbewahren.
tellers sollten strikt eingehalten werden.
Halten Sie sich an die betreffenden Anweisungen.
Sprudel in den Tiefkühlschrank stellen, da
der Druckanstieg in den Behältern zur
Explosion führen und das Gerät beschädigen kann.
verursachen, wenn es direkt nach der
Entnahme aus dem Gefrierschrank gegessen wird.
das Gerät ab und ziehen Sie den Netzstecker aus der Steckdose.
gegenständen.
stände zum Entfernen von Reif und Eis
Page 4
4 electrolux
im Gerät. Verwenden Sie einen Kunststoffschaber.
• Verwenden Sie niemals einen Haartrockner oder andere Heizgeräte, um das Abtauen zu beschleunigen. Starke Hitze
kann die Plastikteile im Innenraum beschädigen und Feuchtigkeit kann in das
elektrische System eindringen, so dass
die Teile unter Spannung stehen.
Montage
Wichtig! Halten Sie sich für den
elektrischen Anschluss strikt an die
Anweisungen der betreffenden Abschnitte.
• Kontrollieren Sie nach dem Auspacken
das Gerät auf eventuelle Beschädigungen. Nehmen Sie das Gerät nicht in Betrieb, wenn es beschädigt ist. Melden Sie
die Schäden umgehend dem Händler,
bei dem Sie es erworben haben. Bewahren Sie in diesem Fall die Verpackung
auf.
• Lassen Sie das Gerät mindestens vier
Stunden stehen, bevor Sie es elektrisch
anschließen, damit das Öl in den Kompressor zurückfließen kann.
• Ausreichenden Freiraum zur Luftzirkulation um das Gerät lassen; anderenfalls besteht Überhitzungsgefahr. Halten Sie sich
für die Belüftung an die Installationsanweisungen.
• Das Gerät sollte zur Vermeidung von Verbrennungen durch Berührung von heißen
Bauteilen (Kompressor, Kondensator)
möglichst mit der Rückseite gegen eine
Wand aufgestellt werden.
• Das Gerät darf nicht in der Nähe von
Heizkörpern oder Kochern installiert werden.
• Vergewissern Sie sich, dass der Netzstecker des Gerätes nach der Installation frei
zugänglich ist.
• Verbinden Sie das Gerät ausschließlich
mit einer Trinkwasserzuleitung.
4)
Kundendienst
• Sollte die Wartung des Gerätes elektrische Arbeiten verlangen, so dürfen diese
nur von einem qualifizierten Elektriker
oder einem Elektro-Fachmann durchgeführt werden.
• Wenden Sie sich für Reparaturen und
Wartung nur an Fachkräfte der autorisierten Kundendienststellen und verlangen
Sie stets Original-Ersatzteile.
Umweltschutz
Das Gerät enthält im Kältekreis oder in
dem Isoliermaterial keine ozonschädigenden Gase. Das Gerät darf nicht wie
normaler Hausmüll entsorgt werden.
Die Isolierung enthält entzündliche Gase: das Gerät muss gemäß den geltenden Vorschriften entsorgt werden; sie
erhalten diese bei Ihrer Gemeindeverwaltung. Nicht das Kälteaggregat beschädigen, insbesondere nicht in der
Nähe des Wärmetauschers. Die Materialien, die bei der Herstellung dieses
Geräts verwendet wurden und mit dem
Symbol
markiert sind, können recy-
celt werden.
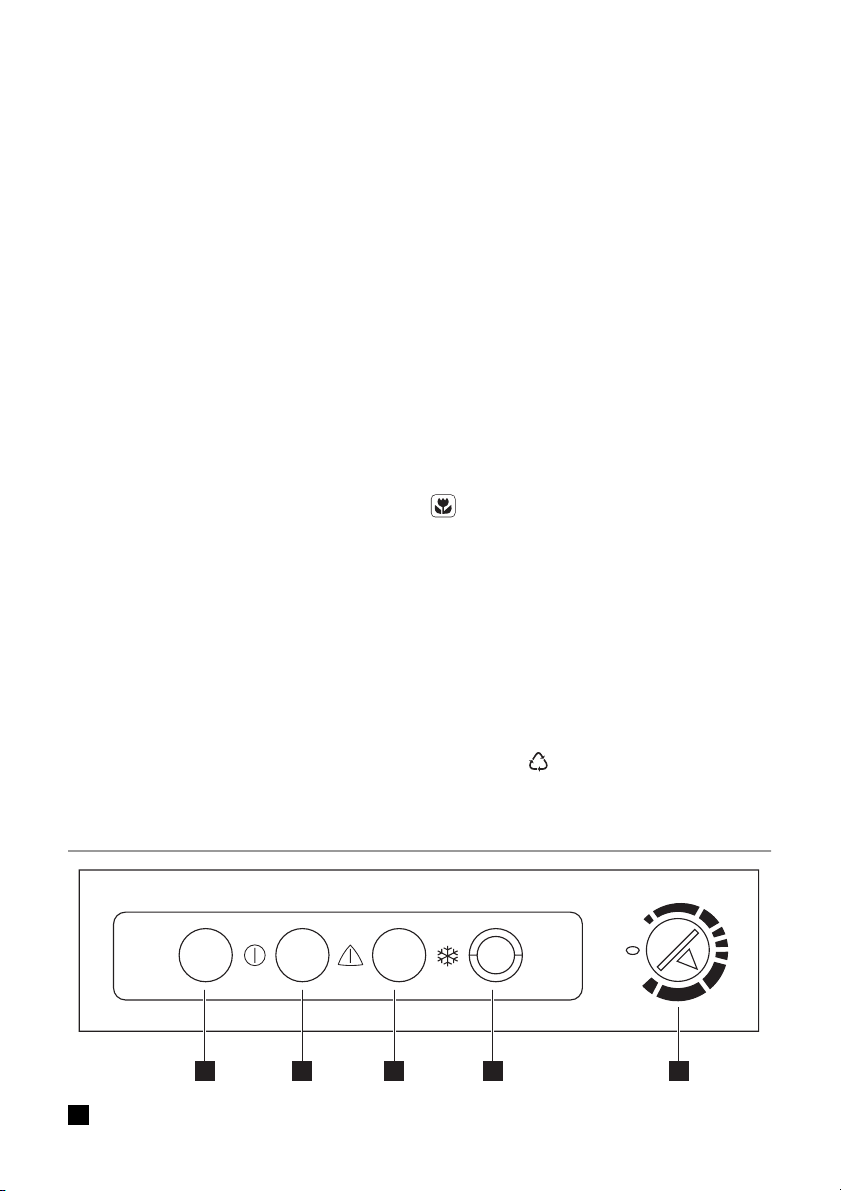
BEDIENBLENDE
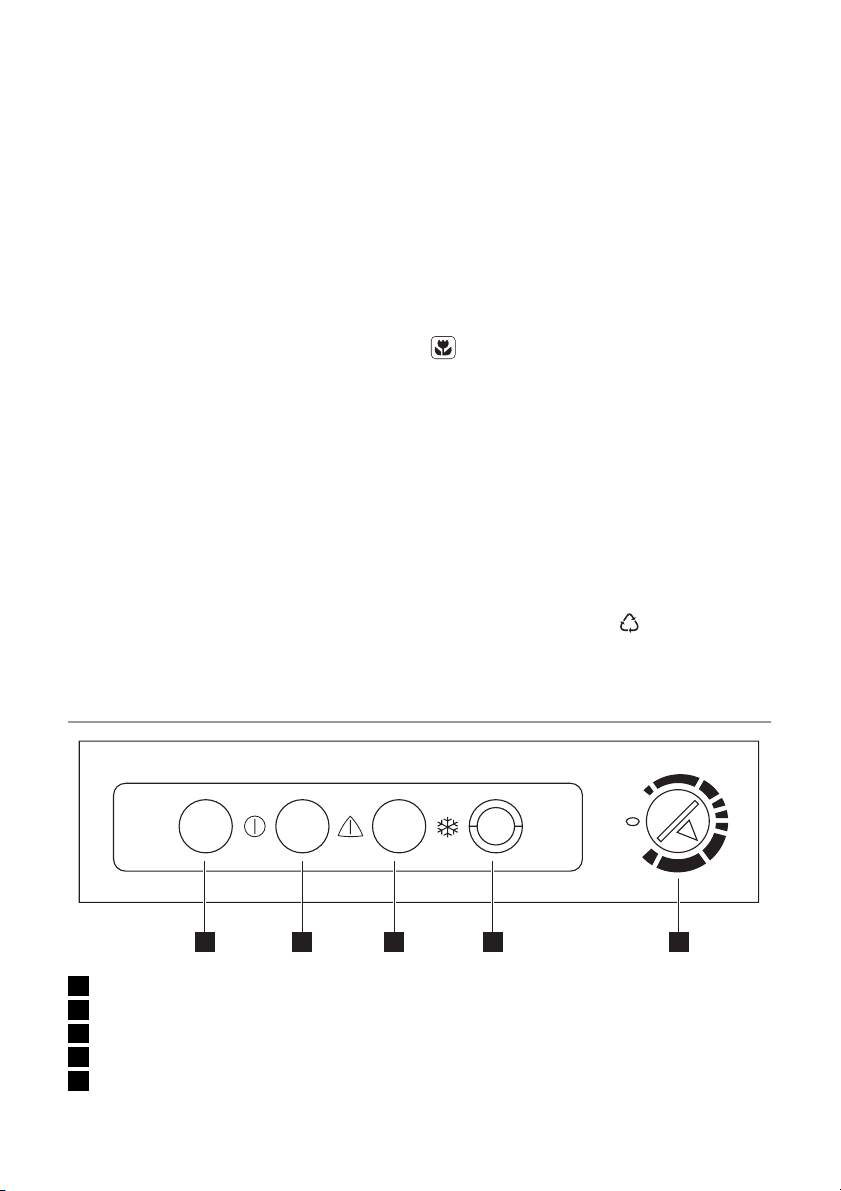
1 2 3 4 5
1 Grüne Kontrolllampe
4) Falls ein Wasseranschluss erforderlich ist.
Page 5
electrolux 5
2 Rote Kontrolllampe
3 Gelbe Kontrolllampe
4 Gefrierschalter
5 Temperaturregler
Einschalten des Geräts
1. Lassen Sie das Gerät nach dem Aufstellen 4 Stunden stehen.
2. Stecken Sie den Stecker in die Netzsteckdose.
3. Drehen Sie den Temperaturregler im
Uhrzeigersinn auf eine mittlere Einstellung.
4. Die grüne Kontrolllampe leuchtet und
bleibt eingeschaltet, bis das Gerät vom
Netz getrennt wird.
5. Drücken Sie die Superfrost-Taste, um
die Superfrost-Funktion einzuschalten
(die gelbe Kontrolllampe leuchtet). Warten Sie 4 Stunden, bis die richtige Temperatur erreicht ist, bevor Sie Lebensmittel einlagern.
Die gelbe Kontrolllampe leuchtet, solange die Superfrost-Taste eingeschaltet
ist.
6. Die rote Kontrolllampe leuchtet ebenfalls, bis die richtige Temperatur erreicht
ist.
Die rote Kontrolllampe erlischt einige
Stunden später, um anzuzeigen, dass
die eingestellte Temperatur erreicht ist.
Sie bleibt ausgeschaltet, um darauf hinzuweisen, dass alles in Ordnung ist. Sie
leuchtet wieder, wenn die Temperatur
zu stark ansteigt, z. B. nachdem die Tür
geöffnet wurde oder Lebensmittel eingelagert wurden. Sie erlischt, wenn die
Temperatur den eingestellten Wert wieder erreicht hat.
7. Drücken Sie die Superfrost-Taste erneut, sobald die eingestellte Temperatur
erreicht wurde (die rote Kontrolllampe ist
ausgeschaltet), um die Superfrost-Funktion auszuschalten. Die gelbe Kontrolllampe erlischt dann.
Ausschalten
1. Drehen Sie den Temperaturregler zum
Ausschalten des Geräts in die Position
„O“.
2. Ziehen Sie den Netzstecker aus der
Steckdose, um das Gerät von der
Stromversorgung zu trennen.
Temperaturregelung
Die Temperatur im Gefrierraum wird durch
den Temperaturregler, der sich auf der Bedienblende befindet, geregelt.
Bedienen Sie das Gerät wie folgt:
• Drehen Sie den Temperaturregler auf eine niedrigere Einstellung, um die minimal
mögliche Kühlung zu erreichen.
• Drehen Sie den Temperaturregler auf eine höhere Einstellung, um die maximal
mögliche Kühlung zu erreichen.
Eine mittlere Einstellung ist im Allgemeinen am besten geeignet.
Allerdings muss für eine exakte Einstellung
berücksichtigt werden, dass die Temperatur im Innern des Gerätes von verschiedenen Faktoren abhängt:
• Raumtemperatur
• Von der Häufigkeit der Türöffnung
• Von der Menge der eingelagerten Lebensmittel
• Und vom Standort des Geräts.
Superfrost-Funktion (Schnellgefrieren)
Wenn mehr als 3-4 kg Lebensmittel eingefroren werden sollen:
1. Drücken Sie die Superfrost-Taste 6-24
Stunden, bevor Sie frische Lebensmittel
in den Gefrierschrank legen, um diese
Funktion zu aktivieren. Die gelbe Kontrolllampe leuchtet auf. Der Kompressor
läuft jetzt kontinuierlich und gewährleistet so eine möglichst schnelle Tiefkühlung der frischen Lebensmittel.
2. Diese Funktion kann jederzeit durch
Drücken der Superfrost-Taste ausgeschaltet werden.
3. Legen Sie die Lebensmittel in das (obe-
re) Tiefkühlfach und lassen Sie die Superfrost-Funktion weitere 24 Stunden
eingeschaltet.
4. Drücken Sie dann die Superfrost-Taste
erneut (die gelbe Kontrolllampe erlischt
und die Taste kehrt in ihre ursprüngliche
Position zurück).
5. Nehmen Sie die gefrorenen Lebensmit-
tel aus dem oberen (Tiefkühl-) Fach und
legen Sie sie in die beiden anderen Fächer (Lagerungsfächer). Um die maximale Gefrierleistung zu erreichen, nehmen Sie die obere Schublade (falls vorhanden) heraus und legen Sie das Ge-
Page 6
6 electrolux
friergut direkt auf den Verdampfer. Beim
Gefrieren kleinerer Mengen ist eine Herausnahme der Schublade nicht notwendig
ERSTE INBETRIEBNAHME
Reinigung des Innenraums
Bevor Sie das Gerät in Betrieb nehmen, beseitigen Sie den typischen "Neugeruch" am
besten durch Auswaschen der Innenteile
mit lauwarmem Wasser und einem neutralen Reinigungsmittel. Sorgfältig nachtrocknen.
TÄGLICHER GEBRAUCH
Einfrieren frischer Lebensmittel
Das (obere) Tiefkühlfach eignet sich zum
Einfrieren von frischen Lebensmitteln und
zum Lagern von gefrorenen und tiefgefrorenen Lebensmitteln über einen längeren Zeitraum.
Aktivieren Sie zum Einfrieren frischer Lebensmittel die Superfrost-Funktion.
Die maximale Menge an Lebensmitteln, die
in 24 Stunden eingefroren werden kann, ist
auf dem Typenschild angegeben, das sich
auf der Innenseite des Geräts befindet.
Der Gefriervorgang dauert mindestens 24
Stunden. Legen Sie während dieses Zeitraums keine weiteren einzufrierenden Lebensmittel in das Gerät.
Lagerung gefrorener Produkte
Lassen Sie das Gerät vor der ersten Inbetriebnahme oder nach einer Zeit, in der
das Gerät nicht benutzt wurde, mindestens
zwei Stunden lang auf den höheren Einstel-
Bleibt die Superfrost-Taste aus Versehen eingeschaltet, wird das Gefriergerät nicht beschädigt, aber es wird unnötig Energie verbraucht. .
Wichtig! Verwenden Sie keine Reinigungsmittel oder Scheuerpulver, da hierdurch die
Oberfläche beschädigt wird.
lungen laufen, bevor Sie Lebensmittel in
das Gefrierfach hinein legen.
Wichtig! Kam es zum Beispiel durch einen
Stromausfall, der länger dauerte als der in
der Tabelle mit den technischen Daten
angegebene Wert (siehe "Ausfalldauer") zu
einem ungewollten Abtauen, dann müssen
die aufgetauten Lebensmittel sehr rasch
verbraucht oder sofort gekocht und (nach
dem Abkühlen) erneut eingefroren werden.
Auftauen
Tiefgefrorene oder gefrorene Lebensmittel
können vor der Verwendung bei Raumtemperatur aufgetaut werden.
Kleinere Gefriergutteile können sogar direkt
aus dem Gefriergerät entnommen und anschließend sofort gekocht werden: in diesem Fall dauert der Garvorgang allerdings
etwas länger.
PRAKTISCHE TIPPS UND HINWEISE
Normale Betriebsgeräusche
• Unter Umständen ist ein leichtes Gurgeln
und Blubbern zu hören, wenn das Kältemittel durch die Leitungen gepumpt wird.
Das ist normal.
• Bei eingeschaltetem Kompressor wird
das Kältemittel umgewälzt und Sie hören
ein Surren und ein pulsierendes Geräusch vom Kompressor. Das ist normal.
• Die thermische Ausdehnung kann ein
plötzliches Krachen verursachen. Das ist
eine natürliche und nicht gefährliche physikalische Erscheinung. Das ist normal.
• Beim Ein- oder Ausschalten des Kom-
Hinweise zum Einfrieren
Im Folgenden finden Sie einige wertvolle
Tipps für einen optimalen Gefriervorgang:
• die maximale Menge an Lebensmitteln,
• der Gefriervorgang dauert 24 Stunden.
pressors ist ein leises "Klicken" des Temperaturreglers zu hören. Das ist normal.
die innerhalb von 24 Stunden eingefroren
werden kann. ist auf dem Typschild angegeben;
Legen Sie während dieses Zeitraums kei-
Page 7
electrolux 7
ne weiteren einzufrierenden Lebensmittel
in das Gefrierfach;
• frieren Sie ausschließlich frische und
gründlich gewaschene Lebensmittel von
sehr guter Qualität ein;
• teilen Sie die Lebensmittel in kleinere Portionen ein, damit diese schnell und vollständig gefrieren und Sie später nur die
Menge auftauen müssen, die Sie gerade
benötigen;
• die einzufrierenden Lebensmittelportionen sollten stets luftdicht in Aluminiumfolie oder in lebensmittelechte Gefrierbeutel
verpackt werden, um so wenig Luft wie
möglich in der Verpackung zu haben;
• achten Sie beim Hineinlegen von frischen, noch ungefrorenen Lebensmitteln
darauf, dass diese keinen Kontakt mit
Gefriergut bekommen, da dieses sonst
antauen kann;
• weniger fetthaltige Lebensmittel lassen
sich besser lagern als fetthaltigere; Salz
verkürzt die Lagerzeit von Lebensmitteln
im Gefrierfach;
• werden Gefrierwürfel direkt nach der Entnahme aus dem Gefrierfach verwendet,
können Sie zu Frostbrand auf der Haut
führen;
REINIGUNG UND PFLEGE
Vorsicht! Ziehen Sie bitte vor jeder
Reinigungsarbeit immer den
Netzstecker aus der Steckdose.
Der Kältekreis des Gerätes enthält
Kohlenwasserstoffe; Wartungsarbeiten
und Nachfüllen von Kältemittel dürfen
daher nur durch vom Hersteller autorisiertes Fachpersonal ausgeführt werden.
Regelmäßige Reinigung
Der gesamte Kühlschrank muss regelmäßig
gereinigt werden:
• Reinigen Sie die Innenseiten und die Zubehörteile mit lauwarmem Wasser und
etwas Neutralseife.
• Prüfen und säubern Sie die Türdichtungen in regelmäßigen Abständen und kontrollieren Sie, dass diese sauber und frei
von Verunreinigungen sind.
• Spülen und trocknen Sie diese sorgfältig
ab.
• es empfiehlt sich, das Einfrierdatum auf
jeder einzelnen Packung zu notieren, um
einen genauen Überblick über die Lagerzeit zu haben.
Hinweise zur Lagerung gefrorener
Produkte
So erzielen Sie die besten Ergebnisse mit
Ihrem Gerät:
• Prüfen Sie sorgfältig, dass die im Handel
erworbenen gefrorenen Lebensmittel
sachgerecht gelagert wurden.
• Achten Sie unbedingt darauf, die eingekauften gefrorenen Lebensmittel in der
kürzest möglichen Zeit in Ihren Gefrierschrank zu bringen.
• Öffnen Sie die Tür nicht zu häufig, und
lassen Sie diese nicht länger offen als unbedingt notwendig.
• Abgetaute Lebensmittel verderben sehr
schnell und eignen sich nicht für ein erneutes Einfrieren.
• Das Haltbarkeitsdatum auf der Tiefkühlkostverpackung sollte nicht überschritten
werden.
Wichtig! Ziehen Sie nicht an Leitungen
und/oder Kabeln im Innern des
Kühlschranks und achten Sie darauf, diese
nicht zu verschieben oder zu beschädigen.
Benutzen Sie zur Reinigung des Innenraums keinesfalls Putzmittel, Scheuerpulver,
stark parfümierte Reinigungsmittel oder
Wachspolituren, da diese die Oberfläche
des Innenraums beschädigen und einen
starken Eigengeruch hinterlassen können.
Reinigen Sie den Kondensator (schwarzes
Gitter) und den Motorkompressor auf der
Geräterückseite mit einer Bürste oder einem Staubsauger. Dadurch verbessert sich
die Leistung des Geräts und es verbraucht
weniger Strom.
Wichtig! Bitte achten Sie darauf, das
Kühlsystem nicht zu beschädigen.
Viele Haushaltsreiniger für Küchen enthalten
Chemikalien, die den im Gerät verwendeten
Page 8

8 electrolux
Kunststoff angreifen können. Aus diesem
Grund ist es empfehlenswert, das Gerät außen nur mit warmem Wasser und etwas
flüssigem Tellerspülmittel zu reinigen.
Schließen Sie das Gerät nach der Reinigung wieder an die Netzversorgung an.
Abtauen des Gefrierschranks
Auf den Ablagen des Gefrierschranks und
im Innern des oberen Fachs bildet sich
stets etwas Reif.
Tauen Sie den Gefrierschrank ab, wenn die
Reifschicht eine Stärke von etwa 3 bis 5
mm erreicht hat.
Wichtig! Stellen Sie den Temperaturregler
bitte 12 Stunden vor dem Abtauen auf eine
kühlere Einstellung, damit eine
ausreichende Kälte als Reserve für die
Unterbrechung im Betrieb entstehen kann.
Entfernen Sie den Reif wie nachstehend erläutert:
1. Schalten Sie das Gerät ab und ziehen
Sie den Netzstecker aus der Steckdose.
2. Nehmen Sie das gesamte Gefriergut heraus, verpacken Sie es in mehrere
Schichten Zeitungspapier und lagern Sie
es an einem kühlen Ort.
Vorsicht! Fassen Sie eingefrorene
Lebensmittel nicht mit nassen Händen
an. Ihre Hände könnten an den
Lebensmitteln festfrieren.
3. Lassen Sie die Tür des Geräts offen stehen und setzen Sie den Kunststoffschaber in die entsprechende Aussparung
unten in der Mitte; stellen Sie eine Schale zum Auffangen des Tauwassers darunter.
Stellen Sie eine Schale mit warmem
Wasser in den Gefrierraum, um den
Abtauprozess zu beschleunigen. Entfernen Sie bereits während des Abtauprozesses vorsichtig Eisstücke, die sich
lösen lassen.
4. Ist das Geräteinnere vollständig abgetaut, trocknen Sie die nassen Oberflächen gründlich ab und bewahren Sie
den Kunststoffschaber für eine spätere
Verwendung auf.
5. Schalten Sie das Gerät ein.
6. Drehen den Temperaturregler in Mittelstellung und lassen Sie das Gefriergerät
mindestens 4 Stunden mit eingeschaltem Gefrierschalter laufen.
7. Nachdem die rote Kontrolllampe erlischt, legen Sie die zuvor ausgelagerten
Lebensmittel wieder in die Fächer.
Warnung! Entfernen Sie Reif und Eis
vom Verdampfer niemals mit scharfen
Gegenständen, da dieser dadurch
beschädigt werden könnte.
Versuchen Sie nicht, den Abtauvorgang durch andere als vom Hersteller
empfohlene mechanische oder sonstige Hilfsmittel zu beschleunigen.
Ein Temperaturanstieg des Gefrierguts
während des Abtauens des Gerätes
kann die Lagerzeit dieser Lebensmittel
verkürzen.
Stillstandzeiten
Bei längerem Stillstand des Geräts müssen
Sie folgendermaßen vorgehen:
1. Trennen Sie das Gerät von der Netzversorgung.
2. Entnehmen Sie alle Lebensmittel.
3. Tauen Sie das Gerät ab; reinigen Sie
den Innenraum und das gesamte Zubehör.
4. Lassen Sie die Türen offen, um das Entstehen unangenehmer Gerüche zu vermeiden.
Page 9
electrolux 9
Wichtig! Möchten Sie bei einer längeren
Abwesenheit das Gerät weiter laufen
lassen, bitten Sie jemanden, gelegentlich
Gefriergut bei einem möglichen
Stromausfall nicht im Innern des Geräts
verdirbt.
die Temperatur zu prüfen, damit das
WAS TUN, WENN …
Warnung! Ziehen Sie vor der
Fehlersuche immer den Netzstecker
aus der Steckdose.
Die Fehlersuche, die in der vorliegenden Gebrauchsanweisung nicht beschrieben ist, darf nur von einem qualifizierten Elektriker oder einer kompetenten Person durchgeführt werden.
Wichtig! Während das Gerät in Betrieb ist,
entstehen bestimmte Geräusche
(Kompressor und Kühlkreislauf).
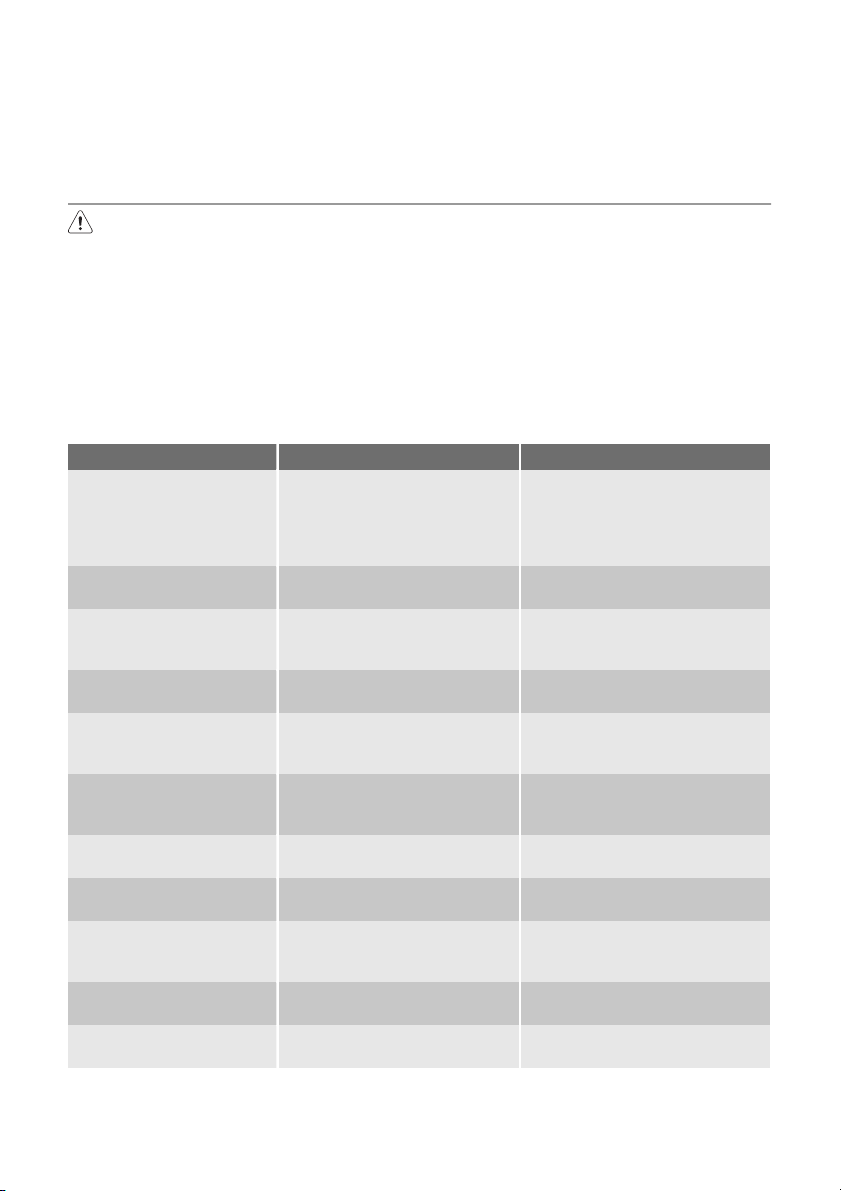
Störung Mögliche Ursache Abhilfe
Das Gerät ist zu laut.
Der Kompressor arbeitet
ständig.
Die Türen schließen nicht richtig
Die Tür wurde zu häufig geöff-
Es wurden zu große Mengen an
In das Gerät eingelegte Lebens-
Die Raumtemperatur ist zu
Zu starke Reif- und Eisbildung.
Die Türen schließen nicht richtig
Der Temperaturregler kann
Es ist zu warm im Gefrierfach
Unebenheiten im Boden sind
durch Unterlegen nicht ausgeglichen worden.
Der Temperaturregler ist falsch
eingestellt.
oder sind nicht fest geschlossen.
net.
Lebensmitteln gleichzeitig zum
Einfrieren eingelegt.
mittel waren noch zu warm.
hoch.
Das Gefriergut ist nicht korrekt
verpackt.
oder sind nicht fest geschlossen.
falsch eingestellt sein.
Der Temperaturregler kann
falsch eingestellt sein.
Wichtig! Das Gerät arbeitet nicht ständig.
Wenn der Kompressor aufhört, bedeutet
das nicht, dass keine Stromversorgung
mehr anliegt. Aus diesem Grund dürfen Sie
erst dann elektrische Teile des Geräts
berühren, nachdem das Gerät vom Netz
getrennt wurde.
Kontrollieren Sie, ob eventuelle
Unebenheiten der Standfläche
korrekt ausgeglichen wurden, so
dass alle vier Füße fest auf dem
Boden stehen.
Stellen Sie eine höhere Temperatur ein.
Prüfen Sie, ob die Türen gut
schließen und die Dichtungen unbeschädigt und sauber sind.
Lassen Sie die Tür nicht länger als
unbedingt erforderlich offen.
Warten Sie einige Stunden und
prüfen Sie dann die Temperatur
erneut.
Lassen Sie Lebensmittel auf
Raumtemperatur abkühlen, bevor
Sie diese einlagern.
Senken Sie die Raumtemperatur.
Verpacken Sie die Lebensmittel
besser.
Prüfen Sie, ob die Türen gut
schließen und die Dichtungen unbeschädigt und sauber sind.
Stellen Sie eine höhere Temperatur ein.
Stellen Sie eine niedrigere Temperatur ein.
Page 10

10 electrolux
Störung Mögliche Ursache Abhilfe
Die Tür schließt nicht richtig oder
Es wurden zu große Mengen an
In das Gerät eingelegte Lebens-
Die einzufrierenden Packungen
Es ist zu kalt im Gefriergerät.
Das Gerät funktioniert
überhaupt nicht. Weder
die Kühlung noch die Beleuchtung funktionieren.
Das Gerät bekommt keinen
Das Gerät ist nicht eingeschal-
Es liegt keine Spannung an der
Das Gerät kühlt nicht Der Stecker ist nicht richtig in die
Es liegt keine Spannung an der
Das Gerät ist nicht eingeschal-
Schließen der Tür
1. Reinigen Sie die Türdichtungen.
2. Stellen Sie die Tür nach Bedarf ein. Sie-
ist nicht fest geschlossen.
Lebensmitteln gleichzeitig zum
Einfrieren eingelegt.
mittel waren noch zu warm.
liegen zu dicht aneinander.
Der Temperaturregler kann
falsch eingestellt sein.
Der Stecker ist nicht richtig in die
Steckdose gesteckt.
Strom.
tet.
Netzsteckdose an (versuchen
Sie bitte, ob ein anderes Gerät
dort funktioniert).
Steckdose gesteckt.
Netzsteckdose an (versuchen
Sie bitte, ob ein anderes Gerät
dort funktioniert).
tet.
3. Ersetzen Sie die defekten Türdichtungen, falls erforderlich. Kontaktieren Sie
den Kundendienst.
he hierzu "Montage".
Prüfen Sie, ob die Tür gut schließt
und die Dichtung unbeschädigt
und sauber ist.
Legen Sie kleinere Mengen an Lebensmitteln in den Gefrierschrank.
Lassen Sie Lebensmittel auf
Raumtemperatur abkühlen, bevor
Sie diese einlagern.
Legen Sie die Lebensmittel so hinein, dass die Luft frei um sie zirkulieren kann.
Stellen Sie eine höhere Temperatur ein.
Stecken Sie den Netzstecker korrekt in die Steckdose.
Versuchen Sie, ein anderes elektrisches Gerät an die Steckdose
anzuschließen.
Schalten Sie das Gerät ein.
Rufen Sie einen Elektriker.
Stecken Sie den Netzstecker korrekt in die Steckdose.
Rufen Sie einen Elektriker.
Schalten Sie das Gerät ein.
TECHNISCHE DATEN
Abmessungen
Höhe 850 mm
Breite 550 mm
Tiefe 612 mm
Ausfalldauer 22 h
Page 11
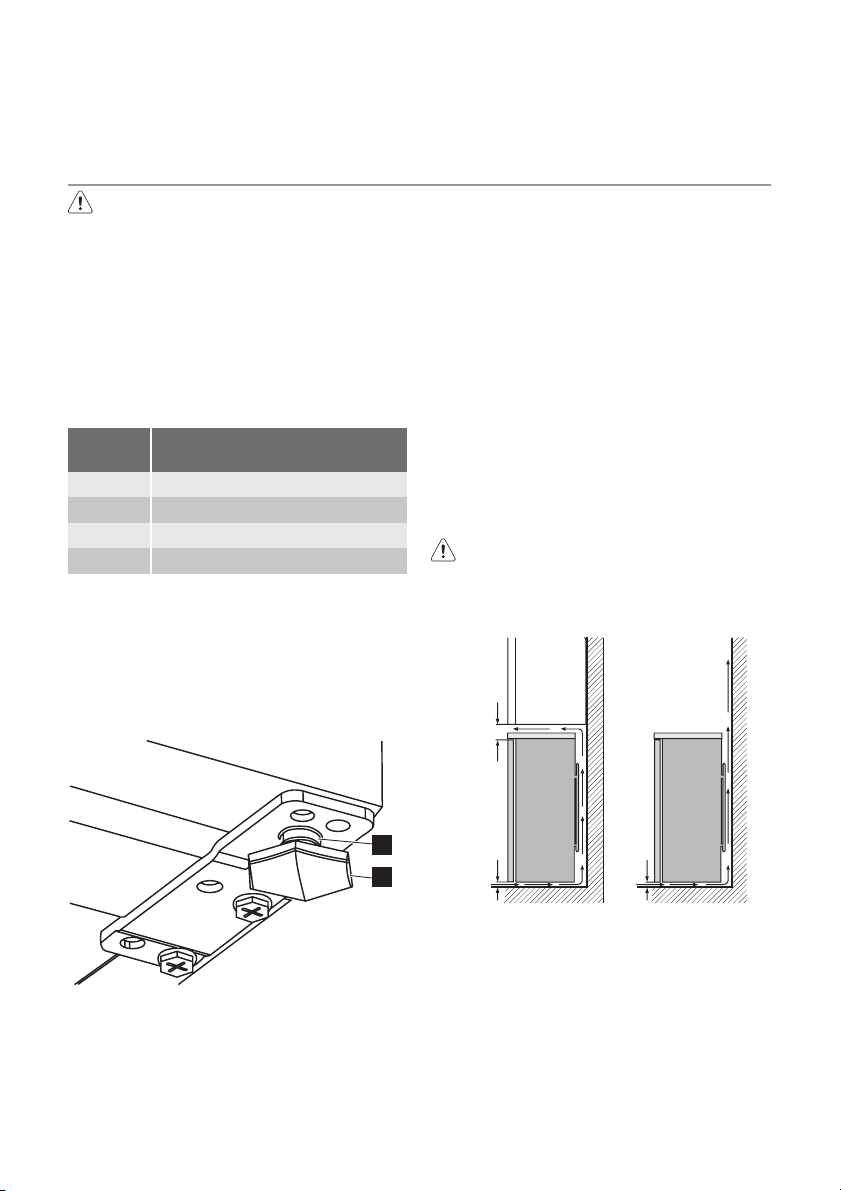
Die technischen Informationen befinden
sich auf dem Typschild innen links im Gerät
sowie auf der Energieplakette.
MONTAGE
Lesen Sie bitte die
"Sicherheitshinweise" sorgfältig vor der
Aufstellung des Geräts durch, um
Gefahren für Sie selbst zu vermeiden
und einen korrekten Betrieb des Geräts
zu gewährleisten.
Aufstellung
Installieren Sie dieses Gerät an einem Ort,
an dem die Umgebungstemperatur mit der
Klimaklasse übereinstimmt, die auf dem
Typschild des Geräts angegeben ist:
Klimaklasse
SN +10°C bis + 32°C
N +16°C bis + 32°C
ST +16°C bis + 38°C
T +16°C bis + 43°C
Ausrichten
Bei der Aufstellung des Gerätes ist dieses
waagerecht auszurichten. Dies lässt sich
mit zwei Schraubfüßen (2) am vorderen Sockel des Gerätes erreichen. Bei Bedarf
kann zum Einstellen der Schraubfüße das
Distanzstück (1) entfernt werden.
Umgebungstemperatur
electrolux 11
mit das Gerät die optimale Leistung bringen
kann, wenn es unter einer überhängenden
Wand installliert wird, sollte der Mindestabstand zwischen der Geräteoberseite und
der Wand mindestens 100 mm betragen.
Allerdings sollte die Aufstellung des Gerätes
unter einer überhängenden Wand nach
Möglichkeit vermieden werden. Die korrekte
waagerechte Ausrichtung des Gerätes kann
mit Hilfe eines oder mehrerer Schraubfüße
am Sockel des Gerätes erfolgen.
Wird das Gerät in einer Ecke aufgestellt,
und zeigt die Scharnierseite dabei zur
Wand, so muss der Abstand zwischen
Wand und Gerät mindestens 10 mm betragen, damit die Tür zum Herausnehmen der
Ablagen geöffnet werden kann.
Warnung! Es muss möglich sein, das
Gerät vom Netz zu trennen; nach der
Installation muss die Steckdose daher
zugänglich bleiben.
1
2
Standort
Das Gerät sollte möglichst weit entfernt von
Wärmequellen wie Heizungen, Boilern oder
direktem Sonnenlicht usw. aufgestellt werden. Sicherstellen, dass die Luft frei auf der
Rückseite des Gerätes zirkulieren kann. Da-
15mm 100mm
15mm
Wechsel des Türanschlags
Wichtig! Die nachfolgend beschriebenen
Tätigkeiten müssen mit Hilfe einer zweiten
Person durchgeführt werden, um ein
Herunterfallen der Türen zu vermeiden.
Beim Wechsel des Türanschlags muss wie
folgt vorgegangen werden:
1. Ziehen Sie den Stecker aus der Steck-
dose.
Page 12

12 electrolux
2. Neigen Sie das Gerät vorsichtig nach
hinten, so dass der Kompressor nicht
den Boden berühren kann.
3. Schrauben Sie beide Schraubfüße ab,
die sich vorne auf beiden Seiten befinden.
4. Entfernen Sie das untere Türscharnier,
indem Sie die zwei Befestigungsschrauben entfernen.
5. Entfernen Sie den Scharnierbolzen unten an der Tür.
6. Schieben Sie den Scharnierbolzen in
das Loch in der Scharnierplatte.
7. Nehmen Sie die Tür ab.
8. Bringen Sie den oberen Scharnierbolzen an der gegenüberliegenden Seite
an.
9. Die Tür auf dem Scharnierbolzen einhängen.
10. Schieben Sie den Scharnierbolzen in
das Loch in der Scharnierplatte und
montieren Sie die Scharniereinheit auf
gegenüberliegenden Seite mit den beiden Befestigungsschrauben.
11. Bringen Sie untere Scharnierplatteneinheit auf der gegenüberliegenden Seite
5) Falls dies vorgesehen ist,
an und achten Sie darauf, dass die Tür
parallel zur Schrankseite ist.
12. Entfernen Sie den Griff und montieren
5)
Sie in wieder.
auf der gegenüber lie-
genden Seite.
13. Schieben Sie das Gerät wieder an seinen Standort, richten Sie es waagerecht aus und nehmen Sie es mindestens vier Stunden lang nicht in Betrieb.
Schließen Sie es dann an die Stromversorgung an.
Prüfen Sie alles erneut, um sicherzustellen,
dass:
• Alle Schrauben fest angezogen sind.
• Die Tür korrekt öffnet und schließt.
Bei niedrigen Umgebungstemperaturen
(z.B. im Winter) kann es sein, dass die Türdichtung nicht richtig am Gerät anliegt.
Warten Sie in diesem Fall auf die natürliche
Anpassung der Dichtung.
Wenden Sie sich bitte an den nächsten
Kundendienst, falls Sie die oben beschrie-
Page 13
electrolux 13
benen Tätigkeiten nicht selber durchführen
möchten. Ein Kundendiensttechniker wird
die Türen dann auf Ihre Kosten umbauen.
Elektrischer Anschluss
Kontrollieren Sie vor der ersten Benutzung
des Gerätes, ob die Netzspannung und frequenz Ihres Hausanschlusses mit den
auf dem Typenschild angegebenen Anschlusswerten übereinstimmen.
Das Gerät muss geerdet sein. Zu diesem
Zweck ist die Netzkabelsteckdose mit ei-
HINWEISE ZUM UMWELTSCHUTZ
Das Symbol auf dem Produkt oder
seiner Verpackung weist darauf hin, dass
dieses Produkt nicht als normaler
Haushaltsabfall zu behandeln ist, sondern
an einem Sammelpunkt für das Recycling
von elektrischen und elektronischen
Geräten abgegeben werden muss. Durch
Ihren Beitrag zum korrekten Entsorgen
dieses Produkts schützen Sie die Umwelt
und die Gesundheit Ihrer Mitmenschen.
Umwelt und Gesundheit werden durch
falsches Entsorgen gefährdet. Weitere
Informationen über das Recycling dieses
nem Schutzkontakt ausgestattet. Falls die
Steckdose Ihres Hausanschlusses nicht geerdet sein sollte, lassen Sie das Gerät bitte
gemäß den geltenden Vorschriften erden
und fragen Sie dafür einen qualifizierten
Elektriker.
Der Hersteller übernimmt keinerlei Haftung
für Schäden oder Verletzungen, die durch
Missachtung der oben genannten Sicherheitshinweise entstehen.
Das Gerät entspricht den EU- Richtlinien.
Produkts erhalten Sie von Ihrem Rathaus,
Ihrer Müllabfuhr oder dem Geschäft, in dem
Sie das Produkt gekauft haben.
Wohin mit den Altgeräten?
Überall dort wo neue Geräte verkauft
werden oder Abgabe bei den offiziellen
SENS-Sammelstellen oder offiziellen
SENS-Recyclern.
Die Liste der offiziellen SENSSammelstellen findet sich unter
www.sens.ch.
Page 14
14 electrolux
Electrolux. Thinking of you.
Partagez notre imagination sur www.electrolux.com
SOMMAIRE
Consignes de sécurité 14
Bandeau de commande 16
Première utilisation 18
Utilisation quotidienne 18
Conseils utiles 18
Entretien et nettoyage 19
CONSIGNES DE SÉCURITÉ
Pour votre sécurité et garantir une utilisation
correcte de l'appareil, lisez attentivement
cette notice, y compris les conseils et avertissements, avant d'installer et d'utiliser
l'appareil pour la première fois. Pour éviter
toute erreur ou accident, veillez à ce que
toute personne qui utilise l'appareil connaisse bien son fonctionnement et ses fonctions de sécurité. Conservez cette notice
avec l'appareil. Si l'appareil doit être vendu
ou cédé à une autre personne, veillez à remettre cette notice au nouveau propriétaire,
afin qu'il puisse se familiariser avec son
fonctionnement et sa sécurité.
Pour la sécurité des personnes et des
biens, conservez et respectez les consignes de sécurité figurant dans cette notice.
Le fabricant décline toute responsabilité en
cas de dommages dus au non-respect de
ces instructions.
Sécurité des enfants et des personnes
vulnérables
• Cet appareil n'est pas destiné à être utilisé par des enfants ou des personnes
dont les capacités physiques, sensorielles ou mentales, ou le manque d'expérience et de connaissance les empêchent
d'utiliser l'appareil sans risque lorsqu'ils
sont sans surveillance ou en l'absence
d'instruction d'une personne responsable
qui puisse leur assurer une utilisation de
l'appareil sans danger.
Empêchez les enfants de jouer avec l'appareil.
• Ne laissez pas les différents emballages à
portée des enfants. Ils pourraient s'asphyxier.
En cas d'anomalie de fonctionnement 20
Caractéristiques techniques 22
Installation 22
En matière de sauvegarde de
l'environnement 25
Sous réserve de modifications
• Si l'appareil doit être mis au rebut, veillez
à couper le câble d'alimentation électrique au ras de l'appareil pour éviter les
risques d'électrocution. Démontez la porte pour éviter que des enfants ne restent
enfermés à l'intérieur.
• Cet appareil est muni de fermetures magnétiques. S'il remplace un appareil équipé d'une fermeture à ressort, nous vous
conseillons de rendre celle-ci inutilisable
avant de vous en débarrasser. Ceci afin
d'éviter aux enfants de s'enfermer dans
l'appareil et de mettre ainsi leur vie en
danger.
Mesures générales de sécurité
Attention Veillez à ce que les orifices
de ventilation ne soient pas obstrués.
• Cet appareil est destiné uniquement à la
conservation d’aliments et/ou de boissons dans le cadre d’un usage domestique normal, tel que celui décrit dans la
présente notice.
• N'utilisez pas d'appareils électriques,
d'agents chimiques ou tout autre système artificiel pour accélérer le processus
de dégivrage.
• N’utilisez pas d'autres appareils électriques (par exemple, sorbetières) à l'intérieur d’appareils réfrigérants sauf s’ils
sont homologués pour cet usage par leur
fabricant.
• Faites très attention lorsque vous déplacez l'appareil afin de ne pas endommager des parties du circuit de refroidissement et ainsi d'éviter des risques de fuite.
• Le circuit de refroidissement de l’appareil
contient de l’isobutane (R600a), un gaz
Page 15
electrolux 15
naturel offrant un haut niveau de compatibilité avec l’environnement mais qui est
néanmoins inflammable.
Pendant le transport et l'installation de
l’appareil, assurez-vous qu'aucune pièce
du circuit de refroidissement n'est endommagée.
Si tel est le cas :
– Évitez les flammes vives (briquet) et
tout autre allumage (étincelles).
– Aérez soigneusement la pièce où se
trouve l'appareil.
• Ne modifiez pas les spécifications de
l'appareil. Un cordon d'alimentation endommagé peut être la cause de courtscircuits, d'incendies et/ou de décharges
électriques.
Avertissement Les composants électriques (cordon d'alimentation, prise,
compresseur) doivent être remplacés
par un technicien d’entretien agréé ou
par un électricien spécialisé.
1. L'appareil ne doit pas être raccordé à
l'aide d'un prolongateur, d'une prise
multiple ou d'un raccordement multiple (risque d'incendie).
2. Assurez-vous que la prise n'est pas
écrasée ou endommagée par l'arrière
de l'appareil. Une prise de courant
endommagée peut surchauffer et
provoquer un incendie.
3. Vérifiez que la prise murale reste ac-
cessible une fois que l'installation est
terminée.
4. Ne débranchez pas l'appareil en tirant
sur le câble, particulièrement lorsque
l'appareil est tiré de son logement.
5. Si la fiche du cordon d'alimentation
est desserrée, ne la branchez pas
dans la prise murale. Risque d'électrocution ou d'incendie !
6. N'utilisez pas l'appareil si le diffuseur
de l'ampoule d'éclairage n'est pas
6)
présent
pour l'éclairage intérieur.
• Cet appareil est lourd. Faites attention en
le déplaçant.
• Ne touchez pas avec les mains humides
les surfaces givrées et les produits con-
gelés (risque de brûlure et d'arrachement
de la peau).
• Évitez une exposition prolongée de l'appareil aux rayons solaires.
•
Ampoules
7)
utilisées dans cet appareil
sont des ampoules spéciales dédiées
uniquement à un usage avec des appareils ménagers. Elles ne conviennent pas
à l'éclairage des pièces d'une habitation.
Ne placez pas d'aliments surgelés sur
le plan de travail car le froid et la vapeur
peuvent produire une condensation
d'eau sur sa face intérieure.
L'égouttement qui en résulterait
risquerait de provoquer des
dysfonctionnements. Par conséquent,
ne placez et ne déposez aucun aliment
surgelé sur le plan de travail.
Utilisation quotidienne
• Ne posez pas d'éléments chauds sur les
parties en plastique de l'appareil.
• Ne stockez pas de gaz ou de liquides inflammables dans l'appareil (risque d'explosion).
• Ne placez pas d'aliments directement
contre la sortie d'air sur la paroi arrière de
l'appareil.
8)
• Un produit décongelé ne doit jamais être
recongelé.
• Conservez les aliments emballés conformément aux instructions de leur fabricant.
• Respectez scrupuleusement les conseils
de conservation donnés par le fabricant
de l'appareil. Consultez les instructions
respectives.
• Ne mettez pas de bouteilles ni de boîtes
de boissons gazeuses dans le compartiment congélateur, car la pression se formant à l'intérieur du contenant pourrait le
faire éclater et endommager ainsi l'appareil.
• Ne consommez pas certains produits tels
que les bâtonnets glacés dès leur sortie
de l'appareil, car ils peuvent provoquer
des brûlures.
6) Si le diffuseur est prévu.
7) Si l'ampoule est prévue.
8) Si l'appareil est sans givre.
Page 16
16 electrolux
Entretien et nettoyage
• Avant toute opération d'entretien, mettez
l'appareil à l'arrêt et débranchez-le.
• N'utilisez pas d'objets métalliques pour
nettoyer l'appareil.
• N'utilisez pas d'objet tranchant pour gratter la couche de givre. Utilisez une spatule en plastique.
• N'utilisez pas d'appareils électriques ou
agents chimiques pour dégivrer l'appareil. La chaleur excessive pourrait endommager le revêtement plastique interne et l'humidité pourrait s'introduire dans
le système électrique.
Installation
Important Avant de procéder au
branchement électrique, respectez
scrupuleusement les instructions fournies
dans cette notice.
• Déballez l'appareil et vérifiez qu'il n'est
pas endommagé. Ne branchez pas l'appareil s'il est endommagé. Signalez immédiatement au revendeur de l'appareil
les dommages constatés. Dans ce cas,
gardez l'emballage.
• Il est conseillé d'attendre au moins quatre
heures avant de brancher l'appareil pour
que le circuit frigorifique soit stabilisé.
• Veillez à ce que l'air circule librement autour de l'appareil pour éviter qu'il ne surchauffe. Pour assurer une ventilation suffisante, respectez les instructions de la
notice (chapitre Installation).
• Placez l'appareil dos au mur pour éviter
tout contact avec le compresseur et le
condenseur (risque de brûlure).
• Placez de préférence votre appareil loin
d'une source de chaleur (chauffage, cuisson ou rayons solaires trop intenses).
• Assurez-vous que la prise murale reste
accessible après l'installation de l'appareil.
• Branchez à l'alimentation en eau potable
uniquement.
9)
Maintenance
• Les branchements électriques nécessaires à l'entretien de l'appareil doivent être
réalisés par un électricien qualifié ou une
personne compétente.
• Cet appareil ne doit être entretenu et réparé que par un Service après-vente autorisé, exclusivement avec des pièces
d'origine.
Protection de l'environnement
Le système frigorifique et l'isolation de
votre appareil ne contiennent pas de
C.F.C. contribuant ainsi à préserver
l'environnement. L'appareil ne doit pas
être mis au rebut avec les ordures ménagères et les déchets urbains. La
mousse d'isolation contient des gaz inflammables : l'appareil sera mis au rebut conformément aux règlements applicables disponibles auprès des autorités locales. Veillez à ne pas détériorer
les circuits frigorifiques, notamment au
niveau du condenseur. Les matériaux
utilisés dans cet appareil identifiés par
le symbole
sont recyclables.
BANDEAU DE COMMANDE
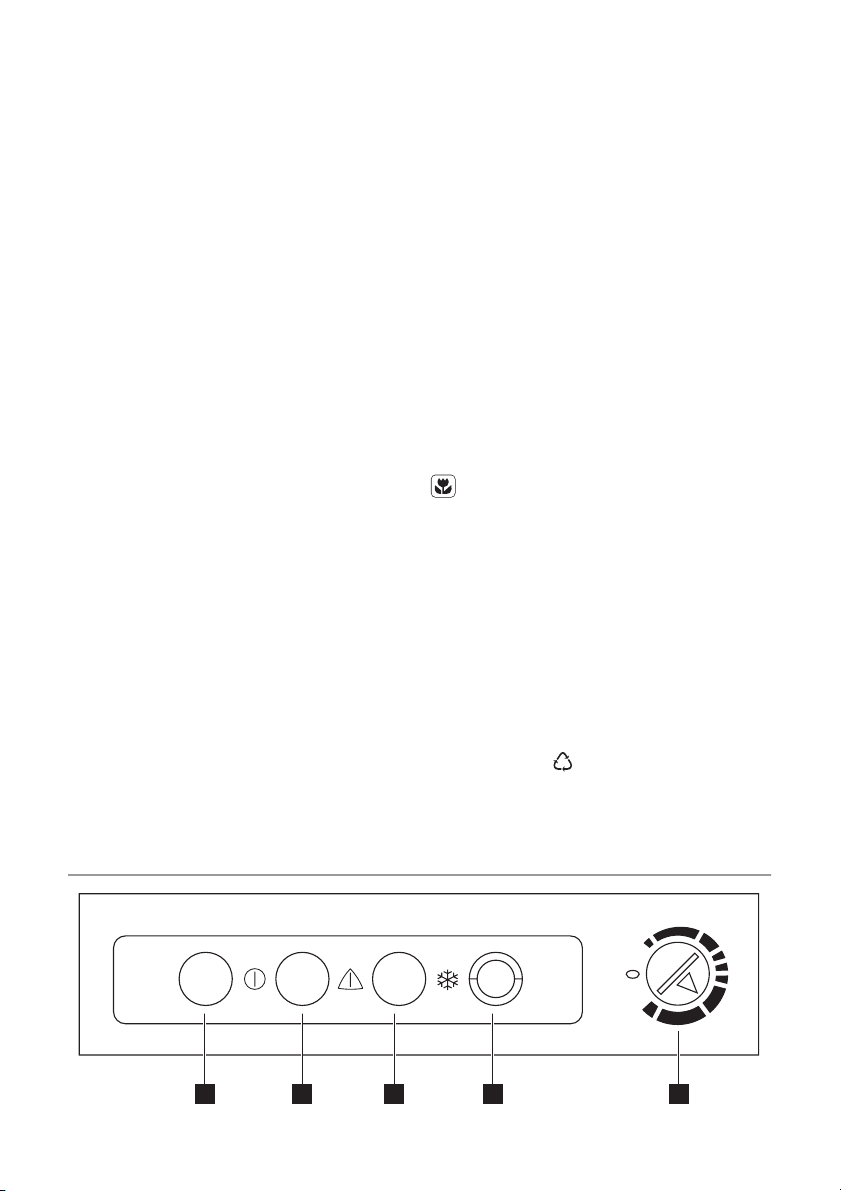
1 2 3 4 5
9) Si un branchement sur le réseau d'eau est prévu.
Page 17
electrolux 17
1 Voyant vert
2 Voyant rouge
3 Voyant jaune
4 Touche de congélation rapide
5 Thermostat
Mise en fonctionnement
1. Après l'installation, attendez quatre heures avant de brancher votre appareil.
2. Branchez l'appareil à une prise murale.
3. Tournez le thermostat dans le sens des
aiguilles d'une montre sur une position
moyenne.
4. Le voyant vert s'allume et reste allumé
jusqu'à ce que l'appareil soit débranché.
5. Appuyez sur la touche de congélation
rapide pour activer la fonction de congélation rapide (le voyant jaune s'allume)
et attendez quatre heures que la température à l'intérieur de l'appareil soit correcte avant d'y placer les aliments.
Le voyant jaune s'allume lorsque la touche de congélation rapide est activée.
6. Le voyant rouge reste également allumé
jusqu'à ce qu'une température correcte
soit atteinte dans l'appareil.
Le voyant rouge s'éteint quelques heures après la mise en fonctionnement indiquant ainsi que la température correcte pour le réglage choisi a été atteinte,
et reste éteint pour indiquer que tout est
en ordre. Il s'allume si la température du
congélateur augmente excessivement,
par exemple après avoir ouvert la porte
du congélateur ou placé des aliments à
l'intérieur de l'appareil, mais le voyant
s'éteint à nouveau lorsque la température revient au niveau de conservation
correct.
7. Lorsque l'appareil a atteint la température définie (le voyant rouge s'éteint),
appuyez à nouveau sur la touche de
congélation rapide pour mettre à l'arrêt
la fonction Congélation Rapide. Le voyant jaune s'éteint alors.
Mise à l'arrêt
1. Pour mettre à l'arrêt l'appareil, tournez
le thermostat sur la position "O"
2. Pour mettre l'appareil hors tension, débranchez-le électriquement.
Réglage de la température
La température régnant à l'intérieur de l'appareil est contrôlée par un thermostat situé
sur le bandeau de commande.
Pour faire fonctionner l'appareil, procédez
comme suit :
• tournez le thermostat sur la position minimum pour obtenir moins de froid.
• tournez le thermostat sur la position
maximum pour obtenir plus de froid.
Une position moyenne est généralement la plus indiquée.
Toutefois, le réglage doit être choisi en tenant compte du fait que la température à
l'intérieur de l'appareil dépend de plusieurs
facteurs :
• la température ambiante
• la fréquence d'ouverture de la porte
• la quantité de denrées stockées
• l'emplacement de l'appareil.
Fonction Congélation Rapide
Pour congeler plus de 3-4 kg d'aliments :
1. Appuyez sur la touche de congélation
rapide pour activer la fonction Congélation Rapide 6 à 24 heures avant de placer les aliments frais dans le congélateur, le voyant jaune s'allume. Le compresseur fonctionne désormais continuellement pour que les denrées fraîches soient congelées le plus rapidement possible.
2. Il est également possible de désactiver
à tout moment cette fonction manuellement en appuyant de nouveau sur la
touche de congélation rapide.
3. Placez les aliments dans le comparti-
ment congélateur (en partie supérieure)
et laissez activée la fonction de congélation rapide pendant 24 heures.
4. Appuyez ensuite à nouveau sur la tou-
che de congélation rapide (le voyant jaune s'éteint et la touche revient en position originale).
5. Déplacez les aliments congelés du com-
partiment supérieur vers les deux autres
compartiments (zone de stockage).
Pour obtenir des résultats de congélation optimaux, enlevez le tiroir supérieur
(si celui-ci est prévu) avant de placer les
aliments à congeler directement sur
l'évaporateur. Vous n'avez pas besoin
Page 18
18 electrolux
d'enlever le tiroir si vous congelez des
quantités d'aliments moins importantes.
Si la touche du congélateur reste malencontreusement allumée, ceci ne nui-
PREMIÈRE UTILISATION
Nettoyage intérieur
Avant d'utiliser l'appareil pour la première
fois, nettoyez l'intérieur et tous les accessoires internes avec de l'eau tiède savonneuse pour supprimer l'odeur caractéristique du "neuf" puis séchez soigneusement.
UTILISATION QUOTIDIENNE
Congélation d'aliments frais
Le compartiment supérieur est idéal pour
congeler des denrées fraîches et conserver
à long terme des aliments surgelés ou congelés.
Pour congeler des denrées fraîches, activez
la fonction Congélation Rapide.
La quantité maximum d'aliments pouvant
être congelée en 24 heures est indiquée sur
la plaque signalétique , située à l'intérieur
de l'appareil.
Le processus de congélation est de 24
heures : vous ne devez ajouter aucune autre denrée à congeler au cours de cette période.
Conservation des aliments congelés
À la mise en service ou après un arrêt prolongé, placez le thermostat sur la position
ra pas au congélateur, mais gaspillera
de l'énergie.
Important N'utilisez pas de produits abrasifs, poudre à récurer, éponge métallique
pour ne pas abîmer la finition.
Max pendant 2 heures environ, avant d'introduire les produits dans le compartiment.
Important En cas de dégivrage accidentel,
dû par exemple à une panne de courant, si
la panne doit se prolonger plus longtemps
qu'il n'est indiqué à la rubrique "temps
d'augmentation" dans la section
Caractéristiques techniques, consommez
les aliments décongelés le plus rapidement
possible ou recongelez-les après les avoir
cuits (une fois refroidis).
La décongélation
Les aliments surgelés ou congelés peuvent
être décongelés à température ambiante.
Les petites pièces peuvent même être cuites sans décongélation préalable : dans ce
cas, la cuisson est plus longue.
CONSEILS UTILES
Bruits de fonctionnement normaux
• Le liquide de refroidissement qui passe
dans le circuit d'évaporation peut produire un bruit de gargouillis ou de bouillonnement. Ce phénomène est normal.
• Le compresseur peut produire un ronronnement aigu ou un bruit de pulsation. Ce
phénomène est normal.
• La dilatation thermique peut provoquer
un soudain, léger bruit de craquement.
C'est un phénomène normal et sans gravité. Ce phénomène est normal.
• Un léger claquement se produit lors de la
mise en fonctionnement/à l'arrêt du compresseur. Ce phénomène est normal.
Conseils pour la congélation
Pour obtenir les meilleurs résultats, voici
quelques conseils importants :
• la quantité maximale de denrées que
vous pouvez congeler par 24 heures est
indiquée sur la plaque signalétique.
• le temps de congélation est de 24 heures. Aucune autre denrée à congeler ne
doit être ajoutée pendant cette période.
• congelez seulement les denrées alimentaires fraîches, de qualité supérieure (une
fois nettoyées).
• préparez la nourriture en petits paquets
pour une congélation rapide et uniforme,
adaptés à l'importance de la consommation.
Page 19
electrolux 19
• enveloppez les aliments dans des feuilles
d'aluminium ou de polyéthylène et assurez-vous que les emballages sont étanches ;
• ne laissez pas des aliments frais, non
congelés, toucher des aliments déjà congelés pour éviter une remontée en température de ces derniers.
• les aliments maigres se conservent mieux
et plus longtemps que les aliments gras ;
le sel réduit la durée de conservation des
aliments
• la température très basse à laquelle se
trouvent les bâtonnets glacés, s'ils sont
consommés dès leur sortie du compartiment congélateur, peut provoquer des
brûlures.
• L'identification des emballages est importante : indiquez la date de congélation du
produit, et respectez la durée de conservation indiquée par le fabricant.
ENTRETIEN ET NETTOYAGE
Attention débrancher l'appareil avant
toute opération d'entretien.
Cet appareil contient des hydrocarbures dans son circuit réfrigérant : l'entretien et la recharge ne doivent donc être
effectués que par du personnel autorisé.
Nettoyage périodique
Cet appareil doit être nettoyé régulièrement :
• Nettoyez l'intérieur et tous les accessoires avec de l'eau tiède savonneuse.
• Vérifiez régulièrement les joints de porte
et nettoyez-les en les essuyant pour éviter toute accumulation de déchets.
• Rincez et séchez soigneusement.
Important Ne pas tirer, déplacer ou
endommager les tuyaux et/ou câbles qui se
trouvent à l'intérieur de l'appareil.
Ne JAMAIS utiliser de produits abrasifs ou
caustiques ni d'éponges avec grattoir pour
nettoyer l'intérieur de façon à ne pas l'abîmer et laisser de fortes odeurs.
Nettoyer le condenseur (grille noire) et le
compresseur situés à l'arrière de l'appareil
avec une brosse ou un aspirateur. Cette
opération améliore les performances de
Conseils pour la conservation des
produits surgelés et congelés du
commerce
Pour une bonne conservation des produits
surgelés et congelés, vous devez :
• vous assurer qu'ils ont bien été conservés au magasin ;
•prévoir un temps réduit au minimum pour
leur transport du magasin d'alimentation
à votre domicile ;
• éviter d'ouvrir trop souvent la porte du
congélateur et ne la laisser ouverte que le
temps nécessaire.
• une fois décongelés, les aliments se détériorent rapidement et ne peuvent pas
être recongelés.
• respecter la durée de conservation indiquée par le fabricant.
l'appareil et permet des économies d'énergie.
Important Attention à ne pas endommager
le système de réfrigération.
De nombreux détergents pour la cuisine recommandés par les fabricants contiennent
des produits chimiques qui peuvent attaquer/endommager les pièces en plastique
utilisées dans cet appareil. Il est par conséquent recommandé d'utiliser seulement de
l'eau chaude additionnée d'un peu de savon liquide pour nettoyer la carrosserie de
l'appareil.
Après le nettoyage, rebranchez l'appareil.
Dégivrage du congélateur
Une certaine quantité de givre se forme
toujours sur les clayettes du congélateur et
autour du compartiment supérieur
Dégivrez le congélateur lorsque l'épaisseur
de la couche de givre est d'environ 3-5
mm.
Important Mettez le thermostat sur la
position maximum 12 heures avant
d'effectuer le dégivrage pour assurer une
réserve de froid suffisante.
Page 20
20 electrolux
Pour enlever le givre, suivez les instructions
ci-dessous :
1. Mettez l'appareil à l'arrêt et débranchezle électriquement.
2. Sortez les denrées congelées, enveloppez celles-ci dans plusieurs feuilles de
papier journal et conservez-les dans un
endroit frais.
Attention Ne touchez pas avec les
mains humides les surfaces givrées et
les produits congelés. Risque de
brûlures ou arrachement de la peau.
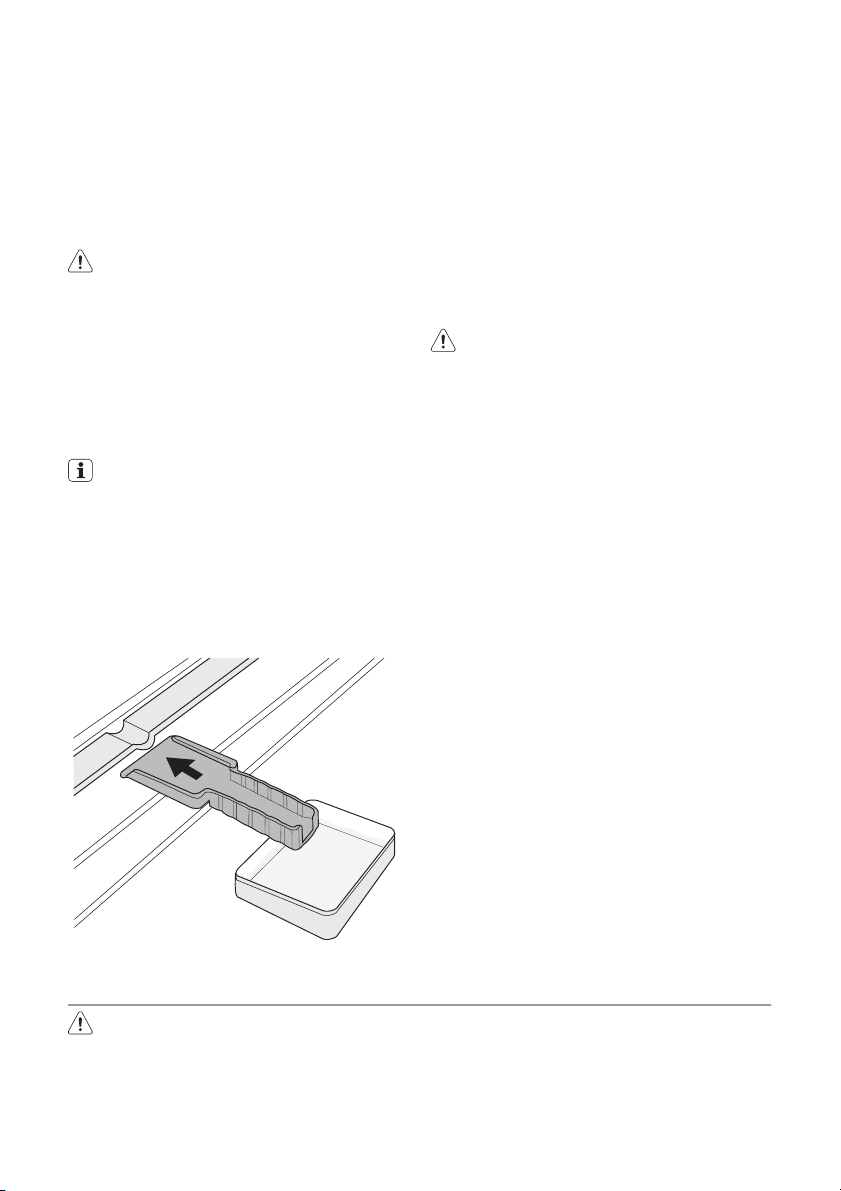
3. Maintenez la porte ouverte et utilisez
une spatule en plastique comme gouttière en l'insérant dans l'emplacement
prévu à cet effet. Placez au-dessous un
récipient pour recueillir l'eau de dégivrage.
Le dégivrage peut être accéléré en plaçant dans le compartiment congélateur
un ou plusieurs récipients d'eau chaude non bouillante, à l'exclusion de toute autre source de chaleur. Retirez
également les morceaux de glace au
fur et à mesure que ceux-ci se détachent, avant que le processus de dégivrage ne soit terminé.
4. Une fois le dégivrage terminé, épongez
et séchez bien l'intérieur du congélateur
et conservez la spatule pour une prochaine utilisation.
5. Mettez l'appareil en fonctionnement.
6. Tournez le thermostat sur une position
moyenne et attendez au moins quatre
heures en laissant la touche de congélation rapide activée.
7. Une fois le voyant rouge éteint, replacez
à nouveau les produits surgelés ou congelés dans les compartiments.
Avertissement N'utilisez en aucun
cas un couteau, un autre objet
tranchant ou un objet métallique pour
gratter la couche de givre, vous risquez
de détériorer irrémédiablement
l'évaporateur.
N'utilisez aucun dispositif mécanique
ou autre pour accélérer le processus
de dégivrage hormis ceux recommandés par le fabricant.
Une élévation de la température des
denrées congelées, pendant la décongélation, peut réduire leur durée de
conservation.
En cas d'absence prolongée ou de
non-utilisation
Prenez les précautions suivantes :
1. débranchez l'appareil
2. retirez tous les aliments
3. dégivrez et nettoyez l'appareil et tous
les accessoires
4. laissez la porte/les portes ouverte(s)
pour prévenir la formation d'odeurs désagréables.
Important Si, toutefois, vous n'avez pas la
possibilité de débrancher et de vider
l'appareil, faites vérifier régulièrement son
bon fonctionnement pour éviter la
détérioration des aliments en cas de panne
de courant.
EN CAS D'ANOMALIE DE FONCTIONNEMENT
Avertissement Avant d'intervenir sur
l'appareil, débranchez-le.
La résolution des problèmes non mentionnés dans la présente notice doit
être exclusivement confiée à un électricien qualifié ou à votre service après
vente.
Important Certains bruits pendant le
fonctionnement (compresseur, circuit de
réfrigérant) sont normaux.
Page 21
electrolux 21
Important L'appareil fonctionne de façon
discontinue. L'arrêt du compresseur ne
signifie donc pas l'absence de courant
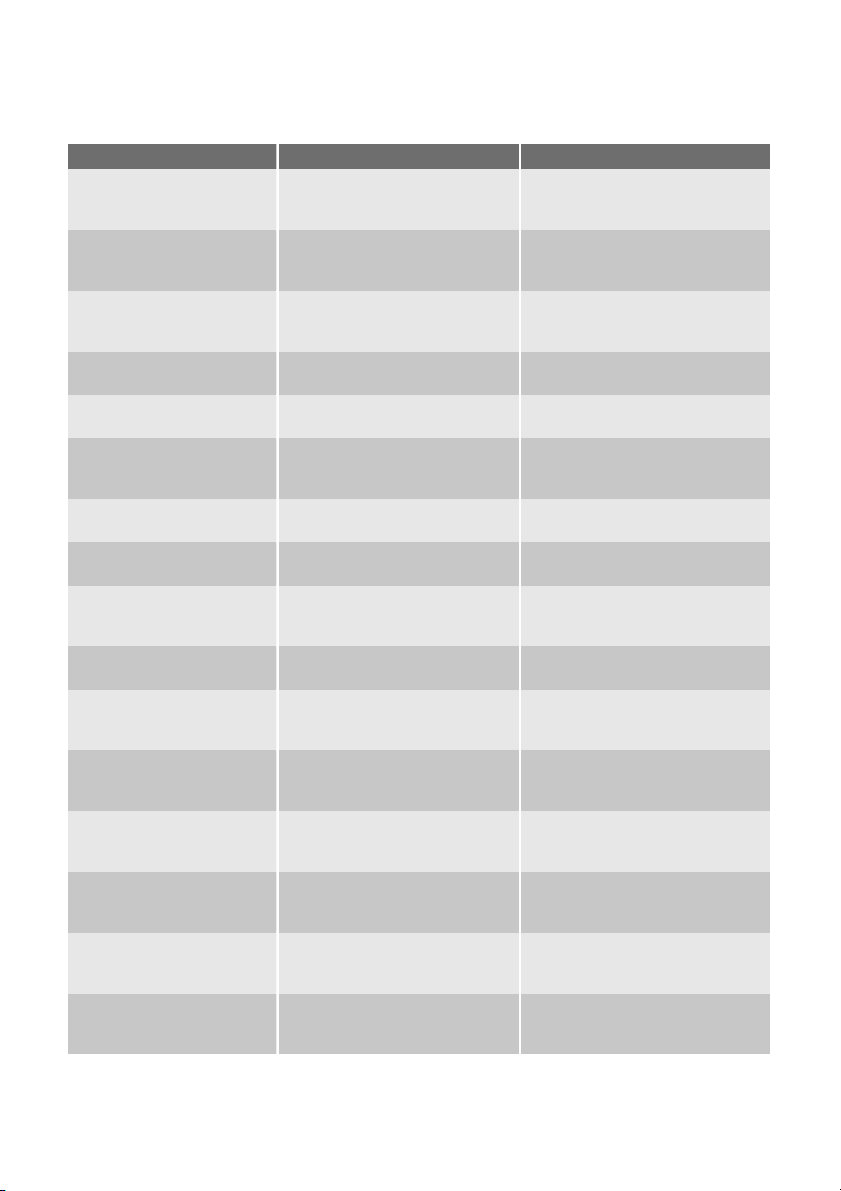
Symptôme Cause possible Solution
L'appareil est bruyant
Le compresseur fonctionne en permanence
Les portes ne sont pas correcte-
La porte a été ouverte trop sou-
Trop de produits frais ont été in-
Les aliments introduits dans
La température ambiante est
Il y a trop de givre et de
glace
Les portes ne sont pas correcte-
Le thermostat n'est pas réglé
La température à l'intérieur du congélateur est
trop élevée
La porte ne ferme pas de façon
Trop de produits frais ont été in-
Les aliments introduits dans
Les produits à congeler sont
La température à l'intérieur du congélateur est
trop basse
L'appareil n'est pas stable Vérifiez la stabilité (les quatre
Le thermostat n'est pas correctement réglé
ment fermées ou ne ferment pas
de façon hermétique
vent
troduits dans l'appareil
l'appareil étaient trop chauds
trop élevée.
Les produits ne sont pas correc-
tement emballés
ment fermées ou ne ferment pas
de façon hermétique
correctement.
Le thermostat n'est pas réglé
correctement.
hermétique ou n'est pas correctement fermée
troduits dans l'appareil
l'appareil étaient trop chauds
placés trop près les uns des autres
Le thermostat n'est pas réglé
correctement.
électrique. C'est pourquoi vous ne devez
jamais toucher les parties électriques de
l'appareil avant de couper le courant.
pieds doivent être en contact
avec le sol)
Modifiez la position du thermostat
pour obtenir une température
moins de froid.
Vérifiez que les portes ferment
correctement et que les joints
sont en bon état et propres
Ne laissez pas la porte ouverte
plus longtemps que nécessaire
Attendez quelques heures et vérifiez de nouveau la température
Laissez refroidir les aliments à
température ambiante avant de
les ranger dans l'appareil
Réduisez la température ambiante.
Emballez les produits de façon
plus adaptée
Vérifiez que les portes ferment
correctement et que les joints
sont en bon état et propres
Modifiez la position du thermostat
pour obtenir moins de froid.
Modifiez la position du thermostat
pour obtenir plus de froid.
Vérifiez que la porte ferme correctement et que le joint est en bon
état et propre
Introduisez de plus petites quantités d'aliments à congeler en même temps.
Laissez refroidir les aliments à
température ambiante avant de
les stocker.
Placez les produits de façon à ce
que l'air puisse circuler entre eux
Modifiez la position du thermostat
pour obtenir moins de froid.
Page 22
22 electrolux
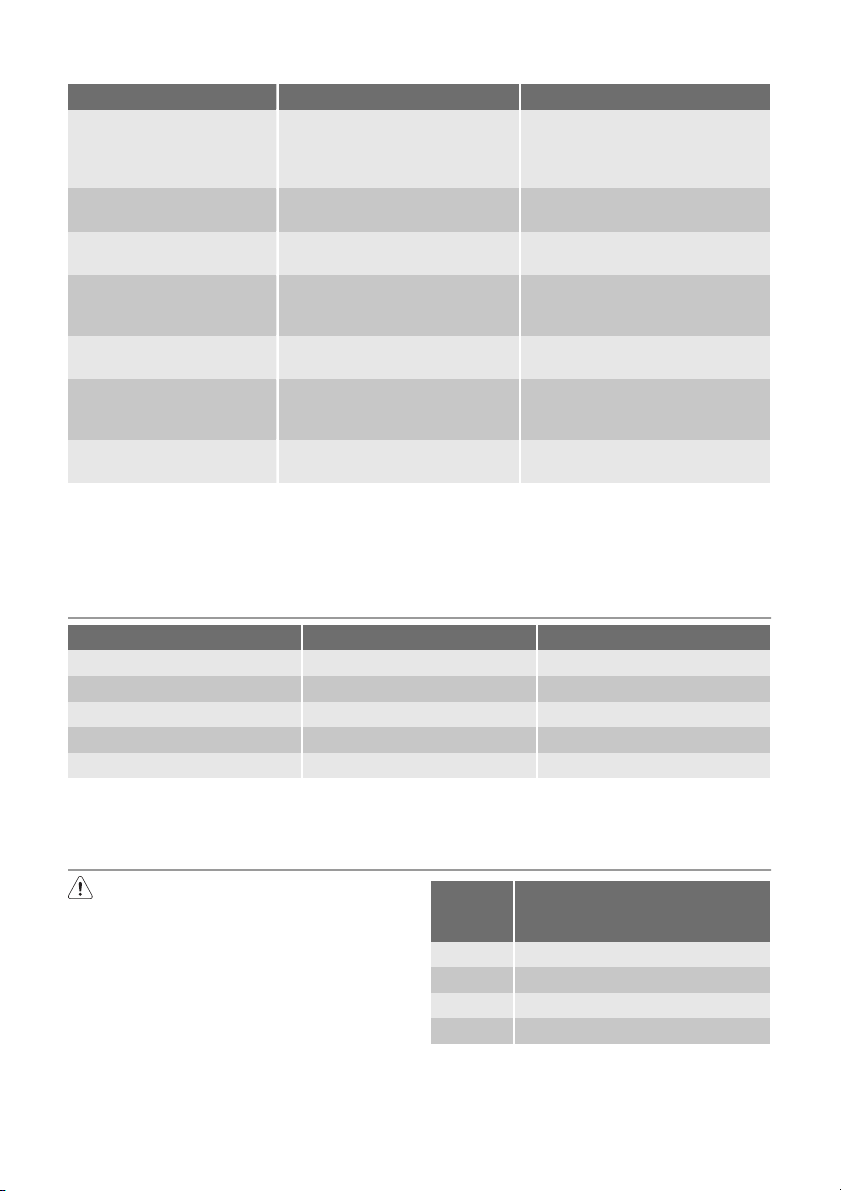
Symptôme Cause possible Solution
L'appareil ne fonctionne
pas du tout. Ni la production de froid ni l'éclairage
ne fonctionnent
L'appareil n'est pas alimenté
L'appareil n'est pas en fonction-
La prise de courant n'est pas ali-
L'appareil ne refroidit
pas du tout
La prise de courant n'est pas ali-
L'appareil n'est pas en fonction-
Fermeture de la porte
1. Nettoyez les joints de la porte.
2. Si nécessaire, ajustez la porte. Consul-
L'appareil n'est pas correctement branché
électriquement
nement
mentée (essayez de brancher un
autre appareil sur la prise)
L'appareil n'est pas correctement branché
mentée (essayez de brancher un
autre appareil sur la prise)
nement
3. Si nécessaire, remplacez les joints défectueux. Contactez le Service Aprèsvente.
Branchez correctement l'appareil
Essayez de brancher un autre appareil sur la prise de courant
Mettez l'appareil en fonctionnement
Faites appel à un électricien qualifié
Branchez correctement l'appareil
Faites appel à un électricien qualifié
Mettez l'appareil en fonctionnement
tez le paragraphe "Installation".
CARACTÉRISTIQUES TECHNIQUES
Dimensions
Hauteur 850 mm
Largeur 550 mm
Profondeur 612 mm
Autonomie de fonctionnement 22 h
Les informations techniques se trouvent sur
la plaque signalétique sur la paroi intérieure
gauche de l'appareil et sur l'étiquette énergétique.
INSTALLATION
Pour votre sécurité et le bon
fonctionnement de l'appareil, veuillez
lire attentivement les "Consignes de
sécurité" avant d'installer l'appareil.
Emplacement
Installez cet appareil à un endroit où la température ambiante correspond à la classe
climatique indiquée sur la plaque signalétique de l'appareil :
Classe
climati-
que
SN +10 à + 32 °C
N +16 à + 32 °C
ST +16 à + 38 °C
T +16 à + 43 °C
Température ambiante
Mise à niveau
Lors de la mise en place de l'appareil, assurez-vous qu'il soit positionné de façon
plane. Servez-vous des deux pieds régla-
Page 23
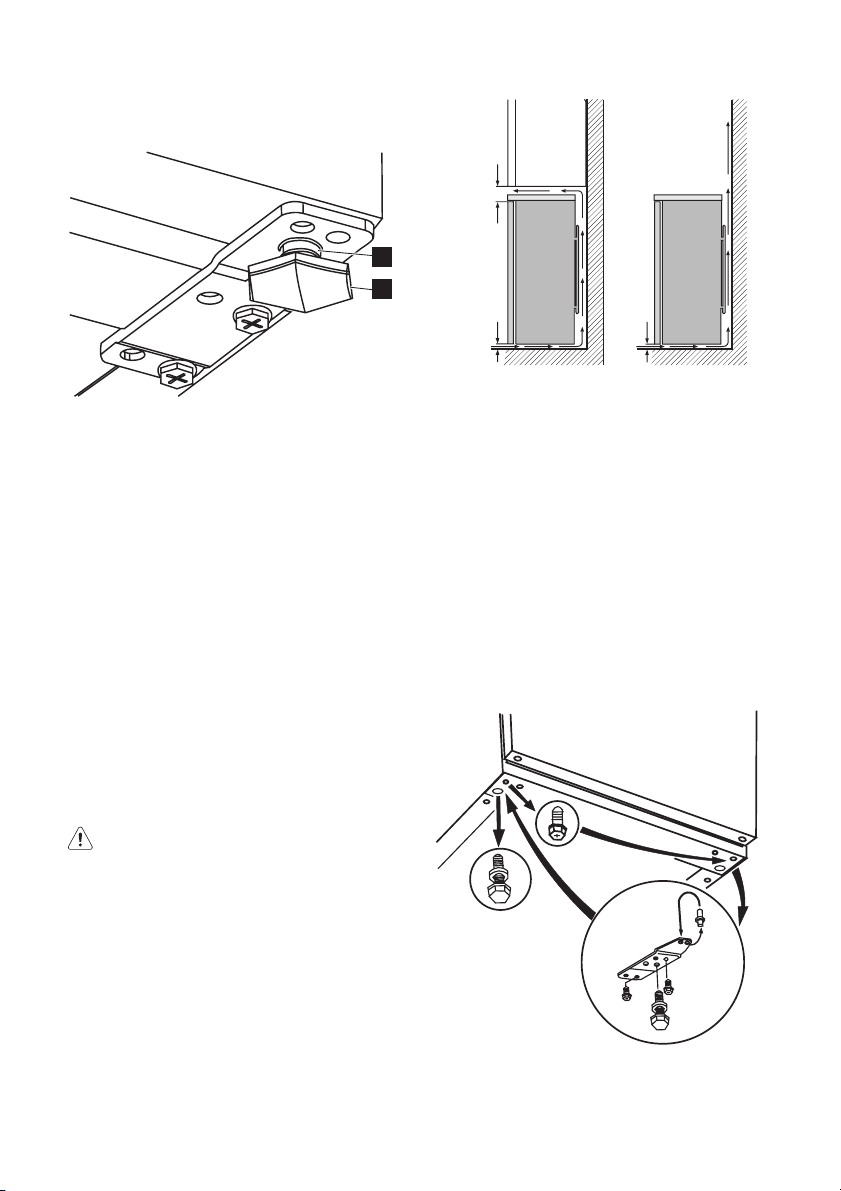
bles se trouvant à l'avant de l'appareil (2). Si
besoin, réglez les pieds en retirant l'entretoise (1).
1
2
electrolux 23
Emplacement
L'appareil doit être installé à bonne distance de toute source de chaleur telle que les
radiateurs, chauffe-eau, lumière directe du
soleil etc. Assurez-vous que l'air circule librement à l'arrière de l'appareil. Pour garantir un rendement optimum si l'appareil
est installé sous un élément suspendu, la
distance entre le haut de l'armoire et l'élément suspendu doit être de 100 mm minimum. Si possible, évitez de placer l'appareil
sous des éléments suspendus. La mise à
niveau se fait à l'aide d'un ou de plusieurs
pieds réglables à la base de l'armoire.
Si l'armoire est placée dans un angle et le
côté avec les charnières est face au mur, la
distance entre le mur et l'armoire doit être
de 10 mm minimum afin de permettre à la
porte de s'ouvrir suffisamment pour pouvoir
sortir les clayettes.
Avertissement L'appareil doit pouvoir
être débranché à tout moment ; Il est
donc nécessaire que la prise murale
reste accessible après l'installation.
15mm 100mm
15mm
Réversibilité de la porte
Important Pour effectuer les opérations
suivantes, il est conseillé de se faire aider
par une autre personne qui se chargera de
maintenir fermement les portes de l'appareil
pendant les opérations.
Pour changer le sens d'ouverture de la porte, suivez les étapes suivantes :
1. Débranchez l'appareil électriquement.
2. Inclinez l'appareil avec précaution vers
l'arrière pour que le compresseur ne
touche pas le sol.
3. Dévissez les pieds réglables situés des
deux côtés avant.
4. Enlevez la charnière de la porte infé-
rieure en dévissant les deux vis de fixation.
Page 24
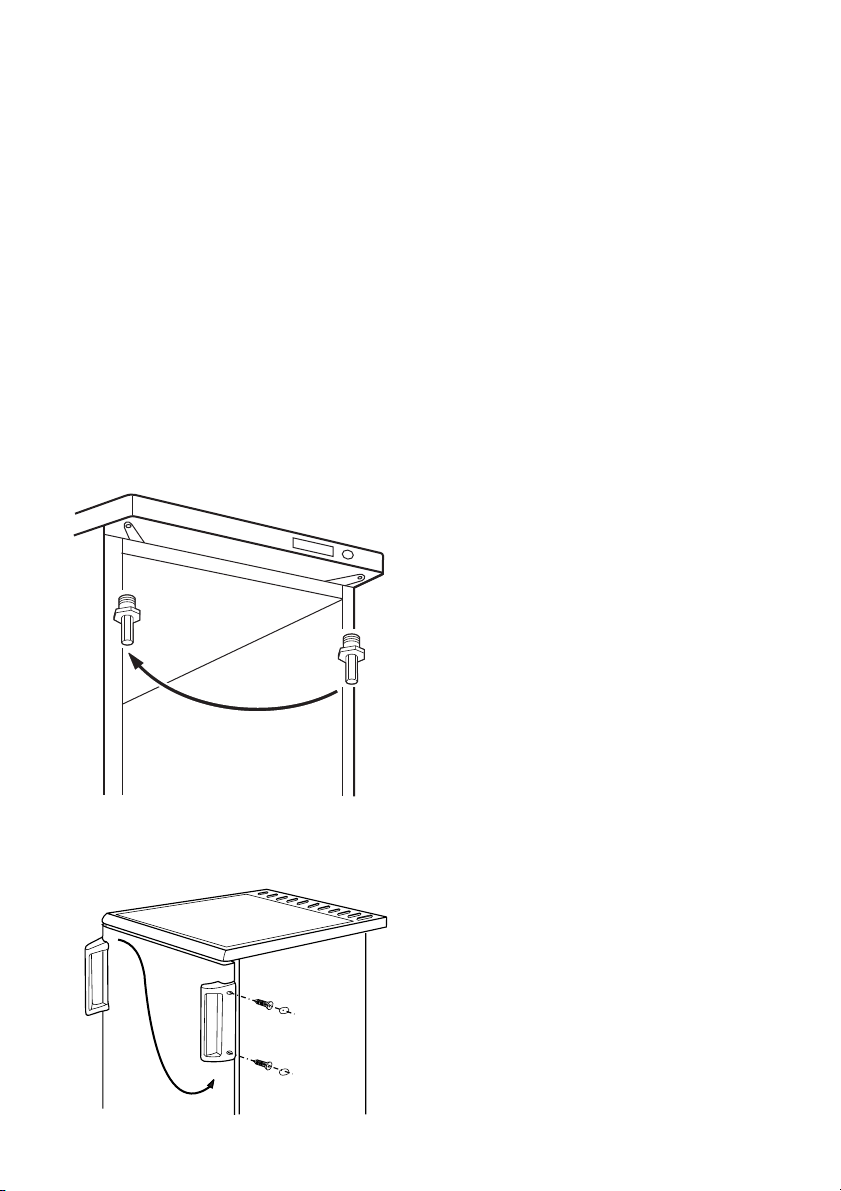
24 electrolux
5. Enlevez la goupille de la charnière située dans le bas de la porte.
6. Insérez la goupille de la charnière dans
le trou situé sur la plaque de la charnière.
7. Enlevez la porte.
8. Remettez le pivot de la charnière supérieure de l'autre côté.
9. Installez la porte sur la goupille de la
charnière.
10. Insérez la goupille de la charnière dans
le trou situé sur la plaque de la charnière et déplacez le montage de la charnière de l'autre côté et remettez-le en
place à l'aide des vis de fixation.
11. Remettez le montage de la plaque de la
charnière inférieure de l'autre côté en
vous assurant que le bord de la porte
est parallèle au côté de l'appareil.
13. Remettez l'appareil en place, mettez-le
d'aplomb, attendez quatre heures au
moins puis branchez-le électriquement.
Contrôlez une dernière fois pour vous assurer que :
• Toutes les vis sont serrées.
• La porte ouvre et ferme correctement.
Si la température ambiante est basse (en
hiver, par exemple), il se peut que le joint
n'adhère pas parfaitement. Dans ce cas,
attendez que le joint reprenne sa taille naturelle.
Si vous ne voulez pas effectuer personnellement les opérations décrites ci-dessus,
contactez votre Service après-vente. Un
technicien du Service après-vente procédera à la réversibilité de la porte à vos frais.
Branchement électrique
Contrôlez, avant de brancher l'appareil, si la
tension et la fréquence indiquées sur la plaque signalétique correspondent à celles de
votre réseau.
L'appareil doit être relié à la terre. La fiche
du câble d'alimentation comporte un logement pour mise à la terre. Si la prise de
courant murale n'est pas mise à la terre,
branchez l'appareil sur une prise de terre
conformément aux normes en vigueur, en
demandant conseil à un électricien qualifié.
Le fabricant décline toute responsabilité en
cas d'incident suite au non-respect des
consignes de sécurité sus-mentionnées.
Cet appareil est conforme aux directives
communautaires.
12.
Enlevez et installez la poignée
l'autre côté.
10) si cela est prévu
10)
de
Page 25
EN MATIÈRE DE SAUVEGARDE DE L'ENVIRONNEMENT
Le symbole sur le produit ou son
emballage indique que ce produit ne peut
être traité comme déchet ménager. Il doit
plutôt être remis au point de ramassage
concerné, se chargeant du recyclage du
matériel électrique et électronique. En vous
assurant que ce produit est éliminé
correctement, vous favorisez la prévention
des conséquences négatives pour
l’environnement et la santé humaine qui,
sinon, seraient le résultat d’un traitement
inapproprié des déchets de ce produit.
Pour obtenir plus de détails sur le recyclage
de ce produit, veuillez prendre contact avec
le bureau municipal de votre région, votre
service d’élimination des déchets ménagers
ou le magasin où vous avez acheté le
produit.
Où aller avec les appareils usagés?
Partout où des appareils neufs sont
vendus, mais aussi dans un centre de
collecte ou une entreprise de
récupération officiels SENS.
La liste des centres de collecte officiels
SENS est disponible sous
www.sens.ch.
electrolux 25
Page 26
26 electrolux
Electrolux. Thinking of you.
Per conoscere meglio il nostro modo di pensare, visitate il
sito www.electrolux.com
INDICE
Informazioni per la sicurezza 26
Pannello dei comandi 28
Primo utilizzo 30
Utilizzo quotidiano 30
Consigli e suggerimenti utili 30
INFORMAZIONI PER LA SICUREZZA
Per garantire un impiego corretto e sicuro
dell'apparecchio, prima dell'installazione e
del primo utilizzo leggere con attenzione il libretto istruzioni, inclusi i suggerimenti e le
avvertenze. Per evitare errori e incidenti, è
importante garantire che tutte le persone
che utilizzano l'apparecchio ne conoscano il
funzionamento e le caratteristiche di sicurezza. Conservare queste istruzioni e accertarsi che rimangano unite all'apparecchio in
caso di vendita o trasloco, in modo che
chiunque lo utilizzi sia correttamente informato sull'uso e sulle norme di sicurezza.
Per la sicurezza delle persone e delle cose
osservare le precauzioni indicate nelle presenti istruzioni per l'utente, il produttore non
è responsabile dei danni provocati da eventuali omissioni.
Sicurezza dei bambini e delle persone
fragili
• Questo apparecchio non deve essere
usato da persone, bambini inclusi, con ridotte capacità fisiche, sensoriali o psichiche, oppure prive di conoscenza e esperienza, a meno che non siano state istruite all'uso dell'apparecchio da parte dei
responsabili della loro sicurezza, oppure
sotto vigilanza di questi.
I bambini devono essere sorvegliati per
assicurarsi che non giochino con l'apparecchio.
• Tenere i materiali di imballaggio al di fuori
della portata dei bambini. Alcuni materiali
possono creare rischi di soffocamento.
• Qualora l'apparecchio venga demolito,
estrarre la spina dalla presa, tagliare il cavo di collegamento (il più vicino possibile
all'apparecchio) e smontare lo sportello
Pulizia e cura 31
Cosa fare se… 32
Dati tecnici 34
Installazione 34
Considerazioni ambientali 37
Con riserva di modifiche
per evitare che i bambini giocando possano subire scosse elettriche o chiudersi
dentro l'apparecchio.
• Se questo nuovo apparecchio, che è dotato di guarnizioni magnetiche nello sportello, va a sostituirne uno più vecchio
avente sportello o coperchio con chiusure a molla, si deve rendere inutilizzabili tali
chiusure prima di eliminare l'apparecchio
sostituito, per evitare che diventi una
trappola mortale per i bambini.
Norme di sicurezza generali
Attenzione Accertarsi che le aperture
di ventilazione non siano ostruite.
• L'apparecchiatura è progettata per la
conservazione domestica di alimenti e/o
bevande nelle modalità descritte nelle
presenti istruzioni.
• Non utilizzare dispositivi meccanici o altri
mezzi artificiali per accelerare lo sbrinamento.
• Non utilizzare altre apparecchiature elettriche (per esempio gelatiere) all'interno
del frigorifero, salvo quelle approvate per
tale scopo dal produttore.
• Non danneggiare il circuito refrigerante.
• Il circuito refrigerante dell'apparecchiatura contiene isobutano (R600a), un gas
naturale con un elevato livello di compatibilità ambientale che, tuttavia, è infiammabile.
Durante il trasporto e l'installazione dell'apparecchiatura, assicurarsi che nessuno dei componenti del circuito refrigerante venga danneggiato.
In caso di danneggiamento del circuito
refrigerante:
Page 27
electrolux 27
– Evitare fiamme libere e scintille
– Aerare bene il locale in cui si trova l'ap-
parecchiatura
• È pericoloso cambiare le specifiche o
modificare il prodotto in qualunque modo. Un danneggiamento del cavo potrebbe provocare cortocircuiti, incendi e/o
scosse elettriche.
Avvertenza Tutti i componenti elettrici
(cavo di alimentazione, spina, compressore) devono essere sostituiti da
un tecnico certificato o da personale
d'assistenza qualificato.
1. Non collegare prolunghe al cavo di
alimentazione.
2. Evitare che il lato posteriore dell'appa-
recchiatura possa schiacciare o danneggiare la spina, causandone il surriscaldamento con un conseguente rischio di incendio.
3. La spina dell'apparecchiatura deve
trovarsi in una posizione accessibile.
4. Evitare di tirare il cavo di alimentazio-
ne.
5. Se la presa elettrica non è perfetta-
mente stabile, non inserire la spina. Il
collegamento potrebbe provocare
scosse elettriche o creare un rischio
di incendio.
6. L'apparecchiatura non deve essere
messo in funzione senza il coprilam-
11)
pada interno
della luce interna.
• Questa apparecchiatura è pesante. Prestare attenzione quando occorre spostarla.
• Evitare di estrarre o di toccare gli alimenti
riposti nel vano congelatore con le mani
bagnate o umide; il contatto potrebbe
provocare abrasioni o ustioni da freddo.
• Evitare un'esposizione prolungata dell'apparecchiatura alla luce solare diretta.
•
Lampadine
12)
utilizzate in questa apparecchiatura sono lampadine speciali selezionate per essere usate unicamente negli elettrodomestici. Non sono adatte per
l'illuminazione degli ambienti.
Non posizionare cibo congelato sul
piano di lavoro, in quanto il freddo e il
11) Per le apparecchiature che prevedono il coprilampada.
12) Nel caso in cui la lampadina sia prevista.
13) Se l'apparecchio è di tipo No-Frost.
vapore potrebbero produrre condensa
all'interno. Il liquido risultante potrebbe
provocare dei malfunzionamenti. Si
consiglia quindi di non posizionare o
lasciare cibi congelati di nessun tipo sul
piano di lavoro.
Uso quotidiano
• Non collocare pentole calde sulle parti in
plastica dell'apparecchio.
• Non collocare gas e liquidi infiammabili
nell'apparecchio, perché potrebbero
esplodere.
• Non collocare gli alimenti direttamente
contro l'uscita dell'aria nella parete po-
steriore.
13)
• Gli alimenti congelati non devono essere
ricongelati una volta scongelati.
• Riporre gli alimenti surgelati preconfezionati secondo le istruzioni del produttore
dell'alimento surgelato.
• Osservare rigorosamente i consigli per la
conservazione degli alimenti del produttore dell'apparecchio. Vedere le relative
istruzioni.
• Non collocare bevande gassate o frizzanti nello scomparto congelatore perché
creano pressione sul recipiente che può
esplodere danneggiando l'apparecchio.
• I ghiaccioli possono provocare bruciature
da gelo se consumati immediatamente
dopo averli tolti dall'apparecchio.
Pulizia e cura
• Prima di eseguire qualunque intervento di
manutenzione, spegnere l'apparecchiatura ed estrarre la spina dalla presa.
• Non pulire l'apparecchiatura con oggetti
metallici.
• Non usare oggetti appuntiti per sbrinare
l'apparecchiatura. Usare un raschietto di
plastica.
• Non utilizzare mai asciugacapelli o altri
apparecchi riscaldanti per accelerare lo
sbrinamento. Un calore eccessivo può
danneggiare le parti in plastica interne e
l'umidità può penetrare nel sistema elettrico rendendolo sotto tensione.
Page 28
28 electrolux
Installazione
Importante Per il collegamento elettrico,
seguire attentamente le istruzioni dei
paragrafi corrispondenti.
• Disimballare l'apparecchio e assicurarsi
che non presenti danni. Non collegare
l'apparecchio se è danneggiato. Segnalare immediatamente gli eventuali danni al
negozio in cui è stato acquistato. In questo caso conservare l'imballaggio.
• Si consiglia di attendere almeno due ore
prima di collegare l'apparecchio per consentire all'olio di arrivare nel compressore.
• Attorno all'apparecchio vi deve essere
un'adeguata circolazione dell'aria, altrimenti si può surriscaldare. Per ottenere
una ventilazione sufficiente seguire le
istruzioni di installazione.
• Se possibile il retro dell'apparecchio dovrebbe essere posizionato contro una
parete per evitare di toccare le parti calde
o di rimanervi impigliati (compressore,
condensatore), evitando così possibili
scottature.
• L'apparecchio non deve essere posto vicino a radiatori o piani di cottura a gas.
• Installare l'apparecchio in modo che la
presa rimanga accessibile.
• Per il collegamento idrico, usare solo sorgenti d'acqua potabile.
14)
Assistenza tecnica
• Gli interventi elettrici sull'apparecchiatura
devono essere eseguiti esclusivamente
da elettricisti qualificati o da personale
competente.
• Gli interventi di assistenza devono essere
eseguiti esclusivamente da tecnici autorizzati e utilizzando solo ricambi originali.
Tutela ambientale
Questo apparecchio non contiene gas
che potrebbero danneggiare lo strato
di ozono nel circuito refrigerante o nei
materiali isolanti. L'apparecchio non
deve essere smaltito assieme ai rifiuti
urbani e alla spazzatura. La schiuma
dell'isolamento contiene gas infiammabili: lo smaltimento dell'apparecchio va
eseguito secondo le prescrizioni vigenti
da richiedere alle autorità locali. Evitare
di danneggiare il gruppo refrigerante,
specialmente nella parte posteriore vicino allo scambiatore di calore. I materiali
usati su questo apparecchio contras-
segnati dal simbolo
sono riciclabili.
PANNELLO DEI COMANDI
1 2 3 4 5
1 Spia verde
2 Spia rossa
3 Spia gialla
4 Interruttore congelatore
5 Regolatore della temperatura
14) Per gli apparecchi che prevedono un collegamento alla rete idrica.
Accensione
1. Al termine dell'installazione, lasciare ri-
posare l'apparecchio per 4 ore.
2. Inserire la spina nella presa a parete.
3. Impostare il Regolatore della Tempera-
tura a un livello medio, ruotandolo in
senso orario.
Page 29
electrolux 29
4. La spia verde si accende e rimane accesa fino a che l'apparecchiatura non viene scollegato dalla presa elettrica.
5. Premere l'interruttore congelatore per
attivare la funzione di congelamento rapido (la spia gialla si accende) e, prima
di inserire cibo all'interno, lasciare in funzione per 4 ore per consentire il raggiungimento della temperatura corretta.
La spia gialla si accende quando l'interruttore congelatore è acceso.
6. Anche la spia rossa si accende fino a
che non viene raggiunta la temperatura
corretta.
Alcune ore dopo l'avvio, la spia rossa si
spegne per indicare che è stata raggiunta la temperatura corretta in base alla
regolazione fatta. La spia rossa, inoltre,
resta spenta spenta indicare che non ci
sono problemi. Questa spia invece si
accende se la temperatura del congelatore aumenta eccessivamente, dopo
aver aperto la porta del dispositivo o dopo aver inserito cibo all'interno del vano.
La spia si dovrebbe comunque spegnere nuovamente non appena la temperatura ritorna normale.
7. Quando l'apparecchiatura ha raggiunto
la temperatura impostata (spia rossa
spenta), premere nuovamente l'interruttore congelatore per spegnere la funzione di congelamento rapido. La spia gialla si spegne.
Spegnimento
1. Per spegnere l’apparecchiatura, ruotare
il regolatore della temperatura in posizione "O".
2. Per scollegare l’apparecchiatura dalla
corrente elettrica, staccare la spina dalla
presa a parete.
Regolazione della temperatura
La temperatura all'interno dell'apparecchiatura è controllata dal Regolatore della Temperatura che si trova sul Pannello dei comandi.
Per regolare il livello di raffreddamento, procedere come segue:
• ruotare il regolatore della temperatura sul
massimo per aumentare l'intensità di raffreddamento.
• ruotare il regolatore della temperatura
verso l'impostazione massima per aumentare l'intensità del raffreddamento.
In condizioni normali, si consiglia di utilizzare una regolazione media.
Tuttavia, è importante ricordare che la temperatura all'interno dell'apparecchiatura dipende dai seguenti fattori:
• temperatura ambiente
• frequenza di apertura della porta
• quantità di alimenti conservati
• posizione dell'apparecchiatura.
Funzione di congelamento rapido
Se è necessario congelare più di 3-4 kg di
cibo:
1. premere l'interruttore Congelatore per
attivare la funzione di congelamento rapido 6-24 ore prima di inserire il cibo
fresco nel congelatore; si accenderà la
spia gialla. Il compressore funziona ora
in modo continuo, al fine di garantire
che i cibi freschi vengano congelati il più
rapidamente possibile.
2. È possibile disattivare la funzione in
qualsiasi momento premendo l'interruttore congelatore.
3. Posizionare il cibo all'interno del vano
congelatore (superiore) e lasciare acceso l'interruttore congelatore per altre 24
ore.
4. Quindi, premere nuovamente l'interrut-
tore congelatore (la spia gialla si spegne
e l'interruttore torna nella sua posizione
originale).
5. Spostare il cibo surgelato dal vano su-
periore (congelatore) agli altri due vani
(vani di conservazione). Per ottenere la
massima prestazione togliere il cestello
superiore (se previsto dal modello) e collocare direttamente i cibi da congelare
sull'evaporatore. Per congelare piccole
quantità di cibo non occorre rimuovere il
cestello.
Se l'interruttore congelatore viene inavvertitamente lasciato inserito (ON), benché ciò non comporti danni al congelatore, si avrà comunque un consumo
eccessivo di corrente.
Page 30

30 electrolux
PRIMO UTILIZZO
Pulizia dell'interno
Prima di utilizzare l'apparecchio per la prima volta, lavare l'interno e gli accessori interni con acqua tiepida e un po' di sapone
neutro in modo a togliere il tipico odore dei
prodotti nuovi, quindi asciugare accuratamente.
UTILIZZO QUOTIDIANO
Congelazione dei cibi freschi
Il vano congelatore (superiore) è adatto alla
congelazione di cibi freschi e alla conservazione a lungo termine di alimenti congelati e
surgelati.
Per la congelazione di cibi freschi azionare
la funzione di congelamento rapido.
La quantità massima di cibo che può essere congelata in 24 ore è riportata sulla tar-
ghetta del modello , un'etichetta che si
trova all'interno dell'apparecchiatura.
Il processo di congelamento dura 24 ore:
finché non è concluso, non aggiungere altro
cibo da congelare.
Conservazione dei surgelati
Al primo avvio o dopo un periodo di non
utilizzo, lasciare in funzione l'apparecchiatura per almeno 2 ore con una regolazione alta prima di introdurre gli alimenti.
Importante Non usare detergenti corrosivi
o polveri abrasive che danneggiano le finiture.
Importante Se si verifica un'interruzione
della corrente elettrica di durata superiore al
"tempo di salita" indicato nella tabella dei
dati tecnici, il cibo scongelato deve essere
consumato rapidamente o cucinato
immediatamente e quindi ricongelato (dopo
il raffreddamento).
Scongelamento
Prima dell'utilizzo, i cibi surgelati o congelati
possono essere scongelati a temperatura
ambiente.
Gli alimenti divisi in piccole porzioni possono essere cucinati direttamente, senza essere prima scongelati: in questo caso, tuttavia, la cottura durerà più a lungo.
CONSIGLI E SUGGERIMENTI UTILI
Rumori normali durante il
funzionamento
• Quando il refrigerante viene pompato attraverso le bobine o le tubazioni si può
sentire un fievole gorgoglio e un borbottio. Non si tratta di un'anomalia.
• Quando il compressore è in funzione, viene pompato il refrigerante e si può sentire
un ronzio e un rumore pulsante dal compressore. Non si tratta di un'anomalia.
• La dilatazione termica potrebbe provocare uno schiocco improvviso. È un fenomeno naturale, non pericoloso. Non si
tratta di un'anomalia.
• Quando il compressore si accende o si
spegne, si sente un lieve scatto del regolatore della temperatura. Non si tratta di
un'anomalia.
Consigli per il congelamento
Per un processo di congelamento ottimale,
ecco alcuni consigli importanti:
• la quantità massima di cibo che può essere congelata in 24 h è riportata sulla
targhetta;
• il processo di congelamento dura 24 ore.
In questo periodo non aggiungere altro
cibo da congelare;
• congelare solo alimenti freschi, di ottima
qualità e accuratamente puliti;
• preparare il cibo in piccole porzioni per
consentire un congelamento rapido e
completo e per scongelare in seguito solo la quantità necessaria;
• avvolgere il cibo in pellicole di alluminio o
in politene e verificare che i pacchetti siano ermetici;
• non lasciare che cibo fresco non congelato entri in contatto con quello già con-
Page 31
electrolux 31
gelato, per evitare un aumento della temperatura in quest'ultimo;
• i cibi magri si conservano meglio e più a
lungo di quelli grassi; il sale riduce il periodo di conservazione del cibo;
• i ghiaccioli, se consumati immediatamente dopo la rimozione dal vano congelatore, possono causare ustioni da congelamento della pelle;
• si consiglia di riportare la data di congelamento su ogni singolo pacchetto per riuscire a tenere traccia del tempo di conservazione;
Consigli per la conservazione dei
surgelati
Per ottenere i migliori risultati con questo
apparecchio:
PULIZIA E CURA
Attenzione Staccare la spina
dell'apparecchio prima di eseguire
lavori di manutenzione.
Questo apparecchio contiene idrocarburi nell'unità di raffreddamento; la manutenzione e la ricarica devono pertanto essere effettuate esclusivamente da
tecnici autorizzati.
Pulizia periodica
L'apparecchio deve essere pulito regolarmente:
• Pulire l'interno e gli accessori con acqua
tiepida e un po' di sapone neutro.
• Controllare regolarmente le guarnizioni
della porta e verificare che siano pulite e
prive di residui.
• Risciacquare e asciugare accuratamente.
Importante Non tirare, spostare o
danneggiare tubi e/o cavi all'interno
dell'apparecchio.
Non usare mai detergenti, polveri abrasive,
prodotti per la pulizia con una forte profumazione o cere lucidanti per pulire l'interno,
in quanto danneggiano la superficie e lasciano un odore forte.
Pulire il condensatore (griglia nera) e il compressore sul retro con una spazzola o un
aspirapolvere. Questa operazione migliorerà
le prestazioni dell'apparecchio riducendo i
consumi elettrici.
• Accertare che i cibi congelati commercialmente siano adeguatamente conservati dal rivenditore.
• Fare in modo che i cibi congelati siano
trasferiti dal negozio al congelatore nel
più breve tempo possibile.
• Non aprire la porta frequentemente o lasciarla aperta più del tempo strettamente
necessario.
• Una volta scongelato, il cibo si deteriora
rapidamente e non può essere ricongelato.
• Non superare il periodo di conservazione
indicato dal produttore.
Importante Non danneggiare il sistema di
raffreddamento.
Molti detergenti per cucine di marca contengono sostanze chimiche in grado di attaccare/danneggiare la plastica impiegata in
questo apparecchio. Per questo motivo si
raccomanda di pulire l'involucro esterno
dell'apparecchio solo con acqua calda con
un po' di liquido detergente.
Dopo la pulizia, ricollegare l'apparecchio alla rete di alimentazione.
Sbrinamento del congelatore
È normale che sui ripiani del congelatore e
intorno allo scomparto superiore si formi,
con il tempo, uno strato di brina
Quando tale strato raggiunge uno spessore
di ca. 3-5 mm, il vano congelatore deve essere sbrinato
Importante Circa 12 ore prima dello
sbrinamento, impostare il termostato su
una regolazione più alta per accumulare
una riserva di freddo sufficiente per
l'interruzione del funzionamento
Procedere come segue:
1. spegnere l'apparecchiatura ed estrarre
la spina dalla presa.
2. rimuovere i surgelati, avvolgerli in carta
di giornale e riporli in un luogo fresco.
Page 32
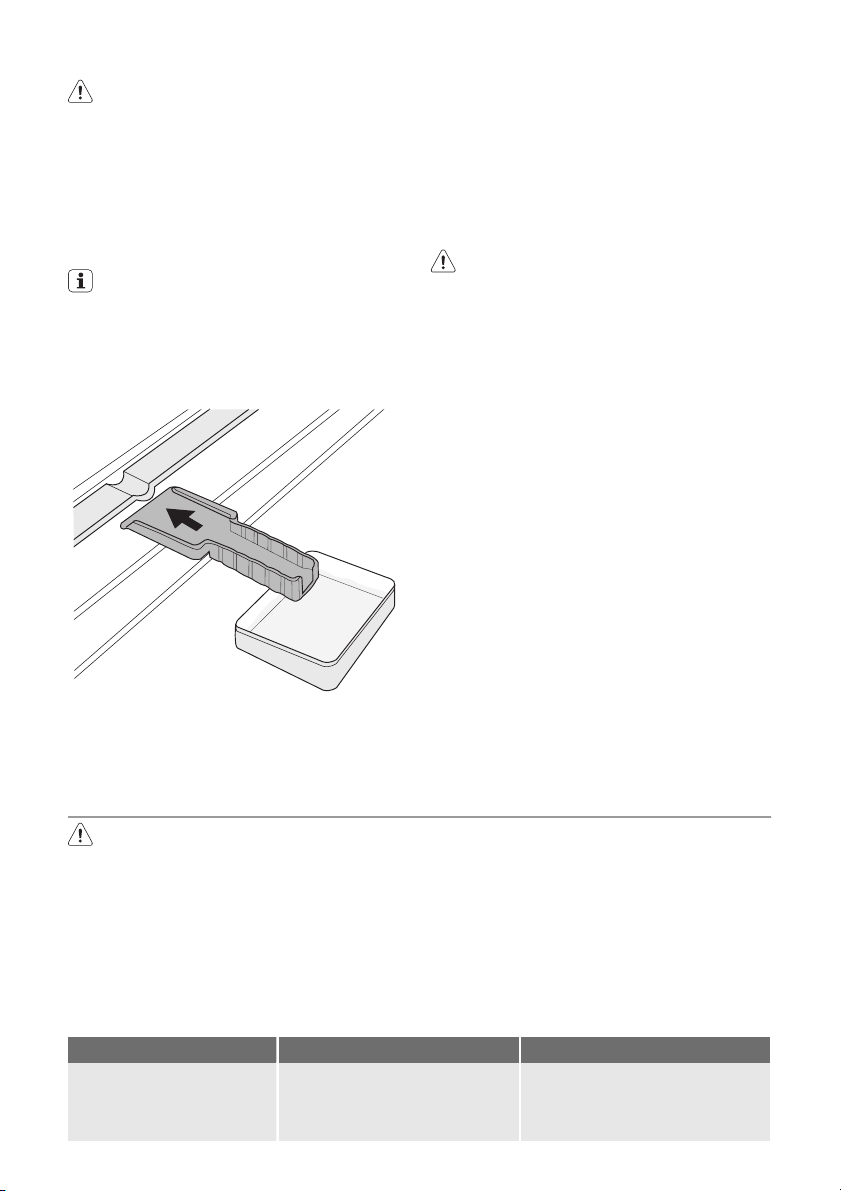
32 electrolux
Attenzione Non toccare il cibo
congelato con le mani bagnate. Le
mani potrebbero aderire all'alimento
congelato.
3. Lasciare aperta la porta e introdurre il
raschietto in plastica nell'apposita sede
al centro della parte inferiore, collocando una bacinella al di sotto per raccogliere l'acqua di sbrinamento.
Per accelerare il processo di sbrinamento, collocare un recipiente di acqua
calda nel vano congelatore. Inoltre, prima che lo sbrinamento sia completo,
rimuovere i pezzi di ghiaccio che si
staccano.
4. Una volta completato lo sbrinamento,
asciugare accuratamente l'interno conservando il raschietto per uso futuro.
5. Accendere l'apparecchiatura.
6. Ruotare il Regolatore della temperatura
in una posizione intermedia e lasciarlo
inserito per almeno 4 ore con l'"Interruttore Congelatore" acceso.
7. Dopo lo spegnimento della spia rossa,
reinserire il cibo precedentemente tolto
negli appositi vani.
Avvertenza Per rimuovere la brina
dall'evaporatore, non usare utensili
metallici appuntiti che possano
danneggiarlo.
Non usare dispositivi elettrici o altri
mezzi sconsigliati dal produttore per
accelerare il processo di sbrinamento.
Un aumento della temperatura dei surgelati durante lo sbrinamento può ridurne la durata di conservazione.
Periodi di inutilizzo
Se l'apparecchiatura non viene utilizzata per
un lungo periodo, adottare le seguenti precauzioni:
1. Scollegare l'apparecchiatura dalla rete
elettrica
2. estrarre tutti gli alimenti
3. Sbrinare e pulire l'apparecchiatura e tutti
gli accessori
4. Lasciare le porte aperte per evitare la
formazione di odori sgradevoli.
Importante Se l'apparecchiatura rimane
accesa, farla controllare periodicamente per
evitare che gli alimenti si deteriorino in caso
di interruzione della corrente elettrica.
COSA FARE SE…
Avvertenza Prima di eseguire la
ricerca guasti, estrarre la spina dalla
presa.
Le operazioni di ricerca guasti, non descritte nel presente manuale, devono
essere eseguite esclusivamente da
elettricisti qualificati o da personale
competente.
Importante Durante l'uso, alcuni rumori di
funzionamento (come quelli del
Problema Possibile causa Soluzione
L'apparecchiatura è rumorosa.
L'apparecchiatura non ha un sostegno adeguato.
compressore o del circuito refrigerante)
sono da considerarsi normali.
Importante Il funzionamento
dell'apparecchiatura è discontinuo, perciò
l'arresto del compressore non segnala
un'interruzione della corrente elettrica. Non
toccare i componenti elettrici
dell'apparecchiatura senza aver prima
interrotto il circuito.
Controllare che l'apparecchiatura
sia appoggiata in modo stabile
(tutti i piedini devono essere a
contatto con il pavimento).
Page 33
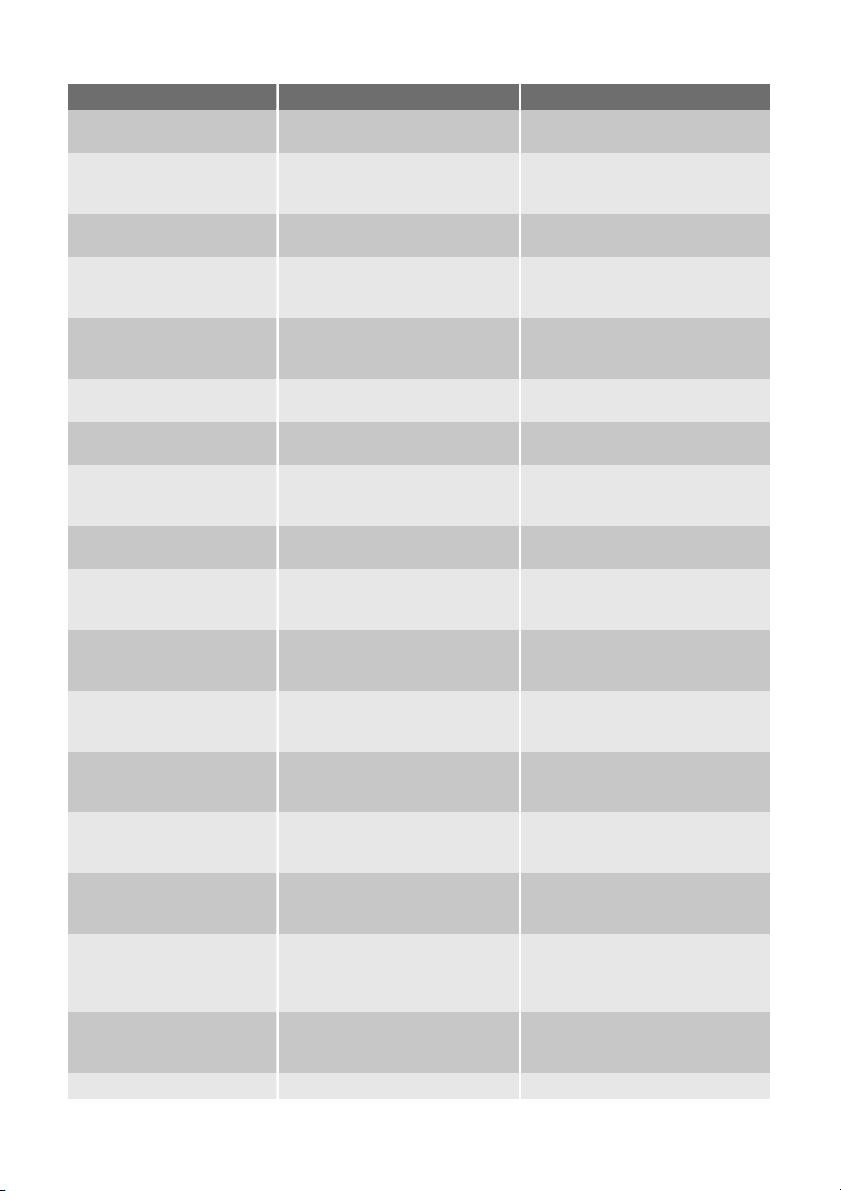
electrolux 33
Problema Possibile causa Soluzione
Il compressore rimane
sempre in funzione.
Le porte non sono perfettamen-
Il controllo termostatico non è
stato impostato correttamente
te chiuse
Impostare una temperatura superiore.
Controllare che le porte si chiudano perfettamente e che le guarnizioni siano integre e pulite.
La porta viene aperta troppo fre-
quentemente.
Sono stati introdotti molti ali-
menti da surgelare contempora-
Limitare il più possibile il tempo di
apertura della porta.
Attendere alcune ore e ricontrollare la temperatura.
neamente.
Gli alimenti introdotti nell'appa-
recchiatura erano troppo caldi.
Prima di introdurre alimenti caldi
nel congelatore, lasciarli raffreddare a temperatura ambiente.
La temperatura ambiente è trop-
po alta.
Presenza di brina eccessiva.
Gli alimenti non sono avvolti correttamente.
Le porte non sono perfettamen-
te chiuse
Abbassare la temperatura ambiente.
Avvolgere correttamente gli alimenti.
Controllare che le porte si chiudano perfettamente e che le guarnizioni siano integre e pulite
Il regolatore della temperatura
non è impostato correttamente
La temperatura all'interno del congelatore è
Il regolatore della temperatura
non è impostato correttamente
Impostare una temperatura superiore
Impostare una temperatura inferiore
troppo alta
La porta non si chiude perfetta-
mente
Controllare che la porta si chiuda
perfettamente e che le guarnizioni
siano integre e pulite
Sono stati introdotti molti ali-
menti da surgelare contempora-
Introdurre gli alimenti da congelare poco alla volta
neamente
Gli alimenti introdotti nell'appa-
recchiatura erano troppo caldi
Prima di introdurre alimenti nel
congelatore, lasciarli raffreddare a
temperatura ambiente.
Gli alimenti da congelare sono
troppo vicini tra loro
Disporre i surgelati in modo da
consentire una corretta circolazione dell'aria fredda
La temperatura all'interno del congelatore è
Il regolatore della temperatura
non è impostato correttamente
Impostare una temperatura superiore
troppo bassa
L'apparecchiatura non
funziona. Non si accendono né il circuito refri-
La spina non è inserita correttamente nella presa di alimentazione
Inserire correttamente la spina
nella presa
gerante né la lampadina
L'apparecchiatura non riceve
corrente
Provare a collegare un'altra apparecchiatura elettrica alla presa di
alimentazione
L'apparecchiatura non è accesa Accendere l'apparecchiatura
Page 34
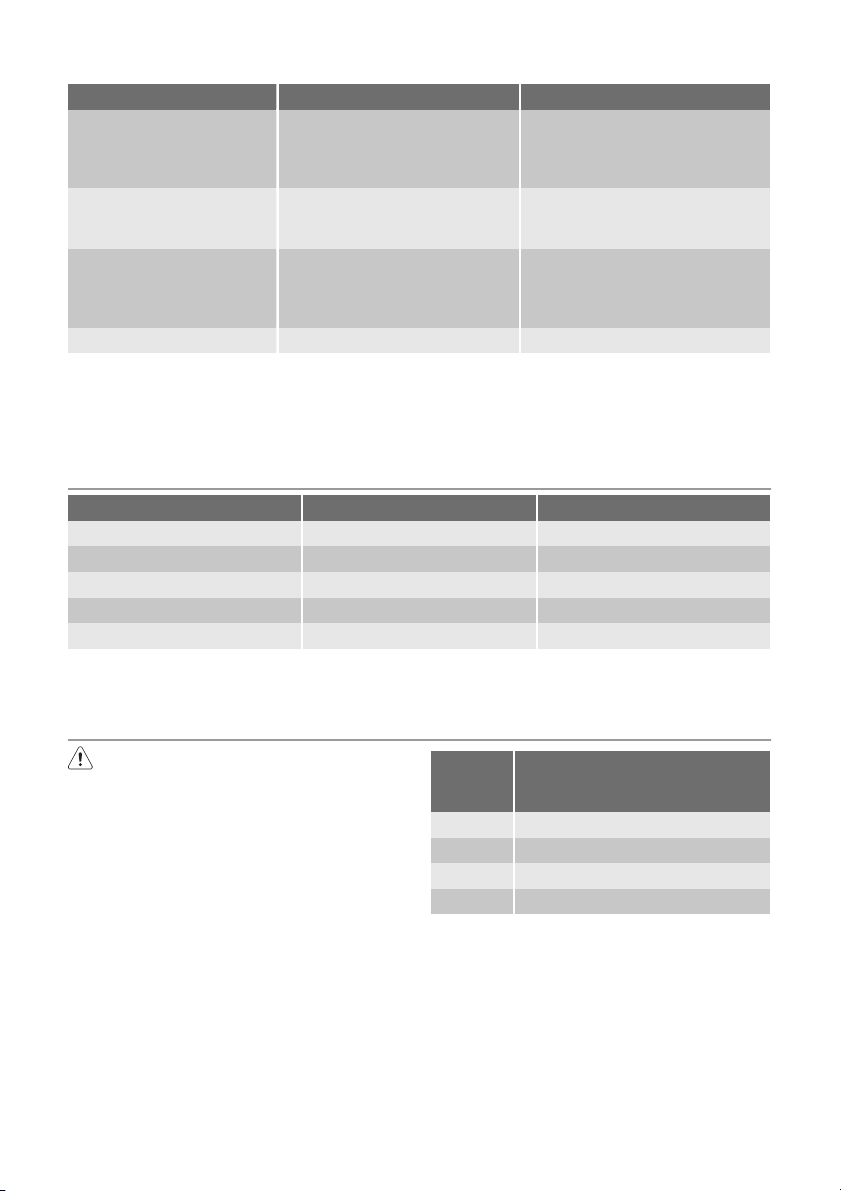
34 electrolux
Problema Possibile causa Soluzione
Nella presa di alimentazione non
L'apparecchiatura non
raffredda
Nella presa di alimentazione non
L'apparecchiatura non è accesa Accendere l'apparecchiatura
Chiusura della porta
1. Pulire le guarnizioni della porta.
2. Se necessario, regolare la porta. Vedere
è presente tensione (provare a
collegarvi un'altra apparecchiatura elettrica)
La spina non è inserita correttamente nella presa di alimentazione
è presente tensione (provare a
collegarvi un'altra apparecchiatura elettrica)
3. Se necessario, sostituire le guarnizioni
della porta difettose. Contattare il Centro di assistenza locale.
Rivolgersi a un elettricista
Inserire correttamente la spina
nella presa
Rivolgersi a un elettricista
"Installazione".
DATI TECNICI
Dimensioni
Altezza 850 mm
Larghezza 550 mm
Profondità 612 mm
Tempo di salita 22 h
I dati tecnici sono riportati sulla targhetta
del modello, applicata sul lato sinistro inter-
no dell'apparecchio, e sull'etichetta dei valori energetici.
INSTALLAZIONE
Leggere con attenzione le "Informazioni
per la sicurezza" per la vostra sicurezza
e per il corretto funzionamento
dell'apparecchio prima di procedere
all'installazione.
Luogo d'installazione
Questa apparecchiatura può essere installata in un luogo asciutto e ben ventilato (garage o una cantina); tuttavia, per ottenere
prestazioni ottimali è consigliabile installarlo
in un luogo la cui temperatura ambiente
corrisponda alla classe climatica indicata
sulla targhetta del modello:
Classe
climati-
ca
SN da +10°C a 32°C
N da +16°C a 32°C
ST da +16°C a 38°C
T da +16°C a 43°C
Temperatura ambiente
Livellamento
L'apparecchio deve trovarsi perfettamente
in piano. Per correggere gli eventuali dislivelli è possibile regolare in altezza i due piedini anteriori (2). Se necessario, regolare i
piedini rimuovendo il distanziatore (1).
Page 35
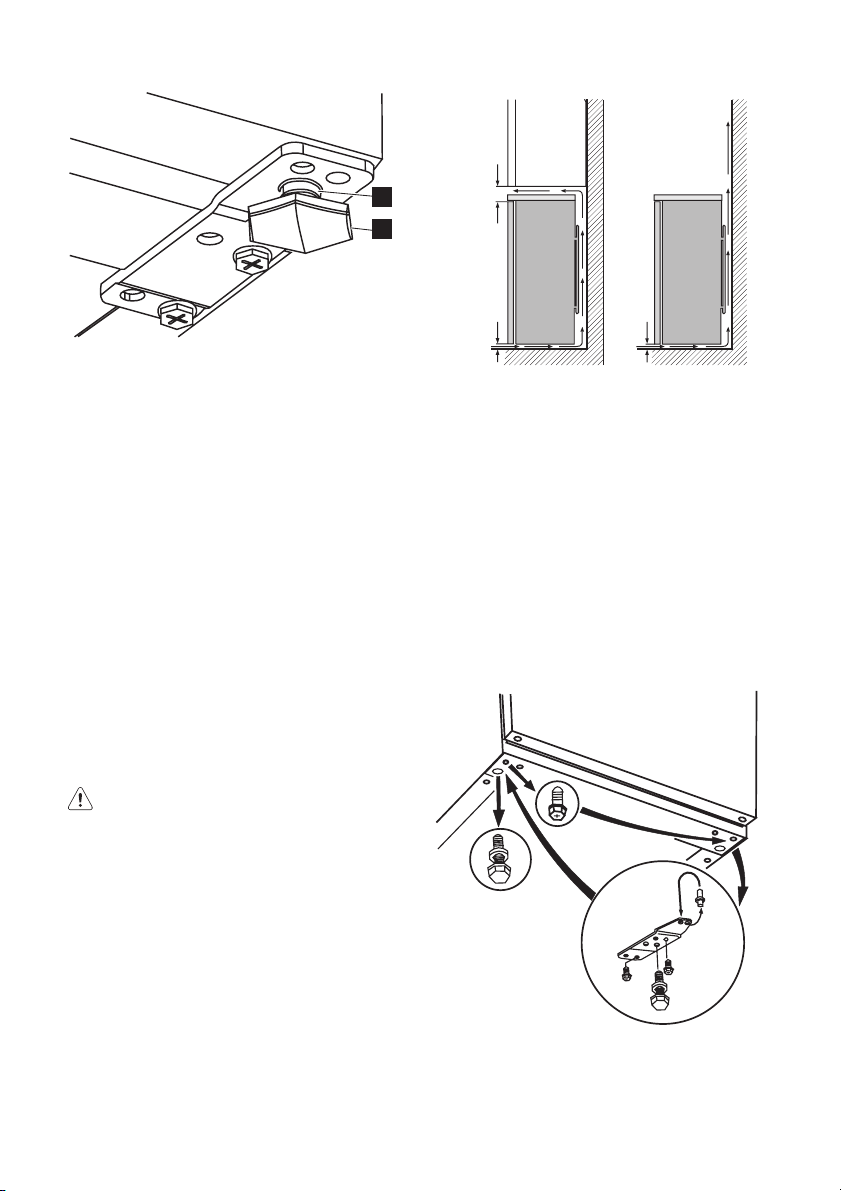
electrolux 35
1
2
Posizione
L'apparecchio deve essere installato lontano da fonti di calore (termosifoni, boiler, luce solare diretta, ecc.). Verificare che sul lato posteriore sia garantita un'adeguata circolazione dell'aria. Per ottenere prestazioni
ottimali, se l'apparecchio è installato al di
sotto di un pensile si raccomanda di mantenere una distanza minima tra quest'ultimo e
lo spigolo superiore dell'apparecchio di almeno 100 mm. Se possibile, tuttavia, evitare di installare l'apparecchio sotto un pensile. Per consentire un perfetto livellamento
dell'apparecchio sono provvisti uno o più
piedini regolabili.
Se l'apparecchio è installato in un angolo
con il lato incernierato verso la parete, la distanza rispetto a quest'utima deve essere
di almeno 10 mm, in modo che la porta
possa aprirsi in misura sufficiente per consentire la rimozione dei ripiani.
Avvertenza Deve essere possibile
scollegare l'apparecchio dalla rete
elettrica; eseguire perciò l'installazione
facendo sì che la spina rimanga
facilmente accessibile.
15mm 100mm
15mm
Reversibilità della porta
Importante Per eseguire le seguenti
operazioni, si raccomanda di farsi aiutare
da un'altra persona che tenga ben ferme le
porte dell'apparecchiatura.
Per modificare la direzione di apertura della
porta, procedere come segue:
1. estrarre la spina dalla presa.
2. Inclinare con cura l'apparecchiatura
verso la parte posteriore, in modo che il
compressore non tocchi il pavimento.
3. Svitare i piedini regolabili che si trovano
sui due lati anteriori.
4. Rimuovere la cerniera della porta infe-
riore svitando le 2 viti di fissaggio.
5. Rimuovere il perno della cerniera dalla
parte inferiore della porta.
Page 36
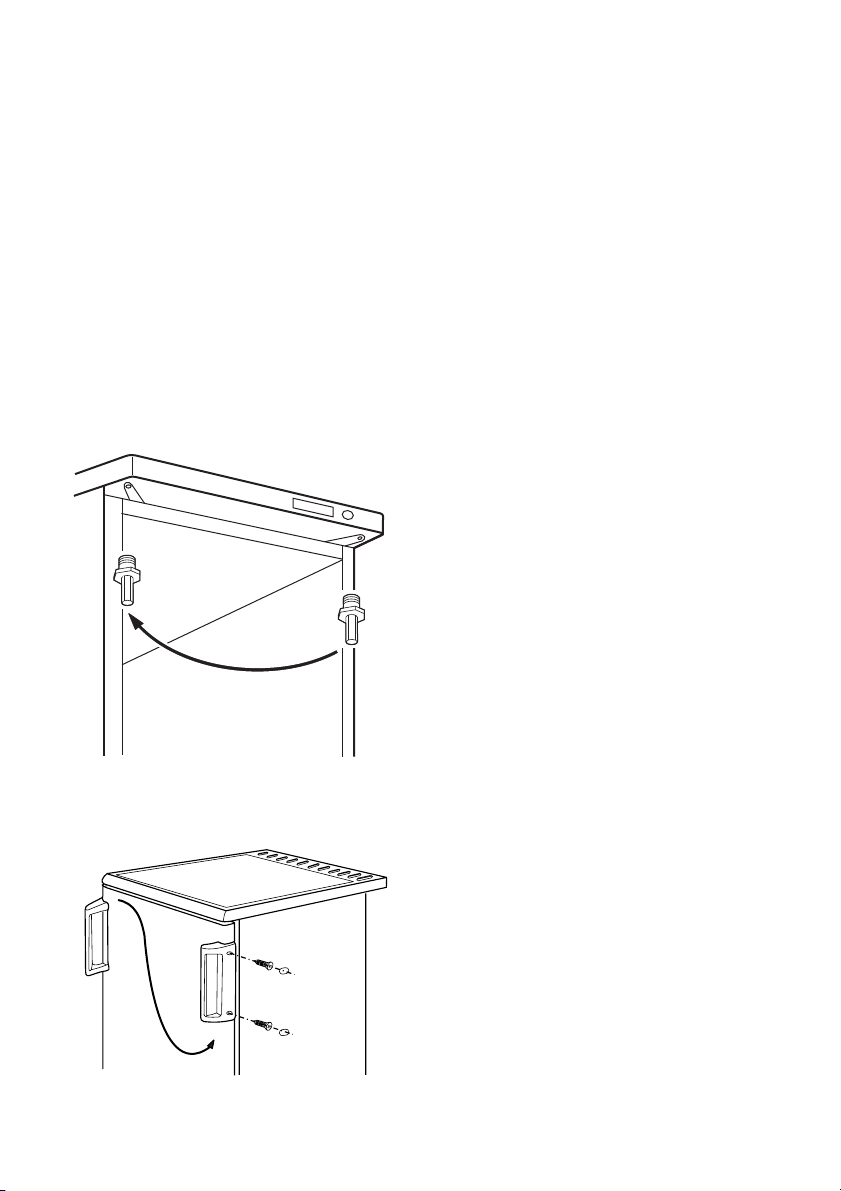
36 electrolux
6. Inserire il perno della cerniera nel foro
della piastra della cerniera.
7. Togliere la porta.
8. Riposizionare il perno della cerniera superiore nella posizione opposta.
9. Posizionare la porta sul perno della cerniera.
10. Inserire il perno della cerniera nel foro
della piastra della cerniera e riposizionare il gruppo cerniera nella posizione
opposta. Quindi, serrare servendosi
delle viti di serraggio.
11. Riposizionare il gruppo della piastra
della cerniera inferiore sul lato opposto,
facendo attenzione che l'estremità della
porta sia in parallelo con il lato del vano.
12.
Rimuovere e installare la maniglia
15)
sul
lato opposto.
13. Riposizionare l'apparecchiatura, livellarla, attendere almeno quattro ore e inserire la spina nella presa.
Effettuare un controllo finale per verificare
che:
• tutte le viti siano serrate.
• La porta si apra e si chiuda correttamen-
te.
Se la temperatura ambiente è bassa (ad
esempio in inverno), è possibile che la guarnizione non aderisca perfettamente. In tal
caso, attendere che aderisca naturalmente.
Per chi non desidera eseguire direttamente
le operazioni sopra descritte, consigliamo di
rivolgersi al punto di assistenza più vicino.
L'intervento di inversione delle porte eseguito dai tecnici del servizio di assistenza è a
carico dell'utente.
Collegamento elettrico
Prima di inserire la spina, verificare che la
tensione e la frequenza riportate sulla targhetta corrispondano ai valori della rete
elettrica domestica.
L'apparecchio deve essere collegato a
massa. La spina del cavo di alimentazione è
dotata di un contatto a tale scopo. Se la
presa della rete elettrica domestica non è
collegata a massa, collegare l'apparecchio
ad una massa separata in conformità alle
norme relative alla corrente, consultando un
elettricista qualificato.
Il fabbricante declina qualsiasi responsabilità se le precauzioni suddette non sono rispettate.
Il presente apparecchio è conforme alle direttive CEE.
15) (se prevista)
Page 37
CONSIDERAZIONI AMBIENTALI
Il simbolo sul prodotto o sulla confezione
indica che il prodotto non deve essere
considerato come un normale rifiuto
domestico, ma deve essere portato nel
punto di raccolta appropriato per il
riciclaggio di apparecchiature elettriche ed
elettroniche. Provvedendo a smaltire questo
prodotto in modo appropriato, si
contribuisce a evitare potenziali
conseguenze negative, che potrebbero
derivare da uno smaltimento inadeguato del
prodotto. Per informazioni più dettagliate
sul riciclaggio di questo prodotto,
contattare l’ufficio comunale, il servizio
electrolux 37
locale di smaltimento rifiuti o il negozio in
cui è stato acquistato il prodotto.
Dove portare gli apparecchi fuori
uso?
In qualsiasi negozio che vende
apparecchi nuovi oppure si
restituiscono ai centri di raccolta ufficiali
della SENS oppure ai riciclatori ufficiali
della SENS.
La lista dei centri di raccolta ufficiali
della SENS è visibile nel sito
www.sens.ch.
Page 38
38 electrolux
Electrolux. Thinking of you.
Share more of our thinking at www.electrolux.com
CONTENTS
Safety information 38
Control panel 40
First use 41
Daily use 41
Helpful Hints and Tips 42
SAFETY INFORMATION
In the interest of your safety and to ensure
the correct use, before installing and first
using the appliance, read this user manual
carefully, including its hints and warnings.
To avoid unnecessary mistakes and accidents, it is important to ensure that all people using the appliance are thoroughly familiar with its operation and safety features.
Save these instructions and make sure that
they remain with the appliance if it is moved
or sold, so that everyone using it through its
life will be properly informed on appliance
use and safety.
For the safety of life and property keep the
precautions of these user's instructions as
the manufacturer is not responsible for
damages caused by omission.
Children and vulnerable people safety
• This appliance is not intended for use by
persons (including children) with reduced
physical, sensory or mental capabilities,
or lack of experience and knowledge, unless they have been given supervision or
instruction concerning use of the appliance by a person responsible for their
safety.
Children should be supervised to ensure
that they do not play with the appliance.
• Keep all packaging well away from children. There is risk of suffocation.
• If you are discarding the appliance pull
the plug out of the socket, cut the connection cable (as close to the appliance
as you can) and remove the door to prevent playing children to suffer electric
shock or to close themselves into it.
• If this appliance featuring magnetic door
seals is to replace an older appliance
having a spring lock (latch) on the door or
Care and cleaning 42
What to do if… 44
Technical data 45
Installation 46
Environmental concerns 48
Subject to change without notice
lid, be sure to make that spring lock unusable before you discard the old appliance. This will prevent it from becoming a
death trap for a child.
General safety
Caution! Keep ventilation openings
clear of obstruction.
• The appliance is intended for keeping
foodstuff and/or beverages in a normal
household as explained in this instruction
booklet.
• Do not use a mechanical device or any
artificial means to speed up the thawing
process.
• Do not use other electrical appliances
(such as ice cream makers) inside of refrigerating appliances, unless they are approved for this purpose by the manufacturer.
• Do not damage the refrigerant circuit.
• The refrigerant isobutane (R600a) is contained within the refrigerant circuit of the
appliance, a natural gas with a high level
of environmental compatibility, which is
nevertheless flammable.
During transportation and installation of
the appliance, be certain that none of the
components of the refrigerant circuit become damaged.
If the refrigerant circuit should become
damaged:
– avoid open flames and sources of igni-
tion
– thoroughly ventilate the room in which
the appliance is situated
• It is dangerous to alter the specifications
or modify this product in any way. Any
Page 39
electrolux 39
damage to the cord may cause a shortcircuit, fire and/or electric shock.
Warning! Any electrical component
(power cord, plug, compressor) must
be replaced by a certified service agent
or qualified service personnel.
1. Power cord must not be lengthened.
2. Make sure that the power plug is not
squashed or damaged by the back of
the appliance. A squashed or damaged power plug may overheat and
cause a fire.
3. Make sure that you can come to the
mains plug of the appliance.
4. Do not pull the mains cable.
5. If the power plug socket is loose, do
not insert the power plug. There is a
risk of electric shock or fire.
6. You must not operate the appliance
16)
without the lamp cover
of interior
lighting.
• This appliance is heavy. Care should be
taken when moving it.
• Do not remove nor touch items from the
freezer compartment if your hands are
damp/wet, as this could cause skin abrasions or frost/freezer burns.
• Avoid prolonged exposure of the appliance to direct sunlight.
•
Bulb lamps
17)
used in this appliance are
special purpose lamps selected for
household appliances use only. They are
not suitable for household room illumination.
Do not place frozen food on the
worktop since cold and vapour may
produce water condensate within its
inner side. The resulting drip liquid may
cause malfunctions. Therefore, do not
place nor leave frozen items of any kind
on the worktop.
Daily Use
• Do not put hot pot on the plastic parts in
the appliance.
• Do not store flammable gas and liquid in
the appliance, because they may explode.
• Do not place food products directly
against the air outlet on the rear wall.
18)
• Frozen food must not be re-frozen once
it has been thawed out.
• Store pre-packed frozen food in accordance with the frozen food manufacturer's
instructions.
• Appliance's manufacturers storage recommendations should be strictly adhered
to. Refer to relevant instructions.
• Do not place carbonated or fizzy drinks in
the freezer compartment as it creates
pressure on the container, which may
cause it to explode, resulting in damage
to the appliance.
• Ice lollies can cause frost burns if consumed straight from the appliance.
Care and cleaning
• Before maintenance, switch off the appliance and disconnect the mains plug from
the mains socket.
• Do not clean the appliance with metal
objects.
• Do not use sharp objects to remove frost
from the appliance. Use a plastic scraper.
• Never use a hair drier or other heating
appliances to speed up defrosting. Excessive heat may damage the plastic interior, and humidity could enter the electric system making it live.
Installation
Important! For electrical connection
carefully follow the instructions given in
specific paragraphs.
• Unpack the appliance and check if there
are damages on it. Do not connect the
appliance if it is damaged. Report possible damages immediately to the place
you bought it. In that case retain packing.
• It is advisable to wait at least four hours
before connecting the appliance to allow
the oil to flow back in the compressor.
• Adequate air circulation should be
around the appliance, lacking this leads
to overheating. To achieve sufficient ventilation follow the instructions relevant to
installation.
16) If the lamp cover is foreseen.
17) If the lamp is foreseen.
18) If the appliance is Frost Free.
Page 40
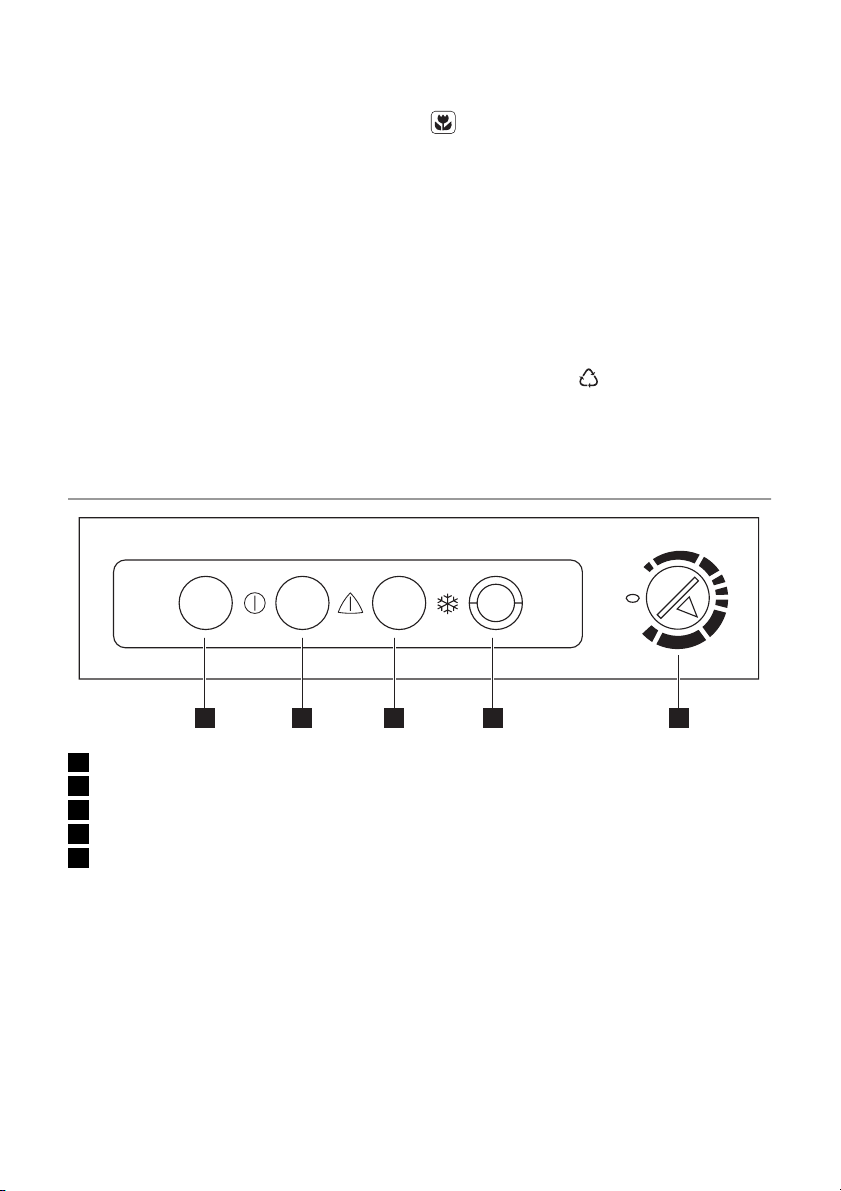
40 electrolux
• Wherever possible the back of the product should be against a wall to avoid
touching or catching warm parts (compressor, condenser) to prevent possible
burn.
• The appliance must not be located close
to radiators or cookers.
• Make sure that the mains plug is accessible after the installation of the appliance.
•
Connect to potable water supply only.
19)
Service
• Any electrical work required to do the
servicing of the appliance should be carried out by a qualified electrician or competent person.
• This product must be serviced by an authorized Service Centre, and only genuine spare parts must be used.
CONTROL PANEL
Environment Protection
This appliance does not contain gasses
which could damage the ozone layer,
in either its refrigerant circuit or insulation materials. The appliance shall not
be discarded together with the urban
refuse and rubbish. The insulation foam
contains flammable gases: the appliance shall be disposed according to
the applicable regulations to obtain
from your local authorities. Avoid damaging the cooling unit, especially at the
rear near the heat exchanger. The materials used on this appliance marked
by the symbol
are recyclable.
1 2 3 4 5
1 Green Indicator Light
2 Red Indicator Light
3 Yellow Indicator Light
4 Freezer Switch
5 Temperature Regulator
Switching on
1. Allow the appliance to stand for 4 hrs
after installation.
2. Insert the plug into the wall socket.
3. Turn the Temperature Regulator clock-
wise to a medium setting.
4. The Green Indicator Light will light up
and remain lit until the appliance is
switched off at the mains.
5. Press the Freezer Switch to activate the
fast-freeze function (Yellow Indicator
Light will illuminate) and leave to run for
4 hours to allow the correct temperature
19) If a water connection is foreseen.
to be reached before placing food inside.
Yellow Indicator Light lights in the
switched-on state of the Freezer Switch.
6. The Red Indicator Light will also illuminate until the correct temperature is
reached.
A few hours after starting up the Red Indicator Light will go out to show that the
correct temperature has been reached
for the setting chosen and will stay out
to indicate that everything is in order. It
will come on if the freezer temperature
rises unduly for instance, after opening
the freezer door or placing food inside
the cabinet, but the light should go out
again when the temperature returns to
the correct storage level.
Page 41
electrolux 41
7. When the appliance has reached the set
temperature (the Red Indicator Light has
gone out) press the Freezer Switch
again to switch off the fast freeze function. The Yellow Indicator Light will go
out.
Switching off
1. To turn off the appliance, turn the Temperature Regulator to the "O" position.
2. To disconnect the appliance from the
power disconnect the mains plug from
the wall socket.
Temperature regulation
The temperature within the appliance is
controlled by the Temperature Regulator
situated on the control panel.
To operate the appliance, proceed as follows:
• turn the Temperature Regulator toward
lower settings to obtain the minimum
coldness.
• turn the Temperature Regulator toward
higher settings to obtain the maximum
coldness.
A medium setting is generally the most
suitable.
However, the exact setting should be chosen keeping in mind that the temperature inside the appliance depends on:
• room temperature
• how often the door is opened
• the quantity of food stored
• the location of the appliance.
Fast Freeze function
If more than 3-4 kg of food is to be frozen:
1. Press the Freezer Switch to activate the
fast-freeze function 6-24 hours before
placing the fresh food in the freezer, the
Yellow Indicator Light will illuminate. The
compressor will now run continuously,
to ensure that the fresh food is frozen as
quickly as possible.
2. It is possible to deactivate the function
at any time by pressing the Freezer
Switch.
3. Place the food in the freezing (top) compartment and leave the Freezer Switch
on for a further 24 hours.
4. Then push the Freezer Switch again (the
Yellow Indicator Light will go out and the
switch turns to its original position).
5. Move frozen food from the top (freezer)
compartment into the other two compartments (storing compartments). For
maximum freezing performance remove
the top drawer (if the drawer is foreseen)
and then place the foods to be frozen
directly on the evaporator. In case of
freezing smaller food volumes you do
not need to remove the drawer.
If the Freezer Switch is accidentally left
on, the freezer will not be damaged,
but energy will be wasted.
FIRST USE
Cleaning the interior
Before using the appliance for the first time,
wash the interior and all internal accessories with lukewarm water and some neutral
soap so as to remove the typical smell of a
brand-new product, then dry thoroughly.
DAILY USE
Freezing fresh food
The freezer (top) compartment is suitable
for freezing fresh food and storing frozen
and deep-frozen food for a long time.
To freeze fresh food activate the fast freeze
function.
The maximum amount of food that can be
frozen in 24 hours is specified on the rating
Important! Do not use detergents or abrasive powders, as these will damage the finish.
plate , a label located on the inside of the
appliance.
The freezing process lasts 24 hours: during
this period do not add other food to be frozen.
Page 42
42 electrolux
Storage of frozen food
When first starting-up or after a period out
of use, before putting the products in the
compartment let the appliance run at least
2 hours on the higher settings.
Important! In the event of accidental
defrosting, for example due to a power
failure, if the power has been off for longer
than the value shown in the technical
characteristics chart under "rising time", the
HELPFUL HINTS AND TIPS
Normal Operating Sounds
• You may hear a faint gurgling and a bubbling sound when the refrigerant is pumped through the coils or tubing. This is
correct.
• When the compressor is on, the refrigerant is being pumped around and you will
hear a whirring sound and a pulsating
noise from the compressor. This is correct.
• The thermic dilatation might cause a sudden cracking noise. It is natural, not dangerous physical phenomenon. This is
correct.
• When the compressor switches on or
switches off, you will hear a faint "click" of
the temperature regulator. This is correct.
Hints for freezing
To help you make the most of the freezing
process, here are some important hints:
• the maximum quantity of food which can
be frozen in 24 hrs. is shown on the rating plate;
• the freezing process takes 24 hours. No
further food to be frozen should be added during this period;
• only freeze top quality, fresh and thoroughly cleaned, foodstuffs;
• prepare food in small portions to enable it
to be rapidly and completely frozen and
to make it possible subsequently to thaw
only the quantity required;
defrosted food must be consumed quickly
or cooked immediately and then re-frozen
(after cooling).
Thawing
Deep-frozen or frozen food, prior to being
used, can be thawed at room temperature.
Small pieces may even be cooked still frozen, directly from the freezer: in this case,
cooking will take longer.
• wrap up the food in aluminium foil or polythene and make sure that the packages
are airtight;
• do not allow fresh, unfrozen food to
touch food which is already frozen, thus
avoiding a rise in temperature of the latter;
• lean foods store better and longer than
fatty ones; salt reduces the storage life of
food;
• water ices, if consumed immediately after
removal from the freezer compartment,
can possibly cause the skin to be freeze
burnt;
• it is advisable to show the freezing in date
on each individual pack to enable you to
keep tab of the storage time.
Hints for storage of frozen food
To obtain the best performance from this
appliance, you should:
• make sure that the commercially frozen
foodstuffs were adequately stored by the
retailer;
• be sure that frozen foodstuffs are transferred from the foodstore to the freezer in
the shortest possible time;
• not open the door frequently or leave it
open longer than absolutely necessary.
• Once defrosted, food deteriorates rapidly
and cannot be refrozen.
• Do not exceed the storage period indicated by the food manufacturer.
CARE AND CLEANING
Caution! Unplug the appliance before
carrying out any maintenance
operation.
This appliance contains hydrocarbons
in its cooling unit; maintenance and recharging must therefore only be carried
out by authorized technicians.
Page 43
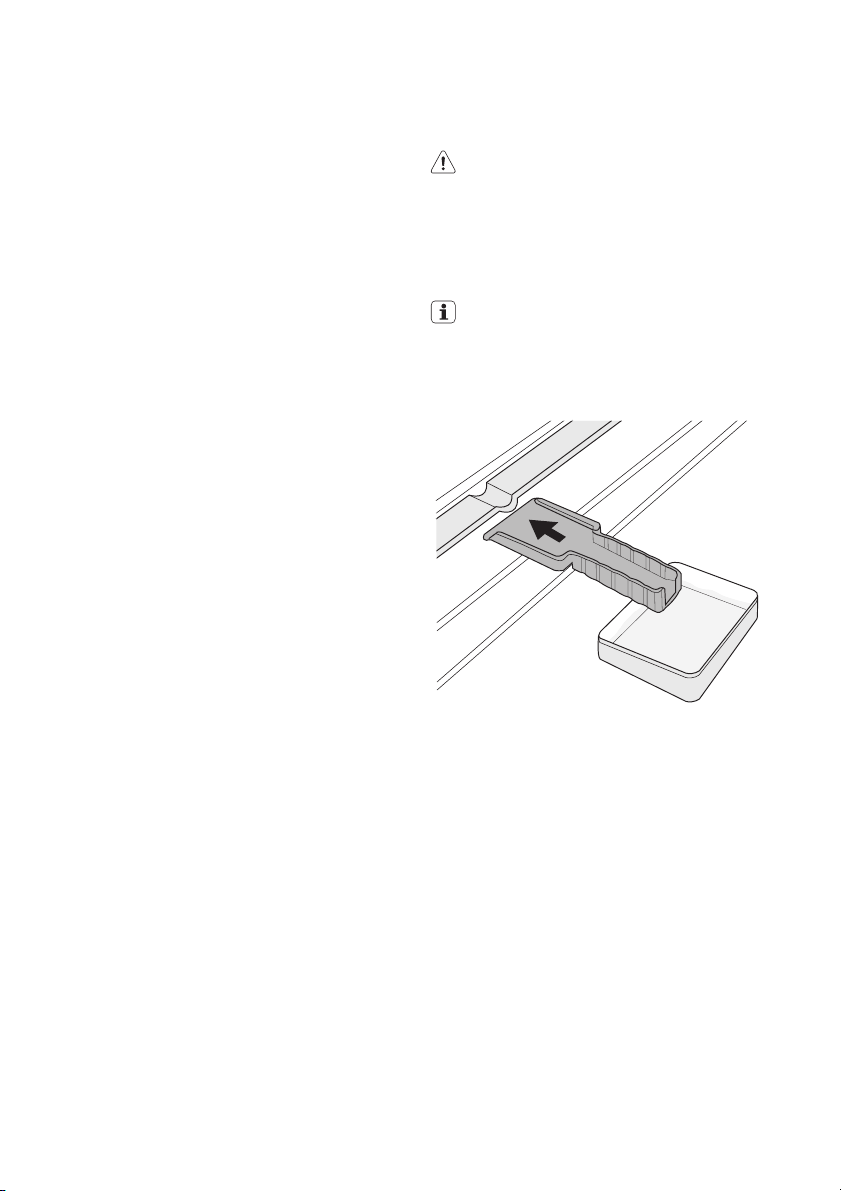
electrolux 43
Periodic cleaning
The equipment has to be cleaned regularly:
• clean the inside and accessories with
lukewarm water and some neutral soap.
• regularly check the door seals and wipe
clean to ensure they are clean and free
from debris.
• rinse and dry thoroughly.
Important! Do not pull, move or damage
any pipes and/or cables inside the cabinet.
Never use detergents, abrasive powders,
highly perfumed cleaning products or wax
polishes to clean the interior as this will
damage the surface and leave a strong
odour.
Clean the condenser (black grill) and the
compressor at the back of the appliance
with a brush or a vacuum cleaner. This operation will improve the performance of the
appliance and save electricity consumption.
Important! Take care of not to damage the
cooling system.
Many proprietary kitchen surface cleaners
contain chemicals that can attack/damage
the plastics used in this appliance. For this
reason it is recommended that the outer
casing of this appliance is only cleaned with
warm water with a little washing-up liquid
added.
After cleaning, reconnect the equipment to
the mains supply.
Defrosting the freezer
A certain amount of frost will always form
on the freezer shelves and around the top
compartment.
Defrost the freezer when the frost layer reaches a thickness of about 3-5 mm.
Important! About 12 hours prior to
defrosting, set the Temperature Rregulator
toward higher settings , in order to build up
sufficient chill reserve for the interruption in
operation.
To remove the frost, follow the instructions
below:
1. Switch off the appliance and disconnect
the mains plug from the mains socket.
2. Remove any stored food, wrap it in several layers of newspaper and put it in a
cool place.
Caution! Do not touch frozen goods
with wet hands. Hands can freeze to
the goods.
3. Leave the door open and insert the
plastic scraper in the appropriate seating at the bottom centre, placing a basin
underneath to collect the defrost water.
In order to speed up the defrosting
process, place a pot of warm water in
the freezer compartment. In addition,
remove pieces of ice that break away
before defrosting is complete.
4. When defrosting is completed, dry the
interior thoroughly and keep the scraper
for future use.
5. Switch on the appliance.
6. Turn the Temperature Regulator to a
medium position and leave to run for at
least 4 hours with the "Freezer Switch"
switch on.
7. After the Red Indicator Light has gone
out, reload the previously removed food
into the compartments.
Page 44
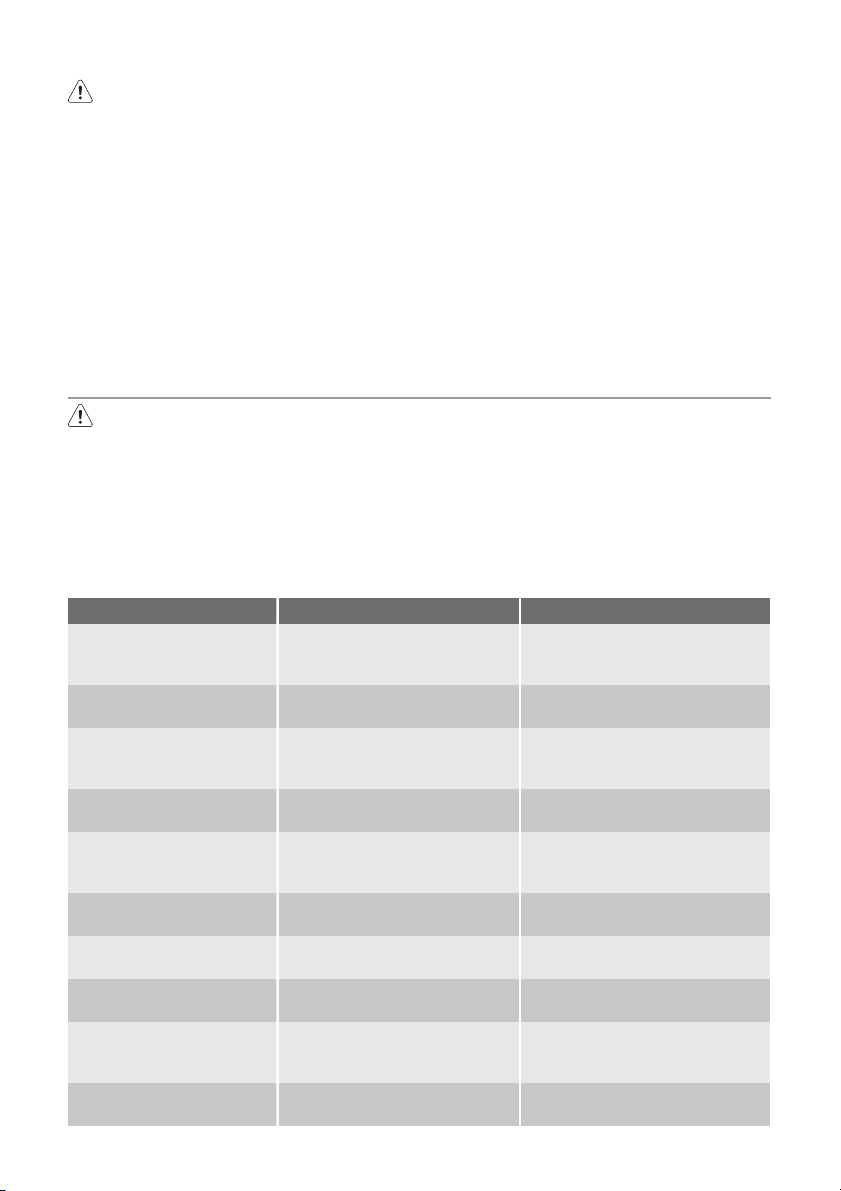
44 electrolux
Warning! Never use sharp metal tools
to scrape off frost from the evaporator
as you could damage it.
Do not use a mechanical device or any
artificial means to speed up the thawing process other than those recommended by the manufacturer.
A temperature rise of the frozen food
packs, during defrosting, may shorten
their safe storage life.
Periods of non-operation
1. disconnect the appliance from electricity
supply
2. remove all food
3. defrost and clean the appliance and all
accessories
4. leave the door/doors open to prevent
unpleasant smells.
Important! If the cabinet will be kept on,
ask somebody to check it once in a while to
prevent the food inside from spoiling in
case of a power failure.
When the appliance is not in use for long
periods, take the following precautions:
WHAT TO DO IF…
Warning! Before troubleshooting,
disconnect the mains plug from the
mains socket.
Only a qualified electrician or competent person must do the troubleshooting that is not in this manual.
Important! There are some sounds during
normal use (compressor, refrigerant
circulation).
Problem Possible cause Solution
The appliance is noisy
The compressor operates continually
Doors are not shut properly or
The door has been opened too
Large quantities of food to be
Food placed in the appliance
The room temperature is too
There is too much frost
and ice
Doors are not shut properly or
The Temperature regulator may
The appliance is not supported
properly
The thermostatic control is set
incorrectly
do not close tightly
frequently
frozen were put in at the same
time
was too warm
high.
Products are not wrapped prop-
erly
do not close tightly
be set incorrectly
Important! The appliance operates
discontinuously, so the stopping of
compressor does not mean being no
current. That is why you must not touch the
electrical parts of the appliance before
breaking the circuit.
Check if the appliance stands stable (all the four feet should be on
the floor)
Set a warmer temperature
Check if the doors close well and
the gaskets are undamaged and
clean
Do not leave the door open longer
than necessary
Wait some hours and then check
the temperature again
Allow food to cool to room temperature before storing
Decrease the room temperature.
Wrap the products better
Check if the doors close well and
the gaskets are undamaged and
clean
Set a warmer temperature
Page 45
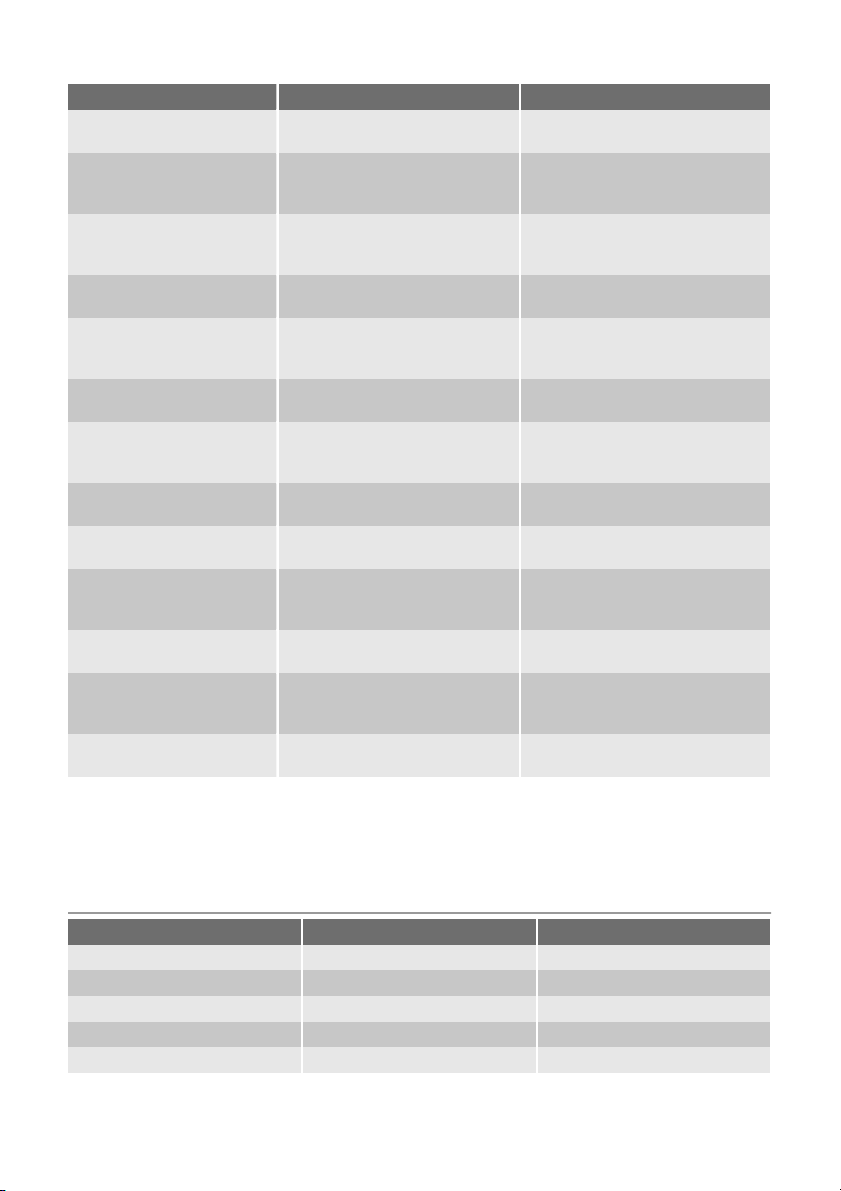
Problem Possible cause Solution
It is too warm in the
freezer
The door does not close tightly
Large quantities of food to be
Food placed in the appliance
Products to be frozen are
It is too cold inside the
freezer
The appliance does not
work at all. Neither cooling nor lighting works
Power does not reach the appli-
The appliance is not switchedonSwitch on the appliance
Temperature regulator may be
set incorrectly
or it is not shut properly
frozen were put in at the same
time
was too warm
placed too closely to each other
Temperature regulator may be
set incorrectly
Plug is not connected to the
mains socket properly
ance
Set a lower temperature
Check if the door closes well and
the gasket is undamaged and
clean
Insert smaller quantities of food to
be frozen at any one time.
Allow food to cool to room temperature before storing.
Place the products in a way so
that cold air could circulate
among them
Set a warmer temperature
Connect the mains plug properly
Try connecting another electrical
device to the power outlet
electrolux 45
There is no voltage in the mains
The appliance does not
cool at all
There is no voltage in the mains
The appliance is not switchedonSwitch on the appliance
Closing the door
1. Clean the door gaskets.
socket (try to connect another
appliance into it)
Plug is not connected to the
mains socket properly
socket (try to connect another
appliance into it)
3. If necessary, replace the defective door
gaskets. Contact the Service Center.
Call an electrician
Connect the mains plug properly
Call an electrician
2. If necessary, adjust the door. Refer to
"Installation".
TECHNICAL DATA
Dimension
Height 850 mm
Width 550 mm
Depth 612 mm
Rising Time 22 h
Page 46
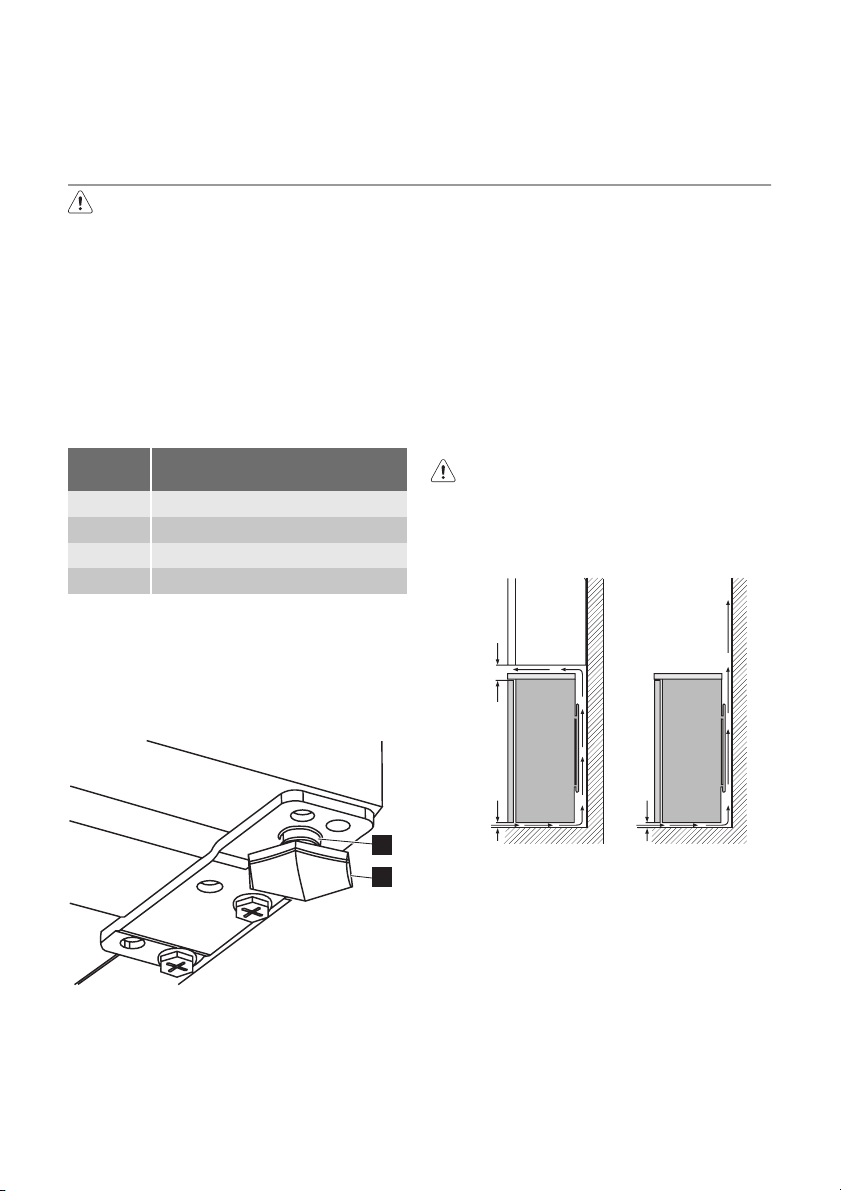
46 electrolux
The technical information are situated in the
rating plate on the internal left side of the
appliance and in the energy label.
INSTALLATION
Read the "Safety Information" carefully
for your safety and correct operation of
the appliance before installing the
appliance.
Positioning
This appliance can be installed in a dry, well
ventilated indoor (garage or cellar) also, but
for optimum performance install this appliance at a location where the ambient temperature corresponds to the climate class
indicated on the rating plate of the appliance:
Climate
class
SN +10°C to + 32°C
N +16°C to + 32°C
ST +16°C to + 38°C
T +16°C to + 43°C
Levelling
When placing the appliance ensure that it
stands level. This can be achieved by two
adjustable feet at the bottom in front (2). If
necessary adjust the feet by removing the
spacer (1).
Ambient temperature
ing wall unit, the minimum distance between the top of the cabinet and the wall
unit must be at least 100 mm . Ideally, however, the appliance should not be positioned below overhanging wall units. Accurate levelling is ensured by one or more adjustable feet at the base of the cabinet.
If the cabinet is placed in a corner and the
side with the hinges facing the wall, the distance between the wall and the cabinet
must be at least 10 mm to allow the door to
open enough so that the shelves can be removed.
Warning! It must be possible to
disconnect the appliance from the
mains power supply; the plug must
therefore be easily accessible after
installation.
1
2
Location
The appliance should be installed well away
from sources of heat such as radiators,
boilers, direct sunlight etc. Ensure that air
can circulate freely around the back of the
cabinet. To ensure best performance, if the
appliance is positioned below an overhang-
15mm 100mm
15mm
Door reversibility
Important! To carry out the following
operations, we suggest that this be made
with another person that will keep a firm
hold on the doors of the appliance during
the operations.
To change the opening direction of the
door, do these steps:
1. Remove the plug from the power socket.
2. Tilt back the appliance carefully so that
the compressor cannot touch the floor.
Page 47
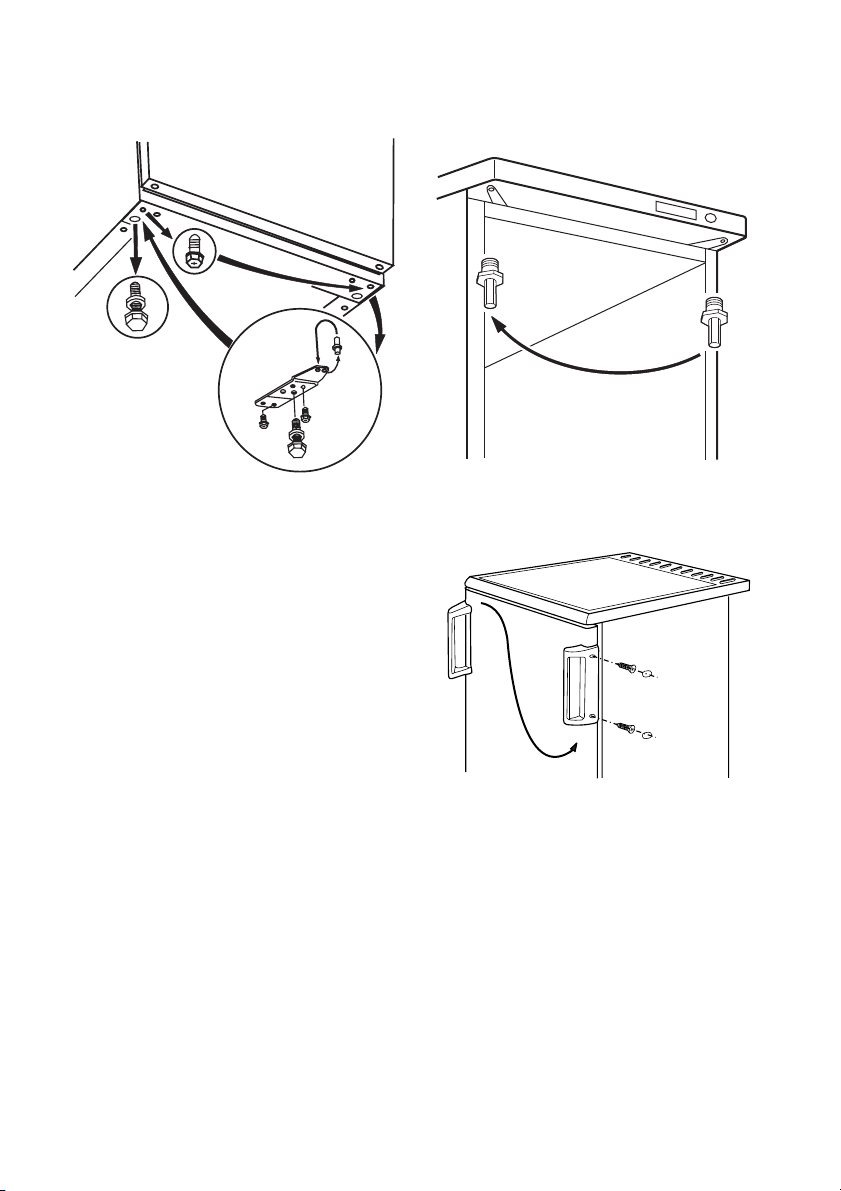
electrolux 47
3. Unscrew the adjustable feet, situated
on both sides at the front .
4. Remove the lower door hinge by unscrewing the 2 retaining screws.
5. Remove the hinge pin from the bottom
of the door.
6. Slot the hinge pin into the hole in the
hinge plate.
7. Take the door off.
8. Refit the upper hinge pin into the opposite location.
9. Fit the door in place on the hinge pin.
10. Slot the hinge pin into the hole in the
hinge plate and relocate the hinge assembly to the opposite location and refit using the retaining screws.
11. Refit the bottom hinge plate assembly
on the opposite side, taking care that
the edge of the door is parallel with the
side of the cabinet.
12.
Remove and install the handle
20)
on the
opposite side.
13. Reposition, level the appliance, wait for
at least four hours and then connect it
to the power socket.
Do a final check to make sure that:
• All screws are tightened.
• The door opens and closes correctly.
If the ambient temperature is cold (i.e. in
Winter), the gasket may not fit perfectly to
the cabinet. In that case, wait for the natural
fitting of the gasket.
In case you do not want to carry out the
above mentioned operations, contact the
nearest After Sales Service Force. The After
Sales Service specialist will carry out the reversibility of the doors at your cost.
20) If foreseen
Page 48
48 electrolux
Electrical connection
Before plugging in, ensure that the voltage
and frequency shown on the rating plate
correspond to your domestic power supply.
The appliance must be earthed. The power
supply cable plug is provided with a contact
for this purpose. If the domestic power supply socket is not earthed, connect the appli-
ENVIRONMENTAL CONCERNS
The symbol on the product or on its
packaging indicates that this product may
not be treated as household waste. Instead
it should be taken to the appropriate
collection point for the recycling of electrical
and electronic equipment. By ensuring this
product is disposed of correctly, you will
help prevent potential negative
ance to a separate earth in compliance with
current regulations, consulting a qualified
electrician.
The manufacturer declines all responsibility
if the above safety precautions are not observed.
This appliance complies with the E.E.C. Directives.
consequences for the environment and
human health, which could otherwise be
caused by inappropriate waste handling of
this product. For more detailed information
about recycling of this product, please
contact your local council, your household
waste disposal service or the shop where
you purchased the product.
Page 49

electrolux 49
Page 50

50 electrolux
Page 51

electrolux 51
Page 52
www.electrolux.com/shop
200383252-00-112009
 Loading...