

Page 1
EN User Manual
Tumble Dryer
LAVATHERM T97689IH
Page 2
www.aeg.com
2
CONTENTS
1. SAFETY INFORMATION.................................................................................................3
2. CONDITIONS OF USE....................................................................................................5
3. SAFETY INSTRUCTIONS................................................................................................ 5
4. PRODUCT DESCRIPTION.............................................................................................. 7
5. ACCESSORIES.................................................................................................................8
6. CONTROL PANEL...........................................................................................................9
7. PROGRAMME TABLE................................................................................................... 12
8. OPTIONS....................................................................................................................... 14
9. BEFORE FIRST USE.......................................................................................................16
10. DAILY USE................................................................................................................... 16
11. HINTS AND TIPS.........................................................................................................19
12. CARE AND CLEANING.............................................................................................. 20
13. TROUBLESHOOTING.................................................................................................23
14. TECHNICAL DATA..................................................................................................... 25
15. INSTALLATION........................................................................................................... 25
16. WARRANTY ................................................................................................................ 26
FOR PERFECT RESULTS
Thank you for choosing this AEG product. We have created it to give you impeccable
performance for many years, with innovative technologies that help make life simpler
features you might not find on ordinary appliances. Please spend a few minutes
reading to get the very best from it.
Visit our website for:
Get usage advice, brochures, trouble shooter, service information:
www.aeg.com
Register your product for better service:
www.registeraeg.com
CUSTOMER CARE AND SERVICE
Always use original spare parts.
When contacting our Authorised Service Centre, ensure that you have the following
data available: Model, PNC, Serial Number.
The information can be found on the rating plate.
Warning / Caution-Safety information
General information and tips
Environmental information
Subject to change without notice.
Page 3
1. SAFETY INFORMATION
Before the installation and use of the appliance,
carefully read the supplied instructions. The
manufacturer is not responsible if an incorrect
installation and use causes injuries and damages. Always
keep the instructions with the appliance for future
reference.
- Read the supplied instructions.
- Caution, risk of fire!
1.1 Children and vulnerable people safety
WARNING!
Risk of suffocation, injury or permanent
disability.
• This appliance can be used by children aged from 8
years and above and persons with reduced physical,
sensory or mental capabilities or lack of experience
and knowledge if they have been given supervision or
instruction concerning use of the appliance in a safe
way and understand the hazards involved.
• Do not let children play with the appliance.
• Children of less than 3 years should be kept away
unless continuously supervised.
• Keep all packaging away from children.
• Keep all detergents away from children.
• Keep children and pets away from the appliance door
when it is open.
• If the appliance has a child safety device, we
recommend you activate it.
• Cleaning and user maintenance shall not be made by
children without supervision.
ENGLISH
3
General Safety
1.2
• Do not change the specification of this appliance.
Page 4

4
www.aeg.com
• If the tumble dryer is put on top of a washing
machine, use the stacking kit. The stacking kit,
available from your authorized vendor, can be used
only with the appliance specified in the instructions,
supplied with the accessory. Read it carefully before
installation (Refer to the Installation leaflet).
• The appliance can be installed as freestanding or
below the kitchen counter with correct space (Refer to
the Installation leaflet).
• Do not install the appliance behind a lockable door, a
sliding door or a door with a hinge on the opposite
side, where the appliance door can not be fully
opened.
• The ventilation openings in the base (if applicable)
must not be obstructed by a carpet.
• Connect the mains plug to the mains socket only at
the end of the installation. Make sure that there is
access to the mains plug after the installation.
• Ensure you have good ventilation in the installation
room to avoid the back flow of gases into the room
from appliances burning other fuels, including open
fires.
• Exhaust air must not be discharged into a flue which is
used for exhausting fumes from appliances burning
gas or other fuels. (if applicable)
• If the supply cord is damaged, it must be replaced by
the manufacturer, its Authorised Service Centre or
similarly qualified persons in order to avoid a hazard.
• Obey the maximum load volume of 8kg (refer to the
“Programme chart” chapter).
• Do not use the appliance if industrial chemicals have
been used for cleaning.
• Wipe away lint that has accumulated around the
appliance.
• Do not run the appliance without a filter. Clean the lint
filter before or after each use.
• Do not dry unwashed items in the tumble dryer.
Page 5

ENGLISH 5
• Items that have been soiled with substances such as
cooking oil, acetone, alcohol, petrol, kerosene, spot
removers, turpentine, waxes and wax removers should
be washed in hot water with an extra amount of
detergent before being dried in the tumble dryer.
• Items such as foam rubber (latex foam), shower caps,
waterproof textiles, rubber backed articles and clothes
or pillows fitted with foam rubber pads should not be
dried in the tumble dryer.
• Fabric softeners, or similar products, should be used
as specified by the fabric softener instructions.
• Remove all objects from pockets such as lighters and
matches.
• Never stop a tumble dryer before the end of the
drying cycle unless all items are quickly removed and
spread out so that the heat is dissipated.
• The final part of a tumble dryer cycle occurs without
heat (cool down cycle) to ensure that the items are left
at a temperature that ensures that the items will not
be damaged.
• Before maintenance, deactivate the appliance and
disconnect the mains plug from the mains socket.
2.
CONDITIONS OF USE
This appliance is intended to be used in
household and similar applications such
as:
• Farm houses
3. SAFETY INSTRUCTIONS
3.1 Installation
• Remove all the packaging.
• Do not install or use a damaged
appliance.
• Obey the installation instruction
supplied with the appliance.
• Always be careful when you move the
appliance because it is heavy. Always
wear safety gloves.
• By clients in serviced apartments,
holiday apartments and other
residential type environments.
• Do not install or use the appliance
where the temperature is less than
5°C or higher than 35°C.
• Make sure that the floor where you
install the appliance is flat, stable,
heat resistant and clean.
• Make sure that there is air circulation
between the appliance and the floor.
• Always move the appliance vertically.
• The rear surface of the appliance
must be put against the wall.
Page 6
6
www.aeg.com
• When the appliance is put in its
permanent position, check if it is fully
level with the aid of a spirit level. If it
is not, adjust the feet until it is.
3.2 Electrical connection
WARNING!
Risk of fire and electrical
shock.
• The appliance must be earthed.
• Make sure that the electrical
information on the rating plate agrees
with the power supply. If not, contact
an electrician.
• Always use a correctly installed
shockproof socket.
• Do not use multi-plug adapters and
extension cables.
• Do not pull the mains cable to
disconnect the appliance. Always pull
the mains plug.
• Do not touch the mains cable or the
mains plug with wet hands.
• Only for UK and Ireland. The
appliance has a 13 amp mains plug. If
it is necessary to change the fuse in
the mains plug, use a 13 amp ASTA
(BS 1362) fuse.
• This appliance complies with the
E.E.C. Directives.
• Oil-affected items can ignite
spontaneously, especially when
exposed to heat sources such as in a
tumble dryer. The items become
warm, causing an oxidation reaction
in the oil. Oxidation creates heat. If
the heat cannot escape, the items can
become hot enough to catch fire.
Piling, stacking or storing oil-affected
items can prevent heat from escaping
and create a fire hazard.
• If it is unavoidable that fabrics that
contain vegetable or cooking oil or
have been contaminated by hair care
products be placed in a tumble dryer
they should first be washed in hot
water with extra detergent -this will
reduce, but not eliminate, the hazard.
3.4 Internal light
WARNING!
Risk of injury.
• Visible LED radiation, do not look
directly into the beam.
• The type of light bulb or halogen
lamp used for this appliance is only
for household appliances. Do not use
it for house lighting.
• To replace the internal light, contact
the Authorised Service Centre.
3.3 Use
WARNING!
Risk of injury, electrical
shock, fire, burns or damage
to the appliance.
• Do not dry the damaged items which
contain padding or fillings.
• Only dry fabrics which are applicable
to dry in the tumble dryer. Follow the
instructions on the fabric label.
• If you have washed your laundry with
a stain remover start an extra rinse
cycle before you start the dryer.
• Do not drink or prepare food with the
condensed water/distilled water. It
can cause health problems to people
and pets.
• Do not sit or stand on the open door.
• Do not dry dripping wet clothes in the
tumble dryer.
3.5 Care and cleaning
WARNING!
Risk of injury or damage to
the appliance.
• Do not use water spray and steam to
clean the appliance.
• Clean the appliance with a moist soft
cloth. Only use neutral detergents. Do
not use abrasive products, abrasive
cleaning pads, solvents or metal
objects.
3.6 Compressor
WARNING!
Risk of damage to the
appliance.
• The compressor and its system in the
tumble dryer is filled with the special
agent which is free from fluoro-chlorohydrocarbons. This system must stay
Page 7
1 2
7
3
4
5
6
9
10
11
12
8
ENGLISH 7
tight. The damage of the system can
cause a leakage.
3.7 Disposal
WARNING!
Risk of injury or suffocation.
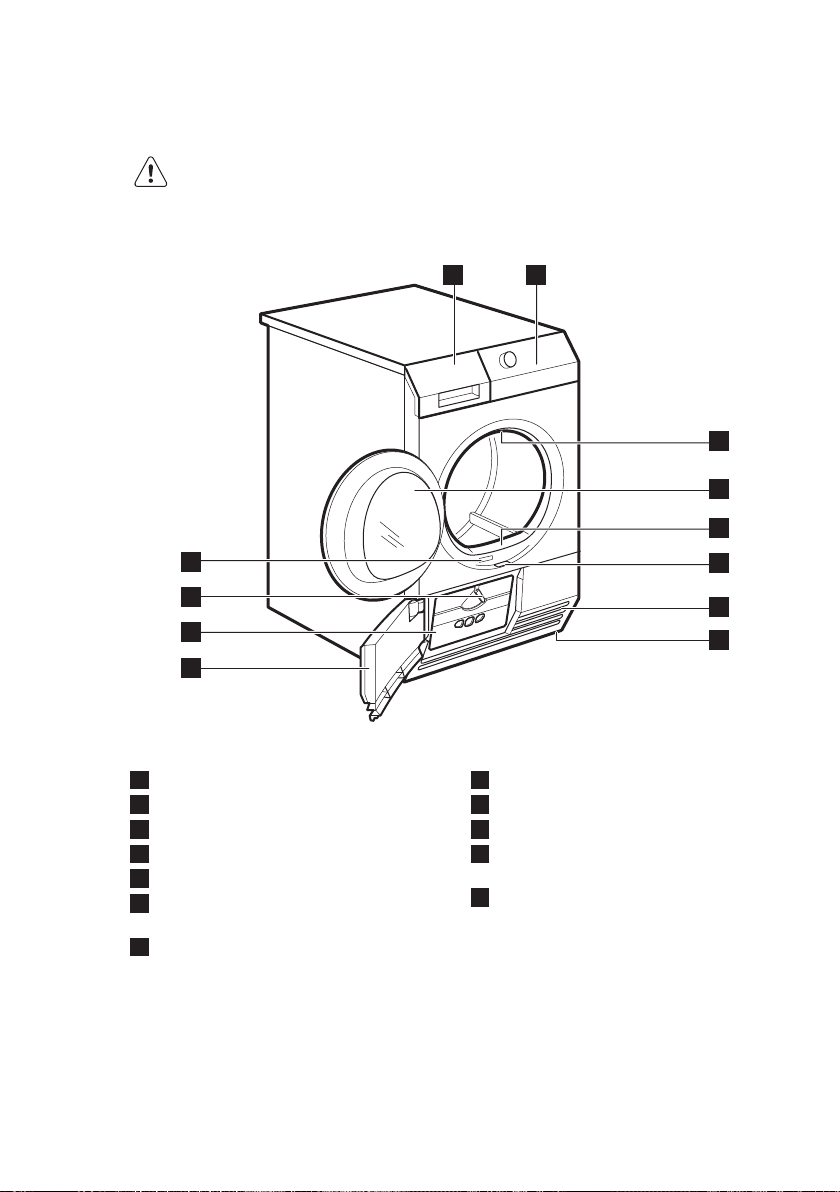
4. PRODUCT DESCRIPTION
• Disconnect the appliance from the
mains supply.
• Cut off the mains cable and discard it.
• Remove the door catch to prevent
children and pets to get closed in the
appliance.
Water container
1
Control panel
2
Internal light
3
Appliance door
4
Filter
5
The button to open the heat
6
exchanger door
Airflow slots
7
Adjustable feet
8
Heat exchanger door
9
Heat exchanger cover
10
The knob to lock the heat exchanger
11
cover
Rating plate
12
Page 8
www.aeg.com
8
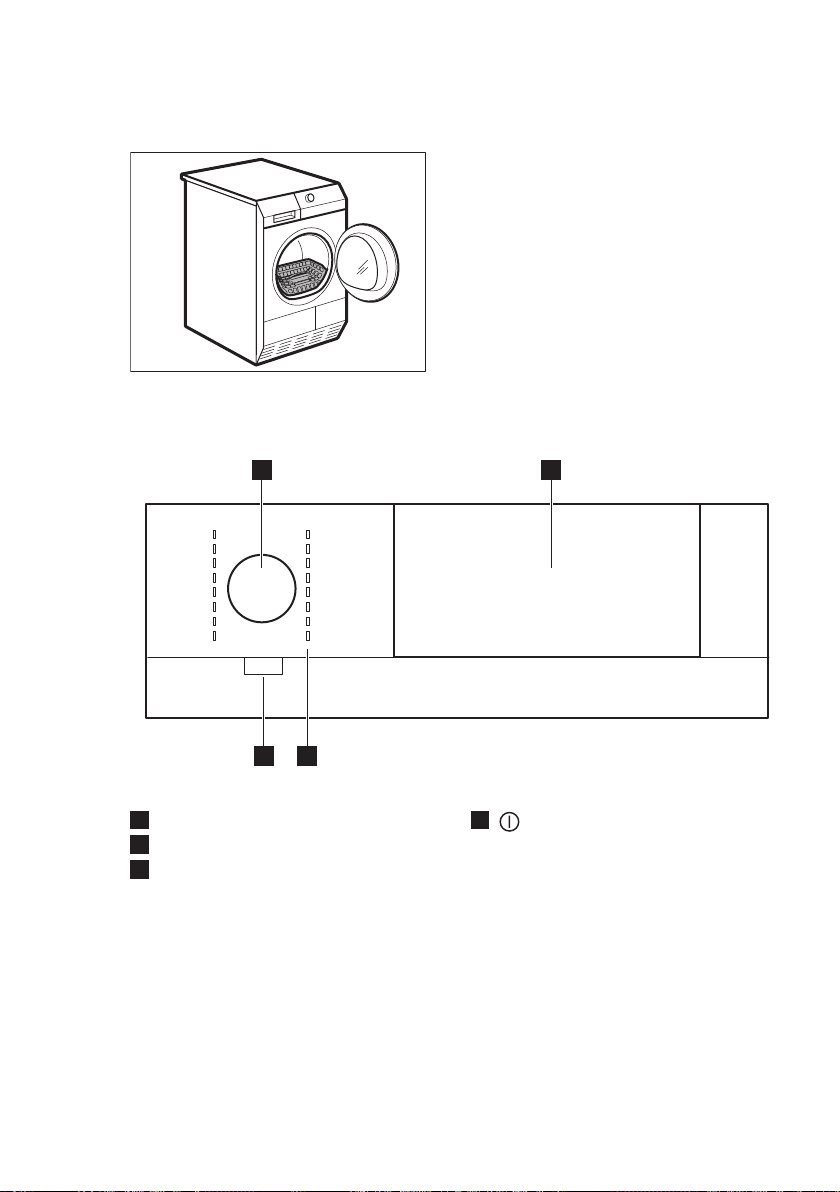
The load door can be
installed by the user in the
opposite side. It can help to
easily put and remove the
laundry or if there is a limit
to install the appliance (see
separate leaflet).
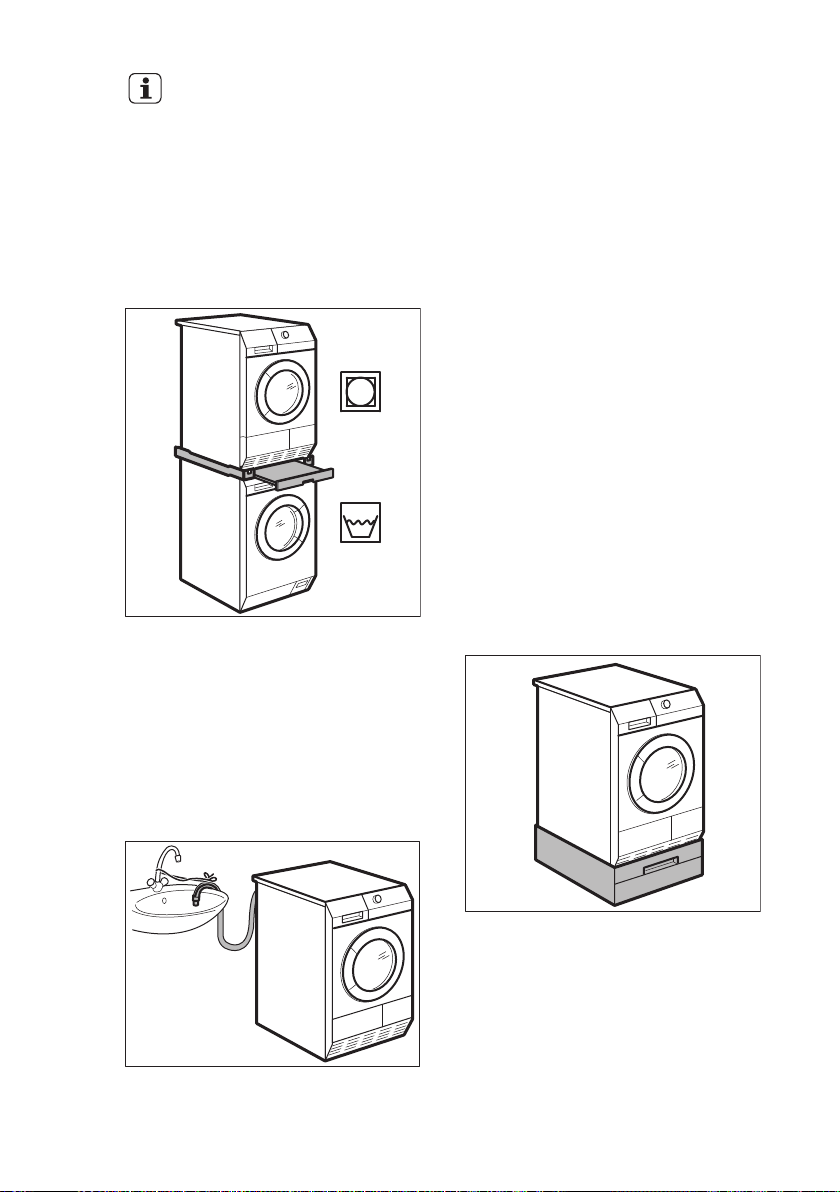
5. ACCESSORIES
5.1 Stacking kit
Accessory name: SKP11, STA8, STA9
Available from your authorized vendor.
Stacking kit can be used only with the
washing machines specified in the
leaflet. See the leaflet attached.
Read carefully the instructions supplied
with the accessory.
5.2 Draining kit
It is available from your authorized
vendor (can be attached to some types
of the tumble dryers)
The accessory for through draining of the
condensed water into a basin, siphon,
gully, etc. After the installation, the water
container is drained automatically. The
water container must stay in the
appliance.
The installed hose must be on the height
from minimum of 50 cm to maximum of 1
m from floor level. The hose cannot be in
loop. Decrease the length of the hose if
necessary.
Read carefully the instructions supplied
with the accessory.
5.3 Pedestal with the drawer
Accessory name: DK11.
Accessory name: PDSTP10.
It is available from your authorized
vendor.
To put the appliance higher at the level
what helps to easy load and remove the
laundry.
The drawer can be used for laundry
storage e.g. : towels, cleaning products
and more.
Page 9
1 2
34
ENGLISH 9
Read carefully the instructions supplied
with the accessory.
5.4 Drying rack
Accessory name: RA6.
6. CONTROL PANEL
It is available from your authorized
vendor (can be attached to some types
of the tumble dryers). Do the check with
the vendor or on the web site if the
accessory is compatible with your
appliance.
Drying rack accessory let to dry safely in
the tumble dryer:
• sport shoes
• wool
• soft toys
• lingerie
Read carefully the instructions supplied
with the accessory.
Programme dial
1
Touch panel with the display
2
Programme indicators
3
4
On/Off
function
button with the Auto Off
Page 10

www.aeg.com10
6.1 The touch panel
As alternative for the buttons to set the
option you must touch the area with the
option name. Each area between the
vertical marks
senses
the user finger.
For accurate selection touch
the centre point of the area
between the vertical marks.
Do not wear gloves when
you touch the panel to set
the function. Make sure the
panel is always clean and
dry.
6.2 Display
Symbol on the display Symbol description
text bar
clock
cycle time indication
estimated hour of the programme end
estimated hour of the time programme end
time programme interval 10min. — 120min.
Page 11

Symbol on the display Symbol description
estimated hour of the programme end with the delayed start
delay start interval 30min. — 20h.
Symbol on the display Symbol description
, ,
, -
-
- - -
extra laundry dryness: default, moderate, maximum
anti-crease phase duration: default, interval (30min. - 120min.)
laundry was spun at: 800 — 1800 rpm
default
ENGLISH 11
Symbol on the display Symbol description
buzzer on
child lock on
time dry option on
indicator:
indicator:
indicator:
drain the water container
clean filter
do the check of the heat exchanger
Page 12

www.aeg.com12
7. PROGRAMME TABLE
Programmes
Extra Dry
Cupboard Dry + 8 kg Drying level: cupboard dry +.
Cupboard Dry 8 kg Drying level: cupboard dry.
Iron Dry 8 kg Drying level: applicable for iron.
Jeans 8 kg
Bed Linen 3 kg
Duvets 3 kg
Time Drying 8 kg
2)
1)
Load
Cottons
8 kg Drying level: extra dry.
Leisure clothing such as jeans,
sweat-shirts of different material
thicknesses (e.g. at the neck, cuffs
and seams).
To dry bed linen such as: single
and double sheet, pillowcase, bedspread.
To dry one or two duvet and pillows (with feather, down or synthetic fillings).
With this programme you can use
the option Time Dry and set the
programme duration.
Synthetics
Properties / Fabric mark
/
/
/
/
/
/
/
/
Extra Dry 3,5 kg Drying level: extra dry.
Cupboard Dry 3,5 kg Drying level: cupboard dry.
Iron Dry 3,5 kg Drying level: applicable for iron.
Easy care fabrics for which a minimum of ironing
is necessary. The drying results can be different
from one type of fabric to the other. Shake the
items before you put them in the appliance.
When the programme is completed, Immediately remove the items and put them on a hanger.
/
Easy Iron
1 kg (or 5
shirts)
/
/
/
Page 13

ENGLISH 13
Programmes
Load
1)
Properties / Fabric mark
To dry outdoor pieces of clothing, technical,
Outdoor 2 kg
sports, pile fabrics, waterproof and breathable
jackets, shell jacket teamed with a removable
fleece or inner insulation.
Silk
1 kg
To dry hand-washable silk with
warm air and gentle movement.
/
Wool fabrics. Gentle drying for hand-washable
woollens. Remove immediately the items when
the programme is completed.
Wool 3)
Extra Quick Mixed 3 kg To dry cotton and synthetic fabrics.
1)
The maximum weight refers to dry items.
2)
For test institutes only: Standard programme for tests are specified in the AS/NZS2442.2 document.
3)
The wool drying cycle of this tumble drying machine has been tested and approved by The Woolmark
Company. The cycle is suitable to dry wool garments, which are labelled "hand wash" provided that the
garments are washed in a Woolmark endorsed hand washing cycle and tumble dried according to the
instructions issued by the manufacturer. 1780SW13W.
1 kg
/
7.1 Programmes and options selection
Options
Anticreas
e
Spun
at
RPM
Time
Dry
Eco
Time
2)
Save
Programmes
1)
Dry
Plus
Cottons; Extra Dry
Cottons; Cupboard Dry +
Cottons; Cupboard Dry
Cottons; Iron Dry
Jeans
Bed Linen
Extra
Silent
Page 14

14
www.aeg.com
Options
Anticreas
e
Spun
at
RPM
Time
Dry
Eco
2)
Programmes
Duvets
Time Drying
Synthetics; Extra Dry
Synthetics; Cupboard Dry
Synthetics; Iron Dry
Easy Iron
Outdoor
1)
Dry
Plus
Time
Save
Extra
Silent
Silk
Wool
Extra Quick Mixed
1)
Together with the programme you can set 1 or more options.
2)
The option is off if the 1 of the options Time Save or Extra Silent is on.
3)
Only with the drying rack — see chapter ACCESSORIES
8. OPTIONS
8.1 Dry Plus
This option helps to get the laundry
more dried. There are 3 possible
selections:
- the default selection which is related
to the programme.
- the selection to get the laundry
lightly dried.
3)
- the selection to get the laundry
more dried.
8.2 Anti-crease
Extends of 30, 60, 90 or 120 minutes the
standard anti-crease phase (30 minutes)
at the end of the drying cycle. This
option prevents laundry from creases.
Laundry can be removed during the anticrease phase.
Page 15

ENGLISH
15
8.3 Spun at RPM
This option helps to set the best
condition to dry the laundry.
If you know the initial spin speed when
you washed you can use this option.
Higher spin speed causes that the
laundry contains less water.
8.4 Buzzer
When the buzzer option is activated you
can hear the sound at the:
• cycle end
• anti-crease phase start and end
• cycle interruption
The buzzer option is by default always
on. You can use this option to activate or
deactivate the sound.
You can activate the Buzzer
option with all programmes.
8.5 Time Dry
8.6 Delay Start
Lets to delay the start of a
drying programme from
minimum of 30 minutes to
maximum of 20 hours.
1. Set the drying programme and
options.
2. Touch the Delay Start option field
again and again.
The time of the delay come into the view
on the display (e.g. if the
programme has to start after 12 hours.)
3. To activate the Delay Start option,
touch the Start/Pause field.
Time to start decreases on the display.
8.7 Eco
This option is on by default with all the
programmes. Does not include the Extra
Quick Mixed programme.
The power consumption is at the
minimum level.
The option Eco is off if 1 of the options
Time Save or Extra Silent is on.
Operates only with the Time Drying
programme. Lets the user to set special
time of drying programme from
minimum 10 min. to maximum of 2 hours
(in 10 min. steps).
8.8 Time Save
Decreases the time of the cycle without
Page 16

www.aeg.com16
the effect on the drying quality. The cycle
time can be shorter by 30% on the
cottons and 40% on synthetics. The
appliance operates with the higher
energy consumption.
8.9 Extra Silent
The appliance operates with low noise 62
9. BEFORE FIRST USE
Before you use the appliance for the first
time do these operations:
• Clean the tumble dryer drum with a
moist cloth.
• Start a short programme (e.g. 30
minutes) with moist laundry.
At the beginning of drying
cycle (3-5 min.) there could
be a slightly higher sound
level. It is because of start of
the compressor that is
normal for compressor
powered appliances such:
refrigerators, freezers.
9.1 Language
The first time you turn on the dryer the
default language comes into the view on
the display. You can confirm it or change
the different language from the available
languages list.
dB without the effect on the drying
quality. The appliance operates slowly
with the longer cycle time.
To set the different language:
1. Turn the programme dial to set your
language.
2. Touch the Start/Pause field.
The language is memorised.
9.2 Clock
The first time you turn on the dryer the
default time comes into the view on the
display. You can confirm or change it.
To set the different time:
1. Turn the programme dial to set new
hour.
2. Touch the Start/Pause field.
The hour is memorised.
3. Turn the programme dial to set new
minutes.
4. Touch the Start/Pause field.
The minutes are memorised.
10. DAILY USE
10.1 Preparing the laundry
• Close the zippers.
• Close the fasteners of the duvet
covers.
• Do not keep ties or ribbons loose
(e.g. apron ribbons). Tie them before
you start a programme.
• Remove all items from the pockets.
• If an item has the internal layer made
of cotton, turn it inside out. Make sure
that the cotton layer is always external
• We recommend that you set the
correct programme applicable for the
type of fabrics that are in the
appliance.
• Do not put fabrics with strong colours
together with fabrics with light
colours. Strong colours can bleed.
Page 17

ENGLISH 17
• Use an applicable programme for
cotton jersey and knitwear to prevent
the items to shrink.
• Make sure that the laundry weight is
not more than the maximum weight
that is in the programme table.
Fabric label Description
Laundry that is applicable for tumble drying.
Laundry that is applicable for tumble drying and resists higher drying
temperature.
Laundry that is applicable for tumble drying but only with low drying
temperature.
Laundry that is not applicable for tumble drying.
10.2 Loading the laundry
CAUTION!
Do not lock the laundry in
between the appliance door
and rubber seal.
1. Pull the appliance door.
2. Load loosely the laundry.
3. Close the appliance door.
• Dry only the laundry that is applicable
for tumble dryer. Refer to the fabric
label on the items.
10.5 Setting a programme
10.3 Turning on the appliance
To turn on the appliance:
Push the On/Off button.
If the appliance is on, some indications
come in to the view on the display.
10.4 Auto Off function
To decrease the energy consumption,
the Auto Off function turns off
automatically the appliance:
• if the Start/Pause field was not
touched in the time of 5 minutes.
• after 5 minutes from the programme
end.
Push the
appliance.
If the appliance is on, some indications
come in to the view on the display.
On/Off
button to turn on the
Use the programme dial to set the
programme.
The possible time to complete the
programme comes into the view on the
display.
The drying time you see is
related to the load of 5 kg
for cotton and jeans
programmes. For the other
programmes the drying time
is related to the
recommended loads. The
drying time of the cotton
and jeans programmes with
the load more than 5 kg is
longer.
Page 18

18
www.aeg.com
10.6 Options
Together with the programme you can
set 1 or more special options.
To activate or deactivate the option
touch the applicable option field.
When the option is activated the LED
above the option field or symbol on the
display comes into the view.
10.7 Child lock option
The child lock can be set to prevent the
children to play with the appliance. The
child lock option locks all push buttons
and the programme dial (this option
does not lock On/Off button).
You can activate the child lock option:
• before you push the Start/Pause
button - the appliance cannot start
• after you push the Start/Pause button
- programmes and option selection is
off.
Child lock option activation:
1. Turn on the dryer.
2. Wait approximately 8 seconds.
3. Select 1 of the available
programmes.
4. Touch at the same time and hold
down the Dry Plus and Anti-crease
option fields.
5. To deactivate the child lock, touch
again the above option fields until
the symbol goes out of the view.
10.8 Starting a programme
To start the programme:
Touch the Start/Pause field.
The appliance starts and the LED above
the touch field does not flash but is
stable.
10.9 Programme change
To change a programme:
1. Push the On/Off button to turn off
the appliance.
2. Push again the On/Off button to turn
on the appliance.
3. Set a new programme.
10.10 Programme end
Clean the filter and drain the
water container after each
drying cycle. (See chapter
CARE AND CLEANING.)
If the drying cycle is completed, the
symbol flashes on the display. If the
Buzzer option is on, the acoustic signal
sounds intermittently for 1 minute.
If you do not turn off the
appliance, the crease guard
phase starts. Laundry can be
removed during this phase.
The symbol comes into the view on
the display.
To remove the laundry:
1. Push the On/Off button for 2
seconds to turn off the appliance.
2. Open the appliance door.
3. Remove the laundry.
4. Close the appliance door.
Page 19

11. HINTS AND TIPS
ENGLISH
19
11.1 Ecological hints
• Spin good the laundry before drying.
• Use the load volumes which are
specified in the programme chart.
• Clean the filter after each drying
cycle.
• Do not use fabric softener to wash
and then dry. In the tumble dryer
laundry becomes soft automatically.
• Use the condensate as distilled water,
e.g. for steam ironing. If it is necessary
clean the condensate before (e.g.
with a coffee filter) to remove possible
small pieces of fluff.
• Always keep the airflow slots on the
bottom of the appliance clear.
• Make sure that is good airflow in the
appliance installation position.
11.2 Adjustment of the
remaining laundry moisture
degree
To change the default degree of the
remaining moisture of the laundry:
1. Turn on the appliance.
2. Wait approximately 8 seconds.
3. Select 1 of available programmes.
4. Touch at the same time and hold
down the Dry Plus and Spun at RPM
option fields.
Spun at RPM option fields for
approximately 2 seconds.
11.3 Deactivating the Tank indicator
The water container indicator is by
default on. It starts to light at the end of
the drying cycle or during the cycle if the
water reservoir is full. If the draining kit is
installed the water container is drained
automatically and indicator can be
permanently off.
To deactivate the indicator:
1. Turn on the appliance.
2. Wait approximately 8 seconds.
3. Select 1 of available programmes.
4. Touch at the same time and hold
down the Dry Plus and Buzzer
option fields.
One of 2 configurations is possible:
• the Tank indicator: is on and
the symbol goes into the
view - the water container
indicator is permanently on
• the Tank indicator: is off and
the symbol goes into the
view - the water container
indicator is permanently off
One of the symbols goes into the view
on the display:
- the maximum dry laundry
- the more dry laundry
- the standard dry laundry
5. Touch the Start/Pause field again
and again until you set necessary
degree.
6. To memorise the setting, touch at
the same time the Dry Plus and
11.4 Language
You can change the language each time
you want.
To set the different language:
1. Turn on the dryer.
2. Wait approximately 8 seconds.
3. Touch at the same time the Anticrease and Spun at RPM option
fields and hold down.
Page 20

Ti me of day
www.aeg.com
20
You see the language name on the
display.
4. Turn the programme dial to set the
new language.
5. Touch the Start/Pause field.
The language is memorised.
11.5 Clock
You can change the clock each time you
want.
To set the different time:
1. Turn on the dryer.
12. CARE AND CLEANING
2. Wait approximately 8 seconds.
3. Touch at the same time the Buzzer
and Time Dry option fields and hold
down.
Clock digits start to flash on the display.
4. Turn the programme dial to set new
hour.
5. Touch the Start/Pause field.
The hour is memorised.
6. Turn the programme dial to set new
minutes.
7. Touch the Start/Pause field.
The minutes are memorised.
12.1 Cleaning the filter
At the end of each cycle the symbol
Filter
is on the display and you must
clean the filter.
The filter collects the fluff.
The fluff occurs while the
cloths are dried in the
tumble dryer.
1. Open the door. Pull the filter.
2. Push the hook to open the filter.
3. Use a moist hand to clean both parts
of the filter.
Page 21

4. If necessary clean the filter with the
brush under warm tap water and/or a
vacuum cleaner. Close the filter.
ENGLISH
12.2 Draining the water
container
Drain the condensed water container
after each drying cycle.
If the condensed water container is full,
the programme breaks off automatically.
Tank
The symbol
and you must drain the water container.
To drain the water container:
1. Pull the water container and keep it
in horizontal position.
2. Move the plastic connection out and
drain the water into a basin or
equivalent receptacle.
is on the display
21
5. If necessary remove fluff from the
filter socket and gasket. You can use
a vacuum cleaner. Put the filter inside
the filter socket.
3. Move plastic connection in and install
water container.
4. To continue the programme press
the Start/Pause button.
12.3 Cleaning the heat
exchanger
If the symbol
the display, do the inspection of the heat
exchanger and its compartment. If there
is a dirt, clean it.
Condenser
flashes on
Page 22

www.aeg.com22
To do the inspection:
1. Open the door. Pull the filter.
2. Move the release button on the
bottom of the door to open the heat
exchanger door.
3. Turn the blockage to unlock the heat
exchanger cover.
4. Lower the heat exchanger cover.
5. If necessary, remove the fluff from
the heat exchanger and its
compartment. You can use wet cloth
and/or a vacuum cleaner with the
brush.
6. Close the heat exchanger cover.
7. Lock the blockage until it snaps.
8. Put the filter back.
12.4 Cleaning the drum
WARNING!
Disconnect the appliance
before you clean it.
Use a standard neutral soap detergent to
clean the inner surface of the drum and
drum ribs. Dry the cleaned surfaces with
a soft cloth.
CAUTION!
Do not use abrasive
materials or steel wool to
clean the drum.
Page 23

ENGLISH 23
12.5 Cleaning the control
panel and housing
Use a standard neutral soap detergent to
clean the control panel and housing.
Use a moist cloth to clean. Dry the
cleaned surfaces with a soft cloth.
CAUTION!
Do not use furniture
cleaning agents or cleaning
agents which can cause
corrosion to clean the
appliance.
13. TROUBLESHOOTING
Problem
The tumble dryer does not operate.
Unsatisfactory
drying result.
1)
The tumble dryer is not connected
to mains supply.
The loading door is opened. Close the loading door.
The On/Off button was not pushed.
The Start/Pause button was not
pushed.
The appliance is in the standby
mode.
Incorrect programme selection. Do the selection of the applicable
The filter is clogged.
The Dry Plus option was in minimum level.
Too high volume of the load. Obey the maximum load volume.
The airflow grill is clogged. Clean the airflow grill in the bot-
Dirt on the humidity sensor in the
drum.
Incorrect remaining laundry moisture degree.
The heat exchanger is clogged.
Possible cause Remedy
4)
12.6 Cleaning the airflow slots
Use a vacuum cleaner to remove the fluff
from the airflow slots.
Connect in at mains socket. Check
fuse in fuse box (domestic installation).
Push the On/Off button.
Push the Start/Pause button.
Push the On/Off button.
programme.
Clean the filter.
Change the Dry Plus option to the
moderate or maximum level.
tom of the appliance.
Clean the front surface of the
drum.
Adjust remaining laundry moisture
degree.
Clean the heat exchanger.
2)
3)
4)
5)
3)
Page 24

www.aeg.com24
Problem
The loading
1)
The filter not locked in the position.
Possible cause Remedy
Put the filter in the correct position.
door does not
closed
The laundry is locked between the
Put the load correctly in the drum.
door and the seal.
Err
(Error) on
the display.
You try to change the programme
or the option after the start of the
cycle.
The option you try to activate is
not applicable with the selected
Turn the tumble dryer off and on.
Make the new selection.
Turn the tumble dryer off and on.
Make the new selection.
programme.
No drum light
Abnormally
elapsing time on
the display.
Programme inactive.
Defective drum lamp. Contact the service centre to re-
place the drum lamp.
The time to end is calculated on
the basis of the volume and damp-
The automatic procedure — this is
not the appliance malfunction.
ness of the laundry.
The water container is full. Drain the water container, push
the Start/Pause button.
3)
Too small laundry volume. Do the selection of time pro-
gramme. The time value must be
related to the load. To dry 1 item
Drying cycle too
short.
or small quantities of the laundry
we recommend to use short times.
The laundry is too dry. Do the selection of time pro-
gramme or higher drying level
(e.g. Extra Dry)
The filter is clogged. Clean the filter.
Too high volume of the load. Obey the maximum load volume.
Drying cycle too
6)
long
The laundry not spun sufficiently. Spin correctly the laundry.
Too low or too high room temperature - this is not the appliance
Ensure a room temperature higher
than +5°C and lower then +35°C.
malfunction.
1)
If there is an error message on the display (e.g. E51): Turn the tumble dryer off and on. Make a selec-
tion of the new programme. Push the Start/Pause button. Does not operate? - contact the service centre
and give the error code.
2)
Follow the programme description — see PROGRAMME TABLE
3)
See chapter CARE AND CLEANING
4)
Only dryers with the Dry Plus option
5)
See HINTS AND TIPS chapter
6)
Note: After maximum 5 hours the drying cycle ends automatically.
Page 25

14. TECHNICAL DATA
Height x Width x Depth 850 x 600 x 600 mm (maximal 640 mm)
Max. depth with the appliance door open 1090 mm
Max. width with the appliance door open 950 mm
Adjustable height 850 mm (+ 15 mm - feet regulation)
Drum volume 118 l
Maximum load volume 8 kg
Voltage 230-240 V
Frequency 50 Hz
Necessary fuse 5 A
Total power 1000 W
Left—on mode power absorption 0,11 W
Off mode power absorption 0,11 W
Type of use Household
Permitted ambient temperature + 5°C to + 35°C
Level of protection against ingress of solid
particles and moisture ensured by the protective cover, except where the low voltage
equipment has no protection against moisture
ENGLISH 25
IPX4
15. INSTALLATION
15.1 Unpacking
CAUTION!
Before use all parts of the
transport packaging must be
removed.
To remove the polystyrene blockages:
1. Open the door.
2. Pull plastic hose with the polystyrene
blockages out from the drum.
15.2 Feet regulation
It is possible to adjust the height of the
tumble dryer. To do that adjust the feet.
Page 26

15mm
> 850 mm
6
00 mm
600 mm
www.aeg.com26
Page 27

17. ENVIRONMENT CONCERNS
ENGLISH 27
Recycle the materials with the symbol .
Put the packaging in applicable
containers to recycle it. Help protect the
environment and human health and to
recycle waste of electrical and electronic
appliances. Do not dispose appliances
marked with the symbol with the
household waste. Return the product to
your local recycling facility or contact
your municipal office.
*
Page 28

This document sets out the terms and conditions of the product
warran ties for A EG Appl iances . It is an im port ant docu ment. P lease
keep it wit h your pr oof of pur chase do cument s in a safe p lace for
futur e refere nce sho uld you re quire se rvic e for your A pplia nce.
1. In this war rant y:
(a) ‘acceptable quali ty’ as referred to i n clause 10 of this warr anty has
the same me aning referred to in the ACL;
(b)
‘ACL’ means Schedule 2 to the Competition and Consumer
Act 2 010;
(c) ‘Applian ce’ means any AEG produc t purchased by you an d
accompa nied by this d ocument;
(d) ‘ASC’ means AEG authorised serv ice centres;
(e) AEG is the bra nd controlled by Elec trolux Home Produc ts Pty Ltd
of 163 O’Riordan Street, Mascot NSW 20 20, ABN 51 00 4 762 341
in respec t of Appliances purchased in Austr alia and Ele ctrolux (NZ)
Limited (co llect ively ‘Ele ctrolux’) of 3 -5 Niall Burgess Road , Mount
Wellington, in respec t of Appliances pu rchased in New Zealan d;
(f) ‘major fail ure’ as refer red to in clause 10 of this warrant y has the
same meani ng referre d to in the ACL and i nclude s a situation when
an Applia nce cann ot be repaired or it is uneconomic for Electrolux,
at its discretion, to repair an A ppliance during the Warrant y Period;
(g) ‘Warranty Period’ means the Appliance is warranted against
manufac turing defec ts in Aus tralia and New Zealand for
60 month s, following the date of o riginal purchase of the Appliance;
(h) ‘you’ means t he purcha ser of the A ppliance not having purchase d
the Appliance for re -sale, and ‘your’ has a c orresp onding me aning.
2. This warr anty only applie s to Appliances purc hased and used in Australia
or New Zealand in normal domestic applications and is in add ition to
(and does no t exclude, re stric t, or modify in any way) any non -exclud able
statutory warranties in Australia or New Zealand.
3. During the Warrant y Period Elec trolux or its ASC w ill, at no extra
charge if yo ur Appliance is read ily acces sible for ser vice, without special
equipment and sub ject to these terms and cond itions, repair or re place
any part s which it conside rs to be def ective. Electrolux or its ASC m ay
use remanufactured par ts to repair your Ap pliance. You agre e that any
replaced A ppliances or par ts become the propert y of Electrolu x. This
warran ty doe s not apply to light glo bes, bat teries, lters or si milar
perishable parts.
4.
Pa
rts an d Appliances not su pplied by El ectro lux are not c overed by
this warranty.
5. To the extent permitted by law, you will bear th e cost of tr ansportation,
travel and d elivery of the Ap pliance to and from Elec trolux or its ASC . If
you reside outsid e of the ser vice area, you will bear the cost of:
(a) t ravel of an au thoris ed representati ve;
(b) transpo rtat ion and delivery of the Appliance to and f rom Elec trolux
or its ASC .
In all inst ances, u nless the Applia nce is tra nspor ted by Electrolux o r
an AEG authorised re presentative, the Applian ce is tran spor ted at the
owner’s co st and risk while in transit to a nd from Elec trolux or its ASC.
6. Proof of purchase is req uired befo re you can ma ke a claim und er
this warranty.
7. You may not make a c laim unde r this war ranty u nless t he defec t
claimed is due to faul ty or defective part s or work manship. Electrolux is
not liable in the follow ing situations (which are not ex hausti ve):
(a) t he Appliance is dam aged by:
(i) accident
(ii) misuse or ab use, including fail ure to properly maint ain or
service
(iii) normal wear and tear
(iv) power surg es, electric al storm damage or i ncorrect powe r supply
(v) incomplete or improper installation
(vi) incorrect, improper or inappropriate operation
(vii) insect or vermin infestation
(viii) failure to comply wit h any addi tional instruc tions supplied with
the Appliance;
(b) the Applia nce is modied with out auth ority from Elec trolux in
writing;
(c) the Applia nce’s serial n umber or w arrant y seal has been removed
or defaced;
(d) the Applia nce was servic ed or repaired by anyone o ther than
Elect rolux, an authori sed repairer or ASC .
8. This warr anty, the contrac t to which it relates a nd the relationshi p between
you and Elec trolux are gover ned by the law applic able where the Ap pliance
was purch ased. Where the A ppliance was purc hased in New Zealand fo r
commerc ial purposes the C onsumer Guarant ee Act does not ap ply.
9.
T
o the extent permitted by law a nd subjec t to your non-excludable
statutory rights and warranties, AEG excludes all warranties and
liabiliti es (other than as cont ained in th is document) inc luding lia bility
for any los s or damage w hether d irect o r indirec t arising from your
purchas e, use or non use of the Ap pliance.
10. For AEG Appliances a nd services in Au stralia, the App liances come
with a guarantee that cannot b e exclude d under th e ACL. You
are entitl ed to a replac ement or re fund for a ma jor failure and for
compensation for any other reasonably foreseeable loss or damage.
You are also enti tled to have th e Appliance repaired or replaced if the
Applian ce fails to b e of accept able quality and t he failure does not
amount to a ma jor failure. The benets to you gi ven by this w arrant y are
in addition to your other right s and remedies unde r a law in relation to
the Appliances or s ervices to which the warr anty relates.
11. At all times d uring the Warrant y Period, Ele ctrolux shall, at its di scretio n,
determi ne wheth er repair, repla cement or refund will apply if a n
Applian ce has a valid warranty claim a pplicable to it.
12. For Appliances and services provided in New Zealand, the Appliances
come with a guarantee pursuant to the prov isions of t he Consumer
Guarante es Act, the Sale of Go ods Ac t and the Fair Trading Act.
13. To enquire ab out claiming under this warranty, plea se follow these ste ps:
(a) c
arefully check the operating instructions, user manual and the
terms of this warra nty;
(b) have the mod el and ser ial numbe r of the App liance available;
(c) have the proof of purchase (e.g. an invoice) ava ilable;
(d) telephone the numbers shown below.
14. You accept that if you make a w arrant y claim, Electrol ux and it s ASC
may exchang e informa tion in rela tion to you to enable Elec trolux to
meet its obligations under this warranty.
Important Notice
Before calling for service, please ensure that the steps listed in clause 13 above have been followed.
FOR SERVICE
or to nd the address of your nearest
state service centre in Australia
PLEASE CALL 1300 363 664
OR EMAIL
customercare@aegaustralia.com.au
For the cost of a local call (Australia only)
SERVICE AUSTRALIA
aeg.com/au
FOR SPARE PARTS
or to nd the address of your nearest
state spare parts centre in Australia
PLEASE CALL 13 13 50
OR EMAIL
customercare@aegaustralia.com.au
For the cost of a local call (Australia only)
FOR SERVICE
or to nd the address of your nearest
authorised service centre in New Zealand
FREE CALL 0800 10 66 10
OR EMAIL customercare@electrolux.co.nz
(New Zealand only)
SERVICE NEW ZEALAND
aeg.co.nz
FOR SPARE PARTS
or to nd the address of your nearest
state spare parts centre in New Zealand
FREE CALL 0800 10 66 20
OR EMAIL customercare@electrolux.co.nz
(New Zealand only)
AEG_Warr_Oct15
Warranty
FOR SALES IN AUSTRALIA AND NEW ZEALAND
ALL AEG BRANDED APPLIANCES
Page 29

www.aeg.com/au
136939890-A-252015
© 2015 Electrolux Home Products Pty Ltd
ABN 51 004 762 341
AMAN_T97689IH_UM_Nov15
 Loading...