

AEG SN71840-5I User Manual

SANTO N 7 18 40-5i
Integrated Fridge Freezer
Operating and Installation Instructions
2
Dear customer,
Before switching on your new refrigerator/freezer on please read these operating instructions carefully. They contain important information for safe
use, for installation and for care of the appliance.
Please keep these operating instructions for future reference. Pass them on
to possible new owners of the appliance.
These operating instructions are for use with several technically comparable
models with varying accessories. Please observe the notes which apply to
your model.
Notes which are important for your safety or for the proper functioning of
the appliance are stressed with a warning triangle and/or with signal words
(Warning!, Important!, Attention!). Please observe the following instructions
carefully.
Additional information regarding operation and practical applications of
the appliance appear after this symbol.
Tips and notes concerning economical and environmentally sound use of
the appliance are marked with the flower.
In the event of a malfunction, these operating instructions contain information on how to rectify faults yourself, see the “Something Not Working”
section.
For futher assistance contact your local AEG Service Force Centre, see the
chapter “Service and Spare Parts”.

3
Contents
Safety . . . . . . . . . . . . . . . . . . . . . . . . . . . . . . . . . . . . . . . . . . . . . . . . . . . . . .4
Disposal . . . . . . . . . . . . . . . . . . . . . . . . . . . . . . . . . . . . . . . . . . . . . . . . . . . .5
Appliance Packaging Information . . . . . . . . . . . . . . . . . . . . . . . . . . . . . .5
Disposal of Old Appliances . . . . . . . . . . . . . . . . . . . . . . . . . . . . . . . . . . . . .5
Remove Transport Packaging . . . . . . . . . . . . . . . . . . . . . . . . . . . . . . . . .6
Shelf Holders . . . . . . . . . . . . . . . . . . . . . . . . . . . . . . . . . . . . . . . . . . . . . . . .6
Description of the Appliance . . . . . . . . . . . . . . . . . . . . . . . . . . . . . . . . . .6
Control Panel . . . . . . . . . . . . . . . . . . . . . . . . . . . . . . . . . . . . . . . . . . . . . . .7
Starting Up and Temperature Regulation . . . . . . . . . . . . . . . . . . . . . . .8
Quick-freezing . . . . . . . . . . . . . . . . . . . . . . . . . . . . . . . . . . . . . . . . . . . . . .9
Interior Accessories . . . . . . . . . . . . . . . . . . . . . . . . . . . . . . . . . . . . . . . .10
Storage Shelves . . . . . . . . . . . . . . . . . . . . . . . . . . . . . . . . . . . . . . . . . . . . .10
Variable Inner Door . . . . . . . . . . . . . . . . . . . . . . . . . . . . . . . . . . . . . . . . . .10
Variable Storage Box . . . . . . . . . . . . . . . . . . . . . . . . . . . . . . . . . . . . . . . . .10
Fresh Food Refrigeration . . . . . . . . . . . . . . . . . . . . . . . . . . . . . . . . . . . .11
Freezing and Storing Frozen Food . . . . . . . . . . . . . . . . . . . . . . . . . . . . .11
Ice Pack . . . . . . . . . . . . . . . . . . . . . . . . . . . . . . . . . . . . . . . . . . . . . . . . . . .12
Preparation of Ice Cubes . . . . . . . . . . . . . . . . . . . . . . . . . . . . . . . . . . . .13
Storage Goods Symbols/ Freezing Calendar . . . . . . . . . . . . . . . . . . . .13
Defrosting . . . . . . . . . . . . . . . . . . . . . . . . . . . . . . . . . . . . . . . . . . . . . . . . .13
Switching Off the Appliance . . . . . . . . . . . . . . . . . . . . . . . . . . . . . . . .14
Cleaning and Care . . . . . . . . . . . . . . . . . . . . . . . . . . . . . . . . . . . . . . . . . .14
Energy Saving Tips . . . . . . . . . . . . . . . . . . . . . . . . . . . . . . . . . . . . . . . . .15
Something Not Working . . . . . . . . . . . . . . . . . . . . . . . . . . . . . . . . . . . . .16
Changing the Light Bulb . . . . . . . . . . . . . . . . . . . . . . . . . . . . . . . . . . . . .17
Service and Spare Parts . . . . . . . . . . . . . . . . . . . . . . . . . . . . . . . . . . . . . .18
Guarantee Conditions . . . . . . . . . . . . . . . . . . . . . . . . . . . . . . . . . . . . . . .19
Installation . . . . . . . . . . . . . . . . . . . . . . . . . . . . . . . . . . . . . . . . . . . . . . . .20
Electrical Connection . . . . . . . . . . . . . . . . . . . . . . . . . . . . . . . . . . . . . . . .20
Positioning . . . . . . . . . . . . . . . . . . . . . . . . . . . . . . . . . . . . . . . . . . . . . . . . .21
Your Appliance Needs Air . . . . . . . . . . . . . . . . . . . . . . . . . . . . . . . . . . . . .21
Reversing the Door . . . . . . . . . . . . . . . . . . . . . . . . . . . . . . . . . . . . . . . . . .21
Housing Dimensions . . . . . . . . . . . . . . . . . . . . . . . . . . . . . . . . . . . . . . . . .22
Instructions for Building-in . . . . . . . . . . . . . . . . . . . . . . . . . . . . . . . . . . .22
Regulations, Standards, Guidelines . . . . . . . . . . . . . . . . . . . . . . . . . . . .27
4
Safety
Please read this instruction book before using the appliance and retain for
future reference. These warnings are provided in the interests of your safety, ensure you understand them fully before using the appliance.
Intended Use
• The appliance is intended for use in the home. It is suitable for the cooling, freezing and storing of frozen food, as well as for making ice. If the
appliance is used for purposes other than those intended or used incorrectly, no liability can be accepted by the manufacturer for any damage
that may be caused.
• Alterations or changes to the appliance are not permitted for reasons of
safety.
Prior to Initial Start–up
• Check the appliance for transport damage. Under no circumstance should
a damaged appliance be plugged in! In the event of damage, please contact your retailer.
Refrigerant
The refrigerant isobutane (R600a) is contained within the refrigerant circuit
of the appliance, a natural gas with a high level of environmental compatibility, which is nevertheless flammable.
• During transportation and installation of the appliance, be certain that
none of the components of the refrigerant circuit become damaged.
• If the refrigerant circuit should become damaged:
– avoid open flames and sources of ignition;
– thoroughly ventilate the room in which the appliance is situated.
Safety of children
• Keep packaging material away from children.
• Please make old appliances unusable prior to disposal. Pull out the mains
plug, cut off the mains cable and remove any locks or catches, to prevent
young children being trapped inside.
• Do not allow children to tamper with the controls or play with the product.
• This appliance is not intended for use by persons (including children) with
reduced physical, sensory or mental capabilities, or lack of experience and
knowledge, unless they have been given supervision or instruction concerning use of the appliance by a person responsible for their safety. Children should be supervised to ensure that they do not play with the
appliance.
5
Daily Operation
• Do not operate any electrical appliances in the refrigerator/freezer (e.g.
electric ice cream makers, mixers etc.).
• Before cleaning the appliance, always switch off the appliance and
disconnect from the electricity supply.
• When unplugging always pull the plug from the mains socket, do not pull
on the cable.
Service
• Under no circumstances should you attempt to repair the appliance yourself. Repairs carried out by inexperienced persons may cause injury or
serious malfunctioning. Contact your local AEG Service Force Centre.
Disposal
Appliance Packaging Information
All materials are environmentally sound.
The plastics can be recycled and are identified as follows:
>PE< for polyethylene, e.g. the outer covering and the bags in the interior.
>PS< for polystyrene foam, e.g. the pads, which are all free of chlorofluorocarbon.
The carton parts are made from recycled paper and should be disposed of
at a waste-paper recycling collection location.
Disposal of Old Appliances
For environmental reasons, refrigeration appliances must be disposed of
properly. This applies to your old appliance, and - at the end of its service
life - to your new appliance as well.
Warning! Before disposing of old appliances make them inoperable.
Remove plug from mains, sever the power cable, remove or destroy any
snap or latch closures, to prevent small children being trapped inside.
• Use an authorised disposal site.
Contact your Local Council or Environmental Health Office to see if there
are facilities in your area to recycle the appliance.
The symbol on the product or on its packaging indicates that this product may not be treated as household waste. Instead it shall be handed over
to the applicable collection point for the recycling of electrical and electronic equipment. By ensuring this product is disposed of correctly, you will
help prevent potential negative consequences for the environment and
human health, which could otherwise be caused by inappropriate waste
handling of this product. For more detailed information about recycling of
this product, please contact your local city office, your household waste
disposal service or the shop where you purchased the product.
6
Remove transport packaging
The appliance and the interior fittings are protected for transport.
• Remove all adhesive tape and packing pieces from the interior of the
appliance.
B
A
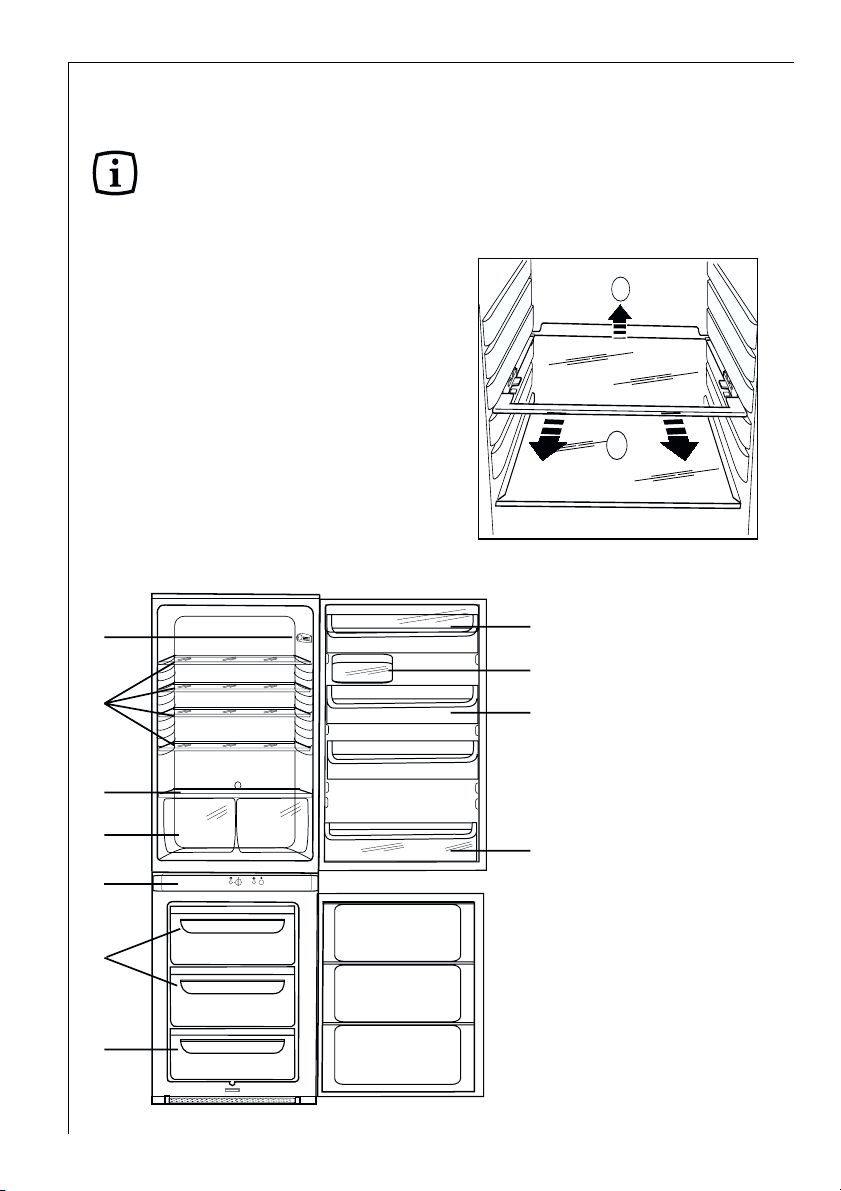
Shelf holders
Your appliance is equipped with shelf
retainers that make it possible to
secure the shelves during transportation.
To remove them proceed as follows:
Raise the shelf from the back, push it
in the direction of the arrow until it
is freed and remove the retainers.
Description of the appliance
A - Dairy compartment
B - Hanging storage box
C - Can storage shelves
D - Bottle storage shelf
E - Light lamp
F - Glass shelves
G - Glass shelf
H - Salad drawers
I - Control panel
J - Compartments for
storing frozen food
L - Compartment for
freezing fresh food
A
B
C
D
E
F
H
G
I
J
L
7
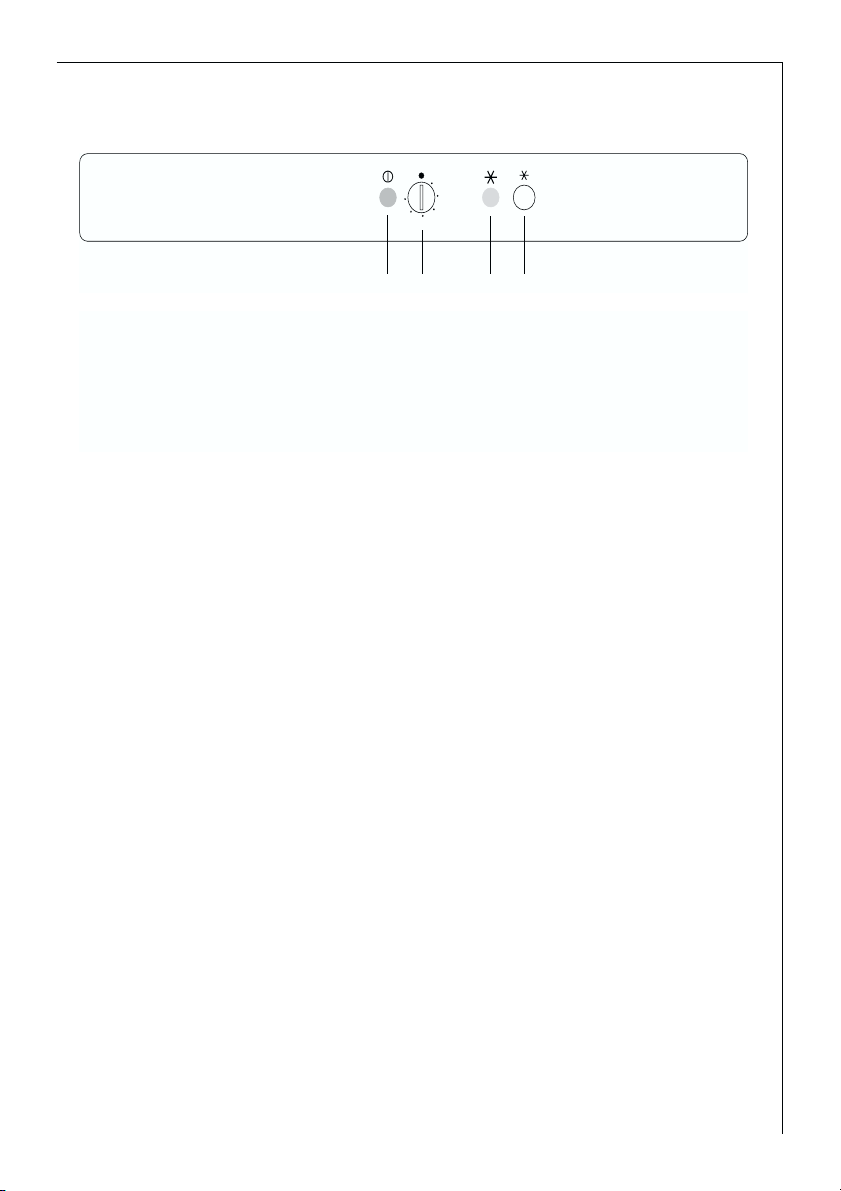
Control Panel
A. Pilot light (green)
B. Thermostat knob
C. Super control light (yellow)
D. Normal/Super push button
The control panel elements are: the thermostat (B) is also the on/off switch for the appliance.
The green pilot light (A), which comes on when the mains voltage is availble. Switch the temperature regulator knob to a number position, the refrigerating unit automatically operates by system control. The yellow pilot
light (C) comes on when the normal/super push botton is pushed.
Important note: if you operate the fast-freeze switch or adjust the tempe-
rature regulator, it may happen that your appliance’s refrigeration motor
does not start immediately but only after some time. This does not mean
that your appliance has a fault..
1
2
6
3
5
4
ACBD

8
Starting up and temperature regulation
Wash the inside of the appliance with lukewarm water with a little bicarbonate of soda added (5ml to 0,5 litre of water). Do not use soap or detergent as the smell may linger. Dry the appliance thoroughly.
• When the refrigerator compartment door is opened, the internal lighting
is switched on. The temperature control knob is located on the control
panel between the fridge and freezer doors.
Setting “0”: Off.
Setting “1”: Highest temperature, (warmest setting).
Setting “6” (end-stop) : Lowest temperature, (coldest setting).
The exact setting should be chosen keeping in mind that the temperature
inside the refrigerator depends on:
-the quantity of food stored
-how often the door is opened
The temperatures in the refrigerator compartment and freezer compartment cannot be independently regulated.
If you want to freeze fresh food rapidly, select setting “6”, ensuring that the
temperature in the refrigerator compartment does not drop below 0°C. You
should reset the temperature control knob to setting “3” or “4”, if this does
occur.
As soon as the fresh food placed in the freezer has frozen, return the temperature control knob to “3” or “4”.
Important!
High ambient temperatures (e.g. on hot summer days) and a cold setting on
the temperature regulator (position"5" to "6") can cause the compressor to
run continuously.
If this happens, turn the temperature regulator back to a warmer setting
(position "3" to "4"). At this setting the compressor will be switched on and
off as usual and automatic defrosting recommenced.

9
Quick-freezing
For quick-freezing, push the Normal/Super button (D). The super
control light (C) will then light up.
The Quick-freezing function accelerates the freezing of fresh food
and, at the same time, protects foodstuffs already stored from
undesirable warming.
If this function is not ended manually, the appliance switches off
the Quick-freezing function after 52 hours. The yellow light goes
out.
This function can be ended manually at any time by pressing the
Normal/Super button again. The yellow light goes out.
 Loading...