

Page 1

SKZ81200F0 EN User manual 2
DE Benutzerinformation 19
PT Manual de instruções 37
ES Manual de instrucciones 56
Page 2

www.aeg.com
2
CONTENTS
1. SAFETY INFORMATION . . . . . . . . . . . . . . . . . . . . . . . . . . . . . . . . . . . . . . . . . . . . . . . . . . . . 3
2. CONTROL PANEL . . . . . . . . . . . . . . . . . . . . . . . . . . . . . . . . . . . . . . . . . . . . . . . . . . . . . . . . . 5
3. DAILY USE . . . . . . . . . . . . . . . . . . . . . . . . . . . . . . . . . . . . . . . . . . . . . . . . . . . . . . . . . . . . . . . . 7
4. HELPFUL HINTS AND TIPS . . . . . . . . . . . . . . . . . . . . . . . . . . . . . . . . . . . . . . . . . . . . . . . . . 11
5. CARE AND CLEANING . . . . . . . . . . . . . . . . . . . . . . . . . . . . . . . . . . . . . . . . . . . . . . . . . . . . 11
6. WHAT TO DO IF… . . . . . . . . . . . . . . . . . . . . . . . . . . . . . . . . . . . . . . . . . . . . . . . . . . . . . . . . 12
7. INSTALLATION . . . . . . . . . . . . . . . . . . . . . . . . . . . . . . . . . . . . . . . . . . . . . . . . . . . . . . . . . . . 14
8. NOISES . . . . . . . . . . . . . . . . . . . . . . . . . . . . . . . . . . . . . . . . . . . . . . . . . . . . . . . . . . . . . . . . . 16
9. TECHNICAL DATA . . . . . . . . . . . . . . . . . . . . . . . . . . . . . . . . . . . . . . . . . . . . . . . . . . . . . . . . 18
10. ENVIRONMENT CONCERNS . . . . . . . . . . . . . . . . . . . . . . . . . . . . . . . . . . . . . . . . . . . . . . . 18
FOR PERFECT RESULTS
Thank you for choosing this AEG product. We have created it to give you impeccable
performance for many years, with innovative technologies that help make life simpler –
features you might not find on ordinary appliances. Please spend a few minutes reading to get
the very best from it.
Visit our website for:
Get usage advice, brochures, trouble shooter, service information:
www.aeg.com
Register your product for better service:
www.aeg.com/productregistration
Buy Accessories, Consumables and Original spare parts for your appliance:
www.aeg.com/shop
CUSTOMER CARE AND SERVICE
We recommend the use of original spare parts.
When contacting Service, ensure that you have the following data available.
The information can be found on the rating plate. Model, PNC, Serial Number.
Warning / Caution-Safety information
General information and tips
Environmental information
Subject to change without notice.
Page 3

ENGLISH 3
1.
SAFETY INFORMATION
In the interest of your safety and to ensure the correct use, before installing
and first using the appliance, read this
user manual carefully, including its hints
and warnings. To avoid unnecessary mistakes and accidents, it is important to
ensure that all people using the appliance are thoroughly familiar with its operation and safety features. Save these
instructions and make sure that they remain with the appliance if it is moved or
sold, so that everyone using it through
its life will be properly informed on appliance use and safety.
For the safety of life and property keep
the precautions of these user's instructions as the manufacturer is not responsible for damages caused by omission.
1.1 Children and vulnerable
people safety
• This appliance is not intended for use
by persons (including children) with reduced physical, sensory or mental capabilities, or lack of experience and
knowledge, unless they have been given supervision or instruction concerning use of the appliance by a person
responsible for their safety.
Children should be supervised to ensure that they do not play with the appliance.
• Keep all packaging well away from
children. There is risk of suffocation.
• If you are discarding the appliance
pull the plug out of the socket, cut the
connection cable (as close to the appliance as you can) and remove the
door to prevent playing children to
suffer electric shock or to close themselves into it.
• If this appliance featuring magnetic
door seals is to replace an older appliance having a spring lock (latch) on
the door or lid, be sure to make that
spring lock unusable before you discard the old appliance. This will prevent it from becoming a death trap for
a child.
1.2 General safety
WARNING!
Keep ventilation openings, in the appliance enclosure or in the built-in structure, clear of obstruction.
• The appliance is intended for keeping
foodstuff and/or beverages in a normal household as explained in this instruction booklet.
• Do not use a mechanical device or any
artificial means to speed up the thawing process.
• Do not use other electrical appliances
(such as ice cream makers) inside of
refrigerating appliances, unless they
are approved for this purpose by the
manufacturer.
• Do not damage the refrigerant circuit.
• The refrigerant isobutane (R600a) is
contained within the refrigerant circuit
of the appliance, a natural gas with a
high level of environmental compatibility, which is nevertheless flammable.
During transportation and installation
of the appliance, be certain that none
of the components of the refrigerant
circuit become damaged.
If the refrigerant circuit should become damaged:
– avoid open flames and sources of
ignition
– thoroughly ventilate the room in
which the appliance is situated
• It is dangerous to alter the specifications or modify this product in any
way. Any damage to the cord may
cause a short-circuit, fire and/or electric shock.
WARNING!
Any electrical component (power
cord, plug, compressor) must be
replaced by a certified service
agent or qualified service personnel to avoid hazard.
1.
Power cord must not be lengthened.
Page 4

www.aeg.com
4
2.
Make sure that the power plug is
not squashed or damaged by the
back of the appliance. A squashed
or damaged power plug may
overheat and cause a fire.
3.
Make sure that you can come to
the mains plug of the appliance.
4.
Do not pull the mains cable.
5.
If the power plug socket is loose,
do not insert the power plug.
There is a risk of electric shock or
fire.
6.
You must not operate the appliance without the lamp cover (if
foreseen) of interior lighting.
• This appliance is heavy. Care should
be taken when moving it.
• Do not remove nor touch items from
the freezer compartment if your hands
are damp/wet, as this could cause skin
abrasions or frost/freezer burns.
• Avoid prolonged exposure of the appliance to direct sunlight.
• Bulb lamps (if foreseen) used in this
appliance are special purpose lamps
selected for household appliances use
only. They are not suitable for household room illumination.
1.3 Daily Use
• Do not put hot pot on the plastic parts
in the appliance.
• Do not store flammable gas and liquid
in the appliance, because they may
explode.
• Do not place food products directly
against the air outlet on the rear wall.
(If the appliance is Frost Free)
• Frozen food must not be re-frozen
once it has been thawed out.
• Store pre-packed frozen food in accordance with the frozen food manufacturer's instructions.
• Appliance's manufacturers storage
recommendations should be strictly
adhered to. Refer to relevant instructions.
• Do not place carbonated or fizzy
drinks in the freezer compartment as it
creates pressure on the container,
which may cause it to explode, resulting in damage to the appliance.
• Ice lollies can cause frost burns if consumed straight from the appliance.
1.4 Care and cleaning
• Before maintenance, switch off the appliance and disconnect the mains plug
from the mains socket.
• Do not clean the appliance with metal
objects.
• Do not use sharp objects to remove
frost from the appliance. Use a plastic
scraper.
• Regularly examine the drain in the refrigerator for defrosted water. If necessary, clean the drain. If the drain is
blocked, water will collect in the bottom of the appliance.
1.5 Installation
For electrical connection carefully follow the instructions given in
specific paragraphs.
• Unpack the appliance and check if
there are damages on it. Do not connect the appliance if it is damaged.
Report possible damages immediately
to the place you bought it. In that case
retain packing.
• It is advisable to wait at least four
hours before connecting the appliance to allow the oil to flow back in
the compressor.
• Adequate air circulation should be
around the appliance, lacking this
leads to overheating. To achieve sufficient ventilation follow the instructions
relevant to installation.
• Wherever possible the back of the
product should be against a wall to
avoid touching or catching warm parts
(compressor, condenser) to prevent
possible burn.
• The appliance must not be located
close to radiators or cookers.
• Make sure that the mains plug is accessible after the installation of the appliance.
• Connect to potable water supply only
(If a water connection is foreseen).
Page 5

1.6 Service
• Any electrical work required to do the
servicing of the appliance should be
carried out by a qualified electrician or
competent person.
• This product must be serviced by an
authorized Service Centre, and only
genuine spare parts must be used.
1.7 Environment Protection
This appliance does not contain
gasses which could damage the
ozone layer, in either its refriger-
2. CONTROL PANEL
ant circuit or insulation materials.
The appliance shall not be discarded together with the urban
refuse and rubbish. The insulation foam contains flammable
gases: the appliance shall be disposed according to the applicable regulations to obtain from
your local authorities. Avoid
damaging the cooling unit, especially at the rear near the heat exchanger. The materials used on
this appliance marked by the
symbol
1
56 4 3 2
ENGLISH 5
are recyclable.
Display
1
Temperature warmer button
2
Temperature colder button
3
OK button
4
Mode button
5
ON/OFF button
6
It is possible to change predefined
sound of buttons to a loudly one by
pressing together Mode button and
Temperature colder button for some
seconds. Change is reversible.
2.1 Display
5 62 431
Timer function
1
COOLMATIC function
2
Minute Minder function
3
Child Lock function
4
Alarm indicator
5
Temperature indicator
6
2.2 Switching on
To switch on the appliance do these
steps:
1.
Connect the mains plug to the power socket.
2.
Press the ON/OFF button if the display is off.
3.
If "dEMo" appears on the display,
the appliance is in demonstration
mode. Refer to "What to do if..."
paragraph.
4.
The temperature indicators show the
set default temperature.
To select a different set temperature refer to "Temperature regulation".
2.3 Switching off
To switch off the appliance do these
steps:
1.
Press the ON/OFF button for 5 sec-
onds.
2.
The display switches off.
Page 6

www.aeg.com
6
3.
To disconnect the appliance from
the power disconnect the mains
plug from the power socket.
2.4 Temperature regulation
The set temperature of the fridge may
be adjusted by pressing the temperature
button.
Set default temperature: +5°C for the
fridge.
The temperature indicator shows the set
temperature.
The set temperature will be reached
within 24 hours.
After a power failure the set temperature remains stored.
2.5 Minute Minder function
The Minute Minder function is to be
used to set an acoustic alarm at the preferred time, useful for example when a
recipe requires to cool down a mixture
for a certain length of time.
To switch on the function:
1.
Press the Mode button until the corresponding icon appears.
The Minute Minder indicator flashes.
The Timer shows the set value (30
minutes) for a few seconds.
2.
Press the Timer regulator button to
change the Timer set value from 1 to
90 minutes.
3.
Press the OK button to confirm.
The Minute Minder indicator is
shown.
The Timer start to flash (min).
At the end of the countdown the Minute
Minder indicator flashes and an audible
alarm sounds:
1.
press OK button to switch off the
sound and terminate the function.
It is possible to deactivate the function
at any time during the countdown:
1.
Press the Mode button until the Mi-
nute Minder indicator flashes.
2.
Press the OK button to confirm.
3.
The Minute Minder indicator goes
off.
It is possible to change the time at any
time during the countdown and at the
end by pressing the Temperature colder
button and the Temperature warmer
button.
2.6 Child Lock function
To lock the buttons from unintentional
operation select the Child Lock function.
To switch on the function:
1.
Press the Mode button until the corresponding icon appears.
2.
The Child Lock indicator flashes.
3.
Press the OK button to confirm.
The Child Lock indicator is shown.
To switch off the function:
1.
Press the Mode button until the
Child Lock indicator flashes.
2.
Press the OK button to confirm.
3.
The Child Lock indicator goes off.
2.7 COOLMATIC function
If you need to insert a large amount of
warm food, for example after doing the
grocery shopping, we suggest activating
the COOLMATIC function to chill the
products more rapidly and to avoid
warming the other food which is already
in the refrigerator.
To switch on the function:
1.
Press the Mode button until the corresponding icon appears.
The COOLMATIC indicator flashes.
2.
Press the OK button to confirm.
The COOLMATIC indicator is
shown.
The COOLMATIC function shuts off automatically after approximately 6 hours.
To switch off the function before its automatic end:
1.
Press the Mode button until the
COOLMATIC indicator flashes.
2.
Press the OK button to confirm.
3.
The COOLMATIC indicator goes off.
The function switches off by selecting a different fridge set temperature.
2.8 Door open alarm
An acoustic alarm will sound if the door
is left open for a few minutes. The door
open alarm conditions are indicated by:
• flashing Alarm indicator
Page 7
• acoustic buzzer
When normal conditions are restored
(door closed), the alarm will stop.
3. DAILY USE
3.1 Cleaning the interior
Before using the appliance for the first
time, wash the interior and all internal
accessories with lukewarm water and
some neutral soap so as to remove the
typical smell of a brand-new product,
then dry thoroughly.
Do not use detergents or abrasive powders, as these will damage the finish.
3.2 Movable shelves
ENGLISH 7
During the alarm, the buzzer can be
switched off by pressing any button.
If “dEMo” appears on the Display, the
appliance is in demonstration mode: refer to “WHAT TO DO IF...” paragraph.
The walls of the refrigerator are equipped with a series of runners so that the
shelves can be positioned as desired.
For better use of space, the front halfshelves can lie over the rear ones.
3.3 Positioning the door
shelves
To permit storage of food packages of
various sizes, the door shelves can be
placed at different heights.
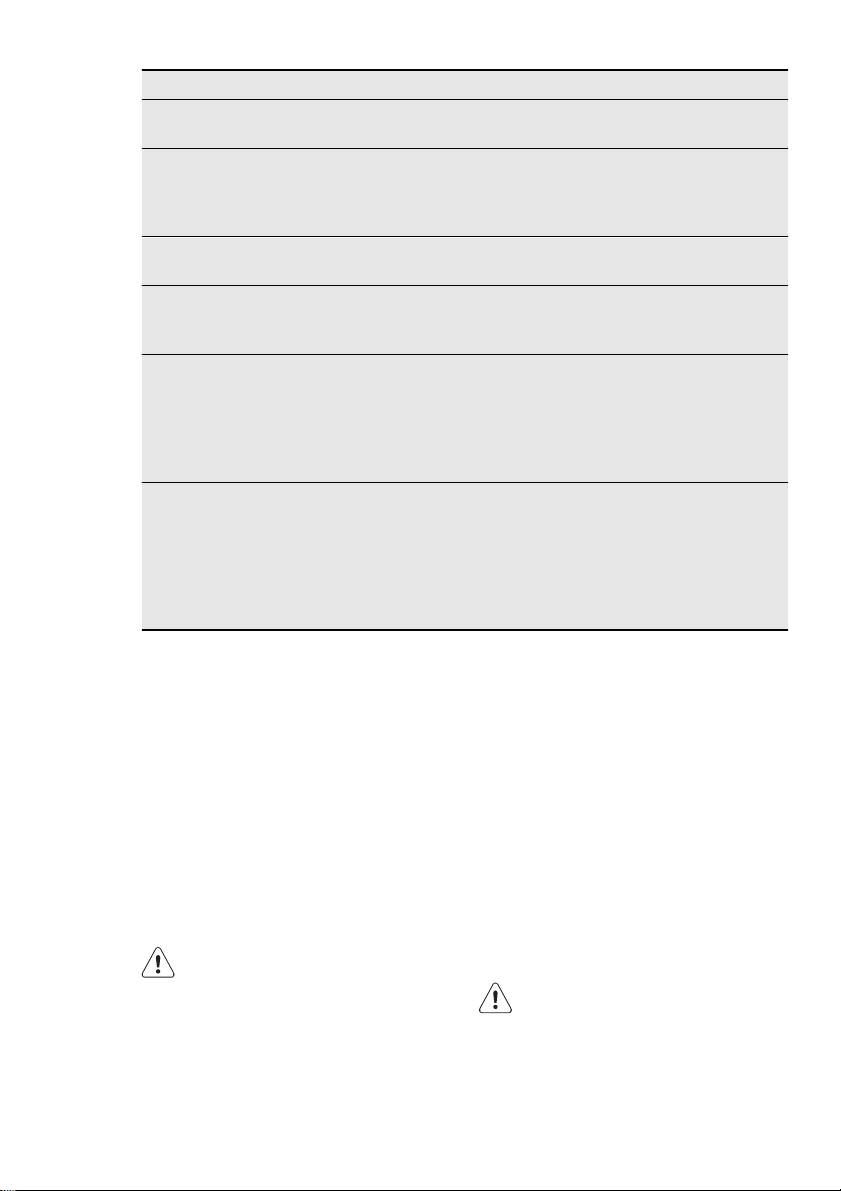
3.4 Carbon Air Filter
CLEANAIR CONTROL
Your appliance is equipped with a carbon filter CLEANAIR CONTROL behind
a flap in the rear wall of the fridge compartment.
The filter purifies the air from unwanted
odours in the fridge and LONGFRESH
compartment meaning that the storage
quality will be further improved.
During the operation, always keep the
air ventilation flap closed.
Page 8
www.aeg.com
8
3.5 LONGFRESH
Compartment
In the LONGFRESH 0°C compartment
the temperature is controlled automatically. It stays constantly at about 0°C, no
adjustment is necessary.
The constant storage temperature of
about 0°C and the relative humidity of
between 45 and 90 % provide optimal
conditions for the various kinds of food.
You can therefore store a variety of fresh
food in the LONGFRESH 0°C compart-
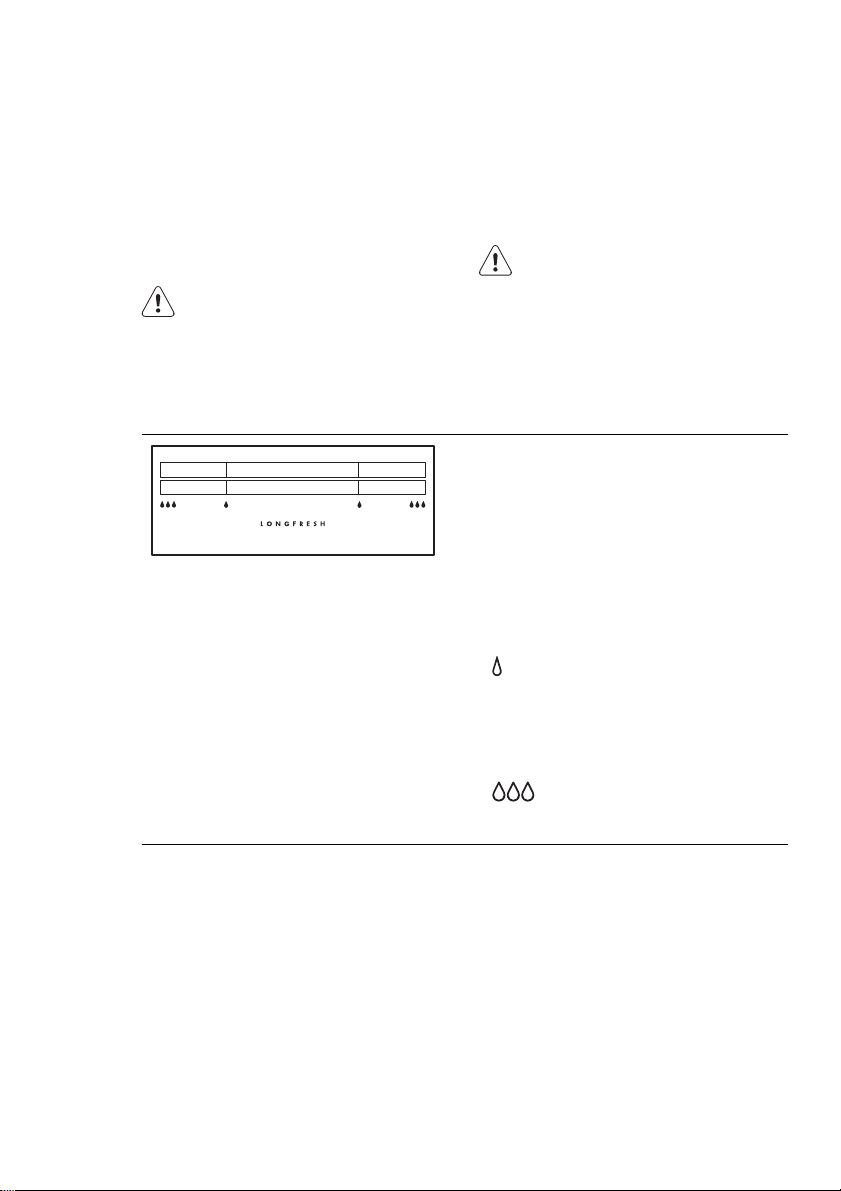
3.6 Humidity control
ment, where it will last up to 3 times longer with better quality compared to normal refrigerator compartments. This allows you to stock more fresh food. Taste,
degree of freshness, quality and nutritional values (vitamins and minerals) are
well preserved. Loss of weight in vegetables and fruit diminishes. Food yields a
higher degree of nutritional value.
The LONGFRESH 0°C compartment is
also suitable for defrosting food.
In this case the thawed food can be stored up to two days .
Both drawers can be used according to
the desired storage conditions independently of each other with lower or
higher humidity.
Regulation for each drawer is separate
and is controlled using the slide valve at
the front of the drawer.
• „Dry“: low air humidity - up to 50 %
relative humidity
This humidity level is reached when
both sliders are set into this position
and the ventilation openings are
wide open.
• Humid“: high relative humidity - up to
90%
This humidity level is reached when
both sliders are set in this position
and the ventilation openings
are closed. Humidity is kept and can
not escape.
Page 9
3.7 Drawer
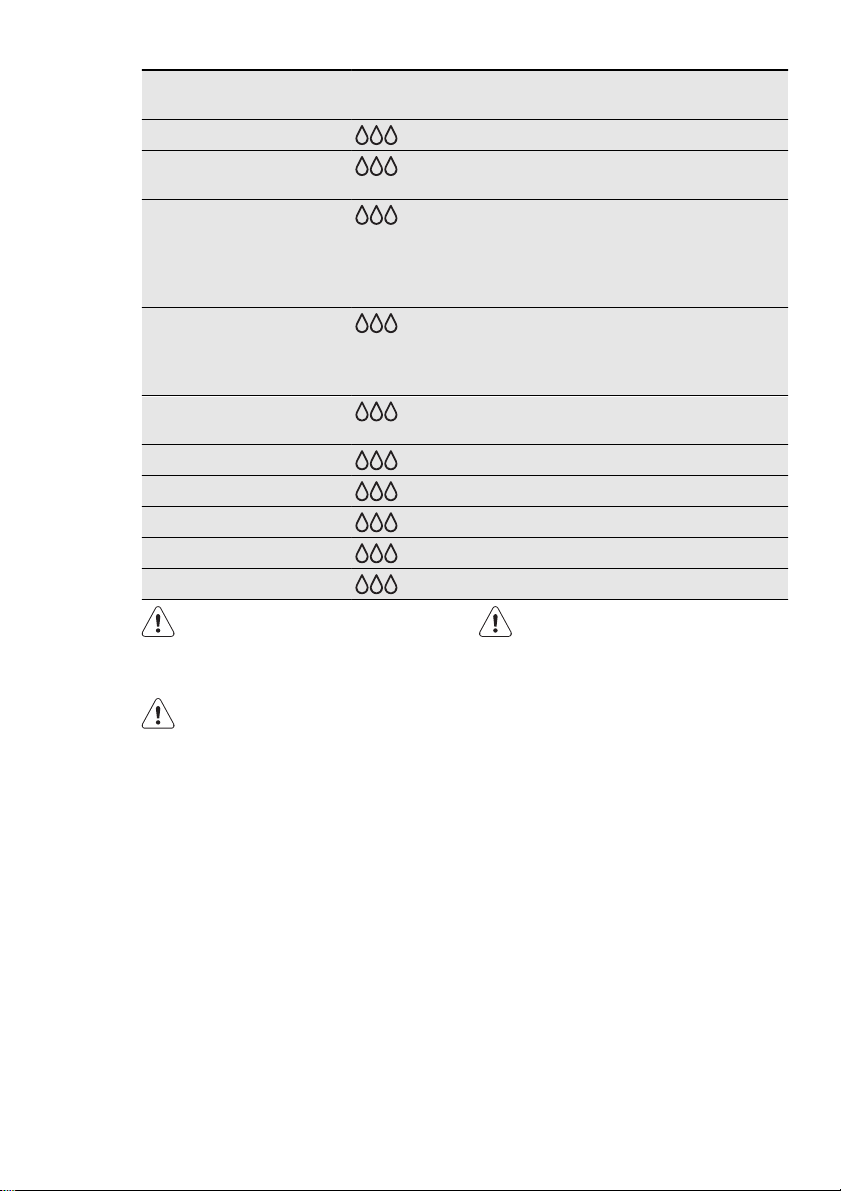
3.8 Storage time in the
Longfresh 0°C compartment
for fresh food
ENGLISH 9
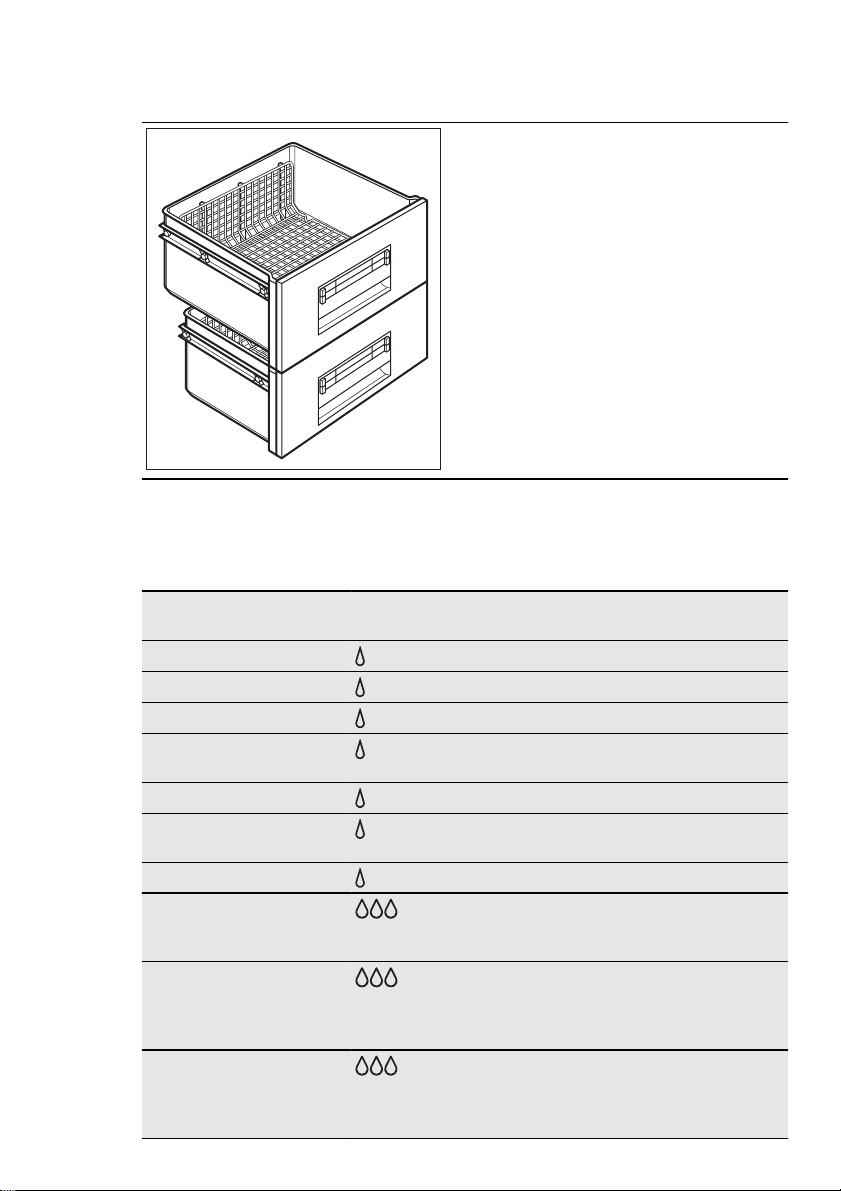
The wire shelves inside the drawers permit that air can circulate freely and consequently a better conservation of foods.
The compartment has stops to prevent
the drawers from falling out when fully
extended.
To remove the drawers (e.g. for cleaning
purposes), pull them out as far as the
stops, lift and extract.
Type of food Air humidity adjust-
Onion
Butter
Large pork cuts
Beef, venison, small
pork cuts, poultry
Tomato sauce
Fish, shellfish, cooked
meat products
Cooked seafood
Salad, vegetables Car-
rots, herbs, Brussels
sprouts, celery
Artichokes, cauliflower,
chicory, iceberg lettuce,
endive, lamb’s lettuce,
lettuce, leeks, radicchio
Broccoli, Chinese
leaves, kale, cabbage,
radishes, Savoy cabbage
ment
"dry”
“dry”
“dry”
“dry”
“dry”
“dry”
“dry”
“humid”
“humid”
“humid”
Storage time
up to 5 months
up to 1 month
up to 10 days
up to 7 days
up to 4 days
up to 3 days
up to 2 days
up to 1 month
up to 21 days
up to 14 days
Page 10
www.aeg.com
10
Type of food Air humidity adjust-
ment
Peas, kohlrabi
Spring onions, radishes,
“humid”
“humid”
asparagus, spinach
Fruit (The riper the fruit,
“humid”
the shorter the storage
time)
Pears, dates (fresh),
strawberries, peaches
Plums (The riper the
“humid”
fruit, the shorter the
storage time)
rhubarb, gooseberries
Apples (not sensitive to
“humid”
cold), quinces
Apricots, cherries
Damsons, grapes
Blackberries, currants
Figs (fresh)
Blueberries, raspberries
Cakes containing cream and other kinds of pastry products can
be stored in the Longfresh 0°C
compartment for 2 or 3 days.
Not to be placed in the Longfresh 0°C compartment:
• cold sensitive fruit which have
to be stored at cellar or room
temperature like pineapple,
bananas, grapefruit, melons,
mango, papaya, oranges, lemons, kiwi fruit.
• The types of food not mentioned above should be stored
in the refrigerator compartment (e.g. all sorts of cheese,
cold cuts, etc.)
“humid”
“humid”
“humid”
“humid”
“humid”
Tips:
• Pay attention to the freshness of the
food, especially on the expiry date.
Quality and freshness influence the
storage time.
• The whole storage cycle time will depend on the preservation conditions
made prior to the final storage in the
fridge.
• Food, fruit or vegetables should always be packed or wrapped up before
storage.
• Animal food always store packed and
dry.
• Food rich in proteins will go bad
quicker. This means seafood will spoil
Storage time
up to 10 days
up to 7 days
up to 1 month
up to 21 days
up to 20 days
up to 14 days
up to 10 days
up to 8 days
up to 7 days
up to 5 days
The level of air humidity in the
drawers depends on the content
of humidity in the stored food,
vegetable and fruit and on the
frequency of door opening
The Longfresh 0°C compartment
is also suitable for slow thawing
of food. In this case the thawed
food can be stored in the Longfresh 0°C compartment for up to
two days.
Page 11

before fish which in turn will spoil before meat. While storing food in a 0°C
compartment storage time for that
kind of food can be increased by up to
three times as well without loss on
quality.
• All food stored in a 0°C compartment
should be taken out of the drawers
4. HELPFUL HINTS AND TIPS
ENGLISH 11
roughly 15-30 min before consumption, particularly fruit and vegetables
to be consumed without any additional cooking process. Allowing fruit and
vegetables to return to room temperature will improve the texture and flavour.
4.1 Hints for energy saving
• Do not open the door frequently or
leave it open longer than absolutely
necessary.
• If the ambient temperature is high and
the Temperature Regulator is set to
low temperature and the appliance is
fully loaded, the compressor may run
continuously, causing frost or ice on
the evaporator. If this happens, set the
Temperature Regulator toward warmer settings to allow automatic defrosting and so a saving in electricity consumption.
4.2 Hints for fresh food
refrigeration
To obtain the best performance:
• do not store warm food or evaporating liquids in the refrigerator
• do cover or wrap the food, particularly
if it has a strong flavour
• position food so that air can circulate
freely around it
5. CARE AND CLEANING
4.3 Hints for refrigeration
Useful hints:
Meat (all types) : wrap in polythene bags
and place on the glass shelf above the
vegetable drawer.
For safety, store in this way only one or
two days at the most.
Cooked foods, cold dishes, etc..: these
should be covered and may be placed
on any shelf.
Fruit and vegetables: these should be
thoroughly cleaned and placed in the
special drawer(s) provided.
Butter and cheese: these should be
placed in special airtight containers or
wrapped in aluminium foil or polythene
bags to exclude as much air as possible.
Milk bottles: these should have a cap
and should be stored in the bottle rack
on the door.
Bananas, potatoes, onions and garlic, if
not packed, must not be kept in the refrigerator.
CAUTION!
Unplug the appliance before carrying out any maintenance operation.
This appliance contains hydrocarbons in its cooling unit; maintenance and recharging must
therefore only be carried out by
authorized technicians.
5.1 Periodic cleaning
The equipment has to be cleaned regularly:
• clean the inside and accessories with
lukewarm water and some neutral
soap.
• regularly check the door seals and
wipe clean to ensure they are clean
and free from debris.
Page 12

www.aeg.com
12
• rinse and dry thoroughly.
Do not pull, move or damage
any pipes and/or cables inside
the cabinet.
Never use detergents, abrasive
powders, highly perfumed cleaning products or wax polishes to
clean the interior as this will damage the surface and leave a
strong odour.
Clean the condenser (black grill) and the
compressor at the back of the appliance
with a brush. This operation will improve
the performance of the appliance and
save electricity consumption.
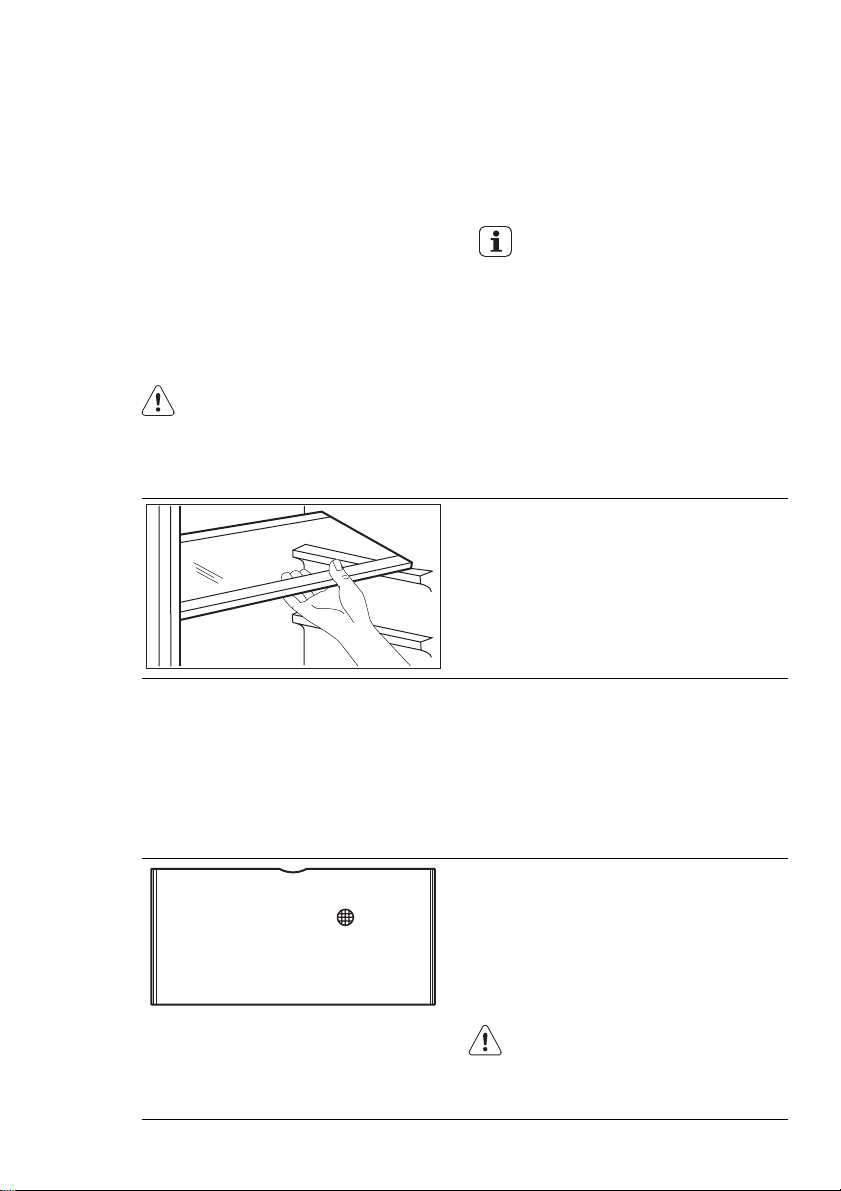
The lowest shelf, dividing the cooler
compartment from the LONGFRESH 0°C
compartment can be removed only for
cleaning. To remove pull out the shelf
straight.
The cover plates above the drawers in
the compartment can be taken out for
cleaning.
After cleaning, reconnect the equipment
to the mains supply.
5.2 Replacing the carbon filter
To get best performance the carbon air
filter should be changed once every
year.
New active air filters can be purchased
from your local dealer.
Refer to “Installation of the carbon air filter” for the instructions.
The air filter is a consumable accessory
and as such is not covered by the guarantee.
5.3 Defrosting of the
refrigerator
Defrosting of the fridge compartment is
automatic.
The water that forms flows into a recipient on the compressor and evaporates.
This recipient cannot be removed.
To make sure fully functionality of the
LONGFRESH 0°C compartment the lowest shelf and cover plates must be put
back in their original position after cleaning.
Take care of not to damage the
cooling system.
Many proprietary kitchen surface cleaners contain chemicals that can attack/
damage the plastics used in this appliance. For this reason it is recommended
that the outer casing of this appliance is
only cleaned with warm water with a little
washing-up liquid added.
6. WHAT TO DO IF…
WARNING!
Before troubleshooting, disconnect the mains plug from the
mains socket.
Only a qualified electrician or
competent person must do the
troubleshooting that is not in this
manual.
5.4 Periods of non-operation
When the appliance is not in use for
long periods, take the following precautions:
• disconnect the appliance from elec-
tricity supply
• remove all food
• defrost (if foreseen) and clean the appliance and all accessories
• leave the door/doors ajar to prevent
unpleasant smells.
If the cabinet will be kept on, ask somebody to check it once in a while to prevent the food inside from spoiling in
case of a power failure.
Page 13

ENGLISH 13
Problem Possible cause Solution
The appliance is
noisy
The appliance is not supported properly
Check if the appliance
stands stable (all the four
feet should be on the
floor)
The appliance does
not operate. The
The appliance is switched
off.
Switch on the appliance.
lamp does not operate.
The mains plug is not
connected to the mains
Connect the mains plug to
the mains socket correctly.
socket correctly.
The appliance has no
power. There is no voltage in the mains socket.
Connect a different electrical appliance to the mains
socket.
Contact a qualified electrician.
The lamp does not
The lamp is in stand-by. Close and open the door.
work.
The lamp is defective. Refer to "Replacing the
lamp".
The compressor operates continually.
The door is not closed
The door has been
The temperature is not
set correctly.
correctly.
opened too frequently.
Set a higher temperature.
Refer to "Closing the
door".
Do not keep the door
open longer than necessary.
The product temperature
is too high.
Let the product temperature decrease to room
temperature before storage.
The room temperature is
too high.
The compressor
does not start imme-
This is normal, no error
has occurred.
Decrease the room temperature.
The compressor starts after a period of time.
diately after pressing the COOLMATIC
switch, or after
changing the temperature.
Water flows on the
rear plate of the refrigerator.
The temperature in
the appliance is too
During the automatic defrosting process, frost defrosts on the rear plate.
The temperature regulator is not set correctly.
This is correct.
Set a higher/lower temperature.
low/high.
Page 14
www.aeg.com
14
Problem Possible cause Solution
The door is not closed
correctly.
The product temperature
is too high.
Refer to "Closing the
door".
Let the product temperature decrease to room
temperature before storage.
Many products are stored
at the same time.
The temperature in
the refrigerator is
There is no cold air circulation in the appliance.
too high.
Upper or lower
square is shown in
the temperature Dis-
An error has occurred in
measuring the temperature
play.
Store less products at the
same time.
Make sure that there is
cold air circulation in the
appliance.
Call your service representative (the cooling system
will continue to keep food
products cold, but temperature adjustment will not
be possible).
dEMo appears on
the Display.
The appliance is in demonstration mode (dEMo).
Keep pressed approximately 10 sec. the OK button since a long sound of
buzzer is heard and the
Display shut off for a short
while: appliance start
works regularly
2.
6.1 Replacing the lamp
The appliance is equipped with a longlife LED interior light.
Only service is allowed to replace the
lighting device. Contact your Service
Center.
If necessary, adjust the door. Refer
to "Installation".
3.
If necessary, replace the defective
door gaskets. Contact the Service
Center.
6.2 Closing the door
1.
Clean the door gaskets.
7. INSTALLATION
WARNING!
Read the "Safety Information"
carefully for your safety and correct operation of the appliance
before installing the appliance.
7.1 Positioning
WARNING!
If you are discarding an old appliance that has a lock or catch on
the door, you must ensure that it
is made unusable to prevent
young children being trapped inside.
Page 15

The appliance shall have the
plug accessible after installation.
Install this appliance at a location where
the ambient temperature corresponds to
the climate class indicated on the rating
plate of the appliance:
Cli-
Ambient temperature
mate
class
SN +10°C to + 32°C
N +16°C to + 32°C
ST +16°C to + 38°C
T +16°C to + 43°C
7.2 Electrical connection
Before plugging in, ensure that the voltage and frequency shown on the rating
7.3 Ventilation requirements
ENGLISH 15
plate correspond to your domestic power supply.
The appliance must be earthed. The
power supply cable plug is provided
with a contact for this purpose. If the domestic power supply socket is not earthed, connect the appliance to a separate
earth in compliance with current regulations, consulting a qualified electrician.
The manufacturer declines all responsibility if the above safety precautions are
not observed.
This appliance complies with the E.E.C.
Directives.
5 cm
min.
200 cm
The airflow behind the appliance must
2
min.
200 cm
be sufficient.
2
Page 16

www.aeg.com
16
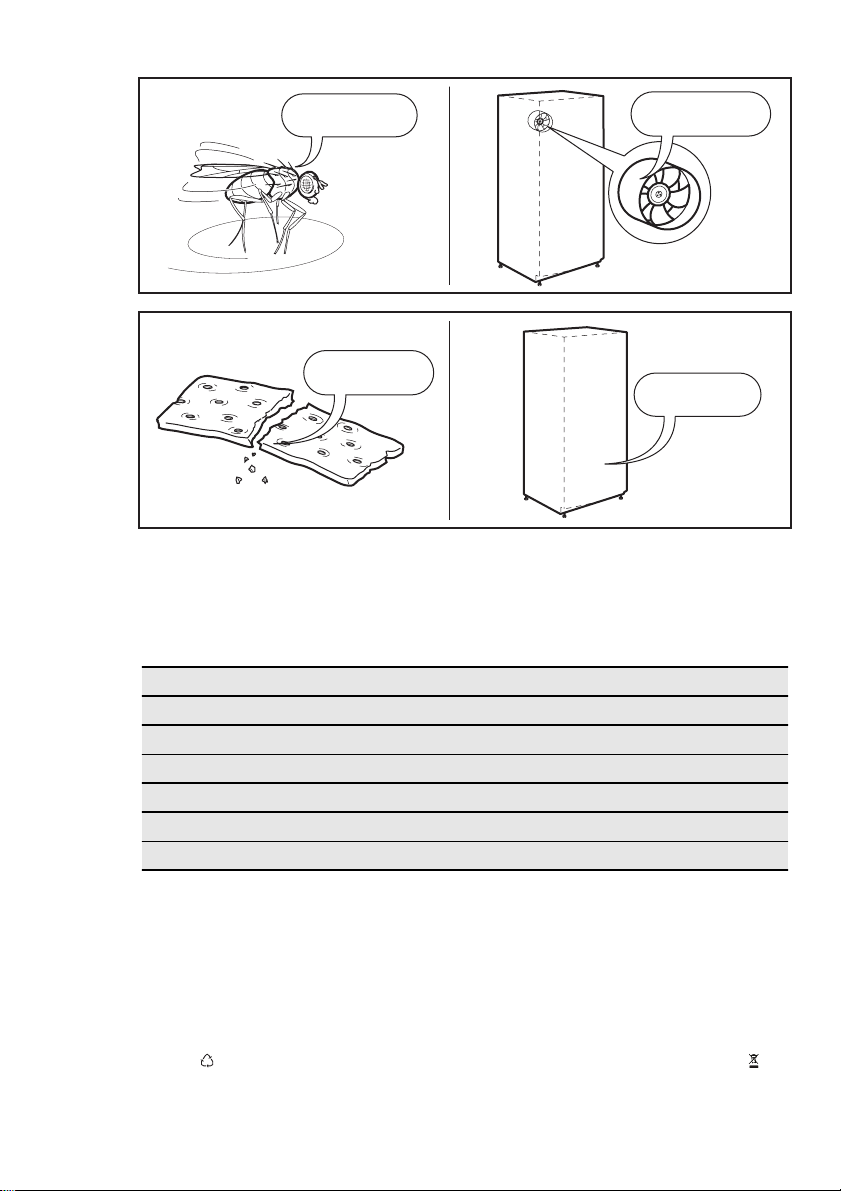
7.4 Installation of the carbon air filter
8. NOISES
There are some sounds during normal
running (compressor, refrigerant circulation).
1
2
The carbon air filter is an active carbon
filter which absorbs bad odors and permits to maintain the best flavour and aroma for all foodstuffs without risk of
odor cross contamination.
On delivery the carbon filter is in a plastic bag to maintain it’s duration and
characteristics. The filter should be
placed behind the flap before the appliance is turned on.
1.
Open the flap cover (1).
2.
Remove the filter from the plastic
bag.
3.
Insert the filter in the slot found in
the back of the flap cover (2).
4.
Close the flap cover.
During operation, always keep
the air ventilation flap closed.
Handle carefully the filter so
fragments do not loosen from
the surface.
OK
SSSRRR!
HISSS!
BLUBB!
CLICK!
BRRR!
CRACK!
Page 17

ENGLISH 17
CLICK!
BRRR!
BLUBB!
CLICK!
BRRR!
BLUBB!
HISSS!
HISSS!
Page 18
www.aeg.com
18
SSSRRR!
CRACK!
9. TECHNICAL DATA
Dimension of the recess
Height 1225 mm
Width 560 mm
Depth 550 mm
Voltage 230-240 V
Frequency 50 Hz
The technical information are situated in
the rating plate on the internal left side
of the appliance and in the energy label.
SSSRRR!
CRACK!
10. ENVIRONMENT CONCERNS
Recycle the materials with the
symbol
applicable containers to recycle it.
Help protect the environment and
human health and to recycle waste
of electrical and electronic
. Put the packaging in
appliances. Do not dispose
appliances marked with the symbol
with the household waste. Return the
product to your local recycling
facility or contact your municipal
office.
Page 19

DEUTSCH 19
INHALT
1. SICHERHEITSHINWEISE . . . . . . . . . . . . . . . . . . . . . . . . . . . . . . . . . . . . . . . . . . . . . . . . . . . 20
2. BEDIENFELD . . . . . . . . . . . . . . . . . . . . . . . . . . . . . . . . . . . . . . . . . . . . . . . . . . . . . . . . . . . . . 22
3. TÄGLICHER GEBRAUCH . . . . . . . . . . . . . . . . . . . . . . . . . . . . . . . . . . . . . . . . . . . . . . . . . . . 24
4. PRAKTISCHE TIPPS UND HINWEISE . . . . . . . . . . . . . . . . . . . . . . . . . . . . . . . . . . . . . . . . . 28
5. REINIGUNG UND PFLEGE . . . . . . . . . . . . . . . . . . . . . . . . . . . . . . . . . . . . . . . . . . . . . . . . . 29
6. WAS TUN, WENN … . . . . . . . . . . . . . . . . . . . . . . . . . . . . . . . . . . . . . . . . . . . . . . . . . . . . . . 30
7. MONTAGE . . . . . . . . . . . . . . . . . . . . . . . . . . . . . . . . . . . . . . . . . . . . . . . . . . . . . . . . . . . . . . 33
8. GERÄUSCHE . . . . . . . . . . . . . . . . . . . . . . . . . . . . . . . . . . . . . . . . . . . . . . . . . . . . . . . . . . . . . 34
9. TECHNISCHE DATEN . . . . . . . . . . . . . . . . . . . . . . . . . . . . . . . . . . . . . . . . . . . . . . . . . . . . . 36
10. UMWELTTIPPS . . . . . . . . . . . . . . . . . . . . . . . . . . . . . . . . . . . . . . . . . . . . . . . . . . . . . . . . . . . 36
FÜR PERFEKTE ERGEBNISSE
Danke, dass Sie sich für dieses AEG Produkt entschieden haben. Wir haben es geschaffen,
damit Sie viele Jahre von seiner ausgezeichneten Leistung und den innovativen Technologien,
die Ihnen das Leben erleichtern, profitieren können. Es ist mit Funktionen ausgestattet, die in
gewöhnlichen Geräten nicht vorhanden sind. Nehmen Sie sich ein paar Minuten Zeit zum
Lesen, um seine Vorzüge kennen zu lernen.
Besuchen Sie uns auf unserer Website, um:
Anwendungshinweise, Prospekte, Fehlerbehebungs- und Service-Informationen zu
erhalten:
www.aeg.com
Ihr erworbenes Produkt zu registrieren, um den besten Service dafür zu
gewährleisten:
www.aeg.com/productregistration
Zubehör, Verbrauchsmaterial und Original-Ersatzteile für Ihr Gerät zu erwerben:
www.aeg.com/shop
KUNDENDIENST UND -BETREUUNG
Bitte verwenden Sie ausschließlich Original-Ersatzteile für Ihre Produkte.
Halten Sie folgende Angaben bereit, wenn Sie sich an den Kundendienst wenden
(diese Informationen finden Sie auf dem Typenschild): Modell, Produktnummer (PNC),
Seriennummer.
Warnungs-/ Sicherheitshinweise.
Allgemeine Hinweise und Ratschläge
Hinweise zum Umweltschutz
Änderungen vorbehalten.
Page 20

www.aeg.com
20
1.
SICHERHEITSHINWEISE
Lesen Sie zu Ihrer Sicherheit und für die
optimale Geräteanwendung vor der Installation und dem Gebrauch des Gerätes die vorliegende Benutzerinformation
aufmerksam durch, einschließlich der
Ratschläge und Warnungen. Es ist wichtig, dass zur Vermeidung von Fehlern
und Unfällen alle Personen, die das Gerät benutzen, mit der Bedienung und
den Sicherheitsvorschriften vertraut sind.
Heben Sie die Benutzerinformation gut
auf und übergeben Sie sie bei einem
Weiterverkauf des Gerätes dem neuen
Besitzer, so dass jeder während der gesamten Lebensdauer des Gerätes über
Gebrauch und Sicherheit informiert ist.
Halten Sie sich zu Ihrer Sicherheit und
zum Schutz Ihres Eigentums strikt an die
Vorsichtsmaßnahmen der vorliegenden
Benutzerinformation, da der Hersteller
bei Missachtung derselben von jeder
Haftung freigestellt ist.
1.1 Sicherheit von Kindern und
hilfsbedürftigen Personen
• Das Gerät darf von Personen (einschließlich Kindern), deren physische,
sensorische Fähigkeiten und deren
Mangel an Erfahrung und Kenntnissen
einen sicheren Gebrauch des Gerätes
ausschließen nur unter Aufsicht oder
nach ausreichender Einweisung durch
eine verantwortungsbewusste Person
benutzt werden, die sicherstellt, dass
sie sich der Gefahren des Gebrauchs
bewusst sind.
Kinder müssen beaufsichtigt werden,
damit sie nicht am Gerät herumspielen
können.
• Halten Sie das Verpackungsmaterial
unbedingt von Kindern fern. Erstickungsgefahr!
• Ziehen Sie vor der Entsorgung des
Gerätes den Netzstecker, schneiden
Sie das Netzkabel (so nah wie möglich
am Gerät) ab und entfernen Sie die
Tür, so dass spielende Kinder vor
elektrischem Schlag geschützt sind
und sich nicht in dem Gerät einschließen können.
• Wenn dieses Gerät mit magnetischer
Türdichtung ein älteres Modell mit
Schnappverschluss (Türlasche) an der
Tür oder auf dem Deckel ersetzt, machen Sie den Schnappverschluss vor
dem Entsorgen des Altgerätes unbrauchbar. So verhindern Sie, dass das
Gerät nicht zu einer Todesfalle für Kinder wird.
1.2 Allgemeine
Sicherheitshinweise
WARNUNG!
Achten Sie darauf, dass die Belüftungsöffnungen im Gehäuse oder in der Einbaunische nicht blockiert sind.
• Das Gerät ist für die Aufbewahrung
von Lebensmitteln und/oder Getränken in einem normalen Haushalt bestimmt, wie in der vorliegenden Gebrauchsanweisung beschrieben wird.
• Benutzen Sie keine mechanischen
oder sonstigen Hilfsmittel, um den
Abtauprozess zu beschleunigen.
• Verwenden Sie keine anderen Elektrogeräte (wie Speiseeisbereiter) in Kühlgeräten, wenn solche Geräte nicht
ausdrücklich vom Hersteller für diesen
Zweck zugelassen sind.
• Beschädigen Sie nicht den Kältekreislauf.
• Das Kältemittel Isobutan (R600a) im
Kältekreislauf des Gerätes ist ein natürliches und sehr umweltfreundliches
Gas, das jedoch leicht entflammbar
ist.
Achten Sie beim Transport und bei
der Aufstellung des Gerätes darauf,
nicht die Komponenten des Kältekreislaufs zu beschädigen.
Bei einer eventuellen Beschädigung
des Kältekreislaufs:
– Offene Flammen und Zündfunken
vermeiden
– Den Raum, in dem das Gerät instal-
liert ist, gut lüften
• Technische und anderweitige Änderungen am Gerät sind gefährlich. Ein
defektes Netzkabel kann Kurzschlüsse
und einen Brand verursachen und/
oder zu Stromschlägen führen.
Page 21

WARNUNG!
Elektrische Bauteile (Netzkabel,
Stecker, Kompressor) dürfen zur
Vermeidung von Gefahren nur
vom Kundendienst oder einer
Fachkraft ausgewechselt werden.
1.
Das Netzkabel darf nicht verlängert werden.
2.
Vergewissern Sie sich, dass der
Netzstecker nicht von der Geräterückseite geklemmt oder beschädigt wird. Ein geklemmter oder
beschädigter Netzstecker überhitzt und kann einen Brand verursachen.
3.
Vergewissern Sie sich, dass der
Netzstecker des Geräts frei zugänglich ist.
4.
Ziehen Sie nicht am Netzkabel.
5.
Stecken Sie den Netzstecker nie in
eine lockere Steckdose. Es besteht Brand- und Stromschlaggefahr.
6.
Betreiben Sie das Gerät nicht ohne Lampenabdeckung (wenn vorgesehen) der internen Beleuchtung.
• Dieses Gerät ist schwer. Vorsicht beim
Transport.
• Entnehmen oder berühren Sie nie mit
nassen/feuchten Händen Tiefkühlgut,
da dies zu Hautverletzungen oder Kälteverbrennungen führen kann.
• Das Gerät nicht direkter Sonneneinstrahlung aussetzen.
• Die Leuchtmittel (wenn vorgesehen) in
diesem Gerät sind Speziallampen, die
nur für Haushaltsgeräte geeignet sind.
Sie eignen sich nicht zur Raumbeleuchtung.
1.3 Täglicher Gebrauch
• Stellen Sie keine heißen Töpfe auf die
Kunststoffteile des Gerätes.
• Lagern Sie keine feuergefährlichen
Gase oder Flüssigkeiten in dem Gerät.
Explosionsgefahr.
• Legen Sie Lebensmittel nicht direkt
vor den Luftauslass in der Rückwand.
(Wenn es ein No-Frost-Gerät ist)
• Ein aufgetautes Produkt darf nicht
wieder eingefroren werden.
DEUTSCH 21
• Abgepackte Tiefkühlkost immer entsprechend den Herstellerangaben aufbewahren.
• Die Lagerempfehlungen des Geräteherstellers sollten strikt eingehalten
werden. Halten Sie sich an die betreffenden Anweisungen.
• Keine kohlensäurehaltigen Getränke
oder Sprudel in den Tiefkühlschrank
stellen, da der Druckanstieg in den
Behältern zur Explosion führen und
das Gerät beschädigen kann.
• Eis am Stiel kann Kälteverbrennungen
verursachen, wenn es direkt nach der
Entnahme aus dem Gefrierschrank gegessen wird.
1.4 Reinigung und Pflege
• Schalten Sie vor Wartungsarbeiten immer das Gerät ab und ziehen Sie den
Netzstecker aus der Steckdose.
• Reinigen Sie das Gerät nicht mit Metallgegenständen.
• Keine scharfen Gegenstände zum Entfernen von Reif und Eis im Gerät verwenden. Verwenden Sie einen Kunststoffschaber.
• Kontrollieren Sie den Tauwasserabfluss im Kühlraum in regelmäßigen
Abständen. Reinigen Sie den Ablauf,
falls nötig. Bei verstopftem Wasserabfluss sammelt sich das Wasser auf dem
Boden des Geräts an.
1.5 Montage
Halten Sie sich für den elektrischen Anschluss strikt an die Anweisungen der betreffenden Abschnitte.
• Kontrollieren Sie nach dem Auspacken
das Gerät auf eventuelle Beschädigungen. Nehmen Sie das Gerät nicht in
Betrieb, wenn es beschädigt ist. Melden Sie die Schäden umgehend dem
Händler, bei dem Sie es erworben haben. Bewahren Sie in diesem Fall die
Verpackung auf.
• Lassen Sie das Gerät mindestens vier
Stunden stehen, bevor Sie es elektrisch anschließen, damit das Öl in den
Kompressor zurückfließen kann.
• Ausreichenden Freiraum zur Luftzirkulation um das Gerät lassen; anderen-
Page 22

www.aeg.com
22
falls besteht Überhitzungsgefahr. Halten Sie sich für die Belüftung an die Installationsanweisungen.
• Das Gerät sollte zur Vermeidung von
Verbrennungen durch Berührung von
heißen Bauteilen (Kompressor, Kondensator) möglichst mit der Rückseite
gegen eine Wand aufgestellt werden.
• Das Gerät darf nicht in der Nähe von
Heizkörpern oder Kochern installiert
werden.
• Vergewissern Sie sich, dass der Netzstecker des Gerätes nach der Installation frei zugänglich ist.
• Wenn ein Wasseranschluss vorgesehen ist, verbinden Sie das Gerät nur
mit dem Trinkwasseranschluss.
1.6 Kundendienst
• Sollte die Wartung des Gerätes elektrische Arbeiten verlangen, so dürfen
diese nur von einem qualifizierten
Elektriker oder einem Elektro-Fachmann durchgeführt werden.
• Wenden Sie sich für Reparaturen und
Wartung nur an Fachkräfte der autorisierten Kundendienststellen und verlangen Sie stets Original-Ersatzteile.
1.7 Umweltschutz
Das Gerät enthält im Kältekreis
oder in dem Isoliermaterial keine
ozonschädigenden Gase. Das
Gerät darf nicht wie normaler
Hausmüll entsorgt werden. Die
Isolierung enthält entzündliche
Gase: das Gerät muss gemäß
den geltenden Vorschriften entsorgt werden; sie erhalten diese
bei Ihrer Gemeindeverwaltung.
Nicht das Kälteaggregat beschädigen, insbesondere nicht in der
Nähe des Wärmetauschers. Die
Materialien, die bei der Herstellung dieses Geräts verwendet
wurden und mit dem Symbol
markiert sind, können recycelt
werden.
2. BEDIENFELD
Display
1
Taste zum Erhöhen der Temperatur
2
Taste zum Senken der Temperatur
3
Taste OK
4
Taste Mode
5
Taste ON/OFF
6
Der voreingestellte Tastenton lässt sich
auf einen lauten Ton einstellen. Halten
Sie dazu die Taste Mode und die Taste
zur Verringerung der Temperatur mehrere Sekunden gedrückt. Die Änderung
lässt sich rückgängig machen.
1
56 4 3 2
2.1 Display
Uhrfunktion
1
COOLMATIC-Funktion
2
Minute Minder-Funktion
3
Kindersicherung
4
Alarmanzeige
5
Temperaturanzeige
6
5 62 431
Page 23

2.2 Einschalten des Geräts
Gehen Sie wie folgt vor, um das Gerät
einzuschalten:
1.
Stecken Sie den Netzstecker in die
Netzsteckdose.
2.
Drücken Sie die Taste ON/OFF,
wenn das Display ausgeschaltet ist.
3.
Wenn auf dem Display „dEMo“ angezeigt wird, befindet sich das Gerät
im Demo-Modus. Schlagen Sie dazu
bitte unter „Was tun, wenn ...“ nach.
4.
Die Temperaturanzeigen zeigen die
jeweils eingestellte Standardtempe-
ratur an.
Informationen zur Auswahl einer anderen Temperatur finden Sie unter „Temperaturregelung“.
2.3 Ausschalten
Zum Ausschalten des Gerätes:
1.
Drücken Sie 5 Sekunden lang die
Taste ON/OFF.
2.
Das Display wird ausgeschaltet.
3.
Ziehen Sie den Gerätestecker aus
der Steckdose, um das Gerät vom
Netz zu trennen.
2.4 Temperaturregelung
Die Temperatur des Kühlschranks lässt
sich durch Drücken des Temperaturreglers einstellen.
Stellen Sie die Standardtemperatur ein:
+5 °C für den Kühlschrank.
Die Temperaturanzeige zeigt die eingestellte Temperatur.
Die eingestellte Temperatur wird innerhalb von 24 Stunden erreicht.
Nach einem Stromausfall bleibt
die eingestellte Temperatur gespeichert.
2.5 Funktion Minute Minder
Mit der Funktion Minute Minder wird ein
akustischer Alarm auf eine gewünschte
Zeit eingestellt. Dies ist zum Beispiel
nützlich, wenn ein Rezept erfordert, dass
eine Speise für eine bestimmte Zeit abkühlen muss.
Zum Einschalten der Funktion:
DEUTSCH 23
1.
Drücken Sie die Taste Mode, bis das
entsprechende Symbol angezeigt
wird.
Die Minute Minder Anzeige blinkt.
Der Timer zeigt den eingestellten
Wert (30 Minuten) ein paar Sekunden lang an.
2.
Drücken Sie die Einstelltaste des
Timers, um den eingestellten Wert
des Timers auf 1 bis 90 Minuten zu
ändern.
3.
Drücken Sie zur Bestätigung die Taste OK.
Die Minute Minder Anzeige erscheint.
Der Timer beginnt zu blinken (min).
Nach Ablauf des Countdowns blinkt die
Anzeige Minute Minder und es ertönt
ein Alarmsignal.
1.
Drücken Sie die Taste OK, um das
Alarmsignal auszuschalten und die
Funktion zu beenden.
Diese Funktion kann während des
Countdowns jederzeit ausgeschaltet
werden:
1.
Drücken Sie die Taste Mode bis die
Anzeige Minute Minder blinkt.
2.
Drücken Sie zur Bestätigung die Tas-
te OK.
3.
Die Anzeige Minute Minder erlischt.
Die Zeit kann während des Countdowns
und am Ende geändert werden, indem
Sie die Tasten zur Erhöhung und Verringerung der Temperatur drücken.
2.6 Funktion Kindersicherung
Wählen Sie die Kindersicherung, um die
Tasten gegen eine unbeabsichtigte Betätigung zu verriegeln.
Zum Einschalten der Funktion:
1.
Drücken Sie die Taste Mode, bis das
entsprechende Symbol angezeigt
wird.
2.
Die Anzeige „Kindersicherung“
blinkt.
3.
Drücken Sie zur Bestätigung die Tas-
te OK.
Die Anzeige „Kindersicherung“
leuchtet.
Zum Ausschalten der Funktion:
1.
Drücken Sie die Taste Mode, bis die
Anzeige „Kindersicherung“ blinkt.
Page 24

www.aeg.com
24
2.
Drücken Sie zur Bestätigung die Taste OK.
3.
Die Anzeige „Kindersicherung“ erlischt.
2.7 Funktion COOLMATIC
Wenn Sie zum Beispiel nach einem Einkauf größere Mengen warmer Lebensmittel einlegen möchten, empfehlen wir
die Aktivierung der Funktion COOLMATIC, um die Produkte schneller zu kühlen
und zu vermeiden, dass die bereits im
Kühlschrank befindlichen Lebensmittel
erwärmt werden.
Zum Einschalten der Funktion:
1.
Drücken Sie die Taste Mode, bis das
entsprechende Symbol angezeigt
wird.
Die COOLMATIC Anzeige blinkt.
2.
Drücken Sie zur Bestätigung die Taste OK.
Die COOLMATIC Anzeige erscheint.
Die Funktion COOLMATIC wird nach etwa 6 Stunden automatisch abgeschaltet.
Zum Ausschalten der Funktion vor ihrer
automatischen Abschaltung:
1.
Die Taste Mode drücken, bis die Anzeige COOLMATIC blinkt.
2.
Drücken Sie zur Bestätigung die Taste OK.
3.
Die Anzeige COOLMATIC erlischt.
Die Funktion wird durch die Auswahl einer anderen Temperatur
für den Kühlraum ausgeschaltet.
2.8 Alarm „Tür offen“
Es ertönt ein Alarmsignal, wenn die Tür
einige Minuten lang offen steht. Der
Alarm „Tür offen“ wird wie folgt angezeigt:
• blinkende Alarmanzeige
• akustisches Signal
Sobald der Normalzustand wiederhergestellt ist (Tür geschlossen), wird der
Alarm deaktiviert.
In der Alarmphase kann das akustische
Alarmsignal durch Drücken einer beliebigen Taste ausgeschaltet werden.
3. TÄGLICHER GEBRAUCH
3.1 Reinigung des Innenraums
Bevor Sie das Gerät in Betrieb nehmen,
beseitigen Sie den typischen „Neugeruch“ am besten durch Reinigen der Innenteile mit lauwarmem Wasser und einer neutralen Seife. Sorgfältig nachtrocknen.
Verwenden Sie keine Reinigungsmittel oder Scheuerpulver, da
hierdurch die Oberfläche beschädigt wird.
Wenn auf dem Display „dEMo“ angezeigt wird, befindet sich das Gerät im
Demo-Modus. Weitere Informationen
finden Sie im Abschnitt „Was tun,
wenn...“.
Page 25

3.2 Verstellbare Ablagen
DEUTSCH 25
Die Wände des Kühlschranks sind mit einer Reihe von Führungsschienen ausgestattet, die verschiedene Möglichkeiten
für das Einsetzen der Ablagen bieten.
Zur besseren Raumnutzung können die
vorderen Hälften der Ablagen auf die
hinteren Hälften gelegt werden.
3.3 Positionierung der
Türeinsätze
Die Türablagen können in unterschiedlicher Höhe positioniert werden, womit
3.4 Kohlefilter
CLEANAIR CONTROL
3.5 LONGFRESH Fach
Im LONGFRESH 0°C Fach wird die Temperatur automatisch geregelt. Sie bleibt
konstant auf ca. 0 °C, es ist keine Einstellung erforderlich.
Die konstante Lagertemperatur von ca. 0
°C und die relative Luftfeuchtigkeit zwischen 45 und 90 % bieten optimale Lagerbedingungen für die verschiedensten
Lebensmittel.
das Lagern verschieden großer Lebensmittelpackungen ermöglicht wird.
Das Gerät ist mit einem Kohlefilter
CLEANAIR CONTROL hinter einer Klappe in der Rückwand des Kühlraums ausgerüstet.
Der Filter reinigt die Luft von unerwünschten Gerüchen im Kühlraum und
im Fach LONGFRESH und verbessert so
die Lagerungsqualität.
Die Lüftungsklappe muss während des
Betriebs stets geschlossen sein.
bußen im Vergleich zu den normalen
Kühlschrankfächern halten. Auf diese
Weise können Sie mehr frische Lebensmittel einlagern. Der Geschmack, Frischegrad und die Nährstoffe (Vitamine und
Mineralien) bleiben gut erhalten. Das
Gemüse und Obst verlieren weniger Gewicht. Die Lebensmittel behalten ihren
Nährwert besser.
Sie können daher eine Vielfalt von frischen Lebensmitteln im LONGFRESH
0°C Fach lagern, in dem die Lebensmittel bis zu 3 Mal länger ohne Qualitätsein-
Das LONGFRESH 0°C Fach eignet sich
auch zum Auftauen von Lebensmitteln.
In diesem Fall können die aufgetauten
Lebensmittel bis zu zwei Tage aufbewahrt werden.
Page 26

www.aeg.com
26
3.6 Feuchtigkeitsregulierung
3.7 Schubladen
Beide Schubladen können je nach den
gewünschten Lagereigenschaften unabhängig von einander mit niedriger oder
höherer Feuchtigkeit genutzt werden.
Die Feuchtigkeit kann für jede Schublade über die Schieberegler an der Vorderseite der Schublade separat geregelt werden.
• „Trocken“: niedrige Luftfeuchtigkeit bis zu 50 % relativer Luftfeuchtigkeit
Dieser Feuchtigkeitsgrad wird erreicht, wenn beide Schieberegler auf
diese Position
tungsschlitze ganz geöffnet sind.
• Feucht“: hohe relative Luftfeuchtigkeit - bis zu 90 %
Dieser Feuchtigkeitsgrad wird erreicht, wenn beide Schieberegler auf
diese Position
Lüftungsschlitze geschlossen sind.
Die Feuchtigkeit wird eingeschlossen
und kann nicht entweichen.
gestellt und die Lüf-
gestellt und die
3.8 Lagerzeit für frische
Lebensmittel im LongfreshFach (0 °C)
Dank der Gitterablagen in den Schubladen kann die Luft ungehindert zirkulieren und somit die Lebensmittel besser
frisch halten.
Die Anschläge im Fach verhindern ein
Herausfallen der Schubladen, wenn diese vollständig herausgezogen werden.
Zum Entfernen der Schubladen (z. B. zur
Reinigung) ziehen Sie diese bis zum Anschlag heraus, heben Sie diese an und
ziehen Sie diese dann ganz heraus.
Page 27

DEUTSCH 27
Lebensmittel Einstellung der Luft-
feuchtigkeit
Zwiebeln
Butter
Große Stücke Schwei-
„trocken“
„trocken“
„trocken“
nefleisch
Rind- und Wildfleisch,
„trocken“
kleine Stücke Schweinefleisch, Geflügel
Tomatensauce
Fisch, Krustentiere, ge-
„trocken“
„trocken“
kochte Fleischgerichte
Gekochte Meeresfrüch-
„trocken“
te
Salat, Gemüse Karot-
„feucht“
ten, Kräuter, Rosenkohl,
Sellerie
Artischocken, Blumen-
„feucht“
kohl, Chicorée, Eisbergsalat, Endivien, Feldsalat, Kopfsalat, Lauch, Radicchio
Brokkoli, Chinakohl,
„feucht“
Grünkohl, Kohl, Rettich,
Wirsing
Erbsen, Kohlrabi
Frühlingszwiebeln, Ra-
„feucht“
„feucht“
dieschen, Spargel, Spinat
Obst (Je reifer die
„feucht“
Frucht, desto kürzer die
Lagerzeit)
Birnen, (frische) Datteln,
Erdbeeren, Pfirsiche
Pflaumen (Je reifer die
„feucht“
Frucht, desto kürzer die
Lagerzeit)
Rhabarber, Stachelbeeren
Äpfel (keine kälteemp-
„feucht“
findlichen Sorten), Quit-
ten
Aprikosen, Kirschen
„feucht“
Lagerzeit
bis zu 5 Monaten
bis zu 1 Monat
bis zu 10 Tagen
bis zu 7 Tagen
bis zu 4 Tagen
bis zu 3 Tagen
bis zu 2 Tagen
bis zu 1 Monat
bis zu 21 Tagen
bis zu 14 Tagen
bis zu 10 Tagen
bis zu 7 Tagen
bis zu 1 Monat
bis zu 21 Tagen
bis zu 20 Tagen
bis zu 14 Tagen
Page 28

www.aeg.com
28
Lebensmittel Einstellung der Luft-
feuchtigkeit
Zwetschgen, Trauben
Brombeeren, Johannis-
„feucht“
„feucht“
beeren
Feigen (frisch)
Blaubeeren, Himbeeren
Kuchen mit Sahne und andere
Produkte aus Teig können 2 bis 3
Tage lang im Longfresh-Fach bei
0 °C aufbewahrt werden.
Die folgenden Lebensmittel dürfen nicht im Longfresh-Fach (0
°C) gelagert werden:
• Kälteempfindliches Obst, wie
z.B. Ananas, Bananen, Grapefruits, Melonen, Mangos, Papayas, Orangen, Zitronen, Kiwis, das bei Keller- oder Raumtemperatur gelagert werden
muss.
• Lebensmittel, die oben nicht
genannt sind, müssen im Kühlraum aufbewahrt werden (z.B.
alle Arten von Käse, Aufschnitt
usw.).
Der Grad der Luftfeuchtigkeit in
den Schubladen hängt vom
Feuchtigkeitsgehalt der gelagerten Lebensmittel, des Gemüses
und Obsts und davon ab, wie
häufig die Tür geöffnet wird.
Das Longfresh-Fach (0 °C) eignet
sich auch zum langsamen Auftauen von Lebensmitteln. In diesem
Fall können die aufgetauten Lebensmittel bis zu zwei Tage lang
im Longfresh-Fach (0 °C) aufbewahrt werden.
„feucht“
„feucht“
Tips:
• Achten Sie auf die Frische der Lebensmittel, insbesondere auf das Haltbarkeitsdatum. Qualität und Frische wirken sich auf die Aufbewahrungsdauer
aus.
• Die Gesamtaufbewahrungsdauer
hängt von den Aufbewahrungsbedingungen vor der endgültigen Lagerung
im Kühlschrank ab.
• Lebensmittel, Obst oder Gemüse
müssen vor der Einlagerung immer in
Behälter oder Folie verpackt werden.
• Tiernahrung ist immer verpackt und
trocken zu lagern.
• Proteinreiche Lebensmittel verderben
schneller. So verderben Meeresfrüchte
schneller als Fisch und dieser schneller
als Fleisch. In einem Fach mit 0 °C
lässt sich diese Art von Lebensmitteln
bis zu dreimal länger und ohne Qualitätsverlust lagern.
• Alle in einem Fach mit 0 °C gelagerten
Lebensmittel sind ca. 15-30 Minuten
vor dem Verzehr aus der Schublade zu
nehmen. Dies gilt insbesondere für
Obst und Gemüse, das ohne weiteres
Kochen verzehrt werden soll. Nehmen
Obst und Gemüse wieder Raumtemperatur an, verbessern sich Textur und
Geschmack.
Lagerzeit
bis zu 10 Tagen
bis zu 8 Tagen
bis zu 7 Tagen
bis zu 5 Tagen
4. PRAKTISCHE TIPPS UND HINWEISE
4.1 Energiespartipps
• Öffnen Sie die Tür nicht zu häufig, und
lassen Sie diese nicht länger offen als
unbedingt notwendig.
• Wenn die Umgebungstemperatur
hoch ist und der Temperaturregler auf
eine niedrige Temperatur eingestellt
und das Gerät voll beladen ist, kann es
zu andauerndem Betrieb des Kompressors und damit zu Reif- oder Eisbildung am Verdampfer kommen.
Stellen Sie in diesem Fall den Temperaturregler auf eine höhere Einstellung
Page 29

ein, die ein automatisches Abtauen
und damit auch einen niedrigeren
Energieverbrauch ermöglicht.
4.2 Hinweise zur Lagerung
gefrorener Produkte
So erzielen Sie die besten Ergebnisse
mit Ihrem Gerät:
• Vergewissern Sie sich, dass die gefrorenen Lebensmittel vom Händler angemessen gelagert wurden.
• Achten Sie unbedingt darauf, die eingekauften gefrorenen Lebensmittel in
der kürzest möglichen Zeit in das Gefriergerät zu bringen.
• Aufgetaute Lebensmittel verderben
sehr schnell und eignen sich nicht für
ein erneutes Einfrieren.
4.3 Hinweise für die Kühlung
Tipps:
Fleisch (alle Sorten): wickeln Sie Fleisch
in lebensmittelechte Tüten und legen
DEUTSCH 29
Sie diese auf die Glasablage über der
Gemüseschublade.
Bitte lagern Sie Fleisch aus Sicherheitsgründen nur einen oder maximal zwei
Tage auf diese Weise.
Gekochte Lebensmittel, kalte Gerichte
usw.: diese können abgedeckt auf eine
Ablage gelegt werden.
Obst und Gemüse: bitte waschen Sie
Obst und Gemüse gründlich und legen
Sie es in die speziell dafür vorgesehene(n) Schublade(n).
Butter und Käse: diese sollten stets in
speziellen luftdichten Behältern verpackt
sein oder in Aluminiumfolie bzw. in lebensmittelechte Tüten eingepackt werden, um so wenig Luft wie möglich in
der Verpackung zu haben.
Milchflaschen: bitte bewahren Sie Milchflaschen stets mit Deckel im Flaschenregal in der Tür auf.
Bananen, Kartoffeln, Zwiebeln und
Knoblauch sollten nicht im Kühlschrank
aufbewahrt werden, außer diese sind dafür speziell verpackt.
5. REINIGUNG UND PFLEGE
VORSICHT!
Ziehen Sie bitte vor jeder Reinigungsarbeit immer den Netzstecker aus der Steckdose.
Der Kältekreis des Gerätes enthält Kohlenwasserstoffe; Wartungsarbeiten und Nachfüllen
von Kältemittel dürfen daher nur
durch vom Hersteller autorisiertes Fachpersonal ausgeführt werden.
5.1 Regelmäßige Reinigung
Das Gerät und der Zubehör müssen regelmäßig gereinigt werden:
• Reinigen Sie die Innenseiten und die
Zubehörteile mit lauwarmem Wasser
und etwas Neutralseife.
• Prüfen und säubern Sie die Türdichtungen in regelmäßigen Abständen
und kontrollieren Sie, dass diese sauber und frei von Verunreinigungen
sind.
• Spülen und trocknen Sie diese sorgfältig ab.
Ziehen Sie nicht an Leitungen
und/oder Kabeln im Gerät und
achten Sie darauf, diese nicht zu
verschieben oder zu beschädigen.
Benutzen Sie zur Reinigung des
Innenraums keinesfalls Putzmittel, Scheuerpulver, stark parfümierte Reinigungsmittel oder
Wachspolituren, da diese die
Oberfläche des Innenraums beschädigen und einen starken Eigengeruch hinterlassen können.
Reinigen Sie den Kondensator (schwarzes Gitter) und den Kompressor auf der
Geräterückseite mit einer Bürste. Dadurch verbessert sich die Leistung des
Geräts und es verbraucht weniger Strom.
Die unterste Ablage, die das Kühlfach
vom LONGFRESH 0°C -Fach abtrennt,
sollte nur für Reinigungszwecke entfernt
Page 30

www.aeg.com
30
werden. Ziehen Sie die Ablage gerade
aus dem Gerät heraus.
Die Abdeckplatten über den Schubladen
im Fach können zu Reinigungszwecken
herausgenommen werden.
Die Anleitung unter „Einsetzen des Kohlefilters“ beachten.
Bei dem Luftfilter handelt es sich um
Verbrauchsmaterial, das nicht unter die
Garantie fällt.
Damit die volle Funktionalität des
LONGFRESH 0°C -Fachs gewährleistet
ist, müssen die unterste Ablage und die
Abdeckplatten nach der Reinigung wieder in ihre ursprüngliche Position eingesetzt werden.
Bitte achten Sie darauf, das Kühlsystem nicht zu beschädigen.
Viele Haushaltsreiniger für Küchen enthalten Chemikalien, die den im Gerät
verwendeten Kunststoff angreifen können. Aus diesem Grund ist es empfehlenswert, das Gerät außen nur mit warmem Wasser und etwas flüssigem Tellerspülmittel zu reinigen.
Schließen Sie das Gerät nach der Reinigung wieder an die Netzversorgung an.
5.2 Ersetzen des AktivkohleFilters
Das beste Ergebnis wird erzielt, wenn
Sie den Kohlefilter einmal jährlich wechseln.
Neue Aktivkohle-Filter erhalten Sie bei
Ihrem Händler vor Ort.
5.3 Abtauen des Kühlschranks
Der Kühlraum taut automatisch ab.
Das dabei angesammelte Wasser läuft in
einen Behälter am Kompressor und verdunstet. Dieser Behälter kann nicht entfernt werden.
5.4 Stillstandzeiten
Bei längerem Stillstand des Gerätes
müssen Sie folgendermaßen vorgehen:
• trennen Sie das Gerät von der Netz-
versorgung
• entnehmen Sie alle Lebensmittel
• Tauen Sie das Gerät ab (sofern vorgesehen). Reinigen Sie den Innenraum
und das gesamte Zubehör.
• lassen Sie die Türen offen/angelehnt,
um das Entstehen unangenehmer Gerüche zu vermeiden.
Möchten Sie bei einer längeren Abwesenheit den Gefrierschrank weiter laufen
lassen, bitten Sie jemanden, gelegentlich die Temperatur zu prüfen, damit das
Gefriergut bei einem möglichen Stromausfall nicht im Innern des Gerätes verdirbt.
6. WAS TUN, WENN …
WARNUNG!
Ziehen Sie vor der Fehlersuche
immer den Netzstecker aus der
Steckdose.
Maßnahmen im Rahmen der
Fehlersuche, die in der vorliegenden Gebrauchsanweisung
nicht beschrieben sind, dürfen
nur von einem qualifizierten
Elektriker bzw. einer anderen
kompetenten Person durchgeführt werden.
Page 31

DEUTSCH 31
Problem Mögliche Ursache Abhilfe
Das Gerät ist zu laut Das Gerät steht nicht sta-
bil.
Kontrollieren Sie, ob eventuelle Unebenheiten der
Standfläche korrekt ausgeglichen wurden, so dass alle vier Füße fest auf dem
Boden stehen.
Das Gerät funktioniert nicht. Die Lam-
Das Gerät ist abgeschaltet.
Schalten Sie das Gerät ein.
pe der Innenbeleuchtung funktioniert nicht.
Der Netzstecker steckt
nicht richtig in der Steckdose.
Das Gerät bekommt kei-
nen Strom. Es liegt keine
Spannung an der Netzsteckdose an.
Stecken Sie den Netzstecker richtig in die Steckdose.
Testen Sie bitte, ob ein anderes Gerät an dieser
Steckdose funktioniert.
Kontaktieren Sie gegebenenfalls einen qualifizierten Elektriker.
Die Lampe der Innenbeleuchtung
Die Lampe befindet sich
im Standby-Modus.
Schließen und öffnen Sie
die Tür.
funktioniert nicht.
Die Lampe ist defekt. Siehe hierzu „Austauschen
der Lampe“.
Der Kompressor arbeitet ständig.
Die Tür ist nicht richtig
Die Tür wurde zu häufig
Die Temperatur ist nicht
richtig eingestellt.
geschlossen.
geöffnet.
Stellen Sie eine höhere
Temperatur ein.
Siehe hierzu „Schließen
der Tür“.
Lassen Sie die Tür nicht
länger als erforderlich offen.
Die Temperatur der ein-
zufrierenden Lebensmittel ist zu hoch.
Lassen Sie die Lebensmittel auf Raumtemperatur
abkühlen, bevor Sie sie in
das Gerät legen.
Die Raumtemperatur ist
zu hoch.
Der Kompressor
schaltet sich nicht
Das ist keine Störung,
sondern normal.
Senken Sie die Raumtemperatur.
Der Kompressor schaltet
sich nach einer Weile ein.
sofort ein, nachdem
Sie die Taste COOLMATIC gedrückt
oder die Temperatur
auf einen anderen
Wert eingestellt haben.
Page 32

www.aeg.com
32
Problem Mögliche Ursache Abhilfe
Wasser fließt an der
Rückwand des Kühlschranks herunter.
Beim automatischen Abtauen fließt das abgetaute Wasser an der Rück-
Das ist normal.
wand des Geräts herunter.
Die Temperatur im
Gerät ist zu hoch/
Der Temperaturregler ist
nicht richtig eingestellt.
Stellen Sie eine höhere/
niedrigere Temperatur ein.
niedrig.
Die Tür ist nicht richtig
geschlossen.
Die Temperatur der Le-
bensmittel ist zu hoch.
Siehe hierzu „Schließen
der Tür“.
Lassen Sie die Lebensmittel auf Raumtemperatur
abkühlen, bevor Sie sie in
das Gerät legen.
Es wurden zu viele Le-
bensmittel auf einmal ein-
Legen Sie weniger Lebensmittel auf einmal ein.
gelegt.
Die Temperatur im
Kühlschrank ist zu
hoch.
Die Temperaturanzeige zeigt oben
oder unten ein
Quadrat an.
Die Kaltluft kann im Gerät
nicht zirkulieren.
Beim Messen der Temperatur ist ein Fehler aufgetreten.
Stellen Sie sicher, dass die
Kaltluft im Gerät zirkulieren
kann.
Bitte wenden Sie sich an
Ihren Kundendienstmitarbeiter (das Kühlsystem hält
zwar die eingelagerten Lebensmittel weiterhin kühl,
doch eine Temperatureinstellung ist nicht mehr
möglich).
Das Display zeigt
dEMoan.
Das Gerät befindet sich
im Demo-Modus (dEMo)..
Halten Sie die OK-Taste
ca. 10 Sekunden gedrückt,
bis ein langer Signalton ertönt und das Display eine
kurze Zeit ausgeschaltet
wird. Das Gerät arbeitet
wieder normal.
2.
6.1 Austauschen der Lampe
Das Gerät ist mit einer langlebigen LEDInnenbeleuchtung ausgestattet.
Die Beleuchtung darf nur von einem
Fachmann ausgetauscht werden. Wenden Sie sich hierzu an den Kundendienst.
Stellen Sie die Tür nach Bedarf ein.
Siehe hierzu „Montage“.
3.
Ersetzen Sie die defekten Türdichtungen, falls erforderlich. Wenden
Sie sich hierzu an den Kundendienst.
6.2 Schließen der Tür
1.
Reinigen Sie die Türdichtungen.
Page 33

7. MONTAGE
DEUTSCH 33
WARNUNG!
Lesen Sie bitte die „Sicherheitshinweise“ vor der Montage des
Geräts sorgfältig durch, um Gefahren für sich selbst zu vermeiden und einen korrekten Betrieb
des Geräts zu gewährleisten.
7.1 Aufstellung
WARNUNG!
Wenn Sie ein altes Gerät entsorgen möchten, das ein Schloss
oder einen Riegel an der Tür besitzt, müssen Sie das Schloss
bzw. den Riegel zunächst unbrauchbar machen, um zu verhindern, dass sich spielende Kinder
darin einschließen können.
Die Steckdose für den Anschluss
des Geräts muss nach der Installation zugänglich sein.
Installieren Sie dieses Gerät an einem
Ort, an dem die Umgebungstemperatur
mit der Klimaklasse übereinstimmt, die
auf dem Typschild des Geräts angegeben ist:
Klimaklasse
SN +10°C bis + 32°C
Umgebungstemperatur
Klima-
Umgebungstemperatur
klasse
N +16°C bis + 32°C
ST +16°C bis + 38°C
T +16°C bis + 43°C
7.2 Elektrischer Anschluss
Kontrollieren Sie vor der ersten Benutzung des Gerätes, ob die Netzspannung
und -frequenz Ihres Hausanschlusses mit
den auf dem Typenschild angegebenen
Anschlusswerten übereinstimmen.
Das Gerät muss geerdet sein. Zu diesem
Zweck ist die Netzkabelsteckdose mit einem Schutzkontakt ausgestattet. Falls
die Steckdose Ihres Hausanschlusses
nicht geerdet sein sollte, lassen Sie das
Gerät bitte gemäß den geltenden Vorschriften erden und fragen Sie dafür einen qualifizierten Elektriker.
Der Hersteller übernimmt keinerlei Haftung für Schäden oder Verletzungen, die
durch Missachtung der oben genannten
Sicherheitshinweise entstehen.
Das Gerät entspricht den EU- Richtlinien.
7.3 Anforderungen an die Belüftung
5 cm
min.
200 cm
2
min.
200 cm
Hinter dem Gerät muss genug Platz für
eine ausreichende Luftzirkulation sein.
2
Page 34

www.aeg.com
34
7.4 Einsetzen des Kohlefilters
1
2
Der Kohlefilter ist ein Aktivkohlefilter,
der schlechte Gerüche aufsaugt und so
den Geschmack und das Aroma der Lebensmittel ohne Risiko von Geruchsübertragung optimal aufrecht erhält.
Der Filter wird mit einer Plastikumhüllung geliefert, die seine Haltbarkeit und
die Bewahrung seiner Eigenschaften
gewährleistet. Der Filter muss hinter
der Klappe eingesetzt werden, bevor
das Gerät eingeschaltet wird.
1.
Öffnen Sie die Klappenabdeckung
(1).
2.
Entnehmen Sie den Filter aus der
Kunststoffverpackung.
3.
Setzen Sie den Filter in den Schlitz
an der Rückseite der Klappenabdeckung (2) ein.
4.
Schließen Sie die Klappenabdeckung.
Die Lüftungsklappe muss während des Betriebs stets geschlossen sein.
Behandeln Sie den Filter sorgfältig, damit sich keine Partikel
von der Oberfläche ablösen.
8. GERÄUSCHE
Während das Gerät in Betrieb ist, entstehen bestimmte Geräusche (Kompressor
und Kühlkreislauf).
OK
SSSRRR!
HISSS!
BLUBB!
CLICK!
BRRR!
CRACK!
Page 35

DEUTSCH 35
CLICK!
BRRR!
BLUBB!
CLICK!
BRRR!
BLUBB!
HISSS!
HISSS!
Page 36

www.aeg.com
36
SSSRRR!
CRACK!
9. TECHNISCHE DATEN
Abmessungen der Einbaunische
Höhe 1225 mm
Breite 560 mm
Tiefe 550 mm
Spannung 230-240 V
Frequenz 50 Hz
Die technischen Daten befinden sich auf
dem Typenschild im Innern des Gerätes
SSSRRR!
CRACK!
auf der linken Seite sowie auf der Energieplakette.
10. UMWELTTIPPS
Recyceln Sie Materialien mit dem
Symbol
Verpackung in den entsprechenden
Recyclingbehältern.
Recyceln Sie zum Umwelt- und
Gesundheitsschutz elektrische und
. Entsorgen Sie die
elektronische Geräte. Entsorgen Sie
Geräte mit diesem Symbol
mit dem Hausmüll. Bringen Sie das
Gerät zu Ihrer örtlichen Sammelstelle
oder wenden Sie sich an Ihr
Gemeindeamt.
nicht
Page 37

PORTUGUÊS 37
ÍNDICE
1. INFORMAÇÕES DE SEGURANÇA . . . . . . . . . . . . . . . . . . . . . . . . . . . . . . . . . . . . . . . . . . . 38
2. PAINEL DE CONTROLO . . . . . . . . . . . . . . . . . . . . . . . . . . . . . . . . . . . . . . . . . . . . . . . . . . . 40
3. UTILIZAÇÃO DIÁRIA . . . . . . . . . . . . . . . . . . . . . . . . . . . . . . . . . . . . . . . . . . . . . . . . . . . . . . 42
4. SUGESTÕES E CONSELHOS ÚTEIS . . . . . . . . . . . . . . . . . . . . . . . . . . . . . . . . . . . . . . . . . . 46
5. MANUTENÇÃO E LIMPEZA . . . . . . . . . . . . . . . . . . . . . . . . . . . . . . . . . . . . . . . . . . . . . . . . 47
6. O QUE FAZER SE… . . . . . . . . . . . . . . . . . . . . . . . . . . . . . . . . . . . . . . . . . . . . . . . . . . . . . . . 48
7. INSTALAÇÃO . . . . . . . . . . . . . . . . . . . . . . . . . . . . . . . . . . . . . . . . . . . . . . . . . . . . . . . . . . . . 50
8. RUÍDOS . . . . . . . . . . . . . . . . . . . . . . . . . . . . . . . . . . . . . . . . . . . . . . . . . . . . . . . . . . . . . . . . . 52
9. DADOS TÉCNICOS . . . . . . . . . . . . . . . . . . . . . . . . . . . . . . . . . . . . . . . . . . . . . . . . . . . . . . . 54
10. PREOCUPAÇÕES AMBIENTAIS . . . . . . . . . . . . . . . . . . . . . . . . . . . . . . . . . . . . . . . . . . . . . 54
PARA RESULTADOS PERFEITOS
Obrigado por escolher este produto AEG. Criámo-lo para lhe oferecer um desempenho
impecável durante vários anos, com tecnologias inovadoras que tornam a sua vida mais fácil –
funcionalidades que poderá não encontrar em aparelhos convencionais. Continue a ler
durante alguns minutos para tirar o máximo partido do produto.
Visite o nosso website para:
Resolver problemas e obter conselhos de utilização, catálogos e informações sobre
serviços:
www.aeg.com
Registar o seu produto para beneficiar de um serviço melhor:
www.aeg.com/productregistration
Adquirir acessórios, consumíveis e peças de substituição originais para o seu
aparelho:
www.aeg.com/shop
APOIO AO CLIENTE E ASSISTÊNCIA
Recomendamos a utilização de peças de substituição originais.
Quando contactar a Assistência, certifique-se de que tem os seguintes dados disponíveis.
A informação encontra-se na placa de características. Modelo, PNC, Número de Série.
Aviso / Cuidado - Informações de segurança.
Informações gerais e conselhos úteis
Informações ambientais
Sujeito a alterações sem aviso prévio.
Page 38

www.aeg.com
38
1.
INFORMAÇÕES DE SEGURANÇA
Para a sua própria segurança e para garantir uma utilização correcta, antes de
instalar e usar o aparelho pela primeira
vez, leia atentamente este manual do
utilizador, incluindo as suas sugestões e
advertências. Para evitar erros e acidentes desnecessários, é importante que todas as pessoas que utilizam o aparelho
conheçam o seu funcionamento e as características de segurança. Guarde estas
instruções e certifique-se de que elas
acompanham o aparelho em caso de
transferência ou venda, para que todos
os que venham a usá-lo estejam devidamente informados quanto à sua utilização e segurança.
Para sua segurança e da propriedade,
guarde as precauções destas instruções
de utilização, uma vez que o fabricante
não é responsável pelos danos causados
por omissão.
1.1 Segurança para crianças e
pessoas vulneráveis
• Este aparelho não se destina a ser utilizado por pessoas (incluindo crianças)
com capacidades físicas, sensoriais ou
mentais reduzidas ou sem experiência
e conhecimento, excepto se lhes tiver
sido dada supervisão ou instrução relativa à utilização do aparelho por uma
pessoa responsável pela sua segurança.
As crianças devem ser vigiadas para
assegurar que não brincam com o
aparelho.
• Mantenha todas as embalagens fora
do alcance das crianças. Existe o risco
de asfixia.
• Se eliminar o aparelho retire a ficha da
tomada, corte o cabo eléctrico (o mais
perto do aparelho possível) e retire a
porta para evitar que crianças a brincar sofram choques eléctricos ou se
fechem dentro do aparelho.
• Se este aparelho, com vedantes de
porta magnéticos for substituir um
aparelho mais velho com fecho de
mola (lingueta) na porta ou tampa,
certifique-se de que o fecho de mola
está desactivado antes de eliminar o
velho aparelho. Tal irá evitar que se
torne numa armadilha fatal para uma
criança.
1.2 Segurança geral
Mantenha as aberturas de ventilação da
caixa do aparelho ou da estrutura integrada sem obstruções.
• O aparelho destina-se à conservação
de alimentos e/ou bebidas em ambiente doméstico normal, como explicado neste manual de instruções.
• Não utilize um dispositivo mecânico
ou qualquer meio artificial para acelerar o processo de descongelação.
• Não utilize outros aparelhos eléctricos
(como máquinas de fazer gelados)
dentro dos aparelhos de refrigeração,
a não ser que sejam aprovados para
este fim pelo fabricante.
• Não danifique o circuito de refrigeração.
• O circuito de refrigeração do aparelho
contém isobutano (R600a), um gás natural com um alto nível de compatibilidade ambiental que é, no entanto, inflamável.
Durante o transporte e a instalação do
aparelho, certifique-se de que nenhum dos componentes do circuito
de refrigeração fica danificado.
Se o circuito de refrigeração for danificado:
– evite chamas vivas e fontes de igni-
ção
– ventile totalmente a divisão onde o
aparelho se encontra
• É perigoso alterar as especificações
ou modificar este produto de qualquer forma. Quaisquer danos no cabo
poderão provocar um curto-circuito,
incêndio e/ou choque eléctrico.
ADVERTÊNCIA
Page 39

ADVERTÊNCIA
A substituição de qualquer componente eléctrico (cabo de alimentação, ficha, compressor)
tem de ser efectuada por um
agente de assistência certificado
ou por pessoal técnico qualificado, para evitar perigo.
1.
Não deve colocar extensões no
cabo de alimentação.
2.
Certifique-se de que a ficha não
está esmagada ou danificada pela
parte posterior do aparelho. Uma
ficha esmagada ou danificada pode sobreaquecer e causar um incêndio.
3.
Certifique-se de que consegue alcançar a ficha do aparelho.
4.
Não puxe o cabo de alimentação.
5.
Se a tomada estiver solta, não introduza a ficha. Existe o risco de
choque eléctrico ou incêndio.
6.
O aparelho não deve funcionar
sem a tampa da lâmpada (se prevista) da iluminação interior.
• Este aparelho é pesado. Tenha cuidado quando o deslocar.
• Não retire nem toque nos itens do
compartimento do congelador se estiver com as mãos húmidas/molhadas,
pois pode sofrer abrasões na pele ou
queimaduras provocadas pelo gelo.
• Evite a exposição prolongada do aparelho à luz solar directa.
• As lâmpadas (se previstas) utilizadas
neste aparelho são lâmpadas especiais, seleccionadas apenas para electrodomésticos. Não são adequadas
para iluminação doméstica.
1.3 Utilização diária
• Não coloque panelas quentes nas partes de plástico do aparelho.
• Não guarde gases ou líquidos inflamáveis no aparelho, porque podem explodir.
• Não coloque alimentos directamente
em frente à saída de ar na parede traseira. (Se o aparelho for do tipo Frost
Free - sem gelo)
• Depois de descongelados, os alimentos não devem ser recongelados.
PORTUGUÊS 39
• Guarde alimentos congelados pré-
-embalados de acordo com as instruções do fabricante do alimento congelado.
• As recomendações de armazenamento dos fabricantes do aparelho devem
ser estritamente cumpridas. Consulte
as respectivas instruções.
• Não coloque bebidas gaseificadas
dentro do congelador, uma vez que
cria pressão no recipiente, podendo
fazer com que expluda, provocando
danos no aparelho.
• Os gelados de gelo podem provocar
queimaduras de gelos se forem consumidos imediatamente depois de retirados do aparelho.
1.4 Limpeza e manutenção
• Antes da manutenção, desligue o aparelho e retire a ficha da tomada.
• Não limpe o aparelho com objectos
de metal.
• Não utilize objectos afiados para remover o gelo do aparelho. Utilize um
raspador de plástico.
• Inspeccione regularmente o orifício de
descarga do frigorífico para presença
de água descongelada. Se necessário,
limpe o orifício de descarga. Se o orifício estiver bloqueado, a água irá acumular na parte inferior do aparelho.
1.5 Instalação
Para efectuar a ligação eléctrica,
siga atentamente as instruções
fornecidas nos parágrafos específicos.
• Desembale o aparelho e verifique se
existem danos. Não ligue o aparelho
se estiver danificado. Em caso de danos, informe imediatamente o local
onde o adquiriu. Nese caso, guarde a
embalagem.
• É recomendável aguardar pelo menos
duas horas antes de ligar o aparelho,
para permitir que o óleo regresse ao
compressor.
• Assegure uma circulação de ar adequada à volta do aparelho, caso contrário pode provocar sobreaquecimento. Para garantir uma ventilação
Page 40

www.aeg.com
40
suficiente, siga as instruções relevantes para a instalação.
• Sempre que possível, a traseira do
aparelho deve ficar virada para uma
parede para evitar toques nas partes
quentes (compressor, condensador) e
possíveis queimaduras.
• Não coloque o aparelho perto de radiadores ou fogões.
• Certifique-se de que a ficha de alimentação fica acessível após a instalação do aparelho.
• Ligue apenas a uma fonte de água potável (se a ligação de água estiver prevista).
1.6 Assistência
• Quaisquer trabalhos eléctricos necessários para a manutenção do aparelho
devem ser efectuados por um electricista qualificado ou pessoa competente.
• A manutenção deste produto deve ser
efectuada por um Centro de Assistên-
cia autorizado, o qual deverá utilizar
apenas peças sobressalentes originais.
1.7 Protecção ambiental
Este aparelho não contém gases
que possam danificar a camada
de ozono, tanto no circuito refrigerante como nos materiais de
isolamento. O aparelho não deverá ser eliminado juntamente
com o lixo doméstico. A espuma
de isolamento contém gases inflamáveis: o aparelho deverá ser
eliminado de acordo com as normas aplicáveis que pode obter
junto das autoridades locais. Evite danificar a unidade de arrefecimento, especialmente na parte
traseira, perto do permutador de
calor. Os materiais utilizado neste aparelho marcados pelo sím-
são recicláveis.
bolo
2. PAINEL DE CONTROLO
Display
1
Botão de aumento da temperatura
2
Botão de diminuição da temperatu-
3
ra
Botão OK
4
Botão Mode
5
Botão ON/OFF
6
É possível alterar o som predefinido dos
botões para outro mais audível premindo simultaneamente o botão Mode e o
botão de diminuição da temperatura durante alguns segundos. A alteração é reversível.
1
56 4 3 2
2.1 Visor
Função Temporizador
1
Função COOLMATIC
2
Função Minute Minder
3
Função de Bloqueio de Segurança
4
para Crianças
Indicador de alarme
5
Indicador de temperatura
6
5 62 431
Page 41

2.2 Ligar
Para ligar o aparelho, efectue os seguintes passos:
1.
Ligue a ficha do aparelho à tomada
eléctrica.
2.
Prima o botão ON/OFF se o display
estiver desligado.
3.
Se o display indicar "dEMo" , o aparelho está em modo de demonstração. Consulte o parágrafo "O que
fazer se...".
4.
Os indicadores de temperatura
apresentam a temperatura predefi-
nida.
Para seleccionar uma temperatura diferente, consulte "Regulação da temperatura".
2.3 Desligar
Para desligar o aparelho, efectue os passos seguintes:
1.
Prima o botão ON/OFF durante 5
segundos.
2.
O visor desliga-se.
3.
Para desligar o aparelho da corrente
desligue a ficha da tomada.
2.4 Regulação da temperatura
A temperatura regulada do frigorífico
pode ser ajustada premindo o botão da
temperatura.
Temperatura predefinida regulada: +5
°C para o frigorífico.
Os indicadores de temperatura apresentam a temperatura regulada.
A temperatura regulada será alcançada
dentro de 24 horas.
Após uma falha de energia a
temperatura regulada permanece memorizada.
2.5 Função Minute Minder
A função Minute Minder destina-se a ser
utilizada para regular um sinal acústico
para uma hora escolhida, sendo útil, por
exemplo, quando uma receita obriga ao
arrefecimento de uma mistura durante
um determinado tempo.
Para ligar a função:
1.
Prima o botão Mode até aparecer o
ícone correspondente.
PORTUGUÊS 41
O indicador Minute Minder fica intermitente.
O Temporizador apresenta o valor
definido (30 minutos) durante alguns
segundos.
2.
Prima o botão regulador do Temporizador para alterar o valor definido
do Temporizador de 1 para 90 minutos.
3.
Prima o botão OK para confirmar.
O indicador Minute Minder é apre-
sentado.
O Temporizador começa a piscar.
(min).
No final da contagem decrescente, o indicador Minute Minder fica intermitente
e é emitido um alarme sonoro:
1.
Prima o botão OK para desligar o
som e terminar a função.
É possível desactivar a função a qualquer altura, durante a contagem decrescente:
1.
Prima o botão Mode até o indicador
Minute Minder ficar intermitente.
2.
Prima o botão OK para confirmar.
3.
O indicador Minute Minder apaga-
-se.
É possível alterar a hora a qualquer altura, durante a contagem decrescente e
no final, premindo o botão de diminuição da temperatura e o botão de aumento da temperatura.
2.6 Função Bloqueio de
Segurança para Crianças
Para evitar o funcionamento não intencional dos botões, seleccione a função
Bloqueio de Segurança para Crianças.
Para ligar a função:
1.
Prima o botão Mode até aparecer o
ícone correspondente.
2.
O indicador Bloqueio de Segurança
para Crianças pisca.
3.
Prima o botão OK para confirmar.
O indicador Bloqueio de Segurança
para Crianças é apresentado.
Para desligar a função:
1.
Prima o botão Mode até o indicador
Bloqueio de Segurança para Crianças piscar.
2.
Prima o botão OK para confirmar.
Page 42

www.aeg.com
42
3.
O indicador Bloqueio de Segurança
para Crianças apaga-se.
2.7 Função COOLMATIC
Se necessitar de inserir uma grande
quantidade de alimentos quentes, por
exemplo após fazer as compras, sugerimos activar a função COOLMATIC para
arrefecer os produtos mais rapidamente
e para evitar aquecer os outros alimentos que já estejam no frigorífico.
Para ligar a função:
1.
Prima o botão Mode até aparecer o
ícone correspondente.
O indicador COOLMATIC fica intermitente.
2.
Prima o botão OK para confirmar.
Aparece o indicador COOLMATIC.
A função COOLMATIC termina automaticamente aproximadamente após 6 horas.
Para desligar a função antes do seu fim
automático:
3. UTILIZAÇÃO DIÁRIA
1.
Prima o botão Mode até o indicador
COOLMATIC ficar intermitente.
2.
Prima o botão OK para confirmar.
3.
O indicador COOLMATIC apaga-se.
A função desliga-se seleccionando uma temperatura regulada do
frigorífico diferente.
2.8 Alarme de porta aberta
Ouve-se um sinal acústico se a porta
permanecer aberta durante alguns minutos. As condições do alarme de porta
aberta são indicadas por:
• indicador de Alarme intermitente
• alarme sonoro acústico
Quando as condições normais são restabelecidas (porta fechada), o alarme pára.
Durante o alarme, o alarme sonoro pode
ser desligado premindo qualquer botão.
3.1 Limpeza do interior
Antes de utilizar o aparelho pela primeira vez, limpe o interior e todos os acessórios com água morna e detergente
neutro, para remover o cheiro típico de
um produto novo, e seque minuciosamente.
Não utilize detergentes ou pós
abrasivos, pois estes produtos
danificam o acabamento.
3.2 Prateleiras móveis
Se o display indicar "dEMo", o aparelho
está em modo de demonstração: consulte o parágrafo "O QUE FAZER SE...".
As paredes do frigorífico têm várias calhas que lhe permitem posicionar as prateleiras como preferir.
Para uma melhor utilização do espaço,
as meias-prateleiras da frente podem assentar sobre as de trás.
Page 43

3.3 Posicionamento das
prateleiras da porta
Para permitir o armazenamento de embalagens de alimentos de várias dimen-
3.4 Filtro de ar de carvão
CLEANAIR CONTROL
3.5 Compartimento
LONGFRESH
A temperatura no compartimento
LONGFRESH 0°C é controlada automaticamente. É mantida constantemente
perto dos 0 °C, sem precisar de regulação.
A temperatura de armazenamento constante próxima dos 0 °C e a humidade relativa entre 45% e 90% proporcionam as
condições óptimas para vários tipos de
alimentos.
Assim, pode armazenar vários tipos de
alimentos frescos no compartimento
PORTUGUÊS 43
sões, as prateleiras da porta podem ser
colocadas a diferentes alturas.
O seu aparelho está equipado com um
filtro de carvão CLEANAIR CONTROL
por detrás de uma aba na parede posterior do compartimento do frigorífico.
O filtro purifica o ar absorvendo odores
desagradáveis no frigorífico e no compartimento LONGFRESH , o que significa que a qualidade de armazenamento
será ainda melhor.
Durante o funcionamento, mantenha
sempre fechada a aba da ventilação de
ar.
LONGFRESH 0°C sabendo que durarão
3 vezes mais e que manterão uma qualidade superior à que teria num frigorífico
normal. Isto permite-lhe armazenar mais
alimentos frescos. O sabor, o grau de
frescura, a qualidade e os valores nutricionais (vitaminas e minerais) são bem
preservados. A perda de peso dos legumes e da fruta diminui. Os alimentos
preservam um valor nutricional superior.
O compartimento LONGFRESH 0°C
também é adequado para descongelar.
Neste caso, os alimentos descongelados
podem ser armazenados até dois dias.
Page 44

www.aeg.com
44
3.6 Controlo de humidade
3.7 Gaveta
As duas gavetas podem ser utilizadas
independentemente de acordo com as
condições de armazenamento pretendidas com vista a conseguir uma humidade mais ou menos elevada.
A regulação de cada gaveta é independente e é controlada utilizando a válvula deslizante na parte anterior da gaveta.
• “Dry” (Seco): baixa humidade do ar até 50 % de humidade relativa
Este nível de humidade é atingido
quando ambos os deslizadores estão
na posição
lação estão totalmente abertas.
• “Humid” (Húmido): humidade do ar
elevada - até 90%
Este nível de humidade é atingido
quando ambos os deslizadores estão
na posição
ventilação estão fechadas. A humidade é mantida e não pode escapar.
e as aberturas de venti-
e as aberturas de
3.8 Tempo de armazenamento
de alimentos frescos no
compartimento Longfresh a 0
°C
As prateleiras em grelha no interior das
gavetas permitem que o ar circule livremente e, consequentemente, que os alimentos sejam melhor conservados.
O compartimento possui batentes para
evitar que as gavetas caiam quando as
puxar completamente.
Para remover as gavetas (por exemplo,
para limpeza), puxe-as tanto quanto os
batentes permitirem, levante-as e retire-
-as.
Page 45

PORTUGUÊS 45
Tipo de alimento Regulação da humida-
de do ar
Cebola
Manteiga
Peças de porco grandes
Carne de vaca, veado,
“seco”
“seco”
“seco”
“seco”
porco (peças pequenas), aves
Molho de tomate
Peixe, marisco, produ-
“seco”
“seco”
tos de carne cozinhada
Marisco cozinhado
Saladas, legumes Ce-
“seco”
“húmido”
nouras, ervas, couves de
Bruxelas, aipo
Alcachofras, couve-flor,
“húmido”
chicória, alface, endívi-
as, alho francês, couve
roxa
Brócolos, folhas chine-
“húmido”
sas, couve, rabanete
Ervilhas, couve-rábano
Cebolinha verde, raba-
“húmido”
“húmido”
netes, espargos, espina-
fres
Fruta (quanto mais ma-
“húmido”
dura, menor é o tempo
de armazenamento)
Peras, tâmaras (frescas),
morangos, pêssegos
Ameixas (quanto mais
“húmido”
madura, menor é o tempo de armazenamento)
ruibarbo, groselhas verdes
Maçãs (não são sensí-
“húmido”
veis ao frio), marmelos
Alperces, cerejas
Damascos, uvas
Amoras silvestres, gro-
“húmido”
“húmido”
“húmido”
selhas
Figos (frescos)
“húmido”
Tempo de armazenamento
até 5 meses
até 1 mês
até 10 dias
até 7 dias
até 4 dias
até 3 dias
até 2 dias
até 1 mês
até 21 dias
até 14 dias
até 10 dias
até 7 dias
até 1 mês
até 21 dias
até 20 dias
até 14 dias
até 10 dias
até 8 dias
até 7 dias
Page 46

www.aeg.com
46
Tipo de alimento Regulação da humida-
de do ar
Mirtilos, framboesas
Os bolos com creme e outros tipos de produtos de pastelaria
podem ser armazenados no
compartimento Longfresh a 0 ºC
durante 2 ou 3 dias.
Não colocar no compartimento
Longfresh a 0 ºC:
• frutas sensíveis ao frio que devem ser armazenadas à temperatura ambiente ou de cave
como ananás, banana, toranja,
melão, manga, papaia, laranja,
limão e quivi.
• Os tipos de alimentos não
mencionados acima deverão
ser armazenados no compartimento do frigorífico (por
exemplo, todos os tipos de
queijo, charcutaria, etc.).
O nível de humidade do ar nas
gavetas depende do teor de humidade dos alimentos, vegetais
e frutas armazenados e da frequência de abertura da porta.
O compartimento Longfresh a 0
ºC também é adequado para
descongelar alimentos lentamente. Neste caso, os alimentos a
descongelar podem ser armazenados no compartimento Longfresh a 0 ºC até dois dias.
Sugestões:
“húmido”
• Tenha em atenção a frescura dos alimentos, especialmente a data de expiração. A qualidade e a frescura influenciam o tempo de armazenamento.
• O tempo total do ciclo de armazenamento dependerá das condições de
conservação anteriores ao armazenamento final no frigorífico.
• Os alimentos, as frutas e os vegetais
devem ser sempre embalados ou embrulhados antes de serem armazenados.
• A comida para animais deve ser sempre armazenada embalada e a seco.
• Os alimentos ricos em proteínas estragam-se mais rapidamente. Isto significa que o marisco se estraga antes do
peixe que, por sua vez, se estraga antes da carne. Ao armazenar alimentos
num compartimento a 0 ºC, é possível
aumentar o tempo de armazenamento
para um tipo de alimento específico
até três vezes e sem perda de qualidade.
• Todos os alimentos armazenados num
compartimento a 0 ºC devem ser retirados das gavetas cerca de 15 a 30 minutos antes do seu consumo, particularmente frutas e vegetais que serão
consumidos sem qualquer processo
de cozedura adicional. Permitir que as
frutas e os vegetais voltem à temperatura ambiente irá melhorar a textura e
o sabor.
Tempo de armazenamento
até 5 dias
4. SUGESTÕES E CONSELHOS ÚTEIS
4.1 Conselhos para poupar
energia
• Não abra muitas vezes a porta nem a
deixe aberta mais tempo do que o necessário.
• Se a temperatura ambiente for alta e o
regulador de temperatura se encontrar na definição de baixa temperatura
com o aparelho completamente
cheio, o compressor pode funcionar
continuamente, causando gelo no
evaporador. Se isto acontecer, coloque o regulador de temperatura em
definições mais quentes, para permitir
a descongelação automática, poupando assim no consumo de electricidade.
Page 47

4.2 Conselhos para a
refrigeração de alimentos
frescos
Para obter o melhor desempenho:
• não guarde alimentos quentes ou líquidos que se evaporam no frigorífico
• cubra ou embrulhe os alimentos, particularmente se tiverem um cheiro forte
• posicione os alimentos de modo a
que o ar possa circular livremente em
redor
4.3 Conselhos para a
refrigeração
Conselhos úteis:
Carne (todos os tipos) : embrulhe em sacos de politeno e coloque na prateleira
de vidro acima da gaveta de vegetais.
5. MANUTENÇÃO E LIMPEZA
PORTUGUÊS 47
Por motivos de segurança, guarde desta
forma por um dia ou dois no máximo.
Alimentos cozinhados, pratos frios, etc:
estes devem estar cobertos e podem ser
colocados em qualquer prateleira.
Fruta e vegetais: estes devem ser minuciosamente limpos e colocados nas gavetas especiais fornecidas.
Manteiga e queijo: estes devem ser colocados em recipientes herméticos especiais ou embrulhados em folha de alumínio ou sacos de politeno para excluir
o máximo de ar possível.
Garrafas de leite: estas devem ter uma
tampa e devem ser armazenadas na prateleira de garrafas na porta.
Bananas, batatas, cebolas e alho, se não
estiverem embalados, não devem ser
guardados no frigorífico.
CUIDADO
Retire a ficha da tomada antes
de efectuar qualquer operação
de manutenção.
Este aparelho contém hidrocarbonetos na sua unidade de arrefecimento; a manutenção e a recarga devem, por isso, ser efectuadas exclusivamente por técnicos autorizados.
5.1 Limpeza periódica
O equipamento tem de ser limpo regularmente:
• limpe o interior e os acessórios com
água morna e sabão neutro.
• verifique regularmente os vedantes de
porta e limpe-os para se certificar de
que estão limpos e sem resíduos.
• lave e seque minuciosamente.
Não puxe, desloque nem danifique quaisquer tubos e/ou cabos
dentro do armário.
Nunca utilize detergentes, pós
abrasivos, produtos de limpeza
muito perfumados ou cera de
polir para limpar o interior, pois
isto irá danificar a superfície e
deixar um odor forte.
Limpe o condensador (grelha preta) e o
compressor que está no fundo do aparelho com uma escova. Esta operação vai
melhorar o desempenho do aparelho e
reduzir o consumo de electricidade.
A prateleira mais baixa, que divide o
compartimento do congelador do compartimento LONGFRESH 0°C só pode
ser retirada para limpeza. Para retirar,
puxe a prateleira a direito.
As tampas acima das gavetas no compartimento podem ser retiradas para
limpeza.
Para garantir uma funcionalidade total
do compartimento LONGFRESH 0°C , a
prateleira mais baixa e as tampas têm de
Page 48

www.aeg.com
48
ser colocadas na posição original após a
limpeza.
Tenha cuidado para não danificar o sistema de arrefecimento.
Muitos agentes de limpeza de superfícies de cozinhas contêm químicos que
podem atacar/danificar os plásticos usados neste aparelho. Por esta razão é
aconselhável que a estrutura exterior
deste aparelho seja limpa apenas com
água morna com um pouco de solução
de limpeza adicionada.
Após a limpeza, volte a ligar o equipamento à tomada de alimentação.
5.2 Substituir o filtro de
carvão
Para obter o melhor desempenho, o filtro de carvão deve ser substituído uma
vez por ano.
Pode adquirir novos filtros representante
local.
Consulte as instruções no capítulo “Instalação do filtro de carvão”.
O filtro é um acessório consumível, pelo
que não está abrangido pela garantia.
5.3 Descongelar o frigorífico
A descongelação do compartimento do
frigorífico é automática.
A água que se forma flui para um recipiente que se encontra sobre o compressor e evapora. Este recipiente não pode
ser removido.
5.4 Períodos de inactividade
Quando o aparelho não é utilizado por
longos períodos, observe as seguintes
precauções:
• desligue o aparelho da tomada da
electricidade
• retire todos os alimentos
• descongele (se previsto) e limpe o
aparelho e todos os acessórios
• deixe a(s) porta(s) aberta(s) para evitar
cheiros desagradáveis.
Se o armário for mantido ligado, peça a
alguém para o verificar esporadicamente, para evitar que os alimentos no interior se estraguem em caso de falha eléctrica.
6. O QUE FAZER SE…
ADVERTÊNCIA
Antes da resolução de problemas, retire a ficha da tomada.
A resolução de problemas que
não se encontram no manual só
deve ser efectuada por um electricista qualificado ou uma pessoa competente.
Problema Causa possível Solução
O aparelho faz baru-
lho
O aparelho não funciona. A lâmpada
não funciona.
A ficha de alimentação
O aparelho não está
apoiado correctamente
O aparelho está desligado.
eléctrica não está correctamente inserida na tomada.
Verifique se o aparelho está estável (os quatro pés
devem estar no chão)
Ligue a máquina.
Ligue a ficha correctamente à tomada.
Page 49

PORTUGUÊS 49
Problema Causa possível Solução
O aparelho não tem ali-
mentação. Não existe
corrente na tomada.
Ligue um aparelho eléctrico diferente à tomada.
Contacte um electricista
qualificado.
A lâmpada não funciona.
A lâmpada está em
stand-by.
Feche e abra a porta.
A lâmpada está avariada. Consulte "Substituir a lâm-
pada".
O compressor funciona continuamen-
A temperatura não está
definida correctamente.
Defina uma temperatura
mais elevada.
te.
A porta não está fechada
correctamente.
A porta foi aberta dema-
siadas vezes.
Consulte a secção "Fechar
a porta".
Não mantenha a porta
aberta mais tempo do que
o necessário.
A temperatura de algum
produto está demasiado
elevada.
Deixe que a temperatura
do produto diminua até à
temperatura ambiente antes de o guardar.
A temperatura ambiente
está demasiado elevada.
O compressor não
arranca imediata-
Isto é normal, não é um
erro.
mente após pressio-
Reduza a temperatura ambiente.
O compressor arranca
após um período de tempo.
nar o botão COOLMATIC ou após alterar a temperatura.
A água escorre na
placa traseira do frigorífico.
Durante o processo de
descongelação automática, a placa traseira des-
Isto é normal.
congela o gelo.
A temperatura no
aparelho está demasiado baixa/elevada.
A porta não está fechada
A temperatura de algum
O regulador da temperatura não está definido
correctamente.
correctamente.
produto está demasiado
elevada.
Regule uma temperatura
mais alta/baixa.
Consulte a secção "Fechar
a porta".
Deixe que a temperatura
do produto diminua até à
temperatura ambiente antes de o guardar.
Guardou demasiados
produtos ao mesmo tem-
Guarde menos produtos
ao mesmo tempo.
po.
Page 50

www.aeg.com
50
Problema Causa possível Solução
A temperatura no
frigorífico está demasiado elevada.
O quadrado superior
ou inferior é apresentado no visor da
temperatura.
Não há circulação de ar
frio no aparelho.
Ocorreu um erro na medição da temperatura
Certifique-se de que existe
circulação de ar frio no
aparelho.
Entre em contacto com o
seu representante de assistência (o sistema de refrigeração irá continuar a
manter os produtos alimentares frios, mas o ajuste da temperatura não será possível).
dEMo aparece intermitente no visor.
O aparelho está no modo
de demonstração (dEMo).
Mantenha o botão OK premido durante aproximadamente 10 segundos a partir do momento em que
ouvir um sinal sonoro longo e o visor se apagar por
um breve momento: o
aparelho começa a funcionar normalmente
2.
6.1 Substituir a lâmpada
O aparelho está equipado com uma luz
interior LED de longa duração.
Apenas a assistência técnica está autorizada a substituir o dispositivo de iluminação. Contacte o seu Centro de Assistência Técnica.
Se necessário, ajuste a porta. Consulte "Instalação".
3.
Se necessário, substitua as juntas
defeituosas da porta. Contacte o
Centro de Assistência Técnica.
6.2 Fechar a porta
1.
Limpe as juntas da porta.
7. INSTALAÇÃO
ADVERTÊNCIA
Leia as "Informações de segurança" cuidadosamente para a
sua segurança e funcionamento
correcto do aparelho antes de o
instalar.
7.1 Posicionamento
ADVERTÊNCIA
Se for eliminar um aparelho velho que tem um bloqueio ou um
fecho na porta, certifique-se de
não funciona para evitar que as
crianças fiquem trancadas lá dentro.
O aparelho deverá ter a ficha
acessível após a instalação.
Instale este aparelho num local com uma
temperatura ambiente que corresponde
Page 51

à classe climática indicada na placa de
dados do aparelho:
Classe
Temperatura ambiente
climática
SN +10 °C a + 32 °C
N +16 °C a + 32 °C
ST +16 °C a + 38 °C
T +16 °C a + 43 °C
7.2 Ligação eléctrica
Antes de ligar, certifique-se de que a
tensão e a frequência indicadas na placa
7.3 Requisitos de ventilação
PORTUGUÊS 51
de dados correspondem à fonte de alimentação doméstica.
O aparelho deve ter uma ligação à terra.
A ficha do cabo de alimentação é fornecida com um contacto para este objectivo. Se a tomada da fonte de alimentação doméstica não estiver ligada à terra,
ligue o aparelho a uma ligação à terra
separada, em conformidade com as normas actuais, consultando um electricista
qualificado.
O fabricante declina toda a responsabilidade caso as precauções de segurança
acima não sejam cumpridas.
Este aparelho cumpre com as directivas.
E.E.C.
5 cm
min.
200 cm
A circulação de ar na parte posterior do
2
min.
200 cm
aparelho tem de ser suficiente.
2
Page 52

www.aeg.com
52
7.4 Instalação do filtro de carvão
8. RUÍDOS
Existem alguns ruídos durante o funcionamento normal (compressor, circulação
do refrigerante).
1
2
O filtro de carvão é um filtro de carvão
activo que absorve os maus odores e
permite preservar os melhores sabores
e aromas de todos os alimentos, sem o
risco de contaminação de odores entre
alimentos.
Na entrega, o filtro de carvão encontra-
-se num saco de plástico para que a
longevidade e as características sejam
preservadas. O filtro deve ser colocado
atrás da aba antes de ligar o aparelho.
1.
Abra a tampa da aba (1).
2.
Remova o filtro do saco de plástico.
3.
Introduza o filtro na ranhura existente na parte posterior da tampa
da aba (2).
4.
Feche a tampa da aba.
Durante o funcionamento, mantenha sempre fechada a aba da
ventilação de ar.
Manuseie o filtro com cuidado
para que não se soltem fragmentos da superfície.
OK
SSSRRR!
HISSS!
BLUBB!
CLICK!
BRRR!
CRACK!
Page 53

PORTUGUÊS 53
CLICK!
BRRR!
BLUBB!
CLICK!
BRRR!
BLUBB!
HISSS!
HISSS!
Page 54

www.aeg.com
54
SSSRRR!
CRACK!
9. DADOS TÉCNICOS
Dimensão do nicho de
instalação
Altura 1225 mm
Largura 560 mm
Profundidade 550 mm
Tensão 230-240 V
Frequência 50 Hz
As informações técnicas encontram-se
na placa de características no lado es-
SSSRRR!
CRACK!
querdo do interior do aparelho e na etiqueta de energia.
10. PREOCUPAÇÕES AMBIENTAIS
Recicle os materiais que apresentem
o símbolo
nos contentores indicados para
reciclagem.
Ajude a proteger o ambiente e a
saúde pública através da reciclagem
. Coloque a embalagem
de aparelhos eléctricos e
electrónicos. Não elimine os
aparelhos que tenham o símbolo
juntamente com os resíduos
domésticos. Coloque o produto num
ponto de recolha para reciclagem
Page 55

local ou contacte as suas
autoridades municipais.
PORTUGUÊS 55
Page 56

www.aeg.com
56
ÍNDICE DE MATERIAS
1. INFORMACIÓN SOBRE SEGURIDAD . . . . . . . . . . . . . . . . . . . . . . . . . . . . . . . . . . . . . . . . 57
2. PANEL DE MANDOS . . . . . . . . . . . . . . . . . . . . . . . . . . . . . . . . . . . . . . . . . . . . . . . . . . . . . . 59
3. USO DIARIO . . . . . . . . . . . . . . . . . . . . . . . . . . . . . . . . . . . . . . . . . . . . . . . . . . . . . . . . . . . . . 61
4. CONSEJOS ÚTILES . . . . . . . . . . . . . . . . . . . . . . . . . . . . . . . . . . . . . . . . . . . . . . . . . . . . . . . 65
5. MANTENIMIENTO Y LIMPIEZA . . . . . . . . . . . . . . . . . . . . . . . . . . . . . . . . . . . . . . . . . . . . . 66
6. QUÉ HACER SI… . . . . . . . . . . . . . . . . . . . . . . . . . . . . . . . . . . . . . . . . . . . . . . . . . . . . . . . . . 67
7. INSTALACIÓN . . . . . . . . . . . . . . . . . . . . . . . . . . . . . . . . . . . . . . . . . . . . . . . . . . . . . . . . . . . 69
8. RUIDOS . . . . . . . . . . . . . . . . . . . . . . . . . . . . . . . . . . . . . . . . . . . . . . . . . . . . . . . . . . . . . . . . . 71
9. DATOS TÉCNICOS . . . . . . . . . . . . . . . . . . . . . . . . . . . . . . . . . . . . . . . . . . . . . . . . . . . . . . . . 73
10. ASPECTOS MEDIOAMBIENTALES . . . . . . . . . . . . . . . . . . . . . . . . . . . . . . . . . . . . . . . . . . . 73
PARA OBTENER RESULTADOS PERFECTOS
Gracias por escoger este producto AEG. Este artículo ha sido creado para ofrecer un
rendimiento impecable durante muchos años, con innovadoras tecnologías que facilitarán su
vida y prestaciones que probablemente no encuentre en electrodomésticos corrientes. Por
favor, dedique algunos minutos a la lectura para disfrutar de todas sus ventajas.
Visite nuestro sitio web para:
Obtener consejos, folletos, soluciones a problemas e información de servicio:
www.aeg.com
Registrar su producto para recibir un mejor servicio:
www.aeg.com/productregistration
Adquirir accesorios, artículos de consumo y recambios originales para su aparato:
www.aeg.com/shop
ATENCIÓN Y SERVICIO AL CLIENTE
Le recomendamos que utilice recambios originales.
Al contactar con el Servicio, cerciórese de tener la siguiente información a mano.
La información se puede encontrar en la placa de características. Modelo, PNC, Número de
serie.
Advertencia - Precaución-Información sobre seguridad.
Datos y recomendaciones generales
Información medioambiental
Salvo modificaciones.
Page 57

ESPAÑOL 57
1.
INFORMACIÓN SOBRE SEGURIDAD
Por su seguridad y para garantizar el funcionamiento correcto del aparato, antes
de instalarlo y utilizarlo por primera vez
lea atentamente este manual del usuario, incluidos los consejos y advertencias.
Para evitar errores y accidentes, es importante que todas las personas que utilicen el aparato estén perfectamente al
tanto de su funcionamiento y de las características de seguridad. Conserve estas instrucciones y no olvide mantenerlas
junto al aparato en caso de su desplazamiento o venta para que quienes lo utilicen a lo largo de su vida útil dispongan
siempre de la información adecuada sobre el uso y la seguridad.
Por la seguridad de personas y bienes,
siga las normas de seguridad indicadas
en estas instrucciones, ya que el fabricante no se hace responsable de daños
provocados por omisiones.
1.1 Seguridad de niños y
personas vulnerables
• Este electrodoméstico no está diseñado para que lo usen personas (incluidos niños) con discapacidad física,
sensorial o mental, o con experiencia
y conocimiento insuficientes, a menos
que una persona responsable de su
seguridad les supervise o instruya en
el uso del electrodoméstico.
No permita que los niños jueguen con
el electrodoméstico.
• Mantenga los materiales de embalaje
alejados de los niños. Existe riesgo de
asfixia.
• Si va a desechar el aparato, extraiga el
enchufe de la toma, corte el cable de
conexión (tan cerca del aparato como
pueda) y retire la puerta para impedir
que los niños al jugar puedan sufrir
descargas eléctricas o quedar atrapados en su interior.
• Si este aparato, que cuenta con juntas
de puerta magnéticas, sustituirá a un
aparato más antiguo con cierre de
muelle (pestillo) en la puerta, cerciórese de inutilizar el cierre de muelle antes de desechar el aparato antiguo.
Evitará así que se convierta en una
trampa mortal para niños.
1.2 Instrucciones generales de
seguridad
ADVERTENCIA
Mantenga libres de obstrucciones las
aberturas de ventilación del alojamiento
del aparato o de la estructura empotrada
• El aparato está diseñado para conservar los alimentos y bebidas de una vivienda normal, como se explica en este folleto de instrucciones.
• No utilice dispositivos mecánicos ni
medios artificiales para acelerar el
proceso de descongelación.
• No utilice otros aparatos eléctricos
(como máquinas para hacer helados)
dentro de los aparatos de refrigeración, a menos que el fabricante haya
autorizado su utilización para estos fines.
• No dañe el circuito del refrigerante.
• El circuito del refrigerante del aparato
contiene isobutano (R600a). Se trata
de un gas natural con un alto nivel de
compatibilidad medioambiental, aunque es inflamable.
Durante el transporte y la instalación
del aparato, cerciórese de no provocar daños en el circuito de refrigeración.
Si el circuito de refrigeración se daña:
– mantenga el aparato alejado de las
llamas y de cualquier fuente de encendido
– ventile bien la habitación en la que
se encuentra el aparato
• Es peligroso alterar las especificaciones o modificar este producto en modo alguno. Cualquier daño en el cable
de alimentación puede provocar un
cortocircuito, un incendio o una descarga eléctrica.
Page 58

www.aeg.com
58
ADVERTENCIA
Los componentes eléctricos (cable de alimentación, enchufe,
compresor) debe sustituirlos un
técnico autorizado o personal de
reparaciones profesional a fin de
evitar riesgos.
1.
El cable de alimentación no se debe prolongar.
2.
Compruebe que la parte posterior
del aparato no aplaste ni dañe el
enchufe. Un enchufe aplastado o
dañado puede recalentarse y provocar un incendio.
3.
Cerciórese de que tiene acceso al
enchufe del aparato.
4.
No tire del cable de alimentación.
5.
Si la toma de red está floja, no introduzca el enchufe. Existe riesgo
de descarga eléctrica o incendio.
6.
No utilice el aparato sin la tapa de
la bombilla (si está provisto de
ella) de iluminación interior.
• Este aparato es pesado. Debe tener
precauciones durante su desplazamiento.
• No retire ni toque elementos del compartimento congelador con las manos
húmedas o mojadas, ya que podría
sufrir abrasión de la piel o quemaduras por congelación.
• Evite la exposición prolongada del
aparato a la luz solar directa.
• Las bombillas que se utilizan en este
aparato (si está provisto de ellas) son
especiales, y se han seleccionado exclusivamente para uso en aparatos domésticos. No pueden utilizarse para la
iluminación de la vivienda.
1.3 Uso diario
• No coloque recipientes calientes sobre las piezas plásticas del aparato.
• No almacene gas ni líquido inflamable
en el aparato, ya que podrían estallar.
• No coloque alimentos directamente
contra la salida de aire de la pared
posterior. (Si el aparato es No Frost,
es decir, no acumula escarcha.)
• Los alimentos que se descongelen no
deben volver a congelarse.
• Guarde los alimentos congelados, que
se adquieren ya envasados, siguiendo
las instrucciones del fabricante.
• Se deben seguir estrictamente las recomendaciones del fabricante del
aparato sobre el almacenamiento.
Consulte las instrucciones correspondientes.
• No coloque bebidas carbonatadas o
con gas en el congelador, ya que se
genera presión en el recipiente, que
podría estallar y dañar el aparato.
• Si se consumen polos helados retirados directamente del aparato, se pueden sufrir quemaduras causadas por el
hielo.
1.4 Cuidado y limpieza
• Antes de realizar tareas de mantenimiento, apague el aparato y desconecte el enchufe de la toma de red.
• No limpie el aparato con objetos metálicos.
• No utilice objetos afilados para eliminar el hielo del aparato. Utilice un raspador plástico.
• Inspeccione habitualmente el desagüe
del agua descongelada del frigorífico.
Si es necesario, limpie el desagüe. Si
el desagüe se bloquea, el agua se
acumulará en la base del aparato.
1.5 Instalación
Para realizar la conexión eléctrica, siga atentamente las instrucciones de los párrafos correspondientes.
• Desembale el aparato y compruebe
que no tiene daños. No conecte el
aparato si está dañado. Informe de los
posibles daños de inmediato a la tienda donde lo adquirió. En ese caso,
conserve el material de embalaje.
• Es recomendable esperar al menos
dos horas antes de conectar el aparato, para permitir que el aceite regrese
al compresor.
• El aparato debe contar con circulación
de aire adecuada alrededor, ya que
de lo contrario se produce recalentamiento. Para conseguir una ventilación
suficiente, siga las instrucciones correspondientes a la instalación.
Page 59

• Siempre que sea posible, la parte posterior del producto debe estar contra
una pared, para evitar que se toquen
las partes calientes (compresor, condensador) y se produzcan quemaduras.
• El aparato no debe colocarse cerca de
radiadores ni de hornillas de cocina.
• Asegúrese de que es posible acceder
al enchufe después de instalar el electrodoméstico.
• Realice la conexión sólo a un suministro de agua potable (si está prevista
una conexión de agua).
1.6 Servicio técnico
• Un electricista homologado deberá
realizar las tareas que se requieran para ejecutar el servicio o mantenimiento de este electrodoméstico.
• Las reparaciones de este aparato debe realizarlas un centro de servicio
2. PANEL DE MANDOS
ESPAÑOL 59
técnico autorizado y sólo se deben
utilizar recambios originales.
1.7 Protección del medio
ambiente
Este aparato no contiene gases
perjudiciales para la capa de
ozono, ni en el circuito de refrigerante ni en los materiales aislantes. El aparato no se debe desechar junto con los residuos urbanos. La espuma aislante contiene gases inflamables: el aparato se debe desechar de acuerdo
con la normativa vigente, que
puede solicitar a las autoridades
locales. No dañe la unidad de refrigeración, en especial la parte
trasera, cerca del intercambiador
de calor. Los materiales de este
aparato marcados con el símbolo
son reciclables.
56 4 3 2
Pantalla
1
Tecla de calentamiento de tempera-
2
tura
Tecla de enfriamiento de temperatu-
3
ra
Tecla OK
4
Tecla Mode
5
Tecla ON/OFF
6
Se puede cambiar el sonido predefinido
de las teclas a otro más alto manteniendo pulsadas al mismo tiempo la tecla
Mode y la de enfriamiento de temperatura durante unos segundos. El cambio
es reversible.
1
2.1 Pantalla
5 62 431
Función de temporizador
1
Función COOLMATIC
2
Función Minute Minder
3
Función de bloqueo de seguridad
4
para niños
Indicador de alarma
5
Indicador de temperatura
6
Page 60

www.aeg.com
60
2.2 Encendido
Para encender el aparato realice los siguientes pasos:
1.
Conecte el enchufe a la toma de corriente.
2.
Pulse la tecla ON/OFF si la pantalla
está apagada.
3.
Si "dEMo" aparece en la pantalla, el
aparato está en el modo de demostración. Consulte el apartado "Qué
hacer si...".
4.
Los indicadores de temperatura
muestran la temperatura predeter-
minada programada.
Para programar otra temperatura, consulte la sección "Regulación de la temperatura".
2.3 Apagado
Para apagar el aparato:
1.
Pulse la tecla ON/OFF durante 5 se-
gundos.
2.
La pantalla se apaga.
3.
Para desconectar el aparato de la
corriente, desconecte el enchufe de
la toma de corriente.
2.4 Regulación de la
temperatura
La temperatura programada en el frigorífico puede ajustarse pulsando la tecla
de temperatura.
Ajuste de la temperatura predeterminada: +5°C para el frigorífico.
El indicador de temperatura muestra la
temperatura programada.
La temperatura programada se alcanza
en un plazo de 24 horas.
Después de un corte del suministro eléctrico, la temperatura ajustada se guarda.
2.5 Función Minute Minder
La función Minute Minder debe utilizarse
para ajustar una alarma acústica a la hora deseada, algo útil por ejemplo para
recetas en las que una mezcla debe enfriarse durante un tiempo determinado.
Para activar la función:
1.
Pulse la tecla Mode hasta que apa-
rezca el icono correspondiente.
El indicador Minute Minder parpadea.
El temporizador muestra el tiempo
programado (30 minutos) durante
unos segundos.
2.
Pulse la tecla de ajuste del temporizador para programar un valor entre
1 y 90 minutos.
3.
Pulse la tecla OK para confirmar.
Aparece el indicador Minute Min-
der .
El Temporizador empieza a parpa-
dear (min).
Al terminar la cuenta atrás, el indicador
Minute Minder parpadea y suena la alarma:
1.
pulse la tecla OK para apagar el so-
nido y desactivar la función.
La función se puede desactivar en cualquier momento durante la cuenta atrás:
1.
Pulse la tecla Mode hasta que par-
padee el indicador Minute Minder .
2.
Pulse la tecla OK para confirmar.
3.
El indicador Minute Minder se apa-
ga.
El tiempo puede modificarse en cualquier momento durante la cuenta atrás y
al finalizar, pulsando las teclas de enfriamiento o calentamiento de temperatura.
2.6 Función Seguro contra la
manipulación por niños
Para bloquear los botones y evitar manipulaciones involuntarias, seleccione la
función de seguro para niños.
Para encender el horno:
1.
Pulse la tecla Mode hasta que apa-
rezca el icono correspondiente.
2.
El indicador de bloqueo para niños
parpadea.
3.
Pulse la tecla OK para confirmar.
Aparece el indicador de bloqueo
para niños.
Para apagar la función:
1.
Pulse la tecla Mode hasta que el blo-
queo para niños parpadee.
2.
Pulse la tecla OK para confirmar.
3.
El indicador de bloqueo para niños
se apaga.
Page 61

2.7 Función COOLMATIC
Si necesita introducir una gran cantidad
de alimentos calientes, por ejemplo,
después de haber hecho la compra, se
aconseja activar la función COOLMATIC
para enfriarlos más rápidamente y evitar
que suba la temperatura de los que ya
se guardan en el frigorífico.
Para activar la función:
1.
Pulse la tecla Mode hasta que aparezca el icono correspondiente.
El indicador COOLMATIC parpadea.
2.
Pulse la tecla OK para confirmar.
Aparece el indicador COOLMATIC.
La función COOLMATIC se desactiva automáticamente después de unas 6 horas.
Para apagar la función antes de que termine automáticamente:
1.
Pulse la tecla Mode hasta que par-
padee el indicador COOLMATIC.
3. USO DIARIO
3.1 Limpieza del interior
Antes de utilizar el aparato por primera
vez, lave el interior y los accesorios internos con agua templada y un jabón neutro para eliminar el típico olor de los
productos nuevos. A continuación seque
bien.
No utilice detergentes ni polvos
abrasivos, ya que podrían dañar
el acabado.
ESPAÑOL 61
2.
Pulse la tecla OK para confirmar.
3.
El indicador COOLMATIC se apaga.
La función se apaga seleccionando una temperatura programada
diferente.
2.8 Alarma de puerta abierta
Si la puerta se queda abierta durante
unos minutos, sonará una señal acústica.
Los indicadores de puerta abierta son
los siguientes:
• indicador de alarma intermitente
• señal acústica
Una vez restablecidas las condiciones
normales (puerta cerrada), la alarma
acústica se detendrá.
La señal acústica se puede desactivar
durante la fase de alarma pulsando para
ello cualquier tecla.
Si "dEMo" aparece en la pantalla, el
aparato está en el modo de demostración: consulte el apartado “Qué hacer
si….”.
3.2 Estantes móviles
Las paredes del frigorífico cuentan con
una serie de guías para colocar los estantes del modo que se prefiera.
Para aprovechar mejor el espacio, los estantes frontales más pequeños pueden
colocarse encima de los traseros.
Page 62

www.aeg.com
62
3.3 Colocación de los estantes
de la puerta
Para poder guardar alimentos de distintos tamaños, los estantes de la puerta se
pueden colocar a diferentes alturas.
3.4 Filtro de carbón
CLEANAIR CONTROL
3.5 LONGFRESH de
detergente
En el compartimento LONGFRESH 0°C
la temperatura se controla automáticamente. Permanece constante a unos
0°C, sin que sea necesario realizar ningún ajuste.
La temperatura constante de almacenamiento a unos 0°C y la humedad relativa
de entre 45 y 90 % ofrecen las condiciones óptimas para las distintas clases de
alimentos.
Por lo tanto, puede guardar toda una variedad de alimentos frescos en el compartimento LONGFRESH 0°C , donde
El aparato lleva un filtro de carbón
CLEANAIR CONTROL situado detrás de
una compuerta ubicada en la parte posterior del compartimento frigorífico.
El filtro purifica el aire, elimina los malos
olores del compartimento frigorífico y
del compartimento LONGFRESH y mejora la calidad de conservación de los
alimentos.
Mantenga siempre cerrada la compuerta
de ventilación durante el funcionamiento.
durarán hasta 3 veces más con mejor calidad que en compartimentos normales
del frigorífico. De esta forma podrá almacenar más alimentos frescos. El sabor, el grado de frescura, la calidad y las
propiedades nutritivas (vitaminas y minerales) se conservan perfectamente. La
pérdida de peso de las verduras y las
frutas se reduce. Los alimentos presentan un mayor grado de valor nutricional.
El compartimento LONGFRESH 0°C
también es adecuado para descongelar
alimentos.
En tal caso, los alimentos descongelados no deben guardarse más de dos
días.
Page 63

3.6 Control de humedad
3.7 Cajón
ESPAÑOL 63
Pueden usarse ambos cajones de
acuerdo con las condiciones de almacenamiento deseadas, siendo un cajón independiente del otro, con mayor o menor humedad.
La regulación de cada cajón es independiente y se controla con la válvula
deslizante de la parte frontal.
• “Seco”: baja humedad del aire, hasta
el 50% de humedad relativa
Este nivel de humedad se obtiene
deslizando ambos pestillos a la posi-
y las aberturas de ventilación
ción
totalmente abiertas.
• “Húmedo”: alta humedad relativa,
hasta el 90%
Este nivel de humedad se obtiene
deslizando ambos pestillos a la posi-
ción
ción cerradas. La humedad se mantiene y no puede salir.
y las aberturas de ventila-
3.8 Tiempo de
almacenamiento en el
compartimento Longfresh 0°C
de alimentos frescos
Las bandejas de rejilla del interior de los
cajones permiten que el aire circule libremente y por lo tanto una mejor conservación de los alimentos.
El compartimento dispone de topes para evitar que los cajones se caigan cuando se extienden totalmente.
Para retirar los cajones (p. ej., con fines
de limpieza), sáquelos hasta el tope, levántelos y extráigalos.
Page 64

www.aeg.com
64
Tipo de alimento Ajuste de la humedad
del aire
Cebollas
Mantequilla
Cortes de cerdo gran-
"seco”
"seco”
"seco”
des
Vacuno, corzo/ciervo,
"seco”
cortes de cerdo pequeños, aves
Salsa de tomate
Pescado, marisco, car-
"seco”
"seco”
nes cocinadas
Marisco cocinado
Ensaladas, verduras
"seco”
“húmedo”
Zanahorias, hierbas, coles de Bruselas, apio
Alcachofas, coliflor, en-
“húmedo”
divias, lechuga iceberg,
endivias, canónigos, lechuga, puerros, achicoria
Brécol, col china, col ri-
“húmedo”
zada, repollo, rábanos,
berza de Saboya
Guisantes, colinabo
Cebolletas, rábanos, es-
“húmedo”
“húmedo”
párragos, espinacas
Frutas (cuanto más ma-
“húmedo”
dura esté la fruta, más
corto será el tiempo de
almacenamiento)
Peras, dátiles (frescos),
fresas, melocotones
Ciruelas (cuanto más
“húmedo”
madura esté la fruta,
más corto será el tiempo de almacenamiento)
ruibarbo, grosellas
Manzanas (no sensibles
“húmedo”
al frío), membrillos
Albaricoques, cerezas
Ciruelas, uvas
Moras, pasas
“húmedo”
“húmedo”
“húmedo”
Tiempo de almacenamiento
hasta 5 meses
hasta 1 mes
hasta 10 días
hasta 7 días
hasta 4 días
hasta 3 días
hasta 2 días
hasta 1 mes
hasta 21 días
hasta 14 días
hasta 10 días
hasta 7 días
hasta 1 mes
hasta 21 días
hasta 20 días
hasta 14 días
hasta 10 días
hasta 8 días
Page 65

ESPAÑOL 65
Tipo de alimento Ajuste de la humedad
del aire
Higos (frescos)
Arándanos, frambuesas
Los pasteles que contienen crema y otros tipos de repostería se
pueden guardar en el compartimento LongFresh a 0°C durante
2 ó 3 días.
No debe colocarse en el compartimento LongFresh 0°C:
• la fruta sensible al frío que deba guardarse en sótanos o a
temperatura ambiente, como
la piña, el plátanos, la uva, el
melón, el mango, la papaya, la
naranja, el limón o el kiwi.
• Los tipos de alimentos no
mencionados arriba deben
guardarse en el compartimento frigorífico (p. ej., todos los
tipos de queso, los embutidos,
etc.)
El nivel de humedad del aire en
los cajones depende del contenido de humedad de los alimentos
guardados, las verduras y las frutas, así como de la frecuencia de
apertura de la puerta
El compartimento LongFresh de
0°C también es adecuado para la
descongelación lenta de los alimentos. En este caso, el alimento descongelado se puede guardar en el compartimento LongFresh a 0°C hasta dos días.
“húmedo”
“húmedo”
• Preste atención a la frescura de los alimentos, especialmente a la fecha de
caducidad. La calidad y la frescura
afectan al tiempo de almacenamiento.
• La duración total del ciclo de almacenamiento dependerá de la condiciones de conservación practicadas antes
del almacenamiento final en el frigorífico.
• Los alimentos, las frutas o las verduras
deben siempre embalarse o taparse
antes de guardarse.
• Los alimentos de origen animal deben
guardarse siempre secos y embalados.
• Los alimentos ricos en proteínas se estropean antes. Esto significa que el
marisco se estropea antes que el pescado y éste antes que la carne. Al
guardar los alimentos en un compartimento a 0°C se puede aumentar el
tiempo de almacenamiento para ese
tipo de alimentos hasta tres veces sin
perder calidad.
• Todos los alimentos guardados en un
compartimento a 0°C deben sacarse
de los cajones unos 15-30 min antes
del consumo, especialmente la fruta y
las verduras para consumirse sin ningún proceso de cocción adicional. Si
se deja que las frutas y verduras recuperen la temperatura ambiente, mejorará la textura y el sabor.
Tiempo de almacenamiento
hasta 7 días
hasta 5 días
Consejos:
4. CONSEJOS ÚTILES
4.1 Consejos para ahorrar
energía
• No abra la puerta con frecuencia ni la
deje abierta más tiempo del estrictamente necesario.
• Si la temperatura ambiente es elevada, la temperatura del aparato se ha
ajustado en los valores más altos y es-
tá totalmente lleno, el compresor podría funcionar de manera continua,
provocando la formación de escarcha
o hielo en el evaporador. Si esto sucede, gire el regulador de temperatura a
valores inferiores para permitir la descongelación automática y ahorrar en
el consumo eléctrico.
Page 66

www.aeg.com
66
4.2 Consejos para la
refrigeración de alimentos
frescos
Para obtener los mejores resultados:
• no guarde en el frigorífico alimentos
calientes ni líquidos en evaporación;
• cubra o envuelva los alimentos, en especial si tienen sabores fuertes;
• coloque los alimentos de modo que el
aire pueda circular libremente entre
ellos.
4.3 Consejos para la
refrigeración
Consejos útiles:
Carne (de todo tipo): guárdela en bolsas
de plástico y colóquela en el estante de
vidrio, sobre el cajón de las verduras.
5. MANTENIMIENTO Y LIMPIEZA
Por razones de seguridad, guárdela de
ese modo durante uno o dos días, como
máximo.
Alimentos cocinados, platos fríos, etc..:
los debe cubrir y puede colocarlos en
cualquiera de los estantes.
Frutas y verduras: se deben limpiar a
conciencia y colocar en los cajones especiales suministrados a tal efecto.
Mantequilla y queso: colóquelos en recipientes herméticos especiales o envueltos en papel de aluminio o en bolsas de
plástico, para excluir tanto aire como sea
posible.
Botellas de leche: deben tener tapa y se
colocarán en el estante para botellas de
la puerta.
Los plátanos, las patatas, las cebollas y
los ajos, si no están empaquetados, no
deben guardarse en el frigorífico.
PRECAUCIÓN
Antes de realizar tareas de mantenimiento, desenchufe el aparato.
Este equipo contiene hidrocarburos en la unidad de refrigeración; por tanto, el mantenimiento y la recarga deben estar a cargo exclusivamente de técnicos
autorizados.
5.1 Limpieza periódica
El equipo debe limpiarse con cierta regularidad:
• limpie el interior y los accesorios con
agua templada y jabón neutro.
• revise y limpie periódicamente las juntas de la puerta para mantenerlas limpias y sin restos;
• aclare y seque a fondo.
No mueva, dañe ni tire de los
conductos o cables del interior
del armario.
No utilice detergentes, polvos
abrasivos, productos de limpieza
perfumados ni ceras para limpiar
el interior, ya que dañarán la superficie y dejarán un fuerte olor.
Limpie el condensador (rejilla negra) y el
compresor de la parte posterior del aparato con un cepillo. Esa operación mejorará el rendimiento del aparato y reducirá el consumo eléctrico.
La rejilla inferior, que separa el compartimento más frío del compartimento
LONGFRESH 0°C puede retirarse sólo
para su limpieza. Para retirarla, tire de la
rejilla hasta el fondo.
Las placas para cubrir situadas encima
de los cajones del compartimento deben retirarse sólo para su limpieza.
Para garantizar el perfecto funcionamiento del compartimento LONGFRESH
0°C , vuelva a colocar las placas para cubrir en su posición original una vez limpias.
Page 67

Tenga cuidado para no dañar el
sistema de refrigeración.
Muchas marcas de limpiadores de superficies de cocina contienen químicos
que pueden atacar o dañar los plásticos
del aparato. Por tal razón, se recomienda que el exterior del aparato se limpie
sólo con agua templada a la que se añadirá un poco de líquido lavavajillas.
Después de la limpieza, vuelva a conectar el aparato a la toma de red.
5.2 Sustitución del filtro de
carbón
Para garantizar un rendimiento óptimo
se recomienda cambiar el filtro de carbón una vez al año.
En la red de distribuidores autorizados
puede adquirir filtros de carbón nuevos.
Consulte las instrucciones del apartado
“Instalación del filtro de carbón”.
El filtro de aire es un accesorio consumible y no está cubierto por la garantía
5.3 Descongelación del
frigorífico
La descongelación del compartimento
frigorífico es automática.
ESPAÑOL 67
El agua que se forma fluye a un recipiente del compresor y se evapora. Este recipiente no se puede quitar.
5.4 Periodos sin
funcionamiento
Si el aparato no se utiliza durante un
tiempo prolongado, tome las siguientes
precauciones:
• desconecte el aparato de la red
eléctrica;
• extraiga todos los alimentos;
• descongele (si así está previsto) y limpie el aparato y todos sus accesorios.
• deje la puerta(s) entreabierta para prevenir olores desagradables.
Si va a mantener el armario en marcha,
solicite a alguien que lo inspeccione de
vez en cuando para evitar que los alimentos se echen a perder en caso de un
corte de energía.
6. QUÉ HACER SI…
ADVERTENCIA
Antes de realizar cualquier reparación, desenchufe el aparato de
la toma de corriente.
Sólo un electricista o un técnico
profesional debe llevar a cabo
cualquier reparación que no figure en este manual.
Problema Posible causa Solución
El aparato hace rui-doEl aparato no está bien
apoyado en el suelo.
Compruebe que los soportes del aparato descansan
sobre una superficie estable (las cuatro patas deben
estar bien apoyadas en el
suelo).
Page 68

www.aeg.com
68
Problema Posible causa Solución
El aparato no funcio-
El aparato está apagado. Encienda el aparato.
na. La bombilla no
funciona.
El aparato no está correc-
tamente enchufado a la
toma de corriente.
El aparato no recibe su-
ministro eléctrico. No hay
tensión en la toma de corriente.
Enchufe el aparato correctamente a la toma de corriente.
Enchufe un aparato eléctrico diferente a la toma de
corriente.
Llame a un electricista cualificado.
La bombilla no funciona.
La bombilla es defectuo-
El compresor funciona continuamente.
La puerta no está bien ce-
La puerta se ha abierto
La bombilla está en espera.
sa.
La temperatura no se ha
ajustado correctamente.
rrada.
con excesiva frecuencia.
Cierre y abra la puerta.
Consulte la sección "Cambio de la bombilla".
Seleccione una temperatura más alta.
Consulte la sección "Cierre de la puerta".
No mantenga abierta la
puerta más tiempo del necesario.
La temperatura de los ali-
mentos es demasiado alta.
Deje que la temperatura
de los alimentos descienda a la temperatura ambiente antes de guardarlos.
La temperatura ambiente
es demasiado alta.
El compresor no se
pone en marcha in-
Esto es normal y no significa que exista un error.
mediatamente des-
Reduzca la temperatura
ambiente.
El compresor se pone en
marcha después de un
cierto tiempo.
pués de pulsar el interruptor COOLMATIC o tras cambiar la
temperatura.
El agua fluye por la
placa posterior del
frigorífico.
Durante el proceso de
descongelación automática, el hielo se descongela
Esto es normal.
en la placa posterior.
La temperatura del
aparato es demasiado baja/alta.
La puerta no está bien ce-
El regulador de temperatura no se ha ajustado correctamente.
rrada.
Seleccione una temperatura más alta o baja.
Consulte la sección "Cierre de la puerta".
Page 69

Problema Posible causa Solución
La temperatura de los ali-
mentos es demasiado alta.
Deje que la temperatura
de los alimentos descienda a la temperatura ambiente antes de guardarlos.
Se han guardado muchos
alimentos al mismo tiem-
Guarde menos productos
al mismo tiempo.
po.
La temperatura del
frigorífico es demasiado alta.
En la pantalla de
temperatura aparece
un cuadrado superior o inferior.
No hay circulación de aire
frío en el aparato.
Se ha producido un error
en la medición de la temperatura
Compruebe que el aire frío
circula libremente en el
aparato.
Póngase en contacto con
su servicio técnico (el sistema de refrigeración seguirá manteniendo fríos los
alimentos, pero no podrá
ajustar la temperatura).
dEMo aparece en la
pantalla.
El aparato está en modo
de demostración (dEMo).
Mantenga pulsada aproximadamente 10 s la tecla
OK; se escucha un largo
sonido del zumbador y la
pantalla se apaga brevemente: el aparato empieza
a funcionar con normalidad.
2.
6.1 Cambio de la bombilla
El aparato está equipado con una luz
LED interior de larga duración.
El dispositivo de iluminación sólo debe
ser sustituido por el servicio técnico.
Póngase en contacto con el servicio técnico.
Si es necesario, ajuste la puerta.
Consulte "Instalación".
3.
Si es necesario, cambie las juntas
defectuosas. Póngase en contacto
con el servicio técnico.
ESPAÑOL 69
6.2 Cierre de la puerta
1.
Limpie las juntas de la puerta.
7. INSTALACIÓN
ADVERTENCIA
Antes de instalar el aparato, lea
atentamente el apartado "Información sobre seguridad" para
garantizar su propia seguridad y
el funcionamiento correcto del
aparato.
7.1 Colocación
ADVERTENCIA
Si va a desechar un aparato antiguo que tiene una cerradura o
cierre en la puerta, deberá asegurarse de su inutilización para
impedir que niños pequeños
queden atrapados en su interior.
Page 70

www.aeg.com
70
El enchufe del aparato debe tener fácil acceso después de la
instalación.
Instale el aparato en un punto en el que
la temperatura ambiente se corresponda
con la clase climática indicada en la placa de datos técnicos del aparato:
Clase
Temperatura ambiente
climática
SN De +10°C a +32°C
N De +16°C a +32°C
ST De +16°C a +38°C
T De +16°C a +43°C
7.2 Conexión eléctrica
Antes de conectar el aparato, compruebe que el voltaje y la frecuencia que
7.3 Requisitos de ventilación
aparecen en la placa de datos técnicos
se corresponden con el suministro de la
vivienda.
El aparato debe tener conexión a tierra.
El enchufe del cable de alimentación se
suministra con un contacto para tal fin. Si
la toma de red de la vivienda carece de
conexión a tierra, conecte el aparato a
una toma de tierra conforme con la normativa, después de consultar a un electricista profesional.
El fabricante rechaza toda responsabilidad si no se toman las precauciones antes indicadas.
Este aparato es conforme con las directivas de la CEE.
5 cm
min.
200 cm
El aire debe poder circular libremente
2
min.
200 cm
por la parte posterior del aparato.
2
Page 71

7.4 Instalación del filtro de carbón
ESPAÑOL 71
8. RUIDOS
1
2
El aparato cuenta con un filtro de carbón activo que absorbe los malos olores, conserva el sabor y el aroma de los
alimentos en condiciones de mantenimiento óptimas y evita la contaminación cruzada de olores.
El filtro de carbón se suministra en una
bolsa de plástico que garantiza su duración e integridad. El filtro se debe colocar detrás de la compuerta antes de
poner en marcha el aparato.
1.
Tire de la compuerta (1).
2.
Saque el filtro de la bolsa de plástico.
3.
Introduzca el filtro en la ranura que
hay en el reverso de la compuerta
(2).
4.
Cierre la compuerta.
Mantenga siempre cerrada la
compuerta de ventilación durante el funcionamiento.
Manipule el filtro con cuidado
para que no se desprendan
fragmentos de su superficie.
Durante el funcionamiento normal del
aparato suelen producirse ciertos ruidos
(compresor, circulación del refrigerante).
OK
SSSRRR!
HISSS!
BLUBB!
CLICK!
BRRR!
CRACK!
Page 72

www.aeg.com
72
CLICK!
BRRR!
BLUBB!
CLICK!
BRRR!
BLUBB!
HISSS!
HISSS!
Page 73

ESPAÑOL 73
SSSRRR!
CRACK!
9. DATOS TÉCNICOS
Medidas de la cavidad
Altura 1225 mm
Anchura 560 mm
Fondo 550 mm
Voltaje 230-240 V
Frecuencia 50 Hz
La información técnica se encuentra en
la placa de datos técnicos en el lado in-
SSSRRR!
CRACK!
terior izquierdo del aparato y en la etiqueta de energía.
10. ASPECTOS MEDIOAMBIENTALES
Recicle los materiales con el símbolo
. Coloque el material de embalaje
en los contenedores adecuados para
su reciclaje.
Ayude a proteger el medio ambiente
y la salud pública, así como a reciclar
residuos de aparatos eléctricos y
electrónicos. No deseche los
aparatos marcados con el símbolo
junto con los residuos domésticos.
Lleve el producto a su centro de
reciclaje local o póngase en contacto
con su oficina municipal.
Page 74

www.aeg.com
74
Page 75

ESPAÑOL 75
Page 76

www.aeg.com/shop
222354225-A-132012
 Loading...