

Page 1

SKD71800F0
REFRIGERATOR USER MANUAL 2
EN
FRIGORIFERO ISTRUZIONI PER L’USO 18
IT
RU
ХОЛОДИЛЬНИК ИНСТРУКЦИЯ ПО
FRIGORÍFICO MANUAL DE INSTRUCCIONES 51
ES
ЭКСПЛУАТАЦИИ
34
Page 2

2
FOR PERFECT RESULTS
Thank you for choosing this AEG product. We have
created it to give you impeccable performance for many
years, with innovative technologies that help make life
simpler – features you might not find on ordinary
appliances. Please spend a few minutes reading to get
the very best from it.
ACCESSORIES AND CONSUMABLES
In the AEG webshop, you’ll find everything you need to
keep all your AEG appliances looking spotless and
working perfectly. Along with a wide range of
accessories designed and built to the high quality
standards you would expect, from specialist cookware
to cutlery baskets, from bottle holders to delicate
laundry bags…
Visit the webshop at:
www.aeg-electrolux.com/shop
Page 3

CONTENTS
Contents
4 Safety information
6 Control panel
10 First use
10 Daily use
12 Helpful hints and tips
13 Care and Cleaning
14 What to do if…
16 Technical data
16 Installation
17 Environmental concerns
3
The following symbols are used in this
user manual:
Important information concerning
your personal safety and information
on how to avoid damaging the
appliance.
General information and tips
Environmental information
Subject to change without notice
Page 4

Safety information
4
SAFETY INFORMATION
In the interest of your safety and to ensure the correct use, before installing and first
using the appliance, read this user manual carefully, including its hints and warnings. To
avoid unnecessary mistakes and accidents, it is important to ensure that all people using
the appliance are thoroughly familiar with its operation and safety features. Save these
instructions and make sure that they remain with the appliance if it is moved or sold, so
that everyone using it through its life will be properly informed on appliance use and safety.
For the safety of life and property keep the precautions of these user's instructions as the
manufacturer is not responsible for damages caused by omission.
Children and vulnerable people safety
• This appliance is not intended for use by persons (including children) with reduced
physical, sensory or mental capabilities, or lack of experience and knowledge, unless
they have been given supervision or instruction concerning use of the appliance by a
person responsible for their safety.
Children should be supervised to ensure that they do not play with the appliance.
• Keep all packaging well away from children. There is risk of suffocation.
• If you are discarding the appliance pull the plug out of the socket, cut the connection
cable (as close to the appliance as you can) and remove the door to prevent playing
children to suffer electric shock or to close themselves into it.
• If this appliance featuring magnetic door seals is to replace an older appliance having
a spring lock (latch) on the door or lid, be sure to make that spring lock unusable before you discard the old appliance. This will prevent it from becoming a death trap for
a child.
General safety
CAUTION!
Keep ventilation openings clear of obstruction.
• The appliance is intended for keeping foodstuff and/or beverages in a normal household as explained in this instruction booklet.
• Do not use a mechanical device or any artificial means to speed up the thawing process.
• Do not use other electrical appliances (such as ice cream makers) inside of refrigerating appliances, unless they are approved for this purpose by the manufacturer.
• Do not damage the refrigerant circuit.
• The refrigerant isobutane (R600a) is contained within the refrigerant circuit of the appliance, a natural gas with a high level of environmental compatibility, which is nevertheless flammable.
During transportation and installation of the appliance, be certain that none of the
components of the refrigerant circuit become damaged.
If the refrigerant circuit should become damaged:
– avoid open flames and sources of ignition
– thoroughly ventilate the room in which the appliance is situated
Page 5

Safety information
• It is dangerous to alter the specifications or modify this product in any way. Any damage to the cord may cause a short-circuit, fire and/or electric shock.
WARNING!
Any electrical component (power cord, plug, compressor) must be replaced by a certified
service agent or qualified service personnel.
1. Power cord must not be lengthened.
2. Make sure that the power plug is not squashed or damaged by the back of the
appliance. A squashed or damaged power plug may overheat and cause a fire.
3. Make sure that you can come to the mains plug of the appliance.
4. Do not pull the mains cable.
5. If the power plug socket is loose, do not insert the power plug. There is a risk of
electric shock or fire.
6.
You must not operate the appliance without the lamp cover
1)
of interior lighting.
• This appliance is heavy. Care should be taken when moving it.
• Do not remove nor touch items from the freezer compartment if your hands are damp/
wet, as this could cause skin abrasions or frost/freezer burns.
• Avoid prolonged exposure of the appliance to direct sunlight.
•
Bulb lamps
2)
used in this appliance are special purpose lamps selected for household
appliances use only. They are not suitable for household room illumination.
Daily use
• Do not put hot pot on the plastic parts in the appliance.
• Do not store flammable gas and liquid in the appliance, because they may explode.
• Appliance's manufacturers storage recommendations should be strictly adhered to. Refer to relevant instructions.
5
Care and cleaning
• Before maintenance, switch off the appliance and disconnect the mains plug from the
mains socket.
• Do not clean the appliance with metal objects.
• Regularly examine the drain in the refrigerator for defrosted water. If necessary, clean
the drain. If the drain is blocked, water will collect in the bottom of the appliance.
Installation
For electrical connection carefully follow the instructions given in specific paragraphs.
• Unpack the appliance and check if there are damages on it. Do not connect the appliance if it is damaged. Report possible damages immediately to the place you bought
it. In that case retain packing.
• It is advisable to wait at least four hours before connecting the appliance to allow the
oil to flow back in the compressor.
1) If the lamp cover is foreseen.
2) If the lamp is foreseen.
Page 6

Control panel
6
• Adequate air circulation should be around the appliance, lacking this leads to overheating. To achieve sufficient ventilation follow the instructions relevant to installation.
• Wherever possible the back of the product should be against a wall to avoid touching
or catching warm parts (compressor, condenser) to prevent possible burn.
• The appliance must not be located close to radiators or cookers.
• Make sure that the mains plug is accessible after the installation of the appliance.
•
Connect to potable water supply only.
3)
Service
• Any electrical work required to do the servicing of the appliance should be carried out
by a qualified electrician or competent person.
• This product must be serviced by an authorized Service Centre, and only genuine spare
parts must be used.
Environment Protection
This appliance does not contain gasses which could damage the ozone layer, in either its
refrigerant circuit or insulation materials. The appliance shall not be discarded together
with the urban refuse and rubbish. The insulation foam contains flammable gases: the
appliance shall be disposed according to the applicable regulations to obtain from your
local authorities. Avoid damaging the cooling unit, especially at the rear near the heat
exchanger. The materials used on this appliance marked by the symbol
are recyclable.
CONTROL PANEL
1 2 3 4 5 6
1 ON/OFF button
2 Mode button
3 OK button
4 Temperature colder button
5 Temperature warmer button
6 Display
It is possible to change predefined sound of buttons to a loudly one by pressing together
Mode button and Temperature colder button for some seconds. Change is reversible.
3) If a water connection is foreseen.
Page 7

Display
78
5 64321
1 Timer function
2 DYNAMICAIR function
3 Minute Minder function
4 Child Lock function
5 Alarm indicator
6 Temperature indicator
7 Holiday function
8 COOLMATIC function
Switching on
To switch on the appliance do these steps:
1. Connect the mains plug to the power socket.
2. Press the ON/OFF button if the display is off.
3. The alarm buzzer could operate after few seconds.
To reset the alarm refer to "High temperature alarm".
4. The temperature indicators show the set default temperature.
To select a different set temperature refer to "Temperature regulation".
Control panel
7
Switching off
To switch off the appliance do these steps:
1. Press the ON/OFF button for 5 seconds.
2. The display switches off.
3. To disconnect the appliance from the power disconnect the mains plug from the pow-
er socket.
Temperature regulation
The set temperature of the fridge may be adjusted by pressing the temperature button.
Set default temperature:
• +5°C for the fridge
The temperature indicator shows the set temperature.
The set temperature will be reached within 24 hours.
After a power failure the set temperature remains stored.
DYNAMICAIR function
To switch on the function:
1. Press the Mode button until the corresponding icon appears.
Page 8

Control panel
8
The DYNAMICAIR indicator flashes.
2. Press the OK button to confirm.
The DYNAMICAIR indicator is shown.
To switch off the function:
1. Press the Mode button until the DYNAMICAIR indicator flashes.
2. Press the OK button to confirm.
3. The DYNAMICAIR indicator goes off.
If the function is activated automatically the DYNAMICAIR indicator is not shown (refer
to "Daily use").
The activation of the DYNAMICAIR function increase the energy consumption.
Minute Minder function
The Minute Minder function is to be used to set an acoustic alarm at the preferred time,
useful for example when a recipe requires to cool down a mixture for a certain lenght of
time.
To switch on the function:
1. Press the Mode button until the corresponding icon appears.
The Minute Minder indicator flashes.
The Timer shows the set value (30 minutes) for a few seconds.
2. Press the Timer regulator button to change the Timer set value from 1 to 90 minutes.
3. Press the OK button to confirm.
The Minute Minder indicator is shown.
The Timer start to flash (min).
At the end of the countdown the Minute Minder indicator flashes and an audible alarm
sounds:
1. Switch off the function.
To switch off the function:
1. Press the Mode button until the Minute Minder indicator flashes.
2. Press the OK button to confirm.
3. The Minute Minder indicator goes off.
It is possible to deactivate the function at any time.
It is possible to change the time at any time and before the end by pressing the Temperature colder button and the Temperature warmer button.
Child Lock function
To lock the buttons from unintentional operation select the Child Lock function.
To switch on the function:
1. Press the Mode button until the corresponding icon appears.
2. The Child Lock indicator flashes.
3. Press the OK button to confirm.
The Child Lock indicator is shown.
To switch off the function:
Page 9
Control panel
1. Press the Mode button until the Child Lock indicator flashes.
2. Press the OK button to confirm.
3. The Child Lock indicator goes off.
COOLMATIC function
If you need to insert a large amount of warm food, for example after doing the grocery
shopping, we suggest activating the COOLMATIC function to chill the products more rapidly and to avoid warming the other food which is already in the refrigerator.
To switch on the function:
1. Press the Mode button until the corresponding icon appears.
The COOLMATIC indicator flashes.
The fridge temperature indicator shows the set temperature of +2°C .
2. Press the OK button to confirm.
The COOLMATIC indicator is shown.
The COOLMATIC function shuts off automatically after approximately 6 hours.
To switch off the function before its automatic end:
1. Press the Mode button until the COOLMATIC indicator flashes.
2. Press the OK button to confirm.
3. The COOLMATIC indicator goes off.
The function switches off by selecting a different fridge set temperature.
9
Holiday function
This function allows you to keep the refrigerator closed and empty during a long holiday
period without the formation of a bad smell.
The fridge compartment must be empty with holiday function on.
To switch on the function:
1. Press the Mode button until the corresponding icon appears.
The Holiday indicator flashes.
The fridge temperature indicator shows the set temperature.
2. Press the OK button to confirm.
The Holiday indicator is shown.
To switch off the function:
1. Press the Mode button until the Holiday indicator flashes.
2. Press the OK button to confirm.
3. The Holiday indicator goes off.
The function switches off by selecting a different fridge set temperature.
Page 10

First use
10
Door open alarm
An acoustic alarm will sound if the door is left open for a few minutes. The door open
alarm conditions are indicated by:
• flashing Alarm indicator
• acoustic buzzer
When normal conditions are restored (door closed), the alarm will stop.
During the alarm, the buzzer can be switched off by pressing any button.
FIRST USE
Cleaning the interior
Before using the appliance for the first time, wash the interior and all internal accessories with lukewarm water and some neutral soap so as to remove the typical smell of a
brand-new product, then dry thoroughly.
Do not use detergents or abrasive powders, as these will damage the finish.
DAILY USE
this appliance is sold in France.
In accordance with regulations valid in this country it must be provided with a special
device (see figure) placed in the lower compartment of the fridge to indicate the coldest
zone of it.
DYNAMICAIR
The refrigerator compartment is equipped with a device that allows for rapid cooling of
foods and more uniform temperature in the compartment.
Page 11

This device activates by itself when needed, for
example for a quick temperature recovering after door opening or when the ambient temperature is high.
Allows you to switch on the device manually
when needed (refer to "DYNAMICAIR Function").
The DYNAMICAIR device stops when the door is
open and restarts immediately after the door
closing.
Movable shelves
The walls of the refrigerator are equipped with a
series of runners so that the shelves can be positioned as desired.
For better use of space, the front half-shelves
can lie over the rear ones.
Daily use
11
Positioning the door shelves
To permit storage of food packages of various sizes, the door shelves can be placed at
different heights.
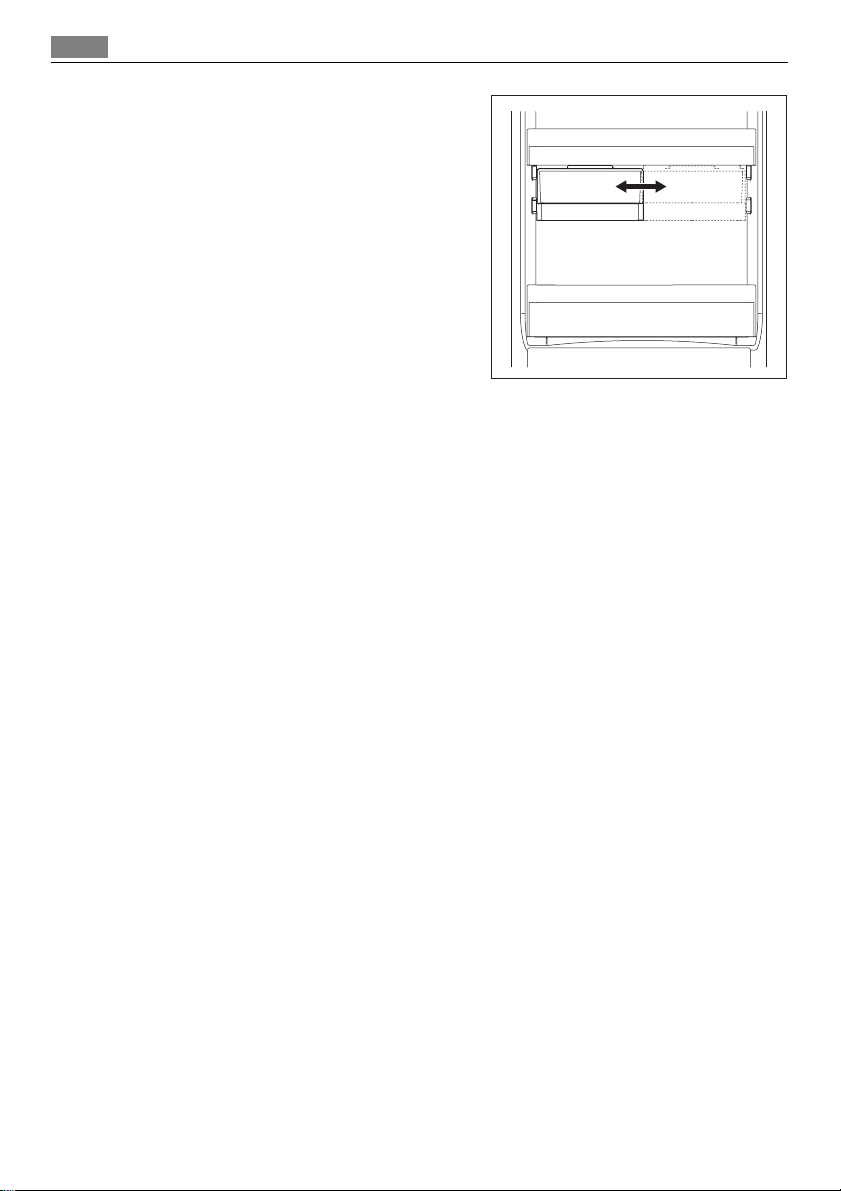
Positioning the sliding box
The sliding box can be placed at different heights.
To make these adjustments proceed as follow:
Page 12
Helpful hints and tips
12
1. lift the shelf with the sliding box up-
wards and out of the holders in the door
2. remove the retaining bracket out of the
guide under the shelf
3. Reverse the above operation to insert
the sliding box at a different height.
HELPFUL HINTS AND TIPS
Hints for energy saving
• Do not open the door frequently or leave it open longer than absolutely necessary.
• If the ambient temperature is high and the Temperature Regulator is set to low tem-
perature and the appliance is fully loaded, the compressor may run continuously, causing frost or ice on the evaporator. If this happens, set the Temperature Regulator toward warmer settings to allow automatic defrosting and so a saving in electricity consumption.
Hints for fresh food refrigeration
To obtain the best performance:
• do not store warm food or evaporating liquids in the refrigerator
• do cover or wrap the food, particularly if it has a strong flavour
• position food so that air can circulate freely around it
Hints for refrigeration
Useful hints:
Meat (all types) : wrap in polythene bags and place on the glass shelf above the vegetable drawer.
For safety, store in this way only one or two days at the most.
Cooked foods, cold dishes, etc..: these should be covered and may be placed on any shelf.
Fruit and vegetables: these should be thoroughly cleaned and placed in the special drawer(s) provided.
Butter and cheese: these should be placed in special airtight containers or wrapped in
aluminium foil or polythene bags to exclude as much air as possible.
Milk bottles: these should have a cap and should be stored in the bottle rack on the door.
Bananas, potatoes, onions and garlic, if not packed, must not be kept in the refrigerator.
Page 13
Care and Cleaning
CARE AND CLEANING
CAUTION!
Unplug the appliance before carrying out any maintenance operation.
This appliance contains hydrocarbons in its cooling unit; maintenance and recharging
must therefore only be carried out by authorized technicians.
Periodic cleaning
The equipment has to be cleaned regularly:
• clean the inside and accessories with lukewarm water and some neutral soap.
• regularly check the door seals and wipe clean to ensure they are clean and free from
debris.
• rinse and dry thoroughly.
Do not pull, move or damage any pipes and/or cables inside the cabinet.
Never use detergents, abrasive powders, highly perfumed cleaning products or wax polishes to clean the interior as this will damage the surface and leave a strong odour.
Clean the condenser (black grill) and the compressor at the back of the appliance with a
brush or a vacuum cleaner. This operation will improve the performance of the appliance
and save electricity consumption.
Take care of not to damage the cooling system.
13
Many proprietary kitchen surface cleaners contain chemicals that can attack/damage the
plastics used in this appliance. For this reason it is recommended that the outer casing of
this appliance is only cleaned with warm water with a little washing-up liquid added.
After cleaning, reconnect the equipment to the mains supply.
Defrosting of the refrigerator
Frost is automatically eliminated from the evaporator of the refrigerator compartment
every time the motor compressor stops, during normal use. The defrost water drains out
through a trough into a special container at the back of the appliance, over the motor
compressor, where it evaporates.
Page 14

What to do if…
14
It is important to periodically clean the defrost
water drain hole in the middle of the refrigerator compartment channel to prevent the water
overflowing and dripping onto the food inside.
Use the special cleaner provided, which you will
find already inserted into the drain hole.
Periods of non-operation
When the appliance is not in use for long periods, take the following precautions:
•
disconnect the appliance from electricity supply
• remove all food
defrost
4)
and clean the appliance and all accessories
•
• leave the door/doors ajar to prevent unpleasant smells.
If the cabinet will be kept on, ask somebody to check it once in a while to prevent the
food inside from spoiling in case of a power failure.
WHAT TO DO IF…
WARNING!
Before troubleshooting, disconnect the mains plug from the mains socket.
Only a qualified electrician or competent person must do the troubleshooting that is not
in this manual.
There are some sounds during normal use (compressor, refrigerant circulation).
Problem Possible cause Solution
The appliance is noisy
The appliance does not operate. The lamp does not
operate.
The mains plug is not connec-
4) If foreseen.
The appliance is not supported
properly
The appliance is switched off. Switch on the appliance.
ted to the mains socket correctly.
Check if the appliance stands stable (all the four feet should be
on the floor)
Connect the mains plug to the
mains socket correctly.
Page 15

What to do if…
Problem Possible cause Solution
The appliance has no power.
The lamp does not work.
The lamp is defective. Refer to "Replacing the lamp".
The compressor operates
continually.
The door is not closed correctly. Refer to "Closing the door".
The door has been opened too
The product temperature is too
The room temperature is too
The compressor does not
start immediately after
pressing the COOLMATIC
switch, or after changing
the temperature.
Water flows on the rear
plate of the refrigerator.
Water flows into the refrigerator.
Products prevent that water
Temperature cannot be
set .
The temperature in the appliance is too low/high.
The door is not closed correctly. Refer to "Closing the door".
The product temperature is too
Many products are stored at
The temperature in the refrigerator is too high.
There is no voltage in the mains
socket.
The lamp is in stand-by. Close and open the door.
The temperature is not set correctly.
frequently.
high.
high.
This is normal, no error has oc-
curred.
During the automatic defrosting process, frost defrosts on
the rear plate.
The water outlet is clogged. Clean the water outlet.
flows into the water collector.
COOLMATIC function switched
on.
The temperature regulator is
not set correctly.
high.
the same time.
There is no cold air circulation
in the appliance.
Connect a different electrical appliance to the mains socket.
Contact a qualified electrician.
Set a higher temperature.
Do not keep the door open longer than necessary.
Let the product temperature decrease to room temperature before storage.
Decrease the room temperature.
The compressor starts after a period of time.
This is correct.
Make sure that products do not
touch the rear plate.
Switch off COOLMATIC manually,
or wait to set the temperature
until the function has reset automatically. Refer to "COOLMATIC
function"..
Set a higher/lower temperature.
Let the product temperature decrease to room temperature before storage.
Store less products at the same
time.
Make sure that there is cold air
circulation in the appliance.
15
Page 16

Technical data
16
Replacing the lamp
The appliance is equipped with a longlife LED interior light.
Only service is allowed to replace the lighting device. Contact your Service Center
Closing the door
1. Clean the door gaskets.
2. If necessary, adjust the door. Refer to "Installation".
3. If necessary, replace the defective door gaskets. Contact the Service Center.
TECHNICAL DATA
Dimension of the recess
Height 1780 mm
Width 560 mm
Depth 550 mm
The technical information are situated in the rating plate on the internal left side of the
appliance and in the energy label.
INSTALLATION
Positioning
WARNING!
If you are discarding an old appliance that has a lock or catch on the door, you must
ensure that it is made unusable to prevent young children being trapped inside.
The appliance shall have the plug accessible after installation.
Install this appliance at a location where the ambient temperature corresponds to the
climate class indicated on the rating plate of the appliance:
Climate class Ambient temperature
SN +10°C to + 32°C
N +16°C to + 32°C
ST +16°C to + 38°C
T +16°C to + 43°C
Electrical connection
Before plugging in, ensure that the voltage and frequency shown on the rating plate correspond to your domestic power supply.
Page 17

Environmental concerns
The appliance must be earthed. The power supply cable plug is provided with a contact
for this purpose. If the domestic power supply socket is not earthed, connect the appliance to a separate earth in compliance with current regulations, consulting a qualified
electrician.
The manufacturer declines all responsibility if the above safety precautions are not observed.
This appliance complies with the E.E.C. Directives.
Ventilation requirements
The airflow behind the appliance must be sufficient.
50 mm
min.
200 cm
ENVIRONMENTAL CONCERNS
17
2
min.
2
200 cm
The symbol on the product or on its packaging indicates that this product may not
be treated as household waste. Instead it should be taken to the appropriate collection
point for the recycling of electrical and electronic equipment. By ensuring this product is
disposed of correctly, you will help prevent potential negative consequences for the
environment and human health, which could otherwise be caused by inappropriate
waste handling of this product. For more detailed information about recycling of this
product, please contact your local council, your household waste disposal service or the
shop where you purchased the product.
Page 18
18
PER RISULTATI PERFETTI
Grazie per aver scelto di acquistare questo prodotto
AEG. Lo abbiamo creato per fornirvi prestazioni
impeccabili per molti anni, grazie a tecnologie
innovative che vi semplificheranno la vita - funzioni che
non troverete sui normali elettrodomestici. Vi invitiamo
di dedicare qualche minuto alla lettura per sapere come
trarre il massimo dal vostro elettrodomestico.
ACCESSORI E PRODOTTI DI CONSUMO
All'interno del webshop AEG troverete tutto ciò che vi
serve per fare in modo che i vostri elettrodomestici AEG
siano sempre perfettamente puliti e funzionanti. Non
mancano inoltre una vasta gamma di accessori studiati
e realizzati conformemente agli elevati standard
qualitativi che vi aspettate: pentole, scolaposate,
portabottiglie e sacchi biancheria delicati...
Visitate il webshop su
www.aeg-electrolux.com/shop
Page 19

INDICE
Indice
20 Informazioni per la sicurezza
22 Pannello dei comandi
26 Primo utilizzo
26 Utilizzo quotidiano
28 Consigli e suggerimenti utili
29 Pulizia e cura
30 Cosa fare se…
32 Dati tecnici
32 Installazione
33 Considerazioni ambientali
19
In questo manuale sono riportati i
seguenti simboli:
Informazioni importanti relative alla
prevenzione dei rischi per la salute
personale e dei danni alle
apparecchiature.
Informazioni e consigli generali
Informazioni in materia di sicurezza
ambientale
Con riserva di modifiche
Page 20
Informazioni per la sicurezza
20
INFORMAZIONI PER LA SICUREZZA
Per garantire un impiego corretto e sicuro dell'apparecchio, prima dell'installazione e del
primo utilizzo leggere con attenzione il libretto istruzioni, inclusi i suggerimenti e le avvertenze. Per evitare errori e incidenti, è importante garantire che tutte le persone che
utilizzano l'apparecchio ne conoscano il funzionamento e le caratteristiche di sicurezza.
Conservare queste istruzioni e accertarsi che rimangano unite all'apparecchio in caso di
vendita o trasloco, in modo che chiunque lo utilizzi sia correttamente informato sull'uso
e sulle norme di sicurezza.
Per la sicurezza delle persone e delle cose osservare le precauzioni indicate nelle presenti
istruzioni per l'utente, il produttore non è responsabile dei danni provocati da eventuali
omissioni.
Sicurezza dei bambini e delle persone fragili
• Questo apparecchio non deve essere usato da persone, bambini inclusi, con ridotte capacità fisiche, sensoriali o psichiche, oppure prive di conoscenza e esperienza, a meno
che non siano state istruite all'uso dell'apparecchio da parte dei responsabili della loro
sicurezza, oppure sotto vigilanza di questi.
I bambini devono essere sorvegliati per assicurarsi che non giochino con l'apparecchio.
• Tenere i materiali di imballaggio al di fuori della portata dei bambini. Alcuni materiali
possono creare rischi di soffocamento.
• Qualora l'apparecchio venga demolito, estrarre la spina dalla presa, tagliare il cavo di
collegamento (il più vicino possibile all'apparecchio) e smontare lo sportello per evitare che i bambini giocando possano subire scosse elettriche o chiudersi dentro l'apparecchio.
• Se questo nuovo apparecchio, che è dotato di guarnizioni magnetiche nello sportello,
va a sostituirne uno più vecchio avente sportello o coperchio con chiusure a molla, si
deve rendere inutilizzabili tali chiusure prima di eliminare l'apparecchio sostituito, per
evitare che diventi una trappola mortale per i bambini.
Norme di sicurezza generali
ATTENZIONE
Accertarsi che le aperture di ventilazione non siano ostruite.
• L'apparecchiatura è progettata per la conservazione domestica di alimenti e/o bevande
nelle modalità descritte nelle presenti istruzioni.
• Non utilizzare dispositivi meccanici o altri mezzi artificiali per accelerare lo sbrinamento.
• Non utilizzare altre apparecchiature elettriche (per esempio gelatiere) all'interno del
frigorifero, salvo quelle approvate per tale scopo dal produttore.
• Non danneggiare il circuito refrigerante.
• Il circuito refrigerante dell'apparecchiatura contiene isobutano (R600a), un gas naturale con un elevato livello di compatibilità ambientale che, tuttavia, è infiammabile.
Durante il trasporto e l'installazione dell'apparecchiatura, assicurarsi che nessuno dei
componenti del circuito refrigerante venga danneggiato.
In caso di danneggiamento del circuito refrigerante:
Page 21

Informazioni per la sicurezza
21
– Evitare fiamme libere e scintille
– Aerare bene il locale in cui si trova l'apparecchiatura
• È pericoloso cambiare le specifiche o modificare il prodotto in qualunque modo. Un
danneggiamento del cavo potrebbe provocare cortocircuiti, incendi e/o scosse elettriche.
AVVERTENZA
Tutti i componenti elettrici (cavo di alimentazione, spina, compressore) devono essere sostituiti da un tecnico certificato o da personale d'assistenza qualificato.
1. Non collegare prolunghe al cavo di alimentazione.
2. Evitare che il lato posteriore dell'apparecchiatura possa schiacciare o danneggiare
la spina, causandone il surriscaldamento con un conseguente rischio di incendio.
3. La spina dell'apparecchiatura deve trovarsi in una posizione accessibile.
4. Evitare di tirare il cavo di alimentazione.
5. Se la presa elettrica non è perfettamente stabile, non inserire la spina. Il collega-
mento potrebbe provocare scosse elettriche o creare un rischio di incendio.
6. L'apparecchiatura non deve essere messo in funzione senza il coprilampada inter-
5)
della luce interna.
no
• Questa apparecchiatura è pesante. Prestare attenzione quando occorre spostarla.
• Evitare di estrarre o di toccare gli alimenti riposti nel vano congelatore con le mani
bagnate o umide; il contatto potrebbe provocare abrasioni o ustioni da freddo.
• Evitare un'esposizione prolungata dell'apparecchiatura alla luce solare diretta.
•
Lampadine
6)
utilizzate in questa apparecchiatura sono lampadine speciali selezionate
per essere usate unicamente negli elettrodomestici. Non sono adatte per l'illuminazione degli ambienti.
Uso normale
• Non appoggiare pentole calde sulle parti in plastica dell'apparecchiatura.
• Non riporre gas o liquidi infiammabili nell'apparecchio: i contenitori potrebbero esplodere.
• Osservare rigorosamente le raccomandazioni del produttore riguardo alla conservazione degli alimenti. Leggere attentamente le relative istruzioni.
Pulizia e cura
• Prima di eseguire qualunque intervento di manutenzione, spegnere l'apparecchiatura
ed estrarre la spina dalla presa.
• Non pulire l'apparecchiatura con oggetti metallici.
• Ispezionare regolarmente lo scarico dell'acqua di sbrinamento. Lo scarico deve essere
sempre perfettamente libero. L'ostruzione dello scarico può causare un deposito di acqua sul fondo dell'apparecchiatura.
5) Per le apparecchiature che prevedono il coprilampada.
6) Nel caso in cui la lampadina sia prevista.
Page 22

Pannello dei comandi
22
Installazione
Per il collegamento elettrico, seguire attentamente le istruzioni dei paragrafi corrispondenti.
• Disimballare l'apparecchio e assicurarsi che non presenti danni. Non collegare l'apparecchio se è danneggiato. Segnalare immediatamente gli eventuali danni al negozio in
cui è stato acquistato. In questo caso conservare l'imballaggio.
• Si consiglia di attendere almeno due ore prima di collegare l'apparecchio per consentire all'olio di arrivare nel compressore.
• Attorno all'apparecchio vi deve essere un'adeguata circolazione dell'aria, altrimenti si
può surriscaldare. Per ottenere una ventilazione sufficiente seguire le istruzioni di installazione.
• Se possibile il retro dell'apparecchio dovrebbe essere posizionato contro una parete
per evitare di toccare le parti calde o di rimanervi impigliati (compressore, condensatore), evitando così possibili scottature.
• L'apparecchio non deve essere posto vicino a radiatori o piani di cottura a gas.
• Installare l'apparecchio in modo che la presa rimanga accessibile.
•
Per il collegamento idrico, usare solo sorgenti d'acqua potabile.
7)
Assistenza tecnica
• Gli interventi elettrici sull'apparecchiatura devono essere eseguiti esclusivamente da
elettricisti qualificati o da personale competente.
• Gli interventi di assistenza devono essere eseguiti esclusivamente da tecnici autorizzati e utilizzando solo ricambi originali.
Tutela ambientale
Questo apparecchio non contiene gas che potrebbero danneggiare lo strato di ozono nel
circuito refrigerante o nei materiali isolanti. L'apparecchio non deve essere smaltito assieme ai rifiuti urbani e alla spazzatura. La schiuma dell'isolamento contiene gas infiammabili: lo smaltimento dell'apparecchio va eseguito secondo le prescrizioni vigenti da richiedere alle autorità locali. Evitare di danneggiare il gruppo refrigerante, specialmente nella
parte posteriore vicino allo scambiatore di calore. I materiali usati su questo apparecchio
contrassegnati dal simbolo
sono riciclabili.
PANNELLO DEI COMANDI
1 2 3 4 5 6
1 ON/OFF tasto
2 Mode tasto
7) Per gli apparecchi che prevedono un collegamento alla rete idrica.
Page 23

Pannello dei comandi
3 OK tasto
4 Tasto Temperatura più fresca
5 Tasto Temperatura più calda
6 Display
E' possibile modificare le impostazioni audio predefinite dei tasti e impostarle con un volume più alto premendo contemporaneamente il tasto Mode ed il tasto temperatura più
fresca per alcuni secondi. La modifica è reversibile.
Display
78
5 64321
1 Funzione timer
2 FunzioneDYNAMICAIR
3 FunzioneMinute Minder
4 Funzione Sicurezza bambini
5 Indicatore allarme
6 Indicatore della temperatura
7 Funzione Holiday
8 FunzioneCOOLMATIC
23
Accensione
Per accendere l'apparecchiatura procedere come segue:
1. Inserire la spina nella presa di alimentazione.
2. Premere il tasto ON/OFF se il display è spento.
3. Il segnale acustico d'allarme potrebbe attivarsi dopo alcuni secondi.
Per resettare l'allarme, consultare la sezione "Allarme di alta temperatura".
4. Gli indicatori di temperatura visualizzano la temperatura impostata predefinita.
Per selezionare una temperatura diversa, consultare la sezione "Regolazione della temperatura".
Spegnimento
Per spegnere l'apparecchiatura, procedere come segue:
1. Premere il tasto ON/OFF per 5 secondi.
2. Il display si spegne.
3. Per scollegare l’apparecchiatura dalla corrente elettrica, staccare la spina dalla presa
di alimentazione.
Regolazione della temperatura
È possibile regolare la temperatura impostata del frigorifero, premendo il tasto temperatura.
Impostare la temperatura predefinita:
• +5°C per il frigorifero
Page 24

Pannello dei comandi
24
Gli indicatori della temperatura visualizzano la temperatura impostata.
La temperatura impostata verrà raggiunta entro 24 ore.
Dopo un'interruzione di corrente la temperatura impostata rimane in memoria.
FunzioneDYNAMICAIR
Per attivare la funzione:
1. Premere il tasto Mode finché non appare l'icona corrispondente.
L'indicatore DYNAMICAIR lampeggia.
2. Premere il tasto OK per confermare.
La spia DYNAMICAIR viene visualizzata.
Per disattivare la funzione:
1. Premere il tasto Mode fino a quando l'indicatore DYNAMICAIR lampeggia.
2. Premere il tasto OK per confermare.
3. La spia DYNAMICAIR si spegne.
Se la funzione è attivata automaticamente l'indicatore DYNAMICAIR non viene visualizza-
to (fare riferimento a "Utilizzo quotidiano").
L'attivazione della funzione DYNAMICAIR aumenta il consumo di energia.
FunzioneMinute Minder
La funzione Minute Minder serve per impostare un segnale acustico in un preciso momento, utile per esempio quando una pietanza richiede il raffreddamento di alimenti misti
per un certo periodo di tempo.
Per attivare la funzione:
1. Premere il tasto Mode finché non appare l'icona corrispondente.
L'indicatore Minute Minder lampeggia.
Il timer visualizza il valore impostato (30 minuti) per alcuni secondi.
2. Premere il tasto Regolatore timer per modificare il valore impostato da 1 a 90 minuti.
3. Premere il tasto OK per confermare.
La spia Minute Minder viene visualizzata.
Il Timer inizia a lampeggiare (min).
Al termine del conto alla rovescia la spia Minute Minder lampeggia e viene emesso un
segnale acustico:
1. Disattivare la funzione.
Per disattivare la funzione:
1. Premere il tasto Mode fino a quando l'indicatore Minute Minder lampeggia.
2. Premere il tasto OK per confermare.
3. La spia Minute Minder si spegne.
È possibile disattivare la funzione in qualsiasi momento.
È possibile modificare l'ora in qualsiasi momento e prima della fine premendo il tasto temperatura più fredda ed il tasto temperatura più calda.
Page 25

Pannello dei comandi
Funzione Sicurezza Bambini
Per evitare che i tasti vengano premuti accidentalmente, selezionare la funzione Sicurezza Bambini.
Per attivare la funzione:
1. Premere il tasto Mode fino a quando non appare l'icona corrispondente.
2. L'indicatore Sicurezza Bambini lampeggia.
3. Premere il tasto OK per confermare.
Viene visualizzato l'indicatore Sicurezza Bambini.
Per disattivare la funzione:
1. Premere il tasto Mode fino a quando l'indicatore Sicurezza Bambini non lampeggia.
2. Premere il tasto OK per confermare.
3. L'indicatore Sicurezza Bambini si spegne.
FunzioneCOOLMATIC
Se occorre inserire una grande quantità di alimenti nel frigorifero, per esempio al ritorno
dalla spesa, è consigliabile attivare la funzione COOLMATIC per raffreddare più rapidamente gli alimenti introdotti nel frigorifero e non intiepidire i cibi già presenti al suo interno.
Per attivare la funzione:
1. Premere il tasto Mode finché non appare l'icona corrispondente.
L'indicatore COOLMATIC lampeggia.
L'indicatore della temperatura del frigorifero visualizza una temperatura di +2 °C.
2. Premere il tasto OK per confermare.
La spia COOLMATIC viene visualizzata.
La funzione COOLMATIC si disattiva automaticamente dopo circa 6 ore.
Per disattivare la funzione prima dello spegnimento automatico:
1. Premere il tasto Mode fino a quando l'indicatore COOLMATIC lampeggia.
2. Premere il tasto OK per confermare.
3. La spia COOLMATIC si spegne.
La funzione si disattiva selezionando un'impostazione di temperatura per il frigorifero di-
versa.
25
Funzione Holiday
Questa funzione consente di mantenere il frigorifero chiuso e vuoto durante un lungo
periodo di vacanza senza che si formino odori sgradevoli.
Quando si attiva la funzione Holiday, il vano frigorifero deve essere vuoto.
Per attivare la funzione:
1. Premere il tasto Mode fino a quando non appare l'icona corrispondente.
L'indicatore Holiday lampeggia.
L'indicatore della temperatura del frigorifero visualizza la temperatura impostata.
2. Premere il tasto OK per confermare.
Page 26

Primo utilizzo
26
Viene visualizzato l'indicatore Holiday.
Per disattivare la funzione:
1. Premere il tasto Mode fino a quando l'indicatore Holiday non lampeggia.
2. Premere il tasto OK per confermare.
3. L'indicatore Holiday si spegne.
La funzione si disattiva selezionando un'impostazione di temperatura per il frigorifero di-
versa.
Allarme porta aperta
Se la porta è lasciata aperta per alcuni minuti, viene emesso un segnale acustico. Le condizioni di allarme della porta aperta sono indicate da:
• indicatore allarme lampeggiante
• segnale acustico
Al ripristino delle condizioni normali (porta chiusa), l'allarme si interrompe.
Durante l'allarme, il segnale acustico può essere disattivato premendo qualsiasi tasto.
PRIMO UTILIZZO
Pulizia dell'interno
Prima di utilizzare l'apparecchio per la prima volta, lavare l'interno e gli accessori interni
con acqua tiepida e un po' di sapone neutro in modo a togliere il tipico odore dei prodotti nuovi, quindi asciugare accuratamente.
Non usare detergenti corrosivi o polveri abrasive che danneggiano le finiture.
UTILIZZO QUOTIDIANO
questa apparecchiatura viene venduta in Francia
Per rispettare la normativa vigente in questo paese, essa deve essere dotata di un particolare dispositivo, posto nella parte bassa della cella frigo (vedi figura) per segnalare la zona piu' fredda del vano.
Page 27

Utilizzo quotidiano
DYNAMICAIR
Il vano frigo è dotato di un dispositivo che consente un rapido raffreddamento degli alimenti e una temperatura più uniforme nello scomparto.
Il suddetto si avvia automaticamente quando necessario, ad esempio per un rapido recupero della temperatura dopo l'apertura dello sportello, o
quando la temperatura ambiente è elevata.
Consente di accendere manualmente il dispositivo quando necessario (fare riferimento a "FunzioneDYNAMICAIR ").
Il dispositivo DYNAMICAIR si interrompe quando
si apre la porta e si riavvia immediatamente dopo la chiusura della suddetta.
Ripiani mobili
Le guide presenti sulle pareti del frigorifero permettono di posizionare i ripiani a diverse altezze.
Per un migliore sfruttamento dello spazio, i semiripiani anteriori possono essere collocati sopra a
quelli posteriori.
27
Posizionamento delle mensole
Per facilitare l'introduzione di alimenti di diverse dimensioni, le mensole della porta possono essere posizionate ad altezze differenti.
Posizionamento della scatola scorrevole
La scatola scorrevole può essere inserita a diverse altezze.
Per regolare l'altezza, procedere come segue:
Page 28

Consigli e suggerimenti utili
28
1. sollevare il ripiano con la parte superiore
della scatola rivolta verso l'alto ed estrar-
la dalle guide
2. togliere le staffe di fissaggio dalla guida
sotto alla mensola
3. Procedere in modo inverso per inserire
una mensola intermedia ad un'altezza di-
versa.
CONSIGLI E SUGGERIMENTI UTILI
Consigli per il risparmio energetico
• Non aprire frequentemente la porta e non lasciarla aperta più di quanto assolutamen-
te necessario.
• Se la temperatura ambiente è elevata, il termostato è impostato su una regolazione
alta e l'apparecchio è a pieno carico, il compressore può funzionare in continuo causando la formazione di brina o ghiaccio sull'evaporatore. In questo caso, ruotare il termostato su una regolazione più bassa per consentire lo scongelamento automatico risparmiando così energia.
Consigli per la refrigerazione di cibi freschi
Per ottenere i migliori risultati:
• non riporre nel frigorifero cibi caldi o liquidi in fase di evaporazione
• coprire o avvolgere il cibo, in particolare se emana un odore forte
• posizionare il cibo in modo che l'aria possa circolare liberamente attorno ad esso
Consigli per la refrigerazione
Consigli utili:
Carne (tutti i tipi): avvolgerla in sacchetti di politene e collocarla sul ripiano di vetro sopra il cassetto delle verdure.
Per motivi di sicurezza, conservarla in queste condizioni solo per uno o due giorni al massimo.
Cibi cucinati, piatti freddi ecc..: dovrebbero essere coperti e possono essere collocati su
qualsiasi ripiano.
Frutta e verdura: dovrebbero essere pulite accuratamente e collocate nell'apposito/i cassetto/i speciale/i.
Burro e formaggio: dovrebbero essere posti in contenitori ermetici speciali o avvolti in
pellicole di alluminio o sacchetti di politene per escludere per quanto possibile l'aria.
Bottiglie di latte: dovrebbero essere tappate e conservate nell'apposito ripiano sulla porta.
Non conservare nel frigorifero banane, patate, cipolle o aglio se non sono confezionati.
Page 29

Pulizia e cura
PULIZIA E CURA
ATTENZIONE
Staccare la spina dell'apparecchio prima di eseguire lavori di manutenzione.
Questo apparecchio contiene idrocarburi nell'unità di raffreddamento; la manutenzione e
la ricarica devono pertanto essere effettuate esclusivamente da tecnici autorizzati.
Pulizia periodica
L'apparecchio deve essere pulito regolarmente:
• Pulire l'interno e gli accessori con acqua tiepida e un po' di sapone neutro.
• Controllare regolarmente le guarnizioni della porta e verificare che siano pulite e prive
di residui.
• Risciacquare e asciugare accuratamente.
Non tirare, spostare o danneggiare tubi e/o cavi all'interno dell'apparecchio.
Non usare mai detergenti, polveri abrasive, prodotti per la pulizia con una forte profumazione o cere lucidanti per pulire l'interno, in quanto danneggiano la superficie e lasciano
un odore forte.
Pulire il condensatore (griglia nera) e il compressore sul retro con una spazzola o un aspirapolvere. Questa operazione migliorerà le prestazioni dell'apparecchio riducendo i consumi elettrici.
Non danneggiare il sistema di raffreddamento.
29
Molti detergenti per cucine di marca contengono sostanze chimiche in grado di attaccare/
danneggiare la plastica impiegata in questo apparecchio. Per questo motivo si raccomanda di pulire l'involucro esterno dell'apparecchio solo con acqua calda con un po' di liquido detergente.
Dopo la pulizia, ricollegare l'apparecchio alla rete di alimentazione.
Sbrinamento del vano frigorifero
Durante l'uso normale, la brina viene eliminata automaticamente dall'evaporatore del vano frigorifero ogni volta che il motocompressore si arresta. L'acqua di sbrinamento giunge attraverso un condotto in un apposito recipiente posto sul retro dell'apparecchio, sopra il motocompressore, dove evapora.
Page 30

Cosa fare se…
30
È importante pulire periodicamente il foro di scarico dell'acqua di sbrinamento, situato al centro
del canale sulla parete posteriore, per evitare che
l'acqua fuoriesca sugli alimenti. Usare l'apposito
utensile già inserito nel foro di scarico.
Periodi di inutilizzo
Quando l'apparecchio non è utilizzato per lunghi periodi, adottare le seguenti precauzioni:
•
scollegare l'apparecchio dalla rete elettrica
• rimuovere tutto il cibo
•
sbrinare
• lasciare la/e porta/e socchiusa/e per evitare odori sgradevoli.
Se l'apparecchio rimane acceso, chiedere a qualcuno di controllare ogni tanto per evitare
che il cibo contenuto marcisca in caso di interruzione dell'alimentazione elettrica.
8)
e pulire l'apparecchio e tutti gli accessori
COSA FARE SE…
AVVERTENZA
Prima della ricerca guasti, estrarre la spina dalla presa.
Le operazioni di ricerca guasti non descritte nel presente manuale devono essere eseguite esclusivamente da elettricisti qualificati o da personale competente.
Durante l'uso, alcuni rumori di funzionamento (come quelli del compressore o del circuito refrigerante) sono da considerarsi normali.
Problema Possibile causa Soluzione
L'apparecchio è rumoroso
L'apparecchio non funziona. La lampadina non si
accende.
8) Se previsto.
L'apparecchio non è appoggiato in modo corretto
L'apparecchio è spento. Accendere l'apparecchio.
Controllare che l'apparecchio sia
appoggiato in modo stabile (tutti
i piedini devono essere a contatto con il pavimento)
Page 31

Cosa fare se…
Problema Possibile causa Soluzione
La spina non è inserita corretta-
L'apparecchio non riceve cor-
La lampadina non si accende.
La lampadina è difettosa. Fare riferimento alla sezione "So-
Il compressore rimane
sempre in funzione.
Lo sportello non è chiuso corret-
Lo sportello viene aperto trop-
La temperatura degli alimenti è
La temperatura ambiente è
Il compressore non si avvia immediatamente dopo
avere premuto il tasto
COOLMATIC , oppure dopo aver cambiato la temperatura.
Sul pannello posteriore
del frigorifero scorre acqua.
All'interno del frigorifero
scorre acqua.
Gli alimenti impediscono all'ac-
Impossibile impostare la
temperatura.
mente nella presa.
rente. Non arriva tensione alla
presa elettrica.
La lampadina è in modalità
stand-by.
La temperatura non è impostata correttamente.
tamente.
po frequentemente.
troppo alta.
troppo alta.
Si tratta di una situazione del
tutto normale che non indica alcun errore.
Durante lo sbrinamento automatico, la brina che si forma
sul pannello posteriore si scioglie.
Lo scarico dell'acqua è ostruito. Pulire lo scarico dell'acqua.
qua di fluire nell'apposito collettore.
FunzioneCOOLMATIC attivata. Disattivare manualmente la fun-
Inserire correttamente la spina
nella presa.
Collegare alla presa un altro apparecchio elettrico.
Rivolgersi a un elettricista qualificato.
Chiudere e riaprire lo sportello.
stituzione della lampadina".
Impostare una temperatura supe-
riore.
Fare riferimento alla sezione
"Chiusura dello sportello".
Limitare il più possibile il tempo
di apertura dello sportello.
Prima di mettere a conservare gli
alimenti, lasciarli raffreddare a
temperatura ambiente.
Abbassare la temperatura ambiente.
Il compressore si avvia dopo un
certo periodo di tempo.
Non si tratta di un'anomalia.
Evitare di disporre gli alimenti a
diretto contatto con il pannello
posteriore.
zione COOLMATIC oppure aspettare e impostare la temperatura
solo dopo che la funzione si è disattivata automaticamente. Fare
riferimento a "FunzioneCOOLMATIC " .
31
Page 32

Dati tecnici
32
Problema Possibile causa Soluzione
La temperatura all'interno
dell'apparecchio è troppo
bassa/alta.
Lo sportello non è chiuso corret-
La temperatura degli alimenti è
Sono stati introdotti molti ali-
La temperatura nel frigorifero è troppo alta.
Il regolatore della temperatura
non è impostato correttamente.
tamente.
troppo alta.
menti contemporaneamente.
L'aria fredda non circola corret-
tamente all'interno dell'apparecchio.
Impostare una temperatura superiore/inferiore.
Fare riferimento alla sezione
"Chiusura dello sportello".
Prima di mettere a conservare gli
alimenti, lasciarli raffreddare a
temperatura ambiente.
Introdurre gli alimenti poco alla
volta.
Adottare le misure necessarie
per garantire una corretta circolazione dell'aria fredda.
Sostituzione della lampadina
L'apparecchiatura è dotata di una lampadina interna a LED a lunga durata.
Solo al servizio assistenza è permesso sostituire l'impianto di illuminazione. Contattare il
Centro di assistenza locale
Chiusura della porta
1. Pulire le guarnizioni della porta.
2. Se necessario, regolare la porta. Vedere "Installazione".
3. Se necessario, sostituire le guarnizioni della porta difettose. Contattare il Centro di
assistenza locale.
DATI TECNICI
Nicchia di incasso
Altezza 1780 mm
Larghezza 560 mm
Profondità 550 mm
Le informazioni tecniche sono riportate sulla targhetta sul lato sinistro interno dell'apparecchio e sull'etichetta dei valori energetici.
INSTALLAZIONE
Luogo d'installazione
AVVERTENZA
Qualora occorra ritirare dall'uso un apparecchio con serratura, si raccomanda di rendere
quest'ultima inservibile per evitare che i bambini possano chiudersi all'interno.
Page 33

Considerazioni ambientali
La spina dell'apparecchio deve essere accessibile dopo l'installazione.
Installare l'apparecchio in un luogo la cui temperatura ambiente corrisponda alla classe
climatica indicata sulla targhetta del modello:
Classe climatica Temperatura ambiente
SN da +10°C a +32°C
N da +16°C a +32°C
ST da +16°C a +38°C
T da +16°C a +43°C
Collegamento elettrico
Prima di inserire la spina, verificare che la tensione e la frequenza riportate sulla targhetta corrispondano ai valori della rete elettrica domestica.
L'apparecchio deve essere collegato a massa. La spina del cavo di alimentazione è dotata
di un contatto a tale scopo. Se la presa della rete elettrica domestica non è collegata a
massa, collegare l'apparecchio ad una massa separata in conformità alle norme relative
alla corrente, consultando un elettricista qualificato.
Il fabbricante declina qualsiasi responsabilità se le precauzioni suddette non sono rispettate.
Il presente apparecchio è conforme alle direttive CEE.
Requisiti di ventilazione
Il flusso d'aria dietro l'apparecchio deve essere
sufficiente.
50 mm
min.
200 cm
2
33
CONSIDERAZIONI AMBIENTALI
Il simbolo sul prodotto o sulla confezione indica che il prodotto non deve essere
considerato come un normale rifiuto domestico, ma deve essere portato nel punto di
raccolta appropriato per il riciclaggio di apparecchiature elettriche ed elettroniche.
Provvedendo a smaltire questo prodotto in modo appropriato, si contribuisce a evitare
potenziali conseguenze negative per l’ambiente e per la salute, che potrebbero derivare
da uno smaltimento inadeguato del prodotto. Per informazioni più dettagliate sul
riciclaggio di questo prodotto, contattare l’ufficio comunale, il servizio locale di
smaltimento rifiuti o il negozio in cui è stato acquistato il prodotto.
min.
200 cm
2
Page 34

34
ДЛЯ ОПТИМАЛЬНЫХ РЕЗУЛЬТАТОВ
Благодарим Вас за выбор данного продукта AEG.
Этот продукт будет безупречно служить Вам долгие
годы – ведь мы создали его с помощью
инновационных технологий, которые облегчат Вашу
жизнь и создадут качества, которые Вы не найдете в
привычных приборах. Потратьте немного времени на
чтение, чтобы получить максимальную пользу от
своей покупки.
АКСЕССУАРЫ И РАСХОДНЫЕ МАТЕРИАЛЫ
В интернет-магазине AEG Вы сможете найти все
необходимое для того, чтобы все ваши приборы AEG
сверкали чистотой и радовали Вас безотказной
работой. Помимо этого, здесь Вы найдете широкий
выбор аксессуаров, разработанных и изготовленных
по самым высоким стандартам, какие только можно
представить – от профессиональной кухонной посуды
до лотков для хранения ножей, от держателей
бутылок до мешков для деликатного белья…
Посетите Интернет-магазин по адресу
www.aeg-electrolux.com/shop
Page 35

СОДЕРЖАНИЕ
Содержание
36 Сведения по технике
безопасности
39 Панель управления
43 Первое использование
43 Ежедневное использование
44 Полезные советы
45 Чистка и уход
47 Что делать, если ...
49 Технические данные
49 Установка
50 Забота об окружающей среде
35
В данном руководстве по
эксплуатации используются
следующие символы:
Важная информация по обеспечению
личной безопасности и
предотвращению повреждений
прибора.
Общая информация и рекомендации
Информация по защите окружающей
среды
Право на изменения сохраняется
Page 36

36
Сведения по технике безопасности
СВЕДЕНИЯ ПО ТЕХНИКЕ БЕЗОПАСНОСТИ
Для обеспечения собственной безопасности и правильной эксплуатации прибора, пе‐
ред его установкой и первым использованием внимательно прочитайте данное руко‐
водство, не пропуская рекомендации и предупреждения. Чтобы избежать нежелатель‐
ных ошибок и несчастных случаев, важно, чтобы все, кто пользуется данным прибо‐
ром, подробно ознакомились с его работой и правилами техники безопасности. Сохра‐
ните настоящее руководство и в случае продажи прибора или его передачи в пользо‐
вание другому лицу передайте вместе с ним и данное руководство, чтобы новый по‐
льзователь получил соответствующую информацию о правильной эксплуатации и пра‐
вилах техники безопасности.
В интересах безопасности людей и имущества соблюдайте меры предосторожности,
указанные в настоящем руководстве, так как производитель не несет ответственности
за убытки, вызванные несоблюдением указанных мер.
Безопасность детей и лиц с ограниченными возможностями
• Данное изделие не предназначено для эксплуатации лицами (в том числе детьми) с
ограниченными физическими, сенсорными или умственными способностями или с
недостаточным опытом или знаниями без присмотра лица, отвечающего за их без‐
опасность, или получения от него соответствующих инструкций, позволяющих им
безопасно эксплуатировать его.
Необходимо следить за тем, чтобы дети не играли с прибором.
• Держите все упаковочные материалы в недоступном для детей месте. Существует
опасность удушения.
• Если прибор больше не нужен, выньте вилку из розетки, обрежьте шнур питания
(как можно ближе к прибору) и снимите дверцу, чтобы дети, играя, не получили
удар током или не заперлись внутри прибора.
• Если данный прибор (имеющий магнитное уплотнение дверцы) предназначен для
замены старого холодильника с пружинным замком (защелкой) дверцы или крышки,
перед утилизацией старого холодильника обязательно выведите замок из строя.
Это позволит исключить превращение его в смертельную ловушку для детей.
Общие правила техники безопасности
ПРЕДУПРЕЖДЕНИЕ!
Не допускайте перекрытия вентиляционных отверстий.
• Настоящий прибор предназначен для хранения продуктов питания и напитков в обы‐
чном домашнем хозяйстве, как описано в настоящем руководстве.
• Не используйте механические приспособления и другие средства для ускорения про‐
цесса размораживания.
• Не используйте другие электроприборы (например, мороженицы) внутри холодиль‐
ных приборов, если производителем не допускается возможность такого использо‐
вания.
• Не допускайте повреждения холодильного контура.
Page 37

Сведения по технике безопасности
37
• Холодильный контур прибора содержит безвредный для окружающей среды, но,
тем не менее, огнеопасный хладагент изобутан (R600a).
При транспортировке и установке прибора следите за тем, чтобы не допустить по‐
вреждения компонентов холодильного контура.
В случае повреждения холодильного контура:
– не допускайте использования открытого пламени и источников воспламенения;
– тщательно проветрите помещение, в котором установлен прибор.
• Изменение характеристик прибора и внесение изменений в его конструкцию сопря‐
жено с опасностью. Поврежденный сетевой шнур может явиться причиной коротко‐
го замыкания, пожара и/или поражения электрическим током.
ВНИМАНИЕ!
Замену электрических частей изделия (шнура питания, вилки, компрессора) должен
производить сертифицированный представитель сервисного центра или квалифициро‐
ванный обслуживающий персонал.
1. Запрещается удлинять сетевой шнур.
2. Следите за тем, чтобы вилка сетевого шнура не оказалась раздавлена или по‐
вреждена задней частью прибора. Раздавленная или поврежденная вилка сете‐
вого шнура может перегреться и стать причиной пожара.
3. Убедитесь в наличии доступа к вилке сетевого шнура прибора.
4. Не тяните сетевой шнур.
5. Если розетка плохо закреплена, не вставляйте в нее вилку сетевого шнура. Су‐
ществует опасность поражения электрическим током или возникновения пожара.
6.
Нельзя пользоваться прибором с лампочкой без плафона
9)
лампочки внутренне‐
го освещения.
• Прибор имеет большой вес. Будьте осторожны при его перемещении.
• Не вынимайте предметы, находящиеся в морозильном отделении, и не трогайте их
мокрыми или влажными руками – это может привести к появлению на руках ссадин
или ожогов от обморожения.
• Не допускайте длительного воздействия прямых солнечных лучей на прибор.
Лампы
10)
используются специальные лампы, предназначенные только для бытовых
•
приборов. Они не подходят для освещения помещений.
Ежедневное использование
• Не ставьте на пластмассовые части прибора горячую посуду.
• Не храните в холодильнике воспламеняющиеся газы и жидкости, так как они могут
взорваться.
• Следует тщательно придерживаться рекомендаций по хранению, данных изготови‐
телем прибора. См. соответствующие указания.
9) Если предусмотрен плафон.
10) Если в этом приборе предусмотрена лампа.
Page 38

38
Сведения по технике безопасности
Чистка и уход
• Перед выполнением операций по чистке и уходу за прибором, выключите его и вы‐
ньте вилку сетевого шнура из розетки. Если невозможно достать розетку, отключи‐
те электропитание.
• Не следует чистить прибор металлическими предметами.
• Регулярно проверяйте сливное отверстие холодильника для талой воды. При необ‐
ходимости прочистите сливное отверстие. Если отверстие закупорится, вода будет
собираться на дне прибора.
Установка
Для подключения к электросети тщательно следуйте инструкциям, приведенным в со‐
ответствующих параграфах.
• Распакуйте изделие и проверьте, нет ли повреждений. Не подключайте к электросе‐
ти поврежденный прибор. Немедленно сообщите о повреждениях продавцу прибо‐
ра. В таком случае сохраните упаковку.
• Рекомендуется подождать не менее четыре часа перед тем, как включать холодиль‐
ник, чтобы масло вернулось в компрессор.
• Необходимо обеспечить вокруг холодильника достаточную циркуляцию воздуха, в
противном случае прибор может перегреваться. Чтобы обеспечить достаточную вен‐
тиляцию, следуйте инструкциям по установке.
• Если возможно, изделие должно располагаться обратной стороной к стене так, что‐
бы во избежание ожога нельзя было коснуться горячих частей (компрессор, испари‐
тель).
• Данный прибор нельзя устанавливать вблизи радиаторов отопления или кухонных
плит.
• Убедитесь, что к розетке будет доступ после установки прибора.
•
Подключайте прибор только к питьевому водоснабжению.
11)
Обслуживание
• Любые операции по техобслуживанию прибора должны выполняться квалифициро‐
ванным электриком или уполномоченным специалистом.
• Техобслуживание данного прибора должно выполняться только специалистами ав‐
торизованного сервисного центра с использованием исключительно оригинальных
запчастей.
11) Если предусмотрено подключение к водопроводу.
Page 39

Панель управления
Защита окружающей среды
Ни холодильный контур, ни изоляционные материалы настоящего прибора не содер‐
жат газов, которые могли бы повредить озоновый слой. Данный прибор нельзя утили‐
зировать вместе с бытовыми отходами и мусором. Изоляционный пенопласт содержит
горючие газы: прибор подлежит утилизации в соответствии с действующими норматив‐
ными положениями, с которыми следует ознакомиться в местных органах власти. Не
допускайте повреждения холодильного контура, особенно, вблизи теплообменника. Ма‐
териалы, использованные для изготовления данного прибора, помеченные символом
, пригодны для вторичной переработки.
ПАНЕЛЬ УПРАВЛЕНИЯ
1 2 3 4 5 6
1 Кнопка ON/OFF
2 Кнопка Mode
3 Кнопка OK
4 Кнопка понижения температуры
5 Кнопка повышения температуры
6 Дисплей
Предустановленный уровень громкости можно изменить. Для этого на несколько се‐
кунд нажмите одновременно кнопку Mode и кнопку понижения температуры. Это изме‐
нение можно отменить.
39
Дисплей
1 Функция таймера
2 Функция DYNAMICAIR.
3 Функция Minute Minder .
4 Функция "Защита от детей"
5 Сигнальный индикатор
6 Индикатор температуры
7 Функция "Отпуск"
8 Функция COOLMATIC.
78
5 64321
Page 40

40
Панель управления
Включение
Чтобы включить прибор, выполните следующие действия:
1. Вставьте вилку сетевого шнура в розетку.
2. Если дисплей отключен, нажмите кнопку ON/OFF .
3. Через несколько секунд может прозвучать звуковой сигнал - сигнализация.
Как сбросить сигнализацию см. в разделе "Оповещение о высокой температуре".
4. На дисплее температуры отображается значение температуры, заданное по умол‐
чанию.
Как выбрать другую температуру, см. в разделе "Регулирование температуры".
Выключение
Для выключения прибора выполните приведенные ниже действия.
1. Нажмите кнопку ON/OFF и удерживайте ее нажатой в течение 5 секунд.
2. Дисплей отключится.
3. Для отключения прибора от сети электропитания извлеките вилку сетевого шнура
из розетки.
Регулирование температуры
Установленное значение температуры холодильника можно изменить с помощью кноп‐
ки регулировки температуры.
Установленная температура по умолчанию:
• +5°C для холодильника
На дисплее температуры отображается заданное значение температуры.
Заданная температура достигается в течение 24 часов.
При сбое в подаче электроэнергии заданное значение температуры сохраняется.
Функция DYNAMICAIR.
Включение функции
1. Нажимайте кнопку Mode, пока на дисплее не появится соответствующий значок.
Замигает индикатор DYNAMICAIR .
2. Нажмите кнопку OK для подтверждения.
Появится индикатор DYNAMICAIR .
Выключение функции
1. Нажмите и не отпускайте кнопку Mode, пока не замигает индикатор DYNAMICAIR .
2. Нажмите кнопку OK для подтверждения.
3. Индикатор DYNAMICAIR погаснет.
При автоматическом включении функции индикатор DYNAMICAIR не загорается (см.
"Ежедневное использование").
Включение функции DYNAMICAIR увеличивает потребление электроэнергии.
Page 41

Панель управления
Функция Minute Minder
Функция Minute Minder может использоваться для подачи звукового сигнала в нужное
время. Это может оказаться полезным, например, когда по рецепту требуется охла‐
ждать тесто в течение определенного времени.
Включение функции:
1. Нажимайте кнопку Mode, пока на дисплее не появится соответствующий значок.
Замигает индикатор Minute Minder .
На дисплее таймера в течение нескольких секунд отображается заданное значе‐
ние (30 минут).
2. С помощью кнопки регулятора таймера измените заданное значение таймера в ин‐
тервале от 1 до 90 минут.
3. Нажмите кнопку OK для подтверждения.
Появится индикатор Minute Minder .
Индикатор таймера замигает (min).
В конце обратного отсчета индикатор Minute Minder замигает, и будет подан звуковой
сигнал:
1. Выключение функции.
Выключение функции:
1. Нажимайте кнопку Mode, пока не замигает индикатор Minute Minder .
2. Нажмите кнопку OK для подтверждения.
3. Индикатор Minute Minder погаснет.
Данную функцию можно отключить в любое время.
Время можно изменить в любой момент до окончания отсчета, нажав кнопки повыше‐
ния и понижения температуры.
41
Функция «Защита от детей»
Функция «Защита от детей» служит для блокировки кнопок управления холодильником.
Включение функции:
1. нажимайте кнопку Mode, пока на дисплее не отобразится соответствующий значок.
2. Замигает индикатор «Защита от детей».
3. Чтобы подтвердить выбор, нажмите кнопку OK.
Отобразится индикатор «Защита от детей».
Выключение функции.
1. Нажимайте кнопку Mode, пока не замигает индикатор «Защита от детей».
2. Чтобы подтвердить выбор, нажмите кнопку OK.
3. Индикатор «Защита от детей» погаснет.
Функция COOLMATIC
Если необходимо поместить в холодильник большое количество теплых продуктов, на‐
пример, после посещения магазина, рекомендуется включить функцию COOLMATIC
для ускоренного охлаждения продуктов и предотвращения повышения температуры
продуктов, уже находящихся в холодильнике.
Включение функции:
Page 42

42
Панель управления
1. Нажимайте кнопку Mode, пока на дисплее не появится соответствующий значок.
Замигает индикатор COOLMATIC.
Дисплей температуры холодильника отразит заданную температуру (+2°C).
2. Нажмите кнопку OK для подтверждения.
Появится индикатор COOLMATIC.
Функция COOLMATIC автоматически отключается примерно через 6 часов.
Выключение функции до ее автоматического завершения:
1. Нажмите и не отпускайте кнопку Mode, пока не замигает индикатор COOLMATIC.
2. Нажмите кнопку OK для подтверждения.
3. Индикатор COOLMATIC погаснет.
Функция выключается при выборе другой заданной температуры холодильника.
Функция «Отпуск»
Функция позволяет оставлять холодильную камеру пустой и закрытой в течение про‐
должительного отсутствия владельца, без образование в ней неприятных запахов.
При включенной функции «Отпуск» в холодильнике не должно быть продуктов.
Включение функции.
1. Нажимайте кнопку Mode, пока на дисплее не отобразится соответствующий значок.
Замигает индикатор «Отпуск».
На дисплее температуры отображается заданное значение температуры.
2. Чтобы подтвердить выбор, нажмите кнопку OK.
Отобразится индикатор «Отпуск».
Выключение функции.
1. Нажимайте кнопку Mode, пока не замигает индикатор «Отпуск».
2. Чтобы подтвердить выбор, нажмите кнопку OK.
3. Индикатор «Отпуск» погаснет.
Функция выключается при задании другой температуры холодильной камеры.
Сигнализация открытой дверцы
Если дверь остается открытой несколько минут, раздается звуковой сигнал. На то, что
дверца не закрыта, указывает:
• мигание сигнального индикатора;
• звуковой сигнал.
После восстановления нормальных условий (дверца закрыта) звуковой сигнал выклю‐
чается.
В режиме сигнализации зуммер можно отключить, нажав любую кнопку.
Page 43

Первое использование
ПЕРВОЕ ИСПОЛЬЗОВАНИЕ
Чистка холодильника изнутри
Перед первым включением прибора вымойте его внутренние поверхности и все внут‐
ренние принадлежности теплой водой с нейтральным мылом, чтобы удалить запах, ха‐
рактерный для только что изготовленного изделия, затем тщательно протрите их.
Не используйте моющие или абразивные средства, т.к. они могут повредить покрытие
поверхностей холодильника.
ЕЖЕДНЕВНОЕ ИСПОЛЬЗОВАНИЕ
Этот бытовой прибор продается во Франции.
В соответствии с действующими в этой стране нормативными документами, он дол‐
жен быть оснащен специальным приспособлением (см. рисунок), размещаемым в ниж‐
нем отделении холодильника для указания в нем самой холодной зоны.
43
DYNAMICAIR
В холодильном отделении предусмотрено устройство, обеспечивающее быстрое охла‐
ждение продуктов и более равномерную температуру в отделении.
Устройство включается самостоятельно по ме‐
ре необходимости, например, с целью быстро‐
го восстановления температуры после откры‐
тия дверцы или в условиях высокой окружаю‐
щей температуры.
Предусмотрена возможность включения ус‐
тройства вручную - в случае необходимости
(см. "Функция DYNAMICAIR ").
Устройство DYNAMICAIR прекращает работать
в случае открывания дверцы и снова включает‐
ся немедленно - после ее закрывания.
Page 44

44
Полезные советы
Съемные полки
На стенках холодильника установлен ряд на‐
правляющих, позволяющих размещать полки
по желанию.
Для оптимального использования простран‐
ства передние половинки полок могут лежать
на задних.
Размещение полок дверцы
Чтобы обеспечить возможность хранить упаковки продуктов различных размеров, пол‐
ки дверцы можно размещать на разной высоте.
Выбор высоты выдвижного ящика
Выдвижной ящик может быть установлен на различной высоте.
Для выполнения этой операции действуйте следующим образом:
1. поднимите полку с выдвижным ящиком
вверх и снимите с держателей дверцы
2. снимите опорный кронштейн ящика с на‐
правляющих под полкой
3. Чтобы установить ящик на другую высо‐
ту, проделайте эту процедуру в обрат‐
ном порядке.
ПОЛЕЗНЫЕ СОВЕТЫ
Рекомендации по экономии электроэнергии
• Не открывайте дверцу слишком часто и не держите ее открытой дольше, чем необ‐
ходимо.
• Если температура окружающей среды высокая, регулятор температуры находится
в самом высоком положении и холодильник полностью загружен, компрессор может
работать без остановок, что приводит к образованию инея или льда на испарителе.
Page 45

Чистка и уход
Если такое случается, поверните регулятор температуры до более низких значе‐
ний, чтобы сделать возможным автоматическое оттаивание, и, следовательно, сни‐
зить потребление электроэнергии.
Рекомендации по охлаждению продуктов
Для получения оптимальных результатов:
• не помещайте в холодильник теплые продукты или испаряющиеся жидкости
• накрывайте или заворачивайте продукты, особенно те, которые имеют сильный запах
• располагайте продукты так, чтобы вокруг них мог свободно циркулировать воздух
Рекомендации по охлаждению
Полезные советы:
Мясо (всех типов): помещайте в полиэтиленовые пакеты и кладите на стеклянную пол‐
ку, расположенную над ящиком для овощей.
Храните мясо таким образом один, максимум два дня, иначе оно может испортиться.
Продукты, подвергшиеся тепловой обработке, холодные блюда и т.д.: должны быть на‐
крыты и могут быть размещены на любой полке.
Фрукты и овощи: должны быть тщательно очищенными; их следует помещать в спе‐
циально предусмотренные для их хранения ящики.
Сливочное масло и сыр: должны помещаться в специальные воздухонепроницаемые
контейнеры или быть обернуты алюминиевой фольгой или полиэтиленовой пленкой,
чтобы максимально ограничить контакт с воздухом.
Бутылки с молоком: должны быть закрыты крышкой и размещены в полке для бутылок
на дверце.
Бананы, картофель, лук и чеснок не следует хранить в холодильнике в неупакованном
виде.
45
ЧИСТКА И УХОД
ПРЕДУПРЕЖДЕНИЕ!
Перед выполнением каких-либо операций по чистке или уходу за прибором выньте вил‐
ку сетевого шнура из розетки.
В холодильном контуре данного прибора содержатся углеводороды; поэтому его об‐
служивание и заправка должны осуществляться только уполномоченными специали‐
стами.
Периодическая чистка
Прибор нуждается в регулярной чистке:
• внутренние поверхности прибора и принадлежности мойте теплой водой с нейтраль‐
ным мылом.
• тщательно проверьте уплотнение дверцы и вытрите его дочиста, чтобы оно было
чистым и без мусора.
• сполосните и тщательно вытрите.
Page 46

46
Чистка и уход
Не тяните, не двигайте и старайтесь не повредить трубки и кабели внутри корпуса.
Никогда не пользуйтесь для чистки внутренних поверхностей моющими средствами,
абразивными порошками, чистящими средствами с сильным запахом или полироваль‐
ными пастами, так как они могут повредить поверхность и оставить стойкий запах.
Прочистите испаритель (черная решетка) и компрессор, расположенные с задней сто‐
роны прибора, щеткой или пылесосом. Эта операция повышает эффективность рабо‐
ты прибора и снижает потребление электроэнергии.
Будьте осторожны, чтобы не повредить систему охлаждения.
Некоторые чистящие средства для кухни содержат химикаты, могущие повредить пласт‐
массовые детали прибора. По этой причине рекомендуется мыть внешний корпус при‐
бора только теплой водой с небольшим количеством моющего средства.
После чистки подключите прибор к сети электропитания.
Размораживание холодильника
При нормальных условиях наледь автоматически удаляется с испарителя холодильно‐
го отделения при каждом выключении мотор-компрессора. Талая вода сливается в спе‐
циальный поддон, установленный с задней стороны прибора над мотор-компрессо‐
ром, и затем оттуда испаряется.
Необходимо периодически прочищать сливное
отверстие, имеющееся посредине канала холо‐
дильного отделения, во избежание попадания
капель воды на находящиеся в ней продукты.
Используйте для этого специальное приспосо‐
бление, которое вы найдете уже вставленным
в сливное отверстие.
Перерывы в эксплуатации
Если прибор не будет использоваться в течение продолжительного времени, примите
следующие меры предосторожности:
• отключите устройство от сети электропитания
• удалите все продукты
•
разморозьте
• оставьте дверцы приоткрытыми, чтобы предотвратить образование неприятного за‐
паха.
12) Если предусмотрено.
12)
вымойте прибор и все принадлежности
Page 47

Что делать, если ...
Если прибор будет продолжать работать, попросите кого-нибудь проверять его время
от времени, чтобы не допустить порчи находящихся в нем продуктов в случае отклю‐
чения электроэнергии.
ЧТО ДЕЛАТЬ, ЕСЛИ ...
ВНИМАНИЕ!
Перед устранением неисправностей выньте вилку сетевого шнура из розетки.
Устранять неисправности, не описанные в данном руководстве, должен только квали‐
фицированный электрик или уполномоченный специалист.
При нормальных условиях эксплуатации слышны некоторые звуки (работы компрессо‐
ра, циркуляции хладагента).
Неисправность Возможная причина Способ устранения
Прибор издает сильный
шум
Прибор не работает. Лам‐
па не горит.
Вилка сетевого шнура не вста‐
На прибор не подается элек‐
Лампа не горит. Лампа находится в режиме
Лампа перегорела. См. раздел "Замена лампы".
Компрессор работает не‐
прерывно.
Неплотно закрыта дверца. См. раздел "Закрытие дверцы".
Дверцу открывали слишком ча‐
Температура продуктов слиш‐
Температура воздуха в поме‐
Компрессор не включает‐
ся сразу после нажатия вы‐
ключателя
COOLMATIC или после из‐
менения температуры.
Прибор не установлен дол‐
жным образом
Прибор выключен. Включите прибор.
влена в розетку как следует.
тропитание. Отсутствует на‐
пряжение в сетевой розетке.
ожидания.
Неправильно задана темпера‐
тура.
сто.
ком высокая.
щении слишком высокая.
Это нормальное явление, это
не является неисправностью.
Проверьте, прочно ли стоит при‐
бор (все четыре ножки должны
стоять на полу)
Как следует вставьте вилку се‐
тевого шнура в розетку.
Подключите к этой сетевой ро‐
зетке другой электроприбор.
Обратитесь к квалифицирован‐
ному электрику.
Откройте и закройте дверцу.
Задайте более высокую темпе‐
ратуру.
Не оставляйте дверцу открытой
дольше, чем это необходимо.
Прежде чем положить продукты
на хранение, дайте им охладить‐
ся до комнатной температуры.
Обеспечьте снижение темпера‐
туры воздуха в помещении.
Компрессор включится через не‐
которое время.
47
Page 48

48
Что делать, если ...
Неисправность Возможная причина Способ устранения
Вода стекает по задней
стенке холодильника.
Вода стекает внутрь холо‐
дильника.
Продукты мешают воде сте‐
Невозможно задать темпе‐
ратуру.
Температура внутри при‐
бора слишком низкая/
слишком высокая.
Неплотно закрыта дверца. См. раздел "Закрытие дверцы".
Температура продуктов слиш‐
Одновременно хранится слиш‐
Температура в холодиль‐
нике слишком высокая.
Во время автоматического раз‐
мораживания на задней пане‐
ли размораживается наледь.
Засорилось сливное отвер‐
стие.
кать в водосборник.
Включена функция
COOLMATIC .
Неправильно задана темпера‐
тура.
ком высока.
ком много продуктов.
Внутри прибора нет циркуля‐
ции холодного воздуха.
Это нормально.
Прочистите сливное отверстие.
Убедитесь, что продукты не ка‐
саются задней стенки.
Выключите функцию
COOLMATIC вручную или подо‐
ждите, пока функция не выклю‐
чится автоматически, после это‐
го задайте температуру. См. раз‐
дел "Функция COOLMATIC ".
Задайте более высокую/более
низкую температуру.
Прежде чем положить продукты
на хранение, дайте им охладить‐
ся до комнатной температуры.
Одновременно храните мень‐
шее количество продуктов.
Убедитесь, что внутри прибора
циркулирует холодный воздух.
Замена лампы
Прибор оборудован светодиодной лампой длительного срока службы.
Этот элемент освещения подлежит замене только в сервисном центре. Обращайтесь
в сервисный центр
Закрытие дверцы
1. Прочистите уплотнители дверцы.
2. При необходимости отрегулируйте дверцу. См. раздел "Установка".
3. При необходимости замените непригодные уплотнители дверцы. Обратитесь в сер‐
висный центр.
Page 49

Технические данные
ТЕХНИЧЕСКИЕ ДАННЫЕ
Размеры ниши для встраива‐
ния
Высота 1780 мм
Ширина 560 мм
Глубина 550 мм
Технические данные указаны на паспортной табличке на левой стенке внутри прибора
и на табличке энергопотребления.
УСТАНОВКА
Размещение
ВНИМАНИЕ!
Если вы выбрасываете старый холодильник с пружинным замком (защелкой) дверцы,
необходимо вывести замок из строя, чтобы дети, играя, не оказались запертыми внутри.
После установки прибора должен быть обеспечен свободный доступ к сетевой вилке.
49
Устанавливайте холодильник в месте, где температура окружающей среды соответ‐
ствует климатическому классу, указанному на табличке с техническими данными:
Климатический класс Температура окружающей среды
SN от +10°C до + 32°C
N от +16°C до + 32°C
ST от +16°C до + 38°C
T от +16°C до + 43°C
Подключение к электросети
Перед включением прибора в сеть удостоверьтесь, что напряжение и частота, указан‐
ные в табличке технических данных, соответствуют параметрам вашей домашней элек‐
трической сети.
Прибор должен быть заземлен. С этой целью вилка сетевого шнура имеет специаль‐
ный контакт заземления. Если розетка электрической сети не заземлена, выполните
отдельное заземление прибора в соответствии с действующими нормами, поручив эту
операцию квалифицированному электрику.
Изготовитель снимает с себя всякую ответственность в случае несоблюдения вышеу‐
казанных правил техники безопасности.
Данное изделие соответствует директивам Европейского Союза.
Page 50

50
Забота об окружающей среде
Требования по вентиляции
Необходимо обеспечить достаточную циркуля‐
цию воздуха с задней стороны холодильника.
50 mm
min.
200 cm
2
ЗАБОТА ОБ ОКРУЖАЮЩЕЙ СРЕДЕ
Символ на изделии или на его упаковке указывает, что оно не подлежит
утилизации в качестве бытовых отходов. Вместо этого его следует сдать в
соответствующий пункт приемки электронного и электрооборудования для
последующей утилизации. Соблюдая правила утилизации изделия, Вы поможете
предотвратить причинение окружающей среде и здоровью людей потенциального
ущерба, который возможен в противном случае, вследствие неподобающего
обращения с подобными отходами. За более подробной информацией об утилизации
этого изделия просьба обращаться к местным властям, в службу по вывозу и
утилизации отходов или в магазин, в котором Вы приобрели изделие.
min.
200 cm
2
Page 51

PARA OBTENER RESULTADOS PERFECTOS
Gracias por escoger este producto AEG. Este artículo ha
sido creado para ofrecer un rendimiento impecable
durante muchos años, con innovadoras tecnologías que
facilitarán su vida y prestaciones que probablemente no
encuentre en electrodomésticos corrientes. Por favor,
dedique algunos minutos a la lectura para disfrutar de
todas sus ventajas.
ACCESORIOS Y CONSUMIBLES
En la página web de AEG, encontrará todo lo necesario
para la perfecta limpieza y funcionamiento de todos sus
electrodomésticos AEG. Junto con una amplia gama de
accesorios diseñados y fabricados conforme a los
elevados estándares de calidad característicos de la
marca, desde utensilios de cocina especializados a
cestos de cubiertos, desde portabotellas a bolsas para el
lavado de prendas delicadas...
51
Visite la tienda web en
www.aeg-electrolux.com/shop
Page 52

Índice de materias
52
ÍNDICE DE MATERIAS
53 Información sobre seguridad
55 Panel de mandos
59 Primer uso
59 Uso diario
61 Consejos útiles
62 Cuidado y limpieza
63 Qué hacer si…
65 Datos técnicos
66 Instalación
67 Aspectos medioambientales
En este manual de usuario se utilizan
los símbolos siguientes:
Datos importantes referentes a su
seguridad personal e información
sobre la manera de evitar que el
aparato sufra daños.
Datos y recomendaciones generales
Información medioambiental
Salvo modificaciones
Page 53

Información sobre seguridad
INFORMACIÓN SOBRE SEGURIDAD
Por su seguridad y para garantizar el funcionamiento correcto del aparato, antes de instalarlo y utilizarlo por primera vez lea atentamente este manual del usuario, incluidos los
consejos y advertencias. Para evitar errores y accidentes, es importante que todas las personas que utilicen el aparato estén perfectamente al tanto de su funcionamiento y de las
características de seguridad. Conserve estas instrucciones y no olvide mantenerlas junto
al aparato en caso de su desplazamiento o venta para que quienes lo utilicen a lo largo
de su vida útil dispongan siempre de la información adecuada sobre el uso y la seguridad.
Por la seguridad de personas y bienes, siga las normas de seguridad indicadas en estas
instrucciones, ya que el fabricante no se hace responsable de daños provocados por omisiones.
Seguridad de niños y personas vulnerables
• Este electrodoméstico no está diseñado para que lo usen personas (incluidos niños)
con discapacidad física, sensorial o mental, o con experiencia y conocimiento insuficientes, a menos que una persona responsable de su seguridad les supervise o instruya
en el uso del electrodoméstico.
No permita que los niños jueguen con el electrodoméstico.
• Mantenga los materiales de embalaje alejados de los niños. Existe riesgo de asfixia.
• Si va a desechar el aparato, extraiga el enchufe de la toma, corte el cable de conexión
(tan cerca del aparato como pueda) y retire la puerta para impedir que los niños al
jugar puedan sufrir descargas eléctricas o quedar atrapados en su interior.
• Si este aparato, que cuenta con juntas de puerta magnéticas, sustituirá a un aparato
más antiguo con cierre de muelle (pestillo) en la puerta, cerciórese de inutilizar el cierre de muelle antes de desechar el aparato antiguo. Evitará así que se convierta en una
trampa mortal para niños.
53
Instrucciones generales de seguridad
PRECAUCIÓN
No obstruya los orificios de ventilación.
• El aparato está diseñado para conservar los alimentos y bebidas de una vivienda nor-
mal, como se explica en este folleto de instrucciones.
• No utilice dispositivos mecánicos ni medios artificiales para acelerar el proceso de des-
congelación.
• No utilice otros aparatos eléctricos (como máquinas para hacer helados) dentro de los
aparatos de refrigeración, a menos que el fabricante haya autorizado su utilización para estos fines.
• No dañe el circuito del refrigerante.
• El circuito del refrigerante del aparato contiene isobutano (R600a). Se trata de un gas
natural con un alto nivel de compatibilidad medioambiental, aunque es inflamable.
Durante el transporte y la instalación del aparato, cerciórese de no provocar daños en
el circuito de refrigeración.
Si el circuito de refrigeración se daña:
Page 54

Información sobre seguridad
54
– mantenga el aparato alejado de las llamas y de cualquier fuente de encendido
– ventile bien la habitación en la que se encuentra el aparato
• Cualquier intento de alterar las especificaciones o modificar este producto puede ser
peligroso. Cualquier daño en el cable de alimentación puede provocar un cortocircuito, un incendio o una descarga eléctrica.
ADVERTENCIA
Los componentes eléctricos (cable de alimentación, enchufe, compresor) debe sustituirlos
un técnico autorizado o personal cualificado.
1. No se debe prolongar el cable de alimentación.
2. Compruebe que la parte posterior del aparato no aplaste ni dañe el enchufe. Un
enchufe aplastado o dañado puede recalentarse y provocar un incendio.
3. Cerciórese de que tiene acceso al enchufe del aparato.
4. No tire del cable de alimentación.
5. Si la toma de corriente está floja, no inserte el enchufe. Existe riesgo de descarga
eléctrica o incendio.
6.
No debe utilizar el aparato sin la tapa de la bombilla
13)
para la iluminación interior.
• Este aparato es pesado. Debe tener precauciones durante su desplazamiento.
• No retire ni toque elementos del compartimento congelador con las manos húmedas
o mojadas, ya que podría sufrir abrasión de la piel o quemaduras por congelación.
• Evite la exposición prolongada del aparato a la luz solar directa.
•
Las bombillas
14)
que se utilizan en este aparato son especiales, y se han seleccionado
exclusivamente para uso en aparatos domésticos. No pueden utilizarse para la iluminación de la vivienda.
Uso diario
• No coloque recipientes calientes sobre las piezas plásticas del aparato.
• No almacene gas ni líquido inflamable en el aparato, ya que podrían estallar.
• Se deben seguir estrictamente las recomendaciones sobre almacenamiento del fabricante del aparato. Consulte las instrucciones correspondientes.
Cuidado y limpieza
• Antes de realizar cualquier tarea de mantenimiento, apague el aparato y desenchúfelo
de la toma de corriente.
• No limpie el aparato con objetos metálicos.
• Revise regularmente el desagüe del agua descongelada del frigorífico. Si es necesario,
limpie el desagüe. Si el desagüe se bloquea, el agua se acumulará en la base del aparato.
Instalación
Para realizar la conexión eléctrica, siga atentamente las instrucciones de los párrafos correspondientes.
13) Si está previsto el uso de la tapa de la bombilla.
14) Si está previsto el uso de bombilla.
Page 55

Panel de mandos
• Desembale el aparato y compruebe que no tiene daños. No conecte el aparato si está
dañado. Informe de los posibles daños de inmediato a la tienda donde lo adquirió. En
ese caso, conserve el material de embalaje.
• Es recomendable esperar al menos dos horas antes de conectar el aparato, para permitir que el aceite regrese al compresor.
• El aparato debe contar con circulación de aire adecuada alrededor, ya que de lo contrario se produce recalentamiento. Para conseguir una ventilación suficiente, siga las instrucciones correspondientes a la instalación.
• Siempre que sea posible, la parte posterior del producto debe estar contra una pared,
para evitar que se toquen las partes calientes (compresor, condensador) y se produzcan quemaduras.
• El aparato no debe colocarse cerca de radiadores ni de hornillas de cocina.
• Asegúrese de que es posible acceder al enchufe después de instalar el electrodoméstico.
•
Realice la conexión sólo con el suministro de agua potable.
15)
Servicio técnico
• Un electricista homologado deberá realizar las tareas que se requieran para ejecutar el
servicio o mantenimiento de este electrodoméstico.
• Las reparaciones de este aparato debe realizarlas un centro de servicio técnico autorizado y sólo se deben utilizar recambios originales.
Protección del medio ambiente
Este aparato no contiene gases perjudiciales para la capa de ozono, ni en el circuito de
refrigerante ni en los materiales aislantes. El aparato no se debe desechar junto con los
residuos urbanos. La espuma aislante contiene gases inflamables: el aparato se debe desechar de acuerdo con la normativa vigente, que puede solicitar a las autoridades locales.
No dañe la unidad de refrigeración, en especial la parte trasera, cerca del intercambiador
de calor. Los materiales de este aparato marcados con el símbolo
son reciclables.
55
PANEL DE MANDOS
1 Tecla ON/OFF
2 Tecla Mode
3 Tecla OK
4 Tecla de enfriamiento de temperatura
5 Tecla de calentamiento de temperatura
6 Pantalla
15) Si está prevista una conexión de agua.
1 2 3 4 5 6
Page 56

Panel de mandos
56
Se puede cambiar el sonido predefinido de las teclas a otro más alto manteniendo pulsadas al mismo tiempo la tecla Mode y la de enfriamiento de temperatura durante unos
segundos. El cambio es reversible.
Pantalla
78
5 64321
1 Función de temporizador
2 Función DYNAMICAIR
3 Función Minute Minder
4 Función de bloqueo de seguridad para niños
5 Indicador de alarma
6 Indicador de temperatura
7 Función Vacaciones
8 Función COOLMATIC
Encendido
Para encender el aparato:
1. Conecte el enchufe a la toma de corriente.
2. Pulse la tecla ON/OFF si la pantalla está apagada.
3. Puede que oiga la señal acústica de alarma tras unos segundos.
Para restaurar la alarma, consulte la sección "Alarma de temperatura alta".
4. Los indicadores de temperatura muestran la temperatura predeterminada programada.
Para programar otra temperatura, consulte la sección "Regulación de la temperatura".
Apagado
Para apagar el aparato:
1. Pulse la tecla ON/OFF durante 5 segundos.
2. La pantalla se apaga.
3. Para desconectar el aparato de la corriente, desconecte el enchufe de la toma de co-
rriente.
Regulación de la temperatura
La temperatura programada en el frigorífico puede ajustarse pulsando la tecla de temperatura.
Ajuste de la temperatura predeterminada:
• +5°C para el frigorífico
El indicador de temperatura muestra la temperatura programada.
La temperatura programada se alcanza en un plazo de 24 horas.
Después de un corte del suministro eléctrico, la temperatura ajustada se guarda.
Page 57

Panel de mandos
Función DYNAMICAIR
Para activar la función:
1. Pulse la tecla Mode hasta que aparezca el icono correspondiente.
El indicador DYNAMICAIR parpadea.
2. Pulse la tecla OK para confirmar.
Aparece el indicador DYNAMICAIR .
Para desactivar la función:
1. Pulse la tecla Mode hasta que parpadee el indicador DYNAMICAIR .
2. Pulse la tecla OK para confirmar.
3. El indicador DYNAMICAIR se apaga.
Si la función se activa automáticamente, el indicador DYNAMICAIR no se muestra (consulte la sección "Uso diario").
La activación de la función DYNAMICAIR incrementa el consumo de energía.
Función Minute Minder
La función Minute Minder debe utilizarse para ajustar una alarma acústica a la hora deseada, algo útil por ejemplo para recetas en las que una mezcla debe enfriarse durante
un tiempo determinado.
Para activar la función:
1. Pulse la tecla Mode hasta que aparezca el icono correspondiente.
El indicador Minute Minder parpadea.
El temporizador muestra el tiempo programado (30 minutos) durante unos segundos.
2. Pulse la tecla de ajuste del temporizador para programar un valor entre 1 y 90 minutos.
3. Pulse la tecla OK para confirmar.
Aparece el indicador Minute Minder .
El Temporizador empieza a parpadear (min).
Al terminar la cuenta atrás, el indicador Minute Minder parpadea y suena la alarma:
1. Desactive la función.
Para desactivar la función:
1. Pulse la tecla Mode hasta que parpadee el indicador Minute Minder .
2. Pulse la tecla OK para confirmar.
3. El indicador Minute Minder se apaga.
La función se puede desactivar en cualquier momento.
El tiempo puede modificarse en cualquier momento antes de que acabe pulsando las teclas de enfriamiento o calentamiento de temperatura.
57
Función Seguro contra la manipulación por niños
Para bloquear los botones y evitar manipulaciones involuntarias, seleccione la función de
seguro para niños.
Para encender el horno:
1. Pulse la tecla Mode hasta que aparezca el icono correspondiente.
2. El indicador de bloqueo para niños parpadea.
Page 58

Panel de mandos
58
3. Pulse la tecla OK para confirmar.
Aparece el indicador de bloqueo para niños.
Para apagar la función:
1. Pulse la tecla Mode hasta que el bloqueo para niños parpadee.
2. Pulse la tecla OK para confirmar.
3. El indicador de bloqueo para niños se apaga.
Función COOLMATIC
Si necesita introducir una gran cantidad de alimentos calientes, por ejemplo, después de
haber hecho la compra, se aconseja activar la función COOLMATIC para enfriarlos más
rápidamente y evitar que suba la temperatura de los que ya se guardan en el frigorífico.
Para activar la función:
1. Pulse la tecla Mode hasta que aparezca el icono correspondiente.
El indicador COOLMATIC parpadea.
El indicador de temperatura del frigorífico muestra la temperatura programada de
+2 °C.
2. Pulse la tecla OK para confirmar.
Aparece el indicador COOLMATIC.
La función COOLMATIC se desactiva automáticamente después de unas 6 horas.
Para apagar la función antes de que termine automáticamente:
1. Pulse la tecla Mode hasta que parpadee el indicador COOLMATIC.
2. Pulse la tecla OK para confirmar.
3. El indicador COOLMATIC se apaga.
La función se apaga seleccionando una temperatura programada diferente.
Función Vacaciones
Esta función permite mantener el frigorífico vacío y cerrado durante periodos largos de
tiempo sin que se formen malos olores.
El compartimento del frigorífico debe estar vacío mientras la función esté activada.
Para activar la función:
1. Pulse la tecla Mode hasta que aparezca el icono correspondiente.
El indicador Vacaciones parpadea.
El indicador de temperatura del frigorífico muestra la temperatura programada.
2. Pulse la tecla OK para confirmar.
Aparece el indicador Vacaciones.
Para desactivar la función:
1. Pulse la tecla Mode hasta que parpadee el indicador Vacaciones.
2. Pulse la tecla OK para confirmar.
3. El indicador Vacaciones se apaga.
Page 59

Primer uso
La función se apaga seleccionando una temperatura programada diferente.
Alarma de puerta abierta
Si la puerta se queda abierta durante unos minutos, sonará una señal acústica. Los indicadores de puerta abierta son los siguientes:
• indicador de alarma intermitente
•señal acústica
Una vez restablecidas las condiciones normales (puerta cerrada), la alarma acústica se detendrá.
La señal acústica se puede desactivar durante la fase de alarma pulsando para ello cualquier tecla.
PRIMER USO
Limpieza de las partes internas
Antes del empleo limpiar todas las partes internas con agua tibia y jabón neutro, a fin de
eliminar el característico olor de nuevo y secarlas luego cuidadosamente.
No utilice detergentes ni polvos abrasivos, ya que podrían dañar el acabado
USO DIARIO
59
este aparato está autorizado para su venta en Francia.
En conformidad con la normativa válida en dicho país, deberá ir provisto de un dispositivo especial (consulte la figura) situado en el compartimiento inferior del frigorífico para
indicar la zona más fría del mismo.
DYNAMICAIR
El compartimento frigorífico cuenta con un dispositivo que permite enfriar los alimentos
con más rapidez y mantener una temperatura más uniforme dentro del compartimento.
Page 60

Uso diario
60
El dispositivo se activa por sí solo cuando es necesario, por ejemplo, para recuperar rápidamente la temperatura después de abrir la puerta o
cuando la temperatura ambiente sea elevada.
Permite encender el dispositivo manualmente
cuando sea necesario (consulte la sección "Función DYNAMICAIR ").
El dispositivo DYNAMICAIR se detiene cuando la
puerta está abierta y se reinicia inmediatamente
después de cerrar la puerta.
Estantes móviles
Las paredes del frigorífico cuentan con guías para colocar los estantes del modo que se prefiera.
Para aprovechar mejor el espacio, los estantes
frontales más pequeños pueden colocarse encima de los traseros.
Colocación de los estantes de la puerta
Para poder guardar alimentos de distintos tamaños, los estantes de la puerta se pueden
colocar a diferentes alturas.
Colocación de la caja deslizante
La caja deslizante se puede colocar a varias alturas.
Para realizar esos ajustes proceda como se indica a continuación:
Page 61

Consejos útiles
1. Sujete el estante que lleva la caja desli-
zante y tire hacia arriba y hacia fuera pa-
ra soltarlo de los soportes de la puerta.
2. Retire la abrazadera de sujeción de la
guía situada por debajo del estante.
3. Invierta la operación anterior para inser-
tar la caja deslizante a otra altura.
CONSEJOS ÚTILES
Consejos para ahorrar energía
• No abra la puerta con frecuencia ni la deje abierta más tiempo del estrictamente nece-
sario.
• Si la temperatura ambiente es elevada, la temperatura del aparato se ha ajustado en
los valores más altos y está totalmente lleno, el compresor podría funcionar de manera continua, provocando la formación de escarcha o hielo en el evaporador. Si esto
sucede, gire el regulador de temperatura a valores inferiores para permitir la descongelación automática y ahorrar en el consumo eléctrico.
61
Consejos para la refrigeración de alimentos frescos
Para obtener los mejores resultados:
• no guarde en el frigorífico alimentos calientes ni líquidos en evaporación;
• cubra o envuelva los alimentos, en especial si tienen sabores fuertes;
• coloque los alimentos de modo que el aire pueda circular libremente entre ellos.
Consejos para la refrigeración
Consejos útiles:
Carne (de todo tipo): guárdela en bolsas de plástico y colóquela en el estante de vidrio,
sobre el cajón de las verduras.
Por razones de seguridad, guárdela de ese modo durante uno o dos días, como máximo.
Alimentos cocinados, platos fríos, etc..: los debe cubrir y puede colocarlos en cualquiera
de los estantes.
Frutas y verduras: se deben limpiar a conciencia y colocar en los cajones especiales suministrados a tal efecto.
Mantequilla y queso: colóquelos en recipientes herméticos especiales o envueltos en papel de aluminio o en bolsas de plástico, para excluir tanto aire como sea posible.
Botellas de leche: deben tener tapa y se colocarán en el estante para botellas de la puerta.
Los plátanos, las patatas, las cebollas y los ajos, si no están empaquetados, no deben guardarse en el frigorífico.
Page 62

Cuidado y limpieza
62
CUIDADO Y LIMPIEZA
PRECAUCIÓN
Antes de realizar tareas de mantenimiento, desenchufe el aparato.
Este equipo contiene hidrocarburos en la unidad de refrigeración; por tanto, el mantenimiento y la recarga deben estar a cargo exclusivamente de técnicos autorizados.
Limpieza periódica
El equipo debe limpiarse de manera habitual:
• Limpie el interior y los accesorios con agua templada y un jabón neutro.
• Revise y limpie periódicamente las juntas de la puerta para mantenerlas limpias y sin
restos.
• Aclare y seque a fondo.
No mueva, dañe ni tire de los conductos o cables del interior del armario.
No utilice detergentes, polvos abrasivos, productos de limpieza perfumados ni cera para
limpiar el interior, ya que dañarán la superficie y dejarán un fuerte olor.
Limpie el condensador (rejilla negra) y el compresor de la parte posterior del aparato con
un cepillo o un aspirador. Esa operación mejorará el rendimiento del aparato y reducirá
el consumo eléctrico.
Tenga cuidado para no dañar el sistema de refrigeración.
Muchas marcas de limpiadores de superficies de cocina contienen químicos que pueden
atacar o dañar los plásticos del aparato. Por tal razón, se recomienda que el exterior del
aparato se limpie sólo con agua templada a la que se añadirá un poco de líquido lavavajillas.
Después de la limpieza, vuelva a conectar el aparato a la toma de red.
Descongelación del frigorífico
La escarcha se elimina automáticamente del evaporador del frigorífico cada vez que se
detiene el compresor, durante el funcionamiento normal. El agua de la descongelación se
descarga hacia un recipiente especial situado en la parte posterior del aparato, sobre el
motor compresor, donde se evapora.
Page 63

Qué hacer si…
Es importante limpiar periódicamente el orificio
de salida del agua de descongelación situado en
la mitad del canal del compartimento frigorífico
para evitar que el agua desborde y caiga sobre
los alimentos del interior. Utilice el limpiador especial suministrado, que hallará ya colocado en
el orificio de desagüe.
Periodos sin funcionamiento
Si el aparato no se utiliza durante un tiempo prolongado, tome las siguientes precauciones:
•
desconecte el aparato de la red eléctrica;
• extraiga todos los alimentos;
•
descongele
• deje la puerta(s) entreabierta para prevenir olores desagradables.
Si va a mantener el armario en marcha, solicite a alguien que lo inspeccione de vez en
cuando para evitar que los alimentos se echen a perder en caso de un corte de energía.
16)
y limpie el aparato y todos los accesorios;
63
QUÉ HACER SI…
ADVERTENCIA
Antes de realizar cualquier reparación, desenchufe el aparato de la toma de corriente.
Sólo un electricista o un técnico profesional debe llevar a cabo cualquier reparación que
no figure en este manual.
Se producen ruidos durante el funcionamiento normal (compresor, circulación del refrigerante).
Problema Causa probable Solución
El aparato hace ruido.
El aparato no funciona.
La bombilla no funciona.
16) Si está previsto.
El aparato no está bien apoyado en el suelo.
El aparato está apagado. Encienda el aparato.
Compruebe que los soportes del
aparato descansan sobre una superficie estable (las cuatro patas
deben estar bien apoyadas en el
suelo).
Page 64

Qué hacer si…
64
Problema Causa probable Solución
El aparato no está correctamen-
El aparato no recibe suministro
La bombilla no funciona.
La bombilla es defectuosa. Consulte la sección "Sustitución
El compresor funciona
continuamente.
La puerta no está bien cerrada. Consulte la sección "Cierre de la
La puerta se ha abierto con ex-
La temperatura de los produc-
La temperatura ambiente es de-
El compresor no se pone
en marcha inmediatamente después de pulsar el interruptor COOLMATIC o
tras cambiar la temperatura.
El agua fluye por la placa
posterior del frigorífico.
El agua fluye al interior
del frigorífico.
Los alimentos impiden que el
No es posible ajustar la
temperatura.
te enchufado a la toma de corriente.
eléctrico. No hay tensión en la
toma de corriente.
La bombilla está en espera. Cierre y abra la puerta.
La temperatura no se ha ajustado correctamente.
cesiva frecuencia.
tos es demasiado alta.
masiado alta.
Esto es normal y no significa
que exista un error.
Durante el proceso de descongelación automática, el hielo se
descongela en la placa posterior.
La salida de agua está obstruida. Limpie la salida de agua.
agua fluya al colector de la misma.
La función COOLMATIC está activada.
Enchufe el aparato correctamente a la toma de corriente.
Enchufe un aparato eléctrico diferente a la toma de corriente.
Llame a un electricista cualificado.
de la bombilla".
Seleccione una temperatura más
alta.
puerta".
No mantenga abierta la puerta
más tiempo del necesario.
Deje que la temperatura de los
alimentos descienda a la temperatura ambiente antes de guardarlos.
Reduzca la temperatura ambiente.
El compresor se pone en marcha
después de un cierto tiempo.
Esto es normal.
Asegúrese de que los alimentos
no entran en contacto con la placa posterior.
Apague manualmente la función
COOLMATIC o espere hasta que
la función se reinicie automáticamente antes de ajustar la temperatura. Consulte la "función
COOLMATIC ".
Page 65

Datos técnicos
Problema Causa probable Solución
La temperatura del aparato es demasiado baja/alta.
La puerta no está bien cerrada. Consulte la sección "Cierre de la
La temperatura de los produc-
Se han guardado muchos ali-
La temperatura del frigorífico es demasiado alta.
El regulador de temperatura no
se ha ajustado correctamente.
tos es demasiado alta.
mentos al mismo tiempo.
No hay circulación de aire frío
en el aparato.
Seleccione una temperatura más
alta o baja.
puerta".
Deje que la temperatura de los
alimentos descienda a la temperatura ambiente antes de guardarlos.
Guarde menos productos al mismo tiempo.
Compruebe que el aire frío circula libremente en el aparato.
Cambio de la bombilla
El aparato está equipado con una luz LED interior de larga duración.
El dispositivo de iluminación sólo debe ser sustituido por el servicio técnico. Póngase en
contacto con el servicio técnico.
Cierre de la puerta
1. Limpie las juntas de la puerta.
2. Si es necesario, ajuste la puerta. Consulte "Instalación".
3. Si es necesario, cambie las juntas de puerta defectuosas. Contacte al Centro de servi-
cio técnico.
65
DATOS TÉCNICOS
Medidas de la cavidad
Altura 1780 mm
Anchura 560 mm
Fondo 550 mm
La información técnica se encuentra en la placa de datos técnicos en el lado interior izquierdo del aparato y en la etiqueta de energía.
Page 66

Instalación
66
INSTALACIÓN
Colocación
ADVERTENCIA
Si va a desechar un aparato antiguo que tiene una cerradura o cierre en la puerta, deberá
asegurarse de su inutilización para impedir que niños pequeños queden atrapados en su
interior.
El enchufe del aparato debe tener fácil acceso después de la instalación.
Instale el aparato en un punto en el que la temperatura ambiente se corresponda con la
clase climática indicada en la placa de datos técnicos del aparato:
Clase climática Temperatura ambiente
SN De +10°C a +32°C
N De +16°C a +32°C
ST De +16°C a +38°C
T De +16°C a +43°C
Conexión eléctrica
Antes de conectar el aparato, compruebe que el voltaje y la frecuencia que aparecen en
la placa de datos técnicos se corresponden con el suministro de la vivienda.
El aparato debe tener conexión a tierra. El enchufe del cable de alimentación se suministra con un contacto para tal fin. Si la toma de red de la vivienda carece de conexión a
tierra, conecte el aparato a una toma de tierra conforme con la normativa, después de
consultar a un electricista profesional.
El fabricante rechaza toda responsabilidad si no se toman las precauciones antes indicadas.
Este aparato es conforme con las directivas de la CEE.
Requisitos de ventilación
El flujo de aire de la parte posterior del aparato
debería ser suficiente.
50 mm
min.
200 cm
2
min.
2
200 cm
Page 67

Aspectos medioambientales
ASPECTOS MEDIOAMBIENTALES
El símbolo que aparece en el aparato o en su embalaje, indica que este producto no
se puede tratar como un residuo normal del hogar. Se deberá entregar, sin coste para el
poseedor, bien al distribuidor, en el acto de la compra de un nuevo producto similar al
que se deshecha, bien a un punto municipal de recolección selectiva de equipos
eléctricos y electrónicos para su reciclaje. Al asegurarse de que este producto se desecha
correctamente, usted ayudará a evitar posibles consecuencias negativas para el medio
ambiente y la salud pública, lo cual podría ocurrir si este producto no se gestionara de
forma adecuada. Para obtener información más detallada sobre el reciclaje de este
producto, póngase en contacto con el Ayuntamiento de su Municipio, ó con la tienda
donde lo compró.
67
Page 68

www.aeg-electrolux.com/shop 2223395950-A-302010
 Loading...