


User manual
Istruzioni per l’uso
Fridge-Freezer
Frigo-Congelatore
SANTO C 8 18 47-4 i
SANTO C 9 18 47-4 i
2
Dear Customer
Thank you for choosing one of our high-quality products.
With this appliance you will experience the perfect combination of func-
tional design and cutting edge technology.
Convince yourself that our appliances are engineered to deliver the best
performance and control - indeed we are setting the highest standards of
excellence.
In addition to this you find environmental and energy saving aspects as an
integral part of our products.
To ensure optimal and regular performance of your appliance please read
this instruction manual carefully. It will enable you to navigate all processes
perfectly and most efficiently.
To refer to this manual any time you need to, we recommend you to keep
it in a safe place. And please pass it to any future owner of the appliance.
We wish you much joy with your new appliance.
The following symbols are used in this manual
Important information concerning your personal safety and information on
how to avoid damaging the appliance
General information and tips
Environmental information

3
Contents
Safety . . . . . . . . . . . . . . . . . . . . . . . . . . . . . . . . . . . . . . . . . . . . . . . . . . . . . .4
Disposal . . . . . . . . . . . . . . . . . . . . . . . . . . . . . . . . . . . . . . . . . . . . . . . . . . . .6
Appliance Packaging Information . . . . . . . . . . . . . . . . . . . . . . . . . . . . . . .6
Disposal of old Appliances . . . . . . . . . . . . . . . . . . . . . . . . . . . . . . . . . . . .6
Remove transport safeguard . . . . . . . . . . . . . . . . . . . . . . . . . . . . . . . . . .6
Shelf holders . . . . . . . . . . . . . . . . . . . . . . . . . . . . . . . . . . . . . . . . . . . . . . . .7
Installation . . . . . . . . . . . . . . . . . . . . . . . . . . . . . . . . . . . . . . . . . . . . . . . . .7
Installation Location . . . . . . . . . . . . . . . . . . . . . . . . . . . . . . . . . . . . . . . . . .7
Your refrigerator needs air . . . . . . . . . . . . . . . . . . . . . . . . . . . . . . . . . . . . .8
Rehingeing the door . . . . . . . . . . . . . . . . . . . . . . . . . . . . . . . . . . . . . . . . . .8
Housing dimensions . . . . . . . . . . . . . . . . . . . . . . . . . . . . . . . . . . . . . . . . . .9
Instructions for total built-in . . . . . . . . . . . . . . . . . . . . . . . . . . . . . . . . . .9
Electrical Connection . . . . . . . . . . . . . . . . . . . . . . . . . . . . . . . . . . . . . . . .13
Prior to Initial Start–Up . . . . . . . . . . . . . . . . . . . . . . . . . . . . . . . . . . . . .13
Operating and indicator panel Fridge . . . . . . . . . . . . . . . . . . . . . . . . .14
Starting up and temperature regulation . . . . . . . . . . . . . . . . . . . . . . .15
Air recycling . . . . . . . . . . . . . . . . . . . . . . . . . . . . . . . . . . . . . . . . . . . . . . . .16
Interior accessories . . . . . . . . . . . . . . . . . . . . . . . . . . . . . . . . . . . . . . . . .16
Fresh food refrigeration . . . . . . . . . . . . . . . . . . . . . . . . . . . . . . . . . . . . .17
Operating and indicator panel appliance . . . . . . . . . . . . . . . . . . . . . .18
Starting up and temperature regulation . . . . . . . . . . . . . . . . . . . . . . .19
Freezing and storing frozen food . . . . . . . . . . . . . . . . . . . . . . . . . . . . .21
Preparation of Ice Cubes . . . . . . . . . . . . . . . . . . . . . . . . . . . . . . . . . . . . .22
Freezing Calendar . . . . . . . . . . . . . . . . . . . . . . . . . . . . . . . . . . . . . . . . . . .22
Defrosting . . . . . . . . . . . . . . . . . . . . . . . . . . . . . . . . . . . . . . . . . . . . . . . . .22
Cleaning and Care . . . . . . . . . . . . . . . . . . . . . . . . . . . . . . . . . . . . . . . . . .23
Energy Saving Tips . . . . . . . . . . . . . . . . . . . . . . . . . . . . . . . . . . . . . . . . . .24
What to do if . . . . . . . . . . . . . . . . . . . . . . . . . . . . . . . . . . . . . . . . . . . . . .25
Correcting Malfunctions . . . . . . . . . . . . . . . . . . . . . . . . . . . . . . . . . . . . . .25
Changing the light bulb . . . . . . . . . . . . . . . . . . . . . . . . . . . . . . . . . . . . . .27
Regulations, Standards, Guidelines . . . . . . . . . . . . . . . . . . . . . . . . . . .27
4
Safety
The safety aspects of our refrigerators/freezers comply with accepted technical standards and the German Appliance Safety Law. Nevertheless, we
consider it our obligation to make you aware of the following safety information:
Intended use
• The refrigerator is intended for use in the home. It is suitable for the cooling, freezing and storing of frozen food, as well as for making ice. If the
appliance is used for purposes other than those intended or used incorrectly, no liability can be accepted by the manufacturer for any damage
that may be caused.
• Alterations or changes to the freezer are not permitted for reasons of
safety.
• If you use the refrigerator in a commercial application or forpurposes
other than the cooling, freezing or frozen storage of foods,please observe all valid legal regulations for your application.
Prior to initial start–up
• Check the refrigerator for transport damage. Under no circumstance
should a damaged appliance be plugged in! In the event of damage, please
contact the vendor.
Refrigerant
The refrigerant isobutane (R600a) is contained within the refrigerant circuit
of the appliance, a natural gas with a high level of environmental compatibility, which is nevertheless flammable.
• During transportation and installation of the appliance, be certain that
none of the components of the refrigerant circuit become damaged.
• If the refrigerant circuit should become damaged:
– avoid open flames and sources of ignition;
– thoroughly ventilate the room in which the appliance is situated.
Safety of children
• Packaging (e.g. wraps, polystyrene) can be dangerous for children. There is
a risk of suffocation! Keep packaging material away from children!
• Please make old appliances unusable prior to disposal. Pull out the mains
plug, cut off the mains cable, break or remove spring or boltcatches, if fitted. By doing this you ensure that children cannot lock themselves in the

5
fridge when playing (there is risk of suffocation!)or get themselves into
other dangerous situations.
• Often children cannot recognise the hazards present in household
appliances. It is therefore important that you ensure adequate supervision
and never let children play with the appliance!
Daily Operation
• Containers with flammable gases or liquids can leak at low temperatures.
There is a risk of an explosion! Do not store any containers with flammable materials such as, for example, spray cans, fire extinguisher refill cartridges etc in the refrigerator/freezer.
• Bottles and cans must not be placed in the freezer compartment. They can
burst when the contents freeze, high carbonate content drinks can even
explode! Never store lemonade, juices, beer, wine, sparkling wine etc. in
the freezer compartment. Exception: high alcohol content spirits can be
stored in the freezer compartment.
• Do not put ice creams or ice cubes in the mouth immediately after removal from the freezer compartment. Very cold ice can freeze to the lips or
tongue and cause injury.
• Do not touch frozen food with wet hands. Your hands could freeze to the
food.
• Do not operate any electrical appliances in the refrigerator/freezer (e.g.
electric ice cream makers, mixers etc.).
• Before cleaning the appliance, always switch off the appliance and unplug
it, or pull the house fuse or switch off the circuit breaker.
• When unplugging always pull the plug from the mains socket, do not pull
on the cable.
In case of malfunction
• If the a malfunction occurs on the appliance, please look first in the "What
to do if ..." section of these instructions. If the information given there
does not help, please do not perform any further repairs yourself.
• Refrigerators/freezers may only be repaired by qualified service engineers.
Improper repairs can give rise to significant hazards. If your appliance
needs repairing, please contact your specialist dealer or our Customer Service.
6
Disposal
Appliance Packaging Information
All materials are environmentally sound! They can be dumped or burned at
an incinerating plant without danger!
About the materials: The plastics can be recycled and are identified as follows:
>PE< for polyethylene, e.g. the outer covering and the bags in the interior.
>PS< for polystyrene foam, e.g. the pads, which are all free of chlorofluorocarbon.
The carton parts are made from recycled paper and should be disposed of
at a waste-paper recycling collection location.
Disposal of old Appliances
For environmental reasons, refrigeration appliances must be disposed of
properly. This applies to your old appliance, and - at the end of its service
life - for your new appliance as well.
Warning! Before disposing of old appliances make them inoperable. Remove plug from mains, sever the power cable, remove or destroy any snap or
latch closures. This eliminates the danger that playing children lock themselves into the appliance (danger of suffocation!) or place themselves into
other life-endangering situations.
Disposal:
• The appliance may not be disposed of with domestic waste or bulky refuse.
• The refrigerant circuit, especially the heat exchanger at the back of the
appliance, may not be damaged.
• The symbol on the product or on its packaging indicates that this product may not be treated as household waste. Instead it shall be handed
over to the applicable collection point for the recycling of electrical and
electronic equipment. By ensuring this product is disposed of correctly,
you will help prevent potential negative consequences for the environment and human health, which could otherwise be caused by inappropriate waste handling of this product. For more detailed information
about recycling of this product, please contact your local city office, your
household waste disposal service or the shop where you purchased the
product.
Remove transport safeguard
The appliance and the interior fittings are protected for transport.
• Pull off the adhesive tape on the left and right side of the door.
• Remove all adhesive tape and packing pieces from the interior of the
appliance.
7
If installation next to a source of heat is unavoidable, the following minimum clearances must be maintained at the sides of the appliance:
– for electric cookers 3 cm;
– for oil and coal fired ranges 30 cm.
If these clearances cannot be maintained a heat insulating pad is required
between the cooker and the refrigeration appliance.
If the refrigeration appliance is installed next to another refrigerator or freezer a clearance of 5 cm at the sides is required, in order to prevent the formation of condensation on the outside of the appliance.
Installation
Installation Location
The appliance should be set up in a well ventilated, dry room.
Energy use is affected by the ambient temperature. The appliance should
therefore
– not be exposed to direct sunlight;
– not be installed next to radiators, cookers or other sources of heat;
– only be installed at a location whose ambient temperature corresponds to
the climate classification, for which the appliance is designed.
The climate classification can be found on the serial plate, which is located
at the left on the inside of the appliance.
The following table shows which ambient temperature is correct for each
climate classification: each climate classification:
Climate classification for an ambient temperature of
SN +10 bis +32 °C
N +16 bis +32 °C
ST +18 bis +38 °C
T +18 bis +43 °C
B
A
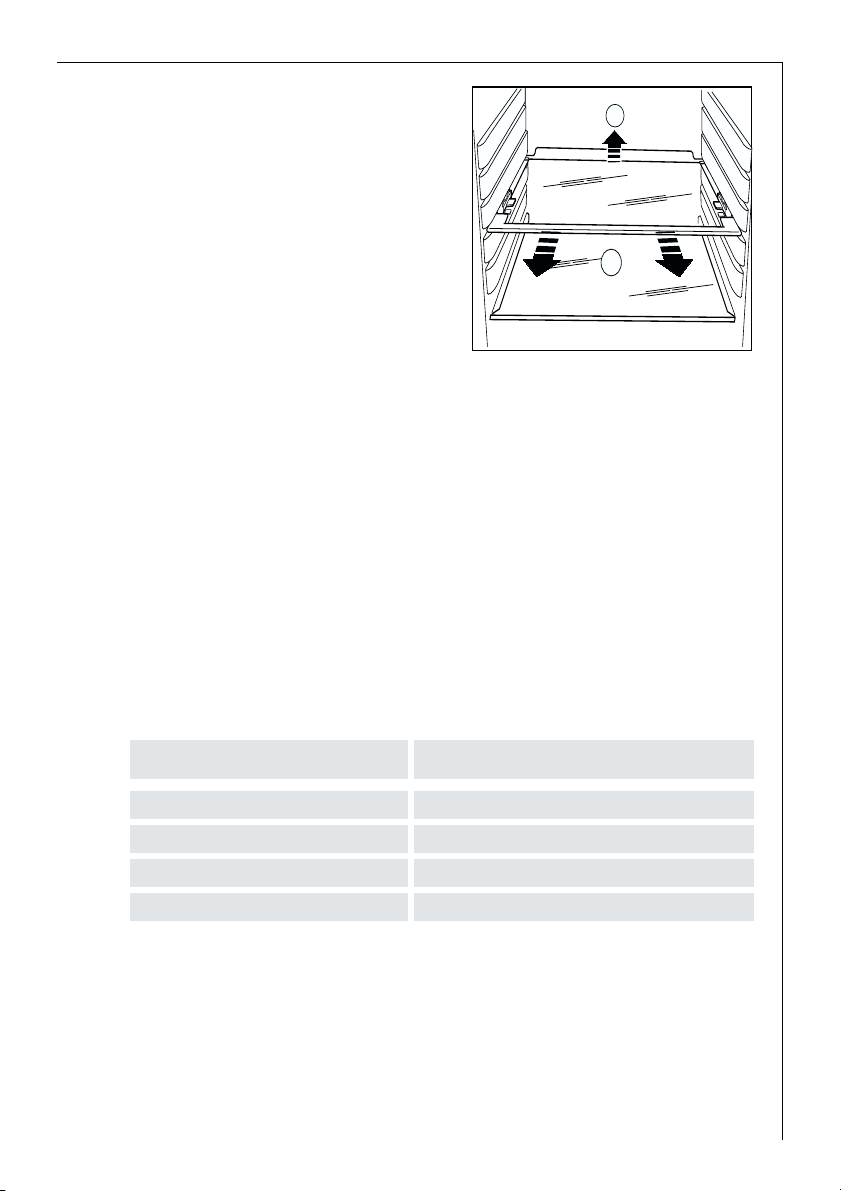
Shelf holders
Your appliance is equipped with shelf
retainers that make it possible to
secure the shelves during transportation.
To remove them proceed as follows:
Raise the shelf from the back, push it
in the direction of the arrow until it
is freed and remove the retainers.
8
Your appliance needs air
For safety reasons, minimum ventilationmust be as shown Fig.
Attention: keep ventilation openings
clear of obstruction;
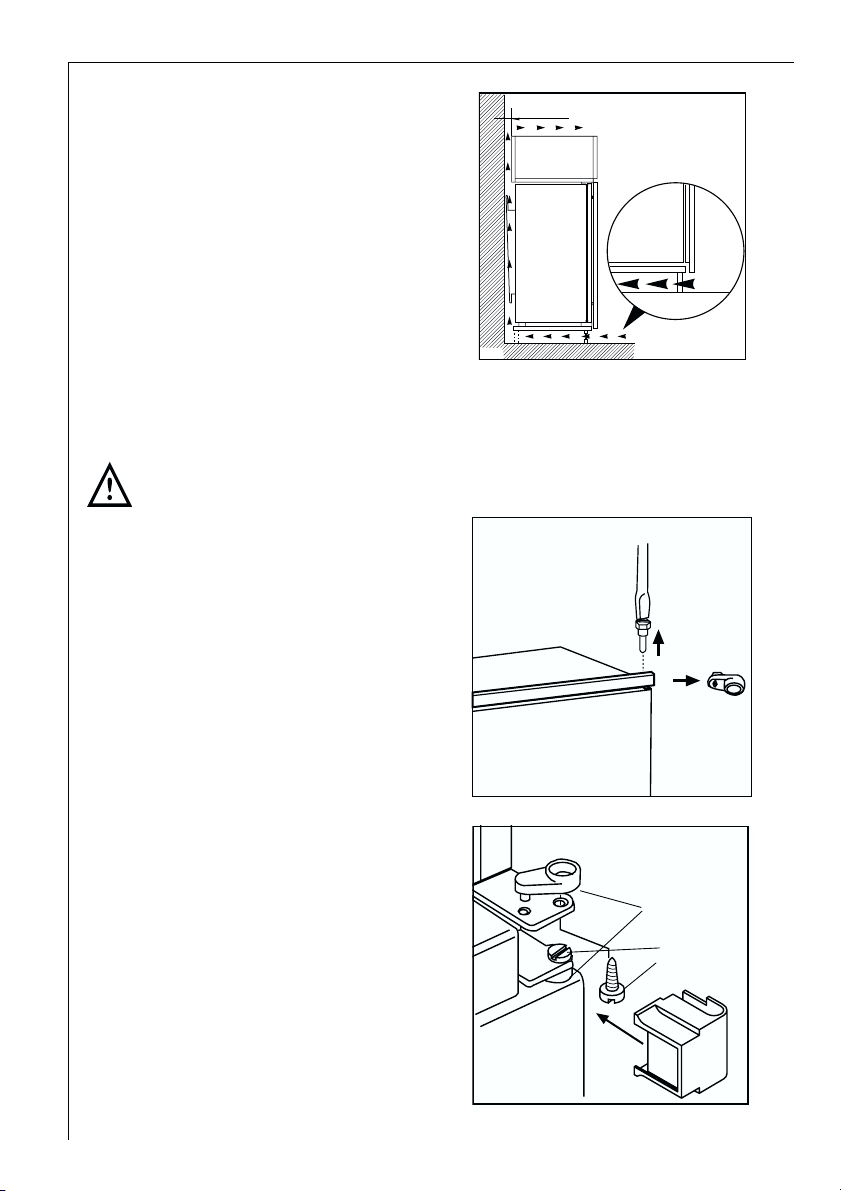
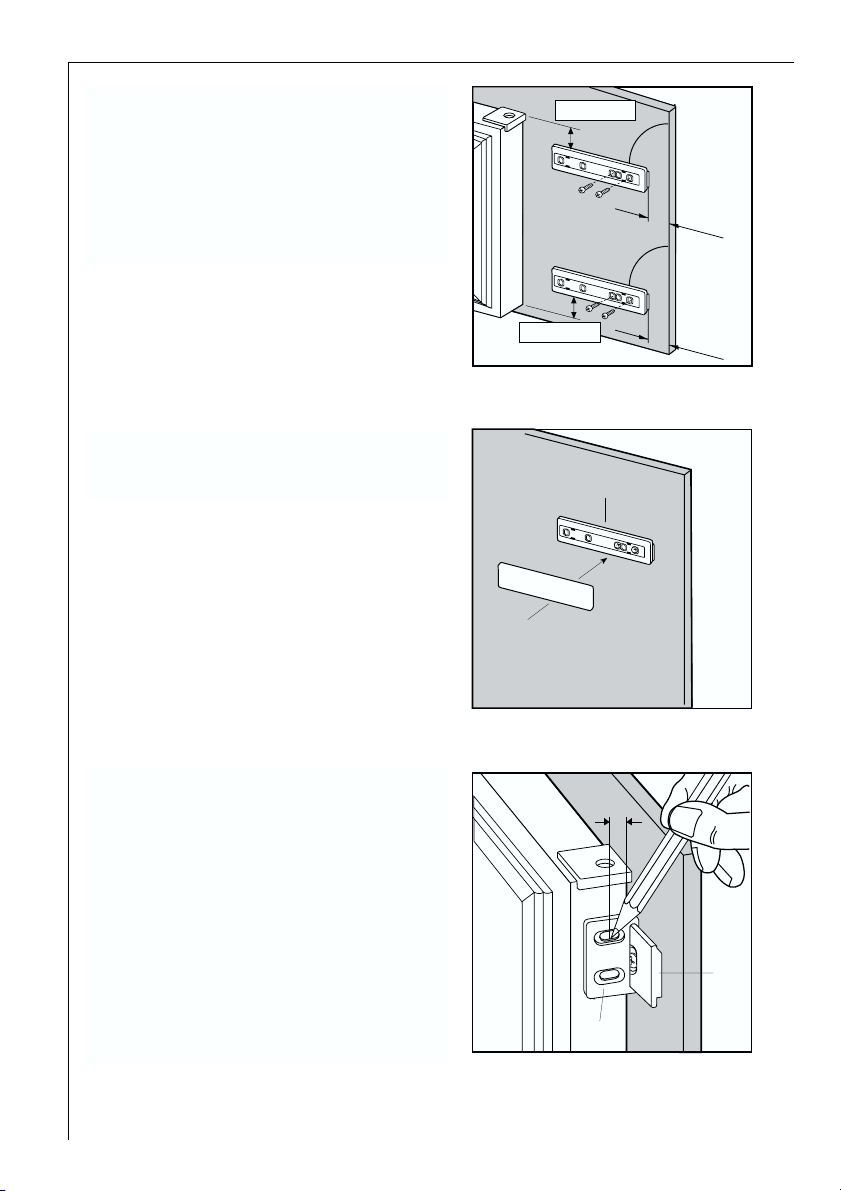
Rehingeing the door
The side at which the door opens can be changed from the right side (factory adjustment) to the left side, if the installation site requires.
Warning! When changing the side at which the door opens, the appliance
may not be connected to the mains. Remove plug from the mains beforehand.
1. Unscrew the upper pin and remove the spacer
2. Remove the upper door
3.
Remove the hinge cover (A).
Unscrew the pins (B) and the spacers (C) and refit them on the
middle hinge of the opposite side.
Snap the hinge cover (A).
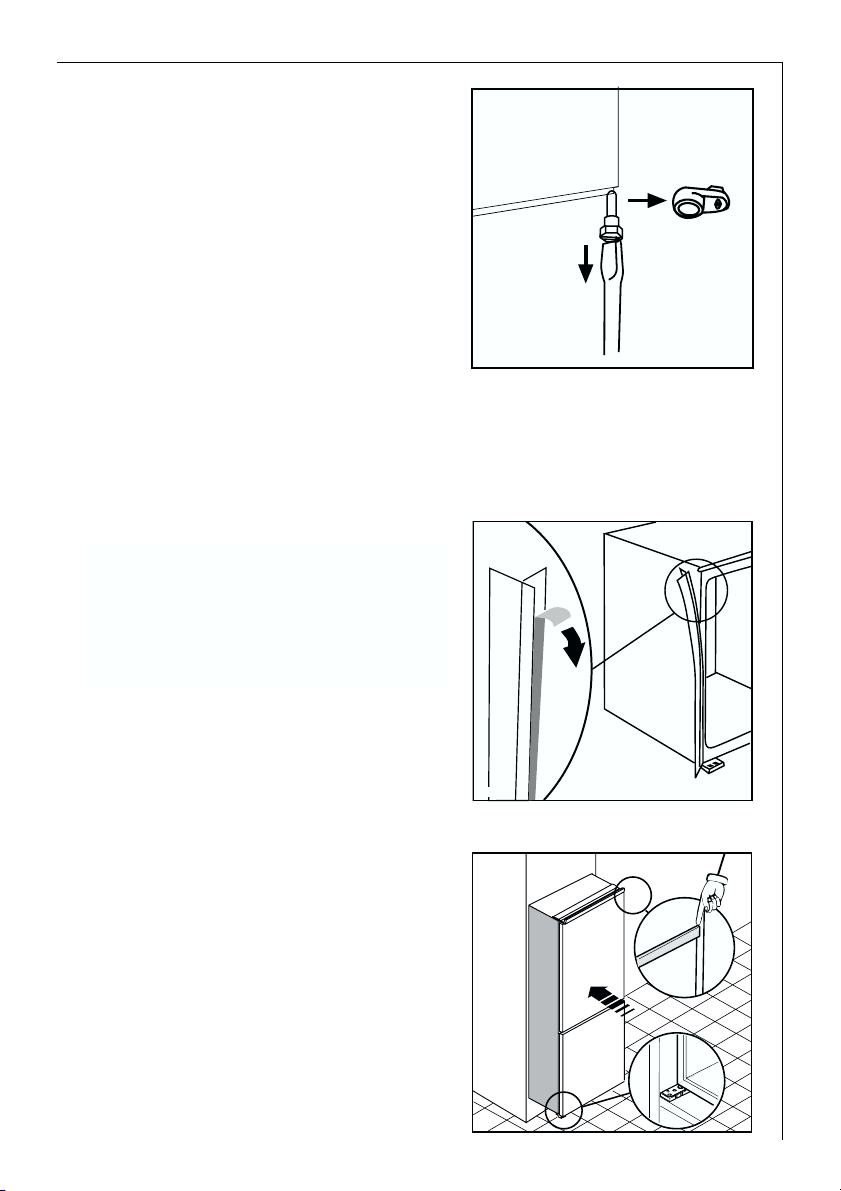
4. Refit the upper door, the upper
pin and the spacer on the opposite side
B
C
A
50 mm
min.
200 cm
D567
2
min.
2
200 cm
9
Housing dimensions
Height 1780 mm
Depth 550 mm
Width 560 mm
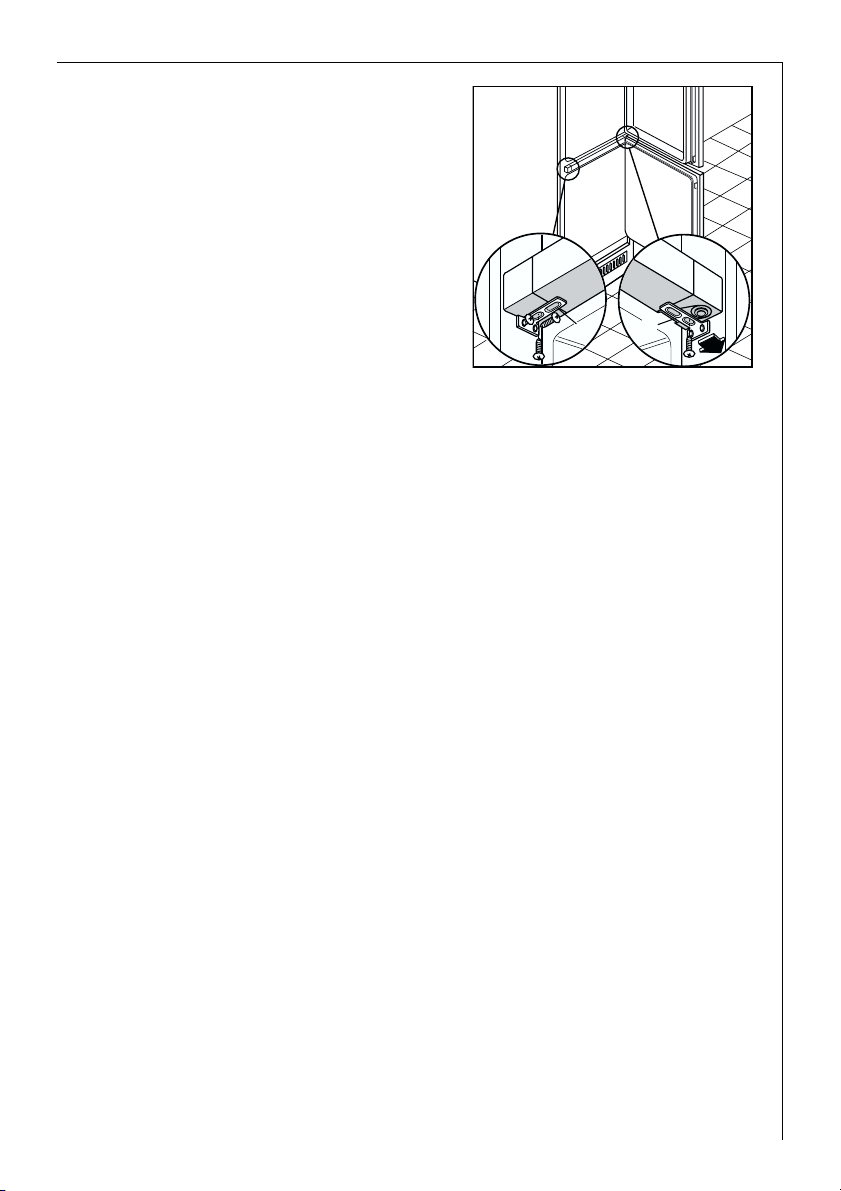
5. Unscrew the lower pin and remove the spacer and refit them on
the opposite side.
Fit the appliance in the niche by
making sure that it stands against
the interior surface of the unit on
the side where the door hinges of
the appliances are fitted. Insert the
appliance until the upper strip butts
up against the unit (1) and make
sure that the lower hinge is in line
with the surface of the unit (2).
Apply joint the sealing strip as shown
in figure.
Instructions for total built-in
D765
1
2
D023
10
I
P
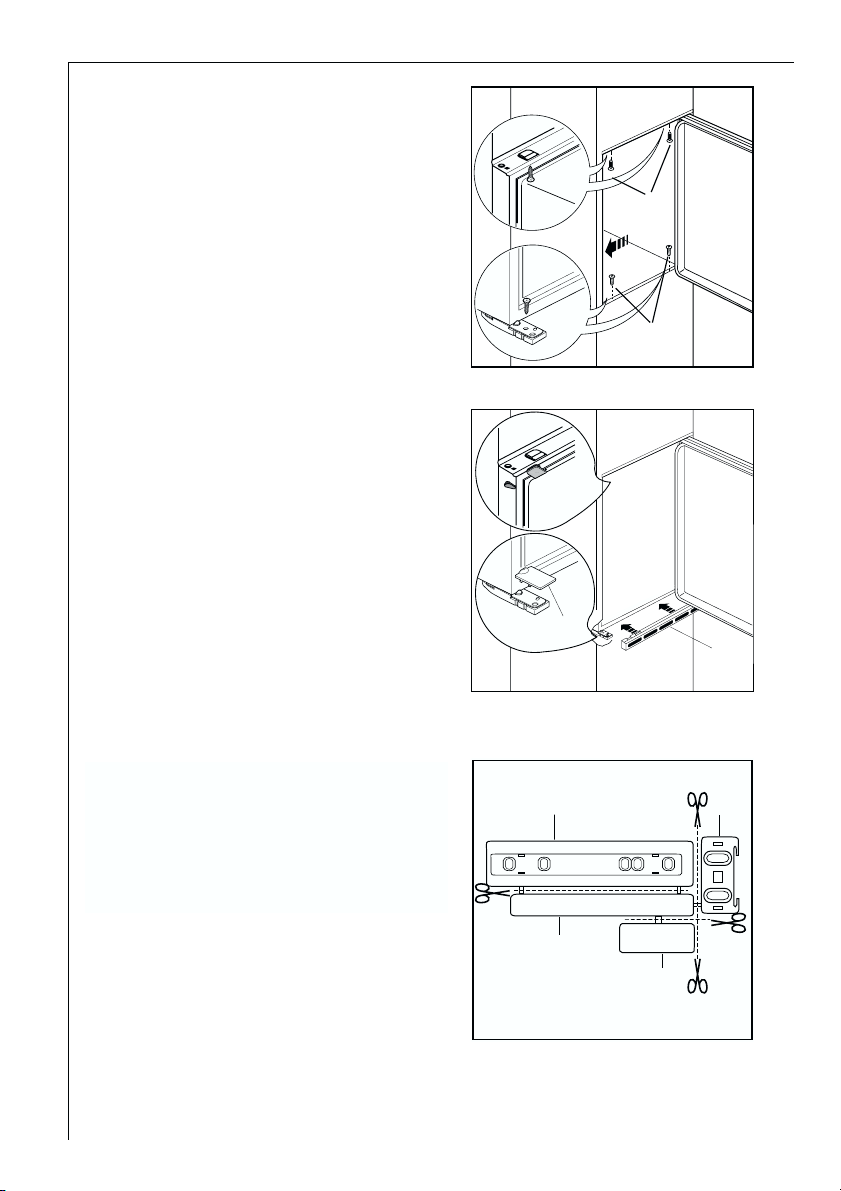
Fasten the appliance with 4 screws
provided in the kit included with the
appliance. (I = short) (P = long)
B
E
C
D
Apply covers (C-D) on joint cover lugs
and into hinge holes.
Snap vent grille (B) and hinge cover
(E) into position.
Separate parts Ha, Hb, Hc, Hd as
shown in the figure
PR266
Ha
Hc
Hb
Hd
11
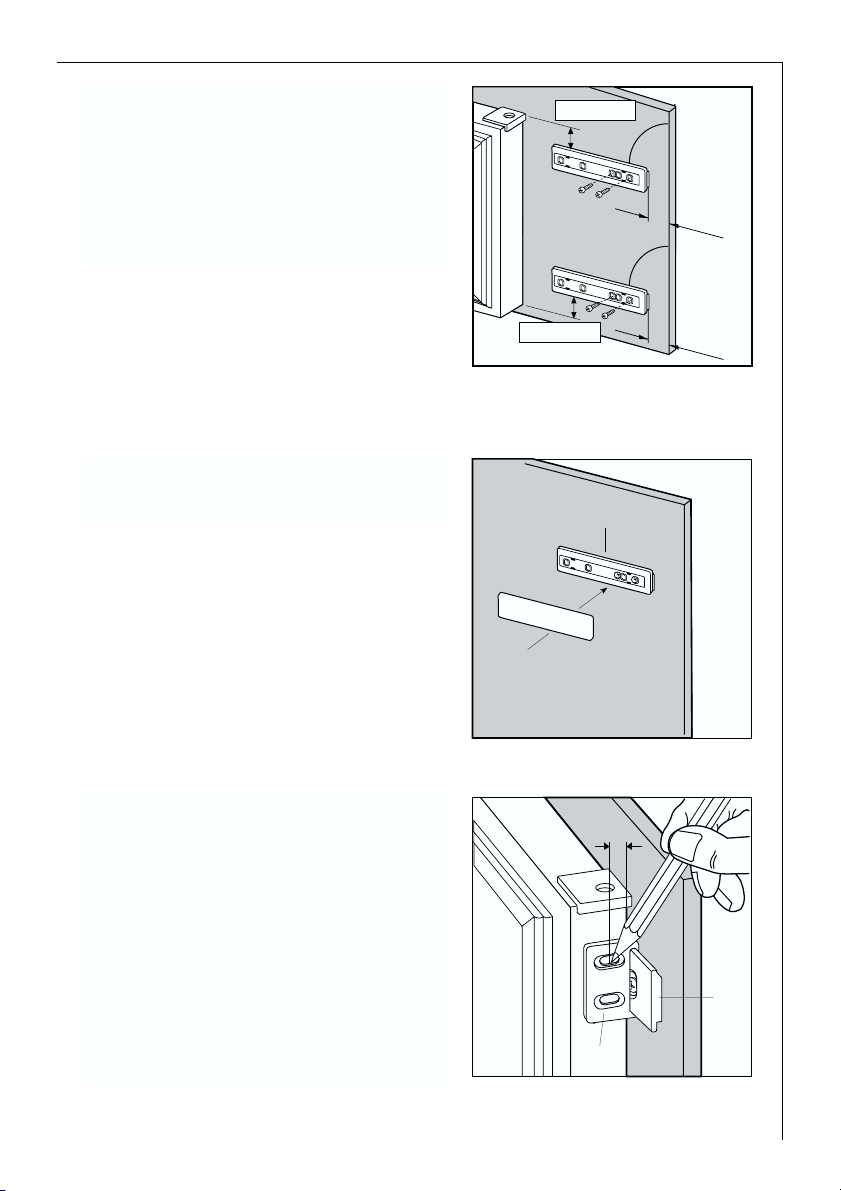
Place guide (Ha) on the inside part of
the furniture door, up and down as
shown in the figure and mark the
position of external holes. After
having drilled holes, fix the guide
with the screws supplied.
Fix cover (Hc) on guide (Ha) until it
clips into place.
Open the appliance door and the furniture door at 90°. Insert the small
square (Hb) into guide (Ha). Put
together the appliance door and the
furniture door and mark the holes as
indicated in the figure.
ca. 50 mm
90°
90°
2
1
m
m
PR33
ca. 50 mm
Hc
Ha
8mm
2
1
m
m
PR167
Ha
Hb
12
Place guide (Ha) on the inside part of
the furniture door, up and down as
shown in the figure and mark the
position of external holes. After
having drilled holes, fix the guide
with the screws supplied.
Fix cover (Hc) on guide (Ha) until it
clips into place.
Open the appliance door and the furniture door at 90°. Insert the small
square (Hb) into guide (Ha). Put
together the appliance door and the
furniture door and mark the holes as
indicated in the figure.
ca. 50 mm
90°
90°
2
1
m
m
PR33
ca. 50 mm
Hc
Ha
8mm
2
1
m
m
PR167
Ha
Hb
13
Prior to Initial Start–Up
• Please clean the appliance interior and all accessories prior to initial start-
up (see section: “Cleaning and Care”).
Electrical connection
Before initial start-up, refer to the appliance rating plate to ascertain if supply voltage and current values correspond with those of the mains at the
installation location.
e.g.: AC 220 ... 240 V 50 Hz or
220 ... 240 V~ 50 Hz
(i.e. 220 to 240 volts alternating current, 50 Hertz)
The rating plate is inside the appliance on the left.
A correctly installed, earthed socket is required for the electrical supply. The
supply must have a fuse rating of at least 10 Amps.
If the socket is not accessible once the appliance is built in, the electrical
installation must include suitable means of isolating the appliance from the
mains (e.g. fuse, cut-out, current trip or similar with a minimum contact
separation of 3 mm).
Attention: The mains connection cable may only be replaced by a skilled
electrician. Please contact your dealer or our customer service department
for repairs.
If the appliance is fixed to the
side of the kitchen unit, simply
slacken the screws in the fixing
brackets (E), move the brackets as
shown in the figure and re-tighten the screws.
E
D735
E
14
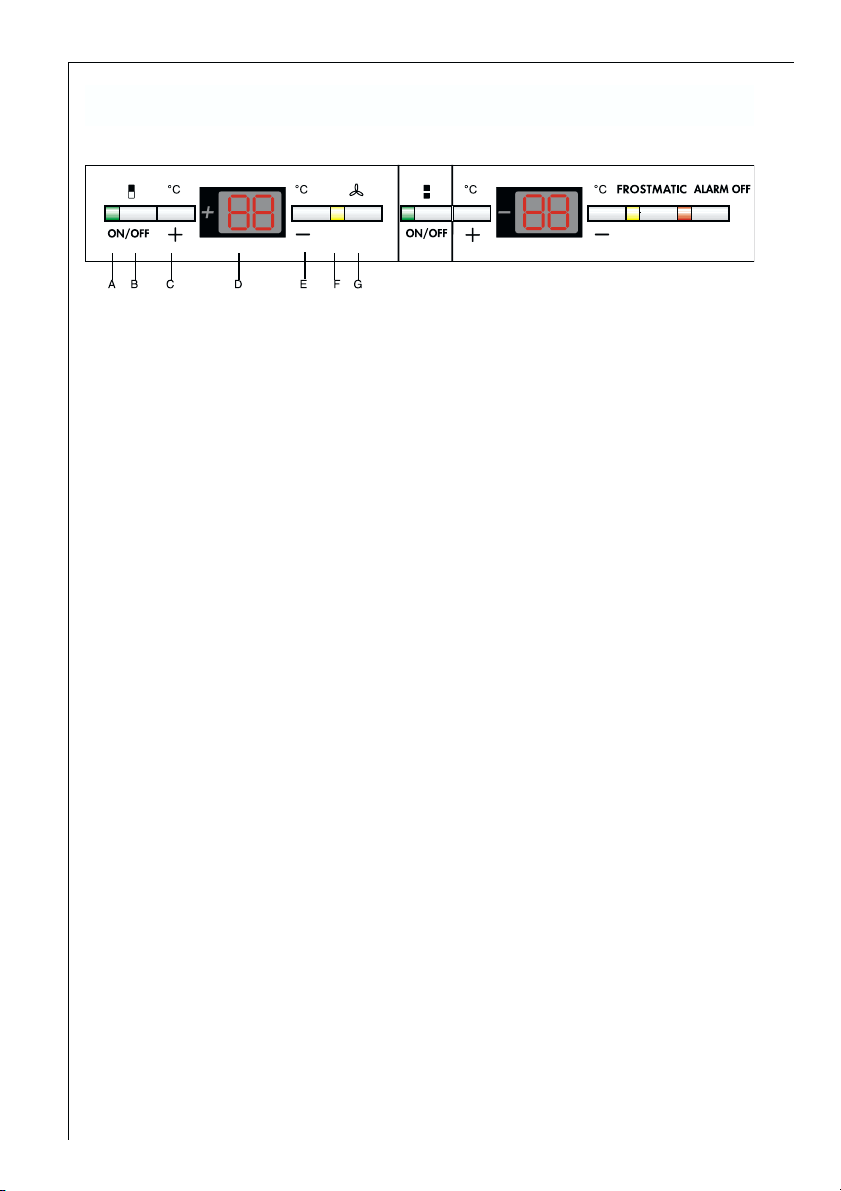
Operating and indicator panel Fridge
A. Mains pilot indicator (green)
B Fridge button ON/OFF
C Temperature setting button (for warmer temperatures)
D Temperature display
E Temperature setting button (for colder temperatures)
F DAC function "on" indicator (yellow)
G DAC button
Temperature setting buttons
The temperature is adjusted using the „C“ (+) and „E“ (-) buttons. These buttons are connected to the temperature display.
• The temperature display is switched over from the display of the ACTUAL
temperature (Temperature display is illuminated) to the display of the DESIRED temperature (Temperature display flashes) by pressing one of the two
buttons, „C“ (+) or „E“ (-).
• Each time one of the two buttons is pressed again the DESIRED temperature is adjusted by 1 °C. The DESIRED temperature must be reached within 24
hours.
If neither button is pressed, the temperature display automatically switches
back after a short period (approx. 5 sec.) to the display of the ACTUAL temperature.
DESIRED temperature means:
The temperature that has been selected for inside the fridge. The DESIRED
temperature is indicated by flashing numbers.
ACTUAL temperature means:
The temperature display indicates the current temperature inside the fridge.
The ACTUAL temperature is indicated with illuminated numbers.

15
Temperature display
The temperature display can indicate several pieces of information.
• During normal operation, the temperature currently present in the fridge
(ACTUAL temperature) is displayed.
• When the temperature is being adjusted a flashing display indicates the
fridge temperature currently set (DESIRED temperature).
Starting Up - Setting the Temperature
1. Plug the mains plug into the mains socket.
2. Press ON/OFF button (B) can function the fridge compartment separately
with the appliance in function. The green mains pilot indicator illuminates.
The appliances start.
3. Press either the „C“ (+) or „E“ (-) button. The temperature display switches
over and the DESIRED temperature currently set flashes on the temperature display.
4. Set the required temperature by pressing the „C“ (+) or „E“ (-) buttons (see
section "Temperature setting buttons"). The temperature display will immediately show the changed setting. Each time the button is pressed the temperature is adjusted by 1 °C.
From a food safety point of view +5 °C should be considered sufficiently
cold for storing food in the fridge.
5. Once the required temperature has been set, after a short period (approx. 5
sec.) the temperature display will change and again indicate the current
ACTUAL temperature inside the fridge. The display will change from flashing
to continuous illumination.
Information! When the setting is changed, the compressor does not start
immediately if automatic defrosting is currently taking place. As the storage temperature within the fridge is reached quickly you can store food
immediately after switching on.
COOLMATIC
The COOLMATIC function is suited for quick cooling of large quantities of
goods in the refrigerator.
1. The COOLMATIC function is switched on by pressing the button “E” (-)
(several times if necessary) until the word “SC” appears in the display.
The COOLMATIC function now provides for intensive cooling. A DESIRED
temperature of +2 °C is automatically selected. The COOLMATIC function is
ended automatically after a period of 6 hours.
2. The COOLMATIC function can be ended manually at any time by pressing
the Button “C” (+).
16
Interior Accessories
Storage Shelves
The glass shelf above the fruit and
vegetable compartment should
always remain in position, to ensure
fruit and vegetables stay fresh longer.
The remaining storage shelves can be
adjusted to various heights:
Pull the storage shelf forward until it
can be tipped up or down and removed.
To insert at a different height use the same procedure in reverse.
Adjustment for tall goods:
Remove the front half of the two-part vario glass storage shelf and insert it
at a different level. Space is thus gained for storage of tall goods on the
underlying storage shelf.
Variable Inner Door
The door compartments can be pulled up and removed, and inserted at
other positions as needed.
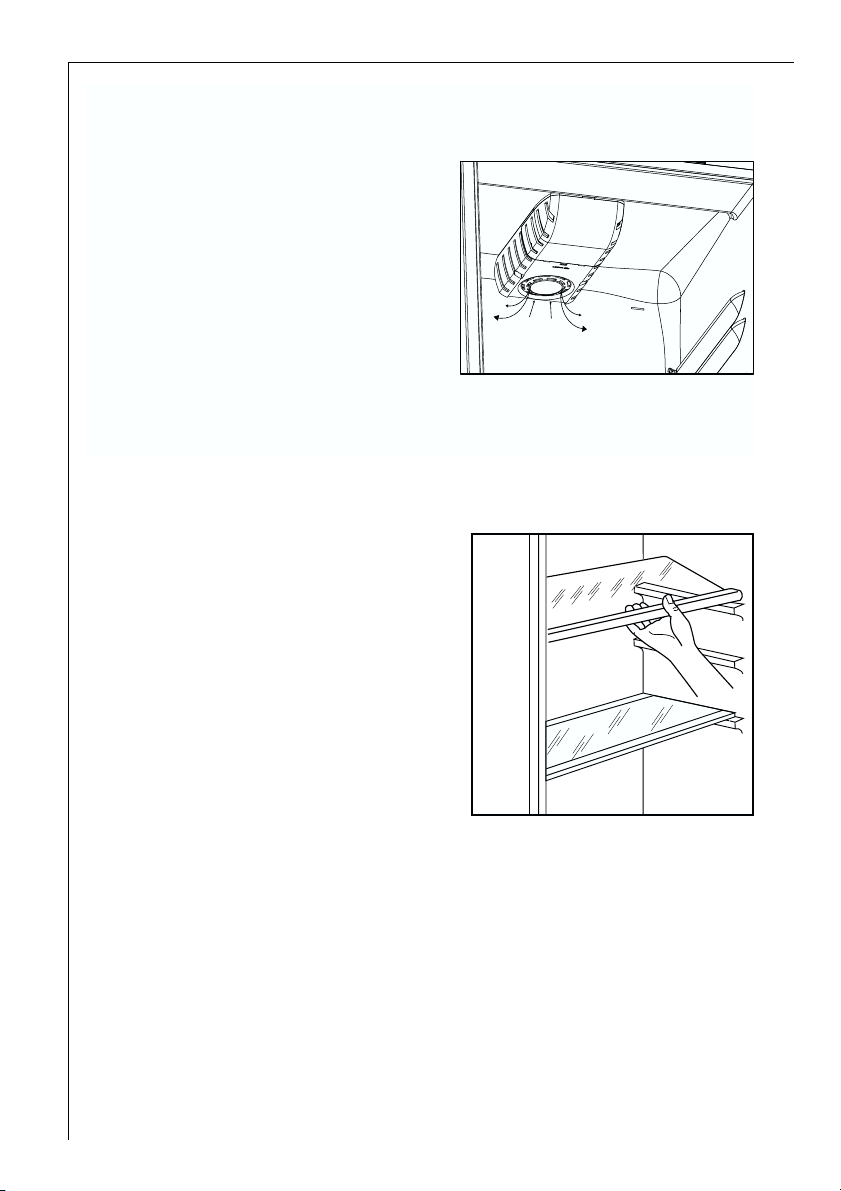
Air recycling
The refrigerator compartment is
equipped with a special
AIRLIGHT- fan which is activated
by pressing the button “G”. The
yellow light “F” is on and this
means that the fan is working.
It is suggested that the fan
(D.A.C.) be used when the ambient temperature exceeds 25°C .
This device allows for rapid cooling of foods and a more uniform
temperature in the compartment.
D338
17
Fresh food refrigeration
To obtain the best performance:
• do not store warm food or evaporating liquide in the refrigeator
• do cover or wrap the food, particularly if it has a strong flavour.
• Position food so that air can circuiate freely round it.
Useful hints:
Meat (all types): wrap in polythene bags and place on the glass shelf above the
vegetable drawer(s)For safety, store in this way only one or two days at the
most. Cooked foods, cold dishes, etc: these should be covered and may be
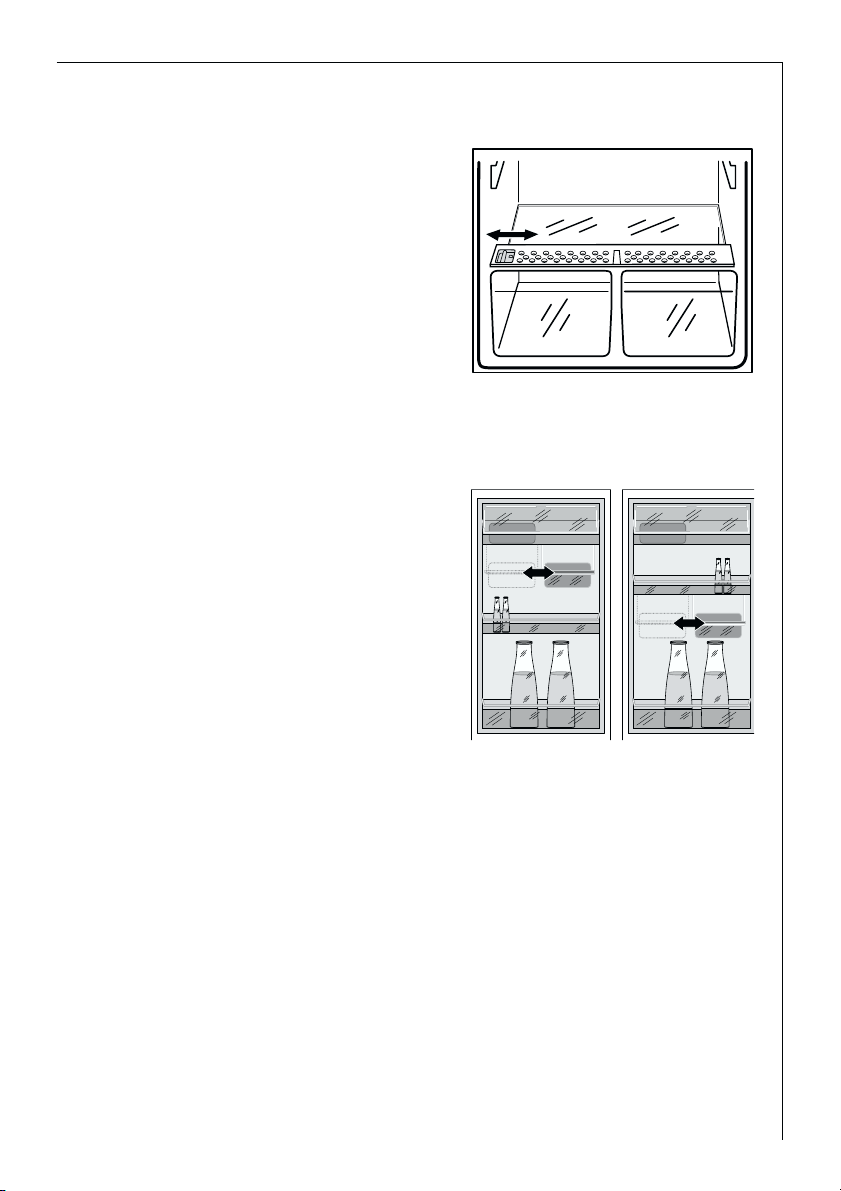
Moisture regulator
There is an adjustable air grille in
front of the shelf above the fruit and
vegetable compartments.
The opening in the ventilation slots
can be adjusted with the slider.
Right slider: Ventilation slots opened.
With the ventilation slots open, more
air circulation results in a lower air
moisture content in the fruit and
vegetable compartments.
Left slider: Ventilation slots closed.
When the ventilation slots are closed,
the natural moisture content of the
food in the fruit and vegetable compartments is preserved for longer.
Variable Storage Box
Some models are equipped with a
variable storage box which is fitted
under a door shelf compartment and
can be slid sideways. The box can be
inserted under any door shelf compartment.
1. To change the position of the storage box; lift the shelf compartment
with the box upwards and out of the
holders in the door and remove the
retaining bracket out of the guide
under the shelf compartment.
2. Reverse the above operation to insert
the shelf at a different height.
 Loading...