

Page 1
S54800DNW0
EL
EN
TR
˕˲ˠˢ˜ˬ
Refrigerator
6RáXWXFX
ˍˡˤˠ˜ˢ˯˔ˮ˛˰ˤ˯
USER MANUAL
.XOODQPD.óODYX]X
S54800DNW0
NO-FROST Refrigerator
UK
NO-FROST Réfrigérateur
FR
NO-FROST Ψυγείο
EL
User manual
Guide d’utilisation
Οδηγίες Χρήσης
Page 2

Index
BEFORE USING THE APPLIANCE.....................................................................2
Safety Instructions...........................................................................................................2
Recommendations.........................................................................................................3
Installation and Switching On The Appliance...............................................................4
Before Switching On........................................................................................................4
THE VARIOUS FUNCTION AND POSSIBILITIES...............................................5
Thermostat Setting..........................................................................................................5
Accessories.....................................................................................................................6
Magic Shelf...............................................................................................................................6
Making Ice Cubes.....................................................................................................................6
Fast Freezing Shelf..................................................................................................................6
Chiller Shelves..........................................................................................................................7
Crisper and Crisper Shelf........................................................................................................7
REMOVING THE CRISPER COVER..........................................................................................8
ARRANGING FOOD IN THE APPLIANCE..........................................................9
Refrigerator Compartment.............................................................................................9
Freezer Compartment...................................................................................................10
CLEANING AND MAINTENANCE......................................................................14
Defrosting ......................................................................................................................14
Replacing The Refrigerator and Freezer Light Bulb..................................................15
TRANSPORTATION AND CHANGING OF INSTALLATION POSITION..............15
Changing of Door Opening Direction..........................................................................15
BEFORE CALLING YOUR AFTER SALES SERVICE.........................................16
THE PARTS OF THE APPLIANCE AND THE COMPARTMENTS.......................18
Tips For Saving Energy.................................................................................................19
UK - 1 -
Page 3

PART- 1.
BEFORE USING THE APPLIANCE
Safety Instructions
• If the model contains R600a-see name plate under refrigerant (the coolant isobutane),
naturals gas that, is very environmentally friendly but also combustible. When
transporting and installing the unit care must be taken to ensure that none of the
refrigeration circuit components become damaged. In the event of damage avoid
naked flames or ignition sources and ventilate the room in which the unit is placed
for a few minutes.
Warning: Keep ventilation openings in appliance enclosure or in structure for building
in, clear of obstruction.
• Do not use mechanical devices or other artificial means to accelerate the defrosting
process.
• Do not use electrical appliances in the refrigerator or freezer compartment of the
appliance.
• If this appliance is to replace an old refrigerator with a lock; break or remove the lock
as a safety measure before storing it, to protect children while playing might lock
themselves inside.
• Old refrigerators and freezers contain insulation gases and refrigerant, which must
be disposed of properly. Entrust the disposal of a scrap unit categorically to
competence of your local waste disposal service and contact your local authority or
your dealer if you have any questions. Please ensure that the pipe of work of your
refrigerating unit does not get damaged prior to being picked-up by the relevant waste
disposal service.
Important note:
Please read this booklet before installing and switching on this appliance. The
manufacturer assumes no responsibility for incorrect installation and usage as described
in this booklet.
UK - 2 -
Page 4
Recommendations
Warning: Do not use mechanical devices or other means to accelerate the defrosting
process, other than those recommended by the manufacturer. Do not use electrical
appliances inside the food storage compartments of the appliance, unless they are of
the type recommended by the manufacturer. Keep ventilation openings, in the appliance
enclosure or in the built-in structure, clear of obstruction. Do not damage the refrigerant
circuit.
• Do not use adopters or shunts which could cause overheating
or burning.
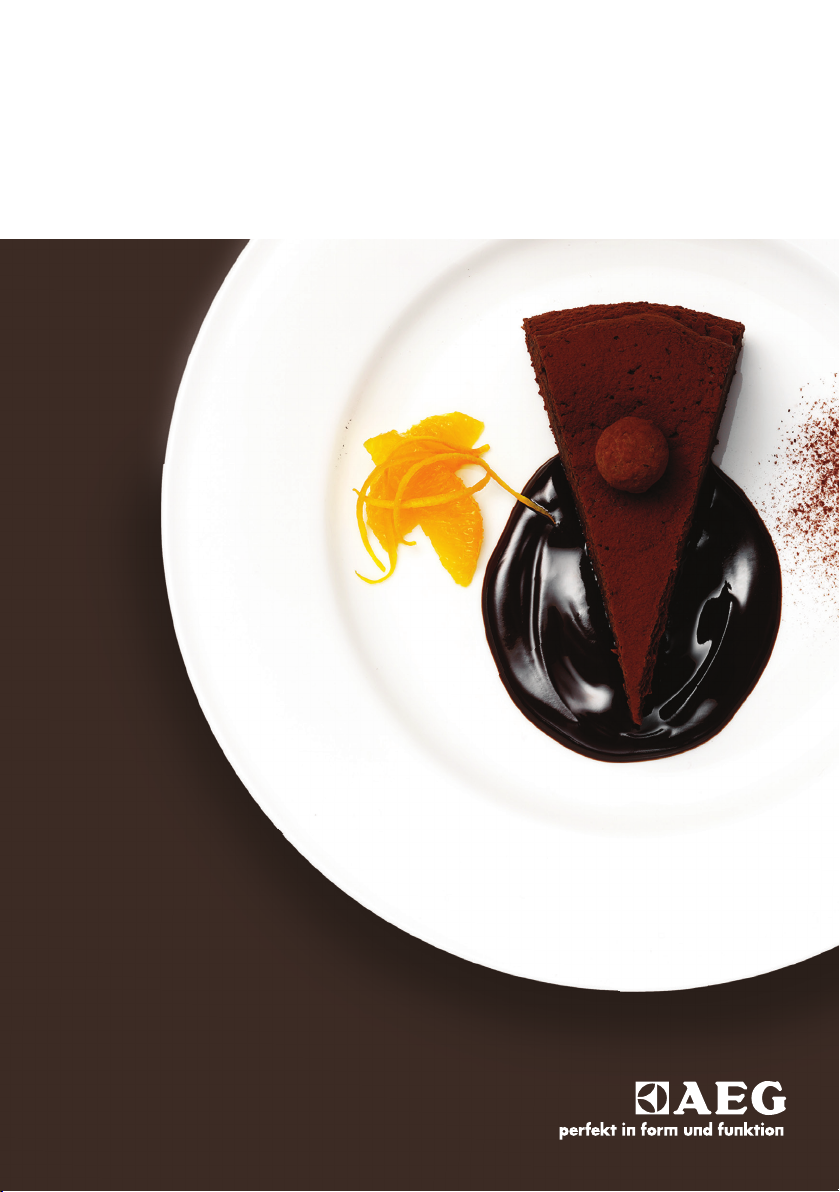
• Do not plug old, warped power supply cables.
• Do not twist and bend the cables.
• Do not allow children to play with the appliance. Children must
NEVER sit on drawers/shelves or hang from the door.
• Do not plug the power supply with wet hands.
• Do not place containers (glass bottles or tin containers) of liquids
into the freezer especially gassy liquids as they could cause
the container to burst during freezing.
• Bottles, which contain a high percentage of alcohol must be
sealed well and placed vertically in the refrigerator.
• Do not touch the cooling surfaces, especially with wet hands as
you could be burnt or hurt.
• Do not eat ice, which have just been removed from the freezer.
• If the supply cord is damaged it must be replaced by the
manufacturer or service agent or appointed qualified person.
• The appliance is not intended for use by people (including children) with reduced
physical, sensory or mental capabilities, or lack of experience and knowledge, unless
they have been given supervision or instruction concerning use of the appliance by
a person responsible for their safety. Children should be supervised to ensure that
they don’t play with the appliance.
• If the supply cord is damaged it must be replaced by the manufacturer or service
agent or similary qualified people in order to avoid a hazard.
UK - 3 -
Page 5
Installation and Switching On The Appliance
• This appliance is connecting to 220-240V and 50 Hz.
• Before making the connection to the power supply, ensure that the voltage on the
nameplate corresponds to the voltage of electrical system in your home.
• If the socket does not match the refrigerator plug, replace the plug with a suitable
one (at least 16 A)
• Insert the plug into a socket with an efficient ground connection. If the socket has no
ground contact, we suggest you call an electrician for assistance.
• Manufacturer is not responsible for failure to complete the ground connection as
described in this booklet.
• Do not place the appliance in direct sunlight.
• Do not use in open air and shall not be exposed to the rain.
• Place the refrigerator far from heat sources and in a
well-ventilated position. The refrigerator should be at least 50
cm from radiators, gas or coal stoves and 5 cm far from electrical
stoves.
• Keep the top free for at least 15 cm.
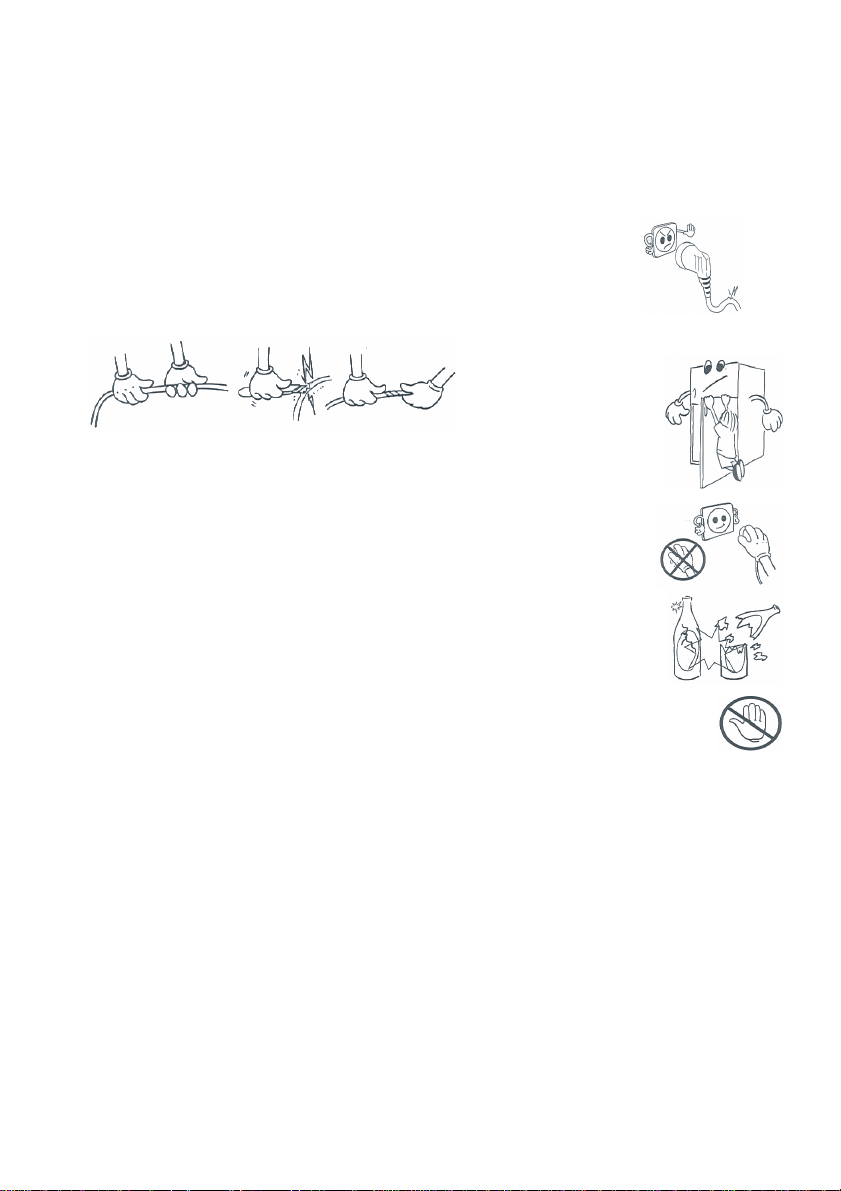
• Do not place heavy and lots of things on the appliance.
• If the appliance is installed next to another refrigerator or freezer,
observe a minimum distance of 2 cm to prevent condensation.
• Install the distance adjustment plastic (the part with black vanes
at the rear) by turning it 90° to prevent the condenser from
touching the wall.
• The appliance must be stand firmly and level on the floor Use
the two front levelling-feet to compensate for an even floor.
• In order to have air circulation under the appliance, the space
under the appliance must be open. Don’t close it with carpet,
etc.
• The outside of the appliance and the accessories inside should
be cleaned with a solution of water and liquid soap; the inside
of the appliance with sodium bicarbonate dissolved in lukewarm
water. After drying replace all the accessories.
Before Switching On
• Wait after 3 hours before plugging the appliance in to the main power
to ensure proper performance.
• There can be an odour when you first switch on the appliance. It will
disappear after the appliance starts to cool.
UK - 4 -
Page 6
PART- 2.
THE VARIOUS FUNCTION AND POSSIBILITIES
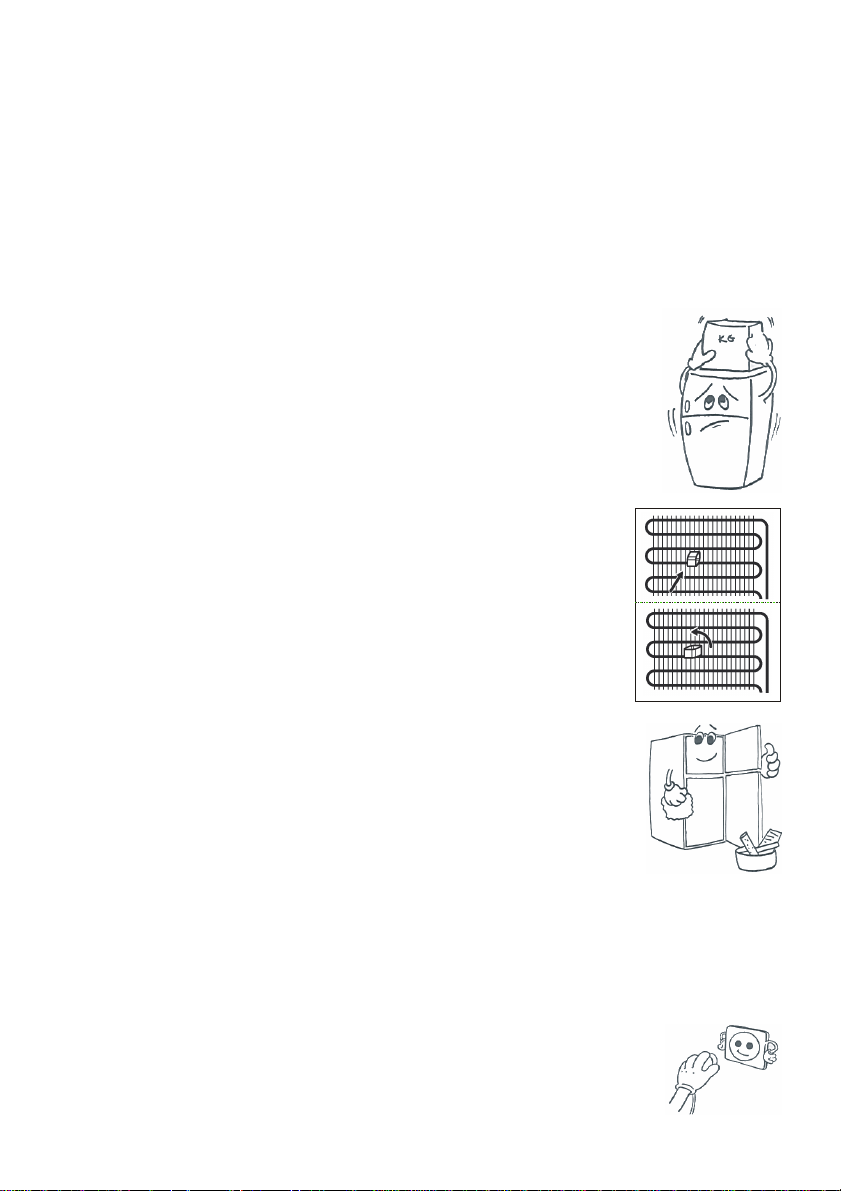
Thermostat Setting
FREEZER THERMOSTATREFRIGERATOR THERMOSTAT
Freezer and refrigerator thermostat automatically regulates the inside temperature of the
compartments. By rotating the knob from position 1 to 5, colder temperatures can be
obtained. In cold seasons, you can set lower positions in order to decrease the energy
consumption.
Freezer Thermostat Setting;
1 – 2 : For short-term storage of food in the freezer compartment, you can set the
knob between minimum and medium position.
3 – 4 : For long-term storage of food in the freezer compartment, you can set knob
medium position.
5 : For freezing the fresh food. Th appliance will work longer. After you get the
cold condition you must position to its original position.
Refrigerator Thermostat Setting;
1 – 2 : For less coldly conditions.
3 – 4 : For normal conditions.
5 : For colder conditions.
• Note that; the ambient temperature, temperature of the freshly stored food and how
often the door is opened, affects the temperature in the refrigerator and freezer
compartment. If required, change the temperature setting.
• When you first switch on the appliance, for starting a suitable cooling, the appliance
should work 24 hours continuously until it cools down to sufficient temperature.
• In this time do not open the door so often and place a lot of food inside the appliance.
• If the unit is switched off or unplugged, you must allow at least 5 minutes before
restarting or re-plugged the unit in order not to damage the compressor.
UK - 5 -
Page 7
Accessories
Magic Shelf
Magic shelf, which is on the crisper cover, was designed to give you more place and
comfort placing the things in the appliance. This shelf is mobile so you can arrange long
or big containers on the crisper cover.
(In some models)
Making Ice Cubes
(In some models)
• Take out the ice making tray
• Fill the water in level of line.
• Place the ice making tray in its original position
• When ice cubes are formed, twist the lever to drop off ice
cubes into the icebox.
Do not fill the icebox with water in order to make ice. It
can be broken.
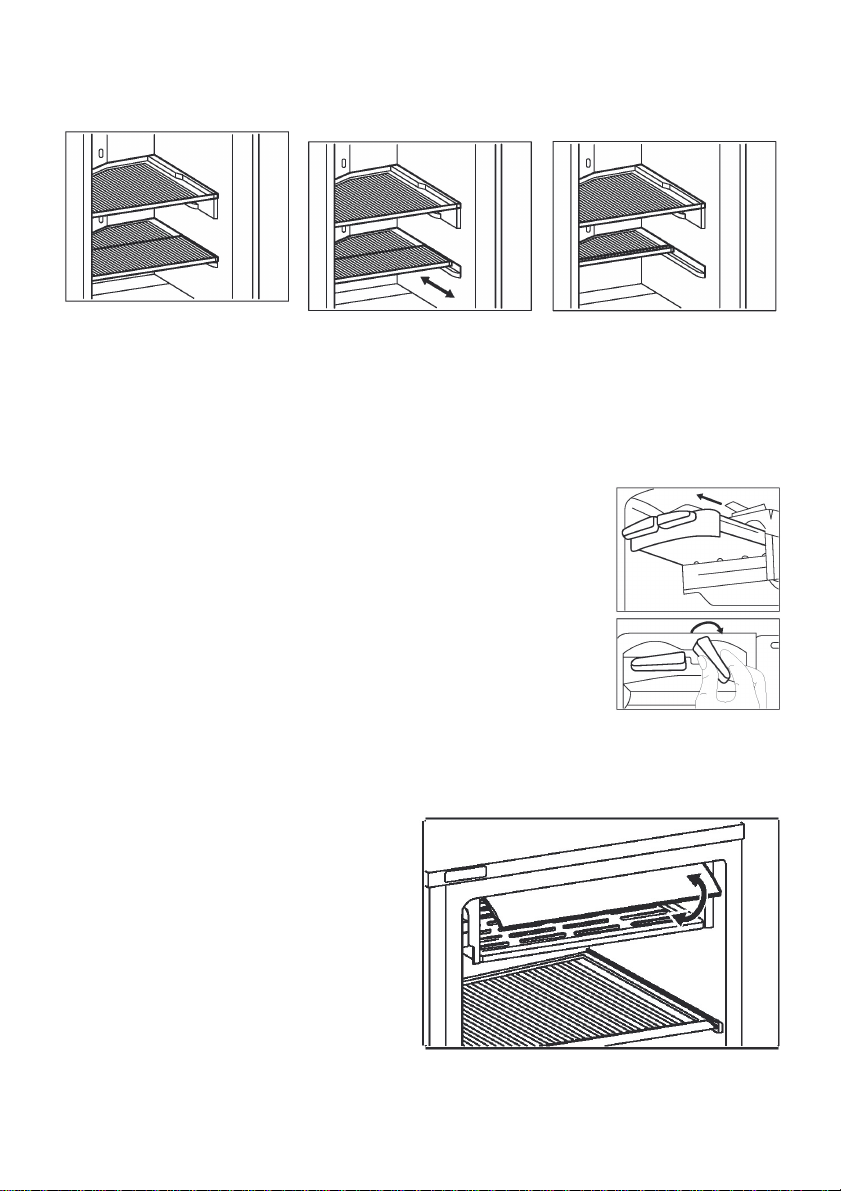
Fast Freezing Shelf
• Use the fast freezing shelf to freeze
home cooking (and fresh foods
which is wanted to freeze) more
quickly because of the freezing
room’s greater freezing power.
• For opening the shelf pull the cover
up, and slide it in to the shelf. You
can close it in the same way
Note that; be sure that the cover of fast freezing shelf is closed before closing the
compartment door. If not, it can not show its fast freezing power.
UK - 6 -
Page 8
Chiller Shelves
Keeping food in the Chiller compartment
instead of the freezer or refrigerator
compartment allows food retain freshness and
flavour longer, while preserving its fresh
appearance. When chiller tray becomes dirty,
remove it and wash it with water.
(Water freezes at 0°C, but foods containing salt
or sugar freeze at temperature lower than that)
Normally people use the chiller compartment
for raw fish, lightly pickled, rice, etc...
Do not put foods you want to freeze or ice trays in order to make ice.
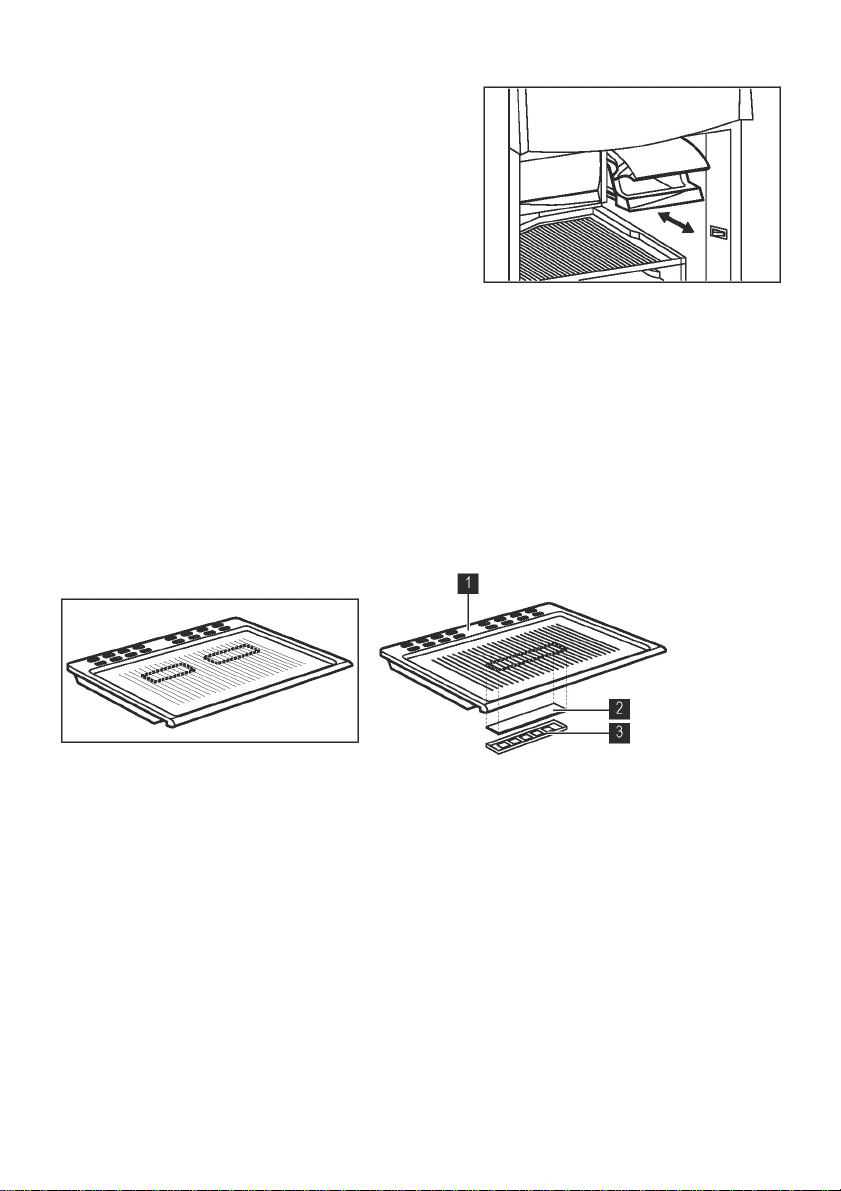
Crisper and Crisper Shelf
(In some models)
The crisper compartment absorbs and decomposes ethylene gas (*) emitted from fruits
and vegetables with a “FILTER” in the crisper shelf, keeping fruits and vegetables fresh.
The filter also eliminates unpleasant odours from inside the crisper, and control the excess
water released by the vegetables, maintaining a high humidity environment inside the
crisper. When the crisper shelf become dirty, remove the filter by taking out the filter cover
and wash the crisper cover with water.
Crisper Cover
Filter
Filter cover
! Do not wash the “Humidity-Control Filter” with water.
(*)NOTE; Ethylene gas is a gas, produced from fruits and vegetables, which accelerates
the ageing of fruits and vegetables. For example, spinach and broccoli turn to yellow
colour easily in places where ethylene gas is abundant.
UK - 7 -
Page 9
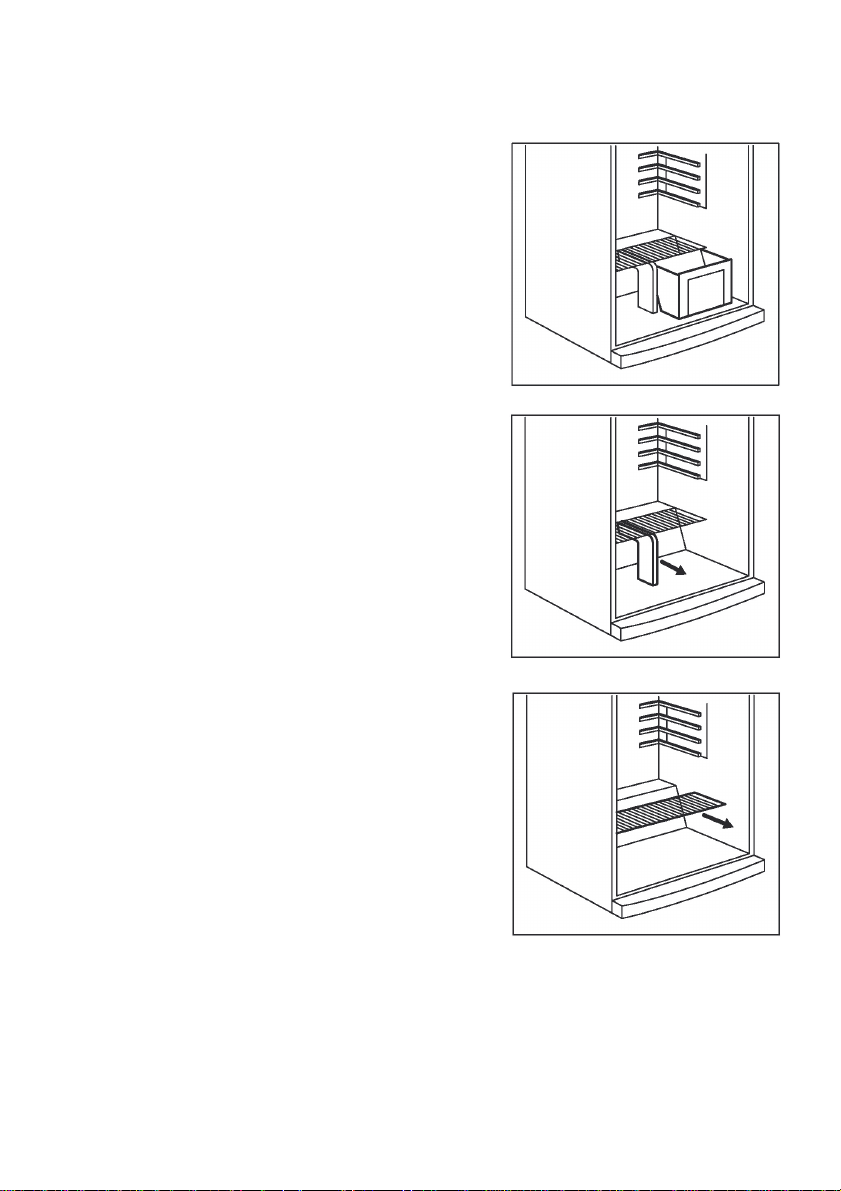
REMOVING THE CRISPER COVER
First Step : Removing the crispers
• It is easy to pull out the crisper because
of the crisper has rollers.
• Pull the crisper out as far as possible
and pull the front part up and out
Second Step: Taking out the partition
crisper center between the crispers.
• Bend the Partition toward left from the
bottom of the part
• Take out the Partition crisper
(In some models)
Third Step: Taking out the crisper cover
• Pull out the crisper cover until the nails
of the cover come on the cavities (right
and left side) of the cabinet.
• When the nails comes into the cavities
pull up and take out the crisper cover
NOTE: Make the inverse of the same operation for the resetting the crisper cover.
All written and visual descriptions in the accessories
may vary according to the appliance model.
UK - 8 -
Page 10
PART- 3.
Covered with plastic folio and bags
ARRANGING FOOD IN THE APPLIANCE
Refrigerator Compartment
• To set the refrigerator compartment to 2-3 graphic bar will be enough for normal
conditions.
• To reduce humidity and consequent increase of frost never place liquids in unsealed
containers in the refrigerator.
• Never place warm food in the refrigerator. Warm food should be allowed to cool at
room temperature and should be arranged to ensure adequate air circulation in the
refrigerator compartment.
• Arrange the meat and cleaned fish (wrapped in packages or sheets of plastic) which
you will use in 1-2 days.
• You can put the fruits and vegetables into crisper without packing.
NOTE: Potatoes, onions and garlic should not be stored in the refrigerator.
FoodStoring time
Vegetables and fruits1 week
Meat and fish2 to 3 days
Fresh cheese3 to 4 daysIn the special door shelf
Butter and Margarine1 weekIn the special door shelf
Bottled product, Milk and
Yoghurt
Eggs1 monthIn the egg shelf
Cooked foodAll shelves
Until the expiry date
recommended by the producer
Where to place in the fridge
department
In the Crisper (without being
wrapped)
Or in a meat box
(on the glass shelf)
In the special door shelf
UK - 9 -
Page 11

Freezer Compartment
• To set the freezer compartment to 2-3 graphic bar will be enough for normal conditions.
• The use of freezer is, storing of deep-frozen or frozen foods for long periods of time
and making ice cubes.
• Do not put fresh and warm foods to the freezer door shelves to be frozen. Only use
for storage of frozen foods.
• Do not put fresh and warm food with frozen food side by side as it can thaw the frozen
food.
• Use the fast freezing shelf to freeze home cooking (and the foods which is wanted to
freeze) more quickly because of the freezing room’s greater freezing power.
• While freezing fresh foods (i.e. meat, fish and mincemeat) divide them in parts you
will use in one time.
• While freezing fresh foods ; Maximum amount of fresh food (in kg) that can be frozen
in 24 hours is indicated on the appliance label.
• For optimum appliance performance to reach maximum freezing capacity, turn the
freezer thermostat knob to position max 24 hours before placing fresh food inthe
freezer.
• After placing fresh food in the freezer, 24 hours on max position is generally
sufficient,After 24 hours, don not need to set the feezer thermostat knob to position
max.
• Attention; In order to save energy, When freezing small amounts of food, don not
need to set the freezer thermostat knob to position max.
• For storing the frozen foods; the instructions shown on frozen food packages should
always be followed carefully and if no information is provided food should not be
stored for more than 3 months from the purchased date.
• When buying frozen foods ensure that these have been frozen at suitable
temperatures and that the packing is intact.
• Frozen foods should be transported in appopriate containers to maintain the quality
of the food and should be returned to the freezing surfaces of the unit in the shortest
possible time.
• If a package of frozen food shows the sign of humidity and abnormal swelling it is
probable that it has been previously stored at an unsuitable temperature and that
the contents have deteriorated.
• The storage life of frozen foods depends on the room temperature, thermostat
setting, how often the door is opened, the type of food and the length of time required
to transport the product from the shop to your home. Always follow the instructions
printed on the package and never exceed the maximum storage life indicated.
Some recommendations have been specified on pages 11, 12 and 13 for the placement
and storage of your food in the deep freeze compartment.
UK - 10 -
Page 12

Meat and fishPreparing
In salty water, aluminum or plastic
SteakWrapping in a foil6-101-2
Lamb meatWrapping in a foil6-81-2
Veal roastWrapping in a foil6-101-2
Veal cubesIn small pieces6-101-2
Lamb cubesIn pieces4-82-3
Minced meatIn packages without using spices1-32-3
Giblets (pieces)In pieces1-31-2
Bologna
sausage/salami
Chicken and turkeyWrapping in a foil7-810-12
Goose and DuckWrapping in a foil4-810
Should be packaged even if it has
membrane
Storing time
(months)
In room temperature
Defrost time
-hour-
Until it is defrosted
Deer, Rabbit, Wild
Boar
Freshwater fishes
(Salmon, Carp,
Crane, Siluroidea)
Lean fish; bass,
turbot, flounder
Fatty fishes (Tunny,
Mackarel, bluefish,
anchovy)
ShellfishCleaned and in bags4-6
Caviar
Snail
In 2.5 kg portions and as fillets9-1210-12
2
After cleaning the bowels and
scales of the fish, wash and dry it;
and if necessary, cut the tail and
head.
In its package, aluminum or
plastic container
container
4-8
2-4
2-3
3
Until it is thawed
completely
Until it is thawed
completely
Until it is thawed
completely
Until it is thawed
completely
Until it is thawed
completely
Until it is thawed
completely
Note: Frozen foods, when thawed, should be cooked just like fresh foods. If they are not
cooked after being thawed they must NEVER be re-frozen.
UK - 11 -
Page 13
Vegetables and
Fruits
Cauliflower
Preparing
Take the leaves apart, cut
the heart into pieces, and
leave it in water with a little
lemon juice for a while
Storing time
(months)
10 - 12It can be used as frozen
In room temperature
Defrost time
-hour-
String beans and
beans
BeansHull and wash12It can be used as frozen
Mushroom and
asparagus
CabbageCleaned6 - 82
Eggplant
Corn
CarrotClean and cut to slices12It can be used as frozen
Pepper
SpinachWashed6 - 92
Apple and pearPeel and slice8 - 10(In Fridge) 5
Apricot and Peach
Strawberry and
Blackberry
Cooked fruits
Plum, cherry,
sourberry
Wash and cut to small
pieces
Wash and cut to small
pieces
Cut to pieces of 2cm after
washing
Clean and pack with its
stem or as sweetcorn
Cut the stem, cut into two
pieces and remove the core
Cut into two pieces and
remove the stone
Wash and hull8 - 122
Adding 10 % of sugar in the
container
Wash and hull the stems8 - 125 - 7
10 - 13It can be used as frozen
6 - 9It can be used as frozen
10 - 12Separate them from one another
12It can be used as frozen
8 - 10It can be used as frozen
4 - 6(In Fridge) 4
124
UK - 12 -
Page 14
Dairy Products
Pastry
Packet (Homogenize)
Milk
Cheese-excluding
white cheese
Butter, margarine
Albumen10 - 1230 gr of it is equal to a yolk.
Egg mixture
(Albumen – yolk)
* Eggs
Yolk
Preparing
In its own packet2 - 3
In slices6 - 8
In its package6
Some salt or sugar is
added for preventing it
from becoming dense.
Some salt or sugar is
added for preventing it
from becoming dense.
Storing time
(months)
1050 gr of it is equal to a yolk.
8 - 1020 gr of it is equal to a yolk.
Storing Conditions
Pure Milk – In its own packet
It can be left in its original
package for storing for a short
time. For long term storage It
should be stored in a plastic
* It should not be frozen with its shells. The white and yolk of the egg should be frozen
separately or as having been well mixed.
In closed container
Storing time
(months)
Bread4 - 62 - 34-5 (220-225 °C)
Biscuits3 - 61 - 1,55-8 (190-200 °C)
Pastry1 - 32 - 35-10 (200-225 °C)
Pie1 - 1,53 - 45-8 (190-200 °C)
Phyllo dough2 - 31 - 1,55-8 (190-200 °C)
Pizza2 - 32 - 415-20 (200 °C)
Thawing time in room
temperature (hours)
Thawing time in owen (min.)
The taste of some spices found in cooked dishes (anise, basilica, watercress, vinegar,
assorted spices, ginger, garlic, onion, mustard, thyme, marjoram, black pepper, etc.)
changes and they assume a strong taste when they are stored for a long period.
Therefore, the frozen food should be added little amount of spices or the desired spice
should be added after the food has been thawed.
The storage period of food is dependent on the oil used. The suitable oils are margarine,
calf fat, olive oil and butter and the unsuitable oils are peanut oil and pig fat.
The food in liquid form should be frozen in plastic cups and the other food should be
frozen in plastic folios or bags.
UK - 13 -
Page 15
PART- 4. CLEANING AND MAINTENANCE
• Disconnect unit from the power supply before cleaning.
• Do not clean the appliance by pouring water.
• The refrigerator and freezer compartment should be
cleaned periodically using a solution of bicarbonate of
soda and lukewarm water
• Clean the accessories separately with soap and water.
Do not clean them in the washing machine.
• Do not use abrasive products, detergents or soaps. After
washing, rinse with clean water and dry carefully. When
the cleaning operations have been completed reconnect
the plug of the unit with dry hands.
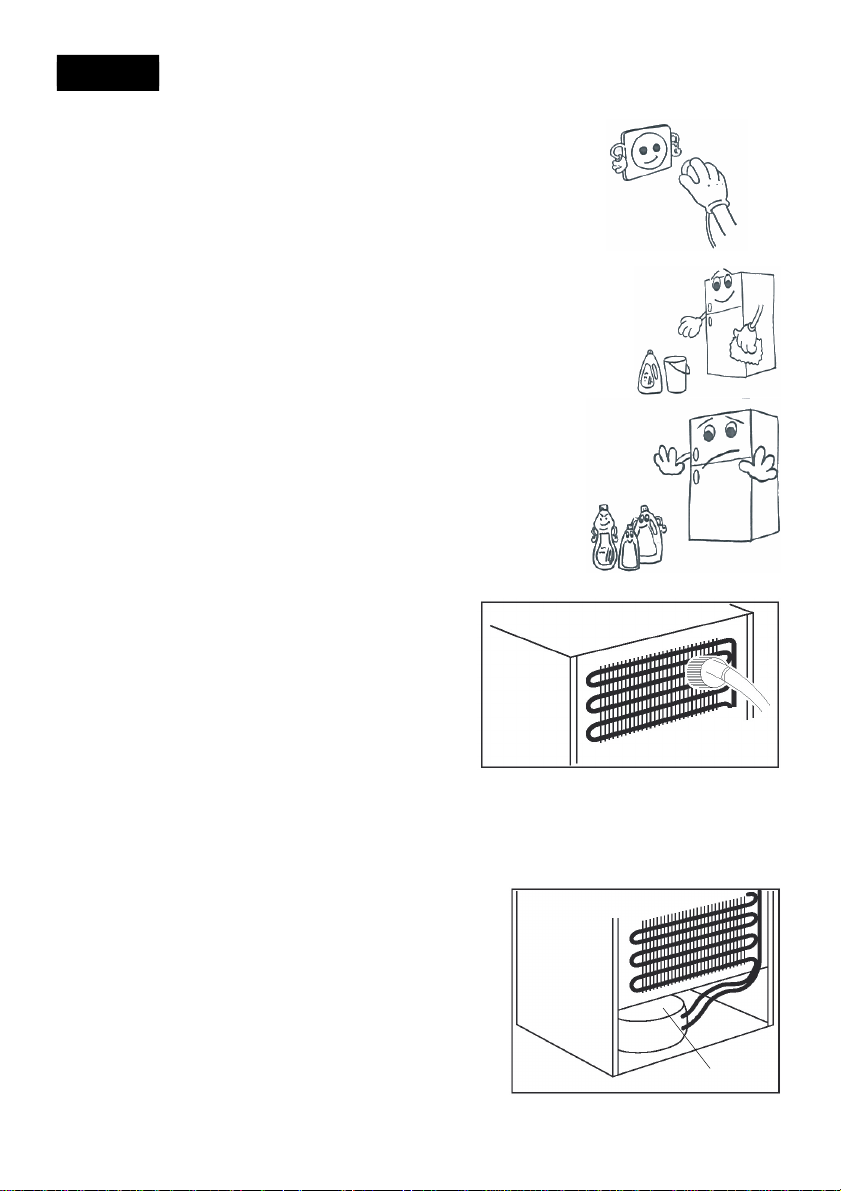
• You should clean the condenser with
broom at least once a year in order to
provide energy saving and increase the
productivity.
THE POWER SUPPLY MUST BE DISCONNECTED.
Defrosting
• Defrosting occurs fully automatically during
operation; the defrost water is collected by the
evaporating tray and evaporates automatically.
UK - 14 -
evaporating tray
Page 16
Replacing The Refrigerator and Freezer Light Bulb
1. Unplug the unit from the power supply,
2. Remove the refrigerator light cover with a minus screw driver, and take out the
cover.
3. Change the present light bulb with a new one of not more than 15 W.
4. Replace the light cover and after waiting 5 minutes plug the unit.
Freezer compartment
PART- 5.
Transportation and Changing of Installation Position
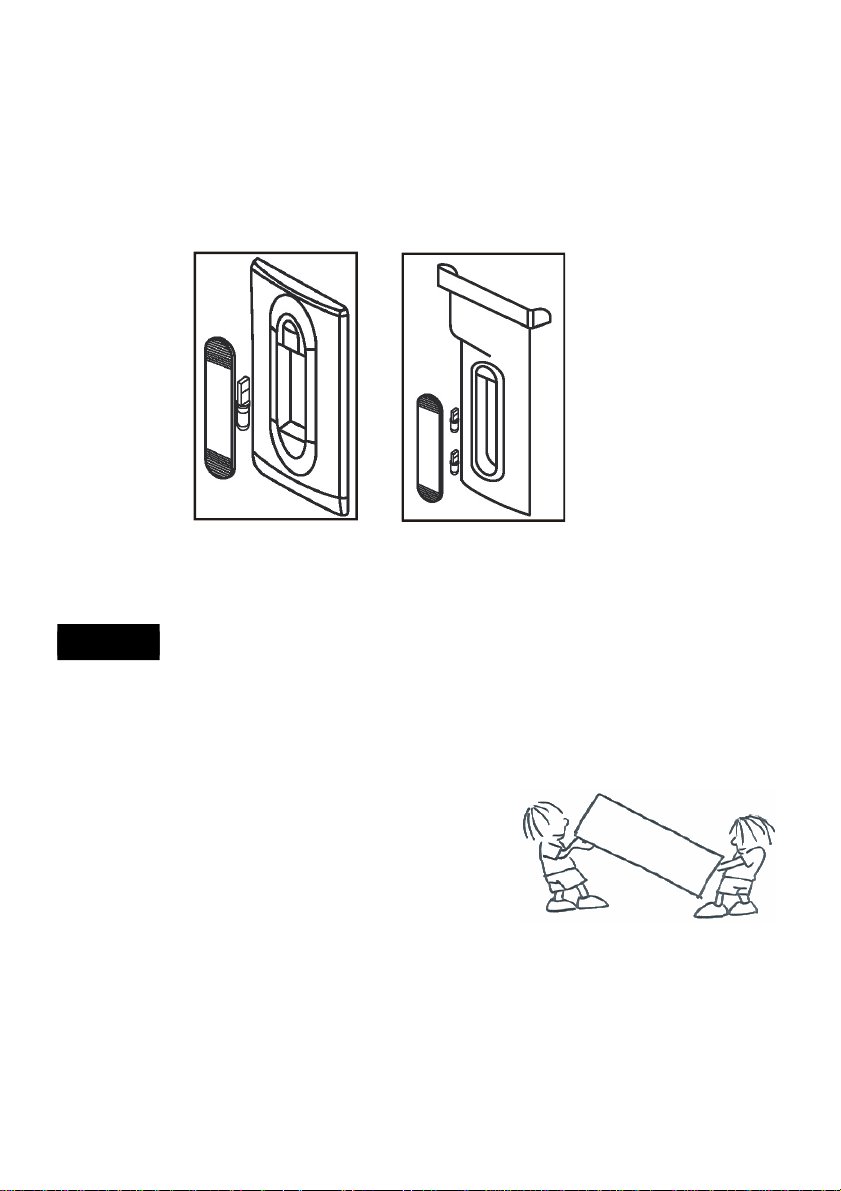
• The original packages and foamed polystyrene (PS) can be concealed if required.
• In transportation the appliance should be tied with a wide stripe or a strong rope.
The rules written on the corrugated box must be applied while transporting.
• Before transporting or changing old installation
position, all the moving objects (i.e., shelves,
crisper…) should be taken out or fixed with
bands in order to prevent the shake.
TRANSPORTATION AND CHANGING OF
INSTALLATION POSITION
Changing of Door Opening Direction
In case you need to change door-opening direction, please consult the domestic after
sales service.
Cooler compartment
(For some models)
UK - 15 -
Page 17

PART- 6.
What to do if your refrigerator does not operate;
Check that;
• There is no power ,
• The general switch in your home is disconnected ,
• The thermostat setting is on «0» position ,
• The socket is not sufficient. To check this, plug in another appliance that you know
which is working into the same socket.
What to do if your refrigerator performs poorly;
Check that;
• You have not overloaded the appliance ,
• The doors are closed perfectly ,
• There is no dust on the condenser ,
• There is enough place at the rear and side walls.
IIf your fridge is operating too loudly;
Normal Noises
Cracking (Ice cracking) Noise:
• During automatic defrosting.
• When the appliance is cooled or warmed (due to expansion of appliance material).
• Heard when the thermostat switches the compressor on/off.
Compressor noise
• Normal motor noise. This noise means that the compressor operates normally
• Compressor may cause more noise for a short time when it is activated.
Bubbling noise and splash:
• This noise is caused by the flow of the refrigerant in the tubes of the system.
Water flow noise:
• Normal flow noise of water flowing to the evaporation container during defrosting.
This noise can be heard during defrosting.
Air Blow Noise:
• Normal fan noise. This noise can be heard in No-Frost fridge during normal operation
of the system due to the circulation of air.
BEFORE CALLING YOUR AFTER SALES SERVICE
If your fridge is not cooling enough;
Your fridge is designed to operate in the ambient temperature intervals stated in the
standards, according to the climate class stated in the information label. We do not
recommend operating your fridge out of stated temperatures value limits in terms of cooling
effectiveness.
UK - 16 -
Page 18
Climate ClassAmbient Temperature (°C)
T
Between 16 and 43 (°C)
ST Between 16 and 38 (°C)
N
Between 16 and 32 (°C)
SN Between 10 and 32 (°C)
• Tropical Climate Class is described as between 16°C and 43°C of ambient
temperatures according to EN ISO15502 standards.
• Appliance complies with EN15502, IEC60335-1 / IEC60335-2-24, 2004/108/EC
standards.
IMPORTANT NOTES:
• Compressor protection function will be activated after sudden power breakdowns or
after unplugging the appliance, because the gas in the cooling system is not
stabilized yet. Your fridge will start after 5 minutes, there is nothing to worry about.
• If you will not use your fridge for a long time (e.g. in summer holidays) unplug it.
Clean your fridge according to Part 4 and leave the door open to prevent humidity
and smell
• If the problem persists after you have followed all the instructions above, please
consult to the nearest service.
• The appliance you bought is designed for home type use and can be used only at
home and for the stated purposes. It is not suitable for commercial or common
use. If the consumer use the appliance in a way that does not comply with these
features, we emphasize that the producer and the dealer shall not be responsible
for any repair and failure within the guarantee period.
• The lifetime of your appliance stated and declared by the Department of the Industry
is 10 years (the period for retaining parts required for the proper functioning of the
appliance).
UK - 17 -
Page 19

PART- 7.
THE PARTS OF THE APPLIANCE AND THE
COMPARTMENTS
This presentation is only for information about the parts of the appliance.
Parts may vary according to the appliance model.
1) Freezer thermostat box
2) Ice box
3) Ice tray
4) Fast freezing shelf
5) Freezer door shelf
6) Top shelf
7) Egg shelf
8) Bottle shelf
9) Bottom shelf
10) Kick plate
UK - 18 -
11) Crisper
12) Crisper cover
13) Refrigerator shelves
14) Refrigerator lamp box / cover
15) Refrigerator thermostat box
16) Chiller shelves
17) Freezer compartment
18) Freezer lamp box / cover
19) Freezer shelf
Page 20

Tips For Saving Energy
1– Install the appliance in a coll, well vantilated room , but not in direct sunlight and
not near heat source (radiator, cooker.. etc). Otherwise use an insulating plate.
2– Allow ward food and drinks to cool down outside the appliance.
3– When thawing frozen food, place it in the refrigerator compartment. The low
temperature of the frozen food will help to cool the refrigerator compartment when
it is thawing. So it causes energy saving. If the frozen food is put out, it causes
wastage of energy.
4– When placing, drinks and slops they must be covered. Otherwise humidity
increases at the appliance. Therefore the working time gets longer. Also
covering drinks and slops helps to save smell and taste.
5– When placing food and drinks, open the appliance door as briefly as possible.
6– Keep close the covers of any different temrepature compartment in the appliance
(crisper, chiller ...etc ).
7– Door gasket must be clean and pliable. Replace gaskets if worn.
8– Occasionally clean the rear of the appliance with a vacuum cleaner or paint brush
to prevent an increased power comsumption.
The symbol on the product or on its packaging
indicates that this product may not be treated as household
waste. Instead it shall be handed over to the applicable
collection point for the recycling of electrical and electronic
equipment. By ensuring this product is disposed of
correctly, you will help prevent potential negative
consequences for the environment and human health,
which could otherwise be caused by inappropriate waste
handling of this product. For more detailed information
about recycling of this product, please contact your local
city office, your household waste disposal service or the
shop where you purchased the product.
UK - 19 -
Page 21

Sommaire
AVANT D’UTILISER CET APPAREIL.................................................................21
Instructions de sécurité...................................................................................................21
Recommandations..........................................................................................................22
Installation et branchement de l’appareil......................................................................23
Avant de brancher l’appareil............................................................................................23
FONCTIONS DIVERSES...................................................................................24
Réglage du thermostat....................................................................................................24
Accessoires......................................................................................................................25
Etagère rétractable....................................................................................................................25
Fabrication de glaçons : (Icematic).........................................................................................25
Compartiment de congélation rapide.......................................................................................25
Compartiments fraîcheur...........................................................................................................26
Bac à légumes et couvercle du bac à légumes......................................................................26
Enlever le couvercle des bacs a Legumes.............................................................................27
RANGEMENT DES ALIMENTS..........................................................................28
Compartiment congélateur.............................................................................................28
Compartiment réfrigérateur.............................................................................................28
NETTOYAGE ET ENTRETIEN............................................................................33
Dégivrage..........................................................................................................................33
Remplacement de l’ampoule du réfrigérateur et du congélateur...............................34
TRANSPORT ET DEPLACEMENT.....................................................................34
Changement du sens d’ouverture de la porte...............................................................34
AVANT D’APPELER LE SERVICE APRES-VENTE.............................................35
Quelques conseils pour économiser de l'énergie.......................................................36
ELEMENTS ET COMPARTIMENTS DE L’APPAREIL.........................................37
FR - 20 -
Page 22

SECTION 1.
AVANT D’UTILISER CET APPAREIL
Instructions de sécurité
• Si le modèle contient le R600a, voir plaque signalétique qui se trouve sous le
réfrigérant (l’isobutane du dispositif de refroidissement), un gaz naturel très
écologique mais aussi combustible. Vous devez être prudent lors du transport et de
l’installation du dispositif pour vous assurer qu’aucun des composants du circuit
de refroidissement n’est endommagé. En cas de dommage, évitez les flammes
nues ou les sources d’allumage, ventilez la chambre dans laquelle le dispositif se
trouve pendant quelques minutes.
Avertissement: Ne bloquez pas les ouvertures situées dans l’appareil ou dans la
structure.
• N’utilisez pas des instruments mécaniques ou autres voies artificielles pour accélérer
le processus de dégivrage.
• N’utilisez pas des appareils électriques dans le réfrigérateur ou dans le compartiment
congélateur de l’appareil.
• Si cet appareil sert à remplacer un vieux réfrigérateur comportant un cadenas, cassez
ou retirez le cadenas, mesure de sécurité, avant de le garder pour éviter que les
enfants ne s’y enferment pendant leurs jeux.
• Les vieux réfrigérateurs et congélateurs contiennent des gaz isolants et réfrigérants
qui doivent être éliminés convenablement. Assignez entièrement la mise au rebus
des appareils au service d’élimination d’ordures de votre localité et contactez
l’autorité locale ou votre fournisseur en cas de questions. Veuillez vous assurer
que le tuyau d’alimentation de votre unité frigorifique n’est pas endommagé avant
que le service d’élimination de déchet ne le récupère.
Remarque importante:
Lisez attentivement ce livret avant d’installer et de mettre en marche l’appareil. Le fabricant
n’assume aucune responsabilité quant à une mauvaise installation et utilisation tel que
le livret le décrit.
FR - 21 -
Page 23

Recommandations
Avertissement : N’utilisez pas d’appareils mécaniques ou d’autres moyens artificiels
pour accélérer le processus de décongélation. N’utilisez pas d’appareils électriques dans
l’espace de stockage des aliments de l’appareil. N’obstruez pas les ouvertures de
ventilation de l’appareil. N’endommagez pas le circuit de liquide réfrigérant du
réfrigérateur.
• N’utilisez pas d’adaptateurs électrique ni de dérivations qui
risqueraient de provoquer une surchauffe ou un embrasement.
• N’utilisez pas de câbles d’alimentation électrique vieux et
endommagés.
• Ne tordez pas et ne pliez pas le câble électrique.
• Interdisez aux enfants de jouer avec cet appareil. Ils ne doivent en
aucun cas s’asseoir sur les compartiments ou les étagères, ni se
suspendre à la porte.
• Ne branchez pas la prise électrique avec des mains mouillées.
• Ne placez pas de récipients contenant des liquides (bouteilles en
verre ou canettes) dans le congélateur, tout particulièrement
lorsqu’il s’agit de boissons gazeuses. Ils risqueraient d’exploser
pendant la congélation.
• Les bouteilles d’alcool doivent être parfaitement rebouchées et
placées verticalement dans le réfrigérateur.
• Ne touchez pas les surfaces de refroidissement, tout
particulièrement si vos mains sont mouillées, car vous risqueriez
de vous brûler ou de vous blesser.
• Ne mangez pas de la glace qui vient juste de sortir du congélateur.
• Cet appareil n’est pas destiné à être utilisé par des personnes (enfants inclus) dont
les capacités physiques, sensorielles ou intellectuelles sont réduites ou bien
manquant d’expérience et de connaissances à moins d’avoir été encadrées ou
formées au niveau de l’utilisation de l’appareil par une personne responsable de
leur sécurité. Surveillez les enfants pour s’assurer qu’ils ne jouent pas avec
l’appareil.
• Si le cordon d’alimentation est endommagé, il doit être remplacé par le fabriquant
ou par un agent de maintenance ou une personne dûment qualifiée.
FR - 22 -
Page 24

Installation et branchement de l’appareil
• Cet appareil fonctionne sur courant alternatif 220-240V, 50 Hz.
• Avant d’effectuer le raccordement électrique, assurez-vous que le voltage indiqué
sur la plaque signalétique correspond au voltage de l’installation électrique de votre
habitation.
• Si la prise de courant et la prise du réfrigérateur ne sont pas compatibles, remplacez
cette dernière par une prise adéquate (au moins 16 A).
• L’appareil doit être relié à la terre. Si vous ne disposez pas de prise de terre, nous
vous conseillons de contacter un électricien.
• Le fabricant décline toute responsabilité en cas de nonraccordement à la terre conformément aux recommandations
de cette brochure.
• N’exposez pas l’appareil aux rayons directs du soleil.
• Cet appareil ne doit pas être utilisé en plein air, ni exposé à la
pluie.
• Placez le réfrigérateur loin des sources de chaleur, dans un
endroit bien ventilé. Il doit se trouver au moins à 50 cm des
radiateurs, fours à gaz ou à charbon et à 5 cm des fours
électriques.
• Prévoyez un espace libre d’au moins 15 cm au-dessus de
l’appareil.
• Evitez de placer des objets lourds ou un grand nombre d’objets
sur l’appareil.
• Si l’appareil est installé à côté d’un autre réfrigérateur ou
congélateur, observez une distance minimale de 2 cm pour
éviter la condensation.
• La base de l’appareil doit être stable et horizontale. Utilisez les
pieds réglables situés à l’avant de l’appareil pour compenser
les irrégularités du sol.
• L’espace situé en dessous de l’appareil doit rester libre pour
assurer la circulation de l’air. Ne le bouchez pas avec un tapis,
etc.
• L’extérieur de l’appareil et les accessoires intérieurs doivent être nettoyés avec une
solution d’eau et de savon liquide. L’intérieur doit être nettoyé avec du bicarbonate
de soude dissous dans de l’eau tiède. Séchez avec soin et remettez les accessoires
en place.
Avant de brancher l’appareil
• Attendez 3 heures avant de brancher l’appareil, afin de garantir des
performances optimales.
• Votre appareil neuf peut avoir une odeur particulière. Celle-ci
disparaîtra une fois qu’il commencera à se refroidir.
FR - 23 -
Page 25

SECTION 2.
FONCTIONS DIVERSES
Réglage du thermostat
THERMOSTAT DU CONGELATEURTHERMOSTAT DU REFRIGERATEUR
Les thermostats du congélateur et du réfrigérateur régulent automatiquement
la température interne des compartiments. En tournant le bouton de la position 1
vers la position 5, vous pouvez obtenir des températures de plus en plus froides.
Durant les saisons froides, vous pouvez régler l’appareil sur les positions
les plus faibles pour économiser de l’énergie.
Réglage du thermostat du congélateur :
1 – 2: Pour la conservation de moyenne durée d’aliments dans le compartiment
congélateur, réglez le bouton du thermostat entre minimum et moyen.
3 – 4: Pour la conservation de longue durée d’aliments dans le compartiment
congélateur, réglez le bouton du thermostat sur moyen.
5: Pour congeler des aliments frais. L’appareil fonctionnera plus longtemps. Une
fois que les aliments sont congelés, régler à nouveau le thermostat sur une position
plus adéquate.
Réglage du thermostat du réfrigérateur :
1 – 2 : Environnement moins froid.
3 – 4 : Environnement normal.
5: Environnement plus froid.
Remarque : la température ambiante, la température des aliments tout juste rangés et la
fréquence d’ouverture de la porte affectent la température des compartiments réfrigérateur
et congélateur. Si nécessaire, changez le réglage du thermostat.
• A la première utilisation de l’appareil, nous vous conseillons de laisser l’appareil
fonctionner sans interruption pendant 24 heures jusqu’à ce qu’il atteigne la
température de refroidissement suffisante.
• Dans ce laps de temps, essayez de ne pas ouvrir la porte trop fréquemment et
placez-y le moins d’aliments possible.
• Si vous débranchez ou arrêtez l’appareil, attendez au moins 5 minutes avant de le
rebrancher ou de le remettre en marche, afin de ne pas endommager le
compresseur.
FR - 24 -
Page 26

Accessoires
Etagère rétractable
Figure -1-Figure -2-Figure -3-
L’étagère rétractable, située au-dessus du couvercle du bac à légumes, a été conçue
pour libérer de l’espace et vous permettre de ranger davantage de produits. Cette étagère
est mobile, de sorte que vous pouvez poser des produits plus longs ou plus gros sur le
couvercle du bac à légumes.
Fabrication de glaçons : (Icematic)
• Retirez le bac à glaçons.
• Remplissez-le d’eau, jusqu’au niveau indiqué par le trait.
• Replacez-le dans sa position d’origine.
• Lorsque les glaçons sont prêts, appuyez sur le levier pour
qu’ils tombent dans le réservoir à glaçons
Ne remplissez pas d’eau le réservoir à glaçons pour fabriquer
des glaçons. Vous pourriez le casser.
(Dans certains modèles)
Compartiment de congélation rapide
• Utilisez le compartiment de congélation rapide
pour congeler vos plats faits maison (et les
aliments frais) plus rapidement. Ce
compartiment bénéficie d’une plus grande
puissance de congélation.
• Pour ouvrir le compartiment, poussez le
couvercle vers le haut et faites-le glisser dans
le compartiment. Fermez-le de la même
manière.
Remarque : vérifiez que le couvercle du compartiment de congélation rapide est fermé
avant de fermer la porte du congélateur. Sinon, la congélation rapide risque de ne pas
fonctionner
FR - 25 -
Page 27

Compartiments fraîcheur
• Lorsque vous placez des aliments dans le
compartiment fraîcheur plutôt que dans le
compartiment congélateur ou réfrigérateur,
ils conservent leur fraîcheur, leur saveur ainsi
qu’un aspect sain plus longtemps. Lorsque
le compartiment fraîcheur est sale, retirez-le
et lavez-le sous l’eau.
(L’eau gèle à 0°C, mais les aliments contenant
du sel ou du sucre gèlent à une température
moins élevée).
• Le compartiment fraîcheur est en général utilisé pour le poisson frais, légèrement
mariné, le riz, etc.
Le compartiment fraîcheur ne permet pas de congeler des aliments ou de fabriquer
des glaçons.
Bac à légumes et couvercle du bac à légumes
(Dans certains modèles)
Le bac à légumes absorbe et élimine le
gaz d’éthylène (*) émis par les fruits et
les légumes grâce au “FILTRE” du
Couvercle du bac
couvercle du bac à légumes, conservant
ainsi la fraîcheur des fruits et légumes.
Le filtre élimine également les odeurs
désagréables du bac à légumes et
contrôle leur excès en eau, maintenant
un environnement très humide à
l’intérieur du bac. Lorsque le couvercle
Filtre
Couvercle du filtre
est sale, retirez le couvercle du filtre, puis
le filtre lui-même et nettoyez le couvercle
du bac avec de l’eau.
! Ne nettoyez pas le “filtre de contrôle d’humidité” avec de l’eau.
(*)REMARQUE : le gaz d’éthylène est un gaz produit par les fruits et les légumes,
qui accélère leur mûrissement. Par exemple, les épinards et les brocolis jaunissent
facilement dans les endroits où le gaz d’éthylène est abondant.
FR - 26 -
Page 28

Enlever le couvercle des bacs a Legumes
Première étape: Enlever les bacs à légumes
• C´est facile de retirer les bacs à légumes car
les bacs sont équipés avec des roulettes.
• Retirez le bac le plus loin possible, soulevez le
devant et retirez entièrement.
Deuxième étape: Enlever la partition intermédiaire
des bacs à légumes entre les bacs.
• Poussez la partition vers la gauche en laissant
le dessous en place.
• Retirez la partition des bacs.
(Dans certains modèles)
Troisième étape: Enlever le couvercle des bacs à
légumes
• Retirez le couvercle des bacs à légumes jusqu´à
ce que les chevilles du couvercle entrent dans
les cavités (sur le côté droit et gauche) du
compartiment.
• Quand les chevilles arrivent dans les cavités,
poussez vers le haut et retirez le couvercle des
bacs à légumes.
REMARQUE : Pour replacer le couvercle du bac à légumes, procédez à l’opération inverse.
Toutes les descriptions écrites et visuelles contenues dans les
accessoires peuvent varier en fonction du modèle de l’appareil.
FR - 27 -
Page 29

SECTION 3. RANGEMENT DES ALIMENTS
Compartiment réfrigérateur
• Régler le compartiment réfrigérateur au niveau de la barre graphique 2-3 sera
suffisant pour les conditions normales.
• Pour réduire l’humidité et l’accumulation consécutive de grive, ne jamais placer
des liquides dans des récipients non fermés à l’intérieur du réfrigérateur.
• Ne jamais placer des aliments chauds dans le réfrigérateur. Laissez-les refroidir
à la température ambiante et placez-les dans le réfrigérateur de manière à
permettre une circulation d’air convenable.
• Placez-y la viande et le poisson nettoyé (emballé dans des paquets ou dans des
feuilles de plastique) qui seront consommés dans les deux jours.
• Les fruits et les légumes peuvent être placés directement dans le bac à légumes,
sans être emballés.
Aliment
Fruits est légumes
Viandes et poissons 2 à 3 jours
Fromage frais 3 à 4 jours Dans la clayette de porte spéciale
Beurre et margarine 1 semaine Dans la clayette de porte spéciale
Produit embouteillé,
lait et
yaourt
Œufs 1 mois Dans le casier à oeufs
Aliments cuits
REMARQUE : Évitez de conserver la patate, l’oignon, l’ail dans le réfrigérateur.
Durée de conservation
1 semaine
Jusqu’à la date de
péremption indiquée par le
fabricant
Lieu de conservation
Bac à légumes (sans emballage)
Emballés dans des sachets ou
des sacs en plastique
ou dans une boîte
(sur la clayette en verre)
Dans la clayette de porte spéciale
Toutes les clayettes
Compartiment congélateur
• Régler le compartiment congélateur au niveau de la barre graphique 2-3 sera
suffisant pour les conditions normales.
• Le congélateur est utilisé pour la conservation à long terme des aliments surgelés
ou congelés, et pour fabriquer des glaçons.
• Ne placez pas des aliments frais et chauds sur les étagères de la porte du
congélateur afin de les congeler. Ne l’utilisez que pour la conservation des aliments
congelés.
• Ne pas placer d’aliments frais ou chauds près des aliments congelés. Ils pourraient
les décongeler.
• Utilisez l’étagère de congélation rapide pour congeler les aliments préparés à la
maison (et les aliments à congeler) plus rapidement en raison de la plus grande
capacité de la salle de congélation.
FR - 28 -
Page 30

• Lorsque vous congelez des aliments frais (viande, poisson et préparations), divisezles en portions utilisables en une fois.
• Lorsque vous congelez les aliments frais, la quantité maximale d’aliment frais (en
kg) qui peut être congelée en 24 heures est indiquée sur l’étiquette de l’appareil.
• Pour que la performance optimale de l’appareil atteigne la capacité de congélation
maximale, tournez le bouton du thermostat du congélateur à la position maximale
24 heures avant l’introduction des aliments frais dans le congélateur.
• Après avoir introduit l’aliment frais dans le congélateur, 24 heures à la position max.
est généralement suffisant ; vous n’avez pas besoin de régler le bouton du thermostat
du congélateur à la position max.
• Attention ; afin d’économiser de l’énergie, lorsque vous congelez de petites quantités
d’aliments, vous n’avez pas besoin de régler le bouton du thermostat du congélateur
à la position max.
• Pour stocker les aliments congelés ; suivez toujours les instructions indiquées
sur les emballages des aliments congelés et si aucune information n’est fournie,
ne conservez pas les aliments plus de 3 mois après la date d’achat.
• Lorsque vous achetez des aliments surgelés, vérifiez qu’ils ont été congelés à des
températures adéquates et que l’emballage est intact.
• Les aliments congelés doivent être transportés dans des emballages appropriés
pour maintenir la qualité de la nourriture et doivent être replacés au congélateur le
plus tôt possible.
• Si l’emballage d’un aliment congelé semble être humide et anormalement gonflé, il
est probable qu’il a été stocké auparavant à une température non adéquate et que
le contenu en a été altéré.
• La durée de conservation des aliments congelés dépend de la température
ambiante, du réglage du thermostat, de la fréquence d’ouverture de la porte, du type
d’aliment et de la durée de transport du magasin jusqu’à la maison. Respecter
toujours les instructions d’utilisation figurant sur le conditionnement et ne dépassez
jamais la durée de stockage indiquée.
FR - 29 -
Page 31

Viande et poisson
Steak Emballé dans un papier
Viande d'agneau Emballée dans un papier
Rôti de veau Emballé dans un papier
Morceaux de veau En petits morceaux
Cubes d’agneau En morceaux
Viande hachée non épicée, dans des
Abats (morceaux) En morceaux
Saucisson de
Bologne/Saucisson
sec
Poulet et dinde Emballage dans un papier
Oie et canard
Biche, lapin,
viande de brousse
Sanglier
Poissons d’eau
douce (saumon,
carpe, silure)
Poisson maigre,
loup de mer,
turbot, poisson
plat
Poissons gras
(thon, maquereau,
poisson bleu,
anchois)
Mollusques et
crustacés
Caviar
Escargot
emballages
Doit être emballé même s’il
comporte un revêtement
Emballage dans un papier
Quantités de 2,5 kg et sans os
Doit être lavé et séché après
avoir été soigneusement nettoyé
et écaillé, la tête et la queue
doivent être coupées au besoin.
Nettoyés et emballés
Dans son emballage, dans une
boîte en aluminium ou en
plastique
Dans de l’eau salée, dans une
boîte en aluminium ou en
plastique
Préparation
Durée de
conservation
(mois)
6-10
6-8
6-10
6-10
4-8
1-3
1-3
7-8
4-8
9-12
2
4-8
2-4
4-6
2-3
3
Période de
décongélation
à la température
ambiante
(heure)
1-2
1-2
1-2
1-2
2-3
2-3
1-2
Jusqu’à
dégivrage
10-12
10
10-12
Jusqu’à
décongélation
complète
Jusqu’à
décongélation
complète
Jusqu’à
décongélation
complète
Jusqu’à
décongélation
complète
Jusqu’à
décongélation
complète
Jusqu’à
décongélation
complète
Remarque: La viande congelée doit être cuite comme de la viande fraîche c’est-à-dire
après décongélation. Si vous ne faites pas cuire la viande après l’avoir sorti du congélateur,
ne l’y remettez pas.
FR - 30 -
Page 32

Légumes et
fruits
Chou-fleur
Haricot vert et
haricot français
Haricots Écosser et laver
Champignons et
asperges
Chou Nettoyé 6 - 8
Aubergine
Maïs
Carotte Nettoyez et découpez-la en
Piment
Épinard Lavé 6 - 9
Pomme et
avocat
Abricot et pêche
Fraise et
framboise
Fruits cuits
Prunes, cerises,
cerises acides Lavez-les et retirez les tiges
Retirez les feuilles, divisez le
trognon en parties et laissez-le
dans de l’eau contenant un peu
de citron
Lavez et coupez-les en petits
morceaux
Lavez et coupez-les en petits
morceaux
Coupez-la en petits morceaux de
2 cm après lavage
Nettoyez et gardez-le avec son
épis ou en grains
tranches
Retirez la tige, divisez-le en deux
et enlevez les pépins
Découpez en épluchant 8 - 10 (Dans le réfrigérateur) 5
Divisez-les en deux et retirez les
pépins
Lavez et nettoyez-les
Ajouter 10% de sucre dans le
récipient
Préparation
Durée de
conservation
(mois)
10 - 12
10 - 13
12
6 - 9
10 - 12
12
12
8 - 10 Il peut être utilisé à l’état
4 - 6
8 - 12
12
8 - 12
Température ambiante
Durée de dégivrage
(heure)
Il peut être utilisé à l’état
congelé
Ils peuvent être utilisés à
l’état congelé
Ils peuvent être utilisés à
l’état congelé
Ils peuvent être utilisés à
l’état congelé
2
Dans des plats différents
Il peut être utilisé à l’état
congelé
Elle peut être utilisée à l’état
congelé
congelé
2
(Dans le réfrigérateur) 4
2
4
5 - 7
FR - 31 -
Page 33

Produits laitiers
Dans une boîte fermée
Pâtisserie
Préparation
Durée de
conservation
Conditions de conservation
(mois)
Lait (homogénéisé)
en paquet
Fromage (excepté
le fromage blanc)
Dans son emballage
En forme de tranches
2 - 3
6 - 8
Lait pur – Dans son emballage
Il peut être laissé dans son
emballage d’origine en vue d’une
conservation courte durée. Il peut
également être emballé dans un
sac en plastique pour une
conservation longue durée.
Beurre, margarine Dans son emballage 6
Blanc d’oeuf 10 - 12 30 grammes du mélange
équivalent à un jaune d’œuf.
Mélange d’œuf
(Blanc –jaune)
Mélangez
soigneusement et
ajoutez-y une pincée
10
50 grammes du mélange
équivalent à un jaune d’œuf.
de sel ou de sucre
pour éviter qu’il
* Œufs
Jaune ‘oeuf
devienne trop lourd.
Mélangez
soigneusement et
ajoutez-y une pincée
8 - 10
20 grammes du mélange
équivalent à un jaune d’œuf.
de sel ou de sucre
pour éviter qu’il
devienne trop lourd.
* L’oeuf ne doit pas être congelé avec la coquille. Le blanc et le jaune d’œuf doivent être
congelés séparément ou après avoir été soigneusement mélangés.
Pain 4 - 6 2 - 3 4-5 (220-225 °C)
Biscuits 3 - 6 1 Pâté 1 - 3 2 - 3 5-10 (200-225 °C)
Tartelette 1 Pâtes filo 2 - 3 1 Pizza 2 - 3 2 - 4 15-20 (200 °C)
Durée de
conservation
(mois)
1,5
3 - 4 5-8 (190-200 °C)
Période de décongélation à
la température ambiante
(heures)
1,5
5-8 (190-200 °C)
1,5
5-8 (190-200 °C)
décongélation dans
le four (minutes)
Durée de
Le goût de certaines épices dans les aliments cuits (anis vert, basilique, cresson d’eau,
vinaigre, épices assorties, gingembre, ail, oignon, moutarde, thym, marjolaine, poivre
noir, etc.) change et le goût de ces aliments devient très fort lorsqu’il sont conservés
pendant longtemps.
Par conséquent, vous devez ajouter un peu d’épices aux aliments congelés ou vous
devez ajouter l’épice de votre choix après la décongélation.
La durée de conservation des aliments est fonction de l’huile utilisée. Les huiles
appropriées sont la margarine, la graisse de veau, l’huile d’olive et le beurre. Les huiles
non appropriées sont l’huile d’arachide, et la graisse de porc.
Les aliments sous forme liquide doivent être congelés dans des boîtes en plastique et
les autres dans des sacs en plastique.
FR - 32 -
Page 34

SECTION 4. NETTOYAGE ET ENTRETIEN
• Débranchez l’appareil avant de le nettoyer.
• Ne versez pas d’eau dans l’appareil pour le nettoyer.
• Les compartiments réfrigérateur et congélateur doivent être
nettoyés régulièrement à l’aide d’une solution de
bicarbonate de soude et d’eau tiède.
• Nettoyez les accessoires séparément avec de l’eau
savonneuse. Ne les lavez pas au lave-vaisselle.
• N’utilisez pas de produits abrasifs ni de détergents. Après
lavage, rincez à l’eau claire et séchez avec soin. Vous pouvez
alors rebrancher l’appareil (vos mains doivent être sèches).
• Le condensateur doit être nettoyé à l’aide d’un
balai au moins une fois par an, afin d’améliorer
les performances de l’appareil et de réaliser
des économies d’énergie.
LA PRISE DOIT ETRE DEBRANCHEE.
Dégivrage
• Le dégivrage s’effectue automatiquement
lorsque l’appareil est en fonctionnement. L’eau
de dégivrage est recueillie dans le bac
d’évaporation et s’évapore automatiquement.
FR - 33 -
Page 35

Remplacement de l’ampoule du réfrigérateur et du congélateur
1. Débranchez l’appareil.
2. Dévissez le couvercle de l’ampoule à l’aide d’un petit tournevis et retirez-le.(A)
3. Remplacez l’ampoule par une nouvelle ampoule d’une puissance maximale de
15 W.(B)
4. Replacez le capot de la lampe et attendez 5 minutes avant de rebrancher
l’appareil.(C)
BOITIER/COUVERCLE
DE L’AMPOULE
SECTION 5.
Transport et déplacement de l’appareil
• Vous pouvez conserver le carton et le polystyrène d’emballage.
• Si vous devez transporter l’appareil, attachez-le avec un tissu large ou une corde
solide. Les consignes écrites sur le carton ondulé doivent être appliquées lors du
transport.
• Avant de transporter ou de déplacer
l’appareil, tous les accessoires (clayettes,
bac à légumes, etc.) doivent être enlevés
ou fixés avec de l’adhésif pour éviter
qu’ils ne bougent.
TRANSPORT ET DEPLACEMENT
Changement du sens d’ouverture de la porte
Si vous devez modifier le sens d’ouverture de la porte, consultez le service après-vente.
BOITIER/COUVERCLE
DE L’AMPOULE
(Dans certains modèles)
FR - 34 -
Page 36

SECTION 6. AVANT D’APPELER LE SERVICE APRES-VENTE
T
ST
N
SN
Le problème à l’origine d’un dysfonctionnement de votre réfrigérateur peut être mineur.
Pour économiser du temps et de l’argent, procédez aux vérifications ci-dessous avant
d’appeler un technicien.
Votre réfrigérateur ne fonctionne pas
Vérifiez :
• qu’il est branché,
• que l’interrupteur général de votre habitation n’est pas déconnecté,
• que le thermostat n’est pas positionné sur « 0 »,
• que la prise est adaptée. Pour ce faire, branchez un autre appareil sur la même
prise.
Votre réfrigérateur ne fonctionne pas de façon optimale
Vérifiez :
• que vous ne l’avez pas surchargé,
• que les portes sont bien fermées,
• que le condensateur n’est pas couvert de poussière,
• que l’espace laissé derrière et sur les côtés de l’appareil est suffisant.
Votre appareil est bruyant :
La gaz de refroidissement qui circule dans le circuit de réfrigération peut parfois émettre
un petit bruit même lorsque le compresseur ne fonctionne pas. Ne vous inquiétez pas,
cela est tout à fait normal. Si vous entendez un bruit différent, vérifiez :
• que l’appareil est bien droit,
• que rien ne touche l’arrière,
• que le contenu de l’appareil ne vibre pas.
Si votre réfrigérateur ne refroidit pas suffisamment ;
• Votre réfrigérateur a été conçu de manière à fonctionner dans la plage de température
ambiante dans les normes conformément à la classe du climat mentionnée dans
l’étiquette de l’information. Le fonctionnement de l’appareil dans des
environnements ayant des valeurs de température non conformes à celles spécifiées
n’est pas recommandé pour une réfrigération efficace.
Classe ClimatiqueTempérature ambiante (°C)
Entre 16 et 43
Entre 16 et 38
Entre 16 et 32
Entre 10 et 32
FR - 35 -
Page 37

Informations relatives à la conformité
• La classe tropicale est définie pour les températures environnementales comprises
entre 16°C et 43°C conformément aux normes TS EN ISO 15502.
• L’appareil a été fabriqué en conformité avec les normes E N1 55 02, IE C6 03 35 -1
/ IEC60335-2-24, 2004/108/EC.
Recommandations
• Si vous n’utilisez pas l’appareil pendant une longue période (par exemple pendant
les vacances d’été) débranchez-le, nettoyez-le et laissez la porte ouverte pour éviter
la formation de moisissures et de mauvaises odeurs.
• Pour arrêter complètement l’appareil, débranchez-le de la prise murale (pour le
nettoyer ou lorsque vous laissez les portes ouvertes).
Quelques conseils pour économiser de l'énergie
1- Installez l'appareil dans une pièce humide, bien aérée, loin de la lumière directe
du soleil et des sources de chaleur comme le radiateur, la cuisinière, etc.) Dans
le cas contraire, utilisez une plaque d'isolation.
2- Laissez les aliments et les boissons chauds refroidir hors de l'appareil.
3- Pour geler les denrées congelées, introduisez-les dans le compartiment
réfrigérateur. La faible température des aliments congelés aidera à la
réfrigération du compartiment réfrigérateur pendant la décongélation. Ce qui
vous aide à économiser de l'énergie. Vous gaspillez de l'énergie lorsque vous
mettez les denrées congelées hors du compartiment réfrigérateur.
4- Veillez à couvrir les boissons et les aliments avant de les introduire dans
l'appareil. Si vous ne le faites pas, l'humidité de l'appareil augmente d'intensité.
Par conséquent, le processus de réfrigération prend plus de temps. Bien plus,
le fait de couvrir vos produits avant de les ranger dans l'appareil les met à l'abri
des mauvaises odeurs.
5- Pendant l'introduction des aliments et des boissons dans l'appareil, laissez la
porte ouverte la moins longtemps possible.
6- Veillez à ce que les couvercles de tous les compartiments de l'appareil restent
fermés.
(bac à légumes, compartiment réfrigérateur, etc.).
7- Le joint de porte doit être propre et flexible. Remplacez les joints en cas d'usure.
8- De temps à autre, nettoyez la partie arrière de votre appareil à l'aide d'un aspirateur
ou d'un pinceau pour éviter qu'il consomme plus d'énergie.
FR - 36 -
Page 38

SECTION 7.
ELEMENTS ET COMPARTIMENTS DE L’APPAREIL
Cette présentation ne sert que de renseignement sur les parties de l’appareil,
Celles-ci pourraient varier en fonction du modèle de l’appareil.
1) THERMOSTAT CONGELATEUR
2) RESERVOIR A GLACONS
3) BAC A GLACONS
4) COMPARTIMENT CONGELATION RAPIDE
5) BACS DU CONGELATEUR
6) BAC SUPERIEUR
7) COMPARTIEMENT A OEUFS
8) PORTE-BOUTEILLES
9) BAC INFERIEUR
10) PROTECTION ANTI-CHOCS
11) BAC A LEGUMES
12) COUVERCLE DU BAC A LEGUMES
13) ETAGERES DU REFRIGERATEUR
14) BOITIER/COUVERCLE DE L’AMPOULE
15) THERMOSTAT REFRIGERATEUR
16) COMPARTIMENT FRAICHEUR
17) COMPARTIMENT CONGELATEUR
18) BOITIER/COUVERCLE DE L’AMPOULE
19) ETAGERE DU CONGELATEUR
FR - 37 -
Page 39

Quelques conseils pour économiser de l'énergie
1- İnstallez l'appareil dans une pièce humide, bien aérée, loin de la lumière directe
du soleil et des sources de chaleur comme le radiateur, la cuisinière, etc.) Dans
le cas contraire, utilisez une plaque d'isolation.
2- Laissez les aliments et les boissons chauds refroidir hors de l'appareil.
3- Pour geler les denrées congelées, introduisez-les dans le compartiment
réfrigérateur. La faible température des aliments congelés aidera à la
réfrigération du compartiment réfrigérateur pendant la décongélation. Ce qui
vous aide à économiser de l'énergie. Vous gaspillez de l'énergie lorsque vous
mettez les denrées congelées hors du compartiment réfrigérateur.
4- Veillez à couvrir les boissons et les aliments avant de les introduire dans
l'appareil. Si vous ne le faites pas, l'humidité de l'appareil augmente d'intensité.
Par conséquent, le processus de réfrigération prend plus de temps. Bien plus,
le fait de couvrir vos produits avant de les ranger dans l'appareil les met à l'abri
des mauvaises odeurs.
5- Pendant l'introduction des aliments et des boissons dans l'appareil, laissez la
porte ouverte la moins longtemps possible.
6- Veillez à ce que les couvercles de tous les compartiments de l'appareil restent
fermés.
(bac à légumes, compartiment réfrigérateur, etc.).
7- Le joint de porte doit être propre et flexible. Remplacez les joints en cas d'usure.
8- De temps à autre, nettoyez la partie arrière de votre appareil à l'aide d'un aspirateur
ou d'un pinceau pour éviter qu'il consomme plus d'énergie.
Les produits électriques et électroniques usagés ne doivent pas être
jetés avec les ordures ménagères. Renseignez-vous auprès du
revendeur où vous avez acheté ce produit pour obtenir la marche à
suivre en matière de recyclage.
FR - 38 -
Page 40

ΠΙΝΑΚΑΣ ΠΕΡΙΕΧΟΜΕΝΩΝ
ΠΡΙΝ ΝΑ ΧΡΗΣΙΜΟΠΟΙΗΣΤΕ ΤΟ ΨΥΓΕΙΟ ...................................40
Τα Παλιά και αχρησιμοποίητα ψυγεία ...................................................40
ΠΡΟΕΙΔΟΠΟΙΗΣΕΙΣ ΑΣΦΑΛΕΙΑΣ .......................................................41
Η Τοποθέτηση και θέτηση σε ενέργεια ...............................................42
Πριν να βάλετε σε ενέργεια το ψυγείο σας .........................................42
Θερμικές Ρυθμίσεις ..............................................................................43
Ο Θερμοστάτης του ψύκτη ............................................................................43
Ο Θερμοστάτης του ψυκτήρα .......................................................................43
ΠΛΗΡΟΦΟΡΙΕΣ ΧΡΗΣΕΩΣ ..........................................................43
Προειδοποιήσεις σχετικά με τη θερμική ρύθμιση ...............................43
Τα αξεσουάρ .........................................................................................44
Κατασκευαστής Πάγων (Παγοματικός).........................................................44
Το τμήμα της ταχείας ψύξης ..........................................................................44
Περαστό Διάφανο Ράφι ...................................................................................45
Το τμήμα της Θερμοκρασίας “0°C”...............................................................45
ΤΟ ΒΓΑΛΣΙΜΟ του ΚΑΠΑΚΙΟΥ ΛΑΧ/ΧΕΙΟΥ .....................................................46
ΤΟΠΟΘΕΤΗΣΗ ΚΑΠΑΚΙΟΥ ΛΑΧ/ΧΕΙΟΥ .........................................................47
ΤΟΠΟΘΕΤΗΣΗ ΤΡΟΦΙΜΩΝ .........................................................48
Ψυκτήρας ..............................................................................................48
Ο Ψύκτης ..............................................................................................49
Αλλαγή της Λαμπτήρας ........................................................................54
ΜΕΤΑΦΟΡΑ ΚΑΙ ΑΛΛΑΓΗ ΘΕΣΕΩΣ ............................................54
Αλλαγή της Κατεύθυνσης Ανοίγματος της Πόρτας ...............................54
ΠΡΙΝ ΚΑΛΕΣΕΤΕ ΤΟ ΤΜΗΜΑ ΤΕΧΝΙΚΗΣ ΕΞΥΠΗΡΕΤΗΣΗΣ ....55
ΤΑ ΜΕΡΗ ΤΗΣ ΣΥΣΚΕΥΗΣ ΚΑΙ ΟΙ ΘΑΛΑΜΟΙ ..............................57
GR - 39 -
Page 41

ΜΕΡΟΣ -1
ΠΡΙΝ ΝΑ ΧΡΗΣΙΜΟΠΟΙΗΣΤΕ ΤΟ ΨΥΓΕΙΟ
Τα Παλιά και αχρησιμοποίητα ψυγεία
• Εάν το μοντέλο σας περιέχει R600a - δείτε την πινακίδα στοιχείων στο εσωτερικό του
ψυγείου (το ψυκτικό ισοβουτάνιο), αυτό είναι ένα φυσικό αέριο το οποίο είναι φιλικό
προς το περιβάλλον αλλά επίσης αναφλέξιμο. Όταν μεταφέρετε και εγκαθιστάτε τη
μονάδα πρέπει να φροντίζετε να εξασφαλίσετε ότι κανένα από τα μέρη του ψυκτικού
κυκλώματος δεν θα υποστεί ζημιά. Σε περίπτωση ζημιάς αποφύγετε γυμνές φλόγες ή
πηγές ανάφλεξης και αερίστε για λίγα λεπτά το χώρο στον οποίο έχει τοποθετηθεί η
μονάδα.
• Το παλιό σας ψυγείο εάν έχει τη κλειδαριά, πριν να το ρίξετε ή να σπάστε, να βγάλετε τη
κλειδαριά, διοτί τα παιδιά ενώ παίζουν, μπορούν να μπαίνουν μέσα του και κλειδώσουν
τον ε’αυτό τους και αυτό μπορεί να προκαλέσει ένα πάθημα
• Τα παλιά ψυγεία και καταψύκτες έχουν μονωτικά είδη και ψυκτικό αέριο που περιέχει
το CFC. Γι’αυτό σκοτώνοντας το παλιό ψυγείο σας προσέξτε να μην ζημιώσετε το
περιβάλλον.
ΣΗΜΑΝΤΙΚΟ ΣΗΜΕΙΩΜΑ
Παρακαλούμε να διαβάσετε προσεκτικά τον εγχειρίδιο πριν να τοποθετήσετε και να βάλετε
σε ενέργεια το ψυγείο σας. Η εταιρεία μας δεν ευθύνεται από τις ζημίες που θα προκαλέσει οι
εσφαλμένες χρήσεις.
Λαμβάνετε υπόψη τις όλες προειδοποιήσεις που βρίσκεται πάνω στη συσκευή ή μέσα στο
εγχειρίδιο και διατηρήστε αυτό το εγχειρίδιο με σκόπο να σας βοηθήσει σε μερικά
προβλήματα που θα μπορέσει να γίνει στο μέλλον.
GR - 40 -
Page 42

ΠΡΟΕΙΔΟΠΟΙΗΣΕΙΣ ΑΣΦΑΛΕΙΑΣ
Προειδοποίηση: Μη χρησιμοποιείτε μηχανικές διατάξεις ή άλλα τεχνητά μέσα για να
επιταχύνετε τη διαδικασία της απόψυξης. Μη χρησιμοποιείτε ηλεκτρικές συσκευές στο χώρο
αποθήκευσης τροφίμων της συσκευής. Διατηρείτε ανοιχτά τα ανοίγματα αερισμού της
συσκευής. Μην προκαλέσετε ζημιά στο κύκλωμα του ψυκτικού μέσου του ψυγείου.
• Μη χρησιμοποιήστε τη μπαλαντέζα και πολυπολική πρίζα
• Μη μεταχειριστήτε το φις που έχει το βεβλημένο, ξεσκισμένο και
παλιό καλώδιο.
• Μη τραβήξτε, μη ζαβώστε και μη ζημιώστε το καλώδιο
• Αυτό το προϊόν σχεδιάστηκε για τη χρήση των ενήλικων. Μην
αφηνέτε τα παιδιά να παίξουν με τη συσκευή και να κρεμαστούν
κρατόντας την πόρτα.
• Για να μην προκαλέσει καμία ηλεκτροπληξία διαρρήδην μη βάλετε/
βγάλτε το τις με το βρεγμένο χερί στο/από πρίζα.
• Στο μέρος κατάψυξης του ψυγείου σας μη βάλετε καθόλου υάλινη
μποτίλια ή κουτιά που περιέχουν τα οξινά τρόφιμα, οι μποτίλιες
ή τα κουτιά μπορούν να εκραγούν.
• Για την ασφάλεια σας μη βάλετε τα εκρηκτικά και εμπρηστικά
αντικείμενα στο ψυγείο σας. Τα ποτά με ύψηλη ποσότητα αλκοόλ
να τοποθετήσετε στο ψυκτήρα oρθά και με καλά κλεισμένα
στόματα.
• Αποφύγετε ο πάγος να αγγίξει στο χέρι σας βγαίνοντας τον πάγο
που αναπαρήγαγα μέσα στο ψύκτη. Ο πάγος μπορεί να επιφέρει
τα εγκαύματα και/ή κόψιμα.
• Μην αγγίζετε στα καταψυγμένα Τρόφιμα ! Μη φάγετε αμέσως τα
παγωτά και τα τους κύβους πάγους που θα βγάλετε από το
ψυκτήρα!
• Tα καταψυγμένα τρόφιμα όταν ξεπαγώσουν, μη τα καταψύξτε ξανά. Μπορεί να
δημιουργήσει κίνδυνο για την υγεία σας, διοτί αυτό μπορεί να επιφέρει τη τροφική
δηλητηρίαση.
• Η συσκευή δεν προορίζεται για χρήση από άτομα (περιλαμβανομένων παιδιών) με
μειωμένες σωματικές, αισθητηριακές ή πνευματικές ικανότητες ή με έλλειψη εμπειρίας
και γνώσης, εκτός αν στα άτομα αυτά έχει παρασχεθεί επιτήρηση ή καθοδήγηση σχετικά
με τη χρήση της συσκευής από άτομο υπεύθυνο για την ασφάλειά τους. Τα παιδιά
πρέπει να βρίσκονται υπό επίβλεψη, ώστε να εξασφαλίζεται ότι δεν παίζουν με τη
συσκευή.
• Αν το καλώδιο τροφοδοσίας έχει υποστεί ζημιά ή φθορά, πρέπει να αντικατασταθεί
από τον κατασκευαστή ή από συνεργείο σέρβις ή από εξουσιοδοτημένο άτομο.
GR - 41 -
Page 43

Η Τοποθέτηση και θέτηση σε ενέργεια
Πριν να μεταχειριστήτε το ψυγείο σας πρέπει να προσέξτε αυτά :
• Το ψυγείο σας ενεργεί σε τάση 220-240 V και 50 Hz.
• Στο καλώδιο δικτύου προσαρμόσθηκε ειδικό γειωμένο φις. Οπωσδήποτε πρέπει να
μεταχειριστήτε το φις αυτό με ειδική γειωμένη πρίζα (16 Α). Εάν δεν υπάρχει τέτοια
πρίζα στο σπίτι σας για την τοποθέτηση καλέστε τον ένα ικανό ηλεκτρολόγο.
• Η εταιρεία μας δεν θα είναι υπεύθυνος από τις ζημίες που θα μπορέσει να παθεί εκ
τούτου έπεται από την μεταχείριση χωρίς τη γείωση.
• Τοποθετήστε το ψυγείο σας μία θέση που δεν θα παθεί σε άμεσα
ηλιακές ακτίνες
• Πρέπει να είναι μακριά τουλάχιστον 50 cm από τις θερμικές πηγές
(όπως κουζίνα, φουρνό, καλοριφέρ ή θερμάστρα) και πρέπει να
είναι μακριά τουλάχιστον 5 cm από τους ηλεκτρικούς φούρνους.
• Δεν πρέπει να χρησιμοποιηθούν στον ύπαιθρο και δεν πρέπει να
μείνει κάτω από τη βροχή.
• Εάν θα τοποθετήσετε το ψυγείο σας κοντά στο ψύκτη, για να
εμποδίσετε να δημιοργήσει υγρασία στην εξωτερική πλευρα,
πρέπει να υπάρξει μεταξύ τους τουλάχιστον 2 cm απόσταση
• Μη βάλετε βαρύ αντικείμενο πάνω στο ψυγείο σας και τοποθετήστε
το, σε κατάλληλη θέση που να υπάρξει τουλάχιστον 15 cm διάκενο
από πάνω
• Για να ενεργεί χωρίς σείσιμο το ψυγείο σας πρέπει να ισοσταθμιστεί
ρυθμίζοντας από τα μπροστινά ποδιά του. Αυτό μπορείτε να
κάνετε στρέφοντας τα ρυθμισμένα ποδιά στη κατεύθυνση ρολοϊού
(ή ανάποδα). Αυτή τη ενέργεία πρέπει να γίνει πριν να βαλθούν τα
τρόφιμα στο ψυγείο.
• Πριν να μεταχειριστήτε το ψυγείο σας, να καθαρίστε όλα τα
κομματιά με χλιαρό νερό που είναι ετοιμασμένο βάλλοντας ένα
κουταλάκι ανθρακική σόδα και ύστερα να ξεβγάλετε με καθαρό
νερό και να στεγνώστε. Να τοποθετήστε όλα τα κομματιά στις
θέσεις τους μετά από το καθάρισμα.
Πριν να βάλετε σε ενέργεια το ψυγείο σας
• Στη πρώτη ενέργεια ή μετά από την μεταφορά του για να ενεργεί
αποδοτικό αφίστε το να αναμένει 3 ώρες (στον όρθιο τρόπο) μετά βάλετε
το φις στη πρίζα. Αλλιώς μπορείτε να ζημιώστε στο κομπρεσέρ
• Στη πρώτη ενέργεια μπορεί να υπάρξει Αποφορά, όμως όταν το ψυγείο
αρχίζει στη ψύξη αυτή θα χάθει
GR - 42 -
Page 44

ΜΕΡΟΣ -2
ΠΛΗΡΟΦΟΡΙΕΣ ΧΡΗΣΕΩΣ
Θερμικές Ρυθμίσεις
Ο Θερμοστάτης του ψυκτήρα και του ψύκτη
Ο Θερμοστάτης του ψύκτηΟ θερμοστάτης του ψυκτήρας
• Εξασφαλίζει να ρυθμιστούν αυτόματα οι θερμοκρασίες του ψυκτήρα και του ψύκτη. Ο
θερμοστάτης μπορεί να ρυθμιστεί σε κάποιο βαθμό από 1 εως 5 που απαιθητεί.. Η
κατάσταση του θερμοστάτη τόσο αυξανηθεί από 1 εως το 5 όσο και αυξάνει το
βαθμό της θερμοκρασίας. Για την εξοικονόμηση της ενέργειας μπορείτε να ενεργηθείτε
το ψυγείο σας σε πιο κάτω θέση Στους χειμερινούς μήνες.
Ο Θερμοστάτης του ψύκτη
5 : Για να αποκτήσουν τους πάγους με ταχύ ρυθμό και για να καταψυχτούν ταχύτερα
των τροφίμων που βάλθηκαν στο ψύκτη. Το ψυγείο σας θα ενεργεί μακροχρόνιος.
Όταν ψύχεται αρκετά ο ψύκτης πρέπει να φέρθει στη παλιά θέση.
3-4: Για τη κανονική χρήση και για τη μακροχρόνια διατήρηση των καταψυγμένων
τροφίμων.
1-2: Για τη διατήρηση των κυβικών πάγων και για την εξοικονόμηση ενέργειας στους
χειμερινές μήνες.
Ο Θερμοστάτης του ψυκτήρα
5 : Για τη περισσότερες ψύξεις,
3-4: Για τη κανονική χρήση. Αυπδοτικότατη θέση είναι αυτή
1-2: Για τη κατώτερη ψύξη
Προειδοποιήσεις σχετικά με τη θερμική ρύθμιση
• Η ρύθμιση του θερμοστάτη πρέπει να γίνεται πάροντας υπόψη ότι η πόρτα του ψυκτήρα
και του ψύκτη τόσο πολύ ανοιγοκλείνουν, πόσα τρόφιμα διατηρούνται μέσα και η
θερμοκρασία του περιβάλλοντος του ψυγείου.
• Στη πρώτη χρήση για να ψυχθεί απολύτως το ψυγείο σας, ανάλογα με τη θερμοκρασία
του περιβάλλοντος πρέπει να ενεργεί 24 ώρες άπαυτο.
• Σε αυτό το χρονικό διάστημα μη ανοιγοκλείνετε τις πόρτες και μη γεμίζετε πολύ το
ψυγείο σας.
• Αν θέλετε να βάλετε σε ενέργεια ξανά το ψυγείο σας μετά από τον βγάλσιμο το φις του
από την πρίζα, για να μην παθεί ζημία του κομπρεσέρ να περιμένετε τουλάχιστον 5
λεπτά για να βάλετε το φις ξανά στη πρίζα.
GR - 43 -
Page 45

Τα αξεσουάρ
Κατασκευαστής Πάγων (Παγοματικός)
• Το παγοδοχείο του παγοματικού γεμίζετε με νερό και
τοποθετήστε στη θέση του
• Περίπου μετά 2 ώρες μπορείτε να πάρετε τους πάγους
σας.
• Πριν βγάλετε το παγοδοχείο από τη θέση του στρέψτε το
βραχίονα του παγοδοχείου προς τη δεξιά εως όλοι οι πάγοι
να ξεχυθούν στο παγοδοχείο.
• Μπορείτε να κάνετε σερβίρισμα βγάλοντας το παγοδοχείο
και μπορείτε να συγκεντρώσετε τους πάγους.
! Το παγοδοχείο είναι μόνο για τη συγκέντρωση των πάγων. Μη το μεταχειριστήτε
βάλλοντας μέσα του νερό για να γίνει πάγο.
Το τμήμα της ταχείας ψύξης
(Σε ορισμένα μοντέλα)
• Εξασφαλίζοντας την ταχύτερα ψύξη των νεών τροφίμων που θα γεμιστούν, εμποδίζει
τον άγγιγμα τους με τα καταψυγμένα τρόφιμα. Μπορείτε να τοποθετήσετε τα τρόφιμα
στα ράφια, στο ψύκτη πάροντας από τα ράφια του τμήματος ταχείας ψύξης μετά από
το πάγωμα των τροφίμων.
• Για να ανοίξετε το καπάκι του τμήματος ταχείας ψύξης, ανασηκώστε το, μπορείτε να το
προωθήστε ξεκινόντας πάνω από τις ράγες και με ίδιο τρόπο μπορείτε να το κλείσετε.
GR - 44 -
Page 46

Περαστό Διάφανο Ράφι
Σχήμα : 1 Σχήμα : 2 Σχήμα : 3
Το περαστό διάφανο ράφι που βρίσκεται πάνω στο διάφανο ράφι του λαχανικοδοχείου (Κοιτ.
7. Μέρος Σελ. 24-25) σχεδιάστηκε για να κερδίσετε τη θέση και την ευκολία. Όταν θέλετε να
δημιουργήσετε την ευρύ περιβάλλον όπως είναι άλλα ράφια (Σχήμα-1), να το τραβάτε προς
το μπροστά (Σχήμα-2) και αν θέλετε να έχετε τον ύψηλο περιβάλλον για την τοποθέτηση του
ύψηλου δοχείου να το προωθήστε προς το πίσω (Σχήμα – 3)
Το τμήμα της Θερμοκρασίας “0°C”
Το τμήμα του βαθμού “0” εξασφαλίζει τα τρόφιμά
σας να μενούν στη θερμοκρασία 0°C. Μπορείτε
να μεταχειριστήτε εκεί ή για την απόψυξη των
καταψυγμένων τροφίμων σας που βγάλετε από
το ψύκτη, ή για την διατήρηση χωρίς να
αναγκάζετε να ψυχράνεστε τα κρέατα και τα
ψαριά (μέσα σε πλαστικές σακούλες ή ως δέμα)
που θα τα φάγετε μέσα 1-2 μέρες.
! Μη βάλετε σε αυτά τα ράφια τα παγοδοχεία ή
τα τρόφιμα που θέλετε να παγώσουν
GR - 45 -
Page 47

ΤΟ ΒΓΑΛΣΙΜΟ του ΚΑΠΑΚΙΟΥ ΛΑΧ/ΧΕΙΟΥ
(Σε ορισμένα μοντέλα)
Πρώτη φάση: Βγάλσιμο των λαχ/χειών
• Τραβήξτε το λαχ/χείο προς τον ε’αυτό σας
• Βγάλτε το μπροστινό μέρος αναβαίνοντας
επάνω
Δευτερή φάση: βγάλσιμο της μέσης ράγας του
λαχανικοδοχείου
• Τραβήξτε προς τον αριστερά από το κάτω
μέρος της ράγας
• Βγάλτε το τραβώντας προς τον ε’αυτό σας.
Τρίτη φάση: Βγάλσιμο του καπάκι
λαχανικοδοχείου
• Τραβήξτε το καπάκι προς τον ε’αυτό σας εως
τα νυχιά να’ρθεί στα κενά που βρίσκονται
στις ράγες.
• Όταν φτάνουν τα νυχιά στα κενά, βγάλτε το
καπάκι ανεβαίνοντας επάνω.
GR - 46 -
Page 48

ΤΟΠΟΘΕΤΗΣΗ ΚΑΠΑΚΙΟΥ ΛΑΧ/ΧΕΙΟΥ
(Σε ορισμένα μοντέλα)
Πρώτη Φάση : Τοποθέτηση του καπακιού του
λαχ/χείου
• Τοποθετήστε τα νυχιά του καπακιού ώστε
να’ρθούν πάνω στίς ράγες.
• Προωθήστε το καπάκι εώς τα νυχιά να
φτάσουν στις θέσεις τους
Δεύτερη φάση : Τοποθέτηση της μεσής ράγας
του λαχ/χείου
• Τοποθετήστε τη μέση ράγα εως να φτάσει
στη θέση της που είναι στον απέναντι τοίχο
και στο δάπεδο
Τρίτη φάση : Τοποθέτηση των
λαχανικοδοχείων
• Τοποθετήστε οι ρόδες του λαχ/χείου ως να
φτάσει πάνω στις ράγες.
• Προωθήστε τον
GR - 47 -
Page 49

ΜΕΡΟΣ -3
ΤΟΠΟΘΕΤΗΣΗ ΤΡΟΦΙΜΩΝ
Ψυκτήρας
• Για να μειώσετε την υγρασία και για να αποτρέψετε τον σχηματισμό πάγου μην
τοποθετείτε υγρά σε δοχεία χωρίς κάλυμμα.
• Τα μαγειρευμένα φαγητά δεν πρέπει να τοποθετούνται στη συντήρηση όσο είναι ακόμη
ζεστά. Αυτά θα πρέπει να κρυώσουν σε θερμοκρασία δωματίου και μετά να
τοποθετηθούν στο ψυγείο με τέτοιο τρόπο ώστε να εξασφαλίζεται η σωστή κυκλοφορία
του αέρα μέσα στην συντήρηση.
• Τοποθετήστε κρέας και ψάρι (τυλιγμένα σε πακέτα) που θα καταναλωθούν σε 1-2 ημέρες.
• Τα φρούτα και τα λαχανικά μπορούν να τοποθετηθούν απευθείας στα συρτάρια
λαχανικών χωρίς να είναι αναγκαία η περιτύλιξη τους.
Οι παρακάτω συμβουλές είναι για την τοποθέτηση και για την καλύτερη διατήρηση των
τροφίμων στο τμήμα της συντήρησης.
Τρόφιμα
Λαχανικά και Φρούτα
Κρέας - Ψάρι
Φρέσκο Τυρί
Βούτυρο, φυτικό
Συσκευασμένο γάλα και
γιαούρτι
Αυγά
Μαγειρευμένα φαγητά
Χρόνος διατήρησης
1 εβδομάδα
2-3 ημέρες
3-4 ημέρες
1 εβδομάδα
Σύμφωνα με την υπόδειξη
του παραγωγού
1 μήνας
Η θέση που θα τοποθετητεί
στην συντήρηση
Στα συρτάρια λαχανικών
(Χωρίς τη περιτύλιξη)
Περιτυλίγοντας σε σακούλες
πολυαιθυλενίου ή μέσα στο κουτί
κρέατος
(στο γυάλινο ράφι πάνω από τις
φρουτολεκάνες)
Στο ειδικό ράφι της πόρτας
Στο ειδικό ράφι της πόρτας
Στο ειδικό ράφι της πόρτας
Στο ράφι αβγοθήκης
Σε κάθε ράφι
GR - 48 -
Page 50

Ο Ψύκτης
• Το τμήμα της κατάψυξης χρησιμοποιείτε για την μακροχρόνια διατήρηση των
κατεψυγμένων τροφίμων και για να κάνετε παγάκια.
• Τα τρόφιμα που καταψύχετε για πρώτη φορά μη τα βάλετε κοντά στα κατεψυγμένα
τρόφιμα.
• Να τοποθετείτε στο ράφι της ταχείας κατάψυξης τα τρόφιμα που θέλετε να καταψύξετε
ώστε να μπορέσετε να τα τοποθετήσετε κοντά στα άλλα κατεψυγμένα τρόφιμα
(τουλάχιστον μετά 24 ώρες).
• Πρέπει να καταψύχετε τα τρόφιμα όπως κρέας, κιμάς, ψάρι κτλ. κομματιάζοντας σε
μερίδες ώστε να τα καταναλώσετε πιο εύκολα.
• Όταν τα τρόφιμα ξεπαγώνουν, αλλοιώνονται γρήγορα και δεν μπορούν να ξαναψυχθούν.
Είναι επικίνδυνο για την υγεία σας γιατί μπορεί να προκαλέσει τροφική δηλητηρίαση.
• Μη βάζετε τα ζεστά φαγητά στην κατάψυξη. Γιατί τα ζεστά φαγητά μπορούν να
αλλοιώσουν τα άλλα κατεψυγμένα τρόφιμα που βρίσκονται μέσα στην κατάψυξη.
• Σε περίπτωση που αγοράζετε κατεψυγμένα τρόφιμα από το σούπερ-μάρκετ, βεβαιωθείτε
ότι είχαν καταψυχτεί και αποθηκευτεί σωστά.
• Θα πρέπει να ακολουθείτε πιστά τις συστάσεις για την συντήρηση των τροφίμων που
δίνει ο παραγωγός. Ανατρέξτε στις αντίστοιχες οδηγίες. Εάν δεν υπάρχει καμία οδηγία,
θα πρέπει να καταναλώσετε τα τρόφιμα σε σύντομο χρονικό διάστημα.
• Τα κατεψυγμένα τρόφιμα πρέπει να μεταφερθούν από το κατάστημα τροφίμων στην
κατάψυξη σας στο μικρότερο δυνατό χρόνο για την αποθήκευση στο ράφι ταχείας
ψύξης. Μη χρησιμοποιείτε τα ράφια της πόρτας για την κατάψυξη.
• Μην αγοράστε τα κατεψευμένα τρόφιμα εμπορίου εάν η συσκευασία τους έχει υγρασία
ή/και δυσοσμία, γιατί τέτοια τρόφιμα μπορούν να είναι αλλοιωμένα !
• Ο χρόνος της αποθήκευσης των κατεψυγμένων τροφίμων αλλάζει ανάλογα με :
- τη θερμοκρασία περιβάλλοντος και με τα είδη τροφίμων,
- με τη συχνότητα του ανοίγματος της πορτάς,
- με τη ρύθμιση του θερμοστάτη και με το χρονικό διάστημα που θα περάσει από
την αγορά εώς την τοποθέτηση στην κατάψυξη.
• Να εφαρμόζετε πιστά τις οδηγίες που δίνει ο παραγωγός και να καταναλώνετε τα τρόφιμα
πριν από την ημερομηνία λήξης.
Οι σχετικές συμβουλές για την τοποθέτηση και για την αποθήκευση των τροφίμων σας
βρίσκονται στις σελίδες 49, 50 και 51.
GR - 49 -
Page 51

ΚΡΕΑΤΑ - ΨΑΡΙΑ
Πριζόλα
Κρέας αρνιού
Μοσχάρι
Κοψίδι μοσχαριού
Κοψίδι προβάτου
Κιμάς
Συκωταριά (κομμ)
Σουτζούκι/Σαλάμι
Κότα - Γαλοπούλα
Χήνα - Πάπια
Ελάφι,
αγριογούρουνο,
λαγός
Ψάρια γλυκού
νερού, πέστροφα,
κυπρίνος κλπ
Άπαχα ψάρια
Λαβράκι, γλώσσα
κ.α
Λιπαρά ψάρια
Παλαμίδα,
γαύρος ,κ.α
Οστρακοειδή
Αυγοτάραχο
Σαλιγκάρια
Ετοιμασία
Τυλίγοντας σε μεμβράνη
Τυλίγοντας σε μεμβράνη
Τυλίγοντας σε μεμβράνη
Μικρά κομματισμένα
Κομματισμένα
Χωρίς καρυκεύματα σε
μορφή πλάκας σε σακούλα
τροφίμων
κομματισμένη
Αν και είναι με μεμβράνη
πρέπει να πακεταριστούν
Τυλίγοντας σε μεμβράνη
Τυλίγοντας σε μεμβράνη
Μερίδες χωρίς κόκαλο ανά
2,5
Πρέπει να πλένονται ,να
καθαρίζονται και να
καταψύχονται σε σακούλα
τροφίμων αφού πρώτα έχουν
στεγνώσει.
Καθαρισμένα και μέσα στις
σακούλες
Στη συσκευασία του, μέσα
στο αλουμίνιο ή πλαστικό
δοχείο
Στο αλμυρό νερό και μέσα
σε αλουμινένιο ή πλαστικό
σκεύος
Χρόνος
Αποθήκευση
ς (μήνας)
6 - 10
6 - 8
6 - 10
6 - 10
4 - 8
1 - 3
1 - 3
1 - 2
7 - 8
4 - 8
9 - 12
2
4 - 8
2 - 4
4 - 6
2 - 3
3
Χρόνος Απόψυξης στη
θερμοκ.Δωματ.
(ώρες)
1 - 2
1 - 2
1 - 2
1 - 2
2 - 3
2 - 3
1 - 2
Έως να ξεπαγώσει
10 - 12
10
10 - 12
Έως να ξεπαγώσει
απολύτως
Έως να ξεπαγώσει
απολύτως
Έως να ξεπαγώσει
απολύτως
Έως να ξεπαγώσει
απολύτως
Έως να ξεπαγώσει
απολύτως
Έως να ξεπαγώσει
απολύτως
Σημείωση : Όταν ξεπαγώσουν τα κατεψυγμένα κρέατα πρέπει να μαγειρευτούν όπως τα
φρέσκα κρέατα. Τα κατεψυγμένα κρέατα δεν θα πρέπει να καταψύχονται ξανά από τη στιγμή
που ξεπαγώνουν.
GR - 50 -
Page 52

ΛΑΧΑΝΙΚΑ και
ΦΡΟΥΤΑ
Ανθοκράμβη
Αμπελοφάσουλο
Αρακάς
Μανιτάρι και
σπαράγγι
Λάχανο
Μελιτζάνα
Καλαμπόκι
Καρότο
Πιπεριά
Σπανάκι
Μήλο και αχλάδι
Ροδάκινο,
βερίκοκο
Φράουλα,
σμέουρο
Ψημένος καρπός
Δαμάσκηνο,
κεράσι, βύσσινο
Ετοιμασία
Χωρίζετε τα φύλλα της,
κομματίζετε και το γουλί της,
μετά αφήστε στο νερολέμονο
Πλένετε και τεμαχίστε
Καθαρίζετε και πλένετε
Καθαρίζετε και τεμαχίζετε
Καθαρίζετε
Πλένετε και τεμαχίζετε ως 2
εκ.
Πακεταρίσετε το σπυρωτό ή
με το κοτσάνι του
Καθαρίζετε και τεμαχίζετε
Κόβετε το κοτσάνι, ανοίγετε
και βγάζετε τα κουκούτσια
Πλένετε
Τεμαχίζετε μετά από την
αποφλοίωση
Ανοίγετε και βγάλτε τα
κουκούτσια
Πλένετε και καθαρίζετε
Προσθέτοντας ζάχαρη (10 %)
στο δοχείο
Πλένετε και καθαρίζετε το
κοτσάνι
Χρόνος
Αποθήκευση
ς (μήνας)
10 - 12
10 - 13
12
6 - 9
6 - 8
10 - 12
12
12
8 - 10
6 - 9
8 - 10
4 - 6
8 - 12
12
8 - 12
Χρόνος Απόψυξης στη
θερμοκ.Δωματ.
(ώρες)
Μπορείτε να χρησιμοποιήστε
ενώ είναι ακόμη κατεψυγμένα
Μπορείτε να χρησιμοποιήστε
ενώ είναι ακόμη κατεψυγμένα
Μπορείτε να χρησιμοποιήστε
ενώ είναι ακόμη κατεψυγμένα
Μπορείτε να χρησιμοποιήστε
ενώ είναι ακόμη κατεψυγμένα
2
Χωρίστε τα κομμάτια
Μπορείτε να χρησιμοποιήστε
ενώ είναι ακόμη
κατεψυγμένα
Μπορείτε να χρησιμοποιήστε
ενώ είναι ακόμη
κατεψυγμένα
Μπορείτε να χρησιμοποιήστε
ενώ είναι ακόμη
κατεψυγμένα
2
5- στο ψυγείο
4- στο ψυγείο
2
4
5 - 7
GR - 51 -
Page 53

Γαλακτικά
προϊόντα και
ζημαρικά
γάλα
Τυρί - εκτός από
τη φέτα
Βούτυρο - φυτικό
Ασπράδι
Αναμιγμένο
αυγό
(ασπράδι -
κρόκος)
Τα αυγά *
Κρόκος
Ετοιμασία
Σε δικιά του συσκευασία
Τεμαχίζετε
Στο δικό του πακέτο
Να ανακατέψετε καλά και να
ρίξετε λιγό αλάτι και ζάχαρη
για να μη πήξει πολύ.
Να ανακατέψετε καλά και να
ρίξετε λιγό αλάτι και ζάχαρη
για να μη πήξει πολύ.
Χρόνος
Αποθήκευση
ς (μήνας)
2 - 3
6 - 8
6
10
Όροι αποθήκευσης
Σκέτο γάλα - Σε δικιά του
συσκευασία
Μπορεί να αφήνεται στο δικό
του πακέτο για βραχυχρόνια.
Για μακροχρόνια
αποθήκευση πρέπει να
περιτυλίξετε με μεμβράνη
Μέσα σε κλεισμένο δοχείο10 - 12
Μέσα σε κλεισμένο δοχείο
Μέσα σε κλεισμένο δοχείο8 - 10
* Το αυγό δεν πρέπει να καταψυχτεί ολόκληρο. Ο κρόκος και το ασπράδι πρέπει να
καταψυχτούν χωριστά ή καλά αναμιγμένα
Ψωμί
Μπισκότο
Μπουρέκι
Τάρτα
Πίτσα
χρόνος
Αποθήκευσης
(μήνας)
4 - 6
3 - 61 - 1,5
1 - 3
1 - 1,5
2 - 3
χρόνος απόψυξης
GR - 52 -
στη θερμοκρασία
δωματίου (ώρες)
2 - 3
2 - 3
3 - 4
2 - 4
χρόνος απόψυξης
στο φουρνό
(λεπτά)
4-5 ( 220-225°C )
5-8 ( 190-200°C )
5-10 ( 200-225°C )
5-8 ( 190-200°C )
15-20 ( 200°C )
Page 54

ΜΕΡΟΣ -4
• Πριν αρχίζετε το καθάρισμα οπωστήποτε να βγάλτε το φις από τη πρίζα.
• Μη πλέντε το ψυγείο σας καταιονίζοντας
• Μπορείτε να καθαρίζετε εσωτερικές και εξωτερικές πλευρές του
ψυγείου σας χρησημοποιόντας με χλιαρό σαπουνόνερο και με
μία μαλακτή πάνα ή με το σφουγγάρι
• Να καθαρίστε τα εξαρτήματα με σαπουνόνερο βγάλοντας χωριστά
από το ψυγείο. Μη τα βάλτε στο μηχανή λάντζας
• Ο πυκνωτής που βρίσκεται στο οπίσθιο μέρος του ψυγείου
πρέπει να καθαριστεί τουλάχιστον ετησίως μεταχειρίζοντας
μία ξερή βούρτσα ή μία ηλεκτρική σκούπα. Μετά το
καθάριμα το καπάκι αερισμόυ πρέπει να τοποθετητεί στη
θέση του.
ΚΑΘΑΡΙΣΜΑ ΚΑΙ ΣΥΝΤΗΡΗΣΗ
• Μη μεταχειριστήτε καθόλου το διαλυτικό και
εμπρηστικό αντικείμενο όπως βενζίνη,
διαλυτικό και όξυ.
• Εκτελόντας αυτή τη ενέργεια προσέξτε το φις
να είναι βγαλμένο από τη πρίζα
Η Συντήρηοη
Η απόψυξη γίνεται αυτόματα κατά τη διάρκεια της
κανονικής λειτουργίας. Το νερό της απόψυξης
αποβάλλεται από ένα αγωγό στο δοχείο
αποστράγγισης στο πίσω μέρος της συσκευής πάνω
από τον κινητήρα του συμπιεστή, όπου και εξατμίζεται.
Λεκάνη εξατμιστή
GR - 53 -
Page 55

Αλλαγή της Λαμπτήρας
Για την αλλαγή της λαμπτήρας που βρίσκεται στο ψυκτήρα :
1- Βγάλτε το φις του ψυγείου από τη
πρίζα.
2- Βγάλτε το καπάκι του κουτιού από τα
κάτω νυχιά μαζί με τη βοήθεια
κατσαβιδιού.
3- Αλλάξτε τη λαμπτήρα με μία καινούρια
λαμπτήρα που η δύναμή της να μην
είναι περισσότερο από 15 Watt.
4- Τοποθετήστε το καπάκι στη θέση του.
5- λεπτά και μετά συνδέστε τη συσκευή
με την πρίζα.
ΜΕΡΟΣ -5
• Το αρχέτυπο αμπαλάζ και οι αφροί μπορούν να διατηρητούν (ανάλογα με την αίτηση)
για την άλλη μία μεταφορά.
• Κατά τη περίπτωση την άλλη μία μεταφορα πρέπει να δέστε το ψυγείο σας με χονδρό
αμπαλάζ, με ταινία ή με σκληρό νήμα και οπωσδήποτε πρέπει εφαρμόστε τις οδηγίες
μεταφοράς που βρίσκεται πάνω στο αμπαλάζ του.
• Κατά τη διαρκεία αλλαγή θέσης και μεταφοράς πρώτα βγάλτε τα κινητά εξαρτήματα (τα
ράφια, αξεσουάρ και λαχανικοδοχείο κλπ.) του ψυγείου σας ή να τα παγιώστε
μπανταρόνοντας μέσα στο ψυγείο .
• Προσέξτε το ψυγείο σας να είναι oρθό κατα τη διαρκεία μετοφοράς
Αλλαγή της Κατεύθυνσης Ανοίγματος της Πόρτας
Σε περίπτωση που χρειαστείτε να αλλάξετε την πλευρά από την οποία ανοίγει η πόρτα,
συμβουλευτείτε το τοπικό τμήμα εξυπηρέτησης πελατών μετά την πώληση.
ΜΕΤΑΦΟΡΑ ΚΑΙ ΑΛΛΑΓΗ ΘΕΣΕΩΣ
(Σε ορισμένα μοντέλα)
GR - 54 -
Page 56

ΜΕΡΟΣ -6
ΠΡΙΝ ΚΑΛΕΣΕΤΕ ΤΟ ΤΜΗΜΑ ΤΕΧΝΙΚΗΣ
ΕΞΥΠΗΡΕΤΗΣΗΣ
Ελέγξτε :
• Εάν υπάρχει βλάβη στην παροχή ρεύματος;
• Αν η πρίζα είναι σταθερά τοποθετημένη
• Αν ο γενικός διακόπτης ρεύματος είναι ανοικτός;
• Αν υπάρχει παροχή ρεύματος (ελέγξτε το τοποθετώντας στην πρίζα μία άλλη συσκευή).
Αν η συσκευή δεν ψύχει αρκετά, ελέγξτε :
• Αν ο θερμοστάτης είναι στη σωστή θέση (θα είναι στη θέση “1”);
• Αν η πόρτα ανοίγει συχνά και αφήνεται ανοιχτή περισσότερο από ότι χρειάζεται ;
• Αν οι πόρτες της συσκευής κλείνουν σωστά ;
• Αν τοποθετήσατε με τέτοιον τρόπο τα φαγητά, έτσι ώστε ο αέρας να κυκλοφορεί ελεύθερα
γύρω από αυτά ;
• Αν συντηρήσατε μεγάλες ποσότητες τροφίμων ;
• Αν είναι επαρκής ο χώρος αερισμού μεταξύ συσκευής και τοίχου ;
Αν τα τρόφιμα υπερψύχονται, ελέγξτε :
• Αν ο θερμοστάτης είναι στη σωστή θέση ; (θα είναι στη θέση “5”);
• Αν αποθηκεύονται πολλά τρόφιμα στην κατάψυξη; (Σε αυτή τη περίπτωση ο συμπιεστής
θα λειτουργήσει παραπάνω για να καταψύξει τα τρόφιμα που βρίσκονται στην κατάψυξη
και αυτό μπορεί να προκαλέσει την υπέρ ψύξη και των τροφίμων που βρίσκονται στο
ψυγείο.)
Αν το ψυγείο σας κάνει πολύ θόρυβο :
Το ψυκτικό υγρό που κυκλοφορεί στο ψυκτικό κύκλωμα του ψυγείου κάνει έναν ανεπαίσθητο
θόρυβο ακόμα και όταν ο συμπιεστής δεν λειτουργεί. Αυτό μην σας ανησυχεί γιατί είναι
φυσιολογικό. Εάν εντοπίσετε διαφορετικούς ήχους ελέγξτε:
• Αν η συσκευή είναι ευθυγραμμισμένη ;
• Αν κάποιο αντικείμενο υπάρχει πίσω στη συσκευή σας;
• Αν τρέμουν τα κινούμενα ράφια ή τα πιάτα που βρίσκονται σε αυτά ;
Συμβουλή
• Κατά τη διάρκεια περιόδων που ή συσκευή δεν χρησιμοποιείται (όπως θερινές
διακοπές) αποσυνδέατε τη συσκευή από τη πρίζα , καθαρίστε τη κατά τις εξηγήσεις
του 4ου μέρους και αφήστε την πόρτα της μισάνοιχτη, επιτρέποντας έτσι τον αέρα να
GR - 55 -
Page 57

κυκλοφορεί εμποδίζοντας το σχηματισμό μούχλας και δυσάρεστων οσμών.
T
N
Το ψυγείο σας έχει σχεδιαστεί ώστε να λειτουργεί στα διαστήματα θερμοκρασίας
περιβάλλοντος που αναφέρονται στις προδιαγραφές, σύμφωνα με την κατηγορία κλίματος
που αναφέρεται στην ετικέτα σήμανσης. Δεν συνιστούμε να θέτετε σε λειτουργία το ψυγείο
σας εκτός των πλαισίων των τιμών των δηλωμένων θερμοκρασιών σχετικά με την
αποτελεσματικότητα ψύξης.
Κατηγορία κλίματοςΘερμοκρασία περιβάλλοντος (°C)
Μεταξύ 16 και 43 (°C)
ST
Μεταξύ 16 και 38 (°C)
Μεταξύ 16 και 32 (°C)
SN
Μεταξύ 10 και 32 (°C)
(*) Η κατηγορία για τροπικό κλίμα έχει καθοριστεί για θερμοκρασίες μεταξύ των 16°C και
43°C σύμφωνα με τα πρότυπα TS EN ISO 15502.
Σημαντικό:
Αυτό το προϊόν διαθέτει ψυκτικό υγρό Γ600 και συμβατό θερμοστάτη ασφαλείας. Εάν
χρειαστεί να αλλαχθεί ο θερμοστάτης για κάποιο λόγο θα πρέπει να αντικατασταθεί με κάποιο
συμβατό. Διαφορετικά μπορεί να προκύψουν επικίνδυνα προβλήματα στο προϊόν.
GR - 56 -
Page 58

5
6
7
8
9
10
11
12
13
14
15
16
17
18
19
1 2 43
ΜΕΡΟΣ -7
ΤΑ ΜΕΡΗ ΤΗΣ ΣΥΣΚΕΥΗΣ ΚΑΙ ΟΙ ΘΑΛΑΜΟΙ
Η παρουσίαση αυτή αποσκοπεί μόνο σε πληροφόρηση ως προς τα μέρη της συσκευής.
Ορισμένα εξαρτήματα ενδέχεται να διαφέρουν, ανάλογα με το μοντέλο της συσκευής.
1) ΘΕΡΜΟΣΤΑΤΗΣ ΚΑΤΑΨΥΞΗΣ
2) ΠΑΓΟΘΗΚΗ
3) ΔΙΣΚΟΣ ΠΑΡΑΣΚΕΥΗΣ ΠΑΓΟΚΥΒΩΝ
4) ΡΑΦΙ ΤΑΧΕΙΑΣ ΚΑΤΑΨΥΞΗΣ
5) ΡΑΦΙ ΚΑΤΑΨΥΞΗΣ
6) ΠΑΝΩ ΡΑΦΙ
7) ΡΑΦΙ ΓΙΑ ΑΥΓΑ
8) ΡΑΦΙ ΓΙΑ ΜΠΟΥΚΑΛΙΑ
9) ΚΑΤΩ ΡΑΦΙ
10) ΠΡΟΣΤΑΤΕΥΤΙΚΗ ΠΛΑΚΑ ΔΑΠΕΔΟΥ
11) ΣΥΡΤΑΡΙ ΛΑΧΑΝΙΚΩΝ
12) ΚΑΛΥΜΜΑ ΣΥΡΤΑΡΙΟΥ ΛΑΧΑΝΙΚΩΝ
13) ΡΑΦΙΑ ΣΥΝΤΗΡΗΣΗΣ
14) ΚΟΥΤΙ/ΚΑΛΥΜΜΑ ΛΑΜΠΑΣ ΣΥΝΤΗΡΗΣΗΣ
15) ΚΟΥΜΠΙ ΘΕΡΜΟΣΤΑΤΗ ΣΥΝΤΗΡΗΣΗΣ
16) ΡΑΦΙΑ ΕΝΤΟΝΗΣ ΨΥΞΗΣ
17) ΘΑΛΑΜΟΣ ΚΑΤΑΨΥΞΗΣ
18) ΚΟΥΤΙ/ΚΑΛΥΜΜΑ ΛΑΜΠΑΣ ΚΑΤΑΨΥΞΗΣ
19) ΡΑΦΙ ΚΑΤΑΨΥΞΗΣ
GR -57-
Page 59

Πρακτικές συμβουλές για εξοικονόμηση ενέργειας
1– Εγκαταστήστε τη συσκευή σε δροσερό, καλά αεριζόμενο χώρο αλλά όχι εκτεθειμένη
σε άμεση ηλιακή ακτινοβολία και οπωσδήποτε όχι κοντά σε πηγή θερμότητας (σώμα
καλοριφέρ, συσκευή μαγειρέματος κλπ). Αλλιώς χρησιμοποιήστε μονωτική πλάκα.
2– Επιτρέπετε σε θερμά φαγητά και ποτά να κρυώνουν έξω από τη συσκευή.
3– Όταν αποψύχετε κατεψυγμένα τρόφιμα, τοποθετείτε τα στο θάλαμο συντήρησης. Η χαμηλή
θερμοκρασία των κατεψυγμένων τροφίμων θα συνεισφέρει στην ψύξη του θαλάμου
συντήρησης όσο αυτά αποψύχονται. Έτσι επιτυγχάνεται εξοικονόμηση ενέργειας. Αν τα
τρόφιμα αποψυχθούν έξω από το ψυγείο, σπαταλάται ενέργεια.
4– Όταν τοποθετείτε ποτά και φαγητά με πολύ νερό, πρέπει να τα καλύπτετε. Αλλιώς
αυξάνεται η υγρασία στη συσκευή. Επομένως επιμηκύνεται ο χρόνο λειτουργίας.
Επίσης καλύπτοντας τα ποτά και τις φαγητά με νερό βοηθάτε να διατηρηθεί το άρωμα
και η γεύση τους.
5– Όταν τοποθετείτε φαγητά και ποτά, ανοίγετε την πόρτα της συσκευής όσο το δυνατόν πιο
σύντομα.
6– Διατηρείτε κλειστά τα καλύμματα όλων των διαφόρων θαλάμων θερμοκρασίας της
συσκευής
(συρτάρι λαχανικών, ψύκτη κλπ).
7– Η στεγανοποίηση της πόρτας πρέπει να είναι καθαρή και ελαστική. Αντικαταστήστε τις
στεγανοποιήσεις αν έχουν φθαρεί.
8– Περιστασιακά καθαρίζετε το πίσω μέρος της συσκευής με ηλεκτρική σκούπα ή πινέλο για
να αποτρέψετε αύξηση της κατανάλωσης ενέργειας.
ΕΛΛΗΝΙΚΑ
Το σύμβολοστο προϊόν ή επάνω στη συσκευασία του
υποδεικνύει ότι δεν πρέπει να μεταχειρίζεστε το προϊόν αυτό ως οικιακό
απόρριμμα . Αντιθέτως θα πρέπει να παραδίδεται στο κατάλληλο
σημείο συλλογής για την ανακύκλωση ηλεκτρικού και ηλεκτρονικού
εξοπλισμού. Εξασφαλίζοντας ότι το προϊόν αυτό διατίθεται σωστά,
συμβάλλετε στην αποτροπή ενδεχόμενων αρνητικών συνεπειών για
το περιβάλλον και την ανθρώπινη υγεία, οι οποίες θα μπορούσαν
διαφορετικά να προκληθούν από ακατάλληλο χειρισμό απόρριψης του
προϊόντος αυτού. Για λεπτομερέστερες πληροφορίες σχετικά με την
ανακύκλωση του προϊόντος αυτού, επικοινωνήστε με το δημαρχείο
της περιοχής σας, την τοπική σας υπηρεσία αποκομιδής οικιακών
απορριμμάτων ή με το κατάστημα όπου αγοράσατε το προϊόν.
GR -58-
Page 60

www.aeg-electrolux.com/shop
52043955
 Loading...