

Page 1
Micromat_Combi 247
Microwave Oven
Instruction Manual
PERFEKT IN FORM UND FUNKTION
Page 2

AEG-ELECTROLUX Micromat_Combi
Dear customer,
Thank you for buying an AEG-ELECTROLUX microwave oven and putting your trust in
the AEG-ELECTROLUX brand name.
Before using your AEG-ELECTROLUX microwave oven for the first time, please read the
instruction book thoroughly. This will enable you to take advantage of all the features that the
appliance offers. It will also ensure trouble-free
operation and minimize unnecessary service calls.
Important information concerning your safety or the operation of your appliance is noted
by this symbol and/or mentions words such as «Warning», «Take care». Be sure to follow
all instructions carefully.
☞ Throughout the manual, this symbol guides you step by step when
operating the appliance.
This symbol indicates further information concerning the use of the appliance.
z The clover indicates energy-saving tips and hints for environmentally friendly use of your
appliance.
In the event of malfunctioning, please follow the instructions given in the section «What to do
if.…….
Technical data.
Overall dimension Width
Cavity dimension Width
2
490 mm
Depth 430 mm
Height 322 mm
248 mm
Depth 305 mm
Height 304 mm
Volume
23 litre
Power source
Fuse
Power consumption
Microwave (Power)
Grill (Power)
Convection Oven (Power)
Weight
230–240 V, 50 Hz
16 A
2900W
900W
1200W
1200W (Fan Assisted)
18 kg
Page 3
MCC247
Contents
When using your microwave oven
Technical data
Safety Instructions
Utensil safety
Testing suitability of cookware
Foil containers
Food safety
Safety instructions when cooking with grill,
Convection and Combination modes
Unpacking
Installation
Connecting to the mains
The microwave and accessories
Name and function of parts
Control panel
Before using your microwave oven for the first time
Turntable installation
Setting the Language
Setting the clock
Child safety lock
Demonstration Mode
2
5
6
7
8
8
9
10
11
12
13
14
3
Page 4
AEG-ELECTROLUX Micromat_Combi
Contents
How to operate your microwave oven
Pause/Clear
Function of Re-turntable
Microwave cooking
Microwave setting guide
Start + 30 Seconds
Kitchen timer
Grill cooking
Thermal Grill Cooking
Convection Cooking
Dual Cooking
Multi Stage Cooking
Auto Defrost
Manual Defrosting
Defrosting Tips
Microwave Hints
Auto Programmes
Slow Cooking
Slow Cooking Tips
14
15
16
17
18
19
20
21
22
25
26
27
28
29
31
32
Oven utensils and accessories guide
Charts
Recommendations for cooking with Grill
General recommendations for cooking with Microwave and Grill
Recommendations for Defrosting using 150W
Auto Programme Universal Defrost
Auto Programme
Auto Programme (Potato Gratin)
Care and cleaning
Care and cleaning
Cleaning the accessories (turntable, support and rack)
Cleaning the interior
Cleaning the exterior
What to do if
Service and spare parts
33
34
35
36
38
40
41
42
43
4
Page 5

MCC247
Safety instructions.
• The built-in safety interlock switches prevent the microwave oven from operating when the
door is open.
• Do not tamper with them, or attempt to operate the oven with the door open as open door
operation can result in exposure to microwave energy.
• Do not allow food spills or cleaner residue to accumulate on door sealing surfaces. See the
Cleaning and Care section for cleaning instructions.
• It is particularly important that the oven door closes properly and that there is no damage to
the: (1) door (warped), (2) hinges and latches (broken or insecure), (3) door seals and sealing
surface. m If the door, hinges/latches or door seals are damaged, the microwave must not be
operated until it has been repaired by a authorized service person.
It is hazardous for anyone except factory trained service personnel to service or
make adjustments to this oven. Contact your nearest authorised service agent if
service should be required.
• Do not remove the outer case, door or control panel at any time. Doing so may cause
exposure to extremely high voltage.
• Install or locate this oven only in accordance with ‘installation instructions’ found in this
manual.
• Use the appliance for its intended use as described in this manual. Do not use corrosive
chemicals in this appliance. This type of oven is specifically designed to heat, cook, or defrost
food. It is not designed for industrial or laboratory use neither for commercial use as this will
invalidate the guarantee.
• Do not operate the oven empty. If food or water is not present to absorb the microwave
energy, the magnetron tube can be damaged.
• Do not store this appliance outdoors. Do not use this product near water.
• Do not attempt to dry clothing or newspapers in the microwave oven. These items can
ignite. Do not use the cavity for storage purposes. Do not leave paper products, cooking
utensils, or food in the cavity when not in use.
If smoke is observed, switch off or unplug the appliance and keep the door closed
in order to stifle any flames. Never use water.
Only allow children to use the microwave, without supervision, when adequate
instructions have been given so that the child is able to use the microwave in a
safe way and understand the hazards of improper use.
Utensil safety
• Most glass, glass ceramic and heat-resistant glass-ware utensils are excellent for use in the
micro-wave oven. Although microwave energy will not heat most glass and ceramic items,
these utensils can become hot as heat transfers from the food to the container. The use of
oven gloves to remove dishes is recommended.
5
Page 6

AEG-ELECTROLUX Micromat_Combi
Testing suitability of cookware
• Place the cookware in the microwave along with a glass half full of water. Heat on Hi
W(900W) (100%) for one minute. If the cookware feels hot, you should not use it. If it is just
slightly warm, you can use it for reheating but not for cooking. If the dish is room
temperature, it is suitable for microwave cooking.
• Paper napkins, wax paper, paper towels, plates, cups, cartons, freezer wrap and cardboard
are great convenience utensils. Always be sure containers are filled with food to absorb
energy and thus avoid the possibility of overheating.
• Many plastic dishes, cups, freezer containers and plastic wraps may be used in the
microwave oven. Follow manufacturer’s instructions when using plastics in the oven. Avoid
using plastic utensils with foods that have high fat or sugar content since these foods reach
high temperatures and could melt some plastics.
• Do not leave oven unattended, and look at it from time to time when heating or cooking
food in plastic, paper or other combustible containers. If smoke is observed, keep door closed,
switch the oven off or disconnect oven until smoke stops.
• Metal utensils and utensils with metallic trim should not be used in the microwave oven,
unless specifically recommended for microwave use.
• Containers with restricted openings, such as bottles, should not be used for microwave
cooking.
• Use caution when removing a lid or cover from a dish to avoid steam burns.
Foil containers
Shallow foil containers may safely be used to reheat foods in your microwave oven providing
the following rules are observed:
• Foil containers should not be more than 3 cms (1 1/4”) deep.
• Foil lids must not be used.
• The foil containers must be at least two-thirds full of food. Empty containers must never be
used.
• Foil containers should be used singly in the microwave oven and should not be allowed to
touch the sides. If your oven has a metal turntable or cooking rack, the foil container should
be placed on an upturned oven-proof plate.
• Foil containers should never be re-used in the microwave oven.
• If the microwave oven has been in use for 15 minutes or more, allow it to cool before using
it again.
• The container and turntable may become hot during use, take great care when removing
either from the oven. It is advisable to use an oven cloth or glove when doing so.
• Remember when using an aluminium foil container that the reheating or cooking times may
be longer than you are used to, always ensure that the food is piping hot before serving.
6
Page 7

MCC247
Food safety
• Do not heat food in a can in the microwave oven. Always remove the food to a suitable
container.
• Deep fat frying should not be done in the microwave oven, because the fat temperature
cannot be controlled, hazardous situations can result.
• Popcorn may be prepared in the microwave oven, but only in special packages or utensils
designed specifically for this purpose. This cooking operation should never be unattended.
• Pierce foods with non-porous skins or membranes to prevent steam build-up and bursting.
Apples, potatoes, chicken livers, and egg yolks are examples of items that should be pierced.
• The contents of feeding bottles and baby food jars are to be stirred or shaken and the
temperature is to be checked before consumption, in order to avoid burns. When heating
liquids, e.g. soups, sauces and beverages in your microwave oven, overheating the liquid
beyond boiling point can occur without evidence of bubbling. This could result in a sudden
boil over of the hot liquid. To prevent this possibility the following steps should be taken:
1. Avoid using straight-sided containers with narrow necks.
2. Do not overheat.
3. Stir the liquid before placing the container in the oven and again halfway through the
heating time.
4. After heating, allow to stand in the oven for a short time, stirring again before carefully
removing the container. Some products such as whole eggs and sealed containers – for
example, closed glass jars – may explode and should not be heated in this oven.
Occasionally, poached eggs may explode during cooking. Always pierce the yolk, then
cover and allow the standing time of one minute before removing cover.
Keep these instructions!
7
Page 8

AEG-ELECTROLUX Micromat_Combi
Safety instructions when cooking with grill, Convection
or combination modes.
1. The glass viewing window may break if water is spilled on it during grilling or convection
cooking.
2. Be sure to use an oven glove when loading and unloading the oven. Containers get very hot
in the oven, so be careful not to burn yourself. The turn-table and metal rack also get very
hot so be sure to use an oven glove when handling them.
3. Do not touch the inner or outer viewing window with metal components when loading or
unloading the oven. The inside of the door and oven get very hot so take care when
attending food in the oven.
4. Do not put the turntable or containers in cold water or try to cool them quickly after use.
5. Do not place items on top of the cabinet. The top of the cabinet gets very hot, so anything
placed on it may be damaged by the heat.
6. Preheat your oven only when using the Grill or Convection modes, never when using
microwave or combination modes (Microwave + Grill or Microwave + Convection)
It is quite normal for steam to be emitted around the door, or for misting to
occur on the door, or even for water droplets to appear below the door during
the cooking cycle. This is merely condensation from the heat of the food and
does not affect the safety of your oven. The door is not intended to seal the oven
cavity completely.
Unpacking
8
• Do not force the turntable to rotate by hand. This may cause malfunctioning.
• Arcing in the oven during microwave operation usually occurs from use of metallic utensils.
Continuous arcing, however, can damage the unit. Stop the programme and check the
utensil.
• Care should be taken not to obstruct any air vents located on the top, rear, side and bottom
of the oven.
Do not use this oven for commercial purposes. This oven is made for domestic use only.
N.B. When you unpack the oven, check that the product is free from damage. Damage or any
missing parts must be reported immediately to the retailer. The oven, parts of the oven or the
accessories may be wrapped by a protection foil. If so, you must remove this foil before using
the oven. Do not leave packing material so that small children can play with it. This can be
hazardous.
Page 9

MCC247
Installation
1. Remove any promotion label from the door.
2. The oven should be installed on a flat, level surface. The surface must be strong enough to
safely bear the weight (18 kg) of the oven, plus the contents. To avoid the possibility of
causing vibration or noise the oven must be in a stable position.
3. Keep the oven away from heat and water. Exposure to heat and water can lower oven
efficiency and lead to malfunctioning, so be sure to install the oven away from heat and
water sources.
4. Do not block air vents on the top and the sides of the cabinet and also do not place any
articles on the top of the oven. If air vents are blocked during operation, the oven may
overheat, and this may lead to malfunctioning. Hot air escapes from the vents, so be sure
not to obstruct it or let curtains come between the oven and the rear wall.
5. Place the oven as far away from radios and TV’s as possible. This oven does conform to EEC
requirements of radio interference suppression, but some interference may occur if it is
placed too close to a radio or TV, so keep them as far apart as possible.
6. If positioned in a corner, leave a gap of at least 5 cm from the walls and 5 cm above the
microwave.
MPORTANT! The oven can be placed almost anywhere in the kitchen. Make sure
the oven is placed on a flat, level surface and that vents as well as the surface
underneath the oven are not blocked (for sufficient ventilation).
Connecting to the mains
The oven is delivered with the power cord and a plug for 230–240 V, 50Hz, earthed socket outlet.
Earth protection minimises the risks should a short circuit occur. Check to ensure the voltage of
the oven matches the supply.
N.B. If the oven is connected to the socket via an extension cord, make sure the cord is earthed.
This appliance must not be used on a non-earth protected power supply.
Contact an electrician if you are uncertain regarding electrical connection of
the oven or provision of earth protection of the supply.
This appliance must be earthed. If this appliance is fitted with a non-
rewireable plug for which your socket is unsuitable, the plug should be cut off
and the appropriate plug fitted. If it is necessary to change the fuse in a nonrewireable plug, the fuse cover must be refitted. If the fuse cover is lost or
damaged, the plug must not be used until a replacement is obtained.
9
Page 10
AEG-ELECTROLUX Micromat_Combi
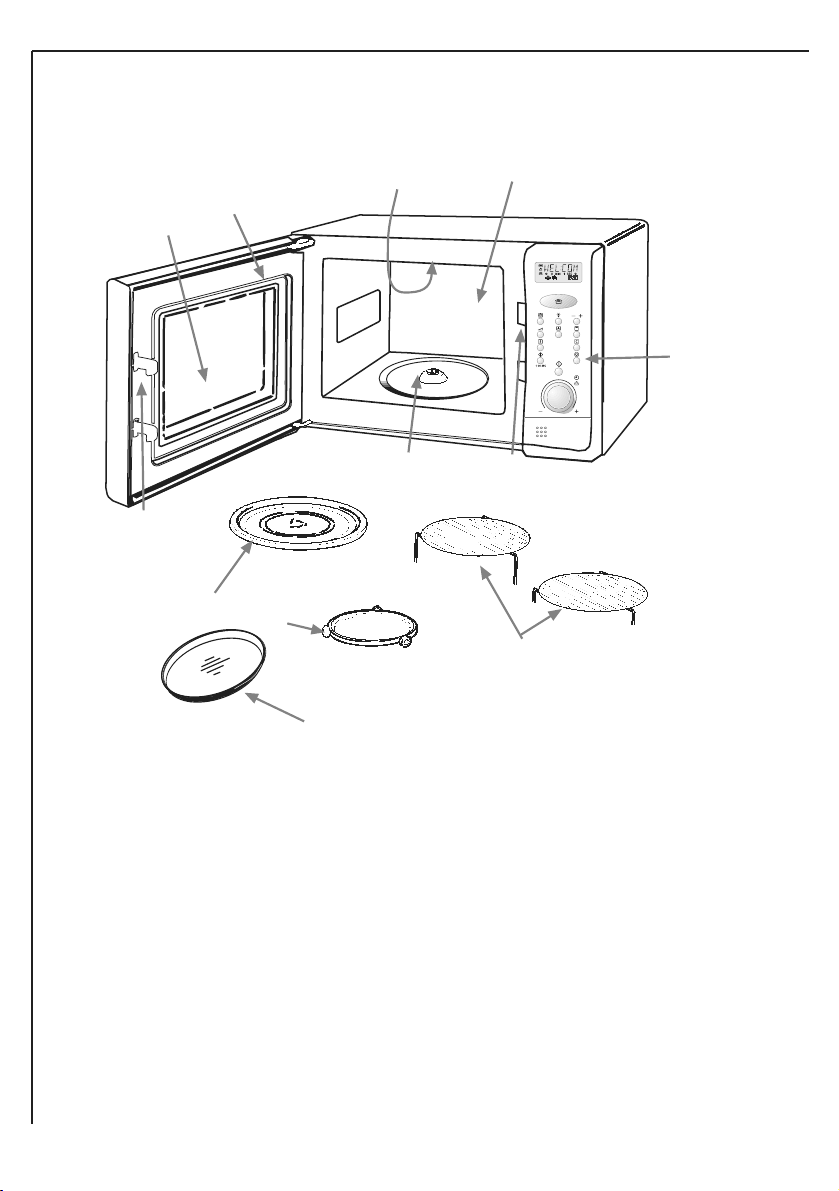
The microwave oven and accessories
10
1
3
2
5
8
4
4
7
6
9
11
10
Name and function of parts
1. Cooking compartment. Wipe the compartment clean after using the oven.
2. Viewing window. Food can be checked while the microwave oven is in operation.
3. Oven door. The door must always be firmly closed while cooking.
4. Latch hook and safety interlock system.
5. Control panel.
6. Turntable support. Place the support on the floor of the cooking chamber to support
the turntable.
7. Turntable. Made of special heat-resistant glass. Food in a suitable container is placed
on this tray for cooking. Do not use the oven without the turntable.
8. Drive shaft for turntable.
9. Grill Rack
10. Grill
11. Drip Tray
Page 11
MCC247
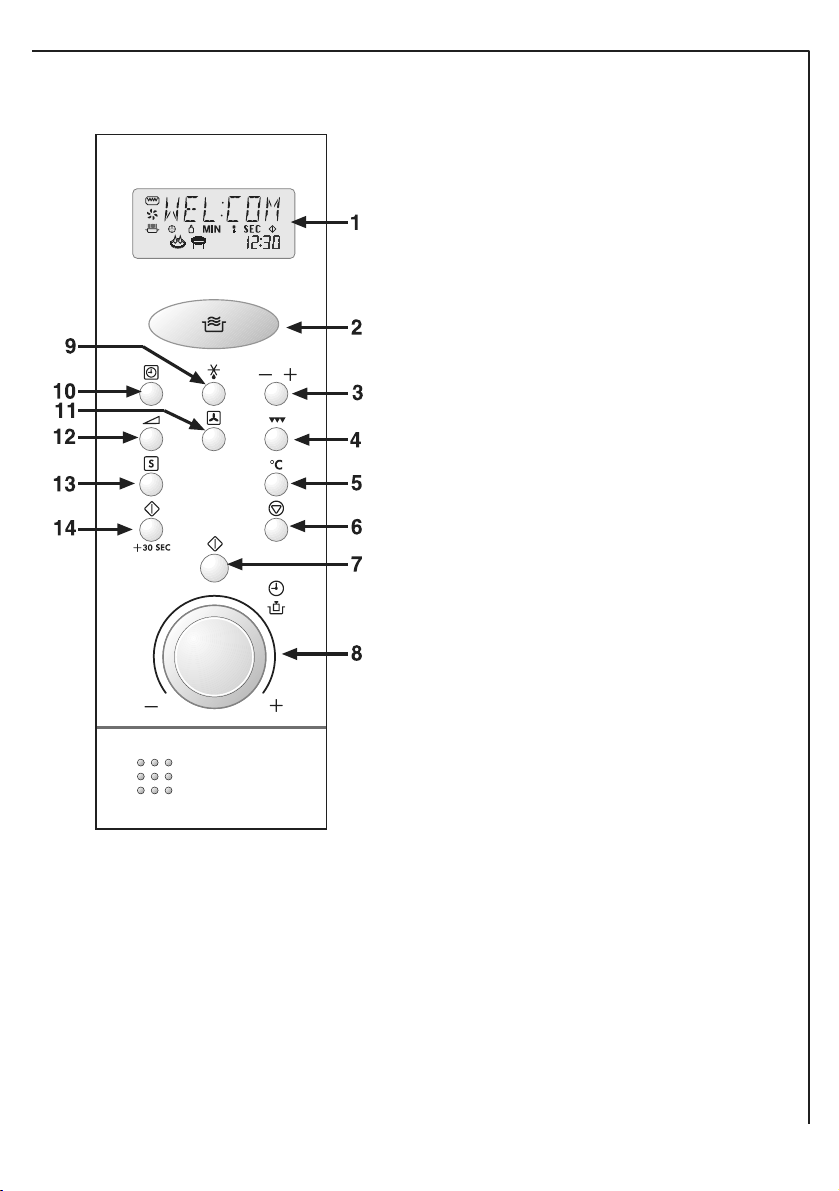
Control panel
1. Display window - showing time of day, operating
mode and cooking time
2. Automatic Programmes:
3. More or Less - Used to increase or decrease the
cooking time during automatic cooking mode.
4. Grill Cooking
5. Dual Cook
6. Pause/Clear - for interrupting or cancelling a
programme and for setting the child lock
7. Start - to start a desired programme.
8. Setting Control Knob - to enter time and weight
or quantity
9. Automatic Defrost
10. Kitchen timer.
11. Convection Cooking
12. Power
13. Slow Cooking
14. Start plus 30 Seconds
11
Page 12
AEG-ELECTROLUX Micromat_Combi
Before using your microwave oven for the first time
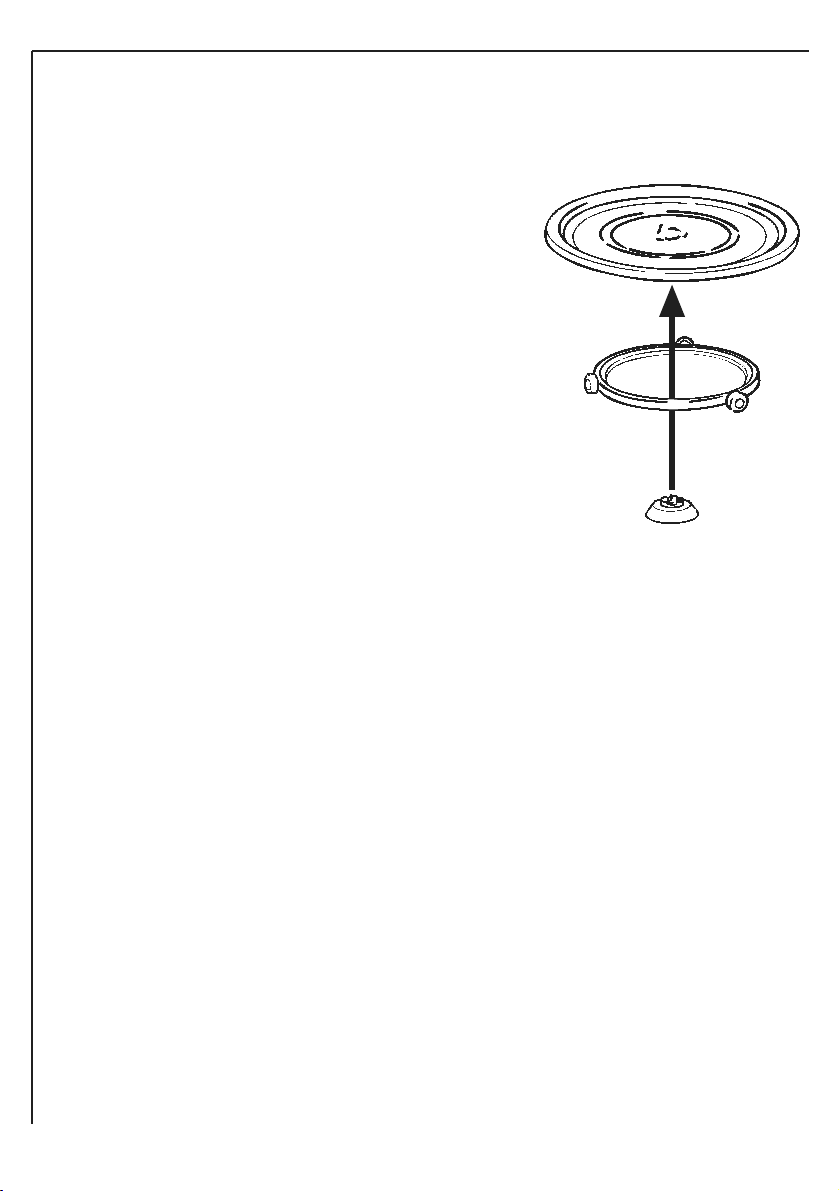
Turntable installation
1. Place the turntable support on the cavity bottom.
2. Place the turntable on top of the turntable support
as shown in the diagram. Make sure that turntable
hub is securely locked in the turntable shaft. Never
place the turntable upside down.
• Both turntable and turntable support must always be
used during cooking.
• All food and containers of food are always placed on
this turntable for cooking.
• This turntable rotates clockwise and anticlockwise;
this is normal.
Setting the Language
☞ When your oven is plugged in for the first time or when power resumes after a power
Interruption, the display window will show
" WELCOME - REFER TO INSTRUCTIONS BEFORE USE "
By pressing 'START' it is possible to select one of four languages (English, German, Spanish and
Portuguese) When you have selected your required language press 'CLEAR STOP' to set your
language.
To set English
1. The oven is pre-set to English, the display will show
" WELCOME - REFER TO INSTRUCTIONS BEFORE USE "
2. press 'STOP/CLEAR' to set.
To set German
1. Press 'START' once, the display will show
" HERZLICH WILKOMMEN - VOR GEBRAUCH DIESES GERAETES BITTE DIE
GABRAUCHSANLEITUNG LESEN "
2. Press 'STOP/CLEAR' to set
12
Page 13

MCC247
To set Spanish
1. Press 'START' two times, the display will show
" BIENVENIDO - ANTES DE UTILIZAR EL HORNO LEER EL MANUAL DE INSTRUCCIONES "
2. Press 'STOP/CLEAR' to set
To set Italian
1. Press 'START' three times, the display will show
" BENVENUTI - LEGGERE LE ISTRUZIONI PRIMA DELLUSO "
2. Press 'STOP/CLEAR' to set
To set French
1. Press 'START' four times, the display will show
" BIENVENU - VEUILLEZ LE MODE DEMPLOI AVANT DUTILISER VOTRE FOUR "
2. Press 'STOP/CLEAR' to set
Setting the clock
☞ When your oven is plugged in for the first time or when power resumes after a power
Interruption, the clock symbol and numbers in the display window flash and the time is reset to
12:00.
Example: To set 4.30
1. Turn the Setting Control Knob clockwise/anti-clockwise until the time of 4.30 is
indicated in the display window.
2. Touch Start to lock in the time and start the clock running. The flashing clock symbol
will disappear from the display.
If you need to change the time of day after setting, open the microwave oven door
and press in the start button for 5 seconds. A single beep will be heard, the clock
symbol and numbers in the display window flash and the time is reset to 12.00.
Example: To change the time to 15.45
1. Open the door of your microwave Oven.
2. Press and hold the Start button for 5 seconds. The time will reset to 12:00 and the
flashing clock symbol will appear in the display window.
3. Turn the Setting Control Knob clockwise until the time of 15.45 is indicated in the
display window.
4. Touch Start to lock in the time and start the clock running. The flashing clock symbol
will disappear from the display.
13
Page 14

AEG-ELECTROLUX Micromat_Combi
Child safety lock
☞ This oven has a safety feature which prevents the accidental running of the oven by a child.
After the lock has been set, no part of the microwave oven will operate until the child lock
feature has been cancelled.
To set:
1. Touch Pause/Clear button so that the time of day only is displayed
2. Press and hold the 'Stop/Clear' button for 3 sec’s, 2 beeps will be heard and LOCK will be
displayed
To cancel the child lock, simply Press and hold the 'Stop/Clear' button for 3 sec’s
2 beeps will be heard. LOCK disappears and the time of day display reappears in
the window.
Demonstration Mode
☞ This oven has a feature which allows the user to run the programmes on the oven with out
activating the Grill element or Magnetron, this allows the user to become familiar with the
programmes on the oven without actually running the oven.
To set:
1. Touch Pause/Clear button so that the time of day only is displayed
2. Press and hold the 'More/Less' button for 3 sec’s, 2 beeps will be heard and L
will be displayed
To cancel Demonstration Mode, simply touch the Pause/Clear button and hold in
for 3 sec’s, 2 beeps will be heard. L disappears and the time of day display
reappears in the window.
How to operate your microwave oven.
Pause/Clear
If you would like to stop the oven during cooking without opening the door, touch Pause/Clear
ONCE. To continue cooking, touch Start. Should food be removed from the oven before the set
cooking time is completed, touch Pause/Clear TWICE.
You can turn off the oven during cooking, to stir or re-arrange food. There are two ways of
doing so;
1. Just open the door, the safety mechanisms will stop microwave power. To continue
cooking, close the door and touch Start.
2. Touch Pause/Clear ONCE, and open the door. To continue cooking, close the door and
touch Start.
14
Page 15

MCC247
How to operate your microwave oven.
Function of Re-turntable
The turntable is specially designed to return to its original starting position when cooking is
finished. If, however, you open the door it will stop immediately even if it has not reached the
correct position. When the oven is stopped before programmed cooking time is finished, for
example, by opening the door, the food should be replaced to the original position so it will
return to its starting position when the cooking cycle is completed.
Time and Power
1. The time increments for the Setting Control Knob are as follows:
Time Increment
0-5 min 15 sec’s
5-10 min 30 sec’s
10-30 min 1 min
30-90 min 5 min
1. The maximum time on the Setting Control Knob is 90 min and it may be turned directly
clockwise from 90 min to 0/15 sec’s or anti-clockwise from 15/0 sec’s to 90 min.
2. To set the variable cooking levels the Power button should be touched as follows:
900W Once (HI W)
750W 2 times
450W 3 times
300W 4 times
150W 5 times (Defrost)
80W 6 times
….or touch and hold the Power button to continuously scroll through all power levels.
To check the power level set at any time during cooking, simply touch the Power button.
3. Once a microwave programme has been set, during the cooking operation the power level
can be changed by touching the Power button until the required new setting is displayed.
The cooking time may also be adjusted up or down in steps of approximately 30 sec’s by
turning the Setting Control Knob clockwise or anti-clockwise as necessary.
15
Page 16

AEG-ELECTROLUX Micromat_Combi
Microwave Cooking
☞ This basic microwave cooking method allows you to cook food for a desired time. In addition to
the maximum power level, you can select different microwave power from 6 levels, Hi W(900W)
to 100W for the foods that require slower cooking.
Foods with high moisture content should be cooked on maximum power as this is the fastest
cooking method and best maintains the natural flavour and texture of the foods.
Example: To cook at 450W for 1 min 30 sec’s:
1. Touch Pause/Clear
2. Touch the Power button 3 times.
"450W - SET TIME" appears in the display
3. Turn the Setting Control Knob clockwise/anti-clockwise until
1:30 is indicated in the display window
"PRESS START" appears in the display
4. Touch Start
16
The Microwave oven is automatically set to
900W(HiW). If this power level is required for cooking, you may set the time and then
press start (You do not need to select the required power) At the end of the cooking
time, the microwave power will automatically stop. The cooling fan and oven light will
still be on until the turntable has returned to its original position. When the oven has
switched off completely, 1 soft audible bell sound will be heard and END will appear in
the display. At this stage, it is not possible to enter any further programmes. To enter
another programme you will have to press the stop/clear button. When the cooking time
has expired, if there is no action taken, 2 soft tones will be heard every 30 seconds for 5
minutes. After 5 minutes, three soft tones will be heard, and the window display will
revert to the time of day.
Page 17

MCC247
Microwave setting guide
Power Setting Suggested use
80W
150W
300W
450W
750W
900W(HiW)
Keeping warm; Keeping foods warm
Defrost; Thawing frozen foods.
Simmer; Completing the cooking cycle of some pot roasts.
Casseroles and stews.
Baked custards or cheesecakes.
Medium; Faster defrosting and reheating for casseroles and
stews.
Baking cakes and sponge puddings
Reheat; Reheating pre-cooked foods.
Roasting joints of meat and poultry.
Boiling or reheating liquids.
Cooking vegetables.
Preheating a browning dish.
Start + 30 Seconds
☞ The microwave oven includes a programme which gives you 30 Seconds of Hi W(900W) power
by touching the Start + 30 Seconds button.
This is a convenient feature when in a hurry and is ideal for quickly reheating small quantities of
liquid such as forgotten cup of coffee, or mug of soup or a small food portion which has cooled
slightly before serving.
To set:
1. Touch the Start + 30 Seconds button.
Repeated pressing of the Start button will add 1 minute to the Cook/Reheat time Ensure liquids
are stirred and check that food is piping hot before serving – if necessary repeat the Start + 30
Seconds programme. At the end of the heating time, the programme will automatically stop.
The cooling fan and oven light will still be on until the turntable has returned to its original
position.
When the oven has switched off completely, 1 soft audible bell sound will be heard and END will
appear in the display. At this stage, it is not possible to enter any further programmes. To enter
another programme you will have to press the stop/clear button. When the cooking time has
expired, if there is no action taken, 2 soft tones will be heard every 30 seconds for 5 minutes.
After 5 minutes, three soft tones will be heard, and the window display will revert to the time of
day.
17
Page 18

AEG-ELECTROLUX Micromat_Combi
Kitchen Timer
Example: To set the kitchen timer for 7 minutes
1. Touch the 'Kitchen Timer' button
2. Turn the Setting Control knob until 7:00 is indicated in
the display window
3. Touch Start. (The time will count down)
When the timer has finished one soft tone will be heard. The display will now reset to the time
of day. During the Microwave cooking it is possible to adjust the length of time required by
turning the Setting Control Knob clockwise or anti-clockwise to increase or decrease the
remaining time in the display in steps of approximately 30 sec’s. It is also possible to change the
Microwave power by touching the Power button.
18
Page 19

MCC247
Grill Cooking
☞ This method is ideal for cooking small, thin cuts of meat, toasting bread or muffins or browning
the tops of dishes such as potato gratin’s and lasagne after cooking by microwave. Remember
that the oven and dishes will be hot.
Example: Set oven to Grill for 15 minutes:
1. Touch Pause/Clear
2. Touch the Grill button once
"GRILL - SET TIME" appears in the display
3. Turn the Setting Control Knob clockwise until 15.00
is showing in the display
"PRESS START" appears in the display
4. Touch Start
At the end of the cooking time, the Oven will
automatically stop. The cooling fan and oven light will still be on until the turntable has
returned to its original position. When the oven has switched off completely, 1 soft audible bell
sound will be heard and END will appear in the display. At this stage, it is not possible to enter
any further programmes. To enter another programme you will have to press the stop/clear
button.
When the cooking time has expired, if there is no action taken, 2 soft tones will be heard every
30 seconds for 5 minutes. After 5 minutes, three soft tones will be heard, and the window display
will revert to the time of day. During this operation, it is possible to adjust the length of cooking
time required by turning the Setting Control Knob clockwise or anti-clockwise to increase or
decrease the remaining time in the display in steps of approximately 30 sec’s.
19
Page 20

AEG-ELECTROLUX Micromat_Combi
Thermal Grill Cooking
☞ During this method of cooking both the fan and the grill element operate together to circulate
hot air around the food to assist the cooking process. This method is ideal for small items such as
sausages. Remember that the oven and dishes will be hot.
Example: Set oven to Thermal Grill for 15 minutes:
1. Touch Pause/Clear
2. Touch the Grill button twice
"GRILL 2 - SET TIME" appears in the display
3. Turn the Setting Control Knob clockwise until 15.00
is showing in the display
"PRESS START" appears in the display
4. Touch Start
At the end of the cooking time, the Oven will
automatically stop. The cooling fan and oven light will still be on until the turntable has
returned to its original position. When the oven has switched off completely, 1 soft audible bell
sound will be heard and END will appear in the display. At this stage, it is not possible to enter
any further programmes. To enter another programme you will have to press the stop/clear
button.
When the cooking time has expired, if there is no action taken, 2 soft tones will be heard every
30 seconds for 5 minutes. After 5 minutes, three soft tones will be heard, and the window display
will revert to the time of day. During this operation, it is possible to adjust the length of cooking
time required by turning the Setting Control Knob clockwise or anti-clockwise to increase or
decrease the remaining time in the display in steps of approximately 30 sec’s.
20
Page 21

MCC247
Convection Cooking
☞ This oven can be used as a conventional oven by using the fan assisted convection oven, the
temperature range is 40
in a conventional oven. Best results are obtained when the oven is preheated, however you can
cook directly, without preheat, by omitting steps 3 and 4 from the following instructions.
Example: Set oven to convection at 200
preheat:
1. Touch Pause/Clear
2. Touch the convection button twelve times
"200C - SET TIME" appears in the display
3. Touch start (the oven will now preheat)
When the oven has finished preheating
" PREHEATING COMPLETE - 200C " appears in the display
4. Touch Pause/Clear once
"200C - SET TIME" appears in the display
5. Turn the Setting Control Knob clockwise until 12.00
is showing in the display
"PRESS START" appears in the display
6. Touch Start
o
C - 250oC. This method is ideal for any food that you would usually cook
o
C for 20 mins with
At the end of the cooking time, the Oven will
automatically stop. The cooling fan and oven light will still
be on until the turntable has returned to its original position. When the oven has switched off
completely, 1 soft audible bell sound will be heard and END will appear in the display. At this
stage, it is not possible to enter any further programmes. To enter another programme you will
have to press the stop/clear button.
When the cooking time has expired, if there is no action taken, 2 soft tones will be heard every
30 seconds for 5 minutes. After 5 minutes, three soft tones will be heard, and the window display
will revert to the time of day. During this operation, it is possible to adjust the length of cooking
time required by turning the Setting Control Knob clockwise or anti-clockwise to increase or
decrease the remaining time in the display in steps of approximately 30 sec’s.
21
Page 22

AEG-ELECTROLUX Micromat_Combi
Dual Cooking
☞ This oven offers you a choice of three methods of dual cooking.
Dual 1 : Convection plus Microwave - For Baking and Roasting
Dual 2 : Convection plus Thermal Grill - For fast crisping
Dual 3 : Microwave plus Thermal Grill - For fast Grilling
☞ Dual 1 : Convection plus Microwave.
This method allows you to combine Convection cooking (100oC - 250oC) with microwave power
(80W, 150W, 300W or 450W) to produce traditional roasted products in less time.
Example: Set oven to Dual Convection (210
for 15 minutes:
1. Touch Pause/Clear
2. Touch the Dual Cook button once
"DUAL 1 200C 450W - SET TIME" appears in the
display
3. Press the convection button once so that 210C is
displayed in the display window
4. Turn the Setting Control Knob clockwise until 15.00
is showing in the display
"PRESS START" appears in the display
5. Touch Start
o
C) plus Microwave
At the end of the cooking time, the Oven will
automatically stop. The cooling fan and oven light will still
be on until the turntable has returned to its original
position. When the oven has switched off completely, 1
soft audible bell sound will be heard and END will appear in
the display. At this stage, it is not possible to enter any
further programmes. To enter another programme you will
have to press the stop/clear button.
When the cooking time has expired, if there is no action taken, 2 soft tones will be heard every
30 seconds for 5 minutes. After 5 minutes, three soft tones will be heard, and the window display
will revert to the time of day. During this operation, it is possible to adjust the length of cooking
time required by turning the Setting Control Knob clockwise or anti-clockwise to increase or
decrease the remaining time in the display in steps of approximately 30 sec’s.
22
Page 23

MCC247
Dual Cooking
☞ Dual 2 : Convection plus Thermal Grill
This method allows you to combine Convection cooking (100oC - 250oC) with the Thermal Grill
and is ideal for small foods which require crisping e.g. frozen potato products (Oven Chips)
Example: Set oven to Dual Convection (230
for 15 minutes:
1. Touch Pause/Clear
2. Touch the Dual Cook button twice
"DUAL 2 210C Grill 2 - SET TIME" appears in the
display
3. Press the convection button twice so that 230C is
displayed in the display window
4. Turn the Setting Control Knob clockwise until 15.00
is showing in the display
"PRESS START" appears in the display
5. Touch Start
o
C) plus Thermal Grill
At the end of the cooking time, the Oven will
automatically stop. The cooling fan and oven light will still
be on until the turntable has returned to its original
position. When the oven has switched off completely, , 1 soft audible bell sound will be heard
and END will appear in the display. At this stage, it is not possible to enter any further
programmes. To enter another programme you will have to press the stop/clear button.
When the cooking time has expired, if there is no action taken, 2 soft tones will be heard every
30 seconds for 5 minutes. After 5 minutes, three soft tones will be heard, and the window display
will revert to the time of day. During this operation, it is possible to adjust the length of cooking
time required by turning the Setting Control Knob clockwise or anti-clockwise to increase or
decrease the remaining time in the display in steps of approximately 30 sec’s.
23
Page 24

AEG-ELECTROLUX Micromat_Combi
Dual Cooking
☞ Dual 3 : Microwave plus Thermal Grill.
This method allow you to combine Microwave power (80W, 150W, 300W or 450W) with the
Thermal Grill and is Ideal for all foods that would usually be grilled e.g. sausages or chops
Example: Set oven to Dual Microwave (300W) plus Thermal Grill
for 15 minutes:
1. Touch Pause/Clear
2. Touch the Dual Cook button three times
"DUAL 3 Grill 2 450W - SET TIME" appears in the
display
3. Press the power button once so that 300W is
displayed in the display window
4. Turn the Setting Control Knob clockwise until 15.00
is showing in the display
"PRESS START" appears in the display
5. Touch Start
At the end of the cooking time, the Oven will
automatically stop. The cooling fan and oven light will still be on until the turntable has
returned to its original position. When the oven has switched off , 1 soft audible bell sound will
be heard and END will appear in the display. At this stage, it is not possible to enter any further
programmes. To enter another programme you will have to press the stop/clear button.
When the cooking time has expired, if there is no action taken, 2 soft tones will be heard every
30 seconds for 5 minutes. After 5 minutes, three soft tones will be heard, and the window display
will revert to the time of day. During this operation, it is possible to adjust the length of cooking
time required by turning the Setting Control Knob clockwise or anti-clockwise to increase or
decrease the remaining time in the display in steps of approximately 30 sec’s.
24
Page 25

MCC247
Multi-Stage Cooking
☞ Multi-stage cooking is ideal for sequential cooking. It allows you to cook at different power
levels and different cooking modes for a chosen time. All stages should be set before starting the
oven.
Example: To set the oven to cook with 450W microwave for 10
minutes then grill for 5 minutes.
1. Touch Pause/Clear
2. Touch Power button 3 times
"450W - SET TIME" appears in the display
3. Turn the Setting Control Knob clockwise until 10.00 is displayed
"PRESS START" appears in the display
4. Touch Grill button once
"GRILL - SET TIME" appears in the display
5. Turn the Setting Control Knob clockwise until 5.00 is displayed
"PRESS START" appears in the display
6. Touch Start
☞ The following table shows the combinations possible when cooking with multi-stage.
st
1
Stage 2nd Stage 3rd Stage
Microwave Microwave Microwave
Microwave Microwave -------Microwave Microwave Grill
Microwave Microwave Thermal Grill
Microwave Microwave Convection
Microwave Microwave Dual
Microwave Grill -------Microwave Thermal Grill -------Microwave Convection -------Microwave Dual --------
It is only possible to defrost manually (you cannot use Auto Defrost) with multi-stage cooking.
After Dual, convection, Thermal Grill or Grill cooking it is not possible to program a further
Microwave setting in this mode.
25
Page 26

AEG-ELECTROLUX Micromat_Combi
Automatic Defrosting
☞ Auto Defrost by Weight is an accurate defrosting method for meat, poultry, fish or bread. The
plus or minus adjust may be used to increase or decrease the pre-set defrosting times as
required. No other changes to the programmes are possible, so if necessary, cancel and reprogramme as required.
The feature also has a built-in pause mechanism to allow for checking and stirring or rearranging
the food. The oven stops approximately one-third of the way through the defrost period and 2
soft audible bell sounds are emitted. If you do not open the door at the pause, the oven restarts
after about 2 minutes and commences the remaining defrost period. To cancel the pause period,
simply touch Start and the programme will continue.
Example: To defrost 1000g of meat:
1 Touch Pause/Clear
2 Touch AUTO button 4 times
"MEAT DEFROST - SET WEIGHT" appears in the display
3 Turn the Setting Control Knob clockwise until 1000g is
displayed
"PRESS START" appears in the display
4 Touch Start
At the end of the defrosting time, the oven will
automatically stop. The cooling fan and oven light will still
be on until the turntable has returned to its original
position.
When the oven has switched off completely, 1 soft audible
bell sound will be heard and END will appear in the display.
At this stage, it is not possible to enter any further
programmes. To enter another programme you will have to
press the stop/clear button.
When the defrosting time has expired, if there is no action taken, 2 soft tones will be heard every
30 seconds for 5 minutes. After 5 minutes, three soft tones will be heard, and the window display
will revert to the time of day.
26
Page 27

MCC247
Manual Defrosting
☞ For manual defrosting (without operating the Auto Defrost feature), use 150W. The blue defrost
symbol appears in the window display whenever this power level is selected. To speed up the
defrosting of dense foods over 450g (1lb), the oven may be started on Hi W(900W) power for
1- 3 minutes, then reduce to 150W until defrosting is complete.
Example: To manually defrost for 9 minutes.
1. Touch Pause/Clear
2. Touch Power button 5 times button
"150W SET TIME" appears in the display
3. Turn the Setting Control Knob clockwise until 9:00 is
displayed
"PRESS START" appears in the display
4. Touch Start
At the end of the defrosting time, the oven will
automatically stop. The cooling fan and oven light will still
be on until the turntable has returned to its original
position.
When the oven has switched off completely, 1 soft audible
bell sound will be heard and END will appear in the display.
At this stage, it is not possible to enter any further
programmes. To enter another programme you will have to
press the stop/clear button.
When the defrosting time has expired, if there is no action
taken, 2 soft tones will be heard every 30 seconds for 5 minutes. After 5 minutes, three soft
tones will be heard, and the window display will revert to the time of day.
During the defrosting operation, it is possible to adjust the length of defrosting time required by
turning the Setting Control Knob clockwise or anti-clockwise to increase or decrease the
remaining time in the display in steps of approximately 30 sec’s.
27
Page 28

AEG-ELECTROLUX Micromat_Combi
Defrosting Tips
1. It is better to underestimate defrosting time if you are unsure. Food will continue to defrost
during the standing time.
2. Separate food as soon as possible.
3. Turn large items, e.g. joints, halfway through the defrosting time, or at pause.
4. Remove any thawed food as soon as possible.
5. Remove or open any packaging before defrosting.
6. Place food in a larger container than that which it was frozen in, this will allow for easy
stirring.
7. Begin thawing poultry, breast side down and turn over halfway through defrosting time or at
pause. Delicate areas such as wing tips can be shielded with small pieces of smooth foil.
8. Standing time is very important, particularly for large, dense foods which cannot be stirred to
ensure that the centre is completely defrosted before cooking.
Microwave Hints
• Always keep the oven clean – avoid spill-overs and do not forget to clean under the glass
tray and the inside of the door.
• Preferably use round or oval casseroles with a lid when cooking in your microwave oven.
• Do not use metal or metal decorated casseroles. Certain plastic materials can melt and be
warped by hot food.
• Cover the food when cooking. Use a glass lid, a plate or grease proof paper.
• Pastry, bread and the like can be defrosted directly in a bread basket or on a paper towel.
• If frozen food is heated in its packaging, the packaging should be opened. Packaging
containing metal or metal decoration must not be used unless specifically recommended for
use in the microwave. Remove metal clips and wire ties.
• Smaller pieces of aluminium foil can be used to cover parts that easily over cook such as
chicken legs.
• Food with peel or skin should be pierced with a fork – e.g. potatoes and sausages. Do not boil
eggs in the microwave oven as they can explode.
• Put large, thick pieces close to the edge of the casserole and try to cut the food in to even
sized pieces. Always place the food in the centre of the oven.
• The food will be evenly cooked if you stir or turn it a few times.
• Always set a shorter cooking time than indicated in your recipe to avoid over cooking. The
larger the amount of food the longer it takes.
• Use little or no water for vegetables.
• Use less salt and spices than for ‘normal’ cooking.
• Season afterwards. · Allow a few minutes ‘standing’ time after the oven has switched off to
ensure complete and even cooking results.
• Always ensure food is piping hot throughout before serving.
• Use pot holders or gloves when taking dishes and food from the oven.
28
Page 29

MCC247
Auto Programmes
☞ The Auto Programme feature allows you to simply and automatically cook a range of popular
foods. Your oven offers the following Auto programmes:
Programme Microwave mode Quantity and increments
Frozen Reheat Microwave Only 0.1kg – 0.6kg ( 0.05kg )
Chilled Reheat Microwave Only 0.1kg – 0.6kg ( 0.05kg )
Liquid Reheat Microwave Only 0.1kg – 1.0kg ( 0.1kg )
Baked Potatoes Microwave plus Convection 0.1kg – 1.7kg ( 0.1kg )
Potato Gratin Microwave plus Convection 0.2kg – 1.9kg ( 0.1kg )
Roast Potatoes Microwave plus Convection 0.2kg – 0.9kg ( 0.1kg )
Frozen Pizza Microwave plus Convection 0.1kg – 0.6kg ( 0.05kg )
Fresh Pizza Microwave plus Convection 0.1kg – 0.6kg ( 0.05kg )
Whole Chicken Microwave plus Convection 0.8kg – 2.0kg ( 0.1kg )
Chicken pieces Microwave plus Convection 0.1kg – 1.0kg ( 0.1kg )
Beef Joint Microwave plus Convection 0.5kg – 2.0kg ( 0.05kg )
Pork Joint Microwave plus Convection 0.5kg – 2.0kg ( 0.05kg )
Lamb Joint Microwave plus Convection 0.5kg – 2.0kg ( 0.05kg )
Steamed Fish Microwave Only 0.1kg – 1.0kg ( 0.05kg )
Baked Fish Microwave plus Convection 0.1kg – 1.0kg ( 0.05kg )
The operation is very easy. Simply touch the Auto Programmes button the correct amount of
times (See Auto Programmes Menu), enter the required weigh and press start.
The plus and minus adjustments can be used to increase or decrease the Programme time to
produce food to personal preference. The feature also has a built-in pause mechanism on some
of the programmes to allow for checking and stirring or rearranging the food.
During the Whole Chicken, Chicken Pieces, Beef Joints, Pork Joints, Lamb Joints and Grilled Fish
programmes the oven stops approximately two-thirds of the way through the Programme and 2
soft audible bell sounds are emitted. If you do not open the door at the pause, the oven restarts
after about 2 minutes and commences the remaining Programme time. To cancel the pause
period, simply touch Start and the programme will continue.
For best results, please follow the guidelines in the Auto Programmes chart.
29
Page 30

AEG-ELECTROLUX Micromat_Combi
Auto Programmes
Example: To cook by Auto Cook a Frozen Pizza:
1. Touch Pause/Clear
2. Touch the Auto Programme button 7 times
"AUTO 6 - FROZEN PIZZA - SET WEIGHT" appears in
the display
3. Turn the Setting Control Knob clockwise until required
weight is displayed
"PRESS START" appears in the display
4. Touch Start
At the end of the auto programme time, the oven will
automatically stop. The cooling fan and oven light will still be on until the turntable has
returned to its original position.
When the oven has switched off completely, 1 soft audible bell sound will be heard and END will
appear in the display. At this stage, it is not possible to enter any further programmes. To enter
another programme you will have to press the stop/clear button.
When the auto programme time has expired, if there is no action taken, 2 soft tones will be
heard every 30 seconds for 5 minutes. After 5 minutes, three soft tones will be heard, and the
window display will revert to the time of day.
30
Page 31

MCC247
Slow Cooking
☞ A choice of two Slow Cook modes are available.
Slow Cook High : 300W microwave power (the first stage of Slow Cooking).
Slow Cook Low : 150W microwave power (for continuing the Slow Cook process by simmering
the food)
☞ This method of cooking is ideal for soups, casseroles and stews. Slow Cook Low may also be used
for keeping food warm once it has been thoroughly cooked.
Do not cook meals using Slow Cook Low, always begin cooking food using Slow Cook High to
bring food to simmering temperature and then continue to cook slowly using Slow Cook Low.
Example: Too cook a casserole using Slow Cook high for 30
minutes, followed by Slow Cook High for 8 Hours.
1. Touch Pause/Clear
2. Touch the Slow Cook button once
"SLOW COOK HIGH - SET TIME" appears in the
display
3. Turn the Setting Control Knob clockwise until 0H30
is showing in the display
4. Touch the Slow Cook button once
"SLOW COOK LOW - SET TIME" appears in the
display
5. Turn the Setting Control Knob clockwise until 8H00
is showing in the display
6. Touch Start
At the end of the cooking time, the Oven will
automatically stop. The cooling fan and oven light will still
be on until the turntable has returned to its original
position. When the oven has switched off , 1 soft audible
bell sound will be heard and END will appear in the display.
At this stage, it is not possible to enter any further
programmes. To enter another programme you will have to
press the stop/clear button.
When the cooking time has expired, if there is no action
taken, 2 soft tones will be heard every 30 seconds for 5 minutes. After 5 minutes, three soft
tones will be heard, and the window display will revert to the time of day. During this operation,
it is possible to adjust the length of cooking time required by turning the Setting Control Knob
clockwise or anti-clockwise to increase or decrease the remaining time in the display in steps of
approximately 30 sec’s.
31
Page 32

AEG-ELECTROLUX Micromat_Combi
Slow Cooking Tips
1. Suitable foods for Slow Cooking are :Liquid dishes e.g. casseroles and stews containing cubed
meat or chicken joint pieces, soups, rice puddings. Root vegetables are particularly useful for
slow cooking - cut into even sized pieces, the larger the size of vegetable the longer cooking
time they will require.
2. Most casseroles or soups should be cooked using two stage Slow Cooking- generally you
should cook on Slow Cook High for the first 25 - 40, then simmer gently on Slow Cook Low
for several hours.
3. A minimum of five hours is usually require to cook food thoroughly using Slow Cook., you
may stir your food during cooking if you wish but this is not essential.
4. Always ensure that your dish is covered with a close fitting lid to ensure that your food does
not dry out. Always ensure that the dish is recovered after stirring.
5. Use sufficient liquid. Liquid may contain water, stock, wine, fruit juice, beer or cider. All
ingredients should be immersed in the liquid to help obtain the best results and to avoid
drying out.
6. Always ensure that your bowl is large enough to accommodate your ingredients.
7. Combine any thickening agents, such as flour, with your meat prior to cooking.
8. If adding Cream or milk always do so at the end of cooking.
9. Always stir you dish well after cooking.
Advantages of cooking Soups/Casseroles using Slow Cook
• You can start the cooking process early in the day, then go off to do other things and return
to a cooked meal.
It is not essential to stir your food due to the gentle heating involved (You may stir your food
•
if you wish). Due to the long, slow cooking process, tough meat is tenderised and flavour
have time to fully develop.
• Convenience and flexibility - meals are ready when you are - once food is thoroughly cooked
and piping hot it can be kept warm using Slow Cook Low.
32
Page 33

MCC247
Oven utensils and accessories guide
A variety of Utensils and Materials may be used for cooking in your microwave oven. For your
safety and to prevent damaging utensils and your oven choose appropriate utensils and materials
for each cooking method. The list below is a general guide.
Material Utensils
Corning ware YES YES YES YES
Ceramic &
Glass
China
Pottery*2 YES YES YES YES
Plastic
Metal Baking pan NO YES YES NO
Paper
Wood NO NO NO NO
Accessories
Heat resistant glass
ware
Glass ware with metal
decoration
Lead crystal glass NO NO NO NO
Without metal
decoration
Microwave oven
heat-proof wear
Plastic wrap YES NO NO NO
Aluminium foil*3 YES YES YES YES
Cups, plates, towels YES NO NO NO
Waxed paper YES NO NO NO
Grill rack NO YES YES YES
Turntable YES YES YES YES
Turntable support YES YES YES YES
Microwave Grill Convection Combination
YES*1 YES YES*1 YES*1
NO NO NO NO
YES YES NO NO
YES NO NO NO
Mode of operation
YES: Utensils and accessories to use NO: Utensils and accessories to avoid
*1 Only if there is no metal trim.
*2 Only if it does not have a glaze containing metal.
*3 NOTE: Use aluminium foil only for shielding purposes, over use may cause arcing.
33
Page 34

AEG-ELECTROLUX Micromat_Combi
Charts
Recommendations for cooking with Grill
Most foods should be placed on the high grilling rack with a dish placed underneath to catch any
food spillage or juices to minimise cleaning. Turn all food halfway through the cooking time.
Food QTY. (Weight) Cooking time Special notes
Toast 2 Slices 5 – 6 min
Cheese on Toast 4 Slices 7 – 8 min 5 – 6 min. to toast. 2 min. with topping
General recommendations for cooking with Microwave and Grill
Use roasting rack on turntable for roast beef and pork, shield thin parts and edges. Place a dish
on the turn-tables under the grill rack to catch food spillage and juices. Turn food, as appropriate
during the cooking time.
Food QTY (Weight)
Bacon 4 (100 g) Grill+150W 7- 9 min
Roast Beef
(Boned)
Roast Pork (Loin) 900 g
Pork Chops 2 - 3(450 g) Grill+150W 20 - 25 min
Chicken, Halved
lengthways
Legs
Frozen Hamburger 4 (200 g) Grill+150W 12 - 15 min
Sausages 450 g Only Grill+150W 10 - 15 min
Fish Steak 2 (350 g) Grill+150W 22 – 24 min
Frozen Potato,
Hash Brown
900 g
450 g
800 g
2 (150 g) Grill+150W 16 – 18 min.
Power Selector
position
Microwave only 750W
Grill+150W
Grill+450W
Grill+150W
Cooking time Special notes
25 min
5 - 6 min
15 - 20 min
25 - 30 min
Brush with oil. Season
with salt and pepper.
Allow 15 – 20 minutes
standing time after
cooking.
Brush with oil. Season
with salt, pepper and
paprika.
Brush with oil. Season
with salt, pepper and
paprika.
Brush with oil, Season
with salt and pepper.
34
Page 35

MCC247
Recommendations for Defrosting using 150W
Some foods such as cakes and fruit will not defrost successfully using Auto Defrost. However
these foods can be successfully thawed manually by using the 150W power setting. The
information on loaves and rolls given in the chart below gives an alternative method of
defrosting bread to the Auto Defrost Bread programme.
FOOD PREPARATION (150W)
Bread
Small loaf
Sliced large
2 slices Place on kitchen paper. 45–60 sec. 5 min.
1 bread roll Place on kitchen paper. 45–60 sec. 5 min.
2 bread rolls Place on kitchen paper. 1–11/2 min. 5 min.
Cakes and Pastry
Gateau
450g/1 lb
Cheesecake
450g/1 lb
Pie (cooked)
450g/1 lb
450g/1 lb
Butter
250g/8.8 oz
(1 packet)
Fruit
225g/8 oz
Soft berry
450g/1 lb
Soft berry
Plated meal
400g/14 oz
Vegetables
Place on microwave-proof rack or kitchen paper.
Turn over halfway through defrosting time.
Place on microwave-proof rack or kitchen paper.
loaf
Turn over halfway through defrosting time.
Remove from packaging, place on plate. 9–11 min. 15–30 min.
Remove from packaging, place on plate. 9–11 min. 15–30 min.
Remove from packaging, place on plate. 7– 9 min. 15–30 min.
Pastry
Remove from packaging, place on plate. 7– 9 min. 15–30 min.
If foil wrapped, remove from wrapper and place on a plate 3– 4 min. 5–10 min.
Place in a single layer in a shallow dish. 5– 6 min. 5–10 min.
fruits
Place in a single layer in a shallow dish.
fruits
Cover with a plate or non P.V.C. cling film.
To reheat, microwave on Hi W(900W)for 3–4 minutes.
It is not necessary to defrost vegetables before cooking.
All vegetables can be thawed and cooked on
Hi W(900W)
8–10 min. 10–15 min.
10–13 min. 10 min
7– 8 min. 5–10 min.
7– 8 min 5–10 min.
STANDING
TIME
35
Page 36

AEG-ELECTROLUX Micromat_Combi
Auto Programmes (Universal Defrost chart)
FOOD ADJUST PREPARATION PAUSE DIRECTIONS STANDING
Beef
Cubed NO Remove any thawed
Minced
Beef Joint
Steak NO If frozen in a block, separate as soon as
Lamb
Cubed NO Remove any thawed
Chops/Cutlets NO If frozen in a block separate as soon as
Lamb Joint
Pork
Chops NO If frozen in a block separate as soon as
Sausages
Bacon
Place on an upturned saucer on a plate
or on a microwave-proof rack. Shield
thin areas and outer edges with smooth
pieces of foil.
possible. Shield outer edges with smooth
pieces of foil.
possible. Arrange chops so the thinner
ends are towards the centre of the
turntable. Shield outer edges with
smooth pieces of foil.
Place on an upturned saucer on a plate
or on a microwave-proof rack. Shield
thin areas and outer edges with smooth
pieces of foil.
possible. Arrange chops so the thinner
ends are towards the centre of the
turntable. Shield outer edges with
smooth pieces of foil.
If frozen in a block, separate as soon as
possible. Shield both any ends of the
sausages with smooth pieces of foil.
Separate as soon as possible. Shield both
ends of bacon with smooth pieces of
foil.
cubes and stir,
ensuring that the
frozen cubes are
around the edge of the
dish.
Remove any thawed
portions and turn over.
Remove foil from
outer
edges but leave on
thin areas. Turn over.
Remove foil and turn
over.
cubes and stir,
ensuring that the
frozen cubes are
around the edge of the
dish.
Remove foil and turn
over.
Remove foil from
outer
edges but leave on
thin areas. Turn over.
Remove foil and turn
over.
Rearrange and remove
sausages that have
thawed.
Separate. Remove any
thawed slices, arrange
remaining slices in a
single layer and shield
both ends with smooth
pieces of foil.
TIME
10–15 min
5–10 min.
30–40 min.
10–15 min.
10–15 min
10–15 min.
30–40 min.
10–15 min.
10–15 min.
5–10 min.
36
Page 37

MCC247
Auto Programmes (Universal Defrost chart)
FOOD ADJUST PREPARATION PAUSE DIRECTIONS STANDING
Spareribs NO If frozen in a block, separate as soon as
Pork Joint
Chicken
Whole
Pieces NO Shield thin parts such as tips with smooth
Turkey
Pieces NO Shield thin parts such as tips with smooth
Fish
Fillets NO Use a shallow dish or microwave proof rack.
Steaks NO Use a shallow dish or microwave proof rack.
Whole fish NO Use a shallow dish or microwave proof rack.
possible. Shield both ends with smooth
pieces of foil.
Place on an upturned saucer on a plate or
on a microwave-proof rack. Shield thin
areas and outer edges with smooth pieces
of foil.
Use an upturned saucer on a plate or a
microwave-proof rack. Place chicken breast
side down. Shield wings, legs and neck with
smooth pieces of foil.
pieces of foil. Arrange so thicker parts are
towards the outside of the dish.
pieces of foil. Arrange so thicker parts are
towards the outside of the dish.
Arrange fillets in an even layer. If frozen in
a block, separate as soon as possible. Shield
tail and thin ends with
smooth pieces of foil.
Arrange fillets in an even layer. If frozen in
a block, separate as soon as possible. Shield
tail and thin ends with
smooth pieces of foil.
Arrange fillets in an even layer. Shield tail
and thin ends with
smooth pieces of foil.
Remove foil. Turn
over, rearrange and
remove any thawed
pieces.
Remove foil from
outer
edges but leave on
thin areas. Turn over.
Remove foil.
Turn over and shield
warm areas with foil.
Remove foil. Turn
over, arrange so
thicker parts are
towards the outside
of the dish.
Remove foil. Turn
over, arrange so
thicker parts are
towards the outside
of the dish.
Remove foil, turn
over, rearrange and
arrange tail ends
under thicker parts
of fish.
Remove foil, turn
over, rearrange and
arrange tail ends
under thicker parts
of fish.
Remove foil, turn
over, rearrange and
arrange tail ends
under thicker parts
of fish.
TIME
10–15 min
30–40 min.
30–40 min.
10–15 min.
10–15 min.
5–10 min.
5–10 min.
5–10 min.
37
Page 38

AEG-ELECTROLUX Micromat_Combi
Auto Programme Charts
FOOD START TEMP UTENSILS PREPARATION PAUSE STAND ADJUST
Frozen
Ready Meal
Chilled
Ready Meal
Liquid
Reheat
Baked
Potatoes
Potato
Gratin
Roast
Potatoes
Frozen Pizza
Fresh Pizza
Whole
Chicken
38
Frozen
-18°C
Chilled
3 –5 °C
Microwave
20°C (Room
Temp)
See Potato Gratin Auto Cook sequence
20°C (Room
Temp)
Frozen
-18°C
Chilled
3 –5 °C
Chilled 5°C Low rack on
Microwave
safe plate
Microwave
safe plate
safe cup or
bowl
Turntable Prick the skin or slit with a
Shallow
microwave
safe dish on
top of the
low grill rack
Low rack Remove from pack. Place on
Low rack Remove from pack. Place on
Pyrex flan
dish
Remove all packaging and
pierce film lid, if there is no
film lid then cover with
microwave wrap and pierce.
Always follow the
instructions printed on the
box of your ready meal.
Remove all packaging and
pierce film lid, if there is no
film lid then cover with
microwave wrap and pierce.
Always follow the
instructions printed on the
box of your ready meal.
Stir during reheat.
After reheat stir well and
allow to stand before
consumption
knife around the centre.
Arrange evenly around the
edge of the turntable.
When cooking one potato
place towards the edge of
the turntable.
Dry the potatoes
thoroughly. Place them in
the dish with 1 tablespoon
of oil and 15g of butter for
every 300g of potatoes.
Turn the potatoes in the oil
to ensure they are coated in
oil before cooking.
low rack.
Ensure the topping is evenly
spread
low rack.
Ensure the topping is evenly
spread
Remove from packaging.
Remove giblets if necessary.
Wash and dry, brush with
oil and seasoning.
Begin cooking breast side
down for best results
No 2 min
No 2 min
No 2 min
No 2 min
Turn
over
No 2 – 3
No 2 – 3
Turn
over
2 min
min
min
10 –
15 min
foods such as
lasagne or
delicate foods such
as fish
foods such as
lasagne or
delicate foods such
as fish
for milk
for larger or
smaller potatoes
for larger or
smaller pieces of
potato
cheese topped
large pizzas or
those
with little topping
cheese topped
large pizzas or
those
with little topping
cooked finish or
very chilled
chicken
for compact
for
for compact
for
for Soups or
Adjust
or
Adjust
or
For
or
For
or
For a well
Page 39

MCC247
Auto Programme Charts
FOOD START TEMP UTENSILS PREPARATION PAUSE STAND ADJUST
Chicken
Pieces
Chilled 5°C High rack Wash and dry, brush
with oil and
seasoning.
Begin cooking skin side
down for best results
Turn over 2 min
For a well
cooked finish
or very
chilled
chicken
Beef Joint
Pork Joint
Lamb Joint
Steamed
Fish
Grilled Fish
Chilled 5°C Low rack on
Chilled 5°C Low rack on
Chilled 5°C Low rack on
Chilled 5°C Microwave
Chilled
3-5°C
Pyrex flan
dish
Pyrex flan
dish
Pyrex flan
dish
safe dish
with lid or
microwave
wrap
High rack Wash and dry, brush
Remove all packaging
and note the weight.
Place on the low rack,
brush with oil and
seasoning.
Remove all packaging
and note the weight.
Place on the low rack,
brush with oil and
seasoning.
Remove all packaging
and note the weight.
Place on the low rack,
brush with oil and
seasoning.
Remove from
packaging. Wash and
dry. For best results
weight the fish. Place
the fish in a dish with
2 – 3 tblsps (45mls) of
liquid e.g. white wine,
water or milk. Cover
dish with lid or
microwave wrap
with oil and seasoning
Begin cooking skin side
down for best results
Remove
excess liquid.
Turn over
and brush
with oil if
desired.
Remove
excess liquid.
Turn over
and brush
with oil if
desired.
Remove
excess liquid.
Turn over
and brush
with oil if
desired.
No 2 min
No 2 min
10 – 15
min
10 – 15
min
10 – 15
min
For a well
cooked finish
or very
chilled
chicken
For a well
cooked finish
or very
chilled
chicken
For a well
cooked finish
or very
chilled pork
For a well
cooked finish
or very
chilled fish
For more
delicate
whole fish or
fish steaks
For a well
cooked finish
or very
chilled fish
39
Page 40

AEG-ELECTROLUX Micromat_Combi
Auto Programme Charts (Potato Gratin)
FOOD START TEMP UTENSILS PREPARATION PAUSE STAND ADJUST
Potato
Gratin
20°C
(room temp)
Low rack
See Potato Gratin Auto
Cook sequence
No 2 min
Potato Gratin Auto Cook sequence
INGREDIENTS 1 SERVING 2 SERVINGS 4 SERVINGS
Butter 2.5 g 5 g 10 g
Potatoes, peeled and
thinly sliced
Onion, peeled and finely
chopped
Streaky Bacon, chopped 1 / 2 rasher 1 rasher 2 rashers
Single Cream 50 mls 100 mls 200 mls
Grated Cheese 25 g 50 g 100 g
Salt and Pepper to taste to taste to taste
Tomato Slices a few a few a few
Parsley, chopped a little a little a little
Approx. Total Weight of
Food (excluding dish)
150 g 300 g 600g
1 / 4 onion 1 / 2 onion 1 onion
300 g 500 g 1100 g
For
or
variations in
serving size or
start
temperature
Suggested Cookware
Microwave and heat proof casserole or deep flan dish.
1 serving 1 litre dish (10 - 15 cm diameter),
2 servings 1.5 litre dish (15 - 20 cm diameter)
4 servings 1.5 - 2.5 litre dish (20 - 25 cm diameter)
☞ Method
1. Use some of the butter to grease the inside of the dish.
2. Place half of the potato slices in the dish, add the onion, bacon and half of the cheese. Place the
remaining potatoes on the top.
3. Pour over the cream and sprinkle on the remaining cheese. Dot with any remaining butter.
4. Place the dish on the turntable.
5. Press Auto Programme button as required (See Auto Programme Menu) to select Potato Gratin
programme. Enter the weight of the Potato Gratin (excluding the dish). A guide to the approximate
food weight obtained if the recommended recipes are used is give above.
6. After cooking, garnish with chopped parsley and tomato slices.
40
Page 41

MCC247
Care and cleaning
The oven must always be clean. Residue of food from spill-overs or spatters will attract
microwave energy causing it to burn on. This could reduce the efficiency of the oven and may
cause bad odours.
Do not attempt to tamper with or make any adjustments or repairs to any part of the oven.
Repairs should only be done by a qualified service technician.
Be sure the oven is off or the unit is unplugged before cleaning.
Cleaning the accessories (turntable, support and Grill rack)
Clean them with mild detergent after removing them for the cavity. Turntable support should be
carefully handled. The inside of the oven and turntable get very hot, so do not touch them
immediately after use.
Cleaning the interior
Always keep the inside of the oven clean. Wipe up spill-overs and food spatters immediately.
Deposits that are allowed to remain on the oven walls, door seal and door surface will absorb
microwave energy, reduce the efficiency of the oven, and possibly damage the oven interior. Use
mild, liquid detergent, warm water and a soft, clean cloth to remove deposits from the base of
the oven. For the side of the oven use a soft damp cloth only, no liquids should be used near the
venting holes.
NEVER USE ABRASIVE CLEANERS, COMMERCIAL OVEN CLEANERS OR STEEL WOOL
PADS ON ANY PART OF THE MICROWAVE OVEN.
To loosen difficult deposits, boil a cup of water in the microwave oven for 2 or 3 minutes.
NEVER USE A KNIFE OR ANY UTENSIL TO REMOVE DEPOSITS FROM OVEN SURFACES.
To remove odours from the oven interior, boil a cup of water plus 2 tablespoons of lemon juice
for 5 minutes.
Cleaning the door seals
Wipe up spill-overs and food spatters immediately. Deposits that are allowed to remain on the
door seals will absorb microwave energy, reduce the efficiency of the oven, and possibly damage
the oven interior. You can only use mild, liquid detergent, warm water and a soft, clean cloth to
remove deposits from the door seals.
Cleaning the exterior
Open the oven door when cleaning the control panel. This will prevent the oven from being
turned on accidentally. You should clean outside surfaces of the oven with mild liquid detergent
and water followed by a wiping with clear water to remove any excess detergent. Dry with a soft
cloth.
Spray-on window cleaners or all purpose spray-on kitchen cleaners can also be used. Never use
abrasive cleaners, scouring pads or harsh chemicals on outside surfaces of your oven. To prevent
damage to the working parts, do not allow water to seep into ventilation openings.
41
Page 42

AEG-ELECTROLUX Micromat_Combi
What to do if……………………….
If the appliance does not work please carry out the following checks before contacting your
local service centre.
If the oven does not come on:
• Check the appliance is connected correctly.
• Check that the oven is plugged in properly.
• Replace the fuse in the plug, if required, with another of the same rating and check that
the plug has been wired correctly.
• Check that the socket switch and/or the switch from the mains supply to the oven are
ON.
• Check that the socket is receiving power, by plugging in an appliance you know to be
working.
• Check that the fuse in the fuse box is intact.
If the microwave does not function:
42
• The child safety lock may have been set.
• Check the controls are set correctly.
• Check settings/procedures against the booklet
• Check the door closes properly (if food particles or other objects have become stuck
inside the door, it will not close properly and microwave cooking will not take place).
• Check the start pad has been depressed.
• If the grill function has been used, the oven may not have cooled sufficiently.
• If the Micro bake function has been used, the oven may not have cooled sufficiently.
Page 43

MCC247
Service and spare parts
When you order service or spare parts, please refer to the product and model number of the
microwave oven. You will find these on the data plate. Write them down here below so you have
them handy whenever you need them.
Model: MCC247
Serial number:
PNC:
Date of purchase:
It is vitally important that you record these details correctly. These details should be recorded
when you remove your new oven from its box
N.B. Remember to save your receipt.
The symbol on the product or on its packaging indicates that this product may not be treated as household
waste. Instead it shall be handed over to the applicable collection point for the recycling of electrical and electronic
equipment. By ensuring this product is disposed of correctly, you will help prevent potential negative consequences
for the environment and human health, which could otherwise be caused by inappropriate waste handling of this
product. For more detailed information about recycling of this product, please contact your local city office, your
household waste disposal service or the shop where you purchased the product.
43
Page 44

Part Number 8221914-02-01
PERFEKT IN FORM UND FUNKTION
 Loading...