

Page 1
L 77480 FL
WASHING MACHINE USER MANUAL
Page 2

2
CONTENTS
4 SAFETY INFORMATION
6 ENVIRONMENT CONCERNS
6 TECHNICAL INFORMATION
7 PRODUCT DESCRIPTION
7 ACCESSORIES
8 CONTROL PANEL
12 PROGRAMMES
15 BEFORE FIRST USE
15 USING THE APPLIANCE
15 LOADING THE LAUNDRY
16 FILLING THE DETERGENT AND ADDITIVES
17 SETTING AND STARTING A PROGRAMME
18 AT THE END OF THE PROGRAMME
20 HELPFUL HINTS AND TIPS
22 CARE AND CLEANING
27 TROUBLESHOOTING
30 INSTALLATION
35 WARRANTY
SERVICE
When contacting Service, ensure that
you have the following data available.
The information can be found on the
rating plate.
Model
PNC
Serial Number
The following symbols are used in this
user manual:
Warning - Important Safety information.
General information and tips
Environmental information
Subject to change without notice
Page 3

FOR PERFECT RESULTS
Thank you for choosing this AEG product. We have created it to give you
impeccable performance for many years, with innovative technologies that help
make life simpler – features you might not find on ordinary appliances. Please spend
a few minutes reading to get the very best from it.
ACCESSORIES AND CONSUMABLES
In the AEG webshop, you’ll find everything you need to keep all your AEG
appliances looking spotless and working perfectly. Along with a wide range of
accessories designed and built to the high quality standards you would expect, from
specialist cookware to cutlery baskets, from bottle holders to delicate laundry bags…
Visit the webshop at:
www.aeg.com/shop
ENGLISH
3
VISIT OUR WEBSITE FOR:
- Products
- Brochures
- User manuals
- Trouble shooter
- Service information
www.aeg.com
Page 4
4
SAFETY INFORMATION
CONDITIONS OF USE
This appliance is intended to be used in
household and similar applications such
as:
• Farm houses.
• By clients in serviced apartments,
holiday apartments and other residential type environments.
Before installation and use, read this
manual carefully:
• For your safety and the safety of your
property
• To help the environment
• For the correct operation of the appliance.
Always keep this instruction manual
with the appliance if you move or give it
to another person.
The manufacturer is not responsible if
an incorrect installation and use causes
damage.
CHILDREN AND VULNERABLE
PERSON SAFETY
• This appliance is not intended for use
by persons (including children) with
reduced phisical, sensory or mental
capabilities, or lack of experience
and knowledge, unless they have
been given supervision or instruction
concerning use of th appliance by a
person responsible for their safety.
Children should be supervised to ensure that they do not play with the
appliance.
• Keep all packaging away from children. There is the risk of suffocation
or injury.
• Keep all detergents away from children.
• Keep children and pets away from
the appliance when the door is open.
• Before you close the appliance door,
ensure there are no children or pets
inside the drum.
• If the appliance has a child safety device, we recommend you activate it.
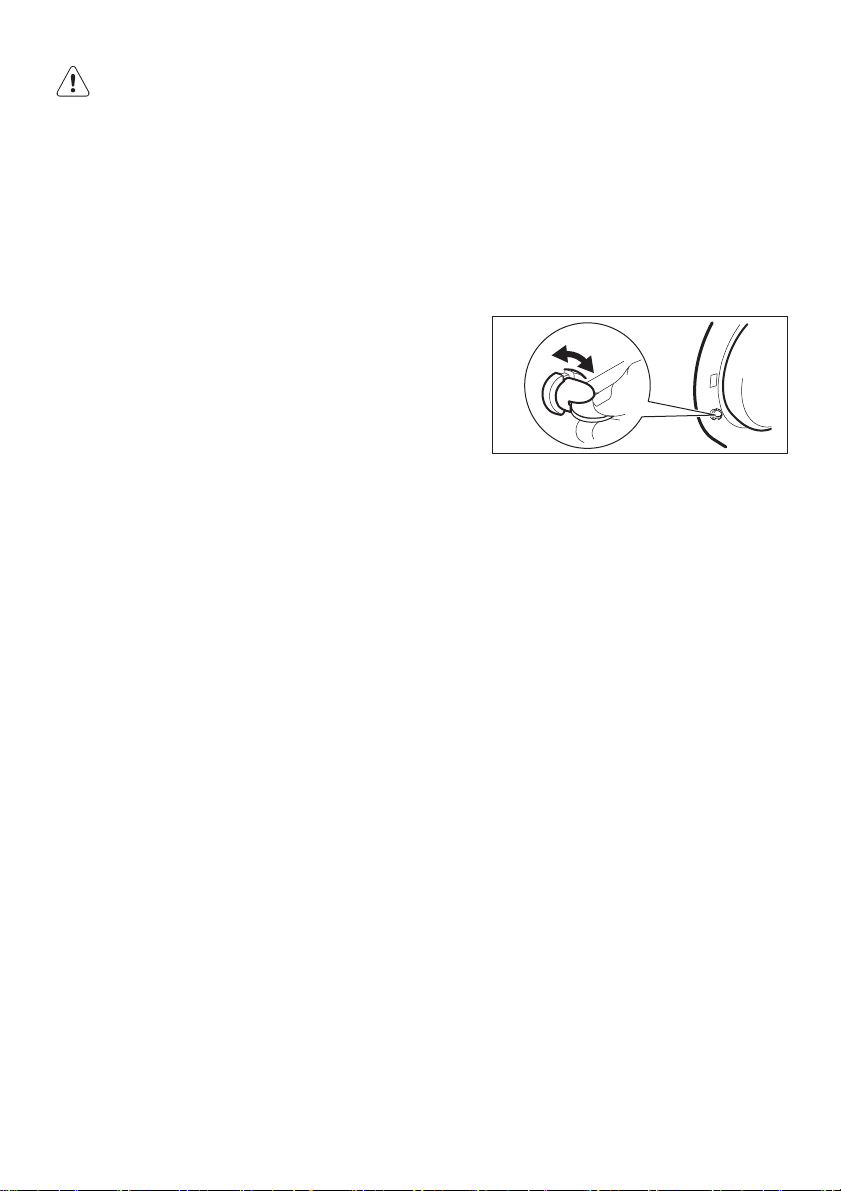
CHILD SAFETY DEVICE
• When you activate this device, you
cannot close the door. This prevents
children or pets being closed inside.
To activate the device, turn it clockwise, until the groove is horizontal.
To deactivate the device, turn it
counterclockwise, until the groove is
vertical.
GENERAL SAFETY
• Do not use the appliance for professional use. The appliance is only for
domestic use.
• Do not change the specifications of
this appliance. There is the risk of injury and damage to the appliance.
• Do not put flammable products or
items that are wet with flammable
products in, near or on the appliance.
Risk of explosion or fire.
• Obey the safety instructions on the
detergent packaging to prevent
burns to eyes, mouth and throat.
• Make sure that you remove all metal
objects from the laundry. Hard and
sharp material can cause damage to
the appliance.
• Do not touch the glass of the door
while a programme operates. The
glass can be hot (only for front-loading appliances).
CARE AND CLEANING
• Turn off the appliance and disconnect the mains plug from the mains
socket.
• Do not use the appliance without the
filters. Make sure that the installation
Page 5

of the filters is correct. An incorrect
installation causes water leakages.
INSTALLATION
• The appliance is heavy, be careful
when you move it.
• Do not transport your appliance without the transit bolts, you can damage
internal components and cause leakages or malfunctions.
• Do not install and connect a damaged appliance.
• Make sure to remove all packaging
and transit bolts before first use.
• Make sure that the mains plug is disconnected from the mains socket
during installation.
• Do not install or use the appliance
where the temperature is less than 0
°C.
• When you install the appliance on a
carpet floor, make sure that there is
air circulation between the appliance
and the carpet. Adjust the feet to
have the necessary space between
the appliance and the carpet.
Water connection
• Do not connect the appliance with
old hoses. Only use new hoses supplied with the appliance.
• Make sure not to cause damage to
the water hoses.
• Do not connect the appliance to new
pipes or pipes not used for a long
time. Let the water flow for some minutes, then connect the inlet hose.
• The first time you use the appliance,
make sure that the water hoses and
the couplings do not have leakages.
ENGLISH
• Make sure that the electrical information on the rating plate agrees with
the power supply.
• Do not use multiple plugs and extension cables. There is a risk of fire.
• Do not replace or change the mains
cable. Contact the service centre.
• Make sure not to cause damage to
the mains plug and cable.
• Connect the mains plug to the mains
socket only at the end of the installation. Make sure that there is access
to the mains plug after the installation.
• Do not pull the mains cable to disconnect the appliance. Always pull
the mains plug.
• If this appliance is supplied from a
cord extension set or electrical portable outlet device, the cord extension
set or electrical portable outlet device must be positioned so that it is
not subject to splashing or ingress of
moisture.
• If the supply cord of this appliance is
damaged, it must be replaced by the
manufacturer, its service agent or
similarly qualified persons to avoid a
hazard.
DISCARD THE APPLIANCE
1.
Disconnect the mains plug from the
mains socket.
2.
Cut off the mains cable and discard
it.
3.
Discard the door catch. This prevents children or pets being accidentally closed inside the appliance. There is a risk of suffocation
(only for front-loading appliances).
5
Electrical connection
• Make sure that the appliance is connected to a correctly installed earthed power outlet.
Page 6

6
ENVIRONMENT CONCERNS
PACKAGING MATERIALS
Recycle the materials with the symbol
.
Put the packaging in applicable containers to recycle it.
ECOLOGICAL HINTS
To help the environment, use less water
and energy, obey these instructions:
• Set a programme without the pre-
wash phase to wash laundry with normal soil.
• Always start a washing programme
with the maximum load of laundry.
• If necessary, use a stain remover
when you set a programme with a
low temperature.
• To use the correct quantity of the de-
tergent, check the water hardness of
your domestic system
TECHNICAL INFORMATION
Dimensions Width / Height / Depth 605 / 850 / 605 mm
Total depth 640 mm
Electrical connection: Voltage
Level of protection against ingress of solid particles
and moisture ensured by the protective cover, except
where the low voltage equipment has no protection
against moisture
Water supply pressure Minimum 0,5 bar (0,05 MPa)
Water supply
Maximum load Cotton 8 kg
Spin speed Maximum 1400 rpm
1)
Connect the water inlet hose to a water tap with a 3/4'' thread.
1)
Overall power
Frequency
Maximum 8 bar (0,8 MPa)
Cold water
The symbol
packaging indicates that this product
may not be treated as household
waste. Instead it should be taken to the
appropriate collection point for the
recycling of electrical and electronic
equipment. By ensuring this product is
disposed of correctly, you will help
prevent potential negative
consequences for the environment and
human health, which could otherwise
be caused by inappropriate waste
handling of this product. For more
detailed information about recycling of
this product, please contact your local
council, your household waste disposal
service or the shop where you
purchased the product.
on the product or on its
230-240 V
2200 W
50 Hz
IPX4
Page 7
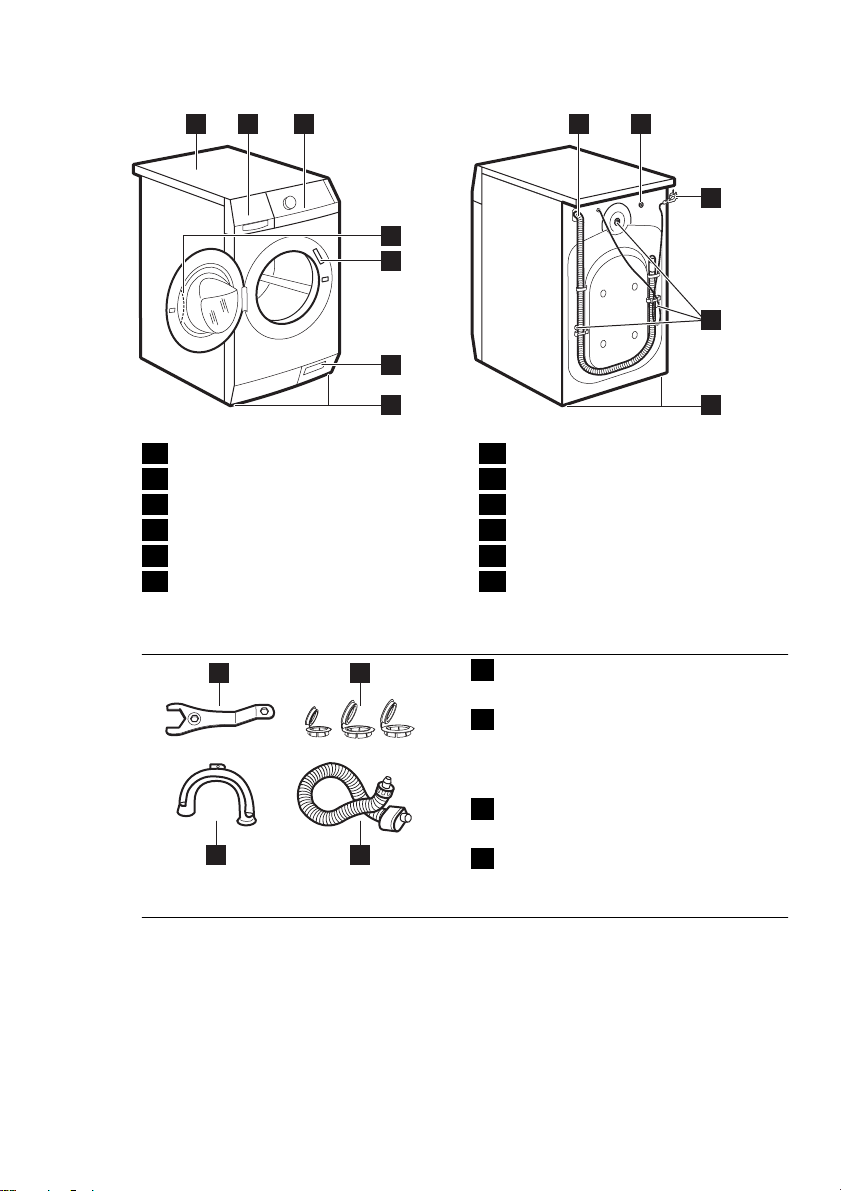
PRODUCT DESCRIPTION
ENGLISH
7
1 2 3 8
Worktop
1
Detergent dispenser
2
Control panel
3
Door handle
4
Rating plate
5
Drain pump
6
ACCESSORIES
1 2
9
0
4
5
1
6
7
Levelling feet
7
Water drain hose
8
Water inlet valve
9
Mains cable
10
Transit bolts
11
Levelling feet
12
Spanner
1
2
To remove the transit bolts.
Plastic caps
2
To close the holes on the rear side
of the cabinet after the removal of
the transit bolts.
Anti-flood inlet hose
3
To prevent possible leakage
34
Plastic hose guide
4
To connect the drain hose on the
edge of a sink.
Page 8
8
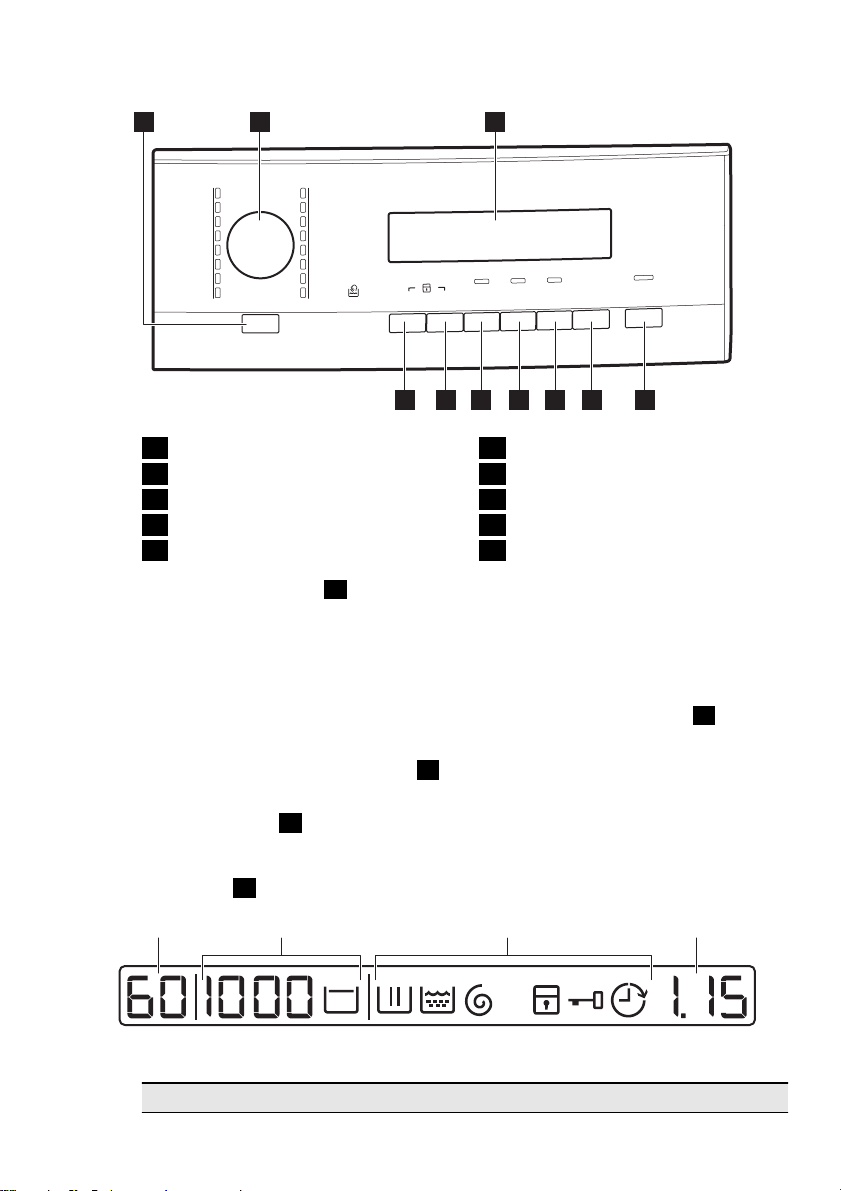
CONTROL PANEL
1 2 3
E
noc
o
m
y
S
pu
E re
oc
2
0
iM
.n
-
k 3
g
iuQ
c
k
tnI
e
n
vis
e
J
ae
sn
ruC
t
a
i
sn
Rinse
pS
i
n
/
D
ar
ni
On/Off
ttons
Co
+ Prewash
Extr
a S
S
nthetics
y
+ Prewash
Easy Iro
Delicates
Wool/Silk
ile
nt
n
Delay
em
i
T
ar
t
x
E
Save
Rinse
sniatS
Spin
.pmeT
Start/Pause
tratS
45678910
On/Off button (On/Off)
1
Programme knob
2
Display
3
Start Pause button
4
Delay start button
5
ON OFF BUTTON
1
Press this button to activate or deactivate the appliance. A tune sounds when
the appliance is activated.
The AUTO Stand-by function automatically deactivates the appliance to decrease the energy consumption when:
• You do not use the appliance for 5
minutes before you press button
4
.
Time save button
6
Extra rinse button
7
Stain button
8
Spin reduction button
9
Temperature button
10
– Set again the washing programme
and all possible options.
• After 5 minutes from the end of the
washing programme. Refer to 'At the
end of programme'.
PROGRAMME KNOB
Turn this knob to set a programme. The
related programme indicator comes on.
– All settings are cancelled.
–
Press button
1
to activate the ap-
pliance again.
DISPLAY
3
A B C D
2
The display shows:
A • The maximum temperature of the programme.
Page 9
B • The default spin speed of the programme.
1)
and 'Rinse Hold' symbols.
2)
C •
•
'No Spin'
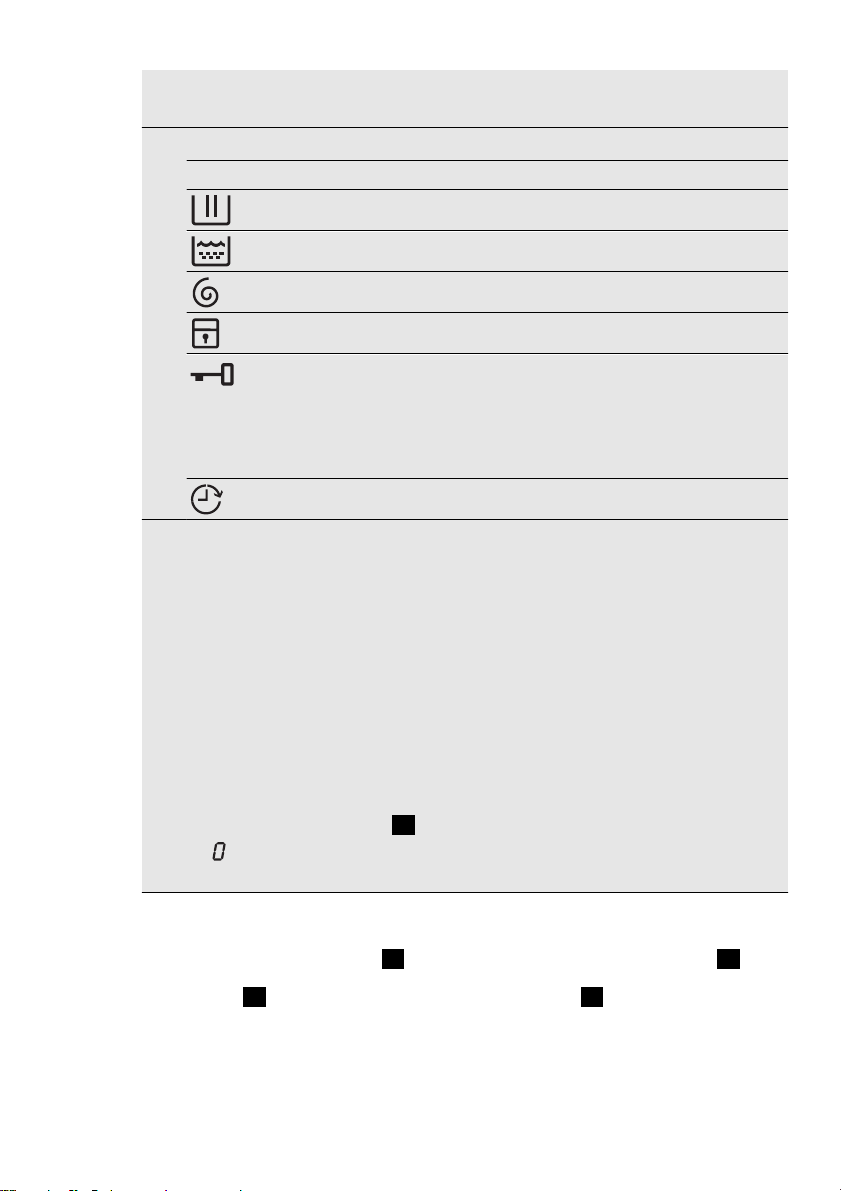
The display symbols.
Symbols Description
Washing phase
Rinse phases
Spin phase
Child lock
You cannot open the door when this symbol is on.
You can open the door only when the symbol goes off.
If the programme is completed but the symbol stays on:
• There is water in the drum.
• The 'Rinse Hold' function is on.
Delay start
D • The programme time
When the programme starts, the time decreases with steps of 1 minute.
• The delay start
When you press the delay start button, the display shows the delay start
time.
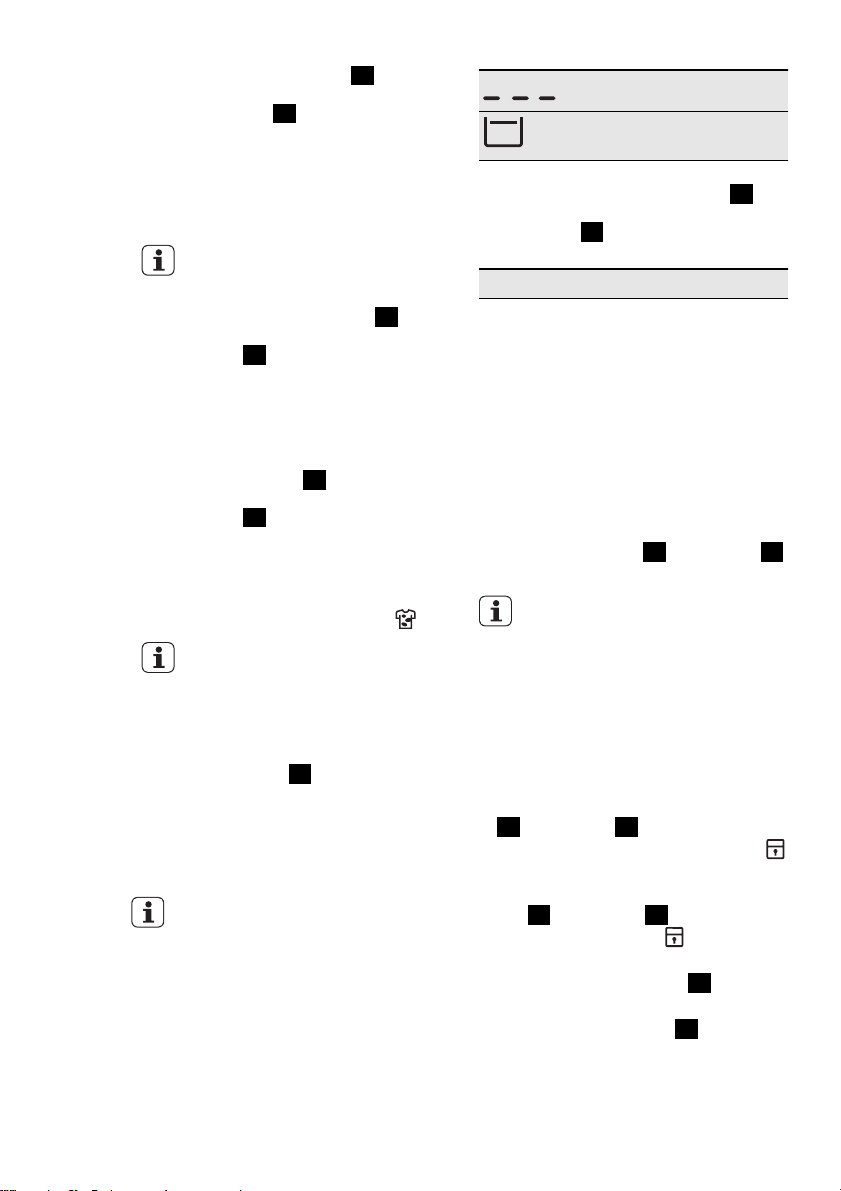
•Alarm codes
If the appliance has a malfunction, the display shows alarm codes. Refer
to 'Troubleshooting' chapter.
•Err
The display shows this message for some seconds if:
– You set a function that is not applicable for the programme.
– You change the programme while in operation.
4
The indicator of button
flashes.
•
When the programme is complete.
1)
Only available for Spin/Drain programme.
2)
The symbols appear on the display when the related phase or function is set.
START/PAUSE BUTTON
Press button
programme.
4
to start or interrupt a
4
DELAY START BUTTON
Press button
5
to delay the start of a
programme from 30 minutes to 20
hours.
ENGLISH
5
9
Page 10
10
TIME SAVE BUTTON
6
Press the button
programme duration.
• Press one time to set 'Shortened duration' for items with daily soil.
• Press two times to set 'Extra Quick'
for items with almost no soil.
Some programmes accept only
one of the two functions.
to decrease the
EXTRA RINSE BUTTON
7
Press button
to a programme.
Use this function for persons allergic to
detergents and in areas where the water is soft.
to add rinsing phases
STAIN BUTTON
8
Press button
to a programme.
Use this function for laundry with hard
stains to remove.
When you set this function, put the
stain remover into compartment
This function increases the programme duration.
This function is not available
with a temperature lower than
40° C.
SPIN BUTTON
Press this button to:
• Decrease the maximum speed of the
spin phase when you set a programme.
The display shows only the spin
speeds available with the set
programme.
• Deactivate the spin phase.
• Activate the 'Rinse Hold' function.
Set this function to prevent fabric
creases. The appliance does not
drain the water when the programme
is completed.
to add the stain phase
9
6
7
8
.
Spin phase is off.
'Rinse Hold' function is
on.
TEMPERATURE BUTTON
10
Press button
temperature.
- - = cold water
to change the default
10
ACOUSTIC SIGNALS
FUNCTION
You can hear the acoustic signals when:
• You activate the appliance.
• You deactivate the appliance.
• You press the buttons.
• The programme is completed.
• The appliance has a malfunction.
To deactivate/activate the acoustic
signals, press button
at the same time for 6 seconds.
If you deactivate the acoustic
signals, they continue to operate only when you press the buttons and when a malfunction occurs.
8
and button
7
CHILD LOCK FUNCTION
This function prevents children operating the control panel.
• To activate the function, press button
10
and button 9 at the same time
until the display shows the symbol
.
• To deactivate the function, press but-
10
ton
and button 9 at the same
time until the symbol
You can activate the function:
•
Before you press button
pliance cannot start.
•
After you press button
buttons and the programme knob
are deactivated.
goes off.
4
: the ap-
4
, all the
Page 11

PERMANENT EXTRA RINSE
FUNCTION
With this function you can keep the extra rinse function permanently on when
you set a new programme.
• To activate the function press button
6
and button 5 at the same time
7
until the indicator of button
is on.
ENGLISH
• To deactivate the function press but-
6
and button 5 at the same
ton
time until the indicator of button
7
is off.
11
Page 12

12
PROGRAMMES
Programme
Temperature
Cottons
95° - Cold
Cottons +
Prewash
95° - Cold
Extra Silent
95° - Cold
Synthetics
60° - Cold
Synthetics +
Prewash
60° - Cold
Easy Iron
4)
60 - Cold
Delicates
40 - Cold
Type of load
Max. weight of load
White and coloured cotton.
max. load 8 kg
White and coloured cotton with
heavy level of soil.
max. load 8 kg
White and coloured cotton.
max. load 8 kg
Synthetic or mixed fabric items
with normal soil.
max. load 4 kg
Synthetic or mixed fabric items
with normal soil.
max. load 4 kg
Synthetic fabrics with normal soil.
max. load 4 kg
Delicate fabrics as acrylics, viscose, polyester items with normal
soil.
max. load 4 kg
Cycle description
Wash
Rinses
Long spin
Wash
Rinses
Long spin
Wash
Stop with
water in
the drum
Rinses
Wash
Rinses
Short spin
Wash
Rinses
Short spin
Wash
Rinses
Short spin
Wash
Rinses
Short spin
Functions
Spin Reduction
Rinse Hold
Prewash
Stains
1)
2)
Extra Rinse
Time Save
3)
Spin Reduction
Rinse Hold
Prewash
Stains
1)
2)
Extra Rinse
Time Save
Prewash
3)
1)
Extra Rinse
2)
Stains
Time Save
3)
Spin Reduction
Rinse Hold
Prewash
Stains
1)
2)
Extra Rinse
Time Save
3)
Spin Reduction
Rinse Hold
Prewash
Stains
1)
2)
Extra Rinse
Time Save
3)
Spin Reduction
Rinse Hold
Prewash
1)
Extra Rinse
Time Save
3)
Spin Reduction
Rinse Hold
Prewash
Stains
1)
2)
Extra Rinse
Time Save
3)
Page 13

ENGLISH
13
Programme
Tempera-
Type of load
Max. weight of load
Cycle description
ture
Wool / Silk
40 - 0°
Machine washable wool. Hand
washable wool and delicate fabrics with «hand washing» care
Wash
Rinses
Short spin
symbol.
max. load 2 kg
Spin / Drain
5)
0°
All fabrics.
The maximum load of the laundry
is related to the type of laundry.
Drainage
of the wa-
ter
Spin
phase.
Rinse All fabrics.
max. load 8 kg
One rinse
with addi-
tive
Spin
phase
Curtains
40° - Cold
Set this programme to wash curtains. It adds automatically the
prewash phase to clean the dust.
Do not put the detergent in the
Prewash
Wash
Rinses
Short spin
prewash compartment.
max. 2 kg
Jeans
60° - Cold
All items in denim.
max. load 8 kg
Wash
Rinses
Short spin
Quick Intensive
60°-40°
Quick washing programme, to be
used for lightly soiled white/fast
coloured cottons and mixed fab-
Wash
Rinses
Long spin
rics.
max. 5 kg
20 Min. 3kg
40° - 30°
Super Eco
Cold
Economy
60°9) and
40°
1)
If you use liquid detergent, set a programme without Prewash.
2)
The Stains function is not available with a temperature lower than 40°C.
Cotton and synthetic items with
light soil or worn only one time.
max. load 3 kg
7)
Mixed fabrics (cotton and synthetic items).
max. load 3 kg
8)
White and colour fast cotton with
normal soil.
max. load 8 kg
Wash
Rinses
Short spin
Wash
Rinses
Short spin
Wash
Rinses
Long spin
Functions
Spin Reduction
Rinse Hold
Spin Reduction
No Spin
Spin Reduction
Rinse Hold
Extra Rinse
6)
Spin Reduction
Rinse Hold
Extra Rinse
Spin Reduction
Rinse Hold
Prewash
1)
Extra Rinse
Time Save
3)
Spin Reduction
Rinse Hold
Extra Rinse
Spin Reduction
Spin Reduction
Rinse Hold
Extra Rinse
Spin Reduction
Rinse Hold
Prewash
1)
Stains
Extra Rinse
Time Save
3)
Page 14

14
3)
If you set the Extra Quick duration, we recommend that you reduce the maximum load. It is
possible to fully load the appliance, however the washing results are reduced.
4)
The wash and spin phase is delicate to prevent the creases of the laundry. The appliance
adds some rinses.
5)
The default phase of the spin speed is related to cotton items. Set the spin speed. Make
sure that it agrees with the laundry. To select the DRAIN programme only, set the function
NO SPIN.
6)
Press Extra Rinse button to add rinses. With a low spin speed the appliance performs
delicate rinses and a short spin.
7)
Set this programme to decrease the time and the consumption of energy and water. Use a
special detergent for very low temperature.
8)
Set this programme to have good washing results and decrease the energy consumption.
The time of the washing programme is extended.
9)
Economy 60ºC programme is recommended for a full load of cotton and is the water and
energy rating programme in accordance with AS/NZS2040.2 and AS/NZS6400.
Page 15

BEFORE FIRST USE
ENGLISH
15
1.
To activate the drain system, put 2
litres of water in the main wash
compartment of the detergent dispenser.
2.
Put a small quantity of detergent in
the main wash compartment of the
USING THE APPLIANCE
1.
Open the water tap.
2.
Connect the mains plug to the
mains socket.
3.
Press button 1 to activate the appliance.
4.
Put the laundry in the appliance.
LOADING THE LAUNDRY
1.
Open the appliance door.
2.
Put the laundry in the drum, one
item at a time. Shake the items before you put them in the appliance.
detergent dispenser. Set and start
a programme for cotton at the
highest temperature without laundry. This removes all possible dirt
from the drum and the tub.
5.
Use the correct quantity of detergent and additives.
6.
Set and start the correct programme for the type of laundry and
soil.
Make sure not to put too much
laundry in the drum.
3.
Close the door.
Make sure that no laundry stays between the seal and the door. There is a
risk of water leakage or damage to the
seal or laundry.
Page 16

16
FILLING THE DETERGENT AND ADDITIVES
The detergent compartment for the prewash phase and the soak
programme.
Add the detergent for prewash and soak before the start of the
programme.
The detergent compartment for the washing phase.
If you use a liquid detergent, put it in immediately before you
start the programme.
Liquid additives compartment (fabric conditioner, starch).
Put the product in the compartment before you start the programme.
This is the maximum level for the quantity of liquid additives.
The compartment for the stain remover.
Put the product in the compartment and set the stain function before you start the programme.
Flap for powder or liquid detergent
Turn it (up or down) in the correct position to use powder or liquid
detergent.
Always obey the instructions that you find on the packaging of the detergent products.
Check the position of the flap
1.
Pull out the detergent dispenser
until it stops.
2.
Press the lever down to remove the
dispenser.
Page 17

5.
Measure out the detergent and the
fabric conditioner.
6.
Carefully close the detergent dispenser. Make sure that the flap
does not cause a blockage when
you close the drawer.
3.
To use powder detergent, turn the
flap up.
4.
To use liquid detergent, turn the
flap down.
With the flap in the position
DOWN:
– Do not use gelatinous or thick
liquid detergents.
– Do not put more liquid deter-
gent than the limit shown on
the flap.
– Do not set the prewash
phase.
– Do not set the delay start
function.
ENGLISH
17
SETTING AND STARTING A PROGRAMME
1.
Turn the programme knob. The related programme indicator comes
on.
2.
The indicator of button 4 flashes
red.
3.
The display shows the default temperature and spin speed. To
change the temperature and/or the
spin speed, press the related buttons.
4.
Set the available functions. The indicator of the set function comes
on or the display shows the related
symbol.
5.
Press button 4 to start the programme. The indicator of button
4
is on.
INTERRUPT A PROGRAMME
1.
Press button 4 . The indicator
flashes.
2.
Press button 4 again. The washing programme continues.
CANCEL A PROGRAMME
1.
Press button 1 to cancel the programme and to deactivate the appliance.
2.
Press button 1 again to activate
the appliance. Now, you can set a
new washing programme.
The appliance does not drain
the water.
Page 18

18
CHANGE A FUNCTION
You can change only some functions
before they operate.
1.
Press button 4 . The indicator
flashes.
2.
Change the function set.
SET THE DELAY START
1.
Press button 5 repeatedly until
the display shows the number of
minutes or hours. The related symbols comes on.
2.
Press button 4 , the appliance
starts the countdown of the delay
start.
When the countdown is complete,
the programme starts automatically.
Before you press button 4 to
start the appliance, you can cancel or change the delay start
setting.
CANCEL THE DELAY START
1.
Press button 4 . The related indicator flashes.
2.
Press button 5 again and again
until the display shows 0’.
3.
Press button 4 . The programme
starts.
OPEN THE DOOR
While a programme or the delay start
operates, the appliance door is locked.
To open the appliance door:
1.
Press button 4 . The door lock
symbol in the display goes off.
2.
Open the appliance door.
3.
Close the appliance door and press
button
delay start continues.
4
. The programme or the
If the temperature and level of
the water in the drum are too
high, the door lock symbol stays
on and you cannot open the
door. To open the door do the
steps that follow:
1.
Deactivate the appliance.
2.
Wait for some minutes.
3.
Make sure that no water is
in the drum.
If you deactivate the appliance,
it is necessary to set the programme again.
AT THE END OF THE PROGRAMME
• The appliance stops automatically.
• The acoustic signals operate.
•
In the display
•
The indicator of the button
off.
• The door lock symbol goes off.
•
Press button
pliance. After five minutes from the
end of the programme, the energy
saving function automatically deacti-
vates the appliance.
comes on.
4
goes
1
to deactivate the ap-
When you activate the appliance again, the display shows
the set of the last performed
programme. Turn the programme knob to set a new cycle.
• Remove the laundry from the appliance. Make sure that the drum is
empty.
• Keep the door ajar, to prevent mildew and odours.
• Close the water tap.
The washing programme is complete
but there is water in the drum:
– The drum turns regularly to prevent
the creases in the laundry.
Page 19

–The door stays locked.
– You must drain the water to open the
door.
To drain the water:
1.
If necessary, decrease the spin
speed.
2.
Press the button 4 . The appliance drains the water and then
spins.
ENGLISH
3.
When the programme is complete
and the door lock symbol goes off,
you can open the door
4.
Deactivate the appliance.
The appliance will automatically
drain and spin after approximately 18 hours.
19
Page 20

20
HELPFUL HINTS AND TIPS
THE LAUNDRY LOAD
• Divide the laundry into: white, coloured, synthetics, delicates and wool.
• Obey the washing instructions that
are on the laundry care labels.
• Do not wash white and coloured
items together.
• Some coloured items may run with
the first wash. We recommend you
wash them separately the first time.
• Buttom up pillowcases, close zippers,
hooks and poopers, and tie up belts.
• Empty the pockets.
• Any laundry with multilayered fabrics,
wool or items with painted illustrations should be turned inside out before washing.
• Remove persistent stains before
washing.
• Rub particularly soiled areas with a
special detergent or detergent paste.
• Treat curtains with special care. Remove hooks or tie them up in a bag
or net.
• Do not wash in the appliance :
– Laundry without hems or tears.
– Underwire’s bras.
– Use a washing bag to wash small
items.
• A very small load can cause balance
problems with the spin phase. If this
occurs, adjust the items in the tub
manually and start the spin phase
again.
STUBBORN STAINS
For some stains, water and detergent is
not sufficient.
We recommend that you remove these
stains before you put the items in the
appliance.
Special stain removers are available.
Use the special stain remover that is applicable to the type of stain and fabric.
DETERGENTS AND ADDITIVES
• Only use detergents and additives
specially made for front load washing
machines.
• Do not mix different types of detergents.
• To help the environment, do not use
more than the correct quantity of detergent.
• Obey the instructions that you find
on the packaging of these products.
• Use the correct products for the type
and colour of the fabric, the programme temperature and the level of
soil.
• If you use liquid detergents, do not
set the prewash phase.
• If your appliance does not have the
detergent dispenser with the flap device, add the liquid detergents with a
dosing ball.
WATER HARDNESS
If the water hardness in your area is
high or moderate, we recommend that
you use a water softener for washing
machines. In areas where the water
hardness is soft it is not necessary to
use a water softener.
To know the water hardness in your
area, contact your local water authority.
Obey the instructions that you find on
the packaging of the products.
Equivalent scales measure the water
hardness:
• German degrees (°dH).
• French degrees (°TH).
• mmol/l (millimol for each litre - international unit for the hardness of water).
• Clarke degrees.
Page 21

Water hardness table
Level Type
°dH °T.H. mmol/l Clarke
Water hardness
1 soft 0-7 0-15 0-1.5 0-9
2 medium 8-14 16-25 1.6-2.5 10-16
3 hard 15-21 26-37 2.6-3.7 17-25
4 very hard > 21 > 37 >3.7 >25
ENGLISH
21
Page 22

22
CARE AND CLEANING
WARNING!
Disconnect the appliance from the
mains supply before you clean it.
DESCALING
The water we use contains limescale. If
it becomes necessary, use a water softener to remove limescales.
Use a special product made for washing machines. Obey the instructions
that you find on the packaging of the
manufacturer.
Do this as an extra wash cycle without
laundry.
EXTERNAL CLEANING
Only clean the appliance with warm
soapy water. Fully dry all the surfaces.
DOOR SEAL
CAUTION!
Do not use alcohol, solvents or
chemical products.
MAINTENANCE WASH
With the low temperature programmes
it is possible that some detergent stays
in the drum. Make sure to do a regular
maintenance wash. To do this:
• Empty the laundry from the drum.
• Set the hottest cotton wash programme
• Use a correct quantity of powder detergent with biological properties.
After each wash, keep the door open
for a while to prevent mould and to let
unpleasant smells go out.
Regularly examine the seal and remove
all objects from the inner part.
DRUM
Regularly examine the drum to prevent
limescale and rust particles.
Only use special products to remove
rust particles from the drum.
To do this:
• Start a short programme for cotton at
the maximum temperature with a
small quantity of detergent.
Page 23

DETERGENT DISPENSER
To clean the dispenser:
1
2
1.
Press the lever.
2.
Pull the dispenser out.
3.
Remove the top part of the liquid
additive compartment.
4.
Clean all the parts with water.
5.
Clean the dispenser recess with a
brush.
6.
Put the dispenser back in the recess.
ENGLISH
23
DRAIN PUMP
Regularly examine the drain
pump and make sure that it is
clean.
Clean the pump if:
• The appliance does not drain the water.
• The drum cannot turn.
• The appliance makes an unusual
noise because of the blockage of the
drain pump.
• The display shows an alarm code because of the problem with water
drain.
WARNING!
1.
Disconnect the mains plug
from the mains socket.
2.
Do not remove the filter
while the appliance operates. Do not clean the drain
pump if the water in the appliance is hot. The water
must be cold before you
clean the drain pump.
Page 24

24
To clean the drain pump:
1
2
1.
Open the drain pump door.
2.
Pull the flap out to remove it.
3.
Put a container below the recess of
the drain pump to collect the water
that flows out.
4.
Press the two levers and pull forward the drainage duct to let the
water flow out.
5.
When the container is full of water,
put the drainage duct back again
and empty the container. Do steps
4 and 5 repeatedly until no more
water flows out from the drain
pump.
6.
Pull back the drainage duct and
turn the filter to remove it.
7.
Remove fluff and objects from the
pump.
8.
Make sure that the impeller of the
pump can turn. If this does not occur, contact the service centre.
Page 25

ENGLISH
9.
2
Clean the filter under the water tap
and put it back in the pump into
25
the special guides.
10.
Make sure that you correctly tighten the filter to prevent leakages.
11.
Put the flap back and close the
1
drain pump door.
THE INLET HOSE FILTER AND
THE VALVE FILTER
It could be necessary to clean the filters
when:
• The appliance does not fill with water.
• The appliance fills with the water for
a long time.
To clean the water inlet filters:
•
The indicator of button
and the display shows the related
alarm. Refer to 'Troubleshooting'.
WARNING!
Disconnect the mains plug from
the mains socket.
1.
Close the water tap.
2.
Remove the water inlet hose from
the water tap.
3.
Clean the filter in the inlet hose
with a stiff brush.
4.
Remove the inlet hose behind the
appliance.
5.
Clean the filter in the valve with a
stiff brush or a towel.
4
flashes
45°
20°
EMERGENCY DRAIN
Because of a malfunction, the appliance
cannot drain the water.
If this occurs, do steps (1) through (6) of
'To clean the drain pump'.
6.
Install again the inlet hose. Make
sure that the couplings are tight to
prevent leakages.
7.
Open the water tap.
If necessary, clean the pump.
Put the drainage duct back and close
the drain pump flap.
Page 26

26
When you drain the water with the
emergency drain procedure, you must
activate again the drain system:
1.
Put 2 litres of water in the main
wash compartment of the detergent dispenser.
2.
Start the programme to drain the
water.
FROST PRECAUTIONS
If the appliance is installed in an area
where the temperature can be less than
0 °C, remove the remaining water from
the inlet hose and the drain pump.
1.
Disconnect the mains plug from the
mains socket.
2.
Close the water tap.
3.
Remove the water inlet hose
4.
Put the two ends of the inlet hose
in a container and let the water
flow out of the hose.
5.
Empty the drain pump. Refer to the
emergency drain procedure
6.
When the drain pump is empty, install the inlet hose again.
WARNING!
Make sure that the temperature
is more than 0 °C before you
use the appliance again.
The manufacturer is not responsible for damages caused by
low temperatures.
Page 27

TROUBLESHOOTING
ENGLISH
27
The machine does not start or it stops
during operation..
First try to find a solution to the problem (refer to the table). If not, contact
the service centre.
With some problems, the acoustic
signals operate and the display
shows an alarm code:
•
- The appliance does not fill
•
- The appliance does not drain
the water.
•
- The appliance door is open or
not closed correctly.
•
- The anti-flood device is on.
WARNING!
Deactivate the appliance before
you do the checks.
with water.
Problem Possible cause Possible solution
The appliance
The water tap is closed. Open the water tap.
does not fill with
water.
The water inlet hose is
damaged.
The filters in the water in-
let hose are blocked .
The water tap is blocked
Make sure that the water inlet
hose has no damages.
Clean the filters. Refer to 'Care
and cleaning'.
Clean the water tap.
or is furred with limescale.
The connection of the
water inlet hose is not
Make sure that the connection is
correct.
correct.
The water pressure is too
low.
The appliance
does not drain the
The water drain hose is
damaged.
Contact your local water authori-
ty.
Make sure that the water drain
hose has no damages.
water.
The filter of the drain
pump is blocked.
Clean the filter of the drain
pump. Refer to 'Care and clean-
ing'.
The connection of the
water drain hose is not
Make sure that the connection is
correct.
correct.
A washing programme
Set the drain programme.
without the drain phase
is set.
The function Rinse &
Set the drain programme.
Hold is on.
The appliance
Close the door correctly.
door is open or
not closed correctly.
Page 28

28
Problem Possible cause Possible solution
The anti-flood device is on.
• Disconnect the appliance.
• Close the water tap.
• Contact the service centre.
The spin phase
The spin phase is off. Set the spin programme.
does not operate.
The filter of the drain
pump is blocked.
Clean the filter of the drain
pump. Refer to 'Care and clean-
ing'.
Balance problems with
the laundry load.
Adjust manually the items in the
tub and start the spin phase
again.
The programme
does not start.
The mains plug is not
connected in the mains
Put in the mains plug.
socket.
Blow out fuse in the
Replace the fuse.
household fuse box.
You did not press button
4
.
Press button 4 .
The delay start is set. To start immediately the pro-
gramme, cancel the delay start.
The Child Lock function
is activated.
There is water on
the floor.
Leakages from the couplings of the water ho-
Deactivate the Child Lock func-
tion.
Make sure that the couplings are
tight.
ses.
Leakages from the drain
pump.
The water drain hose is
damaged.
You cannot open
the appliance
The washing programme
is in operation.
Make sure that the drain pump
filter is tight.
Make sure that the water inlet
hose has no damages.
Let the washing programme end.
door.
There is water in the
drum.
The appliance
makes an unusual
Incorrect level of the appliance.
Set the drain or the spin pro-
gramme.
Adjust the level of the appliance.
Refer to 'Installation'.
noise.
You did not remove the
packaging and/or the
transit bolts.
Remove the packaging and/or
the transit bolts. Refer to 'Instal-
lation'.
The load is very small. Add more laundry in the drum.
Page 29

ENGLISH
Problem Possible cause Possible solution
The appliance fills
with water and
The end of the drain
hose is too low.
Make sure that the drain hose is
in the correct position.
drains immediately.
The washing results are not satisfactory.
You did not remove
The detergent you used
was not sufficient or correct.
stubborn stains before
Increase the detergent quantity
or use a different one.
Use special products to remove
the stubborn stains.
you wash the laundry.
Incorrect temperature
was set.
Make sure that you set the cor-
rect temperature.
Excessive laundry load. Decrease the laundry load.
After the check, activate the appliance.
The programme continues from the
If the display shows other alarm codes,
contact the service centre.
point of interruption.
If the problem occurs again, contact the
service centre.
29
Page 30

30
INSTALLATION
UNPACKING
1.
Use the gloves. Remove the external film. If necessary, use a cutter.
2.
Remove the cardboard top.
3.
Remove the polystyrene packaging
materials.
4.
Remove the internal film.
5.
Open the door. Remove the polystyrene piece from the door seal
and all the items from the drum.
Page 31

6.
Put one of the polystyrene packag-
ENGLISH
31
ing elements on the floor behind
the appliance. Carefully lay the appliance down with the rear side on
the packaging. Make sure you do
not damage the hoses. Make sure
not to damage the hoses.
7.
Remove the polystyrene protection
from the bottom.
8.
Pull up the appliance back into vertical position.
1
2
9.
Remove the power supply cable
and the drain hose from the hose
holders.
10.
Remove the three bolts. Use the
key supplied with the appliance.
11.
Pull out the plastic spacers.
Page 32

32
12.
Cover the holes with the plastic
caps provided in the user manual
bag.
WARNING!
Remove all the packaging and
the transit bolts before you install the appliance.
POSITIONING AND LEVELLING
x4
We recommend that you keep
the packaging and the transit
bolts for when you move the appliance.
• Install the appliance on a flat hard
floor.
• Make sure that carpets do not stop
the air circulation below the appliance.
• Make sure that the appliance does
not touch the wall or other units
• Loosen or tighten the feet to adjust
the level. The correct adjustment of
the appliance levelling feet prevents
the vibration, noise and the movement of the appliance when in operation.
• The appliance must be level and stable.
CAUTION!
Do not put cardboard, wood or
equivalent materials below the
appliance feet to adjust the level.
Page 33

THE INLET HOSE
20
O
45
O
20
20
ENGLISH
33
• Connect the hose to the appliance.
Turn the inlet hose only left or right.
Loosen the ring nut to set it in the
correct position.
O
O
45
O
O
45
• Connect the water inlet hose to the
cold water tap with ¾” thread.
CAUTION!
Make sure that there are no
leaks from the couplings.
Do not use an extension hose if
the inlet hose is too short. Contact the service centre for the replacement of the inlet hose.
Water-stop device
A
WATER DRAINAGE
There are different procedures to connect the drain hose:
The inlet hose has a water stop device.
This device prevents water leaks in the
hose because of its natural ageing. The
red sector in the window «A» shows this
fault .
If this occur, close the water tap and
contact the service centre to replace
the hose.
Page 34

34
With the plastic hose guide.
• On the edge of a sink.
• Make sure that the plastic guide cannot move when the appliance drains.
Attach the guide to the water tap or
the wall.
• To a stand pipe with vent-hole.
Refer to the illustration. Directly into
a drain pipe at a height of not less
than 60 cm and not more than 100
cm. The end of the drain hose must
always be ventilated , i.e. the inner
diameter of the drainpipe must be
larger than the external diameter of
the drain hose.
Without the plastic hose guide.
You can extend the drain hose
to maximum 400 cm. Contact
the service centre for the other
drain hose and the extension.
•To a sink spigot.
Refer to the illustration. Put the drain
hose in the spigot and tighten it with
a clip. Make sure that the drain hose
makes a loop upwards , preventing
remaining particles entering the appliance from the sink.
Page 35

WARRANTY
ENGLISH
35
FOR SALES IN AUSTRALIA AND NEW
ZEALAND
ALL AEG BRANDED APPLIANCES
This document sets out the terms
and conditions of the product warranties for AEG Appliances. It is an
important document. Please keep it
with your proof of purchase documents in a safe place for future reference should you require service for
your Appliance.
1.
In this warranty
a)
‘acceptable quality’ as referred
to in clause 10 of this warranty
has the same meaning referred
to in the ACL;
b)
‘ACL’ means Trade Practices
Amendment (Australian Consumer Law) Act (No.2) 2010;
c)
‘Appliance’ means any AEG
product purchased by you accompanied by this document;
d)
‘ASC’ means AEG’ authorised
serviced centres;
e)
AEG is the brand controlled by
Electrolux Home Products Pty
Ltd of 163 O’Riordan Street,
Mascot, NSW 2020, ABN 51 004
762 341 in respect of Appliances purchased in Australia and
Electrolux (NZ) Limited of 3-5
Niall Burgess Road, Mount
Wellington, in respect of Appliances purchased in New Zealand;
f)
‘major failure’ as referred to in
clause 10 of this warranty has
the same meaning referred to in
the ACL and includes a situation when an Appliance cannot
be repaired or it is uneconomic
for Electrolux, at its discretion,
to repair an Appliance during
the Warranty Period;
g)
‘Warranty Period’ means:
– where the Appliance is used
for personal, domestic or
household use (i.e. normal
single family use) as set out in
the instruction manual, the
Appliance is warranted
against manufacturing defects in Australia and New
Zealand for 60 months, following the date of original
purchase of the Appliance;
– this Appliance is not de-
signed for commercial use
and therefore no warranty applies in this case;
h)
‘you’ means the purchaser of
the Appliance not having purchased the Appliance for resale, and ‘your’ has a corresponding meaning.
2.
This warranty only applies to Appliances purchased and used in Australia or New Zealand and is in addition to (and does not exclude, restrict, or modify in any way) any
non-excludable statutory warranties
in Australia or New Zealand.
3.
During the Warranty Period AEG or
its ASC will, at no extra charge if
your Appliance is readily accessible
for service, without special equipment and subject to these terms
and conditions, repair or replace
any parts which it considers to be
defective. AEG or its ASC may use
remanufactured parts to repair your
Appliance. You agree that any replaced Appliances or parts become
the property of AEG. This warranty
does not apply to light globes, batteries, filters or similar perishable
parts.
4.
Parts and Appliances not supplied
by AEG are not covered by this
warranty.
5.
You will bear the cost of transportation, travel and delivery of the Appliance to and from AEG or its
ASC. If you reside outside of the
Page 36

36
service area, you will bear the cost
of:
a)
travel of an authorised representative;
b)
transportation and delivery of
the Appliance to and from AEG
or its ASC,
In all instances, unless the Appliance is transported by AEG or an
AEG authorised representative, the
Appliance is transported at the
owner’s cost and risk while in transit
to and from AEG or its ASC.
6.
Proof of purchase is required before you can make a claim under
this warranty.
7.
You may not make a claim under
this warranty unless the defect
claimed is due to faulty or defective
parts or workmanship. AEG is not
liable in the following situations
(which are not exhaustive):
a)
the Appliance is damaged by:
– accident
– misuse or abuse, including
failure to properly maintain or
service
– normal wear and tear
– power surges, electrical storm
damage or incorrect power
supply
– incomplete or improper in-
stallation
– incorrect, improper or inap-
propriate operation
– insect or vermin infestation
– failure to comply with any ad-
ditional instructions supplied
with the Appliance;
b)
the Appliance is modified without authority from AEG in writing;
c)
the Appliance’s serial number
or warranty seal has been removed or defaced;
d)
the Appliance was serviced or
repaired by anyone other than
AEG, an authorised repairer or
ASC.
8.
This warranty, the contract to which
it relates and the relationship between you and AEG are governed
by the law applicable where the
Appliance was purchased. Where
the Appliance was purchased in
New Zealand for business purposes
the Consumer Guarantee Act does
not apply.
9.
To the extent permitted by law,
AEG excludes all warranties and liabilities (other than as contained in
this document) including liability for
any loss or damage whether direct
or indirect arising from your purchase, use or non use of the Appliance.
10.
For Appliances and services provided by AEG in Australia, the Appliances come with a guarantee by
AEG that cannot be excluded under the Australian Consumer Law.
You are entitled to a replacement
or refund for a major failure and for
compensation for any other reasonably foreseeable loss or damage.
You are also entitled to have the
Appliance repaired or replaced if
the Appliance fails to be of acceptable quality and the failure does
not amount to a major failure. The
benefits to you given by this warranty are in addition to your other
rights and remedies under a law in
relation to the Appliances or services to which the warranty relates.
11.
At all times during the Warranty Period, AEG shall, at its discretion,
determine whether repair, replacement or refund will apply if an Appliance has a valid warranty claim
applicable to it.
12.
For Appliances and services provided by AEG in New Zealand, the
Appliances come with a guarantee
by AEG pursuant to the provisions
of the Consumer Guarantees Act,
the Sale of Goods Act and the Fair
Trading Act.
13.
To enquire about claiming under
this warranty, please follow these
steps:
Page 37

ENGLISH
a)
carefully check the operating instructions, user manual and the
terms of this warranty;
b)
have the model and serial number of the Appliance available;
c)
have the proof of purchase (eg
an invoice) available;
d)
telephone the numbers shown
below.
14.
You accept that if you make a warranty claim, AEG and its ASC may
exchange information in relation to
you to enable AEG to meet its obligations under this warranty.
Important Notice
Before calling for service, please ensure that the steps listed in point 13 above
have been followed.
37
FOR SERVICE
or to find the address of
your nearest state service
centre in Australia
PLEASE CALL 1300 363
664
OR EMAIL customercare@aegaustralia.com.au
For the cost of a local call (Aus-
tralia only)
FOR SERVICE
or to find the address of
your nearest authorised
service centre in New
Zealand
FREE CALL 0800 10 66
10
OR EMAIL customercare@electrolux.co.nz
(New Zealand only)
SERVICE AUSTRALIA
www.aeg.com/au
SERVICE NEW ZEALAND
FOR SPARE PARTS
or to find the address of
your nearest state spare
parts centre in Australia
PLEASE CALL 13 13 50
OR EMAIL customercare@aegaustralia.com.au
For the cost of a local call (Aus-
tralia only)
FOR SPARE PARTS
or to find the address of
your nearest state spare
parts centre in New Zealand
FREE CALL 0800 10 66
20
OR EMAIL customercare@electrolux.co.nz
(New Zealand only)
Page 38

38
Page 39

ENGLISH
39
Page 40

www.aeg.com/shop 132931130-B-332011
 Loading...