

Page 1
L6FEI828
USER
MANUAL
EN User Manual
Washing Machine
Page 2

www.aeg.com2
CONTENTS
1. SAFETY INFORMATION......................................................................................3
2. SAFETY INSTRUCTIONS.................................................................................... 4
3. PRODUCT DESCRIPTION...................................................................................6
4. TECHNICAL DATA............................................................................................... 7
5. INSTALLATION.....................................................................................................8
6. ACCESSORIES.................................................................................................. 12
7. CONTROL PANEL..............................................................................................12
8. DIAL AND BUTTONS......................................................................................... 13
9. PROGRAMMES .................................................................................................15
10. SETTINGS........................................................................................................ 19
11. BEFORE FIRST USE........................................................................................20
12. DAILY USE....................................................................................................... 20
13. HINTS AND TIPS..............................................................................................24
14. CARE AND CLEANING.................................................................................... 26
15. TROUBLESHOOTING......................................................................................31
16. CONSUMPTION VALUES................................................................................33
17. QUICK GUIDE.................................................................................................. 35
18. ENVIRONMENTAL CONCERNS......................................................................37
FOR PERFECT RESULTS
Thank you for choosing this AEG product. We have created it to give you
impeccable performance for many years, with innovative technologies that help
make life simpler – features you might not find on ordinary appliances. Please
spend a few minutes reading to get the very best from it.
Visit our website to:
Get usage advice, brochures, trouble shooter, service and repair information:
www.aeg.com/support
Register your product for better service:
www.registeraeg.com
Buy Accessories, Consumables and Original spare parts for your appliance:
www.aeg.com/shop
CUSTOMER CARE AND SERVICE
Always use original spare parts.
When contacting our Authorised Service Centre, ensure that you have the
following data available: Model, PNC, Serial Number.
The information can be found on the rating plate.
Warning / Caution-Safety information
General information and tips
Environmental information
Subject to change without notice.
Page 3

1. SAFETY INFORMATION
Before the installation and use of the appliance, carefully
read the supplied instructions. The manufacturer is not
responsible for any injuries or damage that are the result
of incorrect installation or usage. Always keep the
instructions in a safe and accessible location for future
reference.
1.1 Children and vulnerable people safety
• This appliance can be used by children aged from 8
years and above and persons with reduced physical,
sensory or mental capabilities or lack of experience
and knowledge if they have been given supervision or
instruction concerning the use of the appliance in a
safe way and understand the hazards involved.
• Children between 3 and 8 years of age and persons
with very extensive and complex disabilities shall be
kept away from the appliance unless continuously
supervised.
• Children of less than 3 years of age should be kept
away from the appliance unless continuously
supervised.
• Children should be supervised to ensure that they do
not play with the appliance.
• Keep all packaging away from children and dispose of
it appropriately.
• Keep detergents away from children.
• Keep children and pets away from the appliance when
the door is open.
• If the appliance has a child safety device, it should be
activated.
• Children shall not carry out cleaning and user
maintenance of the appliance without supervision.
ENGLISH 3
1.2 General Safety
• Do not change the specification of this appliance.
Page 4

www.aeg.com4
• This appliance is intended to be used in household
and similar applications such as:
– staff kitchen areas in shops, offices and other
working environments;
– by clients in hotels, motels, bed & breakfast and
other residential type environments;
– areas for communal use in blocks of flats or in
launderettes.
• The appliance maximum load is 8 kg. Do not exceed
the maximum load of each programme (refer to the
“Programmes” chapter).
• The operating water pressure at the water entry point
from the outlet connection must be between 0.5 bar
(0.05 MPa) and 10 bar (1.0 MPa).
• The ventilation opening in the base must not be
covered by a carpet, mat, or any floor covering.
• The appliance must be connected to the water mains
using the new supplied hose sets, or other new hose
sets supplied by the Authorised Service Centre.
• Old hose sets must not be reused.
• If the mains power supply cable is damaged, it must
be replaced by the manufacturer, its Authorised
Service Centre or similarly qualified persons to avoid
an electrical hazard.
• Before any maintenance operation, deactivate the
appliance and disconnect the mains plug from the
socket.
• Do not use high pressure water sprays and/or steam
to clean the appliance.
• Clean the appliance with a moist cloth. Use only
neutral detergents. Do not use abrasive products,
abrasive cleaning pads, solvents or metal objects.
2. SAFETY INSTRUCTIONS
2.1 Installation
The installation must comply
with relevant national
regulations.
• Remove all the packaging and the
transit bolts including rubber bush
with plastic spacer.
• Keep the transit bolts in a safe place.
If the appliance is to be moved in the
Page 5

ENGLISH 5
future they must be reattached to lock
the drum to prevent an internal
damage.
• Always take care when moving the
appliance as it is heavy. Always use
safety gloves and enclosed footwear.
• Follow the installation instructions
supplied with the appliance.
• Do not install or use a damaged
appliance.
• Do not install or use the appliance
where the temperature can be less
than 0°C or where it is exposed to the
weather.
• The floor area on which the appliance
is to be installed must be flat, stable,
heat resistant and clean.
• Make sure that there is air circulation
between the appliance and the floor.
• When the appliance is in its
permanent position, check if it is
levelled correctly with the aid of a
spirit level. If it is not, adjust the feet
accordingly.
• Do not install the appliance directly
above a floor drain.
• Do not spray water on the appliance
and do not expose it to excessive
humidity.
• Do not install the appliance where the
appliance door cannot be fully
opened.
• Do not put a closed container to
collect possible water leakage under
the appliance. Contact the Authorised
Service Centre to ensure which
accessories can be used.
2.2 Electrical connection
WARNING!
Risk of fire and electric
shock.
• WARNING: This appliance is
designed to be installed / connected
to a grounding connection in the
building.
• Always use a correctly installed
shockproof socket.
• Make sure that the parameters on the
rating plate are compatible with the
electrical ratings of the mains power
supply.
• Do not use multi-plug adapters and
extension cables.
• Make sure not to cause damage to
the mains plug and to the mains
cable. Should the mains cable need to
be replaced, this must be carried out
by our Authorised Service Centre.
• Connect the mains plug to the mains
socket only at the end of the
installation. Make sure that there is
access to the mains plug after the
installation.
• Do not touch the mains cable or the
mains plug with wet hands.
• Do not pull the mains cable to
disconnect the appliance. Always pull
the mains plug.
2.3 Water connection
• The inlet water shall not exceed
25 °C.
• Do not cause damage to the water
hoses.
• Before connection to new pipes, pipes
not used for a long time, where repair
work has been carried out or new
devices fitted (water meters, etc.), let
the water flow until it is clean and
clear.
• Ensure that there are no visible water
leaks during and after the first use of
the appliance.
• Do not use an extension hose if the
inlet hose is too short. Contact the
Authorised Service Centre for the
replacement of the inlet hose.
• When unpacking the appliance, It is
possible to see water flowing from the
drain hose. This is due to the testing
of the appliance with the use of water
in the factory.
• You can extend the drain hose to
maximum 400 cm. Contact the
Authorised Service Centre for the
other drain hose and the extension.
• Make sure that there is access to the
tap after the installation.
2.4 Use
WARNING!
Risk of injury, electric shock,
fire, burns or damage to the
appliance.
• Follow the safety instructions on the
detergent packaging.
Page 6

www.aeg.com6
• Do not put flammable products or
items that are wet with flammable
products in, near or on the appliance.
• Do not wash fabrics which are heavily
soiled with oil, grease or other greasy
substances. It can damage rubber
parts of the washing machine.
Prewash such fabrics by hand before
loading them into the washing
machine.
• Do not touch the glass door while a
programme operates. The glass can
get hot.
• Make sure that all metal objects are
removed from the laundry.
2.5 Service
• To repair the appliance contact the
Authorised Service Centre. Use
original spare parts only.
• Please note that self-repair or nonprofessional repair can have safety
consequences and might void the
guarantee.
• The following spare parts will be
available for 10 years after the model
has been discontinued: motor and
motor brushes, transmission between
motor and drum, pumps, shock
absorbers and springs, washing drum,
drum spider and related ball bearings,
heaters and heating elements,
including heat pumps, piping and
related equipment including hoses,
valves, filters and aquastops, printed
circuit boards, electronic displays,
pressure switches, thermostats and
sensors, software and firmware
including reset software, door, door
hinge and seals, other seals, door
locking assembly, plastic peripherals
such as detergent dispensers. Please
note that some of these spare parts
are only available to professional
repairers, and that not all spare parts
are relevant for all models.
• Concerning the lamp(s) inside this
product and spare part lamps sold
separately: These lamps are intended
to withstand extreme physical
conditions in household appliances,
such as temperature, vibration,
humidity, or are intended to signal
information about the operational
status of the appliance. They are not
intended to be used in other
applications and are not suitable for
household room illumination.
2.6 Disposal
WARNING!
Risk of injury or suffocation.
• Disconnect the appliance from the
mains electrical and water supplies.
• Cut off the mains electrical cable
close to the appliance and dispose of
it.
• Remove the door catch to prevent
children or pets from becoming
trapped in the drum.
• Dispose of the appliance in
accordance with local requirements
for the disposal of Waste Electrical
and Electronic Equipment (WEEE).
3. PRODUCT DESCRIPTION
3.1 Special features
Your new washing machine meets all
modern requirements for an effective
treatment of laundry with low water,
energy and detergent consumption and
respectful of fabric care.
• The ProSense Technology adjusts
automatically the programme duration
to the laundry in the drum to achieve
perfect washing results in the
minimum possible time. Read the
paragraph "The ProSense
Technology load detection " for more
details.
Page 7
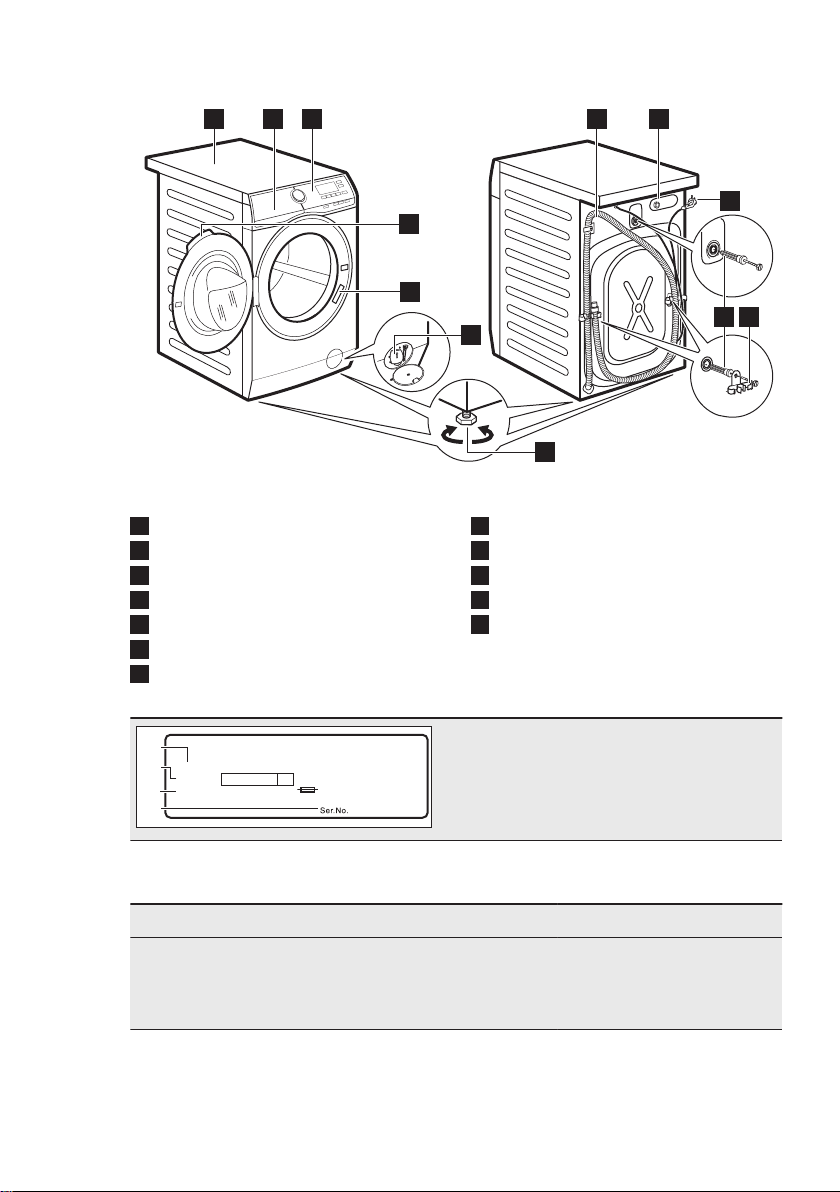
3.2 Appliance overview
1
1 2 3
9
5
6
7
4
10
8
11 12
00000000
00A
Mod.
xxxxxxxxx
000V ~ 00Hz 0000 W
910000000
00
A
B
C
Prod.No.
D
ENGLISH 7
Worktop
1
Detergent dispenser
2
Control panel
3
Door handle
4
Rating plate
5
Drain pump filter
6
Feet for levelling the appliance
7
4. TECHNICAL DATA
Dimension Width/ Height/ Total depth 59,6 cm /84,7 cm /57,7 cm
Electrical connection Voltage
Drain hose
8
Inlet hose connection
9
Mains cable
10
Transit bolts
11
Hose support
12
The rating plate reports the model name
(A), product number (B), electrical ratings
(C) and serial number (D).
Overall power
Fuse
Frequency
230 V
2000 W
10 A
50 Hz
Page 8
1
2
www.aeg.com8
Level of protection against ingress of solid particles and
moisture ensured by the protective cover, except where
the low voltage equipment has no protection against mois‐
ture
Water supply pressure Minimum
Water supply
Maximum Load Cotton 8 kg
Spin Speed Maximum spin speed 1151 rpm
1)
Connect the water inlet hose to a water tap with a 3/4'' thread.
1)
5. INSTALLATION
WARNING!
Refer to Safety chapters.
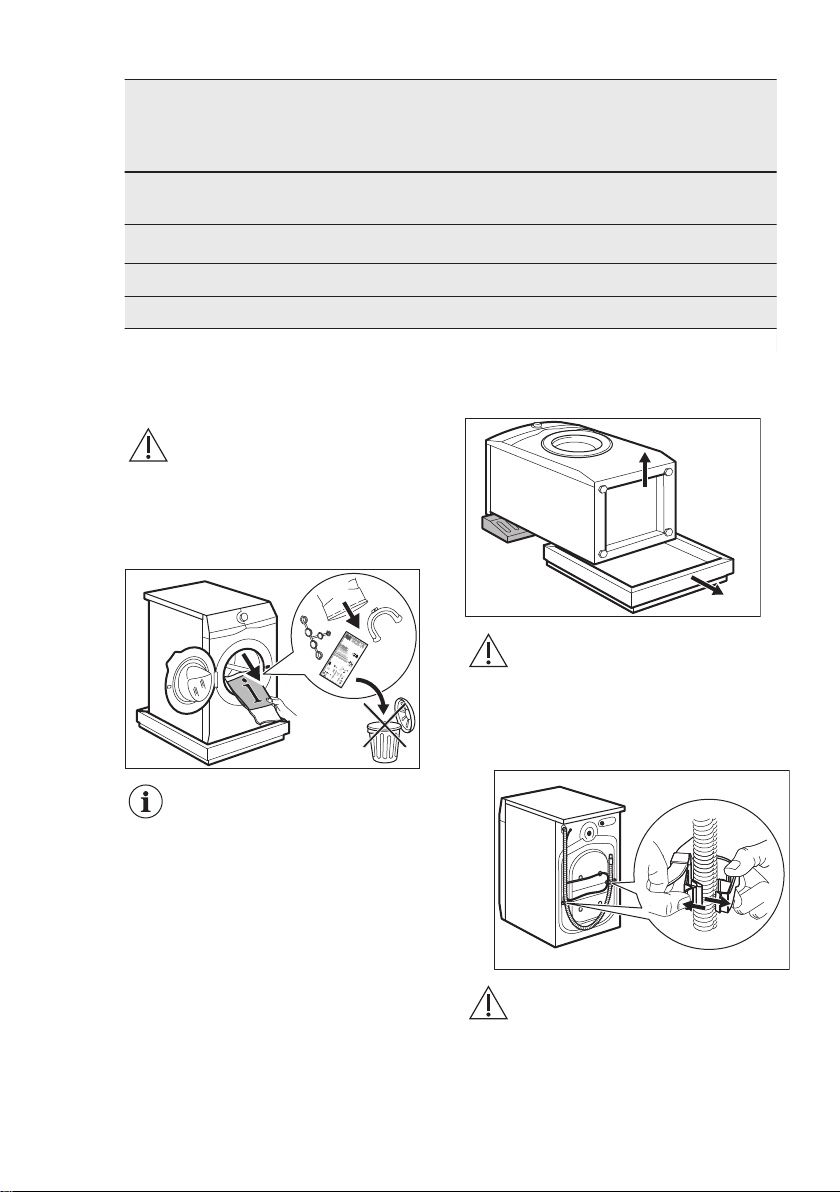
5.1 Unpacking
1. Open the door. Remove all the items
from the drum.
Accessories delivered
with the appliance may
vary depending on the
model.
2. Put the packaging element on the
floor behind the appliance and
carefully put it down onto its rear
side. Remove the polystyrene
protection from the bottom.
Maximum
IPX4
0.5 bar (0.05 MPa)
10 bar (1.0 MPa)
Cold water
CAUTION!
Do not lay washing machine
on its front.
3. Put the appliance back into an
upright position. Remove the power
supply cable and the drain hose from
the hose holders.
WARNING!
It is possible to see
water flowing from the
drain hose. This is
because the washing
machine has been
tested at the factory.
Page 9
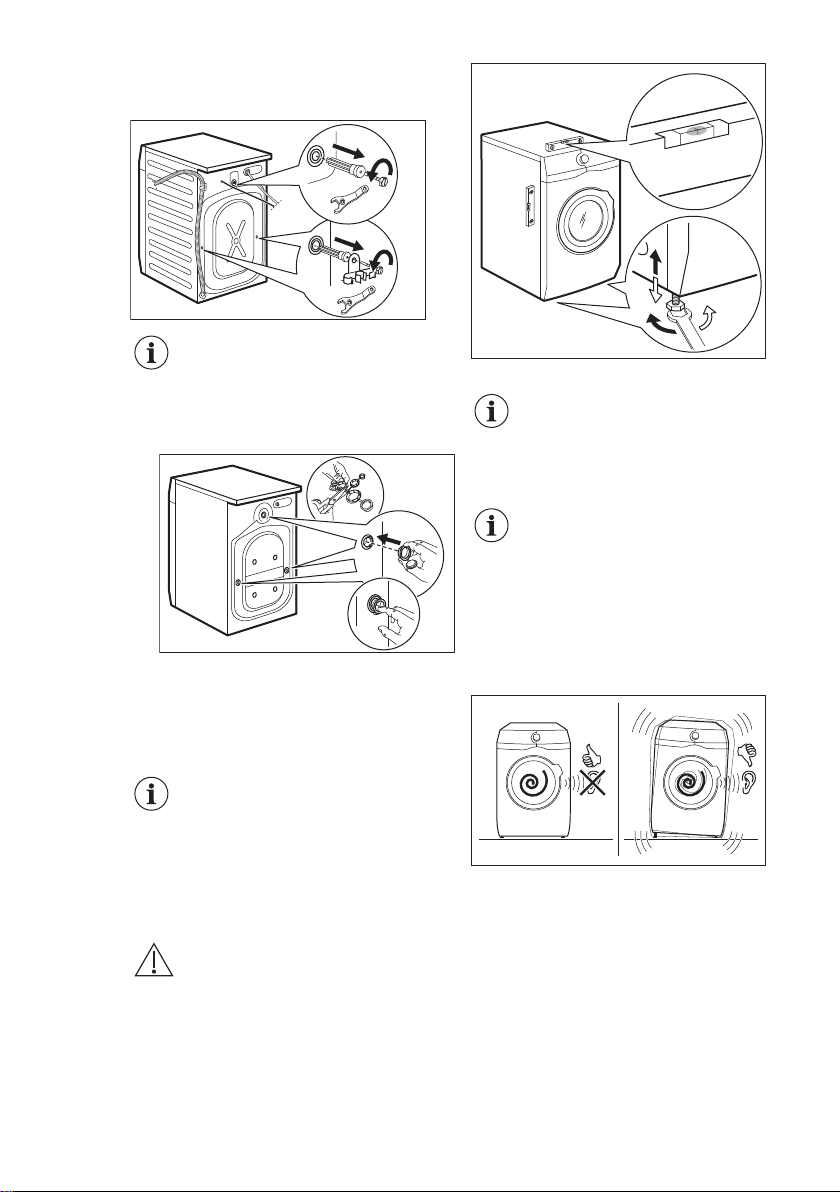
4. Remove the three bolts by using the
x4
key supplied with the appliance. Pull
out the plastic spacers.
We recommend that you
keep the packaging and
the transit bolts for any
transport of the appliance.
5. Put the plastic caps, that you find in
the user manual bag, in the holes.
ENGLISH 9
The appliance must be level and stable.
A correct adjustment of the
appliance level prevents the
vibration, noise and the
movement of the appliance
when in operation.
When the appliance is
installed on a plinth or a
tumble dryer is stacked on
the washing machine, use
the accessories described in
chapter 'Accessories'. Read
carefully the instructions
supplied with the appliance
and with the accessory.
5.2 Positioning and levelling
1. Install the appliance on a flat hard
floor.
Make sure that carpets do
not stop the air circulation
below the appliance.
Make sure that the appliance
does not touch the wall or
other units.
2. Loosen or tighten the feet to adjust
the level.
WARNING!
Do not put cardboard, wood
or equivalent materials
below the appliance feet to
adjust the level.
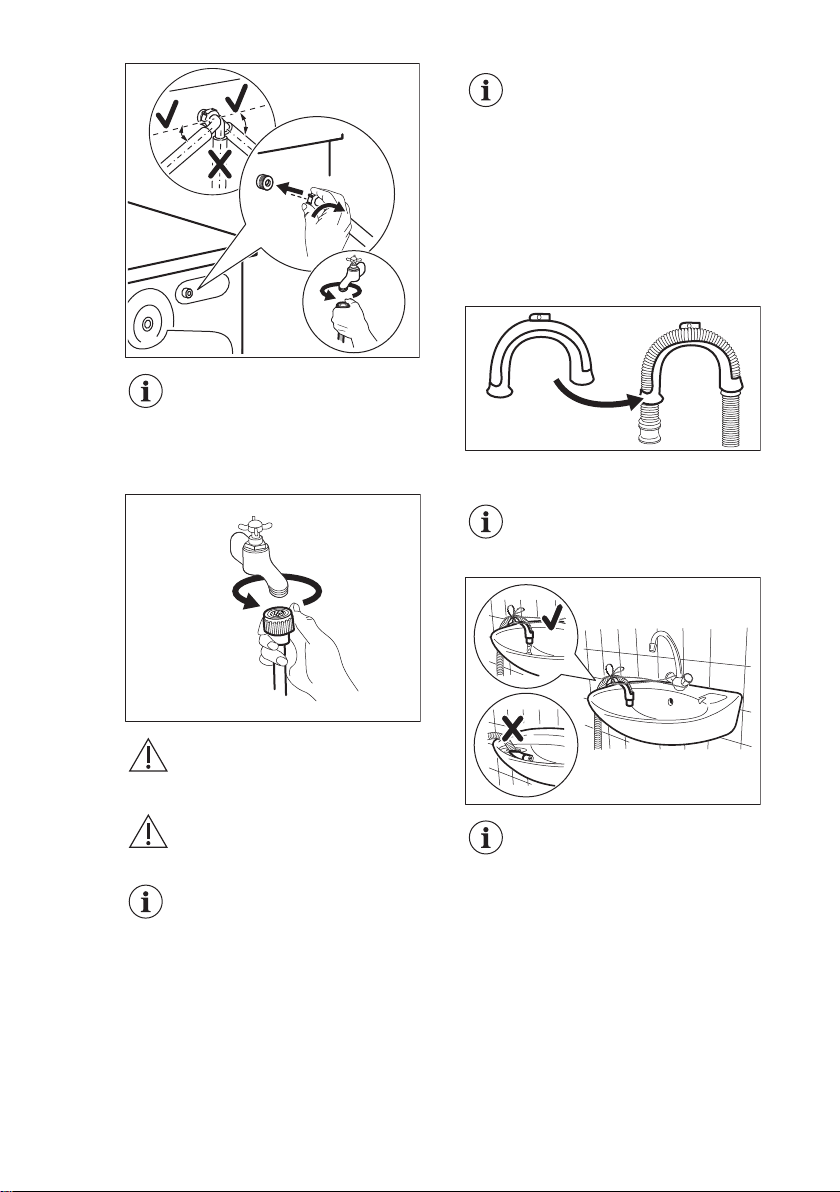
5.3 The inlet hose
1. Connect the water inlet hose to the
back of the appliance.
2. Position it toward left or right
depending on the position of the
water tap.
Page 10
20º20º
45º45º
www.aeg.com10
Make sure that the inlet hose
is not in vertical position.
3. If necessary, loose the ring nut to set
it in the correct position.
4. Connect the water inlet hose to the
cold water tap with 3/4" thread.
You can extend the drain
hose to maximum 400 cm.
Contact the authorized
service centre for the other
drain hose and the
extension.
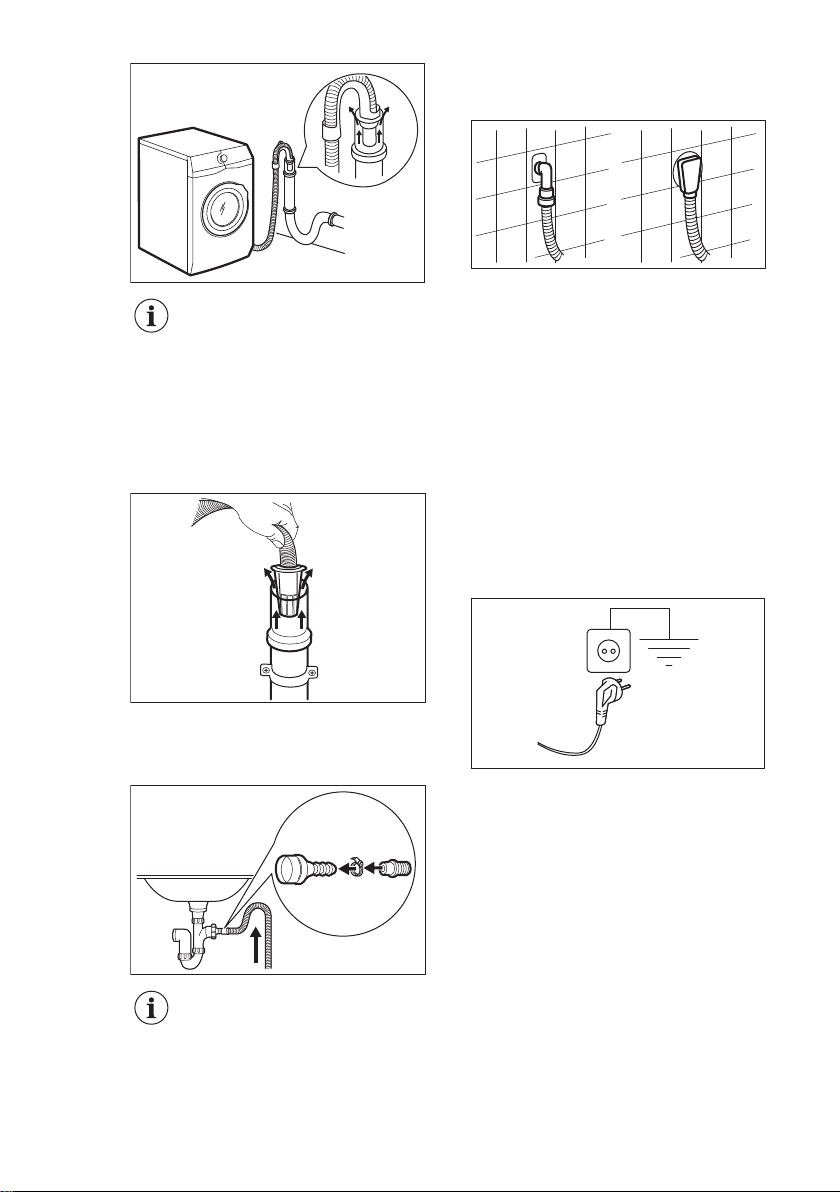
It is possible to connect the drain hose in
different ways:
1. Make a U shape with the drain hose
and put it around the plastic hose
guide.
2. On the edge of a sink - Fasten the
guide to the water tap or to the wall.
Make sure that the plastic
guide cannot move when the
appliance drains.
WARNING!
The inlet water shall not
exceed 25 °C.
CAUTION!
Make sure that there are no
leaks from the couplings.
Do not use an extension
hose if the inlet hose is too
short. Contact the service
centre for the replacement of
the inlet hose.
5.4 Water drainage
The drain hose should be positioned at a
height of not less than 60 cm and not
more than 100 cm from the floor.
Make sure that the drain
hose end is not immersed in
the water. There may be a
return of dirty water into the
appliance.
3. To a stand pipe with vent-hole Insert the drain hose directly into a
drain pipe. Refer to the illustration.
Page 11
ENGLISH 11
6. Position the hose directly to a built-
in drain pipe in the room wall and
tighten it with a clamp.
The end of the drain hose
must always be ventilated ,
i.e. the inner diameter of the
drain pipe (min. 38 mm min. 1.5") must be larger
than the external diameter of
the drain hose.
4. If the end of the drain hose looks like
this (see the picture), you can push it
directly into the stand pipe.
5. Without the plastic hose guide, to
a sink spigot - Put the drain hose in
the spigot and tighten it with a clamp.
Refer to the illustration.
5.5 Electrical connection
At the end of installation you can connect
the mains plug to the mains socket.
The rating plate on the inner edge of the
appliance door and the 'Technical Data'
chapter indicate the necessary electrical
ratings. Make sure that they are
compatible with the mains power supply.
Check that your domestic electrical
installation can take the maximum load
required, also taking into account any
other appliances in use.
Connect the appliance to an earthed
socket.
The power supply cable must be easily
accessible after installing the appliance.
For any electrical work required to install
this appliance, contact our Authorised
Service Centre.
The manufacturer does not accept any
responsibility for damage or injury
through failure to comply with the above
safety precaution.
Make sure that the drain
hose makes a loop to
prevent particles going into
the appliance from the sink.
Page 12
2
3
9 8 6
1
4
5
7
www.aeg.com12
6. ACCESSORIES
6.1 Available in www.aeg.com/shop or from authorised dealer
Read carefully the instructions supplied
with the accessory.
Only appropriate
accessories approved by
AEG ensure the safety
standards of the appliance. If
unapproved parts are used,
any claims will be
invalidated.
6.2 Fixing plate kit
If you install the appliance on a plinth
that is not an accessory supplied by
AEG, secure the appliance in the fixing
plates.
Read carefully the instructions supplied
with the accessory.
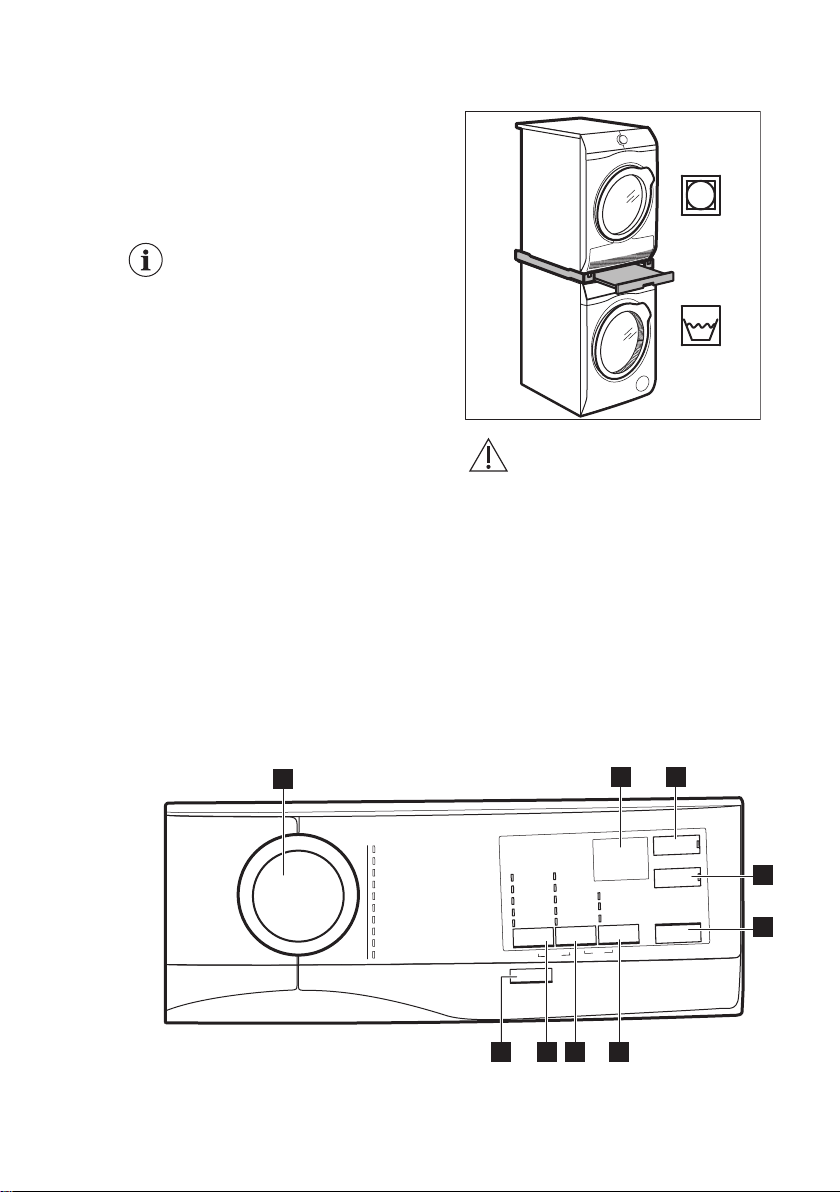
6.3 Stacking kit
The tumble dryer can be stacked on the
top of the washing machine only by
using the correct stacking kit.
WARNING!
Do not put the tumble dryer
under the washing machine.
Verify the compatible
stacking kit by checking the
depth of your appliances.
7. CONTROL PANEL
7.1 Control panel description
Page 13
Programme dial
A
B ED
C
1
Display
2
3
Inicio Diferido touch button
4
Extra Rápido touch button
5
Inicio/Pausa touch button
6
Opc. touch button
• Manchas option
• Pre-lava. option
7.2 Display
• Aclarado/Enxag. option
Centrif. reduction options touch
7
button
• No spin option
• Rinse hold option
8
Temp.ºC touch button
9
On/Off push button
ENGLISH 13
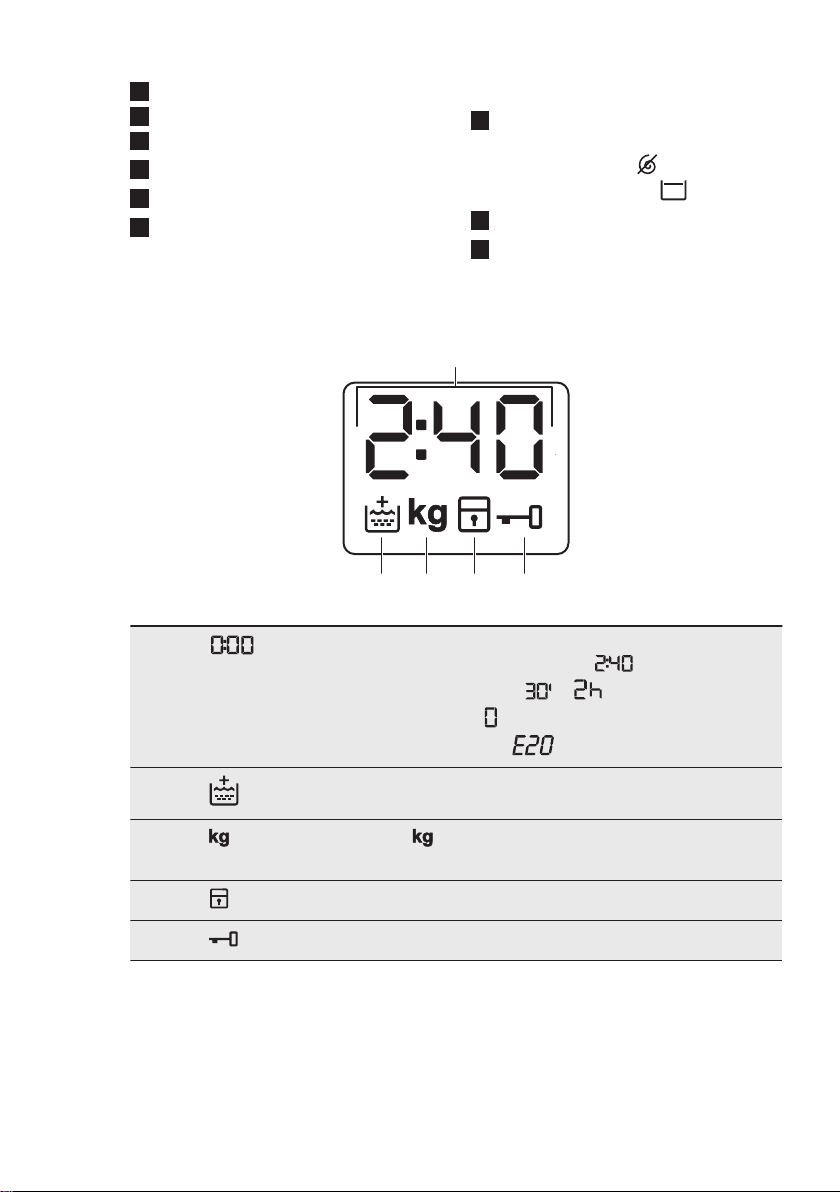
A The digital indicator can show:
B
C
D
E
8. DIAL AND BUTTONS
8.1 On/Off
Pressing this button for a few seconds
allows to activate or deactivate the
• Programme duration (e. g.
• Delay time (e. g.
• Cycle end (
• Warning code (
Extra rinse indicator. It lights on when this option is se‐
lected .
The indicator blink during the laundry load detec‐
tions.
Child safety lock indicator.
Door locked indicator.
appliance. Two different tunes sound
while switching the appliance on or off.
As the Stand-by function automatically
deactivates the appliance to decrease
or ).
).
).
).
Page 14
www.aeg.com14
the energy consumption in a few cases,
you may need to activate the appliance
again.
For more details, refer to Stand-by
paragraph in Daily Use chapter.
8.2 Introduction
The options/functions are
not selectable with all
washing programmes.
Check the compatibility
between options/functions
and washing programmes in
the "Programme Chart". An
option/function can exclude
another one, in this case the
appliance doesn't allow you
to set the incompatible
options/functions together.
Make sure the screen and
touch buttons are always
clean and dry.
8.3 Temp.ºC
When you select a washing programme,
the appliance automatically proposes a
default temperature.
Set this option to change the default
temperature.
The indicator = cold water of the set
temperature comes on (the appliance
does not heat the water).
8.4 Centrif.
When you set a programme, the
appliance automatically sets the
maximum spin speed allowed.
Touch repeatedly this button to:
Activate the Rinse hold option
• Set this option to prevent the laundry
creases.
• The related indicator comes on.
• There is a water in the drum when the
programme is completed.
• The door stays locked and the drum
turns regularly to reduce creasing.
• You must drain the water to unlock
the door.
• If you touch the Inicio/Pausa button,
the appliance performs the spinning
phase and drains the water.
The appliance empties the
water out automatically after
18 hours approximately.
Activate the No spin
• Set this option to deactivate all spin
phases. Only the drain phase is
available.
• The related indicator comes on.
• Set this option for very delicate
fabrics.
• The rinses phase uses more water for
some washing programmes.
The spin speed can be
reduce.
option
8.5 Opc.
Press this button repeatedly to activate
one of the available options.
• Manchas
Select this option to add an anti-stain
phase to a programme in order to
treat heavily soiled or stained laundry
with stain remover.
Pour the stain remover into
compartment . The stain remover will
be added in the appropriate phase of
the washing programme.
This option can increase
the programme duration.
This option is not
available with a
temperature lower than
40 °C.
• Pre-lava.
Use this option to add a prewash
phase at 30 °C before the washing
phase.
This option is recommended for
heavily soiled laundry, especially if
containing sand, dust , mud and other
solid particles.
This option can increase
the programme duration.
• Aclarado/Enxag.
Page 15
ENGLISH 15
The appliance performs only the
rinsing phase, the spinning and the
draining phases of the selected
programme.
The relevant indicator comes on.
8.6 Inicio Diferido
With this option you can delay the start of
a programme in a more convenient time.
Touch repeatedly the button to set the
required delay. The time increases by
steps of 30 minutes up to 90' and from 2
hours up to 20 h.
The indicator of the option and the
indicator of the set value are on. After
touching theInicio/Pausa button the
appliance begins the countdown.
8.7 Extra Rápido
This option may be advisable to shorten
the washing programme.
9. PROGRAMMES
9.1 Programme Chart
Washing programmes
Programme Programme description
Washing programmes
Eco 40-60 White cotton and fast-coloured cotton. Normally soiled
Algod.
Sintéticos
Delicados
Lana/Lãs + Seda
20 min. - 3 kg
Use this option for items with normal or
light soil or items to refresh.
Touch this button once to decrease the
duration.
In case of smaller load, touch this button
twice to set an extra quick programme.
The indicator of the option and the
indicator of the set value are on.
8.8 Inicio/Pausa
Touch the Inicio/Pausa button to start,
pause the appliance or interrupt a
running programme.
items. The energy consumption decreases and the time of the
washing programme is extended, ensuring good washing re‐
sults.
White and coloured cotton heavily and normally soiled cotton
items.
Synthetic items or mixed fabric items. Normally soiled
items.
Delicate fabrics such as acrylics, viscose and mixed fab‐
rics requiring gentler washing. Normally and lightly soiled
items.
Machine washable wool, hand washable wool and other
fabrics with «hand washing» care symbol1).
Cotton and synthetic items lightly soiled or once worn.
Algod. 20°
Mixed fabric (cotton and synthetic items)2).
Page 16
www.aeg.com16
Programme Programme description
Fácil Plancha/Engomar Synthetic items requiring a gentle wash. Normally and light‐
3)
Anti-Alergia
ly soiled items.
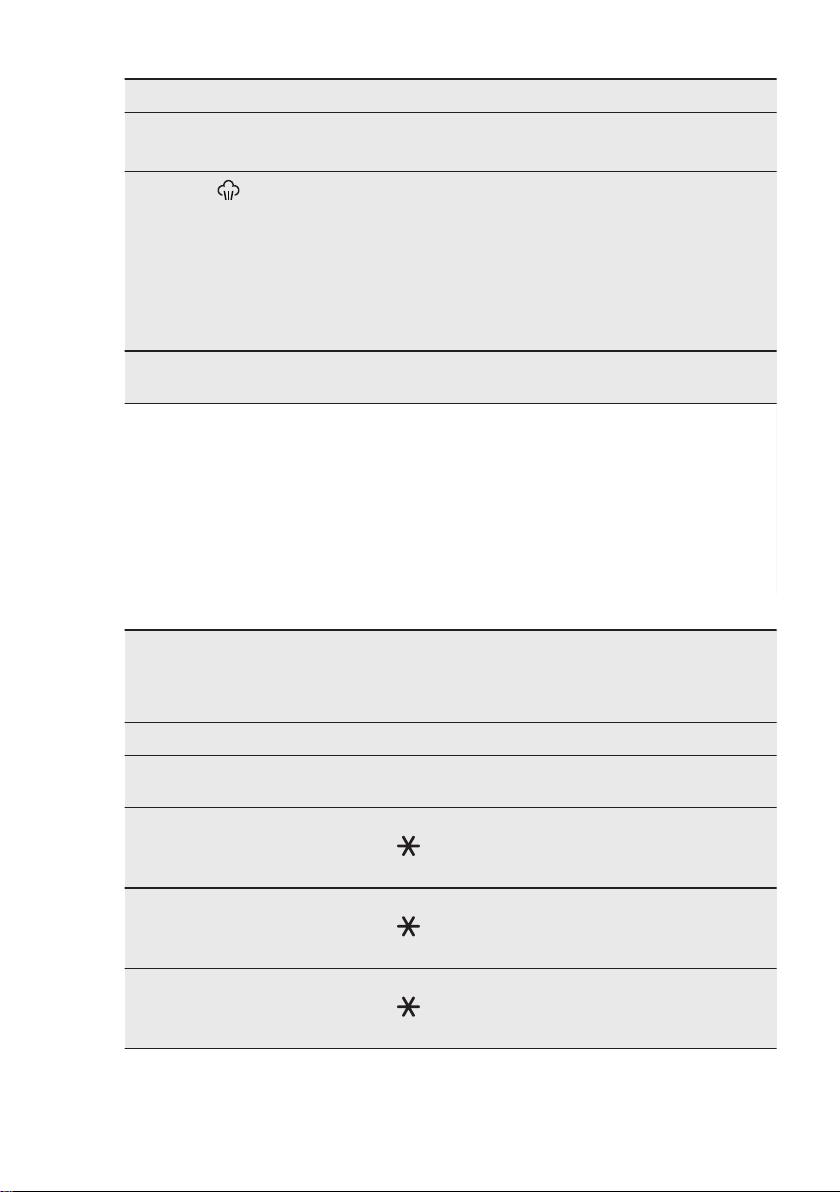
White cotton items. This high-performance wash program
combined with steam vapour, removes more than 99,99% of
bacteria and viruses4) keeping the temperature above 60°C
throughout the washing phase; with an additional action on the
fibers thanks to a vapour phase, an enhanced rinsing phase
ensures a proper removal of detergent and micro-organism
residues. This program ensures also a proper reduction of pol‐
lens/allergenic items.
Centrif./Drenar
1)
During this cycle the drum rotates slowly to ensure a gentle wash. It can seem that the drum doesn't
rotate or doesn't rotate properly, but this is normal for this programme.
2)
This programme is for daily use and has the lowest energy and water consumption whilst maintaining
a good washing performance.
3)
To reduce creasing, this cycle regulates the water temperature and performs a soft wash and spin
phase. The appliance adds some rinses.
4)
Tested for Staphylococcus aureus, Enterococcus faecium, Candida albicans, Pseudomonas aerugino‐
sa and MS2 Bacteriophage in external test performed by Swissatest Testmaterialien AG in 2021 (Test
Report No. 202120117).
All fabrics, except woollens and delicate fabrics. To spin
the laundry and to drain the water in the drum.
Programme temperature, maximum spin speed and maximum load
Programme Default temper‐
ature
Temperature
Reference spin
speed
Spin speed range
Maximum load
range
Washing programmes
Eco 40-60
Algod.
Sintéticos
Delicados
40 °C
40 °C
95 °C (Cold )
40 °C
60 °C (Cold )
30 °C
40 °C (Cold )
1)
1200 rpm
1200 rpm - 800 rpm
1200 rpm
1200 rpm - 800 rpm
1200 rpm
1200 rpm - 800 rpm
1200 rpm
1200 rpm - 800 rpm
8 kg
8 kg
3 kg
2 kg
Page 17
ENGLISH 17
Programme Default temper‐
ature
Temperature
Reference spin
speed
Spin speed range
Maximum load
range
40 °C
Lana/Lãs + Seda
40 °C (Cold )
20 min. - 3 kg
Algod. 20°
30 °C
40 °C - 30 °C
(Cold )
40 °C
Fácil Plancha/Engomar
60 °C (Cold )
Anti-Alergia
Centrif./Drenar
1)
According to Commission Regulation EU 2019/2023, this programme at 40 °C is able to clean normal‐
ly soiled cotton laundry declared to be washable at 40 °C or 60 °C, together in the same cycle.
For the reached temperature in the laundry, the programme duration and other data,
please refer to 'Consumption Values' chapter.
The most efficient programmes in terms of energy consumption are generally those that
perform at lower temperatures and longer duration.
2)
60 °C
-
1200 rpm
1200 rpm - 800 rpm
1200 rpm
1200 rpm - 800 rpm
1200 rpm
1200 rpm - 800 rpm
800 rpm
800 rpm - 800 rpm
1200 rpm
1200 rpm - 800 rpm
1200 rpm
1200 rpm - 800 rpm
1,5 kg
3 kg
8 kg
3 kg
8 kg
8 kg
2)
Set the spin speed. Make sure it is suitable for the type of fabric being washed. If you set the No Spin
option then only the drain phase is available.
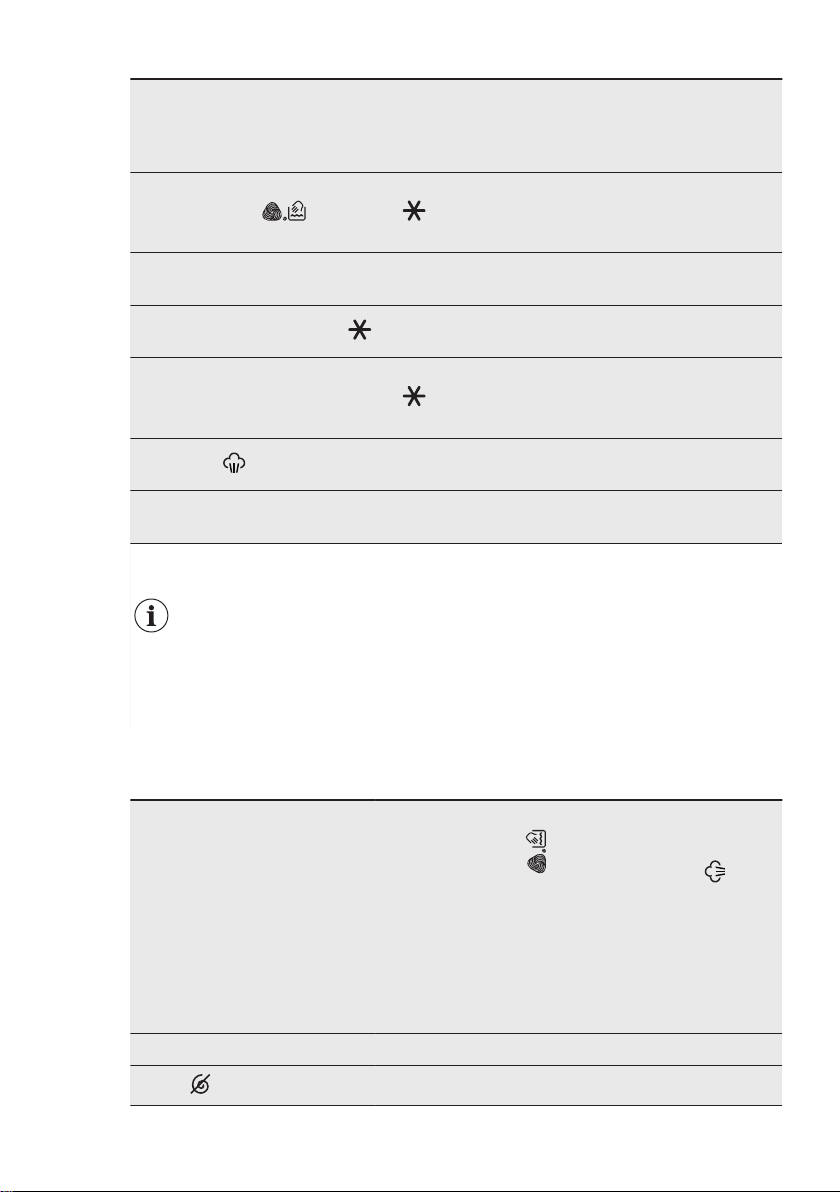
Programme options compatibility
Algod.
Eco 40-60
PROGRAMME
OPTIONS
Delicados
Sintéticos
Lana/Lãs + Seda
Algod. 20°
20 min. - 3 kg
Anti-Alergia
Fácil Plancha/Engomar
Centrif. ■ ■ ■ ■ ■ ■ ■ ■ ■
No spin
■ ■ ■ ■ ■ ■ ■ ■ ■ ■
Centrif./Drenar
Page 18
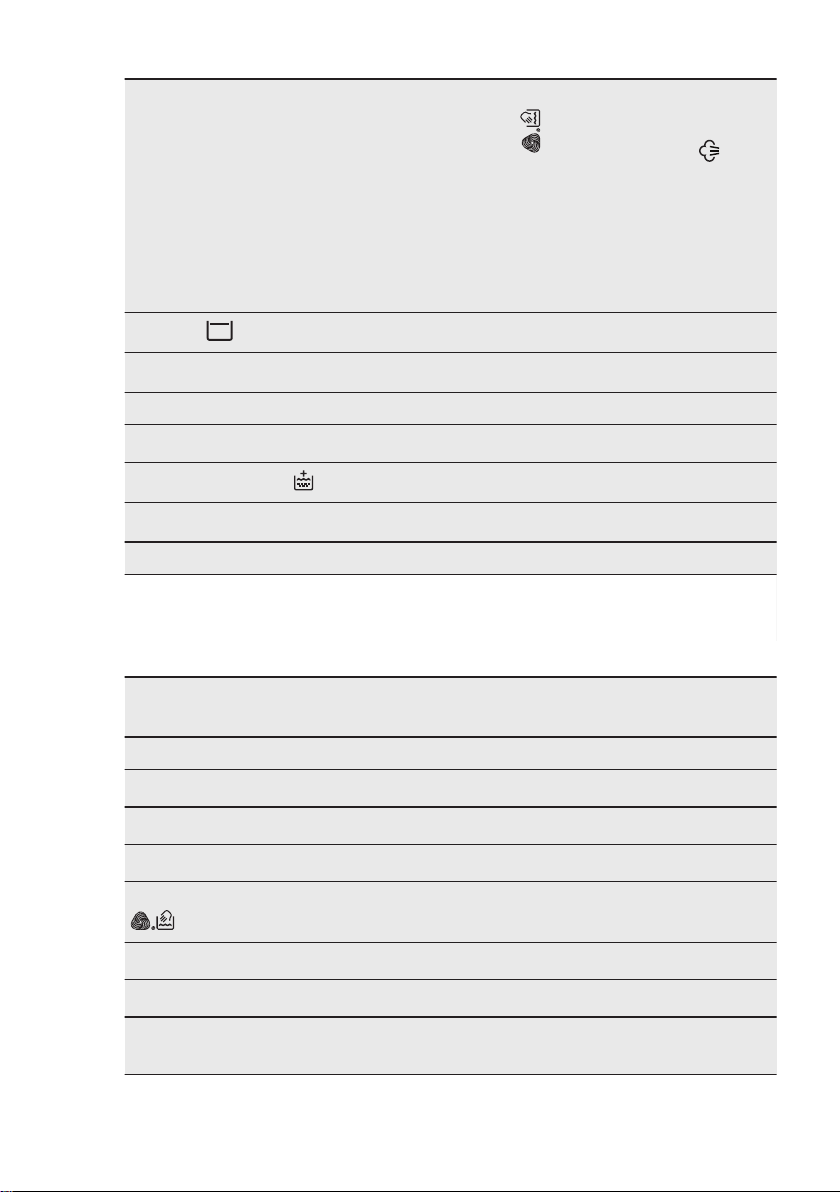
www.aeg.com18
OPTIONS
PROGRAMME
Algod.
Eco 40-60
Delicados
Sintéticos
Lana/Lãs + Seda
Algod. 20°
20 min. - 3 kg
Anti-Alergia
Centrif./Drenar
Fácil Plancha/Engomar
Rinse hold
Manchas
1)
■ ■ ■ ■ ■ ■ ■ ■
■ ■ ■ ■ ■
Pre-lava. ■ ■ ■ ■ ■ ■
Aclarado/Enxag.
Extra Aclarado/Enxag.
Extra Rápido
2)
■ ■ ■ ■ ■ ■ ■ ■ ■
■ ■ ■ ■ ■ ■ ■
■ ■ ■ ■ ■ ■
Inicio Diferido ■ ■ ■ ■ ■ ■ ■ ■ ■ ■
1)
This option is not available with temperature lower than 40 °C.
2)
If you set the shortest duration, we recommend that you decrease the load size. It is possible to fully
load the appliance, however the washing results can be less satisfactory.
Suitable detergents for washing programmes
Programme
Universal
powder
1)
Liquid Uni‐
versal
Liquid for
coloureds
Delicates
woollens
Special
Eco 40-60 ▲ ▲ ▲ -- --
Algod.
Sintéticos
Delicados
Lana/Lãs + Seda
▲ ▲ ▲ -- --
▲ ▲ ▲ -- --
-- -- -- ▲ ▲
-- -- -- ▲ ▲
20 min. - 3 kg
Algod. 20°
Fácil Plancha/
Engomar
-- ▲ ▲ -- --
▲ ▲ ▲ -- --
▲ ▲ ▲ -- --
Page 19
ENGLISH 19
Programme
Anti-Alergia
1)
At temperature higher than 60 °C the use of powder detergent is recommended.
▲ = Recommended -- = Not recommended
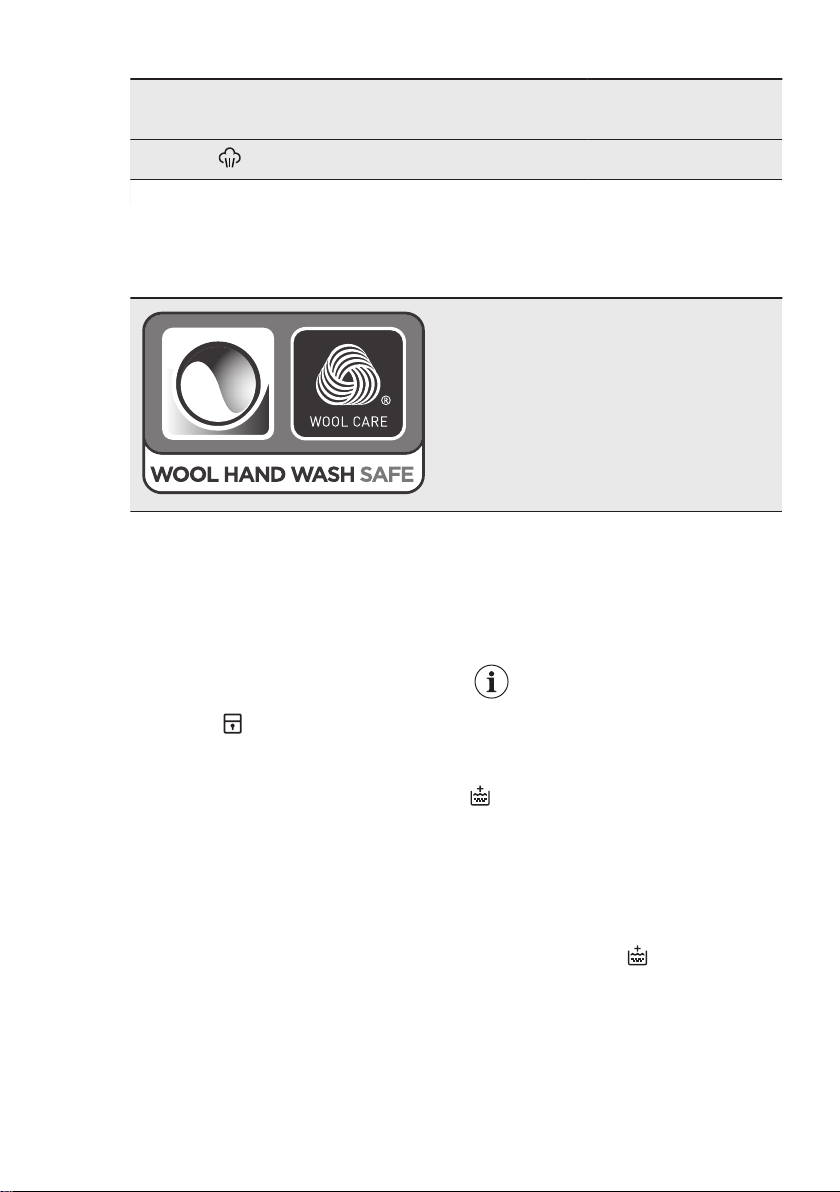
9.2 Woolmark Wool Care - Blue
10. SETTINGS
10.1 Child Lock
With this option you can prevent children
from playing with the control panel.
• To activate/deactivate this option,
touch the Centrif. and the Opc.
buttons simultaneously until the
indicator comes on/goes off on
the display.
You can activate this option:
• After you touch the Inicio/Pausa
button: all the buttons and the
programme dial are deactivated
(except On/Off button ).
• Before you touch the Inicio/Pausa
button: the appliance cannot start.
The appliance keeps the selection of this
option after you switch it off.
10.2 Acoustic signals
The acoustic signals operate when the
programme is completed (sequence of
sounds for about 2 minutes).
Universal
powder
▲ ▲ ▲ -- --
1)
Liquid Uni‐
versal
Liquid for
coloureds
The wool wash cycle of this machine has
been approved by The Woolmark Company
for the washing of wool garments labelled as
«hand wash» provided that the products are
washed according to the instructions on the
garment label and those issued by the manu‐
facturer of this washing machine. M1511
The Woolmark symbol is a Certification mark
in many countries.
Delicates
woollens
To deactivate/activate the acoustic
signals, touch the Inicio Diferido and the
Extra Rápido buttons simultaneously for
about 6 seconds.
If you deactivate the
acoustic signals, they
continue operate when the
appliance has a malfunction.
10.3 Permanent Extra Rinse
With this option you can permanently
have an extra rinse when you set a new
programme.
• To activate/deactivate this option
touch the Temp. ºC button and the
Centrif. button simultaneously until
relevant indicator
off on display.
comes on/goes
Special
Page 20
www.aeg.com20
11. BEFORE FIRST USE
1. Make sure that all transit bolts have
been removed from the appliance.
2. Make sure that the electrical power is
available and the water tap is open.
3. Pour a small quantity of detergent
into the compartment marked
12. DAILY USE
WARNING!
Refer to Safety chapters.
12.1 Activating the appliance
1. Connect the mains plug to the mains
socket.
2. Open the water tap.
3. Press the button for a few seconds to
activate the appliance.
A short tune sounds (if activated).
12.2 Loading the laundry
1. Open the appliance door.
2. Shake the items before you put them
in the appliance.
3. Put the laundry in the drum, one item
at a time.
Make sure not to put too much laundry in
the drum.
4. Close the door firmly.
4. Set and start a programme for cotton
at the highest temperature without
any laundry in the drum.
This removes all possible dirt from the
drum and the tub.
.
CAUTION!
Washing heavily oiled,
greasy stains could cause
damage rubber parts of the
washing machine.
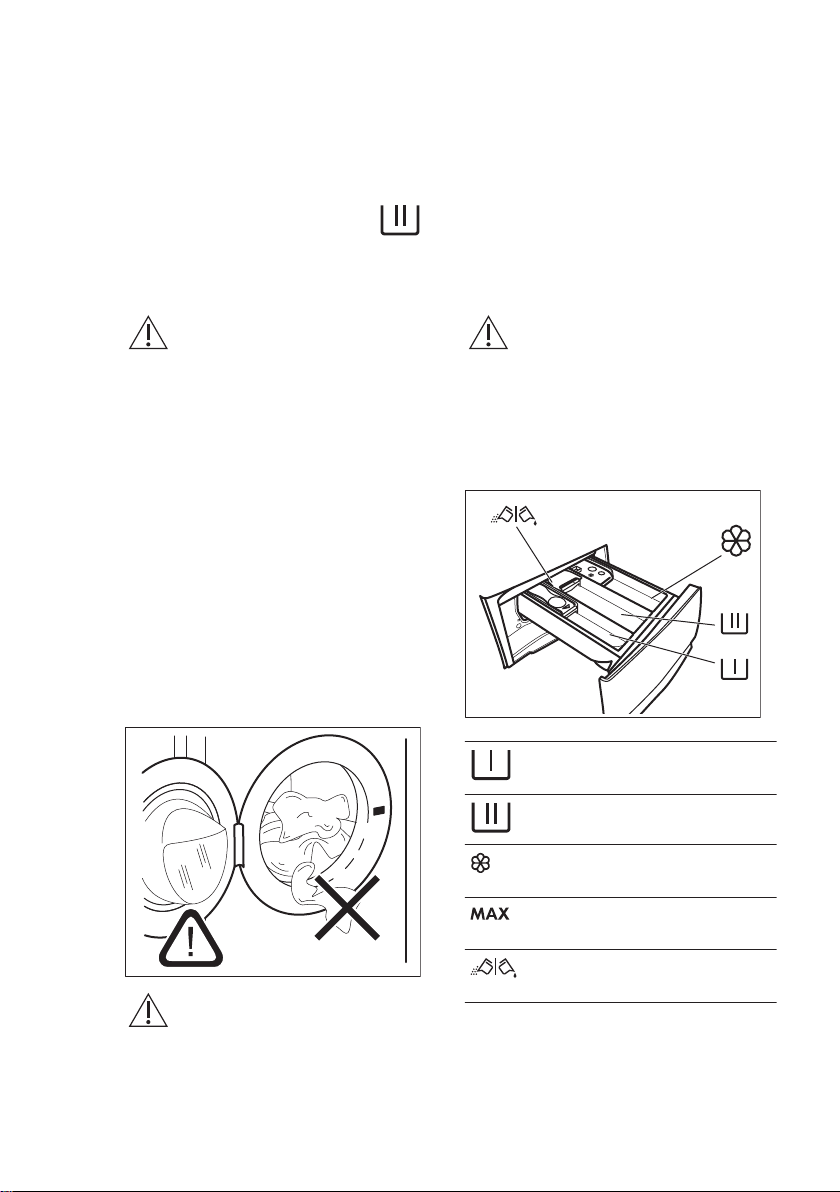
12.3 Filling the detergent and
additives
CAUTION!
Make sure that no laundry
stays between the seal and
the door. There is a risk of
water leakage or damage to
the laundry.
Compartment for prewash phase,
soak programme or stain remover.
Compartment for washing phase.
Compartment for liquid additives
(fabric conditioner, starch).
Maximum level for quantity of
liquid additives.
Flap for powder or liquid
detergent.
Page 21
Always follow the
2
1
instructions that you find on
the packaging of the
detergent products, but we
recommend that you do not
exceed the maximum
indicated level (
quantity will however
guarantee the best washing
results.
After a washing cycle, if
necessary, remove any
detergent residue from the
detergent dispenser.
). This
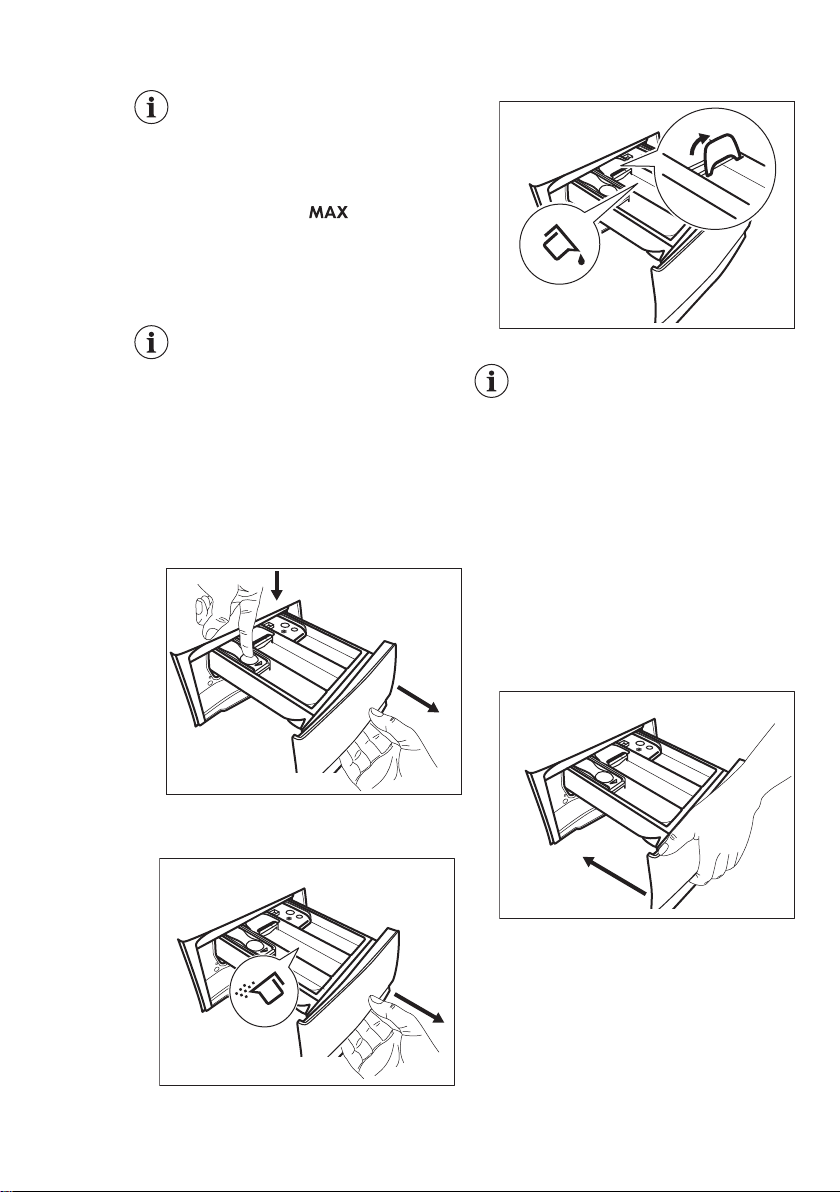
12.4 Check the position of the flap
1. Pull out the detergent dispenser until
it stops.
2. Press the lever down to remove the
dispenser.
ENGLISH 21
4. To use liquid detergent, turn the flap
down.
With the flap in the
position DOWN:
• Do not use gelatinous
or thick liquid
detergents.
• Do not put more
liquid detergent than
the limit shown on the
flap.
• Do not set the
prewash phase.
• Do not set the delay
start function.
5. Measure out the detergent and the
fabric conditioner.
6. Carefully close the detergent
dispenser.
3. To use powder detergent, turn the
flap up.
Make sure that the flap does not cause a
blockage when you close the drawer.
12.5 Setting a programme
1. Turn the programme dial to select the
desired washing programme. The
related programme indicator comes
on.
Page 22
www.aeg.com22
The indicator of the Inicio/Pausa button
flashes.
The display shows an indicative
programme duration.
2. To change the temperature and/or
the spin speed, touch the related
buttons.
3. If desired, set one or more options by
touching the related buttons. The
related indicators come on in the
display and the given information
changes accordingly.
In case a selection is not
possible, no indicator
comes on and an acoustic
signal sounds.
12.6 Starting a programme
with the delay start
Touch the Inicio/Pausa button.
The appliance starts the countdown of
the delay start.
When the countdown is completed, the
programme starts.
The PROSENSE adapts
starts at the end of the
countdown.
Cancelling the delay start after the countdown has started
To cancel the delay start:
1. Touch the Inicio/Pausa button to
pause the appliance. The related
indicator flashes.
2. Touch the Inicio Diferido button
repeatedly until the display shows .
3. Touch the Inicio/Pausa button again
to start the programme immediately.
Changing the delay start after the countdown has started
To change the delay start:
1. Touch the Inicio/Pausa button to
pause the appliance. The related
indicator flashes.
2. Touch the Inicio Diferido button
repeatedly until the display shows the
desired delay time.
3. Touch the Inicio/Pausa button again
to start the new countdown.
12.7 Starting a programme
Touch the Inicio/Pausa button to start the
programme.
The related indicator stops flashing and
stays on.
The programme starts, the door is
locked. The display shows the indicator
.
The drain pump can operate
shortly before the appliance
fills water.
12.8 The ProSense Technology load detection
After touching the Inicio/Pausa button:
1. The ProSense Technology starts the
laundry load detection to calculate
the real programme duration. The
indicator
2. After about 15 minutes the display
shows the new programme duration:
the indicator
dots
The appliance adjusts automatically
the programme duration to the load
to achieve perfect washing results in
the minimum possible time. The
programme duration could increase
or decrease.
and the time dots flash.
goes off and the time
stops flashing.
The ProSense Technology
detection is carried out with
complete washing
programmes only (no
skipping phase selected).
The ProSense Technology is
not available with all
programmes such
as :Lana/Lãs + Seda,
Aclarado/Enxag.,
Centrif.Drenar, and
programmes with short
cycles.
12.9 Interrupting a
programme and changing the
options
When the programme is running, you
can change only some options:
Page 23
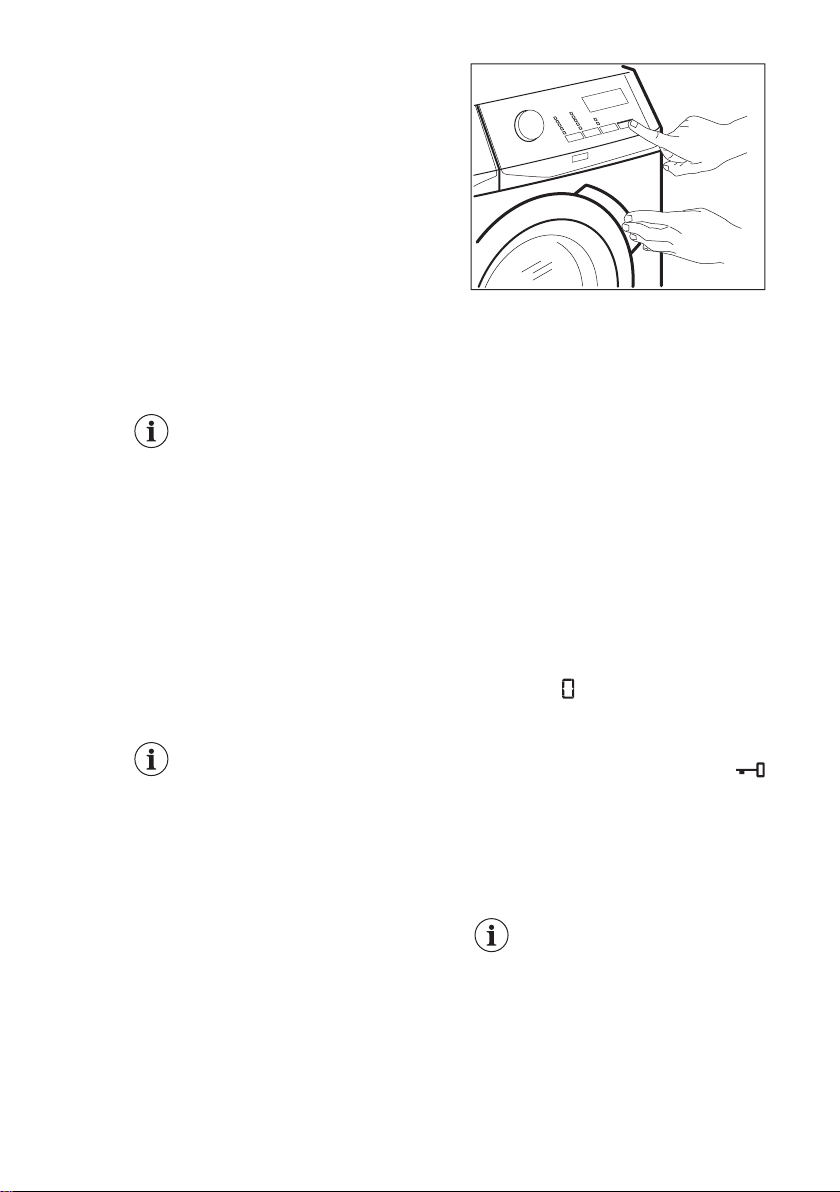
1. Touch the button Inicio/Pausa.
The related indicator flashes.
2. Change the options. The given
information in the display changes
accordingly.
3. Touch the button Inicio/Pausa again.
The washing programme continues.
12.10 Cancelling a running
programme
1. Press the button On/Off to cancel the
programme and to deactivate the
appliance.
2. Press the button On/Off again to
activate the appliance.
Now, you can set a new washing
programme.
If the ProSense phase is
already carried out and the
water filling is already
started, the new programme
starts without repeating the
ProSense phase. The water
and the detergent are not
drained out in order to avoid
waste.
12.11 Opening the door -
Adding garments
While a programme or the delay start
operates, the appliance door is locked.
If the temperature and level
of the water in the drum are
too high and/or the drum still
rotates you cannot open the
door.
1. Touch the Inicio/Pausa button.
In the display the related door lock
indicator goes off.
ENGLISH 23
2. Open the appliance door. If
necessary, add or remove the items.
3. Close the door and touch the Inicio/
Pausa button.
The programme or the delay start
continues.
4. The door can be opened when the
programme is complete, or set
spinning or draining programme/
option and than press Inicio/Pausa
button.
12.12 End of the programme
When the programme has finished, the
appliance stops automatically. The
acoustic signals operate (if they are
active).
In the display all washing phase
indicators become steady and the time
area shows
The indicator of the Inicio/Pausa button
goes off.
The door unlocks and the indicator
goes off.
1. Press the On/Off button to deactivate
the appliance.
After five minutes from the end of the
programme, the energy saving function
automatically deactivates the appliance.
2. Remove the laundry from the
appliance.
3. Make sure that the drum is empty.
.
When you activate the
appliance again, the display
show the end of the last
selected programme. Turn
the programme dial to set a
new cycle.
Page 24
www.aeg.com24
4. Keep the door and the detergent
dispenser slightly ajar to prevent
mildew and odours.
5. Close the water tap.
12.13 Draining water out after
end of cycle
If you have chosen a programme or an
option that does not empty out the water
of the last rinse, the programme is
completed, but:
• The display shows the door locked
indicator
• The drum still turns at regular
intervals to prevent the creases in the
laundry.
• The door stays locked.
• You must drain the water to open the
door:
1. If necessary, touch the Centrif. button
to decrease the spin speed proposed
by the appliance.
2. Press Inicio/Pausa to continue the
cycle
3. When the programme is completed
and the door locked indicator
goes off, you can open the door.
4. Press the On/Off button a few
seconds to deactivate the appliance.
In any case, the appliance
empties the water out
automatically after
approximately 18 hours.
12.14 Stand-by option
The Stand-by function automatically
deactivates the appliance to decrease
the energy consumption when:
• You do not use the appliance for 5
minutes before you touch the Inicio/
Pausa button.
Press the button On/Off to activate
the appliance again.
• After 5 minutes from the end of the
washing programme
Press the On/Off button to activate
the appliance again.
The display shows the end of the last
set programme.
Turn the programme dial to set a new
cycle.
If you set a programme or an
option that ends with water
in the drum, the Stand-by
function doesn't deactivate
the appliance to remind you
to drain the water.
13. HINTS AND TIPS
WARNING!
Refer to Safety chapters.
13.1 The laundry load
• Divide the laundry into: white,
coloured, synthetics, delicates and
wool.
• Follow the washing instructions on the
laundry care labels.
• Do not wash white and coloured items
together.
• Some coloured items can discolour
with the first wash. We recommend
that you wash them separately for the
first couple of times.
• Turn multilayered fabrics, wool and
items with printed illustrations inside
out.
• Pre-treat stubborn stains.
• Wash stubborn stains with a special
detergent.
• Be careful with curtains. Remove the
hooks and put the curtains in a
washing bag or pillowcase.
• A very small load can cause balance
problems with the spin phase leading
to excessive vibration. If this occurs:
a. interrupt the programme and
open the door (refer to "Daily
Use" chapter);
b. manually redistribute the load so
that the items are spaced evenly
around the tub;
c. press the Inicio/Pausa button.
The spin phase continues.
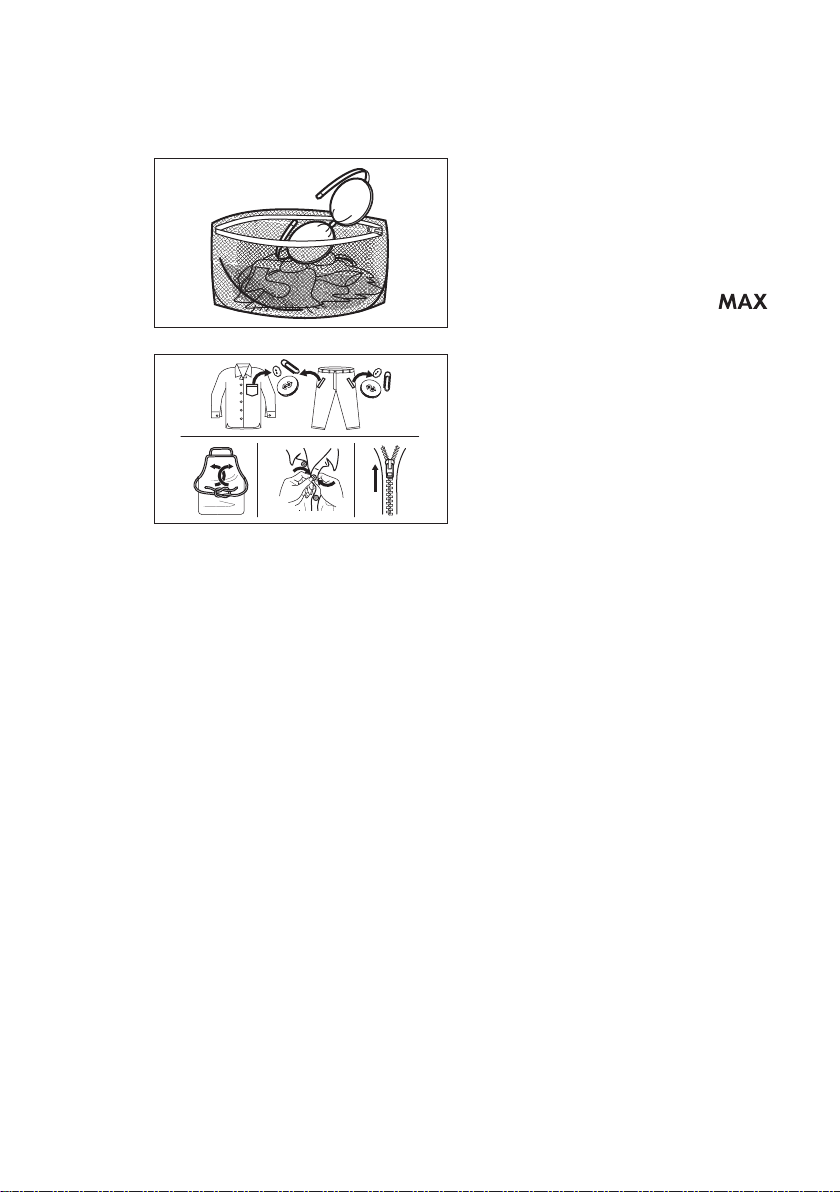
• Button up pillowcases, close zippers,
hooks and poppers. Tie up belts,
cords, shoelaces, ribbons and any
other loose elements.
Page 25
ENGLISH 25
• Do not wash laundry without hems or
with cuts. Use a washing bag to wash
small and/or delicate items (e.g.
underwired bras, belts, tights,
shoelaces, ribbons, etc. ).
• Empty pockets and unfold the items.
13.2 Stubborn stains
For some stains, water and detergent is
not sufficient.
We recommend that you pre-treat these
stains before you put the items in the
appliance.
Special stain removers are available.
Use the special stain remover that is
applicable to the type of stain and fabric.
13.3 Detergent type and
quantity
The choice of detergent and use of
correct quantities not only affects your
wash performance, but also helps to
avoid waste and protect the environment:
• Use only detergents and other
treatments specially made for
washing machines. First, follow these
generic rules:
– powder detergents for all types of
fabric, excluding delicate. Prefer
powder detergents containing
bleach for whites and laundry
sanitization,
– liquid detergents, preferably for
low temperature wash
programmes (60 °C max) for all
types of fabric, or special ones for
woollens only.
• The choice and quantity of detergent
will depend on: type of fabric
(delicates, woollens, cottons, etc), the
colour of clothes, size of the load,
degree of soiling, wash temperature
and hardness of the water used.
• Follow the instructions that you find
on packaging of the detergents or
other treatments without exceeding
the indicated maximum level (
• Do not mix different types of
detergents.
• Use less detergent if:
– you are washing a small load,
– the laundry is lightly soiled,
– there is large amounts of foam
during washing.
• When using detergent tabs or pods,
always put them inside the drum, not
in the detergent dispenser.
Insufficient detergent may cause:
• unsatisfactory washing results,
• the wash load to turn grey,
• greasy clothes,
• mould in the appliance.
Excessive detergent may cause:
• sudsing,
• reduced washing effect,
• inadequate rinsing,
• a greater impact for the environment.
13.4 Ecological hints
To save water, energy and to help
protect the environment, we recommend
that you follow these tips:
• Normally soiled laundry may be
washed without prewash in order to
save detergent, water and time (the
environment is protected too!).
• Loading the appliance to the
maximum capacity indicated for
each programmes helps to reduce
energy and water consumption.
• With adequate pre-treatment, stains
and limited soiling can be removed;
the laundry can then be washed at a
lower temperature.
• To use the correct quantity of
detergent, refer to the quantity
suggested by the detergent producer
and check the water hardness of you
).
Page 26
www.aeg.com26
domestic system. Refer to 'Water
hardness'.
• Set the maximum possible spin
speed for the selected washing
programme before drying your
laundry in a tumble dryer. This will
save energy during drying!
13.5 Water hardness
If the water hardness in your area is high
or moderate, we recommend that you
14. CARE AND CLEANING
WARNING!
Refer to Safety chapters.
14.1 Periodic cleaning
schedule
Periodic cleaning helps to extend the
life of your appliance.
After each cycle, keep the door and the
detergent dispenser slightly ajar to get air
circulation and dry the humidity inside
the appliance: this will prevent mildew
and odours.
If the appliance is not used for a long
time: close the water tap and unplug the
appliance.
Indicative periodic cleaning schedule:
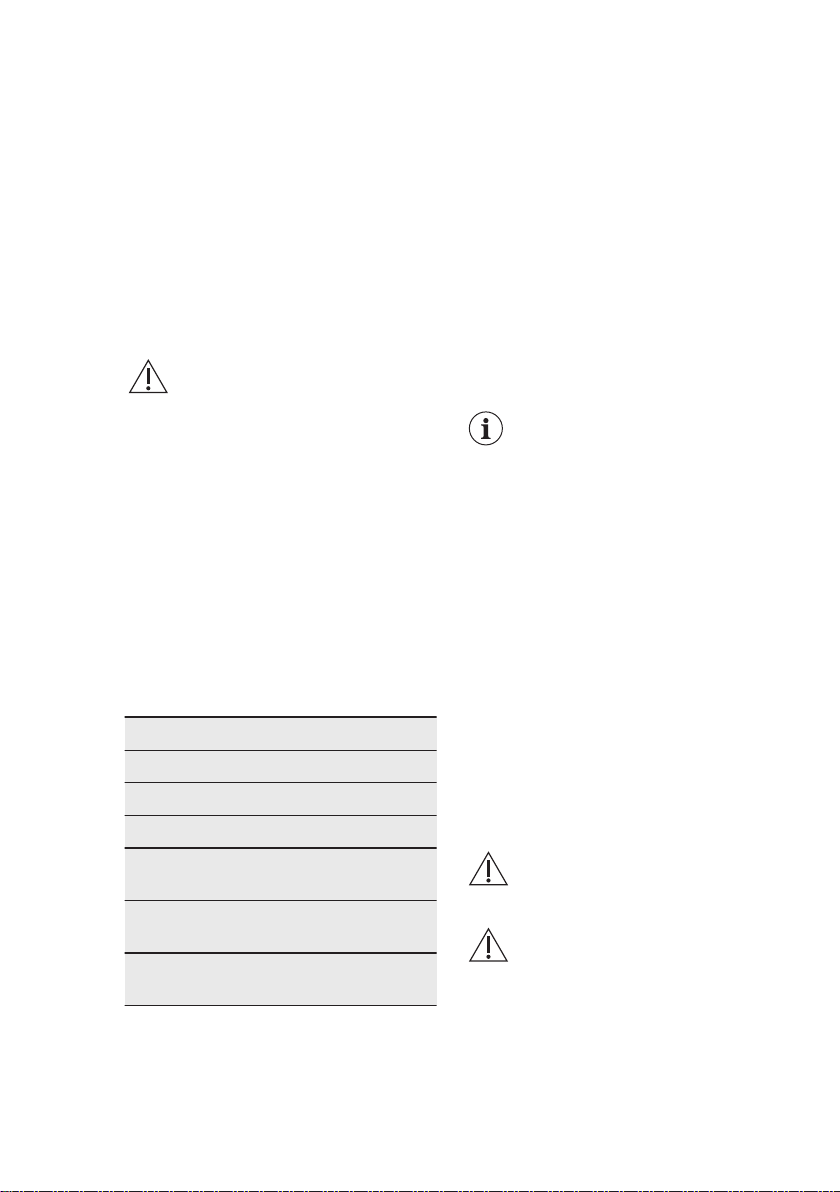
Descaling Twice a year
Maintenance wash Once a month
Clean door seal Every two months
Clean drum Every two months
Clean detergent dis‐
penser
Clean drain pump
filter
Clean the inlet hose
and the valve filter
The following paragraphs explain how
you should clean each part.
Every two months
Twice a year
Twice a year
additive for water softening. In areas
where the water hardness is soft it is not
necessary to use him.
To find out the water hardness in your
area, contact your local water authority.
Use the correct quantity of additive for
water softening. Follow the instructions
that you find on the packaging of the
product.
14.2 Removing foreign objects
Make sure that pockets are
empty and all loose
elements are tied up before
running your cycle. Refer to
'The laundry load' in 'Hints
and tips'.
Remove any foreign objects (such as
metal clip, buttons, coins, etc) that you
may find in the door seal, the filters and
the drum. Refer to 'Door seal with double
lip trap', 'Cleaning the drum', 'Cleaning
the drain pump' and 'Cleaning the inlet
hose and the valve filter' paragraphs. If
necessary, please contact the Authorised
Service Centre.
14.3 External cleaning
Clean the appliance with mild soap and
warm water only. Fully dry all the
surfaces. Do not use a scouring pads or
any scratching material.
CAUTION!
Do not use alcohol, solvents
or chemical products.
CAUTION!
Do not clean the metal
surfaces with chlorine-based
detergent.
Page 27
2
1
ENGLISH 27
14.4 Descaling
If the water hardness in your
area is high or moderate, we
recommend that you use a
water descaling product for
washing machines.
Regularly examine the drum to check
any limescale.
The regular detergents already contain
water softening agents, but we
recommend to run a cycle with empty
drum and a descaling product
occasionally.
Always follow the
instructions that you find on
the packaging of the
product.
14.5 Maintenance wash
With the low temperature programmes it
is possible that some detergent stays in
the drum. Perform a maintenance wash
regularly. To do this:
• Remove all laundry from the drum.
• Select the cotton programme with the
highest temperature or use if is
available programme Limp. Máquina.
Add a small quantity of powder
detergent into empty drum, in order to
rinse out any left residues.
14.6 Door seal
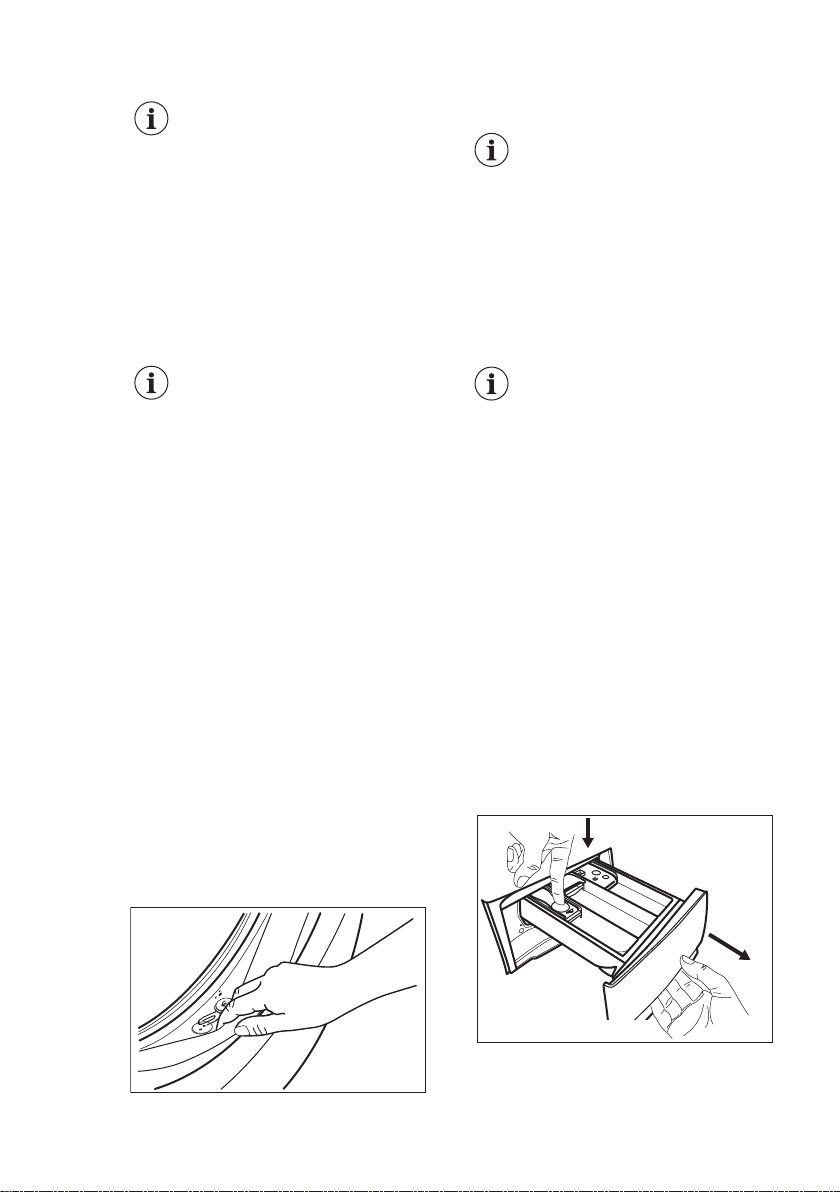
This appliance is designed with a self
cleaning draining system, allowing light
fluff fibers that fall off the clothes to be
drained out with the water. Regularly
examine the seal. Coins, buttons, other
small items can be recovered at the end
of the cycle.
Clean it when needed, using ammonia
cream cleanser agent without scratching
the seal surface.
Always obey the instructions
that you find on the
packaging of the product.
14.7 Cleaning the drum
Regularly examine the drum to prevent
rust particles.
For a complete cleaning:
1. Clean the drum with special products
for stainless steel.
Always follow the
instructions that you find on
the packaging of the
product.
2. Run a short cotton programme at
high temperature or use if is available
programme Limp. Máquina. Add a
small quantity of powder detergent
into empty drum, in order to rinse out
any left residues.
14.8 Cleaning the detergent
dispenser
To prevent possible deposits of dried
detergent or clotted fabric softener
and/or formation of mould in the
detergent dispenser drawer, once in a
while carry out the following cleaning
procedure:
1. Open the drawer. Press the catch
downwards as indicated in the
picture and pull it out.
2. Remove the top part of the additive
compartment to aid cleaning and
flush it out under running warm
water, to remove any traces of
Page 28
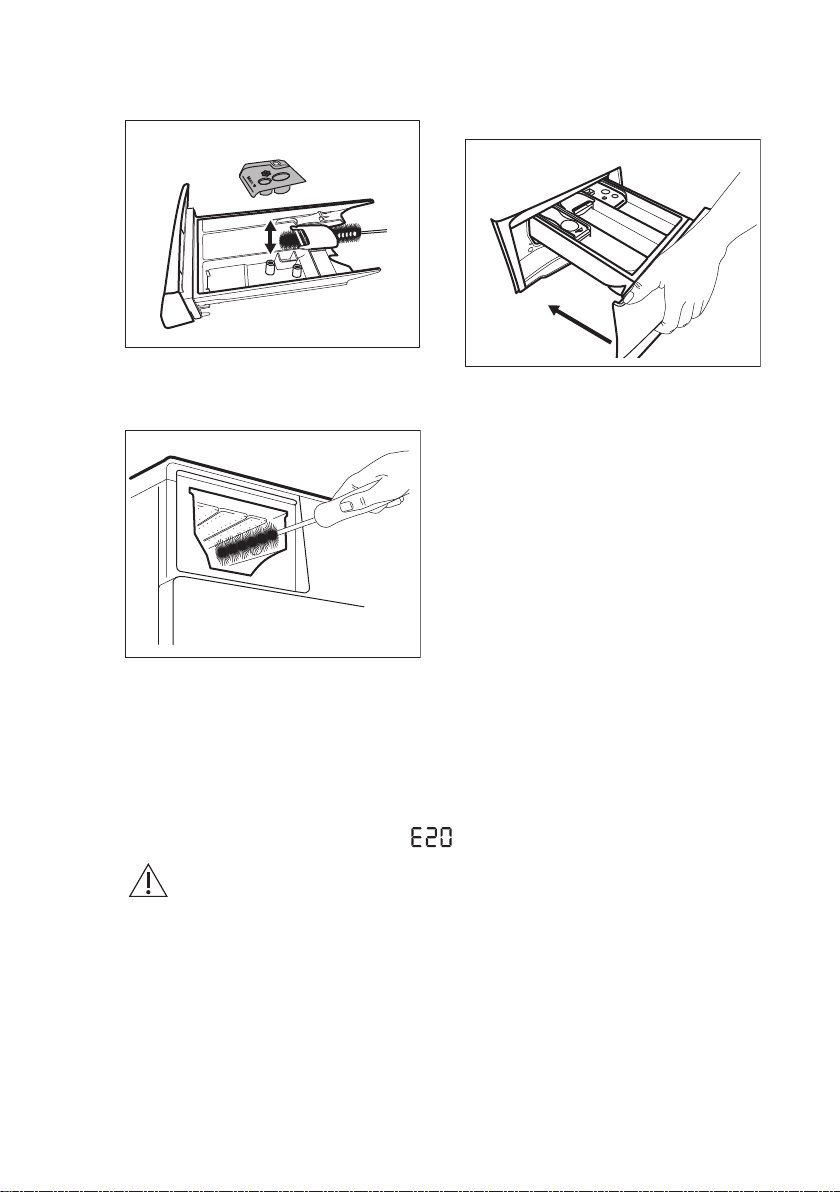
www.aeg.com28
accumulated detergent. After
cleaning, put the top part back into
position.
3. Make sure that all detergent residue
is removed from the upper and lower
part of the recess. Use a small brush
to clean the recess.
4. Insert the detergent drawer into the
guide rails and close it. Run the
rinsing programme without any
clothes in the drum.
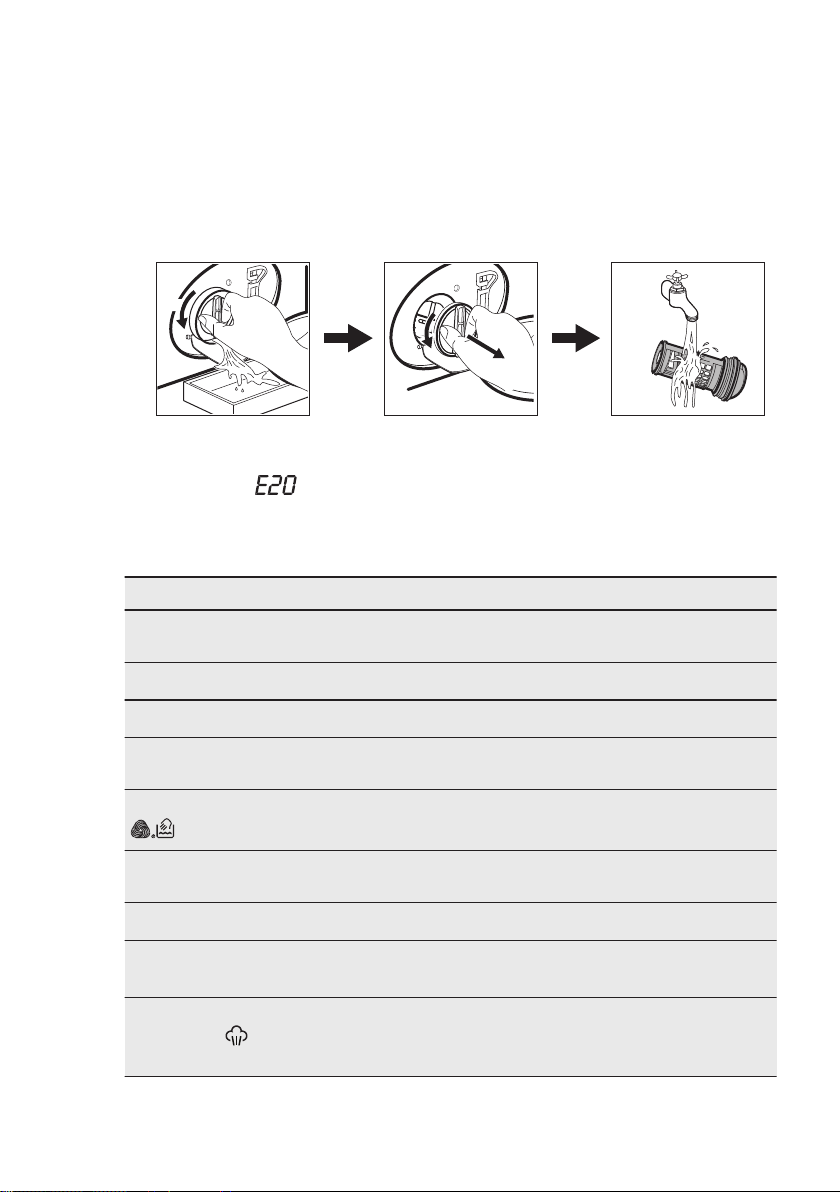
14.9 Cleaning the drain pump
Regularly check the drain pump filter and make sure that it is clean.
Clean the drain pump if:
• The appliance does not drain the water.
• The drum does not turn.
• The appliance makes an unusual noise because of the blockage of the drain pump.
• The display shows the alarm code
WARNING!
• Disconnect the mains plug from the mains socket.
• Do not remove the filter while the appliance operates.
• Do not clean the pump if the water in the appliance is hot. Wait until
the water cools down .
• Repeat Step 3 several times by closing and opening the valve until the
water stops flowing out.
Always keep a rag nearby to dry up any water spillages when removing the filter.
Page 29
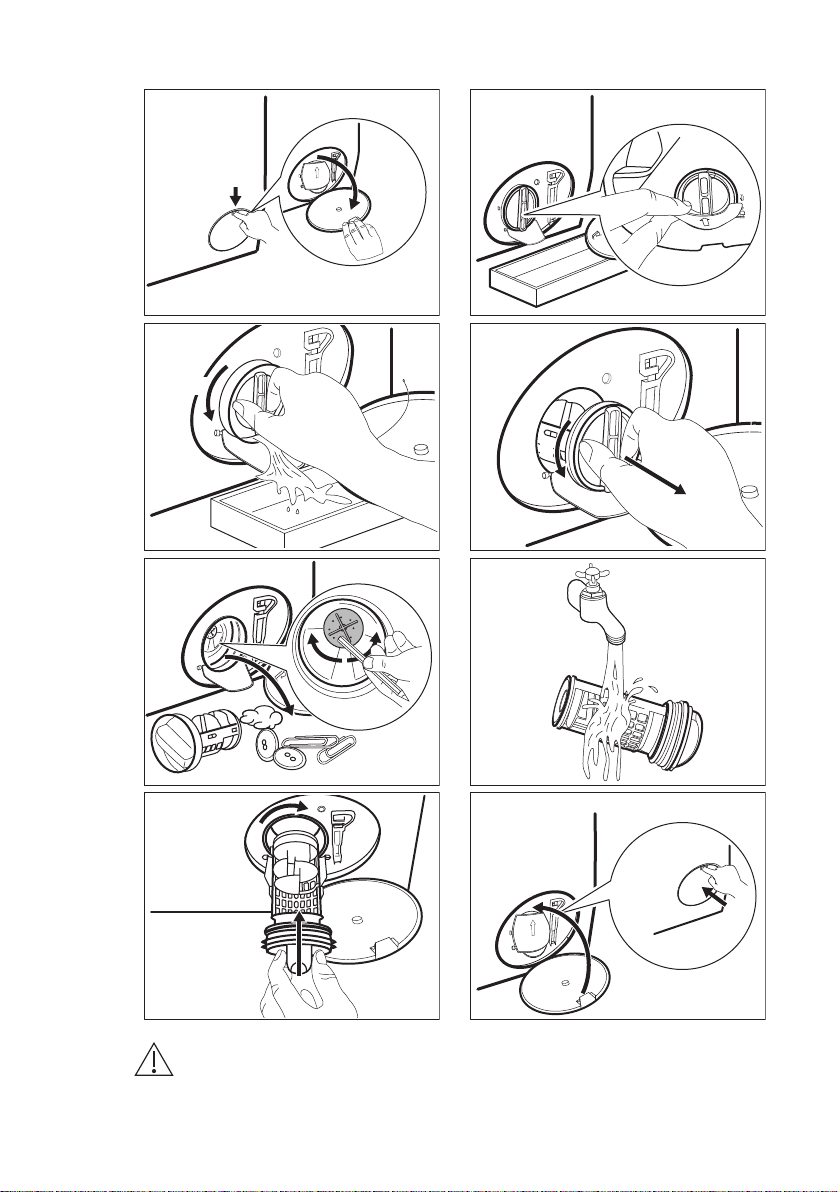
Proceed as follows to clean the pump:
1
2
180˚
2
1
2
1
2
1
1
ENGLISH 29
1.
3.
5. 6.
2.
4.
7.
WARNING!
Make sure that the impeller of the pump can rotate. If it does not rotate,
contact the Authorised Service Centre. Make sure also that you tighten
the filter correctly to prevent leakages.
8.
Page 30
1
2
3
45°
20°
www.aeg.com30
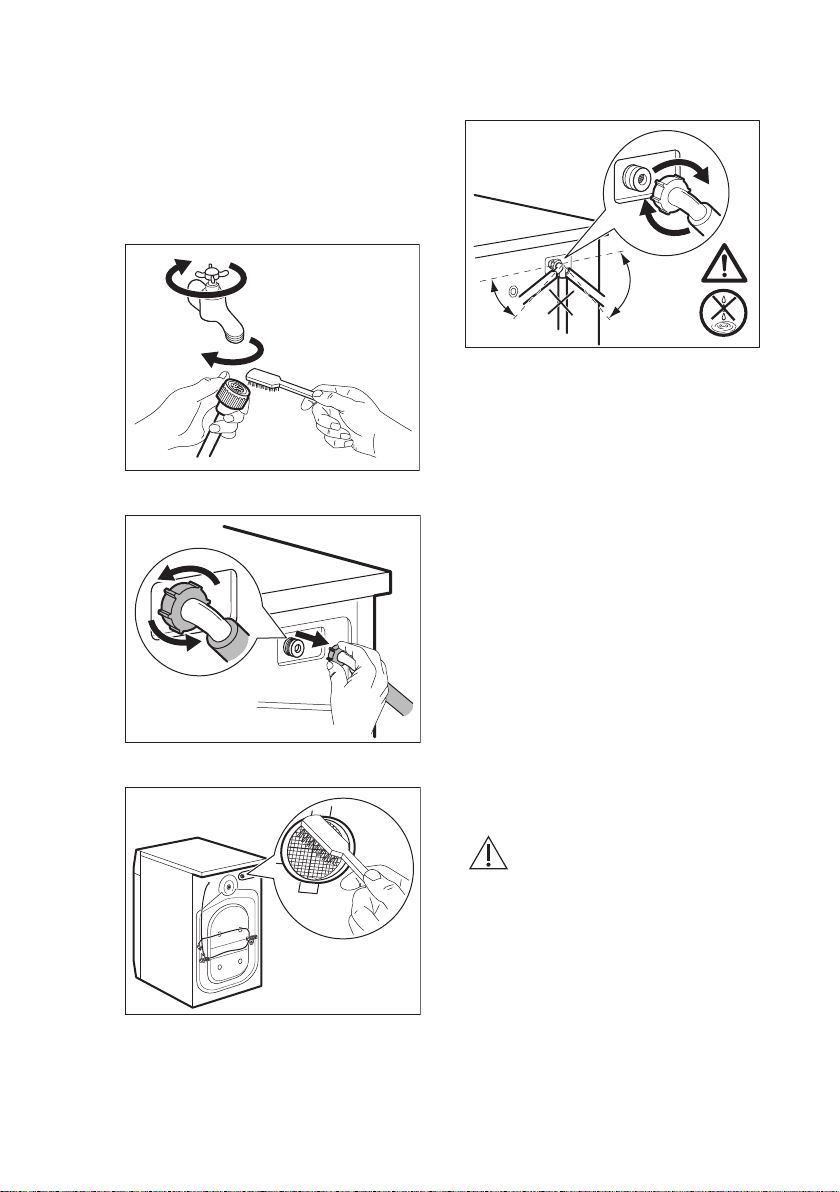
14.10 Cleaning the inlet hose and the valve filter
It is recommended to clean both the
filters of the inlet hose and valve
occasionally to remove any deposit,
collected over the time:
1. Remove the inlet hose from the tap
and clean the filter.
right (not in vertical position)
depending on the position of your
water tap.
14.11 Emergency drain
If the appliance cannot drain the water,
carry out the same procedure, described
in 'Cleaning the drain pump' paragraph. If
2. Remove the inlet hose from the
appliance by loosening the ring nut.
3. Clean the valve filter on the back of
the appliance with a toothbrush.
necessary, clean the pump.
14.12 Frost precautions
If the appliance is installed in an area
where the temperature can reach the
values around 0° C or drop below,
remove the remaining water from the
inlet hose and the drain pump.
1. Disconnect the mains plug from the
mains socket.
2. Close the water tap.
3. Put the two ends of the inlet hose in
a container and let the water flow out
of the hose.
4. Empty the drain pump. Refer to the
emergency drain procedure.
5. When the drain pump is empty,
install the inlet hose again.
WARNING!
Make sure that the
temperature is higher than
0 °C before you use the
appliance again.
The manufacturer is not
responsible for damages
caused by low temperatures.
4. When you reconnect the hose to the
back of the appliance, turn it left or
Page 31
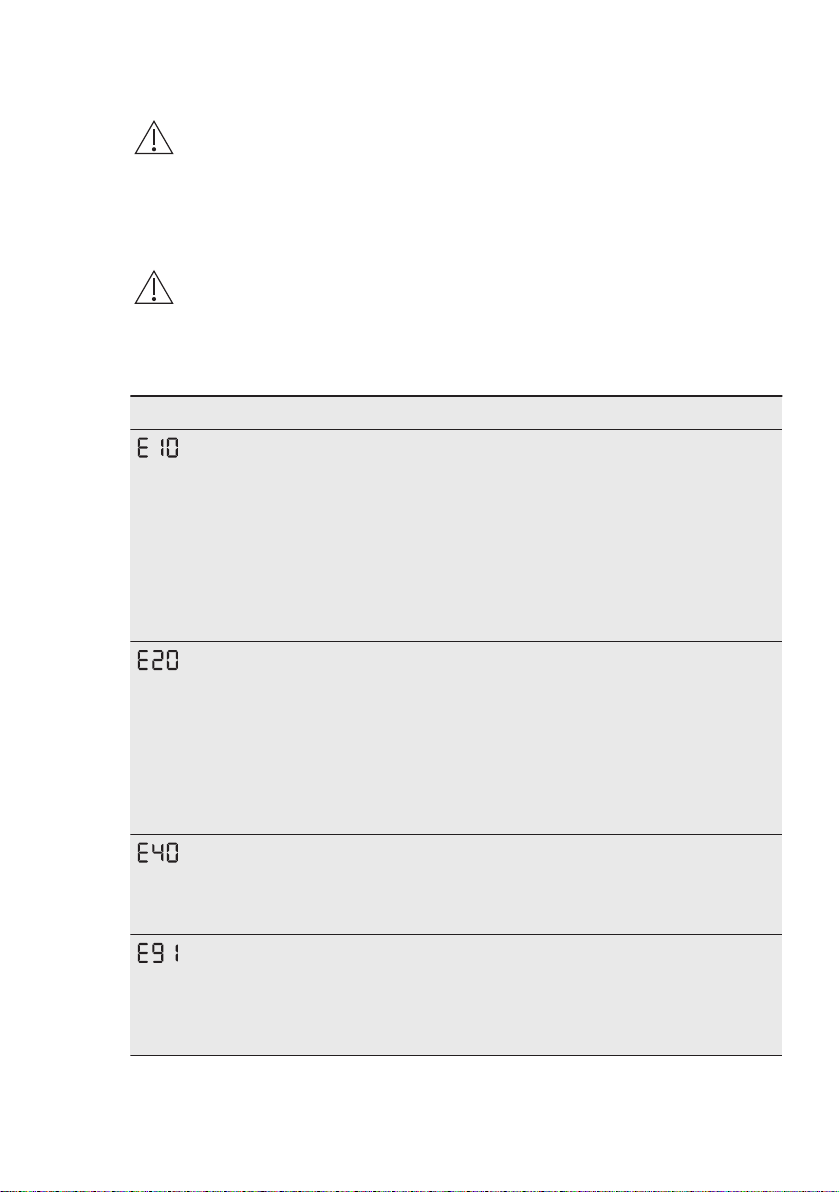
15. TROUBLESHOOTING
WARNING!
Refer to Safety chapters.
15.1 Alarm Codes and Possible failures
The appliance does not start or it stops during operation. First try to find a solution to the
problem (refer to the tables).
WARNING!
Deactivate the appliance before carrying out any check.
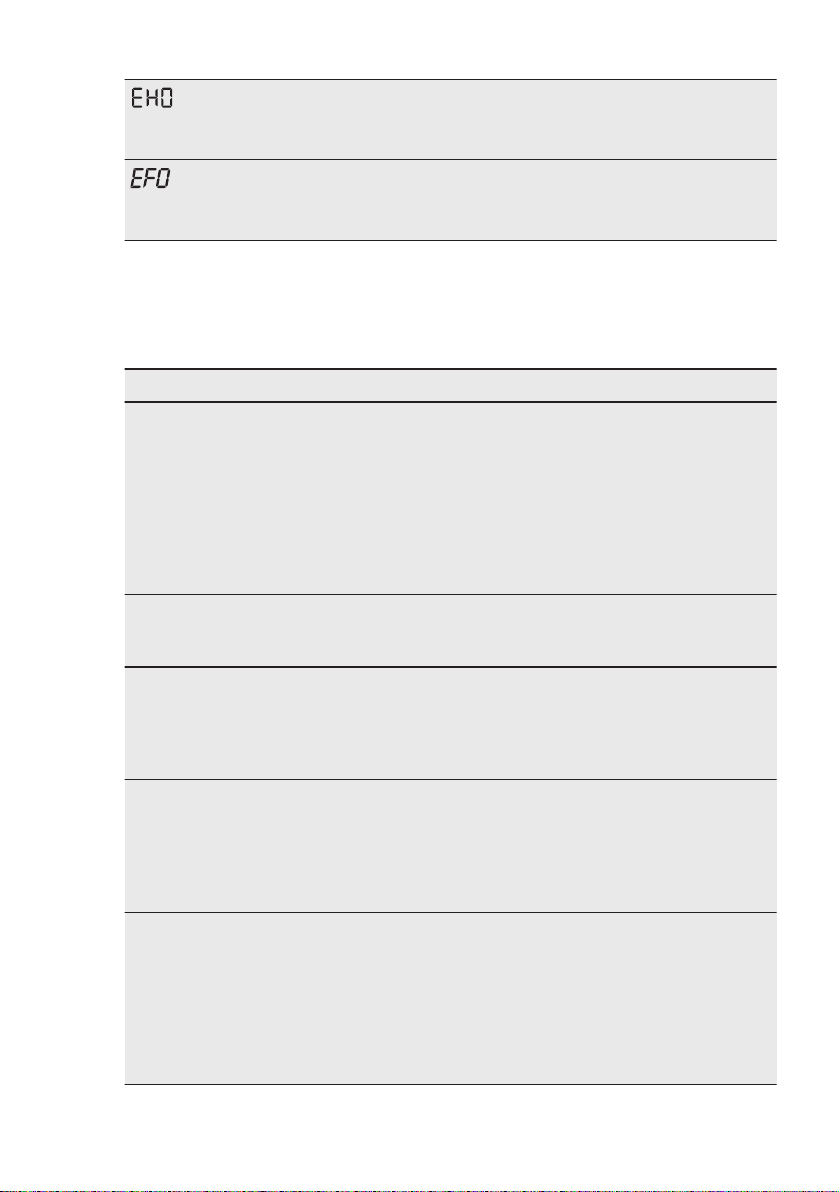
With some problems, the display shows an alarm code and the
Inicio/Pausa button may flash continuously:
Problem Possible solution
• Make sure that the water tap is open.
The appliance does
not fill with water prop‐
erly.
The appliance does
not drain the water.
The appliance door is
open or not closed
correctly.
Internal fail. No com‐
munication between
electronic elements of
the appliance.
• Make sure that the pressure of the water supply is not too low.
For this information, contact your local water authority.
• Make sure that the water tap is not clogged.
• Make sure that the inlet hose has no kinks, damages or
bends.
• Make sure that the connection of the water inlet hose is cor‐
rect.
• Make sure that the filter of the inlet hose and the filter of the
valve are not clogged. Refer to 'Care and cleaning'.
• Make sure that the sink spigot is not clogged.
• Make sure that the drain hose has no kinks or bends.
• Make sure that the drain filter is not clogged. Clean the filter, if
necessary. Refer to "Care and cleaning".
• Make sure that the connection of the drain hose is correct.
• Set the drain programme if you set a programme without drain
phase.
• Set the drain programme if you set an option which ends with
water in the tub.
• Make sure that the door is properly closed.
• The programme was not finished properly or the appliance
stopped too early. Switch the appliance off and on again.
• If the alarm code appears again, contact the Authorised Serv‐
ice Centre.
ENGLISH 31
Page 32
www.aeg.com32
• Wait until mains supply is stable.
The mains supply is
unstable.
• Disconnect the appliance and close the water tap. Contact the
The anti-flood device
Authorised Service Centre.
is on.
If the display shows other alarm codes, deactivate and activate the
appliance. If the problem continues, contact the Authorised Service
Centre.
In case of different problem with the washing machine check the
table below for possible solutions.
Problem Possible solution
• Make sure that the mains plug is connected to the mains
socket.
• Make sure that the appliance door is closed.
The programme does
not start.
• Make sure that there is no damaged fuse in the fuse box.
• Make sure that the Inicio/Pausa has been touched.
• If the delay start is set, cancel the setting or wait for the end of
countdown.
• Deactivate the Child Lock function if it is on.
• Check the position of the knob on the selected programme.
The appliance fills with
water and drains im‐
mediately.
The spin phase does
not operate or the
washing cycle lasts
longer than usual.
• Make sure that the drain hose is in the correct position. The
hose may be positioned too low. Refer to "Installation instruc‐
tion".
• Set the spin programme.
• Make sure that the drain filter is not clogged. Clean the filter, if
necessary. Refer to "Care and cleaning".
• Adjust manually the items in the tub and start the spin phase
again. This problem may be caused by balance problems.
• Make sure that the couplings of the water hoses are tight and
there is not water leakages.
There is water on the
floor.
• Make sure that the water inlet hose and the drain hose have
no damages.
• Make sure you use the correct detergent and the correct
quantity of it.
• Make sure that a washing programme that ends with water in
tub, has not been selected.
• Make sure that the washing programme is finished.
You cannot open the
appliance door.
• Set the drain or the spin programme if there is water in the
drum.
• Make sure that the appliance receives electrical power.
• This problem may be caused by a failure of the appliance.
Contact the Authorised Service Centre.
Page 33
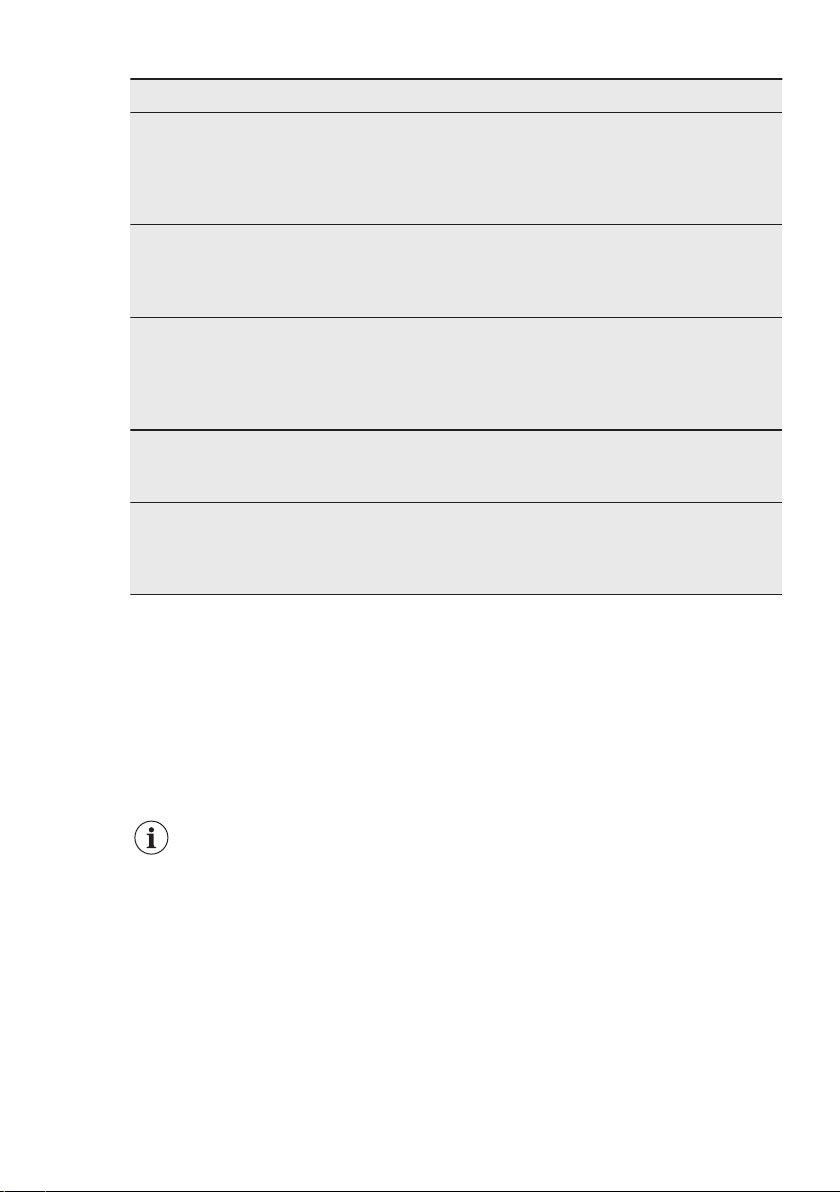
Problem Possible solution
• Make sure the levelling of the appliance is correct. Refer to
The appliance makes
an unusual noise and
vibrates.
The programme dura‐
tion increases or de‐
creases during pro‐
gramme execution.
The washing results
are not satisfactory.
Too much foam in the
drum during the wash‐
ing cycle.
After the washing cy‐
cle, there are some
detergent residues in
the dispenser drawer.
"Installation instruction".
• Make sure that the packaging and/or the transit bolts are re‐
moved. Refer to "Installation instruction".
• Add more laundry in the drum. The load may be too small.
• The ProSense Technology is able to adjust the programme
duration according to the type and the laundry load size. Refer
to "The ProSense Technology load detection" in "Daily Use"
chapter.
• Increase the detergent quantity or use a different detergent.
• Use special products to remove the stubborn stains before
you wash the laundry.
• Make sure that you set the correct temperature.
• Decrease the laundry load.
• Reduce the quantity of detergent.
• Make sure that the flap is in the correct position (UP for pow‐
der detergent - DOWN for liquid detergent).
• Make sure you have used the detergent dispenser according
the indications given in this user manual.
ENGLISH 33
After the check, activate the appliance. The programme continues
from the point of interruption.
If the problem occurs again, contact the Authorised Service Centre.
The necessary data for the service centre are on the rating plate.
16. CONSUMPTION VALUES
16.1 Introduction
See the web link www.theenergylabel.eu for
detailed information about Energy Label.
Page 34
www.aeg.com34
The QR code on the energy label supplied with the
appliance provides a web link to the information
related to the performance of the appliance in the
EU EPREL database. Keep the energy label for
reference together with the user manual and all
other documents provided with this appliance.
It is also possible to find the same information in
EPREL using the link https://eprel.ec.europa.eu
and the model name and product number that you
find on the rating plate of the appliance. Refer to
'Product description' chapter for the position of the
rating plate.
16.2 Legend
kg Laundry load. h:mm Programme duration.
kWh Energy consumption. °C Temperature in the laundry.
Litres Water consumption. rpm Spin speed.
% Remaining moisture at the end of spinning phase. The higher is the spin speed,
the higher is the noise and the lower is the remaining moisture.
Values and programme duration may differ depending on different
conditions (e.g. room temperature, water temperature and pressure, load
size and type of laundry, supply voltage) and also if you change the
default setting of a programme.
16.3 According to Commission Regulation Eu 2019/2023
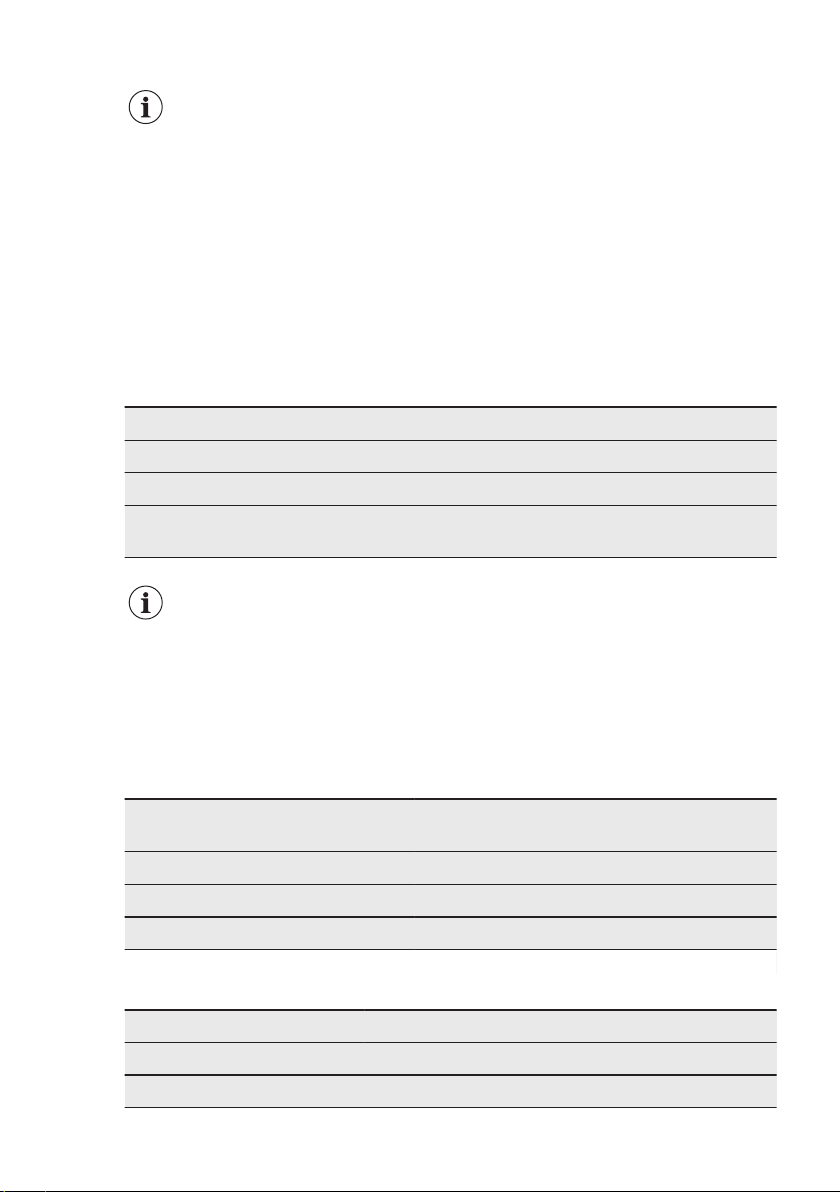
Eco 40-60 pro‐
gramme
Full load 8 0.980 52.0 3:25 53.00 41.0 1151
Half load 4 0.612 42.0 2:40 53.00 34.0 1151
Quarter load 2 0.250 33.0 2:35 55.00 22.0 1151
1)
Maximum spin speed.
Power consumption in different modes
Off (W) Stand-by (W) Delay start (W)
0.50 0.50 4.00
Time to Off/Standby mode is 15 minutes maximum.
kg kWh Litres h:mm % °C
rpm
1)
Page 35
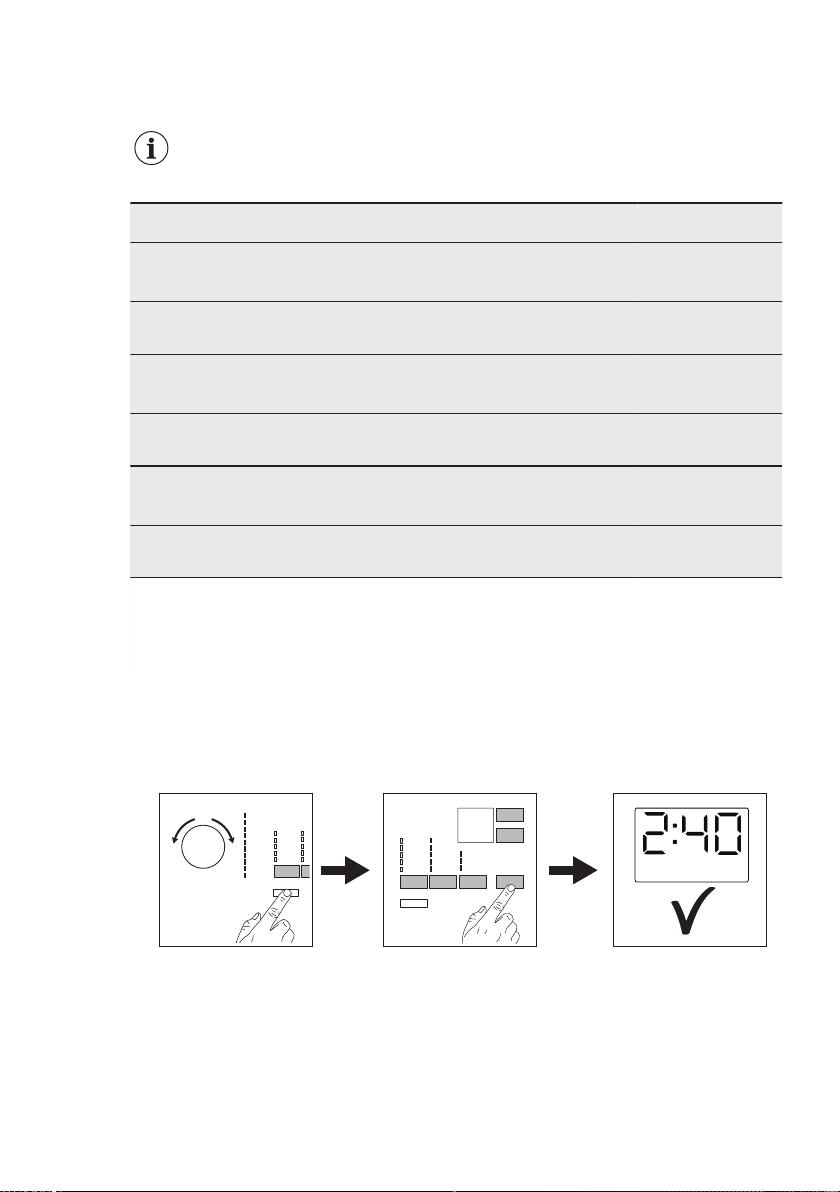
16.4 Common programmes
1
2
1
2
3
These values are indicative only.
ENGLISH 35
Programme
2)
Algod.
95°C
Algod.
60°C
3)
Algod.
20°C
Sintéticos
40°C
Delicados
4)
30°C
Lana/Lãs + Seda
30°C
1)
Reference indicator of the spin speed.
2)
Suitable for washing heavily soiled textiles.
3)
Suitable for washing lightly soiled cottons, synthetic and mixed fabrics.
4)
It also performs as quick washing cycle for lightly soiled laundry.
17. QUICK GUIDE
17.1 Daily use
kg kWh Litres h:mm % °C
rpm
8 2.500 95.0 3:10 53.00 85.0 1200
8 1.650 85.0 2:55 53.00 55.0 1200
8 0.400 85.0 2:55 53.00 20.0 1200
3 0.650 55.0 2:00 35.00 40.0 1200
2 0.300 45.0 1:20 35.00 30.0 1200
1,5 0.300 65.0 1:05 30.00 30.0 1200
1)
Connect the mains plug to the mains
socket.
Open the water tap.
Load the laundry.
Pour the detergent and other treatment
in the proper compartment of the
detergent dispenser.
1. Push the On/Off button to turn the
appliance on. Turn the programme
dial to set the desired programme.
Page 36
1 32
180˚
2
1
www.aeg.com36
2. Set the desired options (1) by means
of the corresponding touch buttons.
To start the programme, touch the
Push the On/Off button to turn the
appliance off.
Inicio/Pausa (2) button.
3. The appliance starts.
At the end of the programme, remove the
laundry.
17.2 Cleaning the drain pump filter
Clean the filter regularly and, especially,
if the alarm code
appears on the
display.
17.3 Programmes
Programmes Load Product description
Eco 40-60 8 kg
White and coloured cottons. Normally soiled
garments.
Algod.
Sintéticos
Delicados
Lana/Lãs + Seda
20 min. - 3 kg
Algod. 20°
Fácil Plancha/Engomar
Anti-Alergia
8 kg White cotton and coloured cotton.
3 kg Synthetic items or mixed fabric items.
2 kg
1,5 kg
3 kg
8 kg Mixed fabrics. Cotton and synthetic items.
3 kg Synthetic items requiring a gentle wash.
8 kg
Delicate fabrics such as acrylics, viscose, poly‐
ester items.
Machine washable wool, hand washable wool
and delicates.
Cotton and synthetic lightly soiled items or once
worn items.
White cotton items. This program removes more
than 99,99% of bacteria and viruses1). It also
ensure a proper reduction of allergens.
Page 37

Programmes Load Product description
All fabrics, except woollens and very delicate
Centrif./Drenar
8 kg
fabrics. Programme for spinning and draining
the water.
1)
Tested for Staphylococcus aureus, Enterococcus faecium, Candida albicans, Pseudomonas aerugino‐
sa and MS2 Bacteriophage in external test performed by Swissatest Testmaterialien AG in 2021 (Test
Report No. 202120117).
18. ENVIRONMENTAL CONCERNS
ENGLISH 37
Recycle materials with the symbol
.
Put the packaging in relevant containers
to recycle it. Help protect the
environment and human health by
recycling waste of electrical and
electronic appliances. Do not dispose of
appliances marked with the symbol
with the household waste. Return the
product to your local recycling facility or
contact your municipal office.
*
Page 38

Page 39

Page 40
www.aeg.com/shop
135987990-A-482021
 Loading...