

Page 1

KM 2000
Kompakt-Küchenmaschine
Multiple Use Appliance
Gebrauchsanweisung
Operating Instructions
AUS ERFAHRUNG GUT
Page 2
12
1
AUTOMATIC PULSE BUTTON
ON/OFF SWITCH
TURBO
G
CA
F
E
D
B
A
B
C
F
E
D
J
K
G
H
I
E
D
F
G
A
B
C
A
B
C
D
K
I
H
43
2
Page 3

13
Congratulations on your purchase of a new AEG
Multiple Use Appliance.
You have purchased a technically reliable appliance which will help you to easily prepare meals
in any number of ways.
As in the case of any technical equipment there
are a few basic things that have to be observed
and complied with for operation of this kitchen
appliance as well.
For this reason please carefully read the
instructions before putting the Multiple Use
Appliance into service and keep them in a safe
place afterwards.
Equipment
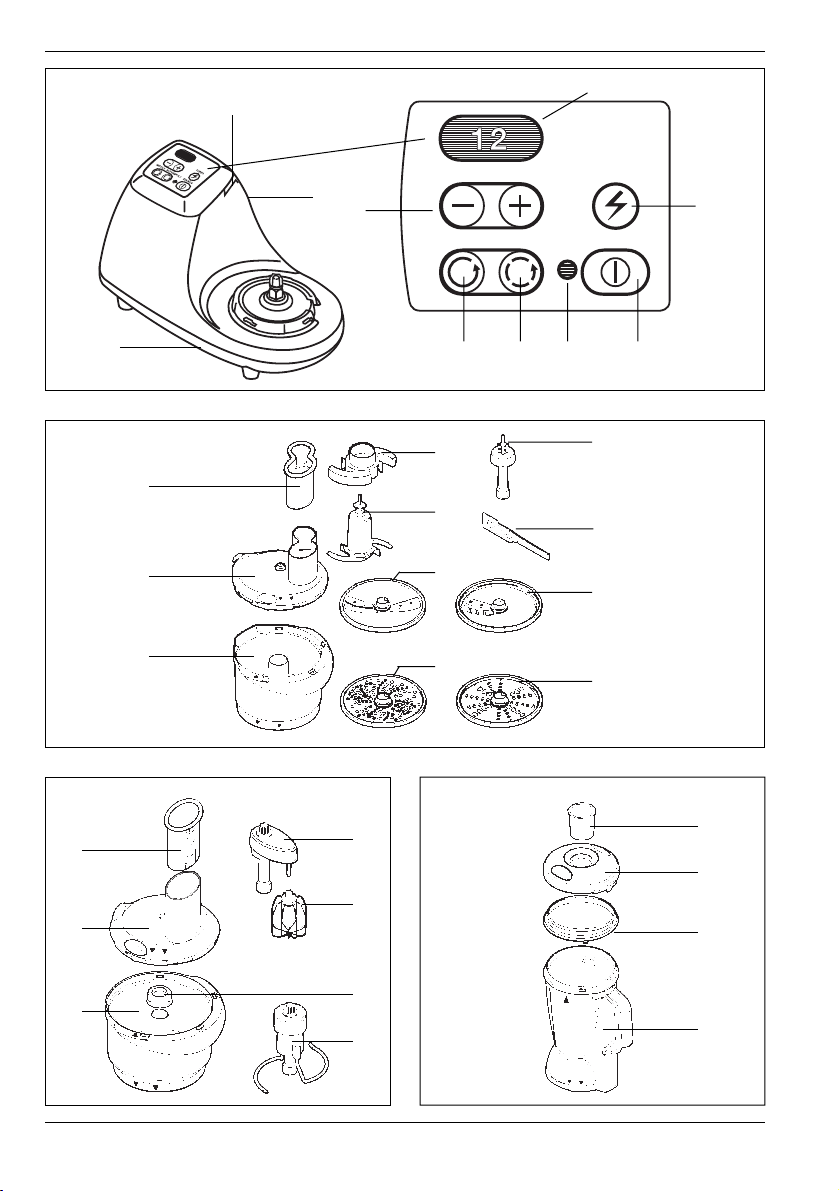
1. Basic unit with operating panel (Figure 1)
A) Operation indicator
B) Speed display
C) ON/OFF switch
D) Buttons for setting the speed
E) Pulse button
F) Automatic pulse button
G) Turbo button
H) Cable storage compartment
I) Latching slot
K) Rating plate
2. Accessory parts for cutting, grating, etc.
(Figure 2)
A) All purpose bowl
B) Cover with latching lug
C) Stopper / measuring beaker
D) Blade protection
E) Metal blades
F) Cutting disk, fine / rough (I)
G) Grating disk (II)
H) Rasping disk, fine / rough (III)
I) French fries disk (IV)
J) Spatula
K) Disk chuck
3. Accessory parts for kneading, stirring,
whipping
(Figure 3)
A) Stirring bowl
B) Cover with latching lug
C) Stopper / measuring beaker
D) Sealing ring
E) Kneading hook
F) Stirring element
G) Beater insert
4. Mixer (Figure 4)
A) Mixer beaker
B) Sealing ring
C) Cover
D) Cover beaker
Page 4

14
Safety instructions
■ The equipment may only be used when
supplied with the voltage indicated on the
rating plate (underside of the unit). Figure 1/K
■ The unit may only be connected to a properly
installed electrical plug socket.
■ Caution! Only operate unit with proper
supervision. Remove mains plug even when
leaving the room for short periods of time.
■ Keep away from children.
■ The mains plug shall be removed whenever the
unit is cleaned, serviced or not in use.
■ Do not remove the unit from the socket
outlet by pulling on the electrical cord.
■ Only handle the metal blade by using the
handle provided for, it is extremely sharp.
Use particular care when rinsing off danger of injury! Store only with protective
cap applied!
■ If the unit is in operation:
DO NOT put your fingers in the filling inlet!
DO NOT put insert any long objects such as
kitchen knives, cooking spoons, spatulas or the
like into the filling inlet!
ONLY use the stopper to push in cutting
material!
■ Remove cover only after the rotating tool
elements have come to a stop.
■ This equipment is solely designed for processing foodstuffs in the household. The
manufacturer shall not be liable for damage
arising from either improper use or use of the
equipment which was not intended.
■ Do not handle the unit with moist or wet
hands.
■ Do not immerse the motor-containing part
in water!
■ Do not leave the unit switched on for unnecessary periods of time. If the unit is not
in use over longer periods then the mains plug
should be removed. Never block or cover
the ventilation slots when the unit is in operation.
■ Do not bend the connecting cable. From time
to time inspect for damage. Have the cable
replace immediately in the event of damage.
It may only be replaced by an authorized
repair shop or an AEG customer service
department as special purpose tools are
required.
■ As a rule:
Repairs on electrical equipment may only
be performed by specialized technical personnel. Improper and unauthorized repair
work may result in serious hazard to the
user.
■ Please contact your AEG specialist supplier or
the AEG customer service department in the
case of failure or malfunction.
This equipment conforms with the following
EU Guidelines:
– 72/23/EWG of February 2, 1973, "Low Voltage
Guideline", including the Amended Guideline
93/68/EWG;
– 89/336/EWG of June 3, 1989 "EMC Guideline",
including Amended Guideline 92/31/EWG.
Technical specifications
Output 550 W
Stirring bowl capacity max. 1,5 kg flour
All purpose bowl capacity max. 1500 ml
Mixer capacity max. 1000 ml
Cleaning before putting into operation:
The bowl and all accessories should be carefully
cleaned and dried before the first use.
Functional description of operating panel:
■ operation indicator (Figure 1 A)
The operation indicator
– is green when the unit is ready for operation.
– is red when the unit is connected with the
mains supply but not yet ready for operation
for one of the following reasons:
a) bowl, mixer or cover not locked
b) if operating tool is blocked
c) flashes red if the motor is overheated.
Page 5

15
■ Speed display
(Figure 1B)
"0" is shown as soon as the unit is connected
to the mains supply.
The pre-selected speed is displayed when it is
ready for operation.
"= =" appears if the operating tool is blocked.
■ ON/OFF button (Figure 1 C)
This button is used to switch the motor on and
off.
■ Buttons for adjusting the speeds
(Figure 1D)
They are used to change the speeds to a higher ("+") or lower ("-") level. By continually
pressing this key the speed may be raised or
lowered in steps.
■ Pulse button (Figure 1E)
The pulse button may be used for momentary
operation of the unit at the respectively set
speed. The unit ceases to operate when the
button is released.
■ Automatic pulse button (Figure 1F)
The unit motor may be periodically switched
on or off at the respectively set speed. The
motor is stopped by pressing the button again.
■ Turbo button (Figure 1G)
While the motor is running the speed may be
briefly increased beyond the respective maximum level possible. The turbo function may be
used for a maximum of 25 seconds. Afterwards, the unit automatically switches back to
the original speed.
This is how to put your Multiple Use Appliance
into operation:
■ Place the unit on a dry and level work surface.
■ The cable storage compartment (Figure 1 H) is
located at the rear of the basic unit. Unused
cable may be stored here if the lead to the
socket outlet is too long.
■ Connect the unit to the mains supply. The operating display (Figure 1 A) is red. A "0" appears
in the speed display (Figure 1 B).
■ Selected the accessories and operating tool
suitable for the work intended.
Use of the All Purpose Bowl
(Figure 2A) /Metal Blade (Figure 2E)/
Metal Plates (Figure 2F-2I)
■ Attaching the all purpose bowl
Place the all purpose bowl (Figure 2 A) onto the
guide grooves in such a way that the marking
(▼/OPEN) on the bowl matches the (▲) on the
Multiple Use Appliance and turn the bowl in a
counterclockwise direction until the bowl becomes latched (the symbol ▼/CLOSED is located
above the marking ▲ on the unit).
■ Using the metal blade
Remove the protective cover before using the
blade.
Caution: metal blade is extremely sharp.
Danger of injury!
Place the blade into the all purpose bowl.
■ Attaching and locking the cover
Place the cover onto the guide lugs so that the
marking (▼⁄ OPEN) on the cover matches the
marking (▲) on the all purpose bowl and turn the
cover in a counterclockwise direction until you
feel the locating pin lock into the slot provided
for (Figure 1) (the symbol ▼/CLOSED is located
above the marking ▲ on the bowl).
Page 6

16
After the cover is locked the operation indicator
(Figure 1 A) switches from red to green. Either the
number "6" or the last selected speed appears in
the speed display (Figure 1 B).
If you use the all purpose bowl then you have the
option, depending on the material to be processed or recipe recommendations, of freely selecting from speeds 1 - 12 by using the buttons for
adjusting the level of speed (Figure 1 D). The
speed may also be changed during operation.
Please note:
Everything which is to be processed in the Multiple Use Appliance has to be carefully prepared.
Remove seeds from fruit having seeds.
Meat and bacon should be de-boned.
Food should be prepared in such a way that it
passes through the filling inlet.
The equipment is started by pressing the ON/OFF
switch (Figure 1 C).
The unit may also be started by means of the
pulse (Figure 1 E) or automatic pulse
(Figure 1 F).
Use the stopper / measuring beaker (Figure 2 C)
for pressing in material to be cut and for closing
the filling inlet.
■ Using the Metal Plates
Place the metal plate selected onto the bayonet
lock of the plate retainer (Figure 2K). Turn the
pate retainer in a counterclockwise direction
until it stops.
Caution: Please do not
touch the cutting
edge. Danger of injury!
Now place the plate
retainer into the
already prepared all
purpose bowl.
Cutting plate Grating plate
fine/rough (Figure 2F) (Figure 2G)
Both sides of the Use speeds 10 - 12
plate may be used. for grating.
Use speeds 1 - 6
for cutting.
Rasping plate
French fries plate
fine/rough (Figure 2I)
(Figure 2 H) Use the plate
Use speeds 1 - 6 with speeds 1 - 4.
for rasping.
Both sides of the plate
may be used.
The following applies as a rule for use of the
metal plates:
■ Prepared food should be cut small enough
that it passes through the filling inlet.
■ Materials should be placed in a vertical direc-
tion, side by side into the filling inlet.
■ Use only the stopper for addition pressing.
■ The thickness of the material to be cut may be
affected by the additional pressure applied.
■ Select the lower speeds for softer cutting
materials and the higher speeds for harder
materials.
Use of the Stirring Bowl (Figure 3A) /
Kneading Hook (Figure 3E) /Stirring
Element (Figure 3F) / Beater Insert
(Figure 3G)
■ Attaching the stirring bowl (Figure 3 A);
cf. section on "Attaching the All Purpose
Bowl"
Page 7

17
■ Place the sealing ring (Figure 3 D) onto the
opening in the middle of the bowl and twist in
a clockwise direction until it stops.
■ Using the kneading hook (Figure 3E) or
beater element (Figure 3F)
Place the kneading hook into the stirring bowl.
If the stirring element is used then it (Figure
3F) has to be locked onto the beater insert
(Figure 3 G) first.
Attaching and Locking the Cover
Cf. section on "Attaching and locking the cover"
for the all purpose bowl.
After the cover is locked the operation indicator
switches from red to green.
The number "1" then appears in the speed display
(Figure 1 B).
If the stirring bowl and kneading or stirring element is used then you have the option, depending on the type and quantity of material to be
processed, of freely selecting from speeds 1 - 6.
The speed may also be changed during operation.
Use of the Mixer (Figure 4)
The mixer is used to prepare liquids and other
things such as sauces, mixed drinks, dressings,
mayonnaise and for fine-cutting of smaller
quantities.
■ Attaching the Mixer Beaker (Figure 4A)
Cf. section on " Attaching the All Purpose
Bowl "
■ Attaching and locking the cover
Position the cover so that the marking (▼/OPEN)
on the cover matches the marking (▲) on the
mixer and turn the cover in a counterclockwise direction until it stops and the symbol
▼/CLOSED is positioned above the marking ▲ on
the mixer.
NOTE: Make certain that the sealing ring (Figure
4 B) is properly inserted in the cover.
After the cover is locked the operation indicator
(Figure 1A) switches from red to green. The number "10" then appears in the speed display (Figure
1 B).
When using the mixer you have the option,
depending on the material to be processed or
recipe recommendations, of freely selecting from
speeds 1 - 12 by using the buttons for adjusting
the level of speed. The speeds may also be
changed during operation.
Afterwards, re-insert the cover beaker (Figure 4
D) in the cover opening.
Maintenance and Cleaning
The basis unit, kneading hook and beater insert
should only be wiped off using a moist cloth!
Make certain that the locking slots (Figure 1) for
the safety latching are always clean. If necessary,
use a dry brush to clean them. The following parts
may be placed into the upper section of a dishwasher and cleaned at 60° C:
– all purpose bowl and stirring bowl with cover
and measuring beaker
– plates and plate retainers
– spatula
– stirring elements
Page 8

18
All other parts should be cleaned under running
water!
Remove and allow to thoroughly dry before reinserting in order to clean the sealing rings
(Figures 3 D and 4 B).
Food which contains a lot of dyes (e.g. carrots)
may discolor plastic parts. Any discoloration may
be removed by means of cooking oils. Use a brush
to clean them if necessary before rinsing. Do not
use any sharp instruments for cleaning purposes.
Special care should be taken with the sharp
blades, metal plates and mixer blades.
Allow all of the parts to thoroughly dry.
For the Sake of the Environment
Do not simply throw away packaging materials.
■ The packaging carton may be brought to a
paper recycling facility or the responsible disposal site.
■ The plastic sacks made of polyethylene (PE)
may be brought to polyethylene collection
points for recycling.
Polyester parts made from foamed polystyrene
(PS) are free of CFC.
Please contact your municipal authority for
information about your local responsible recycling facility.
Customer Service
Our products represent the highest available
quality.
Only with your support are we able to develop
equipment which satisfies your requirements.
Please contact us should you, nevertheless, have
any problems in operating this equipment.
Page 9

19
Examples for Using the KM 2000
All Purpose Bowl with the following accessories:
Food Maximum Preparation Mode of Speed Processing
processing operation time
quantities
1. Metal blades
Meat 750 g cut into 2-3 cm thick cubes 3 10-12 up to 60 sec.
(lean, without sinew)
Swiss cheese 500 g cut into 2-3 cm thick cubes 3 10-12 up to 60 sec.
Boiled eggs 10 Eggs Put all of the eggs into the bowl 2 12 25-30 times
Onions 750 g Cut into quarters 2 12 25-30 times
Carrots 800 g Cut into 2 cm thick pieces 3 12 up to 60 sec.
Parsley 4 bunch Dry and remove stalks 3 12 up to 30 sec.
Chocolate 400 g Breaks into pieces 3 12 up to 45 sec.
Nuts 1000 g Remove hard peels or skins 3 12 up to 60 sec.
Almonds 1000 g Thin skin may be removed 3 12 up to 60 sec.
be grinding
Mayonnaise made from Allow ingredients to reach room
1 l oil and temperature. Except for oil, leave all 3 10-12 30 sec. until oil
4 eggs other ingredients in a foamy state. 3 12 is thoroughly
Add one drop of oil at a time. stirred in
2. Plates
Food Plate NOTE Speed
Carrots Cutting plate (I) Finely cut or rasp raw food or vegetables 1-6
Grating plate (II) Clean grating plate after about 500 g 10-12
Rasping plate (III) 6-12
Cabbage Cutting plate (I) Rough cut to cook 1-6
Rasping plate (II) 6-12
Kohlrabi Cutting plate (I) 1-6
Rasping plate (II) 6-12
French fries pl. (IV) Fill in with unit switched off 1-4
Potato Cutting plate (I) 1-6
Grating plate (II) Clean grating plate after about 500 g 10-12
French fries pl. (IV) Fill in with unit switched off 1-4
Mushrooms Cutting plate (I) 1-6
Apple Cutting plate (I) 1-6
Grating plate (II) Clean grating plate after about 500 g 10-12
Rasping plate (III) 6-12
Cucumber Cutting plate (I) 1-6
Rasping plate (III) 1-6
Celery Cutting plate (I) 1-6
Rasping plate (II) 1-6
Emmentaler cheese Rasping plate (II) 1-6
Onions Cutting plate (I) 1-6
Mode of operation: = impulse operation (Fig. 1E) 2 = autom. impulse operation (Fig. 1F) 3 = continuous operation (Fig. 1C)
*
Page 10

20
Stirring Bowl with the following accessories:
Food Maximum Preparation Mode of Speed Processing
processing operation time
time
1. Kneading hook
Yeast dough made from
Put flour, eggs and sugar into the bowl.
1500 g flour Add fat, yeast and milk. 3 1 30 seconds
Knead. 3 5-6 up to 5 min.
Short-crust pastry made from Put all of the ingredients into the bowl 3 4-5 up to 3 min.
750 g flour and knead.
2. Stirring elem.
Beat egg-whites egg-whites Allow eggs to reach room temperature 3 4-6 up to 3 min.
until frothy of 10 eggs and pour into bowl.
Whip cream 700 ml cream Pour refrigerated cream into the bowl. 3 1-2 up to 2 min.
Sponge cake made from Beat egg-whites and water until frothy. 3 4-6 2 minutes
dough 6 eggs Add sugar. 3 4-6 2 minutes
Add egg yolks. 3 4-6 2 minutes
Added sieved flour. 3 4-6 30 seconds
Sponge mixture made from Add soft margarine and sugar. 3 4-6 4 minutes
500 g Margarine Add eggs.
Add flour. 3 4-6 2 minutes
3 1 up to 60 sec.
Mixer
Food Maximum Preparation Mode of Speed Processing
processing operation time
time
1. Mixing
Fruit cocktail 1 l (0,5 to 0,75 l) Chop fruit. 2 10-12 5-10 times
Milk and fruits Add milk and mix. 3 12 20 seconds
Mayonnaise 1 l Stir eggs and lemon juice together. 3 10 60 seconds
(3 eggs + Slowly add oil through the cover 3 10 approx. 90 sec.
450 ml oil, opening.
lemon juice) Add salt, sugar and mustard. 2 12 5 times
Vegetable soup 1 l Allow cooked vegetables to cool.
Mix with about 1/4 l broth. 2 10-12 5-10 times
Add remaining broth. 3 12 30-40 seconds
2. Chop
Onions 100 g Cut onions into quarters. 2 12 10-12 times
Hard rolls 2 pieces Time. 3 12 30 seconds
Parsley 1 bunch Dry and remove stalks. 3 12 up to 30 sec.
Mode of operation:
1 = impulse operation (Figure 1E)
2 = automatic impulse operation (Figure 1F)
3 = continuous operation (Figure 1C)
*
*
Page 11

AEG Kundendienst in Europa
Deutschland Europa
Sollte dieses AEG Kleingerät wider Erwarten nicht
funktionieren, senden Sie es bitte an folgende Adresse:
Beginnt die Postleitzahl Ihres Wohnortes
mit 2 - 3 - 4 - 5
AEG Kleingeräte-Zentralwerkstatt
Firma Elektro Stefan Irsen
Sachtlebenstraße 1
41541 Dormagen
Beginnt die Postleitzahl Ihres Wohnortes
mit 0 - 1 - 6 - 7 - 8 - 9
AEG Kleingeräte-Zentralwerkstatt
Firma Trepesch GmbH
Steinstraße 500
90419 Nürnberg
In Deutschland steht Ihnen für Fragen , Anregungen
oder bei Problemen rund um unsere Kleingeräte und
Raumpflegegeräte montags bis freitags von 8 bis 18 Uhr
unsere AEG Serviceline unter 01805-30 60 80* zur
Verfügung.
*(Deutsche Telekom 24 Pf/Min.)
Garantiebedingungen
Für dieses Gerät leisten wir - zusätzlich zu
der gesetzlichen Gewährleistung des
Händlers aus Kaufvertrag - dem Endabneh-
mer gegenüber zu den nachstehenden Bedingungen Garantie:
1. Die Garantiezeit beträgt 12 Monate und
beginnt mit dem Zeitpunkt der Übergabe
des Geräts, der durch Rechnung oder
andere Unterlagen zu belegen ist. Die
Garantiezeit ist auf 6 Monate beschränkt,
wenn das Gerät gewerblich genutzt wird.
2. Die Garantie umfaßt die Behebung aller
innerhalb der Garantiezeit auftretenden
Schäden oder Mängel des Geräts, die
nachweislich auf Material- oder Fertigungsfehlern beruhen. Nicht unter die
Garantie fallen Schäden oder Mängel aus
nicht vorschriftsmäßiger Handhabung
sowie Nichtbeachtung der Gebrauchsanweisungen.
3. Im Garantiefall senden Sie das Gerät an
die für Ihren Wohnort zuständige AEG
Kleingeräte-Zentralwerkstatt oder übergeben es Ihrem Fachhändler.
Bei Einsendung achten Sie bitte auf gute
Verpackung, Ihre vollständige AbsenderAnschrift und eine kurze Fehlerbeschreibung. Fügen Sie zum Nachweis Ihres
Garantieanspruchs den Kaufbeleg bei.
4. Die Garantieleistungen werden ohne jede
Berechnung durchgeführt; sie bewirken
weder eine Verlängerung noch einen
Neubeginn der Garantiezeit. Ausgewechselte Teile gehen in unser Eigentum über.
Guarantee
This appliance is covered by the following
guarantee and is in addition to your statutory and other legal rights. All components
wich fail due to defective manufacture will
be repaired or replaced free of charge for a
period of 12 months from the date of
purchase. We will not accept claims if unauthorised modification is made or if nonstandard components are used. The appliance must be used in accordance with the
operating instructions and the guarantee
does not cover any damage caused during
transit or through misuse. In order to establish the date of purchase, advice note or similar document must be produced whenever
the guarantee is claimed.
Garantie
Pour toute mise en œvre de garantie ou de
service après vente, vous devez yous adresser
à votre vendeur.
AEG assure au vendeur le remplacement gratuit des pièces détachées nécessaires à la réparation pendant 1 an, à partir de la date de
votre facture, sauf en cas de non respect des
prescriptions d’utilisation ou lorsqu’une cause étrangère à l’appareil est responsable de la
défaillance.
Les dispositions stipulées ci-dessus ne sont
pas exclusives du bénéfice au profit de
l’acheteur de la garantie légale pour défaut
et vice cachés qui s’applique, en tout état de
cause, dans les conditions des articles 1641 et
suivants, du code civil.
Garantie
AEG Huishoudelijke Apparaten neemt voor
reparaties binnen de garantietermijn - voor
zover de defecten zijn terug te voeren op
materiaal - en/of constructiefouten - de kosten op zich voor materiaal en arbeidsloon.
De garantie bedraagt 12 maanden en gaat in
Österreich, 1230 Wien, 01/8 66 43-333
Belgique/België, 1502 Lembeek, 02/363.04.44
Danmark, 7000 Fredericia, 70 11 74 00
España, Madrid, 1-885-2700
France, 60307 Senlis, 03-44 62 24 24
Great Britain, Service Force 09 90 92 99 29
Hellas, 18346 MO”XATO, 01/4822646
Island, Reykjavik (Bræóurnir Ormsson hf), 91-3 88 20
Italia, 20394 Agrate Brianza (Milano), 39 / 68 99-8 39
Luxembourg, 1273 Luxembourg-Hamm, 4 24 31-433
Nederland, 2400 AC Alphen aan den Rijn, 0172-468 300
Norge, 0516 Oslo, 22 72 58 00
Portugal, 2635-445 Rio de Mouro, (01) 926 75 75
Schweiz/Svizzera, 5506 Mägenwil, 0848 848 348
Suomi, Porissa, puh. (02) 622 3300
Sverige, 10545 Stockholm, 08-738 60 00
op de dag van aankoop. Wanneer garantie
wordt verlangd, dient de faktuur can aankoop te worden overlegd. De garantietermijn
wordt door reparaties niet verlengd. Buiten
elke garantieverplichting vallen losse onderdelen van glas en/of kunststof. Alle overige
kosten, zoals voorrijdkosten, kosten van opzending en administratie, zijn voor rekening
van de eigenaar.
Garanzia
Duranti i primi 12 mesi d’esercizio, vengono
fornite gratuitamente dall’AEG le parti di ricambio riconosciute difettose. La garanzia ha
inizio con il giorno dell’acquisto che deve venir comprovato a mezzo della fattura o boletta di consegna. Per il resto valgono le
condizioni generali di fornitura della rispettiva rappresentanza nazionale.
Garantia
Durante los primeros 12 meses, la AEG se
hace cargo de cuantos costes de material y
horas de trabajos invertidas se produzcan en
la subsanación de defectos. La garantia empieza a regir a partir de la fecha de la entrega, la que deberá justificarse mediante
presentación de la factura o de la nota de depacho. Por lo demás serán de aplicación las
condiciones generales de venta se gun rigen
en el respectivo pais de nuestra representación.
Garantie
In Belgien ist nur die durch belge AEG ausgegebene Garantiekarte gültig.
En Belgique, seule la carte de garantie émise
par la belge AEG est valable.
In België is slechts de door de belge AEG uitgegeven waarborgkaart geldig.
AEG Hausgeräte GmbH, Muggenhofer Straße 135, D-90429 Nürnberg
 Loading...