

Page 1

USER
MANUAL
HK973500FB
EN User Manual 2
Hob
FR Notice d'utilisation 21
Table de cuisson
DE Benutzerinformation 42
Kochfeld
Page 2

www.aeg.com
2
CONTENTS
1. SAFETY INFORMATION...........................................................................................3
2. CONDITIONS OF USE..............................................................................................4
3. SAFETY INSTRUCTIONS.......................................................................................... 5
4. PRODUCT DESCRIPTION........................................................................................ 7
5. DAILY USE..................................................................................................................9
6. HINTS AND TIPS..................................................................................................... 12
7. CARE AND CLEANING.......................................................................................... 13
8. TROUBLESHOOTING.............................................................................................14
9. INSTALLATION....................................................................................................... 16
10. TECHNICAL DATA............................................................................................... 19
11. ENERGY EFFICIENCY.......................................................................................... 19
FOR PERFECT RESULTS
Thank you for choosing this AEG product. We have created it to give you
impeccable performance for many years, with innovative technologies that help
make life simpler features you might not find on ordinary appliances. Please
spend a few minutes reading to get the very best from it.
Visit our website for:
Get usage advice, brochures, trouble shooter, service information:
www.aeg.com/webselfservice
Register your product for better service:
www.registeraeg.com
Buy Accessories, Consumables and Original spare parts for your appliance:
www.aeg.com/shop
CUSTOMER CARE AND SERVICE
Always use original spare parts.
When contacting our Authorised Service Centre, ensure that you have the
following data available: Model, PNC, Serial Number.
The information can be found on the rating plate.
Warning / Caution-Safety information
General information and tips
Environmental information
Subject to change without notice.
Page 3

1. SAFETY INFORMATION
Before the installation and use of the appliance,
carefully read the supplied instructions. The
manufacturer is not responsible for any injuries or
damages that are the result of incorrect installation or
usage. Always keep the instructions in a safe and
accessible location for future reference.
1.1 Children and vulnerable people safety
• This appliance can be used by children aged from 8
years and above and persons with reduced physical,
sensory or mental capabilities or lack of experience
and knowledge if they have been given supervision or
instruction concerning the use of the appliance in a
safe way and understand the hazards involved.
• Do not let children play with the appliance.
• Keep all packaging away from children and dispose of
it appropriately.
• Keep children and pets away from the appliance when
it operates or when it cools down. Accessible parts are
hot.
• If the appliance has a child safety device, this should
be activated.
• Children shall not carry out cleaning and user
maintenance of the appliance without supervision.
• Children aged 3 years and under must be kept away
from this appliance when it is in operation at all times.
ENGLISH
3
General Safety
1.2
• WARNING: The appliance and its accessible parts
become hot during use. Care should be taken to
avoid touching heating elements. Children less than 8
years of age shall be kept away unless continuously
supervised.
• Do not operate the appliance by means of an external
timer or separate remote-control system.
Page 4

www.aeg.com4
• WARNING: Unattended cooking on a hob with fat or
oil can be dangerous and may result in fire.
• NEVER try to extinguish a fire with water, but switch
off the appliance and then cover flame e.g. with a lid
or a fire blanket.
• CAUTION: The cooking process has to be supervised.
A short term cooking process has to be supervised
continuously.
• WARNING: Danger of fire: Do not store items on the
cooking surfaces.
• Metallic objects such as knives, forks, spoons and lids
should not be placed on the hob surface since they
can get hot.
• Do not use a steam cleaner to clean the appliance.
• After use, switch off the hob element by its control
and do not rely on the pan detector.
• If the glass ceramic surface / glass surface is cracked,
switch off the appliance to avoid the possibility of
electric shock.
• If the supply cord is damaged, it must be replaced by
the manufacturer, an authorized Service or similarly
qualified persons in order to avoid a hazard.
• WARNING: Use only hob guards designed by the
manufacturer of the cooking appliance or indicated by
the manufacturer of the appliance in the instructions
for use as suitable or hob guards incorporated in the
appliance. The use of inappropriate guards can cause
accidents.
2.
CONDITIONS OF USE
This appliance is intended to be used in
household and similar applications such
as:
• Farm houses
• By clients in serviced apartments,
holiday apartments and other
residential type environments.
Page 5

3. SAFETY INSTRUCTIONS
ENGLISH
5
3.1 Installation
WARNING!
Only a qualified person must
install this appliance.
• Remove all the packaging.
• Do not install or use a damaged
appliance.
• Follow the installation instruction
supplied with the appliance.
• Keep the minimum distance from the
other appliances and units.
• Always take care when moving the
appliance as it is heavy. Always use
safety gloves and enclosed footwear.
• Seal the cut surfaces with a sealant to
prevent moisture to cause swelling.
• Protect the bottom of the appliance
from steam and moisture.
• Do not install the appliance adjacent
to a door or under a window. This
prevents hot cookware to fall from the
appliance when the door or the
window is opened.
• If the appliance is installed above
drawers make sure that the space,
between the bottom of the appliance
and the upper drawer, is sufficient for
air circulation.
• The bottom of the appliance can get
hot. Make sure to install a noncombustible separation panel under
the appliance to prevent access to the
bottom.
• Make sure that the ventilation space
of 2 mm, between the worktop and
the front of the below unit, is free.
The warranty does not cover damages
caused by the lack of an adequate
ventilation space.
3.2 Electrical Connection
WARNING!
Risk of fire and electrical
shock.
• All electrical connections should be
made by a qualified electrician.
• The appliance must be earthed.
• Before carrying out any operation
make sure that the appliance is
disconnected from the power supply.
• Make sure that the electrical
information on the rating plate agrees
with the power supply. If not, contact
an electrician.
• Make sure the appliance is installed
correctly. Loose and incorrect
electricity mains cable or plug (if
applicable) can make the terminal
become too hot.
• Use the correct electricity mains
cable.
• Do not let the electricity mains cable
tangle.
• Make sure that a shock protection is
installed.
• Use the strain relief clamp on the
cable.
• Make sure the mains cable or plug (if
applicable) does not touch the hot
appliance or hot cookware, when you
connect the appliance to the near
sockets
• Do not use multi-plug adapters and
extension cables.
• Make sure not to cause damage to
the mains plug (if applicable) or to the
mains cable. Contact our Authorised
Service Centre or an electrician to
change a damaged mains cable.
• The shock protection of live and
insulated parts must be fastened in
such a way that it cannot be removed
without tools.
• Connect the mains plug to the mains
socket only at the end of the
installation. Make sure that there is
access to the mains plug after the
installation.
• If the mains socket is loose, do not
connect the mains plug.
• Do not pull the mains cable to
disconnect the appliance. Always pull
the mains plug.
• Use only correct isolation devices: line
protecting cut-outs, fuses (screw type
fuses removed from the holder), earth
leakage trips and contactors.
• The electrical installation must have
an isolation device which lets you
disconnect the appliance from the
mains at all poles. The isolation
device must have a contact opening
width of minimum 3 mm.
Page 6
6
www.aeg.com
3.3 Use
WARNING!
Risk of injury, burns and
electrical shock.
• Remove all the packaging, labelling
and protective film (if applicable)
before first use.
• Use this appliance in a household
environment.
• Do not change the specification of
this appliance.
• Make sure that the ventilation
openings are not blocked.
• Do not let the appliance stay
unattended during operation.
• Set the cooking zone to “off” after
each use.
• Do not rely on the pan detector.
• Do not put cutlery or saucepan lids on
the cooking zones. They can become
hot.
• Do not operate the appliance with
wet hands or when it has contact with
water.
• Do not use the appliance as a work
surface or as a storage surface.
• If the surface of the appliance is
cracked, disconnect immediately the
appliance from the power supply. This
to prevent an electrical shock.
• Users with a pacemaker must keep a
distance of minimum 30 cm from the
induction cooking zones when the
appliance is in operation.
• When you place food into hot oil, it
may splash.
WARNING!
Risk of fire and explosion
• Fats and oil when heated can release
flammable vapours. Keep flames or
heated objects away from fats and oils
when you cook with them.
• The vapours that very hot oil releases
can cause spontaneous combustion.
• Used oil, that can contain food
remnants, can cause fire at a lower
temperature than oil used for the first
time.
• Do not put flammable products or
items that are wet with flammable
products in, near or on the appliance.
WARNING!
Risk of damage to the
appliance.
• Do not keep hot cookware on the
control panel.
• Do not put a hot pan cover on the
glass surface of the hob.
• Do not let cookware to boil dry.
• Be careful not to let objects or
cookware fall on the appliance. The
surface can be damaged.
• Do not activate the cooking zones
with empty cookware or without
cookware.
• Do not put aluminium foil on the
appliance.
• Cookware made of cast iron,
aluminium or with a damaged bottom
can cause scratches on the glass /
glass ceramic. Always lift these
objects up when you have to move
them on the cooking surface.
• This appliance is for cooking
purposes only. It must not be used for
other purposes, for example room
heating.
3.4 Care and cleaning
• Clean regularly the appliance to
prevent the deterioration of the
surface material.
• Deactivate the appliance and let it
cool down before you clean it.
• Disconnect the appliance from the
electrical supply before maintenance.
• Do not use water spray and steam to
clean the appliance.
• Clean the appliance with a moist soft
cloth. Only use neutral detergents. Do
not use any abrasive products,
abrasive cleaning pads, solvents or
metal objects.
3.5 Disposal
WARNING!
Risk of injury or suffocation.
• Contact your municipal authority for
information on how to discard the
appliance correctly.
• Disconnect the appliance from the
mains supply.
Page 7
2
1 11
51 2
4
3
7 6
810 9
ENGLISH 7
• Cut off the mains electrical cable
close to the appliance and dispose of
it.
3.6 Service
• To repair the appliance contact an
Authorised Service Centre.
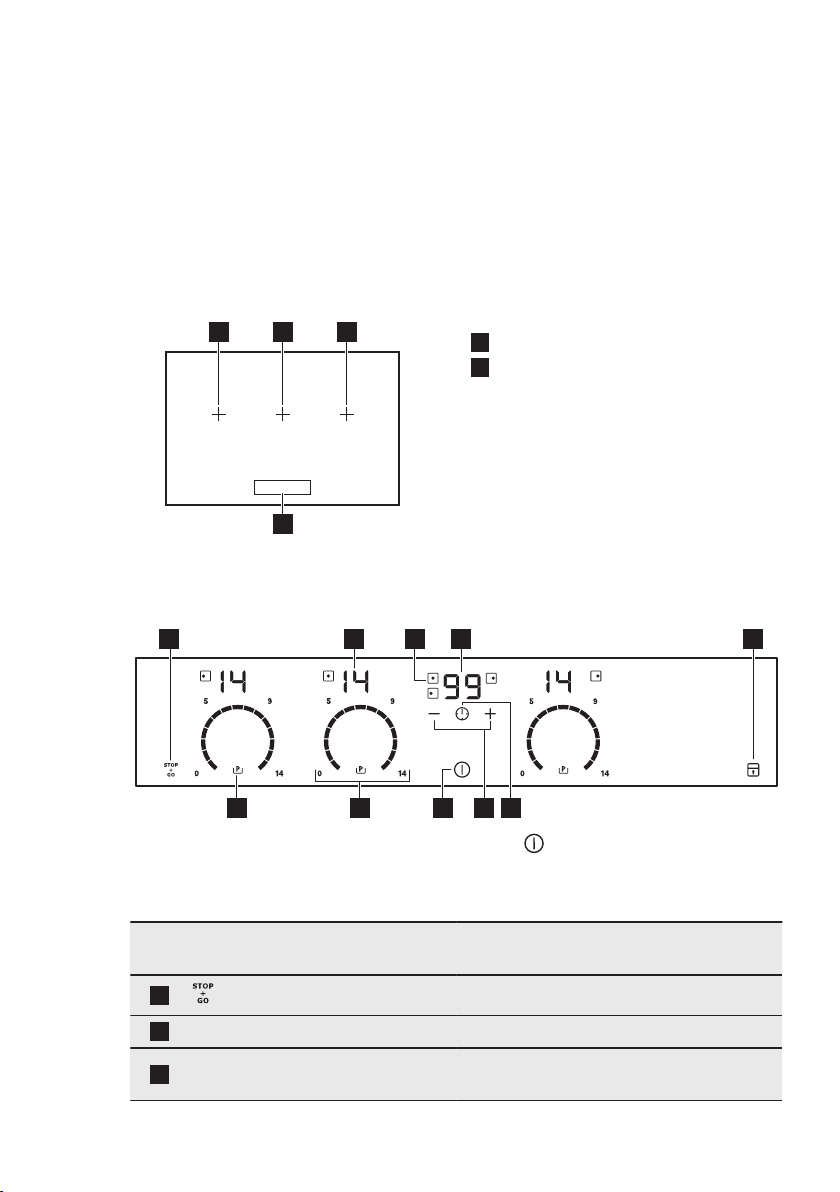
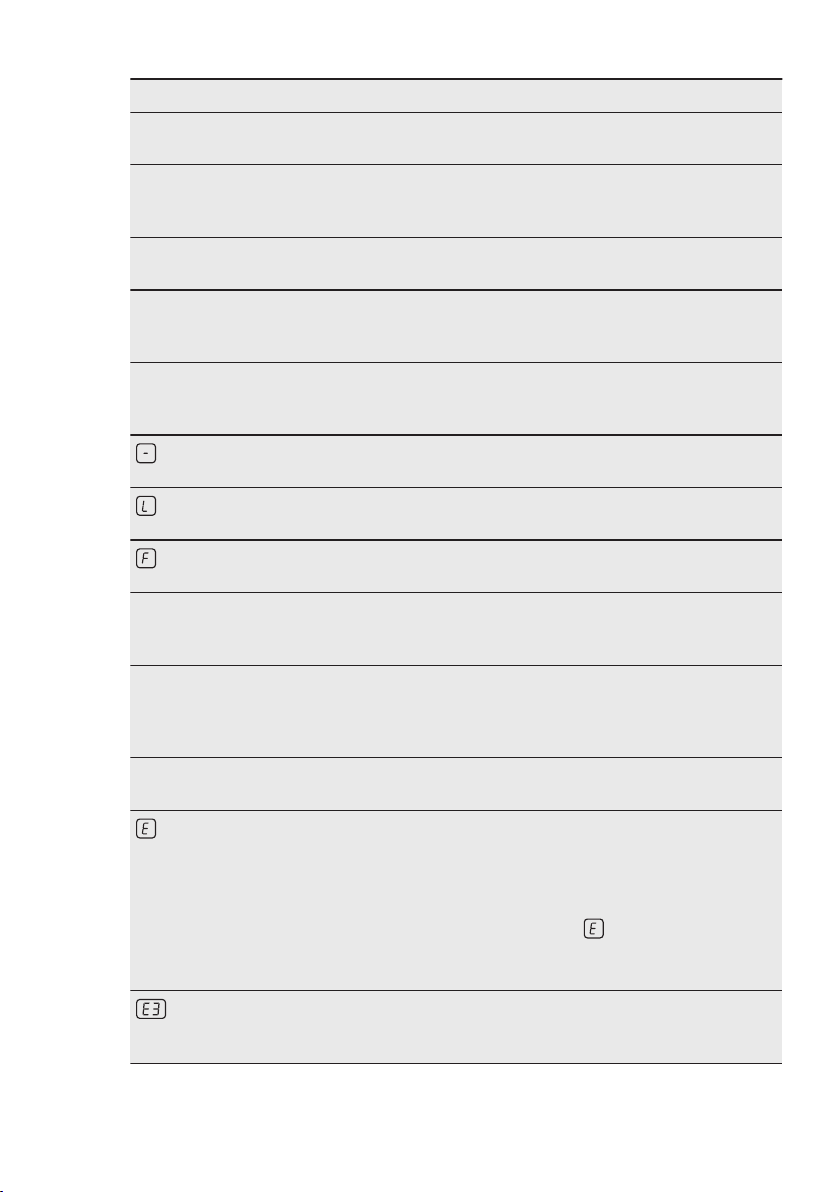
4. PRODUCT DESCRIPTION
4.1 Cooking surface layout
4.2 Control panel layout
• Use original spare parts only.
Induction cooking zone
1
Control panel
2
To see the control panel activate the appliance with .
Use the sensor fields to operate the appliance. The displays, indicators and sounds tell
which functions operate.
Sensor
field
1
- Heat setting display To show the heat setting.
2
- Timer indicators of cooking
3
Function Comment
STOP+GO To activate and deactivate the function.
To show for which zone you set the time.
zones
Page 8

www.aeg.com8
Sensor
field
- Timer display To show the time in minutes.
4
5
6
7
8
- Control bar To set a heat setting.
9
10
Function Comment
Lock / The Child Safety Device
- To select the cooking zone.
- To increase or decrease the time.
/
ON / OFF To activate and deactivate the hob.
Power function To activate and deactivate the function.
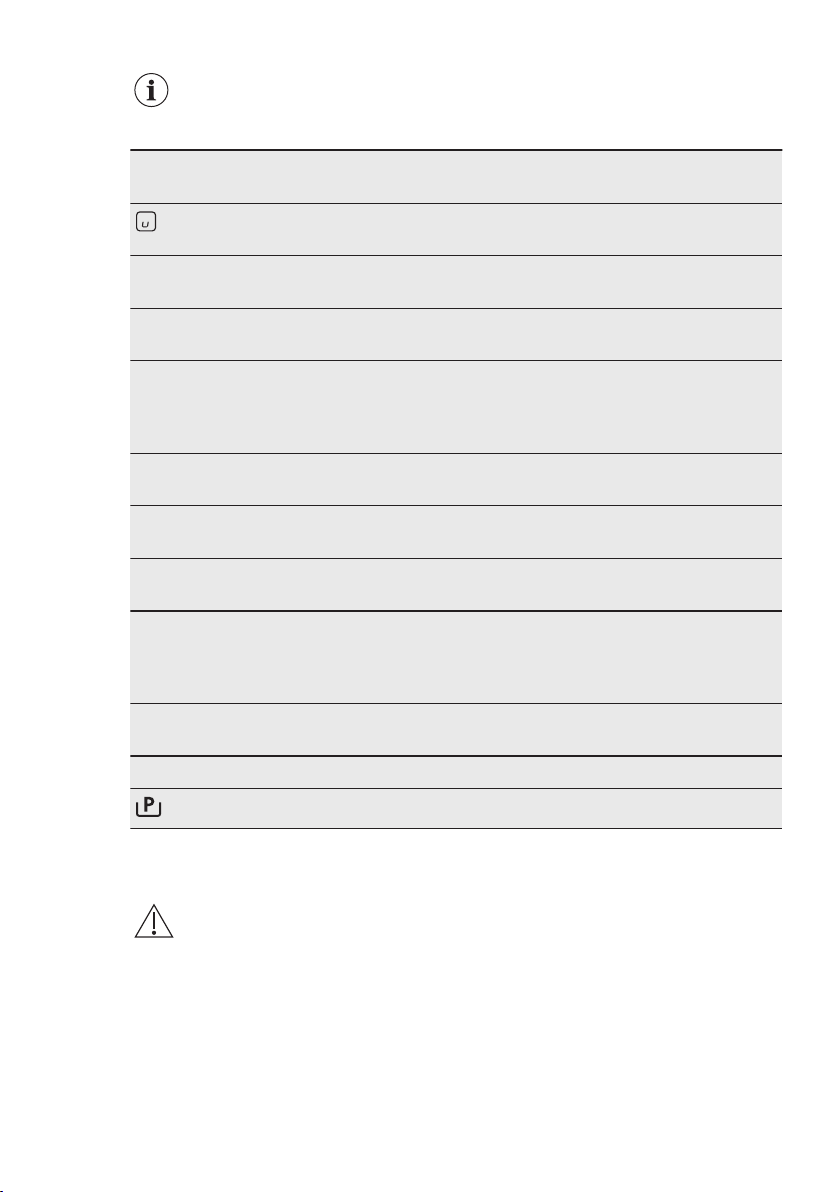
4.3 Heat setting displays
Display Description
The cooking zone is deactivated.
-
The cooking zone operates.
STOP+GO function operates.
Automatic Heat Up function operates.
To lock / unlock the control panel.
+ digit
/ /
Power function operates.
There is a malfunction.
OptiHeat Control (3 step Residual heat indicator): continue cooking /
keep warm / residual heat.
Lock / The Child Safety Device function operates.
Incorrect or too small cookware or no cookware on the cooking zone.
Automatic Switch Off function operates.
Page 9
ENGLISH
9
4.4 OptiHeat Control (3 step
Residual heat indicator)
WARNING!
/ / There is a risk of
burns from residual heat.
The indicator shows the level
of the residual heat.
5. DAILY USE
WARNING!
Refer to Safety chapters.
5.1 Activating and deactivating
Touch for 1 second to activate or
deactivate the hob.
The control panel comes on after you
activate the hob and goes off after you
deactivate the hob. When the hob is
deactivated you can see only
field.
5.2 Automatic Switch Off
The function deactivates the hob
automatically if:
• all cooking zones are deactivated,
• you do not set the heat setting after
you activate the hob,
• you spill something or put something
on the control panel for more than 10
seconds (a pan, a cloth, etc.). An
acoustic signal sounds and the hob
deactivates. Remove the object or
clean the control panel.
• the hob gets too hot (e.g. when a
saucepan boils dry). Let the cooking
zone cool down before you use the
hob again.
• you use incorrect cookware. The
symbol
zone deactivates automatically after 2
minutes.
• you do not deactivate a cooking zone
or change the heat setting. After
some time comes on and the hob
deactivates.
sensor
comes on and the cooking
The induction cooking zones make the
heat necessary for cooking process
directly in the bottom of the cookware.
The glass ceramic is heated by the heat
of the cookware.
The relation between the heat setting
and the time after which the hob
deactivates:
Heat setting The hob deacti-
vates after
, 1 - 3
4 - 7 5 hours
8 - 9 4 hours
10 - 14 1.5 hour
6 hours
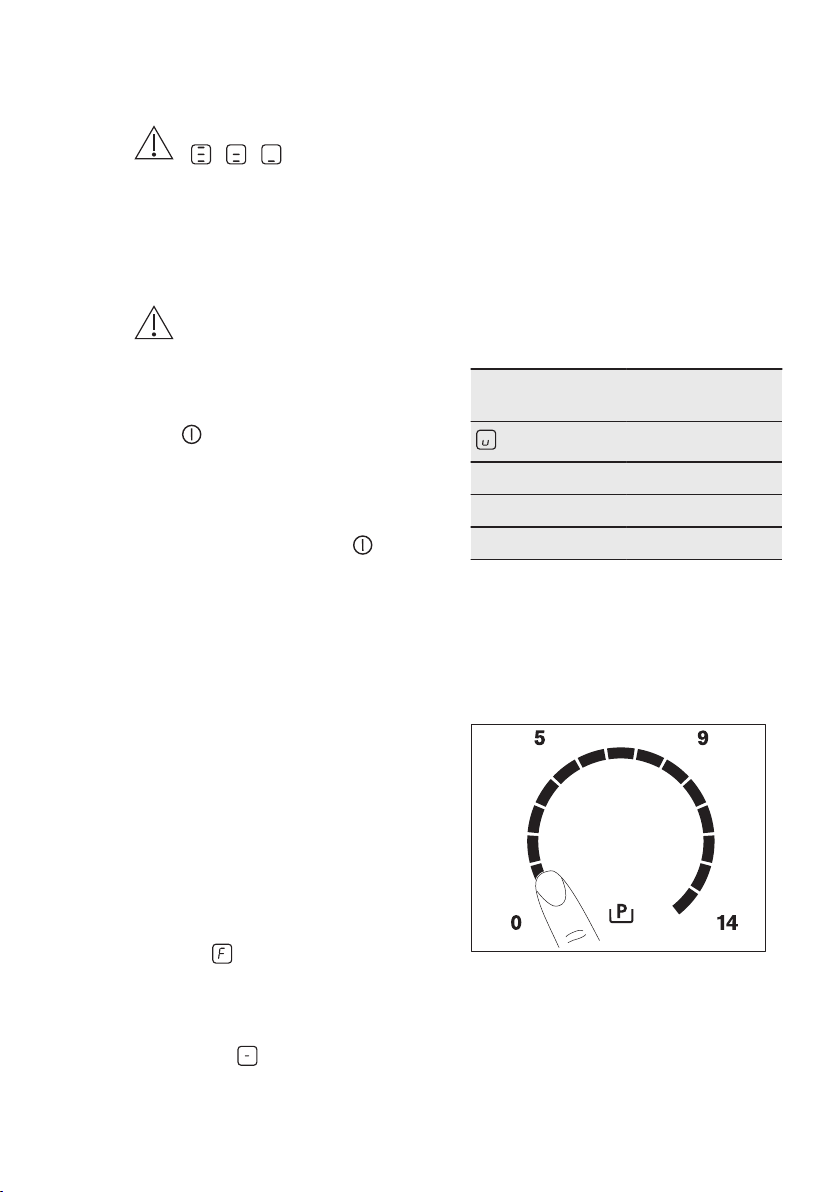
5.3 The heat setting
To set or change the heat setting:
Touch the control bar at the correct heat
setting or move your finger along the
control bar until you reach the correct
heat setting.
5.4 Using the cooking zones
Put the cookware on the cross / square
which is on the surface that you cook.
Cover the cross / square fully. Induction
cooking zones adapt to the dimension of
the bottom of the cookware
automatically. You can cook with the
Page 10

10
www.aeg.com
large cookware on two cooking zones at
the same time.
5.5 Automatic Heat Up
Activate this function to get a desired
heat setting in a shorter time. When it is
on, the zone operates on the highest
setting in the beginning and then
continues to cook at the desired heating
setting.
To activate the function the
cooking zone must be cold.
To activate the function for a cooking
zone: touch ( comes on).
Immediately touch a desired heat
setting. After 5 seconds
To deactivate the function: change the
heat setting.
comes on.
5.6 Power function
This function makes more power
available to the induction cooking zones.
The function can be activated for the
induction cooking zone only for a limited
period of time. After this time the
induction cooking zone automatically
sets back to the highest heat setting.
Refer to “Technical
information” chapter.
To activate the function for a cooking
zone: touch
To deactivate the function: change the
heat setting.
. comes on.
5.7 Timer
Count Down Timer
You can use this function to set how long
the cooking zone should operate for a
single cooking session.
First set the heat setting for the cooking
zone then set the function.
To set the cooking zone: touch
again and again until the indicator of a
necessary cooking zone comes on.
To activate the function: touch
the timer to set the time (00 - 99
of
minutes). When the indicator of the
cooking zone starts to flash slowly the
time counts down.
To see the remaining time: set the
cooking zone with
the cooking zone starts to flash quickly.
The display shows the remaining time.
To change the time: set the cooking
zone with
To deactivate the function: set the
cooking zone with and touch . The
remaining time counts back to 00. The
indicator of the cooking zone goes out.
To stop the sound: touch .
CountUp Timer (The count up timer)
You can use this function to monitor how
long the cooking zone operates.
To set the cooking zone: touch
again and again until the indicator of a
necessary cooking zone comes on.
To activate the function: touch of
the timer. comes on. When the
indicator of the cooking zone starts to
flash slowly the time counts up. The
display switches between
counted time (minutes).
To see how long the cooking zone
operates: set the cooking zone with .
The indicator of the cooking zone starts
to flash quickly. The display shows how
long the zone operates.
To deactivate the function: set the
cooking zone with and touch or
. The indicator of the cooking zone
goes out.
Minute Minder
You can use this function as a Minute
Minder when the hob is activated and
the cooking zones do not operate. The
heat setting display shows
. Touch or .
When the time comes to an
end, the sound operates and
00 flashes. The cooking zone
deactivates.
. The indicator of
and
.
Page 11

ENGLISH
11
To activate the function: touch .
Touch or of the timer to set the
time. When the time comes to an end,
the sound operates and 00 flashes.
To stop the sound: touch .
The function has no effect
on the operation of the
cooking zones.
5.8 STOP+GO
This function sets all cooking zones that
operate to the lowest heat setting.
When the function operates, you cannot
change the heat setting.
The function does not stop the timer
functions.
To activate the function: touch .
comes on.
To deactivate the function: touch .
The previous heat setting comes on.
5.9 Lock
You can lock the control panel while
cooking zones operate. It prevents an
accidental change of the heat setting.
Set the heat setting first.
To activate the function: touch
comes on for 4 seconds. The Timer stays
on.
To deactivate the function: touch
The previous heat setting comes on.
When you deactivate the
hob, you also deactivate this
function.
.
.
5.10 The Child Safety Device
This function prevents an accidental
operation of the hob.
To activate the function: activate the
hob with . Do not set the heat setting.
Touch for 4 seconds. comes on.
Deactivate the hob with
.
To deactivate the function: activate the
hob with
Touch for 4 seconds. comes on.
Deactivate the hob with .
To override the function for only one
cooking time: activate the hob with .
comes on. Touch for 4 seconds.
Set the heat setting in 10 seconds. You
can operate the hob. When you
deactivate the hob with the function
operates again.
. Do not set the heat setting.
5.11 OffSound Control (Deactivating and activating the sounds)
Deactivate the hob. Touch
seconds. The display comes on and goes
out. Touch
comes on. Touch of the timer to
choose one of the following:
- the sounds are off
•
- the sounds are on
•
To confirm your selection wait until the
hob deactivates automatically.
When the function is set to you can
hear the sounds only when:
• you touch
• Minute Minder comes down
• Count Down Timer comes down
• you put something on the control
panel.
for 3 seconds. or
for 3
5.12 Power management
function
• Cooking zones are grouped
according to the location and number
of the phases in the hob. See the
illustration.
• Each phase has a maximum electricity
loading of 3700 W.
• The function divides the power
between cooking zones connected to
the same phase.
• The function activates when the total
electricity loading of the cooking
zones connected to a single phase
exceeds 3700 W.
Page 12

www.aeg.com
12
• The function decreases the power to
the other cooking zones connected to
the same phase.
• The heat setting display of the
reduced zones changes between two
levels.
6. HINTS AND TIPS
WARNING!
Refer to Safety chapters.
6.1 Cookware
For induction cooking zones
a strong electro-magnetic
field creates the heat in the
cookware very quickly.
Use the induction cooking
zones with correct cookware.
Cookware material
• correct: cast iron, steel, enamelled
steel, stainless steel, the bottom
made of multi-layer (with correct mark
from a manufacturer).
• not correct: aluminium, copper,
brass, glass, ceramic, porcelain.
Cookware is correct for an induction
hob if:
• some water boils very quickly on a
zone set to the highest heat setting.
• a magnet pulls on to the bottom of
the cookware.
The bottom of the cookware
must be as thick and flat as
possible.
Cookware dimensions
Induction cooking zones adapt to the
dimension of the bottom of the
cookware automatically to some limit.
The cooking zone efficiency is related to
the diameter of the cookware. The
cookware with a smaller diameter than
the minimum receives only a part of the
power generated by the cooking zone.
Refer to “Technical
information” chapter.
6.2 The noises during operation
If you can hear:
• crack noise: cookware is made of
different materials (sandwich
construction).
• whistle sound: you use the cooking
zone with high power level and the
cookware is made of different
materials (sandwich construction).
• humming: you use high power level.
• clicking: electric switching occurs.
• hissing, buzzing: the fan operates.
The noises are normal and do not refer
to hob malfunction.
6.3 Öko Timer (Eco Timer)
To save energy, the heater of the
cooking zone deactivates before the
count down timer sounds. The difference
in the operation time depends on the
heat setting level and the length of the
cooking operation.
6.4 Examples of cooking
applications
The relation between the heat setting
and the cooking zone consumption of
power is not linear. When you increase
the heat setting, it is not proportional to
the increase of the cooking zone
consumption of power. It means that the
cooking zone with the medium heat
setting uses less than a half of its power.
Page 13
The data in the table is for
guidance only.
ENGLISH 13
Heat setting Use to: Time
(min)
- 1
1 - 3 Hollandaise sauce, melt: but-
1 - 3 Solidify: fluffy omelettes,
3 - 5 Simmer rice and milkbased
5 - 7 Steam vegetables, fish, meat. 20 - 45 Add some tablespoons of liq-
7 - 9 Steam potatoes. 20 - 60 Use max. ¼ l water for 750 g of
7 - 9 Cook larger quantities of food,
9 - 12 Gentle fry: escalope, veal cor-
12 - 13 Heavy fry, hash browns, loin
14 Boil water, cook pasta, sear meat (goulash, pot roast), deep-fry chips.
Keep cooked food warm. as nec-
essary
5 - 25 Mix from time to time.
ter, chocolate, gelatine.
10 - 40 Cook with a lid on.
baked eggs.
25 - 50 Add the minimum twice as
dishes, heating up readycooked meals.
60 - 150 Up to 3 l liquid plus ingredistews and soups.
as necdon bleu, cutlets, rissoles,
sausages, liver, roux, eggs,
pancakes, doughnuts.
steaks, steaks.
Boil large quantities of water. Power function is activated.
essary
5 - 15 Turn halfway through.
Hints
Put a lid on the cookware.
much liquid as rice, mix milk
dishes part procedure
through.
uid.
potatoes.
ents.
Turn halfway through.
7. CARE AND CLEANING
WARNING!
Refer to Safety chapters.
7.1 General information
• Clean the hob after each use.
• Always use cookware with clean
bottom.
• Scratches or dark stains on the surface
have no effect on how the hob
operates.
• Use a special cleaner applicable for
the surface of the hob.
• Use a special scraper for the glass.
7.2 Cleaning the hob
• Remove immediately: melted plastic,
plastic foil, sugar and food with sugar.
If not, the dirt can cause damage to
the hob. Take care to avoid burns. Put
the special scraper on the glass
Page 14

www.aeg.com14
surface at an acute angle and move
the blade on the surface.
• Remove when the hob is sufficiently
cool: limescale rings, water rings, fat
stains, shiny metallic discoloration.
Clean the hob with a moist cloth and
non-abrasive detergent. After
8. TROUBLESHOOTING
WARNING!
Refer to Safety chapters.
8.1 What to do if...
Problem Possible cause Remedy
You cannot activate or operate the hob.
The fuse is blown. Make sure that the fuse is
Activate the hob again and
You touched 2 or more sen-
STOP+GO function oper-
There is water or fat stains
An acoustic signal sounds
and the hob deactivates.
An acoustic signal sounds
when the hob is deactivated.
The hob deactivates. You put something on the
Residual heat indicator does
not come on.
The hob is not connected to
an electrical supply or it is
connected incorrectly.
sor fields at the same time.
ates.
on the control panel.
You put something on one
or more sensor fields.
sensor field .
The zone is not hot because
it operated only for a short
time.
cleaning, wipe the hob dry with a soft
cloth.
• Remove shiny metallic
discoloration: use a solution of water
with vinegar and clean the glass
surface with a moist cloth.
Check if the hob is correctly
connected to the electrical
supply. Refer to the connection diagram.
the cause of the malfunction.
If the fuse is blown again
and again, contact a qualified electrician.
set the heat setting in less
than 10 seconds.
Touch only one sensor field.
Refer to "Daily use" chapter.
Clean the control panel.
Remove the object from the
sensor fields.
Remove the object from the
sensor field.
If the zone operated sufficiently long to be hot, speak
to an Authorised Service
Centre.
Page 15
Problem Possible cause Remedy
Automatic Heat Up function
does not operate.
The highest heat setting is
The heat setting changes
between two levels.
The sensor fields become
hot.
There is no signal when you
touch the panel sensor
fields.
comes on.
comes on.
comes on.
The cookware is incorrect. Use the correct cookware.
The diameter of the bottom
The cookware does not cov-
and a number come on.
comes on.
The zone is hot. Let the zone become suffi-
ciently cool.
The highest heat setting has
set.
Power management function
operates.
The cookware is too large or
you put it too near to the
controls.
The signals are deactivated. Activate the signals.
Automatic Switch Off operates.
The Child Safety Device or
the Lock function operates.
There is no cookware on the
zone.
of the cookware is too small
for the zone.
er the cross / square.
There is an error in the hob. Disconnect the hob from the
The electrical connection is
incorrect. The supply voltage
is out of range.
the same power as the function.
Refer to "Daily use" chapter.
Put large cookware on the
rear zones if possible.
Refer to "Daily use" chapter.
Deactivate the hob and activate it again.
Refer to "Daily use" chapter.
Put cookware on the zone.
Refer to “Hints and tips”
chapter.
Use cookware with correct
dimensions.
Refer to “Technical information” chapter.
Cover the cross / square
fully.
electrical supply for some
time. Disconnect the fuse
from the electrical system of
the house. Connect it again.
If comes on again, speak
to an Authorised Service
Centre.
Speak to a qualified electrician to check the installation.
ENGLISH 15
Page 16
16
www.aeg.com
Problem Possible cause Remedy
comes on.
comes on.
comes on.
There is an error in the hob
because a cookware boiled
dry. Automatic Switch Off
and the overheating protection for the zones operate.
The cooling fan is blocked. Check if objects block the
The electrical connection is
incorrect. The hob is connected only to one phase.
Deactivate the hob. Remove
the hot cookware. After approximately 30 seconds, activate the zone again. If the
cookware was the problem,
the error message goes out.
Residual heat indicator can
stay on. Let the cookware
become sufficiently cool.
Check if your cookware is
compatible with the hob.
Refer to “Hints and tips”
chapter.
cooling fan. If comes on
again, speak to an Authorised Service Centre.
Speak to a qualified electrician to check the installation.
Refer to the connection diagram.
8.2 If you cannot find a solution...
If you cannot find a solution to the
problem yourself, contact your dealer or
an Authorised Service Centre. Give the
data from the rating plate. Give also
three digit letter code for the glass
ceramic (it is in the corner of the glass
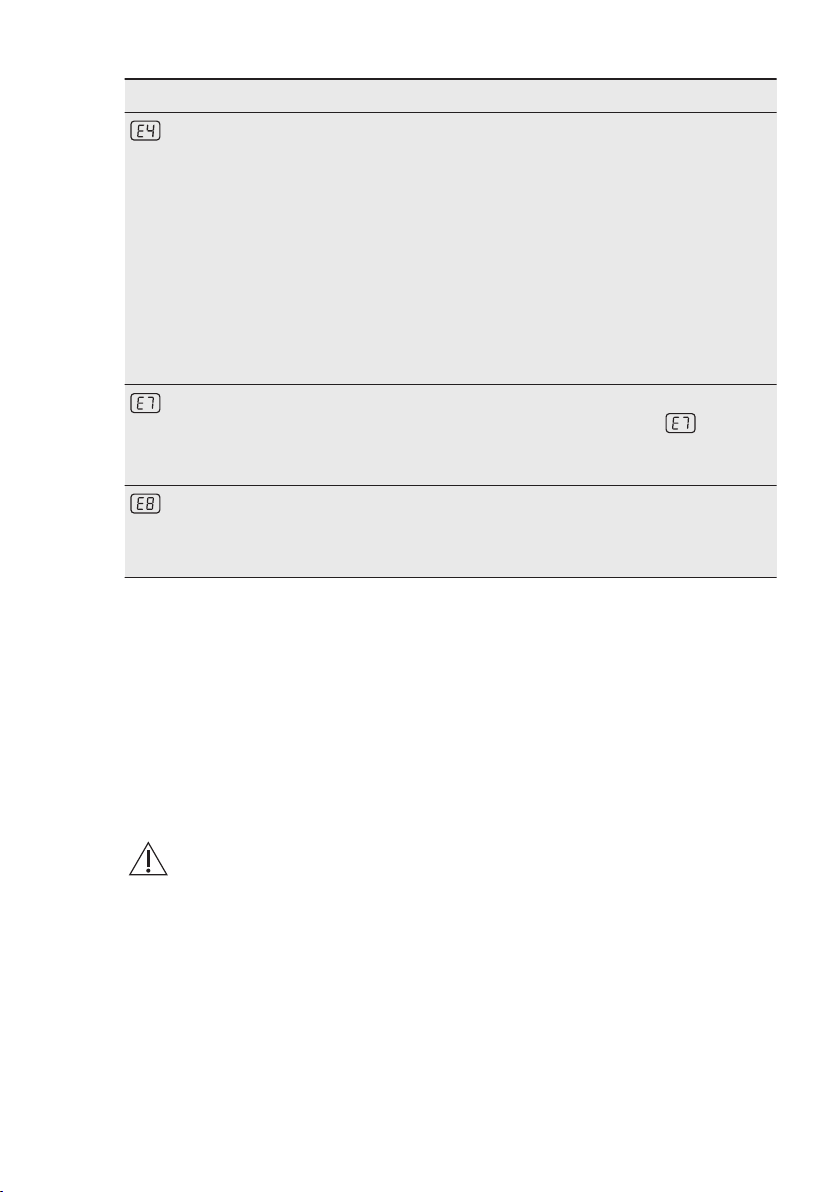
9. INSTALLATION
WARNING!
Refer to Safety chapters.
9.1 Before the installation
Before you install the hob, write down
the information bellow from the rating
plate. The rating plate is on the bottom
of the hob.
Serial number ...........................
surface) and an error message that
comes on. Make sure, you operated the
hob correctly. If not the servicing by a
service technician or dealer will not be
free of charge, also during the warranty
period. The instructions about the
Service Centre and conditions of
guarantee are in the guarantee booklet.
9.2 Built-in hobs
Only use the built-in hobs after you
assemble the hob into correct built-in
units and work surfaces that align to the
standards.
9.3 Connection cable
• The hob is supplied with a connection
cable.
• To replace the damaged mains cable
use the following (or higher) mains
cable type: H05V2V2-F T min 90°C.
Speak to your local Service Centre.
Page 17
min.
50mm
min.
500mm
min.
2mm
min. 2 mm
A
B
A
12 mm
28 mm
38 mm
B
57 mm
41 mm
31 mm
min
30 mm
min. 500 mm
< 20 mm
> 20 mm
min. 2 mm
A
B
A
12 mm
28 mm
38 mm
B
57 mm
41 mm
31 mm
min. 500 mm
ENGLISH 17
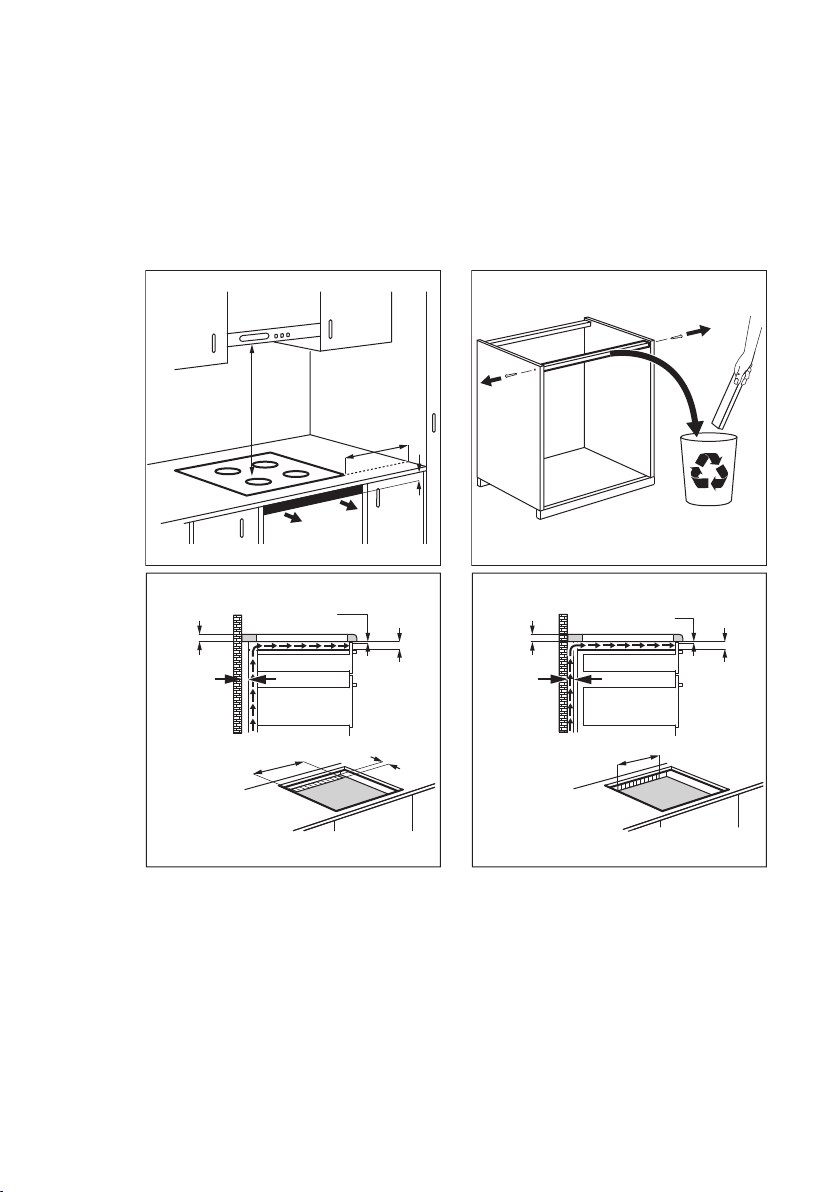
9.4 Attaching the seal
1. Clean the worktop around the cut
out area.
2. Attach the supplied seal stripe to the
lower edge of the hob along the
outer edge of the glass ceramic. Do
not extend it. Make sure that the
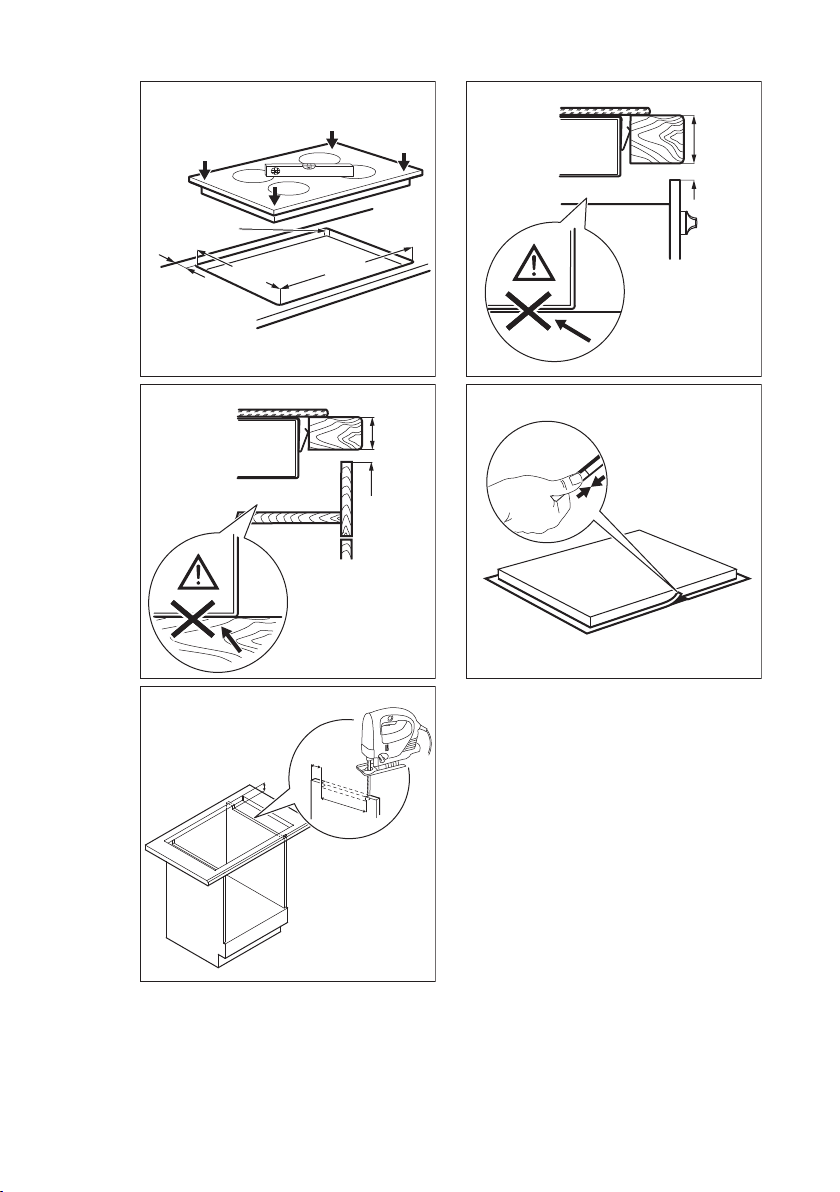
9.5 Assembly
ends of the seal stripe are located in
the middle of one side of the hob.
3. Add some mm when you cut the seal
stripe to the length.
4. Push the two ends of seal stripe
together.
Page 18
min.
55mm
R 5 mm
380
+1
mm
880
+1
mm
min.
38 mm
min.
2 mm
min.
12 mm
min.
2 mm
65±1 mm
490±1 mm
55±1 mm
www.aeg.com18
Page 19

10. TECHNICAL DATA
10.1 Rating plate
Model HK973500FB PNC 949 595 266 01
Typ 60 GCD E2 AU 220 - 240 V 50 - 60 Hz
Induction 6.9 kW Made in Germany
Ser.Nr. ................. 6.9 kW
AEG
10.2 Cooking zones specification
ENGLISH 19
Cooking zone Nominal power
(maximum heat
setting) [W]
Left rear 2300 3200 10 125 - 210
Middle rear 2300 3200 10 125 - 210
Right rear 2300 3200 10 125 - 210
The power of the cooking zones can be
different in some small range from the
data in the table. It changes with the
material and dimensions of the
cookware.
11. ENERGY EFFICIENCY
11.1 Product information according to EU 66/2014
Model identification HK973500FB
Type of hob Built-In Hob
Number of cooking zones 3
Heating technology Induction
Diameter of circular cooking zones (Ø)
Energy consumption per
cooking zone (EC electric
cooking)
Energy consumption of the
hob (EC electric hob)
Left rear
Middle rear
Right rear
Left rear
Middle rear
Right rear
175.3 Wh / kg
Power function
[W]
For optimal cooking results use
cookware not larger than the diameter in
the table.
Power function
maximum duration [min]
Cookware diameter [mm]
21.0 cm
21.0 cm
21.0 cm
174.9 Wh / kg
172.6 Wh / kg
178.3 Wh / kg
EN 60350-2 - Household electric cooking
appliances - Part 2: Hobs - Methods for
measuring performance
11.2 Energy saving
You can save energy during everyday
cooking if you follow below hints.
Page 20

www.aeg.com20
• When you heat up water, use only the
amount you need.
• If it is possible, always put the lids on
the cookware.
• Before you activate the cooking zone
put the cookware on it.
• Put the smaller cookware on the
smaller cooking zones.
• Put the cookware directly in the
centre of the cooking zone.
• Use the residual heat to keep the
food warm or to melt it.
12. ENVIRONMENTAL CONCERNS
Recycle the materials with the symbol .
Put the packaging in applicable
containers to recycle it. Help protect the
environment and human health and to
recycle waste of electrical and electronic
appliances. Do not dispose appliances
marked with the symbol with the
household waste. Return the product to
your local recycling facility or contact
your municipal office.
Page 21

FRANÇAIS
TABLE DES MATIÈRES
1. INFORMATIONS DE SÉCURITÉ............................................................................ 22
2. CONDITIONS D'UTILISATION.............................................................................. 24
3. CONSIGNES DE SÉCURITÉ................................................................................... 24
4. DESCRIPTION DE L'APPAREIL.............................................................................. 26
5. UTILISATION QUOTIDIENNE................................................................................28
6. CONSEILS................................................................................................................32
7. ENTRETIEN ET NETTOYAGE................................................................................ 34
8. EN CAS D'ANOMALIE DE FONCTIONNEMENT................................................34
9. INSTALLATION....................................................................................................... 37
10. CARACTÉRISTIQUES TECHNIQUES.................................................................. 40
11. RENDEMENT ÉNERGÉTIQUE.............................................................................40
POUR DES RÉSULTATS PARFAITS
Merci d'avoir choisi ce produit AEG. Nous l'avons conçu pour qu'il vous offre des
performances irréprochables pour longtemps, en intégrant des technologies
innovantes qui vous simplifient la vie grâce à des caractéristiques que vous ne
trouverez pas forcément sur des appareils ordinaires. Veuillez prendre quelques
instants pour lire cette notice afin d'utiliser au mieux votre appareil.
Visitez notre site Internet pour :
Obtenir des conseils d'utilisation, des brochures, de l'aide, des informations :
www.aeg.com/webselfservice
21
Enregistrez votre produit pour obtenir un meilleur service :
www.registeraeg.com
Acheter des accessoires, consommables et pièces de rechange d'origine pour
votre appareil :
www.aeg.com/shop
SERVICE APRÈS-VENTE
Utilisez toujours des pièces d'origine.
Avant de contacter le service après-vente, assurez-vous de disposer des
informations suivantes : Modèle, PNC, numéro de série.
Vous trouverez ces informations sur la plaque signalétique.
Avertissement/Consignes de sécurité
Informations générales et conseils
Informations en matière de protection de l'environnement
Sous réserve de modifications.
Page 22

www.aeg.com
22
1. INFORMATIONS DE SÉCURITÉ
Avant d'installer et d'utiliser cet appareil, lisez
soigneusement les instructions fournies. Le fabricant ne
pourra être tenu pour responsable des blessures et
dégâts résultant d'une mauvaise installation ou
utilisation. Conservez toujours les instructions dans un
lieu sûr et accessible pour vous y référer ultérieurement.
1.1 Sécurité des enfants et des personnes vulnérables
• Cet appareil peut être utilisé par des enfants de plus
de 8 ans, ainsi que des personnes dont les capacités
physiques, sensorielles et mentales sont réduites ou
dont les connaissances et l'expérience sont
insuffisantes, à condition d'être surveillés ou d'avoir
reçu des instructions concernant l'utilisation sécurisée
de l'appareil et de comprendre les risques encourus.
Ne laissez pas les enfants jouer avec l'appareil.
•
• Ne laissez pas les emballages à la portée des enfants
et jetez-les convenablement.
• Tenez les enfants et les animaux éloignés de l'appareil
lorsqu'il est en cours de fonctionnement ou lorsqu'il
refroidit. Les parties accessibles sont chaudes.
• Si l'appareil est équipé d'un dispositif de sécurité
enfants, nous vous recommandons de l'activer.
• Les enfants ne doivent pas nettoyer ni entreprendre
une opération de maintenance sur l'appareil sans
surveillance.
• Les enfants de moins de 3 ans doivent être tenus
éloignés de l'appareil en permanence lorsqu'il est en
fonctionnement.
Sécurité générale
1.2
• AVERTISSEMENT : L'appareil et ses parties
accessibles deviennent chauds pendant son
fonctionnement. Veillez à ne pas toucher les éléments
chauffants. Les enfants de moins de 8 ans doivent être
Page 23

FRANÇAIS
tenus à l'écart, à moins d'être surveillés en
permanence.
• Ne faites pas fonctionner l'appareil avec un minuteur
externe ou un système de commande à distance.
• AVERTISSEMENT : Il peut être dangereux de laisser
chauffer de la graisse ou de l'huile sans surveillance
sur une table de cuisson car cela pourrait provoquer
un incendie.
• N'essayez JAMAIS d'éteindre un feu avec de l'eau.
Éteignez l'appareil puis couvrez les flammes, par
exemple avec un couvercle ou une couverture
ignifuge.
• ATTENTION : Toute cuisson doit être surveillée. Une
cuisson courte doit être surveillée en permanence.
• AVERTISSEMENT : Risque d'incendie ! N'entreposez
rien sur les surfaces de cuisson.
• Ne posez pas d'objets métalliques tels que couteaux,
fourchettes, cuillères ou couvercles sur la table de
cuisson car ils pourraient chauffer.
• N'utilisez pas de nettoyeur vapeur pour nettoyer
l'appareil.
• Après utilisation, éteignez toujours la zone de cuisson
à l'aide de la manette de commande correspondante
et ne vous fiez pas à la détection des récipients.
• Si la surface vitrocéramique / en verre est fissurée,
éteignez l'appareil pour éviter tout risque
d'électrocution.
• Si le câble d'alimentation est endommagé, il doit être
remplacé par le fabricant, un service de maintenance
agréé ou un technicien qualifié afin d'éviter tout
danger.
• AVERTISSEMENT : Utilisez uniquement les dispositifs
de protection pour table de cuisson conçus ou
indiqués comme adaptés par le fabricant de l'appareil
de cuisson dans les instructions d'utilisation, ou les
dispositifs de protection pour table de cuisson
intégrés à l'appareil. L'utilisation de dispositifs de
protection non adaptés peut entraîner des accidents.
23
Page 24

www.aeg.com
24
2. CONDITIONS D'UTILISATION
Cet appareil est conçu uniquement pour
un usage domestique et des utilisations
telles que :
• des fermes
3. CONSIGNES DE SÉCURITÉ
3.1 Installation
AVERTISSEMENT!
L'appareil doit être installé
uniquement par un
professionnel qualifié.
• Retirez l'intégralité de l'emballage.
• N'installez pas et ne branchez pas un
appareil endommagé.
• Suivez scrupuleusement les
instructions d'installation fournies
avec l'appareil.
• Respectez l'espacement minimal
requis par rapport aux autres
appareils et éléments.
• Soyez toujours vigilants lorsque vous
déplacez l'appareil car il est lourd.
Utilisez toujours des gants de sécurité
et des chaussures fermées.
• Isolez les surfaces découpées à l'aide
d'un matériau d'étanchéité pour
éviter que la moisissure ne provoque
de gonflements.
• Protégez la partie inférieure de
l'appareil de la vapeur et de
l'humidité.
• N'installez pas l'appareil près d'une
porte ou sous une fenêtre. Les
récipients chauds risqueraient de
tomber de l'appareil lors de
l'ouverture de celles-ci.
• Si l'appareil est installé au-dessus de
tiroirs, assurez-vous qu'il y a
suffisamment d'espace entre le fond
de l'appareil et le tiroir supérieur pour
que l'air puisse circuler.
• Le dessous de l'appareil peut devenir
très chaud. Veillez à installer un
panneau de séparation ignifuge sous
l'appareil pour en bloquer l'accès.
• Assurez-vous de laisser un espace de
ventilation de 2 mm entre le plan de
travail et l'avant de l'unité qui se
trouve dessous. La garantie ne couvre
pas les dommages causés par
• Par les clients en résidences
hôtelières, appartements de vacances
et autres lieux de séjour.
l'absence d'un espace de ventilation
adéquat.
3.2 Branchement électrique
AVERTISSEMENT!
Risque d'incendie ou
d'électrocution.
• L'ensemble des branchements
électriques doit être effectué par un
technicien qualifié.
• L'appareil doit être relié à la terre.
• Avant toute intervention, assurez-vous
que l'appareil est débranché.
• Vérifiez que les données électriques
figurant sur la plaque signalétique
correspondent à celles de votre
réseau. Si ce n'est pas le cas,
contactez un électricien.
• Assurez-vous que l'appareil est bien
installé. Un câble d'alimentation lâche
et inapproprié ou une fiche (si
présente) non serrée peuvent être à
l'origine d'une surchauffe des bornes.
• Utilisez le câble d'alimentation
électrique approprié.
• Ne laissez pas le câble d'alimentation
s'emmêler.
• Assurez-vous qu'une protection antiélectrocution est installée.
• Utilisez un collier anti-traction sur le
câble.
• Assurez-vous que le câble
d'alimentation ou la fiche (si présente)
n'entrent pas en contact avec les
surfaces brûlantes de l'appareil ou les
récipients brûlants lorsque vous
branchez l'appareil à des prises
électriques situées à proximité.
• N'utilisez pas d'adaptateurs
multiprises ni de rallonges.
• Veillez à ne pas endommager la fiche
secteur (si présente) ni le câble
d'alimentation. Contactez notre
centre de maintenance agréé ou un
Page 25

FRANÇAIS
25
électricien pour remplacer le câble
d'alimentation s'il est endommagé.
• La protection contre les chocs des
parties sous tension et isolées doit
être fixée de telle manière qu'elle ne
peut pas être enlevée sans outils.
• Ne branchez la fiche d'alimentation à
la prise de courant qu'à la fin de
l'installation. Assurez-vous que la
prise de courant est accessible une
fois l'appareil installé.
• Si la prise de courant est lâche, ne
branchez pas la fiche d'alimentation
secteur.
• Ne tirez jamais sur le câble
d'alimentation pour débrancher
l'appareil. Tirez toujours sur la fiche.
• N'utilisez que des systèmes
d'isolation appropriés : des coupecircuits, des fusibles (les fusibles à
visser doivent être retirés du support),
un disjoncteur différentiel et des
contacteurs.
• L'installation électrique doit être
équipée d'un dispositif d'isolement à
coupure omnipolaire. Le dispositif
d'isolement doit présenter une
distance d'ouverture des contacts
d'au moins 3 mm.
3.3 Utilisation
AVERTISSEMENT!
Risque de blessures, de
brûlures ou d'électrocution.
• Avant la première utilisation, retirez
les emballages, les étiquettes et les
films de protection (si présents).
• Utilisez cet appareil dans un
environnement domestique.
• Ne modifiez pas les caractéristiques
de cet appareil.
• Assurez-vous que les orifices de
ventilation ne sont pas bouchés.
• Ne laissez jamais l'appareil sans
surveillance pendant son
fonctionnement.
• Éteignez les zones de cuisson après
chaque utilisation.
• Ne vous fiez pas uniquement au
détecteur de récipient.
• Ne posez pas de couverts ou de
couvercles sur les zones de cuisson.
Elles sont chaudes.
• N'utilisez jamais cet appareil avec les
mains mouillées ou lorsqu'il est en
contact avec de l'eau.
• N'utilisez jamais l'appareil comme
plan de travail ou comme plan de
stockage.
• Si la surface de l'appareil présente
des fêlures, débranchez
immédiatement l'appareil. pour éviter
tout risque d'électrocution.
• Les porteurs de pacemakers doivent
rester à une distance minimale de
30 cm des zones de cuisson à
induction lorsque l'appareil est en
cours de fonctionnement.
• Lorsque vous versez un aliment dans
de l'huile chaude, elle peut
éclabousser.
AVERTISSEMENT!
Risque d'incendie et
d'explosion.
• Les graisses et l'huile chaudes
peuvent dégager des vapeurs
inflammables. Tenez les flammes ou
les objets chauds éloignés des
graisses et de l'huile lorsque vous
vous en servez pour cuisiner.
• Les vapeurs dégagées par l'huile très
chaude peuvent provoquer une
combustion spontanée.
• L'huile qui a servi contient des restes
d'aliments pouvant provoquer un
incendie à température plus faible
que l'huile n'ayant jamais servi.
• Ne placez pas de produits
inflammables ou d'éléments imbibés
de produits inflammables à l'intérieur
ou à proximité de l'appareil, ni sur
celui-ci.
AVERTISSEMENT!
Risque d'endommagement
de l'appareil.
• Ne laissez pas de récipients chauds
sur le bandeau de commande.
• Ne posez pas de couvercle de
casserole chaud sur la surface en
verre de la table de cuisson.
• Ne laissez pas le contenu des
récipients de cuisson s'évaporer
complètement.
• Prenez soin de ne pas laisser tomber
d'objets ou de récipients sur
Page 26

2
1 11
www.aeg.com26
l'appareil. Sa surface risque d'être
endommagée.
• Ne faites jamais fonctionner les zones
de cuisson avec des récipients de
cuisson vides ou sans aucun récipient
de cuisson.
• Ne placez jamais de papier aluminium
sur l'appareil.
• N'utilisez pas de récipients en fonte
ou en aluminium, ni de récipients
dont le fond est endommagé et
rugueux. Ils risqueraient de rayer le
verre ou la surface vitrocéramique.
Soulevez toujours ces objets lorsque
vous devez les déplacer sur la surface
de cuisson.
• Cet appareil est exclusivement
destiné à un usage culinaire. Ne
l'utilisez pas pour des usages autres
que celui pour lequel il a été conçu, à
des fins de chauffage par exemple.
3.4 Entretien et nettoyage
• Nettoyez régulièrement l'appareil afin
de maintenir le revêtement en bon
état.
• Éteignez l'appareil et laissez-le
refroidir avant de le nettoyer.
• Débranchez l’appareil de
l'alimentation électrique avant toute
opération de maintenance.
• Ne pulvérisez pas d'eau ni de vapeur
pour nettoyer l'appareil.
• Nettoyez l'appareil avec un chiffon
doux humide. Utilisez uniquement
des produits de lavage neutres.
N'utilisez pas de produits abrasifs, de
tampons à récurer, de solvants ni
d'objets métalliques.
3.5 Mise au rebut
AVERTISSEMENT!
Risque de blessure ou
d'asphyxie.
• Contactez votre service municipal
pour obtenir des informations sur la
marche à suivre pour mettre l'appareil
au rebut.
• Débranchez l'appareil de
l'alimentation électrique.
• Coupez le câble d'alimentation au ras
de l'appareil et mettez-le au rebut.
3.6 Maintenance
• Pour réparer l'appareil, contactez un
service après-vente agréé.
• Utilisez exclusivement des pièces
d'origine.
DESCRIPTION DE L'APPAREIL
4.
4.1 Description de la table de cuisson
Zone de cuisson à induction
1
Bandeau de commande
2
Page 27

51 2
4
3
7 6
810 9
FRANÇAIS 27
4.2 Description du bandeau de commande
Pour afficher le bandeau de commande, allumez l'appareil en appuyant sur .
Les touches sensitives permettent de faire fonctionner l'appareil. Les affichages, les
voyants et les signaux sonores indiquent les fonctions activées.
Touche
sensitive
1
- Indicateur du niveau de
2
- Voyants du minuteur des
3
- Affichage du minuteur Pour indiquer la durée, en minutes.
4
5
6
7
8
- Bandeau de sélection Pour sélectionner un niveau de cuisson.
9
10
Fonction Commentaire
STOP+GO Pour activer et désactiver la fonction.
Pour indiquer le niveau de cuisson.
cuisson
Pour indiquer la zone à laquelle se réfère la
zones de cuisson
Verrouillage / Dispositif de
sécurité enfants
- Pour choisir la zone de cuisson.
- Pour augmenter ou diminuer la durée.
/
MARCHE/ARRÊT Pour allumer et éteindre la table de cuisson.
Fonction Booster Pour activer et désactiver la fonction.
durée sélectionnée.
Pour verrouiller ou déverrouiller le bandeau
de commande.
4.3 Indicateurs de niveau de cuisson
Affichage Description
La zone de cuisson est désactivée.
Page 28

28
www.aeg.com
Affichage Description
-
La zone de cuisson est activée.
La fonction STOP+GO est activée.
La fonction Démarrage automatique de la cuisson est activée.
Fonction Booster est activée.
+ chiffre
/ /
Une anomalie de fonctionnement s'est produite.
OptiHeat Control (Voyant de chaleur résiduelle à trois niveaux) : continuer la cuisson / maintien au chaud / chaleur résiduelle.
La fonction Verrouillage /Dispositif de sécurité enfants est activée.
Le récipient est inapproprié ou trop petit, ou bien il n'y a pas de récipient sur la zone de cuisson.
La fonction Arrêt automatique est activée.
4.4 OptiHeat Control (Voyant de chaleur résiduelle à trois niveaux)
AVERTISSEMENT!
/ / Il y a risque de
brûlures par la chaleur
résiduelle. Les voyants
indiquent le niveau de
chaleur résiduelle.
5. UTILISATION QUOTIDIENNE
AVERTISSEMENT!
Reportez-vous aux chapitres
concernant la sécurité.
5.1 Activation et désactivation
Appuyez sur pendant 1 seconde pour
activer ou désactiver la table de cuisson.
Le bandeau de commande s'allume
lorsque vous allumez la table de cuisson
et s'éteint lorsque vous éteignez la table
de cuisson. Lorsque la table de cuisson
est éteinte, seule la touche sensitive
est visible.
Les zones de cuisson à induction
génèrent la chaleur nécessaire
directement sur le fond des récipients de
cuisson. La vitrocéramique est chauffée
par la chaleur des récipients.
5.2 Arrêt automatique
Cette fonction arrête la table de
cuisson automatiquement si :
• toutes les zones de cuisson sont
désactivées,
• vous ne réglez pas le niveau de
cuisson après avoir allumé la table de
cuisson,
• vous avez renversé quelque chose ou
placé un objet sur le bandeau de
commande pendant plus de
10 secondes (une casserole, un
torchon, etc.). Un signal sonore
retentit et la table de cuisson s'éteint.
Retirez l'objet du bandeau de
commande ou nettoyez celui-ci.
Page 29

FRANÇAIS
29
• la table de cuisson surchauffe (par ex.
lorsqu'un récipient chauffe à vide).
Laissez refroidir la zone de cuisson
avant de réutiliser la table de cuisson.
• vous avez utilisé un récipient
inadapté. Le symbole s'allume et
la zone de cuisson se désactive
automatiquement au bout de
2 minutes.
• vous ne désactivez pas la zone de
cuisson ou ne modifiez pas le niveau
de cuisson. Au bout de quelques
instants, s'allume et la table de
cuisson s'éteint.
La relation entre le niveau de cuisson
et la durée après laquelle la table de
cuisson s'éteint :
Niveau de cuisson La table de cuisson
s'éteint au bout de
, 1 - 3
4 - 7 5 heures
8 - 9 4 heures
10 - 14 1,5 heure
6 heures
5.3 Niveau de cuisson
Pour régler ou modifier le niveau de
cuisson :
Appuyez sur le niveau de cuisson
souhaité sur le bandeau de sélection, ou
déplacez votre doigt sur le bandeau de
sélection jusqu'à atteindre le niveau de
cuisson souhaité.
5.4 Utilisation des zones de cuisson
Posez le récipient sur la croix / le carré se
trouvant sur la surface de cuisson.
Recouvrez complètement la croix / le
carré. Les zones de cuisson à induction
s'adaptent automatiquement au
diamètre du fond du récipient utilisé. Les
récipients de grande taille peuvent
reposer sur deux zones de cuisson en
même temps.
5.5 Démarrage automatique de la cuisson
Activez cette fonction pour obtenir le
niveau de cuisson souhaité plus
rapidement. Lorsqu'elle est activée, la
zone commence par chauffer au niveau
de cuisson le plus élevé, puis revient au
niveau de cuisson souhaité.
Pour activer la fonction, la
zone de cuisson doit être
froide
Pour activer la fonction pour une zone
de cuisson : appuyez sur
s'allume). Réglez immédiatement le
niveau de cuisson souhaité. Au bout de
5 secondes, s'allume.
Pour désactiver la fonction : modifiez le
niveau de cuisson.
(
5.6 Fonction Booster
Cette fonction vous permet d'augmenter
la puissance des zones de cuisson à
induction. La fonction peut être activée
pour la zone de cuisson à induction
uniquement pour une durée limitée.
Lorsque cette durée est écoulée, la zone
de cuisson à induction revient
automatiquement au niveau de cuisson
le plus élevé.
Reportez-vous au chapitre
« Caractéristiques
techniques ».
Pour activer la fonction pour une zone
de cuisson : appuyez sur .
s'allume.
Page 30

30
www.aeg.com
Pour désactiver la fonction : modifiez le
niveau de cuisson.
5.7 Minuteur
Minuteur dégressif
Vous pouvez utiliser cette fonction pour
régler la durée de fonctionnement de la
zone de cuisson, uniquement pour une
session.
Sélectionnez d'abord le niveau de
cuisson de la zone de cuisson, puis
réglez la fonction.
Pour sélectionner la zone de cuisson :
appuyez sur
jusqu'à ce que l'indicateur de la zone de
cuisson correspondante s'affiche.
Pour activer la fonction : appuyez sur la
touche du minuteur pour régler la
durée (de 00 à 99 minutes). Lorsque le
voyant de la zone de cuisson commence
à clignoter lentement, le décompte
commence.
Pour voir le temps restant :
sélectionnez la zone de cuisson à l'aide
. Le voyant de la zone de cuisson
de
clignote rapidement. L'affichage indique
la durée restante.
Pour modifier la durée : sélectionnez la
zone de cuisson à l'aide de . Appuyez
ou .
sur
Pour désactiver la fonction :
sélectionnez la zone de cuisson avec
et appuyez sur . Le temps restant est
décompté jusqu'à 00. Le voyant de la
zone de cuisson s'éteint.
Pour arrêter le signal sonore : appuyez
sur .
CountUp Timer (Minuteur progressif)
Cette fonction permet de vérifier la
durée de fonctionnement de la zone de
cuisson sélectionnée.
à plusieurs reprises
Lorsque la durée est
écoulée, un signal sonore
retentit et 00 clignote. La
zone de cuisson se
désactive.
Pour sélectionner la zone de cuisson :
appuyez sur à plusieurs reprises
jusqu'à ce que l'indicateur de la zone de
cuisson correspondante s'affiche.
Pour activer la fonction : appuyez sur la
touche
Lorsque le voyant de la zone de cuisson
clignote lentement, le minuteur démarre.
L'affichage indique, en alternance, et
le nombre de minutes écoulées.
Pour contrôler la durée de
fonctionnement de la zone de cuisson
sélectionnée : sélectionnez la zone de
cuisson à l'aide de . Le voyant de la
zone de cuisson clignote rapidement.
L'affichage indique la durée de
fonctionnement de la zone.
Pour désactiver la fonction :
sélectionnez la zone de cuisson en
appuyant sur
s'éteint.
Minuterie
Vous pouvez utiliser cette fonction
comme Minuterie lorsque la table de
cuisson est allumée mais que les zones
de cuisson ne sont pas activées.
L'affichage du niveau de cuisson indique
Pour activer la fonction : appuyez sur
minuteur pour régler la durée. Lorsque la
durée s'est écoulée, un signal sonore
retentit et 00 clignote.
Pour arrêter le signal sonore : appuyez
sur .
du minuteur. s'allume.
et appuyez sur ou
. Le voyant de la zone de cuisson
.
. Appuyez sur la touche ou du
Cette fonction est sans effet
sur le fonctionnement des
zones de cuisson.
5.8 STOP+GO
Cette fonction sélectionne le niveau de
cuisson le plus bas pour toutes les zones
de cuisson activées.
Lorsque la fonction est en cours, vous ne
pouvez pas modifier le niveau de
cuisson.
Page 31

FRANÇAIS
31
La fonction ne désactive pas les
fonctions du minuteur.
Pour activer la fonction : appuyez sur
. s'allume.
Pour désactiver la fonction : appuyez
. Le niveau de cuisson précédent
sur
s'allume.
5.9 Verrouillage
Vous pouvez verrouiller le bandeau de
commande pendant que les zones de
cuisson fonctionnent. Vous éviterez ainsi
une modification accidentelle du réglage
du niveau de cuisson.
Réglez d'abord le niveau de cuisson.
Pour activer la fonction : appuyez sur
. s'affiche pendant 4 secondes.Le
minuteur reste activé.
Pour désactiver la fonction : appuyez
. Le niveau de cuisson précédent
sur
s'allume.
Lorsque vous éteignez la
table de cuisson, cette
fonction est également
désactivée.
5.10 Dispositif de sécurité
enfants
Cette fonction permet d'éviter une
utilisation involontaire de la table de
cuisson.
Pour activer la fonction : allumez la
table de cuisson en appuyant sur . Ne
sélectionnez pas de réglage de niveau
de cuisson. Appuyez sur
4 secondes. s'allume. Éteignez la
table de cuisson en appuyant sur
Pour désactiver la fonction : allumez la
table de cuisson en appuyant sur . Ne
sélectionnez pas de réglage de niveau
de cuisson. Appuyez sur pendant
4 secondes.
table de cuisson en appuyant sur .
Pour désactiver la fonction le temps
d'une cuisson : allumez la table de
s'allume. Éteignez la
pendant
.
cuisson en appuyant sur . s'allume.
Appuyez sur pendant 4 secondes.
Réglez le niveau de cuisson dans les
10 secondes qui suivent. Vous pouvez
utiliser la table de cuisson. Lorsque vous
éteignez la table de cuisson avec
fonction est de nouveau activée.
, la
5.11 OffSound Control (Activation et désactivation des signaux sonores)
Éteignez la table de cuisson. Appuyez
sur pendant 3 secondes. L'affichage
s'allume, puis s'éteint. Appuyez sur
pendant 3 secondes ; ou s'allume.
Appuyez sur la touche
pour choisir l'une des options suivantes :
• - les signaux sonores sont
désactivés
- les signaux sonores sont activés
•
Pour confirmer le réglage, attendez que
la table de cuisson s'éteigne
automatiquement.
Lorsque cette fonction est réglée sur ,
l'appareil émet des signaux sonores
uniquement lorsque :
• vous appuyez sur
• Minuterie se termine
• Minuteur dégressif se termine
• vous posez un objet sur le bandeau
de commande.
du minuteur
5.12 Fonction Gestionnaire de
puissance
• Des zones de cuisson sont
regroupées en fonction de
l'emplacement et du nombre de
phases de la table de cuisson.
Reportez-vous à l'illustration.
• Chaque phase dispose d'une charge
électrique maximale de 3 700 W.
• La fonction répartit la puissance entre
les zones de cuisson raccordées à la
même phase.
• La fonction s'active lorsque la charge
électrique totale des zones de cuisson
raccordées à une phase simple
dépasse 3 700 W.
Page 32

www.aeg.com
32
• La fonction diminue la puissance des
autres zones de cuisson raccordées à
la même phase.
• L'affichage du niveau de cuisson des
zones à puissance réduite oscille
entre deux niveaux.
6. CONSEILS
AVERTISSEMENT!
Reportez-vous aux chapitres
concernant la sécurité.
6.1 Ustensiles de cuisson
Sur les zones de cuisson à
induction, un champ
électromagnétique puissant
chauffe les récipients très
rapidement.
Utilisez des récipients
adaptés aux zones de
cuisson à induction.
Matériaux des récipients
• adaptés : fonte, acier, acier émaillé,
acier inoxydable, fond multicouche
(homologué par le fabricant).
• inadaptés : aluminium, cuivre, laiton,
verre, céramique, porcelaine.
Les plats de cuisson conviennent pour
l'induction si :
• une petite quantité d'eau contenue
dans un récipient chauffe dans un bref
laps de temps sur une zone de
cuisson réglée sur le niveau de
cuisson maximal.
• un aimant adhère au fond du
récipient.
Le fond de l'ustensile de
cuisson doit être aussi plat
et épais que possible.
Dimensions de l'ustensile
Les zones de cuisson à induction
s'adaptent automatiquement au
diamètre du fond du récipient utilisé,
jusqu'à une certaine limite.
L'efficacité de la zone de cuisson est liée
au diamètre du récipient. Un récipient
plus petit que le diamètre minimal
recommandé ne reçoit qu'une petite
partie de la puissance générée par la
zone de cuisson.
Reportez-vous au chapitre
« Caractéristiques
techniques ».
6.2 Bruits pendant le fonctionnement
Si vous entendez :
• un craquement : le récipient est
composé de différents matériaux
(conception « sandwich »).
• un sifflement : vous utilisez la zone de
cuisson avec un niveau de puissance
élevé et le récipient est composé de
différents matériaux (conception
« sandwich »).
• un bourdonnement : vous utilisez un
niveau de puissance élevé.
• un cliquetis : des commutations
électriques se produisent.
• un sifflement, un bourdonnement : le
ventilateur fonctionne.
Ces bruits sont normaux et n'indiquent
pas une anomalie de la table de
cuisson.
6.3 Öko Timer (Minuteur éco)
Pour réaliser des économies d'énergie, la
zone de cuisson se désactive
automatiquement avant le signal du
minuteur. La différence de temps de
fonctionnement dépend du niveau et de
la durée de cuisson.
Page 33

FRANÇAIS 33
6.4 Exemples de cuisson
Le rapport entre le niveau de cuisson et
la consommation énergétique de la zone
de cuisson n'est pas linéaire. Lorsque
vous augmentez le niveau de cuisson,
l'augmentation énergétique de la zone
utilisée à un niveau de cuisson moyen
utilise moins de la moitié de sa
puissance.
Les valeurs figurant dans le
tableau suivant sont fournies
à titre indicatif.
de cuisson n'est pas proportionnelle.
Cela signifie que la zone de cuisson
Niveau de
cuisson
- 1
1 - 3 Sauce hollandaise, faire fon-
1 - 3 Solidifier : omelettes, œufs co-
3 - 5 Faire mijoter des plats à base
5 - 7 Cuire à la vapeur des légumes,
7 - 9 Cuire des pommes de terre à
7 - 9 Cuire de grandes quantités
9 - 12 Faire revenir : escalopes, cor-
12 - 13 Cuisson à température élevée
14 Faire bouillir de l'eau, cuire des pâtes, griller de la viande (goulasch, bœuf
Utilisation : Durée
(min)
Conservez les aliments cuits au
chaud.
dre : beurre, chocolat, gélatine.
cotte.
de riz et de laitage, réchauffer
des plats cuisinés.
du poisson et de la viande.
la vapeur.
d'aliments, des ragoûts et des
soupes.
dons bleus de veau, côtelettes,
rissolettes, saucisses, foie,
roux, œufs, crêpes, beignets.
des pommes de terre rissolées,
filets, steaks.
braisé), cuire des frites.
Faire bouillir une grande quantité d'eau. La fonction Booster est activée.
au besoin
5 - 25 Mélangez de temps en temps.
10 - 40 Couvrez pendant la cuisson.
25 - 50 Ajoutez au moins deux fois
20 - 45 Ajoutez quelques cuillerées de
20 - 60 Utilisez max. ¼ l d'eau pour
60 - 150 Ajoutez jusqu’à 3 litres de li-
au besoin
5 - 15 Retournez à la moitié du
Conseils
Placez un couvercle sur le récipient.
plus d'eau que de riz. Remuez
les plats à base de lait durant
la cuisson.
liquide.
750 g de pommes de terre.
quide, plus les ingrédients.
Retournez à la moitié du
temps.
temps.
Page 34

www.aeg.com34
7. ENTRETIEN ET NETTOYAGE
AVERTISSEMENT!
Reportez-vous aux chapitres
concernant la sécurité.
7.1 Informations générales
• Nettoyez la table de cuisson après
chaque utilisation.
• Utilisez toujours un plat de cuisson
dont le fond est propre.
• Les rayures ou les taches sombres sur
la surface n'ont aucune incidence sur
le fonctionnement de la table de
cuisson.
• Utilisez un nettoyant spécialement
adapté à la surface de la table de
cuisson.
• Utilisez un racloir spécial pour la vitre.
7.2 Nettoyage de la table de
cuisson
• Enlevez immédiatement : plastique
fondu, films plastiques, sucre et
aliments contenant du sucre. Sinon, la
saleté pourrait endommager la table
de cuisson. Veillez à ne pas vous
brûler. Tenez le racloir spécial incliné
sur la surface vitrée et faites glisser la
lame du racloir pour enlever les
salissures.
• Une fois que la table de cuisson a
suffisamment refroidi, enlevez :
traces de calcaire et d'eau,
projections de graisse, décolorations
métalliques luisantes. Nettoyez la
table de cuisson à l'aide d'un chiffon
humide et d'un détergent non abrasif.
Après le nettoyage, séchez la table de
cuisson à l'aide d'un chiffon doux.
• Pour retirer les décolorations
métalliques brillantes : utilisez une
solution d'eau additionnée de
vinaigre et nettoyez la surface vitrée
avec un chiffon humide.
8. EN CAS D'ANOMALIE DE FONCTIONNEMENT
AVERTISSEMENT!
Reportez-vous aux chapitres
concernant la sécurité.
8.1 En cas d'anomalie de fonctionnement
Problème Cause probable Solution
Vous ne pouvez pas allumer
la table de cuisson ni la faire
fonctionner.
Le fusible a disjoncté. Vérifiez que le fusible est
La table de cuisson n'est pas
connectée à une source
d'alimentation électrique ou
le branchement est incorrect.
Vérifiez que la table de cuisson est correctement branchée à une source d'alimentation électrique. Consultez
le schéma de raccordement.
bien la cause de l'anomalie.
Si les fusibles disjonctent de
manière répétée, faites appel à un électricien qualifié.
Page 35

Problème Cause probable Solution
Allumez de nouveau la table
de cuisson et réglez le niveau de cuisson en moins de
10 secondes.
Vous avez appuyé sur plu-
sieurs touches sensitives en
même temps.
La fonction STOP+GO est
activée.
Il y a de l'eau ou des taches
de graisse sur le bandeau de
commande.
Un signal sonore retentit et
la table de cuisson s'éteint.
Un signal sonore retentit
lorsque la table de cuisson
est éteinte.
La table de cuisson est désactivée.
Le voyant de chaleur résiduelle ne s'allume pas.
La fonction de démarrage
automatique de la cuisson
ne fonctionne pas.
Le niveau de cuisson le plus
Le niveau de cuisson oscille
entre deux niveaux.
Les touches sensitives sont
chaudes.
Aucun signal sonore ne se
fait entendre lorsque vous
appuyez sur les touches sensitives du bandeau.
Vous avez posé quelque
chose sur une ou plusieurs
touches sensitives.
Vous avez posé quelque
chose sur la touche sensitive
.
La zone de cuisson n'est pas
chaude parce qu'elle n'a
fonctionné que peu de
temps.
La zone est chaude. Laissez la zone de cuisson
élevé est réglé.
Le dispositif de gestion de la
puissance est activé.
Le récipient est trop grand
ou vous l'avez placé trop
près des commandes.
Les signaux sonores sont
désactivés.
N'appuyez que sur une seule
touche sensitive à la fois.
Reportez-vous au chapitre
« Utilisation quotidienne ».
Nettoyez le bandeau de
commande.
Retirez l'objet des touches
sensitives.
Retirez l'objet de la touche
sensitive.
Si la zone de cuisson a eu assez de temps pour chauffer,
faites appel à votre service
après-vente agréé.
refroidir.
Le niveau de cuisson le plus
élevé est identique à la fonction.
Reportez-vous au chapitre
« Utilisation quotidienne ».
Placez les récipients de
grande taille sur les zones
de cuisson arrière, si possible.
Activez les signaux sonores.
Reportez-vous au chapitre
« Utilisation quotidienne ».
FRANÇAIS 35
Page 36

www.aeg.com36
Problème Cause probable Solution
s'allume.
s'allume.
s'allume.
Le récipient n'est pas adap-
Le diamètre du fond du réci-
Le récipient de cuisson ne
et un chiffre s'affichent.
s'allume.
La fonction Arrêt automatique est activée.
Le dispositif de sécurité enfants ou de verrouillage est
activé.
Il n'y a pas de récipient sur la
zone de cuisson.
té.
pient de cuisson est trop petit pour la zone de cuisson.
recouvre pas la croix / le carré.
Une erreur s'est produite
dans la table de cuisson.
Le branchement électrique
n'est pas adapté. La tension
d'alimentation est hors limites.
Éteignez la table de cuisson
puis allumez-la de nouveau.
Reportez-vous au chapitre
« Utilisation quotidienne ».
Placez un récipient sur la zone de cuisson.
Utilisez un récipient adapté.
Reportez-vous au chapitre
« Conseils ».
Utilisez un récipient de dimensions appropriées.
Reportez-vous au chapitre
« Caractéristiques techniques ».
Recouvrez complètement la
croix / le carré.
Débranchez la table de cuisson de l'alimentation électrique pendant quelques minutes. Déconnectez le fusible de l'installation domestique. Rebranchez l'appareil.
Si s'affiche à nouveau,
faites appel au service aprèsvente agréé.
Demandez à un électricien
qualifié de vérifier l'installation.
Page 37

Problème Cause probable Solution
s'allume.
s'allume.
s'allume.
Une erreur s'est produite
dans la table de cuisson car
un récipient a chauffé à vide.
La fonction Arrêt automatique et la protection anti-surchauffe des zones sont activées.
Le ventilateur de refroidissement est bloqué.
Le branchement électrique
n'est pas adapté. La table de
cuisson n'est branchée qu'à
une seule phase.
Éteignez la table de cuisson.
Enlevez le récipient chaud.
Au bout d'environ 30 secondes, remettez la zone de
cuisson en fonctionnement.
Si le récipient était bien le
problème, le message d'erreur disparaît. Le voyant de
chaleur résiduelle peut rester allumé. Laissez le récipient de cuisson refroidir.
Vérifiez que le récipient est
compatible avec la table de
cuisson.
Reportez-vous au chapitre
« Conseils ».
Assurez-vous qu'aucun objet
ne bloque le ventilateur de
refroidissement. Si s'affiche à nouveau, faites appel
au service après-vente
agréé.
Demandez à un électricien
qualifié de vérifier l'installation. Consultez le schéma de
raccordement.
FRANÇAIS 37
8.2 Si vous ne trouvez pas de
solution...
Si vous ne trouvez pas de solution au
problème, veuillez contacter votre
revendeur ou un service après-vente
agréé. Veuillez lui fournir les informations
se trouvant sur la plaque signalétique.
Donnez également la combinaison à
3 lettres et chiffres pour la
vitrocéramique (située dans un des coins
de la surface en verre) et le message
9. INSTALLATION
AVERTISSEMENT!
Reportez-vous aux chapitres
concernant la sécurité.
d'erreur qui s'affiche. Assurez-vous
d'utiliser correctement l'appareil. En cas
d'erreur de manipulation de la part de
l'utilisateur, le déplacement du
technicien du service après-vente ou du
vendeur pourra être facturé, même en
cours de garantie. Les instructions
relatives au service après-vente et aux
conditions de garantie figurent dans le
livret de garantie.
9.1 Avant l'installation
Avant d'installer la table de cuisson,
notez les informations de la plaque
signalétique ci-dessous. La plaque
signalétique se trouve au bas de la table
de cuisson.
Page 38

min.
50mm
min.
500mm
min.
2mm
min. 2 mm
A
B
A
12 mm
28 mm
38 mm
B
57 mm
41 mm
31 mm
min
30 mm
min. 500 mm
< 20 mm
> 20 mm
min. 2 mm
A
B
A
12 mm
28 mm
38 mm
B
57 mm
41 mm
31 mm
min. 500 mm
www.aeg.com38
Numéro de série ....................
9.2 Tables de cuisson intégrées
Les tables de cuisson encastrables ne
peuvent être mises en fonctionnement
qu'après avoir été installées dans des
meubles et sur des plans de travail
homologués et adaptés.
9.3 Câble d'alimentation
• La table de cuisson est fournie avec
un câble d'alimentation.
• Pour remplacer le câble
d'alimentation endommagé, utilisez le
type de câble suivant (ou supérieur) :
H05V2V2-F T min. 90 °C. Contactez
votre service après-vente.
9.5 Montage
9.4 Installation du joint
1. Nettoyez la zone de découpe du
plan de travail.
2. Placez le joint fourni sur le bord
inférieur de la table de cuisson, le
long du bord externe de la surface
vitrocéramique. N'étirez pas le joint.
Assurez-vous que les extrémités du
joint se trouvent au milieu d'un bord
latéral de la table de cuisson.
3. Lorsque vous découpez le joint,
ajoutez quelques millimètres de
longueur.
4. Rassemblez les deux extrémités du
joint.
Page 39

min.
55mm
R 5 mm
380
+1
mm
880
+1
mm
min.
38 mm
min.
2 mm
min.
12 mm
min.
2 mm
65±1 mm
490±1 mm
55±1 mm
FRANÇAIS 39
Page 40

www.aeg.com40
10. CARACTÉRISTIQUES TECHNIQUES
10.1 Plaque signalétique
Modèle HK973500FB PNC 949 595 266 01
Type 60 GCD E2 AU 220 - 240 V 50 - 60 Hz
Induction 6.9 kW Fabriqué en Allemagne
Numéro de série .......... 6.9 kW
AEG
10.2 Caractéristiques des zones de cuisson
Zone de cuisson
Arrière gauche 2300 3200 10 125 - 210
Arrière centrale 2300 3200 10 125 - 210
Arrière droite 2300 3200 10 125 - 210
La puissance des zones de cuisson peut
légèrement différer des données du
tableau. Elle dépend de la matière et des
dimensions du récipient.
Puissance nominale (niveau
de cuisson
max.) [W]
Fonction Booster [W]
Pour des résultats de cuisson optimaux,
utilisez des récipients qui ne dépassent
pas les diamètres indiqués dans le
tableau.
11. RENDEMENT ÉNERGÉTIQUE
11.1 Informations sur le produit selon la norme EU 66/2014
Identification du modèle HK973500FB
Type de table de cuisson Table de cuisson
Nombre de zones de cuisson
Technologie de chauffage Induction
Diamètre des zones de
cuisson circulaires (Ø)
Consommation d'énergie
selon la zone de cuisson
(EC electric cooking)
Consommation d'énergie
de la table de cuisson (EC
electric hob)
3
Arrière gauche
Arrière centrale
Arrière droite
Arrière gauche
Arrière centrale
Arrière droite
175,3 Wh/kg
Fonction Booster durée maximale [min]
Diamètre du récipient [mm]
intégrée
21,0 cm
21,0 cm
21,0 cm
174,9 Wh/kg
172,6 Wh/kg
178,3 Wh/kg
Page 41

FRANÇAIS 41
EN 60350-2 - Appareils de cuisson
domestiques électriques - Partie 2 :
Tables de cuisson - Méthodes de mesure
des performances
11.2 Économie d'énergie
Vous pouvez économiser de l'énergie au
quotidien en suivant les conseils suivants.
• Si vous faites chauffer de l'eau, ne
faites chauffer que la quantité dont
vous avez réellement besoin.
• Si possible, couvrez toujours les
récipients de cuisson avec un
couvercle pendant la cuisson.
• Activez toujours la zone de cuisson
après avoir posé le récipient dessus.
• Placez les plus petits récipients sur les
plus petites zones de cuisson.
• Posez directement le récipient au
centre de la zone de cuisson.
• Vous pouvez utiliser la chaleur
résiduelle pour conserver les aliments
au chaud ou pour faire fondre.
12. EN MATIÈRE DE PROTECTION DE
L'ENVIRONNEMENT
Recyclez les matériaux portant le
symbole . Déposez les emballages
dans les conteneurs prévus à cet effet.
Contribuez à la protection de
l'environnement et à votre sécurité,
recyclez vos produits électriques et
électroniques. Ne jetez pas les appareils
portant le symbole avec les ordures
ménagères. Emmenez un tel produit
dans votre centre local de recyclage ou
contactez vos services municipaux.
Page 42

www.aeg.com
42
INHALTSVERZEICHNIS
1. SICHERHEITSHINWEISE.........................................................................................43
2. NUTZUNGSBEDINGUNGEN................................................................................. 45
3. SICHERHEITSANWEISUNGEN.............................................................................. 45
4. GERÄTEBESCHREIBUNG.......................................................................................48
5. TÄGLICHER GEBRAUCH........................................................................................50
6. TIPPS UND HINWEISE............................................................................................53
7. REINIGUNG UND PFLEGE.....................................................................................55
8. FEHLERSUCHE........................................................................................................55
9. MONTAGE...............................................................................................................59
10. TECHNISCHE DATEN.......................................................................................... 61
11. ENERGIEEFFIZIENZ..............................................................................................61
FÜR PERFEKTE ERGEBNISSE
Danke, dass Sie sich für dieses AEG Produkt entschieden haben. Wir haben es
geschaffen, damit Sie viele Jahre von seiner ausgezeichneten Leistung und den
innovativen Technologien, die Ihnen das Leben erleichtern, profitieren können.
Es ist mit Funktionen ausgestattet, die in gewöhnlichen Geräten nicht vorhanden
sind. Nehmen Sie sich ein paar Minuten Zeit zum Lesen, um seine Vorzüge
kennen zu lernen.
Besuchen Sie uns auf unserer Website, um:
Sich Anwendungshinweise, Prospekte, Fehlerbehebungs- und ServiceInformationen zu holen:
www.aeg.com/webselfservice
Ihr Produkt für einen besseren Service zu registrieren:
www.registeraeg.com
Zubehör, Verbrauchsmaterial und Original-Ersatzteile für Ihr Gerät zu kaufen:
www.aeg.com/shop
REPARATUR- UND KUNDENDIENST
Bitte verwenden Sie ausschließlich Original-Ersatzteile für Ihre Produkte.
Halten Sie folgende Angaben bereit, wenn Sie sich an den Kundendienst
wenden: Modell, Produktnummer (PNC), Seriennummer.
Diese Informationen finden Sie auf dem Typenschild.
Warnungs-/Sicherheitshinweise
Allgemeine Informationen und Empfehlungen
Informationen zum Umweltschutz
Änderungen vorbehalten.
Page 43

1. SICHERHEITSHINWEISE
Lesen Sie vor der Montage und dem Gebrauch des
Geräts zuerst die Gebrauchsanleitung. Bei Verletzungen
oder Schäden infolge nicht ordnungsgemäßer Montage
oder Verwendung des Geräts übernimmt der Hersteller
keine Haftung. Bewahren Sie die Anleitung immer an
einem sicheren und zugänglichen Ort zum späteren
Nachschlagen auf.
1.1 Sicherheit von Kindern und schutzbedürftigen Personen
• Das Gerät kann von Kindern ab 8 Jahren und
Personen mit eingeschränkten physischen,
sensorischen oder geistigen Fähigkeiten oder mit
mangelnder Erfahrung und/oder mangelndem Wissen
nur dann verwendet werden, wenn sie durch eine für
ihre Sicherheit zuständige Person beaufsichtigt
werden oder in die sichere Verwendung des Geräts
eingewiesen wurden und die mit dem Gerät
verbundenen Gefahren verstanden haben.
• Kinder dürfen nicht mit dem Gerät spielen.
• Halten Sie sämtliches Verpackungsmaterial von
Kindern fern und entsorgen Sie es auf angemessene
Weise.
• Halten Sie Kinder und Haustiere während des Betriebs
oder der Abkühlphase vom Gerät fern. Berührbare
Teile sind heiß.
• Falls Ihr Gerät mit einer Kindersicherung ausgestattet
ist, empfehlen wir, diese einzuschalten.
• Kinder dürfen keine Reinigung und Wartung ohne
Beaufsichtigung durchführen.
• Kinder bis zu 3 Jahren sind während des Betriebs
unbedingt von dem Gerät fernzuhalten.
DEUTSCH
43
Allgemeine Sicherheit
1.2
• WARNUNG: Das Gerät und die zugänglichen
Geräteteile werden während des Betriebs heiß. Seien
Page 44

44
www.aeg.com
Sie vorsichtig und berühren Sie niemals die
Heizelemente. Halten Sie Kinder unter 8 Jahren vom
Gerät fern, wenn sie nicht ständig beaufsichtigt
werden.
• Schalten Sie das Gerät nicht über eine externe
Zeitschaltuhr oder eine separate Fernsteuerung ein.
• WARNUNG: Kochen mit Fett oder Öl auf einem
unbeaufsichtigten Kochfeld ist gefährlich und kann zu
einem Brand führen.
• Versuchen Sie NICHT einen Brand mit Wasser zu
löschen, sondern schalten Sie das Gerät aus und
bedecken Sie die Flamme mit einem Deckel oder
einer Feuerlöschdecke.
• VORSICHT: Der Kochvorgang muss überwacht
werden. Ein kurzer Kochvorgang muss kontinuierlich
überwacht werden.
• WARNUNG: Brandgefahr: Legen Sie keine
Gegenstände auf dem Kochfeld ab.
• Legen Sie keine Metallgegenstände wie Messer,
Gabeln, Löffel oder Topfdeckel auf die Oberfläche
des Kochfelds, da diese heiß werden können.
• Reinigen Sie das Gerät nicht mit einem
Dampfstrahlreiniger.
• Schalten Sie die Kochzone nach dem Gebrauch ab
und verlassen Sie sich nicht auf die Topferkennung.
• Hat die Glaskeramik-/Glasoberfläche einen Sprung,
schalten Sie das Gerät aus, um einen Stromschlag zu
vermeiden.
• Wenn das Netzkabel beschädigt ist, muss es vom
Hersteller, einem autorisierten Kundendienst oder
einer gleichermaßen qualifizierten Person
ausgetauscht werden, um Gefahrenquellen zu
vermeiden.
• WARNUNG: Verwenden Sie nur Schutzabdeckungen
des Herstellers des Kochgeräts, von ihm in der
Bedienungsanleitung als geeignete und empfohlene
Schutzabdeckungen oder die im Gerät enthaltene
Page 45

Schutzabdeckung. Es besteht Unfallgefahr durch die
Verwendung ungeeigneter Schutzabdeckungen.
2. NUTZUNGSBEDINGUNGEN
DEUTSCH
45
Dieses Gerät ist für die Verwendung im
Haushalt und ähnliche Zwecke
vorgesehen, wie z. B.:
• Bauernhöfe
3. SICHERHEITSANWEISUNGEN
3.1 Montage
WARNUNG!
Nur eine qualifizierte
Fachkraft darf die Montage
des Geräts vornehmen.
• Entfernen Sie das gesamte
Verpackungsmaterial.
• Montieren Sie ein beschädigtes Gerät
nicht und benutzen Sie es nicht.
• Halten Sie sich an die mitgelieferte
Montageanleitung.
• Die Mindestabstände zu anderen
Geräten und Küchenmöbeln sind
einzuhalten.
• Seien Sie beim Bewegen des Gerätes
vorsichtig, da es sehr schwer ist.
Tragen Sie stets
Sicherheitshandschuhe und festes
Schuhwerk.
• Dichten Sie die Ausschnittskanten mit
einem Dichtungsmittel ab, um ein
Aufquellen durch Feuchtigkeit zu
verhindern.
• Schützen Sie die Geräteunterseite vor
Dampf und Feuchtigkeit.
• Installieren Sie das Gerät nicht direkt
neben einer Tür oder unter einem
Fenster. So kann heißes Kochgeschirr
nicht herunterfallen, wenn die Tür
oder das Fenster geöffnet wird.
• Wird das Gerät über Schubladen
eingebaut, achten Sie darauf, dass
zwischen dem Geräteboden und der
oberen Schublade ein ausreichender
Abstand für die Luftzirkulation
vorhanden ist.
• Der Boden des Geräts kann heiß
werden. Achten Sie darauf eine
feuerfeste Trennplatte unter dem
• Gäste in Serviced Apartments,
Ferienwohnungen und anderen
Wohnumgebungen.
Gerät anzubringen, damit der Boden
nicht zugänglich ist.
• Achten Sie darauf, dass zwischen der
Arbeitsplatte und dem Gerät darunter
ein Abstand von 2 mm zur Belüftung
frei gelassen wird. Schäden, die durch
das Fehlen eines Belüftungsabstands
entstehen, sind von der Garantie
ausgenommen.
3.2 Elektrischer Anschluss
WARNUNG!
Brand- und
Stromschlaggefahr.
• Alle elektrischen Anschlüsse sind von
einem geprüften Elektriker
vorzunehmen.
• Das Gerät muss geerdet sein.
• Vor der Durchführung jeglicher
Arbeiten muss das Gerät von der
elektrischen Stromversorgung
getrennt werden.
• Stellen Sie sicher, dass die
elektrischen Daten auf dem
Typenschild den Daten Ihrer
Stromversorgung entsprechen.
Wenden Sie sich anderenfalls an eine
Elektrofachkraft.
• Achten Sie darauf, dass das Gerät
ordnungsgemäß montiert wird. Wenn
freiliegende oder ungeeignete
Netzkabel oder Netzstecker (fall
vorhanden) verwendet werden, kann
der Anschluss überhitzen.
• Stellen Sie sicher, dass Sie das
richtige Kabel für den elektrischen
Netzanschluss verwenden.
• Achten Sie darauf, dass das Netzkabel
nicht lose hängt oder sich verheddert.
Page 46

46
www.aeg.com
• Sorgen Sie dafür, dass ein
Berührungsschutz installiert wird.
• Verwenden Sie die Zugentlastung für
das Kabel.
• Stellen Sie beim elektrischen
Anschluss des Gerätes sicher, dass
das Netzkabel oder ggf. der
Netzstecker nicht mit dem heißen
Gerät oder heißem Kochgeschirr in
Berührung kommt.
• Verwenden Sie keine
Mehrfachsteckdosen oder
Verlängerungskabel.
• Achten Sie darauf, Netzstecker (falls
vorhanden) und Netzkabel nicht zu
beschädigen. Wenden Sie sich zum
Austausch des beschädigten
Netzkabels an unseren autorisierten
Kundendienst oder eine
Elektrofachkraft.
• Alle Teile, die gegen direktes
Berühren schützen, sowie die
isolierten Teile müssen so befestigt
werden, dass sie nicht ohne Werkzeug
entfernt werden können.
• Stecken Sie den Netzstecker erst nach
Abschluss der Montage in die
Steckdose. Stellen Sie sicher, dass der
Netzstecker nach der Montage noch
zugänglich ist.
• Falls die Steckdose lose ist, schließen
Sie den Netzstecker nicht an.
• Ziehen Sie nicht am Netzkabel, wenn
Sie das Gerät vom Netzstrom trennen
möchten. Ziehen Sie stets am
Netzstecker.
• Verwenden Sie nur geeignete
Trenneinrichtungen: Überlastschalter,
Sicherungen (Schraubsicherungen
müssen aus dem Halter entfernt
werden können), Erdschlüsse,
Kontakte.
• Die elektrische Installation muss eine
Trenneinrichtung aufweisen, mit der
Sie das Gerät allpolig von der
Stromversorgung trennen können.
Die Trenneinrichtung muss mit einer
Kontaktöffnungsbreite von
mindestens 3 mm ausgeführt sein.
3.3 Gebrauch
WARNUNG!
Verletzungs-, Verbrennungsund Stromschlaggefahr.
• Entfernen Sie vor dem ersten
Gebrauch das gesamte
Verpackungsmaterial, die Aufkleber
und Schutzfolie (falls vorhanden).
• Das Gerät ist für die Verwendung im
Haushalt vorgesehen.
• Nehmen Sie keine technischen
Änderungen am Gerät vor.
• Die Lüftungsöffnungen dürfen nicht
abgedeckt werden.
• Lassen Sie das Gerät bei Betrieb nicht
unbeaufsichtigt.
• Schalten Sie die Kochzonen nach
jedem Gebrauch aus.
• Verlassen Sie sich nicht auf die
Topferkennung.
• Legen Sie kein Besteck und keine
Topfdeckel auf die Kochzonen. Sie
werden heiß.
• Bedienen Sie das Gerät nicht mit
feuchten oder nassen Händen oder
wenn es mit Wasser in Kontakt
gekommen ist.
• Benutzen Sie das Gerät nicht als
Arbeits- oder Abstellfläche.
• Hat die Geräteoberfläche einen
Sprung, trennen Sie das Gerät
umgehend von der
Spannungsversorgung. Dies dient zur
Vermeidung eines Stromschlags.
• Benutzer mit einem Herzschrittmacher
müssen einen Mindestabstand von 30
cm zu den Induktionskochzonen
einhalten, wenn das Gerät in Betrieb
ist.
• Wenn Sie Nahrungsmittel in heißes Öl
geben, kann dieses spritzen.
WARNUNG!
Brand- und
Explosionsgefahr!
• Erhitzte Öle und Fette können
brennbare Dämpfe freisetzen. Halten
Sie Flammen und erhitzte
Gegenstände beim Kochen mit
Fetten und Ölen von diesen fern.
• Die von sehr heißem Öl freigesetzten
Dämpfe können eine Selbstzündung
verursachen.
• Bereits verwendetes Öl kann
Lebensmittelreste enthalten und
schon bei niedrigeren Temperaturen
eher einen Brand verursachen als
frisches Öl.
• Platzieren Sie keine entflammbaren
Produkte oder Gegenstände, die mit
Page 47

DEUTSCH
47
entflammbaren Produkten benetzt
sind, im Gerät, auf dem Gerät oder in
der Nähe des Geräts.
WARNUNG!
Das Gerät könnte
beschädigt werden.
• Stellen Sie kein heißes Kochgeschirr
auf das Bedienfeld.
• Legen Sie keine heißen Topfdeckel
auf die Glasoberfläche des
Kochfeldes.
• Lassen Sie das Kochgeschirr nicht
leerkochen.
• Lassen Sie keine Gegenstände oder
Kochgeschirr auf das Gerät fallen. Die
Oberfläche könnte beschädigt
werden.
• Schalten Sie die Kochzonen niemals
ein, wenn sich kein Kochgeschirr
darauf befindet, oder wenn das
Kochgeschirr leer ist.
• Legen Sie keine Alufolie auf das
Gerät.
• Kochgeschirr aus Gusseisen,
Aluminium oder mit beschädigten
Böden kann die Glas- bzw.
Glaskeramikoberfläche verkratzen.
Heben Sie das Kochgeschirr stets an,
wenn Sie es auf dem Kochfeld
umsetzen möchten.
• Dieses Gerät ist nur zum Kochen
bestimmt. Jeder andere Gebrauch ist
als bestimmungsfremd anzusehen,
zum Beispiel das Beheizen eines
Raums.
3.4 Reinigung und Pflege
• Reinigen Sie das Gerät regelmäßig,
um eine Abnutzung des
Oberflächenmaterials zu verhindern.
• Schalten Sie das Gerät vor dem
Reinigen aus und lassen Sie es
abkühlen.
• Trennen Sie das Gerät vor
Wartungsarbeiten von der
Spannungsversorgung.
• Reinigen Sie das Gerät nicht mit
Wasserspray oder Dampf.
• Reinigen Sie das Gerät mit einem
weichen, feuchten Tuch. Verwenden
Sie ausschließlich Neutralreiniger.
Benutzen Sie keine Scheuermittel,
scheuernde
Reinigungsschwämmchen,
Lösungsmittel oder
Metallgegenstände.
3.5 Entsorgung
WARNUNG!
Verletzungs- und
Erstickungsgefahr.
• Für Informationen zur
ordnungsgemäßen Entsorgung des
Geräts wenden Sie sich an die
zuständige kommunale Behörde vor
Ort.
• Trennen Sie das Gerät von der
Stromversorgung.
• Schneiden Sie das Netzkabel in der
Nähe des Geräts ab, und entsorgen
Sie es.
3.6 Service
• Wenden Sie sich zur Reparatur des
Geräts an einen autorisierten
Kundendienst.
• Verwenden Sie ausschließlich
Originalersatzteile.
Page 48

2
1 11
51 2
4
3
7 6
810 9
www.aeg.com48
4. GERÄTEBESCHREIBUNG
4.1 Kochfeldanordnung
4.2 Bedienfeldanordnung
Induktionskochzone
1
Bedienfeld
2
Das Bedienfeld wird angezeigt, sobald Sie das Gerät einschalten mit .
Bedienen Sie das Gerät über die Sensorfelder. Die Anzeigen, Kontrolllampen und
akustischen Signale informieren Sie über die aktiven Funktionen.
Sensorfeld
1
- Kochstufenanzeige Zeigt die Kochstufe an.
2
- Kochzonen-Anzeigen des
3
- Timer-Anzeige Zeigt die Zeit in Minuten an.
4
5
6
Funktion Kommentar
STOP+GO Ein- und Ausschalten der Funktion.
Zeigt an, für welche Kochzone die Zeit ein-
Timers
Verriegeln / Kindersicherung
- Auswählen der Kochzone.
gestellt wurde.
Verriegeln/Entriegeln des Bedienfelds.
Page 49

DEUTSCH 49
Sensorfeld
7
8
- Einstellskala Einstellen der Kochstufe.
9
10
Funktion Kommentar
- Erhöhen oder Verringern der Zeit.
/
EIN/AUS Ein- und Ausschalten des Kochfeldes.
Power-Funktion Ein- und Ausschalten der Funktion.
4.3 Anzeigen der Kochstufen
Display Beschreibung
Die Kochzone ist ausgeschaltet.
-
+ Zahl
/ /
Die Kochzone ist eingeschaltet.
Die Funktion STOP+GO ist in Betrieb.
Die Funktion Ankochautomatik ist in Betrieb.
Power-Funktion ist eingeschaltet.
Eine Störung ist aufgetreten.
OptiHeat Control (Restwärmeanzeige, 3-stufig): Weitergaren/Warmhalten/Restwärme.
Die Funktion Verriegeln/Kindersicherung ist in Betrieb.
Das Kochgeschirr ist ungeeignet oder zu klein bzw. es befindet sich
kein Kochgeschirr auf der Kochzone.
Die Funktion Abschaltautomatik ist in Betrieb.
4.4 OptiHeat Control (Restwärmeanzeige, 3-stufig)
WARNUNG!
/ / Es besteht
Verbrennungsgefahr durch
Restwärme. Die Anzeige
zeigt die Restwärmestufe an.
Die Induktionskochzonen erzeugen die
erforderliche Hitze zum Kochen direkt im
Boden des Kochgeschirrs. Die
Glaskeramik wird nur durch die Wärme
des Kochgeschirrs erhitzt.
Page 50

www.aeg.com
50
5. TÄGLICHER GEBRAUCH
WARNUNG!
Siehe Kapitel
"Sicherheitshinweise".
5.1 Ein- und Ausschalten
Berühren Sie 1 Sekunde lang, um das
Kochfeld ein- oder auszuschalten.
Das Bedienfeld wird nach Einschalten
des Kochfelds eingeschaltet und nach
Ausschalten des Kochfelds wieder
ausgeschaltet. Bei ausgeschaltetem
Kochfeld ist nur das Sensorfeld
sichtbar.
5.2 Abschaltautomatik
Mit dieser Funktion wird das Kochfeld
in folgenden Fällen automatisch
ausgeschaltet:
• Alle Kochzonen sind ausgeschaltet.
• Nach dem Einschalten des Kochfelds
wird keine Kochstufe gewählt.
• Das Bedienfeld ist mehr als 10
Sekunden mit verschütteten
Lebensmitteln oder einem
Gegenstand bedeckt (Topf, Tuch
usw.). Ein akustisches Signal ertönt
und das Kochfeld schaltet ab.
Entfernen Sie den Gegenstand oder
reinigen Sie das Bedienfeld.
• Das Kochfeld wird zu heiß (wenn
beispielsweise ein Topf leerkocht).
Lassen Sie die Kochzone abkühlen,
bevor Sie das Kochfeld wieder
verwenden.
• Sie verwenden ungeeignetes
Kochgeschirr. Das Symbol
auf und die Kochzone wird
automatisch nach 2 Minuten
ausgeschaltet.
• Eine Kochzone wurde nicht
ausgeschaltet bzw. die Kochstufe
wurde nicht geändert. Nach einer
Weile leuchtet
Kochfeld schaltet sich aus.
Verhältnis zwischen der Kochstufe und
der Zeit, nach der das Kochfeld
ausgeschaltet wird:
auf und das
leuchtet
Kochstufe Das Kochfeld wird
ausgeschaltet nach
, 1 - 3
4 - 7 5 Stunden
8 - 9 4 Stunden
10 - 14 1,5 Stunden
6 Stunden
5.3 Kochstufe
Einstellen oder Ändern der Kochstufe:
Berühren Sie die Einstellskala auf der
gewünschten Kochstufe oder fahren Sie
mit dem Finger entlang der Skala bis zur
gewünschten Kochstufe.
5.4 Verwendung der Kochzonen
Stellen Sie das Kochgeschirr auf das
Kreuz/Quadrat des gewünschten
Kochfelds. Das Kreuz/Quadrat muss
vollständig bedeckt sein.
Induktionskochzonen passen sich bis zu
einem gewissen Grad automatisch an die
Größe des Kochgeschirrbodens an. Mit
einem großen Kochgeschirr können Sie
auf zwei Kochzonen gleichzeitig kochen.
5.5 Ankochautomatik
Schalten Sie diese Funktion ein, damit
die gewünschte Kochstufeneinstellung in
kürzerer Zeit erreicht wird. Wenn sie
aktiviert ist, schaltet sich die Kochzone
mit der höchsten Stufe ein und wechselt
dann zur gewünschten Einstellung.
Page 51

DEUTSCH
51
Zum Einschalten der
Funktion muss die Kochzone
abgekühlt sein.
Einschalten der Funktion für eine
Kochzone: Berühren Sie ( leuchtet
auf). Berühren Sie dann gleich danach
die gewünschte Kochstufe. Nach 5
Sekunden leuchtet
Ausschalten der Funktion: Ändern Sie
die Kochstufe.
auf.
5.6 Power-Funktion
Diese Funktion stellt den
Induktionskochzonen zusätzliche
Leistung zur Verfügung. Für die
Induktionskochzone kann diese Funktion
nur für einen begrenzten Zeitraum
eingeschaltet werden. Danach schaltet
die Induktionskochzone automatisch
wieder auf die höchste Kochstufe um.
Siehe Kapitel „Technische
Daten“.
Einschalten der Funktion für eine
Kochzone: Berühren Sie
auf.
Ausschalten der Funktion: Ändern Sie
die Kochstufe.
. leuchtet
5.7 Timer
Kurzzeitmesser
Mit dieser Funktion stellen Sie ein, wie
lange eine Kochzone für einen einzelnen
Kochvorgang eingeschaltet bleiben soll.
Stellen Sie zuerst die Kochstufe für die
Kochzone und erst danach die Funktion
ein.
Auswählen der Kochzone:Berühren Sie
so oft, bis die Anzeige der
gewünschten Kochzone aufleuchtet.
Einschalten der Funktion: Berühren Sie
des Timers, um die Zeit einzustellen
(00 - 99 Minuten). Wenn die Anzeige der
Kochzone langsam blinkt, wird die Zeit
heruntergezählt.
So wird die Restzeit angezeigt: Wählen
Sie die Kochzone mit aus. Die
Anzeige der Kochzone blinkt schneller.
Das Display zeigt die Restzeit an.
Ändern der Zeit: Wählen Sie die
Kochzone mit
oder .
Ausschalten der Funktion: Wählen Sie
die Kochzone mit und berühren Sie
. Die Restzeit wird auf 00
heruntergezählt. Die Anzeige der
Kochzone erlischt.
Wenn die eingestellte Zeit
abgelaufen ist, ertönt ein
Signalton und 00 blinkt. Die
Kochzone wird
ausgeschaltet.
Ausschalten des Signaltons:
.
Sie
CountUp Timer (Garzeitmesser)
Mit dieser Funktion können Sie
feststellen, wie lange eine Kochzone
bereits in Betrieb ist.
Auswählen der Kochzone:Berühren Sie
so oft, bis die Anzeige der
gewünschten Kochzone aufleuchtet.
Einschalten der Funktion: Berühren Sie
des Timers. leuchtet auf. Wenn die
Anzeige der Kochzone langsamer blinkt,
wird die Zeit hochgezählt. Das Display
schaltet um zwischen und der
abgelaufenen Zeit (Minuten).
So können Sie feststellen, wie lange
die Kochzone bereits in Betrieb ist:
Wählen Sie die Kochzone mit aus. Die
Anzeige der Kochzone blinkt schneller.
Im Display wird die Einschaltdauer der
Zone angezeigt.
Ausschalten der Funktion: Wählen Sie
die Kochzone mit
oder . Die Anzeige der Kochzonen
erlischt.
Kurzzeit-Wecker
Sie können diese Funktion als KurzzeitWecker benutzen, wenn das Gerät
eingeschaltet ist und die Kochzonen
nicht in Betrieb sind. Das Display zeigt
an.
aus. Berühren Sie
Berühren
und berühren Sie
Page 52

52
www.aeg.com
Einschalten der Funktion: Berühren Sie
. Berühren Sie oder des Timers,
um die Zeit einzustellen. Wenn die
eingestellte Zeit abgelaufen ist, ertönt
ein Signalton und 00 blinkt.
Ausschalten des Signaltons: Berühren
.
Sie
Diese Funktion hat keine
Auswirkung auf den
Kochzonenbetrieb.
5.8 STOP+GO
Mit dieser Funktion werden alle
eingeschalteten Kochzonen auf die
niedrigste Kochstufe geschaltet.
Ist die Funktion eingeschaltet, lässt sich
die Kochstufe nicht ändern.
Die Funktion unterbricht nicht die TimerFunktionen.
Einschalten der Funktion: Berühren Sie
. leuchtet auf.
Ausschalten der Funktion: Berühren Sie
. Die vorherige Kochstufe wird
angezeigt.
5.9 Verriegeln
Sie können das Bedienfeld sperren,
wenn Kochzonen eingeschaltet sind. So
wird verhindert, dass die Kochstufe
versehentlich geändert wird.
Stellen Sie zuerst die Kochstufe ein.
Einschalten der Funktion:Berühren Sie
. leuchtet 4 Sekunden auf.Der
Timer bleibt eingeschaltet.
Ausschalten der Funktion: Berühren Sie
. Die vorherige Kochstufe wird
angezeigt.
Diese Funktion wird auch
ausgeschaltet, sobald das
Kochfeld ausgeschaltet wird.
5.10 Kindersicherung
Diese Funktion verhindert ein
versehentliches Einschalten des
Kochfelds.
Einschalten der Funktion: Schalten Sie
das Kochfeld mit
Kochstufe ein. Berühren Sie 4
Sekunden lang. leuchtet auf. Schalten
Sie das Kochfeld mit aus.
Ausschalten der Funktion: Schalten Sie
das Kochfeld mit
Kochstufe ein. Berühren Sie 4
Sekunden lang. leuchtet auf. Schalten
Sie das Kochfeld mit aus.
Vorübergehendes Ausschalten der
Funktion für einen einzelnen
Kochvorgang: Schalten Sie das Kochfeld
ein. leuchtet auf. Berühren Sie
mit
4 Sekunden lang. Stellen Sie die
Kochstufe innerhalb von 10 Sekunden
ein. Das Kochfeld kann jetzt benutzt
werden. Wenn Sie das Kochfeld mit
ausschalten, wird diese Funktion wieder
eingeschaltet.
ein. Stellen Sie keine
ein. Stellen Sie keine
5.11 OffSound Control (Einund Ausschalten der
Signaltöne)
Schalten Sie das Kochfeld aus. Berühren
Sie 3 Sekunden lang. Das Display wird
ein- und ausgeschaltet. Berühren Sie
3 Sekunden lang. Es wird oder
angezeigt. Berühren Sie des Timers
zum Auswählen von:
• – der Signalton ist ausgeschaltet
• – der Signalton ist eingeschaltet
Ihre Einstellungen werden übernommen,
sobald das Kochfeld automatisch
ausgeschaltet wird.
Haben Sie die Funktion auf
eingestellt, ertönt der Signalton nur in
folgenden Fällen:
• Bei der Berührung von
• Nach Ablauf der für Kurzzeit-Wecker
eingestellten Zeit
• Nach Ablauf der für Kurzzeitmesser
eingestellten Zeit
• Wenn das Bedienfeld bedeckt ist.
Page 53

DEUTSCH
53
5.12 Funktion Power-
Management
• Die Kochzonen werden je nach Lage
auf dem Kochfeld und Anzahl der
Phasen gruppiert. Siehe Abbildung.
• Jede Phase darf mit maximal 3700 W
belastet werden.
• Mit dieser Funktion wird die Leistung
zwischen den einzelnen, an dieselbe
Phase angeschlossenen Kochzonen
aufgeteilt.
• Diese Funktion wird eingeschaltet,
sobald die Gesamtleistung aller an
dieselbe Phase angeschlossenen
Kochzonen 3700 W übersteigt.
• Mit dieser Funktion wird die Leistung
aller anderen Kochzonen reduziert,
6. TIPPS UND HINWEISE
WARNUNG!
Siehe Kapitel
"Sicherheitshinweise".
6.1 Kochgeschirr
Das Kochgeschirr wird bei
Induktionskochzonen durch
ein starkes Magnetfeld sehr
schnell erhitzt.
Benutzen Sie für die
Induktionskochzonen
geeignetes Kochgeschirr.
Kochgeschirrmaterial
• Geeignet: Gusseisen, Stahl,
emaillierter Stahl, Edelstahl, ein
mehrlagiger Topfboden (wenn vom
Hersteller als geeignet markiert).
• Nicht geeignet: Aluminium, Kupfer,
Messing, Glas, Keramik, Porzellan.
Kochgeschirr eignet sich für
Induktions-Kochfelder, wenn:
• Eine geringe Wassermenge auf einer
Kochzone, die auf die höchste Stufe
geschaltet ist, sehr schnell aufkocht.
• Ein Magnet vom Geschirrboden
angezogen wird.
Der Boden des
Kochgeschirrs sollte so dick
und flach wie möglich sein.
die an dieselbe Phase angeschlossen
sind.
• Die Anzeige der Kochzonen mit
reduzierter Leistung wechselt
zwischen zwei Kochstufen.
Abmessungen des Kochgeschirrs
Induktionskochzonen passen sich der
Größe des Geschirrbodens bis zu einer
bestimmten Grenze automatisch an.
Die Kochzoneneffizienz hängt vom
Durchmesser des Kochgeschirrs ab. An
Kochgeschirr mit einem kleineren
Durchmesser als der
Mindestdurchmesser gelangt nur ein Teil
der von der Kochzone erzeugten Hitze.
Siehe Kapitel „Technische
Daten“.
6.2 Betriebsgeräusche
Es gibt verschiedene
Betriebsgeräusche:
• Knacken: Das Kochgeschirr besteht
aus unterschiedlichen Materialien
(Sandwichkonstruktion).
• Pfeifen: Sie haben die Kochzone auf
eine hohe Stufe geschaltet und das
Kochgeschirr besteht aus
unterschiedlichen Materialien
(Sandwichkonstruktion).
• Summen: Sie haben die Kochzone auf
eine hohe Stufe geschaltet.
• Klicken: Bei elektronischen
Schaltvorgängen.
• Zischen, Surren: Der Ventilator läuft.
Page 54

www.aeg.com54
Die Geräusche sind normal und weisen
nicht auf eine Störung des Kochfelds
hin.
Kochzone ist nicht linear. Bei einer
höheren Kochstufe steigt der
Energieverbrauch der Kochzone nicht
proportional an. Das bedeutet, dass die
6.3 Öko Timer (Öko-Timer)
Um Energie zu sparen, schaltet sich die
Kochzonenheizung vor dem Signal des
Kurzzeitmessers ab. Die Abschaltzeit
hängt von der eingestellten Kochstufe
und der Gardauer ab.
Kochzone, die auf eine mittlere
Kochstufe eingestellt ist, weniger als die
Hälfte ihrer maximalen Leistung
verbraucht.
Bei den Angaben in der
folgenden Tabelle handelt
es sich um Richtwerte.
6.4 Anwendungsbeispiele für das Garen
Das Verhältnis zwischen der Kochstufe
und dem Energieverbrauch der
Kochstufe Verwendung: Dauer
(Min.)
- 1
1 - 3 Sauce Hollandaise, Schmelzen
1 - 3 Stocken: Lockere Omeletts,
3 - 5 Köcheln von Reis und Milchge-
5 - 7 Dünsten von Gemüse, Fisch,
7 - 9 Dampfgaren von Kartoffeln. 20 - 60 Max. ¼ l Wasser für 750 g Kar-
7 - 9 Kochen größerer Speisemen-
9 - 12 Bei geringer Hitze anbraten:
12 - 13 Braten bei starker Hitze: Rösti,
Warmhalten von gegarten
Speisen.
von: Butter, Schokolade, Gelatine.
gebackene Eier.
richten, Erhitzen von Fertiggerichten.
Fleisch.
gen, Eintopfgerichte und Suppen.
Schnitzel, Cordon bleu, Kotelett, Frikadellen, Bratwürste,
Leber, Mehlschwitze, Eier,
Pfannkuchen, Donuts.
Lendenstücke, Steaks.
Nach
Bedarf
5 - 25 Gelegentlich umrühren.
10 - 40 Mit Deckel garen.
25 - 50 Mindestens doppelte Menge
20 - 45 Einige Esslöffel Flüssigkeit hin-
60 - 150 Bis zu 3 l Flüssigkeit plus Zuta-
Nach
Bedarf
5 - 15 Nach der Hälfte der Zeit wen-
Hinweise
Legen Sie einen Deckel auf
das Kochgeschirr.
Flüssigkeit zum Reis geben,
Milchgerichte zwischendurch
umrühren.
zugeben.
toffeln verwenden.
ten.
Nach der Hälfte der Zeit wenden.
den.
Page 55

DEUTSCH 55
Kochstufe Verwendung: Dauer
14 Aufkochen von Wasser, Nudeln kochen, Anbraten von Fleisch (Gulasch,
Schmorbraten), Frittieren von Pommes frites.
Aufkochen großer Mengen Wasser. Die Power-Funktion wird eingeschaltet.
7. REINIGUNG UND PFLEGE
WARNUNG!
Siehe Kapitel
"Sicherheitshinweise".
7.1 Allgemeine Informationen
• Reinigen Sie das Kochfeld nach
jedem Gebrauch.
• Achten Sie immer darauf, dass der
Boden des Kochgeschirrs sauber ist.
• Kratzer oder dunkle Flecken auf der
Oberfläche beeinträchtigen die
Funktionsfähigkeit des Kochfelds
nicht.
• Verwenden Sie einen Spezialreiniger
zur Reinigung der
Kochfeldoberfläche.
• Verwenden Sie einen speziellen
Reinigungsschaber für Glas.
7.2 Reinigen des Kochfelds
• Folgendes muss sofort entfernt
werden: geschmolzener Kunststoff,
Hinweise
(Min.)
Plastikfolie, Zucker bzw. zuckerhaltige
Lebensmittel. Andernfalls können die
Verschmutzungen das Kochfeld
beschädigen. Achten Sie darauf, dass
sich niemand Verbrennungen zuzieht.
Den speziellen Reinigungsschaber
schräg zur Glasfläche ansetzen und
über die Oberfläche bewegen.
• Folgendes kann nach ausreichender
Abkühlung des Kochfelds entfernt
werden: Kalk- und Wasserränder,
Fettspritzer und metallisch
schimmernde Verfärbungen. Reinigen
Sie das Kochfeld mit einem feuchten
Tuch und nicht scheuernden
Reinigungsmittel. Wischen Sie das
Kochfeld nach der Reinigung mit
einem weichen Tuch trocken.
• Entfernen Sie metallisch
schimmernde Verfärbungen:
Benutzen Sie für die Reinigung der
Glasoberfläche ein mit einer Lösung
aus Essig und Wasser angefeuchtetes
Tuch.
8. FEHLERSUCHE
WARNUNG!
Siehe Kapitel
"Sicherheitshinweise".
Page 56

www.aeg.com56
8.1 Was tun, wenn ...
Störung Mögliche Ursache Abhilfe
Das Kochfeld kann nicht eingeschaltet oder bedient werden.
Die Sicherung ist durchge-
Schalten Sie das Kochfeld
Zwei oder mehr Sensorfelder
Die Funktion STOP+GO ist
Auf dem Bedienfeld befin-
Ein akustisches Signal ertönt
und das Kochfeld schaltet
ab.
Wenn das Kochfeld ausgeschaltet wird, ertönt ein
akustisches Signal.
Das Kochfeld wird ausgeschaltet.
Die Restwärmeanzeige funktioniert nicht.
Die Ankochautomatik startet
nicht.
Die höchste Kochstufe ist
Das Kochfeld ist nicht oder
nicht ordnungsgemäß an die
Spannungsversorgung angeschlossen.
brannt.
wurden gleichzeitig berührt.
in Betrieb.
den sich Wasser- oder Fettspritzer.
Mindestens ein Sensorfeld
wurde bedeckt.
Sie haben etwas auf das
Sensorfeld gestellt.
Die Kochzone ist nicht heiß,
da sie nur kurze Zeit in Betrieb war.
Die Kochzone ist heiß. Lassen Sie die Kochzone lan-
eingestellt.
Prüfen Sie, ob das Kochfeld
ordnungsgemäß an die
Spannungsversorgung angeschlossen ist. Nehmen Sie
dazu den Anschlussplan zu
Hilfe.
Vergewissern Sie sich, dass
die Sicherung der Grund für
die Störung ist. Brennt die
Sicherung wiederholt durch,
wenden Sie sich an eine zugelassene Elektrofachkraft.
erneut ein und stellen Sie innerhalb von 10 Sekunden
die Kochstufe ein.
Berühren Sie nur ein Sensorfeld.
Siehe Kapitel „Täglicher Gebrauch“.
Wischen Sie das Bedienfeld
ab.
Entfernen Sie den Gegenstand von den Sensorfeldern.
Entfernen Sie den Gegenstand vom Sensorfeld.
War die Kochzone lange genug eingeschaltet, um heiß
zu sein, wenden Sie sich an
den autorisierten Kundendienst.
ge genug abkühlen.
Die höchste Kochstufe hat
die gleiche Leistung wie die
Funktion.
Page 57

Störung Mögliche Ursache Abhilfe
Die Kochstufe schaltet zwischen zwei Kochstufen hin
und her.
Die Sensorfelder werden
heiß.
Es ertönt kein Signalton,
wenn Sie die Sensorfelder
des Bedienfelds berühren.
leuchtet auf.
leuchtet auf.
leuchtet auf.
Sie verwenden ungeeigne-
Der Durchmesser des Koch-
Das Kochgeschirr bedeckt
und eine Zahl werden an-
gezeigt.
Die Power-ManagementFunktion ist eingeschaltet.
Das Kochgeschirr ist zu
groß, oder Sie haben es zu
nahe an die Bedienelemente
gestellt.
Der Signalton ist ausgeschaltet.
Die Abschaltautomatik hat
ausgelöst.
Die Kindersicherung oder
die Tastensperre ist eingeschaltet.
Es wurde kein Kochgeschirr
auf die Kochzone gestellt.
tes Kochgeschirr.
geschirrbodens ist zu klein
für die Kochzone.
das Kreuz/Quadrat nicht.
Es ist ein Fehler im Kochfeld
aufgetreten.
Siehe Kapitel „Täglicher Gebrauch“.
Stellen Sie großes Kochgeschirr nach Möglichkeit auf
die hinteren Kochzonen.
Schalten Sie den Signalton
ein.
Siehe Kapitel „Täglicher Gebrauch“.
Schalten Sie das Kochfeld
aus und wieder ein.
Siehe Kapitel „Täglicher Gebrauch“.
Stellen Sie Kochgeschirr auf
die Kochzone.
Geeignetes Kochgeschirr
benutzen.
Siehe Kapitel „Tipps und
Hinweise“.
Verwenden Sie Kochgeschirr
mit den richtigen Abmessungen.
Siehe Kapitel „Technische
Daten“.
Das Kreuz/Quadrat muss
vollständig bedeckt sein.
Trennen Sie das Kochfeld eine Zeit lang vom Stromnetz.
Schalten Sie die Sicherung
im Sicherungskasten der
Hausinstallation aus. Schalten Sie die Sicherung wieder
ein. Wenn erneut aufleuchtet, wenden Sie sich an
den autorisierten Kundendienst.
DEUTSCH 57
Page 58

www.aeg.com58
Störung Mögliche Ursache Abhilfe
leuchtet auf.
leuchtet auf.
leuchtet auf.
leuchtet auf.
Unsachgemäßer elektrischer
Anschluss. Die Netzspannung liegt außerhalb des zulässigen Bereichs.
Im Kochfeld ist ein Fehler
aufgetreten, da ein Kochgeschirr leer gekocht ist. Die
Abschaltautomatik und der
Überhitzungsschutz für die
Zonen sind aktiviert.
Das Kühlgebläse ist blockiert.
Unsachgemäßer elektrischer
Anschluss. Das Kochfeld ist
nur an eine Phase angeschlossen.
Wenden Sie sich an eine
Elektrofachkraft zur Überprüfung der Installation.
Schalten Sie das Kochfeld
aus. Entfernen Sie das heiße
Kochgeschirr. Schalten Sie
die Kochzone nach etwa 30
Sekunden wieder ein. War
das Kochgeschirr die Ursache des Problems, erlischt
die Fehlermeldung. Die
Restwärmeanzeige leuchtet
eventuell weiter. Lassen Sie
das Kochgeschirr lange genug abkühlen. Prüfen Sie, ob
das Kochgeschirr mit dem
Kochfeld kompatibel ist.
Siehe Kapitel „Tipps und
Hinweise“.
Prüfen Sie, ob ein Gegenstand das Kühlgebläse blo-
ckiert. Wenn erneut aufleuchtet, wenden Sie sich an
den autorisierten Kundendienst.
Wenden Sie sich an eine
Elektrofachkraft zur Überprüfung der Installation. Nehmen Sie dazu den Anschlussplan zu Hilfe.
8.2 Wenn Sie das Problem nicht lösen können...
Wenn Sie das Problem nicht selbst lösen
können, wenden Sie sich an Ihren
Händler oder einen autorisierten
Kundendienst. Geben Sie die Daten, die
Sie auf dem Typenschild finden, an.
Geben Sie dabei den dreistelligen
Buchstaben-Code für die Glaskeramik
(befindet sich in der Ecke der Glasfläche)
und die angezeigte Fehlermeldung an.
Vergewissern Sie sich, dass Sie das
Kochfeld korrekt bedient haben. Wenn
Sie das Gerät falsch bedient haben, fällt
auch während der Garantiezeit für die
Reparatur durch einen Techniker oder
Händler eine Gebühr an. Die
Informationen zum Kundendienst und
die Garantiebedingungen finden Sie im
Garantieheft.
Page 59

9. MONTAGE
min.
50mm
min.
500mm
min.
2mm
DEUTSCH 59
WARNUNG!
Siehe Kapitel
"Sicherheitshinweise".
9.1 Vor der Montage
Notieren Sie vor der Montage des
Kochfelds folgende Daten, die Sie auf
dem Typenschild finden. Das
Typenschild ist auf dem Boden des
Kochfelds angebracht.
Seriennummer ............
9.2 Einbau-Kochfelder
Einbau-Kochfelder dürfen nur nach dem
Einbau in bzw. unter normgerechte,
passende Einbauschränke und
Arbeitsplatten betrieben werden.
9.3 Anschlusskabel
• Das Kochfeld wird mit einem
Anschlusskabel geliefert.
9.5 Montage
• Ersetzen Sie ein defektes Netzkabel
durch ein Netzkabel des folgenden
(oder eines höheren) Typs: H05V2V2-F
T min 90 °C. Wenden Sie sich an den
Kundendienst.
9.4 Anbringen der Dichtung
1. Reinigen Sie die Arbeitsplatte um
den Ausschnittbereich.
2. Bringen Sie das mitgelieferte
Dichtungsband umlaufend auf der
Unterseite des Kochfelds entlang des
äußeren Randes der
Glaskeramikscheibe an. Dehnen Sie
es nicht. Stellen Sie sicher, dass sich
die Enden des Dichtungsbands in
der Mitte auf einer der Seiten des
Kochfelds befinden.
3. Geben Sie einige mm hinzu, wenn
Sie die Länge des Dichtungsbands
zuschneiden.
4. Drücken Sie die beiden Enden des
Dichtungsbands zusammen.
Page 60

min. 2 mm
A
B
A
12 mm
28 mm
38 mm
B
57 mm
41 mm
31 mm
min
30 mm
min. 500 mm
< 20 mm
> 20 mm
min. 2 mm
A
B
A
12 mm
28 mm
38 mm
B
57 mm
41 mm
31 mm
min. 500 mm
min.
55mm
R 5 mm
380
+1
mm
880
+1
mm
min.
38 mm
min.
2 mm
min.
12 mm
min.
2 mm
www.aeg.com60
Page 61

65±1 mm
490±1 mm
55±1 mm
10. TECHNISCHE DATEN
10.1 Typenschild
Modell HK973500FB Produkt-Nummer (PNC) 949 595 266 01
Typ 60 GCD E2 AU 220 - 240 V, 50 - 60 Hz
Induktion 6.9 kW Made in Germany
Ser. Nr. .......... 6.9 kW
AEG
DEUTSCH 61
10.2 Technische Daten der Kochzonen
Kochzone Nennleistung
(höchste Kochstufe) [W]
Hinten links 2300 3200 10 125 - 210
Hinten Mitte 2300 3200 10 125 - 210
Hinten rechts 2300 3200 10 125 - 210
Die Leistung der Kochzonen kann
geringfügig von den Daten in der
Tabelle abweichen. Sie ändert sich je
nach Material und Abmessungen des
Kochgeschirrs.
11. ENERGIEEFFIZIENZ
11.1 Produktinformationen gemäß EU 66/2014
Modellidentifikation HK973500FB
Power-Funktion
[W]
Verwenden Sie für optimale
Kochergebnisse kein Kochgeschirr,
dessen Durchmesser größer als der in
der Tabelle angegebene Wert ist.
Power-Funktion
maximale Einschaltdauer
[Min.]
Durchmesser
des Kochgeschirrs [mm]
Page 62

62
www.aeg.com
Kochfeldtyp Einbau-Kochfeld
Anzahl der Kochzonen 3
Heiztechnologie Induktion
Durchmesser der kreisförmigen Kochzonen (Ø)
Energieverbrauch pro
Kochzone (EC electric cooking)
Energieverbrauch des
Kochfelds (EC electric hob)
Hinten links
Hinten Mitte
Hinten rechts
Hinten links
Hinten Mitte
Hinten rechts
175,3 Wh / kg
21,0 cm
21,0 cm
21,0 cm
174,9 Wh / kg
172,6 Wh / kg
178,3 Wh / kg
EN 60350-2 - Elektrische Kochgeräte für
den Hausgebrauch - Teil 2: Kochfelder Verfahren zur Messung der
Gebrauchseigenschaften
11.2 Energie sparen
Beachten Sie folgende Tipps, um beim
täglichen Kochen Energie zu sparen.
• Wenn Sie Wasser erwärmen,
verwenden Sie nur die benötigte
Menge.
12. UMWELTTIPPS
Recyceln Sie Materialien mit dem Symbol
. Entsorgen Sie die Verpackung in den
entsprechenden Recyclingbehältern.
Recyceln Sie zum Umwelt- und
Gesundheitsschutz elektrische und
elektronische Geräte. Entsorgen Sie
• Decken Sie Kochgeschirr, wenn
möglich, mit einem Deckel ab.
• Stellen Sie Kochgeschirr auf die
Kochzone, bevor Sie sie einschalten.
• Stellen Sie kleineres Kochgeschirr auf
die kleineren Kochzonen.
• Stellen Sie das Kochgeschirr mittig
auf die Kochzone.
• Nutzen Sie die Restwärme, um die
Speisen warm zu halten oder zu
schmelzen.
Geräte mit diesem Symbol nicht mit
dem Hausmüll. Bringen Sie das Gerät zu
Ihrer örtlichen Sammelstelle oder
wenden Sie sich an Ihr Gemeindeamt.
*
Page 63

DEUTSCH 63
Page 64

www.aeg.com/shop
867331465-A-272016
 Loading...