

Page 1

HK634110FB
User manual Induction Hob
Manual de instruções Placa de indução
Page 2
2 Contents
Thank you for choosing one of our high-quality products.
To ensure optimal and regular performance of your appliance please read this
instruction manual carefully. It will enable you to navigate all processes perfectly
and most efficiently. To refer to this manual any time you need to, we recommend
you to keep it in a safe place. And please pass it to any future owner of the
appliance.
We wish you much joy with your new appliance.
CONTENTS
SAFETY INFORMATION 2
INSTALLATION INSTRUCTIONS 3
PRODUCT DESCRIPTION 6
OPERATING INSTRUCTIONS 7
On and Off 7
Automatic Switch Off 7
The heat setting 8
Switching the outer ring on and off 8
Automatic Heat Up 8
Switching the Power function on and off
8
Using the Timer 9
STOP+GO 9
Lock 9
The child safety device 10
HELPFUL HINTS AND TIPS 10
CARE AND CLEANING 12
WHAT TO DO IF… 12
ENVIRONMENT CONCERNS 14
Packaging material 14
Subject to change without notice
SAFETY INFORMATION
For your safety and correct operation of the appliance, read this manual carefully before
installation and use. Always keep these instructions with the appliance even if you move or
sell it. Users must fully know the operation and safety features of the appliance.
General safety
WARNING!
Persons (including children) with reduced physical sensory, mental capabilities or lack of experience and knowledge must not use the appliance. They must have supervision or instruction for the operation of the appliance by a person responsible for their safety.
Child safety
• Only adults can use this appliance. Children must get supervision to make sure that they
do not play with the appliance.
• Keep all packaging away from children. There is a risk of suffocation.
• Keep children away from the appliance when it is on.
Page 3
Installation instructions 3
WARNING!
Start the child safety device to prevent small children and pets from an accidental activation of the appliance.
Safety during operation
• Remove all packaging, stickers and layers from the appliance before the first use.
• Set the cooking zones to "off" after each use.
• Risk of burns! Do not put metallic objects, for example cutlery or saucepan lids, on the
cooking surface, as they can become hot.
• Users with an implanted pacemaker must keep their upper body minimum 30 cm from
induction cooking zones that are switched on.
WARNING!
Fire danger! Overheated fats and oils can catch fire very quickly.
Correct operation
• Always monitor the appliance during operation.
• Only use the appliance for domestic cooking tasks!
• Do not use the appliance as a work or a storage surface.
• Do not put or keep very flammable liquids and materials, or fusible objects (made of
plastic or aluminium) on or near the appliance.
• Be careful when you connect the appliance to the near sockets. Do not let electricity
bonds touch the appliance or hot cookware. Do not let electricity bonds tangle.
How to prevent a damage to the appliance
• If the objects or cookware fall on the glass ceramic, the surface can be damaged.
• Cookware made of cast iron, cast aluminium or with damaged bottoms can scratch the
glass ceramic if you move them on the surface.
• Do not let cookware boil dry to prevent the damage to cookware and glass ceramics.
• Do not use the cooking zones with empty cookware or without cookware.
• Do not cover the parts of the appliance with aluminium foil.
Leave a ventilation space of 5 mm between the worktop and front of the unit be-
•
low it.
INSTALLATION INSTRUCTIONS
Before the installation , note down the serial number (Ser. Nr.) from the rating plate. The
rating plate of the appliance is on its lower casing.
HK634110FB
58 GAD DA AU
AEG-ELECTROLUX
220-240 V 50-60-Hz
949 593 206 01
Induction 3,7 kW
6,6 kW
Page 4
4 Installation instructions
Safety instructions
WARNING!
You must read these!
Make sure that the appliance is not damaged because of transportation. Do not connect a
damaged appliance. If it is necessary, speak to the supplier.
Only an authorised service technician can install, connect or repair this appliance. Use only
original spare parts.
Only use built-in appliances after you assemble the appliance into correct built-in units and
work surfaces that align to the standards.
Do not change the specifications or modify this product. Risk of injury and damage to the
appliance.
Fully obey the laws, ordinances, directives and standards in force in the country where you
use the appliance (safety regulations, recycling regulations, electrical safety rules etc.)!
Keep the minimum distances to other appliances and units!
Install anti-shock protection, for example install the drawers only with a protective floor
directly below the appliance!
Protect the cut surfaces of the worktop against moisture with a correct sealant!
Seal the appliance to the work top with no space left with a correct sealant!
Protect the bottom of the appliance from steam and moisture, e.g. from a dishwasher or
oven!
Do not install the appliance adjacent to doors and below windows! If not, hot cookware can
be hit off the hob when you open doors or windows.
WARNING!
Risk of injury from electrical current. Carefully obey the instructions for electrical connections.
• The electrical mains terminal is live.
• Make electrical mains terminal free of voltage.
• Install correctly to give anti-shock protection.
• Loose and incorrect plug and socket connections can make the terminal become too hot.
• A qualified electrician must install the clamping connections correctly.
• Use a strain relief clamp on cable.
• Use the correct mains cable of type H05BB-F Tmax 90°C (or higher) for a single-phase or
two-phase connection.
• Replace the damaged mains cable with a special cable (type H05BB-F Tmax 90°C; or
higher). Speak your local Service Force Centre.
The appliance must have the electrical installation which lets you disconnect the appliance
from the mains at all poles with a contact opening width of minimum 3 mm.
You must have correct isolation devices: line protecting cut-outs, fuses (screw type fuses
removed from the holder), earth leakage trips and contactors.
Page 5

Assembly
490
+1
mm
R5
600 mm
+1
560
mm
min.
50 mm
min.
5 mm
Installation instructions 5
min. 500 mm
min.
50 mm
min.
38 mm
min.
5 mm
min.
20 mm
min.
25 mm
min.
5 mm
If you use a protection box (additional accessory),
the front ventilation space of 5 mm and protective floor directly below the appliance are not
necessary.
Page 6
6 Product description
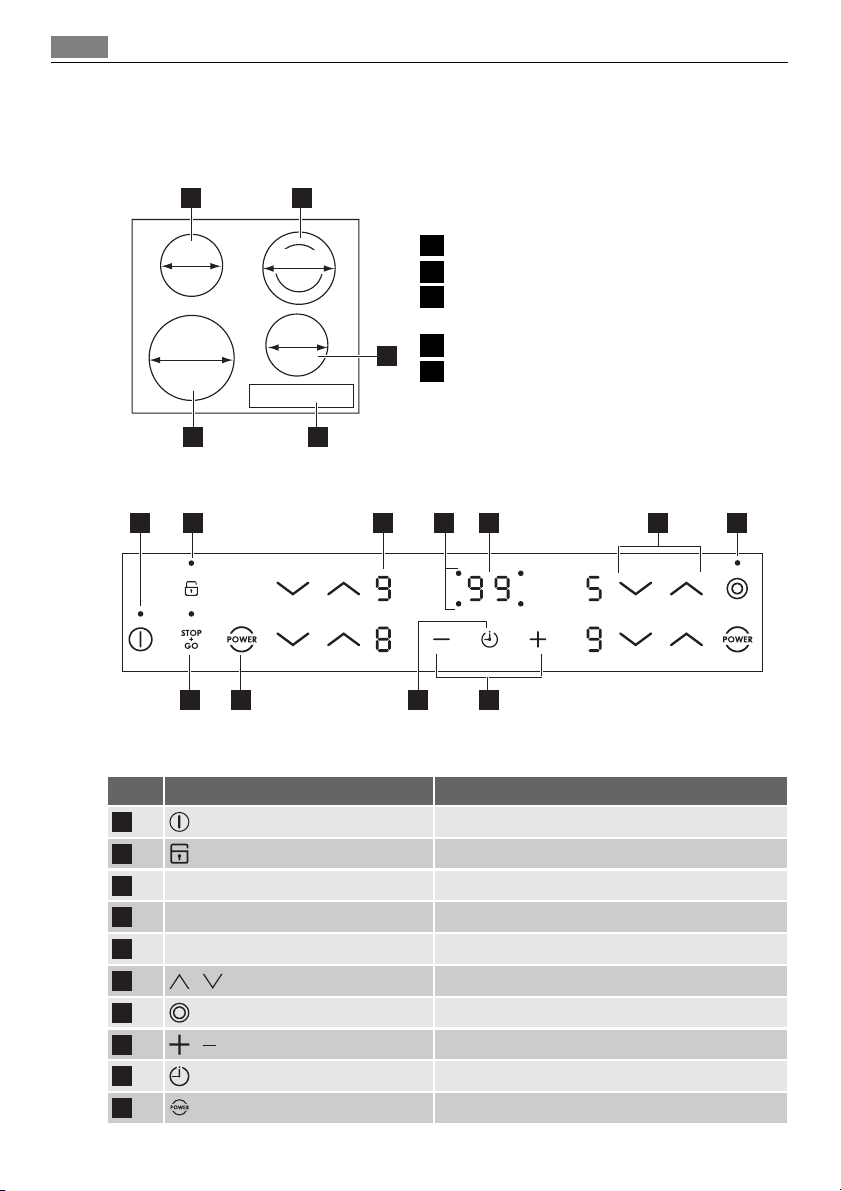
PRODUCT DESCRIPTION
Cooking surface layout
1 2
145
mm
120/180
mm
1 Single cooking zone 1200 W
2 Double cooking zone 700/1700 W
3 Induction cooking zone 1400 W, with Pow-
er function 2500 W
210
mm
145
mm
4 Control panel
3
5 Induction cooking zone 2300 W, with Pow-
er function 3700 W
5
4
Control panel layout
1 2 3 4 5 6 7
891011
Use the sensor fields to operate the appliance. Indicators, displays and sounds tell which
functions operate.
sensor field function
1
2
3
4
5
6
7
8
9
10
with an indicator
a heat setting display shows the heat setting
cooking zones' indicators of timer shows for which zone you set the time
the timer display shows the time in minutes
/ increase or decrease heat setting
with an indicator
/
starts and stops the hob
locks/unlocks the control panel
starts and stops the outer ring
increase or decrease the time
selects the cooking zone
starts the Power function
Page 7
sensor field function
11
Heat setting displays
Display Description
- / -
Residual heat indicator
WARNING!
Risk of burns from residual heat!
Operating instructions
starts and stops the STOP+GO function
The cooking zone is off
Keep warm/STOP+GO function is active
The cooking zone operates
Automatic warm up function is active
The induction cooking zone does not sense the cookware
There is a malfunction
A cooking zone is still hot (residual heat)
Lock/Child safety device is on
Power function is active
The automatic switch off is active
7
The induction cooking zones make the heat directly in the bottom of the cookware. The
glass ceramic is heated by the residual heat of the cookware.
OPERATING INSTRUCTIONS
On and Off
Touch for 1 second to start or stop the appliance.
Automatic Switch Off
The function stops the hob automatically if:
• all cooking zones are off
• you do not set the heat setting after you start the hob.
• you cover a sensor field with an object (a pan, a cloth, etc.) for longer than 10 seconds.
The sound operates until you remove the object.
• the hob gets too hot (e.g. when a saucepan boils dry). Before you use the hob again, the
cooking zone must be cool.
• you use incorrect cookware.
zone stops automatically.
• you do not stop a cooking zone or change the heat setting. After some time
and the hob stops. See the table.
.
comes on in the display and after 2 minutes the cooking
comes on
Page 8
8 Operating instructions
Automatic Switch Off times
Heat setting
Stops after
- - -
6 hours 5 hours 4 hours 1.5 hours
The heat setting
Touch to increase the heat setting. Touch to decrease the heat setting. The display
shows the heat setting. Touch
and at the same time to switch off the cooking zone.
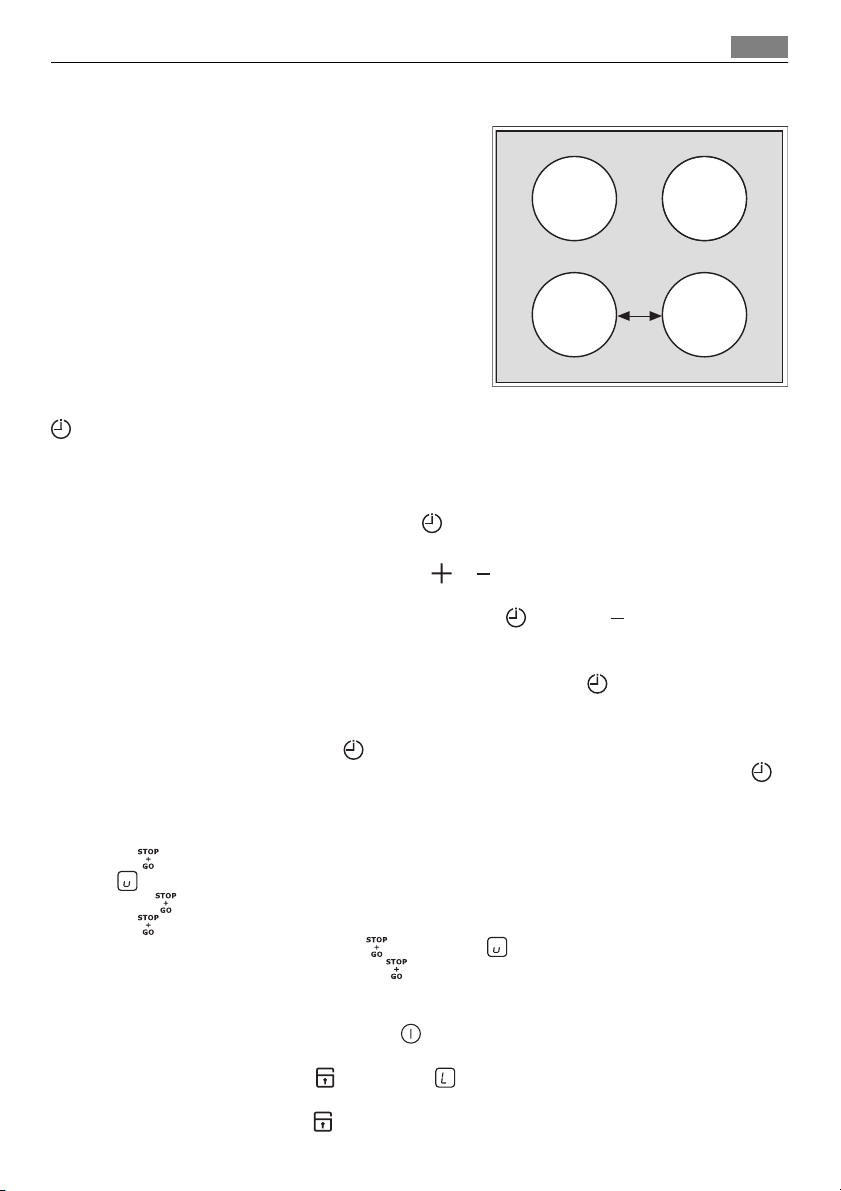
Switching the outer ring on and off
You can match the effective heating surface to the size of the cookware.
To switch on the outer ring touch the sensor field
To switch off the outer ring touch the sensor field
. The indicator comes on.
again. The indicator goes out.
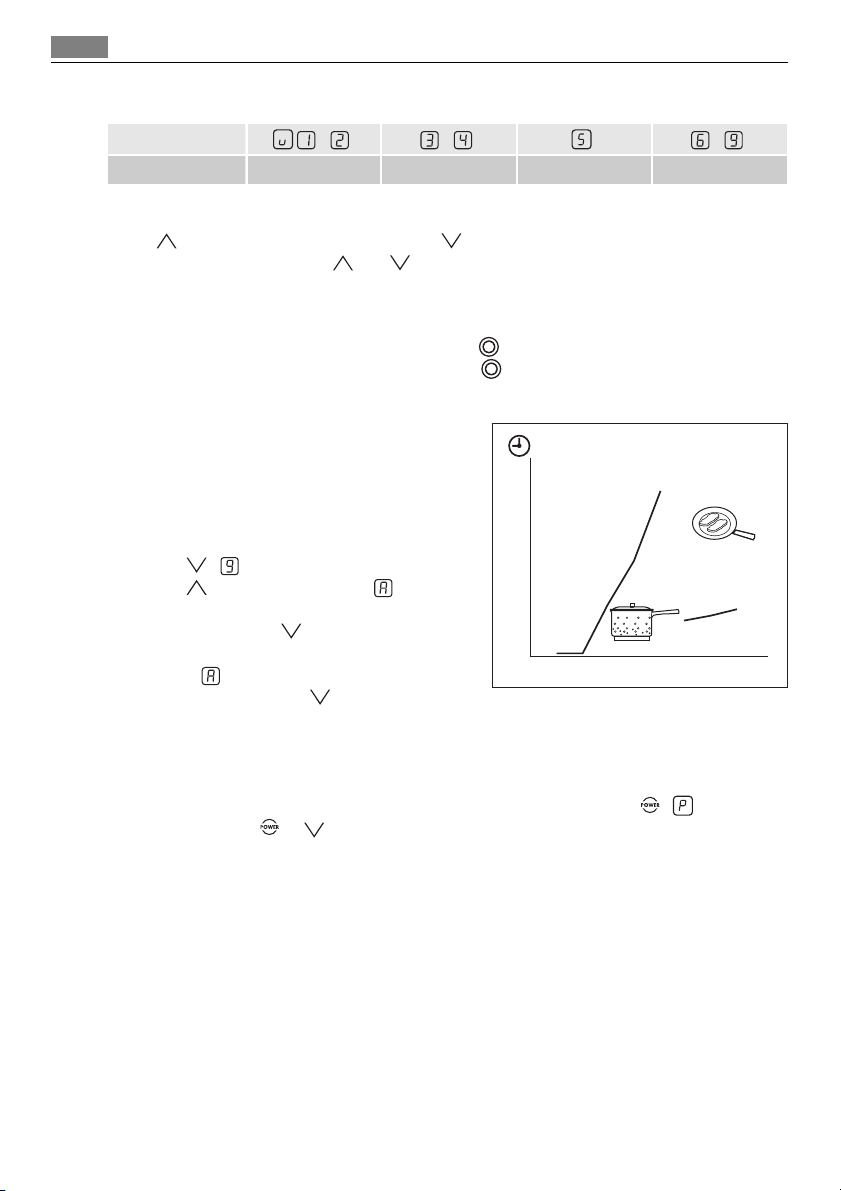
Automatic Heat Up
You can get a necessary heat setting in a shorter
time if you activate the Automatic Heat Up function. This function sets the highest heat setting
for some time (see the graphic), and then decreases to the necessary heat setting.
To start the Automatic Heat Up function:
1. Touch
2. Touch
. comes on in the display.
again and again until comes on
in the display.
3. Immediately touch
again and again until
the necessary heat setting comes on. After 3
seconds
To stop the function touch
comes on in the display.
.
11
10
9
8
7
6
5
4
3
2
1
0
123456789
Switching the Power function on and off
The Power function makes more power available to the induction cooking zones. The Power
function is activated for 10 minutes at most. After that the induction cooking zone automatically switches back to the highest heat setting. To switch on, touch
To switch off, touch
or .
, comes on.
Page 9
99
00
Operating instructions 9
Power management
The power management divides the power between two cooking zones in a pair (see the figure).
The power function increases the power to the
maximum level for one cooking zone in the pair
and automatically decreases in the second cooking zone to a lower power level. The display for
the reduced zone alternates.
Using the Timer
Use the timer to set how long the cooking zone operates for one cooking session.
Set the timer after the selection of the cooking zone.
You can set the heat setting before or after you set the timer.
• Selection of the cooking zone: touch
essary cooking zone comes on.
• Starting or changing the timer: touch
minutes). When the indicator of the cooking zone flashes slower, the time counts down.
• Stopping the timer: select the cooking zone with
timer. The remaining time counts backwards to
goes out.
• Checking the remaining time: select the cooking zone with
cooking zone flashes faster. Display shows the remaining time.
When the time elapses, the sound operates and
• Stopping the sound: touch
You can use the timer as a minute minder while cooking zones do not operate. Touch .
Touch + or - to select the time. When the time elapses, the sound operates and
again and again until the indicator of a nec-
or of the timer to set the time ( 00 -
and touch to switch off the
. The indicator of the cooking zone
. The indicator of the
flashes. The cooking zone switches off.
00
STOP+GO
The function sets all cooking zones that operate to the lowest heat setting - Keep Warm
).
(
When
The
• To activate this function touch
• To deactivate this function touch
operates, you cannot change the heat setting.
function does not stop the timer function.
. The symbol comes on.
. The heat setting that you set before comes on.
00
flashes
Lock
You can lock the control panel, but not . It prevents an accidental change of the heat
setting.
To start this function touch
The Timer stays on.
To stop this function touch
. The symbol comes on for 4 seconds.
. The heat setting that you set before comes on.
Page 10
10 Helpful hints and tips
When you stop the appliance, you also stop this function.
The child safety device
This function prevents an accidental operation of the hob.
Starting the child safety device
• Start the hob with
• Touch
• Stop the hob with
Switching off the child safety device
• Start the hob with
symbol
• Stop the hob with
Overriding the child safety device for one cooking session
• Start the hob with
• Touch
ate the hob.
• When you stop the hob with
for 4 seconds. The symbol comes on.
comes on.
for 4 seconds. Set the heat setting in less than 10 seconds. You can oper-
. Do not set the heat settings .
.
. Do not set the heat settings . Touch for 4 seconds. The
.
. The symbol comes on.
, the child safety device operates again.
HELPFUL HINTS AND TIPS
Use the induction cooking zones with suitable cookware.
Cookware
• The bottom of the cookware must be as thick and flat as possible.
• Cookware made of enamelled steel and with aluminium or copper bottoms can cause
discoloration on glass ceramic surface.
Cookware for induction cooking zones
In induction cooking a powerful electromagnetic field generates an almost instant heat inside the cookware.
Cookware material
• correct: cast iron, steel, enamelled steel, stainless steel, a multi-layer bottom (marked as
correct by a manufacturer).
• not correct: aluminium, copper, brass, glass, ceramic, porcelain.
Cookware is correct for an induction hob if …
• ... some water boils very quickly on a zone set to the highest heat setting..
• ... a magnet pulls on to the bottom of the cookware.
The bottom of the cookware must be as thick and flat as possible.
Cookware dimensions : induction cooking zones adapt to the dimension of the bottom of
the cookware automatically to some limit. But, the magnetic part of the bottom of the
cookware must have a minimum diameter of approximately 3/4 of the cooking zones.
Page 11

Helpful hints and tips
Operating noises
If you can hear
• cracking noise: cookware is made of different materials (Sandwich construction).
• whistling: you use one or more cooking zones with high power levels and the cookware
is made of different materials (Sandwich construction).
• humming: you use high power levels.
• clicking: electric switching occurs.
• hissing, buzzing: the fan operates.
The noises are normal and do not refer to any defects.
Energy saving
• If possible, always put the lids on the cookware.
• Put cookware on a cooking zone before you start it.
• Stop the cooking zones before the end of the cooking time to use residual heat.
• The bottom of pans and cooking zones must have the same dimension.
Examples of cooking applications
The data in the table is for guidance only.
Heat
setting
Keep cooked foods warm as re-
1
1-2 Hollandaise sauce, melt: butter, choco-
1-2 Solidify: fluffy omelettes, baked eggs 10-40
2-3 Simmer rice and milkbased dishes, heat-
3-4 Steam vegetables, fish, meat 20-45
4-5 Steam potatoes 20-60
4-5 Cook larger quantities of food, stews
6-7 Gentle fry: escalope, veal cordon bleu,
7-8 Heavy fry, hash browns, loin steaks,
9 Boil large quantities of water, cook pasta, sear meat (goulash, pot roast), deep fry chips
late, gelatine
ing up ready-cooked meals
and soups
cutlets, rissoles, sausages, liver, roux,
eggs, pancakes, doughnuts
steaks
The Power function is suitable for heating large quantities of water.
Use to: Time Hints
quired
5-25
min
min
25-50
min
min
min
60-150
min
as re-
quired
5-15
min
Cover
Mix occasionally
Cook with a lid on
Add at least twice as much liquid as
rice, stir milk dishes part way
through
Add a few tablespoons of liquid
Use max. ¼ l water for 750 g of potatoes
Up to 3 l liquid plus ingredients
Turn halfway through
Turn halfway through
11
Page 12

12 Care and cleaning
The induction cooking zones are faster and more energy-efficient than traditional cooking
surfaces.
Information on acrylamides
Important! According to the newest scientific knowledge, if you brown food (specially the
one which contains starch), acrylamides can pose a health risk. Thus, we recommend that
you cook at the lowest temperatures and do not brown food too much.
CARE AND CLEANING
Clean the appliance after each use.
Always use cookware with clean bottom.
WARNING!
Sharp objects and abrasive cleaning agents will damage the appliance.
For your safety, do not clean the appliance with steam blasters or high-pressure cleaners.
Scratches or dark stains on the glass ceramic have no effect on how the appliance operates.
To remove the dirt:
1. – Remove immediately: melted plastic, plastic foil, and food with sugar. If not, the
dirt can cause damage to the appliance. Use a special scraper for the glass . Put the
scraper on the glass surface at an acute angle and move the blade on the surface .
– Remove after the appliance is sufficiently cool: limescale rings , water rings, fat
stains, shiny metallic discolorations. Use a special cleaning agent for glass ceramic or
stainless steel.
2. Clean the appliance with a moist cloth and some detergent.
3. At the end rub the appliance dry with a clean cloth.
WHAT TO DO IF…
Problem Possible cause and remedy
You cannot
start the appliance or operate it.
A sound operates when the
appliance is
off.
•
The key lock or child safety device operates
tion "Locking/unlocking the control panel" and “Child safety device”.
•
STOP+GO operates
• You touched 2 or more sensor fields at the same time. Only touch one sensor
field.
• There is water or fat stains on the control panel. Clean the control panel
• Start the appliance again and set the heat setting within 10 seconds.
You covered one or more sensor fields. Uncover the sensor fields.
. Stop the function. See the section "Stop and go".
. Stop the function. See the sec-
Page 13

Problem Possible cause and remedy
A sound operates 6 times,
the appliance
stops.
The residual
heat indicator
does not come
on.
The automatic
warm up function does not
start.
A sound operates and appliance starts
and stops
again. After 5
seconds one
more sound
operates.
Sensor fields
become hot.
The display
changes between two
heat settings.
comes on.
comes on.
and a
number come
on.
and
come on.
You covered one or more sensor fields. Uncover the sensor fields.
The cooking zone is not hot because it operated only for a short time. If the cooking zone must be hot, speak to the after sales service.
•
There is still residual heat on the cooking zone
down
• The highest heat setting is set. The highest heat setting has the same power as
the automatic warm up function.
You covered . Uncover the sensor field.
The cookware is too big or you put it too near the controls. Put large cookware on
the rear cooking zones if necessary.
Power Management decreases the power of this cooking zone. Use cooking zones
on the other side.
• The automatic switch-off operates. Stop the appliance and start it again.
Overheating protection for the cooking zone operates. Stop the cooking zone and
start it again.
• The cookware is incorrect. Use the correct cookware.
• There is no cookware on the cooking zone. Put cookware on the cooking zone.
• The diameter of the bottom of the cookware is too small for the cooking zone.
Use the correct cookware.
There is an error in the appliance.
Disconnect the appliance from the electrical supply for some time. Disconnect the
fuse from the electrical system of the house. Connect again. If
again, speak to the After Sales Service.
Light rays that are too strong on the control panel, for example bright sunlight.
Shade the control panel for a short time, for example with a hand. A sound operates, the appliance stops. Start the appliance again.
What to do if… 13
. Let the cooking zone cool
comes on
Page 14

14 Environment concerns
Problem Possible cause and remedy
come on
There is an error in the appliance, because a cookware boils dry or you use not
correct cookware. Overheating protection for the cooking zone operates. The automatic switch-off operates.
Switch off the appliance. Remove the hot cookware. After approximately 30 seconds switch on the cooking zone again.
cator can stay. Cool down the cookware and check it with the section "Cookware
for the induction cooking zone".
should disappear, residual heat indi-
If you tried the above solutions and cannot repair the problem, speak to your dealer or the
Customer Care Department. Give the data from the rating plate, three-digit-letter code for
the glass ceramic (it is in the corner of the cooking surface) and an error message that
comes on.
If you operated the appliance incorrectly, the servicing by a customer service technician or
dealer will not be free of charge, even during the warranty period. The instructions about
the customer service and conditions of guarantee are in the guarantee booklet.
ENVIRONMENT CONCERNS
The symbol on the product or on its packaging indicates that this product may not be
treated as household waste. Instead it should be taken to the appropriate collection point
for the recycling of electrical and electronic equipment. By ensuring this product is
disposed of correctly, you will help prevent potential negative consequences for the
environment and human health, which could otherwise be caused by inappropriate waste
handling of this product. For more detailed information about recycling of this product,
please contact your local council, your household waste disposal service or the shop where
you purchased the product.
Packaging material
The packaging materials are friendly to the environment and can be recycled. The plastic
components are identified by marking: >PE<,>PS<, etc. Discard the packaging materials as
household waste at the waste disposal facilities in your municipality.
Page 15

Obrigado por escolher um dos nossos produtos de alta qualidade.
Para garantir um desempenho ideal e regular do aparelho, leia atentamente este
manual de instruções. Permitir-lhe-á percorrer todos os processos de forma perfeita
e com grande eficácia. Para consultar este manual sempre que necessário,
recomendamos que o guarde num local seguro e que o passe a qualquer futuro
proprietário do aparelho
Esperamos que desfrute do seu novo aparelho.
ÍNDICE
Índice
15
INFORMAÇÕES DE SEGURANÇA 15
INSTRUÇÕES DE INSTALAÇÃO 17
DESCRIÇÃO DO PRODUTO 19
INSTRUÇÕES DE FUNCIONAMENTO 20
Ligar e desligar 20
Desactivação automática 21
Grau de cozedura 21
Ligar e desligar o circuito calorífico exterior
21
Aquecimento Automático 21
Ligar e desligar a função Power 22
Utilizar o temporizador 22
STOP+GO 22
Bloqueio 23
O dispositivo de segurança para crianças
SUGESTÕES E CONSELHOS ÚTEIS 23
MANUTENÇÃO E LIMPEZA 25
O QUE FAZER SE… 26
PREOCUPAÇÕES AMBIENTAIS 28
Material de embalagem 28
Sujeito a alterações sem aviso prévio
INFORMAÇÕES DE SEGURANÇA
Para sua segurança e funcionamento correcto da máquina, leia este manual cuidadosamente antes da instalação e utilização. Guarde sempre estas instruções com a máquina mesmo
que seja transferida ou vendida. Os utilizadores devem conhecer por completo o funcionamento e as características de segurança da máquina.
Segurança geral
ADVERTÊNCIA
O aparelho não deve ser utilizado por pessoas (incluindo crianças) com capacidades físicas,
sensoriais e mentais reduzidas, ou que não possuam o conhecimento e a experiência necessários. Devem ser vigiadas ou receber formação para a utilização do aparelho por parte de
uma pessoa responsável pela sua segurança.
23
Segurança para crianças
• O aparelho só pode ser utilizado por adultos. As crianças devem ser vigiadas para garan-
tir que não brincam com o aparelho.
• Mantenha as embalagens fora do alcance das crianças. Existe o risco de asfixia.
Page 16

16 Informações de segurança
• Mantenha as crianças afastadas do aparelho quando o mesmo estiver em funcionamen-
to.
ADVERTÊNCIA
Active o dispositivo de segurança para crianças para evitar que crianças e animais liguem
acidentalmente o aparelho.
Segurança durante o funcionamento
• Retire todo o material de embalagem, etiquetas e revestimentos do aparelho antes de o
utilizar pela primeira vez.
• Desligue (posição "off") os focos após cada utilização.
• Perigo de queimaduras! Não coloque objectos metálicos, tais como talheres ou tampas
de panelas na superfície de cozedura, uma vez que podem ficar muito quentes.
• Os utilizadores com um pacemaker implantado devem manter a parte superior do corpo
a uma distância mínima de 30 cm dos focos de indução ligados.
ADVERTÊNCIA
Perigo de incêndio! Gorduras e óleos sobreaquecidos podem inflamar muito rapidamente.
Funcionamento correcto
• Monitorize sempre o aparelho durante o funcionamento.
• Utilize o aparelho exclusivamente para tarefas de cozedura domésticas!
• Não utilize o aparelho como superfície de trabalho ou armazenamento.
• Não coloque nem mantenha líquidos e materiais muito inflamáveis nem objectos fusíveis
(em plástico ou alumínio) sobre ou perto do aparelho.
• Tenha cuidado ao ligar o aparelho às tomadas na proximidade. Não permita que as liga-
ções eléctricas entrem em contacto com o aparelho ou com panelas quentes. Não permita que os fios eléctricos fiquem emaranhados uns nos outros.
Como evitar danos no aparelho
• Se os objectos ou tachos caírem sobre a placa vitrocerâmica, a superfície pode ser danifi-
cada.
• Tachos em ferro fundido, alumínio fundido ou com bases danificadas podem riscar a pla-
ca vitrocerâmica quando deslocados sobre a superfície.
• Não permita que os tachos fervam até ficarem sem água, para evitar danos nos tachos e
na placa vitrocerâmica.
• Não utilizar as zonas de cozedura com tachos vazios ou sem tachos.
• Não cubra o aparelho com folha de alumínio.
Deixe um espaço de ventilação de 5 mm entre a bancada e a parte dianteira da
•
unidade abaixo da mesma.
Page 17

Instruções de instalação
INSTRUÇÕES DE INSTALAÇÃO
Antes da instalação , anote o número de série (Nr. de Série) da placa de características. A
placa de características do aparelho encontra-se na parte inferior do mesmo.
HK634110FB
58 GAD DA AU
AEG-ELECTROLUX
220-240 V 50-60-Hz
Instruções de segurança
ADVERTÊNCIA
Leia atentamente estas instruções!
Certifique-se de que o aparelho não está danificado devido ao transporte. Não ligue um
aparelho danificado. Caso seja necessário, contacte o fornecedor.
O aparelho apenas pode ser instalado, ligado ou reparado por um técnico de assistência autorizado. Utilize apenas peças sobresselentes originais.
Utilize apenas aparelhos de encastrar após montar o aparelho em unidades encastradas
adequadas e superfícies de trabalho de acordo com as normas.
Não altere as especificações nem modifique este produto. Risco de ferimentos e danos no
aparelho.
Respeite na totalidade as leis, regulamentos, directivas e normas vigentes no país onde utiliza o aparelho (normas de segurança, normas de reciclagem, regras de segurança eléctrica,
etc.).
Deverão ser respeitadas as distâncias mínimas entre aparelhos!
Instale uma protecção anti-choque, por exemplo, as gavetas só devem ser instaladas com
um piso protector directamente por baixo do aparelho!
Proteja as superfícies de corte da bancada contra a humidade utilizando um vedante adequado!
Instale o aparelho na bancada, colocando um vedante adequado sem deixar folga!
Proteja a parte inferior do aparelho contra vapor e humidade, por exemplo de uma máquina
de lavar loiça ou de um forno!
Não instale o aparelho perto de portas ou debaixo de janelas! Caso contrário, os tachos
quentes podem ser derrubados sobre a placa ao abrir as portas ou janelas.
949 593 206 01
Induction 3,7 kW
6,6 kW
17
ADVERTÊNCIA
Perigo de ferimentos devido a corrente eléctrica. Cumpra cuidadosamente as instruções para as ligações eléctricas.
• O pino de alimentação está sob tensão.
• Liberte o pino de alimentação da tensão.
• Proceda à instalação correcta para conferir protecção anti-choques.
• Fichas de ligação soltas ou inadequadas poderão provocar o sobreaquecimento dos pi-
nos.
• Todas as ligações devem ser efectuadas por um electricista qualificado.
• Utilize um grampo para aliviar a tensão no cabo.
• No caso de uma ligação monofásica ou bifásica, tem de ser usado o cabo de alimentação
adequado do tipo H05BB-F Tmáx. 90 °C (ou superior).
Page 18

18 Instruções de instalação
• Substitua o cabo de alimentação danificado por um cabo especial (tipo H05BB-F Tmáx.
90 °C; ou superior. Contacte o Centro de Assistência local
O aparelho deve dispor de uma instalação eléctrica que lhe permita desligar o aparelho da
fonte de alimentação em todos os pólos com uma largura mínima da abertura de contacto
de 3 mm.
Deve dispor dos dispositivos de isolamento correctos: disjuntores de protecção, fusíveis (os
fusíveis de rosca devem ser retirados do suporte), barras de fuga à terra e contractores.
Montagem
min. 500 mm
min.
50 mm
min.
5 mm
600 mm
min.
50 mm
+1
560
490
+1
mm
R5
min.
20 mm
mm
min.
25 mm
min.
5 mm
min.
38 mm
min.
5 mm
Page 19

Se utilizar uma caixa de protecção (acessório adicional), o espaço de ventilação frontal de 5 mm e
o piso protector directamente por baixo do aparelho não são necessários.
DESCRIÇÃO DO PRODUTO
Disposição da placa
1 2
Descrição do produto 19
145
mm
120/180
mm
1 Foco de circuito simples 1200 W
2 Foco de circuito duplo 700/1700 W
3 Foco de indução 1400 W, com função Po-
wer 2500 W
210
mm
145
mm
4 Painel de controlo
3
5 Foco de indução 2300 W, com função Po-
wer 3700 W
5
4
Disposição do painel de comando
1 2 3 4 5 6 7
891011
Utilize os campos do sensor para controlar o aparelho. Os indicadores, visores e sons indicam
quais as funções em funcionamento.
campo de sensores função
1
2
3
com um indicador
um visor do grau de cozedura apresenta o grau de cozedura
activa e desactiva a placa
bloqueia/desbloqueia o painel de comando
Page 20

20 Instruções de funcionamento
campo de sensores função
indicadores do temporizador dos fo-
4
cos
visor do temporizador apresenta o tempo em minutos
5
6
7
8
9
10
11
/ aumentar ou diminuir da regulação de temperatu-
com um indicador
/
Visores do grau de cozedura
Visor Descrição
- / -
apresenta para que foco o tempo é regulado
ra
activa e desactiva o anel exterior
aumentar ou diminuir o tempo
Selecção do foco (zona de cozedura)
inicia a função Power
activa e desactiva a função STOP+GO
A zona de cozedura está desactivada
A função Manter Calor/ STOP+GO está activa
A zona de cozedura está em funcionamento
A função de aquecimento automático está activa
A zona de cozedura de indução não detecta os tachos
Existe uma avaria
Ainda existe uma zona de cozedura quente (calor residual)
O dispositivo de bloqueio/segurança para crianças está activo
A função Power está activa
A desconexão automática está activa
Indicador de calor residual
ADVERTÊNCIA
Perigo de queimaduras devido ao calor residual!
Os focos de indução criam o calor directamente na base dos tachos. A vitrocerâmica é
aquecida pelo calor residual dos tachos.
INSTRUÇÕES DE FUNCIONAMENTO
Ligar e desligar
Toque em durante 1 segundo para activar ou desactivar o aparelho.
Page 21

Instruções de funcionamento 21
Desactivação automática
A função desactiva a placa automaticamente se:
• todos os focos estiverem desligados
.
• não configurar o grau de cozedura depois de ligar a placa.
• cobrir um campo de sensores com objectos (um tacho, um pano, etc.) durante mais de 10
segundos. Ouve-se um som até retirar o objecto.
• a placa fica demasiado quente (por exemplo, quando uma panela ferve até ficar sem
água). Antes de utilizar novamente a placa, o foco tem de estar frio.
• utiliza tachos incorrectos.
acende-se no visor e, após 2 minutos, o foco é automatica-
mente desactivado.
• não desligar um foco ou alterar o grau de cozedura. Após algum tempo,
placa desliga-se. Consulte a tabela.
Tempos de Desligamento Automático
Grau de cozedu-
ra
Desliga após
- - -
6 horas 5 horas 4 horas 1,5 horas
Grau de cozedura
Toque em para aumentar o grau de cozedura. Toque em para diminuir o grau de
cozedura. O visor mostra o grau de cozedura. Toque em
e simultaneamente para des-
ligar.
Ligar e desligar o circuito calorífico exterior
Pode fazer corresponder a superfície de aquecimento efectiva ao tamanho do tacho.
Para ligar o circuito calorífico exterior, toque no campo do sensor
-se.
Para desligar o circuito calorífico exterior, toque novamente no campo do sensor
dicador apaga-se.
O indicador acende-
acende-se e a
. O in-
Aquecimento Automático
Pode obter o grau de cozedura necessário num
período de tempo mais curto se activar a função
Aquecimento Automático. Esta função define o
grau de cozedura mais elevado durante algum
tempo (consulte o gráfico) e, em seguida, diminui
para o grau de cozedura necessário.
Para iniciar a função Aquecimento Automático:
1. Toque em
2. Toque várias vezes em
da no visor.
3. Toque imediatamente em
que surja o grau de cozedura necessário. Após
3 segundos,
Para desligar a função, toque em
. acende-se no visor.
até que se acen-
acende-se no visor.
várias vezes até
.
11
10
9
8
7
6
5
4
3
2
1
0
123456789
Page 22

22 Instruções de funcionamento
Ligar e desligar a função Power
A função Power disponibiliza mais potência para os focos de indução. A função Power está
activada, no máximo, durante 10 minutos. De seguida, o foco de indução volta automaticamente para o grau de cozedura mais elevado. Para ligar, toque em
desligar, toque em
ou .
, acende-se. Para
Gestão de energia
A gestão de energia divide a potência entre dois
focos num par (ver a figura). A função Power aumenta a potência para o nível máximo num foco
do par e diminui automaticamente para um nível
de potência inferior no segundo foco. O visor do
foco reduzido muda.
Utilizar o temporizador
Utilize o temporizador para definir o tempo de funcionamento de uma zona de cozedura
para uma sessão de cozedura.
Defina o temporizador após seleccionar a zona de cozedura.
Pode definir o grau de cozedura antes ou depois de definir o temporizador.
• Seleccionar a zona de cozedura: toque em
zona de cozedura necessária se acenda.
• Iniciar ou alterar o temporizador: toque em
tempo (
inicia-se a contagem decrescente do tempo.
• Parar o temporizador: seleccione a zona de cozedura com
gar o temporizador. O tempo restante é contado por ordem decrescente até
cador da zona de cozedura apaga-se.
• Verificar o tempo restante: seleccione a zona de cozedura com
zona de cozedura pisca rapidamente. O visor apresenta o tempo restante.
Quando o tempo termina, o som é emitido e
ga-se.
• Desligar o som: toque em
Pode utilizar o temporizador como cronómetro com as zonas de cozedura estejam desliga-
das. Toque em
som é emitido e
- 99 minutos). Quando o indicador da zona de cozedura piscar lentamente,
00
. Toque em + ou - para seleccionar o tempo. Quando o tempo terminar, o
fica intermitente
00
várias vezes até que o indicador de uma
ou do temporizador para definir o
e toque em para desli-
. O indicador da
fica intermitente. A zona de cozedura apa-
00
STOP+GO
A função define todas as zonas de cozedura em funcionamento para o grau de cozedura
mais baixo - Manter quente (
Quando
está em funcionamento, não é possível alterar o grau de cozedura.
).
00
. O indi-
Page 23

Sugestões e conselhos úteis
A função não desactiva a função de temporizador.
• Para activar esta função, toque em
• Para desactivar esta função, toque em
acende-se.
. O símbolo acende-se.
. O grau de cozedura anteriormente definido
Bloqueio
É possível bloquear o painel de comandos, mas não . Tal impede uma alteração acidental
do grau de cozedura.
Para activar esta função, toque em
O Temporizador permanece ligado.
Para desactivar esta função, toque em
acende-se.
Quando desliga o aparelho, também desactiva esta função.
. O símbolo acende-se durante 4 segundos.
. O grau de cozedura anteriormente definido
O dispositivo de segurança para crianças
Esta função evita o funcionamento acidental da placa.
Ligar o dispositivo de segurança para crianças
• Ligue a placa através de
• Toque em
• Desligue a placa através de
Desligar o dispositivo de segurança para crianças
• Ligue a placa através de
segundos. O símbolo
• Desligue a placa através de
Desactivar o dispositivo de segurança para crianças para uma sessão de cozedura
• Ligue a placa através de
• Toque em
gundos. Pode utilizar a placa.
• Quando desligar a placa com
vamente.
durante 4 segundos. O símbolo acende-se.
durante 4 segundos. Defina o grau de cozedura em menos de 10 se-
. Não regule o grau de cozedura .
.
. Não regule o grau de cozedura . Toque em durante 4
acende-se.
.
. O símbolo acende-se.
, o dispositivo de segurança para crianças funciona no-
23
SUGESTÕES E CONSELHOS ÚTEIS
Utilize os focos de indução com tachos adequados.
Tachos e afins
• O fundo do tacho deve ser o mais espesso e nivelado possível.
• Os tachos com base em aço, alumínio ou cobre poderão deixar descolorações na superfí-
cie de vitrocerâmica.
Tachos para focos de indução
Em cozedura por indução, um campo electromagnético potente gera um calor quase instantâneo dentro do tacho.
Page 24

24 Sugestões e conselhos úteis
Material do tacho
• correcto: ferro fundido, aço, aço esmaltado, aço inoxidável, fundo de multicamadas (as-
sinalado como correcto por um fabricante).
• incorrecto: alumínio, cobre, latão, vidro, cerâmica, porcelana.
Tachos correctos para uma placa de indução se…
• ... alguma água ferver muito rapidamente num foco definido para o grau de cozedura
mais elevado…
• ... um íman se prender ao fundo do tacho.
O fundo dos tachos tem de ser o mais espesso e nivelado possível.
Dimensões dos tachos : os focos de indução adaptam-se automaticamente à dimensão do
fundo dos tachos, até um determinado limite. Mas, a parte magnética da base dos tachos
deve ter um diâmetro mínimo de aproximadamente 3/4 dos focos.
Ruídos de funcionamento
Se conseguir ouvir
• ruído de estalidos: os tachos são feitos de diferentes materiais (construção multicama-
das).
• assobiar: utiliza um ou mais focos com níveis elevados de potência e os tachos são feitos
de materiais diferentes (construção multicamadas).
• zumbido: utiliza níveis elevados de potência.
• clicar: ocorre uma permutação eléctrica.
• zumbidos, assobios: a ventoinha está em funcionamento.
Os ruídos são normais e não constituem qualquer avaria.
Economizar energia
• Coloque sempre que possível as tampas nos tachos.
• Coloque o tacho na zona de cozedura antes de ligar a mesma.
• Desligue as zonas de cozedura antes do fim do tempo de cozedura para utilizar o calor
residual.
• Os fundos dos tachos e as zonas de cozedura deverão ter dimensões idênticas.
Exemplos de aplicações de cozinha
Os dados apresentados na tabela seguinte são apenas de referência.
Grau
de co-
zedura
Manter os alimentos cozinhados quen-
1
tes
1-2 Molho holandês, derreter: manteiga,
1-2 Solidificar: omeletes fofas, ovos cozidos 10-40
chocolate, gelatina
Utilize para: Tempo Conselhos
conforme necessário
5-25
minutos
minutos
Cubra
Misture ocasionalmente
Coza com uma tampa
Page 25

Manutenção e limpeza
25
Grau
de co-
zedura
2-3 Cozer arroz e pratos com base de leite,
aquecer alimentos já cozinhados
3-4 Cozer a vapor legumes, peixe, carne 20-45
4-5 Cozer batatas a vapor 20-60
4-5 Cozer grandes quantidades de alimen-
tos, guisados e sopas
6-7 Fritura ligeira: escalopes, cordon bleu,
costeletas, rissóis, salsichas, fígado,
roux, ovos, panquecas, sonhos
7-8 Fritura intensa, batatas fritas, bifes do
lombo, bifes
9 Ferver grandes quantidades de água, cozer massa, estufar carne (goulash, assado), batatas
fritas
Utilize para: Tempo Conselhos
25-50
minutos
minutos
minutos
60-150
minutos
confor-
me necessário
5-15
minutos
Adicione o dobro do líquido do arroz, mexa os pratos de leite a meio
da cozedura
Adicione algumas colheres de sopa
de líquido
Utilize no máximo ¼ l de água para
750 g de batatas
Até 3 l de líquido mais os ingredientes
Vire depois de decorrida metade do
tempo.
Vire depois de decorrida metade do
tempo.
A função Power é adequada para aquecer grandes quantidades de água.
Os focos de indução são mais rápidos e eficazes em termos de energia do que as superfícies
de cozedura tradicionais.
Informação relativa à acrilamida
Importante De acordo com os conhecimentos científicos mais recentes, se deixar tostar
alimentos (especialmente alimentos que contenham amido), a acrilamida pode representar
um risco para a saúde. Assim, aconselhamos que cozinhe a baixa temperaturas e não deixe
tostar demais os alimentos.
MANUTENÇÃO E LIMPEZA
Limpe o aparelho após cada utilização.
Utilize sempre tachos com a base limpa.
ADVERTÊNCIA
Objectos afiados e detergentes fortes e abrasivos danificam o aparelho.
Por motivos de segurança, não limpe o aparelho com dispositivos de limpeza a vapor ou a
alta pressão.
Riscos ou manchas escuras na placa de vitrocerâmica não comprometem o bom funcionamento do aparelho.
Para remover sujidades:
1. – Remova imediatamente: plástico derretido, películo de plásticos e alimentos com
açúcar. Caso contrário, a sujidade pode provocar danos no aparelho. Utilize um ras-
Page 26

26 O que fazer se…
pador especial para vidro. Coloque o raspador sobre a superfície de vidro em ângulo
agudo e desloque a lâmina sobre a superfície.
– Remova após o aparelho estar suficientemente frio: manchas de calcário, man-
chas de água, manchas de gordura e descolorações metálicas brilhantes. Utilize um
agente de limpeza especial para vitrocerâmica ou aço inoxidável.
2. Limpe o aparelho com um pano húmido e um pouco de detergente.
3. No final, seque o aparelho com um pano limpo.
O QUE FAZER SE…
Problema Possível causa e solução
Não é possível ligar nem
operar o aparelho.
É emitido um
som com o
aparelho desligado.
Um som é
emitido 6 vezes, o aparelho desliga-
-se.
O indicador
de calor residual não se
acende.
A função de
aquecimento
automático
não é activada.
• O bloqueio ou o dispositivo de segurança para crianças entra em funcionamento
. Desligue a função. Consulte a secção "Bloquear/desbloquear o painel de co-
mando" e "Dispositivo de segurança para crianças".
•
STOP+GO entra em funcionamento
"Stop and go".
• Tocou em 2 ou mais campos de sensores em simultâneo. Toque apenas num
campo de sensores.
• Existe água ou manchas de gordura no painel de comando. Limpe o painel de
comando
• Ligue novamente o aparelho e defina o grau de cozedura em 10 segundos.
Cobriu um ou mais campos de sensores. Descubra os campos de sensores.
Cobriu um ou mais campos de sensores. Descubra os campos de sensores.
O foco não está quente porque apenas foi utilizado por pouco tempo. Se o foco
tiver de estar quente, contacte o serviço pós-venda.
•
Ainda existe calor residual no foco
• Está definida a regulação de temperatura máxima. A regulação de temperatura
máxima tem a mesma potência do que a função de aquecimento automático.
. Desligue a função. Consulte a secção
. Deixe o foco arrefecer
Page 27

Problema Possível causa e solução
É emitido um
som e o aparelho liga-se
e desliga-se
novamente.
Após 5 segundos, é
emitido outro
som.
Os campos de
sensores
aquecem.
O visor alterna entre duas
regulações de
temperatura.
acende-
-se.
acende-
-se.
É apresentado e um
número.
e
acendem-se.
acende-
-se
Cobriu . Destape o campo de sensores.
O tacho é grande demais ou colocou-o excessivamente perto dos comandos. Coloque as panelas nos focos traseiros, se necessário.
A gestão de energia reduz a potência deste foco. Utilize focos no outro lado.
• A desactivação automática é accionada. Desligue o aparelho e ligue-o novamente.
A protecção contra o sobreaquecimento do foco é accionada. Desligue o foco e ligue-o novamente.
• O tacho não é o correcto. Utilize um tacho correcto.
• Não existe qualquer tacho no foco. Coloque um tacho no foco.
• O diâmetro do fundo do tacho é demasiado pequeno para o foco. Utilize um tacho correcto.
Existe um erro no aparelho.
Desligue o aparelho da fonte de alimentação eléctrica durante algum tempo. Desli-
gue o fusível do sistema eléctrico doméstico. Volte a ligar. Se
mente, contacte o serviço pós-venda.
Presença de raios de luz demasiado intensos no painel de comando, por exemplo
luz solar forte. Escureça o painel de comando durante pouco tempo, por exemplo
com a mão. É emitido um som, o aparelho desliga-se. Ligue novamente o aparelho.
Existe um erro no aparelho, porque o tacho ferve até ficar sem água ou está a utilizar um tacho incorrecto. A protecção contra o sobreaquecimento do foco é accionada. A desactivação automática é accionada.
Desligue o aparelho. Retire o tacho quente. Após cerca de 30 segundos, ligue novamente o foco.
cer. Deixe arrefecer o tacho e verifique se é adequado na secção "Tachos para o
foco de indução".
deve desaparecer, o indicador de calor residual pode permane-
O que fazer se…
acender nova-
27
Se tiver experimentado as soluções acima indicadas e mesmo assim não for possível reparar
o problema, contacte o fornecedor ou o departamento de apoio ao cliente. Indique os dados
da placa de características, o código de três dígitos e letras da placa vitrocerâmica (no canto
da superfície de cozedura) e a mensagem de erro apresentada.
Se tiver utilizado o aparelho incorrectamente, a visita do técnico do serviço pós-venda ou
do fornecedor pode não ser gratuita, mesmo durante o período de garantia. As instruções
relativas ao serviço ao cliente e as condições da garantia encontram-se no folheto da garantia.
Page 28

28 Preocupações ambientais
PREOCUPAÇÕES AMBIENTAIS
O símbolo no produto ou na embalagem indica que este produto não pode ser tratado
como lixo doméstico. Em vez disso, deve ser entregue ao centro de recolha selectiva para a
reciclagem de equipamento eléctrico e electrónico. Ao garantir uma eliminação adequada
deste produto, irá ajudar a evitar eventuais consequências negativas para o meio ambiente
e para a saúde pública, que, de outra forma, poderiam ser provocadas por um tratamento
incorrecto do produto. Para obter informações mais pormenorizadas sobre a reciclagem
deste produto, contacte os serviços municipalizados locais, o centro de recolha selectiva da
sua área de residência ou o estabelecimento onde adquiriu o produto.
Material de embalagem
O material de embalagem é ecológico e pode ser reciclado. Os componentes de plástico são
identificados por marcas: >PE<,>PS<, etc. Elimine o material de embalagem como resíduo
doméstico nas instalações de eliminação de resíduos da sua zona.
Page 29

293031
Page 30

Page 31

Page 32

www.aeg-electrolux.com/shop
892934337-A-362010
 Loading...