

Page 1

FAVORIT 60660
User manual Dishwasher
Manual de instrucciones Lavavajillas
Kullanma Kılavuzu Bulaşık makinesi
Page 2
Contents
2
Thank you for choosing one of our high-quality products.
To ensure optimal and regular performance of your appliance please read this
instruction manual carefully. It will enable you to navigate all processes perfectly
and most efficiently. To refer to this manual any time you need to, we recommend
you to keep it in a safe plac e. An d p le as e pass it to any future owner of the appliance.
We wish you much joy with your new appliance.
Contents
Operating instructions 3
Safety information 3
Correct use 3
General safety 3
Child safety 3
Installation 4
Product description 5
Control panel 6
The digital display 7
Function buttons 7
Setting mode 7
First use 8
Set the water softener 8
Setting manually 8
Setting electronically 9
Use of dishwasher salt 9
Use of rinse aid 10
Adjusting the dosage of rinse aid 11
Daily use 11
Load cutlery and dishes 12
The lower basket 13
The cutlery basket 13
The upper basket 14
Adjusting the height of the upper basket
Use of detergent 16
Fill with detergent 16
Multi-tab function 17
Activation/deactivation of the Multitab
function 18
Washing programmes 19
Select and start a washing programme 20
Unloading the dishwasher 21
Care and cleaning 21
Cleaning the filters 21
Cleaning the spray arms 22
External cleaning 23
Internal cleaning 23
Prolonged periods of non-operation 23
Frost precautions 23
Moving the machine 23
What to do if… 23
Technical data 25
Hints for test institutes 25
Installation instructions 26
Installation 26
Fitting under a counter (kitchen worktop or
sink) 27
Levelling 27
Water connection 27
Water supply connections 27
Water inlet hose with safety valve 28
Water outlet hose connection 29
Electrical connection 30
15
Environment concerns 30
Packaging material 30
Subject to change without notice
Page 3

Safety information
Operating instructions
Safety information
In the interest of your safety and to ensure the correct use, before installing and first using
the appliance, read this user manual carefully, including its hints and warnings. To avoid
unnecessary mistakes and accidents, it is important to ensure that all people using the
appliance are thoroughly familiar with its operation and safety features. Save these instructions and make sure that they remain with the appliance if it is moved or sold, so that
everyone using it through its life will be properly informed on appliance use and safety.
Correct use
• This dishwasher is only intended for washing household utensils suitable for machine
washing.
• Do not put any solvents in the dishwasher. This could cause an explosion.
• Knives and other items with sharp points must be loaded in the cutlery basket with their
points down or placed in a horizontal position in the upper basket.
• Only use products (detergent, salt and rinse aid) suitable for dishwashers.
• Avoid opening the door whilst the appliance is in operation, hot steam may escape.
• Do not take any dishes out of the dishwasher before the end of the dishwashing cycle.
• After use, isolate the appliance from the power supply and turn off the water supply.
• This product should be serviced only by an authorised service engineer, and only genuine
spare parts should be used.
• Under no circumstances should you attempt to repair the machine yourself. Repairs
carried out by inexperienced persons will cause injury or serious malfunctioning. Contact
your local Service Force Centre. Always insist on genuine spare parts.
3
General safety
• Persons (including children) with reduced physical sensory, mental capabilities or lack
of experience and knowledge must not use the appliance. They must have supervision
or instruction for the operation of the appliance by a person responsible for their safety.
• Dishwasher detergents can cause chemical burns to eyes, mouth and throat. Could endanger life! Comply with the safety instructions of the dishwasher detergent manufacturer.
• Water in the dishwasher is not for drinking purposes. Detergent residue may still be
present in your machine.
• Ensure that the door of the dishwasher is always closed when it is not being loaded or
unloaded. In this way you will avoid anybody tripping over the open door and hurting
themselves.
• Do not sit or stand on the open door.
Child safety
• This appliance is designed to be operated by adults. Don’t allow children to use the
dishwasher unsupervised.
• Keep all packaging well away from children. There is risk of suffocation.
• Keep all detergents in a safe place out of children’s reach.
Page 4
Safety information
4
• Keep children well away from the dishwasher when the door is open.
Installation
• Check your dishwasher for any transport damage. Never connect a damaged machine.
If your dishwasher is damaged contact your supplier.
• All packaging must be removed before use.
• Any electrical and plumbing work required to install this appliance must be carried out
by a qualified and competent person.
• For safety reasons it is dangerous to alter the specifications or attempt to modify this
product in any way.
• Never use the dishwasher if the electrical supply cable and water hoses are damaged; or
if the control panel, work top or plinth area are damaged such that the inside of the
appliance is freely accessible. Contact your local Service Force centre, in order to avoid
hazard.
• All sides of the dishwasher must never be drilled to prevent damage to hydraulic and
electric components.
WARNING!
For electrical and water connection carefully follow the instructions given in specific paragraphs.
Page 5
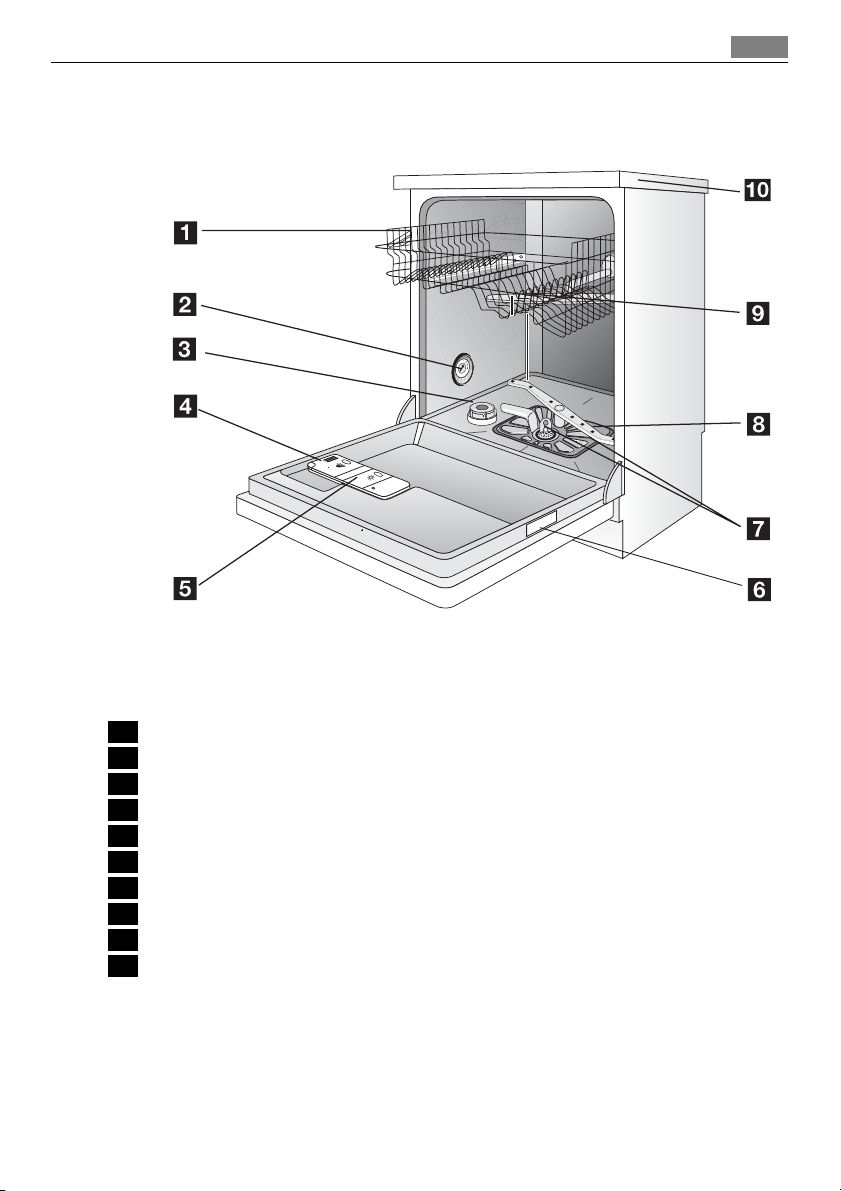
Product description
Product description
5
1 Upper basket
2 Water hardness dial
3 Salt container
4 Detergent dispenser
5 Rinse aid dispenser
6 Rating plate
7 Filters
8 Lower spray arm
9 Upper spray arm
10 Worktop
Page 6
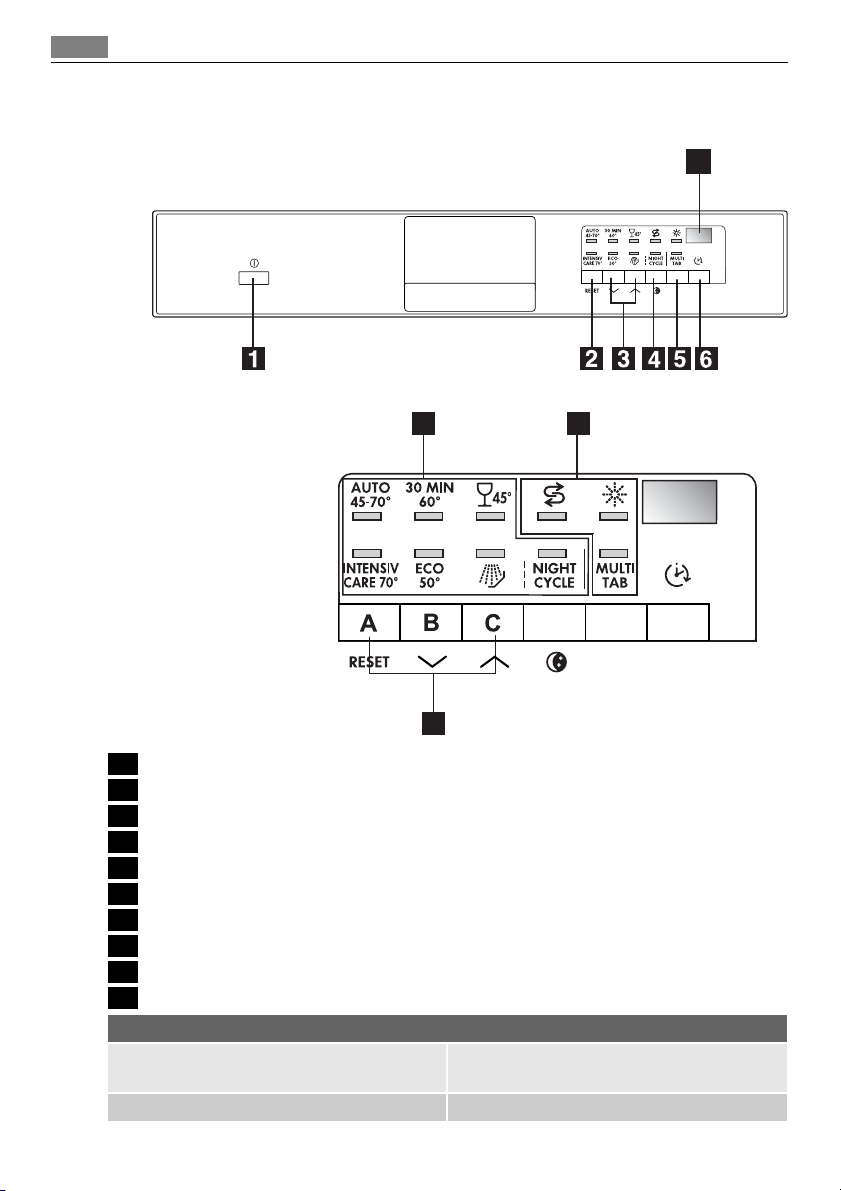
Control panel
6
Control panel
7
10
9
8
1 On/Off button
2 RESET button
3 Programme selection buttons
4 NIGHT CYCLE button
5 MULTITAB button
6 Delay start button
7 Digital display
8 Function buttons
9 Indicator lights
10 Programme lights
Indicator lights
MULTITAB Indicates the activation/deactivation of the
Salt
MULTITAB function (see MULTITAB function)
Illuminates when the special salt has run out.
1)
Page 7
Indicator lights
Control panel
7
Rinse aid
1) The salt and rinse aid indicator lights are never illuminated while a washing programme is running even if filling
with salt and/or rinse aid is necessary.
Illuminates when the rinse aid has run out.
The digital display
The digital display indicates:
• the level of hardness to which the water softener is set,
• the approximate remaining time of the running programme,
• activation/deactivation of the rinse aid dispenser (ONLY with Multitab function active),
• the end of a washing programme (a zero will appear in the digital display),
• the countdown of the delay start,
• fault codes concerning malfunction of the dishwasher.
NIGHT CYCLE button
Night Cycle is a silent washing programme that will not disturb you, even when you sleep.
It can be set at night or in times with a more economical power rate.
During the Night Cycle the pump runs at a very low speed to reach a noise level reduction
of 25% compared to the declaration programme. As a consequence, it has a very long
running time.
Function buttons
The following functions can be set with the help of these buttons:
• setting of the water softener,
• activation/deactivation of the rinse aid dispenser when Multitab function is active.
1)
Setting mode
The appliance is in setting mode when ALL programme lights are illuminated.
Always remember that when performing the following operations:
– selecting a washing programme,
– setting the water softener,
– activating/deactivating the rinse aid,
the appliance MUST be in setting mode.
If a programme light is illuminated, the last performed or selected programme is still set.
In this case, to return to setting mode, the programme has to be cancelled.
To cancel a set programme or a programme in progress
Press and hold the RESET button until all the programme lights illuminate. The programme
has been cancelled and the machine is now in setting mode.
Page 8

First use
8
First use
Before using your dishwasher for the first time:
• Ensure that the electrical and water connections comply with the installation instructions
• Remove all packaging from inside the appliance
• Set the water softener
• Pour 1 litre of water inside the salt container and then fill with dishwasher salt
• Fill the rinse aid dispenser
If you want to use combi detergent tablets such as: "3 in 1", "4 in 1", "5 in 1" etc... set the
Multitab function (see "Multitab function").
Set the water softener
The dishwasher is equipped with a water softener designed to remove minerals and salts
from the water supply, which would have a detrimental or adverse effect on the operation
of the appliance.
The higher the content of these minerals and salts, the harder your water is. Water hardness
is measured in equivalent scales, German degrees (°dH), French degrees (°TH) and mmol/l
(millimol per litre - international unit for the hardness of water).
The softener should be adjusted according to the hardness of the water in your area. Your
local Water Authority can advise you on the hardness of the water in your area.
The water softener must be set in both ways: manually, using the water hardness dial and
electronically.
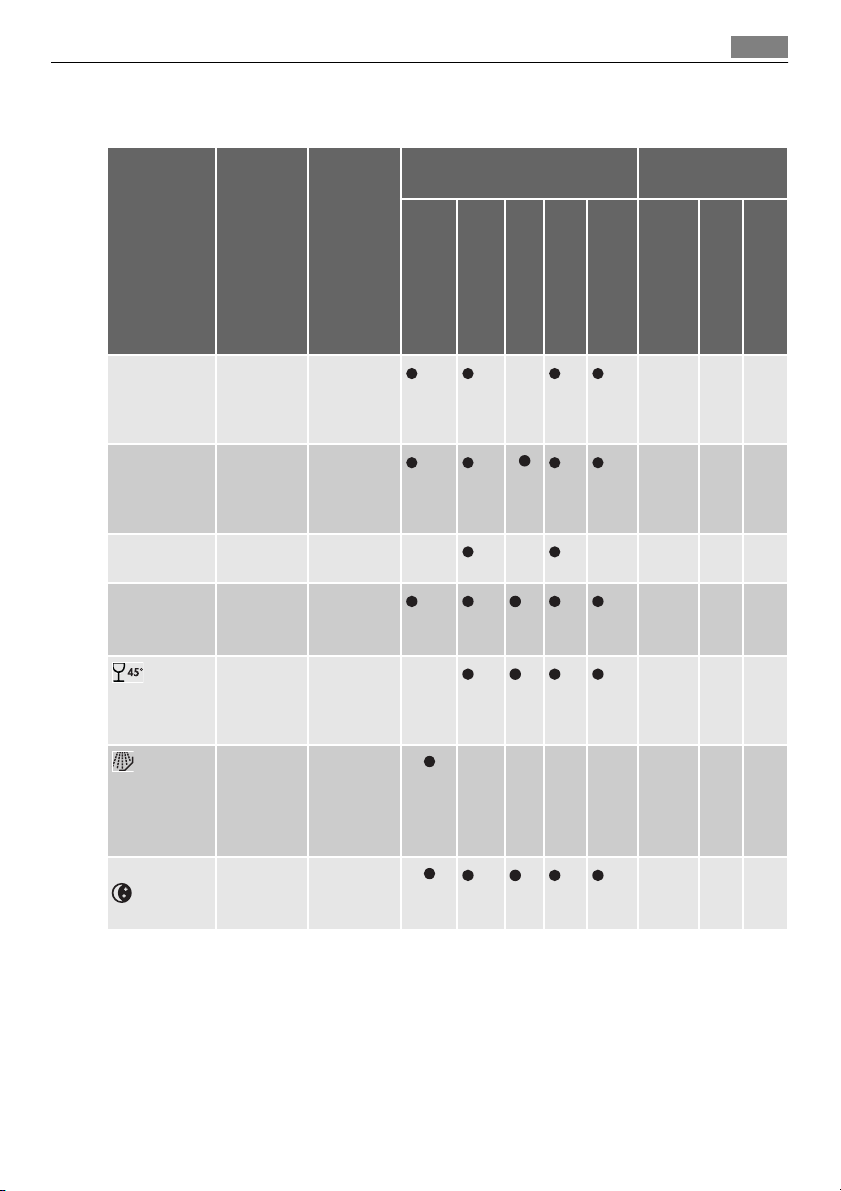
Water hardness Adjusting the water hardness
°dH °TH mmol/l manually electronically
51 - 70 91 - 125 9,1 - 12,5 2 level 10 yes
43 - 50 76 - 90 7,6 - 8,9 2 level 9 yes
37 - 42 65 - 75 6,5 - 7,5 2 level 8 yes
29 - 36 51 - 64 5,1 - 6,4 2 level 7 yes
23 - 28 40 - 50 4,0 - 5,0 2 level 6 yes
19 - 22 33 - 39 3,3 - 3,9 2 level 5 yes
15 - 18 26 - 32 2,6 - 3,2 1 level 4 yes
11 - 14 19 - 25 1,9 - 2,5 1 level 3 yes
4 - 10 7 - 18 0,7 - 1,8 1 level 2 yes
< 4 < 7 < 0,7 1 level 1 no
setting
Use of salt
Setting manually
The dishwasher is factory set at position 2.
Page 9
Use of dishwasher salt
1. Open the dishwasher door.
2. Remove the lower basket from the dishwasher.
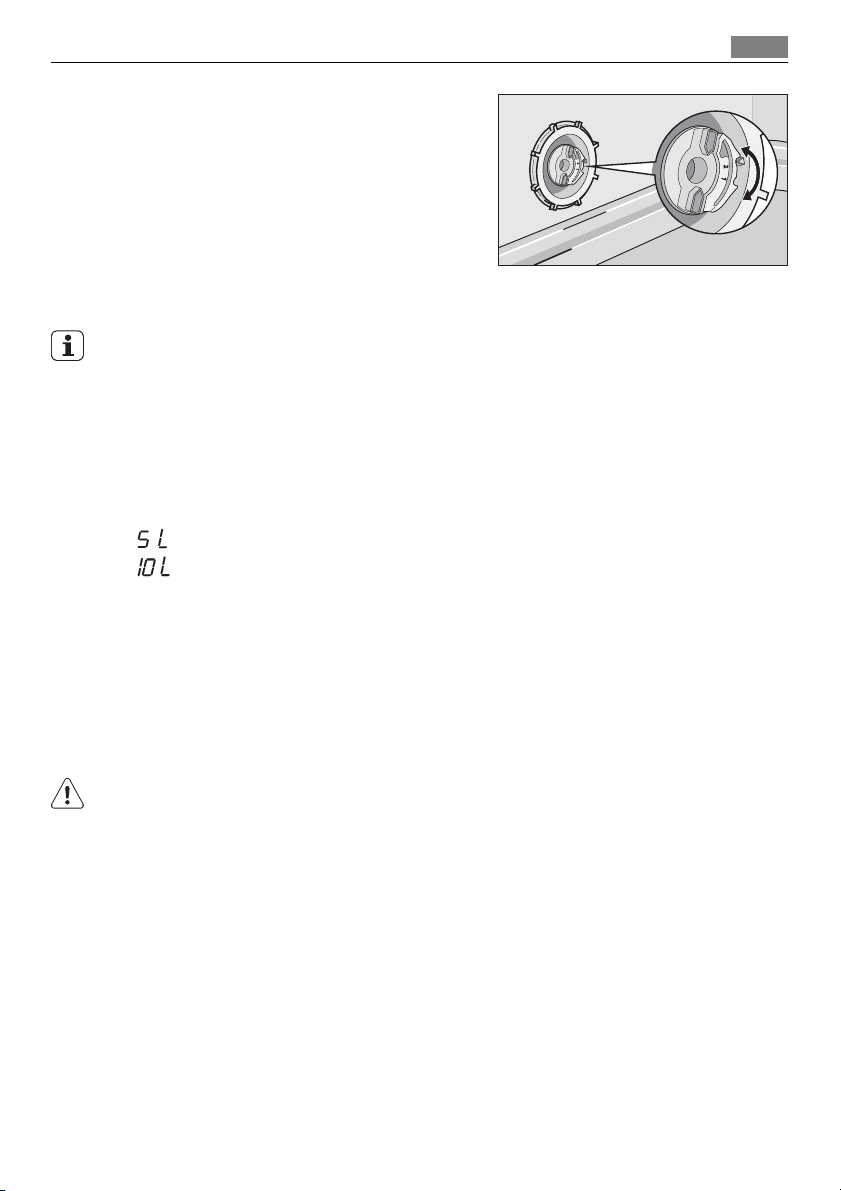
3. Turn the water hardness dial to position 1
or 2 (see table).
4. Replace the lower basket.
Setting electronically
The dishwasher is factory set at level 5.
1. Press the On/Off button. The dishwasher must be in setting mode.
2.
Press simultaneously and keep pressed buttons B and C, until the lights of buttons A,
B and C start flashing.
3.
Press button A, the lights of buttons B and C turn off while the light of button A goes
on flashing. In the digital display is visible the current level.
Examples:
displayed = level 5
displayed = level 10
4.
To change the level, press button A. Each time the button is pressed the level changes
(for the selection of the new level see the chart).
Examples: if the current level is 5, by pressing button A once, level 6 is selected. if the
current level is 10, by pressing button A once, level 1 is selected.
5. To memorise the operation, switch off the dishwasher by pressing the On/Off button.
9
Use of dishwasher salt
WARNING!
Only use salt specifically designed for use in dishwashers. All other types of salt not specifically designed for use in a dishwasher, especially table salt, will damage the water softener. Only fill with salt just before starting one of the complete washing programmes. This
will prevent any grains of salt or salty water, which may have been spilt, remaining on the
bottom of the machine for any period of time, which may cause corrosion.
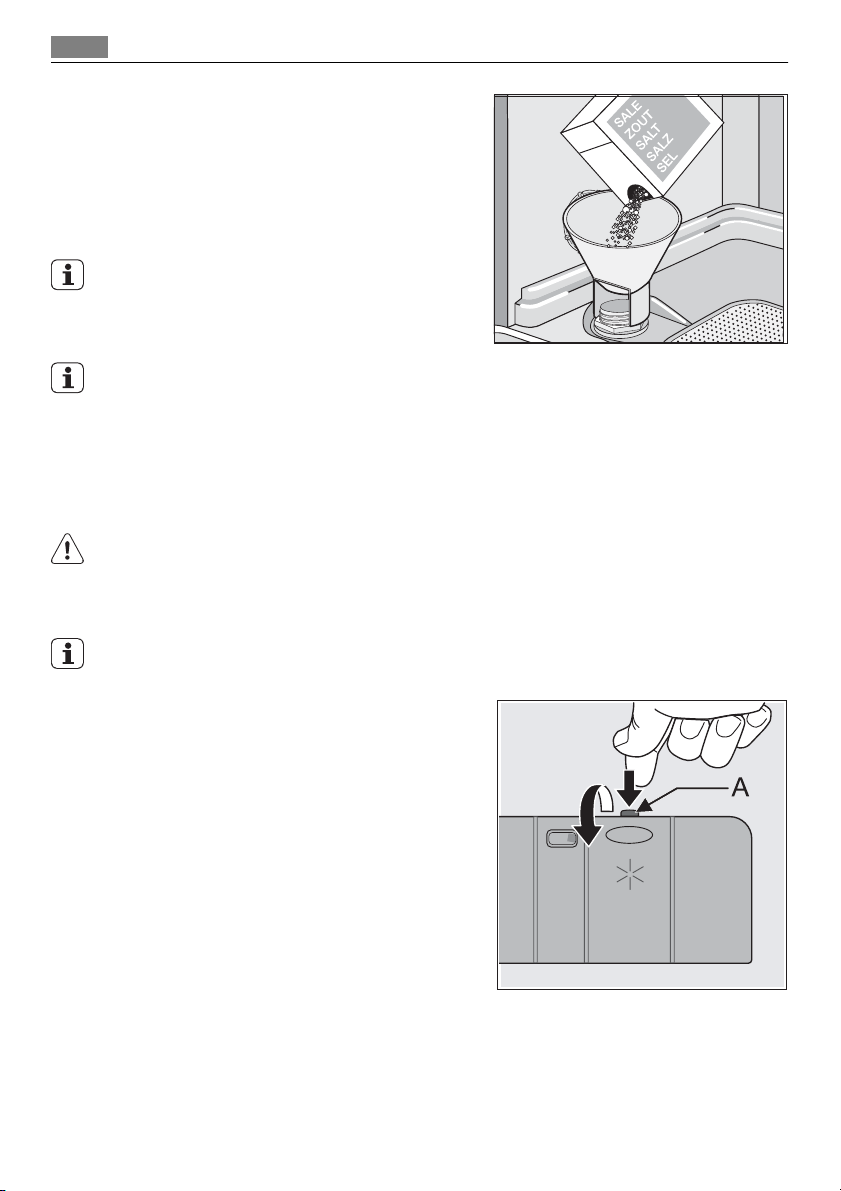
To fill:
1. Open the door, remove the lower basket and unscrew the cap of the salt container by
turning it anticlockwise.
2.
Pour 1 litre of water inside the container (this is necessary only before filling with
salt for the first time) .
Page 10
Use of rinse aid
10
3. Using the funnel provided, pour in the salt
until the container is full.
4. Replace the cap making sure that there is
no trace of salt on the screw thread or on
the gasket.
5. Replace the cap tightly turning it clockwise until it stops with a click.
Do not worry if water overflows from the unit
when filling with salt, this is quite normal.
The salt indicator light on the control panel can remain illuminated for 2-6 hours after the
salt has been replenished, assuming the dishwasher remains switched on. If you are using
salts that take longer to dissolve then this can take longer. The function of the machine is
not affected.
Use of rinse aid
WARNING!
Only use branded rinse aid for dishwashers.
Never fill the rinse aid dispenser with any other substances (e.g. dishwasher cleaning agent,
liquid detergent). This would damage the appliance.
Rinse aid ensures thorough rinsing, and spot and streak free drying.
Rinse aid is automatically added during the last rinse.
1. Open the container by pressing the release
button (A).
Page 11
Daily use
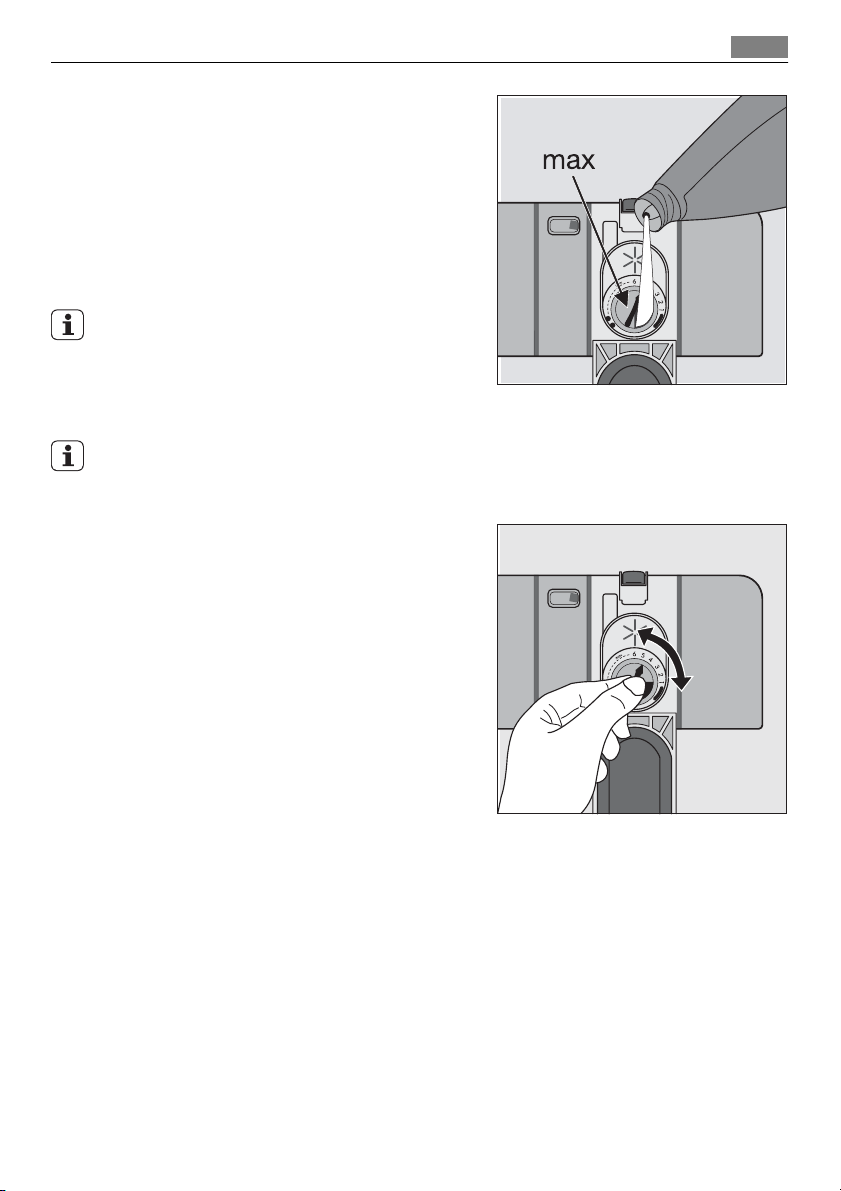
2. Add the rinse aid in the container. The
maximum level for filling is indicated by
"max".
The dispenser holds about 110 ml of rinse
aid, which is sufficient for between 16 and
40 dishwashing cycles, depending upon
the dosage setting.
3. Ensure that the lid is closed after every refill.
Clean up any rinse aid spilt during filling with
an absorbent cloth to avoid excess foaming
during the next wash.
Adjusting the dosage of rinse aid
According to the finish and drying results obtained, adjust the dose of rinse aid by means
of the 6 position selector (position 1= minimum dosage, position 6= maximum dosage).
The dose is factory set in position 4.
Increase the dose if there are drops of water or lime
spots on the dishes after washing.
Reduce it if there are sticky whitish streaks on the
dishes or a bluish film on glassware or knife blades.
11
Daily use
• Check if it's necessary to refill with dishwasher salt or rinse aid.
• Load cutlery and dishes into the dishwasher.
• Fill with dishwasher detergent.
• Select a wash programme suitable for the cutlery and dishes.
• Start the wash programme.
Page 12

Load cutlery and dishes
12
Load cutlery and dishes
Sponges, household cloths and any object that can absorb water may not be washed in the
dishwasher.
• Before loading the dishes, you should:
– Remove all left over food and debris.
– Soften remnants of burnt food in pans
• When loading the dishes and cutlery, please note:
– Dishes and cutlery must not impede the rotation of the spray arms.
– Load hollow items such as cups, glasses, pans, etc. with the opening downwards so
that water cannot collect in the container or a deep base.
– Dishes and items of cutlery must not lie inside one another, or cover each other.
– To avoid damage to glasses, they must not touch.
– Lay small objects in the cutlery basket.
• Plastic items and pans with non stick coatings have a tendency to retain water drops;
these items will not dry as well as porcelain and steel items.
• Light items (plastic bowls etc.) must be loaded in the upper basket and arranged so they
do not move.
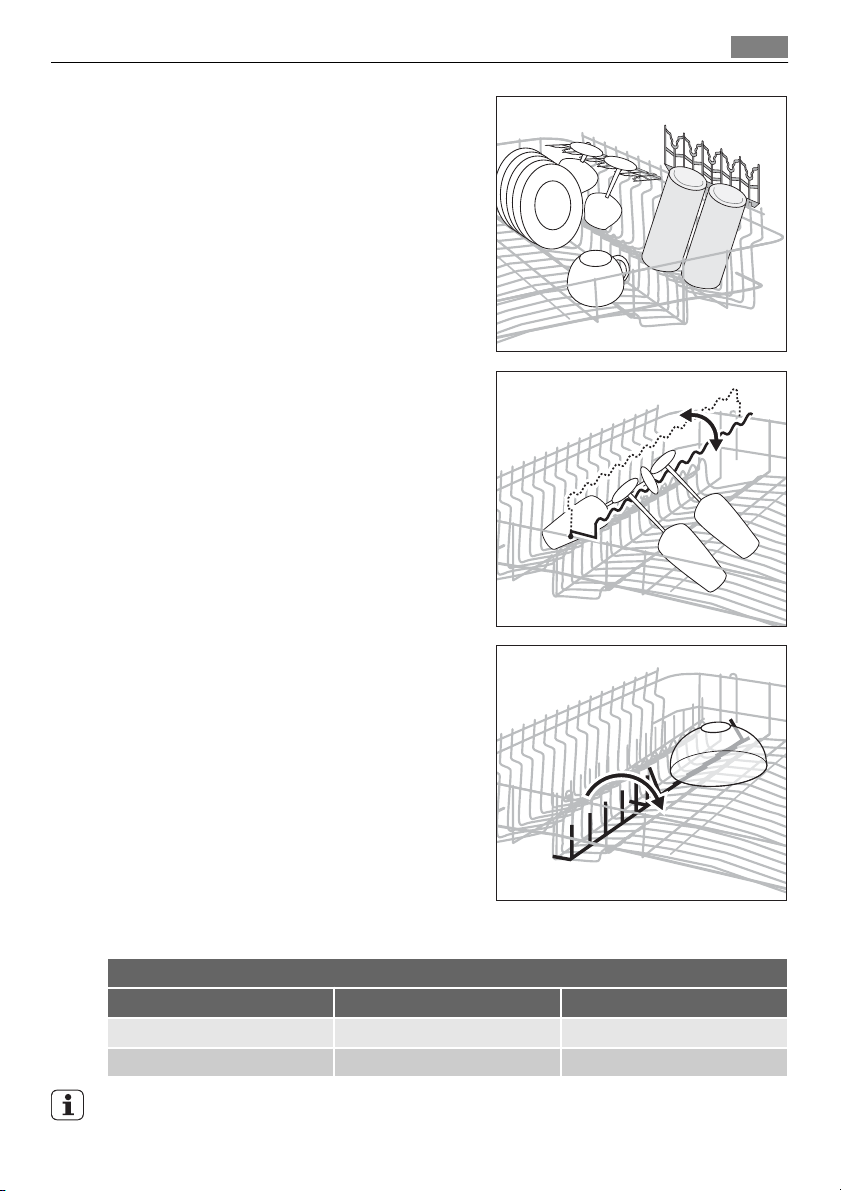
For washing in the dishwasher the following cutlery and dishes
are not suitable: are of limited suitability:
• Cutlery with wooden, horn, china or motherof-pearls handles.
• Plastic items that are not heat resistant.
• Older cutlery with glued parts that are not
temperature resistant.
• Bonded cutlery items or dishes.
• Pewter or copper items.
• Lead crystal glass.
• Steel items prone to rusting.
• Wooden platters.
• Items made from synthetics fibres.
Open the door and slide out the baskets to load the dishes.
• Only wash stoneware in the dishwasher if it
is specially marked as being dishwasher-safe
by the manufacturer.
• Glazed patterns may fade if machine washed
frequently.
• Silver and aluminium parts have a tendency
to discolour during washing: Residues, e.g.
egg white, egg yolk and mustard often cause
discolouring and staining on silver. Therefore
always clean left-overs from silver immediately, if it is not to be washed straight after
use.
Page 13

The lower basket
Load larger and heavily soiled dishes and pans in
the lower basket.
To make it easier to load larger dishes, the 2 plate
racks on the right in the lower basket can be folded
down.
Load cutlery and dishes
13
The cutlery basket
WARNING!
Long bladed knives stored in an upright position are a potential hazard. Long and/or sharp
items of cutlery such as carving knives must be positioned horizontally in the upper basket.
Take care when loading or unloading sharp items such as knives.
To ensure that all items of cutlery in the cutlery basket can be reached by the water, you
should:
Page 14
Load cutlery and dishes
14
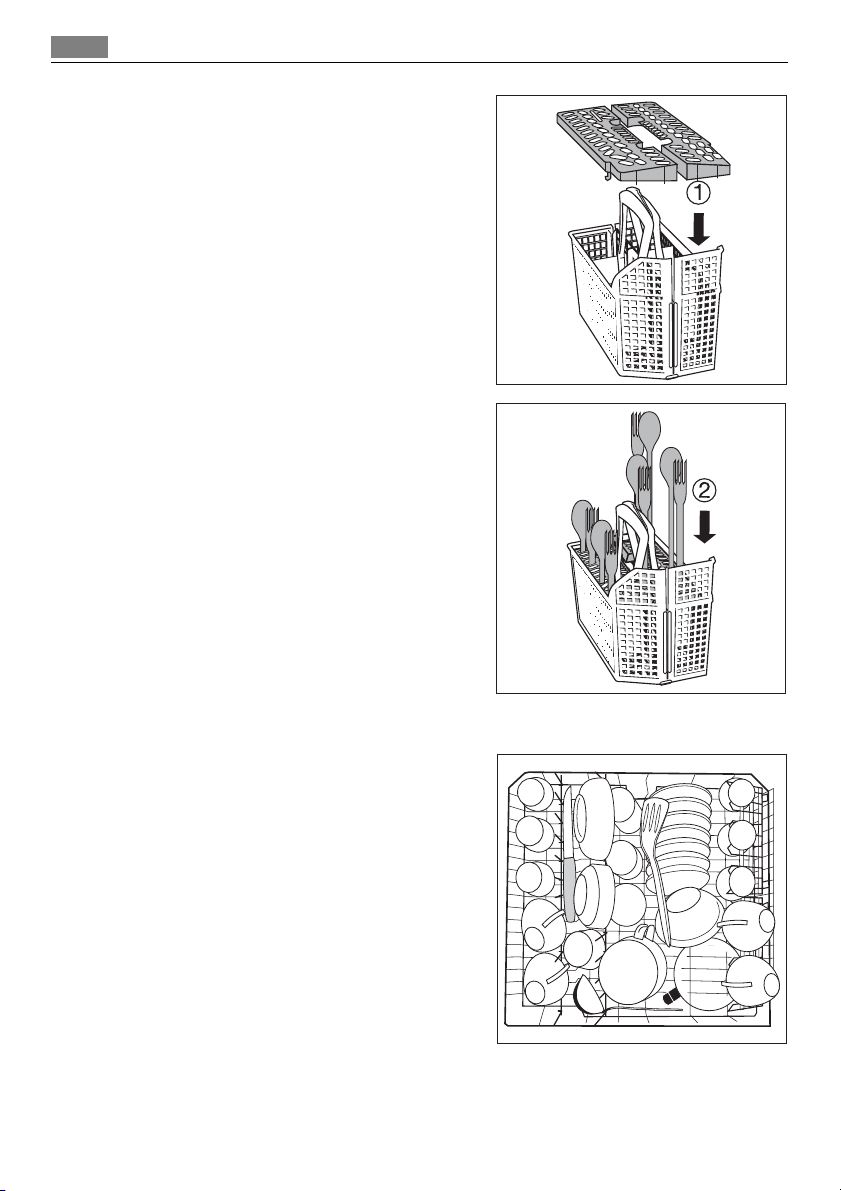
1. Place the grid insert on the cutlery basket.
2. Place forks and spoon in the cutlery basket
with their handles pointing downwards.
For larger utensils, such as whisks, leave off
one half of the cutlery grid.
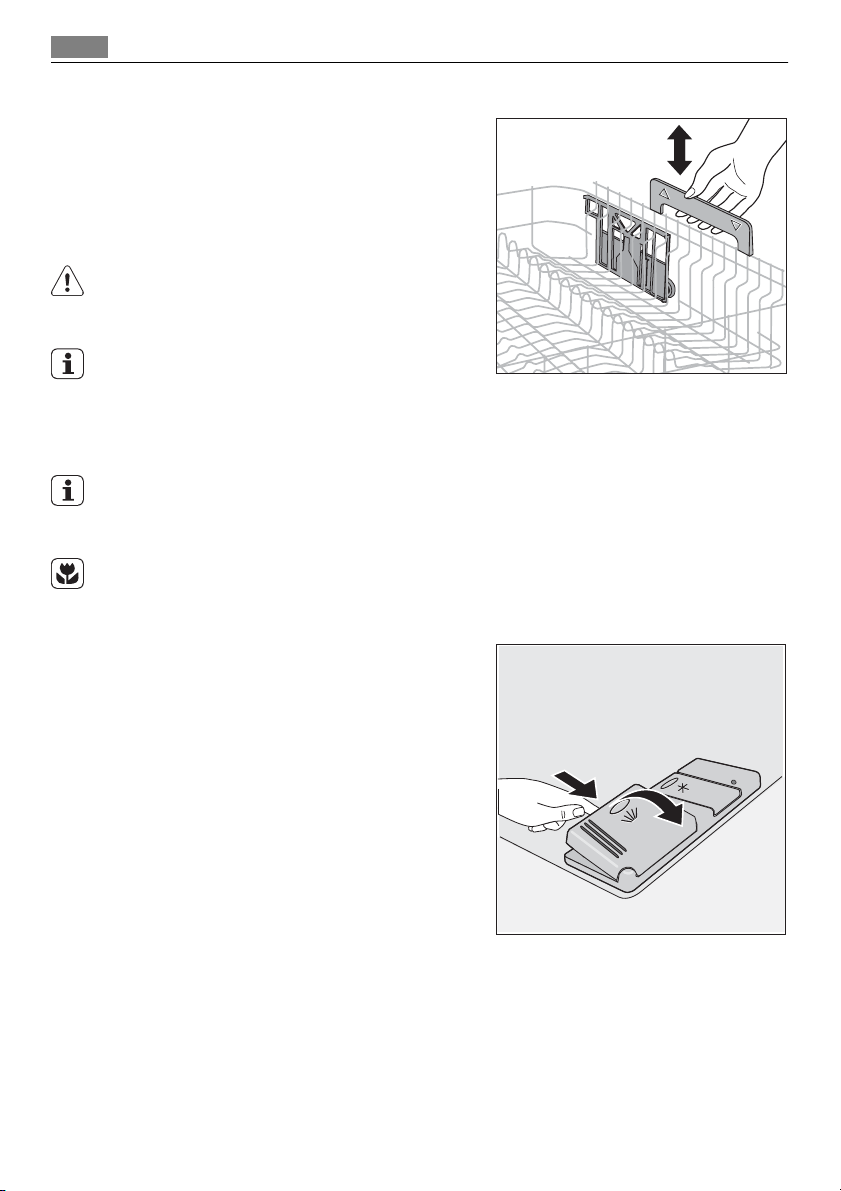
The upper basket
Load smaller, fragile crockery and long, sharp cutlery in the upper basket.
• Arrange items of crockery on and under the
folding cup racks so that they are offset from
each other and water can reach all items.
Page 15
• The cup racks can be folded up out of the way
for tall crockery items.
• Lay or hang wine and brandy glasses in the
slots in the cup racks.
• For glasses with long stems, fold the glass
rack to the right, otherwise fold it away to
the left.
Load cutlery and dishes
15
• The row of spikes on the left of the upper
basket is also in two parts and can be folded
away.
Spikes not folded away: place glasses, mugs
etc. in the upper basket.
Spikes folded away: more room for serving
dishes.
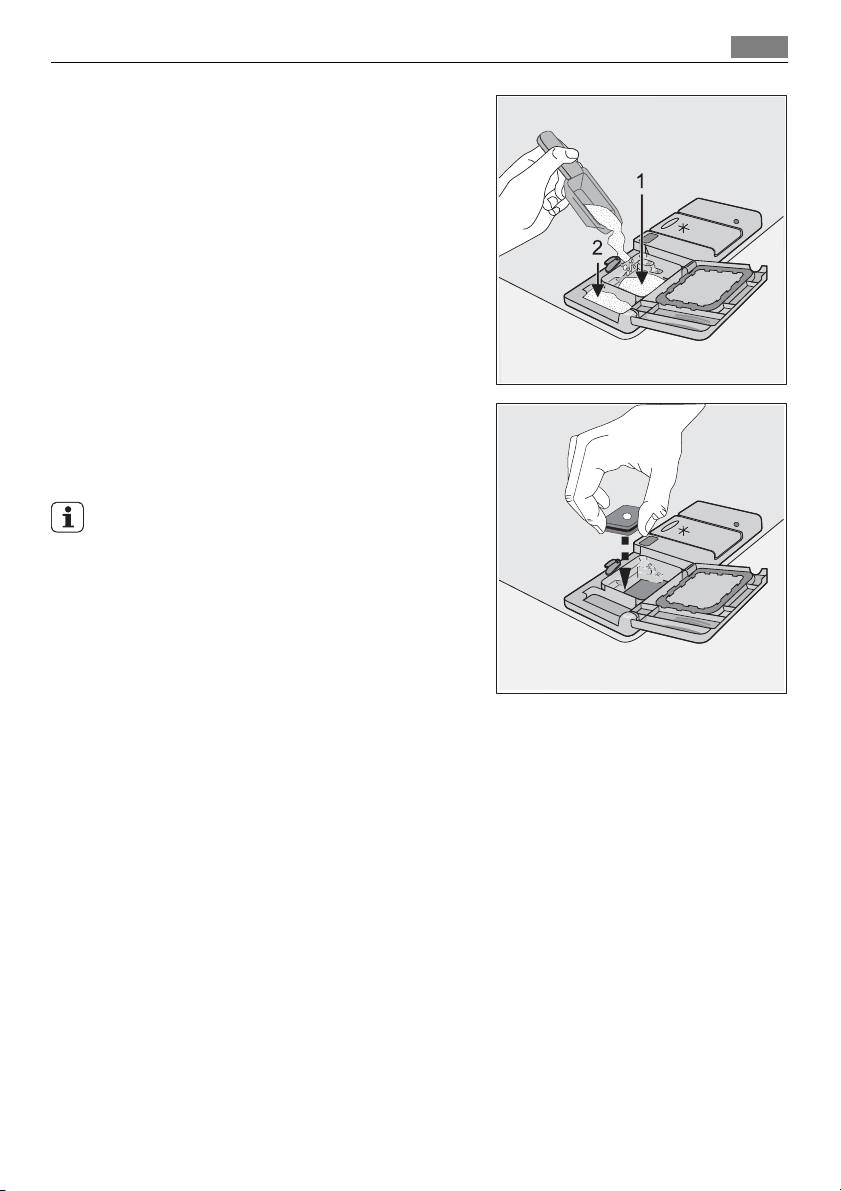
Adjusting the height of the upper basket
Maximum height of the dishes in:
the upper basket the lower basket
With upper basket raised 22 cm 30 cm
With upper basket lowered 24 cm 29 cm
The height of the upper basket can also be adjusted when it is loaded.
Page 16
Use of detergent
16
Raising / lowering the upper basket:
1. Pull out the upper basket completely.
2. Holding the upper basket by the handle,
raise it as far as it will go and then lower
it vertically.
The upper basket will latch into the lower
or the upper position.
WARNING!
After loading your machine always close the
door, as an open door can be a hazard.
Before closing the door, ensure that the spray
arms can rotate freely.
Use of detergent
Only use detergents specifically designed for use in dishwashers.
Please observe the manufacturer's dosing and storage recommendations as stated on the
detergent packaging.
Using no more than the correct amount of detergent contributes to reducing pollution.
Fill with detergent
1. Open the lid.
Page 17
2. Fill the detergent dispenser (1) with detergent. The marking indicates the dosing
levels:
20 = approximately 20 g of detergent
30 = approximately 30 g of detergent.
3. All programmes with prewash need an additional detergent dose (5/10 g) that must
be placed in the prewash detergent chamber (2).
This detergent will take effect during the
prewash phase.
4. When using detergent tablets, place the
tablet in compartment (1)
5. Close the lid and press until it locks in
place.
Detergent tablets
Detergent tablets from different manufactures dissolve at different rates. For this reason,
some detergent tablets do not attain their full
cleaning power during short washing programmes. Therefore, please use long washing
programmes when using detergent tablets, to
ensure the complete removal of detergent residuals.
Multi-tab function
17
Multi-tab function
This appliance is equipped with the "Multitab function", that allows the use of the "Multitab"
combi detergent tablets.
These products are detergents with a combined cleaning, rinsing and salt functions. They
can also contain other different agents depending on which kind of tablets you choose ("3
in 1", "4 in 1", "5 in 1" etc...).
Check whether these detergents are suitable for your water hardness. See the manufacturers instructions.
This function can be selected with all washing programmes. With the selection of this
function the inflow of rinse aid and salt from each respective supply container is automatically deactivated and also the indicator lights for salt and rinse aid are deactivated.
Select the "Multitab function " before the start of a washing programme.
Once this function is selected (indicator light illuminated) it will remain active also for the
following washing programmes.
With the use of the "Multitab function", the cycle durations may change. In this case, in
the digital display, the indication of the running time of the programme is automatically
updated.
Page 18
Multi-tab function
18
Once the programme is running, the "Multitab function " can NO longer be changed. If you
want to exclude the "Multitab function " you have to cancel the programme setting and
then deactivate the "Multitab function ".
In this case you have to set a washing programme (and desired options) again.
Activation/deactivation of the Multitab function
Press the Multitab button: the corresponding indicator light illuminates. This means that
the function is active.
To deactivate the function press the Multitab button again: the indicator light turns off.
If the drying results are not satisfactory we suggest that you:
1. Fill up the rinse aid dispenser with rinse aid.
2. Activate the rinse aid dispenser.
3. Set the rinse aid dosage to position 2.
• The activation/deactivation of the rinse aid dispenser can only be possible with the
"Multitab function" active.
Activation/deactivation of the rinse aid dispenser
1. Press the On/Off button. The dishwasher must be in setting mode.
2.
Press simultaneously buttons B and C, until the lights of buttons A , B, and C start
flashing.
3.
Press button B, the lights of buttons A and C turn off while the light of button B goes
on flashing. The digital display indicates the current setting:
= Rinse aid dispenser deactivated.
= Rinse aid dispenser activated.
4.
To change the setting, press button B again, the digital display indicates the new setting.
5. To memorise the operation, switch off the dishwasher by pressing the On/Off button.
If you decide to turn back to the use of standard detergent system we advise that you:
1. Deactivate the "Multitab function".
2. Fill up the salt container and the rinse aid dispenser again.
3. Adjust the water hardness setting to the highest setting and perform 1 normal washing
programme without loading any dishes.
4. Adjust the water hardness setting according to the hardness of the water in your area.
5. Adjust the rinse aid dosage.
Page 19
Washing programmes
Washing programmes
19
Programme Degree of
soil
AUTO
45-70°
3)
Mixed normal and
heavy soil
INTENSIV
Heavy soil Crockery,
CARE 70°
Type of
load
Crockery,
cutlery,
pots and
pans
cutlery,
pots and
Programme description Consumption val-
1)
ues
2)
Main wash
Prewash
Intermediate rinse
Final rinse
Drying
Duration (minutes)
Energy (kWh)
-
1/2x
1,1 - 1,7
-
1,5 -1,7
Water (litres)
12 - 23
16 - 18
pans
30 MIN 60°
5)
ECO 50°
4)
Light soil Crockery
Normal
soil
Normal
soil
and cutlery
Crockery
and cutlery
Delicate
crockery
and glass-
-
9
0,9
-
12 - 13
1,0 - 1,1
-
14 - 15
0,8 -0,9
ware
Any Partial load
(to be com-
0,1
4
pleted later
in the
6)
day)
NIGHT CYCLE Normal
soil
1) The consumption values are intended as a guide and depends on the pressure and the temperature of the water
and also by the variations of the power supply and the amount of dishes.
2) The digital display shows the programme duration.
3) During the Auto washing programme the amount of soil on the dishes is determined by how cloudy the water
is. The programme duration, water and energy consumption levels can vary; this depends upon if the appliance
is fully or partially loaded and if the dishes are lightly or heavily soiled. The temperature of the water is
automatically adjusted between 45° C and 70° C.
4) Ideal for washing a partially loaded dishwasher. This is the perfect daily programme, made to meet the needs
of a family of 4 persons who only wish to load breakfast and dinner crockery and cutlery.
5) Test programme for test institutes.
6) This programme does not require the use of detergent
Crockery
and cutlery
-
13 - 14
1.1 - 1.3
Page 20
Select and start a washing programme
20
Select and start a washing programme
Select the washing programme and delay start with the door slightly opened. The
start of the programme or the countdown of the delay start will occur only after
the closure of the door. Until then it is possible to modify the settings.
1. Check that the baskets have been loaded correctly and that the spray arms are free to
rotate.
2. Check that the water tap is opened.
3. Press the On/Off button. The dishwasher must be in setting mode.
4. Press one of the two programme buttons to select a washing programme. (see "Washing
programmes" chart).
When a programme is selected the corresponding programme light illuminates and the
programme time flashes on the digital display.
If you want to set the NIGHT CYCLE programme, press the NIGHT CYCLE button, the
corresponding indicator light comes on.
5. Close the dishwasher door, the programme starts automatically.
Setting and starting the programme with delay start
1. After having selected the washing programme, press the delay start button until the
number of hours for the delay start appear in the digital display. The start of the selected
washing programme can be delayed for between 1 and 19 hours.
2. Close the dishwasher door, the countdown starts automatically.
3. The countdown will decrease with steps of 1 hour.
4. The opening of the door will interrupt the countdown. Close the door; the countdown
will continue from the point at which it was interrupted.
5. Once the delay start has elapsed the programme will start automatically.
The selection of the washing programme and delay start can also occur with the door closed.
Keep in mind that in this way, once a washing programme button is pressed you have
ONLY 3 seconds in which you can choose another programme or select a delay start, after
which the selected programme will start automatically.
WARNING!
Interrupt or cancel a washing programme in progress ONLY if it’s absolutely necessary. Attention! Hot steam may escape when the door is opened. Open the door
carefully.
Cancelling a delay start or a washing programme in progress
• Press the RESET button until all the programme lights will illuminate.
• Cancelling a delay start involves also the cancelling of the washing programme set. In
this case you have to set the washing programme again.
• If a new washing programme is to be selected, check that there is detergent in the
detergent dispenser.
Page 21
Unloading the dishwasher
Interrupt a washing programme in progress
• Open the dishwasher door; the programme will stop. Close the door; the programme will
start from the point at which it was interrupted.
• Press the On/Off button, all lights will turn off. Press the On/Off button again; the pro-
gramme will start from the point at which it was interrupted.
End of the washing programme
• The dishwasher will automatically stop and an audible signal informs you of the end of
the washing programme.
• The light of the programme just ended will remain on.
• In the digital display appears a zero.
1. Switch off the dishwasher by pressing the On/Off button.
It is recommended to switch off the appliance once the washing programme has ended. If
this is not done, automatically after about 3 minutes from the end of the programme, all
indicator lights will go off. The digital display shows 1 horizontal bar.
This will help to reduce the consumption of energy when you forget or for any reason
cannot switch the appliance off once the programme has ended.
Press any button (except On/Off) and the control panel will show the same situation (indicator lights and digital display) as when the programme ended.
2. Open the dishwasher's door, leave it ajar and wait a few minutes before removing the
dishes; in this way they will be cooler and the drying will be improved.
Unloading the dishwasher
21
• Hot dishes are sensitive to knocks.
The dishes should therefore be allowed to cool down before removing from the appliance.
• Empty the lower basket first and then the upper one; this will avoid water dripping from
the upper basket onto the dishes in the lower one.
• Water may appear on the sides and the door of the dishwasher as the stainless steel will
eventually become cooler than the dishes.
CAUTION!
When the washing programme has finished, it is recommended that the dishwasher is
unplugged and the water tap turned off.
Care and cleaning
Cleaning the filters
The filters must be checked and cleaned from time to time. Dirty filters will degrade the
washing result.
WARNING!
Before cleaning the filters ensure that the machine is switched off.
1. Open the door, remove the lower basket.
Page 22
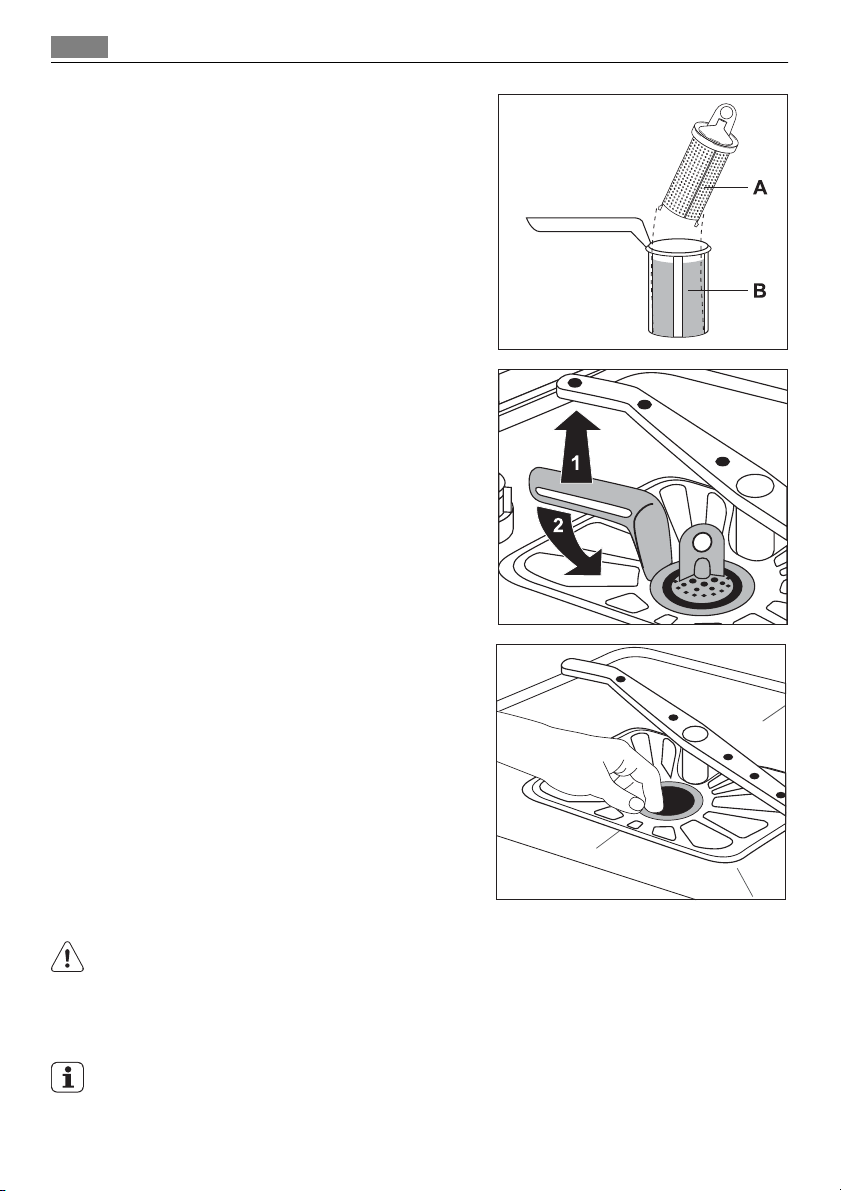
Care and cleaning
22
2. The dishwasher filter system comprises a
coarse filter (A), a microfilter (B) and a flat
filter. Unlock the filter system using the
handle on the microfilter, and remove the
filter system.
3. Turn the handle about 1/4 a turn anti-
clockwise and remove the filter system.
4.
Take hold of the coarse filter (A) by the
handle with the hole and remove from the
microfilter (B).
5. Clean all filters thoroughly under running
water.
6. Remove the flat filter from the base of the
washing compartment and clean both
faces thoroughly.
7. Put the flat filter back in the base of the
washing compartment and ensure that it
fits perfectly.
8.
Place the coarse filter (A) in the microfilter
(B) and press together.
9. Put the filter combination in place and
lock by turning the handle clockwise to the
stop. During this process ensure that the
flat filter does not protrude above the base
of the washing compartment.
WARNING!
NEVER use the dishwasher without filters. Incorrect repositioning and fitting of the filters
will produce poor washing results and may result in damage to the appliance.
Cleaning the spray arms
NEVER try to remove the spray arms.
Page 23

What to do if…
If residues of soil have clogged the holes in the spray arms, remove them with a cocktail
stick.
External cleaning
Clean the external surfaces of the machine and control panel with a damp soft cloth. If
necessary use only neutral detergents. Never use abrasive products, scouring pads or solvent
(acetone, trichloroethylene etc....).
Internal cleaning
Ensure that the seals around the door, the detergent and rinse aid dispensers are cleaned
regularly with a damp cloth.
We recommend every 3 months to run the wash programme for heavy soiled dishes using
detergent but without dishes.
Prolonged periods of non-operation
If you are not using the machine for any prolonged period of time you are advised to:
1. Unplug the appliance and then turn off the water.
2. Leave the door ajar to prevent the formation of any unpleasant smells.
3. Leave the inside of the machine clean.
Frost precautions
Avoid placing the machine in a location where the temperature is below 0°C. If this is
unavoidable, empty the machine, close the appliance door, disconnect the water inlet pipe
and empty it.
23
Moving the machine
If you have to move the machine (moving house etc....):
1. Unplug it.
2. Turn the water tap off.
3. Remove the water inlet and discharge hoses.
4. Pull the machine out together with the hoses.
Avoid over tilting the machine during transportation.
What to do if…
The dishwasher will not start or stops during operation. Certain problems are due to the
lack of simple maintenance or oversights, which can be solved with the help of the indications described in the chart, without calling out an engineer.
Switch off the dishwasher and carry out the following suggested corrective actions.
Fault code and malfunction Possible cause and solution
• continuous flashing of the light of the running programme
•
appears in the digital display.
• intermitted audible signal
The dishwasher does not fill with water.
• The water tap is blocked or furred with limescale.
Clean the water tap.
• The water tap is turned off. Turn the water tap
on.
Page 24
What to do if…
24
Fault code and malfunction Possible cause and solution
• The filter (where present) in the threaded hose
fitting at the water inlet valve is blocked.
Clean the filter in the threaded hose.
• The water inlet hose has not been correctly
laid or it is bent or squashed.
Check the water inlet hose connection.
• continuous flashing of the light of the running programme
•
appears in the digital display.
• intermitted audible signal
The dishwasher will not drain.
• continuous flashing of the light of the running programme
•
appears in the digital display.
• intermitted audible signal
Anti-flood device is activated.
The programme does not start. • The dishwasher’s door has not been properly
• The sink spigot is blocked.
Clean out the sink spigot.
• The water drain hose has not been correctly
laid or it is bent or squashed.
Check the water drain hose connection.
• Close the water tap and contact your local
Service Force Centre.
closed. Close the door.
• The main plug is not plugged in. Insert the
main plug.
• The fuse has blown out in the household fuse
box.
Replace the fuse.
• Delay start has been set.
If dishes are to be washed immediately, cancel
the delay start.
Once these checks have been carried out, switch on the appliance: the programme will
continue from the point at which it was interrupted.
If the malfunction or fault code reappears contact the Service Force Centre.
For other fault codes not described in the above chart, please contact your local Service
Force Centre, quoting the model (Mod.), product number (PNC) and serial number (S.N.).
This information can be found on the rating plate located on the side of the dishwasher
door.
So that you always have these numbers at hand, we recommend you to make a note of
them here:
Mod. : . . . . . . . . . . . . . . . . . . . . . . .
PNC :. . . . . . . . . . . . . . . . . . . . . . . .
S.N. : . . . . . . . . . . . . . . . . . . . . . . . .
The wash results are not satisfactory
The dishes are not clean • The wrong washing programme has been se-
lected.
• The dishes are arranged in such a way as to
stop water reaching all parts of the surface.
The baskets must not be overloaded.
Page 25

Technical data
The wash results are not satisfactory
• The spray arms do not rotate freely due to
incorrect arrangement of the load.
• The filters in the base of the washing compartment are dirty or incorrectly positioned.
• Too little or no detergent has been used.
• Where there are limescales deposits on the
dishes; the salt container is empty or the incorrect level of the water softener has been
set.
• The drain hose connection is not correct.
• The salt container cap is not properly closed.
The dishes are wet and dull • Rinse aid was not used.
There are streaks, milky spots or a bluish coating
on glasses and dishes
Water drops have dried onto glasses and dishes • Increase rinse aid dosing.
• The rinse aid dispenser is empty.
• Decrease rinse aid dosing.
• The detergent may be the cause. Contact the
detergent manufacturer’s consumer care line.
If after all these checks, the problem persists, contact your local Service Force Centre.
Technical data
25
Dimension Width - height - depth (cm) 60 x 85 x 63,5
Electrical connection - Voltage
- Overall power - Fuse
Water supply pressure Minimum - Maximum (MPa) 0,05 - 0,8
Capacity Place settings 12
Information on the electrical connection is given on the rating
plate on the inner edge of the dishwasher's door
Hints for test institutes
Testing in accordance with EN 60704 must be carried out with appliance fully loaded and
using the test programme (see "Washing programmes").
Test in accordance with EN 50242 must be carried out when the salt container and rinse
aid dispenser have been filled with salt and rinse aid respectively and using the test programme (see "Washing programmes").
Full load: 12 standard place settings
Amount of detergent required: 5 g + 25 g (Type B)
Rinse aid setting: position 4 (Type III)
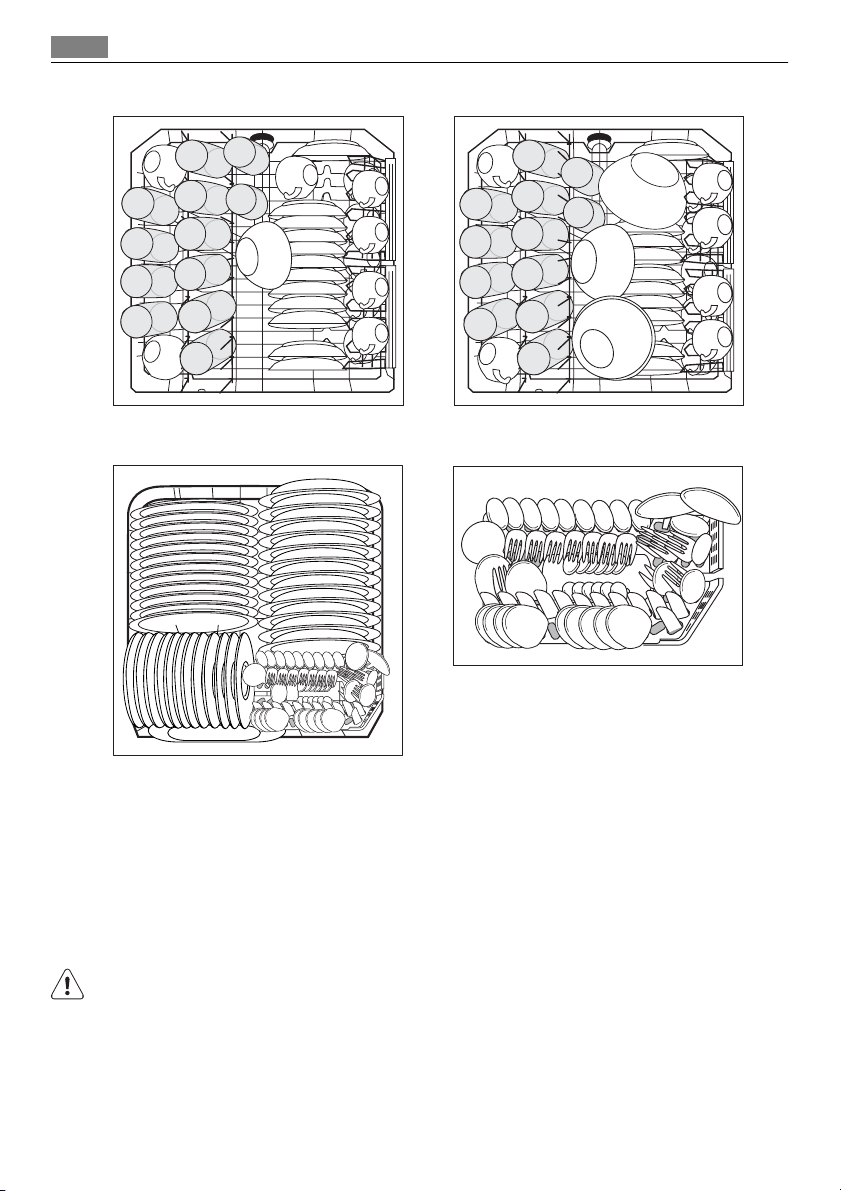
Example loading arrangements:
Upper basket
1)
Page 26
Installation
26
Lower basket with cutlery basket Cutlery basket
1) If there are cup racks in place on the lefthand side or the cutlery tray is in place, remove them.
Installation instructions
Installation
WARNING!
Any electrical and/or plumbing work required to install this appliance should be carried out
by a qualified electrician and/or plumber or competent person.
Remove all packaging before positioning the machine.
If possible, position the machine next to a water tap and a drain.
Page 27
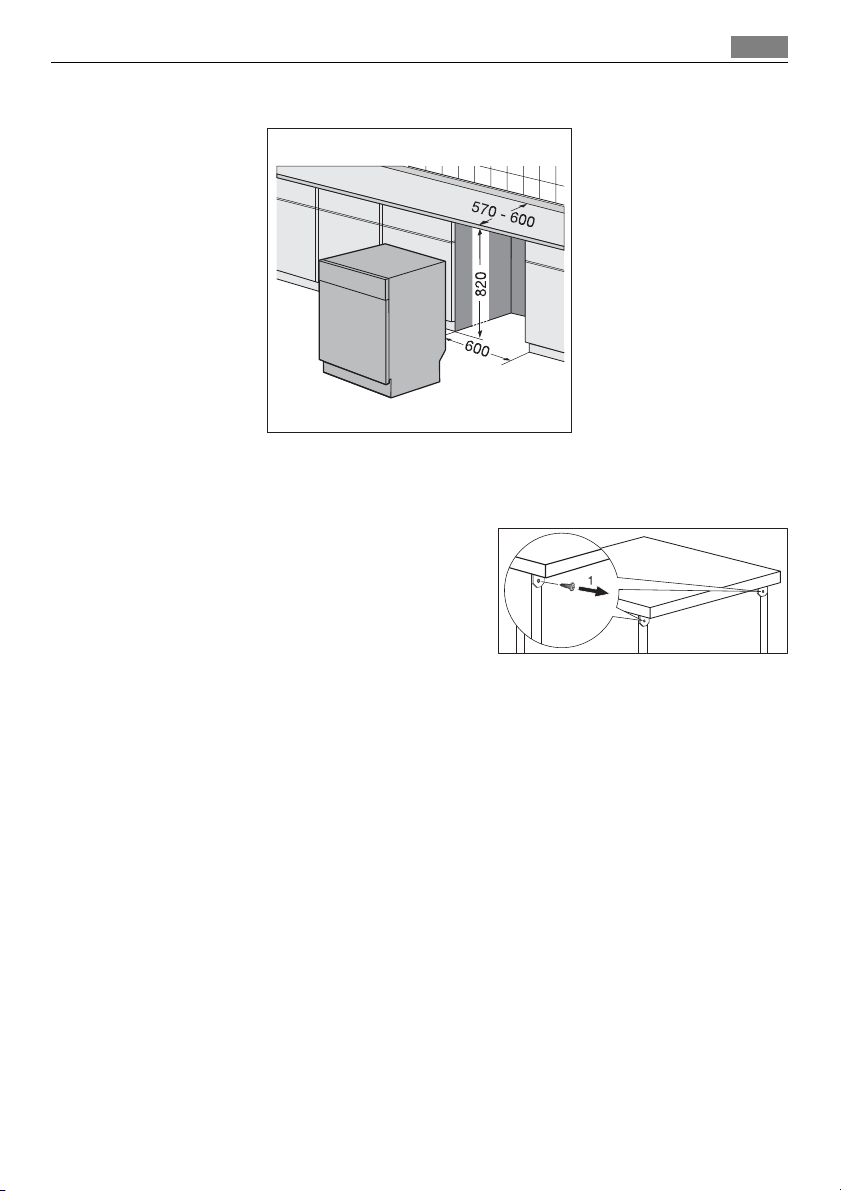
Water connection
Fitting under a counter (kitchen worktop or sink)
By removing the machine's worktop, you can install it under a close fitting sink unit or a
pre-existing top, providing the dimensions of the recess correspond to those shown in the
picture.
Proceed as follows:
1. Remove the machine's worktop by unscrewing the two rear retaining screws,
pull the worktop from the back of the machine and slide out the front slots, lifting
the worktop.
2. Insert the machine after adjusting the levelling with the adjustable feet.
When inserting the machine, ensure that the water inlet and drain hoses are not kinked or
squashed.
During all operations that involve accessibility to internal components the dishwasher has
to be unplugged.
Be sure that once the appliance has been installed, it is easily accessible for the service
engineer in the event that a repair is required.
If the dishwasher is later used as a free-standing appliance, the original worktop must be
re-mounted.
The plinth on free-standing appliances is not adjustable.
27
Levelling
Good levelling is essential for correct closure and sealing of the door. When the appliance
is correctly levelled, the door will not catch on either side of the cabinet. If the door does
not close correctly, loosen or tighten the adjustable feet until the machine is perfectly level.
Water connection
Water supply connections
This appliance can be connected to either a hot (max. 60°) or cold water supply.
Page 28
Water connection
28
With a hot water supply you can have a significant reduction of energy consumption. This
however, depends on how the hot water is produced. (We suggest alternative sources of
energy that are more environmentally friendly as e.g. solar or photovoltaic panels and
aeolian).
For making the connection itself, the coupling nut fitted to the machine's supply hose is
designed to screw onto a 3/4" gas thread spout or to a purpose made quick-coupling tap
such as the Press-block.
The water pressure must be within the limits given in the "Technical specifications". Your
local Water Authority will advise you on the average mains pressure in your area.
The water inlet hose must not be kinked, crushed, or entangled when it is being connected.
The dishwasher features fill and drain hoses which can be turned either to the left or the
right to suit the installation by means of the locknut.
The locknut must be correctly fitted to avoid water leaks.
(Attention! NOT all models of dishwashers have fill and drain hoses provided with locknut.
In this case, this kind of facility is not possible). If the machine is connected to new pipes
or pipes which have not been used for a long time, you should run the water for a few
minutes before connecting the inlet hose.
DO NOT use connection hoses which have previously been used for an old appliance.
This appliance has been fitted with safety features which will prevent the water used in
the appliance from returning back into the drinking water system. This appliance complies
with the applicable plumbing regulations.
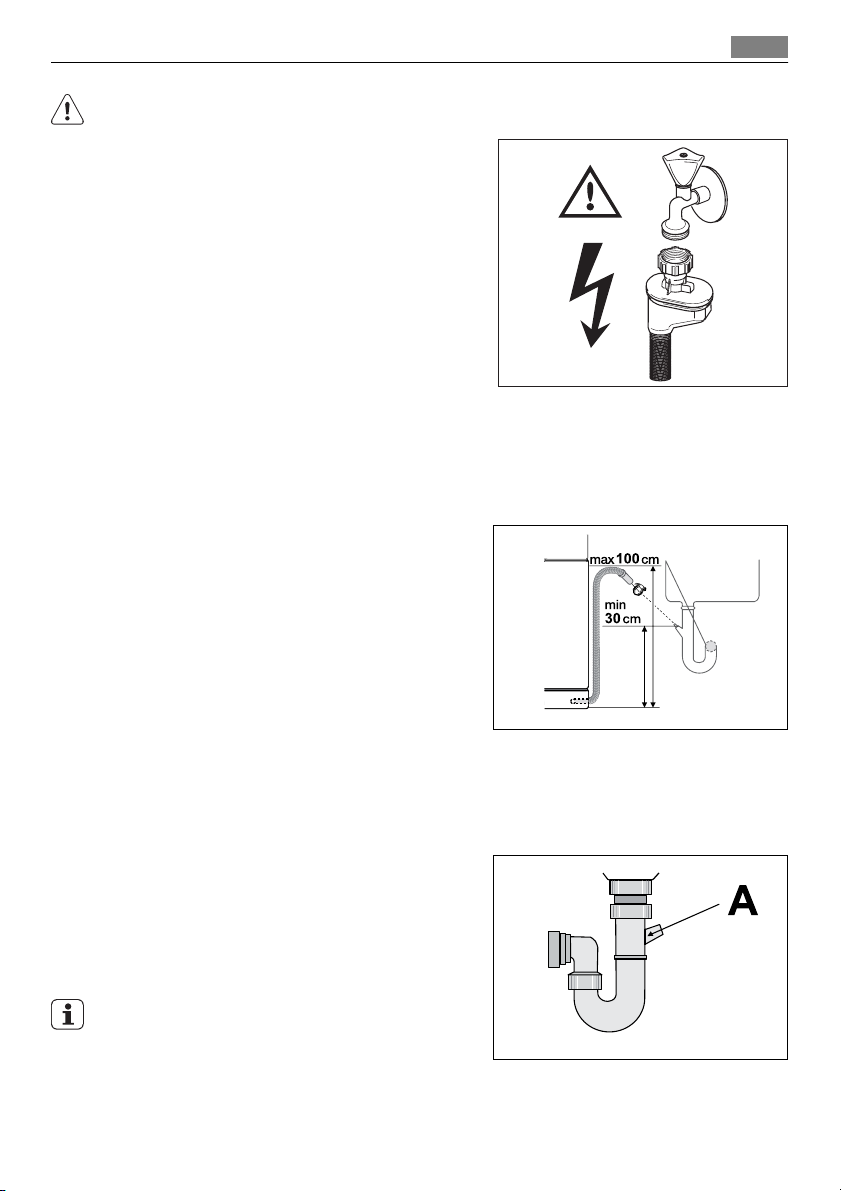
Water inlet hose with safety valve
After connecting the double-walled water inlet hose, the safety valve is next to the tap.
Therefore the water inlet hose is only under pressure while the water is running. If the
water inlet hose starts to leak during this operation, the safety valve cuts off the running
water.
Please take care when installing the water inlet hose:
• The electrical cable for the safety valve is in the double-walled water inlet hose. Do not
immerse the water inlet hose or the safety valve in water.
• If water inlet hose or the safety valve is damaged, remove the mains plug immediately.
• A water inlet hose with safety valve must only be replaced by a specialist or by the Service
Force Centre.
Page 29
Water connection
WARNING!
Warning! Dangerous voltage.
Water outlet hose connection
The end of the drain hose can be connected in the following ways:
1. To the sink outlet spigot, securing it to the underside of the work surface. This will
prevent waste water from the sink running into the machine.
2. To a stand pipe provided with vent-hole, minimum internal diameter 4 cm.
The waste connection must be at a height of between 30 cm (minimum) and 100 cm (maximum)
from the bottom of the dishwasher.
The drain hose can face either to the right or left
of the dishwasher.
Ensure the hose is not bent or squashed as this
could prevent or slow down the discharge of water.
The sink plug must not be in place when the machine is draining as this could cause the water to
syphon back into the machine.
If you use a drain hose extension it must be no longer than 2 metres and its internal diameter
must be no smaller than the diameter of the hose provided.
Likewise the internal diameter of the couplings used for connections to the waste outlet
must be no smaller than the diameter of the hose provided.
When connecting the drain hose to an under sink
trap spigot, the entire plastic membrane (A)
must be removed. Failure to remove all the membrane will result in food particles building up over
time eventually blocking the dishwasher drain
hose spigot.
Our appliances are supplied with a security device
to protect against the return of dirty water back
into the machine. If the spigot of your sink has a
"no return valve" incorporated this can prevent
the correct draining of your dishwasher. We therefore advise you to remove it.
29
Page 30

Electrical connection
30
To avoid water leakage after installation make sure that the water couplings are tight.
Electrical connection
WARNING!
Safety standards require the appliance to be earthed.
Prior to using the appliance for the first time, ensure that the rated voltage and type of
supply on the rating plate match that of the supply where the appliance is to be installed.
The fuse rating is also to be found on the rating plate.
Always plug the mains plug into a correctly installed shockproof socket. Multi-way plugs,
connectors and extension cables must not be used.
This could constitute a fire hazard through overheating.
If necessary, have the domestic wiring system socket replaced. In case that the electrical
cable has to be replaced, contact your local Service Force centre.
The plug must be accessible after the appliance has been installed.
Never unplug the appliance by pulling on the cable. Always pull the plug.
The manufacturer accepts no liability for failure to observe the above safety precautions.
Environment concerns
The symbol on the product or on its packaging indicates that this product may not be
treated as household waste. Instead it should be taken to the appropriate collection point
for the recycling of electrical and electronic equipment. By ensuring this product is disposed
of correctly, you will help prevent potential negative consequences for the environment
and human health, which could otherwise be caused by inappropriate waste handling of
this product. For more detailed information about recycling of this product, please contact
your local council, your household waste disposal service or the shop where you purchased
the product.
Packaging material
The packaging materials are environmentally friendly and can be recycled. The plastic components are identified by markings, e.g. >PE<, >PS<, etc. Please dispose of the packaging
materials in the appropriate container at the community waste disposal facilities.
WARNING!
When a unit is no longer being used:
• Pull the plug out of the socket.
• Cut off the cable and plug and dispose of them.
• Dispose of the door catch. This prevents children from trapping themselves inside and
endangering their lives.
Page 31

Índice de materias
Gracias por elegir uno de nuestros productos de alta calidad.
Si quiere asegurarse de que el electrodoméstico funcione de forma óptima y
continua, lea el manual de instrucciones atentamente. Las instrucciones que
contiene le permitirán realizar todos los procesos con la máxima perfección y
eficacia. Es aconsejable que guarde este manual en un lugar seguro para que pueda
consultarlo siempre que lo necesite. Y no olvide entregárselo al futuro propietario
del electrodoméstico.
Esperamos que disfrute de su nuevo electrodoméstico.
Índice de materias
31
Instrucciones de uso 32
Información sobre seguridad 32
Uso correcto 32
Instrucciones generales de seguridad 32
Seguridad de los niños 32
Instalación 33
Descripción del producto 34
Panel de mandos 35
Visor digital 36
Teclas de función 36
Modo de ajuste 36
Primer uso 37
Ajuste del descalcificador de agua 37
Ajuste manual 38
Ajuste electrónico 38
Uso de sal para lavavajillas 39
Uso de abrillantador 39
Ajuste de la cantidad de abrillantador 40
Uso diario 41
Carga de cubiertos y vajilla 41
Cesto inferior 42
El cesto para cubiertos 43
El cesto superior 44
Ajuste de la altura del cesto superior 45
Uso de detergente 45
Carga de detergente 46
Función Multitab 47
Activation/deactivation of the Multitab
function 47
Programas de lavado 48
Selección e inicio del programa de lavado
49
Descarga del lavavajillas 51
Mantenimiento y limpieza 51
Limpieza de los filtros 51
Limpieza de los brazos aspersores 52
Limpieza del exterior 52
Limpieza interna 52
Periodos prolongados sin funcionamiento
53
Precauciones en caso de congelación 53
Desplazamiento de la máquina 53
Qué hacer si… 53
Datos técnicos 55
Consejos para los institutos de pruebas 55
Instrucciones de instalación 56
Instalación 56
Instalación debajo de una encimera (plano
de trabajo de la cocina o sumidero) 57
Nivelación 57
Conexión de agua 58
Conexiones del suministro de agua 58
Tubo de carga de agua con válvula de
seguridad 58
Conexión del tubo de salida de agua 59
Conexión eléctrica 60
Aspectos medioambientales 60
Materiales de embalaje 60
Salvo modificaciones
117964450-00-102008
Page 32

Información sobre seguridad
32
Instrucciones de uso
Información sobre seguridad
Por su seguridad y para garantizar el funcionamiento correcto del lavavajillas, antes de
instalarlo y utilizarlo por primera vez lea atentamente este manual del usuario, incluidos
los consejos y advertencias. Para evitar errores y accidentes, es importante que todas las
personas que utilicen el aparato estén perfectamente al tanto de su funcionamiento y de
las características de seguridad. Conserve estas instrucciones y no olvide mantenerlas junto
al aparato en caso de su desplazamiento o venta para que quienes lo utilicen a lo largo de
su vida útil dispongan siempre de la información adecuada sobre el uso y la seguridad.
Uso correcto
• Este lavavajillas está destinado exclusivamente al lavado de utensilios del hogar aptos
para el lavado a máquina.
• No introduzca disolventes en el lavavajillas. Existe riesgo de explosión.
• Los cuchillos y otros objetos con puntas afiladas deben colocarse en el cesto para cubiertos con la punta hacia abajo, o en posición horizontal en el cesto superior.
• Utilice exclusivamente productos (detergente, sal y abrillantador) adecuados para lavavajillas.
• No abra la puerta con el aparato en funcionamiento, ya que puede producirse la salida
de vapor caliente.
• No retire platos del lavavajillas antes de que finalice el ciclo de lavado.
• Después del usar el aparato, desconecte la alimentación eléctrica y cierre el suministro
de agua.
• Este producto debe ser reparado por un técnico de servicio autorizado, y sólo se deben
utilizar piezas de recambio originales.
• Nunca intente reparar la máquina personalmente. Las reparaciones realizadas por personal sin experiencia pueden provocar lesiones personales o desperfectos graves. Póngase en contacto con el Centro de servicio técnico. Solicite siempre piezas de recambio
originales.
Instrucciones generales de seguridad
• Los detergentes del lavavajillas pueden provocar quemaduras de origen químico en ojos,
boca y garganta. ¡Pueden representar un riesgo para la vida! Cumpla las instrucciones
de seguridad respecto al detergente para lavavajillas suministradas por el fabricante.
• El agua del lavavajillas no es apta para el consumo humano. Podría haber restos de
detergente en la máquina.
• Cerciórese de que la puerta del lavavajillas esté siempre cerrada cuando no se realicen
operaciones de carga o descarga. De ese modo evitará que alguien tropiece con la puerta
abierta y se haga daño.
• No se siente ni se ponga de pie sobre la puerta abierta.
Seguridad de los niños
• Este aparato está diseñado para ser utilizado por adultos. No permita que los niños
utilicen el lavavajillas sin supervisión.
Page 33

Información sobre seguridad
• Mantenga los materiales de embalaje alejados de los niños. Existe riesgo de asfixia.
• Mantenga los detergentes en un lugar seguro y fuera del alcance de los niños.
• Mantenga a los niños alejados del lavavajillas cuando la puerta se encuentre abierta.
Instalación
• Compruebe si el lavavajillas ha sufrido daños durante el transporte. Nunca se debe conectar una máquina dañada. Si el lavavajillas está dañado, comuníquelo al distribuidor.
• Es necesario retirar todo el material de embalaje antes del uso.
• Cualquier tarea eléctrica o de fontanería que requiera la instalación de este aparato debe
estar a cargo de un profesional cualificado.
• Por razones de seguridad, es peligroso alterar las especificaciones o intentar modificar
este producto en modo alguno.
• En ningún caso debe utilizar el lavavajillas si observa deterioro en el cable de alimentación
eléctrica o los tubos de agua; o si el panel de mandos, la superficie superior o la zona de
peana presentan daños, de modo que pudiera accederse fácilmente al interior del aparato. Para evitar riesgos, póngase en contacto con el Centro de servicio técnico.
• Nunca debe perforar los laterales del lavavajillas, pues podrían producirse daños en los
componentes hidráulicos y eléctricos.
ADVERTENCIA
Al realizar las conexiones eléctricas y de agua, siga atentamente las instrucciones suministradas en los párrafos específicos.
33
Page 34

Descripción del producto
34
Descripción del producto
1 Cesto superior
2 Selección del ajuste de dureza del agua
3 Recipiente de sal
4 Distribuidor de detergente
5 Distribuidor de abrillantador
6 Placa de datos técnicos
7 Filtros
8 Brazo aspersor inferior
9 Brazo aspersor superior
10 Plano de trabajo
Page 35

Panel de mandos
Panel de mandos
7
35
10
9
8
1 Tecla de encendido/apagado
2 RESET Tecla
3 Teclas de selección de programa
4 NIGHT CYCLE Tecla
5 MULTITAB Tecla
6 Tecla de inicio diferido
7 Visor digital
8 Teclas de función
9 Indicadores luminosos
10 Indicadores luminosos del programa
Indicadores luminosos
MULTITAB Indica la activación/desactivación de la función
Sal Se ilumina cuando la sal especial se ha acabado.
MULTITAB (consulte "función MULTITAB")
1)
Page 36

Panel de mandos
36
Indicadores luminosos
Abrillantador
1) Los indicadores luminosos de sal y abrillantador nunca se encienden con un programa de lavado en marcha,
aunque sea necesario añadir sal o abrillantador.
Se enciende al agotarse el abrillantador.
Visor digital
Señala lo siguiente:
• nivel de dureza ajustado para el descalcificador de agua,
• tiempo aproximado que falta para que finalice el programa,
• activación/desactivación del distribuidor de abrillantador (SÓLO cuando está activa la
"función Multitab "),
• final del programa de lavado (en el visor digital aparece un valor cero),
• cuenta atrás para el inicio diferido,
• códigos de avería relacionados con fallos del lavavajillas.
NIGHT CYCLE Tecla
Night Cycle es un programa de lavado silencioso que no le molestará ni siquiera cuando
esté durmiendo. Se puede seleccionar por la noche o en horas del día con un precio energético más económico.
Durante el Night Cycle, la bomba funciona a una velocidad muy baja para lograr una reducción del nivel acústico del 25% respecto al programa determinado. Por tanto, el tiempo
de duración del programa es muy largo.
Teclas de función
Permiten elegir las siguientes funciones:
• ajuste del descalcificador de agua,
• activación/desactivación del distribuidor de abrillantador cuando está activa la función
Multitab.
1)
Modo de ajuste
El aparato se encuentra en modo de ajuste cuando TODOS los indicadores de programa
están encendidos.
Recuerde siempre que, al realizar operaciones como:
– seleccionar un programa de lavado,
– ajustar el descalcificador,
– activar/desactivar el abrillantador,
el aparato se DEBE encontrar en el modo de ajuste.
Si hay un indicador de programa encendido, el último programa ejecutado o seleccionado
sigue seleccionado. En tal caso, será necesario cancelar el programa para volver al modo
de ajuste.
Page 37

Primer uso
Para cancelar el ajuste de un programa o un programa en marcha
Pulse sin soltar la tecla RESET hasta que se enciendan todos los indicadores de programa.
El programa se cancela y la máquina activa el modo de ajuste.
Primer uso
Antes de utilizar el lavavajillas por primera vez:
• Compruebe que las conexiones eléctricas y de agua son conformes con las instrucciones
de instalación
• Retire todo el material de embalaje del interior del aparato
• Ajuste el descalcificador de agua
• Vierta 1 litro de agua en el recipiente de sal y a continuación llénelo con sal para lavavajillas
• Llene el distribuidor de abrillantador
Si desea utilizar pastillas combinadas con detergente, como: "3 en 1", "4 en 1", "5 en 1" etc...
ajuste la función Multitab (consulte "Función Multitab").
Ajuste del descalcificador de agua
El lavavajillas cuenta con un descalcificador de agua que elimina sales y minerales del
suministro de agua, ya que podrían afectar o deteriorar el funcionamiento de la máquina.
Cuanto mayor es el contenido de dichos minerales y sales, más dura será el agua. La dureza
del agua se mide con escalas equivalentes, en grados alemanes (°dH), grados franceses (°TH)
y mmol/l (milimol por litro, unidad internacional de la dureza del agua).
El descalcificador debe ajustarse en función de la dureza que presente el agua de su zona.
La empresa local de suministro de agua puede indicarle el grado de dureza de la misma.
El descalcificador de agua se debe ajustar de dos maneras: manualmente, utilizando el
selector de dureza del agua, y electrónicamente.
Dureza del agua Selección del ajuste de dureza
del agua
°dH °TH mmol/l manualmente electrónica-
mente
51 - 70 91 - 125 9,1 - 12,5 2 nivel 10 sí
43 - 50 76 - 90 7,6 - 8,9 2 nivel 9 sí
37 - 42 65 - 75 6,51 - 7,5 2 nivel 8 sí
29 - 36 51 - 64 5,1 - 6,4 2 nivel 7 sí
23 - 28 40 - 50 4,0 - 5,0 2 nivel 6 sí
19 - 22 33 - 39 3,3 - 3,9 2 nivel 5 sí
15 - 18 26 - 32 2,61 - 3,2 1 nivel 4 sí
11 - 14 19 - 25 1,9 - 2,5 1 nivel 3 sí
4 - 10 7 - 18 0,71 - 1,8 1 nivel 2 sí
37
Uso de sal
Page 38

Ajuste del descalcificador de agua
38
Dureza del agua Selección del ajuste de dureza
°dH °TH mmol/l manualmente electrónica-
< 4 < 7 < 0,7 1 nivel 1 no
del agua
mente
Ajuste manual
El lavavajillas se ajusta en fábrica en la posición 2.
1. Abra la puerta del lavavajillas.
2. Extraiga el cesto inferior del lavavajillas.
3. Coloque el selector de dureza del agua en
la posición 1 ó 2 (consulte la tabla).
4. Vuelva a colocar el cesto inferior.
Ajuste electrónico
El lavavajillas se ajusta en fábrica en el nivel 5.
1. Pulse el botón . El lavavajillas debe estar en modo de ajuste.
2.
Pulse a la vez y sin soltar los botones B y C hasta que las luces de los botones A, B y
C empiecen a destellar.
3.
Pulse el botón A, las luces de los botones B y C se apagan mientras que la del botón
A sigue destellando. En el visor digital aparece el nivel.
Ejemplos:
en el visor = nivel 5
en el visor = nivel 10
4.
Para cambiar el nivel, pulse el botón A. El nivel cambia cada vez que se pulsa el botón.
(Para la selección de un nuevo nivel, consulte la tabla).
Ejemplos: Si el nivel actual es 5, se selecciona el nivel 6 al pulsar el botón A una vez.
Si el nivel actual es 10, se selecciona el nivel 1 al pulsar el botón A una vez.
5. Para grabar la operación en memoria, apague el lavavajillas mediante el botón de encendido/apagado.
Uso de sal
Page 39

Uso de sal para lavavajillas
Uso de sal para lavavajillas
ADVERTENCIA
Utilice exclusivamente sal específica para lavavajillas. Los otros tipos de sal no específicos
para lavavajillas, en especial la sal de mesa, dañarán el descalcificador de agua. Cargue la
sal sólo antes de iniciar uno de los programas de lavado completos. Así evitará que los
granos de sal o el agua salada que pueda haber salpicado permanezcan en el fondo de la
máquina, lo que puede provocar corrosión.
Para cargar:
1. Abra la puerta, extraiga el cesto inferior y desenrosque la tapa del recipiente de sal
girándola de derecha a izquierda.
2.
Vierta 1 litro de agua en el recipiente (esto es necesario sólo antes de cargar sal
por primera vez) .
3. Utilice el embudo suministrado para verter sal hasta llenar el recipiente.
4. Vuelva a colocar la tapa, tras comprobar
que no hay restos de sal en la rosca ni en
la junta.
5. Vuelva a colocar la tapa y ajústela girándola a derecha hasta alcanzar el tope con
un chasquido.
No se preocupe si el agua desborda la unidad
al cargar sal, ya que es algo normal.
39
El indicador luminoso de sal del panel de control puede permanecer encendido de 2 a 6
horas después de la recarga de sal, suponiendo que el lavavajillas siga activado. Si utiliza
sal que tarde más en disolverse, este tiempo puede ser mayor. El funcionamiento de la
máquina no se ve afectado.
Uso de abrillantador
ADVERTENCIA
Utilice exclusivamente abrillantador de marca para lavavajillas.
No llene el distribuidor de abrillantador con otra sustancia (por ej., agente limpiador de
lavavajillas o detergente líquido). Podría dañar el aparato.
El abrillantador garantiza un aclarado perfecto y un secado sin puntos y franjas.
El abrillantador se añade automáticamente durante el último aclarado.
Page 40

Uso de abrillantador
40
1. Para abrir el recipiente pulse el botón de
apertura (A).
2. Añada abrillantador en el recipiente. El nivel de llenado máximo se indica mediante
el texto "max".
El distribuidor tiene una capacidad de unos
110 ml de abrillantador, suficiente para 16
a 40 ciclos de lavado, dependiendo del
ajuste de dosis.
3. Cerciórese de cerrar la tapa después de cada recarga.
Limpie con un paño absorbente las salpicaduras de abrillantador producidas durante la recarga para evitar la formación excesiva de espuma en el siguiente lavado.
Ajuste de la cantidad de abrillantador
Dependiendo de los resultados de acabado y secado obtenidos, ajuste la dosis de abrillantador con el selector de 6 posiciones (la posición 1 es dosis mínima, la posición 6 es máxima).
La dosis se ajusta en fábrica en la posición 4.
Page 41

Aumente la dosis si observa gotas de agua o motas
de cal en la vajilla tras el lavado.
Redúzcala si observa marcas blanquecinas en la
vajilla o una película azulada en las copas o la hoja
de los cuchillos.
Uso diario
• Compruebe si es necesario añadir sal de lavavajillas o abrillantador.
• Cargue los cubiertos y la vajilla en el lavavajillas.
• Añada detergente para lavavajillas.
• Seleccione un programa de lavado adecuado para los cubiertos y la vajilla.
• Inicie el programa de lavado.
Uso diario
41
Carga de cubiertos y vajilla
En el lavavajillas no se deben lavar esponjas, paños de cocina ni ningún objeto que absorba
agua.
• Antes de cargar la vajilla:
– Elimine todos los restos de comida y desechos.
– Ablande los restos de comida pegada de las cazuelas
• Al cargar la vajilla y los cubiertos, tenga en cuenta lo siguiente:
– La vajilla y los cubiertos no deben obstaculizar la rotación de los brazos aspersores.
– Coloque los objetos huecos, como tazas, copas, cazuelas, etc. con la abertura hacia
abajo, para que el agua no pueda acumularse en el recipiente ni en los fondos.
– Los platos y cubiertos no deben colocarse unos dentro de otros ni cubrirse entre sí.
– Para evitar que las copas se dañen, no deben tocarse entre sí.
– Coloque los objetos pequeños en el cesto de los cubiertos.
• Los objetos de plástico y las sartenes con revestimiento antiadherente tienden a retener
gotas de agua; no se secan tan bien como los objetos de porcelana y de acero.
• Los objetos ligeros (cuencos de plástico, etc.) deben colocarse en el cesto superior y
ordenarse de modo que no se muevan.
Page 42

Carga de cubiertos y vajilla
42
Para el lavado de cubiertos y vajilla en el lavavajillas
no son adecuados: son relativamente adecuados:
• Cubiertos con asa de madera, cuerno, cerámica o madreperla.
• Ele mento s de p lá sti co que no re sista n el c alor .
• Cubiertos antiguos con piezas pegadas que no
resistan altas temperaturas.
• Elementos de cubertería o vajilla pegados.
• Objetos de peltre o cobre.
• Copas de cristal de plomo.
• Objetos de acero que puedan oxidarse.
• Bandejas de madera.
• Objetos de fibra sintética.
• Lave los recipientes de barro cocido en el lavavajillas sólo si tienen una marca especial o
una indicación del fabricante.
• Los dibujos de barniz pueden desaparecer si
se lavan a máquina con frecuencia.
• Las piezas de plata y aluminio tienden a perder
color con el lavado: Los restos, como la clara
o la yema de huevo o la mostaza, pueden decolorar o manchar la plata. Por lo tanto, elimine siempre y de inmediato los restos adheridos a la plata si no la va a lavar acto seguido.
Abra la puerta y deslice hacia fuera los cestos para cargar la vajilla.
Cesto inferior
Coloque la vajilla grande y muy sucia y las cazuelas
en el cesto inferior.
To make it easier to load larger dishes, the 2 plate
racks on the right in the lower basket can be folded
down.
Page 43

Carga de cubiertos y vajilla
El cesto para cubiertos
ADVERTENCIA
Los cuchillos de hoja larga colocados en posición vertical representan un riesgo. Los objetos
de cubertería largos o afilados, como los cuchillos para trinchar, se deben colocar en posición
horizontal en el cesto superior. Tenga cuidado al cargar o descargar objetos afilados, como
los cuchillos.
Para que el agua pueda circular alrededor de todos los cubiertos en el cesto, debería realizar
los siguientes pasos:
1. Sitúe la rejilla en el cesto de cubiertos.
2. Coloque los tenedores y las cucharas con
el mango hacia abajo en el cesto de los
cubiertos.
Para utensilios más grandes como, por
ejemplo, batidoras de mano, deje libre la
mitad de la rejilla de los cubiertos.
43
Page 44

Carga de cubiertos y vajilla
44
El cesto superior
Acomode la vajilla pequeña y sensible y los cubiertos largos y puntiagudos en el cesto superior.
• Disponga las piezas de vajilla por encima y por
debajo del soporte de tazas abatible para que
estén compensadas entre sí y el agua de lavado
alcance todos los elementos.
• Los soportes de tazas se pueden abatir para
colocar piezas de vajilla altas.
• Apoye o enganche las copas de vino o de co-
ñac en los enganches de los soportes de tazas.
• Para las copas de tallo alto, abata el soporte
de vasos a la derecha o a la izquierda.
Page 45

• La fila de púas situada a la izquierda del cesto
superior también se divide en dos partes y se
puede abatir.
Púas no abatidas: coloque vasos, tazas, etc.
en el cesto superior.
Púas abatidas: más espacio para platos.
Ajuste de la altura del cesto superior
Altura máxima de platos en:
El cesto superior El cesto inferior
Con el cesto superior elevado 22 cm 30 cm
Con el cesto superior bajado 24 cm 29 cm
La altura del cesto superior también se puede ajustar estando cargado.
Subir / bajar el cesto superior:
1. Retire el cesto superior por completo.
2. Levante el cesto superior por el asa hasta
el tope y bájelo verticalmente.
El cesto superior encaja en la posición inferior o superior.
ADVERTENCIA
Después de cargar la máquina cierre siempre
la puerta, ya que la puerta abierta representa
riesgos.
Uso de detergente
45
Antes de cerrar la puerta, compruebe que los
brazos aspersores giran sin obstrucción.
Uso de detergente
Utilice exclusivamente detergente específico para lavavajillas.
Tenga en cuenta las recomendaciones del fabricante sobre dosis y almacenamiento que se
indican en el envase del detergente.
Atenerse al uso de la cantidad exacta de detergente contribuye a reducir la contaminación.
Page 46

Uso de detergente
46
Carga de detergente
1. Abra la tapa.
2. Llene el distribuidor de detergente (1). La
marca indica el nivel de dosificación:
20 = unos 20 g de detergente
30 = unos 30 g de detergente.
3. Todos los programas con prelavado necesitan una dosis adicional de detergente
(5/10 g), que debe colocarse en el compartimiento de detergente para prelavado
(2).
Ese detergente actúa en la fase de prelavado.
4. Si utiliza pastillas de detergente, coloque
la pastilla en el compartimiento (1)
5. Cierre la tapa y presione hasta que encaje.
Pastillas de detergente
Las pastillas de fabricantes diferentes se disuelven a distinta velocidad. Por ello, algunas
pastillas de detergente no alcanzan la capacidad de limpieza total en los programas de lavado breves. Por lo tanto, si utiliza pastillas de
detergente, emplee programas de lavado prolongados para garantizar la eliminación de los
residuos de detergente.
Page 47

Función Multitab
Función Multitab
Este aparato cuenta con la "función Multitab", que permite el uso de pastillas de detergente
combinadas "Multitab".
Son productos detergentes que combinan las funciones de limpieza, abrillantado y sal.
También pueden contener otros agentes, dependiendo de su tipo ("3 en 1", "4 en 1", "5 en
1" etc.).
Compruebe si dichos detergentes son adecuados para la dureza del agua que utiliza. Consulte las instrucciones del fabricante.
Esta función se puede seleccionar en todos los programas de lavado. La selección de esta
función desactiva automáticamente la entrada de abrillantador y sal de los recipientes
correspondientes, al igual que los indicadores luminosos de sal y abrillantador.
Seleccione la "función Multitab" antes de que se inicie un programa de lavado.
Una vez seleccionada dicha función (indicador luminoso encendido), seguirá activa también
para los demás programas de lavado.
La duración del ciclo puede cambiar cuando se utiliza la "función Multitab". En tal caso, la
indicación del tiempo que dura el programa se actualiza automáticamente en el visor digital.
Una vez que el programa está en marcha, la "función " ya MultitabNO puede cambiarse. Si
desea excluir la "función Multitab" deberá cancelar el ajuste de programa y desactivar la
''función Multitab''.
En tal caso deberá seleccionar nuevamente un programa de lavado (y las opciones que
desee).
Activation/deactivation of the Multitab function
Press the Multitab button: the corresponding indicator light illuminates. This means that
the function is active.
To deactivate the function press the Multitab button again: the indicator light turns off.
Si los resultados del secado no son satisfactorios, realice lo siguiente:
1. Cargue el distribuidor de líquido abrillantador.
2. Active el distribuidor de abrillantador.
3. Ajuste la cantidad de abrillantador en la posición 2.
• La activación/desactivación del distribuidor de abrillantador sólo es posible con la "fun-
ción Multitab" activa.
47
Activación/desactivación del distribuidor de abrillantador
1. Pulse la tecla de encendido/apagado. El lavavajillas debe estar en modo de ajuste.
2.
Pulse a la vez las teclas B y C hasta que los indicadores de las teclas A , B y C comiencen
a parpadear.
3.
Pulse la tecla B. Los indicadores de las teclas A y C se apagan mientras que el de la tecla
B comienza a parpadear. En el visor digital se muestra el ajuste actual:
= Distribuidor de abrillantador desactivado.
= Distribuidor de abrillantador activado.
4.
Para cambiar el ajuste, vuelva a pulsar la tecla B; el visor digital muestra el nuevo ajuste.
5. Para grabar la operación en memoria, apague el lavavajillas mediante la tecla de encendido/apagado.
Page 48

Programas de lavado
48
Si decide volver a utilizar el sistema de detergente normal, es conveniente que:
1. Desactive la "función Multitab".
2. Llene de nuevo los recipientes de sal y de abrillantador.
3. Ajuste el valor de dureza del agua al máximo y ejecute un programa de lavado normal
sin cargar vajilla.
4. Ajuste la dureza de agua de acuerdo con la que exista en su zona.
5. Ajuste la cantidad de abrillantador.
Programas de lavado
Programa Grado de
AUTO 45-70°
INTENSIV CARE
70°
30 MIN 60 °C
5)
ECO 50°
suciedad
3)
Suciedad
normal y
suciedad
extrema
combinadas
Suciedad
persistente
4)
Suciedad
ligera
Suciedad
normal
Suciedad
normal
Cualquiera Carga par-
Tipo de
carga
Vajilla, cubiertos,
cacerolas y
sartenes
Vajilla, cubiertos,
cacerolas y
sartenes
Vajilla y
cubiertos
Vajilla y
cubiertos
Vajilla y
cristalería
fina
cial (para
completarse más
tarde durante el
6)
día)
Descripción del programa Valores de consu-
mo
2)
Prelavado
Lavado principal
Aclarado intermedio
Aclarado final
Secado
Duración (minutos)
-
1/2x
-
-
-
-
-
1)
Energía (kWh)
1,1 - 1,7
1,5 -1,7
0,9
1,0 - 1,1
0,8 -0,9
0,1
Agua (litros)
12 - 23
16 - 18
9
12 - 13
14 - 15
4
Page 49

Selección e inicio del programa de lavado
49
Programa Grado de
suciedad
NIGHT CYCLE Suciedad
normal
1) Los valores de consumo se ofrecen como guía y dependen de la presión y temperatura del agua, así como de
las variaciones del suministro de energía y la cantidad de platos.
2) El visor digital muestra la duración del programa.
3) Durante el programa de lavado automático, el grado de suciedad de la vajilla se puede determinar observando
la turbiedad del agua. La duración del programa y los niveles de consumo de agua y energía pueden variar;
dependiendo de si el lavavajillas está total o parcialmente lleno y de si la vajilla está ligeramente sucia o muy
sucia. La temperatura del agua se regula automáticamente entre 45 °C y 70 °C.
4) Ideal para el lavado de un lavavajillas con carga parcial. Se trata del programa diario perfecto para las necesidades
de una familia de 4 personas que sólo necesita cargar la vajilla y cubertería del desayuno y la comida.
5) Programa de prueba para institutos de ensayo.
6) Este programa no necesita el uso de detergente
Tipo de
carga
Vajilla y
cubiertos
Descripción del programa Valores de consu-
Prelavado
Lavado principal
Aclarado intermedio
Aclarado final
Secado
Selección e inicio del programa de lavado
Seleccione el programa de lavado y el inicio diferido con la puerta entreabierta. El
programa o la cuenta atrás del inicio diferido sólo empieza a funcionar cuando se
cierra la puerta. Hasta ese momento es posible modificar los ajustes realizados.
1)
mo
2)
Energía (kWh)
Duración (minutos)
-
Agua (litros)
13 - 14
1,1 - 1,3
1. Compruebe que los cestos están cargados correctamente y que los brazos aspersores
giran sin obstáculos.
2. Compruebe que el grifo está abierto.
3. Pulse la tecla de encendido/apagado. El lavavajillas debe estar en modo de ajuste.
4. Pulse una de las dos teclas de programa para seleccionar un programa de lavado. (Consulte la tabla "Programas de lavado").
Cuando se selecciona un programa, se enciende el indicador de programa correspondiente y el tiempo de programa parpadea en el visor digital.
Si desea ajustar el programa NIGHT CYCLE, pulse la tecla NIGHT CYCLE; se enciende el
indicador luminoso correspondiente.
5. Cierre la puerta del lavavajillas; el programa se iniciará de manera automática.
Selección e inicio del programa con inicio diferido
1. Después de seleccionar el programa de lavado, pulse esta tecla hasta que la cantidad
de horas que quiera retrasar el inicio parpadee en el indicador digital. El inicio del
programa de lavado se puede diferir de 1 a 19 horas.
2. Cierre la puerta del lavavajillas, la cuenta atrás se iniciará automáticamente.
Page 50

Selección e inicio del programa de lavado
50
3. La cuenta atrás disminuye en intervalos de 1 hora.
4. Si se abre la puerta, la cuenta atrás se interrumpe de inmediato. Cierre la puerta; la
cuenta atrás continúa desde el punto en que se interrumpió.
5. Transcurrido el intervalo de inicio diferido, el programa se pone en marcha automáticamente.
La selección del programa de lavado y del inicio diferido se puede realizar con la puerta
cerrada. De esta forma SÓLO se dispone de 3 segundos para elegir otro programa o un
inicio diferido después de pulsar la tecla de un programa de lavado. Transcurrido ese intervalo de tiempo, el programa seleccionado se pone automáticamente en marcha.
ADVERTENCIA
Interrumpa o cancele un programa de lavado en marcha SÓLO si es absolutamente
necesario. ¡Atención! Al abrir la puerta puede salir vapor caliente. Abra la puerta
con cuidado.
Cancelación de un programa de lavado o de un inicio diferido en marcha
• Pulse la tecla RESET hasta que se enciendan todos los indicadores de programa.
• Cuando se cancela el inicio diferido también se cancela el programa de lavado elegido.
En tal caso es preciso seleccionar de nuevo el programa de lavado.
• Si va a seleccionar un nuevo programa de lavado, compruebe que hay suficiente deter-
gente en el distribuidor.
Interrupción de un programa de lavado en marcha
• Abra la puerta del lavavajillas; el programa se detiene. Cierre la puerta; el programa se
inicia desde el punto en que se interrumpió.
• Pulse la tecla de encendido/apagado. Todos los indicadores se apagan. Vuelva a pulsar
la tecla de encendido/apagado; el programa se inicia desde el punto en que se interrumpió.
Finalización del programa de lavado
• El lavavajillas se detiene automáticamente y una señal acústica le informa del final del
programa de lavado.
• El indicador del programa que acaba de terminar permanece encendido.
• En el visor digital aparece el valor cero.
1. Para desactivar el lavavajillas pulse la tecla de encendido/apagado.
Se recomienda apagar el aparato una vez finalizado el programa de lavado. De lo contrario,
todos los indicadores luminosos se apagarán automáticamente unos 3 minutos después de
finalizar el programa. En el visor digital aparece 1 barra horizontal.
Esto ayudará a reducir el consumo de energía si se le olvida o, por el motivo que sea, no
puede apagar el aparato después de finalizar el programa.
Pulse cualquier tecla (excepto la de encendido/apagado); el panel de mando mostrará la
misma situación (indicadores luminosos y visor digital) que cuando finalizó el programa.
2. Deje la puerta entreabierta y espere unos minutos antes de extraer la vajilla; de ese
modo se enfriará y mejorará el secado.
Page 51

Descarga del lavavajillas
Descarga del lavavajillas
• Los platos calientes son sensibles a los golpes.
Por lo tanto, es necesario esperar a que la vajilla se enfríe antes de retirarla del lavavajillas.
• Vacíe primero el cesto inferior y a continuación el superior; de ese modo evitará el goteo
desde el cesto superior sobre la vajilla situada en el inferior.
• Es posible la presencia de agua en los costados y la puerta del lavavajillas, ya que el acero
inoxidable se enfría antes que la vajilla.
PRECAUCIÓN
Cuando el programa de lavado haya concluido, es conveniente desenchufar el lavavajillas
y cerrar el grifo.
Mantenimiento y limpieza
Limpieza de los filtros
Los filtros deben comprobarse y limpiarse periódicamente. Los filtros sucios degradan el
resultado del lavado.
ADVERTENCIA
Antes de limpiar los filtros asegúrese de que la máquina está apagada.
1. Abra la puerta y extraiga el cesto inferior.
2. El sistema de filtrado del lavavajillas está
compuesto por un filtro grueso (A), un microfiltro (B) y un filtro plano. Utilice el asa
del microfiltro para desbloquear el sistema
de filtrado y extráigalo.
51
Page 52

Mantenimiento y limpieza
52
3. Gire el asa aproximadamente 1/4 en sentido contrario a las agujas del reloj y extraiga el sistema de filtrado.
4.
Tome el filtro grueso (A) por el asa con
orificio y extráigalo del microfiltro (B).
5. Limpie todos los filtros a fondo con agua
corriente.
6. Extraiga el filtro plano de la base del compartimiento de lavado y limpie las dos caras a conciencia.
7. Vuelva a colocar el filtro plano en la base
del compartimiento de lavado y compruebe que encaja perfectamente.
8.
Coloque el filtro grueso (A) en el microfiltro (B) y presiónelos entre sí.
9. Coloque la combinación de filtros en su
posición y bloquee girando el asa a la derecha hasta el tope. Durante este proceso
cerciórese de que el filtro plano no sobresale de la base del compartimiento de lavado.
ADVERTENCIA
El lavavajillas NUNCA se debe utilizar sin filtros. La reinstalación incorrecta de los filtros
reducirá la calidad del lavado y puede provocar daños en el aparato.
Limpieza de los brazos aspersores
NO intente extraer los brazos aspersores.
Si observa que los residuos de alimentos han taponado los orificios del brazo aspersor
superior, elimínelos con un palillo.
Limpieza del exterior
Limpie las superficies externas de la máquina y del panel de mandos con un paño suave y
húmedo. Si es necesario, utilice sólo detergentes neutros. No utilice productos abrasivos,
estropajos ni disolventes (acetona, tricloroetileno, etc.).
Limpieza interna
No olvide limpiar periódicamente las juntas de la puerta y los distribuidores de detergente
y abrillantador con un paño húmedo.
Se recomienda que cada 3 meses ejecute un programa de lavado para vajilla muy sucia,
utilizando detergente pero con el lavavajillas vacío.
Page 53

Qué hacer si…
Periodos prolongados sin funcionamiento
Si no utiliza la máquina durante un tiempo prolongado, es conveniente:
1. Desenchufar la máquina y cerrar el conducto de agua.
2. Dejar la puerta entreabierta para evitar la aparición de olores desagradables.
3. Dejar el interior de la máquina limpio.
Precauciones en caso de congelación
No sitúe la máquina en lugares con temperaturas por debajo de 0 °C. Si tal cosa es inevitable,
vacíe la máquina, cierre la puerta, desconecte el tubo de entrada de agua y vacíelo.
Desplazamiento de la máquina
Si debe desplazar la máquina (por mudanza, etc.):
1. Extraiga la clavija de la toma.
2. Cierre el grifo.
3. Extraiga los tubos de entrada de agua y de desagüe.
4. Retire la máquina junto con los tubos.
No incline la máquina durante su transporte.
Qué hacer si…
El lavavajillas no se pone en marcha o se detiene durante el funcionamiento. Algunos
problemas, que pueden deberse sencillamente a falta de mantenimiento o a descuidos,
pueden resolverse con la ayuda de las indicaciones de la tabla, sin necesidad de llamar al
servicio técnico.
Apague el lavavajillas y lleve a cabo las acciones de corrección recomendadas.
Códigos de error y fallo de funcionamiento Causa y soluciones posibles
• parpadeo continuo del indicador luminoso de
programa en marcha
•
aparece en el visor digital.
• señal acústica intermitente
El lavavajillas no carga agua.
• parpadeo continuo del indicador luminoso de
programa en marcha
•
aparece en el visor digital.
• señal acústica intermitente
El lavavajillas no desagua.
• parpadeo continuo del indicador luminoso de
programa en marcha
• El grifo está bloqueado o tiene incrustaciones
calcáreas.
Limpie el grifo.
• El grifo está cerrado. Abra el grifo.
• El filtro (si está presente) de la conexión de
tubo roscado de la válvula de entrada de agua
está obstruido.
Limpie el filtro del tubo roscado.
• El tubo de entrada de agua no está bien instalado, está doblado u obstruido.
Compruebe la conexión de la toma de entrada.
• El desagüe está obstruido.
Limpie el desagüe.
• El tubo de desagüe no está bien instalado, está
doblado u obstruido.
Compruebe la conexión del tubo de desagüe.
• Cierre el grifo y póngase en contacto con el
Centro de servicio técnico.
53
Page 54

Qué hacer si…
54
Códigos de error y fallo de funcionamiento Causa y soluciones posibles
•
aparece en el visor digital.
• señal acústica intermitente
El dispositivo antiinundación está activado.
El programa no se inicia. • La puerta del lavavajillas no se ha cerrado co-
rrectamente. Cierre la puerta.
• El enchufe principal no está conectado a la
toma. Conecte el enchufe principal.
• Se ha quemado el fusible de la caja de fusibles
de la vivienda.
Cambie el fusible.
• Se ha seleccionado el inicio diferido.
Si decide lavar la vajilla de inmediato, cancele
el inicio diferido.
Una vez realizadas las comprobaciones, encienda el aparato: el programa continuará a partir
del punto en que se interrumpió.
Si el código de error o fallo de funcionamiento se repite, llame al Centro de servicio técnico.
En caso de producirse otros códigos de fallo no descritos en la tabla anterior, consulte al
Centro de servicio técnico local, indicando el modelo (Mod.), el número de producto (PNC)
y el número de serie (S.N.).
Esa información se puede encontrar en la placa de datos técnicos situada en el costado de
la puerta del lavavajillas.
Para que siempre tenga los datos a mano, es conveniente que los anote aquí:
Mod. (Modelo). : . . . . . . . . . . . . . . . . . . . . . . .
PNC (Número de producto) :. . . . . . . . . . . . . . . . . . . . . . . .
S.N.(Número de serie). : . . . . . . . . . . . . . . . . . . . . . . . .
Los resultados del lavado no son satisfactorios
La vajilla no está limpia • Se ha seleccionado el programa de lavado
La vajilla aparece mojada y deslucida • No se utilizó abrillantador.
equivocado.
• La vajilla se ha dispuesto de tal modo que el
agua no llega a todas las partes de la superficie. No se deben sobrecargar los cestos.
• Los brazos aspersores no giran libremente por
la disposición incorrecta de la carga.
• Los filtros de la base del compartimiento de
lavado están sucios o colocados de forma incorrecta.
• Se ha utilizado poco o ningún detergente.
• Si se observan depósitos de cal en la vajilla; el
recipiente de sal está vacío o se ha ajustado
un nivel de descalcificador incorrecto.
• La conexión del tubo de desagüe es incorrecta.
• La tapa del recipiente de sal no está debidamente cerrada.
• El distribuidor de abrillantador está vacío.
Page 55

Datos técnicos
Los resultados del lavado no son satisfactorios
Se ven rayas, puntos blancos o una película azulada en copas y platos
Se han secado gotas de agua en copas y platos • Aumente la dosificación de abrillantador.
• Reduzca la dosificación de abrillantador.
• La causa podría ser el detergente. Llame al teléfono de atención al cliente del fabricante del
detergente.
Si después de las comprobaciones anteriores se repite el problema, póngase en contacto
con el Centro de servicio técnico.
Datos técnicos
Dimensiones Anchura x altura x fondo (cm) 60 x 85 x 63,5
Conexión eléctrica - Voltaje -
Potencia total - Fusible
Presión del suministro de agua Mínima - Máxima (MPa) 0,05 - 0,8
Capacidad cubiertos 12
Los datos de la conexión eléctrica se indican en la placa de datos
técnicos, situada en el borde interno de la puerta del lavavajillas
Consejos para los institutos de pruebas
55
La prueba de conformidad con EN 60704 debe realizarse con el aparato cargado por completo y utilizando el programa de prueba (consulte "Programas de lavado").
La prueba de conformidad con EN 50242 debe realizarse con el recipiente de sal y el
distribuidor de abrillantador cargados con los productos respectivos y utilizando el programa de prueba (consulte "Programas de lavado").
Carga completa: 12 cubiertos estándar
Cantidad de detergente necesaria: 5 g + 25 g (Tipo B)
Ajuste de abrillantador: posición 4 (Tipo III)
Ejemplos de disposición de la carga:
Cesto superior
1)
Page 56

Instalación
56
Cesto inferior con cesto de cubiertos Cesto de cubiertos
1) Si están colocados los soportes de tazas a la izquierda o la bandeja de cubiertos, retírelos.
Instrucciones de instalación
Instalación
ADVERTENCIA
Cualquier trabajo eléctrico o de fontanería que requiera la instalación de este aparato debe
estar a cargo de un electricista homologado o fontanero profesional.
Retire todo el material de embalaje antes de situar el aparato.
Si es posible, coloque el aparato junto a un grifo y un desagüe.
Page 57

Instalación
57
Instalación debajo de una encimera (plano de trabajo de la cocina o sumidero)
La extracción del plano de trabajo del lavavajillas permitalar el lavavajillas perfectamente
ajustado debajo de un fregadero o una encimera existente, siempre que las medidas del
hueco se correspondan con las que se muestran en la imagen
Realice lo siguiente:
1. Extraiga lel plano de trabajo de la máquina;
para ello, desatornille los dos tornillos de
sujeción posteriores, retire el plano de trabajo desde la parte posterior de la máquina
y deslícela hacia fuera de las ranuras delanteras, levantándola
2. Introduzca la máquina después de corregir
la nivelación mediante las patas ajustables.
Al empotrar la máquina, compruebe que los tubos de entrada de agua y de desagüe no
quedan doblados o oprimidos.
Para cualquier operación que requiera el acceso a los componentes internos del lavavajillas,
es necesario desenchufarlo.
Compruebe que una vez instalado el aparato sea fácilmente accesible para el técnico en
caso de requerir reparación.
Si el lavavajillas se utiliza posteriormente como aparato independiente, será necesario volver a montar lel plano de trabajo original
La peana de los aparatos de instalación independientes no es ajustable.
Nivelación
La nivelación correcta es esencial para el cierre y sellado adecuados de la puerta. Si el aparato
está bien nivelado, la puerta no se apoyará en ninguno de los lados del aparato. Si la puerta
no cierra correctamente, afloje o apriete las patas ajustables hasta obtener la nivelación
correcta.
Page 58

Conexión de agua
58
Conexión de agua
Conexiones del suministro de agua
Este aparato se puede conectar a una toma de agua caliente (máx. 60 °C) o fría.
La conexión con el suministro de agua caliente permite reducir de forma importante el
consumo de energía. No obstante, el consumo depende de la fuente de energía utilizada
para calentar el agua. (Se aconseja utilizar fuentes de energía alternativas que sean menos
agresivas con el medio ambiente, como paneles solares o fotovoltáicos y energía eólica).
Para realizar la conexión, la tuerca de acoplamiento instalada en el tubo de suministro de
la máquina está diseñada para enroscarse en un conducto con rosca para gas de 3/4 pulgadas o en un acoplamiento específico como una espiga de conexión rápida.
La presión del agua debe situarse en los límites indicados en las "Especificaciones técnicas".
La empresa de suministro de agua de su zona puede informarle de la presión media de la
red.
Al conectar el tubo de entrada de agua, éste no debe estar doblado, aplastado ni enredado.
El lavavajillas cuenta con tubos de entrada y desagüe que se pueden situar a derecha o
izquierda, en función de la instalación, mediante la contratuerca.
La contratuerca debe estar correctamente instalada para evitar fugas de agua.
(¡Atención! NO todos los modelos de lavavajillas cuentan con tubos de entrada de agua y
de desagüe con contratuerca. En tal caso, esta opción no estará disponible). Si la máquina
se conecta a tubos nuevos o tubos que no se han utilizado durante mucho tiempo, es
necesario dejar correr el agua durante unos minutos antes de conectar el tubo de carga.
NO utilice tubos de conexión procedentes de un aparato antiguo.
Este aparato cuenta con funciones de seguridad que impiden que al agua utilizada regrese
al sistema de agua potable. Este aparato cumple las normas de fontanería vigentes.
Tubo de carga de agua con válvula de seguridad
Después de conectar el tubo de entrada de agua con doble pared, la válvula de seguridad
queda situada junto al grifo. Por lo tanto, el tubo de entrada de agua sólo está bajo presión
cuando corre el agua. Si el tubo de entrada de agua presenta una fuga durante esta operación, la válvula de seguridad interrumpe el paso del agua.
Tenga cuidado al instalar el tubo de entrada de agua:
• El cable eléctrico de la válvula de seguridad se encuentra en el tubo de entrada de agua
de doble pared. No sumerja el tubo de entrada de agua ni la válvula de seguridad.
• Si el tubo de entrada de agua o la válvula de seguridad sufre daños, desconecte el enchufe
principal de inmediato.
• El tubo de entrada de agua con válvula de seguridad sólo debe ser sustituido por un
especialista o por el Centro de servicio técnico.
Page 59

Conexión de agua
ADVERTENCIA
¡Advertencia! Voltaje peligroso.
Conexión del tubo de salida de agua
El extremo del tubo de desagüe se puede conectar de la siguiente forma:
1. Al desagüe, fijándolo debajo de la encimera. Así se evitará que el agua sucia pase del
fregadero a la máquina.
2. A un tubo vertical suministrado, con orificio de ventilación y un diámetro interno de
al menos 4 cm.
La conexión para desagüe debe estar a una altura
de 30 cm (mínima) a 100 cm (máxima) desde la
base del lavavajillas.
El tubo de desagüe puede quedar orientado a la
derecha o a la izquierda del lavavajillas.
Cerciórese de que el tubo no queda doblado ni
aplastado, ya que eso podría impedir o dificultar
la descarga de agua.
El tapón del fregadero no debe estar colocado
cuando la máquina desagua, ya que el agua podría
ser reabsorbida al interior de la máquina.
Si utiliza una prolongación de tubo de desagüe, no debe superar los 2 metros, y su diámetro
interno no debe ser inferior al del tubo suministrado.
De igual modo, el diámetro interno de los acoplamientos utilizados para las conexiones con
el tubo de desagüe no debe ser inferior al diámetro del tubo suministrado.
Al conectar el tubo de descarga al desagüe, bajo
el fregadero, es necesario retirar toda la mem-
brana de plástico (A). Si la membrana no se retira
por completo, se acumularán residuos de alimentos que al cabo del tiempo podrían obstruir la salida del tubo de desagüe del lavavajillas.
Nuestros aparatos se suministran con un dispositivo de seguridad que los protege del retorno de
agua sucia al interior de la máquina. Si el desagüe
tiene una "válvula antirretorno" incorporada, podría impedir el desagüe correcto del lavavajillas. Por lo tanto, se recomienda retirarla.
59
Page 60

Conexión eléctrica
60
Pa ra e vitar fug as d e ag ua t ras la ins tal aci ón, cerciórese de que las conexiones de agua están
bien ajustadas.
Conexión eléctrica
ADVERTENCIA
Las normas de seguridad exigen que el aparato disponga de conexión a tierra.
Antes de usar el aparato por primera vez, compruebe que el voltaje nominal y el tipo de
suministro que indica la placa de datos técnicos coinciden con los del lugar donde se instalará.
La capacidad del fusible también figura en la placa de datos técnicos.
Conecte siempre el enchufe principal a una toma con aislamiento de conexión a tierra. No
se deben utilizar enchufes o conectores múltiples ni cables prolongadores.
Podrían provocar riesgos de incendio en caso de sobrecalentamiento.
Si es necesario, sustituya la toma de la instalación eléctrica de la vivienda. Si fuera necesario
sustituir el cable eléctrico, póngase en contacto con el Centro de servicio técnico.
Debe ser posible acceder al enchufe una vez instalado el aparato.
No tire del cable para desenchufar el aparato. Tire siempre del enchufe.
El fabricante no acepta responsabilidades por fallos debidos al incumplimiento de las normas de seguridad indicadas.
Aspectos medioambientales
El símbolo que aparece en el aparato o en su embalaje, indica que este producto no se
puede tratar como un residuo normal del hogar. Se deberá entregar, sin coste para el
poseedor, bien al distribuidor, en el acto de la compra de un nuevo producto similar al que
se deshecha, bien a un punto municipal de recolección selectiva de equipos eléctricos y
electrónicos para su reciclaje. Al asegurarse de que este producto se desecha correctamente,
usted ayudará a evitar posibles consecuencias negativas para el medio ambiente y la salud
pública, lo cual podría ocurrir si este producto no se gestionara de forma adecuada. Para
obtener información más detallada sobre el reciclaje de este producto, póngase en contacto
con el Ayuntamiento de su Municipio, ó con la tienda donde lo compró.
Materiales de embalaje
Los materiales de embalaje son ecológicos y se pueden reciclar. Los componentes plásticos
se identifican con marcas, por ej. >PE <, >PS <, etc. Deseche los materiales de embalaje en
los contenedores de uso público destinados a tal efecto.
ADVERTENCIA
Si se va a desechar la unidad:
• Extraiga el enchufe de la toma.
• Corte el cable y el enchufe y deséchelos.
• Elimine el cierre de la puerta. Esto evitará que los niños al jugar queden atrapados dentro
y pongan en riesgo su vida.
Page 61

İçindekiler
Yüksek kaliteli ürünlerimizden birini seçtiğiniz için teşekkür ederiz.
Cihazınızdan en uygun ve düzenli performansı almak için, lütfen bu
kullanma kılavuzunu dikkatlice okuyunuz. Bu, bütün işlemleri en iyi ve
en etkin bir şekilde anlamanızı sağlayacaktır. İhtiyacınız olduğunda
bakabilmeniz amacıyla bu kılavuzu güvenli bir yerde saklamanızı
tavsiye ederiz. Ve lütfen kılavuzu cihazın bir sonraki kullanıcısına da
veriniz.
Yeni cihazınızdan keyif almanızı diliyoruz.
İçindekiler
61
Kullanım Talimatları 62
Güvenlik Bilgileri 62
Doğru kullanım 62
Genel güvenlik 62
Çocuk emniyeti 63
Montaj 63
Ürün Tanımı 64
Kontrol Paneli 65
Dijital gösterge 66
Fonksiyon tuşları 66
Ayarlama modu 66
İlk Kullanım 67
Su Yumuşatıcının Ayarlanması 67
Manuel olarak ayarlama 68
Elektronik ayarlama 68
Bulaşık Makinesi Tuzunun Kullanımı
Parlatıcı Bölmenin Doldurulması 69
Parlatıcı dozunun ayarlanması 70
Günlük Kullanım 70
Çatal-bıçaklar Ve Tabakların
Yerleştirilmesi 71
Alt sepet 72
Çatal-bıçak sepeti 72
Üst sepet 73
Üst sepetin yüksekliğinin ayarlanması
Deterjan Kullanımı 75
Deterjan konulması 75
Multi-tablet Fonksiyonu 76
Multitab fonksiyonunun aktive
edilmesi/devre dışı bırakılması 77
117964450-00-102008
Yıkama Programları 78
Bir Yıkama Programının Seçilmesi Ve
Başlatılması 79
Bulaşıkların Makineden Çıkartılması
Bakım Ve Temizlik 81
Filtrelerin temizliği 81
Püskürtme kollarının temizlenmesi
Dış temizlik 83
İç temizlik 83
Uzun süreli kullanmama 83
Donmaya karşı önlemler 83
Makinenin taşınması 83
Servisi Aramadan Önce 83
Teknik Veriler 85
68
Test Enstitüleri İçin Bilgiler 86
Montaj talimatları 87
Montaj 87
Bir mutfak tezgahının (mutfak tezgah
mermeri veya lavabo) altına montaj
Düzlemsellik/seviye ayarlaması
Su Bağlantısı 89
74
Su besleme bağlantıları 89
Emniyet valflı su giriş hortumu 89
Su tahliye hortumu bağlantısı 90
Elektrik Ağlantısı 91
Çevreyle İlgili Bilgiler 91
Ambalaj malzemesi 91
81
83
88
88
Page 62

62
Güvenlik Bilgileri
Önceden haber verilmeksizin değişiklik yapma hakkı saklıdır.
Kullanım Talimatları
Güvenlik Bilgileri
Kendi güvenliğiniz ve cihazın doğru kullanımı için, bu kullanma kılavuzunu ci‐
hazı monte etmeden önce, ipuçları ve uyarı bilgileri de dahil olmak üzere, dik‐
katlice okuyunuz. Gereksiz hatalardan ve kazalardan kaçınmak için, cihazı
kullanan tüm kişilerin cihazın kullanımıyla ve güvenlik özellikleriyle ilgili bilgiye
sahip olması önemlidir. Bu kılavuzu saklayınız ve cihaz başka bir yere taşın‐
dığında veya satıldığında beraberinde veriniz, böylece cihazı kullanacak diğer
kişilerin de cihaz ve güvenliği hakkında bilgi sahibi olması sağlanmış olur.
Doğru kullanım
• Bu bulaşık makinesi, sadece makinede yıkanabilir özellikteki ev eşyalarının
yıkanması için tasarlanmıştır.
• Bulaşık makinesine herhangi bir çözücü koymayınız. Bu tür maddeler bir
patlamaya neden olabilir.
• Bıçaklar ve keskin uçlu diğer nesneler sivri uçları aşağı gelecek şekilde ça‐
tal-bıçak sepetine veya yatay bir şekilde üst sepete konmalıdır.
• Sadece bulaşık makineleri için uygun ürünler (deterjan, tuz ve parlatıcı) kul‐
lanınız.
• Cihaz çalışmaktayken kapağını açmayınız, sıcak buhar çıkabilir.
• Bulaşık yıkama işlemi bitmeden önce hiçbir bulaşığı bulaşık makinesinden
çıkartmayınız.
• Kullandıktan sonra, cihazın elektrik bağlantısını kesiniz ve su beslemesini
kapatınız.
• Bu ürünün servis işlemleri sadece yetkili bir servis mühendisi tarafından ya‐
pılmalıdır ve sadece orijinal yedek parçalar kullanılmalıdır.
• Makineyi asla kendiniz tamir etmeye çalışmayınız. Deneyimsiz kişilerce ya‐
pılacak tamir işlemleri yaralanmaya veya cihazın ciddi şekilde arızalanma‐
sına neden olur. Yerel Yetkili Servis merkezine başvurunuz. Daima orijinal
yedek parça kullanılmasını isteyiniz.
Genel güvenlik
• Bulaşık makinesi deterjanları gözde, ağızda ve boğazda kimyasal yanıklara
neden olabilir. Hayati tehlikeye sebep olabilir! Bulaşık makinesi deterjanı
üreticisinin güvenlik talimatlarına riayet ediniz.
• Bulaşık makinenizdeki su içilmez. Makinenizde halen deterjan kalıntıları
olabilir.
• Bulaşık koyarken ve çıkartırken açma haricinde, bulaşık makinesinin ka‐
pağını her zaman kapalı tutunuz. Bu şekilde, açık kapağa birisinin takılıp
düşmesini ve yaralanmasını önlemiş olurusunuz.
• Açık kapak üzerine oturmayınız veya basmayınız.
Page 63

Güvenlik Bilgileri
Çocuk emniyeti
• Bu cihaz, sadece yetişkinler tarafından kullanım için tasarlanmıştır. Çocuk‐
ların tek başına bulaşık makinesini kullanmasına izin vermeyiniz.
• Tüm ambalaj malzemelerini çocuklardan uzak tutunuz. Boğulma riski teşkil
eder.
• Tüm deterjanları çocukların ulaşamayacağı güvenli bir yere koyunuz.
• Kapağı açıkken, çocukları bulaşık makinesinden uzak tutunuz.
Montaj
• Bulaşık makinenizde nakliyeden kaynaklanan bir hasar olup olmadığını kon‐
trol ediniz. Hasar görmüş bir makineyi asla elektrik prizine takmayınız. Eğer
bulaşık makineniz hasarlı ise, satıcınızı arayınız.
• Kullanımdan önce tüm ambalaj malzemeleri çıkartılmalıdır.
• Bu cihazın montajı için gerekli elektrik ve su bağlantı işlemleri sadece kalifiye
ve uzman bir kişi tarafından yapılmalıdır.
• Güvenlik sebeplerinden ötürü, bu ürünün özelliklerini herhangi bir şekilde
değiştirmek veya ürünü modife etmeye çalışmak tehlikelidir.
• Elektrik besleme kablosunda ve su hortumlarında hasar varsa; veya eğer
kontrol paneli, cihazın üst kısmı ya da taban bölgesi cihazın içine direk eri‐
şimin mümkün olabileceği bir şekilde hasar görmüşse, bulaşık makinesini
asla kullanmayınız. Herhangi bir riskten kaçınmak için yerel Yetkili Servisi‐
nizle temasa geçiniz.
• Hidrolik ve elektrikli bileşenlerine zarar vermemek için, bulaşık makinesinin
hiçbir yanı asla delinmemelidir.
UYARI
Elektrik ve su bağlantısı için ilgili paragraflarda verilen talimatlara dikkatlice
riayet ediniz.
63
Page 64

64
Ürün Tanımı
Ürün Tanımı
1 Üst sepet
2 Su sertliği ayar düğmesi
3 Tuz haznesi
4 Deterjan çekmecesi
5 Parlatıcı çekmecesi
6 Bilgi etiketi
7 Filtreler
8 Alt püskürtme kolu
9 Üst püskürtme kolu
10 Üst tabla
Page 65

Kontrol Paneli
Kontrol Paneli
7
65
10
9
8
1 Açma/Kapama tuşu
2 RESET tuşu
3 Program seçme tuşları
4 NIGHT CYCLE tuşu
5 MULTITAB tuşu
6 Gecikmeli başlatma tuşu
7 Dijital gösterge
8 Fonksiyon tuşları
9 Gösterge ışıkları
10 Program ışıkları
Gösterge ışıkları
MULTITAB MULTITAB fonksiyonunun aktif/devre dı‐
Tuz
şı olduğunu belirtir (bkz. MULTITAB fonk‐
siyonu)
Özel tuz bittiği zaman yanar.
1)
Page 66

66
Kontrol Paneli
Gösterge ışıkları
Parlatıcı
1) Tuz ve parlatıcı gösterge ışıkları, tuz ve / veya parlatıcı eklenmesi gerekli olsa bile bir yıkama
programı devam ederken asla yanmazlar.
Parlatıcı bittiği zaman yanar.
Dijital gösterge
Dijital gösterge aşağıdakileri gösterir:
• Su yumuşatıcının ayarlandığı su sertlik seviyesi,
• Çalışan programın tamamlanması için kalan süre,
• parlatıcı bölmesinin aktive edilmesi/devre dışı bırakılması (SADECE Multi‐
tab fonksiyonu aktifken),
• Yıkama programı sonu (dijital göstergede sıfır rakamı görüntülenir),
• Gecikmeli başlatma için geri sayım,
• Bulaşık makinesinin arızası ile ilgili arıza kodları.
NIGHT CYCLE tuşu
Night Cycle uyurken bile sizi rahatsız etmeyen sessiz bir yıkama programıdır.
Gece ya da elektriğin daha ucuz olduğu diğer saatlerde çalıştırılabilir.
Night Cycle esnasında, ses seviyesinin tanımlanan programdakine oranla %2 5
daha azaltmak için, pompa çok düşük bir hızda çalışır. Bu nedenle, çok uzun
bir çalışma süresine sahiptir.
Fonksiyon tuşları
Aşağıdaki fonksiyonlar bu tuşların yardımıyla ayarlanabilir:
• Su yumuşatıcının ayarlanması,
• Parlatıcı bölmesinin Multitab fonksiyonu aktifken aktive edilmesi/devre dışı
bırakılması.
1)
Ayarlama modu
Eğer TÜM program ışıkları yanarsa, cihaz ayarlama modunda demektir.
Aşağıda yazılı işlemleri yaparken;
– bir yıkama programını seçerken,
– su yumuşatıcıyı ayarlarken,
– parlatıcı kullanımını aktive ederken / devre dışı bırakırken,
cihazın ayarlama modunda OLMASI GEREKTİĞİNİ asla unutmayınız.
Eğer bir program ışığı yanarsa, son uygulanan veya seçilen program hala
ayarlı demektir. Bu durumda, ayarlama moduna dönmek için, programın iptal
edilmesi gerekir.
Ayarlanmış bir programı veya devam eden bir programı iptal etmek için
Tüm program ışıkları yanıncaya kadar, RESET tuşuna basınız ve basılı tutu‐
nuz. Program iptal edilmiştir ve makine şimdi ayar modundadır.
Page 67

İlk Kullanım
İlk Kullanım
Bulaşık makinenizi ilk defa kullanmadan önce:
• Elektrik ve su bağlantılarının montaj talimatlarına uygun yapıldığından emin
olunuz.
• Cihazın içindeki tüm ambalaj malzemelerini çıkartınız.
• Su yumuşatıcının ayarlanması
• Tuz haznesine 1 litre su koyunuz ve sonra bulaşık makinesi tuzu koyunuz.
• Parlatıcı haznesini doldurunuz.
Eğer kombi deterjan tabletleri kullanmak istiyorsanız, örneğin: "3'ü 1 arada",
"4'ü 1 arada", "5'i 1 arada" vs., Multitab fonksiyonunu ayarlayınız (bkz. "Multitab
fonksiyonu").
Su Yumuşatıcının Ayarlanması
Bulaşık makinesi, su sisteminde bulunan ve cihazın çalışmasına zararlı veya
ters etkisi bulunan mineralleri ve tuzları gidermek için tasarlanmış bir su yu‐
muşatıcı ile donatılmıştır.
Bu minerallerin ve tuzların içeriği ne kadar yüksek olursa, su da o kadar sert
olur. Su sertliği eşdeğer ıskalalarda ölçülür; Alman derecesi (°dH), Fransız de‐
recesi (°TH) ve mmol/l (litre başına milimol - su sertliğinin uluslararası birimi).
Yumuşatıcı, bölgenizdeki suyun sertliğine göre ayarlanmalıdır. Yerel su ida‐
reniz, bölgenizdeki suyun sertliği hakkında size bilgi verebilir.
Su yumuşatıcı iki şekilde ayarlanmalıdır: su sertliği ayar düğmesini kullanmak
suretiyle manuel olarak ve elektronik olarak.
Su sertliği Su sertlik ayarının yapıl‐
ması
°dH °TH mmol / l manuel elektronik
51 - 70 91 - 125 9,1 - 12,5 2 seviye 10 evet
43 - 50 76 - 90 7,6 - 8,9 2 seviye 9 evet
37 - 42 65 - 75 6,5 - 7,5 2 seviye 8 evet
29 - 36 51 - 64 5,1 - 6,4 2 seviye 7 evet
23 - 28 40 - 50 4,0 - 5,0 2 seviye 6 evet
19 - 22 33 - 39 3,3 - 3,9 2 seviye 5 evet
15 - 18 26 - 32 2,6 - 3,2 1 seviye 4 evet
11 - 14 19 - 25 1,9 - 2,5 1 seviye 3 evet
4 - 10 7 - 18 0,7 - 1,8 1 seviye 2 evet
< 4 < 7 < 0,7 1 seviye 1 hayır
67
Tuz kullanı‐
mı
Page 68

68
Bulaşık Makinesi Tuzunun Kullanımı
Manuel olarak ayarlama
Bulaşık makinesi, fabrikada pozisyon 2'ye ayarlanmıştır.
1. Bulaşık makinesinin kapağını açı‐
nız.
2. Alt sepeti bulaşık makinesinden çı‐
kartınız.
3. Su sertlik ayar düğmesini pozisyon 1
veya 2'ye getiriniz (tabloya bakınız).
4. Alt sepeti yerine geri takınız.
Elektronik ayarlama
Bulaşık makinesi, fabrikada seviye 5'e ayarlanmıştır.
1. Açma/Kapama tuşuna basınız. Bulaşık makinesi ayarlama modunda ol‐
malıdır.
2. Tuş B ve C'ye aynı anda basınız ve tuş A, B ve C'nin ışıkları yanıp sönmeye
başlayıncaya kadar basılı tutunuz.
3. Tuş A'ya basınız, tuş B'nın ışığı yanıp sönmeye devam ederken tuş C ve
A'nin ışıkları sönecektir. Dijital göstergede geçerli seviye görüntülenir.
Örnekler:
görüntüleniyorsa = seviye 5
görüntüleniyorsa = seviye 10
4. Seviyeyi değiştirmek için, tuş A'ya basınız. Tuşa her basıldığında seviye
değişecektir (yeni bir seviye seçimi için çizelgeye bakınız).
Örnekler: eğer geçerli seviye 5 ise, tuş A'ya bir kez bastığınızda, seviye 6
seçilecektir. eğer geçerli seviye 10 ise, tuş A'ya bir kez bastığınızda, seviye
1 seçilecektir.
5. İşlemi kaydetmek için, Açma/Kapama tuşuna basarak bulaşık makinesini
kapatınız.
Bulaşık Makinesi Tuzunun Kullanımı
UYARI
Sadece, bulaşık makinesinde kullanım için tasarlanmış tuzları kullanınız. Bu‐
laşık makinesinde kullanım için tasarlanmamış olan diğer tüm tuz tipleri, özel‐
likle de yemek tuzu, su yumuşatıcıya zarar verir. Sadece komple yıkama prog‐
ramlarından birini başlatmadan hemen önce tuz koyunuz. Böylece, tuz veya
tuzlu suyun paslanmaya neden olabilecek şekilde makinenin altında belirli bir
süre kalması önlenmiş olur.
Doldurmak için:
Page 69

Parlatıcı Bölmenin Doldurulması
1. Makinenin kapağını açınız, alt sepeti çıkartınız ve saatin tersi yönde dön‐
dürerek tuz haznesinin kapağını sökünüz.
2. Hazneye 1 litre su koyunuz (sadece ilk kez tuz koymadan önce bunu yap‐
mak gereklidir).
3. Ürünle birlikte verilen huniyi kulla‐
narak, tam doluncaya kadar hazne‐
ye tuz doldurunuz.
4. Vida dişlerinde veya conta üzerinde
hiçbir tuz izi olmadığından emin ola‐
rak kapağı yerine geri takınız.
5. Bir klik sesi işitilip durana kadar saat
yönünde döndürerek kapağı geri ta‐
kınız.
Tuz doldururken üniteden su taşması
olursa endişelenmeyin, bu gayet nor‐
maldir.
Kontrol panelindeki tuz gösterge ışığı, bulaşık makinesinin çalıştığını varsa‐
yarak, tuz eklendikten sonra 2-6 saat yanık kalabilir. Eğer çözülmesi uzun za‐
man alan tuzlar kullanıyorsanız, bu süre daha uzun olabilir. Makinenin çalış‐
ması bu durumdan etkilenmez.
Parlatıcı Bölmenin Doldurulması
69
UYARI
Sadece bulaşık makineleri için üretilmiş özel parlatıcıları kullanınız.
Parlatıcı çekmecesine asla başka maddeler koymayınız (örneğin; bulaşık ma‐
kinesi temizleme ajanı, sıvı deterjan). Bu durum cihaza zarar verir.
Parlatıcı, iyi bir durulama sağlar ve kurutmadan sonra leke ve çizik kalmasını
önler.
Parlatıcı, son durulamada otomatik olarak eklenir.
1. Kilit açma tuşuna (A) basarak haz‐
neyi açınız.
Page 70

70
Günlük Kullanım
2. Hazneye parlatıcıyı koyunuz. Mak‐
simum doldurma seviyesi "max" işa‐
reti ile belirtilmiştir.
Parlatıcı çekmecesi yaklaşık 110 ml
parlatıcı alır, bu da doz ayarına bağlı
olarak 16 ile 40 bulaşık yıkama devri
için yeterlidir.
3. Her doldurmadan sonra kapağı ka‐
patınız.
Doldurma esnasında parlatıcı dökülür‐
se, bir sonraki yıkamada aşırı köpük
oluşumunu önlemek için emici bir bezle
siliniz.
Parlatıcı dozunun ayarlanması
Alınan yıkama ve kurulama sonuçlarına göre, 6 pozisyonlu seçme düğmesi
yardımıyla parlatıcı dozunu ayarlayınız (pozisyon 1 - minimum doz, pozisyon
6 - maksimum doz).
Dozun fabrika ayarı pozisyon 4'tür.
Yıkamadan sonra tabaklarda su damlaları
veya kireç lekeleri varsa dozu artırınız.
Eğer tabakların üstünde yapışkan beya‐
zımsı çizgiler veya cam eşyalarla bıçakların
üstünde mavimsi bir tabaka varsa dozu
azaltınız.
Günlük Kullanım
• Bulaşık makinesi tuzu veya parlatıcısı eklemenin gerekli olup olmadığını
kontrol ediniz.
• Çatal-bıçakları ve tabakları bulaşık makinesine koyunuz.
• Deterjan koyunuz.
• Çatal-bıçaklar ve tabaklar için uygun bir yıkama programı seçiniz.
• Yıkama programını başlatınız.
Page 71

Çatal-bıçaklar Ve Tabakların Yerleştirilmesi
Çatal-bıçaklar Ve Tabakların Yerleştirilmesi
Süngerler, ev temizlik bezleri ve suyu emebilecek diğer eşyalar bulaşık maki‐
nesinde yıkanmamalıdır.
• Tabakları yerleştirmeden önce:
– Üzerindeki yemek kalıntılarını ve artıkları çıkartınız.
– Tavalardaki yanmış yemek kalıntılarını yumuşatınız.
• Tabakları ve çatal-bıçakları koyarken, lütfen unutmayınız ki:
– Tabaklar ve çatal-bıçaklar, püskürtme kollarının hareketini engellememe‐
lidir.
– Kupalar, bardaklar, tavalar vs. gibi içi boş eşyaları ağızları aşağı bakacak
şekilde yerleştiriniz, böylece içlerinde veya derin kısımlarında su kalmaz.
– Tabaklar ve çatal-bıçaklar birbirinin üzerine veya birbirlerini kapatacak
şekilde konmamalıdır.
– Bardakların zarar görmesini önlemek için birbirlerine temas etmemelerini
sağlayın.
– Küçük eşyaları çatal-bıçak sepetine koyunuz.
• Plastik eşyalar ve yapışmaz kaplamalı tavalar su damlalarını tutarlar; por‐
selen ve çelik eşyalar gibi bu eşyalar da kurumazlar.
• Hafif parçalar (plastik kaplar, vs.) üst sepete yerleştirilmelidir ve hareket et‐
meyecek şekilde düzenlenmelidir.
Aşağıda belirtilen çatal-bıçakların ve tabakların bulaşık makinesinde yıkanmaları
uygun değildir: sınırlı derecede uygun olanlar:
• Ahşap, boynuz, çiniden yapılma veya
mücevher süslü sapı olan çatal-bıçak‐
lar.
• Isıya dayanıklı olmayan plastik eşyalar.
• Yapışkanlı ve sıcağa dayanıklı olma‐
yan parçaları olan eski çatal-bıçaklar.
• Eklemli çatal-bıçaklar veya tabaklar.
• Kalay-kurşun alaşımlı veya bakır eşya‐
lar.
• Kurşun kristal bardak.
• Paslanır özellikteki çelik eşyalar.
• Ahşap büyük tabaklar.
• Sentetik elyaftan yapılmış eşyalar.
Kapağı açınız ve tabakları koymak için sepetleri dışarı çekiniz.
• Taştan yapılmış eşyaları, sadece eğer
üretici tarafından bulaşık makinesinde
yıkanabileceği belirtilmişse bulaşık ma‐
kinesinde yıkayınız.
• Sırlı parçalar makinede sıkça yıkanırsa
solabilir.
• Gümüş ve alüminyum parçalar, yıkama
esnasında renk atarlar: Yumurta beya‐
zı, yumurta sarısı ve hardal gibi artıklar
genelde renk atmasına neden olur ve
gümüşte leke yapar. Dolayısıyla, eğer
gümüş parçalar kullanımdan hemen
sonra yıkanmayacaksa üzerindeki ar‐
tıkları daima hemen siliniz.
71
Page 72

72
Çatal-bıçaklar Ve Tabakların Yerleştirilmesi
Alt sepet
Büyük ve ağır kirli tabakları ve tavaları alt
sepete koyunuz.
Büyük tabakları daha kolayca yerleştirebil‐
mek için, alt sepette sağ taraftaki 2 tabak
rafı aşağıya katlanabilir.
Çatal-bıçak sepeti
UYARI
Ucu yukarı bakacak şekilde yerleştirilen uzun bıçaklar potansiyel bir tehlikedir.
Dilimleme bıçağı gibi uzun ve / veya keskin çatal-bıçak parçaları üst sepete
yatay olarak yerleştirilmelidir. Bıçaklar gibi keskin eşyaları koyarken veya çı‐
kartırken dikkatli olunuz.
Çatal-bıçak sepetindeki tüm çatal-bıçaklara suyun ulaşabilmesini sağlamak
amacıyla:
Page 73

Çatal-bıçaklar Ve Tabakların Yerleştirilmesi
1. Çatal-bıçak sepetine ayırıcı ızgarayı
yerleştiriniz.
2. Çatal ve kaşıkları çatal-bıçak sepe‐
tine kulpları aşağı bakacak şekilde
yerleştiriniz.
Yumurta çırpacakları gibi daha bü‐
yük bulaşıklar için, çatal-bıçak ızga‐
rasının bir yarısını boş bırakınız.
73
Üst sepet
Küçük, kırılabilir kapları ve uzun keskin ça‐
tal-bıçakları üst sepete koyunuz.
• Çanak-çömlekleri katlanabilir bardak raf‐
larının üstüne ve altına yerleştirin, böyle‐
ce birbirleri arasındaki mesafe dengelen‐
miş olur ve su hepsine erişebilir.
Page 74

74
Çatal-bıçaklar Ve Tabakların Yerleştirilmesi
• Bardak rafları, uzun kaplara değmeye‐
cek şekilde yukarı doğru katlanabilir.
• Şarap ve brendi bardaklarını, bardak
raflarındaki yarıklara yatırınız veya ası‐
nız.
• Uzun kulplu bardaklar için, bardak ra‐
fını sağa veya olmadığı durumlarda so‐
la katlayınız.
• Üst sepetin sol tarafındaki sivri uçları
olan raf da iki parçalıdır ve katlanabilir.
Sivri uçlar katlanmamış haldeyken;
bardakları, kulplu bardakları vs. üst se‐
pete yerleştiriniz.
Sivri uçlar katlanmış haldeyken; servis
tabakları için daha fazla alan açılır.
Üst sepetin yüksekliğinin ayarlanması
Sepete göre maksimum tabak yüksekliği:
üst sepet alt sepet
Üst sepet yukarı kaldırıl‐
mış halde
Üst sepet aşağı indirilmiş
halde
22 cm. 30 cm.
24 cm. 29 cm.
Page 75

Deterjan Kullanımı
Üst sepetin yüksekliği, yüklü durumdayken de ayarlanabilir.
Üst sepetin yükseltilmesi / alçaltılması:
1. Üst sepeti tamamen çekip çıkartınız.
2. Üst sepeti kulpundan tutarken, gittiği
yere kadar yukarı kaldırınız ve sonra
dikey konumda geri indiriniz.
Üst sepet alt veya üst pozisyona ki‐
litlenecektir.
UYARI
Bulaşıkları makineye yerleştirdikten
sonra kapağını daima kapatınız, çünkü
açık bir kapak tehlikeli olabilir.
Kapağı kapatmadan önce, püskürtme
kollarının rahatça dönebildiğinden emin olunuz.
Deterjan Kullanımı
Sadece bulaşık makinesinde kullanım için özel tasarlanmış deterjanları kulla‐
nınız.
Lütfen deterjan ambalajında üretici tarafından belirtilen dozaj ve saklama tav‐
siyelerine uyunuz.
75
Sadece gerektiği kadar deterjan kullanarak, çevre korumasına katkıda bulun‐
muş olursunuz.
Deterjan konulması
1. Kapağı açınız.
Page 76

76
Multi-tablet Fonksiyonu
2. Deterjan çekmecesine (1) deterjanı
koyunuz. İşaretler doz seviyesini be‐
lirtmektedir:
20 = yaklaşık 20 gram deterjan
30 = yaklaşık 30 gram deterjan.
3. Ön yıkamalı tüm programlar, ön yı‐
kama deterjan bölmesine (2) konul‐
ması gereken ek bir deterjan dozu
(5/10 g.) kullanımını gerektirir.
Bu deterjan, ön yıkama aşamasında
etki edecektir.
4. Deterjan tabletleri kullanırken; table‐
ti (1) bölmesine koyunuz.
5. Kapağını kapatınız ve yerine oturun‐
caya kadar bastırınız.
Deterjan tabletleri
Farklı üreticilerin deterjan tabletleri farklı
oranlarda çözülür. Bu sebepten ötürü,
bazı deterjan tabletleri kısa yıkama
programları süresince tam temizlik güç‐
lerine erişemezler. Dolayısıyla, deterjan
tabletleri kullanırken deterjan kalıntıları‐
nın tamamen giderilebilmesi için lütfen
uzun yıkama programlarını seçiniz.
Multi-tablet Fonksiyonu
Bu cihaz, "Multitab" kombi deterjan tabletlerinin kullanımına imkan tanıyan
"Multitab fonksiyonu" ile donatılmıştır.
Bu ürünler, temizleme, durulama ve tuz fonksiyonlarını bir arada barındıran
deterjanlardır. Ayrıca, hangi tip tabletleri seçtiğinize bağlı olarak başka farklı
maddeler de içerebilir ("3'ü 1 arada", "4'ü 1 arada", "5'i 1 arada" vs.).
Bu deterjanların su sertliğinize uygun olup olmadığını kontrol ediniz. Üretici
talimatlarına bakınız.
Bu fonksiyon, tüm yıkama programları için seçilebilir. Bu fonksiyonu seçerek,
ilgili besleme haznelerinden parlatıcı ve tuz akışı otomatik olarak devre dışı
bırakılır ve ayrıca tuz ve parlatıcının gösterge ışıkları da devre dışı bırakılır.
"Multitab fonksiyonunu" bir yıkama programı başlamadan önce seçiniz.
Bu fonksiyon seçildikten sonra (gösterge ışığı yanar), daha sonraki yıkama
programları için de aktif durumda kalır.
"Multitab fonksiyonu" kullanıldığında, devir süreleri değişebilir. Bu durumda,
programın ilerleme süresi dijital göstergede otomatik olarak güncellenir.
Page 77

Multi-tablet Fonksiyonu
Program çalışmaya başlayınca, "Multitab fonksiyonu" artık DEĞİŞTİRİLEMEZ.
Eğer "Multitab fonksiyonunu" devre dışı bırakmak isterseniz, program ayarını
iptal etmeli ve sonra "Multitab fonksiyonunu" devre dışı bırakmalısınız.
Bu durumda, tekrar bir yıkama programı seçmeniz (istediğiniz seçeneklerle)
gerekmektedir.
Multitab fonksiyonunun aktive edilmesi/devre dışı bırakılması
Multitab tuşuna basınız: İlgili gösterge ışığı yanar. Bu, fonksiyonun aktif olduğu
anlamına gelir.
Fonksiyonu devre dışı bırakmak için, Multitab tuşuna tekrar basınız; gösterge
ışığı söner.
Eğer kurutma sonuçları tatmin edici değilse, size önerimiz:
1. Parlatıcı çekmecesine parlatıcı doldurunuz.
2. Parlatıcı çekmecesini aktive ediniz.
3. Parlatıcı dozunu pozisyon 2'ye ayarlayınız.
• Parlatıcı bölmesinin aktive edilmesi/devre dışı bırakılması sadece "Multitab
fonksiyonu" aktifken mümkündür.
Parlatıcı çekmecesinin aktive edilmesi/devre dışı bırakılması
1. Açma/Kapama tuşuna basınız. Bulaşık makinesi ayarlama modunda ol‐
malıdır.
2. Tuş B ve C'ye aynı anda basınız ve tuş A, B ve C'nin ışıkları yanıp sönmeye
başlayıncaya kadar basılı tutunuz.
3. Tuş B'ye basınız, tuş A ve C'nin ışıkları sönerken tuş B'nin ışığı yanıp sön‐
meye başlayacaktır. Dijital gösterge geçerli ayarı gösterir:
= Parlatıcı kullanılmıyor.
= Parlatıcı kullanılıyor.
4. Ayarı değiştirmek için B tuşuna tekrar basınız, dijital gösterge yeni ayarı
görüntüler.
5. İşlemi kaydetmek için, Açma/Kapama tuşuna basarak bulaşık makinesini
kapatınız.
Eğer standart deterjan sistemini kullanmaya geri dönmek isterseniz, aşağıda‐
kileri yapmanızı öneririz:
1. "Multitab fonksiyonunu" devre dışı bırakınız.
2. Tuz haznesini ve parlatıcı çekmecesini tekrar doldurunuz.
3. Su sertliği ayarını en yüksek ayara getiriniz ve makineye hiç bulaşık koy‐
madan 1 normal yıkama programı çalıştırınız.
4. Su sertlik ayarını, bölgenizdeki suyun sertliğine göre ayarlayınız.
5. Parlatıcı dozunu ayarlayınız.
77
Page 78

78
Yıkama Programları
Yıkama Programları
Program Kirlilik
derecesi
AUTO
45-70°
Karışık
3)
normal
ve ağır
kirli
Bulaşık
türü
Çanakçömlek‐
ler, çatalbıçaklar,
tencere‐
ler ve ta‐
valar
INTENSIV
CARE 70°
Ağır kirli Çanak-
çömlek‐
ler, çatalbıçaklar,
tencere‐
ler ve ta‐
valar
30 MIN 60°4)Hafif kirli Çanak-
çömlekler
ve çatalbıçaklar
ECO 50°
Normal
kirli
Çanakçömlekler
5)
ve çatalbıçaklar
Normal
kirli
Hassas
çanakçömlekler
ve cam
eşyalar
Herhangi Bir kısmı
bulaşık
yüklü
(gün için‐
de daha
sonra
dolduru‐
lacak)
Program tanımı Tüketim değerle‐
Ön yıkama
Ana yıkama
6)
Ara durulama
1/2x
Son durulama
Kurutma
1)
ri
Süre (dakika olarak) 2)Enerji (kWs)
-
1,1 - 1,7
-
1,5 -1,7
0,9
-
1,0 - 1,1
-
0,8 -0,9
0,1
Su (litre)
12 - 23
16 - 18
9
12 - 13
14 - 15
4
Page 79

Bir Yıkama Programının Seçilmesi Ve Başlatılması
79
Program Kirlilik
NIGHT
CYCLE
1) Tüketim değerleri size rehber olması için verilmiştir ve suyunuzun basıncına ve sıcaklığına göre
ve ayrıca güç beslemesindeki değişimlere ve koyduğunuz tabak miktarına göre de değişiklik
gösterebilir.
2) Dijital göstergede program süresi görüntülenir.
3) Otomatik yıkama programında, tabaklardaki kirin miktarına suyun ne kadar bulanık olduğuna
göre karar verilir. Program süresi, su ve enerji tüketim seviyeleri değişiklik gösterebilir; bu,
cihazın tam dolu veya kısmen dolu olma durumuna ve tabakların hafif veya ağır kirli olma
durumuna bağlıdır. Suyun sıcaklığı otomatik olarak 45°C ile 70°C arasında ayarlanır.
4) Bulaşık makinesi tam dolu olmadığında kullanım için idealdir. Bu, sadece kahvaltı ve akşam
yemeği bulaşıklarını yıkamak isteyen 4 kişilik bir ailenin ihtiyaçlarını karşılayacak mükemmel bir
günlük programdır.
5) Test enstitüleri için test programı.
6) Bu program, deterjan kullanımı gerektirmez
derecesi
Normal
kirli
Bulaşık
türü
Çanakçömlekler
ve çatalbıçaklar
Program tanımı Tüketim değerle‐
Ön yıkama
Ana yıkama
Ara durulama
Son durulama
Kurutma
1)
ri
Süre (dakika olarak) 2)Enerji (kWs)
-
1.1 - 1.3
Su (litre)
13 - 14
Bir Yıkama Programının Seçilmesi Ve Başlatılması
Yıkama programını ve gecikmeli başlatmayı kapak hafif açık haldeyken seçi‐
niz. Program veya gecikmeli başlatma süresinin geri sayımı ancak kapak ka‐
patıldıktan sonra başlayacaktır. Bu ana kadar, ayarların değiştirilmesi müm‐
kündür.
1. Bulaşıkların sepete doğru yerleştirildiğinden ve püskürtme kollarının rahat‐
ça dönebildiğinden emin olunuz.
2. Su musluğunun açık olduğundan emin olunuz.
3. Açma/Kapama tuşuna basınız. Bulaşık makinesi ayarlama modunda ol‐
malıdır.
4. Yıkama programını seçmek için iki program tuşundan birine basınız. ("Yı‐
kama programları" çizelgesine bakınız).
Bir program seçildiğinde, karşılık gelen program ışığı yanar ve dijital gös‐
tergede program süresi yanıp söner.
NIGHT CYCLE (GECE DEVRİ) programını ayarlamak isterseniz, NIGHT
CYCLE tuşuna basınız, karşılık gelen gösterge ışığı yanar.
5. Bulaşık makinesinin kapağını kapatınız, program otomatik olarak başlaya‐
caktır.
Page 80

80
Bir Yıkama Programının Seçilmesi Ve Başlatılması
Programın gecikmeli başlatmaya ayarlanması ve başlatılması
1. Yıkama programını seçtikten sonra, gecikmeli başlatma için geri sayımı
yapılacak saat sayısı dijital göstergede görüntüleninceye kadar gecikmeli
başlatma tuşuna basınız. Seçilen yıkama programının başlaması 1 ile 19
saat arasında bir süre için ertelenebilir.
2. Bulaşık makinesinin kapağını kapatınız, böylece geri sayım otomatik olarak
başlar.
3. Geri sayım 1 saatlik kademelerle ilerler.
4. Kapağın açılması geri sayımı durdurur. Kapağı kapatınız; geri sayım du‐
raklatıldığı noktadan itibaren devam edecektir.
5. Gecikmeli başlatma süresi sona erdiğinde, program otomatik olarak çalış‐
maya başlayacaktır.
Yıkama programının ve gecikmeli başlatmanın seçilmesi kapak kapalıyken de
yapılabilir. Unutmayınız ki bu şekilde, bir yıkama programı tuşuna bastığınızda
başka bir program seçmek veya gecikmeli başlatmayı seçmek için SADECE
3 saniyeniz vardır, daha sonra seçilen program otomatik olarak başlayacaktır.
UYARI
Çalışmakta olan bir yıkama programını SADECE kesinlikle gerekiyorsa du‐
raklatın veya iptal edin. Dikkat! Kapak açıldığında dışarı sıcak buhar çıkabilir.
Kapağı dikkatlice açınız.
Çalışmakta olan bir yıkama programının veya işlemdeki gecikmeli
başlatmanın iptal edilmesi
• Program ışıkları yanıncaya kadar RESET tuşuna basınız.
• Gecikmeli başlatmanın iptal edilmesi, ayarlanmış yıkama programının da
iptal edilmesi anlamına gelir. Bu durumda, tekrar bir yıkama programı seç‐
meniz gerekmektedir.
• Eğer yeni bir yıkama programı seçilecekse, deterjan çekmecesinde deterjan
olup olmadığını kontrol ediniz.
Çalışmakta olan bir yıkama programının duraklatılması
• Bulaşık makinesinin kapağını açınız; program duracaktır. Kapağı kapatınız;
program duraklatıldığı noktadan itibaren çalışmaya devam edecektir.
• Açma/Kapama tuşuna basınız, tüm ışıklar sönecektir. Açma/Kapama tuşu‐
na tekrar basınız; program duraklatıldığı noktadan itibaren çalışmaya devam
edecektir.
Yıkama programının sonu
• Bulaşık makinesi otomatik olarak duracak ve yıkama programı sona erdiğin‐
de sizi sesli bir sinyalle uyaracaktır.
• Sona eren programın gösterge ışığı yanık kalacaktır.
• Dijital göstergede sıfır rakamı görüntülenir.
1. Açma/Kapama tuşuna basarak bulaşık makinesini kapatınız.
Page 81

Bulaşıkların Makineden Çıkartılması
Yıkama programı sona erdiğinde, cihazı kapatmanız önerilir. Bunun yapılma‐
ması halinde, yaklaşık 3 dakika sonra gösterge ışıklarının tümü sönecektir.
Dijital göstergede 1 yatay çubuk görüntülenir.
Bu, program sona erdiğinde cihazı kapatmayı unutmuş veya herhangi bir se‐
beple kapatamamış olmanız halinde enerji tüketimini azaltmanıza yardımcı
olur.
Herhangi bir tuşa basınız (Açma/Kapama tuşu haricinde), kontrol paneli prog‐
ram sona erdiğindeki ile aynı durumu görüntüleyecektir (gösterge ışıkları ve
dijital gösterge).
2. Kapağı aralık bırakınız ve bulaşıkları çıkartmadan önce birkaç dakika bek‐
leyiniz; bu şekilde soğumaları sağlanacak ve daha iyi kuruyacaklardır.
Bulaşıkların Makineden Çıkartılması
• Sıcak tabaklar darbelere karşı hassastır.
Dolayısıyla, sıcak tabakların cihazdan çıkartılmadan önce soğuması bek‐
lenmelidir.
• Öncelikle alt sepeti sonra da üst sepeti boşaltınız; böylece üst sepetteki su‐
ların alt sepetteki tabakların üstüne damlaması önlenmiş olur.
• Paslanmaz çelik, tabaklara göre daha soğuk olacağından bulaşık makine‐
sinin yanlarında ve kapağında su görülebilir.
DİKKAT
Yıkama programı sona erdiğinde, bulaşık makinesinin fişini prizden çekmeniz
ve su musluğunu kapatmanız önerilir.
81
Bakım Ve Temizlik
Filtrelerin temizliği
Filtreler ara sıra kontrol edilmeli ve temizlenmelidir. Kirli filtreler yıkama per‐
formansını düşürecektir.
UYARI
Filtreleri temizlemeden önce makinenin kapatılmış olduğundan emin olunuz.
1. Kapağı açınız, alt sepeti çıkartınız.
Page 82

82
Bakım Ve Temizlik
2. Bulaşık makinesi filtre sistemi, bir
kaba filtre (A), bir mikro-filtre (B) ve
bir yassı filtreden oluşmaktadır. Mik‐
ro-filtredeki kulpu kullanarak filtre
sistemini açınız ve çıkartınız.
3. Kulpu saatin tersi yönde yaklaşık 1/4
tur döndürünüz ve filtre sistemini çı‐
kartınız.
4. Kaba filtreyi (A) kulpundan tutunuz
ve mikro-filtrenin (B) içinden çıkartı‐
nız.
5. Tüm filtreleri akan suyun altında iyi‐
ce temizleyiniz.
6. Yıkama bölmesinin tabanındaki
yassı filtreyi çıkartınız ve her iki yü‐
zünü de iyice temizleyiniz.
7. Yassı filtreyi yıkama bölmesinin ta‐
banına geri yerleştiriniz ve yerine
tam olarak oturduğundan emin olu‐
nuz.
8. Kaba filtreyi (A) mikro-filtrenin (B)
içine koyunuz ve bastırarak oturtu‐
nuz.
9. Filtre kombinasyonunu yerine takı‐
nız ve kulpunu saat yönünde durun‐
caya kadar döndürerek yerine kilit‐
leyiniz. Bu işlem esnasında, yassı filtrenin yıkama bölmesinin üstüne doğru
çıkıntı yapmadığından emin olunuz.
UYARI
Bulaşık makinesini filtreler olmadan ASLA kullanmayınız. Filtrelerin yanlış yer‐
leştirilmesi ve takılması yıkama performansını düşürür ve cihazın zarar gör‐
mesine neden olabilir.
Page 83

Servisi Aramadan Önce
Püskürtme kollarının temizlenmesi
Püskürtme kollarını ASLA çıkartmaya çalışmayınız.
Eğer kir artıkları püskürtme kollarının deliklerini tıkamışsa, bunları bir kokteyl
çubuğu ile çıkartınız.
Dış temizlik
Makinenin dış yüzeylerini ve kontrol panelini nemli yumuşak bir bezle temiz‐
leyiniz. Gerekirse, sadece nötr deterjanlar kullanınız. Asla aşındırıcı temizlik
ürünleri, ovalama telleri veya çözücüler (aseton, trikloroetilen vs.) kullanmayı‐
nız.
İç temizlik
Kapağın, deterjan ve parlatıcı çekmecelerinin etrafındaki contaları, nemli bir
bezle düzenli olarak temizleyiniz.
Her 3 ayda bir, makineye bulaşık koymadan ve deterjan kullanarak ağır kirli
bulaşıklar programında boş çalıştırınız.
Uzun süreli kullanmama
Eğer makinenizi uzun bir süre kullanmayacaksanız, size önerimiz:
1. Cihazın fişini prizden çekiniz ve suyu kapatınız.
2. Kötü kokuların oluşmasını önlemek için kapağını hafif aralık bırakınız.
3. Makinenin içini temiz halde bırakınız.
83
Donmaya karşı önlemler
Makineyi, sıcaklığın 0°C'nin altına düştüğü yerlere monte etmeyiniz. Eğer bunu
yapmak zorundaysanız, makineyi boşaltınız, kapağını kapatınız, su giriş hor‐
tumunu çıkartınız ve içini boşaltınız.
Makinenin taşınması
Eğer makineyi başka bir yere taşımak zorundaysanız (evi taşırken vs.):
1. Fişini elektrik prizinden çekiniz.
2. Su musluğunu kapatınız.
3. Su giriş ve tahliye hortumlarını çıkartınız.
4. Makineyi hortumlarıyla birlikte çekip çıkartınız.
Nakliye esnasında makineyi yan yatırmayınız.
Servisi Aramadan Önce
Bulaşık makinesi çalışmıyor veya çalışırken durmuyor. Belirli bazı sorunlar,
bazı basit bakım ve kontrollerin yapılmamasından kaynaklanır ve bir teknisyen
çağırmaya gerek kalmadan tabloda belirtilen talimatların yardımıyla çözülebilir.
Bulaşık makinesini kapatınız ve aşağıda önerilen düzeltici işlemleri yapınız.
Page 84

84
Servisi Aramadan Önce
Arıza belirtimi ve sorun Olası sebep ve çözümü
• Çalışan programın ışığının devamlı ya‐
nıp sönüyor.
•
Dijital göstergede
• Fasılalı sesli sinyal.
Bulaşık makinesi su almıyordur.
• Çalışan programın ışığının devamlı ya‐
nıp sönüyor.
•
Dijital göstergede
• Fasılalı sesli sinyal.
Bulaşık makinesi suyu tahliye etmiyor.
• Çalışan programın ışığının devamlı ya‐
nıp sönüyor.
•
Dijital göstergede
• Fasılalı sesli sinyal.
Taşma tespit aygıtı tetiklenmiştir.
Program çalışmaya başlamıyor. • Bulaşık makinesinin kapağı doğru şe‐
görüntüleniyor.
görüntüleniyor.
görüntüleniyor.
• Su musluğu tıkalıdır veya kireç kapla‐
mıştır.
Su musluğunu temizleyiniz.
• Su musluğu kapalıdır. Su musluğunu
açınız.
• Dişli hortum tertibatındaki su giriş valfı
kısmına takılı filtre (varsa) tıkalıdır.
Dişli hortumdaki filtreyi temizleyiniz.
• Su giriş hortumu doğru bir şekilde ko‐
numlandırılmamıştır veya bükülmüş ya
da ezilmiştir.
Su giriş hortumunun bağlantısını kon‐
trol ediniz.
• Lavabo tahliyesi tıkalıdır.
Lavabo tahliyesini temizleyiniz.
• Su tahliye hortumu doğru bir şekilde
konumlandırılmamıştır veya bükülmüş
ya da ezilmiştir.
Su tahliye hortumunun bağlantısını
kontrol ediniz.
• Su musluğunu kapatınız ve yerel yetkili
servisinizi arayınız.
kilde kapatılmamıştır. Kapağı kapatı‐
nız.
• Elektrik fişi takılı değildir. Elektrik fişini
takınız.
• Evin sigorta kutusundaki sigorta yan‐
mıştır / atmıştır.
Sigortayı değiştiriniz.
• Gecikmeli başlatmaya ayarlanmıştır.
Eğer bulaşıkları hemen yıkamanız ge‐
rekiyorsa, gecikmeli başlatmayı iptal
ediniz.
Bu kontrolleri yaptıktan sonra, cihazı açınız; program duraklatıldığı noktadan
itibaren devam edecektir.
Eğer makine tekrar sorun veya arıza belirtirse, yetkili servisinizi arayınız.
Yukarıdaki çizelgede açıklanmayan diğer arıza gösterimleri için, lütfen yetkili
servisinize danışınız ve yetkili servisinizi aradığınızda, cihazın modelini (Mod.),
ürün numarasını (PNC) ve seri numarasını (S.N.) belirtiniz.
Bu bilgiler, bulaşık makinesi kapağının yan tarafına iliştirilmiş bilgi etiketinde
yazılıdır.
Page 85

Teknik Veriler
85
Aşağıdaki numaraların her zaman elinizin altında bulunması için, bunları
aşağıya not etmenizi öneririz:
Mod. : . . . . . . . . . . . . . . . . . . . . . . .
PNC :. . . . . . . . . . . . . . . . . . . . . . . .
S.N. : . . . . . . . . . . . . . . . . . . . . . . . .
Yıkama sonuçları tatmin edici değil.
Tabaklar temiz değil. • Yanlış yıkama programı seçilmiştir.
Tabaklar ıslak ve mat. • Parlatıcı kullanılmamıştır.
Bardakların ve tabakların üzerinde çizgi‐
ler, beyazımsı lekeler veya mavimsi bir
tabaka var.
Su damlaları bardakların ve tabakların
üzerinde kurumuş.
• Tabaklar, suyun tüm yüzeylerine eriş‐
mesini engelleyecek şekilde yerleştiril‐
miştir. Sepetlere aşırı yük konulmama‐
lıdır.
• Bulaşıkların yanlış yerleştirilmesinden
ötürü püskürtme kolları rahatça döne‐
miyordur.
• Yıkama bölmesinin tabanındaki filtreler
çok kirlidir veya yanlış yerleştirilmiştir.
• Çok az deterjan kullanılmıştır veya hiç
deterjan kullanılmamıştır.
• Tabaklar üzerinde kireç kalıntıları var‐
sa; tuz haznesi boştur veya su yumu‐
şatıcı seviyesi yanlış ayarlanmıştır.
• Tahliye hortumu bağlantısı doğru ya‐
pılmamıştır.
• Tuz haznesinin kapağı doğru bir şekil‐
de kapatılmamıştır.
• Parlatıcı çekmecesi boştur.
• Parlatıcı dozunu azaltınız.
• Parlatıcı dozunu artırınız.
• Sebebi kullandığınız deterjan olabilir.
Deterjan üreticisinin müşteri destek
hattına danışınız.
Eğer tüm bu kontrollerden sonra problem devam ediyorsa, yetkili servisinizi
arayınız.
Teknik Veriler
Ebatlar Genişlik x yükseklik x de‐
Elektrik bağlantısı - Voltaj Toplam güç - Sigorta
Su besleme basıncı Minimum - Maksimum
rinlik (cm.)
60 x 85 x 63,5
Elektrik bağlantısı hakkında bilgi, bulaşık makinesi ka‐
pağının iç kenarındaki bilgi etiketinde yazılıdır
0,05 - 0,8
(MPa)
Page 86

86
Test Enstitüleri İçin Bilgiler
Kapasite Yer ayarları 12
Test Enstitüleri İçin Bilgiler
EN 60704 uyarınca test işlemi, cihaz tam dolu iken ve test programı kullanı‐
larak gerçekleştirilmelidir (bkz. "Yıkama programları").
EN 50242 uyarınca test işlemi, tuz haznesi ve parlatıcı çekmecesi tuz ve par‐
latıcı ile doldurulmuş haldeyken ve test programı kullanılarak gerçekleştirilme‐
lidir (bkz. "Yıkama programları").
Tam dolu: 12 kişilik standart yemek takımı
Gerekli deterjan miktarı: 5 g. + 25 g. (Tip B)
Parlatıcı ayarı: pozisyon 4 (Tip III)
Örnek yerleştirme düzenleri:
Üst sepet
1)
Page 87

Çatal-bıçak sepetli alt sepet Çatal-bıçak sepeti
1) Eğer sol tarafta bardak rafları bulunuyorsa veya çatal-bıçak tablası yerindeyse, bunları çıkartın.
Montaj talimatları
Montaj
Montaj
87
UYARI
Bu cihazın montajı için gerekli herhangi bir elektrik ve/veya su bağlantı işlemi
kalifiye bir elektrik teknisyeni ve/veya uzman bir kişi tarafından yapılmalıdır.
Makineyi yerleştirmeden önce tüm ambalaj malzemelerini çıkartınız.
Eğer mümkünse, makineyi bir su musluğunun ve tahliye noktasının yakınına
yerleştiriniz.
Page 88

88
Montaj
Bir mutfak tezgahının (mutfak tezgah mermeri veya lavabo) altına
montaj
Makinenin üst tablasını çıkartarak, yerleştirilecek yerin boyutlarını aşağıdaki
resme göre ayarlayarak makineyi bir lavabo ünitesinin altına veya mevcut bir
tezgahın altına monte edebilirsiniz.
Aşağıdaki işlemleri yapınız:
1. Arkadaki iki tutucu vidayı sökerek
makinenin üst tablasını çıkartınız,
üst tablasını arkadan çekiniz ve üst
tablasını yukarı kaldırmak suretiyle
ön yarıklardan kaydırarak çıkartınız.
2. Ayarlanabilir ayaklar yardımıyla se‐
viye ayarı yaptıktan sonra makineyi
yerleştiriniz.
Makineyi yerine yerleştirirken, su giriş ve tahliye hortumlarının kırılmadığından
veya ezilmediğinden emin olunuz.
Dahili bileşenlere erişimin gerekli olduğu tüm işlemlerde, bulaşık makinesinin
fişi prizden çekilmelidir.
Cihaz monte edildikten sonra, bir tamir işlemi gerekmesi durumunda servis
mühendisi tarafından kolayca erişilebilecek durumda olduğundan emin olunuz.
Eğer bulaşık makinesi ileride tek başına bir ünite şeklinde kullanılacaksa, ori‐
jinal üst tablası geri takılmalıdır.
Tek başına ünite olarak monte edilen cihazların sütun tabanı ayarlanamaz.
Düzlemsellik/seviye ayarlaması
Kapağın doğru bir şekilde kapanması ve su sızdırmaması için seviye ayarının
iyi yapılması önemlidir. Cihazın düzlemsellik seviyesi doğru ayarlandığında,
kapak kabinin herhangi bir tarafına takılmayacaktır. Eğer kapak doğru kapan‐
mıyorsa, makine tam düz seviyeye gelinceye kadar ayarlanabilir ayakları gev‐
şetiniz veya sıkınız.
Page 89

Su Bağlantısı
Su Bağlantısı
Su besleme bağlantıları
Bu cihaz bir sıcak (maks. 60°) veya soğuk su beslemesine bağlanabilir.
Sıcak su beslemesine bağladığınızda, enerji tüketiminde büyük ölçüde azalma
sağlayabilirsiniz. Bununla birlikte, bu durum sıcak suyun nasıl ısıtıldığına bağlı‐
dır. (Çevreyle daha dost olan güneş enerjisi, güneş pili panelleri ve rüzgar en‐
erjisi gibi alternatif enerji kaynaklarını kullanmanızı öneririz).
Bağlantıyı olduğu gibi yapmak için, makinenin besleme hortumuna takılmış
kuplaj somunu bir 3/4 gaz dişli ağzına vidalanmalı veya pres-tipli özel bir hızlıbağlantı musluğuna takılmalıdır.
Su basıncı, "Teknik özellikler" tablosunda verilen limitler dahilinde olmalıdır.
Yerel su idareniz, bölgenizdeki ortalama şebeke basıncı konusunda size bilgi
verebilir.
Su giriş hortumu bağlanırken, bükülmemeli, kırılmamalı veya dolaştırılmama‐
lıdır.
Bulaşık makinesi, montaj şekline göre bir kilit-somunu vasıtasıyla sola veya
sağa döndürülebilir su alma ve tahliye hortumlarına sahiptir.
Su kaçaklarını önlemek için, kilit somunu doğru bir şekilde takılmalıdır.
(Dikkat! Kilit somunlu su alma ve tahliye hortumları bulaşık makinesi modelle‐
rinin hepsinde YOKTUR. Böyle bir durumda, bu tür bir bağlantı mümkün ol‐
mayacaktır). Eğer makine yeni borulara veya uzunca bir süre kullanılmamış
borulara bağlanıyorsa, giriş hortumunu takmadan önce suyu birkaç dakika
akıtmanız gerekir.
Daha önce eski bir makinede kullanılmış olan bağlantı hortumlarını KULLAN‐
MAYINIZ.
Bu cihaz, cihazda kullanılan suyun tekrar içme suyu tesisatına karışmasını
önleyen güvenlik özellikleri ile donatılmıştır. Bu cihaz, yürürlükteki ilgili su te‐
sisatı tüzüklerine uygundur.
89
Emniyet valflı su giriş hortumu
Çift bloklu su giriş hortumunu taktıktan sonra, emniyet valfı musluğa yakın olan
tarafta kalır. Dolayısıyla, su giriş hortumu sadece su gelirken basınç altında
kalır. Eğer su giriş hortumu makine çalışırken su kaçırırsa, emniyet valfı su
akışını keser.
Su giriş hortumunu takarken aşağıdakilere dikkat ediniz:
• Emniyet valfı elektrik kablosu, çift-bloklu su giriş hortumunun içindedir. Su
giriş hortumunu veya emniyet valfını suya batırmayınız.
• Eğer su giriş hortumu veya emniyet valfı hasar görürse, hemen cihazın fişini
prizden çekiniz.
• Emniyet valflı bir su giriş hortumu sadece bir uzman veya Yetkili Servis ta‐
rafından değiştirilmelidir.
Page 90

90
Su Bağlantısı
UYARI
Uyarı! Tehlikeli voltaj.
Su tahliye hortumu bağlantısı
Tahliye hortumunun ucu aşağıdaki şekillerde bağlanabilir:
1. Lavabo tahliyesine, tezgahın alt kısmından takmak suretiyle. Bu yöntem,
atık suyun lavabodan makineye akmasını önleyecektir.
2. Dahili çapı minimum 4 cm. olan, havalandırma menfezli bir tezgah boru‐
suna.
Atık su bağlantısı, bulaşık makinesi taba‐
nından 30 cm (minimum) ile 100 cm (mak‐
simum) arası yükseklikte olmalıdır.
Tahliye hortumu, bulaşık makinesinin
sağına veya soluna döndürülebilir.
Hortumun kırılmamış veya ezilmemiş ol‐
duğundan emin olunuz, çünkü bu durum su
tahliyesini engeller veya yavaşlatır.
Makine tahliye yaparken lavabo tapası ta‐
kılı olmamalıdır, çünkü bu durum suyun
makineye doğru geri basınca maruz kal‐
masına neden olabilir.
Eğer bir tahliye hortumu uzatması kullanıyorsanız, bu hortum 2 metreden uzun
olmamalıdır ve dahili çapı makine hortumunun çapından küçük olmamalıdır.
Aynı şekilde, su tahliye bağlantısında kullanılan bağlantı elemanlarının dahili
çapı da hortumun çapından küçük olmamalıdır.
Tahliye hortumunu bir lavabo-altı tahliye
borusuna bağlarken, plastik membranın
(A) tamamı çıkartılmalıdır. Membranın ta‐
mamının çıkartılmaması, yemek kalıntıları‐
nın zamanla birikim yaparak bulaşık maki‐
nesinin tahliye hortumunun tıkanmasına
neden olur.
Page 91

Elektrik Ağlantısı
Bulaşık makinelerimiz, kirli suyun makineye geri akmasını önleyen bir güvenlik
aygıtı ile donatılmıştır. Eğer lavabonuzun tahliyesinde bir "geri-akış önleme
valfı" varsa, bu valf bulaşık makinenizin doğru tahliye yapmasını engelleyebilir.
Dolayısıyla, bunu çıkartmanızı öneririz.
Kurulum işleminden sonra herhangi bir kaçağı önlemek için, su bağlantılarının
sıkı olduğundan emin olunuz.
Elektrik Ağlantısı
UYARI
Güvenlik standartları cihazın topraklanmasını gerektirir.
Cihazı ilk kez kullanmadan önce, bilgi etiketinde yazılı olan nominal voltaj ve
besleme tipinin cihazın monte edildiği yerdeki değerlerle aynı olduğundan emin
olunuz.
Sigorta bilgileri de bilgi etiketinde yazılıdır.
Elektrik fişi daima doğru bir şekilde takılmış ve elektrik çarpmasına karşı ko‐
rumalı bir prize takılmalıdır. Priz çoğaltıcılar, konnektörler ve uzatma kabloları
kullanılmamalıdır.
Aksi halde aşırı ısınmadan dolayı yangın tehlikesi oluşabilir.
Gerekirse, evin elektrik tesisatı prizini değiştiriniz. Elektrik kablosunun değiş‐
tirilmesi gerekirse, yerel Yetkili Servisinizi arayınız.
Elektrik prizi, cihaz monte edildikten sonra erişilebilir durumda olmalıdır.
Cihazın fişini asla kablosundan tutarak çekmeyiniz. Daima fişin kendisinden
tutarak çekiniz.
Üretici firma, yukarıda belirtilen güvenlik önlemlerine riayet edilmemesinden
kaynaklanan sorunlardan sorumlu değildir.
91
Çevreyle İlgili Bilgiler
Ürünün ya da ambalajının üzerindeki simgesi, bu ürünün normal ev çöpü
gibi atılmayıp, elektrik ve elektronik cihazların geri dönüşüm için verildiği özel
toplama noktalarından birine verilmesi gerektiğini belirtir. Bu ürünün doğru
şekilde imha edilmesine katkıda bulunmakla hem çevreyi, hem de
çevrenizdekilerin sağlığını korumuş olursunuz. Yanlış şekilde imha ise hem
çevreye hem sağlığa zararlıdır. Bu ürünün geri dönüşümüne ilişkin daha
ayrıntılı bilgileri belediyenizden, çöp dairenizden veya ürünü satın almış
olduğunuz bayiden edinebilirsiniz.
Ambalaj malzemesi
Ambalaj malzemeleri çevreyle dosttur ve geri-dönüşümlüdür. Plastik bileşenler
işaretlerle tanımlıdır, örn. >PE<, >PS<, vs. Lütfen ambalaj malzemelerini uy‐
gun çöp atma noktalarına ve atık imha tesislerine teslim ediniz.
Page 92

929394
UYARI
Bir cihaz artık kullanılmayacaksa:
• Fişini elektrik prizinden çekiniz.
• Kabloyu ve fişini kesiniz ve atınız.
• Kapak kilit dilini atınız. Bu yöntem, çocukların cihazla oynarken içinde kilitli
kalmalarını ve yaşamlarının tehlikeye girmesini önleyecektir.
Page 93

Page 94

Page 95

95
Page 96

www.electrolux.com
Para comprar accesorios, consumibles y recambios en nuestra tienda online, por favor visite
nuestro site: www.aeg.com.es
www.aeg-electrolux.com.tr
117964450-00-102008
 Loading...