

Page 1

user manual
Built In Fan/
Steam Cooking Oven
EOB98000
Page 2

We were thinking of you
when we made this product
Page 3

Welcome to the world of Electrolux
Thank you for choosing a first class
product from Electrolux, which hopefully
will provide you with lots of pleasure in
the future. The Electrolux ambition is to
offer a wide variety of quality products
that make your life more comfortable.
You will find some examples on the cov
er in this manual. Please take a few minutes to study this manual so that you
can take advantage of the benefits of
your new machine. We promise that it
will provide a superior User Experience
delivering Ease-of-Mind.
Good luck!
electrolux 3
-
Page 4

4 electrolux contents
T
1
Contents
Safety instructions 5
Description of the Appliance 7
Before Using for the first time 13
Using the Oven 16
Cleaning and Care 55
What to do if …70
Installation Instructions 71
Disposal 76
Index 77
Service 79
he following symbols are used in this user manual:
Important information concerning your personal safety and information on
how to avoid damaging the appliance.
3 General information and tips
2 Environmental information
Page 5

operating instructions electrolux 5
Operating Instructions
Safety instructions
Electrical safety
• This appliance must be only connected by a registered electrician.
• In the event of a fault or damage to
the appliance: Take the fuses out or
switch off.
• Repairs to the appliance must only
be carried out by qualified service
engineers. Considerable danger
may result from improper repairs. If
repairs become necessary, please
contact our Customer Services or
your dealer.
Child Safety
• Never leave children unsupervised
when the appliance is in use.
• The appliance is fitted with a child
safety device.
Safety during Operation
• People (including children) who, because of their physical, sensory or
mental capabilities or their inexperience or ignorance are not able to use
the device safely, should not use this
device without supervision or instruction by a responsible person.
• This appliance is intended to be
used for cooking, roasting and baking food in the home.
• Be careful if connecting electrical appliances to sockets near this
appliance. Electrical leads should
not be allowed to come near the
hotplates or to become caught under the hot oven door.
• Warning: Danger of burns! When
in use, the oven interior surfaces become very hot.
• Warning: When cooking with the
Vigorous Steam function, do not
under any circumstances open
the oven door. The escaping steam
can cause moisture damage to furniture and cabinets. Avoid any direct
contact with escaping steam.
• If you use alcohol in your cooking, a
slightly flammable alcohol/air mixture
may ensue. In this case, be careful
when opening the door. Do not handle any sources of heat, sparks or
naked flames when doing so.
Information on acrylamides
According to the latest scientific
knowledge, intensive browning of
food, especially in products containing starch, can constitute a
health risk due to acrylamides.
Therefore we recommend cooking
at the lowest possible temperatures
and not browning foods too much.
Page 6

6 electrolux safety instructions
How to avoid damage to the appliance
• Do not line the oven with aluminium
foil and do not place baking trays,
pots, etc. on the oven floor, as the
heat that builds up will damage the
oven enamel.
• Fruit juices dripping from the baking
tray will leave stains, which you will
not be able to remove. For very moist
cakes, use a deep tray.
• Do not put any strain on the oven
door when open.
• Never pour water directly into the
oven when it is hot. This could cause
damage to or discoloration of the
enamel.
• Rough handling, especially around
the edges of the front panel, can
cause the glass to break.
• Do not store any flammable materials inside the oven. These could ignite when the oven is switched on.
• Do not store any moist foods inside
the oven. This could damage the
oven enamel.
Note on enamel coating
Changes in the colour of the oven’s
enamel coating as a result of use do not
affect the appliance’s suitability for nor
mal and correct use. They therefore do
not constitute a defect in the sense of
the warranty law.
-
Page 7
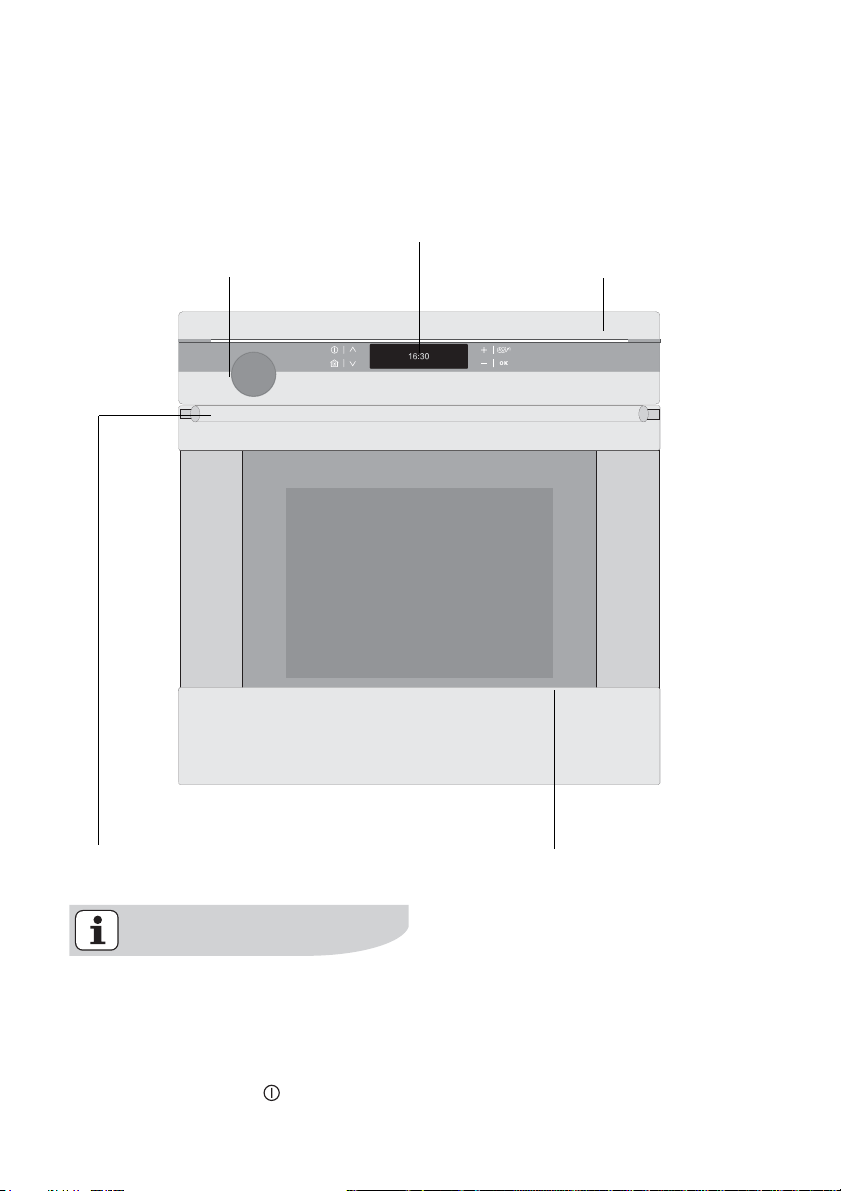
Description of the Appliance
General Overview
Oven displays
and Touch Control sensor fields
description of the appliance electrolux 7
Water drawer
Light bar
Door
handle
The oven switches off after 2 minutes, if no function is selected and is
changed at the oven nothing, the
light remains however on.
In order to switch off the light bar,
oven switch on with
and switch
off again.
Oven door
Page 8
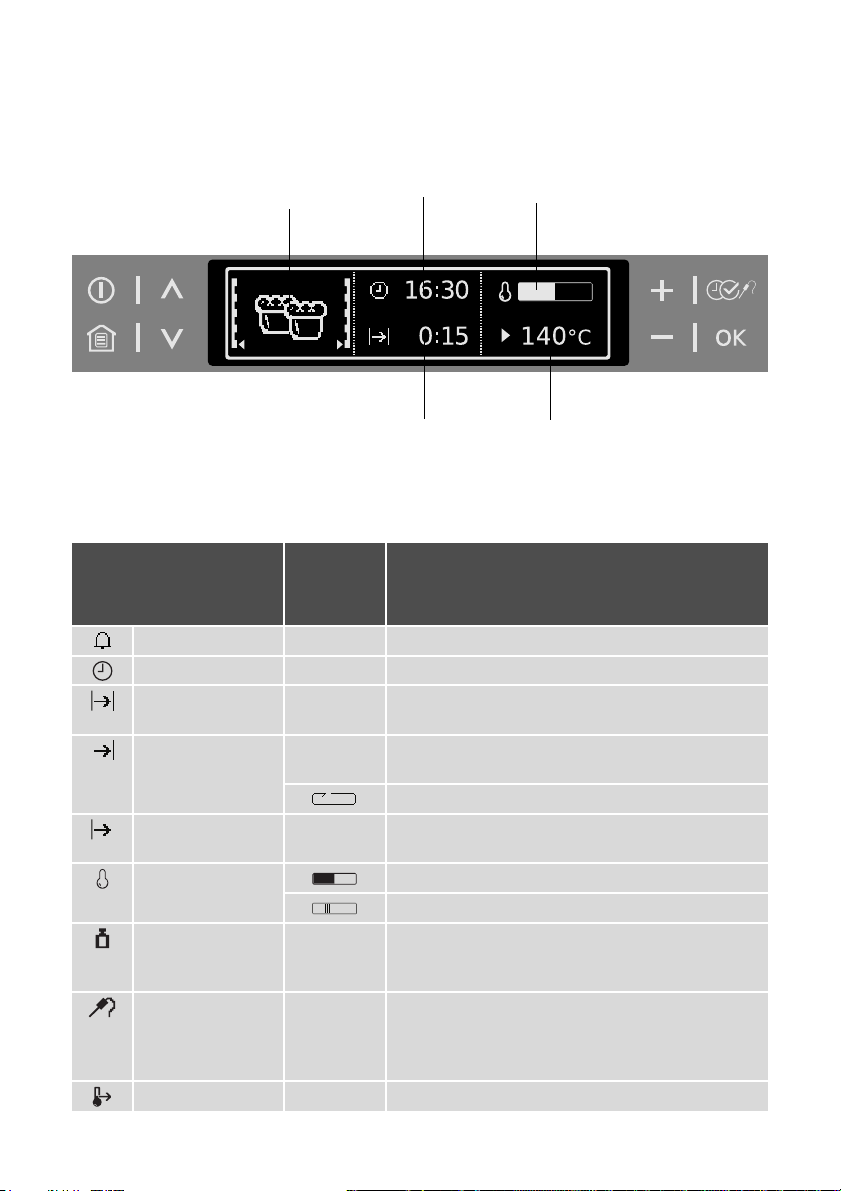
8 electrolux description of the appliance
The electronic oven controls
Indicators
Menu option symbol
(with oven shelf level)
Time functions
Symbols
Certain symbols are displayed in the displayed according to the function set.
Display
Symbol
(Exam-
ples)
Countdown timer 4:30 The countdown timer is active.
Time 10:00 Indicates the current time set.
Duration
End Time
Delay start 0:45 Indicates the time from which the cooking process
Temperature Indicates how far the oven has heated up.
Weight 1.5 kg Options:
Meatprobe
Heat+Hold
1:00 Indicates the period of time required for the cooking
14:05 Indicates the time at which the cooking process is
75°C Options:
80°C
process.
completed.
End time is calculated when
will run.
Rapid heat up is active (shortened heating up time).
–
–
– Meatprobe
– Meatprobe Automatic
–
Heat+Hold
Clock
Heat indicator
Temperature
Weight
Function
Meatprobe
Automatic weight is active.
Weight can be changed.
is plugged in
Core temperature can be changed.
is activated.
is active.
inserted.
Page 9

Touch Control sensor fields
The appliance is operated using Touch
Control sensor fields. You control the
functions by touching the sensor fields.
When you are using the controls
make sure that you only touch one
sensor field. If your finger is applied
too flat, a neighbouring sensor field
could be touched as well.
On/Off
Scroll
Main menu
description of the appliance electrolux 9
Set values
Select
options
Confirm
Sensor
field
Function Comment
, To move down and up in the
menu.
To display main menu. Functions set switch off
To c o n fi r m.
To switch appliance on or off.
To select time functions, additional functions and
probe
.
Meat-
When a function is active:
•
Press once: Change to the higher menu
(function remains active), after 5 seconds
move again into the active menu option
•
Press twice: Up and down in the higher
menu (function switches off)
(except for countdown timer).
Page 10

10 electrolux description of the appliance
Sensor
field
, To set values (e.g. temperature,
time, weight, degree of cooking).
Function Comment
•
To activate value:
–
Press once: Present symbol flashes
–
Press twice: Value can be set
•
To s e t v a lue s :
–
Press once: To set value in single steps
–
Hold down key: To set value in fast steps
•
When setting a cook time or time the display can be re-set to zero if and are
pressed at the same time.
Page 11
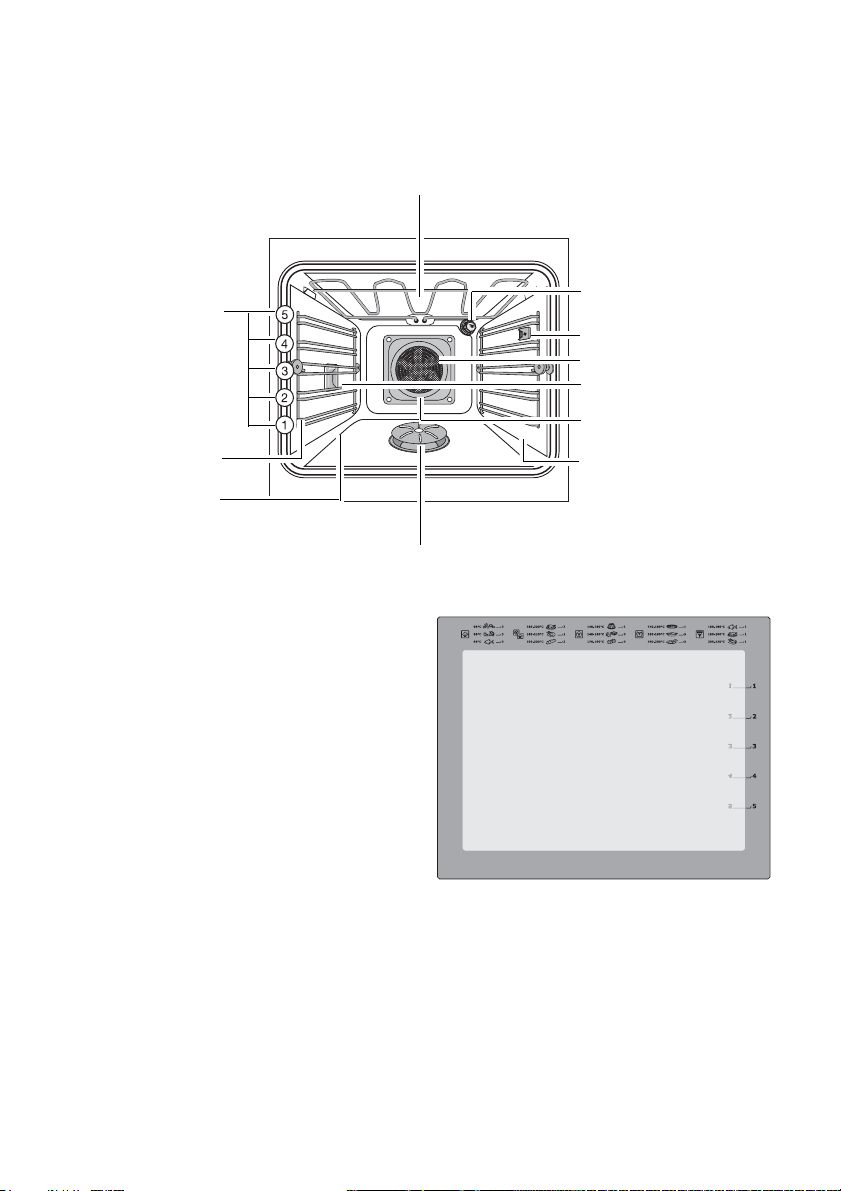
Oven Features
description of the appliance electrolux 11
Top heat and heating elements
Shelf positions
Oven shelf
runners,
Bottom Heat
Steam generator/
Steam rosette
Inside of door
On the inside of the oven door you will
find the numbers of the different oven
shelves.
You will also find some brief information
about the oven's functions, recom
mended shelves and temperatures for
cooking the most popular dishes.
Oven lighting
Meat probe socket
Fan
Oven lighting
Rear wall heating
element/Fat filter
Oven shelf runners,
removable
Page 12
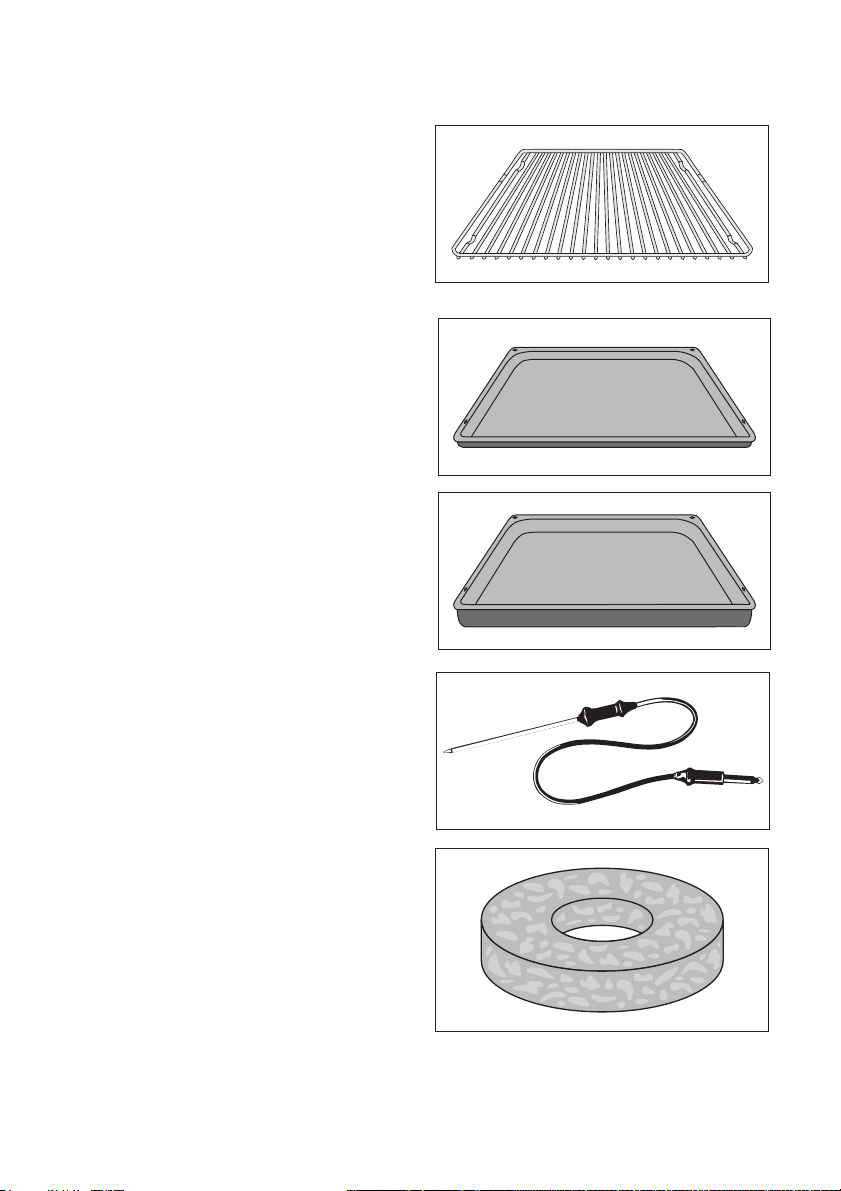
12 electrolux description of the appliance
Oven accessories
Oven shelf
For cookware, cake tins, roasts and
grilled foods.
Baking tray
For cakes and biscuits
(not suitable for Full Steam cooking).
Roasting Pan
For baking and roasting or as a pan for
collecting fat (not suitable for
cooking).
Full Steam
Meat probe
For determining exactly how far joints of
meat are cooked.
QuickSponge 180
Extremely absorbent sponge for absorbing any residual water from the
steam generator.
Page 13
Before Using for the first time
If you would like to change one of
these base settings at a later date,
please refer to the chapter Basic
Settings.
Setting the language
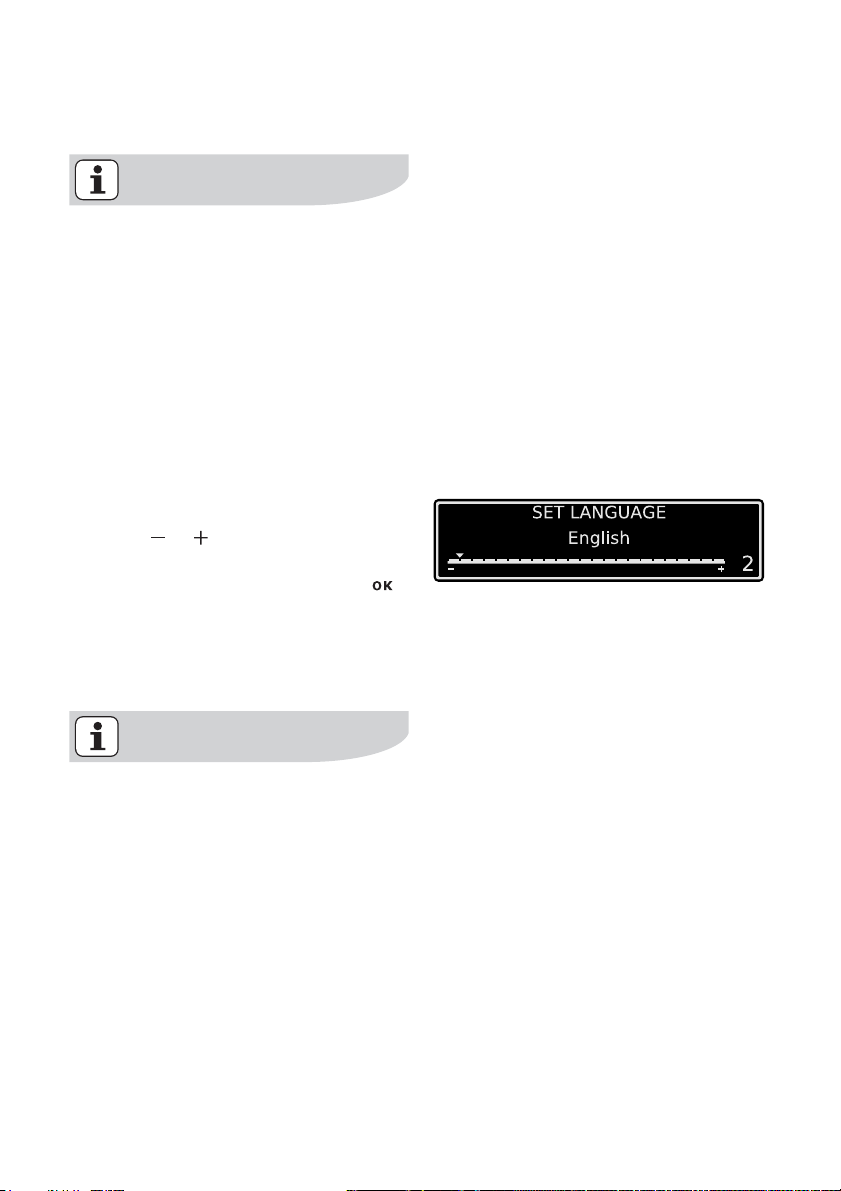
1. When the appliance has been con-
nected to the electrical supply, the
following is shown in the display.
– the company logo
– the version of the software and the
period of operation
– the message ”Set language”
2. Using or , select the desired lan-
guage.
3. Confirm selected language with .
From now on the texts in the display
appear in the language set.
before using for the first time electrolux 13
Setting contrast and brightness
After you have set the language, the
messages “Set contrast” and “Set
brightness” are displayed.
The contrast and the brightness are
set according to the language set
(see section “Setting language”)
Page 14
14 electrolux before using for the first time
Setting the clock
After you have set the contrast and the
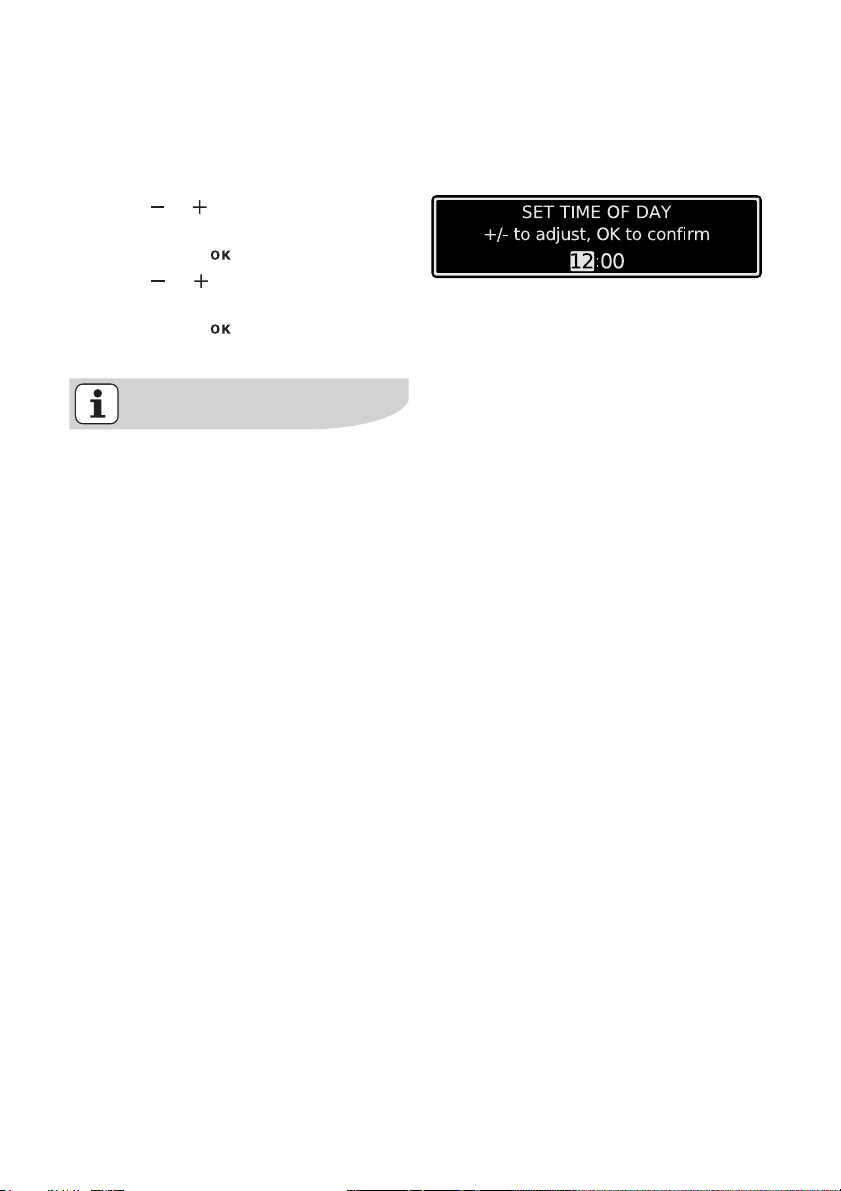
brightness, the message ”Set Time of
Day” is displayed.
4. Using or set the hour of the cur-
rent time.
5. Confirm with .
6. Using or set the minutes of the
current time.
7. Confirm with . The appliance is now ready to use.
The time only has to be set if the appliance is disconnected from the
power supply for a long time.
Page 15

Initial cleaning
Clean the oven before using it for the
first time.
Important: Do not use caustic or
abrasive cleaning agents! These
can damage the oven surfaces.
For the metal surfaces, use commercially available cleaning agents.
1. Open the oven door.
The oven light is lit.
2. Remove all oven accessories, and
clean them with warm water and a
scouring agent.
3. Wash the oven in the same way, and
wipe dry.
4. Wipe the front of the appliance with
a damp cloth.
before using for the first time electrolux 15
Page 16
16 electrolux using the oven
Using the Oven
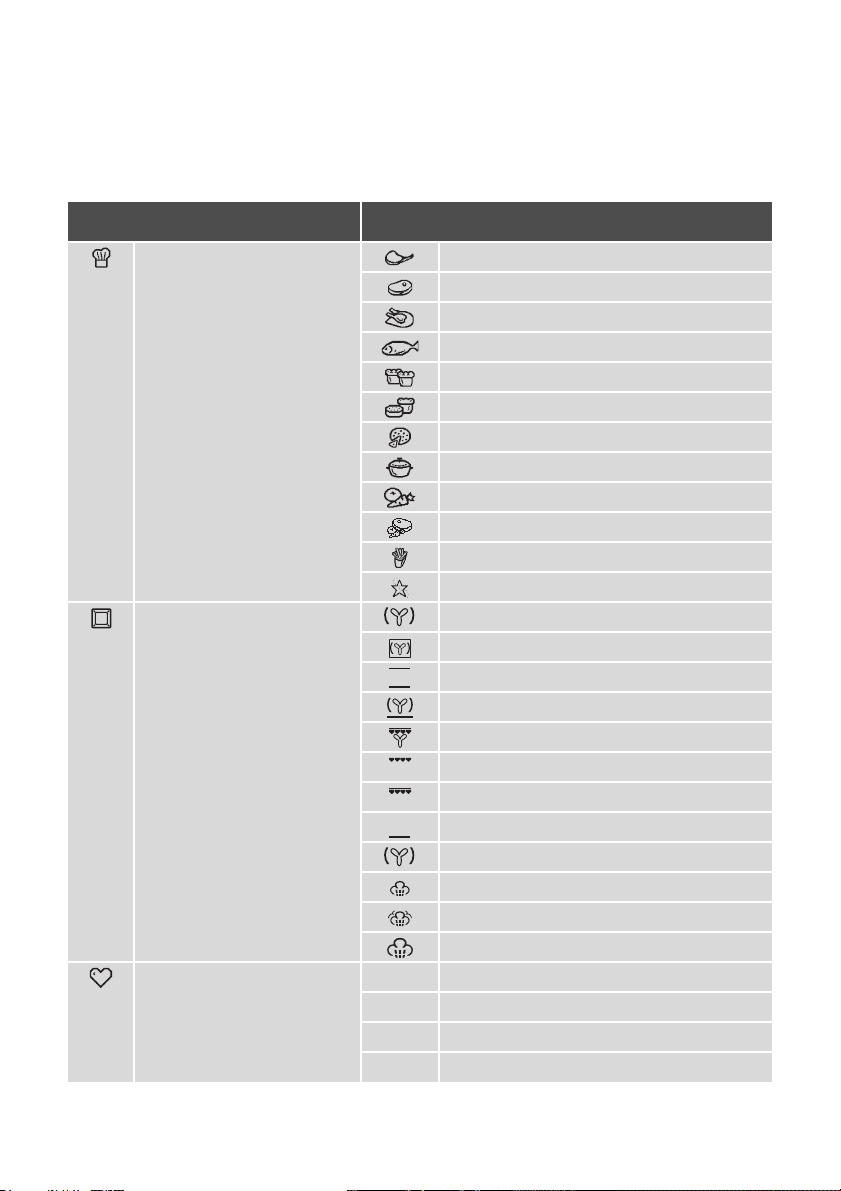
The menus in overview
Main menu Sub-menu
Assisted Cooking Pork/Veal
Heating Functions Fan Cooking
My Programmes 1- My Program
Beef/Game/Lamb
Poultry
Fish
Cake
Desserts
Pizza/Pie/Bread
Casseroles/Gratins
Side Dishes
Combi Steaming
Convenience
Specials
Moist Fan Cooking
Conventional Cooking
Pizza Setting
Turbo Grill
Economy Grill
Dual Grill
Bottom Heat
Slow Cook
Quarter Steam + Heat
Half Steam + Heat
Full Steam
2- My Program
...
Edit Programme Name
Page 17
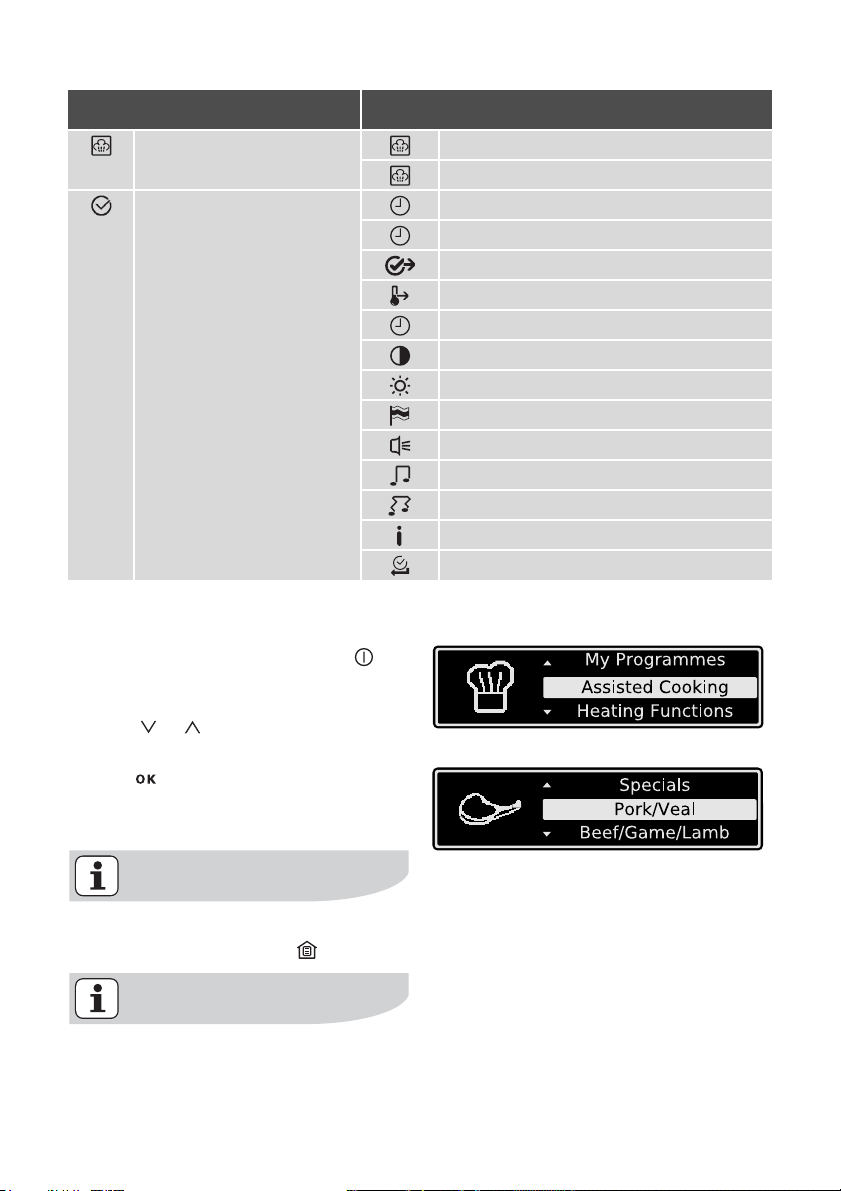
Main menu Sub-menu
Cleaning Menu Steam Cleaning
Basic Settings Set Time of Day
Operation of the menus
Example
1. Switch the appliance on with .
You will find yourself in the main
menu.
2. With or select the desired main
menu.
3. Use to move to the appropriated
sub-menus.
The sub-menu selected is displayed.
using the oven electrolux 17
Cleaning Assistant
Time Indication
Set+Go
Heat+Hold
Time Extension
Display Contrast
Display Brightness
Set language
Buzzer Volume
Key Tones
Alarm/Error Tones
Service
Factory Settings
At every point you can get back to
the the main menu with
.
At the end of most menus there is
the menu option Back.
You use this to go back to the higher
menu.
Page 18

18 electrolux using the oven
You can cancel a procedure by
pressing
.
Then you will find yourself back in
the main menu.
Cooling fan
The fan switches on automatically
in order to keep the appliance’s sur
faces cool. When the oven is
switched off, the fan continues to
run to cool the appliance down, then
switches itself off automatically.
-
Page 19
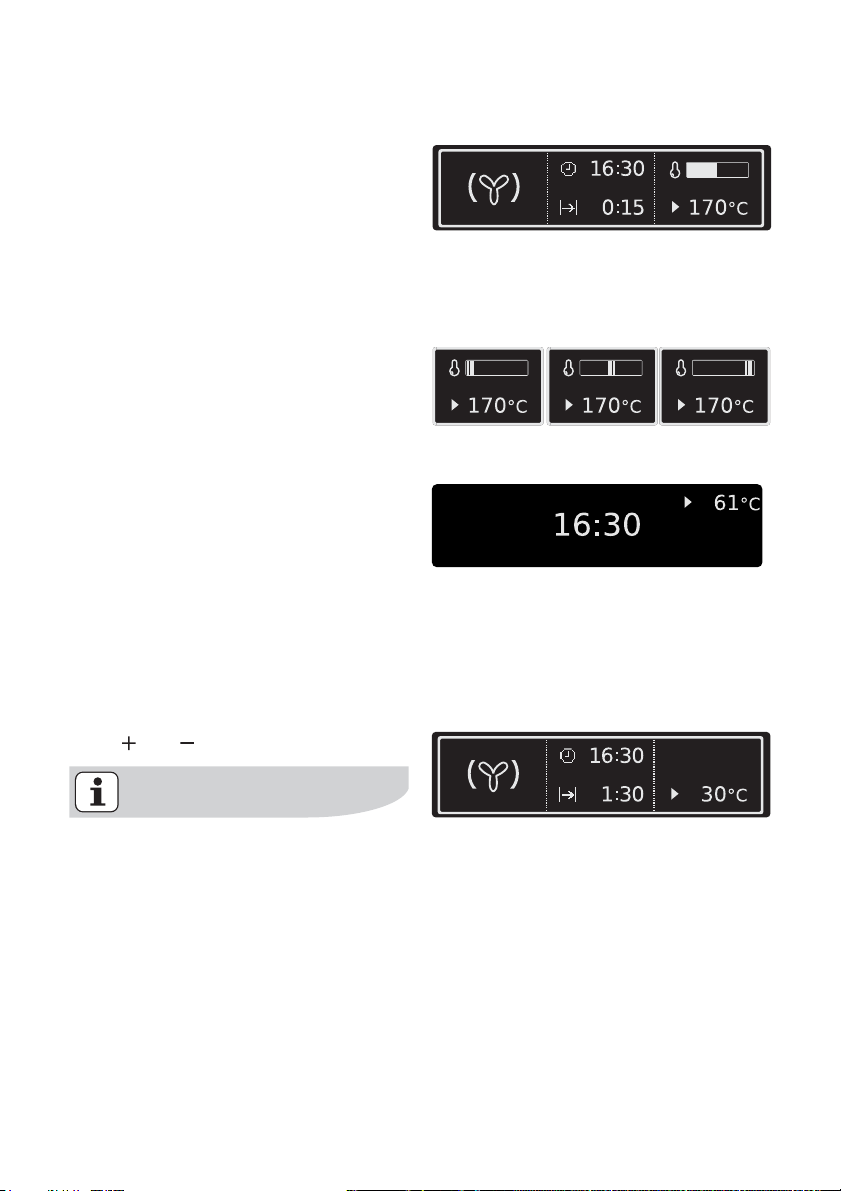
Heat indicator
Heating up indicator
When an oven function has been
switched on the bar that keeps getting
longer indicates how far the oven has
heated up.
Fast heating indicator
With some oven functions the heating
up time is shortened by the automatic
function Fast heating.
Until the set temperature is reached, a
stiped bar goes from left to right in the
heat indicator.
Residual heat indicator
After switching off the oven, the resid-
ual heat is displayed to the degree.
Displaying temperature to the degree
The temperature is displayed to the degree instead of the bar of the heating up
indicator for 5
seconds during the heating up time.
Press and at the same time.
using the oven electrolux 19
When the temperature set is
reached, an audible signal sounds.
Page 20
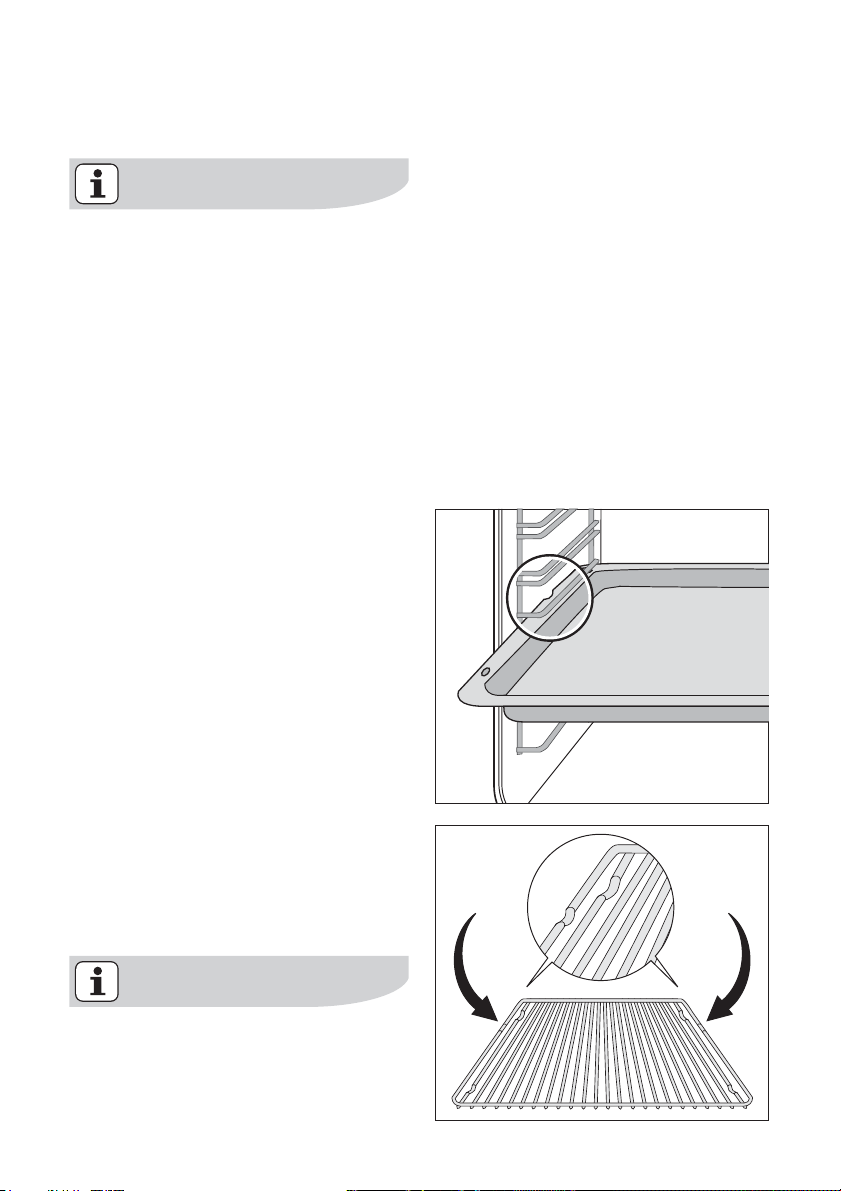
20 electrolux using the oven
Inserting the Oven Shelf, Baking Tray and Roasting Pan
Shelf runner safety and anti-tip device
As a shelf runner safety device, all
insertable components have a small
curved indentation at the bottom on
the right and left-hand edge.
Always insert insertable components so that this indentation is at
the back of the oven interior. This in
dentation is also important for preventing the insertable components
from tipping.
Inserting the baking tray or roasting pan
Push the baking tray or roasting pan between the guide bars of the selected
oven level.
-
Inserting the oven shelf:
Insert the oven shelf so that the feet
point downwards.
Push the oven shelf between the guide
bars of the selected oven level.
The high rim around the oven shelf
is an additional device to prevent
cookware from slipping.
Page 21
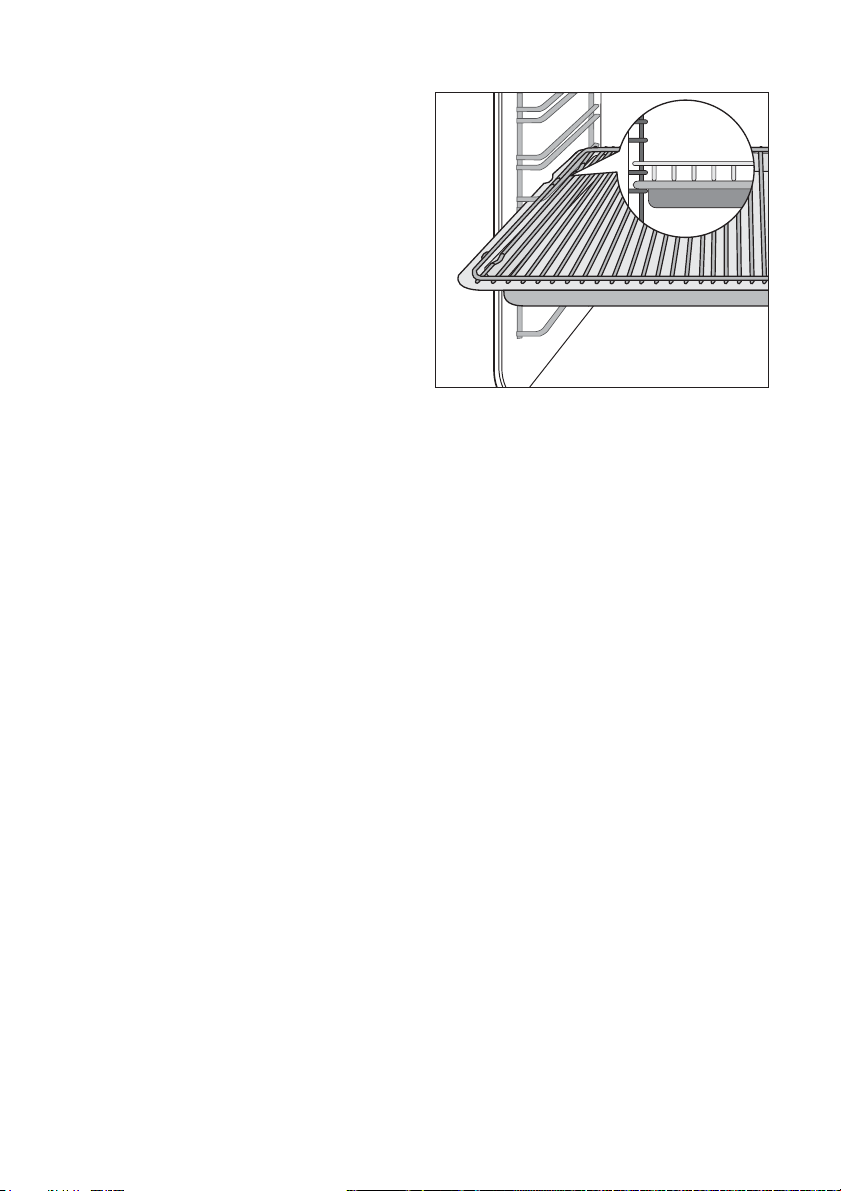
Inserting the oven shelf and roasting pan together
Lay the oven shelf on the roasting pan.
Push the roasting pan between the
guide bars of the selected oven level.
using the oven electrolux 21
Page 22
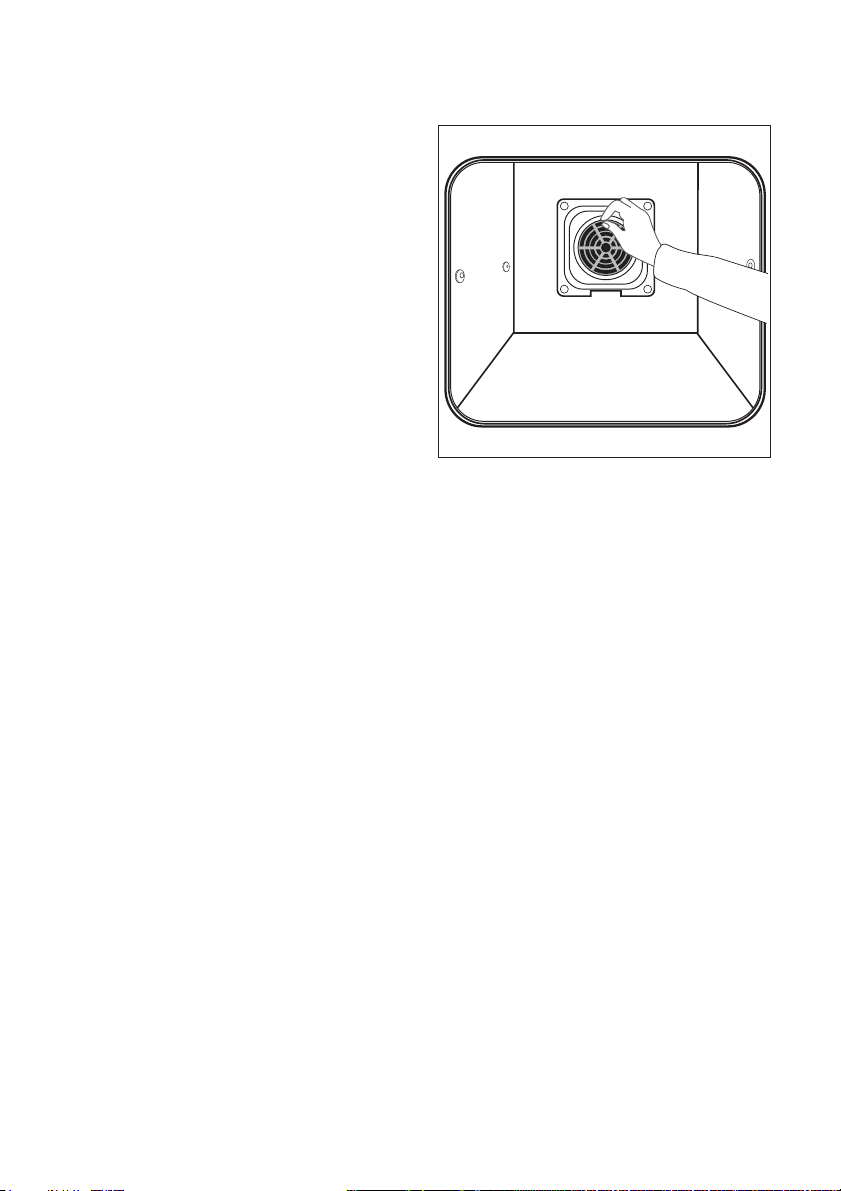
22 electrolux using the oven
Inserting/Removing the Grease Filter
Only use the grease filter when
roasting to protect the rear heating ele
ments from fat splashes.
Inserting the grease filter
Hold the grease filter by the grip and
insert the two mounts downwards into
the opening on the rear wall of the
oven (fan opening).
Taking out the grease filter
Hold the grease filter by the grip and
unhook it.
-
Page 23
The menu Assisted Cooking
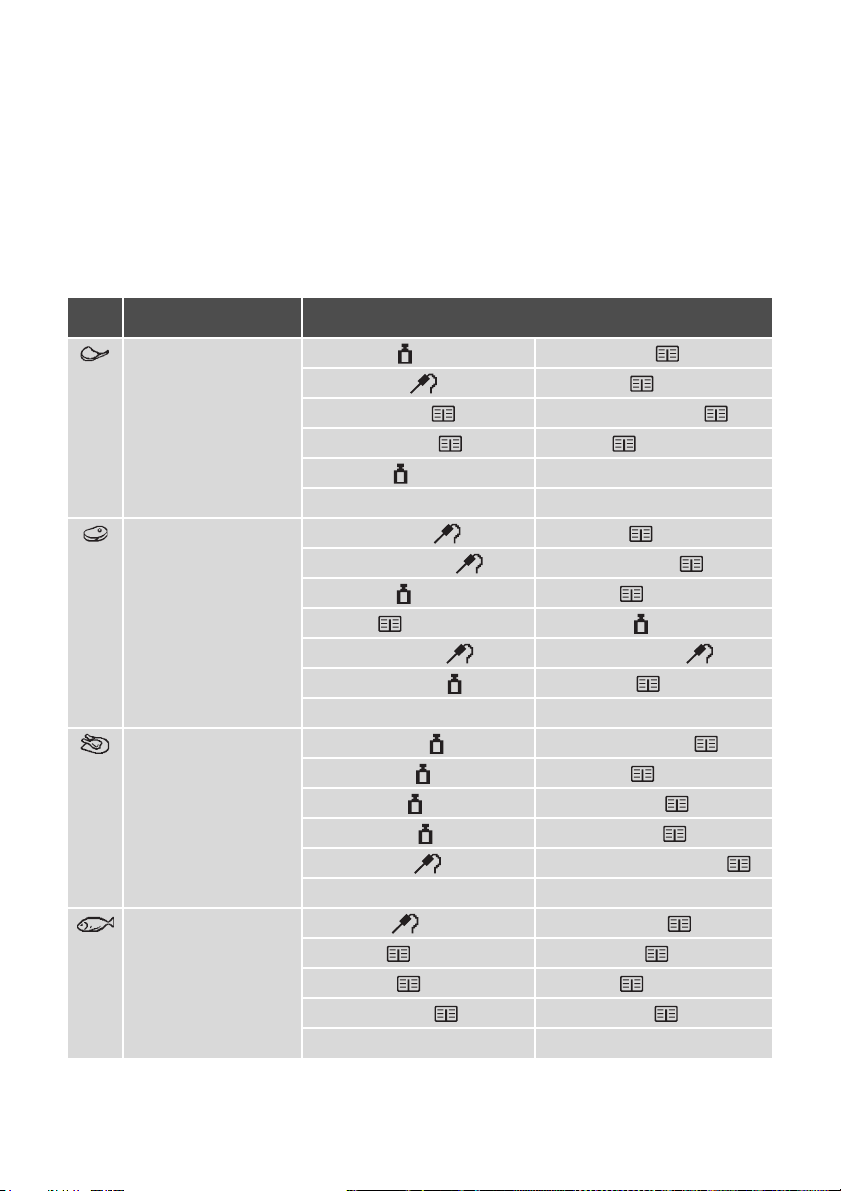
The Assisted Cooking in overview
The dishes in the Kitchen Assistant (except for Specials) are prepared with automatic systems.
The automatic systems offer the optimum settings (oven functions, temperature, cook time) for the respective dish.
Category Dish
Pork/Veal Roast pork Knuckle of veal
Rack of pork Osso buco
Knuckle of pork Stuffed breast of veal
Shoulder of pork Meatloaf
Roast veal
Beef/Game/Lamb Roast beef /fillet Roast hare
Scandanavian beef Rabbit in mustard
Roast beef Wild boar
Pot roast Roast lamb
Saddle of venison Rack of lamb, pink
Saddle of venison Leg of lamb
using the oven electrolux 23
Poultry Chicken, whole Chicken drumsticks
Turkey, whole Coq au Vin
Duck, whole Duck à l’orange
Goose, whole Stuffed chicken
Turkey breast Poached chicken breast
Fish Whole fish Stuffed calamari
Fish fillets Poached fish
Dried code Fish bake
Fish in salt crust Steamed trout
Page 24
24 electrolux using the oven
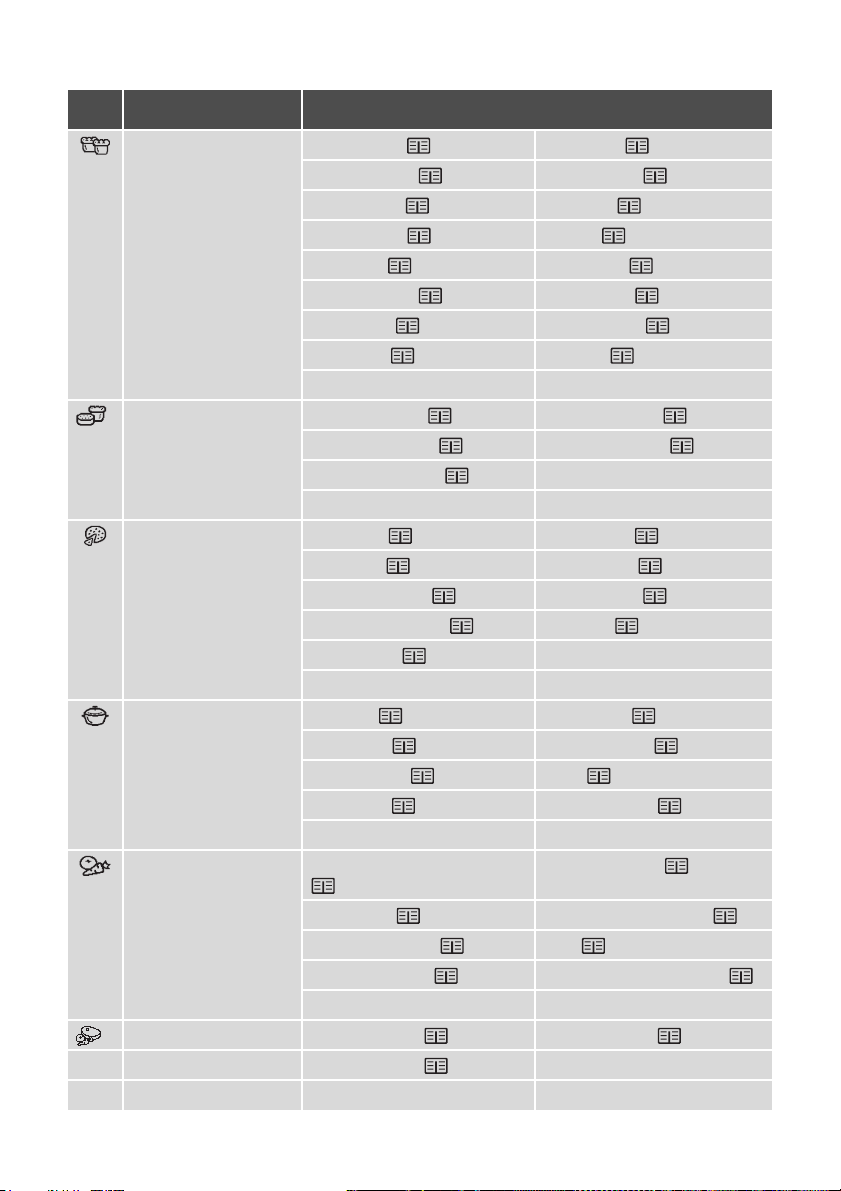
Category Dish
Cake Lemon cake Gugelhupf
Desserts Crème caramel Cherry pudding
Pizza/Pie/Bread Tray pizza Quark cups
Swedish cake Savarin cake
Biscuit base Brownies
Cheesecake Muffins
Fruit cake Tart, sweet
Crumble cake Carrot cake
Butter plait Almond cake
Yeast plait Fruit tart
Coconut custard Yeast dumplings
Cappuccino cake
Onion pie White bread
Quiche Lorraine Famer bread
Goat’s cheese tart Piroggen
Cheese flan
Casseroles/Gratins Lasagne Pasta bake
Cannelloni Baked chicory
Potato gratin Bake
Moussaka Cabbage bake
Side Dishes Mediterranean vegetables Boiled potatoes
Veg etabl es Soft pretzel dumplings
Peeled tomatoes Rice
Jacket potatoes Baked egg soup garnish
Combi Steaming Steam Menu 1 Steam Menu 3
Steam Menu 2
Page 25
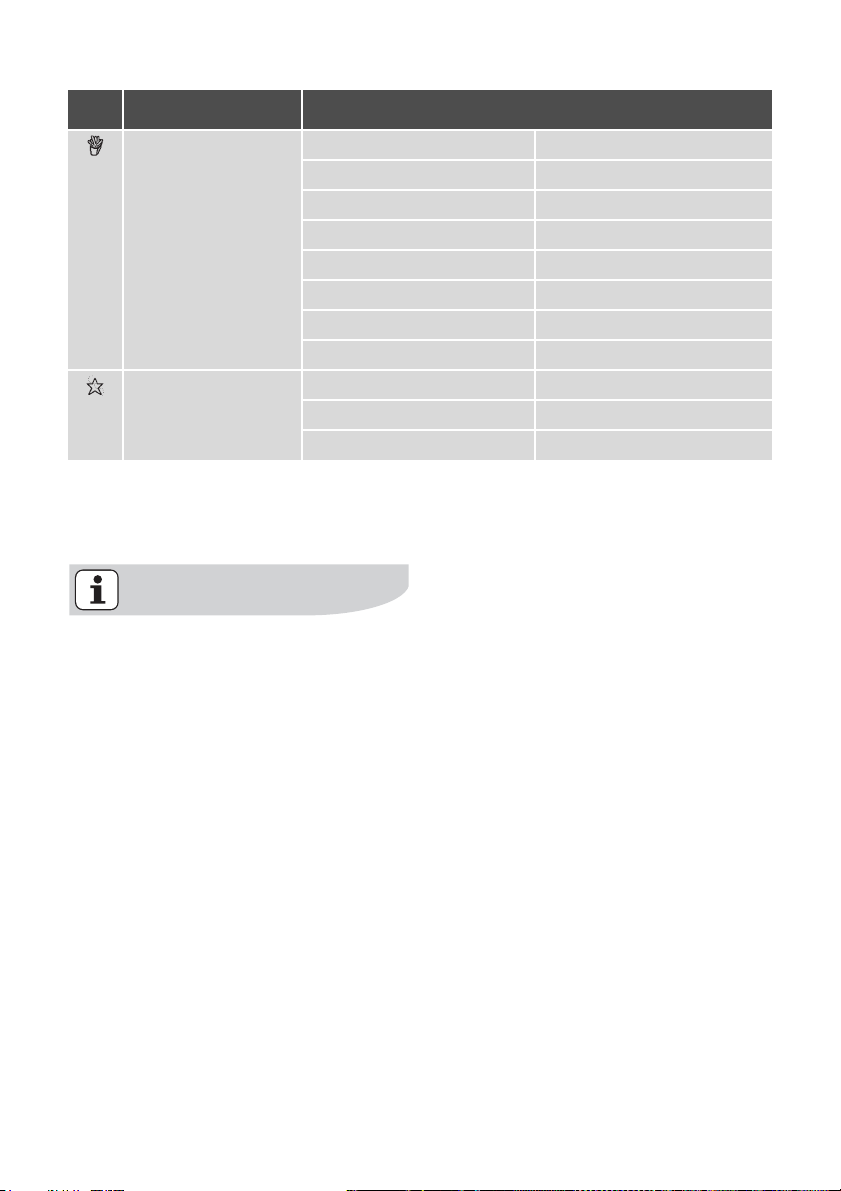
Category Dish
Convenience Pizza, frozen Bread/rolls
American pizza, frozen Bread/rolls, frozen
Pizza, chilled Apple strudel, frozen
Pizza snacks, frozen Fish fillet, frozen
Chips Chicken wings
Croquettes Lasagne/Cannelloni
Röstis
Specials Defrost Keep Warm
Drying Preserving
Regenerating Plate Warming
You will find practical information
on the various automatic systems,
recipes and oven functions in the
accompanying booklet.
using the oven electrolux 25
Using the steam cooking menus in
the combi-steam cooking category
you can get a complete menu ready
at the same time.
The main dish with accompaniments and a dessert are cooked
with one another or after one anoth
er in the oven.
The steam menus are described in
the accompanying leaflet.
-
Page 26
26 electrolux using the oven
Operation of the Assisted Cooking
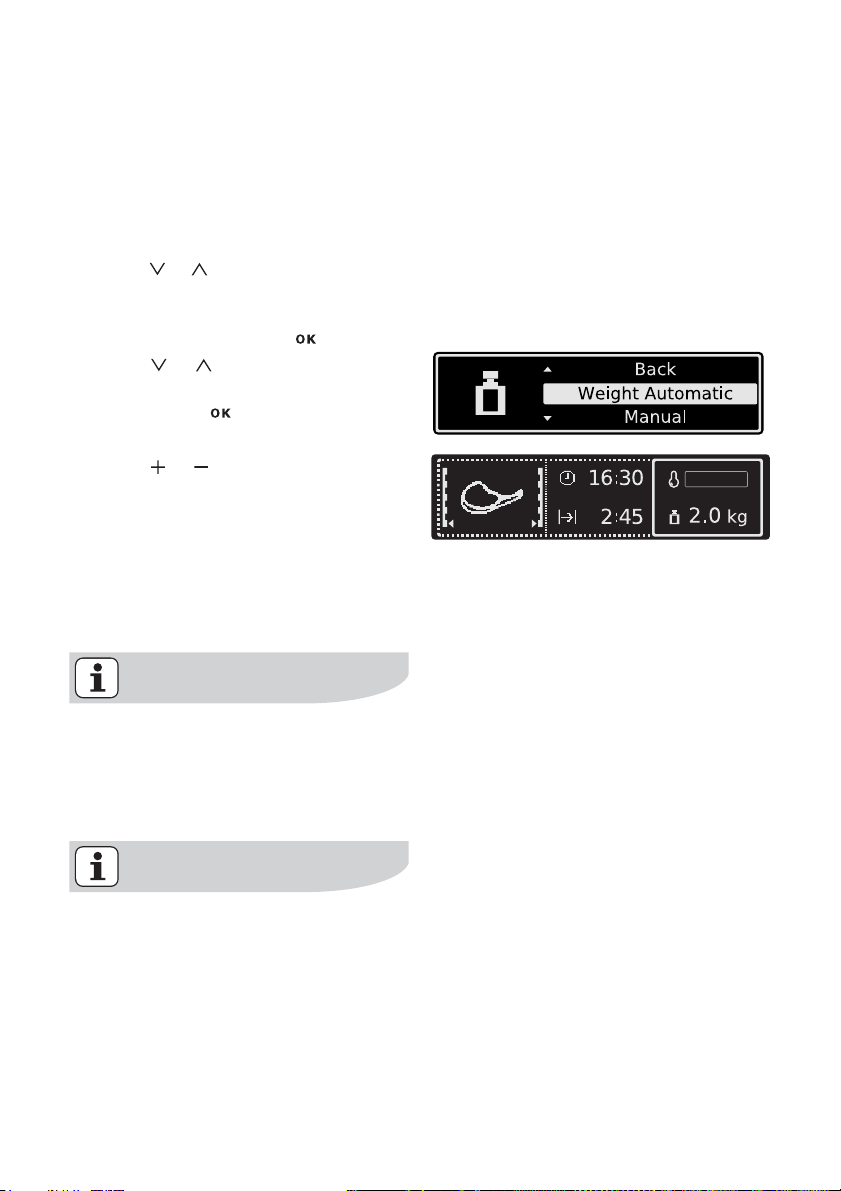
Assisted Cooking with Weight Automatic
The roasting time is automatically determined by inputting the weight.
Example
1. Using or select the menu option
Assisted Cooking, the desired category and the dish.
2. Confirm each one with .
3. Using or select Weight Auto-
matic.
4. Confirm with
5. Using or set the weight of the
food.
The setting changes in 0.2 kg steps.
The automatic programme is started.
As soon as the automatic programme
has finished, an audible signal sounds.
6. Press any key to switch off the sig-
nal.
If the suggested weight is not
changed within approx.
5 seconds,
the programme starts automatical
ly.
The weight can be altered at any time.
With all poultry programmes turn
the food after 30
minutes.
A reminder is displayed.
-
Page 27
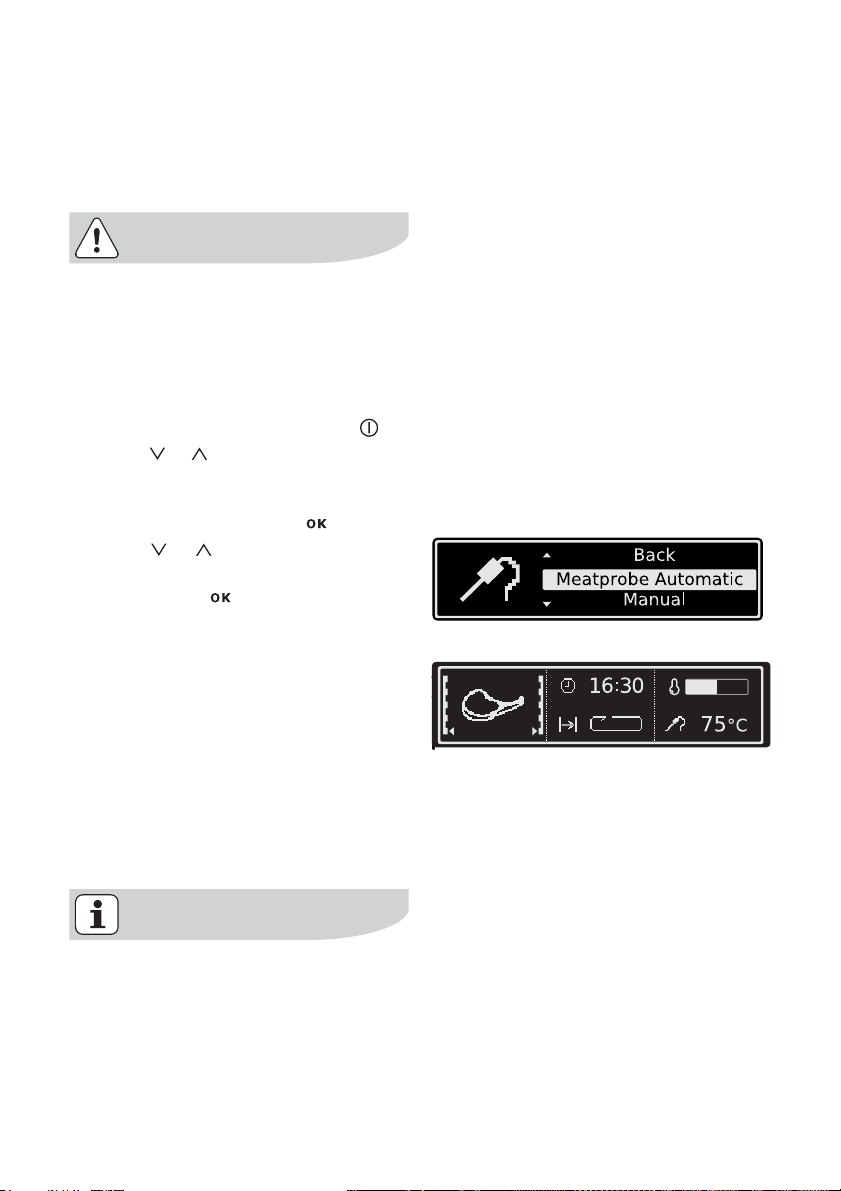
Assisted Cooking with Meatprobe Automatic
The oven switches itself off automatically when the pre-set core temperature
set is reached.
Important: Only the Meatprobe supplied may be used. If replacing,
please use only original replace
-
ment parts.
Example
1. Switch the appliance on using .
2. Using or select the menu option
Assisted Cooking, the desired category and the dish.
3. Confirm each one using .
4. Using or select Meatprobe Au-
tomatic.
5. Confirm with . Message appears telling you to insert
the Meatprobe.
6. Insert Meatprobe (see section Meat-
probe).
7. The automatic programme is start-
ed.
As soon as the automatic programme
has finished, an audible signal sounds.
8. Press any key to switch off the sig-
nal.
9. Remove Meatprobe.
using the oven electrolux 27
and into the socket at the beginning
of the cooking process and that it is
not removed during the cooking
process.
Within a few minutes a provisional
end time at which the set core tem
perature will be reached is calculated. This time is constantly
recalculated and updated in the dis
play. The system requires that the
Meatprobe is pushed into the meat
-
-
Page 28

28 electrolux using the oven
Warning: The Meatprobe is hot!
There is a risk of being burned when
removing the plug and the tip of the
meat probe.
Page 29
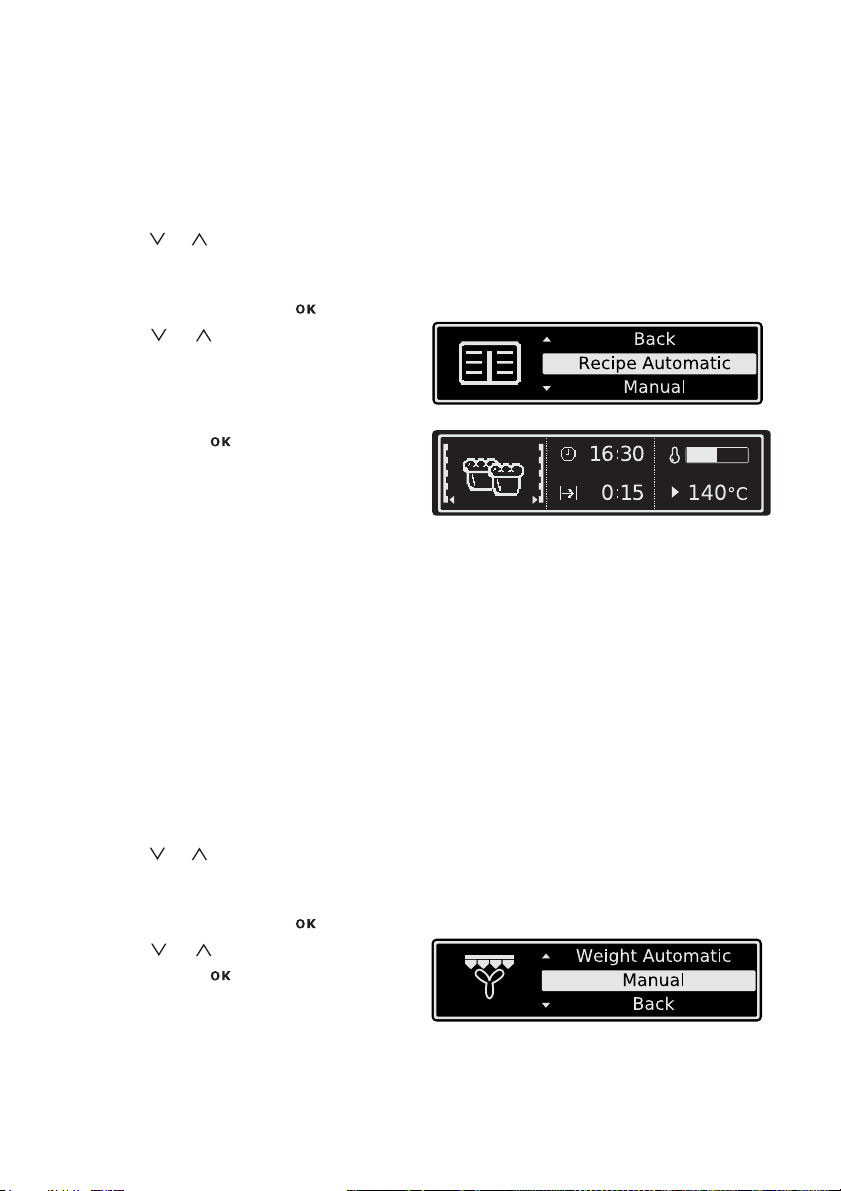
Assisted Cooking with Recipe Automatic
All settings are fixed and cannot be
changed.
Example
1. Using or select the menu option
Assisted Cooking, the desired category and the dish.
2. Confirm each one with .
3. Using or select Recipe Auto-
matic.
4. Confirm with . The automatic programme is started.
As soon as the automatic programme
has finished, an audible signal sounds.
5. Press any key to switch off the sig-
nal.
Manual
With Manual the optimum settings (oven
function and temperature) for the re
spective dish are taken, but you can
change them.
This may be the case if you don’t want
to use the Meatprobe,you don’t know
the weight of your food or have your
own recipe.
using the oven electrolux 29
Example
1. Using or select the menu option
Assisted Cooking, the desired category and the dish.
2. Confirm each one with .
3. Using or select Manual.
4. Confirm with .
You are now in the corresponding oven
function and can carry out the setting
you want (see section “Operating the
oven functions”).
Page 30
30 electrolux using the oven
The Oven Functions menu
The oven functions in overview
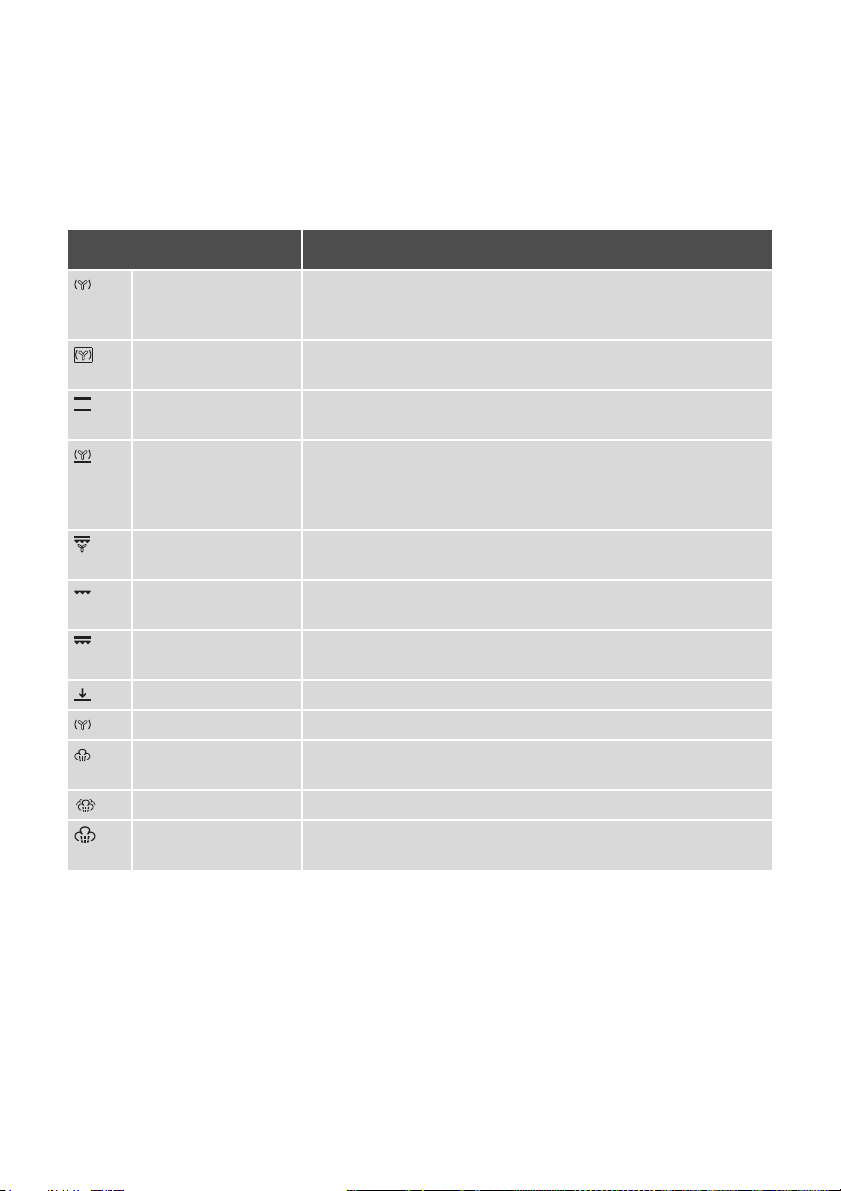
Using the oven functions you can set
baking and roasting sessions to suit
your requirements.
Oven function Application
Fan Cooking
Moist Fan
Cooking
Conventional
Cooking
Pizza Setting
Tur b o Gr i ll
Economy Grill
Dual Grill
For
Bottom Heat
Slow Cook
For preparing especially tender, succulent roasts.
Quarter Steam +
Heat
Half Steam + Heat
Full Steam Cooking
For
baking
on
Set the oven temperatures
up to three oven levels
at the same time.
20-40 °C lower than when using Conventional.
For energy-saving baking and cooking of mainly dry bakery
items as well as for baking in tins on
For
baking
and
roasting
on
For baking on one oven level dishes that require
sive browning and a crispy base
one level.
one oven level
.
.
more inten-
Set the oven temperatures 20-40 °C lower than when using
Conventional.
For
roasting
The function is also suitable for
For
grilling
and for
grilling
ing
.
For
baking
For
baking
larger joints of meat or poultry on one level.
gratinating
flat foodstuffs placed in the
toasting
.
flat foodstuffs in
cakes with
and
crispy or crusty bases
roasting
and warming up frozen or chilled
large quantities
middle of the grill
and
and for
browning
toast-
.
.
foods.
For foods with a high moisture content and for reheating foods.
For fruit, vegetables, fish, potatoes, rice, pasta or special sidedishes.
Page 31
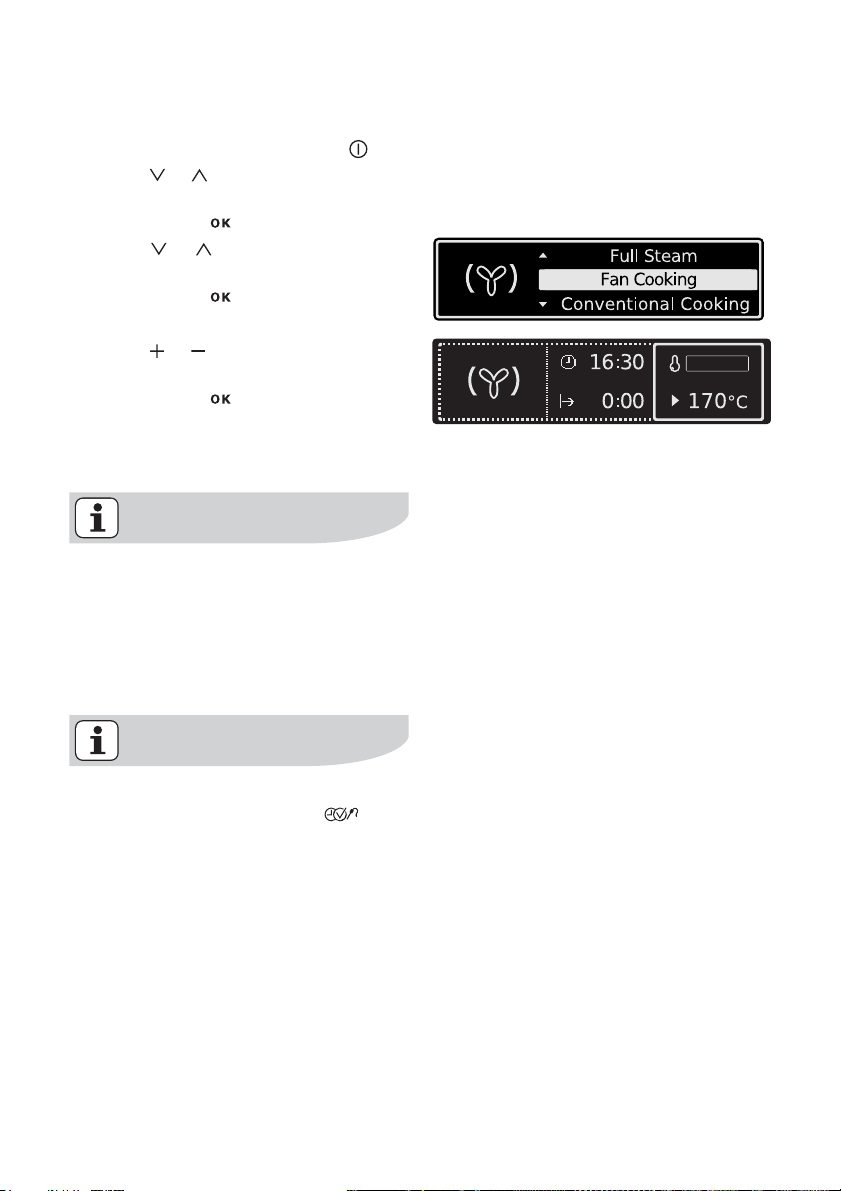
Operating the oven functions
Example
1. Switch the appliance on with .
2. Using or select the menu option
oven function.
3. Confirm with .
4. Using or select oven function
Fan Cooking.
5. Confirm with .
6. Using or set the desired temper-
ature.
7. Confirm with or wait 5 seconds.
The oven starts to heat up.
When the temperature set is reached,
an acoustic signal sounds.
The oven is starting to heat up if
• the symbol for the oven function is
animated.
• the oven light is switched on.
• the corresponding heating element
(e.g. fan) is switched on.
using the oven electrolux 31
Besides the temperature other
functions can be set using
(see section Additional functions).
Page 32
32 electrolux using the oven
The menu My Programmes
My Programmes in overview
Sub menu Description
1- My Program
2- My Program
...
Edit Programme Name To rename stored programmes.
To save optimum settings for your own recipes.
You can store 20 programmes.
Operation of My Programmes
Storing a programme
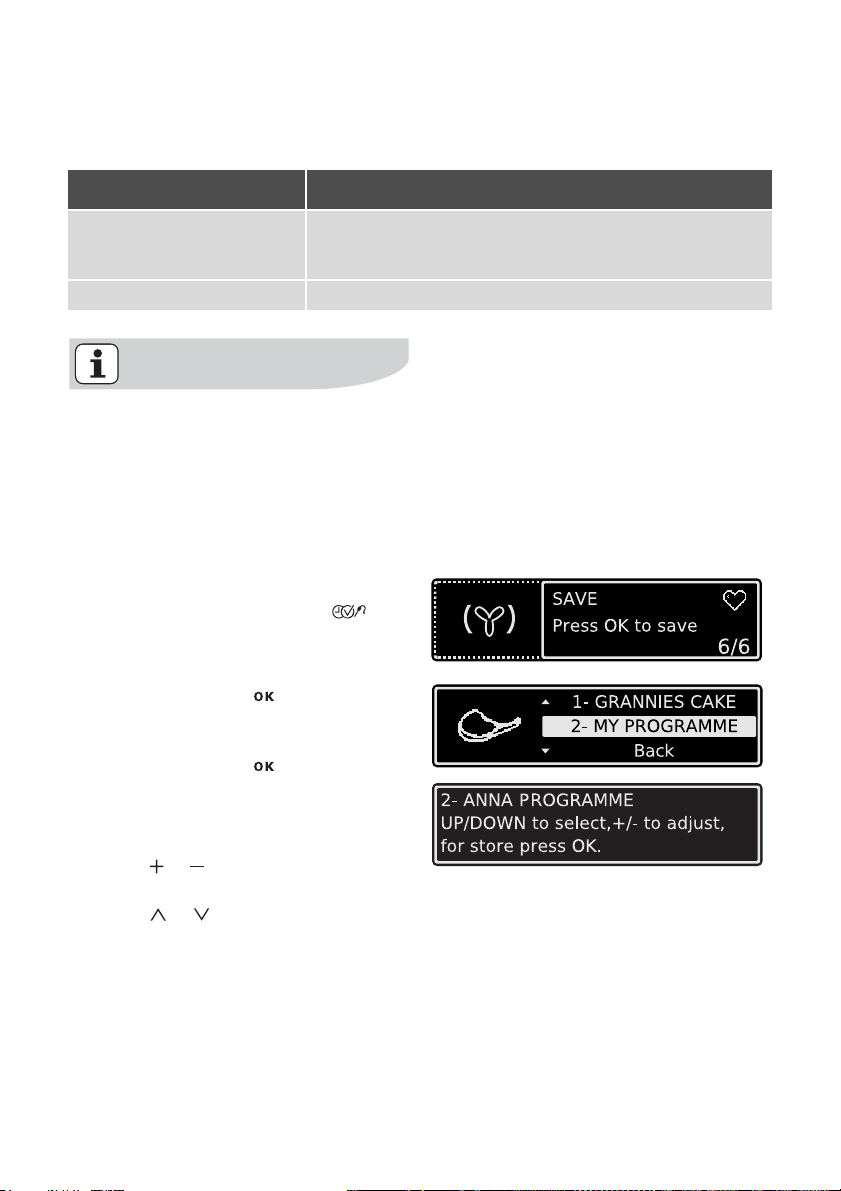
1. Select oven function or Assisted
Cooking with the desired settings.
2. During or after the oven function or
the Assisted Cookingpress
key
repeatedly until the ”SAVE” window
appears.
3. Confirm using the key.
The next free memory position is displayed.
4. Confirm using the key.
5. You can now write the name of your
programme.
The first letter flashes.
6. Using or select the desired letter in alphabetical order.
7. Using or move the writing mark to the right or left.
The next letter flashes and can be
changed, and so on.
Page 33
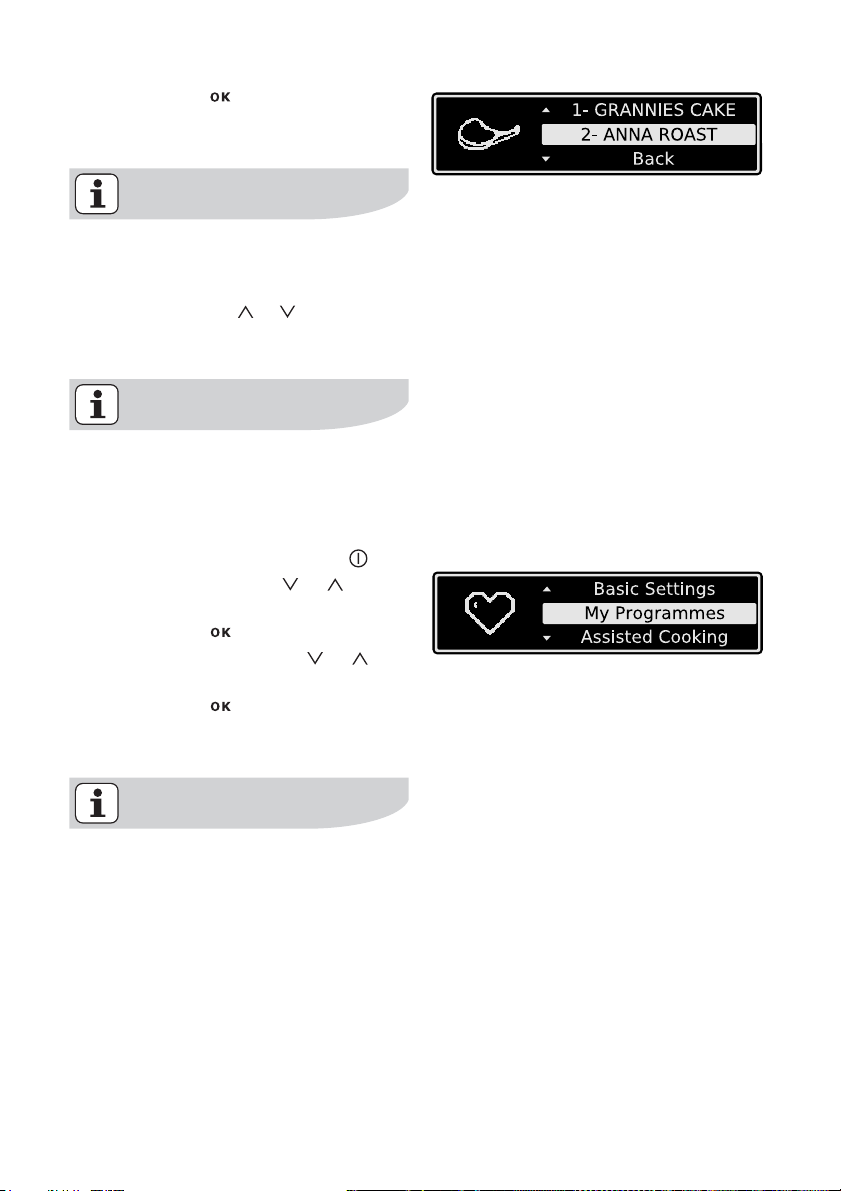
8. Confirm with when you have written your programme name.
Your programme is stored.
Memory positions that are already
filled can be overwritten at any time.
Instead of the suggested free memory position, with or select the
programme that you would like to
overwrite.
2Programmes can be renamed at
any time in the menu ”Edit Pro
-
gramme Name”.
Calling up a programme
1. Switch the appliance on with .
2. Using the arrow keys or select
the menu option My Programmes.
3. Confirm with .
4. Using the direction keys or se-
lect the stored programme.
5. Confirm with .
The stored programme with its settings
starts.
using the oven electrolux 33
If no programmes have been stored,
a message appears to say how pro
grammes are stored.
-
Page 34

34 electrolux using the oven
The cleaning menu
Cleaning in overview
Sub menu Description
Steam Cleaning To clean oven with steam.
Cleaning Assistant Before Steam Cleaning reminds you what has to be
observed with Steam Cleaning
The Cleaning Assistant can be switched on and off.
How you operate the Steam Cleaning and switch the Cleaning Assistant on and off is described in the
section “Cleaning and care”.
Page 35
The menu Basic Settings
The Basic Settings in overview
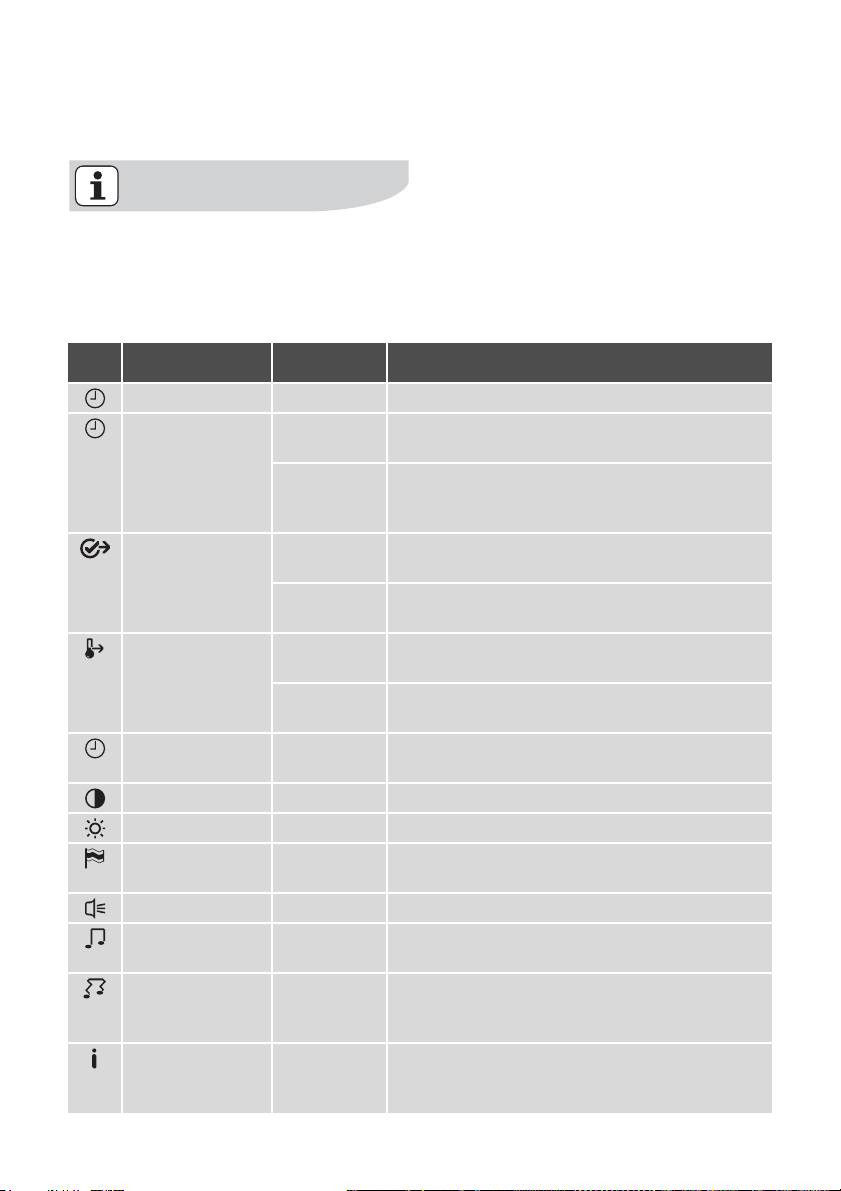
You can change certain basic settings regardless of the task the
oven is performing.
The settings can only be changed if
no oven function is selected.
Setting Display Description
Set Time of Day 12:15 Setting current time on the clock.
Time Indication
Set+Go
Heat+Hold
Time Extension
Display Contrast 1 ..... 10 Set display contrast in steps.
Display Brightness 1 ..... 10 Set display brightness in steps.
Set language
Buzzer Volume 1 ..... 10 Set volume of key beeps and signals in steps.
Key Tones
Alarm/Error Tones
Service ECAIA207
–
On Current time is displayed when the appliance is
switched off.
–
Off
–
On Set+Go function is displayed in the Select options
–
Off Set+Go function is not displayed in the Select op-
–
On Heat+Hold function is displayed in the Select op-
–
Off Heat+Hold function is not displayed in the Select
–
On
–
Off
–
Deutsch
–
....
–
On
–
Off
–
On
–
Off
V03IA003
24
Current time is not displayed when the appliance is
switched off, because the display switches off com
pletely - energy-saving.
window and can be activated.
tions window.
tions window and can be activated.
options window.
Switch Time Extension function on or off.
Select and set language in the display.
Key beeps confirm each time a key is pressed.
Switch key beeps on or off.
Warning beeps sound when steps which cannot be
carried out are selected. Switch warning beeps on
or off.
Indicates the version of the software and the period
of operation.
using the oven electrolux 35
-
Page 36
36 electrolux using the oven
Setting Display Description
Factory Settings Reset all settings to the factory settings (My Pro-
grammes too).
Between 22:00 and 6:00 the display reduces its brightness when the appliance
is switched off to save energy.
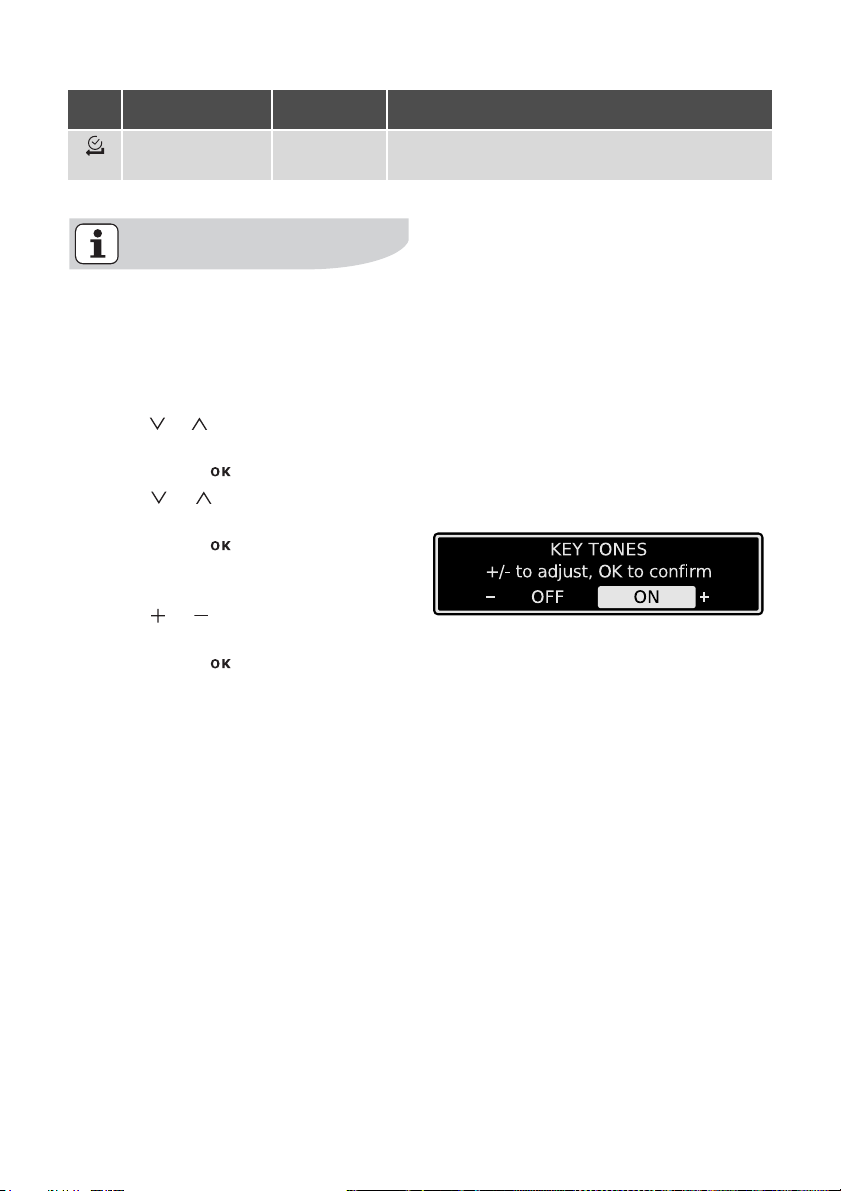
Operation of the Basic Settings
Example
1. Using or select the menu option Basic Settings.
2. Confirm with .
3. Using or go to the setting that
you want to adjust.
4. Confirm with . The value currently set appears in the display.
5. Using or select the desired val-
ue.
6. Confirm with . The setting is changed.
Everyday use of Basic Settings
Set+Go
The function Set+Go means you can set
all settings for an oven function and then
start it later.
Example application:
You prepare a dish in the morning and
enter all necessary settings in the oven.
Your child comes home at lunchtime,
puts the dish in the oven, presses any
key and the oven starts with your set
tings.
Condition:
• Fixed switch-Duration
Page 37
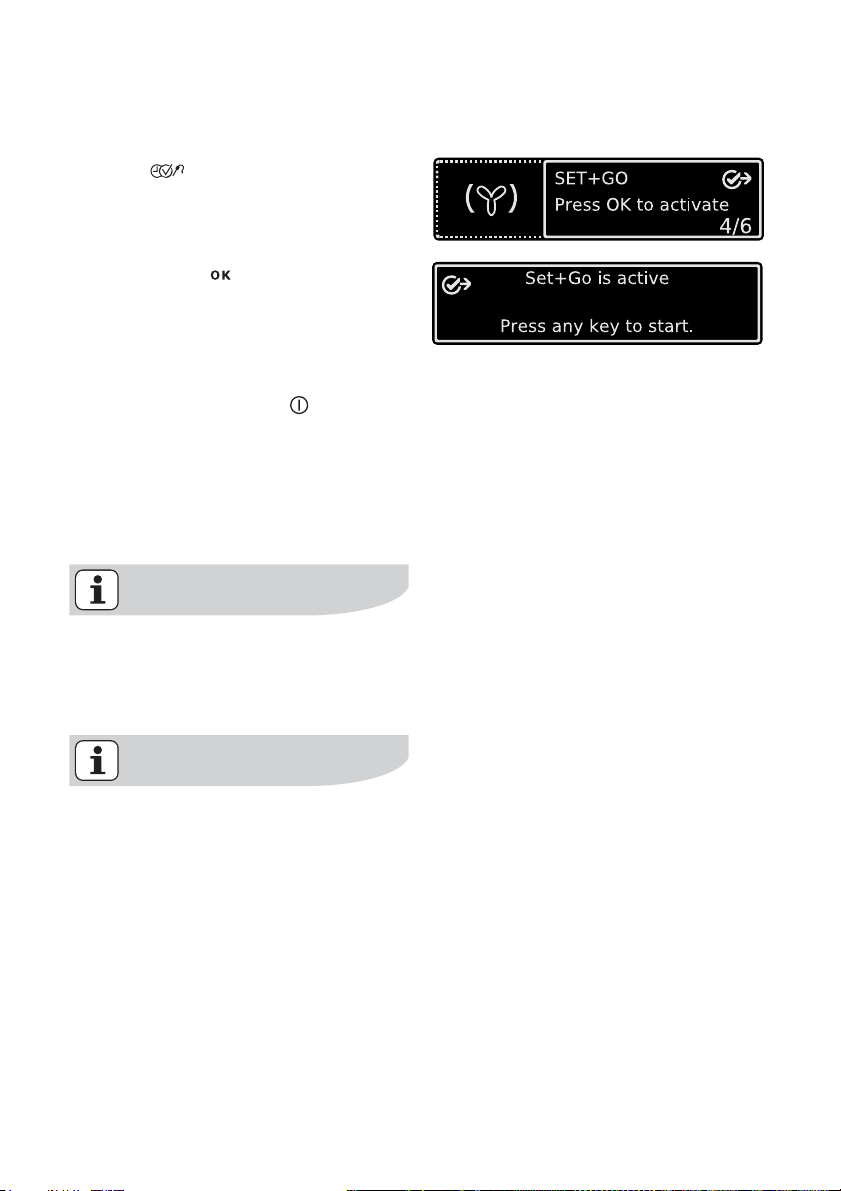
To s wi t ch on Se t +G o
1. Select oven function with desired
settings.
2. Press key repeatedly until the
”Set+Go” window appears.
3. Confirm with .
The function Set+Go is now
switched on.
To start Set+Go
1. Press any key (except ).
Selected oven function starts.
As soon as the oven function is completed, a signal sounds.
2. Press any key to switch off the sig-
nal.
using the oven electrolux 37
While the selected oven function
with is operating Set+Go, the Key
Lock is active (see section Key
Lock).
Set+Go can be activated or deactivated in the Basic Settings menu.
Page 38
38 electrolux using the oven
Heat+Hold
The function Heat+Hold keeps your prepared dish warm for 30 minutes, after
the baking or roasting has ended.
This is helpful, for example, when your
guests are late.
Condition for Heat+Hold:
• Fixed temperatur is above 80°C
• Fixed switch-Duration
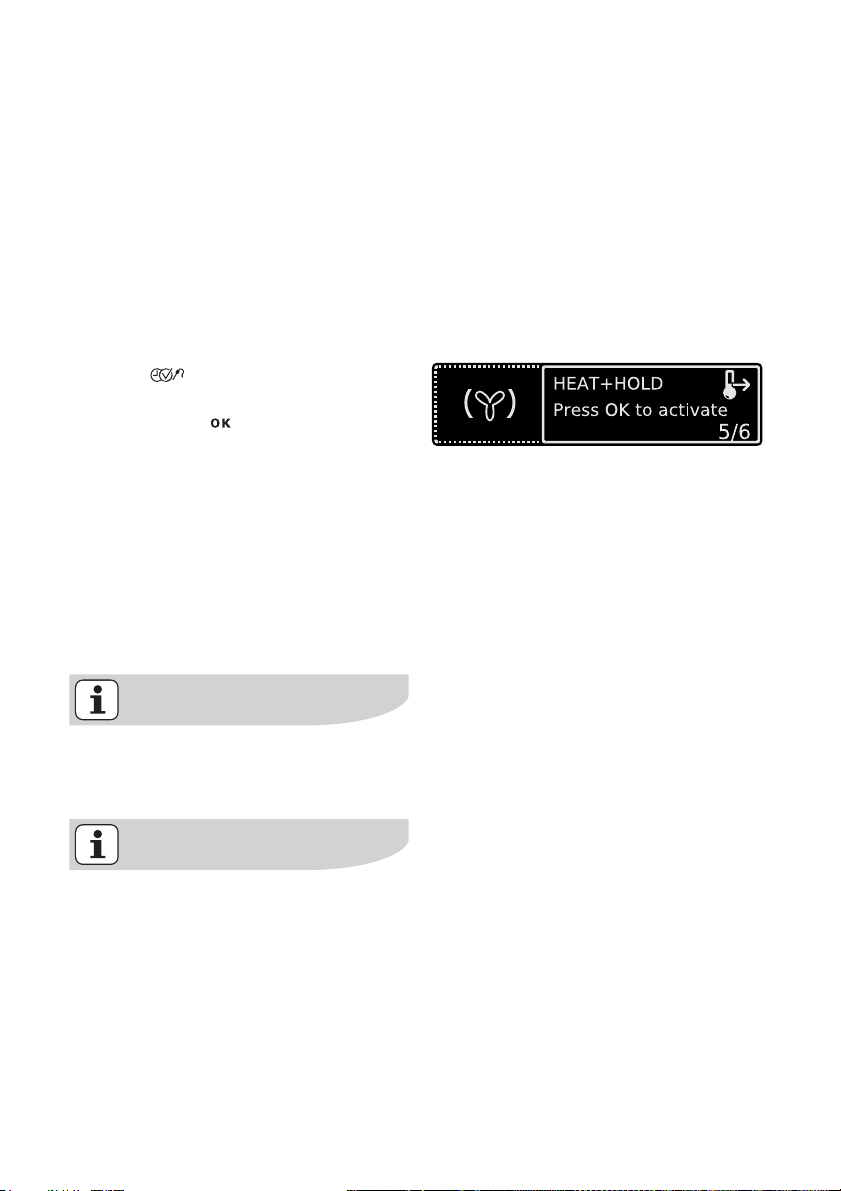
To s wi t ch on He a t+ Hol d
1. Select oven function.
2. Press key repeatedly until the
”Heat+Hold” window appears.
3. Confirm with .
The function Heat+Hold is now
switched on.
4. As soon as the oven function is com-
pleted, a signal sounds and
Heat+Hold starts.
The oven function runs at 80°C for 30
minutes.
As soon as the 30 minutes with
Heat+Hold are over, the oven switches
itself off.
Irrespective of the oven function set
Heat+Hold remains active. You can
move between the oven functions.
Heat+Hold can be activated or deactivated in the Basic Settings
menu.
Page 39
Time Extension
Let the last oven function run again after
the time has elapsed.
Condition:
• All oven functions with Duration or
Weight Automatic.
• No oven functions with Meatprobe
and steam functions.
The Time Extension can be switched on
and off in the menu Basic Settings.
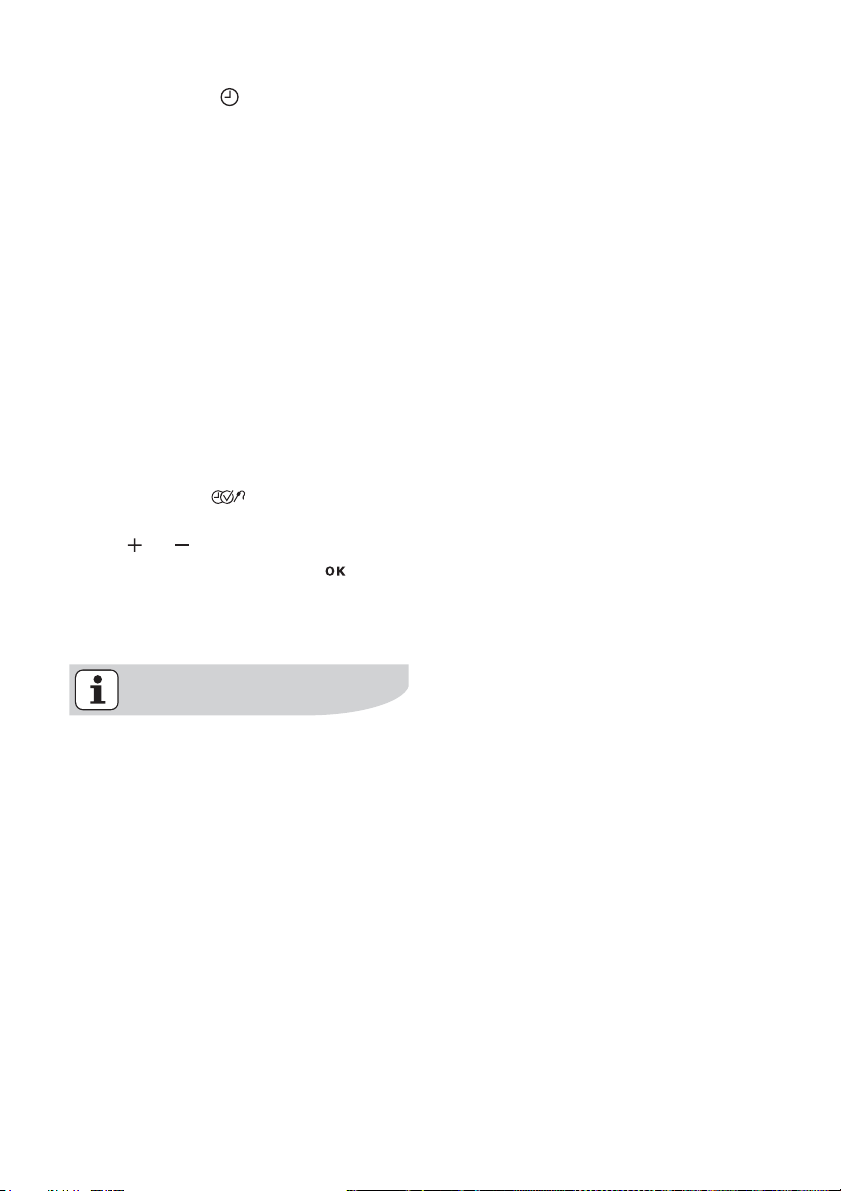
To switch on Time Extension
Oven function is completed.
Signal sounds and message appears.
1. Press any key.
2. Message for Time Extension ap-
pears for approx. 5 minutes.
3. Activate with Time Extension.
4. Set period of the Time Extension us-
ing or.
5. Start Time Extension using or let it
start automatically after 5 seconds.
The settings of the oven funtion are displayed with the new cook time.
using the oven electrolux 39
The rest of the procedure is the same as
a normal oven function. The Time Ex
-
tension can be set repeatedly.
Page 40

40 electrolux using the oven
Additional functions
Your oven is equipped with the following
additional functions:
• Minute Minder
• Duration
• End Time
• Key Lock
• Child Lock
• Automatic switch-off
• Meatprobe
• Steam cooking functions , ,
Page 41
Minute Minder
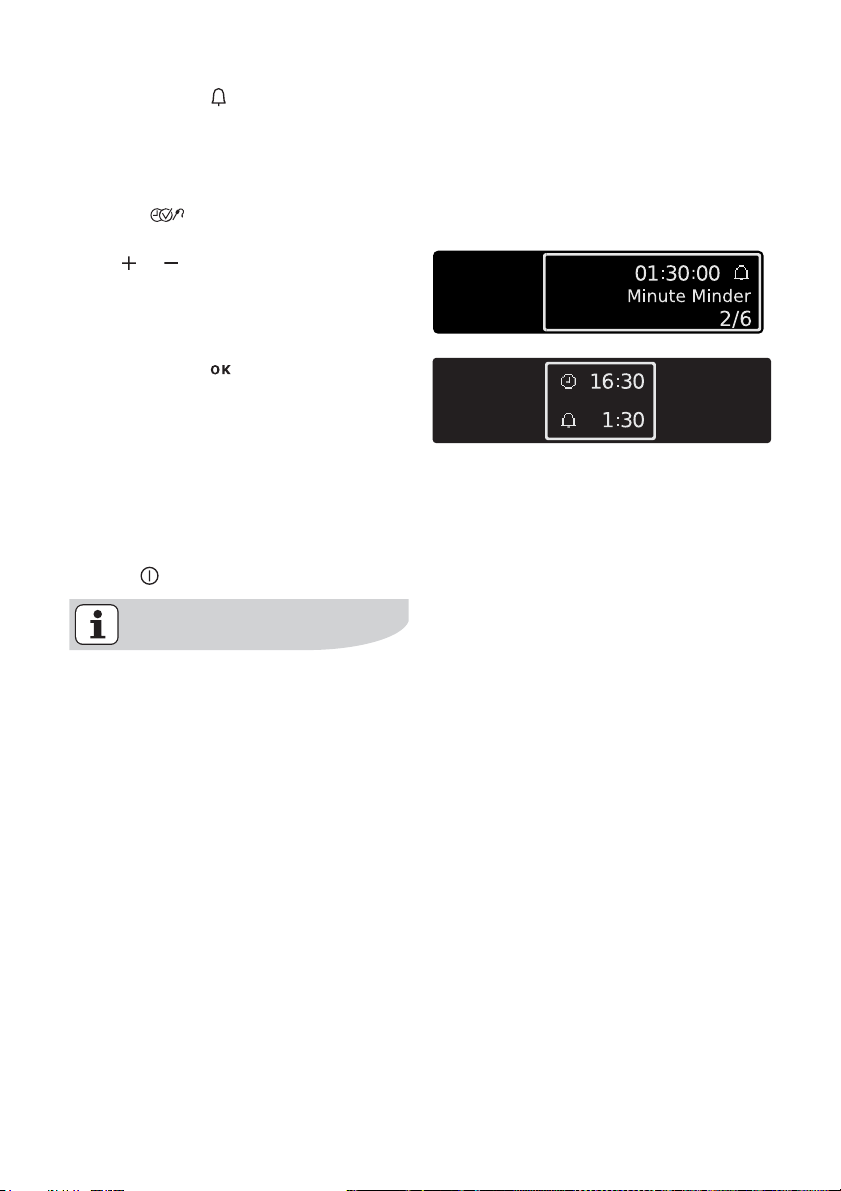
To set a countdown. When it has counted down, an audible signal sounds.
This function has no effect on the operation of the oven.
1. Press key repeatedly until the
”Minute Minder” window appears.
Using or key, set the desired countdown (max. 2 hours 30 minutes).
2. Confirm with or wait 5 seconds.
The last menu option visited and the
remaining time are displayed.
When the time has counted down to
10%, a short signal sounds.
When the time has elapsed, an acoustic
signal sounds for 2
minutes and a mes-
sage is displayed.
3. Press any key to stop the signal (ex-
cept ).
using the oven electrolux 41
The Minute Minder remains active if
you change to another function or
the appliance is switched off.
Page 42
42 electrolux using the oven
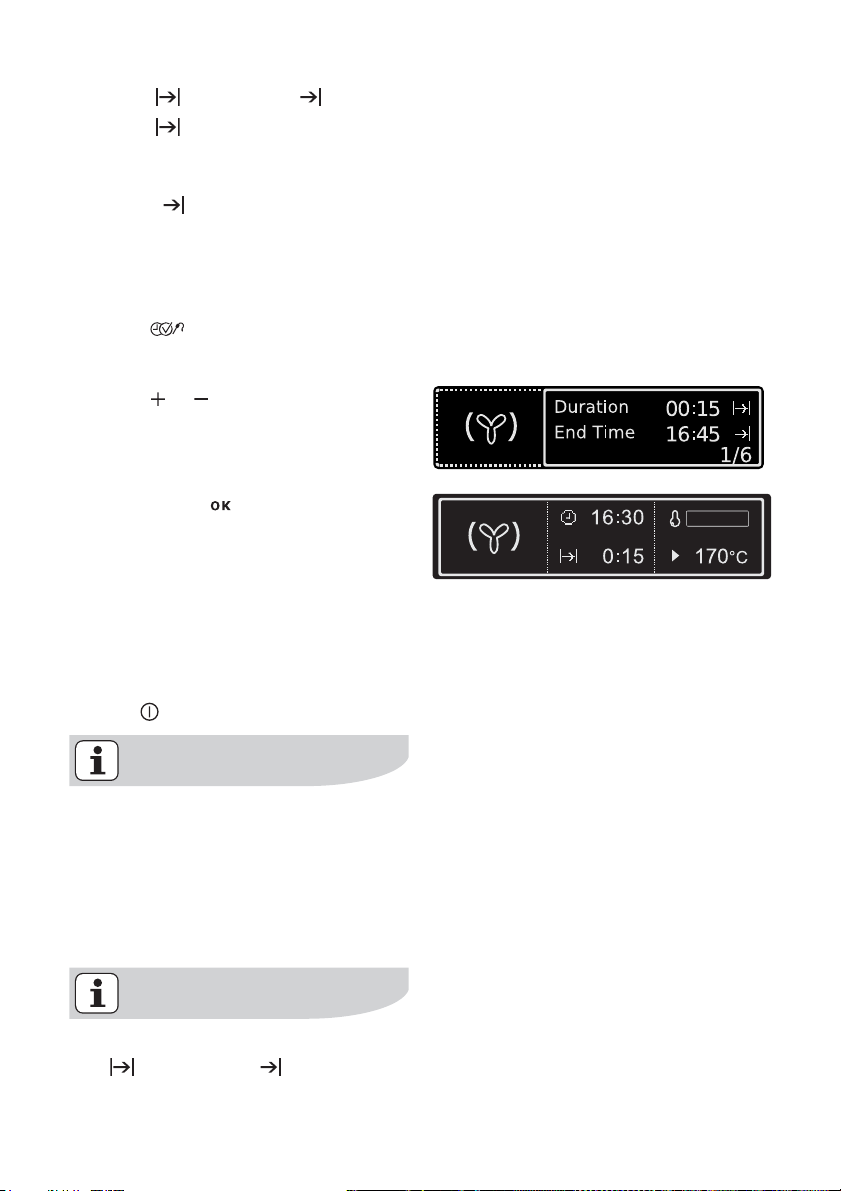
Duration or End Time
Duration
For setting how long the oven is to operate.
End Time
For setting when the oven is to switch itself off again.
1. Select oven function.
2. Press key repeatedly until the
”Duration/End Time” window appears.
3. Using or key, set the desired
cooking time or switch-off time
(max.
23 hours 59 minutes).
4. Confirm with or wait 5 seconds.
The settings of the selected oven
function are displayed with the cook
ing time or switch-off time set.
When the time has elapsed, an acoustic
signal sounds for 2
minutes and a message is displayed.
The oven switches itself off.
5. Press any key to stop the signal (ex-
cept ).
-
Irrespective of the oven function set
the fixed cook time remains. You
can move between the oven func
tions.
Condition: The oven function to
which you move has no fixed cook
time.
If the Meatprobe is inserted, Duration or End Time is not possible.
Page 43

Using residual heat with the
Duration
and End Time clock
functions
When the Duration and End Time
clock functions are used, the oven
switches the heating elements off, when
90% of the time set or calculated has
elapsed. The residual heat present is
used to continue the cooking process
until the time set has elapsed
(3
to 20 mins.).
using the oven electrolux 43
Page 44
44 electrolux using the oven
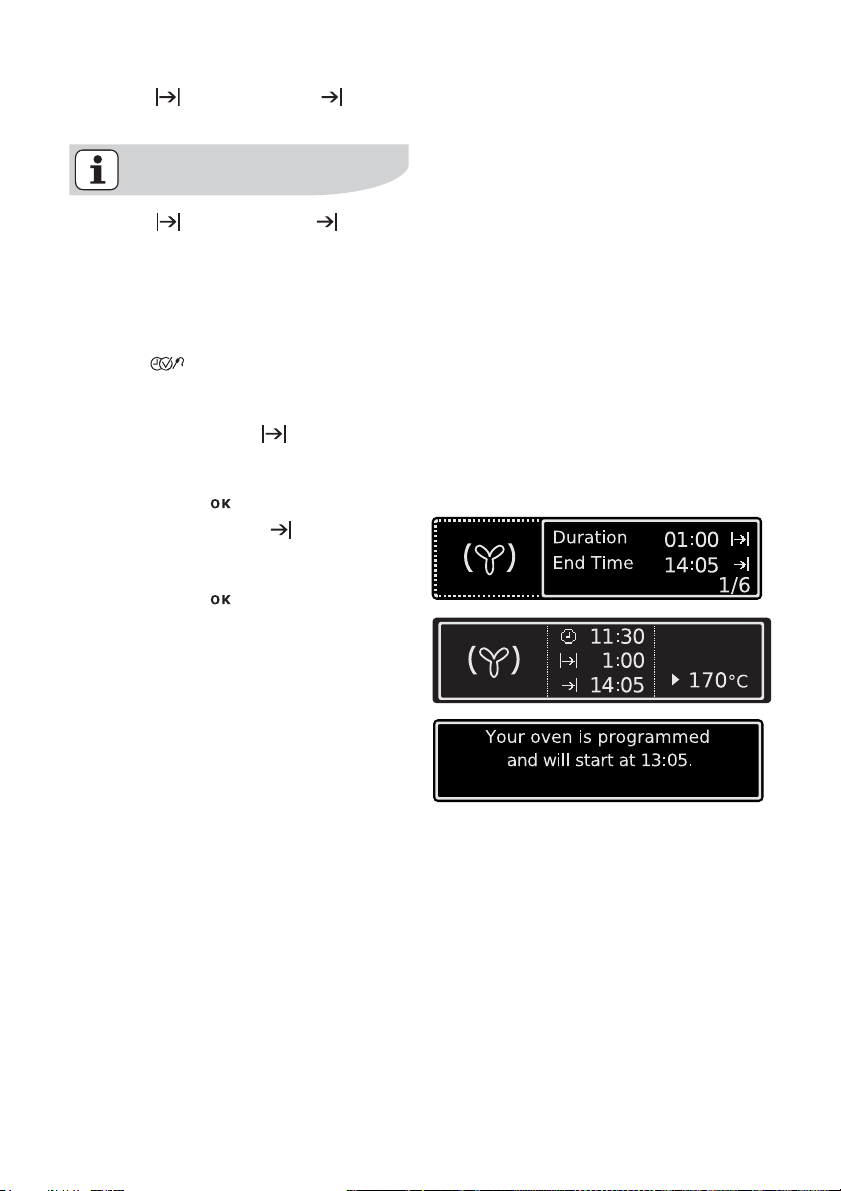
Duration and End Time combined
Duration and End Time can be
used simultaneously, if the oven is
to be switched on and off automati
cally at a later time.
1. Select oven function.
2. Press key repeatedly until the
”Duration/End Time” window appears.
3. Using the Duration function, set
the time required for cooking the
dish, e.g.:
1 hour.
4. Confirm with .
5. Using the End Time function, set
the time at which the dish is to be
ready, e.g.:
14:05.
6. Confirm with or wait 5 seconds.
7. The selected oven function is dis-
played with the cooking time and
switch-off time set for a few sec
-
onds..
-
A message is displayed when the programme starts.
Page 45
Key Lock
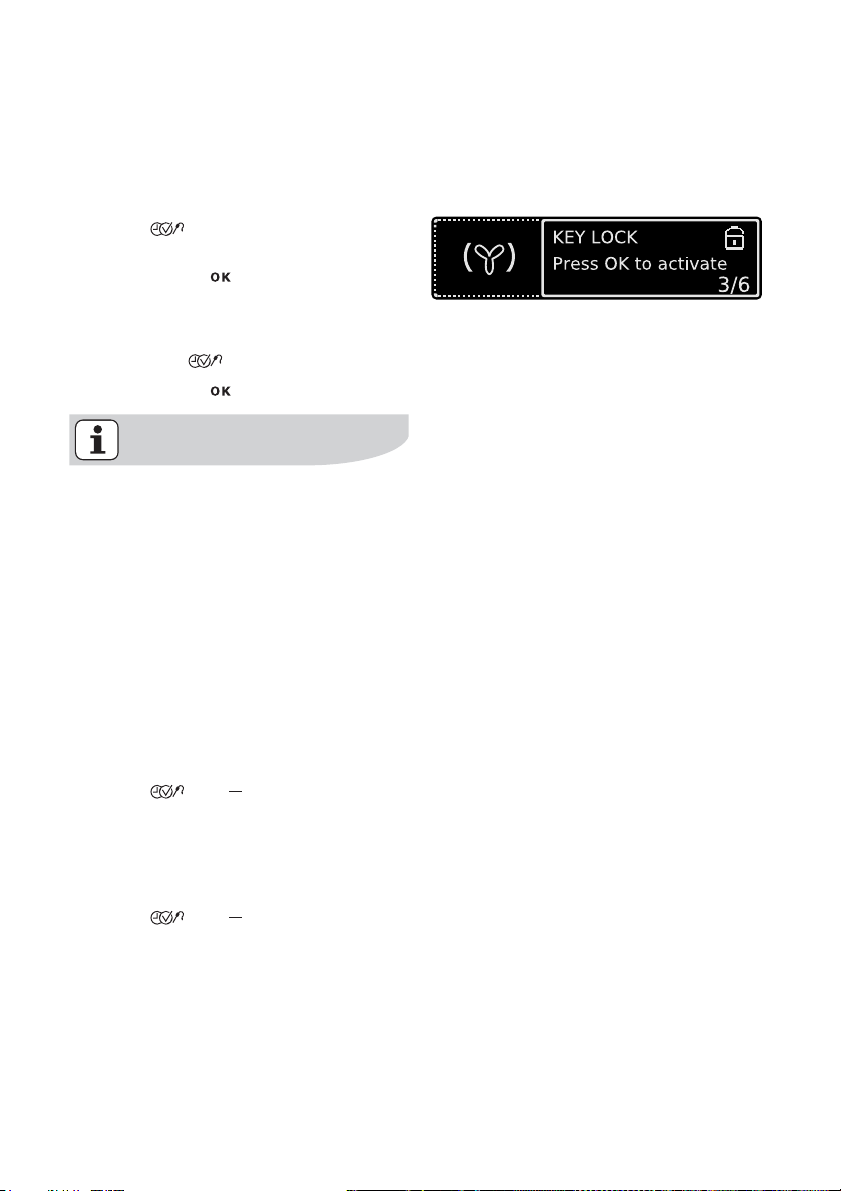
The key lock protects all functions set
from accidental changes.
To switch on Key Lock
1. Select oven function.
2. Press key repeatedly until the
”Key Lock” window appears.
3. Confirm with . The Key Lock is now activated.
To switch off Key Lock
1. Press the key.
2. Confirm with .
The Key Lock does not protect the
appliance from being accidentally
switched off.
After the appliance is switched off,
the
Key Lock is automatically can-
celled.
Child Lock for the oven
As soon as the Child Lock child safety
device is activated, the oven cannot be
operated.
Switching on the Child Lock
No Oven Function must be selected.
using the oven electrolux 45
1. Press and keys at the same
time until a message appears in the
display.
The key lock Child Lock is in operation.
Switching off the Child Lock
1. Press and keys at the same
time until a message appears in the
display.
The Child Lock is now deactivated and
the oven is again ready for use.
Page 46

46 electrolux using the oven
Oven Automatic cut-out
If not switched off after a certain
time, or if the temperature is not
modified, the oven switches off au
tomatically.
A message appears.
The oven switches itself off when the oven temperature is:
30 - 120 °C after 12.5 hours
120 - 200 °C after 8.5 hours
200 - 230 °C after 5.5 hours
Using the appliance after an automatic cut-out
Press the key.
Meatprobe
The oven switches itself off when the
core temperature set by you is reached.
-
Important!: Only the Meatprobe
supplied may be used. If replacing,
please use only original replace
-
ment parts.
Page 47
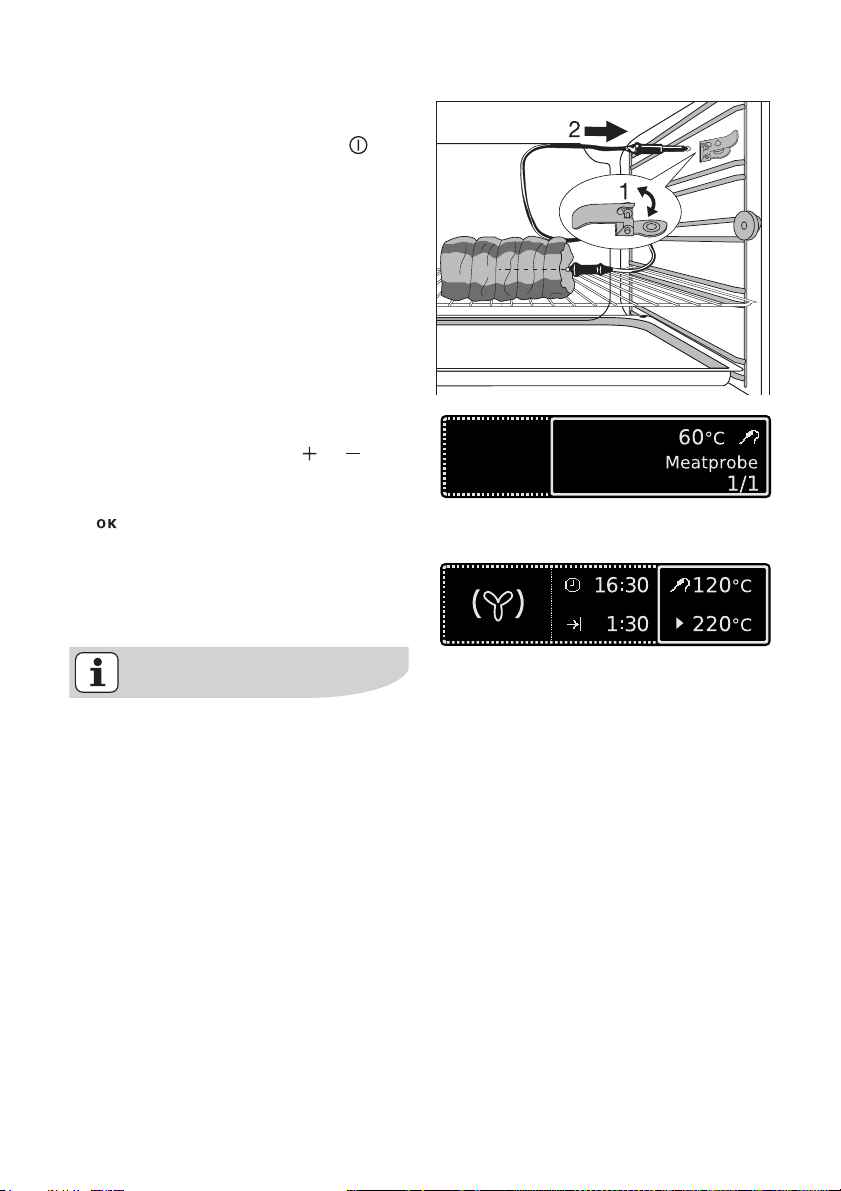
Setting Meatprobe core temperature
1. Switch the appliance on with .
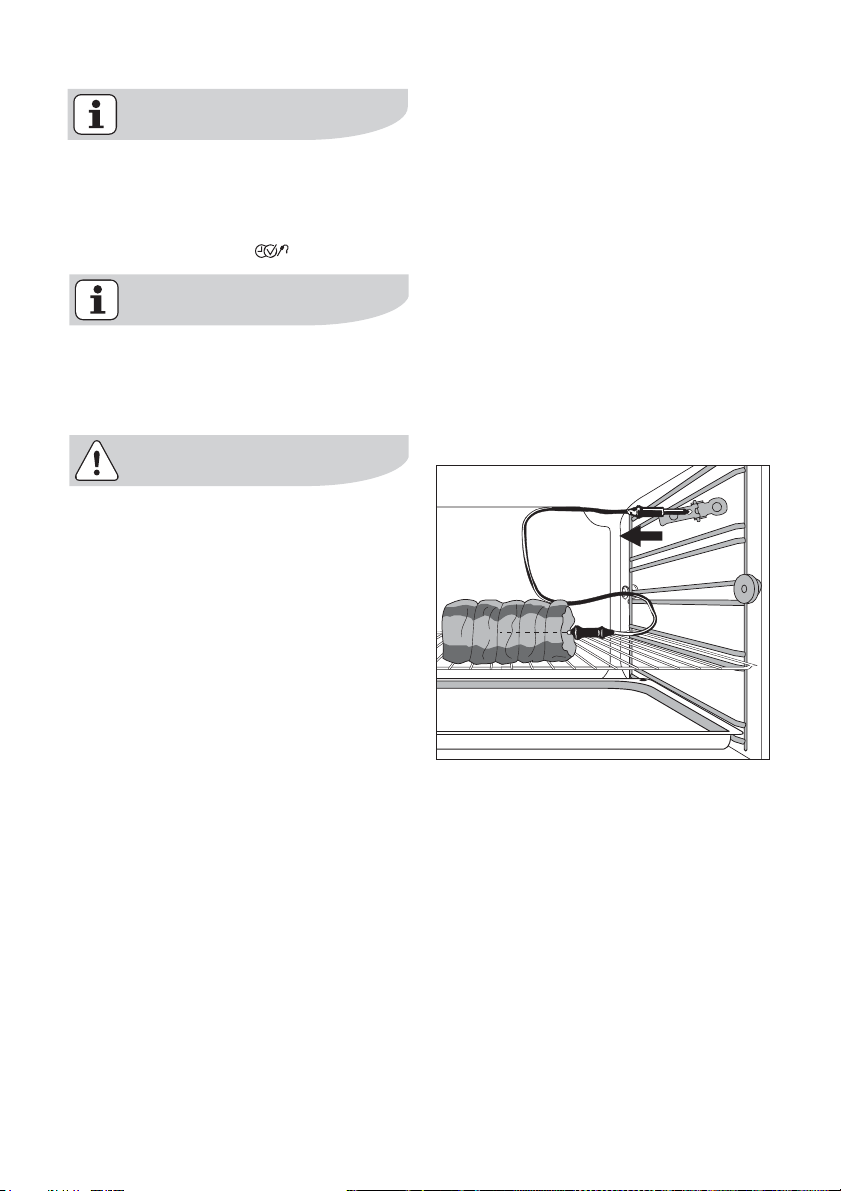
2. Push the tip of the Meatprobe right
into the meat so that the tip is in the
centre of the meat.
3. Insert the plug of the Meatprobe as far as it will go into the socket on the side wall of the oven.
The window ”Meatprobe” is displayed.
4. Within 5 seconds using or set the desired core temperature.
5. Confirm set core temperature with
.
6. Select oven function.
The menu for the oven function is displayed.
7. If necessary, set oven temperature.
using the oven electrolux 47
Within a few minutes a provisional
end time at which the set core tem
perature will be reached is calculated. This time is constantly
recalculated and updated in the dis
play. The system requires that the
Meatprobe is pushed into the meat
and into the socket at the beginning
of the cooking process and that it is
not removed during the cooking
process.
As soon as the pre-set core temperature
is reached, a signal sounds.
8. Press any key to switch off the signal.
-
-
Page 48
48 electrolux using the oven
The Meatprobe can also be set, if an
oven function has already been se
lected.
To subsequently change the core
temperature, press
key.
The core temperature is displayed
from 30°C.
Removing the Meatprobe
Warning: The Meatprobe is very hot.
There is a risk of being burned when
removing the plug and the tip of the
meat probe.
1. Remove the Meatprobe´s plug from
the socket and take the meat out of
the oven.
2. Switch off the appliance.
Page 49
Steam cooking functions
Important: The steam cooking functions must always be set in conjunction with the clock functions
Duration
or End Time (see
section Clock Functions
Duration
/End Time ).
Important: Only water can be used
as the liquid.
A buzzing sound is heard when the
water has been used up. When more
water is added, the buzzing sound is
switched off.
Because of the automatic steam
dispersal period of approx.
5 minutes at the end of the cooking time
and the heating up time of
approx.
than 10
2 minutes, settings of less
minutes have little effect.
Steam will also escape when the door is
opened.
using the oven electrolux 49
Full Steam
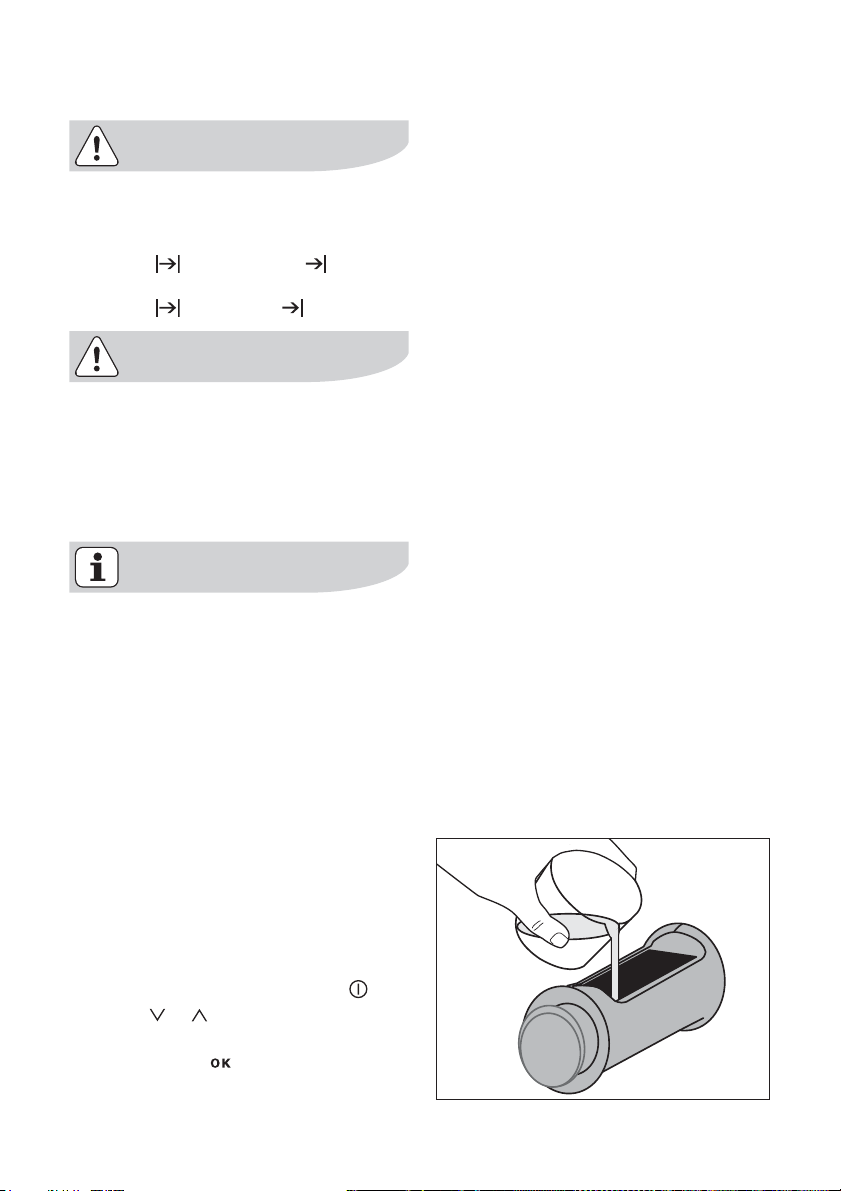
1. Water (approx.650 ml) is not poured
directly into the steam generator, but
into the water drawer in the con
-
trol panel.
The water supply lasts for approx.
30
minutes.
2. Switch the appliance on with .
3. Using or select the menu option
oven function.
4. Confirm with .
Page 50
50 electrolux using the oven
5. Using or the oven function Full
Steam.
6. Confirm with .
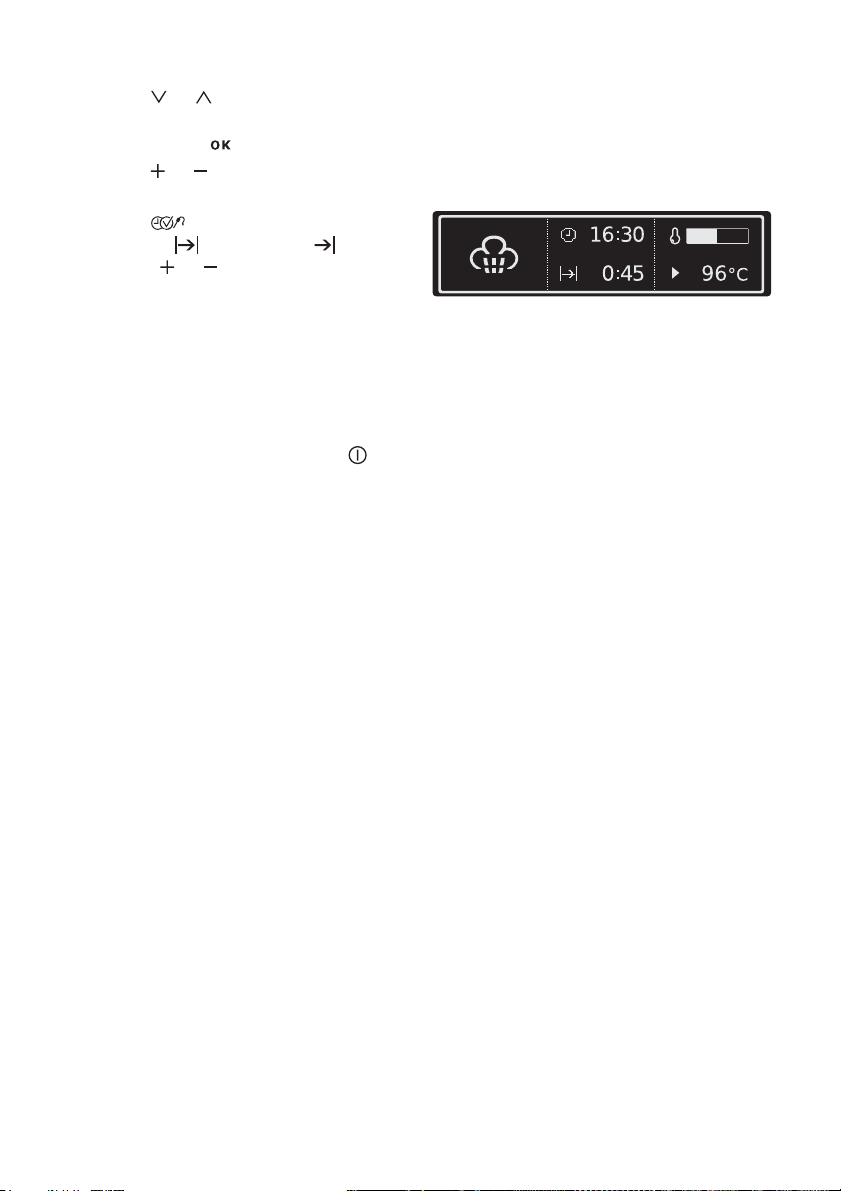
7. Using or key, select the desired
temperature.
8. Using , select the function
Duration or End Time and using the or set the desired cooking time or switch-off time.
After about 2 minutes, the first steam
appears. An audible signal indicates
when the cooking temperature set is
reached.
Another signal indicates the end of the
cooking time.
9. Switch off the appliance with . After the oven has cooled down, soak
up any remaining water from the steam
generator using a sponge and, if neces
sary, wipe out with a little vinegar.
Leave the door open to let the oven dry
completely.
-
Half Steam + Heat and Quarter Steam + Heat
The continual change from hot air to
steam takes place automatically, with
Half Steam + Heat however with a
greater percentage of steam.
The oven functions Half Steam + Heat
and Quarter Steam + Heat are operated
in the same way as the oven function
Full Steam
Page 51
Mechanical door lock
When the appliance is delivered the
door lock is deactivated.
Activating door lock
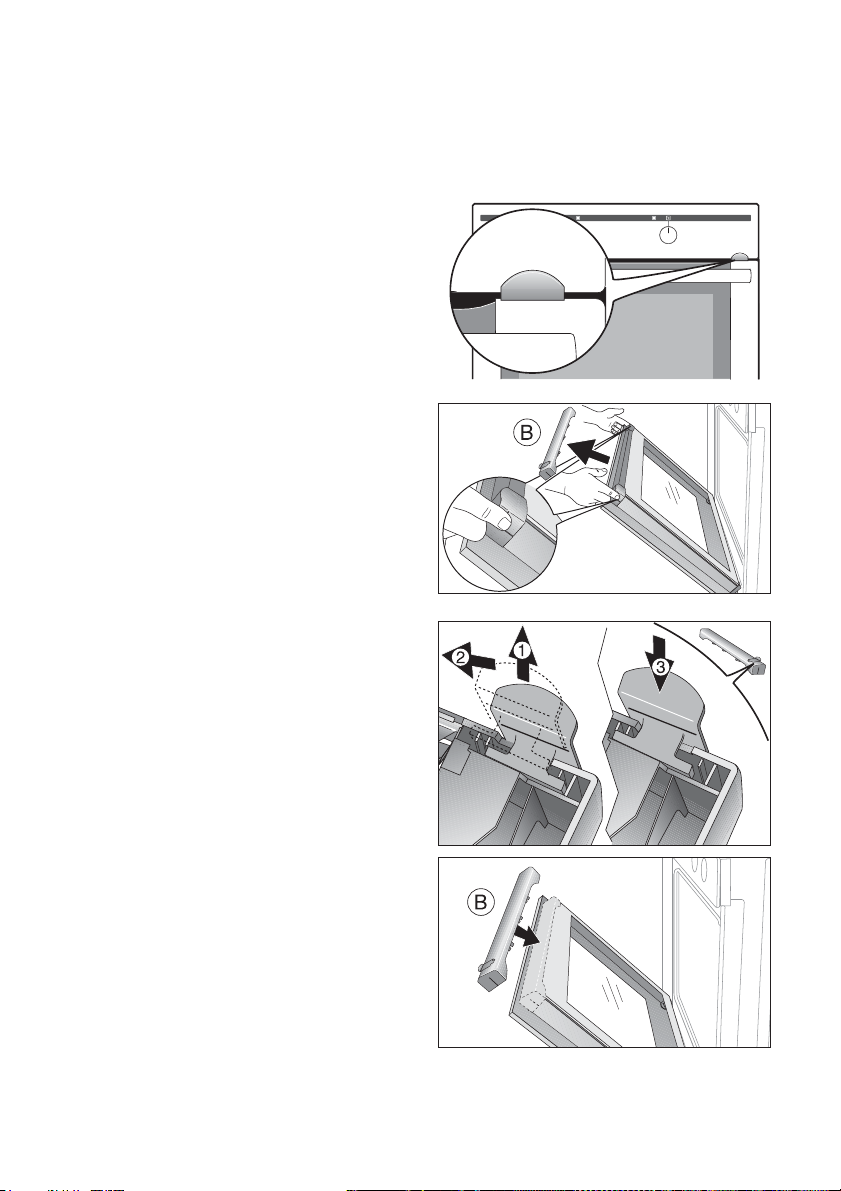
1. Take hold of the door trim (B) on the
upper edge of the door at both sides
and press inwards to release the clip
seal. Then remove the door trim by
pulling it upwards.
using the oven electrolux 51
2. Activate lever:
Remove lever (1) and
move 4mm to the left (2)
and insert (3).
3. Take hold of the door trim (B) at each
side, position it on the inside edge of
the door and plug the door trim
into the upper edge of the door
(B)
Page 52
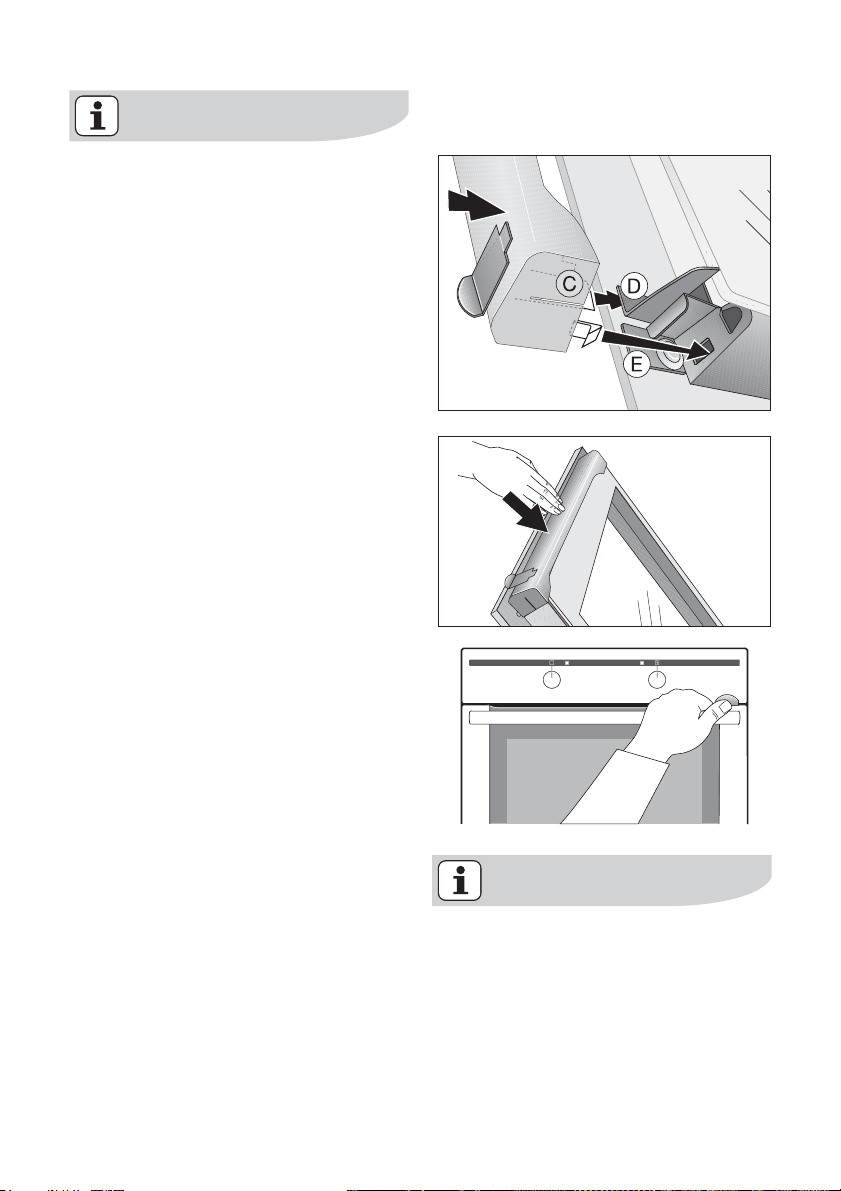
52 electrolux using the oven
On the open side of the door trim (B)
there is a guide bar (C). This must be
pushed between the outer door
panel and the guide corner
(D).
The clip seal (E) must be snapped in.
To open the oven door.
1. Keep lever pressed.
2. Open the door.
To close the oven
Close door without pressing the le-
ver.
Deactivating door lock
To deactivate the door lock, the lever is
moved to the right again. Proceed as
described above.
Switching off the appliance does
not remove the mechanical door
lock.
Page 53
Removing door lock
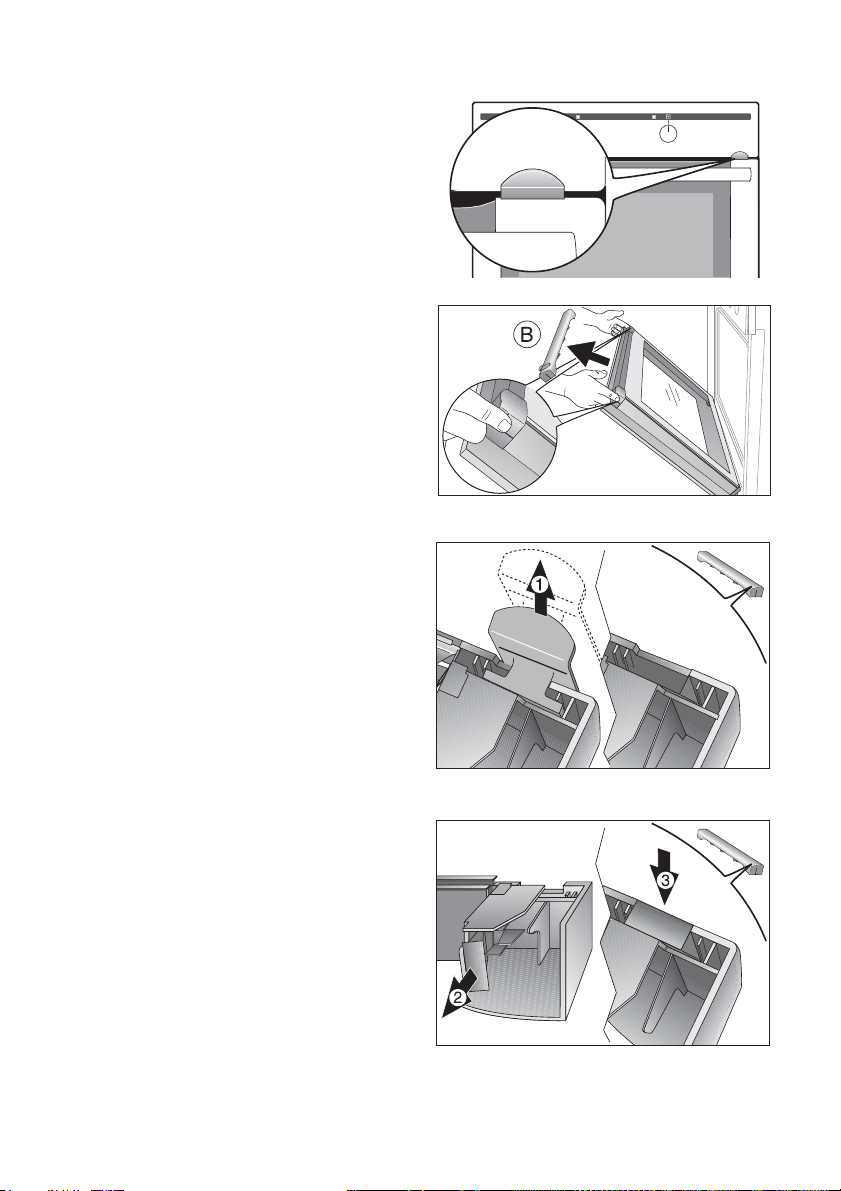
1. Take hold of the door trim (B) on the
upper edge of the door at both sides
and press inwards to release the clip
seal. Then remove the door trim by
pulling it upwards.
2. Demount lever:
Remove lever (1).
using the oven electrolux 53
3. Remove trim from the under side of
the door trim (B)(2) and push in (3).
Page 54
54 electrolux using the oven
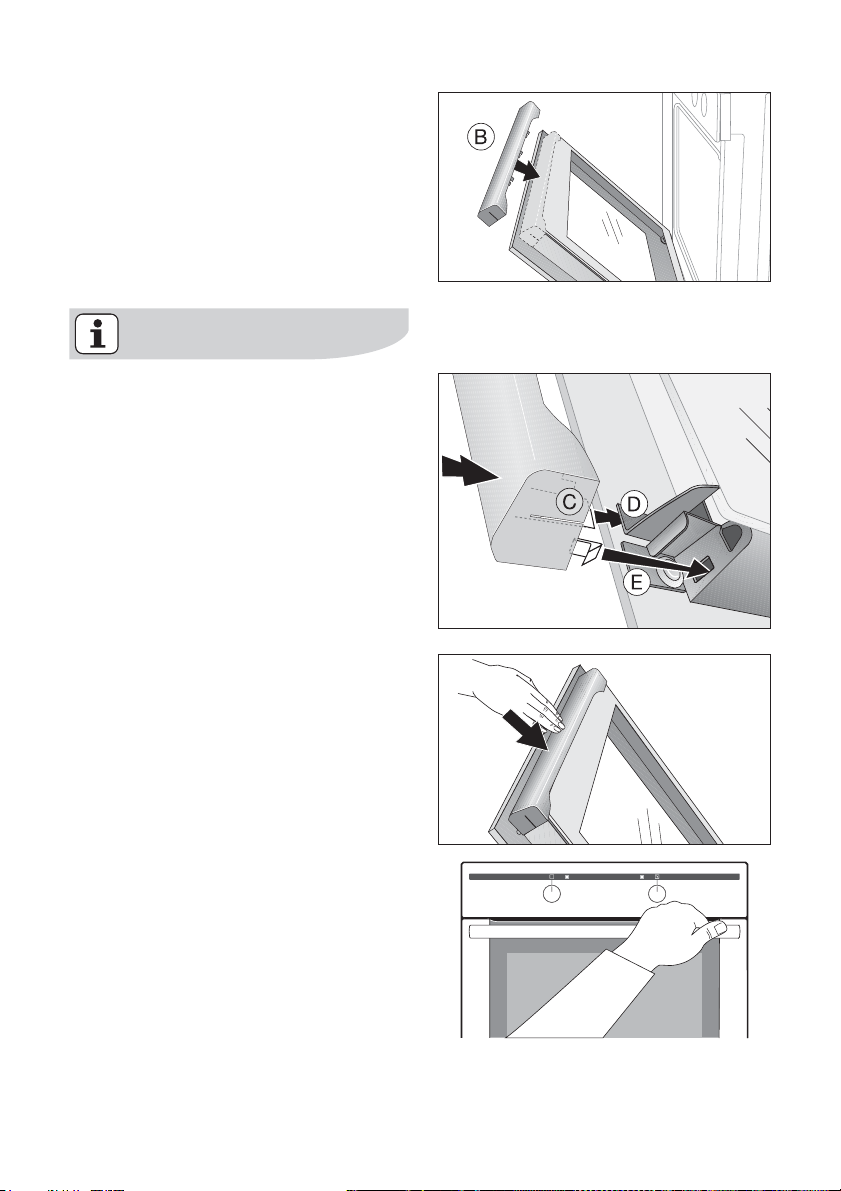
4. Take hold of the door trim (B) at each
side, position it on the inside edge of
the door and push the door trim
onto the upper edge of the door
(B)
On the open side of the door trim (B)
there is a guide bar
(C). This must be
pushed between the outer door
panel and the guide corner
(D).
The clip seal (E) must be snapped in.
5. Close the oven door.
Page 55

Cleaning and Care
Warning: First switch off the appliance and let it cool down before
carrying out any cleaning.
Warning: For safety reasons, do not
clean the appliance with steam blasters
or high-pressure cleaners.
Attention: Do not use any corrosive
cleaning fluids, sharp objects or
stain removers.
Do not clean the glass oven door with
abrasive fluids or metal scrapers, which
could scratch the surface. The glass
could crack and shatter.
Outside of the appliance
• Wipe the front of the appliance with
a soft cloth and a solution of hot wa
ter and washing up liquid.
• For metal fronts, use normal com-
mercially available cleaning agents.
• Please do not use scouring agents
and abrasive sponges.
cleaning and care electrolux 55
Remove stubborn dirt with special
oven cleaners.
Important: if using an oven cleaner
spray, please follow the manufac
turer's instructions exactly.
Accessories
Wash all slide-in units (shelf unit, baking
tray, shelf support rails etc.) after each
use and dry well. Soak briefly to make
them easier to clean.
Fat Filter
1. Clean the fat filter in hot water and washing up liquid or in the dishwash er.
2. Badly burned on soiling can be removed by boiling the filter in a little
water to which 2-3
dishwasher cleaner has been added.
tablespoonsful of
-
-
Oven interior
Clean the appliance after each use. In
this way, dirt is easier to clean off and is
not allowed to burn on.
1. When the oven door is opened, the oven light switches itself on automat ically.
2. After every use, wipe the oven with a solution of washing-up liquid and al low to dry.
-
-
Page 56
56 electrolux cleaning and care
Steam Cleaning
1. Place water (approx. 150 ml) and
1
tablespoon of vinegar directly into
the steam generator.
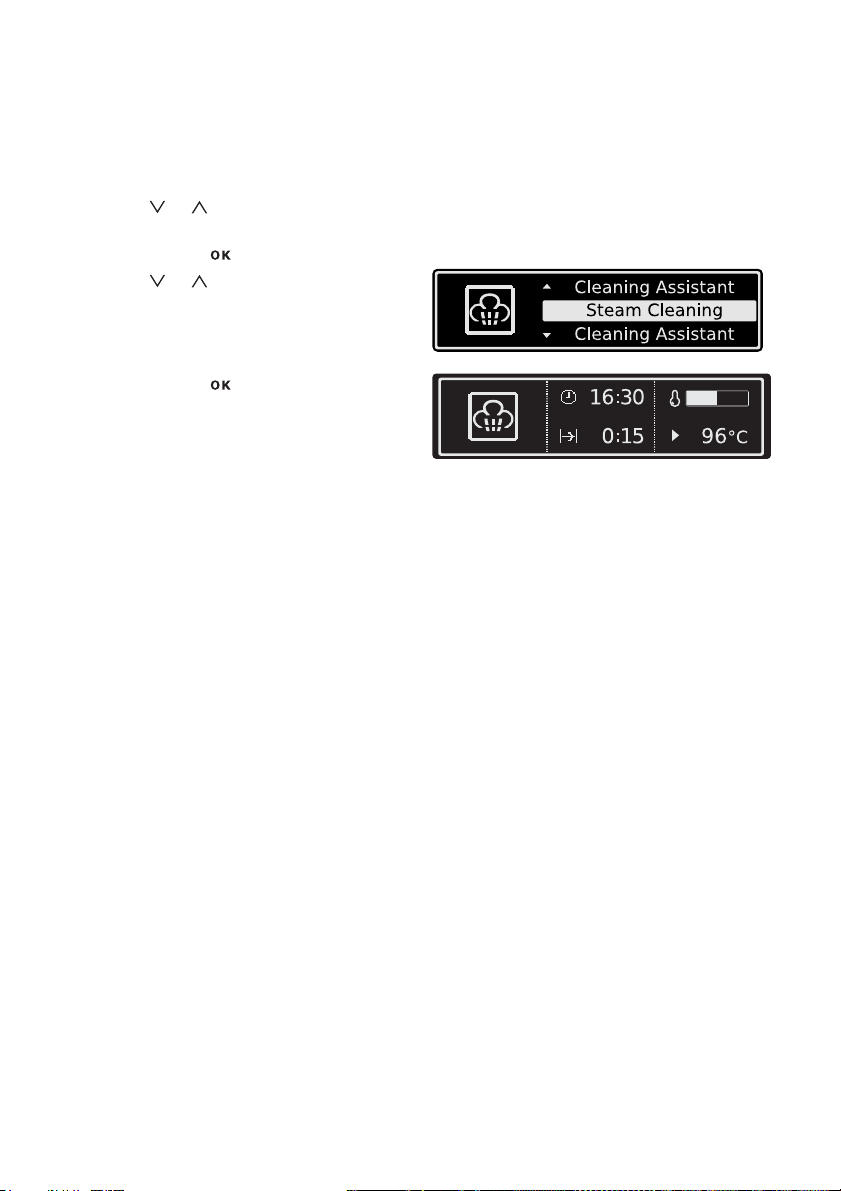
2. Using or select the menu option Cleaning.
3. Confirm with .
4. Using or select the menu option
Steam Cleaning.
5. Confirm with .
The oven now heats up to the required
temperature.
The duration of the process (15 mins.) is
shown in the display.
6. An acoustic signal sounds when the programme has finished.
7. Press any button to switch off the signal.
8. Wipe out the oven with a soft cloth.
Remove any residual water from the
steam generator.
To completely dry the oven, leave
the oven door open for
around
1 hour.
Page 57
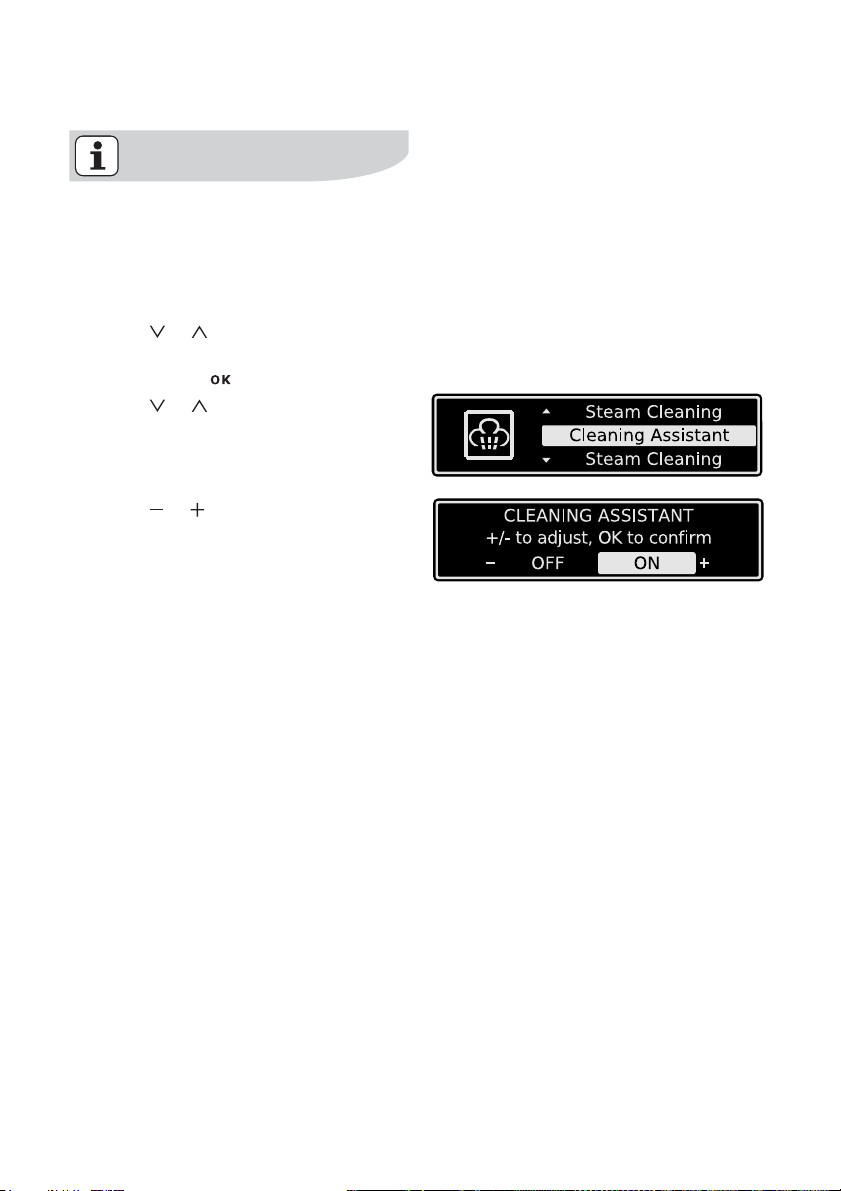
Cleaning Assistant
Before Steam Cleaning the Cleaning
Assistant reminds you what has to
be observed with Steam Cleaning.
Cleaning Assistant To switch on and off
1. Using or select the menu option Cleaning.
2. Confirm with .
3. Using or select the menu option
Cleaning Assistant.
4. Using or switch the Cleaning As-
sistant on or off.
cleaning and care electrolux 57
Page 58
58 electrolux cleaning and care
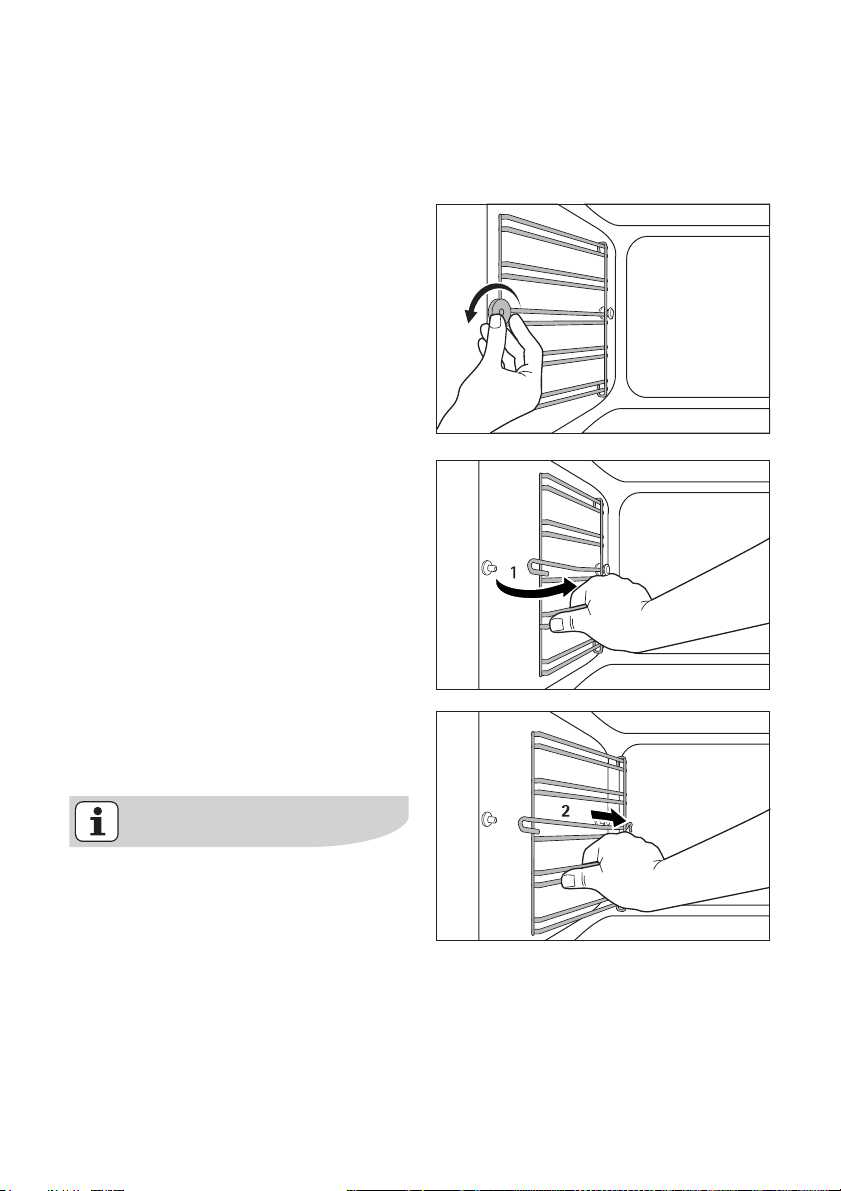
Side Rails
To clean the sides of the oven, the left
and right side rails can be removed.
Taking out the side rails
1. Loosen the screw.
2. Pull the rails sidewards (1).
3. Lift the rails off the side attachments
(2).
To remove/replace the side rails,
open the cover on the Meatprobe
socket.
Page 59
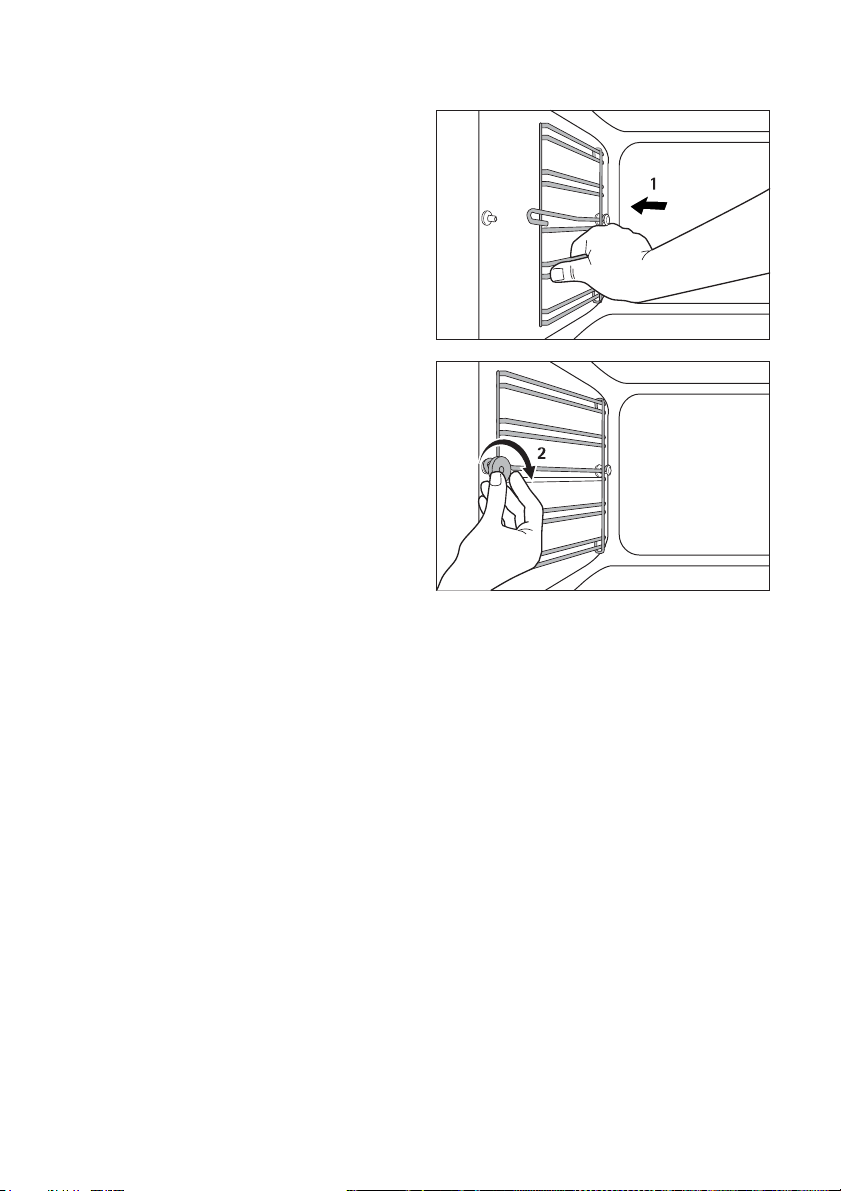
Replace the side rails
1. Set the rails in the rear attachment
and press into the griip on the
side
(1).
2. Insert the screw and tighten (2).
cleaning and care electrolux 59
Page 60
60 electrolux cleaning and care
Steam generation system
Important: Wipe the steam generator dry after each use. Soak up water with a sponge.
Remove any lime residue with water
and vinegar.
Important: Chemical descaling
agents can damage the oven's sur
face enamel. Always follow the
manufacturer's instructions exactly.
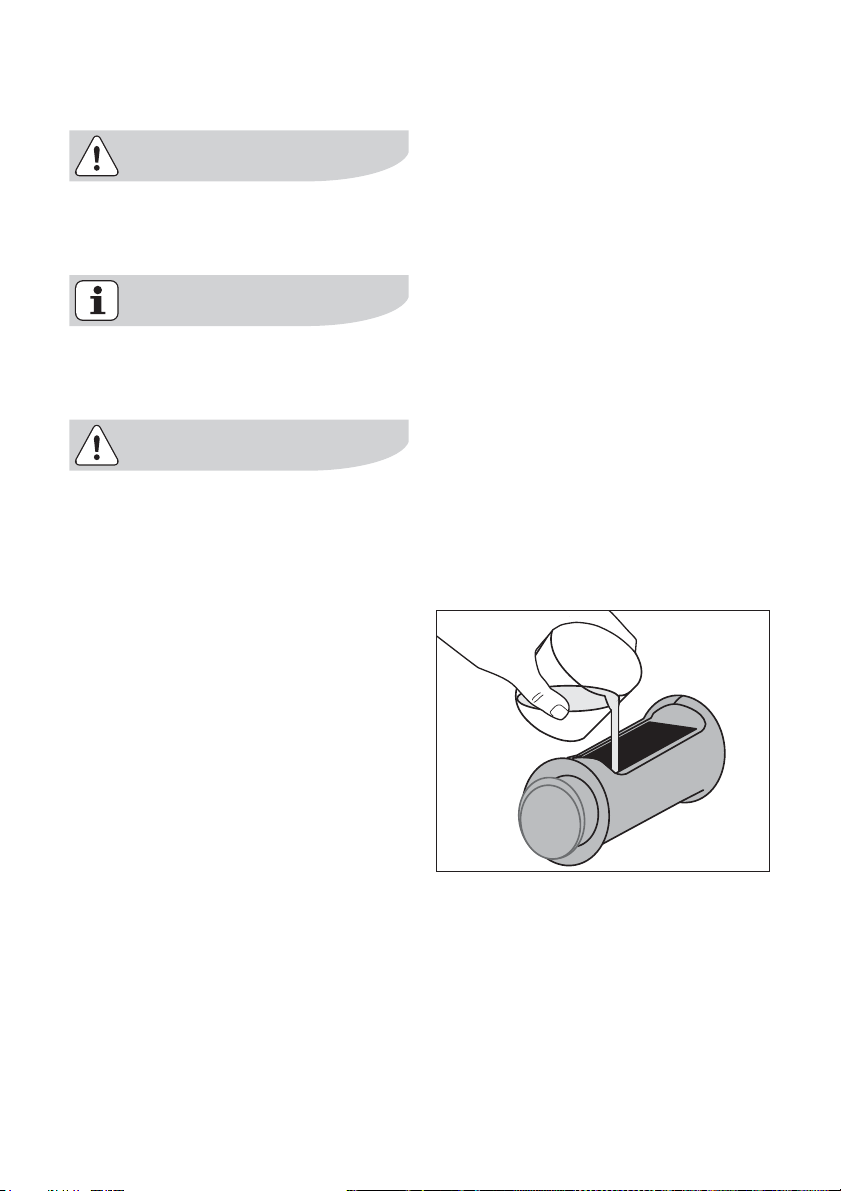
Water Drawer and Steam Generator
1. Pour water and vinegar
(about
250 ml) into the steam gener-
ator via the water drawer.
Leave to work for approx. 10 minutes.
2. Remove the water and vinegar with a non-abrasive sponge.
3. Rinse out the steam generation system through the water drawer using clean water (100-200 ml).
4. Soak up remaining water from the steam generator with the sponge and wipe dry.
5. Leave the oven door open to let the oven dry out completely.
-
Page 61
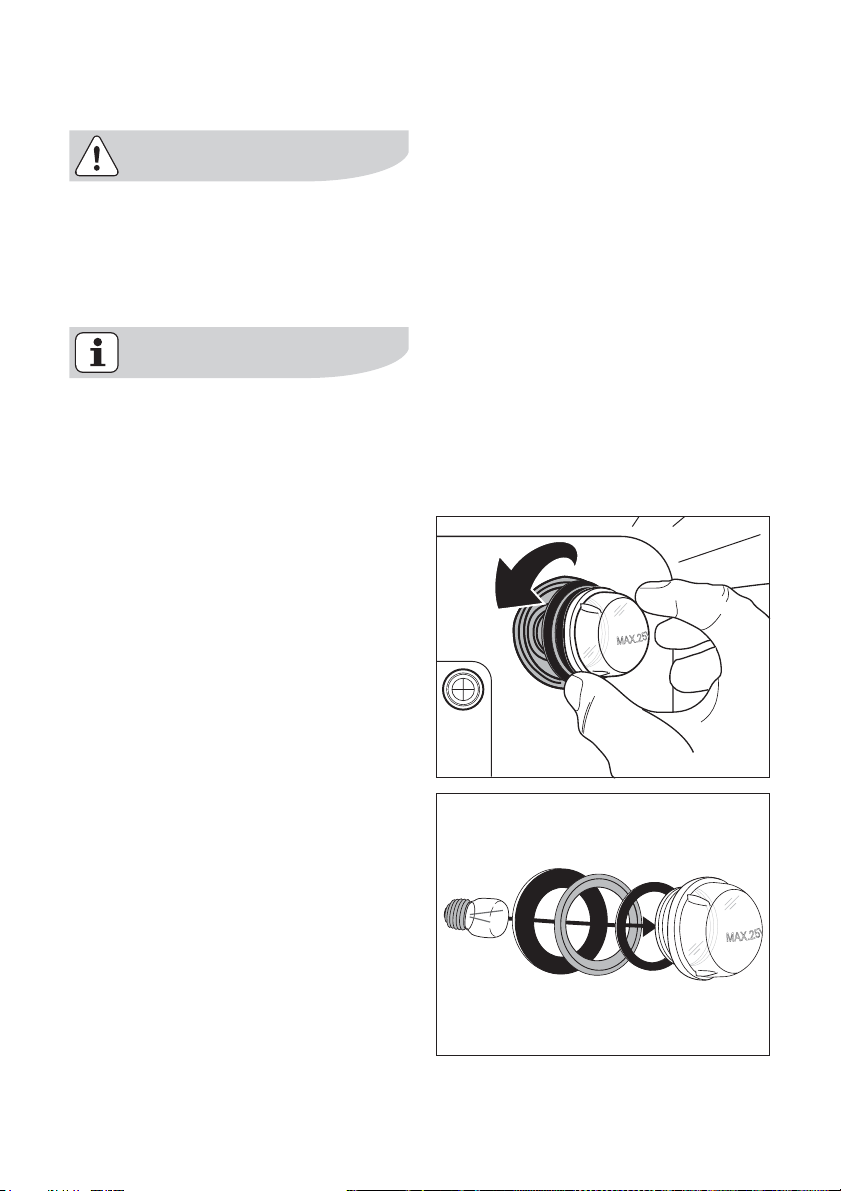
Oven Light
Danger of electrocution! Before replacing the oven light bulb:
• Switch off the oven.
• Take the fuses out of the fuse box, or
switch off.
To protect the oven light bulb and
the glass cap, lay a cloth on the bot
tom of the oven.
Replacing the rear oven light bulb/ cleaning the glass cap
1. Take off the cap by turning to the left.
2. Remove seals and metal ring, and
clean the glass cap.
3. If necessary:
replace bulb with a 25 Watt,
230
V, 3 00 °C heat-resistant oven
light bulb.
cleaning and care electrolux 61
-
4. Fit seals and metal ring to the glass cap.
5. Re-fit the glass cap.
Page 62
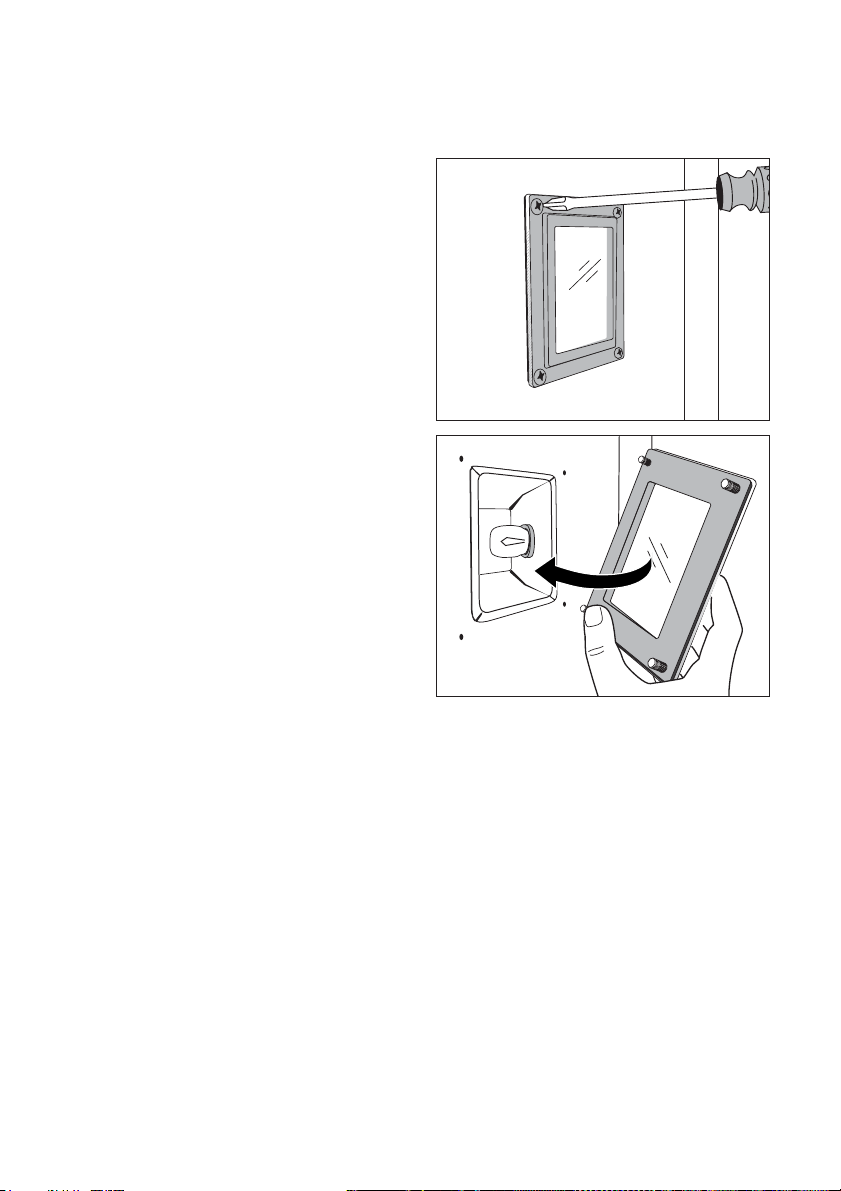
62 electrolux cleaning and care
Replacing the oven side light bulb/ cleaning the glass cap
1. Take out the side rails.
2. Unscrew the metal frame using a
cross-tip screwdriver.
3. Take off the metal frame and seal, and clean.
4. If necessary:
replace bulb with a 25 Watt,
230
V, 3 00 °C heat-resistant oven
light bulb.
5. Put the metal frame and seal back in place, insert screws, and tighten.
6. Replace the side rails.
Page 63
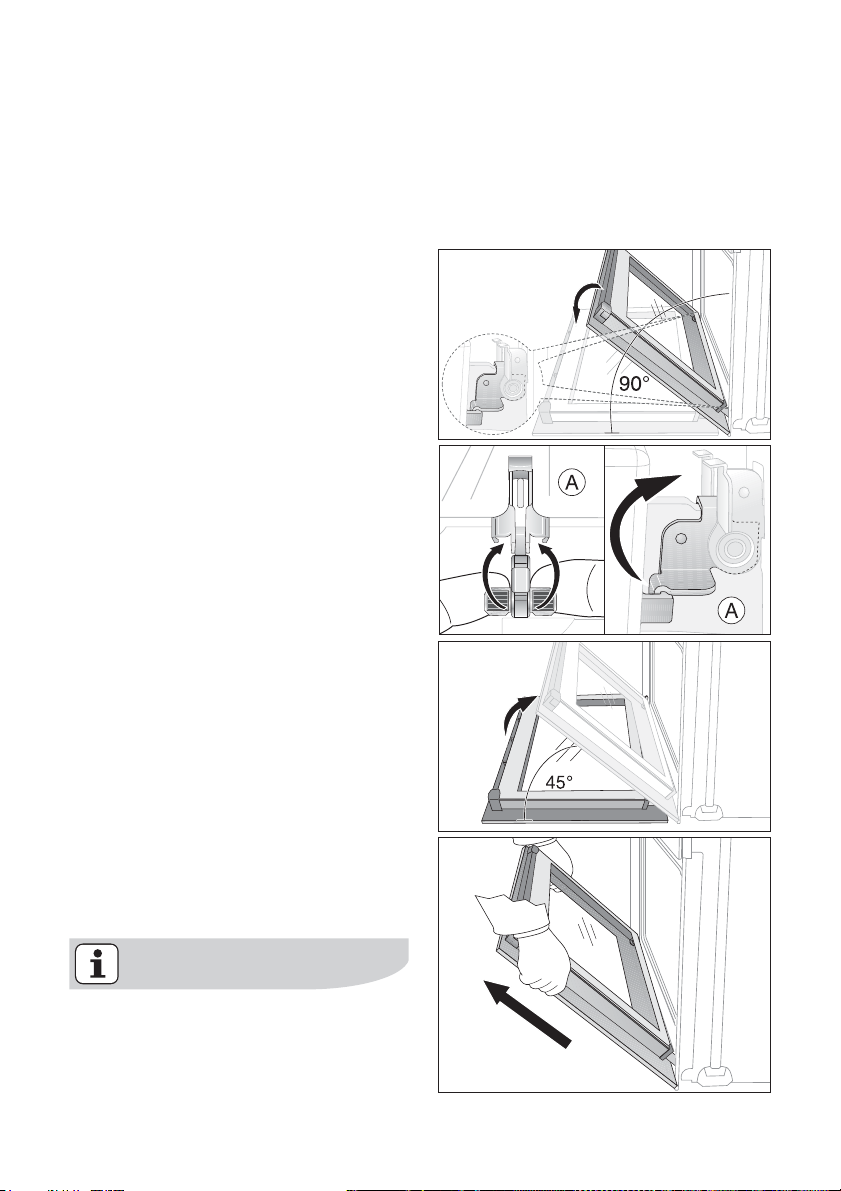
Oven door
For easier cleaning of the oven interior
the oven door of your appliance can be
taken off its hinges.
Removing the oven door from its hinges
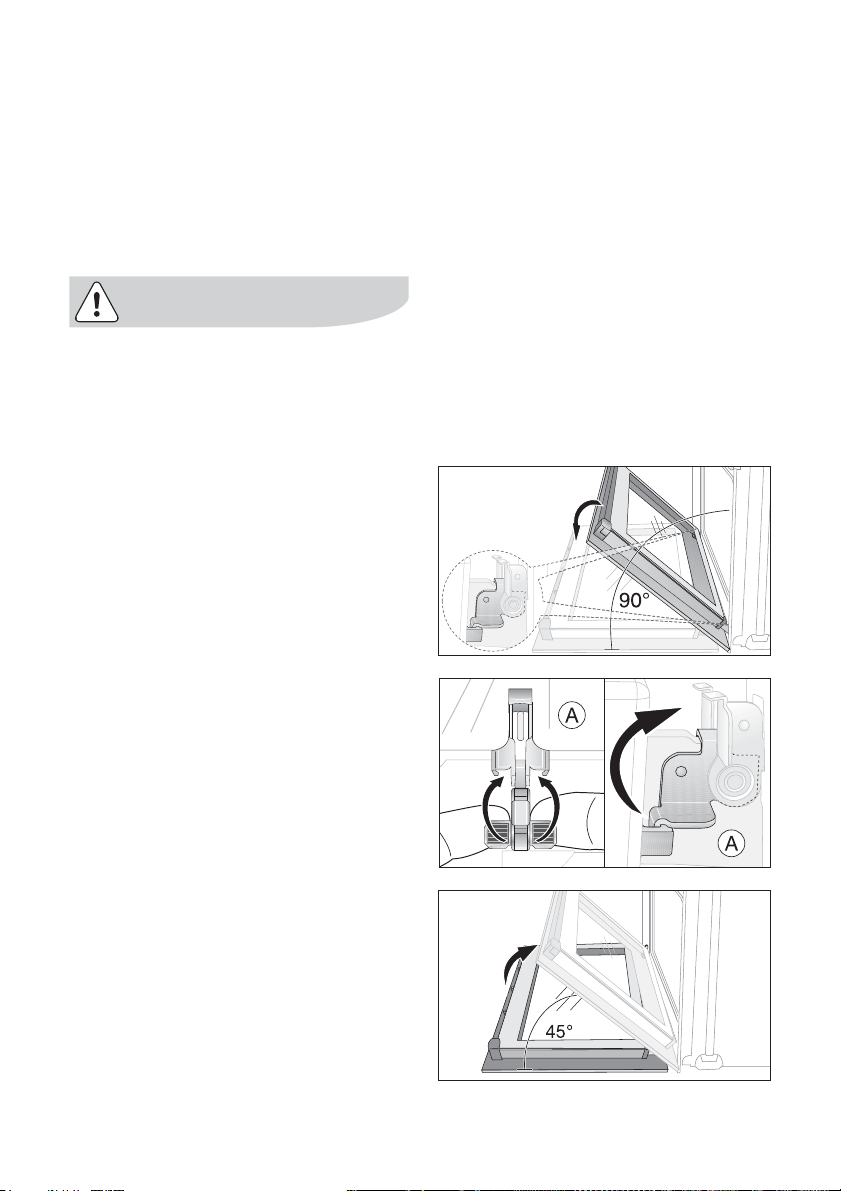
1. Open the oven door as far as it will go.
2. Undo the clamping levers (A) on both door hinges fully.
cleaning and care electrolux 63
3. Close the oven door as far as the first
position (approx. 45°).
4. Take hold of the oven door with a hand on each side and pull it away from the oven at an upwards angle (Take care: It is heavy).
Lay the oven door with the outer
side facing downwards on some
thing soft and level, for example, a
blanket in order to prevent scratch
es.
-
-
Page 64
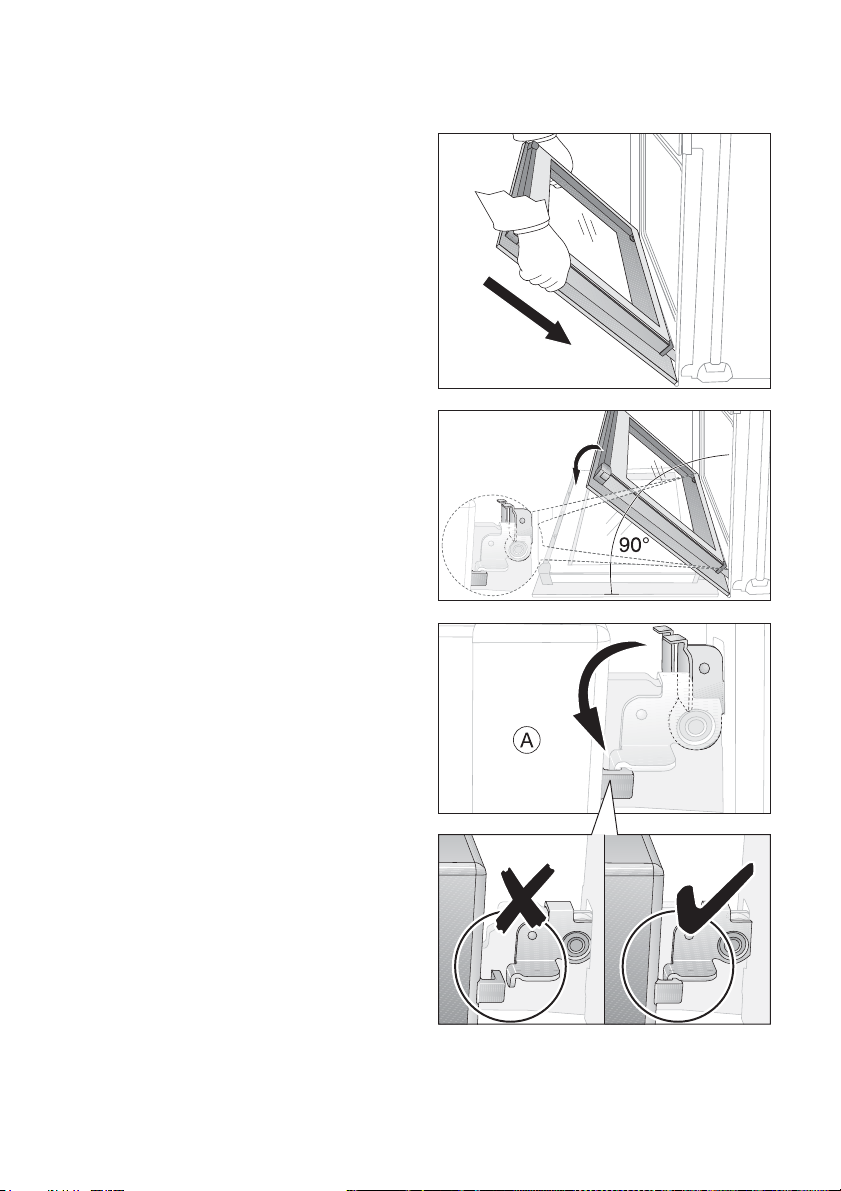
64 electrolux cleaning and care
Hanging the oven door back on its hinges
1. From the handle side take hold of the
oven door with a hand on each side
and hold at an angle of approx. 45°.
Position the recesses on the bottom
of the oven door on the hinges on
the oven.
Let the door slide down as far as it
will go.
2. Open the oven door as far as it will go.
3. Fold up the clamping levers (A) on both door hinges back into their orig inal positions.
4. Close the oven door.
-
Page 65
Oven door glass and water collecting channel
The oven door is fitted with three panels
of glass mounted one behind the other
and a water collecting channel. The in
ner panels and the water collecting
channel can be removed for cleaning.
Important! Rough handling, especially around the edges of the front
panel, can cause the glass to break.
Removing the door glass and water collecting channel
1. Open the oven door as far as it will go.
-
cleaning and care electrolux 65
2. Undo the clamping levers (A) on both door hinges fully.
3. Close the oven door as far as the first
position (approx. 45°).
Page 66
66 electrolux cleaning and care
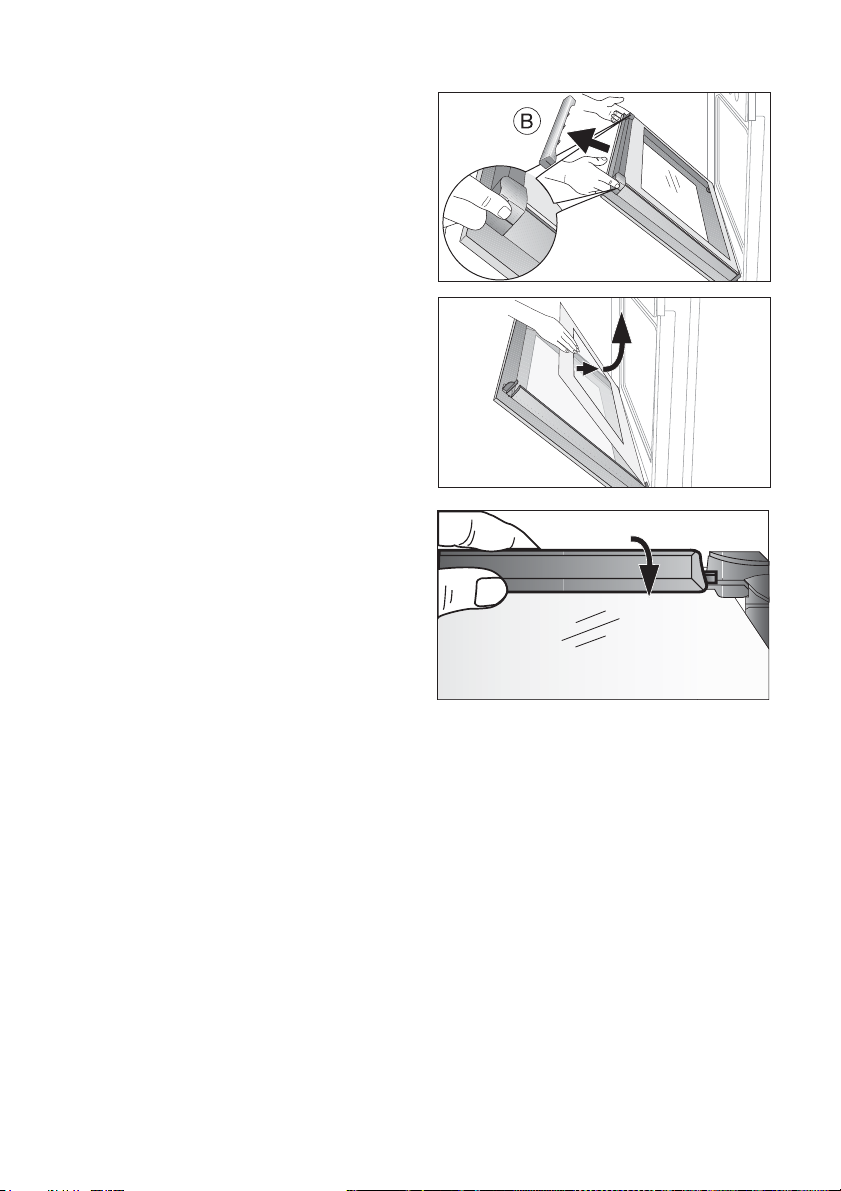
4. Take hold of the door trim (B) on the
upper edge of the door at both sides
and press inwards to release the clip
seal. Then remove the door trim by
pulling upwards
.
5. Hold the upper edge of the door glass and take it out of the guide by pulling it upwards.
6. Tip the water collecting channel towards the door glass and lift upwards to remove from the guide.
Cleaning the door glass and the water collecting channel
Clean the door glass panels and the water collecting channel thoroughly with a
solution of water and washing-up liquid.
Then dry them carefully.
Page 67
Inserting door glass panels and the water collecting channel
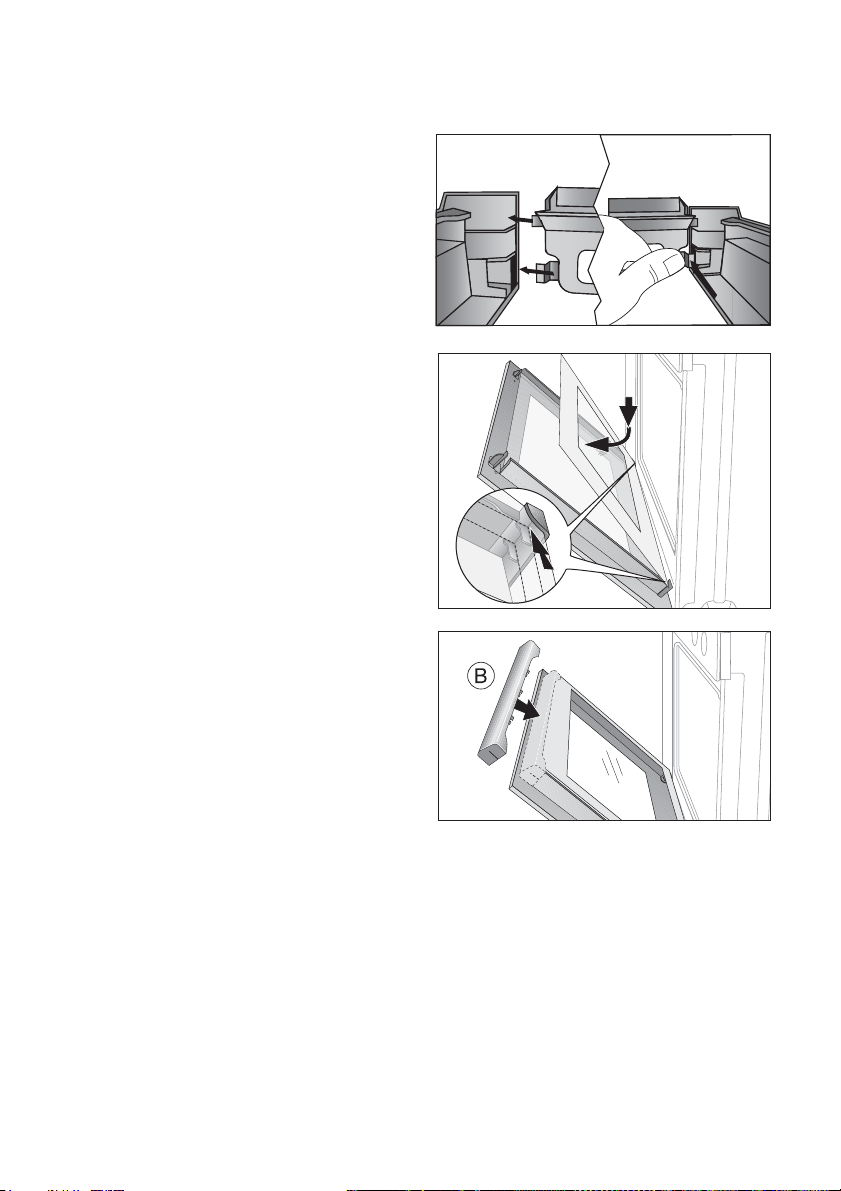
1. Insert the snap-in hook of the water collecting channel sideways into the guide. Apply some pressure from above to snap in hook on the other side.
2. From above, insert the door glass at an angle into the door profile at the bottom edge of the door and lower it.
cleaning and care electrolux 67
3. Take hold of the door trim (B) at each side, position it on the inside edge of the door and push the door trim (B) onto the upper edge of the door.
Page 68
68 electrolux cleaning and care
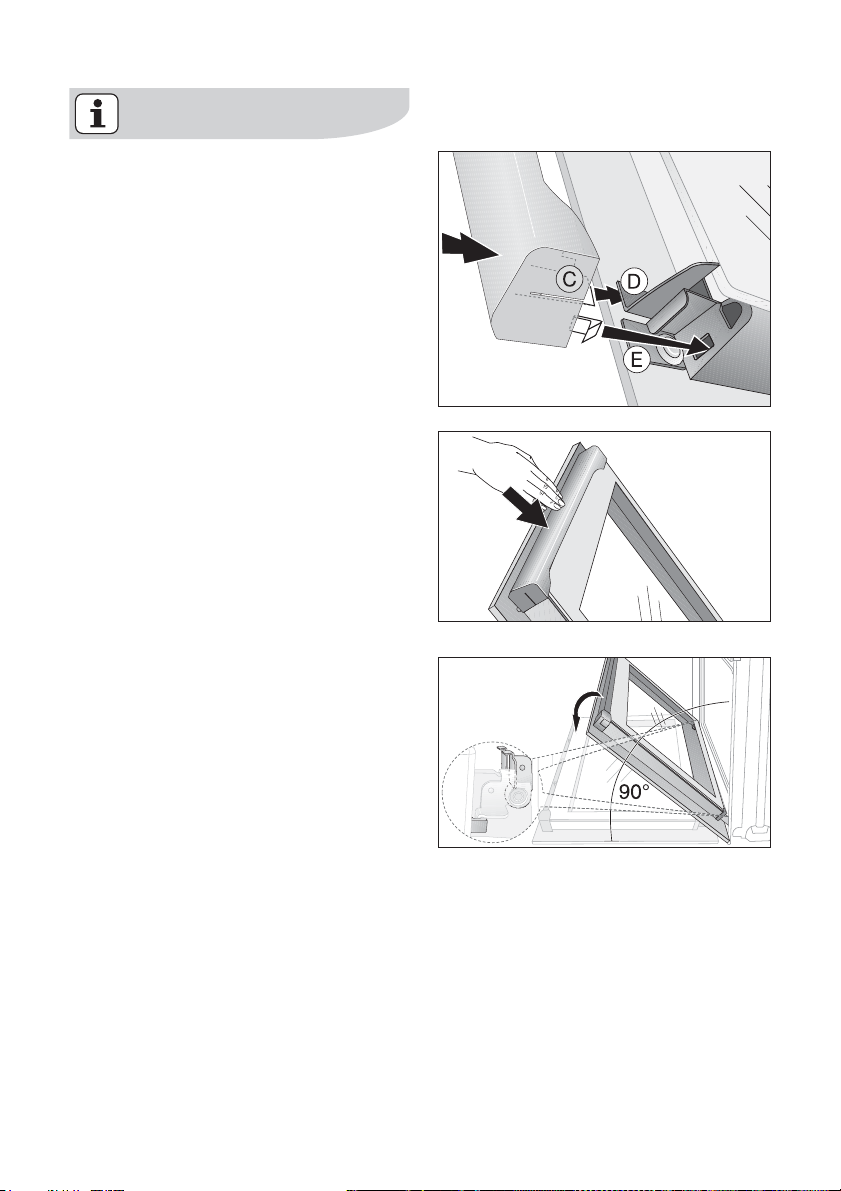
On the open side of the door trim (B)
there is a guide bar (C). This must be
pushed between the outer door
panel and the guide rail (D).
The clip seal (E) must be snapped in.
4. Open the oven door as far as it will go.
Page 69
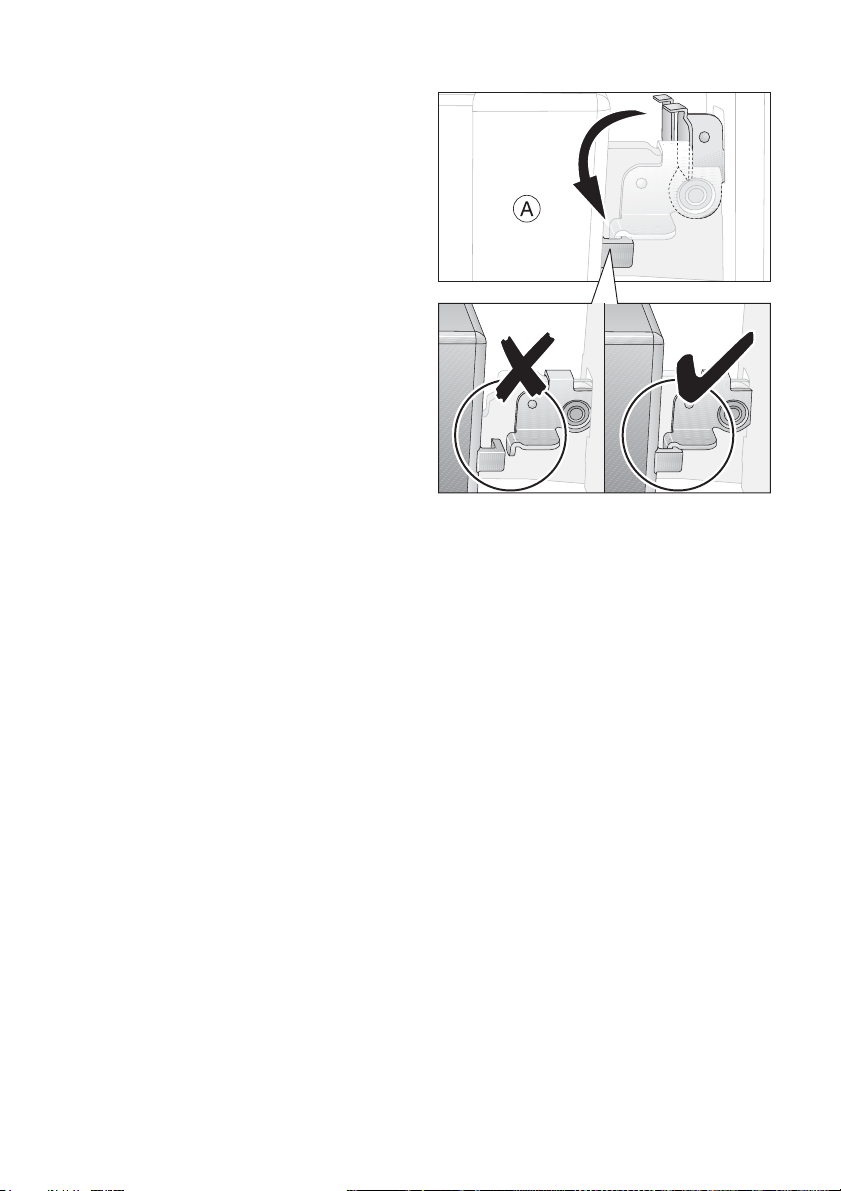
5. Fold up the clamping levers (A) on both door hinges back into their original positions.
6. Close the oven door.
cleaning and care electrolux 69
Page 70
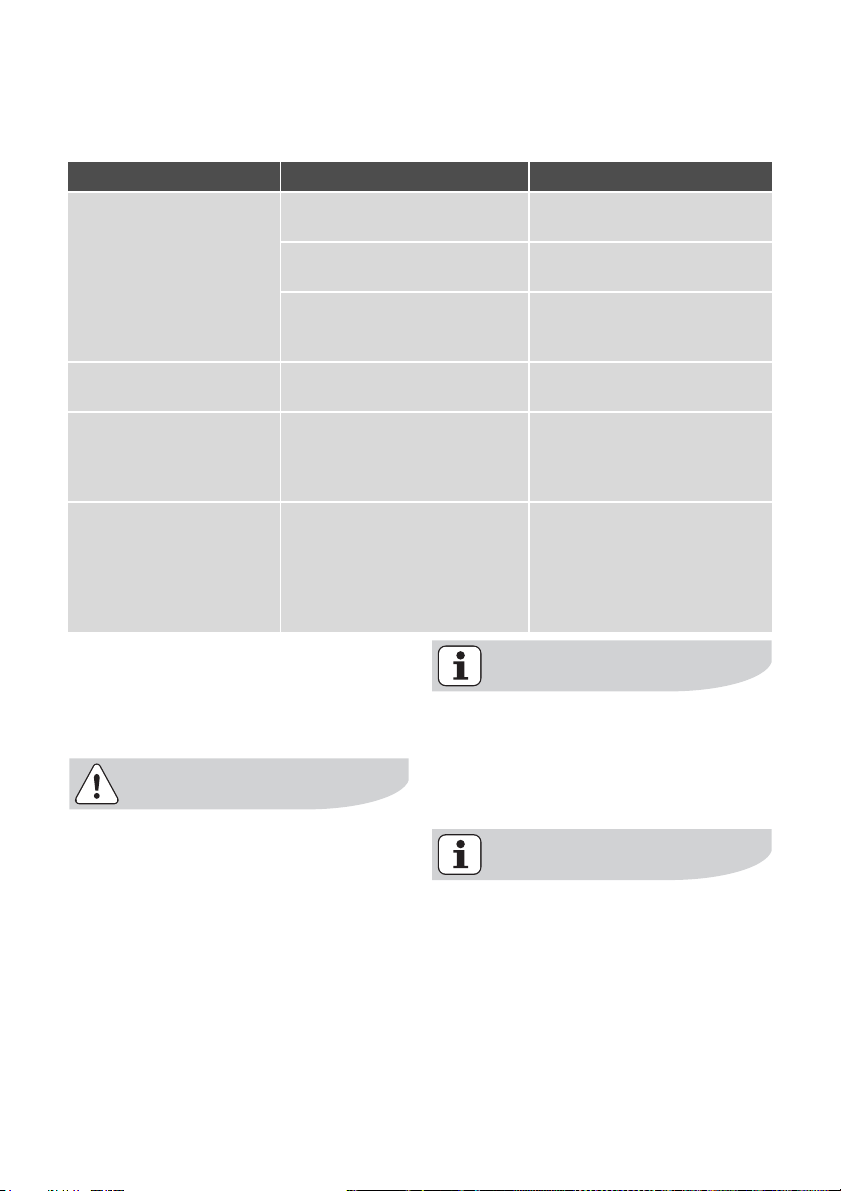
70 electrolux what to do if …
What to do if …
Problem Possible cause Remedy
The oven is not heating up The oven has not been switched onSwitch oven on
The required settings have not
been set
The house wiring fuse (in the
fuse box) has tripped
The oven lighting is not operating
“F11” appears in the clock
display.
A fault code that is not listed above appears in the
clock display
The oven light bulb is faulty Replace oven light bulb
The meat probe has short
circuited or the plug of the meat
probe is not firmly in position in
the socket
Electronic fault Switch the appliance off and on
If you are unable to remedy the
problem by following the above
suggestions, please contact your
dealer or the Customer Care De
-
partment.
Warning! Repairs to the appliance
are only to be carried out by quali
fied service engineers. Considerable danger to the user may result
from improper repairs.
Check the settings
Check fuse. If the fuses trip several times, please call a qualified
electrician
Insert the meat probe plug into
the socket on the oven side wall
as far as it will go
again via the house fuse or the
safety switch in the fuse box.
If it is displayed again, please
contact the Customer Care De
partment
If the appliance has been wrongly
operated, the visit from the custom
er service technician or dealer may
not take place free of charge, even
during the warranty period.
-
Advice on cookers with metal fronts:
Because of the cold surface at the
front of the cooker, opening the
oven door during (or just after) bak
ing or roasting may cause the glass
to steam up.
-
-
-
Page 71

Installation Instructions
Important: Any electrical installation
work must be carried out by a qual
ified electrician/competent person.
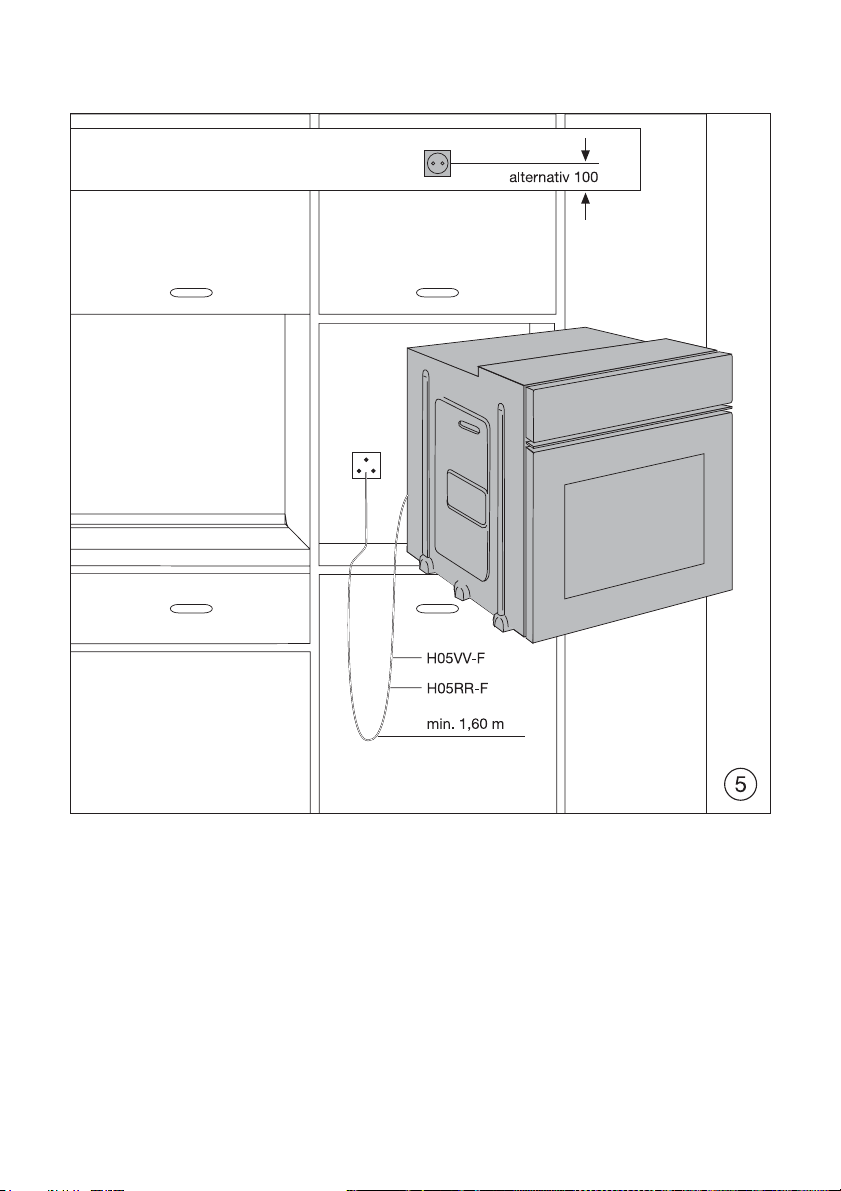
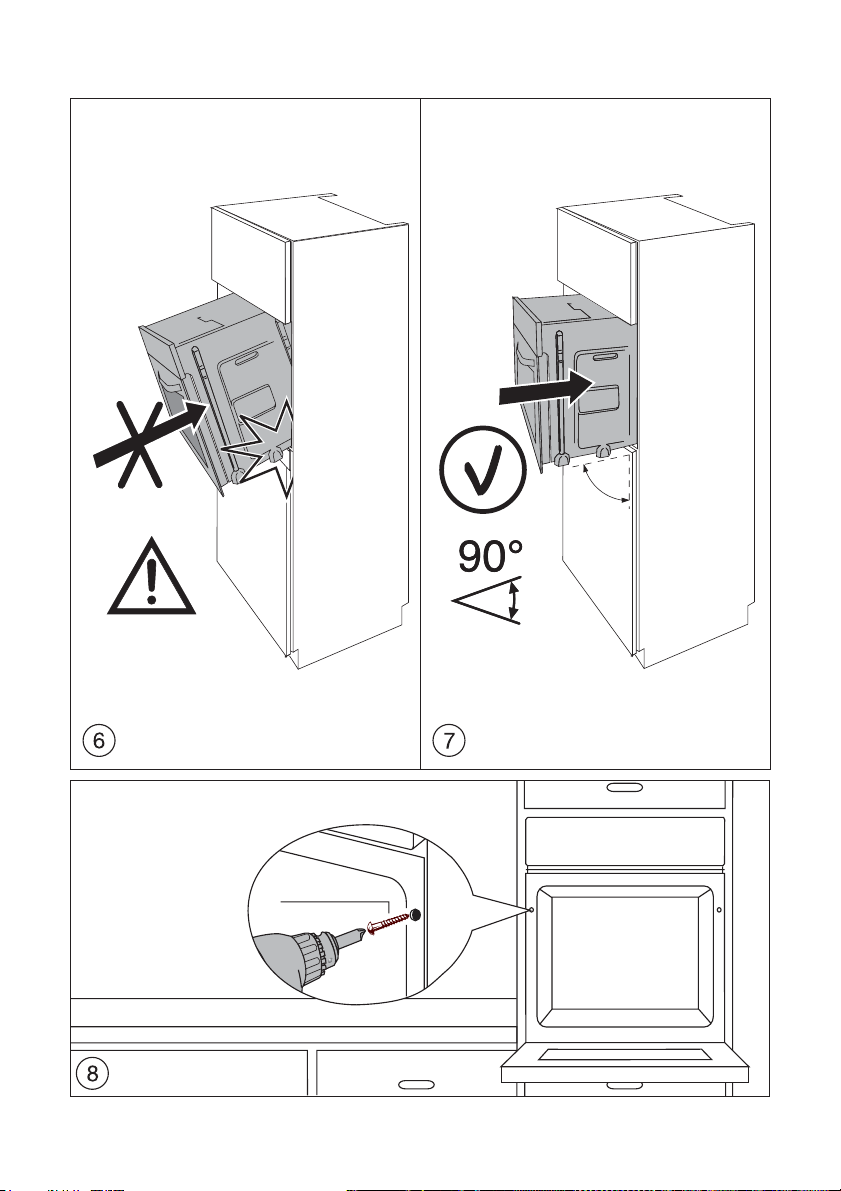
The oven must be installed according to the instructions supplied.
Safety Instructions for the Installer
• Protection against access to live
parts must be guranteed by the in
stallation.
• The unit in which the appliance is fitted must satisfy the requirements of
DIN 68930 in respect of stability.
• This oven must be installed by qualified personnel to the relevant Standards.
• This oven is heavy. Take care when
moving it.
• Remove all packaging, both inside
and outside the oven before using
the oven.
• Do not attempt to modify the oven in
any way.
• The built-in cooker and hobs are fitted with special connector systems.
They may only be combined with
units of the corresponding system.
-
installation instructions electrolux 71
-
Page 72
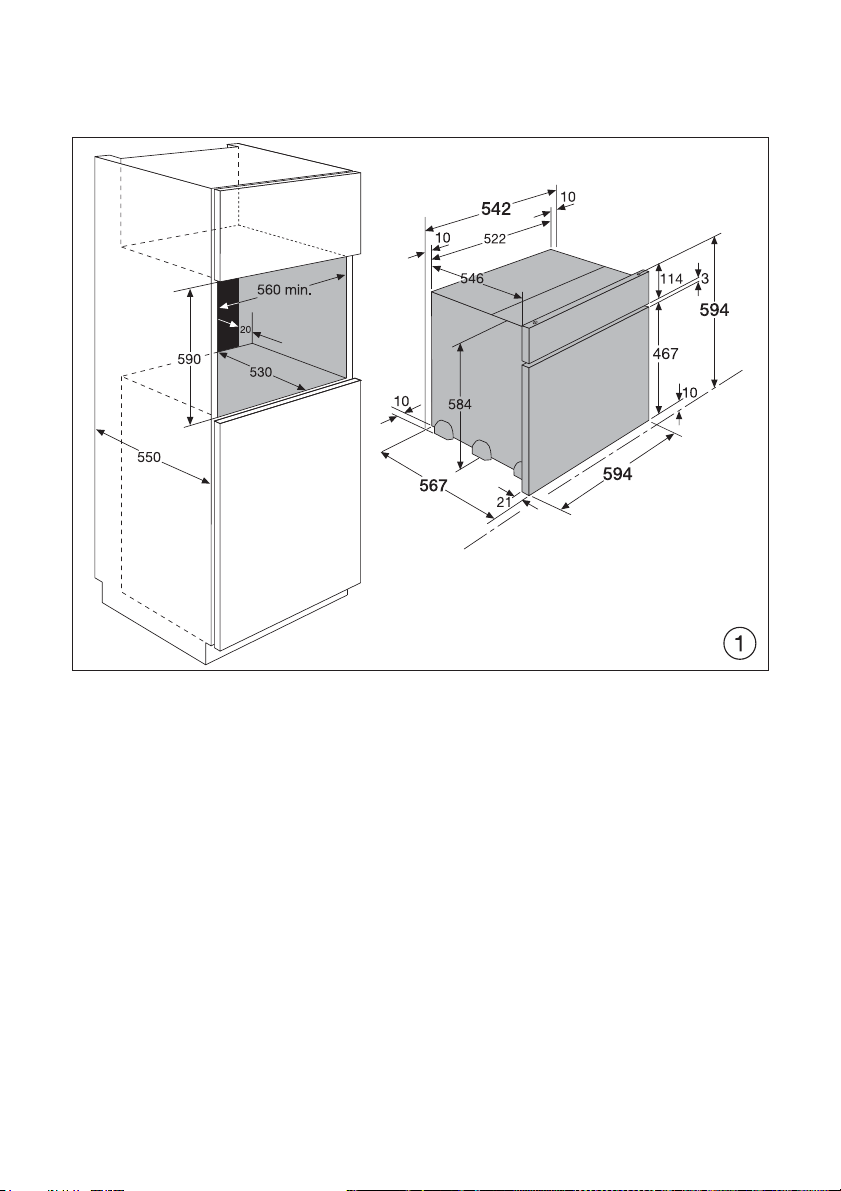
72 electrolux installation instructions
Page 73
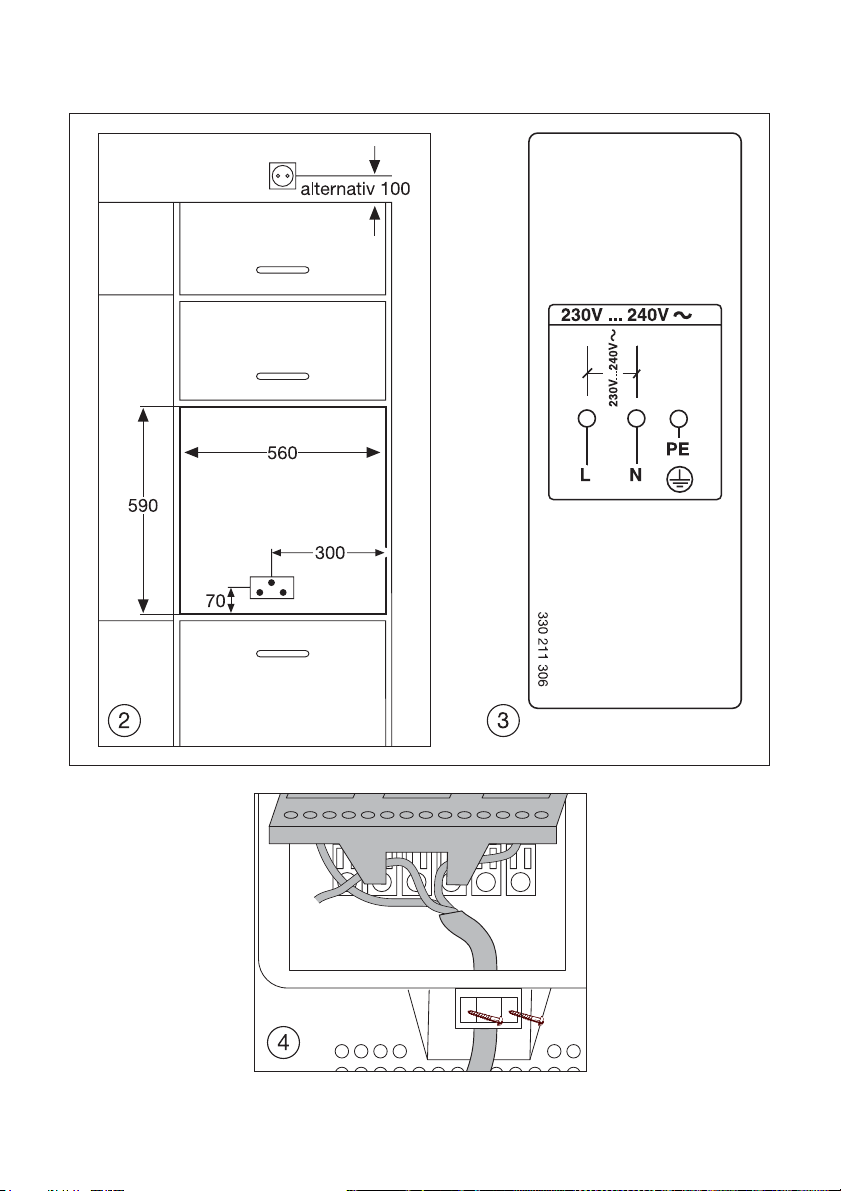
installation instructions electrolux 73
Page 74
74 electrolux installation instructions
Page 75
installation instructions electrolux 75
3,5x25
Page 76

76 electrolux disposal
Disposal
Packaging material
The packaging materials are envi-
ronmentally friendly and can be recycled. The plastic components are
identified by markings, e.g. >PE<,
>PS<, etc. Please dispose of the
packaging materials in the appro
priate container at the community
waste disposal facilities.
Old appliance
The symbol W on the product or on
its packaging indicates that this
product may not be treated as
household waste. Instead it shall be
handed over to the applicable col
lection point for the recycling of
electrical and electronic equipment.
By ensuring this product is dis
posed of correctly, you will help prevent potential negative
consequences for the environment
and human health, which could oth
erwise be caused by inappropriate
waste handling of this product. For
more detailed information about re
cycling of this product, please contact your local city office, your
household waste disposal service
or the shop where you purchased
the product.
-
-
-
Warning: So that the old appliance
can no longer cause any danger,
make it unusable before disposing
of it.
To do this, disconnect the appliance
from the mains supply and remove
the mains cable from the appliance.
-
-
Page 77

Index
index electrolux 77
A
Accessories 12, 20
automatic meat probe 27
automatic recipes 29
Automatic weight 26
B
Baking tray 12, 20
C
Child safety device 45
Cleaning
accessories 55
Oven interior 55
Pre-cleaning 15
Side rails 58
steam generation system 60
Cleaning assistant 57
Clock 8
Clock Funktions 40
Cook time 42
Countdown timer 41
D
Description of the appliance 7
Dishes 23
Display On/Off 35
Door lock 51
E
End time 42
F
Factory settings 35
Fast heating 19
Fat Filter 55
Fault code 70
G
Grease filter 22
H
Heat indicator 19
Heat+Hold 38
Heating up 19
I
Indicators 8
K
Key lock 45
Kitchen Assistant 23
Operation 26
Overview 23
L
Language
setting 13
M
Meat probe 46
Menu
Cleaning 34
My Programmes 32
Operation 17
Oven functions 30, 34, 35
Overview 16
Settings 35
O
Oven
accessories 12
light bulb 61
Oven functions 30, 31
Oven shelf 12, 20
Q
Quick Sponge 180 12
R
Recipes 23, 25
Repairs 5
Residual heat 19
Roasting Pan 12
Roasting pan 20
S
Safety 5
Safety cut-out 46
Set+Go 36
Setting the clock 14
Settings 35
Shelf 13
Side rails 58
Sound settings 35
Steam cleaning 56
Steam cooking functions 49
Storing 32
Symbols 8
T
Time extension 39
U
Using the oven 16
Page 78
78 electrolux service
Service
In the event of technical faults, please
first check whether you can remedy the
problem yourself with the help of the op
erating instructions (section “What to do
if…”).
If you were not able to remedy the problem yourself, please contact the Customer Care Department or one of our
service partners.
In order to be able to assist you quickly,
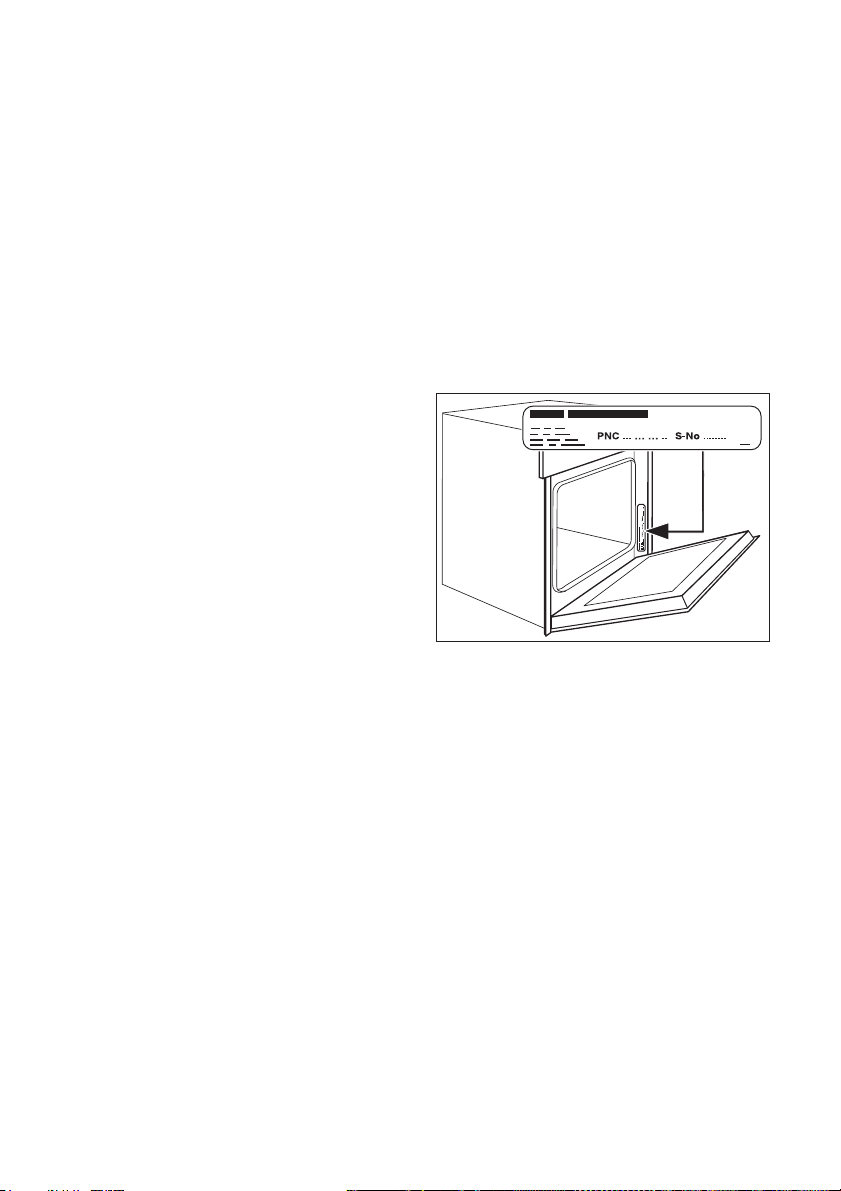
we require the following information:
– Model description
– Product number (PNC)
– Serial number (S No.)
(for numbers see rating plate)
– Ty p e o f f au l t
– Any error messages displayed by the
appliance
So that you have the necessary reference numbers from your appliance at
hand, we recommend that you write
them in here:
-
Model description: .....................................
PNC: .....................................
S No: .....................................
Page 79

Page 80

www.electrolux.com
315 8817 03-A-270907-01
 Loading...