

AEG EKC6707X User Manual
Electric Cooker
INSTRUCTION BOOKLET
Model EKC 6707
35692-4001 |
AUS |

ENGLISH
 Important Safety Information
You MUST read these warnings carefully before installing or using the hob. If you need assistance, contact our Customer Care Department.
•The work of installation must be carried out by competent and qualified installers according to the regulations in force.
•Any modifications to the domestic electrical mains which may be necessary for the installation of the appliance should be carried out only by competent personnel.
•Check your appliance for any transport damage. Never connect a damaged appliance. If your appliance is damaged, contact your supplier.
•It is dangerous to modify, or attempt to modify, the characteristics of this appliance.
•Avoid installation of the appliance near inflammable material (e.g. curtains, tea towels, etc.).
•This appliance is heavy. Take care when moving it.
•This appliance cannot be positioned on a base.
•Remove all packaging before using the appliance.
•Some parts have a shock-resistant plastic film protection. Be sure to remove this plastic film before you start operating the appliance and clean the parts involved using a soft cloth wrung out in warm water to which a little washing up liquid has been added.
•Ensure that the gas and electrical supply complies with the type stated on the rating plate, located near the gas supply pipe.
Child Safety
•This appliance is designed to be operated by adults. Do not allow children to play near or with the appliance.
•The appliance gets hot when it is in use. Children should be kept away until it has cooled.
•Children can also injure themselves by pulling pans or pots off the appliance.
During Use
•This appliance is intended for domestic cooking only. It is not designed for commercial or industrial purposes.
•Ensure a good ventilation around the appliance.Apoor air supply could cause lack of oxygen.
•This appliance is not connected to a combustion products evacuation device. It shall be installed and connected in accordance with current installation regulations. Particular attention shall be given to the relevant requirements regarding ventilation.
•When in use the appliance will produce heat and moisture in the room in which it has been installed. Ensure there is a continuous air supply, keeping air vents in good condition or installing a cooker hood with a venting hose.
•When using the appliance for a long period of time, the ventilation should be improved, by opening a window or increasing the extractor speed.
•If the appliance is fitted with a cover, its function is to protect the surface from dust when closed and to accumulate splashes of grease when open. Do not use for other purposes.
•Always clean the cover before closing.
•Leave the burners and/or plates to cool before closing the cover.
•Do not use this appliance if it is in contact with water. Do not operate the appliance with wet hands.
•Ensure the control knobs are in the ‘OFF’ position when not in use.
•During use the appliance becomes hot. Care should be taken to avoid touching heating elements inside the oven.
•Always stand back from the oven when opening the oven door, to allow any build-up of steam or heat to release.
•When using other electrical appliances, ensure the cable does not come into contact with the hot surfaces of the appliance.
•Unstable or misshapen pans should not be used on the hob burners as unstable pans can cause an accident by tipping or spillage.
•To facilitate ignition, light the burners before placing pans on the grid. After having lit the burners check that the flame is regular.
•Always lower the flame or turn it off before removing the pan.
•Never leave the appliance unattended when cooking with oil and fats.
•This appliance should be kept clean at all times. A build-up of fats or foodstuffs could result in a fire.
•Never use plastic dishes in the oven or on the hob burners. Never line any part of the oven with aluminium foil.
•Always ensure that the oven vent which is located at the centre back of the hob is left unobstructed to ensure ventilation of the oven cavity.
•Perishable food, plastic items and areosols may be affected by heat and should not be stored above the appliance.
•Only heat-resistant plates may be placed in the drawer situated under the oven. Do not p ut combustible materials there.
•Never use steam or high pressure steam cleaners to clean the appliance.
Service
•This appliance should only be repaired or serviced by an authorised Service Engineer and only genuine approved spare parts should be used.
2
Contents
For the User
Important Safety Information |
2 |
Control Panel |
4 |
The Gas Burner Controls |
5 |
Electric Hotplate Control |
6 |
Hints and Tips |
6 |
Electric Oven |
7 |
Before the First Use of the Appliance |
8 |
Hints and Tips for using the hob |
9 |
Hints and Tips for using the oven |
9 |
Defrosting |
13 |
Cooking Chart - Conventional and Fan cooking |
14 |
Cooking Chart - Grilling |
15 |
Cooking Chart - Pizza |
15 |
Maintenance and Cleaning |
16 |
Cleaning the Oven |
17 |
Something not working |
20 |
Service and Spare Parts |
20 |
For the Installer
Instructions for the Installer |
21 |
Technical data |
21 |
Gas connection |
22 |
Adaptation to different kinds of gas |
23 |
Electrical connection |
24 |
 Environmental Information
•After installation, please dispose of the packaging with due regard to safety and the environment.
•When disposing of an old appliance, make it unusable, by cutting off the cable.
•The symbol  on the product or on its packaging indicates that this product may not be treated as household waste. Instead it shall be handed over to the applicable collection point for the recycling of electrical and electronic equipment. By ensuring this product is disposed of correctly, you will help prevent potential negative consequences for the environment and human health, which could otherwise be caused by inappropriate waste handling of this product. For more detailed information about recycling of this product, please contact your local city office, your household waste disposal service or the shop where you purchased the product.
Guide to Use the instructions
The following symbols will be found in the text to guide you throughout the Instructions:
 Safety Instructions
Step by step instructions for an operation
Hints and Tips
Environmental Information
Keep this instruction book for future reference and ensure it is passed on to any new owner.
These instructions are only valid for countries whose identification symbols are shown on the cover of this instruction booklet and on the appliance itself.
This appliance is manufactured according to the following EEC directives:
73/23 EEC - 90/683 EEC - 93/68 EEC - 89/336 EEC - 90/396 EEC,
current edition.
3

Control Panel
|
|
|
|
|
|
|
|
|
|
|
|
|
|
|
|
|
|
|
|
|
|
|
|
|
|
|
|
|
|
|
|
|
|
|
|
|
|
|
|
|
|
|
|
|
|
|
|
|
|
|
|
|
|
|
|
|
|
|
|
|
|
|
|
|
|
|
|
|
|
|
|
|
|
|
|
|
|
|
|
|
|
|
|
|
|
|
|
|
|
|
|
|
|
|
|
|
|
|
|
|
|
|
|
|
|
|
|
|
|
|
|
|
|
|
|
|
|
|
|
|
|
|
|
|
|
|
|
|
|
|
|
|
|
|
|
|
|
|
|
|
|
|
|
|
|
|
|
|
|
|
|
|
|
|
|
|
|
|
|
|
|
|
|
|
|
|
|
|
|
|
|
|
|
|
|
|
|
|
|
|
|
|
|
|
|
|
|
|
|
|
|
|
|
|
|
|
|
|
|
|
|
|
|
|
|
|
|
|
|
|
|
|
|
|
|
|
|
|
|
|
|
|
|
|
|
|
|
|
|
|
|
|
|
|
|
|
|
|
|
|
1 |
|
|
2 |
|
|
|
3 |
4 |
|
|
5 |
|
6 |
|
|
7 8 |
9 |
|
||||||||||||||||||||
1. |
Front left cooking zone control knob |
|
|
6. |
Oven function control knob |
|
|
|
|
|
|
|
|
||||||||||||||||||||||||||
2. |
Back left cooking zone control knob |
|
|
7. |
Mains on Light |
|
|
|
|
|
|
|
|
|
|
|
|
|
|||||||||||||||||||||
3. |
Back right cooking zon control knob |
|
|
8. |
Oven Thermostat Pilot Light |
|
|
|
|
|
|
|
|
||||||||||||||||||||||||||
4. |
Front right cooking zone control knob |
|
|
9. |
Oven thermostat control knob |
|
|
|
|
|
|
||||||||||||||||||||||||||||
5. |
Electronic Programmer |
|
|
|
|
|
|
|
Oven accessories |
|
|
|
|
|
|
|
|
||||||||||||||||||||||
The Oven Cavity |
|
|
|
|
|
|
|
|
|
|
|
|
|
|
|
||||||||||||||||||||||||
|
|
|
|
|
|
|
|
Grill/roasting pan |
|
|
|
|
|
|
|
Grill trivet |
|||||||||||||||||||||||
|
Grill element |
Oven Light |
|
|
|
|
|
|
|
|
|
|
|
|
|
|
|
|
|
|
|
|
|
|
|
|
|
||||||||||||
Anti-tip shelf (x 2)
Oven fan
Ceramic glass hob
Using the hotplates
The control panel incorporates knobs to operate the four hot plates.
A)This is a 7 position control knob: 0 = off and 1-3 indicate the levels of power uo to the mawimum.
B) Double circuit cooking zone: this cooking zone has two heating elements.
- To switch on the smaller cooking zone, turn the relevant control knob to the required heat setting between 1 and 3.
4
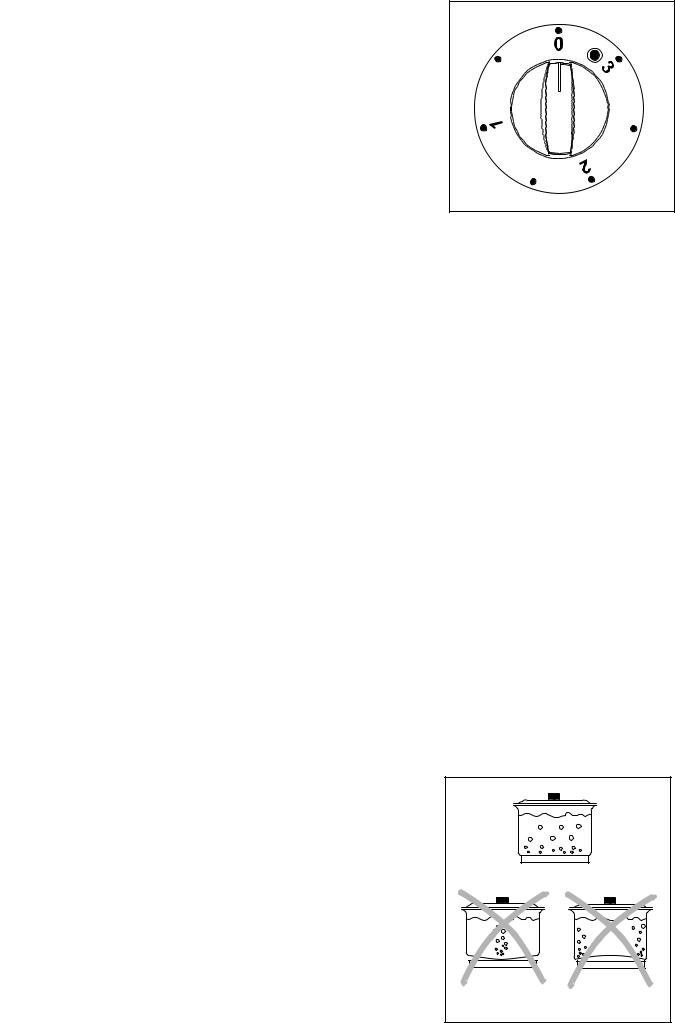
-To switch on both heating elements, turn the control knob to maximum heat setting (3) then turn the knob further to nearly reach the “0” symbol. You will hear a “click” and the wider cooking zone will switch on. Then turn back the knob and adjust it to the required heat setting. Now the two heating elements will operate together, giving a higher power output that a normal cooking zone.
Hob pilot light
The ceramic glass hob is equipped with a pilot light which turns on when the surface is too hot; it is a helpful device which protects users from burns.
This light turns on some minutes after the plate has been set into operation, abd it stays on during the whole time of functioning and also when the plate is off to show the presence of residual heat in the pyroceram surface.
The pilot light turns finally off only when the surface temperature decreases to safety values (lukewarm temperature), more o less 50°C, allowing users to clean the plate with no risk.
 Practical hints
The ceramic glass hob is resistent to sudden changes in temperature, it is insensitive to heat and cold and hals also a good resistence to mechanical blows; a sharpened object, however, no matter if it is small (for example a point of a knife) can irreparably damage the cooking surface, jeopardising its functionality.
Before using the cooking plate for the first time, carefully wash the pyroceram plate with a non-abrasive detergent, dry it and then wsitch it on for about 10 minutes at the highest position.
When using the cooking plate for the first time, unpleasant smells, or smell of burnt material, might be smelt: this is absolutely normal and it is due to the evaporation of greasy working residues and of hte dope used during the installation. These smells will vanish after some time of working.
Attention: if the surface shows a crack, immediately switch the equipment off and call the Aftersales Service.
Suitable pans and pots
Remember that a large pan offers a larger surface to heat and therefore cooks food quicker than a narrow pan.
Always use pans of a size suitable for the food to be cooked. In particular, take care that pans are not too small for liquid preparations which could easily spill over or that they are not too big for food which must be cooked quickly; uncovered areas on the bottom are easily burnt by fats and juice.
For cakes, it is preferable to use tins which do not open. A tin which opens lets out fruit juices and sugar which, when spilling onto the bottom of the oven, caramelize and are difficult to clean. Avoid placing pans with plastic handles in the oven as they may not support the heat.
Saucepans suitable for use on solid plate hobs should have several characteristics:
-they should be heavy duty.
-they should fit the heat area exactly, or be slightly larger for efficient use, NEVER smaller.
-they should have a flat base to ensure good contact with the plate.
This is particularly important when using pans for high temperature frying or pressure cooking.
Ensure pans are large enough to avoid liquids being split onto the plates.
Never leave the plates on without a pan on them or with an empty pan on them.
Particular care should be taken when cooking with oil or fat.
During cooking, when using fats or oils, take particular care as they can, when over-heated, self-ignite.
YES
NO NO
5
Electric Oven
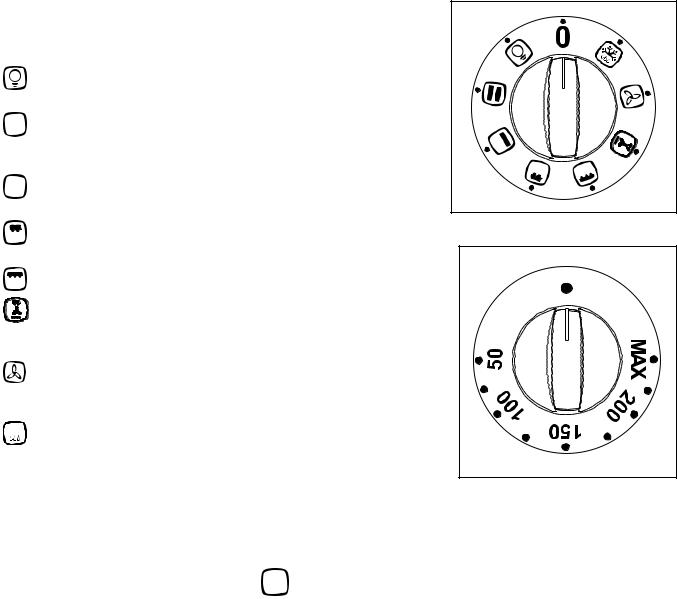
Oven Function and Thermostat control knobs
They enable to select the most appropriate type of heating for the different cooking requirements by appropriately connecting the heating elements and adjusting temperature to the required level.
Oven Light - The oven light will be on without any cooking function
 Conventional cooking - The heat comes from
both the top and bottom element, ensuring even heating inside the oven.
 Bottom heating element - The heat comes from the bottom of the oven only.
Inner grill element only - can be used for grilling small quantities.
Full Grill - The full grill element will be on.
Pizza - The bottom element provides direct heat to
the base of pizzas, quiches or pies, while the fan ensures air is circulated to cook the pizza toppings or pie fillings.
Fan cooking - This allows you to roast or roast and
bake simoultaneously using any shelf, without flavour transference.

 Defrost Setting - This setting is intended to assist in thawing of frozen food.
Thermostat Control Knob
Turn the thermostat control knob clockwise to select temperatures between 50°C and 230°C (MAX).
Thermostat Control Light 
The thermostat control light will come on when the thermostat control knob is turned. The light will remain on until the correct temperature is reached. It will then cycle on and off to show the temperature is being maintained.
Mains on Light 
The mains on light will come on when the oven function control knob and/or the cooking zone control knobs are set.
The Safety Thermostat
This oven is provided with a safety thermostat. In case of malfunctioning of the main thermostat, and consequential over-heating, the safety device will stop the power supply to the appliance. If this happens, call your local Service Force Centre. Under no circumstances should you attempt to repair the appliance yourself.
6

Before the First Use of the Appliance
Before using the appliance, remove all packaging, both inside and outside the appliance, including the advertising labels and any protective film.
Before cooking for the first time, carefully wash the oven accessories.
Before first use, the oven should be heated without food. During this time, an unpleasant odour may be emitted. This is quite normal.
The oven will work only if the time of day has been set.
1.Set the time of day with the electronic programmer (see chapter "Electronic Programmer").
2.Switch the oven function control knob to conventional cooking  .
.
3.Set the thermostat control knob to MAX.
4.Open a window for ventilation.
5.Allow the oven to run empty for approximately 45 minutes.
This procedure should be repeated with the full grill function andfancookingfunction
 forapproximately 5-10 minutes.
Once this operation is carried out, let the oven cool down, then clean the oven cavity with a soft cloth soaked in warm water to which a little mild washing-up liquid has been added.
Storage Drawer
Thestoragedrawerislocatedunderneaththeovencavity.
During cooking the storage drawer may become hot if the oven is on high for a long period of time, thereforeflammablematerialssuchasovengloves, tea towels, plastic aprons etc. should not be stored in the drawer.
Oven accessories such as baking sheets, will also become hot, therefore care should be taken when removing these items from the drawer whilst the oven is in use or still hot.
7
Electronic Programmer
|
|
|
4 |
|
|
|
|
|
|
|
||||
5 |
|
|
|
|
|
|
|
|
|
|
|
|
7 |
|
|
|
|
|
|
|
|
|
|
||||||
|
|
|
|
|
|
|
|
|
|
|
|
|||
|
|
|
|
|
|
|
|
|
|
|
||||
6 |
|
|
|
|
|
|
|
|
|
|
|
|
8 |
|
|
|
|
|
|
|
|
|
|
||||||
|
|
|
|
|
|
|
|
|
|
|
|
|||
|
|
|
|
|
|
|
|
|
|
|
|
|
|
|
|
|
|
|
|
|
|
|
|
|
|
|
|
|
|
2 1 3
1.Push button for selecting a function 
2.Decreasing control button 
3.Increasing control button 
4.Display
5.“Cooking Duration” pilot lamp 

6.“End of cooking” pilot lamp 
7.“Minute minder” pilot lamp 
8.“Time of day” pilot lamp 
The oven will only work if the time of day has been set.
However, the oven can also be operated without any programme.
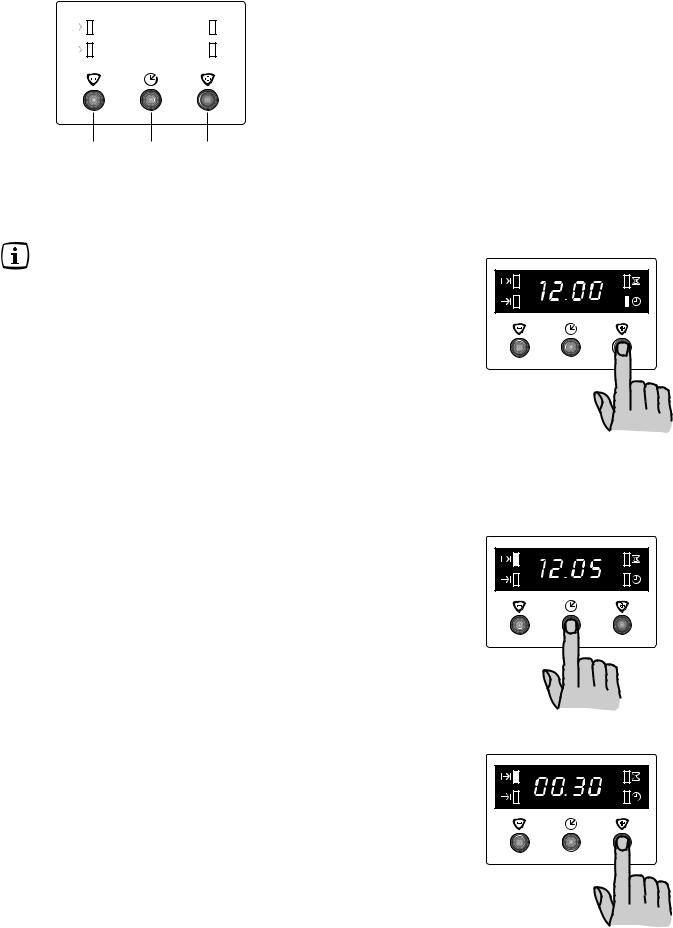
Setting the time of day 
When the power supply is switched on, or after a power failure, the “Time of day” pilot lamp  will flash on the display.
To set the correct time of day:
1.Press button  or
or  .
.
2.After the setting is carried out, wait for 5 seconds: the “Time of day”
pilot lamp  will go out and the display will show the set time. The appliance is ready for use.
To reset the correct time of day:
1.Press button  repeatedly to select the “Time of day” function. The relevant pilot lamp will start flashing. Then proceed as described above. The time of day can only be reset if no automatic function (cook duration
 or end of cooking
  ) has been set.
“Cooking Duration” function 

This function allows the oven to automatically switch off at the end of a programmed cooking duration time. Place food in the oven, select a cooking function and adjust the cooking temperature. Press button repeatedly to select the “Cooking Duration” function. The relevant pilot lamp
 will start flashing. Then, proceed as follows:
To set the duration time:
1.Press button  or
or  .
.
2.After the setting is carried out, wait for 5 seconds: the "Cooking Duration" pilot lamp 
 will come on and the display will revert to the time of day.
3.When cooking time is over, the oven will be switched off automatically and an acoustic alarm will be heard, while the pilot lamp will start flashing. Turn the oven function and the thermostat control knob to zero.
To switch off the acoustic alarm, press any button.
NOTE: turning the acoustic alarm off will reset the oven to manual, and
if the oven function and the thermostat knobs are not set to zero the oven will start to heat again.
To cancel the duration time:
1.Press button  repeatedly to select the “Cooking Duration” function. The relevant pilot lamp
 will flash and the display will show the remaining cooking time.
2.Press button  until the display shows “0:00”. After 5 seconds the pilot lamp will go out and the display will revert to the time of day.
8
 Loading...