

AEG EGL3000X User Manual

instruzioni per l'uso
manual de instrucciones
пдзгЯет чсЮузт
EGL3001X
EGL3000X

XXX XXX XXX - 00 - 20102005
Use & Care Manual
Assembly Instrucions Included
Outdoor Grill
with Electronic Ignition
READ AND SAVE THESE INSTRUCTIONS
Welcome & Congratulations . . . 2
General Safety Instructions . . . 3
Grill Features . . . . . . . . . . . . . . . 5
Grill Assembly
Side shelf
Built-In Instructions . . . . . . . 6-12
Gas Requirements
Pre Operation . . . . . . . . . . . 13-15
Using the Grill. . . . . . . . . . . . . . 18
Lighting the Grill
Using the Rotisserie
& Side Burning . . . . . . . . . . 16-22
Care and Maintenance . . . . . . 23
Troubleshooting . . . . . . . . . 25-28
Warranty . . . . . . . . . . . . . . . . . . 29

WELCOME TO THE WORLD OF ELECTROLUX
Thank you for choosing a first class product from Electrolux, which hopefully
will provide you with lots of pleasure in the future. The Electrolux ambition is to
offer a wide variety of quality products that make your life more comfortable.
You find some examples on the cover in this manual.
Please take a few minutes to study this manual so that you can take
advantage of the benefits of your new machine.
We promise that it’ll make your life a little easier. Good luck!
2
Welcome & Congratulations

3
General Safety Instructions
GENERAL INFORMATION FOR COOKING APPLIANCES
You MUST read these warnings carefully before installing or using the
appliance. If you need assistance, contact our Customer Care Centre.
Keep this instruction book for future reference and ensure it is passed on to any
new owner.
INSTALLATION
It is mandatory that all operations required for the installation are carried out
by a qualified or competent person, in accordance with existing rules and
regulations.
Remove all packaging before using the appliance
Once you removed all packaging from the appliance, ensure that it is not
damaged and in perfect condition. Otherwise, contact your dealer before
proceeding with the installation.
Do not attempt to modify the appliance in any way.
It is dangerous to alter the specification in any way.
Any gas installation must be carried out by a registered competent person,
and in accordance with existing rules and regulations.
The manufacturer will not accept liability, should the above instructions or any
of the other safety instructions incorporated in this book be ignored.
CHILD SAFETY
This appliance is designed to be operated by adults. The appliance gets hot
when it is in use. Do not allow children to play near or with the appliance.
Children should be kept away until it has cooled. Children can also injure
themselves by pulling pans or pots off the appliance.
DURING USE
Ensure a good ventilation around the appliance. A poor air supply could cause
lack of oxygen.
Do not use this appliance if it is in contact with water. Do not operate the
appliance with wet hands.
Ensure the control knobs are in the ‘OFF’ position when not in use.
When using other electrical appliances, ensure the cable does not come into
contact with the hot surfaces of the appliance.
Never leave the appliance unattended when cooking with oil and fats.
Never use plastic or aluminium foil dishes on the appliance.
Perishable food, plastic items and aerosols may be affected by heat and
should not be stored above or below the hob unit. Never use the appliance as a
working space. Do not store things on the appliance.

4
General Safety Instructions
For hygiene and safety reasons, this appliance should be kept clean at all
times. A build-up of fats or other foodstuff could result in a fire.
Take care when frying food in hot oil or fat, as the overheated splashes could
easily ignite.
Carefully supervise cookings with fats or oil, since these types of foodstuff can
result in a fire, if over-heated.
If the appliance is out of order, disconnect it from the gas supply.
Never use steam or high pressure steam cleaners to clean the appliance.
SERVICE
This appliance should only be repaired or serviced by an authorised Service
Engineer and only genuine approved spare parts should be used. Repairs carried
out by unexperienced persons may cause injury or serious malfunctioning.
ENVIRONMENTAL INFORMATION
After installation, please dispose of the packaging with due regard to safety
and the environment.
When disposing of an old appliance, make it unusable, by cutting off the
cable. The symbol on the product or on its packaging indicates that this product
may not be treated as household waste. Instead it shall be handed over to the
applicable collection point for the recycling of electrical and electronic equipment.
By ensuring this product is disposed of correctly, you will help prevent potential
negative consequences for the environment and human health, which could
otherwise be caused by inappropriate waste handling of this product. For more
detailed information about recycling of this product, please contact your local city
office, your household waste disposal service or the shop where you purchased
the product.
5
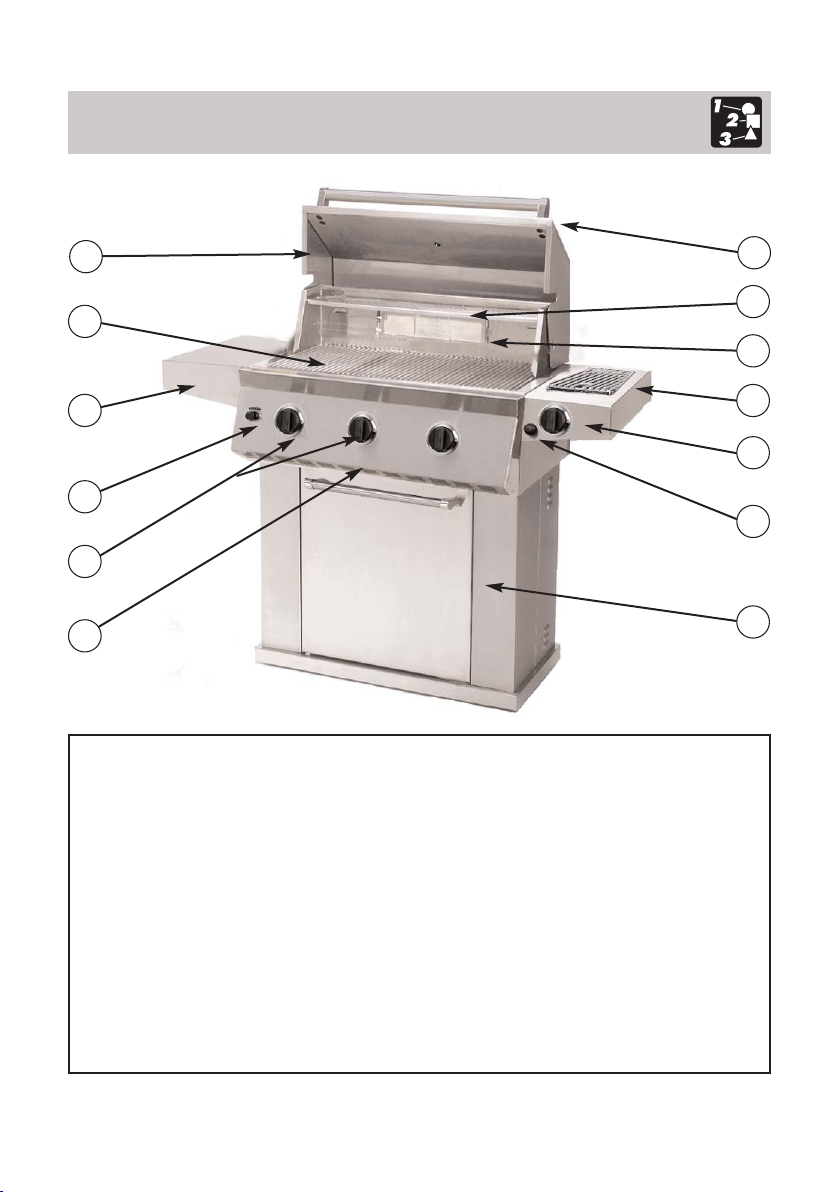
Grill Features
1. Roll top grill hood
2. Grilling/Cooking surface
3. Side Shelf
4. Control knob: back infrared
burner
5. Control knobs: main burners
6. Convection vents
7. Hood Handle
8. Warming shelf
9. Infrared back burner
10. Electronic igniter: main, rear
infrared & side burner
11. Cart with door
12. Side Burner
13. Control knob: Side Burner
1
2
3
4
5
6
7
8
12
9
13
10
11

6
SIDE SHELF ATTACHMENT
1. Attach the shelf to the left side of
grill by inserting the shelf hooks into
the slots on the side of the grill and
pushing down on the shelf
assembly until level with
grill. (See Fig. 1)
2. Lock the shelf in place by inserting
(2) self tapping screws into shelf.
(See Fig. 2)
INTERIOR PARTS INSTALLATION
1. Install the bottom Flavor Grids in the
lower cutouts and around the
igniters. (See Fig. 3)
2. Insert the top row of Flavor Grids
with the 90 degree angled heat
shield (bottom side of flavor grid)
facing the rear of the unit into
cutouts with triangle ridges facing
up. (See Fig. 4-5)
IMPORTANT:
Remove all
protective plastic film from
stainless steel parts prior
to assembly/use.
This film is installed at the
factory to prevent damage that
could occur during shipment
and handling.
Grill Assembly
Fig. 1
Fig. 2
Shelf Hooks
Fig. 3
Fig. 4
Fig. 5
Bottom Flavor Grids
in between burners
Faces the back
of the grill

7
3. Install cooking grates on the ledges
provided on the grill to create your
cooking surface. (See. Fig. 6)
4. Place warming shelf on support
brackets by setting it flat across
brackets allowing the two holes to
line up with the holes on each
bracket. (See Fig. 6)
5. Remove label from drip tray and
verify that the tray is installed
correctly. The drip tray is located
underneath the grill, inside the
storage compartment. (See Fig. 7)
Grill Assembly
Fig. 6
Fig. 7
Cooking Grates
Warming Shelf

8
Fig. 10
Fig. 11
Fig. 8
Fig. 9
Screw Holes
Fig. 12
Side Shelf Tabs
Side Burner Assembly
SIDE BURNER PARTS ASSEMBLY
1. Attach the side shelf to the grill by
inserting the shelf hooks into the
slots on the side of the grill and
pushing down on the shelf
assembly until level with the grill.
(See Fig. 8)
2. Lock the side shelf in place by
inserting (2) hex head screws in the
side burner. (See Fig. 9)
NOTE: A power screwdriver
extension is needed to
insert screws.
3. Install burner and cap.
(See Fig. 10-11)
4. Install grate over burner.
(See Fig. 12)
 Loading...