

Page 1

EGE6182
.................................................. ...............................................
EN HOB USER MANUAL 2
PT PLACA MANUAL DE INSTRUÇÕES 16
TR OCAK KULLANMA KILAVUZU 31
Page 2

www.electrolux.com
2
CONTENTS
1. SAFETY INFORMATION . . . . . . . . . . . . . . . . . . . . . . . . . . . . . . . . . . . . . . . . . . . . . . . . . . . . 3
2. PRODUCT DESCRIPTION . . . . . . . . . . . . . . . . . . . . . . . . . . . . . . . . . . . . . . . . . . . . . . . . . . 5
3. DAILY USE . . . . . . . . . . . . . . . . . . . . . . . . . . . . . . . . . . . . . . . . . . . . . . . . . . . . . . . . . . . . . . 6
4. HELPFUL HINTS AND TIPS . . . . . . . . . . . . . . . . . . . . . . . . . . . . . . . . . . . . . . . . . . . . . . . . . 7
5. CARE AND CLEANING . . . . . . . . . . . . . . . . . . . . . . . . . . . . . . . . . . . . . . . . . . . . . . . . . . . . 8
6. TROUBLESHOOTING . . . . . . . . . . . . . . . . . . . . . . . . . . . . . . . . . . . . . . . . . . . . . . . . . . . . . 9
7. INSTALLATION . . . . . . . . . . . . . . . . . . . . . . . . . . . . . . . . . . . . . . . . . . . . . . . . . . . . . . . . . 11
8. TECHNICAL INFORMATION . . . . . . . . . . . . . . . . . . . . . . . . . . . . . . . . . . . . . . . . . . . . . . . . 14
9. ENVIRONMENT CONCERNS . . . . . . . . . . . . . . . . . . . . . . . . . . . . . . . . . . . . . . . . . . . . . . . 15
WE’RE THINKING OF YOU
Thank you for purchasing an Electrolux appliance. You’ve chosen a product that brings with it
decades of professional experience and innovation. Ingenious and stylish, it has been designed with
you in mind. So whenever you use it, you can be safe in the knowledge that you’ll get great results
every time.
Welcome to Electrolux.
Visit our website for:
Get usage advice, brochures, trouble shooter, service information:
www.electrolux.com
Register your product for better service:
www.electrolux.com/productregistration
Buy Accessories, Consumables and Original spare parts for your appliance:
www.electrolux.com/shop
CUSTOMER CARE AND SERVICE
We recommend the use of original spare parts.
When contacting Service, ensure that you have the following data available.
The information can be found on the rating plate. Model, PNC, Serial Number.
Warning / Caution-Safety information
General information and tips
Environmental information
Subject to change without notice.
Page 3
ENGLISH 3
1.
SAFETY INFORMATION
This appliance is suitable for the following
markets: PT
Before the installation and use of the appliance, carefully read the supplied instructions. The manufacturer is not responsible
if an incorrect installation and use causes
injuries and damages. Always keep the instructions with the appliance for future reference.
TR
1.1 Children and vulnerable
people safety
WARNING!
Risk of suffocation, injury or permanent disability.
• Do not let persons, children included,
with reduced physical sensory, reduced
mental functions or lack of experience
and knowledge use the appliance. They
must have supervision or instruction for
the operation of the appliance by a person who is responsible for their safety.
• Do not let children play with the appliance.
• Keep all packaging away from children.
• Keep children and pets away from the
appliance when it operates or when it
cools down. Accessible parts are hot.
• If the appliance has a child safety device,
we recommend that you activate it.
1.2 Installation
WARNING!
Only a qualified person must install
this appliance.
• Remove all the packaging.
• Do not install or use a damaged appliance.
• Obey the installation instruction supplied
with the appliance.
• Keep the minimum distance from the
other appliances and units.
• Always be careful when you move the
appliance because it is heavy. Always
wear safety gloves.
• Seal the cut surfaces with a sealant to
prevent moisture to cause swelling.
• Protect the bottom of the appliance from
steam and moisture.
• Do not install the appliance adjacent to a
door or under a window. This prevents
hot cookware to fall from the appliance
when the door or the window is opened.
• If the appliance is installed above drawers make sure that the space, between
the bottom of the appliance and the upper drawer, is sufficient for air circulation.
• The bottom of the appliance can get hot.
We recommend to install a non-combustile separation panel under the appliance
to prevent access to the bottom.
Electrical connection
WARNING!
Risk of fire and electrical shock.
• All electrical connections must be made
by a qualified electrician.
• Before every wiring make sure the main
terminal of the appliance is not live.
• Make sure the appliance is installed correctly. Loose and incorrect plug and
socket can make the terminal become
too hot.
• Make sure that a shock protection is installed.
• Do not let the electricity bonds touch the
appliance or hot cookware, when you
connect the appliance to the near sockets.
• Do not let the electricity bonds tangle.
• Use a strain relief clamp on cable.
• Use the correct mains cable.
• Make sure not to cause damage to the
mains plug and to the mains cable. Contact the Service or an electrician to
change a damaged mains cable.
• The electrical installation must have an
isolation device which lets you disconnect the appliance from the mains at all
poles. The isolation device must have a
contact opening width of minimum 3
mm.
• Use only correct isolation devices: line
protecting cut-outs, fuses (screw type
fuses removed from the holder), earth
leakage trips and contractors.
Page 4
www.electrolux.com
4
Gas connection
• All gas connections should be made by
• Make sure that there is air circulation
• The information about the gas supply is
• This appliance is not connected to a de-
1.3 Use
• Use this appliance in a household envi-
• Do not change the specification of this
• Do not use an external timer or a sepa-
• Do not let the appliance stay unattended
• Do not operate the appliance with wet
• Do not put cutlery or saucepan lids on
• Set the cooking zone to “off” after use.
• Do not use the appliance as a work sur-
• If the surface of the appliance is cracked,
• Fats and oil when heated can release
• The vapours that very hot oil releases
• Used oil, that can contain food rem-
a qualified person.
around the appliance.
on the rating plate.
vice, which evacuates the products of
combustion. Make sure to connect the
appliance according to current installation regulations. Pay attention to requirements regarding adequate ventilation.
WARNING!
Risk of injury, burns or electric
shock.
ronment.
appliance.
rate remote-control system to operate
the appliance.
during operation.
hands or when it has contact with water.
the cooking zones. They become hot.
face or as a storage surface.
disconnect immediately the appliance
from the power supply. This to prevent
an electrical shock.
WARNING!
Risk of fire or explosion.
flammable vapours. Keep flames or
heated objects away from fats and oils
when you cook with them.
can cause spontaneous combustion.
nants, can cause fire at a lower temperature than oil used for the first time.
• Do not put flammable products or items
that are wet with flammable products in,
near or on the appliance.
• Do not try to extinguish a fire with water.
Disconnect the appliance and cover the
flame with a lid or a fire blanket.
WARNING!
Risk of damage to the appliance.
• Do not keep hot cookware on the control panel.
• Do not let cookware to boil dry.
• Be careful not to let objects or cookware
fall on the appliance. The surface can be
damaged.
• Do not activate the cooking zones with
empty cookware or without cookware.
• Do not put aluminium foil on the appliance.
• Cookware made of cast iron, aluminium
or with a damaged bottom can cause
scratches on the glass ceramic. Always
lift these objects up when you have to
move them on the cooking surface.
• Provide good ventilation in the room
where the appliance is installed.
• Make sure that the ventilation openings
are not blocked.
• Use only stable cookware with the correct shape and diameter larger than the
dimensions of the burners. There is a risk
of overheating and rupture of the glass
plate (if applicable).
• Make sure the flame does not go out
when you quickly turn the knob from the
maximum to the minimum position.
• Make sure pots are centrally positioned
on the rings and do not stick out over
edges of the cooking surface.
• Use only the accessories supplied with
the appliance.
• Do not install a flame diffuser on the
burner.
1.4 Care and Cleaning
WARNING!
Risk of damage to the appliance.
• Clean regularly the appliance to prevent
the deterioration of the surface material.
• Do not use water spray and steam to
clean the appliance.
Page 5
• Clean the appliance with a moist soft
cloth. Only use neutral detergents. Do
not use abrasive products, abrasive
cleaning pads, solvents or metal objects.
1.5 Disposal
WARNING!
Risk of injury or suffocation.
2. PRODUCT DESCRIPTION
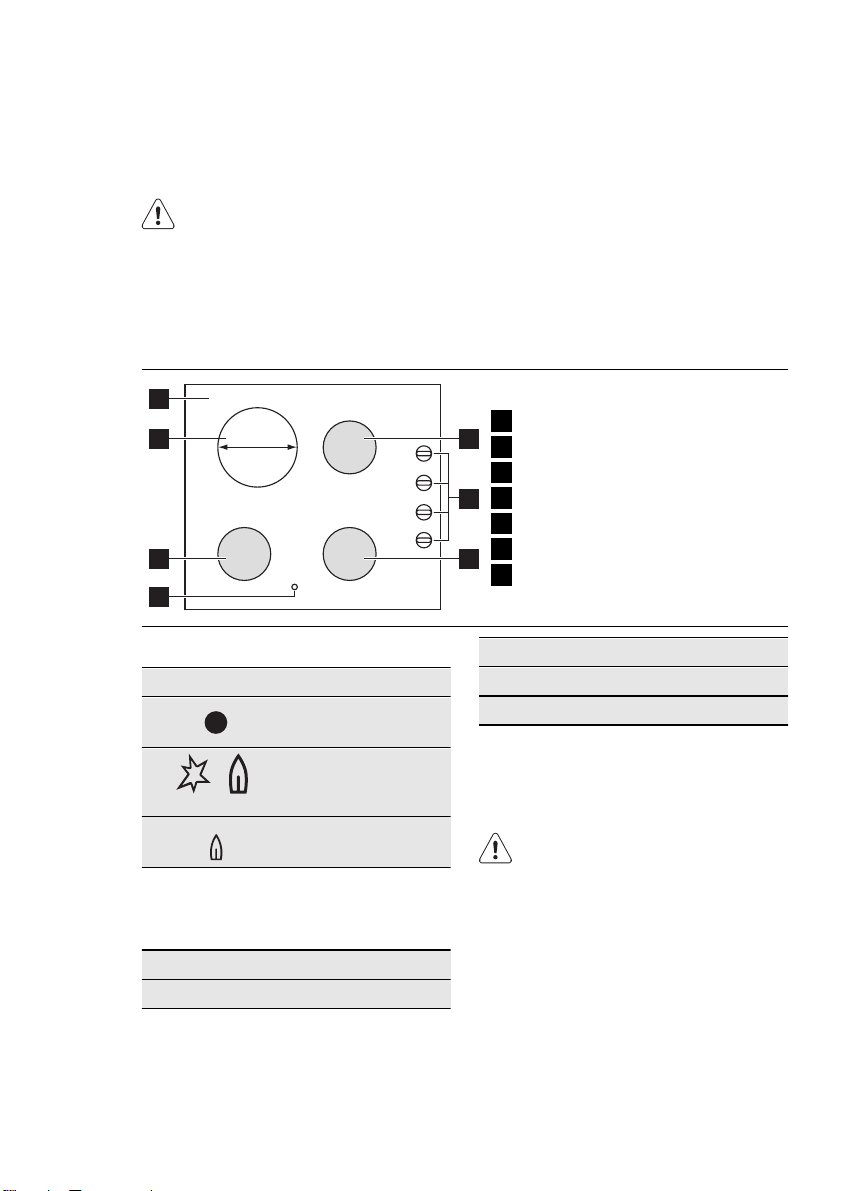
2.1 Cooking surface layout
1
180
mm
6
5
ENGLISH 5
• Contact your municipal authority for information on how to discard the appliance correctly.
• Disconnect the appliance from the mains
supply.
• Cut off the mains cable and discard it.
• Flat the external gas pipes.
Hob top
1
27
Semi-rapid burner
2
Control knobs
3
Auxiliary burner
3
4
Residual heat indicator
5
Rapid burner
6
4
Electric cooking zone 1800 W
7
2.2 Control knobs
Symbol Description
no gas supply / off
position
ignition position /
maximum gas
supply
minimum gas supply
2.3 Electric cooking zones
control knobs
Symbol Function
0 off position
Symbol Function
1
minimum heat
6 maximum heat
2.4 Residual heat indicator
The residual heat indicator comes on when
a cooking zone is hot.
WARNING!
Risk of burns from residual heat!
Page 6
www.electrolux.com
6
3. DAILY USE
WARNING!
Refer to "Safety information" chapter.
3.1 Ignition of the burner
WARNING!
Be very careful when you use open
fire in kitchen environment. Manufacturer decline any responsibility in
case misuse of the flame
Always light the burner before you
put cookware.
To light the burner:
1.
Turn the control knob counterclockwise to the maximum position (
and push it down.
2.
Keep the control knob pushed for approximately 5 seconds; this will let
thermocouple to warm up. If not, the
gas supply will be interrupted.
3.
Adjust the flame after it is regular.
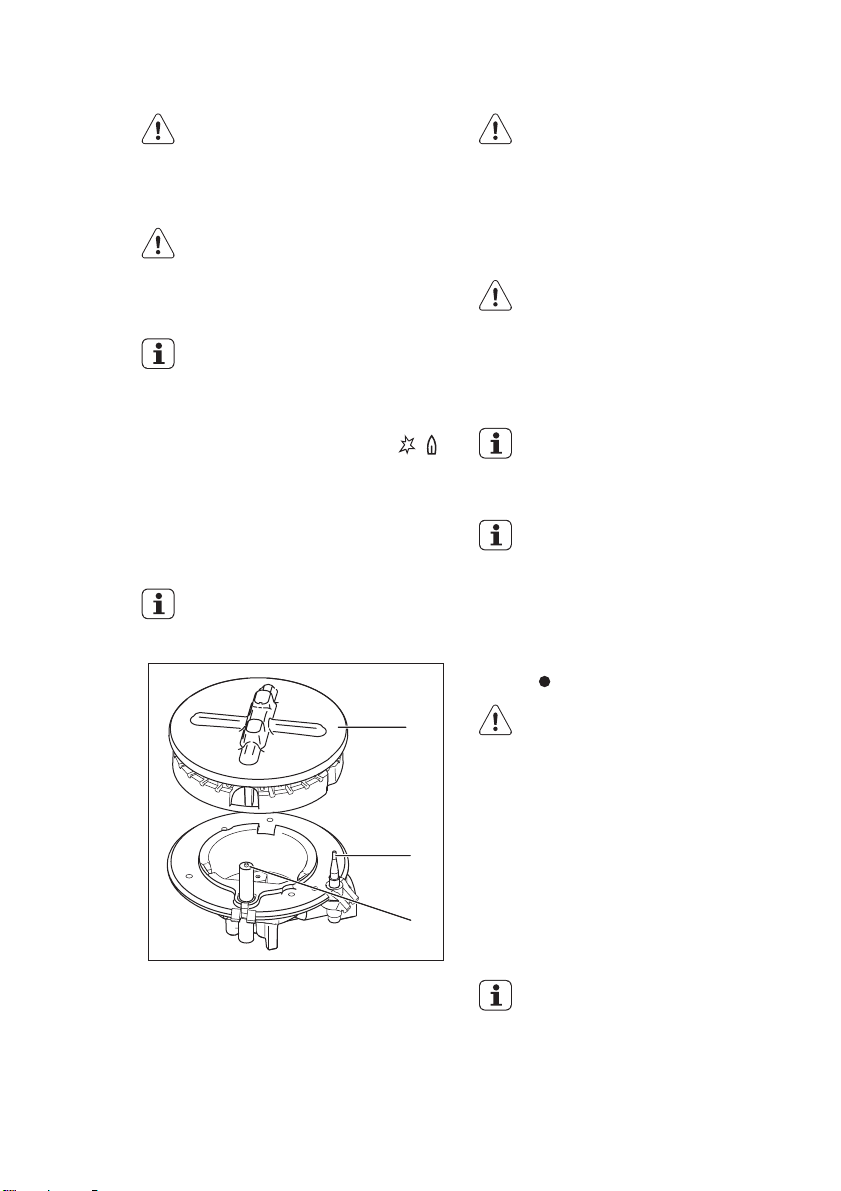
If after some tries the burner does
not light, check if the crown and its
cap are in correct positions.
)
A
WARNING!
Do not keep the control knob
pushed for more than 15 seconds.
If the burner does not light after 15
seconds, release the control knob,
turn it into off position and try to
light the burner again after minimum 1 minute.
In the absence of electricity you
can ignite the burner without electrical device; in this case approach
the burner with a flame, push the
relevant knob down and turn it
counter-clockwise to maximum
gas release position.
If the burner accidentally goes out,
turn the control knob to the off position and try to light the burner
again after minimum 1 minute.
When switching on the mains, after
installation or a power cut, it is
quite normal for the spark generator to be activated automatically.
3.2 Turning the burner off
To put the flame out, turn the knob to the
symbol
.
WARNING!
Always turn the flame down or
switch it off before removing the
pans off the burner.
A)
Burner cap and crown
B)
Thermocouple
C)
Ignition candle
3.3 Operating electric zones
B
C
To switch on and increase the heat setting
turn the knob clockwise. To decrease the
heat setting turn the knob counter-clockwise. To switch off turn the knob to the 0.
Power indicator is activated when electric
cooking zone is turned on, and will stay on
until electric cooking zone is switched off.
When a cooking zone operates, it
hums for a short time. This is typical of all ceramic glass cooking
zones and does not show that the
appliance operates incorrectly.
Page 7

ENGLISH 7
3.4 Before first use
Put on all cooking zones a pan filled with
some water. Set the maximum position
and operate the appliance for approximately 10 minutes until water inside the pans
boils. After that, operate the appliance at
minimum position for 20 minutes. During
this period, an odour and smoke can occur. This is normal. Make sure that the airflow is sufficient.
After this operation, clean the appliance
with a soft cloth soaked in warm water.
3.5 Examples of cooking
applications
Heat
setting:
Use to:
1 Keeping warm
4. HELPFUL HINTS AND TIPS
WARNING!
Refer to "Safety information" chapter.
4.1 Energy saving
• If possible, always put the lids on
the cookware.
• Put cookware on a cooking zone
before you start it.
• Stop the electrical cooking zones
before the end of the cooking
time to use residual heat.
• The bottom of pans and electrical cooking zones must have the
same dimensions.
Heat
Use to:
setting:
2 Gentle simmering
3 Simmering
4 Frying / browning
5 Bringing to the boil
6 Bringing to the boil / quick
frying / deep-frying
Burner Diameters of cook-
ware
Rapid 160 - 260 mm
Semi-rapid 120 - 220 mm
Auxiliary 80 - 160 mm
WARNING!
Do not use cast iron pans, potstones, grill or toaster plates on
gas burners.
WARNING!
Do not put the same pan on two
burners.
• The bottom of the cookware
must be as thick and flat as possible.
• When the liquid starts to boil, turn down
the flame to barely simmer the liquid.
Use cookware with diameters applicable to
the size of burners.
Page 8
www.electrolux.com
8
WARNING!
Make sure pot handles do not protrude over the front edge of the
cooktop and that pots are centrally
positioned on the rings in order to
achieve maximum stability and to
obtain lower gas consumption.
Do not place unstable or deformed pots on
the rings to prevent from spill and injury.
WARNING!
Liquids spilt during cooking can
cause the glass to break
5. CARE AND CLEANING
Information on acrylamides
Important! According to the newest
scientific knowledge, if you brown food
(specially the one which contains starch),
acrylamides can pose a health risk. Thus,
we recommend that you cook at the lowest
temperatures and do not brown food too
much.
WARNING!
Refer to "Safety information" chapter.
Clean the appliance after each use.
Always use cookware with clean bottom.
WARNING!
Deactivate the appliance. Disconnect the appliance from the electrical supply before you clean or do
maintenance work.
Let the gas burner become cool
before you clean it.
It is best to clean the electrical
cooking zone while it is still warm
because you can remove spillage
more easily.
WARNING!
Sharp objects and abrasive cleaning agents can damage the appliance.
For your safety, do not clean the
appliance with steam blasters or
high-pressure cleaners.
Scratches or dark stains on the
surface have no effect on how the
appliance operates.
•You can remove the pan supports to
easily clean the hob.
• To clean the enamelled parts, cap and
crown, wash them with warm soapy water and dry them carefully before you put
them back.
• Wash stainless steel parts with water,
and then dry them with a soft cloth.
• The pan supports are not dishwasher
proof. You must wash them by hand.
• When you wash the pan supports by
hand, be careful when you dry them as
the enamel coating occasionally can
have rough edges. If necessary, you can
remove stubborn stains with a paste
cleaner.
• After you clean the pan supports, make
sure that they are in the correct position.
• Make sure that the arms of the pan supports are in the centre of the burner for
the burner to operate correctly.
• To prevent the hob top from dam-
age, be very careful when you replace the pan supports.
After cleaning, dry the appliance with a soft
cloth.
Removing the dirt:
1.
– Remove immediately: melting
plastic, plastic foil, and food containing sugar. Use a special glass ceramic scraper. Put the scraper on
the glass ceramic surface at an
acute angle and slide the blade on
the surface.
Stop the appliance and let it cool
–
down before you clean: limescale
rings, water rings, fat stains, shiny
metallic discolorations. Use a special
cleaner applicable for surface of
hob..
Page 9
2.
Clean the appliance with a damp cloth
and some detergent.
3.
At the end rub the appliance dry
with a clean cloth.
WARNING!
Do not use knives, scrapers or similar instruments to clean the surface
of the glass or between the rims of
the burners and the frame (if applicable).
WARNING!
Do not slide cookware over the
glass because it could scratch the
surface. Also, do not let hard or
sharp objects fall onto the glass or
hit the edge of the hob.
6. TROUBLESHOOTING
Problem Possible cause Remedy
There is no spark when
lighting the gas.
There is no spark when
lighting the gas.
The flame is blown out immediately after ignition.
The gas ring burns unevenly.
5.1 Cleaning of the spark plug
This feature is obtained through a ceramic
ignition candle with a metal electrode. Keep
these components well clean to prevent
difficult lighting and check that the burner
crown holes are not obstructed.
5.2 Periodic maintenance
Periodically speak your local Service Force
Centre to check the conditions of the gas
supply pipe and the pressure adjuster, if fitted.
• There is no electrical
supply.
• The burner cap and
crown are placed unevenly.
• The thermocouple is not
heated sufficiently.
• The burner crown is
blocked with food residue.
ENGLISH 9
• Make sure that the appliance is connected
and the electrical supply
is switched on.
• Do a check of the fuse.
If the fuse is released
more than one time, refer to a qualified electrician.
• Make sure that the
burner cap and crown
are in the correct positions.
• After lightning the flame,
keep the knob pushed
for approximately 5 seconds.
• Make sure that the injector is not blocked
and the burner crown is
clear of food particles.
Page 10

www.electrolux.com
10
The appliance does not
operate.
The electrical cooking
zone does not heat up.
The effectiveness of the
hob is not satisfactory.
If there is a fault, first try to find a solution to
the problem yourself. If you cannot find a
solution to the problem yourself, speak
your dealer or the local Service Force Centre.
Problem Possible cause Remedy
• There is no electrical
supply.
• Make sure that the appliance is connected
and the electrical supply
is switched on.
• Do a check of the fuse.
If the fuse is released
more than one time, refer to a qualified electrician.
• There is no electrical
supply.
• The wrong knob is used
to operate the cooking
zone.
• Make sure that the appliance is connected
and the electrical supply
is switched on.
• Make sure that you turn
the correct control
knob.
• Do a check of the fuse.
If the fuse is released
more than one time, refer to a qualified electrician.
• The hob is not clean.
• The cookware is not
correct.
• Make sure that the hob
is clean and dry.
• Make sure that the
cookware is the correct
size for the cooking
zone.
• Make sure that the
cookware has a flat bottom.
• Make sure that the heat
setting is correct for this
type of cooking.
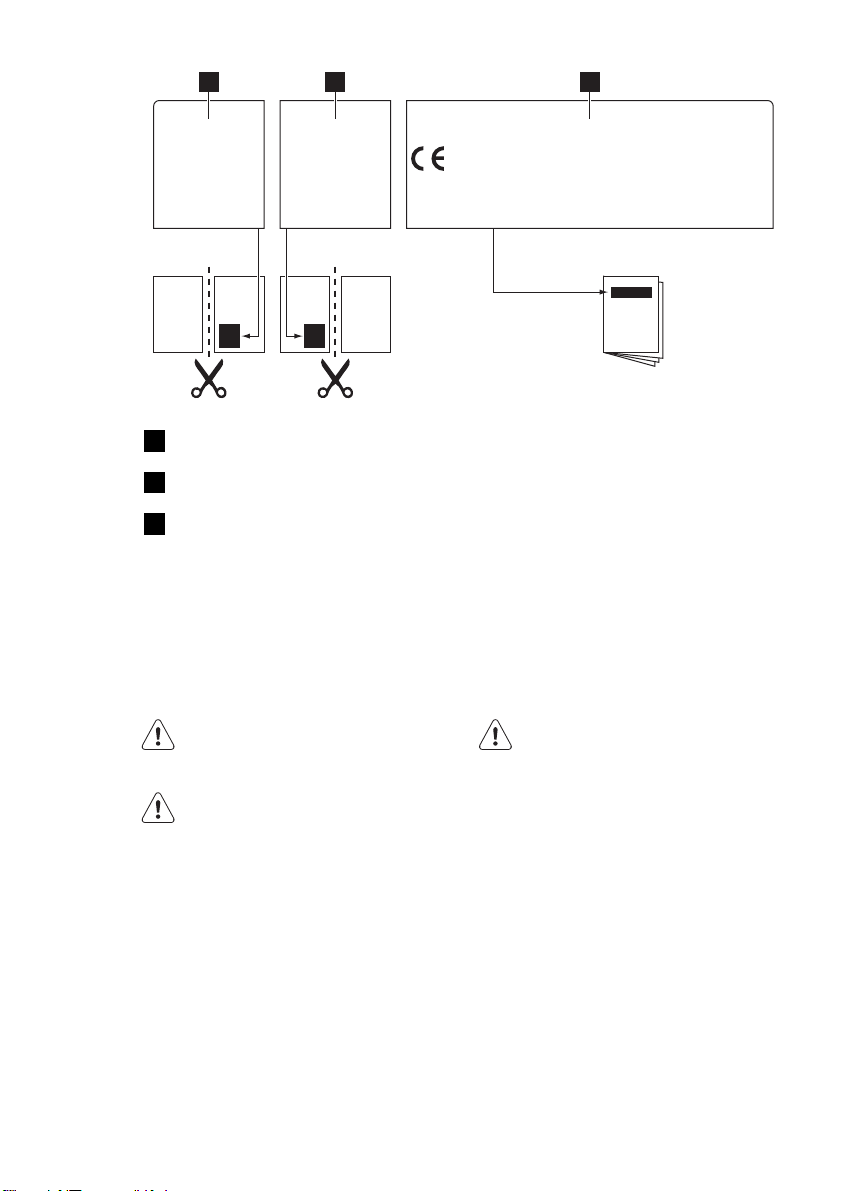
6.1 Labels supplied with the
accessories bag
Stick the adhesive labels as indicated below:
If you operated the appliance incorrectly, or the installation was not
carried out by a registered engineer, the visit from the customer
service technician or dealer may
not take place free of charge, even
during the warranty period.
Page 11
1 2 3
ENGLISH 11
MOD.
PROD.NO.
SER.NO
DATA
Stick it on Guarantee Card and send
1
this part
Stick it on Guarantee Card and keep
2
this part
Stick it on instruction booklet
3
These data are necessary to help you
quickly and correctly. These data are
available on the supplied rating plate.
• Model description .................
7. INSTALLATION
MOD.
PROD.NO.
SER.NO
DATA
MODELMODEL
0049
03 IT
MADE IN ITALY
MOD.
PROD.NO.
SER.NO.
TYPE
230V-50Hz
IP20
• Product number (PNC) .................
• Serial Number (S.N.) .................
Use the original spare parts only. They are
available at Service Force Centre and approved spare parts shops.
WARNING!
Refer to "Safety information" chapter.
WARNING!
The following instructions about installation, connection and maintenance must be carried out by qualified personnel in compliance with
standards and local regulations in
force.
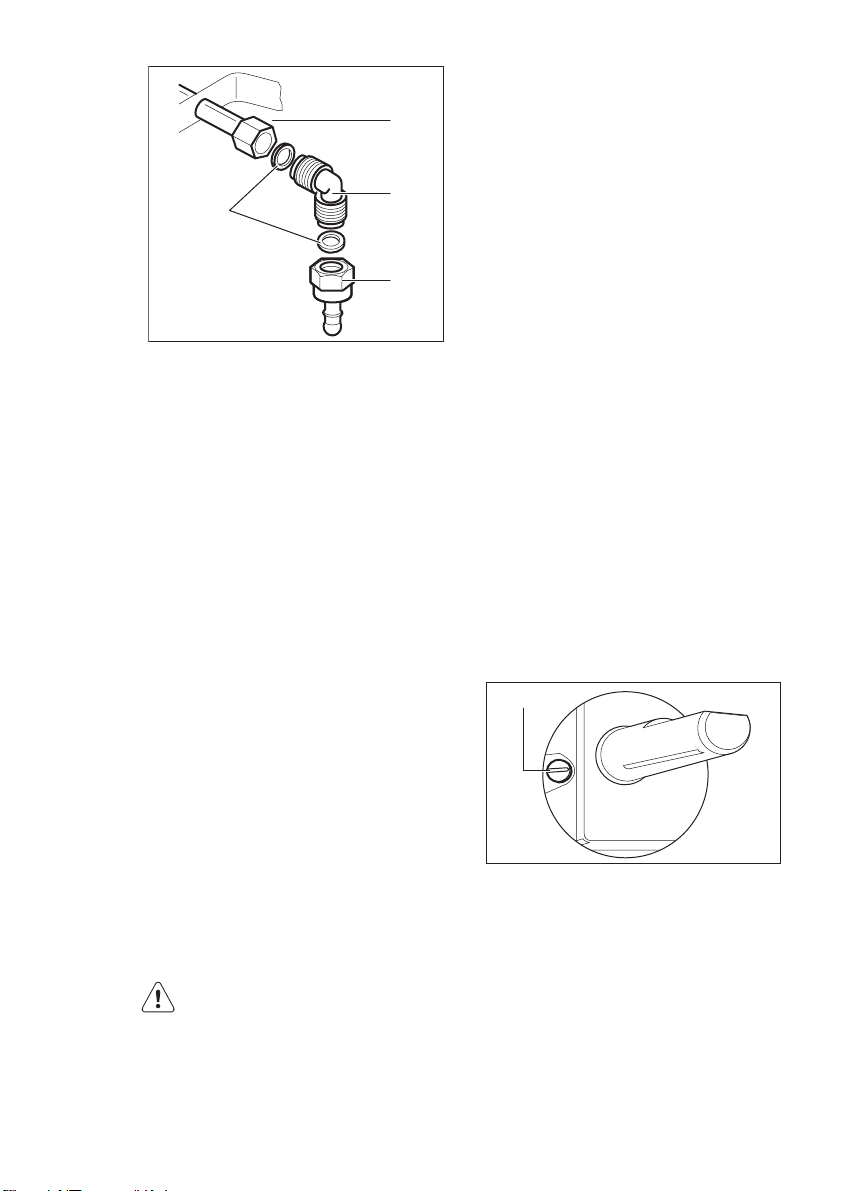
7.1 Gas Connection
Choose fixed connections or use a flexible
pipe in stainless steel in compliance with
the regulation in force. If you use flexible
metallic pipes, be careful they do not come
in touch with mobile parts or they are not
squeezed. Also be careful when the hob is
put together with an oven.
Make sure that the gas supply
pressure of the appliance obeys
the recommended values. The adjustable connection is fixed to the
comprehensive ramp by means of
a threaded nut G 1/2". Screw the
parts without force, adjust the connection in the necessary direction
and tighten everything.
Page 12
www.electrolux.com
12
A)
B)
C)
D)
Liquid gas: use the rubber pipe holder. Al-
ways engage the gasket. Then continue
with the gas connection. The flexible pipe is
prepared for apply when:
– it can not get hot more than room tem-
– it is no longer than 1500 mm;
– it shows no throttles;
– it is not subject to traction or torsion;
– it does not get in touch with cutting
– it can be easily examined in order to
The control of preservation of the flexible
pipe consists in checking that:
– it does not show cracks, cuts, marks of
– the material is not hardened, but shows
– the fastening clamps are not rusted;
– expired term is not due.
If one or more defects are visible, do not
repair the pipe, but replace it.
1)
A
C
B
D
End of shaft with nut
Washer (additional washer is only for
Slovenia and Turkey)
Elbow
Rubber pipe holder for liquid gas (only
for Slovenia and Turkey)
perature, higher than 30°C;
edges or corners;
check its condition.
burnings on the two ends and on its full
length;
its correct elasticity;
When installation is complete,
make sure that the seal of each
pipe fitting is correct. Use a soapy
solution, not a flame!
only for Russia
7.2 Injectors replacement
1.
Remove the pan supports.
2.
Remove the caps and crowns of the
burner.
3.
With a socket spanner 7 remove the
injectors and replace them with the
ones which are necessary for the type
of gas you use (see table in "Technical
Information" chapter).
4.
Assemble the parts, follow the same
procedure backwards.
5.
Replace the rating plate (it is near the
gas supply pipe) with the one for the
new type of gas supply. You can find
this plate in the package supplied with
the appliance.
If the supply gas pressure is changeable or
different from the necessary pressure, you
must fit an applicable pressure adjuster on
the gas supply pipe.
7.3 Adjustment of minimum level
To adjust the minimum level of the burners:
1.
Light the burner.
2.
Turn the knob on the minimum posi-
tion.
3.
Remove the control knob.
4.
With a thin screwdriver, adjust the by-
pass screw position.
A
A)
The by-pass screw
• If you change from natural gas G20 20
mbar (or natural gas G20 13 mbar
liquid gas, fully tighten the by-pass screw
in.
• If you change from liquid gas to natural
gas G20 20 mbar, undo the by-pass
screw approximately 1/4 of a turn.
• If you change from natural gas G20 20
mbar to natural gas G20 13 mbar
do the by-pass screw about 1/4 of a
turn.
1)
1)
un-
) to
Page 13

• If you change from liquid gas to natural
1)
gas G20 13 mbar
, undo the by-pass
screw about 1/2 of a turn.
• If you change from natural gas G20 13
1)
to natural gas G20 20 mbar to
mbar
tighten the by-pass screw about 1/4 of a
turn.
WARNING!
Make sure the flame does not go
out when you quickly turn the knob
from the maximum position to the
minimum position.
7.4 Electrical connection
• Ground the appliance according to safety precautions.
• Make sure that the rated voltage and
type of power on the rating plate agree
with the voltage and the power of the local power supply.
• This appliance is supplied with a mains
cable. It has to be supplied with a correct plug, able to support the load
marked on the rating plate. The plug has
to be fitted in a correct socket.
• Any electrical component must be installed or replaced by the Service Force
Centre technician or qualified service
personnel.
• Always use a correctly installed shockproof socket.
• Make sure that there is an access to the
mains plug after installation.
• Do not pull the mains cable to disconnect the appliance. Always pull the
mains plug.
• The appliance must not be connected
with an extension cable, an adapter or a
multiple connection (risk of fire). Check
that the ground connection is in conformity with the standard and regulations
force.
• The power cable must be placed in such
a way that it does not touch any hot
part.
• Connect the appliance to the mains with
a device that lets to disconnect the appliance from the mains at all poles with a
contact opening width of minimum 3
mm, eg. automatic line protecting cutout, earth leakage trips or fuse.
• None of a parts of the connection cable
can not get a temperature 90 °C. The
ENGLISH 13
blue neutral cable must be connected to
the terminal block label with "N". The
brown (or black) phase cable (fitted in
the terminal block contact marked with
"L") must always be connected to the
live phase.
7.5 Replacement of the
connection cable
To replace the connection cable use only
H05V2V2-F T90 or equivalent type. Make
sure that the cable section is applicable to
the voltage and the working temperature.
The yellow/green earth wire must be approximately 2 cm longer than the brown (or
black) phase wire.
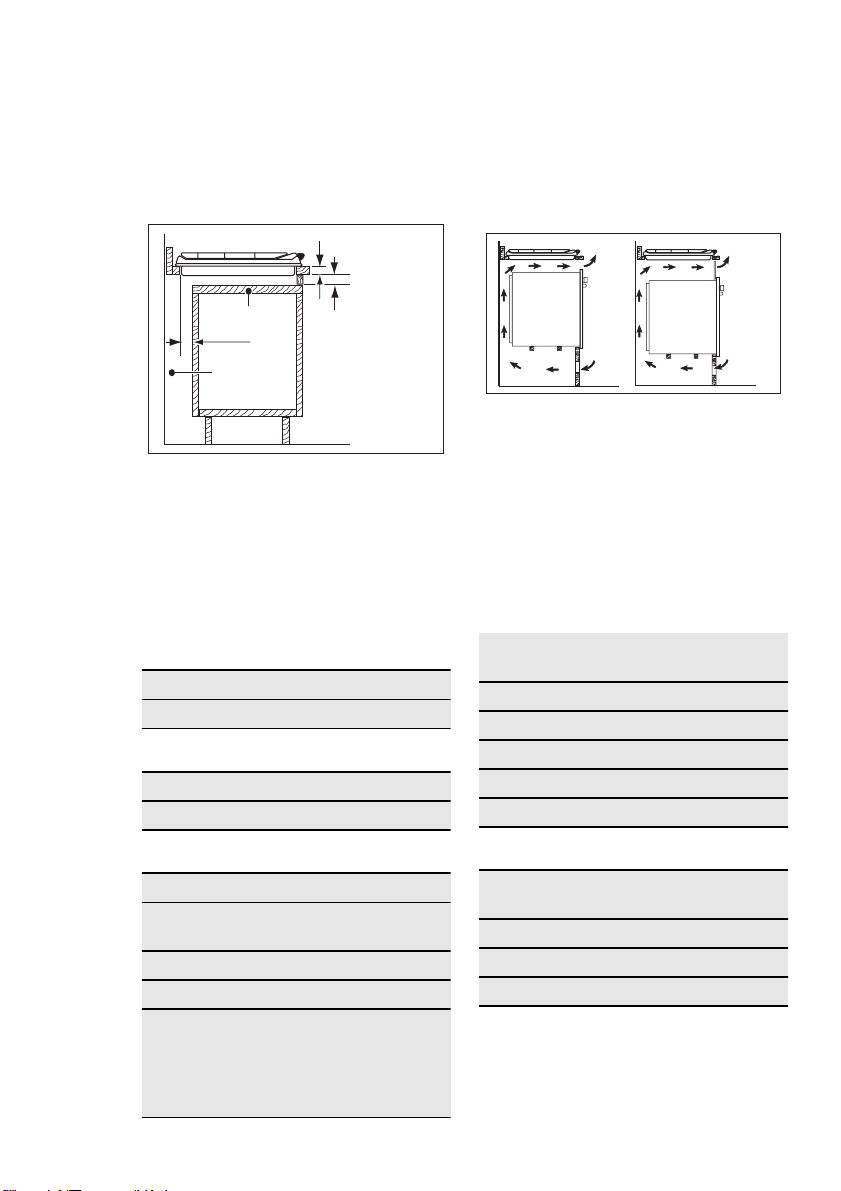
7.6 Building In
min.
650 mm
550 mm
A
min.
55 mm
470 mm
A)
supplied seal
B)
supplied brackets
min.
450 mm
30 mm
B
Page 14
www.electrolux.com
14
7.7 Possibilities for insertion
Kitchen unit with door
The panel installed below the hob must be
easy to remove and let an easy access in
case a technical assistance intervention is
necessary.
30 mm
A
60 mm
min 20 mm
(max 150 mm)
B
A)
Removable panel
B)
Space for connections
8. TECHNICAL INFORMATION
Hob dimensions
Width: 580 mm
Length: 510 mm
Hob recess dimensions
Width: 550 mm
Length: 470 mm
Kitchen unit with oven
The hob recess dimensions must obey the
indication and the kitchen unit must be
equipped with vents to let a continuous
supply of air. The electrical connection of
the hob and the oven must be installed
separately for safety reasons and to let
easy remove oven from the unit.
50 cm2
360 cm2
TOTAL ELECTRIC
POWER:
Electric supply: 230 V ~ 50 Hz
Gas category: II2H3B/P
Gas connection: G 1/2”
Gas supply: G20 (2H) 20 mbar
Appliance class: 3
120 cm2
180 cm2
1.8 kW
Heat input
Rapid burner: 2.7 kW
Semi-rapid burn-
1.9 kW
er:
Auxiliary burner: 1.0 kW
Electric zone: 1.8 kW
TOTAL GAS
POWER:
G20 (2H) 20 mbar
= 5.6 kW
G30/G31 (3B/P)
30/30 mbar = 407
g/h
By-pass diameters
Burner Ø By-pass in
1/100 mm
Auxiliary 28
Semi-rapid 32
Rapid 42
Page 15

ENGLISH 15
Gas burners
NORMAL POWER
BURNER
NORMAL
POWER
REDUCED
POWER
NATURAL GAS
G20 (2H) 20 mbar
LPG
(Butane/Propane)
G30/G31 (3B/P)
30/30 mbar
kW kW
inj. 1/100
mm
m³/h
inj. 1/100
mm
g/h
Auxiliary 1.0 0.33 70 0.095 50 73
Semi-rap-
id
1.9 0.45 96 0.181 71 138
Rapid 2.7 0.75 130 0.257 86 196
Gas burners G20 13 mbar - only Russia
BURNER NORMAL
POWER
REDUCED
POWER
NORMAL POWER
NATURAL GAS
G20 (2H) 13 mbar
kW kW inj. 1/100 mm m³/h
Auxiliary 1.0 0.33 82 0.106
Semi-rapid 2.0 0.45 111 0.212
Rapid 3.0 0.75 149 0.318
9. ENVIRONMENT CONCERNS
Recycle the materials with the symbol
Put the packaging in applicable containers
to recycle it.
Help protect the environment and human
health and to recycle waste of electrical
and electronic appliances. Do not dispose
.
appliances marked with the symbol
the household waste. Return the product
to your local recycling facility or contact
your municipal office.
with
Page 16

www.electrolux.com
16
ÍNDICE
1. INFORMAÇÕES DE SEGURANÇA . . . . . . . . . . . . . . . . . . . . . . . . . . . . . . . . . . . . . . . . . . . 17
2. DESCRIÇÃO DO PRODUTO . . . . . . . . . . . . . . . . . . . . . . . . . . . . . . . . . . . . . . . . . . . . . . . 19
3. UTILIZAÇÃO DIÁRIA . . . . . . . . . . . . . . . . . . . . . . . . . . . . . . . . . . . . . . . . . . . . . . . . . . . . . . 20
4. SUGESTÕES E CONSELHOS ÚTEIS . . . . . . . . . . . . . . . . . . . . . . . . . . . . . . . . . . . . . . . . . 21
5. MANUTENÇÃO E LIMPEZA . . . . . . . . . . . . . . . . . . . . . . . . . . . . . . . . . . . . . . . . . . . . . . . . 22
6. RESOLUÇÃO DE PROBLEMAS . . . . . . . . . . . . . . . . . . . . . . . . . . . . . . . . . . . . . . . . . . . . . 24
7. INSTALAÇÃO . . . . . . . . . . . . . . . . . . . . . . . . . . . . . . . . . . . . . . . . . . . . . . . . . . . . . . . . . . . 26
8. INFORMAÇÃO TÉCNICA . . . . . . . . . . . . . . . . . . . . . . . . . . . . . . . . . . . . . . . . . . . . . . . . . . 29
9. PREOCUPAÇÕES AMBIENTAIS . . . . . . . . . . . . . . . . . . . . . . . . . . . . . . . . . . . . . . . . . . . . 30
ESTAMOS A PENSAR EM SI
Obrigado por ter adquirido um aparelho Electrolux. Escolheu um produto que traz consigo décadas
de experiência profissional e inovação. Engenhoso e elegante, foi concebido a pensar em si. Assim,
quando o utilizar, terá a tranquilidade de quem sabe que terá sempre óptimos resultados.
Bem-vindo(a) à Electrolux.
Visite o nosso website para:
Resolver problemas e obter conselhos de utilização, catálogos e informações sobre
serviços:
www.electrolux.com
Registar o seu produto para beneficiar de um serviço melhor:
www.electrolux.com/productregistration
Adquirir acessórios, consumíveis e peças de substituição originais para o seu aparelho:
www.electrolux.com/shop
APOIO AO CLIENTE E ASSISTÊNCIA
Recomendamos a utilização de peças de substituição originais.
Quando contactar a Assistência, certifique-se de que tem os seguintes dados disponíveis.
A informação encontra-se na placa de características. Modelo, PNC, Número de Série.
Aviso / Cuidado - Informações de segurança.
Informações gerais e conselhos úteis
Informações ambientais
Sujeito a alterações sem aviso prévio.
Page 17

PORTUGUÊS 17
1.
INFORMAÇÕES DE SEGURANÇA
Este aparelho é adequado para os
seguintes mercados: PT
Leia atentamente as instruções fornecidas
antes de instalar e utilizar o aparelho. O fabricante não é responsável por lesões ou
danos resultantes de instalação e utilização
incorrectas. Guarde sempre as instruções
junto do aparelho para futura referência.
TR
•Tenha sempre cuidado quando deslocar
• Vede as superfícies cortadas com um
• Proteja a parte inferior do aparelho con-
• Não instale o aparelho ao lado de uma
1.1 Segurança para crianças e
pessoas vulneráveis
ADVERTÊNCIA
Risco de asfixia, ferimentos ou incapacidade permanente.
• Não permita que o aparelho seja utilizado por pessoas, incluindo crianças, com
capacidades físicas e sensoriais reduzidas, funções mentais reduzidas ou sem
experiência e conhecimento de utilização
do mesmo. Estas pessoas devem ser vigiadas ou ensinadas a utilizar o aparelho
por uma pessoa que seja responsável
pela sua segurança.
• Não permita que as crianças brinquem
com o aparelho.
• Mantenha todos os materiais de embalagem fora do alcance das crianças.
• Mantenha as crianças e os animais domésticos afastados do aparelho quando
este estiver a funcionar ou a arrefecer.
As partes acessíveis estão quentes.
• Se o aparelho tiver um dispositivo de segurança para crianças, recomendamos
que o active.
• Se o aparelho for instalado por cima de
• A parte inferior do aparelho pode ficar
Ligação eléctrica
• Todas as ligações eléctricas têm de ser
• Antes de fazer qualquer ligação eléctrica,
• Certifique-se de que o aparelho é insta-
1.2 Instalação
ADVERTÊNCIA
A instalação deste aparelho só deve ser efectuada por uma pessoa
qualificada.
• Remova todos os elementos da embalagem.
• Não instale nem utilize o aparelho se este estiver danificado.
• Cumpra as instruções de instalação fornecidas com o aparelho.
• Respeite as distâncias mínimas relativamente a outros aparelhos e unidades.
• Certifique-se de que a protecção contra
• Não permita que as ligações eléctricas
• Não permita que as ligações eléctricas
• Utilize uma braçadeira para libertar a
o aparelho porque é pesado. Use sempre luvas de protecção.
vedante para impedir que a humidade
cause dilatações.
tra vapor e humidade.
porta ou debaixo de uma janela. Isso
evita que a abertura de portas ou janelas
faça cair algum tacho quente do aparelho.
gavetas, certifique-se de que o espaço
entre o fundo do aparelho e a gaveta superior é suficiente para permitir a circulação de ar.
quente. Recomendamos a instalação de
um painel de separação não combustível
debaixo do aparelho para evitar o acesso à parte inferior.
ADVERTÊNCIA
Risco de incêndio e choque eléctrico.
efectuadas por um electricista qualificado.
é necessário garantir que o terminal principal do aparelho não está sob tensão.
lado correctamente. Fichas de alimentação eléctrica e tomadas soltas ou inadequadas poderão provocar o sobreaquecimento dos terminais.
choque é instalada.
entrem em contacto com o aparelho ou
com algum tacho quente quando ligar o
aparelho a uma tomada próxima.
fiquem enredadas.
tensão do cabo.
Page 18

www.electrolux.com
18
• Utilize um cabo de alimentação adequa-
• Certifique-se de que não danifica a ficha
• A instalação eléctrica deve possuir um
• Utilize apenas dispositivos de isolamento
Ligação do gás
• Todas as ligações de gás devem ser
• Certifique-se de que existe circulação de
• A informação relativa ao fornecimento de
• Este aparelho não está ligado a um dis-
1.3 Utilização
• Utilize este aparelho em ambiente do-
• Não altere as especificações deste apa-
• Não utilize um temporizador externo ou
• Não deixe o aparelho a funcionar sem vi-
• Não utilize o aparelho com as mãos hú-
do.
e o cabo de alimentação eléctrica. Contacte a Assistência Técnica ou um electricista para substituir o cabo de alimentação se estiver danificado.
dispositivo de isolamento que lhe permita desligar o aparelho da corrente eléctrica em todos os pólos. O dispositivo de
isolamento deve ter uma abertura de
contacto com uma largura mínima de 3
mm.
correctos: disjuntores de protecção, fusíveis (os fusíveis de rosca devem ser retirados do suporte), diferenciais e contactores.
efectuadas por uma pessoa qualificada.
ar em torno do aparelho.
gás encontra-se na placa de características.
positivo de evacuação de produtos de
combustão. Certifique-se de que o aparelho é ligado em conformidade com os
regulamentos de instalação em vigor.
Tenha em atenção os requisitos para
uma ventilação adequada.
ADVERTÊNCIA
Risco de ferimentos, queimaduras
ou choque eléctrico.
méstico.
relho.
um sistema de controlo remoto separado para activar/desactivar o aparelho.
gilância.
midas, nem se este tiver estado em contacto com água.
• Não coloque talheres ou tampas de panelas sobre as zonas de cozedura. Ficam quentes.
• Desligue (off) a zona de cozedura após
cada utilização.
• Não utilize o aparelho como superfície
de trabalho ou armazenamento.
• Se a superfície do aparelho tiver rachada, desligue-o imediatamente da corrente eléctrica. Isso evitará choques eléctricos.
ADVERTÊNCIA
Risco de incêndio ou explosão.
• As gorduras e os óleos podem libertar
vapores inflamáveis quando aquecidos.
Mantenha as chamas e os objectos
aquecidos afastados das gorduras e dos
óleos quando cozinhar com este tipo de
produtos.
• Os vapores que o óleo muito quente liberta podem causar combustão espontânea.
• O óleo usado, que pode conter restos
de alimentos, pode inflamar a uma temperatura inferior à de um óleo usado pela
primeira vez.
• Não coloque produtos inflamáveis ou
objectos molhados com produtos inflamáveis no interior, ao lado ou em cima
do aparelho.
• Não tente extinguir o fogo com água.
Desligue o aparelho e cubra a chama
com uma tampa de tacho ou uma manta
de incêndio.
ADVERTÊNCIA
Risco de danos no aparelho.
• Não coloque nenhum tacho quente sobre o painel de comandos.
• Não deixe que nenhum tacho ferva até
ficar sem água.
• Tenha cuidado e não permita que algum
objecto ou tacho caia sobre o aparelho.
A superfície pode ficar danificada.
• Não active zonas de cozedura com um
tacho vazio ou sem tacho.
• Não coloque folha de alumínio no aparelho.
• Os tachos de ferro fundido e de alumínio
ou que tenham a base danificada podem
riscar a vitrocerâmica. Levante sempre
estes objectos quando precisar de os
deslocar na mesa de trabalho.
Page 19

• Providencie boa ventilação na cozinha
onde o aparelho fica instalado.
• Certifique-se de que as aberturas de
ventilação não ficam bloqueadas.
• Utilize apenas tachos e panelas estáveis,
com forma correcta e diâmetro superior
às dimensões dos queimadores. Existe o
risco de sobreaquecimento e ruptura da
placa de vidro (se aplicável).
• Certifique-se de que a chama não se
apaga quando roda rapidamente o botão da posição do máximo para a posição do mínimo.
• Certifique-se de que os tachos ficam
centrados nos anéis e que não ficam salientes sobre a mesa de trabalho.
• Utilize apenas os acessórios fornecidos
com o aparelho.
• Não instale um difusor de chama sobre
um queimador.
1.4 Manutenção e limpeza
ADVERTÊNCIA
Risco de danos no aparelho.
PORTUGUÊS 19
• Limpe o aparelho com regularidade para
evitar que o material da superfície se deteriore.
• Não utilize jactos de água ou vapor para
limpar o aparelho.
• Limpe o aparelho com um pano macio e
húmido. Utilize apenas detergentes neutros. Não utilize produtos abrasivos, esfregões, solventes ou objectos metálicos.
1.5 Eliminação
ADVERTÊNCIA
Risco de ferimentos e asfixia.
• Contacte a sua autoridade municipal para mais informações sobre a forma como eliminar o aparelho correctamente.
• Desligue o aparelho da alimentação
eléctrica.
• Corte o cabo de alimentação eléctrica e
elimine-o.
• Achate os tubos de gás externos.
2. DESCRIÇÃO DO PRODUTO
2.1 Disposição da mesa de
trabalho
1
180
mm
6
5
2.2 Botões de comando
Símbolo Descrição
sem fornecimento
de gás / posição
desligado
Parte superior da placa
1
27
Queimador semi-rápido
2
Botões de controlo
3
Queimador auxiliar
3
4
Indicador de calor residual
5
Queimador rápido
6
4
Zona de cozedura eléctrica 1800 W
7
Símbolo Descrição
posição de ignição / fornecimento máximo de gás
fornecimento mínimo de gás
Page 20

www.electrolux.com
20
2.3 Botões de controlo das
zonas de cozedura eléctricas
Símbolo Função
0 posição desligado
1
6
aquecimento míni-
aquecimento má-
3. UTILIZAÇÃO DIÁRIA
ADVERTÊNCIA
Consulte o capítulo "Informações
de segurança".
3.1 Ignição do queimador
ADVERTÊNCIA
Seja extremamente cuidadoso
aquando da utilização de chama
aberta no ambiente da cozinha. O
fabricante declina qualquer responsabilidade em caso de utilização incorrecta da chama.
Acenda o queimador sempre antes
de colocar o tacho.
Para acender o queimador:
1.
Rode o botão de comando para a esquerda para a posição do nível máxi-
mo (
) e pressione-o.
2.
Mantenha o botão de controlo pressionado durante aproximadamente 5 segundos; tal irá permitir o aquecimento
do termopar. Caso contrário, o fornecimento de gás será interrompido.
3.
Regule a chama após a regularização
da mesma.
Se, após algumas tentativas, o
queimador não acender, verifique
se a coroa e a respectiva tampa
estão nas posições correctas.
mo
ximo
2.4 Indicação de calor residual
O indicador de calor residual acende quando um foco está quente.
ADVERTÊNCIA
Perigo de queimaduras devido ao
calor residual!
A
B
C
A)
Tampa e coroa do queimador
B)
Termóstato
C)
Ignição
ADVERTÊNCIA
Não mantenha o botão de comando pressionado por mais de 15 segundos.
Se o queimador não acender após
15 segundos, solte o botão de comando, rode-o para a posição off
(desligado) e aguarde no mínimo 1
minuto antes de tentar acender novamente o queimador.
Na ausência de electricidade, é
possível acender o queimador sem
o dispositivo eléctrico. Neste caso,
aproxime uma chama do queimador, pressione o respectivo botão e
rode-o para a esquerda para a posição de libertação máxima de gás.
Page 21

Se o queimador se apagar acidentalmente, rode o botão de comando para a posição de desligado e
aguarde no mínimo 1 minuto antes
de tentar acender o queimador novamente.
Quando ligar a alimentação eléctrica, após a instalação ou um corte
de energia, é normal que o gerador
de faíscas se active automaticamente.
3.2 Desligar o queimador
Para apagar a chama, rode o botão para o
símbolo
.
ADVERTÊNCIA
Reduza sempre a chama ou apague-a antes de retirar as panelas
do queimador.
3.3 Funcionamento das zonas
eléctricas
Para ligar e aumentar a temperatura, rode
o botão para a direita. Para diminuir a temperatura, rode o botão para a esquerda.
Para desligar, rode o botão para 0.
O indicador de funcionamento acende
quando a zona de cozedura eléctrica é ligada e permanece aceso até a zona de
cozedura eléctrica ser desligada.
Quando um foco é activado, emite
um zumbido durante um curto período. Isto é uma característica de
todas as placas de vitrocerâmica e
não significa que o aparelho esteja
avariado.
PORTUGUÊS 21
3.4 Antes da primeira utilização
Coloque um tacho com alguma água em
todas as zonas de cozedura. Seleccione a
regulação máxima e deixe o aparelho em
funcionamento durante 10 minutos ou até
que a água ferva em todos os tachos. Em
seguida, deixe o aparelho em funcionamento na regulação mínima durante 20 minutos. Durante este período, é possível que
se liberte um odor e fumo. Isso é normal.
Certifique-se de que a circulação de ar é
suficiente.
Após esta operação, limpe o aparelho com
um pano macio embebido em água quente
e detergente.
3.5 Exemplos de aplicações de
cozinha
Regulação
do
aquecimento:
Utilize para:
1 Manter quente
2 Lume muito brando
3 Lume brando
4 Fritar/dourar
5 Levar à fervura
6 Levar à fervura/fritura rápida/
fritura prolongada
4. SUGESTÕES E CONSELHOS ÚTEIS
ADVERTÊNCIA
Consulte o capítulo "Informações
de segurança".
4.1 Poupança de energia
• Sempre que possível, coloque
as tampas nos tachos.
• Coloque o tacho na zona de cozedura antes de a ligar.
• Desligue a zona de cozedura
eléctrica antes do fim do tempo
de cozedura para utilizar o calor
residual.
• O fundo do tacho deve ter dimensão igual à da zona de cozedura eléctrica.
• A base do tacho deve ser o mais
espessa e plana possível.
Page 22

www.electrolux.com
22
• Quando o líquido começa a ferver, redu-
Utilize apenas tachos com diâmetro adequado às dimensões dos queimadores.
Queimador Diâmetros de tacho
Semi-rápido 120 - 220 mm
za a chama para cozinhar em lume brando.
Rápido 160 - 260 mm
Auxiliar 80 - 160 mm
ADVERTÊNCIA
Não utilize panelas de ferro fundido, panelas de pedra ou placas de
grelhador ou tostador sobre os
queimadores de gás.
ADVERTÊNCIA
Não coloque a mesma panela sobre dois queimadores.
ADVERTÊNCIA
Certifique-se de que as pegas dos
tachos não ultrapassam a extremidade dianteira da placa e de que
os tachos estão centrados nos
anéis, de forma a conseguir a máxima estabilidade e reduzir o consumo de gás.
Não coloque tachos instáveis ou deformados nos anéis, para evitar que sejam derramados líquidos ou haja ferimentos.
ADVERTÊNCIA
O derrame de líquidos durante a
cozedura pode originar a quebra
do vidro
Informação relativa à
acrilamida
Importante De acordo com os
conhecimentos científicos mais recentes,
se deixar tostar alimentos (especialmente
alimentos que contenham amido), a
acrilamida pode representar um risco para
a saúde. Assim, aconselhamos que
cozinhe a baixa temperaturas e não deixe
tostar demais os alimentos.
5. MANUTENÇÃO E LIMPEZA
ADVERTÊNCIA
Consulte o capítulo "Informações
de segurança".
Limpe o aparelho após cada utilização.
Utilize sempre tachos com a base limpa.
ADVERTÊNCIA
Desligue o aparelho. Desligue o
aparelho da alimentação eléctrica
antes de executar qualquer trabalho de limpeza ou manutenção.
Deixe o queimador de gás arrefecer antes de o limpar.
Quanto à zona de cozedura eléctrica, é melhor limpá-la ainda morna
para ser mais fácil remover a sujidade.
ADVERTÊNCIA
Os objectos aguçados e os produtos de limpeza abrasivos danificam
o aparelho.
Para sua segurança, não limpe o
aparelho com dispositivos de limpeza a vapor ou a alta pressão.
Riscos ou manchas escuras na superfície não afectam o funcionamento do aparelho.
Page 23

• Pode remover os suportes para panelas
para facilitar a limpeza da placa.
• Para limpar as partes esmaltadas, a
tampa e a coroa, lave-as com água e
detergente e seque-as bem antes de
voltar a colocá-las.
• Limpe as peças de aço inoxidável com
água e seque com um pano macio.
• Os suportes para panelas não são resistentes à máquina de lavar loiça. Deve
lavá-los à mão.
• Quando lavar os suportes para panelas
à mão, tenha cuidado quando os secar
porque o revestimento de esmalte pode
ter extremidades pouco polidas. Se necessário, pode remover as manchas difíceis com um produto de limpeza em
pasta.
• Após a limpeza dos suportes para panelas, certifique-se de que ficam bem posicionados.
• Para que os queimadores funcionem
correctamente, certifique-se de que os
braços dos suportes para panelas ficam
centrados nos queimadores.
PORTUGUÊS 23
Desligue o aparelho e deixe-o ar-
–
refecer antes de limpar: manchas
de calcário e de água, salpicos de
gordura e descolorações metálicas
brilhantes. Utilize um agente de limpeza adequado para a superfície da
placa.
2.
Limpe o aparelho com um pano húmido e um pouco de detergente.
3.
No final, seque o aparelho com um
pano limpo.
ADVERTÊNCIA
Não utilize facas, raspadores ou
outros instrumentos semelhantes
para limpar a superfície do vidro ou
entre os rebordos dos queimadores e da estrutura (se aplicável).
ADVERTÊNCIA
Não arraste tachos sobre o vidro
porque podem riscar a superfície.
Não permita também que caiam
objectos rígidos ou aguçados sobre o vidro ou sobre as extremidades da placa.
• Tenha muito cuidado quando voltar
a colocar os suportes para panelas,
para evitar danos na superfície da
placa.
Após a limpeza, seque o aparelho com um
pano macio.
Remoção de sujidades:
1.
– Remova imediatamente: plástico
derretido, película de plástico e resíduos de alimentos que contenham
açúcar. Utilize um raspador especial
para vitrocerâmica. Posicione o raspador sobre a superfície vitrocerâmica em ângulo agudo e faça deslizar
a lâmina sobre a superfície.
5.1 Limpeza do disparador
Esta funcionalidade é obtida através de
uma vela cerâmica de ignição com um
eléctrodo de metal. Mantenha estes componentes bem limpos para evitar dificuldades ao ligar e verifique se os orifícios da
coroa do queimador não estão obstruídos.
5.2 Manutenção periódica
Entre em contacto periodicamente com o
seu centro de assistência local para verificar as condições do tubo de fornecimento
de gás e do regulador de pressão, se instalado.
Page 24

www.electrolux.com
24
6. RESOLUÇÃO DE PROBLEMAS
Problema Causa possível Solução
Não existe faísca ao tentar
acender o gás.
Não existe faísca ao tentar
acender o gás.
A chama apaga-se imediatamente após a ignição.
O anel de gás em combustão não é uniforme.
O aparelho não funciona. • Não existe alimentação
A zona de cozedura eléctrica não aquece.
• Não existe alimentação
eléctrica.
• A tampa e a coroa do
queimador não estão
bem colocadas.
• O termóstato não está
suficientemente quente.
• A coroa do queimador
está bloqueada com resíduos de alimentos.
eléctrica.
• Não existe alimentação
eléctrica.
• Utilizou o botão errado
para activar a zona de
cozedura.
• Certifique-se de que o
aparelho está ligado e
de que a alimentação
eléctrica está activa.
• Verifique o disjuntor. Se
o disjuntor disparar
mais vezes, contacte
um electricista qualificado.
• Certifique-se de que a
tampa e a coroa do
queimador estão nas
posições correctas.
• Após acender a chama,
mantenha o botão pressionado durante 5 segundos.
• Certifique-se de que o
injector não está bloqueado e de que não
há partículas de alimentos na coroa do queimador.
• Certifique-se de que o
aparelho está ligado e
de que a alimentação
eléctrica está activa.
• Verifique o disjuntor. Se
o disjuntor disparar
mais vezes, contacte
um electricista qualificado.
• Certifique-se de que o
aparelho está ligado e
de que a alimentação
eléctrica está activa.
• Certifique-se de que rodou o botão de comando correcto.
• Verifique o disjuntor. Se
o disjuntor disparar
mais vezes, contacte
um electricista qualificado.
Page 25

Problema Causa possível Solução
A eficácia da placa não é
satisfatória.
• A placa não está limpa.
• O tacho não é adequado.
Se existir uma falha, tente primeiro encontrar uma solução para o problema. Se não
conseguir encontrar uma solução para o
problema, contacte o seu fornecedor ou o
centro de assistência local.
Se tiver utilizado o aparelho de forma incorrecta ou se a instalação
não tiver sido executada por um
engenheiro qualificado, a visita do
técnico do serviço de assistência
ou do fornecedor pode não ser
gratuita, mesmo durante o período
de garantia.
1 2 3
PORTUGUÊS 25
• Certifique-se de que a
placa está limpa e seca.
• Certifique-se de que utiliza um tacho com a dimensão correcta para a
zona de cozedura.
• Certifique-se de que o
tacho tem a base plana.
• Certifique-se de que a
regulação de calor é a
correcta para o tipo de
cozedura.
6.1 Etiquetas fornecidas
juntamente com o saco de
acessórios
Coloque os autocolantes tal como indicado
abaixo:
MOD.
PROD.NO.
SER.NO
DATA
Cole-o no Cartão de Garantia e envie
1
esta parte
Cole-o no Cartão de Garantia e guarde
2
esta parte
Cole-o no manual de instruções
3
MOD.
PROD.NO.
SER.NO
DATA
MODELMODEL
03 IT
MADE IN ITALY
Estes dados são necessários para o
ajudar rapidamente e correctamente.
0049
MOD.
PROD.NO.
SER.NO.
TYPE
230V-50Hz
IP20
Estes dados estão disponíveis na placa de características fornecida.
• Descrição do modelo ................
• Número do produto (PNC) .................
•Número de série
(S.N.) ........................................
Utilize apenas peças sobresselentes originais. Estas peças sobresselentes estão
Page 26

www.electrolux.com
26
disponíveis junto do centro de assistência e
lojas autorizadas para a venda das mesmas.
7. INSTALAÇÃO
ADVERTÊNCIA
Consulte o capítulo "Informações
de segurança".
ADVERTÊNCIA
As seguintes instruções de instalação, ligação e manutenção devem
ser executadas por pessoal qualificado em conformidade com as
normas e leis locais em vigor.
A
C
B
7.1 Ligação do gás
Escolha ligações fixas ou utilize um tubo
flexível em aço inoxidável em conformidade
com as normas em vigor. Caso utilize tubos metálicos flexíveis, tome as medidas
necessárias para que estes não entrem em
contacto com partes móveis nem sejam
esmagados. Tenha cuidado também quando a placa estiver instalada em conjunto
com um forno.
Certifique-se de que a pressão de
fornecimento de gás do aparelho
cumpre os valores recomendados.
A ligação ajustável está fixada no
suporte global através de uma porca roscada G 1/2". Aparafuse as
peças sem força excessiva, ajuste
a ligação na direcção necessária e
aperte tudo.
D
A)
Extremidade do veio com porca
B)
Anilha (anilha adicional apenas para Eslovénia e Turquia)
C)
Cotovelo
D)
Suporte de tubo em borracha para gás
líquido (apenas para Eslovénia e Tur-
quia)
Gás líquido: utilize o suporte de tubo em
borracha. Encaixe sempre a junta. De seguida, prossiga com a ligação de gás. O
tubo flexível está pronto para aplicação
quando:
– não ultrapassa a temperatura ambiente,
ou seja, não ultrapassa os 30 °C;
– não ultrapassa 1500 mm de comprimen-
to;
– não apresenta estrangulamentos;
– não está sujeito a tracção ou torção;
– não entra em contacto com extremida-
des ou cantos cortantes;
– pode ser facilmente examinado para ve-
rificação do seu estado.
O controlo e a preservação do tubo flexível
consistem em verificar se:
– não apresenta fendas, cortes ou marcas
de queimaduras em nenhuma extremi-
dade, nem em toda a sua extensão;
– o material não apresenta sinais de endu-
recimento, mas sim a sua correcta elas-
ticidade;
Page 27

– os grampos de fixação não estão enfer-
rujados;
– o prazo de validade não foi ultrapassa-
do.
Caso sejam detectáveis uma ou mais anomalias, não repare o tubo e substitua-o.
Quando a instalação estiver concluída, certifique-se de que a vedação de cada tubo foi realizada correctamente. Utilize uma solução à
base de sabão e não uma cha-
ma!
7.2 Substituição dos injectores
1.
Remova os suportes para panelas.
2.
Remova as tampas e as coroas dos
queimadores.
3.
Com uma chave de porcas de 7 mm,
remova os injectores e substitua-os
pelos necessários para o tipo de gás
que utiliza (consulte a tabela no capítulo "Informação Técnica").
4.
Monte as peças e siga o mesmo procedimento na ordem inversa.
5.
Substitua a placa de características
(localizada perto do tubo de fornecimento de gás) pela correspondente ao
novo tipo de fornecimento de gás. Pode encontrar esta placa na embalagem
fornecida com o aparelho.
Se a pressão de fornecimento de gás for
inconstante ou diferente da pressão necessária, deve instalar um regulador de pressão adequado ao tubo de fornecimento de
gás.
7.3 Regulação para o nível
mínimo
Para regular o nível mínimo dos queimadores:
1.
Acenda o queimador.
2.
Rode o botão para a posição do nível
mínimo.
3.
Remova o botão.
4.
Com uma chave de fendas fina, regule
a posição do parafuso de by-pass.
PORTUGUÊS 27
A
A)
Parafuso de by-pass
• Se mudar de gás natural G20 a 20 mbar
para gás líquido, aperte totalmente o parafuso.
• Se mudar de gás líquido para gás natural G20 a 20 mbar, desaperte o parafuso
de by-pass cerca de 1/4 de volta.
ADVERTÊNCIA
Certifique-se de que a chama não
se apaga quando roda rapidamente o botão da posição do nível máximo para a posição do nível mínimo.
7.4 Ligação eléctrica
• Ligue o aparelho de acordo com as precauções de segurança.
• Certifique-se de que a tensão nominal e
o tipo de alimentação na placa de características estão em conformidade com a
tensão e a potência da corrente eléctrica
local.
• Este aparelho é fornecido com um cabo
de alimentação. Este tem de ser fornecido com uma ficha adequada e capaz de
suportar a carga assinalada na placa de
características. A ficha tem de ficar instalada numa tomada adequada.
• Qualquer componente eléctrico tem de
ser instalado ou substituído pelo técnico
do centro de assistência ou por um técnico de assistência qualificado.
• Utilize sempre uma tomada devidamente
instalada e à prova de choques eléctricos.
• Certifique-se de que existe acesso à ficha de alimentação após a instalação.
• Não puxe o cabo de alimentação eléctrica para desligar o aparelho. Puxe sempre a ficha de alimentação.
• O aparelho não deve ser ligado a um cabo de extensão, a um adaptador ou a
uma ligação múltipla (risco de incêndio).
Page 28

www.electrolux.com
28
• O cabo de alimentação deve ser coloca-
• Ligue o aparelho à alimentação com um
• Nenhuma das partes do cabo de ligação
7.5 Substituição do cabo de
ligação
Para substituir o cabo de ligação, utilize
apenas um do tipo H05V2V2-F T90 ou
equivalente. Certifique-se de que a secção
do cabo é adequada à voltagem e à temperatura de funcionamento. O cabo de terra amarelo/verde tem de ser aproximadamente 2 cm mais comprido do que o cabo
de fase castanho (ou preto).
Verifique se a ligação à terra está em
conformidade com as normas e leis vigentes.
do de forma a que não possa entrar em
contacto com qualquer peça quente.
dispositivo que permita desligar o aparelho da alimentação em todos os pólos
com uma largura de abertura de contacto de, pelo menos, 3 mm, por exemplo,
corte automático de protecção da linha
ou fusíveis de corte de alimentação.
pode atingir uma temperatura de 90 °C.
O cabo azul neutro deve ser ligado ao
bloco de terminais com uma etiqueta
onde consta a letra "N". O cabo de fase
castanho (ou preto) (instalado no terminal indicado com a letra "L") tem de estar sempre ligado à fase com corrente.
A
B
A)
vedante fornecido
B)
suportes fornecidos
7.7 Possibilidade de encastrar
Móvel de cozinha com porta
O painel instalado por baixo da placa tem
de ser de fácil remoção e permitir um acesso fácil no caso de ser necessária a intervenção da assistência técnica.
30 mm
A
60 mm
B
min 20 mm
(max 150 mm)
7.6 Encastre
min.
55 mm
470 mm
30 mm
min.
450 mm
min.
650 mm
550 mm
A)
Painel amovível
B)
Espaço para ligações
Page 29

Móvel de cozinha com forno
As dimensões da cavidade destinada à
placa devem respeitar as indicações e o
móvel de cozinha deve estar equipado
com aberturas de ventilação para permitir
um fornecimento de ar contínuo. As ligações eléctricas da placa e do forno devem
ser efectuadas separadamente por razões
8. INFORMAÇÃO TÉCNICA
PORTUGUÊS 29
de segurança e para permitir a fácil remoção do forno do móvel.
50 cm2
360 cm2
120 cm2
180 cm2
Dimensões da placa
Largura: 580 mm
Comprimento: 510 mm
Dimensões da cavidade da placa
Largura: 550 mm
Comprimento: 470 mm
Produção de calor
Queimador rápi-
2,7 kW
do:
Queimador semi-
1,9 kW
-rápido:
Queimador auxili-
1,0 kW
ar:
Zona eléctrica: 1,8 kW
POTÊNCIA TO-
TAL DO GÁS:
G20 (2H) 20 mbar
= 5,6 kW
G30 (3+) 28-30
mbar = 407 g/h
G31 (3+) 37 mbar
= 400 g/h
POTÊNCIA ELÉC-
1,8 kW
TRICA TOTAL:
Alimentação eléc-
230 V ~ 50 Hz
trica:
Categoria de gás: II2H3+
Ligação do gás: G 1/2”
Fornecimento de
G20 (2H) 20 mbar
gás:
Classe do apare-
3
lho:
Diâmetros de bypass
Queimador Ø bypass em
1/100 mm
Auxiliar 28
Semi-rápido 32
Rápido 42
Page 30

www.electrolux.com
30
Queimadores de gás
PO-
TÊNCIA
REDU-
ZIDA
GÁS NATURAL
G20 (2H) 20
mbar
inj.
1/100
QUEI-
MA-
DOR
POTÊN-
CIA
NORMAL
kW kW
mm
Auxiliar 1.0 0.33 70 0.095 50 73 71
Semi-rá-
pido
1.9 0.45 96 0.181 71 138 136
Rápido 2.7 0.75 130 0.257 86 196 193
9. PREOCUPAÇÕES AMBIENTAIS
POTÊNCIA NORMAL
(Butano/Propano) G30/
G31 (3+) 28-30/37 mbar
inj.
m³/h
1/100
mm
GPL
G30
28–30
mbar
mbar
g/h g/h
G31
37
Recicle os materiais que apresentem o
símbolo
contentores indicados para reciclagem.
Ajude a proteger o ambiente e a saúde
pública através da reciclagem de aparelhos
eléctricos e electrónicos. Não elimine os
. Coloque a embalagem nos
aparelhos que tenham o símbolo
juntamente com os resíduos domésticos.
Coloque o produto num ponto de recolha
para reciclagem local ou contacte as suas
autoridades municipais.
Page 31

TÜRKÇE 31
İÇINDEKILER
1. GÜVENLIK BILGILERI . . . . . . . . . . . . . . . . . . . . . . . . . . . . . . . . . . . . . . . . . . . . . . . . . . . . . . . . . . . . . . . 32
2. ÜRÜN TANIMI . . . . . . . . . . . . . . . . . . . . . . . . . . . . . . . . . . . . . . . . . . . . . . . . . . . . . . . . . . . . . . . . . . . . . . 34
3. GÜNLÜK KULLANIM . . . . . . . . . . . . . . . . . . . . . . . . . . . . . . . . . . . . . . . . . . . . . . . . . . . . . . . . . . . . . . . . 35
4. YARARLI IPUÇLARI VE BILGILER . . . . . . . . . . . . . . . . . . . . . . . . . . . . . . . . . . . . . . . . . . . . . . . . . . . . . 36
5. BAKIM VE TEMIZLIK . . . . . . . . . . . . . . . . . . . . . . . . . . . . . . . . . . . . . . . . . . . . . . . . . . . . . . . . . . . . . . . . 37
6. SORUN GIDERME . . . . . . . . . . . . . . . . . . . . . . . . . . . . . . . . . . . . . . . . . . . . . . . . . . . . . . . . . . . . . . . . . . 38
7. MONTAJ . . . . . . . . . . . . . . . . . . . . . . . . . . . . . . . . . . . . . . . . . . . . . . . . . . . . . . . . . . . . . . . . . . . . . . . . . . 40
8. TEKNIK BILGILER . . . . . . . . . . . . . . . . . . . . . . . . . . . . . . . . . . . . . . . . . . . . . . . . . . . . . . . . . . . . . . . . . . 42
9. ÇEVREYLE ILGILI BILGILER . . . . . . . . . . . . . . . . . . . . . . . . . . . . . . . . . . . . . . . . . . . . . . . . . . . . . . . . . . 43
SİZİ DÜŞÜNÜR
Bir Electrolux ürünü aldığınız için teşekkür ederiz. Size onlarca yıllık profesyonel deneyim ve yenilik sunan bir
ürün tercih ettiniz. Sizi düşünerek tasarlanan yaratıcı ve şık bir ürün. Bu ürünü her kullandığınızda, daima en iyi
sonuçları alacağınızdan emin olabilirsiniz.
Electrolux'e hoş geldiniz.
Web sitemizi aşağıdakiler için ziyaret edin:
Kullanım önerileri, broşürler, sorun giderme bilgileri, servis bilgileri alın:
www.electrolux.com
Ürününüzü daha iyi servis için kaydedin:
www.electrolux.com/productregistration
Cihazınız için Aksesuarlar, Sarf Malzemeleri ve Orijinal yedek parçalar satın alın:
www.electrolux.com/shop
MÜŞTERİ HİZMETLERİ VE SERVİS
Orijinal yedek parça kullanılmasını tavsiye ederiz.
Servis ile iletişim sırasında, aşağıdaki verilerin bulunduğunu kontrol edin.
Bilgiler, bilgi etiketinde yazılıdır. Model, PNC, Seri Numarası.
Uyarı / Dikkat-Güvenlik bilgileri.
Genel bilgiler ve ipuçları
Çevresel bilgiler
Önceden haber verilmeksizin değişiklik yapma hakkı saklıdır.
Page 32

www.electrolux.com
32
1.
GÜVENLİK BİLGİLERİ
Bu cihaz aşağıdaki pazarlar için uygundur:
TR
PT
Cihazın montajından ve kullanımından önce, ve‐
rilen talimatları dikkatlice okuyun. Üretici, yanlış
bir montajın ve kullanımın hasara neden olması
durumunda sorumluluk kabul etmez. Kullanma
kılavuzunu ileride kullanım için daima cihazın ya‐
kınında bulundurun.
1.1 Çocukların ve tehlikeye açık
kişilerin güvenliği
UYARI
Boğulma, yaralanma ya da kalıcı sakat‐
lık riski vardır.
• Çocuklar dahil olmak üzere, fiziksel ve mental
kapasiteleri düşük veya cihazın kullanımına
yönelik deneyimi ve bilgisi olmayan kişilerin ci‐
hazı kullanmalarına izin vermeyin. Bu kişiler
cihazı, güvenliklerinden sorumlu olan bir kişi‐
nin denetimi altında veya cihazın kullanımı
hakkında bu kişi tarafından bilgilendirilmek
kaydıyla kullanabilir.
• Bu cihaz, çocukların oynayabileceği bir oyun‐
cak değildir.
• Tüm ambalaj malzemelerini çocuklardan uzak
tutun.
• Cihaz çalışırken veya soğuma aşamasınday‐
ken çocukları ve evcil hayvanları cihazdan
uzak tutun. Erişilebilir parçalar sıcaktır.
• Cihazda çocuk güvenliği aygıtı varsa bu aygıtı
etkinleştirmenizi tavsiye ederiz.
1.2 Montaj
UYARI
Cihazın montajı sadece kalifiye bir kişi
tarafından yapılmalıdır.
• Tüm ambalajları çıkarın.
• Hasarlı bir cihazı monte etmeyin ya da kullan‐
mayın.
• Cihazla birlikte verilen montaj talimatına uyun.
• Diğer cihazlar ve üniteler arasında olması ge‐
reken minimum mesafeyi koruyun.
• Ağır olduğundan, cihazı taşırken daima dikkat
edin. Her zaman güvenlik eldivenleri kullanın.
• Nemin kabarmaya neden olmasını önlemek
için kesik yüzeyleri yalıtkan malzeme ile yalı‐
tın.
• Cihazın altını buhar ve nemden koruyun.
• Cihazı kapının yakınına veya pencere altına
monte etmeyin. Bu durum, sıcak pişirme kap‐
larının kapı ya da pencere açıldığında cihaz‐
dan düşmesini önler.
• Cihaz çekmecelerin üzerine takılmış ise, cihaz
ile üst çekmece arasındaki boşluğun hava do‐
laşımı için yeterli olduğundan emin olun.
• Cihazın alt kısmı ısınabilir. Cihazın altına yere
temas etmesini engelleyecek ısıya dayanıklı
bir panel konmasını tavsiye ediyoruz.
Elektrik bağlantısı
UYARI
Yangın ve elektrik çarpması riski vardır.
• Tüm elektrik bağlantıları kalifiye bir elektrikçi
tarafından yapılmalıdır.
• Her kablo bağlantısından önce cihazın ana
terminalinde elektrik bulunmadığını kontrol
edin.
• Cihazın montajının doğru yapıldığından emin
olun. Gevşek ve uygun olmayan fiş ile priz,
terminalin çok fazla ısınmasına neden olabilir.
• Bir şok korumasının bulunduğundan emin
olun.
• Cihazı yakındaki prizlere taktığınızda elektrik
bağlantılarının cihaza ya da sıcak pişirme kap‐
larına temas etmesine izin vermeyin.
• Elektrik kablolarının dolanmasına izin verme‐
yin.
• Kablo üzerinde gerilim azaltıcı bir kelepçe kul‐
lanın.
• Doğru elektrik kablosunu kullanın.
• Elektrik fişine ve kablosuna zarar vermemeye
özen gösterin. Hasarlı bir kabloyu değiştirmek
için yetkili servise ya da bir elektrikçiye başvu‐
run.
• Elektrik tesisatı cihazın ana şebeke bağlantısı‐
nı tüm kutuplardan kesebilmenize olanak
sağlayan bir yalıtım malzemesine sahip olma‐
lıdır. Yalıtım malzemesinin kontak açıklığının
genişliği en az 3 mm olmalıdır.
• Sadece doğru yalıtım malzemelerini kullanın:
hat koruyucu devre kesiciler, sigortalar (yuva‐
sından çıkarılan vidalı tip sigortalar), toprak
kaçağı önleyicileri ve kontaktörler.
Page 33

Gaz bağlantısı
• Tüm gaz bağlantıları bir kalifiye personel tara‐
fından yapılmalıdır.
• Cihaz çevresinde hava devridaimi olduğundan
emin olun.
• Gaz beslemesi ile ilgili bilgiler bilgi etiketinde
bulunmaktadır.
• Bu cihaz, yanma ürünlerini boşaltan bir cihaza
bağlanmaz. Cihazı mutlaka geçerli montaj yö‐
netmeliklerine göre bağlayın. Yeterli havalan‐
dırma ile ilgili gereksinimlere dikkat edin.
1.3 Kullanım amacı
UYARI
Yaralanma, yanık ya da elektrik çarp‐
ması riski vardır.
• Bu cihazı ev ortamında kullanın.
• Bu cihazın teknik özelliklerini değiştirmeyin.
• Cihazı çalıştırmak için harici bir zamanlayıcı
ya da ayrı bir uzaktan kumanda sistemi kullan‐
mayın.
• Cihaz çalışır durumdayken denetimsiz bırak‐
mayın.
• Cihazı ıslak eller ile ya da su ile temas halin‐
deyken kullanmayın.
• Pişirme bölgelerinin üzerine çatal-bıçak veya
tencere kapağı koymayın. Bunlar ısınır.
• Kullandıktan sonra pişirme bölgelerini "kapalı"
konumuna ayarlayın.
• Cihazı bir çalışma tezgahı veya bir eşya koy‐
ma masası gibi kullanmayın.
• Cihazın yüzeyi çatlarsa, cihazın elektriğini he‐
men güç kaynağından kesin. Bunun amacı
elektrik çarpmasını önlemektir.
UYARI
Patlama veya yangın riski vardır.
• Katı ve sıvı yağlar ısıtıldıklarında yanıcı buhar‐
lar çıkarabilirler. Bunlarla pişirme yaparken
açık alev ya da ısınmış nesneleri yağlardan
uzak tutun.
• Çok sıcak yağdan çıkan buharlar anlık yanma‐
ya neden olabilir.
• Yiyecek artıkları içerebilen kullanılmış yağ, ilk
kez kullanılan yağdan daha düşük sıcaklıkta
yangına neden olabilir.
• Cihazın içine, üzerine veya yakınına yanıcı
ürünler ya da yanıcı ürünlerle ıslanmış eşyalar
koymayın.
• Ortaya çıkacak herhangi bir ateşi su ile sön‐
dürmeye çalışmayın. Cihazın elektrik bağlantı‐
TÜRKÇE 33
sını kesin ve ateşin üstünü bir kapak veya
yangın battaniyesi ile kapatın.
UYARI
Cihazın zarar görme riski vardır.
• Kontrol paneli üzerine sıcak pişirme kapları
koymayın.
• Pişirme kaplarını kuruyana dek kaynatmayın.
• Nesnelerin ya da pişirme kaplarının cihaz üze‐
rine düşmesine izin vermeyin. Yüzey zarar gö‐
rebilir.
• Pişirme bölgelerini, üzerindeki pişirme kapları
boşken veya üzerinde pişirme kabı yokken
kullanmayın.
• Cihazın üzerine alüminyum folyo koymayın.
• Dökme demir, alüminyum ya da altları hasarlı
pişirme kapları cam seramiğin çizilmesine yol
açabilir. Ocak bölmesindaki nesnelerin yerini
değiştirirken daima kaldırın.
• Cihazın yerleştirildiği odayı iyice havalandırın.
• Havalandırma boşluklarının kapalı olmadığın‐
dan emin olun.
• Ocak bekinin boyutlarından büyük olan doğru
şekil ve çapa sahip, sağlam yapıdaki pişirme
kaplarını kullanın. Cam plakanın (varsa) aşırı
ısınması ve yırtılması riski vardır.
• Düğmeyi maksimum pozisyondan minimum
pozisyona hızlı bir şekilde döndürürken alevin
sönmediğinden emin olun.
• Tavaların halkaların ortasına konumlandığın‐
dan ve pişirme alanının kenarlarından taşma‐
dığından emin olun.
• Sadece cihaz ile verilen aksesuarları kullanın.
• Ocak bekine bir alev dağıtıcı takmayın.
1.4 Bakım ve Temizlik
UYARI
Cihazın zarar görme riski vardır.
• Yüzey malzemesinin bozulmasını önlemek
için cihazı düzenli olarak temizleyin.
• Cihazı temizlemek için su spreyi ve buhar kul‐
lanmayın.
• Cihazı yumuşak nemli bir bezle temizleyin.
Sadece nötr deterjanlar kullanın. Aşındırıcı
ürünleri, aşındırıcı temizleme bezlerini, çözü‐
cüleri veya metal cisimleri kullanmayın.
1.5 Elden çıkarma
UYARI
Yaralanma ya da boğulma riski.
Page 34

www.electrolux.com
34
• Cihazı nasıl doğru şekilde elden çıkaracağını‐
za ilişkin bilgi için belediyenize başvurun.
• Cihazın fişini prizden çekin.
• Elektrik kablosunu kesin ve atın.
• Harici gaz borularınının bağlantısını kesin.
Üretici / İhracatçı :
ELECTROLUX HOME PRODUCTS
CORPORATION NV.
RAKETSTRAAT 40 / RUE DE LA FUSEE 40
B-1130 BRUSSEL / BRUXELLES
2. ÜRÜN TANIMI
2.1 Pişirme yüzeyi düzeni
1
6
5
180
mm
BELGIUM
TEL: +32 2 716 26 00
FAX: +32 2 716 26 01
www.electrolux.com
Kullanım Ömrü Bilgisi :
Kullanım ömrü küçük ev aletlerinde 7 yıl, diğer
beyaz eşya ürünlerinde ise 10 yıldır. Kullanım
ömrü, üretici ve/veya ithalatçı firmanın
cihazınızla ilgili yedek parça temini ve bakım
süresini ifade eder.
Ocağın üst kısmı
1
27
Yarı-hızlı ocak beki
2
Kontrol düğmeleri
3
Yardımcı ocak beki
3
4
Atıl ısı göstergesi
5
Hızlı ocak beki
6
4
Elektrikli pişirme bölgesi 1800 W
7
2.2 Kontrol düğmeleri
Sembol Açıklama
Gaz beslemesi yok /
off (kapalı) konum
Ateşleme pozisyo‐
nu / maksimum gaz
beslemesi
Minimum gaz besle‐
mesi
2.3 Elektrikli pişirme bölgeleri kontrol
düğmeleri
Sembol Fonksiyon
0 kapalı konumu
Sembol Fonksiyon
1 minimum ısı
6 maksimum ısı
2.4 Atıl ısı göstergesi
Atıl ısı göstergesi, pişirme bölgesi sıcak olduğu
zaman yanar.
UYARI
Atıl ısıdan dolayı yanma riski!
Page 35

3. GÜNLÜK KULLANIM
TÜRKÇE 35
UYARI
"Güvenlik bilgileri" bölümüne bakın.
3.1 Ocak bekini ateşleme
UYARI
Mutfakta açık ateş kullanırken çok dik‐
katli olun. Üretici, ateşin yanlış kullanımı
nedeniyle ortaya çıkan durumlardan hiç‐
bir şekilde sorumlu değildir.
Her zaman ocak bekini pişirme kabını
koymadan önce yakın.
Ocak bekini yakmak için:
1.
Kontrol düğmesini saatin tersi yönde, maksi‐
mum konuma çevirin (
bastırın.
2.
Kontrol düğmesini yaklaşık 5 saniye basılı
tutun; bu sayede gaz kesme emniyeti ısına‐
caktır. Aksi takdirde gaz beslemesi kesile‐
cektir.
3.
Normal hale geldikten sonra alevi ayarlayın.
Birkaç denemeden sonra ocak beki
yanmazsa, bek alev başlığının ve ka‐
pağının doğru yerleştirildiğinden emin
olun.
) ve aşağı
UYARI
Kontrol düğmesini 15 saniyeden daha
uzun süre basılı tutmayın.
Ocak beki 15 saniye geçmesine rağmen
yanmazsa, kontrol düğmesini bırakın,
düğmeyi kapalı konumuna getirin ve
ocak bekini tekrar yakmaya çalışmadan
önce en az 1 dakika bekleyin.
Elektrik olmaması halinde, ocak beki
elektriksiz olarak da yakılabilir; böyle bir
durumda, beke bir ateş yaklaştırıp, ilgili
düğmeye basın ve maksimum gaz ko‐
numuna gelene kadar saatin tersi yönde
çevirin.
Eğer brülör kazara sönerse, kontrol
düğmesini off (kapalı) konumuna getiri‐
niz ve en az 1 dakika sonra brülörü tek‐
rar yakmaya çalışınız.
Cihazı monte ettikten veya bir elektrik
kesintisinden sonra cihaza ilk kez elek‐
trik verdiğinizde, kıvılcım dinamosunun
otomatik olarak çalışması gayet normal‐
dir.
3.2 Brülörü kapatma
Alevi söndürmek için, düğmeyi çevirerek
sembolüne getiriniz.
A
UYARI
Pişirme kaplarını ocaktan almadan ön‐
ce, mutlaka alevi kısın veya tamamen
söndürün.
A)
Ocak beki kapağı ve alev başlığı
B)
Gaz kesme emniyeti
C)
Ateşleme ucu
3.3 Elektrikli pişirme bölgelerinin
çalıştırılması
B
C
Ocağı yakmak ve ısı ayarını artırmak için,
düğmeyi saat yönünde çeviriniz. Isı ayarını azalt‐
mak için, düğmeyi saatin tersi yönde çeviriniz.
Ocağı söndürmek için, düğmeyi 0 konumuna ge‐
tiriniz.
Güç göstergesi elektrikli pişirme bölgesi açılınca
etkinleşir ve pişirme bölgesi kapatılıncaya kadar
açık kalır.
Bir pişirme bölgesi çalışıyorken, kısa bir
süre hafif uğultu çıkarır. Bu durum, tüm
cam seramik pişirme bölgelerinin tipik
bir özelliğidir ve cihazın yanlış çalıştığı
veya arızalı olduğu anlamına gelmez.
Page 36

www.electrolux.com
36
3.4 İlk Kullanımdan Önce
Tüm pişirme bölgelerine içinde biraz su bulunan
bir tava koyun. Cihazı maksimum konuma ayar‐
layın ve tavaların içerisindeki su kaynayana ka‐
dar yaklaşık 10 dakika kadar çalıştırın. Ardından,
cihazı 20 dakika minimum konumda çalıştırın. Bu
süre içerisinde, bir koku ve duman gelebilir. Bu
normal bir durumdur. Hava akışının yeterli ol‐
duğundan emin olun.
Bu işlemden sonra cihazı ılık su ile ıslatılmış yu‐
muşak bir bezle temizleyin.
3.5 Pişirme uygulamalarına örnekler
Isı
ayarı:
Kullanım amacı:
1 Sıcak tutma
4. YARARLI İPUÇLARI VE BİLGİLER
UYARI
"Güvenlik bilgileri" bölümüne bakın.
4.1 Enerji tasarrufu
• Mümkünse, kapaklarını pişirme kap‐
larının üzerine koyun.
• Pişirme kaplarını pişirme bölgesine,
çalıştırmadan önce koyun.
• Atıl ısıyı kullanmak için, elektrikli pi‐
şirme bölgelerini pişirme süresi sona
ermeden önce kapayın.
• Tencerelerin / tavaların altı ve elek‐
trikli pişirme bölgeleri aynı boyuta sa‐
hip olmalıdır.
• Pişirme kaplarının tabanı mümkün ol‐
duğunca kalın ve düz olmalıdır.
• Sıvı kaynamaya başladığında, sıvının yavaş
yavaş kaynamaya devam etmesi için alevin
şiddetini azaltınız.
Sadece çapı ocak beklerinin boyutuna uygun
olan pişirme kaplarını kullanın.
Ocak beki Pişirme kaplarının çapları
Hızlı 160 - 260 mm
Yarı hızlı 120 - 220 mm
Yardımcı 80 - 160 mm
Isı
Kullanım amacı:
ayarı:
2 Hafif ısıtma
3 Isıtma
4 Kızartma / kavurma
5 Kaynama derecesine getirme
6 Kaynama derecesine getirme /
hızlı kızartma / bol yağda kızart‐
ma
UYARI
Gazlı ocak bekleri üzerinde dökme de‐
mir pişirme kapları, taş kaplar, ızgara ya
da kızartma kapları kullanmayın.
UYARI
İki ocak beki üzerine aynı tavayı koyma‐
yın.
UYARI
Düşük gaz tüketimi için, kap kulplarının
ocak kenarlarından dışarı taşmadığın‐
dan ve maksimum denge ve düşük gaz
tüketimi için halkalara ortalanmış olarak
konumlandırıldıklarından emin olun.
Dökülmeleri ve yaralanmaları önlemek için halka‐
ların üzerine dengesiz veya yamuk tencereleri
koymayın.
UYARI
Pişirme esnasında sıvı dökülmesi ca‐
mın kırılmasına neden olabilir.
Page 37

Akrilamidler hakkında bilgi
Önemli Bilimsel kaynaklı son bilgilere göre,
yiyecek yüzeyinin kızartılması halinde (özellikle
nişasta içeren ürünlerde), akrilamidler sağlık için
5. BAKIM VE TEMİZLİK
TÜRKÇE 37
tehlike yaratabilmektedir. Bu nedenle, mümkün
olan en düşük sıcaklıklarda pişirmenizi ve
yiyeceğin yüzeyini çok fazla kızartmamanızı
tavsiye ederiz.
UYARI
"Güvenlik bilgileri" bölümüne bakın.
Her kullanımdan sonra cihazı temizleyiniz.
Daima temiz tabanlı pişirme kapları kullanınız.
UYARI
Cihazı kapayın. Bakım işlemi veya te‐
mizlik yapmadan önce cihazın fişini
elektrik prizinden çekin.
Temizlemeden önce gaz bekini
soğumaya bırakın.
Dökülen yemek artıkları daha kolay çı‐
kacağından, elektrikli pişirme bölgesi en
kolay şekilde hala ılıkken temizlenir.
UYARI
Sert ve aşındırıcı temizlik maddeleri ci‐
haza zarar verebilir.
Güvenliğiniz için, cihazı buhar basınçlı
veya yüksek basınçlı temizleyicilerle te‐
mizlemeyin.
Yüzey üzerinde bulunan çiziklerin ve
koyu lekelerin, cihazın çalışması üzerin‐
de etkisi yoktur.
• Izgaraları ocağın kolayca temizlenmesi için çı‐
karabilirsiniz.
• Emaye kısımları, kapak ve alev başlığını te‐
mizlerken ılık sabunlu su ile yıkayın ve yerleri‐
ne takmadan önce iyice kurutun.
• Paslanmaz çelik kısımları su ile iyice yıkayın
ve yumuşak bir bezle kurulayın.
• Ocak ızgaraları bulaşık makinesinde yıkana‐
maz. Bunları elde yıkamanız gerekir.
• Ocak ızgaralarını elinizle yıkarken, emaye
kaplama işlemi sırasında nadiren de olsa kes‐
kin kenarlar kalabileceğinden kurulama esna‐
sında dikkatli olun. Gerekirse, inatçı lekeleri
bir temizleme macunuyla çıkarabilirsiniz.
• Izgaraları temizledikten sonra, doğru yerleşti‐
rildiklerinden emin olun.
• Ocak beklerinin doğru çalışmasını sağlamak
için ızgara kollarının, ocak bekinin merkezinde
olduğundan emin olun.
• Ocak yüzeyinin zarar görmemesi için ızgarala‐
rı değiştirirken çok dikkatli olun.
Temizlik sonrasında, cihazı yumuşak bir bezle
kurulayın.
Kirlerin temizlenmesi:
1.
– Şunları derhal temizleyin: Erimiş plastik,
plastik folyo ve şeker içeren yiyecekler.
Özel bir cam seramik raspası kullanın.
Raspayı cam seramik yüzey üzerine dar
bir açıyla koyun ve bıçağını yüzeyin üze‐
rinde kaydırın.
– Şunları temizlemeden önce cihazı kapa‐
yıp soğumaya bırakın: kireç lekeleri, su
lekeleri, yağ lekeleri, parlak metalik renk
atmaları. Ocak yüzeyi için uygun bir te‐
mizlik maddesi kullanın.
2.
Cihazı nemli bir bezle ve biraz deterjanla te‐
mizleyin.
3.
Son olarak cihazı temiz bir bezle silerek ku‐
rulayın.
UYARI
Camın yüzeyini ya da ocak beki ve çer‐
çeve (varsa) arasındaki bölümü temizle‐
mek için bıçak, kazıyıcı ve benzeri alet‐
ler kullanmayın.
UYARI
Pişirme kaplarını camın üzerinde kay‐
dırmayın, aksi halde yüzeyin çizilmesine
neden olabilir. Ayrıca, camın üzerine
sert ve keskin nesnelerin düşmesine ve‐
ya bu nesnelerin ocağın kenarına çarp‐
masına izin vermeyin.
5.1 Ateşleme ucunun temizlenmesi
Bunun için metal elektrotlu bir seramik ateşleme
ucu kullanılır. Ateşlemede zorluk yaşamamak
için bu parçaları çok temiz tutun ve ocak beki
alev başlığı deliklerinin tıkalı olup olmadığını kon‐
trol edin.
Page 38

www.electrolux.com
38
5.2 Periyodik bakım
Gaz besleme borusunu ve basınç ayarlayıcısını
(eğer varsa) Yetkili Servisinize periyodik olarak
kontrol ettiriniz.
6. SORUN GİDERME
Sorun Olası neden Çözüm
Gazı ateşlerken kıvılcım çık‐
mıyor.
Gazı ateşlerken kıvılcım çık‐
mıyor.
Ateşlendikten sonra alev he‐
men sönüyor.
Gaz halkası düzensiz yanıyor. • Ocak beki alev başlığı yiye‐
• Elektrik beslemesi yoktur. • Cihazın bağlantılarının ya‐
Elektrikli pişirme bölgesi ısın‐
mıyor.
• Elektrik beslemesi yoktur. • Cihazın bağlantılarının ya‐
• Ocak beki kapağı ve alev
başlığı dengesiz yerleştiril‐
miştir.
• Gaz kesme emniyeti yete‐
rince ısınmamıştır.
cek artıkları ile tıkanmış
olabilir.
• Elektrik beslemesi yoktur.
• Pişirme bölgesini çalıştır‐
mak için yanlış düğme kul‐
lanılıyordur.
pıldığından ve elektrik kay‐
nağının açık olduğundan
emin olun.
• Sigortayı kontrol edin. Si‐
gortanın birkaç defa atması
durumunda, kalifiye bir
elektrikçi çağırın.
• Ocak beki kapağının ve
alev başlığının doğru yer‐
leştirildiğinden emin olun.
• Alevi yaktıktan sonra,
düğmeyi yaklaşık 5 saniye
daha basılı tutun.
• Enjektörün tıkalı olmadığın‐
dan ve ocak beki alev baş‐
lığında yemek kalıntıları ol‐
madığından emin olun.
pıldığından ve elektrik kay‐
nağının açık olduğundan
emin olun.
• Sigortayı kontrol edin. Si‐
gortanın birkaç defa atması
durumunda, kalifiye bir
elektrikçi çağırın.
• Cihazın bağlantılarının ya‐
pıldığından ve elektrik kay‐
nağının açık olduğundan
emin olun.
• Doğru kontrol düğmesini
çevirdiğinizden emin olun.
• Sigortayı kontrol edin. Si‐
gortanın birkaç defa atması
durumunda, kalifiye bir
elektrikçi çağırın.
Page 39

Sorun Olası neden Çözüm
Ocağın etkinliği tatmin edici
değil.
• Ocak temiz değildir.
• Pişirme kapları uygun
değildir.
Eğer bir arıza varsa, sorunun çözümünü öncelik‐
le kendiniz bulmaya çalışınız. Eğer sorunun çö‐
zümünü kendi başınıza bulamazsanız, satıcınızı
veya yetkili servisinizi arayınız.
Eğer cihazı yanlış şekilde çalıştırırsanız
veya cihazın montajı yetkili bir teknisyen
tarafından yapılmazsa, yetkili servis tek‐
nisyeninin veya satıcının sizi ziyareti,
garanti süresi sona ermemiş olsa bile
ücretsiz olmayabilir.
1 2 3
TÜRKÇE 39
• Ocağın temiz ve kuru ol‐
duğundan emin olun.
• Pişirme kaplarının pişirme
bölgesi için uygun ebatta
olduğundan emin olun.
• Pişirme kaplarının tabanı‐
nın düz olduğundan emin
olun.
• Bu tip bir pişirme işlemi için
ısı ayarının doğruluğundan
emin olun.
6.1 Aksesuar çantasıyla birlikte
verilen etiketler
Yapışkan etiketleri aşağıda gösterildiği gibi ya‐
pıştırın:
MOD.
PROD.NO.
SER.NO
DATA
Garanti Kartına yapıştırın ve bu kısmı gön‐
1
derin.
Garanti Kartına yapıştırın ve bu kısmı sakla‐
2
yın.
Talimatlar kitapçığına yapıştırın.
3
MOD.
PROD.NO.
SER.NO
DATA
MODELMODEL
03 IT
MADE IN ITALY
Bu bilgiler, size daha hızlı ve daha doğru destek
sağlamak için gereklidir. Bu bilgiler verilen bilgi
etiketinde mevcuttur.
• Model tanımı .................
0049
MOD.
PROD.NO.
SER.NO.
TYPE
230V-50Hz
IP20
• Ürün numarası (PNC) .................
• Seri Numarası (S.N.) .................
Sadece orijinal yedek parçalar kullanın. Orijinal
yedek parçalar sadece yetkili servislerimizden el‐
de edilebilir.
Page 40

www.electrolux.com
40
7. MONTAJ
UYARI
"Güvenlik bilgileri" bölümüne bakın.
UYARI
Montaj, bağlantı ve bakım ile ilgili
aşağıdaki talimatlar, mutlaka standartla‐
ra ve yürürlükteki kurallara uygun olarak
kalifiye bir personel tarafından gerçek‐
leştirilmelidir.
7.1 Gaz Bağlantısı
Yürürlükteki yönetmeliklere uygun olarak, sabit
bağlantılar seçin veya paslanmaz çelikten yapıl‐
ma esnek bir boru kullanın. Eğer esnek metal bo‐
rular kullanıyorsanız, bunların hareketli kısımlara
temas etmemesine veya sıkışmamasına dikkat
edin. Ocak bir fırın ile birlikte monte edildiğinde
de aynı dikkati gösterin.
Cihazın gaz besleme basıncının tavsiye
edilen değerlere uygun olduğundan
emin olun. Ayarlanabilir bağlantı, G 1/2"
dişli bir somun ile çıkış kısmına bağla‐
nır. Parçaları zorlamadan birbirine vida‐
layın, bağlantıyı gereken yönde ayarla‐
yın ve her şeyi sıkın.
A
B
A)
Somunlu pimin ucu
B)
Rondela (ek rondela sadece Slovenya ve
Türkiye'de kullanılır)
C)
Dirsek
D)
Sıvı gaz için lastik boru tutucu (sadece Slo‐
venya ve Türkiye için)
Likit gaz: Lastik boru tutucu kullanın. Her zaman
conta takın. Ardından, gaz bağlantısını yapmaya
başlayın. Esnek boru aşağıdaki durumlarda kul‐
lanılması için hazırlanmıştır:
C
D
– Oda sıcaklığından ve 30°C'den daha fazla
ısınmamalıdır.
– 1500 mm'den daha uzun olmamalıdır.
– Herhangi bir boğum yapmamalıdır.
– Çekilme veya bükülme olmamalıdır.
– Keskin kenarlara veya köşelere temas etme‐
melidir.
– Durumunu kontrol etmek için kolayca gözlene‐
bilir olmalıdır.
Esnek borunun koruma kontrolü, aşağıdaki kon‐
trol aşamalarını içermektedir:
– Her iki ucunda ve tamamında çatlak, kesik ve
yanık izleri olmamalıdır.
– Malzeme sertleşmemiş halde, ancak doğru
esneklikte olmalıdır.
– Sıkma kelepçeleri paslanmamış olmalıdır.
– Son kullanma tarihi geçmemiş olmalıdır.
Bir veya daha fazla kusur görülürse, boruyu tamir
etmeye çalışmayın, yenisiyle değiştirin.
Montaj tamamlandıktan sonra boru
bağlantılarının doğru şekilde yapılıp ya‐
pılmadığını kontrol edin. Bir sabun çö‐
zeltisi kullanın, alev kullanmayın!
7.2 Enjektörlerin değiştirilmesi
1.
Ocak ızgaralarını çıkarın.
2.
Ocak bekinin kapaklarını ve alev başlıklarını
çıkarın.
3.
Bir 7 numara lokma anahtarı kullanarak en‐
jektörleri sökün ve bunların yerine kullan‐
dığınız gaz tipine uygun enjektörler takın
("Teknik Bilgi" bölümündeki tabloya bakın).
4.
Aynı prosedürü geriye uygulayarak parçaları
yerine takın.
5.
Bilgi etiketini (gaz besleme borusunun ya‐
nındadır) kullanılacak yeni gaz beslemesi ti‐
pine uygun etiketle değiştirin. Bu etiketi, ci‐
hazla birlikte verilen paket içerisinde bulabi‐
lirsiniz.
Eğer gaz beslemesi basıncı değişkense veya ge‐
rekli olan basınçtan farklıysa, gaz beslemesi bo‐
rusuna uygun bir basınç regülatörü takın.
7.3 Minimum seviye ayarlaması
Ocak beklerinin minimum seviyesinin ayarlanma‐
sı:
1.
Ocak bekini yakın.
2.
Düğmeyi minimum alev pozisyonuna getirin.
Page 41

3.
Kontrol düğmesini çıkarın.
4.
İnce uçlu bir tornavidayla, baypas vidasının
konumunu ayarlayın.
A
A)
Baypas vidası
• G20 20 mbar'lık doğal gazdan (ya da G20 13
2)
mbar'lık doğal gaz
) likit gaza dönüşüm yapı‐
lıyorsa, baypas vidasını tamamen sıkın.
• Eğer likit gazdan G20 20 mbar'lık doğal gaza
dönüşüm yapılıyorsa, baypas vidasını yakla‐
şık 1/4 tur gevşetin.
• Eğer G20 20 mbar'lık doğal gazdan G20 13
2)
mbar'lık
doğal gaza dönüşüm yapılıyorsa,
baypas vidasını yaklaşık 1/4 tur gevşetin.
•
Eğer likit gazdan G20 13 mbar'lık
2)
doğal ga‐
za dönüşüm yapılıyorsa, baypas vidasını yak‐
laşık 1/2 tur gevşetin.
•
Eğer G20 13 mbar'lık
2)
doğal gazdan G20 20
mbar'lık doğal gaza dönüşüm yapılıyorsa,
baypas vidasını yaklaşık 1/4 tur sıkın.
UYARI
Düğmeyi maksimum pozisyondan mini‐
mum pozisyona hızlı bir şekilde döndü‐
rürken alevin sönmediğinden emin olun.
TÜRKÇE 41
• Cihazın fişini prizden çıkarmak için elektrik
kablosunu çekmeyin. Her zaman fişten tutarak
çekin.
• Cihaz bir uzatma kablosu, adaptör veya çoklu
bağlantı üzerinden bağlanmamalıdır (yangın
riski vardır). Toprak bağlantısının standartlara
ve yürürlükteki kurallara uygun olduğundan
emin olun.
• Güç kablosu herhangi bir sıcak parçaya temas
etmeyecek şekilde yerleştirilmelidir.
• Cihazı elektrik tesisatına, kontak açıklığı en az
3 mm olan ve cihazın elektrik bağlantısını tüm
kutuplardan kesebilen bir aygıt kullanarak
(otomatik devre koruma şalteri, toprak kaçağı
devresi veya sigorta gibi) monte edin.
• Bağlantı kablosunun hiçbir parçası 90°C sı‐
caklığa maruz bırakılmamalıdır. Mavi nötr kab‐
lo, "N" olarak etiketlenmiş terminal bloğuna
bağlanmalıdır. Kahverengi (veya siyah) faz
kablosu ("L" ile işaretlenmiş terminal blok kon‐
tağına takılıdır) daima şebeke fazına bağlan‐
malıdır.
7.5 Bağlantı kablosunun değiştirilmesi
Bağlantı kablosunu değiştirmek için sadece
H05V2V2-F T90 veya eşdeğer tipte bir kablo kul‐
lanın. Kablo kesitinin gerilime ve çalışma sıcak‐
lığına uygun olduğundan emin olun. Sarı/yeşil
toprak kablosu, kahverengi (veya siyah) faz kab‐
losundan yaklaşık 2 cm daha uzun olmalıdır.
7.6 Ankastre Montaj
7.4 Elektrik bağlantısı
• Cihazı, güvenlik önlemlerine uygun olarak top‐
raklayın.
• Bilgi etiketinde yazılı nominal gerilim değerinin
ve güç tipinin, tesisatınızın gerilim ve güç
özellikleriyle uyuştuğundan emin olun.
• Bu cihaz ile birlikte bir elektrik kablosu verilir.
Kablonun, bilgi etiketinde yazılı yük değerini
kaldırabilecek uygun bir fiş ile birlikte kullanıl‐
ması gerekir. Fiş, doğru prize takılmalıdır.
• Herhangi bir elektrikli bileşen, yetkili servis
teknisyeni veya kalifiye servis personeli tara‐
fından takılmalı veya değiştirilmelidir.
• Her zaman doğru monte edilmiş, darbelere
dayanıklı bir priz kullanın.
• Montajdan sonra fişe erişilebildiğinden emin
olun.
2)
sadece Rusya için
min.
55 mm
470 mm
min.
450 mm
30 mm
min.
650 mm
550 mm
Page 42

www.electrolux.com
42
Fırınlı mutfak ünitesi
A
Ocak çıkıntısının boyutları talimatlara uygun ol‐
malı ve mutfak ünitesi sürekli hava dolaşımı
sağlayacak deliklerle donatılmalıdır. Ocak ve fırı‐
nın elektrik bağlantısı güvenlik nedeniyle ve fırını
üniteden kolayca çıkarabilmek için ayrı ayrı yapıl‐
malıdır.
B
A)
cihazla birlikte verilen conta
B)
cihazla birlikte verilen braketler
7.7 Yerleştirme olanakları
Kapaklı mutfak ünitesi
Ocağın altına monte edilen panel, teknik servis
işlemi gerektiğinde kolay erişim için kolayca çıka‐
rılabilir olmalıdır.
30 mm
min 20 mm
(max 150 mm)
60 mm
B
A)
Çıkarılabilir panel
B)
Bağlantılar için alan
A
50 cm2
360 cm2
120 cm2
180 cm2
8. TEKNİK BİLGİLER
Ocak boyutları
Genişlik: 580 mm
Uzunluk: 510 mm
Ocak ankastre montaj boyutları
Genişlik: 550 mm
Uzunluk: 470 mm
Isı girişi
Hızlı ocak beki: 2,7 kW
Yarı-hızlı ocak beki: 1,9 kW
Yardımcı ocak beki: 1,0 kW
Elektrikli pişirme böl‐
gesi:
1,8 kW
Page 43

TÜRKÇE 43
TOPLAM GAZ GÜ‐
CÜ:
TOPLAM ELEKTRİK
GÜCÜ:
Elektrik beslemesi: 230 V ~ 50 Hz
Gaz kategorisi: II2H3B/P
Gaz bağlantısı: G 1/2”
G20 (2H) 20 mbar =
5,6 kW
G30/G31 (3B/P)
30/30 mbar = 407 g/
sa.
1,8 kW
Gaz beslemesi: G20 (2H) 20 mbar
Cihaz sınıfı: 3
Baypas çapları
Ocak beki Ø Baypas 1/100
mm'de
Yardımcı 28
Yarı-hızlı 32
Hızlı 42
Gazlı ocak bekleri
NORMAL GÜÇ
OCAK BE‐
Kİ
NORMAL
GÜÇ
kW kW
AZALTIL‐
MIŞ GÜÇ
DOĞAL GAZ
G20 (2H) 20 mbar
enj. 1/100
mm
m³/sa.
LPG
(Bütan/Propan) G30/
G31 (3B/P) 30/30 mbar
enj. 1/100
mm
g/sa.
Yardımcı 1.0 0.33 70 0.095 50 73
Yarı hızlı 1.9 0.45 96 0.181 71 138
Hızlı 2.7 0.75 130 0.257 86 196
Gazlı ocak bekleri G20 13 mbar - sadece Rusya
OCAK BEKİ NORMAL
GÜÇ
AZALTILMIŞ
GÜÇ
NORMAL GÜÇ
DOĞAL GAZ
G20 (2H) 13 mbar
kW kW enj. 1/100 mm m³/sa.
Yardımcı 1.0 0.33 82 0.106
Yarı hızlı 2.0 0.45 111 0.212
Hızlı 3.0 0.75 149 0.318
9. ÇEVREYLE İLGİLİ BİLGİLER
Şu sembole sahip malzemeler geri
dönüştürülebilir
uygun konteynerlere koyun.
Elektrikli ve elektronik cihaz atıklarının geri
dönüşümüne ve çevre ve insan sağlığının
. Ambalajı geri dönüşüm için
korunmasına yardımcı olun. Ev atığı sembolü
bulunan cihazları atmayın. Ürünü yerel geri
dönüşüm tesislerinize gönderin ya da belediye ile
irtibata geçin.
EEE Yönetmeliğine Uygundur.
Page 44

www.electrolux.com/shop
397269201-A-092012
 Loading...