

Page 1
일렉트로룩스 에스프레소 메이커
EEA 250
Page 2
EG
B
A
F
M
O
N
K
Q
C
D
H
I
J
L
P
R
S
T
U
V
(그림1)
Page 3

한국어
한국어
고객님께
일렉트로룩스 제품을 구입해 주셔서 대단히
감사합니다. 사용하시기 전에 본 사용설명서
를 주의 깊게 읽어 보십시오. 특히 첫 페이지
에 있는 안전수칙을 반드시 읽어 보시기 바
랍니다. 사용 중 언제라도 참고할 수 있도록
사용설명서를 잘 보관하십시오. 본 제품을
타인에게 양도할 경우에는 사용설명서와 함
께 넘겨주시기 바랍니다.
본 기호가 있거나 다음과 같은 문구들(위험!
주의! 중요!)이 표시된 내용은 고객의 안전과
제품의 올바른 기능을 위해 중요하므로 반드
시 숙지해 주시기 바랍니다.
☞ 본 기호는 각 단계별 작동법을 설명합니다.
본 기호는 제품 사용에 대한 추가 정보나 실용
적인 도움말을 제공합니다
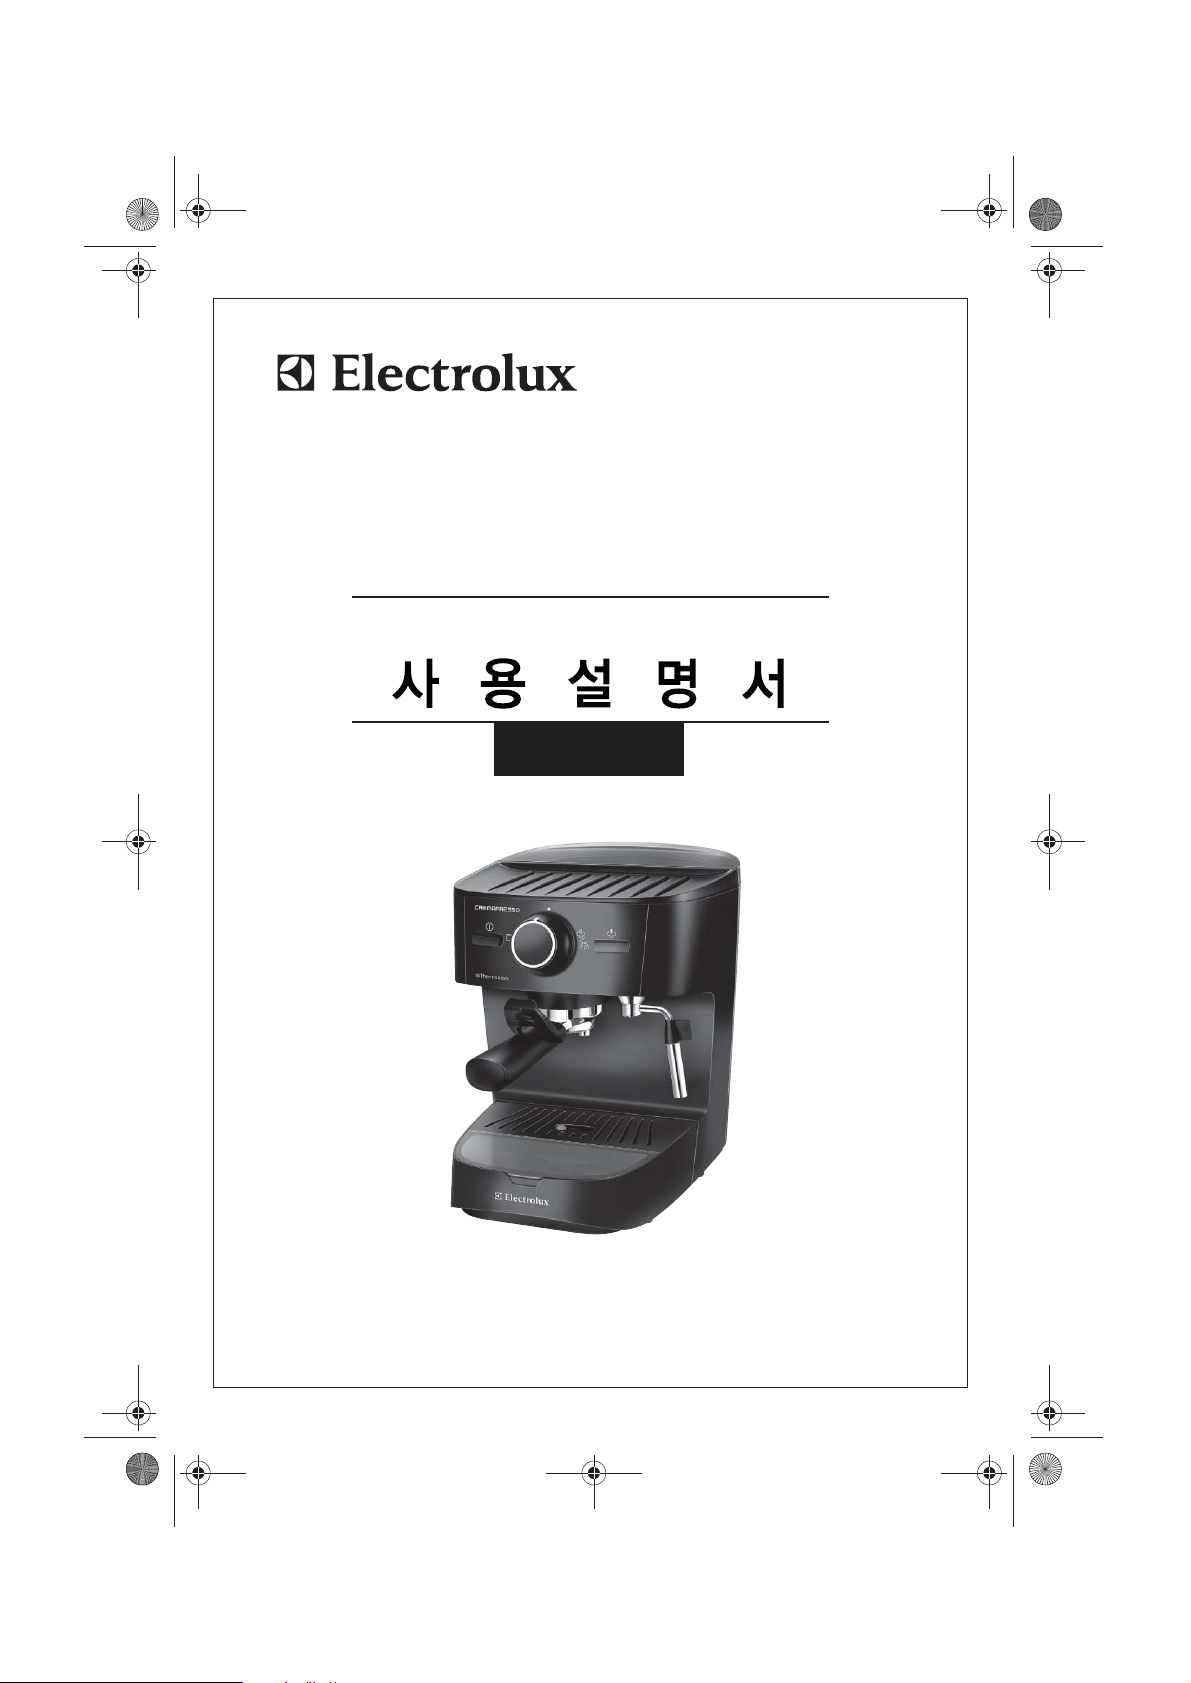
제품 명칭 (그림 1)
A
전원스위치
B
전원 표시등
C
커피/스팀 선택 다이얼
D
스팀 선택 버튼
E
스팀 표시등
F
커피 선택
G
스팀/뜨거운 물 선택
H
잔 예열판
I
물통
J
스팀/뜨거운 물 노즐
K
필터 박스
L
전원코드와 플러그
M
커피 분출구
N
컵 받침대
O
물받이
P
필터 홀더
Q
손 보호대
R
한잔용필터
S
두잔용필터
T
파드용 필터
U
물받이 수면 표시기
V
계량 스푼과 커피 다짐대
안전에 대한 사항
본 제품을 사용하시기 전에 사용설명서를 반
드시 읽어보시기 바랍니다.
일반 안전사항
●
어린이 등 제품 취급이 익숙하지 않은 자나 신
체적, 정신적 문제가 있는 자가 본 제품을 사용
하지 않도록 주의하십시오.
●
어린이의 손이 닿지 않는 곳에 제품을 보관 하
십시오.
●
본 제품을 사용하시기 전에 가정 내의 전원이 제
품 정보판의 전압과 일치하는지 확인하십시오.
●
다음과 같은 경우, 거품을 사용하지 마십시오.
- 코드에 손상이 있을때
- 제품의 본체에 눈에 보이는 손상이 있을 때
●
반드시 접지된 플러그만을 사용하십시오. 연장
케이블이 필요한 경우, 10A 케이블을 사용하십
시오
●
전기 코드의 교체를 포함한 제품의 수리가 필요
한 경우, 제품을 구입하신 곳 또는 일렉트로룩스
고객센터 (1566-1238)로 연락해 주시기 바랍니
다. 전기 제품의 수리는 전문 서비스 요원에 의해
진행되어야 합니다.
●
본 제품은 안정되고 평평한 곳에 설치하여 주십
시오.
●
전원 코드가 연결된 상태에서 제품을 방치하기
마십시오.
●
제품사용후세척및보수를할경우, 먼저전원
이 꺼져있는지 확인하고 전원 코드가 빠져있는
지 확인해 주십시오.
3
Page 4
한국어
●
전원코드가 제품의 뜨거운 부분과 접촉하지 않
게 하십시오.
●
제품이 작동하는 동안 본체 및 액세서리 부분이
뜨겁습니다. 반드시 지정된 손잡이와 다이얼 부
분을 사용하십시오. 세척 및 보관 전에는 제품의
열을 식혀주십시오.
●
스팀 생성시 커피 분출구에서 뜨거운 물이 떨어
질 수 있습니다. 화상의 위험이 있으니, 조심하십
시오.
●
커피 추출 과정 중의 필터 홀더는 압력이 가해진
상태이므로, 작동 중에는 제거하지 마십시오.
화상의 위험이 있습니다.
●
스팀 기능을 사용하실 때 커피 분출구에서 뜨거
운 물이 떨어질 수 있습니다. 화상의 위험이 있으
니, 손을 데지 않도록 주의하여 사용하십시오.
●
스팀분사 밸브를 돌리실 때 뜨거운 물이 떨어질
수 있으니 주의하시면서 천천히 돌려주시기 바
랍니다. 화상의 위험이 있으니, 손을 데지 않도록
주의하여 사용하십시오.
●
제품의 본체를 물에 담그지 마십시오.
●
제품에 표기된 최대 용량을 초과하지 마십시오.
●
물통에는 차가운 물을 채워주십시오. 우유 및 기
타 액체는 사용하지 마십시오.
●
물통이 빈 상태에서 제품을 작동시키지 마십
시오.
●
컵 받침대 및 물받이가 없는 상태에서 제품을 작
동시키지 마십시오.
●
본 제품은 국내에서의 사용을 위해 제작되었습
니다. 사용자의 부적절한 사용으로 인한 제품의
고장에 대해 당사는 책임지지 않습니다.
제품 작동 방법
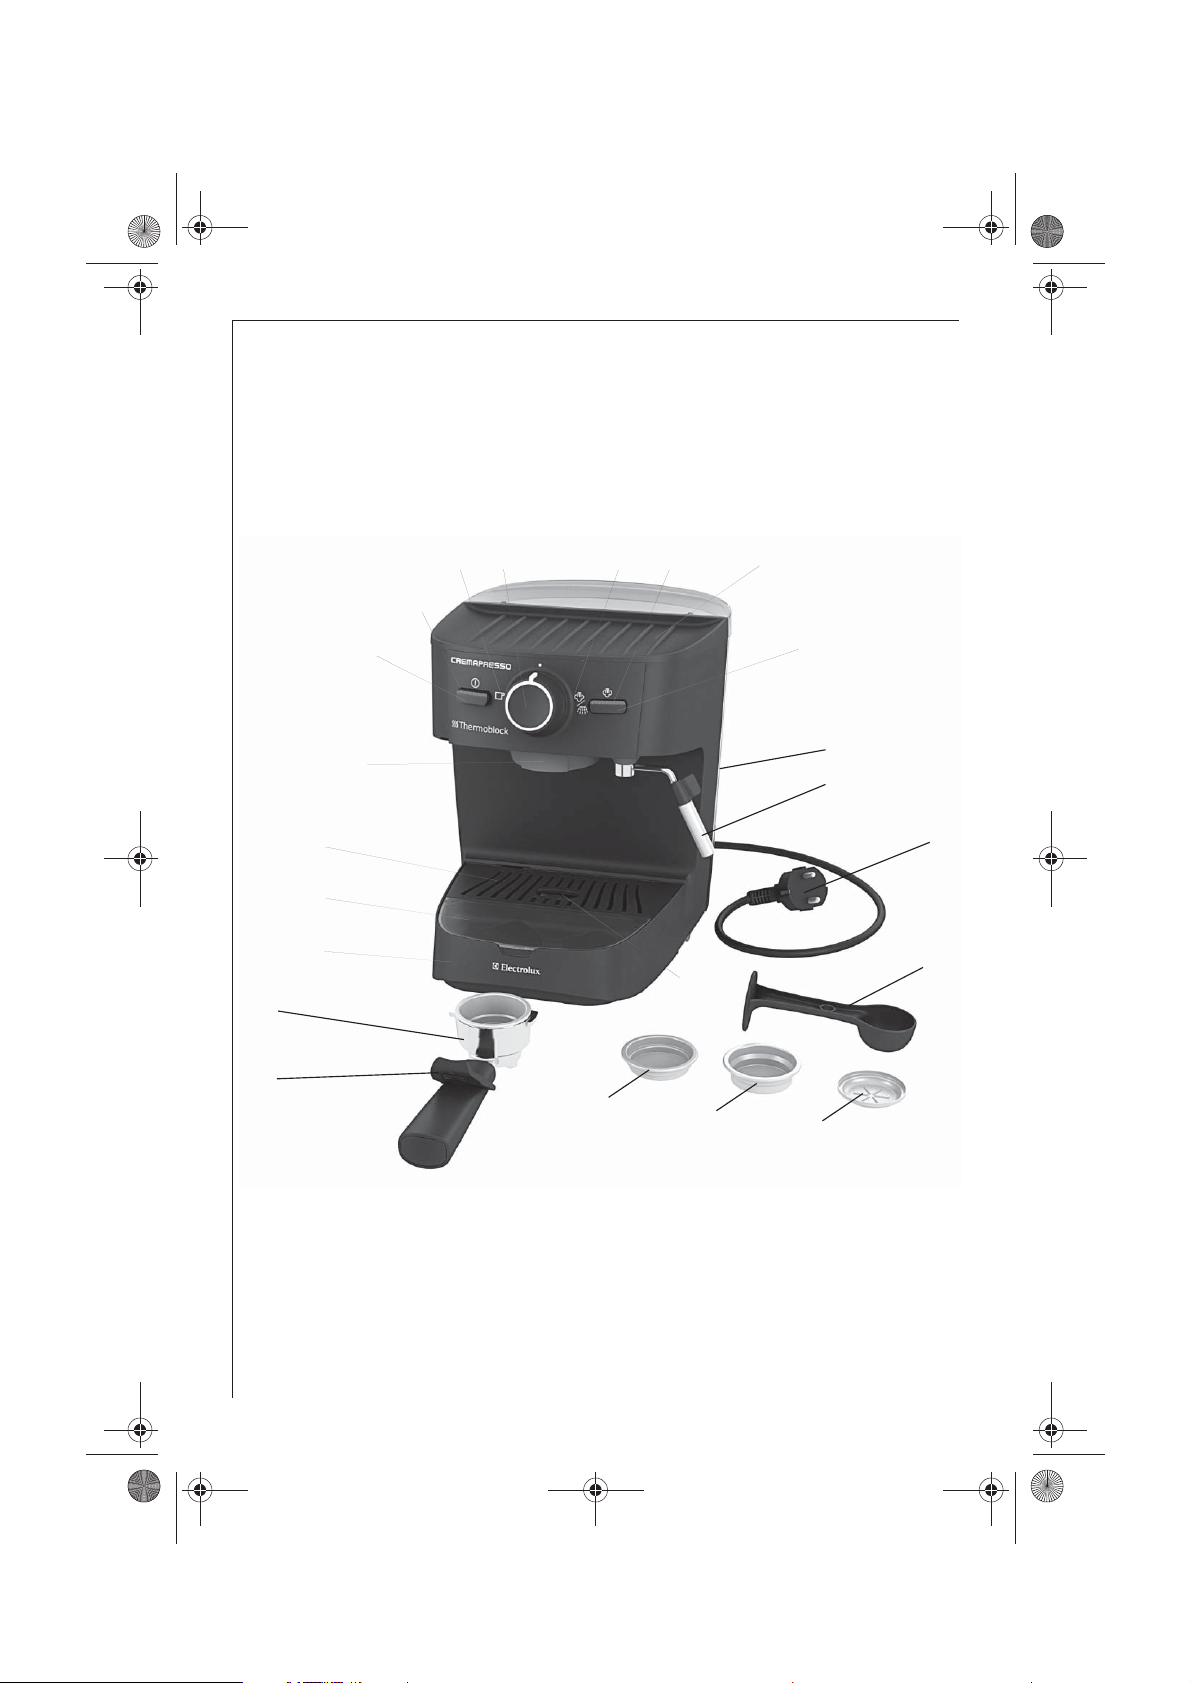
1. 제품을 평평한 곳에 위치해 놓으시고, 물통에 차
가운 물을 채워주십시오. (물통이 빈 상태에서 제
품을 작동시키지 마십시오! ) 전원 플러그를 연결
하고, 제품의 전원을 켜십시오.
2. 제품을 처음 사용할 경우, 컵 받침대에 빈 용기를
놓아주십시오. 전원 표시등이 깜박거리다 멈출 때
까지 기다리십시오. 필터 홀더를 장착하기 전에,
물통의 물이 제품의 히팅 시스템을 통과하게 하십
시오.
3. 에스프레소 만들기: 제품이 예열되어 전원 표시등
이 깜박임을 멈추면, 4번부터 6번까지 순서대로
사용하십시오.
4
Page 5

한국어
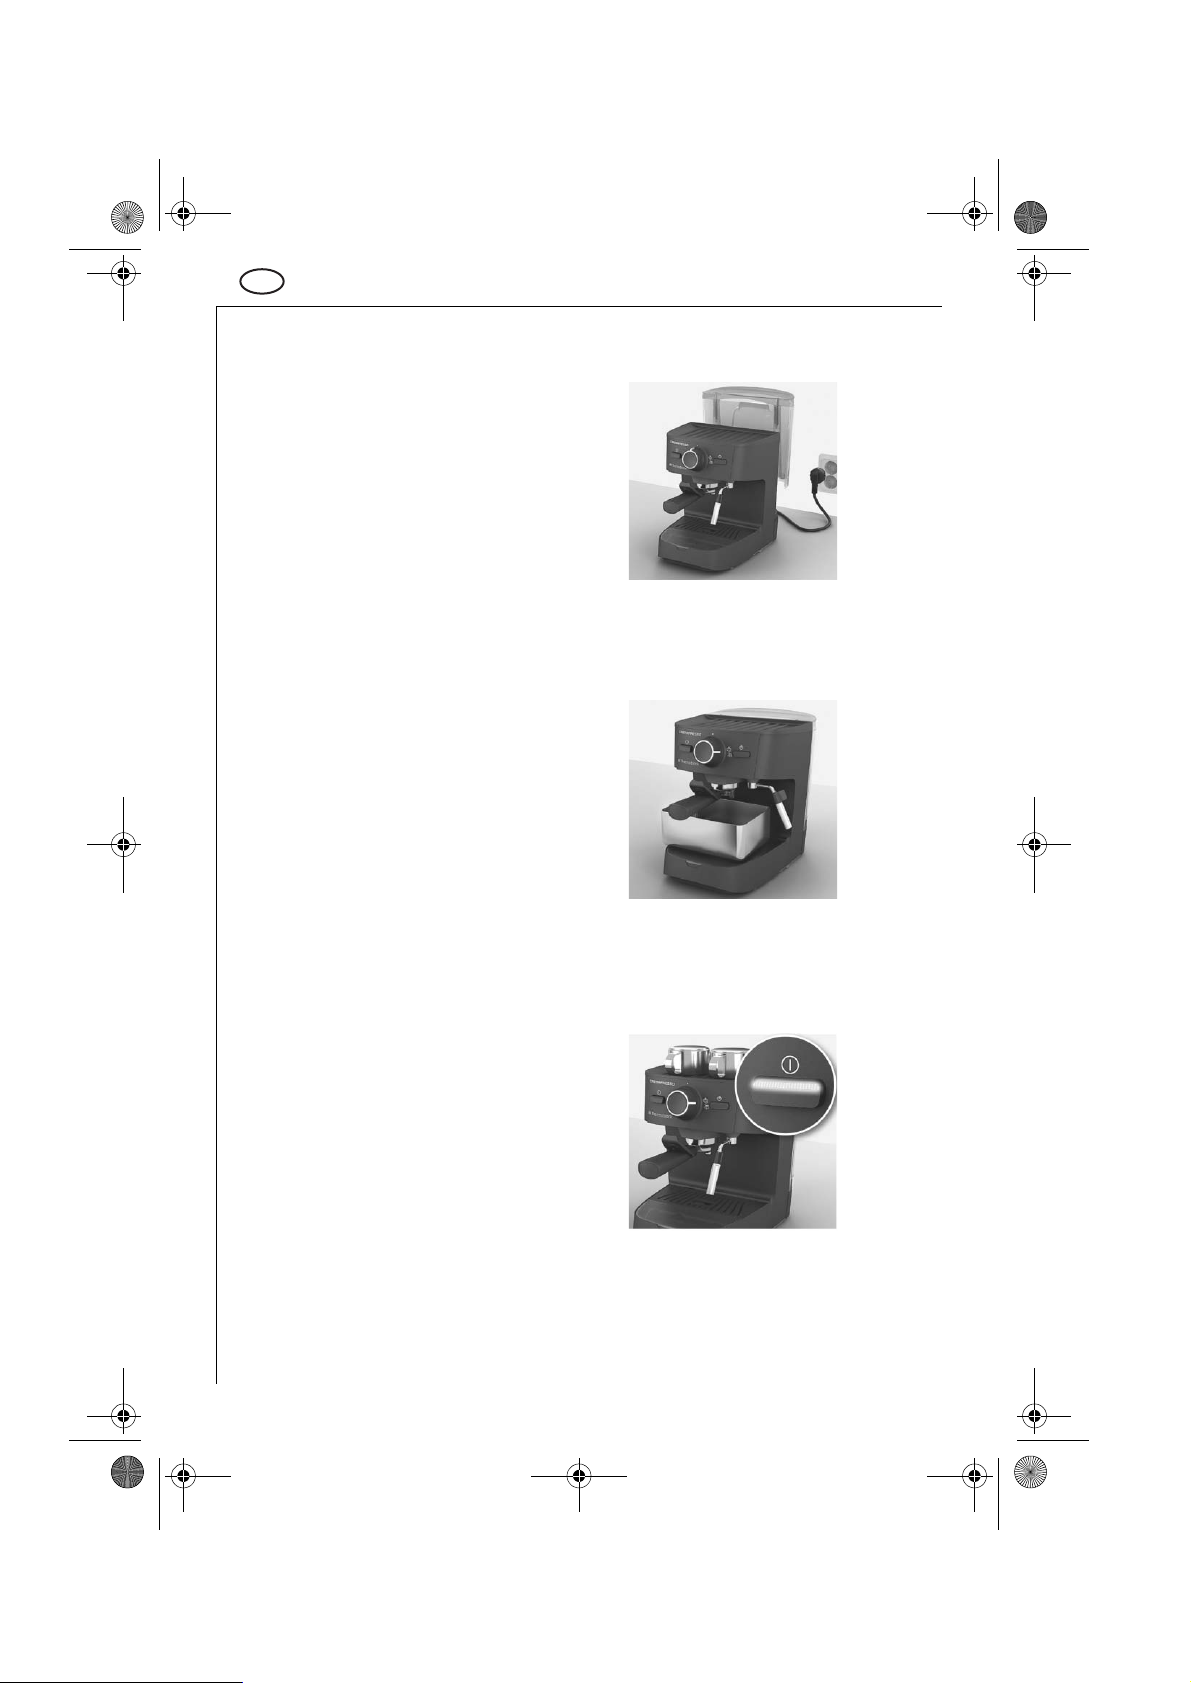
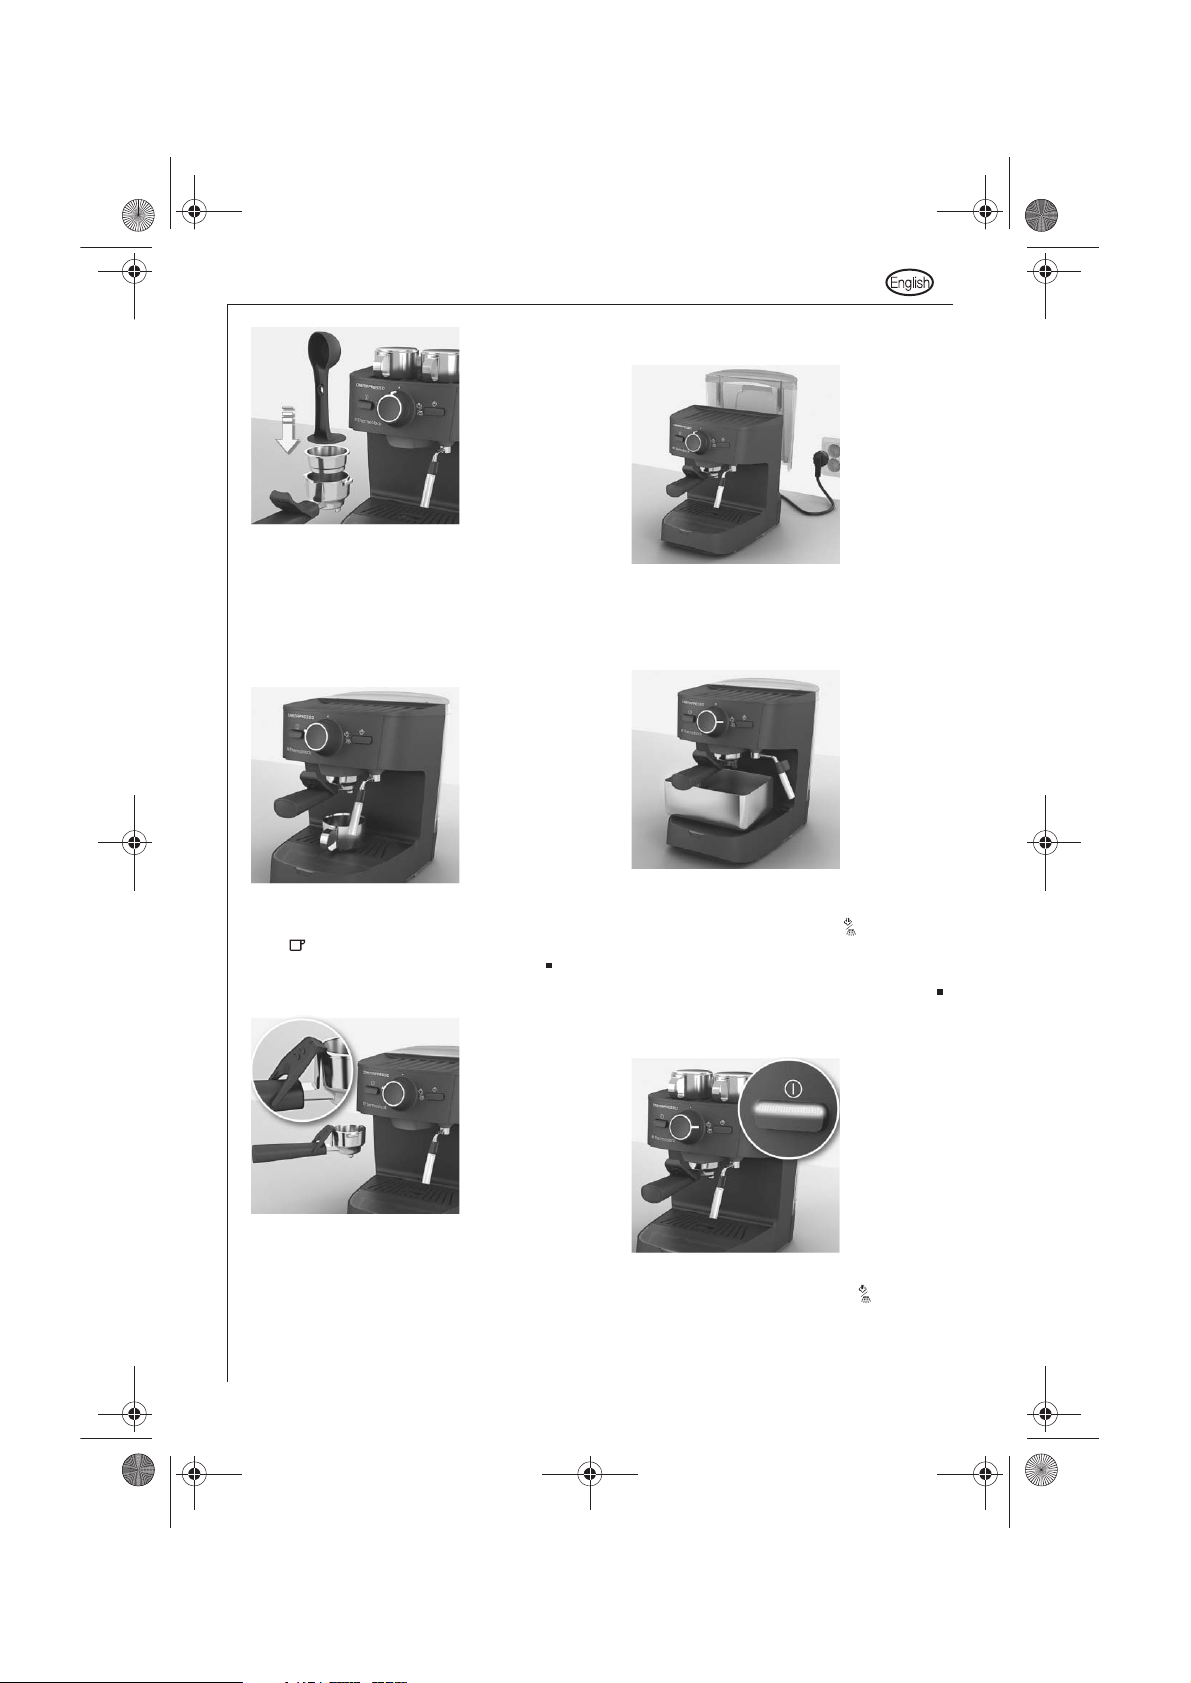
4. 필터 홀더를 들고 손 보호대를 접은 다음 한 잔용
또는 두 잔 용 필터를 필터 홀더에 끼워 넣습니다.
필터에 에스프레소 그라운드 커피를 채웁니다.
(계량 스푼 한 큰술은 한 잔용 필터에, 두 큰술은 두
잔용 필터에 채웁니다.) 커피 다짐대로 가볍게 에
스프레소 그라운드 커피를 필터쪽으로 누릅니다.
5. 필터 홀더를 커피 분출구에 위치시켜 주십시오.
예열이 되면, 커피/스팀 선택 다이얼을 왼쪽
(커피 선택)있는 쪽으로 돌려주십시오. 이제 물은
높은 압력에 의해 에스프레소 그라운드 커피를 통
과하게 됩니다. 원하는 커피의 양이 차면, 커피/스
팀 선택 다이얼을 가운데 있는 쪽으로 돌려주
십시오.
6. 커피 추출 후, 필터 홀더를 왼쪽으로 돌려 커피 분
출구에서 분리하십시오. 손 보호대를 앞쪽으로 구
부려 아래로 내리십시오. 사용한 에스프레소 그라
운드를 가볍게 두드려 필터 홀더에서 떼어 버리십
시오. 필터 홀더와 필터를 물로 헹구시고, 필터 박
스에 보관하기 전에는 반드시 건조 시키십시오.
부가 기능
1. 스팀을 통해 우유 거품이나 기타 액체를 데우실 수
있습니다. 스팀 선택 버튼을 누르시고, 스팀 표시
등이 깜박거리는 것이 멈출 때까지 기다리십시오.
2. 우유나 기타 데우고 싶은 액체를 내열 용기에 따르
신 후, 스팀 노즐을 담그십시오. 커피/스팀 선택
다이얼을 (스팀/뜨거운 물 선택)쪽으로 돌려주
십시오. 스팀의 방출이 원활하도록 용기를 원을 그
리며 돌려주시고, 스팀 노즐이 용기의 바닥에 닿지
않도록 하십시오. 커피/스팀 선택 다이얼을 가운
데 쪽으로 돌려 스팀 만들기를 정지하십시오.
5
Page 6

3. 용기에 스팀 노즐을 담근 후, 커피/스팀 선택 다이
얼을 (스팀/뜨거운 물 선택)으로 돌려 몇 초간
스팀을 방출합니다. 이는 우유 찌꺼기나 기타 액
체의 찌꺼기를 노즐에거 제거하기 위함입니다.
주의: 스팀 파이프가 매우 뜨겁습니다. 열을 식힌
후 스팀 파이프를 헝겊으로 닦아주십시오.
4. 다시 커피를 추출하기 위해서는 스팀 선택 버튼을
한 번 더 누른 후(스팀 표시등이 꺼짐) 커피/스팀
선택 다이얼을 왼쪽 (커피 선택)으로 돌려주십
시오.
5. 뜨거운 물을 추출하기 위해서, 스팀 노즐을 컵에 담
그고, 커피/스팀 선택 다이얼을 오른쪽 (스팀/뜨
거운 물 선택)로 돌려주십시오. 뜨거운 물이 노즐
에서 나옵니다. 선택 다이얼을 가운데 으로 돌
려 뜨거운 물 추출을 정지하십시오.
세척 및 손질
1. 제품을 세척하기 전에 반드시 전원을 끄고 코드를
뽑아 주십시오. 젖은 헝겊으로 제품의 표면을 닦아
주십시오. 필터와 필터 홀더를 핀이나 솔을 이용해
서 청소해 주십시오.
2. 물받이는 물받이 수면 표시기가 컵 받침대 위로
돌출되어 나올 경우 반드시 비워줘야 합니다. 컵
받침대를 분리하여 물을 비우고, 흐르는 물에 헹군
후 건조시켜 주십시오. 위생을 위해 물받이 수면
표시기가 컵 받침대 위로 돌출되지 않은 경우에도
위의 동작을 자주 반복해 주시길 권장합니다.
3. 스팀 노즐을 본체에서 분리하셔서 흐르는 물에 헹
궈 주십시오. 노즐 파이프를 헝겊으로 닦아 주십시
오. 물탱크의 물을 비우고, 흐르는 물로 헹궈 주십
시오.
한국어
6
Page 7
물때제거
1. 물의 경도에 따라 정기적으로 물 때를 제거해 주십
시오. 물탱크에 물을 채우시기 전에, 작은 동전을
이용하여 분출구를 분리시킨 후, 사용설명서에 따
라 물 때를 제거해 주십시오.
2. 제품의 전원을 켜시고, 예열 시키십시오. 필터를 제
거한후필터홀더를장착해주십시오. 필터 홀더
밑에 빈 용기를 준비해 주십시오. 커피/스팀 선택
다이얼을 (커피 선택)쪽으로 돌리신 후, 약 1/4
가량의 물 때 제거용 용해 액이 통과하도록 하십시
오. 제품의 전원을 끄고 물 때 제거용 용해액이 물
때를 녹이도록 약 10분간 기다리십시오.
3. 뜨거운 물 버튼을 누르고, 나머지 물 때 제거용 용
해액이 스팀 노즐을 통과하도록 하십시오. 물통을
다시 깨끗한 물로 채우고, 물통이 비워질 때까지 위
의 과정을 2번 반복해 주십시오. 물 때 제거가 끝나
면, 분출구 내부 필터와 봉인패킹을 재조립해 주시
고, 필터를 제자리에 위치 시켜주십시오.
이런 경우 어떻게 해야 하나요?
A) 전원표시등과 스팀 표시등이 동시에 깜박입니다.
●
커피/스팀 선택 다이얼이 가운데 위치해 있는
지 확인하십시오
●
스팀/뜨거운 물 기능을 지나치게 오래 사용했을
경우, 약 30초간 사용을 중지해 주십시오.
●
제품의 전원을 끄고 약 5분간 기다리신 후, 다시
사용하십시오. 여전히 표시등이 깜박일 경우, 일
렉트로룩스 고객센터에 연락하십시오
B) 에스프레소 온도가 너무 낮습니다.
●
제품을 예열시키기 위해, 에스프레소 그라운드
커피 없이 필터와 필터 홀더를 끼운 채로 추출
과정을 실행하십시오.
●
잔을 미리 데우십시오.
●
물때를 제거하십시오.
C) 에스프레소 추출 속도가 현저하게 줄었습니다.
●
에스프레소 그라운드 커피를 너무 꽉 눌러 필터
에 담지 마십시오.
●
원두를 직접 갈아 그라운드 커피를 만드실 경우,
"중간" 정도의 분말도를 선택해 주십시오.
●
물때를 제거해 주십시오.
D) 에스프레소가 필터 홀더의 가장자리로 흘러 넘칩
니다.
●
필터 홀더가 분출구에 정확하게 끼워져 있는지
확인하십시오.
한국어
7
Page 8

●
필터 홀더를 오른쪽으로 좀 더 꽉 비틀어 주십
시오.
●
필터 홀더 가장자리에 에스프레소 그라운드
커피 찌꺼기를 제거해 주십시오.
E) 에스프레소가 나오지 않습니다.
●
시스템상에 공기가 있으면, 제품 작동 시 너무
큰 소리가 날 수 있습니다. 일정한 속도의 물이
추출될 때가지, 뜨거운 물이 노즐을 통과하도록
하신 후, 커피를 다시 추출하십시오.
●
물통에 물이 채워져 있는지, 본체에 정확하게 끼
워져 있는지 확인하십시오.
●
필터 홀더가 커피 분출구에 정확하게 끼워져 있
는지 확인하십시오.
●
커피/선택 다이얼이 (커피 선택)에 정확하게
위치해 있는지 확인하십시오.
●
에스프레소 그라운드 커피를 너무 꽉 눌러 필터
에 담지 마십시오.
●
커피 분출구 내부 필터를 세척해 주십시오.
●
물때를 제거해 주십시오
F) 크레마가 정상적으로 생성되지 않습니다.
●
필터에 에스프레소 그라운드 커피가 충분히 있
는지 확인하십시오.
●
에스프레소 그라운드 커피를 가볍게 눌러 담아
주십시오.
●
필터를 청소해 주십시오.
G) 우유 거품이 제대로 생성되지 않습니다.
●
항상 차갑고 신선한 저지방 우유를 사용하십시오.
●
스팀 노즐을 세척하십시오.
H) 물의 통과량이 증가했습니다.
●
에스프레소 그라운드 커피의 분말이 너무 크고
거칩니다.
●
에스프레소 그라운드 커피가 필터안에 충분히
있는지 확인하십시오.
I) 제품의 전원이 작동 중에 저절로 꺼집니다.
●
제품 내 펌프에는 온도 퓨즈가 있어 과열을 방지
합니다. 온도 퓨즈는 제품이 과도하게 장시간 사
용되거나 제품 내부에 물이 충분하지 않은 상태
에서 작동 되었을 경우, 기계의 작동을 멈추도록
합니다.
●
커피/스팀 선택 다이얼을 가운데 로 위치시키
고, 전원 코드를 뽑으십시오.
●
약 20분간 제품의 열을 식혀주십시오. 물통에 물
을 채워주십시오.
●
전원 코드를 연결하고, 전원을 켜 제품이 작동
하는지 확인하십시오. 제품이 여전히 작동하지
않을 경우, 일렉트로룩스 고객 센터(1566-1238)
에 연락하십시오.
한국어
8
Page 9
한국어
9
생산일자 확인 방법
본 제품에 부착되어 있는 시리얼 번호를 통해
생
산일자를 확인하실 수 있습니다.
(예) 제조번호 : 0 25 01234
제품기술 정보
사용전압 : 220V / 60Hz
소비전력 : 1250W
폐기
제품 포장재
제품의 포장재는 환경친화적이며, 재활용이 가
능합니다. 플라스틱 구성품들은 >PE, >PS<, 와
같은 기호로 표시되어 있습니다. 제품 포장재들
은 분리수거 하셔서 쓰레기 처리 박스에 버려 주
십시오.
오래된 제품
이 기호가 표시 되어있는 제품은 가정용
쓰레기로 처리될 수 없습니다. 이러한 제품은 가
전제품 재활용 전문 수거 업체에 넘겨져야 합니
다. 본 제품을 적절한 방법으로 처리함으로써
고객님께서는 환경보호에 도움을 주실 수 있습
니다.
제조번호
생산주(25번째 주)
생산년의 마지막 년도
Page 10

Dear customer
Please read these operating instructions
through carefully.
Above all please follow the safety
instructions on the first few pages of
these operating instructions! Please
keep the operating instructions for
future reference. If applicable pass these
instructions on to the next owner of the
appliance.
With the warning triangle and/or by
means of key words (Danger!, Caution!,
Attention!), information is
emphasized which is important for
your safety or the correct functioning
of the appliance. It is essential that this
information is observed.
☞ This symbol guides you step by step
through the operating procedure for
your appliance.
After this symbol you receive
supplementary information on the
practical application and use of the
appliance.
May you have any doubts or suggestion
our Customer Care Center is at your
disposal.
Description of the
appliance (Figure 1)
A ON/OFF button
B Power indicator light
C Selector dial
D Steam button
E Steam indicator light
F Coffee position
G Steam/Hot water position
H Cup rest
I Water tank
J Steam/hot water nozzle
K Filter box
L Power cord & plug
M Brewing head
N Drip grid
O Drip tray
P Filter holder
Q Finger protector
R 1 cup filter
S 2 cup filter
T Filter for prepacked portions
U Level indicator
V Measuring spoon with tamper
Safety instructions
Read the following instruction carefully
before using machine for the first time.
●
This appliance is not intended for use by
persons (including children) with reduced
physical, sensory or mental capabilities, or
lack of experience and knowledge, unless
they have been given supervision or
instruction concerning use of the appliance
by a person responsible for their safety.
●
Children should be supervised to ensure
that they do not play with the appliance.
●
The appliance may only be connected to a
power supply whose voltage and frequency
comply with the specifications on the
rating plate!
●
Never use or pick up the appliance if
- the supply cord is damaged,
- the housing is damaged.
●
The appliance must only be connected to
an earthed socket. If necessary an
extension cable suitable for 10 A can be
used.
●
If the appliance or the supply cord is
damaged, it must be replaced by the
manufacturer, its service agent or similarly
qualified person, in order to avoid hazard.
10
Page 11

●
Always place the appliance on a flat, level
surface.
●
Never leave the appliance unattended
while connected to the supply mains.
●
The appliance must be switched off and
the mains plug withdrawn each time after
use, before cleaning and care.
●
The appliance and accessories become hot
during operation. Use only designated
handles and knobs. Allow to cool down
before cleaning or storage.
●
The mains cable must not come into
contact with any hot parts of the
appliance.
●
Do not remove the filter holder during the
brewing process as the appliance is
pressurised. The risk of burns exists.
●
When the steam function is used there can
be some hot water dripping from the
brewing head. DANGER! The water is hot,
there is a risk for scalding.
●
When opening the steam valve there is a
shot of hot water coming out. Be careful
and open the steam valve slowly. DANGER!
The water is hot, there is a risk for scalding.
●
Do not immerse the appliance in water or
any other liquid.
●
Do not exceed the maximum filling volume
as indicated on the appliances.
●
Fill the water tank only with cold water,
never with milk or other liquids.
●
Do not use the appliance if the water tank
has not been filled.
●
Do not use the appliance without the drip
tray or the drip grid.
●
This appliance is intended for domestic use
only. The manufacturer cannot accept any
liability for possible damage caused by
improper or incorrect use.
Getting started
1. Place the machine on a flat surface and fill
the tank with cold water. (The machine
must not be used with empty tank!) Plug
the power cord into the mains and press the
ON button.
2. When starting the machine for the first
time, place a bowl on the drip grid. Wait
until the power indicator light is steady.
Without inserting the filter holder, let a full
tank of water pass through the machine to
rinse out the heating system.
3. Making an espresso: The machine is ready
to use when the power indicator light is
steady. Then follow the instructions in step
4-6.
11
Page 12
12
4. Choose filter for one or two cups, fold back
the nger protector and put the filter in the
filter holder. Fill the filter with ground
coffee (one scoop for single espresso, two
scoops for double). Use the tamperon the
other side of the spoon to press ground
coffee lightly.
5. Insert the filter holder into position. When
the heating is fnished turn the selector dial
to . Espresso begins to ow through the
coffee outlet - turn the selector dial to
when you have reached a desired amount.
6. After brewing, remove the filter holder.
Twist it to the left and take it out of the
retainer. Fold finger protector forwards and
remove used coffee grounds from the filter.
Then take it out of the holder and clean it
with water. Dry with a cloth before putting
it back into the filter box.
Additional features
1. Steam can be used to froth milk or to heat
liquids. Push the steam button and wait for
the steam temperature indicator light to stop
flashing and go to constant light.
2. Immerse the steam nozzle in a heatproof
container with milk. Start the steam by
turning the selector dial to . Move the
container in circular movements, the
nozzle should not touch the bottom. To
stop the steam, turn the selector dial to
when you have reached the desired
amount of froth.
3. Place a bowl under the steam nozzle and
turn the selector dial back to for a few
seconds. This will remove any residue of
hot water/milk from the steam nozzle.
Page 13

13
Caution: the steam pipe is hot! Allow to
cool down, then clean the steam pipe with
a cloth.
4. To make coffee again, press the steam
button once more (the light will turn off )
and then turn the selector to .
5. For hot water, place a cup under the
steam nozzle and turn the selector dial
to . Hot water comes out of the nozzle.
Turn the dial back to to stop the water.
Cleaning and care
1. Turn the machine off and let it cool
down. Wipe all outer surfaces with a damp
cloth. Clean clogged holes in the filter and
filter holder with a pin or small brush.
2. When the level indicator is visible above
the drip grid, the drip tray must be
emptied. Lift out the drip grid, empty, rinse
and dry the grid and tray. For hygienic
reasons we recommend to do this regularly
even if the level indicator is not visible
above the drip grid.
3. Loosen the steam nozzle and wash it
under running water. Clean the small pipe
with a cloth. Lift out the water tank and
rinse it under running water.
Page 14

Decalcifying
1. Decalcifying is recommended regularly,
depending on water hardness. Remove the
brewing head (keep components together)
with a coin before fi lling the tank with
water and decalcifyer according to product
instructions.
2. Switch the machine on and let it heat up.
Place the filter holder in position, without
any filter. Place a bowl on the drip grid.
Turn the selector dial to and let 1/4 of
the solution pass through. Turn the
machine off and wait for 10 minutes.
3. Push the hot water button and let the
remaining solution fl ow through the steam
nozzle. Fill the water tank with fresh water
and run the machine until the tank is
empty. Repeat twice, with fresh water. Re-
install components and fi x fi lter properly.
Troubleshooting
A) Both power and steam indicator lights
are flashing:
●
Check that the selector dial is turned to .
●
If steam/hot water has been used for too
long, make a pause for 30 seconds.
●
Switch the machine off for 5 minutes and
restart it. If the lights are still flashing,
contact customer support.
B) The espresso temperature is too low:
●
Carry out the brewing procedure without
using espresso grounds, but using the filter
and filter holder, in order to preheat the
system.
●
Preheat the cups.
●
Decalcify the appliance.
C) The flow speed decreases noticeably:
●
Do not press the espresso grounds too
firmly into the filter.
●
Do not grind the espresso grounds too
finely (“medium” fineness).
●
Decalcify the appliance.
D) The espresso is flowing out of the side of
the filter holder:
●
Ensure that the filter holder has been
placed correctly.
●
Twist the filter holder a little more firmly
into the retainer.
●
Clean any espresso grounds away from the
rim of the filter holder.
14
Page 15

15
E) No espresso is coming out:
●
If there is a loud noise from the machine,
this means air is in the system. Let hot water
flow through the nozzle until there is a
steady flow. Then try brewing coffee again.
●
Ensure that the water tank has been filled
and is correctly in place.
●
Ensure that the filter holder has been
placed correctly.
●
Ensure that the selector dial has been
turned right to the position.
●
Do not press the espresso grounds too
firmly into the filter.
●
Clean the brew filter.
●
Decalcify the appliance.
F) The crema is no longer being produced
as it should:
●
Ensure that there are enough espresso
grounds in the filter.
●
Press the espresso grounds lightly.
●
Clean the filter.
G) Too little milk froth is created when
steaming milk:
●
Always use cool, fresh, low-fat milk.
●
Clean the steam nozzle.
H) The flow increases:
●
The espresso grounds have been ground
too rough.
●
Ensure that there are enough espresso
grounds in the filter.
I) The coffee machine switches itself off
while operating:
●
The appliance pump is equipped with a
temperature fuse that protects it from
overheating. The temperature fuse
interrupts the machine’s operation, if the
machine is operated for too long or if the
pump is run without water.
●
Set the selector dial to ”0” and remove the
plug from the mains socket.
●
Leave the machine to cool for at least 20
minutes. Fill up with water.
●
Plug the appliance into the mains again
and switch it on. If the appliance still does
not work, please contact our Customer
Care Department.
●
This appliance is not intended for use by
persons (including children) with reduced
physical, sensory or mental capabilities, or
lack of experience and knowledge, unless
they have been given supervision or
instruction concerning use of the appliance
by a person responsible for their safety.
Disposal
Packaging material
The packaging materials are environmentally
friendly and can be recycled.
The plastic components are identified by
markings, e.g. >PE<, >PS<, etc.
Please dispose of the packaging materials in
the appropriate container at the community
waste disposal facilities.
Old appliance
The symbol on the product or on its
packaging indicates that this product may
not be treated as household waste. Instead it
shall be handed over to the applicable
collection point for the recycling of
electrical and electronic equipment. By
ensuring this product is disposed of
correctly, you will help prevent potential
negative consequences for the environment
and human health, which could otherwise
be caused by inappropriate waste handling
of this product. For more detailed
information about recycling of this product,
please contact your local city office, your
household waste disposal service or the shop
where you purchased the product.
Page 16

Page 17
 Loading...