

Page 1
INSTRUCTION BOOKLET
Mod. EE600x
AU
Page 2

ENGLISH
FOR YOUR PERSONAL
SAFETY
This new appliance is easy to use.
However, it is important to read the
whole of this booklet before installing or
using the appliance for the first time.
This will enable you to obtain the best
results from the appliance, to avoid
incorrect operations and to use the
appliance in complete safety and with
respect for the environment.
DURING USE
− The appliance should be used by adults only. Make
sure that children do not touch the controls or
play with the appliance.
− It is dangerous to modify or to attempt to modify
the characteristics of this product.
− Keep the appliance clean at all times.
− The external parts of the appliance heat up when the
appliance is in use and remain hot for a certain
length of time after it has been turned off. Keep
children away from the appliance until it has
cooled down.
− Always make sure that the appliance is
disconnected from mains before carrying out
maintenance work and before cleaning the
appliance.
− Never attempt to repair faults yourself. Repairs
carried out by unqualified persons may result in
damage to the equipment or personal injury.
Consult this booklet and if you do not find the
information you are looking for contact your
nearest Service Centre. This appliance should be
serviced by authorised Technical Service Centres
only. Always ask for original spare parts to be used.
INSTALLATION AND
MAINTENANCE
− The appliance should be installed and
connected to mains by QUALIFIED
PERSONS only. Before carrying out any
work on the appliance always make sure
that it has been DISCONNECTED from
mains.
− Remove the appliance from the packaging,
check it for damage and make sure that the
power supply cable is in perfect condition.
If any damage is apparent contact your
retailer before using the appliance.
− The Manufacturer declines all
responsibility in the case of nonobservance of accident prevention
regulations.
RECOMMENDATIONS FOR
SAFEGUARDING THE
ENVIRONMENT
PACKAGING
− All packaging material is eco-compatible
and can be recycled. Please help safeguard
the environment by disposing of packaging
correctly using the separated waste
disposal system in place in your area.
OBSOLETE EQUIPMENT
− Obsolete appliances which are no longer
used are worthless items. By disposing of
the appliance in an eco-friendly fashion
various materials used to manufacture the
appliance can be recovered.
− Contact your specialised retailer or the
local council for information concerning
the disposal of the appliance.
1
Page 3

− Before demolishing the appliance, cut the power
supply cable so that it cannot be put to improper
use.
This instruction booklet should be kept with the
appliance for future reference. If the appliance is
sold or transferred, make sure that the booklet is
handed over to the new owners so that they are
aware of the operating instructions and relative
warnings.
2
Page 4

INDEX
INFORMATION FOR THE USER
DESCRIPTION OF THE
COFFEE MACHINE PAGE 4
FIRST USE PAGE 5
MAKING COFFEE PAGE 6
HOT WATER PAGE 7
STEAM PAGE 7
RECIPES PAGE 7
CLEANING & MAINTENANCE PAGE 8
FAULTS PAGE 9
TECHNICAL ASSISTANCE
AND SPARE PARTS PAGE 9
GUARANTEE CONDITIONS (AUS) PAGE 10
GUARANTEE CONDITIONS (NZ) PAGE 11
INFORMATION FOR THE
INSTALLER
TECHNICAL SPECIFICATIONS PAGE 12
INSTALLATION PAGE 12
WATER SUPPLY PAGE 15
ELECTRICAL CONNECTION PAGE 16
DRAWER PAGE 17
EC This appliance conforms to directive
BT 73/26
concerning electrical safety standard EN
60335-1 (August 1995 – Safety of
electrical appliances for domestic use and
similar – General Standards) and EN
60335-2-15 (April 1996 – Special
standards for liquid heating appliances).
Directive EMC 89/336 concerning the
following standards:
− 55014-1
− 55014-2
− 61000-3-2
− 61000-3-3
3
Page 5
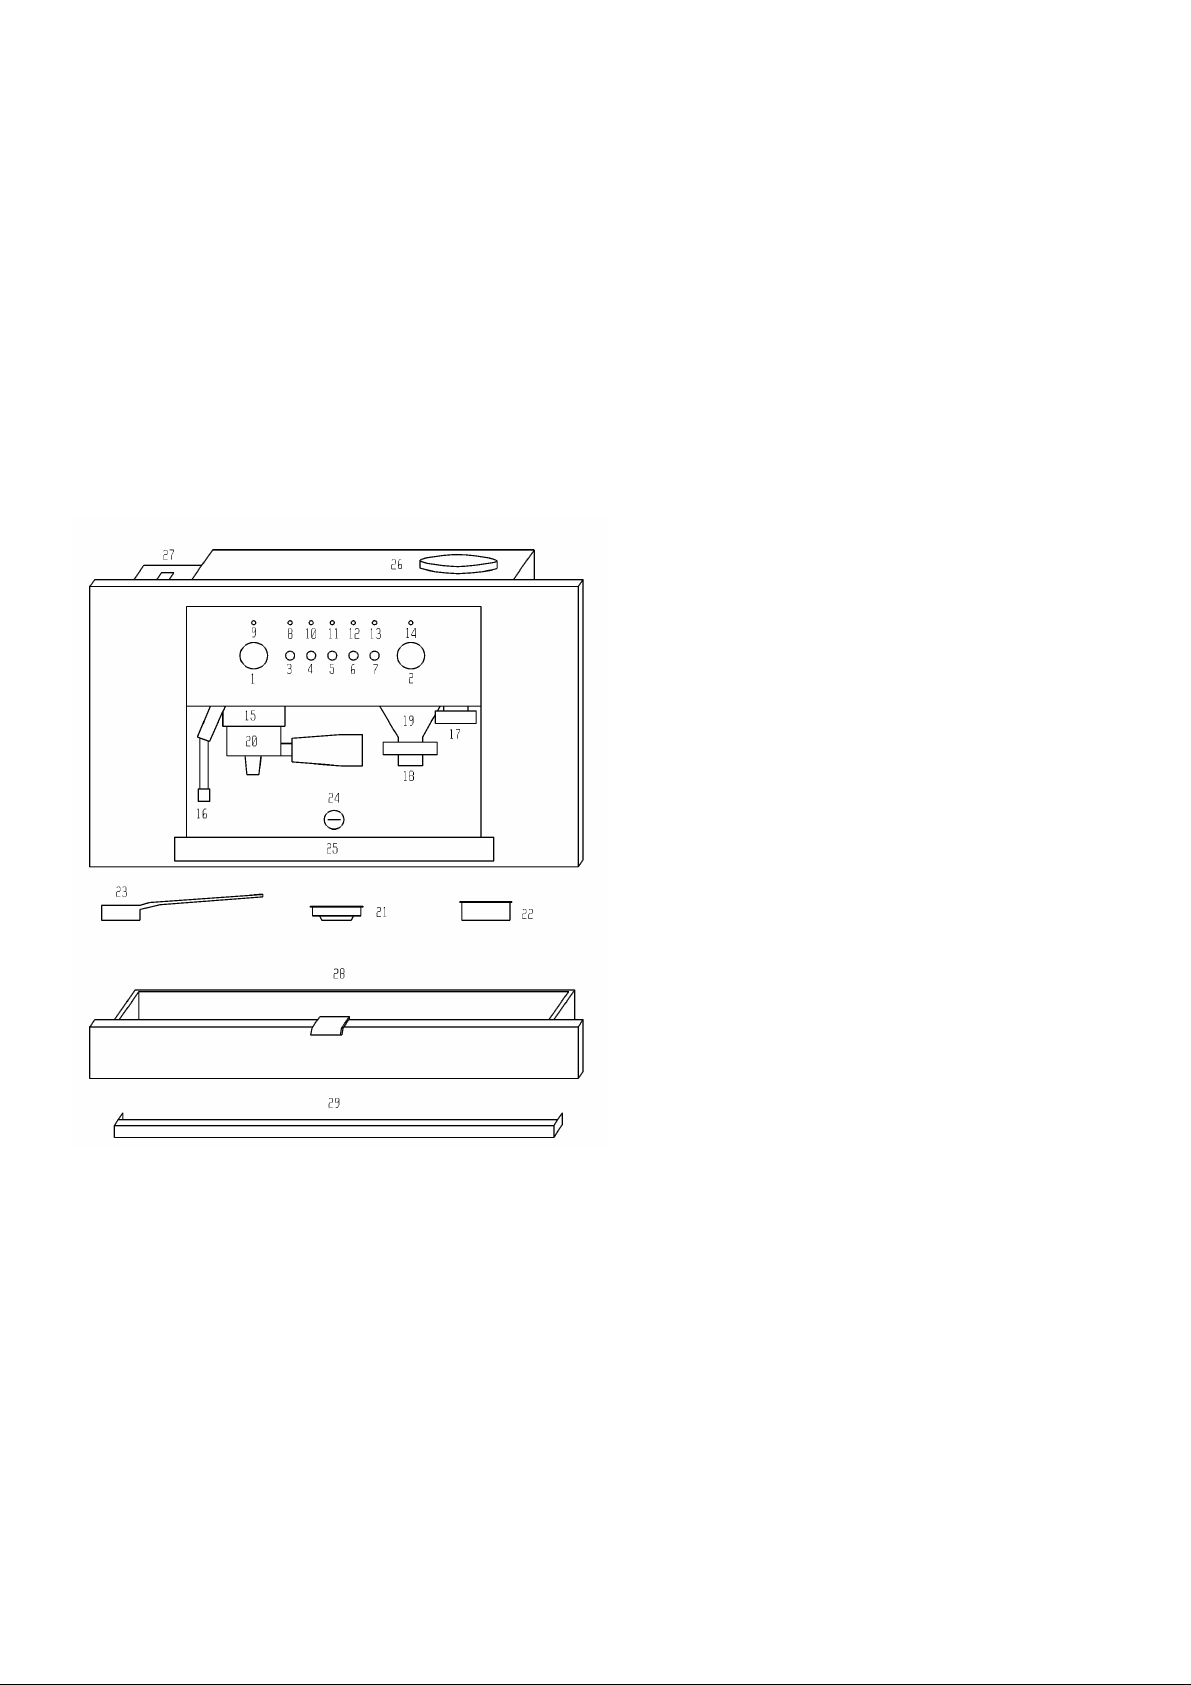
DESCRIPTION OF THE
COFFEE MACHINE
1. Steam knob
2. Grinding texture knob
3. On button
4. Coffee button
5. Hot water button
6. Steam button
7. Light button
8. Orange 'ON' indicator light
9. Red 'water temperature' indicator light
10. Green 'coffee' indicator light
11. Green 'water' indicator light
12. Green 'steam' indicator light
13. Green 'light on' indicator light
14. Green 'doser' indicator light
15. Filter holder ring nut
16. Steam spout
17. Coffee press
18. Grinder button
19. Coffee doser
20. Filter-holder
21. One-cup filter
22. Two-cup filter
23. Measure
24. Unit clamping lock
25. Drip tray
26. Coffee bean holder
27. Water tank
28. Drawer (optional)
29. Fixing bracket
4
Page 6

FIRST USE
FILL THE WATER TANK
− Open the unit clamping lock (ref.24) using the key
supplied.
− Pull the coffee machine out of the unit on the
telescopic runners.
− Fill the water tank (ref.27) located on the left-hand
side of the appliance with approx. 3 litres of water.
− Push the machine back into the unit and fasten the
unit clamping lock.
− Water hardness:
- before filling the water tank make sure that the
Brita filter is in place (see paragraph "Water
supply").
- if the appliance has not been used for a long time it
is advisable to replace the water in the tank with
fresh water and to empty the boiler by pressing the
coffee button (ref.4) repeatedly.
FILL THE COFFEE BEAN HOLDER
−
Open the unit clamping lock (ref.24) using the key
supplied.
− Pull the coffee machine out of the unit on the
telescopic runners.
− Put approx. 200g of coffee beans into the coffee
bean holder (ref.26) on the right-hand side of the
appliance.
− Push the machine back into the unit and fasten the
unit clamping lock.
ADJUSTING THE TEXTURE OF
GROUND COFFEE
?? The machine is supplied already calibrated to
grind coffee beans to the ideal texture.
?? The texture of ground coffee can however be
adjusted using the grinding texture knob (ref.2).
Turn the knob clockwise for a finer texture
and stronger coffee. Turn anticlockwise for
a coarser grind and weaker coffee.
PROGRAMMING THE QUANTITY
OF GROUND COFFEE
− The machine is supplied already
calibrated to supply the ideal dose of
ground coffee for a cup of espresso.
− However, the quantity of ground coffee
supplied can increased or decreased as
follows:
place the filter holder (ref.20) with a onecup filter (ref.21) below the coffee doser
outlet (ref.19) and press the grinder button
(ref.18) gently, do not release the button
immediately. After approx. 10 seconds the
grinder will start, when the quantity
required is reached (recommended dose 7g
corresponding to 6 seconds of grinding)
simply release the button (ref.18) and the
dosage is automatically programmed.
PRELIMINARY START-UP
− Turn the coffee machine on by pressing the
ON button (ref.3). The orange indicator
light (ref.8) lights up to indicate that the
machine is powered.
− Turn the steam knob (ref.1) anti-clockwise.
− Press the hot water button (ref.5) and wait
until all the air in the boiler is released
through the steam spout (ref.16) and water
starts coming through.
− The red indicator light (ref.9) lights up at
the same time to indicate that the water in
the boiler is being heated. When the red
indicator light goes out the water has
reached the required temperature for coffee
making.
− Close the steam knob (ref.1) and release
the hot water button (ref.5).
5
Page 7

ACCESSORIES SUPPLIED
− The coffee machine is supplied with a filter holder
(ref.20) for one-cup filters (ref.21) and two-cup
filters (ref.22).
If you are using pods, us the one-cup filter .
− A measure (ref.23) is also supplied for dosing
ground coffee (approx. 7.2g).
OPTIONAL ACCESSORIES
− A practical drawer with stainless steel front panel is
available as an optional accessory, model ZDRA
600 X.
The drawer is divided into several compartments
for various uses :
- compartment for cups and saucers
- basin for coffee dregs
- compartment for machine accessories (filter,
measure).
- tray
The over all dimensions of the drawer are given on
page 18.
MAKING COFFEE
MAKING COFFEE WITH COFFEE
BEANS
− Place the filter holder (ref.20) beneath the doser
(ref.19) and gently press the grinder button (ref.18)
which will automatically supply the correct oncecup dose of ground coffee. For 2-cup filters (ref.22)
repeat the operation.
− Press the ground coffee with the coffee press
(ref.17) .
− Place the filter holder (ref.20) on the ring nut (15)
making sure it locks into place: move the handle of
the filter holder from let to right.
− Place one or two coffee cups below the spout of the
filter holder.
− When the red water temperature indicator
light (ref.9) goes out, press the coffee
button (ref.4).
− Once the required quantity of coffee has
been reached press the coffee button (ref.4)
a second time to stop supply.
− Remove the filter holder from the ring nut
and empty it of the used ground coffee.
MAKING COFFEE WITH PODS
(E.S.E. system)
− E.S.E stands for Easy Serving Espresso
and is the International standard for
making coffee using pods (a pod is a
disposable single-use portion of roasted
coffee) and a suitable coffee machine. The
E.S.E. system is simple, practical and
ecological since no special maintenance is
required and nature is respected. Lastly,
the system is clean as the special wrapping
prevents spillage and is easily removed and
disposed of after use.
− The machine is designed for use with
ground coffee or pods: single-use
disposable portions of roasted coffee.
− Place the pod in the filter holder.
− Position the filter holder (ref.20) on the
ring nut (ref.15) making sure it locks into
place: move the handle of the filter holder
from left to right.
− Place a coffee cup below the spout of the
filter holder.
− When the red water temperature indicator
light (ref.9) goes out, press the coffee
button (ref.4).
− Once the required quantity of coffee has
been supplied, press the coffee button a
second time to stop supply.
− Take the filter holder off the ring nut and
dispose of the used pod.
6
Page 8

TIPS ON HOW TO PREPARE AN
EXCELLENT ESPRESSO COFFEE
− To make a good espresso coffee, the cleanliness of
the machine and the right temperature are
fundamental.
− Make sure that the filter, the filter holder and the
ring nut are kept perfectly clean.
− Unless you are away for long periods, keep the
machine turned on and the filter holder in the ring
nut to keep it hot.
− Heat the coffee cups by filling them with hot water
(press the coffee button). This also eliminates some
of the water left in the boiler as well as heats the
filter holder.
− When you have finished using the machine clean
the filter holder by running the machine without
coffee. This method eliminates any residues which
could alter the flavour of the coffee the next time
you use the machine.
− For an excellent espresso, let the machine run for
20-25 seconds. The time required depends on the
texture of the ground coffee, the quantity of coffee
used and how firmly the coffee is pressed. The
machine is already calibrated to make good quality
coffee. If necessary the grinding texture and the
quantity of ground coffee dosed can be adjusted
(see paragraph "First Use") to obtain the required
strength and flavour.
HOT WATER
− Place the coffee cup below the steam spout (ref.16).
− Turn the steam knob (ref.1) anti-clockwise.
− Press the hot water button (ref.5). Release the
button when you have the required amount of hot
water and close the steam knob (ref.1).
− Keep the steam button (ref.6) pressed and
wait until the red indicator light (ref.9)
goes out.
− Place the receptacle beneath the steam
spout and slowly turn the steam knob
(ref.1) anti-clockwise.
− When you have finished with the steam
close the steam knob (ref.1) and press the
steam button (ref.6).
RECIPES
ITALIAN CAPPUCCINO
This is a normal espresso coffee with steamheated milk that gives the coffee a milder
flavour and a rich, frothy topping. Serve in a
large cup.
Pour cold milk into a tall jug and heat it using
the steam spout if your machine has one. Add
only the froth to the espresso coffee, to do this
either tilt the jug slightly rocking it backwards
and forwards while you pour or use a spoon to
scoop off the froth.
You can also add a dusting of cocoa powder to
taste.
VIENNESE CAPPUCCINO
This variation is the result of age-old Austrian
tradition.
Prepare a 'long' espresso by letting the
machine run for longer than usual (30-35
seconds), add hot milk followed by whipped
cream. Serve in a medium-sized cup (midway
between and espresso cup and a cappuccino
cup).
Decorate with flakes of chocolate.
STEAM
− Steam is used to make cappuccino coffee (see
chapter "Recipes").
7
Page 9

COLD ESPRESSO SHAKE
Frothy and extremely refreshing, this makes a pleasant
drink on hot days.
Prepare an espresso coffee, add sugar and pour into a
cocktail shaker with large ice cubes. Shake for a few
seconds.
Serve in a tumbler or flûte.
IRISH COFFEE
Any energy-giving tonic.
Warm a tall glass and mix eight parts of hot coffee with
one part whisky and brown sugar.
Gently pour freshly whipped cream over the back of a
spoon so that it floats on the coffee: the result is a layer
of cool white cream on top of the hot dark coffee.
MEXICAN COFFEE
Intense and exotic.
Mix together a portion of double cream, half a teaspoon
of cinnamon, a pinch of nutmeg and sugar in a small
cup and beat until it becomes frothy.
Place a teaspoon of chocolate syrup, a pinch of
cinnamon and the coffee into a medium-sized cup and
blend together.
Top with a teaspoon of vanilla-flavoured cream.
CAPPUCCINO ICE-CREAM
Heat 2 cups of espresso coffee, ¾ cup of single cream
and ½ cup sugar in a pan and bring to boiling point.
Leave to cool before placing in the freezer for 4-5
hours.
Move to the refrigerator ½ hour before
serving.
Serve two-three balls of the ice-cream in a
small bowl and decorate with roasted coffee
beans.
CLEANING AND
MAINTENANCE
EXTERNAL PARTS
− Clean all the external parts of the machine
with a soft cloth, do not use harsh
detergents.
− Do not clean steel surfaces with abrasive
pads or sponges.
− Dry thoroughly using a soft cloth.
DRIP TRAY
− Empty the drip tray (ref.25) regularly to
avoid the overflow of liquids which could
soil and damage the cupboards below the
machine.
− Both the drip tray and the grid are dish-
washer proof.
FILTER/FILTER-HOLDER/RING
NUT
− The filters (ref. 21 and 22), the filter holder
(ref.20) and the ring nut (ref.15) should be
kept clean at all times. Any residual coffee
may alter the taste of the next coffee you
make.
− Put the filter holder and the filter in the
dishwasher every 2 months.
8
Page 10

WATER TANK
− If left unused for long periods it is advisable to
replace the water in the tank with fresh water and to
empty the boiler by pressing the coffee button
(ref.4) repeatedly.
− Clean the water tank (ref.27) periodically to remove
any lime-scale.
− The water tank is dish-washer safe.
− If Brita decalcifying filters are used it is advisable
to replace the filter every 2000 espresso coffees or
at least every two months.
BOILER CLEANING FREQUENCY
− Like any other appliance that uses water, it is
perfectly normal for lime-scale to form inside the
boiler of the coffee machine.
- It is advisable to clean the boiler every six months
as follows:
- Fill the tank with 1.5l water and add half a glass of
vinegar or citric acid.
- Press the coffee button repeatedly so that the
water/vinegar solution comes through a little at a
time until the tank is empty.
- Repeat the operation until clean water comes
through (with no trace of lime-scale).
- Fill the tank with cold water and again press the
coffee button repeatedly to rinse the boiler.
- The machine is now ready for use.
FAULTS
If the machine does not work, check that the problem is
not due to:
1. No power supply
2. An empty water tank
If the power supply cable is damaged or for any other
maintenance operations, contact an Authorised
Electrolux Technical Assistance Centre.
TECHNICAL
ASSISTANCE AND
SPARE PARTS
If the problem persists after carrying out the
check-ups indicated in the previous chapter,
contact your nearest authorised Technical
Assistance centre. Always describe the fault
and give the model (Mod.), product number
(Prod. no.) and serial number (Ser. No.) of the
appliance which are indicated on the
identification plate of the coffee machine.
The plate is located on the external right-hand
side of the machine and is clearly visible when
the machine is opened.
SERVICE AND SPARE PARTS
(AUS)
In the event of your appliance requiring
service, or if you wish to purchase spare parts,
please contact your local ELECTROLUX
Service Force Centr:
Electric Blue Service & Installations P/L
324 Frankston Dandenong Rd,
Dandenong. VIC 3175
Phone:1300 654 488
9
Page 11

ELECTROLUX
WARRANTY AUSTRALIA
Nothing in this warranty, limits any rights you may
have under the Trade Practices Act or any other
Commonwealth or State legislation. Such rights cannot
be changed by the conditions in this warranty.
Subject to the conditions below, this appliance is
warranted by Electrolux Home Products Pty. Ltd.
A.B.N. 51 004 762 341, (the "Company"), to be free
from defects in materials and workmanship for a
period of 24 months following the date of purchase (the
"Warranty Period").
Conditions of the warranty:
1 During the Warranty Period the Company, or its
service agent, will only pay the cost of repairing
or replacing all Company parts on your
appliance which the Company finds to be
defective.
2 The Company will decide if there are any
defects in material and/or workmanship.
3 Light globes, batteries and filters are replaceable
parts and are not covered under this warranty.
4 This warranty applies only for mainland
Australia and Tasmania.
5 The appliance must be installed and operated in
accordance with the Company's instructions.
6 This warranty does not apply to normal wear
and tear, or any service, which is needed after
an accident, alteration, negligence, misuse, fire
or flood.
7 This warranty does not apply to damage caused
if your appliance has been dismantled, repaired
or serviced by any person other than someone
authorised by the Company.
8 If you live outside the service area of the
Company or one of its service agents, this
warranty does not cover the cost of transport of
the appliance for service nor the service agent's
travelling costs to and from your home.
9 If you are required to transport the
appliance to the Company or its service
agent, you must ensure it is securely
packed and insured. The Company
does not accept any responsibility for
loss or damage of the appliance prior to
it being received by the Company or its
service agent.
10 This warranty does not cover loss,
damage or expense to this appliance
caused directly or indirectly by power
surges, electrical storm damage or
incorrect power current.
11 The Company (and any company
related to the Company) will not be
liable for any special, incidental or
consequential damages or for loss,
damage or expense or for personal
injury or loss or destruction of property
arising directly or indirectly from the
use or inability to use this appliance or
any of its parts.
12 This warranty applies only to the
original buyer.
13 This warranty is the only express
warranty given by the Company.
14 If you are the original buyer, please
keep your proof of purchase, which
will be required, if you request service
under this warranty.
15 The Warranty Period is only applicable
when your appliance is used at home
by you and your family as consumers.
16 Use of this appliance for commercial
purposes is covered by this warranty
for a period of 3 months from the date
of purchase.
FOR SERVICE IN AUSTRALIA
PLEASE CALL
13 13 49
FOR SPARE PARTS IN AUSTRALIA
PLEASE CALL
13 13 50
10
Page 12

ELECTROLUX
PLEASE PHONE
APPLIANCE WARRANTY
– NEW ZEALAND –
This appliance is warranted by Electrolux Home
Products (NZ) Ltd (“the Company”) from the date of
purchase. The following terms and conditions apply:
1 The Company or its Authorised Service Centre
will pay the cost of repairing or replacing all
parts of the appliance which the Company or its
Authorised Service Centre find defective for a
period of 24 months following the date of
purchase (the "Warranty Period").
2 During the Warranty Period the Company or its
Authorised Service Centre, will pay the cost of
repairing or replacing all parts, which they find
are defective.
3 Light globes, batteries and filters are
replaceable parts and are not covered under
this warranty.
4 The appliance must be installed and operated
in accordance with the Company’s instructions.
5 This Warranty does not apply to normal wear
and tear, or any service, which is needed after
an accident, negligence, alteration or misuse.
6 This Warranty also does not apply to damage
caused if your appliance has been dismantled,
repaired or serviced by any person other than
someone authorised by the Company.
7 If you live outside the service area of the
Company or its Authorised Service Centre, this
warranty does not cover the cost of transport of
the appliance for service nor the Authorised
Service Centre's travelling costs to and from
your home.
8 If you are required to transport the appliance to
the Company or its Authorised Service Centre,
it must be securely packed and insured. The
Company does not accept any responsibility for
loss or damage prior to it being received by the
Company or its Authorised Service Centre.
9 This warranty is the only express warranty
given by the Company.
10 This Warranty does not cover loss, damage or
expense to this appliance caused directly or
indirectly by power surges, electrical
storm damage or incorrect power
current.
11 The Company (and any company
related to the Company) will not be
liable for any special incidental or
consequential damages or for loss,
damage or expense directly or
indirectly arising from the use or
inability to use this appliance, or for
personal injury or loss or destruction of
other property.
12 Nothing in this warranty is intended to
limit the rights you may have under the
Consumer Guarantees Act 1993,
except to the extent permitted by that
Act, and all provisions of this warranty
shall be read as modified to the extent
necessary to give effect to that
intention.
13 The Consumer Guarantees Act 1993
does not apply if your appliance is
acquired for the purposes of a
“business” (as defined in that Act).
14 This warranty is limited to 90 days from
date of purchase if the appliance is
used for commercial use.
IMPORTANT NOTICE
Before calling a service technician please carefully
check the warranty terms and conditions, the
operating instructions and service booklet if
applicable. If the product fails for any of the
customer responsibility reasons detailed therein, a
service fee will be charged. Please present proof
of purchase to any Authorised Service Centre
should warranty service be required.
SERVICE CENTRES
0800 10 66 10
For your nearest Authorised Service Centre
please look in The Yellow Pages under Home
Appliance Servicing OR Call:
0800 10 66 10
11
Page 13

TECHNICAL
SPECIFICATIONS
− Width 594 mm
− Depth 280 mm
− Height 357 mm
− Tank capacity 3 It.
− Net weight 17 kg
− Gross weight 19 kg
− Power supply voltage 220 V
− Power absorption resistors 1000 W
− Power absorption pump 50 W
− Working pressure 12 bar
− Fuse 10 A.
INSTALLATION
INSTALLING IN MODULAR UNITS
For the appliance to work efficiently when installed in a
modular unit, the unit must have suitable
characteristics.
In conformity with safety standards, the appliance must
be installed correctly in order to guarantee protection
against contact between electrical parts and parts with
purely functional insulation.
All parts that act as guards, even the reveal side panel
for appliances installed at one extremity of a
combination, must be firmly secured so that they
cannot be removed without the use of tools.
It is advisable to avoid installing the appliance
immediately next to refrigerators or freezers since the
heat produced by the appliance could affect their
efficiency.
− Warning:
- connect the power supply cable of suitable
dimensions before securing the power supply unit.
Power supply cable specifications: wire diameter
1mm.
12
Page 14

- Assemble the runners on the sides of the machine
(using the screws supplied) as shown in fig.1.
- Fasten the telescopic runner supports (RH and LH)
using three wood screws (fig.2) and taking care to
follow the measurements shown in fig.2.
- Make a slot in the bottom of the open compartment
following the measurements given in fig.2.
- If the compartment does not have a shelf for the
machine to rest on, assemble the machine fixing
bracket (ref.29) as shown in fig.4. Place screw 1 in
the slot of the bracket and adjust the position before
locking in place using screw 2.
- Fasten the power supply unit (fig.3) to the back of
the appliance in the top left-hand corner using two
wood screws as shown in fig.2.
Fig. 2
Fig. 1
Fig. 3
13
Page 15

Fig. 4
− Assemble the telescopic runners of the coffee
machine in the supports fixed to the inside of the
unit; push the runners in until they reach the limit
stop and action the safety clamps (fig.5).
Fig. 5
14
Page 16

WATER SUPPLY
− Take the lid off the water tank (ref.27) and take out
the Brita filter.
− Take the filter out of the packaging and soak it in
cold water for half an hour before fitting it firmly
into the hole in the tank (fig.6).
− Place the water hose in the relative channel (fig.7)
and push it down until it reaches the bottom of the
tank (fig.8).
− Fill the tank with cold water.
− Warning: fill the tank with cold drinking water
only: do not pour milk or any other liquid into the
tank!
− The Brita filter is available at shops selling
household appliances, at our Technical Service
Centres and at Authorised Spare Parts outlets.
Fig. 7
Fig. 6
Fig. 8
15
Page 17

ELECTRICAL
CONNECTION
− Make sure that the electric circuit is suitably
earthed.
− Connect the power cable supplied to the connector
on the back of the appliance, plug the connector
into the power supply unit on the back of the post
(fig.3) where you will find the terminal board
(fig.9) set to operate at a supply voltage of 230V
monophase.
− Make sure that a circuit breaker is installed in the
electrical circuit of the building to disconnect it
from mains and that contacts are at least 3mm apart.
− WARNING: the supplier disclaims all
responsibility in the case of non-observance of
the above rule.
Fig. 9
16
Page 18

DRAWER
The required dimensions of the compartment for
installing the machine with the drawer are given in fig.
10 and 11.
Fig.10
Fig.11
17
 Loading...