

AEG EBGL3XCN, EBGL3XSP User Manual

EBGL3X
................................................ .............................................
EN OVEN USER MANUAL
www.electrolux.com
2
CONTENTS
1. SAFETY INFORMATION . . . . . . . . . . . . . . . . . . . . . . . . . . . . . . . . . . . . . . . . . . . . . . . . . . . 3
2. SAFETY INSTRUCTIONS . . . . . . . . . . . . . . . . . . . . . . . . . . . . . . . . . . . . . . . . . . . . . . . . . . 4
3. PRODUCT DESCRIPTION . . . . . . . . . . . . . . . . . . . . . . . . . . . . . . . . . . . . . . . . . . . . . . . . . 6
4. BEFORE FIRST USE . . . . . . . . . . . . . . . . . . . . . . . . . . . . . . . . . . . . . . . . . . . . . . . . . . . . . . 7
5. DAILY USE . . . . . . . . . . . . . . . . . . . . . . . . . . . . . . . . . . . . . . . . . . . . . . . . . . . . . . . . . . . . . 7
6. CLOCK FUNCTIONS . . . . . . . . . . . . . . . . . . . . . . . . . . . . . . . . . . . . . . . . . . . . . . . . . . . . . 9
7. USING THE ACCESSORIES . . . . . . . . . . . . . . . . . . . . . . . . . . . . . . . . . . . . . . . . . . . . . . . 10
8.
ADDITIONAL FUNCTIONS . . . . . . . . . . . . . . . . . . . . . . . . . . . . . . . . . . . . . . . . . . . . . . . . 11
9. HELPFUL HINTS AND TIPS . . . . . . . . . . . . . . . . . . . . . . . . . . . . . . . . . . . . . . . . . . . . . . . 11
10.
CARE AND CLEANING . . . . . . . . . . . . . . . . . . . . . . . . . . . . . . . . . . . . . . . . . . . . . . . . . . . 22
11. WHAT TO DO IF… . . . . . . . . . . . . . . . . . . . . . . . . . . . . . . . . . . . . . . . . . . . . . . . . . . . . . . 24
12.
INSTALLATION . . . . . . . . . . . . . . . . . . . . . . . . . . . . . . . . . . . . . . . . . . . . . . . . . . . . . . . . . 25
13. GARANTIE, GARANZIA, GUARANTEE . . . . . . . . . . . . . . . . . . . . . . . . . . . . . . . . . . . . . . . 28
WE’RE THINKING OF YOU
Thank you for purchasing an Electrolux appliance. You’ve chosen a product that brings with it
decades of professional experience and innovation. Ingenious and stylish, it has been designed
with you in mind. So whenever you use it, you can be safe in the knowledge that you’ll get great
results every time.
Welcome to Electrolux.
Visit our website for:
Get usage advice, brochures, trouble shooter, service information:
www.electrolux.com
Register your product for better service:
www.electrolux.com/productregistration
Buy Accessories, Consumables and Original spare parts for your appliance:
www.electrolux.com/shop
CUSTOMER CARE AND SERVICE
We recommend the use of original spare parts.
When contacting Service, ensure that you have the following data available.
The information can be found on the rating plate. Model, PNC, Serial Number.
Warning / Caution-Safety information
General information and tips
Environmental information
Subject to change without notice.

1. SAFETY INFORMATION
Before the installation and use of the appliance, carefully
read the supplied instructions. The manufacturer is not
responsible if an incorrect installation and use causes injuries and damages. Always keep the instructions with
the appliance for future reference.
1.1 Children and vulnerable people safety
WARNING!
Risk of suffocation, injury or permanent disability.
• This appliance can be used by children aged from 8
years and above and persons with reduced physical,
sensory or mental capabilities or lack of experience and
knowledge if they are supervised by an adult or a person who is responsible for their safety.
• Do not let children play with the appliance.
• Keep all packaging away from children.
• Keep children and pets away from the appliance when
it operates or when it cools down. Accessible parts are
hot.
• If the appliance has a child safety device, we recommend that you activate it.
• Cleaning and user maintenance shall not be made by
children without supervision.
ENGLISH 3
1.2 General Safety
• Internally the appliance becomes hot when in operation. Do not touch the heating elements that are in the
appliance. Always use oven gloves to remove or put in
accessories or ovenware.
• Do not use a steam cleaner to clean the appliance.
• Before maintenance cut the power supply.
www.electrolux.com
4
• Do not use harsh abrasive cleaners or sharp metal
• Be careful, when you touch the storage drawer. It can
• To remove the shelf supports first pull the front of the
scrapers to clean the glass door since they can scratch
the surface, which may result in shattering of the glass.
get hot.
shelf support and then the rear end away from the side
walls. Install the shelf supports in the opposite sequence.
2.
SAFETY INSTRUCTIONS
2.1 Installation
WARNING!
Only a qualified person must install this appliance.
• Remove all the packaging.
• Do not install or use a damaged appli-
ance.
• Obey the installation instruction sup-
plied with the appliance.
• Always be careful when you move the
appliance because it is heavy. Always
wear safety gloves.
• Do not pull the appliance by the handle.
• Keep the minimum distance from the
other appliances and units.
• Make sure that the appliance is installed
below and adjacent safe structures.
• The sides of the appliance must stay
adjacent to appliances or to units with
the same height.
Electrical connection
WARNING!
Risk of fire and electrical shock.
• All electrical connections should be
made by a qualified electrician.
• The appliance must be earthed.
• Make sure that the electrical information
on the rating plate agrees with the power supply. If not, contact an electrician.
• Always use a correctly installed shockproof socket.
• Do not use multi-plug adapters and extension cables.
• Make sure not to cause damage to the
mains plug and to the mains cable.
Contact the Service or an electrician to
change a damaged mains cable.
• Do not let mains cables to come in
touch with the appliance door, specially
when the door is hot.
• The shock protection of live and insulated parts must be fastened in such a
way that it cannot be removed without
tools.
• Connect the mains plug to the mains
socket only at the end of the installation. Make sure that there is access to
the mains plug after the installation.
• If the mains socket is loose, do not
connect the mains plug.
• Do not pull the mains cable to disconnect the appliance. Always pull the
mains plug.
• Use only correct isolation devices: line
protecting cut-outs, fuses (screw type
fuses removed from the holder), earth
leakage trips and contactors.
• The electrical installation must have an
isolation device which lets you disconnect the appliance from the mains at all
poles. The isolation device must have a
contact opening width of minimum 3
mm.

2.2 Use
WARNING!
Risk of injury, burns or electric
shock or explosion.
• Use this appliance in a household environment.
• Do not change the specification of this
appliance.
• Make sure that the ventilation openings
are not blocked.
• Do not let the appliance stay unattended during operation.
• Deactivate the appliance after each
use.
• Be careful, when you open the appliance door while the appliance is in operation. Hot air can release.
• Do not operate the appliance with wet
hands or when it has contact with water.
• Do not apply pressure on the open
door.
• Do not use the appliance as a work
surface or as a storage surface.
• Always keep the appliance door closed
when the appliance is in operation.
• Open the appliance door carefully. The
use of ingredients with alcohol can
cause a mixture of alcohol and air.
• Do not let sparks or open flames to
come in contact with the appliance
when you open the door.
• Do not put flammable products or items
that are wet with flammable products
in, near or on the appliance.
WARNING!
Risk of damage to the appliance.
• To prevent damage or discoloration to
the enamel:
– do not put ovenware or other objects
in the appliance directly on the bottom.
– do not put aluminium foil directly on
the bottom of the appliance.
– do not put water directly into the hot
appliance.
– do not keep moist dishes and food in
the appliance after you finish the cooking.
– be careful when you remove or install
the accessories.
ENGLISH 5
• Discoloration of the enamel has no effect on the performance of the appliance. It is not a defect in the sense of
the warranty law.
• Use a deep pan for moist cakes. Fruit
juices cause stains that can be permanent.
2.3 Care and Cleaning
WARNING!
Risk of injury, fire or damage to
the appliance.
• Before maintenance, deactivate the appliance and disconnect the mains plug
from the mains socket.
• Make sure the appliance is cold. There
is the risk that the glass panels can
break.
• Replace immediately the door glass
panels when they are damaged. Contact the Service.
• Be careful when you remove the door
from the appliance. The door is heavy!
• Clean regularly the appliance to prevent
the deterioration of the surface material.
• Remaining fat or food in the appliance
can cause fire.
• Clean the appliance with a moist soft
cloth. Only use neutral detergents. Do
not use abrasive products, abrasive
cleaning pads, solvents or metal objects.
• If you use an oven spray, obey the safety instructions on the packaging.
• Do not clean the catalytic enamel (if applicable) with any kind of detergent.
2.4 Internal light
• The type of light bulb or halogen lamp
used for this appliance, is only for
household appliances. Do not use it for
house lighting.
WARNING!
Risk of electrical shock.
• Before replacing the lamp, disconnect
the appliance from the power supply.
• Only use lamps with the same specifications.
www.electrolux.com
6
2.5 Disposal
WARNING!
Risk of injury or suffocation.
• Disconnect the appliance from the
mains supply.
• Cut off the mains cable and discard it.
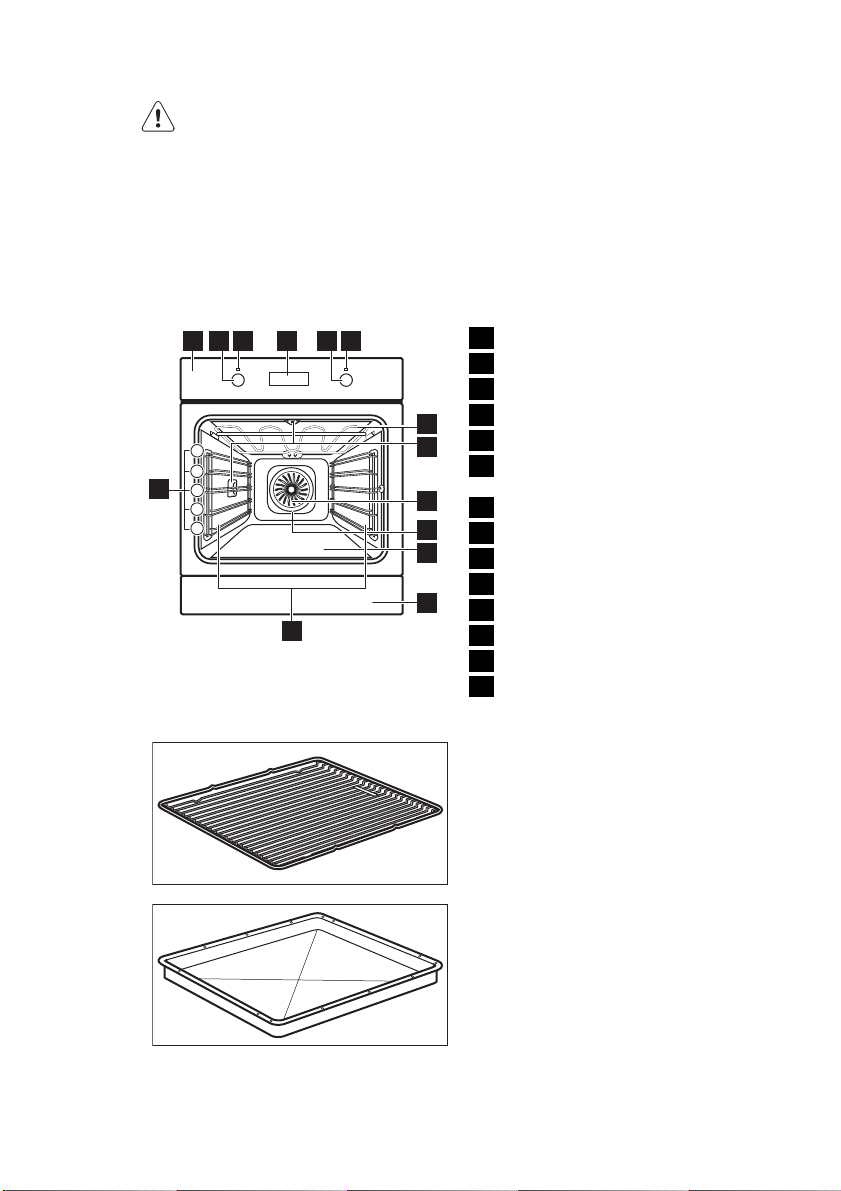
3. PRODUCT DESCRIPTION
1
5
4
14
3
2
1
3.1 Accessories
13
63 42 5
• Remove the door catch to prevent children and pets to get closed in the appliance.
• Dispose of the appliance at any shop
that sells new appliances or at the official SENS collection point. You can find
the list of the official SENS collection
points at www.sens.ch.
Control panel
1
Control knob for oven functions
2
Power lamp / symbol
3
Electronic programmer
4
7
8
9
10
11
12
Control knob for temperature
5
Temperature lamp / symbol / indica-
6
tor
Heating element
7
Lamp
8
Fan
9
Rear wall heating element
10
Bottom heat
11
Drawer
12
Shelf support, removable
13
Shelf positions
14
Wire shelf
For cookware, cake tins, roasts.
Baking tray
For cakes and biscuits.
ENGLISH 7
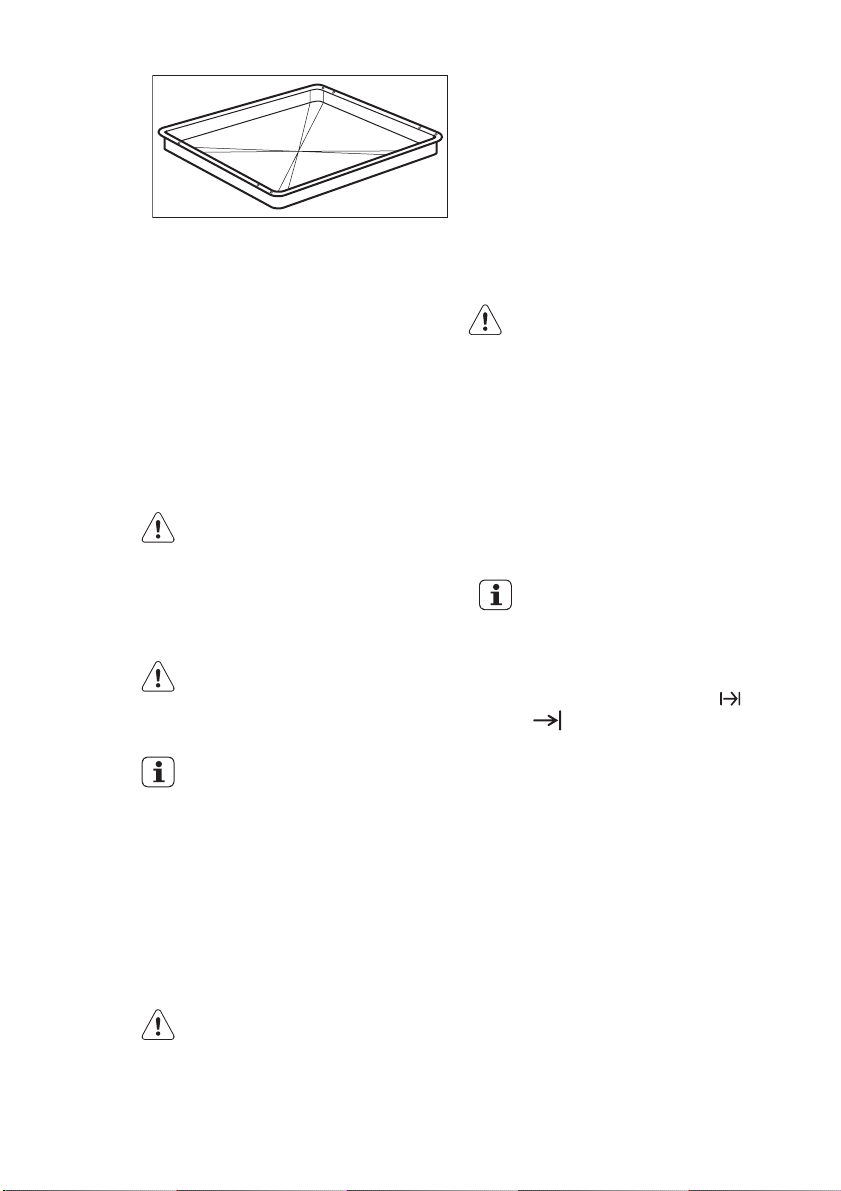
Grill- / Roasting pan
To bake and roast or as a pan to collect
fat.
4. BEFORE FIRST USE
WARNING!
Refer to the Safety chapters.
4.1 Initial Cleaning
• Remove all parts from the appliance.
• Clean the appliance before first use.
Refer to chapter "Care and Cleaning".
4.2 Setting the time
You must set the time before you
operate the appliance.
When you connect the appliance to the
electrical supply the indicator for the Time
of Day function flashes.
Press the + or - button to set the correct
time.
Storage drawer
Below the oven cavity is the storage
drawer.
WARNING!
The storage drawer can become
hot when the appliance operates.
Do not store any flammable materials in the drawer.
After approximately five seconds, the
flashing stops and the display shows the
time of day you set.
Useful information:
• To change the time, press the Selection
button again and again until the indicator for the Time of Day function flashes.
You must not set the Duration
End
• In case of a power cut up to 1 hour, the
time of day is shown and the indicator
for the Time of Day function flashes.
Make sure that the time is correct and
press the Selection button to stop the
flashing.
• In case of a power cut longer than 1
hour, you must set the time again.
) function at the same time.
or
5. DAILY USE
WARNING!
Refer to the Safety chapters.
To use the appliance, press the control
knob. The control knob comes out.
5.1 Activating and deactivating
the appliance
1.
Turn the control knob for the oven
functions to select an oven function.
2.
Turn the control knob for the temperature to select a temperature.
www.electrolux.com
8
3.
5.2 Oven functions
To deactivate the appliance turn the
control knobs for the oven functions
and temperature to off position.
Knob symbol, indicator or
lamp (depends on the model refer to the appliance overview):
• The indicator comes on when the oven
heats up.
• The lamp comes on when the appliance operates.
• The symbol shows whether the knob
controls one of the cooking zones, the
oven functions or the temperature.
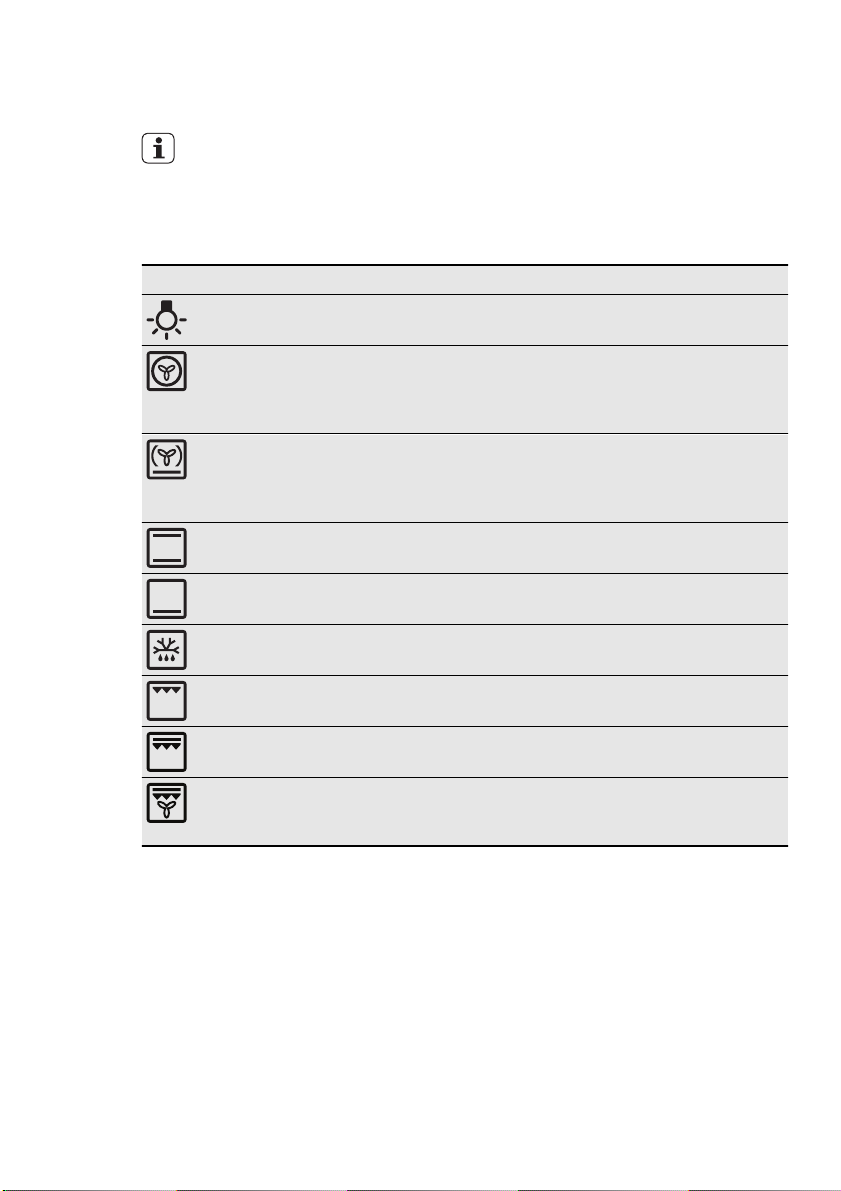
Oven function Application
Light To activate the lamp without a cooking function.
True Fan Cooking To bake on up to 2 oven levels at the same time
and to dry food. Set the oven temperatures 20 40 °C lower than when using Conventional
Cooking.
Pizza Setting To bake food on one shelf position for a more in-
tensive browning and a crispy bottom. Set the
temperature 20 - 40 °C lower than for Conventional Cooking.
Conventional Cooking To bake and roast food on one shelf position.
Bottom Heat To bake cakes with crispy bottom and to pre-
serve food.
Defrost To defrost frozen food.
Grilling To grill flat food and to toast bread.
Fast Grilling To grill flat food in large quantities and to toast
bread.
Turbo Grilling To roast larger meat joints or poultry with bones
on one shelf position. Also to make gratins and
to brown.
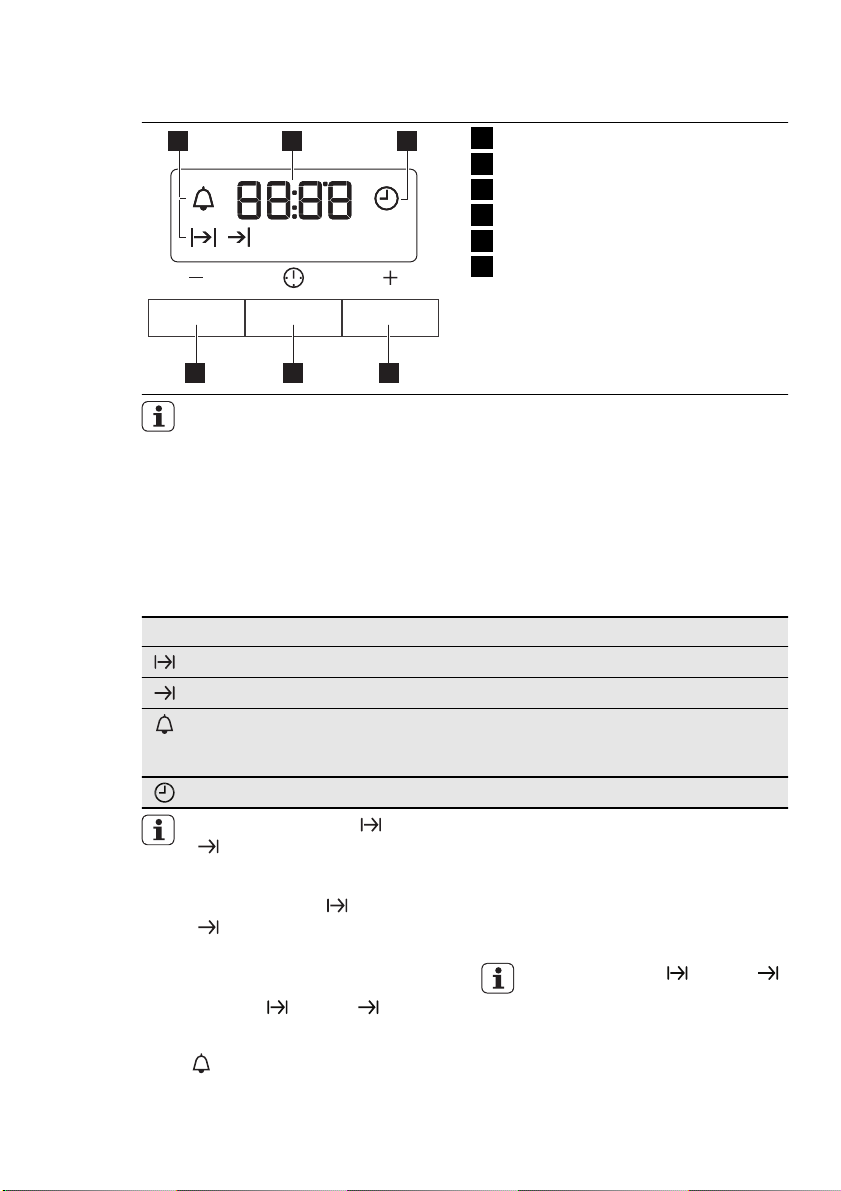
5.3 Electronic programmer
1 2 3
hr min
If you do not use the appliance for
3 minutes, the brightness of the
display decreases to lower the
power consumption. When you
press a button, the display goes
back to the active mode.
6. CLOCK FUNCTIONS
ENGLISH 9
Function indicators
1
Time display
2
Function indicator
3
Button +
4
Selection button
5
Button -
6
456
Clock function Application
Duration To set how long the appliance must operate.
End To set when the appliance must be deactivated.
Minute Minder To set a countdown time. An acoustic signal sounds af-
ter the time period is completed. This function has no
effect on the operation of the appliance.
Time of day To set, change or check the time of day.
3.
You can use Duration and End
at the same time to set the
time when the appliance must be
activated and then deactivated.
First set Duration
.
, then End
Press + or - to set the time for the
necessary clock function.
The display shows the indicator for
the clock function you set. When the
set time ends, the indicator flashes
and an acoustic signal sounds for two
minutes.
6.1 Setting the clock functions
1.
For Duration and End , set an
oven function and temperature. This
is not necessary for the Minute Mind-
.
er
2.
Press the Selection button again and
again until the indicator for the necessary clock function flashes.
4.
Press a button to stop the signal.
5.
Turn the knob for the oven functions
and the knob for the temperature to
the off position.
With the Duration and End
functions, the appliance deactivates automatically.
www.electrolux.com
10
6.2 Cancelling the clock
functions
1.
Press the Selection button again and
again until the necessary function indicator flashes.
7. USING THE ACCESSORIES
WARNING!
Refer to the Safety chapters.
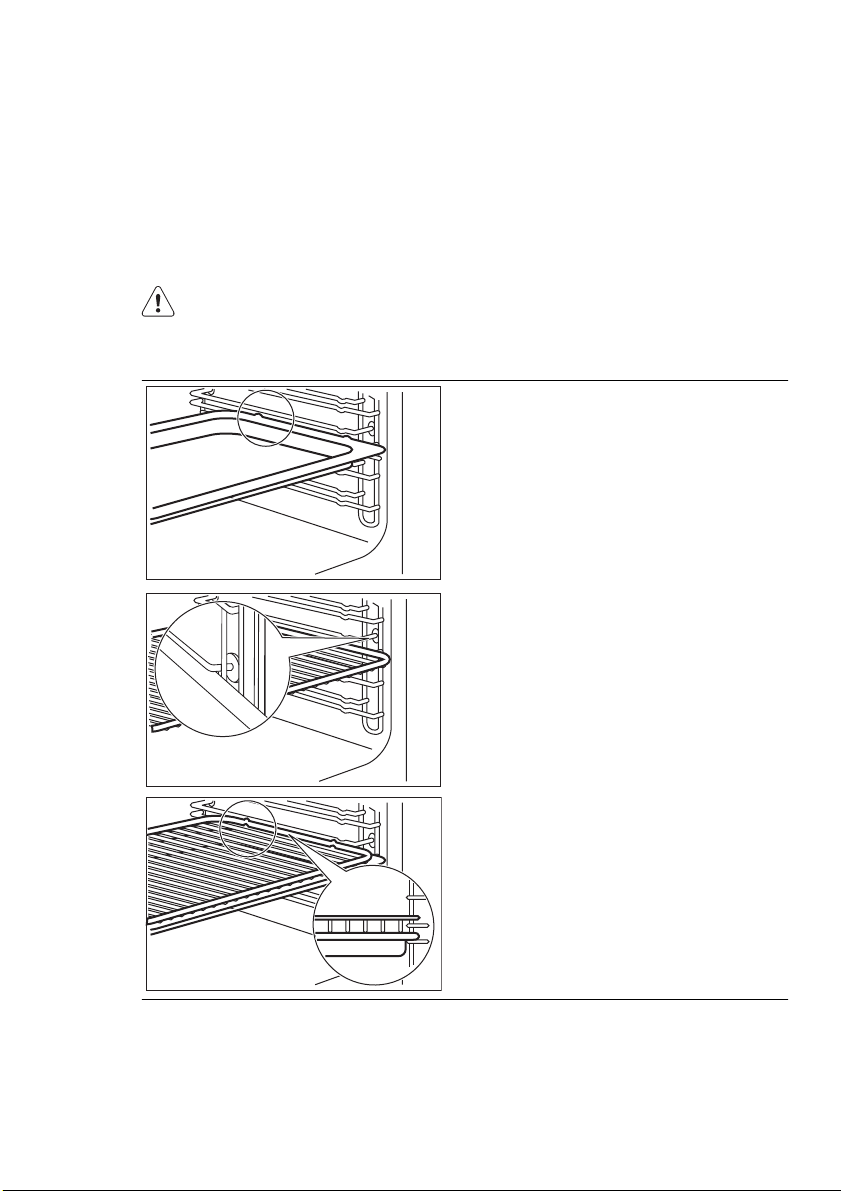
7.1 Inserting the accessories
2.
Press and hold the button -.
The clock function goes out after
some seconds.
Baking tray:
Push the baking tray between the guide
bars of the shelf support.
Wire shelf:
Push the shelf between the guide bars of
the shelf support and make sure that the
feet point down.
• All accessories have small indentations
at the top of the right and left side to increase safety. The indentations are also
anti-tip devices.
Wire shelf and baking tray together:
Push the baking try between the guide
bars of the shelf support and the wire
shelf on the guide bars above.
• The high rim around the shelf is a device which prevents cookware from
slipping.
 Loading...