


EA 1..
Espressoautomat
Automatic Espresso Machine
Máquina de espresso
Máquina de Café Expresso Automática
Automatisk espresso maskin
Espressoautomaatti
Автоматическая кофеварка эспрессо
Automat na espreso
Ekspres ciœnieniowy
Automata presszókávéfõzõ-gép
Αυτόµατη συσκευή παρασκευής εσπρέσο
Gebrauchsanweisung
Operating Instructions
Instrucciones de uso
Manual de Instruções
Bruksanvisning
Käyttöohje
Инструкция по эксплуатации
Návod k použití
Instrukcja obs³ugi
Használati utasítás
Εγχειρίδιο οδηγιών χρήσης
3
4
3
4
C
D
B
A
S
T
R
Q
P
O
N
M
KL
E
F
U
G
H
J
1
2
2
2

5
6
7
5
8
11
3
3
12
9
15
4
10
13
1614

d
Sehr geehrte Kundin,
d
sehr geehrter Kunde,
lesen Sie bitte diese Gebrauchsanweisung sorgfältig durch. Beachten Sie vor
allem die Sicherheitshinweise! Bewahren Sie sie zum späteren Nachschlagen
auf.
Geben Sie die Gebrauchsanweisung
auch an eventuelle Nachbesitzer des
Gerätes weiter.
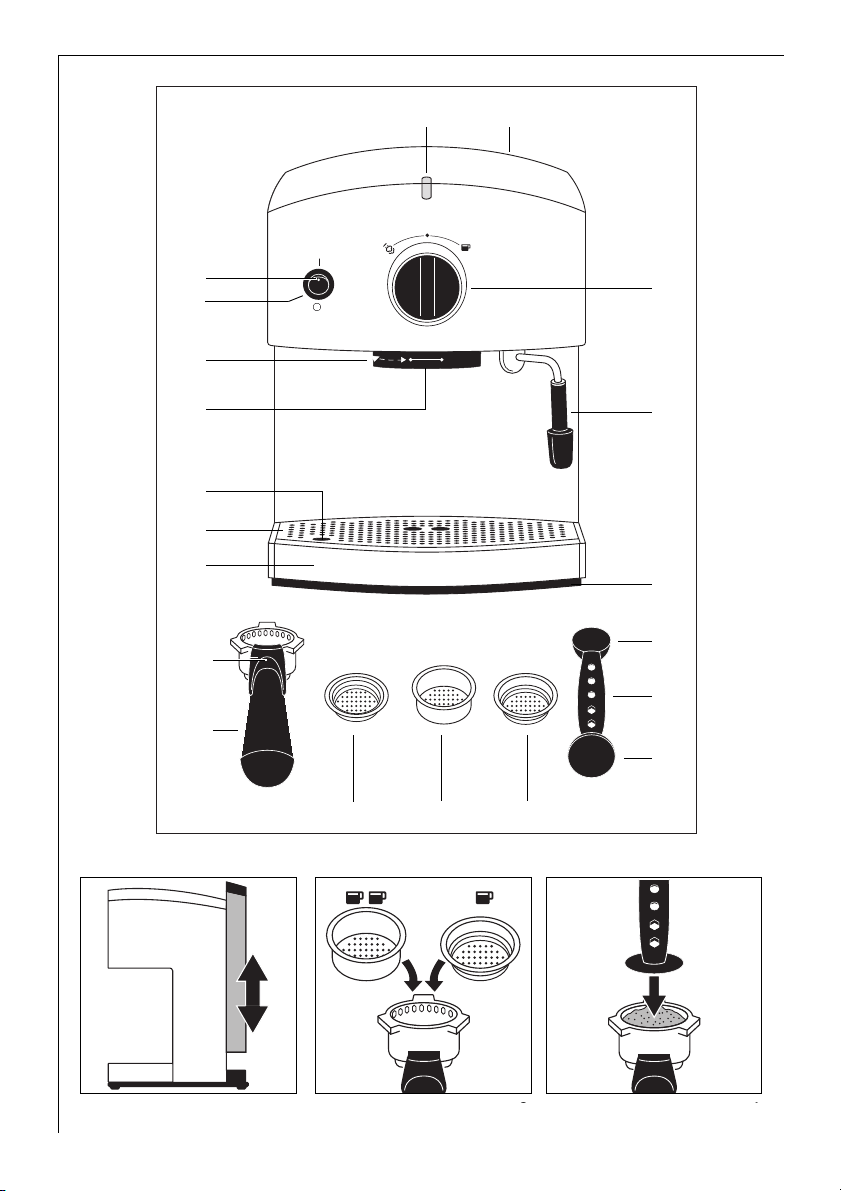
Ausstattung (Bild 1)
A Ein-/Aus-Schalter
B Betriebsanzeige
C Temperaturanzeige
D Wassertank (auf der Rückseite)
E Drehwähler für Kaffee oder Dampf
F Aufschäumdüse (mit Aufsatz)
G Messlöffel
H Wartungshilfe
J Kaffeemehlpresser
K 1-Tassen-Sieb
L 2-Tassen-Sieb
M Sieb für Portionsbeutel (nur EA 130)
N Siebträger
O Fingerschutz
P Tropfschale
Q Tropfgitter
R Füllstandsanzeige
S Brühkopf mit Siebträgeraufnahme
T Sieb im Brühkopf (innen)
U Typschild
1 Sicherheitshinweise
Sicherheit beim Aufstellen
• Das Gerät muss standsicher stehen.
Achten Sie auf eine gerade und waagerechte Aufstellfläche.
• Das Gerät darf nur an ein Stromnetz
angeschlossen werden, dessen Spannung, Stromart und Frequenz mit den
Angaben auf dem Typschild (siehe
Unterseite des Gerätes) übereinstimmen!
Sicherheit beim Betrieb
• Das Netzkabel nie mit heißen Geräteteilen in Berührung bringen!
• Den Netzstecker nie am Kabel aus der
Steckdose ziehen!
• Das Gerät nicht in Betrieb nehmen,
wenn:
– das Kabel beschädigt ist oder
– das Gehäuse sichtbare Beschädig-
gen aufweist.
• Aufschäumdüse, Sieb, Siebträger und
Siebhalterung werden funktionsbedingt während des Betriebes heiß.
• Bitte Kinder fernhalten!
• Funktionsbedingt wird das Gehäuse
während des Betriebs warm.
• Den Siebträger nicht während des
Brühvorganges entnehmen, da das
Gerät unter Druck steht! Verbren-
nungsgefahr!
• Den Wassertank nur mit kaltem Wasser
füllen, niemals mit Mineralwasser,
destilliertem Wasser, Milch oder anderen Flüssigkeiten!
• Gerät nicht in Betrieb nehmen, wenn
der Wassertank nicht gefüllt ist!
• Gerät nicht ohne Tropfschale oder
Tropfgitter betreiben!
Sicherheit bei der Reinigung
• Vor Wartung oder Reinigung sicherstellen, dass das Gerät ausgeschaltet
und der Netzstecker gezogen ist!
• Entkalkungshinweise beachten!
• Das Gerät nicht in Wasser tauchen!
4

d
Sicherheit bei Reparatur
Reparaturen an Elektrogeräten dürfen
nur von Fachkräften durchgeführt
werden. Durch unsachgemäße Reparaturen können erhebliche Gefahren für
den Benutzer entstehen.
Wenn die Netzzuleitung beschädigt ist,
muss der Austausch durch den Hersteller, einen Fachhändler oder eine entsprechend qualifizierte Person
durchgeführt werden, um jede Gefahr
auszuschließen.
Wird das Gerät zweckentfremdet
benutzt oder falsch bedient, kann
keine Haftung für eventuelle Schäden
übernommen werden.
Dieses Gerät entspricht den folgen-
;
den EG-Richtlinien:
• 73/23/EWG vom 19.02.1973 „Niederspannungsrichtlinie", einschließlich
Änderungsrichtlinie 93/68/EWG
• 89/336/EWG vom 03.05.1989 „EMVRichtlinie", einschließlich Änderungsrichtlinie 92/31/EWG
Vor dem ersten Gebrauch
Lesen Sie bitte die Sicherheitshinweise,
um Gefahren für Sie selbst und
Beschädigungen am Gerät zu vermeiden.
0 Stecken Sie den Netzstecker in die
Steckdose.
Vor der ersten Espressozubereitung
sollten Sie das Heizsystem einmal mit
einer Tankfüllung durchspülen. Verfahren Sie dazu genau so, wie unter dem
Abschnitt „Espresso zubereiten“ bzw.
„Milch aufschäumen“ beschrieben,
ohne jedoch Espressomehl in das Sieb
zu geben. Stellen Sie ein möglichst
großes Gefäß in die Mitte des Tropfgitters (Bild 1/ Q) und unter die Aufschäumdüse (Bild 1/ F).
Espresso zubereiten
Nach dem Aufbrühen sollte der
Espresso von einer dichten, schaumigen Schicht, der sogenannten Crema,
bedeckt sein.
Wichtig für einen aromatischen
Espresso mit Crema sind frisches, klares
Wasser, der richtige Mahlgrad und die
Wassertemperatur.
1. Wasser einfüllen (Bild 2)
0 Ziehen Sie den Wassertank nach oben
aus dem Gerät (Bild 2).
0 Öffnen Sie den Tankdeckel.
0 Befüllen Sie den Wassertank nur mit
kaltem, klarem Wasser.
Achten Sie darauf, dass der Wasserpe-
gel nicht unter der Marke MIN (Minimum) und nicht über der Marke MAX
(Maximum) steht.
0 Schließen Sie den Deckel.
0 Setzen Sie den Wassertank wieder ein
und drücken Sie ihn nach unten, so
dass er fest im Gerät sitzt.
Sie können den Tankdeckel auch anhe-
3
ben und zur Seite klappen. So können
Sie den Wassertank auch direkt am
Gerät, z.B. mit einer Kanne, befüllen.
2. Gerät einschalten
0 Schalten Sie das Gerät mit dem Ein-/
Aus-Schalter ein (Bild 1/A). Die
Betriebsanzeige (Bild 1/B, rot) leuchtet, und die Temperaturanzeige
(Bild 1/C, grün) blinkt.
Sobald die Betriebstemperatur erreicht
ist, leuchtet die Temperaturanzeige
dauernd. Die Temperaturanzeige kann
während des Betriebs wieder blinken
zum Zeichen, dass das Gerät nachheizt.
3. Espressomehl einfüllen
(Bild 3, 4)
0 Nehmen Sie den Siebträger, klappen
Sie den Fingerschutz zurück und legen
Sie das 1-Tassen-Sieb oder das 2-Tassen-Sieb in den Siebträger (Bild 3).
5

d
Nur EA 130: Wenn Sie Portionsbeutel
3
benutzen, verwenden Sie das Sieb für
Portionsbeutel (Bild 1/ M und Bild 5).
0 Füllen Sie Espressomehl in das Sieb.
Verwenden Sie:
1 Meßlöffel voll für das 1-Tassen-Sieb,
2 Meßlöffel voll für das 2-Tassen Sieb.
0 Pressen Sie das Espressomehl mit dem
Kaffeemehlpresser (Bild 1/ J) leicht in
das Sieb (Bild 4). Achten Sie darauf,
dass nach dem Pressen das Sieb bis
zum Rand mit Espressomehl gefüllt ist.
Säubern Sie den Rand des Siebes von
Espressomehl.
Pressen Sie das Espressomehl nicht fest
3
in das Sieb! In diesem Fall kann sich der
Durchfluss sehr stark verringern. (Siehe
auch „Was tun, wenn ...“)
Falls Sie das Espressomehl selbst mah-
3
len, wählen Sie den Mahlgrad „mittel“.
4. Siebträger eindrehen
(Bild 6, 7)
0 Positionieren Sie den Siebträger in der
Siebhalterung so, dass sich der Griff
des Siebträgers unterhalb des linken
weißen Dreiecks befindet (Bild 6,“1“).
0 Drehen Sie den Siebträger nach rechts
bis zum Anschlag (Bild 6,“2“), so dass
der Griff nach vorne zeigt und sich
unterhalb der weißen Linie zwischen
den beiden Punkten befindet
(Bild 7,“3“).
5. Tasse(n) unterstellen (Bild 8)
0 Stellen Sie eine Tasse oder zwei Tassen
unter die Öffnungen des Siebträgers
(Bild 8).
6. Espresso aufbrühen
Das Gerät muss die Betriebstempera-
3
tur erreicht haben (grüne Temperaturanzeige Bild 1/C leuchtet dauernd).
0 Drehen Sie den Drehwähler (Bild 1/E)
auf das Symbol . Das Wasser wird
jetzt mit hohem Druck durch das
Espressomehl gepresst.
Kurze Zeit nach dem Start wird der
3
Brühvorgang für einige Sekunden
unterbrochen. Das Kaffeepulver wird
befeuchtet, damit das Aroma sich besser entwickeln kann. Danach wird der
Brühvorgang fortgesetzt.
0 Wenn die gewünschte Menge Espresso
aufgebrüht ist, den Drehwäler zurück
nach links auf die Position "•" drehen.
Nach jeder Espressozubereitung oder
3
nach jedem Dampfbezug, wenn der
Drehwähler in die Position „•“ gedreht
wird, wird das Restwasser in die Tropfschale geleitet. Jede weitere Tasse wird
mit frischem Wasser gebrüht. So erhalten Sie immer den vollen Espressogenuss. Deshalb muss die Tropfschale
regelmäßig geleert werden.
7. Siebträger entnehmen(Bild 9)
0 Drehen Sie den Siebträger nach links
aus der Halterung heraus.
0 Klappen Sie den Fingerschutz nach
vorne und halten Sie ihn gedrückt.
Klopfen Sie das gebrauchte Espressomehl aus dem Siebträger bzw. aus dem
Sieb (Bild 9).
0 Siebhalter und Sieb mit warmem Was-
ser spülen. Siebhalter nicht in der
Geschirrspülmaschine reinigen!
Wenn das Gerät längere Zeit nicht
3
benutzt wird, den Siebträger nicht wieder eindrehen. Dadurch wird die
Lebensdauer der Dichtung am Brühkopf verlängert.
Dampf erzeugen/Milch aufschäumen (Bild 10, 11)
Der heiße Dampf kann zum Aufschäumen von Milch für Cappuccino sowie
zum Erhitzen von Flüssigkeiten verwendet werden.
1. Gerät einschalten
0 Stecken Sie den mitgelieferten Aufsatz
auf die Aufschäumdüse (Bild 10).
6

d
0 Schalten Sie das Gerät mit dem Ein-/
Aus-Schalter (Bild 1/A) ein. Warten
Sie, bis das Gerät seine Betriebstemperatur erreicht hat und die grüne Temperaturanzeige (Bild 1/C) dauernd
leuchtet.
2. Dampf erzeugen/Milch aufschäumen
0 Füllen Sie Milch oder die zu erhitzende
Flüssigkeit in ein hitzebeständiges
Gefäß.
0 Tauchen Sie die Aufschäumdüse in die
Milch bzw. die zu erhitzende Flüssigkeit
(Bild 11).
0 Stellen Sie den Drehwähler (Bild 1/E)
nach links auf das Symbol . Die grüne
Temperaturanzeige (Bild 1/C) blinkt
und das Gerät beginnt, Dampf zu
erzeugen. Zu Anfang können noch
einige Tropfen heißes Wasser mit aus
der Düse austreten.
Wichtig: Die Aufschäumdüse darf den
Boden des Gefäßes nicht berühren, um
den Dampfaustritt nicht zu behindern.
0 Sie stoppen die Dampfzufuhr, indem
Sie den Drehwähler (Bild 1/ E) wieder
nach rechts in die Position „•“ bringen.
0 Stellen Sie die aufgeschäumte Flüssig-
keit ab und drehen Sie den Dampfwähler noch einmal für einige Sekunden
auf das Symbol . Damit entfernen Sie
eventuelle Rückstände von Milch oder
anderen Flüssigkeiten aus der Düse.
Vorsicht! Der Dampf ist heiß.
Für feinen, cremigen Milchschaum ver-
3
wenden Sie am besten kühle, fettarme
Milch.
Cappuccino zubereiten
Füllen Sie eine große Kaffeetasse zu ½
bis ¾ mit Espresso. Geben Sie die aufgeschäumte Milch darüber. Stäuben
Sie etwas Kakaopulver auf den Milchschaum.
Reinigung und Pflege
Tägliche Pflege
Wir empfehlen Ihnen, täglich vor dem
ersten und nach dem letzten Espresso
das System ca. 10 Sekunden lang ohne
Espressomehl durchzuspülen, um zu
vermeiden, dass sich Kaffeepartikel
festsetzen können. Verfahren Sie dazu
wie bei der Espressozubereitung,
jedoch ohne Espressomehl.
0 Stellen Sie danach den Drehwähler
(Bild 1/E) kurz auf die Position .
0 Gießen Sie restliches Wasser aus dem
Wassertank.
Reinigung (Bild 12 – 16)
Schalten Sie vor jeder Reinigung das
1
Gerät aus und ziehen Sie den Netzstecker!
Reinigen Sie kein Teil des Gerätes in
der Geschirrspülmaschine!
0 Wischen Sie alle Flächen an der Ma-
schine mit einem feuchten Tuch ab.
Benutzen Sie keine scharfen oder
scheuernden Reinigungsmittel.
0 Spülen Sie den Wassertank mindestens
einmal pro Woche in normalem Spülwasser.
0 Reinigen Sie das 1-Tassen-Sieb und das
2-Tassen-Sieb von Zeit zu Zeit mit
einer Bürste.
Aufschäumdüse
0 Ziehen Sie den Aufsatz von der Auf-
schäumdüse und spülen Sie den Aufsatz in normalem Spülwasser.
0 Wischen Sie die Aufschäumdüse mit
einem feuchten Tuch sauber. Mit der
Wartungshilfe (Bild 1/ H) können Sie
den Düsenkopf zum Säubern oder Entkalken abschrauben.
Tropfgitter und Tropfschale
Wenn die Füllstandsanzeige (Bild 1/ R)
über das Tropfgitter hinausragt, muss
die Tropfschale geleert werden.
0 Greifen Sie in die Löcher des Tropfgit-
ters. Nehmen Sie das Tropfgitter heraus
und spülen Sie es unter fließendem
Wasser (Bild 12).
7

d
0 Zum Entleeren fassen Sie die Tropf-
schale an beiden Seiten und ziehen Sie
sie nach vorne aus dem Gerät (Bild 13).
0 Nehmen Sie den Kunststoffeinsatz ab
und spülen Sie beides unter fließendem
Wasser (Bild 14).
0 Setzen Sie den Kunststoffeinsatz wie-
der in die Tropfschale ein.
0 Schieben Sie die saubere Tropfschale
zurück in das Gerät und setzen Sie das
Tropfgitter wieder ein.
Brühsieb reinigen
Am Brühkopf befindet sich das Brühsieb, durch das das heiße Wasser
strömt. Untersuchen Sie von Zeit zu
Zeit, ob sich die Löcher des Brühsiebs
mit Kaffeepartikeln zugesetzt haben.
Falls sich die Löcher zugesetzt haben:
0 Schrauben Sie das Brühsieb mit einer
Münze ab (Bild 15).
0 Entnehmen Sie Brühsieb und Dichtung
(Bild 16/1) und entfernen Sie die Dichtung des Brühsiebs (Bild 16/ 2).
0 Reinigen Sie das Brühsieb mit warmem
Wasser und einer Bürste.
0 Spülen Sie die Dichtung mit warmem
Spülwasser.
Wenn das Gerät bei Minustemperatu-
3
ren transportiert werden soll:
0 Wassertank leeren.
0 Drehwähler (Bild 1/E) auf die Position
drehen und das Gerät „ausdampfen“
lassen.
Entkalken
Wenn der Espresso ungewöhnlich langsam durch den Filter läuft, ist es Zeit
für eine Entkalkung.
Wir empfehlen, die Maschine jedes
Vierteljahr zu entkalken. Wenn Sie in
einer Gegend mit hartem Wasser wohnen, muss die Entkalkung evtl. öfter
durchgeführt werden.
Wir empfehlen die Original AEG Ent-
3
kalkungstabletten, PNC 900 195 537/7.
Bestellen können Sie diese über unsere
Serviceline 01801-20 30 90.
Wichtig: Entfernen Sie vor dem Entkalken das Brühsieb (Bild 1/T) und die
Dichtung des Brühsiebes, wie im Abschnitt „Brühsieb reinigen“ beschrieben
(Bild 15, 16).
Füllen Sie erst das Wasser in den Wassertank, dann den Entkalker, niemals
umgekehrt. Es müssen mindestens 0,5 l
Wasser verwendet werden. Entsprechend ist das Entkalkungsmittel zu
dosieren.
0 Ziehen Sie den Netzstecker aus der
Steckdose und lassen Sie das Gerät
abkühlen.
0 Setzen Sie den Siebträger ohne Sieb
ein.
0 Stellen Sie einen ausreichend großen
Behälter unter den Siebträger.
0 Stecken Sie den Netzstecker in die
Steckdose und schalten Sie das Gerät
ein.
0 Stellen Sie den Drehwähler (Bild 1/E)
auf die Position und lassen Sie ca.
1/3 der Entkalkungslösung durch das
System laufen.
0 Danach das Gerät ausschalten und die
Entkalkungslösung ca. 10 Minuten einwirken lassen.
0 Lassen Sie anschließend den Rest durch
das System laufen.
0 Danach den Wassertank gründlich rei-
nigen.
0 Den Wassertank mit frischem Wasser
füllen und die ganze Füllung durch das
System laufen lassen.
Bei starker Verkalkung den Vorgang
wiederholen.
0 Nach dem Entkalken Brühsieb und
Dichtung wieder einsetzen.
Was tun, wenn ...
• die Espressotemperatur zu niedrig ist:
– Führen Sie einen Brühvorgang ohne
Espressomehl, aber mit Sieb und
Siebträger durch, um das System
vorzuwärmen.
– Tassen vorwärmen.
– Gerät entkalken.
8

d
• sich die Durchlaufgeschwindigkeit
merklich verringert:
– Espressomehl nicht zu fest ins Sieb
pressen.
– Espressomehl nicht zu fein mahlen
(Mahlgrad „mittel“).
– Gerät entkalken.
• der Espresso seitlich aus dem Siebträger herausläuft:
– Sicherstellen, daß der Siebträger
richtig im Haltering eingesetzt ist.
– Siebträger etwas fester im Haltering
eindrehen.
– Den Rand des Siebträgers von
Espressomehl reinigen.
• kein Espresso austritt:
– Sicherstellen, daß der Wassertank
gefüllt und richtig eingesetzt ist.
– Sicherstellen, daß der Siebträger
richtig im Haltering eingesetzt ist.
– Sicherstellen, dass der Drehwähler
(Bild 1/E) nach rechts auf die
Position gedreht wurde.
– Espressomehl nicht zu fest in das
Sieb pressen.
– Brühsieb reinigen.
– Gerät entkalken.
• die Cremabildung sich verschlechtert:
– Sicherstellen, daß sich ausreichend
Espressomehl im Sieb befindet.
– Stets frisches Espressomehl verwen-
den.
– Espressomehl leicht andrücken.
• zu wenig Schaum beim Milchaufschäumen entsteht:
– Stets kühle, frische und fettarme
Milch verwenden.
– Aufschäumdüse reinigen.
• der Durchlauf sich erhöht:
– Epressomehl ist zu grob gemahlen:
– Sicherstellen, dass sich ausreichend
Espressomehl im Sieb befindet.
• die Kaffemaschine sich während des
Betriebes ausschaltet:
Die Pumpe des Gerätes ist mit einer
Temperatursicherung ausgestattet, die
es vor Überhitzung schützt. Die Temperatursicherung unterbricht den Betrieb
der Maschine, wenn die Maschine zu
lange ohne Pause betrieben wurde
oder wenn die Pumpe ohne Wasser
gelaufen ist.
– Stellen Sie den Ein- /Aus-Schalter
auf „Aus“ und ziehen Sie den Netzstecker aus der Steckdose.
– Lassen Sie die Maschine mindestens
20 Minuten abkühlen. Füllen Sie
Wasser nach.
– Schließen Sie das Gerät wieder ans
Stromnetz an und schalten Sie es
ein. Falls das Gerät jetzt nicht wieder
funktioniert, wenden Sie sich an
unseren Kundendienst.
Technische Daten
• Netzspannung: 230–240 V, 50 Hz
• Leistungsaufnahme: 1250 W
(Siehe Typenschild auf der Geräteunterseite.)
2 Entsorgung
Verpackungsmaterial
• Geben Sie den Verpackungskarton in
die Altpapiersammlung.
• Den Kunststoffbeutel aus Polyethy-
len (PE) und die FCKW-freien
geschäumten Teile können Sie in
einer Sammelstelle oder einem
Recyclinghof abgeben.
9

g
Dear Customer,
g
Please read this instruction manual
carefully. Please pay particular attention to the safety instructions. Retain it
for future reference.
Give the instruction manual to any
future owner of the machine.
Equipment (Figure 1)
A On/off switch
B Power indicator light
C Temperature indicator light
D Water tank (at the rear)
E Selector dial for coffee or steam
F Steam nozzle (with attachment)
G Measuring spoon
H Maintenance tool
J Ground coffee presser
K 1-cup filter
L 2-cup filter
M Filter for prepacked portions
(only EA130)
N Filter holder
O Finger protector
P Drip catcher
Q Drip grating
R Fill level indicator
S Brew head with filter holder retainer
T Filter in brew head (inside)
U Rating plate
1 Safety instructions
Safety when setting up the
appliance
• The appliance must be stable when
standing. Check that the site at which
the appliance is to be installed is even
and level.
• The appliance may only be connected
to a mains supply which has a voltage,
electricity type and frequency that
complies with the specifications on the
rating plate (see underside of the
appliance).
Safety when operating the
appliance
• Never bring the electrical cord in
contact with hot components of the
appliance.
• Never remove the power plug from the
power point by pulling on the cord.
• Do not use the appliance if:
– the cord is damaged or
– there is visible damage to the
housing.
• The steam nozzle, filter, filter holder
and retainer necessarily become hot
during use.
• Ensure that children are kept away.
• The housing will necessarily become
warm during use.
• Do not remove the filter holder during
the brewing process as the appliance is
pressurised. The risk of burns exists.
• Fill the water tank only with cold
water, never with distilled water,
mineral water, milk or other liquids.
• Do not use the appliance if the water
tank has not been filled.
• Do not use the appliance without the
drip tray or the drip grating.
Safety during cleaning
• Prior to maintenance or cleaning
ensure that the appliance has been
switched off and that the power plug
has been disconnected.
10

g
• Follow the instructions referring to
decalcification.
• Do not immerse the appliance in water.
Safety during repairs
Repairs to electrical appliances may
only be carried out by qualified service
engineers. Improper repairs can give
rise to significant hazards for the user.
If the supply cord is damaged, it must
be replaced by the manufacturer, its
service agent or similarly qualified persons in order to avoid a hazard.
If the appliance is used for purposes
other than those for what it was
intended or is operated wrongly, no liability for possible damages can be
accepted.
This appliance conforms with the
;
following EU Directives:
• 73/23/EEC dated 19.02.1973 “Low
Voltage Directive”, including
Modification Directive 93/ 68 / EEC
• 89/336/EEC dated 03.05.1989 “EMC
Directive”, including Modification
Directive 92/ 31/EEC
Prior to using the appliance for
the first time
Please read the safety instructions in
order to prevent danger to yourself
and damage to the appliance.
0 Insert the power plug into the power
outlet.
Prior to preparing an espresso for the
first time you should rinse out the
heating system once by filling the tank.
Proceed exactly as described in the
section “Making an espresso” and
“Frothing milk”, but without placing
any ground coffee in the filter. Place a
container that is as large as possible in
the middle of the drip grating
(figure 1/ Q) and under the steam nozzle (figure 1/F).
Making an espresso
After having been brewed, the espresso
should be covered with a dense frothy
layer, the so-called crema.
To achieve an aromatic espresso with
crema, fresh, clear water, the correct
size grounds and the water temperature are important.
1. Adding water (Figure 2)
0 Pull the water tank upwards and out of
the appliance (figure 2).
0 Open the tank lid.
0 Fill the water tank with cold, clear
water only.
Ensure that the water line does not lie
below the MIN (minimum) line or
above the MAX (maximum) line.
0 Close the tank lid.
0 Replace the water tank and press it
downwards so that it is sitting firmly in
the appliance.
You can also lift the tank lid and fold it
3
to the side. This enables you to fill the
water tank directly when it is in the
appliance, e.g. with a jug.
2. Switching on the appliance
0 Switch the appliance on using the on/
off switch (figure 1/A). The power indicator (figure 1/ B, red) will illuminate
and the temperature indicator
(figure 1/ C, green) will start to blink.
As soon as the operating temperature
has been attained, the temperature
indicator light will be on. The tempera-
ture indicator may blink again while
the appliance is being used to indicate
that the appliance is re-heating.
11

g
3. Adding espresso grounds
(figures 3, 4)
0 Take the filter holder, fold back the fin-
ger protector and place the 1-cup filter
or the 2-cup filter into the filter holder
(figure 3).
Only EA 130: When using prepacked
3
portions, insert the filter for prepacked
portions (figure 1/ M and figure 5).
0 Fill the filter with espresso grounds.
Use:
1 full measuring spoon for the 1-cup
filter, 2 full measuring spoons for the
2-cup filter.
0 Lightly press the espresso grounds into
the filter (figure 4) using the ground
coffee presser (figure 1/J). Ensure that
after pressing the coffee, the filter is
still filled to the rim with espresso
grounds. Clean any espresso grounds
away from the rim of the filter.
Do not press the espresso grounds too
3
firmly into the filter. In such an event
the flow of water through the coffee
can decrease significantly. (See also
“What to do if…”)
If you grind espresso grounds yourself,
3
choose the “middle” fineness level.
4. Screwing on the filter holder
(Figures 6, 7)
0 Position the filter holder in the filter
retainer such that the handle of the
filter holder is located below the left
white triangle (figure 6,“1“).
0 Twist the filter holder to the right as
far as it will go (figure 6,“2“), so that
the handle is pointing forwards and is
located beneath the white line
between the two points (figure 7,“3“).
5. Placing cup(s) underneath
(Figure 8)
0 Place one or two cups under the open-
ings in the filter holder (figure 8).
6. Brewing an espresso
The appliance must have attained its
3
operating temperature (green light
figure 1/ C is on).
0 Turn the selector dial (figure 1/E) to
the symbol . The water will now be
forced through the espresso grounds
under high pressure.
Prior to the actual brewing process, the
3
ground coffee is moistened to extract
its full aroma. The brewing process is
then continued.
0 When the desired amount of espresso
has been brewed, turn the selector dial
left again to the “•” position.
Each time after making an espresso or
3
after using steam when the selector
dial is turned to the “•” position, any
remaining water is directed to the drip
tray. Each additional cup is brewed
using fresh water. This is how to obtain
the total enjoyment out of espresso.
This is why the drip tray must be emptied regularly.
7. Removing the filter holder
(Figure 9)
0 Twist the filter holder to the left and
out of the retainer.
0 Fold the finger protector forwards and
hold it down. Tap the used espresso
grounds out of the filter holder and
out of the filter (figure 9).
0 Rinse the filter holder and the filter
with warm water. Do not clean the filter holder in the dishwasher!
If the appliance is not going to be used
3
for a longer period of time, do not
screw the filter holder back in. This will
increase the life of the seal located on
the brew head.
12

g
Creating steam/frothing milk
(Figures 10, 11)
The hot steam can be used to froth
milk for a cappuccino or to heat liquids.
1. Switch on the appliance
0 Place the attachment provided onto
the steam nozzle (figure 10).
0 Switch on the appliance using the on/
off switch (figure 1/ A). Wait until the
appliance has attained its operating
temperature and the green temperature indicator (figure 1/C) is on.
2. Creating steam/frothing milk
0 Pour some milk or other liquid to be
heated into a heat-proof container.
0 Immerse the steam nozzle into the milk
or liquid to be heated (figure 11).
0 Turn the selector dial (figure 1/E) to
the left onto the symbol. The green
temperature indicator (figure 1/C) is
blinking and the appliance will begin
to create steam. At the beginning some
drops of water may drip out of the
nozzle as well.
Important: So as not to prevent the
steam from exiting, the steam nozzle
must not touch the base of the container.
0 Stop steam from being emitted by
turning the selector dial (figure 1/ E)
back to the right into the “•” position.
0 Place the steamed liquid to one side
and turn the steam selection switch
back to the symbol for a couple of
seconds. This will remove any milk residue or residue from other liquids out
of the nozzle. Caution: The steam is
hot.
To achieve a fine, creamy milk froth it
3
is best to use cool low-fat milk.
Making a cappuccino
Fill a large coffee cup from ½ to ¾ full
of espresso. Pour the frothed milk over
the top. Sprinkle a little cocoa over the
milk froth.
Cleaning and care
Daily care
We recommend that, each day prior to
the first and after the last espresso, you
rinse out the system for approx. 10
seconds without espresso grounds in
order to prevent particles coffee from
becoming lodged in the appliance. Proceed as for making an espresso, but
without using espresso grounds.
0 Afterwards, turn the selector dial (fig-
ure 1/ E) briefly to the position.
0 Pour any remaining water out of the
water tank.
Cleaning (figures 12 – 16)
Prior to cleaning the appliance, switch
1
it off and disconnect the power plug.
Do not clean any part of the appliance in the dishwasher.
0 Wipe all the appliance’s surfaces using
a damp cloth. Do not use harsh or
scratching cleaning agent.
0 Rinse out the water tank at least once
a week in normal rinse water.
0 Clean the 1-cup filter and the 2-cup
filter from time to time using a brush.
Steam nozzle
0 Remove the attachment from the
steam nozzle and rinse the attachment
in normal rinse water.
0 Wipe the steam nozzle clean using a
damp cloth. You can use the maintenance tool (figure 1/H) to screw off
the nozzle head to clean it or decalcify
it.
Drip grating and drip tray
The drip tray must be emptied when
the level indicator (figure 1/R) is protruding above the drip grating.
0 Insert your fingers into the holes in the
drip grating. Remove the drip grating
and rinse it under running water
(figure 12).
0 To empty it, hold the drip tray on both
sides and pull it forwards and out of
the appliance (figure 13).
13

g
0 Remove the plastic attachment and
rinse both under running water
(figure 14).
0 Place the plastic attachment back into
the drip tray.
0 Push the clean drip tray back into the
appliance and place the drip grating
back in.
Cleaning the brew filter
From time to time check the brew filter
to ensure that the holes in the filter
have not become blocked by coffee
particles. The brew filter is located on
the underside of the brew head.
If the holes have become blocked:
0 Unscrew the brew filter using a coin
(figure 15).
0 Remove the brew filter and seal
(figure 16/ 1) and remove the brew filter’s seal (figure 16/ 2).
0 Clean the brew filter with warm water
and a brush.
0 Rinse the seal with warm rinse water.
If the appliance is to be transported at
3
temperatures below zero:
0 Empty the water tank.
0 Turn the selector dial (figure 1/E) to
the position and let the appliance
dry.
Decalcifying
If the espresso is flowing through the
filter at a slower rate than usual, it is
time for the appliance to be decalcified.
We recommend that you decalcify the
machine once every three months. If
you live in an area with hard water the
decalcifying procedure may have to be
carried out more often.
We recommend to use only the original
3
AEG decalcifying tabs PNC
900 195 537/7.
Important: Prior to decalcifying, remove the brew filter (figure 1/T) and
the brew filter’s seal, as described in
14
the section “Cleaning the brew filter”
(figures 15, 16).
First pour the water into the water
tank, then add the decalcifier; never in
the reverse order. At least 0.5 litres of
water must be used. The decalcifier
should be added accordingly.
0 Remove the power plug from the
power point and allow the appliance to
cool.
0 Place the filter holder in position with-
out the filter.
0 Place a sufficiently large container
under the filter holder.
0 Insert the power plug into the power
point and switch on the appliance.
0 Afterwards, turn the selector dial (fig-
ure 1/ E) to the position and let
approx. 1/3 of the decalcifier flow
through the system.
0 Then switch off the appliance and
allow the decalcifying solution to act
for approx. 10 minutes.
0 Allow the rest of the decalcifying solu-
tion to rinse the brew head.
0 Then thoroughly clean the water tank.
0 Fill the water tank with fresh water
and allow all of the water to flow over
the brew head.
Repeat the procedure if there is a lot of
limescale.
0 After decalcifying the appliance,
replace the brew filter and seal.
What to do if…
• the espresso temperature is too low:
– Carry out the brewing procedure
without using espresso grounds, but
using the filter and filter holder, in
order to preheat the system.
–Preheat the cups.
– Decalcify the appliance.
• the flow speed decreases noticeably:
– Do not press the espresso grounds
too firmly into the filter.
– Do not grind the espresso grounds
too finely (“medium” fineness).
– Decalcify the appliance.

g
• the espresso is flowing out of the side
of the filter holder:
– Ensure that the filter holder has
been placed in the retainer correctly.
– Twist the filter holder a little more
firmly into the retainer.
– Clean any espresso grounds away
from the rim of the filter holder.
• no espresso is coming out:
– Ensure that the water tank has been
filled and is correctly in place.
– Ensure that the filter holder has
been placed in the retainer correctly.
– Ensure that the selector dial
(figure 1/E) has been turned right to
the position.
– Do not press the espresso grounds
too firmly into the filter.
– Clean the brew filter.
– Decalcify the appliance.
• the crema is no longer being produced
as it should:
– Ensure that there are enough
espresso grounds in the filter.
– Always use fresh espresso grounds.
– Press the espresso grounds lightly.
• too little milk froth is created when
steaming milk:
– Always use cool, fresh and low-fat
milk.
– Clean the steam nozzle.
• the flow increases:
– the espresso grounds have been
ground too rough:
– Ensure that there are enough
espresso grounds in the filter.
• the coffee machine switches itself off
while operating:
The appliance pump is equipped with a
temperature fuse that protects it from
overheating. The temperature fuse
interrupts the machine’s operation, if
the machine is operated for too long or
if the pump is run without water.
– Set the on / off switch to “off” and
remove the plug from the mains
socket.
– Leave the machine to cool for at
least 20 minutes. Fill up with water.
– Plug the appliance into the mains
again and switch it on. If the
appliance still does not work, please
contact our Customer Care
Department.
Technical data
• Mains voltage: 230–240 V, 50 Hz
• Power consumption: 1250 W
(See rating plate on the underside of
the appliance.)
2 Disposal
Packaging material
• Place the packaging cardboard in
the waste paper collection.
• The plastic bag made of
polyethylene (PE) and the CFC-free
foam parts can be deposited at a
collection point or a recycling
centre.
15

e
Distinguida cliente,
e
distinguido cliente:
sírvase leer atentamente estas instrucciones de uso. ¡Observe, sobre todo, las
indicaciones para la seguridad! Consérvelas para consultas posteriores.
Entregue las instrucciones de uso también a eventuales propietarios posteriores del aparato.
Equipamiento (Fig. 1)
A Interruptor ON/OFF
B Indicador de funcionamiento
C Indicador de temperatura
D Depósito de agua (en el lado posterior)
E Selector giratorio para café o vapor
F Boquilla de espuma (con suplemento)
G Cuchara medidora
H Ayuda de mantenimiento
J Prensador de café molido
K Filtro para 1 taza
L Filtro para 2 tazas
M Filtro para bolsitas individuales
(sólo EA 130)
N Portafiltros
O Protección para los dedos
P Bandeja recogegotas
Q Rejilla antigoteo
R Indicador de nivel
S Cabezal escaldador con alojamiento
para el portafiltros
T Filtro en el cabezal escaldador (interior)
U Placa de características
1 Indicaciones para la
seguridad
Seguridad en la colocación
• El aparato se tiene que colocar de
forma estable. Cuide de instalarlo en
una superficie lisa y horizontal.
• ¡El aparato sólo se debe conectar a una
red eléctrica cuya tensión, clase de
corriente y frecuencia coincidan con
los datos que figuran en la placa de
características (ver lado inferior del
aparato)!
Seguridad en el funcionamiento
• ¡El cable de red no debe entrar nunca
en contacto con partes calientes del
aparato!
• ¡Para extraer el conector de red de la
caja de enchufe, no tire nunca del
cable!
• El aparato no se debe poner en servicio
si:
– el cable está defectuoso o
– la carcasa muestra defectos visibles.
• Por razones técnicas, la boquilla de
espuma, el filtro, el portafiltros y el
soporte de filtro se calientan durante el
funcionamiento.
• ¡Mantenga alejados a los niños!
• Por razones técnicas, la carcasa se
calienta durante el funcionamiento.
• ¡No retire el portafiltros durante el
proceso de escaldado, dado que el
aparato se encuentra bajo presión!
¡Peligro de quemaduras!
• El depósito de agua sólo se debe llenar
con agua fría; ¡nunca con agua mineral
ni destilada, leche u otros líquidos!
• ¡El aparato no se debe poner en
servicio si el depósito de agua no está
lleno!
• ¡El aparato no se debe utilizar sin
bandeja recogegotas o sin rejilla
antigoteo!
16

e
Seguridad en la limpieza
• ¡Antes de proceder al mantenimiento o
a la limpieza, cerciórese de que el
aparato está desconectado y el
conector separado de la red!
• ¡Observe las indicaciones para la
descalcificación!
• ¡No sumerja el aparato en agua!
Seguridad en la reparación
Las reparaciones en aparatos eléctricos
deben ser ejecutadas únicamente por
técnicos cualificados. En caso de reparaciones inadecuadas se pueden producir considerables peligros para el
usuario.
Si el cable de alimentación estuviera
dañado, la sustitución del mismo sólo
podrá realizarse por el propio fabricante, un distribuidor especializado o
una persona debidamente cualificada
para ello, para excluir cualquier riesgo.
En caso de uso inadecuado o manejo
incorrecto del aparato, no se puede
asumir ninguna responsabilidad en
caso de eventuales daños.
Este aparato es conforme a las
;
siguientes directivas CE:
• 73/23/CEE del 19.02.1973 “Directiva
de Baja Tensión”, incluyendo Directiva
de modificación 93/68/CEE
• 89/336/CEE del 03.05.89 “Directiva de
Compatibilidad Electromagnética”,
incluyendo Directiva de modificación
92/31/CEE
Antes del primer uso
Sírvase leer las indicaciones para la
seguridad para evitar peligros para su
persona y daños en el aparato.
0 Introduzca el enchufe de red en la caja
de enchufe.
Antes de la primera preparación de
espresso debería aclarar una vez el sistema de calentamiento con una carga
del depósito. Para este fin, proceda de
la forma descrita en el apartado “Preparar espresso” o “Espumar leche”, pero
sin colocar café molido en el filtro.
Coloque un recipiente lo más grande
posible en el centro de la rejilla antigoteo (Fig. 1 /Q) y debajo de la boquilla de
espuma (Fig. 1/F).
Preparar espresso
Después del escaldado, el espresso
debería estar cubierto de una densa
capa espumosa: la denominada crema.
Lo importante para obtener un
espresso aromático con crema son
agua fresca y clara, el grado de
molienda correcto y la temperatura del
agua.
1. Introducir el agua (Fig. 2)
0 Retire el depósito de agua hacia arriba
(Fig. 2).
0 Abra la tapa del depósito.
0 Llene el depósito de agua únicamente
con agua fría y clara.
Preste atención a que el nivel de agua
no se sitúe por debajo de la marca MIN
(mínimo) ni por encima de la marca
MAX (máximo).
0 Cierre la tapa.
0 Vuelva a insertar el depósito de agua y
apriételo hacia abajo para situarlo firmemente en el interior del aparato.
También puede levantar la tapa del
3
depósito y abatirla hacia un lado. El
depósito de agua también se puede llenar directamente en el aparato, p.ej.
con la ayuda de una jarra.
2. Conectar el aparato
0 Conecte el aparato con el interruptor
ON/OFF (Fig. 1/A). El indicador de funcionamiento (Fig. 1/B, rojo) se enciende
y el indicador de temperatura (Fig. 1/C,
verde) parpadea.
En cuanto se ha alcanzado la temperatura de servicio, el indicador de temperatura deja de parpadear y se queda
encendido. Durante el funcionamiento, el indicador de temperatura
puede volver a parpadear, lo cual
indica que el aparato vuelve a calentarse.
17

e
3. Introducir café molido
(Fig.3,4)
0 Tome el portafiltros, rebata la protec-
ción para los dedos e inserte el filtro
para 1 o para 2 tazas en el portafiltros
(Fig. 3).
Sólo EA 130: si utiliza bolsitas indivi-
3
duales, hágalo con el filtro para bolsitas individuales (Fig. 1/M y Fig. 5).
0 Introduzca café molido en el filtro. Uti-
lice:
1 cuchara medidora para el filtro para
1 taza, 2 cucharas medidoras para el
filtro para 2 tazas.
0 Con el prensador de café molido (Fig.
1/J), apriete el café ligeramente en el
filtro (Fig. 4). Preste atención a que,
después de prensar, el filtro esté lleno
hasta el borde de café molido. Limpie el
café molido del borde del filtro.
¡No apriete el café molido demasiado
3
en el filtro! En este caso, el flujo se
puede reducir fuertemente. (Véase
también “Qué hacer cuando ...”)
En caso de moler usted mismo su café,
3
elija el grado de molienda “mediano”.
4. Insertar el portafiltros
(Fig.6,7)
0 Posicione el portafiltros en el soporte
de filtro, de modo que el mango del
portafiltros se sitúe por debajo del
triángulo blanco izquierdo (Fig. 6,“1“).
0 Gire el portafiltros hacia la derecha
hasta el tope (Fig. 6,“2“), de modo que
el mango apunte hacia delante y se encuentre por debajo de la línea blanca
entre los dos puntos (Fig. 7,“3“).
5. Colocar la(s) taza(s) (Fig. 8)
0 Coloque una o dos tazas por debajo de
los orificios del portafiltros (Fig. 8).
6. Preparar espresso
El aparato debe haber alcanzado la
3
temperatura de servicio (el indicador
verde de temperatura, fig. 1/C, permanece encendido).
0 Gire el selector (Fig. 1/E) hasta el sím-
bolo . Ahora, el agua es impulsada a
alta presión a través del café molido.
Poco después del comienzo, se inter-
3
rumpe durante algunos segundos el
proceso de erogación. Con ello, el café
molido se humedece, para que el
aroma pueda desarrollarse mejor.
Después, el agua hirviendo a presión
continúa pasando por el café.
0 Cuando haya preparado la cantidad
deseada de espresso, vuelva a girar el
selector giratorio hacia la izquierda a la
posición “•”.
Después de cada preparación de
3
espresso o toma de vapor, el agua restante se conduce a la bandeja recogegotas al girar el selector giratorio a la
posición “•”. Cada nueva taza se prepara con agua fresca. De este modo,
podrá disfrutar siempre plenamente de
su espresso. Por esta razón, la bandeja
recogegotas se tiene que vaciar regularmente.
7. Retirar el portafiltros(Fig. 9)
0 Gire el portafiltros hacia la izquierda
para retirarlo del soporte.
0 Rebata la protección para los dedos
hacia delante y manténgala apretada.
Golpee ligeramente el portafiltros o el
filtro para eliminar el café usado
(Fig. 9).
0 Aclare el portafiltros y el filtro con
agua caliente. ¡El portafiltros no es
apto para el lavavajillas!
En caso de no utilizar el aparato
3
durante un tiempo prolongado, no
vuelva a enroscar el portafiltros. De
este modo se alarga la vida útil de la
junta en el cabezal escaldador.
18

e
Generar vapor/espumar leche
(Fig. 10, 11)
El vapor caliente se puede utilizar para
espumar leche para capuccino, así
como para calentar líquidos.
1. Conexión del aparato
0 Enchufe el suplemento adjunto a la
boquilla de espuma (Fig. 10).
0 Conecte el aparato con el interruptor
ON/OFF (Fig. 1/A). Espere hasta que el
aparato haya alcanzado su temperatura de servicio y el indicador verde de
temperatura (Fig. 1/C) permanezca encendido sin parpadear.
2. Generar vapor/espumar leche
0 Introduzca la leche o el líquido a calen-
tar en un recipiente resistente al calor.
0 Sumerja la boquilla de espuma en la le-
che o en el líquido a calentar (Fig. 11).
0 Coloque el selector giratorio (Fig. 1/E)
hacia la izquierda en el símbolo . El
indicador (Fig. 1/C) verde de temperatura parpadea, el aparato empieza a
producir vapor. Al principio pueden salir todavía unas gotas de agua cliente
de la boquilla.
Importante: la boquilla de espuma no
debe tocar el fondo del aparato para
que la salida del vapor no quede obstaculizada.
0 El suministro de vapor se corta girando
el selector giratorio (Fig. 1/E) de nuevo
hacia la derecha a la posición “•”.
0 Deposite el líquido espumado y vuelva
a girar el selector de vapor durante
unos segundos al símbolo . De este
modo se eliminan eventuales restos de
leche u otros líquidos de la boquilla.
¡Precaución! El vapor está caliente.
Para obtener una espuma de leche fina
3
y cremosa, utilice leche fresca con bajo
contenido en grasa.
Preparar capuccino
Llene una taza de café grande hasta ½
a ¾ de espresso. Vierta la lecha espumada encima. Espolvoree un poco de
polvo de cacao encima de la espuma de
leche.
Limpieza y conservación
Cuidados diarios
Le recomendamos aclarar el sistema
cada día antes del primer y después del
último espresso durante 10 segundos
sin café molido para evitar que se puedan acumular partículas de café. Para
este fin, proceda como para preparar
espresso, pero sin café molido.
0 A continuación, coloque el selector gi-
ratorio (Fig. 1/ E) brevemente en la
posición .
0 Tire el agua restante del depósito de
agua.
Limpieza (Fig. 12 – 16)
¡Antes de cada limpieza, desconecte el
1
aparato y retire el enchufe de red!
¡No limpie ningún elemento del aparato en el lavavajillas!
0 Frote todas las superficies de la máqui-
na con un paño húmedo. No utilice
productos de limpieza agresivos o
abrasivos.
0 Lave el depósito de agua al menos una
vez a la semana en agua con detergente normal.
0 Limpie el filtro para 1 y para 2 tazas de
vez en cuando con un cepillo.
Boquilla de espuma
0 Retire el suplemento de la boquilla de
espuma y lávelo en agua con detergente normal.
0 Limpie la boquilla de espuma con un
paño húmedo. Con la ayuda de mantenimiento (Fig. 1/H) puede desenroscar
el cabezal de boquilla para limpiarlo o
descalcificarlo.
Rejilla antigoteo y bandeja
recogegotas
Cuando el indicador de nivel (Fig. 1/R)
sobrepasa la rejilla antigoteo, se tiene
que vaciar la bandeja recogegotas.
0 Introduzca los dedos en los orificios de
la rejilla. Retire la rejilla antigoteo y lávela bajo el grifo (Fig. 12).
19

e
0 Para vaciar la bandeja recogegotas, su-
jétela por ambos lados y extráigala del
aparato hacia delante (Fig. 13).
0 Quite el inserto de material sintético y
lave ambos elementos bajo el grifo
(Fig. 14).
0 Vuelva a colocar el inserto de material
sintético en la bandeja recogegotas.
0 Vuelva a introducir la bandeja recoge-
gotas limpia en el aparato e inserte la
rejilla antigoteo.
Limpiar el filtro de escaldado
En el cabezal escaldador se encuentra
el filtro de escaldado a través del cual
fluye el agua caliente. Examine de vez
en cuando si los agujeros del filtro de
escaldado han quedado obstruidos por
partículas de café.
Si los agujeros están obstruidos:
0 desenrosque el filtro de escaldado con
la ayuda de una moneda (Fig. 15).
0 Retire el filtro de escaldado y la junta
(Fig. 16/1) y quite la junta del filtro de
escaldado (Fig. 16/2).
0 Limpie el filtro de escaldado con agua
caliente y un cepillo.
0 Lave la junta con agua caliente y de-
tergente.
Si el aparato será transportado a tem-
3
peraturas inferiores a cero grados:
0 vacíe el depósito de agua.
0 Coloque el selector giratorio (Fig. 1/E)
en posición y deje que se evaporen
los restos de agua.
Descalcificar
Cuando el espresso tarda excesivamente en atravesar el filtro, es hora de
descalcificar el aparato.
Recomendamos descalcificar la
máquina cada tres meses. Si vive en
una zona de agua dura, puede ser
necesario efectuar esta operación con
mayor frecuencia.
Recomendamos las pastillas descalcifi-
3
cadoras originales de AEG, PNC 900
195 537/7.
Importante: Antes de descalcificar, retire el filtro de escaldado (Fig. 1/ T) y la
junta del mismo y límpielos de la forma
descrita en el apartado “Limpiar el filtro de escaldado” (Fig. 15, 16).
Introduzca primero el agua en el depósito de agua y sólo después el desincrustante, nunca al revés. Se tienen
que utilizar al menos 0,5 litros de agua.
Dosifique el desincrustante en consecuencia.
0 Retire el enchufe de red de la caja de
enchufe y deje que el aparato se enfríe.
0 Inserte el portafiltros sin filtro.
0 Coloque un recipiente suficientemente
grande debajo del portafiltros.
0 Vuelva a introducir el enchufe de red
en la caja de enchufe y conecte el aparato.
0 Coloque el selector giratorio (Fig. 1/E)
en la posición y deje pasar aprox.
1/3 de la solución desincrustante por el
sistema.
0 A continuación, desconecte el aparato
y deje actuar la solución desincrustante durante aprox. 10 minutos.
0 A continuación, deje que el resto pase
a través del sistema.
0 A continuación, limpie a fondo el de-
pósito de agua.
0 Llene el depósito de agua con agua
fresca y déjela pasar por completo a
través del sistema.
En caso de incrustaciones fuertes,
repita el proceso.
0 Después de descalcificar, vuelva a in-
sertar el filtro de escaldado y la junta.
Qué hacer cuando ...
• la temperatura del espresso es
demasiado baja:
– Efectúe un escaldado sin café
molido, pero con el filtro y el
portafiltros para precalentar el
sistema.
– Precaliente las tazas.
– Descalcifique el aparato.
20

e
• la velocidad de paso se va reduciendo
notablemente:
– No comprima excesivamente el café
molido en el filtro.
– No utilice café molido demasiado
fino (grado de molienda “mediano”).
– Descalcifique el aparato.
• el espresso sale lateralmente del
portafiltros:
– Cerciórese de que el portafiltros está
insertado correctamente en el anillo
de soporte.
– Enrosque el portafiltros un poco más
en el anillo de soporte.
– Elimine el café molido en el borde
del portafiltros.
• no sale espresso:
– Cerciórese de que el depósito de
agua está lleno e insertado
correctamente.
– Cerciórese de que el portafiltros está
insertado correctamente en el anillo
de soporte.
– Cerciórese de que ha girado el
selector giratorio (Fig. 1/E) a la
derecha hasta la posición .
– No comprima excesivamente el café
molido en el filtro.
– Limpie el filtro de escaldado.
– Descalcifique el aparato.
• la formación de crema se ve mermada:
– Cerciórese de que se encuentra
suficiente cantidad de café molido
en el filtro.
– Utilice siempre café molido fresco.
– Apriete ligeramente el café molido.
• al espumar la leche, se produce
demasiado poca espuma:
– Utilice siempre leche fría, fresca y
con poco contenido de grasa.
– Limpie la boquilla de espuma.
• aumenta el caudal:
– El café está molido demasiado
grueso:
– Cerciórese de que se encuentra
suficiente cantidad de café molido
en el filtro.
• la cafetera se desconecta durante el
funcionamiento:
La bomba del aparato esté equipada
con un protector contra
sobretemperatura que la protege
contra el sobrecalentamiento. El
protector contra sobretemperatura
interrumpe el funcionamiento de la
máquina cuando ésta ha sido utilizada
demasiado tiempo de forma
ininterrumpida o la bomba ha
funcionado sin agua.
– Coloque la tecla ON/OFF en “OFF” y
retire el conector de red de la caja de
enchufe.
– Deje enfriar la máquina durante mín.
20 minutos. Rellene con agua.
– Vuelva a conectar el aparato a la red
eléctrica y conéctelo. Si el aparato
no vuelve a funcionar entonces,
consulte a nuestro Servicio
postventa.
Datos técnicos
• Tensión de red: 230–240 V, 50 Hz
• Consumo de potencia: 1250 W
(Ver placa de características en la base
del aparato.)
2 Eliminación
Material de embalaje
• Destine la caja de embalaje a la
recogida de papel.
• La bolsa de polietileno (PE) y los
elementos de espuma sin CFC se
pueden entregar a un servicio de
recogida o de reciclaje.
21

p
Prezado cliente,
p
por favor leia atentamente as instruções que se seguem. Tenha em especial
atenção as instruções de segurança!
Guarde estas instruções para consulta
futura.
Passe o Manual de Instruções a qualquer
eventual futuro proprietário da
máquina.
Equipamento (Figura 1)
A Botão de ligar/desligar
B Luz indicadora de energia
C Indicador de temperatura
D Reservatório de água (na parte traseira)
E Botão de selecção para café ou vapor
F Bico de vapor (com guarnição)
G Colher doseadora
H Ferramenta de manutenção
J Prensa para café moído
K Filtro para 1 chávena
L Filtro para 2 chávenas
M Filtro para saquetas individuais
(apenas na EA 130)
N Suporte do fltro
O Protecção para os dedos
P Tabuleiro de escoamento
Q Grelha de escoamento
R Indicador de nível de enchimento
S Cabeça de infusão com encaixe para
suporte do filtro
T Filtro da cabeça de infusão (no interior)
U Placa de características
1 Instruções de Segurança
Segurança na instalação do
aparelho
• A máquina tem que ser colocada de
modo a que permaneça estável Verifique se a superfície sobre a qual a
máquina vai ser colocada é plana e
horizontal.
• A máquina apenas pode ser ligada a
uma fonte de energia cuja tensão, tipo
de corrente e frequência estejam em
conformidade com as especificações
patentes na placa de características
(ver base do aparelho)
Segurança na operação do
aparelho
• Nunca deixe o cabo de alimentação em
contacto com componentes do aparelho que possam aquecer!
• Nunca desligue a ficha da tomada
puxando o cabo de alimentação!
• Nunca utilize o aparelho se:
– o cabo se encontrar danificado ou
– o corpo da máquina evidenciar
qualquer dano.
• O bico de vapor, o filtro, o suporte do
filtro e o encaixe do suporte do filtro
são componentes que aquecem obrigatoriamente quando a máquina se
encontra em funcionamento.
• Mnater a máquina fora do alcance das
crianças!
• O corpo do aparelho aquece inevitavelmente quando a máquina se encontra
em funcionamento.
• Nunca remover o suporte do filtro
durante o processo de infusão, pois o
aparelho encontra-se sob pressão!
Perigo de queimadura!
• Utilizar apenas água fria para encher o
reservatório de água. Nunca utilizar
água mineral, água destilada, leite ou
outros líquidos!
• Nunca colocar o aparelho em funcionamento com o reservatório de água
vazio!
• Não utilizar o aparelho sem o tabuleiro
e grelha de escoamento montados!
22

p
Segurança na limpeza do
aparelho
• Antes de proceder a qualquer operação
de manutenção ou de limpeza, assegure-se de que o aparelho se encontra
desligado e de que a ficha foi retirada
da tomada de alimentação!
• Ter em atenção as instruções de descalcificação!
• Não mergulhar o aparelho em água!
Segurança na reparação do
aparelho
Qualquer reparação em aparelhos eléctricos apenas pode ser efectuada por
técnicos especializados. Reparações
incorrectas podem ocasionar perigos
para o utilizador.
Se o fio de ligação à rede estiver danificado, a sua substituição deverá ser
realizada exclusivamente pelo fabricante, por um concessionário autorizado ou por uma pessoa que tenha a
qualificação para o fazer, para assim
evitar qualquer tipo de perigo.
A garantia não cobre quaisquer danos
provocados pela utilização incorrecta
do aparelho, ou caso o aparelho tenha
sido utilizado para outros que não os
fins a que se destina.
Este aparelho está em conformidade
;
com as seguintes directivas da UE:
• 73/23/CEE de 19.02.1973 “Directiva de
Baixa Voltagem”, incluindo a Directiva
de Modificação 93/68/CEE
• 89/336/CEE de 03.05.1989 “Directiva
CEM (Interferência e Compatibilidade
Electromagnética)”, incluindo a Directiva de Modificação 92/31/CEE
Antes de colocar a máquina em
funcionamento pela primeira vez
Leia por favor as instruções de segurança, a fim de evitar qualquer perigo
para si e eventuais danos no aparelho.
0 Ligue a ficha do aparelho à tomada de
alimentação.
Antes de preparar pela primeira vez um
café Expresso, deverá enxaguar o sistema de aquecimento enchendo o
reservatório de água. Proceda exactamente conforme indicado na secção
“Preparar café Expresso” e “Preparar
espuma de leite”, mas sem colocar café
moído no filtro. Coloque um recipiente
o maior possível no centro da grelha de
escoamento (Figura 1/Q) por debaixo
do bico de espuma (Figura 1/F).
Preparar café Expresso
Após preparada a infusão, o café
deverá apresentar-se coberto com uma
camada de espuma espessa, a chamada
Crema.
Para preparar um café Expresso aromático é importante ter em atenção a utilização de água pura e fresca, o tipo
correcto de moagem de café e a temperatura da água.
1. Abastecer de água (Figura 2)
0 Puxe o reservatório de água para cima
e para fora do aparelho (Figura 2).
0 Abra a tampa do reservatório.
0 Encha o reservatório apenas com água
fria e pura.
Assegure-se de que o nível de água não
se encontra abaixo da marca MIN
(Mínimo) nem acima da marca MAX
(Máximo).
0 Feche a tampa.
0 Volte a colocar o reservatório de água
no aparelho e pressione para baixo até
que este se encontre perfeitamente
encaixado no aparelho.
Pode também levantar a tampa do
3
reservatório e rodá-la para o lado.
Deste modo, poderá encher o reservatório de água directamente no aparelho, utilizando por exemplo um jarro.
23
 Loading...