

Page 1
DC7003000 EN User manual 2
EL Οδηγίες Χρήσης 36
Page 2
www.aeg.com
2
CONTENTS
1. SAFETY INFORMATION . . . . . . . . . . . . . . . . . . . . . . . . . . . . . . . . . . . . . . . . . . . . . . . . . . . . . . 3
2. SAFETY INSTRUCTIONS . . . . . . . . . . . . . . . . . . . . . . . . . . . . . . . . . . . . . . . . . . . . . . . . . . . . . . 4
3. PRODUCT DESCRIPTION . . . . . . . . . . . . . . . . . . . . . . . . . . . . . . . . . . . . . . . . . . . . . . . . . . . . . 6
4. BEFORE FIRST USE . . . . . . . . . . . . . . . . . . . . . . . . . . . . . . . . . . . . . . . . . . . . . . . . . . . . . . . . . . 6
5. DAILY USE . . . . . . . . . . . . . . . . . . . . . . . . . . . . . . . . . . . . . . . . . . . . . . . . . . . . . . . . . . . . . . . . . 8
6. CLOCK FUNCTIONS . . . . . . . . . . . . . . . . . . . . . . . . . . . . . . . . . . . . . . . . . . . . . . . . . . . . . . . . 11
7. ADDITIONAL FUNCTIONS . . . . . . . . . . . . . . . . . . . . . . . . . . . . . . . . . . . . . . . . . . . . . . . . . . . 12
8. USING THE ACCESSORIES . . . . . . . . . . . . . . . . . . . . . . . . . . . . . . . . . . . . . . . . . . . . . . . . . . . 13
9. HELPFUL HINTS AND TIPS . . . . . . . . . . . . . . . . . . . . . . . . . . . . . . . . . . . . . . . . . . . . . . . . . . . 14
10. CARE AND CLEANING . . . . . . . . . . . . . . . . . . . . . . . . . . . . . . . . . . . . . . . . . . . . . . . . . . . . . . 23
11. WHAT TO DO IF… . . . . . . . . . . . . . . . . . . . . . . . . . . . . . . . . . . . . . . . . . . . . . . . . . . . . . . . . . 26
12. INSTALLATION . . . . . . . . . . . . . . . . . . . . . . . . . . . . . . . . . . . . . . . . . . . . . . . . . . . . . . . . . . . . 26
13. WARRANTY . . . . . . . . . . . . . . . . . . . . . . . . . . . . . . . . . . . . . . . . . . . . . . . . . . . . . . . . . . . . . . . 29
14. GREAT BRITAIN & IRELAND - GUARANTEE/CUSTOMER SERVICE . . . . . . . . . . . . . . . . . 32
15. EUROPEAN GUARANTEE . . . . . . . . . . . . . . . . . . . . . . . . . . . . . . . . . . . . . . . . . . . . . . . . . . . . 33
FOR PERFECT RESULTS
Thank you for choosing this AEG product. We have created it to give you impeccable
performance for many years, with innovative technologies that help make life simpler –
features you might not find on ordinary appliances. Please spend a few minutes reading to get
the very best from it.
Visit our website for:
Get usage advice, brochures, trouble shooter, service information:
www.aeg.com
Register your product for better service:
www.aeg.com/productregistration
Buy Accessories, Consumables and Original spare parts for your appliance:
www.aeg.com/shop
CUSTOMER CARE AND SERVICE
We recommend the use of original spare parts.
When contacting Service, ensure that you have the following data available.
The information can be found on the rating plate. Model, PNC, Serial Number.
Warning / Caution-Safety information
General information and tips
Environmental information
Subject to change without notice.
Page 3

1. SAFETY INFORMATION
Before the installation and use of the appliance, carefully read the supplied instructions. The manufacturer is
not responsible if an incorrect installation and use causes injuries and damages. Always keep the instructions
with the appliance for future reference.
1.1 Children and vulnerable people safety
WARNING!
Risk of suffocation, injury or permanent disability.
• This appliance can be used by children aged from 8
years and above and persons with reduced physical,
sensory or mental capabilities or lack of experience
and knowledge if they are supervised by an adult or a
person who is responsible for their safety.
• Do not let children play with the appliance.
• Keep all packaging away from children.
• Keep children and pets away from the appliance
when it operates or when it cools down. Accessible
parts are hot.
• If the appliance has a child safety device, we recommend that you activate it.
• Cleaning and user maintenance shall not be made by
children without supervision.
ENGLISH 3
1.2 General Safety
• Internally the appliance becomes hot when in operation. Do not touch the heating elements that are in
the appliance. Always use oven gloves to remove or
put in accessories or ovenware.
• Do not use a steam cleaner to clean the appliance.
• Before maintenance cut the power supply.
• Do not use harsh abrasive cleaners or sharp metal
scrapers to clean the glass door since they can
Page 4
www.aeg.com
4
scratch the surface, which may result in shattering of
the glass.
• To remove the shelf supports first pull the front of the
shelf support and then the rear end away from the
side walls. Install the shelf supports in the opposite
sequence.
2.
SAFETY INSTRUCTIONS
2.1 Installation
WARNING!
Only a qualified person must install this appliance.
• Remove all the packaging.
• Do not install or use a damaged appli-
ance.
• Obey the installation instruction sup-
plied with the appliance.
• Always be careful when you move the
appliance because it is heavy. Always
wear safety gloves.
• Do not pull the appliance by the han-
dle.
• Keep the minimum distance from the
other appliances and units.
• Make sure that the appliance is instal-
led below and adjacent safe structures.
• The sides of the appliance must stay
adjacent to appliances or to units with
the same height.
Electrical connection
WARNING!
Risk of fire and electrical shock.
• All electrical connections should be
made by a qualified electrician.
• The appliance must be earthed.
• Make sure that the electrical informa-
tion on the rating plate agrees with
the power supply. If not, contact an
electrician.
• Always use a correctly installed shock-
proof socket.
• Do not use multi-plug adapters and
extension cables.
• Make sure not to cause damage to the
mains plug and to the mains cable.
Contact the Service or an electrician to
change a damaged mains cable.
• Do not let mains cables to come in
touch with the appliance door, specially when the door is hot.
• The shock protection of live and insulated parts must be fastened in such a
way that it cannot be removed without
tools.
• Connect the mains plug to the mains
socket only at the end of the installation. Make sure that there is access to
the mains plug after the installation.
• If the mains socket is loose, do not
connect the mains plug.
• Do not pull the mains cable to disconnect the appliance. Always pull the
mains plug.
• Use only correct isolation devices: line
protecting cut-outs, fuses (screw type
fuses removed from the holder), earth
leakage trips and contactors.
• The electrical installation must have an
isolation device which lets you disconnect the appliance from the mains at
all poles. The isolation device must
have a contact opening width of minimum 3 mm.
2.2 Use
WARNING!
Risk of injury, burns or electric
shock or explosion.
Page 5
• Use this appliance in a household environment.
• Do not change the specification of this
appliance.
• Make sure that the ventilation openings are not blocked.
• Do not let the appliance stay unattended during operation.
• Deactivate the appliance after each
use.
• Be careful, when you open the appliance door while the appliance is in operation. Hot air can release.
• Do not operate the appliance with wet
hands or when it has contact with water.
• Do not apply pressure on the open
door.
• Do not use the appliance as a work
surface or as a storage surface.
• Always keep the appliance door
closed when the appliance is in operation.
• Open the appliance door carefully.
The use of ingredients with alcohol
can cause a mixture of alcohol and air.
• Do not let sparks or open flames to
come in contact with the appliance
when you open the door.
• Do not put flammable products or
items that are wet with flammable
products in, near or on the appliance.
WARNING!
Risk of damage to the appliance.
• To prevent damage or discoloration to
the enamel:
– do not put ovenware or other objects in the appliance directly on the
bottom.
– do not put aluminium foil directly on
the bottom of the appliance.
– do not put water directly into the hot
appliance.
– do not keep moist dishes and food
in the appliance after you finish the
cooking.
– be careful when you remove or install the accessories.
• Discoloration of the enamel has no effect on the performance of the appli-
ENGLISH 5
ance. It is not a defect in the sense of
the warranty law.
• Use a deep pan for moist cakes. Fruit
juices cause stains that can be permanent.
2.3 Care and Cleaning
WARNING!
Risk of injury, fire or damage to
the appliance.
• Before maintenance, deactivate the
appliance and disconnect the mains
plug from the mains socket.
• Make sure the appliance is cold. There
is the risk that the glass panels can
break.
• Replace immediately the door glass
panels when they are damaged. Contact the Service.
• Be careful when you remove the door
from the appliance. The door is heavy!
• Clean regularly the appliance to prevent the deterioration of the surface
material.
• Remaining fat or food in the appliance
can cause fire.
• Clean the appliance with a moist soft
cloth. Only use neutral detergents. Do
not use abrasive products, abrasive
cleaning pads, solvents or metal objects.
• If you use an oven spray, obey the
safety instructions on the packaging.
• Do not clean the catalytic enamel (if
applicable) with any kind of detergent.
2.4 Internal light
• The type of light bulb or halogen lamp
used for this appliance, is only for
household appliances. Do not use it
for house lighting.
WARNING!
Risk of electrical shock.
• Before replacing the lamp, disconnect
the appliance from the power supply.
• Only use lamps with the same specifications.
Page 6
www.aeg.com
6
2.5 Disposal
WARNING!
Risk of injury or suffocation.
• Disconnect the appliance from the
mains supply.
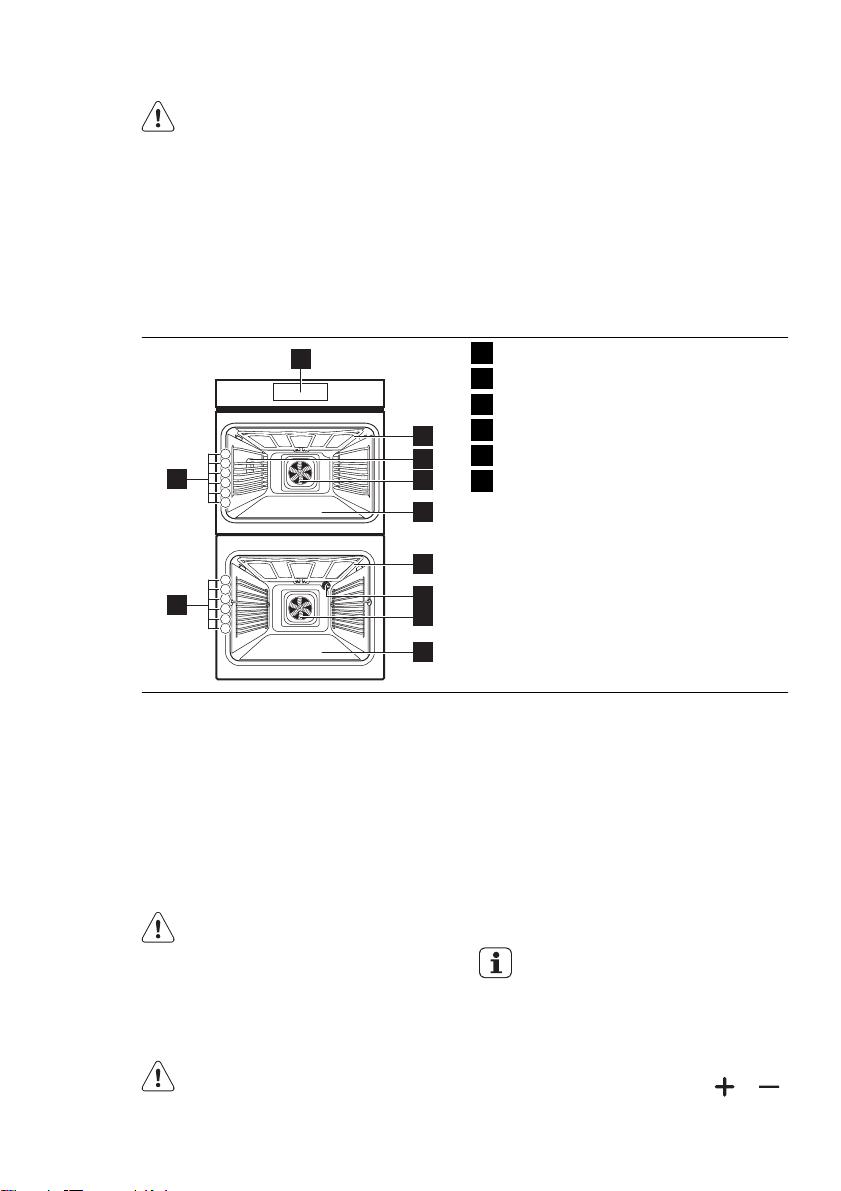
3. PRODUCT DESCRIPTION
3.1 General overview
1
6
5
4
6
3
2
1
• Cut off the mains cable and discard it.
• Remove the door catch to prevent
children and pets to get closed in the
appliance.
Electronic programmer
1
Heating element
2
Oven lamp
3
Fan and rear wall heating element
2
3
4
5
4
Heating element
5
Shelf positions
6
6
5
4
6
3
2
1
3.2 Oven accessories
• Oven shelf
For cookware, cake tins, roasts.
• Deep roasting pan
4. BEFORE FIRST USE
WARNING!
Refer to the Safety chapters.
4.1 Initial Cleaning
• Remove all parts from the appliance.
• Clean the appliance before first use.
Refer to chapter "Care and
Cleaning".
2
3
4
5
To bake and roast or as pan to collect
fat.
• The roasting pan grid
To put in the deep roasting pan.
4.2 Setting the time
The oven only operates after
time set.
When you connect the appliance to the
electrical supply or in case of a power
cut, the Time function indicator flashes
automatically.
To set the current time use the
button.
or
Page 7
After approximately 5 seconds, the flashing stops and the display shows the time
of day set.
You can only change the Time
of day
• the switch-on lock is not on
• none of the clock functions
• no oven function is set.
Duration
if :
or End is set
4.3 Preheating
Preheat the empty appliance to burn off
the remaining grease.
Preheat the two ovens. Heat up one
oven at a time.
Set the functions listed below, if applicable.
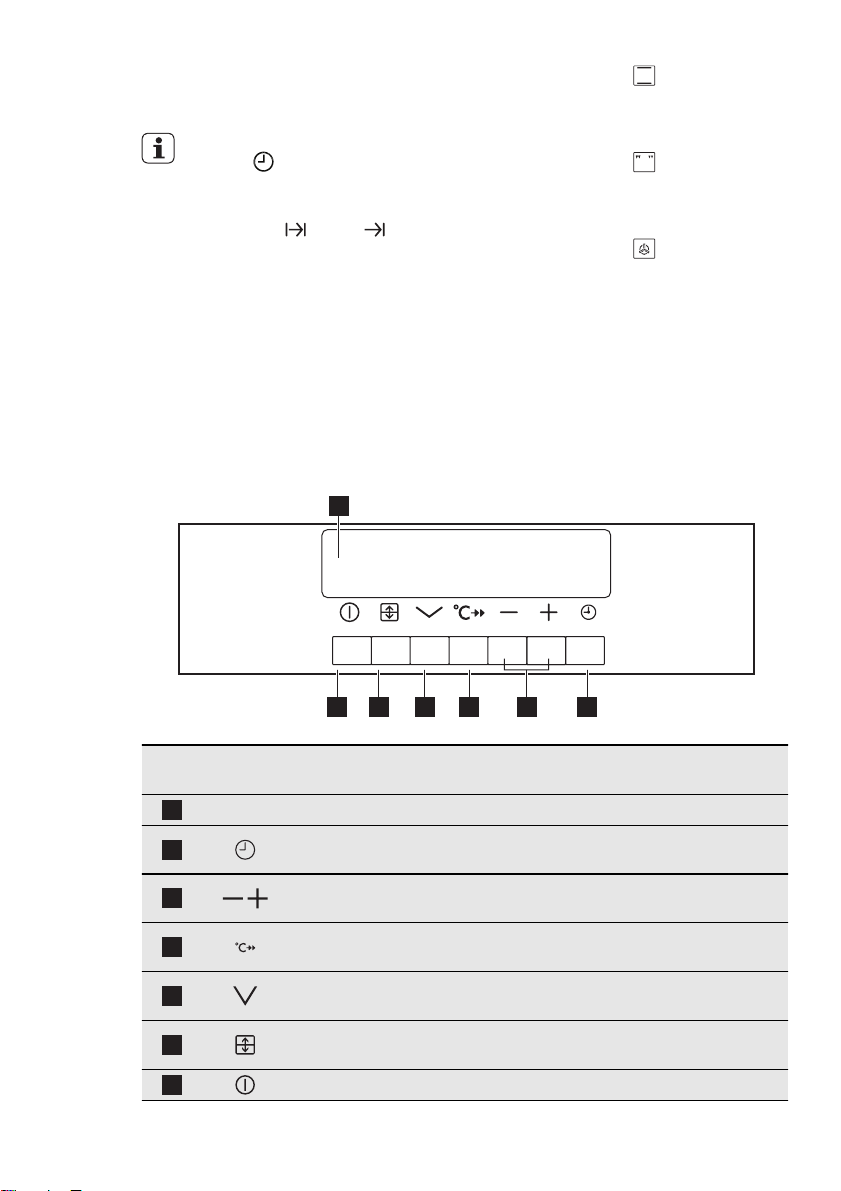
4.4 Control panel
1
ENGLISH 7
1.
Set the function and the maximum temperature.
2.
Let the appliance operate for one
hour.
3.
Set the function and the maximum temperature.
4.
Let the appliance operate for ten minutes.
5.
Set the function and the maximum temperature.
6.
Let the appliance operate for ten mi-
nutes.
Accessories can become hotter than
usually. The appliance can emit an odour
and smoke. This is normal. Make sure
that the airflow is sufficient.
Num-
ber
1
2
3
4
5
6
7
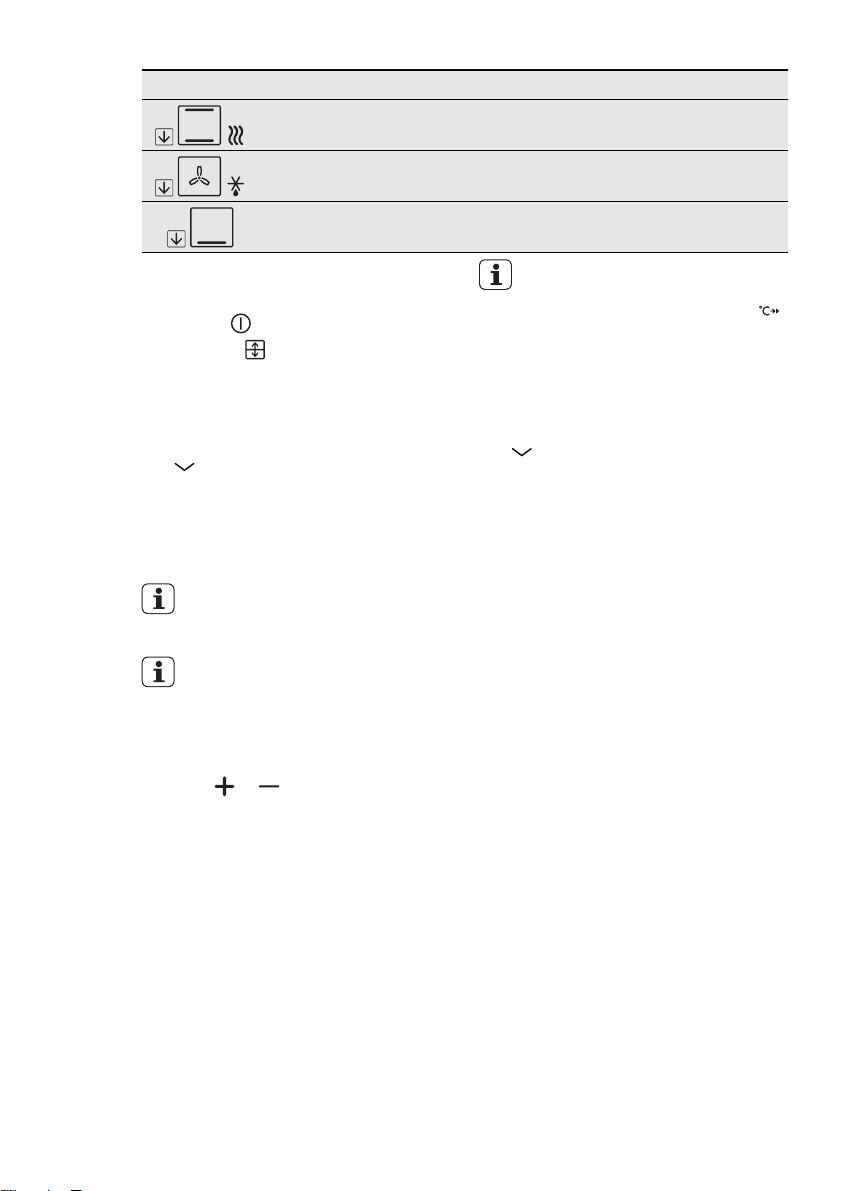
7 6 5 4 2
3
Button Function Description
– Display Shows current settings of the oven.
Clock function
button
Setting but-
tons
Temperature
button
Oven function
selection
Oven selec-
tion
To set a clock function.
To set the value for the temperature and
time.
To show an oven temperature.
To set an oven function or programme.
To switch between top and main oven.
On/Off To set the oven on or off.
Page 8
www.aeg.com
8
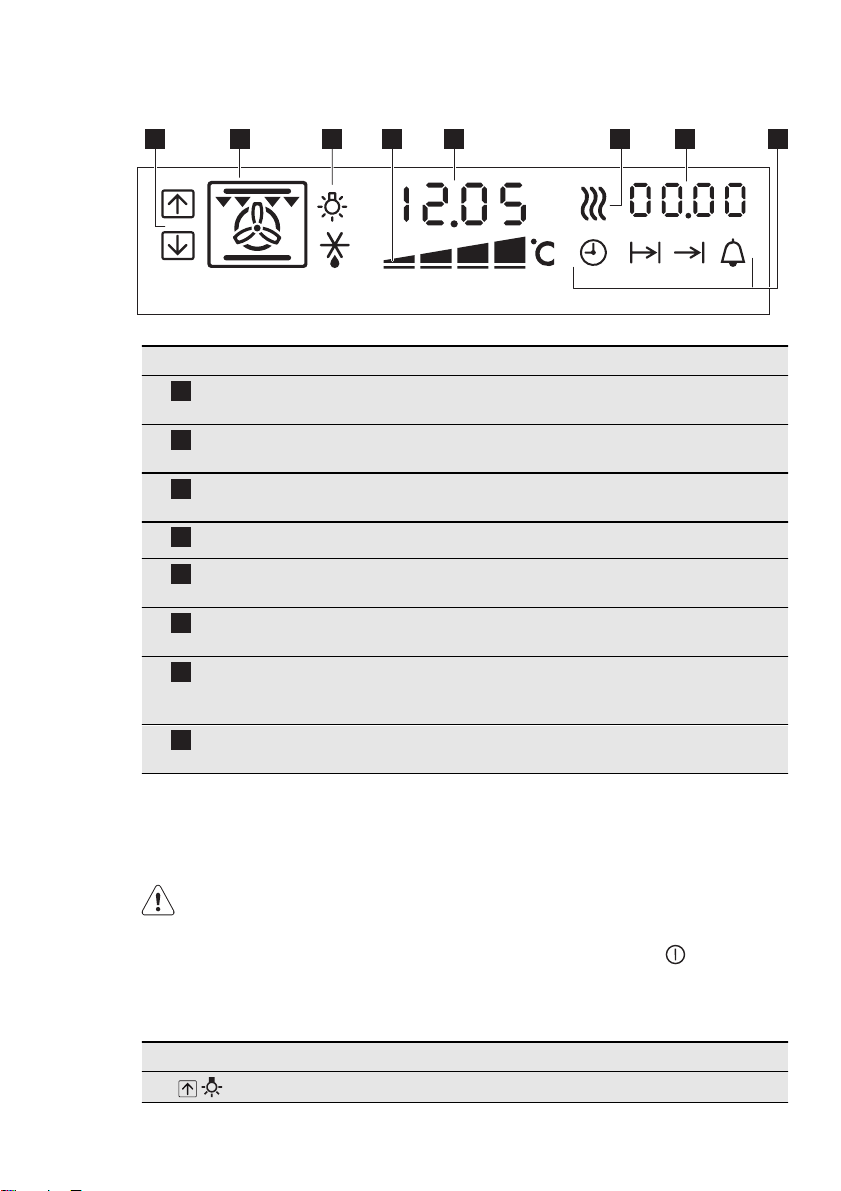
4.5 Indicators of display
21 5
43
6
Number Name Description
Top/Main oven indi-
1
Shows which oven operates.
cator
Oven function indi-
2
Shows the function.
cator
Lamp/Defrost indi-
3
Shows the Lamp/Defrost function is active.
cator
Heat indicator Shows the heat setting.
4
Temperature/Clock
5
indicator
Keep warm indica-
6
Shows the temperature and the time in minutes.
Shows that keep warm function is active.
tor
Cooking time/End
7
Shows the time setting for clock functions.
time/Period of operation
Clock function indi-
8
To set the clock function and minute minder.
cator
7 8
5. DAILY USE
WARNING!
Refer to the Safety chapters.
5.2 Top oven functions
5.1 Switching the appliance on
and off
Press the On/Off button to switch the
appliance on or off.
Oven function Application
Light To light up the oven interior.
Page 9
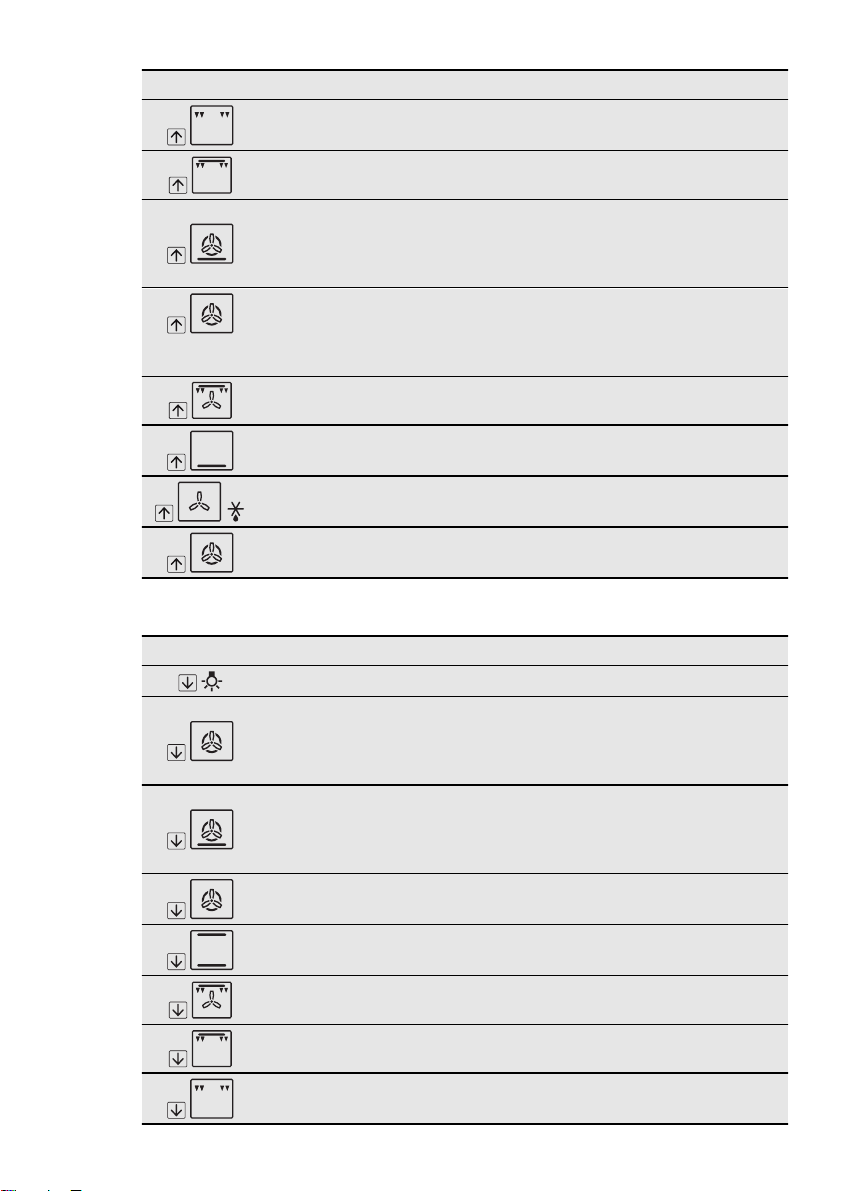
Oven function Application
Economy Grill
Full Grill
Fan Baking
True Fan
Rotitherm Roasting
Base Heating Fin-
ishing
Fan Controlled De-
frosting
Slow Cook
5.3 Main oven functions
ENGLISH 9
To grill flat food items in small quantities
in the middle of the grill. To make toast.
To grill flat food in large quantities. To
toast bread.
To bake on one oven level with a more in-
tensive browning and a crispy base. Set
the oven temperatures 20-40 °C lower
than when using Conventional.
To bake and roast on one oven level at
the same time. Decrease the oven tem-
peratures (20-40 °C) compared with Con-
ventional.
To roast larger joints of meat or poultry
on one level. Also to gratinate and brown.
To bake cakes with crispy or crusty bases
and to preserve food.
To defrost frozen food.
To prepare very lean, tender roasted
food.
Oven function Application
Light To light up the oven interior.
To roast or roast and bake the food that
True Fan
requires the same cooking temperature,
using more than one shelf, without flavour
transference.
To bake on one oven level with a more in-
Fan Baking
tensive browning and a crispy base. Set
the oven temperatures 20-40 °C lower
than when using Conventional.
Slow Cook
Conventional
Cooking
Rotitherm Roasting
Full Grill
Economy Grill
To prepare very lean, tender roasted
food.
To bake and roast on one oven level.
To roast larger joints of meat or poultry
on one shelf position. To brown.
To grill flat food in large quantities. To
toast bread.
To grill flat food items in small quantities
in the middle of the grill. To make toast.
Page 10
www.aeg.com
10
Oven function Application
Keep Warm To keep food warm.
Fan Controlled De-
frosting
Base Heat Finish-
ing
5.4 Selecting an oven
1.
Switch on the appliance using the
On/Off
2.
Press the button repeatedly until
the desired oven appears (Top /
Main )
button.
5.5 Setting the oven function
Use to set the oven function.
The display shows the recommended
temperature.
If you do not change this temperature in
less than approximately 5 seconds, the
appliance starts to heat.
When the appliance operates at
the set temperature, an acoustic
signal sounds.
You can change the oven function while the oven operates.
5.6 Changing the oven
temperature
To defrost frozen food.
To bake cakes with crispy or crusty bases
and to preserve food.
Checking the oven
temperature
Press the Temperature check
button to display the current
temperature of the oven.
5.7 Switching off the oven
function
Use again and again, until the display
does not show an oven function.
5.8 Heat- up indicator
If you switch on an oven function, the
bars on the display come on one by one.
The bars show that the oven temperature increases.
5.9 Residual heat indicator
When you switch off the oven, the bars
on the display show the residual heat.
Press the or button to set the temperature.
Page 11
6. CLOCK FUNCTIONS
6.1 Clock functions
1
2 3 4
7 6 5
Time of day
1
Duration
2
End
3
Minute Minder
4
Selection button
5
Setting button (Plus)
6
Setting button (Minus)
7
ENGLISH 11
SYM-
FUNCTION DESCRIPTION
BOL
Minute Minder To set a countdown (max. 99 minutes). This
function has no effect on the operation of the
appliance.
Duration To set how long the appliance has to be in op-
eration.
End To set the switch-off time for an oven function.
You can use Duration and End at the same
time, if the appliance is to be switched on and
off automatically later.
Time of day To set, change or control the time of day.
• If you set a clock function, the symbol
flashes for approximately 5 seconds. In
these 5 seconds, touch
the time.
• If you set the time, the symbol continues to flash for approximately 5 seconds. After these 5 seconds, the symbol comes on. The time starts to count
down.
or to set
6.2 Setting the clock functions
1.
Switch on the appliance.
2.
Use again and again until the display shows the necessary clock function and the related symbol, for ex-
ample Minute Minder
3.
Use or to set the necessary
time.
.
You can hear an acoustic signal for 2
minutes when the time is completed, “00.00” and the related function
indicator flash. The appliance
switches off.
4.
Use any button to switch off the
acoustic signal.
With Minute Minder the oven
must be switched on to set the
clock function.
With Duration and End the
oven switches off automatically.
With Duration
you must set the oven function
and the temperature first, then
you can set the clock function.
and End
Page 12
www.aeg.com
12
6.3 Heat+Hold
To keep the prepared food warm for 30
minutes, after the cooking is completed.
Switching on Heat+Hold
1.
Set clock functions Duration and/
or End
2.
Use Selection again and again,
until the display shows the symbol
Keep warm
.
.
7. ADDITIONAL FUNCTIONS
3.
Use , the display shows “00:30”
4.
When the set oven function is completed, a signal sounds and Heat
+Hold starts. The set oven function
operates at 80°C for 30 minutes. The
oven then switches off automatically.
The temperature for the set oven
function must be above 80°C.
7.1 Cooling fan
When the appliance operates, the cooling fan switches on automatically. If you
switch off the appliance, the cooling fan
continues to operate until the appliance
cools down.
7.2 Switch-on lock
WARNING!
When the switch-on lock is set,
you can not operate the oven.
Switching on the switch-on lock
1.
Switch on the appliance. No oven
function must be set.
2.
Use Selection and at the same
time, until the display shows
“SAFE”. The switch-on lock is
switched on.
Switching off the switch-on lock
1.
If necessary, switch on the appliance.
2.
Use Selection and at the same
time, until the display stops to show
"SAFE". The switch-on lock switches
off.
7.3 Key lock
This function prevents that you accidentally change the oven function.
Switching on the key lock
1.
If necessary, switch on the appliance.
2.
Set an oven function.
3.
Use Selection and at the same
time, until the display shows “LOC”.
The key lock is switched on.
Switching off the key lock
1.
Use Selection and at the same
time, until the display stops to show
"LOC". The key lock switches off.
The key lock is automatically canceled when the oven function is
switched off.
7.4 Automatic cut-out
The appliance switches off after some
time:
• if you do not switch off the appliance;
• if you do not change the oven temperature.
The last temperature set flashes in the
temperature display.
Oven tempera-
ture
30 °C -120 °C 12.5 h.
120 °C - 200 °C 8.5 h.
200 °C -250 °C 5.5 h.
250 °C -maxi-
mum °C
After an automatic cut-out, switch off the
oven fully. Then you can switch it on
again.
If you set the clock function Duration
matic cut-out switches off.
Switch-off time
3.0 h.
or End , the auto-
Page 13
8. USING THE ACCESSORIES
WARNING!
Refer to the Safety chapters.
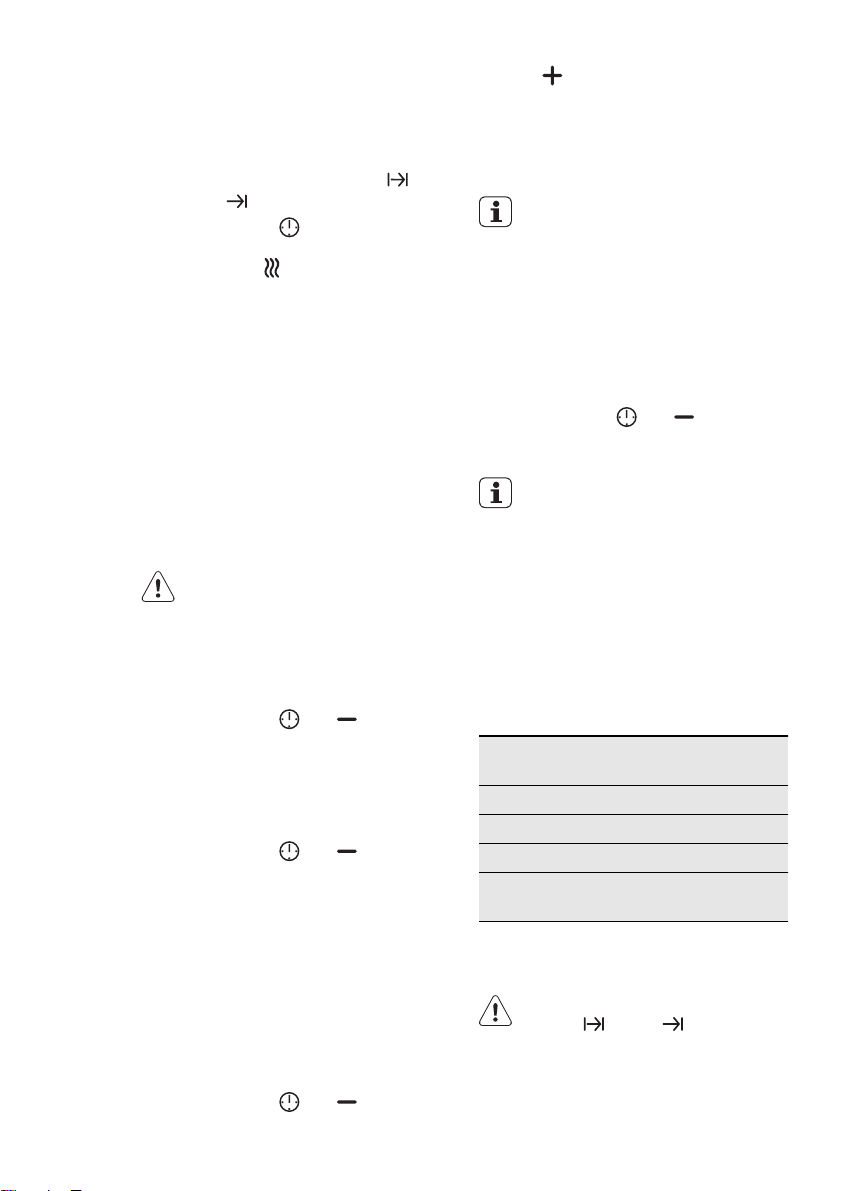
8.1 Inserting the oven accessories
ENGLISH 13
The deep roasting pan and the wire shelf
have side edges. These edges and the
shape of the guide-bars are a special device to prevent the cookware from slipping.
Put in the slide-in accessories so that the
double side edges are at the back of the
oven and point down to the bottom.
Push the slide-in accessories between
the guide-bars of one of the oven levels.
Installing the wire shelf and the deep
pan together
Put the wire shelf on the deep roasting
pan. Push the deep roasting pan between the guide-bars of one of the oven
levels.
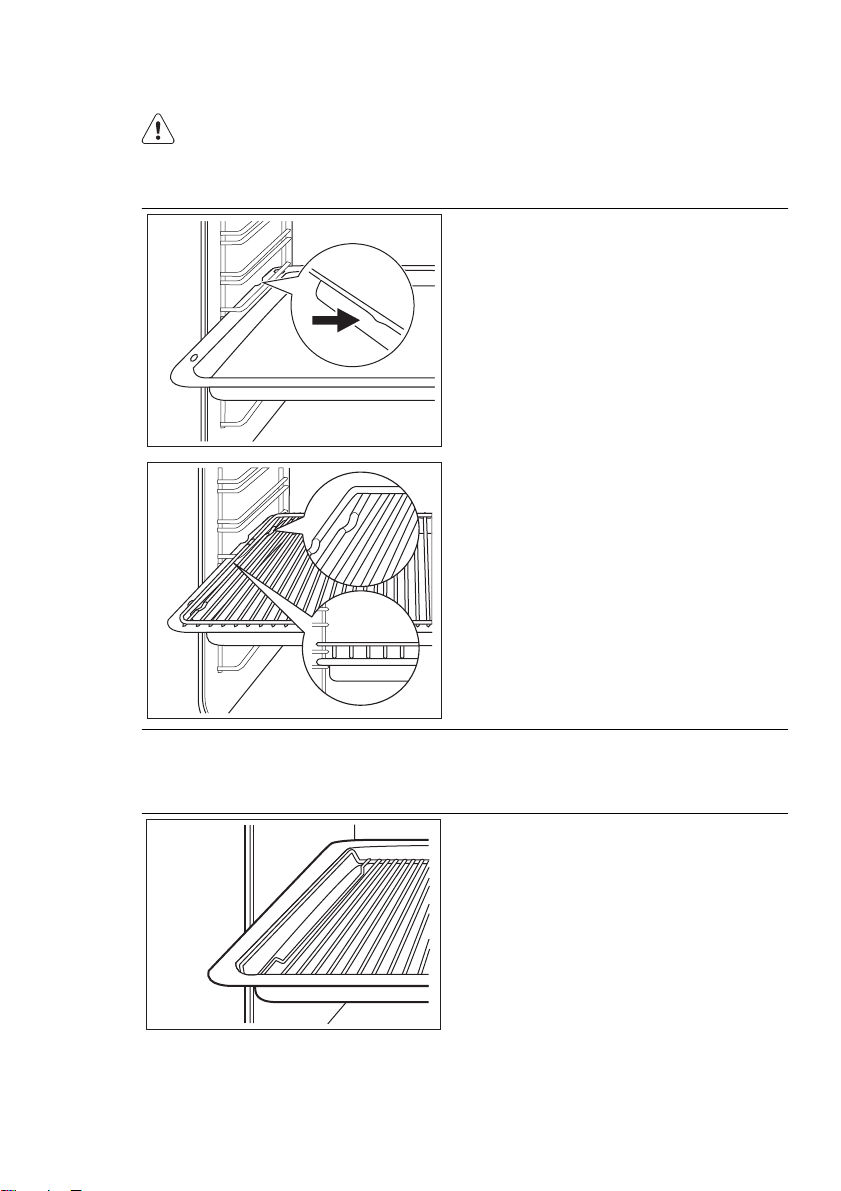
8.2 Grilling set
The grilling set includes the roasting pan
grid and the deep roasting pan.
You can use the roasting pan grid in two
positions: turned up or down.
To roast larger pieces of meat or poultry on one level:
1.
Put the roasting pan grid in the
deep roasting pan. The supports of
the roasting pan grid must point up.
2.
Put the deep roasting pan in the appliance and on the necessary shelf
level.
Page 14
www.aeg.com
14
9. HELPFUL HINTS AND TIPS
To grill flat dishes in large quantities
and to toast:
1.
Put the roasting pan grid in the
deep roasting pan. The supports of
the roasting pan grid must point
down.
2.
Put the deep roasting pan in the appliance and on the necessary shelf
level.
WARNING!
Refer to the Safety chapters.
The temperature and baking
times in the tables are guidelines
only. They depend on the recipes, quality and quantity of the
ingredients used.
CAUTION!
Use a deep baking tray for very
moist cakes. Fruit juices can
cause permanent stains on the
enamel.
9.1 Top oven
The top oven is the smaller of the two
ovens. It has 6 shelf levels. Use is to cook
smaller quantities of food. It gives especially good results when used to cook
fruitcakes, sweets and savoury flants or
quiche.
9.2 Main oven
The main oven is particularly suitable for
cooking larger quantities of food.
9.3 Baking
General instructions
• Your new oven may bake or roast differently to the appliance you had be-
fore. Adapt your usual settings (temperature, cooking times) and shelf levels to the values in the tables.
• With longer baking times, the oven
can be switched off about 10 minutes
before the end of baking time, to use
the residual heat.
When you use frozen food, the trays
in the oven can twist during baking.
When the trays get cold again, the
distortion will be gone.
How to use the Baking Tables
• We recommend to use the lower temperature the first time.
• If you cannot find the settings for a
special recipe, look for the one that is
almost the same.
• Baking time can be extended by 10-15
minutes, if you bake cakes on more
than one level.
• Cakes and pastries at different heights
do not always brown equally at first. If
this occurs, do not change the temperature setting. The differences
equalize during the baking procedure.
Page 15
ENGLISH 15
Tips on baking
Baking results Possible cause Remedy
The cake is not
Incorrect oven level Put the cake on a lower oven level
browned sufficiently below
The cake sinks
(becomes soggy,
Oven temperature too
high
Use a lower setting
lumpy, streaky)
The cake sinks
(becomes soggy,
lumpy, streaky)
The cake sinks
(becomes soggy,
lumpy, streaky)
Cake is too dry
Baking time is too
short
Too much liquid in the
mixture
Oven temperature too
low
Set a longer baking time
Do not set higher temperatures
to decrease baking times
Use less liquid. Look at the mixing
times, specially when you use
mixing machines
Set a higher oven temperature
Cake is too dry Baking time too long Set a shorter baking time
Cake does not
brown equally
Cake does not
brown equally
Cake does not
cook in the baking
Oven temperature too
high and baking time
too short
No equal mixture Put the mixture equally on the
Temperature too low Use a slightly higher oven tem-
Set a lower oven temperature and
a longer baking time
baking tray
perature setting
time set
9.4 Top oven
9.5 Baking
Shelf Positions are not critical but
ensure that oven shelves are
evenly spaced when more than
one is used (e.g. shelf positions 1
and 3)
Food
Temperature
[°C]
Biscuits 170 - 190 10 - 20
Bread 200 - 220 30 - 35
Bread rolls/buns 200 - 220 10 - 15
Cakes:
- Small & Queen 160 - 170 18 - 25
- Sponges 160 - 170 20 - 30
- Victoria Sandwich 160 - 170 18 - 25
- Madeira 140 - 150 75 - 90
Approx Cook Time
(mins)
Page 16

www.aeg.com
16
Food
Temperature
[°C]
Approx Cook Time
(mins)
- Rich Fruit 140 - 150 120 - 150
- Gingerbread 140 - 150 75 - 90
- Meringues 90 - 100 150 - 180
- Flapjack 160 - 170 25 - 30
- Shortbread 130 - 150 45 - 65
Casseroles:
- Beef/Lamb 140 - 160 150 - 180
- Chicken 140 - 160 75 - 90
Convenience Foods Follow manufacturer´s instructions.
Fish 160 - 180 20 - 30
Fish Pie (Potato Topped) 170 - 180 20 - 30
Fruit Pies, Crumbles 170 - 190 30 - 50
Milk Puddings 140 - 160 90 - 120
Pasta Lasagne etc. 160 - 180 40 - 50
Pastry:
- Choux 180 - 190 30 - 40
- Eclairs, Profiteroles 170 - 180 30 - 40
- Flaky/Puff Pies 180 - 190 30 - 40
Shortcrust:
- Mince Pies 180 - 190 15 - 20
- Meat Pies 180 - 200 25 - 35
- Quiche, Tarts, Flans 170 - 190 25 - 50
Scones 210 - 220 8 - 12
Shepard´s Pie 180 - 190 30 - 40
Soufflés 170 - 180 20 - 30
Vegetables:
- Baked Jacket Potatoes 180 - 190 60 - 90
- Roast Potatoes 180 - 190 60- 90
Yorkshire Pudding:
- Large 180 - 190 25 - 40
- Individual 200 - 210 15 - 25
Roasting Meat, Poultry See roasting chart.
Page 17
9.6 Baking
ENGLISH 17
Food Shelf Position Temperature
[°C]
Apple Pie 2 160 - 180 160 - 180
Plate Tart 2 160 - 180 25 - 50
Pizza 2 Follow manufacturer´s instructions.
Quiches/Tarts 2 160 - 180 25 - 50
Approx Cook
Time
(mins)
9.7 Main oven
9.8 Baking
Shelf Positions are not critical but
ensure that oven shelves are
evenly spaced when more than
one is used (e.g. shelf positions 1
and 3)
Food
Biscuits 180 - 190 10 - 20
Bread 190 - 210 30 - 35
Cakes:
- Small & Queen 160 - 170 18 - 25
- Sponges 160 - 170 20 - 25
- Madeira 140 - 160 60 - 75
- Rich Fruit 130 - 140 120 - 150
- Christmas 130 - 140 180 - 270
Fish 160 - 180 20 - 30
Fruit Pies, Crumbles 170 - 180 30 - 50
Milk Puddings 140 - 160 60 - 90
Pastry:
- Choux 180 - 190 30 - 40
- Shortcrust 180 - 190 25 - 35
- Flaky 180 - 190 30 - 40
- Puff Follow manufacturer´s instructions; Reduce the tem-
Plate Tarts 180 - 190 25 - 45
Quiches/Flans 170 - 180 25 - 45
Scones 210 - 230 8 - 12
Temperature
[°C]
perature for Fan oven by 20°C
Approx Cook Time
(mins)
Page 18

www.aeg.com
18
Food
Roasting: Meat and
Poultry
Temperature
[°C]
160 - 180 see Roasting Chart
Approx Cook Time
(mins)
9.9 Baking
Food Shelf Position Temperature [°C]
Apple Pie 3 160 - 180 50 - 60
Plate Tart 3 180 - 200 25 - 50
Pizza 3 Follow manufacturer´s instructions
Quiches/Tarts 3 180 - 200 25 - 50
Approx Cook
Time (m)
9.10 Baking
Food
Temperature
[°C]
Biscuits 180 - 190 10 - 20 3
Bread 200- 220 30 - 35 3
Cakes:
- Small & Queen 170 - 180 18 - 25 3
- Sponges 170 - 180 20 - 25 3
- Madeira 150 - 160 60 - 75 3
- Rich Fruit 140 - 150 120 - 150 3
- Christmas 140 - 150 180 - 270 3
Fish 170 - 180 20 - 30 3
Fruit Pies, Crum-
bles
180 - 200 30 - 50 3
Milk Puddings 150 - 170 60 - 90 3
Pastry:
- Choux 180 - 190 30 - 40 3
- Shortcrust 190 - 200 25 - 35 3
- Flaky 190 - 210 30 - 40 3
- Puff Follow manufacturer´s instructions
Plate Tarts 190 - 200 25 - 45 3
Quiches/Flans 200 - 210 25 - 45 3
Scones 220 - 230 8 - 12 3
Roasting: Meat
and Poultry
170 - 190
Approx Cook
Time
(mins)
see Roasting
Chart
Shelf Position
3
Page 19

9.11 Roasting
Roasting dishes
• Use heat-resistant ovenware to roast
(please read the instructions of the
manufacturer).
• Large roasting joints can be roasted
directly in the deep roasting pan or on
the oven shelf above the deep roasting pan. (If present)
9.13 Roasting
Meat Temperature [°C] Cooking Time
Beef/ Beef boned
Mutton/ Lamb
Pork/ Veal/ Ham
Chicken
Turkey/ Goose
Duck
Pheasant
Rabbit
9.14 Grilling
Always use the grilling function with
maximum temperature setting
Always grill with the oven door
closed
• Roast lean meats in a roasting tin with
a lid. This well keep the meat more
succulent.
• All types of meat, that can be
browned or have crackling, can be
roasted in the roasting tin without the
lid.
9.12 Main oven
20-35 minutes per ½ kg
160 - 180
160 - 180
160 - 180
160 - 180
160 - 180
160 - 180
160 - 180
160 - 180
(1lb) and 20-35 minutes
20-35 minutes per ½ kg
(1lb) and 20-35 minutes
30-40 minutes per ½ kg
(1lb) and 30-40 minutes
15-20 minutes per ½ kg
(1lb) and 20 minutes over
15-20 minutes per ½ kg
(1lb) and 20 minutes over
25-35 minutes per ½ kg
(1lb) and 25-30 minutes
35-40 minutes per ½ kg
(1lb) and 35-40 minutes
20 minutes per ½ kg (1lb)
and 20 minutes over
Always pre-heat the empty oven
with the grill functions for 5 minutes.
• Set the shelf in the shelf level
as recommended in the grilling table.
• Always set the pan to collect
the fat into the first shelf level.
• Grill only flat pieces of meat or
fish.
ENGLISH 19
over
over
over
over
over
Page 20
www.aeg.com
20
9.15 Top oven
9.16 Grilling
Adjust shelf position and grill
pan grid to suit different thicknesses of food
Bacon Rashers 5- 6
Beefburgers 10 - 20
Chicken Joints 20 - 40
Chops
- Lamb 15 - 25
- Pork 20 - 25
Fish - Whole
Trout/ Makarel
Fillets - Plaice/Cod 4 - 6
Kebabs 12 - 18
Kidneys - Lamb/Pig 6 - 10
Sausages 20 - 30
Steaks
- Rare 4 - 6
- Medium 6 - 8
- Well Done 12 - 15
Toasted Sandwiches 3 - 4
Food
Grill Time
(mins in total)
10 -12
9.17 Main oven
9.18 Grilling
Adjust shelf position and grill
pan grid to suit different thicknesses of food
Bacon Rashers 5- 6
Beefburgers 10 - 20
Chicken Joints 20 - 40
Chops
- Lamb 15 - 25
- Pork 20 - 25
Food
Grill Time
(mins in total)
Page 21

ENGLISH 21
Food
Fish - Whole
Trout/ Makarel
Grill Time
(mins in total)
10 -12
Fillets - Plaice/Cod 4 - 6
Kebabs 12 - 18
Kidneys - Lamb/Pig 6 - 10
Sausages 20 - 30
Steaks
- Rare 4 - 6
- Medium 6 - 8
- Well Done 12 - 15
Toasted Sandwiches 3 - 4
9.19 Grilling
Beef
Type of meat Quantity Level Temperature
(°C)
Topside beef or fillet per cm of
1)
- rare
- medium per cm of
per cm of
thickness
1 190 - 200 0:05 - 0:06
1 180 - 190 0:06 - 0:08
thickness
- well done per cm of
1 170 - 180 0:08 - 0:10
thickness
1)
Pre-heat oven
Time (h:min)
thickness
Pork
Type of meat Quantity Level Temperature
Time (h:min)
(°C)
Shoulder, neck, ham 1 - 1.5 kg 1 160 - 180 1:30 - 2:00
Pork chop 1 - 1.5 kg 1 160 - 180 1:00 - 1:30
Meatloaf 750 g - 1kg1 160 - 170 0:45 - 1:00
Knuckle of pork (pre-
750 g - 1kg1 150 - 170 1:30 - 2:00
cooked)
Page 22

www.aeg.com
22
Veal
Type of meat Quantity Level Temperature
Time (h:min)
(°C)
Roast veal 1 kg 1 160 - 180 1:30 - 2:00
Knuckle of veal 1.5 - 2 kg 1 160 - 180 2:00 - 2:30
Lamb
Type of meat Quantity Level Temperature
Time (h:min)
(°C)
Roast lamb, leg of lamb 1 - 1.5 kg 1 150 - 170 1:15 - 2:00
Saddle of lamb 1 - 1.5 kg 1 160 - 180 1:00 - 1:30
Game
Type of meat Quantity Level Temperature
Time (h:min)
(°C)
Saddle of hare, leg of
1)
hare
Up to 1kg3 220 - 250 0:25 - 0:40
Loin of Game 1.5-2 kg 1 210 - 220 1:15 - 1:45
Leg of Game 1.5 - 2 kg 1 200 - 210 1:30 - 2:15
1)
pre-heat oven
Poultry
Type of meat Quantity Level Temperature
Time (h:min)
(°C)
Poultry pieces per
1 200 - 220 0:35 - 0:50
200-250g
Half chicken per
1 190 - 210 0:35 - 0:50
400-500g
Poultry 1 - 1.5 kg 1 190 - 210 0:45 - 1:15
Duck 1.5 - 2 kg 1 180 - 200 1:15 - 1:45
Goose 3.5 - 5 kg 1 160 - 180 2:30 - 3:30
Turkey 2.5 - 3.5kg1 160 - 180 1:45 - 2:30
Turkey 4 - 6 kg 1 140 - 160 2:30 - 4:00
9.20 Defrosting
• Put the food out of the packaging and
set it on a plate on the oven shelf.
• Do not cover with a plate or bowl. This
can extend the time to defrost very
much.
• Put the oven shelf in the first shelf level from the bottom.
Page 23

10. CARE AND CLEANING
ENGLISH 23
WARNING!
Refer to the Safety chapters.
• Clean the front of the appliance with a
soft cloth with warm water and cleaning agent.
• To clean metal surfaces use a usual
cleaning agent
• Clean the oven interior after each use.
Thus you can remove dirt more easily
and it does not burn on.
• Clean stubborn dirt with a special
oven cleaner.
• Clean all oven accessories (with a soft
cloth with warm water and cleaning
agent) after each use and let them dry.
• If you have nonstick accessories, do
not clean them using an aggressive
agents, sharp edged objects or dishwasher. It can destroy nonstick coating!
Stainless steel or aluminium appliances:
Clean the oven door with a wet
sponge only. Dry it with a soft
cloth.
Do not use steel wool, acids or
abrasive materials as they can
damage the oven surface. Clean
the oven control panel with the
same precautions
To support this self-cleaning process
heat the oven without any food
regularly:
1.
Open the oven door.
2.
Remove all accessories from the
oven.
3.
Close the door.
4.
Set the maximum oven temperature
and let the oven operate for 1 hour.
5.
Clean the oven cavity with a soft and
damp sponge.
CAUTION!
Do not attempt to clean catalytic
surfaces with oven sprays, abrasive cleaners, soap or other
cleaning agents. This may damage the catalytic surface.
Discolouration of the catalytic
surface has no effect on catalytic
properties.
10.2 Shelf supports
You can remove the shelf supports to
clean the side walls.
10.1 Catalytic walls
The walls with a catalytic coating are
self-cleaning. They absorb fat which collects on walls while the oven operates.
Removing the shelf supports
1.
Pull the front of the shelf support
away from the side wall.
Page 24

www.aeg.com
24
2.
Pull the rear end of the shelf support away from the side wall and remove it.
1
2
Installing the shelf supports
Install the shelf supports in the opposite
sequence.
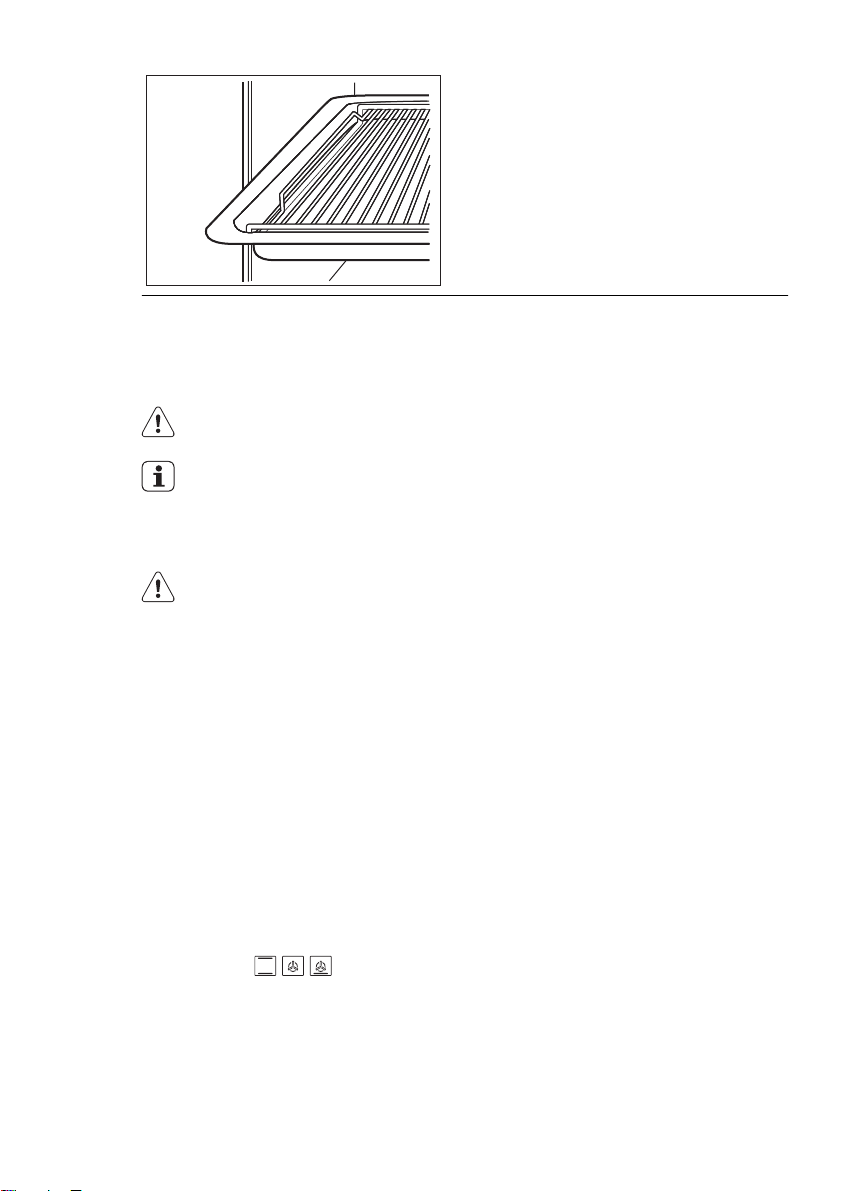
10.3 Oven door and glass panels
A
A
45°
Valid with telescopic runners:
The retaining pins on the telescopic shelf runners must point
to the front!
CAUTION!
Be careful when you remove the
door from the appliance. The
door is heavy!
Put the oven door with the outer
side down on a soft and level surface to prevent scratches.
Removing the oven door
1.
Open the oven door as far as it
goes.
2.
Fully press the clamping levers (A)
on the two door hinges.
3.
Close the oven door until it is at an
angle of approximately 45°.
4.
Hold the door with one hand on
each side and pull it away from the
appliance at an upwards angle.
5.
Now you can remove the inner glass
panels and clean them.
To install the door do the above
steps in the opposite sequence.
The oven door has 2, 3 or 4 panels of glass (depends on the
model).
CAUTION!
Rough handling of the glass, especially around the edges of the
front panel, can cause the glass
to break.
Page 25

2
B
1
10.4 Oven lamp
WARNING!
There is a danger of electrical
shock!
Before you change the oven lamp:
• Switch off the oven.
• Remove the fuses in the fuse box or
switch off the circuit breaker.
Put a cloth on the bottom of the
oven for protection of the oven
light and glass cover.
ENGLISH 25
Removing and cleaning the door
glasses
1.
Hold the door trim (B) on the top
edge of the door at the two sides
and push inwards to release the clip
seal.
2.
Pull the door trim to the front to remove it.
3.
Hold the door glass panels on their
top edge one by one and pull them
upwards from the guide.
4.
Clean the door glass panels.
To install panels do the above steps
in the opposite sequence. Insert the
smaller panel first, and then the
larger one.
2.
Use a narrow, blunt object (e.g. a
teaspoon) to remove the glass cover. Clean the glass cover.
Replacing the oven lamp
1.
You can find the lamp glass cover at
the back of the cavity.
Turn the lamp glass cover counterclockwise to remove it.
2.
Clean the glass cover.
3.
Replace the oven lamp with applicable 300°C heat-resistant oven lamp.
Use the same oven lamp type.
4.
Install the glass cover.
10.5 Replacing the oven lamp
1.
The oven lamp is on the left side of
the oven cavity. Remove the left
shelf rail for access to the lamp.
3.
If necessary, replace the oven lamp
with an applicable 300 °C heat-resistant oven lamp.
Use the same oven lamp type.
4.
Install the glass cover.
5.
Install the left shelf rail.
Page 26
www.aeg.com
26
11. WHAT TO DO IF…
WARNING!
Refer to the Safety chapters.
Problem Possible cause Solution
The oven does not heatupThe appliance is switch-
The oven does not heatupThe clock is not set Set the clock. Refer to
The oven does not heatupThe necessary settings
The oven does not heatupThe automatic cut-out is
The oven does not heatupThe fuse is released Make sure, if the fuse is
The oven lamp does not
operate
The display shows an error code that is not in
this list
If you cannot find a solution to the problem yourself, contact your dealer or the
service centre.
The necessary data for the service centre
is on the rating plate. The rating plate is
We recommend that you write the data here:
Model (MOD.) .........................................
Product number (PNC) .........................................
Serial number (S.N.) .........................................
ed off
are not set
switched on
The oven lamp is defective
There is an electronic
fault
on the front frame of the appliance cavity.
Switch on the appliance
"Setting the clock"
Make sure, the settings
are correct
Refer to "Automatic cut-
out"
the cause for the malfunction. If the fuse releases again and again,
refer to an authorized
electrician
Replace the oven lamp
• Switch off the appliance with the house
fuse or the safety
switch in the fuse box
and switch it on again
• If the display shows
the error code again,
refer to the Customer
Care Department
12. INSTALLATION
WARNING!
Refer to the Safety chapters.
The built-in unit must meet the
stability requirements of DIN
68930.
Page 27

16
5
min. 600
min. 2000
min. 550
min. 907
min. 300
min. 560
max. 570
20
ENGLISH 27
538
888
866
888
866
874-879
11
548
Page 28

www.aeg.com
28
90
0
2x 3,5x25
12.1 Electrical installation
WARNING!
Only a qualified and competent
person must do the electrical installation.
The manufacturer is not responsible if you do not follow safety
precautions from the Safety
chapters.
This appliance is supplied without a
main plug and a main cable.
Applicable cable types : H07 RN-F, H05
RN-F, H05 RRF, H05 VV-F, H05 V2V2-F
(T90), H05 BB-F
12.2 Electrical Installation
• Enquiries regarding the installation of
the cooker point, if required, should
be made to your Regional Electricity
Company to ensure compliance with
their regulations.
• The appliance socket switch should be
outside the cabinet but within 2 m of
the appliance to make it accessible to
Page 29

switch off the appliance in case of an
emergency.
• To protect the hands, wear gloves
when lifting the oven into its housing.
HOUSE CIRCUIT
Earth leakage and continuity
tests must be carried out before
the appliance is connected to the
mains supply and re-checked after fitting.
GETTING THINGS READY
CHOICE OF ELECTRICAL
CONNECTION
There are three possible ways to connect your appliance. In each case the appliance should be operated using at
least 6 mm² twin core and earth PVC insulated multicore cable. Please choose
from the most appropriate after reading
the different methods :
a)
By connecting to a cooker point (having a double pole isolating switch
with at least 3 mm contact separation
in all poles and neutral) and protected with a fuse or miniature circuit
breaker at your mains fuse box.
b)
By connecting the appliance together with a hob directly to a cooker
point(s). Having a double pole isolat-
ENGLISH 29
ing switch with at least 3 mm contact
separation in all poles and neutral.
c)
If you wish to connect an oven and a
hob to a cooker point you can by
connecting the oven and hob separately to the cooker point. Oven and
hob units should be separately connected to a cooker point. (See Picture)
A
BC
A)
Cooker Point
B)
Hob
C)
Oven
It is good practice to :
– Fit an Earth Leakage Circuit
Breaker to your house wiring.
– Wire your appliance to the lat-
est IEE regulations.
13. WARRANTY
FOR SALES IN AUSTRALIA AND NEW
ZEALAND
ALL AEG BRANDED APPLIANCES
This document sets out the terms and
conditions of the product warranties
for AEG Appliances. It is an important
document. Please keep it with your
proof of purchase documents in a safe
place for future reference should you
require service for your Appliance.
1.
In this warranty
a)
‘acceptable quality’ as referred to
in clause 10 of this warranty has
the same meaning referred to in
the ACL;
b)
‘ACL’ means Trade Practices
Amendment (Australian Consumer Law) Act (No.2) 2010;
c)
‘Appliance’ means any AEG
product purchased by you accompanied by this document;
d)
‘ASC’ means AEG’ authorised
serviced centres;
e)
AEG is the brand controlled by
Electrolux Home Products Pty
Ltd of 163 O’Riordan Street, Mascot, NSW 2020, ABN 51 004 762
341 in respect of Appliances purchased in Australia and Electrolux (NZ) Limited of 3-5 Niall Burgess Road, Mount Wellington, in
Page 30

www.aeg.com
30
respect of Appliances purchased
in New Zealand;
f)
‘major failure’ as referred to in
clause 10 of this warranty has the
same meaning referred to in the
ACL and includes a situation
when an Appliance cannot be repaired or it is uneconomic for
Electrolux, at its discretion, to repair an Appliance during the
Warranty Period;
g)
‘Warranty Period’ means:
– where the Appliance is used
for personal, domestic or
household use (i.e. normal single family use) as set out in the
instruction manual, the Appliance is warranted against manufacturing defects in Australia
and New Zealand for 60
months, following the date of
original purchase of the Appliance;
– this Appliance is not designed
for commercial use and therefore no warranty applies in this
case;
h)
‘you’ means the purchaser of the
Appliance not having purchased
the Appliance for re-sale, and
‘your’ has a corresponding meaning.
2.
This warranty only applies to Appliances purchased and used in Australia or New Zealand and is in addition to (and does not exclude, restrict, or modify in any way) any nonexcludable statutory warranties in
Australia or New Zealand.
3.
During the Warranty Period AEG or
its ASC will, at no extra charge if
your Appliance is readily accessible
for service, without special equipment and subject to these terms and
conditions, repair or replace any
parts which it considers to be defective. AEG or its ASC may use remanufactured parts to repair your Appliance. You agree that any replaced
Appliances or parts become the
property of AEG. This warranty does
not apply to light globes, batteries,
filters or similar perishable parts.
4.
Parts and Appliances not supplied
by AEG are not covered by this warranty.
5.
You will bear the cost of transportation, travel and delivery of the Appliance to and from AEG or its ASC. If
you reside outside of the service
area, you will bear the cost of:
a)
travel of an authorised representative;
b)
transportation and delivery of the
Appliance to and from AEG or its
ASC,
In all instances, unless the Appliance
is transported by AEG or an AEG authorised representative, the Appliance is transported at the owner’s
cost and risk while in transit to and
from AEG or its ASC.
6.
Proof of purchase is required before
you can make a claim under this warranty.
7.
You may not make a claim under this
warranty unless the defect claimed is
due to faulty or defective parts or
workmanship. AEG is not liable in
the following situations (which are
not exhaustive):
a)
the Appliance is damaged by:
– accident
– misuse or abuse, including fail-
ure to properly maintain or
service
– normal wear and tear
– power surges, electrical storm
damage or incorrect power
supply
– incomplete or improper instal-
lation
– incorrect, improper or inappro-
priate operation
– insect or vermin infestation
– failure to comply with any ad-
ditional instructions supplied
with the Appliance;
b)
the Appliance is modified without authority from AEG in writing;
c)
the Appliance’s serial number or
warranty seal has been removed
or defaced;
d)
the Appliance was serviced or repaired by anyone other than
AEG, an authorised repairer or
ASC.
Page 31

ENGLISH 31
8.
This warranty, the contract to which
it relates and the relationship between you and AEG are governed
by the law applicable where the Appliance was purchased. Where the
Appliance was purchased in New
Zealand for business purposes the
Consumer Guarantee Act does not
apply.
9.
To the extent permitted by law, AEG
excludes all warranties and liabilities
(other than as contained in this
document) including liability for any
loss or damage whether direct or indirect arising from your purchase,
use or non use of the Appliance.
10.
For Appliances and services provided by AEG in Australia, the Appliances come with a guarantee by
AEG that cannot be excluded under
the Australian Consumer Law. You
are entitled to a replacement or refund for a major failure and for compensation for any other reasonably
foreseeable loss or damage. You are
also entitled to have the Appliance
repaired or replaced if the Appliance
fails to be of acceptable quality and
the failure does not amount to a major failure. The benefits to you given
by this warranty are in addition to
your other rights and remedies un-
11.
At all times during the Warranty Period, AEG shall, at its discretion, determine whether repair, replacement
or refund will apply if an Appliance
has a valid warranty claim applicable
to it.
12.
For Appliances and services provided by AEG in New Zealand, the
Appliances come with a guarantee
by AEG pursuant to the provisions of
the Consumer Guarantees Act, the
Sale of Goods Act and the Fair Trading Act.
13.
To enquire about claiming under
this warranty, please follow these
steps:
a)
carefully check the operating instructions, user manual and the
terms of this warranty;
b)
have the model and serial number of the Appliance available;
c)
have the proof of purchase (eg
an invoice) available;
d)
telephone the numbers shown
below.
14.
You accept that if you make a warranty claim, AEG and its ASC may
exchange information in relation to
you to enable AEG to meet its obligations under this warranty.
der a law in relation to the Appliances or services to which the warranty
relates.
Important Notice
Before calling for service, please ensure that the steps listed in point 13 above have
been followed.
SERVICE AUSTRALIA
www.aeg.com/au
FOR SERVICE
or to find the address of your nearest state service centre in Australia
PLEASE CALL 1300 363 664
OR EMAIL customercare@aegaustralia.com.au
For the cost of a local call (Australia only)
FOR SPARE PARTS
or to find the address of your nearest state spare parts centre in Australia
PLEASE CALL 13 13 50
OR EMAIL customercare@aegaustralia.com.au
For the cost of a local call (Australia only)
Page 32

www.aeg.com
32
SERVICE NEW ZEALAND
FOR SERVICE
or to find the address of your nearest authorised service centre in New Zealand
FREE CALL 0800 10 66 10
OR EMAIL customercare@electrolux.co.nz
(New Zealand only)
FOR SPARE PARTS
or to find the address of your nearest state spare parts centre in New Zealand
FREE CALL 0800 10 66 20
OR EMAIL customercare@electrolux.co.nz
(New Zealand only)
14. GREAT BRITAIN & IRELAND - GUARANTEE/
CUSTOMER SERVICE
14.1 Standard guarantee
conditions:
We, Electrolux, undertake that if within
12 months of the date of the purchase
this Electrolux appliance or any part
thereof is proved to be defective by reason only of faulty workmanship or materials, we will, at our option repair or replace the same FREE OF CHARGE for labour, materials or carriage on condition
that:
• Appliance has been correctly installed
and used only on the electricity supply
stated on the rating plate.
• Appliance has been used for normal
domestic purposes only, in accordance with manufacturer's instructions.
• Appliance hasn't been serviced, maintained, repaired, taken apart or tampered with by person not authorised
by us.
• Electrolux Service Force Centre must
undertake all service work under this
guarantee
• Any appliance or defective part replaced shall become the Company's
property.
• This guarantee is in addition to your
statutory and other legal rights.
Exclusions
• Damage, calls resulting from transport, improper use, neglect, light
bulbs, removable parts of glass, plastic.
• Costs for calls to put right appliance
which is improperly installed, calls to
appliances outside United Kingdom.
• Appliances found to be in use within a
commercial environment, plus those
which are subject to rental agreements.
• Products of Electrolux manufacturer
that are not marketed by Electrolux
Service and Spare Parts.Please contact
your local Service Force Centre: 08445
616 616(Call will be routed to Service
Force Centre covering your postcode
area). For address of local Service Force
Centre and further information, please
visit: www.serviceforce.co.uk Before
calling out an engineer, please ensure
you have read the details under the
heading "What to do if... / Troubleshooting". When you contact the Service
Force Centre you will need to give the
following details: Your name, address
and postcode, your telephone number,
clear concise details of the fault, model
and serial number of the appliance
(found on the rating plate), the purchase
date. Please note a valid purchase re-
Page 33

ceipt or guarantee documentation is required for in guarantee service calls.
Customer Care.Please contact our Customer Care Department: Electrolux Major Appliances, Addington Way, Luton,
Bedfordshire, LU4 9QQ or visit our website at www.electrolux.co.uk
Customer Care
Depart-
Tel: (Calls may be recorded for training purposes)
ment,
Electro-
08445 613 613
lux
AEG-
08445 611 611
Electrolux
15. EUROPEAN GUARANTEE
ENGLISH 33
Customer Care
Depart-
Tel: (Calls may be recorded for training purposes)
ment,
Zanussi-
08445 612 612
Electrolux
For Customer Service in The
Republic of Ireland please
contact us at the address
below:
Electrolux Group (Irl) Ltd, Long Mile
Road, Dublin 12, Republic of Ireland
Tel: +353 (0)1 4090751, Email: service.eid@electrolux.ie
This appliance is guaranteed by Electrolux in each of the countries listed at the
back of this user manual, for the period
specified in the appliance guarantee or
otherwise by law. If you move from one
of these countries to another of the
countries listed, the appliance guarantee
will move with you subject to the following qualifications:-
• The appliance guarantee starts from
the date you first purchased the appliance which will be evidenced by production of a valid purchase document
issued by the seller of the appliance.
• The appliance guarantee is for the
same period and to the same extent
for labour and parts as exists in your
new country of residence for this particular model or range of appliances.
16. WWW.ELECTROLUX.COM
Albania +355 4 261 450 Rruga “Kavajës”, ish-parku auto-
• The appliance guarantee is personal
to the original purchaser of the appliance and cannot be transferred to another user.
• The appliance is installed and used in
accordance with instructions issued by
Electrolux and is only used within the
home, i.e. is not used for commercial
purposes.
• The appliance is installed in accordance with all relevant regulations in
force within your new country of residence.
The provisions of this European Guarantee do not affect any of the rights granted to you by law.
buzëve, Tiranë
Page 34

www.aeg.com
34
Belgique/België/Belgien
+32 2 7162444 Raketstraat 40, 1130 Brussel/
Bruxelles
Česká Republika +420 261 302 261 Budějovická 3, Praha 4, 140 21
Danmark +45 70 11 74 00 Strevelinsvej 38-40, 7000 Frederi-
cia
Deutschland +49 180 32 26 622 Fürther Str. 246, 90429 Nürnberg
Eesti +37 2 66 50 030 Pärnu mnt. 153, 11624 Tallinn
España +34 902 11 63 88 Carretera M-300, Km. 29,900 Al-
calá de Henares Madrid
France 08 92 68 24 33
www.electrolux.fr
(0.34€/min)
Great Britain +44 8445 616 616 Addington Way, Luton, Bedford-
shire LU4 9QQ
Hellas +30 23 10 56 19 70 4, Limnou Str., 54627 Thessaloni-
ki
Hrvatska +385 1 63 23 338 Slavonska avenija 3, 10000 Za‐
greb
Ireland +353 1 40 90 753 Long Mile Road Dublin 12
Italia +39 (0) 434 558500 Corso Lino Zanussi, 30 - 33080
Porcia (PN)
Latvija +371 67313626 Kr. Barona iela 130/2, LV-1012,
Riga
Lietuva +370 5 278 06 03 Ozo 10a, LT-08200 Vilnius
Luxembourg +352 42 431 301 Rue de Bitbourg, 7, L-1273
Hamm
Magyarország (06-1)467-3205
+361 252 1773
H-1142 Budapest XIV, Erzsébet
Királyné útja 87
Nederland +31 17 24 68 300 Vennootsweg 1, 2404 CG - Al-
phen aan den Rijn
Norge +47 81 5 30 222 Risløkkvn. 2 , 0508 Oslo
Österreich 0810 955030 Herziggasse 9, 1230 Wien
Polska +48 22 43 47 300 ul. Kolejowa 5/7, 01–217 Wars‐
zawa
Portugal +35 12 14 40 39 39 Quinta da Fonte - Edifício Gon-
çalves Zarco - Q 35 -2774-518
Paço de Arcos
Romania +40 21 451 20 30 Str. Garii Progresului 2, S4,
040671 RO
Schweiz - Suisse Svizzera
0848 848 111 Industriestrasse 10, CH-5506 Mä-
genwil
Page 35

ENGLISH 35
Slovenija +38 61 24 25 731 Gerbičeva ulica 110, 1000 Ljubl‐
Slovensko +421 2 32 14 13
34-5
Suomi 030 600 5200
Lankapuhelinverkosta 0,0828€/puhelu+0,032€/min Matkapuhelinverkosta 0,192€/min
Sverige +46 (0)771 76 76 76 Electrolux Service, S:t Göransga-
Türkiye +90 21 22 93 10 25 Tarlabaşı caddesi no : 35 Tak‐
Россия 8-800-200-3589 129090 Москва, Олимпийский
Україна +380 44 586 20 60 04074 Київ,
17. ENVIRONMENT CONCERNS
Recycle the materials with the
symbol
applicable containers to recycle it.
Help protect the environment and
human health and to recycle waste
of electrical and electronic
. Put the packaging in
jana
Electrolux Slovakia s.r.o., Elec‐
trolux Domáce spotrebiče SK,
Galvaniho 17/B, 821 04 Bratisla‐
va
tan 143, S-105 45 Stockholm
sim İstanbul
проспект, 16, БЦ "Олимпик"
вул.Автозаводська, 2а, БЦ
"Алкон"
appliances. Do not dispose
appliances marked with the symbol
with the household waste. Return the
product to your local recycling
facility or contact your municipal
office.
Page 36

www.aeg.com
36
ΠΕΡΙΕΧΌΜΕΝΑ
1. ΠΛΗΡΟΦΟΡΊΕΣ ΓΙΑ ΤΗΝ ΑΣΦΆΛΕΙΑ . . . . . . . . . . . . . . . . . . . . . . . . . . . . . . . . . . . . . . . 37
2. ΟΔΗΓΊΕΣ ΓΙΑ ΤΗΝ ΑΣΦΆΛΕΙΑ . . . . . . . . . . . . . . . . . . . . . . . . . . . . . . . . . . . . . . . . . . . . 38
3. ΠΕΡΙΓΡΑΦΉ ΠΡΟΪΌΝΤΟΣ . . . . . . . . . . . . . . . . . . . . . . . . . . . . . . . . . . . . . . . . . . . . . . . 41
4. ΠΡΙΝ ΑΠΌ ΤΗΝ ΠΡΏΤΗ ΧΡΉΣΗ . . . . . . . . . . . . . . . . . . . . . . . . . . . . . . . . . . . . . . . . . . . 41
5. ΚΑΘΗΜΕΡΙΝΉ ΧΡΉΣΗ . . . . . . . . . . . . . . . . . . . . . . . . . . . . . . . . . . . . . . . . . . . . . . . . . . 43
6. ΛΕΙΤΟΥΡΓΊΕΣ ΡΟΛΟΓΙΟΎ . . . . . . . . . . . . . . . . . . . . . . . . . . . . . . . . . . . . . . . . . . . . . . . 46
7. ΠΡΌΣΘΕΤΕΣ ΛΕΙΤΟΥΡΓΊΕΣ . . . . . . . . . . . . . . . . . . . . . . . . . . . . . . . . . . . . . . . . . . . . . . 47
8. ΧΡΉΣΗ ΤΩΝ ΕΞΑΡΤΗΜΆΤΩΝ . . . . . . . . . . . . . . . . . . . . . . . . . . . . . . . . . . . . . . . . . . . . 48
9. ΧΡΉΣΙΜΕΣ ΣΥΜΒΟΥΛΈΣ . . . . . . . . . . . . . . . . . . . . . . . . . . . . . . . . . . . . . . . . . . . . . . . . 50
10. ΦΡΟΝΤΊΔΑ ΚΑΙ ΚΑΘΆΡΙΣΜΑ . . . . . . . . . . . . . . . . . . . . . . . . . . . . . . . . . . . . . . . . . . . . . 59
11. ΤΙ ΝΑ ΚΆΝΕΤΕ ΑΝ... . . . . . . . . . . . . . . . . . . . . . . . . . . . . . . . . . . . . . . . . . . . . . . . . . . . . 63
12. ΕΓΚΑΤΆΣΤΑΣΗ . . . . . . . . . . . . . . . . . . . . . . . . . . . . . . . . . . . . . . . . . . . . . . . . . . . . . . . . 64
ΓΙΑ ΑΡΙΣΤΑ ΑΠΟΤΕΛΕΣΜΑΤΑ
Σας ευχαριστούμε που επιλέξατε αυτό το προϊόν της AEG. Το σχεδιάσαμε για να σας παρέχει
άψογη απόδοση για πολλά χρόνια, με πρωτοποριακές τεχνολογίες που θα κάνουν τη ζωή σας
πιο απλή και με χαρακτηριστικά που ενδεχομένως δεν θα βρείτε σε κοινές συσκευές. Σας
παρακαλούμε να αφιερώσετε λίγα λεπτά και να διαβάσετε τις οδηγίες, ώστε να διασφαλίσετε
την καλύτερη δυνατή χρήση της συσκευής σας.
Επισκεφθείτε την ιστοσελίδα μας για να:
βρείτε υποδείξεις χρήσης, φυλλάδια, συμβουλές για την επίλυση προβλημάτων,
πληροφορίες συντήρησης:
www.aeg.com
καταχωρήσετε το προϊόν σας, ώστε να έχετε καλύτερο σέρβις:
www.aeg.com/productregistration
αγοράσετε εξαρτήματα, αναλώσιμα και γνήσια ανταλλακτικά για τη συσκευή σας:
www.aeg.com/shop
ΥΠΟΣΤΗΡΙΞΗ ΠΕΛΑΤΩΝ ΚΑΙ ΣΕΡΒΙΣ
Συνιστάται η χρήση γνήσιων ανταλλακτικών.
Όταν επικοινωνείτε με το σέρβις, βεβαιωθείτε ότι έχετε διαθέσιμα τα ακόλουθα στοιχεία.
Τα στοιχεία αυτά θα τα βρείτε στην πινακίδα τεχνικών χαρακτηριστικών. Μοντέλο, Κωδ.
προϊόντος (PNC), Αριθμός σειράς.
Προειδοποίηση / Προσοχή - Πληροφορίες ασφαλείας.
Γενικές πληροφορίες και συμβουλές
Περιβαλλοντικές πληροφορίες
Υπόκειται αε αλλαγές χωρίς προειδποίηση.
Page 37

1. ΠΛΗΡΟΦΟΡΊΕΣ ΓΙΑ ΤΗΝ ΑΣΦΆΛΕΙΑ
Πριν από την εγκατάσταση και τη χρήση της συσκευής,
διαβάστε προσεκτικά τις παρεχόμενες οδηγίες. Ο κατα‐
σκευαστής δεν ευθύνεται αν προκληθεί τραυματισμός ή
ζημιά από λανθασμένη εγκατάσταση και χρήση. Να φυ‐
λάσσετε πάντα αυτές τις οδηγίες μαζί με τη συσκευή για
μελλοντική αναφορά.
1.1 Ασφάλεια παιδιών και ευπαθών ατόμων
ΠΡΟΕΙΔΟΠΟΙΗΣΗ
Κίνδυνος ασφυξίας, τραυματισμού ή μόνιμης ανα‐
πηρίας.
• Η συσκευή αυτή μπορεί να χρησιμοποιηθεί από παι‐
διά ηλικίας 8 ετών και άνω και από άτομα με μειωμέ‐
νες σωματικές, αισθητηριακές ή πνευματικές δυνατό‐
τητες ή έλλειψη εμπειρίας και γνώσης, εάν επιβλέπο‐
νται από ενήλικα ή άτομο υπεύθυνο για την ασφάλειά
τους.
• Μην αφήνετε τα παιδιά να παίζουν με τη συσκευή.
• Φυλάσσετε όλα τα υλικά συσκευασίας μακριά από τα
παιδιά.
• Κρατάτε τα παιδιά και τα κατοικίδια ζώα μακριά από
τη συσκευή όταν λειτουργεί ή όταν ψύχεται. Τα προ‐
σβάσιμα μέρη είναι πολύ ζεστά.
• Εάν η συσκευή διαθέτει διάταξη ασφαλείας για παιδιά,
συνιστάται η ενεργοποίησή της.
• Ο καθαρισμός και η συντήρηση από το χρήστη δεν
πρέπει να πραγματοποιούνται από παιδιά χωρίς επί‐
βλεψη.
ΕΛΛΗΝΙΚΑ 37
1.2 Γενικές πληροφορίες για την ασφάλεια
• Το εσωτερικό της συσκευής θερμαίνεται κατά τη χρή‐
ση. Μην αγγίζετε τις αντιστάσεις που βρίσκονται εντός
της συσκευής. Χρησιμοποιείτε πάντα γάντια φούρνου
όταν αφαιρείτε ή εισάγετε εξαρτήματα ή σκεύη.
Page 38

www.aeg.com
38
• Μη χρησιμοποιείτε ατμοκαθαριστή για τον καθαρισμό
της συσκευής.
• Πριν από οποιαδήποτε εργασία συντήρησης, διακό‐
πτετε την παροχή ρεύματος.
• Μη χρησιμοποιείτε ισχυρά διαβρωτικά καθαριστικά ή
αιχμηρές μεταλλικές ξύστρες για να καθαρίσετε τη
γυάλινη πόρτα του φούρνου, καθότι μπορεί να χαρά‐
ξουν την επιφάνεια, και αυτό μπορεί να προκαλέσει
θραύση του γυαλιού.
• Για να αφαιρέσετε τις πλευρικές σχάρες, πρώτα τρα‐
βήξτε να αποσπάσετε το μπροστινό άκρο της πλευρι‐
κής σχάρας και κατόπιν το πίσω άκρο από τα πλαϊνά
τοιχώματα. Τοποθετήστε τις πλευρικές σχάρες, ακο‐
λουθώντας την αντίστροφη σειρά.
2.
ΟΔΗΓΊΕΣ ΓΙΑ ΤΗΝ ΑΣΦΆΛΕΙΑ
2.1 Εγκατάσταση
ΠΡΟΕΙΔΟΠΟΙΗΣΗ
Η εγκατάσταση αυτής της συ‐
σκευής πρέπει να εκτελείται μόνο
από κατάλληλα καταρτισμένο
άτομο.
• Αφαιρέστε όλα τα υλικά της συσκευα‐
σίας.
• Αν η συσκευή έχει υποστεί ζημιά, μην
προβείτε σε εγκατάσταση ή χρήση της.
• Ακολουθείτε τις οδηγίες εγκατάστασης
που παρέχονται με τη συσκευή.
• Να είστε πάντα προσεκτικοί κατά τη
μετακίνηση της συσκευής, καθότι είναι
βαριά. Φοράτε πάντα γάντια ασφα‐
λείας.
• Μην τραβάτε τη συσκευή από τη λαβή.
• Τηρείτε την ελάχιστη απόσταση από
τις άλλες συσκευές και μονάδες.
• Βεβαιωθείτε ότι οι κατασκευές κάτω
από τις οποίες ή δίπλα στις οποίες
εγκαθίσταται η συσκευή είναι ασφα‐
λείς.
• Οι πλευρές της συσκευής πρέπει να
πρόσκεινται σε συσκευές ή μονάδες με
το ίδιο ύψος.
Ηλεκτρική σύνδεση
ΠΡΟΕΙΔΟΠΟΙΗΣΗ
Κίνδυνος πυρκαγιάς και ηλεκτρο‐
πληξίας.
• Όλες οι ηλεκτρικές συνδέσεις πρέπει
να πραγματοποιούνται από επαγγελ‐
ματία ηλεκτρολόγο.
• Η συσκευή πρέπει να είναι γειωμένη.
• Βεβαιωθείτε ότι οι πληροφορίες σχετι‐
κά με το ηλεκτρικό ρεύμα στην πινακί‐
δα τεχνικών χαρακτηριστικών συμφω‐
νούν με την παροχή ρεύματος. Αν δεν
συμφωνούν, επικοινωνήστε με ηλεκ‐
τρολόγο.
• Χρησιμοποιείτε πάντα μια σωστά εγκα‐
τεστημένη πρίζα με προστασία κατά
της ηλεκτροπληξίας.
• Μη χρησιμοποιείτε πολύπριζα και
μπαλαντέζες.
• Προσέχετε να μην προκληθεί ζημιά
στο φις και το καλώδιο ρεύματος. Επι‐
κοινωνήστε με το Σέρβις ή έναν ηλεκ‐
Page 39

τρολόγο για την αλλαγή ενός κατε‐
στραμμένου καλωδίου ρεύματος.
• Μην επιτρέπετε σε καλώδια ρεύματος
να έρχονται σε επαφή με την πόρτα
της συσκευής, ιδιαίτερα όταν η πόρτα
είναι ζεστή.
• Η προστασία από ηλεκτροπληξία των
υπό τάση ή μονωμένων τμημάτων
πρέπει να στερεώνεται με τέτοιο τρό‐
πο, ώστε να μην είναι δυνατή η αφαί‐
ρεσή της χωρίς εργαλεία.
• Συνδέστε το φις τροφοδοσίας στην
πρίζα μόνον αφού έχει ολοκληρωθεί η
εγκατάσταση. Μετά την εγκατάσταση,
βεβαιωθείτε ότι είναι δυνατή η πρό‐
σβαση στο φις τροφοδοσίας.
• Εάν η πρίζα είναι χαλαρή, μη συνδέετε
το φις τροφοδοσίας.
• Μην τραβάτε το καλώδιο τροφοδοσίας
για να αποσυνδέσετε τη συσκευή.
Τραβάτε πάντα το φις τροφοδοσίας.
• Χρησιμοποιείτε μόνο σωστές διατάξεις
απομόνωσης: ασφαλειοδιακόπτες,
ασφάλειες (βιδωτές ασφάλειες αφαι‐
ρούμενες από την υποδοχή), διακό‐
πτες διαφυγής ρεύματος και ρελέ.
• Στην ηλεκτρική εγκατάσταση της συ‐
σκευής θα πρέπει να προβλέπεται μο‐
νωτική διάταξη που θα επιτρέπει την
αποσύνδεση της συσκευής από το δί‐
κτυο ρεύματος από όλους τους πό‐
λους. Η μονωτική διάταξη πρέπει να
έχει ελάχιστη απόσταση 3 χιλιοστών
μεταξύ των επαφών.
2.2 Χρήση
ΠΡΟΕΙΔΟΠΟΙΗΣΗ
Κίνδυνος τραυματισμού, εγκαυ‐
μάτων, ηλεκτροπληξίας ή έκρη‐
ξης.
• Χρησιμοποιείτε αυτή τη συσκευή σε οι‐
κιακό περιβάλλον.
• Μην αλλάζετε τις προδιαγραφές αυτής
της συσκευής.
• Βεβαιωθείτε ότι τα ανοίγματα αερισμού
δεν είναι φραγμένα.
• Μην αφήνετε τη συσκευή χωρίς επιτή‐
ρηση όταν μαγειρεύετε.
• Απενεργοποιείτε τη συσκευή μετά από
κάθε χρήση.
• Πρέπει να προσέχετε όταν ανοίγετε
την πόρτα της συσκευής ενόσω η συ‐
ΕΛΛΗΝΙΚΑ 39
σκευή βρίσκεται σε λειτουργία. Μπορεί
να διαφύγει καυτός αέρας.
• Μη χρησιμοποιείτε τη συσκευή με
βρεγμένα χέρια ή όταν βρίσκεται σε
επαφή με νερό.
• Μην εφαρμόζετε πίεση στην πόρτα της
συσκευής όταν η πόρτα είναι ανοιχτή.
• Μη χρησιμοποιείτε τη συσκευή ως επι‐
φάνεια εργασίας ή ως επιφάνεια από‐
θεσης αντικειμένων.
• Κρατάτε πάντα κλειστή την πόρτα της
συσκευής όταν η συσκευή βρίσκεται
σε λειτουργία.
• Ανοίγετε την πόρτα της συσκευής προ‐
σεκτικά. Η χρήση υλικών με αλκοόλη
μπορεί να δημιουργήσει μείγμα αλκοό‐
λης και αέρα.
• Κατά το άνοιγμα της πόρτας, μην επι‐
τρέπετε σε σπινθήρες ή γυμνές φλόγες
να έρθουν σε επαφή με τη συσκευή.
• Μην τοποθετείτε μέσα, κοντά ή επάνω
στη συσκευή εύφλεκτα αντικείμενα ή
αντικείμενα εμποτισμένα με εύφλεκτα
προϊόντα.
ΠΡΟΕΙΔΟΠΟΙΗΣΗ
Υπάρχει κίνδυνος πρόκλησης ζη‐
μιάς στη συσκευή.
• Για να αποφευχθεί η πρόκληση ζημιάς
ή ο αποχρωματισμός της εμαγιέ επιφά‐
νειας:
– Μην τοποθετείτε σκεύη ή άλλα αντι‐
κείμενα απευθείας σε επαφή με το δά‐
πεδο της συσκευής.
– Μην τοποθετείτε αλουμινόχαρτο
απευθείας σε επαφή με το δάπεδο της
συσκευής.
– μην τοποθετείτε νερό απευθείας μέ‐
σα στη συσκευή όταν αυτή είναι ζεστή.
– μην αφήνετε υγρά πιάτα και φαγητά
μέσα στη συσκευή μετά την ολοκλή‐
ρωση του μαγειρέματος.
– κατά την αφαίρεση ή την τοποθέτηση
των εξαρτημάτων απαιτείται προσοχή.
• Ο αποχρωματισμός της εμαγιέ επιφά‐
νειας δεν επηρεάζει την απόδοση της
συσκευής. Δεν αποτελεί ελάττωμα
σύμφωνα με την εγγύηση.
• Χρησιμοποιείτε βαθύ ταψί για κέικ με
μεγάλη ποσότητα υγρών. Οι χυμοί
φρούτων προκαλούν λεκέδες οι οποίοι
μπορεί να είναι μόνιμοι.
Page 40

www.aeg.com
40
2.3 Φροντίδα και καθάρισμα
ΠΡΟΕΙΔΟΠΟΙΗΣΗ
Υπάρχει κίνδυνος τραυματισμού,
πυρκαγιάς ή βλάβης της συ‐
σκευής.
• Πριν από την πραγματοποίηση συντή‐
ρησης, απενεργοποιήστε τη συσκευή
και αποσυνδέστε το φις τροφοδοσίας
από την πρίζα.
• Βεβαιωθείτε ότι η συσκευή είναι κρύα.
Υπάρχει ο κίνδυνος θραύσης των υα‐
λοπινάκων.
• Αντικαταστήστε άμεσα τους υαλοπίνα‐
κες της πόρτας όταν έχουν υποστεί ζη‐
μιά. Επικοινωνήστε με το κέντρο σέρ‐
βις.
• Απαιτείται προσοχή κατά την αφαίρε‐
ση της πόρτας από τη συσκευή. Η
πόρτα είναι βαριά!
• Καθαρίζετε τακτικά τη συσκευή για να
αποτραπεί τυχόν επιδείνωση της κατά‐
στασης του υλικού της επιφάνειας.
• Υπολείμματα λίπους ή τροφών στη συ‐
σκευή μπορούν να προκαλέσουν πυρ‐
καγιά.
• Καθαρίστε τη συσκευή με ένα υγρό μα‐
λακό πανί. Χρησιμοποιείτε μόνο ουδέ‐
τερα απορρυπαντικά. Μη χρησιμο‐
ποιείτε λειαντικά προϊόντα, σφουγγα‐
ράκια που χαράσσουν, διαλύτες ή με‐
ταλλικά αντικείμενα.
• Αν χρησιμοποιείτε σπρέι καθαρισμού
για φούρνους, ακολουθείτε τις οδηγίες
ασφαλείας στη συσκευασία.
• Μην καθαρίζετε την καταλυτική εμαγιέ
επίστρωση (εάν υπάρχει) με κανένα εί‐
δος απορρυπαντικού.
2.4 Εσωτερικό φως
• Ο τύπος λαμπτήρα πυράκτωσης ή
αλογόνου που χρησιμοποιείται σε αυ‐
τή τη συσκευή προορίζεται μόνο για οι‐
κιακές συσκευές. Μην τον χρησιμο‐
ποιείτε για οικιακό φωτισμό.
ΠΡΟΕΙΔΟΠΟΙΗΣΗ
Κίνδυνος ηλεκτροπληξίας.
• Πριν από την αντικατάσταση του λαμ‐
πτήρα, αποσυνδέετε πάντα τη συ‐
σκευή από την ηλεκτρική τροφοδοσία.
• Χρησιμοποιείτε μόνο λαμπτήρες με τις
ίδιες προδιαγραφές.
2.5 Απόρριψη
ΠΡΟΕΙΔΟΠΟΙΗΣΗ
Κίνδυνος τραυματισμού ή ασφυ‐
ξίας.
• Αποσυνδέστε τη συσκευή από την πα‐
ροχή ρεύματος.
• Κόψτε το καλώδιο τροφοδοσίας και
απορρίψτε το.
• Αφαιρέστε το μάνταλο της πόρτας για
να αποτραπεί ο εγκλεισμός παιδιών ή
ζώων μέσα στη συσκευή.
Page 41

3. ΠΕΡΙΓΡΑΦΉ ΠΡΟΪΌΝΤΟΣ
3.1 Γενική επισκόπηση
1
6
5
4
6
3
2
1
ΕΛΛΗΝΙΚΑ 41
Ηλεκτρονικός προγραμματιστής
1
Αντίσταση
2
Λαμπτήρας φούρνου
3
Ανεμιστήρας και πίσω αντίσταση
2
3
4
5
4
Αντίσταση
5
Θέσεις σχαρών
6
6
5
4
6
3
2
1
3.2 Πρόσθετα εξαρτήματα
2
3
4
5
• Βαθύ ταψί ψησίματος
φούρνου
• Ράφι φούρνου
Για μαγειρικά σκεύη, φόρμες γλυκών,
ψητά.
• Σχάρα ταψιού ψησίματος
4. ΠΡΙΝ ΑΠΌ ΤΗΝ ΠΡΏΤΗ ΧΡΉΣΗ
ΠΡΟΕΙΔΟΠΟΙΗΣΗ
Ανατρέξτε στα κεφάλαια σχετικά
με την ασφάλεια.
4.1 Αρχικός καθαρισμός
•Αφαιρέστε όλα τα εξαρτήματα από τη
συσκευή.
• Καθαρίστε τη συσκευή πριν από την
πρώτη χρήση.
Ανατρέξτε στο κεφάλαιο «Φροντί‐
δα και καθαρισμός».
4.2 Ρύθμιση της ώρας
Ο φούρνος μπορεί να τεθεί σε
λειτουργία μόνο μετά από τη ρύθ‐
μιση της ώρας.
Όταν συνδέετε τη συσκευή στην ηλεκτρι‐
κή τροφοδοσία ή σε περίπτωση διακο‐
πής ρεύματος, η ένδειξη της ώρας ανα‐
βοσβήνει αυτόματα.
Για να ρυθμίσετε την τρέχουσα ώρα,
χρησιμοποιήστε το πλήκτρο
Μετά από περίπου 5 δευτερόλεπτα, η έν‐
δειξη σταματάει να αναβοσβήνει και στην
οθόνη εμφανίζεται η ρυθμισμένη ώρα της
ημέρας.
Για μαγείρεμα και ψήσιμο ή ως ταψί
για συλλογή λίπους.
Για τοποθέτηση στο βαθύ ταψί.
ή .
Μπορείτε να αλλάξετε την ώρα
της ημέρας
μόνο εάν:
•δεν είναι ενεργοποιημένη η λει‐
τουργία κλειδώματος,
• δεν έχει ρυθμιστεί κάποια από
τις λειτουργίες ρολογιού "Διάρ‐
κεια"
ή "Τέλος"
• και δεν έχει ρυθμιστεί καμία λει‐
τουργία φούρνου.
Page 42

www.aeg.com
42
4.3 Προθέρμανση
Προθερμάνετε την κενή συσκευή για να
καούν τα υπολείμματα λίπους.
Προθερμάνετε και τους δύο φούρνους.
Προθερμάνετε ένα φούρνο τη φορά.
Επιλέξτε τις λειτουργίες που παρατίθε‐
νται παρακάτω, κατά περίπτωση.
1.
Επιλέξτε τη λειτουργία και τη μέ‐
γιστη θερμοκρασία.
2.
Αφήστε τη συσκευή να λειτουργήσει
για μία ώρα.
3.
Επιλέξτε τη λειτουργία και τη μέ‐
γιστη θερμοκρασία.
4.4 Πίνακας χειριστηρίων
1
4.
Αφήστε τη συσκευή να λειτουργήσει
για δέκα λεπτά.
5.
Επιλέξτε τη λειτουργία και τη μέ‐
γιστη θερμοκρασία.
6.
Αφήστε τη συσκευή να λειτουργήσει
για δέκα λεπτά.
Τα εξαρτήματα μπορεί να αποκτήσουν
υψηλότερη θερμοκρασία από ό,τι συν‐
ήθως. Από τη συσκευή μπορεί να αναδυ‐
θεί μια οσμή και καπνός. Αυτό είναι φυ‐
σιολογικό. Βεβαιωθείτε ότι υπάρχει
επαρκής κυκλοφορία του αέρα.
Αριθ‐
μός
1
2
3
4
5
6
7
Πλήκ‐
Λειτουργία Περιγραφή
τρο
– Οθόνη
Πλήκτρο λει‐
τουργίας ρο‐
λογιού
Πλήκτρα ρύθ‐
Πλήκτρο θερ‐
μοκρασίας
Επιλογή λει‐
τουργίας
φούρνου
Επιλογή
φούρνου
On/Off
7 6 5 4 2
3
Εμφανίζει τις τρέχουσες ρυθμίσεις του φούρ‐
νου.
Για ρύθμιση της λειτουργίας ρολογιού.
μισης
Για ρύθμιση της θερμοκρασίας και της ώρας.
Για την εμφάνιση της θερμοκρασίας του
φούρνου.
Για τη ρύθμιση μιας λειτουργίας ή ενός προ‐
γράμματος του φούρνου.
Για εναλλαγή μεταξύ του πάνω και του κύ‐
ριου φούρνου.
Για την ενεργοποίηση ή την απενεργοποίη‐
ση του φούρνου.
Page 43

4.5 Ενδείξεις της οθόνης
ΕΛΛΗΝΙΚΑ 43
21 5
43
6
Αριθμός Ονομασία Περιγραφή
Ένδειξη πάνω/κύ‐
1
Υποδεικνύει ποιος φούρνος λειτουργεί.
ριου φούρνου
Ένδειξη λειτουργίας
2
Υποδεικνύει τη λειτουργία.
φούρνου
Ένδειξη λαμπτήρα/
3
απόψυξης
Ένδειξη σκάλας Υποδεικνύει τη σκάλα μαγειρέματος.
4
Ένδειξη θερμοκρα‐
5
σίας/ρολογιού
Ένδειξη διατήρησης
6
θερμότητας
Ώρα μαγειρέματος/
7
Ώρα τέλους/Περίο‐
Υποδεικνύει ότι η λειτουργία λαμπτήρα/από‐
ψυξης είναι ενεργοποιημένη.
Υποδεικνύει τη θερμοκρασία και την ώρα σε
λεπτά.
Υποδεικνύει ότι έχει ενεργοποιηθεί η λειτουρ‐
γία διατήρησης θερμότητας.
Εμφανίζει τη ρύθμιση της ώρας για τις λειτουρ‐
γίες ρολογιού.
δος λειτουργίας
Ένδειξη λειτουργίας
8
ρολογιού
Για τη ρύθμιση της λειτουργίας ρολογιού και
του χρονομετρητή.
7 8
5. ΚΑΘΗΜΕΡΙΝΉ ΧΡΉΣΗ
ΠΡΟΕΙΔΟΠΟΙΗΣΗ
Ανατρέξτε στα κεφάλαια σχετικά
με την ασφάλεια.
5.2 Λειτουργίες πάνω φούρνου
Λειτουργία φούρνου Χρήση
Φωτισμός Φούρ‐
νου
5.1 Ενεργοποίηση και
απενεργοποίηση συσκευής
Πιέστε το πλήκτρο On/Off για να
ενεργοποιήσετε ή να απενεργοποιήσετε
τη συσκευή.
Για φωτισμό στο εσωτερικό του φούρνου.
Page 44

www.aeg.com
44
Λειτουργία φούρνου Χρήση
Για ψήσιμο στο γκριλ μικρών ποσοτήτων
Γκριλ Μονό
Πλήρης Λειτουργία
Γκριλ
επίπεδων τροφίμων στο κέντρο του γκριλ.
Για φρυγάνισμα ψωμιού.
Για ψήσιμο στο γκριλ μεγάλων ποσοτήτων
τροφίμων σε φέτες. Για φρυγάνισμα ψω‐
Για ψήσιμο με έντονο ρόδισμα και τραγανή
βάση σε ένα επίπεδο του φούρνου. Ρυθμί‐
Ψήσιμο Με Αέρα
στε τη θερμοκρασία του φούρνου κατά
20-40 °C χαμηλότερα σε σύγκριση με τη
λειτουργία «Πάνω + Κάτω Θέρμανση».
Για ψήσιμο σε ένα επίπεδο του φούρνου
Θερμός Αέρας
ταυτόχρονα. Μειώστε τη θερμοκρασία του
φούρνου (κατά 20-40 °C) σε σύγκριση με
τη λειτουργία «Πάνω + Κάτω Θέρμαν‐
Για ψήσιμο μεγαλύτερων μερίδων κρέατος
Έντονο Ψήσιμο
ή πουλερικών σε ένα επίπεδο. Επίσης, για
γκρατινάρισμα και για ρόδισμα.
Ολοκλήρωση Με
Κάτω Αντίσταση
Απόψυξη Με Ανεμι‐
στήρα
Χαμηλή Θερμοκρα‐
σία
Για ψήσιμο κέικ με ξεροψημένη ή τραγανή
βάση και για συντήρηση τροφίμων.
Για την απόψυξη κατεψυγμένων τροφί‐
Για την προετοιμασία ιδιαίτερα άπαχων,
τρυφερών ψητών.
μιού.
ση».
μων.
5.3 Λειτουργίες κύριου φούρνου
Λειτουργία φούρνου Χρήση
Φωτισμός Φούρ‐
νου
Θερμός Αέρας
Ψήσιμο Με Αέρα
Χαμηλή Θερμοκρα‐
σία
Πάνω + Κάτω Θέρ‐
μανση
Για φωτισμό στο εσωτερικό του φούρνου.
Για ψήσιμο φαγητών που χρειάζονται την
ίδια θερμοκρασία ψησίματος, χρησιμο‐
ποιώντας περισσότερα από ένα ράφια,
χωρίς ανάμειξη γεύσεων.
Για ψήσιμο με έντονο ρόδισμα και τραγανή
βάση σε ένα επίπεδο του φούρνου. Ρυθμί‐
στε τη θερμοκρασία του φούρνου κατά
20-40 °C χαμηλότερα σε σύγκριση με τη
λειτουργία «Πάνω + Κάτω Θέρμανση».
Για την προετοιμασία ιδιαίτερα άπαχων,
τρυφερών ψητών.
Για ψήσιμο σε ένα επίπεδο του φούρνου.
Page 45

Λειτουργία φούρνου Χρήση
Έντονο Ψήσιμο
Πλήρης Λειτουργία
Γκριλ
Γκριλ Μονό
Διατήρηση Θερμό‐
τητας
Απόψυξη Με Ανεμι‐
στήρα
Ολοκλήρωση Με
Κάτω Αντίσταση
5.4 Επιλογή φούρνου
1.
Ενεργοποιήστε τη συσκευή χρησιμο‐
ποιώντας το πλήκτρο On/Off
2.
Πατήστε επανειλημμένα το πλήκτρο
μέχρι να εμφανιστεί ο επιθυμητός
φούρνος (Πάνω / Κύριος).
.
5.5 Ρύθμιση της λειτουργίας
φούρνου
Χρησιμοποιήστε το για να ρυθμίσετε
τη λειτουργία φούρνου.
Η οθόνη εμφανίζει τη συνιστώμενη θερ‐
μοκρασία.
Αν δεν αλλάξετε αυτή τη θερμοκρασία σε
λιγότερα από 5 περίπου δευτερόλεπτα, η
συσκευή αρχίζει να θερμαίνεται.
Όταν η συσκευή λειτουργεί στη
θερμοκρασία που έχετε ορίσει,
ακούγεται ένα ηχητικό σήμα.
Μπορείτε να αλλάξετε τη λειτουρ‐
γία του φούρνου, ενώ λειτουργεί
ο φούρνος.
5.6 Αλλαγή της θερμοκρασίας
του φούρνου
ΕΛΛΗΝΙΚΑ 45
Για ψήσιμο μεγαλύτερων μερίδων κρέατος
ή πουλερικών σε μία θέση σχάρας. Για ρό‐
δισμα.
Για ψήσιμο στο γκριλ μεγάλων ποσοτήτων
τροφίμων σε φέτες. Για φρυγάνισμα ψω‐
μιού.
Για ψήσιμο στο γκριλ μικρών ποσοτήτων
επίπεδων τροφίμων στο κέντρο του γκριλ.
Για φρυγάνισμα ψωμιού.
Για τη διατήρηση των φαγητών ζεστών.
Για την απόψυξη κατεψυγμένων τροφί‐
μων.
Για ψήσιμο κέικ με ξεροψημένη ή τραγανή
βάση και για συντήρηση τροφίμων.
Έλεγχος της θερμοκρασίας του
φούρνου
Πιέστε το πλήκτρο ελέγχου της
θερμοκρασίας
σετε την τρέχουσα θερμοκρασία
του φούρνου.
για να εμφανί‐
5.7 Απενεργοποίηση της
λειτουργίας φούρνου
Χρησιμοποιήστε το ξανά και ξανά, μέ‐
χρι να μην εμφανίζεται στην οθόνη μια
λειτουργία φούρνου.
5.8 Ένδειξη θέρμανσης
Αν ενεργοποιήσετε μια λειτουργία φούρ‐
νου, οι ράβδοι στην οθόνη ανάβουν μίαμία. Οι ράβδοι δείχνουν ότι η θερμοκρα‐
σία του φούρνου αυξάνεται.
5.9 Ένδειξη υπολειπόμενης
θερμότητας
Όταν σβήνετε το φούρνο, οι ράβδοι στην
οθόνη εμφανίζουν την υπολειπόμενη
θερμότητα.
Πιέστε το πλήκτρο ή για να ρυθμί‐
σετε τη θερμοκρασία.
Page 46

www.aeg.com
46
6. ΛΕΙΤΟΥΡΓΊΕΣ ΡΟΛΟΓΙΟΎ
6.1 Λειτουργίες ρολογιού
1
2 3 4
7 6 5
ΣΥΜΒΟ‐ΛΟΛΕΙΤΟΥΡΓΙΑ ΠΕΡΙΓΡΑΦΗ
Ώρα της ημέρας
1
Διάρκεια
2
Τέλος
3
Υπενθύμιση λεπτών
4
Κουμπί επιλογής
5
Κουμπί ρύθμισης (Συν)
6
Κουμπί ρύθμισης (Μείον)
7
Υπενθύμιση λε‐
πτών
Για να ρυθμίσετε αντίστροφη μέτρηση (μέγ. 99
λεπτά). Αυτό δεν έχει καμία επίδραση στη λει‐
τουργία της συσκευής.
Διάρκεια Για να ρυθμίσετε πόση ώρα η συσκευή πρέπει
να λειτουργεί.
Τέλος Για να ρυθμίσετε την ώρα απενεργοποίησης για
μια λειτουργία φούρνου.
Μπορείτε να χρησιμοποιήσετε τις λειτουργίες
διάρκειας και τέλους ταυτόχρονα, ακόμη κι αν ο
φούρνος πρόκειται να ενεργοποιηθεί και να απε‐
νεργοποιηθεί αυτόματα αργότερα.
Ώρα της ημέρας Για να ρυθμίσετε, να αλλάξετε ή να ελέγξετε την
ώρα της ημέρας.
• Αν ρυθμίσετε τη λειτουργία ρολογιού,
το σύμβολο αναβοσβήνει για περίπου
5 δευτερόλεπτα. Σε αυτά τα 5 δευτερό‐
λεπτα, αγγίξτε το
ρυθμίσετε την ώρα.
• Αν ρυθμίσετε την ώρα, το σύμβολο
συνεχίζει να αναβοσβήνει για περίπου
5 δευτερόλεπτα. Μετά από αυτά τα 5
δευτερόλεπτα, το σύμβολο ανάβει. Αρ‐
χίζει η αντίστροφη μέτρηση της ώρας.
ή το για να
6.2 Ρύθμιση των λειτουργιών
ρολογιού
1.
Ενεργοποιήστε τη συσκευή.
2.
Χρησιμοποιήστε το ξανά και ξανά
μέχρι η οθόνη να εμφανίζει την απα‐
ραίτητη λειτουργία ρολογιού και το
αντίστοιχο σύμβολο, για παράδειγμα
Χρονομετρητής
3.
Χρησιμοποιήστε το ή το για να
ρυθμίσετε τον απαιτούμενο χρόνο.
Θα ακούσετε ένα ηχητικό σήμα για 2
λεπτά όταν ολοκληρωθεί ο χρόνος,
ενώ αναβοσβήνει η ένδειξη «00.00»
και η ένδειξη της σχετικής λειτουρ‐
γίας. Η συσκευή απενεργοποιείται.
4.
Χρησιμοποιήστε οποιοδήποτε πλήκ‐
τρο για να απενεργοποιήσετε το ηχη‐
τικό σήμα.
Με τον Χρονομετρητή , πρέπει
να ενεργοποιήσετε το φούρνο για
να ρυθμίσετε τη λειτουργία ρολο‐
γιού.
.
Page 47

Με τη Διάρκεια και το Τέλος
, ο φούρνος απενεργοποιείται
αυτόματα.
Με τη Διάρκεια
, πρέπει να ρυθμίσετε πρώτα
τη λειτουργία φούρνου και τη
θερμοκρασία και μετά μπορείτε
να ρυθμίσετε τη λειτουργία ρολο‐
γιού.
και το Τέλος
6.3 Heat+Hold
Η λειτουργία αυτή χρησιμοποιείται για τη
διατήρηση του φαγητού ζεστού για 30
λεπτά μετά από την ολοκλήρωση του μα‐
γειρέματος.
Ενεργοποίηση της λειτουργίας Heat
+Hold
1.
Ρυθμίστε τις λειτουργίες ρολογιού
Διάρκεια
ή/και Τέλος .
7. ΠΡΌΣΘΕΤΕΣ ΛΕΙΤΟΥΡΓΊΕΣ
7.1 Ανεμιστήρας
Όταν η συσκευή βρίσκεται σε λειτουργία,
ενεργοποιείται αυτόματα ο ανεμιστήρας.
Αν απενεργοποιήσετε τη συσκευή, ο ανε‐
μιστήρας συνεχίζει να λειτουργεί μέχρι να
κρυώσει η συσκευή.
7.2 Κλείδωμα ενεργοποίησης
ΠΡΟΕΙΔΟΠΟΙΗΣΗ
Όταν έχει ρυθμιστεί το κλείδωμα
ενεργοποίησης, δεν μπορείτε να
θέσετε σε λειτουργία το φούρνο.
Ρύθμιση του κλειδώματος
ενεργοποίησης
1.
Ενεργοποιήστε τη συσκευή. Δεν
πρέπει να είναι ρυθμισμένη καμία
λειτουργία φούρνου.
2.
Χρησιμοποιήστε το κουμπί επιλογής
και το ταυτόχρονα, μέχρι η
οθόνη να εμφανίζει την ένδειξη
«SAFE». Το κλείδωμα ενεργοποίη‐
σης έχει τεθεί σε λειτουργία.
Κατάργηση του κλειδώματος
ενεργοποίησης
1.
Ενεργοποιήστε τη συσκευή, αν
χρειάζεται.
ΕΛΛΗΝΙΚΑ 47
2.
Χρησιμοποιήστε το κουμπί επιλογής
ξανά και ξανά, μέχρι η οθόνη να
εμφανίζει το σύμβολο Διατήρηση
Θερμότητας
3.
Χρησιμοποιήστε το , στην οθόνη
εμφανίζεται η ένδειξη «00:30»
4.
Μόλις ολοκληρωθεί η ρυθμισμένη
λειτουργία φούρνου, ηχεί ένα σήμα
και ξεκινά η λειτουργία Heat+Hold. Η
ρυθμισμένη λειτουργία φούρνου
συνεχίζεται για 30 λεπτά στους 80°C.
Μόλις ολοκληρωθεί αυτό το διάστη‐
μα, ο φούρνος σβήνει αυτόματα.
Η θερμοκρασία για τη ρυθμισμέ‐
νη λειτουργία φούρνου πρέπει να
είναι πάνω από 80°C.
2.
Χρησιμοποιήστε το κουμπί επιλογής
και το ταυτόχρονα, μέχρι η
οθόνη να μην εμφανίζει την ένδειξη
«SAFE». Απενεργοποιείται το κλεί‐
δωμα ενεργοποίησης.
.
7.3 Κλείδωμα πλήκτρων
Η λειτουργία αυτή αποτρέπει την ακού‐
σια τροποποίηση της λειτουργίας του
φούρνου.
Ενεργοποίηση του κλειδώματος
πλήκτρων
1.
Ενεργοποιήστε τη συσκευή, αν
χρειάζεται.
2.
Επιλέξτε μια λειτουργία φούρνου.
3.
Χρησιμοποιήστε το κουμπί επιλογής
και το ταυτόχρονα, μέχρι η
οθόνη να εμφανίζει την ένδειξη
«LOC». Το κλείδωμα πλήκτρων έχει
ενεργοποιηθεί.
Απενεργοποίηση του κλειδώματος
πλήκτρων
1.
Χρησιμοποιήστε το κουμπί επιλογής
και το ταυτόχρονα, μέχρι η
οθόνη να μην εμφανίζει την ένδειξη
«LOC». Το κλείδωμα πλήκτρων έχει
απενεργοποιηθεί.
Page 48

www.aeg.com
48
Το κλείδωμα πλήκτρων ακυρώνε‐
ται αυτόματα, όταν απενεργο‐
ποιηθεί η λειτουργία φούρνου.
7.4 Αυτόματη διακοπή
Η συσκευή απενεργοποιείται αυτόματα
μετά από λίγη ώρα:
• αν δεν απενεργοποιήσετε τη συσκευή,
• αν δεν αλλάξετε τη θερμοκρασία του
φούρνου.
Η τελευταία ρύθμιση θερμοκρασίας του
φούρνου αναβοσβήνει στην ένδειξη θερ‐
μοκρασίας.
Θερμοκρασία
φούρνου
Ώρα απενεργο‐
ποίησης
30 °C - 120 °C 12,5 ώρες
8. ΧΡΉΣΗ ΤΩΝ ΕΞΑΡΤΗΜΆΤΩΝ
ΠΡΟΕΙΔΟΠΟΙΗΣΗ
Ανατρέξτε στα κεφάλαια σχετικά
με την ασφάλεια.
Θερμοκρασία
φούρνου
Ώρα απενεργο‐
ποίησης
120 °C - 200 °C 8,5 ώρες
200 °C -250 °C 5,5 ώρες
250 °C -μέγιστη
3,0 ώρες
θερμοκρασία °C
Μετά από μια αυτόματη διακοπή, απε‐
νεργοποιήστε τελείως το φούρνο. Μετά,
μπορείτε να τον ενεργοποιήσετε ξανά.
Αν ρυθμίσετε τη λειτουργία ρολο‐
γιού Διάρκεια
απενεργοποιείται η αυτόματη δια‐
κοπή.
ή Τέλος ,
Page 49

8.1 Τοποθέτηση των εξαρτημάτων φούρνου
Το βαθύ ταψί και η μεταλλική σχάρα
έχουν πλαϊνά άκρα. Τα άκρα αυτά και το
σχήμα των οδηγών ράβδων είναι μια ειδι‐
κή διάταξη για να αποτρέπεται η ολίσθη‐
ση των μαγειρικών σκευών.
Τοποθετήστε τα συρόμενα εξαρτήματα
με τέτοιο τρόπο, ώστε τα άκρα με την
προεξοχή να βρίσκονται στο πίσω μέρος
του φούρνου και να είναι στραμμένα
προς τα κάτω. Ωθήστε τα συρόμενα
εξαρτήματα ανάμεσα στις οδηγούς ρά‐
βδους σε ένα από τα επίπεδα του φούρ‐
νου.
Ταυτόχρονη τοποθέτηση μεταλλικής
σχάρας και βαθιού ταψιού
Τοποθετήστε τη μεταλλική σχάρα επάνω
στο βαθύ ταψί. Ωθήστε το βαθύ ταψί
ανάμεσα στις οδηγούς ράβδους σε ένα
από τα επίπεδα του φούρνου.
ΕΛΛΗΝΙΚΑ 49
8.2 Σετ γκριλ
Το σετ γκριλ περιλαμβάνει τη σχάρα τα‐
ψιού ψησίματος και το βαθύ ταψί.
Μπορείτε να χρησιμοποιήσετε τη σχάρα
ταψιού ψησίματος σε δύο θέσεις: στραμ‐
μένη προς τα επάνω ή προς τα κάτω.
Για ψήσιμο μεγαλύτερων μερίδων κρέα‐
τος ή πουλερικών σε ένα επίπεδο:
1.
Τοποθετήστε τη σχάρα ταψιού ψησί‐
ματος στο βαθύ ταψί. Τα στηρίγματα
της σχάρας ταψιού ψησίματος πρέ‐
πει να είναι στραμμένα προς τα επά‐
νω.
2.
Τοποθετήστε το βαθύ ταψί στη συ‐
σκευή, στο επιθυμητό επίπεδο σχά‐
ρας.
Page 50

www.aeg.com
50
9. ΧΡΉΣΙΜΕΣ ΣΥΜΒΟΥΛΈΣ
Για ψήσιμο στο γκριλ μεγάλων ποσοτή‐
των φαγητού σε φέτες, καθώς και για
φρυγάνισμα ψωμιού:
1.
Τοποθετήστε τη σχάρα ταψιού ψησί‐
ματος στο βαθύ ταψί. Τα στηρίγματα
της σχάρας ταψιού ψησίματος πρέ‐
πει να είναι στραμμένα προς τα κά‐
τω.
2.
Τοποθετήστε το βαθύ ταψί στη συ‐
σκευή, στο επιθυμητό επίπεδο σχά‐
ρας.
ΠΡΟΕΙΔΟΠΟΙΗΣΗ
Ανατρέξτε στα κεφάλαια σχετικά
με την ασφάλεια.
Η θερμοκρασία και οι ώρες ψησί‐
ματος στους πίνακες είναι μόνο
ενδεικτικές. Εξαρτώνται από τις
συνταγές, την ποιότητα και την
ποσότητα των συστατικών που
χρησιμοποιούνται.
ΠΡΟΣΟΧΗ
Χρησιμοποιείτε βαθύ ταψί ψησί‐
ματος για κέικ με μεγάλη ποσότη‐
τα υγρών. Οι χυμοί φρούτων
μπορεί να προκαλέσουν μόνι‐
μους λεκέδες στις εμαγιέ επιφά‐
νειες.
9.1 Πάνω φούρνος
Ο πάνω φούρνος είναι ο μικρότερος από
τους δύο φούρνους. Έχει 6 επίπεδα σχά‐
ρας. Χρησιμοποιήστε τον για το μαγείρε‐
μα μικρότερων ποσοτήτων φαγητού. Πα‐
ρέχει πολύ καλά αποτελέσματα όταν
χρησιμοποιείται για το ψήσιμο κέικ φρού‐
των, γλυκών και αλμυρών φλαν ή κις.
9.2 Κύριος φούρνος
Ο κύριος φούρνος είναι ιδιαίτερα κατάλ‐
ληλος για το μαγείρεμα μεγαλύτερων πο‐
σοτήτων φαγητού.
9.3 Ψήσιμο
Γενικές υποδείξεις
• Ο καινούργιος σας φούρνος μπορεί να
ψήνει με διαφορετικό τρόπο σε σχέση
με τη συσκευή που είχατε. Προσαρμό‐
στε τις συνήθεις ρυθμίσεις σας (θερμο‐
κρασία, χρόνος ψησίματος) και τα επί‐
πεδα σχάρας στις τιμές που αναφέρο‐
νται στους πίνακες.
• Στους χρόνους ψησίματος μεγαλύτε‐
ρης διάρκειας, μπορείτε να σβήσετε το
φούρνο 10 λεπτά περίπου πριν συμ‐
πληρωθεί το διάστημα ψησίματος, για
να εκμεταλλευτείτε την υπολειπόμενη
θερμότητα.
Όταν χρησιμοποιείτε κατεψυγμένα τρόφι‐
μα, τα ταψιά μπορεί να παραμορφωθούν
κατά το ψήσιμο. Όταν τα ταψιά κρυώ‐
σουν και πάλι, θα επιστρέψουν ξανά στο
κανονικό τους σχήμα.
Τρόπος χρήσης των πινάκων ψησίματος
• Την πρώτη φορά συνιστάται να χρησι‐
μοποιήσετε τη χαμηλότερη θερμοκρα‐
σία.
• Αν δεν μπορείτε να βρείτε τις ρυθμίσεις
για μια συγκεκριμένη συνταγή, επιλέξ‐
τε μια παρόμοια.
• Ο χρόνος ψησίματος μπορεί να παρα‐
ταθεί κατά 10–15 λεπτά, αν ψήνετε
κέικ σε περισσότερα από ένα επίπεδα.
• Τα κέικ και τα γλυκά σε διαφορετικά
επίπεδα φούρνου δεν ροδίζουν πάντο‐
τε στην αρχή με ομοιόμορφο τρόπο. Σε
μια τέτοια περίπτωση, μην αλλάζετε τη
ρύθμιση θερμοκρασίας. Οι διαφορές
εξομαλύνονται κατά τη διάρκεια του
ψησίματος.
Page 51

Συμβουλές για το ψήσιμο
Αποτέλεσμα ψησί‐
ματος
Το κέικ δεν έχει
ροδίσει αρκετά
Εσφαλμένο επίπεδο
φούρνου
στο κάτω μέρος
Το κέικ κάθεται
(λασπώνει, σβο‐
Πολύ υψηλή θερμο‐
κρασία φούρνου
λιάζει, έχει ρα‐
βδώσεις)
Το κέικ κάθεται
(λασπώνει, σβο‐
Πολύ σύντομος χρό‐
νος ψησίματος
λιάζει, έχει ρα‐
βδώσεις)
Το κέικ κάθεται
Πολλά υγρά στο μείγ‐μαΧρησιμοποιήστε λιγότερα υγρά.
(λασπώνει, σβο‐
λιάζει, έχει ρα‐
βδώσεις)
Το κέικ είναι πολύ
στεγνό
Το κέικ είναι πολύ
στεγνό
Πολύ χαμηλή θερμο‐
κρασία φούρνου
Πολύ μεγάλη διάρκεια
ψησίματος
Πολύ υψηλή θερμο‐
Το κέικ δεν ροδίζει
ομοιόμορφα
κρασία και πολύ σύν‐
τομος χρόνος ψησίμα‐
τος
Το κέικ δεν ροδίζει
Μη ομοιόμορφο μείγμα Απλώστε ομοιόμορφα το μείγμα
ομοιόμορφα
Το κέικ δεν ψήνε‐
ται εντός του κα‐
Πολύ χαμηλή θερμο‐
κρασία
θορισμένου χρό‐
νου ψησίματος
9.4 Πάνω φούρνος
ΕΛΛΗΝΙΚΑ 51
Πιθανή αιτία Αντιμετώπιση
Τοποθετήστε το κέικ σε χαμηλότε‐
ρο επίπεδο φούρνου
Χρησιμοποιήστε χαμηλότερη θερ‐
μοκρασία
Αυξήστε το χρόνο ψησίματος
Μη χρησιμοποιείτε υψηλότερη
θερμοκρασία για να μειώσετε το
χρόνο ψησίματος
Ελέγξτε το χρόνο ανάμειξης, ειδι‐
κά αν χρησιμοποιείτε μίξερ
Ρυθμίστε υψηλότερη θερμοκρασία
φούρνου
Μειώστε το χρόνο ψησίματος
Μειώστε τη θερμοκρασία του
φούρνου και αυξήστε το χρόνο
ψησίματος
στο ταψί ψησίματος
Χρησιμοποιήστε ελαφρώς υψηλό‐
τερη θερμοκρασία ψησίματος
9.5 Ψήσιμο
Οι θέσεις σχάρας δεν είναι κρίσι‐
μες, αλλά φροντίστε τα ράφια
φούρνου να είναι ομοιόμορφα κα‐
τανεμημένα όταν χρησιμοποιού‐
νται περισσότερα από ένα (π.χ.
θέσεις σχάρας 1 και 3)
Τύπος φαγητού
Θερμοκρασία
[°C]
Μπισκότα 170 - 190 10 - 20
Χρόνος μαγειρέματος
(περίπου)
(λεπτά)
Page 52

www.aeg.com
52
Τύπος φαγητού
Θερμοκρασία
[°C]
Χρόνος μαγειρέματος
(περίπου)
(λεπτά)
Ψωμί 200 - 220 30 - 35
Ψωμάκια/τσουρεκάκια 200 - 220 10 - 15
Κέικ:
- Μικρά και μεγάλα 160 - 170 18 - 25
- Παντεσπάνι 160 - 170 20 - 30
- Κέικ «σάντουιτς» 160 - 170 18 - 25
- Μαδέιρα 140 - 150 75 - 90
- Κέικ φρούτων 140 - 150 120 - 150
- Μπισκότα πιπερόριζας 140 - 150 75 - 90
- Μαρέγκες 90 - 100 150 - 180
- Μπάρες με νιφάδες
βρώμης και ξηρά φρούτα
160 - 170 25 - 30
- Μπισκότα βουτύρου 130 - 150 45 - 65
Στη γάστρα:
- Βοδινό/Αρνί 140 - 160 150 - 180
- Κοτόπουλο 140 - 160 75 - 90
Εύκολα φαγητά Ακολουθήστε τις οδηγίες του κατασκευαστή.
Ψάρι 160 - 180 20 - 30
Ψαρόπιτα (Καλυμμένη με
πατάτες)
Τάρτες φρούτων, Ζύμη
crumble
170 - 180 20 - 30
170 - 190 30 - 50
Γλυκά με γάλα 140 - 160 90 - 120
Ζυμαρικά, Λαζάνια κλπ. 160 - 180 40 - 50
Γλυκίσματα:
- Σου 180 - 190 30 - 40
- Εκλέρ, Προφιτερόλ 170 - 180 30 - 40
- Πίτες με φύλλο κρού‐
στας/σφολιάτας
180 - 190 30 - 40
Ζύμη για τάρτα:
- Κιμαδόπιτες 180 - 190 15 - 20
- Κρεατόπιτες 180 - 200 25 - 35
- Κις, Τάρτες, Φλαν 170 - 190 25 - 50
Βουτήματα 210 - 220 8 - 12
Πίτα του βοσκού 180 - 190 30 - 40
Page 53

ΕΛΛΗΝΙΚΑ 53
Τύπος φαγητού
Σουφλέ 170 - 180 20 - 30
Λαχανικά:
- Ψητές πατάτες με φλού‐
δα
- Πατάτες φούρνου 180 - 190 60- 90
Πουτίγκα Γιόρκσαϊρ:
- Μεγάλη 180 - 190 25 - 40
- Ατομική 200 - 210 15 - 25
Ψήσιμο κρέατος, πουλε‐
ρικών
Θερμοκρασία
[°C]
180 - 190 60 - 90
Βλέπε πίνακα ψησίματος.
Χρόνος μαγειρέματος
(περίπου)
(λεπτά)
9.6 Ψήσιμο
Τύπος φαγητού Θέση σχάρας Θερμοκρασία
[°C]
Μηλόπιτα 2 160 - 180 160 - 180
Τάρτα 2 160 - 180 25 - 50
Πίτσα 2 Ακολουθήστε τις οδηγίες του κατα‐
σκευαστή.
Κις/Τάρτες 2 160 - 180 25 - 50
Χρόνος μαγειρέ‐
ματος (περίπου)
(λεπτά)
9.7 Κύριος φούρνος
9.8 Ψήσιμο
Οι θέσεις σχάρας δεν είναι κρίσι‐
μες, αλλά φροντίστε τα ράφια
φούρνου να είναι ομοιόμορφα κα‐
τανεμημένα όταν χρησιμοποιού‐
νται περισσότερα από ένα (π.χ.
θέσεις σχάρας 1 και 3)
Τύπος φαγητού
Μπισκότα 180 - 190 10 - 20
Ψωμί 190 - 210 30 - 35
Κέικ:
- Μικρά και μεγάλα 160 - 170 18 - 25
- Παντεσπάνι 160 - 170 20 - 25
- Μαδέιρα 140 - 160 60 - 75
Θερμοκρασία
[°C]
Χρόνος μαγειρέματος
(περίπου)
(λεπτά)
Page 54

www.aeg.com
54
Τύπος φαγητού
Θερμοκρασία
[°C]
Χρόνος μαγειρέματος
(περίπου)
(λεπτά)
- Κέικ φρούτων 130 - 140 120 - 150
- Χριστουγεννιάτικο 130 - 140 180 - 270
Ψάρι 160 - 180 20 - 30
Τάρτες φρούτων, Ζύμη
crumble
170 - 180 30 - 50
Γλυκά με γάλα 140 - 160 60 - 90
Γλυκίσματα:
- Σου 180 - 190 30 - 40
- Ζύμη για τάρτα 180 - 190 25 - 35
- Φύλλο κρούστας 180 - 190 30 - 40
- Φύλλο σφολιάτας Ακολουθήστε τις οδηγίες του κατασκευαστή. Μειώ‐
στε τη θερμοκρασία για το φούρνο με ανεμιστήρα
κατά 20°C
Τάρτες 180 - 190 25 - 45
Κις/Φλαν 170 - 180 25 - 45
Βουτήματα 210 - 230 8 - 12
Ψήσιμο: Κρέας και Που‐
λερικά
160 - 180 βλέπε πίνακα ψησίματος
9.9 Ψήσιμο
Τύπος φαγητού Θέση σχάρας Θερμοκρασία [°C]
ματος (περίπου)
(λ)
Μηλόπιτα 3 160 - 180 50 - 60
Τάρτα 3 180 - 200 25 - 50
Χρόνος μαγειρέ‐
Πίτσα
3
Ακολουθήστε τις οδηγίες του κατα‐
σκευαστή
Κις/Τάρτες 3 180 - 200 25 - 50
9.10 Ψήσιμο
Τύπος φαγητού
Θερμοκρασία
[°C]
Μπισκότα 180 - 190 10 - 20 3
Ψωμί 200- 220 30 - 35 3
Κέικ:
Χρόνος μαγειρέ‐
ματος (περίπου)
(λεπτά)
Θέση σχάρας
Page 55

ΕΛΛΗΝΙΚΑ 55
Τύπος φαγητού
- Μικρά και μεγά‐
λα
Θερμοκρασία
[°C]
170 - 180 18 - 25 3
Χρόνος μαγειρέ‐
ματος (περίπου)
(λεπτά)
Θέση σχάρας
- Παντεσπάνι 170 - 180 20 - 25 3
- Μαδέιρα 150 - 160 60 - 75 3
- Κέικ φρούτων 140 - 150 120 - 150 3
- Χριστουγεννιάτι‐
κο
140 - 150 180 - 270 3
Ψάρι 170 - 180 20 - 30 3
Τάρτες φρούτων,
Ζύμη crumble
180 - 200 30 - 50 3
Γλυκά με γάλα 150 - 170 60 - 90 3
Γλυκίσματα:
- Σου 180 - 190 30 - 40 3
- Ζύμη για τάρτα 190 - 200 25 - 35 3
- Φύλλο κρούστας 190 - 210 30 - 40 3
- Φύλλο σφολιά‐
τας
Ακολουθήστε τις οδηγίες του κατασκευαστή
Τάρτες 190 - 200 25 - 45 3
Κις/Φλαν 200 - 210 25 - 45 3
Βουτήματα 220 - 230 8 - 12 3
Ψήσιμο: Κρέας και
Πουλερικά
170 - 190
9.11 Ψήσιμο
Μαγειρικά σκεύη ψησίματος
• Χρησιμοποιείτε σκεύη ανθεκτικά στη
θερμότητα για το ψήσιμο στο φούρνο
(ανατρέξτε στις οδηγίες του κατα‐
σκευαστή).
• Μπορείτε να τοποθετήσετε μεγάλα
κομμάτια ψητού απευθείας στο βαθύ
ταψί ή στο ράφι φούρνου πάνω από
το βαθύ ταψί. (Εάν υπάρχει)
βλέπε πίνακα ψη‐
σίματος
• Ψήστε άπαχα κρέατα σε ταψί ψησίμα‐
τος με καπάκι. Με τον τρόπο αυτό, το
κρέας δεν θα στεγνώσει.
• Όλα τα είδη κρέατος που θέλετε να ρο‐
δίσουν ή να αποκτήσουν κρούστα,
μπορούν να ψηθούν σε ταψί ψησίμα‐
τος χωρίς καπάκι.
9.12 Κύριος φούρνος
3
9.13 Ψήσιμο
Κρέας Θερμοκρασία [°C] Χρόνος ψησίματος
Μοσχάρι/Μοσχάρι με κό‐
καλο
160 - 180
20-35 λεπτά ανά ½ kg
(1lb) και 20-35 λεπτά πα‐
ραπάνω
Page 56

www.aeg.com
56
Κρέας Θερμοκρασία [°C] Χρόνος ψησίματος
Πρόβατο/Αρνί
Χοιρινό/Μοσχάρι/Χοιρο‐
μέρι
Κοτόπουλο
Γαλοπούλα/Χήνα
Πάπια
Φασιανός
Λαγός
9.14 Ψήσιμο στο γκριλ
Χρησιμοποιείτε πάντα τη λειτουργία
γκριλ με τη μέγιστη ρύθμιση θερμοκρα‐
σίας
Ψήνετε πάντα στο γκριλ με την
πόρτα του φούρνου κλειστή
Προθερμαίνετε πάντα τον κενό
φούρνο για 5 λεπτά χρησιμο‐
ποιώντας τις λειτουργίες γκριλ.
• Τοποθετείτε τη σχάρα στο συν‐
ιστώμενο επίπεδο σύμφωνα με
τον πίνακα για ψήσιμο στο
γκριλ.
• Τοποθετείτε πάντα το ταψί
συλλογής λίπους στο πρώτο
επίπεδο σχάρας.
• Ψήνετε στο γκριλ μόνο φέτες
κρέατος ή ψαριού.
Τύπος φαγητού
160 - 180
160 - 180
160 - 180
160 - 180
160 - 180
160 - 180
160 - 180
9.15 Πάνω φούρνος
9.16 Γκριλ
20-35 λεπτά ανά ½ kg
(1lb) και 20-35 λεπτά πα‐
30-40 λεπτά ανά ½ kg
(1lb) και 30-40 λεπτά πα‐
15-20 λεπτά ανά ½ kg
(1lb) και 20 λεπτά παρα‐
15-20 λεπτά ανά ½ kg
(1lb) και 20 λεπτά παρα‐
25-35 λεπτά ανά ½ kg
(1lb) και 25-30 λεπτά πα‐
35-40 λεπτά ανά ½ kg
(1lb) και 35-40 λεπτά πα‐
20 λεπτά ανά ½ kg (1lb)
και 20 λεπτά παραπάνω
Προσαρμόστε τη θέση σχάρας
και τη σχάρα ταψιού ψησίματος
ανάλογα με το πάχος του φαγη‐
τού
Χρόνος στο γκριλ
(λεπτά συνολικά)
Λεπτές φέτες μπέικον 5- 6
Μπιφτέκια 10 - 20
Κομμάτια κοτόπουλου 20 - 40
Μπριζόλες
ραπάνω
ραπάνω
πάνω
πάνω
ραπάνω
ραπάνω
Page 57

ΕΛΛΗΝΙΚΑ 57
Τύπος φαγητού
- Αρνί 15 - 25
- Χοιρινό 20 - 25
Ψάρι - Ολόκληρο
Πέστροφα/ Σκουμπρί
Φιλέτα - Καλκάνι/Μπακαλιάρος 4 - 6
Κεμπάπ 12 - 18
Νεφρά - Αρνί/Χοιρινό 6 - 10
Λουκάνικα 20 - 30
Μπριζόλες
- Λίγο ψημένο 4 - 6
- Μέτρια ψημένο 6 - 8
- Καλοψημένο 12 - 15
Τοστ (σάντουιτς) 3 - 4
Χρόνος στο γκριλ
(λεπτά συνολικά)
10 -12
9.17 Κύριος φούρνος
9.18 Γκριλ
Προσαρμόστε τη θέση σχάρας
και τη σχάρα ταψιού ψησίματος
ανάλογα με το πάχος του φαγη‐
τού
Λεπτές φέτες μπέικον 5- 6
Μπιφτέκια 10 - 20
Κομμάτια κοτόπουλου 20 - 40
Μπριζόλες
- Αρνί 15 - 25
- Χοιρινό 20 - 25
Ψάρι - Ολόκληρο
Πέστροφα/ Σκουμπρί
Φιλέτα - Καλκάνι/Μπακαλιάρος 4 - 6
Κεμπάπ 12 - 18
Νεφρά - Αρνί/Χοιρινό 6 - 10
Λουκάνικα 20 - 30
Μπριζόλες
- Λίγο ψημένο 4 - 6
- Μέτρια ψημένο 6 - 8
Τύπος φαγητού
Χρόνος στο γκριλ
(λεπτά συνολικά)
10 -12
Page 58

www.aeg.com
58
Τύπος φαγητού
Χρόνος στο γκριλ
(λεπτά συνολικά)
- Καλοψημένο 12 - 15
Τοστ (σάντουιτς) 3 - 4
9.19 Γκριλ
Βοδινό
Είδος κρέατος Ποσότη‐ταΕπί‐
πεδο
Πλάτη βοδινού ή φιλέτο για κάθε εκα‐
- λίγο ψημένο
1)
για κάθε
εκατοστό
1 190 - 200 0:05 - 0:06
πάχους
- μέτρια ψημένο για κάθε
1 180 - 190 0:06 - 0:08
εκατοστό
πάχους
- καλοψημένο για κάθε
1 170 - 180 0:08 - 0:10
εκατοστό
πάχους
1)
Προθερμάνετε το φούρνο
Χοιρινό
Είδος κρέατος Ποσότη‐ταΕπί‐
πεδο
Ωμοπλάτη, λαιμός, μπούτι 1 έως 1,5kg1 160 - 180 1:30 - 2:00
Θερμοκρασία
(°C)
Θερμοκρασία
(°C)
Χρόνος
(ώρες:λεπτά)
τοστό πάχους
Χρόνος
(ώρες:λεπτά)
Χοιρινές μπριζόλες 1 έως 1,5kg1 160 - 180 1:00 - 1:30
Ρολό κρέατος 750 g - 1kg1 160 - 170 0:45 - 1:00
Χοιρινό κότσι (προβρα‐
750 g - 1kg1 150 - 170 1:30 - 2:00
σμένο)
Μοσχάρι
Είδος κρέατος Ποσότη‐ταΕπί‐
πεδο
Θερμοκρασία
(°C)
Χρόνος
(ώρες:λεπτά)
Ψητό μοσχάρι 1 kg 1 160 - 180 1:30 - 2:00
Μοσχάρι κότσι 1,5 - 2 kg 1 160 - 180 2:00 - 2:30
Page 59

ΕΛΛΗΝΙΚΑ 59
Αρνί
Είδος κρέατος Ποσότη‐ταΕπί‐
πεδο
Θερμοκρασία
(°C)
Χρόνος
(ώρες:λεπτά)
Ψητό αρνί, αρνί μπούτι 1 έως 1,5kg1 150 - 170 1:15 - 2:00
Αρνίσια σπάλα 1 έως 1,5kg1 160 - 180 1:00 - 1:30
Κυνήγι
Είδος κρέατος Ποσότη‐ταΕπί‐
Σπάλα λαγού, μπούτι λα‐
1)
γού
Έως 1 Kg 3 220 - 250 0:25 - 0:40
πεδο
Θερμοκρασία
(°C)
Χρόνος
(ώρες:λεπτά)
Μπριζόλα Κυνήγι 1,5 - 2 kg 1 210 - 220 1:15 - 1:45
Μπούτι από κυνήγι 1,5 - 2 kg 1 200 - 210 1:30 - 2:15
1)
προθερμάνετε το φούρνο
Πουλερικά
Είδος κρέατος Ποσότη‐ταΕπί‐
Κομμάτια πουλερικών ανά
πεδο
1 200 - 220 0:35 - 0:50
Θερμοκρασία
(°C)
Χρόνος
(ώρες:λεπτά)
200-250g
Μισό κοτόπουλο ανά
1 190 - 210 0:35 - 0:50
400-500g
Πουλερικά 1 έως 1,5kg1 190 - 210 0:45 - 1:15
Πάπια 1,5 - 2 kg 1 180 - 200 1:15 - 1:45
Χήνα 3,5 - 5 kg 1 160 - 180 2:30 - 3:30
Γαλοπούλα 2,5 - 3,5kg1 160 - 180 1:45 - 2:30
Γαλοπούλα 4 - 6 kg 1 140 - 160 2:30 - 4:00
9.20 Ξεπάγωμα
• Αφαιρέστε τη συσκευασία από τα τρό‐
φιμα και τοποθετήστε τα σε ένα πιάτο
στη σχάρα του φούρνου.
10. ΦΡΟΝΤΊΔΑ ΚΑΙ ΚΑΘΆΡΙΣΜΑ
ΠΡΟΕΙΔΟΠΟΙΗΣΗ
Ανατρέξτε στα κεφάλαια σχετικά
με την ασφάλεια.
• Μην τα σκεπάζετε με πιάτο ή μπολ.
Κάτι τέτοιο μπορεί να παρατείνει σημα‐
ντικά το χρόνο ξεπαγώματος.
• Τοποθετήστε τη σχάρα φούρνου στο
πρώτο επίπεδο σχάρας από κάτω.
• Καθαρίστε την πρόσοψη της συσκευής
με μαλακό πανί, ζεστό νερό και καθα‐
ριστικό.
Page 60

www.aeg.com
60
• Για να καθαρίσετε τις μεταλλικές επι‐
φάνειες, χρησιμοποιήστε ένα κοινό κα‐
θαριστικό.
• Καθαρίζετε το εσωτερικό του φούρνου
μετά από κάθε χρήση. Με τον τρόπο
αυτό, τα υπολείμματα αφαιρούνται πιο
εύκολα και δεν καίγονται.
• Καθαρίστε τους επίμονους λεκέδες με
ειδικά καθαριστικά για φούρνους.
• Καθαρίστε όλα τα εξαρτήματα του
φούρνου (με μαλακό πανί, ζεστό νερό
και καθαριστικό) μετά από κάθε χρήση
και αφήστε τα να στεγνώσουν.
• Αν χρησιμοποιείτε αντικολλητικά εξαρ‐
τήματα, μην τα καθαρίζετε με ισχυρά
καθαριστικά, αιχμηρά αντικείμενα ή
στο πλυντήριο. Μπορεί να καταστρα‐
φεί η αντικολλητική επίστρωση!
Συσκευές από ανοξείδωτο χάλυ‐
βα ή αλουμίνιο:
Καθαρίστε την πόρτα του φούρ‐
νου μόνο με υγρό σφουγγάρι.
Σκουπίστε την με μαλακό πανί.
Μη χρησιμοποιείτε ατσαλόμαλλο,
οξέα ή αποξεστικά υλικά, καθώς
μπορεί να προκληθεί ζημιά στην
επιφάνεια του φούρνου. Καθαρί‐
στε τον πίνακα ελέγχου του
φούρνου λαμβάνοντας τις ίδιες
προφυλάξεις
10.1 Καταλυτικά τοιχώματα
Τα τοιχώματα με καταλυτική επίστρωση
είναι αυτοκαθαριζόμενα. Απορροφούν τα
λίπη που συγκεντρώνονται στα τοιχώμα‐
τα ενώ λειτουργεί ο φούρνος.
Για να διευκολύνετε αυτή τη διαδικασία
αυτοκαθαρισμού, θερμαίνετε το φούρνο
χωρίς φαγητό τακτικά:
1.
Ανοίξτε την πόρτα του φούρνου.
2.
Αφαιρέστε όλα τα εξαρτήματα από το
φούρνο.
3.
Κλείστε την πόρτα.
4.
Ρυθμίστε το φούρνο στη μέγιστη
θερμοκρασία και αφήστε το φούρνο
να λειτουργήσει για 1 ώρα.
5.
Καθαρίστε το εσωτερικό του φούρ‐
νου με ένα μαλακό και υγρό σφουγ‐
γάρι.
ΠΡΟΣΟΧΗ
Μην επιχειρήσετε να καθαρίσετε
καταλυτικές επιφάνειες με σπρέι
καθαρισμού για φούρνο, λειαντι‐
κά καθαριστικά, σαπούνι ή άλλα
προϊόντα καθαρισμού. Μπορεί να
προκληθεί ζημιά στην καταλυτική
επιφάνεια.
Ο αποχρωματισμός των καταλυ‐
τικών επιφανειών δεν επηρεάζει
τις καταλυτικές ιδιότητες.
10.2 Στηρίγματα ραφιών
Τα στηρίγματα ραφιών μπορούν να
αφαιρεθούν για τον καθαρισμό των πλαϊ‐
νών τοιχωμάτων.
Αφαίρεση των στηριγμάτων ραφιών
1.
Τραβήξτε το μπροστινό τμήμα του
στηρίγματος ραφιών για να το απο‐
σπάσετε από το πλαϊνό τοίχωμα.
Page 61

ΕΛΛΗΝΙΚΑ 61
2.
Τραβήξτε το πίσω άκρο του στηρίγ‐
ματος ραφιών από το πλαϊνό τοίχω‐
μα και αφαιρέστε το.
1
2
Τοποθέτηση των στηριγμάτων
ραφιών
Τοποθετήστε τα στηρίγματα ραφιών στη
θέση τους, ακολουθώντας την παραπά‐
νω διαδικασία με την αντίστροφη σειρά.
10.3 Πόρτα και τζάμια φούρνου
A
A
45°
Η πόρτα του φούρνου έχει 2, 3 ή
4 τζάμια (ανάλογα με το μοντέλο).
Ισχύει για τηλεσκοπικούς βραχίο‐
νες:
Οι πείροι στερέωσης των τηλε‐
σκοπικών βραχιόνων πρέπει να
είναι στραμμένοι προς τα εμπρός!
ΠΡΟΣΟΧΗ
Απαιτείται προσοχή κατά την
αφαίρεση της πόρτας από τη συ‐
σκευή. Η πόρτα είναι βαριά!
Τοποθετήστε την πόρτα του
φούρνου πάνω σε μια μαλακή και
επίπεδη επιφάνεια με την εξωτε‐
ρική πλευρά στραμμένη προς τα
κάτω, ώστε να αποφευχθούν οι
γρατζουνιές.
Αφαίρεση της πόρτας του φούρνου
1.
Ανοίξτε τελείως την πόρτα του φούρ‐
νου.
2.
Πιέστε μέχρι τέρμα τους μοχλούς σύ‐
σφιξης (Α) στους δύο μεντεσέδες της
πόρτας.
3.
Κλείστε την πόρτα του φούρνου μέ‐
χρι να βρίσκεται σε γωνία περίπου
45°.
4.
Κρατήστε την πόρτα με ένα χέρι σε
κάθε πλευρά και τραβήξτε να την
αφαιρέσετε από τη συσκευή με γω‐
νία προς τα πάνω.
5.
Στη συνέχεια, μπορείτε να αφαιρέσε‐
τε τα εσωτερικά τζάμια και να τα κα‐
θαρίσετε.
Για να τοποθετήσετε την πόρτα,
πραγματοποιήστε τα παραπάνω βή‐
ματα με την αντίστροφη σειρά.
Page 62

www.aeg.com
62
ΠΡΟΣΟΧΗ
Η βίαιη μεταχείριση των τζαμιών,
ειδικά στις άκρες του μπροστινού
τζαμιού, μπορεί να έχει ως απο‐
τέλεσμα τη θραύση του κρυστάλ‐
λου.
2
B
1
10.4 Λαμπτήρας φούρνου
ΠΡΟΕΙΔΟΠΟΙΗΣΗ
Υπάρχει κίνδυνος ηλεκτροπλη‐
ξίας!
Πριν αλλάξετε το λαμπτήρα του
φούρνου:
•Σβήστε το φούρνο.
• Αφαιρέστε τις ασφάλειες από τον πίνα‐
κα ασφαλειών ή απενεργοποιήστε τον
ασφαλειοδιακόπτη κυκλώματος.
Τοποθετήστε ένα πανί στη βάση
του φούρνου για προστασία του
λαμπτήρα φούρνου και του γυά‐
λινου καλύμματος.
Αντικατάσταση του λαμπτήρα του
φούρνου
1.
Το γυάλινο κάλυμμα του λαμπτήρα
βρίσκεται στο πίσω μέρος του θαλά‐
μου του φούρνου.
Στρέψτε το γυάλινο κάλυμμα του
λαμπτήρα αριστερόστροφα για να το
αφαιρέσετε.
2.
Καθαρίστε το γυάλινο κάλυμμα.
Αφαίρεση και καθαρισμός των τζαμιών
της πόρτας
1.
Κρατήστε το πλαίσιο της πόρτας (B)
στο πάνω άκρο της πόρτας και από
τις δύο πλευρές και σπρώξτε το
προς τα μέσα για να απασφαλιστεί
το κλιπ.
2.
Τραβήξτε το πλαίσιο της πόρτας
προς τα εμπρός για να το αφαιρέσε‐
τε.
3.
Κρατήστε τα τζάμια της πόρτας από
το πάνω άκρο, ένα–ένα, και τραβήξ‐
τε τα προς τα πάνω από τον οδηγό.
4.
Καθαρίστε τα τζάμια της πόρτας.
Για να τοποθετήσετε τα τζάμια,
πραγματοποιήστε τα παραπάνω βή‐
ματα με την αντίστροφη σειρά. Το‐
ποθετήστε πρώτα το μικρότερο τζάμι
και μετά το μεγαλύτερο.
3.
Αντικαταστήστε το λαμπτήρα του
φούρνου με κατάλληλο λαμπτήρα
φούρνου ανθεκτικό σε θερμοκρασίες
έως 300 °C.
Χρησιμοποιείτε τον ίδιο τύπο
λαμπτήρα φούρνου.
4.
Τοποθετήστε το γυάλινο κάλυμμα
στη θέση του.
10.5 Αντικατάσταση του
λαμπτήρα του φούρνου
1.
Ο λαμπτήρας του φούρνου βρίσκεται
στην αριστερή πλευρά του εσωτερι‐
κού του φούρνου. Αφαιρέστε την
αριστερή ράβδο ραφιών για πρόσβα‐
ση στο λαμπτήρα.
2.
Χρησιμοποιήστε ένα στενό, μη αι‐
χμηρό αντικείμενο (π.χ. ένα κουταλά‐
κι) για να αφαιρέσετε το γυάλινο κά‐
λυμμα. Καθαρίστε το γυάλινο κάλυμ‐
μα.
Page 63

11. ΤΙ ΝΑ ΚΆΝΕΤΕ ΑΝ...
ΠΡΟΕΙΔΟΠΟΙΗΣΗ
Ανατρέξτε στα κεφάλαια σχετικά
με την ασφάλεια.
Πρόβλημα Πιθανή αιτία Αντιμετώπιση
Ο φούρνος δεν θερμαίνε‐
ται
Ο φούρνος δεν θερμαίνε‐
ται
Ο φούρνος δεν θερμαίνε‐
ται
Ο φούρνος δεν θερμαίνε‐
ται
Ο φούρνος δεν θερμαίνε‐
ται
Ο λαμπτήρας του φούρ‐
νου δεν λειτουργεί
ΕΛΛΗΝΙΚΑ 63
3.
Αν χρειάζεται, αντικαταστήστε το
λαμπτήρα του φούρνου με κατάλλη‐
λο λαμπτήρα φούρνου ανθεκτικό στη
θερμότητα έως 300 °C.
Χρησιμοποιήστε τον ίδιο τύπο
λαμπτήρα φούρνου.
4.
Τοποθετήστε το γυάλινο κάλυμμα.
5.
Τοποθετήστε στη θέση της την αρι‐
στερή ράβδο ραφιών.
Η συσκευή είναι απενερ‐
γοποιημένη
Δεν είναι ρυθμισμένο το
ρολόι
Ενεργοποιήστε τη συ‐
σκευή
Ρυθμίστε το ρολόι. Ανα‐
τρέξτε στην ενότητα
«Ρύθμιση ρολογιού»
Δεν έχουν καθοριστεί οι
απαραίτητες ρυθμίσεις
Η αυτόματη διακοπή εί‐
ναι ενεργοποιημένη
Βεβαιωθείτε ότι οι ρυθμί‐
σεις είναι σωστές
Ανατρέξτε στην ενότητα
«Αυτόματη διακοπή»
Έχει πέσει η ασφάλεια Ελέγξτε αν η ασφάλεια
είναι η αιτία της δυσλει‐
τουργίας. Αν η ασφάλεια
πέφτει συχνά, απευθυν‐
θείτε σε εξουσιοδοτημένο
ηλεκτρολόγο
Ο λαμπτήρας του φούρ‐
νου είναι ελαττωματικός
Αντικαταστήστε το λαμ‐
πτήρα φούρνου
Page 64

www.aeg.com
64
Πρόβλημα Πιθανή αιτία Αντιμετώπιση
Η οθόνη εμφανίζει ένα
κωδικό σφάλματος που
δεν βρίσκεται σε αυτή τη
λίστα
Υπάρχει ηλεκτρονική
βλάβη
• Απενεργοποιήστε τη
συσκευή από το γενικό
διακόπτη του σπιτιού ή
από το διακόπτη
ασφαλείας στον πίνα‐
κα ασφαλειών και κα‐
τόπιν ενεργοποιήστε
την ξανά
• Αν η οθόνη εμφανίσει
ξανά τον κωδικό σφάλ‐
ματος, απευθυνθείτε
στο τμήμα υποστήρι‐
ξης πελατών
Εάν δεν μπορείτε να αντιμετωπίσετε το
πρόβλημα μόνοι σας, επικοινωνήστε με
τον αντιπρόσωπο ή το κέντρο σέρβις.
Τα απαραίτητα στοιχεία για το κέντρο
σέρβις βρίσκονται στην πινακίδα τεχνι‐
Συνιστούμε να συμπληρώσετε τα στοιχεία εδώ:
Μοντέλο (MOD.) .........................................
Κωδικός προϊόντος (PNC) .........................................
Αριθμός σειράς (S.N.) .........................................
κών χαρακτηριστικών. Η πινακίδα τεχνι‐
κών χαρακτηριστικών βρίσκεται στο
μπροστινό πλαίσιο του θαλάμου της συ‐
σκευής.
12. ΕΓΚΑΤΆΣΤΑΣΗ
ΠΡΟΕΙΔΟΠΟΙΗΣΗ
Ανατρέξτε στα κεφάλαια σχετικά
με την ασφάλεια.
Η εντοιχιζόμενη μονάδα πρέπει
να πληροί τις απαιτήσεις σταθε‐
ρότητας του προτύπου DIN
68930.
Page 65

16
5
min. 600
min. 2000
min. 550
min. 907
min. 300
min. 560
max. 570
20
ΕΛΛΗΝΙΚΑ 65
538
888
866
888
866
874-879
11
548
Page 66

www.aeg.com
66
90
0
2x 3,5x25
12.1 Ηλεκτρική εγκατάσταση
ΠΡΟΕΙΔΟΠΟΙΗΣΗ
Η ηλεκτρική εγκατάσταση πρέπει
να εκτελείται μόνο από κατάλλη‐
λα καταρτισμένο άτομο.
Ο κατασκευαστής δεν είναι υπεύ‐
θυνος για τυχόν βλάβες σε περί‐
πτωση μη τήρησης των προφυ‐
λάξεων ασφαλείας των κεφα‐
λαίων Ασφαλείας.
Η συσκευή αυτή παρέχεται χωρίς φις και
καλώδιο τροφοδοσίας.
Κατάλληλοι τύποι καλωδίου: H07 RN-F,
H05 RN-F, H05 RRF, H05 VV-F, H05
V2V2-F (T90), H05 BB-F
12.2 Ηλεκτρική εγκατάσταση
• Σε περίπτωση που έχετε ερωτήσεις
σχετικά με την εγκατάσταση των δια‐
κοπτών κουζίνας, αν απαιτούνται,
απευθυνθείτε στην τοπική εταιρεία
ηλεκτρισμού για να εξασφαλιστεί η
συμμόρφωση με τους κανονισμούς
της.
• Ο διακόπτης της πρίζας της συσκευής
πρέπει να βρίσκεται έξω από το ντου‐
Page 67

λάπι αλλά εντός 2m από τη συσκευή
ώστε να είναι εφικτή η απενεργοποίη‐
ση της συσκευής σε περίπτωση έκτα‐
κτης ανάγκης.
• Για την προστασία των χεριών, φοράτε
γάντια κατά την ανύψωση του φούρ‐
νου στο περίβλημα του.
ΟΙΚΙΑΚΟ ΚΥΚΛΩΜΑ
Πρέπει να εκτελεστούν δοκιμές
διαρροής γείωσης και συνέχειας
πριν συνδεθεί η συσκευή στην
παροχή ρεύματος και να ελεγ‐
χθούν πάλι μετά την τοποθέτηση.
ΠΡΟΕΤΟΙΜΑΣΙΑ - ΕΠΙΛΟΓΗ
ΗΛΕΚΤΡΙΚΗΣ ΣΥΝΔΕΣΗΣ
Υπάρχουν τρεις πιθανοί τρόποι σύνδε‐
σης της συσκευής. Σε κάθε περίπτωση, η
συσκευή πρέπει να λειτουργεί χρησιμο‐
ποιώντας καλώδιο πολύκλωνο μονωμέ‐
νο με PVC, δίκλωνο και γείωσης διαμέ‐
τρου τουλάχιστον 6mm². Επιλέξτε τον
πιο κατάλληλο τρόπο αφού διαβάσετε τις
διάφορες μεθόδους:
a)
Σύνδεση σε διακόπτη κουζίνας (με
διακόπτη απομόνωσης διπλού πόλου
με διαχωρισμό επαφής τουλάχιστον
3mm σε όλους τους πόλους και τον
ουδέτερο), ο οποίος προστατεύεται
από ασφάλεια ή μικρό ασφαλειοδια‐
κόπτη στον πίνακα ασφαλειών.
b)
Σύνδεση της συσκευής μαζί με τις
εστίες απευθείας σε διακόπτη(ες)
κουζίνας. Με διακόπτη απομόνωσης
ΕΛΛΗΝΙΚΑ 67
διπλού πόλου με διαχωρισμό επαφής
τουλάχιστον 3mm σε όλους τους πό‐
λους και τον ουδέτερο.
c)
Αν θέλετε να συνδέσετε ένα φούρνο
και εστίες σε διακόπτη κουζίνας, συν‐
δέστε το φούρνου και τις εστίες ξεχω‐
ριστά στο διακόπτη κουζίνας. Ο
φούρνος και οι εστίες πρέπει να συν‐
δεθούν ξεχωριστά στο διακόπτη κου‐
ζίνας. (Βλ. εικόνα)
A
BC
A)
Διακόπτης κουζίνας
B)
Εστίες
C)
Φούρνος
Συνιστάται να:
– Εγκαταστήσετε έναν ασφαλειο‐
διακόπτη διαρροής γείωσης
στην καλωδίωση του σπιτιού
σας.
– Συνδέσετε τα καλώδια της συ‐
σκευής σύμφωνα με τους τε‐
λευταίους κανονισμούς IEE.
13. ΠΕΡΙΒΑΛΛΟΝΤΙΚΆ ΘΈΜΑΤΑ
Ανακυκλώστε τα υλικά που φέρουν
το σύμβολο
υλικά συσκευασίας σε κατάλληλα
δοχεία για ανακύκλωση.
Συμβάλλετε στην προστασία του
περιβάλλοντος και της ανθρώπινης
υγείας ανακυκλώνοντας τις άχρηστες
. Τοποθετήστε τα
ηλεκτρικές και ηλεκτρονικές
συσκευές. Μην απορρίπτετε με τα
οικιακά απορρίμματα συσκευές που
φέρουν το σύμβολο
το προϊόν στην τοπική σας μονάδα
ανακύκλωσης ή επικοινωνήστε με τη
δημοτική αρχή.
. Επιστρέψτε
Page 68

www.aeg.com/shop
892957104-A-492012
 Loading...