

Page 1

PERFECT
DB 4050
Dampfbügler
Steam irons
Fer à repasser à vapeur
Ferro de engomar a vapor
Höyrysilitysraudat
Naparovací žehlicka
Gõzölõs vasaló
Elazko parowe
Gebrauchsanweisung
Operating instructions
Mode d’emploi
Instruções de utilização
Käyttöohje
Návod k použití
Használati útmutató
Instrukcja obs³ugi
Page 2
1
D
F
E
G H
J
K
C
L
M
B
P
A
O
N
a
MAX
d
c
b
2
MAX
3
2
Page 3
AB
6/A
4
5
6/B
7
8
3
Page 4
9
10
4
Page 5

g
Ironing table - Recommendations for use
Fabric
Synthetics
Polyacrilic
Polyamide
Polyester
Cellulose
Natural fibres
Silk
Woollens
Temperature
Selector
Steam
Selector
Steam off
“0”
Steam off
“0”
Steam off
“0”
Steam on
“1”–“2”
g
Comments
Acrylan, Dralon, Lycra, Orlon, Vonnel
Enkalon, Grilon, Nylon, Perlon
Rilsan
Dacron, Diolen, Kodel, Trevira, Vestan
Cellulose fibres, acetate, cupro,
viscose such as: Cuprama, Colvera,
Phyron, Rayon, Tricell
Silk, wool and synthetic fibres can
be dry-ironed by covering with a
damp cloth and ironing over the
cloth
Steam ironing can be used in the low
to medium setting of the steam selector .
Cotton
Linen
Setting when
-not in use
For mixed fibres we recommend ironing at the lower temperature (that of the more sensitive fibre),
e.g., polyester-cotton at the polyester setting.
Varied ironing speeds and fabric dampness can mean that the optimal setting can differ from that
recommended in the table!
= Cold
Steam on
“2”–“3”
Steam on
“2”–“3”
Steam off
“0”
Constant steam possible from •••
position
Super steam jet from ••• position for
stubborn creases
Remove plug
11
Page 6

g
Dear customer
g
Please read these operating instructions carefully. Above all please
observe the safety instructions on
the initial pages of these operating
instructions! Please keep these operating instructions for future reference.
Pass them on to any subsequent owner
of the appliance.
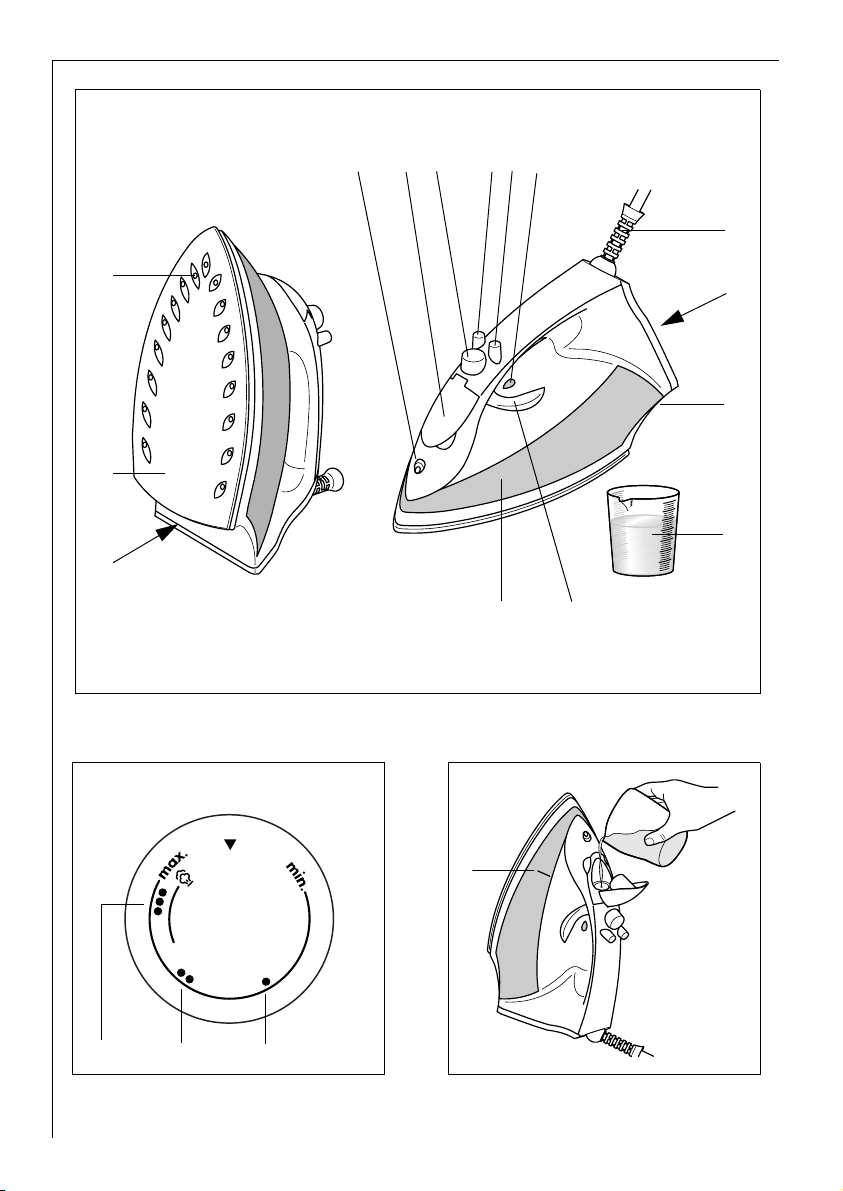
Features (Figure 1)
A Rating plate
B Stainless steel soleplate
C Steam exit holes
D Spray nozzle
E Filling aperture
F Steam selector
G Jet button
H Spray function button
J Power indicator
K Mains cord
L Heel with care information
M Cord storage
N Temperature selector
O Transparent water reservoir
P Measuring beaker
Temperature Selector (Figure 2)
a “Cold” setting
b Synthetics
c Silk/wool
d Cotton/linen
1 Safety Instructions
• The appliance may only be operated
using the voltage and current rating
indicated on the rating plate
(Figure 1/A).
• The appliance should only be plugged
into a socket installed according to
regulations.
• Caution! When in use, the soleplate
and cover of the iron reach high operating temperatures!
• Do not leave the appliance alone when
switched on.Even when leaving the
room for a short period remove the
plug. Keep children away from the
appliance.
When steam ironing, steam is emitted
1
from the holes in the soleplate – risk
of burns!
• Always remove the mains plug before
cleaning the steam iron, filling with
water or emptying.
• Never immerse the steam iron in water!
• Always stand the steam iron on its
heel.
• Do not twist or bend the mains cord or
wrap it round the iron while it is still
hot. Only store the appliance once it is
cool and after emptying any remaining
water.
• Please check the mains cord from time
to time for damage! Special tools are
required to repair a damaged mains
cord. To repair this or any other fault
please contact your specialist dealer or
your local customer service centre.
Repairs to electrical appliances may
only be carried out by qualified specialists! Repairs carried out by inexperienced persons may cause serious
injury to the user.
12
Page 7

g
Technical Data
Power consumption: 1600W
Mains voltage: 230V
This appliance complies with the fol-
;
lowing EU Directives:
– 73/23/EEC of 19.02.1973 “Low volt-
age directive”, including modification directive 93/68/EEC.
– 89/336/EEC of 03.05.1989 “EMC
directive”, including modification
directive 92/31/EEC.
Using for the First Time
Setting the Temperature
(Figure 2)
Please note the internationally applicable care symbols on garment labels.
On good quality garments they indicate the correct ironing temperatures.
The ironing table indicates which temperature is most appropriate for a particular type of fabric. We recommend
sorting the washing first. Start with
materials that require low temperature
ironing (e.g. PERLON). Follow on by
ironing materials that require progressively higher temperatures. In this way
you avoid damaging sensitive fabrics
by using too high a temperature. When
switched on, the power indicator lamp
lights up (Figure 1/J); it goes out when
the temperature set has been reached.
However, if the temperature selector
(Figure 1/N) is turned back, please note
that it takes a while for the soleplate
to cool down. Only when the power
indicator light comes on again has the
soleplate reached the cooler temperature.
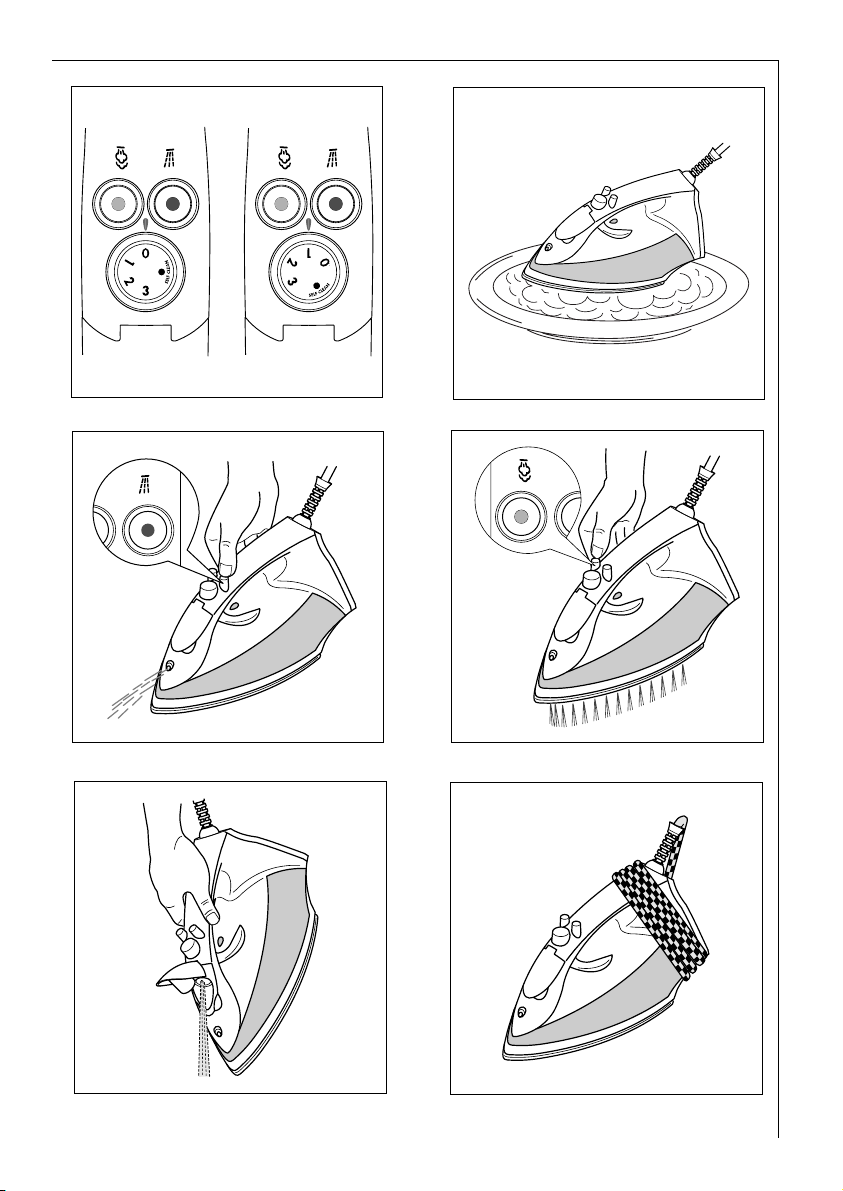
Dry Ironing
0 Set the steam selector (Figure 1/F) to
position “0” (Figure 4/A).
0 Turn the temperature selector
(Figure 1/N) to the desired temperature.
Steam Ironing
Filling the Steam Iron (Figure 3)
The water reservoir should only be
filled when the plug has been removed
from the socket.
0 Set the steam selector to position
“0” = dry iron (Figure 4/A) and hold
the appliance upright.
0 Fill the water reservoir at most to the
“MAX” mark. To do this, you can use
the measuring beaker supplied
(Figure 1/P).
Water Quality
You can use tap water up to 3 mmol/I
17° dH water hardness level. Your local
Water Authority can advise you on the
hardness of the water in your area. If
the water from your tap is harder than
the above, please use distilled water
available from a chemist or a 50:50
mixture of tap water and distilled
water. Never use battery water under
any circumstances!
When using for the first time,
please note:
0 Fill the reservoir with water; set the
steam selector (Figure 1/F) to position
“3” (Figure 4/B).
0 Heat the appliance and place it with
the soleplate facing downwards on an
iron rest or plate (Figure 5) to allow the
water to steam through and activate
the steam chamber.
You will obtain optimal steaming
3
results and the noise produced by the
steaming will be steadier after the
water reservoir has been filled and
drained three times.
13
Page 8

g
Ironing with Steam
To steam iron, set the temperature
selector (Figure 1/N) to the required
fabric type and wait until the power
indicator (Figure 1/J) goes out - only
then set the steam selector(Figure 1/F)
to position “1” (Figure 4/B), “2” or “3” .
You will find which temperature setting (fabric type) matches which steam
setting in the ironing table. As soon as
the iron is held horizontally steam
begins to form. When the iron is set
upright again the steam supply stops
automatically.
Spray Function (Figure 6/A)
The first time you use the appliance,
or if you have not used it for a long
time, you will need to press the spray
function button (Figure 1/H) several
times before water comes out of the
spray nozzle (Figure 1/D). You can also
use the spray function when dry ironing.
Super Steam Jet Function
(Figure 6/B)
The super steam jet function is of
valuable assistance when ironing, for
example, creases, embroidery etc. You
can trigger the additional steam jet
both when steam ironing and when dry
ironing.
0 Set the temperature selector
(Figure 1/N) to the “max.” position and
wait until the correct temperature has
been reached, i.e., until the power indicator (Figure 1/J) goes out.
0 Raise the steam iron a little away from
the material and press the steam jet
button (Figure 1/G).
Always wait another 5 seconds before
pressing the steam jet button again.
Steaming hanging items of
clothing
0 Turn the temperature selector
(Figure 1/N) to the “max.” position
and wait until the power indicator
(Figure 1/J) goes out.
0 Hang the article concerned on a
hanger and hold the steam iron at
a distance of 10 - 20 cm from the
material.
0 Now press the steam jet button
(Figure 1/G). Wait at least 5 seconds
before pressing the button again.
Warning: Do not attempt to freshen
1
up clothing whilst it is still being worn.
Risk of burning!
Storage
Remove the plug from the socket!
Set the temperature selector
(Figure 1/N) to the “Cold” position
(Figure 2/a) and the steam selector
(Figure 1/F) to position “0” (Figure 4/A).
Empty out remaining water (Figure 7).
Store the appliance standing upright.
To store properly wrap the mains cord
around the cord storage (Figures 1/M
and 8).
14
Page 9

g
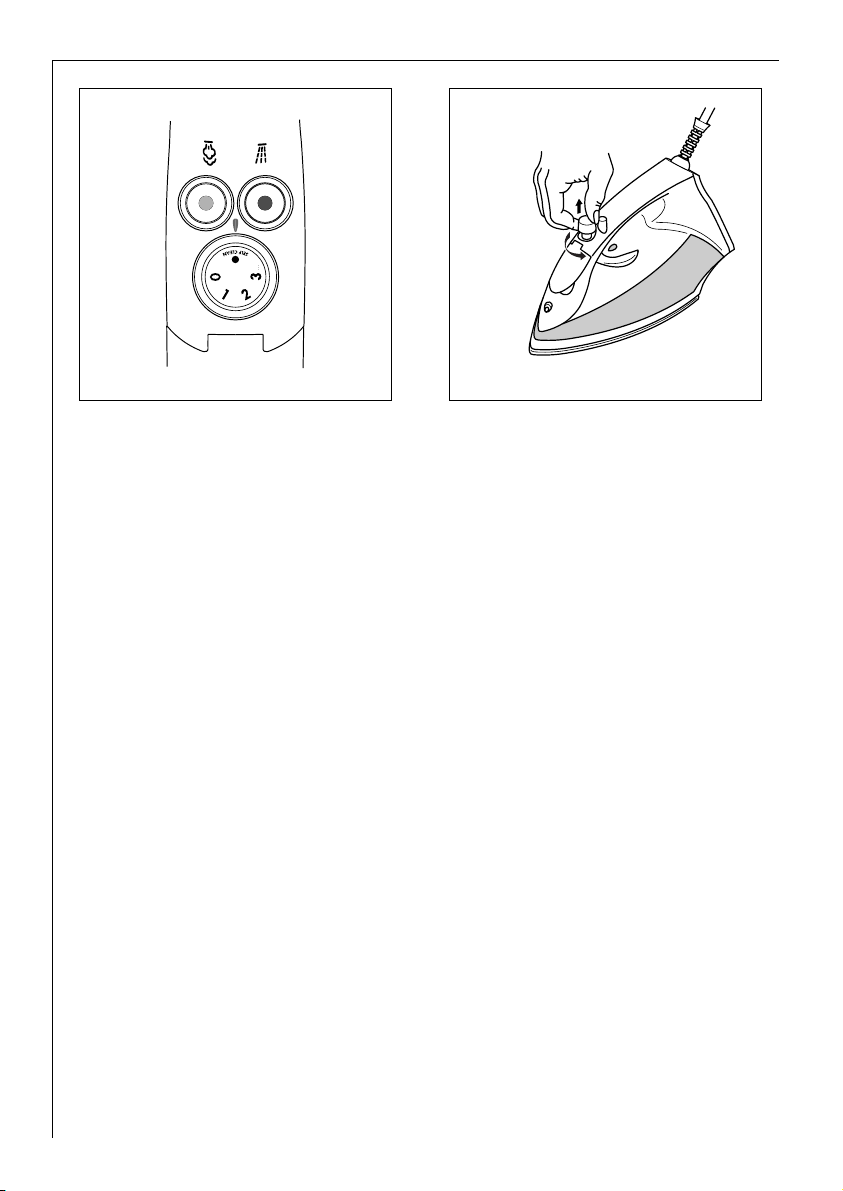
Care and Maintenance
Cleaning the valve
We advise you to occasionally clean
the valve (Figure 10). To do this, turn
the steam selector (Figure 1/F) anticlockwise past position "0" to the "SELF
CLEAN" setting (Figure 9. You will feel
a certain amount of resistance!), and
then pull upwards on the steam selector to remove.
After cleaning, push the steam selector
back into the body (note the position
of the lug on the steam selector) and
turn it clockwise back to position "0".
Descaling
When using tap water for steaming,
limescale is deposited in the steam
chamber; heavy deposits reduce the
quantity of steam produced.
For descaling use lukewarm water and
vinegar essence – mixing ratio 1:1.
Pour the mixture into the appliance
when cold and disconnected from the
mains (Figure 3).
Proprietary brands of descaler are
too aggressive and must not be used!
0 Unplug from the mains.
0 Set the steam selector (Figure 1/F) to
position “0” (Figure 4/A).
0 Fill the water reservoir (Figure 1/O) to
the “MAX” mark.
0 Set the temperature selector
(Figure 1/N) to “max.”.
0 Insert the plug into the socket.
0 Wait until the power indicator
(Figure 1/J) goes out.
0 Remove the plug from the mains.
0 Place the appliance horizontally on an
iron rest or plate (Figure 5).
0 Set the steam selector (Figure 1/F) to
position “3” (Figure 4/B) and allow all
the mixture to flow through.
0 Afterwards repeat the procedure using
clear water and then heat the iron
briefly to allow the steam chambers to
dry. Your steam iron is now ready for
use again.
As a precaution we recommend descaling every three months.
15
Page 10

g
What to do, if ...
• no “steam” appears when using on a
steam setting?
– In warm, dry air (during the winter),
reduced amounts of vapour are normal because it is absorbed by the dry
air before condensing.
– Emptying the filled water reservoir
can wash out fluff. Remove the
mains cord and tip the filled appliance forwards at an angle (Figure 7)
so that the water can run out of the
filling aperture.
• drops of water are coming out of the
steam exit holes?
– Do not set the steam selector to
position “1” or higher until the temperature for steam ironing has been
reached. If the temperature has been
set too low for steam ironing
increase the setting.
• stains appear on the washing while
ironing?
– Clean the steam iron. Rub the sole-
plate while still warm with a mixture
of water and vinegar or with a nonabrasive cleaning agent.
– When dry ironing fluff can enter the
steam chambers and carbonise. This
can lead to stains as the water
passes through. Therefore also clean
the inside of the water reservoir. Fill
it with water and gently shake the
steam iron. Then pour the water out.
• the soleplate is rough or furred?
– The iron temperature was set too
high.
– Select the correct ironing tempera-
ture for the fabric (see ironing
table).
2 Protect the Environment
Do not simply throw packaging material away.
• The cardboard packaging can be recycled in the waste paper collection.
• Deposit the plastic bag made of polyethylene (PE) at a PE collection point
for recycling.
• Padding materials are made of foamed
polystyrene (PS). They are CFC free.
Please inquire with your local authority
about your local recycling centre.
Customer Service
Our products are of the highest quality.
Should you nevertheless have questions concerning the use of this appliance, please write to us. Only with your
support can we be sure to develop
appliances to suit your needs.
16
Page 11

AEG Kundendienst in Deutschland
AEG Kundendienst in Europa
Sollte dieses AEG Gerät wider Erwarten nicht
funktionieren, senden Sie es bitte an
folgende Adresse:
Beginnt die Postleitzahl Ihres Wohnortes
mit 2 - 3 - 4 - 5
AEG Kleingeräte-Zentralwerkstatt
Firma Elektro Stefan Irsen
Sachtlebenstraße 1, 41541 Dormagen
Beginnt die Postleitzahl Ihres Wohnortes
mit 0 - 1 - 6 - 7 - 8 - 9
AEG Kleingeräte-Zentralwerkstatt
Firma Trepesch GmbH
Steinstraße 500, 90419 Nürnberg
In Deutschland stehen wir Ihnen für Fragen,
Anregungen oder bei Problemen rund um unsere
Kleingeräte und Raumpflegegeräte
montags bis freitags von 8 bis 18 Uhr
zur Verfügung.
AEG Serviceline unter 01805-30 60 80*
Fax: 0911/ 3 23-49 19 30
E-Mail: service.kleingeraete@aeg-hausgeraete.de
*(Deutsche Telekom 0,12 Euro/min.)
Garantiebedingungen
Der Endabnehmer dieses Geräts (Verbraucher) hat bei einem
Kauf dieses Geräts von einem Unternehmer (Händler) in
Deutschland im Rahmen der Vorschriften über den Verbrauchsgüterkauf gesetzliche Rechte, die durch diese Garantie
nicht eingeschränkt werden. Diese Garantie räumt dem Verbraucher also zusätzliche Rechte ein. Dies vorausgeschickt, leisten wir, AEG Hausgeräte GmbH, gegenüber dem Verbraucher
Garantie für dieses Gerät für den Zeitraum von 24 Monaten ab Übergabe zu den folgenden Bedingungen:
1. Mit dieser Garantie haften wir dafür, dass dieses neu hergestellte Gerät im Zeitpunkt der Übergabe vom Händler an
den Verbraucher die in unserer Produktbeschreibung für
dieses Gerät aufgeführten Eigenschaften aufweist. Ein
Mangel liegt nur dann vor, wenn der Wert oder die Gebrauchstauglichkeit dieses Geräts erheblich gemindert ist.
Zeigt sich der Mangel nach Ablauf von sechs (6) Monaten
ab dem Übergabezeitpunkt, so hat der Verbraucher nachzuweisen, dass das Gerät bereits im Übergabezeitpunkt
mangelhaft war. Nicht unter diese Garantie fallen Schäden
oder Mängel aus nicht vorschriftsmäßiger Handhabung sowie Nichtbeachtung der Gebrauchsanweisungen.
2. Dieses Gerät fällt nur dann unter diese Garantie, wenn es
in einem der Mitgliedsstaaten der Europäischen Union gekauft wurde, es bei Auftreten des Mangels in Deutschland
betrieben wird und Garantieleistungen auch in Deutschland erbracht werden können. Mängel müssen uns inner-
In diesen Ländern gelten die Garantiebedingungen der örtlichen
Vertriebsorganisationen. Diese können dort eingesehen werden.
In these countries our AEG sales organisations own guarantee
conditions are applicable. Please obtain further details direct.
Österreich, 4010 Linz, 0732 / 770101 - 30
Belgique/België, 1502 Lembeek, 02/363.04.44
Czech Republic, Hanusova ul., Praha 4, 02/6112 6112
Danmark, 7000 Fredericia, 70 11 74 00
España, Madrid, 1-885-2700
France, 60307 Senlis, 03-44 62 24 24
Great Britain, Service Force 08705 929 929
Hellas, 18346 MOÓXATO, 01/4822646
Island, Reykjavik (Bræóurnir Ormsson hf), 91-3 88 20
Italia, 33080 Porcia (PN), 0434 39 41
Kroatien, 10000 Zagreb, 385 1 6323 333
Luxembourg, 1273 Luxembourg-Hamm, 4 24 31-443
Magyarország, 1142 Budapest, 36-1-252-1773
Nederland, 2400 AC Alphen aan den Rijn, 0172-468 300
Norge, 0516 Oslo, 22 72 58 00
Poland, 02-034 Warszawa, 022 874 33 33
Portugal, 2635-445 Rio de Mouro, (21) 926 75 75
Romania, 713421 Bucaresti, 01-230-8730
Russia, 129090 Moscow, +7 095 956 2917, 937 7893
Slovakia, 81105 Bratislava, 07/4333 9757
Slovenija, Tražaš ka 132, 1000 Ljubljana, 01 24 25 730
Schweiz/Svizzera, 5506 Mägenwil, 062/889 93 00
Suomi, Porissa, puh. (02) 622 3300
Sverige, 10545 Stockholm, 08-672 53 60
Turkey, Tarlabasi cad no:35 Taksim/Istanbul-0, 262-7249420
halb von zwei (2) Monaten nach dessen Kenntnis angezeigt
werden.
3. Mängel dieses Geräts werden wir innerhalb angemessener
Frist nach Mitteilung des Mangels unentgeltlich beseitigen; die zu diesem Zweck erforderlichen Aufwendungen,
insbesondere Arbeits- und Materialkosten werden von uns
getragen. Über diese Nachbesserung hinausgehende Ansprüche werden durch diese Garantie dem Verbraucher
nicht eingeräumt.
4. Im Garantiefall ist das Gerät vom Verbraucher an die für
seinen Wohnort zuständige AEG-Zentralwerkstatt zu versenden, wobei das Gerät gut zu verpacken ist und die vollständige Anschrift des Verbrauchers zusammen mit einer
kurzen Fehlerbeschreibung in das Paket zu legen ist. Zum
Nachweis des Garantie-Anspruchs ist der Sendung der Original-Kaufbeleg (Kassenzettel, Rechnung) beizufügen.
5. Garantieleistungen bewirken weder eine Verlängerung
noch einen Neubeginn der Garantiezeit für dieses Gerät;
ausgewechselte Teile gehen in unser Eigentum über.
6. Mängelansprüche aus dieser Garantie verjähren in zwei (2)
Jahren ab dem Zeitpunkt der Übergabe des Geräts vom
Händler an den Verbraucher, der durch den Original-Kaufbeleg (Kassenzettel, Rechnung) zu belegen ist; wenn dieses
Gerät gewerblich genutzt wird, beträgt die Verjährungsfrist sechs (6) Monate.
AEG Hausgeräte GmbH, D-90429 Nürnberg, Muggenhofer Straße 135 Änderungen vorbehalten
Page 12

AEG Hausgeräte GmbH
Postfach 1036
D-90327 Nürnberg
http://www.aeg.hausgeraete.de
© Copyright by AEG
822 949 208 – 0103
 Loading...