

AEG DB 1500-2 XE User Manual [en, ru, de, es, fr, it, cs, pl]

DB 1500-2 XE
Original instructions
Originalbetriebsanleitung
Notice originale
Istruzioni originali
Manual original
Manual original
Oorspronkelijke
gebruiksaanwijzing
Original brugsanvisning
Original bruksanvisning
Bruksanvisning i original
Alkuperäiset ohjeet
Πρωτότυπο οδηγιών χρήσης
Orijinal işletme talimatı
Původním návodem k používání
Pôvodný návod na použitie
Instrukcją oryginalną
Eredeti használati utasítás
Izvirna navodila
Originalne pogonske upute
Instrukcijām oriģinālvalodā
Originali instrukcija
Algupärane kasutusjuhend
Оригинальное руководство по
эксплуатации
Оригинално ръководство за
експлоатация
Instrucţiuni de folosire originale
Оригинален прирачник за работа
原始的指南
ITALIANO
MAGYAR
HRVATSKI
LATVISKI
ROMÂNIA
ESPAÑOL
Technical Data,Safety Instructions, Specied Conditions of Use,
МАКЕДОНСКИ
EC-Declaration of Conformity, Mains connection, Maintenance, Symbols
Technische Daten, Sicherheitshinweise, Bestimmungsgemäße Verwendung,
CE-Konformitätserklärung, Netzanschluss, Wartung, Symbole
Caractéristiques techniques, Instructions de sécurité, Utilisation conforme aux
prescriptions, Declaration CE de Conformité, Branchement secteur, Entretien, Symboles
Dati tecnici,Norme di sicurezza,Utilizzo conforme, Dicharazione di Conformità
CE, Collegamento alla rete, Manutenzione, Simboli
Datos técnicos, Instrucciones de seguridad, Aplicación de acuerdo a la nalidad,
Declaracion de Conformidad CE, Conexión eléctrica, Mantenimiento, Símbolos
Características técnicas, Instruções de segurança, Utilização autorizada,
Declaração de Conformidade CE, Ligação à rede, Manutenção, Symbole
Technische gegevens, Veiligheidsadviezen, Voorgeschreven gebruik van het
systeem, EC-Konformiteitsverklaring, Netaansluiting,Onderhoud, Symbolen
Tekniske data, Sikkerhedshenvisninger, Tiltænkt formål,
CE-Konformitetserklæring, Nettilslutning, Vedligeholdelse, Symboler
Tekniske data, Spesielle sikkerhetshenvisninger, Formålsmessig bruk,
CE-Samsvarserklæring, Nettilkopling, Vedlikehold, Symboler
Tekniska data, Säkerhetsutrustning, Använd maskinen Enligt anvisningarna,
CE-Försäkran, Nätanslutning, Skötsel, Symboler
Tekniset arvot, Turvallisuusohjeet, Tarkoituksenmukainen käyttö,
Todistus CE-standardinmukaisuudesta, Verkkoliitäntä, Huolto, Symbolit
Фечнйкб уфпйчейб, Ейдйкеу хрпдейоейу буцблейбу, Чсзуз ухмцщнб ме фп укпрп рсппсйумпх,
Дзлщуз рйуфпфзфбу ек, Ухндеуз уфп злекфсйкп дйкфхп, Ухнфзсзуз,
Teknik veriler, Güvenliğiniz için talimatlar, Kullanim, CE uygunluk beyanice, Şebeke
bağlantisi, Bakim, Semboller
Technická data, Speciální bezpečnostní upozornění, Oblast využití,
Ce-prohlášení o shodě, Připojení na sít, Údržba, Symboly
Technické údaje, Špeciálne bezpečnostné pokyny, Použitie podľa predpisov,
CE-Vyhlásenie konformity, Sieťová prípojka, Údrzba, Symboly
Dane techniczne, Specjalne zalecenia dotyczące bezpieczeństwa, Użytkowanie zgodne z
przeznaczeniem, Świadectwo zgodności ce, Podłączenie do sieci, Gwarancja, Symbole
Műszaki adatok, Különleges biztonsági tudnivalók, Rendeltetésszerű használat,
Ce-azonossági nyilatkozat, Hálózati csatlakoztatás, Karbantartás, Szimbólumok
Tehnični podatki, Specialni varnostni napotki, Uporaba v skladu z namembnostjo,
Ce-izjava o konformnosti, Omrežni priključek, Vzdrževanje,Simboli
Tehnički podaci, Specijalne sigurnosne upute, Propisna upotreba,
CE-Izjava konformnosti, Priključak na mrežu, Održavanje, Simboli
Tehniskie dati, Speciālie drošības noteikumi, Noteikumiem atbilstošs izmantojums,
Atbilstība CE normām, Tīkla pieslēgums, Apkope, Simboli
Techniniai duomenys, Ypatingos saugumo nuorodos, Naudojimas pagal paskirtį,
CE Atitikties pareiškimas, Elektros tinklo jungtis, Techninis aptarnavimas, Simboliai
Tehnilised andmed, Spetsiaalsed turvajuhised, Kasutamine vastavalt otstarbele,
EÜ Vastavusavaldus, Võrku ühendamine, Hooldus, Sümbolid
Технические данные, Рекомендации по технике безопасности,
Использо- вание, Подключение к электросети, Обслуживание, Символы
Технически данни, Специални указания за безопасност, Използване по предназначение,
СЕ-Декларация за съответствие, Свързване към мрежата, Поддръжка, Символи
Date tehnice, Instrucţiuni de securitate, Condiţii de utilizare specicate, Declaraţie
de conformitate, Alimentare de la reţea, Intreţinere, Simboluri
Технички Податоци, Упатство За Употреба, Специфицирани Услови На
Употреба, Еу-декларација За Сообразност, Главни Врски, Одржување, Симболи
技术数据, 特殊安全指示, 正确地使用机器, 欧洲安全规定说明, 电源插头, 维
修, 符号
Ухмвплб
Por favor leia e conserve em
Prosimy o uważne przeczytanie i przestrzeganie
zaleceń zamie szczonych w tej instrukcji.
Пожалуйста, прочтите и сохраните
Ве мoлиме прочитаjте го и
Please read and save
these instructions!
Bitte lesen und
aufbewahren!
Prière de lire et de
conserver!
Si prega di leggere le
istruzioni e di conservarle!
Lea y conserve estas
instrucciones por favor!
seu poder!
Lees en let goed op
deze adviezen!
Vær venlig at læse og
opbevare!
Vennligst les og
oppbevar!
Var god läs och tag tillvara
dessa instruktioner!
Lue ja säilytö!
Рбсбкблю дйбвЬуфе
фйт кбй цхлЬофе фйт!
Lütfen okuyun ve
saklayın
Po přečtení uschovejte
Prosím prečítať a
uschovať!
Olvassa el és
őrizze meg
Prosimo preberite in
shranite!
Molimo pročitati i
sačuvati
Pielikums lietošanas
pamācībai
Prašome perskaityti ir
neišmesti!
Palun lugege läbi ja hoidke
настоящую! инструкцию
Моля прочетете и
Va rugăm citiţi şi păstraţi
aceste instrucţiuni
чувајте го ова упатство!
请详细阅读并妥善保存!
alal!
запазете!
ENGLISH
DEUTSCH
FRANÇAIS
PORTUGUES
NEDERLANDS
DANSK
NORSK
SVENSKA
SUOMI
ÅËËÇNÉÊÁ
TÜRKÇE
ČESKY
SLOVENSKY
POLSKI
SLOVENSKO
LIETUVIŠKAI
EESTI
РУССКИЙ
БЪЛГАÐÑÊÈ
中文
14
16
18
20
22
24
26
28
30
32
34
36
38
40
42
44
46
48
50
52
54
56
58
60
62
64
66
2 3
10
12
13
9
11
8
6
7
4 5
1
2
30°
30°
2
30°
1
3
6 7
3
1
2
3
START
STOP
START
4
STOP
8 9
ø 80 mm - ø 162 mm
ø 32 mm - ø 90 mm
10 11
1
1
2
3
2
3 4
12 13
TECHNICAL DATA Diamond Drill
Rated input ..............................................................................
Output ......................................................................................
No-load speed, 1st gear ..........................................................
No-load speed, 2nd gear .........................................................
Speed under load max., 1st gear ............................................
Speed under load max., 2nd gear ...........................................
Percussion rate max. ...............................................................
Drilling capacity, 1st gear .........................................................
Drilling capacity, 2nd gear .......................................................
Drive shank..............................................................................
Gear neck diameter .................................................................
Weight according EPTA-Procedure 01/2003 ...........................
Noise information
Measured values determined according to EN 60 745.
Typically, the A-weighted noise levels of the tool are:
Sound pressure level (K = 3 dB(A)) .......................................
Sound power level (K = 3 dB(A)) ............................................
Wear ear protectors!
Vibration information
Total vibration values (vector sum in the three axes)
determined according to EN 60745.
Vibration emission value ah:
Drilling into metal .....................................................................
Uncertainty K ...........................................................................
Percussion drilling into concrete ..............................................
Uncertainty K ...........................................................................
Drilling into concrete ................................................................
Uncertainty K ...........................................................................
DB 1500-2 XE
.......................1500 W
.........................820 W
....................0-1500 min
....................0-3000 min
.........................890 min
.......................1770 min
.....................48000 min
....................80-162 mm
......................32-90 mm
........................M18
...........................57 mm
..........................4,2 kg
.........................100 dB (A)
......................... 111 dB (A)
.......................< 2,5 m/s
..........................1,5 m/s
...........................13 m/s
..........................3,6 m/s
...........................20 m/s
..........................1,5 m/s
-1
-1
-1
-1
-1
2
2
2
2
2
2
WARNING
The vibration emission level given in this information sheet has been measured in accordance with a standardised test given
in EN 60745 and may be used to compare one tool with another. It may be used for a preliminary assessment of exposure.
The declared vibration emission level represents the main applications of the tool. However if the tool is used for different
applications, with different accessories or poorly maintained, the vibration emission may differ. This may signicantly increase
the exposure level over the total working period.
An estimation of the level of exposure to vibration should also take into account the times when the tool is switched off or
when it is running but not actually doing the job. This may signicantly reduce the exposure level over the total working period.
Identify additional safety measures to protect the operator from the effects of vibration such as: maintain the tool and the
accessories, keep the hands warm, organisation of work patterns.
WARNING! Read all safety warnings and all
instructions, including those given in the accompanying
brochure. Failure to follow the warnings and instructions
may result in electric shock, re and/or serious injury.
Save all warnings and instructions for future reference.
SAFETY INSTRUCTIONS
Wear ear protectors. Exposure to noise can cause hearing
loss.
Use auxiliary handles supplied with the tool. Loss of
control can cause personal injury.
Hold power tool by insulated gripping surfaces, when
performing an operation where the cutting accessory
may contact hidden wiring or its own cord. Contact with
a „live“ wire will also make exposed metal parts of the power
tool „live“ and shock the operator.
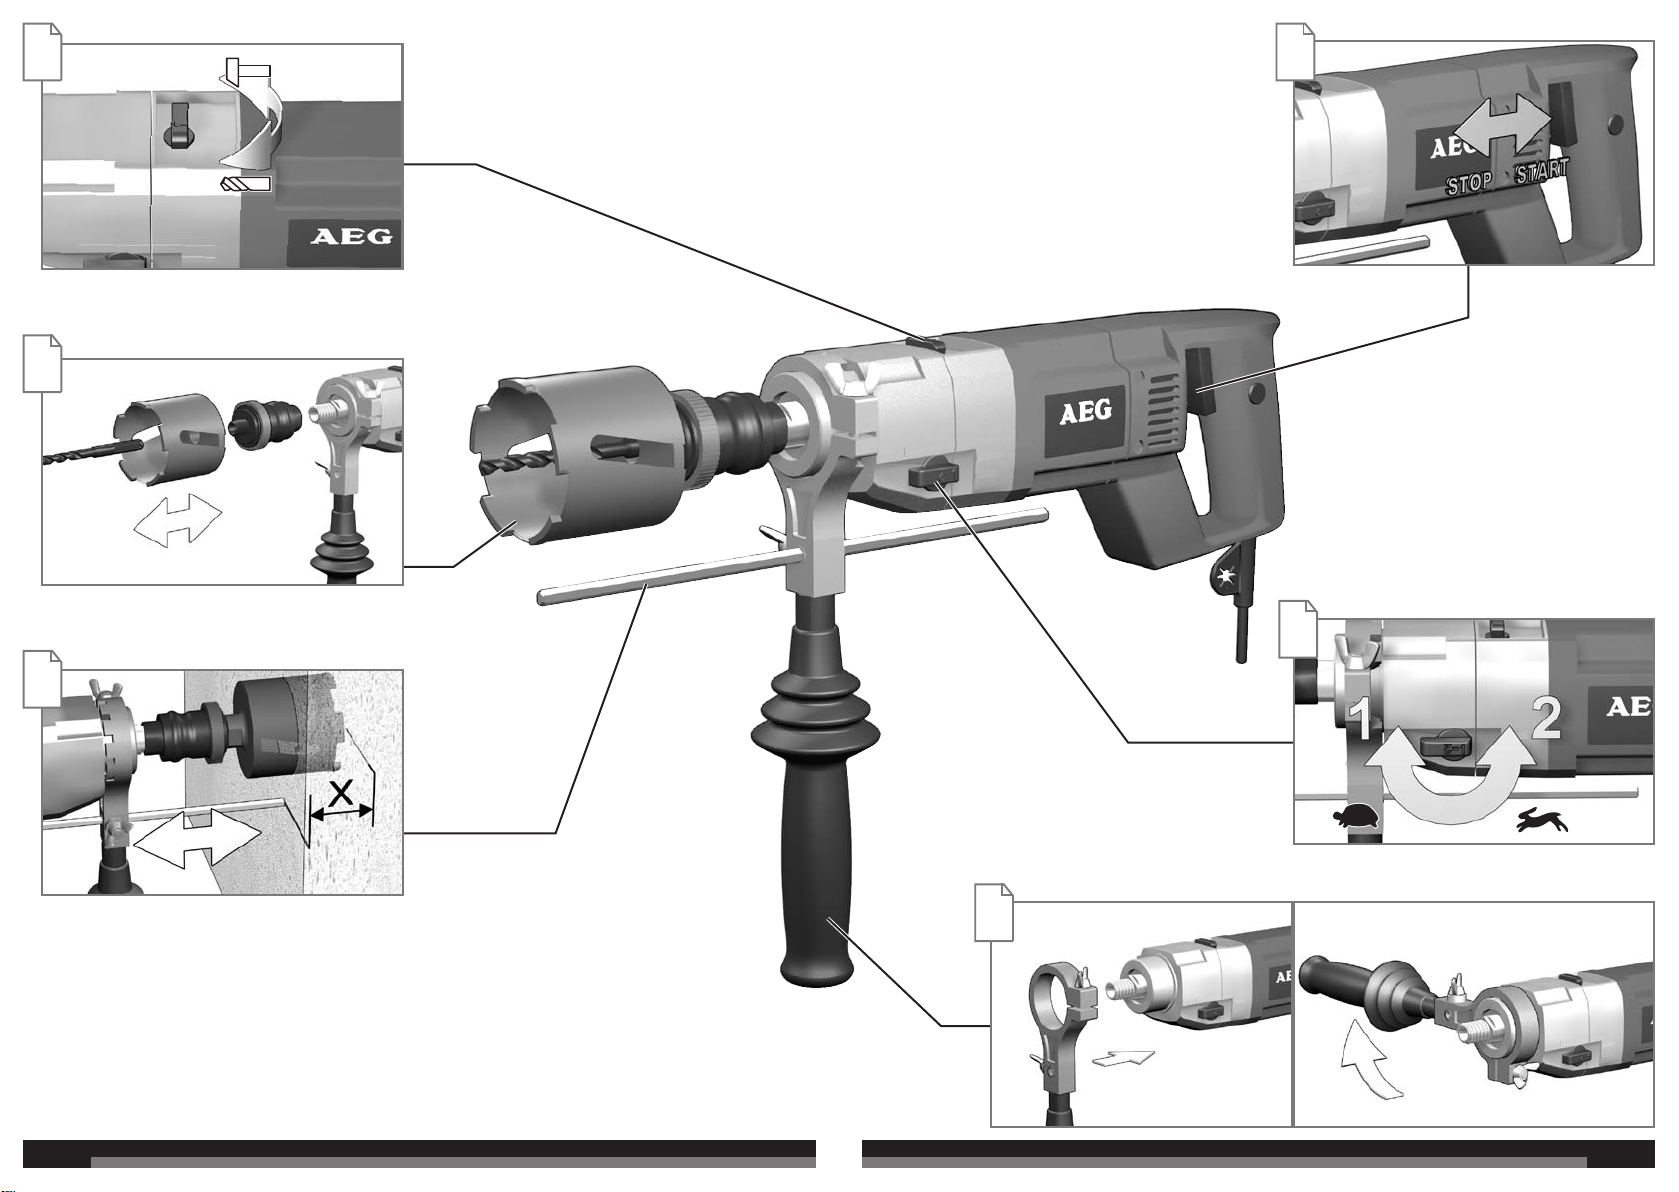
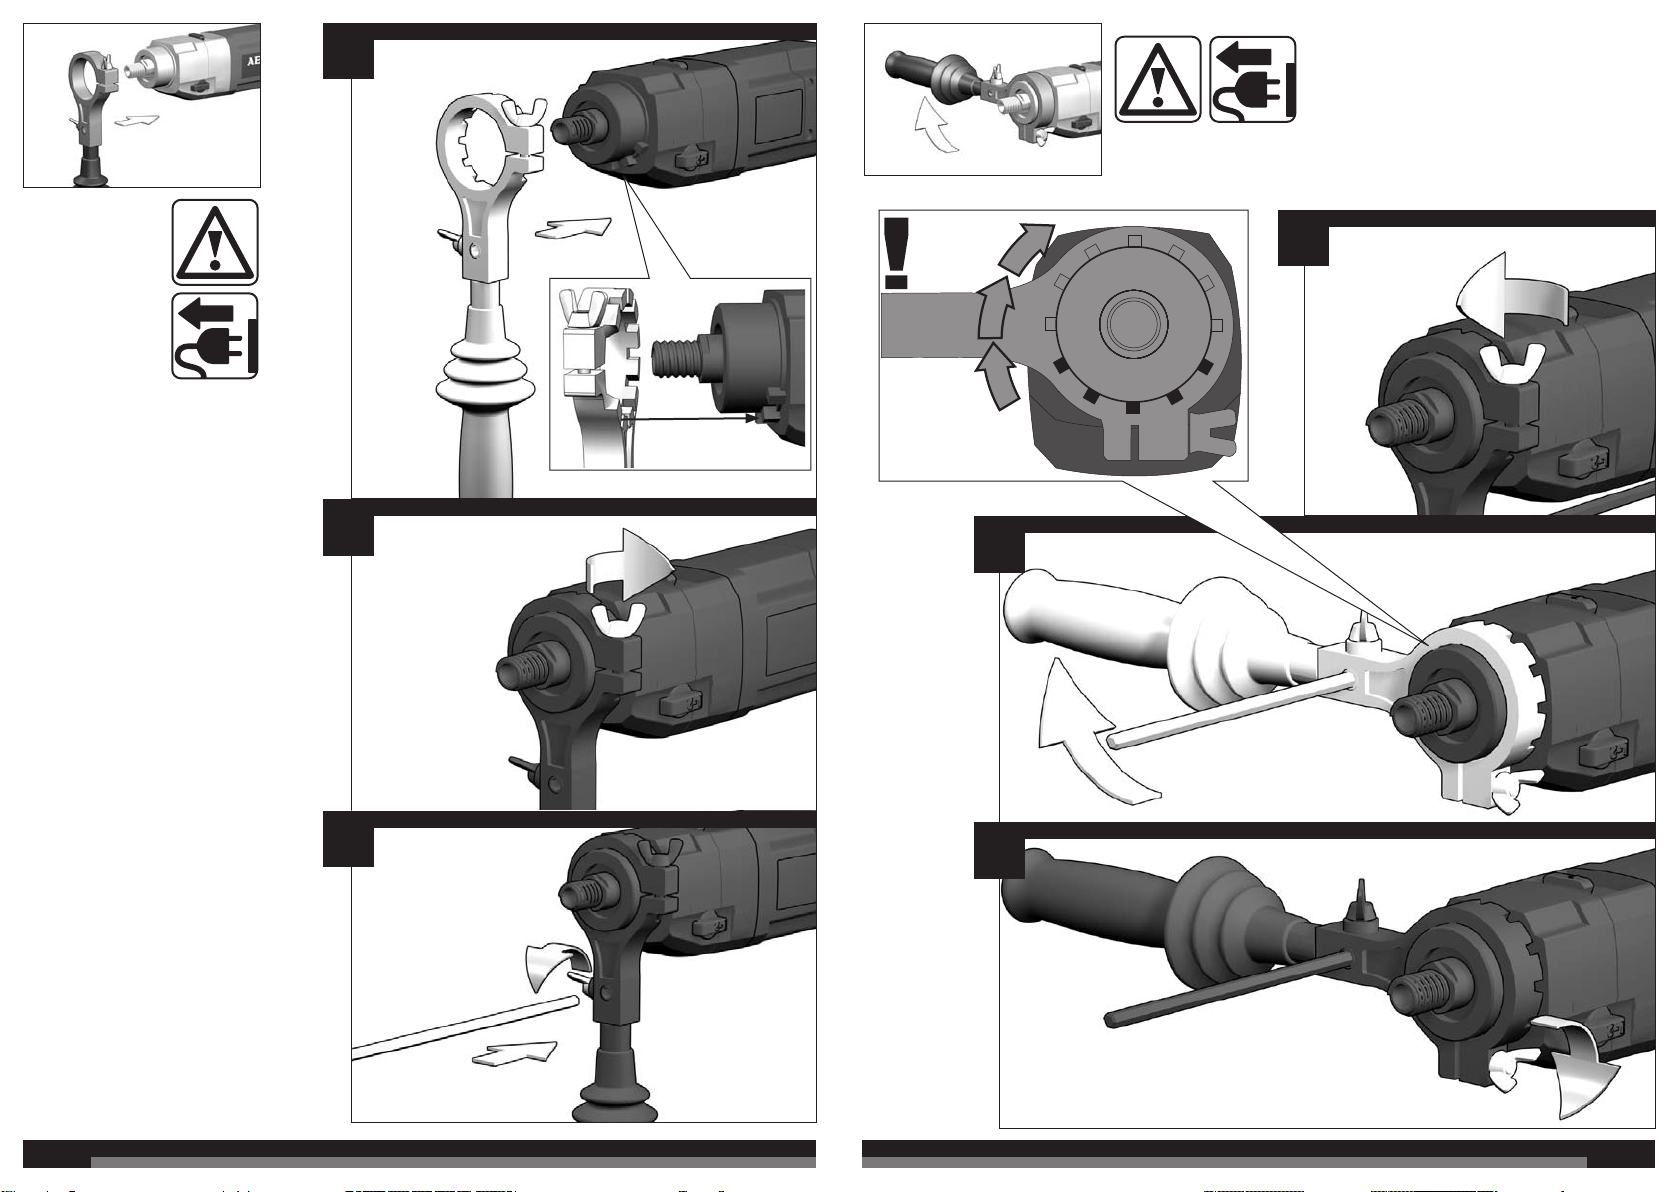
When working with large drill diameters, the auxiliary handle
must be fastened in a right angle with the main handle (see
illustrations, section “Twisting the handle”).
The built-in friction clutch only reacts to jerky locking, which
is why you should always use the additional handle.
Appliances used at many different locations including open
air must be connected via a current surge preventing switch.
Always wear goggles when using the machine. It is
recommended to wear gloves, sturdy non slipping shoes
and apron.
Sawdust and splinters must not be removed while the
machine is running.
The dust that arises when working with this tool can be
detrimental to health and therefore not reach the body. Wear
a suitable dust protection mask.
Always disconnect the plug from the socket before carrying
out any work on the machine.
Only plug-in when machine is switched off.
Keep mains lead clear from working range of the machine.
Always lead the cable away behind you.
When working in walls ceiling, or oor, take care to avoid
electric cables and gas or waterpipes.
SPECIFIED CONDITIONS OF USE
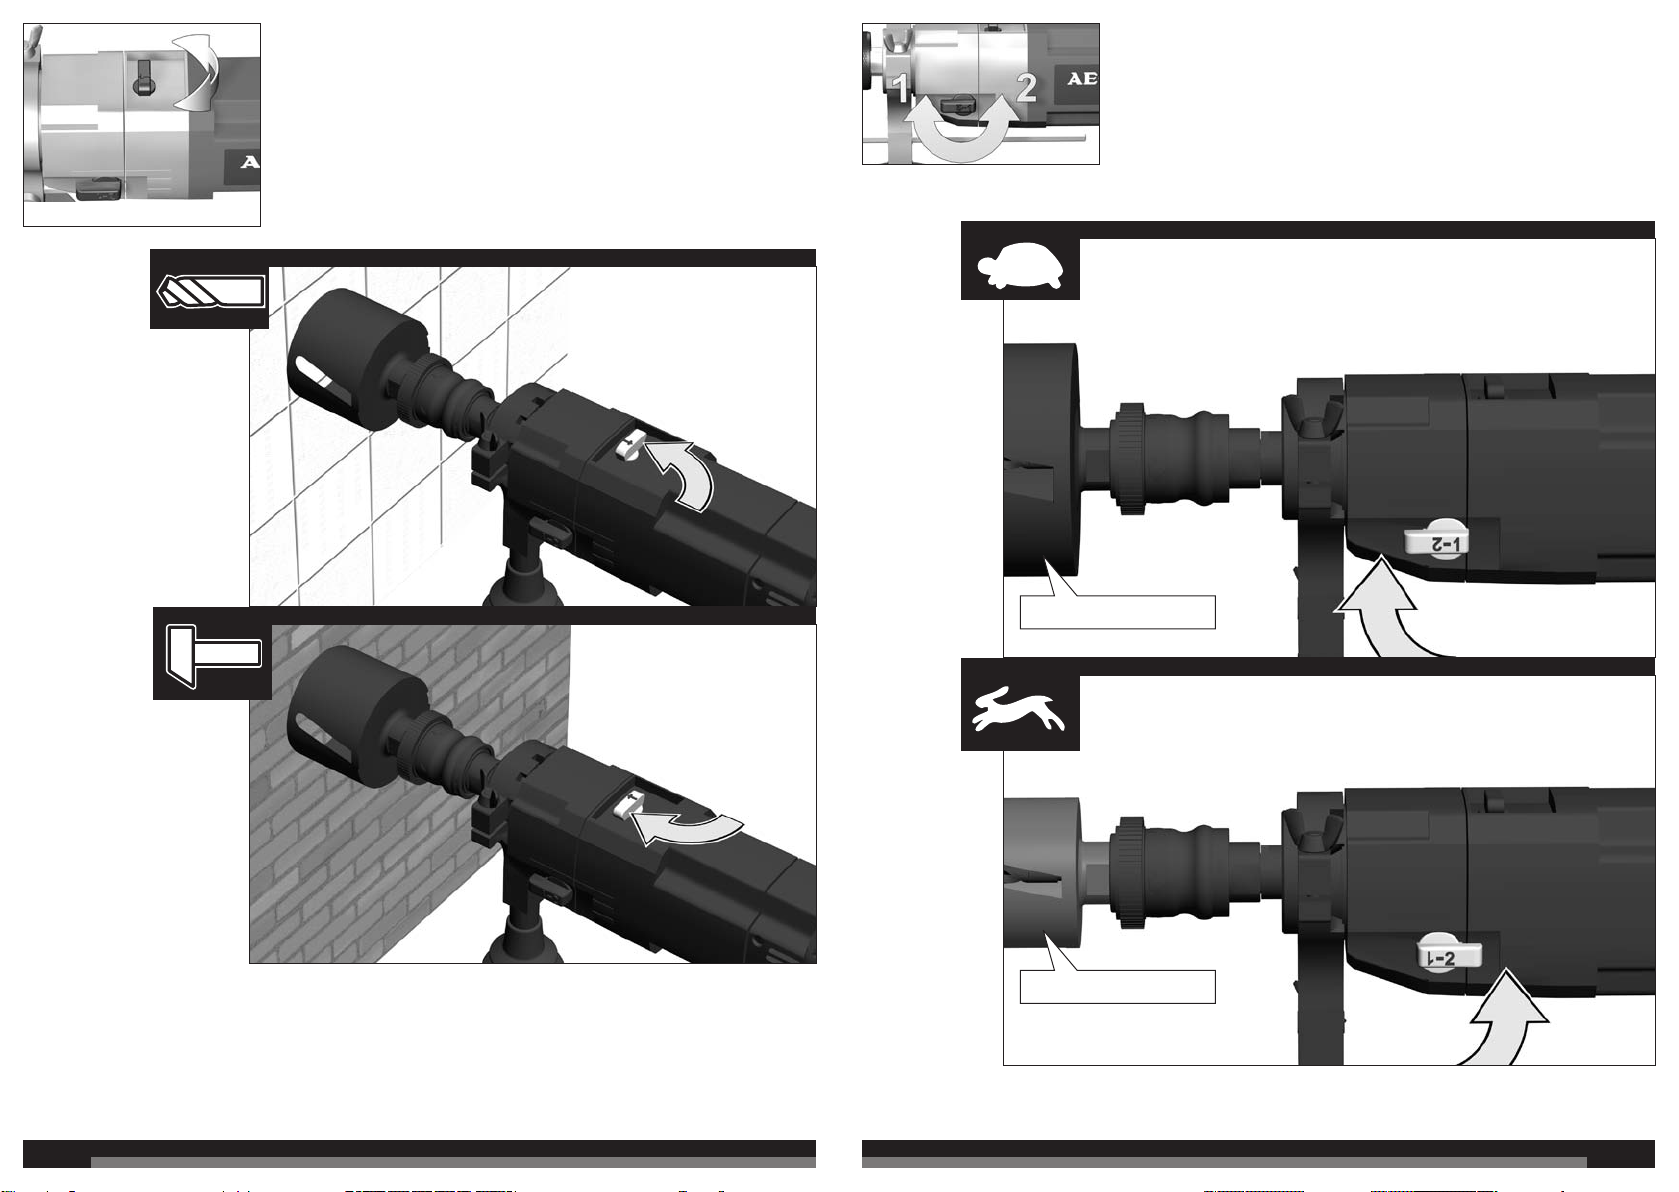
The diamond drill can be used to drill with diamond dry drill
bits. With drill chuck mounted the machine is suitable for
percussive drilling in rock and drilling holes in wood and
steel. The machine is not suitable for wet drilling in concrete.
Do not use this product in any other way as stated for
normal use.
EC-DECLARATION OF CONFORMITY
We declare under our sole responsibility that this product is
in conformity with the following standards or standardized
documents.
EN 60745-1:2009 + A11:2010
EN 60745-2-1:2010
EN 55014-1:2006 + A1:2009 + A2:2011
EN 55014-2:1997 + A1:2001 + A2:2008
EN 61000-3-2:2006 + A1:2009 + A2:2009
EN 61000-3-3:2008
in accordance with the regulations
2011/65/EU (RoHs)
2006/42/EC
2004/108/EC
Winnenden, 2012-09-10
Rainer Kumpf
Director Product Development
Authorized to compile the technical le
MAINS CONNECTION
Connect only to single-phase a.c. current and only to the
system voltage indicated on the rating plate. It is also
possible to connect to sockets without an earthing contact
as the design conforms to safety class II.
PROTECTION OF MOTOR IN CASE OF OVERLOAD
Motor protection device controlled by motor load. The
machine will slowly continue to run in order to cool the motor
down. After sufcient cooling machine can be restarted by
switching off and on again.
SOFT PERCUSSION
Depending on the material that is to be machined, soft
percussion may result in a sharp reduction in drilling time or
a longer tool life for the diamond segments.
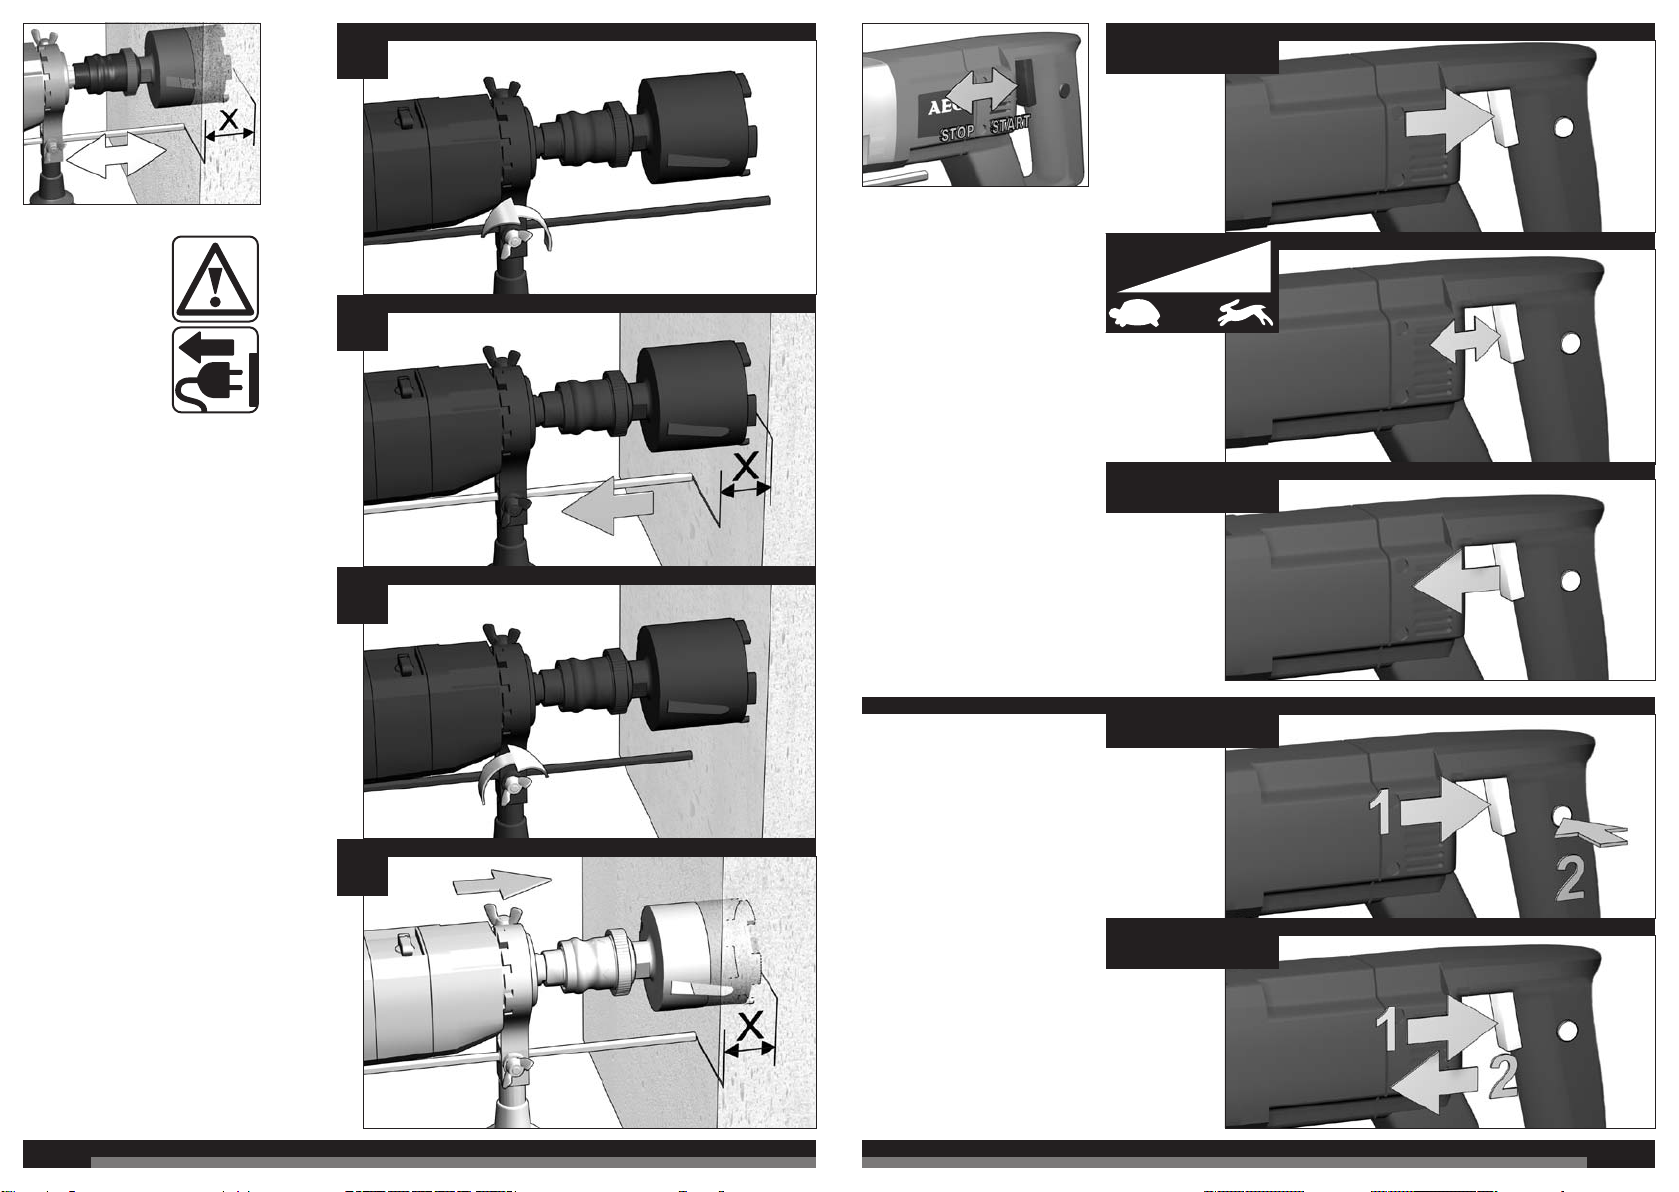
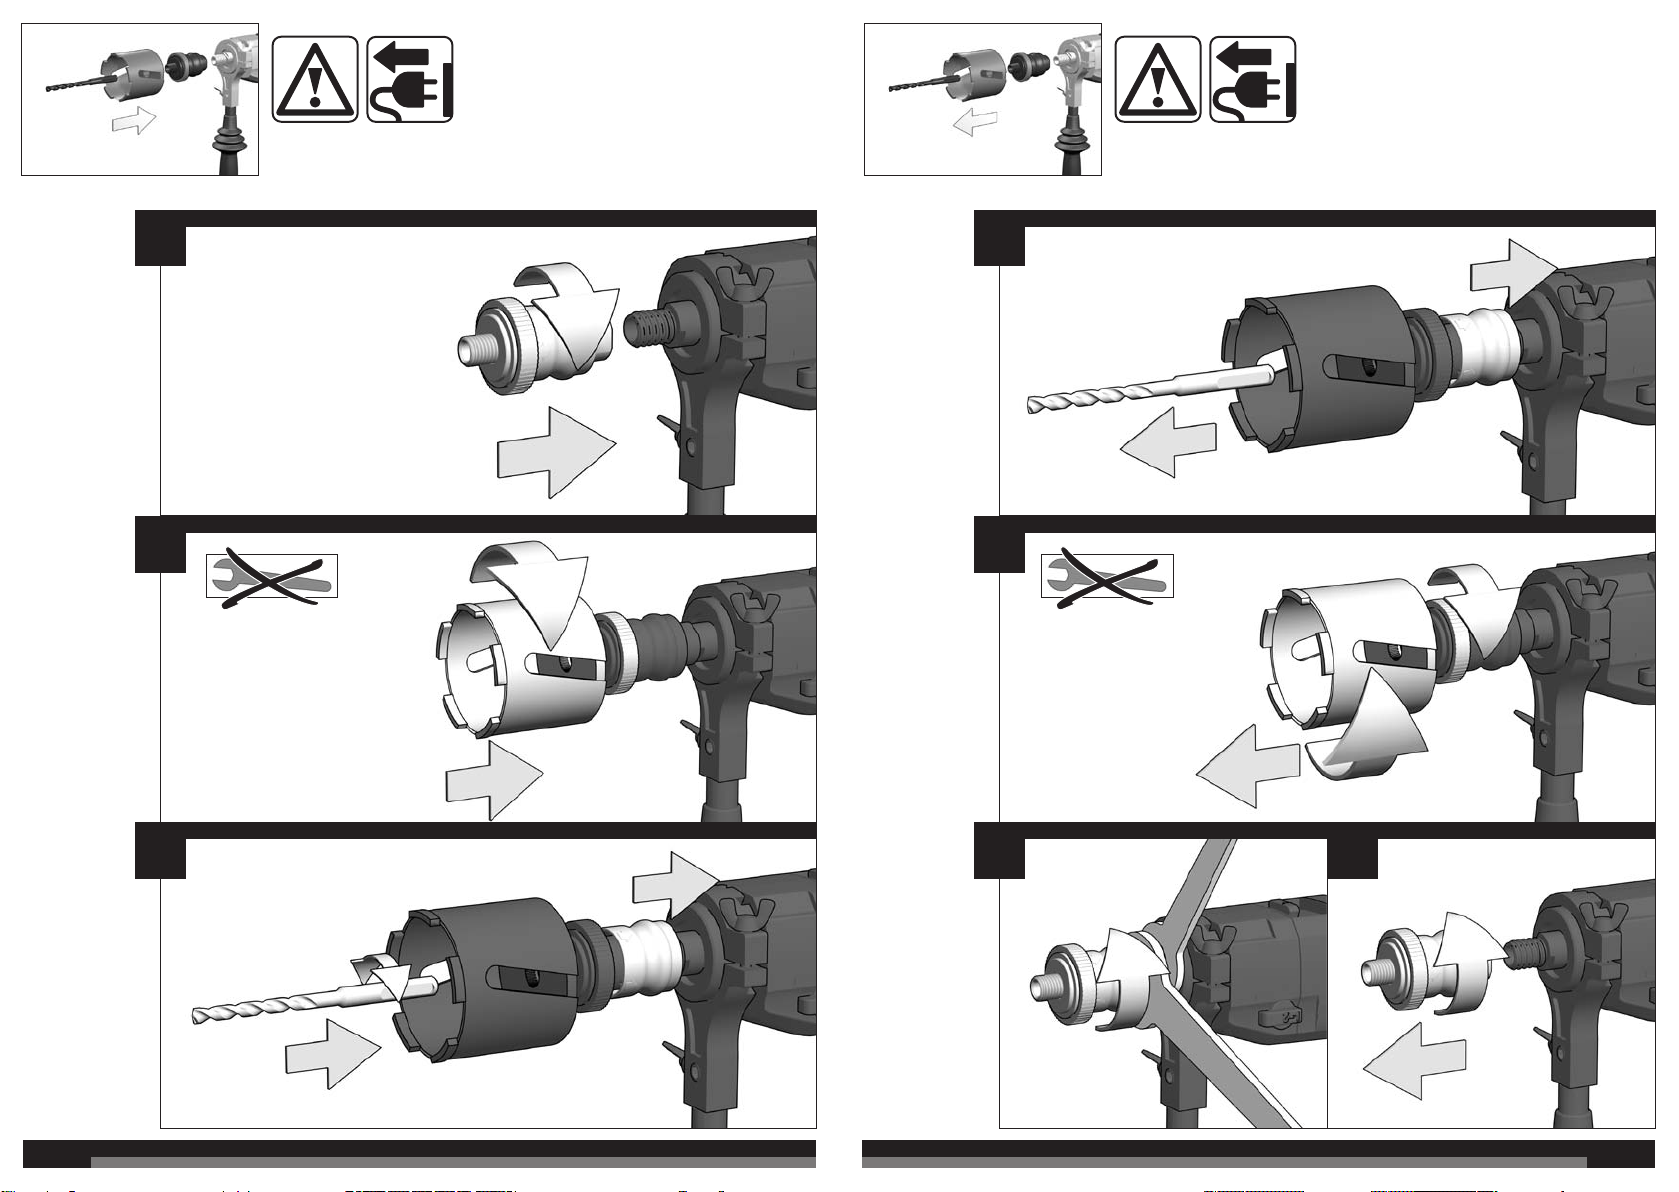
ADVICE FOR OPERATION
To gain a better drill progress take out the centre bit after
having reached a depth of about 10-15 mm. Insert core
cutter into the existing groove and let machine run up
smoothly.
Bore-holes which don’t have to be applied exactly can be
drilled without a centre bit. For that purpose apply the core
cutter slantingly and put the machine slowly straight when a
depth of about 5 mm has been reached. (This is only
possible when using short core cutters!)
If drill cores should come loose, take core cutter from the
material and remove drill cores.
For best performance the diamond segments should be
“roughed-up” to expose the fragments of diamond: To
expose the diamond fragments rub surface of segments
with stone
MAINTENANCE
The ventilation slots of the machine must be kept clear at all
times.
Use only AEG accessories and spare parts. Should
components need to be replaced which have not been
described, please contact one of our AEG service agents
(see our list of guarantee/service addresses).
If needed, an exploded view of the tool can be ordered.
Please state the Article No. as well as the machine type
printed on the label and order the drawing at your local
service agents or directly at: AEG Electric Tools GmbH,
Max-Eyth-Straße 10, D-71364 Winnenden, Germany.
SYMBOLS
Please read the instructions carefully
before starting the machine.
Always disconnect the plug from the socket
before carrying out any work on the
machine.
Accessory - Not included in standard
equipment, available as an accessory.
Do not dispose of electric tools together
with household waste material! In
observance of European Directive 2002/96/
EC on waste electrical and electronic
equipment and its implementation in
accordance with national law, electric tools
that have reached the end of their life must
be collected separately and returned to an
environmentally compatible recycling
facility.
Class II construction, tool in which
protection against electric shock does not
rely on basic insulation only, but in which
additional safety precautions, such as
double insulation or reinforced insulation,
are provided.
14 15
ENGLISH ENGLISH
TECHNISCHE DATEN Diamantbohrmaschine
Nennaufnahmeleistung............................................................
Abgabeleistung ........................................................................
Leerlaufdrehzahl im 1. Gang ...................................................
Leerlaufdrehzahl im 2. Gang ...................................................
Lastdrehzahl max. im 1. Gang.................................................
Lastdrehzahl max. im 2. Gang.................................................
Leerlaufschlagzahl max. ..........................................................
Bohr-ø im 1. Gang ...................................................................
Bohr-ø im 2. Gang ...................................................................
Bohrspindel..............................................................................
Spannhals-ø ............................................................................
Gewicht nach EPTA-Prozedur 01/2003 ...................................
Geräuschinformationen
Messwerte ermittelt entsprechend EN 60 745.
Der A-bewertete Geräuschpegel des Gerätes beträgt
typischerweise:
Schalldruckpegel (K = 3 dB(A)) ..............................................
Schalleistungspegel (K = 3 dB(A)) .........................................
Gehörschutz tragen!
Vibrationsinformationen
Schwingungsgesamtwerte (Vektorsumme dreier Richtungen)
ermittelt entsprechend EN 60745:
Schwingungsemissionswert ah:
Bohren in Metall: ...................................................................
Unsicherheit K = ..................................................................
Schlagbohren in Beton: ........................................................
Unsicherheit K = ..................................................................
Bohren in Beton ....................................................................
Unsicherheit K = ..................................................................
DB 1500-2 XE
.......................1500 W
.........................820 W
....................0-1500 min
....................0-3000 min
.........................890 min
.......................1770 min
.....................48000 min
....................80-162 mm
......................32-90 mm
........................M18
...........................57 mm
..........................4,2 kg
.........................100 dB (A)
......................... 111 dB (A)
.......................< 2,5 m/s
..........................1,5 m/s
...........................13 m/s
..........................3,6 m/s
...........................20 m/s
..........................1,5 m/s
-1
-1
-1
-1
-1
2
2
2
2
2
2
WARNUNG
Der in diesen Anweisungen angegebene Schwingungspegel ist entsprechend einem in EN 60745 genormten Messverfahren
gemessen worden und kann für den Vergleich von Elektrowerkzeugen miteinander verwendet werden. Er eignet sich auch für
eine vorläuge Einschätzung der Schwingungsbelastung.
Der angegebene Schwingungspegel repräsentiert die hauptsächlichen Anwendungen des Elektrowerkzeugs. Wenn allerdings
das Elektrowerkzeug für andere Anwendungen, mit abweichenden Einsatzwerkzeugen oder ungenügender Wartung
eingesetzt wird, kann der Schwingungspegel abweichen. Dies kann die Schwingungsbelastung über den gesamten
Arbeitszeitraum deutlich erhöhen.
Für eine genaue Abschätzung der Schwingungsbelastung sollten auch die Zeiten berücksichtigt werden, in denen das Gerät
abgeschaltet ist oder zwar läuft, aber nicht tatsächlich im Einsatz ist. Dies kann die Schwingungsbelastung über den
gesamten Arbeitszeitraum deutlich reduzieren.
Legen Sie zusätzliche Sicherheitsmaßnahmen zum Schutz des Bedieners vor der Wirkung von Schwingungen fest wie zum
Beispiel: Wartung von Elektrowerkzeug und Einsatzwerkzeugen, Warmhalten der Hände, Organisation der Arbeitsabläufe.
WARNUNG!
Anweisungen, auch die in der beiliegenden Broschüre.
Versäumnisse bei der Einhaltung der Sicherheitshinweise
und Anweisungen können elektrischen Schlag, Brand und/
oder schwere Verletzungen verursachen.
Bewahren Sie alle Sicherheitshinweise und
Anweisungen für die Zukunft auf.
Lesen Sie alle Sicherheitshinweise und
SPEZIELLE SICHERHEITSHINWEISE
Tragen Sie Gehörschutz. Die Einwirkung von Lärm kann
Gehörverlust bewirken.
Benutzen Sie die mit dem Gerät gelieferten
Zusatzhandgriffe. Der Verlust der Kontrolle kann zu
Verletzungen führen.
Halten Sie das Gerät an den isolierten Griffächen,
wenn Sie Arbeiten ausführen, bei denen das
Einsatzwerkzeug verborgene Stromleitungen oder das
eigene Kabel treffen kann. Der Kontakt mit einer
spannungsführenden Leitung setzt auch die metallenen
Geräteteile unter Spannung und führt zu einem elektrischen
Schlag.
Bei großen Bohrdurchmessern muss der Zusatzhandgriff
rechtwinklig zum Haupthandgriff befestigt werden (siehe
auch im Bildteil, Abschnitt "Handgriff verdrehen").
Die eingebaute Rutschkupplung spricht nur bei ruckartigem
Blockieren an, deshalb Zusatzhandgriff immer benutzen.
Steckdosen in Außenbereichen müssen mit FehlerstromSchutzschaltern ausgerüstet sein. Das verlangt die
Installationsvorschrift für Ihre Elektroanlage. Bitte beachten
Sie das bei der Verwendung unseres Gerätes.
Beim Arbeiten mit der Maschine stets Schutzbrille tragen.
Schutzhandschuhe, festes und rutschsicheres Schuhwerk
und Schürze werden empfohlen.
Späne oder Splitter dürfen bei laufender Maschine nicht
entfernt werden.
Beim Arbeiten entstehender Staub ist oft
gesundheitsschädlich und sollte nicht in den Körper
gelangen. Geeignete Staubschutzmaske tragen.
Vor allen Arbeiten an der Maschine Stecker aus der
Steckdose ziehen.
Maschine nur ausgeschaltet an die Steckdose anschließen.
Anschlußkabel stets vom Wirkungsbereich der Maschine
fernhalten. Kabel immer nach hinten von der Maschine
wegführen.
Beim Arbeiten in Wand, Decke oder Fußboden auf
elektrische Kabel, Gas- und Wasserleitungen achten.
BESTIMMUNGSGEMÄßE VERWENDUNG
Die Diamantbohrmaschine ist einsetzbar zum Bohren mit
Diamant-Trockenbohrkronen. Mit aufgesetztem Bohrfutter
ist die Maschine geeignet zum Schlagbohren in Gestein und
zum Bohren in Holz und Stahl. Die Maschine ist nicht
geeignet zum Nassbohren in Beton.
Dieses Gerät darf nur wie angegeben bestimmungsgemäß
verwendet werden.
CE-KONFORMITÄTSERKLÄRUNG
Wir erklären in alleiniger Verantwortung, dass dieses
Produkt mit den folgenden Normen oder normativen
Dokumenten übereinstimmt.
EN 60745-1:2009 + A11:2010
EN 60745-2-1:2010
EN 55014-1:2006 + A1:2009 + A2:2011
EN 55014-2:1997 + A1:2001 + A2:2008
EN 61000-3-2:2006 + A1:2009 + A2:2009
EN 61000-3-3:2008
gemäß den Bestimmungen der Richtlinien
2011/65/EU (RoHs)
2006/42/EG
2004/108/EG
Winnenden, 2012-09-10
Rainer Kumpf
Director Product Development
Bevollmächtigt die technischen Unterlagen
zusammenzustellen
NETZANSCHLUSS
Nur an Einphasen-Wechselstrom und nur an die auf dem
Leistungsschild angegebene Netzspannung anschließen.
Anschluss ist auch an Steckdosen ohne Schutzkontakt
möglich, da ein Aufbau der Schutzklasse II vorliegt.
BELASTUNGSABHÄNGIGER MOTORSCHUTZ
Bei hoher Motorüberlastung wird der Überlastschutz
ausgelöst. Die Maschine läuft langsam weiter zum Kühlen
der Motorwicklung. Erst nach ausreichender Kühlung ist ein
Einschalten der Maschine möglich, hierzu Maschine ausund wieder einschalten.
SOFTSCHLAG
Abhängig vom zu bearbeitenden Werkstoff, kann der
Softschlag eine deutliche Reduzierung der Bohrzeit oder
eine längere Standzeit der Diamantsegmente bewirken.
ARBEITSHINWEISE
Zum Erreichen eines größeren Bohrfortschritts nach ca
10-15 mm Bohrtiefe den Zentrierbohrer herausnehmen,
Bohrkrone in vorhandene Rille einsetzen und Maschine
langsam anlaufen lassen.
Bohrungen welche nicht exakt angesetzt werden müssen,
können ohne Zentrierbohrer durchgeführt werden.
Hierzu die Bohrkrone schräg ansetzen und ab einer
Bohrtiefe von ca. 5 mm die Maschine langsam gerade
richten. (Nur bei kurzen Bohrkronen möglich).
Sollten sich Bohrkerne lösen, Bohrkrone aus dem Material
herausziehen und Bohrkerne entfernen.
Eine geschärfte Bohrkrone erleichtert die Anwendung und
den Bohrfortschritt. Schärfmöglichkeiten: In Kalksandstein
oder in einer Schärfplatte
WARTUNG
Stets die Lüftungsschlitze der Maschine sauber halten.
Nur AEG Zubehör und Ersatzteile verwenden. Bauteile,
deren Austausch nicht beschrieben wurde, bei einer AEG
Kundendienststelle auswechseln lassen (Broschüre
Garantie/Kundendienstadressen beachten).
Bei Bedarf kann eine Explosionszeichnung des Gerätes
unter Angabe der Maschinen Type und der zehnstelligen
Nummer auf dem Leistungsschild bei Ihrer
Kundendienststelle oder direkt bei AEG Electric Tools
GmbH, Max-Eyth-Straße 10, D-71364 Winnenden,
Germany angefordert werden.
SYMBOLE
Bitte lesen Sie die
Gebrauchsanweisung vor
Inbetriebnahme sorgfältig durch.
Vor allen Arbeiten an der Maschine Stecker
aus der Steckdose ziehen.
Zubehör - Im Lieferumfang nicht enthalten,
empfohlene Ergänzung aus dem
Zubehörprogramm.
Werfen Sie Elektrowerkzeuge nicht in den
Hausmüll! Gemäss Europäischer Richtlinie
2002/96/EG über Elektro- und ElektronikAltgeräte und Umsetzung in nationales
Recht müssen verbrauchte
Elektrowerkzeuge getrennt gesammelt und
einer umweltgerechten Wiederverwertung
zugeführt werden.
Schutzklasse II, Elektrowerkzeug, bei dem
der Schutz gegen elektrischen Schlag nicht
nur von der Basisisolierung abhängt,
sondern in dem zusätzliche
Schutzmaßnahmen, wie doppelte Isolierung
oder verstärkte Isolierung, angewendet
werden.
16 17
DEUTSCH DEUTSCH
CARACTÉRISTIQUES TECHNIQUES Carotteuse Diamant
Puissance nominale de réception............................................
Puissance utile ........................................................................
Vitesse de rotation 1ère vitesse ..............................................
Vitesse de rotation 2ème vitesse .............................................
Vitesse de rotation en charge 1ère vitesse .............................
Vitesse de rotation en charge 2ème vitesse ............................
Perçage à percussion max. .....................................................
Ø de perçage dans 1ère vitesse..............................................
Ø de perçage dans 2ème vitesse ............................................
Broche de perçage ..................................................................
ø du collier ...............................................................................
Poids suivant EPTA-Procedure 01/2003 .................................
Informations sur le bruit
Valeurs de mesure obtenues conformément à la EN 60 745.
Les mesures réelles (A) des niveaux acoustiques de
l’appareil sont :
Niveau de pression acoustique (K = 3 dB(A)) ........................
Niveau d‘intensité acoustique (K = 3 dB(A)) ..........................
Toujours porter une protection acoustique!
Informations sur les vibrations
Valeurs totales des vibrations (somme vectorielle de trois
sens) établies conformément à EN 60745.
Valeur d’émission vibratoire ah:
Perçage dans le métal .............................................................
Incertitude K ............................................................................
Perçage à percussion dans le béton .......................................
Incertitude K ............................................................................
Perçage dans le béton.............................................................
Incertitude K ............................................................................
DB 1500-2 XE
.......................1500 W
.........................820 W
....................0-1500 min
....................0-3000 min
.........................890 min
.......................1770 min
.....................48000 min
....................80-162 mm
......................32-90 mm
........................M18
...........................57 mm
..........................4,2 kg
.........................100 dB (A)
......................... 111 dB (A)
.......................< 2,5 m/s
..........................1,5 m/s
...........................13 m/s
..........................3,6 m/s
...........................20 m/s
..........................1,5 m/s
-1
-1
-1
-1
-1
2
2
2
2
2
2
UTILISATION CONFORME AUX PRESCRIPTIONS
La perceuse au diamant peut être utilisée pour percer avec
des couronnes de perçage diamantées sèches. Si le
mandrin de serrage est mis en place, la machine convient
au perçage à percussion dans la pierre ainsi qu’au perçage
dans le bois et l’acier. La machine ne convient pas au
perçage dans le béton avec apport d’eau.
Comme déjà indiqué, cette machine n’est conçue que pour
être utilisée conformément aux prescriptions.
DECLARATION CE DE CONFORMITÉ
Nous déclarons sous notre responsabilité que ce produit est
en conformité avec les normes ou documents normalisés
suivants
EN 60745-1:2009 + A11:2010
EN 60745-2-1:2010
EN 55014-1:2006 + A1:2009 + A2:2011
EN 55014-2:1997 + A1:2001 + A2:2008
EN 61000-3-2:2006 + A1:2009 + A2:2009
EN 61000-3-3:2008
conformément aux réglementations
2011/65/EU (RoHs)
2006/42/CE
2004/108/CE
Winnenden, 2012-09-10
des briques de sable calcaire ou dans une plaque
d’affûtage.
ENTRETIEN
Tenir toujours propres les orices de ventilation de la
machine.
N’utiliser que des pièces et accessoires AEG. Pour des
pièces dont l’échange n’est pas décrit, s’adresser de
préférence aux stations de service après-vente AEG (voir
brochure Garantie/Adresses des stations de service
après-vente).
Si besoin est, une vue éclatée de l’appareil peut être
fournie. S’adresser, en indiquant bien le numéro à dix
chiffres porté sur la plaque signalétique, à votre station de
service après-vente (voir liste jointe) ou directement à AEG
Electric Tools GmbH, Max-Eyth-Straße 10,
D-71364 Winnenden, Germany.
SYMBOLES
Veuillez lire avec soin le mode
d‘emploi avant la mise en service
Avant tous travaux sur la machine extraire
la che de la prise de courant.
AVERTISSEMENT
Le niveau vibratoire indiqué dans ces instructions a été mesuré selon un procédé de mesure normalisé dans la norme
EN 60745 et peut être utilisé pour comparer des outils électriques entre eux. Il convient aussi à une estimation provisoire de la
sollicitation par les vibrations.
Le niveau vibratoire indiqué représente les applications principales de l’outil électrique. Toutefois, si l’outil électrique est utilisé
pour d’autres applications, avec des outils rapportés qui diffèrent ou une maintenance insufsante, il se peut que le niveau
vibratoire diverge. Cela peut augmenter nettement la sollicitation par les vibrations sur tout l’intervalle de temps du travail.
Pour une estimation précise de la sollicitation par les vibrations, on devrait également tenir compte des temps pendant
lesquels l’appareil n’est pas en marche ou tourne sans être réellement en service. Cela peut réduire nettement la sollicitation
par les vibrations sur tout l’intervalle de temps du travail.
Dénissez des mesures de sécurité supplémentaires pour protéger l’utilisateur contre l’inuence des vibrations, comme par
exemple : la maintenance de l’outil électrique et des outils rapportés, le maintien au chaud des mains, l’organisation des
déroulements de travail.
AVERTISSEMENT! Lisez toutes les consignes de
sécurité et les instructions, même celles qui se trouvent
dans la brochure ci-jointe. Le non-respect des
avertissements et instructions indiqués ci après peut
entraîner un choc électrique, un incendie et/ou de graves
blessures sur les personnes.
Bien garder tous les avertissements et instructions.
INSTRUCTIONS DE SÉCURITÉ PARTICULIERES
Portez une protection acoustique. L’inuence du bruit
peut provoquer la surdité.
Utilisez les poignées supplémentaires livrées en même
temps que l’appareil. La perte de contrôle peut mener à
des blessures.
Maintenez l’appareil par les surfaces de poignée isolées
lorsque vous exécutez des travaux pendant lesquels
l’outil de coupe peut toucher des lignes électriques
dissimulées ou le propre câble. Le contact avec un câble
sous tension met les parties métalliques de l’appareil sous
tension et provoque une décharge électrique.
Pour effectuer de grands diamètres de perçage, la poignée
supplémentaire doit être montée perpendiculairement à la
poignée principale. Voir aussi les gures se trouvant dans le
chapitre « Ajustement de la poignée ».
L’accouplement à friction intégré ne réagit que lors d’un
blocage brusque. C’est pourquoi il faut toujours utiliser la
poignée supplémentaire.
Les prises de courant se trouvant à l’extérieur doivent être
équipées de disjoncteurs différentiel conformément aux
prescriptions de mise en place de votre installation
électrique. Veuillez en tenir compte lors de l’utilisation de
notre appareil.I
Toujours porter des lunettes protectrices en travaillant avec
la machine. Des gants de sécurité, des chaussures solides
et à semelles antidérapantes et un tablier sont
recommandés.
Ne jamais enlever les copeaux ni les éclats lorsque la
machine est en marche.
Les poussières qui sont dégagées pendant les travaux sont
souvent nocives pour la santé et ne devraient pas pénétrer
dans le corps. Porter un masque de protection approprié
contre les poussières.
Avant tous travaux sur la machine extraire la che de la
prise de courant.
Ne raccorder la machine au réseau que si l’interrupteur est
en position arrêt.
Le câble d’alimentation doit toujours se trouver en dehors
du champ d’action de la machine. Toujours maintenir le
câble d’alimentation à l’arrière de la machine.
Lors du perçage dans les murs, les plafonds ou les
planchers, toujours faire attention aux câbles électriques et
aux conduites de gaz et d’eau.
Rainer Kumpf
Director Product Development
Autorisé à compiler la documentation technique.
BRANCHEMENT SECTEUR
Raccorder uniquement à un courant électrique
monophasé et uniquement à la tension secteur indiquée sur
la plaque signalétique. Le raccordement à des prises de
courant sans contact de protection est également possible
car la classe de protection II est donnée.
PROTECTION DE SURCHARGE DU MOTEUR
Dispositif de protection du moteur déclenché par le niveau
de charge. La machine continue de fonctionner lentement
de manière à refroidir le moteur. Après un refroidissement
sufsant, un redémarrage de la machine est possible ;
arrêter la machine, puis la remettre en marche.
PERCUSSION PEUT MENER
Selon le matériau à usiner, la percussion peut mener à une
nette réduction du temps de perçage ou à une plus longue
durée de vie des segments diamantés.
CONSEILS PRATIQUES
An d’obtenir une progression de perçage plus élevée,
enlever le foret de centrage après avoir atteint une
profondeur d’alésage d’environ 10 à 15 mm, ensuite
introduire la couronne de forage dans la rainure existante et
mettre la machine en marche à une vitesse modérée.
Pour des perçages sans précision particulière, il est
possible de travailler sans foret de centrage. Pour cela,
incliner légèrement la couronne diamantée au départ de
l’opération, puis, dès que la profondeur de 5 mm est
atteinte, redresser lentement la machine. (Ceci n’est
possible que pour des couronnes diamantées courtes.)
Lorsqu’il y a des carottes se détachant du matériau, retirer
la couronne diamantée du matériau et enlever celles-ci.
Une couronne diamantée affûtée facilite l’utilisation de la
machine et la progression du travail. Affûtage possible dans
Accessoires - Ces pièces ne font pas partie
de la livraison. Il s’agit là de compléments
recommandés pour votre machine et
énumérés dans le catalogue des
accessoires.
Ne pas jeter les appareils électriques dans
les ordures ménagères! Conformément à la
directive européenne 2002/96/EG relative
aux déchets d‘équipements électriques ou
électroniques (DEEE), et à sa transposition
dans la législation nationale, les appareils
électriques doivent être collectés à part et
être soumis à un recyclage respectueux de
l’environnement.
Classe de protection II, outil électrique au
niveau duquel la protection contre la foudre
ne dépend pas uniquement de l‘isolation de
base et au niveau duquel des mesures de
protection ultérieurs ont été prises, telles
que la double isolation ou l‘isolation
augmentée.
18 19
FRANÇAIS FRANÇAIS
DATI TECNICI Carotatori
Potenza assorbita nominale ....................................................
Potenza erogata ......................................................................
Numero di giri a vuoto in 1. velocità ........................................
Numero di giri a vuoto in 2. Velocità ........................................
Numero di giri a carico, max. in 1. velocità ..............................
Numero di giri a carico, max. in 2. Velocità .............................
Percussione a pieno, max. ......................................................
ø Foratura in 1. velocità ...........................................................
ø Foratura in 2. velocità ...........................................................
Attaco mandrino ......................................................................
ø collare ...................................................................................
Peso secondo la procedura EPTA 01/2003. ............................
Informazioni sulla rumorosità
Valori misurati conformemente alla norma EN 60 745.
La misurazione A del livello di pressione acustica dell’utensile
è di solito di:
Livello di rumorosità (K = 3 dB(A)) .........................................
Potenza della rumorosità (K = 3 dB(A)) .................................
Utilizzare le protezioni per l‘udito!
Informazioni sulle vibrazioni
Valori totali delle oscillazioni (somma di vettori in tre direzioni)
misurati conformemente alla norma EN 60745
Valore di emissione dell’oscillazione ah:
Perforazione in metallo ............................................................
Incertezza della misura K ........................................................
Perforazione a percussione .....................................................
Incertezza della misura K
Perforazione in calcestruzzo ...................................................
Incertezza della misura K ........................................................
AVVERTENZA
Il livello di vibrazioni indicato nelle presenti istruzioni è stato misurato in conformità con un procedimento di misurazione
codicato nella EN 60745 e può essere utilizzato per un confronto tra attrezzi elettrici. Inoltre si può anche utilizzare per una
valutazione preliminare della sollecitazione da vibrazioni.
Il livello di vibrazioni indicato rappresenta le applicazioni principali dell’attrezzo elettrico. Se viceversa si utilizza l’attrezzo
elettrico per altri scopi, con accessori differenti o con una manutenzione insufciente, il livello di vibrazioni può risultare
diverso. E questo può aumentare decisamente la sollecitazione da vibrazioni lungo l’intero periodo di lavorazione.
Ai ni di una valutazione precisa della sollecitazione da vibrazioni si dovrebbero tenere presente anche i periodi in cui
l’apparecchio rimane spento oppure, anche se acceso, non viene effettivamente utilizzato. Ciò può ridurre notevolmente la
sollecitazione da vibrazioni lungo l’intero periodo di lavorazione.
Stabilite misure di sicurezza supplementari per la tutela dell’operatore dall’effetto delle vibrazioni, come ad esempio:
manutenzione dell’attrezzo elettrico e degli accessori, riscaldamento delle mani, organizzazione dei processi di lavoro.
AVVERTENZA! E’ necessario leggere tutte le
indicazioni di sicurezza e le istruzioni, anche quelle
contenute nella brochure allegata. In caso di mancato
rispetto delle avvertenze di pericolo e delle istruzioni
operative si potrà creare il pericolo di scosse elettriche,
incendi e/o incidenti gravi.
Conservare tutte le avvertenze di pericolo e le istruzioni
operative per ogni esigenza futura.
NORME DI SICUREZZA
Indossare protezioni acustiche adeguate. L'esposizione
prolungata al rumore senza protezione può causare danni
all'udito.
Utilizzare l'utensile con la sua impugnatura
supplementare. La perdita di controllo potrebbe causare
danneggiamenti all'utilizzatore.
Impugnare l’apparecchio sulle superci di tenuta isolate
mentre si eseguono lavori durante i quali l’utensile da
taglio potrebbe entrare in contatto con cavi di corrente
o con il proprio cavo d’alimentazione. In caso di contatto
con una linea portatrice di tensione anche le parti metalliche
della macchina vengono sottoposte a tensione provocando
una scossa di corrente elettrica.
Quando si lavora con punte di grande diametro,
l’impugnatura supplementare deve essere ben ssata ad
angolo retto con l’impugnatura principale (vedere gura
Sezione “Inserire l’impugnatura”).
DB 1500-2 XE
.......................1500 W
.........................820 W
....................0-1500 min
....................0-3000 min
.........................890 min
.......................1770 min
.....................48000 min
....................80-162 mm
......................32-90 mm
........................M18
...........................57 mm
..........................4,2 kg
.........................100 dB (A)
......................... 111 dB (A)
.......................< 2,5 m/s
..........................1,5 m/s
...........................13 m/s
..........................3,6 m/s
...........................20 m/s
..........................1,5 m/s
L’accoppiamento elastico montato reagisce solo in caso di
blocco brusco, pertanto utilizzare sempre l’impugnatura
supplementare.
Gli apparecchi mobili usati all’aperto devono essere
collegati interponendo un interruttore di sicurezza per guasti
di corrente.
Durante l’uso dell’apparecchio utilizzare sempre gli occhiali
di protezione. Inoltre si consiglia di usare sistemi di
protezione per la respirazione e per l’udito, oltre ai guanti di
protezione.
Non rimuovere trucioli o schegge mentre l’utensile è in
funzione.
La polvere che si produce durante il lavoro è spesso
dannosa per la salute e non dovrebbe essere aspirata.
Portare un´adeguata mascherina protettiva.
Prima di effettuare qualsiasi lavoro sulla macchina togliere
la spina dalla presa di corrente.
-1
-1
-1
-1
-1
2
2
2
2
2
2
Inserire la spina solo con interruttore su posizione “OFF”.
Tenere sempre lontano il cavo di collegamento dall’area di
lavoro dell’attrezzo.
Forando pareti, softti o pavimenti, si faccia attenzione ai
cavi elettrici e alle condutture dell’acqua e del gas.
UTILIZZO CONFORME
Il trapano può essere utilizzato per la foratura con punte
diamantate a secco. Con un apposito autocentrante il
trapano è ideale per la foratura a percussione in roccia e per
la foratura in legno ed acciaio. L’attrezzo non è adatto per la
foratura ad umido in calcestruzzo.
Utilizzare il prodotto solo per l’uso per cui è previsto.
DICHARAZIONE DI CONFORMITÀ CE
Dichiariamo, assumendo la piena responsabilità di tale
dichiarazione, che il prodotto è conforme alla seguenti
normative e ai relativi documenti:
EN 60745-1:2009 + A11:2010
EN 60745-2-1:2010
EN 55014-1:2006 + A1:2009 + A2:2011
EN 55014-2:1997 + A1:2001 + A2:2008
EN 61000-3-2:2006 + A1:2009 + A2:2009
EN 61000-3-3:2008
in base alle prescrizioni delle direttive
2011/65/EU (RoHs)
2006/42/CE
2004/108/CE
Winnenden, 2012-09-10
Rainer Kumpf
Director Product Development
Autorizzato alla preparazione della documentazione tecnica
COLLEGAMENTO ALLA RETE
Connettere solo corrente alternata mono fase e solo al
sistema di voltaggio indicato sulla piastra. E’ possibile anche
connettere la presa senza un contatto di messa a terra così
come prevede lo schema conforme alla norme di sicurezza
di classe II.
MOTORE SOVRACCARICATO
Protezione del motore contro il sovraccarico. L’apparecchio
lavora lentamente per il raffreddamento del motore. Dopo
un reffreddamento sufciente é possibile riattivare
l’apparecchio, per cui, spegnere e riaccendere.
COLPO SOFT
A seconda del materiale da lavorare, il colpo soft può
causare una notevole riduzione del tempo di trapanatura
oppure una maggiore vita utile dei segmenti diamantati.
ISTRUZIONI D‘USO
Dopo aver raggiunto un buon livello di foratura, cioè ad una
profondità del foro di circa 10-15 mm, togliere la punta da
centri, inserire la corona a forare nell’apposita scanalatura e
azionare l’utensile ad un numero di giri ridotto.
Quando si devono eseguire forature non precise si può
trapanare senza la punta di centraggio. Inserire la corona e
mettere la macchina in posizione diritta no a quando non si
raggiunge una profondità di ca. 5 mm. (E’ possibile usando
solo punte corte!!!) Componenti del sistema di perforazione
a secco con tecnica al diamante senza aspiratore polvere.
Se la corona si dovesse svitare, togliere dalla corona il
materiale e rimuovere la carota.
Una corona a forare ben aflata consente un utilizzo più
agevole e migliori e più rapidi risultati di foratura: Modalità di
aflatura: nella pietra arenaria o su apposita piastra
MANUTENZIONE
Tener sempre ben pulite le fessure di ventilazione
dell’apparecchio.
Utilizzare esclusivamente accessori e pezzi di ricambio
AEG. L’installazione di pezzi di ricambio non specicamente
prescritti dall’AEG va preferibilmente effettuata dal servizio
di assistenza clienti AEG (ved. opuscolo Garanzia/Indirizzi
Assistenza tecnica).
In caso di mancanza del disegno esploso, può essere
richiesto al seguente indirizzo: AEG Electric Tools GmbH,
Max-Eyth-Straße 10, D-71364 Winnenden, Germany.
SIMBOLI
Leggere attentamente le istruzioni
per l‘uso prima di mettere in funzione
l‘elettroutensile.
Prima di effettuare qualsiasi lavoro sulla
macchina togliere la spina dalla presa di
corrente.
Accessorio - Non incluso nella dotazione
standard, disponibile a parte come
accessorio.
Non gettare le apparecchiature elettriche
tra i riuti domestici. Secondo la Direttiva
Europea 2002/96/CE sui riuti di
pparecchiature elettriche ed elettroniche e
la sua attuazione in conformità alle norme
nazionali, le apparecchiature elettriche
esauste devono essere accolte
separatamente, al ne di essere
reimpiegate in modo eco-compatibile.
Classe di protezione II, utensile elettrico sul
quale la protezione contro la folgorazione
elettrica non dipende soltanto
dall‘isolamento di base e sul quale trovano
applicazione ulteriori misure di protezione,
come il doppio isolamento o l’isolamento
maggiorato.
20 21
ITALIANO ITALIANO
 Loading...